your care after leg amputation book: above knee · needs you will have after the loss of limb, ......
TRANSCRIPT
Your Care after Leg AmputationAbove Knee

Talk to your doctor or health care team if you have any questions about your care.
For more health information, contact the Library for Health Information at 614-293-3707 or e-mail [email protected].
Above KneeTable of Contents
About Your Care and Rehabilitation
About Your Care .................................................................................................................... 4
What to Expect .... .................................................................................................................. 5
Daily Care and Preventing Problems
Understanding Vascular Disease ....................................................................................... 6
Preventing Problems from Vascular Disease ................................................................. 8
Daily Foot Care and Safety .................................................................................................. 9
Skin Care and Sensitivity ................................................................................................... 13
Wound Care ........................................................................................................................... 14
Care of Your Residual Limb (Stump)
Wrapping for Above Knee Amputation ........................................................................... 16
Shrinker Sock Use to Reduce Swelling .......................................................................... 18
Pain Management
About Pain and Pain Control .............................................................................................. 19
Phantom Pain ......................................................................................................................... 21
Mirror Therapy ...................................................................................................................... 23
Positioning and Stretches ........................................................................................... 24
Strengthening Exercises .............................................................................................. 27

3
Healthy Living
Making the Most of Your Healthcare Visits ................................................................... 32
Heart Healthy Eating with DASH ...................................................................................... 34
Leisure as Part of Your Rehabilitation ............................................................................. 37
Adapted Sports and Recreation ....................................................................................... 39
Mental Health
Phases of Recovery from Amputation ............................................................................ 42
Depression after Amputation ............................................................................................ 43
Adapting to Life .................................................................................................................... 45
Relaxation Techniques ........................................................................................................ 46
Peer Visiting Program ......................................................................................................... 47
Resources and Support Groups ....................................................................................... 48
Mobility
Taking a Wheelchair Up and Down Stairs and Curbs ................................................. 49
How to Adapt an Entrance for a Wheelchair .................................................................. 51
Saving Energy and Making Work Easier ....................................................................... 54
Prosthesis
Preparing for Prosthesis ..................................................................................................... 55
Balance Exercises for Prosthesis ...................................................................................... 57
Prosthetic and Orthotic Companies ................................................................................ 59
4
About Your Care
Amputee rehabilitationAmputee Rehabilitation at Ohio State Wexner Medical Center supports the physical and emotional needs you will have after the loss of limb, whether due to an accident, illness, birth defect, or cancer. We will help you gain new skills and learn to adapt as you become more independent.
Our servicesThe Specialty Amputee Program offers rehabilitation services to help in each phase of your recovery — from services provided in the hospital (inpatient services) to those offered after returning home (outpatient services). They are all designed to help you reach your highest level of recovery.
We can help you• Care for your amputation to prevent future problems
• Have comfort and independence with your amputation if you do not have an artificial limb
• Prepare for an artificial limb (prosthesis) for the best fit and function
• Return to driving, if possible
• Return to work and daily activities, such as walking and climbing stairs, if possible
Your treatment team After your surgery, our team of doctors, nurses, and therapists is specially trained for after-amputation care. Your team of specialists may include:
• Doctors who specialize in diagnosing and treating patients with injuries or diseases.
• Nurses who specialize in patient care, health promotion, and disease prevention.
• Physical therapists who specialize in helping patients with strength, balance, and mobility.
• Recreational therapists who specialize in adapted recreation, adjusting to disability, and returning to the community.
• Occupational therapists who specialize in improving patients’ ability to do daily life activities.
• Prosthetists who specialize in fitting, adjusting, and caring for artificial limbs.
• Pain management specialists who specialize in evaluating and treating patients’ pain.
• Dietitians who specialize in nutrition and diet changes to support your health and wellness.
• Counselors who provide a variety of counseling, rehabilitation, and support services.
About this book This book will be used to teach you about your care. You are not expected to learn all of this information before you go home, but keep this book to use as a resource. If you do not understand anything, let your healthcare team know and they will explain another way.

5
.
What to Expect
After surgery While in the hospital after your surgery, your healthcare team will teach you how to take care of your incision and residual limb. They will teach you how to check your skin and watch for problems. You will also begin learning to safely move around.
Inpatient rehabilitation at Dodd HallThe goal of rehabilitation is to return you to the highest quality of life at home, at work, and in the community. We offer many types of therapy to help you with your recovery. The therapy is tailored to you, so you will be involved in planning your treatment.
Your therapy goals may include helping you to move around safely, adjusting to doing daily activities in a new way, using new equipment, or doing leisure activities. You will later practice the skills learned in therapy in your room with the help of your rehab team.
Our team will do all we can to support you, your family, and your caregivers as you recover.
Outpatient rehabilitation With Outpatient Rehabilitation Services at Ohio State’s Wexner Medical Center, we know each patient is an individual, with individual needs and goals. That is why your therapy program will be personalized to you. Your team will work with you to develop your care plan. Family and caregivers are encouraged to take part and help set goals.
Your therapy goals may include:
• Working on activities that you are having problems with in your daily life
• Planning for your long-term needs
• Setting goals for living at home, self-care, and staying safe in the community
• Exercise and training programs
• Recommending equipment and changes to your home
• Helping you continue to adapt and gain new skills
The time you spend in the clinic is designed to challenge you and give you things to work on at home and in the community.
You may receive care from Ohio State Wexner Medical Center from surgery through recovery, or just for rehabilitation and therapy. Whatever your journey, we would like to give you an idea of what you can expect.

6
Understanding Vascular Disease
Vascular disease is a condition where there is a problem with blood flow and circulation in the body. The vascular system, also called the circulatory system, is made up of vessels that carry blood and lymph throughout the body. Normal blood flow transports blood to and from areas of the body without interruption. Lymph gets rid of waste products in your cells, helping the body to fight infection.
With vascular disease, there may be problems in veins, arteries, or lymph:
• Arteries: Carry blood full of oxygen and nutrients from the heart and lungs to all other areas of the body.
• Veins: Return the blood that has waste products from all parts of the body back to the heart and lungs.
• Lymph vessels and nodes: Vessels that carry lymph to all parts of the body. Nodes are small glands that can be felt in the armpit, groin, neck, under the jaw and chin, and behind the ears.
Your risk for vascular diseaseMany people are at risk for vascular disease, depending on their health, lifestyle behaviors, and family history. Common risk factors include:
� Being age 45 years or older
� A self or family history of Coronary Artery Disease (CAD)
� A family history of vascular disease
� A sedentary lifestyle and/or poor diet
Types of vascular diseaseThe disease may be called other names, based on the body system affected:
• Atherosclerosis or hardening of arteries: Plaque builds up on the lining of arteries limiting blood flow. As the blood vessel narrows, it is harder for oxygen-rich blood to flow.
• Peripheral artery, Peripheral Vein, or Renal Artery Disease: The peripheral arteries and veins are those blood vessels that are located outside of your heart. You may hear the terms PAD or PVD to describe where arteries or veins are blocked with plaque. If the artery to the kidney is blocked, it is called renal artery disease.
Normal artery
Artery partlyblocked
Artery totallyblocked withblood clot
� Tobacco use
� Having high cholesterol or lipids
� Having high blood pressure
� Having diabetes
� Being overweight
7
• Carotid Artery Disease: Arteries on either side of the neck are blocked from plaque, or there may be a blood clot.
• Blood Clots: Blood clots can occur when there is prolonged bed rest or lack of movement, damage to veins from injury, infection, or other conditions that cause slow blood flow.
Ì Deep Vein Thrombosis (DVT) is a serious condition where the clot is in a deep vein of the chest, pelvis, or leg.
• Aneurysm: A weak part of a blood vessel wall that swells and bulges out, limiting blood flow. Aneurysm is more likely to occur in the aorta (heart), abdomen, or kidneys.
Other vascular problems• Lymphedema: Swelling in the body from problems with draining lymph.
• Varicose and Spider Veins: A vein will swell when the valves inside the vein do not work well to regulate blood flow. Varicose veins are enlarged and can appear twisted or bulging. Spider veins are like varicose veins, but smaller and closer to the surface.
• Buerger’s Disease: Leads to blocked veins in the arms and legs causing low blood supply to the hands and fingers or feet and toes.
• Raynaud’s Disease: Skin of the hands or feet may be white or bluish and feel numb or cold. This usually occurs when it is cold out.
Signs
In the early stages, you may not have any signs of vascular disease. If you are not being treated for it, you may have the following signs of poor circulation over time:
• Pain, called claudication, in your leg or foot, that happens while walking or during exercise. While pain may stop at rest, some people report muscle spasms and pain in advanced vascular disease.
• Feel dizzy, faint, or have a headache.
• Feel numb or lose muscle control where circulation is poor. It is more common in the arms, legs, muscles of the face, or one side of the body.
• Cool, pale skin, or cold hands and feet.
• Skin color under nails of fingers and toes may be reddish-blue, especially when legs are down or lower than the heart.
• Trouble speaking.
• Sores or wounds that take a long time to heal or look dark (black) in color.
• Loss of hair on legs and feet.
• Weak pulse in the legs and/or feet.
Testing and treatmentIf you have one or more of these signs, see your healthcare provider. Tests may be done to find out the cause of your problem and options for treatment. Treatment types for vascular disease include lifestyle changes, medicines, and surgery.
8
If you have had an amputation because of vascular disease, you can reduce your risk of problems by taking steps to prevent the build up of plaque in your arteries. Some key steps include staying active, not smoking, managing diabetes, and proper foot care.
Stay active and keep blood circulating• Do some form of physical activity each day. Your therapist will
work with you to find exercises that are right for your ability level.
• Do not stay in the same position for long periods of time. Try to vary your activity throughout the day.
• Learn the proper positions for sitting and lying down.
• Do not wear tight clothing on your lower body.
Don’t smoke or use nicotine in any form• Tobacco in any form causes serious damage to the arteries,
causing them to constrict.
• Nicotine found in tobacco makes it harder for the blood to carry oxygen and to travel through the blood vessels. Nicotine can be found in products like cigarettes, e-cigarettes (vapor), and smokeless tobacco.
• There are many smoking cessation programs available to help you quit. Ask your healthcare provider about options.
Manage your diabetes• If you have diabetes, it is very important to keep your blood
sugar (glucose) within the recommended levels.
• Blood sugar control will help decrease long-term complications, such as decreased blood circulation, ulcers on your foot or leg, kidney failure, or vision problems.
Foot care• Take good care of your foot. Have a plan for daily care and first
aid, choose good footwear, and have your doctor check your foot at each visit. See more about foot care on page 9.
Preventing Problems from Vascular Disease

9
Daily Foot Care and Safety
Daily careEvery day:
1. Look at your foot and pay special attention to the:
• Top and bottom
• Sides and heel
• Toes and toenails
• Between each toe
You may need to use a mirror or a magnifier to help you see all the parts of your foot and toes.
Watch for these changes:
• Redness
• Infection
• Sores
• Ingrown toenails
• Dryness
• Cracks in the skin
• Blisters
If you notice any of these changes, contact your doctor.
If you cannot reach or see your foot, ask a family member, friend, or nurse to check your foot for you.
2. Wash all parts of your foot with a mild super-fatted soap, such as Dove or Basis, a clean wash cloth, and warm water. Be sure to rinse off all of the soap because it can build up and dry out your skin.
After a leg amputation, taking care of your foot is very important. If your amputation is because of vascular disease or diabetes, you are at even higher risk for problems.
To take care of your foot, have a plan for daily care and first aid, choose good footwear, and have your doctor check your foot at each visit.

10
3. Dry your foot well using a clean towel. Gently pat dry all areas of the foot and carefully dry between each toe.
4. Apply lotion on your foot. Choose a lotion that has lanolin and is alcohol-free. Do not put lotion between your toes. If sweating is a problem, lightly sprinkle cornstarch or talcum powder on your foot after drying it.
Nail careTrimming your toenails can be hard to do if they are thick or brittle. If you have poor vision or cannot reach your foot, it may also be hard to trim your own nails. A family member or foot doctor (podiatrist) will need to help you with your toenail care if you have problems doing it.
If you are able to trim your own nails, follow these guidelines:
• File your toenails straight across and to the shape of your toe. Use as emery board, a type of nail file that uses a rough surface to file nails.
• Avoid filing your toenails too short as this can lead to ingrown nails.
• If your toenails are thick and hard, cut the nails after a bath or shower, when the nails are softer.
• Use good light when trimming or filing your nails.
• Be careful to cut just your toenails, not your toes or foot.
• Never use sharp or pointed objects to cut your toenails. Even a metal file can be dangerous.
Cut straight across
Cut even with end of toe
Toe Nail - Right
Do not cut into corners
Toe Nail - Wrong
Do not cut shorter than end of toe
Foot first aidFinding and treating a foot sore or injury early is important for preventing more serious problems.
If you injure your foot or notice a sore, follow these steps:
1. Clean the area with mild soap and warm water.
2. Pat the area dry with a clean towel.
3. Do not use antibiotic ointments, such as Neosporin or Bacitracin, unless your doctor tells you.
4. Cover the area with a plain gauze pad.
5. Wrap gauze around your foot and secure the gauze with tape. Do not put tape on your skin.
6. Stay off of your foot.
11
Contact your doctor if:
• You have signs of infection, such as redness, foul smell, or pus.
• Your sore or injury is not better after 24 hours.
Protect your footFeet are prone to injury, so it is important to do things to protect them.
• Do not go barefoot indoors or outdoors.
• Do not use heating pads, space heaters, or hot water bottles on or near your foot.
• Do not use harsh chemicals, such as iodine, corn removers, betadine, alcohol, or peroxide. These can burn your skin.
• See your podiatrist regularly.
• Gently file calluses with a pumice stone, file, or emery board.
• Carefully file your toenails straight across using an emery board.
• Do not wear tight clothes, such as girdles, garters, or slacks. These can decrease circulation to your foot.
• Never soak your foot. This dries out the skin.
• Do not cut your calluses or corns.
• Do not expose your foot to very hot or cold temperatures.
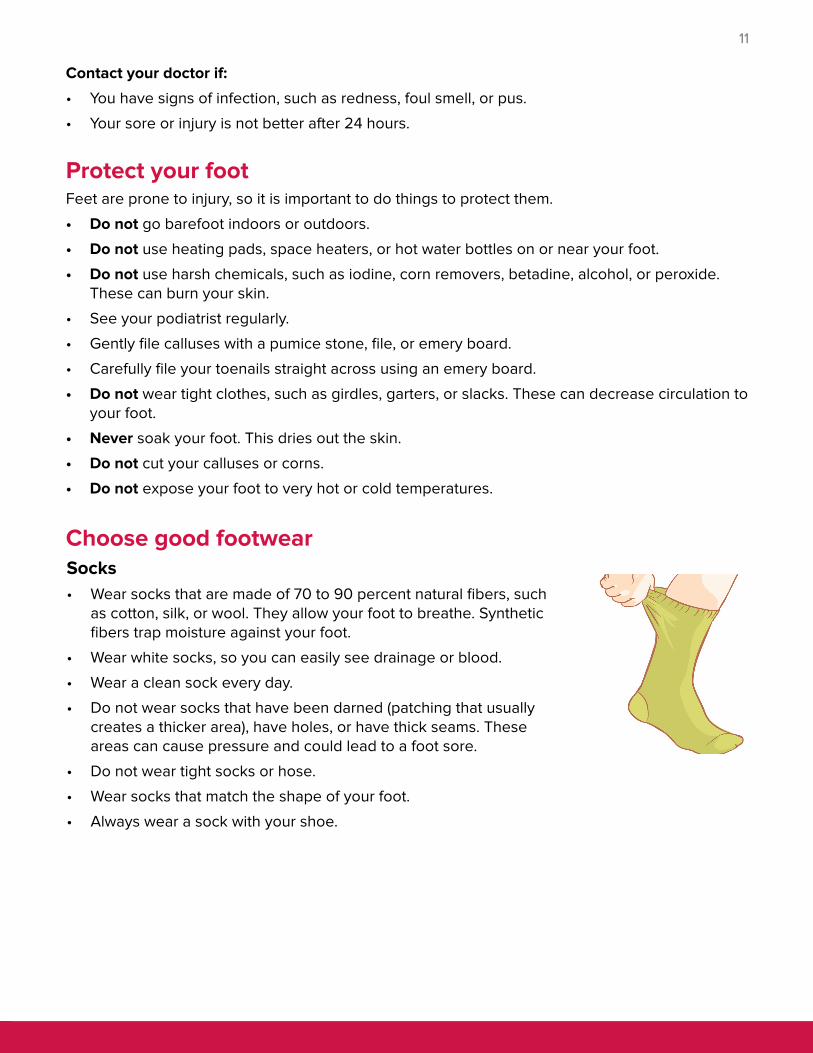
Choose good footwearSocks• Wear socks that are made of 70 to 90 percent natural fibers, such
as cotton, silk, or wool. They allow your foot to breathe. Synthetic fibers trap moisture against your foot.
• Wear white socks, so you can easily see drainage or blood.
• Wear a clean sock every day.
• Do not wear socks that have been darned (patching that usually creates a thicker area), have holes, or have thick seams. These areas can cause pressure and could lead to a foot sore.
• Do not wear tight socks or hose.
• Wear socks that match the shape of your foot.
• Always wear a sock with your shoe.
12
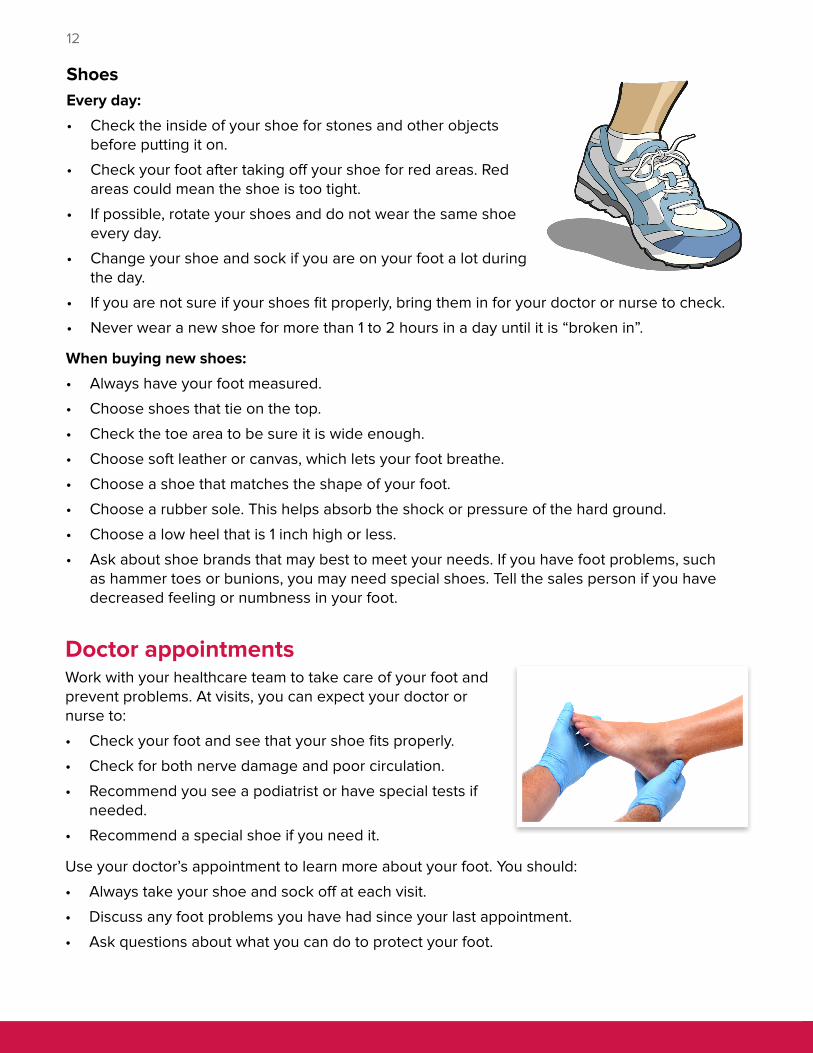
ShoesEvery day:
• Check the inside of your shoe for stones and other objects before putting it on.
• Check your foot after taking off your shoe for red areas. Red areas could mean the shoe is too tight.
• If possible, rotate your shoes and do not wear the same shoe every day.
• Change your shoe and sock if you are on your foot a lot during the day.
• If you are not sure if your shoes fit properly, bring them in for your doctor or nurse to check.
• Never wear a new shoe for more than 1 to 2 hours in a day until it is “broken in”.
When buying new shoes:
• Always have your foot measured.
• Choose shoes that tie on the top.
• Check the toe area to be sure it is wide enough.
• Choose soft leather or canvas, which lets your foot breathe.
• Choose a shoe that matches the shape of your foot.
• Choose a rubber sole. This helps absorb the shock or pressure of the hard ground.
• Choose a low heel that is 1 inch high or less.
• Ask about shoe brands that may best to meet your needs. If you have foot problems, such as hammer toes or bunions, you may need special shoes. Tell the sales person if you have decreased feeling or numbness in your foot.
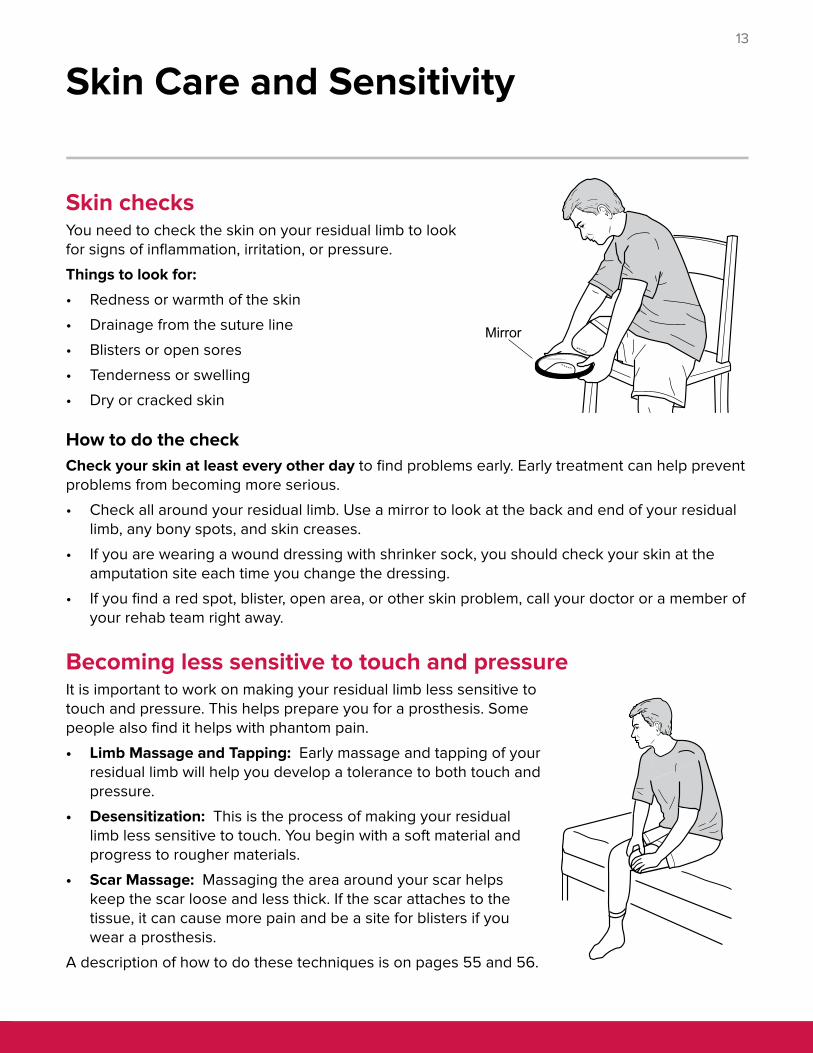
Doctor appointmentsWork with your healthcare team to take care of your foot and prevent problems. At visits, you can expect your doctor or nurse to:
• Check your foot and see that your shoe fits properly.
• Check for both nerve damage and poor circulation.
• Recommend you see a podiatrist or have special tests if needed.
• Recommend a special shoe if you need it.
Use your doctor’s appointment to learn more about your foot. You should:
• Always take your shoe and sock off at each visit.
• Discuss any foot problems you have had since your last appointment.
• Ask questions about what you can do to protect your foot.
13
Skin Care and Sensitivity
Skin checksYou need to check the skin on your residual limb to look for signs of inflammation, irritation, or pressure.
Things to look for:
• Redness or warmth of the skin
• Drainage from the suture line
• Blisters or open sores
• Tenderness or swelling
• Dry or cracked skin
How to do the check Check your skin at least every other day to find problems early. Early treatment can help prevent problems from becoming more serious.
• Check all around your residual limb. Use a mirror to look at the back and end of your residual limb, any bony spots, and skin creases.
• If you are wearing a wound dressing with shrinker sock, you should check your skin at the amputation site each time you change the dressing.
• If you find a red spot, blister, open area, or other skin problem, call your doctor or a member of your rehab team right away.
Becoming less sensitive to touch and pressureIt is important to work on making your residual limb less sensitive to touch and pressure. This helps prepare you for a prosthesis. Some people also find it helps with phantom pain.
• Limb Massage and Tapping: Early massage and tapping of your residual limb will help you develop a tolerance to both touch and pressure.
• Desensitization: This is the process of making your residual limb less sensitive to touch. You begin with a soft material and progress to rougher materials.
• Scar Massage: Massaging the area around your scar helps keep the scar loose and less thick. If the scar attaches to the tissue, it can cause more pain and be a site for blisters if you wear a prosthesis.
A description of how to do these techniques is on pages 55 and 56.
Mirror
14
Wound Care
Wound care is done to clean your wound or incision, inspect the area, and to prevent infection.
• Do your wound care 2 times a day or if the dressing is wet, gets dirty, or becomes loose.
• You can stop doing this care when the drainage stops.
• If you remove the dressing and there is no drainage on the gauze, you can leave the dressing off.
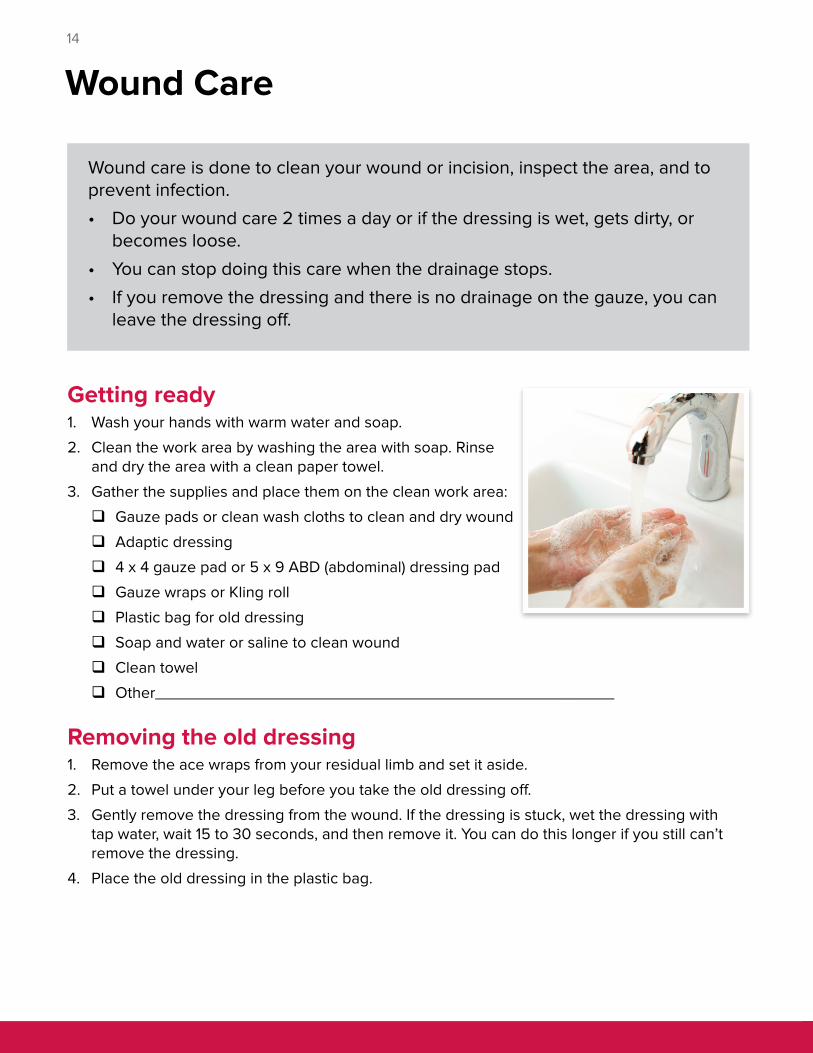
Getting ready1. Wash your hands with warm water and soap.
2. Clean the work area by washing the area with soap. Rinse and dry the area with a clean paper towel.
3. Gather the supplies and place them on the clean work area:
� Gauze pads or clean wash cloths to clean and dry wound
� Adaptic dressing
� 4 x 4 gauze pad or 5 x 9 ABD (abdominal) dressing pad
� Gauze wraps or Kling roll
� Plastic bag for old dressing
� Soap and water or saline to clean wound
� Clean towel
� Other___________________________________________________
Removing the old dressing1. Remove the ace wraps from your residual limb and set it aside.
2. Put a towel under your leg before you take the old dressing off.
3. Gently remove the dressing from the wound. If the dressing is stuck, wet the dressing with tap water, wait 15 to 30 seconds, and then remove it. You can do this longer if you still can’t remove the dressing.
4. Place the old dressing in the plastic bag.

15
Cleaning the wound 1. Wash your hands again.
2. Use soap and water on a gauze pad or clean cloth. Start at one end of the wound and clean to the other end. Be sure to wash away any drainage or dried blood.
3. Wash over the incision, but do not scrub it hard.
4. Pat gently with a dry gauze pad or clean towel, drying from one end to the other.
5. Inspect the wound for redness, drainage, swelling, or odor.
6. Cover the wound with a new dressing. First put on the adaptic dressing if you have drainage. Then follow with a gauze pad or ABD pad. Wrap with the gauze roll or Kling to hold the dressing in place. Your treatment team will tell you when to stop doing this step.
7. Apply the ace wraps around your residual limb.
8. Clean up the work area and place the old dressing in the trash.
9. Wash your hands again.
Call your doctor if you have:• Increased pain in or around the wound
• Change in the amount of drainage
• Change in color or odor of drainage
• A wound that gets larger
• Red streaks on the skin near the wound
• Redness or increased warmth in the area around the wound
16
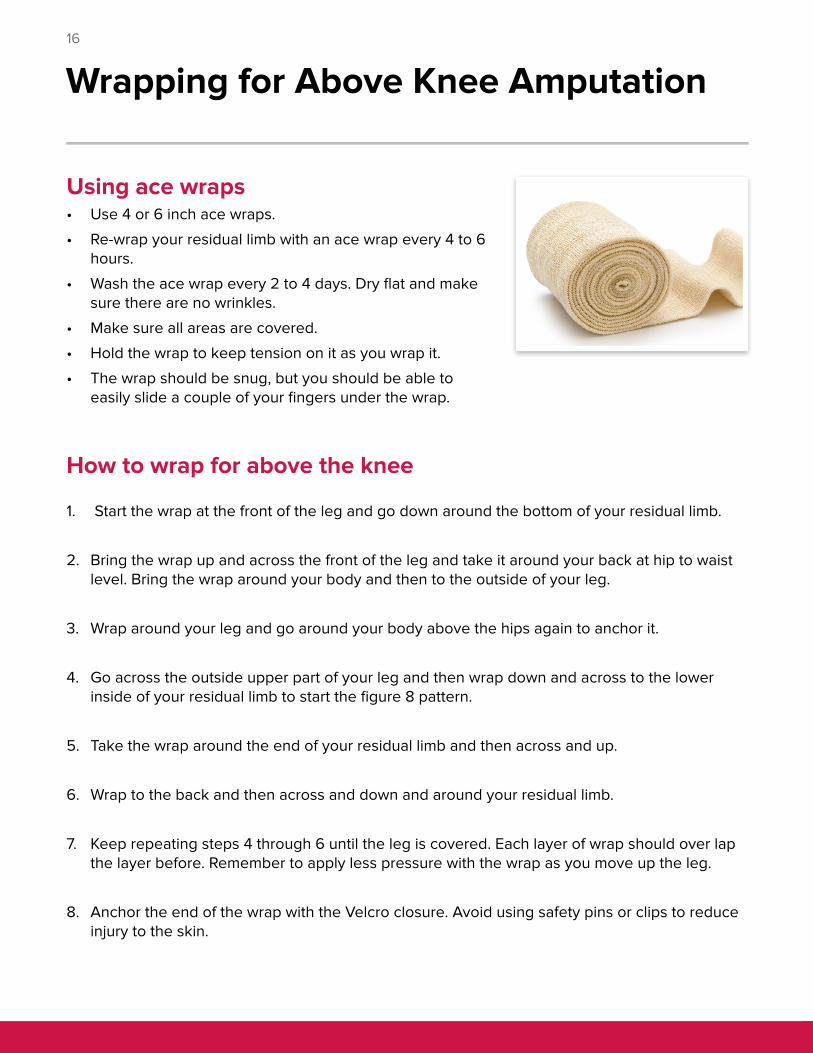
Wrapping for Above Knee Amputation
Using ace wraps• Use 4 or 6 inch ace wraps.
• Re-wrap your residual limb with an ace wrap every 4 to 6 hours.
• Wash the ace wrap every 2 to 4 days. Dry flat and make sure there are no wrinkles.
• Make sure all areas are covered.
• Hold the wrap to keep tension on it as you wrap it.
• The wrap should be snug, but you should be able to easily slide a couple of your fingers under the wrap.
How to wrap for above the knee
1. Start the wrap at the front of the leg and go down around the bottom of your residual limb.
2. Bring the wrap up and across the front of the leg and take it around your back at hip to waist level. Bring the wrap around your body and then to the outside of your leg.
3. Wrap around your leg and go around your body above the hips again to anchor it.
4. Go across the outside upper part of your leg and then wrap down and across to the lower inside of your residual limb to start the figure 8 pattern.
5. Take the wrap around the end of your residual limb and then across and up.
6. Wrap to the back and then across and down and around your residual limb.
7. Keep repeating steps 4 through 6 until the leg is covered. Each layer of wrap should over lap the layer before. Remember to apply less pressure with the wrap as you move up the leg.
8. Anchor the end of the wrap with the Velcro closure. Avoid using safety pins or clips to reduce injury to the skin.

17
Ace wrapping stepsAbove Knee Wrap
Step 1 Step 2
Step 3 Step 4 Step 5
Step 6 Step 7 Step 8

18
Shrinker Sock Use to Reduce Swelling
Use of shrinker socks• An elastic shrinker sock may be used alone or with elastic
bandages to help control swelling in your residual limb.
• It may be best to stretch the sock before placing it on your residual limb if it is still very sensitive to touch and pressure.
• The sock should be pulled tight against the end of your limb, with no gap between the end of your limb and the sock.
Stretching the sock
1. Hold onto the top of the sock with both hands. Your fingers should be on the inside of the sock and your thumbs on the outside.
2. Gather or scrunch the extra material down in your hands and pull to stretch out the sock until the bottom is flat.
3. Place the flat inside part of the sock against the end of your residual limb.
4. Keeping the stretch on the sock, pull the sock up the leg in one motion. The material will slide from between your thumbs and fingers.

19
About Pain and Pain Control
Pain rating scaleHow do you experience pain? Pain is personal and different for each person. We will ask you to use a pain rating scale to help us understand your pain and to set goals for pain control. You will be asked about your pain often. Anytime you have pain, tell your healthcare team.
Use the scale and choose the number (0 to 10), description, or face that best matches the pain you feel now.
It is important to control your pain as a part of your overall treatment. Uncontrolled pain can interfere with sleep, healing, thinking, activity, and appetite. Ask for relief from pain before your pain worsens.

20
Pain control with medicineYour doctor has ordered medicine to help control your pain. Taking your pain medicine as ordered by your doctor will bring you the most relief as your body heals. You may need to take your pain medicine before certain treatments and activities to improve your recovery.
To lower the risk of problems with your pain medicine, your doctor will treat your pain with the lowest dose of medicine for the shortest amount of time possible. When the cause of your pain goes away or lessens, your doctor may change your medicines or how you take them.
Pain control without medicineMany patients find that using non-drug therapy for pain control brings them additional relief. Options include:
• Breathing patterns
• Massage
• Relaxation
• Visual imagery or meditation
• Exercise or movement
• Distraction, such as reading, watching a movie, or gaming
• Aromatherapy
• Heat or cold therapy (limit time of use)
• Listening to music
Talk to a staff member to learn more.
Talking about your painTell your healthcare team as much as you can about your pain. Share with them:
• Location: Where does it hurt?
• Intensity: How strong does the pain feel?
• Duration: How long do you feel the pain? How often does the pain occur?
• Causes: What makes the pain worse?
• Relief: What helps the pain?
• What the pain is like: Is it burning? Sharp? Dull? Stabbing? Spasms? Aching?

21
Phantom Pain
Cause of painThe cause of phantom pain is not known, but experts recognize that these are real sensations, which come from the spinal cord and brain. It is believed that the parts of the brain and spinal cord that had been getting messages from that limb are now disconnected. Without input, the brain may be getting mixed signals that something is not right and interprets it as pain.
Not everyone with a leg amputation has phantom pain. When they do have it, the pain is very real, such as cramping, burning, stabbing, or shooting pain.
Some things that can make phantom pain worse:
• Being too tired
• Too much pressure on the residual limb
• Changes in the weather
• An artificial limb or prosthesis that does not fit properly
Things you can do that may help ease the painThese feelings may get weaker and happen less often overtime, but they may never go away completely. There are some things you can try to help ease the pain.
• Use massage, tapping, and squeezing to desensitize your residual limb.
• Slowly tighten and release the muscle in the limb.
• Take medicine if your doctor orders it.
• Keep the residual limb warm.
• Exercise your residual limb.
• Change your position.
• Take a warm bath or use a shower massage, but only after the incision line is closed and healed.
• Think about relaxing the part of the body that is missing.
• If you have a prosthesis on, take it off for a few minutes.
• If you do not have your prosthesis on, put it on and get active.
• If there is swelling, try an ace wrap or shrinker sock on the limb.
The word phantom means something that you can feel, but cannot see. After your leg is amputated, it is common to sometimes feel like your leg is still there. This is called a phantom sensation. If you feel pain as though your leg is still there, it is called phantom pain.
• Poor circulation
• Swelling
• Infection
• Stress

22
If you find that your prosthesis causes more pain, you may need to adjust the socks to improve the fit or have other adjustments made. Talk to your doctor or therapist about your pain causes.
Other treatmentsMost people with an amputation find the pain happens less often and is less severe over time. In some cases, other treatments may be needed to control the pain.
Treatments may include:• Mirror Therapy: A mirror is used to show a reflection of your unaffected leg in place of your
residual leg to trick your brain into thinking the leg is there and moving without pain. See page 23 for more information.
• Nerve stimulator (called a Transcutaneous Electrical Nerve Stimulation or TENS): A low-voltage electrical current is used to stimulate the nerves.
• Biofeedback: By using sensors, you learn to control your body’s reaction to pain, such as relaxing certain muscles or slowing your breathing.
• Acupuncture: A technique in which practitioners stimulate specific points on the body, most often by inserting thin needles through the skin.
• Hypnosis: A technique in which clinicians make suggestions to a patient who has undergone a process designed to relax them and focus the mind.
• Medicine.
• Surgery.
Speak with your healthcare team about the options available and what may be right for you.
Phantom pain recordYou may find it helpful to keep a log of any phantom pain and sensations you feel. You can make up your own record to keep track - whatever works best for you. Keep track of when you had the pain, where it felt like it was, how long it lasted, how much it hurt, and what you were doing when it happened. This might help you find some of the things that cause your pain. You may also want to keep track of what you did to ease the pain and how well it worked.
Sample Record:
Date Pain level (0 to 10 scale)
Location and type
How often or how long
What I was doing
July 26 6 /10 Bottom of foot - burning
10 to 15 times - OR - 2 hours of the day
Waking up from nap
July 27 4 /10 Bottom of foot - achy
5 to 10 times - OR - 1 hour of the day
Sitting, watching TV

23
Mirror Therapy
How it worksPhantom limb pain is a painful sensation that a person may feel after a body part no longer exists. Mirror therapy can be used to help reduce these unwanted or painful phantom sensations.
The treatment uses a mirror to show a reflection of the unaffected leg in place of the residual limb. It is believed that this treatment may help retrain and calm the areas in the brain responsible for feeling pain, which are still there after an amputation. The idea is that the reflection tricks the brain into thinking that the limb is there and moving without pain. These exercises can be done for any level of amputation, as long as the opposite limb is still intact.
Alternative: Sitting in a chair, with the mirror facing your unaffected leg.
Recommended: Sitting or lying in bed with the mirror facing your unaffected leg.
Setting up Mirror• You can use any long mirror. The size
of a standard, light-weight closet mirror works well. You can buy these at a low cost from many department stores.
Position• This can be done sitting or lying down.
See the positions shown on the right.
• Place the mirror between your legs, with your residual limb behind the mirror and your unaffected leg in front.
• Anything you do with your unaffected leg should look as if you are doing it with both legs.
Getting started• Do movements with your unaffected leg
below the level of your injury.
Ì For above knee amputation, focus on doing ankle and knee movements in all directions.
• Aim to spend 15 minutes every day.
• Focus on the mirror for the entire time.
• You may feel very emotional at first, so begin slowly.
24
Positioning and Stretches
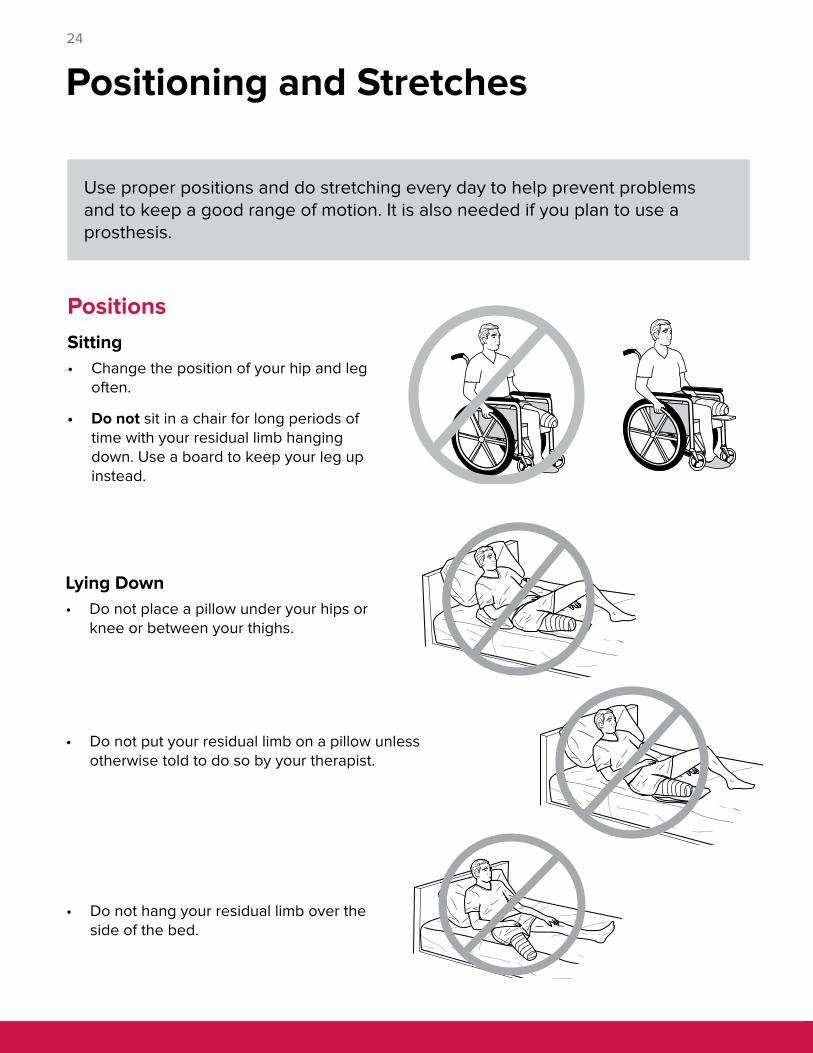
Use proper positions and do stretching every day to help prevent problems and to keep a good range of motion. It is also needed if you plan to use a prosthesis.
PositionsSitting• Change the position of your hip and leg
often.
• Do not sit in a chair for long periods of time with your residual limb hanging down. Use a board to keep your leg up instead.
• Do not hang your residual limb over the side of the bed.
Lying Down• Do not place a pillow under your hips or
knee or between your thighs.
• Do not put your residual limb on a pillow unless otherwise told to do so by your therapist.

25
Stretches Only do the stretches checked by your therapist.
Do each marked stretch ____ times each (repetitions) ____ times per day (sets).
Do not bounce back and forth when doing stretches.
� Alternative (Advanced) Prone Stretch
• Lie on your stomach. Place a rolled towel under your residual limb. Lie in this position for 20 minutes.
• As you stretch the hip flexor muscle, you may increase the size of the towel roll.
� Hamstring Stretch with Unaffected Leg Lying
• Lie on your back.
• Bring your unaffected limb toward your chest. Put your arm around your thigh and pull even closer. Hold for 20 seconds.
• Bring your unaffected knee toward your chest.
• Straighten your leg until you feel a stretch in the back of your thigh.
� Prone Lying
• Lie on your stomach for 20 minutes, 2 or 3 times a day. Do not put a pillow under your stomach.
• If you are not able to lie on your stomach, you can lie on your back unless you have been told not to by your therapist.
26
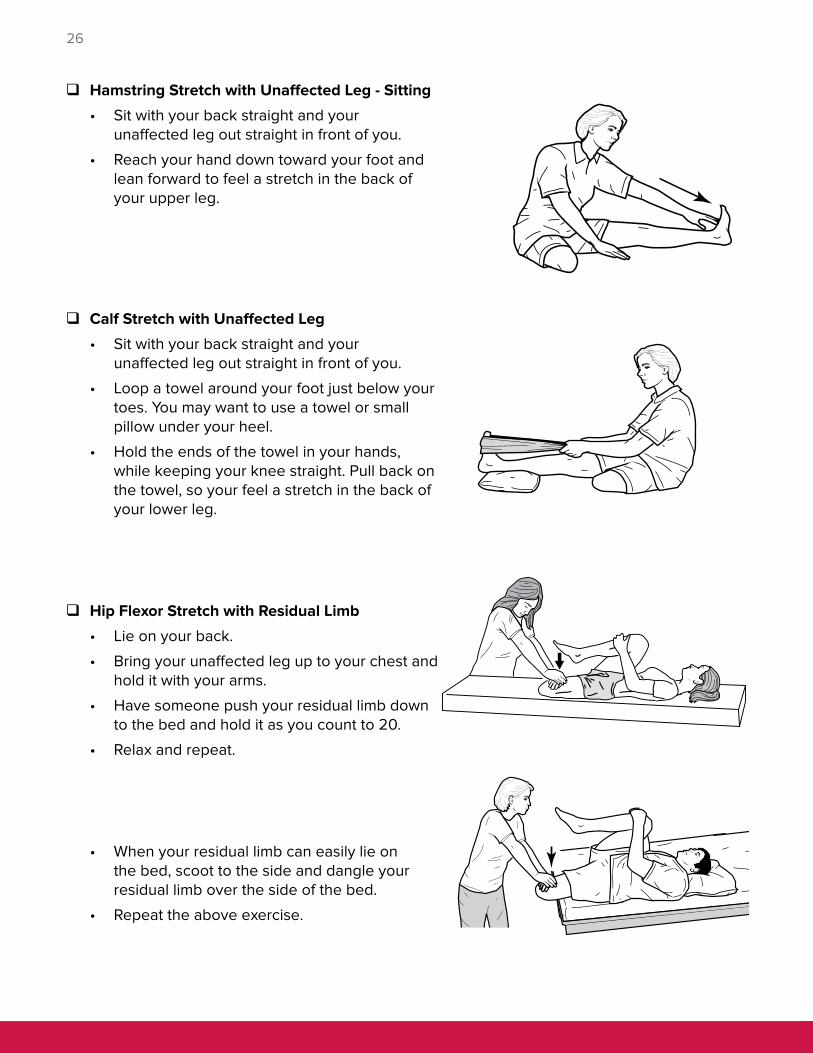
� Hamstring Stretch with Unaffected Leg - Sitting
• Sit with your back straight and your unaffected leg out straight in front of you.
• Reach your hand down toward your foot and lean forward to feel a stretch in the back of your upper leg.
� Calf Stretch with Unaffected Leg
• Sit with your back straight and your unaffected leg out straight in front of you.
• Loop a towel around your foot just below your toes. You may want to use a towel or small pillow under your heel.
• Hold the ends of the towel in your hands, while keeping your knee straight. Pull back on the towel, so your feel a stretch in the back of your lower leg.
� Hip Flexor Stretch with Residual Limb
• Lie on your back.
• Bring your unaffected leg up to your chest and hold it with your arms.
• Have someone push your residual limb down to the bed and hold it as you count to 20.
• Relax and repeat.
• When your residual limb can easily lie on the bed, scoot to the side and dangle your residual limb over the side of the bed.
• Repeat the above exercise.

27
Strengthening Exercises
Only do the exercises checked by your therapist.
Do each marked exercise ____ times each (repetitions) ____ times per day (sets).
� Gluteal Sets
• Squeeze your buttocks together.
• Hold for 5 seconds and release.
� Hip Adduction with Towel Roll
• Lie on your back. Place a rolled towel or pillow between your unaffected leg and residual limb as low as feels comfortable.
• Squeeze the towel while you count to 5.
• Relax and repeat.
� Pelvic Tilt
• Lie on your back. Bend your knee, so the foot of your unaffected leg is resting flat on the floor.
• Place your hands in the small of your back.
• Push your lower back into your hands. Hold as you count to 5.
• Relax and repeat.
Do the exercises slowly with smooth motions to avoid injury. Be sure to keep breathing while you exercise. Do not hold your breath because it could cause your blood pressure to rise.
Pelvic Tilt

28
� Abdominal Bracing
• Lie on the floor and inhale with your lower back flat against the floor.
• Exhale and gently pull in your abdominal muscles. Keep your neck and shoulders relaxed. Do not bear down or forcefully suck in your abdomen.
• Inhale and relax.
� Hip Flexion
• Lie on your back.
• Lift up your residual limb to point at the ceiling as much as possible.
• Return to lying flat.
• Relax and repeat.
� Hip Out and In (Adduction)
• Lie on your back.
• Move your residual limb out to the side and back in.
• Relax and repeat.
� Hip Abduction on Side
• Lie on your side and lift your top leg toward the ceiling. Do not turn your knee up toward the ceiling.
• Return to the starting position.
• Repeat.
• Do this same exercise with your other leg on top.
29
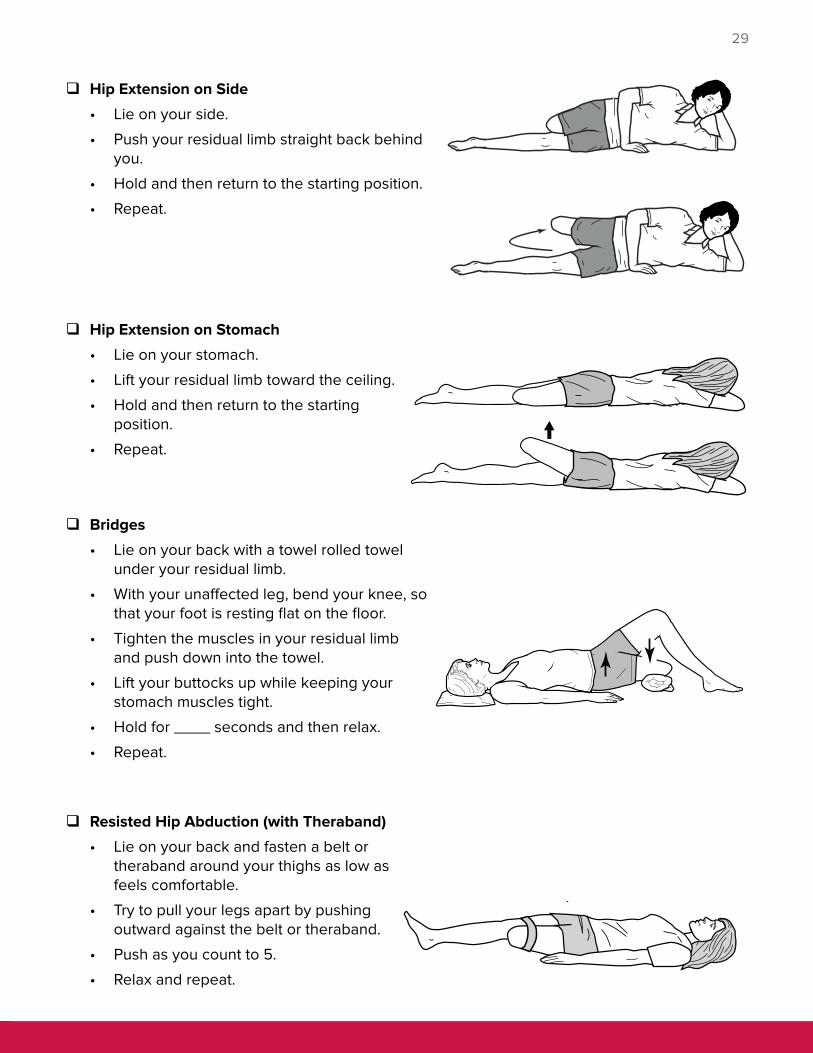
� Hip Extension on Side
• Lie on your side.
• Push your residual limb straight back behind you.
• Hold and then return to the starting position.
• Repeat.
� Hip Extension on Stomach
• Lie on your stomach.
• Lift your residual limb toward the ceiling.
• Hold and then return to the starting position.
• Repeat.
� Bridges
• Lie on your back with a towel rolled towel under your residual limb.
• With your unaffected leg, bend your knee, so that your foot is resting flat on the floor.
• Tighten the muscles in your residual limb and push down into the towel.
• Lift your buttocks up while keeping your stomach muscles tight.
• Hold for ____ seconds and then relax.
• Repeat.
� Resisted Hip Abduction (with Theraband)
• Lie on your back and fasten a belt or theraband around your thighs as low as feels comfortable.
• Try to pull your legs apart by pushing outward against the belt or theraband.
• Push as you count to 5.
• Relax and repeat.
Hip Extension 1
Hip Adduction

30
� Alternative Hip Adduction
• Lie on your side with your unaffected leg on top.
• Bring your top leg forward and let your foot rest on the floor in front of you.
• Lift your residual limb toward the ceiling and back down.
• Repeat.
� Partial Sit-up
• Lie on your back.
• Bend your hips, so the foot of your unaffected leg is resting flat on the floor. Rest your hands on your thighs.
• Slowly curl up until your head and shoulder blades are off the floor.
• Look up to the ceiling as you do this exercise.
• Repeat.
� Knee Up Abdominal Crunches
• Lie on your back on a pad or mat, with your knee bent and foot flat on the floor. Put your arms at your sides.
• Lift your foot, head and hands off the floor, while you tighten your stomach muscles and flatten your lower back to the floor.
• Pump your arms up and down slightly.
• Slowly return to the start position.
• Relax and repeat.

31
� Hip Extension on Hands and Knee
• Kneel down on a mat or pad to cushion your knee. Place a pillow under your foot and lower leg.
• Balance yourself on your hands and knee.
• Slowly lift your residual limb out behind you. Control the motions and lighten your buttock muscles as you lift. Keep your hips and back still and level to the ground.
• Hold. Slowly return to the starting position.
• Repeat.
� Leg to Side (Quadruped Hip Abduction)
• Kneel down on a mat or pad to cushion your knee.
• Balance yourself on your hands and knee.
• Slowly lift your residual limb out to the side. Control the motions and lighten your buttock muscles as you lift. Keep your hips and back still and level to the ground.
• Hold. Slowly return to the starting position.
• Repeat.
32
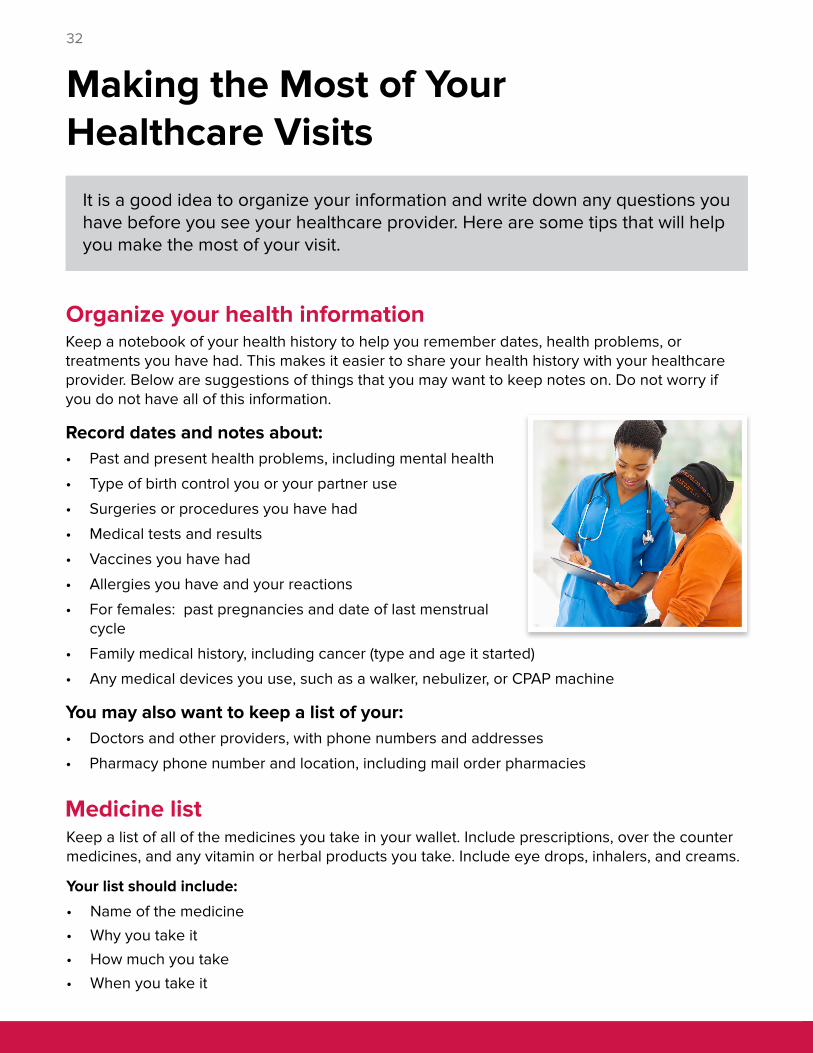
Making the Most of Your Healthcare Visits
It is a good idea to organize your information and write down any questions you have before you see your healthcare provider. Here are some tips that will help you make the most of your visit.
Keep a notebook of your health history to help you remember dates, health problems, or treatments you have had. This makes it easier to share your health history with your healthcare provider. Below are suggestions of things that you may want to keep notes on. Do not worry if you do not have all of this information.
Record dates and notes about:• Past and present health problems, including mental health
• Type of birth control you or your partner use
• Surgeries or procedures you have had
• Medical tests and results
• Vaccines you have had
• Allergies you have and your reactions
• For females: past pregnancies and date of last menstrual cycle
• Family medical history, including cancer (type and age it started)
• Any medical devices you use, such as a walker, nebulizer, or CPAP machine
You may also want to keep a list of your:• Doctors and other providers, with phone numbers and addresses
• Pharmacy phone number and location, including mail order pharmacies
Organize your health information
Medicine listKeep a list of all of the medicines you take in your wallet. Include prescriptions, over the counter medicines, and any vitamin or herbal products you take. Include eye drops, inhalers, and creams.
Your list should include:
• Name of the medicine
• Why you take it
• How much you take
• When you take it
33
Things to bring
During your visit
• Write down any questions you have. Underline the ones that you want to make sure are answered.
• Write down any symptoms or problems, especially any new symptoms you have had since your last visit.
• Ask a friend or family member to come with you to listen and take notes while you are talking with your provider.
• For patients that do not read, speak, or understand spoken English, arrangements can be made for someone who speaks their language, called an interpreter, to help at the visit. An interpreter may come in person to the appointment or use a telephone or video screen. Tell the office or clinic (before the appointment if possible) if an interpreter is needed.
• Insurance information
• Photo ID, such as your driver’s license
• Your list of questions
• Your list of medicines
• Glasses or hearing aids, if needed
Preparing for your visit
• Ask about anything you don’t understand.
• Make sure you understand any medicine you need to take, including how much you should take, the time of day you should take it, and for how many days. Ask about any side effects you should watch for and what you should do if these happen to you.
• Ask for written instructions or make your own notes about your care.
• It is helpful if you can schedule your next appointment at the end of each office or clinic visit. Be sure to mark your appointments on a calendar as a reminder.

34
DASH, or Dietary Approaches to Stop Hypertension, is an eating plan that lowers blood pressure and LDL (bad) cholesterol to reduce your risk of stroke. The food groups listed show examples of daily or weekly servings for a 2,000-calorie-a-day diet. You may need more or less servings each day based on your calorie (energy) needs. Talk to your provider for support.
Sodium - limit to 2,300 mg or less per dayYour provider may recommend 1,500 mg or less per day.
• 1 teaspoon of salt has 2,300 mg of sodium.
• Most of the sodium in our diets comes from processed foods, like lunch meat, canned soups and vegetables, and boxed or packaged mixes.
• Read food labels to learn how much sodium is in a food.
Grains - eat 6 to 8 servings per day• 1 serving equals:
Ì 1 slice of bread
Ì 1 ounce of dry cereal (about ½ to 1 ¼ cups, depending on cereal type)
Ì ½ cup of cooked rice, pasta, grains, or cereal
• Choose whole grains (100% whole wheat or whole grain bread, brown rice, quinoa, or oatmeal) over refined grains (white flour, degermed cornmeal, white bread, or white rice).
Vegetables - eat 4 to 5 servings per day• 1 serving equals:
Ì 1 cup raw, leafy vegetables
Ì ½ cup chopped raw or cooked vegetables
Ì ½ cup low-sodium vegetable juice
Fruits - eat 4 to 5 servings per day• 1 serving equals:
Ì 1 medium fruit
Ì ¼ cup dried fruit
Ì ½ cup fresh, frozen, or canned fruit
Ì ½ cup fruit juice
• Choose whole fruits (fresh, frozen, or dried) over juice.
.
Heart Healthy Eating with DASH
35
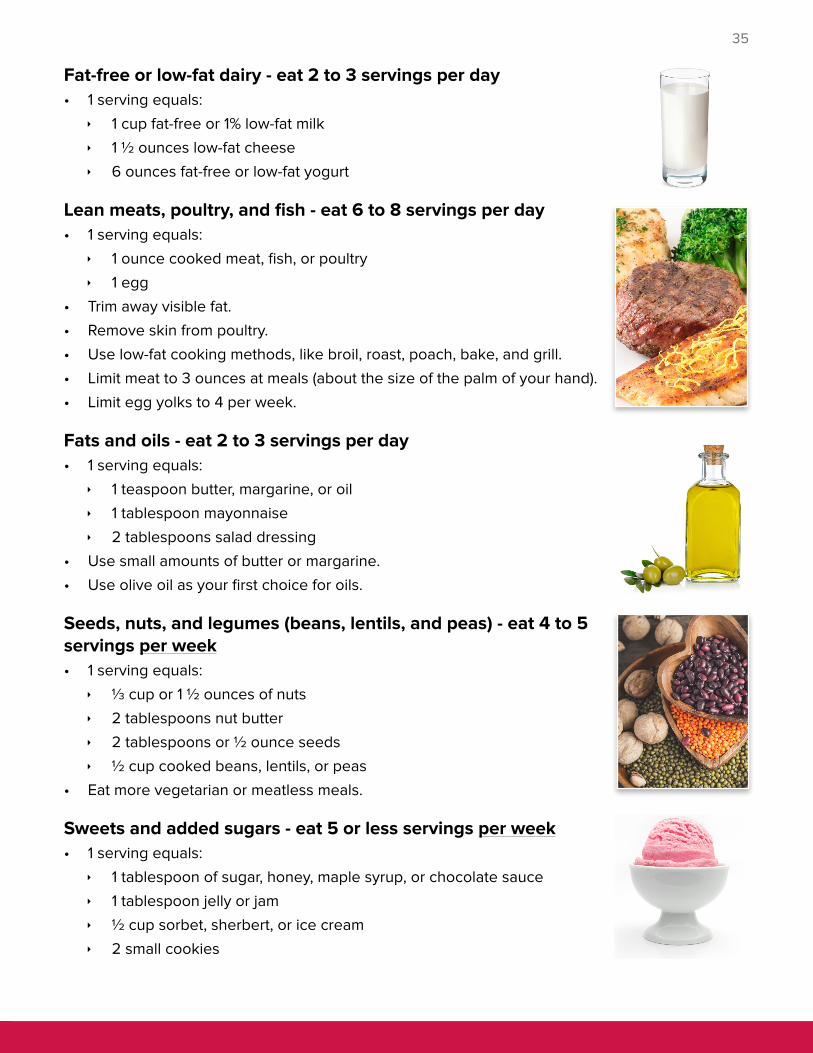
Fat-free or low-fat dairy - eat 2 to 3 servings per day• 1 serving equals:
Ì 1 cup fat-free or 1% low-fat milk
Ì 1 ½ ounces low-fat cheese
Ì 6 ounces fat-free or low-fat yogurt
Lean meats, poultry, and fish - eat 6 to 8 servings per day• 1 serving equals:
Ì 1 ounce cooked meat, fish, or poultry
Ì 1 egg
• Trim away visible fat.
• Remove skin from poultry.
• Use low-fat cooking methods, like broil, roast, poach, bake, and grill.
• Limit meat to 3 ounces at meals (about the size of the palm of your hand).
• Limit egg yolks to 4 per week.
Fats and oils - eat 2 to 3 servings per day• 1 serving equals:
Ì 1 teaspoon butter, margarine, or oil
Ì 1 tablespoon mayonnaise
Ì 2 tablespoons salad dressing
• Use small amounts of butter or margarine.
• Use olive oil as your first choice for oils.
Seeds, nuts, and legumes (beans, lentils, and peas) - eat 4 to 5 servings per week• 1 serving equals:
Ì ⅓ cup or 1 ½ ounces of nuts
Ì 2 tablespoons nut butter
Ì 2 tablespoons or ½ ounce seeds
Ì ½ cup cooked beans, lentils, or peas
• Eat more vegetarian or meatless meals.
Sweets and added sugars - eat 5 or less servings per week• 1 serving equals:
Ì 1 tablespoon of sugar, honey, maple syrup, or chocolate sauce
Ì 1 tablespoon jelly or jam
Ì ½ cup sorbet, sherbert, or ice cream
Ì 2 small cookies

36
• Keep sugar on the food label to less than 10 grams per serving.
• Men: limit sugar to no more than 150 calories or about 3 tablespoons (38 grams) per day.
• Women: limit sugar to no more than 100 calories or about 2 tablespoons (25 grams) per day.
• A 12-ounce can of regular soda has about 40 grams of sugar!
Tip: Read food labels to learn what is in a food. This will help you to make healthier choices. Look at calories, saturated fat, sodium, and sugars.
For more information about DASH, visit:
• National Heart, Lung, and Blood Institute at www.nhlbi.nih.gov/health/health-topics/topics/dash
• MedlinePlus at medlineplus.gov/dashdiet.html
DASH sample 1-day menu
Breakfast Dinner
1 cup bran flakes cereal 3 ounces lean beef with 2 tablespoons fat-free beef gravy
1 medium banana 1 cup green beans sauteed in ½ teaspoon olive oil
1 cup 1% low-fat milk 1 small baked potato topped with 1 tablespoon fat-free sour cream, 1 tablespoon low-fat shredded cheddar cheese, 1 tablespoon chopped scallions
1 slice 100% whole wheat bread 1 small whole wheat roll with 1 teaspoon tub margarine
1 teaspoon butter or soft margarine 1 small apple
½ cup orange juice or orange segments 1 cup 1% low-fat milk
Lunch Snacks
¾ cup chicken salad on 2 slices 100% whole wheat bread
⅓ cup almonds, unsalted
Salad with ½ cup fresh cucumber slices, ½ cup tomato wedges, 1 tablespoon sunflower seeds, 1 teaspoon Italian dressing
½ cup raisins
½ cup fruit cocktail ½ cup low-fat, low-sugar Greek yogurt

37
Leisure as Part of Your Rehabilitation
I like to...
What do you like to do?
As you learn to adapt to your amputation, talk to your healthcare team about your interests. We will work with you to both build your skills and adjust the leisure activities you are interested in to fit your abilities.
� do something meaningful � be active � feel commitment to something � be busy � do lots of different things � take it easy and relax � do something different from work and
school � be able to do what I want � be spontaneous � make and carry out plans � try my own methods of doing things � compete with others � compete with myself to do better � laugh and enjoy � make use of my skills � improve my skills � have something to show for my efforts
� get approval for what I do � be successful at what I do � have a feeling of personal worth � learn more about myself or a topic � develop relationships with other people � be part of a group or team � meet new people � develop friendships � help others � be in attractive surroundings
Leisure activitiesCheck the activities you enjoy or would like to try. Share this list with your healthcare team, family, and friends. Your community may have classes and programs available through libraries, park and recreation departments, senior centers, and fitness clubs.
Relaxation activities � House plants � Computer / Internet � Crossword puzzles � Jigsaw puzzles � Library
� Listening to music � Meditating � Movies � Pet care � Reading books
� Video games � Word search games � Writing � _____________________ � _____________________
38
Creative activities � Acting � Art shows � Baking or cooking � Ballet � Broadway plays � Canning food � Church activities � Collectibles � Community activities � Concerts � Crocheting
� Drawing � Flower arranging � Home repair and
improvement � Jewelry making � Knitting � Museums � Needlepoint � Opera � Painting � Photography
� Play musical instruments � Pottery or ceramics � Quilting � Scrap booking � Sewing � Singing � Woodworking � _____________________ � _____________________ � _____________________
Social activities � Bingo � Board Games � Card games � Checkers or chess � Clubs / organizations � Cornhole / bean bag toss
� Darts � Dominoes � Eating out � Going to parties � Politics � Pool, billiards or snooker
� Shopping � Socializing with friends � Traveling � Volunteer work � _____________________ � _____________________
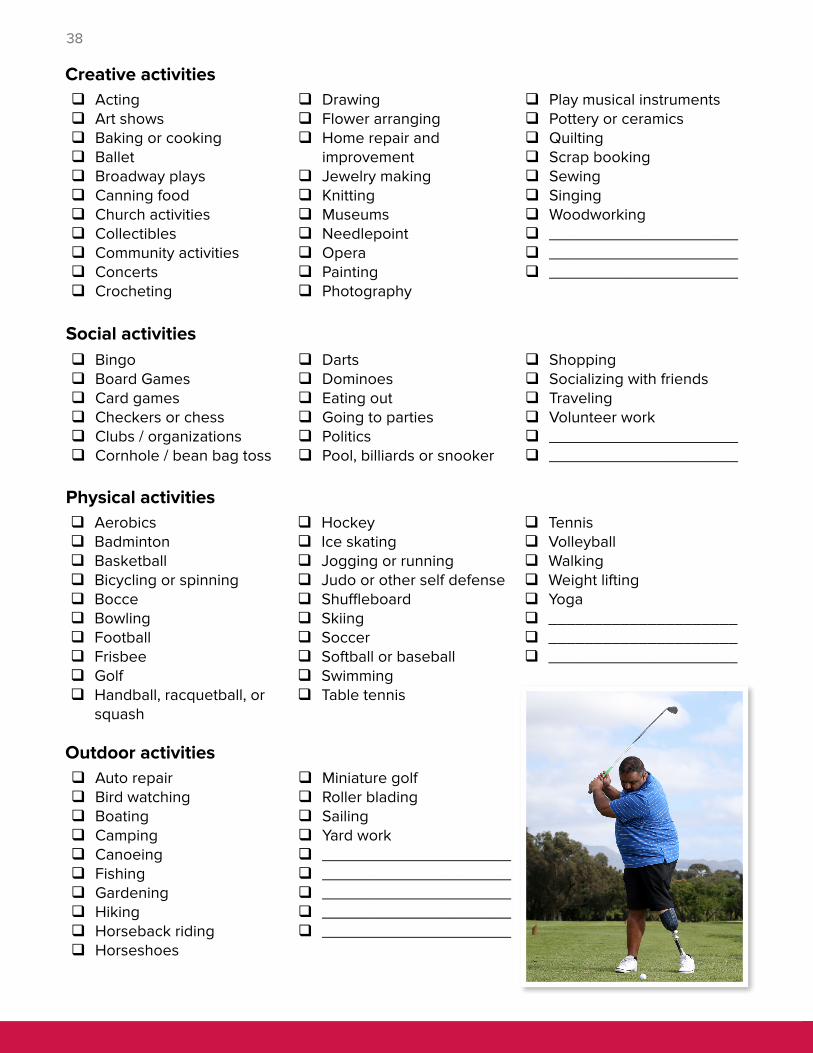
Physical activities � Aerobics � Badminton � Basketball � Bicycling or spinning � Bocce � Bowling � Football � Frisbee � Golf � Handball, racquetball, or
squash
� Hockey � Ice skating � Jogging or running � Judo or other self defense � Shuffleboard � Skiing � Soccer � Softball or baseball � Swimming � Table tennis
� Tennis � Volleyball � Walking � Weight lifting � Yoga � _____________________ � _____________________ � _____________________
Outdoor activities � Auto repair � Bird watching � Boating � Camping � Canoeing � Fishing � Gardening � Hiking � Horseback riding � Horseshoes
� Miniature golf � Roller blading � Sailing � Yard work � _____________________ � _____________________ � _____________________ � _____________________ � _____________________
39
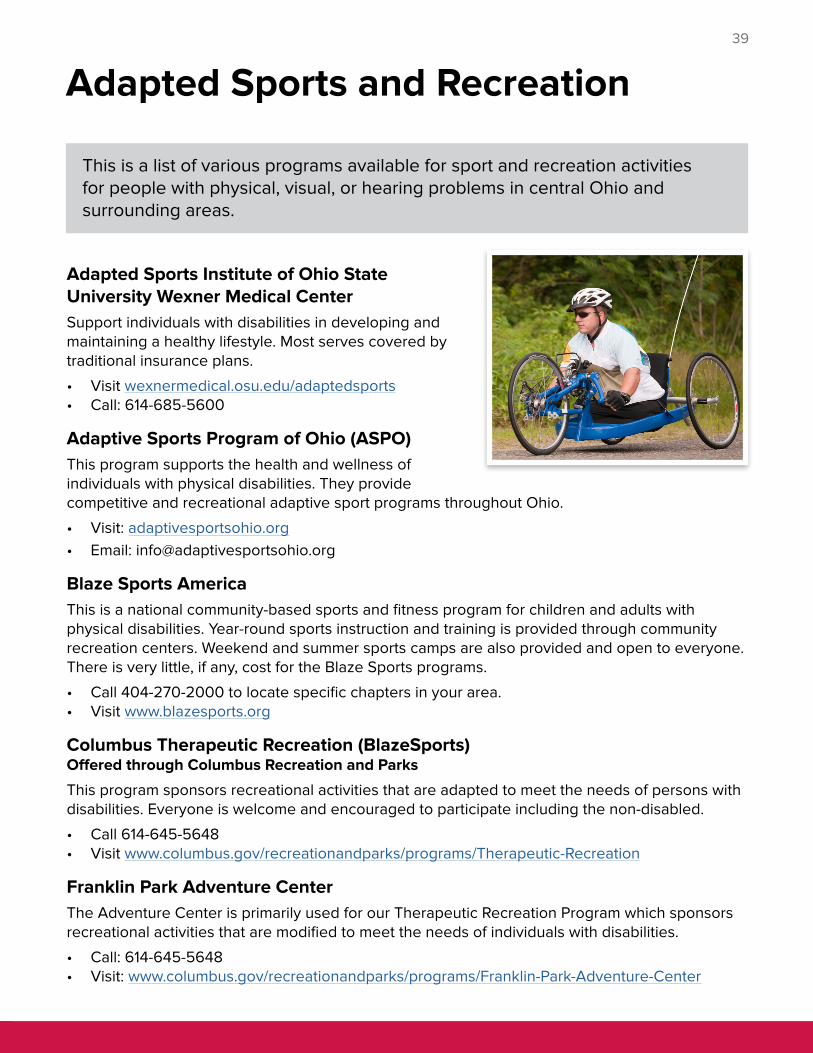
Adapted Sports and Recreation
This is a list of various programs available for sport and recreation activities for people with physical, visual, or hearing problems in central Ohio and surrounding areas.
Adapted Sports Institute of Ohio State University Wexner Medical CenterSupport individuals with disabilities in developing and maintaining a healthy lifestyle. Most serves covered by traditional insurance plans.
• Visit wexnermedical.osu.edu/adaptedsports • Call: 614-685-5600
Adaptive Sports Program of Ohio (ASPO) This program supports the health and wellness of individuals with physical disabilities. They provide competitive and recreational adaptive sport programs throughout Ohio.
• Visit: adaptivesportsohio.org• Email: [email protected]
Blaze Sports AmericaThis is a national community-based sports and fitness program for children and adults with physical disabilities. Year-round sports instruction and training is provided through community recreation centers. Weekend and summer sports camps are also provided and open to everyone. There is very little, if any, cost for the Blaze Sports programs.
• Call 404-270-2000 to locate specific chapters in your area.• Visit www.blazesports.org
Columbus Therapeutic Recreation (BlazeSports) Offered through Columbus Recreation and Parks
This program sponsors recreational activities that are adapted to meet the needs of persons with disabilities. Everyone is welcome and encouraged to participate including the non-disabled.
• Call 614-645-5648• Visit www.columbus.gov/recreationandparks/programs/Therapeutic-Recreation
Franklin Park Adventure CenterThe Adventure Center is primarily used for our Therapeutic Recreation Program which sponsors recreational activities that are modified to meet the needs of individuals with disabilities.
• Call: 614-645-5648 • Visit: www.columbus.gov/recreationandparks/programs/Franklin-Park-Adventure-Center
40
Fishing Has No Boundaries Central OhioOrganization opens up the great outdoors for people with disabilities through the world of fishing.
• Call 614-383-8851 or email: [email protected]• Visit www.fhnbcentralohio.org
Fore HopeThis organization uses golf as an instrument to help in the rehabilitation of persons with disabilities or an inactive lifestyle. The team consists of Certified Therapeutic Recreation Specialists and golf professionals.
• Call 614-566-4243 or email: [email protected]• Visit www.ohiohealth.com/services/neuroscience/our-programs/forehope
Miami Valley Adapted SportsThis U.S. Paralympic Sports Club provides recreational and competitive sporting opportunities for individuals with physical disabilities.
• Visit www.miamivalleyadaptedsports.org
Ohio Sled HockeyThis program provides league and tournament play for kids with physical disabilities. Children with spina bifida, paralysis, cerebral palsy, and muscular dystrophy are some of those served by this sport.
• Visit pointstreaksites.com/view/ohiosledhockey/home-page-535
• Email: [email protected] (Columbus Ohio Blades) or [email protected] (Columbus Blue Jackets Sled Hockey Team)
Paralyzed Veterans of AmericaThe Paralyzed Veterans of America (PVA) assists veterans with spinal cord injuries or disease, including Multiple Sclerosis and ALS (Amyotrophic Lateral Sclerosis, better known as Lou Gehrig’s Disease).
• Call 1-800-424-8200 (National) or 1-800-248-2548 (Buckeye Chapter)
Recreation UnlimitedThis is the largest provider in the state of Ohio serving people with disabilities in the area of sports, recreation, and education.
• Call 740-548-7006 or email: [email protected]• Visit www.recreationunlimited.org
Shane Center for Therapeutic HorsemanshipThis therapeutic horseback riding organization serves both children and adults with a wide array of disabilities. Instructors are certified through The North American Riding for the Handicapped Association. All horses are specially selected and trained for therapeutic riding.
• Call 740-625-9324 • Email: [email protected]• Visit www.equineassistedtherapy.org
41
Adaptive Sports Connection (also known as TAASC)This organization provides equipment and lessons that meet your needs - from beginners to competitive athletes. Sports include cycling, kayaking, skiing and snowboarding, water skiing, climbing, paddleboarding, small boat sailing, and big boat sailing.
• Call 614-389-3921• Visit taasc.org
The Miracle League of Central OhioThis program welcomes children with disabilities from 3 to 21 years of age to play in Miracle league baseball. The field is fully accessible to all children who are visually impaired, wheelchair or walker-restricted, or who use any type of mobility device. Darree Field Park is located at 6259 Cosgray Road in Dublin, Ohio.
• Visit www.ohiomiracleleague.org/index.html• Email: [email protected]
The Ohio State University Adapted Recreational Sports (ARS) Adapted ProgramsPrograms offer a wide variety of accommodations for members with visual, physical, or hearing impairments.
• Call 614-688-3693 or email: [email protected]• Visit recsports.osu.edu/accommodations-inclusion/adapted-programs
Willow Ridge Therapeutic Riding FacilityThis program provides equine assisted therapy to youth who are developmentally disabled or emotionally at risk.
• Call 614-778-9122 or email: [email protected]• Visit www.willowridgeequinetherapy.org
YMCA of Central OhioCall the location closest to you to see what specific programs and adaptive equipment are available. Most Y’s are very open to accommodating clients however they can, even if information is not in writing. If client is not a member of YMCA, a program is still available. Cost will vary and is determined on an individual basis.
• Visit www.ymcacolumbus.org
42
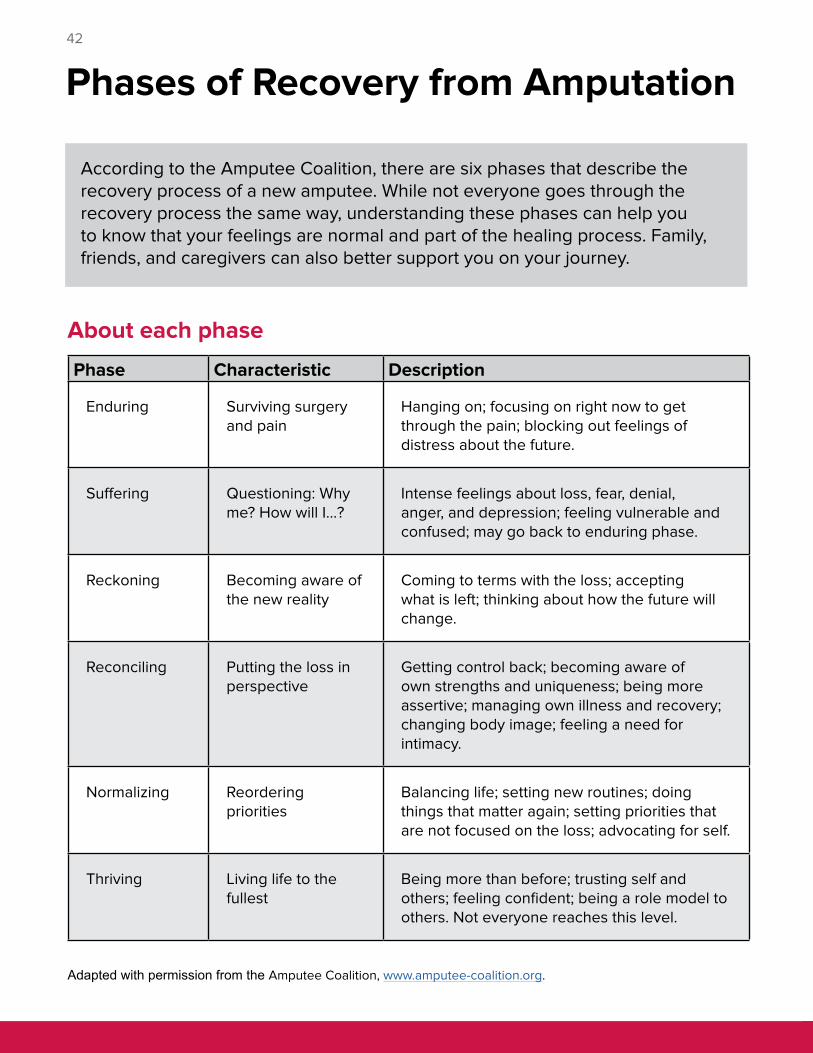
Phases of Recovery from Amputation
About each phase
Phase Characteristic Description
Enduring Surviving surgery and pain
Hanging on; focusing on right now to get through the pain; blocking out feelings of distress about the future.
Suffering Questioning: Why me? How will I...?
Intense feelings about loss, fear, denial, anger, and depression; feeling vulnerable and confused; may go back to enduring phase.
Reckoning Becoming aware of the new reality
Coming to terms with the loss; accepting what is left; thinking about how the future will change.
Reconciling Putting the loss in perspective
Getting control back; becoming aware of own strengths and uniqueness; being more assertive; managing own illness and recovery; changing body image; feeling a need for intimacy.
Normalizing Reordering priorities
Balancing life; setting new routines; doing things that matter again; setting priorities that are not focused on the loss; advocating for self.
Thriving Living life to the fullest
Being more than before; trusting self and others; feeling confident; being a role model to others. Not everyone reaches this level.
Adapted with permission from the Amputee Coalition, www.amputee-coalition.org.
According to the Amputee Coalition, there are six phases that describe the recovery process of a new amputee. While not everyone goes through the recovery process the same way, understanding these phases can help you to know that your feelings are normal and part of the healing process. Family, friends, and caregivers can also better support you on your journey.

43
Prevention
Signs of depression
• Learn about amputation and recovery. Information can help lessen your fears. Talk to your healthcare team about your questions and concerns.
• Talk to someone who has been there. Ohio State’s Peer Visiting Program information is on page 47.
• Make the most of rehabilitation and keep track of your progress. The more you recover, the better you will feel.
• Spend time with family and friends. Talk about your feelings.
• Keep up your interests and hobbies, or start new ones.
• Stay active.
• Do not drink alcohol.
• Talk to a healthcare professional as soon as you notice signs of depression.
When a person is depressed, he or she has several signs nearly everyday that last at least 2 weeks, such as:
• Increased frustration, irritability, or grouchiness
• Loss of interest and pleasure in activities you used to enjoy
• Feeling sad, empty, or down
• Crying more than usual
• Feeling slowed down, restless, or unable to sit still
• Feeling worthless or guilty
• Feeling pessimistic or hopeless
• Feeling anxious or worried
• Changes in appetite, weight loss, or gain
• Change in sleep patterns – being unable to sleep or sleeping too much
• Problems concentrating, thinking, remembering, or making decisions
• Withdrawing from people or events you normally enjoy
• Loss of energy or feeling tired all the time
• Sexual problems
If you have any of these signs for more than 2 weeks, or if you have had thoughts of suicide or of trying to harm yourself or others, see your doctor or get help right away.
Depression after Amputation
As you or a loved one learns to deal with the changes in your life, you may have feelings of sadness, anxiety, frustration, or anger. When sadness changes into depression, it is important to seek help. Talk to your doctor or others on your healthcare team.
44
Where to get help• In the hospital, talk with your nurse, doctor, psychologist, social worker, or therapist. They can
provide or recommend help for you.
• After discharge, talk to your primary care doctor or social worker.
• Ohio State’s Rehabilitation Psychology program provides help to patients coping with chronic illness, chronic pain, or disability. To make an appointment or get a referral, call 614-293-3830. They can give you information about available mental health services.
• Counselors - Your doctor, nurse, social worker, or hospital chaplain can provide counseling or help you find a counselor if you need one. Individual counseling, group therapy, or family counseling may be helpful.
• Church, temple, mosque, or other place of worship - These can be sources of fellowship and community. Many people find it helpful to talk with a spiritual leader about their grief.
• Social work organizations - Social work organizations and local hospitals can help you find services and support groups in your area.
• Mental health services - Mental health organizations and centers may provide education and information about other available services.
Ì Contact Mental Health America of Franklin County at 614-221-1441 or visit www.mhafc.org for a resource directory and fact sheets.
Ì Contact National Mental Health America at 1-800-969-6642 or visit www.mentalhealthamerica.net for health information and help finding treatment and support groups.
• Community Resources - HandsOn Central Ohio offers 24-hour referrals to community resources by calling 211, or visit www.handsoncentralohio.org.
• In an emergency, call 911 or go to or call the Emergency Department at University Hospital at 614-293-8333.
Help AnytimeIf you have feelings of hurting yourself or others, get help right away. There are 24-hour hotlines that you can call anytime.
• National Suicide Prevention Lifeline - 1-800-273-TALK (8255)
• Netcare Crisis Hotline - 614-276-2273
• Suicide Prevention 24-hour Hotline - 614-221-5445

45
Learning to adapt after having an amputation can be hard. It is common to have fear, stress, sadness, and frustration. Don’t try to go through it alone. Talk about your feelings with people you feel close to and trust.
Tips to help you adapt• Be kind to yourself.
Pay attention to your health. Get plenty of rest and eat a balanced diet. Do not use alcohol and other substances because they can add to your problems.
• Take one day at a time. Do the best you can to get through each day. Have a schedule and aim to do one important task each day.
• Learn about your abilities and care. Understanding the changes in your abilities and how to take care of yourself can lessen stress and prevent problems. Educate others to help them to support you and to lessen their fears.
• Get the equipment you need. Talk to your healthcare team about what equipment you need, where to get it, and what resources there are to help you with this.
• Set goals. Start by listing some simple activities you want to do, like writing letters or talking to friends. Later you can list future plans. Remember goals and plans can be changed.
• Write in a journal. Write down your feelings of loss. Write down things you are thankful for. You can also use your journal to track your progress.
• Do relaxation techniques. Relaxation techniques can help you to let go of the physical and emotional stress that change can cause in your life.
• Use leisure activities to find pleasure. Your therapist will work with you to find activities you enjoy and help you learn new skills.
• Connect with others who have been through it. Your healthcare team can connect you to individuals or support groups. There are also communities of people that connect online to share experiences and support.
• Be active. Being active can boost hormones that lower stress and create a sense of well being. Work with your therapist on how you can safely be active.
Adapting to Life
46
Relaxation Techniques
Learn relaxation techniques to reduce stress and anxiety. Try different techniques to find what works best for you. As your practice your techniques, your ability to relax will improve over time. Here are some options.
Listening to musicListen to your favorite music by itself or play music while using another relaxation technique. Look for music that helps you to feel calm and relaxed, such as classical music or nature sounds. Try also guided meditation music.
Breathing exercises1. Find a quiet room.
2. Turn on music that you find relaxing.
3. Get into a relaxing position.
4. Close your eyes and think of an image in your mind that will help you to relax, such as a calm, peaceful setting or a place you have enjoyed visiting.
5. Breathe in deeply. Hold your breath and tense your muscles. Keep them tense for a second or two.
6. Relax your muscles as you breathe out.
7. Starting with the muscles in your lower legs, work your way up your body to your head, tightening and relaxing each muscle group.
Guided imagery Close your eyes and think of a time and place when you felt safe and comfortable. Imagine those surroundings, sights, smells, and sounds. Bring as much of that experience back to the here and now as possible. When you feel ready, take a deep breath and open your eyes.
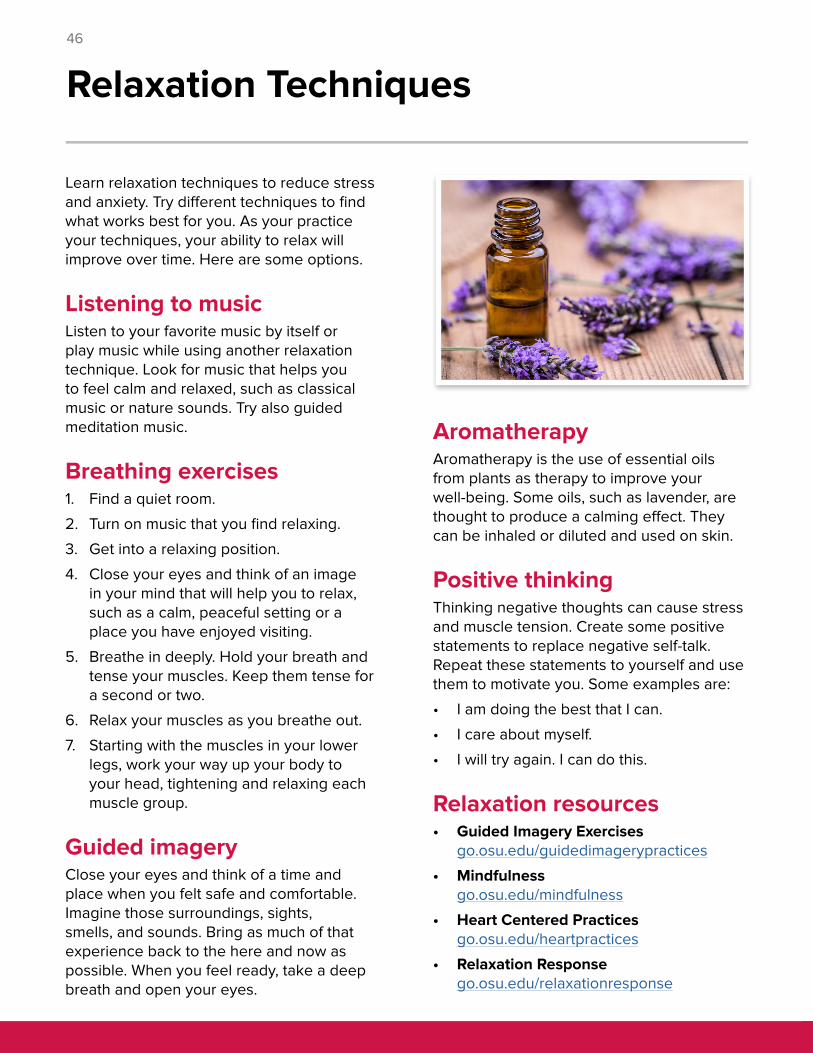
AromatherapyAromatherapy is the use of essential oils from plants as therapy to improve your well-being. Some oils, such as lavender, are thought to produce a calming effect. They can be inhaled or diluted and used on skin.
Positive thinkingThinking negative thoughts can cause stress and muscle tension. Create some positive statements to replace negative self-talk. Repeat these statements to yourself and use them to motivate you. Some examples are:
• I am doing the best that I can.
• I care about myself.
• I will try again. I can do this.
Relaxation resources• Guided Imagery Exercises
go.osu.edu/guidedimagerypractices
• Mindfulness go.osu.edu/mindfulness
• Heart Centered Practices go.osu.edu/heartpractices
• Relaxation Response go.osu.edu/relaxationresponse
47
Peer Visiting Program
Someone who has “been there”No one is potentially in a better position to understand about living life with an amputation or supporting a person with limb loss than someone who has been there. That is why the Ohio State University has partnered with the Amputee Coalition to provide peer support to amputees and their families through the Certified Peer Visiting (CPV) Program.
Who are peer visitorsPeer visitors are trained volunteers who have adjusted well to limb loss and lead full, active lives. They have lived with limb loss for at least one year and believe that peer support is a vital part of the recovery process. Peer visitors may also be family members of amputees.
These individuals are trained and certified by the Amputee Coalition. They are available to meet with amputee spouses, parents, and caregivers.
What to expect from a peer visit Peer visitors are available to meet with you in person or over the phone to listen and provide support. They may share their own experiences and offer helpful insight and tips for your recovery.
They do not provide medical advice, but simply help answer questions that you may have about living life with limb loss.
Every effort is made to match you to a peer visitor who closely relates to your individual situation.
To request a peer visit:
Call: 614-293-4523 Email: [email protected] Visit: www.amputee-coalition.org
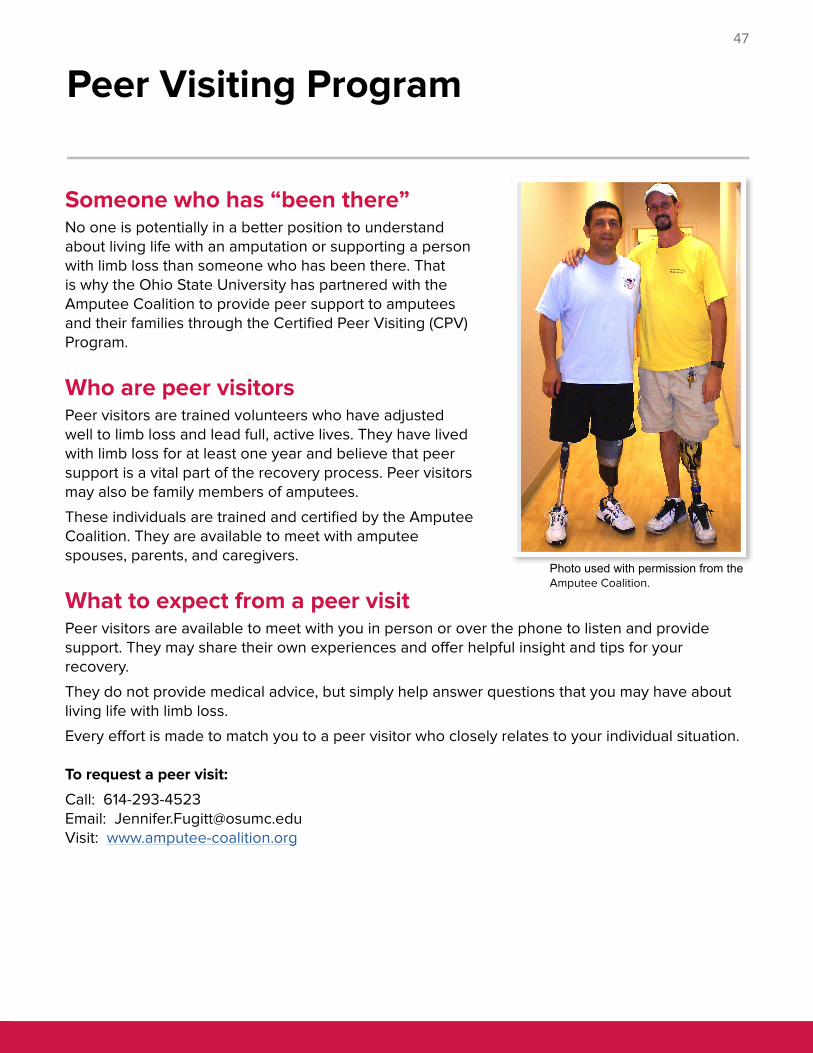
Photo used with permission from the Amputee Coalition.
48
Resources and Support Groups
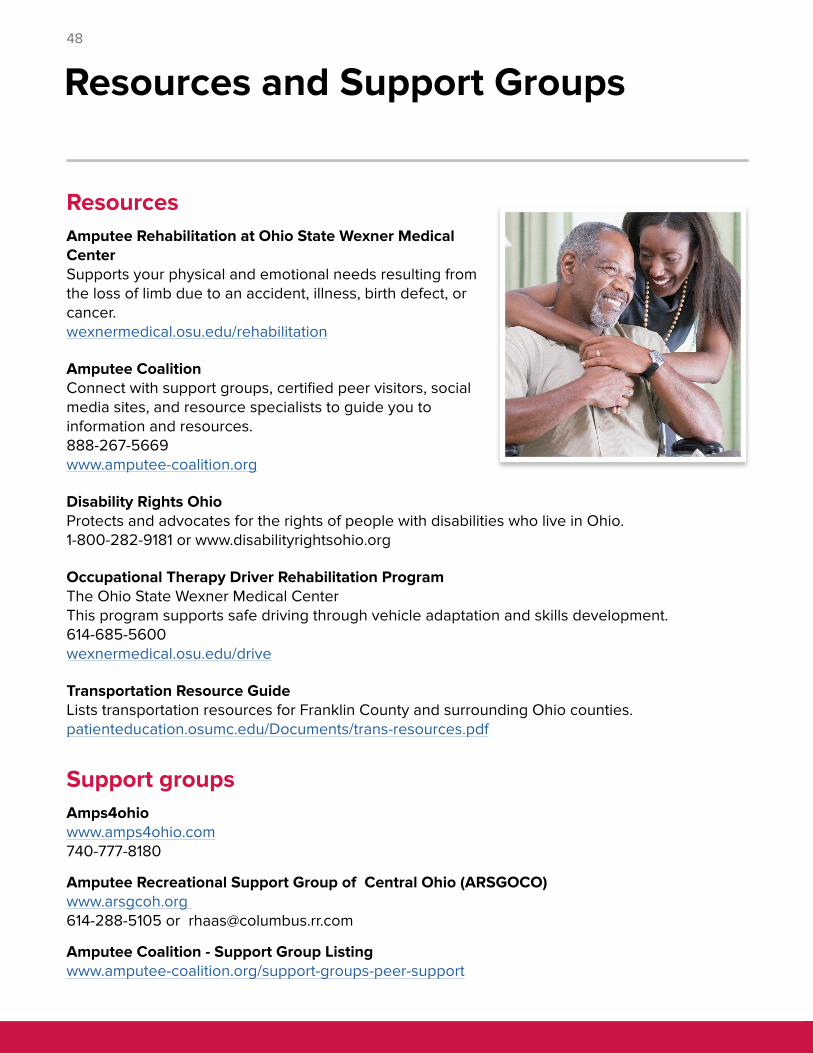
Resources Amputee Rehabilitation at Ohio State Wexner Medical Center Supports your physical and emotional needs resulting from the loss of limb due to an accident, illness, birth defect, or cancer. wexnermedical.osu.edu/rehabilitation
Amputee Coalition Connect with support groups, certified peer visitors, social media sites, and resource specialists to guide you to information and resources. 888-267-5669 www.amputee-coalition.org
Disability Rights Ohio Protects and advocates for the rights of people with disabilities who live in Ohio. 1-800-282-9181 or www.disabilityrightsohio.org
Occupational Therapy Driver Rehabilitation Program The Ohio State Wexner Medical Center This program supports safe driving through vehicle adaptation and skills development. 614-685-5600 wexnermedical.osu.edu/drive
Transportation Resource Guide Lists transportation resources for Franklin County and surrounding Ohio counties. patienteducation.osumc.edu/Documents/trans-resources.pdf
Support groups Amps4ohio www.amps4ohio.com 740-777-8180
Amputee Recreational Support Group of Central Ohio (ARSGOCO) www.arsgcoh.org 614-288-5105 or [email protected]
Amputee Coalition - Support Group Listing www.amputee-coalition.org/support-groups-peer-support

49
Taking a Wheelchair Up and Down Stairs and Curbs
Going up the stairsTwo people are needed to get the wheelchair up the stairs. Do NOT try this with one person. It is unsafe. The stronger of the two people should be behind the wheelchair. This person will do most of the lifting.
1. Back the wheelchair up to the stairs.
2. Get into position:
• One helper gets on the stairs and holds the handles. Make sure that the handle grips do not slip off. Have one foot on the step above the wheelchair and the other foot on the next higher step.
• The other helper gets in front of the wheelchair and holds onto its frame just above the front wheels. Do NOT hold onto any parts that can come off, such as the footrests or armrests.
• Both helpers should bend their knees and arch their backs before lifting.
3. Together, both helpers tilt the wheelchair back finding the balance point where only the back wheels are on the ground.
4. Gently lift and roll the wheelchair up onto the next step. If the person in the wheelchair is able to help, he or she should pull back on the wheels.
5. The helpers should reposition themselves on each step after each lift.
6. After going up all the steps, keep the chair tilted back until the front wheels clear the top step. Gently lower the wheelchair, so all four wheels are on the ground.
Going down the stairsYou will need two people to get the wheelchair down the stairs. Do NOT try this with one person. It is unsafe. The stronger of the two people should be behind the wheelchair. This person will do most of the lifting.
1. Roll the wheelchair forward to the stairs.
2. Get into position:
• One helper gets in back of the wheelchair and holds onto the handles. Make sure that the handle grips do not slip off.
50
• The other helper gets on the stairs in front of the wheelchair and holds onto its frame just above the front wheels. Do NOT hold onto any parts that can come off, such as the footrests or armrests. Have one foot on the second step and one foot on the third step.
• Both helpers should bend their knees and arch their backs before moving the wheelchair.
3. Together, both helpers tilt the wheelchair back finding the balance point where only the back wheels are on the ground.
4. Gently roll the wheelchair down each step.
5. The helpers should reposition themselves on each step after each lift.
6. When the chair is at the bottom of the stairs, gently lower the wheelchair, so all fours wheels are on the ground.
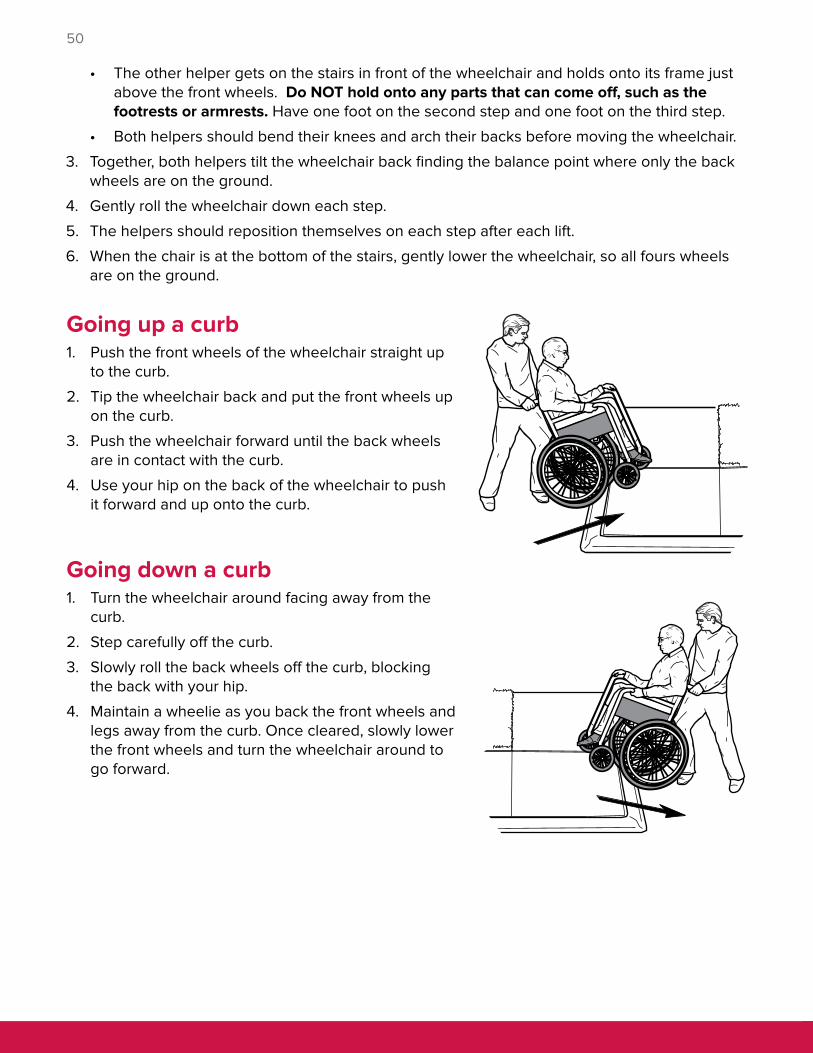
Going up a curb1. Push the front wheels of the wheelchair straight up
to the curb.
2. Tip the wheelchair back and put the front wheels up on the curb.
3. Push the wheelchair forward until the back wheels are in contact with the curb.
4. Use your hip on the back of the wheelchair to push it forward and up onto the curb.
Going down a curb1. Turn the wheelchair around facing away from the
curb.
2. Step carefully off the curb.
3. Slowly roll the back wheels off the curb, blocking the back with your hip.
4. Maintain a wheelie as you back the front wheels and legs away from the curb. Once cleared, slowly lower the front wheels and turn the wheelchair around to go forward.
51
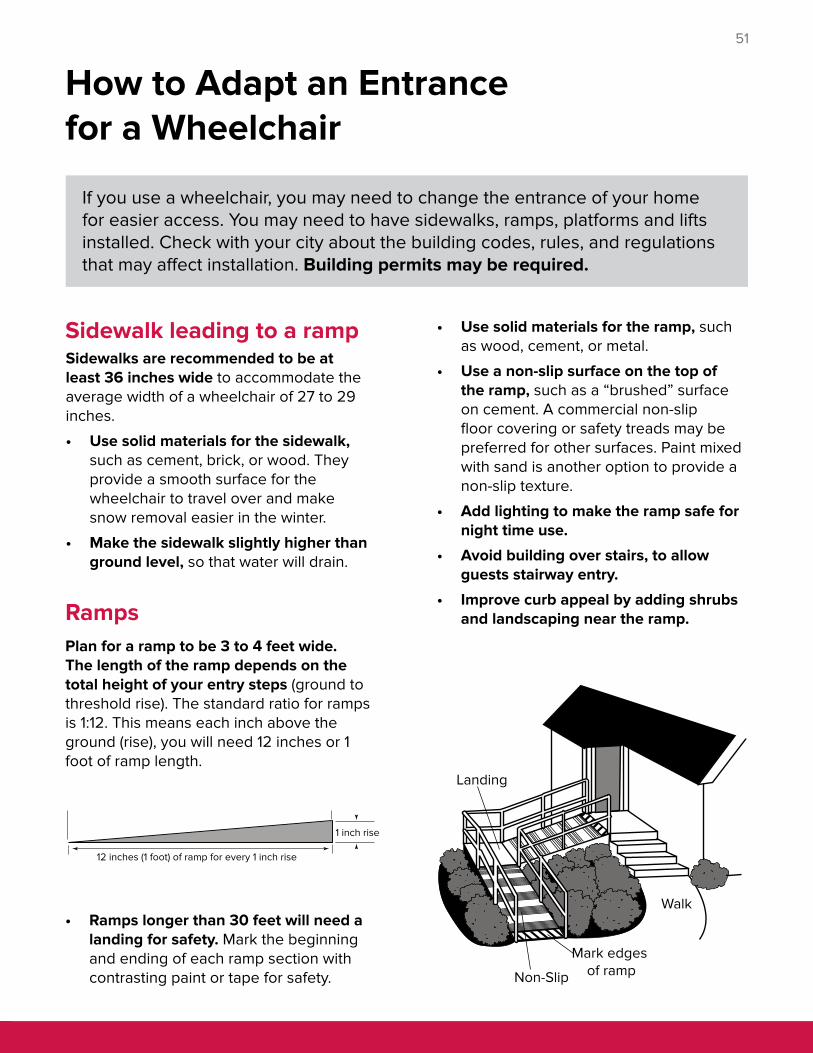
Sidewalk leading to a ramp
Ramps
Sidewalks are recommended to be at least 36 inches wide to accommodate the average width of a wheelchair of 27 to 29 inches.
• Use solid materials for the sidewalk, such as cement, brick, or wood. They provide a smooth surface for the wheelchair to travel over and make snow removal easier in the winter.
• Make the sidewalk slightly higher than ground level, so that water will drain.
• Use solid materials for the ramp, such as wood, cement, or metal.
• Use a non-slip surface on the top of the ramp, such as a “brushed” surface on cement. A commercial non-slip floor covering or safety treads may be preferred for other surfaces. Paint mixed with sand is another option to provide a non-slip texture.
• Add lighting to make the ramp safe for night time use.
• Avoid building over stairs, to allow guests stairway entry.
• Improve curb appeal by adding shrubs and landscaping near the ramp.
Plan for a ramp to be 3 to 4 feet wide. The length of the ramp depends on the total height of your entry steps (ground to threshold rise). The standard ratio for ramps is 1:12. This means each inch above the ground (rise), you will need 12 inches or 1 foot of ramp length.
• Ramps longer than 30 feet will need a landing for safety. Mark the beginning and ending of each ramp section with contrasting paint or tape for safety.
If you use a wheelchair, you may need to change the entrance of your home for easier access. You may need to have sidewalks, ramps, platforms and lifts installed. Check with your city about the building codes, rules, and regulations that may affect installation. Building permits may be required.
How to Adapt an Entrance for a Wheelchair
1 inch rise
12 inches (1 foot) of ramp for every 1 inch rise
Landing
Walk
Mark edges of rampNon-Slip
Surface
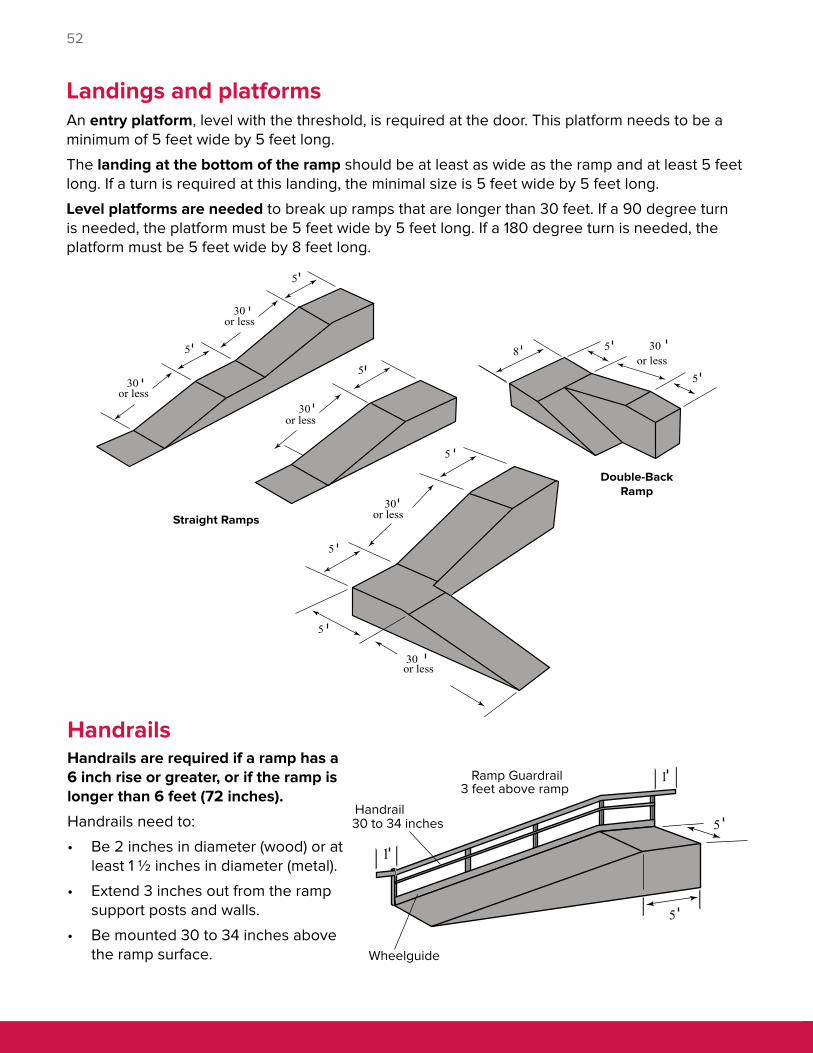
52
An entry platform, level with the threshold, is required at the door. This platform needs to be a minimum of 5 feet wide by 5 feet long.
The landing at the bottom of the ramp should be at least as wide as the ramp and at least 5 feet long. If a turn is required at this landing, the minimal size is 5 feet wide by 5 feet long.
Level platforms are needed to break up ramps that are longer than 30 feet. If a 90 degree turn is needed, the platform must be 5 feet wide by 5 feet long. If a 180 degree turn is needed, the platform must be 5 feet wide by 8 feet long.
30or less
5
5
5
30or less
30or less
8 5
5
Double-BackRamp
30or less
30or less
5
5
Straight Ramps
30or less
5
Landings and platforms
HandrailsHandrails are required if a ramp has a 6 inch rise or greater, or if the ramp is longer than 6 feet (72 inches).
Handrails need to:
• Be 2 inches in diameter (wood) or at least 1 ½ inches in diameter (metal).
• Extend 3 inches out from the ramp support posts and walls.
• Be mounted 30 to 34 inches above the ramp surface.
30 to 34 inches
5
1
1
5
Wheelguide
Ramp Guardrail
Handrail
3 feet above ramp

53
• Extend 1 foot (12 inches) past the end of the ramp and end at a post / wall or be rounded off.
• Have ramp guardrail installed 36 inches above the ramp surface.
• Have a wheel guide installed, at least 2 inches high, along both sides of the ramp floor. This will prevent the front wheels of the wheelchair from slipping off the ramp edge.
Lift considerations:
• Lifts must sit on a sturdy platform of 5 feet wide by 5 feet long. Cement, bricks, or patio blocks may be used.
• You will need an outside electrical outlet.
• An outside light is needed for safety.
• You may need to build a platform “bridge” from the lift (in its raised position) to the entry door. This platform should be at least 5 feet long.
• The lift should be able to handle a load of 300 to 400 pounds.
• Lifts can be ordered or adjusted to meet a variety of heights.
3236
48
54
Platform
Control Switch
Varies
Lift Dimensions
Electric porch liftsPorch lifts can be more expensive than ramp construction. If there is not enough room for a ramp or if extensive ramping is required, a lift becomes an affordable option. Search for local suppliers at www.yellowpages.com, using the search term “wheelchair lifts & ramps”. The lifts are weather proof and have a lock and key for safety and security.

54
Saving Energy and Making Work Easier
General tips• Wait 30 minutes after eating before doing a task.
Work done after a meal causes more demand for oxygen to your heart.
• Avoid doing activities in hot and humid or very cold temperatures. Extreme heat or cold can be dangerous for the heart.
• Talk with staff about how to adapt your home to make things easier. Ask about local resources to help with the cost.
Pace yourself to save energy• Get at least 6 to 8 hours of sleep each night.
• Rest for 20 to 30 minutes at least twice a day. Stop and rest for 15 minutes if you get tired, whether or not you have finished your task.
• Alternate easy tasks with hard tasks or spread a task out over the day.
• Focus your energy on the things you can do.
• Ask for help when things get too demanding or hire help when you can.
• Avoid stress as much as possible.
Use labor-saving methods and devices to save energy• Create work areas where you can comfortably sit to do things, such as making food or
grooming yourself.
• Organize work areas and keep items where you use them. Store things you use most often at chest height to avoid stretching to reach them.
• Get rid of unneeded work, such as wearing clothes that do not need to be ironed.
• Use automatic or electric appliances, such as an electric can opener, mixer, washer and dryer, and dishwasher.
• Use wheels to move things. Use a cart for your garbage cans that you can pull with a riding mower. Use a cart to move your laundry.
• Use proper body mechanics. Slide rather than lift things. Do not lean forward without supporting yourself. Instead, rest your elbows on counter tops.
• Use aids for daily tasks, such as using a long-handled shoe horn or a sock aid. You can also use a grabber to reach things from a seated position.
• Bathroom changes can help make bathing easier, such as using a hand held shower head. Use a shower bench to sit and an elevated toilet seat.
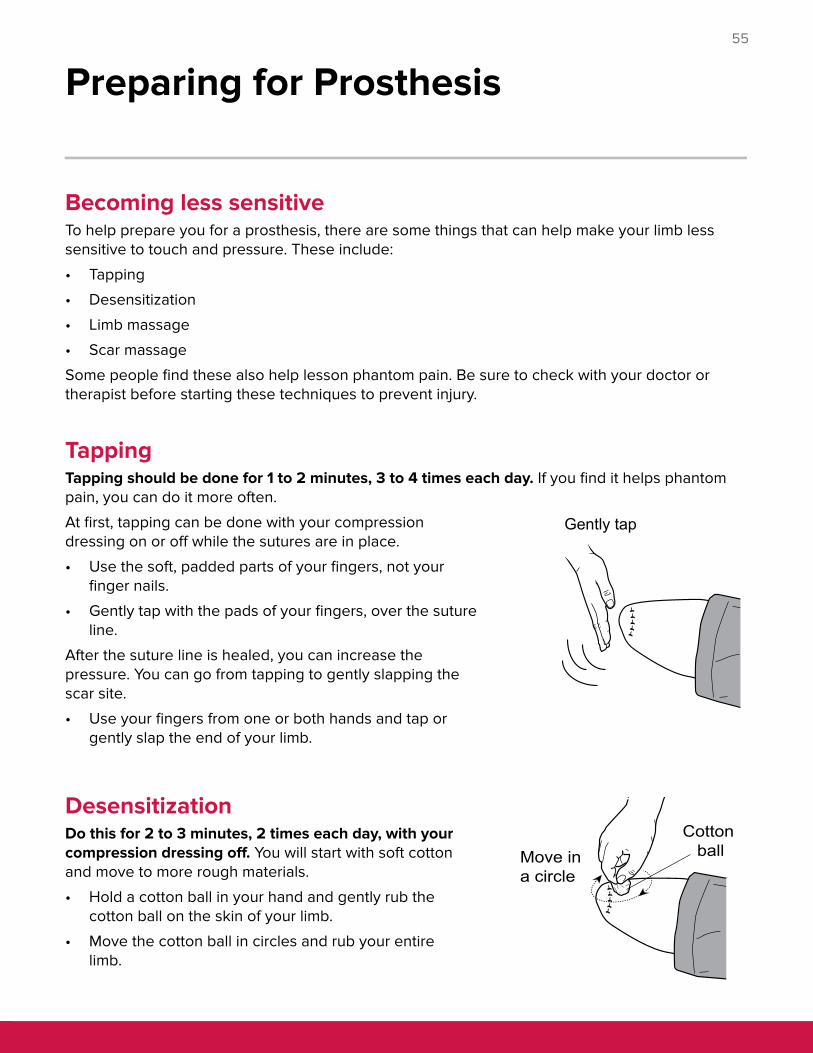
55
Preparing for Prosthesis
Becoming less sensitiveTo help prepare you for a prosthesis, there are some things that can help make your limb less sensitive to touch and pressure. These include:
• Tapping
• Desensitization
• Limb massage
• Scar massage
Some people find these also help lesson phantom pain. Be sure to check with your doctor or therapist before starting these techniques to prevent injury.
TappingTapping should be done for 1 to 2 minutes, 3 to 4 times each day. If you find it helps phantom pain, you can do it more often.
At first, tapping can be done with your compression dressing on or off while the sutures are in place.
• Use the soft, padded parts of your fingers, not your finger nails.
• Gently tap with the pads of your fingers, over the suture line.
After the suture line is healed, you can increase the pressure. You can go from tapping to gently slapping the scar site.
• Use your fingers from one or both hands and tap or gently slap the end of your limb.
DesensitizationDo this for 2 to 3 minutes, 2 times each day, with your compression dressing off. You will start with soft cotton and move to more rough materials.
• Hold a cotton ball in your hand and gently rub the cotton ball on the skin of your limb.
• Move the cotton ball in circles and rub your entire limb.
Move ina circle
Cotton ball
Gently tap

56
• When you are able, use a rougher material, like a paper towel, instead of the cotton ball.
• As you are able, use a terry cloth towel or washcloth, instead of the paper towel.
• Keep doing this until you are able to tolerate the gentle rubbing of the terry cloth.
Limb massageMassage for at least 5 minutes, 3 to 4 times each day. You can do it more often if it helps ease phantom pain. You can do massage with your compression dressing off or on.
• Using one or both hands, gently squeeze and release to massage your limb. At first, be cautious around your suture line or scar.
• Start at your suture line and massage up and around your entire limb.
• After your sutures are removed and the site has healed, you can increase the pressure when you squeeze to massage the deeper muscles.
Scar massage Scar massage is done to keep your scar from getting stiff and tight. If the scar attaches to the tissue, it can cause more pain and be a site for blisters when you wear the prosthesis. Massaging the area will help keep the scar loose and less thick.
Do this 1 time each day when you bathe.
• Before your suture line heals, you will not be pressing on the scar line. You will move the skin around the bone at the end of your limb. It is best to do this when your compression dressing is off.
Ì Place 2 of your fingertips on the skin over the bony end of your limb.
Ì Press firmly and move your fingers in circles across the bone.
Ì Keep making circles until you have massaged all of the skin around the end of your limb.
• After your suture line has healed, place your fingers on the scar line and move in circles across your scar. Press in gently along the scar to move the skin over the tissue lying underneath.
ClothMove ina circle
Move insmall circles
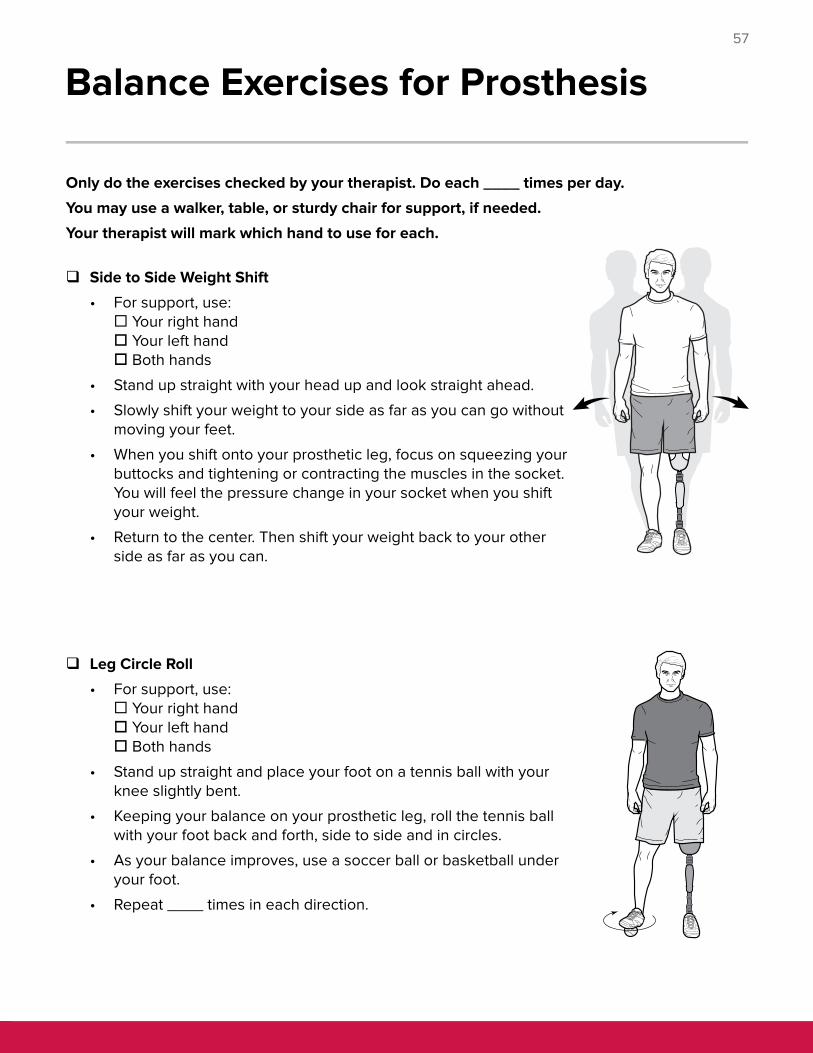
57
Balance Exercises for Prosthesis
Only do the exercises checked by your therapist. Do each ____ times per day.
You may use a walker, table, or sturdy chair for support, if needed.
Your therapist will mark which hand to use for each.
� Side to Side Weight Shift
• For support, use: Your right hand Your left hand Both hands
• Stand up straight with your head up and look straight ahead.
• Slowly shift your weight to your side as far as you can go without moving your feet.
• When you shift onto your prosthetic leg, focus on squeezing your buttocks and tightening or contracting the muscles in the socket. You will feel the pressure change in your socket when you shift your weight.
• Return to the center. Then shift your weight back to your other side as far as you can.
� Leg Circle Roll
• For support, use: Your right hand Your left hand Both hands
• Stand up straight and place your foot on a tennis ball with your knee slightly bent.
• Keeping your balance on your prosthetic leg, roll the tennis ball with your foot back and forth, side to side and in circles.
• As your balance improves, use a soccer ball or basketball under your foot.
• Repeat ____ times in each direction.
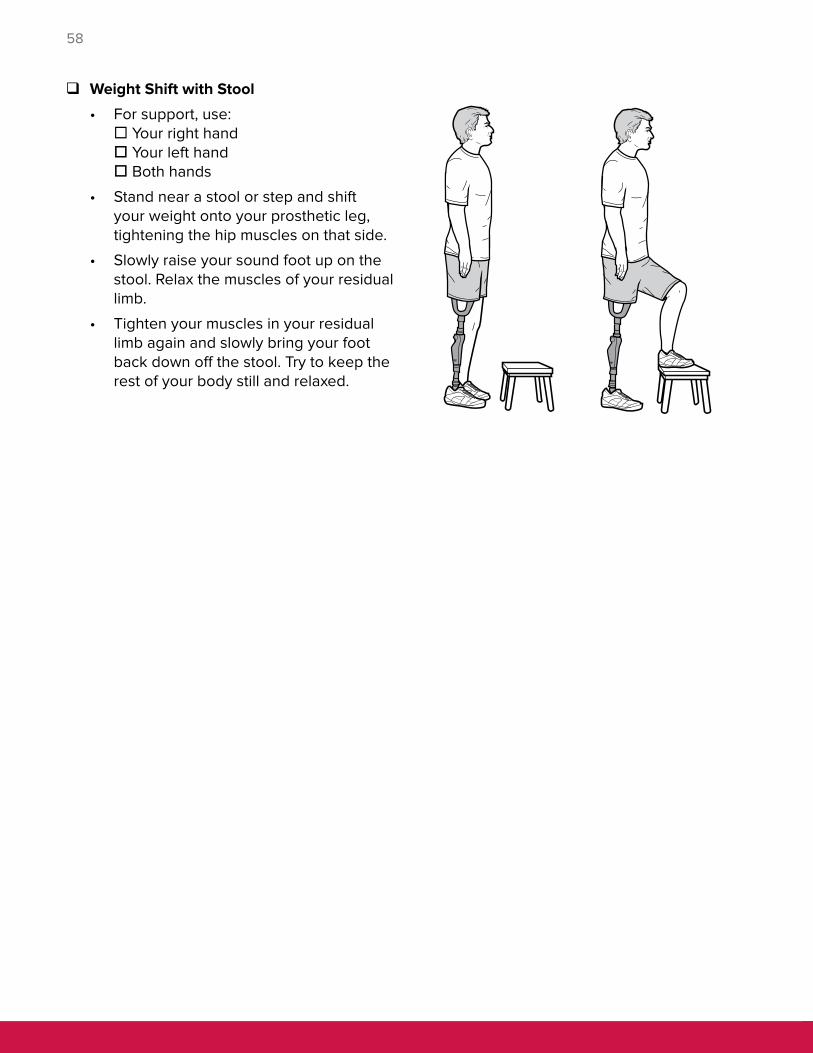
58
� Weight Shift with Stool
• For support, use: Your right hand Your left hand Both hands
• Stand near a stool or step and shift your weight onto your prosthetic leg, tightening the hip muscles on that side.
• Slowly raise your sound foot up on the stool. Relax the muscles of your residual limb.
• Tighten your muscles in your residual limb again and slowly bring your foot back down off the stool. Try to keep the rest of your body still and relaxed.
59
Prosthetic and Orthotic Companies
American Orthopedics Prosthetic & Orthotic Services www.amerortho.com
Two locations:
1151 West 5th AvenueColumbus, OH 43212614-291-6454
2200 N. Limestone St. Suite 108Springfield, OH 45503937-342-0150www.amerortho.com
BioCARE Orthopedic Prosthetics and Orthotics Inc.prostheticlimbcolumbusohio.com
Two locations:
2976 East Broad StreetColumbus, Ohio 43209614-754-7514
8889 Basil Western Road NWCanal Winchester, Ohio 43110614-920-2811
Capital Prosthetic & Orthotic Center, Inc.www.capitalprosthetics.net
4678 Larwell DriveColumbus, OH 43220614-451-0446; 1-800-215-0764
Locations also in Mount Vernon, Newark, and Zanesville.
These are some of the companies in central Ohio that provide prosthetics and special braces, called orthotics. There may be others in your area. Go to www.abcoandp.org to search for an accredited facility in your area or search the yellow pages online for more locations. Be sure to check with your insurance company to see if they have a certain company you should contact.
Central Ohio Orthotic & Prosthetic Center, Inc.coopc.org
3059 East Mound StreetColumbus, OH 43209614-231-4256
Hanger Prosthetics & Orthotics, Inc.www.hangerclinic.com
Three locations in Columbus:
1357 Dublin RoadColumbus, OH 43215614-481-8338
1210 Gemini Place, Suite 101Columbus, OH 43240614-436-3516
255 Taylor Station Road, Suite 200Columbus, OH 43123614-471-8210
34 locations in Ohio, including Dayton, Lancaster, Marion, Springfield and Zanesville. Optimus Prostheticswww.optimusprosthetics.com
3132 Olentangy River RoadColumbus, Ohio 43202614-263-LIMB (5462)
Locations

© 2006 - April 17, 2018, The Ohio State University Wexner Medical Center.