your company ergonomic plan
TRANSCRIPT

Your Company Ergonomic Plan
Is Critical to Standing Straight
Field or Office
Same risks to you!

An ant can lift 1,000 times it body weight but . . . .
While an ant may be much stronger and more efficient at moving materials,
manual handling of containers and materials may expose workers to physical
conditions (e.g., force, awkward postures, and repetitive motions) that can lead
to injuries, wasted energy, and wasted time.
This week’s focus will be on raising your awareness on the identification of risks
and solutions to help prevent Ergonomic injuries from Lifting and Manual
Material Handling.

The first step to Injury Prevention is
knowing what can hurt you !Conduct a Lifting and Manual Handling Risk Assessment
1) Identify the Manual Handling Tasks that need to be assessed
2) Observe the Tasks
3) Identify the Risk Factors:
• Awkward postures (bending, twisting)
• Forceful exertions (carrying or lifting heavy loads)
• Repetitive motions (frequent reaching, lifting, carrying)
• Pressure points (grasping or contact from loads, leaning against
parts or surfaces that are hard or have sharp edges)
• Static postures (maintaining fixed positions for a long time)
4) Identify the body parts that are impacted from the risk factors
5) Develop solutions to address the Risk Factors
6) Communicate the Solutions
7) Reassess the tasks to ensure the solutions are implemented and
effective
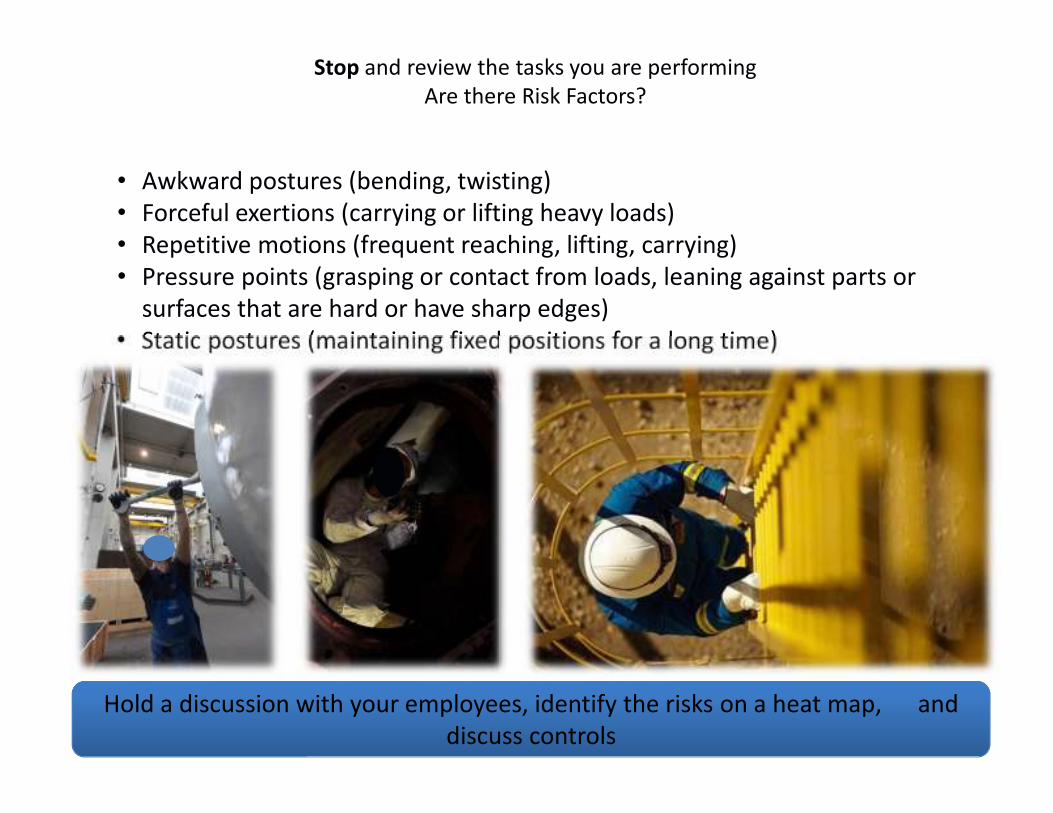
Stop and review the tasks you are performing
Are there Risk Factors?
• Awkward postures (bending, twisting)
• Forceful exertions (carrying or lifting heavy loads)
• Repetitive motions (frequent reaching, lifting, carrying)
• Pressure points (grasping or contact from loads, leaning against parts or
surfaces that are hard or have sharp edges)
• Static postures (maintaining fixed positions for a long time)
Hold a discussion with your employees, identify the risks on a heat map, and
discuss controls

Use Proper Lifting Techniques
• Keep a wide base of support
• Your feet should be shoulder-width apart, with one foot slightly ahead of the other
• Squat down, bending at the hips and knees only.
• Keep good posture. Look straight ahead, and keep your back straight, your chest out, and your
shoulders back. This helps keep your upper back straight while having a slight arch in your lower
back.
• Slowly lift by straightening your hips and knees (not your back). Keep your back straight, and don't
twist as you lift.
• Hold the load as close to your body as possible, at the level of your belly button.
•Use your feet to change direction, taking small steps.
• Don’t twist your body
• Lead with your hips as you change direction. Keep your shoulders in line with your hips as you move.
• Set down your load carefully, squatting with the knees and hips only.

Use ALL resourses available to assist in the lift
2-person lifts for
• Heavy
• Awkward
• Long articles
Machines such as• Cranes
• Hoists
• Winches
• Scissor Lifts
• Come along
• Forklift Trucks
• Hydraulic Jacks
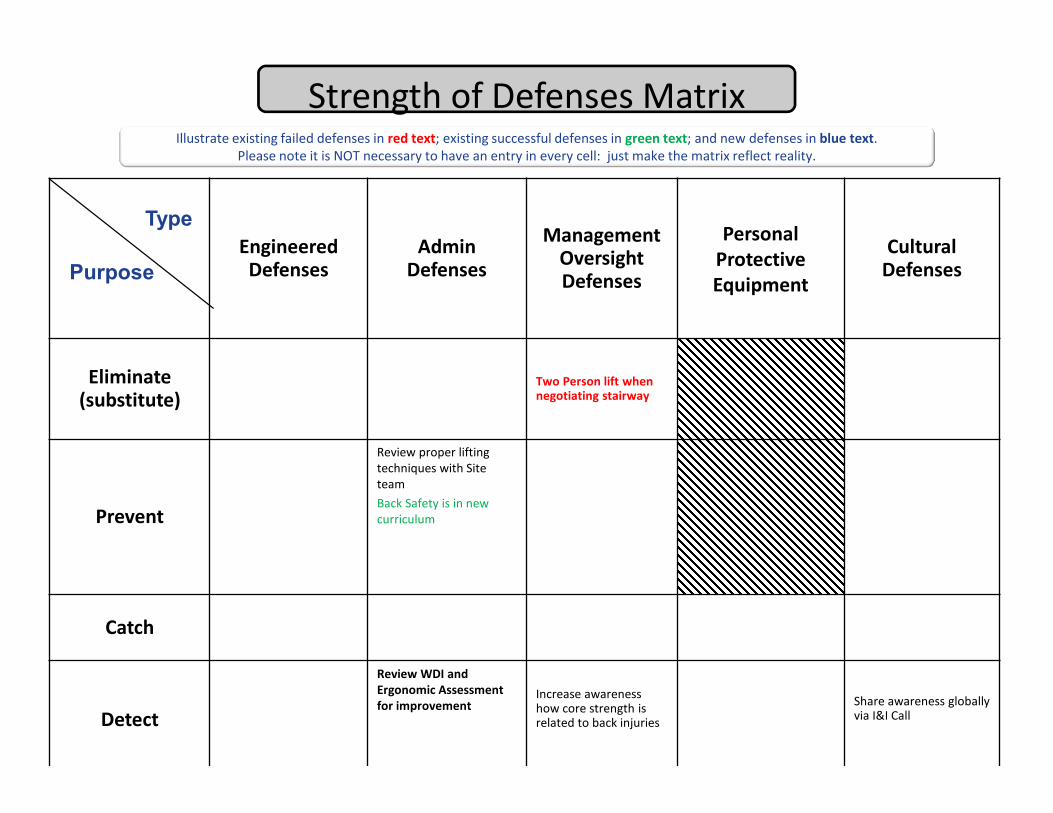
Strength of Defenses Matrix
Engineered Defenses
Admin Defenses
Management Oversight Defenses
Personal
Protective
Equipment
Cultural Defenses
Eliminate (substitute)
Two Person lift when negotiating stairway
Prevent
Review proper lifting
techniques with Site
team
Back Safety is in new
curriculum
Catch
Detect
Review WDI and
Ergonomic Assessment
for improvement Increase awarenesshow core strength is related to back injuries
Share awareness globally via I&I Call
Purpose
Type
Illustrate existing failed defenses in red text; existing successful defenses in green text; and new defenses in blue text.
Please note it is NOT necessary to have an entry in every cell: just make the matrix reflect reality.
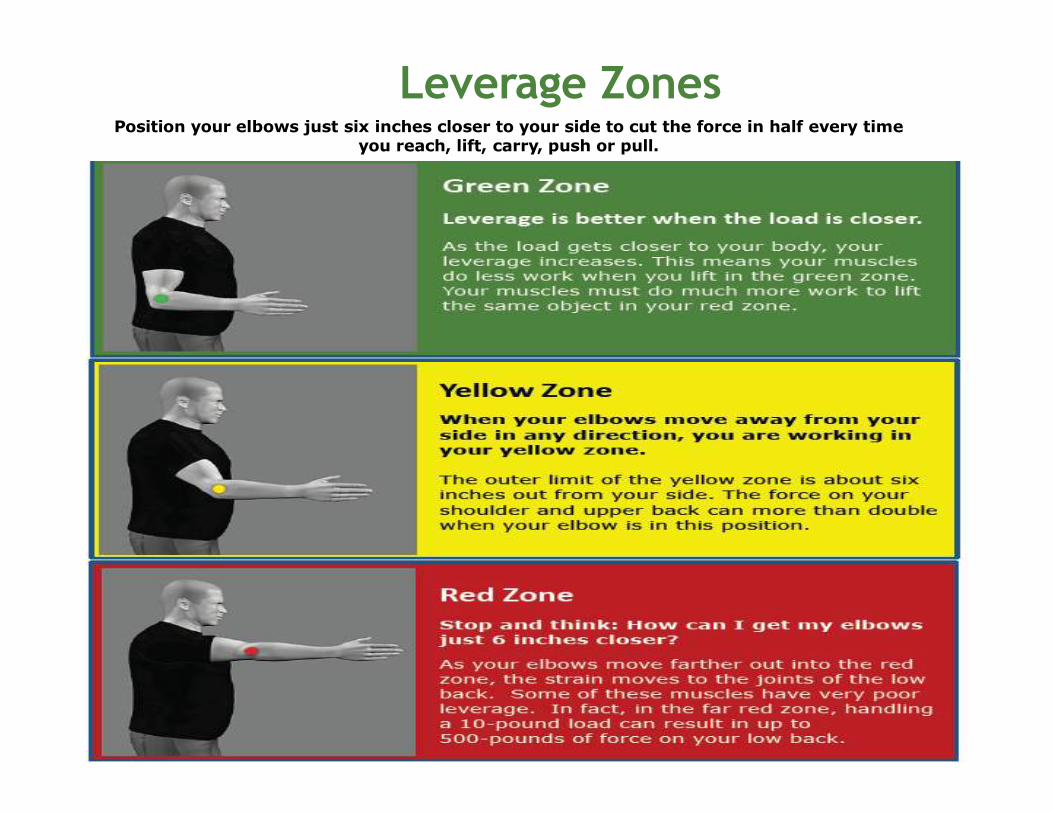
Leverage ZonesPosition your elbows just six inches closer to your side to cut the force in half every time
you reach, lift, carry, push or pull.
Green Zone
Leverage is better when the load is closer.
As the load gets closer to your body, your leverage increases. Thismeans your muscles do less work when you lift in the green zone. Yourmuscles must do much more work to lift the same object in your redzone.

Workstation ergonomics leverage zones


A simple tool like a screw driver can cause an ergonomic injury.
• While technology has advanced and tools help us to easily perform tasks that otherwise would be difficult or impossible, the simplest tools have the potential for causing severe ergonomic injuries.
• This weeks focus will be on raising your awareness on the ergonomic impacts from Repetition and Vibration while using Powered and Non-Powered Hand Tools including some solutions to help prevent Ergonomic injuries.
Since the dawn of time cavemen used tools . . . How times have changed.
It’s not always complexity that
causes injuries

Handle size The right-sized handle is one that allows the hand to go more than halfway around the handle without the thumb and
fingers meeting. The recommended grip diameter in most cases falls between 2 – 2½ inches (50 and 60 mm). To
provide good control of the tool and prevent pain and pressure hot spots in the palm of the hand, handles should be
at least 4¾ inches (120 mm) long. A precision grip (when the tool is pinched between the tips of the thumb and
fingers) is primarily used for work that requires control rather than a lot of force. Handles for precision tools should be
¼ to ½ inch (8 to 13 mm) in diameter and at least 4 inches (100 mm) long.
Grip surfaces The grip surfaces of hand tools should be smooth, non-conductive, and slightly compressible to dampen vibration and
better distribute hand pressure. Avoid tools that have grooves for finger — for most people the grooves are either too
big or too widely or closely spaced. The resulting pressure ridges across the hand can damage nerves or create hot
spots of pain. Grooves along the length of the handle are intended to prevent slipping but can also cut into the hand
and create pressure ridges, particularly if the tool is in continuous use. If a grooved handle is the only choice available,
ensure that the grooves are many, narrow and shallow. If it is available, try a grip shape that is non-cylindrical.
Triangular grips measuring approximately 4½ inches (110 mm) around at their widest part can be quite comfortable
and help to increase power.
If the tool fits . . . Use it !

Weight Weight is often a problem with power tools and tools such as axes, hammers, and saws. To reduce
hand, arm, and shoulder fatigue, the hand tool should not weigh more than 5 lbs. (2.3 kg). If the center
of gravity of a heavy tool is far from the wrist, this maximum weight should be reduced. Studies have
shown that tools weighing 2 to 3¾ lbs. (0.9 to 1.75 kg) feel “just right” for most workers. For precision
work where the small muscles of the hand support the tool, it should weigh far less. Lighter is better.
Heavy tools can be made easier to use by suspending or counterweighting them.
Triggers
Many power tools have a trigger that is operated either by the thumb or one or more fingers. To avoid
hand and forearm fatigue, look for tools that can be activated by either hand. Also, the trigger should
have a mechanism that holds or locks it in place while the tool is being used. Triggers should be at least
1 inch (25 mm long) for single-finger activation and 2 inches (50 mm) long for two-finger activation. Use
four-finger activation only with suspended tools.
If the tool fits . . . Use it !
There is no real definition for an “ergonomic tool”.
Look for hand tools that have features such as the ones described above.
If the tool fits, it’s the right one for the worker and the job, whether or not it’s called
“ergonomic”.

Understanding Vibration
• Vibration can be explained as the back and forth motion
produced by objects such as tools, machinery and equipment. It
has two components:
• Frequency (or repeat rate)
• Amplitude (or displacement)
• Some objects vibrate by design, such as impact wrenches and
sanders, while others vibrate due to defects or malfunctioning.
• When a worker uses or handles a vibrating object, the vibration
is transmitted to the hands and arms, resulting in hand/arm
vibration.
• Both frequency and amplitude play a role in the injury process.
Exposure to excessive vibration can result in vibration-related injuries and diseases such as vibration
white finger, Raynaud’s phenomenon and carpal tunnel syndrome.
In extreme cases, these injuries and diseases can even lead to permanent impairment of the hands
and arms.
The adverse effect produced by exposure to vibration is called hand-arm vibration syndrome (HAVS).

Reducing exposure to hand-arm vibration
• Identify the tasks that require the use of powered hand tools
• Evaluate the extent of use of the equipment, with regard to the
duration and intensity of vibration.
• Proper tool selection can eliminate or lessen the issue:
� Utilizing Anti-vibration tools when possible
� Use alternative tools and methods for certain jobs (such as
hydraulic tools in place of vibratory tools).
� Informing and training to workers in the proper use and
handling of tools and equipment and recognizing HAVS
symptoms
� Let the tool do the work. Use as light a grip as possible to keep
the tool under control. A tight grip restricts blood flow in the
hands and fingers and allows more vibration to pass from the
tool to the body.
� Implement rest periods for vibratory tool operators.
� Selection and use of anti-vibration gloves
The best way to avoid injury is to work with non-vibrating tools whenever possible.
When that is not possible here are some simple steps to take:

How do you know if you have an ergonomic problem?
You may have a problem if you have any of these symptoms:
• Tingling
• Swelling in the joints
• Decreased ability to move
• Decreased grip strength
• Pain from movement, pressure, or exposure to cold or
vibration
• Continual muscle fatigue
• Sore muscles
• Numbness
• Change in the skin color of your hands or fingertips
These symptoms may not appear immediately because they develop over weeks,
months, or years.
By then, the damage may be serious.
Take action before you notice any symptoms.

Preparing your body for tasks - Stretching
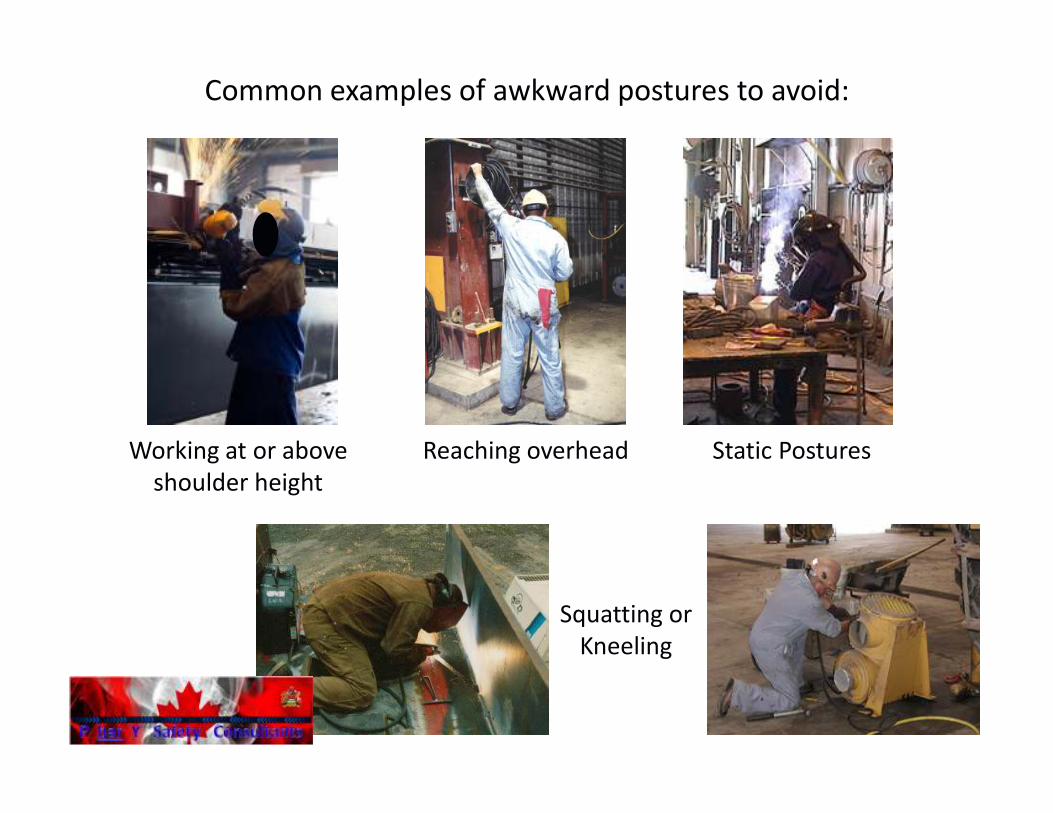
Common examples of awkward postures to avoid:
Squatting or
Kneeling
Working at or above
shoulder height
Reaching overhead Static Postures
37–
43
in
34 –
37 in
28 –
35 in
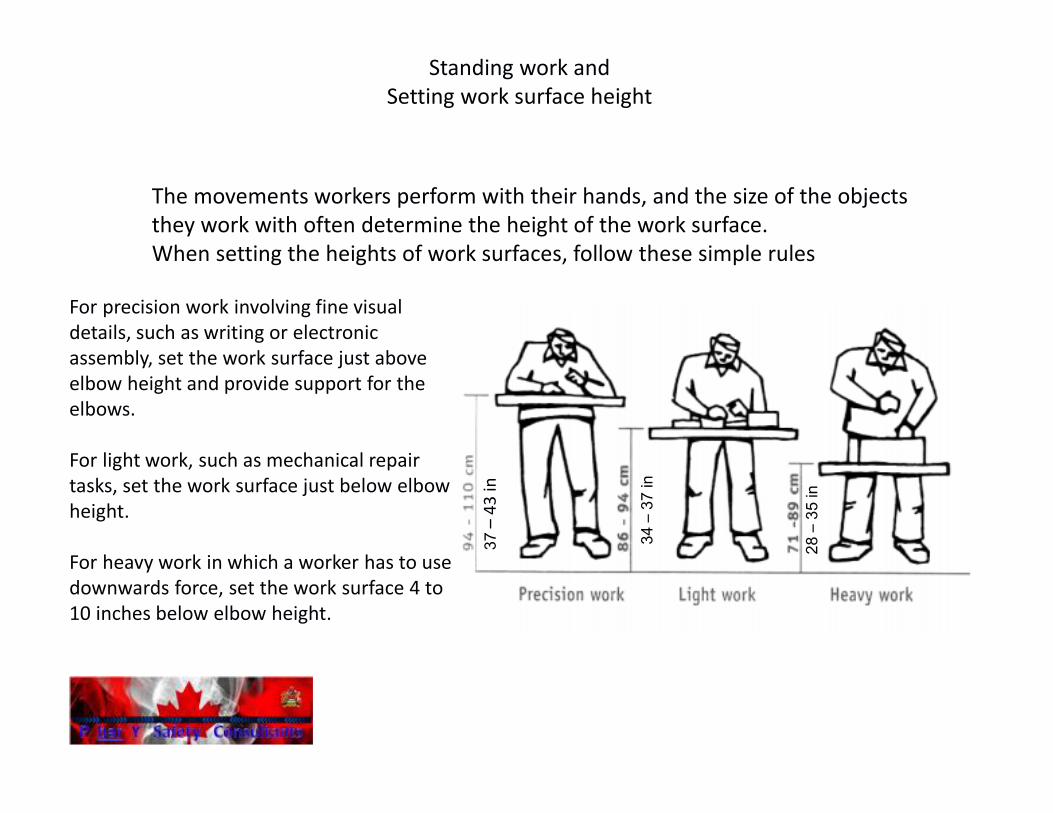
Standing work and
Setting work surface height
For precision work involving fine visual
details, such as writing or electronic
assembly, set the work surface just above
elbow height and provide support for the
elbows.
For light work, such as mechanical repair
tasks, set the work surface just below elbow
height.
For heavy work in which a worker has to use
downwards force, set the work surface 4 to
10 inches below elbow height.
The movements workers perform with their hands, and the size of the objects
they work with often determine the height of the work surface.
When setting the heights of work surfaces, follow these simple rules

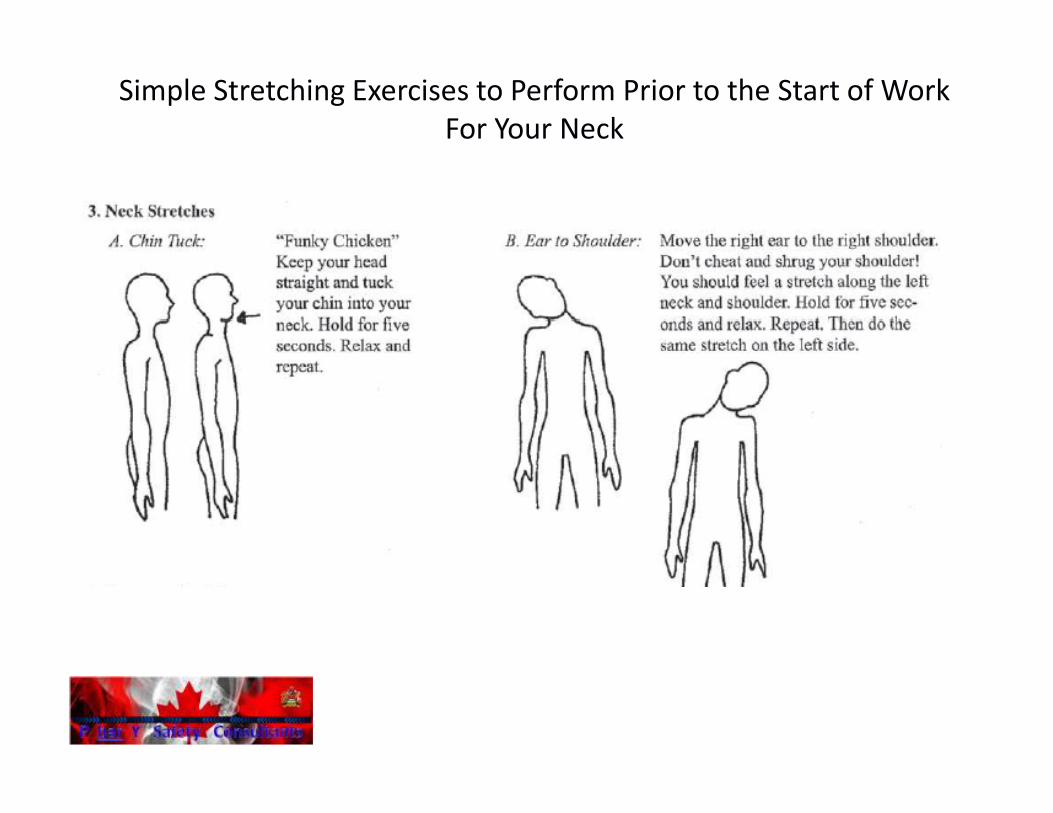
Stretching Reduces Fatigue� Stretching increases blood supply and nutrients to joint structures and soft tissues.
� Stretching increases soft tissue temperature and allows for greater elasticity of tissues.
� Stretching increases joint synovial fluid (lubricant for bones and articular cartilage) that allows
greater range of motion and reduces joint degeneration.
� Stretching increases a joint’s ability to move through a greater range of motion with less energy
required to do so.
� Stretching decreases tightness and resistance in tendons and muscles.
Stretching Improves Muscular Balance and Posture� Soft tissue structures often adapted poorly to effects of gravity and poor postural habits.
� Stretching realigns soft tissue structures, thus reducing effort to achieve & maintain good posture
in activities of daily living.
Stretching Improves Muscle Coordination� Stretching enhances nerve impulse velocity (the time it takes an impulse to travel to the brain
and back to the muscle).
� Stretching helps opposing muscle groups work in a more coordinated fashion.
Positive Impacts of Stretching Prior to the Start of Work
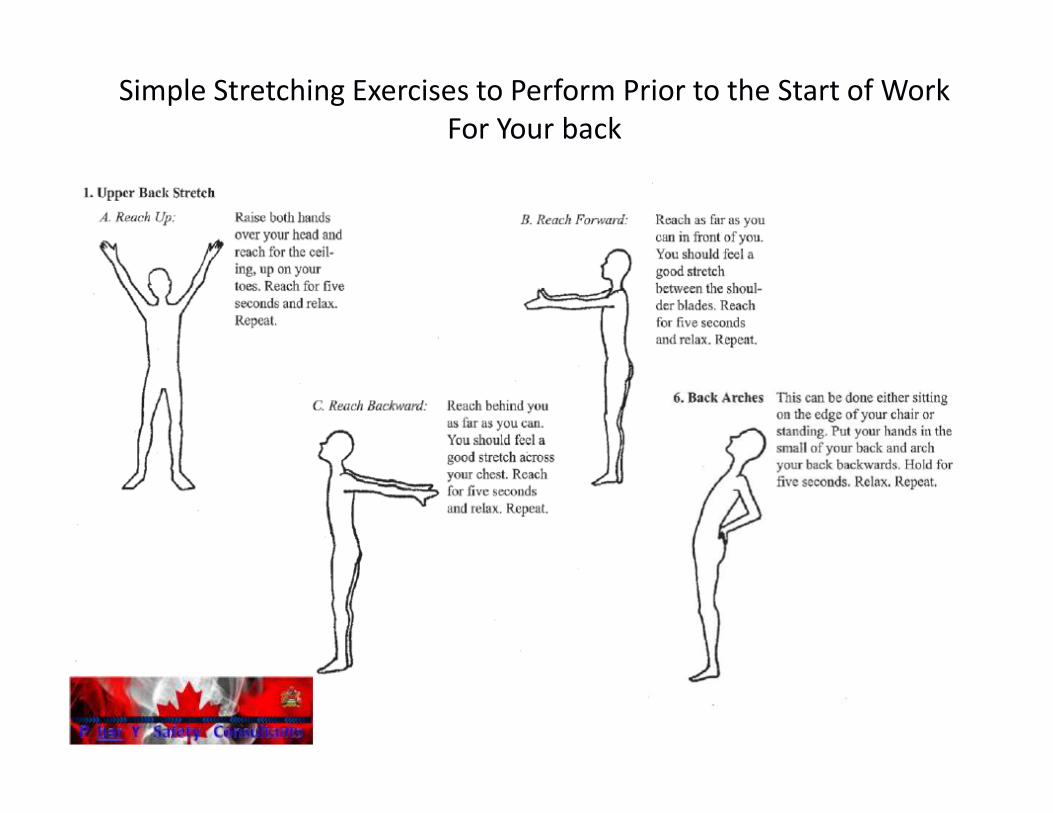
Simple Stretching Exercises to Perform Prior to the Start of Work
For Your back

Simple Stretching Exercises to Perform Prior to the Start of Work
For Your Shoulders
Simple Stretching Exercises to Perform Prior to the Start of Work
For Your Neck

It feels like we spend most of our lives behind a steering wheel or
behind a desk. No wonder our bodies complain ! According to a recent study, most people spend an
average of 8.7 hours at work and 6 of those hours
sitting behind their desk.
Non-commercial drivers spend an average of 1.7 hours
a day behind the wheel.
That’s an average of 7.7 hours a day sitting, and in most
cases in a position that will have a negative ergonomic
impact to the body.
Posture is the most important aspect when looking at
workstation design as well as how we set up our
vehicles for driving.
This week’s focus will be on raising your awareness on
the ergonomic impacts from long drives and office
safety including some solutions to help prevent
Ergonomic injuries.

Adjusting the Drivers Seat of your Motor Vehicle Adjusting the driver’s seatRead to vehicle manual and understand all the adjustments that you can do (e.g., seat position,
backrest angle, headrest position, steering wheel height and tilt, seat belt, mirrors). Common
adjustments include:
Seat height - raise the seat as high as you can but still be
comfortable. This height will optimize your vision through the
windows. You should be able to see at least 3 in (76 mm) over
the top of the steering wheel. Ensure that you have sufficient
room between the roof and the top of your head. Adjust the
mirrors after you have finished setting the other features.
Seat cushion length, if possible - adjust the seat length so
that the back of your knees is about 1-1/4 to 2 3/8 in (3 - 6
cm) from the front on the seat.
Seat forward/back position - move the seat forward until
you can easily push the pedals through their full range with
your whole foot, not just your toes. You may have to readjust
the seat height to get better control of the pedals.
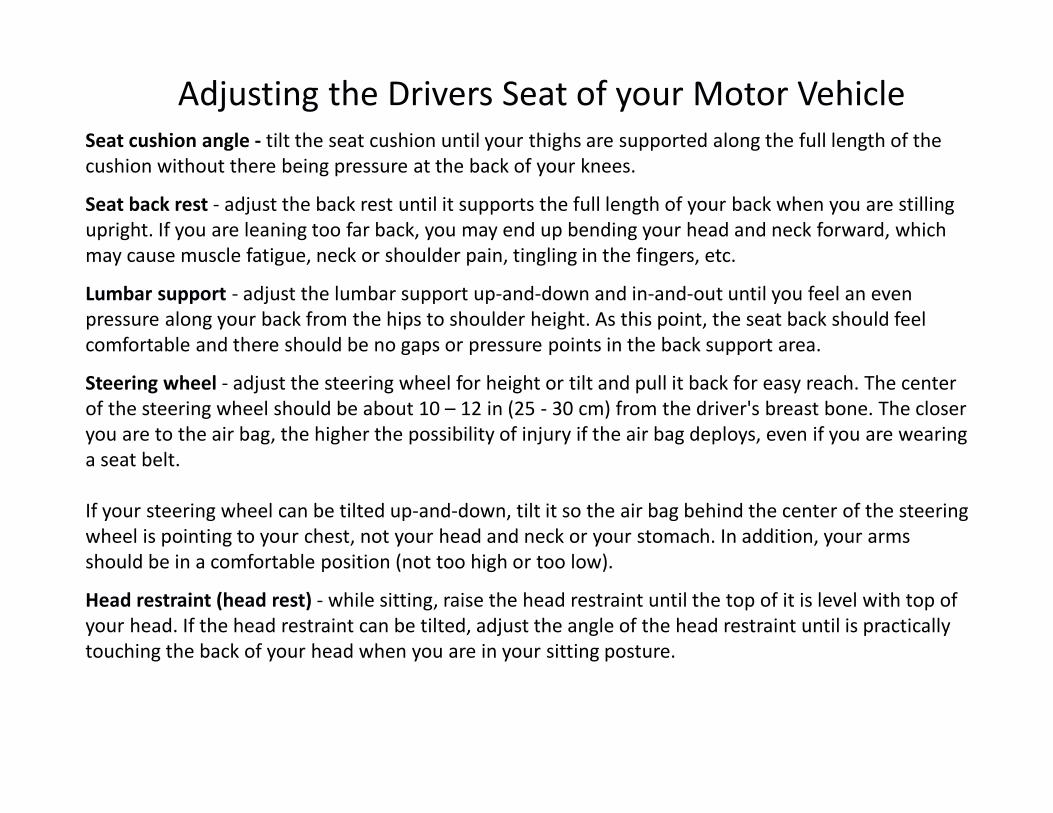
Seat cushion angle - tilt the seat cushion until your thighs are supported along the full length of the
cushion without there being pressure at the back of your knees.
Seat back rest - adjust the back rest until it supports the full length of your back when you are stilling
upright. If you are leaning too far back, you may end up bending your head and neck forward, which
may cause muscle fatigue, neck or shoulder pain, tingling in the fingers, etc.
Lumbar support - adjust the lumbar support up-and-down and in-and-out until you feel an even
pressure along your back from the hips to shoulder height. As this point, the seat back should feel
comfortable and there should be no gaps or pressure points in the back support area.
Steering wheel - adjust the steering wheel for height or tilt and pull it back for easy reach. The center
of the steering wheel should be about 10 – 12 in (25 - 30 cm) from the driver's breast bone. The closer
you are to the air bag, the higher the possibility of injury if the air bag deploys, even if you are wearing
a seat belt.
If your steering wheel can be tilted up-and-down, tilt it so the air bag behind the center of the steering
wheel is pointing to your chest, not your head and neck or your stomach. In addition, your arms
should be in a comfortable position (not too high or too low).
Head restraint (head rest) - while sitting, raise the head restraint until the top of it is level with top of
your head. If the head restraint can be tilted, adjust the angle of the head restraint until is practically
touching the back of your head when you are in your sitting posture.
Adjusting the Drivers Seat of your Motor Vehicle
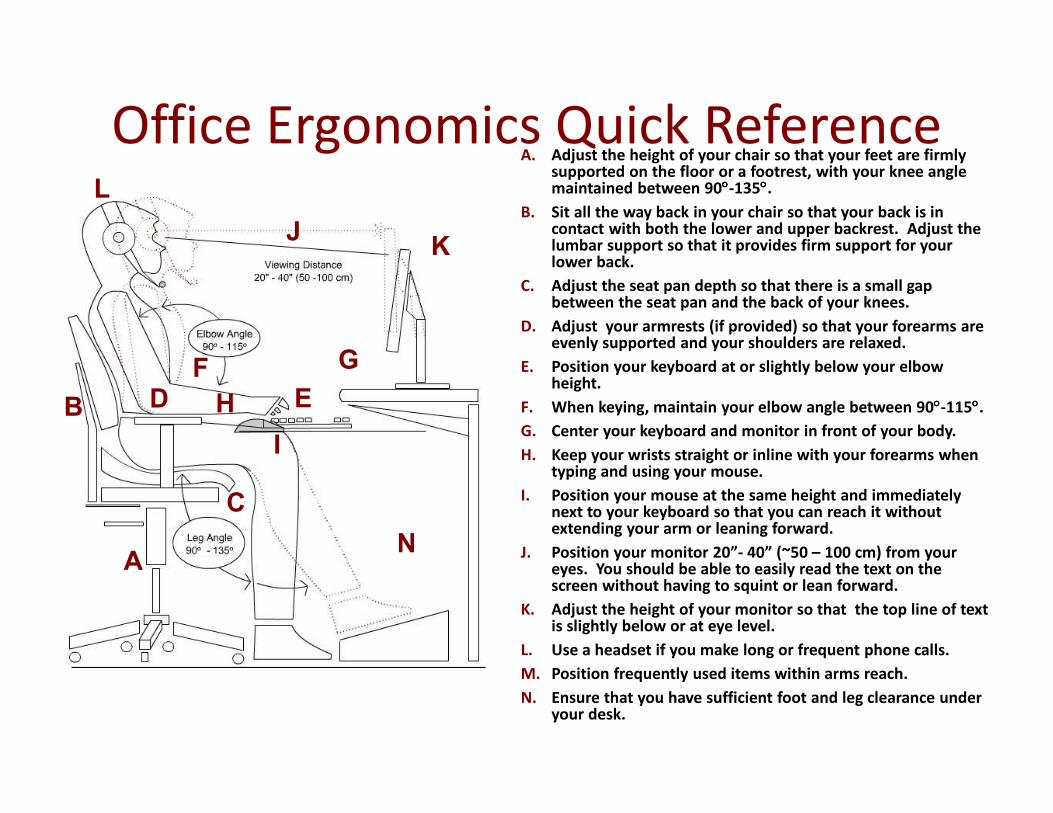
Office Ergonomics Quick Reference
A
B
C
D EF G
H
I
JK
L
N
A. Adjust the height of your chair so that your feet are firmly supported on the floor or a footrest, with your knee angle maintained between 90°°°°-135°°°°.
B. Sit all the way back in your chair so that your back is in contact with both the lower and upper backrest. Adjust the lumbar support so that it provides firm support for your lower back.
C. Adjust the seat pan depth so that there is a small gap between the seat pan and the back of your knees.
D. Adjust your armrests (if provided) so that your forearms are evenly supported and your shoulders are relaxed.
E. Position your keyboard at or slightly below your elbow height.
F. When keying, maintain your elbow angle between 90°°°°-115°°°°.
G. Center your keyboard and monitor in front of your body.
H. Keep your wrists straight or inline with your forearms when typing and using your mouse.
I. Position your mouse at the same height and immediately next to your keyboard so that you can reach it without extending your arm or leaning forward.
J. Position your monitor 20”- 40” (~50 – 100 cm) from your eyes. You should be able to easily read the text on the screen without having to squint or lean forward.
K. Adjust the height of your monitor so that the top line of text is slightly below or at eye level.
L. Use a headset if you make long or frequent phone calls.
M. Position frequently used items within arms reach.
N. Ensure that you have sufficient foot and leg clearance under your desk.

Option 1: Best Choice
Laptop with External Monitor; Keyboard and Mouse
Advantages
• Most comfortable arrangement
• Minimized visual strain
• If using a docking station, daily setup time is minimal
Disadvantages
• Cost
Examples of setups and solutions Tips and References
• Use a good chair and sit back
• Top of screen equal to eye height
• No glare on screen
• Sit at arms length from monitor
• Feet flat on floor or footrest
• Use a document holder
• Wrists flat and straight
• Arms and elbows close to body
• Center monitor & keyboard in front of you
• Use a negative tilt keyboard tray
• Use a stable work surface
• Take frequent short breaks
Adjusting up your Workspace for Laptop Use
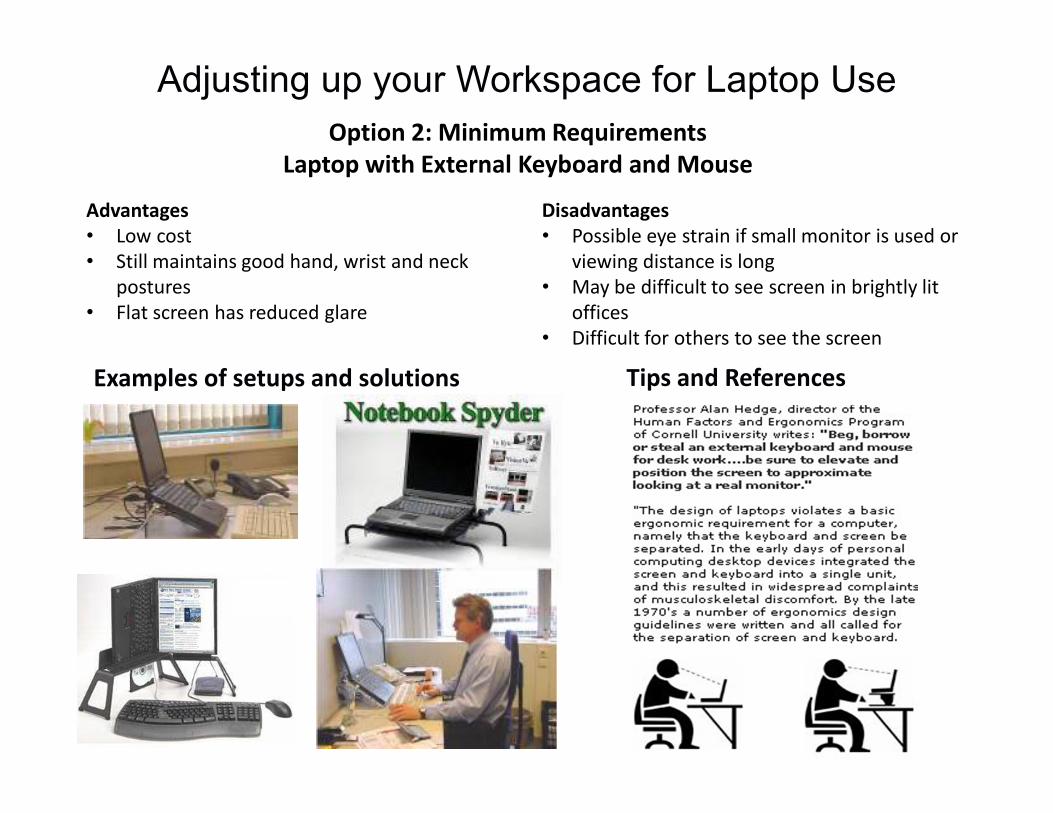
Option 2: Minimum Requirements
Laptop with External Keyboard and Mouse
Adjusting up your Workspace for Laptop Use
Advantages
• Low cost
• Still maintains good hand, wrist and neck
postures
• Flat screen has reduced glare
Disadvantages
• Possible eye strain if small monitor is used or
viewing distance is long
• May be difficult to see screen in brightly lit
offices
• Difficult for others to see the screen
Examples of setups and solutions Tips and References

Option 3: Laptop on its own
Only acceptable for travelers or mobile employees.
Not acceptable for "long term" use in a single office
Advantages
• No added equipment costs
Disadvantages
• Impossible for a proper ergonomic setup. Either the screen will be too
low or the keyboard will be too high.
• Poor hand postures during "clicking and dragging" with built in pointer
device.
• Not much typing feedback, so performance may suffer.
• 2 keys more likely to be pressed simultaneously.
Example of setups
Tips for Using a Laptop Computer
• If the keyboard is in an optimal position for the user, the screen isn't and if the screen is optimal the
keyboard isn't. … you need to pay special attention to how you use your laptop because it can cause
you problems.
• Laptop User Type – Full time Users are more apt to have problems that Occasional Users
• Occasional Users - Find a chair that is comfortable and that you can sit back in positioning your
laptop in your lap for the most neutral wrist posture that you can achieve angling the laptop screen
so that you can see this with the least amount of neck deviation.
• Full-time Users - Position the computer on your desk/work surface in front of you so that you can
see the screen without bending your neck.
• Incorporate mini-breaks every 20 to 30 minutes to break up repetition and static postures.
• Maintain a comfortable viewing distance from your screen: about 18-30 inches.
• Keep your head and neck in a neutral posture; avoid excessive neck flexion or rotation.
• Angle the screen so that it is perpendicular to your line of sight, if lighting permits.
• Position the keyboard at elbow height, and keep your wrists straight while keying. Experiment with
table height, chair height and keyboard angle to maintain neutral wrist postures.
• Remember: if you raise your chair use a footrest to support your feet. When seated your hips should
be slightly higher than your knees.
• The hands and wrists should be kept in a straight wrist posture when typing and should not be
resting on a pal rest, table, or lap while typing. Wrist and palm rests are designed to provide support
during breaks from typing.

• Move to passenger seat and place laptop
on your lap.
• Never sit in the driver’s seat while
resting the laptop on the passenger seat
and vice versa.
• Store laptop in car trunk.
• Ensures you get out of the car and
stretch your legs before using the
laptop.
• Change position frequently and take
breaks.
• Do not work on your laptop for
prolonged periods (i.e., for more than
10-15 minutes at a time).
But my car is my office . . . . .
Some helpful tips if you must perform “office type of work” in your vehicle.
BUT NEVER WHILE DRIVING THE VEHICLE !
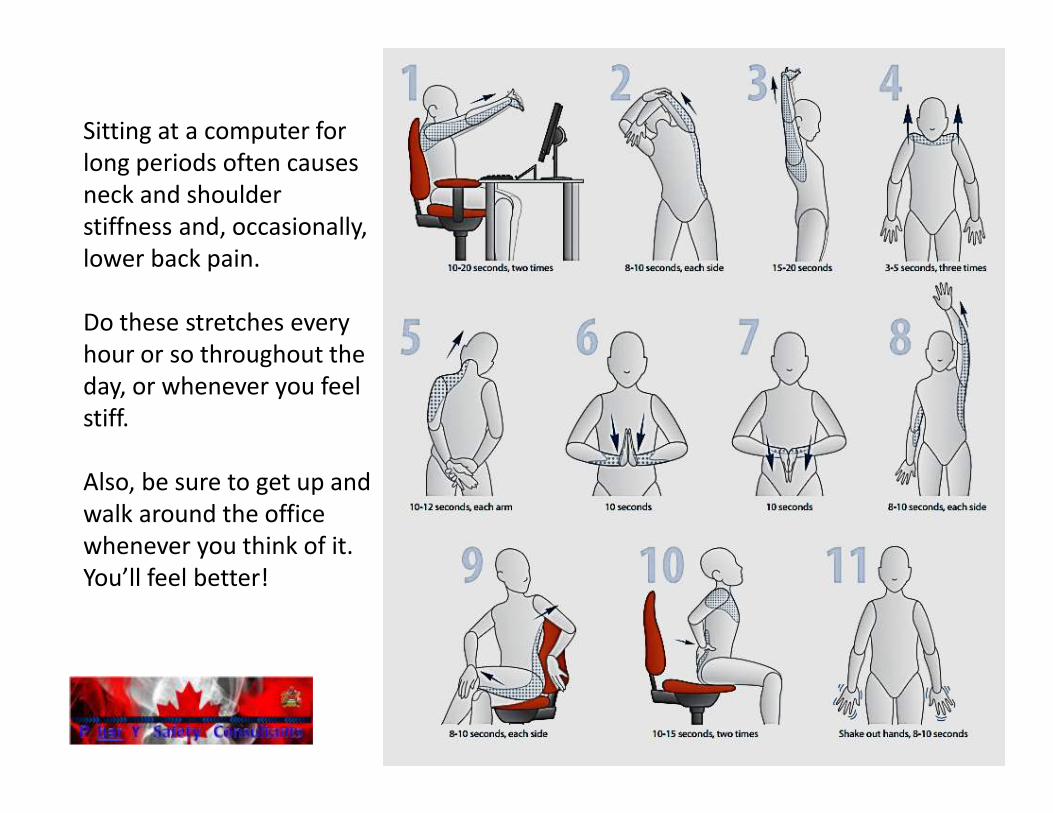
Sitting at a computer for
long periods often causes
neck and shoulder
stiffness and, occasionally,
lower back pain.
Do these stretches every
hour or so throughout the
day, or whenever you feel
stiff.
Also, be sure to get up and
walk around the office
whenever you think of it.
You’ll feel better!
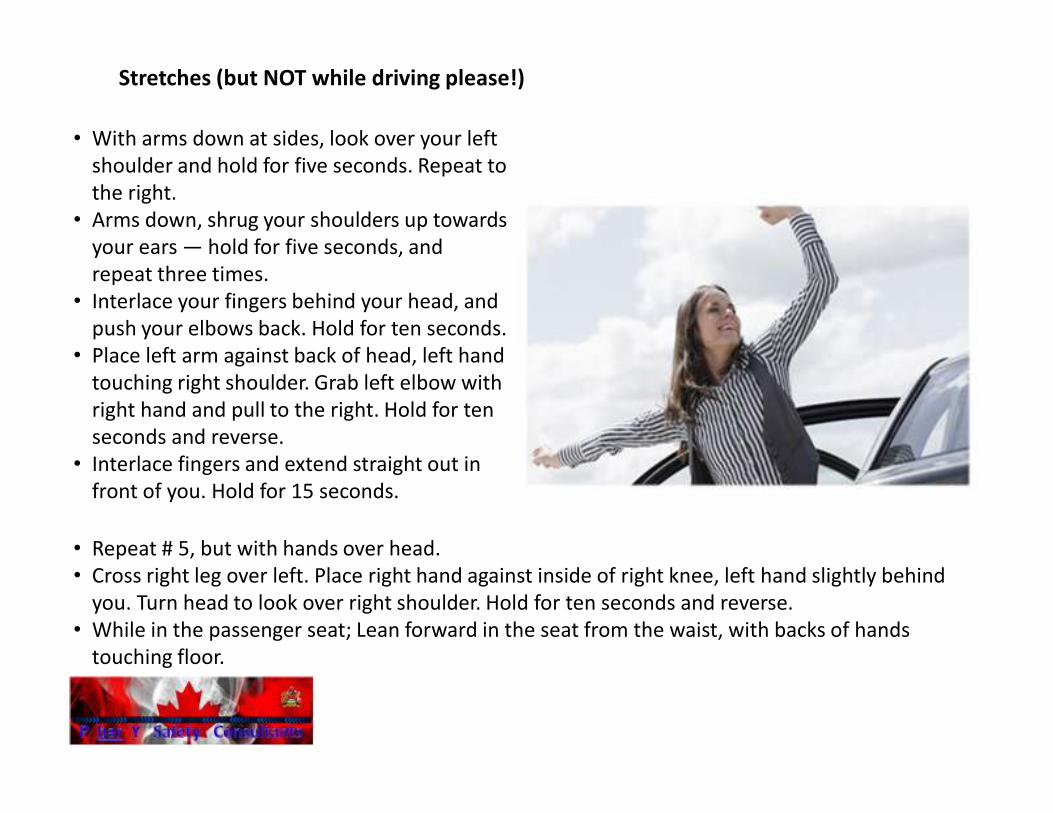
• With arms down at sides, look over your left
shoulder and hold for five seconds. Repeat to
the right.
• Arms down, shrug your shoulders up towards
your ears — hold for five seconds, and
repeat three times.
• Interlace your fingers behind your head, and
push your elbows back. Hold for ten seconds.
• Place left arm against back of head, left hand
touching right shoulder. Grab left elbow with
right hand and pull to the right. Hold for ten
seconds and reverse.
• Interlace fingers and extend straight out in
front of you. Hold for 15 seconds.
• Repeat # 5, but with hands over head.
• Cross right leg over left. Place right hand against inside of right knee, left hand slightly behind
you. Turn head to look over right shoulder. Hold for ten seconds and reverse.
• While in the passenger seat; Lean forward in the seat from the waist, with backs of hands
touching floor.
Stretches (but NOT while driving please!)