z e p c a m m a n a g e r i n t e g rat ion w i th g e ne ... · t h e s e t u p p r o c e s s y o...
TRANSCRIPT

Zepcam Manager integration with Genetec Security Center
1

PRODUCT DESCRIPTION ● Abbreviations ● Version Management ● Functionality ● Prerequisites
CONFIGURING YOUR INTEGRATION ● Basic Integration ● Zepcam Connect Integration
More information and FAQ on: www.zepcam.com/support 2

OVERVIEW Product description for the Zepcam Manager integration with Genetec
Security Center
PRODUCT DESCRIPTION
Abbreviations
DS Docking Station
ZM Zepcam Manager
ZC Zepcam Connect
GSC Genetec Security Center
GCT Genetec Config Tool
GSD Genetec Security Desk
Version Management
Tested versions
ZM 5.1
GSC 5.7
Functionality The integration between Zepcam Manager (ZM) and Genetec Security Center (GSC) makes
it easy to watch and retrieve video data of cameras connected to ZM. By using the latest market standards of ONVIF Profile S for live streaming.
Prerequisites
Before we can start configuring the integration between ZM and GSC there are a couple of prerequisites. You will need to have access to ZM with an valid license for Onvif integrations. You will also need access to a GSC server with administrator rights. The two of these need to be able to communicate over an active internet connection, or set up in the same local network. During the setup process you will need a pc or desktop for configuring the integration. At the end of the manual you should be able to:
● Use Genetec to view Zepcam live streaming cameras. ● Use Genetec to control Zepcam PTZ cameras.
More information and FAQ on: www.zepcam.com/support 3

CONFIGURING YOUR INTEGRATION
Basic Integration
First open your browser, go to your ZM and log in.
More information and FAQ on: www.zepcam.com/support 4

Go to Admin → Integrations and click the “Add ONVIF login” button
More information and FAQ on: www.zepcam.com/support 5

Fill in a ONVIF username and password, remember these you’ll need these later in the manual. Then scroll down and press “Submit”.
More information and FAQ on: www.zepcam.com/support 6

Now add devices to the channels that you would like. In this manual we have added a Zepcam Mobile Video Box on channel 1. Scroll down and press “Submit”.
Now open GCT and log in
More information and FAQ on: www.zepcam.com/support 7

Now click “Video” and click the “+ Video unit” button in the bottom left.
More information and FAQ on: www.zepcam.com/support 8

In the manual add pop-up change the following settings: ● Manufacturer → Onvif ● Product type → All ● IP address → your ZM IP address ● HTTP port → 80* ● Authentication → Specific ● Username → The username you’ve chosen in ZM as the ONVIF login ● Password → The password you’ve chosen in ZM as the ONVIF password ● Use HTTPS → OFF
[Note] * Port 80 is the default port, if this does not work use port 7101 - 7120
Now click “Add and close” and you should have added a new video unit under the archiver tab.
More information and FAQ on: www.zepcam.com/support 9

Now open GSD and log in
Click the Monitoring section and drag camera 1 into the view
More information and FAQ on: www.zepcam.com/support 10

Now if the MVB is streaming to ZM you should be able to see the live stream in GSD
More information and FAQ on: www.zepcam.com/support 11
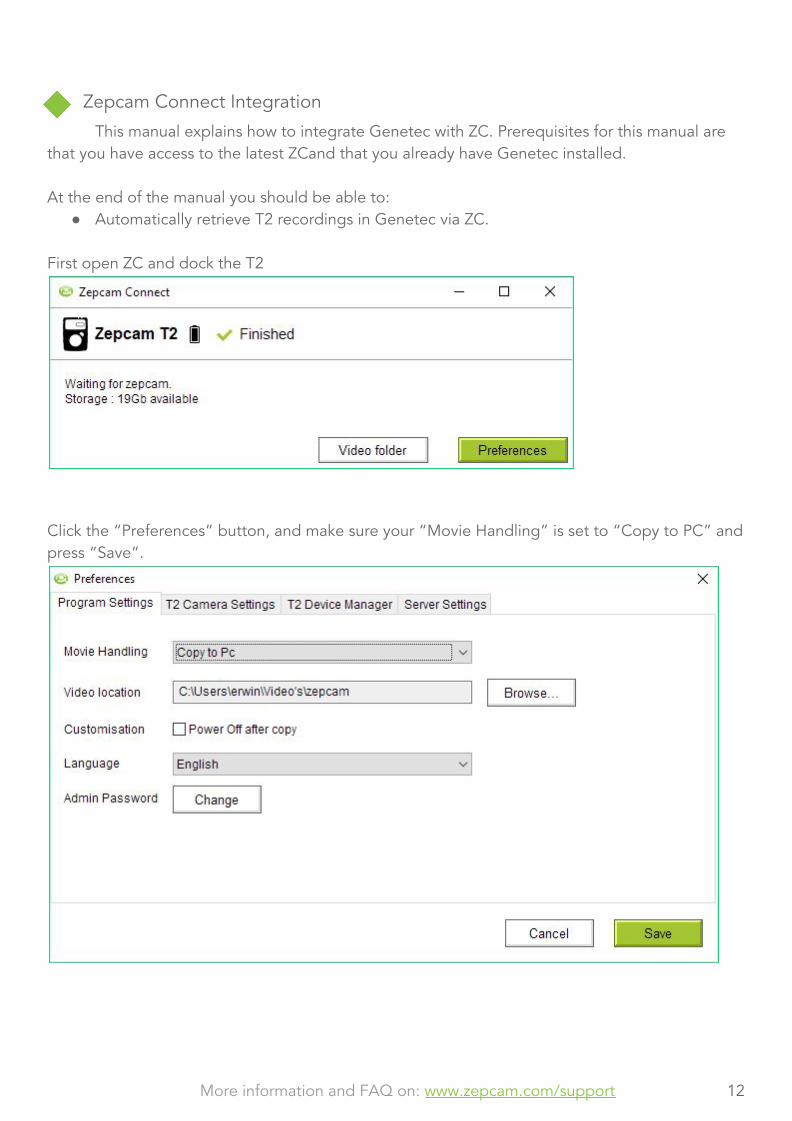
Zepcam Connect Integration
This manual explains how to integrate Genetec with ZC. Prerequisites for this manual are that you have access to the latest ZCand that you already have Genetec installed.
At the end of the manual you should be able to:
● Automatically retrieve T2 recordings in Genetec via ZC.
First open ZC and dock the T2
Click the “Preferences” button, and make sure your “Movie Handling” is set to “Copy to PC” and press “Save”.
More information and FAQ on: www.zepcam.com/support 12

Now navigate to the “Video folder”, there should be a new T2 directory. We are going to use this directory to link to Genetec, so remember the location.
[Note] If you’re using ZC on a different device than GCS you should set up a shared folder between the two devices.
More information and FAQ on: www.zepcam.com/support 13

Select “Offline device” from the dropdown menu.
More information and FAQ on: www.zepcam.com/support 14

Fill in a useful name for your “Unit name”, we advise to use your T2 serial number. Fill in the path of the T2 directory in the Zepcam Video folder and click “Add and close”.
More information and FAQ on: www.zepcam.com/support 15

Now open Genetec Security Desk and open the archives tab. Select your camera and day of the recordings you want to retrieve. Now press the “Generate report” button.
More information and FAQ on: www.zepcam.com/support 16

Drag the generated report into one of the frames and you are able to view your T2 recordings in Genetec (it may take some time for Genetec to process the video).
You have now successfully configured your T2 camera to be automatically offloaded to Genetec. As long as your ZC is running in the background all recordings for this T2 that are being offloaded using ZC will automatically show up in Genetec.
More information and FAQ on: www.zepcam.com/support 17