z22se: camshaft and balancer shaft chains · total vauxhall|123 with everything out of the way,...
TRANSCRIPT

guides and of course the chains
themselves. Timing the chains is
actually simple, as the new chains
come with handy paint marks that
line up with the timing marks on
the sprockets — these only go on
one way, so you can’t get it wrong.
Frequent oil changes can alleviate
the problem, but even on this low
mileage Astra Coupe which had
enjoyed 10,000-mile oil changes,
we still found slack in the chain.
It goes without saying though, that
VMR would change the oil and filter
as a matter of course when doing a
job like this.
The workshop guides advise
less than four hours for this job and
if you’ve done it once, we reckon
we could rip through it the next time.
If you’re doing the job at home, you
should allow most of a day — cam
timing is something you really
shouldn’t rush.
In theory you need the special
tool that we use here to lock the cam
sprockets, but it’s possible to use two
big drill bits instead. You’ll also need
your big torque wrench and a dial
gauge, but if you’re doing it at home
remember that you’ll need access
under the car too, so drive it onto
some ramps before you start ripping
the engine apart. Right then, here’s
how it’s done.
With the Vauxhall 2.2 motor’s habit of wearing out or snapping chains, here’s a foolproof way to swap camshaft and balancer shaft chains.
A chain is better than a belt,
right? Not if it’s the Vauxhall
2.2 motor with its habit of
snapping chains. We show you how
to swap the cam chain and while
you’re in there, it’s just rude not to
do the balancer shaft chain too.
In the old days, camshafts were
driven by chain. They got noisy
and rattled a bit, but they hardly
ever broke. Then in the name of
refinement, someone invented a
camshaft driven by a rubber-toothed
belt that made a nice little earner for
the dealership service department.
As we all know, a rubber cam belt
might be quieter than a chain but it
also has a habit of wearing out and
snapping, taking your head and
valves with it.
So a chain-driven cam is the better
option then? In theory yes, but in
the case of the Vauxhall 2.2 motor,
the chain tensioner and chain itself
have developed a reputation for
premature wear. Affecting cars on a
Y-plate up to 2002 registration, the
problem can start with a rattly chain
but in extreme cases can snap, at
which point it’s goodbye to 16 valves
and your cylinder head. A recall was
never issued for this problem, but it
would most likely have been quietly
attended to if you took the car for
main dealer servicing.
All of which explains why we’re
changing the chain on this Astra
Coupe belonging to Derek at VMR
Autos in Dursley (01453 890736).
Sensibly wanting to avoid a top-end
rebuild, Derek was fitting a new chain
and tensioner before any expensive
damage happened, and as the chain
which drives the 2.2 engine’s twin
balancer shafts is fitted behind the
camshaft drive chain, it makes sense
to replace that at the same time.
We used genuine Vauxhall kits for
both chains, which came complete
with new drive sprockets, tensioners,
Z22SE: CAMSHAFT AND
BALANCER SHAFT CHAINS
Words and Photos: Paul Wager
If you’re up for the challenge
of a cam chain swap, you won’t
need us to tell you how to get
the plastic cover off the engine.
You will need to disconnect the
battery, remove the top cover, air
box and piping, then disconnect
the electrical connectors around
the cam cover. Take all four plugs
out as well, in order to make the
engine easier to turn by hand (no
compression, see).
1
122|TOTAL VAUXHALL
TOOLSSocket set
Torque wrench
Drill bits/bolts or cam locking tool
Car ramps
Trolley jack
Dial gauge
TECH NOTE
TOV70.tech 122 27/3/07 16:50:14
TOTAL VAUXHALL|123
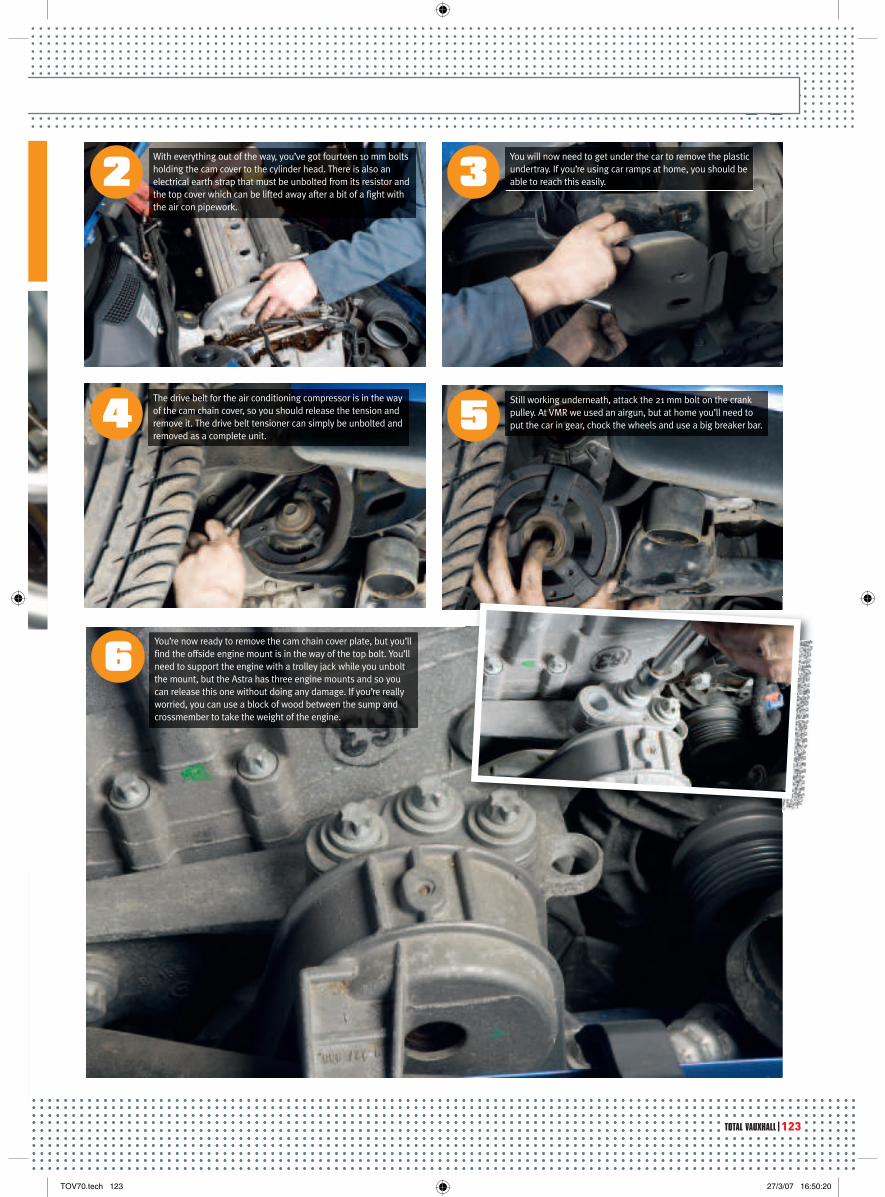
With everything out of the way, you’ve got fourteen 10 mm bolts
holding the cam cover to the cylinder head. There is also an
electrical earth strap that must be unbolted from its resistor and
the top cover which can be lifted away after a bit of a fight with
the air con pipework.
2You will now need to get under the car to remove the plastic
undertray. If you’re using car ramps at home, you should be
able to reach this easily.3
The drive belt for the air conditioning compressor is in the way
of the cam chain cover, so you should release the tension and
remove it. The drive belt tensioner can simply be unbolted and
removed as a complete unit.4
Still working underneath, attack the 21 mm bolt on the crank
pulley. At VMR we used an airgun, but at home you’ll need to
put the car in gear, chock the wheels and use a big breaker bar.5
You’re now ready to remove the cam chain cover plate, but you’ll
find the offside engine mount is in the way of the top bolt. You’ll
need to support the engine with a trolley jack while you unbolt
the mount, but the Astra has three engine mounts and so you
can release this one without doing any damage. If you’re really
worried, you can use a block of wood between the sump and
crossmember to take the weight of the engine.
6
TOV70.tech 123 27/3/07 16:50:20
124|TOTAL VAUXHALL 124|TOTAL VAUXHALL
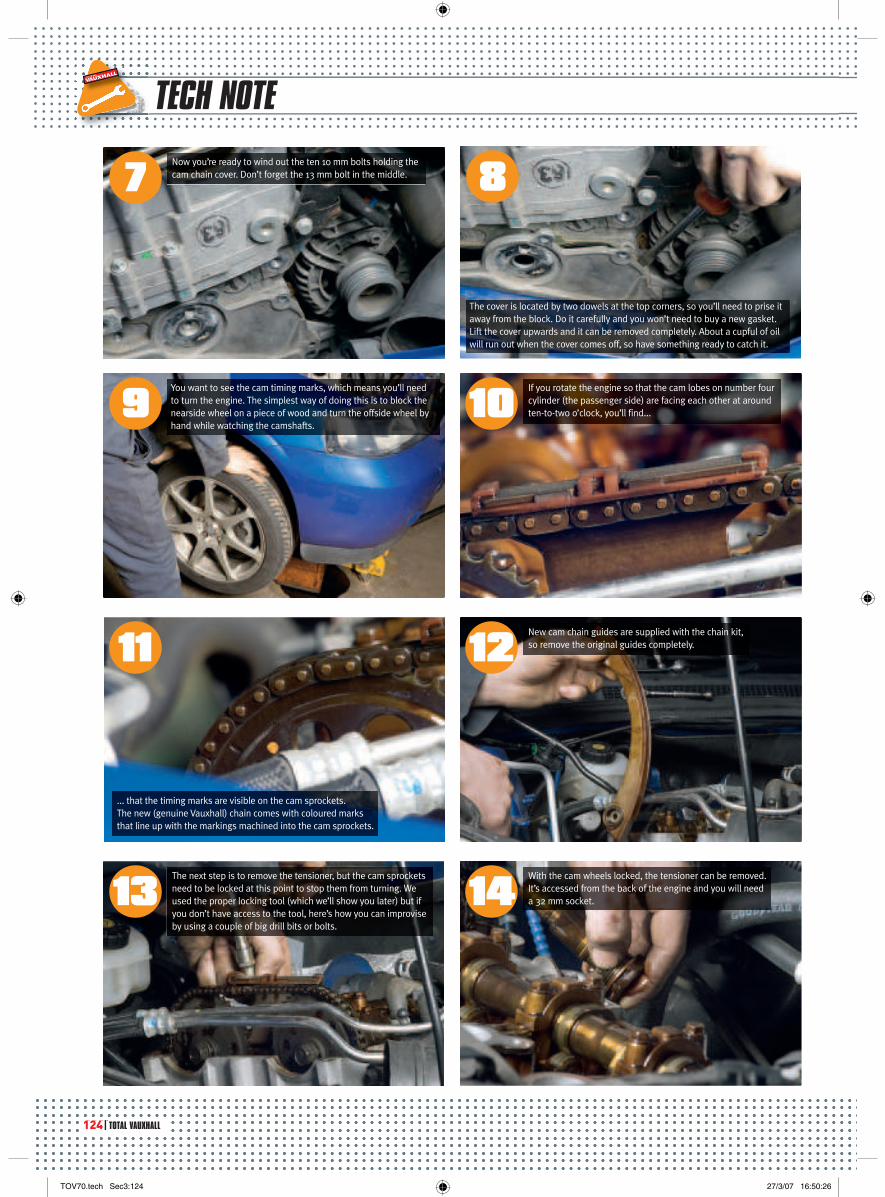
You want to see the cam timing marks, which means you’ll need
to turn the engine. The simplest way of doing this is to block the
nearside wheel on a piece of wood and turn the offside wheel by
hand while watching the camshafts.9
If you rotate the engine so that the cam lobes on number four
cylinder (the passenger side) are facing each other at around
ten-to-two o’clock, you’ll find...10
... that the timing marks are visible on the cam sprockets.
The new (genuine Vauxhall) chain comes with coloured marks
that line up with the markings machined into the cam sprockets.
11New cam chain guides are supplied with the chain kit,
so remove the original guides completely.12
The next step is to remove the tensioner, but the cam sprockets
need to be locked at this point to stop them from turning. We
used the proper locking tool (which we’ll show you later) but if
you don’t have access to the tool, here’s how you can improvise
by using a couple of big drill bits or bolts.
13With the cam wheels locked, the tensioner can be removed.
It’s accessed from the back of the engine and you will need
a 32 mm socket.14
Now you’re ready to wind out the ten 10 mm bolts holding the
cam chain cover. Don’t forget the 13 mm bolt in the middle.7
The cover is located by two dowels at the top corners, so you’ll need to prise it
away from the block. Do it carefully and you won’t need to buy a new gasket.
Lift the cover upwards and it can be removed completely. About a cupful of oil
will run out when the cover comes off, so have something ready to catch it.
8
TECH NOTE
124|TOTAL VAUXHALL
TOV70.tech Sec3:124 27/3/07 16:50:26

TOTAL VAUXHALL|125
Getting the sprockets off the camshafts is hard work. They’re
tightened to 85 Nm, so ideally you’ll need two people for the
job. We called in VMR boss Kev for the additional muscle.15Once the cam sprockets
have been removed from
the camshafts, you are
ready to remove the lower
sprocket, but first you will
need to remove the front
chain guide to allow enough
slack in the chain. It’s just
unbolted once you have
removed this blanking plug
in the casting. The lower
sprocket is located on a
keyway on the crankshaft,
and (not so) with the chain
completely slack, it will just
slide off.
16
The chain itself can then be removed from above.
17
You’ve dismantled so much by now that it’s rude not to change
the chain driving the balancer shafts also. When we checked the
tension on ours it was pretty slack too, so it’s well worth doing.
The first step is to remove the tensioner, which simply unbolts.18
New chain guides and sprockets are supplied as part of the kit,
so whip them off too.19
TOV70.tech Sec3:125 27/3/07 16:50:33

126|TOTAL VAUXHALL
A new crank sprocket for the balancer chain is also supplied in
the box, so slide that off too.21
Right then, time to sweep up all those bolts rolling around under
the car and think about putting it back together. It’s crucial to do
it all in the right sequence or it just won’t go back together. Your
first job is to fit the new balancer shaft chain: here’s what comes
in the box from Vauxhall. The chain is fitted with the coloured link
aligned to the machined mark on the crank sprocket.
22
Line the marks up as you fit the chain and the sprocket, and
it should be timed up.23You’re now ready to fit the new balancer chain guides —
three of them.24
With the guides and tensioner out of the way, the balancer chain
will simply pull off.20
TECH NOTE
TOV70.tech Sec3:126 27/3/07 16:50:37

TOTAL VAUXHALL|127
Bolt up the new balancer chain tensioner and if you’re happy
that it’s all timed up correctly, pull the pin out of it and the
plunger will spring out to take up the slack.25Now we move on to the cam chain. First of all you need to lower
the chain in from above.26
Just like the balancer chain, the cam chain is timed using paint
marks on the chain, the marks machined on the sprockets and
another paint mark on the lower sprocket.27
TOV70.tech Sec3:127 27/3/07 16:50:43
128|TOTAL VAUXHALL
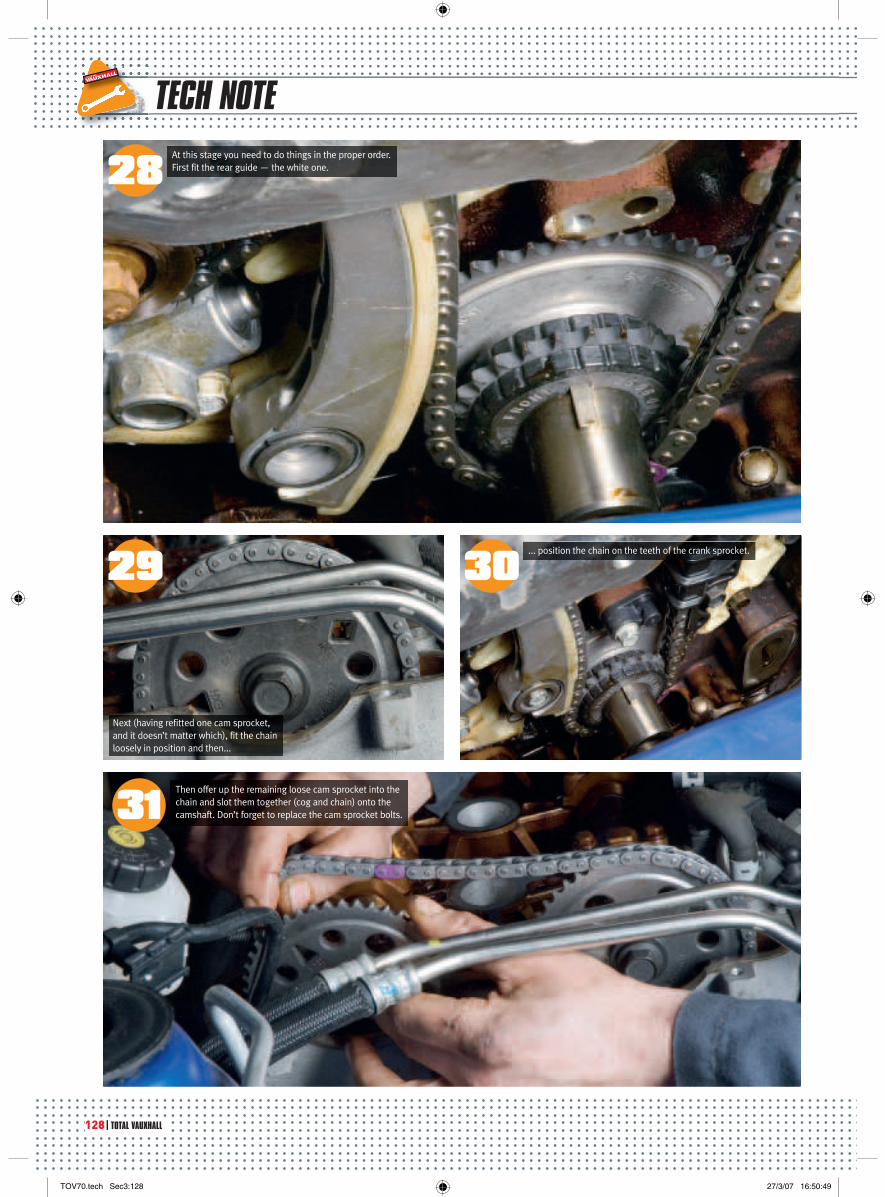
At this stage you need to do things in the proper order.
First fit the rear guide — the white one.28
Next (having refitted one cam sprocket,
and it doesn’t matter which), fit the chain
loosely in position and then...
29... position the chain on the teeth of the crank sprocket.
30
Then offer up the remaining loose cam sprocket into the
chain and slot them together (cog and chain) onto the
camshaft. Don’t forget to replace the cam sprocket bolts.31
TECH NOTE
TOV70.tech Sec3:128 27/3/07 16:50:49

TOTAL VAUXHALL|129
32Finally, position either your
home-made tool or the proper
locking tool, as shown here, to
hold the sprockets. This is the
official Vauxhall tool supplied
by Kent-Moore under part
number KM6148. We found a
similar tool online at www.
mccormicktools.com under
their reference VS4766 for
around £50.
33
Fit the new oil spray jet supplied in the box. Our existing one
looked fine, but even a microscopic particle could block the jet
and damage the new chain.34Fit the new cam chain
tensioner from the
side of the engine.
As you bolt it into
place, you’ll feel the
slack being taken out
of the chain — after
fitting ours, the chain
was noticeably tighter
than before.
35
With everything in place, enlist your helper again and tighten the
sprockets to the camshafts. The specification is a hefty 85 Nm on
the torque wrench, followed by a further 30-degree turn and then
a final 15-degree turn. For this you’ll need to borrow or buy...36
... a dial gauge indicator like this, which has a fixed pointer and
a rotating scale to accurately measure the rotation of the bolt.37
With the chains all timed and torqued, the hard work is done.
Rotate the engine a few times using the road wheel to check
that everything is as it should be, then all that’s left for you
to do is to refit the bits left over — the chain cover, engine
mount, top cover, airbox and plastic cover — then grit your
teeth and turn the key.
38
Fit the front guide — the black one.
PARTS PRICECamshaft chain kit £115.00 (inc VAT)
Balancer chain kit £105.00 (inc VAT)
Camshaft locking tool £50.23 (inc VAT)
TOV70.tech Sec3:129 27/3/07 16:50:55