zargis cardioscan user manualmultimedia.3m.com/mws/media/594654o/zargis-cardioscan-user-ma… ·...
TRANSCRIPT
Cardioscan version 2.0 - User Manual. 001-LB-0001 Rev. 17 Page 1 of 22
Zargis Cardioscan™
User Manual
Manufacturer: Zargis Medical 2 Research Way
Princeton, NJ 08540 (U.S.A.) Phone: 609-488-4608 Fax: 609-228-6100
www.zargis.com
EC REPEMERGO EUROPEMolenstraat 152513 BH, The HagueThe Netherlands
EC REPEC REPEMERGO EUROPEMolenstraat 152513 BH, The HagueThe Netherlands
Caution: Federal law restricts this device to sale by or on the order of a physician.
CAUTION: Read this manual before using the device.
© 2009 Zargis Medical Corp., All Rights Reserved. 0086
Cardioscan version 2.0 - User Manual. 001-LB-0001 Rev. 17 Page 2 of 22
TABLE OF CONTENTS
1. General Information 3
2. Getting Started 5
3. Upgrading to Multiple Users 8
4. Web-enabled Collaboration via the Zargis Telemedicine Server 8
5. Instructions for Use 9
6. Reviewing Analysis Results 12
7. Saving Data 17
8. Opening Previously Recorded Data 17
9. Exporting & Importing Data 18
10. Adjusting Acquisition Lead Time 18
11. Using Shortcut Keys 18
12. Navigating Menus 19
13. Understanding Recording Quality 20
14. Troubleshooting 22
15. Warranty Information 22

Cardioscan version 2.0 - User Manual. 001-LB-0001 Rev. 17 Page 3 of 22
1. General Information
The Zargis Acoustic Cardioscan device (“Cardioscan”) is designed to support physicians in analyzing cardiac sounds for the identification and classification of suspected murmurs. When murmurs are detected by Cardioscan, they are graphically displayed according to their intensity, timing and location. In addition, Cardioscan indicates whether or not a suspected murmur meets the characteristics for classification as a Class I murmur according to the ACC/AHA Recommendations for Echocardiography in Asymptomatic Patients With Cardiac Murmurs.
1.1. Indications for Use
The Zargis Acoustic Cardioscan is an electronic auscultatory device intended to provide support to the physician in the evaluation of heart sounds in patients.
The product will acquire and record the acoustic signals of the heart and analyze these signals.
The analysis procedure will identify specific heart sounds that may be present. Identified sounds include S1, S2, and suspected murmurs.
The device is indicated for use in a clinical setting, by a physician or by trained personnel who
are acting on the orders of a licensed physician. It is not intended as a sole means of diagnosis. The interpretations of heart sounds offered by Cardioscan are only significant when used in
conjunction with physician over-read as well as consideration of all other relevant patient data.
1.2. Contra-Indications for Use
Cardioscan is not intended to be a diagnostic device. It does not supersede the judgment of the qualified medical personnel. The device is intended to aid the physician in the evaluation of heart sounds. The physician is responsible for reviewing and interpreting the results, along with the auscultatory findings and medical history, in making a referral decision.
The device is not intended for use on severely obese patients, where the physician has
difficulty auscultating with an acoustic stethoscope.
1.3. Precautions
Only qualified medical personnel should use the device. Cardioscan is intended for use only with physician over-read. Cardioscan is not a diagnostic
device.
Cardioscan is intended for use only on patients with heart rates between 50 and 120 beats per minute.
This manual provides instructions for use of the Cardioscan device and assumes that the user is
familiar with the Windows operating system on PCs. Zargis recommends that all personnel who operate the device thoroughly read and understand this manual.
The device is intended for use in a physician office setting. As with normal auscultation, the physician’s office should have minimal background noise from the street, telephones, radio, conversation, and office clatter.

Cardioscan version 2.0 - User Manual. 001-LB-0001 Rev. 17 Page 4 of 22
It is strongly recommended that the users of the Cardioscan software use computing and networking security features to protect patient data created and stored using this software. Please consult your institution’s data management or computer technical service personnel to implement appropriate security measures.
A WARNING, CAUTION, and NOTE used in this manual will be boxed and have the following significance:
WARNING: Maintenance or operating procedures, techniques, etc., that may result in possible injury, death, or other serious adverse reactions if not carefully followed.
CAUTION: Maintenance or operating procedures techniques, etc., that may result in equipment malfunctions, equipment failure or damage to equipment if not carefully followed.
NOTE: Maintenance or operating procedure that is considered essential to emphasize.
1.4. System Requirements
To run version 2.0 of the Cardioscan software, your system must meet these specifications: Windows XP SP2 or later or Vista 32-bit 512MB of RAM minimum, 1.0 GB recommended Intel Pentium 4 compatible or later 1024 x 600 graphic display or better USB 1.1 port or better
The specifications of the blue USB wireless dongle are as follows: Compliant with Bluetooth® V1.1, V1.2 & V2.0. Supporting profiles: Networking, Dial-up, Fax, LAN access, and Headset. Operating systems: Windows XP & Vista. Interfaces: Compliant with USB 1.1 & 2.0. Data transmission rate: 3Mbps. Working distance: 5-10m. FCC approval: FCC ID - WQ7I-BTD-04.
To minimize the potential for interference, do not use the Cardioscan system within 5m of an active microwave oven. Additionally, the presence of multiple, active WiFi networks may interfere with the wireless functionality of the system.
NOTE: The USB Transceiver device complies with Part 15 of the FCC Rules. Operation is subject to the following two conditions: 1. This device may not cause harmful interference, and 2. This device must accept any interference received, including interference that may cause undesired operation.
FCC NOTE: THE MANUFACTURER IS NOT RESPONSIBLE FOR ANY RADIO OR TV INTERFERENCE CAUSED BY UNAUTHORIZED MODIFICATIONS TO THIS EQUIPMENT. SUCH

Cardioscan version 2.0 - User Manual. 001-LB-0001 Rev. 17 Page 5 of 22
MODIFICATIONS COULD VOID THE USER’S AUTHORITY TO OPERATE THE EQUIPMENT.
1.5. Patient Privacy
The privacy and security of certain individually identifiable health information may be protected by state, federal, international, and/or foreign laws that regulate and restrict how such information can be used, disclosed, stored and transmitted. In some instances, you may even be prohibited from permitting any third party to access such information without first obtaining prior written authorization to do so.
You are solely and fully responsible for determining, understanding, and complying with any
and all laws that affect how you may store and transmit any electronic individually identifiable health information through use of the Software. If you determine that you are not able to comply with a law or restriction that applies to your use and disclosure (including transmission) of individually identifiable health information through the Software, then you should not proceed to save such information. By proceeding to save any information, you hereby assume all risks, responsibilities and liabilities associated with using, storing, and/or transmitting such information, including sound files, electronically or otherwise.
This program does not require you to enter individually identifiable health information in
order to function. Records can be stored and recalled through the use of a timestamp or an arbitrarily assigned identifier. If you choose to enter a meaningful Patient Name or Patient Identifier, then you agree to assume any and all risks of and liabilities incurred with transmitting and storing such individually identifiable health information through the software, including risks to the privacy and security of such individually identifiable health information.
2. Getting Started
2.1. Installing Cardioscan
Follow these steps to install Cardioscan on your computer:
1. First, insert the blue wireless dongle into your computer. 2. Next, insert the CD and follow the on-screen instructions for installation and
stethoscope connection. If the installation program does not start automatically, run the setup.exe file directly from the CD.
2.2. The Cardioscan USB Wireless Dongle
The blue USB wireless dongle allows communication between the PC on which the Cardioscan software is installed and electronic stethoscopes that Zargis Medical Corp. has approved for use with Cardioscan. The USB wireless dongle receives and transmits data via the commonly accepted Bluetooth® short range wireless connectivity standard. To install the USB wireless dongle, plug the device into an open USB port on the PC on which the Cardioscan software has been loaded and activated.

Cardioscan version 2.0 - User Manual. 001-LB-0001 Rev. 17 Page 6 of 22
Anytime Cardioscan tries to connect to the stethoscope but does not detect a USB wireless dongle on the PC, the following screen will be displayed:
USB Wireless Dongle Detection Window
2.3. Pairing & Connecting the Stethoscope with the Cardioscan Software
After launching the Cardioscan software, the following screens will help you connect Cardioscan to your stethoscope. Launch Window
Yes, connect now. (First make sure the blue USB wireless dongle is inserted)
No, do not connect. (I want to review recordings without the stethoscope)
Make sure to insert the wireless dongle before re-launching Cardioscan.

Cardioscan version 2.0 - User Manual. 001-LB-0001 Rev. 17 Page 7 of 22
Add New Scope Window
The screen below will appear each time you attempt to connect Cardioscan to your stethoscope. Stethoscope Connection Window
Indicates the Target Stethoscope to which Cardioscan is attempting to connect.
Tips for Preventing Lost Wireless Connections 1. Auscultate the patient as close to the PC as possible. 2. Avoid having objects or people between the stethoscope and the PC. 3. Avoid having your hand cover the entire chest piece (location of the stethoscope’s Bluetooth® antenna.)

Cardioscan version 2.0 - User Manual. 001-LB-0001 Rev. 17 Page 8 of 22
2.4. Adding Comments to a Recording
You can add comments to a file by clicking on the “Comments” icon located at the left of the screen. A green check mark on this icon indicates that comments exist for the file.
2.5. Adding a New Stethoscope
To connect any Model 3200 stethoscope to any installation of Cardioscan for the first time, you must launch the “Add New Stethoscope” window. This window is accessible by selecting “Manage Stethoscopes” from the “Tools” menu or by selecting “Add New Stethoscope” from the pull-down field below the “Stethoscope Connection” button.
2.6. Connecting Your Stethoscope
Once you’ve added a stethoscope as described above, the stethoscope can be connected to Cardioscan. This connection can take place upon Cardioscan launch or by selecting your stethoscope from the pull-down field to the right of the “Stethoscope Connection” button. If your stethoscope is not connected, the Stethoscope Connection button will display a red “X” instead of a green “”.
NOTE: Follow these tips to prevent lost wireless connections: 1. Auscultate the patient as close to the PC as possible. 2. Avoid having objects or people between the stethoscope and the PC. 3. Avoid having your hand cover the entire chest piece (location of the stethoscope’s Bluetooth® antenna.)
NOTE: It is not possible to connect to a stethoscope that is actively connected to another PC.
2.7. Registering Your Software
To register your copy of Cardioscan, click the “Register” option under the Help file menu and follow the instructions that appear.
3. Upgrading to Multiple Users
To upgrade your copy of Cardioscan so that it may used by multiple users, either select “Increase Stethoscopes” under the “Help” menu option, go to www.zargis.com or contact Zargis via email at [email protected]. Upgrading to multiple user status allows the software to pair with more than one stethoscope at a time. You must contact Zargis to upgrade to a greater number of users.
4. Web-enabled Collaboration via the Zargis Telemedicine Server
Go to www.zargis.com or contact Zargis at [email protected] to acquire access to www.ZargisTelemed.com—Zargis’ telemedicine portal—which allows you to share files with other physicians and/or cardiologists for immediate second opinions.
Cardioscan version 2.0 - User Manual. 001-LB-0001 Rev. 17 Page 9 of 22
5. Instructions for Use
5.1. Icons & Buttons
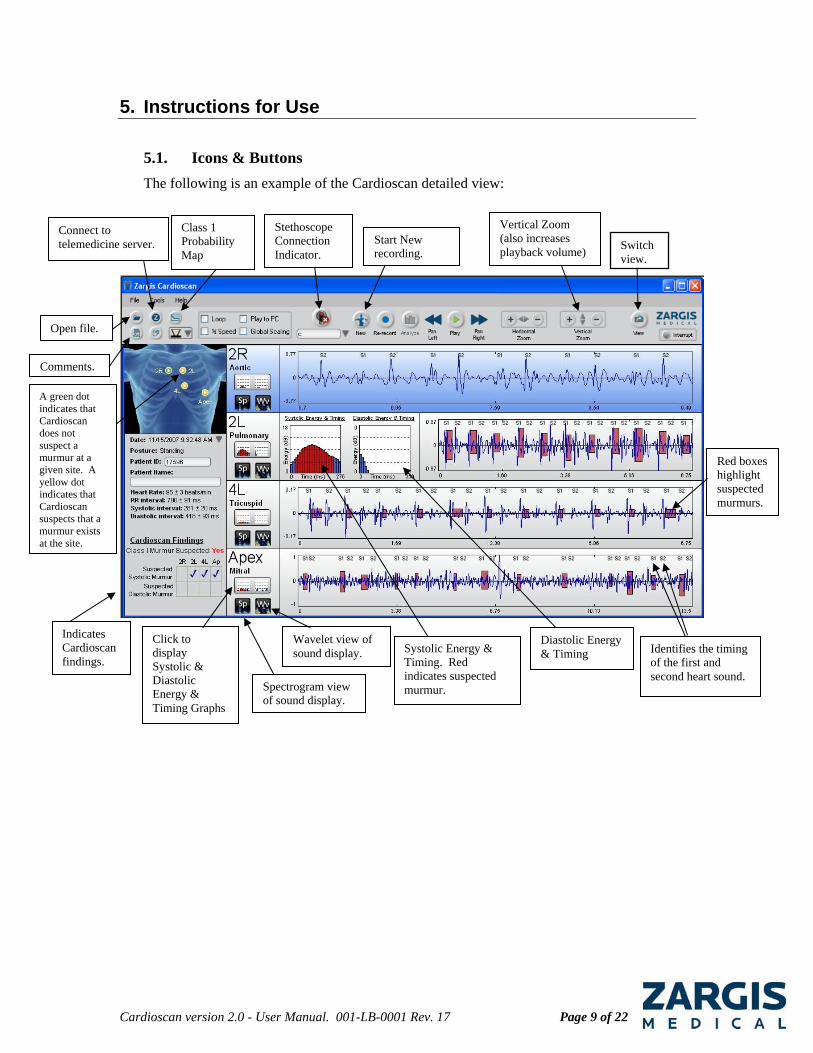
The following is an example of the Cardioscan detailed view:
Wavelet view of sound display. Systolic Energy &
Timing. Red indicates suspected murmur.
Open file.
Comments.
Stethoscope Connection Indicator.
Click to display Systolic & Diastolic Energy & Timing Graphs
Switch view.
Red boxes highlight suspected murmurs.
A green dot indicates that Cardioscan does not suspect a murmur at a given site. A yellow dot indicates that Cardioscan suspects that a murmur exists at the site.
Identifies the timing of the first and second heart sound.
Indicates Cardioscan findings.
Connect to telemedicine server.
Class 1 Probability Map
Start New recording.
Spectrogram view of sound display.
Diastolic Energy & Timing
Vertical Zoom (also increases playback volume)
Cardioscan version 2.0 - User Manual. 001-LB-0001 Rev. 17 Page 10 of 22
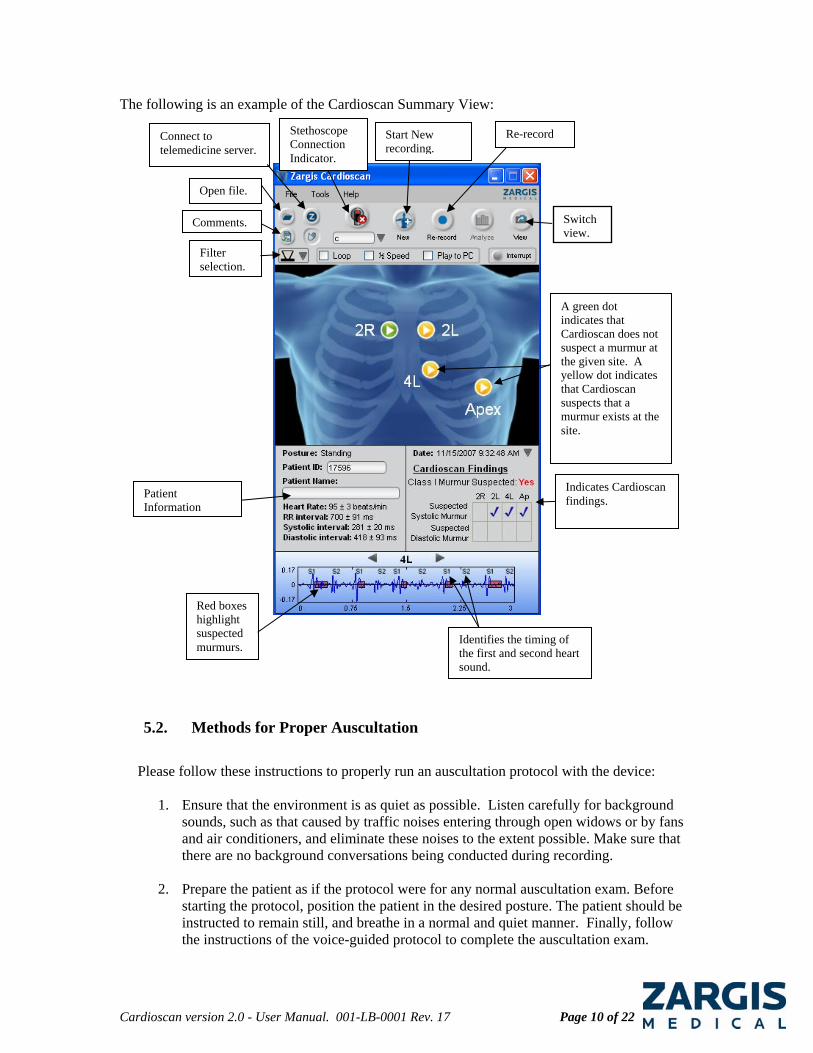
The following is an example of the Cardioscan Summary View:
5.2. Methods for Proper Auscultation
Please follow these instructions to properly run an auscultation protocol with the device:
1. Ensure that the environment is as quiet as possible. Listen carefully for background
sounds, such as that caused by traffic noises entering through open widows or by fans and air conditioners, and eliminate these noises to the extent possible. Make sure that there are no background conversations being conducted during recording.
2. Prepare the patient as if the protocol were for any normal auscultation exam. Before
starting the protocol, position the patient in the desired posture. The patient should be instructed to remain still, and breathe in a normal and quiet manner. Finally, follow the instructions of the voice-guided protocol to complete the auscultation exam.
Filter selection.
Open file.
A green dot indicates that Cardioscan does not suspect a murmur at the given site. A yellow dot indicates that Cardioscan suspects that a murmur exists at the site.
Switch view.
Red boxes highlight suspected murmurs.
Identifies the timing of the first and second heart sound.
Connect to telemedicine server.
Indicates Cardioscan findings.
Comments.
Patient Information
Start New recording.
Stethoscope Connection Indicator.
Re-record

Cardioscan version 2.0 - User Manual. 001-LB-0001 Rev. 17 Page 11 of 22
3. Adjust the stethoscope so that the earpiece volume level is at a setting you find comfortable.
NOTE: The volume level of the stethoscope does not affect the volume level of recordings.
4. Ensure that the User ID for the stethoscope you intend to use for the exam is listed
under the “Target Stethoscope” heading at the top of the window. To connect with a different stethoscope (one which has already been paired), use the pull-down arrow beneath the “Target Stethoscope” heading. For instructions on pairing a stethoscope with the software, see the section of this manual entitled: “Pairing & Connecting the Stethoscope with the Cardioscan Software”.
5. Click on the New button.
6. Enter a patient ID in the Patient ID field. Use an ID letter and/or number combination that allows ready access to all patients under your care. (Patient ID names may contain any combination of letters and numbers up to 20 characters long. Note that Cardioscan ONLY permits use of the following characters in patient IDs: any letter, any number, the dash symbol, and the underscore symbol).
7. Select the appropriate patient posture from the pull-down menu that appears under the
Patient ID field and then click the “OK” button. Click on Cancel if you do not want to continue with an auscultation exam.
8. A voice prompt reports the recording posture, and prompts you to press “OK” when
you are ready to begin recording. When the patient is ready, and you have the stethoscope turned on and placed on the patient’s chest, AND you can hear heart sounds, click the “OK” button (or press the M button).
9. Listen to the patient’s heart sounds at the indicated site. Utilize the “Signal Preview” at
the lower left portion of the window as a visual aid in gauging signal quality. Once a recording begins, you will see the waveform for the site in real-time in the sound display corresponding to the recording site.
10. It is preferable to auscultate on top of bare skin. To reduce hand-motion artifacts, hold
the stethoscope with a steady hand while recording.
11. Continue the recording protocol for the remaining sites.
12. Pressing the M button during a recording will re-record the current site.
For additional information about conducting quality recordings, see the section of this document entitled “Understanding Recording Quality”.

Cardioscan version 2.0 - User Manual. 001-LB-0001 Rev. 17 Page 12 of 22
5.3. Interrupting the Recording Sequence
Between recordings during the protocol, you may click on the red Interrupt button to pause a recording or cancel out of the protocol. Clicking on the Interrupt button brings up a dialog window with the options to resume the sequence or cancel out of the protocol.
5.4. Signal Quality Errors
If Cardioscan deems a recording to be of acceptable quality, a voice prompt indicates that the site recording is complete. For more information on what constitutes a good heart sound recording, please refer to the section of this manual entitled “Understanding Recording Quality”.
If Cardioscan rejects a recording, it reports the error to you as a voice prompt, a status window
message, and by coloring the recorded signal red. Follow the prompts for the failure cause and suggested corrective action. The program prompts you for an immediate re-recording.
5.5. Re-recording an Auscultation Site
If you want to re-record a particular site after the protocol completes, click on the circular Re-record button at the top of the window. A voice-guided protocol guides you through a sequence of steps similar to those listed in the above section. You can only re-record a site before analyzing the file.
6. Reviewing Analysis Results
After successful completion of a recording protocol, you may review the recorded data. If the
recorded data is satisfactory, press the Analyze button at the top of the screen (or press the M button on the stethoscope) to initiate analysis of the recorded sounds. When the analysis has
completed, the Results Summary window will appear on the screen. The Switch View icon located at the top right of Results window allows you to toggle between the “Summary View” and “Detailed View” versions of the Results Window.
The Cardioscan algorithm analyzes each heart sound recording by detecting individual heart
beats, determining whether murmurs are present during systole or diastole, and whether the detected beats are likely to reflect conditions that should be referred to a specialist for evaluation. The results of the Cardioscan analysis are presented in textual and graphical form, at the patient level and at the level of individual recordings (site-level).
6.1. Patient-Level Findings
6.1.1. Summary Hemodynamic Findings
Cardioscan reports summary hemodynamic findings in the left panel under the torso model.
The median instantaneous heart rate is reported along with the standard deviation of the heart rate across the four auscultatory sites. Also reported are the median and standard deviation values for the “RR interval” which is the interval between successive first heart sounds. The summary findings also include the median and standard deviation of the systolic and diastolic intervals. Note that the systolic and diastolic intervals sum to the RR interval.
Cardioscan version 2.0 - User Manual. 001-LB-0001 Rev. 17 Page 13 of 22
6.1.2. Patient-level murmur classification
The Cardioscan algorithm calculates the probability that the patient has a murmur that has
auscultatory features that correspond to Class I indications for referral to echocardiography of an asymptomatic patient as defined by the American College of Cardiology/American Heart Association (ACC/AHA) Practice Guidelines for the Management of Patients with Valvular Heart Disease. The ACC/AHA guidelines define the Class I indications for echo referral in an asymptomatic patient as being diastolic, continuous, holosystolic or late systolic murmurs, or mid-systolic murmurs of grade 3 or higher.
When the Cardioscan analysis algorithm has determined that a patient’s suspected murmur has characteristics consistent with a Class I indication for referral to echocardiography, the findings area of the software window displays “Class I Murmur Suspected: Yes” under the “Cardioscan Findings” heading.
The patient-level Class I Murmur referral decision in Cardioscan demonstrated a sensitivity of 97% with a specificity of 76%.
6.2. Site-level Findings
6.2.1. Murmur detection
Cardioscan analyzes each detected beat for the presence of systolic or diastolic murmurs.
The results are displayed in the site-level findings checkbox (see image below). The results are defined as follows:
Suspected Systolic Murmur: The analysis algorithm detected a sound consistent with a murmur in the systolic time interval.
Suspected Diastolic Murmur: The analysis algorithm detected a sound consistent with a murmur in the diastolic time interval.
Site-level Findings Checkbox
If there is no check mark in either box at a site, then Cardioscan did not find significant evidence for a murmur at that site.
When analyzed at the patient-level, Cardioscan’s Murmur Detection algorithm demonstrated a sensitivity of 97% with a specificity of 70%.

Cardioscan version 2.0 - User Manual. 001-LB-0001 Rev. 17 Page 14 of 22
If fewer than 3 complete heart beats were detected at a site, then Cardioscan does not analyze the site for the presence of murmurs. In this case, Cardioscan will display question marks in the site-level results boxes for that site.
6.2.2. Energy and Timing
The Systolic and Diastolic Energy and Timing Profiles for a site appear when you click on the
Energy & Timing button located to the left of the sound display. The energy profiles are a normalized calculation of the median mid-band frequency energy over the heart sound recording, divided into systolic and diastolic intervals. This profile provides a simple display of mid-band frequency energy variation across systole and diastole.
The Systolic Energy & Timing Profile illustrates the energy and timing results for the systolic
interval. If a murmur is detected in the systolic interval, the corresponding portion of the energy and timing profile will appear in red. Areas of systolic mid-band frequency energy which Cardioscan does not identify as a murmur are depicted in blue.
The Diastolic Energy & Timing profile illustrates the energy and timing results for the
diastolic interval. If a murmur is detected in the diastolic interval, the corresponding portion of the energy and timing profile will appear in red. Areas of diastolic mid-band frequency energy which Cardioscan does not identify as a murmur are depicted in blue.
NOTE: The energy values do not correspond to murmur grade. NOTE: The energy scales are different for systole and diastole
If the analysis algorithm detects murmurs at a site, the average murmur onset and duration, as
a percentage of the systolic or diastolic duration are also shown. In this case, the Systolic or Diastolic Energy & Timing Profiles show the average interval of the suspected murmur as a red-colored bar overlaid on top of the energy profile.
If the energy profile has values greater than 18 dB in systole or 9dB in diastole, the plot scales
to the largest value in the profile, and draws a yellow line marking the 18 dB or 9dB level. Please be aware of this display change for interpreting the energy profile results.
6.2.3. Site-Level Class I Murmur Probability
The Cardioscan algorithm calculates the probability that each recording contains a murmur that has auscultatory features that correspond to Class I indications for referral to echocardiography of an asymptomatic patient as defined by the American College of Cardiology/American Heart Association (ACC/AHA) Practice Guidelines for the Management of Patients with Valvular Heart Disease. The ACC/AHA guidelines define the Class I indications for echo referral in an asymptomatic patient as being diastolic, continuous, holosystolic or late systolic murmurs, or mid-systolic murmurs of grade 3 or higher. These site-level murmur probabilities are aggregated to compute the patient-level probability of Class I indications for murmur referral.
The probability that a detected systolic murmur has Class I indications for referral based on
the timing and loudness of the murmur is displayed using a two-dimensional probability map. For each recording site, the average timing and loudness of the systolic murmur is represented by a colored dot. The murmur loudness is measured in decibels relative to the average energy of the
Cardioscan version 2.0 - User Manual. 001-LB-0001 Rev. 17 Page 15 of 22
signal and the timing is represented as the “center of energy” of the murmur. Overlaid on this plot is a probability contour map that indicates the probability that given a systolic murmur is present, it contains timing and loudness characteristics consistent with a Class I murmur in an asymptomatic patient. The probability can be interpreted by the positioning of the dot in reference to the displayed contour lines. When the dot falls within the gray area for a given recording site, then Cardioscan has classified the systolic interval as possessing a suspected Class I murmur. When Cardioscan’s algorithm does not suspect that a murmur is present in a recording, no dot will appear on the corresponding probability map.
Due to the fact that the ACC/AHA guidelines classify all diastolic murmurs as Class I Murmurs, Cardioscan does not provide a separate probability map for the diastolic interval. Whenever a diastolic murmur is detected, the patient should be considered to possess a Class I murmur at that site.
To view the Systolic Class I Murmur Probability Maps for all four recording sites, click the
Systolic Class I Murmur Probability Map icon appearing at the top of the screen.
6.3. Color-coding of Auscultation Site Markers on Torso Image
Following analysis, the four circles on the torso image are color-coded as follows: -When a circle appears in green, this indicates that Cardioscan does not suspect the presence
of a murmur at the corresponding auscultation site. -When a circle appears in yellow, this indicates that Cardioscan suspects that a murmur exists
at the corresponding auscultation site, and the findings are listed in the rectangular grid under the “Cardioscan Findings” heading.
6.4. Heart Sound Display
The heart sound recordings (phonocardiograms) are displayed in the four right-hand panels, one corresponding to each auscultatory site. The recordings are analyzed to determine regions where noise artifacts have caused clipping of the signal; any region that Cardioscan determined to contain signal clipping is displayed in yellow. Yellow regions are deemed to be of poor quality and are not used in analysis.
The display of the phonocardiograms often reveals the time structure of the heart sounds and a trained observer can detect individual heart beats. In signals that are very noisy and of poor quality it can be difficult to discern individual heart beats.
The heart sound recordings reveal the results of the beat detection and murmur detection in detail. Each signal annotated with S1 and S2 labels which correspond to the first heart sound and second heart sound, respectively. The labels appear directly over these identified heart sound events.
Detected murmurs are also indicated by colored display boxes that show the locations of suspected murmurs. The left and right edges of the box indicate the onset and offset of the murmur, and the height of the box indicates its amplitude.
6.5. Spectrogram & Wavelet Display Options
6.5.1. Spectrogram
The spectrogram is a time-frequency distribution presented as a two-dimensional color plot of the heart sound energy distributed over time and frequency. Black represents minimum energy

Cardioscan version 2.0 - User Manual. 001-LB-0001 Rev. 17 Page 16 of 22
while red is maximum energy. The x-axis represents the time index while the y-axis is a linear frequency range of 0 – 500 Hz. The spectrogram provides an additional perspective on the
recorded sound. To view a sound display in spectrogram mode, click the Spectrogram icon appearing to the left of the sound display. To return a sound display to the standard, default view,
click the PCG icon that appears to the left of the display.
6.5.2. Wavelet
The wavelet decomposition is a different time-frequency representation that also may be useful for viewing features of heart sounds. Cardioscan uses the Morlet Wavelet, which possesses ideal characteristics for heart sound analysis. The x-axis of the Cardioscan wavelet display represents the time index. The y-axis is a nonlinear frequency scale that extends from a low end of approximately 15 Hz to a high end of approximately 580 Hz. The spacing of the wavelet channels is linear for the lower frequency range and logarithmic for the higher
frequencies. To view a sound display in wavelet mode, click the Wavelet icon appearing to the left of the sound display.
6.6. Signal Pan & Zoom
To zoom in or out on a sound display, first “select” the chosen display by clicking on it, then make use of either the Horizontal Zoom or Vertical Zoom buttons located at the top of the screen. Zooming in provides more detail. Zooming out provides less detail. The mouse wheel may be used to perform horizontal zoom on a selected trace. The Vertical Zoom will increase and decrease the volume of the recording as it affects the visual and the audible amplitude of the recording.
You can scroll along the analyzed heart sound signal by using the Pan buttons. To move left,
select the chosen display by clicking on it and then make use of the Pan Left button. To move right, select the chosen display by clicking on it and then make use of the Pan Right button.
Note: It is also possible to pan left and right through the sound displays by using the Drag
icon located on the toolbar. Click this hand-shaped icon and you have the ability to pan left or right through any of the sound displays in the results windows by placing the mouse cursor on a sound display and then dragging the cursor in the direction you wish to scroll. Deactivate this
feature by clicking the Drag icon again.
6.7. Playing Back a Recording
To play back a portion of the analyzed heart sound signal, click on the Play button. It plays what you see in the graph. Note that during playback a red cursor scrolls across the sound display in synchrony with the recording. Click the Stop button to end the playback.
CAUTION: The audio quality of heart sound recordings played back through a PC audio jack may not be suitable for use when making a diagnosis due to the PC’s sound card and/or the frequency response of the headphones/speakers. Zargis recommends using the electronic stethoscope when listening to recorded heart sounds with Cardioscan.
Cardioscan version 2.0 - User Manual. 001-LB-0001 Rev. 17 Page 17 of 22
6.8. Slow Playback of Heart Sounds
The “½ Speed” option located at the top of the screen allows you to play back recordings at half speed with no significant change in the spectral properties of the signal. To play recordings back at half speed, check the box next to “½ Speed”, and then click the Play button. Once activated, the ½ Speed setting stays activate until the box is unchecked.
6.9. Playing Back a Specific Portion of a Recording
To play back a specific portion of a recording, simply click with your mouse on the area of the sound display where you want playback to begin and drag your mouse to the right to highlight the area of interest. Once an area of the sound display has been highlighted in this way, hit the Play button to listen to the specific section. Note that you must select a segment of sound at least one-second in duration in order for this feature to function. Clear a highlighted area by left-clicking anywhere on the sound display.
6.10. Looped Playback
The Loop option appearing at the top of the screen allows you to play back an entire recording, or a specific portion of a recording, in a loop that will continue until the Stop button is clicked. To play a full recording in loop mode, select the corresponding sound display by clicking on it, then check the box next to “Loop”, and then click the Play button. To play a specific portion of a recording in loop mode, use the cursor to highlight the area of interest on a sound display, activate the Loop setting, and then click the Play button. Once activated, the Loop setting stays activate until the check box is unchecked.
6.11. Printing Results
To print a copy of the Cardioscan results window, select Print under the File menu. By default, a copy of the corresponding “Cardioscan User Comments & Results Summary” will also print each time a Cardioscan results window is printed. This print setting can be turned off by going to Tools | Settings and un-checking the radio button that appears under “Comments Printing”.
7. Saving Data
The device software saves data files of heart sound recordings once the Analyze button is clicked.
If your computer has Vista, saved files will be located in the following directory: C:\Users\Public\Public Documents\ZargisMedical\ZargisCardioscan If your computer has XP, saved files will be located in the following directory: C:\Documents and Settings\All Users\SharedDocuments\ZargisMedical\ZargisCardioscan
8. Opening Previously Recorded Data
Use the “Open File” icon, or select the “Open” option under File, to open a previously recorded and analyzed set of heart sounds. Files in the Open window can be sorted by Patient ID, Stethoscope ID, Date of Recording, or Patient Last Name. Click on the recording of your choice and select Open to view the saved analysis.
Cardioscan version 2.0 - User Manual. 001-LB-0001 Rev. 17 Page 18 of 22
8.1. Sample Files
Cardioscan comes pre-loaded with a selection of natural heart sounds commonly encountered in clinical practice. Select the ‘Open Sample Files’ option under the File menu to view any of your sample files. The Patient ID for these files will be the murmur type, and the Patient Name will be ‘Sample.’ Additional sample files including S3, S4, opening snaps, mid-systolic clicks, and additional systolic and diastolic murmurs of various types can be purchased from www.zargis.com.
9. Exporting & Importing Data
9.1. Exporting Data
By selecting ‘Export Recording as .wav’ from the file menu, Cardioscan allows you to export an audio-only version of a heart sound recording, in the common .wav file format, to a USB flash drive, the local hard drive of your computer, or to a server. When the ‘Export Recording to wav.’ window opens, select the Recording Site(s) you would like to export, and then select the Filter Mode (Bell, Diaphragm, or Extended) for each site.
By selecting ‘Export’ from the file menu, you can export the native .zac file (which includes
the heart sound recordings and associated analysis results), to any location on your PC. Cardioscan also allows you to export the native (.zac) versions of Cardioscan to the Zargis
Telemedicine Server by selecting ZargisTelemed.com from the File menu.
9.2. Importing Data
To import files from your PC into Cardioscan, select the “Import” option from the file menu. In the Open window that appears, select the file(s) that you wish to import. Once the import is complete, you will be able to access these files as you would any other Cardioscan file.
10. Adjusting Acquisition Lead Time
A selection under Tools | Settings allows you to adjust the length of the “lead time”, or waiting period, before Cardioscan begins recording at a site. Lead time options: 0, 1, 2, or 4 seconds. You can also select ‘Manual’, which will allow you to start recording when you press the (M) button on the stethoscope.
11. Using Shortcut Keys
The device is equipped with some shortcut keys that can help you move through options without using mouse selection.
Use the ENTER key for the “OK” option on all pop-up dialog boxes. Use the ESC key for the CANCEL or NO option on some of the dialog windows. For some
windows, the mouse must be used to select the “No” option.
Cardioscan version 2.0 - User Manual. 001-LB-0001 Rev. 17 Page 19 of 22
The ALT key can be used to select the menu bar options. Use the ALT key in conjunction with the arrow keys or underlined letter on the menu options to select an option and then press enter.
12. Navigating Menus
Cardioscan contains the following menu selections: File Tools Help
12.1. File
File | Start New Recording Select this option to begin a new patient recording.
File | Open Select this option to open or re-analyze a previous recording. Navigate by Patient ID or Analysis Date in the Open Patient Record window to locate the recording you are seeking and then click Open to view saved analysis results or select Re-Analyze to have the file analyzed again by Cardioscan.
File | Open Sample Files Select this option to open any sample files. All sample, including those purchased at www.zargis.com will be located in this folder. File | Import Selecting this option opens the Import window where you can import .zac files from anywhere on your PC. File | Export Selecting this option opens the Export window where you can export entire .zac files to the location of your choice
File | Export Recording as .wav Selecting this option opens the Export Recording as .wav window. File | Zargistelemed.com Selecting this option opens the Zargis Telemedicine Server. File | Printer Setup Selecting this option allows you to change the printer settings.
File | Print Select this option to print the contents of the Recording Window in its current form.
File | Recently Viewed This option displays the five most recently viewed files.
File | Exit Select this option to exit out of the application.

Cardioscan version 2.0 - User Manual. 001-LB-0001 Rev. 17 Page 20 of 22
12.2. Tools
Tools | Settings Selecting this option opens the Settings window, from where you can:
Change the recording lead time. Set playback to go to your PC’s audio output or the stethoscope. Indicate whether or not comments should be included when printing results. Choose “Summary View” or “Detailed View” as the default view for the Results
Window. Set the default setting for patient posture. Set the default setting for the sound display. Adjust the length of the “lead time”, or waiting period, before Cardioscan begins
recording at a site, or set the recordings to start when the (M) button on the stethoscope is pressed.
Tools | Manage Stethoscopes Selecting this option opens the “Manage Stethoscopes” window from where you can change stethoscope settings, add a new stethoscope, or delete stethoscopes.
12.3. Help
Help | User Manual Selecting this option opens the Cardioscan User Manual. Help| Contact Zargis Medical Use this option to view contact information for Zargis and provide feedback about our products. Help| Register Cardioscan This will bring up the “Registration” window. Help| Increase Stethoscopes Select this option to enable your installation of Cardioscan to connect with additional stethoscopes.
Help | About Cardioscan
Select this option to view the product version number along with telephone numbers and addresses for requesting further information or making service inquiries.
13. Understanding Recording Quality
The quality of the recordings depends on user technique, the environment, and subject compliance. High-quality recordings will increase the accuracy of the analysis results.
There are three main factors that affect recording quality: The acoustic environment: Try to ensure that the auscultation procedure is carried out
in a quiet environment. Listen carefully for background sounds, such as that caused by traffic noises entering through open windows or by fans and air conditioners, and eliminate these noises to the extent possible. Make sure that there are no background conversations being conducted during recording. Take steps to prevent interruptions during the protocol.

Cardioscan version 2.0 - User Manual. 001-LB-0001 Rev. 17 Page 21 of 22
The patient: The patient should be properly prepared so that the recordings can be made with the stethoscope against bare skin. The patient should be instructed to breathe in a normal and quiet manner. The patient should be instructed to maintain a still and steady posture. If there are digestive sounds present, the recordings should be made after they have subsided.
The placement and handling of the stethoscope: The stethoscope should be carefully
and accurately position over the intercostal spaces to obtain best signal quality. For the apex recording, the point of maximum impulse should be palpated and the recording taken from that location. The stethoscope should be held in position in a manner that minimizes motion artifact.
The Cardioscan system has some built-in quality checks to detect conditions of low signal
quality and to better ensure that only signals of good quality are accepted. These quality checks may require that you re-record at a given site immediately following the recording.
When Cardioscan determines that you must re-record, a notification message is displayed in
the status box and also given through the voice prompts. In addition, the sound signal will be colored red as further indication that re-recording needs to occur.
Required re-recording will occur for: Stethoscope Volume Too Loud: Cardioscan automatically selects a gain level
based upon the first two seconds of recording. If the first two seconds of the recording are very soft, Cardioscan could inappropriately increase the gain setting. Make sure that the first two seconds are representative of the entire recording. One cause for this indication is excessive background speech or hand-motion artifacts. Please record again with a steady hand in a quiet environment.
No or Low Signal Energy: This can occur if the stethoscope gain is too low or the stethoscope is not well-coupled to the patient’s chest. Cardioscan automatically selects a gain level based upon the first two seconds of recording. A loud artifact noise in the first two seconds could cause Cardioscan to inappropriately decrease the gain setting. Make sure that the first two seconds are representative of the entire recording. Ensure that the stethoscope is properly positioned on the patient. In some severely obese patients, it may not be possible to obtain a satisfactory signal.
Average Energy Level of Recording Too High: Can occur when the average energy level of the entire 20-second recording is deemed to be too high based on established thresholds. Please record again with a steady hand in a quiet environment, and make sure that the first two seconds of the recording are representative of the entire recording so that Cardioscan adjusts the gain appropriately.
Recording Contains an Unacceptable Amount of “Clipping”: Can occur when more than half the duration of the recording contains detected “clipping”. Please record again with a steady hand in a quiet environment, and make sure that the first two seconds of the recording are representative of the entire recording so that Cardioscan adjusts the gain appropriately.

Cardioscan version 2.0 - User Manual. 001-LB-0001 Rev. 17 Page 22 of 22
14. Troubleshooting
Problem Potential Cause Solution Cannot connect to stethoscope
No USB wireless dongle installed/ USB wireless dongle not properly installed
Install USB wireless dongle. See the section of this manual entitled “The Cardioscan USB Wireless Dongle”.
Stethoscope not paired Pair stethoscope. See the “Connecting Your Stethoscope” section of this manual.
Each unique Stethoscope ID can only be connected to one stethoscope
If your office has multiple stethoscopes, make sure you are trying to connect to the correct Stethoscope ID.
Undetermined Turn off the stethoscope, wait a few seconds, and then turn the stethoscope back on.
Playback to stethoscope while viewing the Spectrogram or Wavelet causes beeping sound in stethoscope ear tips
Older model PC or laptop graphics cards cannot support the PC's selected screen resolution with Cardioscan
Either: 1) Decrease the screen resolution of your PC -OR- 2) Under the "Tools" Menu of Cardioscan, select "Settings" and select "Disable cursor in Wavelet/Spectrogram playback"
Playback to stethoscope while viewing the Spectrogram or Wavelet causes the Bluetooth connection to drop
Same as above Same as above
Noisy recorded signal Excessive background noise Take actions to reduce the background noises heard in the auscultation environment. See the “Understanding Recording Quality” section of this manual.
Signal shown in the display plots is clipped
Noisy recording See the “Understanding Recording Quality” section of this manual.
Poor data quality reported Excessive background noise Take actions to reduce the background noises heard in the auscultation environment. See the “Understanding Recording Quality” section of this manual.
Excessive stethoscope motion
Hold the stethoscope with a steady hand, firmly pressing against the patient’s chest while recording. See the “Understanding Recording Quality” section of this manual.
If you experience a problem with Cardioscan that is not addressed in this manual, please
review our support and Frequently Asked Questions page at www.zargis.com/support. If you are still unable to solve the problem, please email a detailed description of the problem to [email protected] or contact Zargis at 609-488-4608.
15. Warranty Information
Please refer to your Cardioscan End-User License Agreement for the terms of your warranty.
Littmann is a registered trademark of 3M. Windows is a registered trademark of Microsoft. Bluetooth is a registered trademark of the Bluetooth SIG, Inc.