zero voltage closing control (vbm switch) instruction...
TRANSCRIPT

I.750-505
Revision: May 2004 Supersedes: June 2001
Raising the Standard Across the Line
Joslyn Hi-Voltage Zero Voltage Closing Control
(VBM Switch) Instruction Manual
Joslyn Hi-Voltage Corporation Proprietary - All rights reserved
Joslyn Hi-Voltage 4000 East 116th Street Cleveland, OH 44105 USA Tel: (216) 271-6600 Fax (216) 341-3615 www.joslynhivoltage.com

ZVC Instruction Manual I. 750-505
2
TABLE OF CONTENTS: Introduction..................................................................................................................... 3
Features Description....................................................................................................... 5 1.) Zero Voltage Closing ......................................................................................................................... 5 2.) Low Close Energy.............................................................................................................................. 5 3.) Automatic Calibration........................................................................................................................ 6 4.) Calibration Data Storage.................................................................................................................... 6 5.) Voltage Zero Synchronization ........................................................................................................... 6 6.) Improper Sequence Trip..................................................................................................................... 6 7.) Flashing Self Check LED .................................................................................................................. 7 8.) Error Indication.................................................................................................................................. 7 9.) Error Reset ......................................................................................................................................... 7
Control Panel................................................................................................................... 8 1.) Dip Switch Settings and Descriptions................................................................................................ 8 2.) Control Command Switches .............................................................................................................. 9 3.) Control Indication .............................................................................................................................. 9 4.) LED Indication Summary ................................................................................................................ 10
Installation..................................................................................................................... 11 1.) VBM ................................................................................................................................................ 12 2.) Control Power .................................................................................................................................. 12 3.) Zero Crossing Timing Reference Signal.......................................................................................... 12 4.) Open Commands.............................................................................................................................. 13 5.) Close Commands ............................................................................................................................. 13 6.) Calibration........................................................................................................................................ 13
Programming ................................................................................................................ 14 Calibration Procedure............................................................................................................................. 15
A.) VBM Setup ................................................................................................................................. 15 B.) Control Setup............................................................................................................................... 15 C.) Calibration ................................................................................................................................... 15 D.) Calibration Complete .................................................................................................................. 17
Troubleshooting ............................................................................................................ 18
Specifications................................................................................................................. 20 Standard Features ....................................................................................................................................21 Non-Standard Options Available ............................................................................................................21 Manual Revision Notes ...........................................................................................................................21 Joslyn Hi-Voltage Reference Material ....................................................................................................22
APPENDIX A................................................................................................................ 23 1.) Sample Wave forms ..........................................................................................................................23 2.) Power System Background Data...................................................................................................... 23
A.) Basic System Timing Principles.................................................................................................. 23 B.) ABC and CBA Voltage rotations ................................................................................................ 24 C.) Phase-to-Phase Reference Sensing.............................................................................................. 25

ZVC Instruction Manual I. 750-505
3
Introduction The Joslyn Zero Voltage Closing (ZVC) control is a state-of-the-art microprocessor based capacitor control. The purpose of the Zero Voltage Closing system is to virtually eliminate capacitor energization transients by independently energizing each phase of the capacitor bank coincident with the occurrence of the phase’s zero system voltage reference point. The expected benefits include:
• Increased “power quality” by utilizing capacitor switching with significantly reduced voltage spikes which are a nuisance to sensitive equipment such as computers and adjustable speed drives.
• Increased capacitor and switch life.
• Reduction of induced voltages into the low voltage control wiring.
• Reduction of station ground transients and reduction of distribution ground
transients. The zero voltage control operates from the input of an external close command. When the close command is received, the control issues independent close commands to the individual switch poles so the contact closing of each pole occurs at a point that corresponds to the zero voltage crossing reference of that phase. The actual closing sequence of the poles is selected to minimize the time from first pole closure to last pole closure. A selected reference phase of the system voltage is used for determining the zero voltage crossing information and an internal calibration process is used for determining accurate closing time requirements. Using this information, the microprocessor determines the individual close command delays required to ensure pole closures at points corresponding to the system zero voltage crossing. The ZVC control is designed to provide accurate and independent pole closing control. Based on detailed system studies and sophisticated system testing, the control was designed to automatically close the switches at strategic points that correspond to the zero voltage crossing and the bank’s configuration. For a grounded bank configuration, the capacitor phases are energized at a target 0.3 milliseconds after each respective phase zero voltage crossing point. For Ungrounded capacitor bank configurations, the control initiates the first pole to close 0.3 milliseconds after the zero voltage crossing reference point. The second pole automatically closes 0.3 milliseconds after the voltage difference between the first and second phases is zero (which occurs 30 electrical degrees after the first poles zero voltage crossing point). The third pole is closed at 0.3 milliseconds after the zero voltage crossing reference point associated with that phase. The microprocessor

ZVC Instruction Manual I. 750-505
4
control circuitry is intentionally designed to energize at these timing points to allow for any switch variations to have minimal affects on the intended transient reduction results. A timing accuracy of +/- 0.89 milliseconds, with respect to the zero voltage crossing target point, is expected to be maintained after initial set-up of the control system. With this level of accuracy and control, overvoltages can be reduced from a theoretical maximum of 2 per unit voltage to 0.1 per unit voltage. Also, overcurrents can be reduced to less than 0.2 per unit current of the maximum theoretical inrush currents that ranged from 40-100 per unit current for back-to-back capacitor bank switching and 5-20 per unit current for single bank switching.

ZVC Instruction Manual I. 750-505
5
Features Description 1.) Zero Voltage Closing
The Zero Voltage Closing control accepts the normal close command from an external signal, typically a capacitor controller or a manual control switch. Each single phase VBM is internally given separate close commands so that each switch contact closure occurs at a programmed target related to the zero voltage reference point.
2.) Low Close Energy
Each individual VBM pole is provided with consistent close energy from charged capacitors located in the control. The voltage on the close capacitors (one for each phase) is monitored and maintained by the microprocessor in the control. If a close command is received and proper close capacitor voltage cannot be attained, a “Low Capacitor Energy” error occurs. A repeating single flash of the “Calibrated” LED and a solidly illuminated “Self Check” LED indicates this error. When this error occurs, all close operations are blocked. The error will automatically clear itself when the proper capacitor close voltage is attained.
Important Operating Note: Tthe capacitor voltage can be measured for each phase in the field by utilizing the test terminals points located in the corners of the control and just above the front display panel. The capacitor voltage value for each phase will range between 125 – 128Vdc. The common/ground terminal point is located at test point TP3. Test point TP2 to TP3 measures Phase A, TP4 to TP3 measures Phase B, and TP5 to TP3 measures Phase C. Test TP1 to TP3 measures the charging input circuit and will range between 352 – 362Vdc. See Figure 1 for additional details on the terminal locations.
TP3 TP2
INCREASE
NORMAL
JOSLYN HI-VOLTAGE
ZERO VOLTAGE CLOSE CONTROL
Figure 1: SCR Board Test Terminals
TP5 TP1 TP4
Ribbon Cable Connection
ZVC Instruction Manual I. 750-505
6
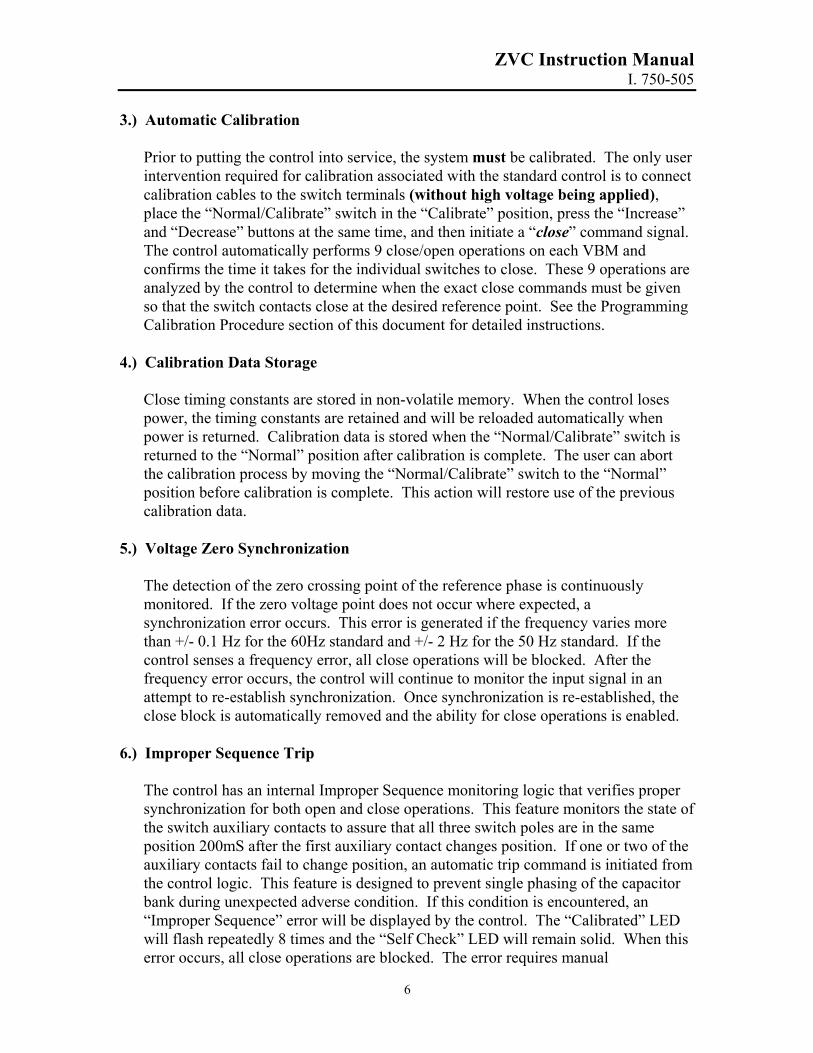
3.) Automatic Calibration Prior to putting the control into service, the system must be calibrated. The only user intervention required for calibration associated with the standard control is to connect calibration cables to the switch terminals (without high voltage being applied), place the “Normal/Calibrate” switch in the “Calibrate” position, press the “Increase” and “Decrease” buttons at the same time, and then initiate a “close” command signal. The control automatically performs 9 close/open operations on each VBM and confirms the time it takes for the individual switches to close. These 9 operations are analyzed by the control to determine when the exact close commands must be given so that the switch contacts close at the desired reference point. See the Programming Calibration Procedure section of this document for detailed instructions.
4.) Calibration Data Storage
Close timing constants are stored in non-volatile memory. When the control loses power, the timing constants are retained and will be reloaded automatically when power is returned. Calibration data is stored when the “Normal/Calibrate” switch is returned to the “Normal” position after calibration is complete. The user can abort the calibration process by moving the “Normal/Calibrate” switch to the “Normal” position before calibration is complete. This action will restore use of the previous calibration data.
5.) Voltage Zero Synchronization
The detection of the zero crossing point of the reference phase is continuously monitored. If the zero voltage point does not occur where expected, a synchronization error occurs. This error is generated if the frequency varies more than +/- 0.1 Hz for the 60Hz standard and +/- 2 Hz for the 50 Hz standard. If the control senses a frequency error, all close operations will be blocked. After the frequency error occurs, the control will continue to monitor the input signal in an attempt to re-establish synchronization. Once synchronization is re-established, the close block is automatically removed and the ability for close operations is enabled.
6.) Improper Sequence Trip
The control has an internal Improper Sequence monitoring logic that verifies proper synchronization for both open and close operations. This feature monitors the state of the switch auxiliary contacts to assure that all three switch poles are in the same position 200mS after the first auxiliary contact changes position. If one or two of the auxiliary contacts fail to change position, an automatic trip command is initiated from the control logic. This feature is designed to prevent single phasing of the capacitor bank during unexpected adverse condition. If this condition is encountered, an “Improper Sequence” error will be displayed by the control. The “Calibrated” LED will flash repeatedly 8 times and the “Self Check” LED will remain solid. When this error occurs, all close operations are blocked. The error requires manual

ZVC Instruction Manual I. 750-505
7
confirmation/resetting by simultaneously pressing of the “Increase” and “Decrease” buttons. After resetting the control, the "Self Check" LED will again begin flashing, indicating that the control is now ready to initiate a close operation.
7.) Flashing Self Check LED
When the "Self Check" LED is flashing, the control is operating normally. The "Self Check" LED will turn on and remain on if an error condition occurs. When the "Self Check" LED is off, the 120 VAC power is too low or turned off.
8.) Error Indication If an error occurs, the “Calibrated” LED will flash to indicate the source of the error. The LED flashes the error code then turns off for 2 seconds and repeats this sequence. The errors are prioritized so that if more than one error is present, the higher priority error is indicated. Refer to the LED Indication Summary on page 11 and the Troubleshooting section for detailed description of error codes and potential corrective actions.
9.) Error Reset
Once an error occurs, it remains latched until it is acknowledged. To clear the error indication, press and hold both the “Increase” and “Decrease” pushbuttons at the same time. If the error condition is no longer present, the "Self Check" LED will begin flashing to indicate a Normal mode condition. If the error condition is still present, the error code indication will remain after the attempted reset. There are two errors that do not require manual acknowledgement. The frequency synchronization error and Low Capacitor Energy error will automatically reset once the abnormal condition is corrected or the system returns to within the control's defined parameters.
Important Operating Note: CAUTION: The VBM switches are fully equipped with the capability to manually/mechanically open and close each pole independently. Based on the Improper Sequence feature highlighted above, the internal control logic will automatically initiate an open command for all the switches if the user attempts to manually open or close one of the VBM poles while the control is energized. Also, if the control is re-energized with one or two of the poles closed, the control will automatically initiate an open command to open all the poles. This feature is desirable in order to prevent inadvertent single phasing conditions. The following steps are recommended if the user desires to manually operate the VBM switches during routine inspection/testing when the system high voltage has been removed:
1. De-energize the control to prevent electrical operating capability. 2. Manually open/close each VBM pole as desired. 3. Upon completion of the work activity, manually switch all the VBMs to the open
position. 4. Re-energize the control to restore electrical operating capability.
ZVC Instruction Manual I. 750-505
8
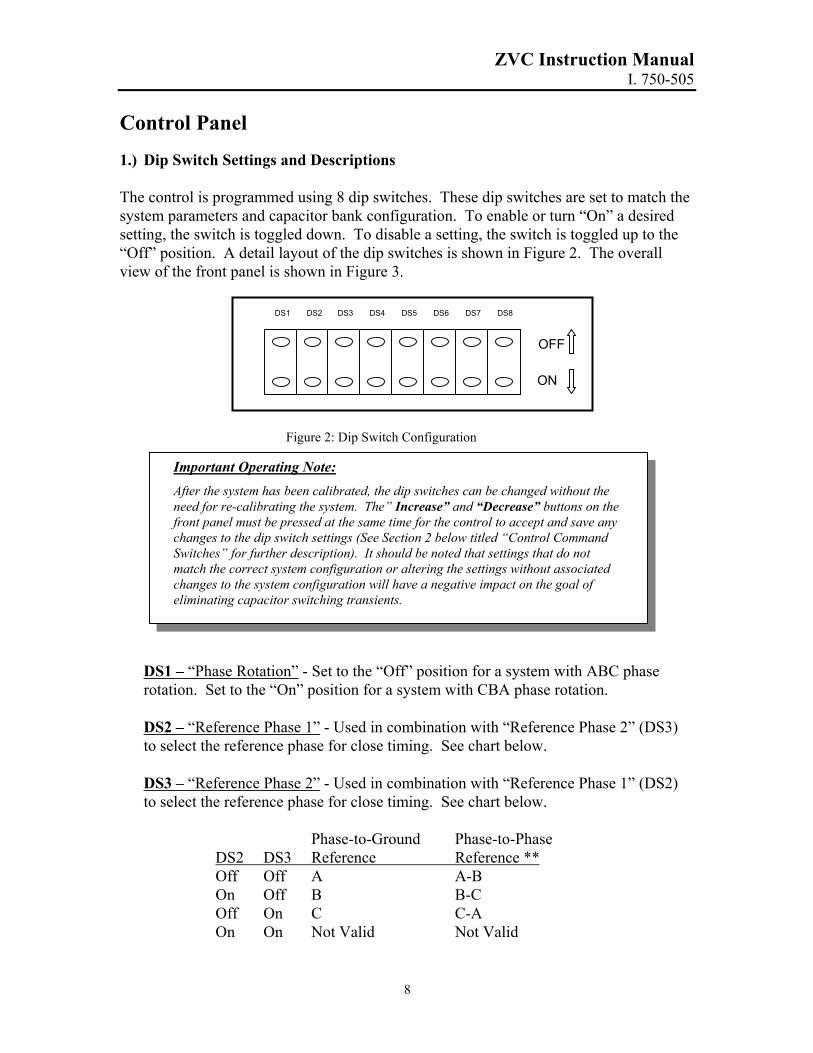
Control Panel 1.) Dip Switch Settings and Descriptions The control is programmed using 8 dip switches. These dip switches are set to match the system parameters and capacitor bank configuration. To enable or turn “On” a desired setting, the switch is toggled down. To disable a setting, the switch is toggled up to the “Off” position. A detail layout of the dip switches is shown in Figure 2. The overall view of the front panel is shown in Figure 3.
DS1 – “Phase Rotation” - Set to the “Off” position for a system with ABC phase rotation. Set to the “On” position for a system with CBA phase rotation. DS2 – “Reference Phase 1” - Used in combination with “Reference Phase 2” (DS3) to select the reference phase for close timing. See chart below. DS3 – “Reference Phase 2” - Used in combination with “Reference Phase 1” (DS2) to select the reference phase for close timing. See chart below. Phase-to-Ground Phase-to-Phase DS2 DS3 Reference Reference ** Off Off A A-B On Off B B-C Off On C C-A On On Not Valid Not Valid
Important Operating Note:
After the system has been calibrated, the dip switches can be changed without the need for re-calibrating the system. The” Increase” and “Decrease” buttons on the front panel must be pressed at the same time for the control to accept and save any changes to the dip switch settings (See Section 2 below titled “Control Command Switches” for further description). It should be noted that settings that do not match the correct system configuration or altering the settings without associated changes to the system configuration will have a negative impact on the goal of eliminating capacitor switching transients.
DS1 DS2 DS3 DS4 DS6 DS7 DS8
OFF
ON
DS5
Figure 2: Dip Switch Configuration

ZVC Instruction Manual I. 750-505
9
** If the reference PT is connected phase-to-phase, select the appropriate phase-to-phase reference from the above chart and then place DS6 (Phase-to-Phase Reference) to the “On” position. DS4 – “Five Minute Close Block” - Set to the “On” position to block the next close operation for a duration of five minutes after a trip operation. This option should always be used to prevent potential switching errors of re-energizing a charged capacitor bank that has been recently tripped off line. This option can be turned to the “Off” position if this feature is accomplished through an existing capacitor control or relay system. DS5 – “Ungrounded Bank” - Set to the “Off” position if the capacitor bank configuration is grounded. Set to the “On” position if the capacitor bank configuration is ungrounded. DS6 – “Phase-to-Phase Reference” - Set to the “Off” position if the reference PT is connected phase-to-ground. Set to the “On” position if the reference PT is connected phase-to-phase. DS7 and DS8 are not used at this time and the actual “On-Off” position has no impact on the control.
2.) Control Command Switches
Normal/Calibrate Toggle Switch - When the toggle switch shown in Figure 3 is placed in the down position, the calibration procedure is started. The Calibration procedure continues until completed normally or aborted by moving the toggle switch back to the “Normal” position before the “Calibrated” LED is illuminated. Increase & Decrease Buttons – The simultaneous pressing of the “Increase” & “Decrease” buttons, shown in Figure 3, will perform the following:
• Reset any latched error conditions when the toggle switch is in the “Normal” position.
• Enables or activate any changes made to the Dip Switch settings (Shown in Figure 2) when the toggle switch is in the “Normal” position.
• Signals the microprocessor that the calibration process is to begin when the toggle switch is in the “Calibrate” position.
3.) Control Indication
Self Check LED - This red LED flashes at a constant one second rate when the system is functioning normally. Error conditions are shown by either steady on or steady off. Calibrated LED - This green LED is steady on when the system has valid calibration

ZVC Instruction Manual I. 750-505
10
Important Operating Note:
All three LEDs flash at a one second rate to indicate the start of the calibration process. This condition should only occur when the “Normal/Calibrate” toggle switch is in the “Calibrate” position.
data and is operating normally. This LED will flash with a defined error logic if an error condition is detected. Calibration in Progress LED - This red LED is off during normal control operation. This LED is steady on only when the calibration procedure is in progress.
4.) LED Indication Summary Condition Self Check LED Calibrated LED Cal. in Progress LED Normal Flashing On Off Power off Off Off Off Error Conditions Low Cap Energy On 1 Flashes Off or On Sync Error On 2 Flashes Off or On Close Error On 3 Flashes Off or On Calibration Error On 4 Flashes Off or On Improper Sequence On 8 Flashes Off Calibration Process Calibration Required Flashing Off Off Start of Calibration Flashing Flashing Flashing Calibration in Process Flashing Off On Calibration Completed Flashing On Off
Figure 3: ZVC Front Panel View
INCREASE
DECREASE
NORMAL
CALIBRATE
JOSLYN HI-VOLTAGE
ZERO VOLTAGE CLOSE CONTROL
SELF CHECK CALIBRATED
CALIBRATION IN PROGRESS

ZVC Instruction Manual I. 750-505
11
Installation Refer to the supplied Zero Voltage Closing interconnection drawing for detailed interface wiring requirements. This drawing, along with the associated control schematic and wiring drawings, will highlight the details of any special options purchased and will identify the specific terminal points in the control where the external control power, close, and open signals are to be connected. A general layout of the system and control is shown in Figure 4. The Joslyn Zero Voltage Closing control system consist of the following components:
• Zero Voltage Closing control cabinet • Three VBM mechanism (poles) • Three VBM pole cables (Standard 17’-6” or 26’maximum
lengths)
The individual poles are connected to the control using cables with keyed pin connectors on the switch end.
Important Operating Note: Connection of the individual cables to the correct system phase designation is critical to obtain proper operation.
Figure 4: General System Layout
VBM Switch Cable
VBMs (Actual configuration varies based system voltage application)
Joslyn Control Cabinet
Calibration Cable
Connection
Interconnection Terminal Blocks
TB ZVC
ControlPanel
PTB
(Note: The cables can be shortened as required in the field but it is recommended that all 3 cables be kept at the same lengths.)

ZVC Instruction Manual I. 750-505
12
The following items represent the specific details and requirements for proper installation of the Joslyn ZVC system. 1.) VBM
The VBM poles must be purchased or modified specifically for zero voltage closing applications. These switches are manufactured with a dedicated contact that provides a proper feedback signal to the control.
2.) Control Power
The standard control requires 120 Vac, 50 or 60 Hertz, to be connected to the designated terminal points within the control. Controls can also be purchased to operate using 125Vdc control power. The supplied interconnection wiring diagram should be used to confirm the actual control power purchased.
3.) Zero Crossing Timing Reference Signal
The following parameters of the reference signal must be determined:
• Voltage signal represents system A, B, or C phase-to-ground reference. • Voltage signal represents system A-B, B-C, or C-A phase-to-phase
reference. A single AC power source can be used as the AC timing reference signal and control power. The reference signal and control power inputs have separate terminal points within the control. If the same AC voltage source is to be used for both reference signal and the control power, a jumper is to be installed between the designated terminal points. If the AC power source is too noisy for use as a timing reference, the
Important Operating Note:
A standard control utilizes a single AC source to power the control and supply the required wetting voltage for the external open and close contacts. This AC source is also used to supply the necessary timing reference signal. See Item 3, Zero Crossing Timing Reference Signal, below if the control AC power can not be used as a timing signal reference due to noise or signal disturbances on the source. The 120VAC source used as the “AC Power” must be capable of supplying the necessary power requirements associated with opening the VBM switches. Each solenoid requires 60 amps RMS (a total of 180 amps for the three single phase switches) for 1 1/2 cycles. The power source transformer and wiring to the control must be sized to allow no more than a 5% voltage drop during inrush current flow. Failure to meet this requirement will significantly reduce the expected long life of the solenoid operators and will void the warranty of the switches. See Joslyn Document 3045A0169 (AC control power) and 3045A0176 (DC control power) on recommended control power wiring for solenoid operated VBM and VBT Switches for further guidelines on selecting proper source transformers and control power cables based on cable lengths.

ZVC Instruction Manual I. 750-505
13
reference signal can be supplied from a second voltage source and wired to the appropriate terminal points. Figure 5 is supplied as a general terminal block layout reference. Refer to the supplied interconnection wiring diagram for complete details on the terminal locations and designations for the specific control purchased.
4.) Open Commands
The external open command contact is wired to designated terminal points in the ZVC control cabinet. A minimum open command time of 0.2 seconds is recommended. The supplied “Interconnection Wiring Diagram” in the control should be used for the specific connection of the open command contact.
5.) Close Commands
The external close command contact is wired to designated terminal points in the ZVC control cabinet. A minimum close command time of 0.2 seconds is recommended. The supplied “Interconnection Wiring Diagram” in the control should be used for the specific connection of the open command contact.
6.) Calibration
Before the control can perform the desired close operations, it must be calibrated to match the system installation parameters, which include:
• System phase rotation (ABC or CBA). • Voltage signal phase representation and connection. • Capacitor bank configuration (grounded or ungrounded).
The calibration process is performed automatically before high voltage is applied to the system. Refer to the section titled “Programming” for detailed information and connection requirements to initiate the automatic calibration process.
Important Operating Note:
The zero voltage crossing of the voltage timing reference signal is constantly monitored. Internal software routines analyze the zero voltage crossing signals to minimize the possibility of triggering on false zero crossings which could occur due to noise on the reference source. Shielded control cable is required for this installation to assure maximum protection against the possibility of noise interference. The shield of the cable should only be grounded at the source end. The time reference signal source needs to be 120 VAC for either 50 or 60 Hertz. Upon powering up, the control automatically determines if the frequency is 50 or 60 Hz through a sampling method and then registers the system’s frequency in the control's memory.
Important Operating Note:
The control will not issue close commands unless the control is calibrated.

ZVC Instruction Manual I. 750-505
14
Programming The control features can be set or adjusted at any time by placing the dip switches into the appropriate positions. The “Increase” and “Decrease” buttons on the control panel must be pressed at the same time for the control to accept and save any changes to the dip switch settings (See Item 2, Control Command Switches, under the “Control Panel” section for further description). To start the automatic calibration procedure, place the “Normal/Calibrate” switch into the “Calibrate” position. When the calibration procedure is finished, as indicated by the “Calibrated” LED being solidly on, place the calibration switch into the “Normal” position to store the obtained calibration data. If the “Normal/Calibrate” switch is placed in the “Normal” position before the “Calibrated” LED is on, the calibration will be aborted and the old calibration values will be retained in memory.
Control Power Terminal
Block 1
2
PTB
(Positive)
(Return)
Figure 5: Typical Control Terminal Block Interface C i
Represent Customer Wiring
Typical Control Terminal Block (TB) Layout
Note: See Interconnection Diagram for specific terminal connections for the open/close contacts
1
15
16
26
Alarm Output
(shown in Alarm State)
120VAC Zero
Reference Signal input
Common
N/C
N/O
Neutral
Hot
52
Customer Open
Contact
27
Customer Close
Contact
Calibration Cable
Connector
53
56
57
64
53
72
3-1 “b” Aux. Contacts (State
when switch closed)
3-1 “a” Aux. Contacts (State
when switch closed)
78

ZVC Instruction Manual I. 750-505
15
Calibration Procedure
The following is a description of the sequence for Automatic Calibration of the Zero Voltage Closing control used with VBM switches. The calibration procedure only needs to be performed upon initial setup of the system or if any of the VBM poles are replaced after the initial calibration process. The calibration process can be performed either in the field or at the user’s service center. After the calibration procedure, the poles MUST stay in the same position (i.e. phase A identified in the shop is installed on phase A in the field) as used during the calibration process. If the switch locations are changed/altered, the calibration procedure needs to be repeated in the field.
A.) VBM Setup
1. Take the necessary steps to de-energize and/or isolate the system high voltage
from the terminals of the VBM. If the calibration process is being performed in the shop, proceed to step 3.
2. Disconnect the high voltage cable leads from the VBM high voltage terminals.
3. Connect the factory supplied calibration cables with Molex pin connector into
the mating connector within the control cabinet junction box and clip the calibration cable leads to the switch terminals as marked on the cables.
B.) Control Setup
1. Verify the “Normal/Calibrate” toggle switch is in the “Normal” position.
2. Place the “Normal/Calibrate” toggle switch in the “Calibrate” position. Once the toggle switch is in the “Calibrate” position, all three of the front panel's LEDs will start to flash which indicates that the control is ready to begin calibration.
3. Press the “Increase” and Decrease” buttons on the control panel at the same
time to signal the microprocessor that the calibration process is to begin.
C.) Calibration
1. To initiate the automatic calibration process, provide a “close” command to
the control. If the switches are in the open position, the control will start calibration by automatically closing each switch independently. If the switches are in the close position, the control will initiate an open command and will then begin the fully automatic calibration process.

ZVC Instruction Manual I. 750-505
16
2. When the control is finished processing the close time data, the “Calibrated”
LED will turn on and the “Calibration in Progress” LED will turn off.
3. After the “Calibrated” LED turns on, place the “Normal/Calibrate” toggle switch to the “Normal” position. This action saves the calibration results to non-volatile memory. The control is now ready for service.
Important Operating Notes:
1.) The control will internally block the automatic closing of the switches until an internal five (5) minute timer expires.
2.) The control will automatically close each switch independently. After a few seconds of processing timing data, the control will start flashing the “Calibration in Progress” LED and then will internally issue an open command. The control will automatically cycle through 9 complete automatic close operation samples with the required 5 minutes duration between each open operation. The complete process needs to continue uninterrupted and will require about 45 minutes to complete.
3.) If the control encounters a discrepancy, an error message will be displayed by flashing the “Calibrated” LED and will suspend the calibration process. The user must acknowledge the error by initiating a reset command (simultaneous pressing of the Increase and Decrease arrows). If the calibration process is interrupted more than one time with the same error, stop and review the “Troubleshooting” section of this manual to help determine the root cause for the error.
Important Operating Note:
If the “Normal/Calibrate” switch is placed into the “Normal” position before the “Calibrated” LED turns on, the calibration process is aborted and the previously stored data is retained. If the calibration is successful, the “Self Check” LED will be flashing, “Calibrated” LED will remain on, and the “Calibration in Progress” LED will turn off.

ZVC Instruction Manual I. 750-505
17
D.) Calibration Complete
1. Remove the calibration cable connections from the VBM terminals and the control cabinet as part of the “VBM Setup” procedure.
2. Re-install the primary cable leads that were disconnected during the
calibration process.
3. Open the VBMs.
4. Verify that the dip switch settings are correct for the application. If the dip switches are changes, the “Increase” and “Decrease” buttons on the control panel must be pressed at the same time for the control to accept the new dip switch settings (See Item 2, Control Command Switches, under the “Control Panel” section for further description).
5. The control and switches are ready for the user to apply high voltage to the
capacitor bank system.
ZVC Instruction Manual I. 750-505
18
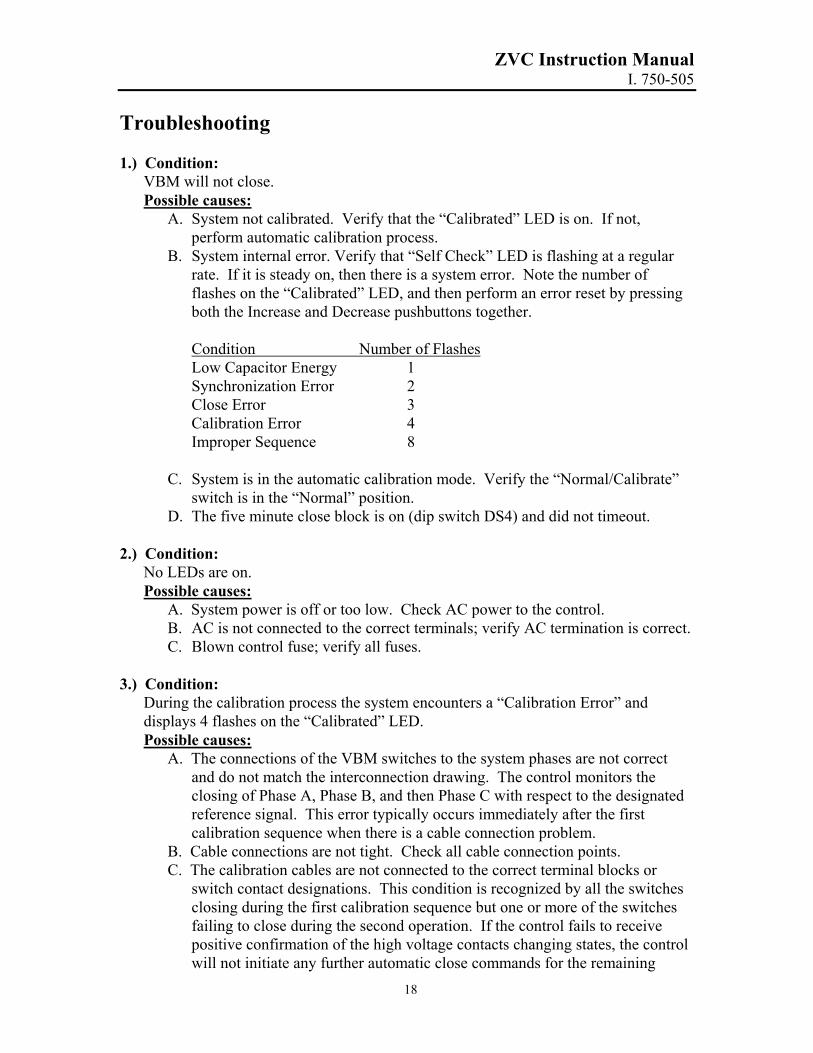
Troubleshooting 1.) Condition:
VBM will not close. Possible causes:
A. System not calibrated. Verify that the “Calibrated” LED is on. If not, perform automatic calibration process.
B. System internal error. Verify that “Self Check” LED is flashing at a regular rate. If it is steady on, then there is a system error. Note the number of flashes on the “Calibrated” LED, and then perform an error reset by pressing both the Increase and Decrease pushbuttons together.
Condition Number of Flashes Low Capacitor Energy 1 Synchronization Error 2 Close Error 3 Calibration Error 4 Improper Sequence 8
C. System is in the automatic calibration mode. Verify the “Normal/Calibrate”
switch is in the “Normal” position. D. The five minute close block is on (dip switch DS4) and did not timeout.
2.) Condition:
No LEDs are on. Possible causes:
A. System power is off or too low. Check AC power to the control. B. AC is not connected to the correct terminals; verify AC termination is correct. C. Blown control fuse; verify all fuses.
3.) Condition:
During the calibration process the system encounters a “Calibration Error” and displays 4 flashes on the “Calibrated” LED. Possible causes:
A. The connections of the VBM switches to the system phases are not correct and do not match the interconnection drawing. The control monitors the closing of Phase A, Phase B, and then Phase C with respect to the designated reference signal. This error typically occurs immediately after the first calibration sequence when there is a cable connection problem.
B. Cable connections are not tight. Check all cable connection points. C. The calibration cables are not connected to the correct terminal blocks or
switch contact designations. This condition is recognized by all the switches closing during the first calibration sequence but one or more of the switches failing to close during the second operation. If the control fails to receive positive confirmation of the high voltage contacts changing states, the control will not initiate any further automatic close commands for the remaining
ZVC Instruction Manual I. 750-505
19
switches. During the calibration process, the control closes in the same sequence: Phase B first, followed by phases C and A, respectively.
4.) Condition:
The system encounters a “Close Error” error and displays 3 flashes on the “Calibrated” LED. This error occurs if any of the close capacitors have too high a voltage after a close command is issued. Possible causes:
A. Cable connections are not tight. Check all cable connections and external termination points.
B. Defective SCR on the SCR board. Press the reset and attempt to continue normal operation. If the problem continues, place a meter on the terminals identified in Figure 1 to monitor the capacitor voltage levels. Verify that the capacitor voltage for each phase is discharged after a close operation.
5.) Condition:
The system encounters an “Improper Sequence” error and displays 8 flashes on the “Calibrated” LED. This error represents anti-single phasing protection and occurs if a switch fails to close or open within a designated amount of time (200mS) after the first switch closed or opened. Possible causes:
A. Cable connections are not tight. Check all cable connections and external termination points.
B. A single switch was manually opened. C. If the error occurs after an open operation, confirm that the control power for
the installation is consistent with the control power requirements outlined in the “Important Operating Note” in Item 2, Control Power, under the “Installation” section of this manual.
6.) Condition:
Higher than expected close transients are encountered when system is energized. Accurate monitoring equipment displays and records high close transients. Possible causes:
A. The control has encountered an error. Verify the appropriate flashing of the “Self Check” LED and identify any errors displayed on the “Calibrated” LED.
B. The Dip Switch settings do not accurately represent the actual capacitor configuration or the system phase rotation selected. Verify the bank and system configuration parameters.
C. The Dip Switch settings were appropriately revised/changed but the “Increase” and “Decrease” buttons were not pressed at the same time in order to have the microprocessor enable/activate the changes.
D. The phase connected to the zero reference phase input does not match settings.

ZVC Instruction Manual I. 750-505
20
Specifications Timing Accuracy: +/- 0.89ms at 3 sigma with respect to designated zero
voltage crossing target point Close Response Time: 5-7 cycles after receiving external close command Open Response Time: 3 – 5 cycles after receiving external open command Temperature Range: -30° C to +70° C * Control Voltage: 120 Vac nominal, +/- 10%
* Control is designed for operation through this range, however timing variances greater than 0.89ms could be encountered below –18 degrees Celsius and above 60 degrees Celsius. These variances are expected to remain within 1 ms of the zero voltage crossing reference point.
Specifications subject to change without notice.
ZVC Instruction Manual I. 750-505
21
Standard Features
Automatic Improper Sequence Trip Extra switch auxiliary contacts (4-“a” and 4-“b”) Control Alarm output contact (form C) Control cabinet heater Calibration Cable (18’-6’’ or 27’ lengths)
Non-Standard Options Available
Two pole control for ungrounded capacitor bank applications Capacitor Operated Low Energy Trip Undervoltage Trip Aluminum Cabinet By-pass ZVC Mode Switch
This option allows emergency close operations without using the ZVC control logic. Note: Operating under this mode by-passes the error logic outlined in Item 4, LED Indication Summary, under the “Control Panel” section of this manual.
Manual Revision Notes
Date: Scope: 7/00 Initial release of microprocessor based ZVC control instructions
for VBM switching. 6/01 Pages 4 and 21 changed from zero voltage crossing point to zero
voltage crossing target point. Change Specifications Close Response Time from 4-6 cycles to 5-7 cycles.
5/04 The following is a summary of the significant changes/corrections
in the instruction manual since the last revision date:
• The test terminals locations were revised in Figure 1. • The Dip Switch active positions were changed in Figure 2. • The functionality of the “Increase” & “Decrease” buttons in Item 2 on page
9 was revised. • The listing of error conditions in Item 4 on page 10 was revised. • The description of the Zero Crossing Timing Reference Signal was revised
in Item 3 of the Installation Section on page 12. • The Control Setup, Item B, in the Programming Section on page 15 was
revised to include a step to press the “Increase” & “Decrease” button to initiate the microprocessor at the start of the calibration process.
• The number of calibration operations changed from 8 to 9 in “Important Operating Note” in Item C in the Programming section on page 16.

ZVC Instruction Manual I. 750-505
22
Joslyn Hi-Voltage Reference Material
Appendix A Standard System Voltage Reference information (Included in this manual) I. 750-310 Model VBM Fault Interrupter Instructions D.B. 750-502 Joslyn Varmaster Vacuum Switch Systems 3045A0169 Power input and recommended control power wiring for solenoid operated
VBM and VBT Switches 3045A0176 Recommended power input for DC, direct energy, operated VBM
switches 85 WM 221-7 Synchronous Closing Control for Shunt Capacitors – R. W.Alexander,
Pennsylvania Power & Light Company, Allentown, Pennsylvania.
ZVC Instruction Manual I. 750-505
23
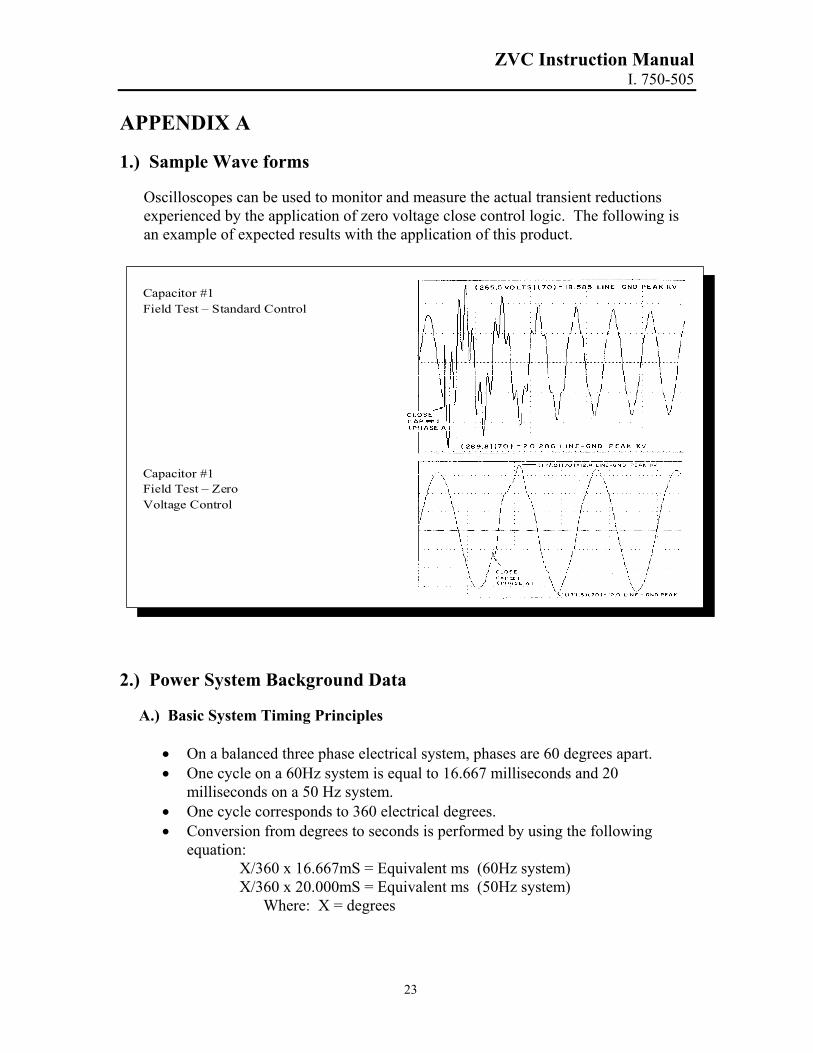
APPENDIX A 1.) Sample Wave forms
Oscilloscopes can be used to monitor and measure the actual transient reductions experienced by the application of zero voltage close control logic. The following is an example of expected results with the application of this product.
2.) Power System Background Data
A.) Basic System Timing Principles
• On a balanced three phase electrical system, phases are 60 degrees apart. • One cycle on a 60Hz system is equal to 16.667 milliseconds and 20
milliseconds on a 50 Hz system. • One cycle corresponds to 360 electrical degrees. • Conversion from degrees to seconds is performed by using the following
equation: X/360 x 16.667mS = Equivalent ms (60Hz system) X/360 x 20.000mS = Equivalent ms (50Hz system) Where: X = degrees
Capacitor #1 Field Test – Standard Control
Capacitor #1 Field Test – Zero Voltage Control
ZVC Instruction Manual I. 750-505
24
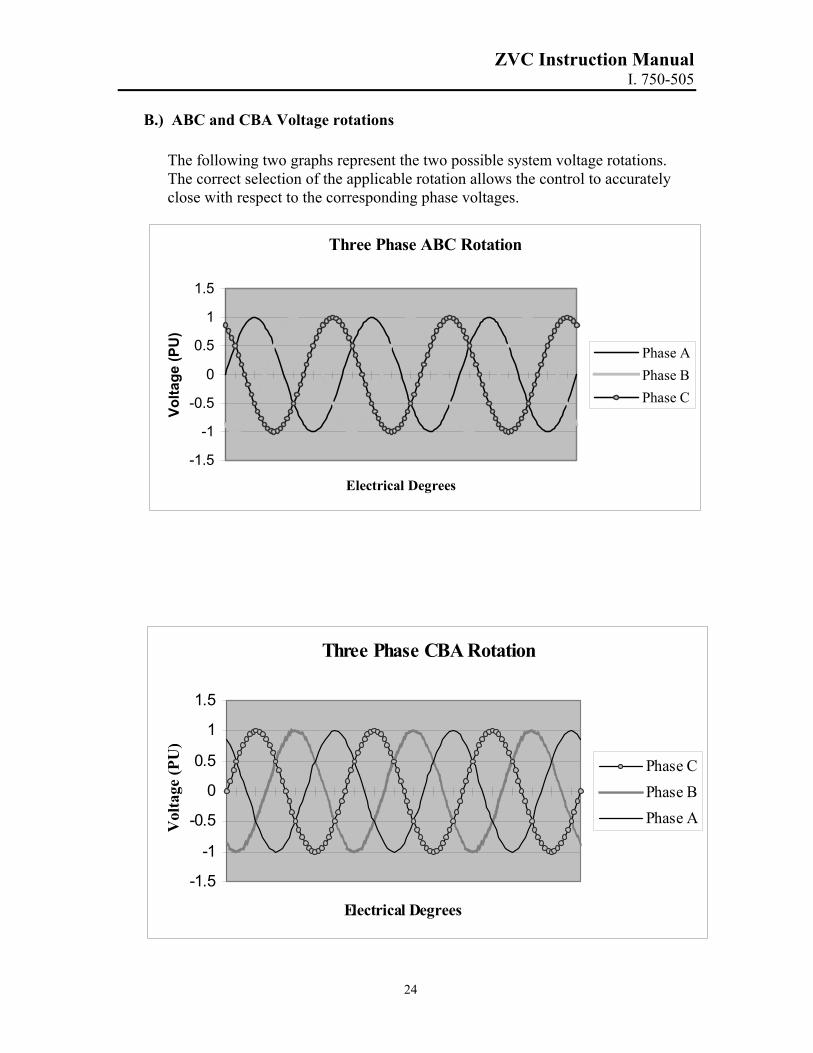
B.) ABC and CBA Voltage rotations
The following two graphs represent the two possible system voltage rotations. The correct selection of the applicable rotation allows the control to accurately close with respect to the corresponding phase voltages.
Three Phase CBA Rotation
-1.5
-1
-0.5
0
0.5
1
1.5
Electrical Degrees
Vol
tage
(PU
)
Phase CPhase BPhase A
Three Phase ABC Rotation
-1.5
-1
-0.5
0
0.5
1
1.5
Electrical Degrees
Volta
ge (P
U)
Phase APhase BPhase C

ZVC Instruction Manual I. 750-505
25
C.) Phase-to-Phase Reference Sensing
The following reference information relates to customers using Phase-to-Phase voltage sensing consideration:
ABC Rotation: When the voltage reference source is connected phase-to-phase with an ABC rotation system, the resultant wave will lead each phase by 30 degrees. The actual timing equates to + 1.389mS for 60Hz (30/360 x 16.67mS = 1.389mS) and + 1.667mS for 50Hz (30/360 x 20mS = 1.667mS).
CBA Rotation: When the voltage reference source is connected phase-to-phase with an CBA rotation system, the resultant wave will lag each phase by 30 degrees. The actual timing equates to a negative 1.389mS for 60Hz and a negative 1.667mS for 50Hz.
A summary for phase-to-phase transformers sensing with respect to the individual phase voltages is represented in the table below and demonstrated in a sample timing graph: PT Connection Phase Rotation ABC Phase Rotation CBA
A and B A - 30 degree lead A - 30 degree lag B - 30 degree lag B - 30 degree lead
B and C B - 30 degree lead B - 30 degree lag C - 30 degree lag C - 30 degree lead
C and A C - 30 degree lead C - 30 degree lag A - 30 degree lag A - 30 degree lead
ABC Rotation with A-B Phase-to-Phase Reference
-2-1.5
-1-0.5
00.5
11.5
2
Electrical Degrees
Vol
tage
(PU
) Phase APhase BPhase CPhase A-B