zetadocs for microsoft dynamics nav installation...
TRANSCRIPT
Zetadocs for Microsoft Business Solutions Navision
Installation Guide
Version history
Version: 18/11/2009
Equisys plc
Equisys House
32 Southwark Bridge Road
London SE1 9EU
United Kingdom
Tel + 44 (0)20 7203 4000
Fax +44 (0)20 7203 4005
Equisys Inc
30,000 Mill Creek Avenue
Suite 335
Alpharetta GA 30022
USA
Tel +1 (770) 772 7201
Fax +1 (770) 442 5789
www.equisys.com
Contact: Equisys Technical Support, [email protected]
Copyright Notice
Copyright © 2009 Equisys plc, London 1991 ” 2009. All rights reserved.
No part of this document may be reproduced or transmitted in any form or by any means, electronic or
mechanical, including photocopying, without the prior written permission of Equisys plc.
All trademarks are acknowledged.
Zetadocs for Microsoft Business Solutions Navision Installation Guide
Introduction
This edition 18/11/2009 © Copyright Equisys plc 2009 All trademarks acknowledged All rights reserved Page 2
Contents
1. Introduction ............................................................................................................ 4 1.1 Installation Pack Contents ....................................................................................................................4 1.2 Technical Specifications .......................................................................................................................4
2. How Zetadocs Interacts with Navision .................................................................... 5
3. Understanding your Requirements ......................................................................... 6 3.1 Archiving your Documents ....................................................................................................................6 3.2 Document Delivery using Fax ................................................................................................................6 3.3 Working with Zetadocs Document Templates .......................................................................................6 3.4 Identifying the Required Reports ..........................................................................................................6
4. Installing Zetadocs for NAV .................................................................................... 7 4.1 Installation and Configuration Overview ...............................................................................................7 4.2 Installing the Zetadocs Client ................................................................................................................7 4.3 Configuring Zetadocs Client Licensing ..................................................................................................8
5. Zetadocs for NAV Document Templates .................................................................. 9 5.1 Creating the Document Templates Folder .............................................................................................9 5.2 Adding the Standard Document Templates ..........................................................................................9
6. Modifying a Navision Report .................................................................................. 9 6.1 Glossary of Terms ............................................................................................................................... 10 6.2 Backup Reports .................................................................................................................................. 10 6.3 Import the Zetadocs for NAV Report Template .................................................................................... 10 6.4 Creating your Modified Report ............................................................................................................ 10 6.5 Global, Local and Text Constants ........................................................................................................ 11 6.6 CA/L Code Segments .......................................................................................................................... 11
7. Configuring Report Settings ................................................................................. 12 7.1 Zetadocs Embedded Commands ” OnPreDataItem ............................................................................. 12 7.2 Zetadocs Embedded Commands ” OnAfterGetRecord ........................................................................ 12 7.3 Zetadocs Embedded Commands - OnPostDataItem() ......................................................................... 15
8. Validating your Modified Reports ..........................................................................15 8.1 Troubleshooting your Modified Reports ............................................................................................. 16
9. Configuring Report Selection and Printing ........................................................... 16 9.1 Navision Report Selection ................................................................................................................... 16 9.2 Navision Printer Setup ........................................................................................................................ 17
10. Testing your Solution ............................................................................................. 17 10.1 Testing Document Delivery ................................................................................................................. 18
11. Upgrading your System ........................................................................................ 18 11.1 Overview of System Upgrade Requirements ....................................................................................... 18 11.2 Understanding your New System Requirements ................................................................................. 19
12. Appendix A: Document Templates ........................................................................ 21 12.1 Using Preconfigured Document Templates ......................................................................................... 21 12.2 Preconfigured Document Template Features ...................................................................................... 21 12.3 Template Wizard - Adding an attachment to a template .....................................................................22 12.4 Replacing the stationery .....................................................................................................................23 12.5 Adjusting the Email message ..............................................................................................................24
13. Appendix B – Report Modification ........................................................................ 26 13.1 Remittance Advice Report ...................................................................................................................26 13.2 Alternate Archiving Strategies ............................................................................................................27 13.3 Local Template Folder .........................................................................................................................29 13.4 SharePoint Content Types ..................................................................................................................29
Zetadocs for Microsoft Business Solutions Navision Installation Guide
Introduction
This edition 18/11/2009 © Copyright Equisys plc 2009 All trademarks acknowledged All rights reserved Page 3
13.5 Sales Order Report Example ...............................................................................................................29 13.6 Dynamic Fields .................................................................................................................................... 31
Zetadocs for Microsoft Business Solutions Navision Installation Guide
Introduction
This edition 18/11/2009 © Copyright Equisys plc 2009 All trademarks acknowledged All rights reserved Page 4
1. Introduction
Thank you for choosing Zetadocs for Microsoft Business Solutions Navision which will henceforth refer to as
Zetadocs for NAV for simplicity. Zetadocs for NAV enables users to send an array of different documents out
to customers and suppliers from their Navision system. It helps accounts departments streamline business
processes, reduce the costs of handling paper documents and enhances customer service. It enables
Navision users to create and deliver statements, invoices, remittances and other financial documents
instantly from their PC. Zetadocs also archives documents to Microsoft SharePoint so they can be retrieved
promptly, enabling users to respond to queries instantly.
The aim of this document is to guide you through the installation of Zetadocs for NAV for your Navision
system. The document contains a brief overview of Zetadocs and provides a step by step guide as to how to
install Zetadocs for NAV. It is recommended that you read through the relevant installation materials before
starting with an installation.
1.1 Installation Pack Contents
The software is supplied on a CD and contains the following:
Zetadocs SharePoint Extensions
Folder containing:
SharePoint Extensions installer
Target OS: Windows Server 2008, Windows Server 2003, MOSS and WSS v3.0
Zetadocs Client
Installs everything that is needed on the end user desktop:
Zetadocs Client
Target OS: Windows Server 2008, Windows Server 2003, XP, Vista
Documentation
Documentation (installation, configuration and deployment instructions)
1.2 Technical Specifications
This section details the minimum system requirements for the software.
Client Operating systems supported
“ Windows®
Vista Business, Ultimate and Enterprise (x86 or running 32 bit on x64)
“ Windows®
XP SP2 (x86 or running 32 bit on x64)
“ Windows®
Server 2003 SP1 or later (x86 or running 32 bit on x64)
“ Windows®
Server 2008
“ Requires Microsoft.NET Framework®
version 2.0
“ Integrates with Microsoft Office Outlook®
2003 SP2 and Microsoft Office Outlook 2007
“ Integrates with Lotus®
Notes®
V6.5 and above
“ Integrates with SMTP email systems
“ Active Directory®
integration for rapid and easy deployment to all network users
Client Hardware requirements
“ It is recommended that systems have Pentium®
class CPUs of 1 GHz or higher with 1GB RAM or more
PDF capabilities
“ Create PDF files which are readable using Adobe®
Reader®
software version 5 and later
“ Supports PDF attachments created in PDF 1.2, 1.3, 1.4 and 1.5 standards
“ Specify PDF security options such as allow printing, content extraction and password protection
“ Password protection using 40-bit and 128-bit encryption
Other software requirements
“ Integrates with Navision versions 3.60 and 3.70 (x86 or running 32 bit on x64)
“ Supports MOSS, WSS v3.0 (x86 or running 32 bit on x64)
Zetadocs for Microsoft Business Solutions Navision Installation Guide
How Zetadocs Interacts with Navision
This edition 18/11/2009 © Copyright Equisys plc 2009 All trademarks acknowledged All rights reserved Page 5
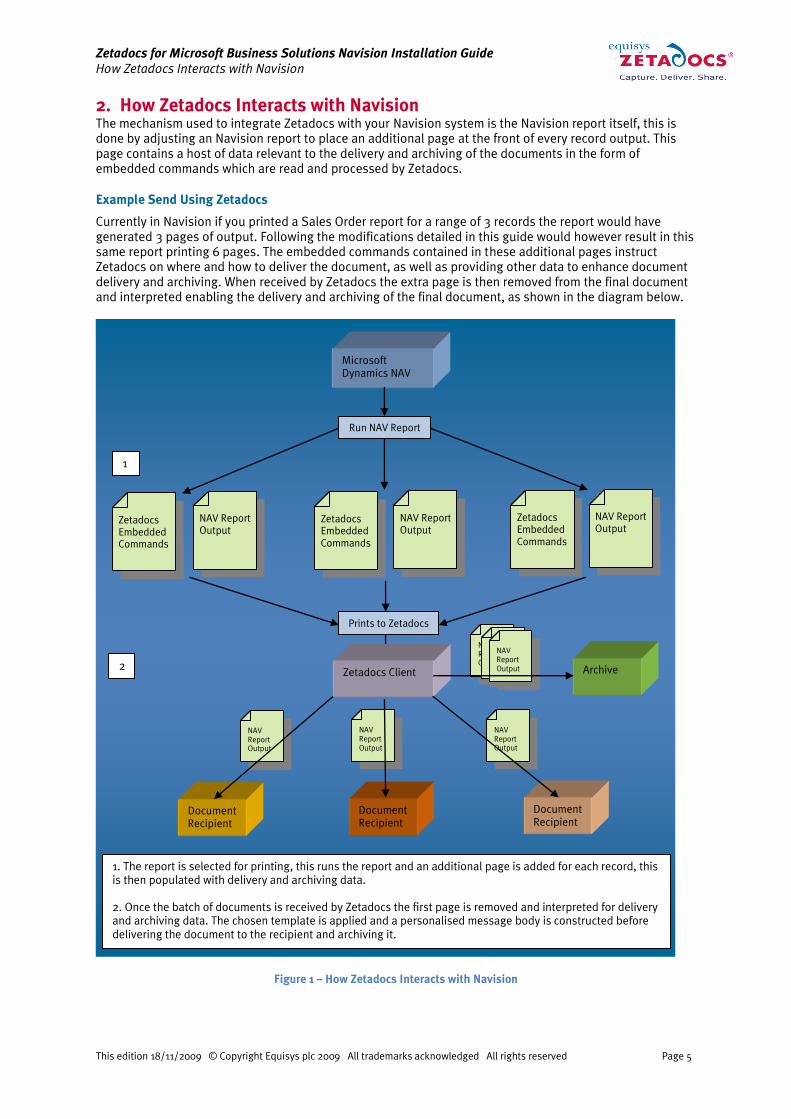
2. How Zetadocs Interacts with Navision
The mechanism used to integrate Zetadocs with your Navision system is the Navision report itself, this is
done by adjusting an Navision report to place an additional page at the front of every record output. This
page contains a host of data relevant to the delivery and archiving of the documents in the form of
embedded commands which are read and processed by Zetadocs.
Example Send Using Zetadocs
Currently in Navision if you printed a Sales Order report for a range of 3 records the report would have
generated 3 pages of output. Following the modifications detailed in this guide would however result in this
same report printing 6 pages. The embedded commands contained in these additional pages instruct
Zetadocs on where and how to deliver the document, as well as providing other data to enhance document
delivery and archiving. When received by Zetadocs the extra page is then removed from the final document
and interpreted enabling the delivery and archiving of the final document, as shown in the diagram below.
Figure 1 – How Zetadocs Interacts with Navision
Microsoft
Dynamics NAV
Document
Recipient
NAV
Report
Output
Document
Recipient
Document
Recipient
1. The report is selected for printing, this runs the report and an additional page is added for each record, this
is then populated with delivery and archiving data.
2. Once the batch of documents is received by Zetadocs the first page is removed and interpreted for delivery
and archiving data. The chosen template is applied and a personalised message body is constructed before
delivering the document to the recipient and archiving it.
Zetadocs Client
Zetadocs
Embedded
Commands
Zetadocs
Embedded
Commands
NAV Report
Output
NAV Report
Output
Zetadocs
Embedded
Commands
NAV Report
Output
Prints to Zetadocs
NAV
Report
Output
NAV
Report
Output
Archive
NAV
Report
Output
1
.
Run NAV Report
2
\
.
NAV
Report
Output
NAV
Report
Output
Zetadocs for Microsoft Business Solutions Navision Installation Guide
Understanding your Requirements
This edition 18/11/2009 © Copyright Equisys plc 2009 All trademarks acknowledged All rights reserved Page 6
3. Understanding your Requirements
Before beginning your install it is recommended that you identify your requirements in advance. Whilst
most of the setup options available during the report modifications are straightforward some do require
that you set criteria that you may not have previously worked with or considered.
3.1 Archiving your Documents
When configuring your archive you should be aware that your archive structure and other settings may
impact any future system upgrades. Zetadocs can be more closely integrated with NAV versions 4, 5 and 6
offering additional functionality. Should you wish in future to upgrade your Navision system it will be a far
simpler process if future upgrades were considered during the initial system setup. As such we have
suggested default values we would recommend you utilise. If you do not wish to archive documents sent by
Zetadocs then simply leave the archiving fields commented out in the code imported for each report.
Archiving to SharePoint
Zetadocs has the capacity to integrate with a SharePoint site for document archiving and retrieval. If you are
intending archive to SharePoint from Zetadocs you need to install the Zetadocs SharePoint extensions. We
would recommend carrying out that part of this installation first, before carrying on with the rest of the
installation as you will need to specify the archiving address in the your report setup. If you are intending to
use SharePoint proceed to the SharePoint Extensions Installation Guide on your product CD or download it
from here.
Structuring your SharePoint Archive
Zetadocs will automatically create the structure of your archive within the SharePoint Document Library
using the structure specified when you modify your reports. The requirements of this structure should be
determined by the volume of documents sent and how you wish to group your documents. The default
strategy used in the report template takes its structure from the date in the format YYYY-MM-DD or 2009-
08-06, thus grouping all document together based upon when they were sent to Zetadocs. A range of
alternate strategies are available and to ensure upgradability of your system we would recommend you
choose one of the strategies outlined in the appendices.
Archiving to a Folder
Zetadocs is also capable of archiving to a folder location, it is important to ensure that all Zetadocs users
have access to the specified folder location. The choices of structure shown above are again recommended.
For details of archiving to a folder location please see the appendices for more details.
3.2 Document Delivery using Fax
If the system is to support delivery by fax, then the Zetafax Server and Client applications need to be
installed. Zetafax is a separate product available from Equisys and as such comes with its own installation
instructions for more details please contact [email protected].
3.3 Working with Zetadocs Document Templates
Document templates are combinations of attachments, stationery and a message body that can be created
and stored within Zetadocs. These can then be used to ensure that documents that are sent out on a regular
basis have all required information and can be created quickly and consistently throughout an organization.
It is therefore important to identify how to use document templates to achieve the look and feel of your
organizations existing documentation. The document templates provided are covered in greater detail in
Appendix A of this guide but each of the templates is designed to support an individual report and comes
with a piece of generic stationery, and a simple message body tailored to the specific report type. It is thus
simple to use the provided templates adding only your own stationery and tuning the message body to
reflect the organisations specific correspondence. If you do not wish to use document templates then
simply skip section 5.
3.4 Identifying the Required Reports
Zetadocs supports the majority of the most commonly used reports, however due to the variety of reports
and the customizable nature of reports it is difficult to provide a definitive list of compatible reports. The list
below contains those reports for which we have provided an example modified report on the product CD.
The main requirement for a report to be Zetadocs compatible is that it allows the Zetadocs Embedded
Commands Data item to be located in front of every record output. This step detailed in section 6.6 places a
Zetadocs for Microsoft Business Solutions Navision Installation Guide
Installing Zetadocs for NAV
This edition 18/11/2009 © Copyright Equisys plc 2009 All trademarks acknowledged All rights reserved Page 7
pair of text boxes into the first page of the report which contain our embedded commands. As explained
earlier these are then interpreted by Zetadocs on printing so if this page can be successfully added to the
report then it should be Zetadocs compatible. Identify those reports you wish to convert for sending using
Zetadocs and make a note of them for reference later in the install as they should be backed up before
modifications are performed.
Report Samples:
Sales Order
Sales Invoice
Sales Quote
Sales Credit Memo
Statement
Remittance Advice
Purchase Order
4. Installing Zetadocs for NAV
4.1 Installation and Configuration Overview
This section aims to provide a brief overview of the installation and configuration process for Zetadocs for
NAV.
Installing the Zetadocs Client
o Zetadocs Client licensing and registration
Installing the Zetadocs for NAV Document Templates (Optional)
Modifying a NAV Report
o Backing up the existing reports
o Adding Zetadocs code to your reports
Configuring Report Settings
Validating your modified reports
Configuring Report Selection and Printing
o Navision report selection
o Navision printer selection
Testing your Solution
o Testing Document Delivery
4.2 Installing the Zetadocs Client
This section describes the installation of the Zetadocs Client, this should be performed on every client
machine which is part of your system install.
Ensure the currently logged in user has local administration rights on the machine that is being
installed upon.
o This is required to install pre-requisite components used in Zetadocs. These permissions
can be elevated temporarily for the installation.
Insert the Zetadocs for NAV CD.
When the CD Browser runs, follow the menu options and select the ERP system relevant to your
system.
Select the option to begin installing the Zetadocs Client in either 32 or 64 bit as appropriate.
The Zetadocs Client installer is a combination of installers. When you begin installing the Zetadocs Client
you will be prompted with the installation options for Zetadocs. There are also a number of pre-requisites
Zetadocs for Microsoft Business Solutions Navision Installation Guide
Installing Zetadocs for NAV
This edition 18/11/2009 © Copyright Equisys plc 2009 All trademarks acknowledged All rights reserved Page 8
for the Zetadocs Client which must be installed first. Please follow the installation dialogs with this ordered
check list.
Zetadocs Client
o Install pre-requisites of Zetadocs Client (If the Zetadocs Client has previously been
installed on the machine this dialog may not appear as pre-requisites will already be
installed)
o Choose language
o Choose Installation Directory
o Choose Installation Type
Evaluation
Administration
Typically only installed by an administrator on the server machine.
Installs the Zetadocs Client and the Zetadocs Admin Configuration
application for licensing and network configurations of Zetadocs.
Standard
Typically the most used installation on regular client machines.
Once you select Finish, the Zetadocs PDF Configuration program will launch.
4.3 Configuring Zetadocs Client Licensing
Before you can start using Zetadocs you must license and register it, enable users and setup file sharing
folders for storage of company accessories (templates, stationery and attachments). The Zetadocs PDF
configuration program is automatically installed as part of your Zetadocs system when you select the
Administration install option during installation.
This program allows you to manage your Zetadocs PDF program across your network, allowing licensing,
registration, shared folders and user accounts to be modified.
Zetadocs Client Licensing and Setup
Actions:
Launch the Zetadocs PDF Configuration.
Choose the license location (General Tab).
o Active Directory (requires that user has access rights to write to AD)
o Shared Network Folder
Enter your Zetadocs license number and company name and register online.
Enter your registration key on receiving the registration success email.
Add the required users.
Leave Network Archiving off if you are using SharePoint as an archive.
Zetadocs Client
Actions:
Start the client.
If using Active Directory licensing, Zetadocs should locate the license automatically, otherwise, go
to Tools Options\Licensing and enter the path to the network folder containing the Zetadocs
license.
Restart client if necessary.
You can confirm that you are successful if the splash screen shows the Automation tag beside the
number of users.
Zetadocs for Microsoft Business Solutions Navision Installation Guide
Zetadocs for NAV Document Templates
This edition 18/11/2009 © Copyright Equisys plc 2009 All trademarks acknowledged All rights reserved Page 9
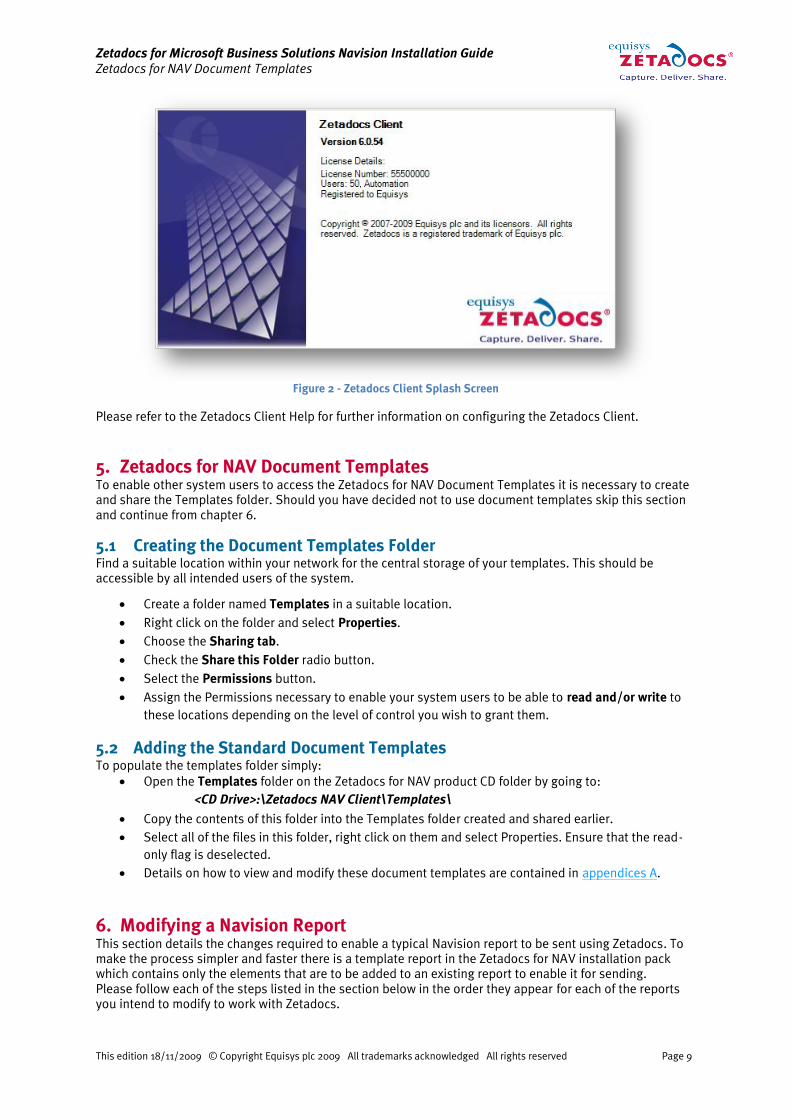
Figure 2 - Zetadocs Client Splash Screen
Please refer to the Zetadocs Client Help for further information on configuring the Zetadocs Client.
5. Zetadocs for NAV Document Templates
To enable other system users to access the Zetadocs for NAV Document Templates it is necessary to create
and share the Templates folder. Should you have decided not to use document templates skip this section
and continue from chapter 6.
5.1 Creating the Document Templates Folder
Find a suitable location within your network for the central storage of your templates. This should be
accessible by all intended users of the system.
Create a folder named Templates in a suitable location.
Right click on the folder and select Properties.
Choose the Sharing tab.
Check the Share this Folder radio button.
Select the Permissions button.
Assign the Permissions necessary to enable your system users to be able to read and/or write to
these locations depending on the level of control you wish to grant them.
5.2 Adding the Standard Document Templates
To populate the templates folder simply:
Open the Templates folder on the Zetadocs for NAV product CD folder by going to:
<CD Drive>:\Zetadocs NAV Client\Templates\
Copy the contents of this folder into the Templates folder created and shared earlier.
Select all of the files in this folder, right click on them and select Properties. Ensure that the read-
only flag is deselected.
Details on how to view and modify these document templates are contained in appendices A.
6. Modifying a Navision Report
This section details the changes required to enable a typical Navision report to be sent using Zetadocs. To
make the process simpler and faster there is a template report in the Zetadocs for NAV installation pack
which contains only the elements that are to be added to an existing report to enable it for sending.
Please follow each of the steps listed in the section below in the order they appear for each of the reports
you intend to modify to work with Zetadocs.
Zetadocs for Microsoft Business Solutions Navision Installation Guide
Modifying a Navision Report
This edition 18/11/2009 © Copyright Equisys plc 2009 All trademarks acknowledged All rights reserved Page 10
Note: This method works for most reports; however, due to the customizable nature of reports it may not fit
all reports exactly. Therefore, the location of where to insert the code below may need to vary but the code
will remain the same.
6.1 Glossary of Terms
6.2 Backup Reports
In order to be able to uninstall the Zetadocs for NAV software it is recommended that you backup the
Navision reports you are editing before modifying them to work with Zetadocs. Alternatively, reports can be
duplicated and saved with new report ID’s before adding the Zetadocs for NAV changes. Either way it is
recommended that you add the Version List EQ3.0DE after saving the completed report.
Open the Navision client and connect to/open the Navision database.
Open the Object Designer (ToolsObject Designer).
Click on Report button in the designer menu.
Select all the reports that you identified earlier and are going to edit for Zetadocs for NAV.
Select Export objects in file menu (FileExport).
Export objects to a Backup of Reports before Zetadocs for NAV3.0.fob file.
Keep the Backup of Objects before Zetadocs for NAV3.0.fob in a safe place.
6.3 Import the Zetadocs for NAV Report Template
Open the Navision client and connect to/open the Navision database.
Open the Object Designer (ToolsObject Designer).
Select File Import from the Navision menu and import the file below into Navision.
<CD Drive>:\Documentation\NAV v3.6 v3.7 systems\ZD-Report Template.txt
Note: The template is based on the ‚Sales Header‛ table as it is based upon a Sales Order report. We have
also included at the same location sample modified reports for Sales Order, Sales Invoice, Sales Quote,
Sales Credit Memo, Statement, Purchase Order and Remittance Advice to aid in developing your
understanding of how the reports operate. The Remittance Advice report is significantly different from the
other reports and has a dedicated section in the appendices detailing its specific setup process.
6.4 Creating your Modified Report
Now that you have imported the template you need to open the template in the Object Designer to enable
you to copy various items from it into your report. We will proceed by setting up the Sales Invoice report as
an example.
Locate the template in the Object Designer and select Design.
The report will open in the Report Designer.
Return to the Object Designer and locate the report you wish to modify, click Design.
You will need to keep the original report ID for the Remittance and Statement Reports for these
proceed to section 6.5 below.
For the other reports you can set your own id’s if you wish, to do this Select File Save As from
the Navision menu.
Enter a new ID and name for the report based upon what is available in your system e.g. ID:10075
Sales Order becomes 50075 ZD-Sales Order.
Click OK to create the modified report.
Term Description
Document Any printable document that can be printed to the Zetadocs printer. Typically
refers to a Navision Report output in this context.
Report A Navision Report.
Template The report template provided.
Document Template A collection of stationery, attachments and message body Zetadocs can apply
to documents prior to delivery
Zetadocs for Microsoft Business Solutions Navision Installation Guide
Modifying a Navision Report
This edition 18/11/2009 © Copyright Equisys plc 2009 All trademarks acknowledged All rights reserved Page 11
6.5 Global, Local and Text Constants
Return to the template in the Report Designer and select ViewCA/L Globals.
Select all global variables (Ctrl + A), right-click and select Copy.
Switch to your report and select ViewCA/L Globals.
Scroll to the bottom of any existing Globals in your report and select the blank global variable row,
right-click and select Paste to paste the additional Zetadocs Globals into the report.
The Variables are by default set for Sales reports, should you be creating a Purchase report select
the Customer variable and replace it with Vendor. The Datatype should remain Record with
Subtype Vendor.
If upon compilation the report indicates that there are duplicate values as can occur with Customer
for example. In these instances compare the two, they would usually have the same values by
default, and remove one of the instances as appropriate.
Return to the template and select the Text Constants tab, select all and then copy.
Paste these at the bottom of any existing text constants in your report.
6.6 CA/L Code Segments
Next you need to add code to your report.
Create Zetadocs Embedded Commands Data Item
In the report designer select an empty row in your report and create a new data item of type
Integer called Zetadocs Embedded Commands.
Move the data item up to just below your main data item and indent once so that it will be the first
page of output in your report.
In the template in the Report Designer select ViewSections.
Select and copy the two textboxes located in the Zetadocs Embedded Commands, Body(1) section.
Paste these textboxes into the same section in your report.
Zetadocs Embedded Commands Data Item Code
Next you need to add the Code that enables your report to print the embedded commands Zetadocs uses to
send your document to the desired recipients. We have code which needs to be pasted from the template
into the corresponding OnPreDataItem(), OnAfterGetRecord() and OnPostDataItem() sections.
Select the Zetadocs Embedded Commands DataItem in the template.
Click ViewC/AL Code or press F9 to open the C/AL Editor.
Select and copy all of the content from the OnPreDataItem() section.
Go to your report and select the Zetadocs Embedded Commands DataItem.
Click ViewC/AL Code or press F9 to open the C/AL Editor.
Paste the code copied earlier into the OnPreDataItem() section.
Repeat this procedure copying the contents from the OnAfterGetRecord() and OnPostDataItem()
sections.
OnInitReport Code
There is also some additional code required in the OnInitReport() section.
Go to the Report Designer for the Template and select an empty row.
Click ViewC/AL Code or press F9 to open the C/AL Editor.
Select and copy all of the content from the Report ” OnInitReport() section.
Go to your report and open in the Report Designer, select an empty row.
Click ViewC/AL Code or press F9 to open the C/AL Editor.
Paste the code copied earlier into the Report ” OnInitReport() section.
Zetadocs for Microsoft Business Solutions Navision Installation Guide
Configuring Report Settings
This edition 18/11/2009 © Copyright Equisys plc 2009 All trademarks acknowledged All rights reserved Page 12
7. Configuring Report Settings
Having successfully copied the various elements from the template into a copy of your existing report we
now need to configure these elements to match your requirements. An example Sales Order report is
available in the appendix for reference of how this should look when complete.
7.1 Zetadocs Embedded Commands – OnPreDataItem
The OnPreDataItem contents control the number of iterations the report goes through and ensures that
each document creating by the report has a corresponding set of embedded commands to ensure it is
delivered correctly.
SETRANGE(Number,1,1);
7.2 Zetadocs Embedded Commands – OnAfterGetRecord
The code that you imported into your report will not operate properly until it has been adjusted for each
individual report. What follows is a breakdown of the code which should allow you to understand enough to
enter suitable values or adjust them as required. Sections which should potentially be modified are
highlighted using red text, with fields requiring static values to be entered are denoted by <> either side.
Default Fields
Separator := '\'; Customer.GET("Sales Header"."Sell-to Customer No.");
This string identifies the table in Navision from which we are sourcing the various fields, the values above
are from the Sales Order report. Replace these with the appropriate values for your report e.g. for Sales
Invoices. ‚Sales Invoice Header‛.‛Sell-to Customer No.‛. If you were to be working on a Purchase report
you would replace Customer with Vendor and then Sell-to Customer No. with Buy-from Vendor No. This
would give you Vendor.GET("Purchase Header"."Buy-from Vendor No.");.
IF NOT (BatchCommandAdded) THEN BEGIN EmbComms := STRSUBSTNO(Batch ,'<Batch Name>' ) + Separator; EmbComms := EmbComms + STRSUBSTNO(BatchPreview ,'<YES/NO>' ) + Separator; EmbComms := EmbComms + STRSUBSTNO(StartDocument) + Separator; BatchCommandAdded := TRUE; END ELSE BEGIN EmbComms := STRSUBSTNO(StartDocument) + Separator; END;
This code identifies whether the print is a Batch or a single document and applies embedded commands
accordingly. The areas where you should add values are outlined below.
EmbComms := EmbComms + STRSUBSTNO(Batch ,'<Batch Name>' ) + Separator; This string determines the name of the batch being sent, this is often representative of their purpose e.g.
Sales Invoice. A suitable string could read EmbComms := EmbComms + STRSUBSTNO(Batch ,'Sales
Invoices' ) + Separator;
EmbComms := EmbComms + STRSUBSTNO(BatchPreview ,'<YES/NO>' ) + Separator; This string determines whether batches are previewed before sending, replace with either YES or NO. We
would recommend you initially use YES until you are satisfied the system is configured as expected.
EmbComms := EmbComms + STRSUBSTNO(StartDocument) + Separator; EmbComms := EmbComms + STRSUBSTNO(DeliveryOption, '<Email, Print, Fax>' ) + Separator;
This string determines the delivery method Zetadocs will employ. These can be placed in sequence
separated by a comma to act as a failover e.g. Email, Fax, Print will result in Zetadocs attempting to send via
Email. Should this fail due to insufficient addressing information Zetadocs will then try Fax and then finally
Print to deliver the document.
Zetadocs for Microsoft Business Solutions Navision Installation Guide
Configuring Report Settings
This edition 18/11/2009 © Copyright Equisys plc 2009 All trademarks acknowledged All rights reserved Page 13
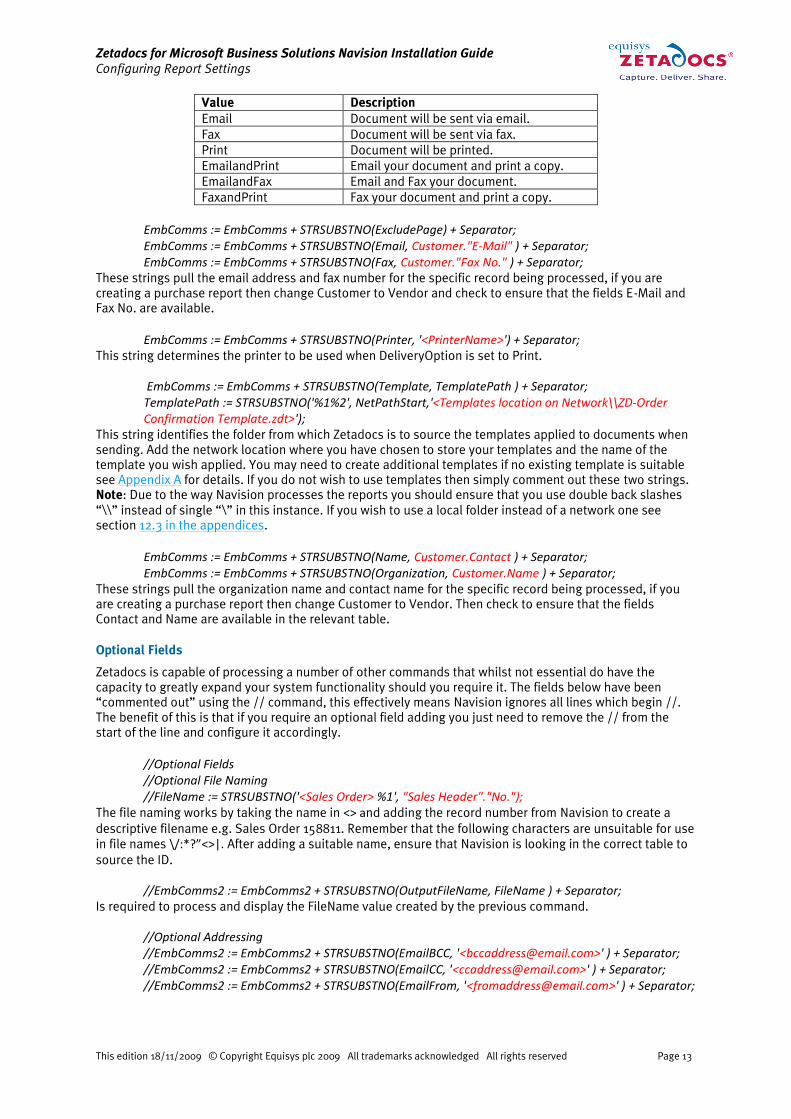
Value Description
Email Document will be sent via email.
Fax Document will be sent via fax.
Print Document will be printed.
EmailandPrint Email your document and print a copy.
EmailandFax Email and Fax your document.
FaxandPrint Fax your document and print a copy.
EmbComms := EmbComms + STRSUBSTNO(ExcludePage) + Separator; EmbComms := EmbComms + STRSUBSTNO(Email, Customer."E-Mail" ) + Separator; EmbComms := EmbComms + STRSUBSTNO(Fax, Customer."Fax No." ) + Separator;
These strings pull the email address and fax number for the specific record being processed, if you are
creating a purchase report then change Customer to Vendor and check to ensure that the fields E-Mail and
Fax No. are available.
EmbComms := EmbComms + STRSUBSTNO(Printer, '<PrinterName>') + Separator;
This string determines the printer to be used when DeliveryOption is set to Print.
EmbComms := EmbComms + STRSUBSTNO(Template, TemplatePath ) + Separator; TemplatePath := STRSUBSTNO('%1%2', NetPathStart,'<Templates location on Network\\ZD-Order Confirmation Template.zdt>');
This string identifies the folder from which Zetadocs is to source the templates applied to documents when
sending. Add the network location where you have chosen to store your templates and the name of the
template you wish applied. You may need to create additional templates if no existing template is suitable
see Appendix A for details. If you do not wish to use templates then simply comment out these two strings.
Note: Due to the way Navision processes the reports you should ensure that you use double back slashes
‚\\‛ instead of single ‚\‛ in this instance. If you wish to use a local folder instead of a network one see
section 12.3 in the appendices.
EmbComms := EmbComms + STRSUBSTNO(Name, Customer.Contact ) + Separator; EmbComms := EmbComms + STRSUBSTNO(Organization, Customer.Name ) + Separator;
These strings pull the organization name and contact name for the specific record being processed, if you
are creating a purchase report then change Customer to Vendor. Then check to ensure that the fields
Contact and Name are available in the relevant table.
Optional Fields
Zetadocs is capable of processing a number of other commands that whilst not essential do have the
capacity to greatly expand your system functionality should you require it. The fields below have been
‚commented out‛ using the // command, this effectively means Navision ignores all lines which begin //.
The benefit of this is that if you require an optional field adding you just need to remove the // from the
start of the line and configure it accordingly.
//Optional Fields //Optional File Naming //FileName := STRSUBSTNO('<Sales Order> %1', "Sales Header"."No.");
The file naming works by taking the name in <> and adding the record number from Navision to create a
descriptive filename e.g. Sales Order 158811. Remember that the following characters are unsuitable for use
in file names \/:*?”<>|. After adding a suitable name, ensure that Navision is looking in the correct table to
source the ID.
//EmbComms2 := EmbComms2 + STRSUBSTNO(OutputFileName, FileName ) + Separator; Is required to process and display the FileName value created by the previous command.
//Optional Addressing //EmbComms2 := EmbComms2 + STRSUBSTNO(EmailBCC, '<[email protected]>' ) + Separator; //EmbComms2 := EmbComms2 + STRSUBSTNO(EmailCC, '<[email protected]>' ) + Separator; //EmbComms2 := EmbComms2 + STRSUBSTNO(EmailFrom, '<[email protected]>' ) + Separator;
Zetadocs for Microsoft Business Solutions Navision Installation Guide
Configuring Report Settings
This edition 18/11/2009 © Copyright Equisys plc 2009 All trademarks acknowledged All rights reserved Page 14
The bcc and cc fields operate as you would expect, the email from field allows you to set an alternate
address from which all these documents will appear to have originated e.g. [email protected]. You can
use values sourced from the Navision database for these values in much the same way as we did above
with the Customer.Contact and Customer.Name values.
//Optional Archiving //EmbComms2 := EmbComms2 + STRSUBSTNO(ZDArchiveDocument, '<YES/NO>' ) + Separator;
This string determines whether documents are archived or not on sending, replace with either YES or NO.
//Need to format the date to be 01 not just 1 for days and months under 10 // day := DATE2DMY(TODAY,1); IF day < 10 THEN DD := STRSUBSTNO('0%1', day) ELSE DD := STRSUBSTNO('%1', day); month := DATE2DMY(TODAY,2); IF month < 10 THEN MM := STRSUBSTNO('0%1', month) ELSE MM := STRSUBSTNO('%1', month); YYYY := STRSUBSTNO('%1', DATE2DMY(TODAY,3)); Datefolder := STRSUBSTNO('%1-%2-%3',YYYY,MM,DD);
This section of code is responsible for generating the date so it can be used to give the archive structure.
The only area where you need to modify it could be the Datefolder string which you can adjust to give you
the year, month and day elements in a different order.
Output YYYY-MM-DD or 2009-07-09
Datefolder := STRSUBSTNO('%1-%2-%3',YYYY,MM,DD);
Output DD-MM-YYYY or 09-07-2009
Datefolder := STRSUBSTNO('%1-%2-%3',DD,MM,YYYY);
ArchiveFolder := STRSUBSTNO('sharepoint: http://%1,%2/%3/', '<SharePoint URL/docs>', '<Archive>',
Datefolder); The archive folder string facilitates archiving to your SharePoint sites document library, it then utilizes a
year, month and then day folder structure e.g. 2009-09-03. It is possible to replace these date values with
organization name for example which would file documents according to the recipient organization.
Alternate archiving sample code is provided in the appendix. To use this simply add your SharePoint
document library address and then name in the spaces above.
//EmbComms2 := EmbComms2 + STRSUBSTNO(ZDArchiveFolder, ArchiveFolder ) + Separator; //EmbComms2 := EmbComms2 + STRSUBSTNO(ArchiveDocumentType, '<Sales Order>' ) + Separator;
The archive document type string adds meta data to the archived file, for effective storage these should
reflect the content types used in your SharePoint archive. For suitable values please see the appendices.
//EmbComms2 := EmbComms2 + STRSUBSTNO(FieldRecNum, "Sales Header"."No." ) + Separator; //EmbComms2 := EmbComms2 + STRSUBSTNO(FieldCompNum, Customer."No." ) + Separator;
These strings pull the record number and customer number for the specific record being processed, if you
are creating a purchase report then change Customer to Vendor. Then check to ensure that the fields are
available in the relevant tables. These fields are used by the preconfigured templates, should you decide
not to include them simply remove the relevant embedded commands from the templates in question.
//End Optional
Once you have added all of the values necessary close the C/AL Editor and the Report Designer windows,
you will be asked to save the report changes. Ensure the Compiled checkbox is ticked and select Yes to save
your changes and compile.
Zetadocs for Microsoft Business Solutions Navision Installation Guide
Validating your Modified Reports
This edition 18/11/2009 © Copyright Equisys plc 2009 All trademarks acknowledged All rights reserved Page 15
7.3 Zetadocs Embedded Commands - OnPostDataItem()
The OnPostDataItem contents shown below ensure that the Navision report content is contained on a new
page. The exclude page embedded command causes that page to be removed and analyzed on printing to
Zetadocs. Thus the code below ensures that any Navision report content is on a fresh page on printing to
Zetadocs.
CurrReport.NEWPAGE();
8. Validating your Modified Reports
To ensure that the report is operating as expected it is recommended that you run the report and validate
that it generates suitable values. The most effective way to do this is to preview the report as this displays
the first page of the report, which is automatically used by Zetadocs to provide information on the
document for delivery. This is not displayed in items printed to Zetadocs as it is instead this first page is
interpreted and then skipped.
Previewing the Report
To preview the report:
Go to the Object Designer and select the modified report.
Select the Run button and enter appropriate filter details.
Click Preview and the Print Preview window should open containing the embedded commands
Zetadocs uses on the first page.
Interpreting the Embedded Commands
Understanding the embedded commands used is relatively straightforward as they are largely self
explanatory.
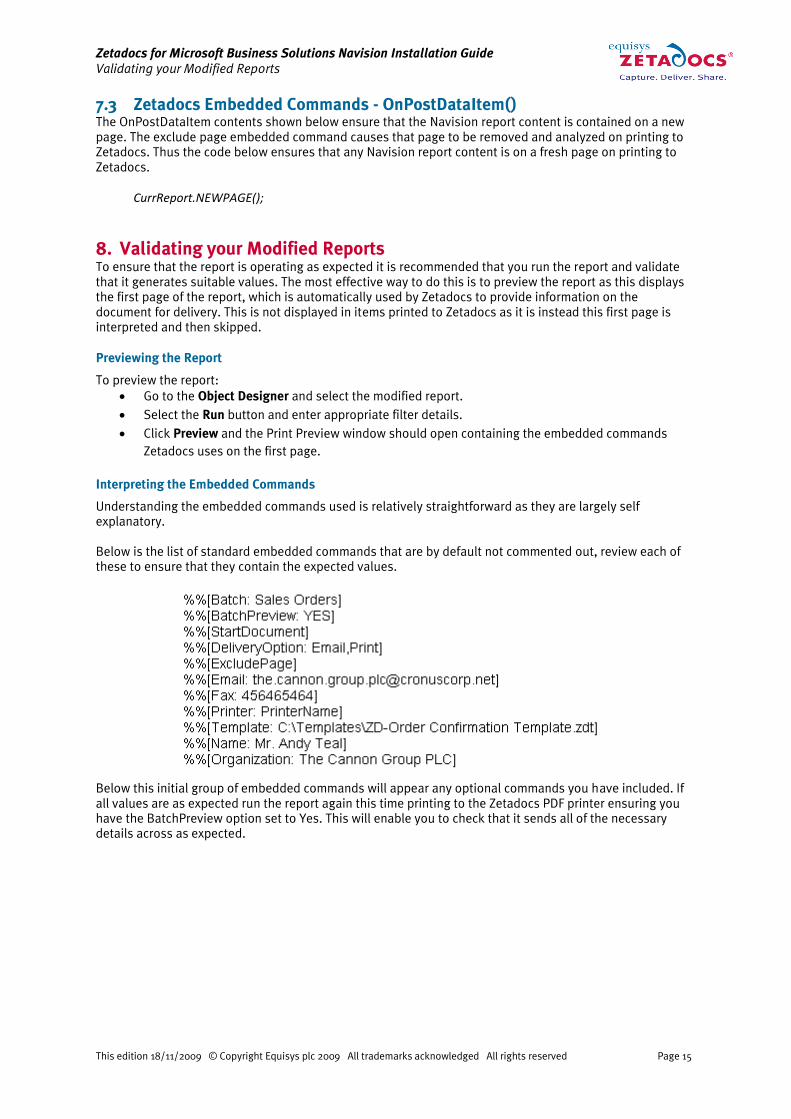
Below is the list of standard embedded commands that are by default not commented out, review each of
these to ensure that they contain the expected values.
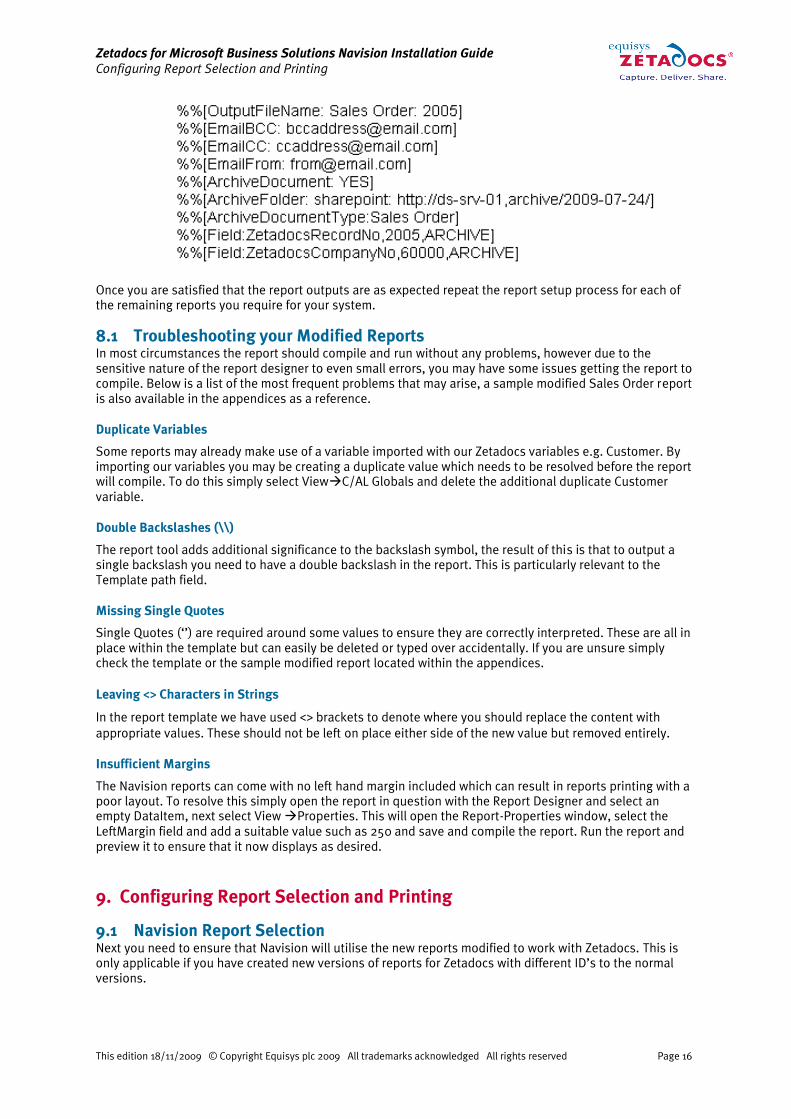
Below this initial group of embedded commands will appear any optional commands you have included. If
all values are as expected run the report again this time printing to the Zetadocs PDF printer ensuring you
have the BatchPreview option set to Yes. This will enable you to check that it sends all of the necessary
details across as expected.
Zetadocs for Microsoft Business Solutions Navision Installation Guide
Configuring Report Selection and Printing
This edition 18/11/2009 © Copyright Equisys plc 2009 All trademarks acknowledged All rights reserved Page 16
Once you are satisfied that the report outputs are as expected repeat the report setup process for each of
the remaining reports you require for your system.
8.1 Troubleshooting your Modified Reports
In most circumstances the report should compile and run without any problems, however due to the
sensitive nature of the report designer to even small errors, you may have some issues getting the report to
compile. Below is a list of the most frequent problems that may arise, a sample modified Sales Order report
is also available in the appendices as a reference.
Duplicate Variables
Some reports may already make use of a variable imported with our Zetadocs variables e.g. Customer. By
importing our variables you may be creating a duplicate value which needs to be resolved before the report
will compile. To do this simply select ViewC/AL Globals and delete the additional duplicate Customer
variable.
Double Backslashes (\\)
The report tool adds additional significance to the backslash symbol, the result of this is that to output a
single backslash you need to have a double backslash in the report. This is particularly relevant to the
Template path field.
Missing Single Quotes
Single Quotes (‘’) are required around some values to ensure they are correctly interpreted. These are all in
place within the template but can easily be deleted or typed over accidentally. If you are unsure simply
check the template or the sample modified report located within the appendices.
Leaving <> Characters in Strings
In the report template we have used <> brackets to denote where you should replace the content with
appropriate values. These should not be left on place either side of the new value but removed entirely.
Insufficient Margins
The Navision reports can come with no left hand margin included which can result in reports printing with a
poor layout. To resolve this simply open the report in question with the Report Designer and select an
empty DataItem, next select View Properties. This will open the Report-Properties window, select the
LeftMargin field and add a suitable value such as 250 and save and compile the report. Run the report and
preview it to ensure that it now displays as desired.
9. Configuring Report Selection and Printing
9.1 Navision Report Selection
Next you need to ensure that Navision will utilise the new reports modified to work with Zetadocs. This is
only applicable if you have created new versions of reports for Zetadocs with different ID’s to the normal
versions.
Zetadocs for Microsoft Business Solutions Navision Installation Guide
Testing your Solution
This edition 18/11/2009 © Copyright Equisys plc 2009 All trademarks acknowledged All rights reserved Page 17
Actions:
Go to Sales & Receivables within Navision and select SetupReport Selection Sales.
The Report Selection – Sales window will open, select the relevant document type from the Usage
drop down box e.g. Order.
The existing Navision report currently used is displayed, select the Report ID field and the click on
the up arrow displayed in the field.
This will open the Objects window, search through this list and select your Modified report.
Navision will now use the modified report when creating the relevant sales document.
Repeat this for each modified Sales and Receivables report that you want to enable for sending via
Zetadocs. Once complete for the Sales reports repeat the above process for any modified reports managed
from the Purchases and Payables section within Navision.
Figure 3 – Report Selection
9.2 Navision Printer Setup
Any report that has been Zetadocs enabled must have the Zetadocs printer selected in the printer selections
to ensure that it is the default printer when sending a print job using Zetadocs.
Actions:
In the Navision Navigation Pane, select the General Ledger option.
Click Setup Printer Selections.
Click on the Report ID field and select the arrow to open the Objects window.
Select a Zetadocs enabled report, you will be returned to the Printer Selections window.
Select the Printer Name field and open the Printers window.
Choose the Zetadocs PDF printer from the list and click OK.
Repeat this process for all reports you have modified for use with Zetadocs.
10. Testing your Solution
Now that you have completed the installation and setup of your reports it is time to test each to ensure that
it is operating as expected.
Zetadocs for Microsoft Business Solutions Navision Installation Guide
Upgrading your System
This edition 18/11/2009 © Copyright Equisys plc 2009 All trademarks acknowledged All rights reserved Page 18
10.1 Testing Document Delivery
Having set up the report and printer selections you now need to ensure that your newly modified reports
are delivered and archived as expected. We recommend verifying the following for each report.
Delivery Validation
Select the report and print it as usual from Navision, ensure that the delivery preferences for this report are
applied as expected. These could include bcc, cc and from fields.
Archiving Validation (if implemented)
Ensure that the selected archiving policy is successfully implemented for the report and that archived
documents appear in your archive as expected.
Document Templates (if implemented)
Print the report and ensure the correct template and stationery have been applied. You should further
ensure that the message body has been populated with the correct Navision data.
Delivery Method Failover (if implemented)
If you set up delivery method failover then you should test this by printing a report which is missing the
primary delivery information. For example if your delivery method was set to E-mail, Hard Copy then the
primary delivery method is email, if no email address is provided for a customer the system should then
instead print the document using the printer specified.
11. Upgrading your System
This chapter aims to explain the steps required to upgrade a Zetadocs for NAV system operating with
Navision versions 3.60 and 3.70 to NAV versions 4, 5 and 6. This guide does not contain all of the
information to perform the update but instead identifies the information you require from your existing
system to be able to follow the standard install procedure. Having read through this chapter you should be
able to perform a standard Zetadocs install on a NAV 4, 5or 6 system with the necessary settings to get it
operating consistently with your previous system. Zetadocs offers an array of functionality to NAV 4, 5 and 6
users which is not available with other previous Navision versions. Once you have updated your system to
operate at a basic level like your previous system you can explore the further settings available to gain
access to these additional features.
11.1 Overview of System Upgrade Requirements
The software solution provided by Zetadocs for NAV v3.0 for NAV system 4, 5 and 6 is more integrated
solution that that provided to Navision 3.60 and 3.70 customers. As such a few steps are necessary to
ensure that your upgraded system operates as before. Zetadocs when operating with Navision 3.60/3.70
relied on the use of modified Navision reports to provide the delivery information and settings. However
when integrated with NAV 4, 5 and 6 Zetadocs has a set of forms and cards within NAV which allow you to
configure the delivery options more flexibly using a set of delivery rules. Due to these differences the
upgrade process is very similar to performing a standard installation, however to ensure continuity between
your existing and upgraded systems it is important to identify any settings you wish to employ to ensure
consistent behaviour. The steps below will explain how to source this key information so you can use it as a
base for your entries in these new NAV forms and cards.
Upgrading Zetadocs to integrate with NAV 4, 5 or 6
Upgrading Zetadocs is relatively straightforward as you can follow the standard installation process for your
NAV version. Our installer will detect the version of the Zetadocs Client and will simply skip this step of the
install if the appropriate version is already present, otherwise you will be asked if you wish to modify the
existing install. The main challenge is in ensuring that the new system integrates successfully with your
previous system so that any archives and templates etc operate as before.
Backup Modified Reports
When upgrading your NAV system you may wish to keep a copy of the existing modified reports as these
can inform the system rules configuration.

Zetadocs for Microsoft Business Solutions Navision Installation Guide
Upgrading your System
This edition 18/11/2009 © Copyright Equisys plc 2009 All trademarks acknowledged All rights reserved Page 19
To backup your reports:
Open the Navision client and connect to/open the Navision database.
Open the Object Designer (ToolsObject Designer).
Click on the Report button in the designer menu.
Select the reports you have modified to work with Zetadocs.
Select Export in file menu (FileExport).
Export each report objects to a suitable named txt file.
Keep these in a safe place.
Upgrade NAV
Now that you have backed up the modified reports you can perform the upgrade of your NAV system, once
you are satisfied the system has been updated correctly you can update the Zetadocs client.
11.2 Understanding your New System Requirements
Once you have finished installing your updated Zetadocs for NAV system you will need to configure the
document delivery settings to match your customer needs. This is done by using a series of rules which
allow documents to be delivered based upon the Company and Document set individually or in combination
(see below). A rule is a collection of settings which are applied on sending a document, including details
such as the recipient, delivery method, archiving settings and the Zetadocs Template to apply. These
settings were previously set in the report on Navision 3.60/3.70 systems, in this way documents can be
handled differently depending on your preferences when sending to a given recipient.
Understanding Rules in Action
Zetadocs for NAV attempts to apply rules starting with the level 4 rules and proceeding down through the
rules until a rule matches the circumstances of the document you are sending, at which point the rule is
applied and the document sent.
Levels:
1. The Default Rule
Allows you to specify a basic rule that can be used by any Zetadocs enabled report.
2. Per Document Set
Allows you to specify more specific settings for Zetadocs enabled documents by type.
3. Per Company
All Zetadocs enabled documents being sent to a particular company can have the
following rule settings overridden (This includes documents which are being sent using
either the Level 1 or a Level 2 rule settings):
i. The contact information to which the document will be sent
ii. The method of delivery by which the document will be sent (Email, Fax, Hard-
Copy)
4. Per Company, per Document Set
All Zetadocs enabled documents being sent to a particular company and that are part of a
particular document set can have the following rule settings overridden (this includes
documents which are being sent using either the Level 1 or a Level 2 rule settings and has
had some settings already overridden by a Level 3 rule settings)
i. The Zetadocs Template that will be applied to the document
ii. The contact information to which the document will be sent
iii. The method of delivery by which the document will be sent (Email, Fax, Hard-
Copy)
The existing report modifications effectively provided you with Level 1 and level2 rule options, as you could
determine how a document was handled based upon its document set, these document sets map to the
individual reports you currently have set up. As such you need to be aware of how this will impact the
configuration of your system, we would recommend that initially you set your level1 default and level2 rules
to match the options you had previously set in your reports. This will then enable you to have a system
Zetadocs for Microsoft Business Solutions Navision Installation Guide
Upgrading your System
This edition 18/11/2009 © Copyright Equisys plc 2009 All trademarks acknowledged All rights reserved Page 20
which by default operates in the same fashion as your previous system, upon which you can build the more
sophisticated rules.
Locating Previous System Settings
The information required to create rules mirroring your previous system is available from the reports we
backed up earlier. By opening the txt files for each report and locating the section called Zetadocs
Embedded Commands, which contains all the delivery settings used previously for that report. The example
below demonstrates how to extract the relevant information for use in a system setup.
Open one of the modified reports that you backed up earlier.
Scroll through the report and locate the section containing the Zetadocs Embedded Commands
DataItem, it will contain the additional Zetadocs code adding on install.
Review this code, each of the fields identified below contains pertinent information for your system
setup.
o The strings below are those which contained ‘settings’ in your previous system which are
now configured through the NAV UI.
o The strings should appear in the report in the order they are listed below, any lines of code
not covered below can be safely ignored.
String analysis
EmbComms := EmbComms + STRSUBSTNO(BatchPreview ,'YES' ) + Separator;
Batch Preview value is YES.
EmbComms := EmbComms + STRSUBSTNO(DeliveryOption, 'Email, Print' ) + Separator;
This string maps to the Delivery Method Priority field, in NAV versions 4, 5 and 6. This takes the form of
three drop down boxes which can be used to specify 3 unique delivery methods. In this case E-Mail and
Hard Copy (Print) would be the chosen values.
TemplatePath := STRSUBSTNO('%1%2', NetPathStart,'ds-srv-01\\Templates\\ZD-Order Confirmation
Template.zdt');
This string contains the path to the template for this report, the value to take from this string is ds-srv-
01\\Templates\\ZD-Order Confirmation Template.zdt. You may have set up a new templates folder during
the install, if so simply use that address instead of this one.
EmbComms2 := EmbComms2 + STRSUBSTNO(EmailBCC, '[email protected]' ) + Separator;
Email BCC value of [email protected].
EmbComms2 := EmbComms2 + STRSUBSTNO(EmailCC, '[email protected]' ) + Separator;
Email CC value of [email protected].
EmbComms2 := EmbComms2 + STRSUBSTNO(EmailFrom, '[email protected]' ) + Separator;
Email From value of [email protected].
EmbComms2 := EmbComms2 + STRSUBSTNO(ZDArchiveDocument, 'YES' ) + Separator;
This string contains the value which maps to the Archive Sent Documents field, in this case archiving is
turned on.
Datefolder := STRSUBSTNO('%1-%2-%3',YYYY,MM,DD);
This string contains the structure of the date archive, the example above would give the structure YYYY-
MM-DD.
ArchiveFolder := STRSUBSTNO('sharepoint: http://%1,%2/%3/', 'ds-srv-01', 'archive', Datefolder);
This string contains the SharePoint Site which would be in this case http://ds-srv-01, it also contains the
Archive library which is archive.
If you were able to follow one of the recommended Archiving folder structure options in your initial install
on a Navision 3.60/3.70 system, then you should be able to choose the corresponding archive layout using
the options within you updated Zetadocs for NAV system. If you were unable to use a suggested format you
Zetadocs for Microsoft Business Solutions Navision Installation Guide
Appendix A: Document Templates
This edition 18/11/2009 © Copyright Equisys plc 2009 All trademarks acknowledged All rights reserved Page 21
may not be able to continue archiving items in the same fashion using your new install. A separate archive
continuing from the upgrade point may have to be used instead.
Upgrade the Zetadocs Client
Whilst the Zetadocs client is the same for all Navision versions there are a number of additional files which
are only compatible with versions 4, 5 and 6. You will need to follow the instructions in the Installation
Guide for your particular NAV version. If you are also updating your Zetadocs version it may deviate slightly
by asking you to upgrade your existing version of the Zetadocs Client. Either way progress through the
wizard as per the instructions provided.
Using Existing Templates
You may have modified the standard templates and stationery that worked with your Navision 3.60/3.70
system, these templates can still be used with your updated system. To do this either specify the existing
Templates folder location when setting up you new Zetadocs system or copy them to any new location you
set up.
Update SharePoint Extensions (Optional Component)
If you are only updating your NAV system then your existing SharePoint Extensions installation will be up to
date and will continue to operate as normal. If you are updating to a newer version of Zetadocs for NAV then
for details on updating the Zetadocs SharePoint extensions click here to view our website or contact us at
Proceeding with the Installation
Now that you have located the essential setup information you can proceed to upgrade you NAV system,
once this is complete you can begin your Zetadocs install. Open the Zetadocs for Microsoft Dynamics NAV
Installation Guide which is part of your product CD or download and follow the instructions therein to
upgrade your system.
12. Appendix A: Document Templates
You should have already specified the shared folder where these templates are to be stored during the
install process as this is required to make them available to other network users. We have provided you
with a wide range of some dozen preconfigured templates and you should already have configured your
reports to point towards them or stated alternate templates you now wish to create.
12.1 Using Preconfigured Document Templates
Zetadocs for NAV has a number of preconfigured document templates included within it to make setting up
a system quicker and easier. These templates contain Zetadocs stationery and a message body which have
been deliberately constructed to provide a starting point from which to build and customize your system.
Should you wish to construct your own templates instructions on manually creating them are available in
the Advanced Configuration guide or by accessing the help installed with the Zetadocs Client. You should
though find it easier to follow the instructions here to modify the standard templates to your needs.
12.2 Preconfigured Document Template Features
The document templates contain Zetadocs stationery and a suitably generic message body reflective of
each templates purpose.
Attachments
The document templates come without an attachment included to allow you to include your own company
specific documents like terms and conditions that you may wish to distribute.
Stationery
A single stationery file has been provided which by default is applied to all ZD Templates included with your
installation. This means you would only be required to update this stationery once for it to apply to all
document templates.
Zetadocs for Microsoft Business Solutions Navision Installation Guide
Appendix A: Document Templates
This edition 18/11/2009 © Copyright Equisys plc 2009 All trademarks acknowledged All rights reserved Page 22
Message Body Text
The message body text contains a default message which would form the email message body and subject
when the document is sent using Zetadocs for NAV. This allows for the use of dynamics fields to populate
information from Navision automatically into the email reducing the time required to process business
documents. In the message in section 11.5 you can clearly see several examples of these fields.
Viewing the Template details
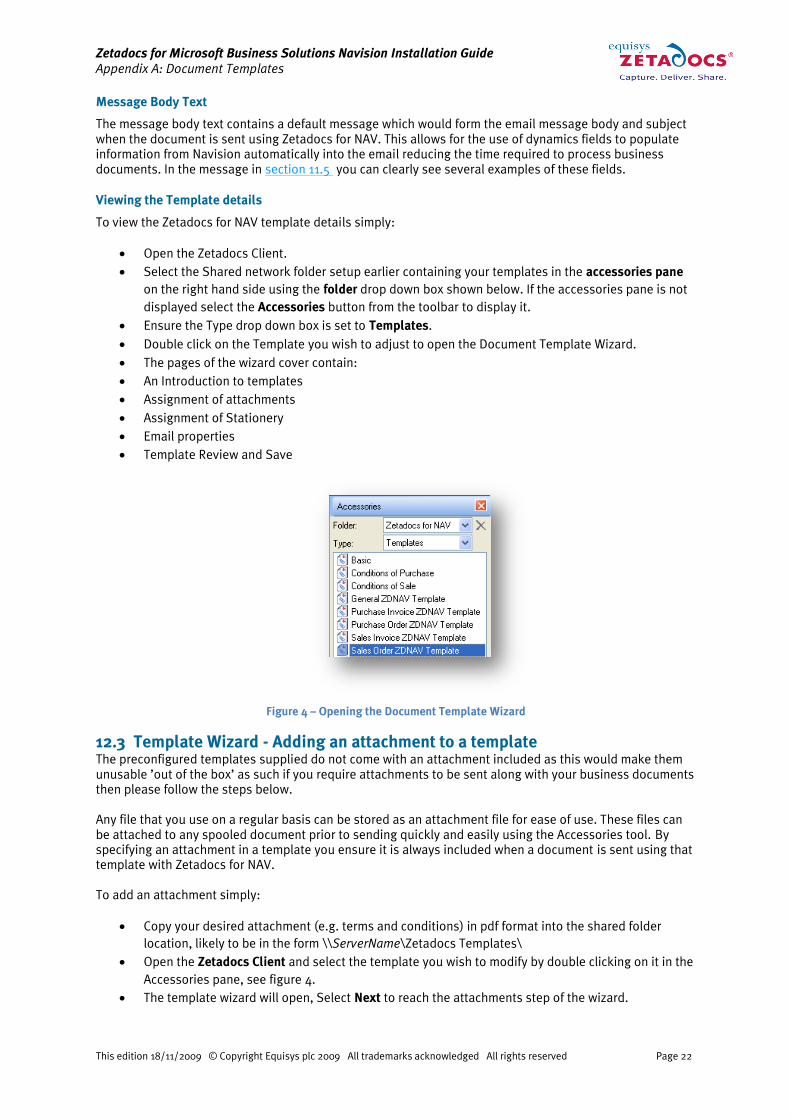
To view the Zetadocs for NAV template details simply:
Open the Zetadocs Client.
Select the Shared network folder setup earlier containing your templates in the accessories pane
on the right hand side using the folder drop down box shown below. If the accessories pane is not
displayed select the Accessories button from the toolbar to display it.
Ensure the Type drop down box is set to Templates.
Double click on the Template you wish to adjust to open the Document Template Wizard.
The pages of the wizard cover contain:
An Introduction to templates
Assignment of attachments
Assignment of Stationery
Email properties
Template Review and Save
Figure 4 – Opening the Document Template Wizard
12.3 Template Wizard - Adding an attachment to a template
The preconfigured templates supplied do not come with an attachment included as this would make them
unusable ’out of the box’ as such if you require attachments to be sent along with your business documents
then please follow the steps below.
Any file that you use on a regular basis can be stored as an attachment file for ease of use. These files can
be attached to any spooled document prior to sending quickly and easily using the Accessories tool. By
specifying an attachment in a template you ensure it is always included when a document is sent using that
template with Zetadocs for NAV.
To add an attachment simply:
Copy your desired attachment (e.g. terms and conditions) in pdf format into the shared folder
location, likely to be in the form \\ServerName\Zetadocs Templates\
Open the Zetadocs Client and select the template you wish to modify by double clicking on it in the
Accessories pane, see figure 4.
The template wizard will open, Select Next to reach the attachments step of the wizard.
Zetadocs for Microsoft Business Solutions Navision Installation Guide
Appendix A: Document Templates
This edition 18/11/2009 © Copyright Equisys plc 2009 All trademarks acknowledged All rights reserved Page 23
Select the Shared Network Folder by selecting the Folder drop down box.
Your attachment should appear as one of the attachment options.
Select the attachment and click the Add button.
Select Next to be taken to the stationery template wizard page. If you are happy with the existing
settings in the remaining wizard steps skip past them using next and select Finish to save your
changes.
12.4 Replacing the stationery
The templates comes with stationery included, this single piece of stationery is applied to all of the
templates provided. As such by simply replacing this one file you can ensure your stationery is applied to all
of the provided templates.
Adding company stationery to the Zetadocs client
To add your stationery to the Zetadocs Client simply open your existing company stationery and print it
selecting the Zetadocs PDF printer using the steps below.
Open your stationery in Word or another suitable application. The standard stationery has been
provided to you in Word format in the templates folders as well, so you can adjust and print that if
desired.
Select print and select Zetadocs PDF as your printer.
This will open the Zetadocs client with your stationery within it.
Select the File menu and then Save As Stationery.
You will then be prompted to provide the name and save location of the stationery, you should
select the shared network folder mentioned earlier this is likely to be in the form
\\ServerName\Zetadocs Templates\.
If you wish to apply this stationery to the existing preconfigured templates this file should be
named ZD - Stationery.zds this will overwrite the existing standard stationery and will now be used
by all of the templates provided.
Should you wish to apply this stationery to a single template, name the file as you see fit then open
the Zetadocs client.
Next open the template wizard by double clicking on the template you wish to modify.
Go to the third page of the wizard using the next button the screen shown below will appear.
Select your stationery by selecting the Folder drop down box and selecting the Shared Network
folder.
Selecting the existing stationery from the selected stationery window as shown.
Zetadocs for Microsoft Business Solutions Navision Installation Guide
Appendix A: Document Templates
This edition 18/11/2009 © Copyright Equisys plc 2009 All trademarks acknowledged All rights reserved Page 24
Figure 5 – The Document Template Wizard
Click the Remove button.
Select your new stationery file and press Add.
Select Next to be taken to the email message template wizard page. If you are happy with the
existing message select next again and then select Finish to save your changes.
12.5 Adjusting the Email message
The preconfigured templates contain an email message populated with dynamics field data from Navision
and static text generically phrased to allow them to be applicable in a number of situations. The messages,
like the one shown below, work with Navision to automatically create a personalised message that contains
contact details, names, order numbers and organization names.
Note: If you have chosen not to use the optional commands to generate the Record No. you will need to
remove the %%[ZetadocsRecordNo] embedded command from the message body as the value will not have
been extracted from Navision and passed to Zetadocs.
Messages using Dynamics Fields
Subject: Order Confirmation for order number: %%[ZetadocsRecordNo] for %%[Organization]
Message Body:
FAO: %%[Name]
Dear Customer,
I'm pleased to attach your order confirmation, reference number %%[ZetadocsRecordNo].
Kind regards,
Sales Team
When sent using the Zetadocs for NAV Client these fields are replaced with the corresponding fields from
Navision, and would appear thus:
Zetadocs for Microsoft Business Solutions Navision Installation Guide
Appendix A: Document Templates
This edition 18/11/2009 © Copyright Equisys plc 2009 All trademarks acknowledged All rights reserved Page 25
Message with Dynamic Fields Populated
Subject: Order Confirmation for order number: 300381 for Equisys plc
Message Body:
FAO: John Smith
Dear Customer,
I'm pleased to attach your order confirmation, reference number 300381.
Kind regards,
Sales Team
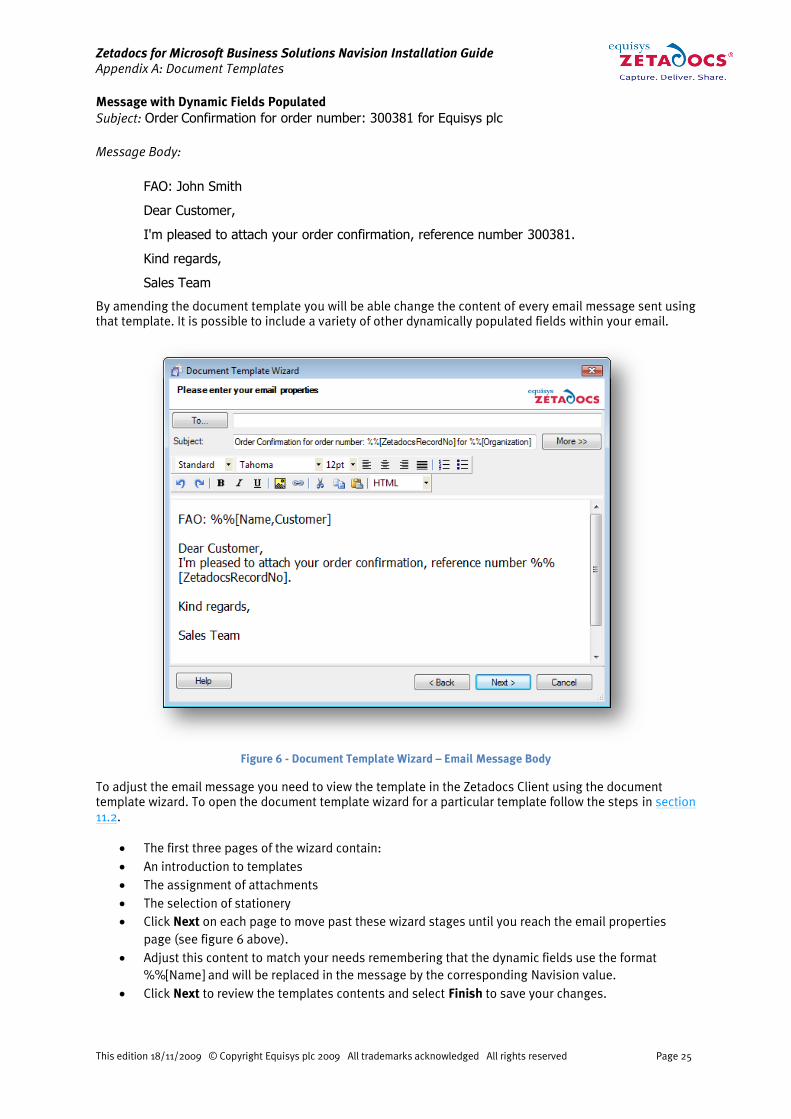
By amending the document template you will be able change the content of every email message sent using
that template. It is possible to include a variety of other dynamically populated fields within your email.
Figure 6 - Document Template Wizard – Email Message Body
To adjust the email message you need to view the template in the Zetadocs Client using the document
template wizard. To open the document template wizard for a particular template follow the steps in section
11.2.
The first three pages of the wizard contain:
An introduction to templates
The assignment of attachments
The selection of stationery
Click Next on each page to move past these wizard stages until you reach the email properties
page (see figure 6 above).
Adjust this content to match your needs remembering that the dynamic fields use the format
%%[Name] and will be replaced in the message by the corresponding Navision value.
Click Next to review the templates contents and select Finish to save your changes.
Zetadocs for Microsoft Business Solutions Navision Installation Guide
Appendix B – Report Modification
This edition 18/11/2009 © Copyright Equisys plc 2009 All trademarks acknowledged All rights reserved Page 26
13. Appendix B – Report Modification
13.1 Remittance Advice Report
The major difference between setting up the remittance reports and the other reports in this guide is that
we are unable to use the additional DataItem mechanism to place our code in the report. Instead we need
to add the code to an existing DataItem as described below.
Adding Global, Local and Text Constants
Return to the template in the Report Designer and select ViewCA/L Globals.
Select all global variables (Ctrl + A), right-click and select Copy.
Switch to your report and select ViewCA/L Globals.
Scroll to the bottom of any existing Globals in your report and select the blank global variable row,
right-click and select Paste to paste the additional Zetadocs Globals into the report.
The Variables are by default set for Sales reports, should you be creating a Purchase report select
the Customer variable and replace it with Vendor. The Datatype should remain Record with
Subtype Vendor.
If upon compilation the report indicates that there are duplicate values as can occur with Customer
for example. In these instances compare the two, they would usually have the same values by
default, and remove one of the instances as appropriate.
Return to the template and select the Text Constants tab, select all and then copy.
Paste these at the bottom of any existing text constants in your report.
Modifying the Top DataItem
In the report designer select the top DataItem.
In the template in the Report Designer select ViewSections.
Select and copy the two textboxes located in the Zetadocs Embedded Commands, Body(1) section.
Go to the top DataItem and select ViewSections.
Select the top section and select EditInsert New, choose Group Header for Section type and
ensure the Insert Section value is set to Before Current selection then click OK.
Paste the textboxes from the template into this new Group Header in your report.
Adding DataItem Code
Next you need to add the Code that enables your report to print the embedded commands Zetadocs uses to
send your document to the desired recipients. We have code which needs to be pasted from the template
into the corresponding OnAfterGetRecord() section. Note: this is in contrast to other reports whereby we
copy code into the OnPreDataItem() and OnPostDataItem() sections as well.
Select the Zetadocs Embedded Commands DataItem in the template.
Click ViewC/AL Code or press F9 to open the C/AL Editor.
Select and copy all of the content from the OnAfterGetRecord() section.
Go to your report and select the Top DataItem.
Click ViewC/AL Code or press F9 to open the C/AL Editor.
Paste the code copied earlier into the OnAfterGetRecord() section below any existing content.
Configuring the Modified Report Settings
You should follow the standard report configuration settings in section 7.2 and implement the specific step
below in addition.
Remove the code line in red below from the top of the OnAfterGetRecord() section:
Separator := '\';
Customer.GET("Sales Header"."Sell-to Customer No.");
Zetadocs for Microsoft Business Solutions Navision Installation Guide
Appendix B – Report Modification
This edition 18/11/2009 © Copyright Equisys plc 2009 All trademarks acknowledged All rights reserved Page 27
This is because the report already contains the GET at the top of the report so when sourcing data from
Navision you can use commands like Vend.‛No.‛ or Vend.‛E-mail‛ instead.
13.2 Alternate Archiving Strategies
We have provided below some sample archiving strategies and the code required to implement them. We
recommend that you use one the structures detailed below as they are those available in later versions of
Zetadocs for NAV and will ensure upgrade compatibility.
Breaking Down the Archive Folder String
Existing string in template:
ArchiveFolder := STRSUBSTNO('sharepoint: http://%1,%2/%3/', 'ds-srv-01/docs', 'Archive', Datefolder); String Breakdown
This section of the string identifies that we are archiving to SharePoint
sharepoint: http://%1,%2/%3/'
This section of the string identifies how many parts the string is going to have e.g.
%1<SharePoint site>
%2<doclib>
%3 Datefolder
Therefore when constructed is becomes: http://<SharePoint site>, <doclib>/YYYY-MM-DD
Or once completed for example: http://ds-srv-01/docs, Archive/2009-03-30.
Non SharePoint Based Archiving
Whilst SharePoint archiving offers a number of benefits in circumstances where it is not available it is
possible to archive to other folder locations instead. In the example we are working through below we are
going to set the archive to the local hard drive although a network location would be equally valid.
Target Archive location: C:\Archive
Archive folder structure: Company/Date
Date structure: YYYY-MM-DD
Modifications required
To get items to archive to a folder location we first need to review our target location and structure and how
this affects the string. The slashes also need replacing as a non web based address will need to use
backslashes in its folder address.
Modified String:
ArchiveFolder := STRSUBSTNO('%1\\%2\\%3\\,'C:\\Archive', Customer.Name, Datefolder);
%1'C:\\Archive' %2 Customer.Name
%3 Datefolder
Once run this would give an output folder address in the form C:\Archive\Sample Company\2009-07-20.
SharePoint Archive Structure
When using Zetadocs with NAV versions 4, 5 and 6 users are provided with options within NAV which allows
them to structure there archive using a combination of the Company, DOCTYPE and Date. This means items
can be stored using any of these individually or in combination and it is recommended that you follow this
model as well if possible to ensure future upgrade compatibility.
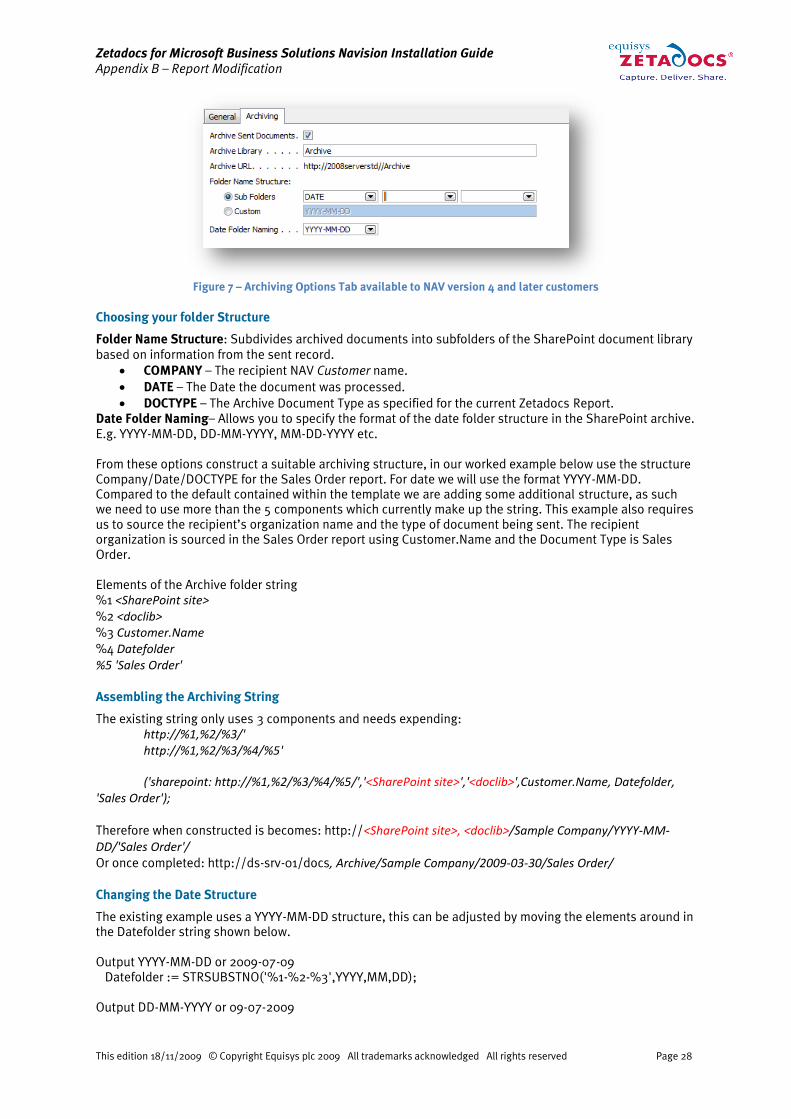
Zetadocs for Microsoft Business Solutions Navision Installation Guide
Appendix B – Report Modification
This edition 18/11/2009 © Copyright Equisys plc 2009 All trademarks acknowledged All rights reserved Page 28
Figure 7 – Archiving Options Tab available to NAV version 4 and later customers
Choosing your folder Structure
Folder Name Structure: Subdivides archived documents into subfolders of the SharePoint document library
based on information from the sent record.
COMPANY ” The recipient NAV Customer name.
DATE ” The Date the document was processed.
DOCTYPE ” The Archive Document Type as specified for the current Zetadocs Report.
Date Folder Naming” Allows you to specify the format of the date folder structure in the SharePoint archive.
E.g. YYYY-MM-DD, DD-MM-YYYY, MM-DD-YYYY etc.
From these options construct a suitable archiving structure, in our worked example below use the structure
Company/Date/DOCTYPE for the Sales Order report. For date we will use the format YYYY-MM-DD.
Compared to the default contained within the template we are adding some additional structure, as such
we need to use more than the 5 components which currently make up the string. This example also requires
us to source the recipient’s organization name and the type of document being sent. The recipient
organization is sourced in the Sales Order report using Customer.Name and the Document Type is Sales
Order.
Elements of the Archive folder string
%1 <SharePoint site>
%2 <doclib> %3 Customer.Name %4 Datefolder
%5 'Sales Order'
Assembling the Archiving String
The existing string only uses 3 components and needs expending:
http://%1,%2/%3/' http://%1,%2/%3/%4/%5'
('sharepoint: http://%1,%2/%3/%4/%5/','<SharePoint site>','<doclib>',Customer.Name, Datefolder, 'Sales Order'); Therefore when constructed is becomes: http://<SharePoint site>, <doclib>/Sample Company/YYYY-MM-DD/'Sales Order'/
Or once completed: http://ds-srv-01/docs, Archive/Sample Company/2009-03-30/Sales Order/
Changing the Date Structure
The existing example uses a YYYY-MM-DD structure, this can be adjusted by moving the elements around in
the Datefolder string shown below.
Output YYYY-MM-DD or 2009-07-09
Datefolder := STRSUBSTNO('%1-%2-%3',YYYY,MM,DD);
Output DD-MM-YYYY or 09-07-2009
Zetadocs for Microsoft Business Solutions Navision Installation Guide
Appendix B – Report Modification
This edition 18/11/2009 © Copyright Equisys plc 2009 All trademarks acknowledged All rights reserved Page 29
Datefolder := STRSUBSTNO('%1-%2-%3',DD,MM,YYYY);
13.3 Local Template Folder
If you wish to use templates that are stored locally on the machine then this is possible, however it does
mean that any updates would have to be repeated in each local area. To get Zetadocs to search for
templates in a local folder simply change the template path field as shown below with the text in red
needing to be replaced with the folder location you have copied your templates too. Note that due to the
way Navision processes reports you are required to use double backslashes ‚\\‛ instead of simple ones
which would normally be used.
TemplatePath := STRSUBSTNO('C:\\Templates\\ZD-Sales Credit Memo Template.zdt', NetPathStart);
13.4 SharePoint Content Types
During the SharePoint Extensions install you will have created a number Zetadocs Content Types in your
SharePoint site which are displayed below. This table should form the reference when selecting Archive
Document Types to ensure items are archived correctly. A Content Type is a concept that allows you to
'mark' documents as being of a particular type. For example, you might have a content type of 'Sales
Invoice' or 'Purchase Order’ for those specific report types. By using Content types you can create a
SharePoint archive which is more effective at locating and retrieving documents when searched.
Content Type Name
Purchase Finance Charge
Purchase Order
Purchase Return Order
Sales Credit Memo
Sales Finance Charges
Sales Invoice
Sales Quote
Sales Service-Repairs
Statement
Remittance Advice Journal
Purchase Credit Memo
Purchase Invoice
Purchase Misc Charge
Sales Back Order
Sales Debit Memo
Sales Fulfillment Order
Sales Order
Sales Return Order
Sales Warranty
13.5 Sales Order Report Example
Below is an example of a modified Sales Order report with the appropriate values throughout for our
example system.
Zetadocs Embedded Commands – OnPreDataItem() SETRANGE(Number1,1); Zetadocs Embedded Commands – OnAfterGetRecord()
Separator := '\'; Customer.GET("Sales Header"."Sell-to Customer No."); IF NOT (BatchCommandAdded) THEN BEGIN EmbComms := STRSUBSTNO(Batch ,'Sales Orders' ) + Separator; EmbComms := EmbComms + STRSUBSTNO(BatchPreview ,'YES' ) + Separator;
Zetadocs for Microsoft Business Solutions Navision Installation Guide
Appendix B – Report Modification
This edition 18/11/2009 © Copyright Equisys plc 2009 All trademarks acknowledged All rights reserved Page 30
EmbComms := EmbComms + STRSUBSTNO(StartDocument) + Separator; BatchCommandAdded := TRUE; END ELSE BEGIN EmbComms := STRSUBSTNO(StartDocument) + Separator; END; EmbComms := EmbComms + STRSUBSTNO(Batch ,'Sales Orders' ) + Separator; EmbComms := EmbComms + STRSUBSTNO(BatchPreview ,'YES' ) + Separator; EmbComms := EmbComms + STRSUBSTNO(StartDocument) + Separator; EmbComms := EmbComms + STRSUBSTNO(DeliveryOption, 'Email, Print' ) + Separator; EmbComms := EmbComms + STRSUBSTNO(ExcludePage) + Separator; EmbComms := EmbComms + STRSUBSTNO(Email, Customer."E-Mail" ) + Separator; EmbComms := EmbComms + STRSUBSTNO(Fax, Customer."Fax No." ) + Separator; EmbComms := EmbComms + STRSUBSTNO(Printer, 'PrinterName') + Separator; TemplatePath := STRSUBSTNO('%1%2', NetPathStart,'ds-srv-01\\Templates\\ZD-Order Confirmation Template.zdt'); EmbComms := EmbComms + STRSUBSTNO(Template, TemplatePath ) + Separator; EmbComms := EmbComms + STRSUBSTNO(Name, Customer.Contact ) + Separator; EmbComms := EmbComms + STRSUBSTNO(Organization, Customer.Name ) + Separator; //Optional Fields //Optional File Naming FileName := STRSUBSTNO('Sales Order %1', "Sales Header"."No."); EmbComms2 := EmbComms2 + STRSUBSTNO(OutputFileName, FileName ) + Separator; //Optional Addressing EmbComms2 := EmbComms2 + STRSUBSTNO(EmailBCC, '[email protected]' ) + Separator; EmbComms2 := EmbComms2 + STRSUBSTNO(EmailCC, '[email protected]' ) + Separator; EmbComms2 := EmbComms2 + STRSUBSTNO(EmailFrom, '[email protected]' ) + Separator; //Optional Archiving EmbComms2 := EmbComms2 + STRSUBSTNO(ZDArchiveDocument, 'YES' ) + Separator; // //Need to format the date to be 01 not just 1 for days and months under 10 // day := DATE2DMY(TODAY,1); IF day < 10 THEN DD := STRSUBSTNO('0%1', day) ELSE DD := STRSUBSTNO('%1', day); month := DATE2DMY(TODAY,2); IF month < 10 THEN MM := STRSUBSTNO('0%1', month) ELSE MM := STRSUBSTNO('%1', month); YYYY := STRSUBSTNO('%1', DATE2DMY(TODAY,3)); Datefolder := STRSUBSTNO('%1-%2-%3',YYYY,MM,DD); ArchiveFolder := STRSUBSTNO('sharepoint: http://%1,%2/%3/', 'ds-srv-01', 'archive', Datefolder); EmbComms2 := EmbComms2 + STRSUBSTNO(ZDArchiveFolder, ArchiveFolder ) + Separator;
Zetadocs for Microsoft Business Solutions Navision Installation Guide
Appendix B – Report Modification
This edition 18/11/2009 © Copyright Equisys plc 2009 All trademarks acknowledged All rights reserved Page 31
EmbComms2 := EmbComms2 + STRSUBSTNO(ArchiveDocumentType, 'Sales Order' ) + Separator; EmbComms2 := EmbComms2 + STRSUBSTNO(FieldRecNum, "Sales Header"."No." ) + Separator; EmbComms2 := EmbComms2 + STRSUBSTNO(FieldCompNum, Customer."No." ) + Separator; //End Optional
Zetadocs Embedded Commands – OnPostDataItem() CurrReport.NEWPAGE();
13.6 Dynamic Fields
Zetadocs allows you to define fields that can be included within the delivery information in the recipients,
subject and body text of the email. You will need to create a corresponding text constant in the C/AL
Globals section for each using the existing FieldRecNum and FieldCompNum text constants as patterns for
how to proceed.
To create a field use the command:
%%[field: «fieldname», «fieldvalue»]
Where:
«fieldname» is any descriptive word for your field, but with no spaces e.g. firstname
«fieldvalue» is the value of the field.
For example:
%%[field: firstname, Harry]
To use the field within the email, simply include it using the command:
%%[«field name»]
For example:
%%[firstname]
In this example, the field firstname would be replaced with the value Harry. It is also possible to give a
default value to be used for the field if it has not been defined, using the command:
%%[«fieldname», «default value»]
For example:
%%[firstname, Customer]
In this example, if the value of firstname has not been set it would be replaced with Customer instead.
Dynamic fields can be combined with the other embedded commands. You can use these fields to put
merge values in any set embedded command for example:
%%[Field, name, Harry]
%%[Field, company, Widgets Inc.]
%%[OutputFilename: %%[company] - %%[name] ]
The output filename of the document that includes the above embedded commands will be ‚Widgets Inc. ”
Harry‛. As before, you can also add a default value.
For example:
Zetadocs for Microsoft Business Solutions Navision Installation Guide
Appendix B – Report Modification
This edition 18/11/2009 © Copyright Equisys plc 2009 All trademarks acknowledged All rights reserved Page 32
%%[OutputFilename: %%[company] - %%[firstname, Customer]]
So the output filename of the document this time will be ‚Widget Inc. - Customer‛, since the dynamic field
firstname was not defined in the document.
When field commands are used in conjunction with the archiving commands for SharePoint, a third
parameter denotes that the field value should be passed as metadata for the document. This is done by
specifying the following:
%%[Field: «fieldname», «fieldvalue», ARCHIVE]