© anselm spoerri lecture 10 flash –recap –key components & tools –animating bitmaps...
Post on 20-Dec-2015
217 views
TRANSCRIPT
© Anselm Spoerri
Lecture 10
Flash– Recap
– Key Components & Tools
– Animating Bitmaps– How to modify Color and Transparency of Bitmap
– Animating along Motion Path
– Creating Mask Effect
– Demonstration
– Symbols & Library
– Buttons– Simple Text Button
– Animated Button
– Gradient Tool
– Embed Flash Movie in Web Page

© Anselm Spoerri
Recap – Timeline
© Anselm Spoerri
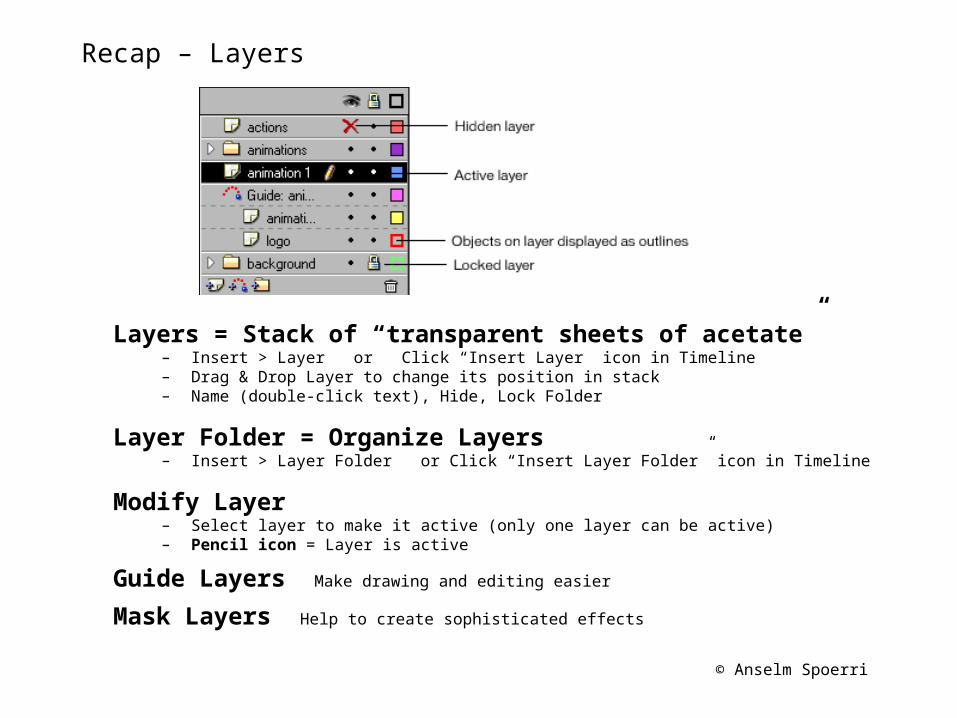
Recap – Layers
Layers = Stack of “transparent sheets of acetate” – Insert > Layer or Click “Insert Layer” icon in Timeline– Drag & Drop Layer to change its position in stack – Name (double-click text), Hide, Lock Folder
Layer Folder = Organize Layers– Insert > Layer Folder or Click “Insert Layer Folder” icon in Timeline
Modify Layer– Select layer to make it active (only one layer can be active)– Pencil icon = Layer is active
Guide Layers Make drawing and editing easier
Mask Layers Help to create sophisticated effects

© Anselm Spoerri
Recap – ToolsArrow (Selection) tool and Modifiers: snap to, smooth, straight
– Reshaping lines and shapes Reshaping pointer
Free Transform tool and its modifiers: scale, rotate, skew etc.– Transform dialog panel: Modify > Transform
Lasso tool and its modifiers = polygon etc.
Text toolCircle and Square tools and Modifiers: Object Drawing on / off
– Stroke and Fill properties of graphic in Property Inspector
Pencil tool and Modifiers = straight, smooth etc.
Paint Bucket tool and Modifiers = fill large gaps etc.– Apply Gradient and use Fill Transform tool
Eraser toolZoom tool and Modifiers: zoom in, zoom out (or use Alt-click)
Line Color
Fill Color
Tool Options LOOK here as well as Properties Inspector

© Anselm Spoerri
Recap – Graphic Objects
Graphic Objects = Items on Stage– Move, copy, delete, transform, stack, align, and group graphic objects. – Link graphic object to a URL. – Keep in mind: modifying lines and shapes can alter other lines and
shapes on the same layer if Object Drawing is not selected
Must first Select Object to Modify it

© Anselm Spoerri
Recap – Keyframes
Keyframe = Define Change in Animation – Flash can tween, or fill in, frames between keyframes – Change length of tweened animation by dragging keyframe in
Timeline.
Create Keyframe1. Select a frame in Timeline2. Insert > Keyframe
Only Keyframes are Editable
Frame Management– Delete a frame, keyframe, or frame sequence,
– Select and Insert > Remove Frame or right-click (Windows)
– Extend duration of Keyframe– Alt-drag (Windows) keyframe to new final frame
– Change length of a tweened sequence, drag the beginning or ending keyframe left or right.

© Anselm Spoerri
Recap – Tweened Animation
Motion Tweening– Define properties such as position, size, and rotation for
graphic in one frame and then change those properties in another frame
Shape Tweening– Draw a shape at one point in time, and then change shape or
draw another shape at another point in time
If you want Flash to tween the movement of more than one graphic, each must be on a separate layer.
To quickly prepare elements in document for tweened animation
– Select elements
– Use Modify > Distribute to Layers

© Anselm Spoerri
Recap – Animations and their Representations in Timeline
Motion Tweens – Black dot at beginning keyframe; intermediate tweened frames have black
arrow with a light-blue background.
Shape Tweens – Black dot at beginning keyframe; intermediate frames have a black arrow with
a light-green background.
Dashed line = – Tween is broken or incomplete
– Cause?– Final keyframe missing– Motion Tween: does NOT contain symbol, groups or type– Shape Tween: contains symbol, groups or type

© Anselm Spoerri
Recap – Shape Tweening
Similar to Morphing– One shape appears to change into another shape over time
Use Ungrouped Graphics to Tween Shapes
1. Create or select first keyframe
2. Create or place artwork in first keyframe
3. Create second keyframe and select it1. Select artwork in second keyframe 2. Modify shape, color, or position of artwork
(e.g. use “Free Transform” tool)
4. Select first keyframe in Timeline In Properties Inspector 1. Select “Shape” from “Tween” menu2. Select option from “Blend” menu:
a) Distributive: intermediate shapes smoother and more irregular.b) Angular: preserves apparent corners and straight lines.

© Anselm Spoerri
Recap – Motion Tween
• Instances of Symbol
• Groups
• Type = Text
Instances, groups, and type tween:
– Position, Size, Rotation, and Skew
Instances and type tween:
– Color shifts and Fade in / out (= Alpha) Bitmap needs to be converted into Symbol
To tween the color of groups or type, you must make them into symbols.
Animate individual text characters separately– Break text apart– Place letters on separate layers

© Anselm Spoerri
Recap – Motion Tweening
Use Symbols or Groups or Type to Tween Motions
Create Motion Tween a) Create first keyframe
– If needed: select frames want to add and apply Insert > Frames– Insert > Create Motion Tween
Automatically turns graphic in symbol– In last frame, move object to new location on the Stage.
Flash automatically creates the ending keyframe.
b) Create starting and ending keyframes – Select two keyframes and frames in between– Insert > Create Motion Tween

© Anselm Spoerri
Recap – Reshaping Text
Reshaping Text into its individual letter shapes– Select text with Arrow tool
– Modify > Break Apart
Distribute Text Letters to Layers – Select all letters
– Modify > Distribute to Layers
Organize letters in Layer Folder– Insert > Layer Folder
– Select layers containing letters: Drag & drop into Layer Folder
Morph Text– Select Text and apply “Modify > Break Apart” TWICE
– Apply Shape Tween !

© Anselm Spoerri
Recap – Modify Color and Transparency of Bitmap
! Bitmap needs to be Converted into Graphic Symbol
1. Drag Symbol with Bitmap onto Stage
Creates instance of symbol.
2. Select first keyframe, then Select Instance on Stage
3. In Property Inspector, select Color pull-down
4. Select “Advanced”, modify “Alpha” & “Color Channels”
5. Select next keyframe, then select instance on Stage
6. In Property Inspector, select Color pull-down and Select “Advanced”, modify “Alpha” & “Color Channels”
7. Apply Motion Tween (if not done already)

© Anselm Spoerri
Recap – Motion Tweening along Path
Tweening Motion along Path1. Create Motion Tweened Animation
2. Select layer containing motion-tweened animation
3. Insert > Timeline > Motion Guide or Right-click layer and choose “Add Motion Guide”
4. Use Pen, Pencil, Line, Circle, Rectangle, or Brush tool to draw desired path
5. Lock Motion Guide layer
6. Snap center of layer to beginning of line in the first frame, and to end of the line in the last frame
Link Layer to Motion Guide Layer a) Drag existing layer below motion guide layer.
All objects on this layer automatically snap to motion path.
b) Create new layer under motion guide layerObjects tweened on this layer are automatically tweened along motion path.
c) Select layer below motion guide layer. Choose Modify > Layer and select Guided.

© Anselm Spoerri
Recap – Creating Mask Layer
1 Select or create layer objects that appear inside mask
2 With layer selected, choose Insert > Layer – Mask layer always masks layer immediately below it
3 Place a filled shape or symbol instance on mask layer
4 Right-click (Windows) mask layer's name in Timeline, and choose Mask from the context menu.
5 Display mask effect in Flash, LOCK mask layer and masked layer

© Anselm Spoerri
Library
Window > Library
Library stores– Symbols created in Flash,– Imported video clips, sound
clips, bitmaps, and vector artwork
Can open library of any Flash file
Create Permanent Libraries – Available whenever you launch
Flash.
Flash includes Sample Libraries – Containing buttons, graphics,
movie clips, and sounds.
Window > Common Libraries

© Anselm Spoerri
Symbols and Instances
Symbols = Reusable Elements in Document – Symbols = graphics, buttons, video clips, sound files, or fonts– Symbol stored in file's library– Use symbols for every element that appears more than once.
Create Instance– Place symbol on Stage, you create an instance of that symbol.– Modify properties of instance without affecting master symbol– Edit master symbol to change all instances.
Symbols Reduce File Size – Flash stores symbol in the file only once greatly reduces file size

© Anselm Spoerri
Symbol - Behavior Types
Graphic Symbols for static images
Button Symbols to create interactive buttons
Movie Clip Symbols to create reusable pieces of animation
Font Symbols to use in other Flash movies
Convert Element to Symbol – Insert > Convert to Symbol– Drag the selection to the Library panel– Convert to Symbol from the context menu

© Anselm Spoerri
Create Symbol and Edit Instance
Create Symbol from Object on Stage1. Select Object on Stage2. Drag & Drop into Library Window3. Convert to Symbol dialog box appears
– Select Behavior = Graphic– Object on Stage now an instance of the symbol
Create New Empty SymbolMake sure nothing is selected on Stage 1. Choose Insert > New Symbol
– Name symbol– Choose Behavior : Graphic, Button, or Movie Clip.
Flash adds symbol to Library and switches to symbol-editing mode. 2. Create Symbol Content
– Use Timeline, draw with drawing tools etc.
Edit Instance of Symbol– Select instance on Stage– In Property Inspector change Color, Transparency …

© Anselm Spoerri
Editing Symbol versus Editing Instance
Editing Symbol Rest of Document disappears and only symbol appears
– Edit > Edit SymbolsWhen finished creating symbol content, return to movie-editing mode:– Click Back button at the left side of information bar above Stage.– Choose Edit > Edit Document.– Click the scene name in the information bar above the Stage.
Editing Instances– Edit > Edit Document
Flash Document consists of– Document’s Main Timeline
– Edit > Edit Document takes you to Main Timeline– Library that contains Symbols that have their own timeline
– Edit > Edit Symbols takes you to the timeline of a symbol– Double clicking on instance of symbol takes you
to the timeline of symbol

© Anselm Spoerri
Creating Button
Button = Four-Frame interactive movie clips– Select button behavior for symbol– Flash creates Timeline with four frames. – First three frames display the button's three possible states:
UP, OVER, DOWN– Fourth frame defines the active area of button– Timeline doesn't actually play, it simply reacts to pointer movement
and actions by jumping to the appropriate frame.
Make Button Interactive in a Movie– Place instance of button symbol on Stage – Assign actions to the instance. Actions must be assigned to instance in
movie, not to frames in button's Timeline
© Anselm Spoerri
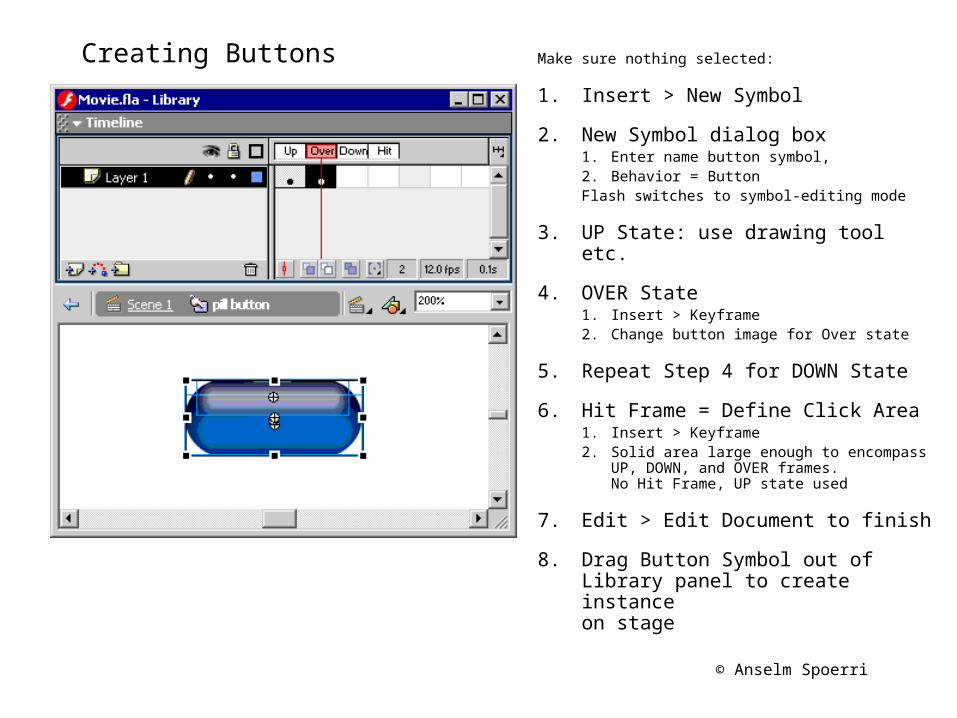
Creating Buttons Make sure nothing selected:
1. Insert > New Symbol
2. New Symbol dialog box1. Enter name button symbol, 2. Behavior = ButtonFlash switches to symbol-editing mode
3. UP State: use drawing tool etc.
4. OVER State1. Insert > Keyframe2. Change button image for Over state
5. Repeat Step 4 for DOWN State
6. Hit Frame = Define Click Area1. Insert > Keyframe2. Solid area large enough to encompass
UP, DOWN, and OVER frames. No Hit Frame, UP state used
7. Edit > Edit Document to finish
8. Drag Button Symbol out of Library panel to create instanceon stage

© Anselm Spoerri
Enabling, Editing, and Testing Buttons
By default, Flash keeps buttons disabled as you create them, – Easier to select and work with them– When button is disabled, clicking button selects it.
Button = Enabled it responds to mouse events
Best to Disable buttons as you work– Enable buttons to quickly test their behavior.
Control > Enable Simple Buttons
Select Enabled Button– Use the Arrow tool to drag a selection rectangle around the button.
Move Enabled Button– Select the button, as described above– Use the arrow keys to move the button
Test Button – Control > Enable Simple Buttons. – Move the pointer over the enabled button to test it

© Anselm Spoerri
Step 0 – Download files, Launch Flash, Create Document
Create folder “mp10” in “My Documents” folder
Download Files (select zip file & extract into “mp10”)
http://scils.rutgers.edu/~aspoerri/Teaching/MPOnline/Lectures/Lecture10/stepbystep/
Launch Flash– Start > Macromedia > Flash
Create Flash Document and Set its Properties – File > New Important: select Flash File (ActionScript 2.0) !– Modify > Document or use Property Inspector
– Frame Rate = 12 Dimensions = 100 x 30 Background color = White
– Use scrollbars and Magnification tool to see Stage at sufficient size
Using Grid, Rulers and Guides– Rulers View > Rulers– Guides View > Guides > Show Guides

© Anselm Spoerri
Step 1 – Create Button Symbol – UP state
Make sure that “Library” is visible (Window > Library)
1. Insert > New Symbol– “Create New Symbol” dialog: select “Button”
– Name it “Home Button”
– Notice that button appears in list of Library symbols
– Flash switches to “Edit Symbol” mode and four-frame “button view” appears
– Name Layer 1 = “Shape” in Symbol View

© Anselm Spoerri
Step 1 (cont.) – Create Button Symbol – UP state
2. Select UP frame in Timeline– Select Rectangle tool
– Use Tool “Options” to specify corner radius = 10
– Select Stroke Color = Black and Fill Color = Blue in Property Inspector
– Draw Rectangle with Width = 60 and Height = 30
– Create Guides at -30, 0 and 30 horizontally and center rectangle
– Select Arrow Tool to select fill of rectangle
– Property Inspector: select Fill color and specify Blue Sphere effect
– Select Fill Transform tool to change orientation, spread and shape of gradient
– Insert New Layer using “Insert > Timeline > Layer” – name it “Text”
– Select Text tool and add white “Home” text and center it on button– Use Typesize = 14 pt
– Create Guide for baseline of text
© Anselm Spoerri
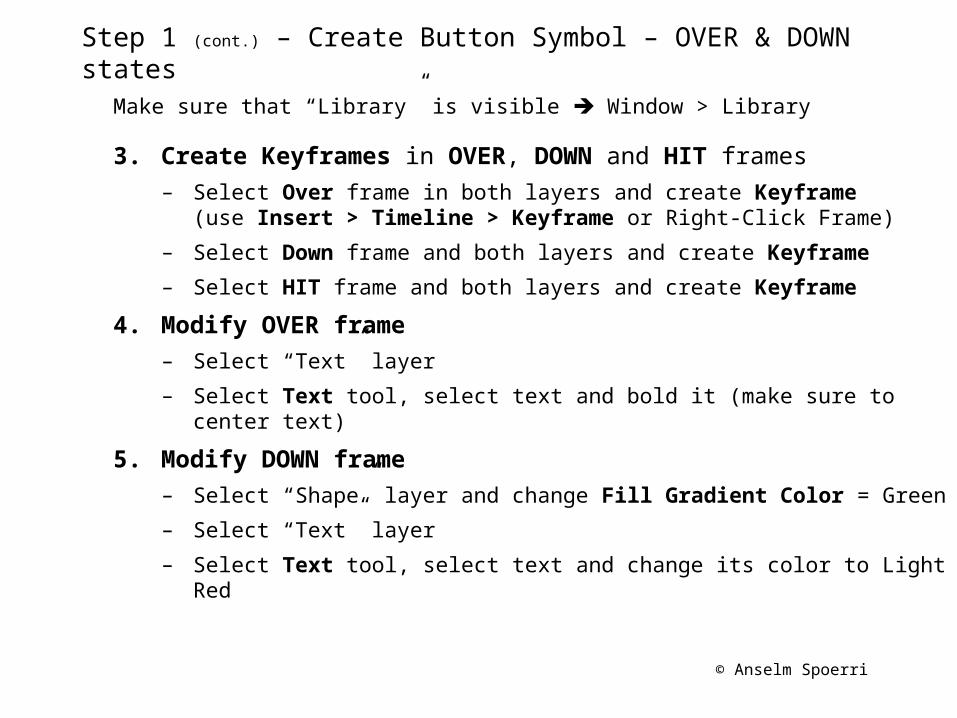
Step 1 (cont.) – Create Button Symbol – OVER & DOWN states
Make sure that “Library” is visible Window > Library
3. Create Keyframes in OVER, DOWN and HIT frames – Select Over frame in both layers and create Keyframe
(use Insert > Timeline > Keyframe or Right-Click Frame)
– Select Down frame and both layers and create Keyframe
– Select HIT frame and both layers and create Keyframe
4. Modify OVER frame– Select “Text” layer
– Select Text tool, select text and bold it (make sure to center text)
5. Modify DOWN frame– Select “Shape” layer and change Fill Gradient Color = Green
– Select “Text” layer
– Select Text tool, select text and change its color to Light Red

© Anselm Spoerri
Step 1 (cont.)– Test & Export Interactive Button
1. Switch to “Edit Document” Mode
2. Drag & Drag “Home Button” onto Stage
3. Resize Button to Fit Stage– Select Free Transform tool, select button and resize to fill Stage
4. Control > Enable Simple Buttons– Place cursor over and click button
5. Export Button– File > Export Movie
– Saves it as SWF file

© Anselm Spoerri
Recap – Create Simple Text Button
1. Insert > New Symbol
2. Select “Button”
3. Create “UP” State
4. Insert Keyframe “OVER” and Modify
5. Insert Keyframe “DOWN” and Modify
6. Insert Keyframe “HIT”

© Anselm Spoerri
Step 2 – Create Animated Button
1. Import Images
2. Convert Images to Graphic Symbols Insert > Convert to Symbol
3. Create Movie Clip using “Insert > New Symbol”
4. Insert Graphic Symbol and Animate
5. Create Button
6. Insert Movie Clip in “Over” State
7. Specify “Hit” area for Button by creating rectangle that defines “hotspot”
8. Make sure Animation only plays once Select end keyframe in Animation MovieClip Open Actions Window: Window > Actions Type ActionScript “stop ();” in Actions Window

© Anselm Spoerri
Step 3 – Add Hyperlink to Interactive Button
1. Select “Home Button” on Stage(make sure you have the button selected and not the frame that contains the button).
2. Open “Actions” Window via “Window > Actions”
3. Paste this code into Actions Window :
on (release) { getUrl (filename);}This attaches action to button using ActionScript. Important: Flash File (ActionScript 2.0) !
4. Test Movie
5. Export Button– File > Export Movie
– Saves it as SWF file, which you can import in Dreamweaver

© Anselm Spoerri
Step 4 – Embed Flash Movie in Web Page
1. Launch Dreamweaver
2. Create Layout Table and Layout Cell
3. Place cursor in Layout Cell that will contain Flash Movie
4. Embed in Dreamweaver– Insert > Media > Flash
and navigate to SWF file to embed

© Anselm Spoerri
Recap – Enabling, Editing, and Testing Buttons
By default, Flash keeps buttons disabled as you create them, – Easier to select and work with them– When button is disabled, clicking button selects it.
Button = Enabled it responds to mouse events
Best to disable buttons as you work– Enable buttons to quickly test their behavior.
Control > Enable Simple Buttons
Select Enabled Button– Use the Arrow tool to drag a selection rectangle around the button.
Move Enabled Button– Select the button, as described above– Use the arrow keys to move the button
Test Button – Control > Enable Simple Buttons. – Move the pointer over the enabled button to test it