· iv experiences with oracle solutions on linux for ibm system z chapter 3. installing oracle and...
TRANSCRIPT
ibm.com/redbooks
Experiences with Oracle Solutions onLinux for IBM System z
Sam AmsaveluKathryn ArrellMarc Connolly
Dennis DutcavichMike EbbersTerry ElliottBrent Howe
David Simpson
Installing Oracle on Linux for IBM System z
Using Oracle on Linux on z
Oracle’s Maximum Availability Architecture
Front cover

Experiences with Oracle Solutions on Linux for IBM System z
May 2009
International Technical Support Organization
SG24-7634-00
© Copyright International Business Machines Corporation 2009. All rights reserved.Note to U.S. Government Users Restricted Rights -- Use, duplication or disclosure restricted by GSA ADPSchedule Contract with IBM Corp.
First Edition (May 2009)
This edition applies to Version 10gR2 of the Oracle Database and Oracle E-Business Suite R12.
Note: Before using this information and the product it supports, read the information in “Notices” on page xi.
Contents
Notices . . . . . . . . . . . . . . . . . . . . . . . . . . . . . . . . . . . . . . . . . . . . . . . . . . . . . . . xiTrademarks . . . . . . . . . . . . . . . . . . . . . . . . . . . . . . . . . . . . . . . . . . . . . . . . . . . xii
Preface . . . . . . . . . . . . . . . . . . . . . . . . . . . . . . . . . . . . . . . . . . . . . . . . . . . . . . xiiiThe team that wrote this book . . . . . . . . . . . . . . . . . . . . . . . . . . . . . . . . . . . . . xiiiBecome a published author . . . . . . . . . . . . . . . . . . . . . . . . . . . . . . . . . . . . . . . xivComments welcome. . . . . . . . . . . . . . . . . . . . . . . . . . . . . . . . . . . . . . . . . . . . . xv
Part 1. Overview and Installation. . . . . . . . . . . . . . . . . . . . . . . . . . . . . . . . . . . . . . . . . . . . . . . 1
Chapter 1. Why customers are choosing to use Oracle products on Linux on IBM System z . . . . . . . . . . . . . . . . . . . . . . . . . . . . . . . . . . . . . . 3
1.1 Excellent virtualization capabilities of IBM System z. . . . . . . . . . . . . . . . . . 41.2 Ability to exploit existing disaster recovery plans . . . . . . . . . . . . . . . . . . . . 41.3 Security provided by IBM System z. . . . . . . . . . . . . . . . . . . . . . . . . . . . . . . 51.4 High availability features provided by IBM System z. . . . . . . . . . . . . . . . . . 61.5 Green features of IBM System z . . . . . . . . . . . . . . . . . . . . . . . . . . . . . . . . . 6
1.5.1 The IBM Project Big Green . . . . . . . . . . . . . . . . . . . . . . . . . . . . . . . . . 71.6 Ease of interfacing with traditional data. . . . . . . . . . . . . . . . . . . . . . . . . . . . 81.7 Increased performance and scalability capabilities of z10 . . . . . . . . . . . . . 81.8 Specialty engines available on IBM System z. . . . . . . . . . . . . . . . . . . . . . . 81.9 End to end solution for dynamic infrastructure data center . . . . . . . . . . . . . 91.10 Cost savings . . . . . . . . . . . . . . . . . . . . . . . . . . . . . . . . . . . . . . . . . . . . . . . 91.11 Customer scenarios . . . . . . . . . . . . . . . . . . . . . . . . . . . . . . . . . . . . . . . . 101.12 Summary . . . . . . . . . . . . . . . . . . . . . . . . . . . . . . . . . . . . . . . . . . . . . . . . . 101.13 Oracle solutions available on IBM System z . . . . . . . . . . . . . . . . . . . . . . 12
Chapter 2. Installing Red Hat Enterprise Linux 5 Linux on IBM System z for Oracle products. . . . . . . . . . . . . . . . . . . . . . . . . . . . . . . . . . . . . . 13
2.1 Introduction . . . . . . . . . . . . . . . . . . . . . . . . . . . . . . . . . . . . . . . . . . . . . . . . 142.2 Perform Stage 1 of the installation . . . . . . . . . . . . . . . . . . . . . . . . . . . . . . 14
2.2.1 Define the network interface cards . . . . . . . . . . . . . . . . . . . . . . . . . . 142.2.2 Define the PARM and CONF files. . . . . . . . . . . . . . . . . . . . . . . . . . . 152.2.3 Define the EXEC and begin Stage 1 of the installation. . . . . . . . . . . 16
2.3 Stage 2 of the installation . . . . . . . . . . . . . . . . . . . . . . . . . . . . . . . . . . . . . 242.4 Alternative to using PARM and CONF files. . . . . . . . . . . . . . . . . . . . . . . . 40
2.4.1 Initiate the bootstrap loader. . . . . . . . . . . . . . . . . . . . . . . . . . . . . . . . 402.4.2 Define the network interface cards . . . . . . . . . . . . . . . . . . . . . . . . . . 41
2.5 Resources . . . . . . . . . . . . . . . . . . . . . . . . . . . . . . . . . . . . . . . . . . . . . . . . . 46
© Copyright IBM Corp. 2009. All rights reserved. iii
Chapter 3. Installing Oracle and creating a database on Red Hat Enterprise Linux 5 . . . . . . . . . . . . . . . . . . . . . . . . . . . . . . . . . . . . . . . . . . . . . 47
3.1 Obtain the Oracle code and documentation . . . . . . . . . . . . . . . . . . . . . . . 483.2 Install the Oracle Code . . . . . . . . . . . . . . . . . . . . . . . . . . . . . . . . . . . . . . . 483.3 Install patch 7349124 . . . . . . . . . . . . . . . . . . . . . . . . . . . . . . . . . . . . . . . . 503.4 Upgrade to 10.2.0.4 by installing Patch Set 6810189 . . . . . . . . . . . . . . . . 513.5 Create an Oracle Database. . . . . . . . . . . . . . . . . . . . . . . . . . . . . . . . . . . . 54
Chapter 4. Setting up an IBM disk storage system to use with Oracle on Linux on System z . . . . . . . . . . . . . . . . . . . . . . . . . . . . . . . . . . . 57
4.1 Overview . . . . . . . . . . . . . . . . . . . . . . . . . . . . . . . . . . . . . . . . . . . . . . . . . . 584.1.1 Areas to consider . . . . . . . . . . . . . . . . . . . . . . . . . . . . . . . . . . . . . . . 58
4.2 Striping alternatives. . . . . . . . . . . . . . . . . . . . . . . . . . . . . . . . . . . . . . . . . . 594.2.1 Oracle ASM. . . . . . . . . . . . . . . . . . . . . . . . . . . . . . . . . . . . . . . . . . . . 604.2.2 LVM (operating system striping) . . . . . . . . . . . . . . . . . . . . . . . . . . . . 604.2.3 Storage pool striping (rotate extents) . . . . . . . . . . . . . . . . . . . . . . . . 614.2.4 Striping recommendations . . . . . . . . . . . . . . . . . . . . . . . . . . . . . . . . 62
4.3 RAID 10 vs. RAID 5. . . . . . . . . . . . . . . . . . . . . . . . . . . . . . . . . . . . . . . . . . 634.4 FCP/SCSI and FICON/ECKD considerations . . . . . . . . . . . . . . . . . . . . . . 644.5 Oracle storage-related parameters . . . . . . . . . . . . . . . . . . . . . . . . . . . . . . 664.6 z/VM considerations . . . . . . . . . . . . . . . . . . . . . . . . . . . . . . . . . . . . . . . . . 674.7 ASMLib or UDEV for device persistence. . . . . . . . . . . . . . . . . . . . . . . . . . 684.8 ORION disk performance testing tool . . . . . . . . . . . . . . . . . . . . . . . . . . . . 694.9 Client example. . . . . . . . . . . . . . . . . . . . . . . . . . . . . . . . . . . . . . . . . . . . . . 724.10 Configuring FCP/SCSI storage . . . . . . . . . . . . . . . . . . . . . . . . . . . . . . . . 74
4.10.1 Gathering storage requirements . . . . . . . . . . . . . . . . . . . . . . . . . . . 744.10.2 Attaching an FCP device under z/VM . . . . . . . . . . . . . . . . . . . . . . . 754.10.3 Configuring Linux guests for zFCP . . . . . . . . . . . . . . . . . . . . . . . . . 774.10.4 Configuring multipathing . . . . . . . . . . . . . . . . . . . . . . . . . . . . . . . . . 824.10.5 Setting Oracle device permissions with UDEV . . . . . . . . . . . . . . . . 864.10.6 UDEV rules for Multipath devices . . . . . . . . . . . . . . . . . . . . . . . . . . 874.10.7 Configure ASMLib with FCP multipathing device . . . . . . . . . . . . . . 884.10.8 Configure LVM with FCP multipathing device. . . . . . . . . . . . . . . . . 89
4.11 Reference documents . . . . . . . . . . . . . . . . . . . . . . . . . . . . . . . . . . . . . . . 89
Chapter 5. Oracle Database Vault installation on Linux for System z . . . 915.1 Introduction . . . . . . . . . . . . . . . . . . . . . . . . . . . . . . . . . . . . . . . . . . . . . . . . 925.2 Install Database Vault 10.2.0.3 . . . . . . . . . . . . . . . . . . . . . . . . . . . . . . . . . 925.3 Enable connection with the SYSDBA privilege . . . . . . . . . . . . . . . . . . . . . 955.4 Starting Database Vault Administrator . . . . . . . . . . . . . . . . . . . . . . . . . . . 955.5 Disabling Database Vault . . . . . . . . . . . . . . . . . . . . . . . . . . . . . . . . . . . . . 965.6 Install the Database 10.2.0.4 Patch Set . . . . . . . . . . . . . . . . . . . . . . . . . . 975.7 10.2.0.4 Patch Set post installation . . . . . . . . . . . . . . . . . . . . . . . . . . . . . . 995.8 Enable Oracle Database Vault 10.2.0.4 . . . . . . . . . . . . . . . . . . . . . . . . . . 99
iv Experiences with Oracle Solutions on Linux for IBM System z
5.8.1 Reconfigure Database Vault with DVCA. . . . . . . . . . . . . . . . . . . . . 1005.8.2 Enable the Database Vault triggers with DVCA . . . . . . . . . . . . . . . 1015.8.3 Re-link Oracle executables with DV_ON . . . . . . . . . . . . . . . . . . . . 101
Chapter 6. Installing Oracle EBS R12 in a mixed architecture configuration with DB. . . . . . . . . . . . . . . . . . . . . . . . . . . . . . . . . . . . . . . . . . . . 105
6.1 Hardware and software required . . . . . . . . . . . . . . . . . . . . . . . . . . . . . . . 1066.2 Documentation required . . . . . . . . . . . . . . . . . . . . . . . . . . . . . . . . . . . . . 1066.3 Steps to set up the mixed architecture configuration . . . . . . . . . . . . . . . 108
6.3.1 Install E-Business Suite R12 on Linux x86 . . . . . . . . . . . . . . . . . . . 1096.3.2 Upgrade the Linux x86 DB tier to latest patchset . . . . . . . . . . . . . . 1106.3.3 Create the target database on Linux on z . . . . . . . . . . . . . . . . . . . . 1116.3.4 Export and import the database files. . . . . . . . . . . . . . . . . . . . . . . . 1116.3.5 Final configuration step . . . . . . . . . . . . . . . . . . . . . . . . . . . . . . . . . . 111
6.4 Patches that need to be installed . . . . . . . . . . . . . . . . . . . . . . . . . . . . . . 113
Chapter 7. Installing PeopleSoft on Linux on z . . . . . . . . . . . . . . . . . . . . 1157.1 Introduction . . . . . . . . . . . . . . . . . . . . . . . . . . . . . . . . . . . . . . . . . . . . . . . 1167.2 Setting up the installation . . . . . . . . . . . . . . . . . . . . . . . . . . . . . . . . . . . . 116
7.2.1 Download PeopleSoft Enterprise from Oracle E-delivery . . . . . . . . 1167.2.2 Install on Linux . . . . . . . . . . . . . . . . . . . . . . . . . . . . . . . . . . . . . . . . 1177.2.3 Install and configure on Windows . . . . . . . . . . . . . . . . . . . . . . . . . . 117
7.3 Setting up the Oracle Database on Linux25 . . . . . . . . . . . . . . . . . . . . . . 1177.3.1 Connect to Idle Instance on Linux25. . . . . . . . . . . . . . . . . . . . . . . . 1187.3.2 Create the Oracle Database (createdb10.sql script) . . . . . . . . . . . . 1197.3.3 Creating catalog views and utility table spaces (utlspace.sql) . . . . 1207.3.4 Creating PS.PSDBOWNER Table (dbowner.sql) . . . . . . . . . . . . . . 1217.3.5 Creating HRMS table spaces (hcddl.sql) . . . . . . . . . . . . . . . . . . . . 1217.3.6 Creating PeopleSoft Database roles (psroles.sql) . . . . . . . . . . . . . 1217.3.7 Creating the PeopleSoft Database Owner ID (psadmin.sql) . . . . . . 1227.3.8 Setting up and creating the connect ID . . . . . . . . . . . . . . . . . . . . . . 123
7.4 Data Mover on Windows . . . . . . . . . . . . . . . . . . . . . . . . . . . . . . . . . . . . . 1247.5 Run Data Mover on Linux . . . . . . . . . . . . . . . . . . . . . . . . . . . . . . . . . . . . 134
7.5.1 Run rel849un.sql script on Linux. . . . . . . . . . . . . . . . . . . . . . . . . . . 1347.6 Summary . . . . . . . . . . . . . . . . . . . . . . . . . . . . . . . . . . . . . . . . . . . . . . . . . 135
Part 2. Using Oracle on Linux on z . . . . . . . . . . . . . . . . . . . . . . . . . . . . . . . . . . . . . . . . . . . 137
Chapter 8. Using Linux accounting with Oracle. . . . . . . . . . . . . . . . . . . . 1398.1 Virtual CPU time accounting . . . . . . . . . . . . . . . . . . . . . . . . . . . . . . . . . . 1408.2 New Field – st, steal time . . . . . . . . . . . . . . . . . . . . . . . . . . . . . . . . . . . . 1408.3 Example of output from Red Hat 4 and SLES10. . . . . . . . . . . . . . . . . . . 1418.4 A second point about Linux accounting. . . . . . . . . . . . . . . . . . . . . . . . . . 143
Contents v
Chapter 9. CICS Access Manager with an Oracle DB on Linux on z . . . 1459.1 The autologon feature . . . . . . . . . . . . . . . . . . . . . . . . . . . . . . . . . . . . . . . 1469.2 Connecting to a database with AM4CICS . . . . . . . . . . . . . . . . . . . . . . . . 146
9.2.1 Change the AM4CICS installation. . . . . . . . . . . . . . . . . . . . . . . . . . 1479.2.2 Change the CICS application . . . . . . . . . . . . . . . . . . . . . . . . . . . . . 147
9.3 Summary . . . . . . . . . . . . . . . . . . . . . . . . . . . . . . . . . . . . . . . . . . . . . . . . . 148
Chapter 10. Oracle Database migration to Linux for z using Transportable database . . . . . . . . . . . . . . . . . . . . . . . . . . . . . . . . . . . . . . . . . . 149
10.1 Assumptions . . . . . . . . . . . . . . . . . . . . . . . . . . . . . . . . . . . . . . . . . . . . . 15010.2 Introduction . . . . . . . . . . . . . . . . . . . . . . . . . . . . . . . . . . . . . . . . . . . . . . 15010.3 Step 1: Validate the applicability of TDB technology. . . . . . . . . . . . . . . 15110.4 Step 2: Validate the prerequisites . . . . . . . . . . . . . . . . . . . . . . . . . . . . . 15210.5 Step 3: Decide where to run the conversion . . . . . . . . . . . . . . . . . . . . . 15310.6 Step 4: Prepare the environments. . . . . . . . . . . . . . . . . . . . . . . . . . . . . 15410.7 Step 5: Create the conversion scripts . . . . . . . . . . . . . . . . . . . . . . . . . . 15510.8 Step 6: Move the appropriate files. . . . . . . . . . . . . . . . . . . . . . . . . . . . . 16010.9 Step 7: Run the conversion . . . . . . . . . . . . . . . . . . . . . . . . . . . . . . . . . . 16210.10 Step 8: Create the new database at the target . . . . . . . . . . . . . . . . . . 16510.11 Step 9: Post database creation activities at the target . . . . . . . . . . . . 16710.12 Step 10: Validate the new database at the target . . . . . . . . . . . . . . . . 16810.13 Conclusion. . . . . . . . . . . . . . . . . . . . . . . . . . . . . . . . . . . . . . . . . . . . . . 16810.14 Reference documents . . . . . . . . . . . . . . . . . . . . . . . . . . . . . . . . . . . . . 169
Chapter 11. Using hardware security modules with Oracle Advanced Security . . . . . . . . . . . . . . . . . . . . . . . . . . . . . . . . . . . . . . . . . . . 171
11.1 Overview . . . . . . . . . . . . . . . . . . . . . . . . . . . . . . . . . . . . . . . . . . . . . . . . 17211.2 Case study environment . . . . . . . . . . . . . . . . . . . . . . . . . . . . . . . . . . . . 17311.3 Basic configuration sequence . . . . . . . . . . . . . . . . . . . . . . . . . . . . . . . . 17611.4 Verification and configuration of the HSM . . . . . . . . . . . . . . . . . . . . . . . 17711.5 Configure Oracle Database and Clients for OAS using Oracle Wallets and
JSSE Keystores . . . . . . . . . . . . . . . . . . . . . . . . . . . . . . . . . . . . . . . . . . . 18211.5.1 Check database state and verify that OAS is installed . . . . . . . . . 18211.5.2 Configure SQL*Net files . . . . . . . . . . . . . . . . . . . . . . . . . . . . . . . . 18411.5.3 Create Oracle wallets and Java keystores . . . . . . . . . . . . . . . . . . 18911.5.4 Stop and restart the Oracle Database's Listener . . . . . . . . . . . . . 19211.5.5 Test SQL*Plus access using Oracle wallets . . . . . . . . . . . . . . . . . 19411.5.6 Reviewing and running the sample Java applications . . . . . . . . . 196
11.6 Configure Oracle Database for OAS using an HSM . . . . . . . . . . . . . . . 19911.6.1 Recreate the Oracle Database's wallet and populate the HSM . . 20011.6.2 Stop and restart the Oracle Database's Listener and the DB . . . . 20211.6.3 Test SQL*Plus access and verify HSM access. . . . . . . . . . . . . . . 202
11.7 Summary . . . . . . . . . . . . . . . . . . . . . . . . . . . . . . . . . . . . . . . . . . . . . . . . 20511.8 Supplemental notes. . . . . . . . . . . . . . . . . . . . . . . . . . . . . . . . . . . . . . . . 205
vi Experiences with Oracle Solutions on Linux for IBM System z
11.8.1 Issues encountered. . . . . . . . . . . . . . . . . . . . . . . . . . . . . . . . . . . . 20511.9 References . . . . . . . . . . . . . . . . . . . . . . . . . . . . . . . . . . . . . . . . . . . . . . 209
Chapter 12. Using DB Control or DB Console with Grid Control Server 21112.1 Choices of managing a database on Linux on z . . . . . . . . . . . . . . . . . . 21212.2 DBConsole and grid agents on Linux for System z. . . . . . . . . . . . . . . . 21212.3 Install 10.2.0.3 Database on SLES10 . . . . . . . . . . . . . . . . . . . . . . . . . . 213
12.3.1 First step - install 10.2.0.2 . . . . . . . . . . . . . . . . . . . . . . . . . . . . . . . 21312.3.2 Second step - install 10.2.0.3 . . . . . . . . . . . . . . . . . . . . . . . . . . . . 217
12.4 Install Grid Control Server . . . . . . . . . . . . . . . . . . . . . . . . . . . . . . . . . . . 21912.5 Return to the Linux host to configure the agent . . . . . . . . . . . . . . . . . . 222
12.5.1 Set up agent to connect to Grid on Win XP . . . . . . . . . . . . . . . . . 22412.6 Add another database instance to Grid on Win XP. . . . . . . . . . . . . . . . 22812.7 Summary . . . . . . . . . . . . . . . . . . . . . . . . . . . . . . . . . . . . . . . . . . . . . . . . 238
Part 3. Maximum Availability Architecture . . . . . . . . . . . . . . . . . . . . . . . . . . . . . . . . . . . . . 241
Chapter 13. Components for providing high availability for Oracle on Linux on IBM System Z . . . . . . . . . . . . . . . . . . . . . . . . . . . . . . . . . . . . 243
13.1 Overview . . . . . . . . . . . . . . . . . . . . . . . . . . . . . . . . . . . . . . . . . . . . . . . . 24313.2 Oracle Maximum Availability Architecture (MAA) . . . . . . . . . . . . . . . . . 245
13.2.1 MAA component technologies . . . . . . . . . . . . . . . . . . . . . . . . . . . 24613.2.2 Oracle Enterprise Manager (OEM) Grid Control . . . . . . . . . . . . . . 24613.2.3 Oracle Clusterware: ClusterReady Server (CRS) . . . . . . . . . . . . . 24613.2.4 Oracle Database Server . . . . . . . . . . . . . . . . . . . . . . . . . . . . . . . . 247
13.3 MAA with Security . . . . . . . . . . . . . . . . . . . . . . . . . . . . . . . . . . . . . . . . . 25113.4 IBM high-availability components . . . . . . . . . . . . . . . . . . . . . . . . . . . . . 252
13.4.1 System z hardware features . . . . . . . . . . . . . . . . . . . . . . . . . . . . . 25213.4.2 System z virtualization . . . . . . . . . . . . . . . . . . . . . . . . . . . . . . . . . 25313.4.3 Linux operating system . . . . . . . . . . . . . . . . . . . . . . . . . . . . . . . . . 25413.4.4 Other IBM products . . . . . . . . . . . . . . . . . . . . . . . . . . . . . . . . . . . . 25513.4.5 IBM disaster recovery options. . . . . . . . . . . . . . . . . . . . . . . . . . . . 255
13.5 Possible customer scenarios . . . . . . . . . . . . . . . . . . . . . . . . . . . . . . . . 25613.5.1 Scenario 1 . . . . . . . . . . . . . . . . . . . . . . . . . . . . . . . . . . . . . . . . . . . 25713.5.2 Scenario 2 . . . . . . . . . . . . . . . . . . . . . . . . . . . . . . . . . . . . . . . . . . . 25713.5.3 Scenario 3 . . . . . . . . . . . . . . . . . . . . . . . . . . . . . . . . . . . . . . . . . . . 25813.5.4 Scenario 4 . . . . . . . . . . . . . . . . . . . . . . . . . . . . . . . . . . . . . . . . . . . 25813.5.5 Scenario 5 - HA and disaster recovery . . . . . . . . . . . . . . . . . . . . . 259
13.6 Summary . . . . . . . . . . . . . . . . . . . . . . . . . . . . . . . . . . . . . . . . . . . . . . . . 259
Chapter 14. Using Oracle Clusterware for a single instance database failover . . . . . . . . . . . . . . . . . . . . . . . . . . . . . . . . . . . . . . . . . . . . 261
14.1 Overview . . . . . . . . . . . . . . . . . . . . . . . . . . . . . . . . . . . . . . . . . . . . . . . . 26214.2 Case study environment . . . . . . . . . . . . . . . . . . . . . . . . . . . . . . . . . . . . 263
Contents vii

14.3 Basic installation sequence . . . . . . . . . . . . . . . . . . . . . . . . . . . . . . . . . . 26514.4 Detailed component installation sequence . . . . . . . . . . . . . . . . . . . . . . 267
14.4.1 Oracle clusterware installation overview . . . . . . . . . . . . . . . . . . . . 26814.4.2 Disk allocation and partitioning requirements . . . . . . . . . . . . . . . . 26914.4.3 Disk permission requirements. . . . . . . . . . . . . . . . . . . . . . . . . . . . 27214.4.4 Allocating space for the Oracle binaries . . . . . . . . . . . . . . . . . . . . 27314.4.5 Verifying cluster configuration and setup . . . . . . . . . . . . . . . . . . . 27414.4.6 Running the Clusterware installation. . . . . . . . . . . . . . . . . . . . . . . 275
14.5 Oracle Automatic Storage Management installation . . . . . . . . . . . . . . . 27814.6 Install database software on each node . . . . . . . . . . . . . . . . . . . . . . . . 27914.7 Create a single-instance database on the first node . . . . . . . . . . . . . . . 27914.8 Configure the other node for a database instance failover . . . . . . . . . . 28014.9 Create and prepare a single DB instance failover procedure and add to the
cluster registry . . . . . . . . . . . . . . . . . . . . . . . . . . . . . . . . . . . . . . . . . . . . 28314.10 Testing Oracle clusterware functionality . . . . . . . . . . . . . . . . . . . . . . . 285
14.10.1 Start up the database with Oracle Clusterware. . . . . . . . . . . . . . 28514.10.2 Testing relocation of the database with Oracle Clusterware. . . . 28614.10.3 Testing manual shutdown of database using sqlplus . . . . . . . . . 28714.10.4 Manually shut down a Linux guest running Oracle DB . . . . . . . . 29014.10.5 Re-establish the original cluster configuration . . . . . . . . . . . . . . 292
14.11 Summary . . . . . . . . . . . . . . . . . . . . . . . . . . . . . . . . . . . . . . . . . . . . . . . 293
Part 4. Appendixes . . . . . . . . . . . . . . . . . . . . . . . . . . . . . . . . . . . . . . . . . . . . . . . . . . . . . . . . 295
Appendix A. Scripts for using Hardware Security Modules with Oracle Advanced Security . . . . . . . . . . . . . . . . . . . . . . . . . . . . . . . . 297
A.1 Shell scripts. . . . . . . . . . . . . . . . . . . . . . . . . . . . . . . . . . . . . . . . . . . . . . . 298A.1.1 listTraceAndAuditFiles.sh . . . . . . . . . . . . . . . . . . . . . . . . . . . . . . . . 298A.1.2 deleteTraceAndAuditFiles.sh . . . . . . . . . . . . . . . . . . . . . . . . . . . . . 298A.1.3 rmanDeleteArchivelogs.sh . . . . . . . . . . . . . . . . . . . . . . . . . . . . . . . 298A.1.4 testOracleWalletUtilities.sh . . . . . . . . . . . . . . . . . . . . . . . . . . . . . . . 299A.1.5 runASOSSLDemo.sh . . . . . . . . . . . . . . . . . . . . . . . . . . . . . . . . . . . 304A.1.6 runJSSEDemo.sh . . . . . . . . . . . . . . . . . . . . . . . . . . . . . . . . . . . . . . 304A.1.7 setEnv.sh . . . . . . . . . . . . . . . . . . . . . . . . . . . . . . . . . . . . . . . . . . . . 305A.1.8 makeIt.sh . . . . . . . . . . . . . . . . . . . . . . . . . . . . . . . . . . . . . . . . . . . . 306
A.2 Ant Configuration Files . . . . . . . . . . . . . . . . . . . . . . . . . . . . . . . . . . . . . . 306A.2.1 Phase 1 build.xml . . . . . . . . . . . . . . . . . . . . . . . . . . . . . . . . . . . . . . 306A.2.2 Phase 1 common.xml . . . . . . . . . . . . . . . . . . . . . . . . . . . . . . . . . . . 316A.2.3 Phase 2 build.xml . . . . . . . . . . . . . . . . . . . . . . . . . . . . . . . . . . . . . . 318A.2.4 Phase 2 common.xml . . . . . . . . . . . . . . . . . . . . . . . . . . . . . . . . . . . 330A.2.5 ASOSSL.java . . . . . . . . . . . . . . . . . . . . . . . . . . . . . . . . . . . . . . . . . 332A.2.6 JSSEExample.java . . . . . . . . . . . . . . . . . . . . . . . . . . . . . . . . . . . . . 335A.2.7 createASOSSL_User.sql . . . . . . . . . . . . . . . . . . . . . . . . . . . . . . . . 339
viii Experiences with Oracle Solutions on Linux for IBM System z
A.2.8 createJSSE_User.sql . . . . . . . . . . . . . . . . . . . . . . . . . . . . . . . . . . . 339
Appendix B. Shell script for CRS failover . . . . . . . . . . . . . . . . . . . . . . . . . 341B.1 viewCRSresources.sh. . . . . . . . . . . . . . . . . . . . . . . . . . . . . . . . . . . . . . . 342B.2 Oracle Clusterware Action Script (action_DB01.pl) . . . . . . . . . . . . . . . . 342B.3 setOracleCRSenv.sh . . . . . . . . . . . . . . . . . . . . . . . . . . . . . . . . . . . . . . . 344B.4 setOracleASMenv.sh . . . . . . . . . . . . . . . . . . . . . . . . . . . . . . . . . . . . . . . 347B.5 setOracleDBenv.sh . . . . . . . . . . . . . . . . . . . . . . . . . . . . . . . . . . . . . . . . . 349
Related publications . . . . . . . . . . . . . . . . . . . . . . . . . . . . . . . . . . . . . . . . . . 353IBM Redbooks . . . . . . . . . . . . . . . . . . . . . . . . . . . . . . . . . . . . . . . . . . . . . . . . 353Other publications . . . . . . . . . . . . . . . . . . . . . . . . . . . . . . . . . . . . . . . . . . . . . 353Online resources . . . . . . . . . . . . . . . . . . . . . . . . . . . . . . . . . . . . . . . . . . . . . . 354How to get Redbooks . . . . . . . . . . . . . . . . . . . . . . . . . . . . . . . . . . . . . . . . . . . 355Help from IBM . . . . . . . . . . . . . . . . . . . . . . . . . . . . . . . . . . . . . . . . . . . . . . . . 355
Index . . . . . . . . . . . . . . . . . . . . . . . . . . . . . . . . . . . . . . . . . . . . . . . . . . . . . . . 357
Contents ix

x Experiences with Oracle Solutions on Linux for IBM System z

Notices
This information was developed for products and services offered in the U.S.A.
IBM may not offer the products, services, or features discussed in this document in other countries. Consult your local IBM representative for information on the products and services currently available in your area. Any reference to an IBM product, program, or service is not intended to state or imply that only that IBM product, program, or service may be used. Any functionally equivalent product, program, or service that does not infringe any IBM intellectual property right may be used instead. However, it is the user's responsibility to evaluate and verify the operation of any non-IBM product, program, or service.
IBM may have patents or pending patent applications covering subject matter described in this document. The furnishing of this document does not give you any license to these patents. You can send license inquiries, in writing, to: IBM Director of Licensing, IBM Corporation, North Castle Drive, Armonk, NY 10504-1785 U.S.A.
The following paragraph does not apply to the United Kingdom or any other country where such provisions are inconsistent with local law: INTERNATIONAL BUSINESS MACHINES CORPORATION PROVIDES THIS PUBLICATION "AS IS" WITHOUT WARRANTY OF ANY KIND, EITHER EXPRESS OR IMPLIED, INCLUDING, BUT NOT LIMITED TO, THE IMPLIED WARRANTIES OF NON-INFRINGEMENT, MERCHANTABILITY OR FITNESS FOR A PARTICULAR PURPOSE. Some states do not allow disclaimer of express or implied warranties in certain transactions, therefore, this statement may not apply to you.
This information could include technical inaccuracies or typographical errors. Changes are periodically made to the information herein; these changes will be incorporated in new editions of the publication. IBM may make improvements and/or changes in the product(s) and/or the program(s) described in this publication at any time without notice.
Any references in this information to non-IBM Web sites are provided for convenience only and do not in any manner serve as an endorsement of those Web sites. The materials at those Web sites are not part of the materials for this IBM product and use of those Web sites is at your own risk.
IBM may use or distribute any of the information you supply in any way it believes appropriate without incurring any obligation to you.
Information concerning non-IBM products was obtained from the suppliers of those products, their published announcements or other publicly available sources. IBM has not tested those products and cannot confirm the accuracy of performance, compatibility or any other claims related to non-IBM products. Questions on the capabilities of non-IBM products should be addressed to the suppliers of those products.
This information contains examples of data and reports used in daily business operations. To illustrate them as completely as possible, the examples include the names of individuals, companies, brands, and products. All of these names are fictitious and any similarity to the names and addresses used by an actual business enterprise is entirely coincidental.
COPYRIGHT LICENSE:
This information contains sample application programs in source language, which illustrate programming techniques on various operating platforms. You may copy, modify, and distribute these sample programs in any form without payment to IBM, for the purposes of developing, using, marketing or distributing application programs conforming to the application programming interface for the operating platform for which the sample programs are written. These examples have not been thoroughly tested under all conditions. IBM, therefore, cannot guarantee or imply reliability, serviceability, or function of these programs.
© Copyright IBM Corp. 2009. All rights reserved. xi
Trademarks
IBM, the IBM logo, and ibm.com are trademarks or registered trademarks of International Business Machines Corporation in the United States, other countries, or both. These and other IBM trademarked terms are marked on their first occurrence in this information with the appropriate symbol (® or ™), indicating US registered or common law trademarks owned by IBM at the time this information was published. Such trademarks may also be registered or common law trademarks in other countries. A current list of IBM trademarks is available on the Web at http://www.ibm.com/legal/copytrade.shtml
The following terms are trademarks of the International Business Machines Corporation in the United States, other countries, or both:
AIX®CICS®DirMaint™DS6000™DS8000®ECKD™FICON®FlashCopy®GDPS®Geographically Dispersed
Parallel Sysplex™
HiperSockets™IBM®Parallel Sysplex®PR/SM™Processor Resource/Systems
Manager™RACF®Redbooks®Redbooks (logo) ®System p®System Storage™
System z10™System z9®System z®WebSphere®z/OS®z/VM®z9®zSeries®
The following terms are trademarks of other companies:
Novell, SUSE, the Novell logo, and the N logo are registered trademarks of Novell, Inc. in the United States and other countries.
Oracle, JD Edwards, PeopleSoft, Siebel, and TopLink are registered trademarks of Oracle Corporation and/or its affiliates.
Red Hat, and the Shadowman logo are trademarks or registered trademarks of Red Hat, Inc. in the U.S. and other countries.
J2EE, Java, JDBC, JDK, JNI, JVM, VIS, and all Java-based trademarks are trademarks of Sun Microsystems, Inc. in the United States, other countries, or both.
Windows, and the Windows logo are trademarks of Microsoft Corporation in the United States, other countries, or both.
UNIX is a registered trademark of The Open Group in the United States and other countries.
Linux is a trademark of Linus Torvalds in the United States, other countries, or both.
Other company, product, or service names may be trademarks or service marks of others.
xii Experiences with Oracle Solutions on Linux for IBM System z
Preface
Linux® for System z® offers many advantages to customers who rely upon the IBM® mainframe systems to run their businesses. Linux for System z takes advantage of the qualities of service in the System z hardware and in z/VM®, making it a robust industrial strength Linux. This provides an excellent platform for hosting Oracle® solutions that run in your enterprise.
This IBM Redbooks® publication describes experiences gained while installing and testing several Oracle solutions, such as:
� Setting up Red Hat® Enterprise Linux 5 for Oracle� Installing Oracle Data Vault� Using Grid Control to manage 10gR2 Databases� Using Oracle’s Maximum Availability Architecture best practices with IBM
System z
It also includes many general hints and tips for running Oracle products on IBM System z with Linux and z/VM.
Interested readers would include database consultants, installers, administrators, and system programmers. This is not meant to replace Oracle documentation, but to supplement it with our experiences while installing and using Oracle products.
The team that wrote this book
This book was produced by a team of specialists from around the world working at the International Technical Support Organization, Poughkeepsie Center.
Sam Amsavelu is a Certified Consulting IT Architect in the IBM Advanced Technical Support Organization supporting Oracle on System z Linux and Siebel® on System z customers. He has more than 25 years of IT experience in IBM products.
Kathryn Arrell is an Oracle Specialist at the IBM/Oracle International Competency Center at IBM San Mateo. Previously she worked as an ERP specialist at the ITSO in Poughkeepsie, New York.
Marc Connolly is a core technologist at Oracle Corporation supporting IBM customer needs with Oracle products. In general he supports Oracle's
© Copyright IBM Corp. 2009. All rights reserved. xiii
Linux-based core technology product set, which includes the database and related components, but in particular he specializes in Oracle's Fusion Middleware.
Dennis Dutcavich is a System z Oracle Specialist with the American sales division. Dennis is part of Sales and Distribution in the Americas. He is a Technical Sales Specialist supporting Linux on IBM System z presale opportunities.
Mike Ebbers is a Project Leader at the IBM ITSO in Poughkeepsie with 35 years of mainframe experience.
Terry Elliott is an IBM System z Specialist working in the IBM/Oracle International Competency Center at IBM San Mateo. He has over 30 years of experience in information technology. Before joining the IBM Oracle International Competency Center, Terry was an ERP System z Performance Specialist.
Brent Howe is an IBM System z Oracle/Siebel Specialist in the IBM/Oracle International Competency Center at IBM San Mateo.
David Simpson is a System z Oracle Specialist working for Advanced Technical Support (ATS) in the America's Sales and Distribution team. David previously worked for IBM Global Business Services hosting Oracle systems for consulting engagements.
Thanks to the following people for their contributions to this project:
Pat Blaney, IBM USGaylan Braselton, IBM USBruce Frank, IBM USRichard Lewis, IBM USNicolas Marescaux, IBM FranceTom Russell, IBM Canada
Roy Costa, IBM International Technical Support Organization, Poughkeepsie
Paul Bramy, OracleDavid Ong, Oracle
Brad Hinson, Red Hat
Become a published author
Join us for a two- to six-week residency program! Help write a book dealing with specific products or solutions, while getting hands-on experience with
xiv Experiences with Oracle Solutions on Linux for IBM System z
leading-edge technologies. You will have the opportunity to team with IBM technical professionals, Business Partners, and Clients.
Your efforts will help increase product acceptance and customer satisfaction. As a bonus, you will develop a network of contacts in IBM development labs, and increase your productivity and marketability.
Find out more about the residency program, browse the residency index, and apply online at:
ibm.com/redbooks/residencies.html
Comments welcome
Your comments are important to us!
We want our books to be as helpful as possible. Send us your comments about this book or other IBM Redbooks in one of the following ways:
� Use the online Contact us review Redbooks form found at:
ibm.com/redbooks
� Send your comments in an e-mail to:
� Mail your comments to:
IBM Corporation, International Technical Support OrganizationDept. HYTD Mail Station P0992455 South RoadPoughkeepsie, NY 12601-5400
Preface xv

xvi Experiences with Oracle Solutions on Linux for IBM System z
Part 1 Overview and Installation
In these chapters we provide information about the following topics:
� Why customers are running Oracle solutions on Linux for IBM System z
� Installing Oracle 10gR2 on Red Hat Enterprise Linux 5 Update 2 (5.2)
� Options for setting up IBM disk storage to be used with Oracle on Linux for System z
� Installing Oracle Datavault with the Oracle 10gR2 database
� Installing E-Business Suite R12 with the database on Linux on System z
� Installing PeopleSoft® with the database on Linux on System z
Part 1
© Copyright IBM Corp. 2009. All rights reserved. 1

2 Experiences with Oracle Solutions on Linux for IBM System z
Chapter 1. Why customers are choosing to use Oracle products on Linux on IBM System z
Many customers are running their Oracle products on Linux on IBM System z. This chapter provides a list of the top reasons why customers are doing that. The objective is to help you evaluate your environment to understand if these reasons could benefit you.
The many reasons customers chooses Linux on IBM system z for their mission critical applications or data servers can vary. The reasons are based on the advanced architecture of the IBM System z infrastructure which provides many high-availability advantages and unique characteristics. This chapter lists some of the key reasons. Your IBM representative can provide more detailed information.
1
© Copyright IBM Corp. 2009. All rights reserved. 3
1.1 Excellent virtualization capabilities of IBM System z
The solid virtualization capabilities of z/VM and System z are a key reason why running Oracle on System z is a popular solution.
z/VM provides highly flexible test and production environments for enterprises deploying database and e-business solutions.
z/VM helps enterprises meet their growing demands for multi-system server solutions with a broad range of support for operating system environments including z/OS® and Linux on System z.
z/VM offers the following:
� Mature technology
VM/370, introduced in 1972, enhanced and significantly expanded for Linux in recent years.
� Software Hypervisor integrated in hardware
– Sharing of CPU, memory, and I/O resources– Virtual network – virtual switches and routers – Virtual I/O (mini-disks, virtual cache, and so on)– Virtual appliances (SNA/NCP, and so on)
� Easy management
– Fast provisioning of preinstalled and configured Linux images. This can be accomplished in minutes instead of days or weeks.
– No additional space, electric connections, or network cables.– Compatible with the data center practice of standardizing on strategic
software stacks with consistent levels and patches.
The capability to rapidly deploy Linux guests with Oracle databases is used by many customers in their infrastructure simplification strategy.
1.2 Ability to exploit existing disaster recovery plans
For most customers running on System z there are well established business processes and disciplines for disaster recovery and business resiliency already
Resource: For a discussion of the benefits of virtualization on System z, see Using IBM Virtualization to Manage Cost and Efficiency at:
http://www.redbooks.ibm.com/abstracts/redp4527.html/
4 Experiences with Oracle Solutions on Linux for IBM System z
in place in their organization. Oracle solutions on the mainframe can easily fit into the disaster recovery infrastructure that is already in place for the mainframe.
This reason has been mentioned by many customers as one of the key reasons they moved their Oracle databases to Linux on z.
1.3 Security provided by IBM System z
The IBM System z and the z/VM software continue to offer a secure environment to run mission-critical applications with features such as:
� Integrated cryptographic accelerator
– Advanced Encryption Standard (AES) 192 and 256 – Stronger hash algorithm with Secure Hash Algorithm (SHA-512)
� Tamper-resistant Crypto Express2 feature
– Supports high levels of security for demanding applications– Fully programmable and configurable– Highly scalable performance for SSL transactions
� Trusted Key Entry (TKE) 5.2 with optional Smart Card reader
� IBM LPARs have been certified to the security level of Evaluation Assurance Level 5 (EAL5)
� z/VM has achieved the EAL 4+ level of certification
The z/VM Control Program has the ability to operate without interference or harm, intentional or not, from guest virtual machines. It ensures the inability of a virtual machine to circumvent system security features and access controls and the ability of the Control Program to protect virtual machines from each other, which is all done with the help of System z hardware and firmware.
Security is maintained by knowing who is accessing the system or its resources, ensuring a user has access only to system resources specifically permitted and knowing who is accessing (or failing to access) what resources while providing an audit trail.
The security of the mainframe z/VM V5.3 RACF® feature has been repackaged and is now called “RACF Security Server for z/VM”. It operates with z/VM V5.3 or above to provide increased password security for words and password phrases.
The security features provided with PR/SM™, RACF for z/VM, along with Oracle Database Security features offer the most secure environment to run database applications.
Chapter 1. Why customers are choosing to use Oracle products on Linux on IBM System z 5
1.4 High availability features provided by IBM System z
Oracle's Maximum Availability Architecture can be used to compliment the high-availability features of the mainframe. This topic is explored in more detail in Chapter 13, “Components for providing high availability for Oracle on Linux on IBM System Z” on page 243.
1.5 Green features of IBM System z
These are some of the “green” features of the mainframe:
� Distributed servers often run at average utilization levels in the range of 5% to 20%.
– Production servers, development servers, test servers
� Virtualization and workload management enable standardization and consolidation on the mainframe.
– Run multiple images on fewer processors – Achieve utilization levels of 85% or more
� Become lean and green through IT consolidation and infrastructure simplification, as illustrated in Figure 1-1.
6 Experiences with Oracle Solutions on Linux for IBM System z

Figure 1-1 Server Farm to Lean Green Data Center
For example, z/VM enables you to create a virtual machine for short-term Oracle Database use (for example if a DBA needs to resolve a unique problem or handle a specific test and then recycle the resources back to the pool when completed rather than installing and de-installing a physical box).
1.5.1 The IBM Project Big Green
IBM will consolidate thousands of servers onto approximately 30 IBM System z mainframes. We expect substantial savings in multiple dimensions: energy, software, and system support costs. One major proof point of the Project Big Green initiative is that the consolidated environment will use 80% less energy.
Chapter 1. Why customers are choosing to use Oracle products on Linux on IBM System z 7
This transformation is enabled by the sophisticated virtualization capability of System z. For more information, go to:
http://www-304.ibm.com/jct03001c/press/us/en/presskit/21440.wss
1.6 Ease of interfacing with traditional data
For over 40 years many companies’ mission-critical data has been stored in the mainframe. By running Oracle solutions on Linux on z, the interface to this heritage data is easy and efficient to handle. The use of hipersockets enables speedy access to this data.
1.7 Increased performance and scalability capabilities of z10
z10 has delivered increased performance on the mainframe for applications that need more performance capability.
Performance levels of the New Enterprise Quad Core z10 processor chip are provided by:
� Chips of 4.4 GHz—additional throughput means improved price/performance� Cache rich environment optimized for data serving� 50+ instructions added to improve compiled code efficiency
Scalability is now availability at new levels:
� System z10™ EC scales to 64 application processors� System z10 BC scales to 10 application processors� System z9® EC scales to 54 application processors� Up to 11 (z10 EC), 8 (z9 EC) dedicated I/O processors � From hundreds to thousands of Linux virtual servers
For example, one customer is today running a single Oracle Database on a 54-way z9 while another is running over 300 small databases on five IFLs.
1.8 Specialty engines available on IBM System z
Cost savings are significant based on the Linux Specialty Engine:
� IFL processors for Linux are additional engines dedicated to Linux workloads:
8 Experiences with Oracle Solutions on Linux for IBM System z

– Support z/VM and Linux on System z– IFL processors run at “full speed”
• z9 EC, z9 BC, z10 EC, z10 BC, z9 EC, z9 BC, z800, z890
� Traditional IBM and Independent Software Vendor (ISV) mainframe software charges are unaffected.
� Linux and z/VM charged only against the IFLs.
1.9 End to end solution for dynamic infrastructure data center
The dynamic infrastructure data center is the data center of the future. This is driven by the need for greater energy efficiency, which is a global issue with significant impact today and will have an even greater impact in the future.
Data center design must change. Technology and business growth uncertainty and rising costs drive the need for a new approach.
� IT efficiency enables energy efficiency.
� IT and facilities must work together.
Energy efficiency is a key metric to evaluate overall IT operational efficiency.
The dynamic infrastructure data center is an evolutionary new model for efficient IT delivery that includes the following:
� New economics - Virtualization with optimized systems and networks to break the lock between IT resources and business services.
� Rapid service delivery - Service management enables visibility, control and automation to deliver quality service at any scale.
� Aligned with business goals - Real-time integration of transactions, information, and analytics, and delivery of IT as a service.
1.10 Cost savings
All the above contribute to the cost savings achieved by running Oracle solutions on the mainframe.
Some examples of potential savings are:
� Deploying virtual servers can reduce hardware requirements, which may result in savings when purchasing, installing, and configuring new hardware.
Chapter 1. Why customers are choosing to use Oracle products on Linux on IBM System z 9
� Fewer hardware servers occupy less space, which may result in savings on raised floor requirements, heating, cooling, and electricity.
� Virtual servers can be created in minutes, which can help reduce cost and time associated with planning for new business requirements.
� Sharing operating systems and application code between virtual servers can save on software costs, systems management, and staffing.
� System management tools are delivered as part of the system, which can help avoid the cost of additional software to perform these tasks.
� Network costs may be reduced since virtual servers communicate using HiperSockets™ or VM guest LANs, and virtual channel-to-channel adapters.
� Oracle’s multicore pricing applies to IBM System z10.
Because of these savings, Oracle on System z offers the best TCO with the best service level.
1.11 Customer scenarios
There are many examples of customers running Oracle Databases on Linux on System z. Here are some typical scenarios:
� High availability mission-critical database - in production for four years with no unplanned outages
� Large databases for OLTP - large 5 TB database on 50 IFLS
� Large databases for Data Warehouse - 2 to 3 TB DW database
� Many small databases with simplified infrastructure
– 300 databases on five z9 IFLS– 400 virtual servers on 14 z9 IFLS– 85 virtual servers on 10 z9 IFLs
� Oracle RAC implementations for availability and scalability
– RAC with WebSphere® portal on two z9s– 4-node RAC for 25TB DB for DW on z9
1.12 Summary
IBM System z brings the following advantages to Oracle and Linux:
� The most reliable hardware platform available
10 Experiences with Oracle Solutions on Linux for IBM System z

– Redundant processors and memory– Error detection and correction– Remote Support Facility (RSF)– Non-disruptive hardware updates
� Centralized Linux systems are easier to manage.
� Designed to support mixed workloads.
– Allows consolidation while maintaining one server per application.– Complete workload isolation.– High-speed inter-server connectivity.
� Massively scale your workload on a single System z mainframe.
– Host many Linux virtual machines on z/VM.– Each virtual machine on z/VM can access up to 24,576 devices.– System z10 EC scales to 64 application processors.– System z9 EC scales to 54 application processors.– Up to 11 (z10 EC), 8 (z9 EC) dedicated I/O processors. – z/VM is designed to support more than 1 TB of active virtual memory.
� The legendary IBM mainframe—IBM System z
– Legendary dependability– Extremely security-rich
• Highest security classification for general purpose servers. • System z LPAR technology is EAL 5 certified.
– Designed for multiple diverse workloads executing concurrently– Proven high volume data acquisition and management
� System z offers the ultimate in virtualization:
– Virtualize everything with very high levels of utilization• CPU, memory, network, I/O, cryptographic features, Coupling Facility
– z/VM• Support for large real memory and 32 processors• Enhanced security and LDAP server/client• Enhanced memory management for Linux guests• Enhanced management functions for Linux
� The open standards operating system—Linux for System z
– Reliable, stable, security-rich– Available from multiple distributors– Plentiful availability of skilled administrators and developers– Large selection of applications, middleware, and tooling from IBM, ISVs
and Open Source
Chapter 1. Why customers are choosing to use Oracle products on Linux on IBM System z 11
1.13 Oracle solutions available on IBM System z
Oracle has three main families of products available on IBM System z:
� Oracle Database Server
� Oracle Fusion Middleware
� Oracle Application Suites (DB Tier on z):
– Oracle E-Business Suite – Oracle's PeopleSoft Enterprise– Oracle's Siebel applications
The availability of Oracle products on each Linux distribution is constantly changing. The official certification information is posted in the certify section on:
http://www.otn.oracle.com/support/metalink/content.html
For other information, go to:
http://w3-03.ibm.com/support/techdocs/atsmastr.nsf/WebIndex/WP101298http://www-03.ibm.com/systems/z/os/linux/
12 Experiences with Oracle Solutions on Linux for IBM System z
Chapter 2. Installing Red Hat Enterprise Linux 5 Linux on IBM System z for Oracle products
This chapter provides the steps to install a Red Hat Enterprise Linux 5 guest to support an Oracle 10gR2 Database and other Oracle products. We assume that you are performing a new installation, not updating a Red Hat Enterprise Linux 4 and Oracle 10.2.0.3 database.
Note: Oracle certified Oracle Database 10.2.0.4 on Red Hat Enterprise Linux 5 in 4Q 2008.
2
© Copyright IBM Corp. 2009. All rights reserved. 13

2.1 Introduction
Before beginning this process, ensure that z/VM guest Directory entries have been prepared and the user is able to log in to z/VM and use CMS. The Red Hat installation process has two major steps,
� Stage 1 - Initiate the Red Hat bootstrap loader
� Stage 2 - Install Red Hat Enterprise Linux
2.2 Perform Stage 1 of the installation
In this section, you will perform Stage 1 of the Red Hat install. This process starts the Red Hat bootstrap loader system. The bootstrap process includes the completion of the following tasks:
� Defining the network interface cards
� Defining the PARM and CONF files
Note: There is an alternative to using PARM and CONF files that is covered in 2.4, “Alternative to using PARM and CONF files” on page 40.
� Defining the EXEC and beginning Stage 1 of the installation
� Punching and IPLing the Red Hat reader images
� Connecting to the installation images (this installation uses NFS)
� Making the VNC connection to perform the next Red Hat Enterprise Linux 5 stage of the installation
2.2.1 Define the network interface cards
The installation requires that the guest have a network interface defined. Under z/VM, this is most commonly done by defining a virtual Network Interface Card (NIC) and a VSWITCH. The NIC is then coupled to the VSWITCH. The NIC is defined in the z/VM user definition, displayed in Figure 2-1, in the NICDEF entry.
14 Experiences with Oracle Solutions on Linux for IBM System z

Figure 2-1 z/VM user definition
2.2.2 Define the PARM and CONF files
The installation needs kernel parameters and network definitions to complete successfully. The two methods available are: Defining the parameters dynamically as you do the install as described in 2.4, “Alternative to using PARM and CONF files” on page 40, or create a PARM file containing kernel parameters and a CONF file containing network and disk parameters. Though not required, this is strongly recommended.
Sample PARM and CONF files are shown in Example 2-1 and Example 2-2.
Example 2-1 PARM file
Sample RH5U2 PARM file:
ramdisk_size=40000 root=/dev/ram0 ro ip=off CMSDASD=191 CMSCONFFILE=RHU2.CONF vnc
Example 2-2 RH5U2 CONF file
Sample RH5U2 CONF file:
DASD=200,300 HOSTNAME=lhotse.us.oracle.com NETTYPE=qeth IPADDR=130.35.55.1 SUBCHANNELS=0.0.0480,0.0.0481,0.0.0482 NETWORK=130.35.52.0 NETMASK=255.255.252.0
Chapter 2. Installing Red Hat Enterprise Linux 5 Linux on IBM System z for Oracle products 15
SEARCHDNS=us.oracle.com BROADCAST=130.35.52.255 GATEWAY=130.35.52.1 DNS=130.35.249.41 MTU=1500 PORTNAME=UNASSIGNED LAYER2=0
The values in bold should be changed to work in your environment; however, the overall format of the CONF file should not change. The SUBCHANNELS parameter defines the subchannel addresses for the NIC. LAYER2=0 is used because the VSWITCH is operating in Layer 3 (IP) mode. If the VSWITCH is operating in Layer 2 (ETH) mode, you should set LAYER2=1 and VSWITCH=1. If you are unsure, you should check with the network administrator. For more information on this parameter, see the following article:
http://kbase.redhat.com/faq/FAQ_69_12554.shtm
2.2.3 Define the EXEC and begin Stage 1 of the installation
This section assumes that the Red Hat Enterprise Linux 5 installation tree is available via FTP. From z/VM, log in as the user and transfer the kernel and initial RAMdisk image (initrd) necessary to begin the install. Be sure to set the logical record length to 80 before transferring the kernel and initrd (LOCSITE FIX 80 if FTPing from z/VM, or SITE FIX 80 if FTPing to z/VM).
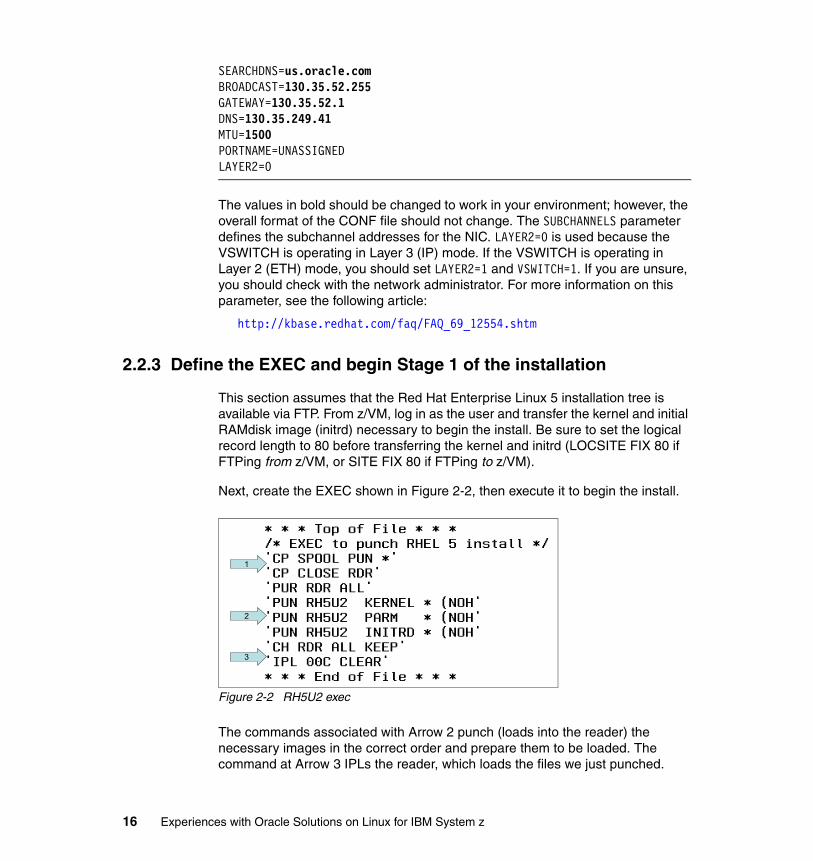
Next, create the EXEC shown in Figure 2-2, then execute it to begin the install.
Figure 2-2 RH5U2 exec
The commands associated with Arrow 2 punch (loads into the reader) the necessary images in the correct order and prepare them to be loaded. The command at Arrow 3 IPLs the reader, which loads the files we just punched.
1
2
3
16 Experiences with Oracle Solutions on Linux for IBM System z
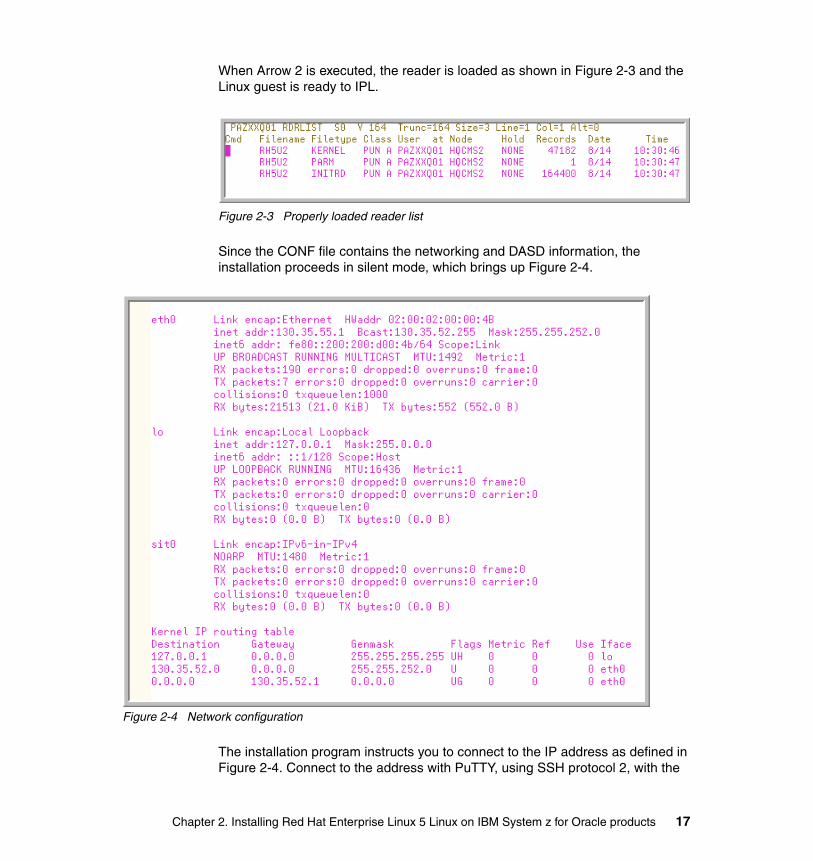
When Arrow 2 is executed, the reader is loaded as shown in Figure 2-3 and the Linux guest is ready to IPL.
Figure 2-3 Properly loaded reader list
Since the CONF file contains the networking and DASD information, the installation proceeds in silent mode, which brings up Figure 2-4.
Figure 2-4 Network configuration
The installation program instructs you to connect to the IP address as defined in Figure 2-4. Connect to the address with PuTTY, using SSH protocol 2, with the
Chapter 2. Installing Red Hat Enterprise Linux 5 Linux on IBM System z for Oracle products 17
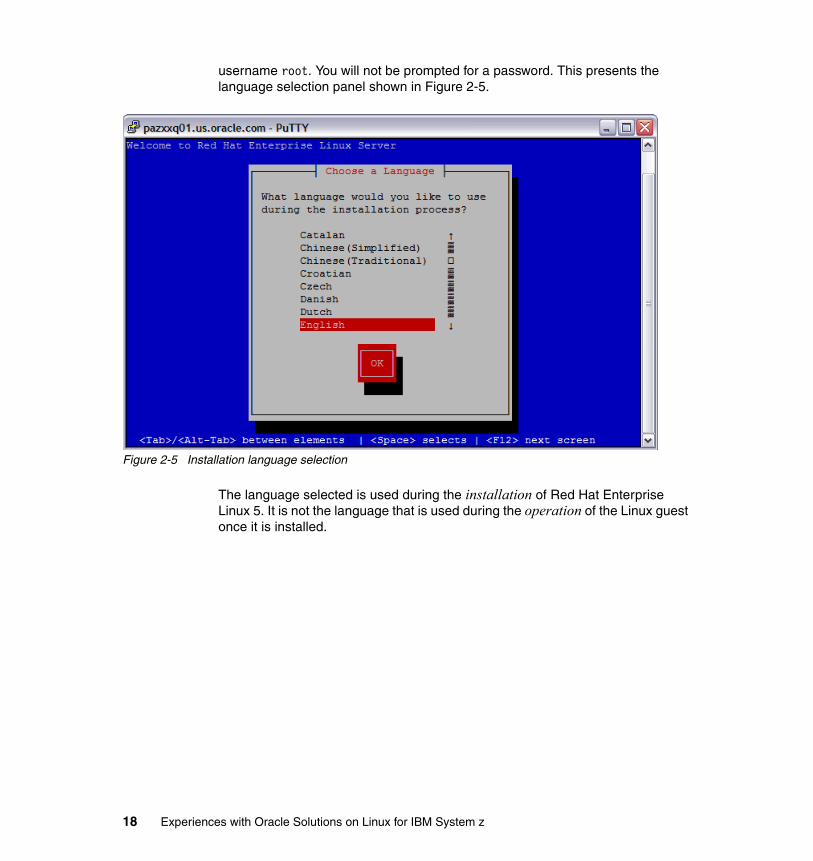
username root. You will not be prompted for a password. This presents the language selection panel shown in Figure 2-5.
Figure 2-5 Installation language selection
The language selected is used during the installation of Red Hat Enterprise Linux 5. It is not the language that is used during the operation of the Linux guest once it is installed.
18 Experiences with Oracle Solutions on Linux for IBM System z
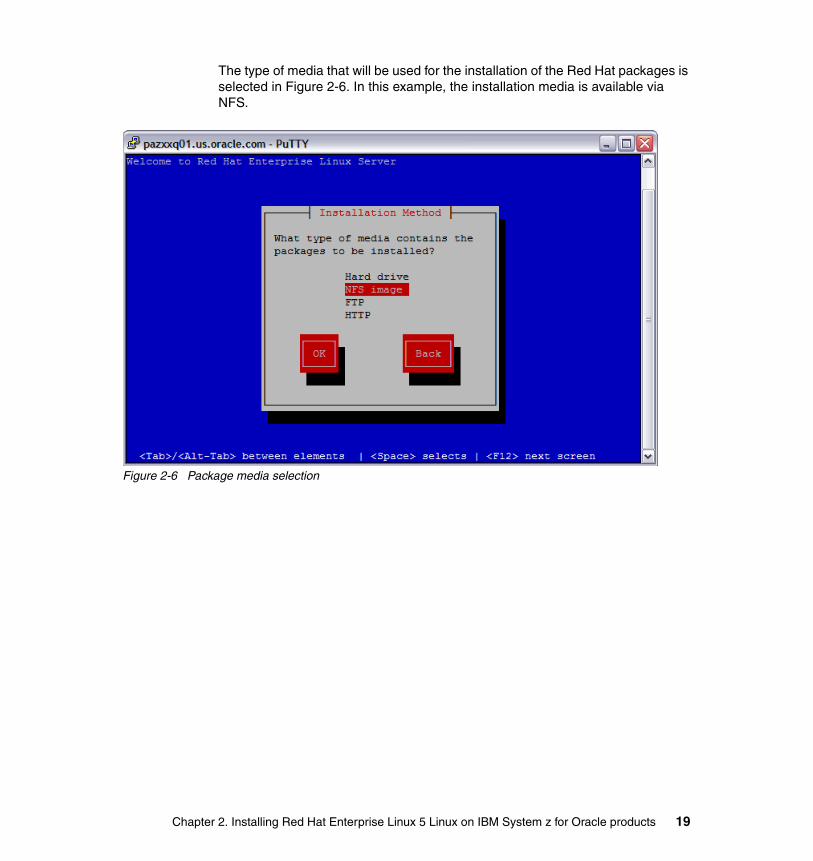
The type of media that will be used for the installation of the Red Hat packages is selected in Figure 2-6. In this example, the installation media is available via NFS.
Figure 2-6 Package media selection
Chapter 2. Installing Red Hat Enterprise Linux 5 Linux on IBM System z for Oracle products 19
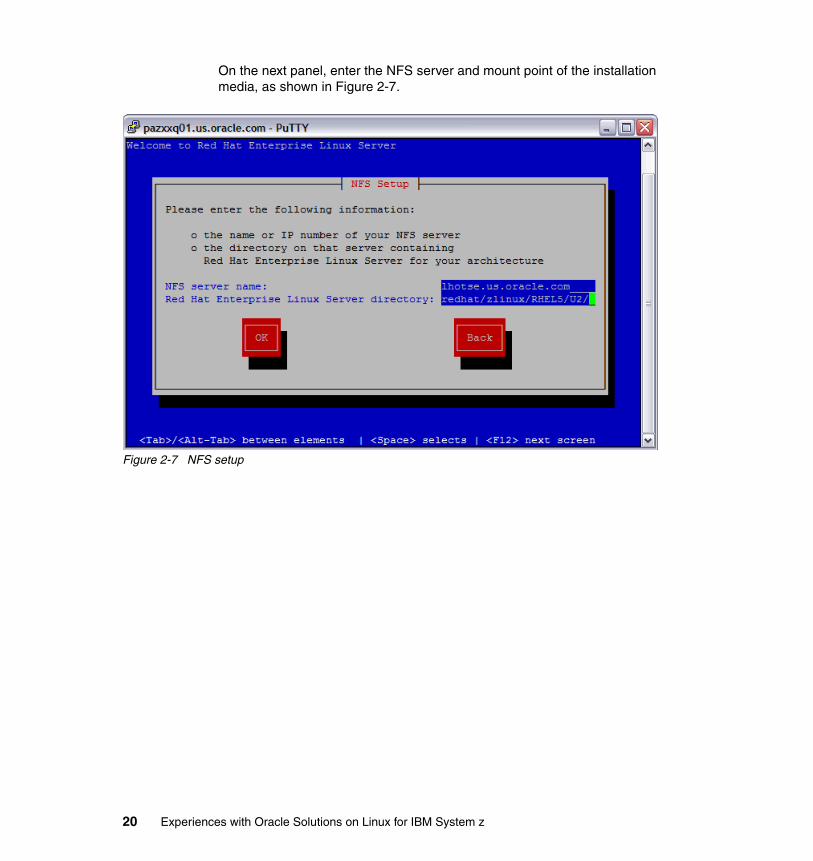
On the next panel, enter the NFS server and mount point of the installation media, as shown in Figure 2-7.
Figure 2-7 NFS setup
20 Experiences with Oracle Solutions on Linux for IBM System z
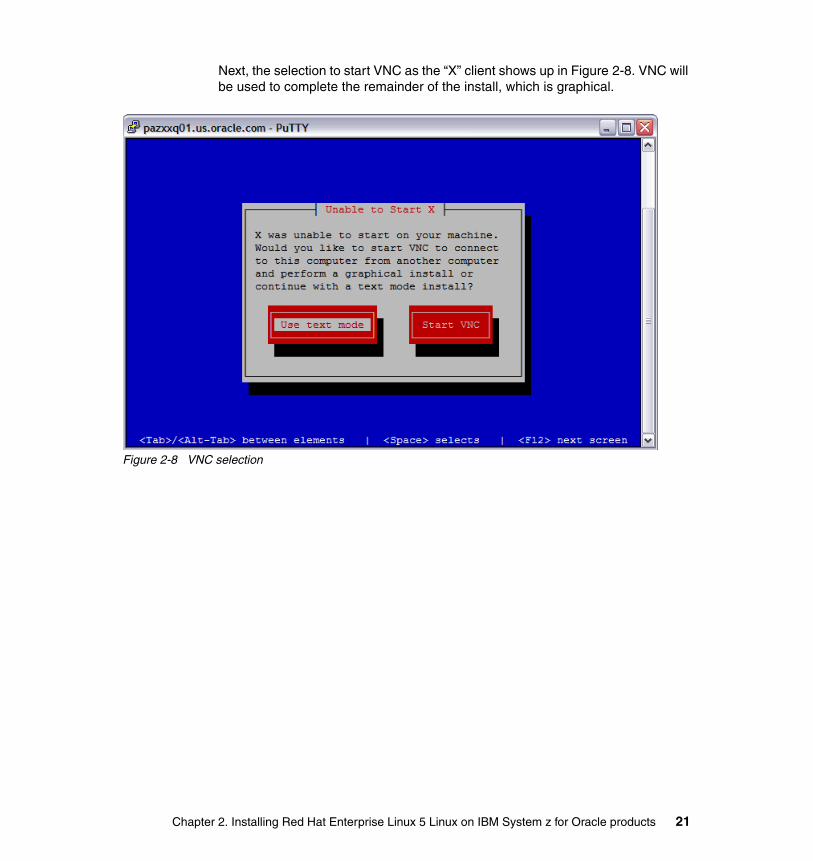
Next, the selection to start VNC as the “X” client shows up in Figure 2-8. VNC will be used to complete the remainder of the install, which is graphical.
Figure 2-8 VNC selection
Chapter 2. Installing Red Hat Enterprise Linux 5 Linux on IBM System z for Oracle products 21
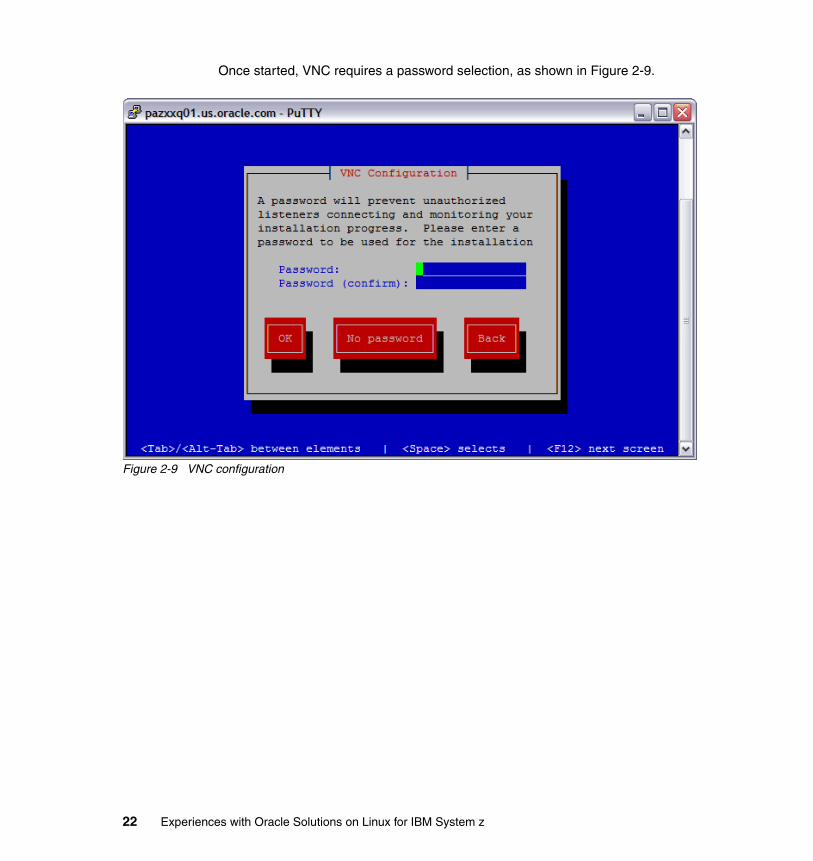
Once started, VNC requires a password selection, as shown in Figure 2-9.
Figure 2-9 VNC configuration
22 Experiences with Oracle Solutions on Linux for IBM System z
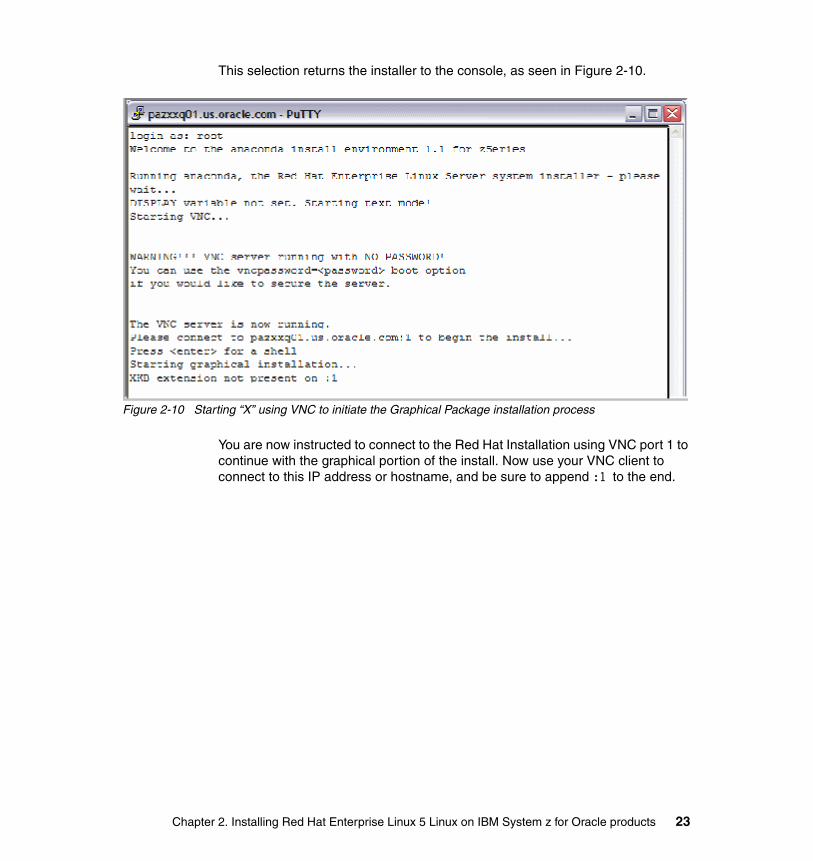
This selection returns the installer to the console, as seen in Figure 2-10.
Figure 2-10 Starting “X” using VNC to initiate the Graphical Package installation process
You are now instructed to connect to the Red Hat Installation using VNC port 1 to continue with the graphical portion of the install. Now use your VNC client to connect to this IP address or hostname, and be sure to append :1 to the end.
Chapter 2. Installing Red Hat Enterprise Linux 5 Linux on IBM System z for Oracle products 23
2.3 Stage 2 of the installation
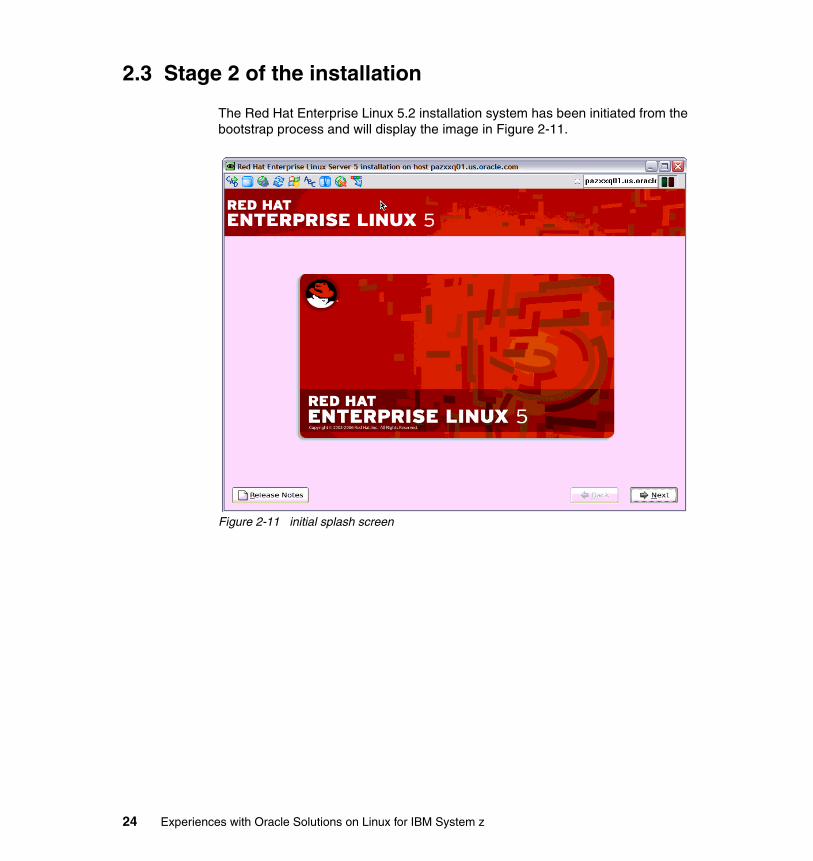
The Red Hat Enterprise Linux 5.2 installation system has been initiated from the bootstrap process and will display the image in Figure 2-11.
Figure 2-11 initial splash screen
24 Experiences with Oracle Solutions on Linux for IBM System z
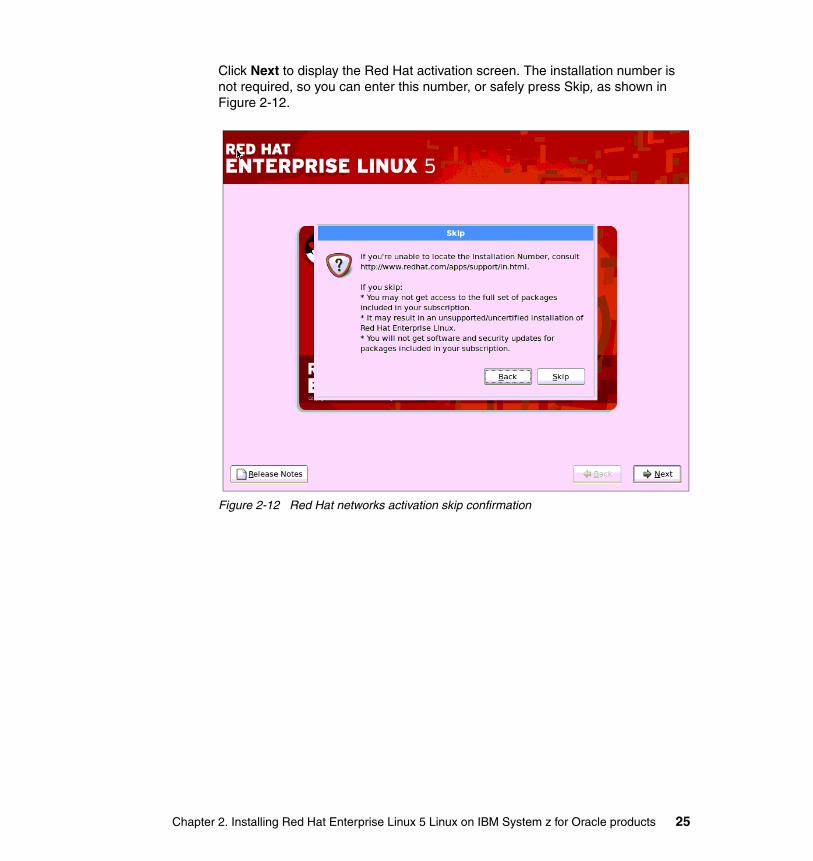
Click Next to display the Red Hat activation screen. The installation number is not required, so you can enter this number, or safely press Skip, as shown in Figure 2-12.
Figure 2-12 Red Hat networks activation skip confirmation
Chapter 2. Installing Red Hat Enterprise Linux 5 Linux on IBM System z for Oracle products 25
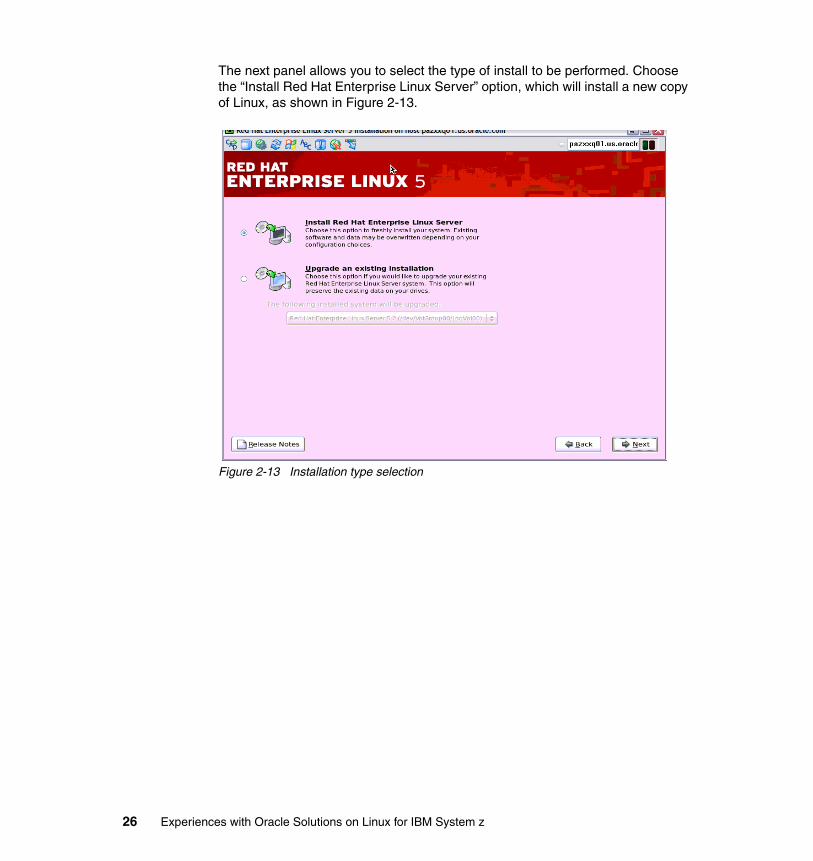
The next panel allows you to select the type of install to be performed. Choose the “Install Red Hat Enterprise Linux Server” option, which will install a new copy of Linux, as shown in Figure 2-13.
Figure 2-13 Installation type selection
26 Experiences with Oracle Solutions on Linux for IBM System z
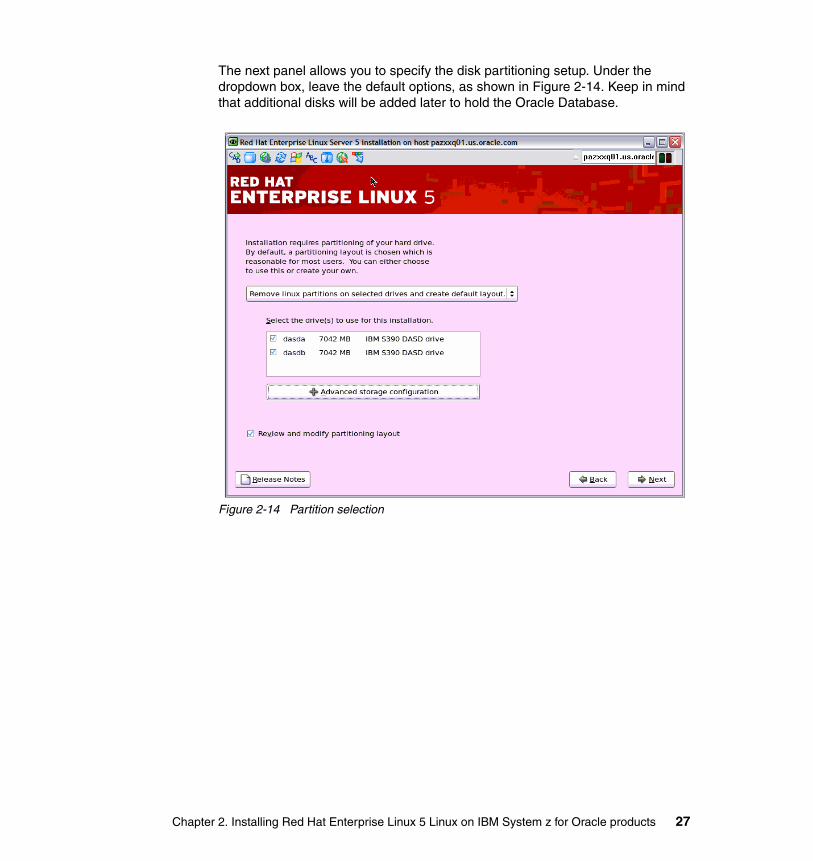
The next panel allows you to specify the disk partitioning setup. Under the dropdown box, leave the default options, as shown in Figure 2-14. Keep in mind that additional disks will be added later to hold the Oracle Database.
Figure 2-14 Partition selection
Chapter 2. Installing Red Hat Enterprise Linux 5 Linux on IBM System z for Oracle products 27
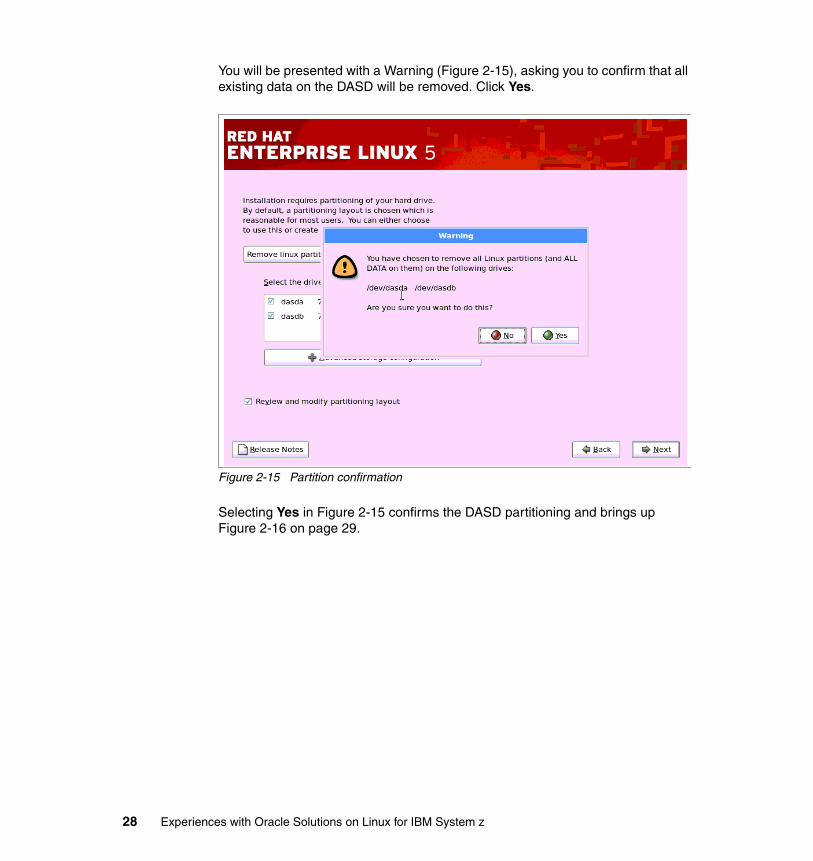
You will be presented with a Warning (Figure 2-15), asking you to confirm that all existing data on the DASD will be removed. Click Yes.
Figure 2-15 Partition confirmation
Selecting Yes in Figure 2-15 confirms the DASD partitioning and brings up Figure 2-16 on page 29.
28 Experiences with Oracle Solutions on Linux for IBM System z
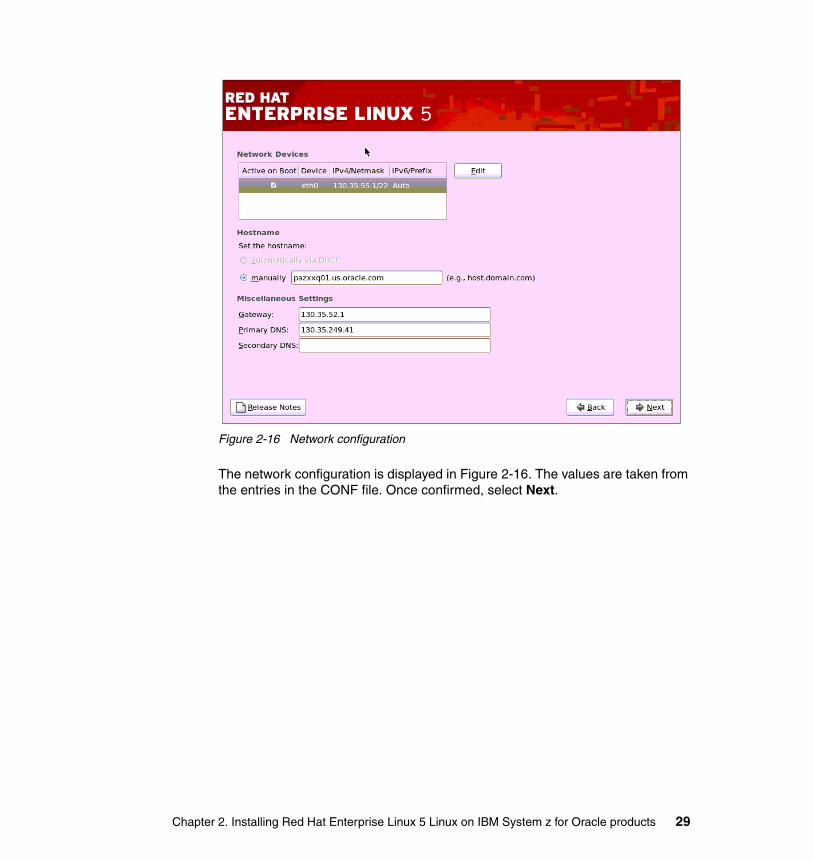
Figure 2-16 Network configuration
The network configuration is displayed in Figure 2-16. The values are taken from the entries in the CONF file. Once confirmed, select Next.
Chapter 2. Installing Red Hat Enterprise Linux 5 Linux on IBM System z for Oracle products 29
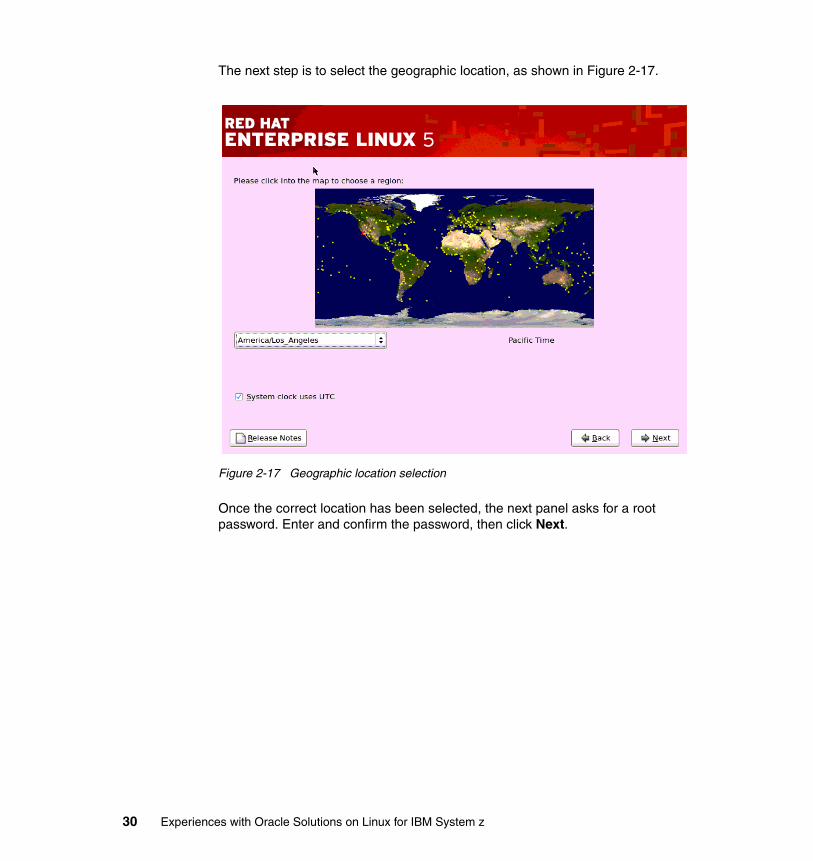
The next step is to select the geographic location, as shown in Figure 2-17.
Figure 2-17 Geographic location selection
Once the correct location has been selected, the next panel asks for a root password. Enter and confirm the password, then click Next.
30 Experiences with Oracle Solutions on Linux for IBM System z
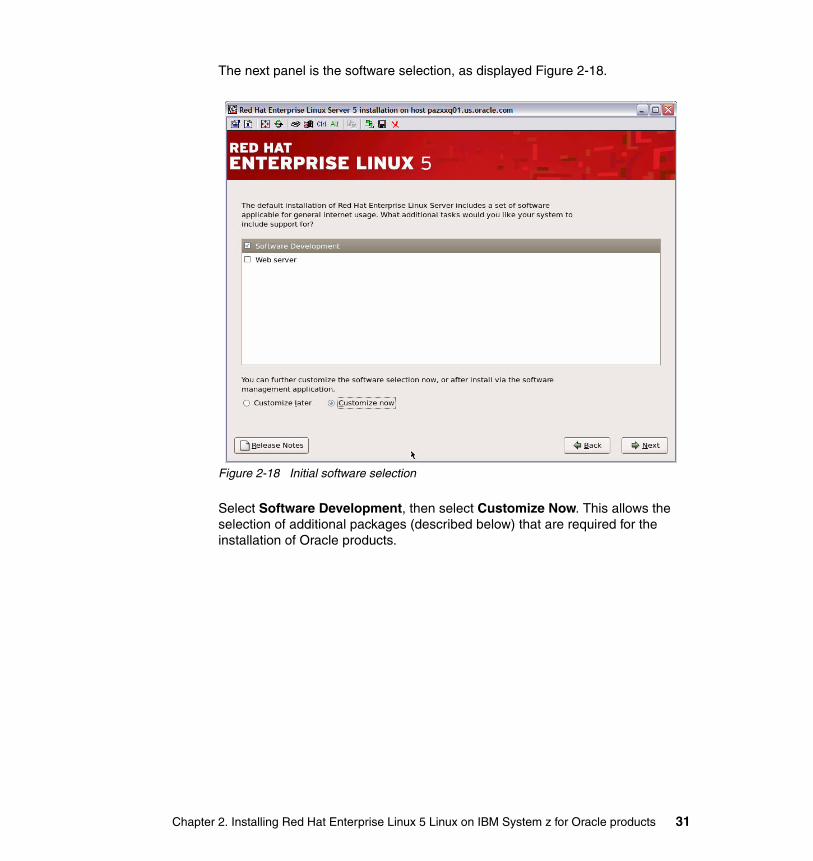
The next panel is the software selection, as displayed Figure 2-18.
Figure 2-18 Initial software selection
Select Software Development, then select Customize Now. This allows the selection of additional packages (described below) that are required for the installation of Oracle products.
Chapter 2. Installing Red Hat Enterprise Linux 5 Linux on IBM System z for Oracle products 31
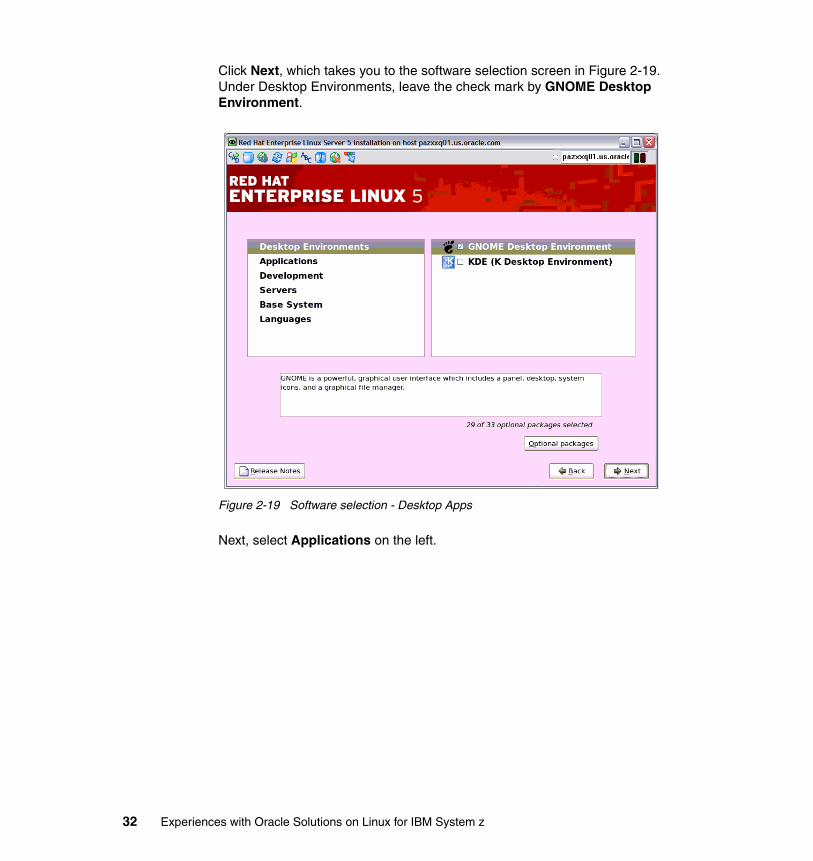
Click Next, which takes you to the software selection screen in Figure 2-19. Under Desktop Environments, leave the check mark by GNOME Desktop Environment.
Figure 2-19 Software selection - Desktop Apps
Next, select Applications on the left.
32 Experiences with Oracle Solutions on Linux for IBM System z
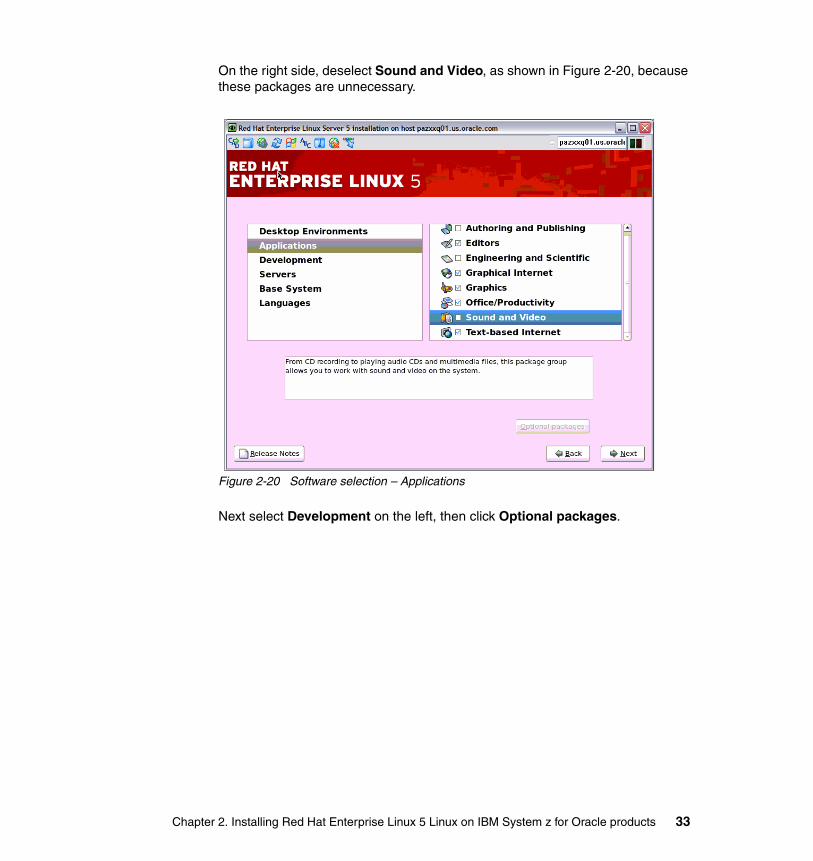
On the right side, deselect Sound and Video, as shown in Figure 2-20, because these packages are unnecessary.
Figure 2-20 Software selection – Applications
Next select Development on the left, then click Optional packages.
Chapter 2. Installing Red Hat Enterprise Linux 5 Linux on IBM System z for Oracle products 33
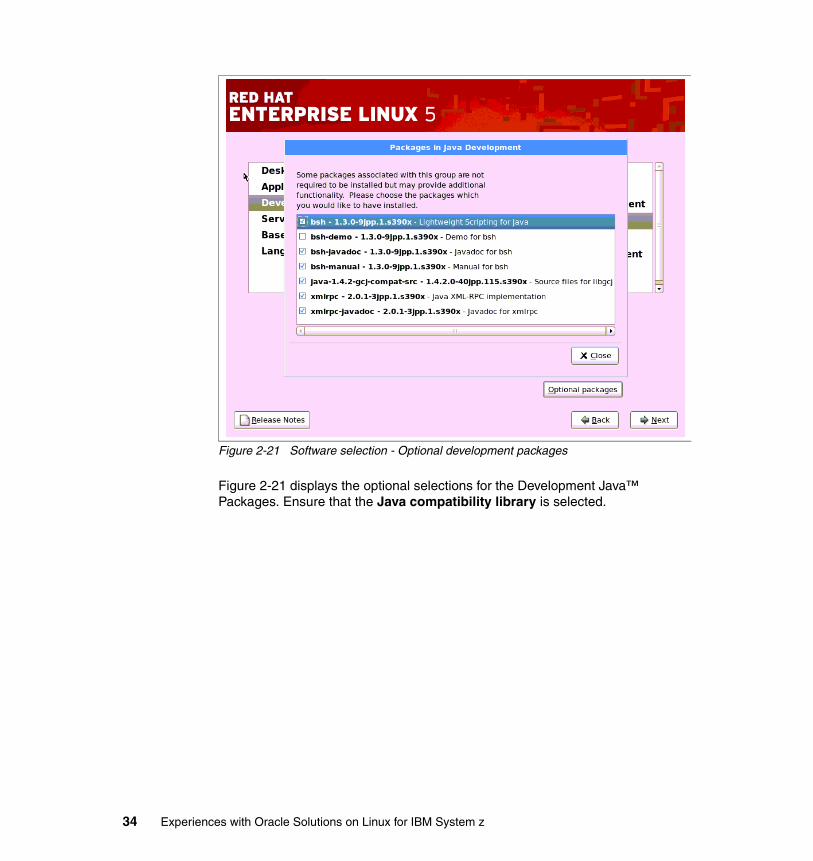
Figure 2-21 Software selection - Optional development packages
Figure 2-21 displays the optional selections for the Development Java™ Packages. Ensure that the Java compatibility library is selected.
34 Experiences with Oracle Solutions on Linux for IBM System z
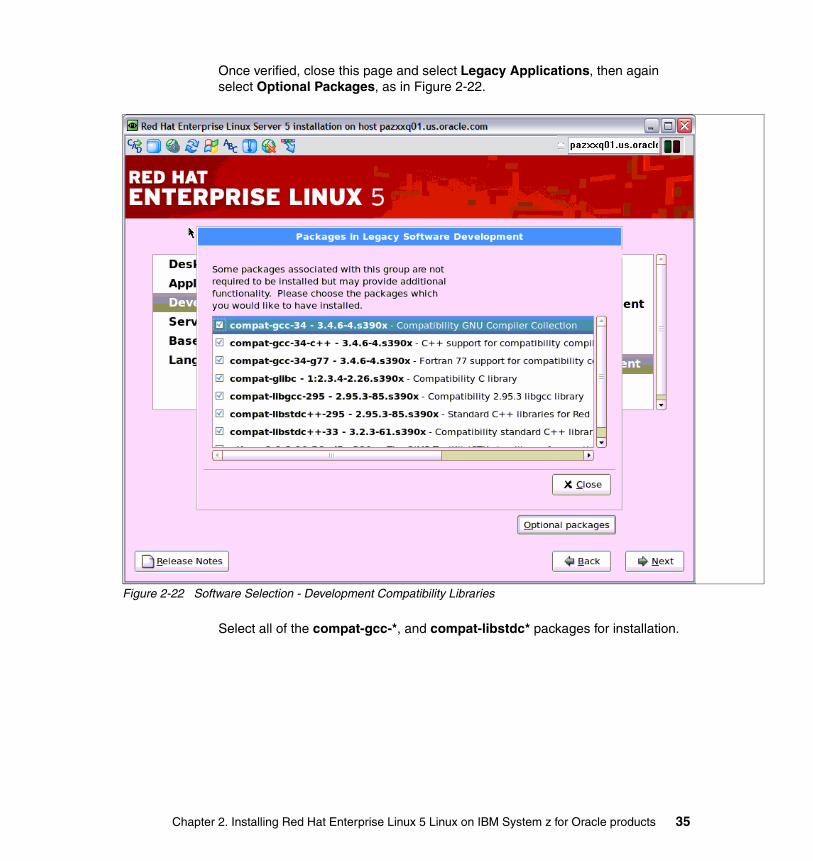
Once verified, close this page and select Legacy Applications, then again select Optional Packages, as in Figure 2-22.
Figure 2-22 Software Selection - Development Compatibility Libraries
Select all of the compat-gcc-*, and compat-libstdc* packages for installation.
Chapter 2. Installing Red Hat Enterprise Linux 5 Linux on IBM System z for Oracle products 35
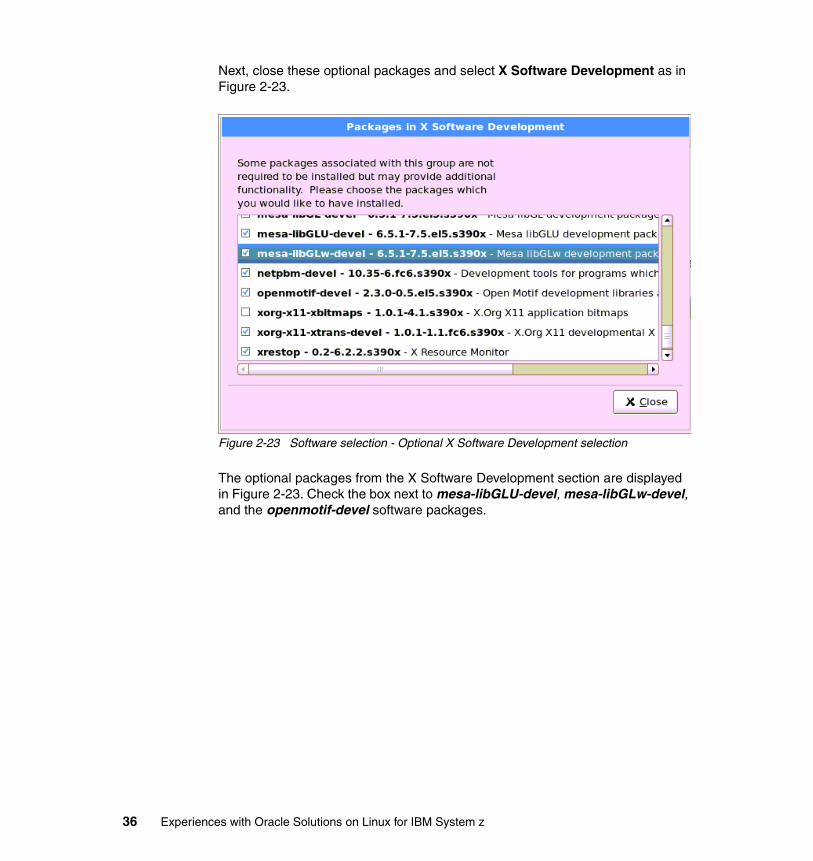
Next, close these optional packages and select X Software Development as in Figure 2-23.
Figure 2-23 Software selection - Optional X Software Development selection
The optional packages from the X Software Development section are displayed in Figure 2-23. Check the box next to mesa-libGLU-devel, mesa-libGLw-devel, and the openmotif-devel software packages.
36 Experiences with Oracle Solutions on Linux for IBM System z
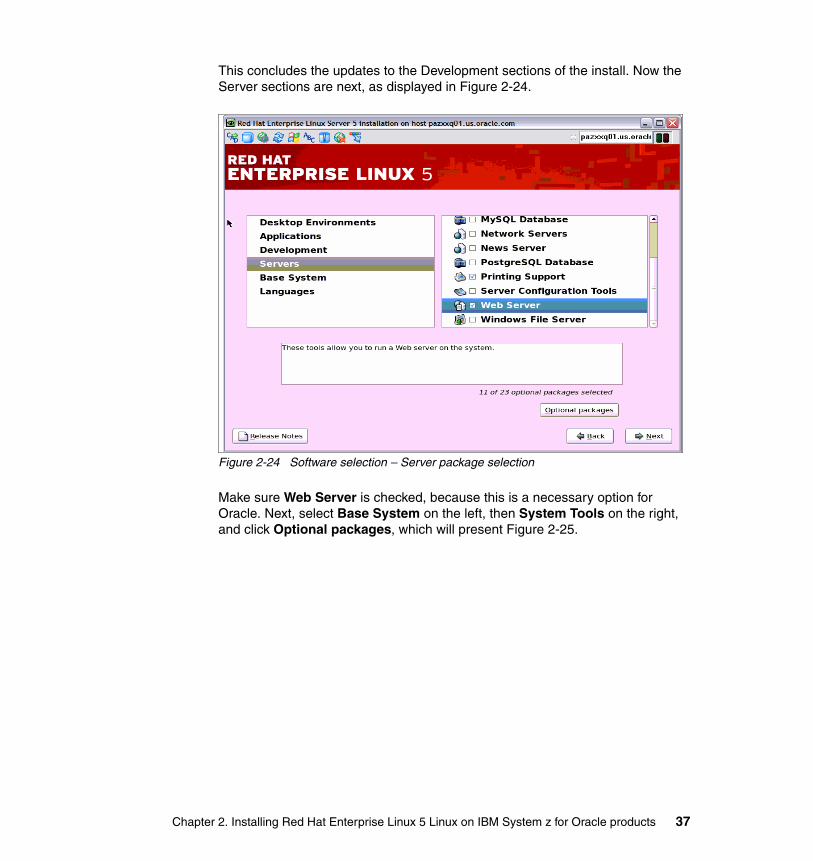
This concludes the updates to the Development sections of the install. Now the Server sections are next, as displayed in Figure 2-24.
Figure 2-24 Software selection – Server package selection
Make sure Web Server is checked, because this is a necessary option for Oracle. Next, select Base System on the left, then System Tools on the right, and click Optional packages, which will present Figure 2-25.
Chapter 2. Installing Red Hat Enterprise Linux 5 Linux on IBM System z for Oracle products 37
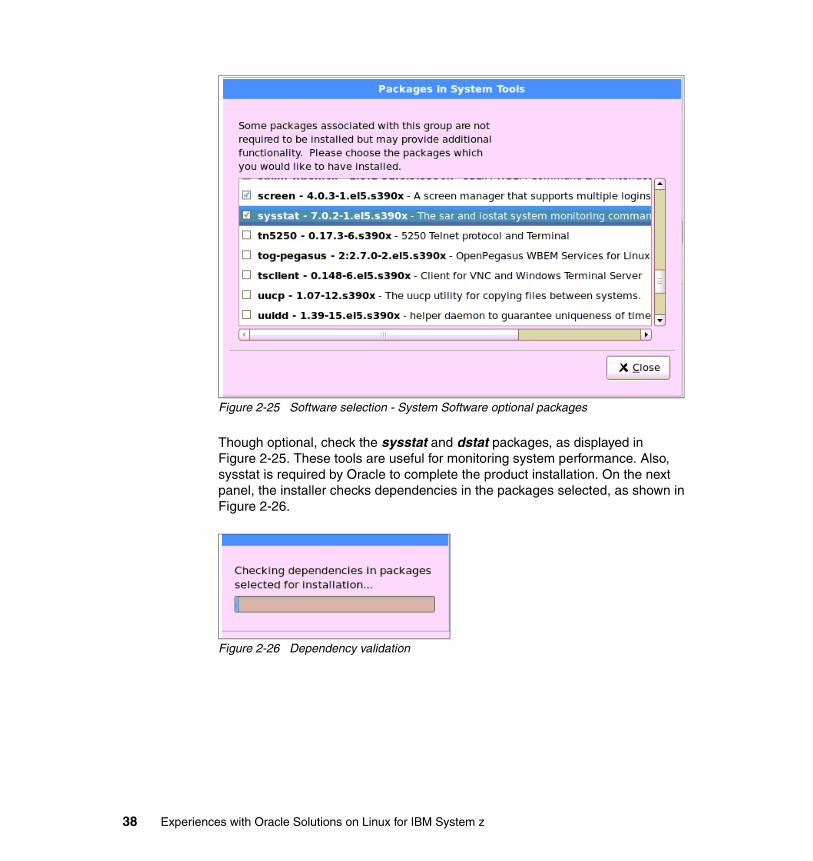
Figure 2-25 Software selection - System Software optional packages
Though optional, check the sysstat and dstat packages, as displayed in Figure 2-25. These tools are useful for monitoring system performance. Also, sysstat is required by Oracle to complete the product installation. On the next panel, the installer checks dependencies in the packages selected, as shown in Figure 2-26.
Figure 2-26 Dependency validation
38 Experiences with Oracle Solutions on Linux for IBM System z
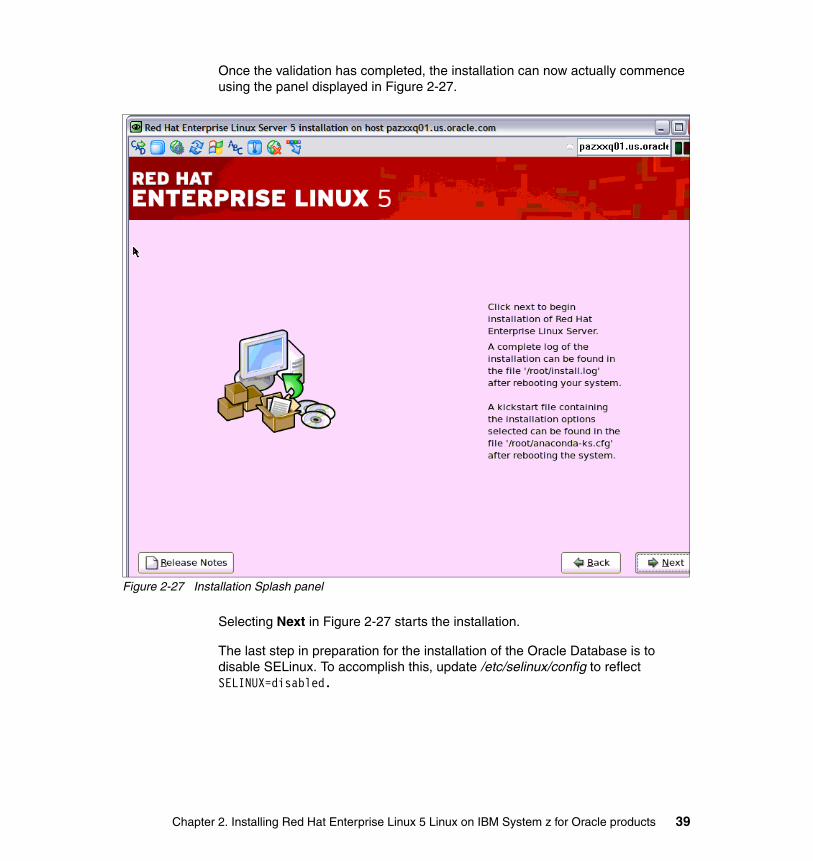
Once the validation has completed, the installation can now actually commence using the panel displayed in Figure 2-27.
Figure 2-27 Installation Splash panel
Selecting Next in Figure 2-27 starts the installation.
The last step in preparation for the installation of the Oracle Database is to disable SELinux. To accomplish this, update /etc/selinux/config to reflect SELINUX=disabled.
Chapter 2. Installing Red Hat Enterprise Linux 5 Linux on IBM System z for Oracle products 39
To verify that you have the required 31-bit and the 64-bit libraries installed, execute the following rpm command, which can be used to distinguish between an s390 (31-bit) or s390x (64-bit) package:
#rpm -qa --queryformat "%{NAME}-%{VERSION}-%{RELEASE} (%{ARCH})\n" | grep packagename
Replacing packagename with the package to query, you should see the following results:
# rpm -qa --queryformat "%{NAME}-%{VERSION}-%{RELEASE} (%{ARCH})\n" | grep glibc-develglibc-devel-2.5-24 (s390)glibc-devel-2.5-24 (s390x)# rpm -qa --queryformat "%{NAME}-%{VERSION}-%{RELEASE} (%{ARCH})\n" | grep libaiolibaio-0.3.106-3.2 (s390x)libaio-0.3.106-3.2 (s390)
At this point, you now have a Red Hat Enterprise Linux 5 guest ready for the installation of an Oracle Database 10gR2 or Oracle Application Server 10g. The steps for the Oracle installation are detailed in Chapter 3, “Installing Oracle and creating a database on Red Hat Enterprise Linux 5” on page 47.
2.4 Alternative to using PARM and CONF files
If you choose not to use a PARM or CONF file, you can enter the detailed information, as shown in this section.
2.4.1 Initiate the bootstrap loader
Start the Red Hat bootstrap loader system. The bootstrap process includes the completion of the following tasks:
� Defining the network interface cards
� Punching and IPLing the Red Hat reader images
� Inputting definitions of the network for the installation
� Connecting to the installation images (this installation used NFS)
� Allocating the necessary DASD
� Making the VNC connection to perform the installation
40 Experiences with Oracle Solutions on Linux for IBM System z
2.4.2 Define the network interface cards
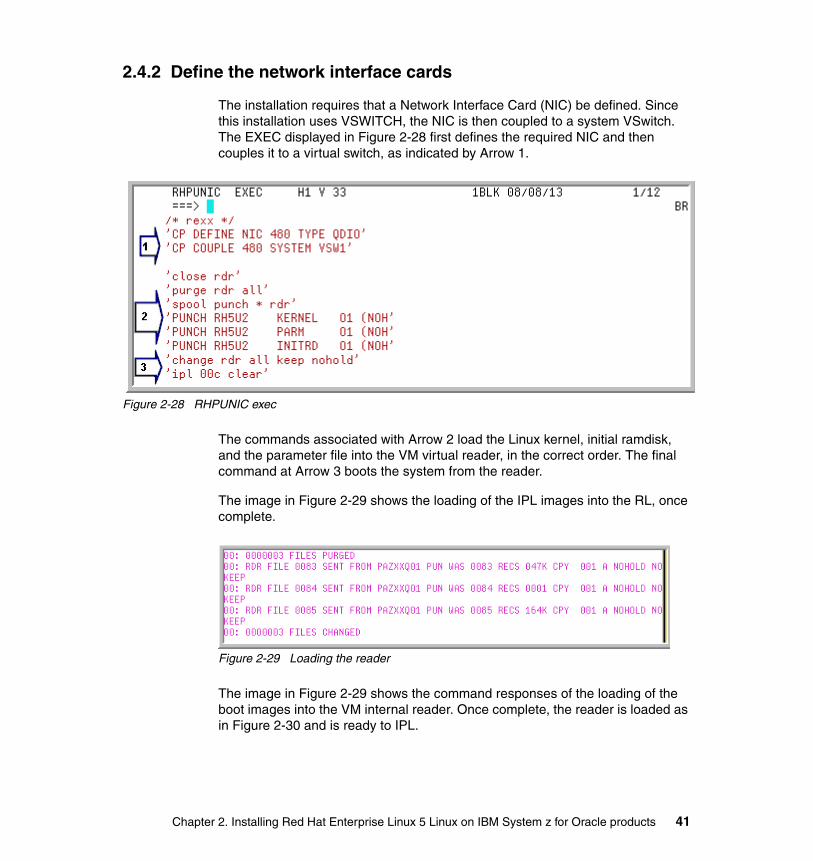
The installation requires that a Network Interface Card (NIC) be defined. Since this installation uses VSWITCH, the NIC is then coupled to a system VSwitch. The EXEC displayed in Figure 2-28 first defines the required NIC and then couples it to a virtual switch, as indicated by Arrow 1.
Figure 2-28 RHPUNIC exec
The commands associated with Arrow 2 load the Linux kernel, initial ramdisk, and the parameter file into the VM virtual reader, in the correct order. The final command at Arrow 3 boots the system from the reader.
The image in Figure 2-29 shows the loading of the IPL images into the RL, once complete.
Figure 2-29 Loading the reader
The image in Figure 2-29 shows the command responses of the loading of the boot images into the VM internal reader. Once complete, the reader is loaded as in Figure 2-30 and is ready to IPL.
Chapter 2. Installing Red Hat Enterprise Linux 5 Linux on IBM System z for Oracle products 41
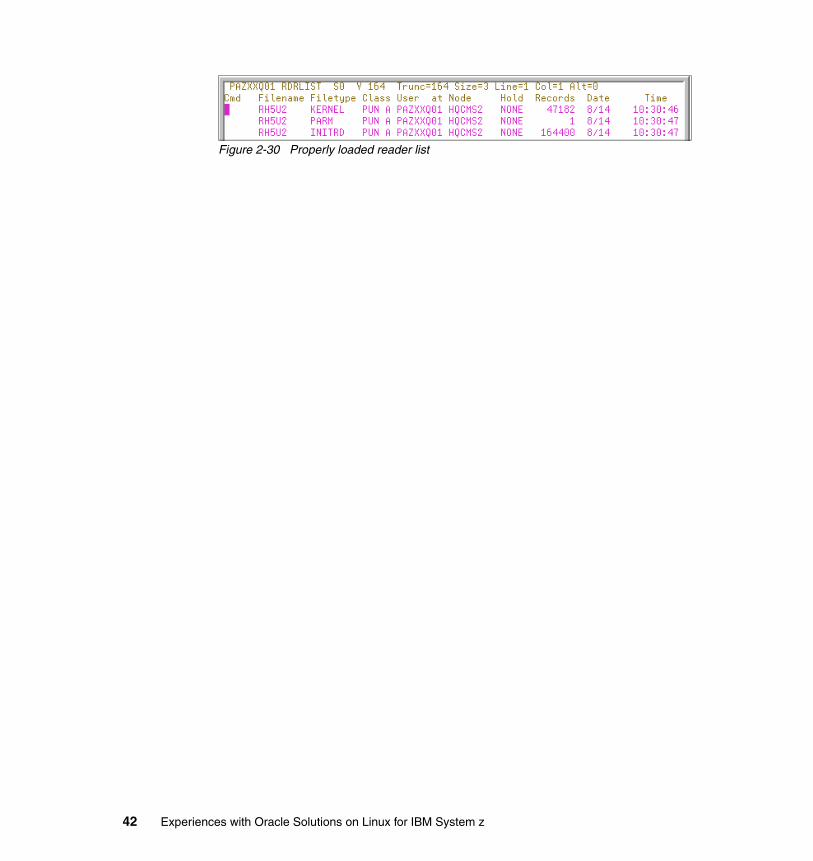
Figure 2-30 Properly loaded reader list
42 Experiences with Oracle Solutions on Linux for IBM System z
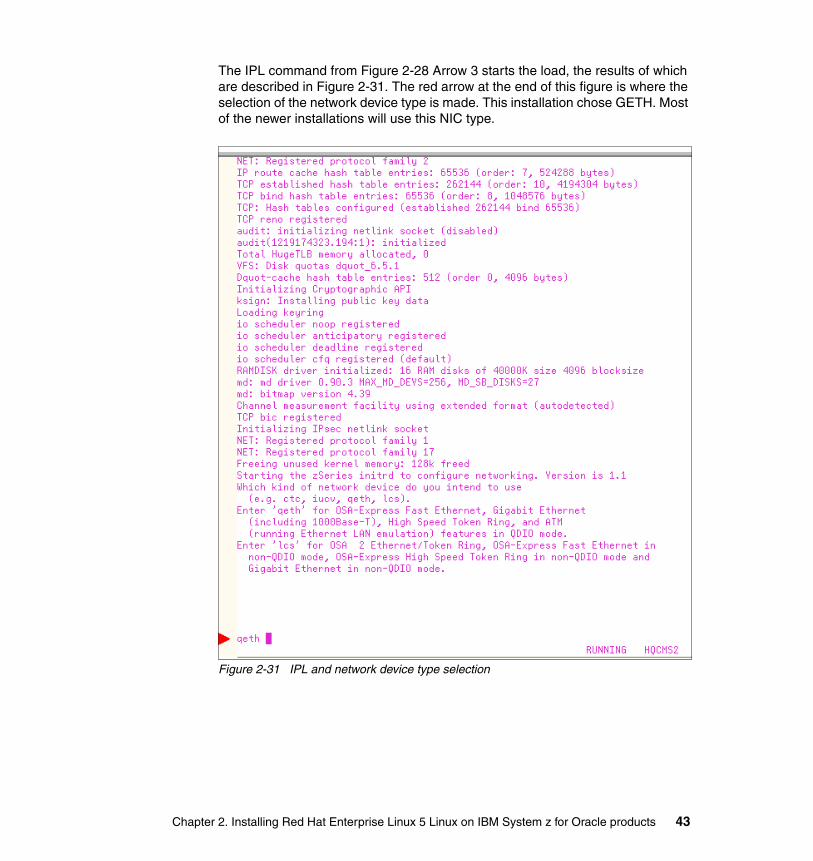
The IPL command from Figure 2-28 Arrow 3 starts the load, the results of which are described in Figure 2-31. The red arrow at the end of this figure is where the selection of the network device type is made. This installation chose GETH. Most of the newer installations will use this NIC type.
Figure 2-31 IPL and network device type selection
Chapter 2. Installing Red Hat Enterprise Linux 5 Linux on IBM System z for Oracle products 43
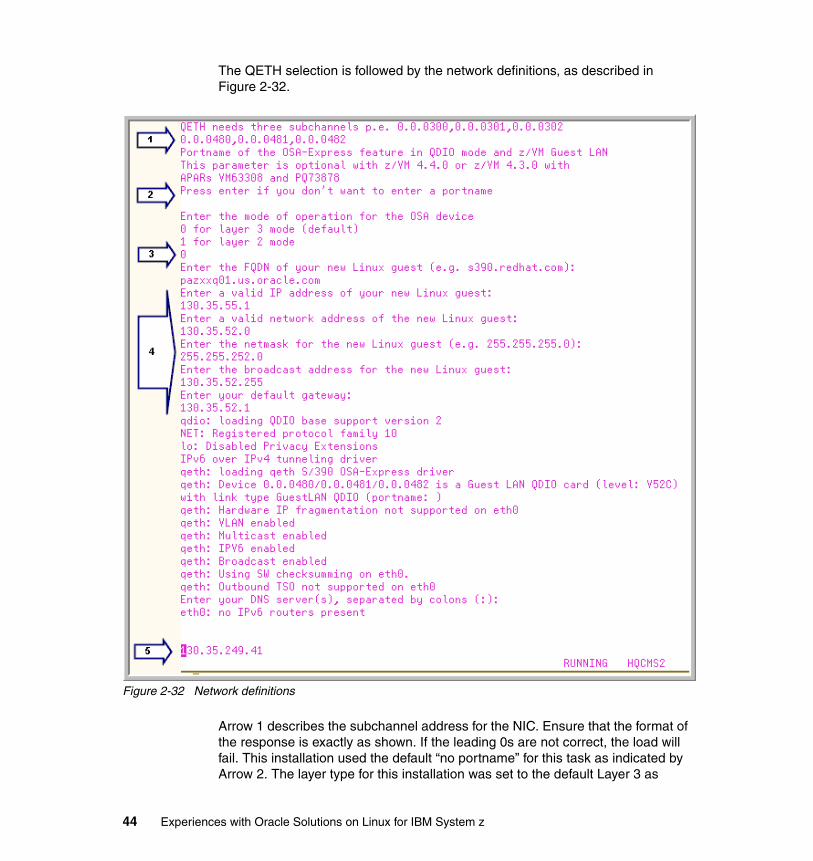
The QETH selection is followed by the network definitions, as described in Figure 2-32.
Figure 2-32 Network definitions
Arrow 1 describes the subchannel address for the NIC. Ensure that the format of the response is exactly as shown. If the leading 0s are not correct, the load will fail. This installation used the default “no portname” for this task as indicated by Arrow 2. The layer type for this installation was set to the default Layer 3 as
44 Experiences with Oracle Solutions on Linux for IBM System z

indicated at Arrow 3. The host name and network addresses described by Arrow 4 are typically supplied by network administration. The IP address indicated by Arrow 5 is the response for the DNS Server request. It likes to hide, depending on the panel roll. Following the DNS request, a second request for DNS is presented and the default value was taken. This brings up Figure 2-4 on page 17.
Figure 2-33 Network configuration
The network configuration confirmation is presented in Figure 2-33, then the DASD request in Figure 2-34 is shown.
Chapter 2. Installing Red Hat Enterprise Linux 5 Linux on IBM System z for Oracle products 45
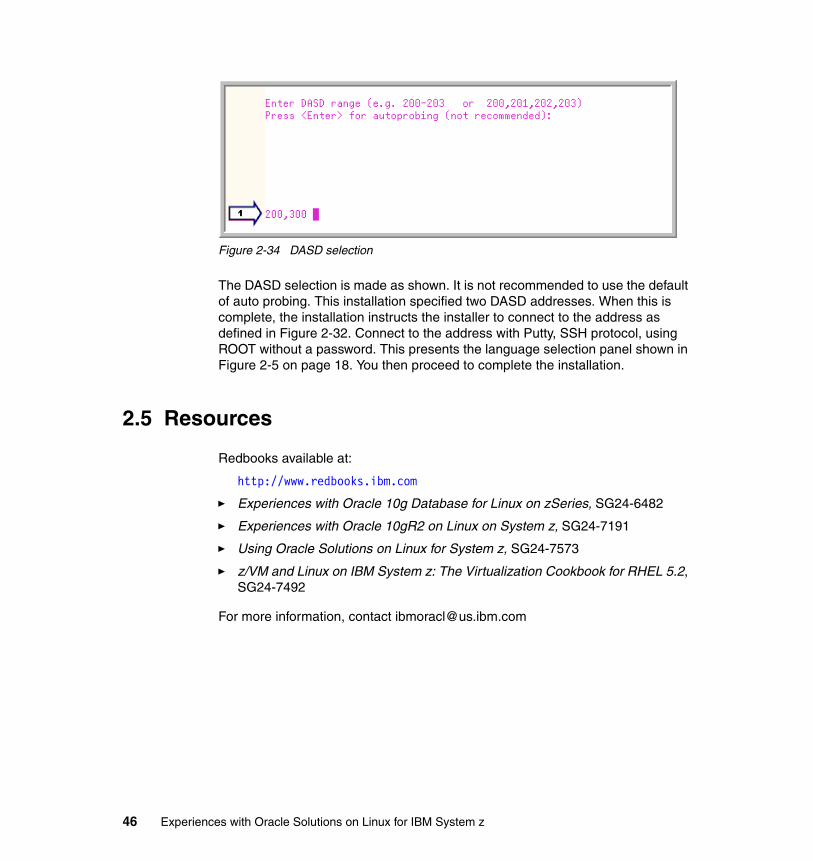
Figure 2-34 DASD selection
The DASD selection is made as shown. It is not recommended to use the default of auto probing. This installation specified two DASD addresses. When this is complete, the installation instructs the installer to connect to the address as defined in Figure 2-32. Connect to the address with Putty, SSH protocol, using ROOT without a password. This presents the language selection panel shown in Figure 2-5 on page 18. You then proceed to complete the installation.
2.5 Resources
Redbooks available at:
http://www.redbooks.ibm.com
� Experiences with Oracle 10g Database for Linux on zSeries, SG24-6482
� Experiences with Oracle 10gR2 on Linux on System z, SG24-7191
� Using Oracle Solutions on Linux for System z, SG24-7573
� z/VM and Linux on IBM System z: The Virtualization Cookbook for RHEL 5.2, SG24-7492
For more information, contact [email protected]
46 Experiences with Oracle Solutions on Linux for IBM System z
Chapter 3. Installing Oracle and creating a database on Red Hat Enterprise Linux 5
This chapter describes the steps to install Oracle and create a single instance database. This activity follows the installation of a Linux guest with Red Hat Enterprise Linux 5 Update 2, as described in Chapter Chapter 2, “Installing Red Hat Enterprise Linux 5 Linux on IBM System z for Oracle products” on page 13.
The steps are:
� Obtain the Oracle code
� Install the Oracle code
� Apply patch 7349124 by copying the files
� Apply 10.2.0.4 Patch Set 6810189
� Create a database
Not all of the panels are included here. A detailed installation is described in Chapter 3 of Using Oracle Solutions on Linux on System z, SG24-7573.
3
© Copyright IBM Corp. 2009. All rights reserved. 47
3.1 Obtain the Oracle code and documentation
Download Oracle 10.2.0.2 for Linux on z from otn.oracle.com and the Oracle 10.2.0.2 Release note and Installation Guide. Download patch 7349124. Use the IBM Redbooks publications listed above as a guide.
Download the 10.2.0.4 Patch Set 6810189 from metalink.oracle.com and the Patch Set readme file. The Patch Set is found under the platform IBM zSeries® Based Linux.
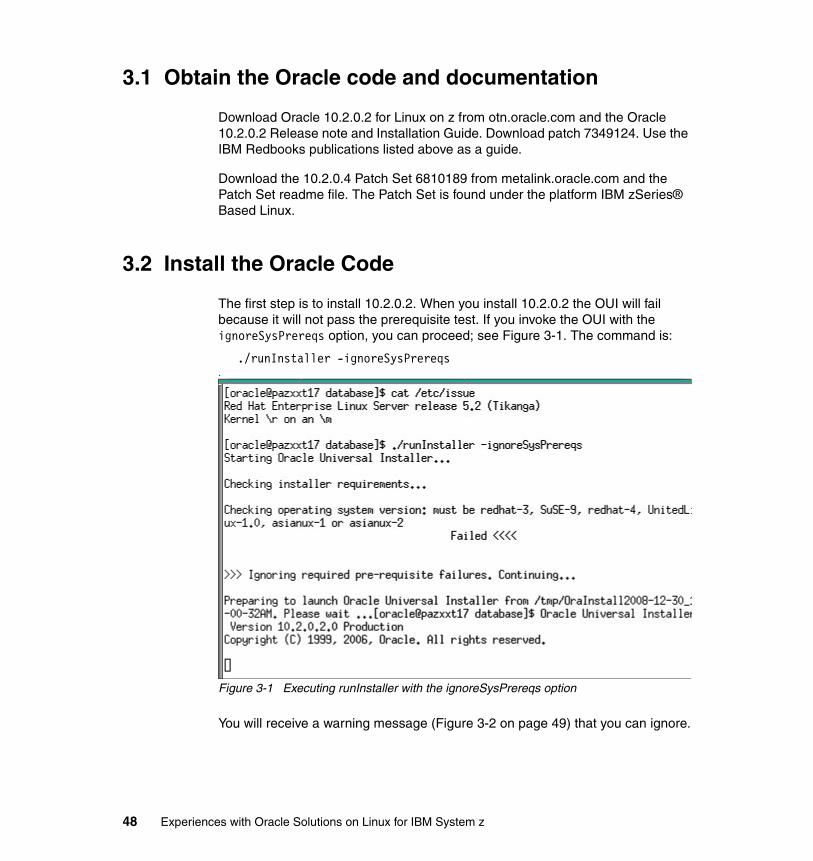
3.2 Install the Oracle Code
The first step is to install 10.2.0.2. When you install 10.2.0.2 the OUI will fail because it will not pass the prerequisite test. If you invoke the OUI with the ignoreSysPrereqs option, you can proceed; see Figure 3-1. The command is:
./runInstaller -ignoreSysPrereqs.
Figure 3-1 Executing runInstaller with the ignoreSysPrereqs option
You will receive a warning message (Figure 3-2 on page 49) that you can ignore.
48 Experiences with Oracle Solutions on Linux for IBM System z

Figure 3-2 Ignore the prereq check fail for Red Hat Enterprise Linux 5
Chapter 3. Installing Oracle and creating a database on Red Hat Enterprise Linux 5 49

The OUI will then fail with a link error, because the 10.2.0.2 download has the incorrect stub libraries for Linux on z; see Figure 3-3.
Figure 3-3 Link of Oracle executables fail with incorrect stub libraries
3.3 Install patch 7349124
You then need to apply patch 7349124 to get past this link error. As of this writing, the patch requires opatch to be installed. However, you are not yet at that point in the installation, so you must manually copy the libraries from the patch to the correct library in the ORACLE_HOME/oracle/SI directories.
COPY stubs from patch 7349124Manually move the files from the patch. Do not try to install with opatch.
[oracle@pazxxt17 stubs]$ cp -p /oracle/unzips/7349124/files/lib/stubs/* /oracle/SI/lib/stubs[oracle@pazxxt17 stubs]$ cp -p /oracle/unzips/7349124/files/lib32/stubs/* /oracle/SI/lib32/stubs
50 Experiences with Oracle Solutions on Linux for IBM System z
After copying the libraries from the patch, click Retry and complete the installation of 10.2.0.2 on Red Hat Enterprise Linux 5.
The Retry works for the failed link, and 10202 binaries install successfully.
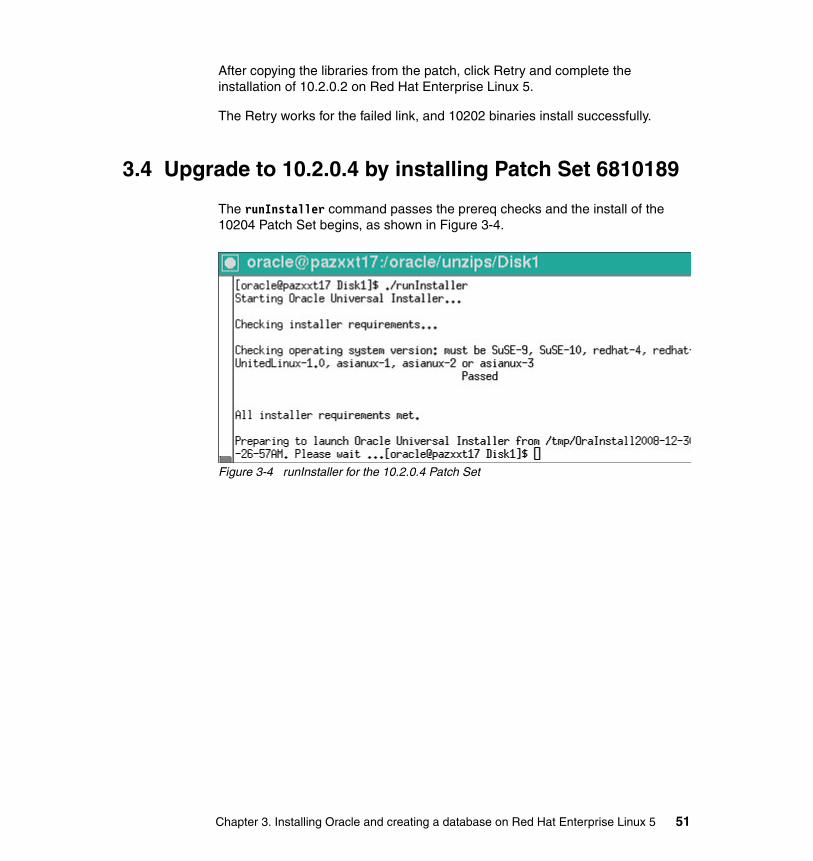
3.4 Upgrade to 10.2.0.4 by installing Patch Set 6810189
The runInstaller command passes the prereq checks and the install of the 10204 Patch Set begins, as shown in Figure 3-4.
Figure 3-4 runInstaller for the 10.2.0.4 Patch Set
Chapter 3. Installing Oracle and creating a database on Red Hat Enterprise Linux 5 51
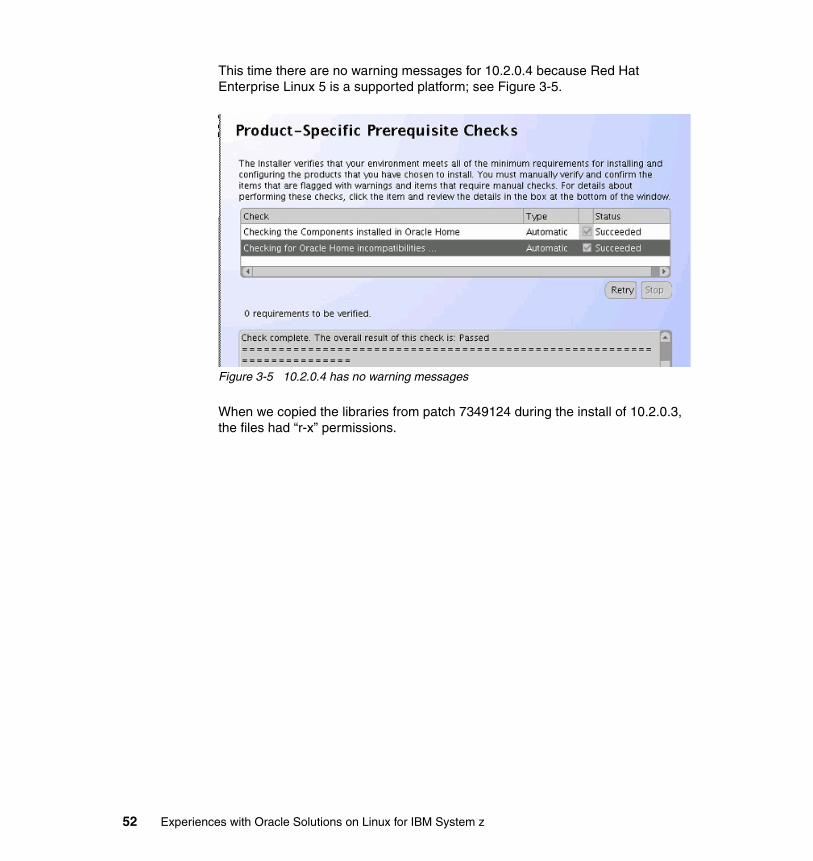
This time there are no warning messages for 10.2.0.4 because Red Hat Enterprise Linux 5 is a supported platform; see Figure 3-5.
Figure 3-5 10.2.0.4 has no warning messages
When we copied the libraries from patch 7349124 during the install of 10.2.0.3, the files had “r-x” permissions.
52 Experiences with Oracle Solutions on Linux for IBM System z
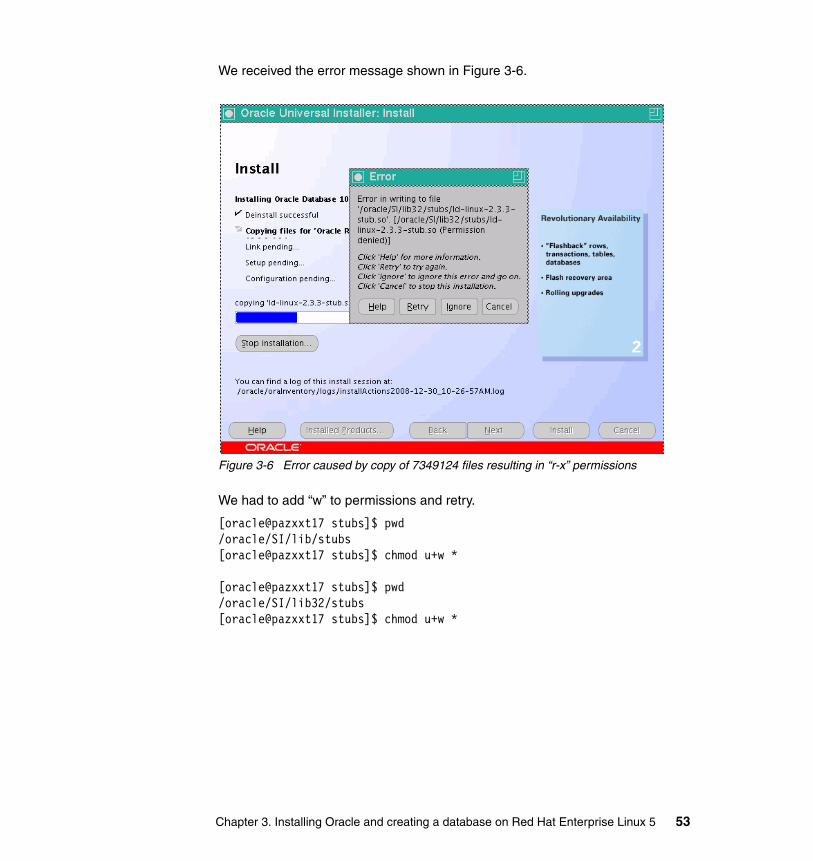
We received the error message shown in Figure 3-6.
Figure 3-6 Error caused by copy of 7349124 files resulting in “r-x” permissions
We had to add “w” to permissions and retry.
[oracle@pazxxt17 stubs]$ pwd/oracle/SI/lib/stubs[oracle@pazxxt17 stubs]$ chmod u+w *
[oracle@pazxxt17 stubs]$ pwd/oracle/SI/lib32/stubs[oracle@pazxxt17 stubs]$ chmod u+w *
Chapter 3. Installing Oracle and creating a database on Red Hat Enterprise Linux 5 53
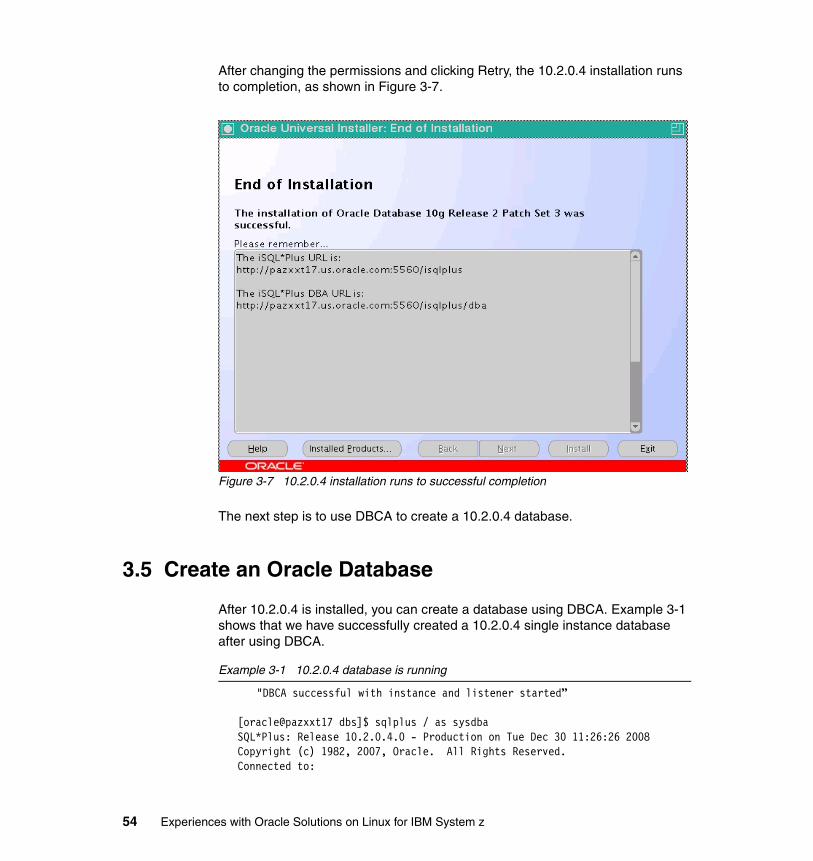
After changing the permissions and clicking Retry, the 10.2.0.4 installation runs to completion, as shown in Figure 3-7.
Figure 3-7 10.2.0.4 installation runs to successful completion
The next step is to use DBCA to create a 10.2.0.4 database.
3.5 Create an Oracle Database
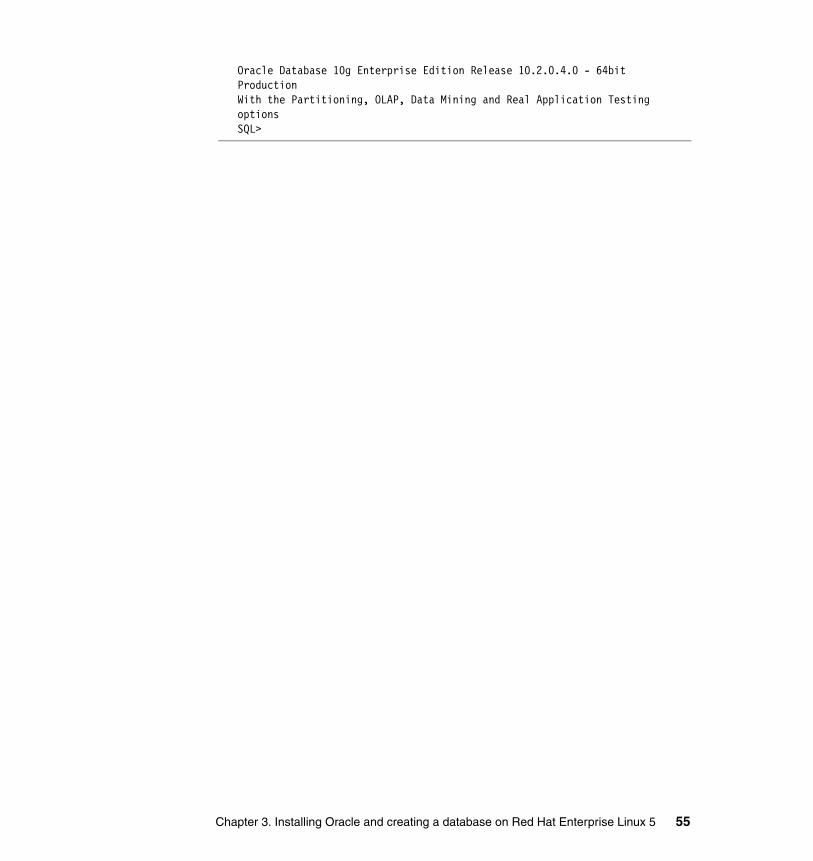
After 10.2.0.4 is installed, you can create a database using DBCA. Example 3-1 shows that we have successfully created a 10.2.0.4 single instance database after using DBCA.
Example 3-1 10.2.0.4 database is running
"DBCA successful with instance and listener started”
[oracle@pazxxt17 dbs]$ sqlplus / as sysdbaSQL*Plus: Release 10.2.0.4.0 - Production on Tue Dec 30 11:26:26 2008Copyright (c) 1982, 2007, Oracle. All Rights Reserved.Connected to:
54 Experiences with Oracle Solutions on Linux for IBM System z
Oracle Database 10g Enterprise Edition Release 10.2.0.4.0 - 64bit ProductionWith the Partitioning, OLAP, Data Mining and Real Application Testing optionsSQL>
Chapter 3. Installing Oracle and creating a database on Red Hat Enterprise Linux 5 55

56 Experiences with Oracle Solutions on Linux for IBM System z

Chapter 4. Setting up an IBM disk storage system to use with Oracle on Linux on System z
This chapter provides the points to consider when acquiring and setting up an IBM DS8000® Storage System to be used for running Oracle under Linux and z/VM. We include actual configurations as examples.
4
© Copyright IBM Corp. 2009. All rights reserved. 57

4.1 Overview
Database I/O is one of the slowest and most expensive operations that a database performs. Time spent designing your Oracle I/O subsystem making sure data is striped across as many physical disks (or spindles) as possible, ensuring that there are no bottlenecks with channel bandwidth, utilizing multiple storage controllers to leverage cache, and using direct or asynchronous I/O for Oracle data files are all significant factors to help avoid performance issues.
It is also important to design your I/O storage in such a way that the system will not be hindered by any one hardware failure. If recovery is needed, your design should ensure that no database transactions are lost.
This chapter discusses the points to consider when acquiring and setting up a storage array (such as an IBM DS8000 Storage Array) for running Oracle under System z Linux and virtualizing these databases under z/VM.
4.1.1 Areas to consider
When setting up a new storage array, there are many key decisions that need to be made in order to best configure your storage subsystem. Figure 4-1 on page 59 illustrates a lot of the technical considerations that may have to be taken into account when designing your storage subsystem for your Oracle Database. We will then discuss the following in this chapter:
� Striping alternatives (ASM, Storage Array Striping, LVM)
� RAID 10 or RAID 5 disk configurations
� FCP/SCSI or FICON/ECKD™ storage
� Oracle Storage-related parameters
� z/VM storage considerations
� ASMLib or UDEV for Device Persistence
� Customer example with FCP and ASM
� Configuring multipathing for FCP/SCSI storage
58 Experiences with Oracle Solutions on Linux for IBM System z
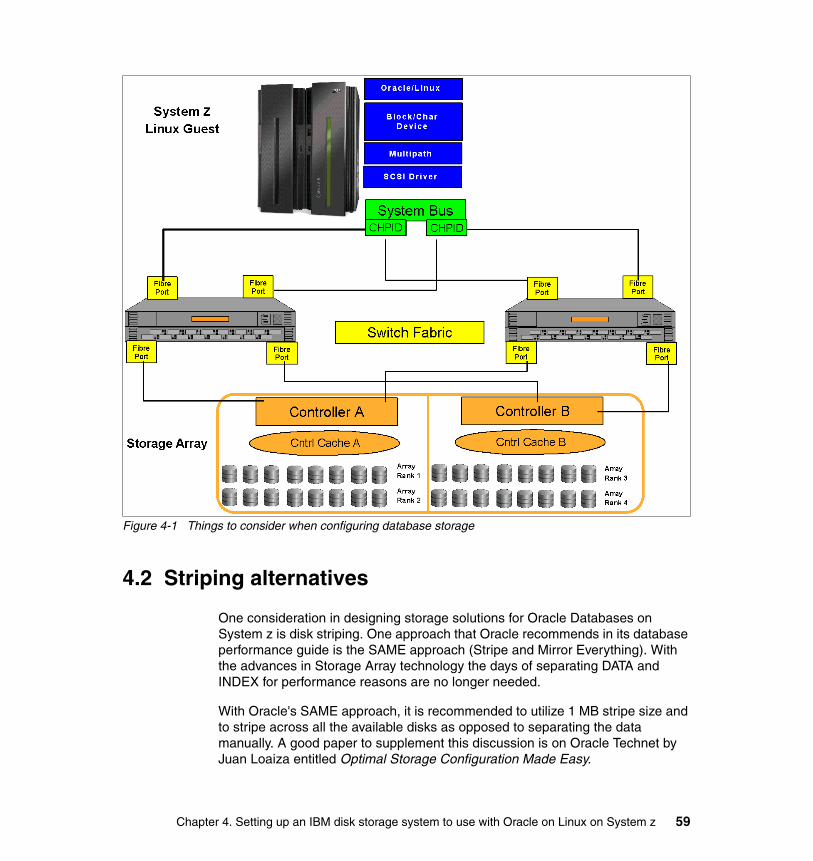
Figure 4-1 Things to consider when configuring database storage
4.2 Striping alternatives
One consideration in designing storage solutions for Oracle Databases on System z is disk striping. One approach that Oracle recommends in its database performance guide is the SAME approach (Stripe and Mirror Everything). With the advances in Storage Array technology the days of separating DATA and INDEX for performance reasons are no longer needed.
With Oracle's SAME approach, it is recommended to utilize 1 MB stripe size and to stripe across all the available disks as opposed to separating the data manually. A good paper to supplement this discussion is on Oracle Technet by Juan Loaiza entitled Optimal Storage Configuration Made Easy.
Chapter 4. Setting up an IBM disk storage system to use with Oracle on Linux on System z 59
It should be noted that SAME does not always give the optimal performance; its goal is to achieve 90% optimal for all workloads, and allow for changing loads. Manual layouts can achieve better performance provided none of the disks become hot spots and full bandwidth of all the disks is never needed. Not having the optimal disk configuration can have a major impact on system performance. Sometimes the simplest approach works best.
4.2.1 Oracle ASM
Oracle ASM is Oracle's methodology for striping database files across as many disk devices as possible. When configuring ASM you should make sure that Disk/LUNs are assigned with the same size, type, and speed. Oracle ASM for Oracle 10g utilizes a 1 MB stripe size to stripe the database files across all the disk devices assigned to a particular disk group. Oracle ASM is a form of software striping to raw or block devices.
Oracle REDO logs are also striped across the disk devices in the disk group, but are internally striped with a 128 KB stripe size.
Oracle recommends the SAME approach for ASM files as well, by having one or two disk groups (if utilizing a Flash Recovery Area) and not separating the data and index data files into different disk groups.
4.2.2 LVM (operating system striping)
Another striping methodology used for Oracle Databases is Logical Volume Manager (LVM). For Oracle LVM database file systems, it is recommended to use ext3 file systems and striping the data files across as many disk devices as possible, and also to set the number of stripes to the same number for disk devices or LUNs making up the stripe set. One advantage with LVM is that you can even spread your I/O across different storage array controllers to maximize throughput.
An important factor for database performance is determining the optimal stripe size for the database. Selecting the most appropriate stripe size (stripe depth) should be based on the characteristics of the database such as the size of a typical I/O and the concurrency of the database.
With a database that has few concurrent accesses but a lot of sequential I/O, you want to make sure that stripe size (stripe depth) is set so that 1 Oracle I/O results in 1 I/O to each disk. So, for example, if your typical Oracle I/O is 1 MB, then a stripe size of 256 K across four disks would result in just one physical I/O (assuming block is not cached) to be performed on each disk. Typical stripe sizes (depth) for DSS databases are 256 KB to 1 MB.
60 Experiences with Oracle Solutions on Linux for IBM System z
With high concurrent on-line transactional databases (OLTP), you should make sure that each Oracle I/O does not result in more than one physical I/O to occur on your storage subsystem. Setting the strip size (stripe depth) to n * DB_BLOCK_SIZE, where n is greater than 1, is recommended. If working with physical disks directly (non SAN), you should also ensure alignment of disk partitions with the stripe size to help avoid the situation of an Oracle data block spanning multiple physical disks. In this case, it is recommended to set the stripe size (stripe depth) to at least twice the Oracle block size. Typical stripe sizes for OLTP databases are 32 K and 64 K.
If systems are performing a lot of large sequential I/O or a lot of full table scans, then it is beneficial to set the stripe size (stripe depth), to n * DB_BLOCK_SIZE where n is smaller than the DB_FILE_MULTIBLOCK_READ_COUNT (used for read ahead for full table scans).
4.2.3 Storage pool striping (rotate extents)
With the DS8000 storage arrays, you can now stripe across storage arrays. Hardware striping is generally faster than software striping (LVM) and should be considered for large I/O intensive databases. Figure 4-2 on page 62 illustrates a storage array striping example, with a 1 GB stripe size spread over one side or controller because you cannot do storage array striping across storage arrays.
Chapter 4. Setting up an IBM disk storage system to use with Oracle on Linux on System z 61
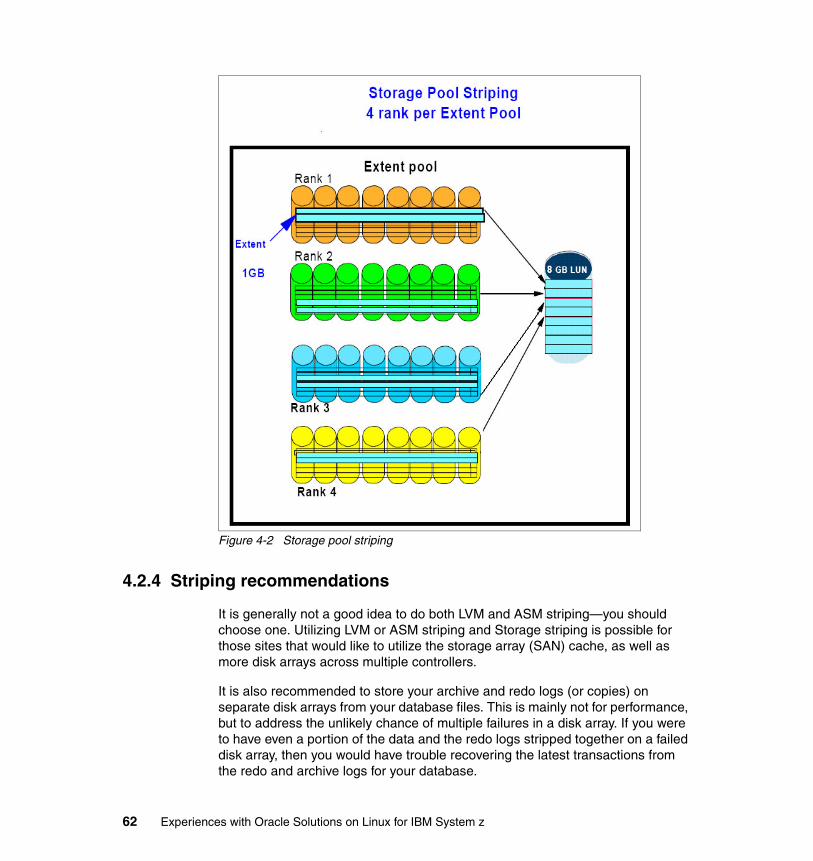
Figure 4-2 Storage pool striping
4.2.4 Striping recommendations
It is generally not a good idea to do both LVM and ASM striping—you should choose one. Utilizing LVM or ASM striping and Storage striping is possible for those sites that would like to utilize the storage array (SAN) cache, as well as more disk arrays across multiple controllers.
It is also recommended to store your archive and redo logs (or copies) on separate disk arrays from your database files. This is mainly not for performance, but to address the unlikely chance of multiple failures in a disk array. If you were to have even a portion of the data and the redo logs stripped together on a failed disk array, then you would have trouble recovering the latest transactions from the redo and archive logs for your database.
62 Experiences with Oracle Solutions on Linux for IBM System z
For large databases on a storage array, it can also be advantageous to separate out the archive and redo logs to their own storage array. By having the archive logs on separate disk arrays, performance will not be affected during log switching and subsequent sequential writing of the archive logs. Databases with very high I/O to the redo logs can benefit from separate storage arrays by utilizing their own write cache on a storage array. In this type of configuration, when Oracle log writer (LGRW) performs large sequential writes from the redo log buffer to a dedicated SAN cache on dedicated storage, LGWR runs a lot smother with less disk queuing.
In DSS environments that have a few processes that do a lot of sorting and writes to TEMP, it may also be prudent to create a third Oracle ASM disk group or file system for the TEMP table space. Creating a separate temp disk group allows you to set up write cache bias in the SAN with a dedicated storage array for the sequential I/O.
These suggestions are dependent on a lot of factors such as what other systems and databases are accessing the SAN, as well as the different types of workloads for the database. It is always best to test, test, and then test your storage array configurations with tools such as Orion (detailed later on in this chapter) in order to configure and optimize the configuration for your environment.
4.3 RAID 10 vs. RAID 5
With today's advanced Storage Array technologies such as the DS8000 series of storage arrays, there are essentially two recommended ways to configure storage: either RAID 10 (mirror and strip) or Hardware RAID 5 (parity disk). Systems that utilize RAID 5 software are not recommended for Oracle Database files.
RAID 10 provides redundancy by data being written to both drives. For each data drive, there is a second drive that contains exactly the same data. If one drive fails, the other drive can then provide an exact copy of the lost data. By stripping (RAID 0) across the available drives in an array group added performance can be gained by allowing parallelism to all the drives in the array.
RAID 5 protects data through use of parity information. With RAID 5, both data and parity information are striped across all the drives in the RAID group. If a drive fails, the original data can be reconstructed from the surviving drives using the parity information.
Once the Oracle DBMS writer uses up a storage array's memory cache, then essentially RAID 5 storage requires four I/Os (read the parity, read the data,
Chapter 4. Setting up an IBM disk storage system to use with Oracle on Linux on System z 63

update the data and parity), and you can at most do two of these writes in parallel because the parity needs to be synchronously written for recoverability.
With RAID 10, you can perform these writes in parallel across the entire array, which requires just two I/Os (one for each disk in the mirror), hence RAID 10 does perform better for write-intensive databases.
Hardware RAID 5 is good for sites that are cost constrained with databases that are primarily read intensive because both RAID 5 and RAID 10 require the same amount of I/Os for reads. With RAID 5, though, you have more usable storage available since RAID10 requires every disk to be mirrored and hence is not as cost effective.
There are many debates between RAID 10 and RAID 5. With advances in storage arrays the write parity penalty for RAID 5 has been minimized somewhat with dedicated firmware that is optimized to handle parity calculations. With larger SAN caches this write penalty can be minimized to a degree. A good compromise for some sites utilizing the newer storage arrays has been to utilize RAID 5 for the database files and RAID 10 for the more write-intensive sequential redo logs.
4.4 FCP/SCSI and FICON/ECKD considerations
Another important consideration in configuring storage is deciding on the most appropriate channel technology for your environment. There are two types of channel/disk storage technologies for System z, namely FCP/SCSI and FICON/ECKD.
System z can utilize fixed (512-byte) blocks SCSI or Extended Count Key Data (ECKD) disk devices. ECKD devices are connected with Fiber Connector (FICON®), while SCSI devices are connected with Fiber Channel Protocol (FCP) connection technology.
The standard FICON channel subsystem on System z machines provides multipath access for performance and availability to the disk subsystems as a basic hardware feature, so no additional configuration for multipathing is required, unlike for FICON/ECKD storage. Figure 4-3 on page 65 details how multipath occurs at the hardware level for FICON devices.
64 Experiences with Oracle Solutions on Linux for IBM System z
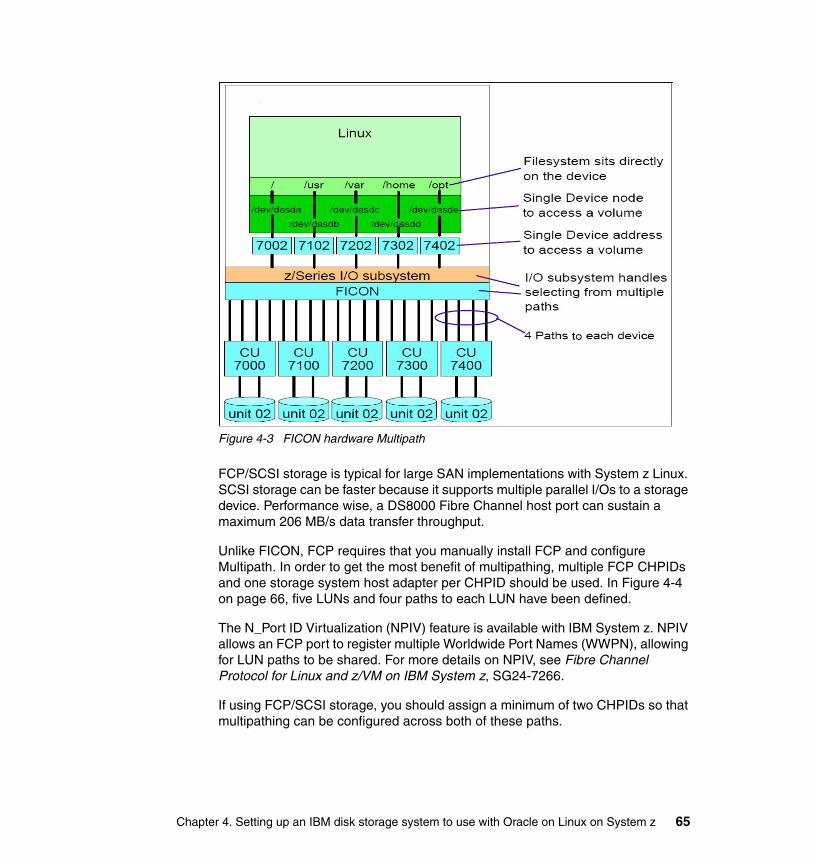
Figure 4-3 FICON hardware Multipath
FCP/SCSI storage is typical for large SAN implementations with System z Linux. SCSI storage can be faster because it supports multiple parallel I/Os to a storage device. Performance wise, a DS8000 Fibre Channel host port can sustain a maximum 206 MB/s data transfer throughput.
Unlike FICON, FCP requires that you manually install FCP and configure Multipath. In order to get the most benefit of multipathing, multiple FCP CHPIDs and one storage system host adapter per CHPID should be used. In Figure 4-4 on page 66, five LUNs and four paths to each LUN have been defined.
The N_Port ID Virtualization (NPIV) feature is available with IBM System z. NPIV allows an FCP port to register multiple Worldwide Port Names (WWPN), allowing for LUN paths to be shared. For more details on NPIV, see Fibre Channel Protocol for Linux and z/VM on IBM System z, SG24-7266.
If using FCP/SCSI storage, you should assign a minimum of two CHPIDs so that multipathing can be configured across both of these paths.
Chapter 4. Setting up an IBM disk storage system to use with Oracle on Linux on System z 65
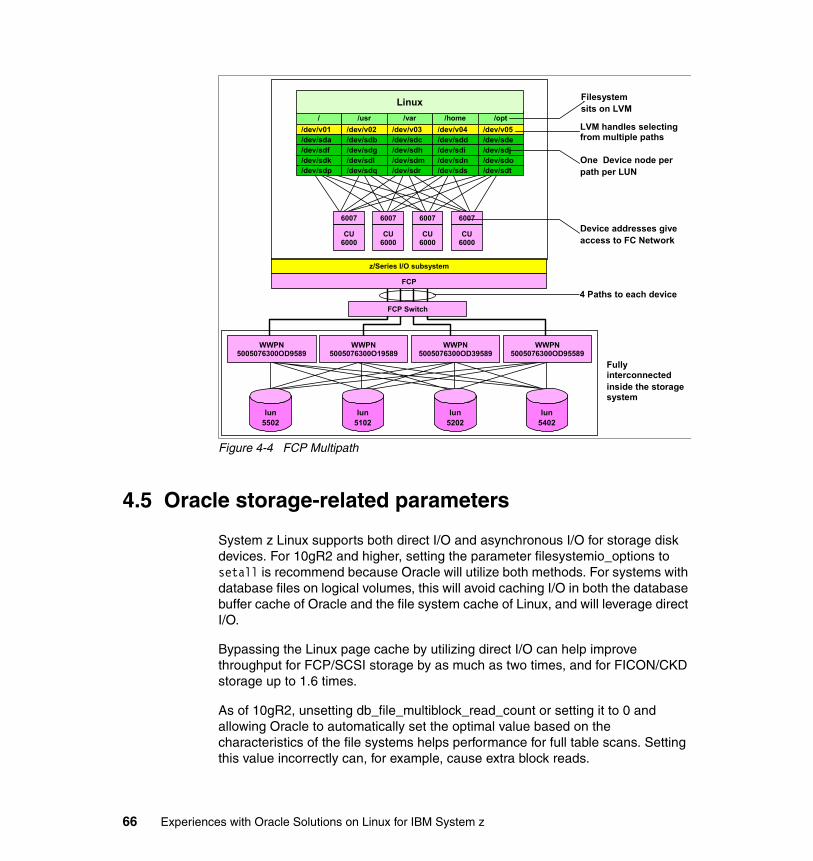
Figure 4-4 FCP Multipath
4.5 Oracle storage-related parameters
System z Linux supports both direct I/O and asynchronous I/O for storage disk devices. For 10gR2 and higher, setting the parameter filesystemio_options to setall is recommend because Oracle will utilize both methods. For systems with database files on logical volumes, this will avoid caching I/O in both the database buffer cache of Oracle and the file system cache of Linux, and will leverage direct I/O.
Bypassing the Linux page cache by utilizing direct I/O can help improve throughput for FCP/SCSI storage by as much as two times, and for FICON/CKD storage up to 1.6 times.
As of 10gR2, unsetting db_file_multiblock_read_count or setting it to 0 and allowing Oracle to automatically set the optimal value based on the characteristics of the file systems helps performance for full table scans. Setting this value incorrectly can, for example, cause extra block reads.
6007
CU6000
6007
CU6000
6007
CU6000
6007
CU6000
/ /usr /var /home /opt/dev/v01 /dev/v02 /dev/v03 /dev/v04 /dev/v05/dev/sda /dev/sdb /dev/sdc /dev/sdd /dev/sde/dev/sdf /dev/sdg /dev/sdh /dev/sdi /dev/sdj/dev/sdk /dev/sdl /dev/sdm /dev/sdn /dev/sdo/dev/sdp /dev/sdq /dev/sdr /dev/sds /dev/sdt
Linux
z/Series I/O subsystem
FCP
FCP Switch
lun5502
lun5102
lun5202
lun5402
WWPN5005076300OD9589
WWPN5005076300O19589
WWPN5005076300OD39589
WWPN5005076300OD95589
Filesystemsits on LVM
LVM handles selecting from multiple paths
One Device node perpath per LUN
Device addresses giveaccess to FC Network
4 Paths to each device
Fully interconnectedinside the storage system
66 Experiences with Oracle Solutions on Linux for IBM System z

Another parameter that is important for Oracle disk performance is Oracle block size. For example, if the majority of writes are small 256 bytes and you have the default 8 K Oracle block size, then you would be performing twice the amount of I/O than if you had chosen a smaller Oracle block size of 4 K. Likewise, if you are doing a lot of index and full table read scans, then a larger 16 K or 32 K block size can be more beneficial.
4.6 z/VM considerations
Oracle Databases that utilize shared storage for Oracle RAC can either be configured with all Linux guests configured on the same LPAR, or across multiple LPARs on the same machine, or separate System z machines. It is important in both cases when utilizing shared storage to have z/VM configured properly for shared nodes (Linux guests) in the RAC cluster.
If the storage is on the same LPAR, by utilizing multiple guests in the LPAR under one z/VM, then the first Linux guest should own the disk in Read/Write Mode, and subsequent guests that require access should have LINKS to the storage device. You must also append a V to the primary access mode (read, write, multiple write, and so on) indicating that this minidisk can be shared among virtual machines. For example, on linora1 we might define, in the z/VM user directory, the following:
MDISK 0350 3390 1 1669 LINORA MWV
Then for the user directory on linora2 we would include a LINK statement to the shared storage device:
LINK LINORA1 0350 0350 MWV
If the storage is to be shared across multiple Linux guests in separate LPARs either on the same machine, or across separate System z machines, then it is recommended to utilize dedicated storage devices. On the subsequent guests, use RDEVICE statements to let z/VM know that this storage device is shared. For example, you can define the following in an exec invoked by AUTOLOG1's PROFILE EXEC at IPL time:
'CP vary off 2E13-2E1C' 'CP SET RDEVICE 2E13-2E1C TYPE DASD SHARED YES MDC OFF''CP vary on 2E13-2E1C'
Then a DEDICATE for the device in the user directory entry for the server:
DEDICATE 2E13 2E13DEDICATE 2E14 2E14 …
Chapter 4. Setting up an IBM disk storage system to use with Oracle on Linux on System z 67
DECICATE 2E1C 2E1C
Minidisk cache ON can cause issues with Oracle seeing different System Change Numbers (SCNs) on different nodes in the RAC cluster, so for shared storage you should disable minidisk cache.
4.7 ASMLib or UDEV for device persistence
ASMLib is a Linux rpm utility that helps with disk configuration for Oracle Databases. Oracle ASM disk can be configured with or without ASMLib, but for FCP/SCSI storage you should use either UDEV or ASMLib to ensure device persistence.
If a problem occurs with access to a disk device and a Linux guest can no longer see the disk, it is possible for Linux to mount the disk in a different order than before so that the device order is changed, and what was once /dev/sdb is now /dev/sda.
With Linux 2.6 kernels and greater, UDEV can now also be used to ensure that disk device names remain consistent and that the correct file permissions get set for the Oracle ASM and the Oracle clusterware disk, if utilizing Oracle RAC. Without ASMLib or UDEV rules, device permissions that need to be changed from root:root, will prevent Oracle from starting up on reboot because the Oracle user requires direct access to the block device.
If using ASMLib, there is a simple command to label a disk for ASM. With UDEV, you have to modify the UDEV configuration file for each disk you add and you have to determine a unique ID to match the disk name and learn the UDEV configuration syntax.
Another benefit of ASMLib is that the configuration is persistent on the database disk. If for some reason your operating system needs to be reinstalled, UDEV configuration will be overwritten because it resides in /etc/udev/rules.d. You will need to restore these files before the database can access the storage.
Performance is about the same for UDEV and ASMLib. ASMLib does provide reduced user mode-to-kernel mode context switches during periods of high I/O, and reduced file handle usage due to a single call to ASMLib.
However, ASMLib is tied to your Linux kernel level, and therefore upgrades and Linux patching must be carefully planned with this in mind. This can be a major concern for sites that consistently patch their Linux kernels to the very latest levels because the kernel-dependent ASMLib rpm is released after kernel patches are released.
68 Experiences with Oracle Solutions on Linux for IBM System z
4.8 ORION disk performance testing tool
Orion is a disk utility provided by Oracle to help test various storage configurations for Oracle Databases.
The Orion I/O utility issues I/Os randomly just like an Oracle Database, using the same methodologies to access the storage media as if you were running Oracle RDBMS, without the extra steps of setting up the database and configuring testing scripts. Orion produces results that are about 95% of what you should expect for your Oracle Database running under that storage configuration.
The Orion Oracle Database disk utility provides a breakdown of the various I/O patterns that an Oracle Database is usually configured for. To summarize, these are:
Large sequential I/OLarge sequential I/O is typical with large decision support systems (DSS), backup and restores, and with large data loads such as SQL*loader. Large sequential loads typically access the disk storage systems in big chunks, 1 MB at a time, and this is one of the reasons Oracle utilizes a 1 MB stripe size when databases are configured with Oracle ASM. Systems with large sequential I/O are typically concerned with megabytes per second, or MB/s.
Large random I/OAnother type of disk I/O seen in DSS systems is large random I/O. This can be for loads of data that load a large amount of data but the I/O is spread out with disk striping, partitioning, parallel processing, or updating many table spaces spread out across multiple storage disk devices. To the I/O storage systems this is seen as large random I/O.
Small random I/OOnline transaction processing (OLTP) databases usually insert/update and delete many transactions at a time. The transaction size (record size) is usually smaller than in DSS databases. Transactions are sized to be smaller than the Oracle block size of the database in order to be most efficient when trying to process many transactions at a time. If the typical transaction is just greater than the Oracle block size, then extra I/O is needed.
Note: You should not use the Orion write option if you already have a database using the disk, because Orion with the write option will overwrite your data.
Chapter 4. Setting up an IBM disk storage system to use with Oracle on Linux on System z 69
These small transactions typically generate small random reads (for example, indexes) and writes. OLTP applications are usually concerned with I/O per second or IOPS for large volumes of reads and writes.
Mixed workloadTypically it is not just simply one type of I/O that is seen in a database. For example, in a high-transaction OLTP database you will for the most part see small random I/O, but you also have to back up the database with the Oracle RMAN utility, which involves large sequential I/O. The Orion tool classifies these different types of I/O as mixed workloads.
1. You can download the ORION tool from Oracle's Web site:
http://www.oracle.com/technology/software/tech/orion/index.html
2. Next you need to gunzip the tool into your directory:
-bash-3.00$ gunzip orion_zlinux.gz
3. Then you need to use an editor such as vi and add your storage devices to the file (with no spaces or blank lines) and create a file named, for example, mytest.lun (with no comments):
-bash-3.00$ vi mytest.lun/dev/dasdp1/dev/dasdq1
4. Our next step was to verify that all the volumes were in fact accessible with the Linux dd command:
-bash-3.00$ dd if=/dev/zero of=/dev/dasdp1 bs=1M count=128128+0 records in128+0 records out
5. To run a test you can run various tests based on the load characteristics of your database, so if you will be performing a lot of small random I/O then you can test with oltp. If configuring for large database loads, then dss might be more appropriate. You can see all the parameters with help:
./orion_zlinux -help
For a preliminary set of data:
-run simple
For a basic set of data:
-run normal
To evaluate storage for an OLTP database:
-run oltp
70 Experiences with Oracle Solutions on Linux for IBM System z
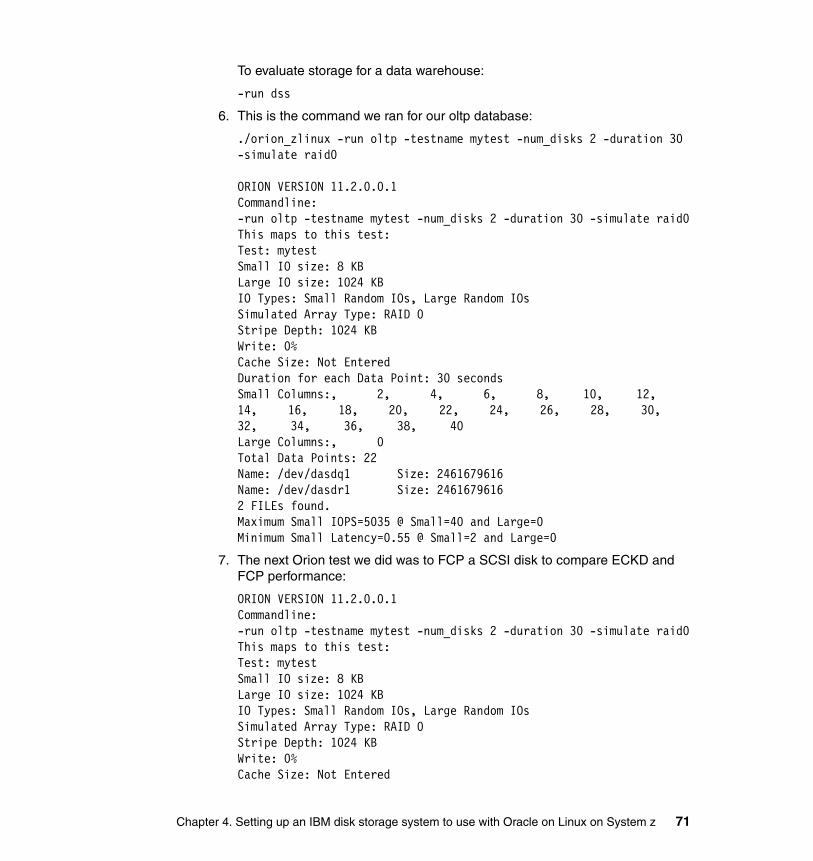
To evaluate storage for a data warehouse:
-run dss
6. This is the command we ran for our oltp database:
./orion_zlinux -run oltp -testname mytest -num_disks 2 -duration 30 -simulate raid0
ORION VERSION 11.2.0.0.1Commandline:-run oltp -testname mytest -num_disks 2 -duration 30 -simulate raid0This maps to this test:Test: mytestSmall IO size: 8 KBLarge IO size: 1024 KBIO Types: Small Random IOs, Large Random IOsSimulated Array Type: RAID 0Stripe Depth: 1024 KBWrite: 0%Cache Size: Not EnteredDuration for each Data Point: 30 secondsSmall Columns:, 2, 4, 6, 8, 10, 12, 14, 16, 18, 20, 22, 24, 26, 28, 30, 32, 34, 36, 38, 40Large Columns:, 0Total Data Points: 22Name: /dev/dasdq1 Size: 2461679616Name: /dev/dasdr1 Size: 24616796162 FILEs found.Maximum Small IOPS=5035 @ Small=40 and Large=0Minimum Small Latency=0.55 @ Small=2 and Large=0
7. The next Orion test we did was to FCP a SCSI disk to compare ECKD and FCP performance:
ORION VERSION 11.2.0.0.1Commandline:-run oltp -testname mytest -num_disks 2 -duration 30 -simulate raid0This maps to this test:Test: mytestSmall IO size: 8 KBLarge IO size: 1024 KBIO Types: Small Random IOs, Large Random IOsSimulated Array Type: RAID 0Stripe Depth: 1024 KBWrite: 0%Cache Size: Not Entered
Chapter 4. Setting up an IBM disk storage system to use with Oracle on Linux on System z 71
Duration for each Data Point: 30 secondsSmall Columns:, 2, 4, 6, 8, 10, 12, 14, 16, 18, 20, 22, 24, 26, 28, 30, 32, 34, 36, 38, 40Large Columns:, 0Total Data Points: 22Name: /dev/sda1 Size: 10737401856Name: /dev/sdb1 Size: 107374018562 FILEs found.Maximum Small IOPS=24945 @ Small=24 and Large=0Minimum Small Latency=0.60 @ Small=12 and Large=0
For this test, the IOPS (inserts per second) went from 5035 on ECKD to 24,945 under FCP storage.
Now this is not a proper test comparing these storage configurations. The point is to test your configurations and find the best fit for your database, before you go through the trouble of installing and loading your database, and then find out it is performing not as fast as you originally hoped for.
4.9 Client example
In this example, a DS8100 was used with RAID 5 storage for a large data warehouse application. Since the database was primarily being used for reads and reporting, and cost and available disk space were concerns, it was decided to use RAID 5 storage on a DS8100 since, once loaded, the database would be primarily used for a lot of random reads. Figure 4-5 on page 73 shows a picture of a DS8100 storage array.
72 Experiences with Oracle Solutions on Linux for IBM System z
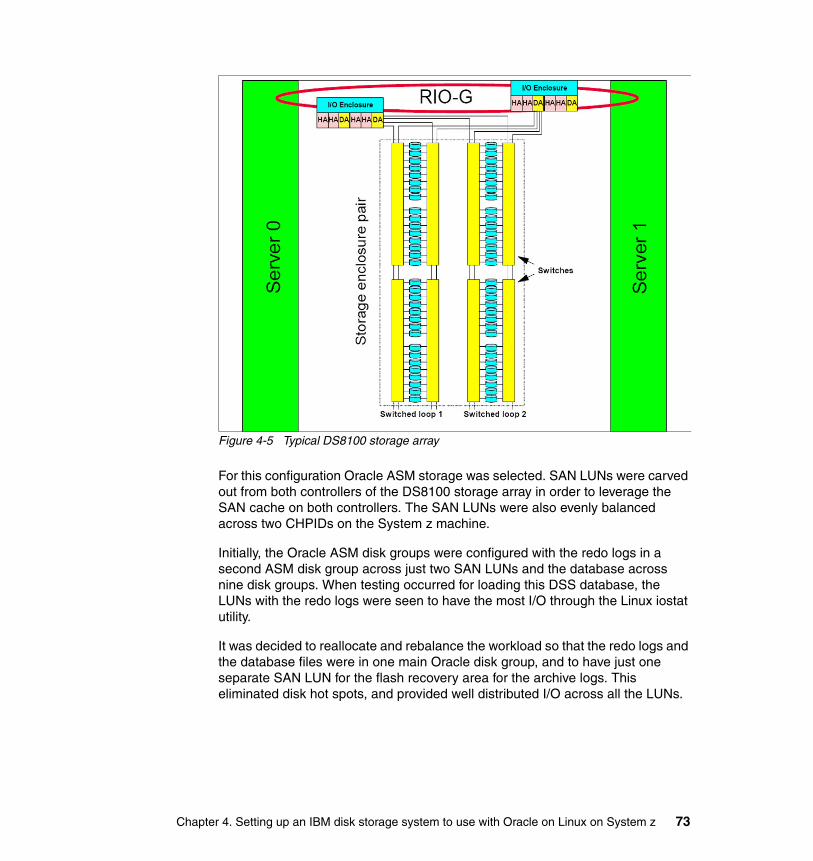
Figure 4-5 Typical DS8100 storage array
For this configuration Oracle ASM storage was selected. SAN LUNs were carved out from both controllers of the DS8100 storage array in order to leverage the SAN cache on both controllers. The SAN LUNs were also evenly balanced across two CHPIDs on the System z machine.
Initially, the Oracle ASM disk groups were configured with the redo logs in a second ASM disk group across just two SAN LUNs and the database across nine disk groups. When testing occurred for loading this DSS database, the LUNs with the redo logs were seen to have the most I/O through the Linux iostat utility.
It was decided to reallocate and rebalance the workload so that the redo logs and the database files were in one main Oracle disk group, and to have just one separate SAN LUN for the flash recovery area for the archive logs. This eliminated disk hot spots, and provided well distributed I/O across all the LUNs.
Chapter 4. Setting up an IBM disk storage system to use with Oracle on Linux on System z 73

4.10 Configuring FCP/SCSI storage
The following steps show how to configure storage for Oracle on FCP/SCSI storage. Since FCP storage does not have fault tolerance for multiple paths built in like FICON storage does, this section details the additional steps required to build in Multipath fault tolerance and then configure the storage for Oracle ASM.
4.10.1 Gathering storage requirements
The fist step in configuring an FCP disk is to gather all the LUN requirements from your storage administrator, that is, gathering the World Wide Port Names (WWPNs) and the FCP Logical Unit Numbers (LUNs).
Then on the System z machine you will need to assign the real physical FCP address (commonly referred to as FCP_DEV) based on an assigned System z Channel Path ID or CHPID. FCP_DEV and the associated CHPID are set up with Input/Output Configuration Program (IOCP).
When configuring the CHPIDs on System z for multipathing, each path to the LUN requires a separate System z CHPID to be available.
In cases of Oracle RAC, for which shared storage is needed for OCR (Cluster Registry), Voting Disk, and ASM disk, for two or more Oracle RAC nodes, because you will need concurrent access to a LUN for the OCR (Cluster Registry), Voting Disk, and ASM disk. Each of these separate Oracle RAC nodes require access through a different System z FCP channel.
The z10 EC supports up to 336 FICON Express4 channels, each one operating at 1, 2, or 4 GB/sec.
In our example we gathered the following information, as shown below and in Figure 4-6 on page 75.
FCP CHPID: 7F, 8F and 7B, 8B FCP_DEV (Cntl unit Addr): 7f00, 8f00 and 7b00, 8b00 Device Addresses: 7F00-7F0F, 8F00-8F0F, 7B00-7B0F, 8B00-8B0F10 GB LUN Numbers: EF00 & EF01
FCP Device address Port: 8f00Target WWPN: 0x500507630338cbbf LUN Ids: 0x40ef400000000000, 0x40ef400100000000
74 Experiences with Oracle Solutions on Linux for IBM System z
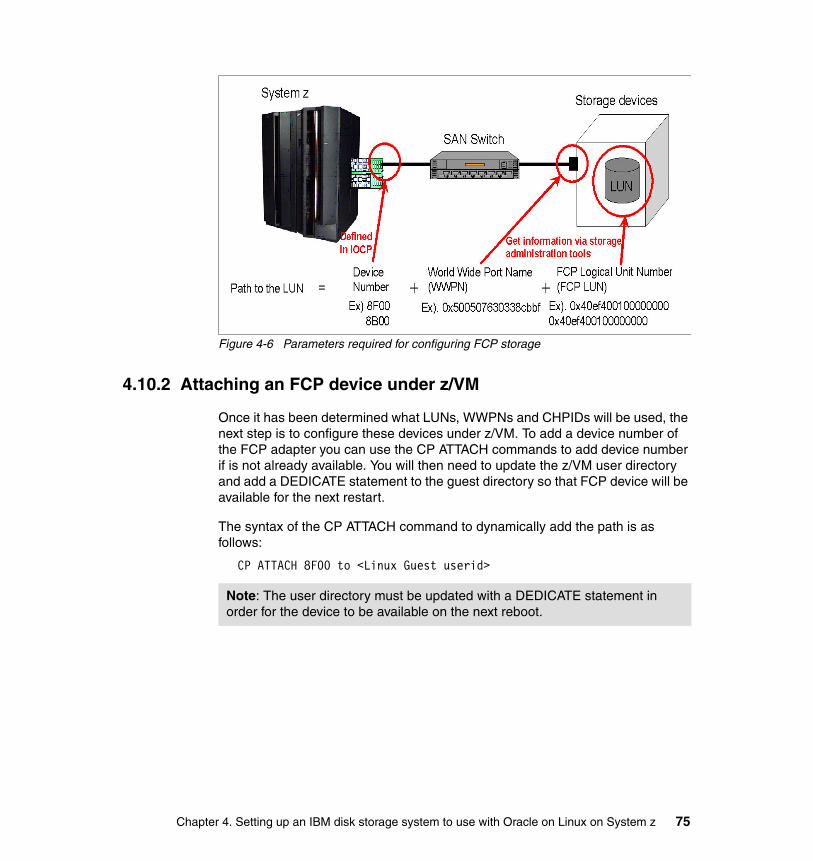
Figure 4-6 Parameters required for configuring FCP storage
4.10.2 Attaching an FCP device under z/VM
Once it has been determined what LUNs, WWPNs and CHPIDs will be used, the next step is to configure these devices under z/VM. To add a device number of the FCP adapter you can use the CP ATTACH commands to add device number if is not already available. You will then need to update the z/VM user directory and add a DEDICATE statement to the guest directory so that FCP device will be available for the next restart.
The syntax of the CP ATTACH command to dynamically add the path is as follows:
CP ATTACH 8F00 to <Linux Guest userid>
Note: The user directory must be updated with a DEDICATE statement in order for the device to be available on the next reboot.
Chapter 4. Setting up an IBM disk storage system to use with Oracle on Linux on System z 75
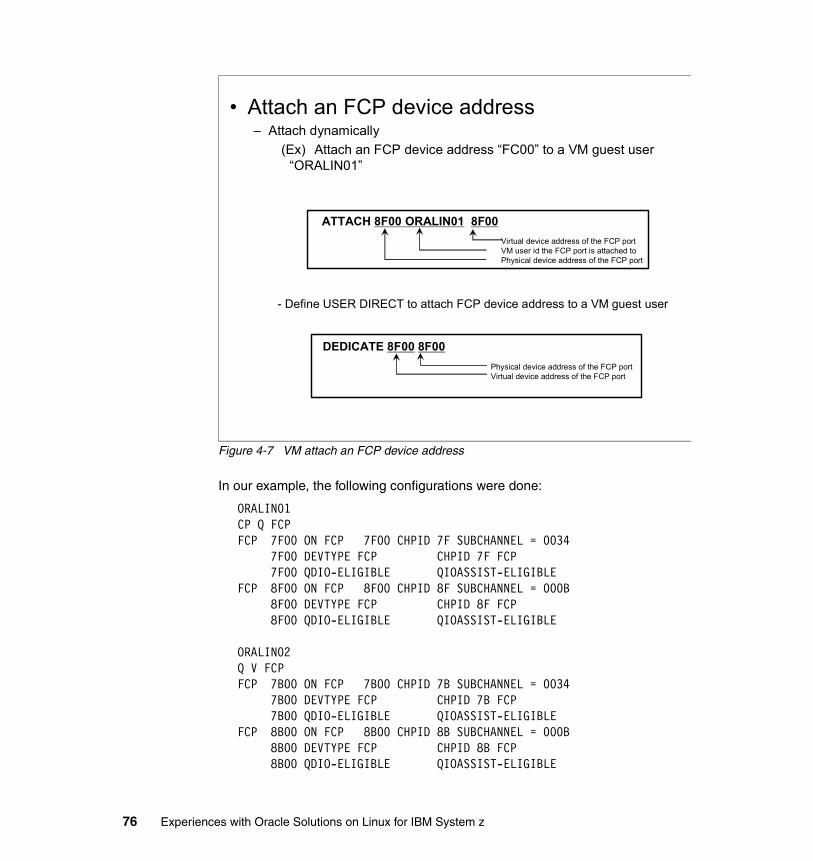
Figure 4-7 VM attach an FCP device address
In our example, the following configurations were done:
ORALIN01CP Q FCP FCP 7F00 ON FCP 7F00 CHPID 7F SUBCHANNEL = 0034 7F00 DEVTYPE FCP CHPID 7F FCP 7F00 QDIO-ELIGIBLE QIOASSIST-ELIGIBLE FCP 8F00 ON FCP 8F00 CHPID 8F SUBCHANNEL = 000B 8F00 DEVTYPE FCP CHPID 8F FCP 8F00 QDIO-ELIGIBLE QIOASSIST-ELIGIBLE
ORALIN02 Q V FCP FCP 7B00 ON FCP 7B00 CHPID 7B SUBCHANNEL = 0034 7B00 DEVTYPE FCP CHPID 7B FCP 7B00 QDIO-ELIGIBLE QIOASSIST-ELIGIBLE FCP 8B00 ON FCP 8B00 CHPID 8B SUBCHANNEL = 000B 8B00 DEVTYPE FCP CHPID 8B FCP 8B00 QDIO-ELIGIBLE QIOASSIST-ELIGIBLE
• Attach an FCP device address– Attach dynamically
(Ex) Attach an FCP device address “FC00” to a VM guest user “ORALIN01”
- Define USER DIRECT to attach FCP device address to a VM guest user
ATTACH 8F00 ORALIN01 8F00Virtual device address of the FCP portVM user id the FCP port is attached to Physical device address of the FCP port
DEDICATE 8F00 8F00Physical device address of the FCP portVirtual device address of the FCP port
76 Experiences with Oracle Solutions on Linux for IBM System z
4.10.3 Configuring Linux guests for zFCP
Once a z/VM Linux guest's user directory is updated, the next step is to configure zFCP at the Linux level to ensure that you can access the LUNs from multiple paths, for high availability. This section provides some of the basic steps to configure for FCP multipathing. Refer to Fibre Channel Protocol for Linux and z/VM on IBM System z, SG24-7266 for more details about these and other storage configuration tasks.
You should also make sure that a /etc/zfcp.conf file exists for Red Hat systems, and that /etc/modprobe.conf has an entry, scsi_hostadapter, for the zfcp module.
[root@oralin01 ~]# cat /etc/modprobe.confalias eth0 qethalias hsi0 qethoptions dasd_mod dasd=0200-0204,0400-0408,0500-0513,0300-0302alias scsi_hostadapter zfcp
Load the modprobe driverThe zfcp driver must be loaded before FCP devices can be configured. To load the FCP driver you can run the modprobe command:
#load the zfcp module # modprobe zfcp
You can use the Linux lsmod command to make sure the driver is loaded:
[root@oralin01 ~]# lsmod | grep zfcpzfcp 237856 8 [permanent]scsi_transport_fc 29440 1 zfcpqdio 63824 6 qeth,zfcpscsi_mod 210888 3 zfcp,scsi_transport_fc,sd_mod
Adding an FCP LUN for Red Hat The following steps can be used to bring online an FCP LUN for Red Hat systems. The first step is to set the virtual FCP adapter online with the following command:
echo 1 >> /sys/bus/ccw/devices/0.0.< fcp-device>/online
For example, on Linux system oralin01 we ran the following commands to bring the FCP devices 7f00 and 8f00 online:
echo 1 >> /sys/bus/ccw/drivers/zfcp/0.0.7f00/onlineecho 1 >> /sys/bus/ccw/drivers/zfcp/0.0.8f00/online
Chapter 4. Setting up an IBM disk storage system to use with Oracle on Linux on System z 77
The next step is to add a Storage Server (WWPN) to the FCP device:
echo <wwpn-address> > /sys/bus/ccw/devices/0.0.<fcp-device>/port_add
For example, on oralin01 we added WWPN 0x500507630338cbbf to FCP devices 7f00 and 8f00:
echo 0x500507630338cbbf > /sys/bus/ccw/drivers/zfcp/0.0.7f00/port_addecho 0x500507630338cbbf > /sys/bus/ccw/drivers/zfcp/0.0.8f00/port_add
The next step is to add a logical unit (LUN) to the WWPN with the following command:
echo <disk> > /sys/bus/ccw/devices/0.0.<fcp-device>/<wwpn-address>/unit_add
For example, on oralin01, we added LUNs 0x40ef400000000000 and 0x40ef400100000000 to the WWPN:
echo 0x40ef400000000000 > /sys/bus/ccw/drivers/zfcp/0.0.7f00/0x500507630338cbbf/unit_add echo 0x40ef400100000000 > /sys/bus/ccw/drivers/zfcp/0.0.7f00/0x500507630338cbbf/unit_addecho 0x40ef400000000000 > /sys/bus/ccw/drivers/zfcp/0.0.8f00/0x500507630338cbbf/unit_addecho 0x40ef400100000000 > /sys/bus/ccw/drivers/zfcp/0.0.8f00/0x500507630338cbbf/unit_add
For this example, we utilized the following syntax in the configurations:
xxxx(7f00) device address of FCP port <fcp-device>yyyyyyyyyyyyyyyy (0x500507630338cbbf)target WWPN <wwpn-address>zzzz (0x40ef400000000000) target LUN ID <disk>
When complete, /sys/bus/ccw/drivers/zfcp/0.0.xxxx/yyyyyyyyyyyyyyyy/zzzz000000000000 is created (corresponding to the recognition of the LUN assigned in Storage).
A quicker method on Red Hat systems is to simply add the new disk information in the /etc/zfcp.conf file and then run the /sbin/zfcpconf.sh script, which essentially performs the steps listed above. The entries in /etc/zfcp.conf are of the form: (0.0.xxxx 0x01 0xyyyyyyyyyyyyyyyy 0x00 0xzzzz000000000000).
Note: The fields for SCSI ID (0x01) and SCSI LUN (0x00) are obsolete and no longer required, but are included due to Red Hat Bug 251719, which is now fixed in some releases.
78 Experiences with Oracle Solutions on Linux for IBM System z
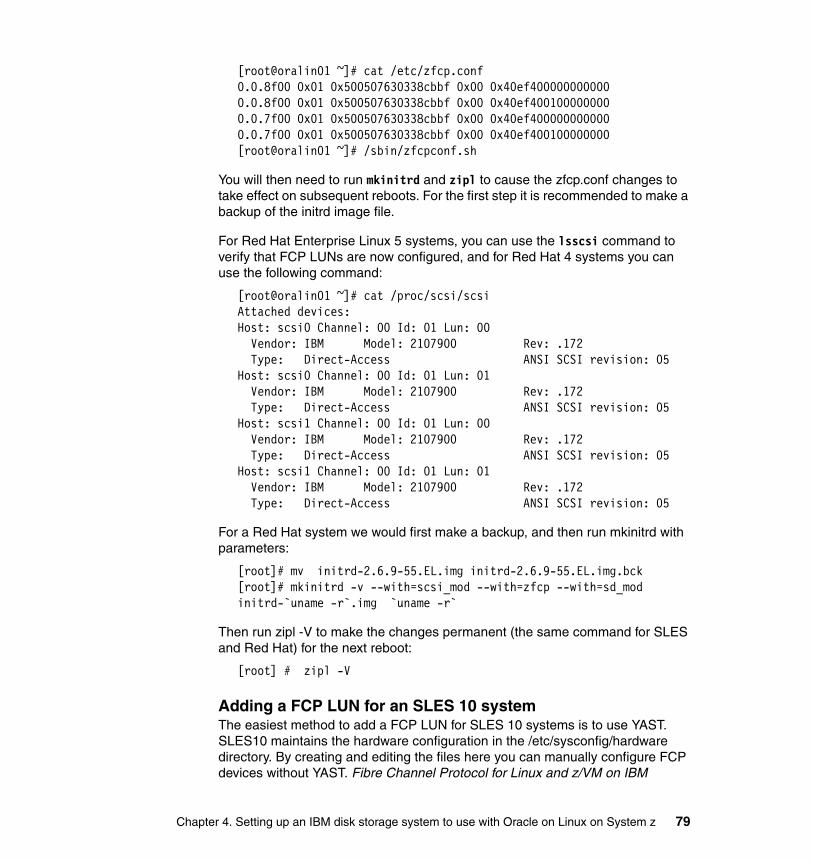
[root@oralin01 ~]# cat /etc/zfcp.conf0.0.8f00 0x01 0x500507630338cbbf 0x00 0x40ef4000000000000.0.8f00 0x01 0x500507630338cbbf 0x00 0x40ef4001000000000.0.7f00 0x01 0x500507630338cbbf 0x00 0x40ef4000000000000.0.7f00 0x01 0x500507630338cbbf 0x00 0x40ef400100000000[root@oralin01 ~]# /sbin/zfcpconf.sh
You will then need to run mkinitrd and zipl to cause the zfcp.conf changes to take effect on subsequent reboots. For the first step it is recommended to make a backup of the initrd image file.
For Red Hat Enterprise Linux 5 systems, you can use the lsscsi command to verify that FCP LUNs are now configured, and for Red Hat 4 systems you can use the following command:
[root@oralin01 ~]# cat /proc/scsi/scsiAttached devices:Host: scsi0 Channel: 00 Id: 01 Lun: 00 Vendor: IBM Model: 2107900 Rev: .172 Type: Direct-Access ANSI SCSI revision: 05Host: scsi0 Channel: 00 Id: 01 Lun: 01 Vendor: IBM Model: 2107900 Rev: .172 Type: Direct-Access ANSI SCSI revision: 05Host: scsi1 Channel: 00 Id: 01 Lun: 00 Vendor: IBM Model: 2107900 Rev: .172 Type: Direct-Access ANSI SCSI revision: 05Host: scsi1 Channel: 00 Id: 01 Lun: 01 Vendor: IBM Model: 2107900 Rev: .172 Type: Direct-Access ANSI SCSI revision: 05
For a Red Hat system we would first make a backup, and then run mkinitrd with parameters:
[root]# mv initrd-2.6.9-55.EL.img initrd-2.6.9-55.EL.img.bck[root]# mkinitrd -v --with=scsi_mod --with=zfcp --with=sd_mod initrd-`uname -r`.img `uname -r`
Then run zipl -V to make the changes permanent (the same command for SLES and Red Hat) for the next reboot:
[root] # zipl -V
Adding a FCP LUN for an SLES 10 systemThe easiest method to add a FCP LUN for SLES 10 systems is to use YAST. SLES10 maintains the hardware configuration in the /etc/sysconfig/hardware directory. By creating and editing the files here you can manually configure FCP devices without YAST. Fibre Channel Protocol for Linux and z/VM on IBM
Chapter 4. Setting up an IBM disk storage system to use with Oracle on Linux on System z 79
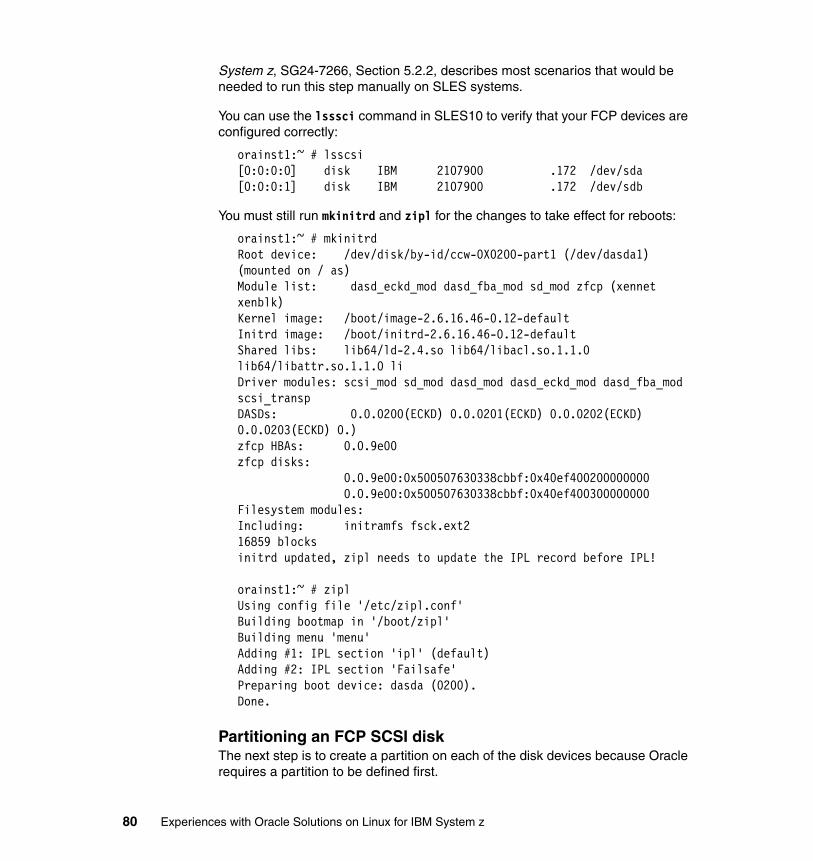
System z, SG24-7266, Section 5.2.2, describes most scenarios that would be needed to run this step manually on SLES systems.
You can use the lsssci command in SLES10 to verify that your FCP devices are configured correctly:
orainst1:~ # lsscsi[0:0:0:0] disk IBM 2107900 .172 /dev/sda[0:0:0:1] disk IBM 2107900 .172 /dev/sdb
You must still run mkinitrd and zipl for the changes to take effect for reboots:
orainst1:~ # mkinitrdRoot device: /dev/disk/by-id/ccw-0X0200-part1 (/dev/dasda1) (mounted on / as)Module list: dasd_eckd_mod dasd_fba_mod sd_mod zfcp (xennet xenblk)Kernel image: /boot/image-2.6.16.46-0.12-defaultInitrd image: /boot/initrd-2.6.16.46-0.12-defaultShared libs: lib64/ld-2.4.so lib64/libacl.so.1.1.0 lib64/libattr.so.1.1.0 li Driver modules: scsi_mod sd_mod dasd_mod dasd_eckd_mod dasd_fba_mod scsi_transp DASDs: 0.0.0200(ECKD) 0.0.0201(ECKD) 0.0.0202(ECKD) 0.0.0203(ECKD) 0.)zfcp HBAs: 0.0.9e00 zfcp disks: 0.0.9e00:0x500507630338cbbf:0x40ef400200000000 0.0.9e00:0x500507630338cbbf:0x40ef400300000000Filesystem modules:Including: initramfs fsck.ext216859 blocksinitrd updated, zipl needs to update the IPL record before IPL!
orainst1:~ # ziplUsing config file '/etc/zipl.conf'Building bootmap in '/boot/zipl'Building menu 'menu'Adding #1: IPL section 'ipl' (default)Adding #2: IPL section 'Failsafe'Preparing boot device: dasda (0200).Done.
Partitioning an FCP SCSI diskThe next step is to create a partition on each of the disk devices because Oracle requires a partition to be defined first.
80 Experiences with Oracle Solutions on Linux for IBM System z
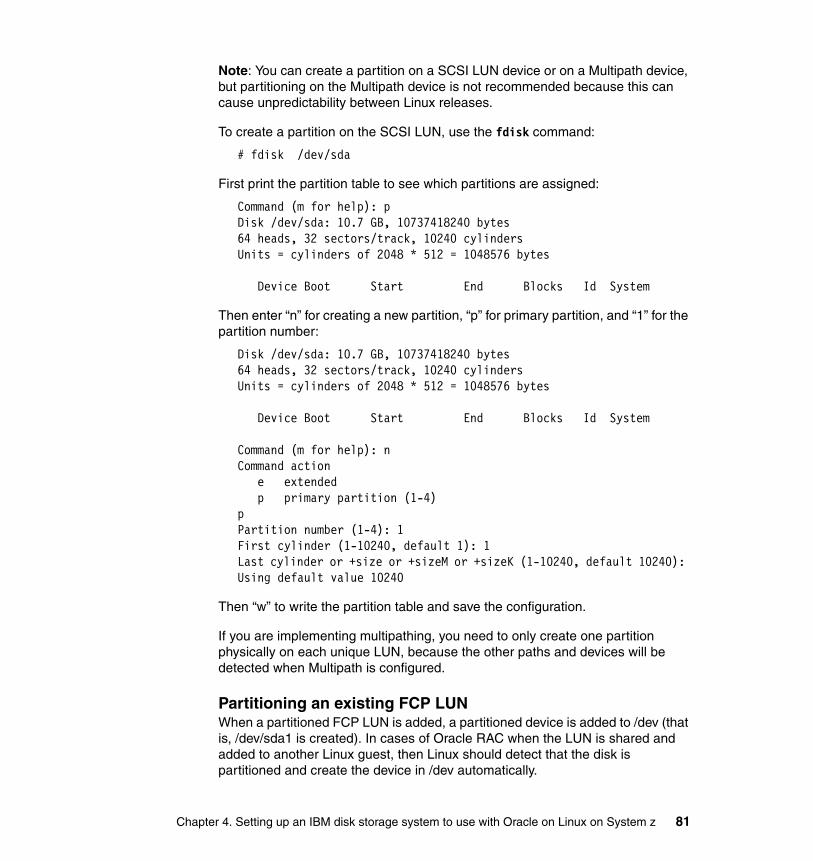
Note: You can create a partition on a SCSI LUN device or on a Multipath device, but partitioning on the Multipath device is not recommended because this can cause unpredictability between Linux releases.
To create a partition on the SCSI LUN, use the fdisk command:
# fdisk /dev/sda
First print the partition table to see which partitions are assigned:
Command (m for help): pDisk /dev/sda: 10.7 GB, 10737418240 bytes64 heads, 32 sectors/track, 10240 cylindersUnits = cylinders of 2048 * 512 = 1048576 bytes
Device Boot Start End Blocks Id System
Then enter “n” for creating a new partition, “p” for primary partition, and “1” for the partition number:
Disk /dev/sda: 10.7 GB, 10737418240 bytes64 heads, 32 sectors/track, 10240 cylindersUnits = cylinders of 2048 * 512 = 1048576 bytes
Device Boot Start End Blocks Id System
Command (m for help): nCommand action e extended p primary partition (1-4)pPartition number (1-4): 1First cylinder (1-10240, default 1): 1Last cylinder or +size or +sizeM or +sizeK (1-10240, default 10240): Using default value 10240
Then “w” to write the partition table and save the configuration.
If you are implementing multipathing, you need to only create one partition physically on each unique LUN, because the other paths and devices will be detected when Multipath is configured.
Partitioning an existing FCP LUN When a partitioned FCP LUN is added, a partitioned device is added to /dev (that is, /dev/sda1 is created). In cases of Oracle RAC when the LUN is shared and added to another Linux guest, then Linux should detect that the disk is partitioned and create the device in /dev automatically.
Chapter 4. Setting up an IBM disk storage system to use with Oracle on Linux on System z 81
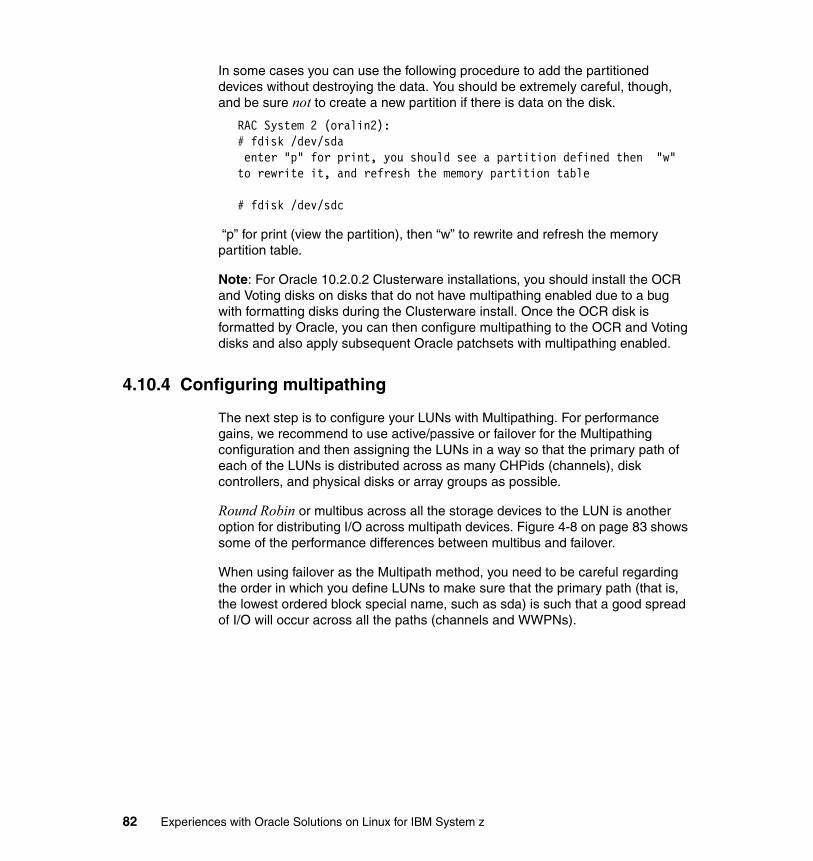
In some cases you can use the following procedure to add the partitioned devices without destroying the data. You should be extremely careful, though, and be sure not to create a new partition if there is data on the disk.
RAC System 2 (oralin2):# fdisk /dev/sda enter "p" for print, you should see a partition defined then "w" to rewrite it, and refresh the memory partition table
# fdisk /dev/sdc
“p” for print (view the partition), then “w” to rewrite and refresh the memory partition table.
Note: For Oracle 10.2.0.2 Clusterware installations, you should install the OCR and Voting disks on disks that do not have multipathing enabled due to a bug with formatting disks during the Clusterware install. Once the OCR disk is formatted by Oracle, you can then configure multipathing to the OCR and Voting disks and also apply subsequent Oracle patchsets with multipathing enabled.
4.10.4 Configuring multipathing
The next step is to configure your LUNs with Multipathing. For performance gains, we recommend to use active/passive or failover for the Multipathing configuration and then assigning the LUNs in a way so that the primary path of each of the LUNs is distributed across as many CHPids (channels), disk controllers, and physical disks or array groups as possible.
Round Robin or multibus across all the storage devices to the LUN is another option for distributing I/O across multipath devices. Figure 4-8 on page 83 shows some of the performance differences between multibus and failover.
When using failover as the Multipath method, you need to be careful regarding the order in which you define LUNs to make sure that the primary path (that is, the lowest ordered block special name, such as sda) is such that a good spread of I/O will occur across all the paths (channels and WWPNs).
82 Experiences with Oracle Solutions on Linux for IBM System z

Figure 4-8 Failover vs. multibus performance
Typically for SLES 10 systems, the required device mapper rpms are already installed with the operating system install, so this step is not required. For Red Hat systems (or SLES systems if not installed), you may need to download and install the appropriate device mapper rpm for your kernel level.
The following rpm command was used to install the Multipath on a Red Hat system:
[root@oralin01 ]# rpm -ivh device-mapper-multipath-0.4.5-31.el4.s390x.rpmwarning: device-mapper-multipath-0.4.5-31.el4.s390x.rpm: V3 DSA signature: NOKEY, key ID db42a60ePreparing... ########################################### [100%] 1:device-mapper-multipath########################################### [100%]
For SLES10 systems, you should verify that the Multipath rpm is installed with the following command:
orainst1:/etc # rpm -qa --queryformat="%{n}-%{v}-%{r}.%{arch}.rpm\n" | grep multipathmultipath-tools-0.4.7-34.18.s390x.rpm
Chapter 4. Setting up an IBM disk storage system to use with Oracle on Linux on System z 83
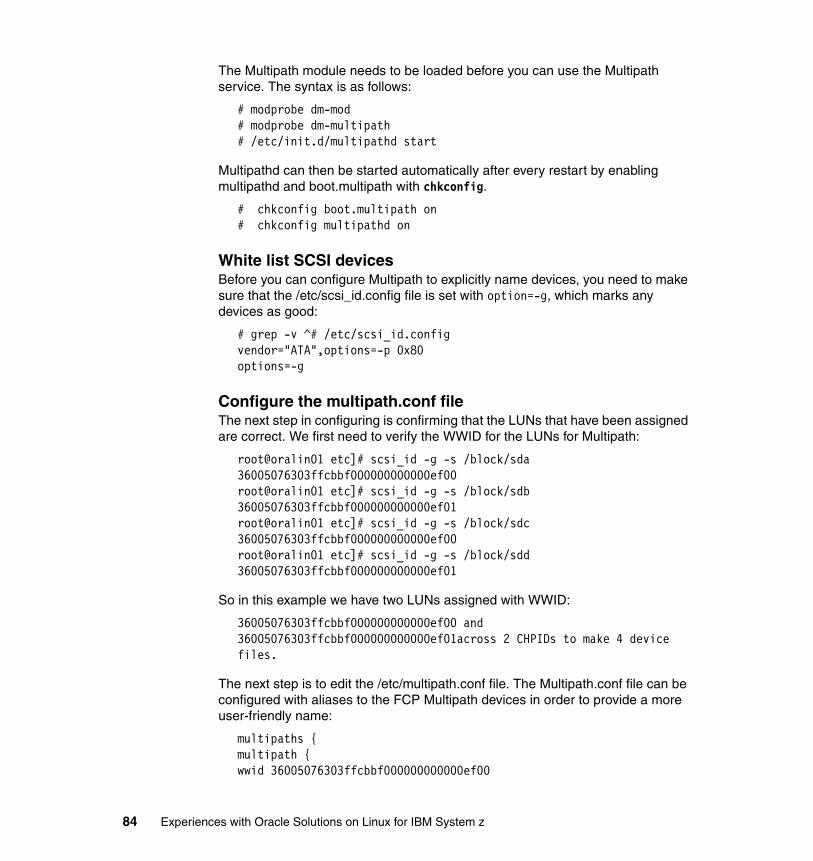
The Multipath module needs to be loaded before you can use the Multipath service. The syntax is as follows:
# modprobe dm-mod# modprobe dm-multipath# /etc/init.d/multipathd start
Multipathd can then be started automatically after every restart by enabling multipathd and boot.multipath with chkconfig.
# chkconfig boot.multipath on# chkconfig multipathd on
White list SCSI devicesBefore you can configure Multipath to explicitly name devices, you need to make sure that the /etc/scsi_id.config file is set with option=-g, which marks any devices as good:
# grep -v ^# /etc/scsi_id.configvendor="ATA",options=-p 0x80options=-g
Configure the multipath.conf fileThe next step in configuring is confirming that the LUNs that have been assigned are correct. We first need to verify the WWID for the LUNs for Multipath:
root@oralin01 etc]# scsi_id -g -s /block/sda36005076303ffcbbf000000000000ef00root@oralin01 etc]# scsi_id -g -s /block/sdb36005076303ffcbbf000000000000ef01root@oralin01 etc]# scsi_id -g -s /block/sdc36005076303ffcbbf000000000000ef00root@oralin01 etc]# scsi_id -g -s /block/sdd36005076303ffcbbf000000000000ef01
So in this example we have two LUNs assigned with WWID:
36005076303ffcbbf000000000000ef00 and 36005076303ffcbbf000000000000ef01across 2 CHPIDs to make 4 device files.
The next step is to edit the /etc/multipath.conf file. The Multipath.conf file can be configured with aliases to the FCP Multipath devices in order to provide a more user-friendly name:
multipaths {multipath {wwid 36005076303ffcbbf000000000000ef00
84 Experiences with Oracle Solutions on Linux for IBM System z
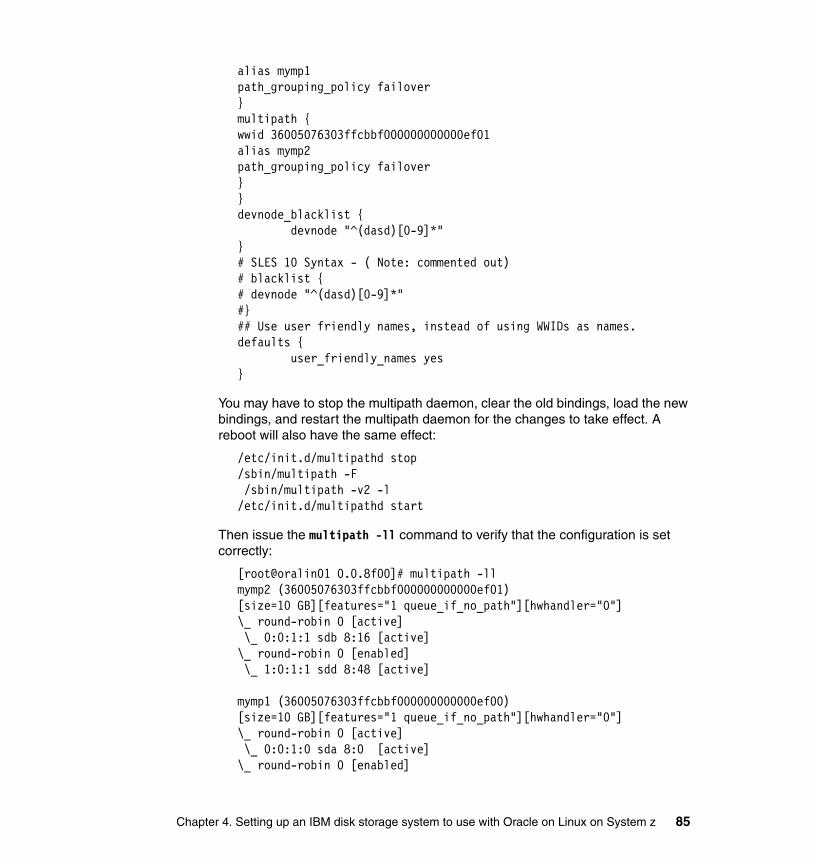
alias mymp1path_grouping_policy failover}multipath {wwid 36005076303ffcbbf000000000000ef01alias mymp2path_grouping_policy failover}}devnode_blacklist { devnode "^(dasd)[0-9]*"}# SLES 10 Syntax - ( Note: commented out)# blacklist {# devnode "^(dasd)[0-9]*"#}## Use user friendly names, instead of using WWIDs as names.defaults { user_friendly_names yes}
You may have to stop the multipath daemon, clear the old bindings, load the new bindings, and restart the multipath daemon for the changes to take effect. A reboot will also have the same effect:
/etc/init.d/multipathd stop/sbin/multipath -F /sbin/multipath -v2 -l/etc/init.d/multipathd start
Then issue the multipath -ll command to verify that the configuration is set correctly:
[root@oralin01 0.0.8f00]# multipath -llmymp2 (36005076303ffcbbf000000000000ef01)[size=10 GB][features="1 queue_if_no_path"][hwhandler="0"]\_ round-robin 0 [active] \_ 0:0:1:1 sdb 8:16 [active]\_ round-robin 0 [enabled] \_ 1:0:1:1 sdd 8:48 [active]
mymp1 (36005076303ffcbbf000000000000ef00)[size=10 GB][features="1 queue_if_no_path"][hwhandler="0"]\_ round-robin 0 [active] \_ 0:0:1:0 sda 8:0 [active]\_ round-robin 0 [enabled]
Chapter 4. Setting up an IBM disk storage system to use with Oracle on Linux on System z 85
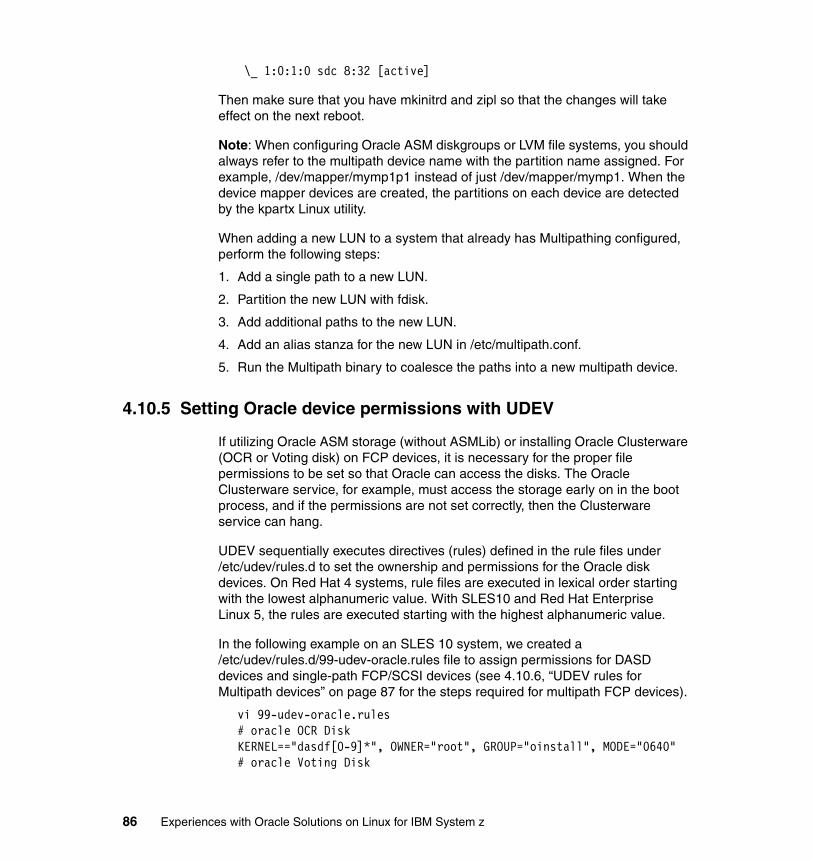
\_ 1:0:1:0 sdc 8:32 [active]
Then make sure that you have mkinitrd and zipl so that the changes will take effect on the next reboot.
Note: When configuring Oracle ASM diskgroups or LVM file systems, you should always refer to the multipath device name with the partition name assigned. For example, /dev/mapper/mymp1p1 instead of just /dev/mapper/mymp1. When the device mapper devices are created, the partitions on each device are detected by the kpartx Linux utility.
When adding a new LUN to a system that already has Multipathing configured, perform the following steps:
1. Add a single path to a new LUN.
2. Partition the new LUN with fdisk.
3. Add additional paths to the new LUN.
4. Add an alias stanza for the new LUN in /etc/multipath.conf.
5. Run the Multipath binary to coalesce the paths into a new multipath device.
4.10.5 Setting Oracle device permissions with UDEV
If utilizing Oracle ASM storage (without ASMLib) or installing Oracle Clusterware (OCR or Voting disk) on FCP devices, it is necessary for the proper file permissions to be set so that Oracle can access the disks. The Oracle Clusterware service, for example, must access the storage early on in the boot process, and if the permissions are not set correctly, then the Clusterware service can hang.
UDEV sequentially executes directives (rules) defined in the rule files under /etc/udev/rules.d to set the ownership and permissions for the Oracle disk devices. On Red Hat 4 systems, rule files are executed in lexical order starting with the lowest alphanumeric value. With SLES10 and Red Hat Enterprise Linux 5, the rules are executed starting with the highest alphanumeric value.
In the following example on an SLES 10 system, we created a /etc/udev/rules.d/99-udev-oracle.rules file to assign permissions for DASD devices and single-path FCP/SCSI devices (see 4.10.6, “UDEV rules for Multipath devices” on page 87 for the steps required for multipath FCP devices).
vi 99-udev-oracle.rules# oracle OCR DiskKERNEL=="dasdf[0-9]*", OWNER="root", GROUP="oinstall", MODE="0640"# oracle Voting Disk
86 Experiences with Oracle Solutions on Linux for IBM System z
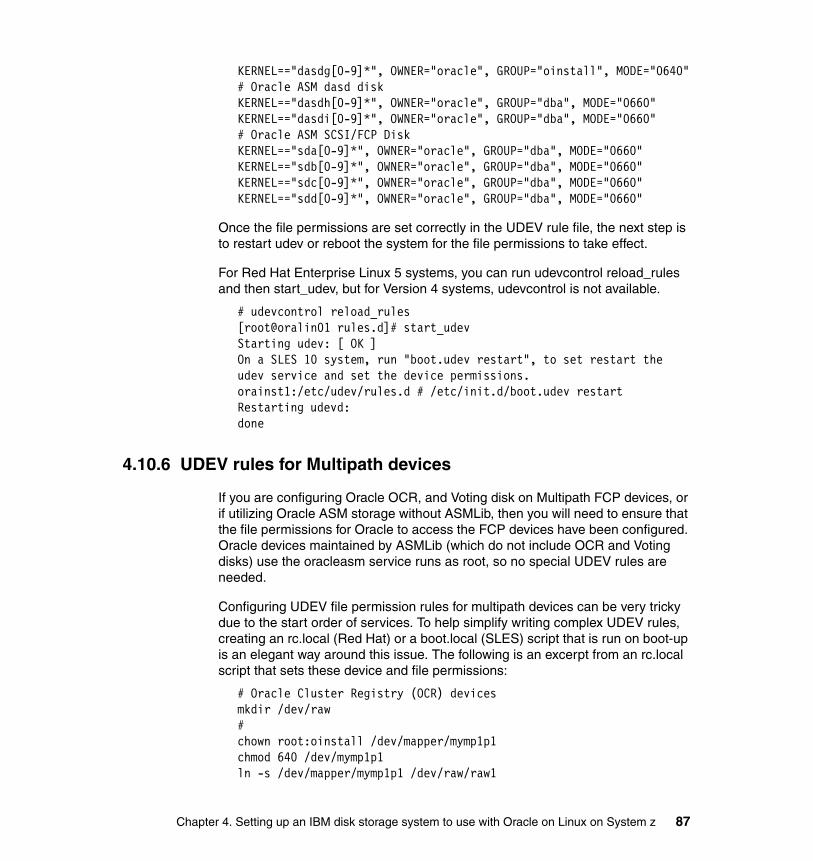
KERNEL=="dasdg[0-9]*", OWNER="oracle", GROUP="oinstall", MODE="0640"# Oracle ASM dasd diskKERNEL=="dasdh[0-9]*", OWNER="oracle", GROUP="dba", MODE="0660"KERNEL=="dasdi[0-9]*", OWNER="oracle", GROUP="dba", MODE="0660"# Oracle ASM SCSI/FCP DiskKERNEL=="sda[0-9]*", OWNER="oracle", GROUP="dba", MODE="0660"KERNEL=="sdb[0-9]*", OWNER="oracle", GROUP="dba", MODE="0660"KERNEL=="sdc[0-9]*", OWNER="oracle", GROUP="dba", MODE="0660"KERNEL=="sdd[0-9]*", OWNER="oracle", GROUP="dba", MODE="0660"
Once the file permissions are set correctly in the UDEV rule file, the next step is to restart udev or reboot the system for the file permissions to take effect.
For Red Hat Enterprise Linux 5 systems, you can run udevcontrol reload_rules and then start_udev, but for Version 4 systems, udevcontrol is not available.
# udevcontrol reload_rules [root@oralin01 rules.d]# start_udevStarting udev: [ OK ]On a SLES 10 system, run "boot.udev restart", to set restart the udev service and set the device permissions. orainst1:/etc/udev/rules.d # /etc/init.d/boot.udev restartRestarting udevd: done
4.10.6 UDEV rules for Multipath devices
If you are configuring Oracle OCR, and Voting disk on Multipath FCP devices, or if utilizing Oracle ASM storage without ASMLib, then you will need to ensure that the file permissions for Oracle to access the FCP devices have been configured. Oracle devices maintained by ASMLib (which do not include OCR and Voting disks) use the oracleasm service runs as root, so no special UDEV rules are needed.
Configuring UDEV file permission rules for multipath devices can be very tricky due to the start order of services. To help simplify writing complex UDEV rules, creating an rc.local (Red Hat) or a boot.local (SLES) script that is run on boot-up is an elegant way around this issue. The following is an excerpt from an rc.local script that sets these device and file permissions:
# Oracle Cluster Registry (OCR) devicesmkdir /dev/raw#chown root:oinstall /dev/mapper/mymp1p1chmod 640 /dev/mymp1p1ln -s /dev/mapper/mymp1p1 /dev/raw/raw1
Chapter 4. Setting up an IBM disk storage system to use with Oracle on Linux on System z 87

chmod 640 /dev/raw/raw1chown root:oinstall /dev/raw/raw1###### Oracle Cluster Voting disks#####chown oracle:oinstall /dev/mapper/mymp2p1chmod 660 /dev/mymp2p1ln -s /dev/mapper/mymp2p1 /dev/raw/raw2chmod 660 /dev/raw/raw2chown oracle:oinstall /dev/raw/raw2
Note: In the following example, links to /dev/raw/raw1 and raw2 were created so that it was easier to get around the Multipath Oracle 10.2.0.2 Clusterware install issue to a Multipath disk. By initially linking /dev/raw/raw1 to the single-path device, that is, /dev/sda1 for the initial CRS install, and then changing the rc.local script to have the links point to the Multipath device /dev/mapper/mymp1p1 afterward, we were able to complete the installation of Oracle Clusterware.
4.10.7 Configure ASMLib with FCP multipathing device
If you plan to utilize Oracle ASM storage with ASMLib and not UDEV, you can now add the new FCP LUNs to ASMLib. This section assumes that the Oracle ASMLib rpms are already installed and configured.
For example, as root you could run:
[root@oralin01 init.d]# /etc/init.d/oracleasm createdisk MYMP1 /dev/mapper/mymp1p1Marking disk "/dev/mapper/mymp1p1" as an ASM disk: [ OK ][root@oralin01 init.d]# /etc/init.d/oracleasm createdisk MYMP2 /dev/mapper/mymp2p1Marking disk "/dev/mapper/mymp2p1" as an ASM disk: [ OK ][root@oralin01 init.d]# /etc/init.d/oracleasm listdisksMYMP1MYMP2
If utilizing Oracle ASM shared storage across Linux guests, then you should be sure to run oracleasm scandisk on the other Oracle nodes so that storage will be seen by Oracle ASM:
[root@oralin02 init.d]# /etc/init.d/oracleasm scandisk
Once the devices have been marked and discovered by ASMLib, Oracle ASM can then utilize the new FCP storage.
88 Experiences with Oracle Solutions on Linux for IBM System z
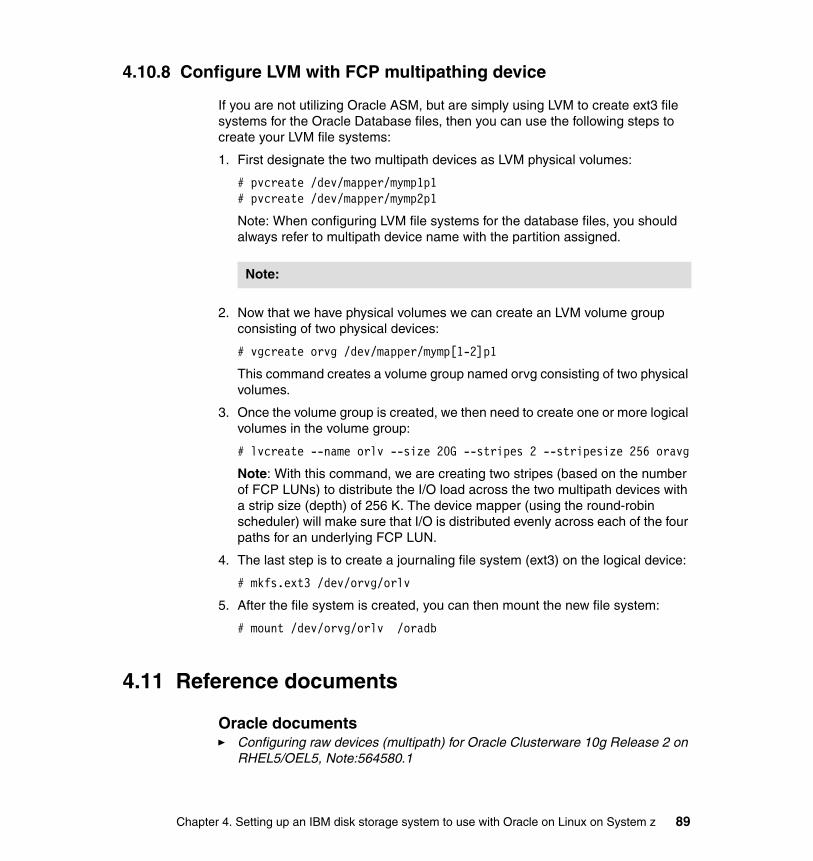
4.10.8 Configure LVM with FCP multipathing device
If you are not utilizing Oracle ASM, but are simply using LVM to create ext3 file systems for the Oracle Database files, then you can use the following steps to create your LVM file systems:
1. First designate the two multipath devices as LVM physical volumes:
# pvcreate /dev/mapper/mymp1p1# pvcreate /dev/mapper/mymp2p1
Note: When configuring LVM file systems for the database files, you should always refer to multipath device name with the partition assigned.
2. Now that we have physical volumes we can create an LVM volume group consisting of two physical devices:
# vgcreate orvg /dev/mapper/mymp[1-2]p1
This command creates a volume group named orvg consisting of two physical volumes.
3. Once the volume group is created, we then need to create one or more logical volumes in the volume group:
# lvcreate --name orlv --size 20G --stripes 2 --stripesize 256 oravg
Note: With this command, we are creating two stripes (based on the number of FCP LUNs) to distribute the I/O load across the two multipath devices with a strip size (depth) of 256 K. The device mapper (using the round-robin scheduler) will make sure that I/O is distributed evenly across each of the four paths for an underlying FCP LUN.
4. The last step is to create a journaling file system (ext3) on the logical device:
# mkfs.ext3 /dev/orvg/orlv
5. After the file system is created, you can then mount the new file system:
# mount /dev/orvg/orlv /oradb
4.11 Reference documents
Oracle documents� Configuring raw devices (multipath) for Oracle Clusterware 10g Release 2 on
RHEL5/OEL5, Note:564580.1
Note:
Chapter 4. Setting up an IBM disk storage system to use with Oracle on Linux on System z 89
� Configuring raw devices (singlepath) for Oracle Clusterware 10g Release 2 on RHEL5/OEL5, Note:465001.1
� How to Dynamically Add and Remove SCSI Devices on Linux, Note:603868.1� Oracle 10g and 11g Performance Tuning Guide, Oracle Corporation� RAC PACK Presentation - Back-of-the-Envelope Database Storage Design -
Nitin Vengurlekar� OPTIMAL STORAGE CONFIGURATION MADE EASY, Juan Loaiza� http://otn.oracle.com/deploy/availability/pdf/oow2000_same.pdf� Oracle ORION, Installation Guide
IBM documents� How to use FC-attached SCSI Devices with Linux on System z at:
http://download.boulder.ibm.com/ibmdl/pub/software/dw/linux390/docu/l26cts00.pdf
� Developer Works - Multipathing with SCSI disks
� Linux For System z Installation Workshop (SuSE SLES10-FCP), Richard Lewis
� Linux for System z Performance Update - Martin Kammerer
� Special thanks to Brent Howe, Pat Blaney, and Richard Lewis for their review of and input to this document.
� Cloning FCP-attached SCSI SLES9 Linux for zSeries Systems, Robert Brenneman
IBM Redbooks publications� Linux for IBM System z9 and IBM zSeries, SG24-6694
� IBM System Storage DS8000 Architecture and Implementation, SG24-6786
� Fibre Channel Protocol for Linux and z/VM on IBM System z at:
http://www.redbooks.ibm.com/abstracts/sg247266.html
Other references� Red Hat Enterprise Linux manual
http://www.redhat.com/docs/manuals/enterprise/RHEL-4-Manual/s390-multi-install-guide/s1-s390info-zfcp.html
� Red Hat Tech Note “Using the zFCP Driver” http://www.redhat.com/docs/manuals/enterprise/RHEL-5-manual/Installation_Guide-en-US/s1-s390info-zfcp.html
90 Experiences with Oracle Solutions on Linux for IBM System z
Chapter 5. Oracle Database Vault installation on Linux for System z
This chapter describes our experiences with installing Database Vault on Linux on z. The references we used were:
� References: Oracle Database Vault Installation Guide 10g Release 2 (10.2) for IBM zSeries Based Linux E10074-01, March 2008
� Oracle Database Vault Administrator's Guide 10g Release 2 (10.2) B25166-09, February 2008
� Oracle Database Patch Set Notes 10g Release 2 (10.2.0.4) Patch Set 3 for IBM zSeries Based Linux
5
© Copyright IBM Corp. 2009. All rights reserved. 91

5.1 Introduction
Oracle Database Vault can restrict access to data in an Oracle Database from any user, including users who traditionally have had SYSDBA or administrative access. Thus, it can prevent even read access to the data by administrators, but still allow them to maintain the Oracle Database system.
The following paragraph is from the installation guide. It is placed here to emphasize that attention to detail in planning and implementation that needs to be used with Database Vault.
“In a default Database Vault installation, the operating system authentication to the database is disabled. In addition, connections to the database using the SYSDBA privilege (that is, those that use the AS SYSDBA clause) are disabled. This is a security feature and is implemented to prevent misuse of the SYSDBA privilege.”
The environment used in this discussion begins with an Oracle 10.2.0.3 database installed on SLES10 Linux running on the IBM zSeries. Two separate installs are described in the following sections. First, Oracle Database Vault 10.2.0.3 is installed on the 10.2.0.3 database. Second, the Oracle Database 10.2.0.4 Patch Set 3 is installed and this patch set also contains the 10.2.0.4 Database Vault Upgrade.
5.2 Install Database Vault 10.2.0.3
The installation of Database Vault transforms the existing 10.2.0.3 Oracle Database system into a 10.2.0.3 Oracle Database Vault system. The Database Vault zip file is downloaded from OTN, unzipped and made ready for runInstaller to start the OUI to install Database Vault. Oracle Database Vault is installed into an existing Oracle Home, so everything, including OEM DBcontrol, iSQL*Plus, the DB instance and listeners, needs to be stopped in the Oracle Home before Database Vault is installed. Figure 5-1 on page 93 is presented by the OUI.
92 Experiences with Oracle Solutions on Linux for IBM System z
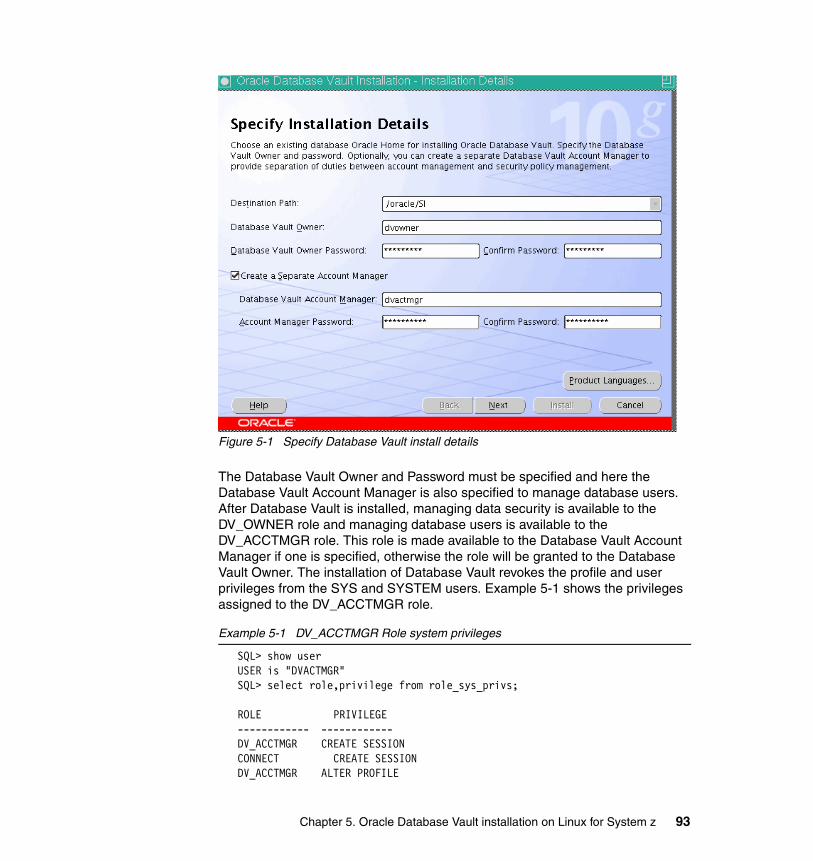
Figure 5-1 Specify Database Vault install details
The Database Vault Owner and Password must be specified and here the Database Vault Account Manager is also specified to manage database users. After Database Vault is installed, managing data security is available to the DV_OWNER role and managing database users is available to the DV_ACCTMGR role. This role is made available to the Database Vault Account Manager if one is specified, otherwise the role will be granted to the Database Vault Owner. The installation of Database Vault revokes the profile and user privileges from the SYS and SYSTEM users. Example 5-1 shows the privileges assigned to the DV_ACCTMGR role.
Example 5-1 DV_ACCTMGR Role system privileges
SQL> show userUSER is "DVACTMGR"SQL> select role,privilege from role_sys_privs;
ROLE PRIVILEGE------------ ------------DV_ACCTMGR CREATE SESSIONCONNECT CREATE SESSIONDV_ACCTMGR ALTER PROFILE
Chapter 5. Oracle Database Vault installation on Linux for System z 93
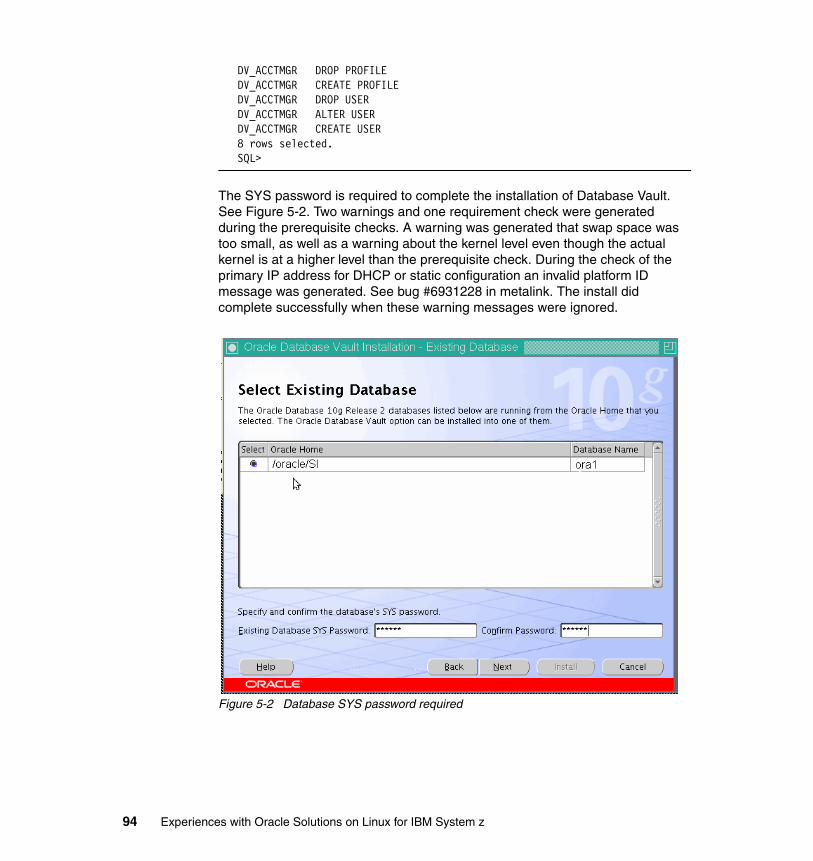
DV_ACCTMGR DROP PROFILEDV_ACCTMGR CREATE PROFILEDV_ACCTMGR DROP USERDV_ACCTMGR ALTER USERDV_ACCTMGR CREATE USER8 rows selected.SQL>
The SYS password is required to complete the installation of Database Vault. See Figure 5-2. Two warnings and one requirement check were generated during the prerequisite checks. A warning was generated that swap space was too small, as well as a warning about the kernel level even though the actual kernel is at a higher level than the prerequisite check. During the check of the primary IP address for DHCP or static configuration an invalid platform ID message was generated. See bug #6931228 in metalink. The install did complete successfully when these warning messages were ignored.
Figure 5-2 Database SYS password required
94 Experiences with Oracle Solutions on Linux for IBM System z
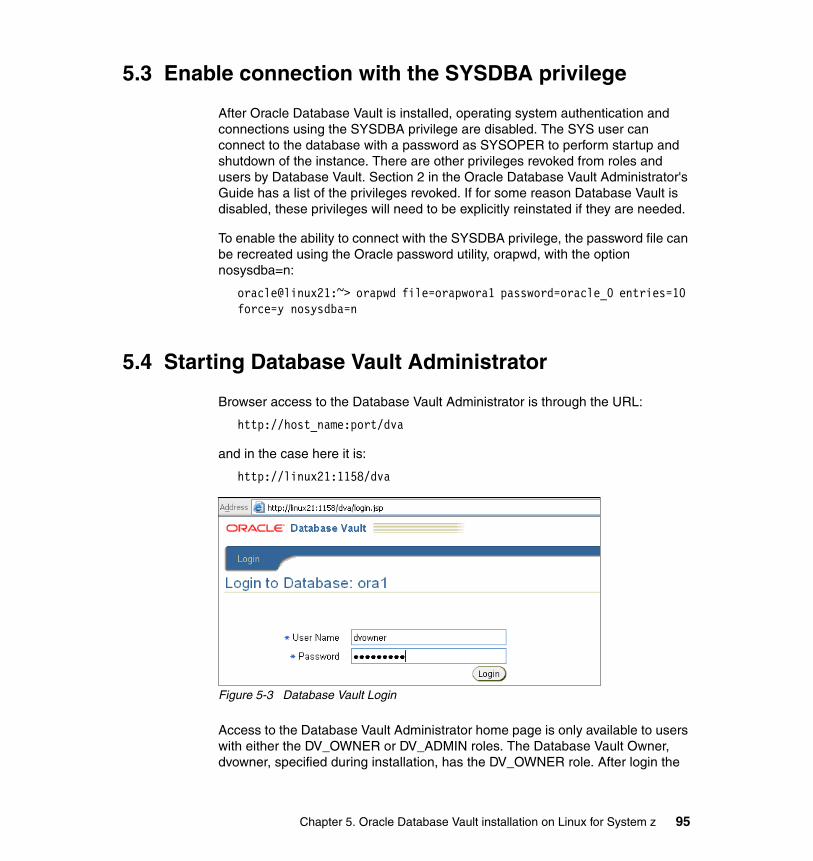
5.3 Enable connection with the SYSDBA privilege
After Oracle Database Vault is installed, operating system authentication and connections using the SYSDBA privilege are disabled. The SYS user can connect to the database with a password as SYSOPER to perform startup and shutdown of the instance. There are other privileges revoked from roles and users by Database Vault. Section 2 in the Oracle Database Vault Administrator's Guide has a list of the privileges revoked. If for some reason Database Vault is disabled, these privileges will need to be explicitly reinstated if they are needed.
To enable the ability to connect with the SYSDBA privilege, the password file can be recreated using the Oracle password utility, orapwd, with the option nosysdba=n:
oracle@linux21:~> orapwd file=orapwora1 password=oracle_0 entries=10 force=y nosysdba=n
5.4 Starting Database Vault Administrator
Browser access to the Database Vault Administrator is through the URL:
http://host_name:port/dva
and in the case here it is:
http://linux21:1158/dva
Figure 5-3 Database Vault Login
Access to the Database Vault Administrator home page is only available to users with either the DV_OWNER or DV_ADMIN roles. The Database Vault Owner, dvowner, specified during installation, has the DV_OWNER role. After login the
Chapter 5. Oracle Database Vault installation on Linux for System z 95
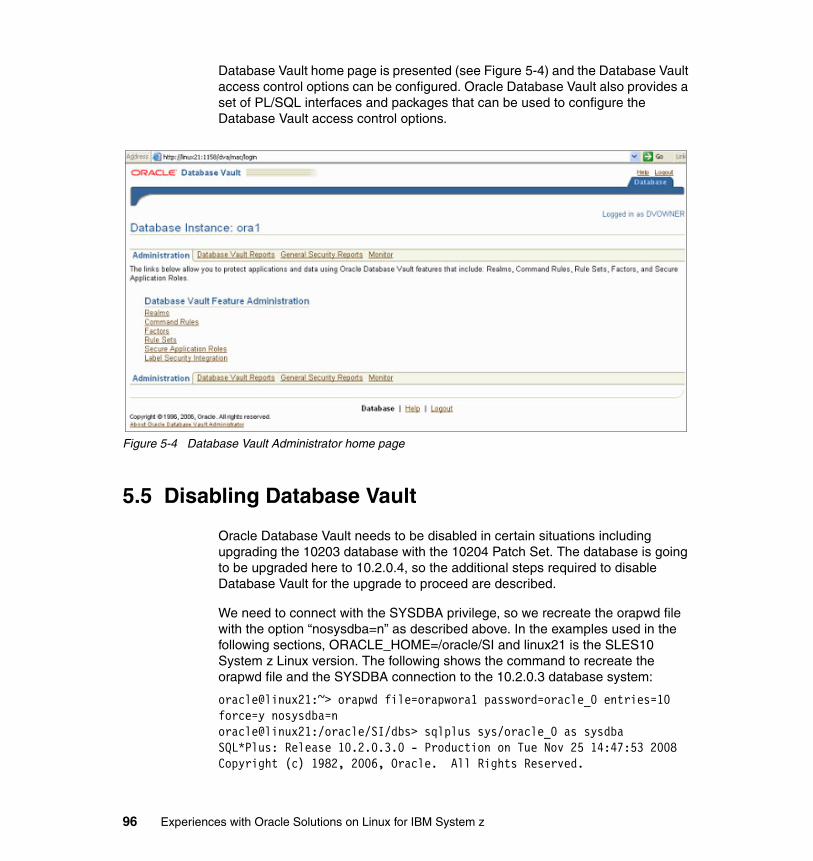
Database Vault home page is presented (see Figure 5-4) and the Database Vault access control options can be configured. Oracle Database Vault also provides a set of PL/SQL interfaces and packages that can be used to configure the Database Vault access control options.
Figure 5-4 Database Vault Administrator home page
5.5 Disabling Database Vault
Oracle Database Vault needs to be disabled in certain situations including upgrading the 10203 database with the 10204 Patch Set. The database is going to be upgraded here to 10.2.0.4, so the additional steps required to disable Database Vault for the upgrade to proceed are described.
We need to connect with the SYSDBA privilege, so we recreate the orapwd file with the option “nosysdba=n” as described above. In the examples used in the following sections, ORACLE_HOME=/oracle/SI and linux21 is the SLES10 System z Linux version. The following shows the command to recreate the orapwd file and the SYSDBA connection to the 10.2.0.3 database system:
oracle@linux21:~> orapwd file=orapwora1 password=oracle_0 entries=10force=y nosysdba=noracle@linux21:/oracle/SI/dbs> sqlplus sys/oracle_0 as sysdbaSQL*Plus: Release 10.2.0.3.0 - Production on Tue Nov 25 14:47:53 2008Copyright (c) 1982, 2006, Oracle. All Rights Reserved.
96 Experiences with Oracle Solutions on Linux for IBM System z
Connected to:Oracle Database 10g Enterprise Edition Release 10.2.0.3.0 - 64bit ProductionWith the Partitioning, Oracle Label Security, OLAP, Data Miningand Oracle Database Vault options
After connecting, the instance is shut down and the Oracle Database executables are relinked with the “dv_off” option. The two entries here show the relink of the Oracle executables:
oracle@linux21:/oracle/SI/rdbms/lib> make -f ins_rdbms.mk dv_offoracle@linux21:/oracle/SI/bin> relink oracle
The next step in disabling Database Vault is to reconnect with the SYSDBA privilege, start up the instance, and unlock the DVSYS Database Vault account:
SQL> alter user dvsys identified by dvsys account unlock;
Once the DVSYS account is unlocked, the Oracle Database Vault Configuration Assistant (DVCA) is run to disable the triggers in the DVSYS schema:
oracle@linux21:/oracle/SI/dbs> dvca -action disable -oh /oracle/SI/ -service ora1 -owner_account dvowner -logfile dvcalog.txt -silentSYS Password:oracle_0Owner Account Password:dvowner_0DVCA startedExecuting task ALTER_TRIGGER_DLLoracle@linux21:/oracle/SI/dbs>
Now that Database Vault is disabled, we are ready to install the 10.2.0.4 patch set that will upgrade both the 10203 database and Database Vault. Running opatch lsinventory -all, we see that there are three products in the Oracle Home being upgraded: they are 10202 database, 10203 Patch Set, and 10203 Database Vault.
5.6 Install the Database 10.2.0.4 Patch Set
The patch set is downloaded from metalink, is unzipped to a convenient directory, and the patch set notes are accessed in the unzipped directory. We are ready to install the patch set with runInstaller and the OUI. Two parts of the 10.2.0.4 Patch Set summary panel are in Figure 5-5 on page 98 and 5-6 on page 98 to show some of the effects of the install.
Chapter 5. Oracle Database Vault installation on Linux for System z 97
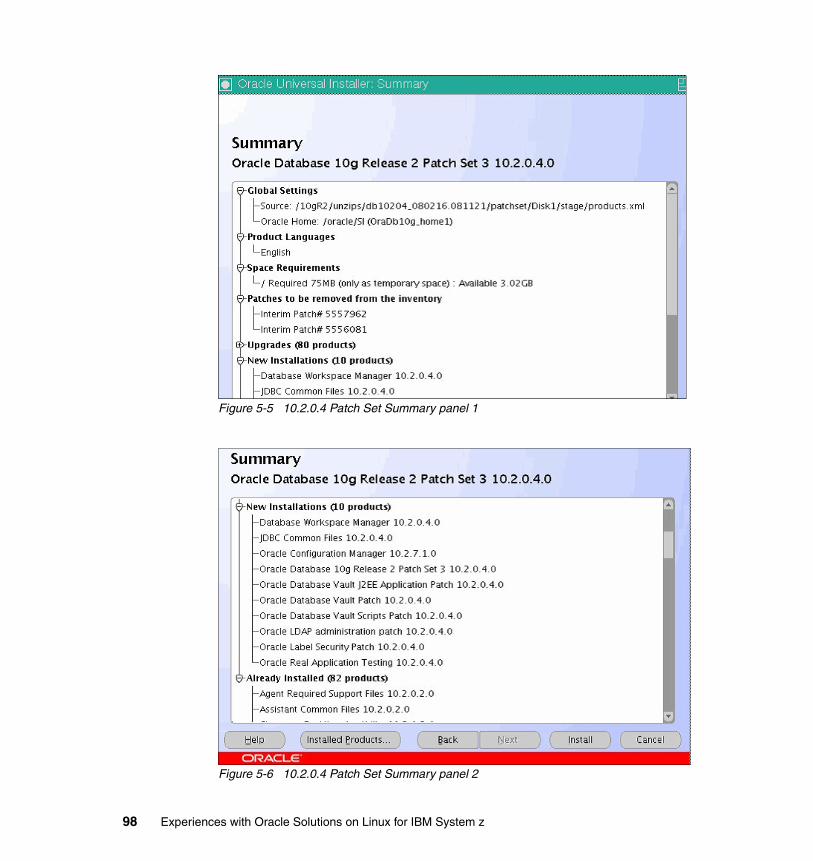
Figure 5-5 10.2.0.4 Patch Set Summary panel 1
Figure 5-6 10.2.0.4 Patch Set Summary panel 2
98 Experiences with Oracle Solutions on Linux for IBM System z
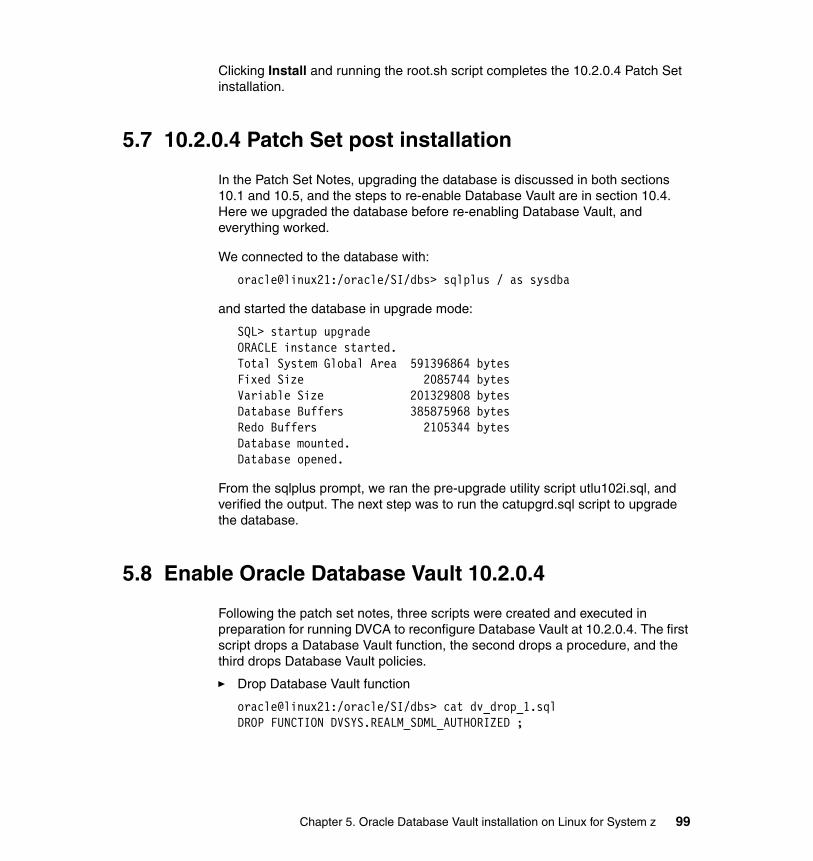
Clicking Install and running the root.sh script completes the 10.2.0.4 Patch Set installation.
5.7 10.2.0.4 Patch Set post installation
In the Patch Set Notes, upgrading the database is discussed in both sections 10.1 and 10.5, and the steps to re-enable Database Vault are in section 10.4. Here we upgraded the database before re-enabling Database Vault, and everything worked.
We connected to the database with:
oracle@linux21:/oracle/SI/dbs> sqlplus / as sysdba
and started the database in upgrade mode:
SQL> startup upgradeORACLE instance started.Total System Global Area 591396864 bytesFixed Size 2085744 bytesVariable Size 201329808 bytesDatabase Buffers 385875968 bytesRedo Buffers 2105344 bytesDatabase mounted.Database opened.
From the sqlplus prompt, we ran the pre-upgrade utility script utlu102i.sql, and verified the output. The next step was to run the catupgrd.sql script to upgrade the database.
5.8 Enable Oracle Database Vault 10.2.0.4
Following the patch set notes, three scripts were created and executed in preparation for running DVCA to reconfigure Database Vault at 10.2.0.4. The first script drops a Database Vault function, the second drops a procedure, and the third drops Database Vault policies.
� Drop Database Vault function
oracle@linux21:/oracle/SI/dbs> cat dv_drop_1.sqlDROP FUNCTION DVSYS.REALM_SDML_AUTHORIZED ;
Chapter 5. Oracle Database Vault installation on Linux for System z 99
� Drop Database Vault procedure
oracle@linux21:/oracle/SI/dbs> cat dv_drop_2.sqlDROP PROCEDURE DVSYS.SYNCHRONIZE_POLICY_FOR_OBJECT;
� Drop Database Vault policies
oracle@linux21:/oracle/SI/dbs> cat dv_drop_policies_1.sqlDECLARE CURSOR stmt IS SELECT u.name, o.name, r.pname FROM user$ u, obj$ o, rls$ r WHERE u.user# = o.owner# AND r.obj# = o.obj# AND bitand(r.stmt_type,65536) > 0;
object_schema VARCHAR2(32) := NULL;object_name VARCHAR2(32) := NULL;policy_name VARCHAR2(32) := NULL;
BEGIN OPEN stmt; LOOP FETCH stmt INTO object_schema, object_name, policy_name; EXIT WHEN stmt%NOTFOUND; DBMS_RLS.DROP_POLICY( '"'||object_schema||'"', '"'||object_name||'"', '"'||policy_name||'"'); END LOOP; CLOSE stmt; END;/
� Run Database Vault clean-up scripts
SQL> @dv_drop_1 Function dropped. SQL> @dv_drop_2 Procedure dropped.SQL>@dv_drop_policies_1 PL/SQL procedure successfully completed.
5.8.1 Reconfigure Database Vault with DVCA
Here is the syntax we used with DVCA to reconfigure Database Vault. In this example we supplied all the passwords as optional parameters, and thus there are no password prompts as there were in the earlier example.
100 Experiences with Oracle Solutions on Linux for IBM System z
oracle@linux21:/oracle/SI> dvca -action option -oh /oracle/SI -jdbc_str jdbc:oracle:oci:@ora1 -owner_account dvowner -acctmgr_account dvactmgr -logfile /oracle/SI/dbs/dvca_action_option_10204.log -nodecrypt -sys_passwd oracle_0 -owner_passwd dvowner_0 -acctmgr_passwd dvactmgr_0
DVCA started
There were about two pages of messages generated by dvca reconfigure after the started message above that are not shown here. Among the messages were two ORA-01920 messages specifying that there was a conflict with the user name specified for the owner_account and acctmgr_account dvca options. We used the same names from the earlier version of Database Vault and apparently you need to either delete the names or specify new names to avoid these messages. The messages were ignored and the existing users were assigned as Database Vault owner and Database Vault account manager.
5.8.2 Enable the Database Vault triggers with DVCA
The database vault triggers that were disabled before installing the patch set are re-enabled with the following:
oracle@linux21:/oracle/SI> dvca -action enable -service ora1 -owner_account dvowner -logfile /oracle/SI/dbs/dvca_action_enable_10204.log -nodecrypt -sys_passwd oracle_0 -owner_passwd dvowner_0 DVCA startedExecuting task ALTER_TRIGGER_DLL
After the triggers are re-enabled, connect to the database and lock the DVSYS user:
SQL> alter user dvsys account lock;
5.8.3 Re-link Oracle executables with DV_ON
Before doing the upgrade, we re-linked Oracle with the dv_off option and now, after the patch set upgrade is installed, we need to re-link with the dv_on option:
oracle@linux21:/oracle/SI/rdbms/lib> make -f ins_rdbms.mk dv_onoracle@linux21:/oracle/SI/bin> relink oracle
There are several messages generated by the re-link but they are not shown.
Chapter 5. Oracle Database Vault installation on Linux for System z 101
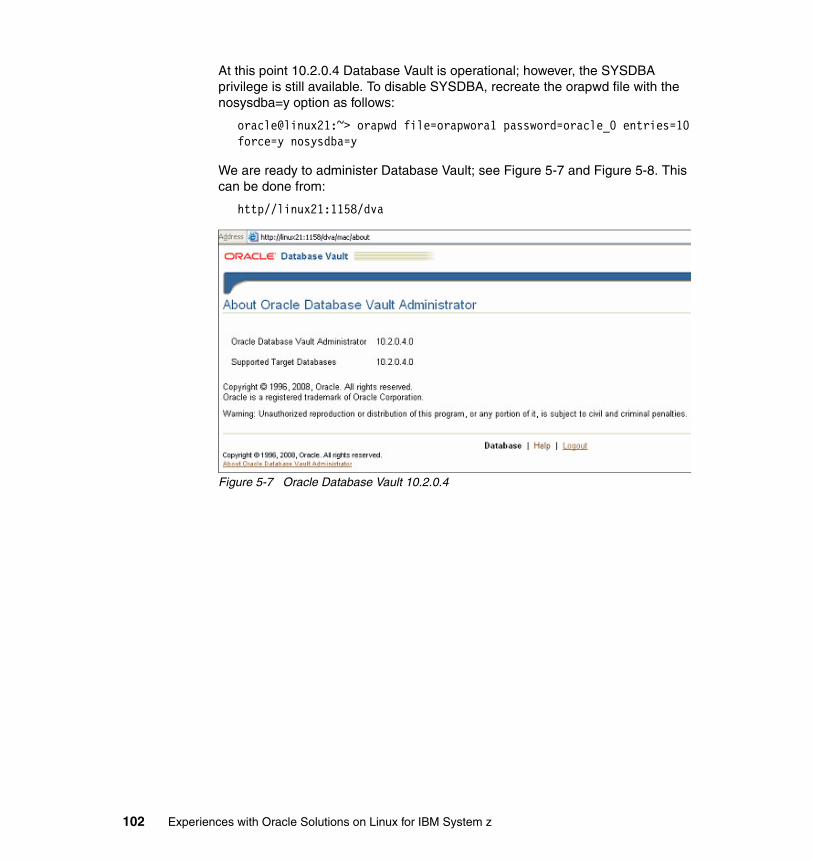
At this point 10.2.0.4 Database Vault is operational; however, the SYSDBA privilege is still available. To disable SYSDBA, recreate the orapwd file with the nosysdba=y option as follows:
oracle@linux21:~> orapwd file=orapwora1 password=oracle_0 entries=10force=y nosysdba=y
We are ready to administer Database Vault; see Figure 5-7 and Figure 5-8. This can be done from:
http//linux21:1158/dva
Figure 5-7 Oracle Database Vault 10.2.0.4
102 Experiences with Oracle Solutions on Linux for IBM System z

Figure 5-8 Oracle Database Vault 10.2.0.4 home page
There is a Quick Start Tutorial in Section 3 of the Oracle Database Vault Administrator's Guide that can be used to get started. The first step is to create a realm, by selecting Realms from the home page in Figure 5-8. A realm is a functional grouping of database objects that are to be secured using Database Vault. After the realm is created, database objects are registered to the realm for Database Vault protection. Specific users or roles are authorized to access the objects in the realm. This can prevent unauthorized access of the database objects in the realm by the DBA or administrators with system privileges.
Chapter 5. Oracle Database Vault installation on Linux for System z 103

104 Experiences with Oracle Solutions on Linux for IBM System z
Chapter 6. Installing Oracle EBS R12 in a mixed architecture configuration with DB
In June 2008, Oracle certified EBS R12 (12.0.4) to run in a mixed architecture with the database (10.2.0.3) on Linux on System z. In 2009 there is a plan to certify R12 to run with the 10.2.0.4 database. This chapter describes:
� The level of software and hardware required� The documentation required� The mixed architecture implementation� The steps required to install using MetaLink notes
This is an example of how to use the Oracle documentation to complete the installation process and is not meant to replace Oracle documentation.
6
© Copyright IBM Corp. 2009. All rights reserved. 105

6.1 Hardware and software required
The three components needed (for an initial test system) are:
� Database tier on Linux for z:
– The hardware should be a guest with at least two CPUs and 4 GB of memory.
– The Operating System can be SLES10 or Red Hat AS4. – The Oracle Database level is 10.2.0.2 with patchset 10.2.0.3.– Note: the plan is to certify the latest patch set 10.2.0.4 on SLES10, RH4,
and Red Hat Enterprise Linux 5 as the database tier in 2009.
� Middle tier:
– The middle tier can be any platform that is certified for Oracle EBS. The hardware should have at least two CPUs and 8 GB of memory. The version of EBS is Oracle R12 with the latest RUP.
– For the first part of the installation this is the DB tier and the mid tier.
� Disk storage:
– The Linux guest on IBM System z will need at least 300 GB of IBM System Storage™ for the database, depending on the size of your existing database.
– The middle tier will use at least 400 GB of IBM System Storage depending on the size of your database.
– This minimum listed here assumes the VIS™ demo database.
6.2 Documentation required
Here is the list of documents that you should use.
Oracle DocumentationThe Oracle documentation is available at:
http://otn.oracle.com � 10gR2 Installation Guide for IBM zSeries Based Linux – B25200-01� Oracle Applications Installation Guide: Using Rapid Install, B31295-06� Oracle Applications Maintenance Procedures, B31569-02� Oracle Applications Maintenance Utilities, B31568-02� Oracle Applications Patching Procedures, 31567-03
106 Experiences with Oracle Solutions on Linux for IBM System z
Oracle MetaLink notesMetaLink notes are available at:
http://metalink.oracle.com
R12 Information
� MetaLink note 405293.1, Oracle Applications Release Notes Release 12� MetaLink note 405565.1, Oracle Applications Release 12 Installation
Guidelines� MetaLink note 402310.1, Oracle Applications Installation and Upgrade Notes
Release 12 (12.0.4) for Linux (32-bit)
The mixed architecture installation requires using several MetaLink notes:
� MetaLink note 456197.1, Using Oracle E-Business Suite Release 12 with a Database Tier Only Platform
� MetaLink note 454750.1, Oracle applications Release 12 with Oracle Database 10.2.0 interoperability notes
� MetaLink note 454616.1, Export/Import Process for Oracle E-Business Suite Release 12, Database Instances Using Oracle Database 10g Release 2
� MetaLink note 734763.1 Using Transportable Database to migrate E-Business Suite R12 Using Oracle Database 10gR2
� MetaLink note 387859.1, Using AutoConfig to Manage System Configurations in Oracle E-Business Suite Release 12
Note: If you use AIX® as your middle tier, you can use the Transportable Database method to move the database to Linux on z, as these platforms are the same Endian format. If you use Linux x86 as the mid tier, you must use the export import process (datapump utility) to move the database to Linux on z, because these platforms have a different Endian format.
Other useful information about Metalink:
� Metalink note 415007.1, Oracle Application Server with Oracle E-Business Suite Release 12 FAQ
� MetaLink note 406982.1, Cloning Oracle Applications Release 12 with Rapid Clone
� MetaLink note 388577.1, Using Oracle 10g Release 2 Real Application Clusters and Automatic Storage Management with Oracle E-Business Suite Release 12
Note: The MetaLink notes change frequently and the patch numbers change as new versions become available. Be sure to use the current versions of the MetaLink notes.
Chapter 6. Installing Oracle EBS R12 in a mixed architecture configuration with DB 107

Redbooks There are several IBM Redbooks publications with examples of installing Oracle 10gR2 on Linux for System z available. Search
http:www.redbooks.ibm.com
with those keywords.
In this book, Chapter 3, “Installing Oracle and creating a database on Red Hat Enterprise Linux 5” on page 47 describes creating a database on Red Hat Enterprise Linux 5 on z. Chapter 3 in Using Oracle Solutions with Linux on z, SG24-7573 describes our experiences in installing a single instance database on SLES10. These examples can be used in conjunction with Oracle documentation when you are ready to install the 10gR2 as the target database on Linux for System z.
6.3 Steps to set up the mixed architecture configuration This section describes the steps to create a mixed architecture configuration with the database tier on Linux on z. We assume a Linux x86 middle tier. The first step is to read the documentation.
Then the installation steps, as shown in Figure 6-1, are:
1. Install a complete setup on Linux x86.
2. Upgrade the database level on Linux x86 to the latest patchset, in this case 10.2.0.4.
3. Configure the x86 to connect to the 10.2.0.4 DB on Linux x86.
4. Export the DB files from Linux x 86.
5. Create the target database on Linux on z and import the DB files.
6. Configure the applications tier to connect to the new target database.
108 Experiences with Oracle Solutions on Linux for IBM System z
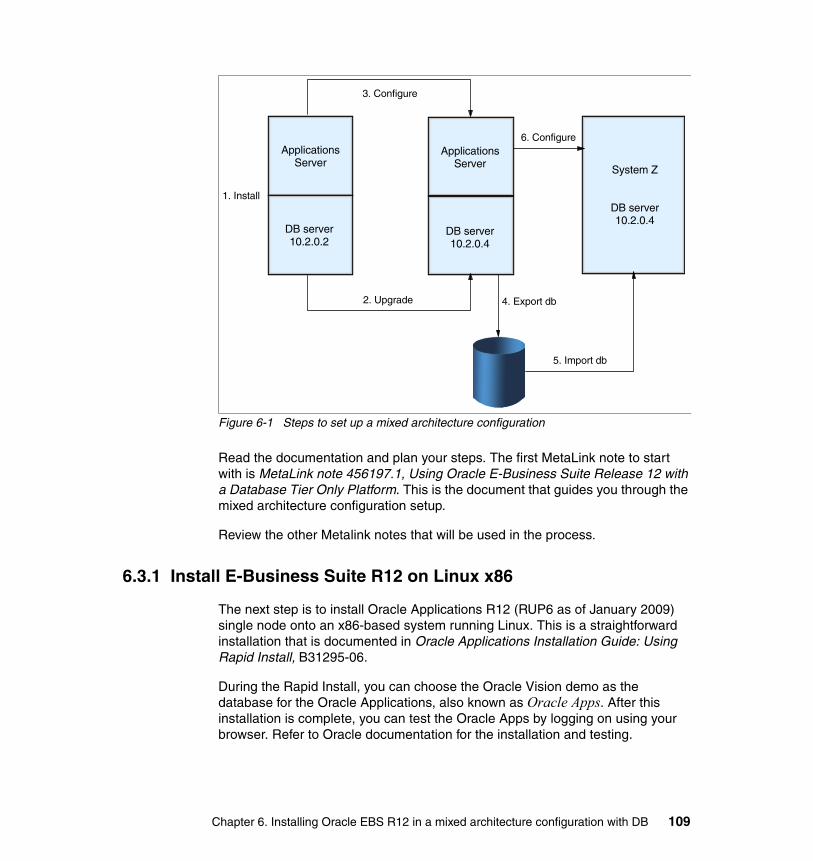
Figure 6-1 Steps to set up a mixed architecture configuration
Read the documentation and plan your steps. The first MetaLink note to start with is MetaLink note 456197.1, Using Oracle E-Business Suite Release 12 with a Database Tier Only Platform. This is the document that guides you through the mixed architecture configuration setup.
Review the other Metalink notes that will be used in the process.
6.3.1 Install E-Business Suite R12 on Linux x86
The next step is to install Oracle Applications R12 (RUP6 as of January 2009) single node onto an x86-based system running Linux. This is a straightforward installation that is documented in Oracle Applications Installation Guide: Using Rapid Install, B31295-06.
During the Rapid Install, you can choose the Oracle Vision demo as the database for the Oracle Applications, also known as Oracle Apps. After this installation is complete, you can test the Oracle Apps by logging on using your browser. Refer to Oracle documentation for the installation and testing.
ApplicationsServer
DB server10.2.0.2
ApplicationsServer
DB server10.2.0.4
3. Configure
2. Upgrade
6. Configure
System Z
DB server10.2.0.4
1. Install
4. Export db
5. Import db
Chapter 6. Installing Oracle EBS R12 in a mixed architecture configuration with DB 109
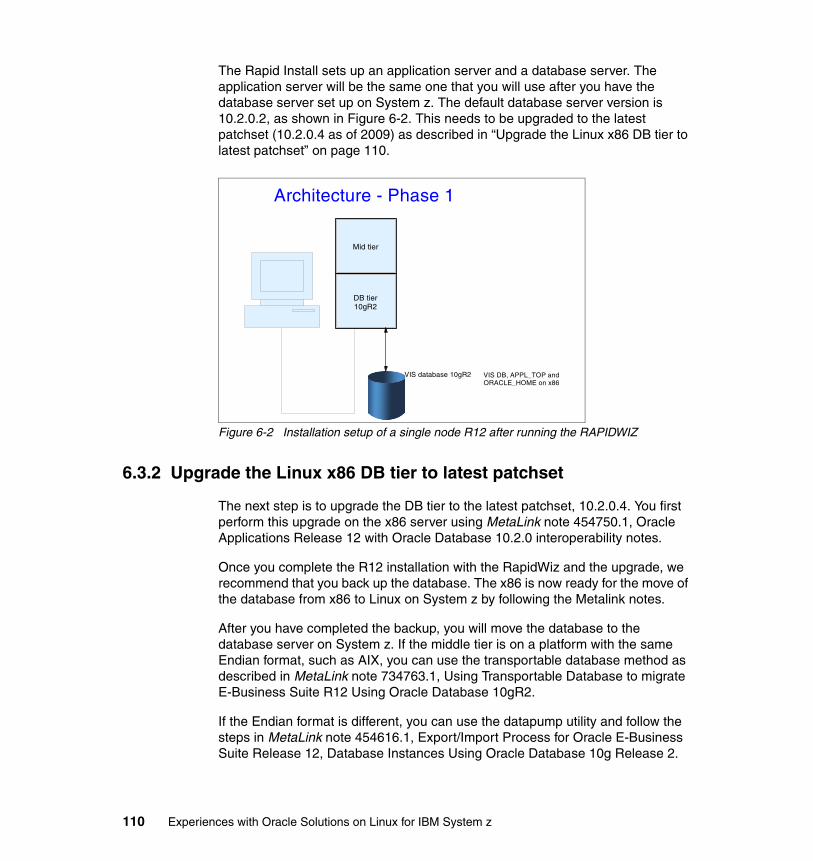
The Rapid Install sets up an application server and a database server. The application server will be the same one that you will use after you have the database server set up on System z. The default database server version is 10.2.0.2, as shown in Figure 6-2. This needs to be upgraded to the latest patchset (10.2.0.4 as of 2009) as described in “Upgrade the Linux x86 DB tier to latest patchset” on page 110.
Figure 6-2 Installation setup of a single node R12 after running the RAPIDWIZ
6.3.2 Upgrade the Linux x86 DB tier to latest patchset
The next step is to upgrade the DB tier to the latest patchset, 10.2.0.4. You first perform this upgrade on the x86 server using MetaLink note 454750.1, Oracle Applications Release 12 with Oracle Database 10.2.0 interoperability notes.
Once you complete the R12 installation with the RapidWiz and the upgrade, we recommend that you back up the database. The x86 is now ready for the move of the database from x86 to Linux on System z by following the Metalink notes.
After you have completed the backup, you will move the database to the database server on System z. If the middle tier is on a platform with the same Endian format, such as AIX, you can use the transportable database method as described in MetaLink note 734763.1, Using Transportable Database to migrate E-Business Suite R12 Using Oracle Database 10gR2.
If the Endian format is different, you can use the datapump utility and follow the steps in MetaLink note 454616.1, Export/Import Process for Oracle E-Business Suite Release 12, Database Instances Using Oracle Database 10g Release 2.
Mid tier
DB tier10gR2
VIS database 10gR2 VIS DB, APPL_TOP and ORACLE_HOME on x86
Architecture - Phase 1
110 Experiences with Oracle Solutions on Linux for IBM System z

6.3.3 Create the target database on Linux on z
Follow the Oracle Database documentation on Linux for z, supplemented by “Redbooks” on page 108, to create your 10.2.0.4 Database on Linux on z.
6.3.4 Export and import the database files
This section takes you through the steps to migrate the R12 Applications database from the source platform (x86) to the target platform (LoZ). Follow the MetaLink note 454616.1, Export/Import Process for Oracle E-Business Suite Release 12, Database Instances Using Oracle Database 10g Release 2.
This is the required process to move the database from x86 to Linux on System z, because the Endian formats are not the same:
� Run export steps on the source machine to create an export file.
� Run import steps on the target machine to import the data files.
� Complete the post installation steps including running AutoConfig.
Note: In one case, we had to modify the create database script to allow for sufficient space in the data files.
Remember, if the middle tier is on a platform with the same Endian format, such as AIX, you can use the transportable database method as described in MetaLink note 734763.1 Using Transportable Database to migrate E-Business Suite R12 Using Oracle Database 10gR2.
6.3.5 Final configuration step
The final stage is to complete all the steps in the post-migration tasks. This includes running AutoConfig to connect the middle tier to the new target DB tier on Linux on z.
This completes the installation of the VIS or PROD database of R12 with the mixed architecture configuration database on Linux on System z.
After the completion of the installation process, the configuration of the environment is shown in Figure 6-3 on page 112.
Chapter 6. Installing Oracle EBS R12 in a mixed architecture configuration with DB 111
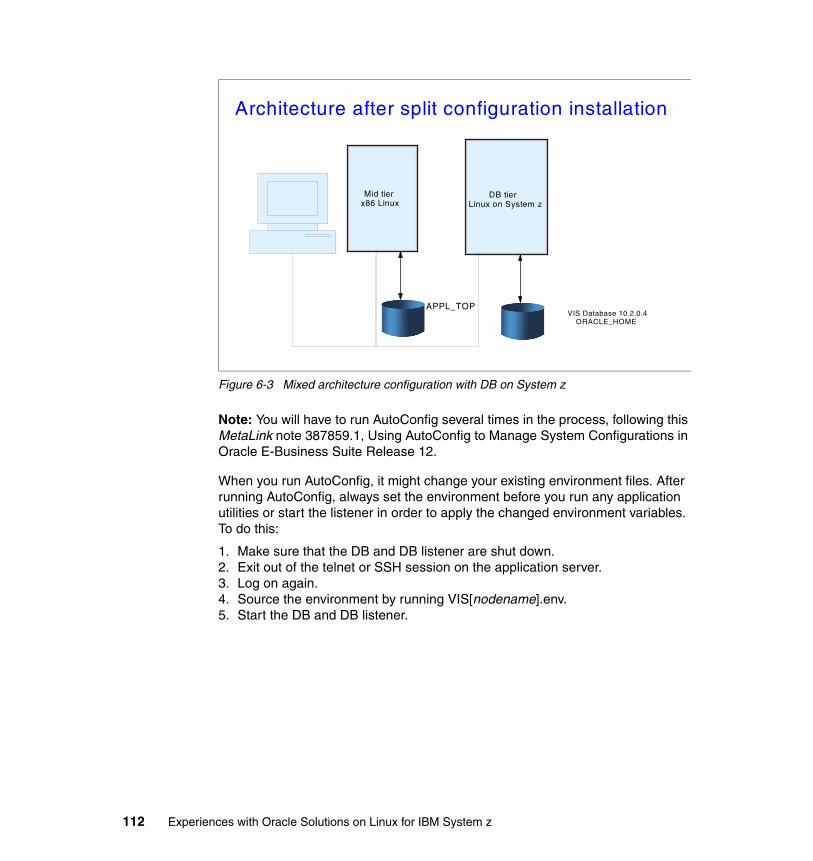
Figure 6-3 Mixed architecture configuration with DB on System z
Note: You will have to run AutoConfig several times in the process, following this MetaLink note 387859.1, Using AutoConfig to Manage System Configurations in Oracle E-Business Suite Release 12.
When you run AutoConfig, it might change your existing environment files. After running AutoConfig, always set the environment before you run any application utilities or start the listener in order to apply the changed environment variables. To do this:
1. Make sure that the DB and DB listener are shut down.2. Exit out of the telnet or SSH session on the application server.3. Log on again.4. Source the environment by running VIS[nodename].env.5. Start the DB and DB listener.
Mid tier x86 Linux
DB tier Linux on System z
VIS Database 10.2.0.4 ORACLE_HOME
Architecture after split configuration installation
APPL_TOP
112 Experiences with Oracle Solutions on Linux for IBM System z

6.4 Patches that need to be installedBe sure to use the current versions of the MetaLink notes to get the latest patch numbers. Check the patch readme files for any patches you will be installing.
� If you are using 10.2.0.3, make sure you get the bundled patch for 10.2.0.3 Database on LoZ - 6319846.
� Check for the latest AutoConfig patch.
Chapter 6. Installing Oracle EBS R12 in a mixed architecture configuration with DB 113

114 Experiences with Oracle Solutions on Linux for IBM System z
Chapter 7. Installing PeopleSoft on Linux on z
This chapter describes the steps we executed to install a PeopleSoft Oracle Database Server on Linux for IBM System z using People-Tools 8.49 and HRdemo 9.0.
We cover the following topics:
� Setting up the environment
� Creating the DB on Linux on System z
� Using DataMover
The following document was used:
Enterprise PeopleTools 8.49 Installation for Oracle, April 2007
7
© Copyright IBM Corp. 2009. All rights reserved. 115

7.1 Introduction
The objective of this section is to provide some details about setting up a PeopleSoft (Oracle) Database Server on Linux on IBM System z. A PeopleSoft database will be created and loaded with the HR demo 9.0 data. The PeopleTools 8.49 install script for Linux on System z, setup.zlinux, does not include a database wizard, so the details here show how to set up a PeopleSoft database on Linux without using the database wizard.
The first step is to run the script setup.zlinux on Linux on System z and select the only option available, the batch server. After this step one could configure the batch server; however, the reason for running this step here is to obtain the data mover, psdmtx, binary. The data mover will be in the bin directory under the directory that was specified as the PeopleSoft Home when the setup.zlinux script was run. The next step is to set up a Windows® PeopleSoft workstation. The SQL scripts to create a PeopleSoft database will be moved from the Windows installation to Linux on System z, where they will be used to create the database. The last step will be to run data mover on Windows until the data mover input script is created. The script will be moved to Linux and the data mover will be run on Linux to load the HR demo database.
7.2 Setting up the installation
This section covers the initial software installation required to set up the environment for this solution. We used a Linux guest called Linux25 running under z/VM.
7.2.1 Download PeopleSoft Enterprise from Oracle E-delivery
PeopleSoft Enterprise PeopleTools 8.49 was downloaded from the Oracle E-delivery site at:
http://edelivery.oracle.com/
It consists of these zip files:
B42585-01.zipB42586-01.zipB42587-01.zipB42588-01.zipB42589-01.zipB42590-01.zipB42591-01.zip
116 Experiences with Oracle Solutions on Linux for IBM System z
In addition, PeopleSoft Enterprise Human Resources Management System and Campus Solutions 9.0, B34591-01.zip, was downloaded from E-delivery. These will be installed on Windows, in addition to PeopleTools, to create the data mover input script which will be used to load the PeopleSoft Oracle Database on Linux. The HR demo 9.0 data will also be available on Windows after the install and it will be moved to Linux to be loaded into the Oracle Database.
7.2.2 Install on Linux
On Linux, unzip the seven PeopleTools 8.49 files downloaded above and run setup.zlinux. The only selection available, batch server, is selected. The only thing needed is the PeopleTools data mover binary, psdmtx, which will be in the bin directory under the PeopleSoft home directory specified after running setup.zlinux. On Linux25, /psoft/pt849 is $PS_HOME, so the data mover can be run from the /psoft/pt849/bin directory.
7.2.3 Install and configure on Windows
Unzip the seven PeopleTools 8.49 files and the HR file on Windows and install. The Windows system here is psoft01 and the PS_HOME is c:\pt9x. The Oracle client home is c:\pt849\orawin. After the Oracle client is installed, install PTools and HR into the same PS_HOME on Windows which is noted above as c:\pt9x. From Windows, copy c:\pt9x\data\* to /psoft/pt849/data/ on Linux25 and also copy c:\pt9x\scripts\nt\* to /psoft/pt849/scripts/linux/. The scripts just copied are used to manually build the database on Linux following the steps in Appendix B, Creating a database manually on Unix, in the Enterprise PeopleTools 8.49 Installation for Oracle, April 2007 referenced document.
Also, copy all the files in the scripts directory on Windows to the scripts directory on Linux. In the copies (or FTP) the from PS_HOME is on Windows and the to PS_HOME is on Linux. Only a few of the files are needed from the Windows data and scripts directories on Linux; however, it was simpler to FTP them all.
7.3 Setting up the Oracle Database on Linux25
An Oracle 10.2.0.3 instance is available on Linux25 and no discussion of its installation is given here. The scripts\nt directory copied to scripts/linux above contains the SQL that is used to create/setup the PeopleSoft Oracle Database. The steps in running the scripts are described in Appendix B - Creating a Database Manually on UNIX®, in the Enterprise PeopleTools 8.49 Installation for Oracle document, dated April 2007. The scripts are modified for Linux, a connection is made to the Oracle 10.2.0.3 instance, and the modified scripts are
Chapter 7. Installing PeopleSoft on Linux on z 117
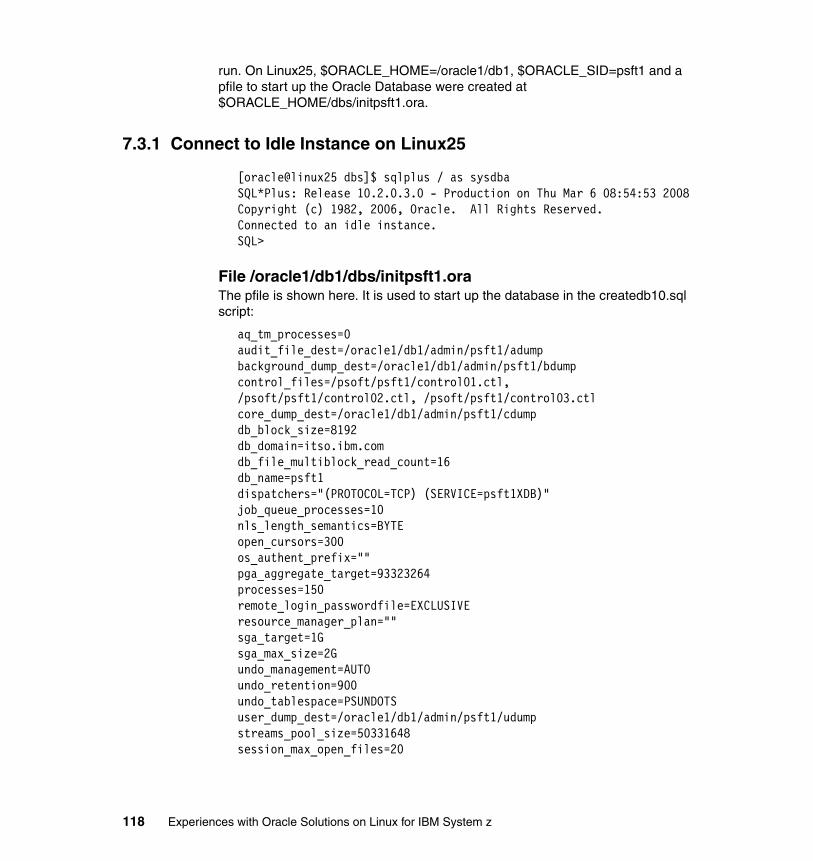
run. On Linux25, $ORACLE_HOME=/oracle1/db1, $ORACLE_SID=psft1 and a pfile to start up the Oracle Database were created at $ORACLE_HOME/dbs/initpsft1.ora.
7.3.1 Connect to Idle Instance on Linux25
[oracle@linux25 dbs]$ sqlplus / as sysdbaSQL*Plus: Release 10.2.0.3.0 - Production on Thu Mar 6 08:54:53 2008Copyright (c) 1982, 2006, Oracle. All Rights Reserved.Connected to an idle instance.SQL>
File /oracle1/db1/dbs/initpsft1.oraThe pfile is shown here. It is used to start up the database in the createdb10.sql script:
aq_tm_processes=0audit_file_dest=/oracle1/db1/admin/psft1/adumpbackground_dump_dest=/oracle1/db1/admin/psft1/bdumpcontrol_files=/psoft/psft1/control01.ctl, /psoft/psft1/control02.ctl, /psoft/psft1/control03.ctlcore_dump_dest=/oracle1/db1/admin/psft1/cdumpdb_block_size=8192db_domain=itso.ibm.comdb_file_multiblock_read_count=16db_name=psft1dispatchers="(PROTOCOL=TCP) (SERVICE=psft1XDB)"job_queue_processes=10nls_length_semantics=BYTEopen_cursors=300os_authent_prefix=""pga_aggregate_target=93323264processes=150remote_login_passwordfile=EXCLUSIVEresource_manager_plan=""sga_target=1Gsga_max_size=2Gundo_management=AUTOundo_retention=900undo_tablespace=PSUNDOTSuser_dump_dest=/oracle1/db1/admin/psft1/udumpstreams_pool_size=50331648session_max_open_files=20
118 Experiences with Oracle Solutions on Linux for IBM System z
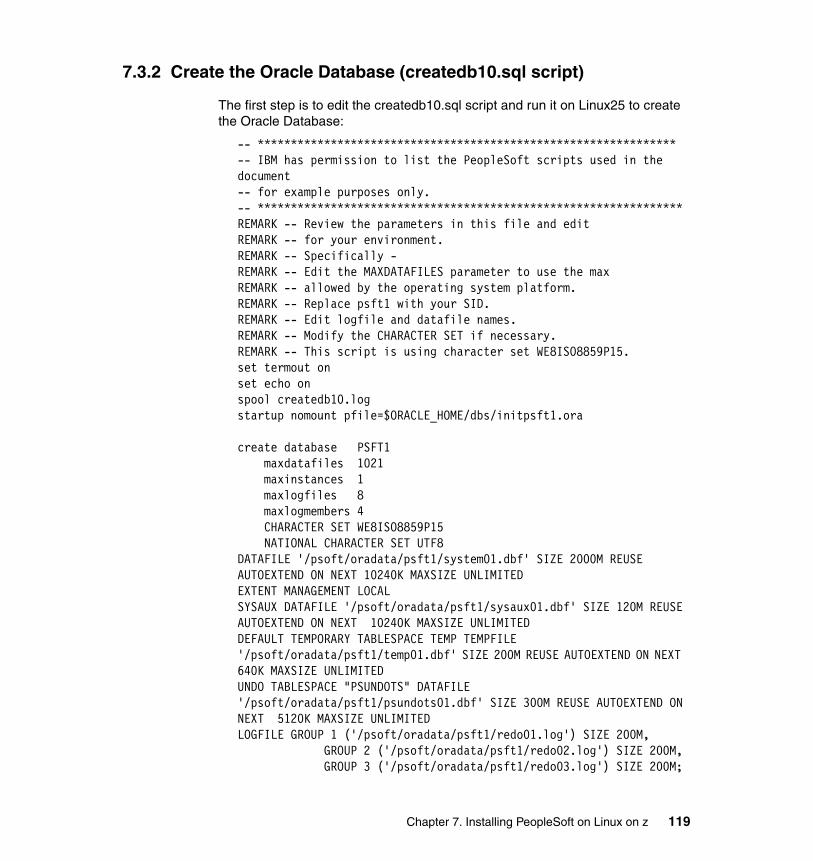
7.3.2 Create the Oracle Database (createdb10.sql script)
The first step is to edit the createdb10.sql script and run it on Linux25 to create the Oracle Database:
-- ***************************************************************-- IBM has permission to list the PeopleSoft scripts used in the document -- for example purposes only.-- ****************************************************************REMARK -- Review the parameters in this file and editREMARK -- for your environment.REMARK -- Specifically -REMARK -- Edit the MAXDATAFILES parameter to use the maxREMARK -- allowed by the operating system platform.REMARK -- Replace psft1 with your SID.REMARK -- Edit logfile and datafile names.REMARK -- Modify the CHARACTER SET if necessary.REMARK -- This script is using character set WE8ISO8859P15.set termout onset echo onspool createdb10.logstartup nomount pfile=$ORACLE_HOME/dbs/initpsft1.ora
create database PSFT1 maxdatafiles 1021 maxinstances 1 maxlogfiles 8 maxlogmembers 4 CHARACTER SET WE8ISO8859P15 NATIONAL CHARACTER SET UTF8DATAFILE '/psoft/oradata/psft1/system01.dbf' SIZE 2000M REUSE AUTOEXTEND ON NEXT 10240K MAXSIZE UNLIMITEDEXTENT MANAGEMENT LOCALSYSAUX DATAFILE '/psoft/oradata/psft1/sysaux01.dbf' SIZE 120M REUSE AUTOEXTEND ON NEXT 10240K MAXSIZE UNLIMITEDDEFAULT TEMPORARY TABLESPACE TEMP TEMPFILE '/psoft/oradata/psft1/temp01.dbf' SIZE 200M REUSE AUTOEXTEND ON NEXT 640K MAXSIZE UNLIMITEDUNDO TABLESPACE "PSUNDOTS" DATAFILE '/psoft/oradata/psft1/psundots01.dbf' SIZE 300M REUSE AUTOEXTEND ON NEXT 5120K MAXSIZE UNLIMITEDLOGFILE GROUP 1 ('/psoft/oradata/psft1/redo01.log') SIZE 200M, GROUP 2 ('/psoft/oradata/psft1/redo02.log') SIZE 200M, GROUP 3 ('/psoft/oradata/psft1/redo03.log') SIZE 200M;
Chapter 7. Installing PeopleSoft on Linux on z 119
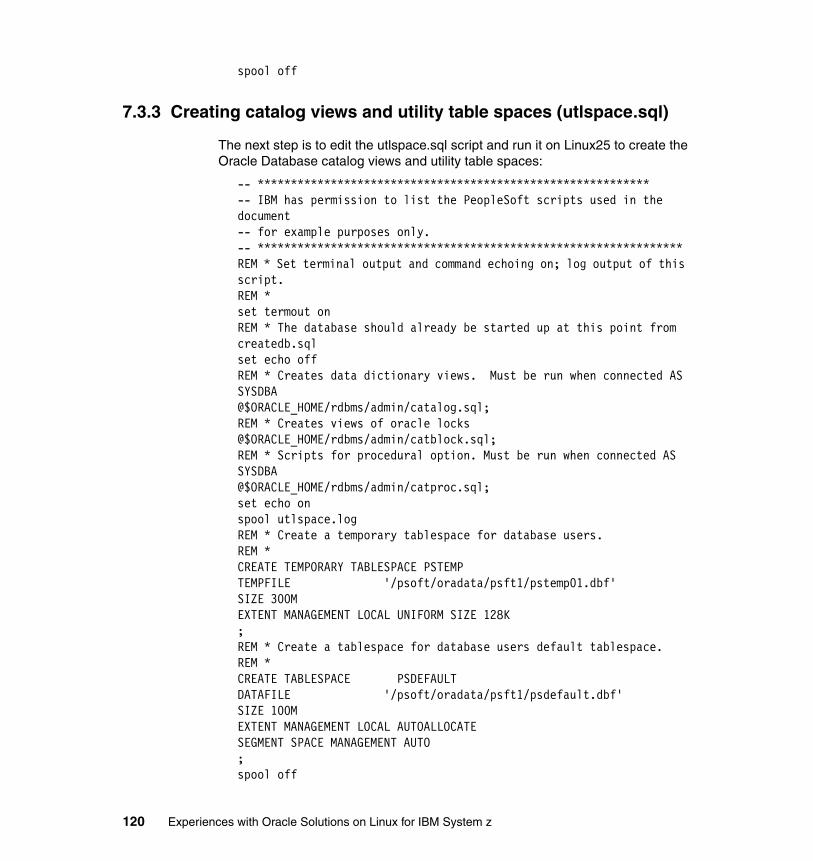
spool off
7.3.3 Creating catalog views and utility table spaces (utlspace.sql)
The next step is to edit the utlspace.sql script and run it on Linux25 to create the Oracle Database catalog views and utility table spaces:
-- ***********************************************************-- IBM has permission to list the PeopleSoft scripts used in the document -- for example purposes only. -- ****************************************************************REM * Set terminal output and command echoing on; log output of this script.REM *set termout onREM * The database should already be started up at this point from createdb.sqlset echo offREM * Creates data dictionary views. Must be run when connected AS SYSDBA@$ORACLE_HOME/rdbms/admin/catalog.sql;REM * Creates views of oracle locks@$ORACLE_HOME/rdbms/admin/catblock.sql;REM * Scripts for procedural option. Must be run when connected AS SYSDBA@$ORACLE_HOME/rdbms/admin/catproc.sql;set echo onspool utlspace.logREM * Create a temporary tablespace for database users.REM *CREATE TEMPORARY TABLESPACE PSTEMPTEMPFILE '/psoft/oradata/psft1/pstemp01.dbf' SIZE 300MEXTENT MANAGEMENT LOCAL UNIFORM SIZE 128K;REM * Create a tablespace for database users default tablespace.REM *CREATE TABLESPACE PSDEFAULTDATAFILE '/psoft/oradata/psft1/psdefault.dbf' SIZE 100MEXTENT MANAGEMENT LOCAL AUTOALLOCATESEGMENT SPACE MANAGEMENT AUTO;spool off
120 Experiences with Oracle Solutions on Linux for IBM System z
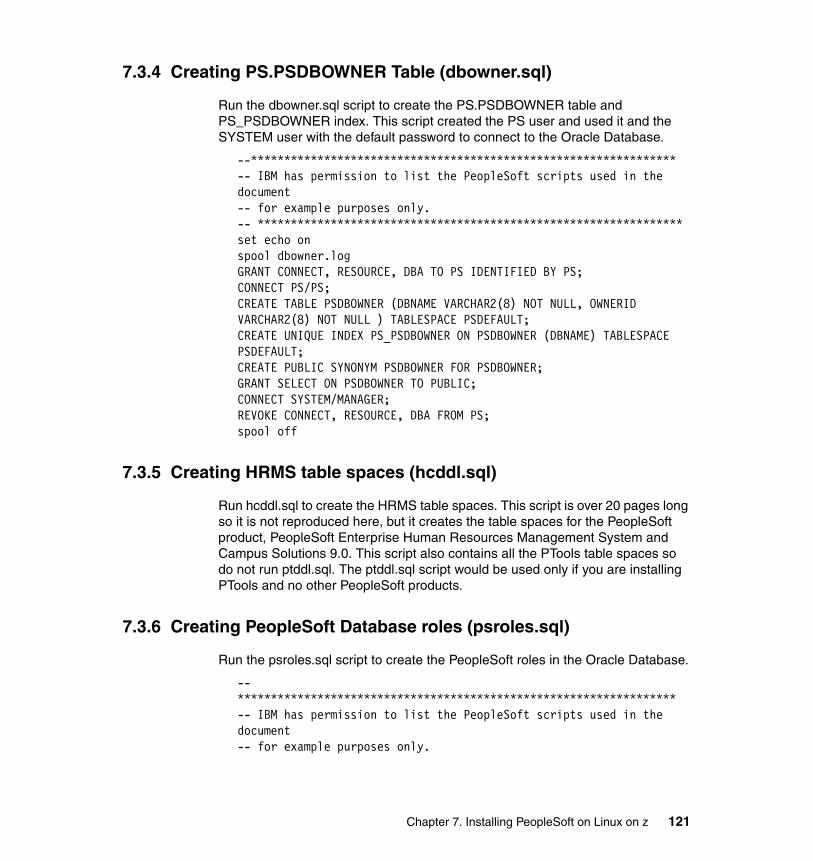
7.3.4 Creating PS.PSDBOWNER Table (dbowner.sql)
Run the dbowner.sql script to create the PS.PSDBOWNER table and PS_PSDBOWNER index. This script created the PS user and used it and the SYSTEM user with the default password to connect to the Oracle Database.
--****************************************************************-- IBM has permission to list the PeopleSoft scripts used in the document -- for example purposes only. -- ****************************************************************set echo onspool dbowner.logGRANT CONNECT, RESOURCE, DBA TO PS IDENTIFIED BY PS;CONNECT PS/PS;CREATE TABLE PSDBOWNER (DBNAME VARCHAR2(8) NOT NULL, OWNERID VARCHAR2(8) NOT NULL ) TABLESPACE PSDEFAULT;CREATE UNIQUE INDEX PS_PSDBOWNER ON PSDBOWNER (DBNAME) TABLESPACE PSDEFAULT;CREATE PUBLIC SYNONYM PSDBOWNER FOR PSDBOWNER;GRANT SELECT ON PSDBOWNER TO PUBLIC;CONNECT SYSTEM/MANAGER;REVOKE CONNECT, RESOURCE, DBA FROM PS;spool off
7.3.5 Creating HRMS table spaces (hcddl.sql)
Run hcddl.sql to create the HRMS table spaces. This script is over 20 pages long so it is not reproduced here, but it creates the table spaces for the PeopleSoft product, PeopleSoft Enterprise Human Resources Management System and Campus Solutions 9.0. This script also contains all the PTools table spaces so do not run ptddl.sql. The ptddl.sql script would be used only if you are installing PTools and no other PeopleSoft products.
7.3.6 Creating PeopleSoft Database roles (psroles.sql)
Run the psroles.sql script to create the PeopleSoft roles in the Oracle Database.
-- ******************************************************************-- IBM has permission to list the PeopleSoft scripts used in the document -- for example purposes only.
Chapter 7. Installing PeopleSoft on Linux on z 121

-- ******************************************************************REMARK -- These are the minimum privileges required to run PeopleSoftREMARK -- applications. If you plan to run SQL<>Secure, you will need toREMARK -- grant "execute any procedure" to PSUSER and PSADMIN.
set echo onspool psroles.logDROP ROLE PSUSER;DROP ROLE PSADMIN;CREATE ROLE PSUSER;GRANT CREATE SESSION TO PSUSER;CREATE ROLE PSADMIN;GRANTANALYZE ANY,ALTER SESSION, ALTER TABLESPACE, ALTER ROLLBACK SEGMENT,CREATE CLUSTER, CREATE DATABASE LINK, CREATE PUBLIC DATABASE LINK,CREATE PUBLIC SYNONYM, CREATE SEQUENCE, CREATE SNAPSHOT,CREATE SESSION, CREATE SYNONYM, CREATE TABLE, CREATE VIEW,CREATE PROCEDURE, CREATE TRIGGER, CREATE TABLESPACE, CREATE USER,CREATE ROLLBACK SEGMENT,DROP PUBLIC DATABASE LINK, DROP PUBLIC SYNONYM, DROP ROLLBACK SEGMENT,DROP TABLESPACE, DROP USER, MANAGE TABLESPACE, RESOURCE,EXP_FULL_DATABASE, IMP_FULL_DATABASE,GRANT ANY ROLE, ALTER USER, BECOME USERTO PSADMIN WITH ADMIN OPTION;spool off
7.3.7 Creating the PeopleSoft Database Owner ID (psadmin.sql)
Run the psadmin.sql script to create the PeopleSoft Owner ID, SYSADM. This ID is the PeopleSoft Administrator schema and it is also used to load the HRdemo data with the PeopleSoft data mover.
-- ******************************************************************-- IBM has permission to list the PeopleSoft scripts used in the document -- for example purposes only. -- ******************************************************************
122 Experiences with Oracle Solutions on Linux for IBM System z

REMARK -- This script sets up the PeopleSoft Owner ID. An Oracle DBA isREMARK -- required to run this script.set echo onspool psadmin.logACCEPT ADMIN CHAR PROMPT 'Enter name of PeopleSoft Owner ID: 'ACCEPT PASSWORD CHAR PROMPT 'Enter PeopleSoft Owner ID password:'PROMPTPROMPT Enter a desired default tablespace for this user.PROMPTPROMPT Please Note: The tablespace must already existPROMPT If you are unsure, enter PSDEFAULT or SYSTEMPROMPTACCEPT TSPACE CHAR PROMPT 'Enter desired default tablespace:'REMARK -- Create the PeopleSoft Administrator schema.create user &ADMIN identified by &PASSWORD default tablespace &TSPACEtemporary tablespace pstemp;grant PSADMIN TO &ADMIN;REMARK -- PeopleSoft Administrator needs unlimited tablespace in order toREMARK -- create the PeopleSoft application tablespaces and tables in DataREMARK -- Mover. This system privilege can only be granted to schemas, notREMARK -- Oracle roles.grant unlimited tablespace to &ADMIN;REMARK -- Run the commands below to create database synonyms.REMARK -- Modify the connect string appropriately for your organization.connect system/managerset echo offREMARK @$ORACLE_HOME/rdbms/admin/catdbsynREMARK @$ORACLE_HOME/sqlplus/admin/pupbldspool off
7.3.8 Setting up and creating the connect ID
The connect.sql script creates the connect ID, PEOPLE, and grants CREATE SESSION privilege to the ID. Access to the PeopleSoft database is granted to the connect ID, PEOPLE, explicitly via the initial Data Mover load script generated by DBSETUP to include the following grants:
grant select on PSSTATUS to PEOPLE;grant select on PSOPRDEFN to PEOPLE;
Chapter 7. Installing PeopleSoft on Linux on z 123

grant select on PSACCESSPRFL to PEOPLE;
In order to work, the connect ID, PEOPLE, and connect password, PEOP1E, must be specified at the client configuration manager or the configuration file of any two-tier client accessing the PeopleSoft application. Note that the defaults included in the script for the id/password are used here.
-- ******************************************************************-- IBM has permission to list the PeopleSoft scripts used in the document -- for example purposes only. -- ******************************************************************REMARK -- This script sets up the PeopleSoft Connect ID.REMARK -- An Oracle DBA is required to run this script priorREMARK -- to loading a PSOFT database.REMARK --REMARK -- If you wish to use the default CONNECTID and PASSWORD,REMARK -- then run this script as is.REMARK -- If you wish to change the default CONNECTID and PASSWORD,REMARK -- DELETE the default CREATE and GRANT statements below andREMARK -- uncomment the template version modifying the followingREMARK -- parameters <CONNECTID> , <PASSWORD> , <TSPACE>REMARK --REMARK -- Create the PeopleSoft Administrator schema.set echo onspool connect.logREMARK -- drop user people cascade;create user people identified by peop1e default tablespace PSDEFAULTtemporary tablespace PSTEMP;GRANT CREATE SESSION to people;REMARK -- drop user <CONNECTID> cascade;REMARK -- create user <CONNECTID> identified by <PASSWORD> default tablespace <TSPACE>REMARK -- temporary tablespace <TSPACE>;REMARK -- GRANT CREATE SESSION to <CONNECTID>;spool off
7.4 Data Mover on Windows
Now that the database is created and set up with the PeopleSoft IDs and connection information on Linux, the next step is to move to PeopleSoft on Windows to create the Data Mover input script. The PeopleSoft on Windows
124 Experiences with Oracle Solutions on Linux for IBM System z
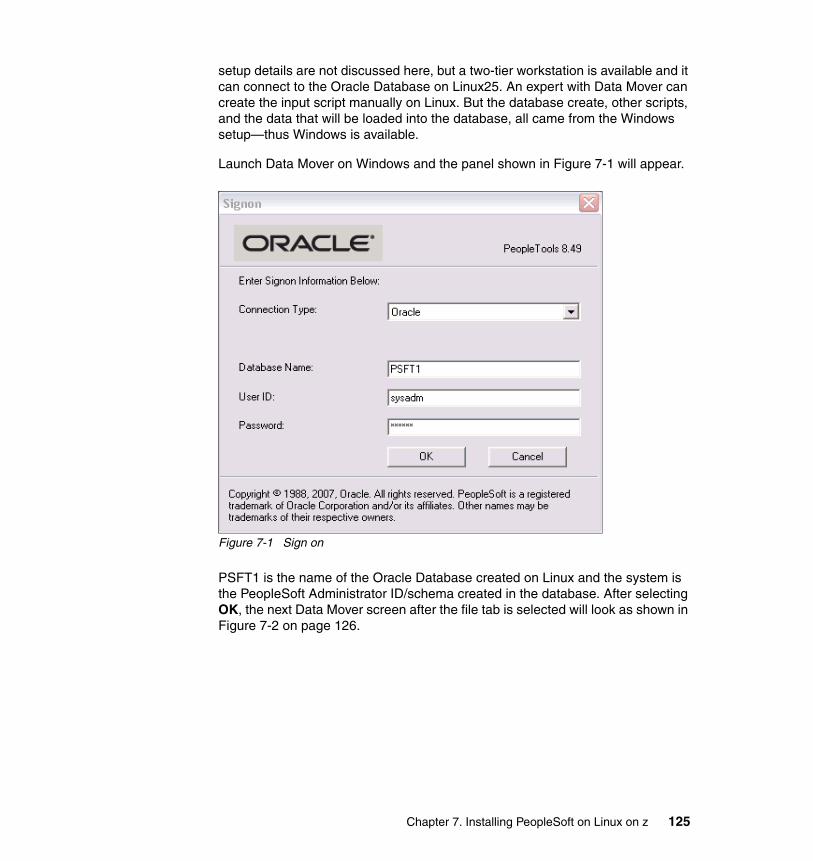
setup details are not discussed here, but a two-tier workstation is available and it can connect to the Oracle Database on Linux25. An expert with Data Mover can create the input script manually on Linux. But the database create, other scripts, and the data that will be loaded into the database, all came from the Windows setup—thus Windows is available.
Launch Data Mover on Windows and the panel shown in Figure 7-1 will appear.
Figure 7-1 Sign on
PSFT1 is the name of the Oracle Database created on Linux and the system is the PeopleSoft Administrator ID/schema created in the database. After selecting OK, the next Data Mover screen after the file tab is selected will look as shown in Figure 7-2 on page 126.
Chapter 7. Installing PeopleSoft on Linux on z 125
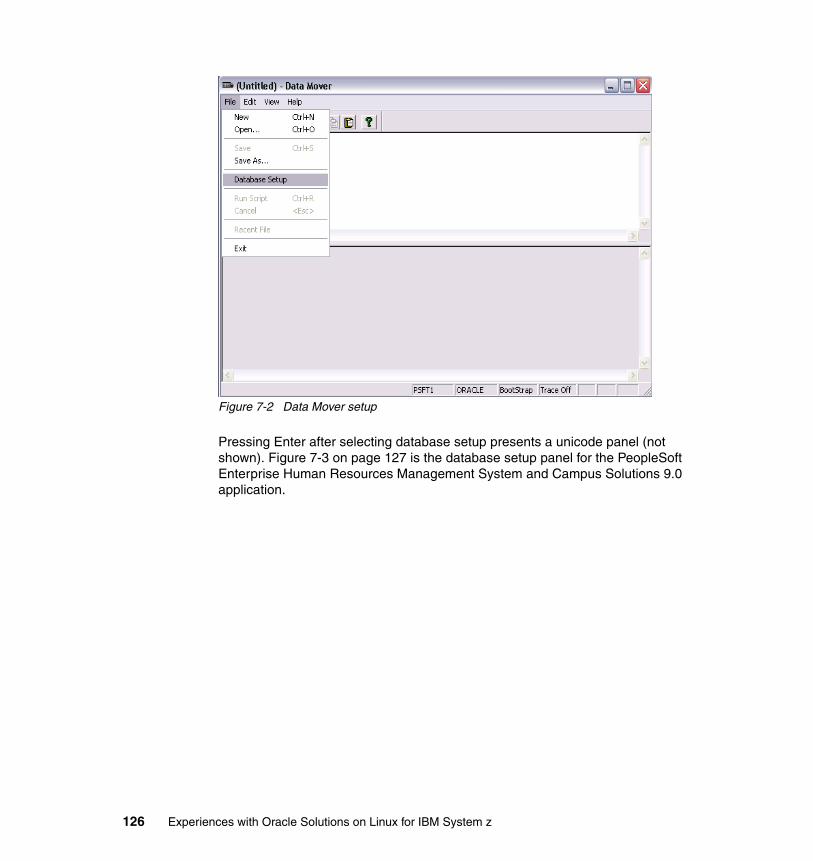
Figure 7-2 Data Mover setup
Pressing Enter after selecting database setup presents a unicode panel (not shown). Figure 7-3 on page 127 is the database setup panel for the PeopleSoft Enterprise Human Resources Management System and Campus Solutions 9.0 application.
126 Experiences with Oracle Solutions on Linux for IBM System z
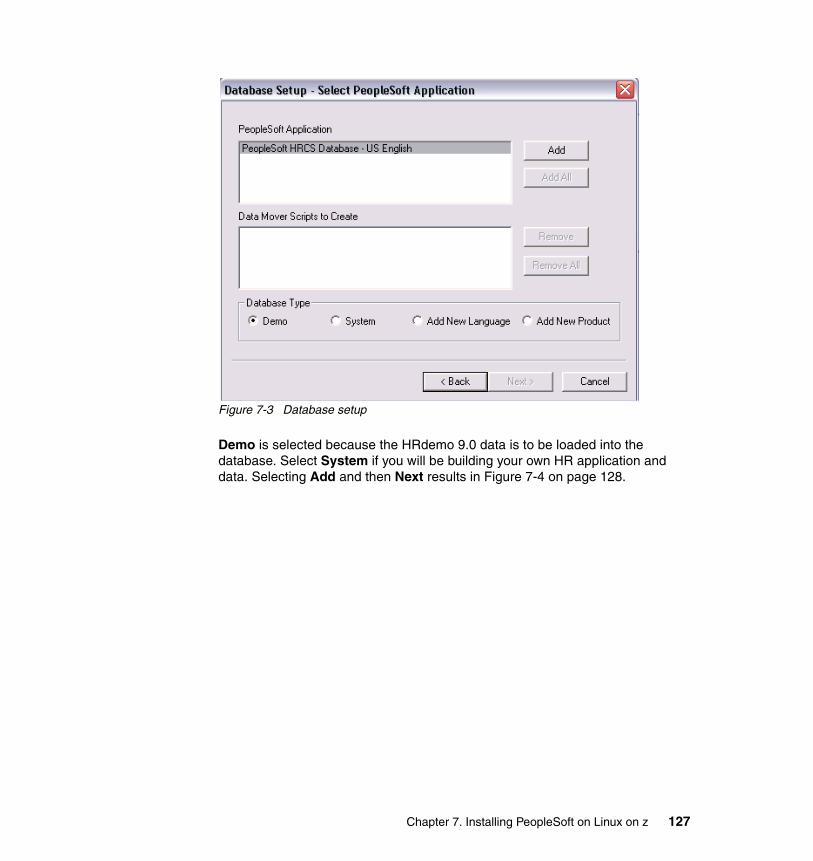
Figure 7-3 Database setup
Demo is selected because the HRdemo 9.0 data is to be loaded into the database. Select System if you will be building your own HR application and data. Selecting Add and then Next results in Figure 7-4 on page 128.
Chapter 7. Installing PeopleSoft on Linux on z 127

Figure 7-4 Database parameters
Selecting Finish presents the Data Mover input script panel shown in Figure 7-5 on page 129 that can be edited, but here the input script will be saved and copied to the Linux system so that Data Mover can be run directly on the Linux system. It is possible to execute Data Mover from Windows here to load the database in PeopleSoft two-tier mode.
128 Experiences with Oracle Solutions on Linux for IBM System z
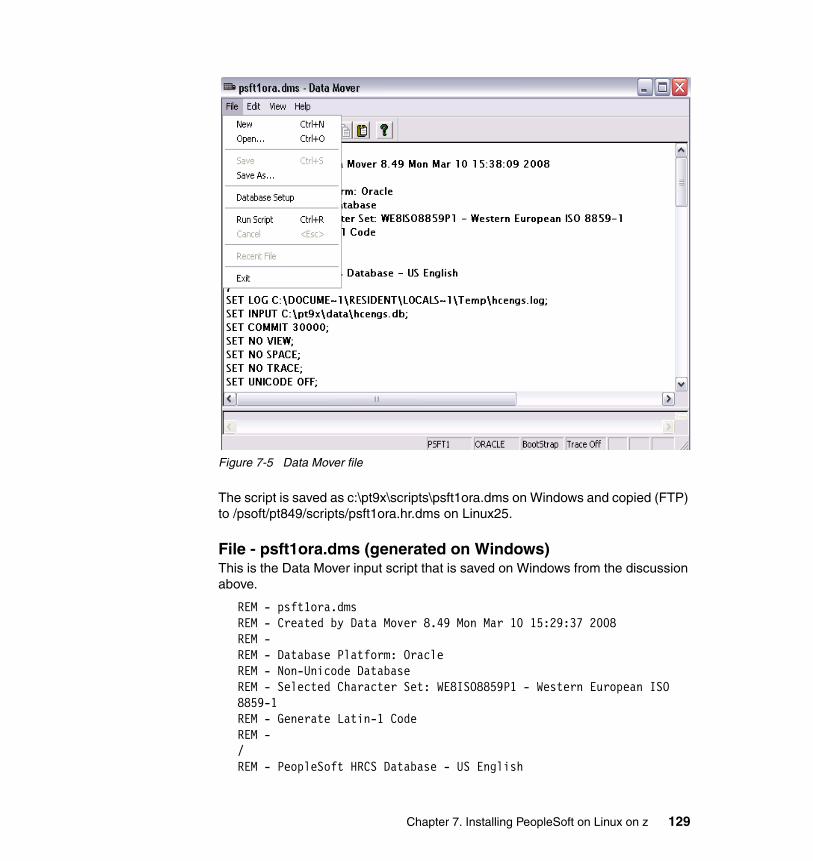
Figure 7-5 Data Mover file
The script is saved as c:\pt9x\scripts\psft1ora.dms on Windows and copied (FTP) to /psoft/pt849/scripts/psft1ora.hr.dms on Linux25.
File - psft1ora.dms (generated on Windows)This is the Data Mover input script that is saved on Windows from the discussion above.
REM - psft1ora.dmsREM - Created by Data Mover 8.49 Mon Mar 10 15:29:37 2008REM -REM - Database Platform: OracleREM - Non-Unicode DatabaseREM - Selected Character Set: WE8ISO8859P1 - Western European ISO 8859-1REM - Generate Latin-1 CodeREM -/REM - PeopleSoft HRCS Database - US English
Chapter 7. Installing PeopleSoft on Linux on z 129

/SET LOG C:\DOCUME~1\RESIDENT\LOCALS~1\Temp\hcengs.log;SET INPUT C:\pt9x\data\hcengs.db;SET COMMIT 30000;SET NO VIEW;SET NO SPACE;SET NO TRACE;SET UNICODE OFF;SET IGNORE_DUPS;SET ENABLED_DATATYPE 9.0;IMPORT *;
REM - PeopleSoft HRCS Database - US English/SET LOG C:\DOCUME~1\RESIDENT\LOCALS~1\Temp\hcengl.log;SET INPUT C:\pt9x\data\hcengl.db;SET COMMIT 30000;SET NO VIEW;SET NO SPACE;SET NO TRACE;SET UNICODE OFF;SET IGNORE_DUPS;SET ENABLED_DATATYPE 9.0;IMPORT *;
REM - Final Database cleanupREM -REM - Based on your inputs to Database Setup, you will be usingREM - ConnectID's to connect to your PeopleSoft ApplicationREM -/INSERT INTO PS.PSDBOWNER VALUES('PSFT1', 'SYSADM');UPDATE PSSTATUS SET OWNERID = 'SYSADM';UPDATE PSOPRDEFN SET SYMBOLICID = 'SYSADM1', OPERPSWD = OPRID, ENCRYPTED = 0;UPDATE PSACCESSPRFL SET ACCESSID = 'SYSADM', SYMBOLICID = 'SYSADM1', ACCESSPSWD = 'SYSADM', VERSION = 0, ENCRYPTED = 0;UPDATE PSOPTIONS SET LICENSE_CODE = '117fefffff8fffffebf1197832qimmg', LICENSE_GROUP = '1';UPDATE PS_INSTALLATION SETHGA='Y', BENEFIT_ADMINISTRN='Y', CSS='Y', PSERECRUIT='Y', AV='Y', CCU='Y', DI='Y',INSTALLED_GP_AUS='Y', INSTALLED_GP_BRA='Y', INSTALLED_PAY_GBL='Y', INSTALLED_GP_FRA='Y',
130 Experiences with Oracle Solutions on Linux for IBM System z
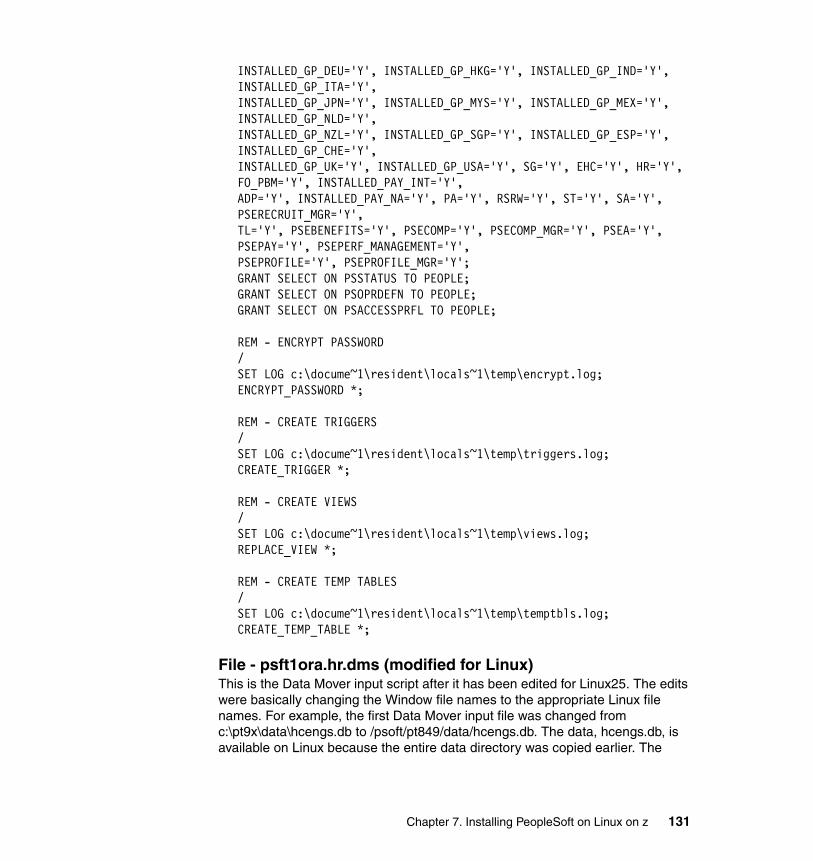
INSTALLED_GP_DEU='Y', INSTALLED_GP_HKG='Y', INSTALLED_GP_IND='Y', INSTALLED_GP_ITA='Y',INSTALLED_GP_JPN='Y', INSTALLED_GP_MYS='Y', INSTALLED_GP_MEX='Y', INSTALLED_GP_NLD='Y',INSTALLED_GP_NZL='Y', INSTALLED_GP_SGP='Y', INSTALLED_GP_ESP='Y', INSTALLED_GP_CHE='Y',INSTALLED_GP_UK='Y', INSTALLED_GP_USA='Y', SG='Y', EHC='Y', HR='Y', FO_PBM='Y', INSTALLED_PAY_INT='Y',ADP='Y', INSTALLED_PAY_NA='Y', PA='Y', RSRW='Y', ST='Y', SA='Y', PSERECRUIT_MGR='Y',TL='Y', PSEBENEFITS='Y', PSECOMP='Y', PSECOMP_MGR='Y', PSEA='Y', PSEPAY='Y', PSEPERF_MANAGEMENT='Y',PSEPROFILE='Y', PSEPROFILE_MGR='Y';GRANT SELECT ON PSSTATUS TO PEOPLE;GRANT SELECT ON PSOPRDEFN TO PEOPLE;GRANT SELECT ON PSACCESSPRFL TO PEOPLE;
REM - ENCRYPT PASSWORD/SET LOG c:\docume~1\resident\locals~1\temp\encrypt.log;ENCRYPT_PASSWORD *;
REM - CREATE TRIGGERS/SET LOG c:\docume~1\resident\locals~1\temp\triggers.log;CREATE_TRIGGER *;
REM - CREATE VIEWS/SET LOG c:\docume~1\resident\locals~1\temp\views.log;REPLACE_VIEW *;
REM - CREATE TEMP TABLES/SET LOG c:\docume~1\resident\locals~1\temp\temptbls.log;CREATE_TEMP_TABLE *;
File - psft1ora.hr.dms (modified for Linux)This is the Data Mover input script after it has been edited for Linux25. The edits were basically changing the Window file names to the appropriate Linux file names. For example, the first Data Mover input file was changed from c:\pt9x\data\hcengs.db to /psoft/pt849/data/hcengs.db. The data, hcengs.db, is available on Linux because the entire data directory was copied earlier. The
Chapter 7. Installing PeopleSoft on Linux on z 131
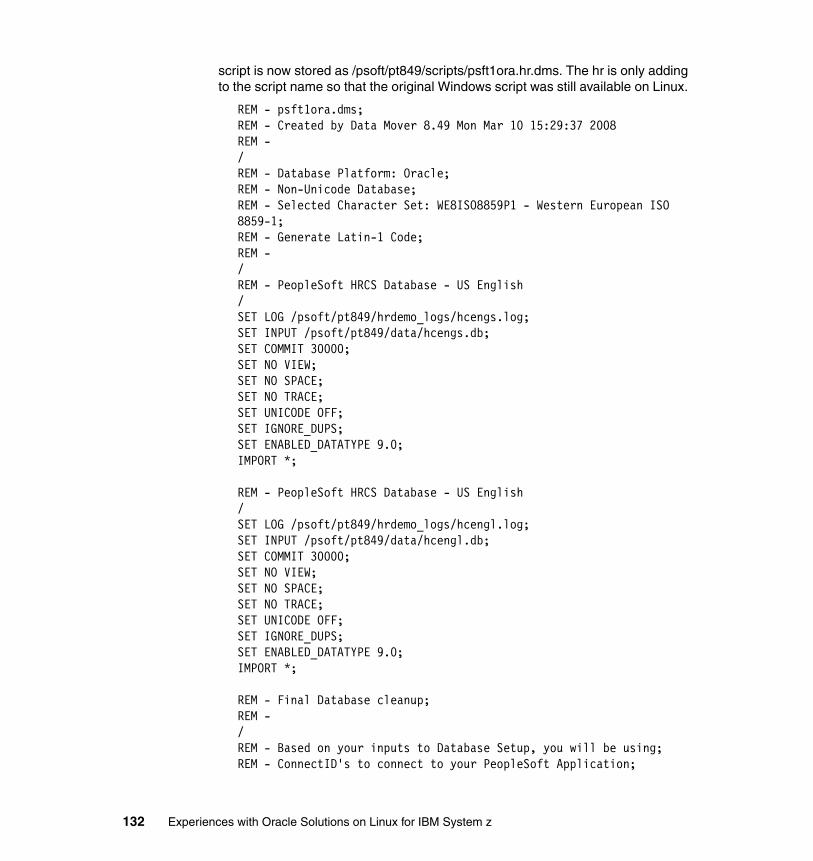
script is now stored as /psoft/pt849/scripts/psft1ora.hr.dms. The hr is only adding to the script name so that the original Windows script was still available on Linux.
REM - psft1ora.dms;REM - Created by Data Mover 8.49 Mon Mar 10 15:29:37 2008REM -/REM - Database Platform: Oracle;REM - Non-Unicode Database;REM - Selected Character Set: WE8ISO8859P1 - Western European ISO 8859-1;REM - Generate Latin-1 Code;REM -/REM - PeopleSoft HRCS Database - US English/SET LOG /psoft/pt849/hrdemo_logs/hcengs.log;SET INPUT /psoft/pt849/data/hcengs.db;SET COMMIT 30000;SET NO VIEW;SET NO SPACE;SET NO TRACE;SET UNICODE OFF;SET IGNORE_DUPS;SET ENABLED_DATATYPE 9.0;IMPORT *;
REM - PeopleSoft HRCS Database - US English/SET LOG /psoft/pt849/hrdemo_logs/hcengl.log;SET INPUT /psoft/pt849/data/hcengl.db;SET COMMIT 30000;SET NO VIEW;SET NO SPACE;SET NO TRACE;SET UNICODE OFF;SET IGNORE_DUPS;SET ENABLED_DATATYPE 9.0;IMPORT *;
REM - Final Database cleanup;REM -/REM - Based on your inputs to Database Setup, you will be using;REM - ConnectID's to connect to your PeopleSoft Application;
132 Experiences with Oracle Solutions on Linux for IBM System z
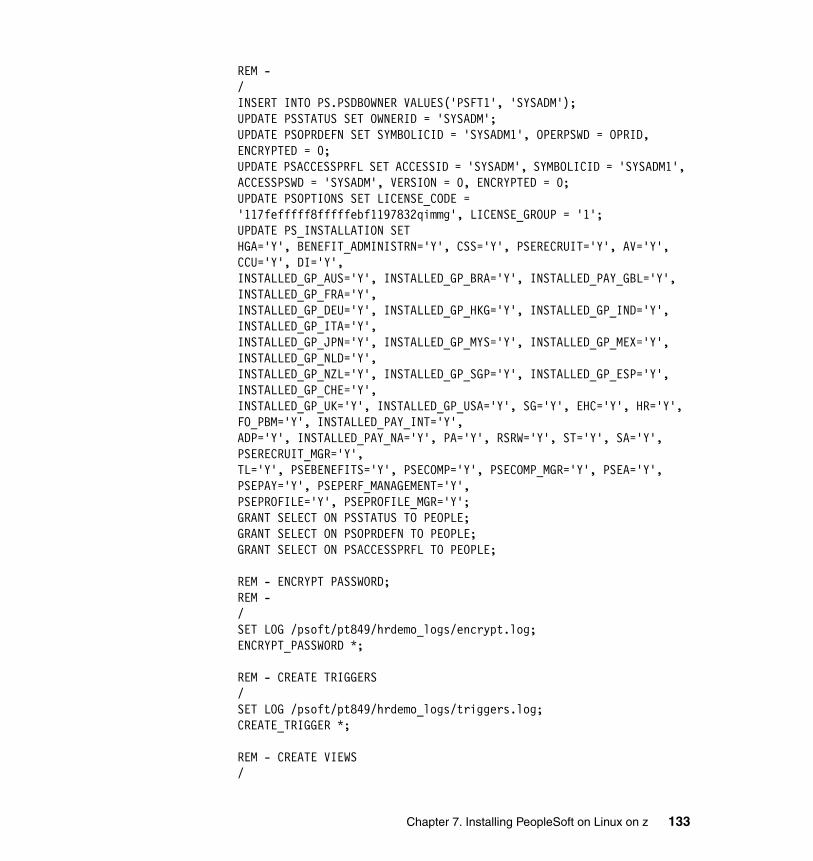
REM -/INSERT INTO PS.PSDBOWNER VALUES('PSFT1', 'SYSADM');UPDATE PSSTATUS SET OWNERID = 'SYSADM';UPDATE PSOPRDEFN SET SYMBOLICID = 'SYSADM1', OPERPSWD = OPRID, ENCRYPTED = 0;UPDATE PSACCESSPRFL SET ACCESSID = 'SYSADM', SYMBOLICID = 'SYSADM1', ACCESSPSWD = 'SYSADM', VERSION = 0, ENCRYPTED = 0;UPDATE PSOPTIONS SET LICENSE_CODE = '117fefffff8fffffebf1197832qimmg', LICENSE_GROUP = '1';UPDATE PS_INSTALLATION SETHGA='Y', BENEFIT_ADMINISTRN='Y', CSS='Y', PSERECRUIT='Y', AV='Y', CCU='Y', DI='Y',INSTALLED_GP_AUS='Y', INSTALLED_GP_BRA='Y', INSTALLED_PAY_GBL='Y', INSTALLED_GP_FRA='Y',INSTALLED_GP_DEU='Y', INSTALLED_GP_HKG='Y', INSTALLED_GP_IND='Y', INSTALLED_GP_ITA='Y',INSTALLED_GP_JPN='Y', INSTALLED_GP_MYS='Y', INSTALLED_GP_MEX='Y', INSTALLED_GP_NLD='Y',INSTALLED_GP_NZL='Y', INSTALLED_GP_SGP='Y', INSTALLED_GP_ESP='Y', INSTALLED_GP_CHE='Y',INSTALLED_GP_UK='Y', INSTALLED_GP_USA='Y', SG='Y', EHC='Y', HR='Y', FO_PBM='Y', INSTALLED_PAY_INT='Y',ADP='Y', INSTALLED_PAY_NA='Y', PA='Y', RSRW='Y', ST='Y', SA='Y', PSERECRUIT_MGR='Y',TL='Y', PSEBENEFITS='Y', PSECOMP='Y', PSECOMP_MGR='Y', PSEA='Y', PSEPAY='Y', PSEPERF_MANAGEMENT='Y',PSEPROFILE='Y', PSEPROFILE_MGR='Y';GRANT SELECT ON PSSTATUS TO PEOPLE;GRANT SELECT ON PSOPRDEFN TO PEOPLE;GRANT SELECT ON PSACCESSPRFL TO PEOPLE;
REM - ENCRYPT PASSWORD;REM -/SET LOG /psoft/pt849/hrdemo_logs/encrypt.log;ENCRYPT_PASSWORD *;
REM - CREATE TRIGGERS/SET LOG /psoft/pt849/hrdemo_logs/triggers.log;CREATE_TRIGGER *;
REM - CREATE VIEWS/
Chapter 7. Installing PeopleSoft on Linux on z 133
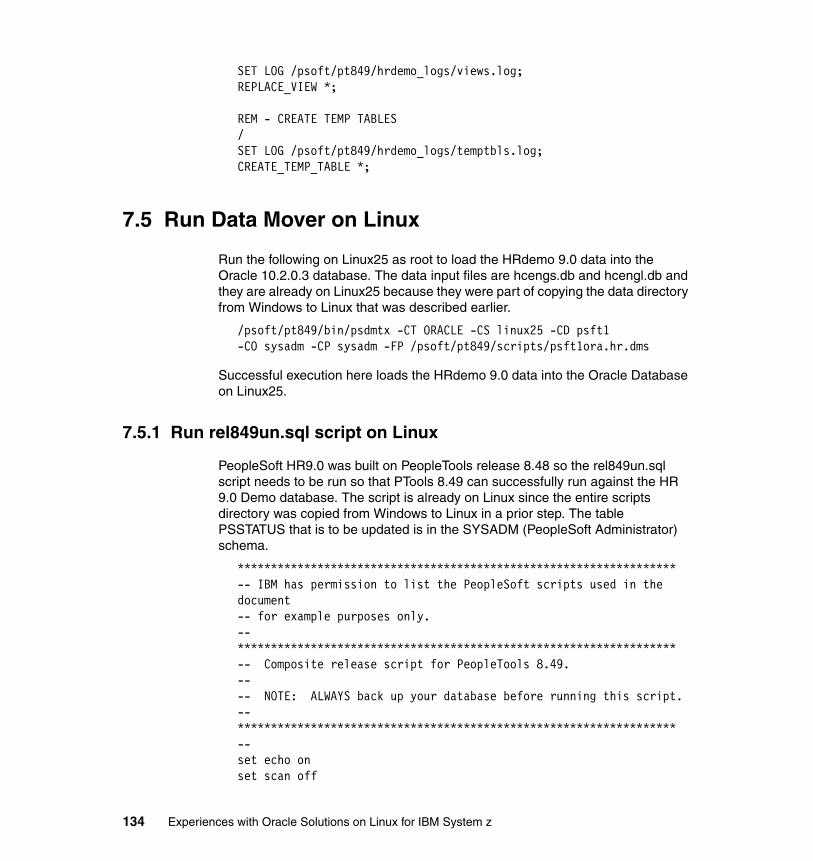
SET LOG /psoft/pt849/hrdemo_logs/views.log;REPLACE_VIEW *;
REM - CREATE TEMP TABLES/SET LOG /psoft/pt849/hrdemo_logs/temptbls.log;CREATE_TEMP_TABLE *;
7.5 Run Data Mover on Linux
Run the following on Linux25 as root to load the HRdemo 9.0 data into the Oracle 10.2.0.3 database. The data input files are hcengs.db and hcengl.db and they are already on Linux25 because they were part of copying the data directory from Windows to Linux that was described earlier.
/psoft/pt849/bin/psdmtx -CT ORACLE -CS linux25 -CD psft1 -CO sysadm -CP sysadm -FP /psoft/pt849/scripts/psft1ora.hr.dms
Successful execution here loads the HRdemo 9.0 data into the Oracle Database on Linux25.
7.5.1 Run rel849un.sql script on Linux
PeopleSoft HR9.0 was built on PeopleTools release 8.48 so the rel849un.sql script needs to be run so that PTools 8.49 can successfully run against the HR 9.0 Demo database. The script is already on Linux since the entire scripts directory was copied from Windows to Linux in a prior step. The table PSSTATUS that is to be updated is in the SYSADM (PeopleSoft Administrator) schema.
******************************************************************-- IBM has permission to list the PeopleSoft scripts used in the document -- for example purposes only. -- ****************************************************************** -- Composite release script for PeopleTools 8.49.---- NOTE: ALWAYS back up your database before running this script.-- ******************************************************************--set echo onset scan off
134 Experiences with Oracle Solutions on Linux for IBM System z
spool rel849un.logUPDATE PSSTATUS SET TOOLSREL='8.49', LASTREFRESHDTTM = SYSDATE;CREATE UNIQUE INDEX PSAPSROLECLASS ON PSROLECLASS (CLASSID, ROLENAME) TABLESPACE PSINDEX STORAGE (INITIAL 40000 NEXT 100000 MAXEXTENTS UNLIMITED PCTINCREASE 0) PCTFREE 10 PARALLEL NOLOGGING;ALTER INDEX PSAPSROLECLASS NOPARALLEL LOGGING;CREATE INDEX PSCPSTREELEAF ON PSTREELEAF(SETID, TREE_NAME, EFFDT DESC, TREE_NODE_NUM, RANGE_FROM, RANGE_TO) TABLESPACE PSINDEX STORAGE (INITIAL 40000 NEXT 100000 MAXEXTENTS UNLIMITED PCTINCREASE 0) PCTFREE 10 PARALLEL NOLOGGING;ALTER INDEX PSCPSTREELEAF NOPARALLEL LOGGING;COMMIT;SPOOL OFF
7.6 Summary
At this point the Enterprise PeopleTools 8.49 PeopleBook: System and Server Administration document from March 2007 can be used to complete the setup of a PeopleSoft Enterprise system. Since tools and hr are already installed on the Windows system here, the PeopleSoft Configuration Manager could be used to install a workstation so a PeopleSoft Application Designer two-tier connection could be made to the Oracle Database on Linux. Further PeopleSoft Enterprise setup and configuration will probably require the installation of a Web server and the use of the PSADMIN utility.
Chapter 7. Installing PeopleSoft on Linux on z 135

136 Experiences with Oracle Solutions on Linux for IBM System z
Part 2 Using Oracle on Linux on z
In this part we provide examples of using Oracle on Linux on z that cover our experiences with:
� Linux accounting
� Connecting to CICS® using Oracle Access Manager
� Using the Transportable databases feature to move Oracle Databases to Linux on z
� Using Hardware Security Modules with Oracle Advanced Security
� Using Grid Control Server with SLES10 and Red Hat Enterprise Linux 5
Part 2
© Copyright IBM Corp. 2009. All rights reserved. 137

138 Experiences with Oracle Solutions on Linux for IBM System z
Chapter 8. Using Linux accounting with Oracle
The objective of this chapter is to share the data we saw when viewing Linux CPU utilization data while running Oracle Databases on Linux on z.
It is important to understand this if you are using the data for:
� Capacity planning of CPU resources needed by Linux
� Having the Oracle cost-based optimizer choose the best plan to execute
In earlier releases of Linux on System z, the Linux CPU data recorded by Linux tools such as vmstat was inaccurate in the reported distribution of CPU time between user and kernel contexts. A second issue arises when running under z/VM because the kernel cannot determine, when it has work to d, whether or not it has actually been dispatched by z/VM. Since this is true when running Oracle on Linux on z under z/VM, using this data for the two purposes mentioned above can lead to undesirable results.
The good news is that these two issues are resolved in the versions of the Linux kernel above 2.6.11. To ensure your data is accurate, you should update to these versions of Linux: Red Hat Enterprise Linux 5 or SLES10.
8
© Copyright IBM Corp. 2009. All rights reserved. 139
8.1 Virtual CPU time accounting
Prior to kernel 2.6.11, Linux used tick-based accounting to provide CPU utilization. The kernel assigned the 0.01 second between timer interrupts to whatever context was running at the time of the interrupt. No consideration was made for the fact that the context may have switched during the time between interrupts. This is the case whether Linux was running on an LPAR on system z or under z/VM. A second issue arose under z/VM as the kernel could not determine when it was dispatched by z/VM.
Beginning with the 2.6.11 kernel, changes were made to Linux that made the CPU utilization data more accurate. The changes are subject to a kernel parameter, CONFIG_VIRT_CPU_ACCOUNTING, which is on by default. If the parameter is set off when the kernel is configured, the CPU data will remain as in prior versions of Linux.
If you are running on SLES10 or Red Hat Enterprise Linux 5 (both have kernels higher than 2.6.11) and the kernel is configured with the parameter turned on, you will see correct Linux CPU utilization from Linux utilities such as vmstat, and your programs that use timer system calls will get correct CPU data from Linux.
Essentially, two changes were made. The first is that the CPU timer is only updated when the virtual CPU is backed by a real CPU. The second is that Store CPU Timer (stpt) instructions were placed in Linux where context switches are handled. These two changes allow Linux to accurately record CPU utilization. Linux also uses the difference between the CPU timer and the wall clock to record when it has been placed in an involuntary wait. This involuntary wait time is described below as steal time (st). It indicates that the Linux kernel had work to do, but it was not dispatched by z/VM.
More information is available on these Web sites:
http://www.ibm.com/developerworks/linux/linux390/perf/tuning_rec_CPUtimes_virtual.htmlhttp://linux.derkeiler.com/Mailing-Lists/Kernel/2004-08/1311.html
8.2 New Field – st, steal time
The virtual CPU accounting changes described above add a new field to Linux utilities such as vmstat and top and add a new field in the /proc/stat file. This new field is the time that Linux has work to run; however, it has not been dispatched by z/VM. A quick check in Red Hat Enterprise Linux 5 or SLES10 to determine whether the kernel has been configured with virtual CPU accounting turned on is
140 Experiences with Oracle Solutions on Linux for IBM System z
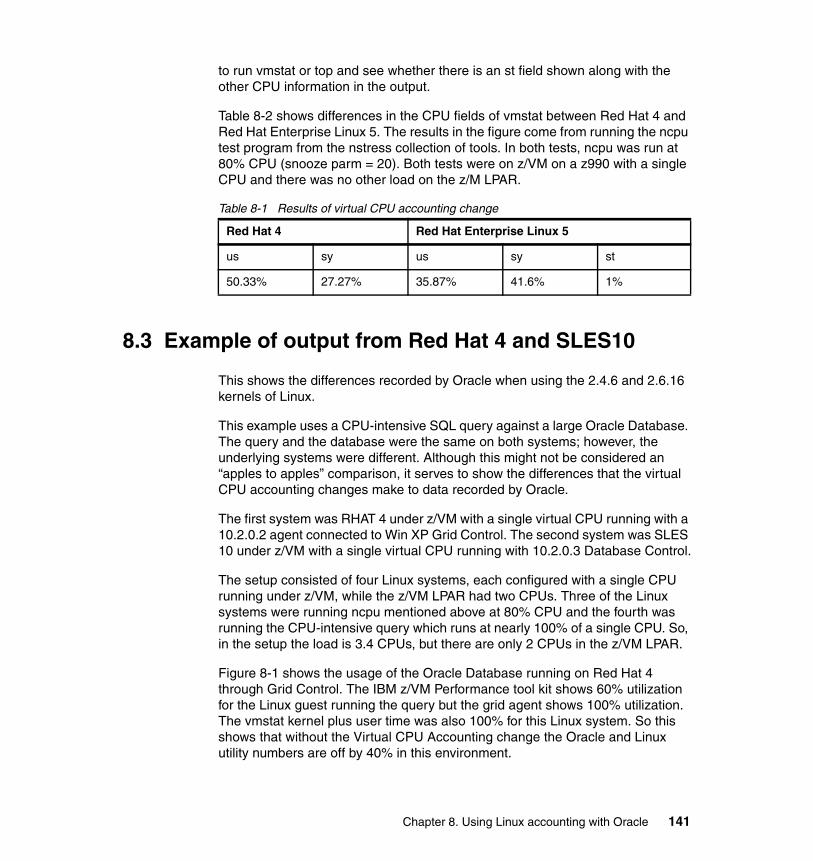
to run vmstat or top and see whether there is an st field shown along with the other CPU information in the output.
Table 8-2 shows differences in the CPU fields of vmstat between Red Hat 4 and Red Hat Enterprise Linux 5. The results in the figure come from running the ncpu test program from the nstress collection of tools. In both tests, ncpu was run at 80% CPU (snooze parm = 20). Both tests were on z/VM on a z990 with a single CPU and there was no other load on the z/M LPAR.
Table 8-1 Results of virtual CPU accounting change
8.3 Example of output from Red Hat 4 and SLES10
This shows the differences recorded by Oracle when using the 2.4.6 and 2.6.16 kernels of Linux.
This example uses a CPU-intensive SQL query against a large Oracle Database. The query and the database were the same on both systems; however, the underlying systems were different. Although this might not be considered an “apples to apples” comparison, it serves to show the differences that the virtual CPU accounting changes make to data recorded by Oracle.
The first system was RHAT 4 under z/VM with a single virtual CPU running with a 10.2.0.2 agent connected to Win XP Grid Control. The second system was SLES 10 under z/VM with a single virtual CPU running with 10.2.0.3 Database Control.
The setup consisted of four Linux systems, each configured with a single CPU running under z/VM, while the z/VM LPAR had two CPUs. Three of the Linux systems were running ncpu mentioned above at 80% CPU and the fourth was running the CPU-intensive query which runs at nearly 100% of a single CPU. So, in the setup the load is 3.4 CPUs, but there are only 2 CPUs in the z/VM LPAR.
Figure 8-1 shows the usage of the Oracle Database running on Red Hat 4 through Grid Control. The IBM z/VM Performance tool kit shows 60% utilization for the Linux guest running the query but the grid agent shows 100% utilization. The vmstat kernel plus user time was also 100% for this Linux system. So this shows that without the Virtual CPU Accounting change the Oracle and Linux utility numbers are off by 40% in this environment.
Red Hat 4 Red Hat Enterprise Linux 5
us sy us sy st
50.33% 27.27% 35.87% 41.6% 1%
Chapter 8. Using Linux accounting with Oracle 141
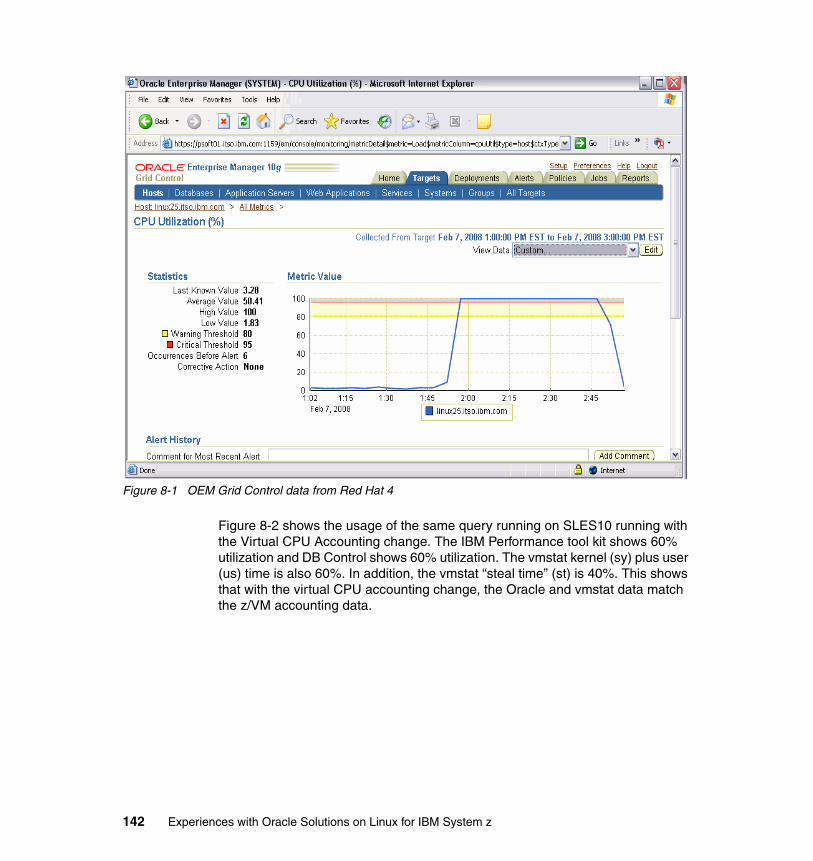
Figure 8-1 OEM Grid Control data from Red Hat 4
Figure 8-2 shows the usage of the same query running on SLES10 running with the Virtual CPU Accounting change. The IBM Performance tool kit shows 60% utilization and DB Control shows 60% utilization. The vmstat kernel (sy) plus user (us) time is also 60%. In addition, the vmstat “steal time” (st) is 40%. This shows that with the virtual CPU accounting change, the Oracle and vmstat data match the z/VM accounting data.
142 Experiences with Oracle Solutions on Linux for IBM System z
Figure 8-2 OEM Database Control data from SLES 10
8.4 A second point about Linux accounting
We discovered that there is a bug in the generic Linux accounting routine that affects running Oracle on Linux for z if you are using Red Hat Enterprise Linux 5 or SLES10 SP1 or above. This manifests itself by showing high CPU when running Oracle Clusterware even if there is no activity on the system. Also, the Linux and the VM accounting information does not match.
The workaround is to set hz_timer to 1. However, the generic bug will be fixed in future releases. Red Hat 5 kernel level 2.6.18-124.el5 will have this fix. The version of SLES is not yet known. With these versions you will no longer have to set hz_timer to 1.
This is an example of our results. For our test we ran two Linux guests with just CRS 10.2.0.3 running. We had installed the performance patch 6056783. We
Chapter 8. Using Linux accounting with Oracle 143
used ESAMON from Velocity Software to measure the Linux guest usage from VM. We used the vmstat command on the Linux guest.
The first row shows the results with the Linux accounting error. The second row was the result when we set “echo 1 > /proc/sys/kernel/hz_timer”. This is a workaround until the Linux accounting error is fixed in upgrades of SLES 10 and Red Hat Enterprise Linux 5 as of 2Q 2009.
The percentage numbers are an average of 10 x 1 minute intervals.
Table 8-2 Results with and without workaround
As you can see, the results with the error are unpredictable and unreasonable.
Test vmstat (us+sy)Node B
VM totalNode A
VM VirtualNode A
Linux vmstat (us+sys)Node B
VM TotalNode B
VM VirtualNode B
with Linux accounting error
8.2% 18.4% 10.4% 9% 19.6% 11%
with hz_timer set to 1
2% 2.6% 2.5% 2% 2.3% 2.4%
144 Experiences with Oracle Solutions on Linux for IBM System z
Chapter 9. CICS Access Manager with an Oracle DB on Linux on z
This chapter discusses moving an Oracle Database from z/OS to Linux on IBM System z while using CICS Access Manager (AM4CICS). The scenario is based on using AM4CICS with CICS transactions running on z/OS getting data from an Oracle Database that is running on Linux on z.
We cover changes that might be required, both in the installation of AM4CICS and in the application programs. We point you to documentation to help you make adjustments for the database connection.
9
© Copyright IBM Corp. 2009. All rights reserved. 145

9.1 The autologon feature
Each instance of Oracle Access Manager for CICS TS communicates directly with one OSDI service or one remote database.
AM4CICS manages the connections between CICS tasks and Oracle via a predefined thread table. Each entry in the thread table identifies a potential connection (thread) between a CICS task and the Oracle Database. The thread table entry lists which CICS transactions are eligible to use the thread, how many copies of the thread should be created, whether the thread remains connected to Oracle after use and how the Oracle user ID should be derived. The thread table also identifies the Oracle server, either local or remote, that CICS tasks will interact with when connecting and executing SQL statements. The thread table is created by the customer at install time.
AM4CICS implements an autologon feature, whereby a CICS transaction need not have to issue an explicit CONNECT statement in order to establish connectivity to an Oracle server. When the first SQL statement is encountered, AM4CICS assigns a thread to the active CICS task, and an implicit CONNECT statement is issued. When accessing a local Oracle server, autologon connections can optionally be configured as OS-authenticated connections. In this case no password is required to be sent to the Oracle server, because RACF has already checked the user ID and password of the CICS user. This option is the most common way for z/OS customers to maintain security, since the authority of the user is controlled by RACF, and it minimizes the work required by the Oracle DBA in defining Oracle user IDs.
For remote Oracle servers on any platform, autologon is restricted to authenticated connections—OS-authenticated connections are not supported. The receiving Oracle data base must get both an Oracle user ID (OID) and a valid password.
9.2 Connecting to a database with AM4CICS
Connections for Oracle CICS TS transactions, whether to a local or remote database, are created and reused based on criteria defined in the thread table, and they are assigned to a CICS TS transaction the first time that it accesses Oracle.
For local databases on z/OS, AM4CICS can connect with an OS-authenticated user ID, which means the user has already been checked by RACF, and no password has to be sent to Oracle. With a remote Oracle, the OS-authenticated
146 Experiences with Oracle Solutions on Linux for IBM System z

option is not available. Autologon will still connect you to the remote Oracle, but you must supply an Oracle user ID and password to the remote Oracle.
If you have been using the most common option, that of using OS-authenticated user IDs, then you have two options. They are discussed in the next section.
1. Change the AM4CICS installation
2. Change the CICS application
9.2.1 Change the AM4CICS installation
With OS-authenticated user IDs, there are usually very few entries required in the customer-created thread table, because all possible combinations can be taken care of with one entry. For non-OS-authenticated user IDs the customer must specify as many thread entries as required to relate the various CICS transaction codes to Oracle user IDs. For example, you could choose to have a distinct user ID for a set of read-only inquiry transaction codes. Another thread table entry (and OID and password) could be used for another set of transaction codes. The point is that you may have to redesign the mapping of transaction codes to Oracle user IDs, and this may mean that more thread entries are required. This also means that there must be a static mapping from some attribute of the CICS transaction (program name, terminal ID, transaction ID) to an Oracle user ID.
Using the thread table to assign the OID and password does allow multiple transactions to use the same thread. The thread will be reused if the next transaction has the same authority credentials. This avoids the Oracle Logon processing in the DB server.
9.2.2 Change the CICS application
Another technique is to change the CICS application program to issue an explicit connect supplying the user ID and password. This gives you the most flexibility, because the code added to the CICS transaction could determine the RACF user ID and pass that through. This does force the customer to examine every CICS transaction to decide what to use as the user ID.
AM4CICS will reuse a thread if it is open and use the same authentication credentials as the previous transaction. If you use an explicit connect, then there will be no thread reuse, and an Oracle logon will be performed for each transaction. This may increase the CPU time required per transaction, both in the AM4CICS thread, and in the remote Database server.
Chapter 9. CICS Access Manager with an Oracle DB on Linux on z 147
9.3 Summary
Customers must examine the current AM4CICS installation, and their current transaction authentication strategies. If they are using OS-authenticated transactions, then some planning and migration effort is required, because an explicit Oracle user ID and password must be supplied, either in the connect string supplied by the transaction, or in the thread tables created in the installation of AM4CICS.
More information is available in:
� Chapter 11 of Oracle 10gR2 System Administrator Guide for z/OS, B25398.
� Metalink note 268161.1 - Z/OS Support Guide to the Access Manager for CICS V9.2.0 and 10g
� MetaLink note 259732.1 Oracle Access Manager for CICS 9.2 / 10g Sample Installation for a Remote Database
148 Experiences with Oracle Solutions on Linux for IBM System z
Chapter 10. Oracle Database migration to Linux for z using Transportable database
In this chapter, we provide a quick overview and the steps involved in migrating Oracle Database onto a System z Linux platform from another platform using Transportable databases (TDB). The TDB technology is available on Oracle 10g Release 2 and later.
RMAN is used by TDB to create the scripts and for the data files conversion to the new platform. Only the data files that have undo data require RMAN conversion.The data files conversion can be performed at the target as well as at the source platform.
By transporting the entire database (user data as well as the Oracle dictionary), Transportable database technology reduces the overall database migration time. Complexity is also reduced, compared to other traditional migration utilities such as data export/import.
However, the TDB technology is applicable only if the source and target database platforms are in the same endian format. Later in this document, we will discuss how to verify the endian format on the source and target platforms.
10
© Copyright IBM Corp. 2009. All rights reserved. 149

10.1 Assumptions
This document does not replace any IBM or Oracle documents. We assume that the user is reasonably skilled in the following:
� Oracle Database administration activities� AIX/Linux System administration skills
10.2 Introduction
This is an experience-based paper outlining the Oracle Database migration between an IBM System z Linux environment and an IBM System p® AIX environment using Transportable database technology.
Either environment can be the source and the other can be the target. In our example we have chosen to migrate an Oracle Database from a System p AIX environment as the source to a System z Linux environment as the target.
Source environment details� IBM System: p630 � IP Address: 9.19.55.147� Operating system: AIX 5.2 � Oracle Database: Oracle10g Release 10.2.0.4 Enterprise Edition
Target environment details� IBM System: z/990 � IP Address: 9.19.53.59� Operating system: Red Hat Enterprise Linux 5 on System z� Oracle Database: Oracle10g Release 10.2.0.4 Enterprise Edition
Migration process flowThe following steps are required to perform a data migration across platforms using Transportable database technology.
1. Validate the applicability of Transportable database technology.
2. Validate the prerequisites.
3. Decide where to run the conversion.
4. Prepare the environments.
5. Create the conversion scripts.
6. Move the appropriate files.
150 Experiences with Oracle Solutions on Linux for IBM System z
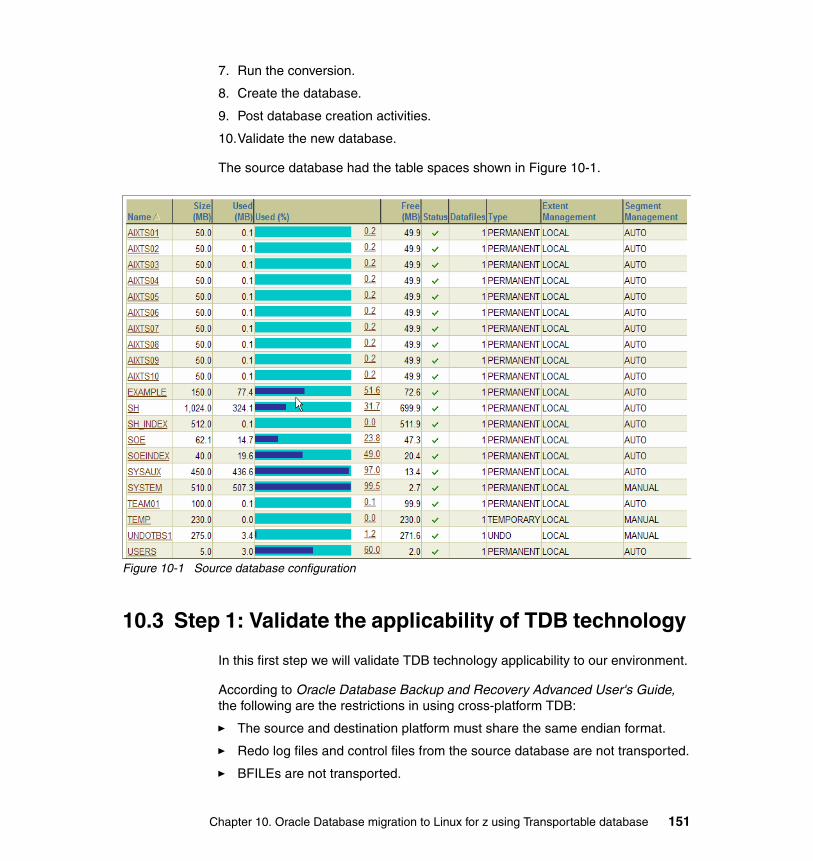
7. Run the conversion.
8. Create the database.
9. Post database creation activities.
10.Validate the new database.
The source database had the table spaces shown in Figure 10-1.
Figure 10-1 Source database configuration
10.3 Step 1: Validate the applicability of TDB technology
In this first step we will validate TDB technology applicability to our environment.
According to Oracle Database Backup and Recovery Advanced User's Guide, the following are the restrictions in using cross-platform TDB:
� The source and destination platform must share the same endian format.
� Redo log files and control files from the source database are not transported.
� BFILEs are not transported.
Chapter 10. Oracle Database migration to Linux for z using Transportable database 151
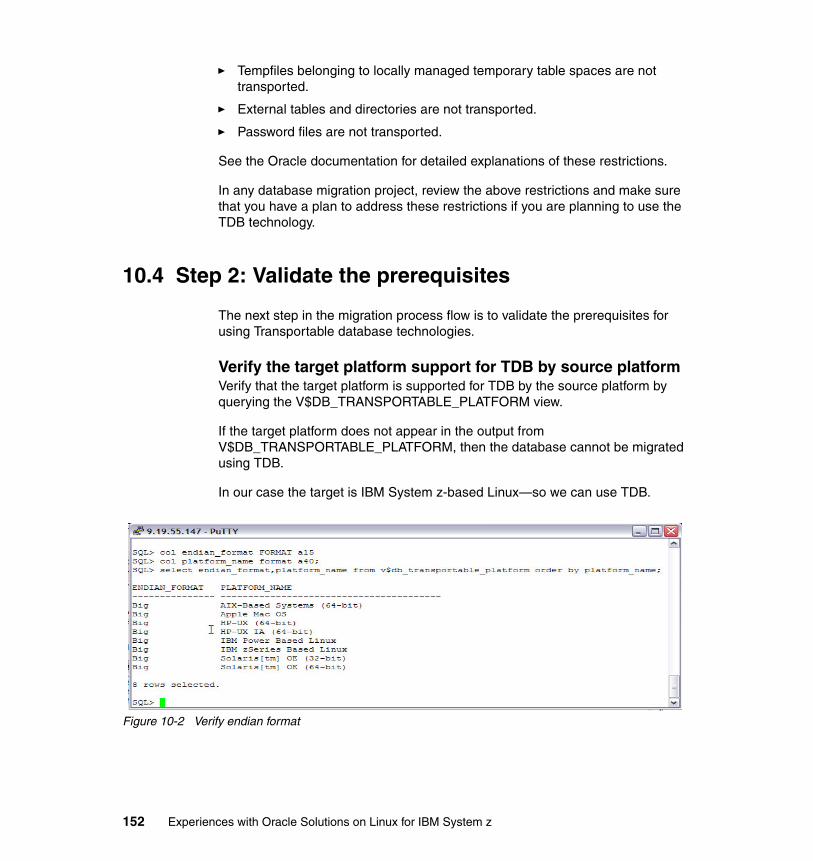
� Tempfiles belonging to locally managed temporary table spaces are not transported.
� External tables and directories are not transported.
� Password files are not transported.
See the Oracle documentation for detailed explanations of these restrictions.
In any database migration project, review the above restrictions and make sure that you have a plan to address these restrictions if you are planning to use the TDB technology.
10.4 Step 2: Validate the prerequisites
The next step in the migration process flow is to validate the prerequisites for using Transportable database technologies.
Verify the target platform support for TDB by source platformVerify that the target platform is supported for TDB by the source platform by querying the V$DB_TRANSPORTABLE_PLATFORM view.
If the target platform does not appear in the output from V$DB_TRANSPORTABLE_PLATFORM, then the database cannot be migrated using TDB.
In our case the target is IBM System z-based Linux—so we can use TDB.
Figure 10-2 Verify endian format
152 Experiences with Oracle Solutions on Linux for IBM System z
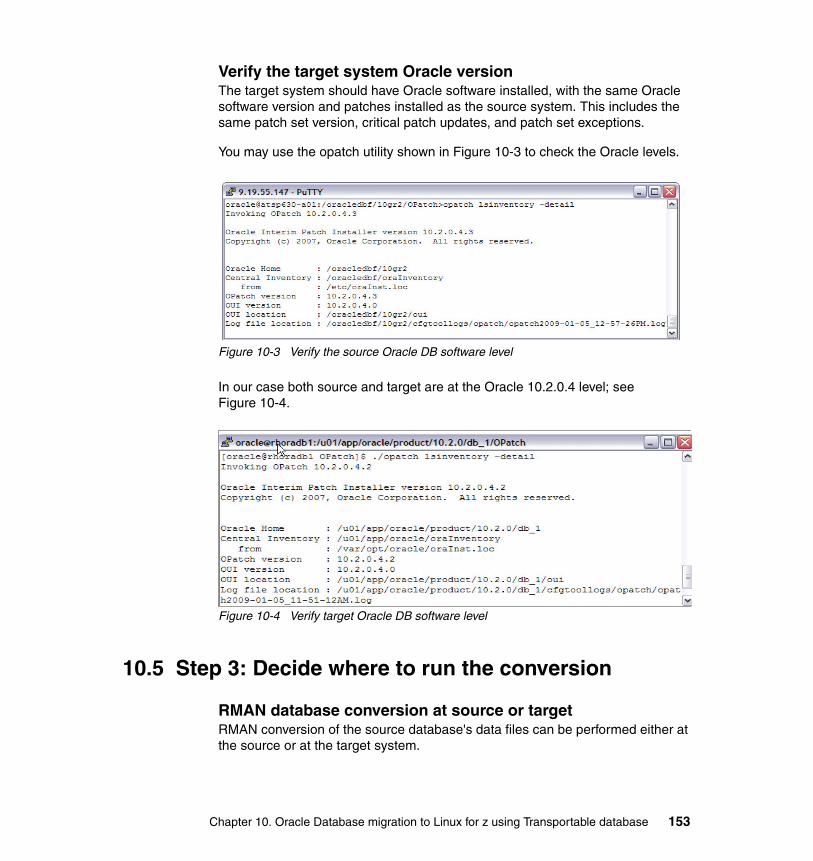
Verify the target system Oracle versionThe target system should have Oracle software installed, with the same Oracle software version and patches installed as the source system. This includes the same patch set version, critical patch updates, and patch set exceptions.
You may use the opatch utility shown in Figure 10-3 to check the Oracle levels.
Figure 10-3 Verify the source Oracle DB software level
In our case both source and target are at the Oracle 10.2.0.4 level; see Figure 10-4.
Figure 10-4 Verify target Oracle DB software level
10.5 Step 3: Decide where to run the conversion
RMAN database conversion at source or targetRMAN conversion of the source database's data files can be performed either at the source or at the target system.
Chapter 10. Oracle Database migration to Linux for z using Transportable database 153
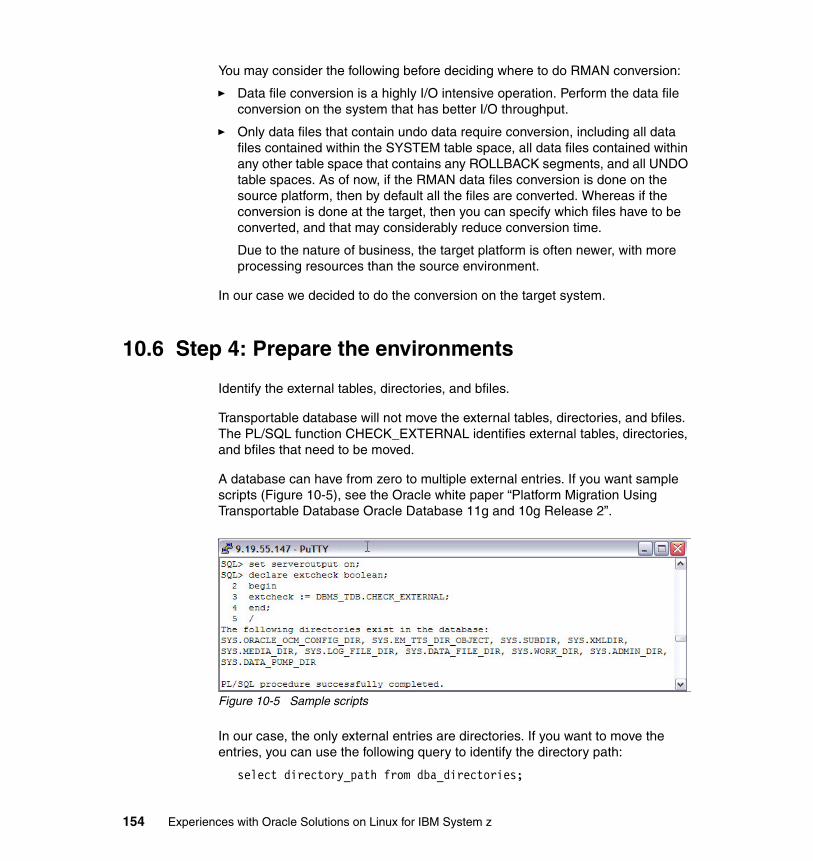
You may consider the following before deciding where to do RMAN conversion:
� Data file conversion is a highly I/O intensive operation. Perform the data file conversion on the system that has better I/O throughput.
� Only data files that contain undo data require conversion, including all data files contained within the SYSTEM table space, all data files contained within any other table space that contains any ROLLBACK segments, and all UNDO table spaces. As of now, if the RMAN data files conversion is done on the source platform, then by default all the files are converted. Whereas if the conversion is done at the target, then you can specify which files have to be converted, and that may considerably reduce conversion time.
Due to the nature of business, the target platform is often newer, with more processing resources than the source environment.
In our case we decided to do the conversion on the target system.
10.6 Step 4: Prepare the environments
Identify the external tables, directories, and bfiles.
Transportable database will not move the external tables, directories, and bfiles. The PL/SQL function CHECK_EXTERNAL identifies external tables, directories, and bfiles that need to be moved.
A database can have from zero to multiple external entries. If you want sample scripts (Figure 10-5), see the Oracle white paper “Platform Migration Using Transportable Database Oracle Database 11g and 10g Release 2”.
Figure 10-5 Sample scripts
In our case, the only external entries are directories. If you want to move the entries, you can use the following query to identify the directory path:
select directory_path from dba_directories;
154 Experiences with Oracle Solutions on Linux for IBM System z
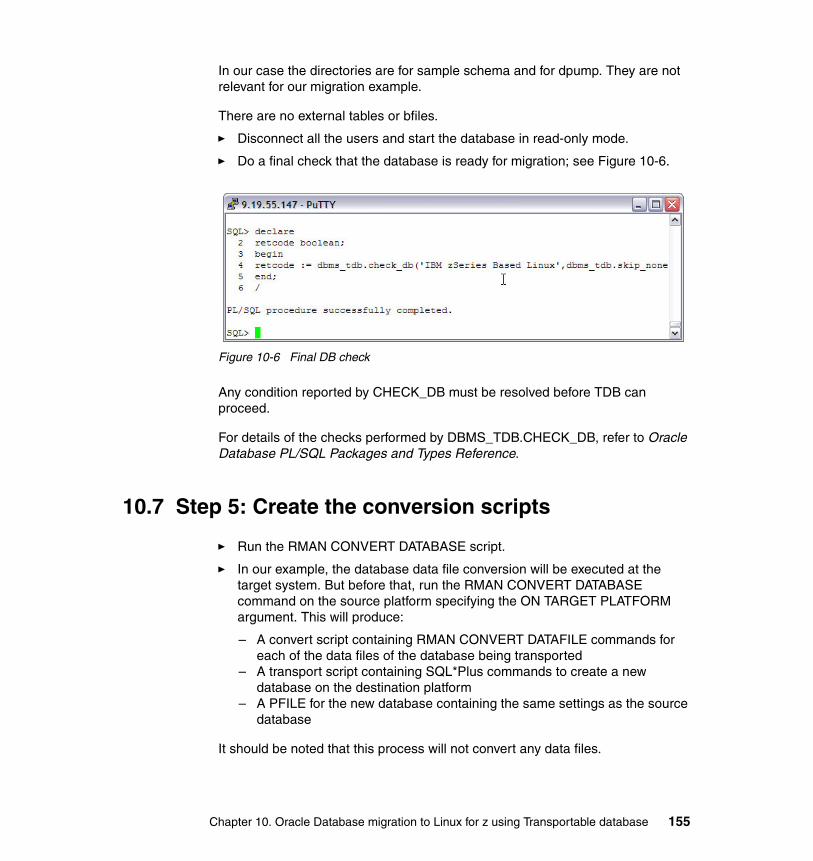
In our case the directories are for sample schema and for dpump. They are not relevant for our migration example.
There are no external tables or bfiles.
� Disconnect all the users and start the database in read-only mode.
� Do a final check that the database is ready for migration; see Figure 10-6.
Figure 10-6 Final DB check
Any condition reported by CHECK_DB must be resolved before TDB can proceed.
For details of the checks performed by DBMS_TDB.CHECK_DB, refer to Oracle Database PL/SQL Packages and Types Reference.
10.7 Step 5: Create the conversion scripts
� Run the RMAN CONVERT DATABASE script.
� In our example, the database data file conversion will be executed at the target system. But before that, run the RMAN CONVERT DATABASE command on the source platform specifying the ON TARGET PLATFORM argument. This will produce:
– A convert script containing RMAN CONVERT DATAFILE commands for each of the data files of the database being transported
– A transport script containing SQL*Plus commands to create a new database on the destination platform
– A PFILE for the new database containing the same settings as the source database
It should be noted that this process will not convert any data files.
Chapter 10. Oracle Database migration to Linux for z using Transportable database 155
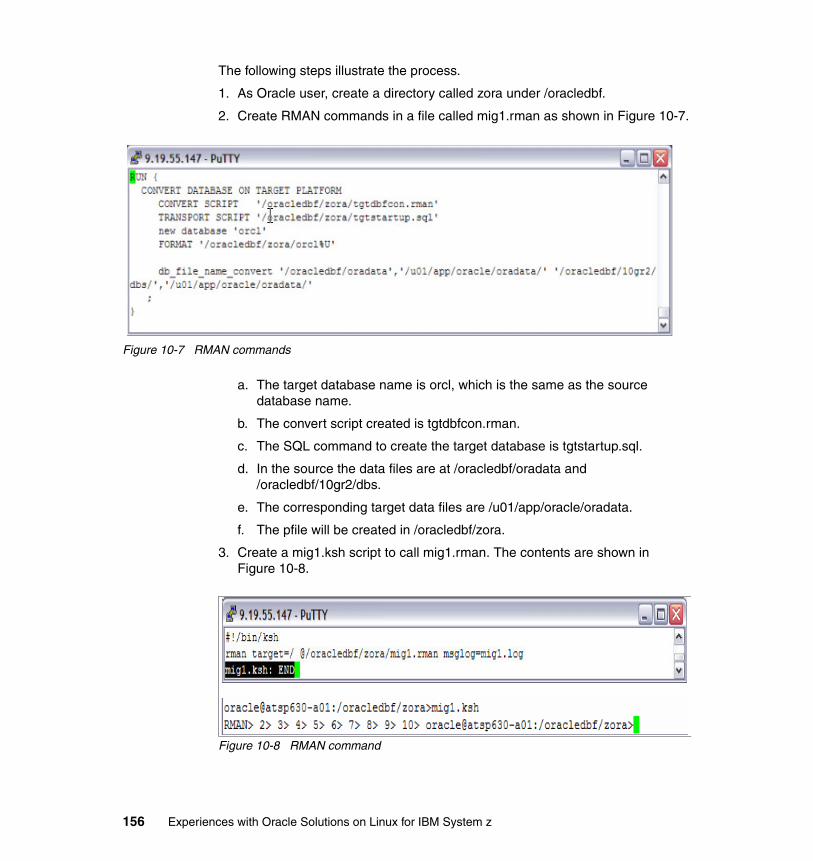
The following steps illustrate the process.
1. As Oracle user, create a directory called zora under /oracledbf.
2. Create RMAN commands in a file called mig1.rman as shown in Figure 10-7.
Figure 10-7 RMAN commands
a. The target database name is orcl, which is the same as the source database name.
b. The convert script created is tgtdbfcon.rman.
c. The SQL command to create the target database is tgtstartup.sql.
d. In the source the data files are at /oracledbf/oradata and /oracledbf/10gr2/dbs.
e. The corresponding target data files are /u01/app/oracle/oradata.
f. The pfile will be created in /oracledbf/zora.
3. Create a mig1.ksh script to call mig1.rman. The contents are shown in Figure 10-8.
Figure 10-8 RMAN command
156 Experiences with Oracle Solutions on Linux for IBM System z
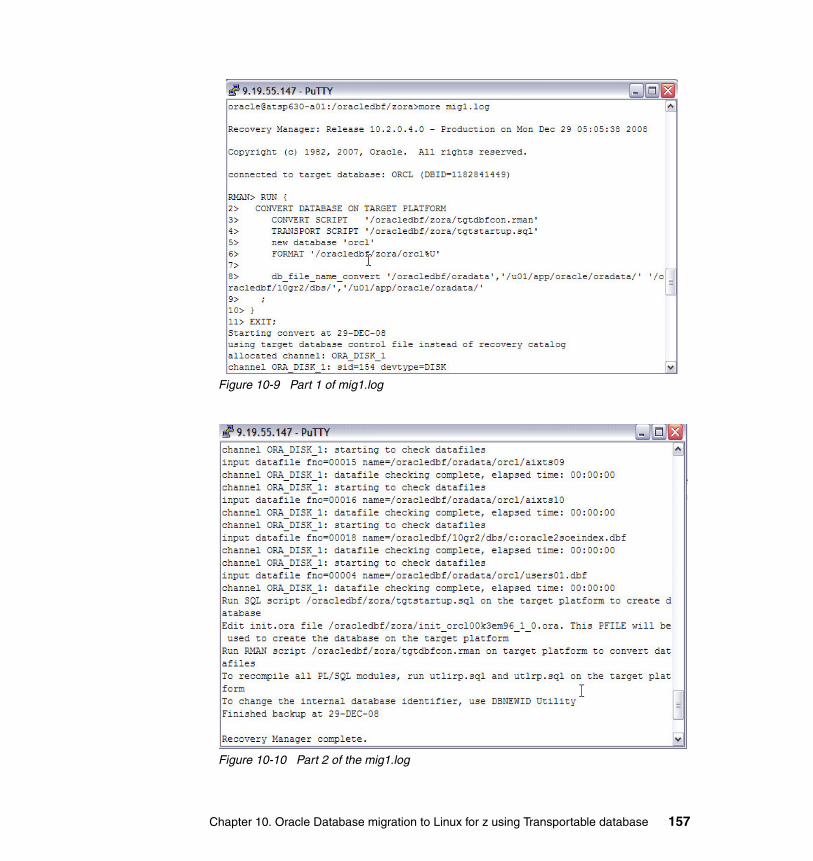
Figure 10-9 Part 1 of mig1.log
Figure 10-10 Part 2 of the mig1.log
Chapter 10. Oracle Database migration to Linux for z using Transportable database 157
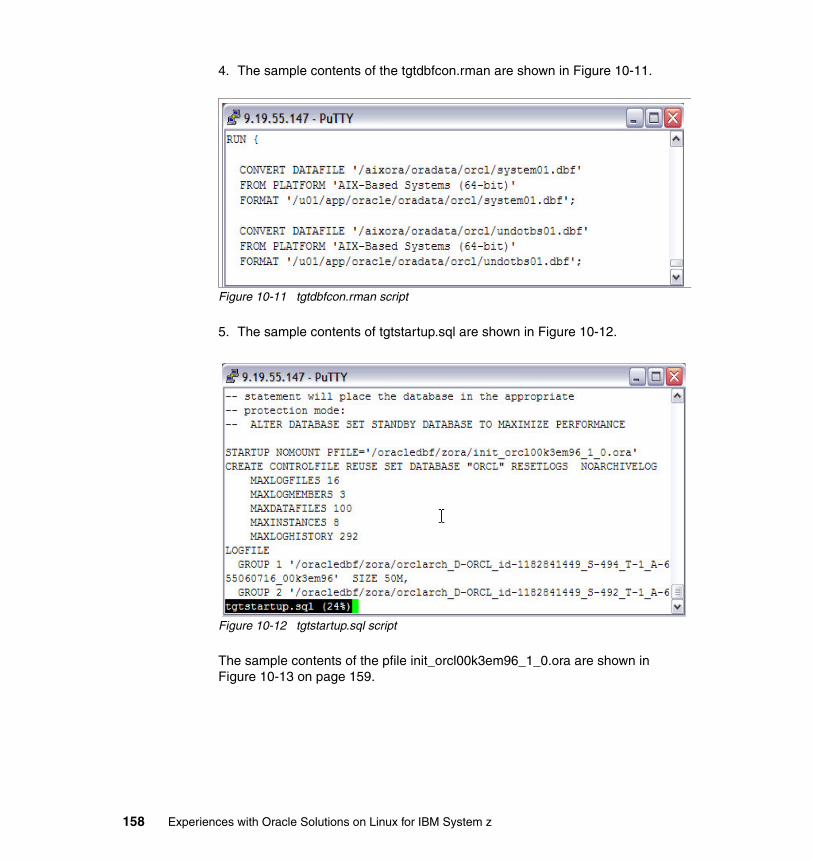
4. The sample contents of the tgtdbfcon.rman are shown in Figure 10-11.
Figure 10-11 tgtdbfcon.rman script
5. The sample contents of tgtstartup.sql are shown in Figure 10-12.
Figure 10-12 tgtstartup.sql script
The sample contents of the pfile init_orcl00k3em96_1_0.ora are shown in Figure 10-13 on page 159.
158 Experiences with Oracle Solutions on Linux for IBM System z
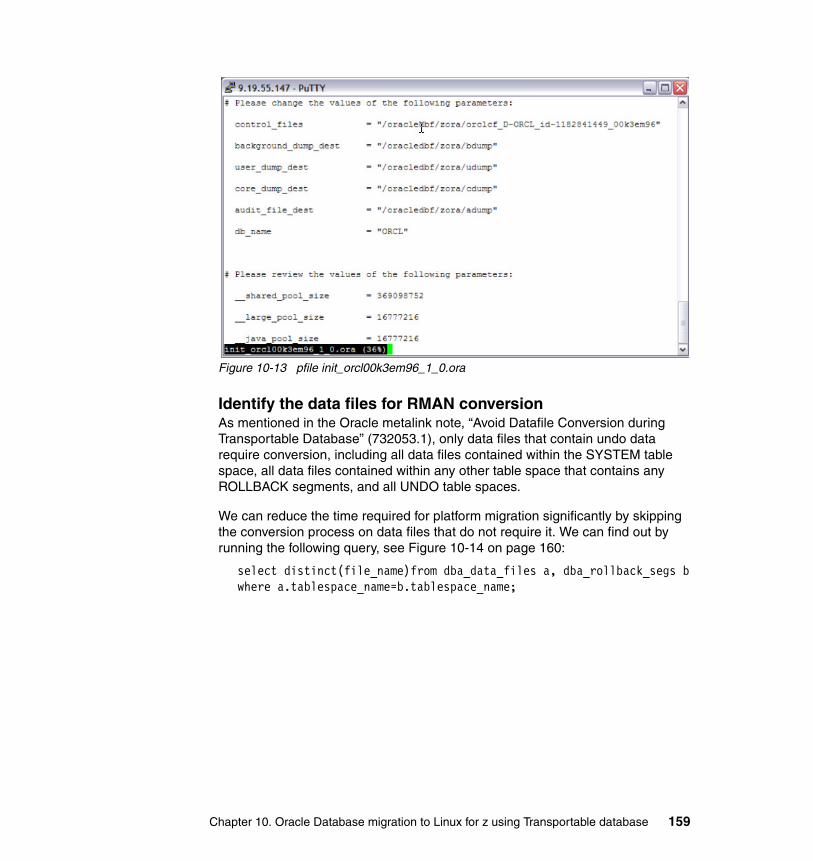
Figure 10-13 pfile init_orcl00k3em96_1_0.ora
Identify the data files for RMAN conversionAs mentioned in the Oracle metalink note, “Avoid Datafile Conversion during Transportable Database” (732053.1), only data files that contain undo data require conversion, including all data files contained within the SYSTEM table space, all data files contained within any other table space that contains any ROLLBACK segments, and all UNDO table spaces.
We can reduce the time required for platform migration significantly by skipping the conversion process on data files that do not require it. We can find out by running the following query, see Figure 10-14 on page 160:
select distinct(file_name)from dba_data_files a, dba_rollback_segs bwhere a.tablespace_name=b.tablespace_name;
Chapter 10. Oracle Database migration to Linux for z using Transportable database 159
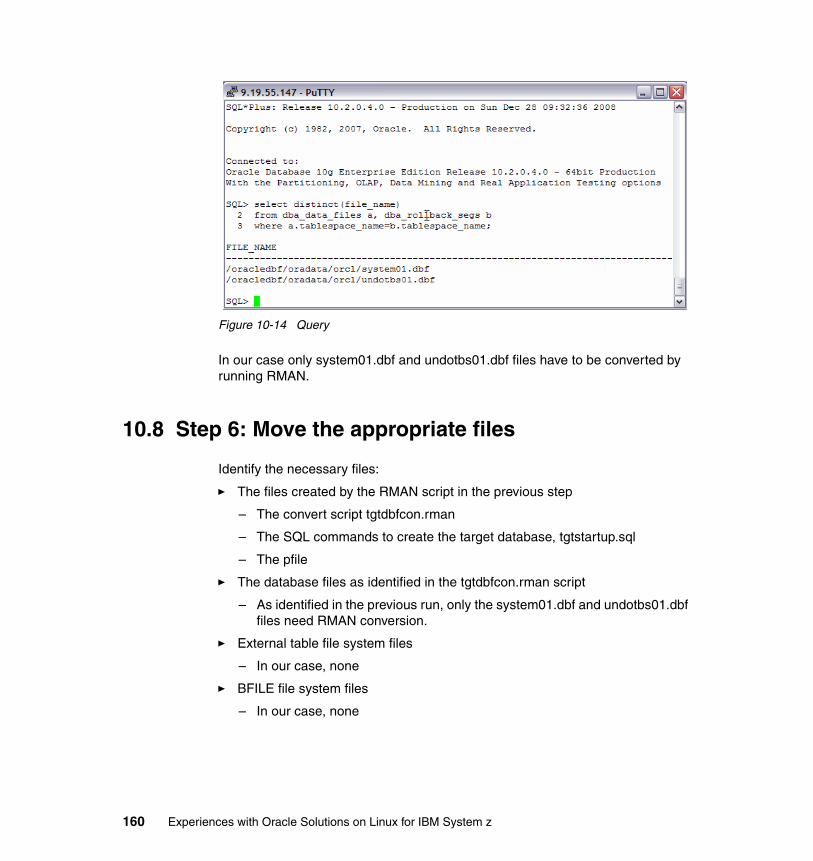
Figure 10-14 Query
In our case only system01.dbf and undotbs01.dbf files have to be converted by running RMAN.
10.8 Step 6: Move the appropriate files
Identify the necessary files:
� The files created by the RMAN script in the previous step
– The convert script tgtdbfcon.rman
– The SQL commands to create the target database, tgtstartup.sql
– The pfile
� The database files as identified in the tgtdbfcon.rman script
– As identified in the previous run, only the system01.dbf and undotbs01.dbf files need RMAN conversion.
� External table file system files
– In our case, none
� BFILE file system files
– In our case, none
160 Experiences with Oracle Solutions on Linux for IBM System z
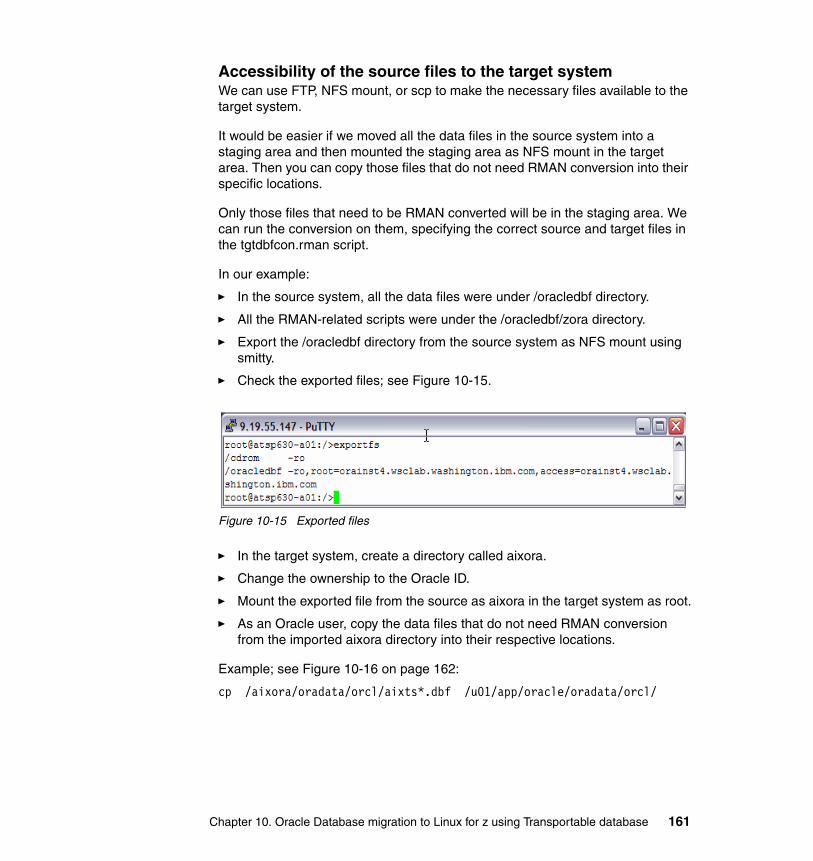
Accessibility of the source files to the target systemWe can use FTP, NFS mount, or scp to make the necessary files available to the target system.
It would be easier if we moved all the data files in the source system into a staging area and then mounted the staging area as NFS mount in the target area. Then you can copy those files that do not need RMAN conversion into their specific locations.
Only those files that need to be RMAN converted will be in the staging area. We can run the conversion on them, specifying the correct source and target files in the tgtdbfcon.rman script.
In our example:
� In the source system, all the data files were under /oracledbf directory.
� All the RMAN-related scripts were under the /oracledbf/zora directory.
� Export the /oracledbf directory from the source system as NFS mount using smitty.
� Check the exported files; see Figure 10-15.
Figure 10-15 Exported files
� In the target system, create a directory called aixora.
� Change the ownership to the Oracle ID.
� Mount the exported file from the source as aixora in the target system as root.
� As an Oracle user, copy the data files that do not need RMAN conversion from the imported aixora directory into their respective locations.
Example; see Figure 10-16 on page 162:
cp /aixora/oradata/orcl/aixts*.dbf /u01/app/oracle/oradata/orcl/
Chapter 10. Oracle Database migration to Linux for z using Transportable database 161
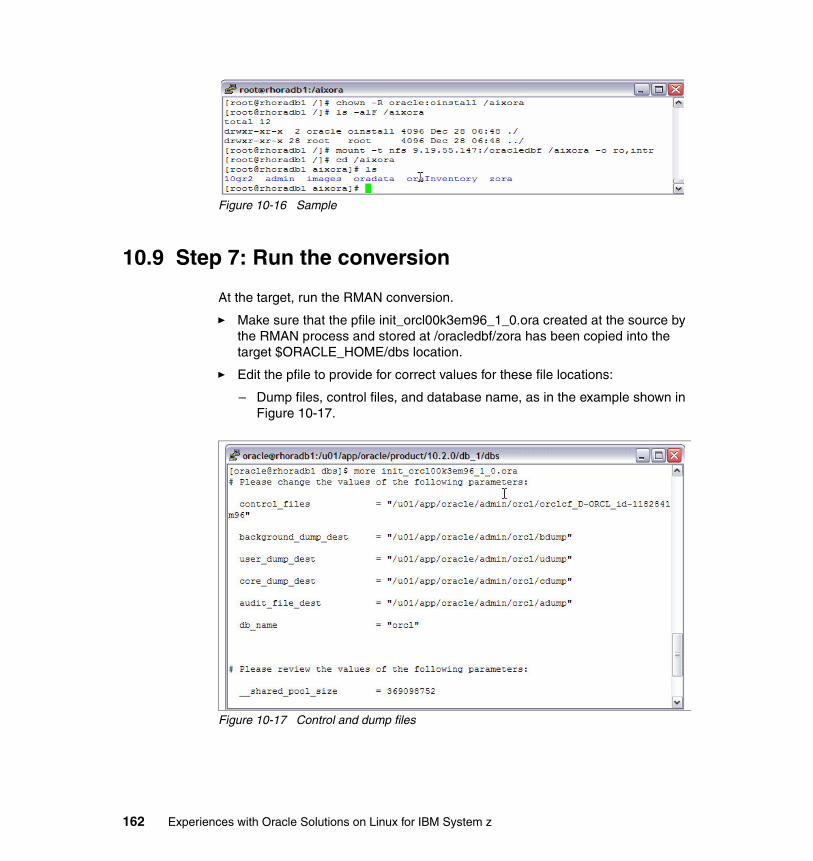
Figure 10-16 Sample
10.9 Step 7: Run the conversion
At the target, run the RMAN conversion.
� Make sure that the pfile init_orcl00k3em96_1_0.ora created at the source by the RMAN process and stored at /oracledbf/zora has been copied into the target $ORACLE_HOME/dbs location.
� Edit the pfile to provide for correct values for these file locations:
– Dump files, control files, and database name, as in the example shown in Figure 10-17.
Figure 10-17 Control and dump files
162 Experiences with Oracle Solutions on Linux for IBM System z
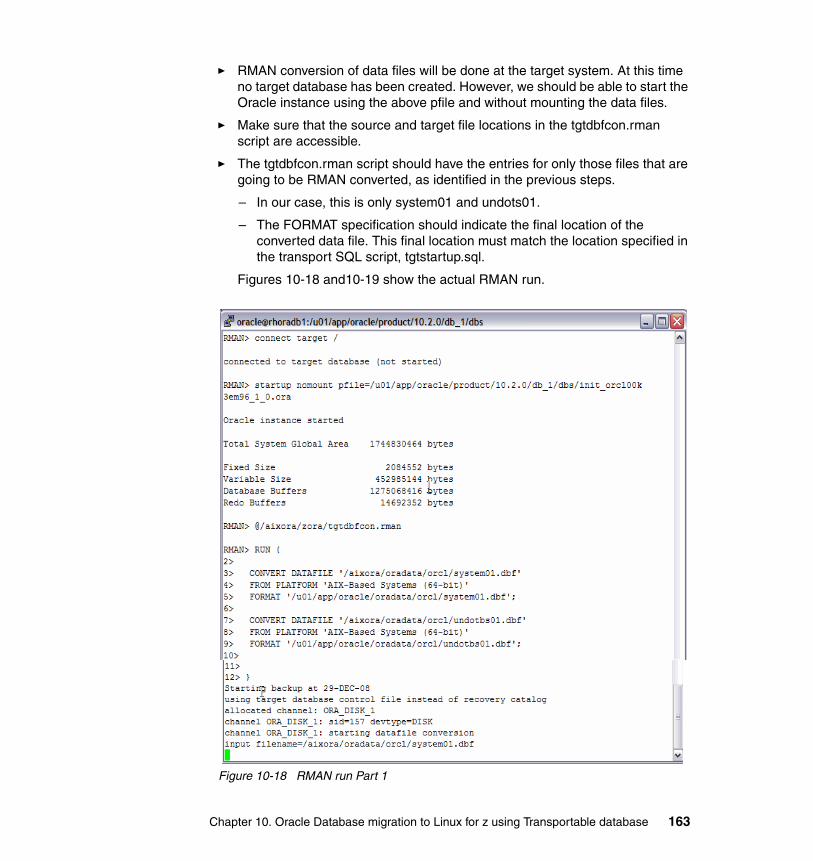
� RMAN conversion of data files will be done at the target system. At this time no target database has been created. However, we should be able to start the Oracle instance using the above pfile and without mounting the data files.
� Make sure that the source and target file locations in the tgtdbfcon.rman script are accessible.
� The tgtdbfcon.rman script should have the entries for only those files that are going to be RMAN converted, as identified in the previous steps.
– In our case, this is only system01 and undots01.
– The FORMAT specification should indicate the final location of the converted data file. This final location must match the location specified in the transport SQL script, tgtstartup.sql.
Figures 10-18 and10-19 show the actual RMAN run.
Figure 10-18 RMAN run Part 1
Chapter 10. Oracle Database migration to Linux for z using Transportable database 163
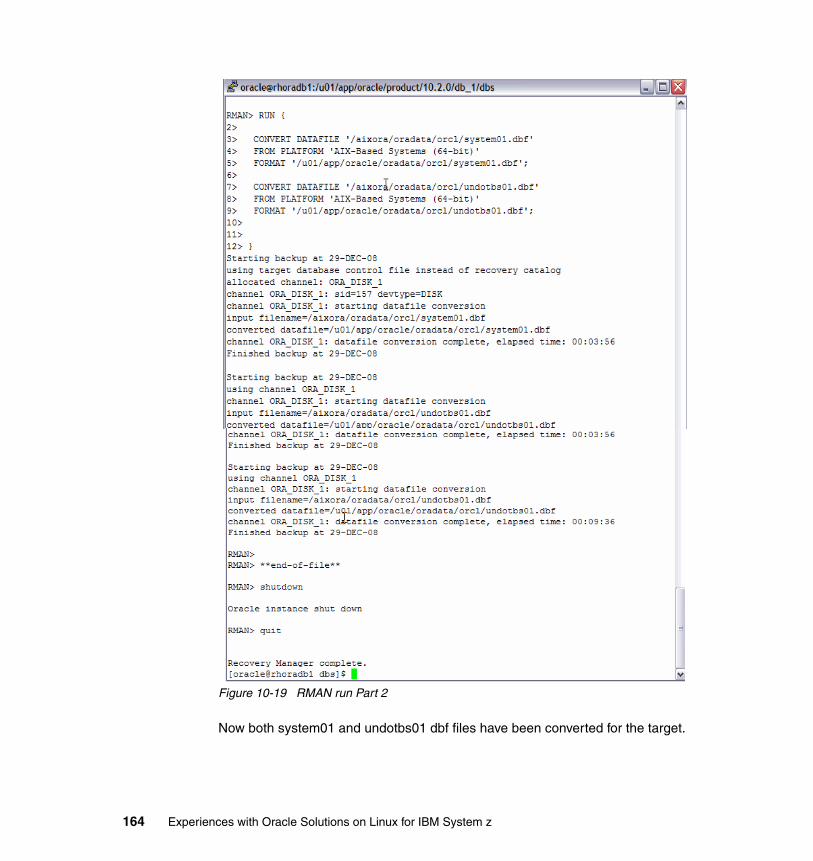
Figure 10-19 RMAN run Part 2
Now both system01 and undotbs01 dbf files have been converted for the target.
164 Experiences with Oracle Solutions on Linux for IBM System z
10.10 Step 8: Create the new database at the target
Customize the tgtstartup.sql script to create the target databaseThe next step in the migration process flow is to create the target database using the target database script tgtstartup.sql. This SQL script does the following activities:
� Creates the database using the pfile information.
� Controls file, log file, and data file creation and association.
� Opens the database with RESETLOGS.
� Any temp file additions.
� pfile upgrade.
� utlirp.sql for catalog script.
� ulrp.sql for recompilation of invalid packages.
For convenience and easy handling the tgtstartup.sql may be split into two parts as tg1.sql and tgt2.sql. The tgt1.sql creates the first three steps until temp file additions and the tgt2.sql performs the remaining steps.
Make sure that the log file locations, temp file sizes, and any other customizations needed are incorporated. Figures 10-20 and 10-21 show the execution of database creation activities.
Chapter 10. Oracle Database migration to Linux for z using Transportable database 165
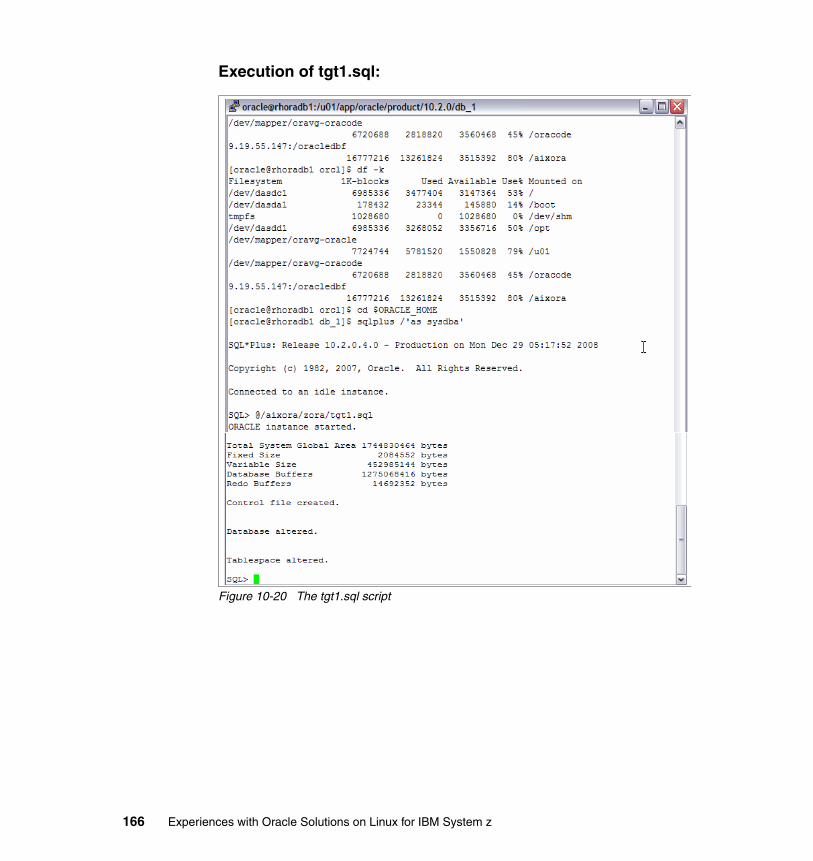
Execution of tgt1.sql:
Figure 10-20 The tgt1.sql script
166 Experiences with Oracle Solutions on Linux for IBM System z
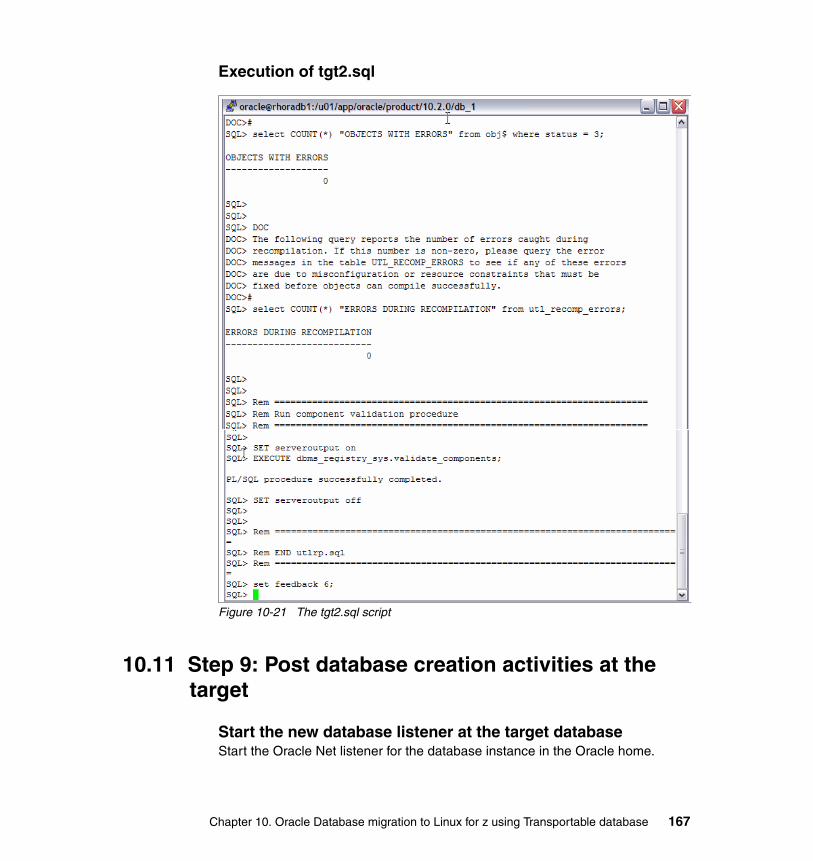
Execution of tgt2.sql
Figure 10-21 The tgt2.sql script
10.11 Step 9: Post database creation activities at the target
Start the new database listener at the target databaseStart the Oracle Net listener for the database instance in the Oracle home.
Chapter 10. Oracle Database migration to Linux for z using Transportable database 167
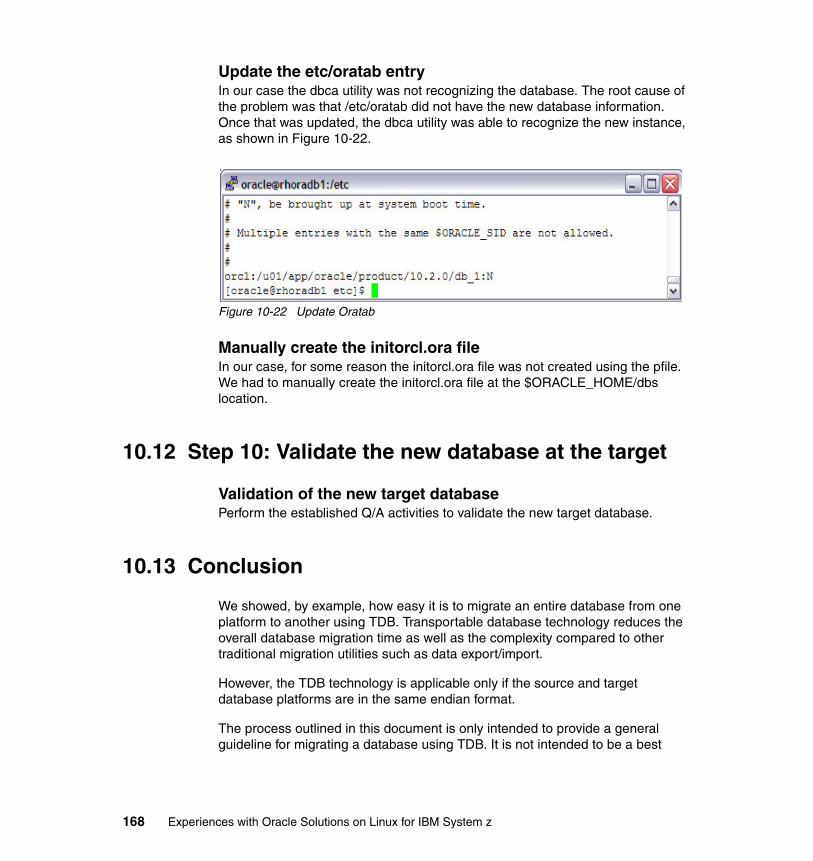
Update the etc/oratab entry In our case the dbca utility was not recognizing the database. The root cause of the problem was that /etc/oratab did not have the new database information. Once that was updated, the dbca utility was able to recognize the new instance, as shown in Figure 10-22.
Figure 10-22 Update Oratab
Manually create the initorcl.ora file In our case, for some reason the initorcl.ora file was not created using the pfile. We had to manually create the initorcl.ora file at the $ORACLE_HOME/dbs location.
10.12 Step 10: Validate the new database at the target
Validation of the new target database Perform the established Q/A activities to validate the new target database.
10.13 Conclusion
We showed, by example, how easy it is to migrate an entire database from one platform to another using TDB. Transportable database technology reduces the overall database migration time as well as the complexity compared to other traditional migration utilities such as data export/import.
However, the TDB technology is applicable only if the source and target database platforms are in the same endian format.
The process outlined in this document is only intended to provide a general guideline for migrating a database using TDB. It is not intended to be a best
168 Experiences with Oracle Solutions on Linux for IBM System z
practice reference. The user of this document should refer to appropriate Oracle and IBM materials for additional reference.
10.14 Reference documents
These documents are available on otn.oracle.com and www.ibm.com.
Oracle documents� Platform Migration Using Transportable Database Oracle Database 11g and
10g Release 2 � Avoid Datafile Conversion during Transportable Database (metalink Doc ID:
732053.1)� Oracle Database Backup and Recovery Advanced User's Guide (Part
B14191)� Oracle Database Backup and Recovery Reference (Part B14194)� Oracle Database High Availability Best Practices (Part B25159)
IBM documents� RMAN scripts for Oracle Database Cross Platform Migration (TD104627), by
Sanjay Ruprell. See
http://www-03.ibm.com/support/techdocs/atsmastr.nsf/WebIndex/TD104627
� Oracle Database Migration: Transporting an Entire Oracle10g Database between Different Platforms, by JayMin Yon
Chapter 10. Oracle Database migration to Linux for z using Transportable database 169

170 Experiences with Oracle Solutions on Linux for IBM System z
Chapter 11. Using hardware security modules with Oracle Advanced Security
This chapter covers the configuration and enabling of hardware security modules for Oracle Databases. An Oracle Wallet is a software container that holds private keys and other trust points of PKI certificates. Oracle Advanced Security provides support for the PKCS#11 industry standard. This allows the private keys that were previously stored on a file system to be created and stored in secure devices such as Hardware Security Modules or Smart Cards.
As you read this chapter, remember that this was simply an exercise to provide you with an example of how you could use this facility. We do not consider the larger and very important overall topics of cryptographic policy adoption, implementation, or best practices.
The reference documents we used are listed in “References” on page 209.
The additional scripts and files we used are listed in Appendix A, “Scripts for using Hardware Security Modules with Oracle Advanced Security” on page 297.
11
© Copyright IBM Corp. 2009. All rights reserved. 171

11.1 Overview
Cryptography is a broad and yet highly specialized area of technology. The purpose of this chapter is not to provide a comprehensive review of the subject area. It is assumed the reader is familiar with the general concepts, the standards, and the facilities normally employed to implement encryption and authentication requirements using SSL, and in particular Public Key Infrastructure (PKI). It is further assumed that the reader is generally familiar with the IBM System z Crypto features and options such as hardware Accelerator, Crypto Coprocessor and CP Assist Crypto Functions. Occasionally we do add specifics which hopefully will help clarify areas that may not be readily apparent.
As part of Oracle Database Enterprise Edition, Oracle Advanced Security (OAS) provides a comprehensive suite of security features that protect enterprise networks and securely extend them to the Internet. It provides a single source of integration with multiple network encryption, data integrity and authentication solutions, single sign-on services, and security protocols.
Because an Oracle Database may contain very sensitive information (employee and financial records, customer orders, product information, and so on) and because of the security threats (eavesdropping and data theft, data tampering, falsifying user identities) security is a concern—OAS offers solutions to protect your database. For data encryption and data integrity, you can configure either Oracle Net (SQL*Net) native encryption (for example AES and SHA1 at the Oracle SQL*Net layer) or using Secure Sockets (SSL).
This chapter is about Oracle Advanced Security (OAS) using SSL. You can configure Oracle Advanced Security SSL to provide authentication for the database only, the client only, or both client and database. We should note that you can also configure SSL features in combination with other authentication methods supported by Oracle Advanced Security (database user names and passwords, RADIUS, and Kerberos), though that is not our focus here.
To support PKI requirements, Oracle Advanced Security1 includes the following features in addition to SSL:
� Oracle wallets, where you can store PKI credentials� Oracle Wallet Manager, which you can use to manage your Oracle wallets� Certificate validation with certificate revocation lists (CRLs)� Hardware security module support
To be more precise, the purpose of this chapter is to explain the setup and configuration necessary for an Oracle Database instance to use a PKCS#11
1 For a complete overview of Oracle Database's OAS, consult the Oracle Database Advanced Security Administrator's Guide 10g.
172 Experiences with Oracle Solutions on Linux for IBM System z
compliant hardware security module (HSM) for authentication and encryption/decryption purposes. There will be some treatment of the configuration details related to the setting of token labels and master keys on the specific HSM we used. But these are offered solely for completeness of context. It should be noted though, that the manner in which any HSM is managed, from configuration to initialization and master key management or feature setting, differs by vendor, make and even model. The HSM device-specific sections used herein apply to the IBM 4764 PCI-X Cryptographic Coprocessor. Your HSM will have similar requirements for initialization and management, so refer to your HSM vendor's documentation for relevant details.
11.2 Case study environment
It is important to keep in mind that our environment was configured to verify an Oracle Database's ability to use an HSM on System z under Linux. The speed of cryptographic function performance was not our concern. However, apart from additional security, offloading cryptographic processing requirements is one of the principal reasons for deploying an HSM.
Our environment consisted of a single SLES 10 SP1 Linux instance running as a guest under the control of z/VM. It should be noted that z/VM and the configuration and operation of the HSM itself was transparent to the Oracle Database. That is to say, in a functional sense there was nothing specific in the configuration we present that bore directly upon the virtualized nature of Linux or Oracle's operation within the Linux guest. The very same configuration and procedures we present here could be implemented and used when running in LPAR mode, that is, without z/VM. Therefore, although very important, we do not address any of the details regarding the virtualization of cryptographic facilities. For information related to VM guest configuration of cryptographic coprocessors, refer to z/VM CP Planning and Administration, SC24-6083.
It may help to explain what we mean by an “Oracle client”. From the standpoint of an Oracle Database, a “client” is anything that communicates with it. This might seem evident but consider this: one Oracle Database can be the client of another, for example, through a database link.
In terms of deployment frequency, however, an Oracle client is generally an application process communicating directly with it as in a legacy client-server model or, more contemporaneously, a component running within an n-tier application server setting (J2EE™, .NET, and others). In all cases, Oracle “clients” communicate with an Oracle Database and these clients can be required to authenticate themselves to it. The reverse is true also: an Oracle
Chapter 11. Using hardware security modules with Oracle Advanced Security 173
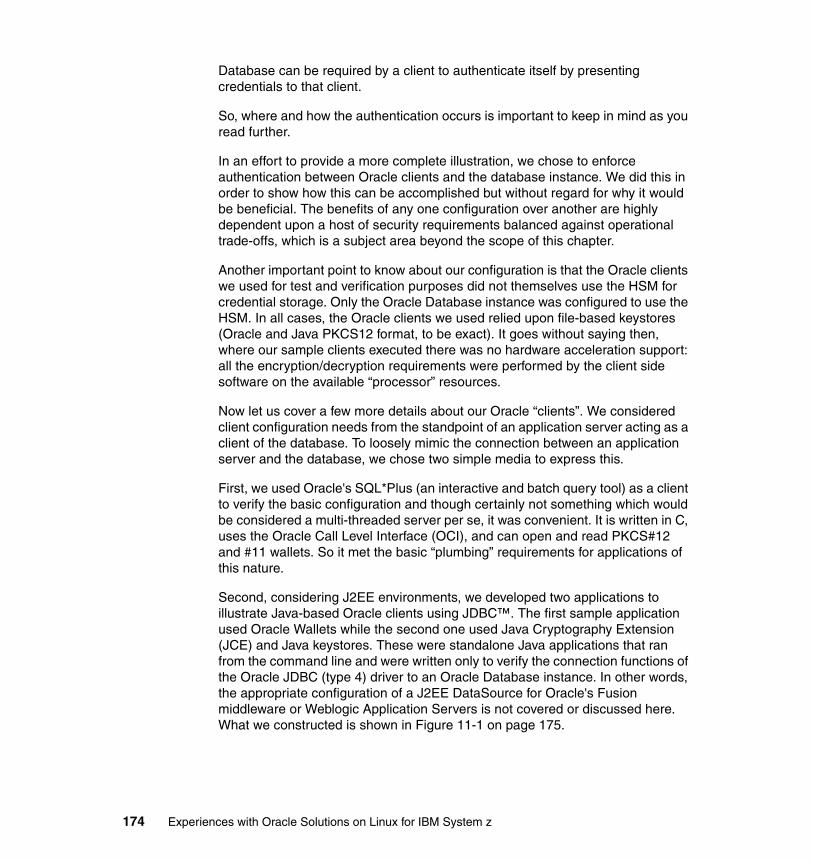
Database can be required by a client to authenticate itself by presenting credentials to that client.
So, where and how the authentication occurs is important to keep in mind as you read further.
In an effort to provide a more complete illustration, we chose to enforce authentication between Oracle clients and the database instance. We did this in order to show how this can be accomplished but without regard for why it would be beneficial. The benefits of any one configuration over another are highly dependent upon a host of security requirements balanced against operational trade-offs, which is a subject area beyond the scope of this chapter.
Another important point to know about our configuration is that the Oracle clients we used for test and verification purposes did not themselves use the HSM for credential storage. Only the Oracle Database instance was configured to use the HSM. In all cases, the Oracle clients we used relied upon file-based keystores (Oracle and Java PKCS12 format, to be exact). It goes without saying then, where our sample clients executed there was no hardware acceleration support: all the encryption/decryption requirements were performed by the client side software on the available “processor” resources.
Now let us cover a few more details about our Oracle “clients”. We considered client configuration needs from the standpoint of an application server acting as a client of the database. To loosely mimic the connection between an application server and the database, we chose two simple media to express this.
First, we used Oracle's SQL*Plus (an interactive and batch query tool) as a client to verify the basic configuration and though certainly not something which would be considered a multi-threaded server per se, it was convenient. It is written in C, uses the Oracle Call Level Interface (OCI), and can open and read PKCS#12 and #11 wallets. So it met the basic “plumbing” requirements for applications of this nature.
Second, considering J2EE environments, we developed two applications to illustrate Java-based Oracle clients using JDBC™. The first sample application used Oracle Wallets while the second one used Java Cryptography Extension (JCE) and Java keystores. These were standalone Java applications that ran from the command line and were written only to verify the connection functions of the Oracle JDBC (type 4) driver to an Oracle Database instance. In other words, the appropriate configuration of a J2EE DataSource for Oracle's Fusion middleware or Weblogic Application Servers is not covered or discussed here. What we constructed is shown in Figure 11-1 on page 175.
174 Experiences with Oracle Solutions on Linux for IBM System z
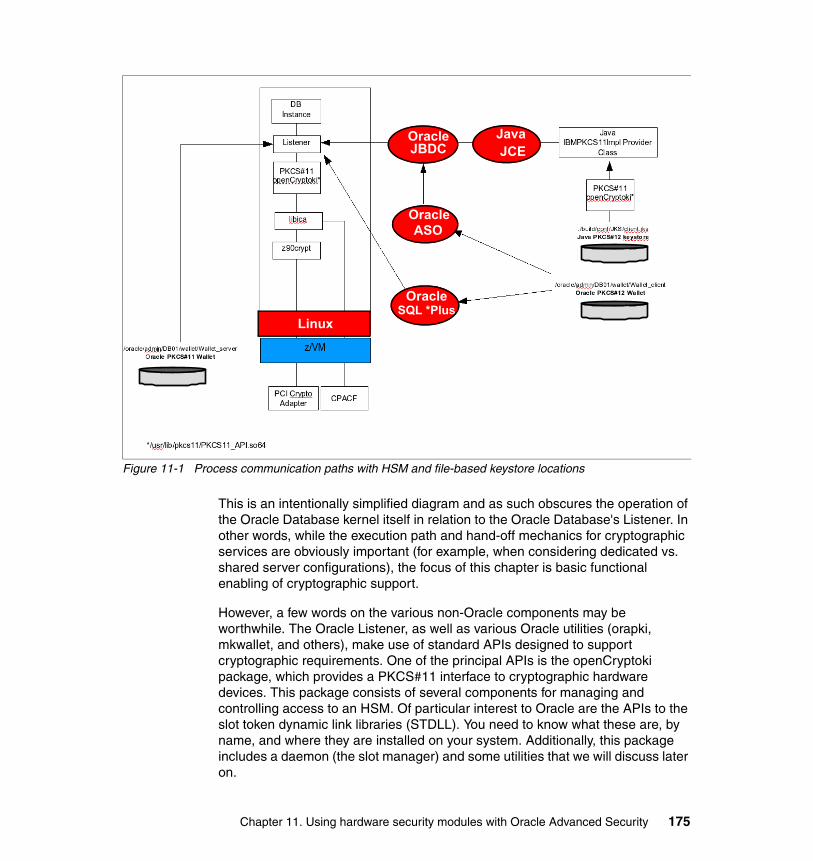
Figure 11-1 Process communication paths with HSM and file-based keystore locations
This is an intentionally simplified diagram and as such obscures the operation of the Oracle Database kernel itself in relation to the Oracle Database's Listener. In other words, while the execution path and hand-off mechanics for cryptographic services are obviously important (for example, when considering dedicated vs. shared server configurations), the focus of this chapter is basic functional enabling of cryptographic support.
However, a few words on the various non-Oracle components may be worthwhile. The Oracle Listener, as well as various Oracle utilities (orapki, mkwallet, and others), make use of standard APIs designed to support cryptographic requirements. One of the principal APIs is the openCryptoki package, which provides a PKCS#11 interface to cryptographic hardware devices. This package consists of several components for managing and controlling access to an HSM. Of particular interest to Oracle are the APIs to the slot token dynamic link libraries (STDLL). You need to know what these are, by name, and where they are installed on your system. Additionally, this package includes a daemon (the slot manager) and some utilities that we will discuss later on.
OracleJBDC
OracleASO
OracleSQL *Plus
JCEJava
Linux
Chapter 11. Using hardware security modules with Oracle Advanced Security 175
The second component is libica. This is an IBM interface library routine which accesses the cryptographic accelerator functions. What should be noted here is that this component is responsible for directing and managing requests either to the HSM or directly to the CP Assist for Cryptographic Function (CPACF). Asymmetric requests (RSA) are passed from libica to the z90crypt device driver which in turn communicates directly with the HSM (in our example, via PCI support) to perform the very processor-intensive public key operations during handshakes. Note that, if no HSM is available (dedicated or virtual) or if the HSM cannot respond (it is too busy), then libica performs the request in software.
CPACF functionality is standard on every System z processor (PU) and is a set of System z instructions implemented on those processors. CPACF supports symmetric cryptography operations (such as DES, TDES, AES). If this feature has been enabled, then libica executes the request by using the CPACF instructions, typically for post SSL handshake operations (that is, after session keys have been generated). If not, the functions are performed in software.
11.3 Basic configuration sequence
We divided the configuration and setup process into three phases. The first phase involved the verification and configuration of the HSM. This amounted to checking the state of things from the Linux kernel side of the fence and making sure that all the necessary drivers, packages, utilities and so on were installed and configured so that we could work with the HSM.
In the second phase we reconfigured a previously installed and running Oracle Database instance for “Native OAS” SSL support using standard PKCS12 keystores (Oracle and JSSE). This was done to verify that OAS was functioning properly with these keystores, among other things. The verification process of this phase involved logging onto the Oracle Database instance via sqlplus as well as using two standalone Java applications (see Appendix A, “Scripts for using Hardware Security Modules with Oracle Advanced Security” on page 297) in order to identify any issues with the basic OAS configuration.
The third phase was to reconfigure the database Listener again, but this time so that it used an HSM for key encryption/decryption and storage. The keystore configuration for sqlplus and the Java applications remained the same in both phases, as did the verification steps.
1. Verification and configuration of HSM
Before starting, we verified the presence of the HSM and then configured it for our purposes. In this step, we made sure all the appropriate packages were installed and that the PKCS subsystem could communicate with the HSM. It was in this phase that we set the master keys on the device.
176 Experiences with Oracle Solutions on Linux for IBM System z

2. Configure Oracle Database and Clients for OAS using Oracle Wallets and JSSE Keystores
In the second step we modified listener.ora, tnsnames.ora and sqlnet.ora for the database to use PKCS12-compliant Oracle wallets. The client's tnsnames.ora and sqlnet.ora were also modified to use Oracle wallets but we created a JSSE keystore for the client as well. It was in this step that we also created two Oracle “users” (ASODEMO and SSLUSER) in the database whose credentials would be supplied externally by the contents of the PKCS12 wallets. After these minor changes were completed, we stopped and restarted the Oracle Listener and verified that everything was functioning properly by logging on with SQL*Plus and running our sample applications.
3. Configure Oracle Database for OAS using an HSM
The third phase was in essence the same as the second except that we changed the Oracle Database configuration so that it used a PKCS11 style Oracle wallet. What we did at this point was twofold: First we created an Oracle wallet that contained information Oracle utilities could use (initially and for post-configuration purposes) to manipulate the HSM (store, retrieve, delete, list keys, certificates, and so on). This same Oracle wallet would be used subsequently by the Oracle Listener in order to communicate with the HSM for public key operations. Here, too, we stopped and restarted the Oracle Listener and verified everything was functioning properly using sqlplus and our sample Java applications.
In the remaining sections we detail most of the relevant actions we took for all three phases. We now summarize each phase more precisely.
11.4 Verification and configuration of the HSM
The first step is to verify that the PKCS subsystem is installed and operable.
In order to communicate with our HSM we needed to have the OpenCryptoki PKCS subsystem installed and functioning. OpenCryptoki is an open source implementation of Public-Key Cryptography Standard #11 (PKCS#11) which uses the libica shared library to access IBM cryptographic adapters. This package comes with a few dependencies (for example, libica, openssl, and others) but these we retrieved from IBM sites and installed them rather painlessly. Consult the Appendix for our package version and release details.
What follows are the steps we took to make sure we could work with the HSM through the z90crpyt device driver and then initialize it. The first action was to make some quick checks to insure the HSM's driver (z90crypt) was installed and
Chapter 11. Using hardware security modules with Oracle Advanced Security 177
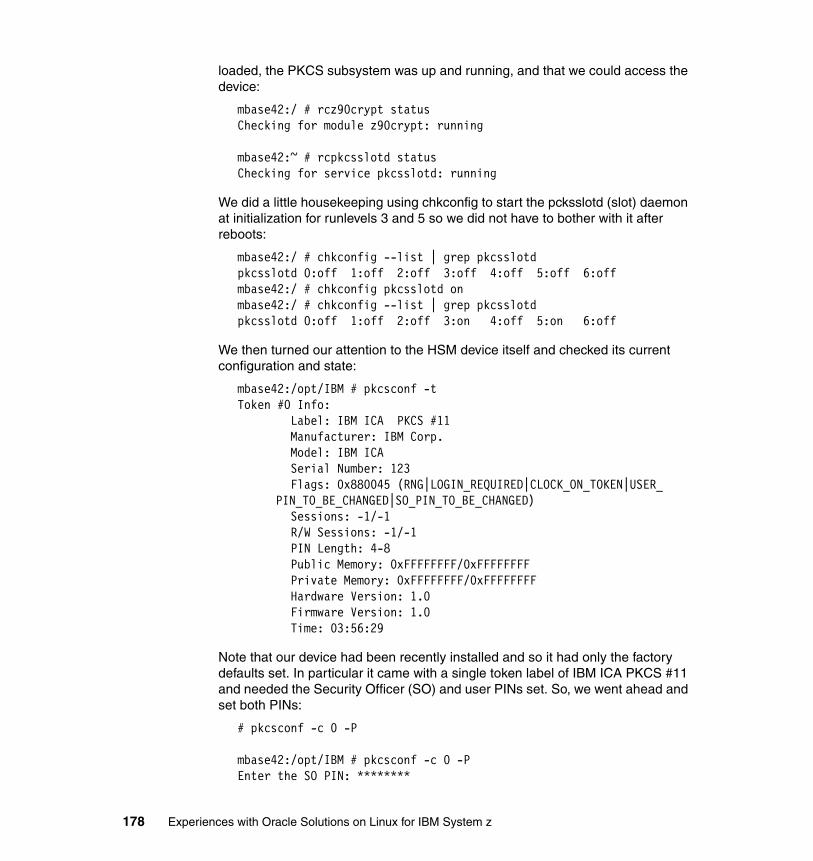
loaded, the PKCS subsystem was up and running, and that we could access the device:
mbase42:/ # rcz90crypt statusChecking for module z90crypt: running
mbase42:~ # rcpkcsslotd statusChecking for service pkcsslotd: running
We did a little housekeeping using chkconfig to start the pcksslotd (slot) daemon at initialization for runlevels 3 and 5 so we did not have to bother with it after reboots:
mbase42:/ # chkconfig --list | grep pkcsslotdpkcsslotd 0:off 1:off 2:off 3:off 4:off 5:off 6:offmbase42:/ # chkconfig pkcsslotd onmbase42:/ # chkconfig --list | grep pkcsslotdpkcsslotd 0:off 1:off 2:off 3:on 4:off 5:on 6:off
We then turned our attention to the HSM device itself and checked its current configuration and state:
mbase42:/opt/IBM # pkcsconf -tToken #0 Info: Label: IBM ICA PKCS #11 Manufacturer: IBM Corp. Model: IBM ICA Serial Number: 123 Flags: 0x880045 (RNG|LOGIN_REQUIRED|CLOCK_ON_TOKEN|USER_
PIN_TO_BE_CHANGED|SO_PIN_TO_BE_CHANGED) Sessions: -1/-1 R/W Sessions: -1/-1 PIN Length: 4-8 Public Memory: 0xFFFFFFFF/0xFFFFFFFF Private Memory: 0xFFFFFFFF/0xFFFFFFFF Hardware Version: 1.0 Firmware Version: 1.0 Time: 03:56:29
Note that our device had been recently installed and so it had only the factory defaults set. In particular it came with a single token label of IBM ICA PKCS #11 and needed the Security Officer (SO) and user PINs set. So, we went ahead and set both PINs:
# pkcsconf -c 0 -P
mbase42:/opt/IBM # pkcsconf -c 0 -PEnter the SO PIN: ********
178 Experiences with Oracle Solutions on Linux for IBM System z
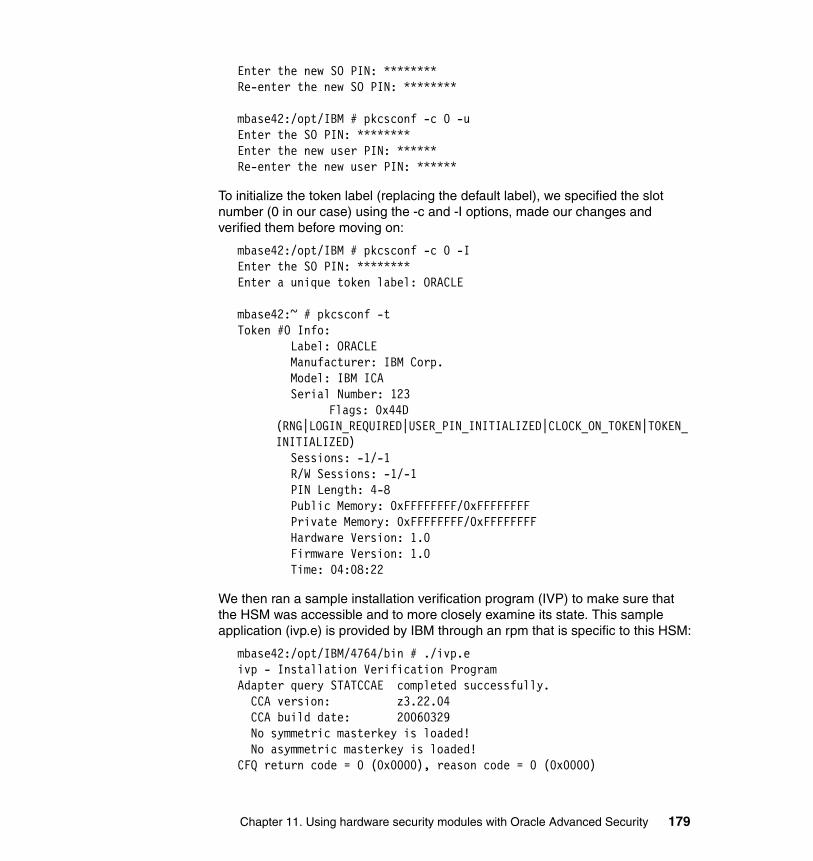
Enter the new SO PIN: ********Re-enter the new SO PIN: ********
mbase42:/opt/IBM # pkcsconf -c 0 -uEnter the SO PIN: ********Enter the new user PIN: ******Re-enter the new user PIN: ******
To initialize the token label (replacing the default label), we specified the slot number (0 in our case) using the -c and -I options, made our changes and verified them before moving on:
mbase42:/opt/IBM # pkcsconf -c 0 -IEnter the SO PIN: ********Enter a unique token label: ORACLE
mbase42:~ # pkcsconf -tToken #0 Info: Label: ORACLE Manufacturer: IBM Corp. Model: IBM ICA Serial Number: 123
Flags: 0x44D (RNG|LOGIN_REQUIRED|USER_PIN_INITIALIZED|CLOCK_ON_TOKEN|TOKEN_INITIALIZED)
Sessions: -1/-1 R/W Sessions: -1/-1 PIN Length: 4-8 Public Memory: 0xFFFFFFFF/0xFFFFFFFF Private Memory: 0xFFFFFFFF/0xFFFFFFFF Hardware Version: 1.0 Firmware Version: 1.0 Time: 04:08:22
We then ran a sample installation verification program (IVP) to make sure that the HSM was accessible and to more closely examine its state. This sample application (ivp.e) is provided by IBM through an rpm that is specific to this HSM:
mbase42:/opt/IBM/4764/bin # ./ivp.eivp - Installation Verification ProgramAdapter query STATCCAE completed successfully. CCA version: z3.22.04 CCA build date: 20060329 No symmetric masterkey is loaded! No asymmetric masterkey is loaded!CFQ return code = 0 (0x0000), reason code = 0 (0x0000)
Chapter 11. Using hardware security modules with Oracle Advanced Security 179
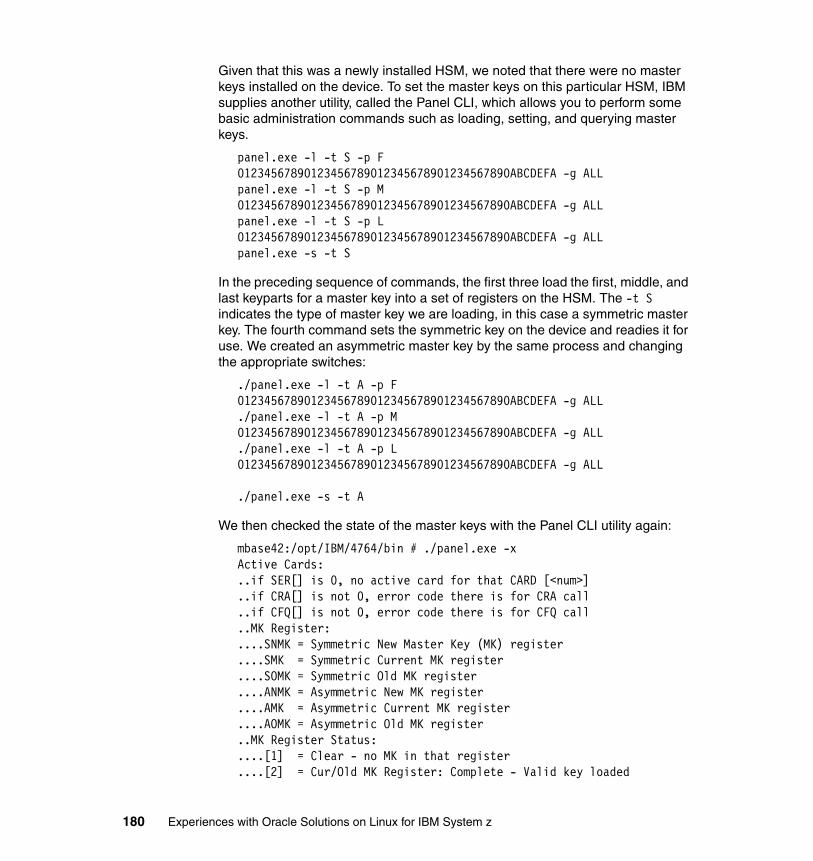
Given that this was a newly installed HSM, we noted that there were no master keys installed on the device. To set the master keys on this particular HSM, IBM supplies another utility, called the Panel CLI, which allows you to perform some basic administration commands such as loading, setting, and querying master keys.
panel.exe -l -t S -p F 01234567890123456789012345678901234567890ABCDEFA -g ALLpanel.exe -l -t S -p M 01234567890123456789012345678901234567890ABCDEFA -g ALLpanel.exe -l -t S -p L 01234567890123456789012345678901234567890ABCDEFA -g ALLpanel.exe -s -t S
In the preceding sequence of commands, the first three load the first, middle, and last keyparts for a master key into a set of registers on the HSM. The -t S indicates the type of master key we are loading, in this case a symmetric master key. The fourth command sets the symmetric key on the device and readies it for use. We created an asymmetric master key by the same process and changing the appropriate switches:
./panel.exe -l -t A -p F 01234567890123456789012345678901234567890ABCDEFA -g ALL./panel.exe -l -t A -p M 01234567890123456789012345678901234567890ABCDEFA -g ALL./panel.exe -l -t A -p L 01234567890123456789012345678901234567890ABCDEFA -g ALL
./panel.exe -s -t A
We then checked the state of the master keys with the Panel CLI utility again:
mbase42:/opt/IBM/4764/bin # ./panel.exe -xActive Cards:..if SER[] is 0, no active card for that CARD [<num>]..if CRA[] is not 0, error code there is for CRA call..if CFQ[] is not 0, error code there is for CFQ call..MK Register:....SNMK = Symmetric New Master Key (MK) register....SMK = Symmetric Current MK register....SOMK = Symmetric Old MK register....ANMK = Asymmetric New MK register....AMK = Asymmetric Current MK register....AOMK = Asymmetric Old MK register..MK Register Status:....[1] = Clear - no MK in that register....[2] = Cur/Old MK Register: Complete - Valid key loaded
180 Experiences with Oracle Solutions on Linux for IBM System z
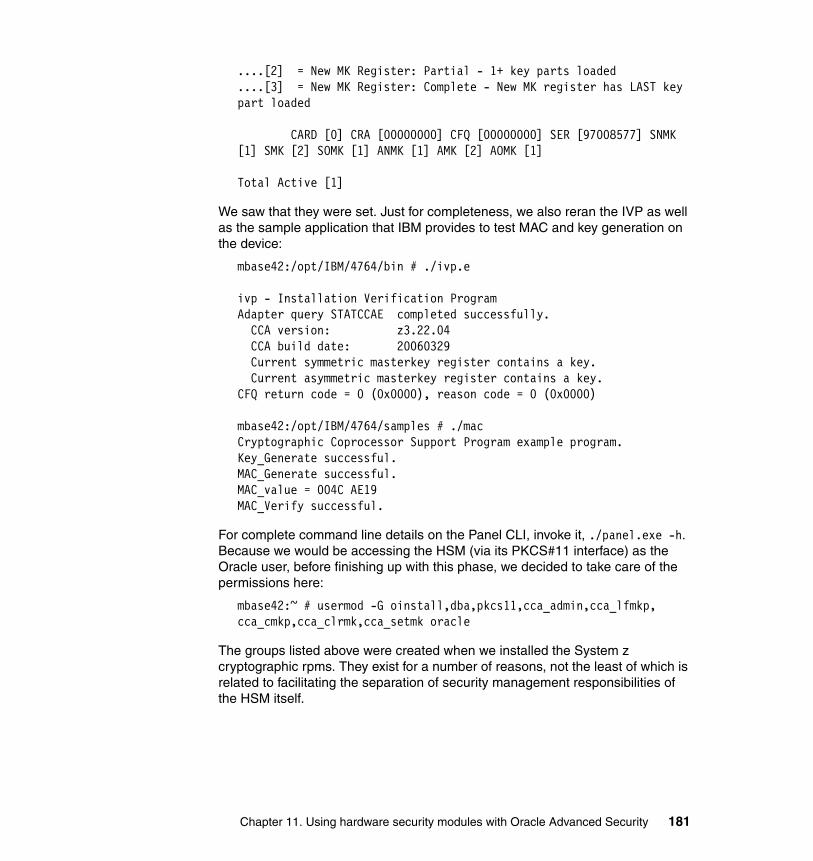
....[2] = New MK Register: Partial - 1+ key parts loaded
....[3] = New MK Register: Complete - New MK register has LAST key part loaded
CARD [0] CRA [00000000] CFQ [00000000] SER [97008577] SNMK [1] SMK [2] SOMK [1] ANMK [1] AMK [2] AOMK [1]
Total Active [1]
We saw that they were set. Just for completeness, we also reran the IVP as well as the sample application that IBM provides to test MAC and key generation on the device:
mbase42:/opt/IBM/4764/bin # ./ivp.e
ivp - Installation Verification ProgramAdapter query STATCCAE completed successfully. CCA version: z3.22.04 CCA build date: 20060329 Current symmetric masterkey register contains a key. Current asymmetric masterkey register contains a key.CFQ return code = 0 (0x0000), reason code = 0 (0x0000)
mbase42:/opt/IBM/4764/samples # ./macCryptographic Coprocessor Support Program example program.Key_Generate successful.MAC_Generate successful.MAC_value = 004C AE19MAC_Verify successful.
For complete command line details on the Panel CLI, invoke it, ./panel.exe -h. Because we would be accessing the HSM (via its PKCS#11 interface) as the Oracle user, before finishing up with this phase, we decided to take care of the permissions here:
mbase42:~ # usermod -G oinstall,dba,pkcs11,cca_admin,cca_lfmkp, cca_cmkp,cca_clrmk,cca_setmk oracle
The groups listed above were created when we installed the System z cryptographic rpms. They exist for a number of reasons, not the least of which is related to facilitating the separation of security management responsibilities of the HSM itself.
Chapter 11. Using hardware security modules with Oracle Advanced Security 181

11.5 Configure Oracle Database and Clients for OAS using Oracle Wallets and JSSE Keystores
This configuration involves several steps.
11.5.1 Check database state and verify that OAS is installed
As the Oracle user, we started this phase with a quick visual check to see if our database instance and Listener were up:
oracle@mbase42:~> ps -ef | grep pmonoracle 6347 6318 0 22:39 pts/0 00:00:00 grep pmonoracle 22391 1 0 Dec28 ? 00:01:57 ora_pmon_DB01oracle@mbase42:~> ps -ef | grep inheritoracle 6349 6318 0 22:39 pts/0 00:00:00 grep inheritoracle 22374 1 0 Dec28 ? 00:00:07 /oracle/db/10.2.0.3/bin/tnslsnr LISTENER -inherit
We then checked the status of the Listener:
oracle@mbase42:~> lsnrctl statusLSNRCTL for Linux: Version 10.2.0.3.0 - Production on 04-FEB-2009 23:11:51
Copyright (c) 1991, 2006, Oracle. All rights reserved.
Connecting to (DESCRIPTION=(ADDRESS=(PROTOCOL=TCP)(HOST=mbase42.mop.fr.ibm.com)(PORT=1521)))STATUS of the LISTENER------------------------Alias LISTENERVersion TNSLSNR for Linux: Version 10.2.0.3.0 - ProductionStart Date 04-FEB-2009 19:44:14Uptime 0 days 3 hr. 27 min. 36 secTrace Level adminSecurity ON: Local OS AuthenticationSNMP OFFListener Parameter File /oracle/db/10.2.0.3/network/admin/listener.oraListener Log File /oracle/db/10.2.0.3/network/log/listener.logListening Endpoints Summary...
182 Experiences with Oracle Solutions on Linux for IBM System z
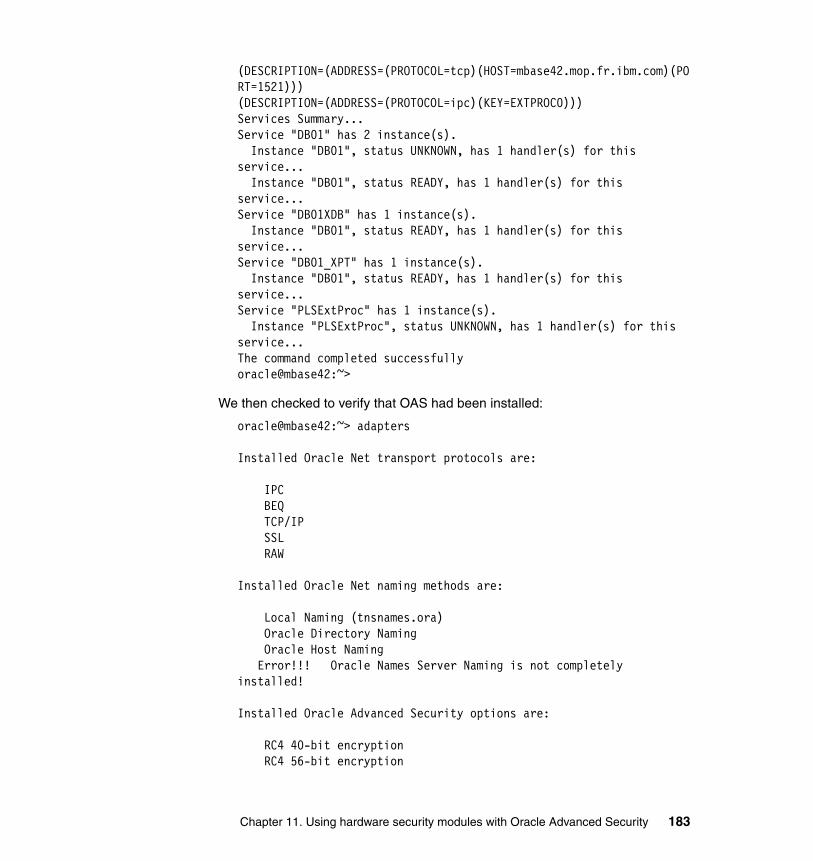
(DESCRIPTION=(ADDRESS=(PROTOCOL=tcp)(HOST=mbase42.mop.fr.ibm.com)(PORT=1521)))(DESCRIPTION=(ADDRESS=(PROTOCOL=ipc)(KEY=EXTPROC0)))Services Summary...Service "DB01" has 2 instance(s). Instance "DB01", status UNKNOWN, has 1 handler(s) for this service... Instance "DB01", status READY, has 1 handler(s) for this service...Service "DB01XDB" has 1 instance(s). Instance "DB01", status READY, has 1 handler(s) for this service...Service "DB01_XPT" has 1 instance(s). Instance "DB01", status READY, has 1 handler(s) for this service...Service "PLSExtProc" has 1 instance(s). Instance "PLSExtProc", status UNKNOWN, has 1 handler(s) for this service...The command completed successfullyoracle@mbase42:~>
We then checked to verify that OAS had been installed:
oracle@mbase42:~> adapters
Installed Oracle Net transport protocols are:
IPC BEQ TCP/IP SSL RAW
Installed Oracle Net naming methods are:
Local Naming (tnsnames.ora) Oracle Directory Naming Oracle Host Naming Error!!! Oracle Names Server Naming is not completely installed!
Installed Oracle Advanced Security options are:
RC4 40-bit encryption RC4 56-bit encryption
Chapter 11. Using hardware security modules with Oracle Advanced Security 183
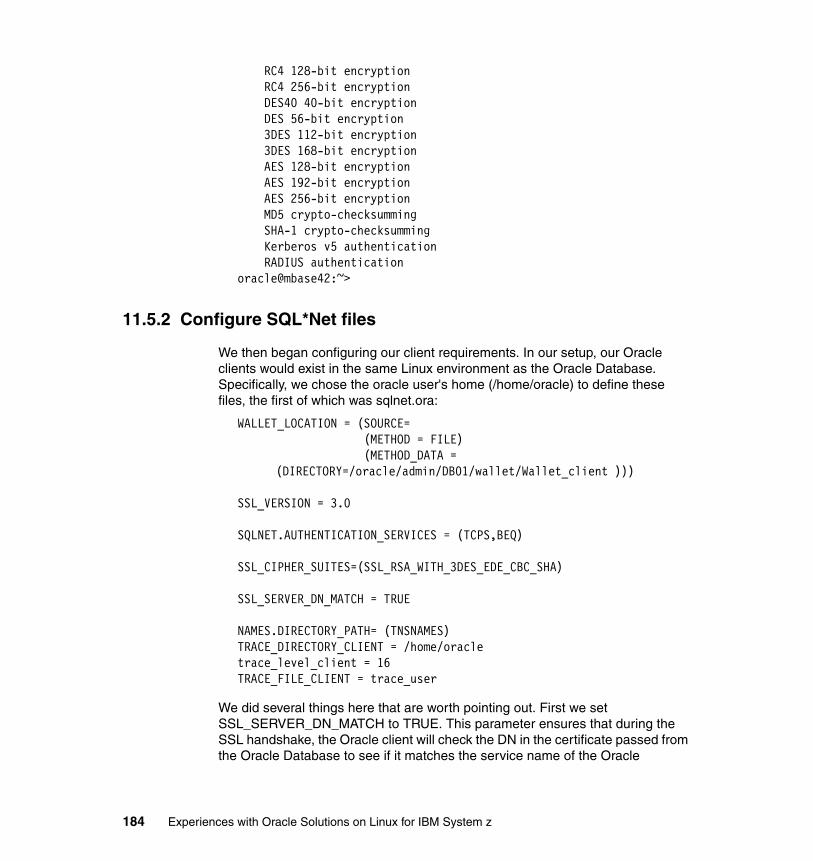
RC4 128-bit encryption RC4 256-bit encryption DES40 40-bit encryption DES 56-bit encryption 3DES 112-bit encryption 3DES 168-bit encryption AES 128-bit encryption AES 192-bit encryption AES 256-bit encryption MD5 crypto-checksumming SHA-1 crypto-checksumming Kerberos v5 authentication RADIUS authenticationoracle@mbase42:~>
11.5.2 Configure SQL*Net files
We then began configuring our client requirements. In our setup, our Oracle clients would exist in the same Linux environment as the Oracle Database. Specifically, we chose the oracle user's home (/home/oracle) to define these files, the first of which was sqlnet.ora:
WALLET_LOCATION = (SOURCE= (METHOD = FILE) (METHOD_DATA =
(DIRECTORY=/oracle/admin/DB01/wallet/Wallet_client )))
SSL_VERSION = 3.0
SQLNET.AUTHENTICATION_SERVICES = (TCPS,BEQ)
SSL_CIPHER_SUITES=(SSL_RSA_WITH_3DES_EDE_CBC_SHA)
SSL_SERVER_DN_MATCH = TRUE
NAMES.DIRECTORY_PATH= (TNSNAMES)TRACE_DIRECTORY_CLIENT = /home/oracletrace_level_client = 16TRACE_FILE_CLIENT = trace_user
We did several things here that are worth pointing out. First we set SSL_SERVER_DN_MATCH to TRUE. This parameter ensures that during the SSL handshake, the Oracle client will check the DN in the certificate passed from the Oracle Database to see if it matches the service name of the Oracle
184 Experiences with Oracle Solutions on Linux for IBM System z
Database it is connecting to. The service name the client will be checking for is specified in its tnsnames.ora file by the SSL_SERVER_CERT_DN parameter.
The rationale behind SSL_SERVER_DN_MATCH is simple. If an Oracle Database can be configured with a valid certificate and if that database instance can present it to Oracle clients, what assurance do the clients have that the certificate the database is presenting is in fact one which the database instance is legitimately entitled to present (that is, it was the product of a recognized CA)?
As a practical matter, clients cannot be 100% sure. The SSL_SERVER_DN_MATCH is a way to mitigate some of that uncertainty. In other words, if the certificate is in fact valid and can be trusted, this is good. But if the DN embedded in the certificate also matches the service name of the database instance (provided by the client's tnsnames.ora SSL_SERVER_CERT_DN parameter), the Oracle client can be more assured that the Oracle Database it is connecting to is in fact the one identified in the certificate it was presented with during the handshake. If there are any discrepancies, the Oracle client can terminate the connection process.
Note too that we declared where our Oracle wallets would be located for the client even though at this point they did not exist. The cipher list specification, SL_CIPHER_SUITES, indicates which cipher suites (that is, data encryption routines and key sizes) the client can handle. Because our goal was not only encryption but authentication, we could not use a Diffie-Hellman anonymous authentication cipher suite (which only supports encryption). Aside from that, beyond the desire to limit choice negotiation during the handshake and to use an SSL V3 cipher, our selection of SSL_RSA_WITH_3DES_EDE_CBC_SHA as the cipher suite was arbitrary.
We also enable tracing to produce logs that we could examine during our testing. We continued by configuring our Oracle client's tnsnames.ora file as follows:
DB01_NO_SSL = (DESCRIPTION = (ADDRESS_LIST = (ADDRESS = (PROTOCOL = TCP)(HOST = mbase42.mop.fr.ibm.com)(PORT = 1521)) ) (CONNECT_DATA = (SERVICE_NAME = DB01) ) )
DB01_SSL = (DESCRIPTION = (ADDRESS_LIST =
Chapter 11. Using hardware security modules with Oracle Advanced Security 185
(ADDRESS = (PROTOCOL = TCPS)(HOST = mbase42.mop.fr.ibm.com)(PORT = 2484)) ) (CONNECT_DATA = (SERVICE_NAME = DB01) ) (SECURITY=(SSL_SERVER_CERT_DN="CN=DB01")) )
EXTPROC_CONNECTION_DATA = (DESCRIPTION = (ADDRESS_LIST = (ADDRESS = (PROTOCOL = IPC)(KEY = EXTPROC0)) ) (CONNECT_DATA = (SID = PLSExtProc) (PRESENTATION = RO) ) )
We configured one alias, DB01_NO_SSL, for non-SSL access to the database and another for an SSL named DB01_SSL with the protocol set appropriately.
Moving along, we then modified the Oracle Database's SQL*Net files, the first of which was sqlnet.ora, which was stored in its default location $ORACLE_HOME/network/admin/sqlnet.ora (or $TNS_ADMIN/sqlnet.ora):
SQLNET.AUTHENTICATION_SERVICES= (TCPS, BEQ)
NAMES.DIRECTORY_PATH= (TNSNAMES)
SSL_CLIENT_AUTHENTICATION = TRUE
SSL_CIPHER_SUITES=(SSL_RSA_WITH_3DES_EDE_CBC_SHA)
SSL_VERSION = 3.0
WALLET_LOCATION = (SOURCE = (METHOD = FILE) (METHOD_DATA = (DIRECTORY = /oracle/admin/DB01/wallet/Wallet_server) ) )
TRACE_DIRECTORY_SERVER = /oracle/db/10.2.0.3/network/trace
186 Experiences with Oracle Solutions on Linux for IBM System z
trace_level_server = SUPPORTTRACE_FILE_server = trace_server
You will note several things the Oracle Database's sqlnet.ora file has in common with an Oracle client. First, the database itself has a wallet location declared. Again, at this point the wallet does not exist. All we did at this time was make modifications to this file. Note as well the cipher list specification, SL_CIPHER_SUITES, which was restricted to the same cipher suite as the Oracle client. Again, this was purely arbitrary and your circumstances may differ relative to your requirements (for example, internal organizational standards, HSM capabilities, and so on).
What is perhaps more interesting is the SSL_CLIENT_AUTHENTICATION setting of TRUE. This declaration tells the Oracle Database to request the Oracle client to pass its credentials to it during the handshake. If the Oracle Database does not receive a certificate from the client, or if upon receipt it cannot validate the client's certificate, then the connection request will be rejected by the Oracle Database.
We continued by configuring our Oracle Database's listener.ora file (in the same location as sqlnet.ora):
# listener.ora Network Configuration File: /oracle/db/10.2.0.3/network/admin/listener.ora# Generated by Oracle configuration tools.
TRACE_LEVEL_LISTENER = ADMINTRACE_FILE_LISTENER = listenerTRACE_DIRECTORY_LISTENER = /oracle/db/10.2.0.3/network/traceLOG_FILE_LISTENER = listenerLOG_DIRECTORY_LISTENER = /oracle/db/10.2.0.3/network/logLOGGING_LISTENER = ON
SID_LIST_LISTENER = (SID_LIST = (SID_DESC = (SID_NAME = PLSExtProc) (ORACLE_HOME = /oracle/db/10.2.0.3) (PROGRAM = extproc) )
(SID_DESC = (GLOBAL_DBNAME = DB01) (SID_NAME = DB01) (ORACLE_HOME = /oracle/db/10.2.0.3) )
Chapter 11. Using hardware security modules with Oracle Advanced Security 187
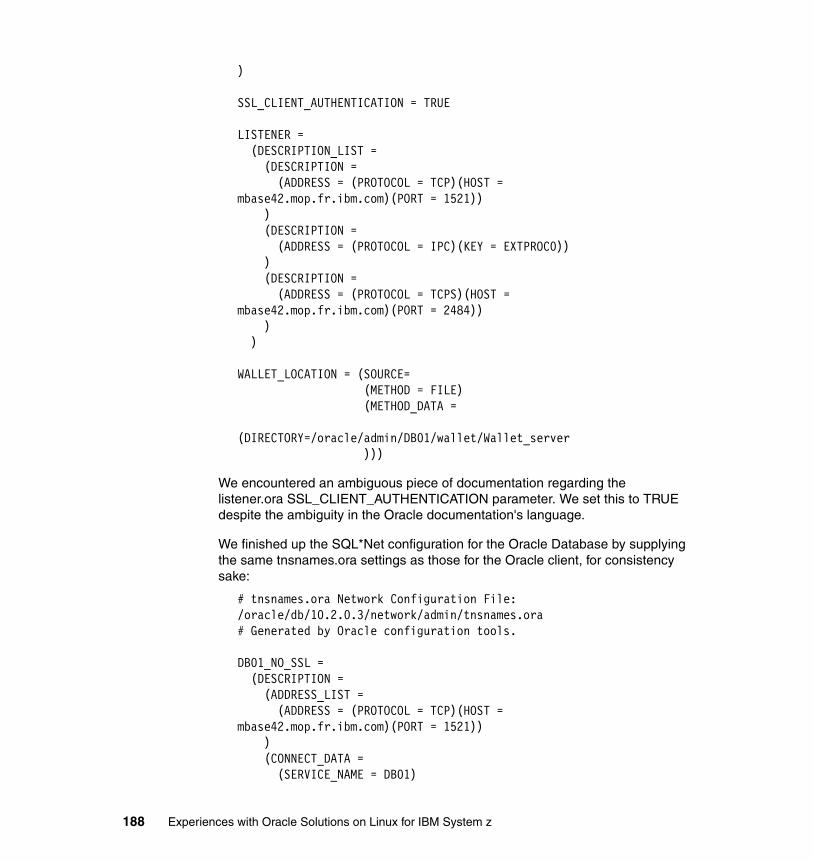
)
SSL_CLIENT_AUTHENTICATION = TRUE
LISTENER = (DESCRIPTION_LIST = (DESCRIPTION = (ADDRESS = (PROTOCOL = TCP)(HOST = mbase42.mop.fr.ibm.com)(PORT = 1521)) ) (DESCRIPTION = (ADDRESS = (PROTOCOL = IPC)(KEY = EXTPROC0)) ) (DESCRIPTION = (ADDRESS = (PROTOCOL = TCPS)(HOST = mbase42.mop.fr.ibm.com)(PORT = 2484)) ) )
WALLET_LOCATION = (SOURCE= (METHOD = FILE) (METHOD_DATA = (DIRECTORY=/oracle/admin/DB01/wallet/Wallet_server )))
We encountered an ambiguous piece of documentation regarding the listener.ora SSL_CLIENT_AUTHENTICATION parameter. We set this to TRUE despite the ambiguity in the Oracle documentation's language.
We finished up the SQL*Net configuration for the Oracle Database by supplying the same tnsnames.ora settings as those for the Oracle client, for consistency sake:
# tnsnames.ora Network Configuration File: /oracle/db/10.2.0.3/network/admin/tnsnames.ora# Generated by Oracle configuration tools.
DB01_NO_SSL = (DESCRIPTION = (ADDRESS_LIST = (ADDRESS = (PROTOCOL = TCP)(HOST = mbase42.mop.fr.ibm.com)(PORT = 1521)) ) (CONNECT_DATA = (SERVICE_NAME = DB01)
188 Experiences with Oracle Solutions on Linux for IBM System z
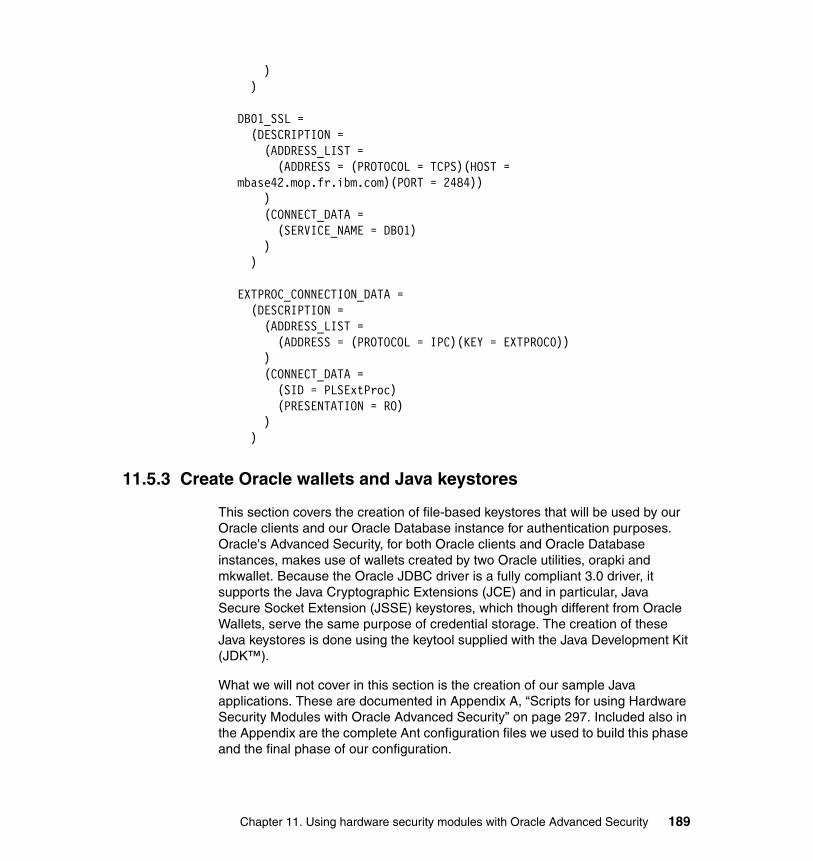
) )
DB01_SSL = (DESCRIPTION = (ADDRESS_LIST = (ADDRESS = (PROTOCOL = TCPS)(HOST = mbase42.mop.fr.ibm.com)(PORT = 2484)) ) (CONNECT_DATA = (SERVICE_NAME = DB01) ) )
EXTPROC_CONNECTION_DATA = (DESCRIPTION = (ADDRESS_LIST = (ADDRESS = (PROTOCOL = IPC)(KEY = EXTPROC0)) ) (CONNECT_DATA = (SID = PLSExtProc) (PRESENTATION = RO) ) )
11.5.3 Create Oracle wallets and Java keystores
This section covers the creation of file-based keystores that will be used by our Oracle clients and our Oracle Database instance for authentication purposes. Oracle's Advanced Security, for both Oracle clients and Oracle Database instances, makes use of wallets created by two Oracle utilities, orapki and mkwallet. Because the Oracle JDBC driver is a fully compliant 3.0 driver, it supports the Java Cryptographic Extensions (JCE) and in particular, Java Secure Socket Extension (JSSE) keystores, which though different from Oracle Wallets, serve the same purpose of credential storage. The creation of these Java keystores is done using the keytool supplied with the Java Development Kit (JDK™).
What we will not cover in this section is the creation of our sample Java applications. These are documented in Appendix A, “Scripts for using Hardware Security Modules with Oracle Advanced Security” on page 297. Included also in the Appendix are the complete Ant configuration files we used to build this phase and the final phase of our configuration.
Chapter 11. Using hardware security modules with Oracle Advanced Security 189
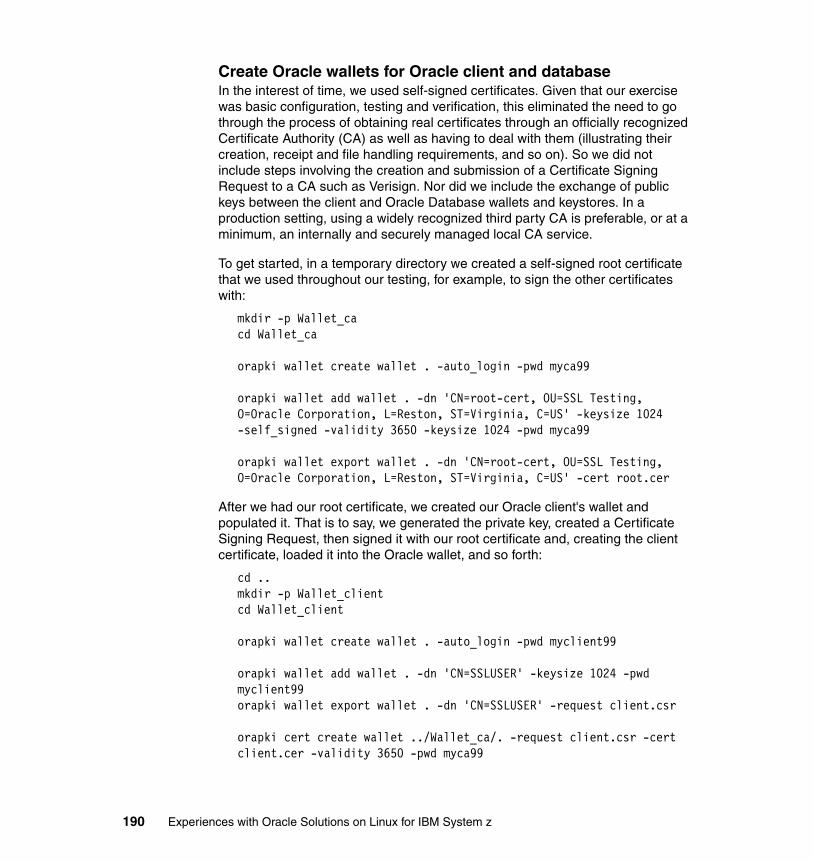
Create Oracle wallets for Oracle client and databaseIn the interest of time, we used self-signed certificates. Given that our exercise was basic configuration, testing and verification, this eliminated the need to go through the process of obtaining real certificates through an officially recognized Certificate Authority (CA) as well as having to deal with them (illustrating their creation, receipt and file handling requirements, and so on). So we did not include steps involving the creation and submission of a Certificate Signing Request to a CA such as Verisign. Nor did we include the exchange of public keys between the client and Oracle Database wallets and keystores. In a production setting, using a widely recognized third party CA is preferable, or at a minimum, an internally and securely managed local CA service.
To get started, in a temporary directory we created a self-signed root certificate that we used throughout our testing, for example, to sign the other certificates with:
mkdir -p Wallet_cacd Wallet_ca
orapki wallet create wallet . -auto_login -pwd myca99
orapki wallet add wallet . -dn 'CN=root-cert, OU=SSL Testing, O=Oracle Corporation, L=Reston, ST=Virginia, C=US' -keysize 1024 -self_signed -validity 3650 -keysize 1024 -pwd myca99
orapki wallet export wallet . -dn 'CN=root-cert, OU=SSL Testing, O=Oracle Corporation, L=Reston, ST=Virginia, C=US' -cert root.cer
After we had our root certificate, we created our Oracle client's wallet and populated it. That is to say, we generated the private key, created a Certificate Signing Request, then signed it with our root certificate and, creating the client certificate, loaded it into the Oracle wallet, and so forth:
cd ..mkdir -p Wallet_clientcd Wallet_client
orapki wallet create wallet . -auto_login -pwd myclient99
orapki wallet add wallet . -dn 'CN=SSLUSER' -keysize 1024 -pwd myclient99orapki wallet export wallet . -dn 'CN=SSLUSER' -request client.csr
orapki cert create wallet ../Wallet_ca/. -request client.csr -cert client.cer -validity 3650 -pwd myca99
190 Experiences with Oracle Solutions on Linux for IBM System z

orapki wallet add wallet . -trusted_cert -cert ../Wallet_ca/root.cer -pwd myclient99
orapki wallet add wallet . -user_cert -cert client.cer -pwd myclient99
orapki wallet display wallet . -pwd myclient99
This was followed by our creation of the Oracle wallet for the Oracle Database itself in the same manner:
cd ..mkdir -p Wallet_servercd Wallet_server
orapki wallet create wallet . -auto_login -pwd myserver99 orapki wallet add wallet . -dn 'CN=DB01' -keysize 1024 -pwd myserver99
orapki wallet export wallet . -dn 'CN=DB01' -request server.csr cert create wallet ../Wallet_ca/. -request server.csr -cert server.cer -validity 3650 -pwd myca99 orapki wallet add wallet . -trusted_cert -cert ../Wallet_ca/root.cer -pwd myserver99 orapki wallet add wallet . -user_cert -cert server.cer -pwd myserver99
orapki wallet display wallet . -pwd myserver99
We then set the permissions appropriately on these wallets and copied them to their respective file locations, which we had created earlier (not shown) and specified in the sqlnet.ora and listener.ora files for the Oracle client and the database instance.
Create JSSE keystores for Oracle JDBC ClientWhat remained was the creation of the Java keystores, the steps for which paralleled those of the Oracle wallet creation:
cd ..mkdir -p JKScd JKS
Chapter 11. Using hardware security modules with Oracle Advanced Security 191
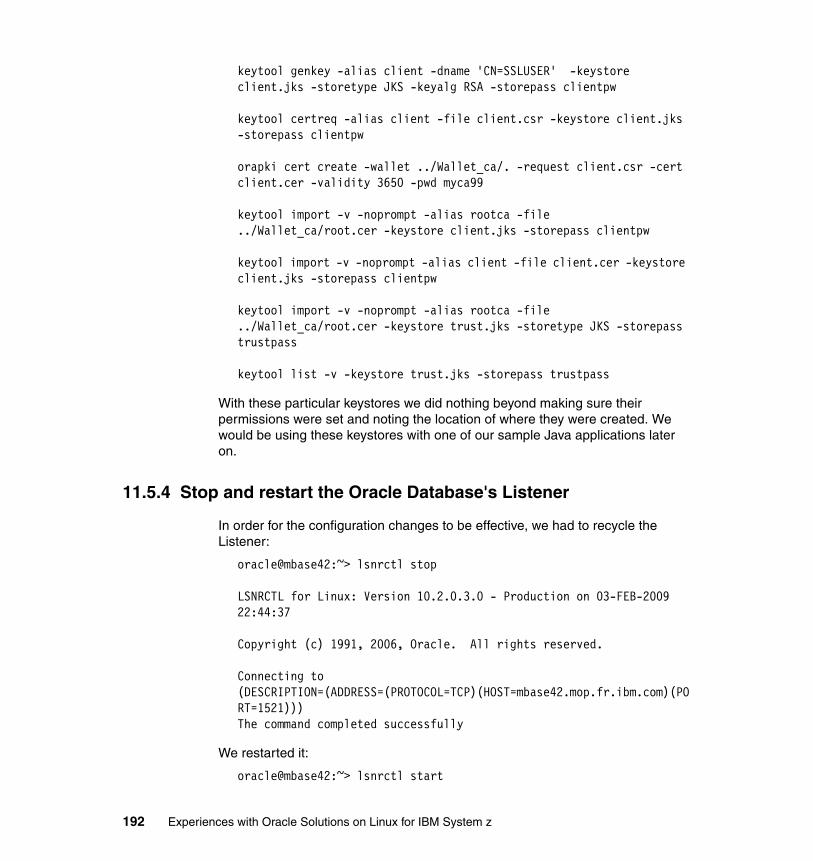
keytool genkey -alias client -dname 'CN=SSLUSER' -keystore client.jks -storetype JKS -keyalg RSA -storepass clientpw
keytool certreq -alias client -file client.csr -keystore client.jks -storepass clientpw
orapki cert create -wallet ../Wallet_ca/. -request client.csr -cert client.cer -validity 3650 -pwd myca99
keytool import -v -noprompt -alias rootca -file ../Wallet_ca/root.cer -keystore client.jks -storepass clientpw
keytool import -v -noprompt -alias client -file client.cer -keystore client.jks -storepass clientpw
keytool import -v -noprompt -alias rootca -file ../Wallet_ca/root.cer -keystore trust.jks -storetype JKS -storepass trustpass
keytool list -v -keystore trust.jks -storepass trustpass
With these particular keystores we did nothing beyond making sure their permissions were set and noting the location of where they were created. We would be using these keystores with one of our sample Java applications later on.
11.5.4 Stop and restart the Oracle Database's Listener
In order for the configuration changes to be effective, we had to recycle the Listener:
oracle@mbase42:~> lsnrctl stop
LSNRCTL for Linux: Version 10.2.0.3.0 - Production on 03-FEB-2009 22:44:37
Copyright (c) 1991, 2006, Oracle. All rights reserved.
Connecting to (DESCRIPTION=(ADDRESS=(PROTOCOL=TCP)(HOST=mbase42.mop.fr.ibm.com)(PORT=1521)))The command completed successfully
We restarted it:
oracle@mbase42:~> lsnrctl start
192 Experiences with Oracle Solutions on Linux for IBM System z

LSNRCTL for Linux: Version 10.2.0.3.0 - Production on 03-FEB-2009 22:45:03
Copyright (c) 1991, 2006, Oracle. All rights reserved.
Starting /oracle/db/10.2.0.3/bin/tnslsnr: please wait...
TNSLSNR for Linux: Version 10.2.0.3.0 - ProductionSystem parameter file is /home/oracle/network/admin/listener.oraLog messages written to /oracle/db/10.2.0.3/network/log/listener.logTrace information written to /oracle/db/10.2.0.3/network/trace/listener.trcListening on: (DESCRIPTION=(ADDRESS=(PROTOCOL=tcp)(HOST=mbase42.mop.fr.ibm.com)(PORT=1521)))Listening on: (DESCRIPTION=(ADDRESS=(PROTOCOL=ipc)(KEY=EXTPROC0)))Listening on: (DESCRIPTION=(ADDRESS=(PROTOCOL=tcps)(HOST=mbase42.mop.fr.ibm.com)(PORT=2484)))Connecting to (DESCRIPTION=(ADDRESS=(PROTOCOL=TCP)(HOST=mbase42.mop.fr.ibm.com)(PORT=1521)))STATUS of the LISTENER------------------------Alias LISTENERVersion TNSLSNR for Linux: Version 10.2.0.3.0 - ProductionStart Date 03-FEB-2009 22:45:03Uptime 0 days 0 hr. 0 min. 0 secTrace Level adminSecurity ON: Local OS AuthenticationSNMP OFFListener Parameter File /home/oracle/network/admin/listener.oraListener Log File /oracle/db/10.2.0.3/network/log/listener.logListener Trace File /oracle/db/10.2.0.3/network/trace/listener.trcListening Endpoints Summary... (DESCRIPTION=(ADDRESS=(PROTOCOL=tcp)(HOST=mbase42.mop.fr.ibm.com)(PORT=1521))) (DESCRIPTION=(ADDRESS=(PROTOCOL=ipc)(KEY=EXTPROC0)))
Chapter 11. Using hardware security modules with Oracle Advanced Security 193
(DESCRIPTION=(ADDRESS=(PROTOCOL=tcps)(HOST=mbase42.mop.fr.ibm.com)(PORT=2484)))Services Summary...Service "DB01" has 1 instance(s). Instance "DB01", status UNKNOWN, has 1 handler(s) for this service...Service "PLSExtProc" has 1 instance(s). Instance "PLSExtProc", status UNKNOWN, has 1 handler(s) for this service...The command completed successfullyoracle@mbase42:~>
11.5.5 Test SQL*Plus access using Oracle wallets
Testing access using Oracle's wallets amounts to specifying where the client's sqlnet.ora and tnsnames.ora files are located and then invoking them:
oracle@mbase42:~> export TNS_ADMIN=~/network/adminoracle@mbase42:~> sqlplus /@db01_ssl
SQL*Plus: Release 10.2.0.3.0 - Production on Tue Feb 3 22:50:19 2009
Copyright (c) 1982, 2006, Oracle. All Rights Reserved.
Connected to:Oracle Database 10g Enterprise Edition Release 10.2.0.3.0 - 64bit ProductionWith the Partitioning, OLAP and Data Mining options
SQL>
If there were errors during the connection processing and if they were not readily identifiable from SQL*Plus, we would resort to examining the Oracle client's trace files and perhaps the Oracle Database's SQL*Net log and trace files. Typically what we look for in these files are the conditions and circumstances around a failed connection attempt. These files are an indispensable source of configuration debugging information. For example, a client trace would contain basic information about where the Oracle client was getting its configuration parameters as well as its sequence of interactions with the Oracle Database instance:
03-FEB-2009 22:50:19:370] --- TRACE CONFIGURATION INFORMATION FOLLOWS ---
194 Experiences with Oracle Solutions on Linux for IBM System z
[03-FEB-2009 22:50:19:370] New trace stream is /home/oracle/trace_user_10645.trc[03-FEB-2009 22:50:19:370] New trace level is 16[03-FEB-2009 22:50:19:370] --- TRACE CONFIGURATION INFORMATION ENDS ---[03-FEB-2009 22:50:19:370] --- PARAMETER SOURCE INFORMATION FOLLOWS ---[03-FEB-2009 22:50:19:370] Attempted load of system pfile source /home/oracle/network/admin/sqlnet.ora[03-FEB-2009 22:50:19:370] Parameter source loaded successfully[03-FEB-2009 22:50:19:370][03-FEB-2009 22:50:19:370] Attempted load of local pfile source /home/oracle/.sqlnet.ora[03-FEB-2009 22:50:19:370] Parameter source was not loaded[03-FEB-2009 22:50:19:370][03-FEB-2009 22:50:19:370] -> PARAMETER TABLE LOAD RESULTS FOLLOW <-[03-FEB-2009 22:50:19:370] Successful parameter table load[03-FEB-2009 22:50:19:370] -> PARAMETER TABLE HAS THE FOLLOWING CONTENTS <-[03-FEB-2009 22:50:19:370] SSL_SERVER_DN_MATCH = TRUE[03-FEB-2009 22:50:19:370] SSL_CIPHER_SUITES = (SSL_RSA_WITH_3DES_EDE_CBC_SHA)[03-FEB-2009 22:50:19:370] TRACE_DIRECTORY_CLIENT = /home/oracle[03-FEB-2009 22:50:19:370] WALLET_LOCATION = (SOURCE= (METHOD = FILE) (METHOD_DATA = (DIRECTORY=/oracle/admin/DB01/wallet/Wallet_client)))[03-FEB-2009 22:50:19:370] NAMES.DIRECTORY_PATH = (TNSNAMES)[03-FEB-2009 22:50:19:370] TRACE_FILE_CLIENT = trace_user[03-FEB-2009 22:50:19:370] SQLNET.AUTHENTICATION_SERVICES = (TCPS,BEQ)[03-FEB-2009 22:50:19:370] SSL_CLIENT_AUTHENTICATION = TRUE[03-FEB-2009 22:50:19:370] trace_level_client = 16[03-FEB-2009 22:50:19:370] SSL_VERSION = 3.0[03-FEB-2009 22:50:19:371] --- PARAMETER SOURCE INFORMATION ENDS ---[03-FEB-2009 22:50:19:371] --- LOG CONFIGURATION INFORMATION FOLLOWS ---[03-FEB-2009 22:50:19:371] Log stream will be "/home/oracle/sqlnet.log"[03-FEB-2009 22:50:19:371] Log stream validation not requested[03-FEB-2009 22:50:19:371] --- LOG CONFIGURATION INFORMATION ENDS ---
Chapter 11. Using hardware security modules with Oracle Advanced Security 195
It is good practice to be ready to locate and examine the contents of the trace and log files. For helpful shell scripts that do this, see Appendix A, “Scripts for using Hardware Security Modules with Oracle Advanced Security” on page 297.
11.5.6 Reviewing and running the sample Java applications
The source and the shell scripts for our sample Java applications are supplied in Appendix A. At this stage, what we were verifying was that a Java application, using JDBC, could connect to our Oracle instance using the Oracle wallet or Java keystore containing the client credentials we had created earlier.
Without getting into all the details of our sample applications, briefly reviewing the Java source and looking at their invocation can be instructive. For example, Oracle's proprietary JDBC extensions to support its wallets requires the location of the client's wallet to be made available (via a Property object) along with the SQL*Net descriptor for the Oracle Database instance (specified on the JDBC connection's URL). Looking at the ASOSSL.java sample, we can see that it expects to receive the file location of the client wallet along with the descriptor and that the connection will require the Oracle Database's DN to match the service name specified in the descriptor:
... props.setProperty ("oracle.net.wallet_location",oracleClientWalletLocation);props.setProperty("oracle.net.ssl_server_dn_match", "true");
....
Invoking the ASOSSL.java sample from the command line then would look like the following:
java rbs.ASOSSL "(SOURCE=(METHOD=file)(METHOD_DATA=(DIRECTORY=/oracle/admin/DB01/wallet/Wallet_client)))" ASODEMO ASODEMO "jdbc:oracle:thin:@(DESCRIPTION=(ADDRESS_LIST=(ADDRESS=(PROTOCOL=TCPS)(HOST=mbase42.mop.fr.ibm.com)(PORT=2484)))(CONNECT_DATA=(SERVICE_NAME=DB01))(SECURITY=(SSL_SERVER_CERT_DN=\"CN=DB01\")))"
Similarly, the JSSEExample.java application, instead of using an Oracle wallet, uses a Java keystore. Regardless, it needs to communicate to the Oracle JDBC driver where the Java keystore (and truststore that carries our trusted root certificate) is located but also with the same SQL*Net descriptor for the Oracle Database instance:
196 Experiences with Oracle Solutions on Linux for IBM System z
... try {
props.setProperty("javax.net.ssl.keyStore",keyStoreFileLocation); props.setProperty("javax.net.ssl.keyStoreType",keyStoreType); props.setProperty("javax.net.ssl.keyStorePassword",keyStorePassword);
props.setProperty("javax.net.ssl.trustStore",trustStoreFileLocation); props.setProperty("javax.net.ssl.trustStoreType",trustStoreType); props.setProperty("javax.net.ssl.trustStorePassword",trustStorePassword); props.setProperty("oracle.net.ssl_version","3.0"); //should default to TLS 1.0 first, followed by SSL 3.0 props.setProperty("oracle.net.ssl_server_dn_match", "true"); props.setProperty("oracle.net.authentication_services","(TCPS)"); OracleDataSource ods = new OracleDataSource(); //ods.setUser(userID); //ods.setPassword(userPassword); ods.setURL(jdbcURL); // passed in via command line along with other parms System.out.println ("setConnectionProperties(props)"); ods.setConnectionProperties(props); System.out.println ("getConnection()"); Connection conn = ods.getConnection(); System.out.println ("createStatement()"); Statement stmt = conn.createStatement ();
Chapter 11. Using hardware security modules with Oracle Advanced Security 197

System.out.println ("executeQuery()"); ResultSet rset = stmt.executeQuery ("select ENAME from SSLUSER.emp"); while (rset.next ()) System.out.println (rset.getString (1)); conn.close();
}...
After configuring our shell scripts (see Appendix A) we ran the sample Java applications. The first sample, ASOSSL.java, which uses Oracle wallets, produced the following:
oracle@mbase42:~/Phase_1/SetupConfiguration> . ./runASOSSLDemo.sh
ASOSSL Started :Tue Feb 03 23:42:39 CET 2009VERSION CHECK : 102oracleClientWalletLocation : (SOURCE=(METHOD=file)(METHOD_DATA=(DIRECTORY=/oracle/admin/DB01/wallet/Wallet_client)))jdbcURL : jdbc:oracle:thin:@(DESCRIPTION=(ADDRESS_LIST=(ADDRESS=(PROTOCOL=TCPS)(HOST=mbase42.mop.fr.ibm.com)(PORT=2484)))(CONNECT_DATA=(SERVICE_NAME=DB01))(SECURITY=(SSL_SERVER_CERT_DN="CN=DB01")))setConnectionProperties(props)getConnection()createStatement()executeQuery()person #1person #2person #3person #4person #5person #6Completion Code=0oracle@mbase42:~/Phase_1/SetupConfiguration>
The second Java application, using Java keystores, produced similar output:
oracle@mbase42:~/Phase_1/SetupConfiguration> . ./runJSSEDemo.sh
JSSEExample Started :Tue Feb 03 23:46:22 CET 2009VERSION CHECK : 101keyStoreFileLocation : ./build/conf/JKS/client.jkskeyStoreType : JKS
198 Experiences with Oracle Solutions on Linux for IBM System z
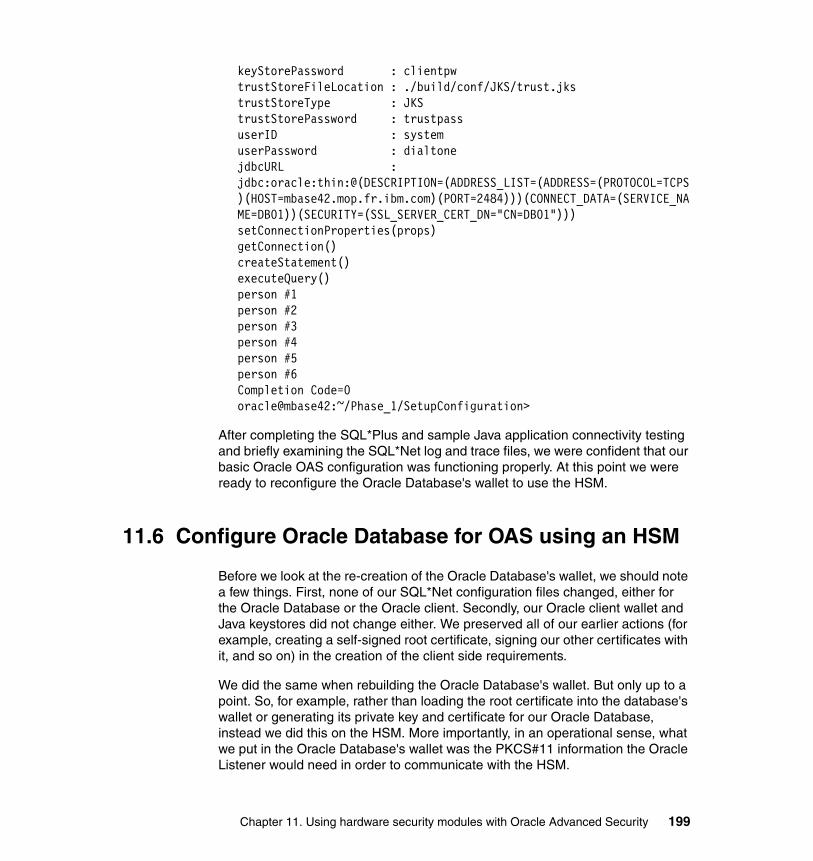
keyStorePassword : clientpwtrustStoreFileLocation : ./build/conf/JKS/trust.jkstrustStoreType : JKStrustStorePassword : trustpassuserID : systemuserPassword : dialtonejdbcURL : jdbc:oracle:thin:@(DESCRIPTION=(ADDRESS_LIST=(ADDRESS=(PROTOCOL=TCPS)(HOST=mbase42.mop.fr.ibm.com)(PORT=2484)))(CONNECT_DATA=(SERVICE_NAME=DB01))(SECURITY=(SSL_SERVER_CERT_DN="CN=DB01")))setConnectionProperties(props)getConnection()createStatement()executeQuery()person #1person #2person #3person #4person #5person #6Completion Code=0oracle@mbase42:~/Phase_1/SetupConfiguration>
After completing the SQL*Plus and sample Java application connectivity testing and briefly examining the SQL*Net log and trace files, we were confident that our basic Oracle OAS configuration was functioning properly. At this point we were ready to reconfigure the Oracle Database's wallet to use the HSM.
11.6 Configure Oracle Database for OAS using an HSM
Before we look at the re-creation of the Oracle Database's wallet, we should note a few things. First, none of our SQL*Net configuration files changed, either for the Oracle Database or the Oracle client. Secondly, our Oracle client wallet and Java keystores did not change either. We preserved all of our earlier actions (for example, creating a self-signed root certificate, signing our other certificates with it, and so on) in the creation of the client side requirements.
We did the same when rebuilding the Oracle Database's wallet. But only up to a point. So, for example, rather than loading the root certificate into the database's wallet or generating its private key and certificate for our Oracle Database, instead we did this on the HSM. More importantly, in an operational sense, what we put in the Oracle Database's wallet was the PKCS#11 information the Oracle Listener would need in order to communicate with the HSM.
Chapter 11. Using hardware security modules with Oracle Advanced Security 199
11.6.1 Recreate the Oracle Database's wallet and populate the HSM
When reviewing the following commands, consult Appendix A for the values of variables that begin with PKCS11. These are defined in the common.xml file included in the Ant build section of the Appendix.
# Create a root cert
mkdir -p Wallet_cacd Wallet_caorapki wallet create -wallet . -auto_login -pwd myca99
# Add a self-signed cert to the wallet for root cert purposesorapki wallet add -wallet . -dn 'CN=root-cert, OU=SSL Testing, O=Oracle Corporation, L=Reston, ST=Virginia, C=US' -keysize 1024 -self_signed -validity 3650 -keysize 1024 -pwd myca99
# Export the root cert just created
orapki wallet export -wallet . -dn 'CN=root-cert, OU=SSL Testing, O=Oracle Corporation, L=Reston, ST=Virginia, C=US' -cert root.cer # Load the root cert onto the token
keytool -Pm root.cer ${PKCS11_API_LIB} ${PKCS11_TOKEN_LABEL} ${PKCS11_TOKEN_LABEL_PWD} root_cert
# Display the root cert just loaded onto the token, from the token
keytool -list -v -alias root_cert ${PKCS11_TOKEN_ACCESS_VALUES}
# Begin creation of dbserver cert
cd ..mkdir -p Wallet_servercd Wallet_server
# Create a wallet orapki wallet create -wallet . -auto_login -pwd myserver99 # Add PKCS#11 info into it
200 Experiences with Oracle Solutions on Linux for IBM System z
orapki wallet p11_add -wallet . -p11_lib ${PKCS11_API_LIB} -p11_tokenlabel ${PKCS11_TOKEN_LABEL} -p11_tokenpw ${PKCS11_TOKEN_LABEL_PWD} -p11_certlabel db_cert -pwd myserver99
# Create cert request and generate key pair on PKCS#11 device
keytool -Pq myserver99 . 'CN=DB01' 1024 dbserver.csr
# Sign the cert req created above using the root CA created earlier and create db server cert
orapki cert create -wallet ../Wallet_ca/. -request dbserver.csr -cert dbserver.cer -validity 3650 -pwd myca99
# Load the signed db server cert onto the token
mkwallet -Pm dbserver.cer ${PKCS11_API_LIB} ${PKCS11_TOKEN_LABEL} ${PKCS11_TOKEN_LABEL_PWD} db_cert
# Display the db server cert just loaded onto the token, from the token
keytool -list -v -alias db_cert ${PKCS11_TOKEN_ACCESS_VALUES} # Verify the db server wallet can be opened and can access the token
orapki wallet p11_verify -wallet . -pwd myserver99 # Begin creation of client cert
cd ..mkdir -p Wallet_clientcd Wallet_client
orapki wallet create -wallet . -auto_login -pwd myclient99
orapki wallet add -wallet . -dn 'CN=SSLUSER' -keysize 1024 -pwd myclient99
orapki wallet export -wallet . -dn 'CN=SSLUSER' -request client.csr
# Sign the client cert req created above using the root ca created earlier and create client certorapki cert create -wallet ../Wallet_ca/. -request client.csr -cert client.cer -validity 3650 -pwd myca99
Chapter 11. Using hardware security modules with Oracle Advanced Security 201
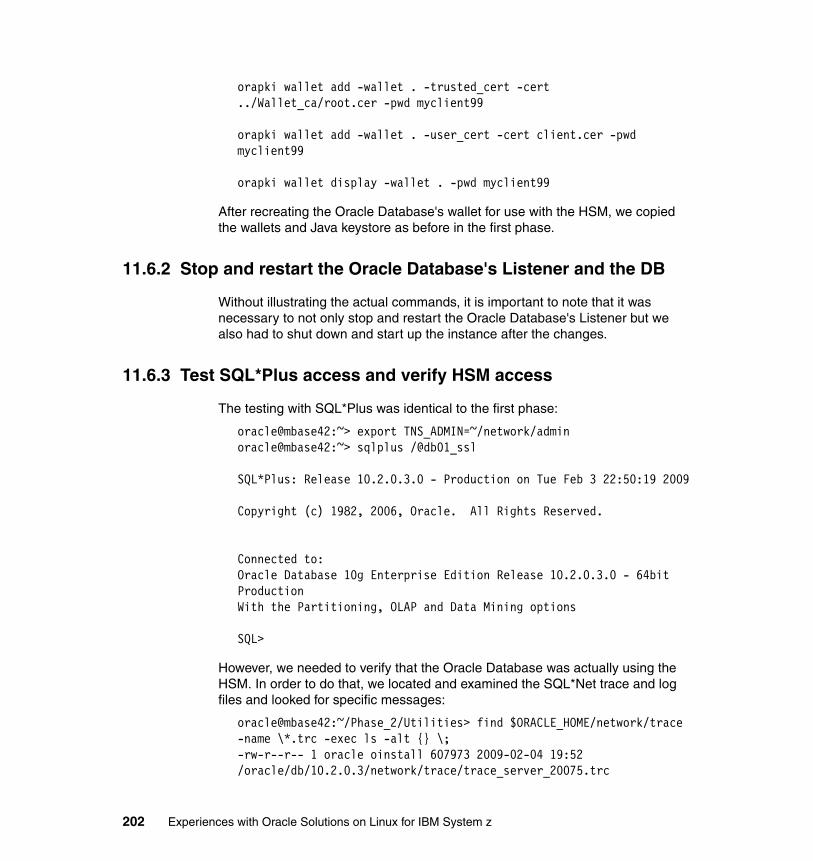
orapki wallet add -wallet . -trusted_cert -cert ../Wallet_ca/root.cer -pwd myclient99 orapki wallet add -wallet . -user_cert -cert client.cer -pwd myclient99
orapki wallet display -wallet . -pwd myclient99
After recreating the Oracle Database's wallet for use with the HSM, we copied the wallets and Java keystore as before in the first phase.
11.6.2 Stop and restart the Oracle Database's Listener and the DB
Without illustrating the actual commands, it is important to note that it was necessary to not only stop and restart the Oracle Database's Listener but we also had to shut down and start up the instance after the changes.
11.6.3 Test SQL*Plus access and verify HSM access
The testing with SQL*Plus was identical to the first phase:
oracle@mbase42:~> export TNS_ADMIN=~/network/adminoracle@mbase42:~> sqlplus /@db01_ssl
SQL*Plus: Release 10.2.0.3.0 - Production on Tue Feb 3 22:50:19 2009
Copyright (c) 1982, 2006, Oracle. All Rights Reserved.
Connected to:Oracle Database 10g Enterprise Edition Release 10.2.0.3.0 - 64bit ProductionWith the Partitioning, OLAP and Data Mining options
SQL>
However, we needed to verify that the Oracle Database was actually using the HSM. In order to do that, we located and examined the SQL*Net trace and log files and looked for specific messages:
oracle@mbase42:~/Phase_2/Utilities> find $ORACLE_HOME/network/trace -name \*.trc -exec ls -alt {} \;-rw-r--r-- 1 oracle oinstall 607973 2009-02-04 19:52 /oracle/db/10.2.0.3/network/trace/trace_server_20075.trc
202 Experiences with Oracle Solutions on Linux for IBM System z
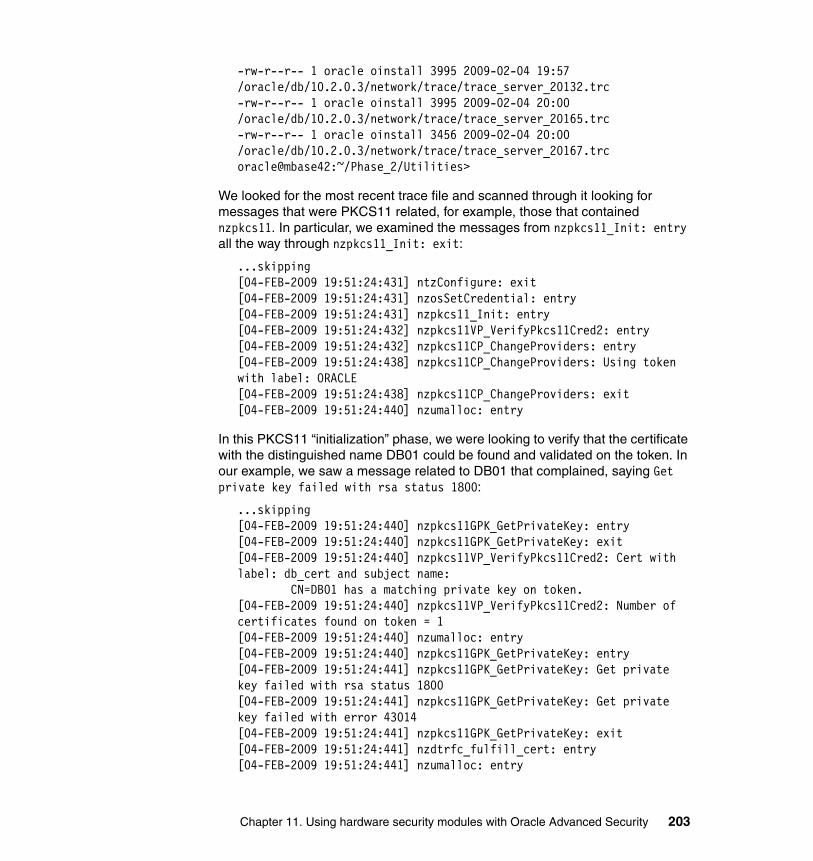
-rw-r--r-- 1 oracle oinstall 3995 2009-02-04 19:57 /oracle/db/10.2.0.3/network/trace/trace_server_20132.trc-rw-r--r-- 1 oracle oinstall 3995 2009-02-04 20:00 /oracle/db/10.2.0.3/network/trace/trace_server_20165.trc-rw-r--r-- 1 oracle oinstall 3456 2009-02-04 20:00 /oracle/db/10.2.0.3/network/trace/trace_server_20167.trcoracle@mbase42:~/Phase_2/Utilities>
We looked for the most recent trace file and scanned through it looking for messages that were PKCS11 related, for example, those that contained nzpkcs11. In particular, we examined the messages from nzpkcs11_Init: entry all the way through nzpkcs11_Init: exit:
...skipping[04-FEB-2009 19:51:24:431] ntzConfigure: exit[04-FEB-2009 19:51:24:431] nzosSetCredential: entry[04-FEB-2009 19:51:24:431] nzpkcs11_Init: entry[04-FEB-2009 19:51:24:432] nzpkcs11VP_VerifyPkcs11Cred2: entry[04-FEB-2009 19:51:24:432] nzpkcs11CP_ChangeProviders: entry[04-FEB-2009 19:51:24:438] nzpkcs11CP_ChangeProviders: Using token with label: ORACLE[04-FEB-2009 19:51:24:438] nzpkcs11CP_ChangeProviders: exit[04-FEB-2009 19:51:24:440] nzumalloc: entry
In this PKCS11 “initialization” phase, we were looking to verify that the certificate with the distinguished name DB01 could be found and validated on the token. In our example, we saw a message related to DB01 that complained, saying Get private key failed with rsa status 1800:
...skipping[04-FEB-2009 19:51:24:440] nzpkcs11GPK_GetPrivateKey: entry[04-FEB-2009 19:51:24:440] nzpkcs11GPK_GetPrivateKey: exit[04-FEB-2009 19:51:24:440] nzpkcs11VP_VerifyPkcs11Cred2: Cert with label: db_cert and subject name: CN=DB01 has a matching private key on token.[04-FEB-2009 19:51:24:440] nzpkcs11VP_VerifyPkcs11Cred2: Number of certificates found on token = 1[04-FEB-2009 19:51:24:440] nzumalloc: entry[04-FEB-2009 19:51:24:440] nzpkcs11GPK_GetPrivateKey: entry[04-FEB-2009 19:51:24:441] nzpkcs11GPK_GetPrivateKey: Get private key failed with rsa status 1800[04-FEB-2009 19:51:24:441] nzpkcs11GPK_GetPrivateKey: Get private key failed with error 43014[04-FEB-2009 19:51:24:441] nzpkcs11GPK_GetPrivateKey: exit[04-FEB-2009 19:51:24:441] nzdtrfc_fulfill_cert: entry[04-FEB-2009 19:51:24:441] nzumalloc: entry
Chapter 11. Using hardware security modules with Oracle Advanced Security 203
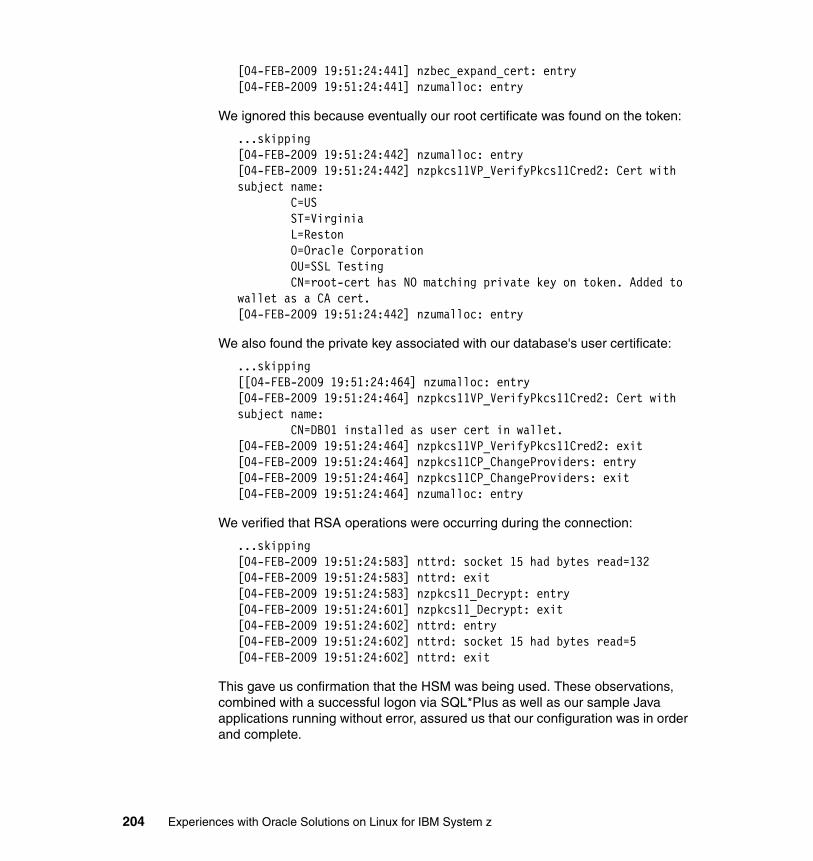
[04-FEB-2009 19:51:24:441] nzbec_expand_cert: entry[04-FEB-2009 19:51:24:441] nzumalloc: entry
We ignored this because eventually our root certificate was found on the token:
...skipping[04-FEB-2009 19:51:24:442] nzumalloc: entry[04-FEB-2009 19:51:24:442] nzpkcs11VP_VerifyPkcs11Cred2: Cert with subject name: C=US ST=Virginia L=Reston O=Oracle Corporation OU=SSL Testing CN=root-cert has NO matching private key on token. Added to wallet as a CA cert.[04-FEB-2009 19:51:24:442] nzumalloc: entry
We also found the private key associated with our database's user certificate:
...skipping[[04-FEB-2009 19:51:24:464] nzumalloc: entry[04-FEB-2009 19:51:24:464] nzpkcs11VP_VerifyPkcs11Cred2: Cert with subject name: CN=DB01 installed as user cert in wallet.[04-FEB-2009 19:51:24:464] nzpkcs11VP_VerifyPkcs11Cred2: exit[04-FEB-2009 19:51:24:464] nzpkcs11CP_ChangeProviders: entry[04-FEB-2009 19:51:24:464] nzpkcs11CP_ChangeProviders: exit[04-FEB-2009 19:51:24:464] nzumalloc: entry
We verified that RSA operations were occurring during the connection:
...skipping[04-FEB-2009 19:51:24:583] nttrd: socket 15 had bytes read=132[04-FEB-2009 19:51:24:583] nttrd: exit[04-FEB-2009 19:51:24:583] nzpkcs11_Decrypt: entry[04-FEB-2009 19:51:24:601] nzpkcs11_Decrypt: exit[04-FEB-2009 19:51:24:602] nttrd: entry[04-FEB-2009 19:51:24:602] nttrd: socket 15 had bytes read=5[04-FEB-2009 19:51:24:602] nttrd: exit
This gave us confirmation that the HSM was being used. These observations, combined with a successful logon via SQL*Plus as well as our sample Java applications running without error, assured us that our configuration was in order and complete.
204 Experiences with Oracle Solutions on Linux for IBM System z
11.7 Summary
This chapter introduced the use of Oracle Advanced Security SSL using an Hardware Storage Module for secure credential storage as well as signing and key encryption/decryption requirements. This facet of Oracle Database Advanced Security is only one from the entire Oracle solution set. There are other facilities which can strengthen and satisfy application and data security needs.
Additionally, while Public Key Infrastructure offers considerable benefits to organizations in need of the basic security services, those who are considering a PKI should evaluate their environment first to understand where security is required and then determine how and by which solutions they can fulfill those needs.
When considering a PKI, careful planning is critical. Understanding the available technology is also critical and this can be facilitated by simple proof-of-concepts which model internal operational business patterns. Hopefully we have provided an example which can help you get started along this path.
11.8 Supplemental notes
This section offers some additional information.
11.8.1 Issues encountered
There were several issues we encountered along the way. What follows are notes about our experiences and how we responded.
HSM utility group permissionsContrary to the IBM CCA documentation, the root user ended up needing to be a member of pkcs11, cca_admin, cca_lfmkp, cca_cmkp, cca_clrmk,cca_setmk in order to work with the HSM. When we first began to work with the HSM, we were getting errors from the utilities that did not include descriptions in the error message text, for example:
mbase42:/opt/IBM/4764/bin # ./panel.exe -l -t A -p F 01234567890123456789012345678901234567890ABCDEFAMaster Key LOAD returned [0008005a]
Working only from the readme notes provided by HSM's rpm, we were at a loss. However, we chased down the IBM CCA Programmer's Guide (page 338) which
Chapter 11. Using hardware security modules with Oracle Advanced Security 205
states “If a user does not have the proper group membership for a particular master key operation, the error 0008005a (hex) is returned and an error message is printed to the system log.”
But we were running this as root, so we could not understand why we were getting these messages. To get a better look at things, we turned on tracing (added -g ALL) for this utility:
mbase42:/opt/IBM/4764/bin # ./panel.exe -l -t A -p F 01234567890123456789012345678901234567890ABCDEFA -g ALLMaster Key LOAD returned [0008005a]
We tailed /var/messages/log during its execution:
Jan 8 17:24:40 mbase42 panel.exe: IBM Crypto ./f_sapi/safbmkp.c:362, Feb 14 2007:09:34:02: Your user is not a member of group [cca_lfmkp]. Please review the manual for CSNBMKPJan 8 17:24:40 mbase42 panel.exe: 0002; L1826; panel.cpp. loadMasterKey returned 0008005a
As we discovered the missing groups, we added them. Note that the installation of the openCrypto packages created these groups. Given the nature of the utility, it may have been a change in its operation (better security) to require any and all (including root) users to be members of the required groups, which did not get reflected in the documentation. But this is only speculation. Adding the groups for all the specific CCA functions we needed cleared the way for moving along with the project. Of course, in a true production or non-test configuration, you would assign these groups to specific security officers in a way that provides for better isolation of duties (knowledge of master keys, who can set which ones, and so on) as a key goal. However, our efforts were focused on fundamental mechanics of operations.
Oracle SQL*Net Listener parameter ambiguityWe encountered an ambiguous piece of documentation regarding the Listener's SSL_CLIENT_AUTHENTICATION parameter. The Oracle documentation on this parameter in the Listener configuration says three things:
“Use the parameter SSL_CLIENT_AUTHENTICATION to specify whether or not a client is authenticated using the Secure Sockets Layer (SSL). The database server authenticates the client. Therefore, this value should be set to false. If this parameter is set to true, the Listener attempts to authenticate the client, which can result in a failure.”*
We definitely wanted the Oracle Database to ask the client to pass its certificate so that it could be examined, so the first sentence would seem to warrant setting it to TRUE. It was also understood that the database, after receiving a valid
206 Experiences with Oracle Solutions on Linux for IBM System z

certificate, would begin the logon process for the user defined in the database and identified by the Common Name in the certificate that was passed from the client.
But why we would want to preclude this process sequence was not readily clear. In fact, by default it is set to TRUE (on). In any event, we could never find an adequate explanation in the Oracle documentation we examined what “failure” meant. So, in an effort to understand the behavior of this setting in the listener.ora, we first explicitly set this to TRUE in our environment and went with the assumption, implied by the documentation, that in effect the responsibility for authentication of the Oracle user (specified in the Oracle wallet or via a Java keystore) would fall on the Listener but without any assumptions about what the actual results would be.
To test the behavior, we dropped our Oracle user (SSLUSER) from the Oracle Database which had been defined as:
create user SSLUSER identified externally as 'CN=SSLUSER';
We tried to log in:
With the Partitioning, OLAP and Data Mining optionsoracle@mbase42:~> sqlplus system/*******
SQL*Plus: Release 10.2.0.3.0 - Production on Tue Feb 3 18:21:58 2009
Copyright (c) 1982, 2006, Oracle. All Rights Reserved.
Connected to:Oracle Database 10g Enterprise Edition Release 10.2.0.3.0 - 64bit ProductionWith the Partitioning, OLAP and Data Mining options
SQL> drop user SSLUSER cascade;
User dropped.
SQL> exitDisconnected from Oracle Database 10g Enterprise Edition Release 10.2.0.3.0 - 64bit ProductionWith the Partitioning, OLAP and Data Mining optionsoracle@mbase42:~> sqlplus /@db01_ssl
SQL*Plus: Release 10.2.0.3.0 - Production on Tue Feb 3 18:22:46 2009
Chapter 11. Using hardware security modules with Oracle Advanced Security 207
Copyright (c) 1982, 2006, Oracle. All Rights Reserved.
ERROR:ORA-01017: invalid username/password; logon denied
Enter user-name:
The Oracle Database instance responded with an ORA-01017. Normally this error indicates that either the username is not a recognized username or that the password is incorrect. But recall, we were not logging on directly and specifying a user name. The only information supplied was in the Oracle wallet. The association of an existing Oracle user in the database “identified externally as CN=SSLUSER” was gone.
To further test this, we removed the SSL_CLIENT_AUTHENTICATION parameter from the Oracle Database's listener.ora file, stopped and restarted the Listener but got the same result logging on with the Oracle wallet's credentials. We also explicitly set it to FALSE and received exactly the same result, which overall leaves us not exactly certain what this parameter's meaning is for the Oracle Listener.
*http://download.oracle.com/docs/cd/B19306_01/network.102/b14213/listener.htm#i501561
Oracle wallet utility workaroundsWe needed the 64-bit JVM™ in order to access the SQL*Net libraries via JNI™ properly. There are known bugs (6999080, 3046922) filed on this but apparently they have not been applied to this distribution of Oracle. Rather than rework this shell script on our own, we applied a quick fix by changing the following:
# Run the wallet manager toolif [ x$IS_64BIT = x"YES" ]; then$JRE_HOME/bin/Java -d64 -cp $PKI_JAR:$JSSL_JAR:$OEMLT_JAR:$OJMISC_JAR oracle.security.pki.textui.OraclePKITextUI "$@"else$JRE_HOME/bin/Java -cp $PKI_JAR:$JSSL_JAR:$OEMLT_JAR:$OJMISC_JAR oracle.security.pki.textui.OraclePKITextUI "$@"fi
to the following:
# Run the wallet manager toolif [ x$IS_64BIT = x"YES" ]; then
208 Experiences with Oracle Solutions on Linux for IBM System z

#$JRE_HOME/bin/Java -d64 -cp $PKI_JAR:$JSSL_JAR:$OEMLT_JAR:$OJMISC_JAR oracle.security.pki.textui.OraclePKITextUI "$@"/opt/ibm/java2-s390x-50/bin/Java -d64 -cp $PKI_JAR:$JSSL_JAR:$OEMLT_JAR:$OJMISC_JAR oracle.security.pki.textui.OraclePKITextUI "$@"else$JRE_HOME/bin/Java -cp $PKI_JAR:$JSSL_JAR:$OEMLT_JAR:$OJMISC_JAR oracle.security.pki.textui.OraclePKITextUI "$@"fi
Additional RPMsOur kernel was missing a few of the necessary RPMs:
mbase42:/tmp # uname -aLinux mbase42 2.6.16.60-0.21-default #1 SMP Tue May 6 12:41:02 UTC 2008 s390x s390x s390x GNU/Linux
mbase42:/tmp # find . -name "*.rpm"./zLinuxCryptoPackages/openCryptoki-2.2.4-0.7.s390.rpm./zLinuxCryptoPackages/openCryptoki-32bit-2.2.4-0.7.s390.rpm./zLinuxCryptoPackages/openCryptoki-64bit-2.2.4-0.7.s390x.rpm./zLinuxCryptoPackages/openCryptoki-devel-2.2.4-0.7.s390.rpm./zLinuxCryptoPackages/openssl-devel-0.9.8a-18.26.s390x.rpm./zLinuxCryptoPackages/openssl-devel-32bit-0.9.8a-18.26.s390x.rpm./zLinuxCryptoPackages/xcryptolinzGA-3.28-rc08.s390x.rpm
The xcryptolinzGA package contained the utilities we used to set the master keys on the HSM.
11.9 References
� Oracle Database Advanced Security Administrator's Guide 10g Release 2 (10.2) Part Number B14268-02
� 4764 PCI-X Cryptographic Coprocessor CCA Support Program Installation Manual Release 3.30, Fourth Edition, September 2008
� Using Cryptographic Adapters for Web Servers with Linux on IBM System z9 and zSeries, REDP-4131, Jack Hoarau, Yann Kindelberger, 2006
� Monitoring System z Cryptographic Services, REDP-4358, Patrick Kappeler, Guillaume Hoareau, et al. Feb 2008
� Secure Key Solution with the Common Cryptographic Architecture Application Programmer's Guide, Linux for System z, SC33-8294, May 2007
Chapter 11. Using hardware security modules with Oracle Advanced Security 209
� System z Cryptographic Services and z/OS PKI Services, SG24-7470, Patrick Kappeler, Guillaume Hoareau, et al. May 2008
� Security on z/VM, SG24-7471, Paola Bari, Helio Almeida, et al. Nov 2007
� IBM 4764 PCI-X Cryptographic Coprocessor CCA Support Program Overview at:
http://www-03.ibm.com/security/cryptocards/pcixcc/overcca.shtml
210 Experiences with Oracle Solutions on Linux for IBM System z
Chapter 12. Using DB Control or DB Console with Grid Control Server
There are several ways to manage an Oracle Database running on Linux for IBM System z. This chapter describes how to use the agent that is shipped with the database. In our example we installed a database on SLES10.
The Oracle Grid Control Server does not run on Linux on System z. You can use a platform such as x86 Linux to run the Grid Control Server to manage the databases and applications running on Linux on System z.
12
© Copyright IBM Corp. 2009. All rights reserved. 211
12.1 Choices of managing a database on Linux on z
The choices are:
� Use Database Control, which is shipped with the database product. It is run on the same Linux guest as the database but can only be used to manage the database in the same ORACLE_HOME.
� Use the grid control agent that is available for download from otn.oracle.com under the Enterprise Manager heading. It is part of the mass agent download section. Today the agent available is 10.2.0.2, which is supported for SUSE® Linux Enterprise Server 9 (SLES9) and Red Hat Enterprise Linux 4 (RHEL4) on Linux on z. How to use this has been described in detail in Appendix E in Experiences with Oracle 10g Solutions on Linux for IBM System z, SG24-7191.
� Use the grid control agent that is shipped with the database code. For the 10.2.0.3 database version the agent that is shipped is the 10.1.0.5 agent. This is supported on the same Linux versions as the database which today is SUSE Linux Enterprise Server 9 (SLES9), SUSE Linux Enterprise Server 10 (SLES10) and Red Hat Enterprise Linux 4 (RHEL4). This option is described in this chapter. Red Hat Enterprise Linux 5 was certified with 10.2.0.4 patchset in 4Q, 2008.
At this time, the supported options are shown in Table 12-1.
Table 12-1 Supported options
12.2 DBConsole and grid agents on Linux for System z
The 10.2.0.2 standalone grid agent described in Appendix E of Experiences with Oracle 10g Solutions on Linux for IBM System z, SG24-7191, is not supported by Oracle with a 10.2.0.3 database. on SLES10. However, the 10.1.0.5 agent that is part of the 10.2.0.3 database can be used as a remote grid agent on Linux on System z. The following notes describe how to set up a configuration to connect the 10.1.0.5 agent on Linux to OEM Grid on Win XP. The Linux host is
Product DB Level Red Hat 4 Red Hat 5 SLES 9 SLES 10
DB Console 10.2.0.3 Yes Yes Yes Yes
10.2.0.2 agent from otn download 10.2.0.3 Yes No Yes No
10.1.0.5 agent shipped with 10.2.0.3 DB
10.2.0.3 Yes Yes Yes Yes
212 Experiences with Oracle Solutions on Linux for IBM System z
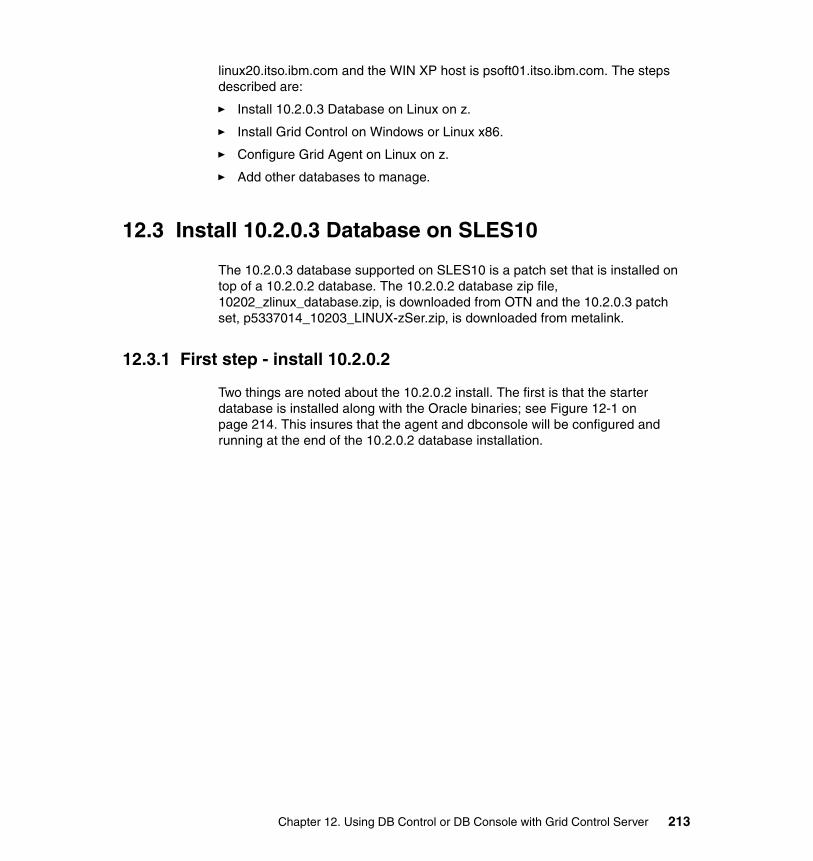
linux20.itso.ibm.com and the WIN XP host is psoft01.itso.ibm.com. The steps described are:
� Install 10.2.0.3 Database on Linux on z.
� Install Grid Control on Windows or Linux x86.
� Configure Grid Agent on Linux on z.
� Add other databases to manage.
12.3 Install 10.2.0.3 Database on SLES10
The 10.2.0.3 database supported on SLES10 is a patch set that is installed on top of a 10.2.0.2 database. The 10.2.0.2 database zip file, 10202_zlinux_database.zip, is downloaded from OTN and the 10.2.0.3 patch set, p5337014_10203_LINUX-zSer.zip, is downloaded from metalink.
12.3.1 First step - install 10.2.0.2
Two things are noted about the 10.2.0.2 install. The first is that the starter database is installed along with the Oracle binaries; see Figure 12-1 on page 214. This insures that the agent and dbconsole will be configured and running at the end of the 10.2.0.2 database installation.
Chapter 12. Using DB Control or DB Console with Grid Control Server 213
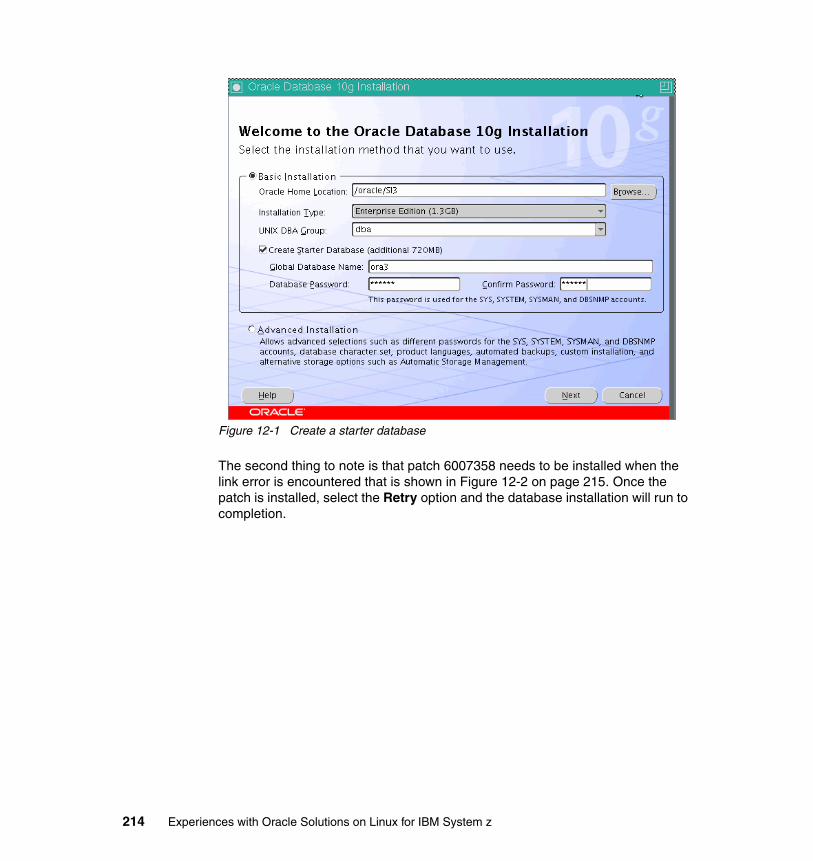
Figure 12-1 Create a starter database
The second thing to note is that patch 6007358 needs to be installed when the link error is encountered that is shown in Figure 12-2 on page 215. Once the patch is installed, select the Retry option and the database installation will run to completion.
214 Experiences with Oracle Solutions on Linux for IBM System z

Figure 12-2 Link error requiring patch 6007358
Chapter 12. Using DB Control or DB Console with Grid Control Server 215

The 10.2.0.2 End of Installation panel in Figure 12-3 shows that OEM Database Control is available at port 5501.
Figure 12-3 URLs for the 10.2.0.2 Database
At the completion of the installation, there is an agent running, $ORACLE_HOME/bin/emagent, and its status is available with the command shown in Example 12-1:
Example 12-1 The emctl command
oracle@linux20:~> emctl status agentTZ set to US/EasternOracle Enterprise Manager 10g Database Control Release 10.2.0.2.0Copyright (c) 1996, 2005 Oracle Corporation. All rights reserved.---------------------------------------------------------------Agent Version : 10.1.0.4.1OMS Version : 10.1.0.4.0Protocol Version : 10.1.0.2.0Agent Home : /oracle/SI3/linux20.itso.ibm.com_ora3Agent binaries : /oracle/SI3Agent Process ID : 15495Parent Process ID : 14561Agent URL : http://linux20.itso.ibm.com:1832/emd/main
216 Experiences with Oracle Solutions on Linux for IBM System z
Started at : 2008-09-02 12:04:29Started by user : oracleLast Reload : 2008-09-02 12:04:29Last successful upload : 2008-09-02 13:27:26Total Megabytes of XML files uploaded so far : 4.96Number of XML files pending upload : 4Size of XML files pending upload(MB) : 0.04Available disk space on upload filesystem : 13.12%---------------------------------------------------------------Agent is Running and Ready
For the standalone agent (discussed in Appendix E of Experiences with Oracle 10gR2 Solutions on Linux for IBM System z, SG24-7191), the agent home is $AGENT_HOME/agent10g. Here, the agent home is $ORACLE_HOME/<host><domain>_SID/. This is important later when the agent currently supporting the dbconsole on the local Linux host is changed to connect to OEM Grid.
The status of the dbconsole is also available with the emctl command; see Example 12-2.
Example 12-2 The emctl status command
oracle@linux20:~> emctl status dbconsoleTZ set to US/EasternOracle Enterprise Manager 10g Database Control Release 10.2.0.2.0Copyright (c) 1996, 2005 Oracle Corporation. All rights reserved.http://linux20.itso.ibm.com:5501/em/console/aboutApplicationOracle Enterprise Manager 10g is running.------------------------------------------------------------------Logs are generated in directory /oracle/SI3/linux20.itso.ibm.com_ora3/sysman/log
From the status messages, the dbconsole version is 10.2.0.2 and the agent version is 10.1.0.4 after the 10202 database has been installed.
12.3.2 Second step - install 10.2.0.3
Everything from the 10202 install needs to be stopped including the Listener, the database, the agent, the dbconsole, and the isqlplus server, before installing the 10203 patch set. Once the patch set installation is complete, start the Listener and run dbua, the database upgrade assistant, to upgrade the 10202 starter database so it is usable with a 10203 Oracle system. After the patch set has
Chapter 12. Using DB Control or DB Console with Grid Control Server 217

been installed and the starter database has been upgraded with dbua, an agent and dbconsole are running, which can be verified as shown in Example 12-3.
Example 12-3 checking status on DBconsole
oracle@linux20:~> emctl status dbconsoleOracle Enterprise Manager 10g Database Control Release 10.2.0.3.0Copyright (c) 1996, 2006 Oracle Corporation. All rights reserved.http://linux20.itso.ibm.com:5501/em/console/aboutApplicationOracle Enterprise Manager 10g is running.------------------------------------------------------------------Logs are generated in directory /oracle/SI3/linux20.itso.ibm.com_ora3/sysman/log
oracle@linux20:~> emctl status agentOracle Enterprise Manager 10g Database Control Release 10.2.0.3.0Copyright (c) 1996, 2006 Oracle Corporation. All rights reserved.---------------------------------------------------------------Agent Version : 10.1.0.5.1OMS Version : 10.1.0.5.0Protocol Version : 10.1.0.2.0Agent Home : /oracle/SI3/linux20.itso.ibm.com_ora3Agent binaries : /oracle/SI3Agent Process ID : 28128Parent Process ID : 27373Agent URL : http://linux20.itso.ibm.com:1832/emd/mainStarted at : 2008-09-02 16:59:53Started by user : oracleLast Reload : 2008-09-02 16:59:53Last successful upload : 2008-09-02 22:17:43Total Megabytes of XML files uploaded so far : 6.22Number of XML files pending upload : 0Size of XML files pending upload(MB) : 0.00Available disk space on upload filesystem : 9.40%---------------------------------------------------------------Agent is Running and Ready
From the status messages, the dbconsole version is 10.2.0.3 and the agent version is 10.1.0.5 after the 10203 patch set has been installed. The agent home in the status message is the same as the prior level but the original agent home has been saved by dbua in a directory of the same name with a suffix of update.
218 Experiences with Oracle Solutions on Linux for IBM System z

12.4 Install Grid Control Server
Note that when installing Grid Control you must make a certain selection. A 10.2.0.2 Grid install including a new database was done on Win XP. The first panel selection is shown in Figure 12-4.
Figure 12-4 WIN XP Grid install
The default selection of “Require Secure Communication for all agents” was unchecked on the panel shown in Figure 12-5 on page 220 during the Grid installation. The default works for the standalone grid agent, but so far we were not successful in making a secure connection from the 10105 agent to Win XP Grid.
Chapter 12. Using DB Control or DB Console with Grid Control Server 219
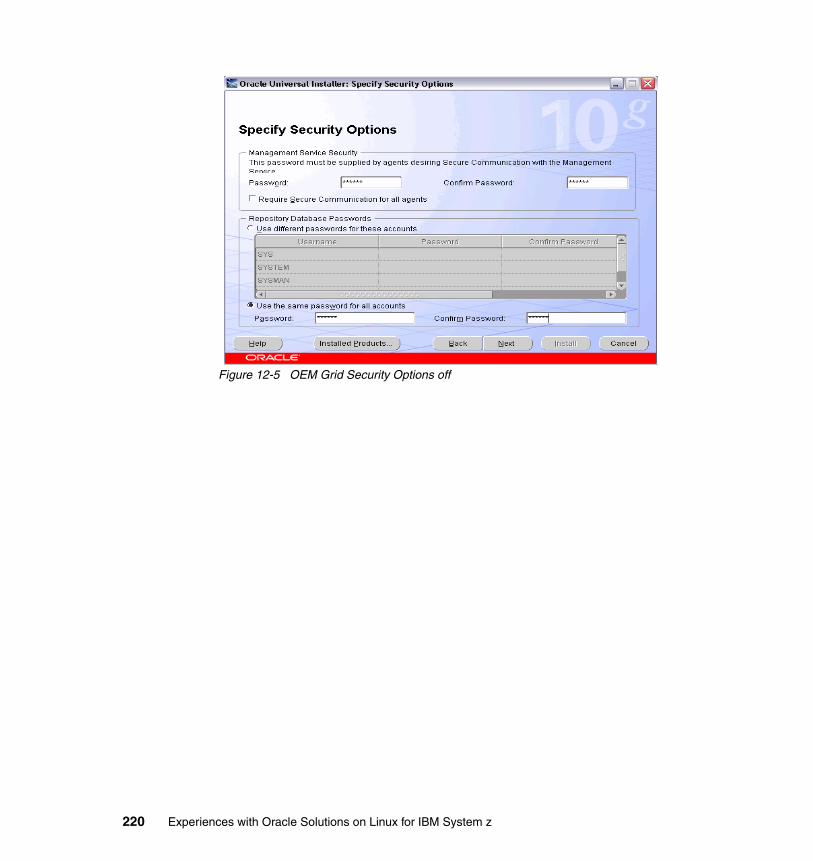
Figure 12-5 OEM Grid Security Options off
220 Experiences with Oracle Solutions on Linux for IBM System z
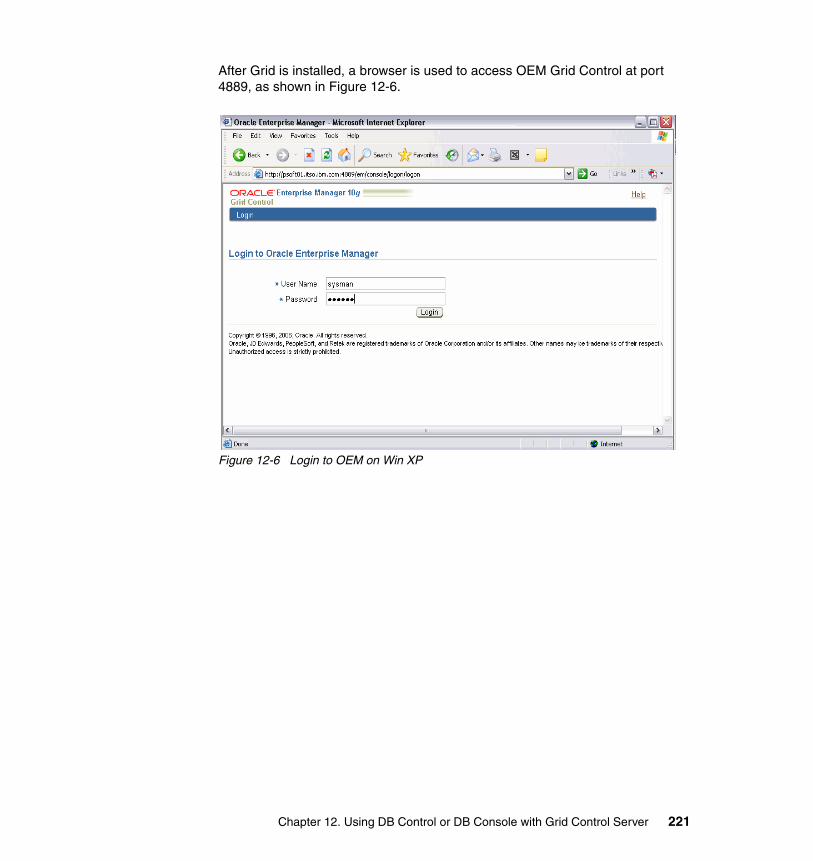
After Grid is installed, a browser is used to access OEM Grid Control at port 4889, as shown in Figure 12-6.
Figure 12-6 Login to OEM on Win XP
Chapter 12. Using DB Control or DB Console with Grid Control Server 221
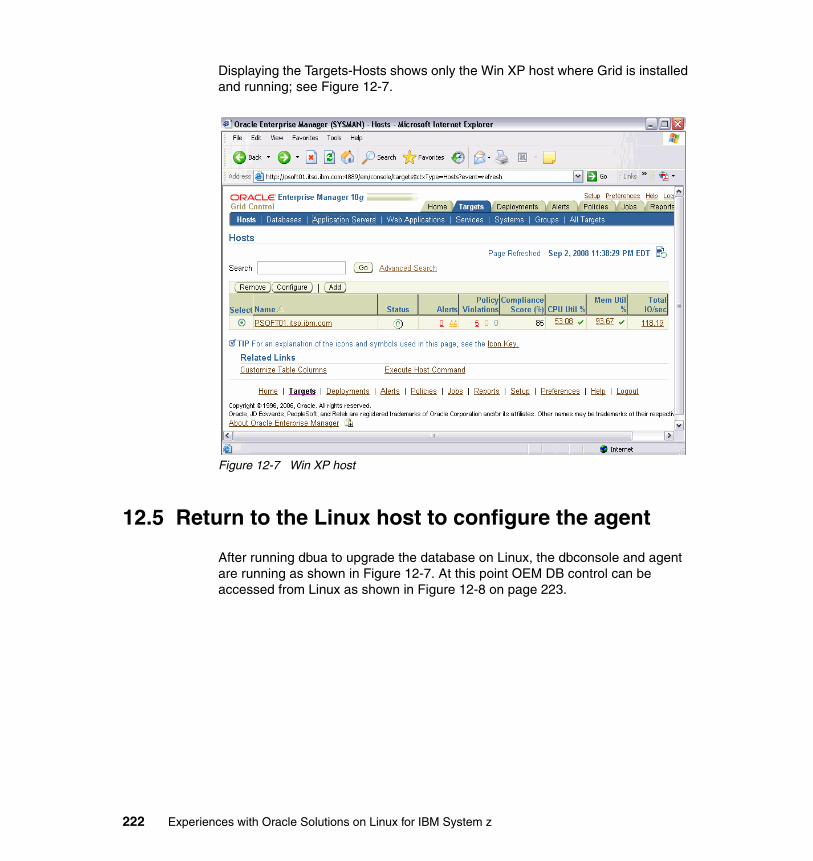
Displaying the Targets-Hosts shows only the Win XP host where Grid is installed and running; see Figure 12-7.
Figure 12-7 Win XP host
12.5 Return to the Linux host to configure the agent
After running dbua to upgrade the database on Linux, the dbconsole and agent are running as shown in Figure 12-7. At this point OEM DB control can be accessed from Linux as shown in Figure 12-8 on page 223.
222 Experiences with Oracle Solutions on Linux for IBM System z
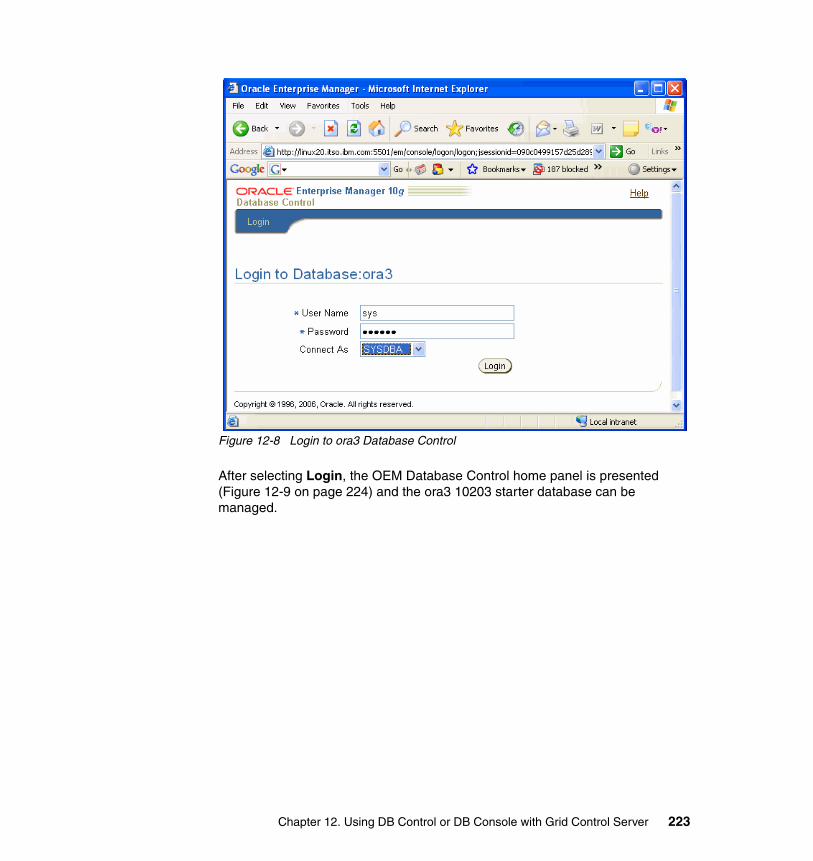
Figure 12-8 Login to ora3 Database Control
After selecting Login, the OEM Database Control home panel is presented (Figure 12-9 on page 224) and the ora3 10203 starter database can be managed.
Chapter 12. Using DB Control or DB Console with Grid Control Server 223
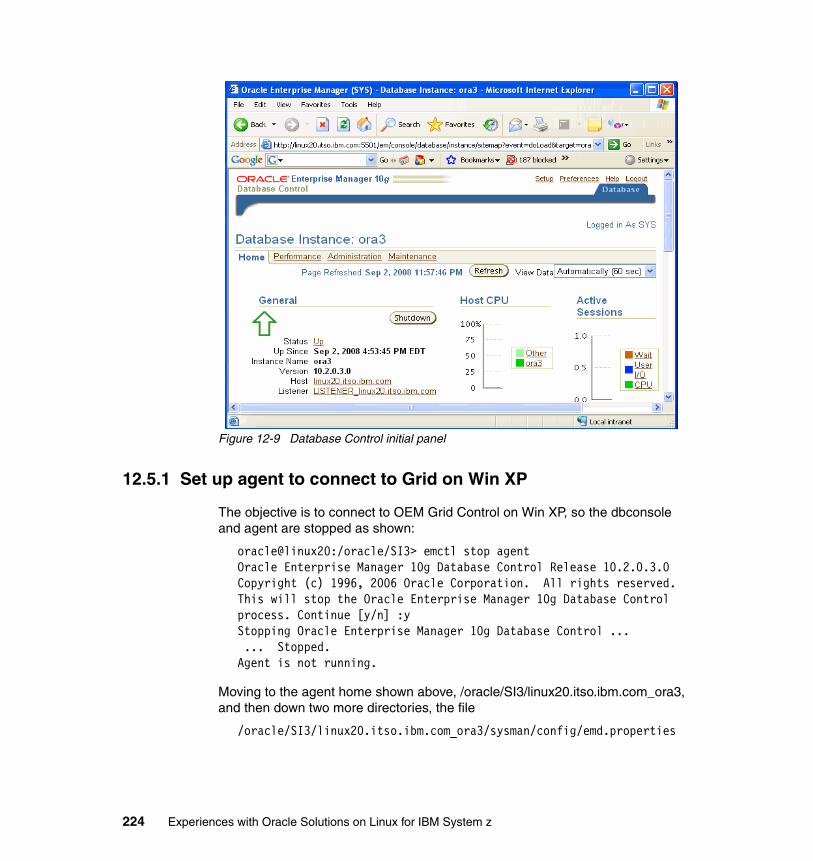
Figure 12-9 Database Control initial panel
12.5.1 Set up agent to connect to Grid on Win XP
The objective is to connect to OEM Grid Control on Win XP, so the dbconsole and agent are stopped as shown:
oracle@linux20:/oracle/SI3> emctl stop agentOracle Enterprise Manager 10g Database Control Release 10.2.0.3.0Copyright (c) 1996, 2006 Oracle Corporation. All rights reserved.This will stop the Oracle Enterprise Manager 10g Database Control process. Continue [y/n] :yStopping Oracle Enterprise Manager 10g Database Control ... ... Stopped.Agent is not running.
Moving to the agent home shown above, /oracle/SI3/linux20.itso.ibm.com_ora3, and then down two more directories, the file
/oracle/SI3/linux20.itso.ibm.com_ora3/sysman/config/emd.properties
224 Experiences with Oracle Solutions on Linux for IBM System z
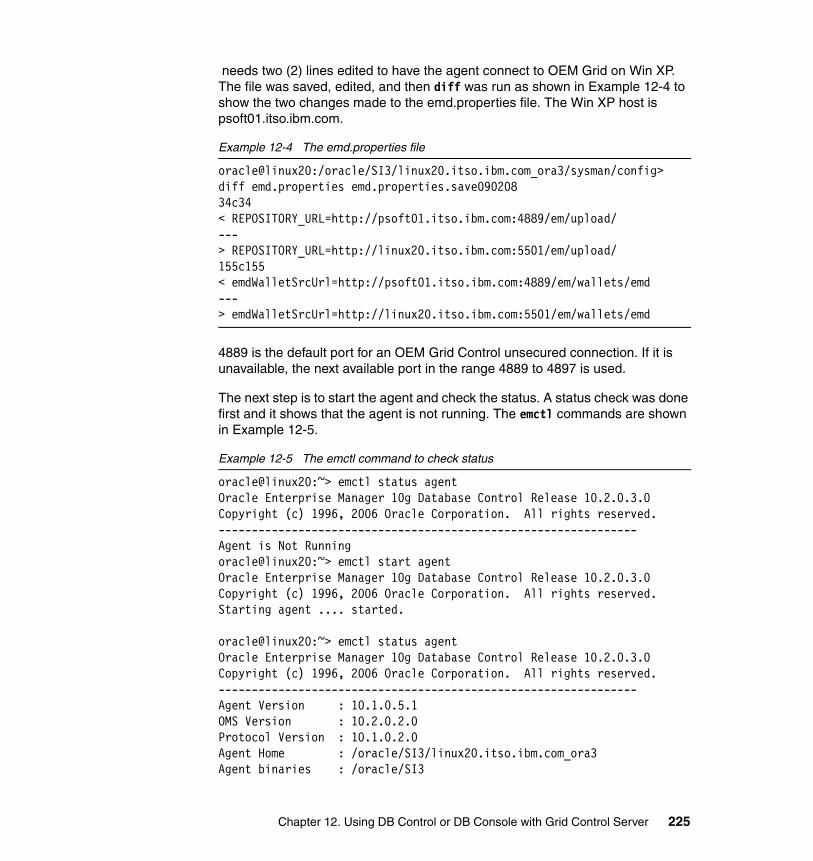
needs two (2) lines edited to have the agent connect to OEM Grid on Win XP. The file was saved, edited, and then diff was run as shown in Example 12-4 to show the two changes made to the emd.properties file. The Win XP host is psoft01.itso.ibm.com.
Example 12-4 The emd.properties file
oracle@linux20:/oracle/SI3/linux20.itso.ibm.com_ora3/sysman/config> diff emd.properties emd.properties.save09020834c34< REPOSITORY_URL=http://psoft01.itso.ibm.com:4889/em/upload/---> REPOSITORY_URL=http://linux20.itso.ibm.com:5501/em/upload/155c155< emdWalletSrcUrl=http://psoft01.itso.ibm.com:4889/em/wallets/emd---> emdWalletSrcUrl=http://linux20.itso.ibm.com:5501/em/wallets/emd
4889 is the default port for an OEM Grid Control unsecured connection. If it is unavailable, the next available port in the range 4889 to 4897 is used.
The next step is to start the agent and check the status. A status check was done first and it shows that the agent is not running. The emctl commands are shown in Example 12-5.
Example 12-5 The emctl command to check status
oracle@linux20:~> emctl status agentOracle Enterprise Manager 10g Database Control Release 10.2.0.3.0Copyright (c) 1996, 2006 Oracle Corporation. All rights reserved.---------------------------------------------------------------Agent is Not Runningoracle@linux20:~> emctl start agentOracle Enterprise Manager 10g Database Control Release 10.2.0.3.0Copyright (c) 1996, 2006 Oracle Corporation. All rights reserved.Starting agent .... started.
oracle@linux20:~> emctl status agentOracle Enterprise Manager 10g Database Control Release 10.2.0.3.0Copyright (c) 1996, 2006 Oracle Corporation. All rights reserved.---------------------------------------------------------------Agent Version : 10.1.0.5.1OMS Version : 10.2.0.2.0Protocol Version : 10.1.0.2.0Agent Home : /oracle/SI3/linux20.itso.ibm.com_ora3Agent binaries : /oracle/SI3
Chapter 12. Using DB Control or DB Console with Grid Control Server 225
Agent Process ID : 12873Parent Process ID : 12870Agent URL : http://linux20.itso.ibm.com:1832/emd/mainStarted at : 2008-09-03 10:06:55Started by user : oracleLast Reload : 2008-09-03 10:06:55Last successful upload : 2008-09-03 10:07:37Total Megabytes of XML files uploaded so far : 4.51Number of XML files pending upload : 0Size of XML files pending upload(MB) : 0.00Available disk space on upload filesystem : 9.30%---------------------------------------------------------------Agent is Running and Ready
The agent status message shows that the agent is up and running. Note here that the agent status messages do not show the repository URL that is shown in the status messages by the standalone agent. The status also shows that it has recently successfully uploaded data to the repository that is now the OEM Grid Control database. Moving back to the OEM Grid Control on Win XP, the Targets Hosts panel shows (Figure 12-10 on page 227) that the 10105 agent on Linux on System z has registered the host, linux20.itso.ibm.com, with Grid Control. From above the host, psoft01.itso.ibm.com, is where OEM Grid Control is running and is WIN XP.
226 Experiences with Oracle Solutions on Linux for IBM System z
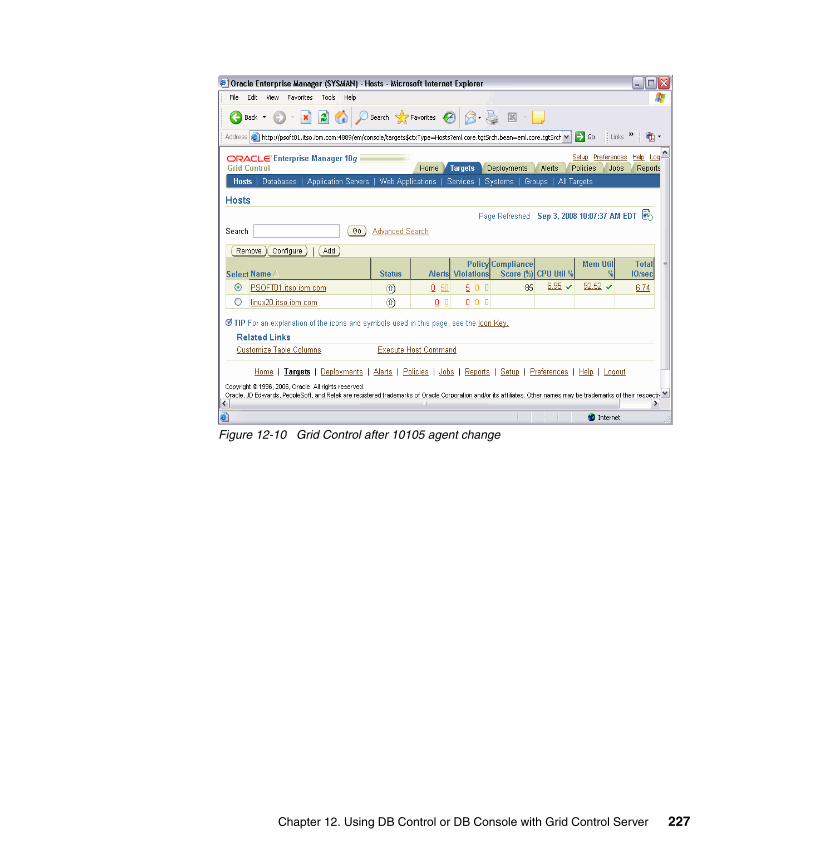
Figure 12-10 Grid Control after 10105 agent change
Chapter 12. Using DB Control or DB Console with Grid Control Server 227
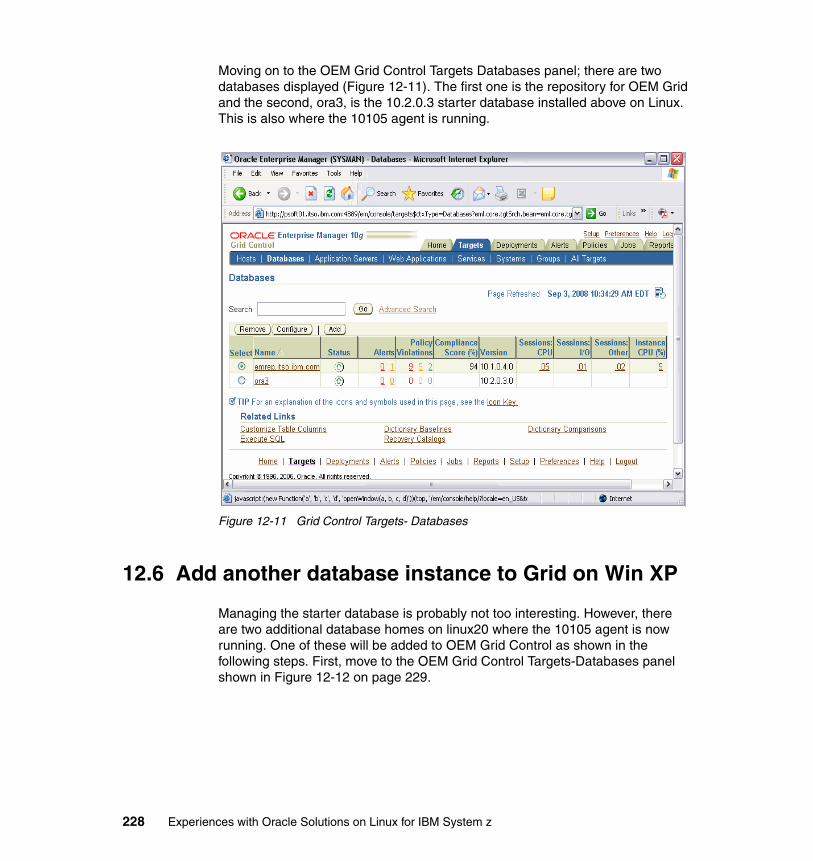
Moving on to the OEM Grid Control Targets Databases panel; there are two databases displayed (Figure 12-11). The first one is the repository for OEM Grid and the second, ora3, is the 10.2.0.3 starter database installed above on Linux. This is also where the 10105 agent is running.
Figure 12-11 Grid Control Targets- Databases
12.6 Add another database instance to Grid on Win XP
Managing the starter database is probably not too interesting. However, there are two additional database homes on linux20 where the 10105 agent is now running. One of these will be added to OEM Grid Control as shown in the following steps. First, move to the OEM Grid Control Targets-Databases panel shown in Figure 12-12 on page 229.
228 Experiences with Oracle Solutions on Linux for IBM System z
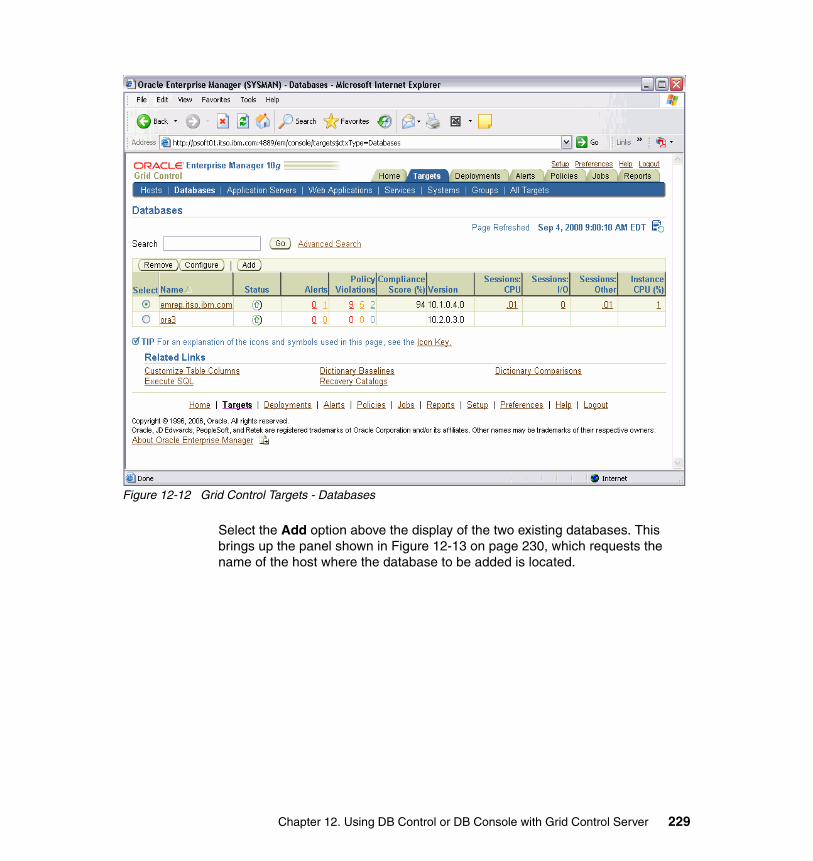
Figure 12-12 Grid Control Targets - Databases
Select the Add option above the display of the two existing databases. This brings up the panel shown in Figure 12-13 on page 230, which requests the name of the host where the database to be added is located.
Chapter 12. Using DB Control or DB Console with Grid Control Server 229
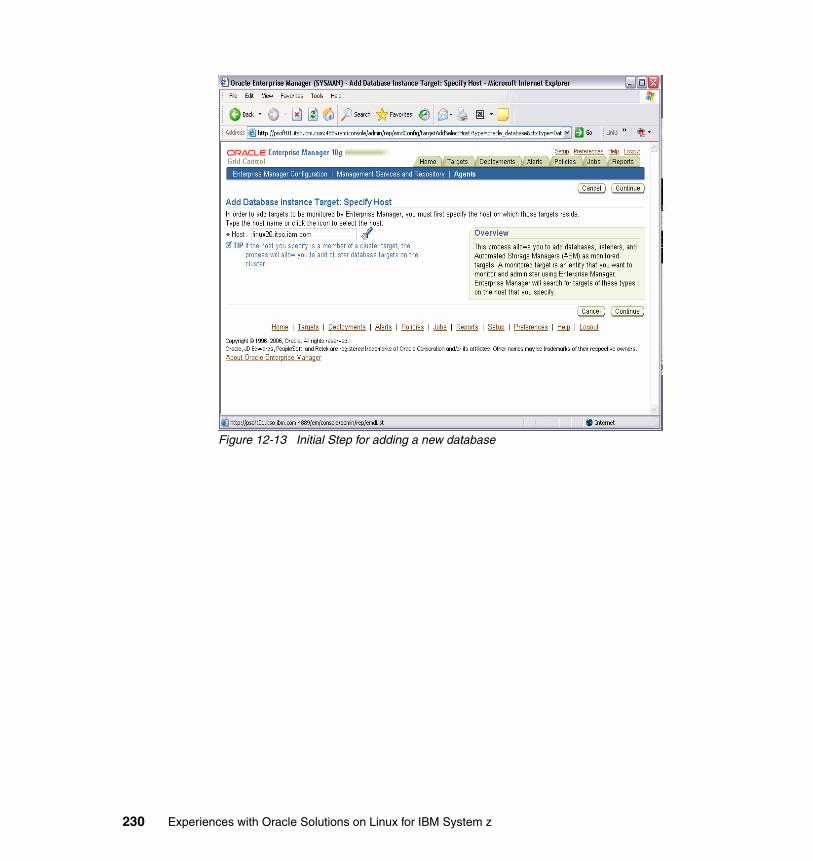
Figure 12-13 Initial Step for adding a new database
230 Experiences with Oracle Solutions on Linux for IBM System z
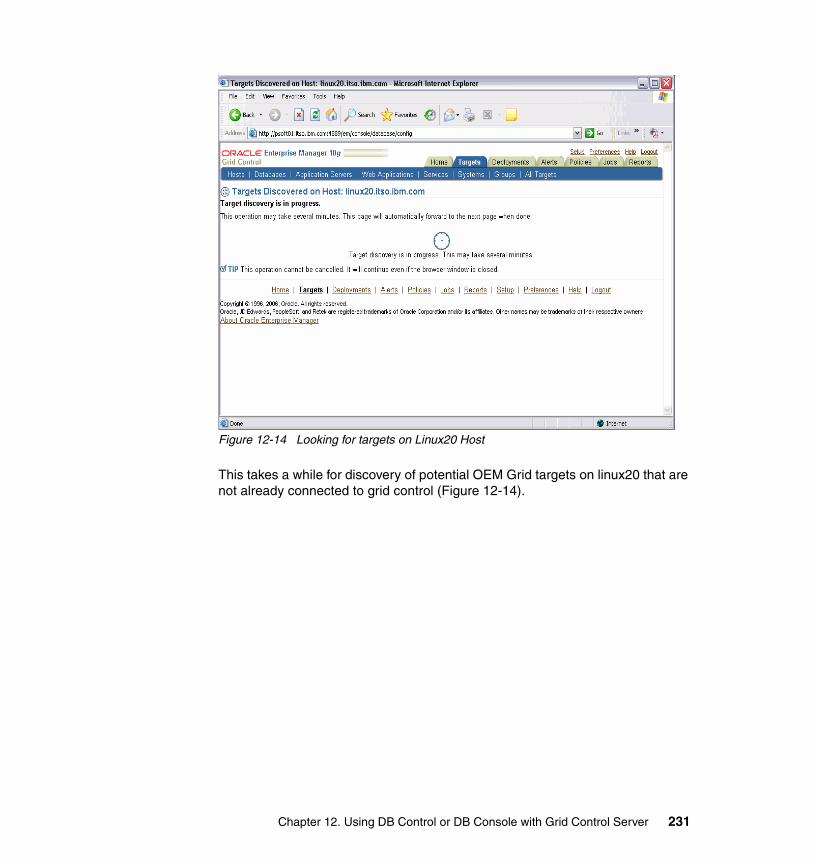
Figure 12-14 Looking for targets on Linux20 Host
This takes a while for discovery of potential OEM Grid targets on linux20 that are not already connected to grid control (Figure 12-14).
Chapter 12. Using DB Control or DB Console with Grid Control Server 231
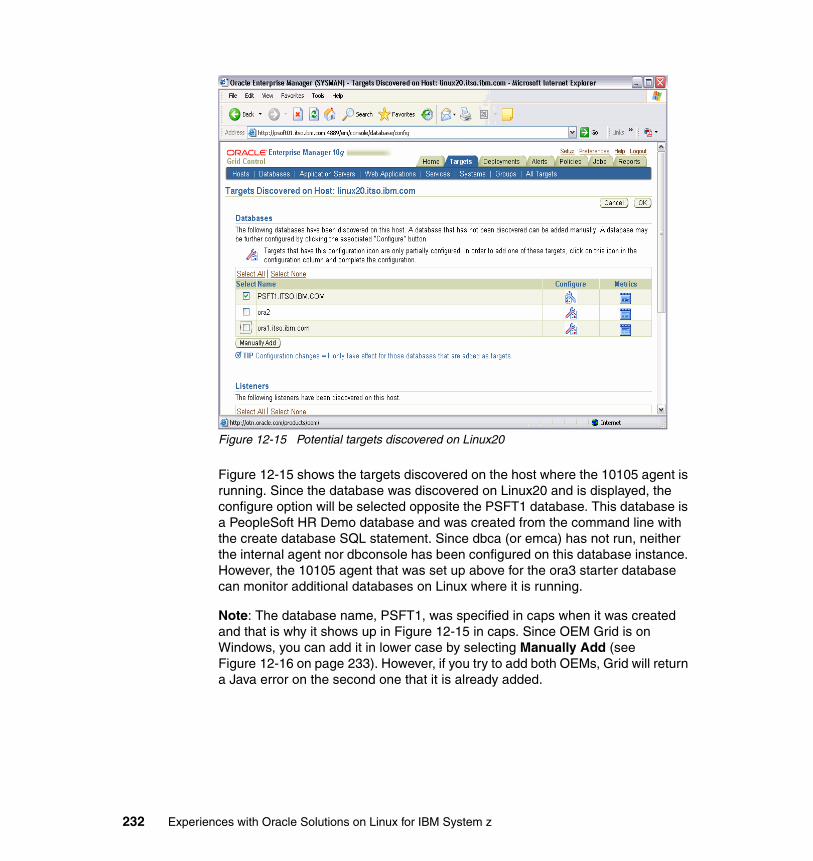
Figure 12-15 Potential targets discovered on Linux20
Figure 12-15 shows the targets discovered on the host where the 10105 agent is running. Since the database was discovered on Linux20 and is displayed, the configure option will be selected opposite the PSFT1 database. This database is a PeopleSoft HR Demo database and was created from the command line with the create database SQL statement. Since dbca (or emca) has not run, neither the internal agent nor dbconsole has been configured on this database instance. However, the 10105 agent that was set up above for the ora3 starter database can monitor additional databases on Linux where it is running.
Note: The database name, PSFT1, was specified in caps when it was created and that is why it shows up in Figure 12-15 in caps. Since OEM Grid is on Windows, you can add it in lower case by selecting Manually Add (see Figure 12-16 on page 233). However, if you try to add both OEMs, Grid will return a Java error on the second one that it is already added.
232 Experiences with Oracle Solutions on Linux for IBM System z
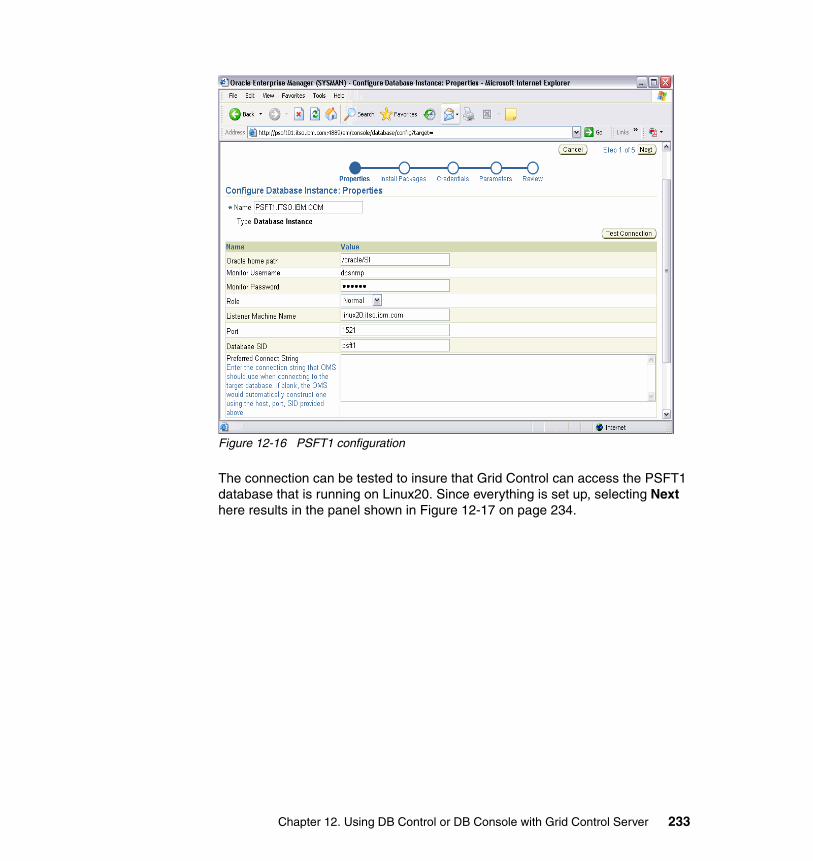
Figure 12-16 PSFT1 configuration
The connection can be tested to insure that Grid Control can access the PSFT1 database that is running on Linux20. Since everything is set up, selecting Next here results in the panel shown in Figure 12-17 on page 234.
Chapter 12. Using DB Control or DB Console with Grid Control Server 233
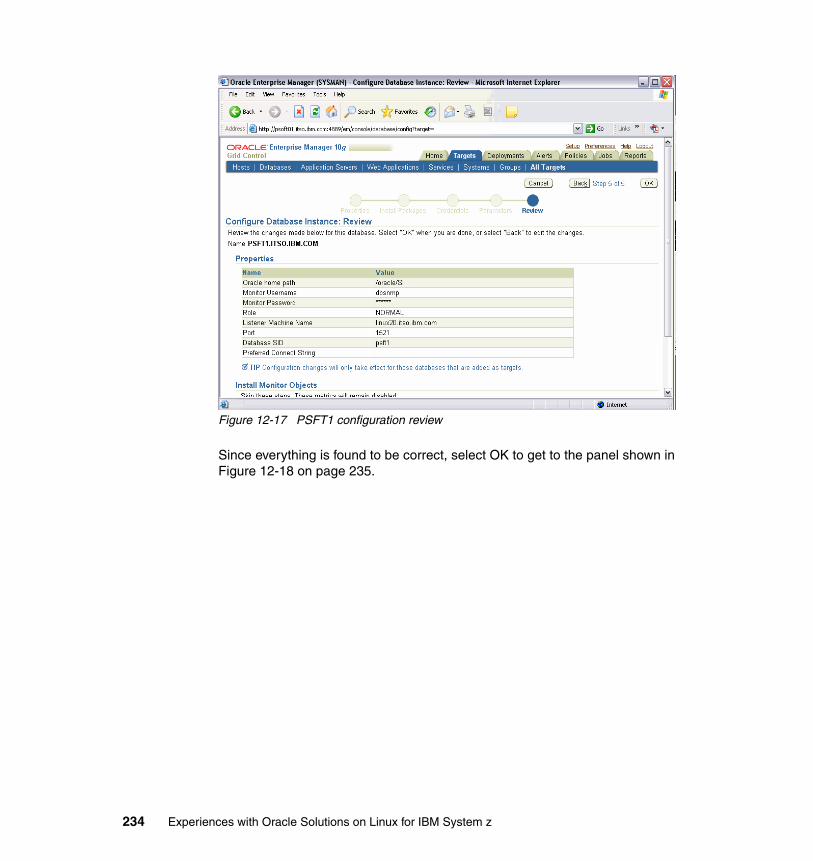
Figure 12-17 PSFT1 configuration review
Since everything is found to be correct, select OK to get to the panel shown in Figure 12-18 on page 235.
234 Experiences with Oracle Solutions on Linux for IBM System z
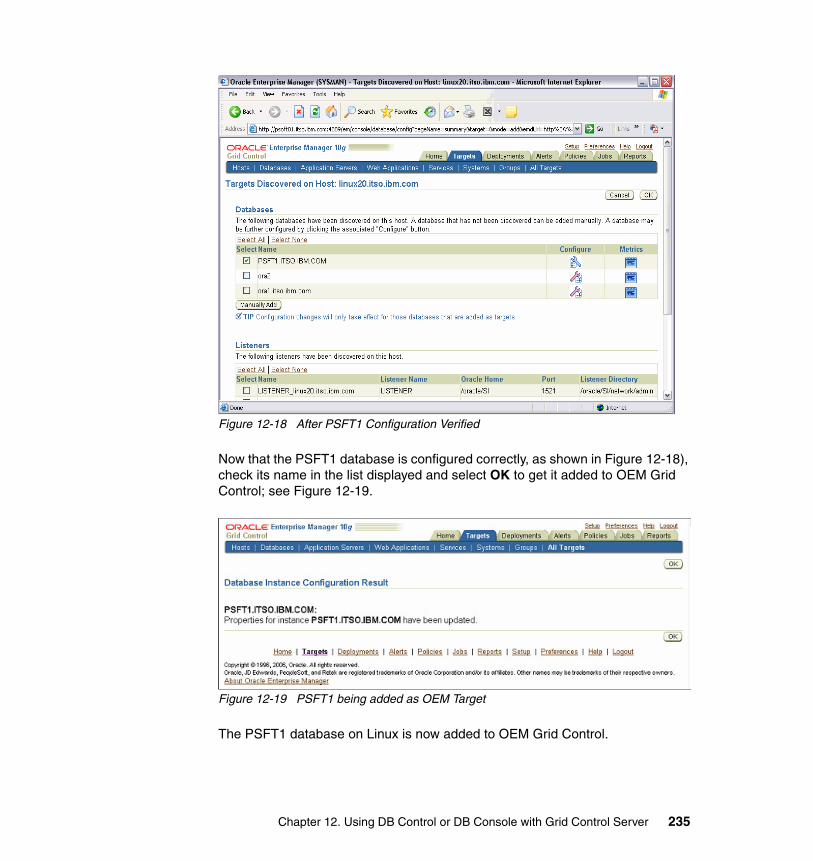
Figure 12-18 After PSFT1 Configuration Verified
Now that the PSFT1 database is configured correctly, as shown in Figure 12-18), check its name in the list displayed and select OK to get it added to OEM Grid Control; see Figure 12-19.
Figure 12-19 PSFT1 being added as OEM Target
The PSFT1 database on Linux is now added to OEM Grid Control.
Chapter 12. Using DB Control or DB Console with Grid Control Server 235
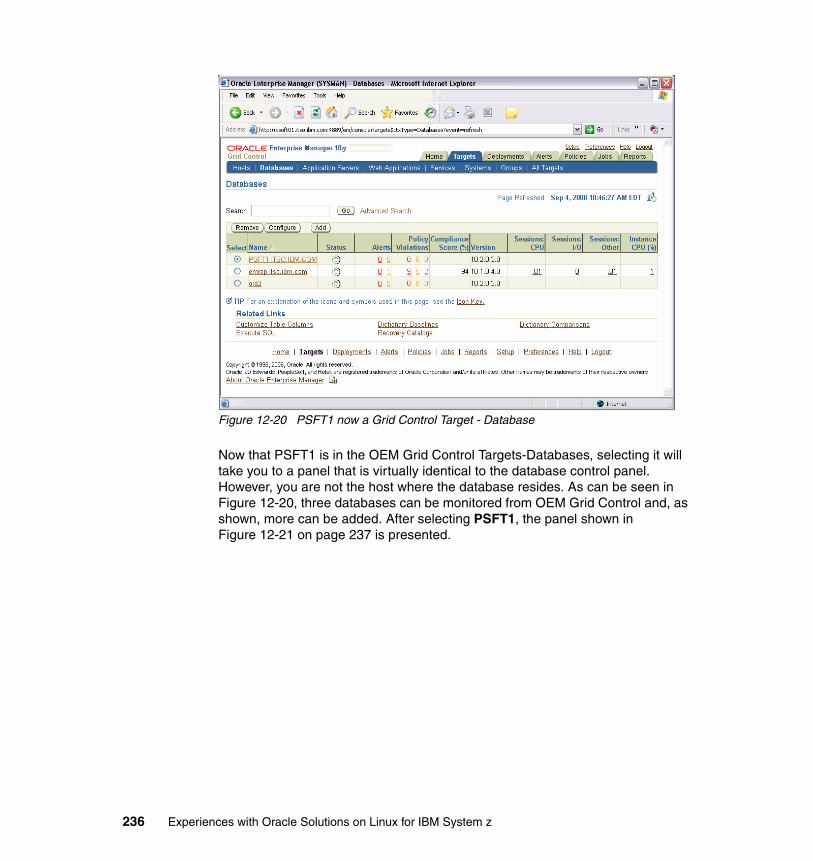
Figure 12-20 PSFT1 now a Grid Control Target - Database
Now that PSFT1 is in the OEM Grid Control Targets-Databases, selecting it will take you to a panel that is virtually identical to the database control panel. However, you are not the host where the database resides. As can be seen in Figure 12-20, three databases can be monitored from OEM Grid Control and, as shown, more can be added. After selecting PSFT1, the panel shown in Figure 12-21 on page 237 is presented.
236 Experiences with Oracle Solutions on Linux for IBM System z
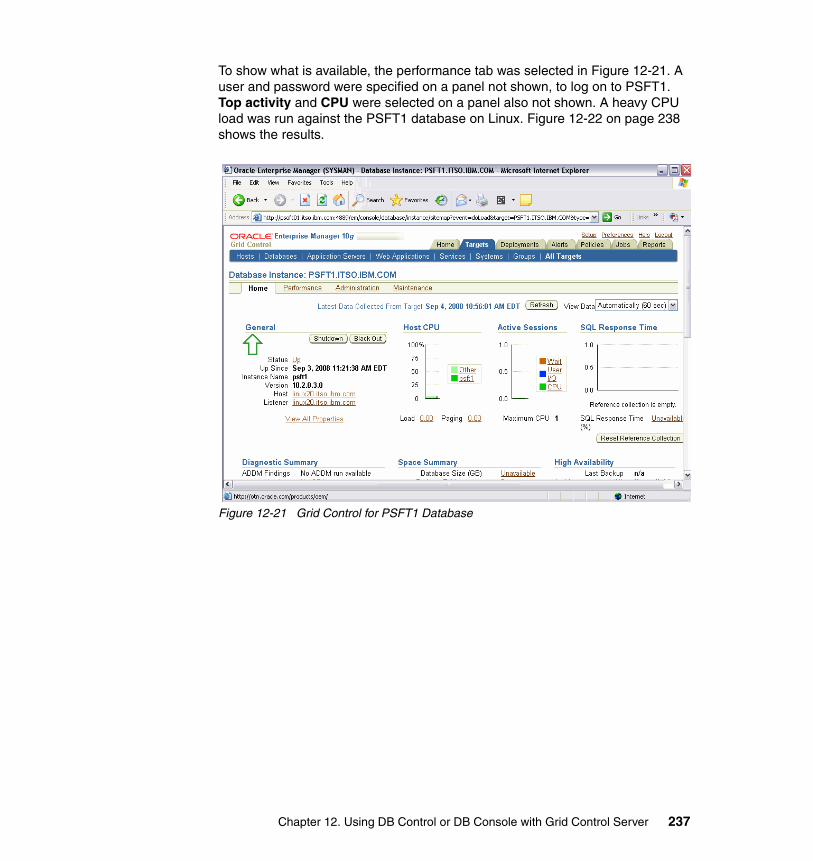
To show what is available, the performance tab was selected in Figure 12-21. A user and password were specified on a panel not shown, to log on to PSFT1. Top activity and CPU were selected on a panel also not shown. A heavy CPU load was run against the PSFT1 database on Linux. Figure 12-22 on page 238 shows the results.
Figure 12-21 Grid Control for PSFT1 Database
Chapter 12. Using DB Control or DB Console with Grid Control Server 237
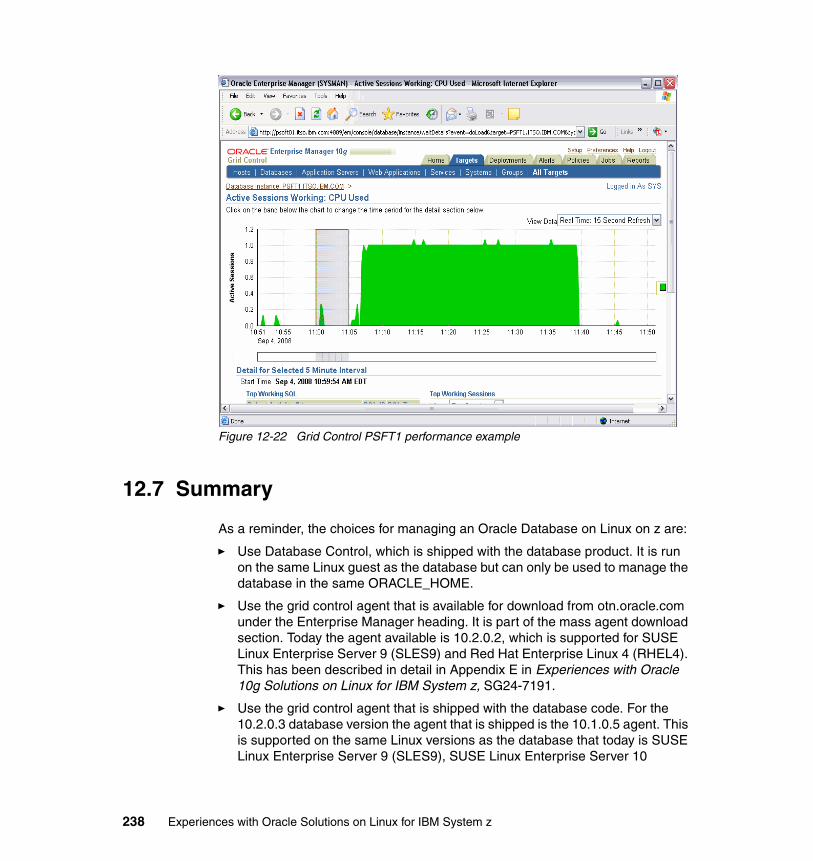
Figure 12-22 Grid Control PSFT1 performance example
12.7 Summary
As a reminder, the choices for managing an Oracle Database on Linux on z are:
� Use Database Control, which is shipped with the database product. It is run on the same Linux guest as the database but can only be used to manage the database in the same ORACLE_HOME.
� Use the grid control agent that is available for download from otn.oracle.com under the Enterprise Manager heading. It is part of the mass agent download section. Today the agent available is 10.2.0.2, which is supported for SUSE Linux Enterprise Server 9 (SLES9) and Red Hat Enterprise Linux 4 (RHEL4). This has been described in detail in Appendix E in Experiences with Oracle 10g Solutions on Linux for IBM System z, SG24-7191.
� Use the grid control agent that is shipped with the database code. For the 10.2.0.3 database version the agent that is shipped is the 10.1.0.5 agent. This is supported on the same Linux versions as the database that today is SUSE Linux Enterprise Server 9 (SLES9), SUSE Linux Enterprise Server 10
238 Experiences with Oracle Solutions on Linux for IBM System z
(SLES10) and Red Hat Enterprise Linux 4 (RHEL4). This option is described in this chapter.
Note: In one installation we encountered a problem based on the time change in November. We needed to install a DST patch when the agent was installed before the time change was done. If the agent is installed after the time change, then the DST patch was not necessary. See Metalink Note 471451.1 DST Requirements Master Note for Grid Control Components.
Chapter 12. Using DB Control or DB Console with Grid Control Server 239

240 Experiences with Oracle Solutions on Linux for IBM System z
Part 3 Maximum Availability Architecture
This part describes the components of Oracle’s Maximum Availability Architecture and how it can be used with IBM HA capabilities to provide a robust environment for mission-critical applications using an Oracle Database.
Part 3
© Copyright IBM Corp. 2009. All rights reserved. 241

242 Experiences with Oracle Solutions on Linux for IBM System z
Chapter 13. Components for providing high availability for Oracle on Linux on IBM System Z
This chapter is an overview of the components which Oracle and IBM provide that enable customers to be able to achieve their desired level of availability when running Oracle solutions on Virtual Linux Servers on IBM System z.
The components of Oracle Maximum Availability Architecture (MAA) and IBM System z High Availability are defined. Several technologies from Oracle and IBM are recommended for implementing MAA in a System z Virtual Linux machine environment.
Based on our experiences, we describe several possible scenarios of how customers are combining these features to provide a high availability platform for running Oracle solutions on IBM System z, using the capabilities of Oracle MAA.
13.1 Overview
Oracle products are being continually enhanced to provide more options for customers to improve the availability of their applications. This section describes
13
© Copyright IBM Corp. 2009. All rights reserved. 243
the key components and points to a detailed description of how to implement on Linux on IBM System z. The key components of Oracle’s Maximum Availability Architecture are:
� Oracle Enterprise Manager
� Oracle Clusterware (Cluster Ready Services (CRS))
� Oracle Database Server
– Oracle Automatic Storage Management (ASM)– Oracle Flashback– Oracle Recovery Manager (RMAN)– Oracle Streams– Oracle Real Application Clusters (RAC)– Oracle Data Guard
� Oracle Security Features
– Oracle Internet Directory (OID)– Oracle Data Vault
IBM System z has always been the leading IBM high availability platform. The components that provide high availability on IBM System z are:
� IBM System z hardware features
– IBM Integrated Facility for Linux (IFL) – IBM System z PR/SM and Logical Partitioning (LPAR) – IBM System z HiperSockets
� IBM System z virtualization
– IBM z/VM – IBM System z Directory Maintenance (DirMaint™)
� Linux operating system
� Other IBM associated products
– DS8000 Storage Subsystem– IBM Storage Flash Copy– Storage virtualization
� IBM Disaster Recovery options
– IBM Geographically Dispersed Parallel Systems (GDPS®)– Global Mirroring
As shown in Figure 13-1, there are many components available to architect an HA solution to meet HA requirements when running Oracle solutions on IBM System z.
244 Experiences with Oracle Solutions on Linux for System z
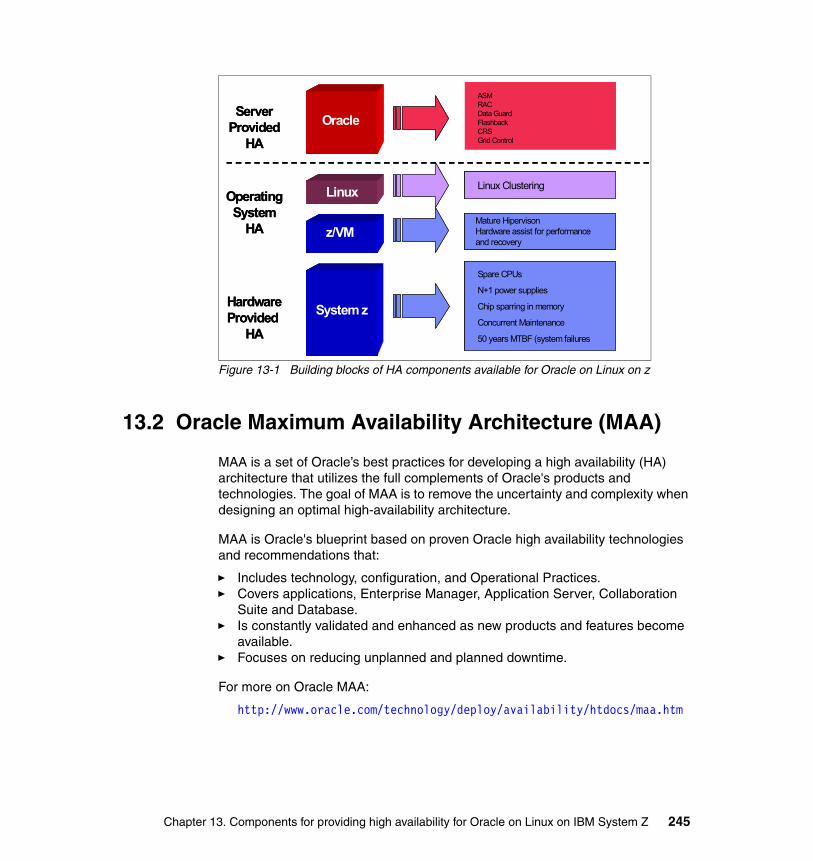
Figure 13-1 Building blocks of HA components available for Oracle on Linux on z
13.2 Oracle Maximum Availability Architecture (MAA)
MAA is a set of Oracle’s best practices for developing a high availability (HA) architecture that utilizes the full complements of Oracle's products and technologies. The goal of MAA is to remove the uncertainty and complexity when designing an optimal high-availability architecture.
MAA is Oracle's blueprint based on proven Oracle high availability technologies and recommendations that:
� Includes technology, configuration, and Operational Practices.� Covers applications, Enterprise Manager, Application Server, Collaboration
Suite and Database. � Is constantly validated and enhanced as new products and features become
available.� Focuses on reducing unplanned and planned downtime.
For more on Oracle MAA:
http://www.oracle.com/technology/deploy/availability/htdocs/maa.htm
System z
z/VM
Linux
Oracle
Spare CPUs
N+1 power supplies
Chip sparring in memory
Concurrent Maintenance
50 years MTBF (system failures
Mature HipervisonHardware assist for performance and recovery
Linux Clustering
ASMRACData GuardFlashbackCRSGrid Control
HardwareProvided
HA
OperatingSystem
HA
ServerProvided
HA
System zSystem z
z/VMz/VM
LinuxLinux
OracleOracle
Spare CPUs
N+1 power supplies
Chip sparring in memory
Concurrent Maintenance
50 years MTBF (system failures
Spare CPUs
N+1 power supplies
Chip sparring in memory
Concurrent Maintenance
50 years MTBF (system failures
Mature HipervisonHardware assist for performance and recovery
Mature HipervisonHardware assist for performance and recovery
Linux ClusteringLinux Clustering
ASMRACData GuardFlashbackCRSGrid Control
ASMRACData GuardFlashbackCRSGrid Control
HardwareProvided
HA
OperatingSystem
HA
ServerProvided
HA
Chapter 13. Components for providing high availability for Oracle on Linux on IBM System Z 245
13.2.1 MAA component technologies
The areas that we will discuss are:
� Oracle Enterprise Manager� Oracle Clusterware� Oracle Database� Oracle options for security
13.2.2 Oracle Enterprise Manager (OEM) Grid Control
Enterprise Manager Grid Control is Oracle's single, integrated solution for administering, operating, and monitoring applications and systems. It provides enhanced manageability and automation for the Grid. It also extends the manageability to non-Oracle management frameworks and middleware.
For more on OEM Grid Control:
http://www.oracle.com/technology/products/oem/index.html
We have described our installation experiences with Oracle Grid Control agent in Appendix E of Experiences with Oracle 10gR2 Solutions on Linux for IBM System z, SG24-7191 and in “Using DB Control or DB Console with Grid Control Server” on page 211 in this book.
13.2.3 Oracle Clusterware: ClusterReady Server (CRS)
Oracle Clusterware is portable cluster software that allows clustering of single servers so that they cooperate as a single system. Oracle Clusterware also provides the required infrastructure for Oracle Real Application Clusters (RAC). In addition, Oracle Clusterware enables the protection of any Oracle application or any other kind of application within a cluster.
For more on Oracle Clusterware, see:
http://www.oracle.com/technology/products/database/clusterware/index.html
This topic is covered in detail as part of the RAC installation topics in previous IBM Redbooks publications that are referred to in “Related publications” on page 353. Using CRS for a single instance failover is described in “Using Oracle Clusterware for a single instance database failover” on page 261 in this book.
246 Experiences with Oracle Solutions on Linux for System z
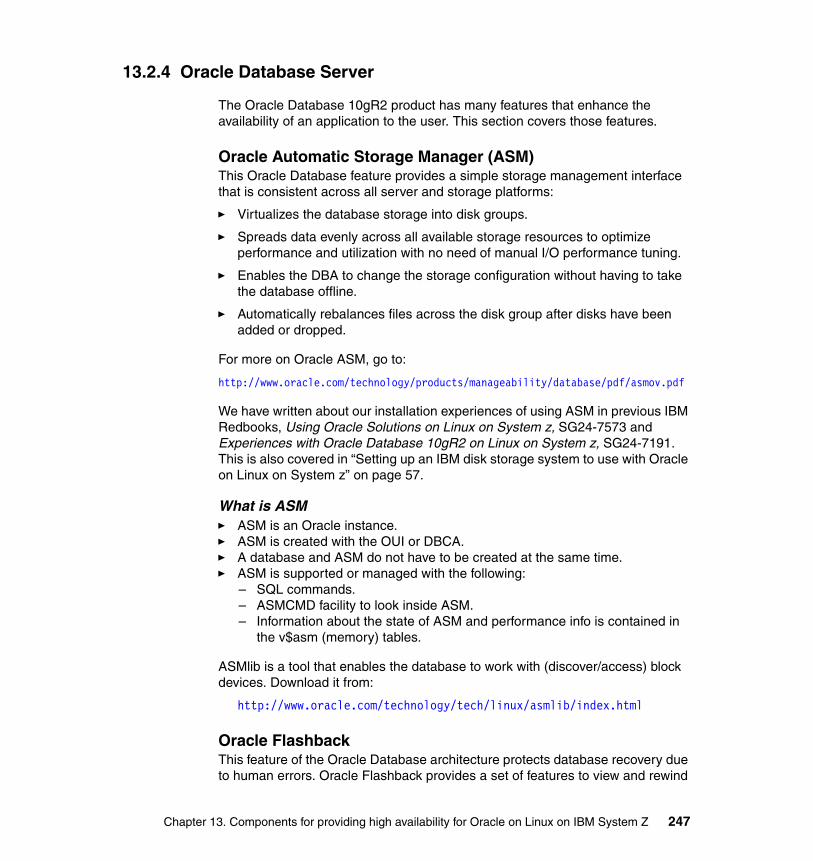
13.2.4 Oracle Database Server
The Oracle Database 10gR2 product has many features that enhance the availability of an application to the user. This section covers those features.
Oracle Automatic Storage Manager (ASM)This Oracle Database feature provides a simple storage management interface that is consistent across all server and storage platforms:
� Virtualizes the database storage into disk groups.
� Spreads data evenly across all available storage resources to optimize performance and utilization with no need of manual I/O performance tuning.
� Enables the DBA to change the storage configuration without having to take the database offline.
� Automatically rebalances files across the disk group after disks have been added or dropped.
For more on Oracle ASM, go to:
http://www.oracle.com/technology/products/manageability/database/pdf/asmov.pdf
We have written about our installation experiences of using ASM in previous IBM Redbooks, Using Oracle Solutions on Linux on System z, SG24-7573 and Experiences with Oracle Database 10gR2 on Linux on System z, SG24-7191. This is also covered in “Setting up an IBM disk storage system to use with Oracle on Linux on System z” on page 57.
What is ASM� ASM is an Oracle instance.� ASM is created with the OUI or DBCA.� A database and ASM do not have to be created at the same time.� ASM is supported or managed with the following:
– SQL commands.– ASMCMD facility to look inside ASM.– Information about the state of ASM and performance info is contained in
the v$asm (memory) tables.
ASMlib is a tool that enables the database to work with (discover/access) block devices. Download it from:
http://www.oracle.com/technology/tech/linux/asmlib/index.html
Oracle FlashbackThis feature of the Oracle Database architecture protects database recovery due to human errors. Oracle Flashback provides a set of features to view and rewind
Chapter 13. Components for providing high availability for Oracle on Linux on IBM System Z 247
data back and forth in time. The Oracle Flashback feature offers the capability to query historical data, perform change analysis, and perform self-service repair to recover from logical corruptions while the database is online.
For more on Oracle Flashback, see:
http://www.oracle.com/technology/deploy/availability/htdocs/Flashback_Overview.htm
Oracle Recovery Manager (RMAN)Oracle Recovery Manager (RMAN), a command-line and Enterprise Manager-based tool, is the Oracle-preferred method for efficiently backing up and recovering Oracle Database. RMAN is designed to work intimately with the server, providing block-level corruption detection during backup and restore. RMAN optimizes performance and space consumption during backup with file multiplexing and backup set compression, and integrates with Oracle Secure Backup and third party media management products for tape backup.
RMAN takes care of all underlying database procedures before and after backup or restore, freeing dependency on OS and SQL*Plus scripts. It provides a common interface for backup tasks across different host operating systems, and offers features not available through user-managed methods, such as parallelization of backup/recovery data streams, backup files retention policy, and detailed history of all backups.
For more on RMAN, see:
http://www.oracle.com/technology/deploy/availability/htdocs/rman_overview.htm
Using RMAN to back up an Oracle Database on Linux on System z is covered in Chapter 6 of Experiences with Oracle 10g Database for Linux on zSeries, SG24-6482.
Oracle StreamsOracle Streams enables the propagation and management of data, transactions, and events in a data stream either within a database, or from one database to another. The stream routes published information to subscribed destinations. The result is a new feature that provides greater functionality and flexibility than traditional solutions for capturing and managing events, and sharing the events with other databases and applications.
For more information, see:
http://www.oracle.com/technology/products/dataint/htdocs/streams_fo.html
248 Experiences with Oracle Solutions on Linux for System z
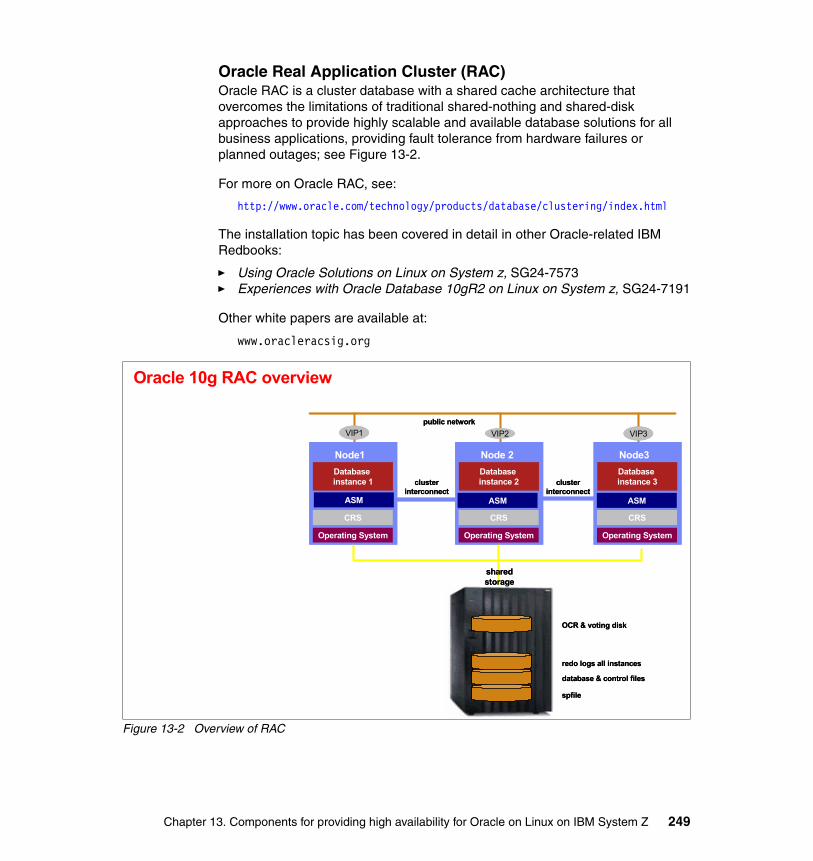
Oracle Real Application Cluster (RAC)Oracle RAC is a cluster database with a shared cache architecture that overcomes the limitations of traditional shared-nothing and shared-disk approaches to provide highly scalable and available database solutions for all business applications, providing fault tolerance from hardware failures or planned outages; see Figure 13-2.
For more on Oracle RAC, see:
http://www.oracle.com/technology/products/database/clustering/index.html
The installation topic has been covered in detail in other Oracle-related IBM Redbooks:
� Using Oracle Solutions on Linux on System z, SG24-7573� Experiences with Oracle Database 10gR2 on Linux on System z, SG24-7191
Other white papers are available at:
www.oracleracsig.org
Figure 13-2 Overview of RAC
Oracle 10g RAC overview
public network
clusterinterconnect
clusterinterconnect
VIP1 VIP3
Node3
Operating System
CRS
Database instance 3
VIP2
Node1
Operating System
CRS
Database instance 1
Node 2
Operating System
CRS
Database instance 2
redo logs all instances
database & control files
shared storage
OCR & voting disk
spfile
ASM ASM ASM
Chapter 13. Components for providing high availability for Oracle on Linux on IBM System Z 249
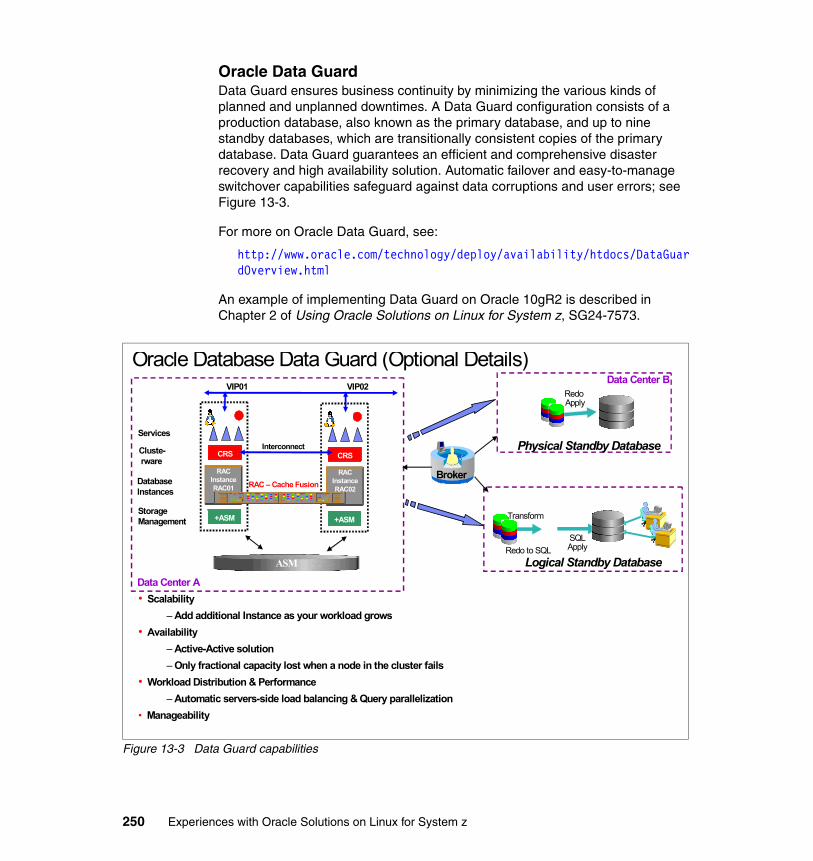
Oracle Data GuardData Guard ensures business continuity by minimizing the various kinds of planned and unplanned downtimes. A Data Guard configuration consists of a production database, also known as the primary database, and up to nine standby databases, which are transitionally consistent copies of the primary database. Data Guard guarantees an efficient and comprehensive disaster recovery and high availability solution. Automatic failover and easy-to-manage switchover capabilities safeguard against data corruptions and user errors; see Figure 13-3.
For more on Oracle Data Guard, see:
http://www.oracle.com/technology/deploy/availability/htdocs/DataGuardOverview.html
An example of implementing Data Guard on Oracle 10gR2 is described in Chapter 2 of Using Oracle Solutions on Linux for System z, SG24-7573.
Figure 13-3 Data Guard capabilities
• Scalability– Add additional Instance as your workload grows
• Availability– Active-Active solution– Only fractional capacity lost when a node in the cluster fails
• Workload Distribution & Performance– Automatic servers-side load balancing & Query parallelization
• Manageability
ASM
RACInstanceRAC01
CRS
+ASM
Interconnect
VIP01
RACInstanceRAC02
CRS
+ASM
VIP02
RAC – Cache Fusion
Services
Cluste-rware
DatabaseInstances
StorageManagement
Redo Apply
Logical Standby Database
SQLApplyRedo to SQL
Transform
Physical Standby Database
Broker
Data Center A
Data Center BOracle Database Data Guard (Optional Details)
250 Experiences with Oracle Solutions on Linux for System z
13.3 MAA with Security
Oracle Internet Directory (OID)Oracle Internet Directory is an LDAP v3 directory that leverages the scalability, high availability and security features of the Oracle Database. Oracle Internet Directory serves as the central user repository for Oracle Identity Management, simplifying user administration in the Oracle environment and providing a standards-based application directory for the heterogeneous enterprise. Additionally, Oracle Directory Synchronization allows Oracle Identity Management to seamlessly integrate with other directories and enterprise user repositories, allowing users to leverage identity information wherever it resides.
For more about Oracle OID, see:
http://www.oracle.com/technology/products/oid/index.html
We have described our installation experiences with AS10g in SG24-Experiences with Oracle 10gR2 Solutions on Linux for IBM System z, SG24-7191.
Oracle Data VaultOracle Database Vault helps protect against the insider threat and address regulatory compliance needs. Oracle Database Vault can prevent highly privileged users, including powerful application DBAs and others, from accessing sensitive applications and data in Oracle Databases outside their authorized responsibilities. Oracle Database Vault can protect existing applications quickly and easily and requires no changes to existing applications.
For more on Oracle Data Vault, see:
http://www.oracle.com/database/database-vault.html
We describe our installation experiences in Chapter 5, “Oracle Database Vault installation on Linux for System z” on page 91.
IBM Crypto CardThe optional Crypto Express 2 Coprocessor (CEX2C) comes as a PCI-X (Peripheral Component Interconnect eXtended) pluggable feature that provides a high performance and secure cryptographic environment.
We describe how to use this with Oracle in Chapter 11, “Using hardware security modules with Oracle Advanced Security” on page 171.
Chapter 13. Components for providing high availability for Oracle on Linux on IBM System Z 251

13.4 IBM high-availability components
This section lists the IBM features that can be incorporated into a high-availability scenario.
13.4.1 System z hardware features
The IBM System z range has evolved over the last 40 years as the IBM mainframe offering. These systems can now support up to 64 processors and 1.5 TB of memory and yet can cost-effectively be deployed to support small enterprise requirements where only one processor may be required. The mainframe today has joined the open systems world with its full Linux compatibility, enhanced with z/VM to provide true virtualization capabilities. Regardless of which operating system is being used, the System z hardware provides unparalleled availability, scalability and security.
For more on System z, see:
http://www-03.ibm.com/systems/z/?cm_re=masthead-_-products-_-sys-zseries
IBM Integrated Facility for Linux (IFL)An IBM System IFL is a central processor (CP) dedicated to Linux workloads. The IFL processor enables you to purchase additional processing capacity exclusively for Linux workloads. The IFL hardware feature is isolated from general use. It is supported by z/VM, the Linux operating system and Linux applications, and cannot run other IBM operating systems such as IBM z/OS. An IFL has the functionality of a general purpose System z processor and operates at full capacity.
More on IBM System z IFL is at:
http://www-03.ibm.com/systems/z/os/linux/ifl.html
System z PR/SM and logical partitioning (LPAR) System z LPAR is virtualization performed at the hardware layer and managed by a PR/SM facility.
Processor Resource/Systems Manager™ is a function that allows the processor to operate several system control programs (SCPs) simultaneously in logical partition (LPAR) mode. It provides for logical partitioning of the real machine.
A logical partition (LPAR) is a set of functions that create a programming environment that is defined by the System z architecture. An LPAR is
252 Experiences with Oracle Solutions on Linux for System z
conceptually similar to a virtual machine environment except that the LPAR is a function of the processor. Also LPAR does not depend on an operating system to create the virtual machine environment.
IBM LPARs have been certified to the security level of Evaluation Assurance Level 5 (EAL5). EAL5 certification confirms that PR/SM can be configured and used in environments where separation of workloads is a requirement, but where the use of a single hardware platform is desirable for reasons of economy, flexibility, security, or management. PR/SM is designed to prevent the flow of information among logical processor partitions, providing highly secure isolation. This isolation allows Linux for System z to run in different logical partitions on a single System z server.
For more about IBM System z, LPAR, and z/VM, go to:
http://www-03.ibm.com/systems/z/advantages/virtualization/features.html
IBM System z HiperSocketsHiperSockets is a technology that provides high-speed TCP/IP connectivity within a central processor complex. It eliminates the need for any physical cabling or external networking connections between servers running in different LPARs. The communication is through the system memory of the processor, so virtual servers are connected to via a high-performance low latency “internal LAN”. This technology is ideal for supporting Oracle RAC and Data Guard.
For more information about IBM System z HiperSockets, go to:
http://www.redbooks.ibm.com/abstracts/SG246816.html?Open
13.4.2 System z virtualization
With mainframe virtualization, you can create multiple virtual servers and consolidate a wide range of workloads on a single physical server. This enables you to streamline the management of your computing environment and reduce maintenance and support costs by simplifying your infrastructure.
IBM z/VMIBM z/VM server virtualization technology is designed to offer the capability to clients to run hundreds or even thousands of Linux servers on a single System z running with other operating systems or as a large-scale Linux-only enterprise server solution.
Chapter 13. Components for providing high availability for Oracle on Linux on IBM System Z 253

VSwitch and Virtual Lanz/VM Virtual Switch (VSWITCH) is a z/VM networking function that is designed to improve the interaction between guests running under z/VM and the physical network connected to the zSeries processor.
IBM has VLAN support for z/VM Virtual Switch, z/VM QDIO Guest LAN, and z/VM HiperSockets Guest LAN, allowing z/VM guests to create and participate in virtual LAN configurations.
For more information about these features, see:
http://www.redbooks.ibm.com/abstracts/redp3719.html
IBM System z Directory Maintenance (DirMaint)DirMaint for z/VM is a CMS application that helps manage an installation's VM directory. Directory statements can be added, deleted, or altered using the DirMaint directory statement-like commands. DirMaint provides automated validation and extent allocation routines to reduce the chance of operator error.
For more information about DirMaint, see:
http://www.vm.ibm.com/related/dirmaint/
13.4.3 Linux operating system
You can run Linux for IBM System z in native mode (in an LPAR) or as a virtual guest (under z/VM). If you have one large Oracle production database, you might consider running it in native mode. However, if you are running many databases, you would have many Linux guests under one or more z/VM systems.
Linux is an open industry standard operating platform that is strongly supported by IBM and Oracle. Standardizing on Linux allows companies to simplify their infrastructures and drive down operating costs. Many of the reliability, availability and security (RAS) features in modern systems are implemented at higher layers in the software stack, making Linux more portable and cost effective than any other operating platform. The two distributions certified for Oracle products involved in MAA strategy association with System z as of the publishing of this book are Red Hat and Novell® SUSE.
For more information about Red Hat and SUSE, see:
� http://www.redhat.com/rhel/server/mainframe/� http://www.novell.com/linux/mainframe/
254 Experiences with Oracle Solutions on Linux for System z
13.4.4 Other IBM products
DS8000 Storage SubSystem and Storage Area Network (SAN) For more information about IBM SAN Storage, see:
http://www-03.ibm.com/systems/storage/san/?cm_re=masthead-_-products-_-stg-san
IBM Storage FlashCopyIBM Storage FlashCopy® addresses the key requirement for continuous application availability by using the capability of the IBM Storage Subsystems supported by IBM System z (DS8000, DS6000™, ESS 800, SAN VC) to generate data copies without imposing load on the application server (“zero” impact). These copies are then used for backup, for restore, or for replication purposes.
For more information about IBM Storage FlashCopy, see:
http://www-03.ibm.com/systems/storage/news/center/virtualization/
Storage virtualizationWith IBM Systems Storage virtualization solutions, you can reduce the complexity of managing your storage environments by centralizing, simplifying and automating storage tasks associated with storage systems, storage networks, replication services, and capacity management. Our storage solutions are designed to help you take advantage of instantaneous data access, any time, from anywhere.
13.4.5 IBM disaster recovery options
IBM has offerings such as Geographically Dispersed Parallel Sysplex™ (GDPS) and Global Mirroring. Global Mirroring (also known as asynchronous PPRC) is a remote copy technology that enables a two-site disaster recovery and backup solution for the System z and open systems environments. Using asynchronous technology, Global Mirror operates over high-speed Fibre.
For more information, see GDPS Family - An Introduction to Concepts and Capabilities, SG24-6374 at:
http://www.redbooks.ibm.com/abstracts/sg246374.html?Open
Chapter 13. Components for providing high availability for Oracle on Linux on IBM System Z 255
13.5 Possible customer scenarios
IBM System z has been designed with built-in high availability RAS characteristics. Having multiple systems and using them with other IBM components can provide even more availability.
Oracle provides high availability for its software for every platform on which it runs, through the many features provided with the database and other products.
The availability levels can be described as:
� High availability (HA)
Provide service during defined periods, at acceptable or agreed upon levels, and mask unplanned outages from end users. It employs Fault Tolerance Automated Failure Detection, Recovery, Bypass Reconfiguration, Testing, Problem and Change Management.
� Continuous operations (CO)
Continuously operate and mask planned outages from end users. It employs non-disruptive hardware and software changes, non-disruptive configuration, and software coexistence.
� Continuous availability (CA)
Deliver non-disruptive service to the end user 7 days a week, 24 hours a day (there are no planned or unplanned outages).
Depending on the application requirement, you can choose a combination of IBM and Oracle features to provide the level required, starting with high availability and moving to an ultimate goal of continuous availability.
This section identifies possible scenarios based on the need for high availability by showing how to eliminate single points of failure. It describes the combinations of Oracle and IBM components which can be used to avoid those points of failure.
Some examples that provide high availability using IBM and Oracle components are:
� Scenario 1
Using the reliability features of System z
� Scenario 2
Using Oracle CRS for Single Instance Database Failover and System z
� Scenario 3
Using Oracle Real Application Clusters and System z
256 Experiences with Oracle Solutions on Linux for System z
� Scenario 4
– Using Oracle RAC in multiple System z environments in one site– Using Oracle RAC and Oracle Data Guard to provide HA and continuous
operations
� Scenario 5
Using two locations for disaster recovery with IBM components such as GDPS, Metro Mirroring, Global Mirroring and Oracle features such as RAC and /or Dataguard.
The customer scenarios will vary based on their applications and their requirements for service level. The objective is to reduce the single points of failure by using more components of Oracle and IBM System z. The possible single points of failure (SPOF) are:
� System z hardware� Disk subsystem� LPAR� z/VM � Linux� Oracle DB and Application
The System z hardware and the IBM disk subsystem are designed with redundant components.
13.5.1 Scenario 1
In this first case, an Oracle single instance is installed on a single Linux server that runs under z/VM or in native LPAR mode. Oracle DB features, such as ASM, Flashback, Recovery Manager, and Oracle Enterprise Manager would normally be used in all scenarios, including this one.
13.5.2 Scenario 2
Scenario 1 can be enhanced to offer protection against database failure by using Oracle Clusterware (CRS) to enable failover to another Linux guest. Oracle Clusterware could be used with a single instance database to protect against human error or operating system failure. CRS enables continuous operation for a rolling upgrade strategy for Linux upgrades and Oracle Database upgrades. It can be used under z/VM or native LPAR mode.
Chapter 13. Components for providing high availability for Oracle on Linux on IBM System Z 257

This scenario uses the combination of the following Oracle and IBM features to provide some degree of HA:
� IBM System z server � IBM z/VM � Linux distributions� Oracle Database features� Oracle Grid Control� Oracle Clusterware to secure your single database � Oracle ASM used as a Cluster Logical Volume Manager
This scenario is described in detail in “Using Oracle Clusterware for a single instance database failover” on page 261.
13.5.3 Scenario 3
This scenario shows how you can use Oracle RAC to ensure higher levels of availability. It can be implemented under VM or native LPARs. Oracle RAC can be implemented in several ways to assist you in meeting your SLA needs, such as:
� Two or more guests in one LPAR� Two or more guests, each in their own LPAR (Scenario four)� Two or more guests on two or more physical machines (Scenario five)
Scenario 4 uses Oracle components such as:
� CRS� RAC� ASM
If you also introduce Data Guard, you can improve the continuous operations by protecting against human error and by providing rolling upgrade capability.
13.5.4 Scenario 4
In this scenario, the Oracle RAC nodes are installed on multiple Linux servers that run under multiple z/VM systems on multiple LPARs on multiple System z servers. No SPOFs for the Oracle environment remain.
Data Guard can be included for the rolling upgrade capability.
258 Experiences with Oracle Solutions on Linux for System z
13.5.5 Scenario 5 - HA and disaster recovery
In this extension of Scenario 4, a backup site is implemented. The Oracle RAC nodes are installed on multiple Linux servers that run under multiple z/VM systems on multiple LPARs on multiple System z servers. No SPOFs exist for the Oracle environment.
The linkage between the sites is a form of DASD replication. There are several choices to provide the replication of data between the sites such as the IBM Global Mirroring and GDPS. Another option is to use Oracle Dataguard or Oracle Streams to replicate the data.
13.6 Summary
Using components of IBM System z and Oracle Products, customers can achieve the level of high availability they require for their applications. They can build reliable and flexible solutions that take advantage of:
� System z quality of service � Increased security at infrastructure and application layers� Integrated centralized and simplified administration (GDPS, rapid
provisioning of new environment, isolation of environments)� Optimized resource utilization� Data and information availability � Oracle Database features:
– Oracle ASM– Oracle Clusterware (CRS)– Oracle RAC– Oracle Data Guard
Figure 13-4 on page 260 shows some of the combinations that can be used to increase availability to meet your requirements.
Chapter 13. Components for providing high availability for Oracle on Linux on IBM System Z 259

Figure 13-4 Range of solutions
This shows the range of solutions under z/VM. There is also the option to implement these on native LPARs.
Oracle RAC on an IBM system z“Virtualized Machines”
“Extended” Oracle RAC on IBM System z servers
Oracle RAC in a LPAR
z/VM
RAC
z/VM z/VM
RAC
……
z/VM z/VM
RAC
Application and datacenter Scalability
Availability
260 Experiences with Oracle Solutions on Linux for System z
Chapter 14. Using Oracle Clusterware for a single instance database failover
This chapter describes how to use Oracle Clusterware to provide single instance database failover.
Background and supplementary information can be found in the Oracle manual Oracle Database Oracle Clusterware and Oracle Real Application Clusters Administration and Deployment Guide 10g Release 2 (10.2), B14197.
14
© Copyright IBM Corp. 2009. All rights reserved. 261
14.1 Overview
Oracle Clusterware is portable cluster software that allows clustering of single servers so that they cooperate as a single system. Oracle Clusterware provides the infrastructure for Oracle Real Application Clusters (RAC). In addition, Oracle Clusterware enables the protection of any Oracle application or any other kind of application in a cluster.
Given this flexibility, Oracle Clusterware can be used to support Single Instance Database Failover configurations. The central goal in this context is to monitor a database instance running on a server, and if a failure is detected, to restart the instance on the same node or relocate it to another server in the cluster. This chapter describes how you can use Oracle Clusterware to do just that, protect a single instance database.
Oracle Clusterware provides a number of features, two of which are central to Single Instance Database Failover requirements: restart of a database instance upon failure or inadvertent shutdown and restart of a database on a surviving node upon node failure.
While the focus of this chapter is Oracle Clusterware and how it can be used to protect single instances of Oracle Database, an important element of the clusterware's deployment is related to how an Oracle Database's file storage requirements are addressed.
There are many different configurations for a single instance Oracle Database, yet all can be loosely categorized by how the database files (user data, control files, redo logs, and so on) are deployed:
� Single Instance Databases using a file system
� Single Instance Databases using unclustered Automatic Storage Management
� Single Instance Databases using clustered Automatic Storage Management
By file system, we include the deployment of Oracle Database files on raw or block devices in both shared and non-shared configurations, along with the standard interpretation of a file system. Automatic Storage Management (ASM) on the other hand is a feature of the Oracle Database that provides the database administrator with a simple storage management interface that is consistent across all server and storage platforms. As a vertically integrated file system and volume manager, purposely built for Oracle Database files, ASM provides the performance of async I/O with the easy management of a file system. ASM provides the capability that saves DBAs time and provides flexibility to manage a dynamic database environment with increased efficiency.
262 Experiences with Oracle Solutions on Linux for IBM System z

ASM can be deployed so that it supports a single Oracle Database instance or many separate single instance Oracle Databases. ASM can also be installed in a clustered configuration across two or more nodes. A clustered ASM configuration provides a storage pool which can be shared by multiple single-instance Oracle Databases running in any node of the cluster where the clustered ASM instance is running.
Further, ASM is a key enabling technology of Oracle Maximum Availability Architecture (MAA). MAA is Oracle's best practice blueprints based on proven Oracle high-availability technologies and recommendations. The goal of MAA is to achieve an optimal high-availability architecture at the lowest cost and complexity.
With MAA's blueprints in mind we chose to implement this sample configuration using ASM's built-in clustering features. By default, Oracle Clusterware automatically protects clustered ASM instances so this allowed us to focus our attention on protecting and managing a single instance of the database.
14.2 Case study environment
Our intent for this chapter was not to delve deeply into the concepts and facilities, for example, of ASM, or for that matter into the z/VM environmental provisioning which went into the configuration of this case study. Nor, in the interest of time, did we discuss the application of Linux kernel fixes, Oracle patches, or IBM maintenance. For details on Oracle and IBM technologies and relevant topics referenced herein, consult “Related publications” on page 353for additional source material. We also did not devote time to the Oracle installation prerequisites either, given these are treated well in the existing documentation.
Our environment consisted of two identically configured SLES 10 SP2 Linux instances running as guests under the control of z/VM Version 5 Release 2.0, both within the same LPAR; see Figure 14-1 on page 264. These Linux guests shared several disks and were configured with a set of IP addresses required by Oracle Clusterware. All Oracle software was 10g R2 with all current patches applied. The Oracle software itself was installed on separate file systems mounted on each node and is not depicted in the diagrams that follow.
Chapter 14. Using Oracle Clusterware for a single instance database failover 263
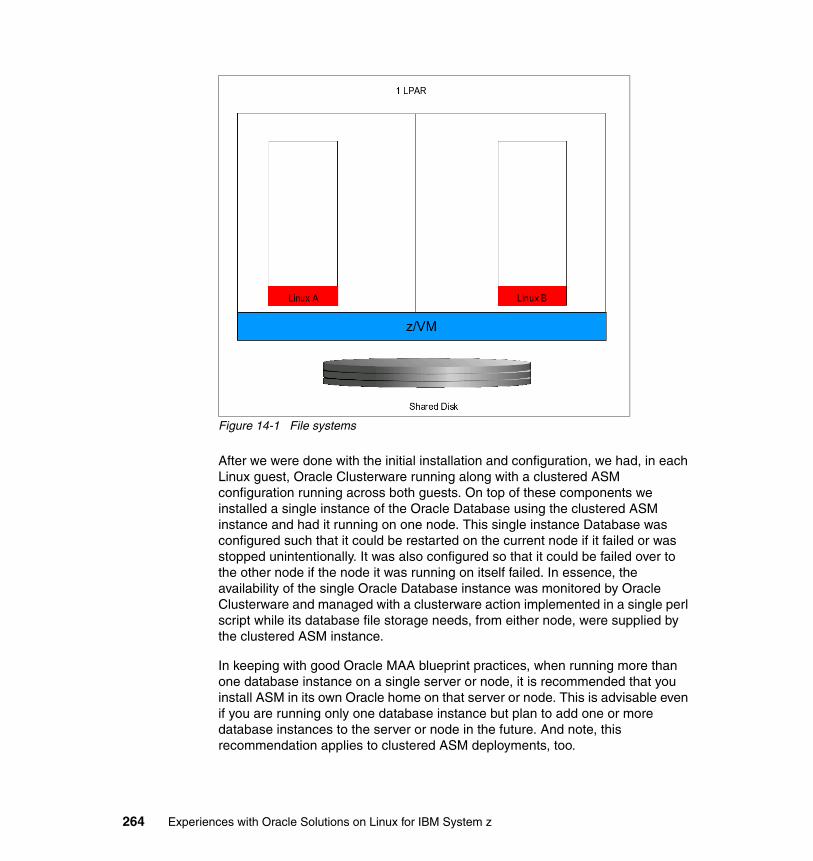
Figure 14-1 File systems
After we were done with the initial installation and configuration, we had, in each Linux guest, Oracle Clusterware running along with a clustered ASM configuration running across both guests. On top of these components we installed a single instance of the Oracle Database using the clustered ASM instance and had it running on one node. This single instance Database was configured such that it could be restarted on the current node if it failed or was stopped unintentionally. It was also configured so that it could be failed over to the other node if the node it was running on itself failed. In essence, the availability of the single Oracle Database instance was monitored by Oracle Clusterware and managed with a clusterware action implemented in a single perl script while its database file storage needs, from either node, were supplied by the clustered ASM instance.
In keeping with good Oracle MAA blueprint practices, when running more than one database instance on a single server or node, it is recommended that you install ASM in its own Oracle home on that server or node. This is advisable even if you are running only one database instance but plan to add one or more database instances to the server or node in the future. And note, this recommendation applies to clustered ASM deployments, too.
264 Experiences with Oracle Solutions on Linux for IBM System z
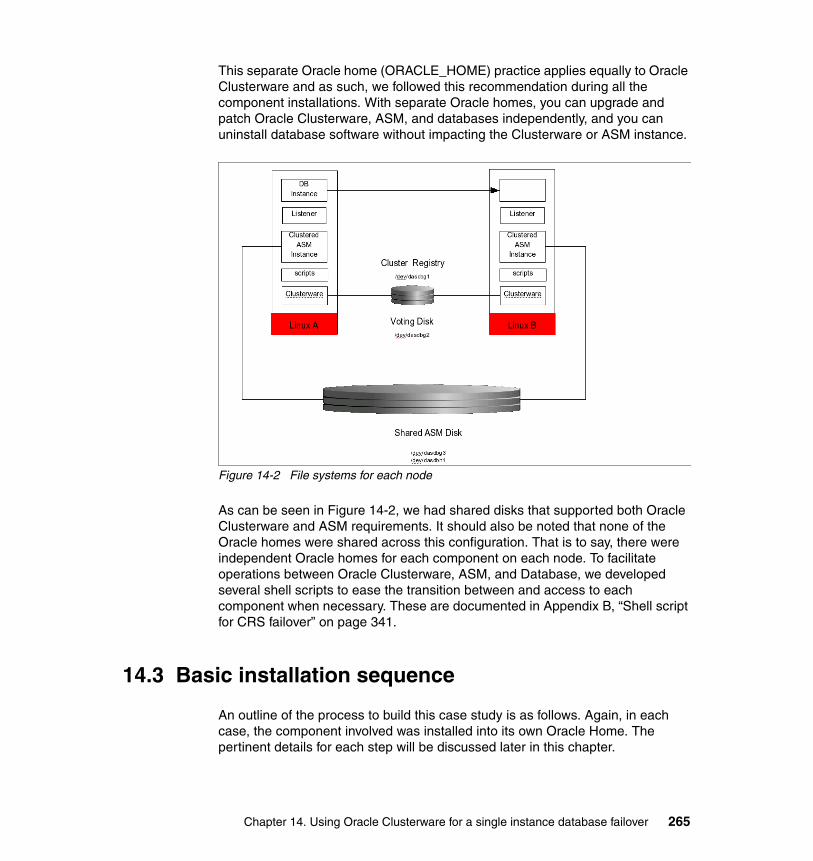
This separate Oracle home (ORACLE_HOME) practice applies equally to Oracle Clusterware and as such, we followed this recommendation during all the component installations. With separate Oracle homes, you can upgrade and patch Oracle Clusterware, ASM, and databases independently, and you can uninstall database software without impacting the Clusterware or ASM instance.
Figure 14-2 File systems for each node
As can be seen in Figure 14-2, we had shared disks that supported both Oracle Clusterware and ASM requirements. It should also be noted that none of the Oracle homes were shared across this configuration. That is to say, there were independent Oracle homes for each component on each node. To facilitate operations between Oracle Clusterware, ASM, and Database, we developed several shell scripts to ease the transition between and access to each component when necessary. These are documented in Appendix B, “Shell script for CRS failover” on page 341.
14.3 Basic installation sequence
An outline of the process to build this case study is as follows. Again, in each case, the component involved was installed into its own Oracle Home. The pertinent details for each step will be discussed later in this chapter.
Chapter 14. Using Oracle Clusterware for a single instance database failover 265
1. Install Oracle Clusterware
Information detailing this is covered in Chapter 4 of Oracle Clusterware and Oracle Real Application Clusters Installation Guide for Linux. Chapters 1 - 3 provide background information that was useful during the install. After installation, we verified the basic functionality of the clusterware. We needed to be sure we could query its state and see it running on each node.
2. Install a Clustered ASM instance
Information on installing a clustered ASM instance can be found in Chapter 5 of Oracle Clusterware and Oracle Real Application Clusters Installation Guide for Linux, specifically Step 5.2.1.
After these two component installations were complete we had separate Oracle Clusterware and ASM homes on each node. The clusterware was running and accessible on and from both nodes, as was the ASM instance. Additionally, a Listener was up on each node and executing from its independent ASM home where it was installed. The ASM instance provided an ASM disk group (created during the ASM install) which could be used by our single-instance Oracle Database from either node. After installation we verified that the ASM instance was available and accessible on each node. This was done by logging on to each node's instance and directly verifying that it was started.
3. Perform a software-only database install on each node
On each node, we installed only the database software. We did not create a database at this point. We installed the database software on the first node and then installed the software again on the other node.
4. Create a database on only one node
We chose a node in our cluster (pazxxt10) and on that cluster invoked the Oracle Database Creation Assistant ($ORACLE_HOME/bin/dbca) shell script from the Oracle Database home (not the ASM or Clusterware homes) and selected ASM as the place to host our database's files. The Oracle Database Creation Assistant detected the running ASM instance and offered that as an option for the database files.
5. Configure another node for database instance failover
We modified the Oracle Database configuration on the other node to allow it to host the single-instance database when failed over from the first node.
Recall that we now had an instance of the Oracle Database running on our first node. What we needed to do next was to configure the other node to be ready to start up the database instance if the node failed or the database instance was relocated. In order to do that we needed to do several things. First, we needed to copy the init.ora file for the instance over to an identical file location on the other node. We also had to create a database password
266 Experiences with Oracle Solutions on Linux for IBM System z
file with the same credentials as the node we had just installed the instance on, and then we had to create the “admin” directory as well. This admin directory tree is where the various Oracle Database kernel dump files get written to.
6. Configure Oracle Clusterware with an “action” perl script
On each node we made the perl script (see action_DB01.pl in the appendix) available to Oracle Clusterware. This involved placing it in an accessible location, setting the appropriate permissions on the perl script, and then registering it with the Clusterware.
7. Test single-instance failover scenarios
The tests we performed were threefold. First we needed to verify our ability to relocate our Oracle Database instance from one node to the other. Being able to relocate a database instance has considerable operational value. For example, if one node was host to several instances of Oracle Database, you could move the database workloads around within your cluster relatively effortlessly, for example for node maintenance or workload balancing. Another reason to test the relocation function of Oracle Clusterware would be to return the cluster to its original configuration after a node which crashed was brought back on line.
Secondly, we needed to be certain that if our Oracle Database instance was stopped or crashed for whatever reason, that Oracle Clusterware could restart it. The third test, and perhaps the most critical, was to verify the behavior of Oracle Clusterware when the Linux node itself crashed or was shut down.
Two helpful reference manuals are:
� Oracle Database Oracle Clusterware and Oracle Real Application Clusters Administration and Deployment Guide 10g Release 2 (10.2), B14197
� Oracle Clusterware Administration and Deployment Guide 11g Release 1 (11.1), B28255-06
14.4 Detailed component installation sequence
We have purposely omitted detailed treatment of the Oracle installation processes. These are all discussed in Oracle installation guides for each component. What follows are those aspects of the installation and configuration that we felt were meaningful or noteworthy.
Chapter 14. Using Oracle Clusterware for a single instance database failover 267
14.4.1 Oracle clusterware installation overview
We decided to install the Oracle software on separate file systems mounted on each node. There are two critical requirements of Oracle Clusterware: the location of the Cluster Registry and the Voting Disks, and the network configuration for external and intra-node communication.
In Oracle Clusterware, the information about a cluster's configuration is stored in the Oracle Cluster Registry (OCR). Since every node managed in an Oracle Clusterware cluster can be used to modify the cluster configuration (to record manual or dynamic node configuration changes, state, and so on), the OCR must be stored on a shared and accessible (from every node) storage medium, either in a named file in a directory of a shared file system or via shared raw or block devices.
Secondly, like other cluster software, Oracle Clusterware employs a disk-based area, accessible throughout the cluster, as a vehicle through which intra-node communication problems can be detected. This disk area is called the Voting Disk. Its purpose is to prevent what is commonly referred to as Split Brain. This is when clusters act independently of one another and cause shared data to be corrupted through unsynchronized access.
Generally speaking, when deploying Oracle Clusterware on System z Linux, the OCR and Voting Disks must be configured using either OCFS (a clustered file system from Oracle), or shared raw or block devices if you do not want the failover processing to include dismounting and remounting disks. In the interest of illustrating the general features of Oracle Clusterware for single instance database failover and for the sake of simplicity, and because raw devices are deprecated in future Linux kernels, we chose block devices for our case study.
The network requirements for Oracle Clusterware are simple: three types of IP addresses are required. The first one is a private address for each node and supports intra-node communication by Oracle Clusterware. The second is a public address for each node, which is used as the Virtual IP (VIP) address for client connections and for connection failover. Finally, there is the fixed public host name address for each node, typically assigned by the system administrator when Linux is initially installed.
If you have a domain name server (DNS), then you can register both the fixed public address and the Oracle Clusterware VIP addresses with the DNS. If you do not have a DNS, then you must make sure that both of these addresses are in the node's /etc/hosts file (for all cluster nodes), and any client system's /etc/hosts file that requires access to the database (or to be complete, a cluster aware application).
268 Experiences with Oracle Solutions on Linux for IBM System z
14.4.2 Disk allocation and partitioning requirements
We decided to use an unshared mount point (/scratch) as a place to install our binaries for each Oracle component requirement. So our focus, relative to the shared disk requirements of Oracle Clusterware, was confined to allocation and placement of the OCR and the Voting Disk. Because this was a simple functional case study, we did not duplex either the OCR or the Voting Disk.
We were given two disks that were shared between our Linux guests (pazxxt10, pazxxt11) and identified as 0400 and 0401. Our first step was to have a quick look at them; see Example 14-1.
Example 14-1 Listing of DASD
pazxxt10:~ # lsdasd0.0.0200(ECKD) at (94: 0) is dasda: active at blocksize 4096, 1802880 blocks, 7042 MB0.0.0207(FBA ) at (94: 28) is dasdh: active at blocksize 512, 4194296 blocks, 2047 MB0.0.0300(ECKD) at (94: 0) is dasdk: active at blocksize 4096, 1802880 blocks, 7042 MB0.0.0301(ECKD) at (94:44) is dasdl: active at blocksize 4096, 1802880 blocks, 7042 MB0.0.0302(ECKD) at ( 94: 48) is dasdm : active at blocksize 4096, 1802880 blocks, 7042 MB0.0.0303(ECKD) at ( 94: 52) is dasdn : active at blocksize 4096, 1802880 blocks, 7042 MB0.0.0304(ECKD) at ( 94: 56) is dasdo : active at blocksize 4096, 1802880 blocks, 7042 MB0.0.0400(ECKD) at ( 94:232) is dasdbg : active at blocksize 4096, 1802880 blocks, 7042 MB0.0.0401(ECKD) at ( 94:236) is dasdbh : active at blocksize 4096, 1802880 blocks, 7042 MB0.0.0402(ECKD) at ( 94:240) is dasdbi : active at blocksize 4096, 1802880 blocks, 7042 MB0.0.0403(ECKD) at ( 94:244) is dasdbj : active at blocksize 4096, 1802880 blocks, 7042 MB0.0.0404(ECKD) at ( 94:248) is dasdbk : active at blocksize 4096, 1802880 blocks, 7042 MBpazxxt10:~ #
We could see that they were already formatted and online. We decided to take the 0400 disk, dasdbg, and partition it for our OCR and Voting Disk requirements leaving the balance of unused space on 0400 to be later combined with the entire space on 0401 (dasdbh) for our clustered ASM instance disk group needs.
Then we created three partitions as follows:
dasdbg part #1 - OCR( 260m)dasdbg part #2 - Voting Disk( 260m)dasdbg part #3 - ASM(6522m)
We went with 260m on the OCR and the Voting Disk simply to round up from the 256m recommended. But before we did anything, we needed to take a closer look at the first disk, dasdbg. We could see that it had a partition on it already, as shown in Example 14-2.
Example 14-2 Checking the first disk
pazxxt10:~ # fdasd -p /dev/dasdbg
Chapter 14. Using Oracle Clusterware for a single instance database failover 269
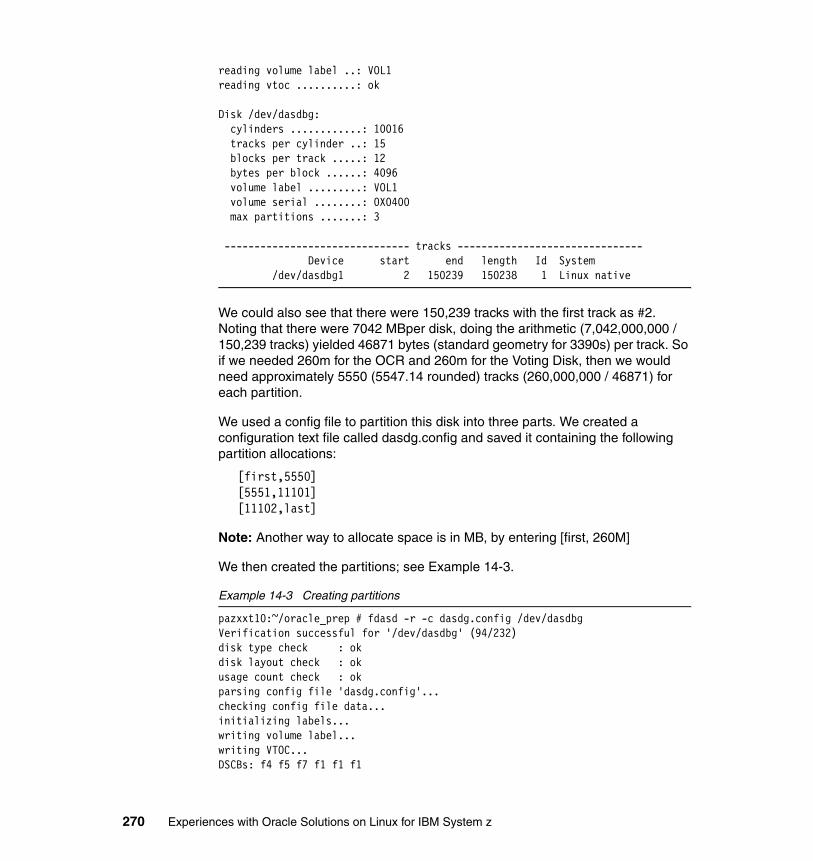
reading volume label ..: VOL1reading vtoc ..........: ok
Disk /dev/dasdbg: cylinders ............: 10016 tracks per cylinder ..: 15 blocks per track .....: 12 bytes per block ......: 4096 volume label .........: VOL1 volume serial ........: 0X0400 max partitions .......: 3
------------------------------- tracks ------------------------------- Device start end length Id System /dev/dasdbg1 2 150239 150238 1 Linux native
We could also see that there were 150,239 tracks with the first track as #2. Noting that there were 7042 MBper disk, doing the arithmetic (7,042,000,000 / 150,239 tracks) yielded 46871 bytes (standard geometry for 3390s) per track. So if we needed 260m for the OCR and 260m for the Voting Disk, then we would need approximately 5550 (5547.14 rounded) tracks (260,000,000 / 46871) for each partition.
We used a config file to partition this disk into three parts. We created a configuration text file called dasdg.config and saved it containing the following partition allocations:
[first,5550][5551,11101][11102,last]
Note: Another way to allocate space is in MB, by entering [first, 260M]
We then created the partitions; see Example 14-3.
Example 14-3 Creating partitions
pazxxt10:~/oracle_prep # fdasd -r -c dasdg.config /dev/dasdbgVerification successful for '/dev/dasdbg' (94/232)disk type check : okdisk layout check : okusage count check : okparsing config file 'dasdg.config'...checking config file data...initializing labels...writing volume label...writing VTOC...DSCBs: f4 f5 f7 f1 f1 f1
270 Experiences with Oracle Solutions on Linux for IBM System z

rereading partition table....
Afterwards, we confirmed the results, shown in Example 14-4.
Example 14-4 Confirming partition creation
pazxxt10:~/oracle_prep # fdasd -p /dev/dasdbgreading volume label ..: VOL1reading vtoc ..........: ok
Disk /dev/dasdbg: cylinders ............: 10016 tracks per cylinder ..: 15 blocks per track .....: 12bytes per block ......: 4096 volume label .........: VOL1 volume serial ........: 0X0400 max partitions .......: 3------------------------------- tracks ------------------------------- Device start end length Id System /dev/dasdbg1 2 5550 5549 1 Linux native /dev/dasdbg2 5551 11101 5551 2 Linux native /dev/dasdbg3 11102 150239 139138 3 Linux nativeexiting...
The next step, which is critical, was to initialize these OCR and Voting Disk partitions; see Example 14-5.
Example 14-5 Initializing OCR and voting disk
pazxxt10:~/utils # dd if=/dev/zero of=/dev/dasdbg1 bs=1k count=260000 260000+0 records in260000+0 records out266240000 bytes (266 MB) copied, 71.6638 seconds, 3.7 MB/spazxxt10:~/utils # dd if=/dev/zero of=/dev/dasdbg2 bs=1k count=260000260000+0 records in260000+0 records out266240000 bytes (266 MB) copied, 77.7535 seconds, 3.4 MB/s
At this point, even though we did not need to, we also initialized the front end of the third partition that we would be using later on for ASM. We also partitioned and then initialized the other disk, dasdbgh, which would be used as well for our ASM requirements. We do not detail those steps here, however, but simply note them in passing.
Chapter 14. Using Oracle Clusterware for a single instance database failover 271
14.4.3 Disk permission requirements
The OCR and Voting Disk have specific file permission needs when it comes to Oracle Clusterware, and these permissions vary at two distinct times. The first is during installation, the second time is after a shutdown or boot of Linux.
During the Oracle Clusterware installation, the ownership of OCR partition needs to be that of the installation owner (such as “oracle”) on all member nodes of the cluster. The installation owner must own the OCR partitions so that the Oracle Universal Installer (OUI) can write to them. During installation, OUI changes ownership of the OCR partitions back to root toward the end of the process.
After installation, the permissions need to be maintained across reboots of the kernel. In past releases of SLES, the *-udev.permissions files were used. These files were stored in the /etc/udev/permissions.d directory. In later 2.6 kernels, the *-udev.permissions files were obsoleted (in SLES10 as well as Red Hat Enterprise Linux 5) and this functionality merged into the “rules” files which on SLES10 are located in the /etc/udev/rules.d directory.
If you are not familiar with udev rules, you should consult the man pages.
With the new udev rules.d rule file formats, we created a file called 99-dasd.rules so that it would be applied after all the other rules are applied in rule.d (they are applied in file name collating sequence). We also did this because it is not a good idea to edit the 59-dasd.rules, because this file could get replaced with kernel upgrades. Additionally, a typo in the 59-dasd.rules could render the system non-usable.
So, we created our 99-dasd.rules file with the values shown in Example 14-6.
Example 14-6 The 99-dasd rules file
oracle@pazxxt10:/etc/udev/rules.d> more 99-dasd.rules## This file should be installed in /etc/udev/rules.d#
# for partitions import parent informationKERNEL=="*[0-9]", IMPORT{parent}=="ID_*"
KERNEL=="dasdbg1", OWNER="root", GROUP="dba", MODE="640"
# Oracle voting disk fileKERNEL=="dasdbg2", OWNER="oracle", GROUP="dba", MODE="660"
# Oracle ASM disks
272 Experiences with Oracle Solutions on Linux for IBM System z

KERNEL=="dasdbg3", OWNER="oracle", GROUP="dba", MODE="660" KERNEL=="dasdbh1", OWNER="oracle", GROUP="dba", MODE="660"
Before we did anything else, we checked the current settings; see Example 14-7.
Example 14-7 Check of current settings
pazxxt10:/etc/udev/rules.d # ls -al /dev/dasdb*brw-r----- 1 root disk 94, 232 Nov 1 08:14 /dev/dasdbgbrw-r----- 1 root disk 94, 233 Nov 1 08:14 /dev/dasdbg1brw-r----- 1 root disk 94, 234 Nov 1 08:14 /dev/dasdbg2brw-r----- 1 root disk 94, 235 Nov 1 08:14 /dev/dasdbg3brw-r----- 1 root disk 94, 236 Nov 1 08:14 /dev/dasdbhbrw-r----- 1 root disk 94, 237 Nov 1 08:14 /dev/dasdbh1
Then, we invoked udevtrigger to test our new rules and verify that the permissions would be applied properly, after a reboot. We also scp'ed this file to the other node and invoked udevtrigger there as well. We could see, after the udevtrigger invocation, that the permissions were what was required during normal post-install operations; see Example 14-8.
Example 14-8 Permissions after udevtrigger invocation
pazxxt10:/etc/udev/rules.d # ls -al /dev/dasdb*
brw-r----- 1 root disk 94, 232 Nov 1 08:15 /dev/dasdbgbrw-rw---- 1 root dba 94, 233 Nov 1 08:15 /dev/dasdbg1brw-r--r-- 1 oracle dba 94, 234 Nov 1 08:15 /dev/dasdbg2brw-rw---- 1 oracle dba 94, 235 Nov 1 08:15 /dev/dasdbg3brw-r----- 1 root disk 94, 236 Nov 1 08:15 /dev/dasdbhbrw-rw---- 1 oracle dba 94, 237 Nov 1 08:15 /dev/dasdbh1
However, this is what we wanted after a reboot and not during the installation. So we changed the OCR permissions so that the owner would be “oracle”. We did this on both nodes before proceeding with the installation.
14.4.4 Allocating space for the Oracle binaries
Because we would eventually need to have separate directories for the ASM and database binaries and configuration files, we created these additional directories, too, while we were creating the directories for Oracle Clusterware on each node as:
/scratch/oracle/asm/10.2.0.3/scratch/oracle/crs/10.2.0.3
Chapter 14. Using Oracle Clusterware for a single instance database failover 273
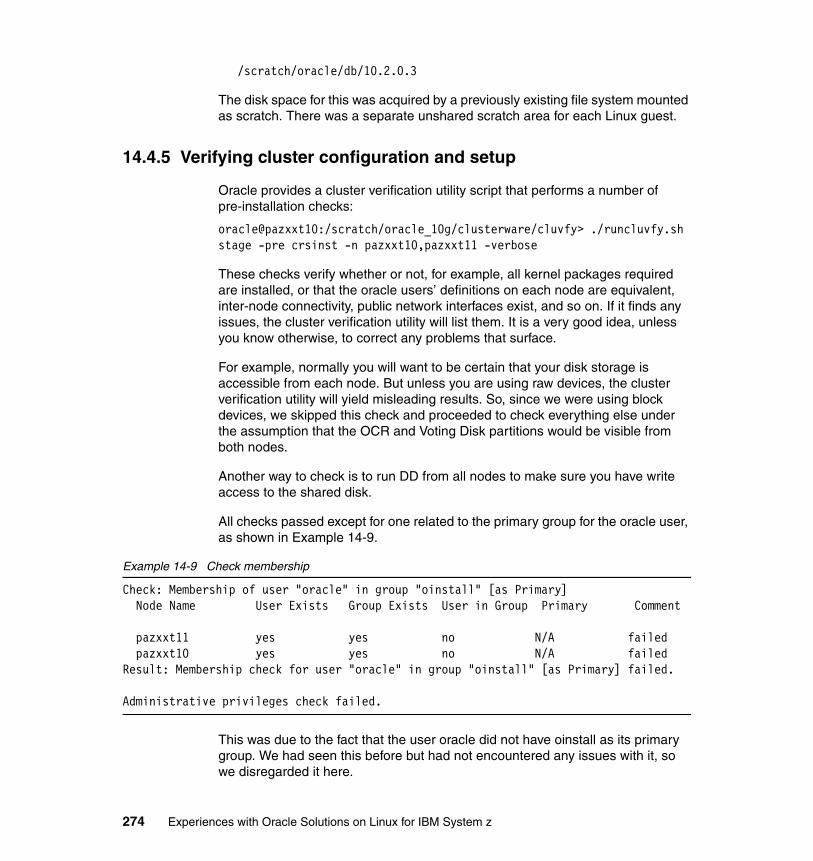
/scratch/oracle/db/10.2.0.3
The disk space for this was acquired by a previously existing file system mounted as scratch. There was a separate unshared scratch area for each Linux guest.
14.4.5 Verifying cluster configuration and setup
Oracle provides a cluster verification utility script that performs a number of pre-installation checks:
oracle@pazxxt10:/scratch/oracle_10g/clusterware/cluvfy> ./runcluvfy.sh stage -pre crsinst -n pazxxt10,pazxxt11 -verbose
These checks verify whether or not, for example, all kernel packages required are installed, or that the oracle users’ definitions on each node are equivalent, inter-node connectivity, public network interfaces exist, and so on. If it finds any issues, the cluster verification utility will list them. It is a very good idea, unless you know otherwise, to correct any problems that surface.
For example, normally you will want to be certain that your disk storage is accessible from each node. But unless you are using raw devices, the cluster verification utility will yield misleading results. So, since we were using block devices, we skipped this check and proceeded to check everything else under the assumption that the OCR and Voting Disk partitions would be visible from both nodes.
Another way to check is to run DD from all nodes to make sure you have write access to the shared disk.
All checks passed except for one related to the primary group for the oracle user, as shown in Example 14-9.
Example 14-9 Check membership
Check: Membership of user "oracle" in group "oinstall" [as Primary] Node Name User Exists Group Exists User in Group Primary Comment
pazxxt11 yes yes no N/A failed pazxxt10 yes yes no N/A failedResult: Membership check for user "oracle" in group "oinstall" [as Primary] failed.
Administrative privileges check failed.
This was due to the fact that the user oracle did not have oinstall as its primary group. We had seen this before but had not encountered any issues with it, so we disregarded it here.
274 Experiences with Oracle Solutions on Linux for IBM System z
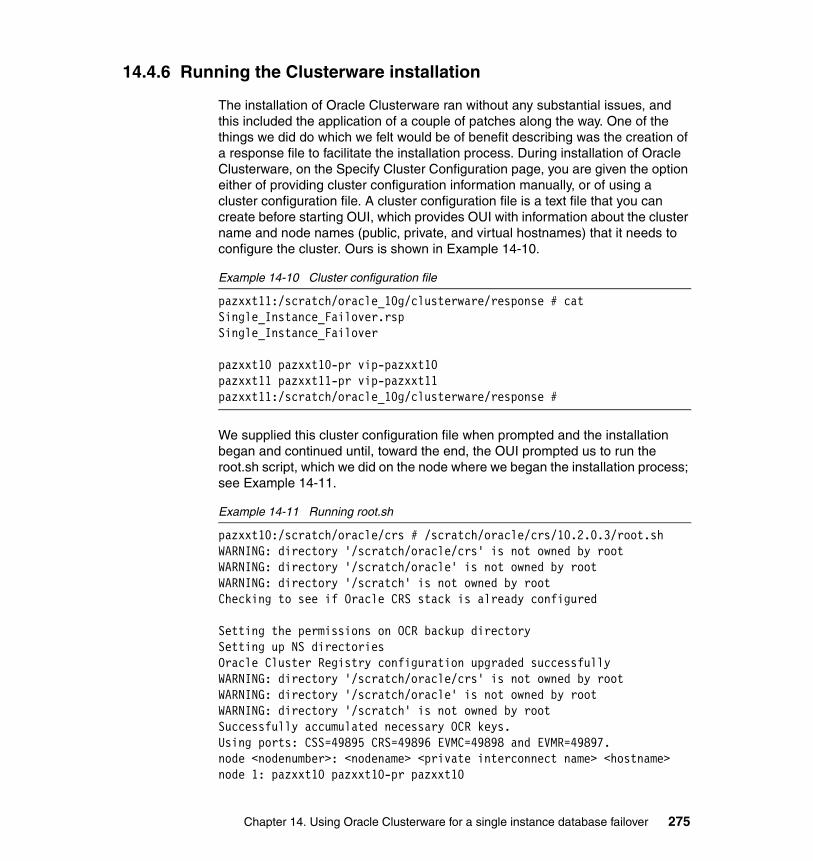
14.4.6 Running the Clusterware installation
The installation of Oracle Clusterware ran without any substantial issues, and this included the application of a couple of patches along the way. One of the things we did do which we felt would be of benefit describing was the creation of a response file to facilitate the installation process. During installation of Oracle Clusterware, on the Specify Cluster Configuration page, you are given the option either of providing cluster configuration information manually, or of using a cluster configuration file. A cluster configuration file is a text file that you can create before starting OUI, which provides OUI with information about the cluster name and node names (public, private, and virtual hostnames) that it needs to configure the cluster. Ours is shown in Example 14-10.
Example 14-10 Cluster configuration file
pazxxt11:/scratch/oracle_10g/clusterware/response # cat Single_Instance_Failover.rspSingle_Instance_Failover
pazxxt10 pazxxt10-pr vip-pazxxt10pazxxt11 pazxxt11-pr vip-pazxxt11pazxxt11:/scratch/oracle_10g/clusterware/response #
We supplied this cluster configuration file when prompted and the installation began and continued until, toward the end, the OUI prompted us to run the root.sh script, which we did on the node where we began the installation process; see Example 14-11.
Example 14-11 Running root.sh
pazxxt10:/scratch/oracle/crs # /scratch/oracle/crs/10.2.0.3/root.shWARNING: directory '/scratch/oracle/crs' is not owned by rootWARNING: directory '/scratch/oracle' is not owned by rootWARNING: directory '/scratch' is not owned by rootChecking to see if Oracle CRS stack is already configured
Setting the permissions on OCR backup directorySetting up NS directoriesOracle Cluster Registry configuration upgraded successfullyWARNING: directory '/scratch/oracle/crs' is not owned by rootWARNING: directory '/scratch/oracle' is not owned by rootWARNING: directory '/scratch' is not owned by rootSuccessfully accumulated necessary OCR keys.Using ports: CSS=49895 CRS=49896 EVMC=49898 and EVMR=49897.node <nodenumber>: <nodename> <private interconnect name> <hostname>node 1: pazxxt10 pazxxt10-pr pazxxt10
Chapter 14. Using Oracle Clusterware for a single instance database failover 275
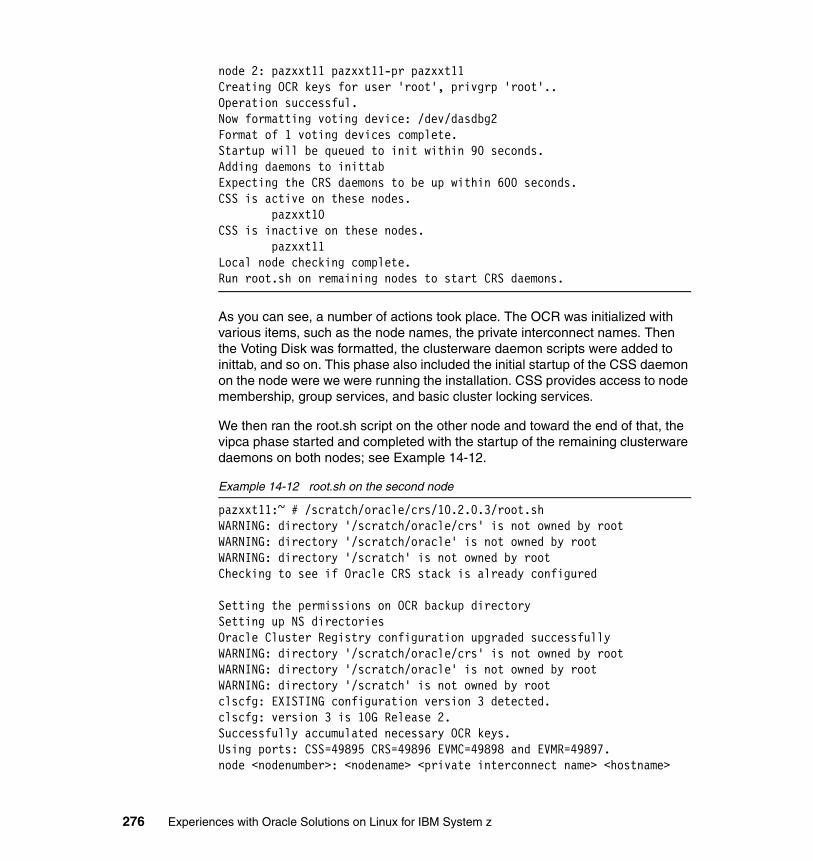
node 2: pazxxt11 pazxxt11-pr pazxxt11Creating OCR keys for user 'root', privgrp 'root'..Operation successful.Now formatting voting device: /dev/dasdbg2Format of 1 voting devices complete.Startup will be queued to init within 90 seconds.Adding daemons to inittabExpecting the CRS daemons to be up within 600 seconds.CSS is active on these nodes. pazxxt10CSS is inactive on these nodes. pazxxt11Local node checking complete.Run root.sh on remaining nodes to start CRS daemons.
As you can see, a number of actions took place. The OCR was initialized with various items, such as the node names, the private interconnect names. Then the Voting Disk was formatted, the clusterware daemon scripts were added to inittab, and so on. This phase also included the initial startup of the CSS daemon on the node were we were running the installation. CSS provides access to node membership, group services, and basic cluster locking services.
We then ran the root.sh script on the other node and toward the end of that, the vipca phase started and completed with the startup of the remaining clusterware daemons on both nodes; see Example 14-12.
Example 14-12 root.sh on the second node
pazxxt11:~ # /scratch/oracle/crs/10.2.0.3/root.shWARNING: directory '/scratch/oracle/crs' is not owned by rootWARNING: directory '/scratch/oracle' is not owned by rootWARNING: directory '/scratch' is not owned by rootChecking to see if Oracle CRS stack is already configured
Setting the permissions on OCR backup directorySetting up NS directoriesOracle Cluster Registry configuration upgraded successfullyWARNING: directory '/scratch/oracle/crs' is not owned by rootWARNING: directory '/scratch/oracle' is not owned by rootWARNING: directory '/scratch' is not owned by rootclscfg: EXISTING configuration version 3 detected.clscfg: version 3 is 10G Release 2.Successfully accumulated necessary OCR keys.Using ports: CSS=49895 CRS=49896 EVMC=49898 and EVMR=49897.node <nodenumber>: <nodename> <private interconnect name> <hostname>
276 Experiences with Oracle Solutions on Linux for IBM System z
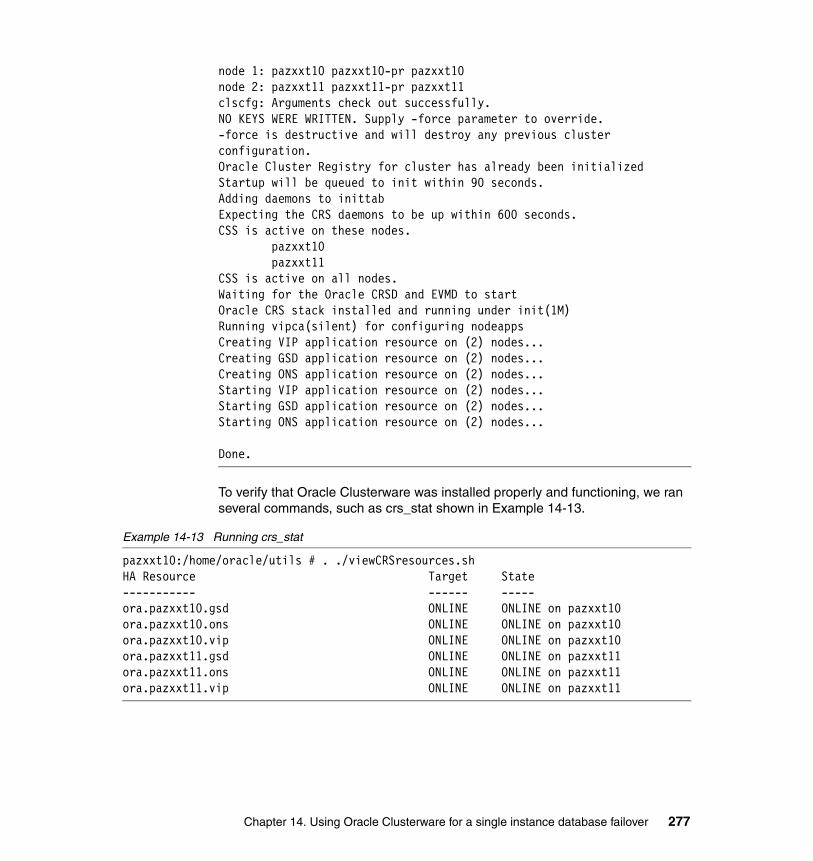
node 1: pazxxt10 pazxxt10-pr pazxxt10node 2: pazxxt11 pazxxt11-pr pazxxt11clscfg: Arguments check out successfully.NO KEYS WERE WRITTEN. Supply -force parameter to override.-force is destructive and will destroy any previous clusterconfiguration.Oracle Cluster Registry for cluster has already been initializedStartup will be queued to init within 90 seconds.Adding daemons to inittabExpecting the CRS daemons to be up within 600 seconds.CSS is active on these nodes. pazxxt10 pazxxt11CSS is active on all nodes.Waiting for the Oracle CRSD and EVMD to startOracle CRS stack installed and running under init(1M)Running vipca(silent) for configuring nodeappsCreating VIP application resource on (2) nodes...Creating GSD application resource on (2) nodes...Creating ONS application resource on (2) nodes...Starting VIP application resource on (2) nodes...Starting GSD application resource on (2) nodes...Starting ONS application resource on (2) nodes...
Done.
To verify that Oracle Clusterware was installed properly and functioning, we ran several commands, such as crs_stat shown in Example 14-13.
Example 14-13 Running crs_stat
pazxxt10:/home/oracle/utils # . ./viewCRSresources.shHA Resource Target State----------- ------ -----ora.pazxxt10.gsd ONLINE ONLINE on pazxxt10ora.pazxxt10.ons ONLINE ONLINE on pazxxt10ora.pazxxt10.vip ONLINE ONLINE on pazxxt10ora.pazxxt11.gsd ONLINE ONLINE on pazxxt11ora.pazxxt11.ons ONLINE ONLINE on pazxxt11ora.pazxxt11.vip ONLINE ONLINE on pazxxt11
Chapter 14. Using Oracle Clusterware for a single instance database failover 277

14.5 Oracle Automatic Storage Management installation
For our case study we chose to use a clustered ASM configuration. The OUI discovered the presence of Oracle Clusterware running on both nodes and asked us if we wanted to install ASM into our cluster. We indicated our intention to do so and started the installation process.
During the installation of ASM, we created a disk group (DISK_GROUP_01) using the /dev/dasdbg3 and /dev/dasdbh1 partitions we had created earlier.
The clustered ASM installation went well and when we finished we had a running ASM instance on each node, pazxxt10 and pazxxt11 with +ASM1 and +ASM2 ORACLE_SIDs, respectively. We could see the ASM instances running on each node, for example:
oracle@pazxxt10:/scratch/oracle> ps -ef | grep pmon | grep -v greporacle 20403 1 0 Nov01 ? 00:00:27 asm_pmon_+ASM1
But we wanted to verify that they had started up properly, so we checked them using the srvctl command, shown in Example 14-14.
Example 14-14 srvctl command
oracle@pazxxt10:~> srvctl status asm -n pazxxt10ASM instance +ASM1 is running on node pazxxt10.oracle@pazxxt10:~> srvctl status asm -n pazxxt11ASM instance +ASM2 is running on node pazxxt11.oracle@pazxxt10:~>
We also wanted to verify that our disk group was mounted and available, so we checked the ASM instance via sqlplus, as shown in Example 14-15.
Example 14-15 Checking the ASM instance
oracle@pazxxt10:~> sqlplus "/ as sysdba"
SQL*Plus: Release 10.2.0.3.0 - Production on Thu Nov 13 18:06:59 2008Copyright (c) 1982, 2005, Oracle. All Rights Reserved.Connected to:Oracle Database 10g Enterprise Edition Release 10.2.0.3.0 - 64bit ProductionWith the Partitioning, Real Application Clusters, OLAP and Data Mining options
SQL> select name, state from V$ASM_DISKGROUP;
NAME STATE------------------------------ -----------
278 Experiences with Oracle Solutions on Linux for IBM System z

DISK_GROUP_01 MOUNTED
SQL>
We also checked to see whether Oracle Clusterware had the ASM instances properly registered, and we found that they were; see Example 14-16.
Example 14-16 Checking the Oracle clusterware registration
oracle@pazxxt10:~/utils> . ./viewCRSresources.shHA Resource Target State----------- ------ -----ora.pazxxt10.ASM1.asm ONLINE ONLINE on pazxxt10ora.pazxxt10.ASM_LISTENER_PAZXXT10.lsnr ONLINE ONLINE on pazxxt10ora.pazxxt10.gsd ONLINE ONLINE on pazxxt10ora.pazxxt10.ons ONLINE ONLINE on pazxxt10ora.pazxxt10.vip ONLINE ONLINE on pazxxt10ora.pazxxt11.ASM2.asm ONLINE ONLINE on pazxxt11ora.pazxxt11.ASM_LISTENER_PAZXXT11.lsnr ONLINE ONLINE on pazxxt11ora.pazxxt11.gsd ONLINE ONLINE on pazxxt11ora.pazxxt11.ons ONLINE ONLINE on pazxxt11ora.pazxxt11.vip ONLINE ONLINE on pazxxt11
14.6 Install database software on each node
We did not create a database at this point. We installed the database software on the first node and then installed the software again on the other node. There were no significant issues at this point and the installation went well.
14.7 Create a single-instance database on the first node
We then ran dbca from the database home on pazxxt10 and chose the clustered ASM instance as the place to build the database. The database creation ran fine and we verified that the new DB instance was up and running alongside the ASM instance on pazxxt10; see Example 14-17.
Example 14-17 Verifying the DB instance
oracle@pazxxt10:/scratch/oracle> ps -ef pmon | grep -v greporacle 13971 1 0 12:13 ? 00:00:00 ora_pmon_DB01oracle 20403 1 0 Nov03 ? 00:00:27 asm_pmon_+ASM1
Chapter 14. Using Oracle Clusterware for a single instance database failover 279

We also tested the database instance to be sure by querying one of the sample application tables (which we chose to install); see Example 14-18.
Example 14-18 Testing the DB instance
oracle@pazxxt10:/scratch/oracle> sqlplus scott/dialtoneSQL*Plus: Release 10.2.0.3.0 - Production on Tue Nov 4 12:33:42 2008
Copyright (c) 1982, 2005, Oracle. All Rights Reserved.
Connected to:Oracle Database 10g Enterprise Edition Release 10.2.0.3.0 - 64bit ProductionWith the Partitioning, OLAP and Data Mining options
SQL> select count(*) from emp;
COUNT(*)---------- 14
SQL>
We then shut down the database instance (named DB01) because we were done with it for the moment. It is worth noting at this point that later on, after the Oracle Clusterware failover action perl script was installed and in place, we would no longer be starting or shutting down the database instance manually. Any startup or shutdown that we wanted to do in the future, after the Oracle Clusterware was managing the database instances, would have to be done via Oracle Clusterware commands. But more on that later.
14.8 Configure the other node for a database instance failover
In order to prepare the other node, pazxxt11, in our cluster so that it could support a failover (or Clusterware “relocate” action) of our instance, there were several things we had to do.
280 Experiences with Oracle Solutions on Linux for IBM System z
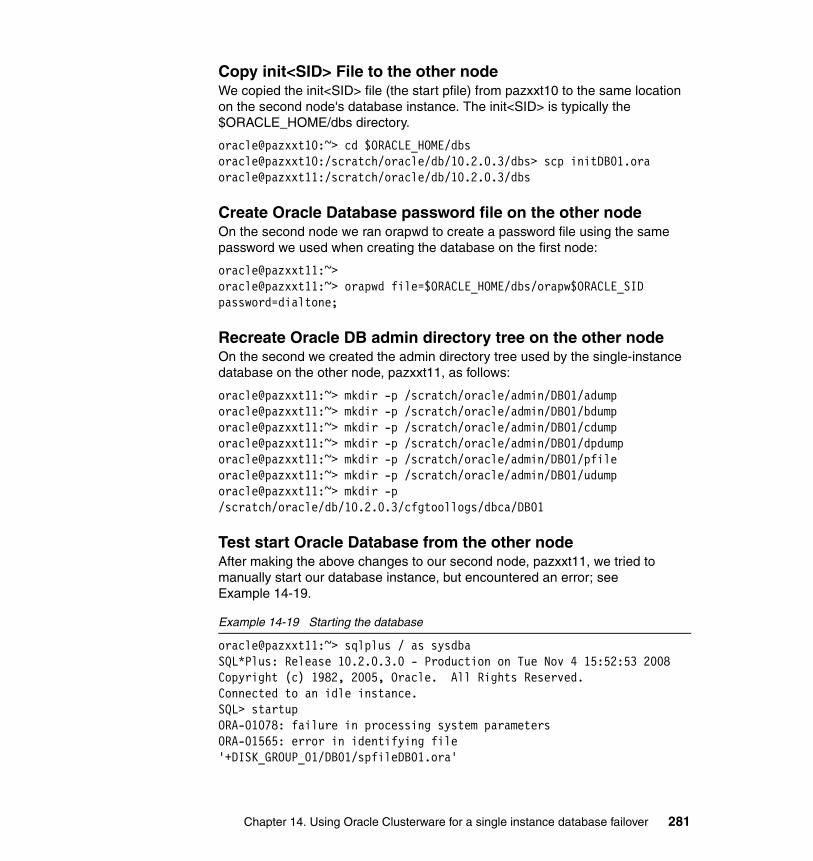
Copy init<SID> File to the other nodeWe copied the init<SID> file (the start pfile) from pazxxt10 to the same location on the second node's database instance. The init<SID> is typically the $ORACLE_HOME/dbs directory.
oracle@pazxxt10:~> cd $ORACLE_HOME/dbsoracle@pazxxt10:/scratch/oracle/db/10.2.0.3/dbs> scp initDB01.ora oracle@pazxxt11:/scratch/oracle/db/10.2.0.3/dbs
Create Oracle Database password file on the other nodeOn the second node we ran orapwd to create a password file using the same password we used when creating the database on the first node:
oracle@pazxxt11:~> oracle@pazxxt11:~> orapwd file=$ORACLE_HOME/dbs/orapw$ORACLE_SID password=dialtone;
Recreate Oracle DB admin directory tree on the other nodeOn the second we created the admin directory tree used by the single-instance database on the other node, pazxxt11, as follows:
oracle@pazxxt11:~> mkdir -p /scratch/oracle/admin/DB01/adumporacle@pazxxt11:~> mkdir -p /scratch/oracle/admin/DB01/bdumporacle@pazxxt11:~> mkdir -p /scratch/oracle/admin/DB01/cdumporacle@pazxxt11:~> mkdir -p /scratch/oracle/admin/DB01/dpdumporacle@pazxxt11:~> mkdir -p /scratch/oracle/admin/DB01/pfileoracle@pazxxt11:~> mkdir -p /scratch/oracle/admin/DB01/udumporacle@pazxxt11:~> mkdir -p /scratch/oracle/db/10.2.0.3/cfgtoollogs/dbca/DB01
Test start Oracle Database from the other nodeAfter making the above changes to our second node, pazxxt11, we tried to manually start our database instance, but encountered an error; see Example 14-19.
Example 14-19 Starting the database
oracle@pazxxt11:~> sqlplus / as sysdbaSQL*Plus: Release 10.2.0.3.0 - Production on Tue Nov 4 15:52:53 2008Copyright (c) 1982, 2005, Oracle. All Rights Reserved.Connected to an idle instance.SQL> startupORA-01078: failure in processing system parametersORA-01565: error in identifying file '+DISK_GROUP_01/DB01/spfileDB01.ora'
Chapter 14. Using Oracle Clusterware for a single instance database failover 281
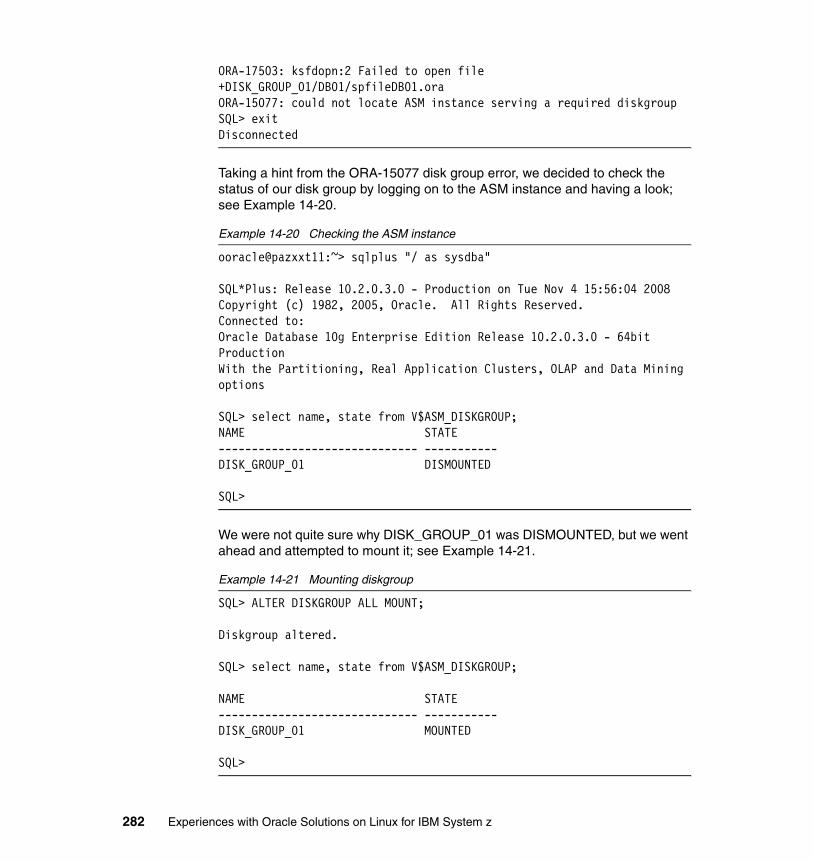
ORA-17503: ksfdopn:2 Failed to open file +DISK_GROUP_01/DB01/spfileDB01.oraORA-15077: could not locate ASM instance serving a required diskgroupSQL> exitDisconnected
Taking a hint from the ORA-15077 disk group error, we decided to check the status of our disk group by logging on to the ASM instance and having a look; see Example 14-20.
Example 14-20 Checking the ASM instance
ooracle@pazxxt11:~> sqlplus "/ as sysdba"
SQL*Plus: Release 10.2.0.3.0 - Production on Tue Nov 4 15:56:04 2008Copyright (c) 1982, 2005, Oracle. All Rights Reserved.Connected to:Oracle Database 10g Enterprise Edition Release 10.2.0.3.0 - 64bit ProductionWith the Partitioning, Real Application Clusters, OLAP and Data Mining options
SQL> select name, state from V$ASM_DISKGROUP;NAME STATE------------------------------ -----------DISK_GROUP_01 DISMOUNTED
SQL>
We were not quite sure why DISK_GROUP_01 was DISMOUNTED, but we went ahead and attempted to mount it; see Example 14-21.
Example 14-21 Mounting diskgroup
SQL> ALTER DISKGROUP ALL MOUNT;
Diskgroup altered.
SQL> select name, state from V$ASM_DISKGROUP;
NAME STATE------------------------------ -----------DISK_GROUP_01 MOUNTED
SQL>
282 Experiences with Oracle Solutions on Linux for IBM System z
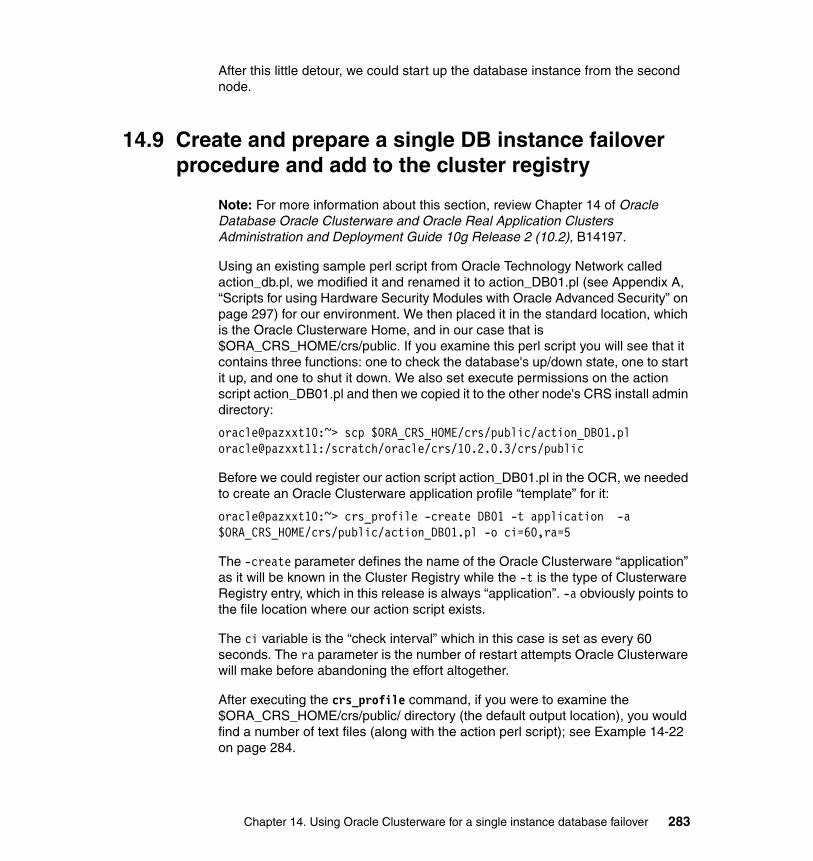
After this little detour, we could start up the database instance from the second node.
14.9 Create and prepare a single DB instance failover procedure and add to the cluster registry
Note: For more information about this section, review Chapter 14 of Oracle Database Oracle Clusterware and Oracle Real Application Clusters Administration and Deployment Guide 10g Release 2 (10.2), B14197.
Using an existing sample perl script from Oracle Technology Network called action_db.pl, we modified it and renamed it to action_DB01.pl (see Appendix A, “Scripts for using Hardware Security Modules with Oracle Advanced Security” on page 297) for our environment. We then placed it in the standard location, which is the Oracle Clusterware Home, and in our case that is $ORA_CRS_HOME/crs/public. If you examine this perl script you will see that it contains three functions: one to check the database's up/down state, one to start it up, and one to shut it down. We also set execute permissions on the action script action_DB01.pl and then we copied it to the other node's CRS install admin directory:
oracle@pazxxt10:~> scp $ORA_CRS_HOME/crs/public/action_DB01.pl oracle@pazxxt11:/scratch/oracle/crs/10.2.0.3/crs/public
Before we could register our action script action_DB01.pl in the OCR, we needed to create an Oracle Clusterware application profile “template” for it:
oracle@pazxxt10:~> crs_profile -create DB01 -t application -a $ORA_CRS_HOME/crs/public/action_DB01.pl -o ci=60,ra=5
The -create parameter defines the name of the Oracle Clusterware “application” as it will be known in the Cluster Registry while the -t is the type of Clusterware Registry entry, which in this release is always “application”. -a obviously points to the file location where our action script exists.
The ci variable is the “check interval” which in this case is set as every 60 seconds. The ra parameter is the number of restart attempts Oracle Clusterware will make before abandoning the effort altogether.
After executing the crs_profile command, if you were to examine the $ORA_CRS_HOME/crs/public/ directory (the default output location), you would find a number of text files (along with the action perl script); see Example 14-22 on page 284.
Chapter 14. Using Oracle Clusterware for a single instance database failover 283
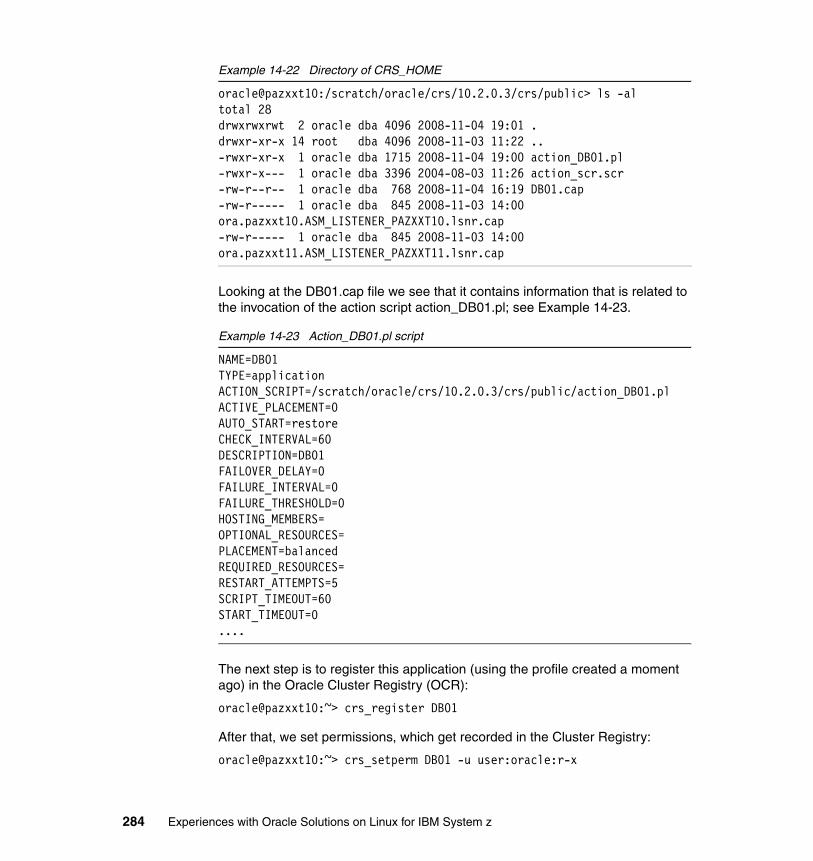
Example 14-22 Directory of CRS_HOME
oracle@pazxxt10:/scratch/oracle/crs/10.2.0.3/crs/public> ls -altotal 28drwxrwxrwt 2 oracle dba 4096 2008-11-04 19:01 .drwxr-xr-x 14 root dba 4096 2008-11-03 11:22 ..-rwxr-xr-x 1 oracle dba 1715 2008-11-04 19:00 action_DB01.pl-rwxr-x--- 1 oracle dba 3396 2004-08-03 11:26 action_scr.scr-rw-r--r-- 1 oracle dba 768 2008-11-04 16:19 DB01.cap-rw-r----- 1 oracle dba 845 2008-11-03 14:00 ora.pazxxt10.ASM_LISTENER_PAZXXT10.lsnr.cap-rw-r----- 1 oracle dba 845 2008-11-03 14:00 ora.pazxxt11.ASM_LISTENER_PAZXXT11.lsnr.cap
Looking at the DB01.cap file we see that it contains information that is related to the invocation of the action script action_DB01.pl; see Example 14-23.
Example 14-23 Action_DB01.pl script
NAME=DB01TYPE=applicationACTION_SCRIPT=/scratch/oracle/crs/10.2.0.3/crs/public/action_DB01.plACTIVE_PLACEMENT=0AUTO_START=restoreCHECK_INTERVAL=60DESCRIPTION=DB01FAILOVER_DELAY=0FAILURE_INTERVAL=0FAILURE_THRESHOLD=0HOSTING_MEMBERS=OPTIONAL_RESOURCES=PLACEMENT=balancedREQUIRED_RESOURCES=RESTART_ATTEMPTS=5SCRIPT_TIMEOUT=60START_TIMEOUT=0....
The next step is to register this application (using the profile created a moment ago) in the Oracle Cluster Registry (OCR):
oracle@pazxxt10:~> crs_register DB01
After that, we set permissions, which get recorded in the Cluster Registry:
oracle@pazxxt10:~> crs_setperm DB01 -u user:oracle:r-x
284 Experiences with Oracle Solutions on Linux for IBM System z
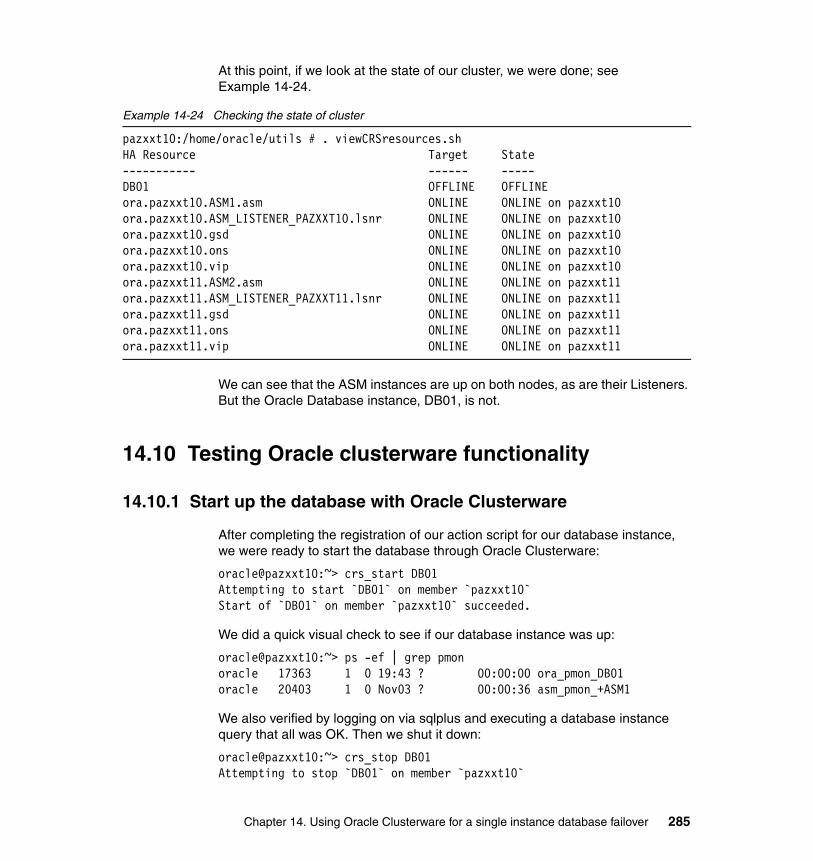
At this point, if we look at the state of our cluster, we were done; see Example 14-24.
Example 14-24 Checking the state of cluster
pazxxt10:/home/oracle/utils # . viewCRSresources.shHA Resource Target State----------- ------ -----DB01 OFFLINE OFFLINEora.pazxxt10.ASM1.asm ONLINE ONLINE on pazxxt10ora.pazxxt10.ASM_LISTENER_PAZXXT10.lsnr ONLINE ONLINE on pazxxt10ora.pazxxt10.gsd ONLINE ONLINE on pazxxt10ora.pazxxt10.ons ONLINE ONLINE on pazxxt10ora.pazxxt10.vip ONLINE ONLINE on pazxxt10ora.pazxxt11.ASM2.asm ONLINE ONLINE on pazxxt11ora.pazxxt11.ASM_LISTENER_PAZXXT11.lsnr ONLINE ONLINE on pazxxt11ora.pazxxt11.gsd ONLINE ONLINE on pazxxt11ora.pazxxt11.ons ONLINE ONLINE on pazxxt11ora.pazxxt11.vip ONLINE ONLINE on pazxxt11
We can see that the ASM instances are up on both nodes, as are their Listeners. But the Oracle Database instance, DB01, is not.
14.10 Testing Oracle clusterware functionality
14.10.1 Start up the database with Oracle Clusterware
After completing the registration of our action script for our database instance, we were ready to start the database through Oracle Clusterware:
oracle@pazxxt10:~> crs_start DB01Attempting to start `DB01` on member `pazxxt10`Start of `DB01` on member `pazxxt10` succeeded.
We did a quick visual check to see if our database instance was up:
oracle@pazxxt10:~> ps -ef | grep pmonoracle 17363 1 0 19:43 ? 00:00:00 ora_pmon_DB01oracle 20403 1 0 Nov03 ? 00:00:36 asm_pmon_+ASM1
We also verified by logging on via sqlplus and executing a database instance query that all was OK. Then we shut it down:
oracle@pazxxt10:~> crs_stop DB01Attempting to stop `DB01` on member `pazxxt10`
Chapter 14. Using Oracle Clusterware for a single instance database failover 285
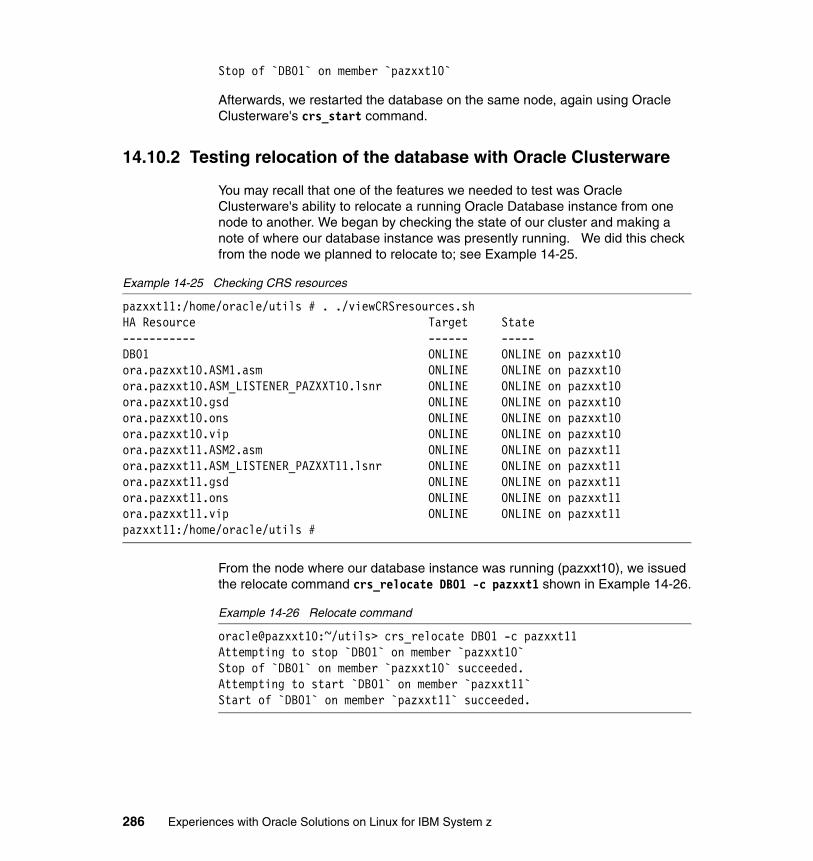
Stop of `DB01` on member `pazxxt10`
Afterwards, we restarted the database on the same node, again using Oracle Clusterware's crs_start command.
14.10.2 Testing relocation of the database with Oracle Clusterware
You may recall that one of the features we needed to test was Oracle Clusterware's ability to relocate a running Oracle Database instance from one node to another. We began by checking the state of our cluster and making a note of where our database instance was presently running. We did this check from the node we planned to relocate to; see Example 14-25.
Example 14-25 Checking CRS resources
pazxxt11:/home/oracle/utils # . ./viewCRSresources.shHA Resource Target State----------- ------ -----DB01 ONLINE ONLINE on pazxxt10ora.pazxxt10.ASM1.asm ONLINE ONLINE on pazxxt10ora.pazxxt10.ASM_LISTENER_PAZXXT10.lsnr ONLINE ONLINE on pazxxt10ora.pazxxt10.gsd ONLINE ONLINE on pazxxt10ora.pazxxt10.ons ONLINE ONLINE on pazxxt10ora.pazxxt10.vip ONLINE ONLINE on pazxxt10ora.pazxxt11.ASM2.asm ONLINE ONLINE on pazxxt11ora.pazxxt11.ASM_LISTENER_PAZXXT11.lsnr ONLINE ONLINE on pazxxt11ora.pazxxt11.gsd ONLINE ONLINE on pazxxt11ora.pazxxt11.ons ONLINE ONLINE on pazxxt11ora.pazxxt11.vip ONLINE ONLINE on pazxxt11pazxxt11:/home/oracle/utils #
From the node where our database instance was running (pazxxt10), we issued the relocate command crs_relocate DB01 -c pazxxt1 shown in Example 14-26.
Example 14-26 Relocate command
oracle@pazxxt10:~/utils> crs_relocate DB01 -c pazxxt11Attempting to stop `DB01` on member `pazxxt10`Stop of `DB01` on member `pazxxt10` succeeded.Attempting to start `DB01` on member `pazxxt11`Start of `DB01` on member `pazxxt11` succeeded.
286 Experiences with Oracle Solutions on Linux for IBM System z

During the relocate execution, we could see the state of the database change from ONLINE to OFFLINE on pazxxt10; see Example 14-27.
Example 14-27 View CRS resources when OFFLINE
pazxxt11:/home/oracle/utils # . ./viewCRSresources.shHA Resource Target State----------- ------ -----DB01 ONLINE OFFLINEora.pazxxt10.ASM1.asm ONLINE ONLINE on pazxxt10ora.pazxxt10.ASM_LISTENER_PAZXXT10.lsnr ONLINE ONLINE on pazxxt10......
Then we changed from OFFLINE to ONLINE on pazxxt11; see Example 14-28.
Example 14-28 Checking for ONLINE status
pazxxt11:/home/oracle/utils # . ./viewCRSresources.shHA Resource Target State----------- ------ -----DB01 ONLINE ONLINE on pazxxt11ora.pazxxt10.ASM1.asm ONLINE ONLINE on pazxxt10ora.pazxxt10.ASM_LISTENER_PAZXXT10.lsnr ONLINE ONLINE on pazxxt10
14.10.3 Testing manual shutdown of database using sqlplus
Now that we could start, stop, and relocate an Oracle Database instance, we needed to test the behavior of Oracle Clusterware when a database was stopped unexpectedly. Our expectations were that Oracle Clusterware would find, after the “check” interval had expired, that the database instance was no longer up, and it would attempt to restart it on the node where it was last running, in this case, pazxxt11, where we had just relocated it to. So we shut it down; as shown in Example 14-29.
Example 14-29 Shutdown of DB
oracle@pazxxt11:~> sqlplus / as sysdba
SQL*Plus: Release 10.2.0.3.0 - Production on Wed Nov 5 07:59:33 2008
Copyright (c) 1982, 2005, Oracle. All Rights Reserved.
Connected to:Oracle Database 10g Enterprise Edition Release 10.2.0.3.0 - 64bit Production
Chapter 14. Using Oracle Clusterware for a single instance database failover 287
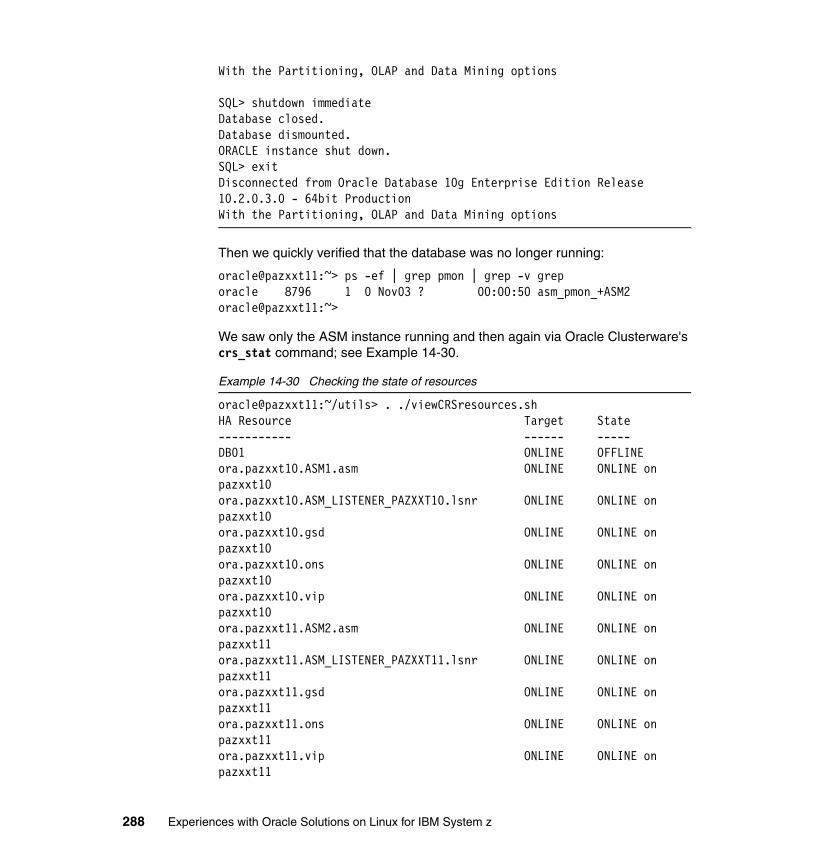
With the Partitioning, OLAP and Data Mining options
SQL> shutdown immediateDatabase closed.Database dismounted.ORACLE instance shut down.SQL> exitDisconnected from Oracle Database 10g Enterprise Edition Release 10.2.0.3.0 - 64bit ProductionWith the Partitioning, OLAP and Data Mining options
Then we quickly verified that the database was no longer running:
oracle@pazxxt11:~> ps -ef | grep pmon | grep -v greporacle 8796 1 0 Nov03 ? 00:00:50 asm_pmon_+ASM2oracle@pazxxt11:~>
We saw only the ASM instance running and then again via Oracle Clusterware's crs_stat command; see Example 14-30.
Example 14-30 Checking the state of resources
oracle@pazxxt11:~/utils> . ./viewCRSresources.shHA Resource Target State----------- ------ -----DB01 ONLINE OFFLINEora.pazxxt10.ASM1.asm ONLINE ONLINE on pazxxt10ora.pazxxt10.ASM_LISTENER_PAZXXT10.lsnr ONLINE ONLINE on pazxxt10ora.pazxxt10.gsd ONLINE ONLINE on pazxxt10ora.pazxxt10.ons ONLINE ONLINE on pazxxt10ora.pazxxt10.vip ONLINE ONLINE on pazxxt10ora.pazxxt11.ASM2.asm ONLINE ONLINE on pazxxt11ora.pazxxt11.ASM_LISTENER_PAZXXT11.lsnr ONLINE ONLINE on pazxxt11ora.pazxxt11.gsd ONLINE ONLINE on pazxxt11ora.pazxxt11.ons ONLINE ONLINE on pazxxt11ora.pazxxt11.vip ONLINE ONLINE on pazxxt11
288 Experiences with Oracle Solutions on Linux for IBM System z
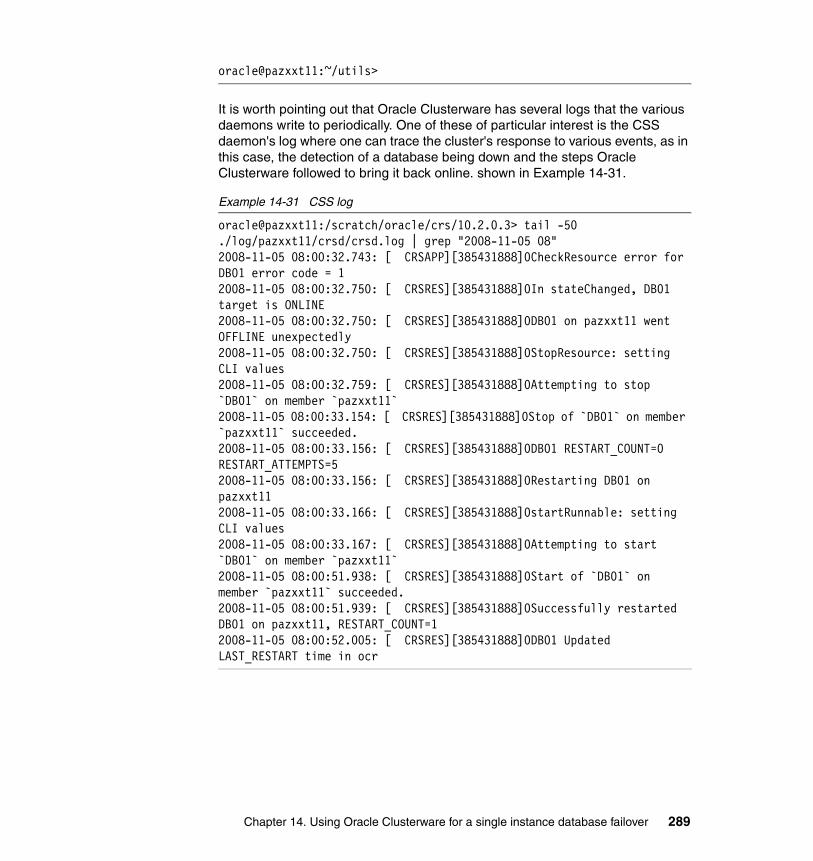
oracle@pazxxt11:~/utils>
It is worth pointing out that Oracle Clusterware has several logs that the various daemons write to periodically. One of these of particular interest is the CSS daemon's log where one can trace the cluster's response to various events, as in this case, the detection of a database being down and the steps Oracle Clusterware followed to bring it back online. shown in Example 14-31.
Example 14-31 CSS log
oracle@pazxxt11:/scratch/oracle/crs/10.2.0.3> tail -50 ./log/pazxxt11/crsd/crsd.log | grep "2008-11-05 08"2008-11-05 08:00:32.743: [ CRSAPP][385431888]0CheckResource error for DB01 error code = 12008-11-05 08:00:32.750: [ CRSRES][385431888]0In stateChanged, DB01 target is ONLINE2008-11-05 08:00:32.750: [ CRSRES][385431888]0DB01 on pazxxt11 went OFFLINE unexpectedly2008-11-05 08:00:32.750: [ CRSRES][385431888]0StopResource: setting CLI values2008-11-05 08:00:32.759: [ CRSRES][385431888]0Attempting to stop `DB01` on member `pazxxt11`2008-11-05 08:00:33.154: [ CRSRES][385431888]0Stop of `DB01` on member `pazxxt11` succeeded.2008-11-05 08:00:33.156: [ CRSRES][385431888]0DB01 RESTART_COUNT=0 RESTART_ATTEMPTS=52008-11-05 08:00:33.156: [ CRSRES][385431888]0Restarting DB01 on pazxxt112008-11-05 08:00:33.166: [ CRSRES][385431888]0startRunnable: setting CLI values2008-11-05 08:00:33.167: [ CRSRES][385431888]0Attempting to start `DB01` on member `pazxxt11`2008-11-05 08:00:51.938: [ CRSRES][385431888]0Start of `DB01` on member `pazxxt11` succeeded.2008-11-05 08:00:51.939: [ CRSRES][385431888]0Successfully restarted DB01 on pazxxt11, RESTART_COUNT=12008-11-05 08:00:52.005: [ CRSRES][385431888]0DB01 Updated LAST_RESTART time in ocr
Chapter 14. Using Oracle Clusterware for a single instance database failover 289
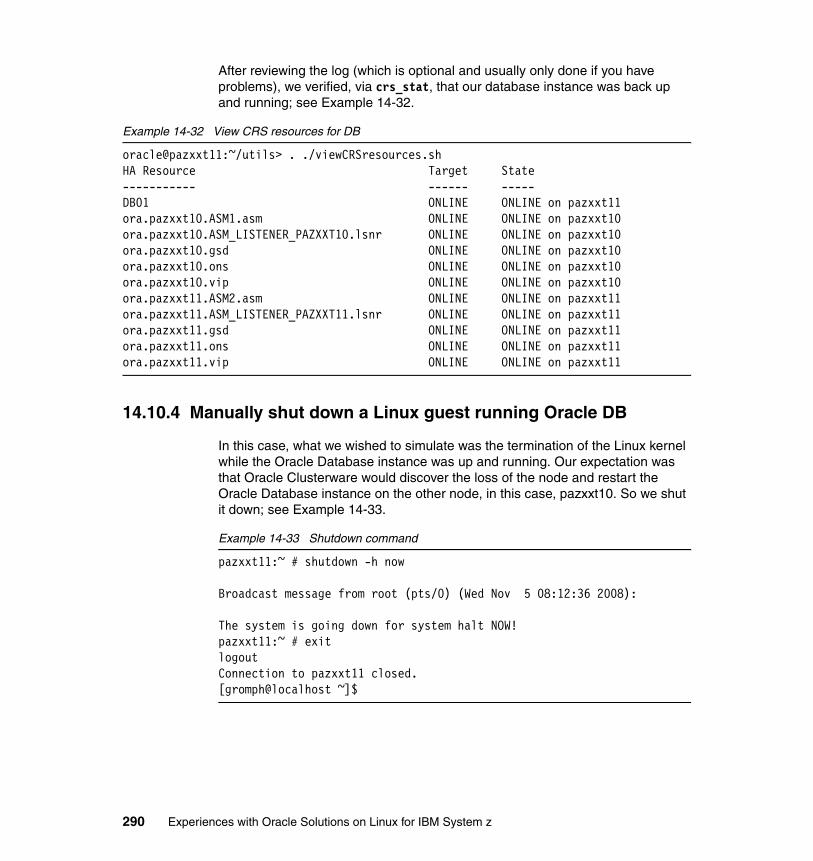
After reviewing the log (which is optional and usually only done if you have problems), we verified, via crs_stat, that our database instance was back up and running; see Example 14-32.
Example 14-32 View CRS resources for DB
oracle@pazxxt11:~/utils> . ./viewCRSresources.shHA Resource Target State----------- ------ -----DB01 ONLINE ONLINE on pazxxt11ora.pazxxt10.ASM1.asm ONLINE ONLINE on pazxxt10ora.pazxxt10.ASM_LISTENER_PAZXXT10.lsnr ONLINE ONLINE on pazxxt10ora.pazxxt10.gsd ONLINE ONLINE on pazxxt10ora.pazxxt10.ons ONLINE ONLINE on pazxxt10ora.pazxxt10.vip ONLINE ONLINE on pazxxt10ora.pazxxt11.ASM2.asm ONLINE ONLINE on pazxxt11ora.pazxxt11.ASM_LISTENER_PAZXXT11.lsnr ONLINE ONLINE on pazxxt11ora.pazxxt11.gsd ONLINE ONLINE on pazxxt11ora.pazxxt11.ons ONLINE ONLINE on pazxxt11ora.pazxxt11.vip ONLINE ONLINE on pazxxt11
14.10.4 Manually shut down a Linux guest running Oracle DB
In this case, what we wished to simulate was the termination of the Linux kernel while the Oracle Database instance was up and running. Our expectation was that Oracle Clusterware would discover the loss of the node and restart the Oracle Database instance on the other node, in this case, pazxxt10. So we shut it down; see Example 14-33.
Example 14-33 Shutdown command
pazxxt11:~ # shutdown -h now
Broadcast message from root (pts/0) (Wed Nov 5 08:12:36 2008):
The system is going down for system halt NOW!pazxxt11:~ # exitlogoutConnection to pazxxt11 closed.[gromph@localhost ~]$
290 Experiences with Oracle Solutions on Linux for IBM System z
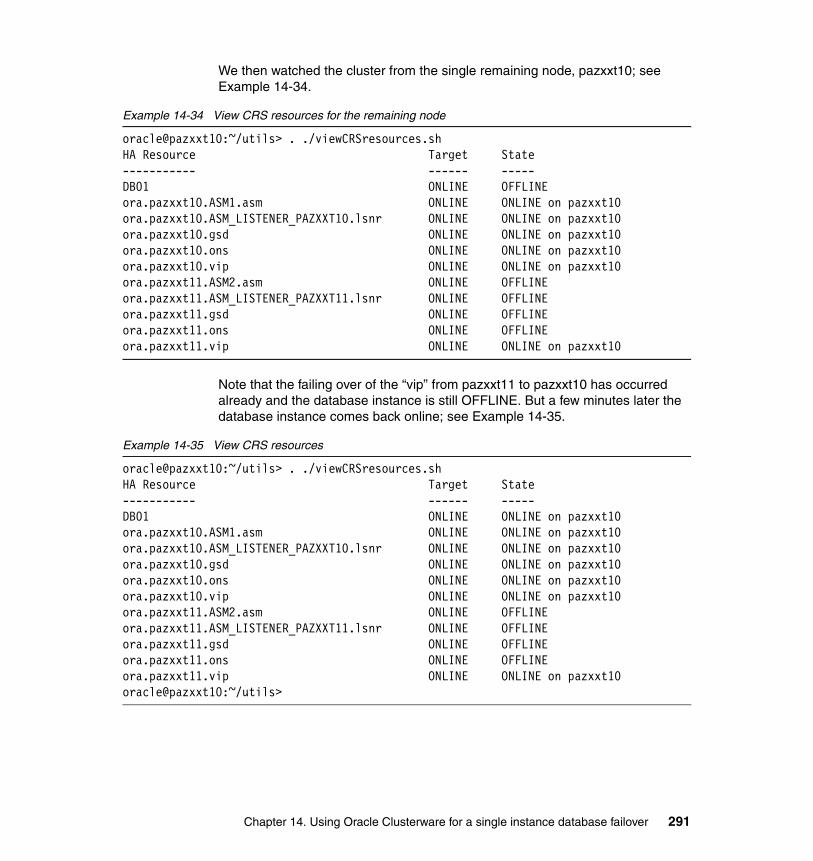
We then watched the cluster from the single remaining node, pazxxt10; see Example 14-34.
Example 14-34 View CRS resources for the remaining node
oracle@pazxxt10:~/utils> . ./viewCRSresources.shHA Resource Target State----------- ------ -----DB01 ONLINE OFFLINEora.pazxxt10.ASM1.asm ONLINE ONLINE on pazxxt10ora.pazxxt10.ASM_LISTENER_PAZXXT10.lsnr ONLINE ONLINE on pazxxt10ora.pazxxt10.gsd ONLINE ONLINE on pazxxt10ora.pazxxt10.ons ONLINE ONLINE on pazxxt10ora.pazxxt10.vip ONLINE ONLINE on pazxxt10ora.pazxxt11.ASM2.asm ONLINE OFFLINEora.pazxxt11.ASM_LISTENER_PAZXXT11.lsnr ONLINE OFFLINEora.pazxxt11.gsd ONLINE OFFLINEora.pazxxt11.ons ONLINE OFFLINEora.pazxxt11.vip ONLINE ONLINE on pazxxt10
Note that the failing over of the “vip” from pazxxt11 to pazxxt10 has occurred already and the database instance is still OFFLINE. But a few minutes later the database instance comes back online; see Example 14-35.
Example 14-35 View CRS resources
oracle@pazxxt10:~/utils> . ./viewCRSresources.shHA Resource Target State----------- ------ -----DB01 ONLINE ONLINE on pazxxt10ora.pazxxt10.ASM1.asm ONLINE ONLINE on pazxxt10ora.pazxxt10.ASM_LISTENER_PAZXXT10.lsnr ONLINE ONLINE on pazxxt10ora.pazxxt10.gsd ONLINE ONLINE on pazxxt10ora.pazxxt10.ons ONLINE ONLINE on pazxxt10ora.pazxxt10.vip ONLINE ONLINE on pazxxt10ora.pazxxt11.ASM2.asm ONLINE OFFLINEora.pazxxt11.ASM_LISTENER_PAZXXT11.lsnr ONLINE OFFLINEora.pazxxt11.gsd ONLINE OFFLINEora.pazxxt11.ons ONLINE OFFLINEora.pazxxt11.vip ONLINE ONLINE on pazxxt10oracle@pazxxt10:~/utils>
Chapter 14. Using Oracle Clusterware for a single instance database failover 291

A quick perusal of the CSS daemon's log reveals in detail what happened after the Linux kernel was shut down, shown in Example 14-36.
Example 14-36 log for crs
pazxxt10:/scratch/oracle/crs/10.2.0.3 # tail -50 ./log/pazxxt10/crsd/crsd.log | grep "2008-11-05 08"2008-11-05 08:13:44.780: [ CRSEVT][420043088]0Processing member leave for pazxxt11, incarnation: 32008-11-05 08:13:44.790: [ CRSEVT][420043088]0Do failover for: pazxxt112008-11-05 08:13:45.159: [ CRSRES][407628112]0startRunnable: setting CLI values2008-11-05 08:13:45.166: [ CRSRES][407628112]0Attempting to start `ora.pazxxt11.vip` on member `pazxxt10`2008-11-05 08:13:52.785: [ CRSRES][407628112]0Start of `ora.pazxxt11.vip` on member `pazxxt10` succeeded.2008-11-05 08:13:52.920: [ CRSRES][416446800]0startRunnable: setting CLI values2008-11-05 08:13:52.926: [ CRSRES][416446800]0Attempting to start `DB01` on member `pazxxt10`2008-11-05 08:14:19.654: [ CRSRES][416446800]0Start of `DB01` on member `pazxxt10` succeeded.2008-11-05 08:14:19.656: [ CRSEVT][420043088]0Post recovery done evmd event for: pazxxt112008-11-05 08:14:19.686: [ CRSEVT][420043088]0Processing RecoveryDonepazxxt10:/scratch/oracle/crs/10.2.0.3 #
14.10.5 Re-establish the original cluster configuration
In this exercise our objective, after bringing our Linux guest (pazxxt11) back up, was to return the cluster back to its original state with the DB instance running where we had it after the initial relocation to pazxxt11. As we could see from pazxxt10, after rebooting pazxxt11, not only was Oracle Clusterware available and running, but so was ASM; see Example 14-37.
Example 14-37 Verifying CRS resources
oracle@pazxxt10:~/utils> . ./viewCRSresources.shHA Resource Target State----------- ------ -----DB01 ONLINE ONLINE on pazxxt10ora.pazxxt10.ASM1.asm ONLINE ONLINE on pazxxt10ora.pazxxt10.ASM_LISTENER_PAZXXT10.lsnr ONLINE ONLINE on pazxxt10ora.pazxxt10.gsd ONLINE ONLINE on pazxxt10ora.pazxxt10.ons ONLINE ONLINE on pazxxt10ora.pazxxt10.vip ONLINE ONLINE on pazxxt10ora.pazxxt11.ASM2.asm ONLINE ONLINE on pazxxt11
292 Experiences with Oracle Solutions on Linux for IBM System z
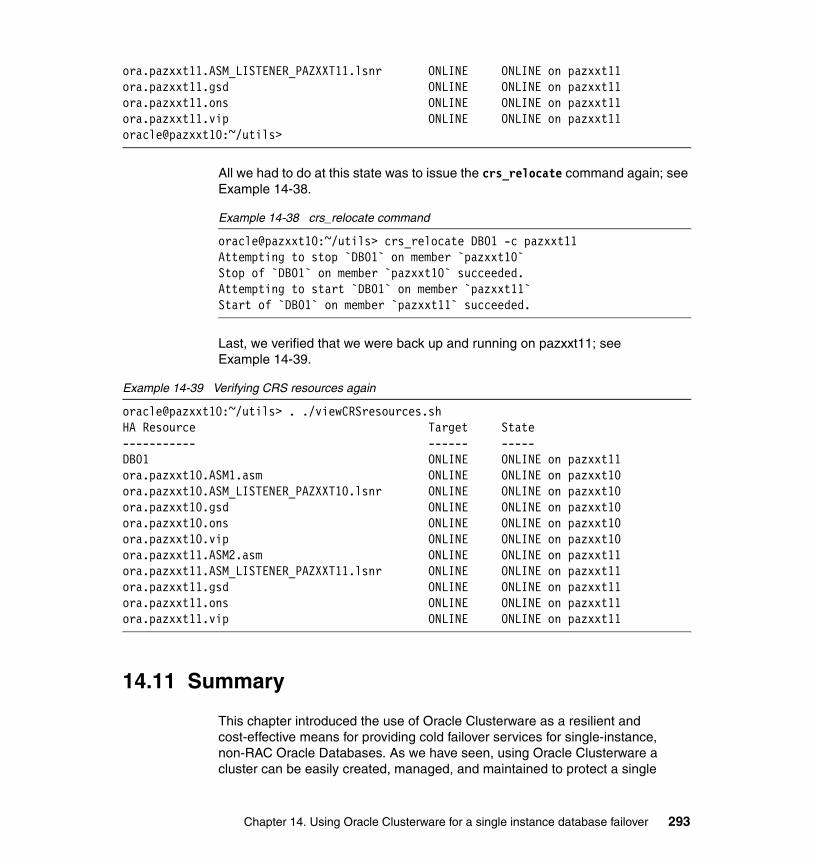
ora.pazxxt11.ASM_LISTENER_PAZXXT11.lsnr ONLINE ONLINE on pazxxt11ora.pazxxt11.gsd ONLINE ONLINE on pazxxt11ora.pazxxt11.ons ONLINE ONLINE on pazxxt11ora.pazxxt11.vip ONLINE ONLINE on pazxxt11oracle@pazxxt10:~/utils>
All we had to do at this state was to issue the crs_relocate command again; see Example 14-38.
Example 14-38 crs_relocate command
oracle@pazxxt10:~/utils> crs_relocate DB01 -c pazxxt11Attempting to stop `DB01` on member `pazxxt10`Stop of `DB01` on member `pazxxt10` succeeded.Attempting to start `DB01` on member `pazxxt11`Start of `DB01` on member `pazxxt11` succeeded.
Last, we verified that we were back up and running on pazxxt11; see Example 14-39.
Example 14-39 Verifying CRS resources again
oracle@pazxxt10:~/utils> . ./viewCRSresources.shHA Resource Target State----------- ------ -----DB01 ONLINE ONLINE on pazxxt11ora.pazxxt10.ASM1.asm ONLINE ONLINE on pazxxt10ora.pazxxt10.ASM_LISTENER_PAZXXT10.lsnr ONLINE ONLINE on pazxxt10ora.pazxxt10.gsd ONLINE ONLINE on pazxxt10ora.pazxxt10.ons ONLINE ONLINE on pazxxt10ora.pazxxt10.vip ONLINE ONLINE on pazxxt10ora.pazxxt11.ASM2.asm ONLINE ONLINE on pazxxt11ora.pazxxt11.ASM_LISTENER_PAZXXT11.lsnr ONLINE ONLINE on pazxxt11ora.pazxxt11.gsd ONLINE ONLINE on pazxxt11ora.pazxxt11.ons ONLINE ONLINE on pazxxt11ora.pazxxt11.vip ONLINE ONLINE on pazxxt11
14.11 Summary
This chapter introduced the use of Oracle Clusterware as a resilient and cost-effective means for providing cold failover services for single-instance, non-RAC Oracle Databases. As we have seen, using Oracle Clusterware a cluster can be easily created, managed, and maintained to protect a single
Chapter 14. Using Oracle Clusterware for a single instance database failover 293
Oracle instance from a system or server failure. Additionally, building a Single Instance Failover configuration that is based upon a clustered ASM configuration can further reduce operational complexity by delegating most of the critical database storage needs (availability, performance, management, and so on) to ASM, which in turn simplifies the overall management of Oracle Database instances themselves.
Oracle Clusterware is a powerful component of Oracle's Maximum Available Architecture and should be a part of every setting where availability and operational simplicity are key goals.
References� Oracle Database Oracle Clusterware and Oracle Real Application Clusters
Installation Guide 10g Release 2 (10.2) for Linux Part Number B14203-09
� Oracle Database Installation Guide 10g Release 2 (10.2) for IBM zSeries Based Linux Part Number B25400-01
� Installing Oracle 10gR2 on SLES10 Linux on System z
http://www.redbooks.ibm.com/abstracts/tips0669.html
� Oracle Database Oracle Clusterware and Oracle Real Application Clusters Administration and Deployment Guide 10g Release 2 (10.2), B14197
� Oracle Clusterware Administration and Deployment Guide 11g Release 1 (11.1), B28255-06B14197-03
294 Experiences with Oracle Solutions on Linux for IBM System z
Part 4 Appendixes
Part 4
© Copyright IBM Corp. 2009. All rights reserved. 295

296 Experiences with Oracle Solutions on Linux for IBM System z
Appendix A. Scripts for using Hardware Security Modules with Oracle Advanced Security
In this appendix we provide the list of scripts and files we used in Chapter 11, “Using hardware security modules with Oracle Advanced Security” on page 171.
A
© Copyright IBM Corp. 2009. All rights reserved. 297
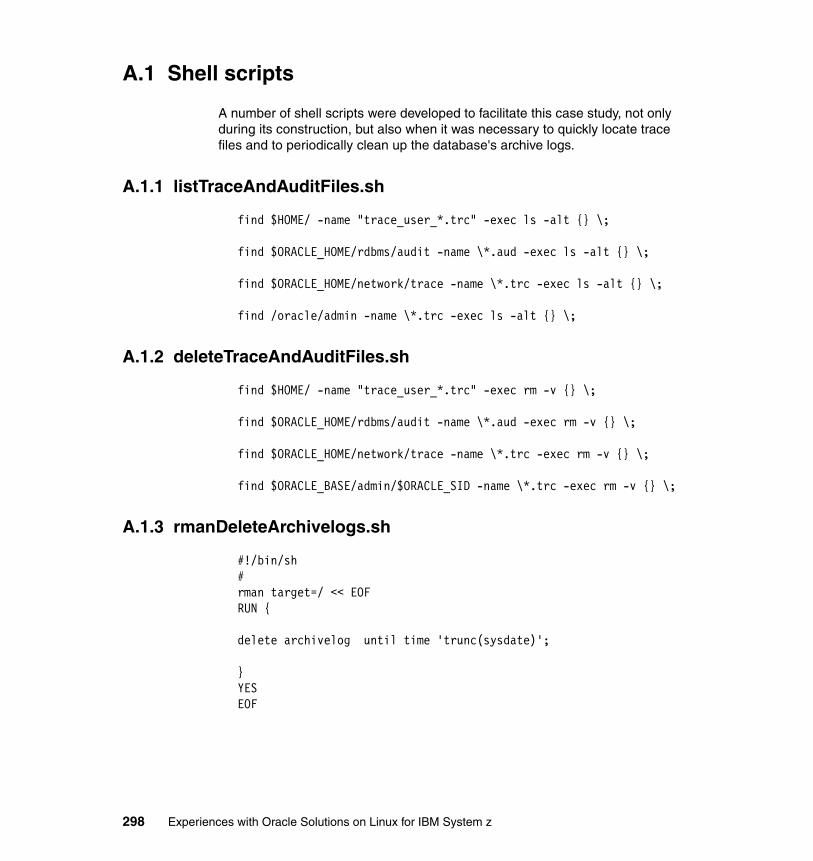
A.1 Shell scripts
A number of shell scripts were developed to facilitate this case study, not only during its construction, but also when it was necessary to quickly locate trace files and to periodically clean up the database's archive logs.
A.1.1 listTraceAndAuditFiles.sh
find $HOME/ -name "trace_user_*.trc" -exec ls -alt {} \;
find $ORACLE_HOME/rdbms/audit -name \*.aud -exec ls -alt {} \;
find $ORACLE_HOME/network/trace -name \*.trc -exec ls -alt {} \;
find /oracle/admin -name \*.trc -exec ls -alt {} \;
A.1.2 deleteTraceAndAuditFiles.sh
find $HOME/ -name "trace_user_*.trc" -exec rm -v {} \;
find $ORACLE_HOME/rdbms/audit -name \*.aud -exec rm -v {} \;
find $ORACLE_HOME/network/trace -name \*.trc -exec rm -v {} \;
find $ORACLE_BASE/admin/$ORACLE_SID -name \*.trc -exec rm -v {} \;
A.1.3 rmanDeleteArchivelogs.sh
#!/bin/sh#rman target=/ << EOFRUN {
delete archivelog until time 'trunc(sysdate)';
}YESEOF
298 Experiences with Oracle Solutions on Linux for IBM System z
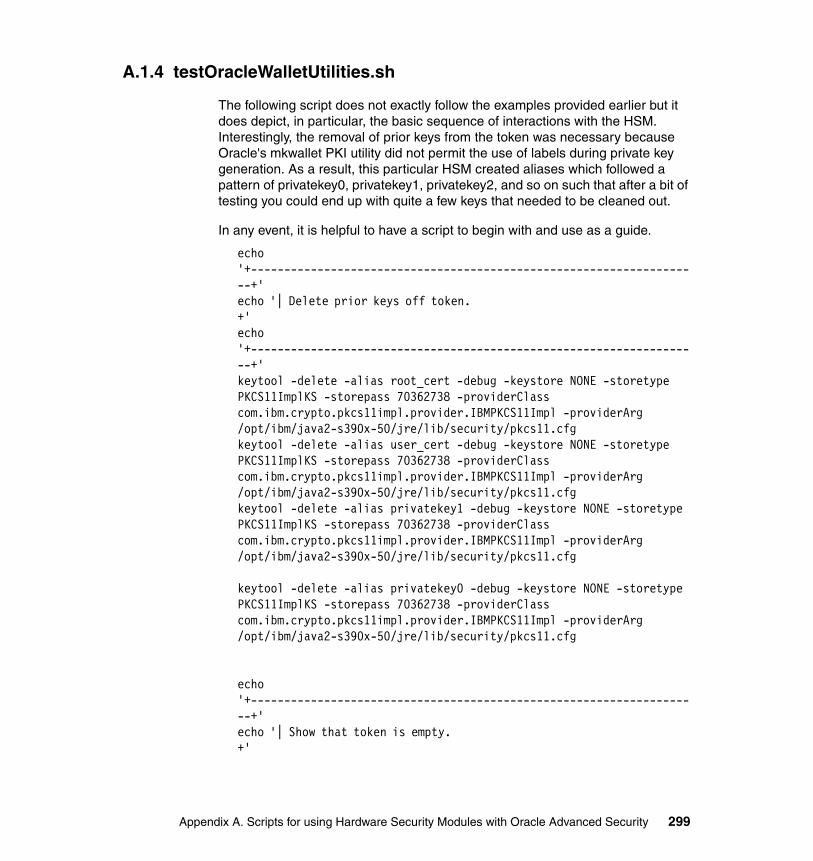
A.1.4 testOracleWalletUtilities.sh
The following script does not exactly follow the examples provided earlier but it does depict, in particular, the basic sequence of interactions with the HSM. Interestingly, the removal of prior keys from the token was necessary because Oracle's mkwallet PKI utility did not permit the use of labels during private key generation. As a result, this particular HSM created aliases which followed a pattern of privatekey0, privatekey1, privatekey2, and so on such that after a bit of testing you could end up with quite a few keys that needed to be cleaned out.
In any event, it is helpful to have a script to begin with and use as a guide.
echo '+--------------------------------------------------------------------+'echo '| Delete prior keys off token. +'echo '+--------------------------------------------------------------------+'keytool -delete -alias root_cert -debug -keystore NONE -storetype PKCS11ImplKS -storepass 70362738 -providerClass com.ibm.crypto.pkcs11impl.provider.IBMPKCS11Impl -providerArg /opt/ibm/java2-s390x-50/jre/lib/security/pkcs11.cfgkeytool -delete -alias user_cert -debug -keystore NONE -storetype PKCS11ImplKS -storepass 70362738 -providerClass com.ibm.crypto.pkcs11impl.provider.IBMPKCS11Impl -providerArg /opt/ibm/java2-s390x-50/jre/lib/security/pkcs11.cfgkeytool -delete -alias privatekey1 -debug -keystore NONE -storetype PKCS11ImplKS -storepass 70362738 -providerClass com.ibm.crypto.pkcs11impl.provider.IBMPKCS11Impl -providerArg /opt/ibm/java2-s390x-50/jre/lib/security/pkcs11.cfg
keytool -delete -alias privatekey0 -debug -keystore NONE -storetype PKCS11ImplKS -storepass 70362738 -providerClass com.ibm.crypto.pkcs11impl.provider.IBMPKCS11Impl -providerArg /opt/ibm/java2-s390x-50/jre/lib/security/pkcs11.cfg
echo '+--------------------------------------------------------------------+'echo '| Show that token is empty. +'
Appendix A. Scripts for using Hardware Security Modules with Oracle Advanced Security 299
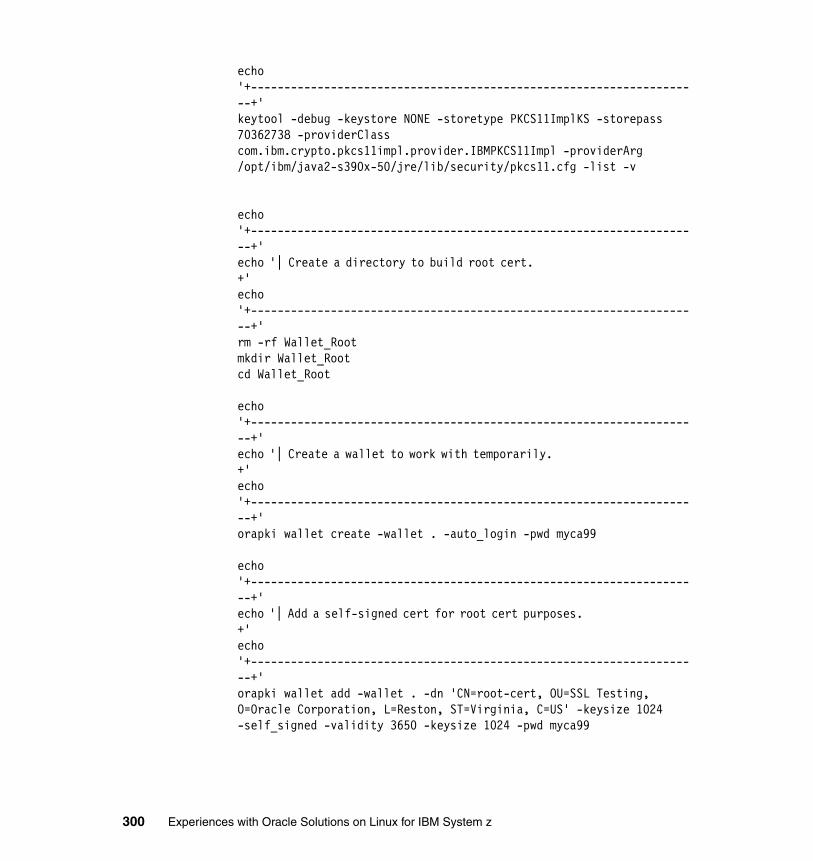
echo '+--------------------------------------------------------------------+'keytool -debug -keystore NONE -storetype PKCS11ImplKS -storepass 70362738 -providerClass com.ibm.crypto.pkcs11impl.provider.IBMPKCS11Impl -providerArg /opt/ibm/java2-s390x-50/jre/lib/security/pkcs11.cfg -list -v
echo '+--------------------------------------------------------------------+'echo '| Create a directory to build root cert. +'echo '+--------------------------------------------------------------------+'rm -rf Wallet_Rootmkdir Wallet_Rootcd Wallet_Root
echo '+--------------------------------------------------------------------+'echo '| Create a wallet to work with temporarily. +'echo '+--------------------------------------------------------------------+'orapki wallet create -wallet . -auto_login -pwd myca99
echo '+--------------------------------------------------------------------+'echo '| Add a self-signed cert for root cert purposes. +'echo '+--------------------------------------------------------------------+'orapki wallet add -wallet . -dn 'CN=root-cert, OU=SSL Testing, O=Oracle Corporation, L=Reston, ST=Virginia, C=US' -keysize 1024 -self_signed -validity 3650 -keysize 1024 -pwd myca99
300 Experiences with Oracle Solutions on Linux for IBM System z

echo '+--------------------------------------------------------------------+'echo '| Display the cert just created. +'echo '+--------------------------------------------------------------------+'orapki wallet display -wallet . -pwd myca99
echo '+--------------------------------------------------------------------+'echo '| Export the root cert just created. +'echo '+--------------------------------------------------------------------+'orapki wallet export -wallet . -dn 'CN=root-cert, OU=SSL Testing, O=Oracle Corporation, L=Reston, ST=Virginia, C=US' -cert root.cer
echo '+--------------------------------------------------------------------+'echo '| Load the root cert onto the token. +'echo '+--------------------------------------------------------------------+'mkwallet -Pm root.cer "/usr/lib/pkcs11/PKCS11_API.so64" ORACLE 70362738 root_cert
echo '+--------------------------------------------------------------------+'echo '| Display the root cert just loaded onto the token, from the token. +'echo '+--------------------------------------------------------------------+'keytool -alias root_cert -keystore NONE -storetype PKCS11ImplKS -storepass 70362738 -providerClass
Appendix A. Scripts for using Hardware Security Modules with Oracle Advanced Security 301
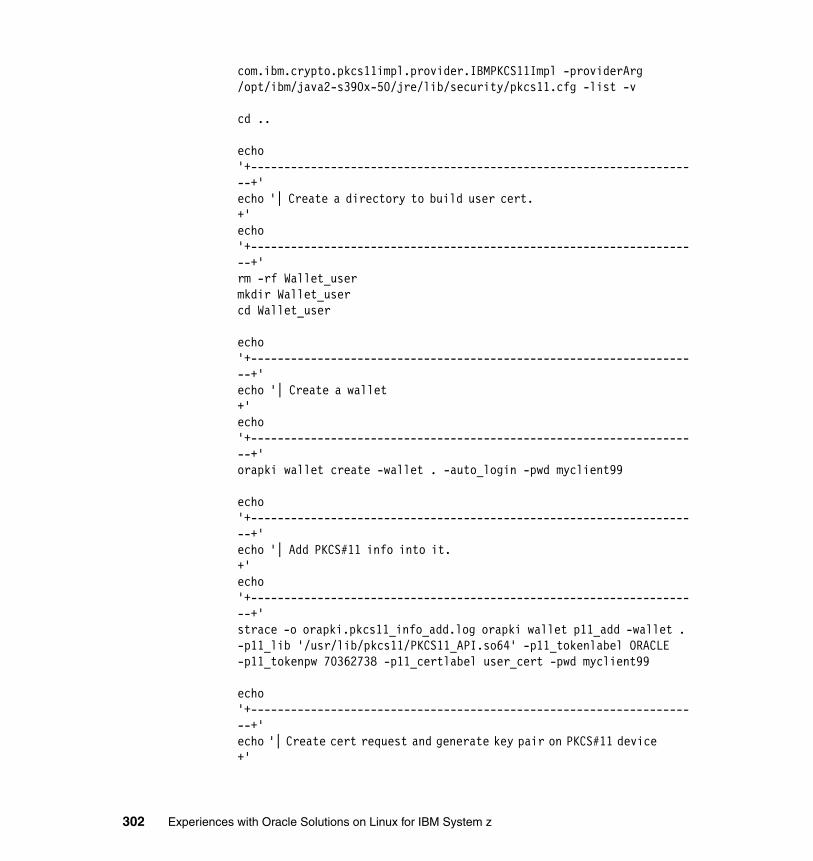
com.ibm.crypto.pkcs11impl.provider.IBMPKCS11Impl -providerArg /opt/ibm/java2-s390x-50/jre/lib/security/pkcs11.cfg -list -v
cd ..
echo '+--------------------------------------------------------------------+'echo '| Create a directory to build user cert. +'echo '+--------------------------------------------------------------------+'rm -rf Wallet_usermkdir Wallet_usercd Wallet_user
echo '+--------------------------------------------------------------------+'echo '| Create a wallet +'echo '+--------------------------------------------------------------------+'orapki wallet create -wallet . -auto_login -pwd myclient99
echo '+--------------------------------------------------------------------+'echo '| Add PKCS#11 info into it. +'echo '+--------------------------------------------------------------------+'strace -o orapki.pkcs11_info_add.log orapki wallet p11_add -wallet . -p11_lib '/usr/lib/pkcs11/PKCS11_API.so64' -p11_tokenlabel ORACLE -p11_tokenpw 70362738 -p11_certlabel user_cert -pwd myclient99
echo '+--------------------------------------------------------------------+'echo '| Create cert request and generate key pair on PKCS#11 device +'
302 Experiences with Oracle Solutions on Linux for IBM System z
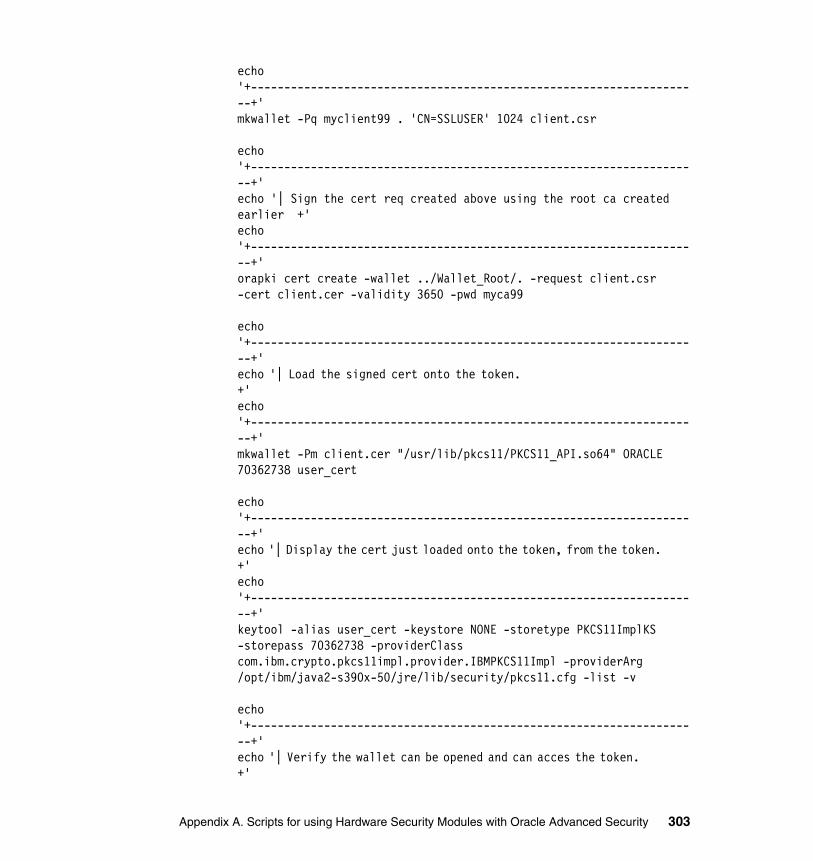
echo '+--------------------------------------------------------------------+'mkwallet -Pq myclient99 . 'CN=SSLUSER' 1024 client.csr
echo '+--------------------------------------------------------------------+'echo '| Sign the cert req created above using the root ca created earlier +'echo '+--------------------------------------------------------------------+'orapki cert create -wallet ../Wallet_Root/. -request client.csr -cert client.cer -validity 3650 -pwd myca99
echo '+--------------------------------------------------------------------+'echo '| Load the signed cert onto the token. +'echo '+--------------------------------------------------------------------+'mkwallet -Pm client.cer "/usr/lib/pkcs11/PKCS11_API.so64" ORACLE 70362738 user_cert
echo '+--------------------------------------------------------------------+'echo '| Display the cert just loaded onto the token, from the token. +'echo '+--------------------------------------------------------------------+'keytool -alias user_cert -keystore NONE -storetype PKCS11ImplKS -storepass 70362738 -providerClass com.ibm.crypto.pkcs11impl.provider.IBMPKCS11Impl -providerArg /opt/ibm/java2-s390x-50/jre/lib/security/pkcs11.cfg -list -v
echo '+--------------------------------------------------------------------+'echo '| Verify the wallet can be opened and can acces the token. +'
Appendix A. Scripts for using Hardware Security Modules with Oracle Advanced Security 303
echo '+--------------------------------------------------------------------+'strace -o orapki.pkcs11_verify.log orapki wallet p11_verify -wallet . -pwd myclient99
A.1.5 runASOSSLDemo.sh
#!/bin/sh
# Find the right echo.if [ "X`/bin/echo -e`" = "X-e" ]; then ECHO=/bin/echoelse ECHO="/bin/echo -e"fi
rm -f jdbc.log
java rbs.ASOSSL "(SOURCE=(METHOD=file)(METHOD_DATA=(DIRECTORY=/oracle/admin/DB01/wallet/Wallet_client)))" ASODEMO ASODEMO "jdbc:oracle:thin:@(DESCRIPTION=(ADDRESS_LIST=(ADDRESS=(PROTOCOL=TCPS)(HOST=mbase42.mop.fr.ibm.com)(PORT=2484)))(CONNECT_DATA=(SERVICE_NAME=DB01))(SECURITY=(SSL_SERVER_CERT_DN=\"CN=DB01\")))"
# tracing notes:
# jdbc logging (java.util.logging) you need to use ojdbc14_g.jar (set it via setEnv.sh) and add "-Doracle.jdbc.Trace=true"# JNI trace: add -verbose:jni # basic java logging: add "-Djava.util.logging.config.file=OracleLog.properties"
A.1.6 runJSSEDemo.sh
#!/bin/sh
# Find the right echo.if [ "X`/bin/echo -e`" = "X-e" ]; then ECHO=/bin/echo
304 Experiences with Oracle Solutions on Linux for IBM System z
else ECHO="/bin/echo -e"fi
rm -f jdbc.log
java -Djava.util.logging.config.file=OracleLog.properties -Djavax.net.debug=ssl:handshake:data rbs.JSSEExample ./build/conf/JKS/client.jks JKS clientpw ./build/conf/JKS/trust.jks JKS trustpass system dialtone "jdbc:oracle:thin:@(DESCRIPTION=(ADDRESS_LIST=(ADDRESS=(PROTOCOL=TCPS)(HOST=mbase42.mop.fr.ibm.com)(PORT=2484)))(CONNECT_DATA=(SERVICE_NAME=DB01))(SECURITY=(SSL_SERVER_CERT_DN=\"CN=DB01\")))"
# tracing notes:
# jdbc logging (java.util.logging) you need to use ojdbc14_g.jar (set it via setEnv.sh) and add "-Doracle.jdbc.Trace=true"# JNI trace: add -verbose:jni # basic java logging: add "-Djava.util.logging.config.file=OracleLog.properties"# JSSE ssl tracing: java -Djavax.net.debug=ssl:handshake:data
A.1.7 setEnv.sh
##!/bin/sh
unset CLASSPATH# to enable jdbc logging (java.util.logging) you need to use ojdbc14_g.jar
#export CLASSPATH=.:`pwd`/build/standalone/classes/:`pwd`/build/common/classes:$ORACLE_HOME/jdbc/lib/ojdbc14_g.jar:$ORACLE_HOME/jlib/oraclepki.jarexport CLASSPATH=.:`pwd`/build/standalone/classes/:`pwd`/build/common/classes:./Miscellaneous/ojdbc5.jar:$ORACLE_HOME/jlib/oraclepki.jar
# see note in build.xml at sqlplus target for reason behind including Oracle's bin here:#export PATH=$ORACLE_HOME/bin:$PATH
Appendix A. Scripts for using Hardware Security Modules with Oracle Advanced Security 305
# following is for type 2 JDBC driver:export LD_LIBRARY_PATH=$ORACLE_HOME/lib
A.1.8 makeIt.sh
echo "Ant build log: build_log.txt"export TNS_ADMIN=$ORACLE_HOME/network/adminecho TNS_ADMIN reset to $TNS_ADMINant all -logfile build_log.txt -verbosecat build_log.txt | grep BUILD
# look for errors from the sqlplus stepsVALUE=`cat createOracleSSLDBObjects.log createOracleASODBObjects.log | grep ORA-`if [ -z "$VALUE" ]; then VALUE=`cat createOracleSSLDBObjects.log createOracleASODBObjects.log | grep SP2-0310` if [ -z "$VALUE" ]; then echo "The demo sql executed with no apparent errors, but you may want to verify" fielse echo $VALUEfi
A.2 Ant Configuration Files
We used Ant in order to rapidly build and rebuild our two phases. Clearly this is not necessary, but if you are comfortable with Ant and want to quickly reproduce what we did, this is an excellent way to get started.
A.2.1 Phase 1 build.xml
<?xml version="1.0" encoding="iso-8859-1"?><!DOCTYPE project [ <!ENTITY common SYSTEM "file:./common.xml">]><project name="zCryptoDemo" default="all" basedir=".">
306 Experiences with Oracle Solutions on Linux for IBM System z
<!-- =================================================================== --> <!-- common class path --> <!-- =================================================================== --> &common;
<target name="init" depends="common"> <property name="app.name" value="mqClient"/>
<property name="bld.compiler" value="classic"/> <property name="class.files" value="**/*.class"/> <property name="bak.files" value="**/*~"/> <property name="log.files" value="**/*.log"/>
<property name="app.root.dir" value="."/> <property name="src.dir" value="./src"/> <property name="src.standalone.dir" value="${src.dir}/standalone"/> <property name="src.common.dir" value="${src.dir}/common"/> <property name="src.conf.dir" value="${src.dir}/conf"/> <property name="bld.dir" value="./build"/> <property name="bld.common.dir" value="${bld.dir}/common"/> <property name="bld.conf.dir" value="${bld.dir}/conf"/>
<property name="dst.standalone.dir" value="${bld.dir}/standalone"/>
</target>
<target name="clean" depends="init"> <delete dir="${bld.dir}"/> <delete> <fileset dir="." includes="${bak.files}" defaultexcludes="no"/> <fileset dir="." includes="${log.files}" defaultexcludes="no"/> </delete>
Appendix A. Scripts for using Hardware Security Modules with Oracle Advanced Security 307
</target>
<target name="setup" depends="clean"> <mkdir dir="${bld.dir}"/>
<mkdir dir="${bld.conf.dir}"/> <mkdir dir="${bld.conf.dir}/Wallet_ca"/> <mkdir dir="${bld.conf.dir}/Wallet_client"/> <mkdir dir="${bld.conf.dir}/Wallet_server"/> <mkdir dir="${bld.conf.dir}/JKS"/>
<mkdir dir="${bld.common.dir}"/> <mkdir dir="${bld.common.dir}/classes"/>
<mkdir dir="${dst.standalone.dir}"/> <mkdir dir="${dst.standalone.dir}/classes"/> </target>
<target name="common-classes" depends="setup"> <javac srcdir="${src.common.dir}" destdir="${bld.common.dir}/classes" debug="on">
<compilerarg value="-Xlint"/> <classpath> <path refid="common.class.path"/> </classpath> </javac> </target> <target name="standalone-classes" depends="common-classes"> <javac srcdir="${src.standalone.dir}" destdir="${dst.standalone.dir}/classes" debug="on">
<compilerarg value="-Xlint"/> <classpath> <path refid="common.class.path"/> <pathelement location="${bld.common.dir}/classes"/> </classpath> </javac> </target>
<target name="CreateAndCopyWallets" depends="standalone-classes"> <description>
308 Experiences with Oracle Solutions on Linux for IBM System z
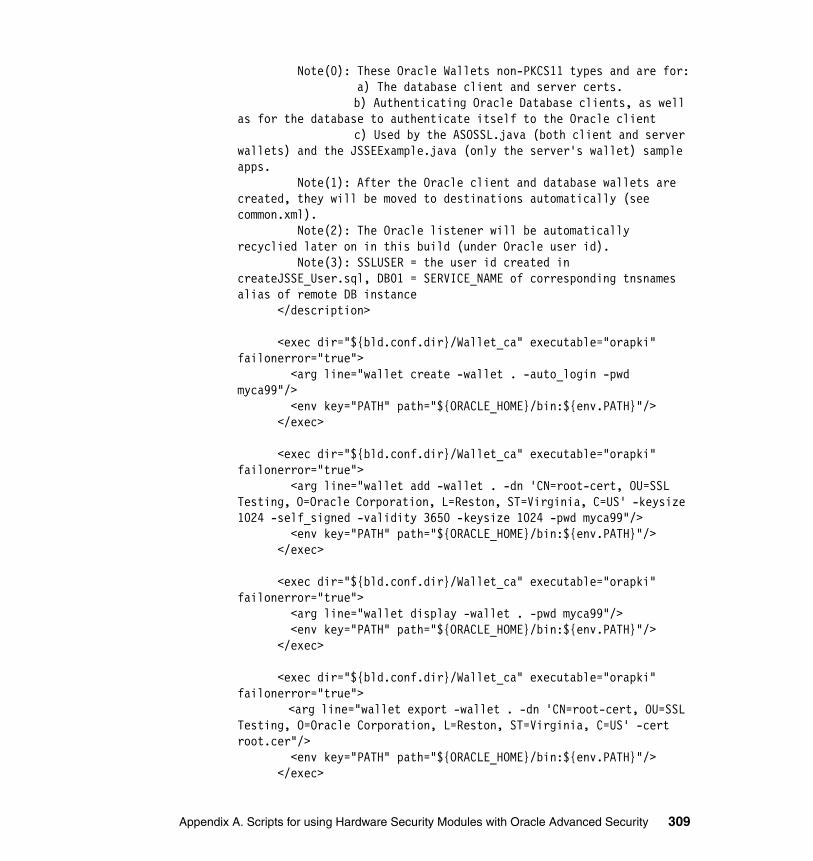
Note(0): These Oracle Wallets non-PKCS11 types and are for: a) The database client and server certs. b) Authenticating Oracle Database clients, as well as for the database to authenticate itself to the Oracle client c) Used by the ASOSSL.java (both client and server wallets) and the JSSEExample.java (only the server's wallet) sample apps. Note(1): After the Oracle client and database wallets are created, they will be moved to destinations automatically (see common.xml). Note(2): The Oracle listener will be automatically recyclied later on in this build (under Oracle user id). Note(3): SSLUSER = the user id created in createJSSE_User.sql, DB01 = SERVICE_NAME of corresponding tnsnames alias of remote DB instance </description>
<exec dir="${bld.conf.dir}/Wallet_ca" executable="orapki" failonerror="true"> <arg line="wallet create -wallet . -auto_login -pwd myca99"/> <env key="PATH" path="${ORACLE_HOME}/bin:${env.PATH}"/> </exec>
<exec dir="${bld.conf.dir}/Wallet_ca" executable="orapki" failonerror="true"> <arg line="wallet add -wallet . -dn 'CN=root-cert, OU=SSL Testing, O=Oracle Corporation, L=Reston, ST=Virginia, C=US' -keysize 1024 -self_signed -validity 3650 -keysize 1024 -pwd myca99"/> <env key="PATH" path="${ORACLE_HOME}/bin:${env.PATH}"/> </exec>
<exec dir="${bld.conf.dir}/Wallet_ca" executable="orapki" failonerror="true"> <arg line="wallet display -wallet . -pwd myca99"/> <env key="PATH" path="${ORACLE_HOME}/bin:${env.PATH}"/> </exec>
<exec dir="${bld.conf.dir}/Wallet_ca" executable="orapki" failonerror="true"> <arg line="wallet export -wallet . -dn 'CN=root-cert, OU=SSL Testing, O=Oracle Corporation, L=Reston, ST=Virginia, C=US' -cert root.cer"/> <env key="PATH" path="${ORACLE_HOME}/bin:${env.PATH}"/> </exec>
Appendix A. Scripts for using Hardware Security Modules with Oracle Advanced Security 309
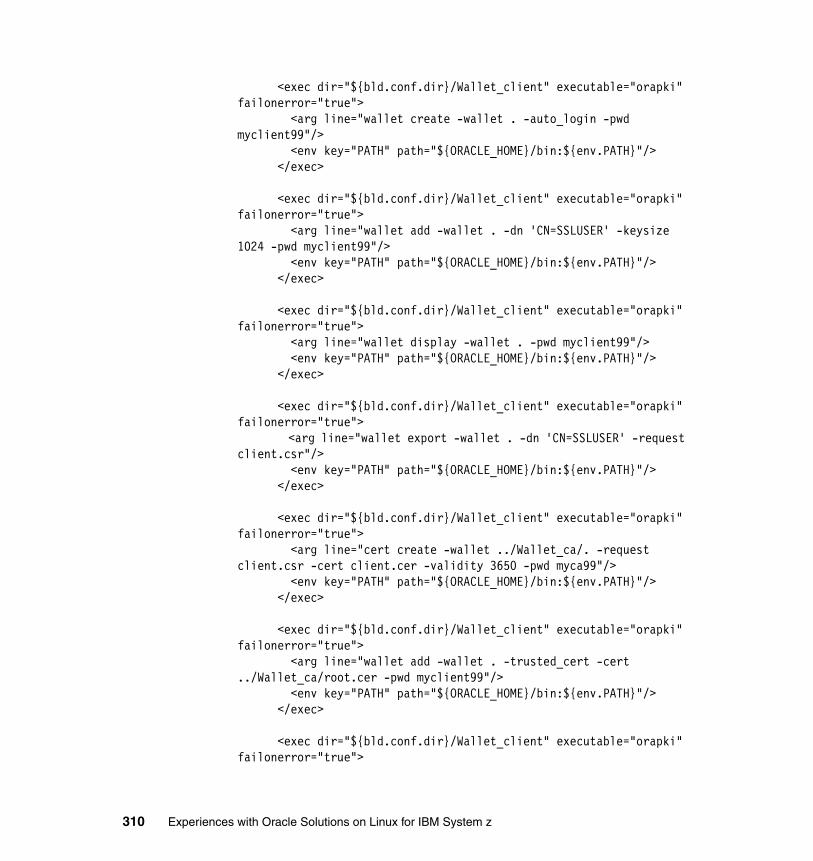
<exec dir="${bld.conf.dir}/Wallet_client" executable="orapki" failonerror="true"> <arg line="wallet create -wallet . -auto_login -pwd myclient99"/> <env key="PATH" path="${ORACLE_HOME}/bin:${env.PATH}"/> </exec>
<exec dir="${bld.conf.dir}/Wallet_client" executable="orapki" failonerror="true"> <arg line="wallet add -wallet . -dn 'CN=SSLUSER' -keysize 1024 -pwd myclient99"/> <env key="PATH" path="${ORACLE_HOME}/bin:${env.PATH}"/> </exec>
<exec dir="${bld.conf.dir}/Wallet_client" executable="orapki" failonerror="true"> <arg line="wallet display -wallet . -pwd myclient99"/> <env key="PATH" path="${ORACLE_HOME}/bin:${env.PATH}"/> </exec> <exec dir="${bld.conf.dir}/Wallet_client" executable="orapki" failonerror="true"> <arg line="wallet export -wallet . -dn 'CN=SSLUSER' -request client.csr"/> <env key="PATH" path="${ORACLE_HOME}/bin:${env.PATH}"/> </exec> <exec dir="${bld.conf.dir}/Wallet_client" executable="orapki" failonerror="true"> <arg line="cert create -wallet ../Wallet_ca/. -request client.csr -cert client.cer -validity 3650 -pwd myca99"/> <env key="PATH" path="${ORACLE_HOME}/bin:${env.PATH}"/> </exec>
<exec dir="${bld.conf.dir}/Wallet_client" executable="orapki" failonerror="true"> <arg line="wallet add -wallet . -trusted_cert -cert ../Wallet_ca/root.cer -pwd myclient99"/> <env key="PATH" path="${ORACLE_HOME}/bin:${env.PATH}"/> </exec> <exec dir="${bld.conf.dir}/Wallet_client" executable="orapki" failonerror="true">
310 Experiences with Oracle Solutions on Linux for IBM System z

<arg line="wallet add -wallet . -user_cert -cert client.cer -pwd myclient99"/> <env key="PATH" path="${ORACLE_HOME}/bin:${env.PATH}"/> </exec>
<exec dir="${bld.conf.dir}/Wallet_client" executable="orapki" failonerror="true"> <arg line="wallet display -wallet . -pwd myclient99"/> <env key="PATH" path="${ORACLE_HOME}/bin:${env.PATH}"/> </exec> <exec dir="${bld.conf.dir}/Wallet_server" executable="orapki" failonerror="true"> <arg line="wallet create -wallet . -auto_login -pwd myserver99"/> <env key="PATH" path="${ORACLE_HOME}/bin:${env.PATH}"/> </exec> <exec dir="${bld.conf.dir}/Wallet_server" executable="orapki" failonerror="true"> <arg line="wallet add -wallet . -dn 'CN=DB01' -keysize 1024 -pwd myserver99"/> <env key="PATH" path="${ORACLE_HOME}/bin:${env.PATH}"/> </exec>
<exec dir="${bld.conf.dir}/Wallet_server" executable="orapki" failonerror="true"> <arg line="wallet display -wallet . -pwd myserver99"/> <env key="PATH" path="${ORACLE_HOME}/bin:${env.PATH}"/> </exec> <exec dir="${bld.conf.dir}/Wallet_server" executable="orapki" failonerror="true"> <arg line="wallet export -wallet . -dn 'CN=DB01' -request server.csr"/> <env key="PATH" path="${ORACLE_HOME}/bin:${env.PATH}"/> </exec> <exec dir="${bld.conf.dir}/Wallet_server" executable="orapki" failonerror="true"> <arg line="cert create -wallet ../Wallet_ca/. -request server.csr -cert server.cer -validity 3650 -pwd myca99"/> <env key="PATH" path="${ORACLE_HOME}/bin:${env.PATH}"/> </exec>
Appendix A. Scripts for using Hardware Security Modules with Oracle Advanced Security 311

<exec dir="${bld.conf.dir}/Wallet_server" executable="orapki" failonerror="true"> <arg line="wallet add -wallet . -trusted_cert -cert ../Wallet_ca/root.cer -pwd myserver99"/> <env key="PATH" path="${ORACLE_HOME}/bin:${env.PATH}"/> </exec> <exec dir="${bld.conf.dir}/Wallet_server" executable="orapki" failonerror="true"> <arg line="wallet add -wallet . -user_cert -cert server.cer -pwd myserver99"/> <env key="PATH" path="${ORACLE_HOME}/bin:${env.PATH}"/> </exec>
<exec dir="${bld.conf.dir}/Wallet_server" executable="orapki" failonerror="true"> <arg line="wallet display -wallet . -pwd myserver99"/> <env key="PATH" path="${ORACLE_HOME}/bin:${env.PATH}"/> </exec> <exec dir="${app.root.dir}" executable="sh" failonerror="true"> <arg line="-c 'chmod -R a+r ${bld.dir}'"/> <env key="PATH" path="${ORACLE_HOME}/bin:${env.PATH}"/> </exec>
<exec dir="${bld.conf.dir}" executable="sh" failonerror="true"> <arg line="-c 'cp ./Wallet_client/* ${ORACLE_CLIENT_WALLET_LOCATION}'"/> <env key="PATH" path="${ORACLE_HOME}/bin:${env.PATH}"/> </exec> <exec dir="${bld.conf.dir}" executable="sh" failonerror="true"> <arg line="-c 'cp ./Wallet_server/* ${ORACLE_SERVER_WALLET_LOCATION}'"/> <env key="PATH" path="${ORACLE_HOME}/bin:${env.PATH}"/> </exec>
</target>
<target name="CreateKeystores" depends="CreateAndCopyWallets"> <description>
312 Experiences with Oracle Solutions on Linux for IBM System z

Note(0): These key stores are for the JSSEExample.java sample. Note(1): SSLUSER = the user id created in createJSSE_User.sql. The db's listener uses the Oracle wallet (in ${bld.conf.dir}/Wallet_server) created earlier (see above) </description>
<exec dir="${bld.conf.dir}/JKS" executable="keytool" failonerror="true"> <arg line="-genkey -alias client -dname 'CN=SSLUSER' -keystore client.jks -storetype JKS -keyalg RSA -storepass clientpw"/> <env key="PATH" path="${ORACLE_HOME}/bin:${env.PATH}"/> </exec> <exec dir="${bld.conf.dir}/JKS" executable="keytool" failonerror="true"> <arg line="-certreq -alias client -file client.csr -keystore client.jks -storepass clientpw"/> <env key="PATH" path="${ORACLE_HOME}/bin:${env.PATH}"/> </exec>
<exec dir="${bld.conf.dir}/JKS" executable="orapki" failonerror="true"> <arg line="cert create -wallet ../Wallet_ca/. -request client.csr -cert client.cer -validity 3650 -pwd myca99"/> <env key="PATH" path="${ORACLE_HOME}/bin:${env.PATH}"/> </exec>
<exec dir="${bld.conf.dir}/JKS" executable="keytool" failonerror="true"> <arg line="-import -v -noprompt -alias rootca -file ../Wallet_ca/root.cer -keystore client.jks -storepass clientpw "/> <env key="PATH" path="${ORACLE_HOME}/bin:${env.PATH}"/> </exec> <exec dir="${bld.conf.dir}/JKS" executable="keytool" failonerror="true"> <arg line="-import -v -noprompt -alias client -file client.cer -keystore client.jks -storepass clientpw"/> <env key="PATH" path="${ORACLE_HOME}/bin:${env.PATH}"/> </exec>
<exec dir="${bld.conf.dir}/JKS" executable="keytool" failonerror="true">
Appendix A. Scripts for using Hardware Security Modules with Oracle Advanced Security 313
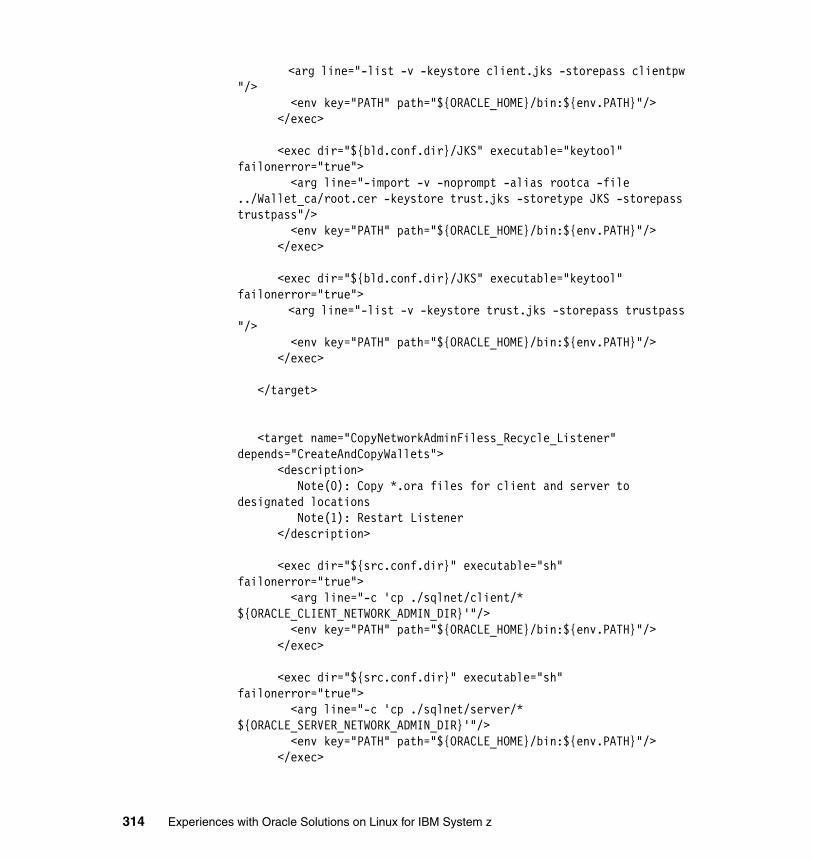
<arg line="-list -v -keystore client.jks -storepass clientpw "/> <env key="PATH" path="${ORACLE_HOME}/bin:${env.PATH}"/> </exec> <exec dir="${bld.conf.dir}/JKS" executable="keytool" failonerror="true"> <arg line="-import -v -noprompt -alias rootca -file ../Wallet_ca/root.cer -keystore trust.jks -storetype JKS -storepass trustpass"/> <env key="PATH" path="${ORACLE_HOME}/bin:${env.PATH}"/> </exec> <exec dir="${bld.conf.dir}/JKS" executable="keytool" failonerror="true"> <arg line="-list -v -keystore trust.jks -storepass trustpass "/> <env key="PATH" path="${ORACLE_HOME}/bin:${env.PATH}"/> </exec> </target>
<target name="CopyNetworkAdminFiless_Recycle_Listener" depends="CreateAndCopyWallets"> <description> Note(0): Copy *.ora files for client and server to designated locations Note(1): Restart Listener </description>
<exec dir="${src.conf.dir}" executable="sh" failonerror="true"> <arg line="-c 'cp ./sqlnet/client/* ${ORACLE_CLIENT_NETWORK_ADMIN_DIR}'"/> <env key="PATH" path="${ORACLE_HOME}/bin:${env.PATH}"/> </exec> <exec dir="${src.conf.dir}" executable="sh" failonerror="true"> <arg line="-c 'cp ./sqlnet/server/* ${ORACLE_SERVER_NETWORK_ADMIN_DIR}'"/> <env key="PATH" path="${ORACLE_HOME}/bin:${env.PATH}"/> </exec>
314 Experiences with Oracle Solutions on Linux for IBM System z
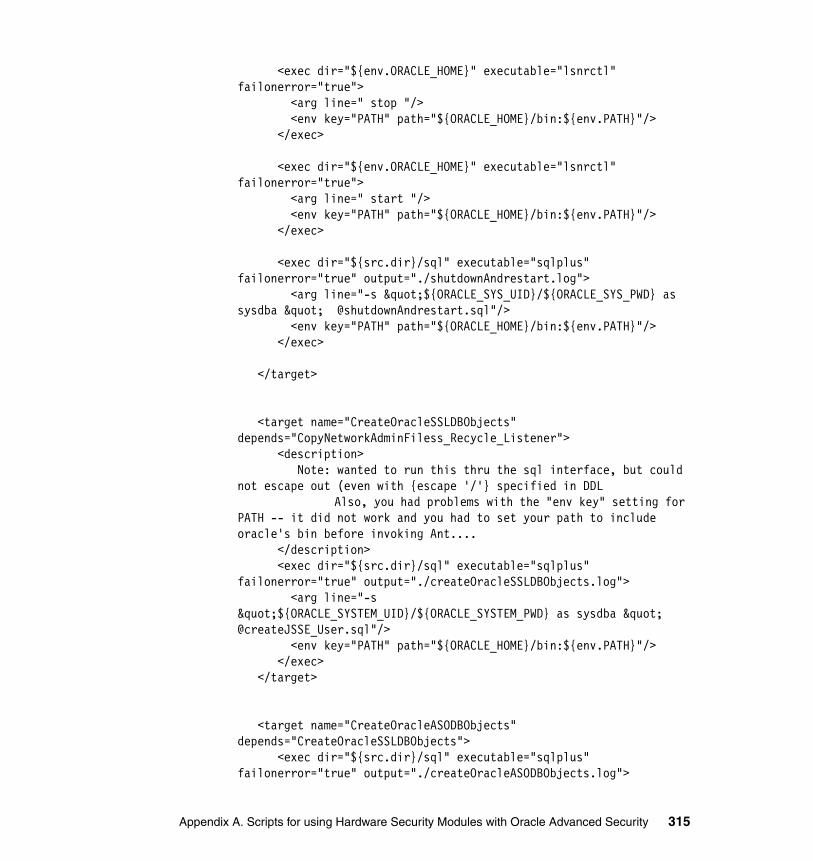
<exec dir="${env.ORACLE_HOME}" executable="lsnrctl" failonerror="true"> <arg line=" stop "/> <env key="PATH" path="${ORACLE_HOME}/bin:${env.PATH}"/> </exec> <exec dir="${env.ORACLE_HOME}" executable="lsnrctl" failonerror="true"> <arg line=" start "/> <env key="PATH" path="${ORACLE_HOME}/bin:${env.PATH}"/> </exec> <exec dir="${src.dir}/sql" executable="sqlplus" failonerror="true" output="./shutdownAndrestart.log"> <arg line="-s "${ORACLE_SYS_UID}/${ORACLE_SYS_PWD} as sysdba " @shutdownAndrestart.sql"/> <env key="PATH" path="${ORACLE_HOME}/bin:${env.PATH}"/> </exec>
</target>
<target name="CreateOracleSSLDBObjects" depends="CopyNetworkAdminFiless_Recycle_Listener"> <description> Note: wanted to run this thru the sql interface, but could not escape out (even with {escape '/'} specified in DDL Also, you had problems with the "env key" setting for PATH -- it did not work and you had to set your path to include oracle's bin before invoking Ant.... </description> <exec dir="${src.dir}/sql" executable="sqlplus" failonerror="true" output="./createOracleSSLDBObjects.log"> <arg line="-s "${ORACLE_SYSTEM_UID}/${ORACLE_SYSTEM_PWD} as sysdba " @createJSSE_User.sql"/> <env key="PATH" path="${ORACLE_HOME}/bin:${env.PATH}"/> </exec> </target>
<target name="CreateOracleASODBObjects" depends="CreateOracleSSLDBObjects"> <exec dir="${src.dir}/sql" executable="sqlplus" failonerror="true" output="./createOracleASODBObjects.log">
Appendix A. Scripts for using Hardware Security Modules with Oracle Advanced Security 315

<arg line="-s "${ORACLE_SYSTEM_UID}/${ORACLE_SYSTEM_PWD} as sysdba " @createASOSSL_User.sql"/> <env key="PATH" path="${ORACLE_HOME}/bin:${env.PATH}"/> </exec> </target>
<target name="all" depends ="init, clean, setup,
common-classes, standalone-classes, CreateAndCopyWallets, CreateKeystores, CopyNetworkAdminFiless_Recycle_Listener, CreateOracleSSLDBObjects, CreateOracleASODBObjects"
/>
</project>
A.2.2 Phase 1 common.xml
<?xml version="1.0" encoding="iso-8859-1"?>
<property name="env" environment="env" value="env"/><property name="JAVA_HOME" value="${env.JAVA_HOME}"/><property name="J2EE_HOME" value="${env.J2EE_HOME}"/>
<property name="ORACLE_HOST" value="LOCALHOST"/><property name="ORACLE_LISTENER_PORT" value="1521"/><property name="ORACLE_BASE" value="${env.ORACLE_BASE}"/><property name="ORACLE_HOME" value="${env.ORACLE_HOME}"/><property name="ORACLE_SID" value="${env.ORACLE_SID}"/><property name="ORACLE_SYSTEM_UID" value="SYSTEM"/><property name="ORACLE_SYSTEM_PWD" value="DIALTONE"/><property name="ORACLE_SYS_UID" value="SYS"/><property name="ORACLE_SYS_PWD" value="DIALTONE"/><property name="ORACLE_DBA_UID" value="APPLICATIONDBA"/><property name="ORACLE_DBA_PWD" value="DIALTONE"/>
316 Experiences with Oracle Solutions on Linux for IBM System z
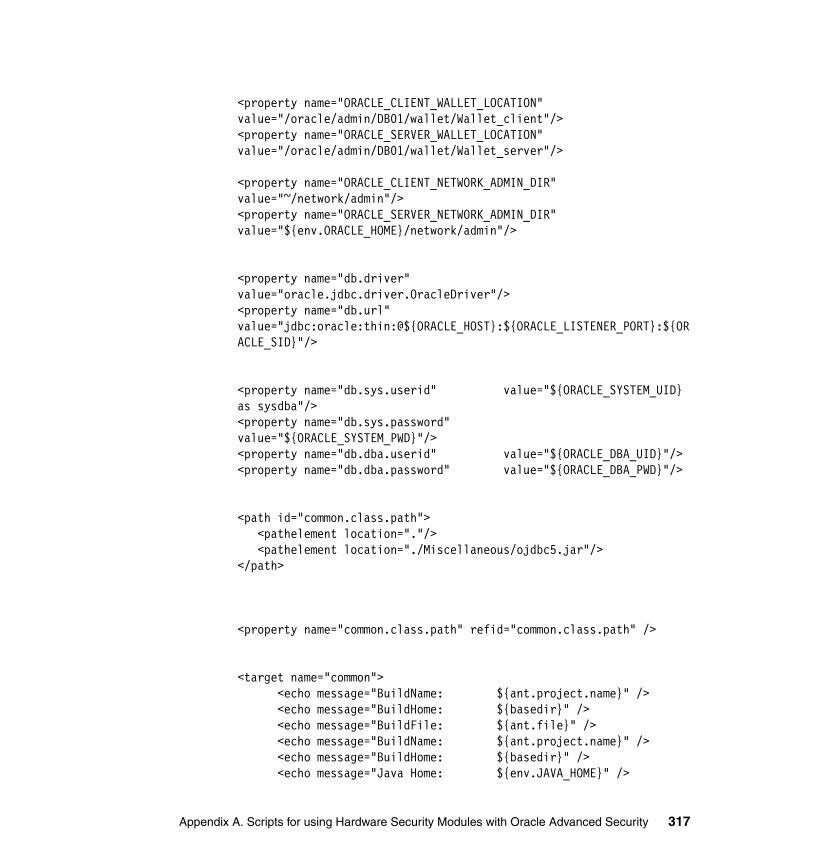
<property name="ORACLE_CLIENT_WALLET_LOCATION" value="/oracle/admin/DB01/wallet/Wallet_client"/><property name="ORACLE_SERVER_WALLET_LOCATION" value="/oracle/admin/DB01/wallet/Wallet_server"/>
<property name="ORACLE_CLIENT_NETWORK_ADMIN_DIR" value="~/network/admin"/><property name="ORACLE_SERVER_NETWORK_ADMIN_DIR" value="${env.ORACLE_HOME}/network/admin"/>
<property name="db.driver" value="oracle.jdbc.driver.OracleDriver"/><property name="db.url" value="jdbc:oracle:thin:@${ORACLE_HOST}:${ORACLE_LISTENER_PORT}:${ORACLE_SID}"/>
<property name="db.sys.userid" value="${ORACLE_SYSTEM_UID} as sysdba"/><property name="db.sys.password" value="${ORACLE_SYSTEM_PWD}"/><property name="db.dba.userid" value="${ORACLE_DBA_UID}"/><property name="db.dba.password" value="${ORACLE_DBA_PWD}"/>
<path id="common.class.path"> <pathelement location="."/> <pathelement location="./Miscellaneous/ojdbc5.jar"/></path>
<property name="common.class.path" refid="common.class.path" />
<target name="common"> <echo message="BuildName: ${ant.project.name}" /> <echo message="BuildHome: ${basedir}" /> <echo message="BuildFile: ${ant.file}" /> <echo message="BuildName: ${ant.project.name}" /> <echo message="BuildHome: ${basedir}" /> <echo message="Java Home: ${env.JAVA_HOME}" />
Appendix A. Scripts for using Hardware Security Modules with Oracle Advanced Security 317
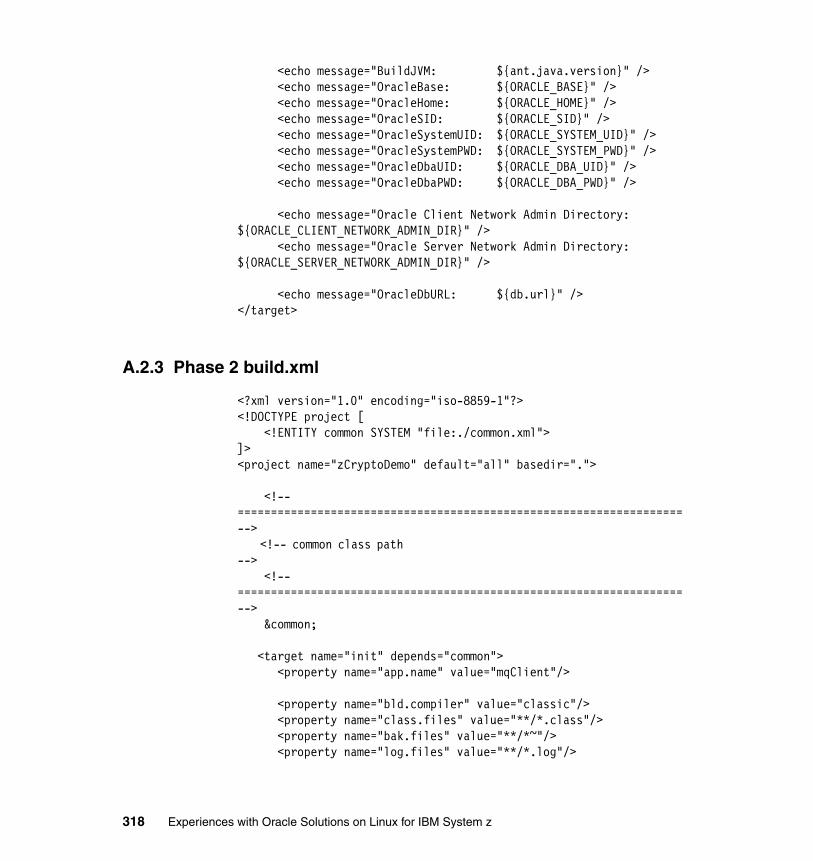
<echo message="BuildJVM: ${ant.java.version}" /> <echo message="OracleBase: ${ORACLE_BASE}" /> <echo message="OracleHome: ${ORACLE_HOME}" /> <echo message="OracleSID: ${ORACLE_SID}" /> <echo message="OracleSystemUID: ${ORACLE_SYSTEM_UID}" /> <echo message="OracleSystemPWD: ${ORACLE_SYSTEM_PWD}" /> <echo message="OracleDbaUID: ${ORACLE_DBA_UID}" /> <echo message="OracleDbaPWD: ${ORACLE_DBA_PWD}" />
<echo message="Oracle Client Network Admin Directory: ${ORACLE_CLIENT_NETWORK_ADMIN_DIR}" /> <echo message="Oracle Server Network Admin Directory: ${ORACLE_SERVER_NETWORK_ADMIN_DIR}" />
<echo message="OracleDbURL: ${db.url}" /></target>
A.2.3 Phase 2 build.xml
<?xml version="1.0" encoding="iso-8859-1"?><!DOCTYPE project [ <!ENTITY common SYSTEM "file:./common.xml">]><project name="zCryptoDemo" default="all" basedir=".">
<!-- =================================================================== --> <!-- common class path --> <!-- =================================================================== --> &common;
<target name="init" depends="common"> <property name="app.name" value="mqClient"/>
<property name="bld.compiler" value="classic"/> <property name="class.files" value="**/*.class"/> <property name="bak.files" value="**/*~"/> <property name="log.files" value="**/*.log"/>
318 Experiences with Oracle Solutions on Linux for IBM System z
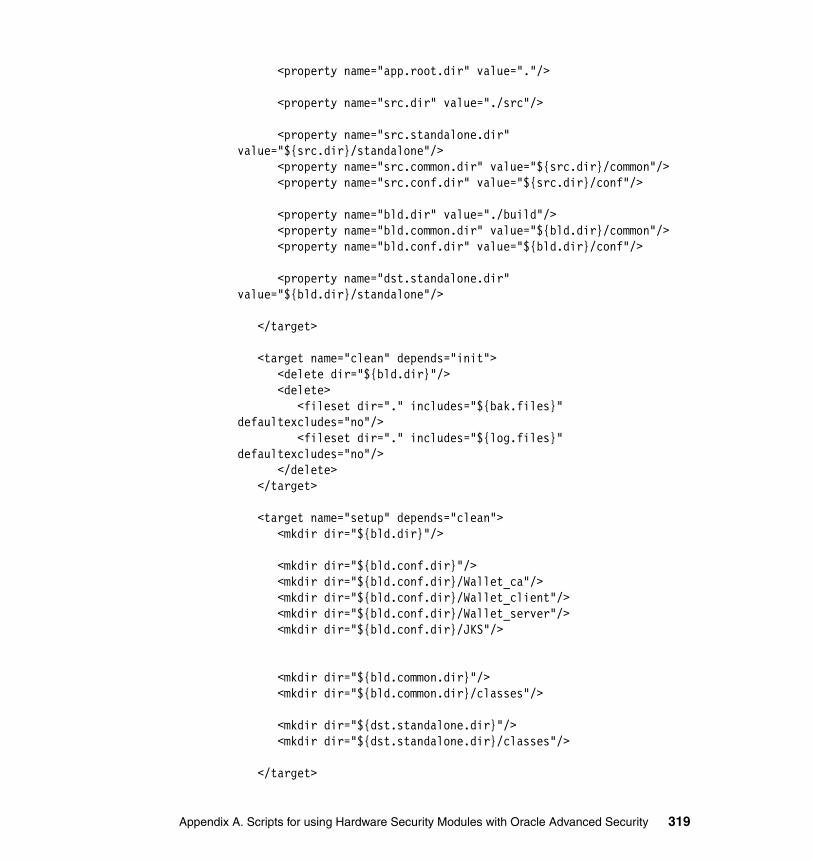
<property name="app.root.dir" value="."/> <property name="src.dir" value="./src"/> <property name="src.standalone.dir" value="${src.dir}/standalone"/> <property name="src.common.dir" value="${src.dir}/common"/> <property name="src.conf.dir" value="${src.dir}/conf"/> <property name="bld.dir" value="./build"/> <property name="bld.common.dir" value="${bld.dir}/common"/> <property name="bld.conf.dir" value="${bld.dir}/conf"/>
<property name="dst.standalone.dir" value="${bld.dir}/standalone"/>
</target>
<target name="clean" depends="init"> <delete dir="${bld.dir}"/> <delete> <fileset dir="." includes="${bak.files}" defaultexcludes="no"/> <fileset dir="." includes="${log.files}" defaultexcludes="no"/> </delete> </target>
<target name="setup" depends="clean"> <mkdir dir="${bld.dir}"/>
<mkdir dir="${bld.conf.dir}"/> <mkdir dir="${bld.conf.dir}/Wallet_ca"/> <mkdir dir="${bld.conf.dir}/Wallet_client"/> <mkdir dir="${bld.conf.dir}/Wallet_server"/> <mkdir dir="${bld.conf.dir}/JKS"/>
<mkdir dir="${bld.common.dir}"/> <mkdir dir="${bld.common.dir}/classes"/>
<mkdir dir="${dst.standalone.dir}"/> <mkdir dir="${dst.standalone.dir}/classes"/> </target>
Appendix A. Scripts for using Hardware Security Modules with Oracle Advanced Security 319
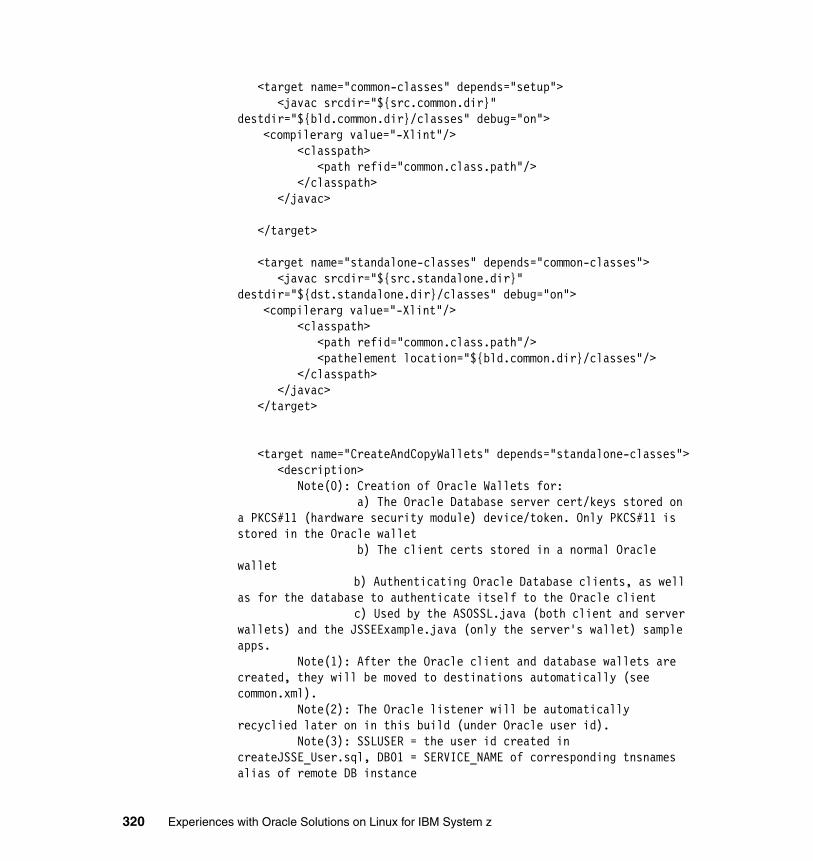
<target name="common-classes" depends="setup"> <javac srcdir="${src.common.dir}" destdir="${bld.common.dir}/classes" debug="on">
<compilerarg value="-Xlint"/> <classpath> <path refid="common.class.path"/> </classpath> </javac> </target> <target name="standalone-classes" depends="common-classes"> <javac srcdir="${src.standalone.dir}" destdir="${dst.standalone.dir}/classes" debug="on">
<compilerarg value="-Xlint"/> <classpath> <path refid="common.class.path"/> <pathelement location="${bld.common.dir}/classes"/> </classpath> </javac> </target>
<target name="CreateAndCopyWallets" depends="standalone-classes"> <description> Note(0): Creation of Oracle Wallets for: a) The Oracle Database server cert/keys stored on a PKCS#11 (hardware security module) device/token. Only PKCS#11 is stored in the Oracle wallet b) The client certs stored in a normal Oracle wallet b) Authenticating Oracle Database clients, as well as for the database to authenticate itself to the Oracle client c) Used by the ASOSSL.java (both client and server wallets) and the JSSEExample.java (only the server's wallet) sample apps. Note(1): After the Oracle client and database wallets are created, they will be moved to destinations automatically (see common.xml). Note(2): The Oracle listener will be automatically recyclied later on in this build (under Oracle user id). Note(3): SSLUSER = the user id created in createJSSE_User.sql, DB01 = SERVICE_NAME of corresponding tnsnames alias of remote DB instance
320 Experiences with Oracle Solutions on Linux for IBM System z

</description>
<echo message="Delete prior keys from PKCS#11 token" /> <exec dir="${bld.conf.dir}" executable="keytool" failonerror="false"> <arg line="-delete -alias root_cert ${PKCS11_TOKEN_ACCESS_VALUES}"/> <env key="PATH" path="${ORACLE_HOME}/bin:${env.PATH}"/> </exec>
<exec dir="${bld.conf.dir}" executable="keytool" failonerror="false"> <arg line="-delete -alias db_cert ${PKCS11_TOKEN_ACCESS_VALUES}"/> <env key="PATH" path="${ORACLE_HOME}/bin:${env.PATH}"/> </exec> <echo message="Show that token is empty" /> <exec dir="${bld.conf.dir}" executable="keytool" failonerror="true"> <arg line="-list -v ${PKCS11_TOKEN_ACCESS_VALUES}"/> <env key="PATH" path="${ORACLE_HOME}/bin:${env.PATH}"/> </exec>
<echo message="Begin creation of root cert" /> <echo message="Create a wallet to work with temporarily" /> <exec dir="${bld.conf.dir}/Wallet_ca" executable="orapki" failonerror="true"> <arg line="wallet create -wallet . -auto_login -pwd myca99"/> <env key="PATH" path="${ORACLE_HOME}/bin:${env.PATH}"/> </exec>
<echo message="Add a self-signed cert to the wallet for root cert purposes" /> <exec dir="${bld.conf.dir}/Wallet_ca" executable="orapki" failonerror="true">
Appendix A. Scripts for using Hardware Security Modules with Oracle Advanced Security 321
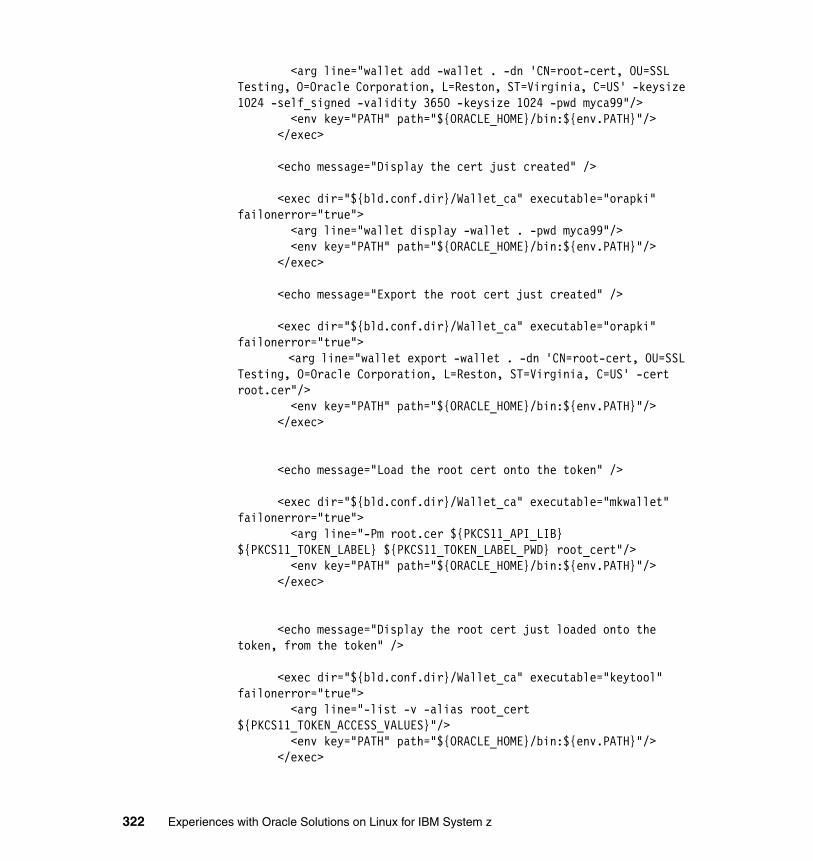
<arg line="wallet add -wallet . -dn 'CN=root-cert, OU=SSL Testing, O=Oracle Corporation, L=Reston, ST=Virginia, C=US' -keysize 1024 -self_signed -validity 3650 -keysize 1024 -pwd myca99"/> <env key="PATH" path="${ORACLE_HOME}/bin:${env.PATH}"/> </exec>
<echo message="Display the cert just created" /> <exec dir="${bld.conf.dir}/Wallet_ca" executable="orapki" failonerror="true"> <arg line="wallet display -wallet . -pwd myca99"/> <env key="PATH" path="${ORACLE_HOME}/bin:${env.PATH}"/> </exec>
<echo message="Export the root cert just created" />
<exec dir="${bld.conf.dir}/Wallet_ca" executable="orapki" failonerror="true"> <arg line="wallet export -wallet . -dn 'CN=root-cert, OU=SSL Testing, O=Oracle Corporation, L=Reston, ST=Virginia, C=US' -cert root.cer"/> <env key="PATH" path="${ORACLE_HOME}/bin:${env.PATH}"/> </exec> <echo message="Load the root cert onto the token" />
<exec dir="${bld.conf.dir}/Wallet_ca" executable="mkwallet" failonerror="true"> <arg line="-Pm root.cer ${PKCS11_API_LIB} ${PKCS11_TOKEN_LABEL} ${PKCS11_TOKEN_LABEL_PWD} root_cert"/> <env key="PATH" path="${ORACLE_HOME}/bin:${env.PATH}"/> </exec>
<echo message="Display the root cert just loaded onto the token, from the token" />
<exec dir="${bld.conf.dir}/Wallet_ca" executable="keytool" failonerror="true"> <arg line="-list -v -alias root_cert ${PKCS11_TOKEN_ACCESS_VALUES}"/> <env key="PATH" path="${ORACLE_HOME}/bin:${env.PATH}"/> </exec>
322 Experiences with Oracle Solutions on Linux for IBM System z
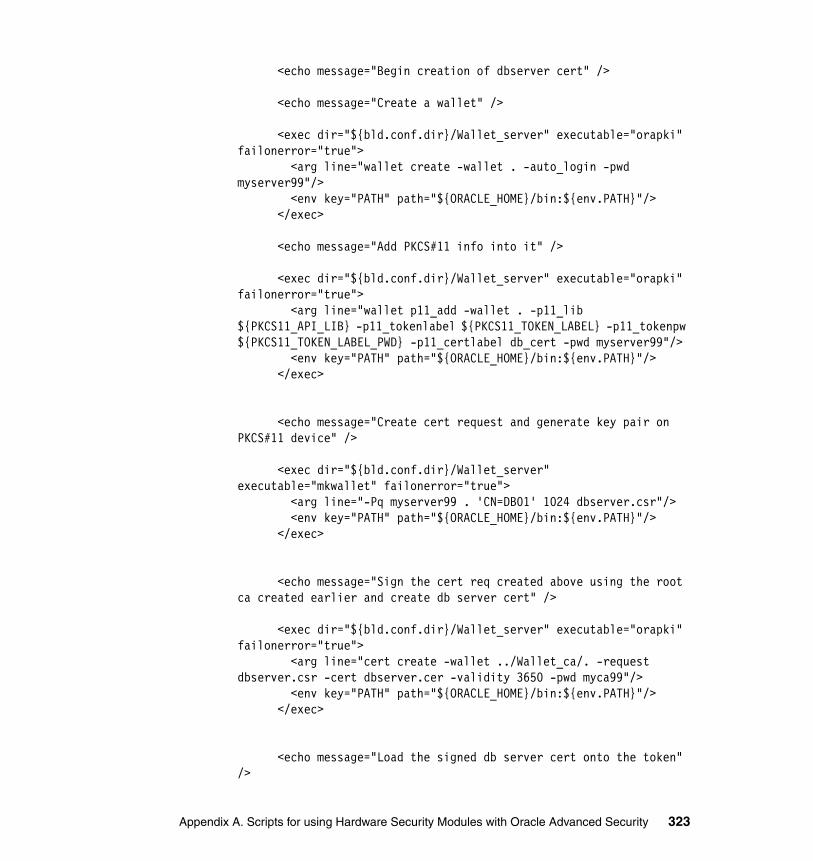
<echo message="Begin creation of dbserver cert" />
<echo message="Create a wallet" /> <exec dir="${bld.conf.dir}/Wallet_server" executable="orapki" failonerror="true"> <arg line="wallet create -wallet . -auto_login -pwd myserver99"/> <env key="PATH" path="${ORACLE_HOME}/bin:${env.PATH}"/> </exec> <echo message="Add PKCS#11 info into it" /> <exec dir="${bld.conf.dir}/Wallet_server" executable="orapki" failonerror="true"> <arg line="wallet p11_add -wallet . -p11_lib ${PKCS11_API_LIB} -p11_tokenlabel ${PKCS11_TOKEN_LABEL} -p11_tokenpw ${PKCS11_TOKEN_LABEL_PWD} -p11_certlabel db_cert -pwd myserver99"/> <env key="PATH" path="${ORACLE_HOME}/bin:${env.PATH}"/> </exec>
<echo message="Create cert request and generate key pair on PKCS#11 device" />
<exec dir="${bld.conf.dir}/Wallet_server" executable="mkwallet" failonerror="true"> <arg line="-Pq myserver99 . 'CN=DB01' 1024 dbserver.csr"/> <env key="PATH" path="${ORACLE_HOME}/bin:${env.PATH}"/> </exec>
<echo message="Sign the cert req created above using the root ca created earlier and create db server cert" />
<exec dir="${bld.conf.dir}/Wallet_server" executable="orapki" failonerror="true"> <arg line="cert create -wallet ../Wallet_ca/. -request dbserver.csr -cert dbserver.cer -validity 3650 -pwd myca99"/> <env key="PATH" path="${ORACLE_HOME}/bin:${env.PATH}"/> </exec>
<echo message="Load the signed db server cert onto the token" />
Appendix A. Scripts for using Hardware Security Modules with Oracle Advanced Security 323
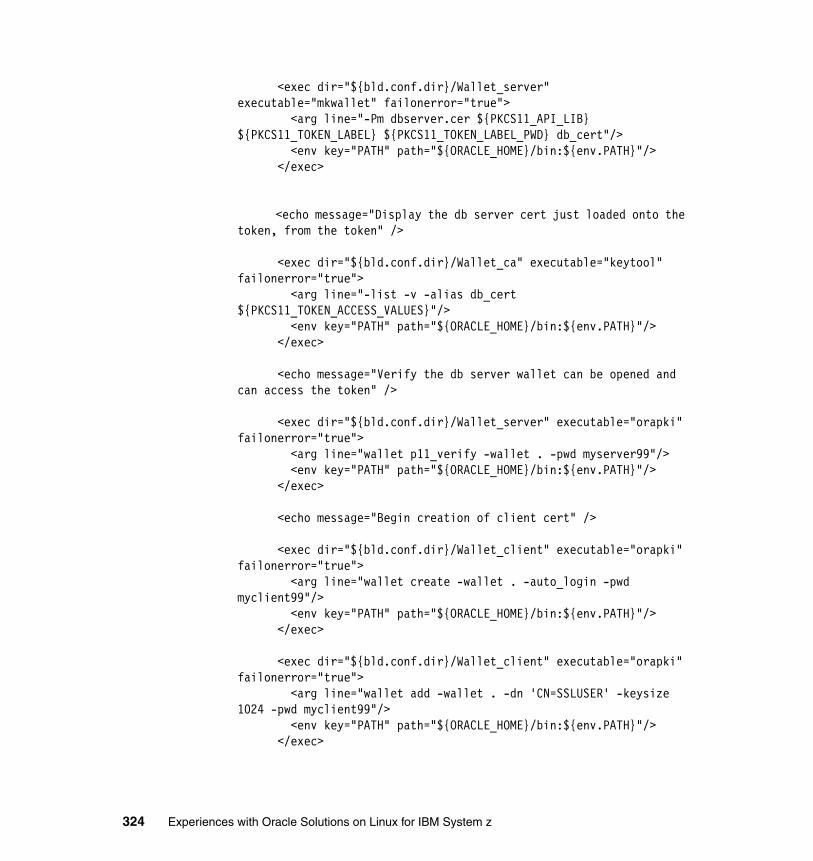
<exec dir="${bld.conf.dir}/Wallet_server" executable="mkwallet" failonerror="true"> <arg line="-Pm dbserver.cer ${PKCS11_API_LIB} ${PKCS11_TOKEN_LABEL} ${PKCS11_TOKEN_LABEL_PWD} db_cert"/> <env key="PATH" path="${ORACLE_HOME}/bin:${env.PATH}"/> </exec>
<echo message="Display the db server cert just loaded onto the token, from the token" />
<exec dir="${bld.conf.dir}/Wallet_ca" executable="keytool" failonerror="true"> <arg line="-list -v -alias db_cert ${PKCS11_TOKEN_ACCESS_VALUES}"/> <env key="PATH" path="${ORACLE_HOME}/bin:${env.PATH}"/> </exec> <echo message="Verify the db server wallet can be opened and can access the token" />
<exec dir="${bld.conf.dir}/Wallet_server" executable="orapki" failonerror="true"> <arg line="wallet p11_verify -wallet . -pwd myserver99"/> <env key="PATH" path="${ORACLE_HOME}/bin:${env.PATH}"/> </exec> <echo message="Begin creation of client cert" />
<exec dir="${bld.conf.dir}/Wallet_client" executable="orapki" failonerror="true"> <arg line="wallet create -wallet . -auto_login -pwd myclient99"/> <env key="PATH" path="${ORACLE_HOME}/bin:${env.PATH}"/> </exec>
<exec dir="${bld.conf.dir}/Wallet_client" executable="orapki" failonerror="true"> <arg line="wallet add -wallet . -dn 'CN=SSLUSER' -keysize 1024 -pwd myclient99"/> <env key="PATH" path="${ORACLE_HOME}/bin:${env.PATH}"/> </exec>
324 Experiences with Oracle Solutions on Linux for IBM System z

<exec dir="${bld.conf.dir}/Wallet_client" executable="orapki" failonerror="true"> <arg line="wallet display -wallet . -pwd myclient99"/> <env key="PATH" path="${ORACLE_HOME}/bin:${env.PATH}"/> </exec> <exec dir="${bld.conf.dir}/Wallet_client" executable="orapki" failonerror="true"> <arg line="wallet export -wallet . -dn 'CN=SSLUSER' -request client.csr"/> <env key="PATH" path="${ORACLE_HOME}/bin:${env.PATH}"/> </exec> <exec dir="${bld.conf.dir}/Wallet_client" executable="orapki" failonerror="true"> <arg line="cert create -wallet ../Wallet_ca/. -request client.csr -cert client.cer -validity 3650 -pwd myca99"/> <env key="PATH" path="${ORACLE_HOME}/bin:${env.PATH}"/> </exec>
<exec dir="${bld.conf.dir}/Wallet_client" executable="orapki" failonerror="true"> <arg line="wallet add -wallet . -trusted_cert -cert ../Wallet_ca/root.cer -pwd myclient99"/> <env key="PATH" path="${ORACLE_HOME}/bin:${env.PATH}"/> </exec> <exec dir="${bld.conf.dir}/Wallet_client" executable="orapki" failonerror="true"> <arg line="wallet add -wallet . -user_cert -cert client.cer -pwd myclient99"/> <env key="PATH" path="${ORACLE_HOME}/bin:${env.PATH}"/> </exec>
<exec dir="${bld.conf.dir}/Wallet_client" executable="orapki" failonerror="true"> <arg line="wallet display -wallet . -pwd myclient99"/> <env key="PATH" path="${ORACLE_HOME}/bin:${env.PATH}"/> </exec> <exec dir="${app.root.dir}" executable="sh" failonerror="true"> <arg line="-c 'chmod -R a+r ${bld.dir}'"/> <env key="PATH" path="${ORACLE_HOME}/bin:${env.PATH}"/> </exec>
Appendix A. Scripts for using Hardware Security Modules with Oracle Advanced Security 325
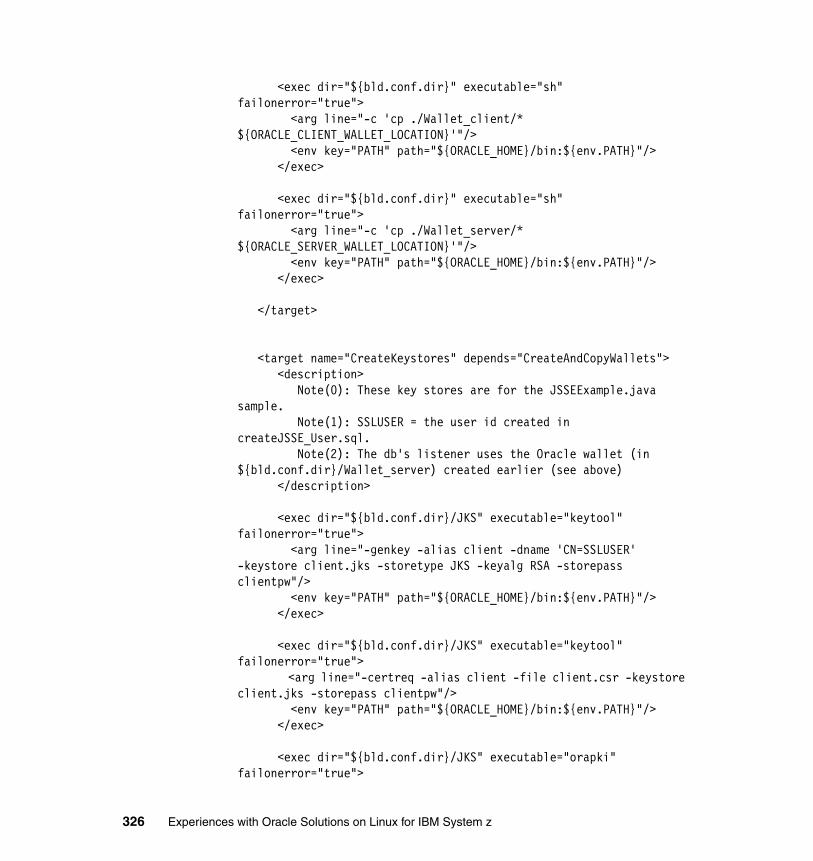
<exec dir="${bld.conf.dir}" executable="sh" failonerror="true"> <arg line="-c 'cp ./Wallet_client/* ${ORACLE_CLIENT_WALLET_LOCATION}'"/> <env key="PATH" path="${ORACLE_HOME}/bin:${env.PATH}"/> </exec> <exec dir="${bld.conf.dir}" executable="sh" failonerror="true"> <arg line="-c 'cp ./Wallet_server/* ${ORACLE_SERVER_WALLET_LOCATION}'"/> <env key="PATH" path="${ORACLE_HOME}/bin:${env.PATH}"/> </exec>
</target>
<target name="CreateKeystores" depends="CreateAndCopyWallets"> <description> Note(0): These key stores are for the JSSEExample.java sample. Note(1): SSLUSER = the user id created in createJSSE_User.sql. Note(2): The db's listener uses the Oracle wallet (in ${bld.conf.dir}/Wallet_server) created earlier (see above) </description>
<exec dir="${bld.conf.dir}/JKS" executable="keytool" failonerror="true"> <arg line="-genkey -alias client -dname 'CN=SSLUSER' -keystore client.jks -storetype JKS -keyalg RSA -storepass clientpw"/> <env key="PATH" path="${ORACLE_HOME}/bin:${env.PATH}"/> </exec> <exec dir="${bld.conf.dir}/JKS" executable="keytool" failonerror="true"> <arg line="-certreq -alias client -file client.csr -keystore client.jks -storepass clientpw"/> <env key="PATH" path="${ORACLE_HOME}/bin:${env.PATH}"/> </exec>
<exec dir="${bld.conf.dir}/JKS" executable="orapki" failonerror="true">
326 Experiences with Oracle Solutions on Linux for IBM System z

<arg line="cert create -wallet ../Wallet_ca/. -request client.csr -cert client.cer -validity 3650 -pwd myca99"/> <env key="PATH" path="${ORACLE_HOME}/bin:${env.PATH}"/> </exec>
<exec dir="${bld.conf.dir}/JKS" executable="keytool" failonerror="true"> <arg line="-import -v -noprompt -alias rootca -file ../Wallet_ca/root.cer -keystore client.jks -storepass clientpw "/> <env key="PATH" path="${ORACLE_HOME}/bin:${env.PATH}"/> </exec> <exec dir="${bld.conf.dir}/JKS" executable="keytool" failonerror="true"> <arg line="-import -v -noprompt -alias client -file client.cer -keystore client.jks -storepass clientpw"/> <env key="PATH" path="${ORACLE_HOME}/bin:${env.PATH}"/> </exec>
<exec dir="${bld.conf.dir}/JKS" executable="keytool" failonerror="true"> <arg line="-list -v -keystore client.jks -storepass clientpw "/> <env key="PATH" path="${ORACLE_HOME}/bin:${env.PATH}"/> </exec> <exec dir="${bld.conf.dir}/JKS" executable="keytool" failonerror="true"> <arg line="-import -v -noprompt -alias rootca -file ../Wallet_ca/root.cer -keystore trust.jks -storetype JKS -storepass trustpass"/> <env key="PATH" path="${ORACLE_HOME}/bin:${env.PATH}"/> </exec> <exec dir="${bld.conf.dir}/JKS" executable="keytool" failonerror="true"> <arg line="-list -v -keystore trust.jks -storepass trustpass "/> <env key="PATH" path="${ORACLE_HOME}/bin:${env.PATH}"/> </exec> </target>
Appendix A. Scripts for using Hardware Security Modules with Oracle Advanced Security 327
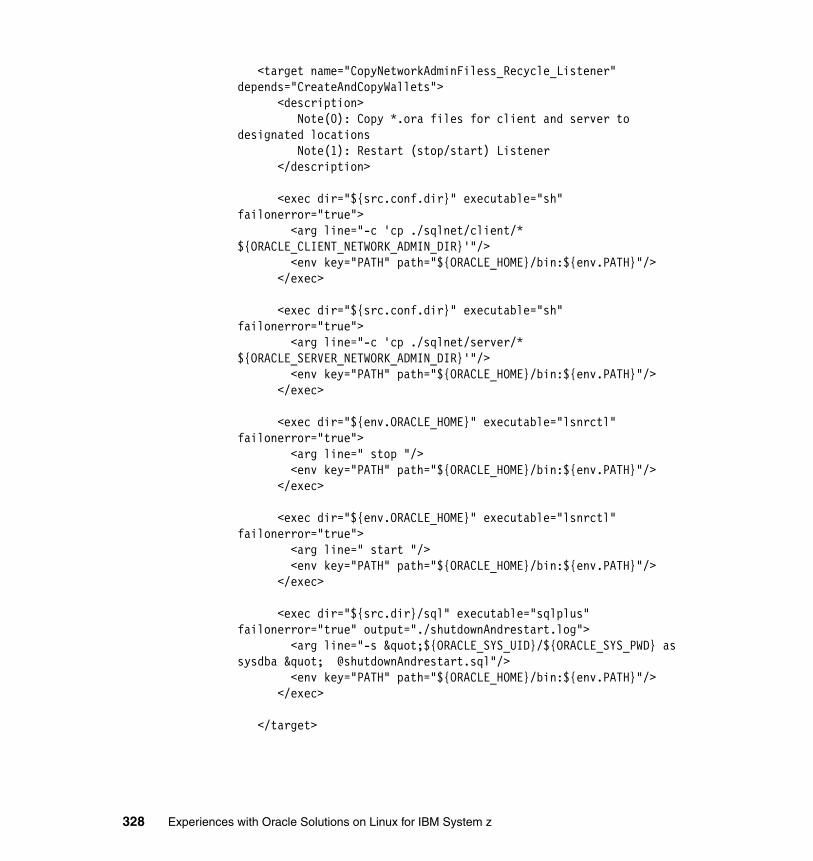
<target name="CopyNetworkAdminFiless_Recycle_Listener" depends="CreateAndCopyWallets"> <description> Note(0): Copy *.ora files for client and server to designated locations Note(1): Restart (stop/start) Listener </description>
<exec dir="${src.conf.dir}" executable="sh" failonerror="true"> <arg line="-c 'cp ./sqlnet/client/* ${ORACLE_CLIENT_NETWORK_ADMIN_DIR}'"/> <env key="PATH" path="${ORACLE_HOME}/bin:${env.PATH}"/> </exec> <exec dir="${src.conf.dir}" executable="sh" failonerror="true"> <arg line="-c 'cp ./sqlnet/server/* ${ORACLE_SERVER_NETWORK_ADMIN_DIR}'"/> <env key="PATH" path="${ORACLE_HOME}/bin:${env.PATH}"/> </exec> <exec dir="${env.ORACLE_HOME}" executable="lsnrctl" failonerror="true"> <arg line=" stop "/> <env key="PATH" path="${ORACLE_HOME}/bin:${env.PATH}"/> </exec> <exec dir="${env.ORACLE_HOME}" executable="lsnrctl" failonerror="true"> <arg line=" start "/> <env key="PATH" path="${ORACLE_HOME}/bin:${env.PATH}"/> </exec>
<exec dir="${src.dir}/sql" executable="sqlplus" failonerror="true" output="./shutdownAndrestart.log"> <arg line="-s "${ORACLE_SYS_UID}/${ORACLE_SYS_PWD} as sysdba " @shutdownAndrestart.sql"/> <env key="PATH" path="${ORACLE_HOME}/bin:${env.PATH}"/> </exec>
</target>
328 Experiences with Oracle Solutions on Linux for IBM System z
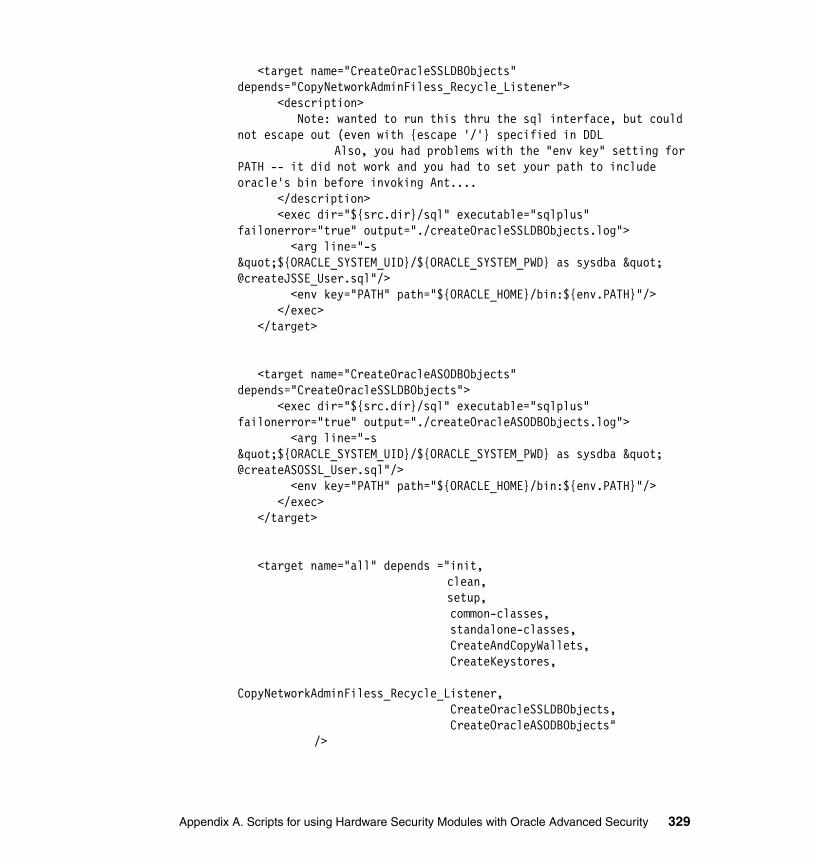
<target name="CreateOracleSSLDBObjects" depends="CopyNetworkAdminFiless_Recycle_Listener"> <description> Note: wanted to run this thru the sql interface, but could not escape out (even with {escape '/'} specified in DDL Also, you had problems with the "env key" setting for PATH -- it did not work and you had to set your path to include oracle's bin before invoking Ant.... </description> <exec dir="${src.dir}/sql" executable="sqlplus" failonerror="true" output="./createOracleSSLDBObjects.log"> <arg line="-s "${ORACLE_SYSTEM_UID}/${ORACLE_SYSTEM_PWD} as sysdba " @createJSSE_User.sql"/> <env key="PATH" path="${ORACLE_HOME}/bin:${env.PATH}"/> </exec> </target>
<target name="CreateOracleASODBObjects" depends="CreateOracleSSLDBObjects"> <exec dir="${src.dir}/sql" executable="sqlplus" failonerror="true" output="./createOracleASODBObjects.log"> <arg line="-s "${ORACLE_SYSTEM_UID}/${ORACLE_SYSTEM_PWD} as sysdba " @createASOSSL_User.sql"/> <env key="PATH" path="${ORACLE_HOME}/bin:${env.PATH}"/> </exec> </target>
<target name="all" depends ="init, clean, setup,
common-classes, standalone-classes, CreateAndCopyWallets, CreateKeystores, CopyNetworkAdminFiless_Recycle_Listener, CreateOracleSSLDBObjects, CreateOracleASODBObjects"
/>
Appendix A. Scripts for using Hardware Security Modules with Oracle Advanced Security 329

</project>
A.2.4 Phase 2 common.xml
<?xml version="1.0" encoding="iso-8859-1"?>
<property name="env" environment="env" value="env"/><property name="JAVA_HOME" value="${env.JAVA_HOME}"/><property name="J2EE_HOME" value="${env.J2EE_HOME}"/>
<property name="ORACLE_HOST" value="LOCALHOST"/><property name="ORACLE_LISTENER_PORT" value="1521"/><property name="ORACLE_BASE" value="${env.ORACLE_BASE}"/><property name="ORACLE_HOME" value="${env.ORACLE_HOME}"/><property name="ORACLE_SID" value="${env.ORACLE_SID}"/><property name="ORACLE_SYSTEM_UID" value="SYSTEM"/><property name="ORACLE_SYSTEM_PWD" value="DIALTONE"/><property name="ORACLE_SYS_UID" value="SYS"/><property name="ORACLE_SYS_PWD" value="DIALTONE"/><property name="ORACLE_DBA_UID" value="APPLICATIONDBA"/><property name="ORACLE_DBA_PWD" value="DIALTONE"/>
<property name="ORACLE_CLIENT_WALLET_LOCATION" value="/oracle/admin/DB01/wallet/Wallet_client"/><property name="ORACLE_SERVER_WALLET_LOCATION" value="/oracle/admin/DB01/wallet/Wallet_server"/>
<property name="ORACLE_CLIENT_NETWORK_ADMIN_DIR" value="~/network/admin"/><property name="ORACLE_SERVER_NETWORK_ADMIN_DIR" value="${env.ORACLE_HOME}/network/admin"/>
<property name="PKCS11_API_LIB" value="'/usr/lib/pkcs11/PKCS11_API.so64'"/><property name="PKCS11_TOKEN_LABEL" value="ORACLE"/><property name="PKCS11_TOKEN_LABEL_PWD" value="70362738"/><property name="PKCS11_KEY_STORE" value="NONE"/>
330 Experiences with Oracle Solutions on Linux for IBM System z
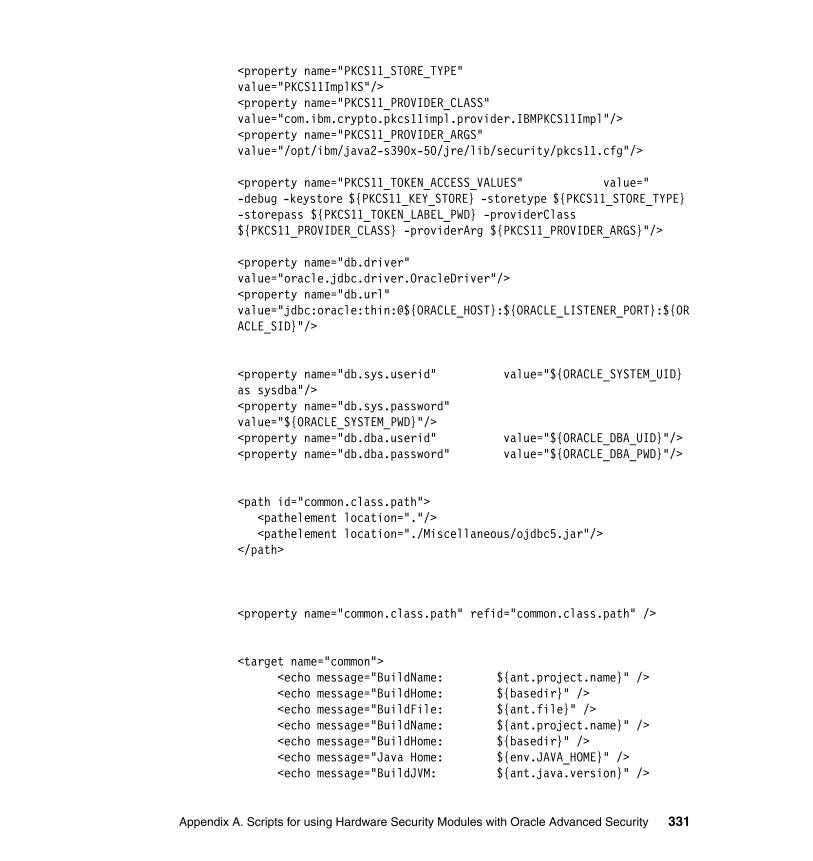
<property name="PKCS11_STORE_TYPE" value="PKCS11ImplKS"/><property name="PKCS11_PROVIDER_CLASS" value="com.ibm.crypto.pkcs11impl.provider.IBMPKCS11Impl"/><property name="PKCS11_PROVIDER_ARGS" value="/opt/ibm/java2-s390x-50/jre/lib/security/pkcs11.cfg"/>
<property name="PKCS11_TOKEN_ACCESS_VALUES" value=" -debug -keystore ${PKCS11_KEY_STORE} -storetype ${PKCS11_STORE_TYPE} -storepass ${PKCS11_TOKEN_LABEL_PWD} -providerClass ${PKCS11_PROVIDER_CLASS} -providerArg ${PKCS11_PROVIDER_ARGS}"/>
<property name="db.driver" value="oracle.jdbc.driver.OracleDriver"/><property name="db.url" value="jdbc:oracle:thin:@${ORACLE_HOST}:${ORACLE_LISTENER_PORT}:${ORACLE_SID}"/>
<property name="db.sys.userid" value="${ORACLE_SYSTEM_UID} as sysdba"/><property name="db.sys.password" value="${ORACLE_SYSTEM_PWD}"/><property name="db.dba.userid" value="${ORACLE_DBA_UID}"/><property name="db.dba.password" value="${ORACLE_DBA_PWD}"/>
<path id="common.class.path"> <pathelement location="."/> <pathelement location="./Miscellaneous/ojdbc5.jar"/></path>
<property name="common.class.path" refid="common.class.path" />
<target name="common"> <echo message="BuildName: ${ant.project.name}" /> <echo message="BuildHome: ${basedir}" /> <echo message="BuildFile: ${ant.file}" /> <echo message="BuildName: ${ant.project.name}" /> <echo message="BuildHome: ${basedir}" /> <echo message="Java Home: ${env.JAVA_HOME}" /> <echo message="BuildJVM: ${ant.java.version}" />
Appendix A. Scripts for using Hardware Security Modules with Oracle Advanced Security 331
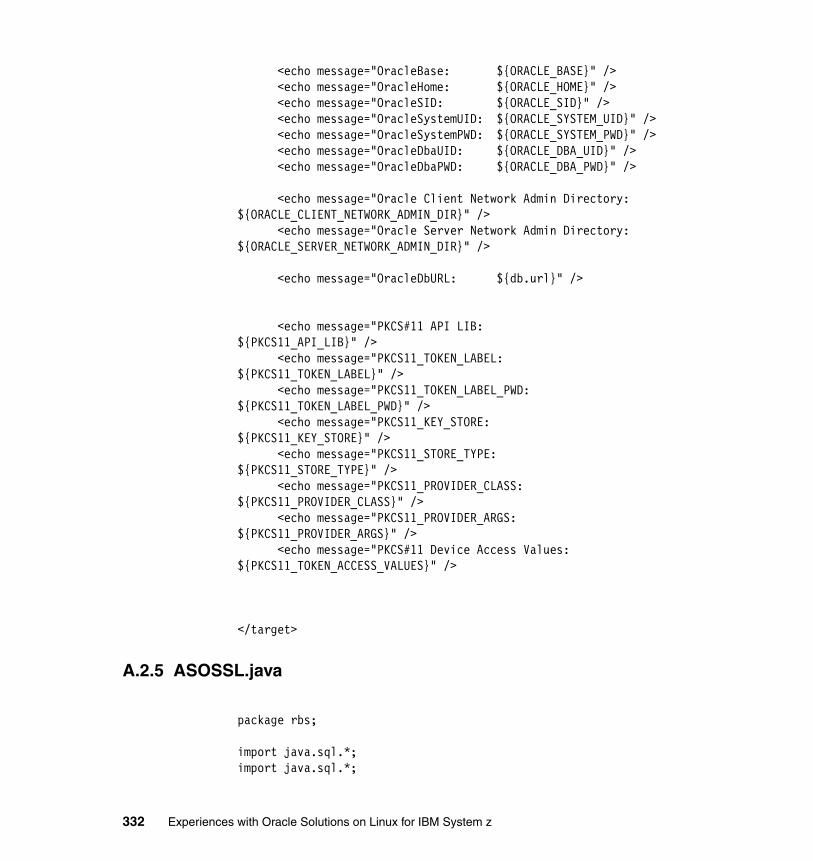
<echo message="OracleBase: ${ORACLE_BASE}" /> <echo message="OracleHome: ${ORACLE_HOME}" /> <echo message="OracleSID: ${ORACLE_SID}" /> <echo message="OracleSystemUID: ${ORACLE_SYSTEM_UID}" /> <echo message="OracleSystemPWD: ${ORACLE_SYSTEM_PWD}" /> <echo message="OracleDbaUID: ${ORACLE_DBA_UID}" /> <echo message="OracleDbaPWD: ${ORACLE_DBA_PWD}" />
<echo message="Oracle Client Network Admin Directory: ${ORACLE_CLIENT_NETWORK_ADMIN_DIR}" /> <echo message="Oracle Server Network Admin Directory: ${ORACLE_SERVER_NETWORK_ADMIN_DIR}" />
<echo message="OracleDbURL: ${db.url}" />
<echo message="PKCS#11 API LIB: ${PKCS11_API_LIB}" /> <echo message="PKCS11_TOKEN_LABEL: ${PKCS11_TOKEN_LABEL}" /> <echo message="PKCS11_TOKEN_LABEL_PWD: ${PKCS11_TOKEN_LABEL_PWD}" /> <echo message="PKCS11_KEY_STORE: ${PKCS11_KEY_STORE}" /> <echo message="PKCS11_STORE_TYPE: ${PKCS11_STORE_TYPE}" /> <echo message="PKCS11_PROVIDER_CLASS: ${PKCS11_PROVIDER_CLASS}" /> <echo message="PKCS11_PROVIDER_ARGS: ${PKCS11_PROVIDER_ARGS}" /> <echo message="PKCS#11 Device Access Values: ${PKCS11_TOKEN_ACCESS_VALUES}" />
</target>
A.2.5 ASOSSL.java
package rbs;
import java.sql.*;import java.sql.*;
332 Experiences with Oracle Solutions on Linux for IBM System z
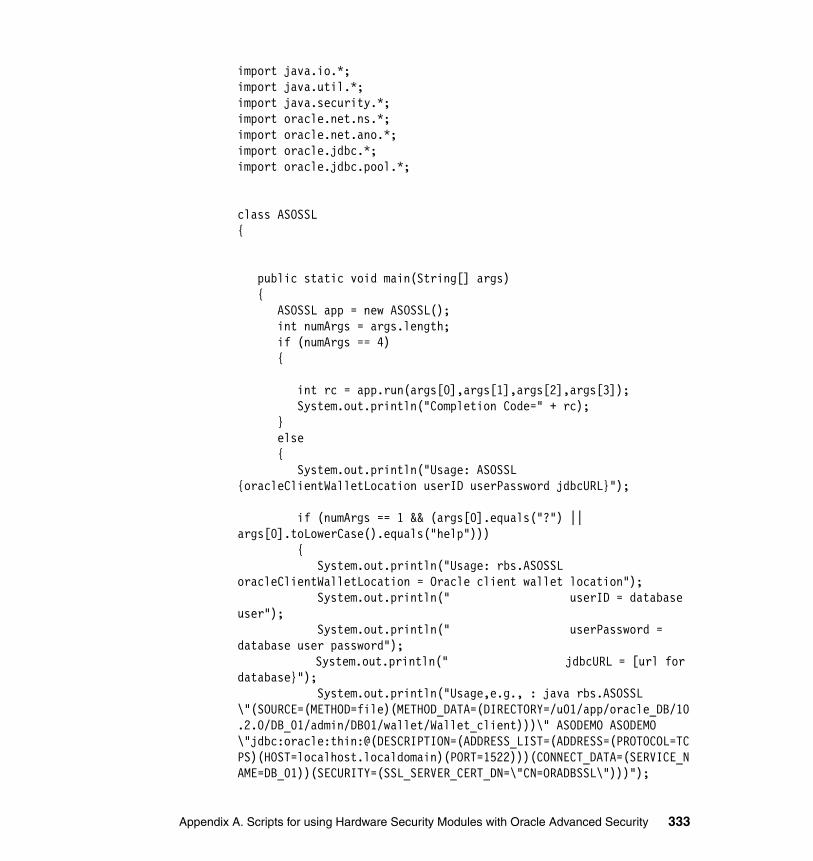
import java.io.*;import java.util.*;import java.security.*;import oracle.net.ns.*;import oracle.net.ano.*;import oracle.jdbc.*;import oracle.jdbc.pool.*;
class ASOSSL{
public static void main(String[] args) { ASOSSL app = new ASOSSL(); int numArgs = args.length; if (numArgs == 4) {
int rc = app.run(args[0],args[1],args[2],args[3]); System.out.println("Completion Code=" + rc); } else { System.out.println("Usage: ASOSSL {oracleClientWalletLocation userID userPassword jdbcURL}");
if (numArgs == 1 && (args[0].equals("?") || args[0].toLowerCase().equals("help"))) { System.out.println("Usage: rbs.ASOSSL oracleClientWalletLocation = Oracle client wallet location"); System.out.println(" userID = database user"); System.out.println(" userPassword = database user password"); System.out.println(" jdbcURL = [url for database}"); System.out.println("Usage,e.g., : java rbs.ASOSSL \"(SOURCE=(METHOD=file)(METHOD_DATA=(DIRECTORY=/u01/app/oracle_DB/10.2.0/DB_01/admin/DB01/wallet/Wallet_client)))\" ASODEMO ASODEMO \"jdbc:oracle:thin:@(DESCRIPTION=(ADDRESS_LIST=(ADDRESS=(PROTOCOL=TCPS)(HOST=localhost.localdomain)(PORT=1522)))(CONNECT_DATA=(SERVICE_NAME=DB_01))(SECURITY=(SSL_SERVER_CERT_DN=\"CN=ORADBSSL\")))");
Appendix A. Scripts for using Hardware Security Modules with Oracle Advanced Security 333
} } }
private int run(String oracleClientWalletLocation, String userID, String userPassword, String jdbcURL) {
System.out.println("\nASOSSL Started :" + new java.util.Date().toString());
System.out.println("VERSION CHECK : 102");
/* Echo what we were given */ System.out.println("oracleClientWalletLocation : " + oracleClientWalletLocation); System.out.println("jdbcURL : " + jdbcURL);
Properties props = new Properties();
try { Security.addProvider(new oracle.security.pki.OraclePKIProvider());
props.setProperty ("oracle.net.ssl_version","3.0"); props.setProperty ("oracle.net.wallet_location",oracleClientWalletLocation); props.setProperty("oracle.net.ssl_server_dn_match", "true");
OracleDataSource ods = new OracleDataSource(); ods.setURL(jdbcURL); ods.setUser(userID); ods.setPassword(userPassword); System.out.println ("setConnectionProperties(props)"); ods.setConnectionProperties(props); System.out.println ("getConnection()"); Connection conn = ods.getConnection();
334 Experiences with Oracle Solutions on Linux for IBM System z
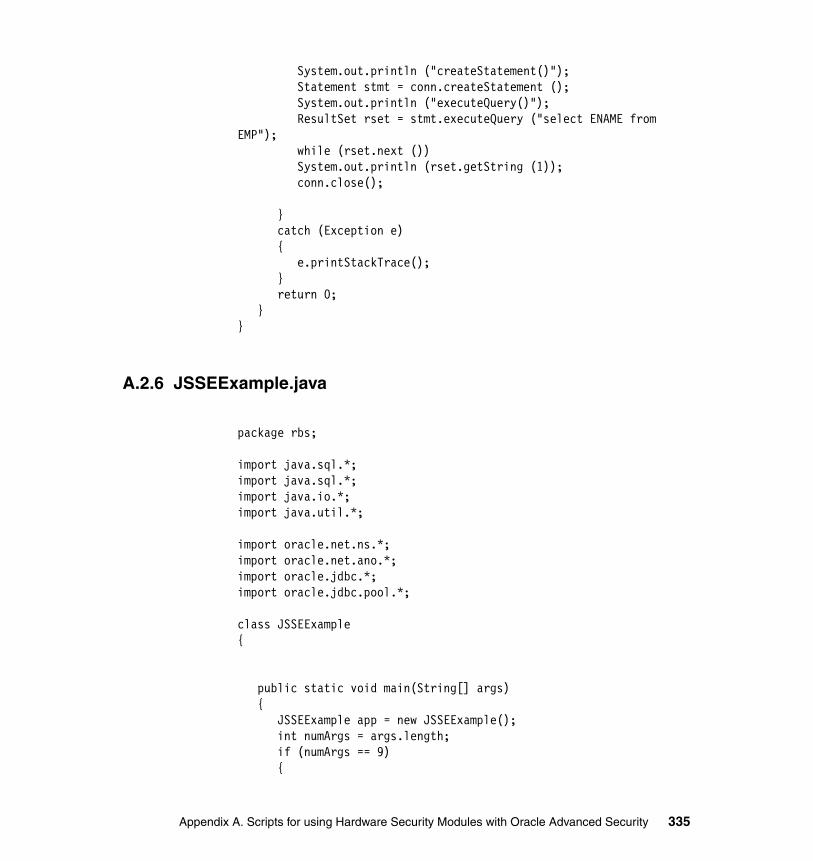
System.out.println ("createStatement()"); Statement stmt = conn.createStatement (); System.out.println ("executeQuery()"); ResultSet rset = stmt.executeQuery ("select ENAME from EMP"); while (rset.next ()) System.out.println (rset.getString (1)); conn.close();
} catch (Exception e) { e.printStackTrace(); } return 0; }}
A.2.6 JSSEExample.java
package rbs;
import java.sql.*;import java.sql.*;import java.io.*;import java.util.*;
import oracle.net.ns.*;import oracle.net.ano.*;import oracle.jdbc.*; import oracle.jdbc.pool.*;
class JSSEExample{
public static void main(String[] args) { JSSEExample app = new JSSEExample(); int numArgs = args.length; if (numArgs == 9) {
Appendix A. Scripts for using Hardware Security Modules with Oracle Advanced Security 335
int rc = app.run(args[0],args[1],args[2],args[3],args[4],args[5],args[6],args[7],args[8]); System.out.println("Completion Code=" + rc); } else { System.out.println("Usage: JSSEExample {keyStoreFileLocation keyStoreType keyStorePassword trustStoreFileLocation trustStoreType trustStorePassword userID userPassword jdbcURL}");
if (numArgs == 1 && (args[0].equals("?") || args[0].toLowerCase().equals("help"))) { System.out.println("Usage: JSSEExample {keyStore = ] ,"); System.out.println(" keyStoreFileLocation = key store file location"); System.out.println(" keyStoreType = key store type "); System.out.println(" keyStorePassword = key store password"); System.out.println(" trustStoreFileLocation = trust store file location"); System.out.println(" trustStoreType = trust store type "); System.out.println(" trustStorePassword = trust store password"); System.out.println(" userID = database user"); System.out.println(" userPassword = database user passwordd"); System.out.println(" jdbcURL = [url for database}"); System.out.println("Usage, e.g.,: java rbs.JSSEExample ./build/conf/JKS/keys.jks JKS clientpw ./build/conf/JKS/trust.jks JKS serverpw system dialtone \"jdbc:oracle:thin:@(DESCRIPTION=(ADDRESS_LIST=(ADDRESS=(PROTOCOL=TCPS)(HOST=localhost.localdomain)(PORT=1522)))(CONNECT_DATA=(SERVICE_NAME=DB_01))(SECURITY=(SSL_SERVER_CERT_DN=\"CN=ORADBSSL\")))\""); } } }
336 Experiences with Oracle Solutions on Linux for IBM System z
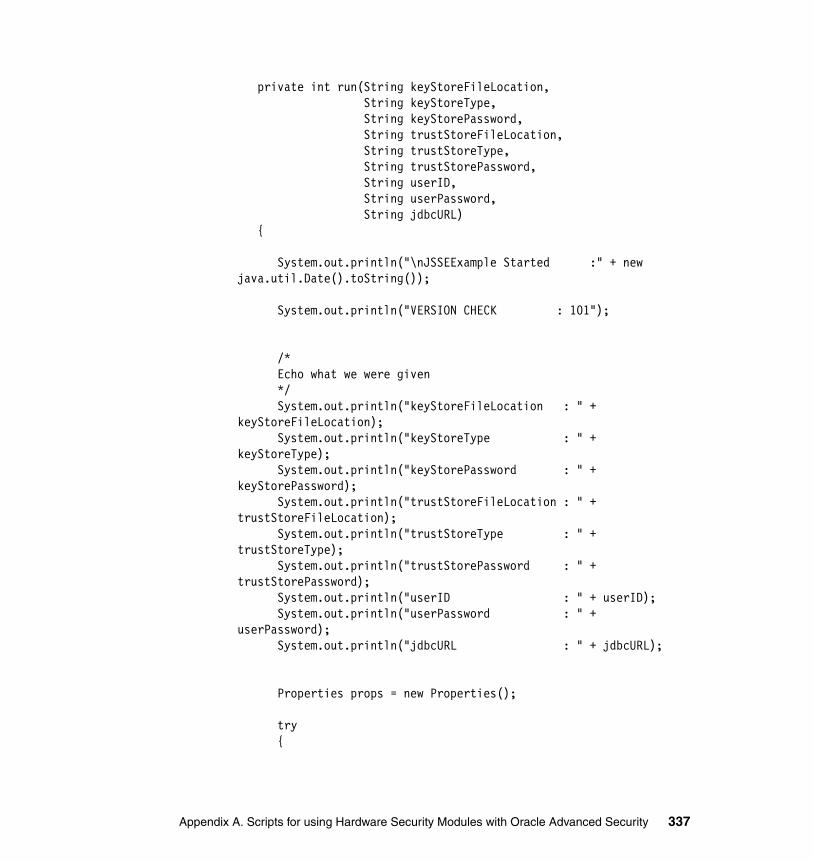
private int run(String keyStoreFileLocation, String keyStoreType, String keyStorePassword, String trustStoreFileLocation, String trustStoreType, String trustStorePassword, String userID, String userPassword, String jdbcURL) {
System.out.println("\nJSSEExample Started :" + new java.util.Date().toString());
System.out.println("VERSION CHECK : 101");
/* Echo what we were given */ System.out.println("keyStoreFileLocation : " + keyStoreFileLocation); System.out.println("keyStoreType : " + keyStoreType); System.out.println("keyStorePassword : " + keyStorePassword); System.out.println("trustStoreFileLocation : " + trustStoreFileLocation); System.out.println("trustStoreType : " + trustStoreType); System.out.println("trustStorePassword : " + trustStorePassword); System.out.println("userID : " + userID); System.out.println("userPassword : " + userPassword); System.out.println("jdbcURL : " + jdbcURL);
Properties props = new Properties();
try {
Appendix A. Scripts for using Hardware Security Modules with Oracle Advanced Security 337
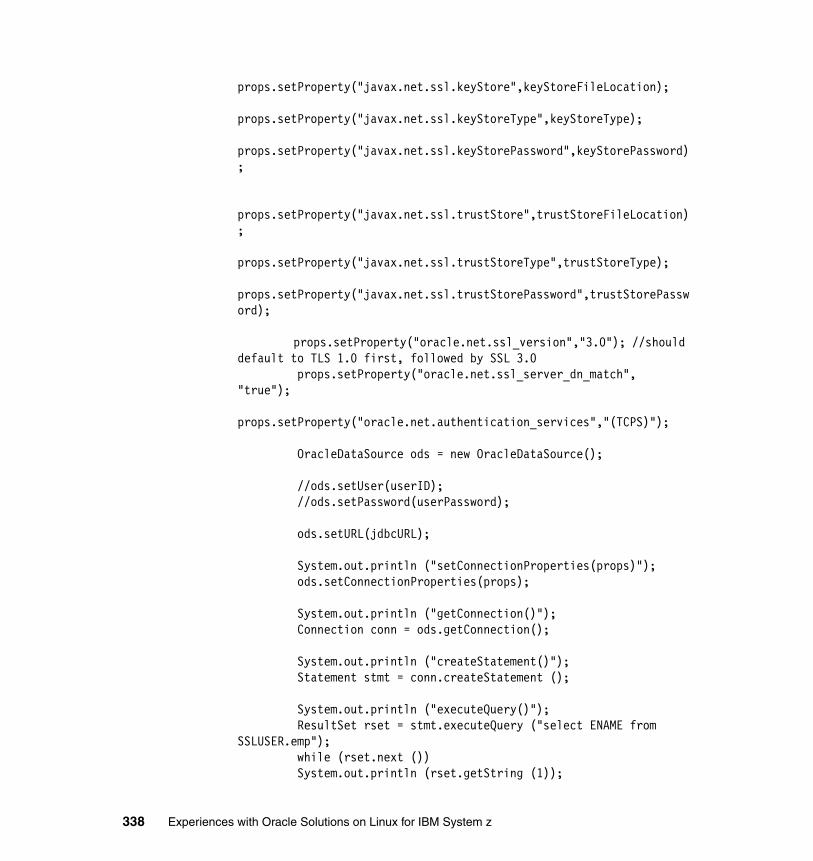
props.setProperty("javax.net.ssl.keyStore",keyStoreFileLocation); props.setProperty("javax.net.ssl.keyStoreType",keyStoreType); props.setProperty("javax.net.ssl.keyStorePassword",keyStorePassword);
props.setProperty("javax.net.ssl.trustStore",trustStoreFileLocation); props.setProperty("javax.net.ssl.trustStoreType",trustStoreType); props.setProperty("javax.net.ssl.trustStorePassword",trustStorePassword); props.setProperty("oracle.net.ssl_version","3.0"); //should default to TLS 1.0 first, followed by SSL 3.0 props.setProperty("oracle.net.ssl_server_dn_match", "true"); props.setProperty("oracle.net.authentication_services","(TCPS)"); OracleDataSource ods = new OracleDataSource(); //ods.setUser(userID); //ods.setPassword(userPassword); ods.setURL(jdbcURL); System.out.println ("setConnectionProperties(props)"); ods.setConnectionProperties(props); System.out.println ("getConnection()"); Connection conn = ods.getConnection(); System.out.println ("createStatement()"); Statement stmt = conn.createStatement (); System.out.println ("executeQuery()"); ResultSet rset = stmt.executeQuery ("select ENAME from SSLUSER.emp"); while (rset.next ()) System.out.println (rset.getString (1));
338 Experiences with Oracle Solutions on Linux for IBM System z
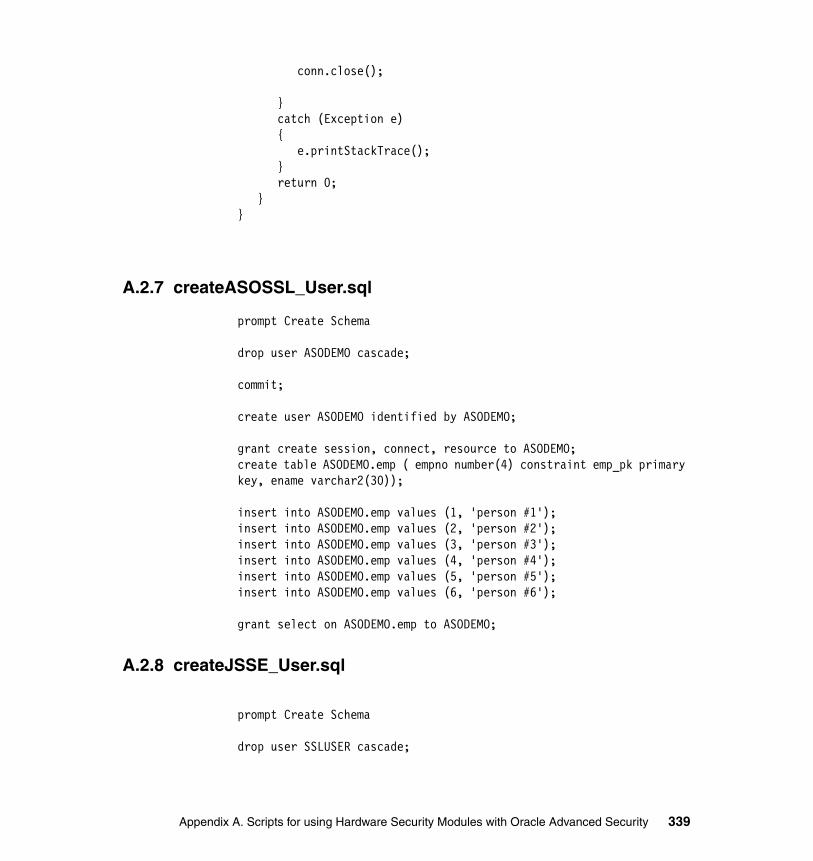
conn.close();
} catch (Exception e) { e.printStackTrace(); } return 0; }}
A.2.7 createASOSSL_User.sql
prompt Create Schema
drop user ASODEMO cascade;
commit;
create user ASODEMO identified by ASODEMO;
grant create session, connect, resource to ASODEMO;create table ASODEMO.emp ( empno number(4) constraint emp_pk primary key, ename varchar2(30));
insert into ASODEMO.emp values (1, 'person #1');insert into ASODEMO.emp values (2, 'person #2');insert into ASODEMO.emp values (3, 'person #3');insert into ASODEMO.emp values (4, 'person #4');insert into ASODEMO.emp values (5, 'person #5');insert into ASODEMO.emp values (6, 'person #6');
grant select on ASODEMO.emp to ASODEMO;
A.2.8 createJSSE_User.sql
prompt Create Schema
drop user SSLUSER cascade;
Appendix A. Scripts for using Hardware Security Modules with Oracle Advanced Security 339
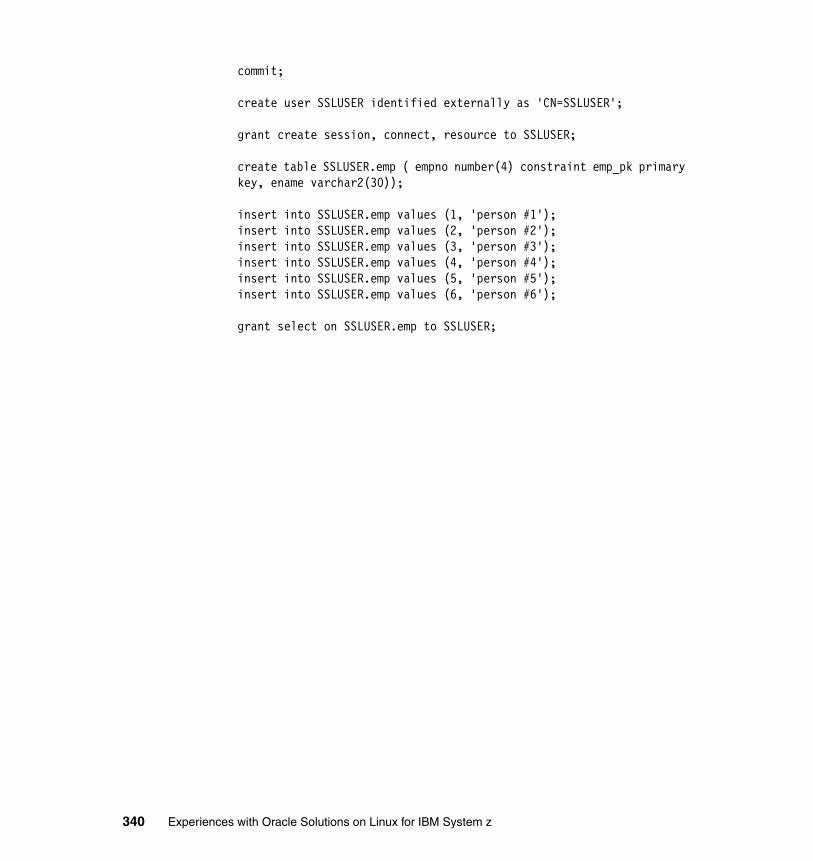
commit;
create user SSLUSER identified externally as 'CN=SSLUSER';
grant create session, connect, resource to SSLUSER;
create table SSLUSER.emp ( empno number(4) constraint emp_pk primary key, ename varchar2(30));
insert into SSLUSER.emp values (1, 'person #1');insert into SSLUSER.emp values (2, 'person #2');insert into SSLUSER.emp values (3, 'person #3');insert into SSLUSER.emp values (4, 'person #4');insert into SSLUSER.emp values (5, 'person #5');insert into SSLUSER.emp values (6, 'person #6');
grant select on SSLUSER.emp to SSLUSER;
340 Experiences with Oracle Solutions on Linux for IBM System z
Appendix B. Shell script for CRS failover
Several shell scripts were developed to facilitate this case study. They show up by name occasionally in “Using Oracle Clusterware for a single instance database failover” on page 261. They are offered here in their entirety in case their use needs clarification or detail.
B
© Copyright IBM Corp. 2009. All rights reserved. 341
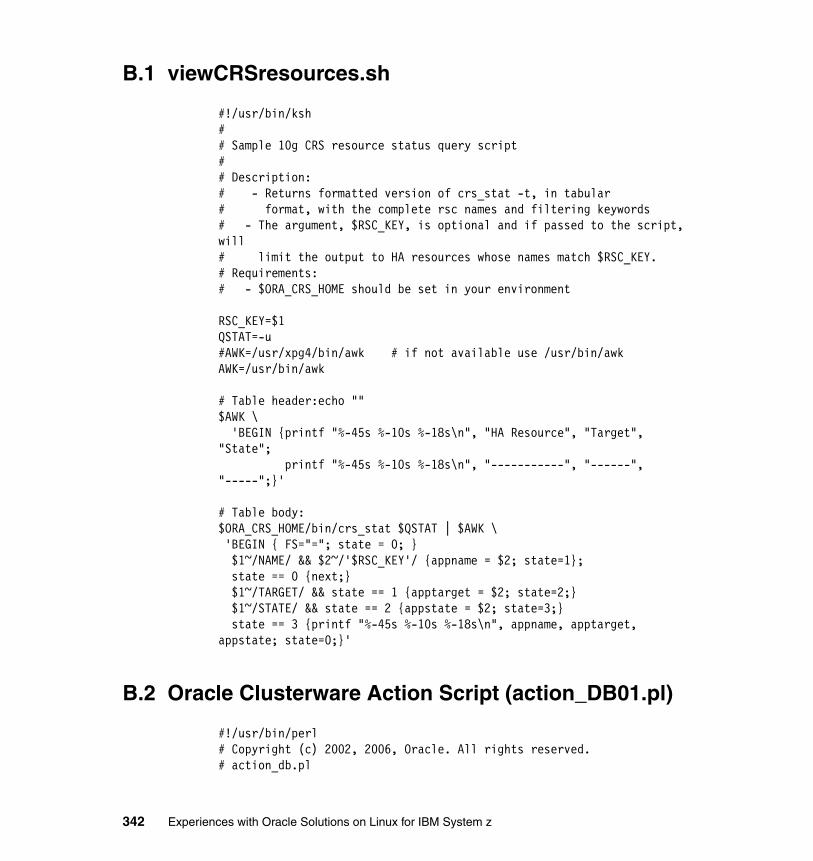
B.1 viewCRSresources.sh
#!/usr/bin/ksh## Sample 10g CRS resource status query script## Description:# - Returns formatted version of crs_stat -t, in tabular# format, with the complete rsc names and filtering keywords# - The argument, $RSC_KEY, is optional and if passed to the script, will# limit the output to HA resources whose names match $RSC_KEY.# Requirements:# - $ORA_CRS_HOME should be set in your environment
RSC_KEY=$1QSTAT=-u#AWK=/usr/xpg4/bin/awk # if not available use /usr/bin/awkAWK=/usr/bin/awk
# Table header:echo ""$AWK \ 'BEGIN {printf "%-45s %-10s %-18s\n", "HA Resource", "Target", "State"; printf "%-45s %-10s %-18s\n", "-----------", "------", "-----";}'
# Table body:$ORA_CRS_HOME/bin/crs_stat $QSTAT | $AWK \ 'BEGIN { FS="="; state = 0; } $1~/NAME/ && $2~/'$RSC_KEY'/ {appname = $2; state=1}; state == 0 {next;} $1~/TARGET/ && state == 1 {apptarget = $2; state=2;} $1~/STATE/ && state == 2 {appstate = $2; state=3;} state == 3 {printf "%-45s %-10s %-18s\n", appname, apptarget, appstate; state=0;}'
B.2 Oracle Clusterware Action Script (action_DB01.pl)
#!/usr/bin/perl # Copyright (c) 2002, 2006, Oracle. All rights reserved. # action_db.pl
342 Experiences with Oracle Solutions on Linux for IBM System z
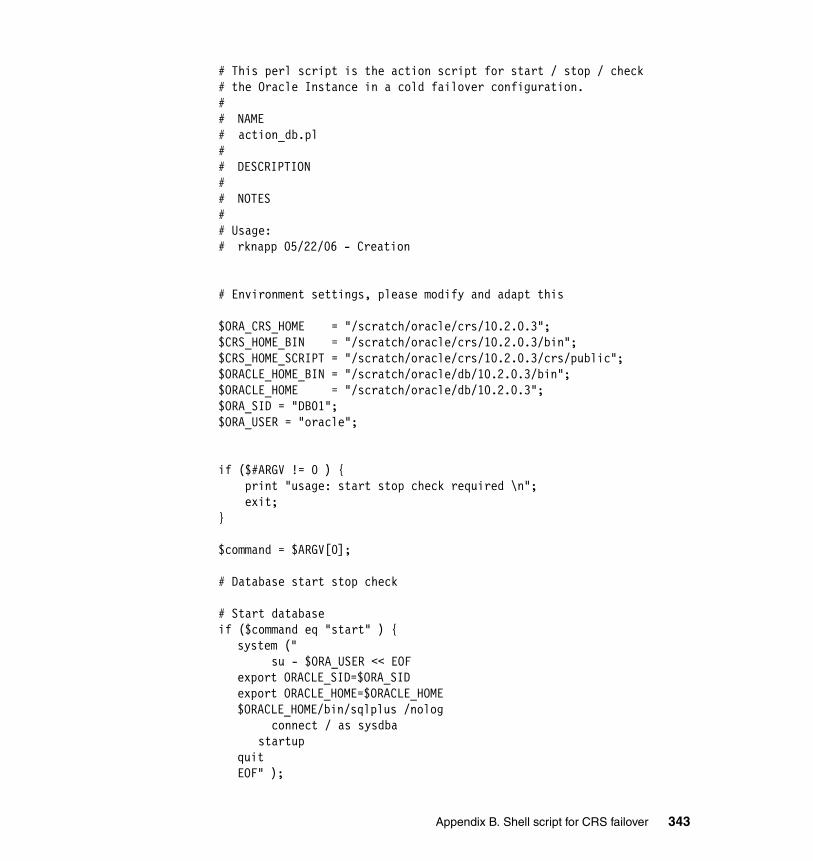
# This perl script is the action script for start / stop / check # the Oracle Instance in a cold failover configuration.# # NAME# action_db.pl# # DESCRIPTION## NOTES## Usage:# rknapp 05/22/06 - Creation
# Environment settings, please modify and adapt this
$ORA_CRS_HOME = "/scratch/oracle/crs/10.2.0.3";$CRS_HOME_BIN = "/scratch/oracle/crs/10.2.0.3/bin";$CRS_HOME_SCRIPT = "/scratch/oracle/crs/10.2.0.3/crs/public";$ORACLE_HOME_BIN = "/scratch/oracle/db/10.2.0.3/bin";$ORACLE_HOME = "/scratch/oracle/db/10.2.0.3";$ORA_SID = "DB01";$ORA_USER = "oracle";
if ($#ARGV != 0 ) { print "usage: start stop check required \n"; exit;}
$command = $ARGV[0];
# Database start stop check
# Start databaseif ($command eq "start" ) {
system (" su - $ORA_USER << EOF
export ORACLE_SID=$ORA_SIDexport ORACLE_HOME=$ORACLE_HOME$ORACLE_HOME/bin/sqlplus /nolog
connect / as sysdba startup
quitEOF" );
Appendix B. Shell script for CRS failover 343
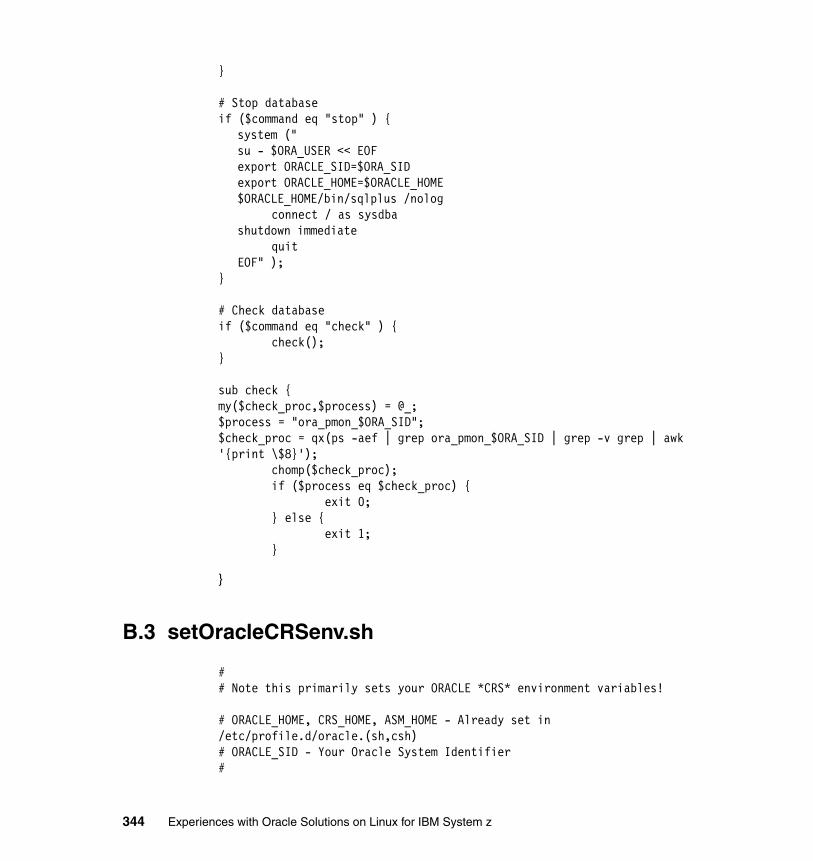
}
# Stop databaseif ($command eq "stop" ) {
system ("su - $ORA_USER << EOFexport ORACLE_SID=$ORA_SIDexport ORACLE_HOME=$ORACLE_HOME$ORACLE_HOME/bin/sqlplus /nolog
connect / as sysdbashutdown immediate
quitEOF" );
}
# Check databaseif ($command eq "check" ) { check();}
sub check {my($check_proc,$process) = @_;$process = "ora_pmon_$ORA_SID";$check_proc = qx(ps -aef | grep ora_pmon_$ORA_SID | grep -v grep | awk '{print \$8}'); chomp($check_proc); if ($process eq $check_proc) { exit 0; } else { exit 1; }
}
B.3 setOracleCRSenv.sh
## Note this primarily sets your ORACLE *CRS* environment variables!
# ORACLE_HOME, CRS_HOME, ASM_HOME - Already set in /etc/profile.d/oracle.(sh,csh)# ORACLE_SID - Your Oracle System Identifier#
344 Experiences with Oracle Solutions on Linux for IBM System z

export ORACLE_SID=DB01
# For RAC export ORA_CRS_HOME=${CRS_HOME} export ORA_ASM_HOME=${ASM_HOME}
# Reset ORACLE_HOME
export ORACLE_HOME=${CRS_HOME}
# Save original PATH if not already done, else if already set, restore PATH to original state
if test -z $ORIGINAL_PATH;then export ORIGINAL_PATH=$PATHelse export PATH=$ORIGINAL_PATHfi
# Get settings ulimit, max process, open files values only. If script does not exist, we simply use defaults.if test -f /etc/sysconfig/defineOracleKernelParms; then . /etc/sysconfig/defineOracleKernelParmselse echo "Warning: could not find /etc/sysconfig/defineOracleKernelParms script, using defaults"fi
# Grid Control Agent Home export AGENT_HOME=$ORACLE_HOME/agent
export TNS_ADMIN=$ORACLE_HOME/network/admin unset ORA_NLS10 unset ORA_NLS33 # Set ORA_NLSxx depending on 9i or 10g test -d $ORACLE_HOME/ocommon/nls/admin/data && export ORA_NLS33=$ORACLE_HOME/ocommon/nls/admin/data test -d $ORACLE_HOME/nls/data && export ORA_NLS10=$ORACLE_HOME/nls/data
PATH=$ORACLE_HOME/bin:$PATH:~/utils LD_LIBRARY_PATH=$ORACLE_HOME/lib:$ORACLE_HOME/ctx/lib
Appendix B. Shell script for CRS failover 345
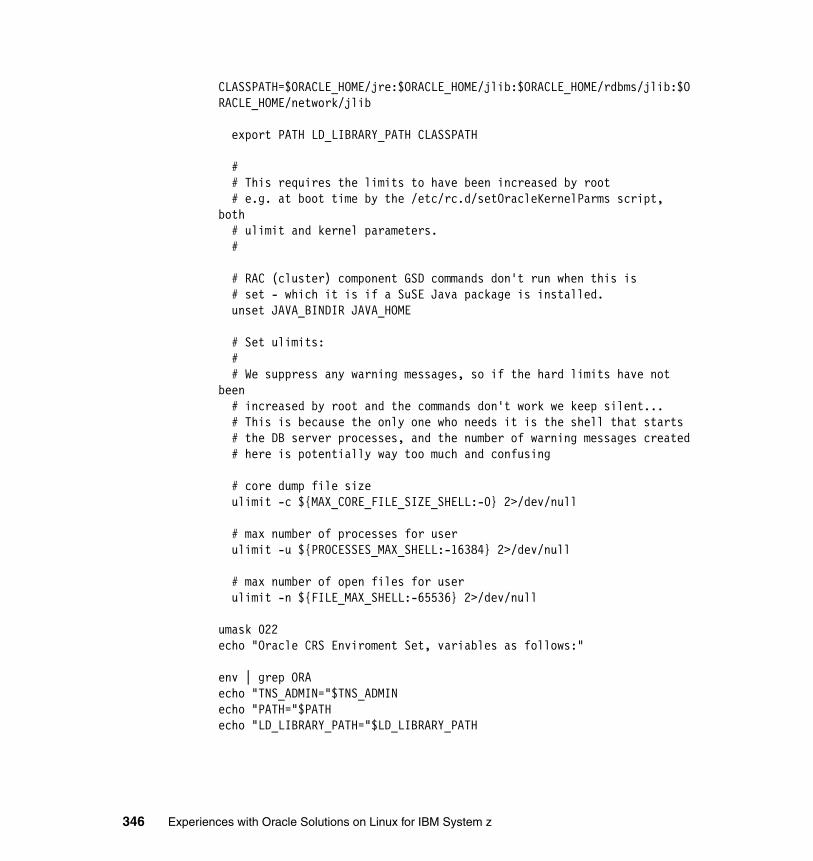
CLASSPATH=$ORACLE_HOME/jre:$ORACLE_HOME/jlib:$ORACLE_HOME/rdbms/jlib:$ORACLE_HOME/network/jlib
export PATH LD_LIBRARY_PATH CLASSPATH
# # This requires the limits to have been increased by root # e.g. at boot time by the /etc/rc.d/setOracleKernelParms script, both # ulimit and kernel parameters. #
# RAC (cluster) component GSD commands don't run when this is # set - which it is if a SuSE Java package is installed. unset JAVA_BINDIR JAVA_HOME
# Set ulimits: # # We suppress any warning messages, so if the hard limits have not been # increased by root and the commands don't work we keep silent... # This is because the only one who needs it is the shell that starts # the DB server processes, and the number of warning messages created # here is potentially way too much and confusing
# core dump file size ulimit -c ${MAX_CORE_FILE_SIZE_SHELL:-0} 2>/dev/null
# max number of processes for user ulimit -u ${PROCESSES_MAX_SHELL:-16384} 2>/dev/null
# max number of open files for user ulimit -n ${FILE_MAX_SHELL:-65536} 2>/dev/null
umask 022echo "Oracle CRS Enviroment Set, variables as follows:"
env | grep ORAecho "TNS_ADMIN="$TNS_ADMINecho "PATH="$PATHecho "LD_LIBRARY_PATH="$LD_LIBRARY_PATH
346 Experiences with Oracle Solutions on Linux for IBM System z

B.4 setOracleASMenv.sh
## Note this primarily sets your ORACLE *ASM* environment variables! # ORACLE_HOME, CRS_HOME, ASM_HOME - Already set in /etc/profile.d/oracle.(sh,csh)# ORACLE_SID - Your Oracle System Identifier #
# Set ASM SID per node
THIS_HOST=`/bin/hostname -s 2>/dev/null`
unset ORACLE_SID
echo "Setting ORACLE_SID on server:" $THIS_HOST
case $THIS_HOST in pazxxt10) export ORACLE_SID=+ASM1 ;; pazxxt11) export ORACLE_SID=+ASM2 ;;esac
if test -z $ORACLE_SID;then echo "Could not set ORACLE_SID for server: " $THIS_HOSTelse echo "ORACLE_SID set to: " $ORACLE_SIDfi
# For RAC export ORA_CRS_HOME=${CRS_HOME} export ORA_ASM_HOME=${ASM_HOME}
# Reset ORACLE_HOME
export ORACLE_HOME=${ASM_HOME}
# Save original PATH if not already done, else if already set, restore PATH to original state
if test -z $ORIGINAL_PATH;
Appendix B. Shell script for CRS failover 347
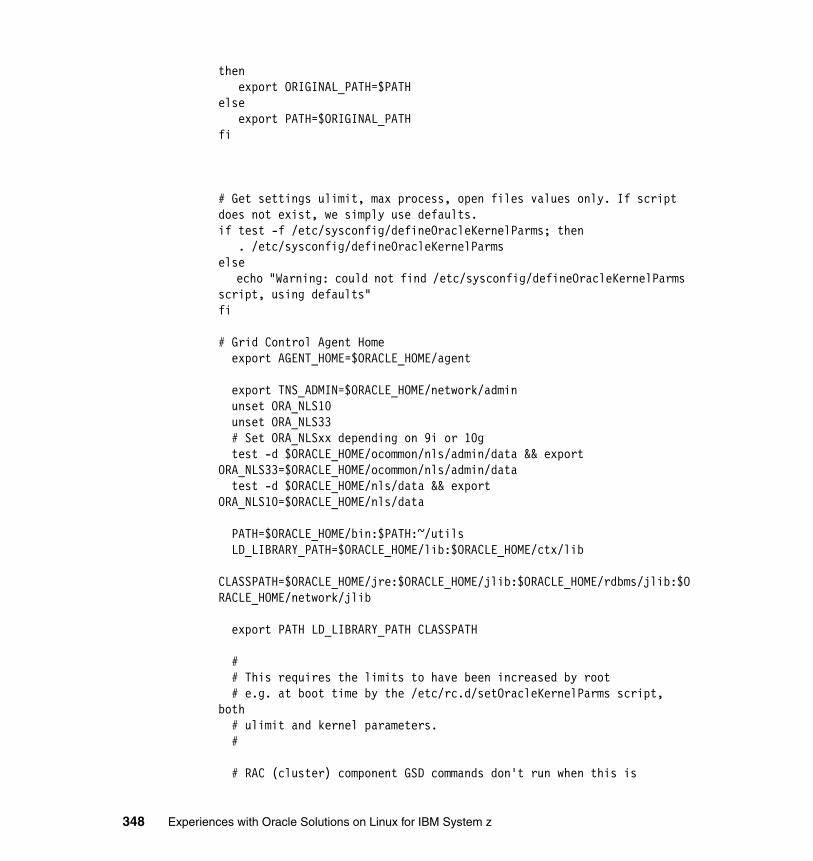
then export ORIGINAL_PATH=$PATHelse export PATH=$ORIGINAL_PATHfi
# Get settings ulimit, max process, open files values only. If script does not exist, we simply use defaults.if test -f /etc/sysconfig/defineOracleKernelParms; then . /etc/sysconfig/defineOracleKernelParmselse echo "Warning: could not find /etc/sysconfig/defineOracleKernelParms script, using defaults"fi
# Grid Control Agent Home export AGENT_HOME=$ORACLE_HOME/agent
export TNS_ADMIN=$ORACLE_HOME/network/admin unset ORA_NLS10 unset ORA_NLS33 # Set ORA_NLSxx depending on 9i or 10g test -d $ORACLE_HOME/ocommon/nls/admin/data && export ORA_NLS33=$ORACLE_HOME/ocommon/nls/admin/data test -d $ORACLE_HOME/nls/data && export ORA_NLS10=$ORACLE_HOME/nls/data
PATH=$ORACLE_HOME/bin:$PATH:~/utils LD_LIBRARY_PATH=$ORACLE_HOME/lib:$ORACLE_HOME/ctx/lib CLASSPATH=$ORACLE_HOME/jre:$ORACLE_HOME/jlib:$ORACLE_HOME/rdbms/jlib:$ORACLE_HOME/network/jlib
export PATH LD_LIBRARY_PATH CLASSPATH
# # This requires the limits to have been increased by root # e.g. at boot time by the /etc/rc.d/setOracleKernelParms script, both # ulimit and kernel parameters. #
# RAC (cluster) component GSD commands don't run when this is
348 Experiences with Oracle Solutions on Linux for IBM System z
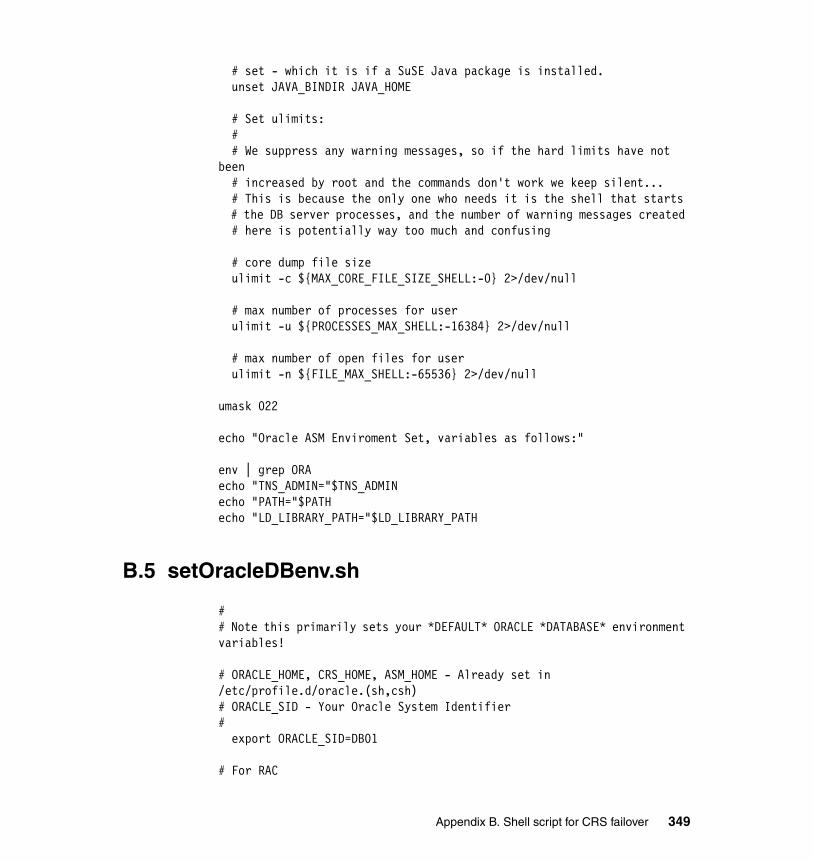
# set - which it is if a SuSE Java package is installed. unset JAVA_BINDIR JAVA_HOME
# Set ulimits: # # We suppress any warning messages, so if the hard limits have not been # increased by root and the commands don't work we keep silent... # This is because the only one who needs it is the shell that starts # the DB server processes, and the number of warning messages created # here is potentially way too much and confusing
# core dump file size ulimit -c ${MAX_CORE_FILE_SIZE_SHELL:-0} 2>/dev/null
# max number of processes for user ulimit -u ${PROCESSES_MAX_SHELL:-16384} 2>/dev/null
# max number of open files for user ulimit -n ${FILE_MAX_SHELL:-65536} 2>/dev/null
umask 022
echo "Oracle ASM Enviroment Set, variables as follows:"
env | grep ORAecho "TNS_ADMIN="$TNS_ADMINecho "PATH="$PATHecho "LD_LIBRARY_PATH="$LD_LIBRARY_PATH
B.5 setOracleDBenv.sh
## Note this primarily sets your *DEFAULT* ORACLE *DATABASE* environment variables! # ORACLE_HOME, CRS_HOME, ASM_HOME - Already set in /etc/profile.d/oracle.(sh,csh)# ORACLE_SID - Your Oracle System Identifier # export ORACLE_SID=DB01
# For RAC
Appendix B. Shell script for CRS failover 349
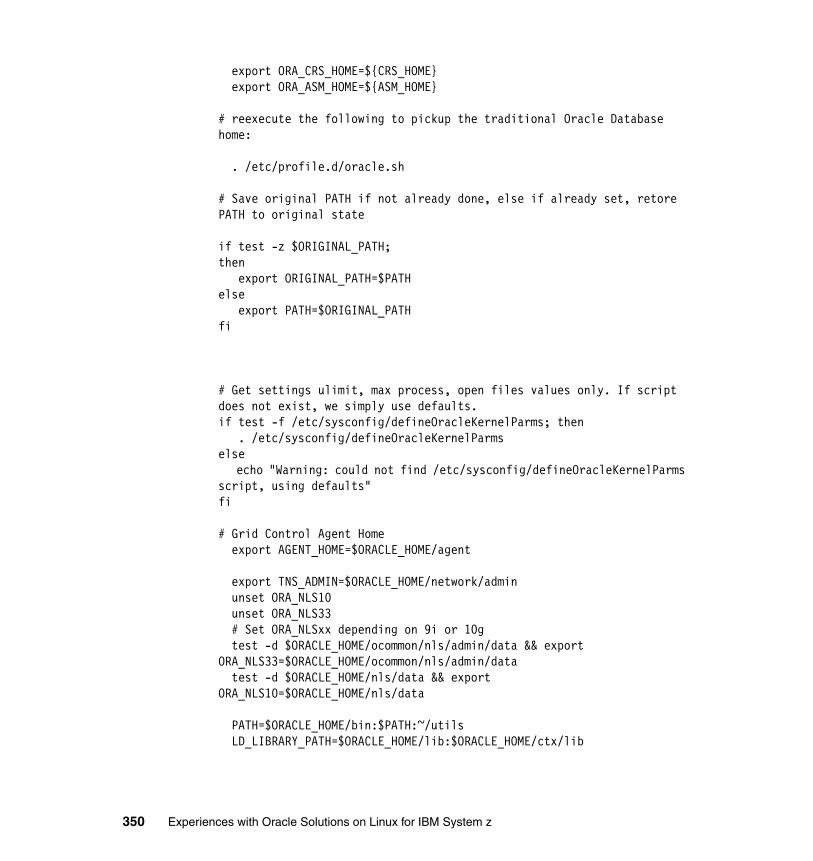
export ORA_CRS_HOME=${CRS_HOME} export ORA_ASM_HOME=${ASM_HOME}
# reexecute the following to pickup the traditional Oracle Database home:
. /etc/profile.d/oracle.sh
# Save original PATH if not already done, else if already set, retore PATH to original state
if test -z $ORIGINAL_PATH; then export ORIGINAL_PATH=$PATHelse export PATH=$ORIGINAL_PATHfi
# Get settings ulimit, max process, open files values only. If script does not exist, we simply use defaults.if test -f /etc/sysconfig/defineOracleKernelParms; then . /etc/sysconfig/defineOracleKernelParmselse echo "Warning: could not find /etc/sysconfig/defineOracleKernelParms script, using defaults"fi
# Grid Control Agent Home export AGENT_HOME=$ORACLE_HOME/agent
export TNS_ADMIN=$ORACLE_HOME/network/admin unset ORA_NLS10 unset ORA_NLS33 # Set ORA_NLSxx depending on 9i or 10g test -d $ORACLE_HOME/ocommon/nls/admin/data && export ORA_NLS33=$ORACLE_HOME/ocommon/nls/admin/data test -d $ORACLE_HOME/nls/data && export ORA_NLS10=$ORACLE_HOME/nls/data
PATH=$ORACLE_HOME/bin:$PATH:~/utils LD_LIBRARY_PATH=$ORACLE_HOME/lib:$ORACLE_HOME/ctx/lib
350 Experiences with Oracle Solutions on Linux for IBM System z
CLASSPATH=$ORACLE_HOME/jre:$ORACLE_HOME/jlib:$ORACLE_HOME/rdbms/jlib:$ORACLE_HOME/network/jlib
export PATH LD_LIBRARY_PATH CLASSPATH
# # This requires the limits to have been increased by root # e.g. at boot time by the /etc/rc.d/setOracleKernelParms script, both # ulimit and kernel parameters. #
# RAC (cluster) component GSD commands don't run when this is # set - which it is if a SuSE Java package is installed. unset JAVA_BINDIR JAVA_HOME
# Set ulimits: # # We suppress any warning messages, so if the hard limits have not been # increased by root and the commands don't work we keep silent... # This is because the only one who needs it is the shell that starts # the DB server processes, and the number of warning messages created # here is potentially way too much and confusing
# core dump file size ulimit -c ${MAX_CORE_FILE_SIZE_SHELL:-0} 2>/dev/null
# max number of processes for user ulimit -u ${PROCESSES_MAX_SHELL:-16384} 2>/dev/null
# max number of open files for user ulimit -n ${FILE_MAX_SHELL:-65536} 2>/dev/null
umask 022
echo "Oracle DB Enviroment Set, variables as follows:"
env | grep ORAecho "TNS_ADMIN="$TNS_ADMINecho "PATH="$PATH
echo "LD_LIBRARY_PATH="$LD_LIBRARY_PATH
Appendix B. Shell script for CRS failover 351

352 Experiences with Oracle Solutions on Linux for IBM System z
Related publications
The publications listed in this section are considered particularly suitable for a more detailed discussion of the topics covered in this book.
IBM Redbooks
For information about ordering these publications, see “How to get Redbooks” on page 355. Note that some of the documents referenced here may be available in softcopy only.
� Using Oracle Solutions on Linux on System z, SG24-7573
� Experiences with Oracle Database on Linux on zSeries, SG24-6552 (Oracle9i)
� Experiences with Oracle Database 10g on Linux on zSeries, SG24-6482 (Oracle 10gR1)
� Experiences with Oracle Database 10gR2 on Linux on System z, SG24-7191
� Linux for IBM zSeries and S/390: Distributions, SG24-6264
� Linux for S/390, SG24-4987
� Linux on IBM zSeries and S/390: ISP/ASP Solutions, SG24-6299
� Building Linux Systems under IBM VM, REDP0120
� Linux on zSeries and S/390: Systems Management, SG24-6820
� z/VM and Linux on zSeries: From LPAR to Virtual Servers in Two Days, SG24-6695
� Linux Handbook A Guide to IBM Linux Solutions and Resources, SG24-7000
� Fibre Channel Protocol for Linux and z/VM on IBM System z, SG24-7266
Other publications
These publications are also relevant as further information sources:
� 10gR2 Quick Installation Guide for IBM zSeries Based Linux – B28935-01
� 10gR2 Installation Guide for IBM zSeries Based Linux – B25400-01
© Copyright IBM Corp. 2009. All rights reserved. 353
� Oracle Database Release Notes 10g Release 2 (10.2) for IBM zSeries Based Linux – B25399-04
� Oracle Database Oracle Clusterware and Oracle Real Application Clusters Installation Guide 10g Release 2 (10.2) for Linux – B14203-08
� Oracle Database Oracle Clusterware and Oracle Real Application Clusters Administration and Deployment Guide 10g Release 2 (10.2) – B14197-09
� Oracle Clusterware Administration and Deployment Guide 11g Release 1 (11.1) – B28255-06
� MetaLink Notes
– Note 259301.1 CRS and 10g Real Application Clusters
– Note 268937.1 Repairing or Restoring an Inconsistent OCR in RAC
– Note 239998.1 10g RAC How to clean up after a failed CRS Install
– Note 220970.1 RAC Frequently Asked Questions Topics
– Note 420382.1 Requirements for Installing Oracle 10gR2 RDBMS on RHEL 4 on zLinux (s390x).
– Note 431443.1 Requirements for Installing Oracle 10gR2 RDBMS on SLES 9 zLinux (s390x)
– Note 270577.1 Installing Oracle 9i on IBM z/Series - SLES8/9
– Note 415182.1 DB Install Requirements Quick Reference - zSeries based Linux .
– Note 417001.1 Errors installing 10.2.0.2 patchset on IBM ZSeries Based Linux.
Online resources
These Web sites are also relevant as further information sources:
� Oracle Technolody Network
http://otn.oracle.com
� Oracle Metalink - for Oracle support
http://metalink.oracle.com
� Oracle Corporate address
http://www.oracle.com
� Oracle RAC User Group
http://www.oraclesigrac.org
354 Experiences with Oracle Solutions on Linux for IBM System z
How to get Redbooks
You can search for, view, or download Redbooks, Redpapers, Technotes, draft publications and Additional materials, as well as order hardcopy Redbooks, at this Web site:
ibm.com/redbooks
Help from IBM
IBM Support and downloads
ibm.com/support
IBM Global Services
ibm.com/services
Related publications 355

356 Experiences with Oracle Solutions on Linux for IBM System z

Index
Symbols$ORA_CRS_HOME 283$ORACLE_HOME/bin/emagent 216$PS_HOME 117//edelivery.oracle.com/. 116/dev/mapper/mymp1p1 88/etc/hosts file 268/etc/scsi_id.config 84/etc/sysconfig/hardware 79/proc/stat file 140/proc/sys/kernel/hz_timer 144/psoft/pt849/bin 117
Numerics10.2.0.4 150, 2122.6.11 kernel, 14059-dasd.rules 27299-dasd.rules 272
Aadmin directory tree 281Advanced Encryption Standard 5AIX 150AM4CICS 145–146ASM 244, 247, 258, 294ASM diskgroup 73ASM home 266ASM instance 264, 266, 278ASMCMD facility 247ASMLib 58, 68ASODEMO 177Asymmetric requests (RSA) 176async I/O 262asynchronous I/O 58authenticated connection 146authentication 172, 174authority credential 147AutoConfig 112autologon 146Automated Failure Detection 256Automatic Storage Management 244ava Cryptography Extension (JCE) 174
© Copyright IBM Corp. 2009. All rights reserved.
Bbasic cluster locking service 276BFILE 151bfiles 154block devices 268, 274bootstrap loader 14bootstrap process 24bug #6931228 94business resiliency 4
CCall Level Interface (OCI) 174Campus Solutions 9.0 126capacity planning 139CCA 206Certificate Authority (CA) 190Certificate Signing Request 190changing permissions 54check interval 283CHECK_DB 155CHECK_EXTERNAL 154chkconfig 178CHPID 65, 74CICS Access Manager 145CICS application program 147CICS task 146CICS TS 146clean-up script 100client-server model 173cluster aware application 268cluster configuration 274Cluster Logical Volume Manager 258Cluster Ready Services 244Cluster Registry 268, 283clustered ASM instance 266, 279Clusterware 244, 246clusterware daemon script 276common.xml file 200compat-gcc 35compat-libstdc 35CONF file 14CONFIG_VIRT_CPU_ACCOUNTING parameter 140
357
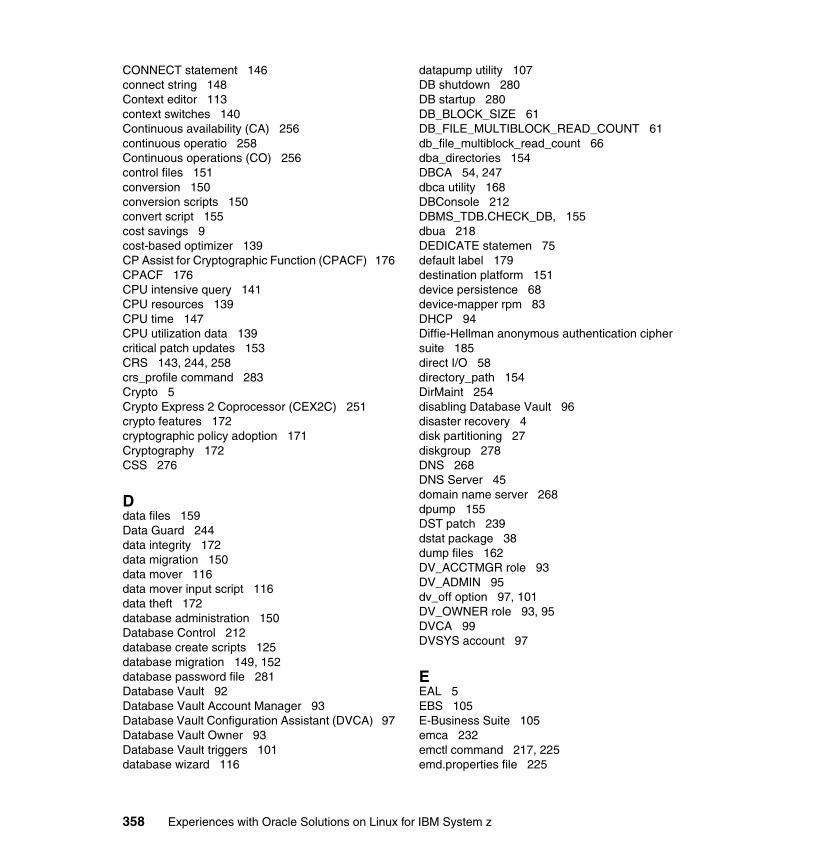
CONNECT statement 146connect string 148Context editor 113context switches 140Continuous availability (CA) 256continuous operatio 258Continuous operations (CO) 256control files 151conversion 150conversion scripts 150convert script 155cost savings 9cost-based optimizer 139CP Assist for Cryptographic Function (CPACF) 176CPACF 176CPU intensive query 141CPU resources 139CPU time 147CPU utilization data 139critical patch updates 153CRS 143, 244, 258crs_profile command 283Crypto 5Crypto Express 2 Coprocessor (CEX2C) 251crypto features 172cryptographic policy adoption 171Cryptography 172CSS 276
Ddata files 159Data Guard 244data integrity 172data migration 150data mover 116data mover input script 116data theft 172database administration 150Database Control 212database create scripts 125database migration 149, 152database password file 281Database Vault 92Database Vault Account Manager 93Database Vault Configuration Assistant (DVCA) 97Database Vault Owner 93Database Vault triggers 101database wizard 116
datapump utility 107DB shutdown 280DB startup 280DB_BLOCK_SIZE 61DB_FILE_MULTIBLOCK_READ_COUNT 61db_file_multiblock_read_count 66dba_directories 154DBCA 54, 247dbca utility 168DBConsole 212DBMS_TDB.CHECK_DB, 155dbua 218DEDICATE statemen 75default label 179destination platform 151device persistence 68device-mapper rpm 83DHCP 94Diffie-Hellman anonymous authentication cipher suite 185direct I/O 58directory_path 154DirMaint 254disabling Database Vault 96disaster recovery 4disk partitioning 27diskgroup 278DNS 268DNS Server 45domain name server 268dpump 155DST patch 239dstat package 38dump files 162DV_ACCTMGR role 93DV_ADMIN 95dv_off option 97, 101DV_OWNER role 93, 95DVCA 99DVSYS account 97
EEAL 5EBS 105E-Business Suite 105emca 232emctl command 217, 225emd.properties file 225
358 Experiences with Oracle Solutions on Linux for IBM System z
encryption/decryption 173endian forma 149endian format 168Enterprise Manager 244ESAMON 144Evaluation Assurance Level 5Evaluation Assurance Level 5 (EAL5) 253explicit connect 147export/impor 149export/import 168Extended Count Key Data (ECKD) 64extermal directories 154external tables 154
FFault Tolerance 256FCP Logical Unit Numbers (LUNs) 74FCP/SCSI 58, 64Fiber Channel Protocol (FCP) 64Fiber Connector (FICON®) 64FICON/ECKD 58FICON/ECKD. 64file systems 264filesystemio_options 66fixed public host name 268Flash Recovery Area 60Flashback 244, 248, 257FORMAT specification 163
GGDPS 259Geographically Dispersed Parallel Sysplex (GDPS) 255Global Mirror 255Global Mirroring 244GNOME Desktop Environment 32green features 6Grid Control 141, 246grid control agent 212, 238Grid Control Server 211group services 276
Hhardware security module 171hardware security module (HSM) 173hcengl.db 134hcengs.db 134
heritage data 8High availability (HA) 256high CPU 143HiperSockets 244hipersockets 8HiperSockets Guest LAN 254HR demo 116HRdemo 9.0 127Human Resources Management System 126Hypervisor 4hz_timer 143
II/O intensive operation 154IBM DS8000® Storage System 57IBM Storage Flash Copy 244IBM z/VM Performance tool kit 141IBM’s Project Green 7IFL 244, 252IFL processors 8implicit CONNECT 146init.ora file 266installation verification program (IVP) 179Integrated Facility for Linux 252intra-node communication 268involuntary wait 140IOCP (Input/Output Configuration Program) 74IOPS 72IP Address 150iSQL*Plus 92isqlplus server 217ivp.e 179
JJ2EE 173Java compatibility library 34Java keystore 207Java keystores 174JSSE 176
KKerberos 172keystores 174, 189
Llarge random I/O 69large sequential I/O 69
Index 359
LDAP 11legacy Applications 35legacy data 8LGRW (Oracle log writer) 63libica 177libica. 176Linux 254Linux accounting 143Linux accounting error 144listener 112, 217listener.ora file 191local server 146LPAR 67, 140, 173, 244, 253, 258lsssci command 80LVM 58LVM (Logical Volume Manager) 60
MMAA 243, 245MAC 181mass agent 238masterkeys 180Maximum Availability Architecture 6MDISK 67MetaLink notes for EBS 107middle tier 106migration 149migration effort 148migration time 149minidisk cache 68mission critical applications 5mixed architecture configuration 108mkinitrd command 80multipath 65, 74, 82multi-threaded server 174
NN_Port ID Virtualization (NPIV) 65native encryption 172ncpu test program 141network encryption 172Network Interface Card (NIC) 14NFS mount 161NFS server 20node membership 276node names 276nosysdba=n 95nosysdba=y 102
nstress collection of tools 141ntegrated Facility for Linux 244
OOCFS 268OCR 268, 273–274, 276OCR (Cluster Registry) 74OEM DBcontrol 92OEM Grid Control 226OEM Grid Server 212OID 146, 244online transaction processing (OLTP) 69opatch utility 153openCrypto package 206openCryptoki package 175openmotif-devel 36openssl 177Oracle
Automatic Storage Managemen 244Clusterware 244Data Guard 244Enterprise Manager 244Flashback 244Real Application Clusters 244Recovery Manager 244Streams 244
Oracle 10.2.0.4 Patch Set 6810189 47Oracle Advanced Security 171, 205Oracle Applications 12Oracle ASM 60Oracle Clusterware 82, 246, 257, 262, 264, 292Oracle Data Vault 244Oracle Database 10.2.0.4 13Oracle Database Creation Assistant (DBCA) 266Oracle Database Server 12Oracle Database Vault 91–92, 251Oracle Dataguard 259Oracle E-Business Suite 111Oracle Enterprise Manager 257Oracle Fusion Middleware 12Oracle Internet Directory (OID) 251Oracle JDBC (type 4) 174Oracle Logon 147Oracle Maximum Availability Architecture (MAA). 263Oracle Net listener 167Oracle owner 273Oracle Real Application Clusters (RAC) 262
360 Experiences with Oracle Solutions on Linux for IBM System z

Oracle RMAN 70Oracle Streams 259Oracle user ID 146Oracle Wallet 171, 207Oracle Wallet Manager, 172Oracle Wallets 189orapwd file 96orapwd, 95Orion 69OS-authenticated connection 146OS-authenticated user IDs 147OSDI service 146otn.oracle.com 212OUI 247, 275
PPARM file 14partition table 81password file 95, 152password prompt 100password utility 95patch 6007358 214patch 6056783 143patch 7349124 47patch set exceptions 153patch set note 99patch set version 153patchset 96PCI-X 251pcksslotd (slot) 178PeopleSoft 115PeopleSoft (Oracle) Database Server 116PeopleSoft Administrator ID 125PeopleSoft Enterprise 116PeopleSoft Home 116PeopleSoft id 124PeopleTools 8.49 116Peripheral Component Interconnect eXtended 251perl script 267, 283PFILE 155pfile 165pfile init_orcl00k3em96_1_0.ora 158PKI 205PKI certificates 171PL/SQL function 154PL/SQL interface 96PPRC) 255PR/SM 5, 244, 253
predefined thread table 146prerequisite checks. 94prerequisites 150private address 268private interconnect names 276private keys 171Property object 196PS_HOME 117psdmtx 116PSFT1 125psft1ora.dms 129psft1ora.hr.dms 131PSSTATUS table 134public address 268Public Key Infrastructure (PKI 172
QQDIO Guest LAN 254QETH 43Quick Start Tutoria 103
RRAC 244, 258RACF 5, 146RACF user ID 147RADIUS 172Raid 10 58, 63Raid 5 58, 63RAMdisk 16Rapid Install 109RAS 254raw devices 268rc.local script 88Real Application Clusters 244real CPU 140Realms 103reconfigure database vault 100Recovery Manager 244Red Hat 5 13Redbooks Web site 355
Contact us xvredo log 63Redo log files 151re-enable database vault 99rel849un.sql script 134remote server 146repository 228repository URL 226
Index 361
restrictions 152revocation lists 172RHEL4 212RMAN 149, 153, 244, 248RMAN database conversion 153ROLLBACK segments 154, 159rolling upgrade 258root.sh scrip 276rotate extents 61RSF 11
SSAME (Stripe and Mirror Everything) 59same endian 151sample schema 155SAN 62SAN LUNs 73SCSI ID 78SCSI LUN 78Secure Sockets (SSL 172security 5security protocols 172self signed root certificate 190SELINUX 39single instance database 108Single Instance Database Failover 262Single Instance Failover 294single sign-on 172SL_CIPHER_SUITES 185SLES10 79, 212SLES9 212slot token dynamic link libraries (STDLL) 175Smart Cards 171source database 149, 151Split Brain 268SQL statement 146sqlnet.ora file 191sqlplus 278SSL 172SSL_CLIENT_AUTHENTICATION 206SSL_SERVER_CERT_DN parameter 185SSLUSER 207staging area 161standalone agent 217steal time (st) 140, 142Storage Array Striping 58storage pool 263Store CPU Timer (stpt) 140
swap space 94symmetric masterkey 180SYSDBA Privilege 95SYSDBA privilege 92, 95SYSOPER 95sysstat 38system control programs (SCP) 252SYSTEM table space 154, 159System z10 EC 11
Ttable spaces 151target database 108, 149target files 161target platform 152TCP/IP connectivity 253TDB 149TDB technology 149Tempfiles 152tgtdbfcon.rman 156, 160tgtstartup.sql 156, 160, 163thread table entry 146tick based accounting 140timer interrupts 140timer system calls 140token label 179transaction codes 147transport script 155Transportable Database 107transportable databases 149trust points 171Trusted Key Entry 5two-tier mode 128
UUDEV 58, 68, 86udevcontrol reload_rules 87udevtrigge 273ulrp.sql 165undo data 154UNDO table spaces 159upgrade mode 99utlirp.sql 165
VV$DB_TRANSPORTABLE_PLATFORM 152valid password 146
362 Experiences with Oracle Solutions on Linux for IBM System z
Velocity Software 144VIP addresses 268virtual
I/O 4network 4servers 10
virtual CPU 140Virtual IP 268Virtual Switch (VSWITCH) 254virtualization capabilities 4VISION demo database 109VLAN 254vmstat 140, 142VNC 21VNC connection 14Voting Disk 74, 274, 276VSWITCH 14
Wwall clock 140wallets 172Weblogic Application Server 174workload management 6World Wide Port Names (WWPNs) 74Worldwide Port Names (WWPN) 65
YYAST 79
Zz/OS 146z/VM 4, 14, 263z90crpyt device driver 177zipl command 80
Index 363

364 Experiences with Oracle Solutions on Linux for IBM System z

(0.5” spine)0.475”<
->0.875”
250 <->
459 pages
Experiences with Oracle Solutions on Linux for IBM
System z


®
SG24-7634-00 ISBN 0738432652
INTERNATIONAL TECHNICALSUPPORTORGANIZATION
BUILDING TECHNICALINFORMATION BASED ONPRACTICAL EXPERIENCE
IBM Redbooks are developed by the IBM International Technical Support Organization. Experts from IBM, Customers and Partners from around the world create timely technical information based on realistic scenarios. Specific recommendations are provided to help you implement IT solutions more effectively in your environment.
For more information:ibm.com/redbooks
®
Experiences with Oracle Solutions onLinux for IBM System z
Installing Oracle on Linux for IBM System z
Using Oracle on Linux on z
Oracle’s Maximum Availability Architecture
Linux for System z offers many advantages to customers who rely upon the IBM mainframe systems to run their businesses. Linux for System z takes advantage of the qualities of service in the System z hardware and in z/VM, making it a robust industrial strength Linux. This provides an excellent platform for hosting Oracle solutions that run in your enterprise.
This IBM Redbooks publication describes experiences gained while installing and testing several Oracle solutions, such as:� Setting up Red Hat Enterprise Linux 5 for Oracle� Installing Oracle Data Vault� Using Grid Control to manage 10gR2 Databases� Using Oracle’s Maximum Availability Architecture best
practices with IBM System zIt also includes many general hints and tips for running Oracle products on IBM System z with Linux and z/VM.
Interested readers would include database consultants, installers, administrators, and system programmers. This is not meant to replace Oracle documentation, but to supplement it with our experiences while installing and using Oracle products.
Back cover