neilkolban.comneilkolban.com/.../02/kolbans-odm-dsi-book-2015-02.pdf · sources of knowledge on odm...
TRANSCRIPT
Page 1
Table of ContentsComplex Event Processing...................................................................................................................9Basics of ODM Decision Server Insights...........................................................................................10
Solution..........................................................................................................................................10Concepts.........................................................................................................................................11Entity..............................................................................................................................................11Event..............................................................................................................................................11Solution Gateway...........................................................................................................................12Inbound and outbound connectivity..............................................................................................12Agents............................................................................................................................................13Business Object Model – BOM.....................................................................................................14Time...............................................................................................................................................14
When does an event arrive?......................................................................................................15Aggregating event and entity data.................................................................................................16Architecture...................................................................................................................................17Sources of Knowledge on ODM DSI............................................................................................17
The IBM Knowledge Center.....................................................................................................17Books on Event Processing.......................................................................................................17Important IBM Technical Notes................................................................................................18
Installation..........................................................................................................................................18Environment preparation...............................................................................................................27
Developing a solution.........................................................................................................................31Eclipse – Insight Designer.............................................................................................................32Naming conventions for projects and artifacts..............................................................................33Creating a new solution.................................................................................................................34
The SOLUTION.MF file..........................................................................................................37The solution map view...................................................................................................................37Modeling the Business Object Model (BOM)...............................................................................38
Defining Entity Types...............................................................................................................38Defining Event Types................................................................................................................38Business Model Definitions......................................................................................................38
Modeling Concepts...............................................................................................................40Modeling Entity Types.........................................................................................................41Modeling Event Types..........................................................................................................41Modeling Properties.............................................................................................................42Modeling Relationships........................................................................................................43Vocabulary............................................................................................................................44Importing Event and Entity types from XML Schema........................................................44Sharing a BOM project.........................................................................................................44Suggested initial language for initial business model definitions........................................45
Defining Entity initializations...................................................................................................45Defining attribute enrichments..................................................................................................46Generated Business Object Model............................................................................................47The structure of BOM projects.................................................................................................48
Modeling the connectivity of a solution........................................................................................48Inbound bindings.......................................................................................................................50Inbound endpoints.....................................................................................................................51Outbound bindings....................................................................................................................51Outbound endpoints..................................................................................................................51
Page 2
HTTP Bindings.........................................................................................................................52JMS Bindings............................................................................................................................52Notes about connections...........................................................................................................52Sample Connectivity Definitions..............................................................................................52
A sample inbound HTTP definition.....................................................................................52A sample inbound JMS definition........................................................................................52A sample outbound JMS definition......................................................................................53
Implementing Agents.....................................................................................................................53The Agent Description File – .adsc....................................................................................54
Rule Agents...............................................................................................................................56Building an action rule.........................................................................................................58Bound entities.......................................................................................................................60The order of rules evaluation................................................................................................61Life cycle of the bound entity...............................................................................................61Emitting an event..................................................................................................................61Augmenting the rules with new logic...................................................................................61
Java Agents...............................................................................................................................67Building a Java Agent Project..............................................................................................68The Java Agent Description File - .adsc...............................................................................69Implement the Java class......................................................................................................70The Agent and EntityAgent classes......................................................................................71Creating model objects – events, concepts and entities.......................................................71Emitting new events.............................................................................................................72Accessing the bound entity...................................................................................................72JavaAgent lifecycle..............................................................................................................72JavaAgent Metadata.............................................................................................................73Adding additional classes.....................................................................................................73Using OSGi services in rules................................................................................................85Debugging the Java Agent....................................................................................................96Java functions mapped to rule language...............................................................................97Attaching a source level Debugger......................................................................................97
Deleting Agent projects.............................................................................................................98Defining global aggregates............................................................................................................99
Global event aggregates..........................................................................................................101Global entity aggregates..........................................................................................................102Programming with aggregates................................................................................................105
Managing projects with Eclipse...................................................................................................106Hiding closed projects.............................................................................................................106
Developing a solution extension..................................................................................................108Developing an entity initialization extension..........................................................................110Developing a Data Provider Extension...................................................................................111
Deploying a solution.........................................................................................................................114Exporting a solution.....................................................................................................................114Deploying a solution to a DSI Server..........................................................................................116Determining which solutions are deployed..................................................................................119Selecting what is deployed with a solution..................................................................................119Redeploying a solution................................................................................................................120Stopping a solution......................................................................................................................120Undeploying a solution................................................................................................................121Deleting a solution.......................................................................................................................121
Page 3
Deploying agents.........................................................................................................................123Exporting an agent project......................................................................................................123Deploying an agent to a DSI Server........................................................................................125
Repairing / Cleaning your DSI deployments...............................................................................125Event history.....................................................................................................................................126Deploying Connectivity Configurations...........................................................................................128
Enabling ODM DSI to receive incoming JMS messages............................................................130Enabling ODM DSI to send outgoing JMS messages.................................................................131Enabling ODM DSI to receive incoming MQ messages.............................................................131
Testing a solution..............................................................................................................................132Building a Java client for test......................................................................................................132
TestDriver Methods.................................................................................................................136addDebugReceiver(DebugReceiver)..................................................................................136connect().............................................................................................................................137connect(timeout).................................................................................................................137connect(solutionName)......................................................................................................137connect(solutionName, timeout)........................................................................................137createRelationship(entity, key)...........................................................................................138createRelationship(t)..........................................................................................................138deleteAllEntities()..............................................................................................................138deleteAllEntities(entityType).............................................................................................138deleteEntity(entityType, entityId)......................................................................................138endTest().............................................................................................................................138disconnect()........................................................................................................................138fetchEntity(entityTypeClass, entitiyId)..............................................................................138getAgentEvent(DebugInfo)................................................................................................139getConceptFactory(conceptFactoryClass)..........................................................................139getEventFactory()...............................................................................................................139getModelSerializer()...........................................................................................................139getProductId().....................................................................................................................139getProperties()....................................................................................................................139getProperty(property, def)..................................................................................................139getRuntimeServers()...........................................................................................................139getSolutionGateway().........................................................................................................139getSolutionProperty().........................................................................................................140isRuntimeReady()...............................................................................................................140isSolutionReady()...............................................................................................................140loadEntities(entities)...........................................................................................................140loadEntity(entity)................................................................................................................140removeDebugReceiver(r)...................................................................................................140resetSolutionState()............................................................................................................140setGatewayMaxSubmitDelay()..........................................................................................141setProperties().....................................................................................................................141setProperty().......................................................................................................................141startRecording()..................................................................................................................141stopRecording()..................................................................................................................141submitEvent(event)............................................................................................................141toXMLBytes()....................................................................................................................141toXMLString()....................................................................................................................141updateEntity(entity)............................................................................................................141
Page 4
validateProperties()............................................................................................................141Using the TestDriver...............................................................................................................141Using the ConceptFactory.......................................................................................................142Creating an instance of an entity.............................................................................................143Creating an instance of an event.............................................................................................143Retrieving an entity.................................................................................................................143Scripting tests with JavaScript................................................................................................143
Example of creating an entity.............................................................................................144Example of creating an event.............................................................................................144
Using Insight Inspector................................................................................................................144Submitting events though HTTP.................................................................................................147
Making a REST call from Java...............................................................................................152Submitting events through JMS...................................................................................................153
Configuring ODM DSI for JMS.............................................................................................153Writing an external JMS client to send events........................................................................153
Using soapUI for functional testing.............................................................................................154Operations.........................................................................................................................................156
Creating a new server..................................................................................................................156Starting and stopping the server...................................................................................................156Changing port numbers................................................................................................................156Server administration properties..................................................................................................157DSI JMX Access..........................................................................................................................157
JMX – AgentStats...................................................................................................................158Attributes............................................................................................................................158Operations..........................................................................................................................158Data Structures...................................................................................................................158
JMX – ConnectivityManager..................................................................................................159JMX – DataLoadManager.......................................................................................................159
Attributes............................................................................................................................159Operations..........................................................................................................................159
JMX – GlobalProperties..........................................................................................................159JMX – JobManager.................................................................................................................159
Attributes............................................................................................................................159Operations..........................................................................................................................160Data Structures...................................................................................................................160
JMX – OutboundBufferManager............................................................................................161JMX – ServerAdmin...............................................................................................................161JMX – Solutions......................................................................................................................162
Attributes............................................................................................................................162Operations..........................................................................................................................162Data Structures...................................................................................................................162
Configuring the data as persistent................................................................................................163Using SmartCloud Analytics Embedded..........................................................................................164Design Considerations......................................................................................................................165
The processing of events..............................................................................................................165The Business Rule Language...........................................................................................................166
Terms in scope.............................................................................................................................166The "when" part...........................................................................................................................166The "definitions" part...................................................................................................................167The "if" part.................................................................................................................................168
Page 5
The "then" and "else" parts..........................................................................................................168The action parts............................................................................................................................168
The "set" action.......................................................................................................................168The "emit" action....................................................................................................................169The "define" action.................................................................................................................169The "print" action....................................................................................................................169The "clear" action....................................................................................................................170The "add" action......................................................................................................................170The "remove" action...............................................................................................................170The "for each" action..............................................................................................................170
Variable values.............................................................................................................................171Time operators.............................................................................................................................171Expression construction...............................................................................................................173
Logical expressions.................................................................................................................173Numeric expressions...............................................................................................................174String expressions...................................................................................................................174Time Expressions....................................................................................................................175Aggregation expressions.........................................................................................................175Counting expressions..............................................................................................................176Geospatial expressions............................................................................................................176
Reasoning over previous events..................................................................................................177The "then" construct and multiple possibilities......................................................................178
Debugging a solution........................................................................................................................178Logging Events............................................................................................................................179Examining a problem...................................................................................................................179Understanding a trace file............................................................................................................179Understanding messages..............................................................................................................180
Geometry..........................................................................................................................................181Custom Business Object Models......................................................................................................181REST Requests.................................................................................................................................183
REST – List solutions..................................................................................................................184REST – List Entity Types............................................................................................................184REST – List Entity Instances.......................................................................................................184REST – Get an Entity Instance....................................................................................................185REST – Update an Entity Instance..............................................................................................185REST – Create an Entity Instance...............................................................................................185REST – Delete all Entity Instances..............................................................................................186REST – Delete an Entity Instance...............................................................................................186REST – List aggregates...............................................................................................................186REST – Get aggregate.................................................................................................................186REST Programming.....................................................................................................................186
REST Programming in Java....................................................................................................186Patterns.............................................................................................................................................187
Perform an action when an X Event happens..............................................................................187Create a Bound Entity when an X Event happens.......................................................................187Delete a Bound Entity when a Y Event happens.........................................................................188Perform an action if a previous event happened within a time period........................................188Perform an action when a second X Event happens within a minute..........................................188Update a bound entity based on an event....................................................................................188Filter the handling of an event based on event content................................................................189
Page 6
Process an incoming event after a period of time........................................................................189Sources of Events.............................................................................................................................189
Database table row updates..........................................................................................................189IBM BPM....................................................................................................................................192
Performance Data Warehouse.................................................................................................192Explicit Java Integration Service.................................................................................................192
OSGi.................................................................................................................................................193The OSGi Bundle.........................................................................................................................193The OSGi framework...................................................................................................................195Bundle Activators........................................................................................................................195The Bundle Context.....................................................................................................................195The Bundle object........................................................................................................................195Bundle Listeners..........................................................................................................................195Working with services..................................................................................................................196The OSGi Blueprint component model.......................................................................................196
WebSphere Liberty...........................................................................................................................197Configuration...............................................................................................................................197Development................................................................................................................................199Features........................................................................................................................................199Deploying Applications...............................................................................................................200Security........................................................................................................................................200
SSL Security............................................................................................................................200DB data access.............................................................................................................................203
Adding a data source...............................................................................................................203Accessing a DB from a Java Agent.........................................................................................207
WebSphere JMS Access...............................................................................................................208WebSphere MQ Access................................................................................................................209JMX and Mbeans.........................................................................................................................210Logging and tracing.....................................................................................................................213Using the Admin Center..............................................................................................................214Special consideration when using with ODM DSI......................................................................215
WebSphere eXtreme Scale...............................................................................................................215Client APIs...................................................................................................................................217
ObjectMap API.......................................................................................................................217Entity Manager API.....................................................................................................................217REST Data Service API...............................................................................................................217
IBM DB2..........................................................................................................................................217Writing DB2 Java Procedures and Functions..............................................................................217
Deploying a JAR into DB2.....................................................................................................218DB2 Triggers................................................................................................................................218DB2 and XML.............................................................................................................................218
IBM Data Studio...............................................................................................................................219IBM MQ...........................................................................................................................................219
Installation of MQ........................................................................................................................220Administering WebSphere MQ....................................................................................................225
Creating a Queue Manager.....................................................................................................225Creating Queues on a Queue Manager...................................................................................226Disabling MQ Security...........................................................................................................227Putting messages to MQ Queues............................................................................................228
BOM – The Business Object Model.................................................................................................229
Page 7
BOM Java Programming.............................................................................................................229IlrObjectModel........................................................................................................................229IlrModelElement.....................................................................................................................230IlrNamespace..........................................................................................................................230IlrType.....................................................................................................................................231IlrClass....................................................................................................................................231IlrAttribute..............................................................................................................................232IlrDynamicActualValue..........................................................................................................232Creating an IlrObjectModel from a .bom................................................................................233
Java...................................................................................................................................................234Writing to a file in Java................................................................................................................234Introspecting a Java BOM...........................................................................................................234JavaScript fragments in Nashorn.................................................................................................235
Dumping the methods of a class.............................................................................................235Java Dates and Times...................................................................................................................235
Creating instances of ZonedDateTime....................................................................................235Eclipse..............................................................................................................................................236
Installing Eclipse Marketplace.....................................................................................................236Installing the Liberty Developer Tools........................................................................................237Associating an Eclipse Server View with DSI.............................................................................238Viewing server logs.....................................................................................................................242
Other related tools............................................................................................................................242TechPuzzles......................................................................................................................................242
DSI TechPuzzle 2015-01-30........................................................................................................244Description..............................................................................................................................244Solution...................................................................................................................................244
Worked Examples.............................................................................................................................245Simple Human Resources............................................................................................................245
Experiment Scenarios.......................................................................................................................247The Education Session …............................................................................................................247Sales orders .................................................................................................................................247
Language puzzles …........................................................................................................................248Collections...................................................................................................................................248Language general.........................................................................................................................248
Things to do .....................................................................................................................................248
Page 8
Complex Event ProcessingIn the real world, events happen all the time.
• A passenger boards a plane
• A movie is watched on Netflix
• A credit card transaction happens in Kuala Lumpur
• An item is added to an on-line shopping basket
But what is the nature of an event? What are its attributes and what is its meaning? Let us take a few moments and examine this idea which will serve us well in the rest of the material.
Events have two consistent attributes associated with them.
First, every event happens at some discrete moment in time. Looking back at our sample list of events, hopefully you can see that there will be a real-world time at which such an event occurs. Byrealizing that an event happens at a specific time, we can start to apply reasoning upon the order or sequence of events. If we say that one event happens before an another, what we are saying is that the time when the first event happened is before the time the second event happened. This sounds simple enough but given enough events of different types, we can start to look for patterns and take actions on those patterns.
Given that a real world event happens at a specific time we can also start to apply reasoning on an event not happening. This is a powerful notion. Using this idea we can further enrich our understanding and processing of events.
The second attribute of an event we wish to consider is the notion of what did the event apply to?
Looking back at our list we can map our events to questions related to that event.
A passenger boards a plane Who was the passenger? Which flight did he board?
A movie is watched on Netflix What was the name of the movie?
A credit card transaction happens in Kuala Lumpur Which credit card was involved?
An item is added to an on-line shopping basket What was the item? Which shopping basket was the item added to?
This is the time we can introduce a term that will be used throughout our study. The term is an "entity". This term is used to refer to described the "what" with which an event is associated. By realizing that every event has a corresponding entity, we now have another powerful reasoning ability. We can now reason over the set of events that apply to an individual entity.
Recapping, when an event occurs that event happened at a specific time and is associated with a specific entity.
Given these ideas, a notion of data processing against these areas was considered and given the general name "complex event processing". Complex event processing is the examination of events arriving from potentially multiple sources and performing reasoning over those events to detect and respond to patterns, expectations or omissions found in those events. This was a pretty dry description … to make it more real to us, the IBM ODM DSI product is an instance of a complex event processing solution.
Once we understand that a complex event processing system can be supplied sets of events and can
Page 9
then reason over these events, what next? This introduces another idea, that of performing an action. It is all well and good to detect events but if we do nothing with the new knowledge, there is little value. What we need to do is detect the events, reason over them and as a result perform some action. What might that action be? A complex event processing system has to be flexible in that respect. In the ODM DSI world, the action could be the sending of a request to another IT system to perform a task such as sending an email, updating a database or initiating a process instance… but these are merely examples. The nature of the action is likely to be extremely varied and as such a good complex event processing environment must be flexible in how actions can be performed.
See also:
• Wikipedia – Complex event processing
• The Power of Events: An Introduction to Complex Event Processing in Distributed Enterprise Systems
Basics of ODM Decision Server InsightsTo start our examination of the IBM ODM DSI product we have to define some terms and concepts which will crop up frequently in our travels. Some of these concepts are quite abstract and will only be fully appreciated over time. Don't worry if you don't fully grasp their power or significanceon first reading. Simply knowing that they exist will be a good starting point.
Solution
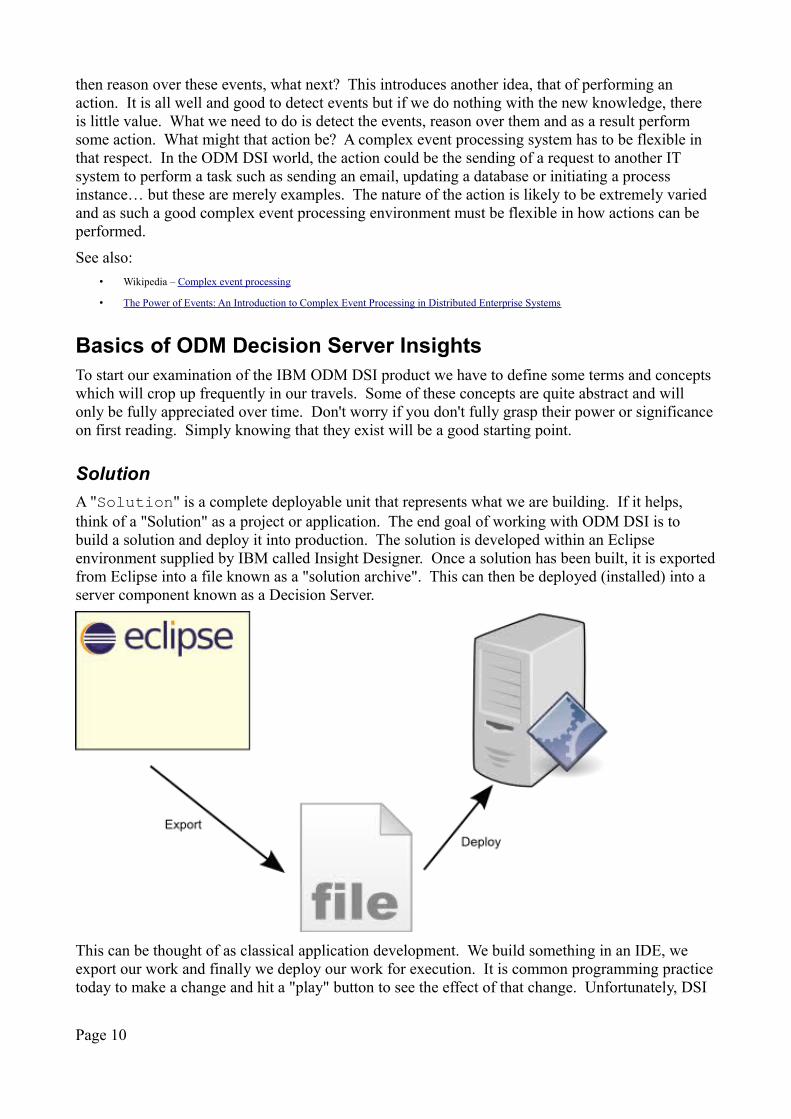
A "Solution" is a complete deployable unit that represents what we are building. If it helps, think of a "Solution" as a project or application. The end goal of working with ODM DSI is to build a solution and deploy it into production. The solution is developed within an Eclipse environment supplied by IBM called Insight Designer. Once a solution has been built, it is exportedfrom Eclipse into a file known as a "solution archive". This can then be deployed (installed) into a server component known as a Decision Server.
This can be thought of as classical application development. We build something in an IDE, we export our work and finally we deploy our work for execution. It is common programming practicetoday to make a change and hit a "play" button to see the effect of that change. Unfortunately, DSI
Page 10
doesn't lend itself to that notion. When we change something in the source of our solution, we mustgo through the export/deploy cycle each time we want to test what we have changed. We simply must acknowledge that this is the way things are (as of today) and integrate this testing cycle into our work patterns.
Concepts
In Object Oriented programming, we have the idea of inherited types. For example, I could define a"Vehicle" type as an object that has properties such as:
• Number of wheels
• Maximum passengers
• Fuel type
However if I wanted to create new types such as "Cars" or "Boats" those could be considered "inherited" or "derived" from the base "Vehicle" type. In some programming languages (eg. Java) we can define that the base type is not "instantiable" in its own right but instead must be extended by some other type in order to be of use. This is known as an "abstract" type.
In DSI, a "Concept" is a generic object that has properties defined against it. It is not instantiable by itself but rather forms the base for other types. When we further talk about things called entities and events, we will find that they can both be derived from a concept definition.
Entity
We have seen that a "Concept" is a model of an abstract thing. An instantiated "Entity" is a unique instance of a named "Concept" and may have relationships to other Entities.
Think of an entity as a model of a "specific thing". For example, we have the "concept" of a car butwe have an instance of a real car … that real car instance would be an example of an "Entity". Every unique entity has a unique identifier associated with it to allow us to distinguish one entity instance from another. In our example of cars, the car's unique identity may be modeled as its number plate or VIN.
The structure of an instance of an entity must be modeled before it can be used and is modeled using the notion of a "Business Model". An Entity may have many attributes associated with it and each attribute is also modeled. For example, an instance of a car has attributes such as paint color, manufacturer, year built, mileage and more. We don't want to model every conceivable attribute in our Entity description, instead we want to only model the attributes that will be used to reason against that Entity.
One of the primary purposes of ODM DSI is to maintain models of Entities at run-time.
See also:
• Defining Entity Types
Event
Think about something happening at some point in time. This is the core notion of an event. An event carries with it a payload of data. This payload is considered to be the "attributes" of the event.Each event must have a mandatory attribute that carries the date and time at which the event is considered to have happened. Events are defined within the "Business Model". A component
Page 11
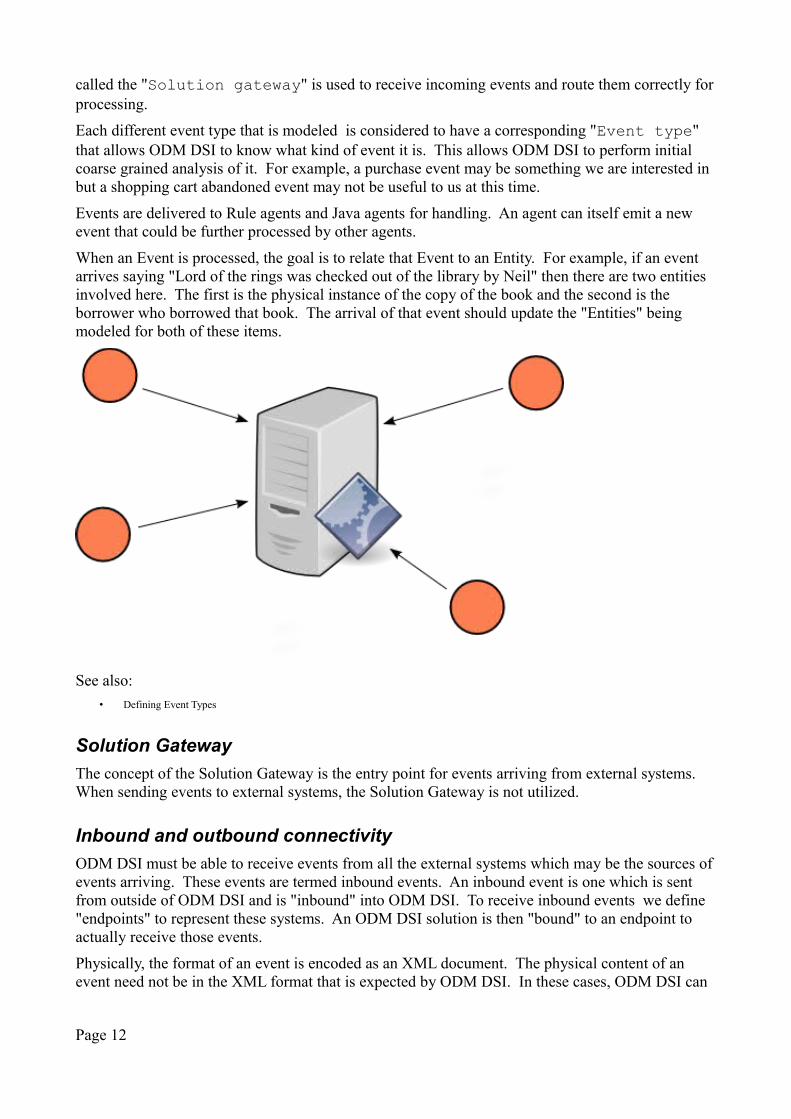
called the "Solution gateway" is used to receive incoming events and route them correctly forprocessing.
Each different event type that is modeled is considered to have a corresponding "Event type" that allows ODM DSI to know what kind of event it is. This allows ODM DSI to perform initial coarse grained analysis of it. For example, a purchase event may be something we are interested in but a shopping cart abandoned event may not be useful to us at this time.
Events are delivered to Rule agents and Java agents for handling. An agent can itself emit a new event that could be further processed by other agents.
When an Event is processed, the goal is to relate that Event to an Entity. For example, if an event arrives saying "Lord of the rings was checked out of the library by Neil" then there are two entities involved here. The first is the physical instance of the copy of the book and the second is the borrower who borrowed that book. The arrival of that event should update the "Entities" being modeled for both of these items.
See also:
• Defining Event Types
Solution Gateway
The concept of the Solution Gateway is the entry point for events arriving from external systems. When sending events to external systems, the Solution Gateway is not utilized.
Inbound and outbound connectivity
ODM DSI must be able to receive events from all the external systems which may be the sources ofevents arriving. These events are termed inbound events. An inbound event is one which is sent from outside of ODM DSI and is "inbound" into ODM DSI. To receive inbound events we define "endpoints" to represent these systems. An ODM DSI solution is then "bound" to an endpoint to actually receive those events.
Physically, the format of an event is encoded as an XML document. The physical content of an event need not be in the XML format that is expected by ODM DSI. In these cases, ODM DSI can
Page 12
perform a transformation of the incoming data into a form it can use.
Similar to events arriving at ODM DSI, we may also want to transmit outbound events to an external system. All systems, whether they be used for inbound or outbound processing will be modeled as "endpoints" and the target destination for an outbound event will be bound to such an endpoint.
For the ODM DSI product, the reality is that events sent or received will arrive or be transmitted over either JMS or HTTP.
See also:
• Modeling the connectivity of a solution
Agents
The phrase "Agent" is rather vague but once understood, no better phrase is likely to be found. The idea here is that when an event arrives, some logic processing is performed by ODM DSI to reflect what that event means. The "thing" in ODM DSI that performs this processing work is called an "Agent". During the development of an ODM DSI solution, you will build out one or more Agents to perform these tasks. It is the Agent that hosts the business logic that determines what should happen when events arrive.
When an event arrives at an agent, it can perform a number of distinct actions:
• A new event can be emitted based on the arrival of the original event
• Create a new instance of a unique entity
• Update an existing entity from data contained or calculated from the event
• Delete a previously created instance of an entity
• Schedule a subsequent invocation of the agent at some time in the future
From an IBM ODM DSI perspective, an agent is built within the Eclipse tooling through either Javacoding, rules or scoring.
When an agent is built, it subscribes to one or more types of events thus registering its desire and ability to handle those. Only those agents which subscribe to particular type of event will receive a copy of an instance of that event for processing. Agents that have not subscribed to a particular type of event are simply unaware of it should such an event arrive at DSI. We can think of an agent as having an "interface" and events that don't have the corresponding matching type don't pass through that interface.
When an event is published, a copy of the event will be received by all agents that have a matching interface.
Each agent has a priority property that governs its relative priority amongst other agents. Agents with a higher priority will receive the event prior to agents with a lower priority.
An agent is associated with an entity. The entity to which the agent is associated is called the "Bound Entity". The agent can perform all kinds of activity against the bound entity including updating its information. Entities can have relationships with other entities. An agent can access any other entity that has a relationship with its bound entity but in a read-only manner.
See also:
• Implementing Agents
Page 13
Business Object Model – BOM
The Business Object Model or BOM as it will be commonly called, is the model of data made by the solution designer. It is used to describe both entities and events. The BOM is build from BMD files but under the covers is its own technology.
See also:
• BOM – The Business Object Model
Time
The very nature of ODM DSI means that we have to give a lot of thought to the concept of time. Although it may seem redundant, we are also going to refresh out own minds on some basics of time.
Let us start with how we measure time. When we measure things, we ascribe units to them. For distance it is miles, for weight it is pounds, for volume we may use liters. So what then are our units of time?
Our base unit is the second. Beyond that we have hours, days, weeks, months and years.
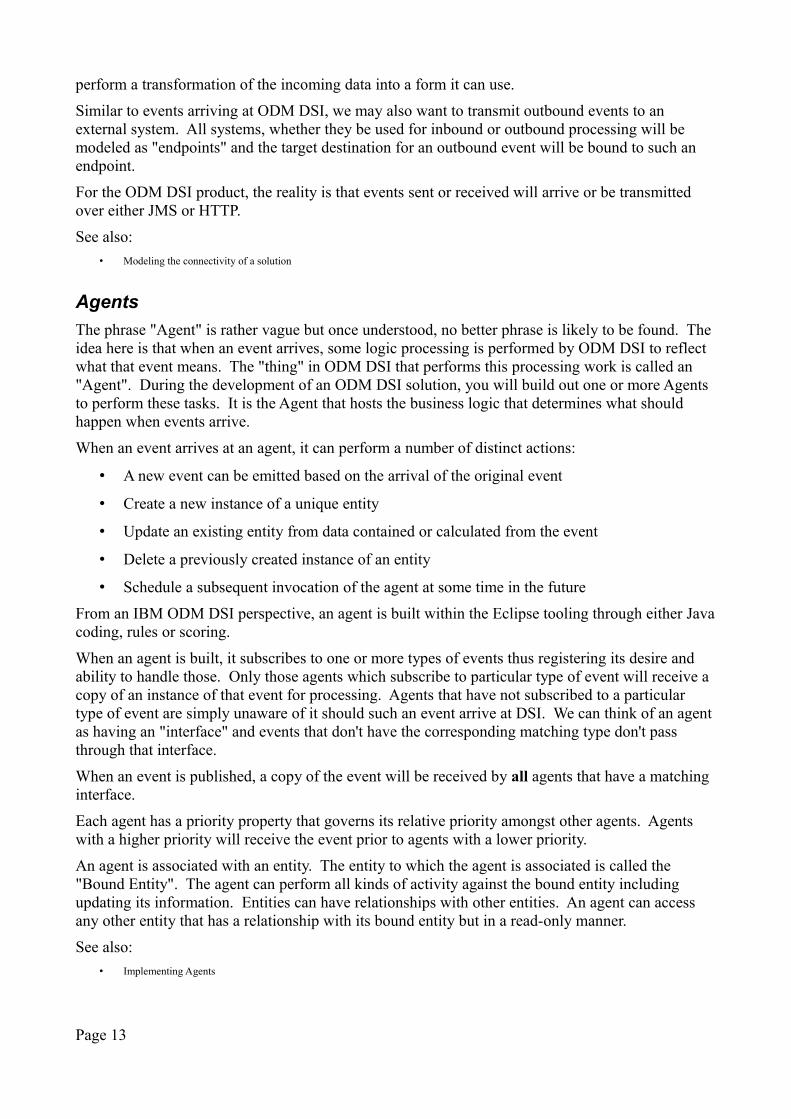
With this in mind, I can start to refer to durations of time. I might say "15 seconds" or "46 years" and these refer to durations or spans of time. However, time is an odd thing ... it flows in one direction (from the past to the future) and on that "timeline" there are individual marks. We call those "points in time". For example, 4:27pm on July 29th, 1968 was a specific point in time. Another point in time will be 3:14:07 on January 19th, 2038 where this one is in the future.
Although we can refer to specific points in time such as 9:20pm we run into another consideration when contemplating timezones. 9:20pm in Texas is 3:20am in London on the next day. So simply saying 9:20pm is not sufficient to fix a point on the timeline, we need to consider which timezone that time refers to. However, a time point is just that ... a mark on the timeline that we can always say is "some number of seconds ago or until". It is a relative value. If the timepoint is exactly 8 hours from now and I start a stopwatch ticking down, then no matter where I travel in the world with that stopwatch, the timepoint will happen irrespective of my local wall clock time.
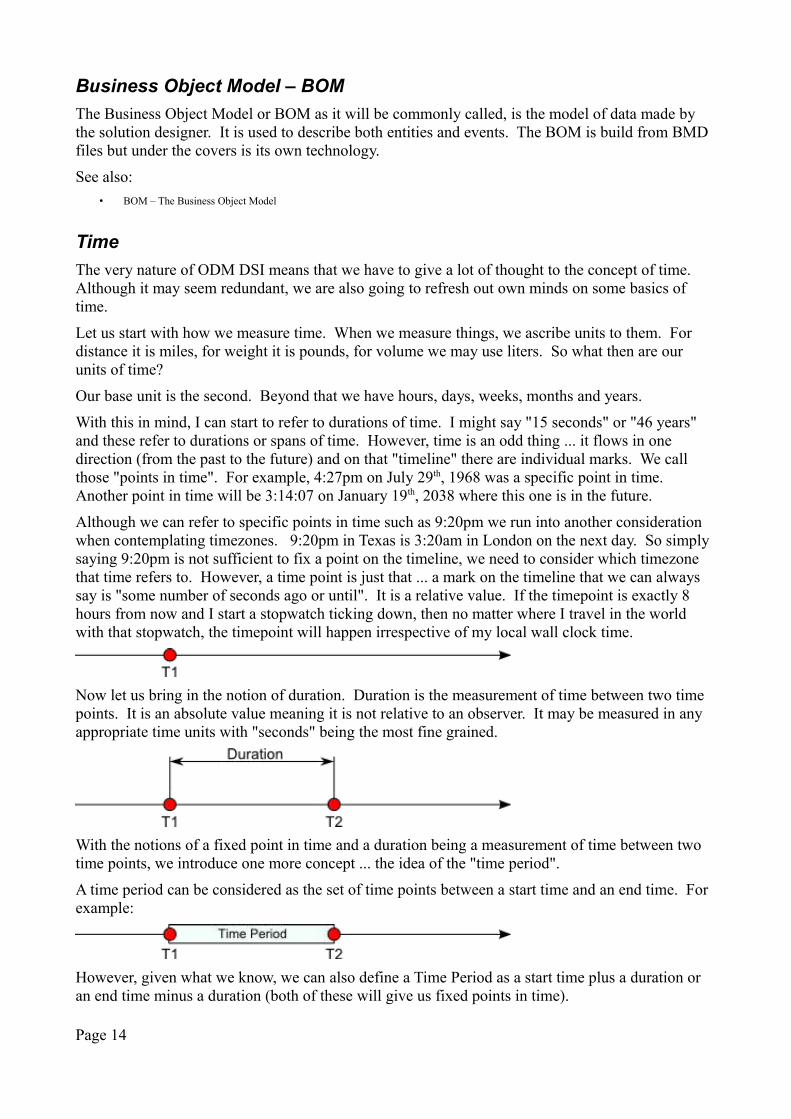
Now let us bring in the notion of duration. Duration is the measurement of time between two time points. It is an absolute value meaning it is not relative to an observer. It may be measured in any appropriate time units with "seconds" being the most fine grained.
With the notions of a fixed point in time and a duration being a measurement of time between two time points, we introduce one more concept ... the idea of the "time period".
A time period can be considered as the set of time points between a start time and an end time. For example:
However, given what we know, we can also define a Time Period as a start time plus a duration or an end time minus a duration (both of these will give us fixed points in time).
Page 14
If all of this is making your head hurt we are about done but before that, consider all the following as examples of durations and maybe a light bulb will go on:
• today – The duration starting at the previous midnight and lasting for 24 hours
• this month – The duration starting on the 1st of the month and lasting for however many daysthis month contains
• one hour before closing – The duration defined as the preceding hour before the pub shuts until we can drink no more
• new years day – The duration from midnight on January 1st to midnight on January 2nd.
Make sure to distinguish the subtle distinction between a time duration and a time period. In summary, a time duration is a length of time encompassing no fixed time points while a time period is also a length of time that maps out all time points within that period.
See also:
• Time operators
When does an event arrive?
This sounds like an odd question. From what we have said so far we should imagine that the event arrives at ODM DSI when it is received by the ODM DSI server after it was sent by the event generating system. And that is true. However, there is a subtlety. From a processing standpoint, when should the rule believe the event as having arrived?
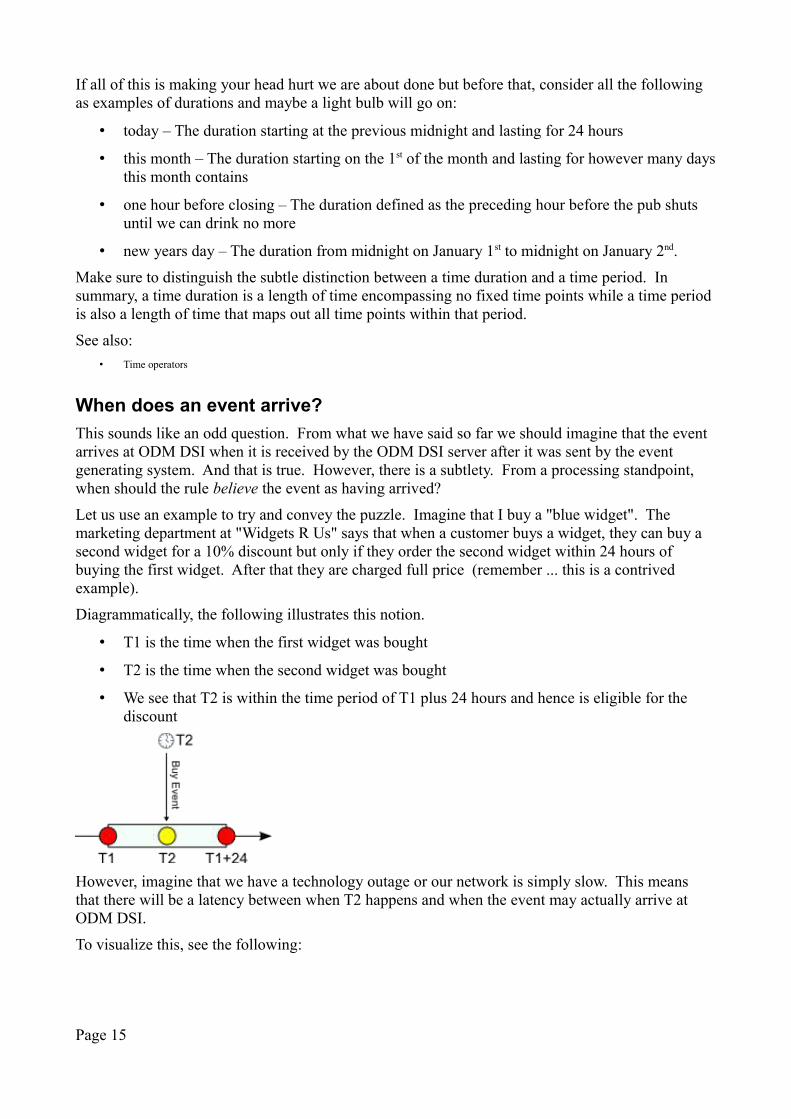
Let us use an example to try and convey the puzzle. Imagine that I buy a "blue widget". The marketing department at "Widgets R Us" says that when a customer buys a widget, they can buy a second widget for a 10% discount but only if they order the second widget within 24 hours of buying the first widget. After that they are charged full price (remember ... this is a contrived example).
Diagrammatically, the following illustrates this notion.
• T1 is the time when the first widget was bought
• T2 is the time when the second widget was bought
• We see that T2 is within the time period of T1 plus 24 hours and hence is eligible for the discount
However, imagine that we have a technology outage or our network is simply slow. This means that there will be a latency between when T2 happens and when the event may actually arrive at ODM DSI.
To visualize this, see the following:
Page 15
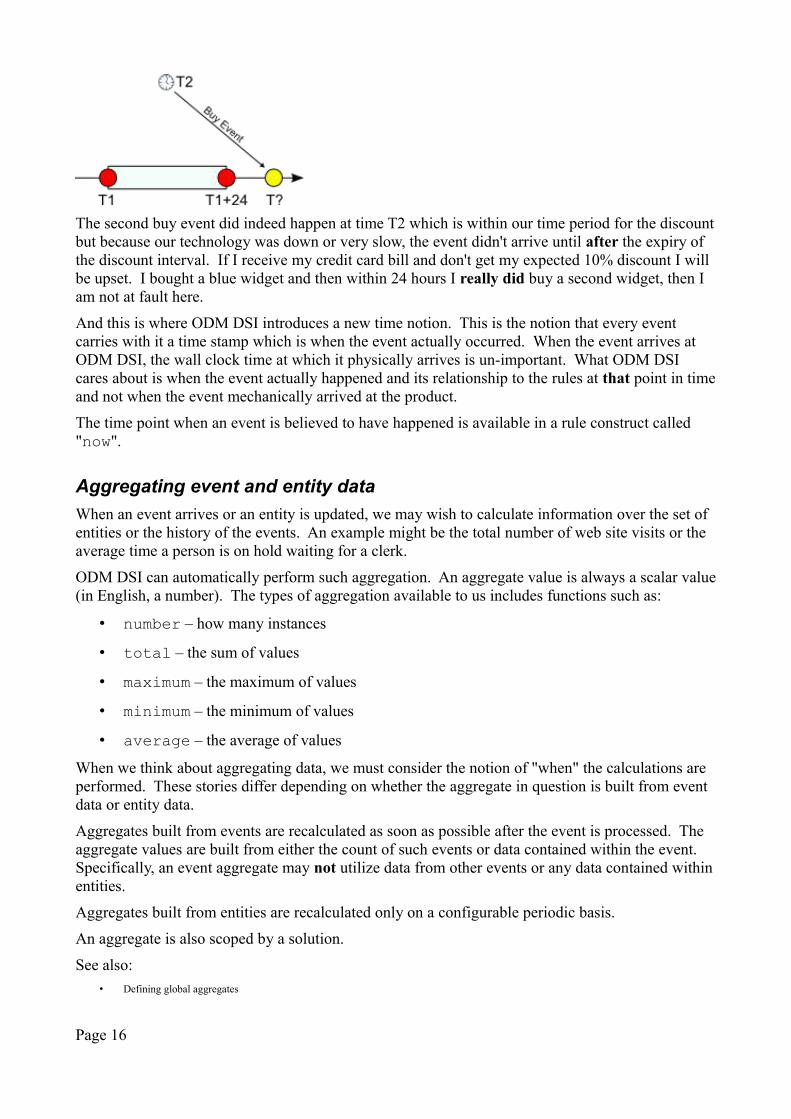
The second buy event did indeed happen at time T2 which is within our time period for the discountbut because our technology was down or very slow, the event didn't arrive until after the expiry of the discount interval. If I receive my credit card bill and don't get my expected 10% discount I will be upset. I bought a blue widget and then within 24 hours I really did buy a second widget, then I am not at fault here.
And this is where ODM DSI introduces a new time notion. This is the notion that every event carries with it a time stamp which is when the event actually occurred. When the event arrives at ODM DSI, the wall clock time at which it physically arrives is un-important. What ODM DSI cares about is when the event actually happened and its relationship to the rules at that point in timeand not when the event mechanically arrived at the product.
The time point when an event is believed to have happened is available in a rule construct called "now".
Aggregating event and entity data
When an event arrives or an entity is updated, we may wish to calculate information over the set of entities or the history of the events. An example might be the total number of web site visits or the average time a person is on hold waiting for a clerk.
ODM DSI can automatically perform such aggregation. An aggregate value is always a scalar value(in English, a number). The types of aggregation available to us includes functions such as:
• number – how many instances
• total – the sum of values
• maximum – the maximum of values
• minimum – the minimum of values
• average – the average of values
When we think about aggregating data, we must consider the notion of "when" the calculations are performed. These stories differ depending on whether the aggregate in question is built from event data or entity data.
Aggregates built from events are recalculated as soon as possible after the event is processed. The aggregate values are built from either the count of such events or data contained within the event. Specifically, an event aggregate may not utilize data from other events or any data contained withinentities.
Aggregates built from entities are recalculated only on a configurable periodic basis.
An aggregate is also scoped by a solution.
See also:
• Defining global aggregates
Page 16
Architecture
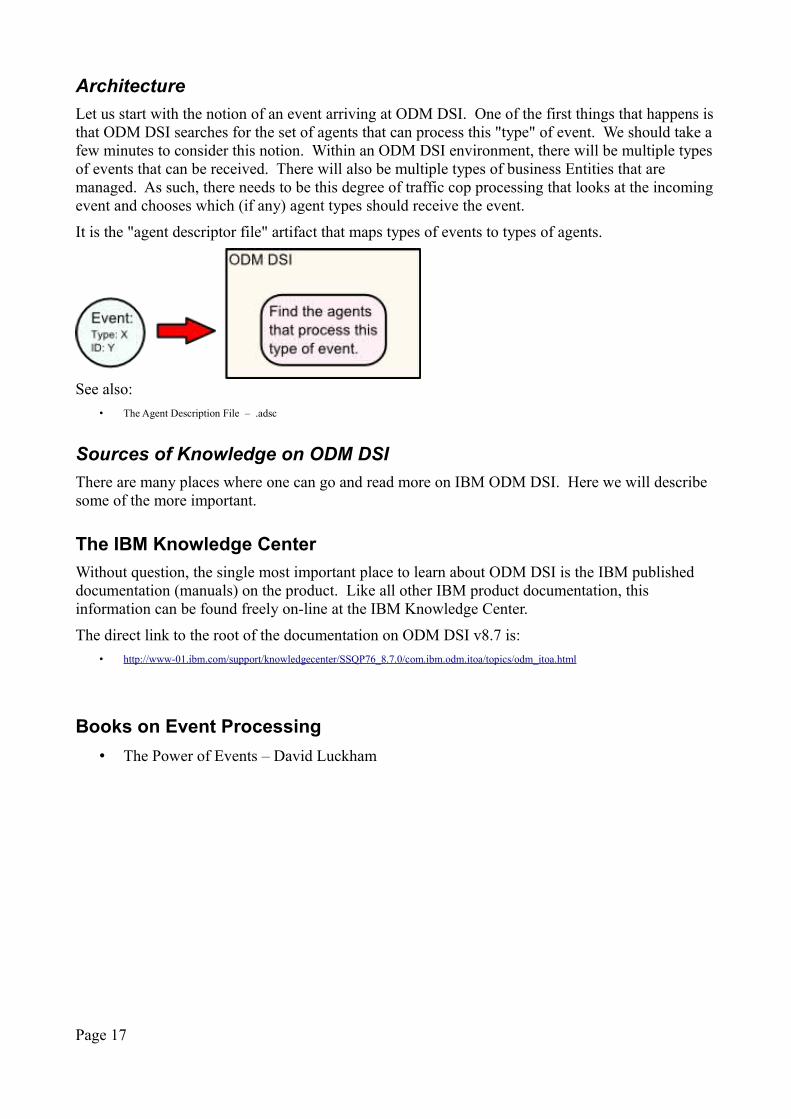
Let us start with the notion of an event arriving at ODM DSI. One of the first things that happens isthat ODM DSI searches for the set of agents that can process this "type" of event. We should take a few minutes to consider this notion. Within an ODM DSI environment, there will be multiple typesof events that can be received. There will also be multiple types of business Entities that are managed. As such, there needs to be this degree of traffic cop processing that looks at the incomingevent and chooses which (if any) agent types should receive the event.
It is the "agent descriptor file" artifact that maps types of events to types of agents.
See also:
• The Agent Description File – .adsc
Sources of Knowledge on ODM DSI
There are many places where one can go and read more on IBM ODM DSI. Here we will describe some of the more important.
The IBM Knowledge Center
Without question, the single most important place to learn about ODM DSI is the IBM published documentation (manuals) on the product. Like all other IBM product documentation, this information can be found freely on-line at the IBM Knowledge Center.
The direct link to the root of the documentation on ODM DSI v8.7 is:
• http://www-01.ibm.com/support/knowledgecenter/SSQP76_8.7.0/com.ibm.odm.itoa/topics/odm_itoa.html
Books on Event Processing
• The Power of Events – David Luckham
Page 17

Important IBM Technical Notes• Known Limitations in 8.7 - 2014-12-05
InstallationThe part numbers for the components of the product are:
Description Part Number
IBM Decision Server Insights for Windows 64 bits (IM Repository) V8.7 multilingual CN38ZML
IBM Operational Decision Manager Advanced V8.7 for Windows Multilingual eAssembly CRUB3ML
The pre-requsites and supported packages can be found at the following IBM web page:
http://www-01.ibm.com/support/docview.wss?uid=swg27023067
However note that the above is for IBM ODM Advanced as a whole and not just the DSI sub components.
The product can be installed through the IBM Installation Manager product manager. Installation Manager is a tool that can be used to perform installation and update tasks. It has knowledge of a variety of products and the file systems and directory structures in which they live.
Installation Manager can be found on the Internet here.
The supported environment for installation is:
• IBM Installation Manager v1.7.1 or better
• JDK 1.7.0
• Eclipse 4.2.2.2 or better
Page 18
• 64 bit environment only
If the product was downloaded from IBM, it will be contained in a "tar" file that is called:
DSI_WIN_64_BITS_IMR_V8.7_ML
This should be extracted into its own folder. Make sure you have sufficient disk space as it is gigabytes in size. Windows does not appear to have a native "tar" file extractor but one can download 7Zip (http://www.7-zip.org/) to perform the extraction.
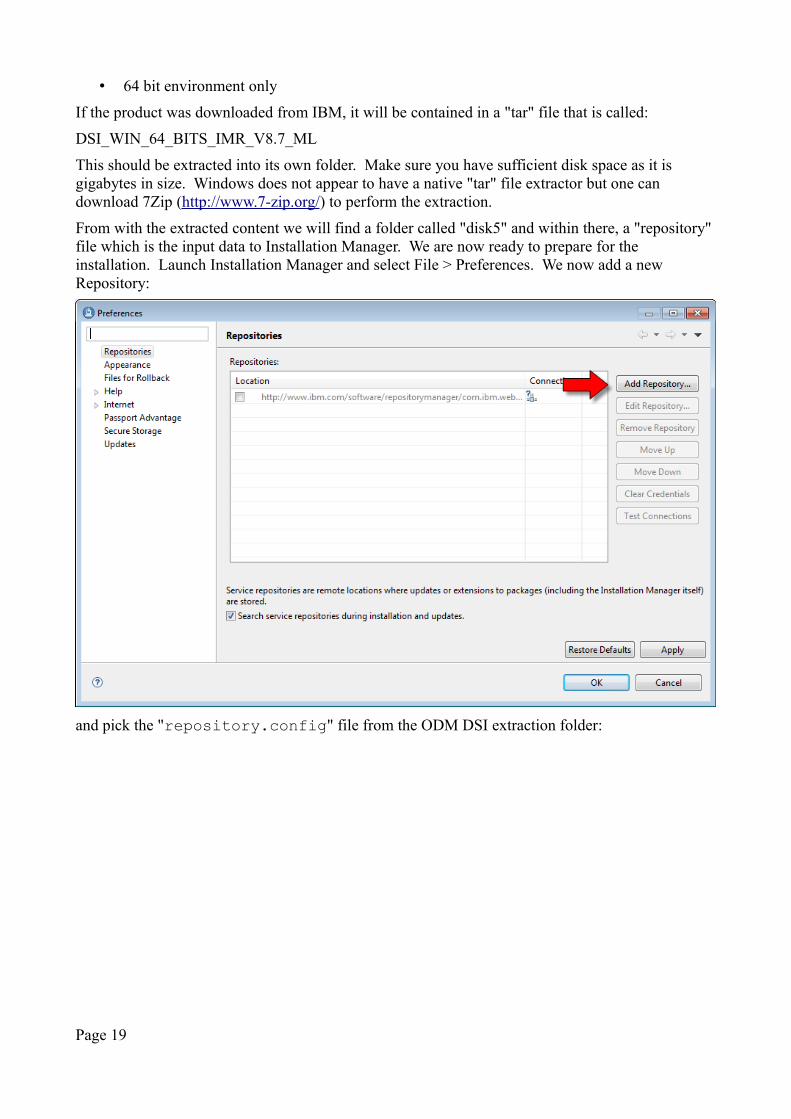
From with the extracted content we will find a folder called "disk5" and within there, a "repository" file which is the input data to Installation Manager. We are now ready to prepare for the installation. Launch Installation Manager and select File > Preferences. We now add a new Repository:
and pick the "repository.config" file from the ODM DSI extraction folder:
Page 19

When we launch Installation Manager Install screens to install ODM DSI, we are first presented with the following screen:
After selecting that we do indeed wish to install the product, we are prompted to accept the licensing terms.
Page 20
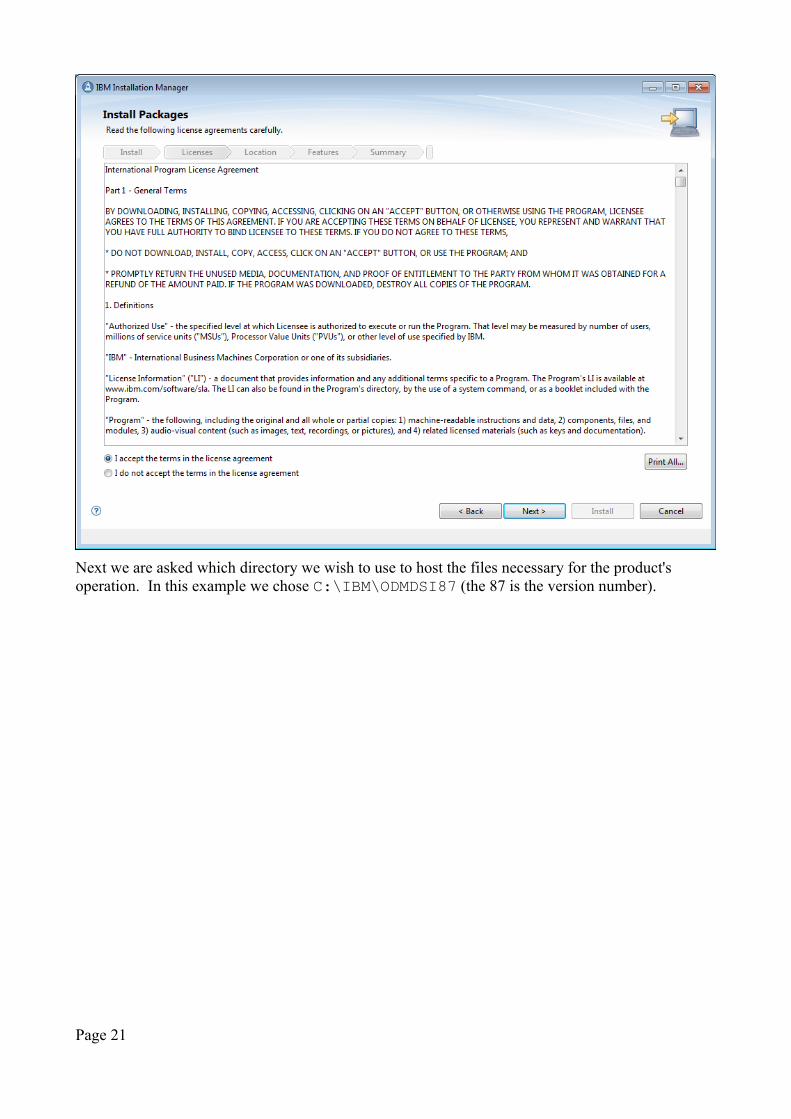
Next we are asked which directory we wish to use to host the files necessary for the product's operation. In this example we chose C:\IBM\ODMDSI87 (the 87 is the version number).
Page 21
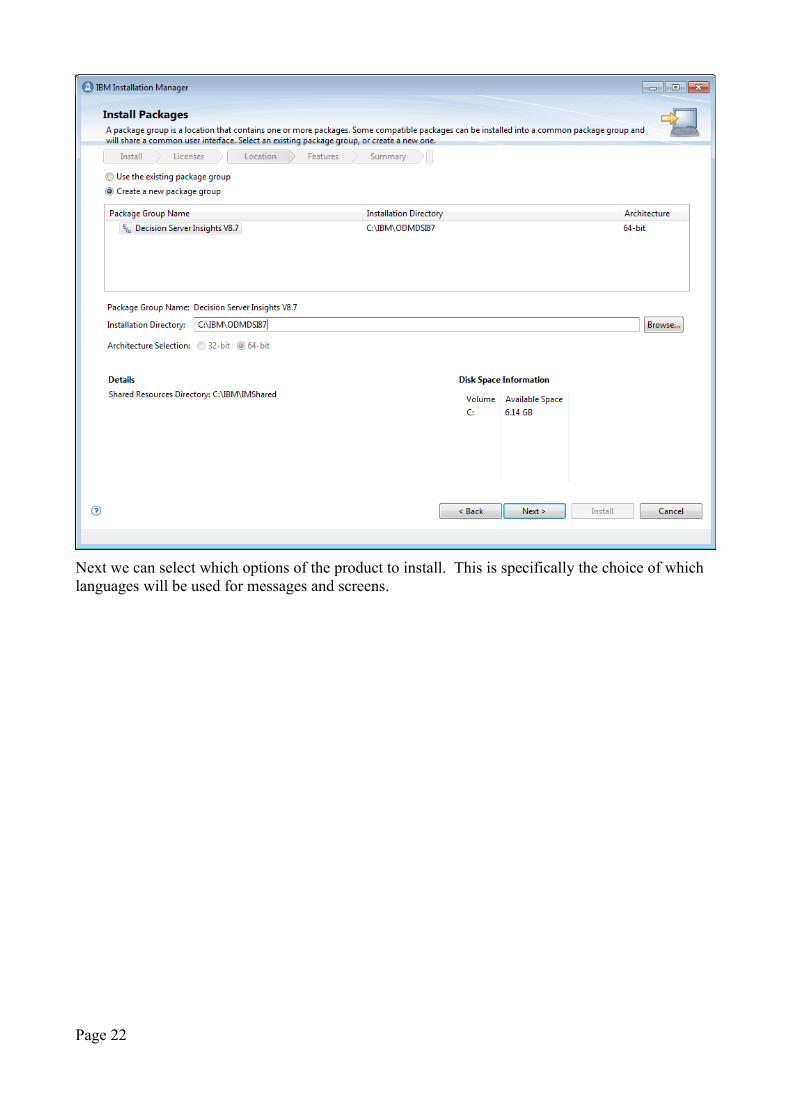
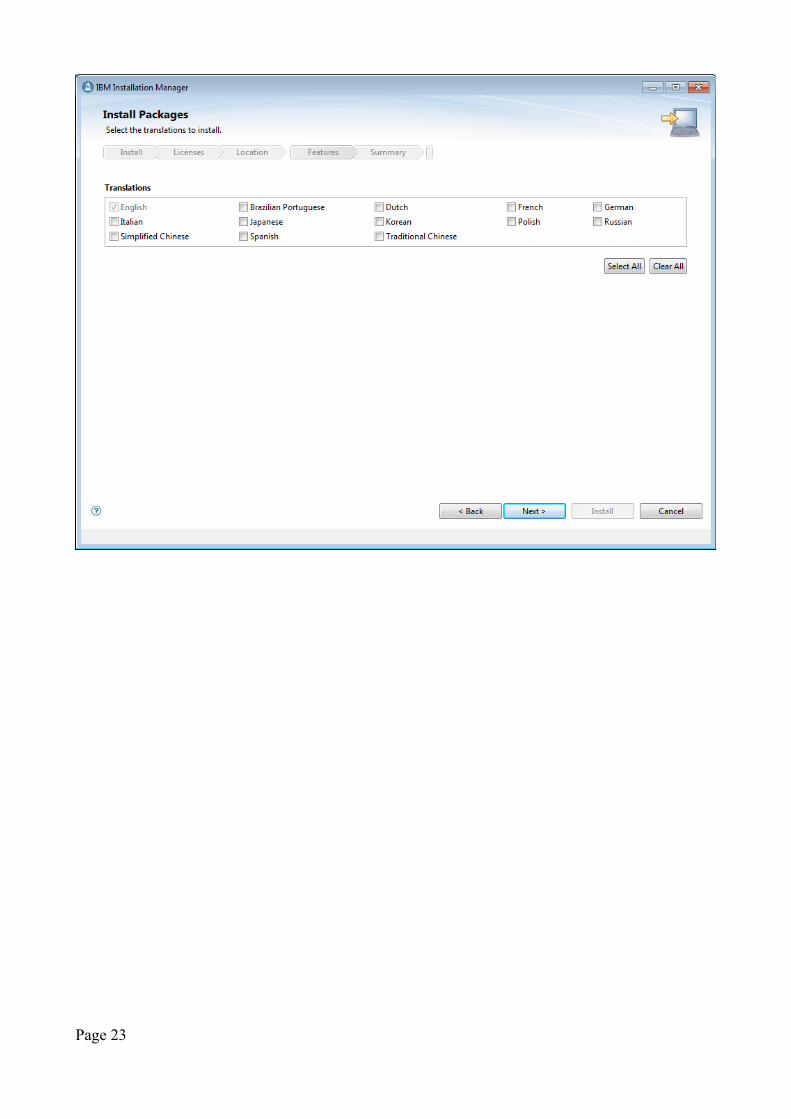
Next we can select which options of the product to install. This is specifically the choice of which languages will be used for messages and screens.
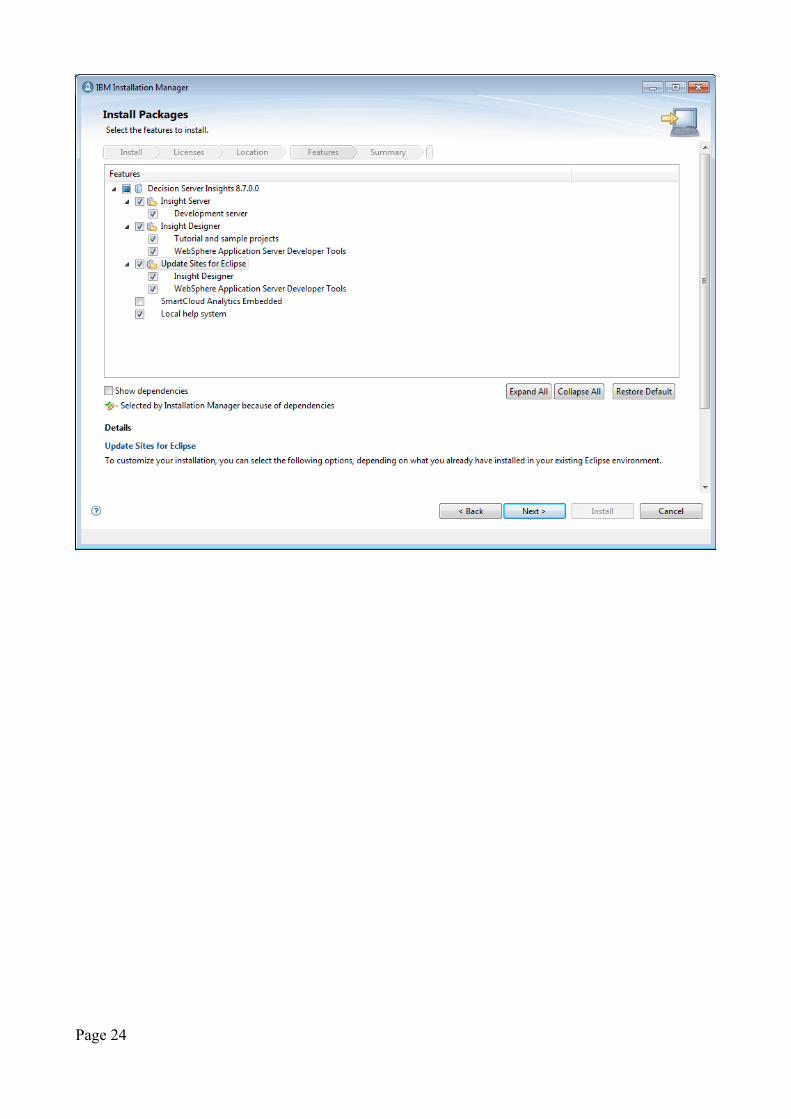
Page 22
Page 23
Page 24
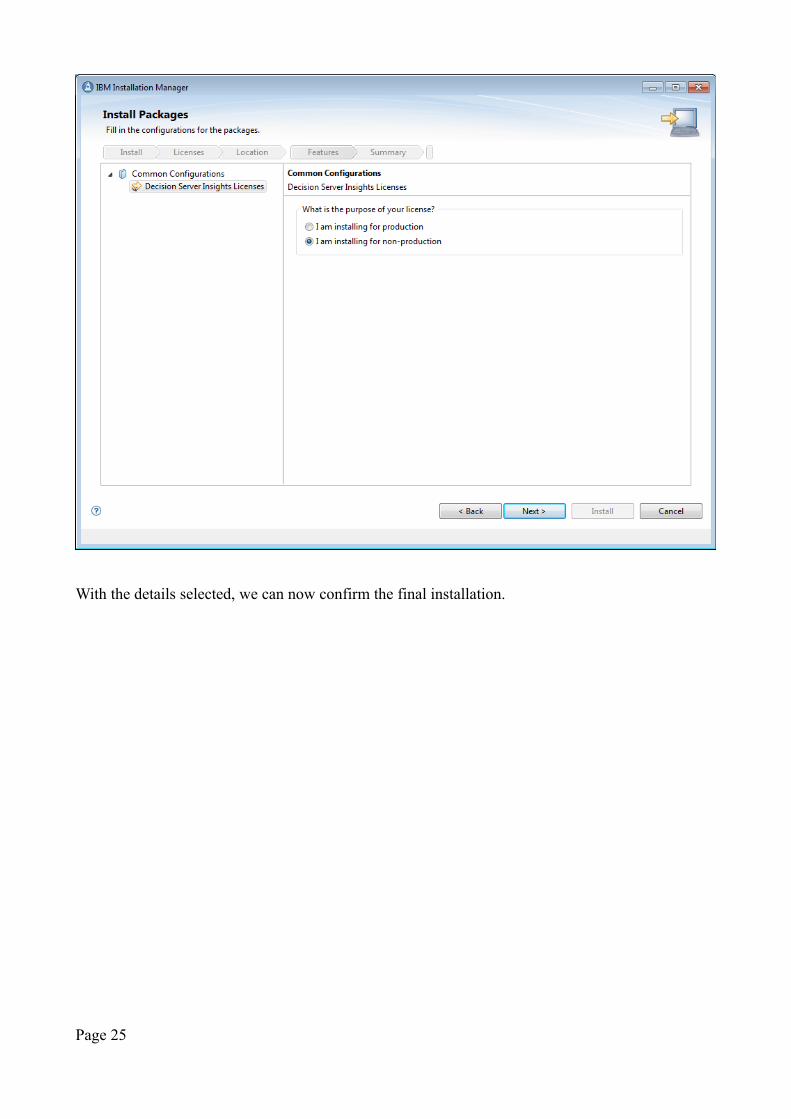
With the details selected, we can now confirm the final installation.
Page 25
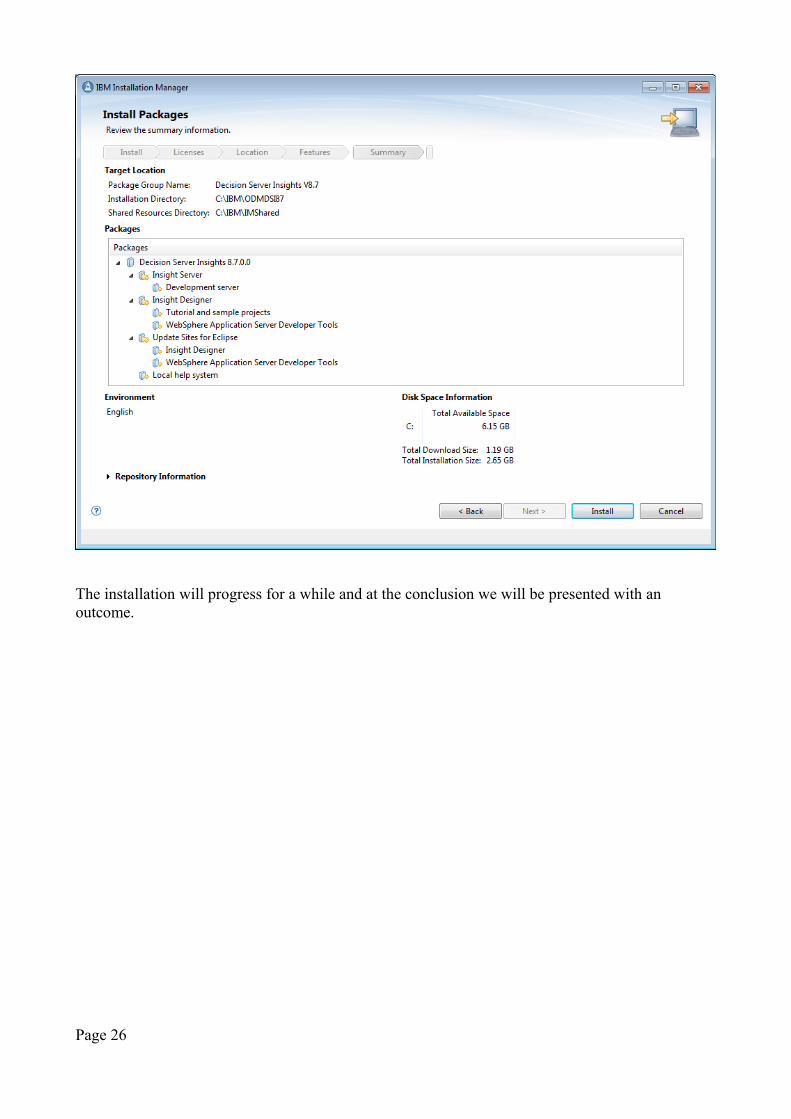
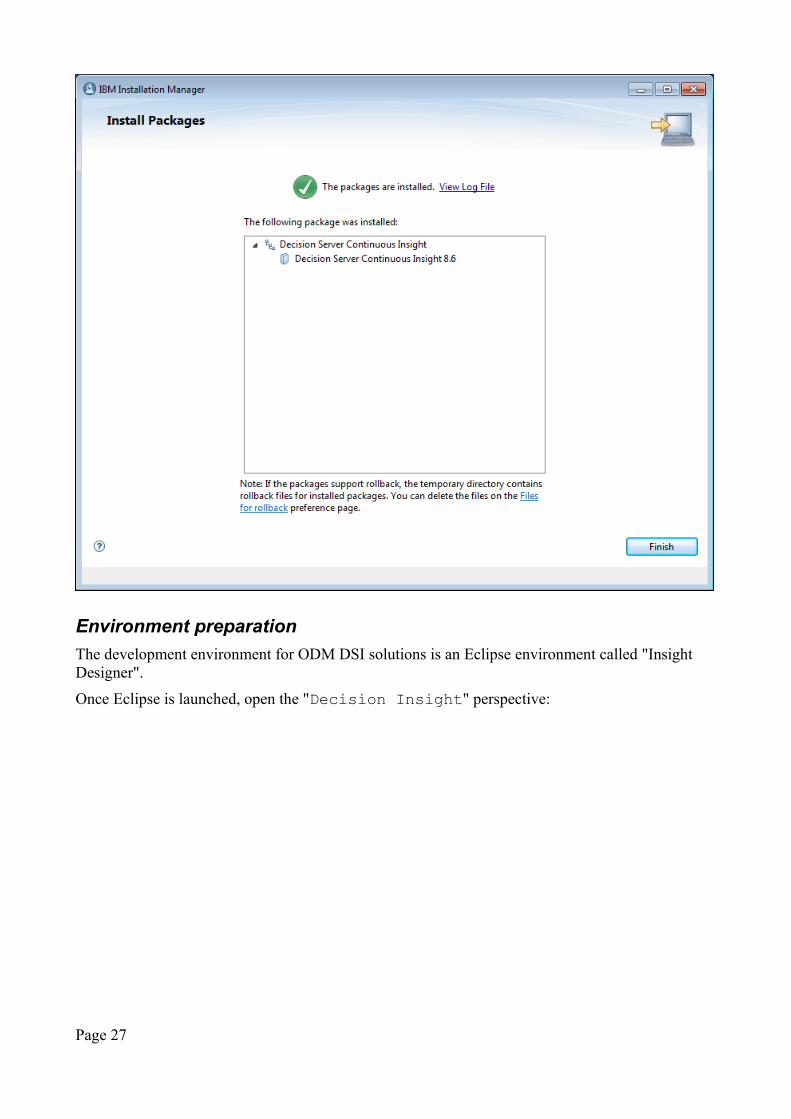
The installation will progress for a while and at the conclusion we will be presented with an outcome.
Page 26
Environment preparation
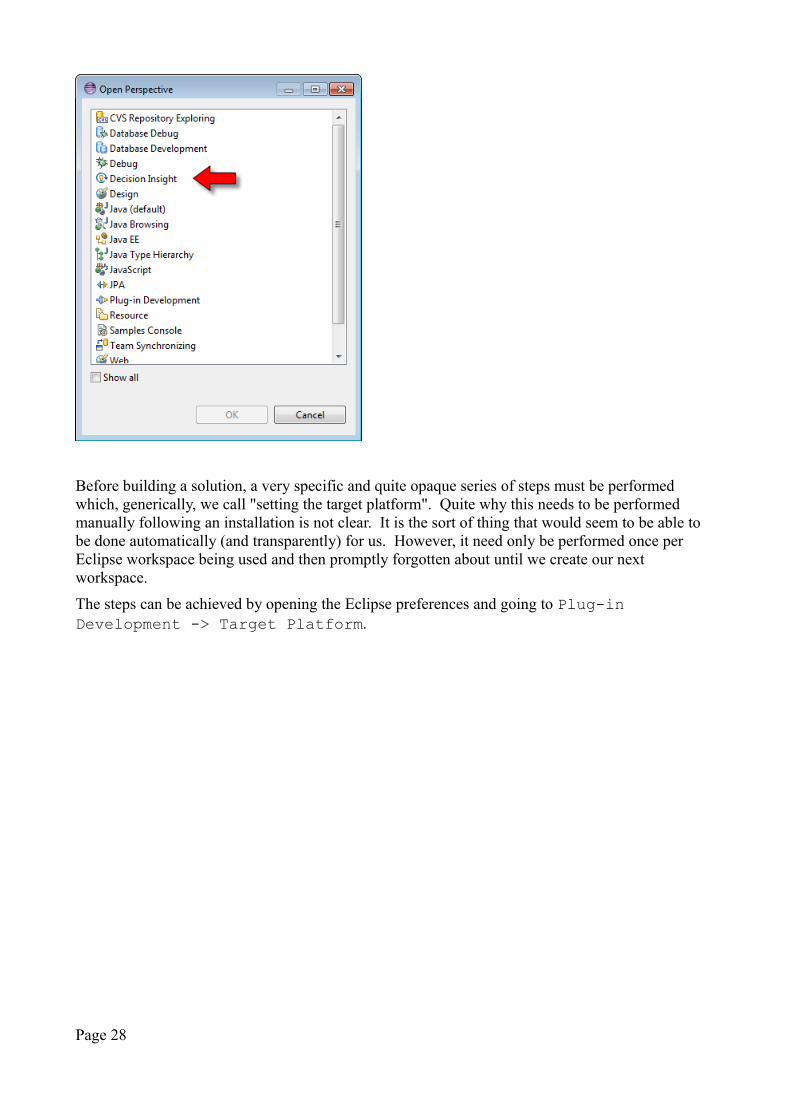
The development environment for ODM DSI solutions is an Eclipse environment called "Insight Designer".
Once Eclipse is launched, open the "Decision Insight" perspective:
Page 27
Before building a solution, a very specific and quite opaque series of steps must be performed which, generically, we call "setting the target platform". Quite why this needs to be performed manually following an installation is not clear. It is the sort of thing that would seem to be able to be done automatically (and transparently) for us. However, it need only be performed once per Eclipse workspace being used and then promptly forgotten about until we create our next workspace.
The steps can be achieved by opening the Eclipse preferences and going to Plug-in Development -> Target Platform.
Page 28
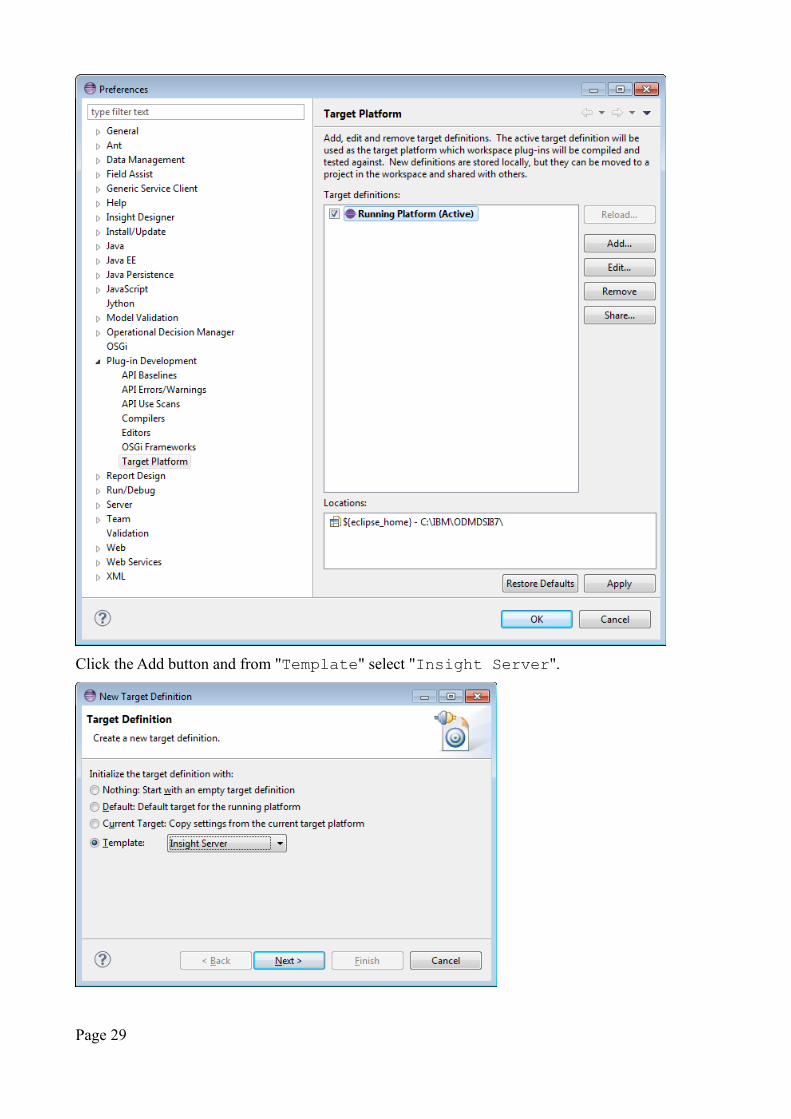
Click the Add button and from "Template" select "Insight Server".
Page 29
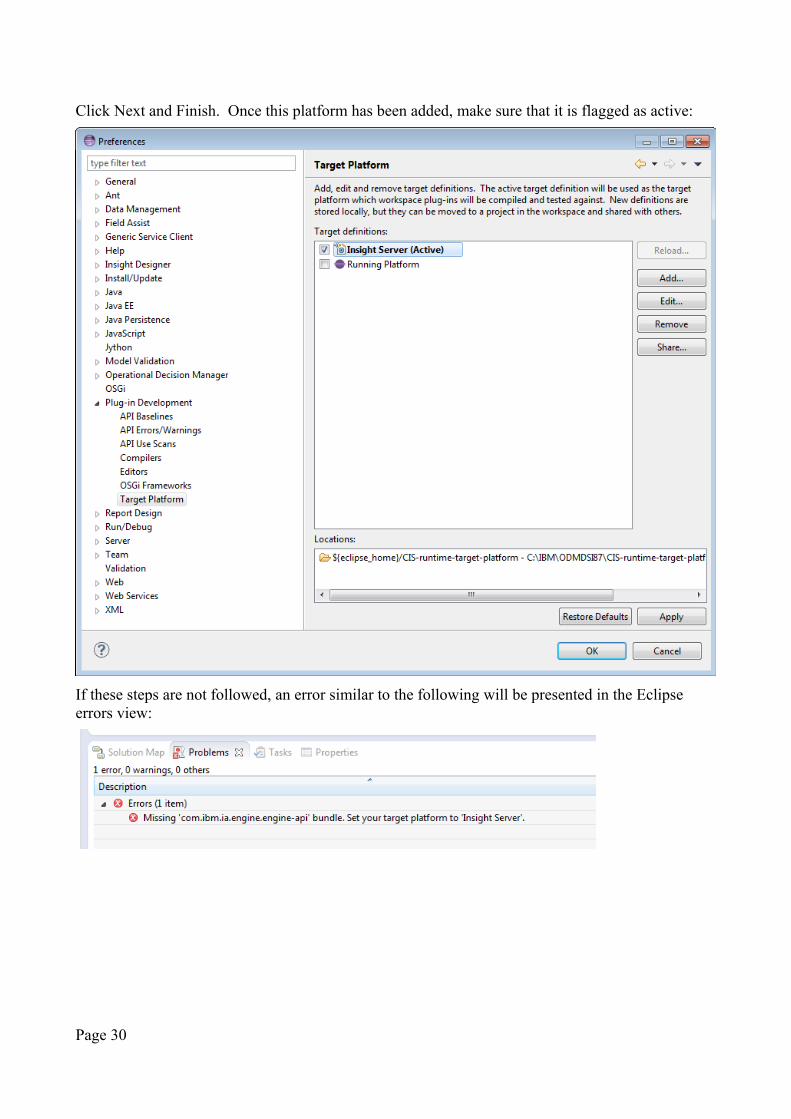
Click Next and Finish. Once this platform has been added, make sure that it is flagged as active:
If these steps are not followed, an error similar to the following will be presented in the Eclipse errors view:
Page 30
Developing a solutionODM DSI solutions are built through a combination of design (thought) and practical actions (interaction with the tools). What we will consider here are the practical steps of building such a solution.
Not all ODM DSI solutions will utilize all aspects of the technology. For example, some solutions may need Java Agents while others simply won't. There are however certain parts of a solution project that are common to each and every such project.
The common parts include:
• Creation of a solution project
• Creation of a business model
• Creation of a connectivity definition
• Exporting a solution
• Generation of a connectivity file
• Deployment of the solution
Some of the solution specific parts will include:
• Creation of Rules Agent projects
• Creation of Java Agent projects
• Definition of Global Aggregates
ODM DSI solutions are built using an instance of the Eclipse development tool. The Eclipse version supplied is at release level 4.2.2 which is also known by Eclipse folks as "Juno".
The overall pattern for building a new solution from scratch is:
1. Create a new Solution project (and a BOM project)
2. Create a new Business Model Definition
1. Define Entity Types
2. Define Event Types
3. Create a new Connectivity Definition
1. Complete the .cdef file
4. Create a new Rule Agent Project
1. Complete the agent.adsc file
5. Create a new Action Rule
6. Export the solution (Exporting a solution)
7. Deploy the solution (Deploying a solution to a DSI Server)
8. Generate connectivity file (Deploying Connectivity Configurations)
1. Edit the file
9. Deploy connectivity file (Deploying Connectivity Configurations)
Page 31

Eclipse – Insight Designer
The development tooling for ODM DSI is called "Insight Designer". Although this is the name given to it by IBM, it can simply be thought of as Eclipse with IBM ODM DSI plugins added to it. The version of Eclipse is known as 4.2 (aka Juno). This a back-level version of Eclipse so beware. This may cause you issues if you want to use Insight Designer for more than building ODM DSI solutions. As such, I don't recommend that. Use Insight Designer only for building DSI and use a second Eclipse (and latest) for non DSI projects.
Version Name Platform Version
Juno 4.2
Kepler 4.3
Luna 4.4
After opening Eclipse for the first time, one should switch to the ODM DSI perspective. An Eclipseperspective is the set of editors and views that are logically grouped together. The DSI perspective provides everything needed to build DSI solutions.
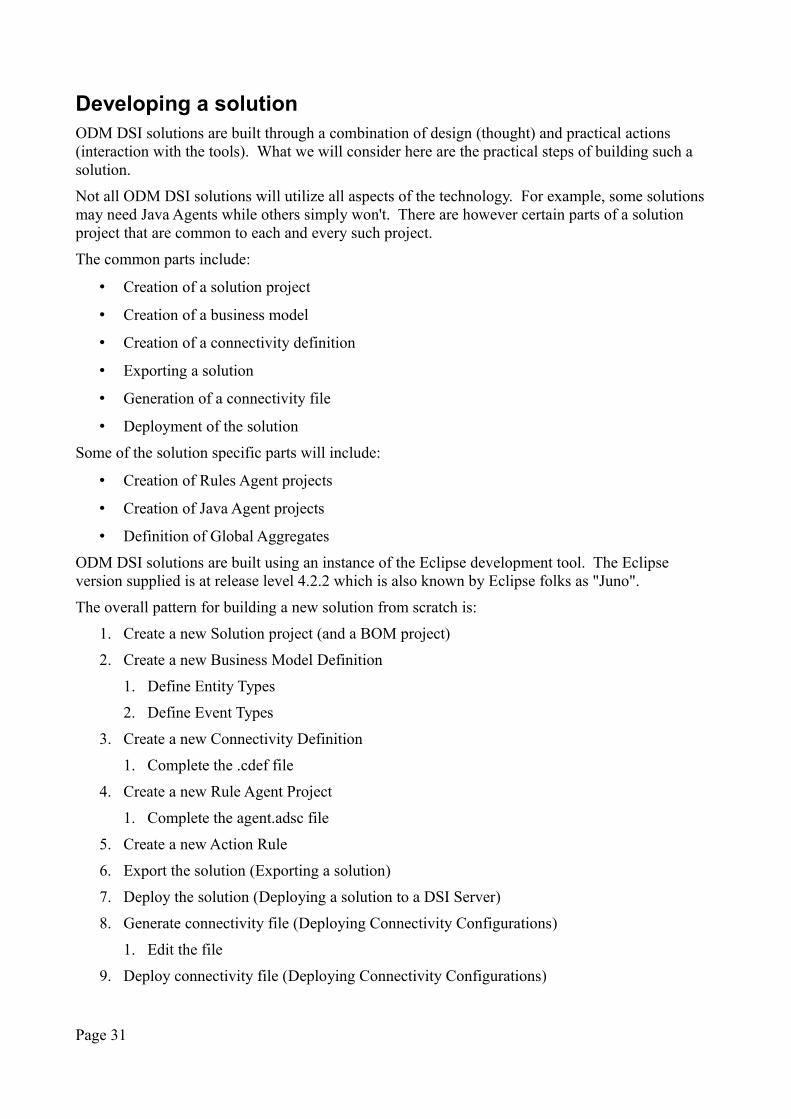
To change perspective, use the Window > Open Perspective > Other menu item:
And selected "Decision Insight":
Page 32
You will know which perspective you are in as it will be highlighted in the bar at the top of Eclipse:
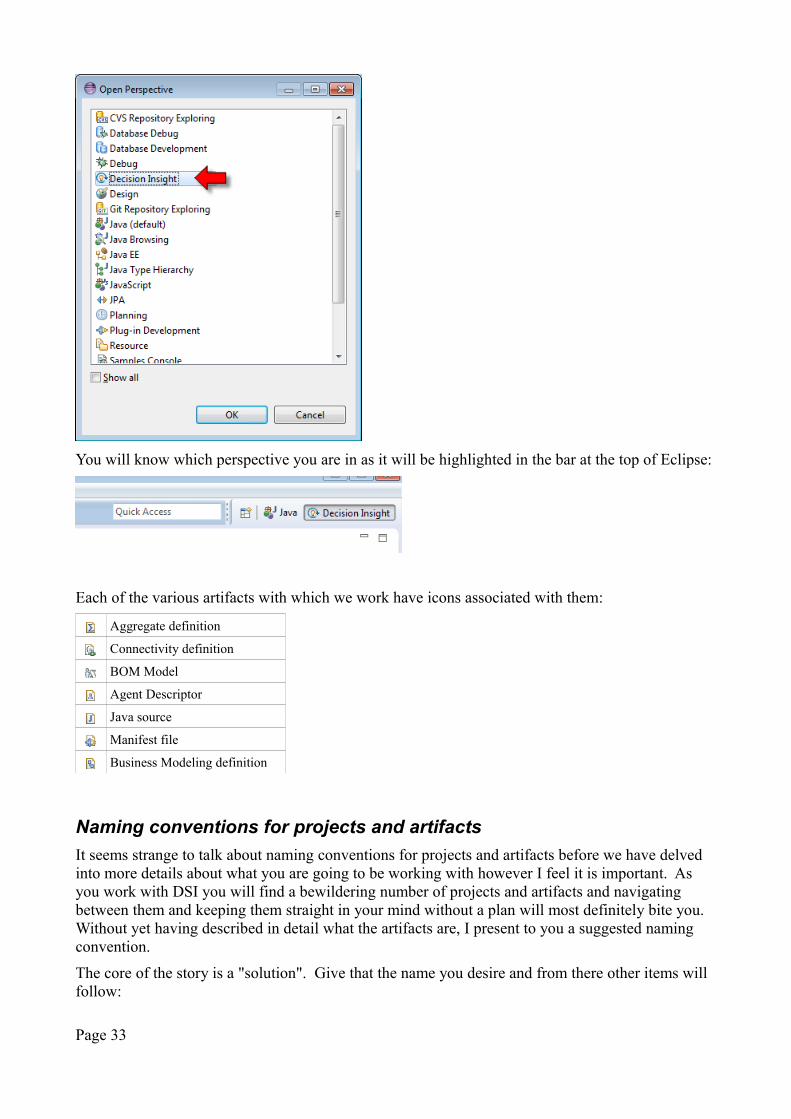
Each of the various artifacts with which we work have icons associated with them:
Aggregate definition
Connectivity definition
BOM Model
Agent Descriptor
Java source
Manifest file
Business Modeling definition
Naming conventions for projects and artifacts
It seems strange to talk about naming conventions for projects and artifacts before we have delved into more details about what you are going to be working with however I feel it is important. As you work with DSI you will find a bewildering number of projects and artifacts and navigating between them and keeping them straight in your mind without a plan will most definitely bite you. Without yet having described in detail what the artifacts are, I present to you a suggested naming convention.
The core of the story is a "solution". Give that the name you desire and from there other items will follow:
Page 33
Artifact type Suggested naming
Solution Project <solution>
BOM Project <solution> - BOM
Business Model Definition • Package - <solution>• Name – BusinessModel
Java Agent Project • Project name - <solution> - Java Agent - <Java Agent name>• Agent Name - <Java Agent name>
Rule Agent Project <solution> - Rule Agent - <Rule Agent project name>
Rule • Package - <solution>• Name – Rule name
Extension Project <solution> - Extension - <Extension Name>
Data Provider Extension • Package - <solution>.ext• Class name - <Data Provider Name>
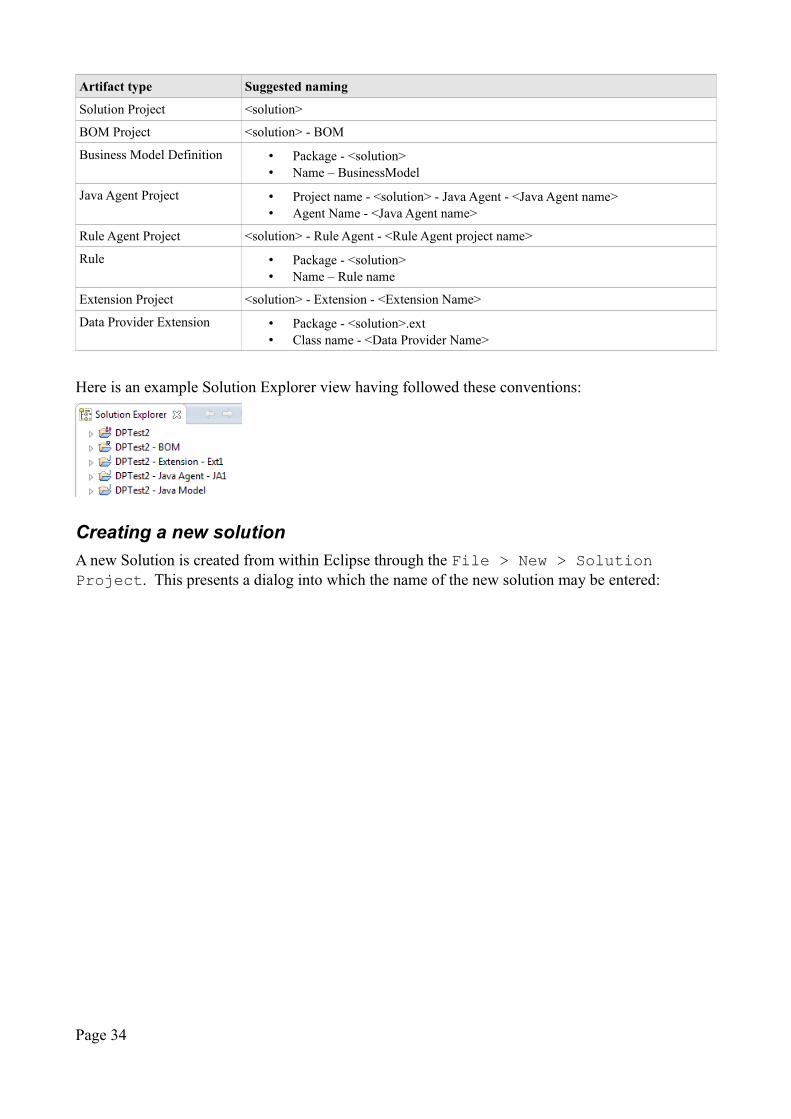
Here is an example Solution Explorer view having followed these conventions:
Creating a new solution
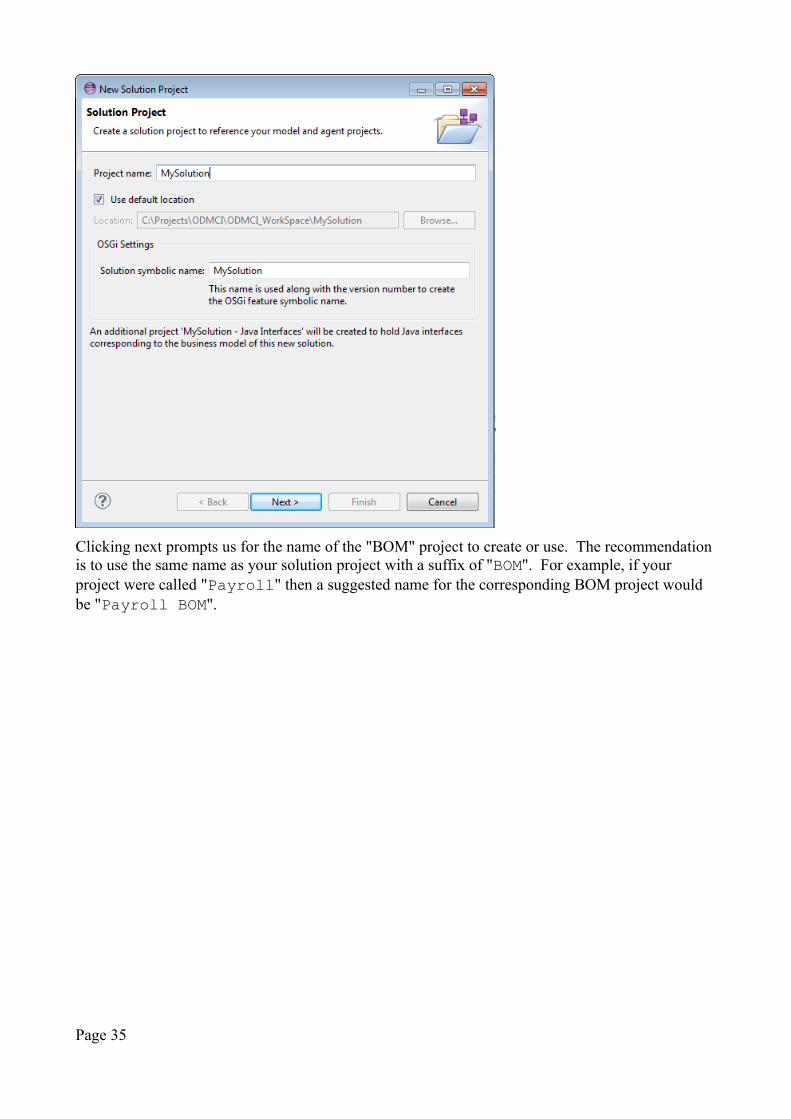
A new Solution is created from within Eclipse through the File > New > Solution Project. This presents a dialog into which the name of the new solution may be entered:
Page 34
Clicking next prompts us for the name of the "BOM" project to create or use. The recommendation is to use the same name as your solution project with a suffix of "BOM". For example, if your project were called "Payroll" then a suggested name for the corresponding BOM project would be "Payroll BOM".
Page 35
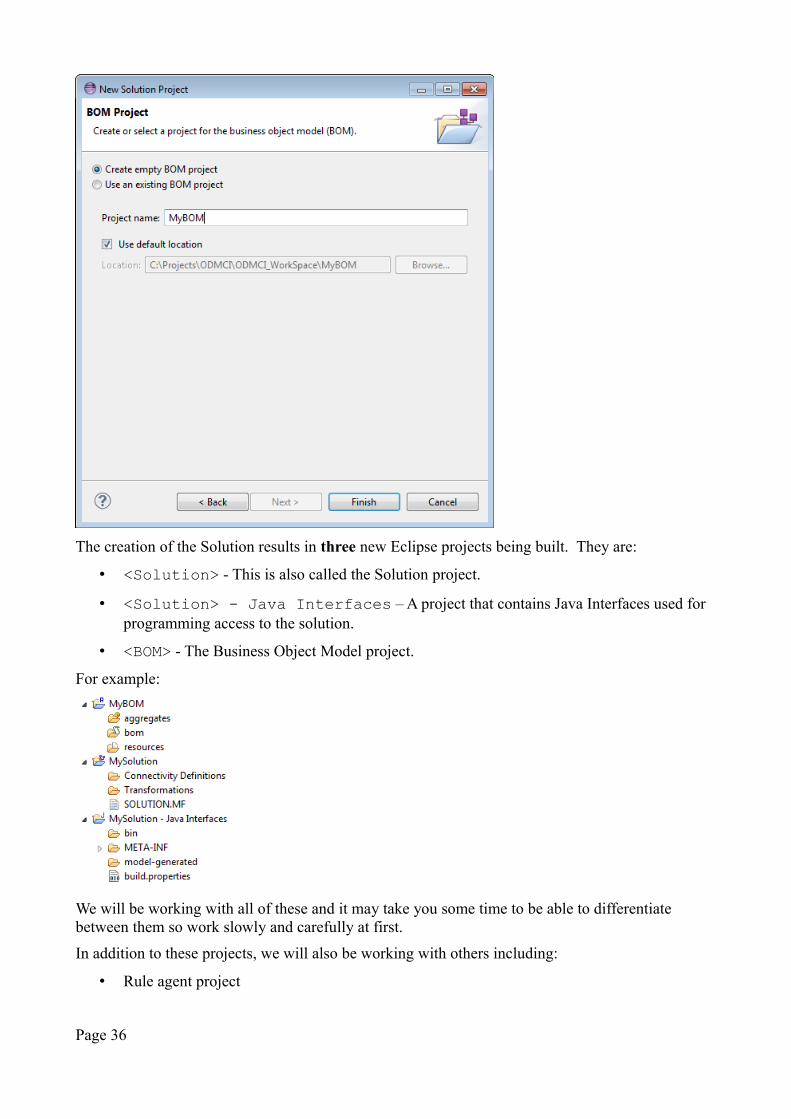
The creation of the Solution results in three new Eclipse projects being built. They are:
• <Solution> - This is also called the Solution project.
• <Solution> - Java Interfaces – A project that contains Java Interfaces used for programming access to the solution.
• <BOM> - The Business Object Model project.
For example:
We will be working with all of these and it may take you some time to be able to differentiate between them so work slowly and carefully at first.
In addition to these projects, we will also be working with others including:
• Rule agent project
Page 36
• Java agent project
• Predictive scoring agent project
• OSGi project
The SOLUTION.MF file
When a solution project is created, a manifest file called SOLUTION.MF is created within the project. This is a text file that may be edited. Contained within the file are some solution wide properties:
• IBM-IA-SolutionName – The name of the solution
• IBM-IA-SolutionVersion – The current version of the solution
• IBM-IA-ZoneId – An optional property that defines the time zone in which the solution operates.
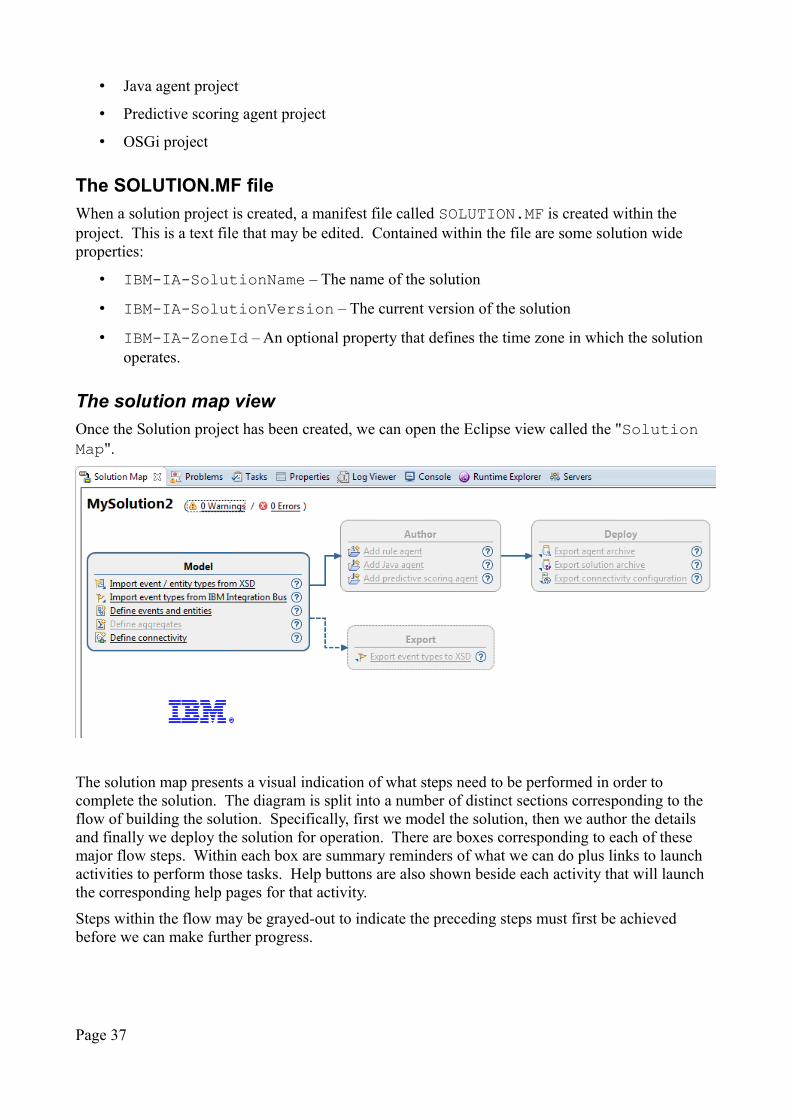
The solution map view
Once the Solution project has been created, we can open the Eclipse view called the "Solution Map".
The solution map presents a visual indication of what steps need to be performed in order to complete the solution. The diagram is split into a number of distinct sections corresponding to the flow of building the solution. Specifically, first we model the solution, then we author the details and finally we deploy the solution for operation. There are boxes corresponding to each of these major flow steps. Within each box are summary reminders of what we can do plus links to launch activities to perform those tasks. Help buttons are also shown beside each activity that will launch the corresponding help pages for that activity.
Steps within the flow may be grayed-out to indicate the preceding steps must first be achieved before we can make further progress.
Page 37
Modeling the Business Object Model (BOM)
One of the first things we will do when creating a new solution is to model the business data. We can do this either by importing an XML schema definition or by manual entry. The modeling of thedata must happen before the creation of the agents that will be used to process that data.
When building a BOM, we will create items that represent:
• Entity types
• Event types
• Concepts
• Enumerations
• Properties
• Relationships
Defining Entity Types
An entity is an instance of a specific type of object. For example, "Neil" is an entity instance of an entity type called "IBM Employee". In order to create instances of entities, we must first declare the structure of the entity type that an entity will be instantiated from.
An entity type is a hierarchical data definition composed of properties and relationships. Each entity type definition has a property that will serve to hold the unique identity of an instance of that type. No two entities of the same entity type may have the same identity value. The actual data type of the identity must be a String.
Relationships are directional between two entities.
Entity Types are defined within Business Model Definition files.
See also:
• Entity
• Modeling Entity Types
• Business Model Definitions
Defining Event Types
Similar to Entity Types, we also have to define Event Types. When an event arrives, it will represent an instance of a particular event type. Event types are also hierarchical data structures. Every event contains at least one property that represents when (date/time) the event was originated.This is also modeled in the corresponding event type definition.
Event Types are defined within Business Model Definition files.
See also:
• Entity
• Modeling Event Types
• Business Model Definitions
Business Model Definitions
The Business Model Definitions file is used to hold definitions for both Entity Types and Event
Page 38
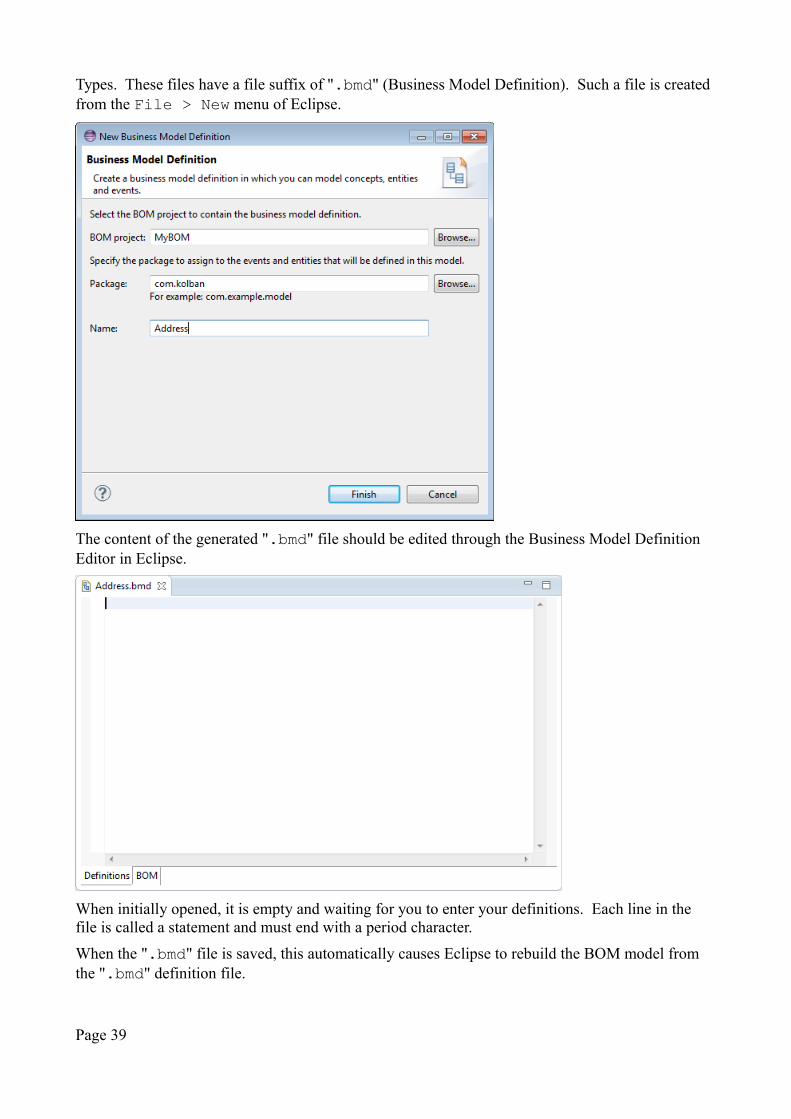
Types. These files have a file suffix of ".bmd" (Business Model Definition). Such a file is created from the File > New menu of Eclipse.
The content of the generated ".bmd" file should be edited through the Business Model Definition Editor in Eclipse.
When initially opened, it is empty and waiting for you to enter your definitions. Each line in the file is called a statement and must end with a period character.
When the ".bmd" file is saved, this automatically causes Eclipse to rebuild the BOM model from the ".bmd" definition file.
Page 39
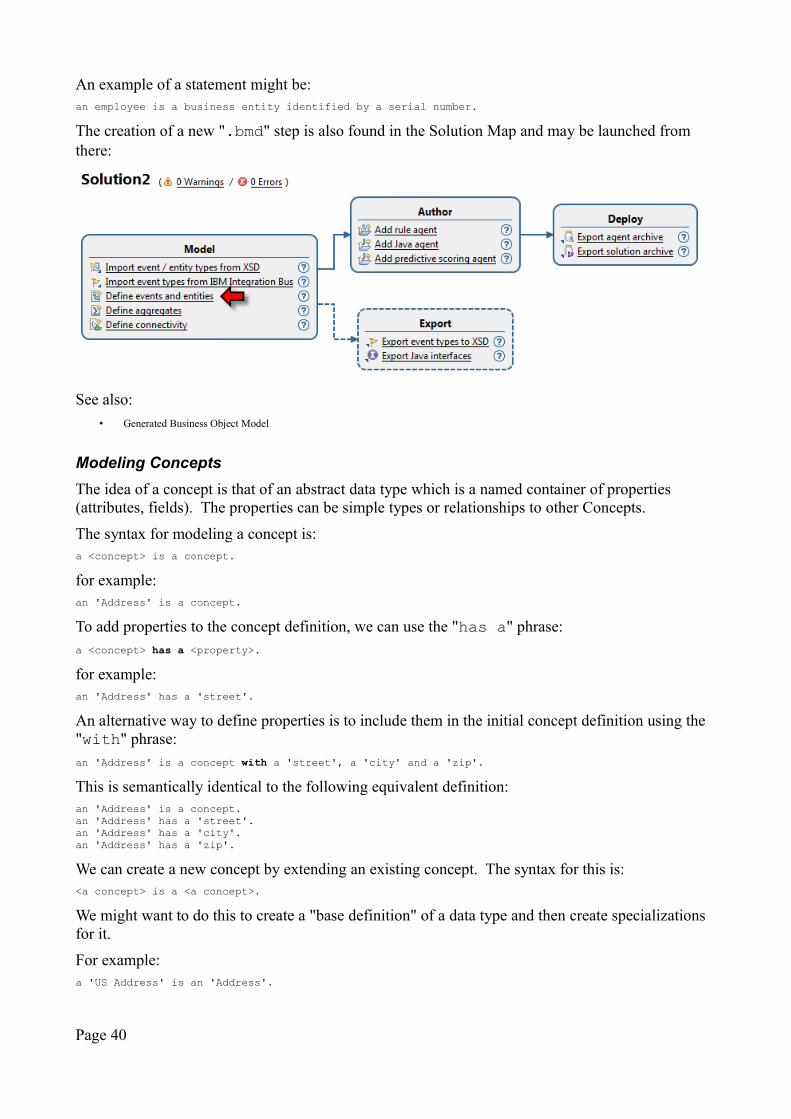
An example of a statement might be:an employee is a business entity identified by a serial number.
The creation of a new ".bmd" step is also found in the Solution Map and may be launched from there:
See also:
• Generated Business Object Model
Modeling Concepts
The idea of a concept is that of an abstract data type which is a named container of properties (attributes, fields). The properties can be simple types or relationships to other Concepts.
The syntax for modeling a concept is:a <concept> is a concept.
for example:an 'Address' is a concept.
To add properties to the concept definition, we can use the "has a" phrase:a <concept> has a <property>.
for example:an 'Address' has a 'street'.
An alternative way to define properties is to include them in the initial concept definition using the "with" phrase:an 'Address' is a concept with a 'street', a 'city' and a 'zip'.
This is semantically identical to the following equivalent definition:an 'Address' is a concept.an 'Address' has a 'street'.an 'Address' has a 'city'.an 'Address' has a 'zip'.
We can create a new concept by extending an existing concept. The syntax for this is:<a concept> is a <a concept>.
We might want to do this to create a "base definition" of a data type and then create specializations for it.
For example:a 'US Address' is an 'Address'.
Page 40
a 'US Address' has a 'state'.
There is also the idea of an "enumeration" where we can define the possible values of a concept:a <concept> can be one of: <value>, <value>, ... ,<value>.
For example:a 'Security Classification' can be one of: 'Unclassified', 'Internal Use Only', 'Confidential'.
See also:
• Concepts
Modeling Entity Types
When we model an Entity Type what we are really doing is building a data model that will be used by ODM DSI to represent an instance of such an entity. This data model is hierarchical in nature and is composed of properties and relationships. Each entity type must have a property that is considered its identity (or key). No two distinct entities may have the same value for this identity property. The data type for the identity property must be String.
For example, if we are modeling an Entity that represents an Employee, we might choose a propertycalled "employeeNumber" as the identity. When an event is processed, we can use a property in the event to locate the corresponding Entity (if one exists). The phrase "identified by" defines the property to be used as the "key".
The syntax for modeling an entity type is:an <entity> is a business entity identified by a <property>.
For example:an 'Employee' is a business entity identified by a 'serial number'.
Similar to the "concept" definition, we can model properties of an entity using either the "has" or "with" phrases:an 'Employee' is a business entity identified by a 'serial number'.an 'Employee' has a 'name'.an 'Employee' has a 'department'.
oran 'Employee' is a business entity identified by a 'serial number' with a 'name' and a 'department'.
which style you choose is merely a matter of preference as they are functionally identical.
See also:
• Entity
• Defining Entity Types
Modeling Event Types
When our solutions are deployed, we will be sending in events for the run-time to process. Before the run-time can receive such events, we have to model them in a similar fashion to our modeling ofconcepts and entities. An event is also a data type definition that has a name and a set of properties.However, one of the properties of an event must be of the data type "date & time" and will be used to identify the timestamp at which the event was created. This is used by the run-time for timebased reasoning. If we don't explicitly model this timestamp, one will be provided for us.
Other properties can be modeled on the event using the "has a" and "with" syntaxes.
The syntax for modeling an event type is:
Page 41

an <event> is a business event.
For example:a 'Promotion' is a business event.
If we choose not to supply an explicit property to be used to hold the timestamp of the event, a default is provided called "timestamp". If we desire to explicitly name the property to be used tocontain the timestamp, we can use the following syntax:an <event> is a business event time-stamped by a <property>.
For example:a 'Promotion' is a business event time-stamped by an 'approval date'.
An additional option available to us when defining events it to extend an existing event definition. The general syntax for this is:an <event> is an <event>.
For example:an 'Executive Promotion' is a 'Promotion' with a 'business justification'.
See also:
• Event
• Defining Event Types
Modeling Properties
A Concept, an Entity Type and an Event Type can all have properties. We will generically call concept types, entity types and event types "objects". There are a couple of ways to model such properties all of which are semantically identical.
Using "with":... with a <property>, a <property>, ..., a <property>.
... with a <property>, a <property>, ... and a <property>.
Using "has":a <[concept|entity|event]> has a <property>.
Both of the above will define named properties on the target object. There is an additional phrase that can be used to define a boolean (true/false) property which is "can be".
Using "can be"a <[concept|entity|event]> can be a <property>. // This property will be a boolean.
For example:an 'Employee' can be 'retired'.
The data type for a property, if not explicitly specified is of type "text". To specify alternative data types, the type can follow the name of the property within parenthesis. The following types areallowed:
• numeric
• integer
• text
• date
Page 42

• time
• date & time
• duration
• a geometry
In the following example, notice the data type definition for "date of birth" and "salary":a 'Person' is a concept.a 'Person' has a 'name'.a 'Person' has a 'date of birth' (date).
an 'Employee' is a 'Person' identified by a 'serial number'.an 'Employee' has a 'department'.an 'Employee' has a 'salary' (numeric).
When an instance of an entity or an event is created, the properties are not initially set with values. We can set default values of a property in its definition using the syntax(<type>, <value> by default)
For example:an 'Employee' has a 'salary' (numeric, 0 by default).
If the property of an entity or event must have a value to make the object meaningful, we can flag the property is being required with the syntax:[mandatory]
for example:an 'Employee' has a 'department' [mandatory].
Each of the properties described so far has a single value, however we can imagine an object as being able to have a property which is a list of values.
For example, in the simple case of an Employee having a property called a "telephone number", we might declare:an 'Employee' has a 'telephone number'.
however it is not unlikely that he may have multiple telephone numbers. We can express this using the syntax "has some":a <object> has some <properties>.
For example:an 'Employee' has some 'telephone numbers'.
The resulting property is now a list of values instead of a singular value.
Modeling Relationships
So far we have considered only the definition of properties of simple types within a model but we can also have those properties be richer definitions such as concepts.
A relationship to a concept uses the "has" keyword:a <[entity|event|concept]> has a <concept>.
In this case we would define an entity or event as having a named property that is an instance of the concept. The property would have the same name as the concept. For example:a 'Person' has an 'Address'.
Page 43
This would create a property called "address" of data type "Address".
We can specify a different name using:a <[entity|event|concept] has a <concept>, named the <name>.
For example:a 'Person' has an 'Address', named the 'address'.
A third possibility is to provide the name and type of the concept using:a <[entity|event|concept]> has a <property> (a <concept>).
a 'Person' has an 'address' (an 'Address').
Yet another option is to use the "that is" phrase:a <[entity|event|concept] has a <property> that is a <concept>.
For example:a 'Person' has an 'address' that is an 'Address'.
Each of these are semantically equivalent and simply offer alternative styles of description. Which one to use merely becomes a matter of choice. As if this wasn't enough … IBM has gone out of its way to provide even more options. Instead of using the phrase "has", you can also specify "is related to". The following are all equivalent:a 'Person' is related to an 'Address'.a 'Person' is related to an 'Address', named the 'address'.a 'Person' is related to an 'Address' (an 'Address').a 'Person' is related to an 'Address' that is an 'Address'.
We are truly spoiled for choice.
Vocabulary
Comments can be inserted into a ".bmd" by starting a line with two dash symbols-- This is a comment
Importing Event and Entity types from XML Schema
An XML Schema can be imported into Eclipse to define the Events and Entities. In order to allow Eclipse to parse the content correctly, annotations must be added. These provide instructions on how the Schema should be interpreted.
To flag a schema complex type as an event, we would add:<annotation>
<appinfo source="http://www.ibm.com/ia/Annotation"><event />
</appinfo></annotation>
The element within a complex type that represents an event that is to be used as the timestamp of the event must also be flagged:<annotation>
<appinfo source="http://www.ibm.com/ia/Annotation"><timestamp />
</appinfo></annotation>
Sharing a BOM project
When we create a solution project, one of the wizard screens allows us to create a new BOM project. On that screen we also have the option of linking to an existing BOM project.
Page 44
The newly created Solution project will have the same concept, entity and event definitions available to as those found in the original solution project. Changes to the .bmd will be visible in all projects that utilize the BOM project.
Suggested initial language for initial business model definitions
When defining data models there are multiple ways to achieve the same definition. This is partly due to the flexibility of the English language and the syntax and grammar associated with it.
It is suggested that while one learns DSI that you keep your descriptions simple. In English, one can express an idea in a perfect, unambiguous fashion using as few words as possible.
For example, I am likely to say:My car outside my house is a red Toyota Corrola.
as opposed to:I have a car.It is outside my house.It's color is red.It is made by Toyota.It is a Corrola.
However, the second example contains exactly the same information as the first. One may argue that the first example is far superior to the second but I claim that this is simply because you can seethe solution in front of you. When ever you have the answer before you, it can immediately be recognized as correct however when you don't yet have the answer, building "an" answer that is correct is more important than building a perfect answer first time around.
When building an entity, I suggest the following pattern:an ENTITY is a business entity identified by a 'f1'.an ENTITY has a 'f2'.an ENTITY has a 'f3'.…an ENTITY has a 'fN'.
This pattern says that we define an entity with only its single key property and then add the additional properties to the definition one per line.
Similarly, I advocate the construction of an event as:an EVENT is a business event.an EVENT has a 'f1'.an EVENT has a 'f2'.…an EVENT has a 'fN'.
Defining Entity initializations
When an event arrives for processing and there is not yet a corresponding entity associated with the event, we can either explicitly create a new entity or else we can model how such an entity should be implicitly created from the data in the event.
There are two techniques available for us.
In the statements page of the BMD editor, we can define an initialization which generically reads as:an <entity> is initialized from an <event>, where <this entity> comes from <property of this event>.
In addition, we can also define actions to be performed such as setting additional properties of the
Page 45
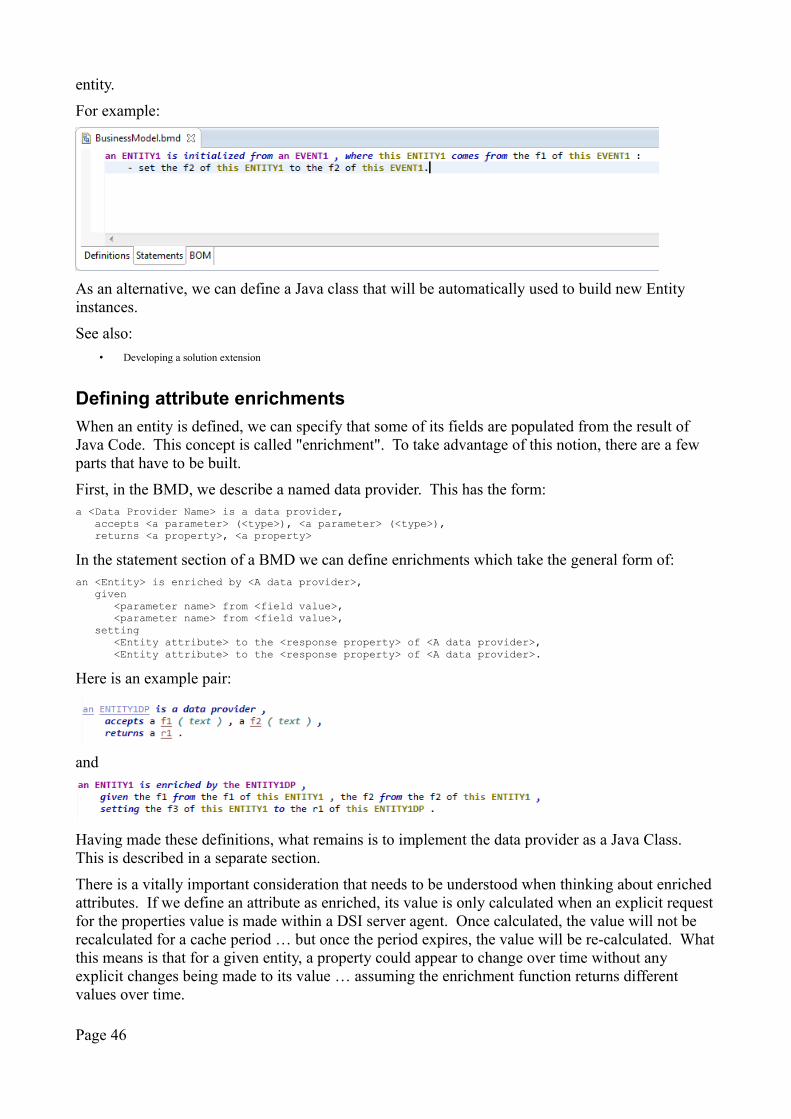
entity.
For example:
As an alternative, we can define a Java class that will be automatically used to build new Entity instances.
See also:
• Developing a solution extension
Defining attribute enrichments
When an entity is defined, we can specify that some of its fields are populated from the result of Java Code. This concept is called "enrichment". To take advantage of this notion, there are a few parts that have to be built.
First, in the BMD, we describe a named data provider. This has the form:a <Data Provider Name> is a data provider,
accepts <a parameter> (<type>), <a parameter> (<type>),returns <a property>, <a property>
In the statement section of a BMD we can define enrichments which take the general form of:an <Entity> is enriched by <A data provider>,
given<parameter name> from <field value>,<parameter name> from <field value>,
setting<Entity attribute> to the <response property> of <A data provider>,<Entity attribute> to the <response property> of <A data provider>.
Here is an example pair:
and
Having made these definitions, what remains is to implement the data provider as a Java Class. This is described in a separate section.
There is a vitally important consideration that needs to be understood when thinking about enriched attributes. If we define an attribute as enriched, its value is only calculated when an explicit requestfor the properties value is made within a DSI server agent. Once calculated, the value will not be recalculated for a cache period … but once the period expires, the value will be re-calculated. Whatthis means is that for a given entity, a property could appear to change over time without any explicit changes being made to its value … assuming the enrichment function returns different values over time.
Page 46
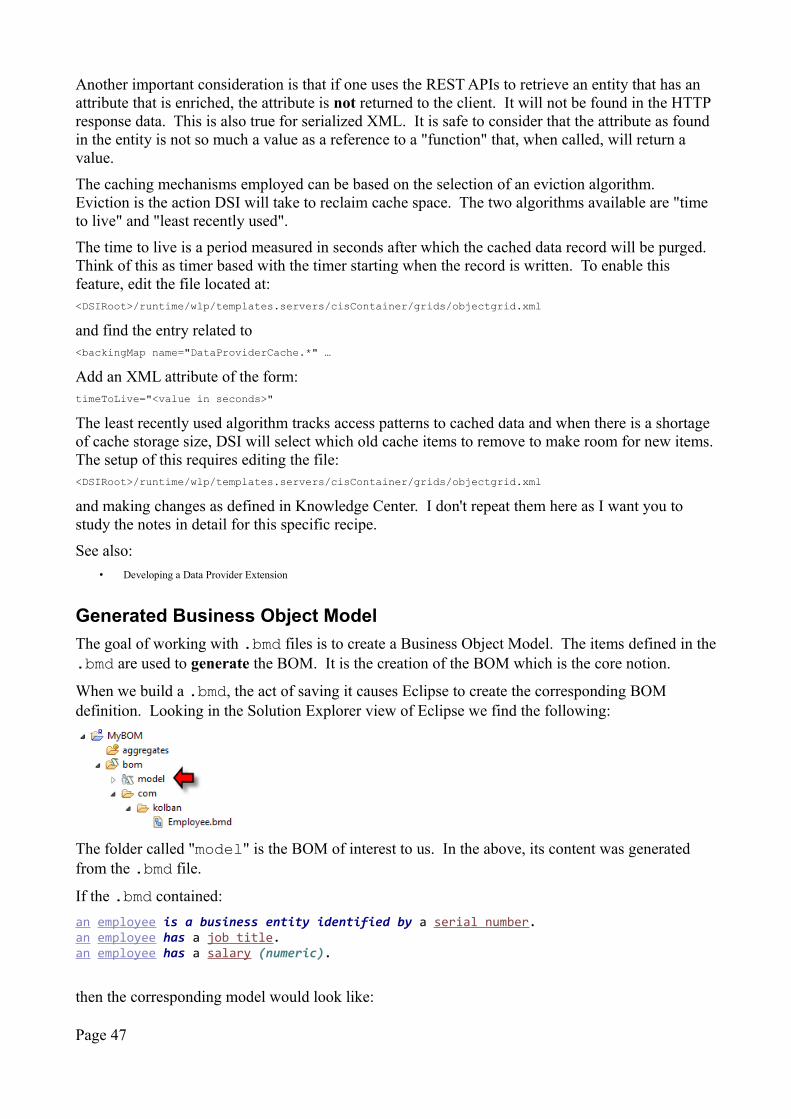
Another important consideration is that if one uses the REST APIs to retrieve an entity that has an attribute that is enriched, the attribute is not returned to the client. It will not be found in the HTTP response data. This is also true for serialized XML. It is safe to consider that the attribute as found in the entity is not so much a value as a reference to a "function" that, when called, will return a value.
The caching mechanisms employed can be based on the selection of an eviction algorithm. Eviction is the action DSI will take to reclaim cache space. The two algorithms available are "time to live" and "least recently used".
The time to live is a period measured in seconds after which the cached data record will be purged. Think of this as timer based with the timer starting when the record is written. To enable this feature, edit the file located at:<DSIRoot>/runtime/wlp/templates.servers/cisContainer/grids/objectgrid.xml
and find the entry related to <backingMap name="DataProviderCache.*" …
Add an XML attribute of the form:timeToLive="<value in seconds>"
The least recently used algorithm tracks access patterns to cached data and when there is a shortage of cache storage size, DSI will select which old cache items to remove to make room for new items.The setup of this requires editing the file:<DSIRoot>/runtime/wlp/templates.servers/cisContainer/grids/objectgrid.xml
and making changes as defined in Knowledge Center. I don't repeat them here as I want you to study the notes in detail for this specific recipe.
See also:
• Developing a Data Provider Extension
Generated Business Object Model
The goal of working with .bmd files is to create a Business Object Model. The items defined in the.bmd are used to generate the BOM. It is the creation of the BOM which is the core notion.
When we build a .bmd, the act of saving it causes Eclipse to create the corresponding BOM definition. Looking in the Solution Explorer view of Eclipse we find the following:
The folder called "model" is the BOM of interest to us. In the above, its content was generated from the .bmd file.
If the .bmd contained:
an employee is a business entity identified by a serial number.an employee has a job title.an employee has a salary (numeric).
then the corresponding model would look like:
Page 47
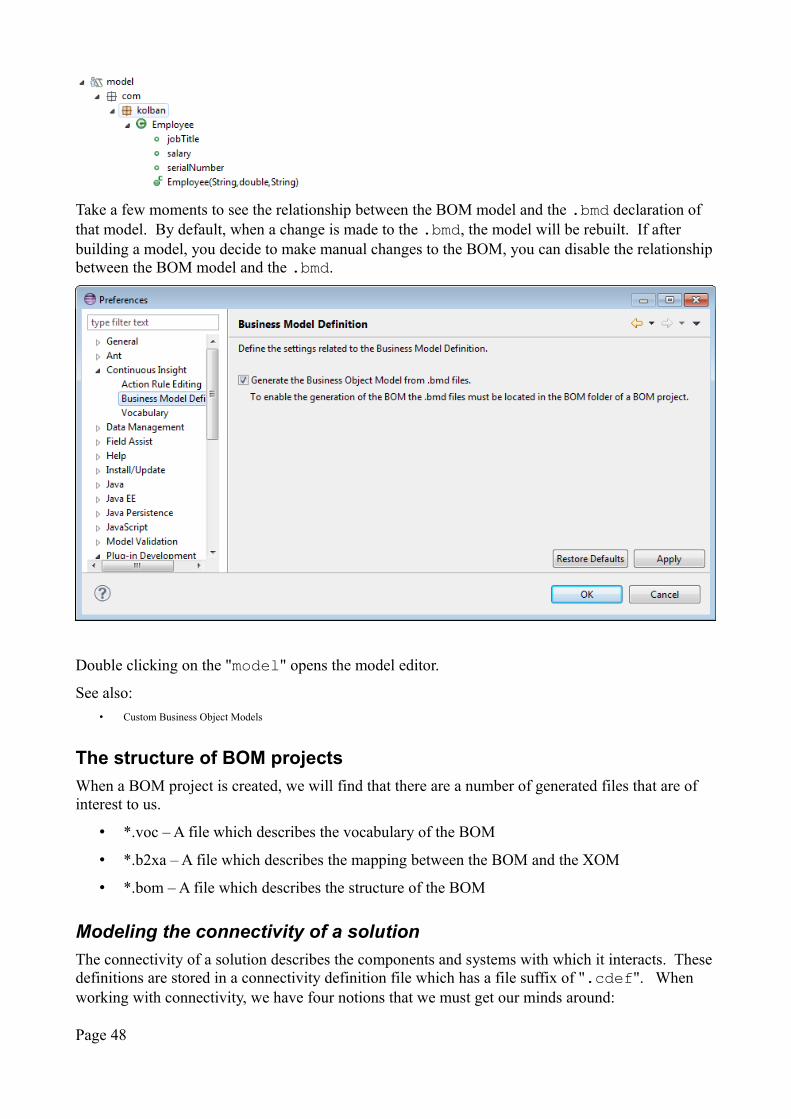
Take a few moments to see the relationship between the BOM model and the .bmd declaration of that model. By default, when a change is made to the .bmd, the model will be rebuilt. If after building a model, you decide to make manual changes to the BOM, you can disable the relationshipbetween the BOM model and the .bmd.
Double clicking on the "model" opens the model editor.
See also:
• Custom Business Object Models
The structure of BOM projects
When a BOM project is created, we will find that there are a number of generated files that are of interest to us.
• *.voc – A file which describes the vocabulary of the BOM
• *.b2xa – A file which describes the mapping between the BOM and the XOM
• *.bom – A file which describes the structure of the BOM
Modeling the connectivity of a solution
The connectivity of a solution describes the components and systems with which it interacts. Thesedefinitions are stored in a connectivity definition file which has a file suffix of ".cdef". When working with connectivity, we have four notions that we must get our minds around:
Page 48

• Inbound Bindings
• Inbound Endpoints
• Outbound Bindings
• Outbound Endpoints
Let us first develop the notion of "bindings" vs "endpoints".
Consider your telephone. I know I can call you and tell you something important because I know you have a phone. You are "bound" to your phone. I am also assuming you have an email address. If I want to tell you something, I could also send you an email. You are "bound" to your email address.
If some major event happens (you win the lottery), I can inform you of that event by calling your phone or sending you an email. Even if I don't know you, I know how to leverage those communication technologies to deliver information to you. Both you and I can leverage the notion of the binding.
However, if I grab my phone to call you or open my mail client to email you, there is still something missing. That is the actual phone number I use to call you or your actual email address used to reach you. The fact that you are bound to a telephone and an email account are logical concepts, we still need additional information to reach you. And that is where the second concept comes into play. That is the notion of the "endpoint". An endpoint is the concrete information associated with a binding type that allows me to reach you as opposed to reaching someone else. The endpoint information is contextual to the type of binding. A phone number is related to a telephone binding while an email address is related to an email binding.
Returning to ODM DSI, when we build a solution we describe one or more bindings that tell ODM DSI which sources of information to listen upon for which events. Once we have described a binding, we have told the solution "You are able to receive events via HTTP" or "You are able receive events via JMS", however we have not yet told ODM DSI what is the URL path for an HTTP event or what is the queue name for a JMS message. That is where we add the "endpoint" information. For each binding we created, we must also create a corresponding endpoint definition.
The definition of these bindings and endpoints is entered in a file called a "Connectivity Definition"which has a file suffix of ".cdef".
This file can be created within Eclipse by creating a new Connectivity Definition which is associated with an existing solution project:
Page 49
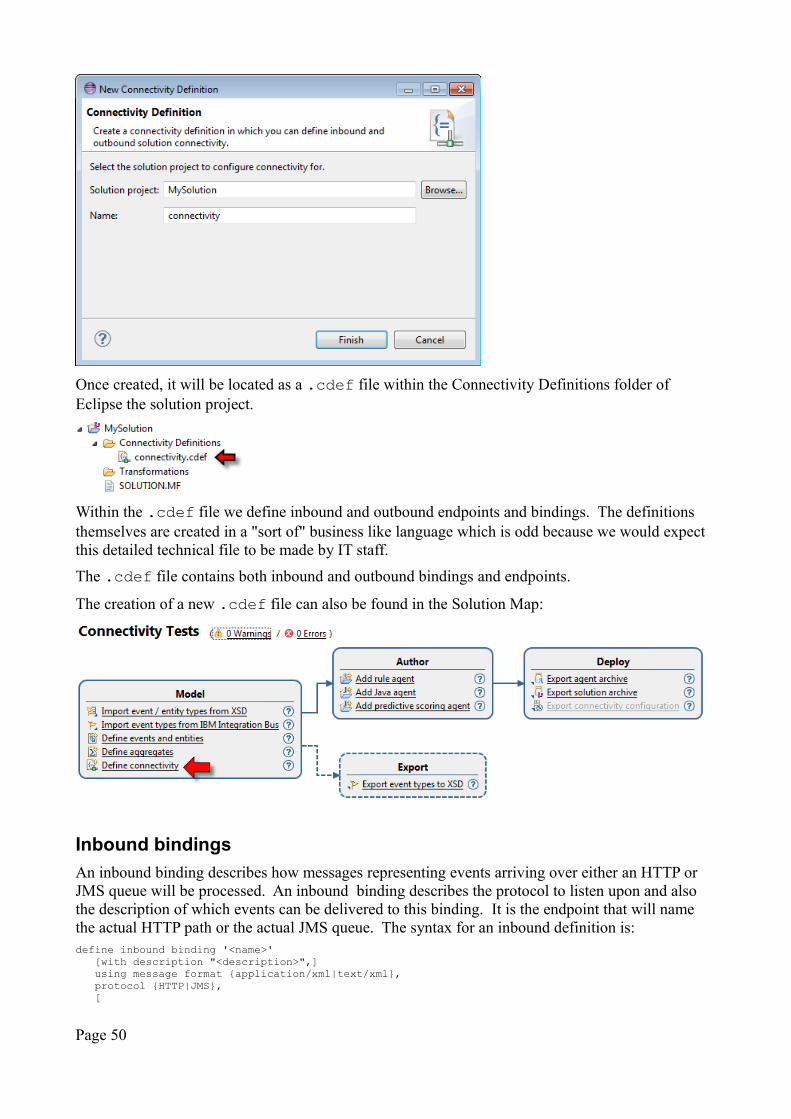
Once created, it will be located as a .cdef file within the Connectivity Definitions folder of Eclipse the solution project.
Within the .cdef file we define inbound and outbound endpoints and bindings. The definitions themselves are created in a "sort of" business like language which is odd because we would expect this detailed technical file to be made by IT staff.
The .cdef file contains both inbound and outbound bindings and endpoints.
The creation of a new .cdef file can also be found in the Solution Map:
Inbound bindings
An inbound binding describes how messages representing events arriving over either an HTTP or JMS queue will be processed. An inbound binding describes the protocol to listen upon and also the description of which events can be delivered to this binding. It is the endpoint that will name the actual HTTP path or the actual JMS queue. The syntax for an inbound definition is:define inbound binding '<name>'
[with description "<description>",]using message format {application/xml|text/xml},protocol {HTTP|JMS},[
Page 50
classifying messages:if matches "<Xpath expression>"
…]{accepting any event. |aceepting events:
- <event>*. |accepting no events.}
Inbound endpoints
An inbound endpoint is used to represent a source of an event. The syntax for an inbound HTTP endpoint definition is:define inbound HTTP endpoint '<endpoint name>'
[with description "<description>",]using binding '<inbound binding>',url path "<url path>"[, advanced properties:
- 'name': "value" *].
The url path must consist of at least two parts. For example "/x/y".
The syntax for an inbound JMS endpoint is:define inbound HTTP endpoint '<endpoint name>'
[with description "<description>",]using binding '<inbound binding>'[, advanced properties:
- 'name': "value" *].
See also:
• WebSphere JMS Access
• Deploying Connectivity Configurations
Outbound bindings
The syntax for an outbound binding is:define outbound binding '<binding name>'
withdescription "<description>",
usingmessage format <message format>,protocol <JMS|HTTP>,
delivering events :- event- event.
Outbound endpoints
An outbound endpoint is related to an outbound binding. It describes how to transmit the outgoing message.
The syntax for an outbound endpoint HTTP is:define outbound HTTP endpoint '<endpoint name>'
withdescription "<endpoint description>",
usingbinding '<referenced binding>',
url "<endpoint url>".
For an outbound JMS endpoint, the syntax is:define outbound JMS endpoint '<endpoint name>'
with
Page 51
description "<endpoint description>"using
binding '<referenced binding>',connection factory "<connection factory>",destination "<destination>".
The <connection factory> is a JNDI reference to a JMS connection factory. Similarly, the <destination> is a JNDI reference to a JMS destination (a queue or a topic).
See also:
• WebSphere JMS Access
HTTP Bindings
For inbound, this is the URL path on the ODM DSI server to which HTTP POST requests can be made passing in event data as the body of the message in XML format.
JMS Bindings
For inbound bindings, this will be the JMS queue
Notes about connections
• If we send an event to an inbound connection which is not configured to accept that kind of event then it is discarded with a log message written to the console.
Sample Connectivity Definitions
The following are sample connectivity definitions.
A sample inbound HTTP definition
In this sample, we define a binding called "Binding1" which is going to receive XML events overHTTP. The type of event being listened for is a "sale" event. We will listen for this on an endpoint called "Endpoint1" which is an HTTP endpoint found at "/Sales/EP1".
define inbound binding 'Binding1' using message format application/xml ,
protocol HTTP , accepting events :
- sale . define inbound HTTP endpoint 'Endpoint1'
using binding 'Binding1' , url path "/Sales/EP1".
A sample inbound JMS definition
define inbound binding 'in2' using
message format application/xml , protocol JMS ,
accepting any event .
define inbound JMS endpoint 'in2ep'using
binding 'in2'.
Page 52

A sample outbound JMS definition
Here is a sample outbound JMS definition:
define outbound binding 'out1'using message format application/xml ,
protocol JMS , delivering events :
- PQR Event . define outbound JMS endpoint 'out1ep'
using binding 'out1' ,
connection factory "jms/qcf1", destination "jms/q1".
The way to interpret this entry is "When an event of type 'PQR Event' is emitted by a solution, then send it via JMS formatted as XML. The destination queue will be the queue found by looking up the JNDI definition called 'jms/q1' to which a message can be delivered through the JMS connection factory found by looking up the JNDI definition called 'jms/qcf1'.
Implementing Agents
Agents are built within Insight Designer (Eclipse) through the creation of an agent project.
The key actions that will be undertaken to build an agent will be:
• Describing which events an agent is interested in processing.
• Describing the entity instance that the agent will manipulate.
• Describing the rules and logic that the agent will perform when an event arrives.
• Describing what (if any) additional events will be emitted.
When implementing an agent, you basically have two primary choices available to you. You can create either a Rule Agent or a Java Agent. In both cases, you are describing what happens when anevent arrives and how it relates to the entity instance associated (bound) to that agent. The choice of whether or not you implement your agent as a Rule Agent or a Java Agent has a number of considerations.
You might implement your agent as a Rule Agent if …
• You want your rules to read close to English
• You need to work with the history of preceding events
You might implement your agent as a Java Agent if …
• You need to interact with external systems accessible through Java APIs or libraries
• You are more comfortable coding to Java than the Rule Agent language
See also:
• Agents
Page 53
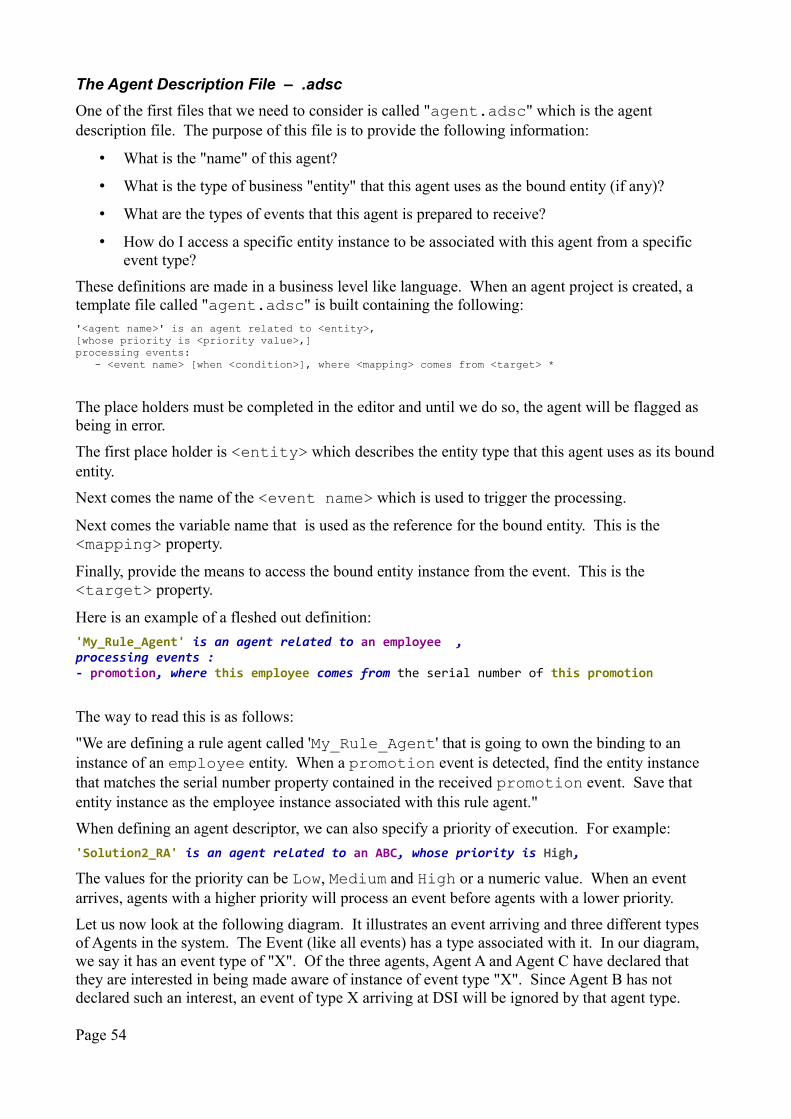
The Agent Description File – .adsc
One of the first files that we need to consider is called "agent.adsc" which is the agent description file. The purpose of this file is to provide the following information:
• What is the "name" of this agent?
• What is the type of business "entity" that this agent uses as the bound entity (if any)?
• What are the types of events that this agent is prepared to receive?
• How do I access a specific entity instance to be associated with this agent from a specific event type?
These definitions are made in a business level like language. When an agent project is created, a template file called "agent.adsc" is built containing the following:'<agent name>' is an agent related to <entity>,[whose priority is <priority value>,]processing events:
- <event name> [when <condition>], where <mapping> comes from <target> *
The place holders must be completed in the editor and until we do so, the agent will be flagged as being in error.
The first place holder is <entity> which describes the entity type that this agent uses as its boundentity.
Next comes the name of the <event name> which is used to trigger the processing.
Next comes the variable name that is used as the reference for the bound entity. This is the <mapping> property.
Finally, provide the means to access the bound entity instance from the event. This is the <target> property.
Here is an example of a fleshed out definition:
'My_Rule_Agent' is an agent related to an employee , processing events :- promotion, where this employee comes from the serial number of this promotion
The way to read this is as follows:
"We are defining a rule agent called 'My_Rule_Agent' that is going to own the binding to an instance of an employee entity. When a promotion event is detected, find the entity instance that matches the serial number property contained in the received promotion event. Save that entity instance as the employee instance associated with this rule agent."
When defining an agent descriptor, we can also specify a priority of execution. For example:
'Solution2_RA' is an agent related to an ABC, whose priority is High,
The values for the priority can be Low, Medium and High or a numeric value. When an event arrives, agents with a higher priority will process an event before agents with a lower priority.
Let us now look at the following diagram. It illustrates an event arriving and three different types of Agents in the system. The Event (like all events) has a type associated with it. In our diagram, we say it has an event type of "X". Of the three agents, Agent A and Agent C have declared that they are interested in being made aware of instance of event type "X". Since Agent B has not declared such an interest, an event of type X arriving at DSI will be ignored by that agent type.
Page 54
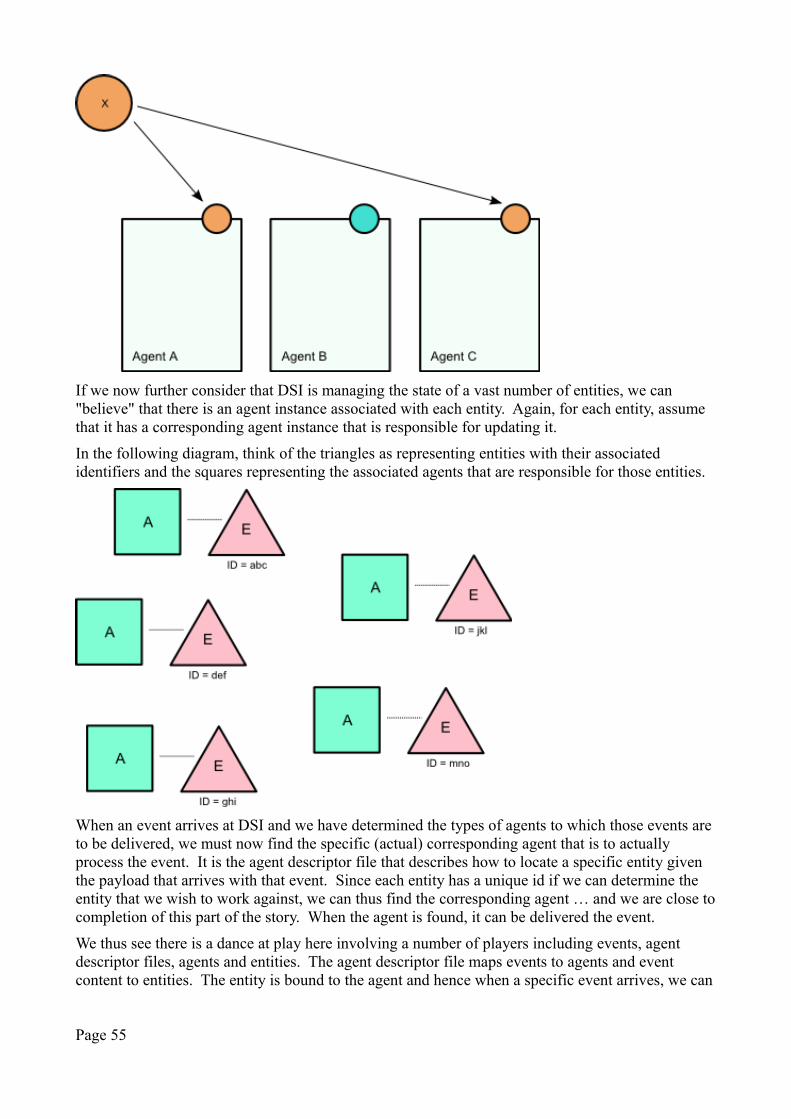
If we now further consider that DSI is managing the state of a vast number of entities, we can "believe" that there is an agent instance associated with each entity. Again, for each entity, assume that it has a corresponding agent instance that is responsible for updating it.
In the following diagram, think of the triangles as representing entities with their associated identifiers and the squares representing the associated agents that are responsible for those entities.
When an event arrives at DSI and we have determined the types of agents to which those events are to be delivered, we must now find the specific (actual) corresponding agent that is to actually process the event. It is the agent descriptor file that describes how to locate a specific entity given the payload that arrives with that event. Since each entity has a unique id if we can determine the entity that we wish to work against, we can thus find the corresponding agent … and we are close tocompletion of this part of the story. When the agent is found, it can be delivered the event.
We thus see there is a dance at play here involving a number of players including events, agent descriptor files, agents and entities. The agent descriptor file maps events to agents and event content to entities. The entity is bound to the agent and hence when a specific event arrives, we can
Page 55
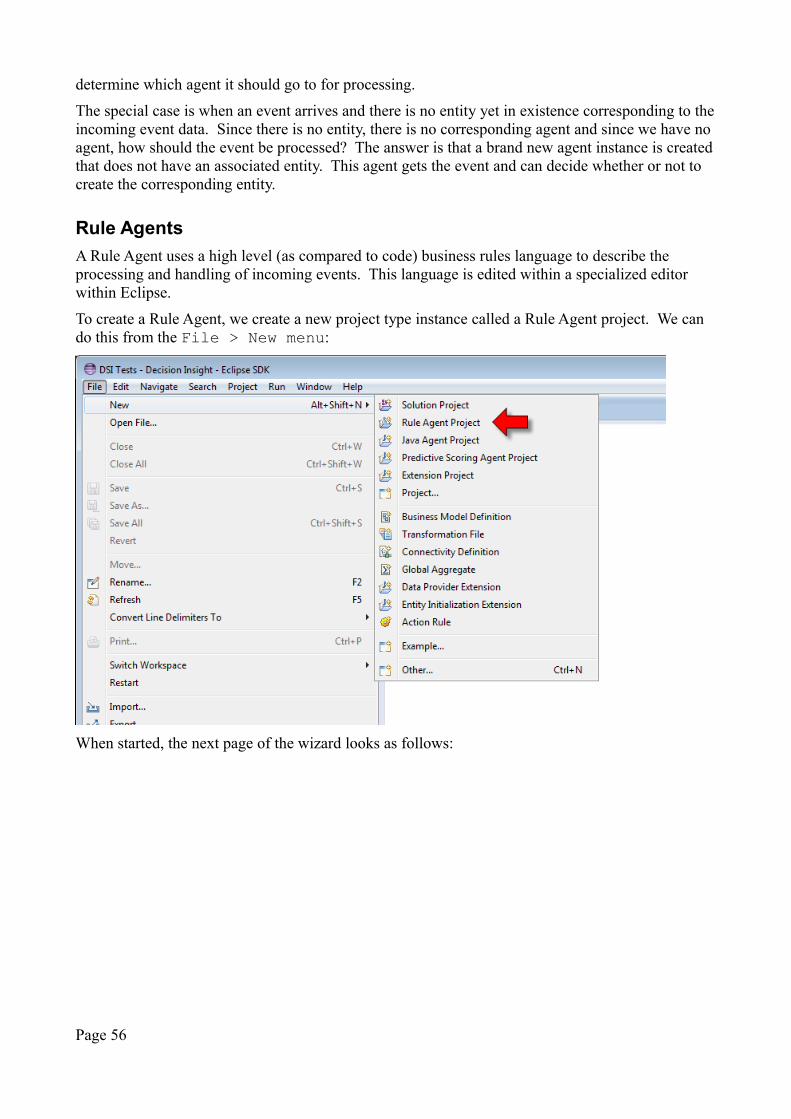
determine which agent it should go to for processing.
The special case is when an event arrives and there is no entity yet in existence corresponding to theincoming event data. Since there is no entity, there is no corresponding agent and since we have no agent, how should the event be processed? The answer is that a brand new agent instance is createdthat does not have an associated entity. This agent gets the event and can decide whether or not to create the corresponding entity.
Rule Agents
A Rule Agent uses a high level (as compared to code) business rules language to describe the processing and handling of incoming events. This language is edited within a specialized editor within Eclipse.
To create a Rule Agent, we create a new project type instance called a Rule Agent project. We can do this from the File > New menu:
When started, the next page of the wizard looks as follows:
Page 56

We are then asked to enter the name of the Eclipse project to be created and select the Solution Project which will include this Rule Agent for deployment.
Within the Eclipse workspace folder structure, the project that is created by this wizard looks as follows:
Notes that the project, when created is flagged as containing errors. The errors will be found in a file called "agent.adsc" which is the agent descriptor file. This file must be modified to reflect what your agent will do and is described elsewhere.
The creation of a new Rule Agent can also be found in the Solution Map:
Page 57

See also:
• The Agent Description File – .adsc
Building an action rule
After completing the agent description, we can start to build out action rules. Action rules are the individual rules that are used to describe processing upon the arrival of a corresponding event for a Rule Agent. An Action Rule is created from the context menu:
Rules are created under the rules folder of the Rule Agent project:
When a rule is created, it can be opened in the Rule Editor within Eclipse:
Page 58

A rule is composed of a variety of parts describe in the specification of the rule language.
First we will look at the optional "definition part".
A definition part is the declaration of variables that exist only for the duration of the rule being processed. You can think of these loosely as local variables.
The syntax of the definition part is:definitions
set '<variable>' to <value>;…
The value of an expression can be a variety of types including constants, expressions and business terms.
Here are some variable definitions of constants:
definitions set 'maxAmount' to 100000;set 'open' to true;set 'country' to "USA";
The next part of a rule we will look at is called the rule condition. It is composed of an "if … then … else …" construct. Following the "if" statement is a condition. If then condition evaluates to true then the following action is performed otherwise the action following the "else" is performed.
The general syntax of this part is:if
<expression>then
<action>
here are some examples:
if
Page 59
the salary of 'the employee' is more than 50000then
print "He earns enough";
Describing how expressions can be constructed will be its own section as there are many varied considerations.
The final part of a rule is the action section. Here we define what we wish to happen based on the outcome of expression evaluation. Think of the action as the "now do this" part of a rule.
The "if … then … else …" nature of a rule describes what the logic will be but not when it will be applied. To capture that information we specify which events we wish to cause the processing of the rule.
We do this with the syntax:when <event> occurs
For example:
when a promotion occurs if
the salary of 'the employee' is more than 50000then
print "He earns enough";
When a corresponding event arrives, it is processed as soon as possible. There is no delay in its processing.
Bound entities
When an event arrives at a rule agent, we have already instructed the agent on how to find the corresponding bound entity. However, if this is the first event associated with that entity and no "is initialized by …" statement is present in the BMD, there may not yet be a bound entity and we may choose to create one.
At a high level, our logic would bewhen <event> occursif
the <boundEntity> is nullthen
set <boundEntity> to a new <Entity>
Creating a rule such as this and giving it a higher priority than other rules is a good idea. This will ensure that a bound entity always exists. When we create the new entity instance, it is likely that we will want to initialize its properties. We can do that with the following syntax:set <boundEntity> to a new <Entity> wherethe <propertyName> is <value>,the <propertyName> is <value>,…;
However, take care with the following:when <event> occursif
the <boundEntity> is nullthen
set <boundEntity> to a new <Entity>else
do something else
Page 60
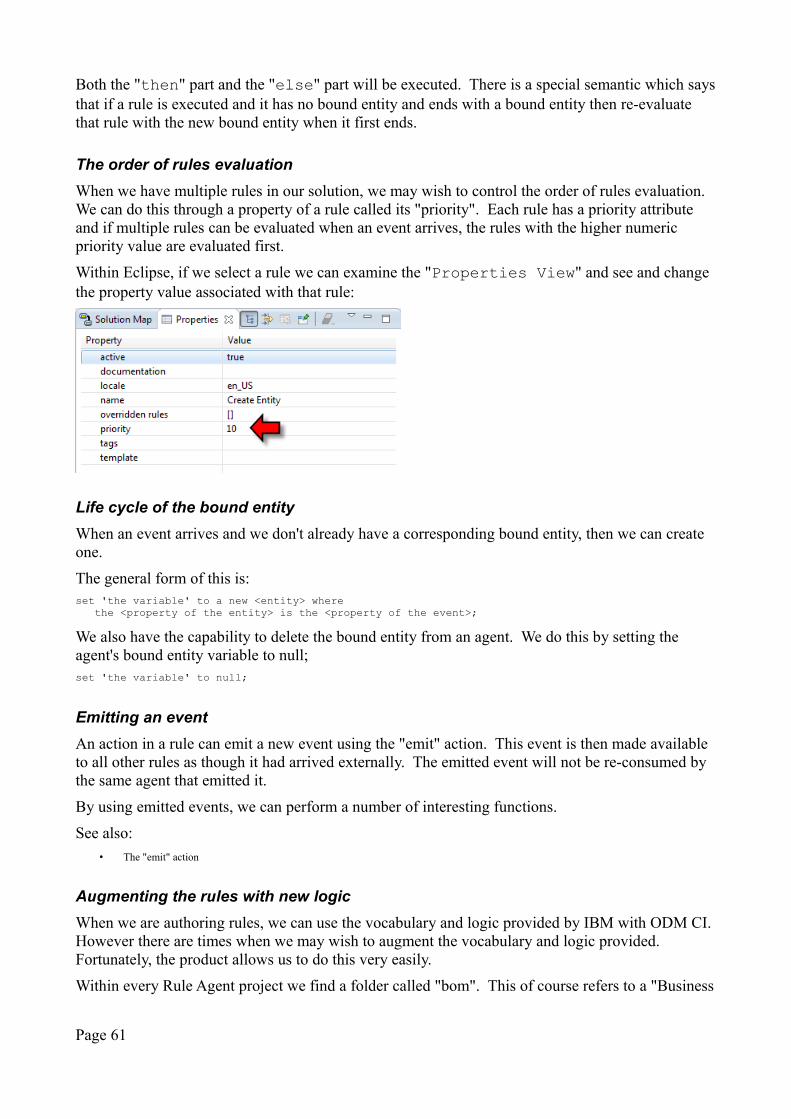
Both the "then" part and the "else" part will be executed. There is a special semantic which saysthat if a rule is executed and it has no bound entity and ends with a bound entity then re-evaluate that rule with the new bound entity when it first ends.
The order of rules evaluation
When we have multiple rules in our solution, we may wish to control the order of rules evaluation. We can do this through a property of a rule called its "priority". Each rule has a priority attribute and if multiple rules can be evaluated when an event arrives, the rules with the higher numeric priority value are evaluated first.
Within Eclipse, if we select a rule we can examine the "Properties View" and see and change the property value associated with that rule:
Life cycle of the bound entity
When an event arrives and we don't already have a corresponding bound entity, then we can create one.
The general form of this is:set 'the variable' to a new <entity> where
the <property of the entity> is the <property of the event>;
We also have the capability to delete the bound entity from an agent. We do this by setting the agent's bound entity variable to null;set 'the variable' to null;
Emitting an event
An action in a rule can emit a new event using the "emit" action. This event is then made available to all other rules as though it had arrived externally. The emitted event will not be re-consumed by the same agent that emitted it.
By using emitted events, we can perform a number of interesting functions.
See also:
• The "emit" action
Augmenting the rules with new logic
When we are authoring rules, we can use the vocabulary and logic provided by IBM with ODM CI. However there are times when we may wish to augment the vocabulary and logic provided. Fortunately, the product allows us to do this very easily.
Within every Rule Agent project we find a folder called "bom". This of course refers to a "Business
Page 61
Object Model". Within this folder we can create additional Business Object Models which merge with the BOM provided at the solution level. What we define in this Rule Agent specific BOM becomes available within the rules of the Rule Agent.
We will illustrate this with an example.
One of the actions available to us is called "print". What this action does is write string data to the console. The "print" action expects a string as a parameter. But what if we want to sent otherdata types to the console such as events or entities? The simple answer is that we can't, because they are not strings and print can only accept a string.
In a programming environment, we could "cast" the data type to a string or ask the object to return astring representation as might be found in calling the object's "toString()" method.
So ... to illustrate, the following does not work:
when a XYZ Event occurs then
print 'the ABC';
A syntax error is shown against the "print" action.
Wouldn't it be nice if we could describe our rule as follows:
when a XYZ Event occurs then
print 'the ABC' as text ;
We can in fact do this, but we have to augment the BOM to add new constructs, in this case the addition of "<Object> as text".
Here is how we do it.
1. From eclipse, go to File > New > Other and create a new "BOM Entry"
Page 62
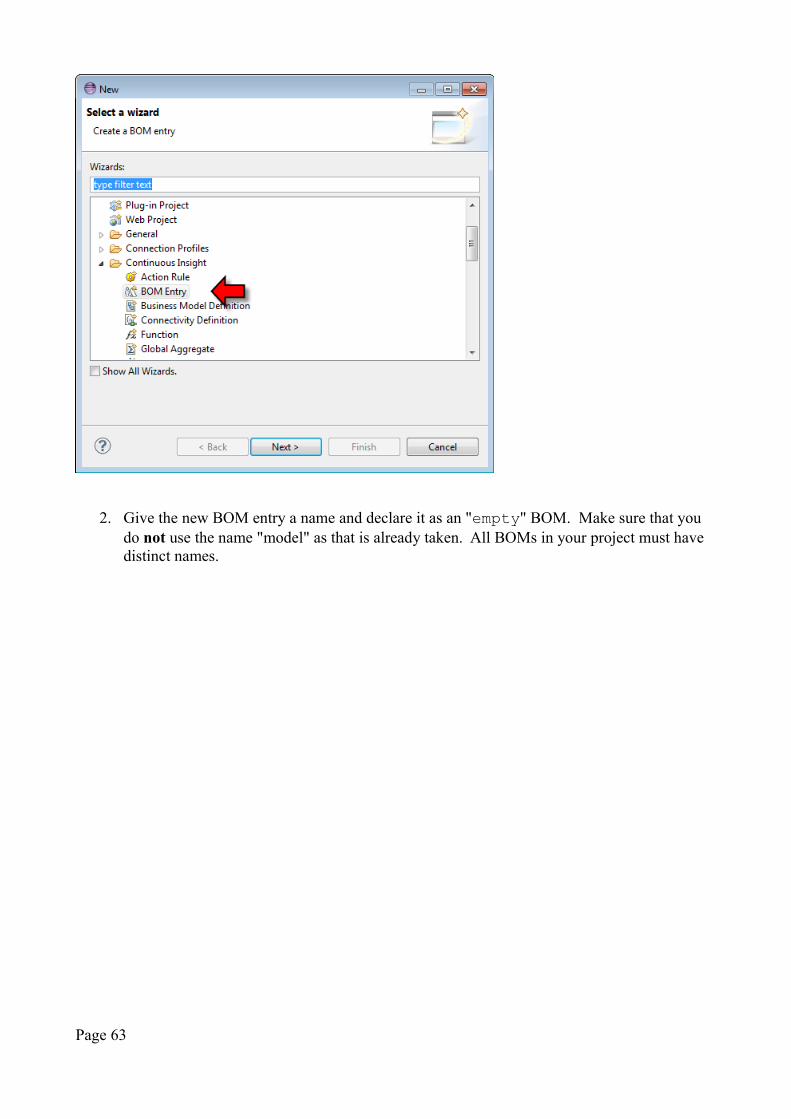
2. Give the new BOM entry a name and declare it as an "empty" BOM. Make sure that you do not use the name "model" as that is already taken. All BOMs in your project must have distinct names.
Page 63
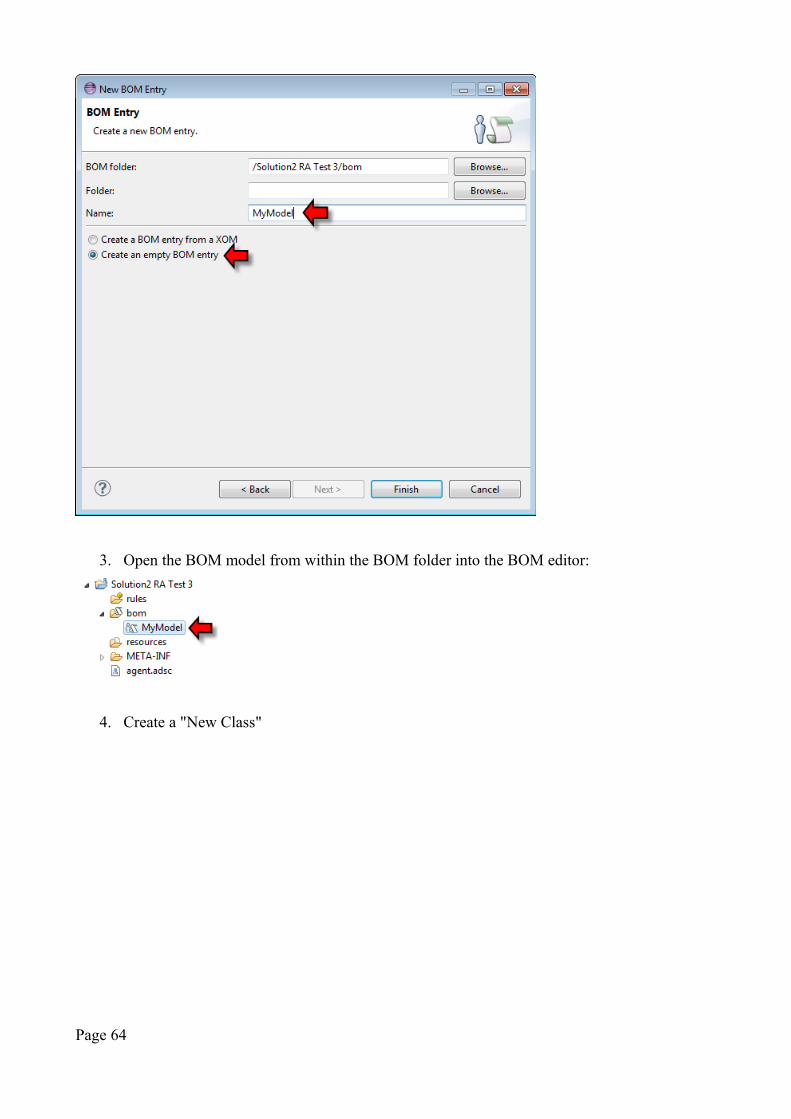
3. Open the BOM model from within the BOM folder into the BOM editor:
4. Create a "New Class"
Page 64
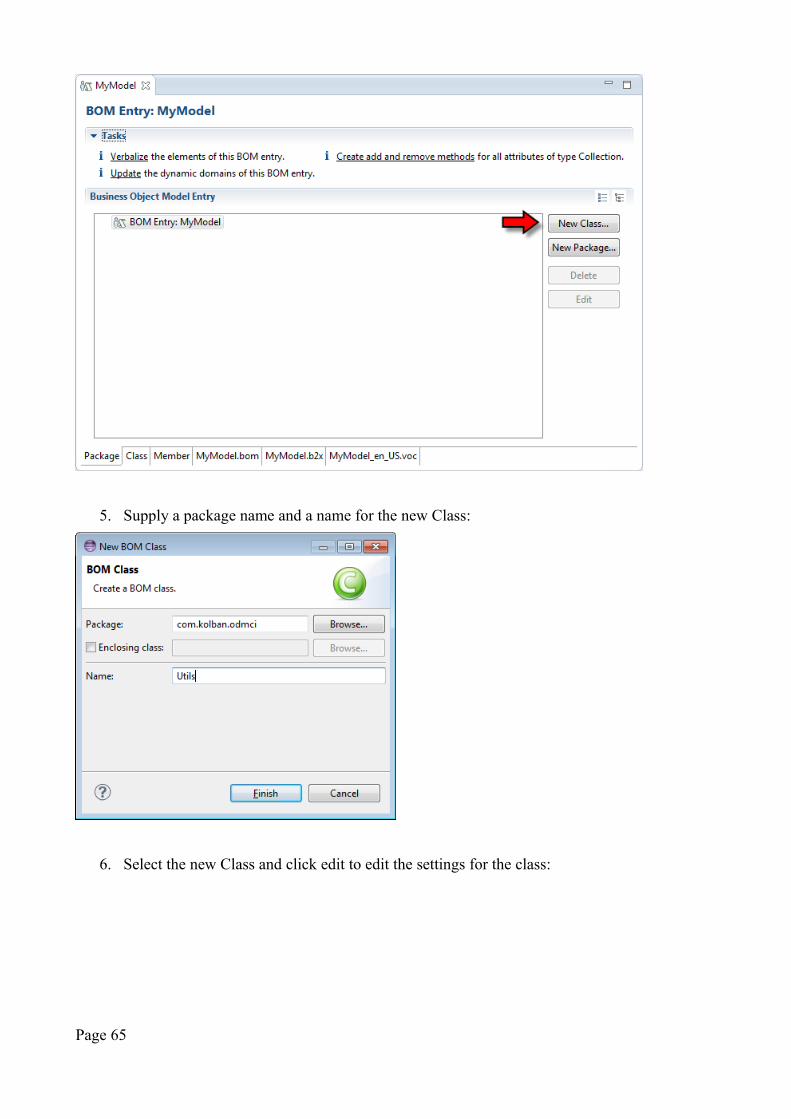
5. Supply a package name and a name for the new Class:
6. Select the new Class and click edit to edit the settings for the class:
Page 65
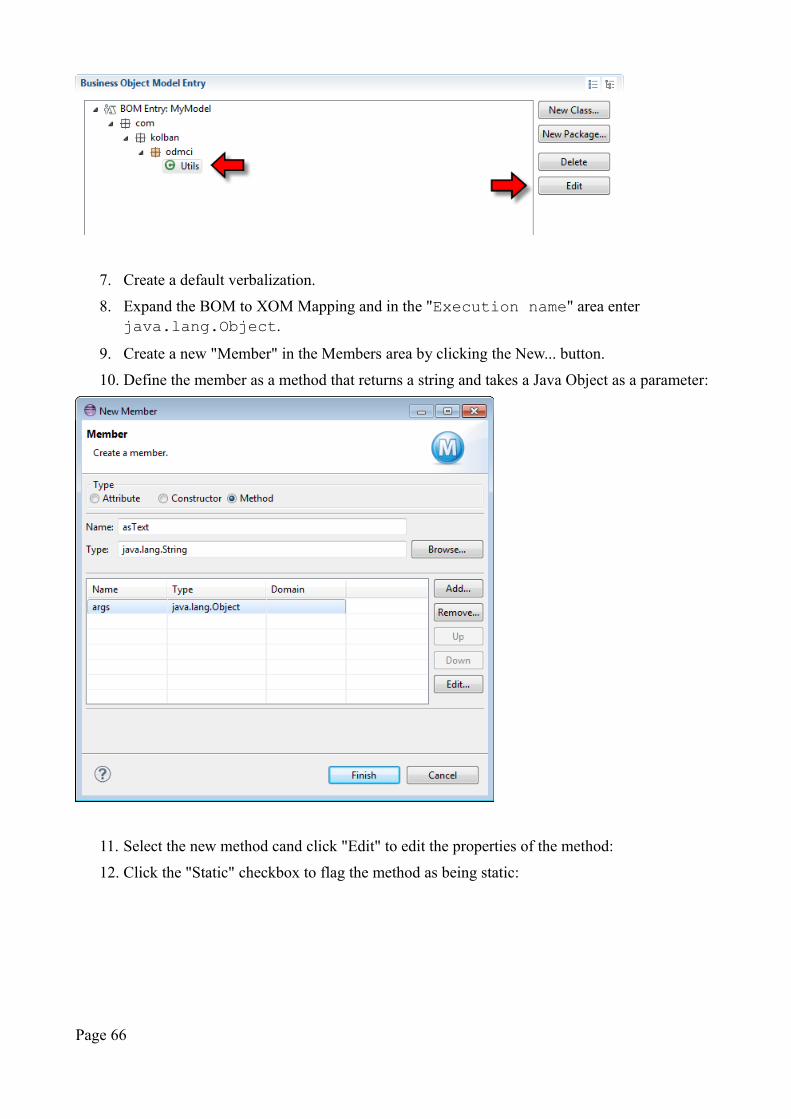
7. Create a default verbalization.
8. Expand the BOM to XOM Mapping and in the "Execution name" area enter java.lang.Object.
9. Create a new "Member" in the Members area by clicking the New... button.
10. Define the member as a method that returns a string and takes a Java Object as a parameter:
11. Select the new method cand click "Edit" to edit the properties of the method:
12. Click the "Static" checkbox to flag the method as being static:
Page 66

13. Define a verbalization for the member:
14. Edit the BOM to XOM mapping to return the string representation of the object.
15. Save the model.
You will now find that your vocabulary has been extended to include "<Object> as text" as an extension.
Java Agents
We have seen that the logical notion of an agent is to be associated with an entity and to process arriving events. When an agent is declared, we state which types of events should be able to be delivered to it. We have spoken about an agent type called the Rule Agent but there are others. Oneof the other types available to us is called the Java Agent. A Java Agent is an implementation of a Java Class that will be instantiated and called when an event arrives that is defined of interest to it. Similar to the Rule Agent, the Java Agent also has an agent descriptor file which describes which events it will listen upon. When an instance of such an event arrives, a new instance of the Java Agent class is created and the event is passed to the process(Event) method of that agent.
Page 67
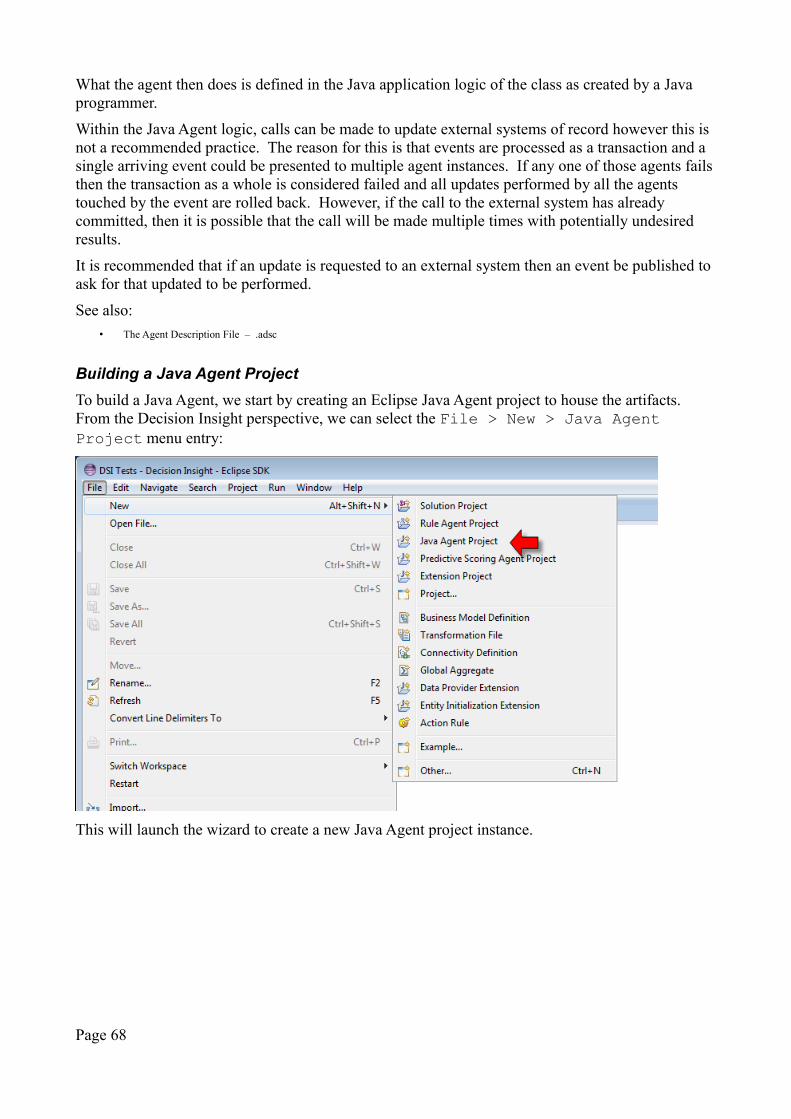
What the agent then does is defined in the Java application logic of the class as created by a Java programmer.
Within the Java Agent logic, calls can be made to update external systems of record however this is not a recommended practice. The reason for this is that events are processed as a transaction and a single arriving event could be presented to multiple agent instances. If any one of those agents failsthen the transaction as a whole is considered failed and all updates performed by all the agents touched by the event are rolled back. However, if the call to the external system has already committed, then it is possible that the call will be made multiple times with potentially undesired results.
It is recommended that if an update is requested to an external system then an event be published to ask for that updated to be performed.
See also:
• The Agent Description File – .adsc
Building a Java Agent Project
To build a Java Agent, we start by creating an Eclipse Java Agent project to house the artifacts. From the Decision Insight perspective, we can select the File > New > Java Agent Project menu entry:
This will launch the wizard to create a new Java Agent project instance.
Page 68
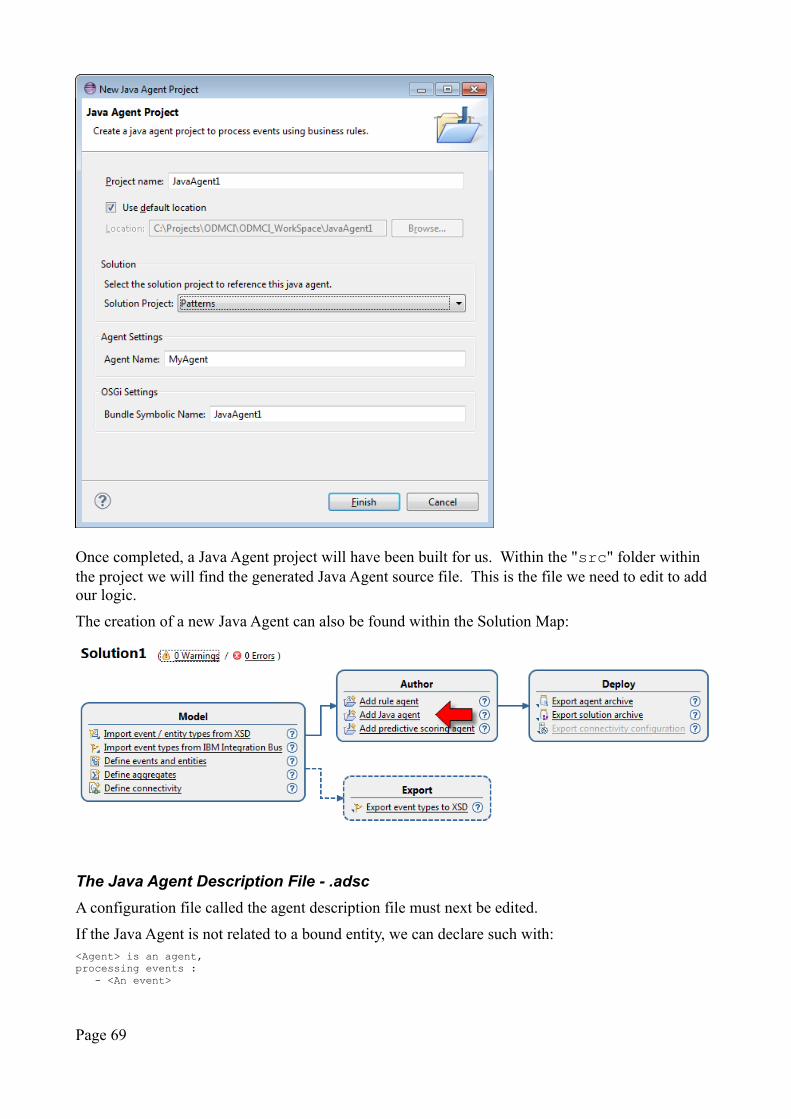
Once completed, a Java Agent project will have been built for us. Within the "src" folder within the project we will find the generated Java Agent source file. This is the file we need to edit to add our logic.
The creation of a new Java Agent can also be found within the Solution Map:
The Java Agent Description File - .adsc
A configuration file called the agent description file must next be edited.
If the Java Agent is not related to a bound entity, we can declare such with:<Agent> is an agent,processing events :
- <An event>
Page 69
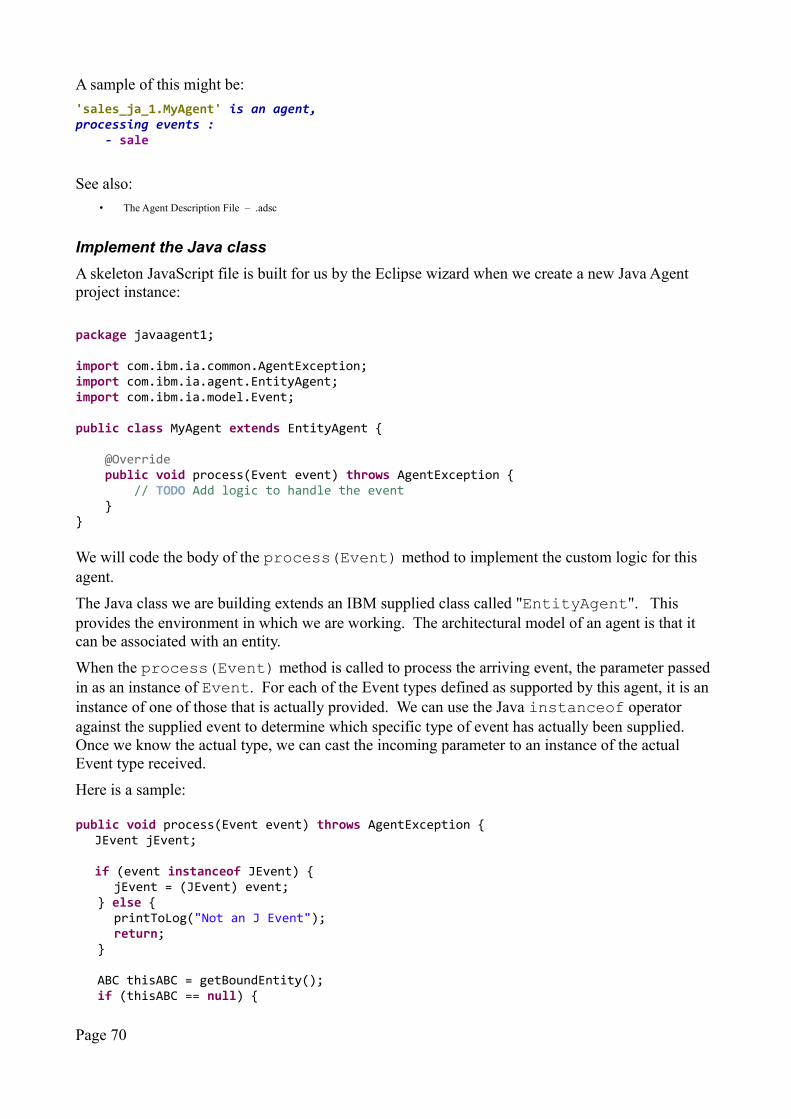
A sample of this might be:
'sales_ja_1.MyAgent' is an agent, processing events : - sale
See also:
• The Agent Description File – .adsc
Implement the Java class
A skeleton JavaScript file is built for us by the Eclipse wizard when we create a new Java Agent project instance:
package javaagent1;
import com.ibm.ia.common.AgentException;import com.ibm.ia.agent.EntityAgent;import com.ibm.ia.model.Event;
public class MyAgent extends EntityAgent { @Override public void process(Event event) throws AgentException { // TODO Add logic to handle the event }}
We will code the body of the process(Event) method to implement the custom logic for this agent.
The Java class we are building extends an IBM supplied class called "EntityAgent". This provides the environment in which we are working. The architectural model of an agent is that it can be associated with an entity.
When the process(Event) method is called to process the arriving event, the parameter passed in as an instance of Event. For each of the Event types defined as supported by this agent, it is an instance of one of those that is actually provided. We can use the Java instanceof operator against the supplied event to determine which specific type of event has actually been supplied. Once we know the actual type, we can cast the incoming parameter to an instance of the actual Event type received.
Here is a sample:
public void process(Event event) throws AgentException {JEvent jEvent;
if (event instanceof JEvent) { jEvent = (JEvent) event; } else { printToLog("Not an J Event"); return; }
ABC thisABC = getBoundEntity(); if (thisABC == null) {
Page 70
thisABC = createBoundEntity(); } thisABC.setKey(jEvent.getEventKey()); thisABC.setFieldABC1(jEvent.getFieldJ2());
updateBoundEntity(thisABC);
printToLog("MyAgent Java finished");} // End of process()
The Agent and EntityAgent classes
A Java Agent extends either an Agent or an EntityAgent class. EntityAgent is itself an extension of Agent.
Included in these classes are:
• String agentName – The name of the agent.
See also:
• KnowledgeCenter – EntityAgent – 8.7
• KnowledgeCenter – Agent – 8.7
Creating model objects – events, concepts and entities
Within a Java Agent, we commonly wish to create new instance of events, concepts and entities. We can achieve this through the notion of the ConceptFactory. A ConceptFactory is a Java object which has construction methods for each of the events, concepts and entities defined within a singleBDM.
For example, if we have a BDM that defines a Concept called "MyConcept", an event called "MyEvent" and an entity called "MyEntity", then we will find that a new class called "ConceptFactory" is created within the package for the BDM. This ConceptFactory will have methods called:
• createMyConcept()
• createMyEvent()
• createMyEntity()
There will be a variety of signatures for these methods. Upon calling these methods, an instance of an object representing the corresponding item will be returned.
Within a Java Agent, one gets the ConceptFactory itself by using the Agent defined method called "getConceptFactory()" which takes the Class representing the ConceptFactory contained in the BDM.
Things get a little interesting with the objects returned by a ConceptFactory based on their definitions. If a property in an object is a List then we have extra functions. Specifically, a list property will have:
• setXXX(List)
• List getXXX()
• addTo_XXX(item)
Page 71
• removeFrom_XXX(item)
• clear_XXX()
Emitting new events
To emit a new event we can call the emit(Event) method. This of course takes as a parameter the event that we wish to publish. We can create a new instance of such an event using a ConceptFactory. For example:ConceptFactory cf = getConceptFactory(ConceptFactory.class);EVENT2 event2 = cf.createEVENT2(ZonedDateTime.now());event2.setF1("f1 value");event2.setF2("F2 Value");emit(event2);
Accessing the bound entity
We can retrieve the entity using the getBoundEntity() method. If the agent does not yet have a bound entity, the resulting reference returned will be null. We can use this to inform our code that it should create a new instance of an entity using the createBoundEntity() method.It is also permissible for an agent to simply not have an associated entity. This is considered an unbound agent. In this case, we define the Java class as extending "Agent" as opposed to "EntityAgent".
A specific Entity instance object has setter and getter methods for each of the properties defined to it. These are get<Property>() and set<Property>(value).
If a bound entity instance is modified or created, we must use the updateBoundEntity(Entity) method to commit the changes.
If we wish to disassociate a bound entity from the agent, we can use the deleteBoundEntity() method.
Here is an example of accessing an entity which, if it doesn't exist, is created:public void process(Event event) throws AgentException {
System.out.println(this.agentName + ": Serialized event: " + getModelSerializer().serializeEvent(DataFormat.GENERIC_XML, event));
NewClass newClass = (NewClass)event;Session session = (Session) getBoundEntity();
// Test to see if we have an existing entityif (session == null) {
System.out.println("No session entity!");session = (Session)createBoundEntity();session.setSessionName(newClass.getSessionName());updateBoundEntity(session);System.out.println("Created a new Session: " +
getModelSerializer().serializeEntity(DataFormat.GENERIC_XML, session));} else {
System.out.println(this.agentName + ": Existing Serialized entity: " + getModelSerializer().serializeEntity(DataFormat.GENERIC_XML, session));
}} // End of process
JavaAgent lifecycle
A one time call is made to a function called init().
When an instance of a JavaAgent is brought into existence to service an event, its activated() method is called. Before the JavaAgent is destroyed, its deactivated() method is called. This gives us the opportunity to perform initialization and subsequent cleanup prior to handling the
Page 72
event.
JavaAgent Metadata
From within an instance of a JavaAgent, we can determine meta data about it through a variety of ways.
• this.agentName – The name of the agent
• getAgentDescriptor() - Retrieves an AgentDescriptor object which has getters for:
◦ AgentName
◦ Entityid
◦ EntityType
◦ Priority
◦ Version
• getAgentVersion() - Retrieves the version of the agent.
• getSolutionDescriptor() - Retrieves information about the solution which this JavaAgent is associated with. The returned object is a SolutionDescriptor which has properties for:
◦ SolutionName
◦ SolutionVersion
◦ Version
Adding additional classes
A Java Agent is implemented as an OSGi bundle and follows the technical rules associated with OSGi. Ideally, we don't have to know the programming details of OSGi but we do need to understand a few points. Unlike a "normal" Java application which can reference anything on a classpath, OSGi bundles can only reference packages that are explicitly declared as being necessaryfor the operation of the bundle. This may initially sound like added complexity but the reality is that it is a good thing. By explicitly stating that a bundle has a dependency on package XYZ then, when the bundle is loaded, the runtime can validate that XYZ is available to it. The alternative is that at runtime, only when the code attempts to reference XYZ, will a potential omission of the implementation of an XYZ be detected.
To build an OSGi bundle, we need to create an eclipse OSGi Bundle Project:
Page 73
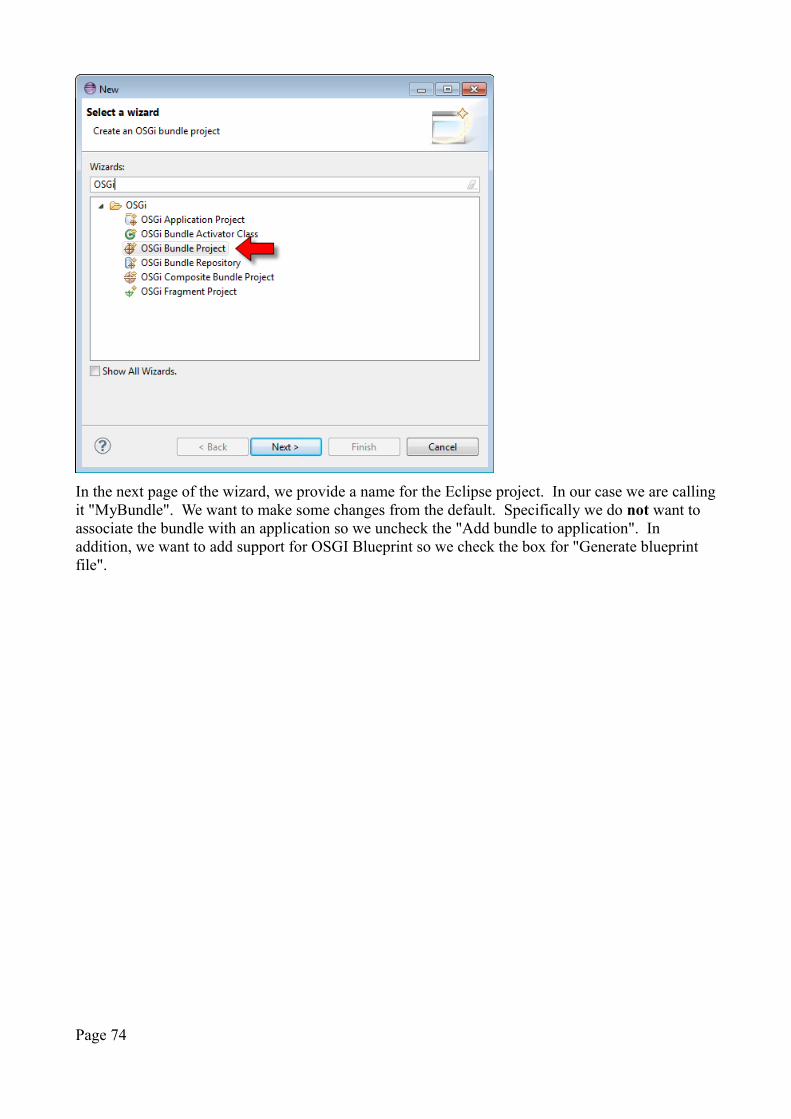
In the next page of the wizard, we provide a name for the Eclipse project. In our case we are callingit "MyBundle". We want to make some changes from the default. Specifically we do not want to associate the bundle with an application so we uncheck the "Add bundle to application". In addition, we want to add support for OSGI Blueprint so we check the box for "Generate blueprint file".
Page 74
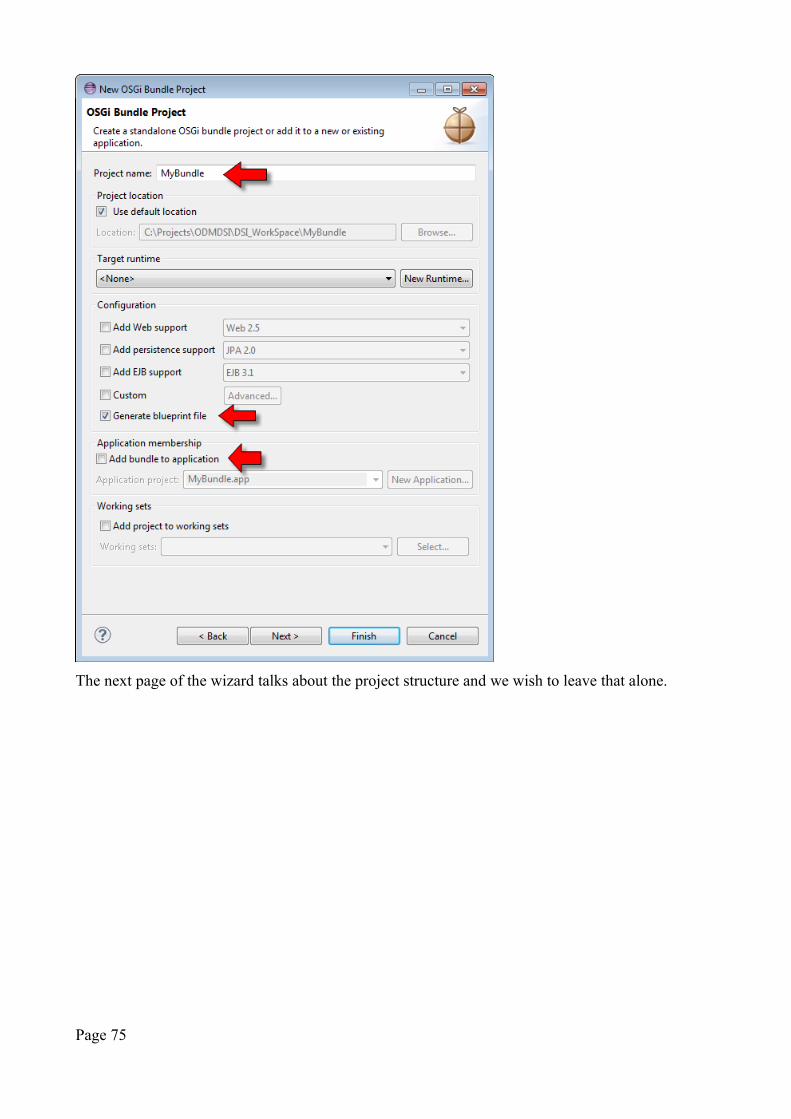
The next page of the wizard talks about the project structure and we wish to leave that alone.
Page 75

The final page of the wizard allows us to provide some core details of the OSGi bundle configuration. An important change here is to remove the "Bundle root" definition. This changes the location of the OSGi configuration data in the generated project.
The project generated at the conclusion of the wizard should look as follows:
Page 76

We can now implement the Java code within our project. Here we will build a simple example.
Create a package called "com.kolban" and create a Java interface within called "Greeting".package com.kolban;
public interface Greeting {public String greet(String name);
}
This defines the interface we wish to expose.
Next, we create a new package called "com.kolban.impl" which contains a class called "GreetingImpl" that is the implementation of the Greeting interface:package com.kolban.impl;import com.kolban.Greeting;
public class GreetingImpl implements Greeting {@Overridepublic String greet(String name) {
System.out.println("GreetingImpl says hello to: " + name);return "Hello " + name + " from GreetingImpl";
}}
The resulting project will look as follows:
We have now completed the code level implementation of our Java function. We could easily extend this by adding additional interfaces and implementation classes to this project. We will stop here simply because we are merely illustrating a technique.
What remains in this project is to define what is exposed by the OSGi bundle that this module implements. The nature of OSGi is to hide implementations. What then does this service wish to expose? The answer is the the interface only.
We want to open the MANIFEST.MF file contained in the META-INF folder using the Eclipse
Page 77

manifest editor.
Next we switch to the Runtime tab and define which of the Java packages we are exposing from thisbundle. In our case it will be "com.kolban".
We must also define that the "bin" folder of the build will be included in the Classpath of the bundle. In the Classpath area, click Add.. and select "bin":
Page 78
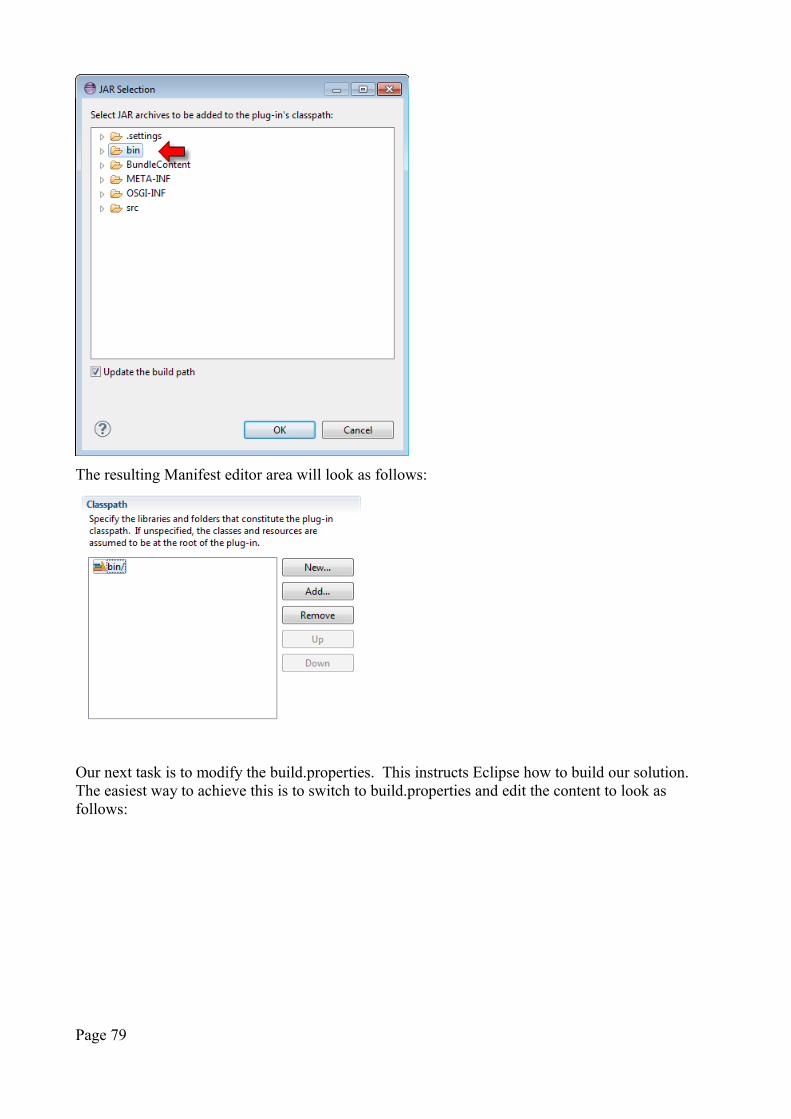
The resulting Manifest editor area will look as follows:
Our next task is to modify the build.properties. This instructs Eclipse how to build our solution. The easiest way to achieve this is to switch to build.properties and edit the content to look as follows:
Page 79

At this point, were we to install this OSGi bundle into an OSGi framework, users would be able to retrieve the interface called com.kolban.Greeting however a very skilled reader might at this point say "What use is getting an interface because I need access to an implementation?". We couldhave also exposed the "com.kolban.impl" package but this defeats the value of OSGi which is to ensure that only logical function is exposed and not dirty implementation. From an OSGi standpoint, what we now want is an OSGi service that will return us an implementation when needed. This is where the OSGi Blueprint story now comes into play.
Open the OSG-INF/blueprint/blueprint.xml file in the Eclipse OSGi Blueprint editor:
Our first step will be to define a bean that refers to our implementation of the service we wish to expose:
Page 80
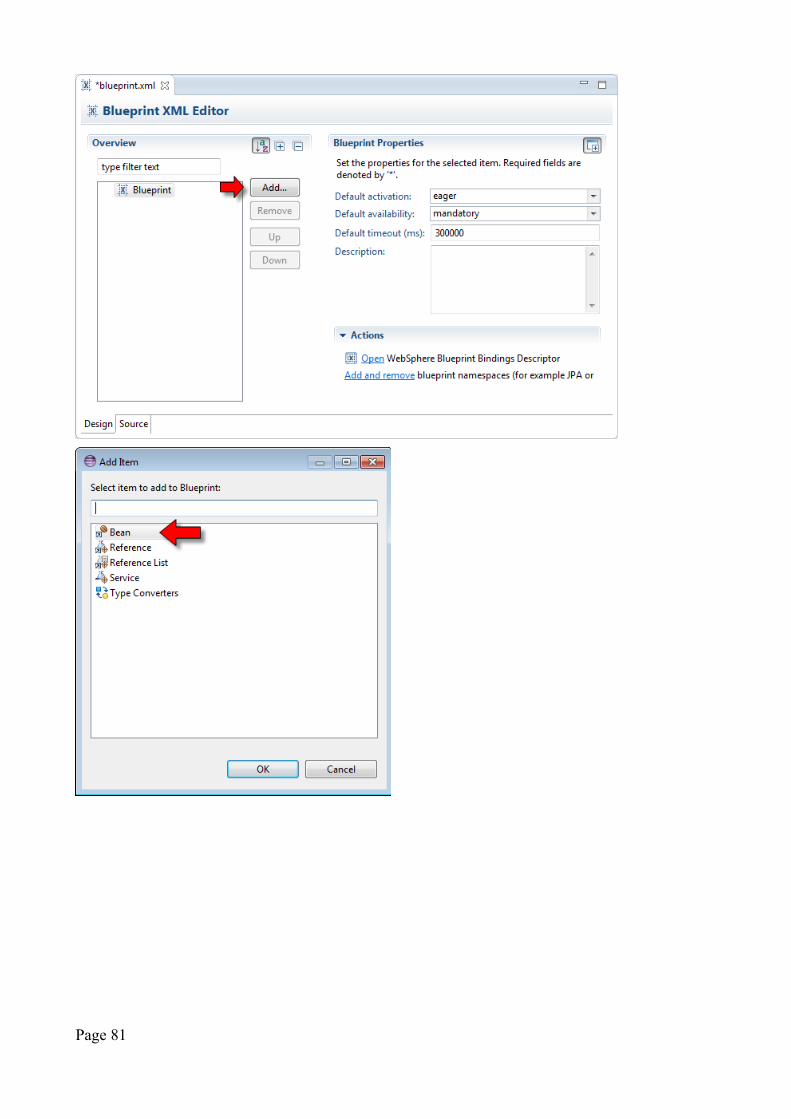
Page 81

Next we create a service from this bean:
In the new blueprint folder, create a file called "blueprint.xml". The content of this file should be:<?xml version="1.0" encoding="UTF-8"?><blueprint xmlns="http://www.osgi.org/xmlns/blueprint/v1.0.0">
<bean id="GreetingImplBean" class="com.kolban.impl.GreetingImpl" /><service ref="GreetingImplBean" id="GreetingImplBeanService"
interface="com.kolban.Greeting"></service></blueprint>
Note: Here is a cheat example of a build.properties that I have found to work:
Page 82
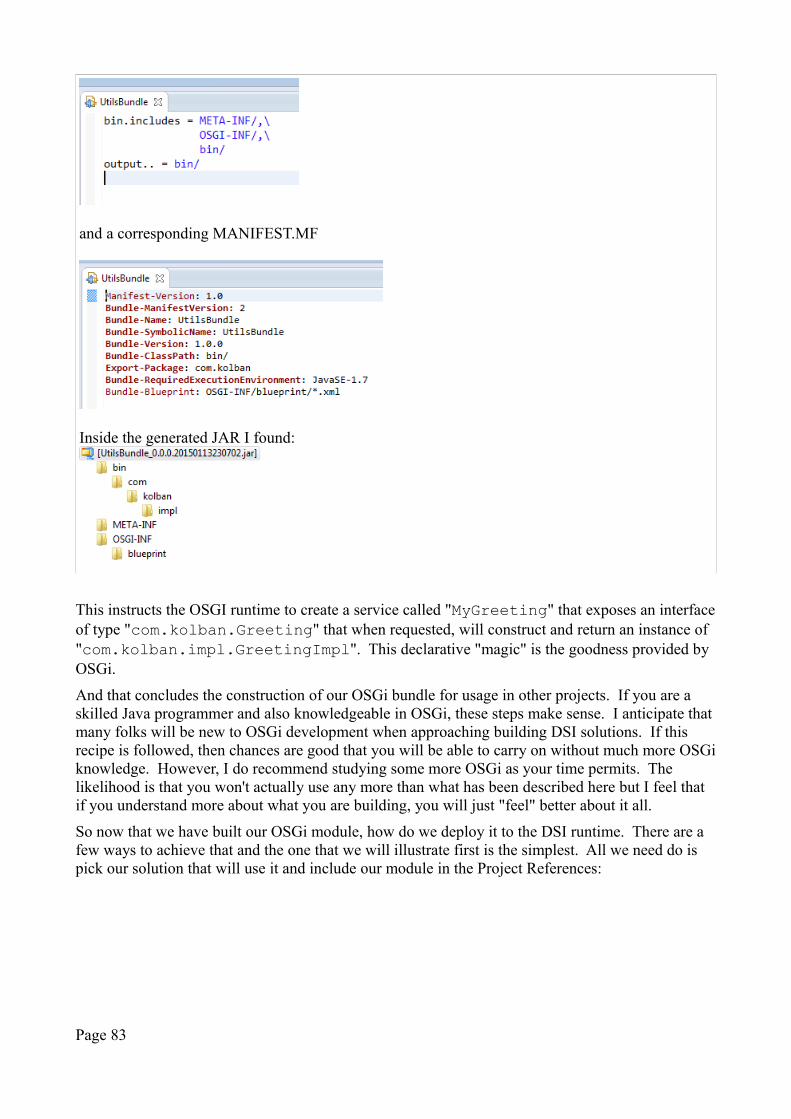
and a corresponding MANIFEST.MF
Inside the generated JAR I found:
This instructs the OSGI runtime to create a service called "MyGreeting" that exposes an interfaceof type "com.kolban.Greeting" that when requested, will construct and return an instance of "com.kolban.impl.GreetingImpl". This declarative "magic" is the goodness provided by OSGi.
And that concludes the construction of our OSGi bundle for usage in other projects. If you are a skilled Java programmer and also knowledgeable in OSGi, these steps make sense. I anticipate that many folks will be new to OSGi development when approaching building DSI solutions. If this recipe is followed, then chances are good that you will be able to carry on without much more OSGiknowledge. However, I do recommend studying some more OSGi as your time permits. The likelihood is that you won't actually use any more than what has been described here but I feel that if you understand more about what you are building, you will just "feel" better about it all.
So now that we have built our OSGi module, how do we deploy it to the DSI runtime. There are a few ways to achieve that and the one that we will illustrate first is the simplest. All we need do is pick our solution that will use it and include our module in the Project References:
Page 83

When the solution is deployed, this will now bring our bundle in with it.
Finally, we come to the payoff. We can now create a Java Agent and in that Java Agent actually leverage our new bundle. Because a Java Agent is itself an OSGi Bundle, we must edit the MANIFEST.MF of the Java Agent and declare that we are importing the "com.kolban" package:
Page 84
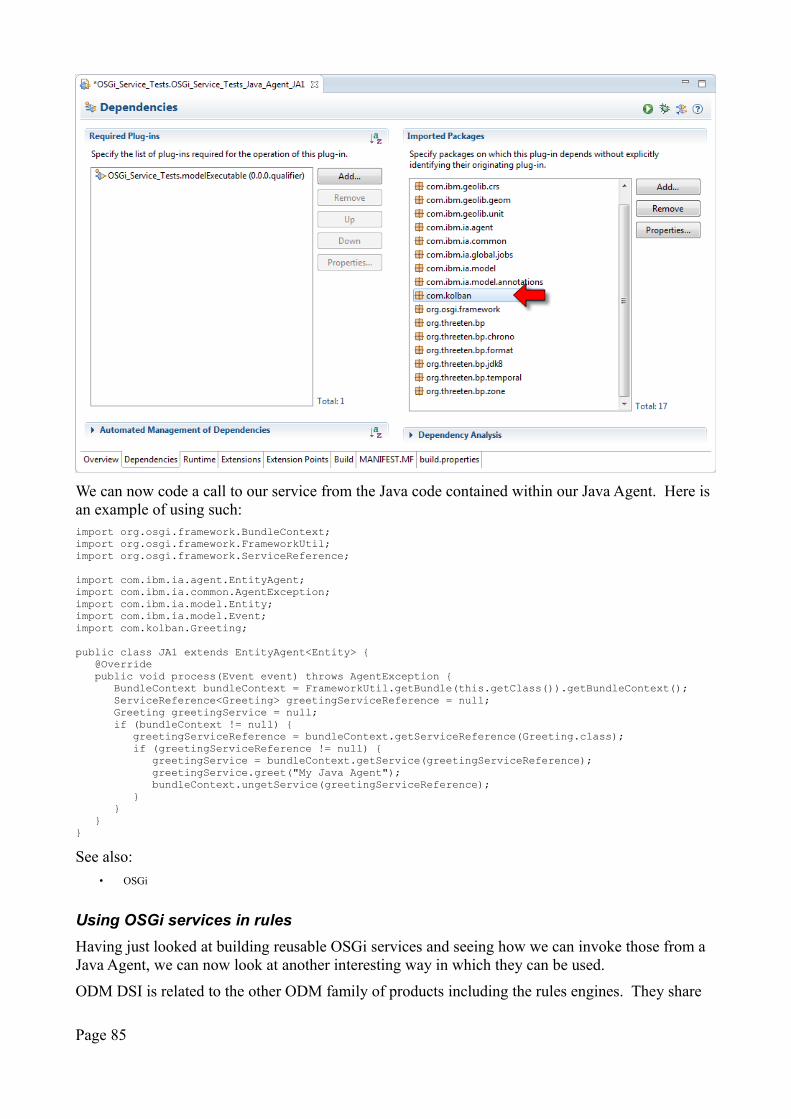
We can now code a call to our service from the Java code contained within our Java Agent. Here is an example of using such:import org.osgi.framework.BundleContext;import org.osgi.framework.FrameworkUtil;import org.osgi.framework.ServiceReference;
import com.ibm.ia.agent.EntityAgent;import com.ibm.ia.common.AgentException;import com.ibm.ia.model.Entity;import com.ibm.ia.model.Event;import com.kolban.Greeting;
public class JA1 extends EntityAgent<Entity> {@Overridepublic void process(Event event) throws AgentException {
BundleContext bundleContext = FrameworkUtil.getBundle(this.getClass()).getBundleContext();ServiceReference<Greeting> greetingServiceReference = null;Greeting greetingService = null;if (bundleContext != null) {
greetingServiceReference = bundleContext.getServiceReference(Greeting.class);if (greetingServiceReference != null) {
greetingService = bundleContext.getService(greetingServiceReference);greetingService.greet("My Java Agent");bundleContext.ungetService(greetingServiceReference);
}}
}}
See also:
• OSGi
Using OSGi services in rules
Having just looked at building reusable OSGi services and seeing how we can invoke those from a Java Agent, we can now look at another interesting way in which they can be used.
ODM DSI is related to the other ODM family of products including the rules engines. They share
Page 85
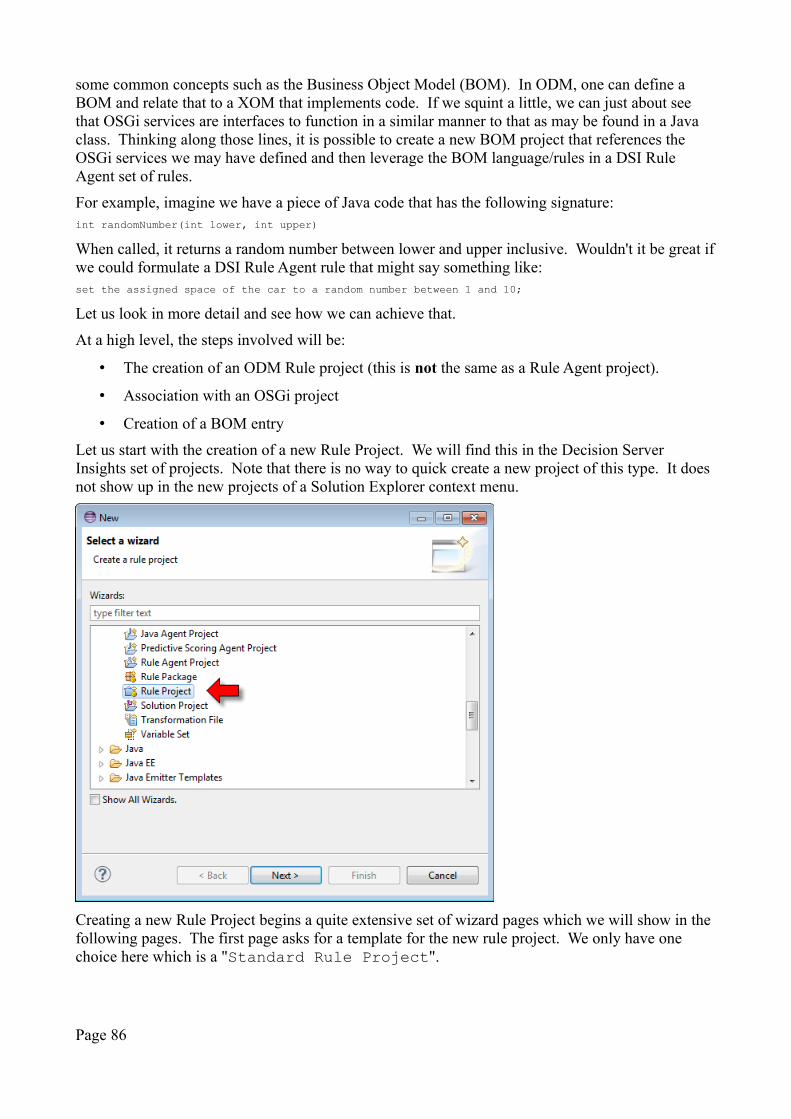
some common concepts such as the Business Object Model (BOM). In ODM, one can define a BOM and relate that to a XOM that implements code. If we squint a little, we can just about see that OSGi services are interfaces to function in a similar manner to that as may be found in a Java class. Thinking along those lines, it is possible to create a new BOM project that references the OSGi services we may have defined and then leverage the BOM language/rules in a DSI Rule Agent set of rules.
For example, imagine we have a piece of Java code that has the following signature:int randomNumber(int lower, int upper)
When called, it returns a random number between lower and upper inclusive. Wouldn't it be great ifwe could formulate a DSI Rule Agent rule that might say something like:set the assigned space of the car to a random number between 1 and 10;
Let us look in more detail and see how we can achieve that.
At a high level, the steps involved will be:
• The creation of an ODM Rule project (this is not the same as a Rule Agent project).
• Association with an OSGi project
• Creation of a BOM entry
Let us start with the creation of a new Rule Project. We will find this in the Decision Server Insights set of projects. Note that there is no way to quick create a new project of this type. It does not show up in the new projects of a Solution Explorer context menu.
Creating a new Rule Project begins a quite extensive set of wizard pages which we will show in the following pages. The first page asks for a template for the new rule project. We only have one choice here which is a "Standard Rule Project".
Page 86
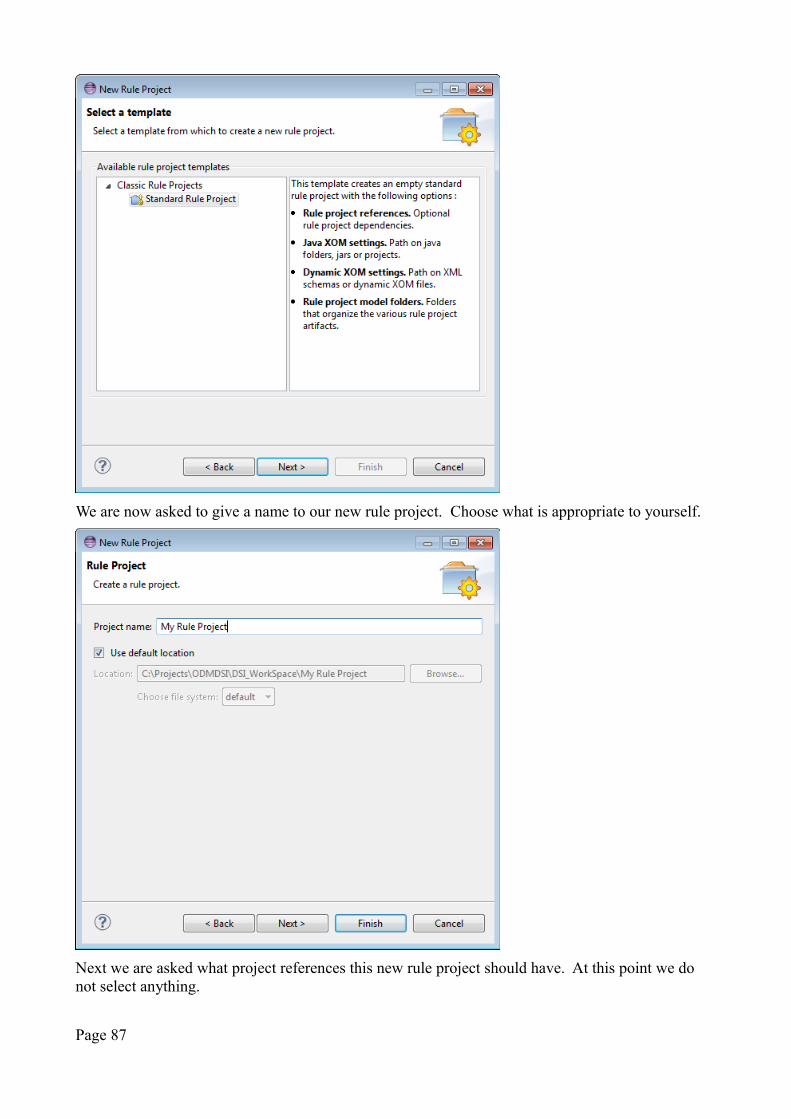
We are now asked to give a name to our new rule project. Choose what is appropriate to yourself.
Next we are asked what project references this new rule project should have. At this point we do not select anything.
Page 87
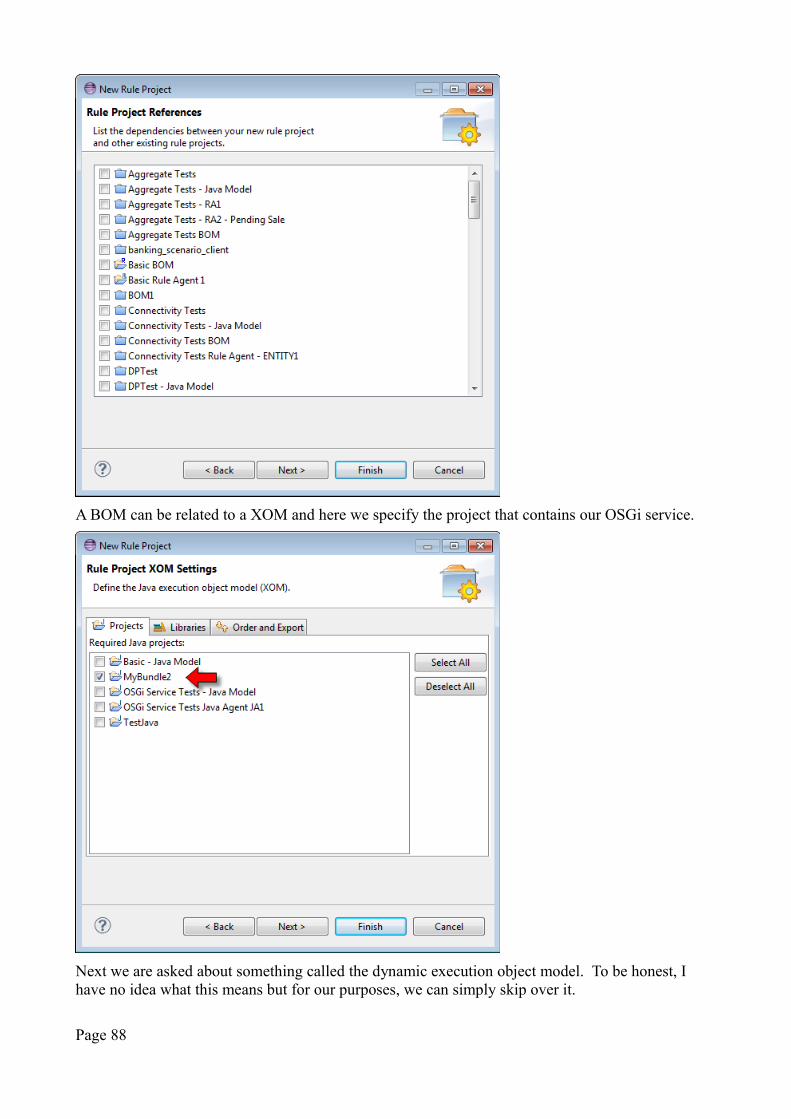
A BOM can be related to a XOM and here we specify the project that contains our OSGi service.
Next we are asked about something called the dynamic execution object model. To be honest, I have no idea what this means but for our purposes, we can simply skip over it.
Page 88
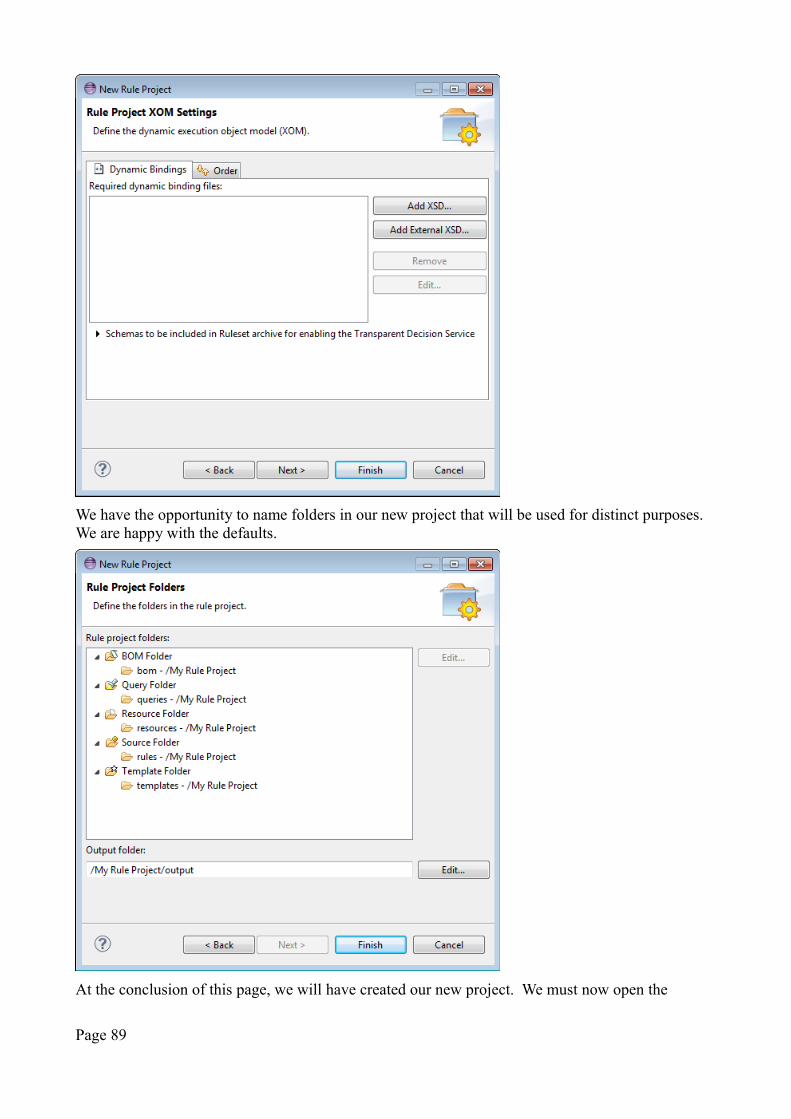
We have the opportunity to name folders in our new project that will be used for distinct purposes. We are happy with the defaults.
At the conclusion of this page, we will have created our new project. We must now open the
Page 89
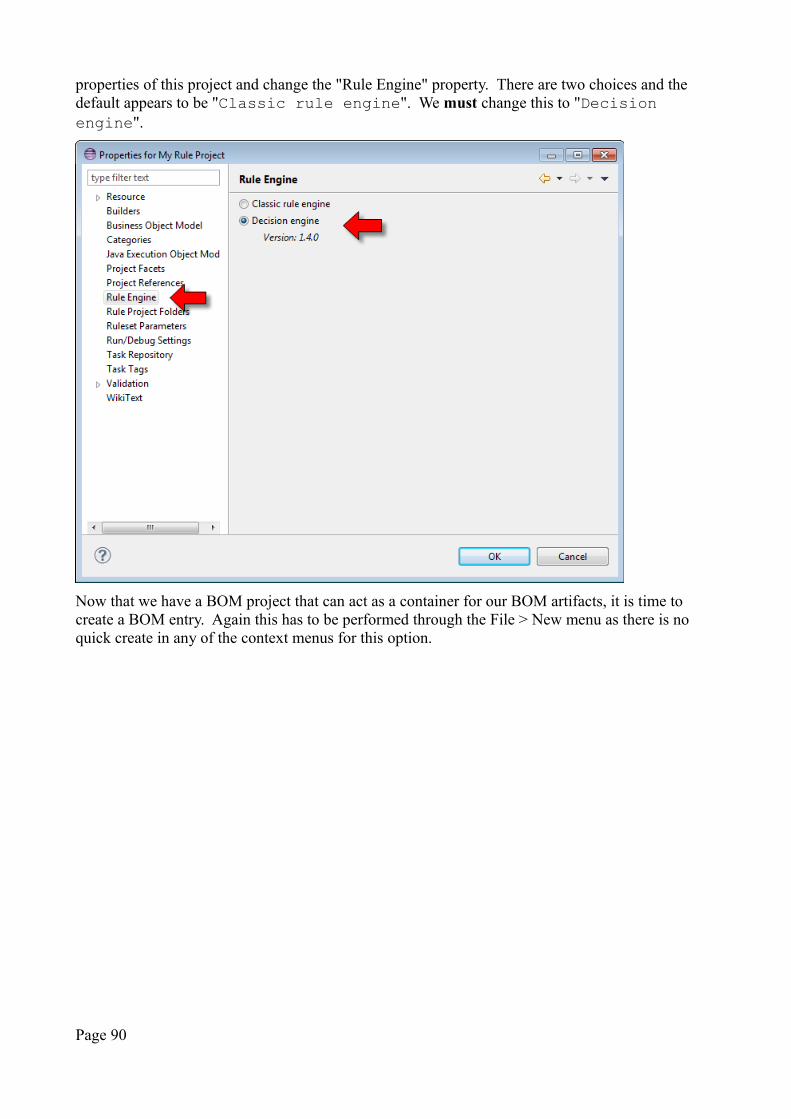
properties of this project and change the "Rule Engine" property. There are two choices and the default appears to be "Classic rule engine". We must change this to "Decision engine".
Now that we have a BOM project that can act as a container for our BOM artifacts, it is time to create a BOM entry. Again this has to be performed through the File > New menu as there is no quick create in any of the context menus for this option.
Page 90
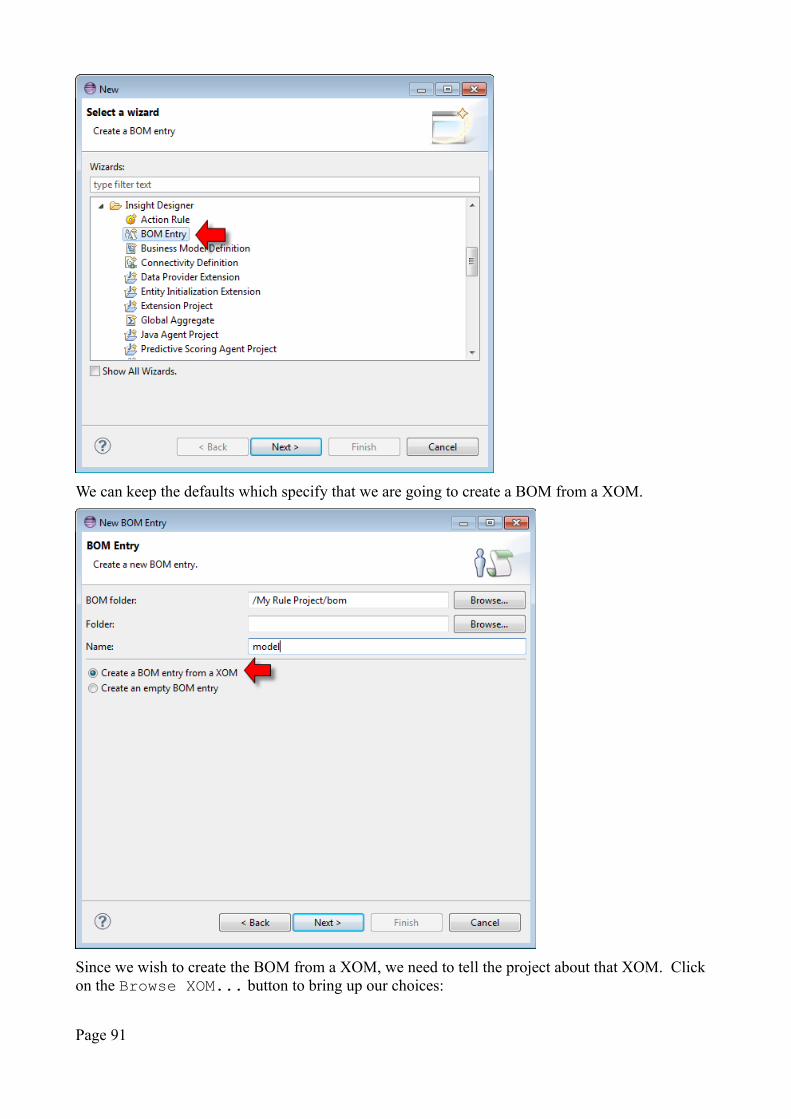
We can keep the defaults which specify that we are going to create a BOM from a XOM.
Since we wish to create the BOM from a XOM, we need to tell the project about that XOM. Click on the Browse XOM... button to bring up our choices:
Page 91
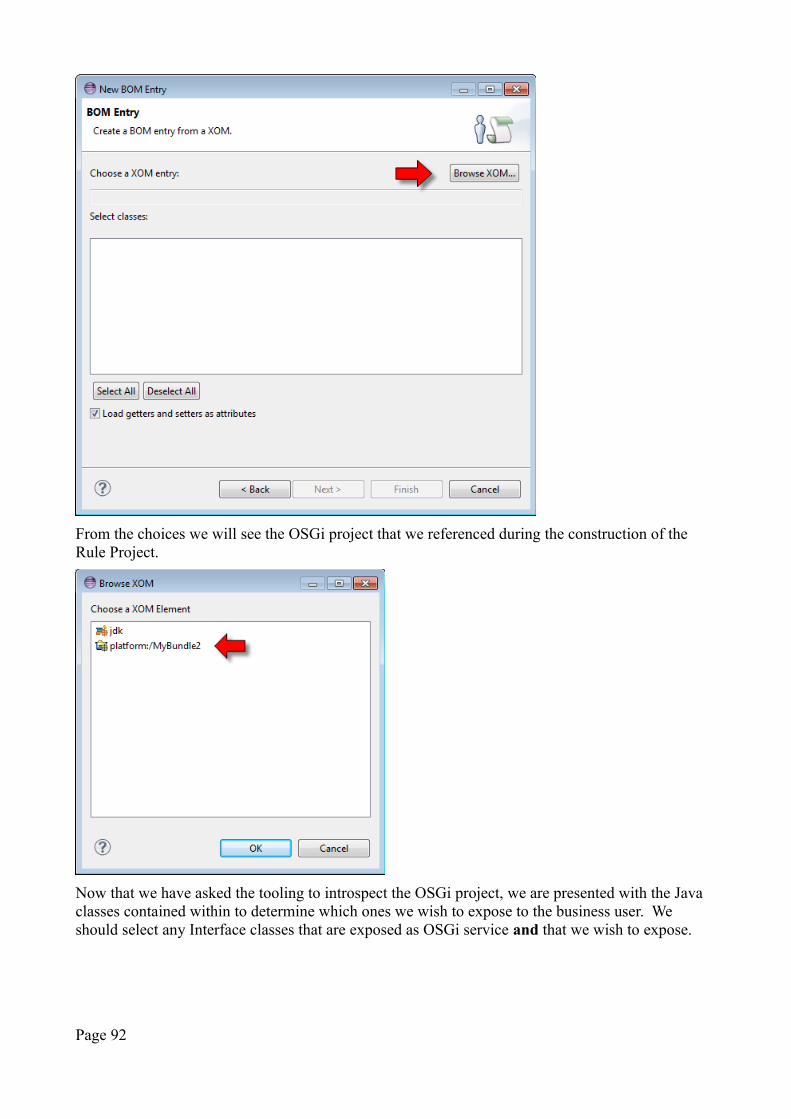
From the choices we will see the OSGi project that we referenced during the construction of the Rule Project.
Now that we have asked the tooling to introspect the OSGi project, we are presented with the Java classes contained within to determine which ones we wish to expose to the business user. We should select any Interface classes that are exposed as OSGi service and that we wish to expose.
Page 92
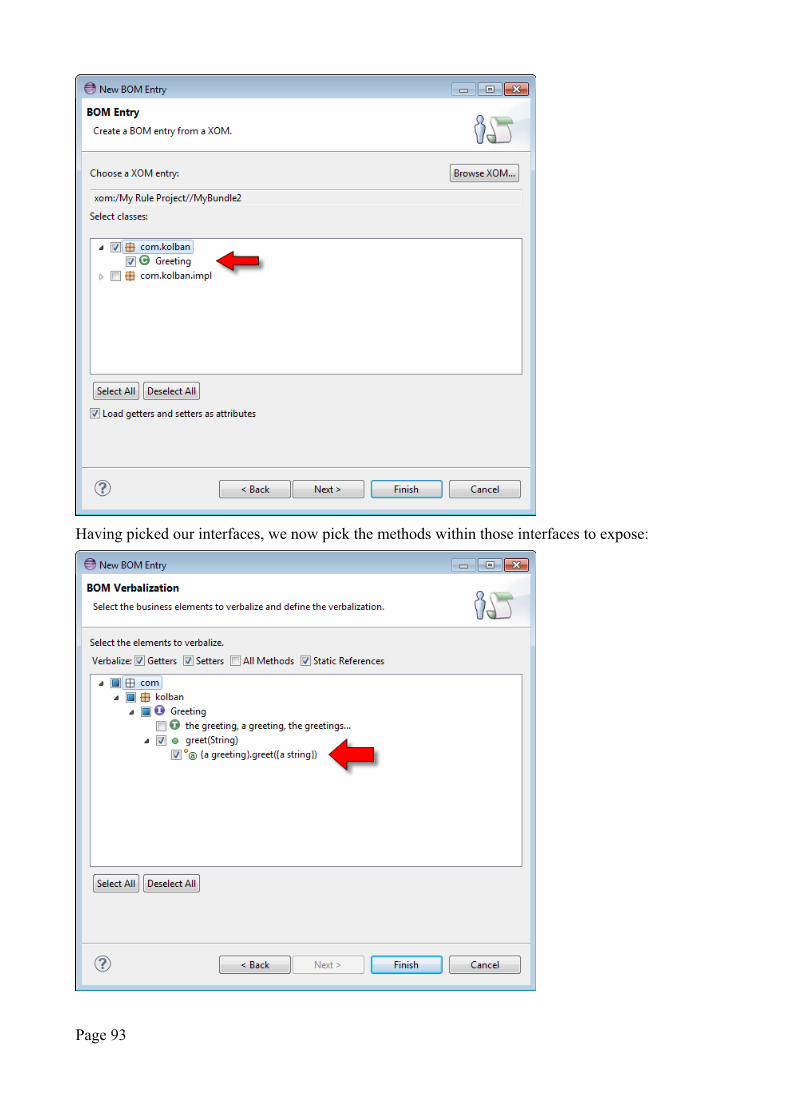
Having picked our interfaces, we now pick the methods within those interfaces to expose:
Page 93
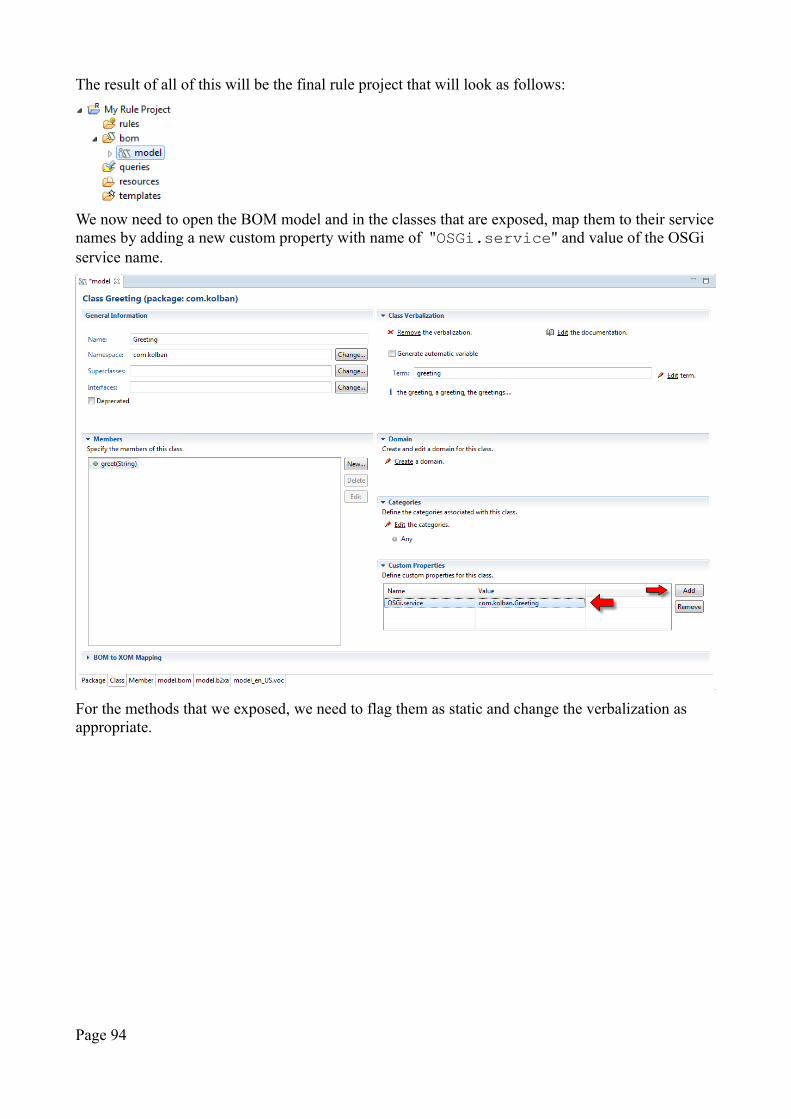
The result of all of this will be the final rule project that will look as follows:
We now need to open the BOM model and in the classes that are exposed, map them to their servicenames by adding a new custom property with name of "OSGi.service" and value of the OSGi service name.
For the methods that we exposed, we need to flag them as static and change the verbalization as appropriate.
Page 94
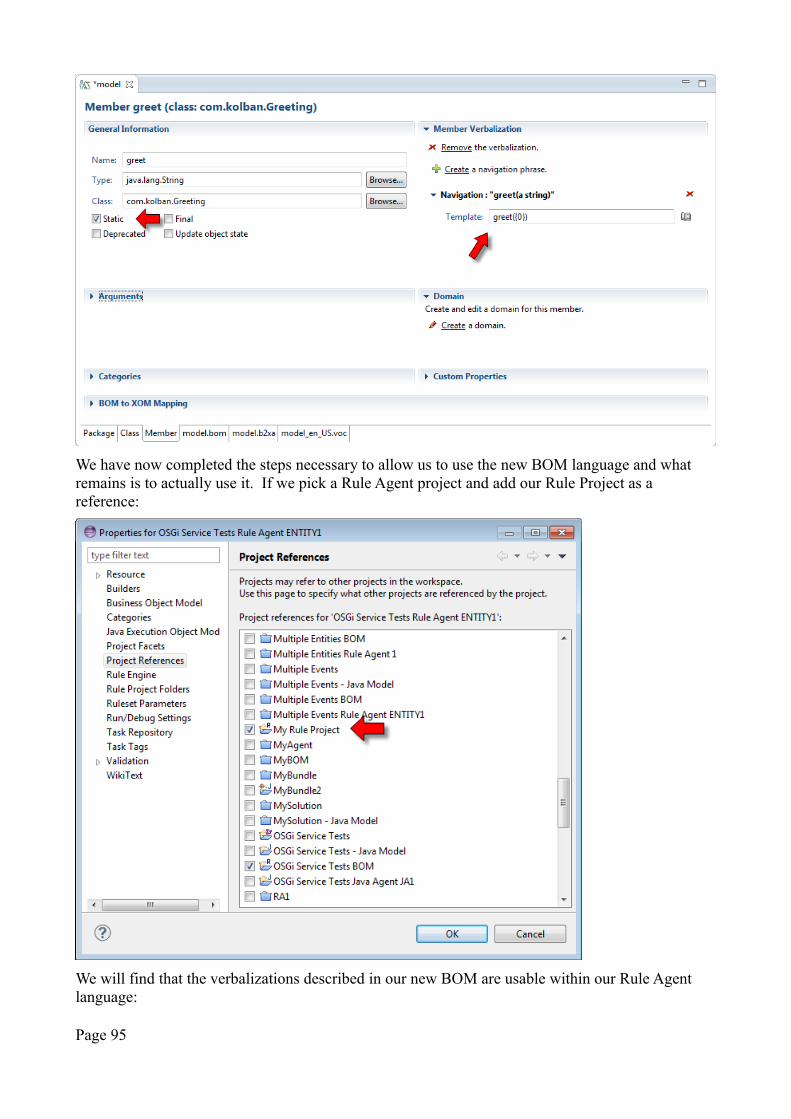
We have now completed the steps necessary to allow us to use the new BOM language and what remains is to actually use it. If we pick a Rule Agent project and add our Rule Project as a reference:
We will find that the verbalizations described in our new BOM are usable within our Rule Agent language:
Page 95
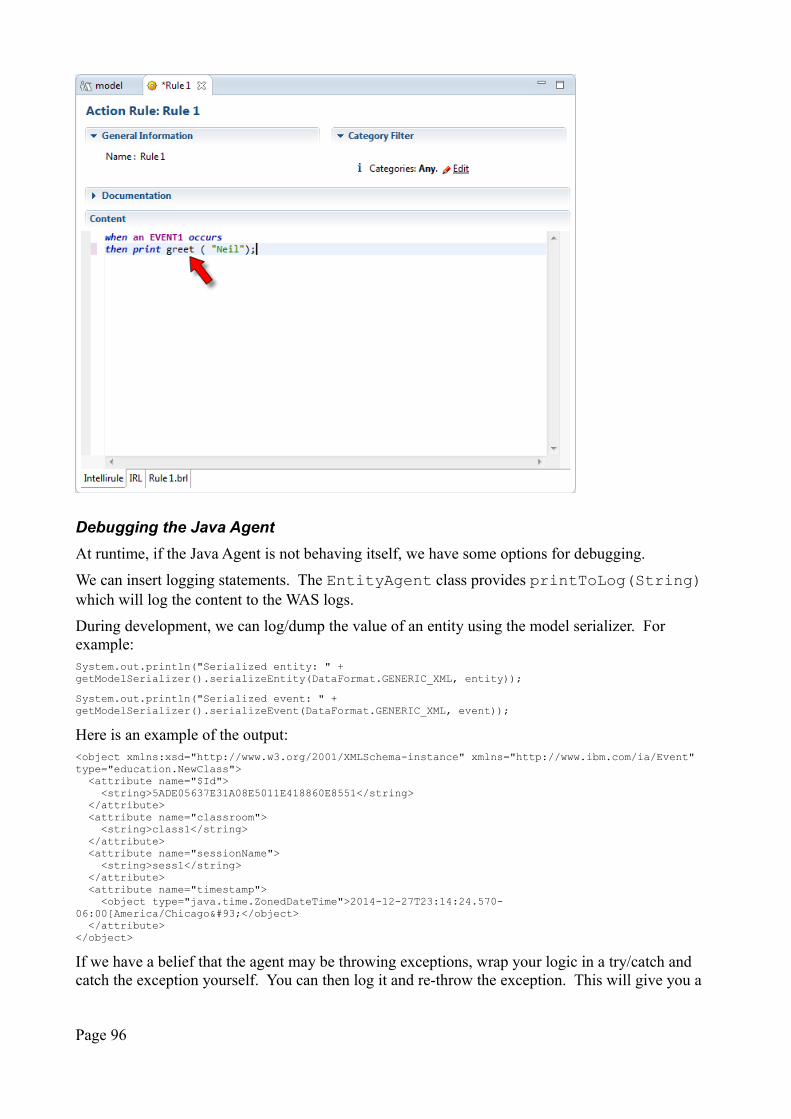
Debugging the Java Agent
At runtime, if the Java Agent is not behaving itself, we have some options for debugging.
We can insert logging statements. The EntityAgent class provides printToLog(String) which will log the content to the WAS logs.
During development, we can log/dump the value of an entity using the model serializer. For example:System.out.println("Serialized entity: " + getModelSerializer().serializeEntity(DataFormat.GENERIC_XML, entity));
System.out.println("Serialized event: " + getModelSerializer().serializeEvent(DataFormat.GENERIC_XML, event));
Here is an example of the output:<object xmlns:xsd="http://www.w3.org/2001/XMLSchema-instance" xmlns="http://www.ibm.com/ia/Event" type="education.NewClass"> <attribute name="$Id"> <string>5ADE05637E31A08E5011E418860E8551</string> </attribute> <attribute name="classroom"> <string>class1</string> </attribute> <attribute name="sessionName"> <string>sess1</string> </attribute> <attribute name="timestamp"> <object type="java.time.ZonedDateTime">2014-12-27T23:14:24.570-06:00[America/Chicago]</object> </attribute></object>
If we have a belief that the agent may be throwing exceptions, wrap your logic in a try/catch and catch the exception yourself. You can then log it and re-throw the exception. This will give you a
Page 96
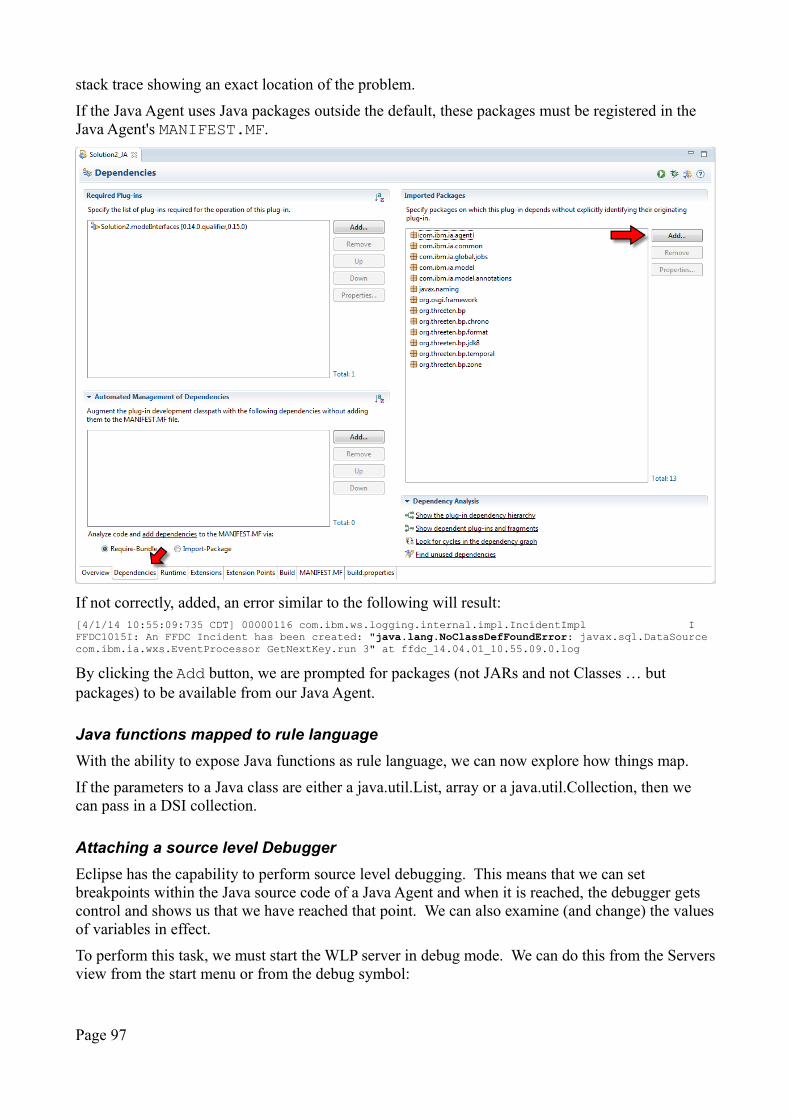
stack trace showing an exact location of the problem.
If the Java Agent uses Java packages outside the default, these packages must be registered in the Java Agent's MANIFEST.MF.
If not correctly, added, an error similar to the following will result:[4/1/14 10:55:09:735 CDT] 00000116 com.ibm.ws.logging.internal.impl.IncidentImpl I FFDC1015I: An FFDC Incident has been created: "java.lang.NoClassDefFoundError: javax.sql.DataSource com.ibm.ia.wxs.EventProcessor GetNextKey.run 3" at ffdc_14.04.01_10.55.09.0.log
By clicking the Add button, we are prompted for packages (not JARs and not Classes … but packages) to be available from our Java Agent.
Java functions mapped to rule language
With the ability to expose Java functions as rule language, we can now explore how things map.
If the parameters to a Java class are either a java.util.List, array or a java.util.Collection, then we can pass in a DSI collection.
Attaching a source level Debugger
Eclipse has the capability to perform source level debugging. This means that we can set breakpoints within the Java source code of a Java Agent and when it is reached, the debugger gets control and shows us that we have reached that point. We can also examine (and change) the valuesof variables in effect.
To perform this task, we must start the WLP server in debug mode. We can do this from the Serversview from the start menu or from the debug symbol:
Page 97

Once the server has been started (from Eclipse) there is continued communication between Eclipse and the server. Anytime we add a break point in a Java Agent source statement, the execution will pause when the break point is reached.
Deleting Agent projects
If after creating an agent project and associating it with a solution if we then choose to delete the agent project, we must also remove the association between the solution and the agent. This is doneby opening the properties for the solution project and selecting the "Project References". Inthere we will find that there may still exist a reference to an agent project which now no longer exists. If we un-check the reference we will have restored consistency.
Page 98
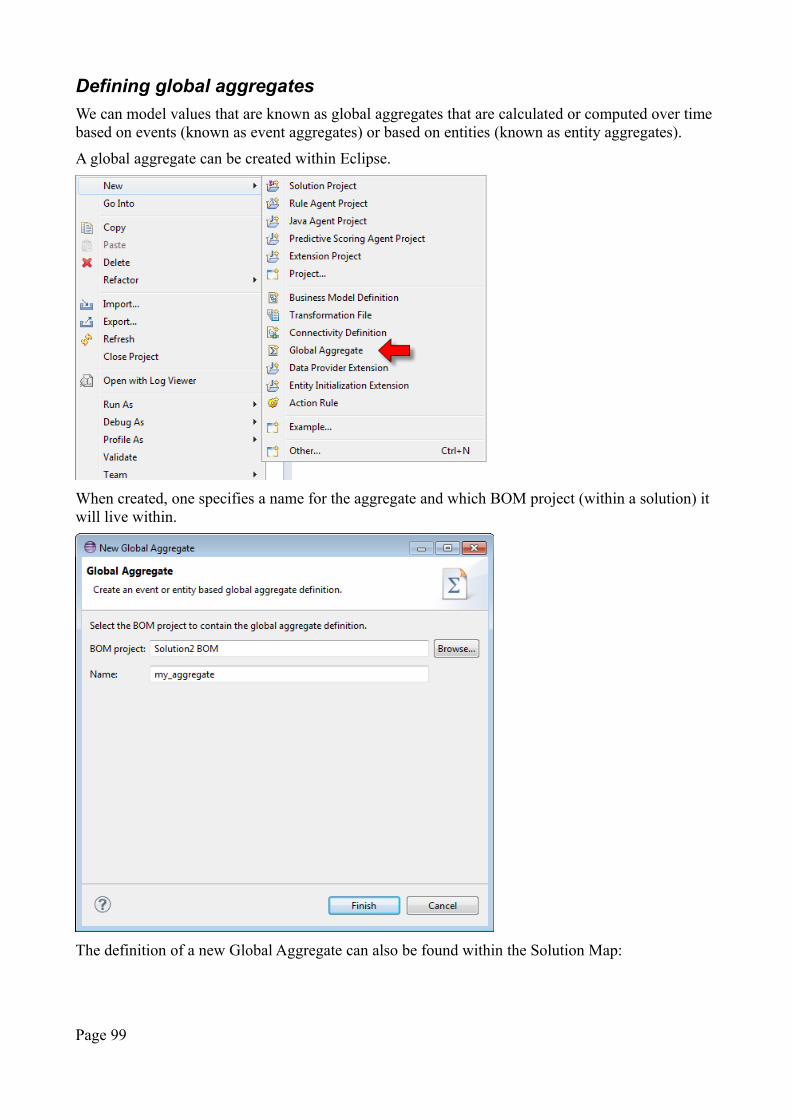
Defining global aggregates
We can model values that are known as global aggregates that are calculated or computed over time based on events (known as event aggregates) or based on entities (known as entity aggregates).
A global aggregate can be created within Eclipse.
When created, one specifies a name for the aggregate and which BOM project (within a solution) it will live within.
The definition of a new Global Aggregate can also be found within the Solution Map:
Page 99
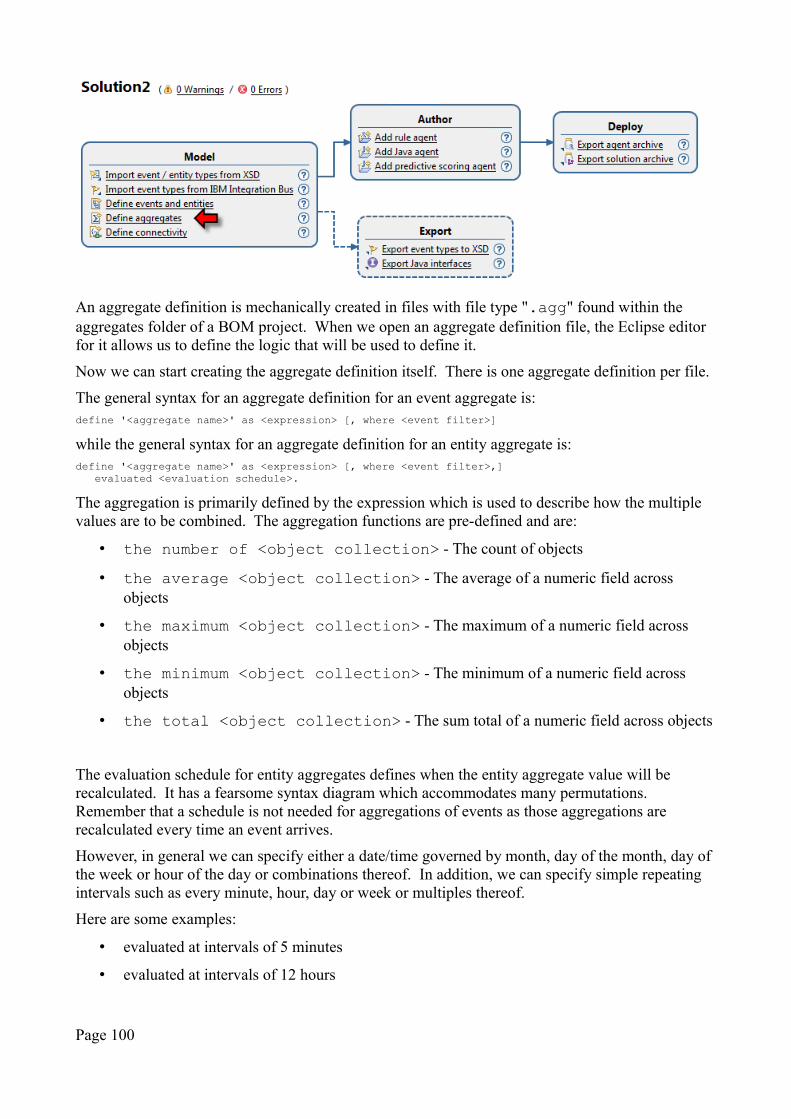
An aggregate definition is mechanically created in files with file type ".agg" found within the aggregates folder of a BOM project. When we open an aggregate definition file, the Eclipse editor for it allows us to define the logic that will be used to define it.
Now we can start creating the aggregate definition itself. There is one aggregate definition per file.
The general syntax for an aggregate definition for an event aggregate is:define '<aggregate name>' as <expression> [, where <event filter>]
while the general syntax for an aggregate definition for an entity aggregate is:define '<aggregate name>' as <expression> [, where <event filter>,]
evaluated <evaluation schedule>.
The aggregation is primarily defined by the expression which is used to describe how the multiple values are to be combined. The aggregation functions are pre-defined and are:
• the number of <object collection> - The count of objects
• the average <object collection> - The average of a numeric field across objects
• the maximum <object collection> - The maximum of a numeric field across objects
• the minimum <object collection> - The minimum of a numeric field across objects
• the total <object collection> - The sum total of a numeric field across objects
The evaluation schedule for entity aggregates defines when the entity aggregate value will be recalculated. It has a fearsome syntax diagram which accommodates many permutations. Remember that a schedule is not needed for aggregations of events as those aggregations are recalculated every time an event arrives.
However, in general we can specify either a date/time governed by month, day of the month, day of the week or hour of the day or combinations thereof. In addition, we can specify simple repeating intervals such as every minute, hour, day or week or multiples thereof.
Here are some examples:
• evaluated at intervals of 5 minutes
• evaluated at intervals of 12 hours
Page 100
• evaluated at intervals of 1 day
• evaluated every Saturday at 2:00 AM
• evaluated every minute
An aggregate value must always be a numeric. It appears that there are also restrictions on what may be used to calculate aggregate values. At this time, it appears that the aggregate can only be built from the values of entity properties of event properties and not upon any computation associated with them. To make this clear, we can sum, average and calculate the min and max of properties but not computed properties.
The implication of this is that some items that we think we should be able to aggregate can't be. Forexample, if a property field is of type duration, that can't be converted into a number and then aggregated.
See also:
• Aggregating event and entity data
Global event aggregates
Let us look specifically at global event aggregates. The formal syntax is:define '<aggregate variable name>' as <aggregate expression>
[, where <event filter> ][, defaulting to <value> if there is less than <time> of event history]
The aggregate expression is defined as one of:
• the average <expr>
• the maximum <expr>
• the minimum <expr>
• the number of <expr>
• the total <expr>
The "where" clause allows us to filter in or out events for inclusion in the aggregate calculation. For example, a sales event at a coffee shop may be for coffee or cakes. If we wanted to aggregate the total of coffee sales, we may wish to define:define 'coffee_total' as ...
where the type of sales event is 'Coffee'
An interesting question arises if we consider asking for an aggregate value before we have accumulated enough information. For example, if we have newly started a solution and we wish to determine if the current sale is close to the average, what does it mean if we have no data about the previous sales yet calculated?
To answer this question, event aggregates have the notion of a default value which will be used when ever an aggregate value is needed and we don't (yet) have enough data.define 'average wait time' as …
, defaulting to 3 if there is then than 30 minutes of event history
Once there is sufficient data, the default value will no longer be used and the actual calculated valuewill take effect.
Page 101
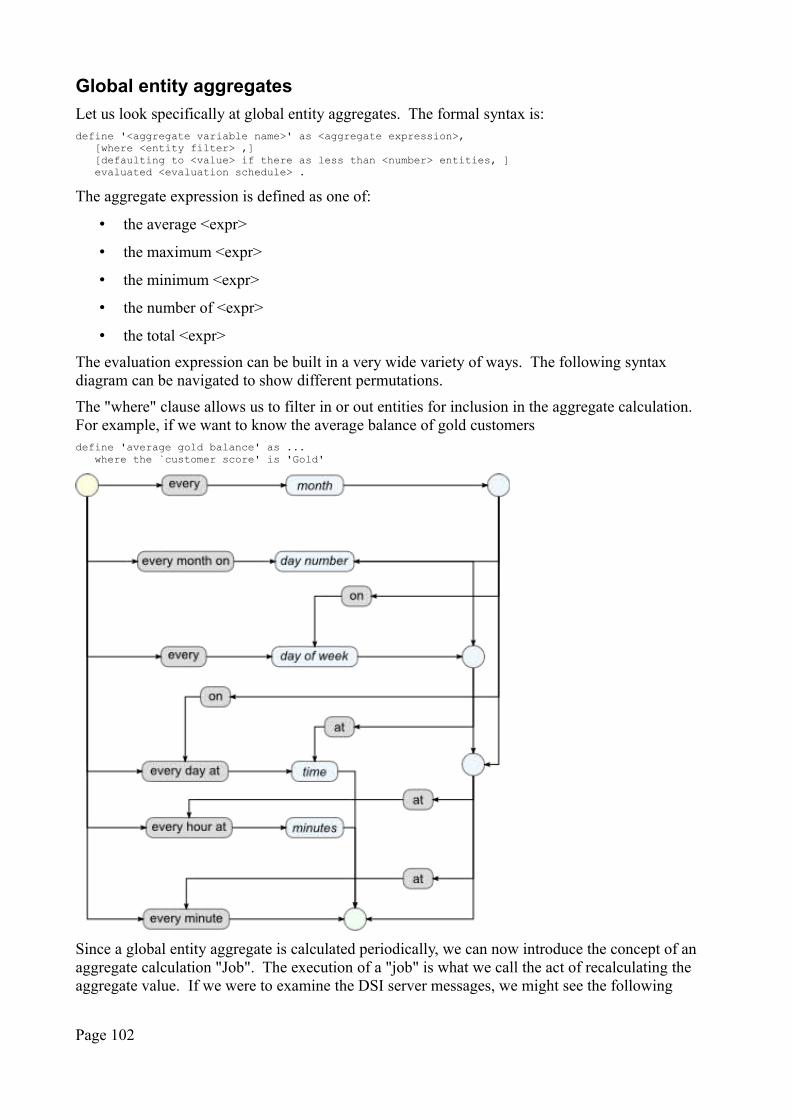
Global entity aggregates
Let us look specifically at global entity aggregates. The formal syntax is:define '<aggregate variable name>' as <aggregate expression>,
[where <entity filter> ,][defaulting to <value> if there as less than <number> entities, ]evaluated <evaluation schedule> .
The aggregate expression is defined as one of:
• the average <expr>
• the maximum <expr>
• the minimum <expr>
• the number of <expr>
• the total <expr>
The evaluation expression can be built in a very wide variety of ways. The following syntax diagram can be navigated to show different permutations.
The "where" clause allows us to filter in or out entities for inclusion in the aggregate calculation. For example, if we want to know the average balance of gold customersdefine 'average gold balance' as ...
where the `customer score' is 'Gold'
Since a global entity aggregate is calculated periodically, we can now introduce the concept of an aggregate calculation "Job". The execution of a "job" is what we call the act of recalculating the aggregate value. If we were to examine the DSI server messages, we might see the following
Page 102
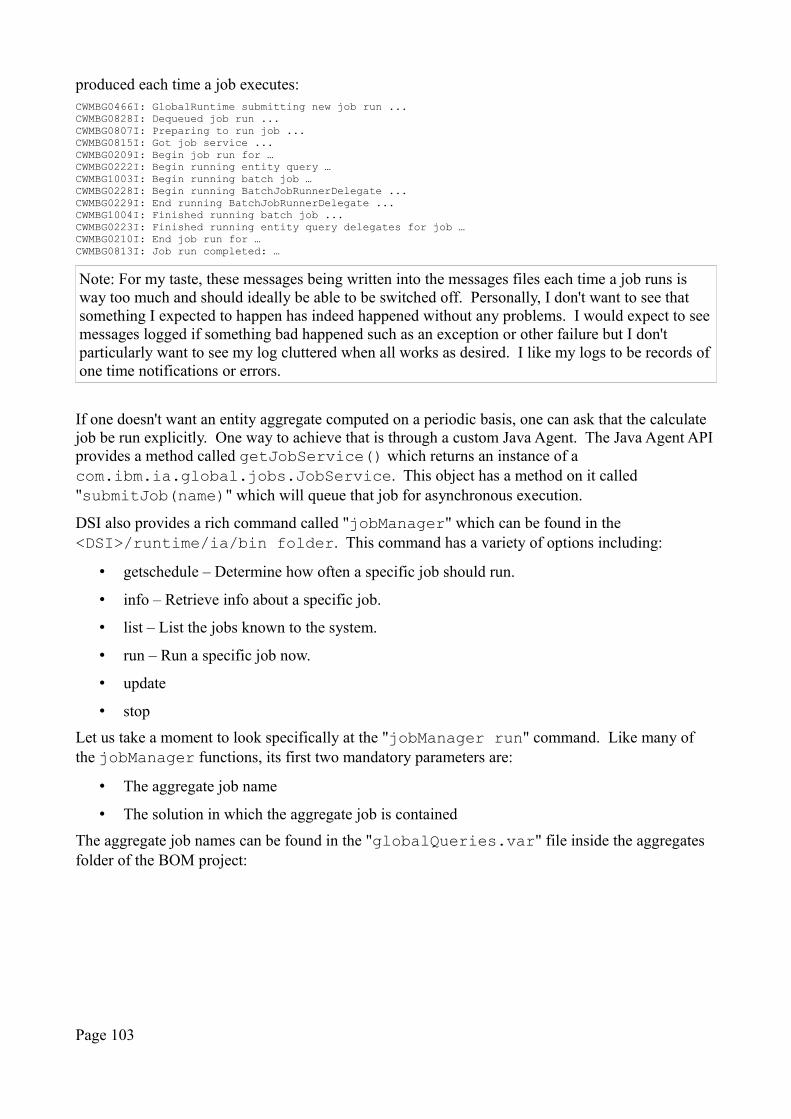
produced each time a job executes:CWMBG0466I: GlobalRuntime submitting new job run ...CWMBG0828I: Dequeued job run ...CWMBG0807I: Preparing to run job ...CWMBG0815I: Got job service ... CWMBG0209I: Begin job run for …CWMBG0222I: Begin running entity query …CWMBG1003I: Begin running batch job …CWMBG0228I: Begin running BatchJobRunnerDelegate ... CWMBG0229I: End running BatchJobRunnerDelegate ... CWMBG1004I: Finished running batch job ...CWMBG0223I: Finished running entity query delegates for job …CWMBG0210I: End job run for …CWMBG0813I: Job run completed: …
Note: For my taste, these messages being written into the messages files each time a job runs is way too much and should ideally be able to be switched off. Personally, I don't want to see that something I expected to happen has indeed happened without any problems. I would expect to seemessages logged if something bad happened such as an exception or other failure but I don't particularly want to see my log cluttered when all works as desired. I like my logs to be records ofone time notifications or errors.
If one doesn't want an entity aggregate computed on a periodic basis, one can ask that the calculate job be run explicitly. One way to achieve that is through a custom Java Agent. The Java Agent APIprovides a method called getJobService() which returns an instance of a com.ibm.ia.global.jobs.JobService. This object has a method on it called "submitJob(name)" which will queue that job for asynchronous execution.
DSI also provides a rich command called "jobManager" which can be found in the <DSI>/runtime/ia/bin folder. This command has a variety of options including:
• getschedule – Determine how often a specific job should run.
• info – Retrieve info about a specific job.
• list – List the jobs known to the system.
• run – Run a specific job now.
• update
• stop
Let us take a moment to look specifically at the "jobManager run" command. Like many of the jobManager functions, its first two mandatory parameters are:
• The aggregate job name
• The solution in which the aggregate job is contained
The aggregate job names can be found in the "globalQueries.var" file inside the aggregates folder of the BOM project:
Page 103

An example of such a file might contain:
What is important here is the mapping between the Name property and the Verbalization. For the purposes of DSI, the Verbalization is the name of the aggregate you modeled in Eclipse. This is the name known to the developers and designers of a solution. The Name property is what we are going to call the "Job Name" when we think of jobs. There is an encoding or mapping that will takeus from a verbalization to a job name but that is not important here. Instead, think of it like this:
Page 104
"I have created an aggregate definition in a '.agg' file and that aggregate definition has a name. If I now open the globalQueries definition file, I can find that name in the 'Verbalization' column and from there read back to the 'Name' column to now find the corresponding 'Job Name'"
As to why we have this level of indirection, I have no idea. If I were to guess it is because a verbalization name is meant to be high level yet for some internal technical reasons, we can't use the same allowable characters (eg. spaces or underscores) that we can use in the verbalization as we use in the Job Name. It may be awkward to have to have a level of indirection but it isn't a show stopper and over time we may learn more about why we have this state of affairs.
Since an aggregate definition is modeled in a BOM project and a BOM project is contained within asolution, we now have knowledge of both parts of the job's identity.
We can now use the 'jobManger run' command to cause the job to run and hence the corresponding entity aggregate to be recalculated. The command takes an additional mandatory parameter which is a descriptive piece of text. The value is un-important to operation but will be kept with the history or logging of the job so that we may identify it later should we need.
An example run might be:jobManager run defvartotalx95widgets Aggregate_Tests "hello world!"
This might respond with:Job successfully submitted, job id = 749957f5-eee7-4092-1d11-e4047e5a0132
Note that the command returns immediately as the job is scheduled to run. The command doesn't wait for the job to complete.
To determine the outcome or status of the job, we can run "jobManager info <jobName> <solution>". By default it will return the details for the last instance of that type of job submitted but we can also supply a jobId that is returned when a job is started to examine a specific job instance.
The "jobManager list" command lists previously submitted jobs including their jobIds and their status.
Programming with aggregates
When programming with aggregates, we will find that the names of the aggregate variables are "encoded". Specifically:
• The variable name starts with 'defvar'
• Special characters (eg. '_') are encoded as '$xNN$` where NN is the codepoint in decimal.
A Java function to decode such vars would be:public static String decodeAggregateVar(String aggregateVar) {
String patternString = "\\$x(\\w{1,3})\\$";Matcher matcher = Pattern.compile(patternString).matcher(aggregateVar);String[] parts = aggregateVar.replaceFirst("^defvar", "").split(patternString);String output = "";int i = 0;while (matcher.find()) {
output += parts[i++] + Character.toChars(Integer.parseInt(matcher.group(1)))[0];}if (i < parts.length) {
output += parts[i];}return output;
}
Page 105

Managing projects with Eclipse
It is very easy to get started with Eclipse and if one is only using it infrequently, it is likely you don't need to change anything or work with it in any additional way that you don't already understand. However, if you are going to work with it extensively, there are capabilities in it which can improve your workflow dramatically.
Hiding closed projects
We are likely going to spend some time within the Solution Explorer view. This shows us all the projects that relate to ODM DSI. If we have a workspace which contains many projects, things can become cluttered very quickly.
One of the options in this view is to choose what to hide.
Within that dialog, we can check the box next to "Closed projects". What this says is that any projects which are closed will not be shown in the view. We can then close any projects that we aren't working on at the moment. These projects remain in the workspace but they are "hidden" from the current view.
Page 106
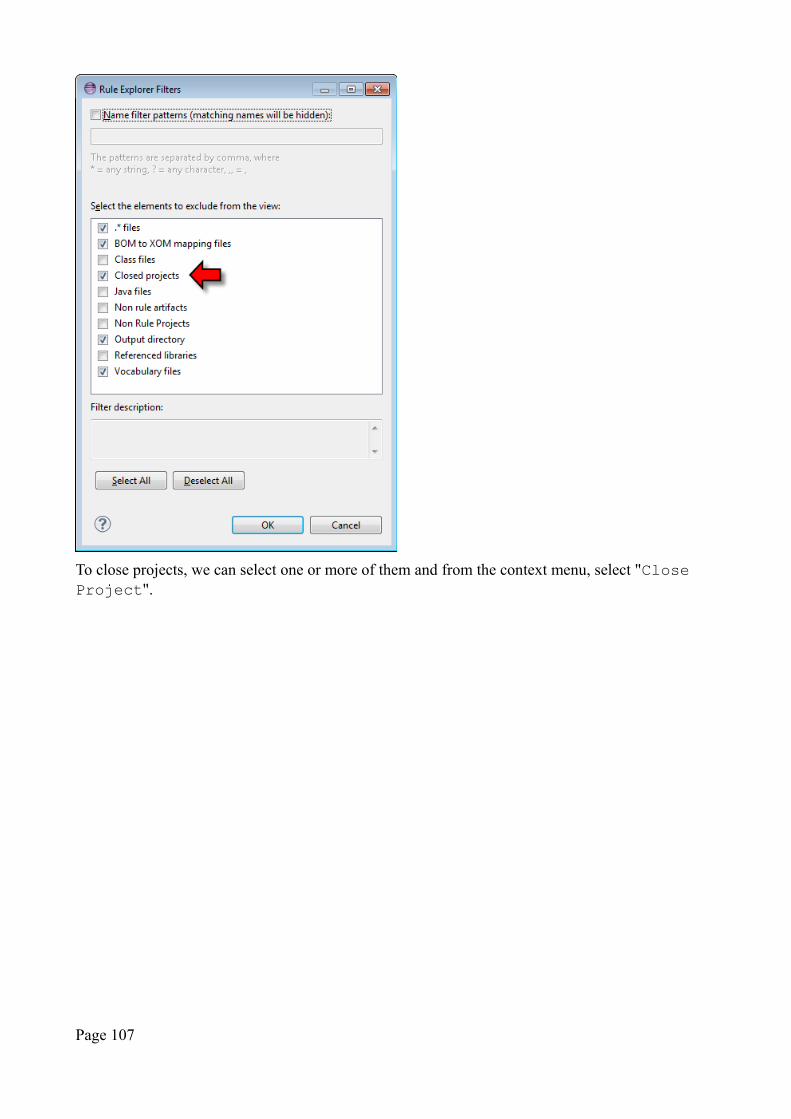
To close projects, we can select one or more of them and from the context menu, select "Close Project".
Page 107

The projects will be closed and resources related to them unloaded from Eclipse. The Solution Explorer view will then update to no longer shown them. If we want to reveal them again, we can un-check the filter that says to hide closed projects and re-open them.
When opening a Solution project, we will also be asked if we wish to open related projects. This will restore all the projects related to a solution.
Developing a solution extension
A solution extension is the general name given to function supplied by DSI that doesn't specifically fit elsewhere. It isn't rules or BOM definitions.
ODM DSI currently provides two types of extensions. These are:
• Initialization Extensions
• Data Provider Extensions
In both these cases, they are implemented as Java code. This Java Code lives inside yet another ODM DSI Eclipse project type called an "Extension Project". This type of project can be
Page 108
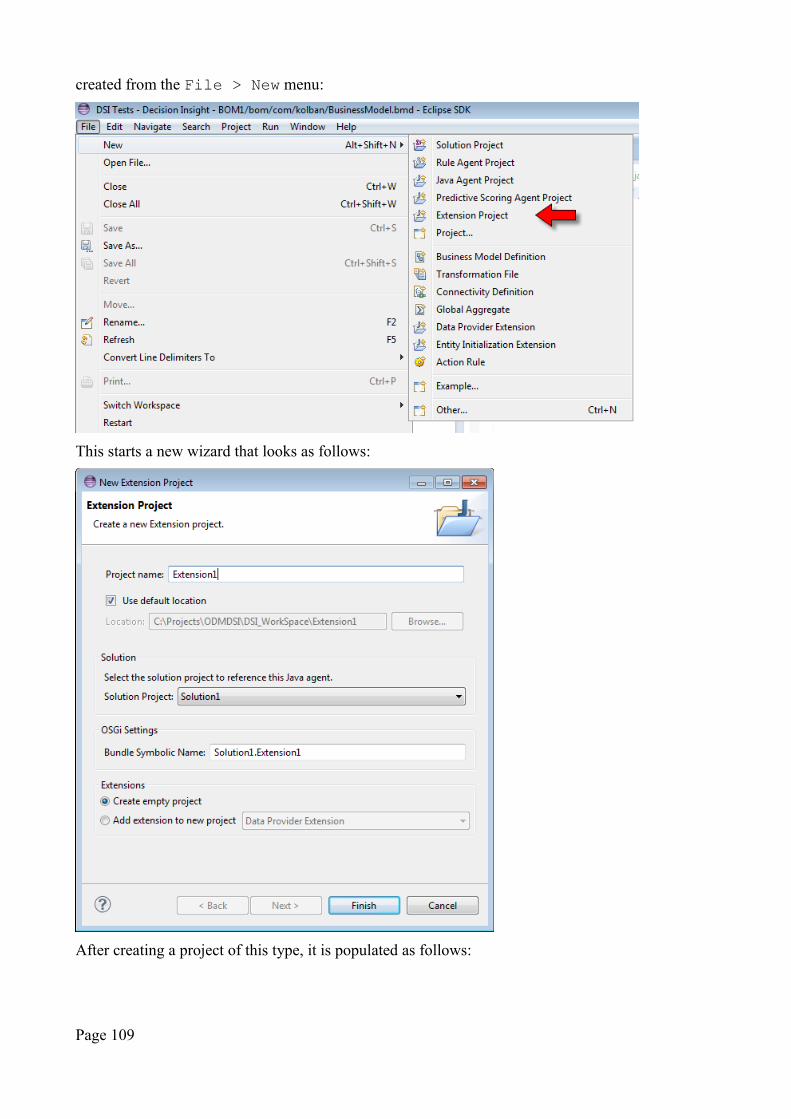
created from the File > New menu:
This starts a new wizard that looks as follows:
After creating a project of this type, it is populated as follows:
Page 109
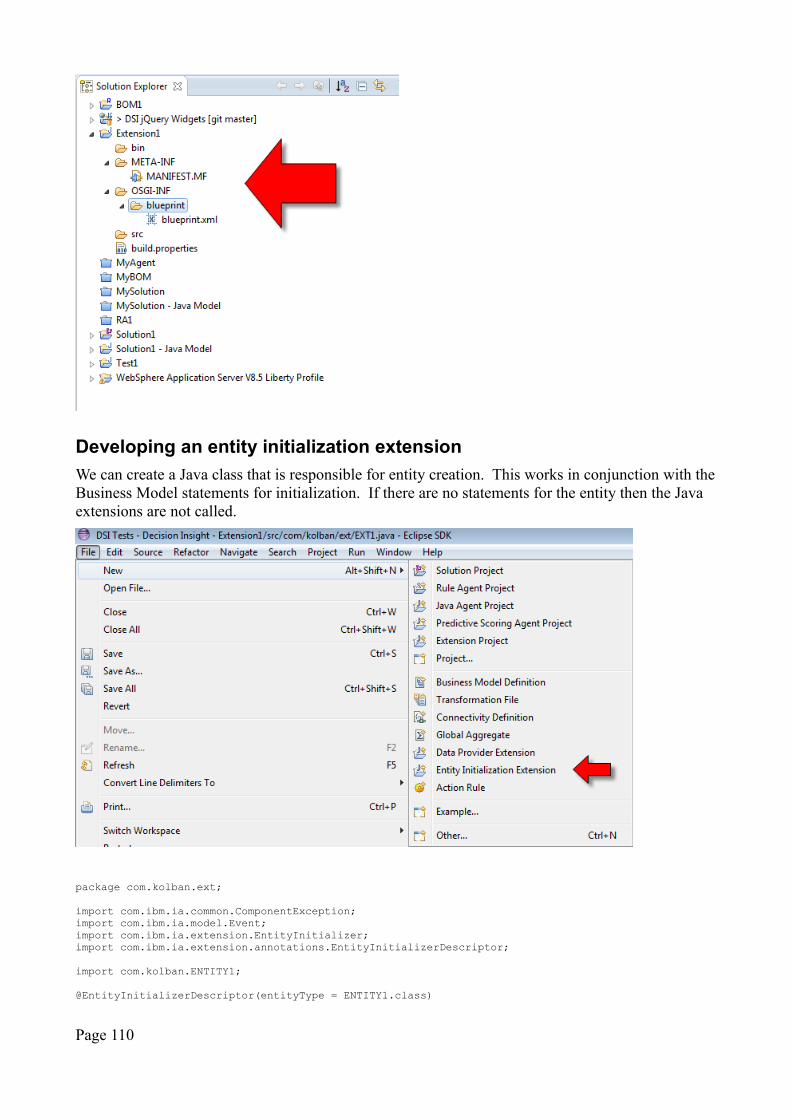
Developing an entity initialization extension
We can create a Java class that is responsible for entity creation. This works in conjunction with theBusiness Model statements for initialization. If there are no statements for the entity then the Java extensions are not called.
package com.kolban.ext;
import com.ibm.ia.common.ComponentException;import com.ibm.ia.model.Event;import com.ibm.ia.extension.EntityInitializer;import com.ibm.ia.extension.annotations.EntityInitializerDescriptor;
import com.kolban.ENTITY1;
@EntityInitializerDescriptor(entityType = ENTITY1.class)
Page 110
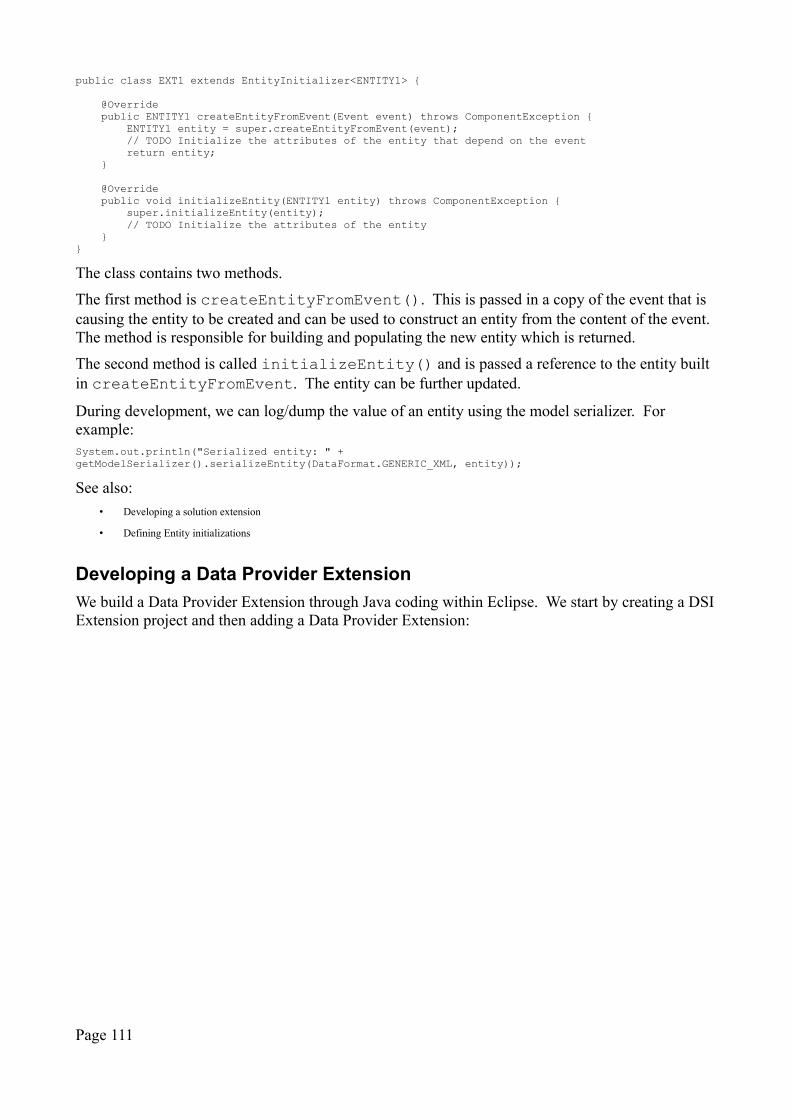
public class EXT1 extends EntityInitializer<ENTITY1> {
@Override public ENTITY1 createEntityFromEvent(Event event) throws ComponentException { ENTITY1 entity = super.createEntityFromEvent(event); // TODO Initialize the attributes of the entity that depend on the event return entity; }
@Override public void initializeEntity(ENTITY1 entity) throws ComponentException { super.initializeEntity(entity); // TODO Initialize the attributes of the entity }}
The class contains two methods.
The first method is createEntityFromEvent(). This is passed in a copy of the event that is causing the entity to be created and can be used to construct an entity from the content of the event. The method is responsible for building and populating the new entity which is returned.
The second method is called initializeEntity() and is passed a reference to the entity built in createEntityFromEvent. The entity can be further updated.
During development, we can log/dump the value of an entity using the model serializer. For example:System.out.println("Serialized entity: " + getModelSerializer().serializeEntity(DataFormat.GENERIC_XML, entity));
See also:
• Developing a solution extension
• Defining Entity initializations
Developing a Data Provider Extension
We build a Data Provider Extension through Java coding within Eclipse. We start by creating a DSIExtension project and then adding a Data Provider Extension:
Page 111
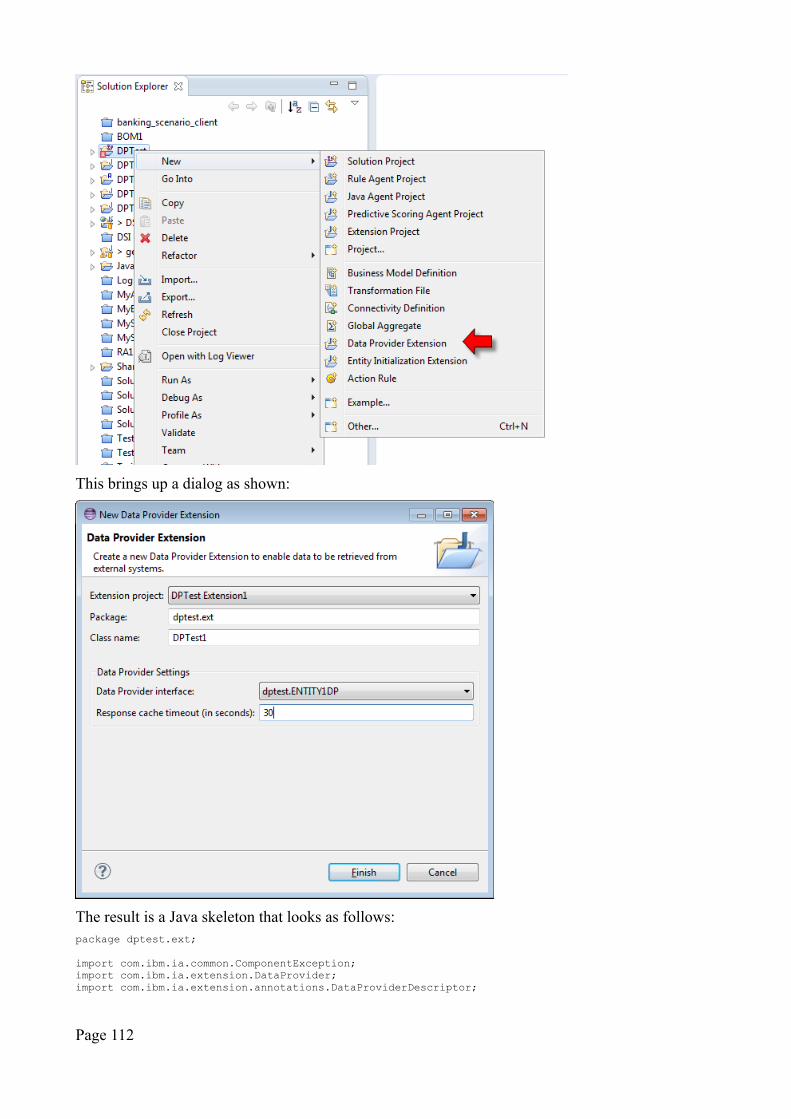
This brings up a dialog as shown:
The result is a Java skeleton that looks as follows:package dptest.ext;
import com.ibm.ia.common.ComponentException;import com.ibm.ia.extension.DataProvider;import com.ibm.ia.extension.annotations.DataProviderDescriptor;
Page 112
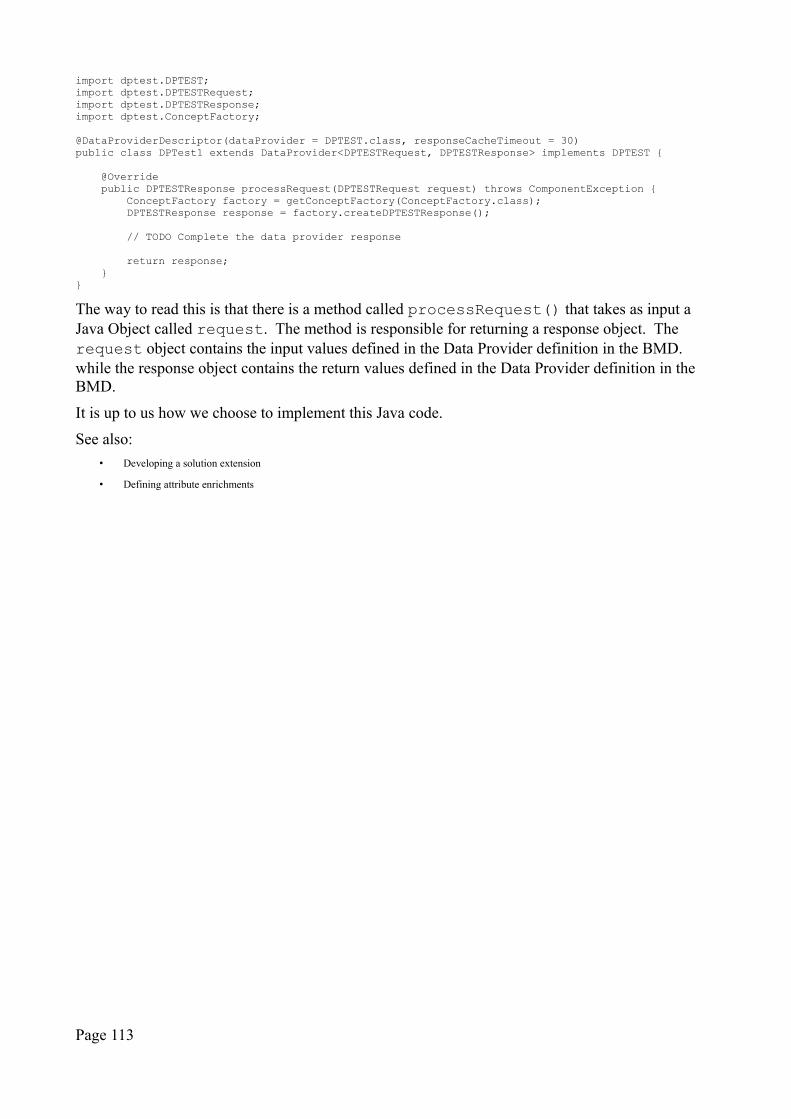
import dptest.DPTEST;import dptest.DPTESTRequest;import dptest.DPTESTResponse;import dptest.ConceptFactory;
@DataProviderDescriptor(dataProvider = DPTEST.class, responseCacheTimeout = 30)public class DPTest1 extends DataProvider<DPTESTRequest, DPTESTResponse> implements DPTEST { @Override public DPTESTResponse processRequest(DPTESTRequest request) throws ComponentException { ConceptFactory factory = getConceptFactory(ConceptFactory.class); DPTESTResponse response = factory.createDPTESTResponse(); // TODO Complete the data provider response return response; } }
The way to read this is that there is a method called processRequest() that takes as input a Java Object called request. The method is responsible for returning a response object. The request object contains the input values defined in the Data Provider definition in the BMD. while the response object contains the return values defined in the Data Provider definition in the BMD.
It is up to us how we choose to implement this Java code.
See also:
• Developing a solution extension
• Defining attribute enrichments
Page 113
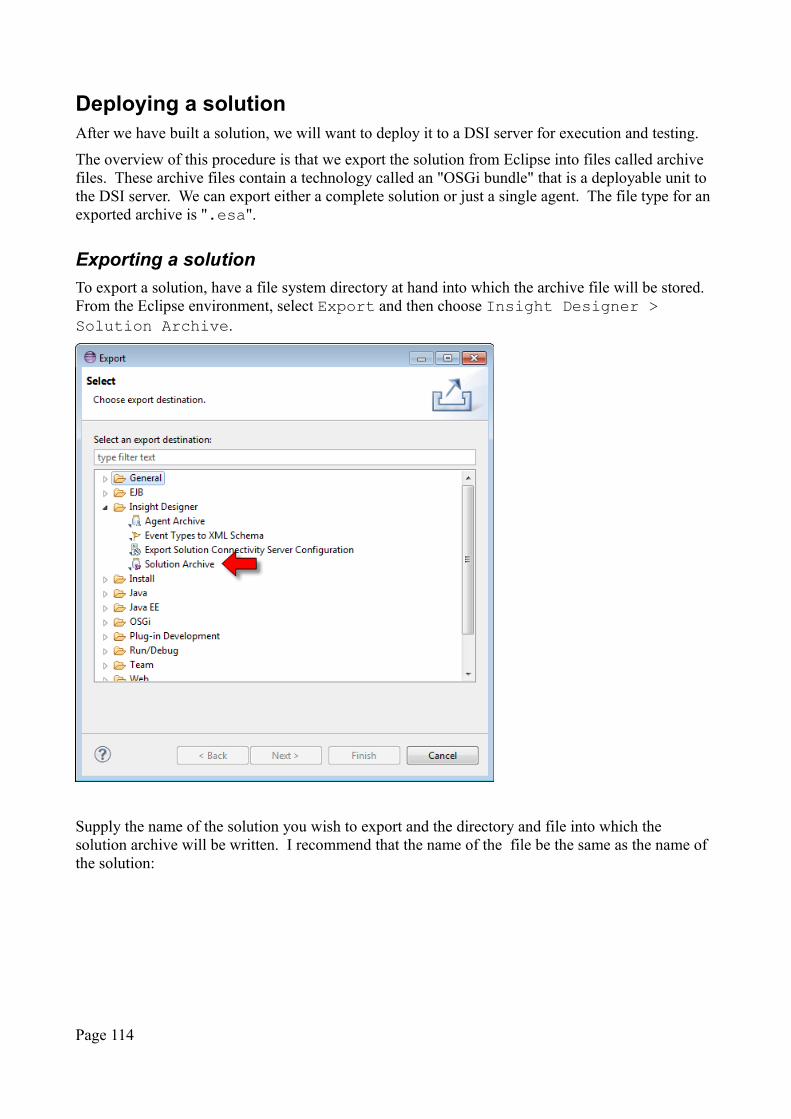
Deploying a solutionAfter we have built a solution, we will want to deploy it to a DSI server for execution and testing.
The overview of this procedure is that we export the solution from Eclipse into files called archive files. These archive files contain a technology called an "OSGi bundle" that is a deployable unit to the DSI server. We can export either a complete solution or just a single agent. The file type for an exported archive is ".esa".
Exporting a solution
To export a solution, have a file system directory at hand into which the archive file will be stored. From the Eclipse environment, select Export and then choose Insight Designer > Solution Archive.
Supply the name of the solution you wish to export and the directory and file into which the solution archive will be written. I recommend that the name of the file be the same as the name of the solution:
Page 114
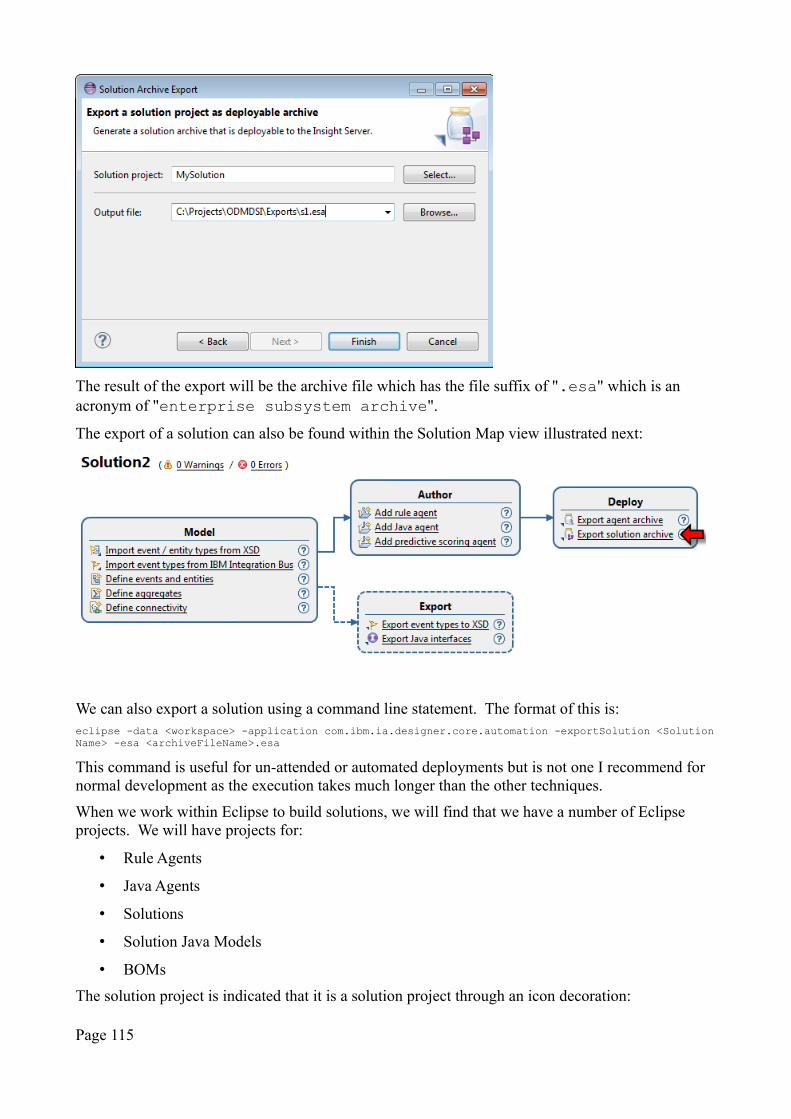
The result of the export will be the archive file which has the file suffix of ".esa" which is an acronym of "enterprise subsystem archive".
The export of a solution can also be found within the Solution Map view illustrated next:
We can also export a solution using a command line statement. The format of this is:eclipse -data <workspace> -application com.ibm.ia.designer.core.automation -exportSolution <SolutionName> -esa <archiveFileName>.esa
This command is useful for un-attended or automated deployments but is not one I recommend for normal development as the execution takes much longer than the other techniques.
When we work within Eclipse to build solutions, we will find that we have a number of Eclipse projects. We will have projects for:
• Rule Agents
• Java Agents
• Solutions
• Solution Java Models
• BOMs
The solution project is indicated that it is a solution project through an icon decoration:
Page 115
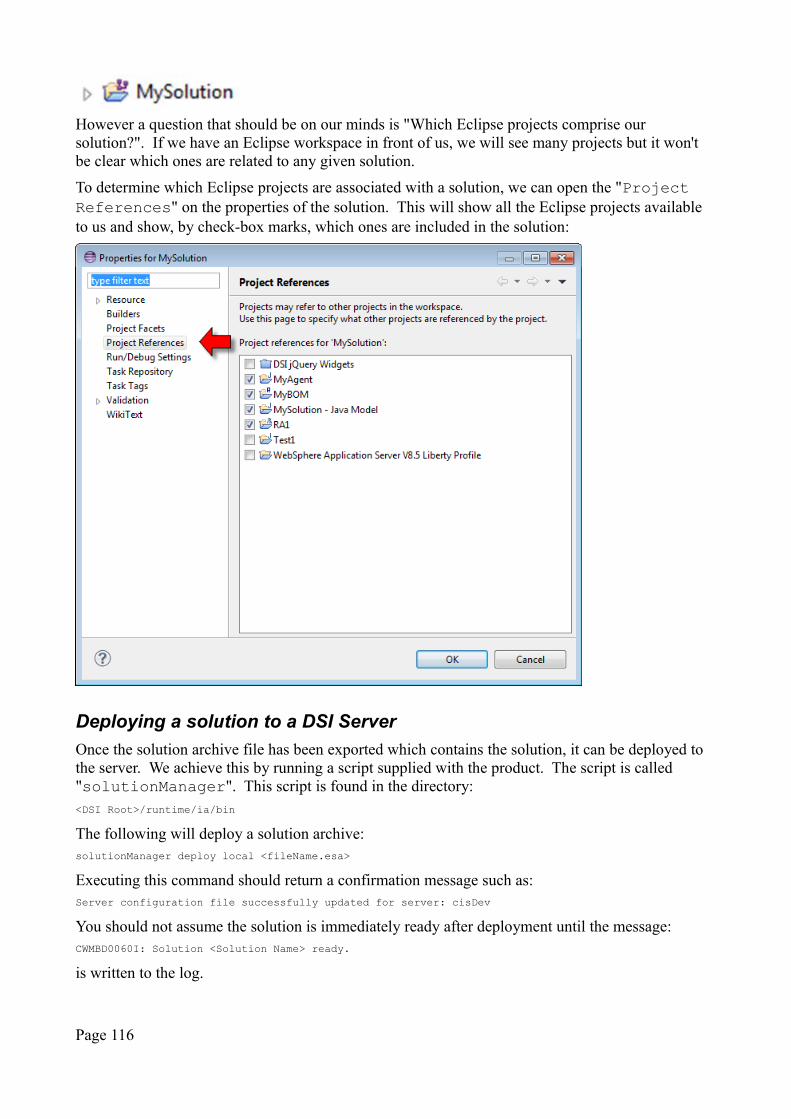
However a question that should be on our minds is "Which Eclipse projects comprise our solution?". If we have an Eclipse workspace in front of us, we will see many projects but it won't be clear which ones are related to any given solution.
To determine which Eclipse projects are associated with a solution, we can open the "Project References" on the properties of the solution. This will show all the Eclipse projects available to us and show, by check-box marks, which ones are included in the solution:
Deploying a solution to a DSI Server
Once the solution archive file has been exported which contains the solution, it can be deployed to the server. We achieve this by running a script supplied with the product. The script is called "solutionManager". This script is found in the directory:<DSI Root>/runtime/ia/bin
The following will deploy a solution archive:solutionManager deploy local <fileName.esa>
Executing this command should return a confirmation message such as:Server configuration file successfully updated for server: cisDev
You should not assume the solution is immediately ready after deployment until the message:CWMBD0060I: Solution <Solution Name> ready.
is written to the log.
Page 116
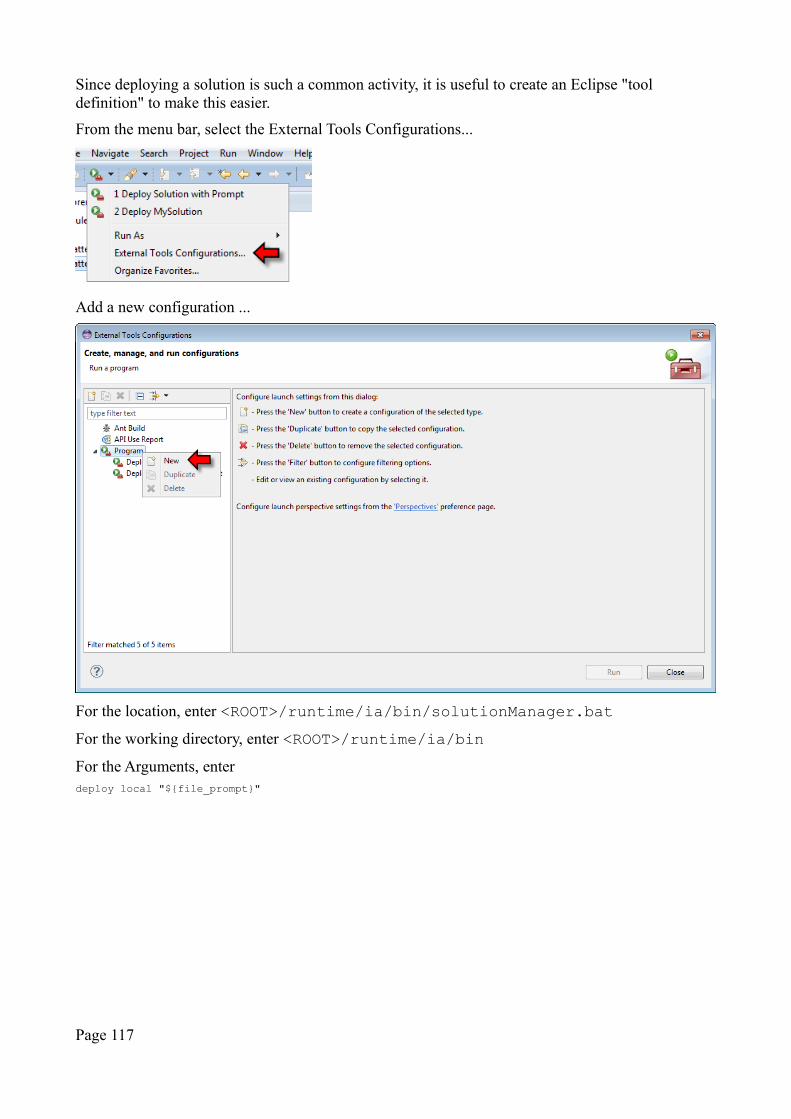
Since deploying a solution is such a common activity, it is useful to create an Eclipse "tool definition" to make this easier.
From the menu bar, select the External Tools Configurations...
Add a new configuration ...
For the location, enter <ROOT>/runtime/ia/bin/solutionManager.bat
For the working directory, enter <ROOT>/runtime/ia/bin
For the Arguments, enterdeploy local "${file_prompt}"
Page 117
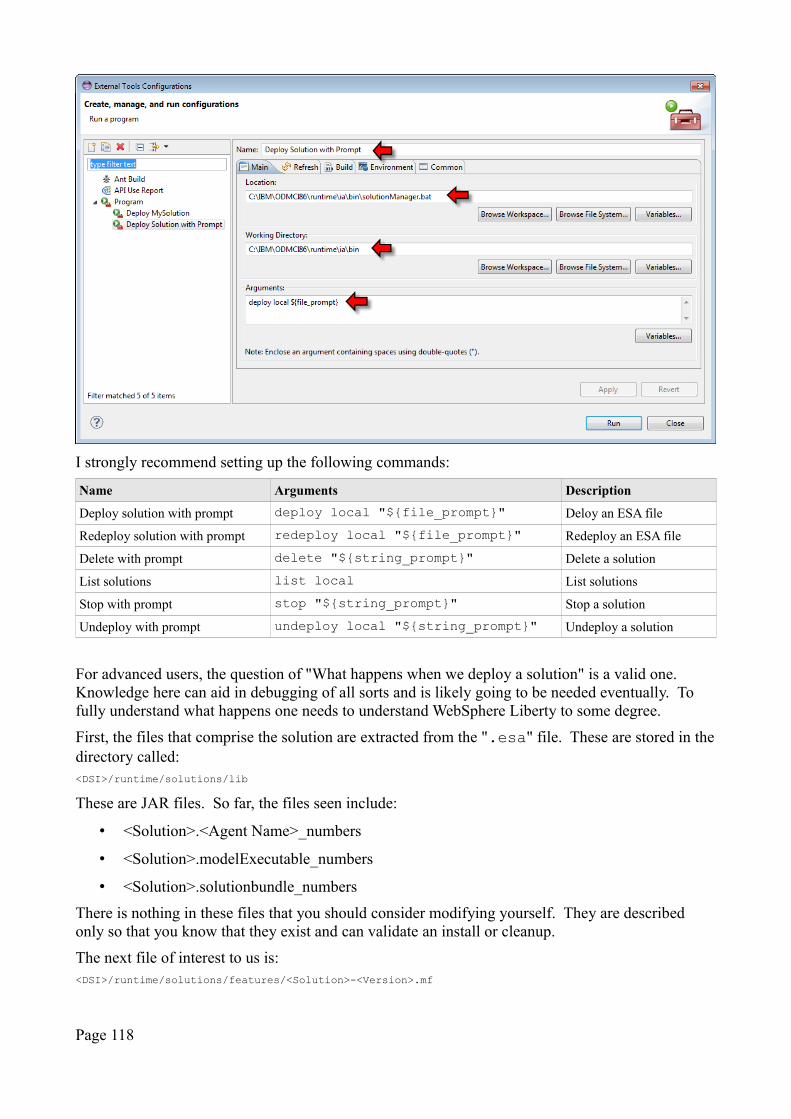
I strongly recommend setting up the following commands:
Name Arguments Description
Deploy solution with prompt deploy local "${file_prompt}" Deloy an ESA file
Redeploy solution with prompt redeploy local "${file_prompt}" Redeploy an ESA file
Delete with prompt delete "${string_prompt}" Delete a solution
List solutions list local List solutions
Stop with prompt stop "${string_prompt}" Stop a solution
Undeploy with prompt undeploy local "${string_prompt}" Undeploy a solution
For advanced users, the question of "What happens when we deploy a solution" is a valid one. Knowledge here can aid in debugging of all sorts and is likely going to be needed eventually. To fully understand what happens one needs to understand WebSphere Liberty to some degree.
First, the files that comprise the solution are extracted from the ".esa" file. These are stored in thedirectory called:<DSI>/runtime/solutions/lib
These are JAR files. So far, the files seen include:
• <Solution>.<Agent Name>_numbers
• <Solution>.modelExecutable_numbers
• <Solution>.solutionbundle_numbers
There is nothing in these files that you should consider modifying yourself. They are described only so that you know that they exist and can validate an install or cleanup.
The next file of interest to us is:<DSI>/runtime/solutions/features/<Solution>-<Version>.mf
Page 118
This is a Java manifest file. Again, it should never be hand modified. However, reading it we will find an entry called "Subsystem-Content" which seems to map to the JAR files and seems to show what files actually constitute the solution. This could be useful if you knew a solution name and wanted to validate that all the expected implementation files were present.
Finally there are changes made to the Liberty master server.xml file located at:<DSI>/runtime/wlp/user/servers/<serverName>/server.xml
Two changes are made. First, in the <featureManager> stanza, a new entry is added for the newly installed solution. It will have the format:<feature>solutions:Solution:Version</feature>
The second change to the file is an entry that reads:<ia_runtimeSolutionVersion currentVersion="Solution:Version" solutionName="Solution"/>
The act of undeploying a solution does not delete the files but merely removes the entries from server.xml. If we have previously undeployed a solution and want that solution restored without changing the files, we can run:solutionManager deploy local <fileName.esa> --activateOnly=true
The addition of the --activateOnly=true flag causes the solution to be deployed without changing the solution implementation files.
To delete the solution implementation files, see the solutionManager delete command.
See also:
• Undeploying a solution
• Deleting a solution
Determining which solutions are deployed
We can ask DSI which solutions are deployed using the command:solutionManager list local
If no solutions are present, the response will be:No solutions were found for server: cisDev
Selecting what is deployed with a solution
We can think of a solution as an aggregate of a number of related Eclipse projects including Rule Agents and Java Agents. When we export a solution archive and deploy it to a DSI server, that will bring with it those related projects. However, which projects are the set of projects associated with a solution? What if we wish to add or remove an agent project?
The answer to these questions can be found in the Eclipse properties of the Solution Project. If we open the properties for a Solution project and view the "Project References", we will find check marks beside the related projects that are included with the solution archive. Un-checking or checking entries, changes their exclusion or inclusion.
Page 119
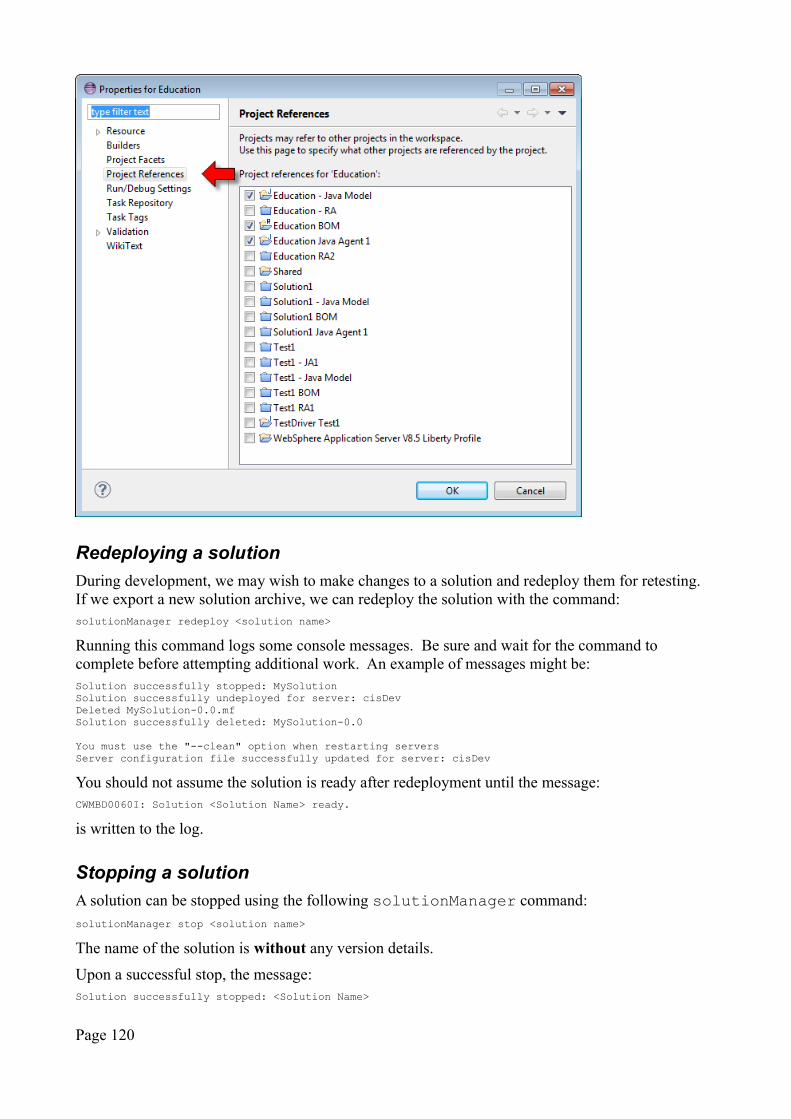
Redeploying a solution
During development, we may wish to make changes to a solution and redeploy them for retesting. If we export a new solution archive, we can redeploy the solution with the command:solutionManager redeploy <solution name>
Running this command logs some console messages. Be sure and wait for the command to complete before attempting additional work. An example of messages might be:Solution successfully stopped: MySolutionSolution successfully undeployed for server: cisDevDeleted MySolution-0.0.mfSolution successfully deleted: MySolution-0.0
You must use the "--clean" option when restarting serversServer configuration file successfully updated for server: cisDev
You should not assume the solution is ready after redeployment until the message:CWMBD0060I: Solution <Solution Name> ready.
is written to the log.
Stopping a solution
A solution can be stopped using the following solutionManager command:solutionManager stop <solution name>
The name of the solution is without any version details.
Upon a successful stop, the message:Solution successfully stopped: <Solution Name>
Page 120
is displayed.
This script also has properties:
• --host=name
• --port=value
• --username=value
• --password=value
• --trustStoreLocation=value
• --trustStorePassword=value
Undeploying a solution
A solution can be un-deployed using the solutionManager script.solutionManager undeploy local <solution name>-<version>
The name of the solution must include the version number. Before a solution can be undeployed, itmust first be stopped.
Upon a successful un-deploy, the following message is displayed:Solution successfully undeployed for server: <server name>
Following an un-deploy, the Liberty server.xml has the entry in <featureManager> and the<ia_runtimeSolutionVersion> removed. The physical deployed files found in:<DSI>/runtime/solutions/lib
remain in place.
This script also has properties:
• --host=name
• --port=value
• --username=value
• --password=value
• --trustStoreLocation=value
• --trustStorePassword=value
See also:
• Deploying a solution to a DSI Server
• Stopping a solution
Deleting a solution
When one deploys a solution, a set of files are placed into WLP directories so that it may read and use them. The following command will delete the files corresponding to the named solution.solutionManager delete <Solution>-<Version>
The server must be stopped in order to run the command.
The location on the file system where these can be found are:
Page 121
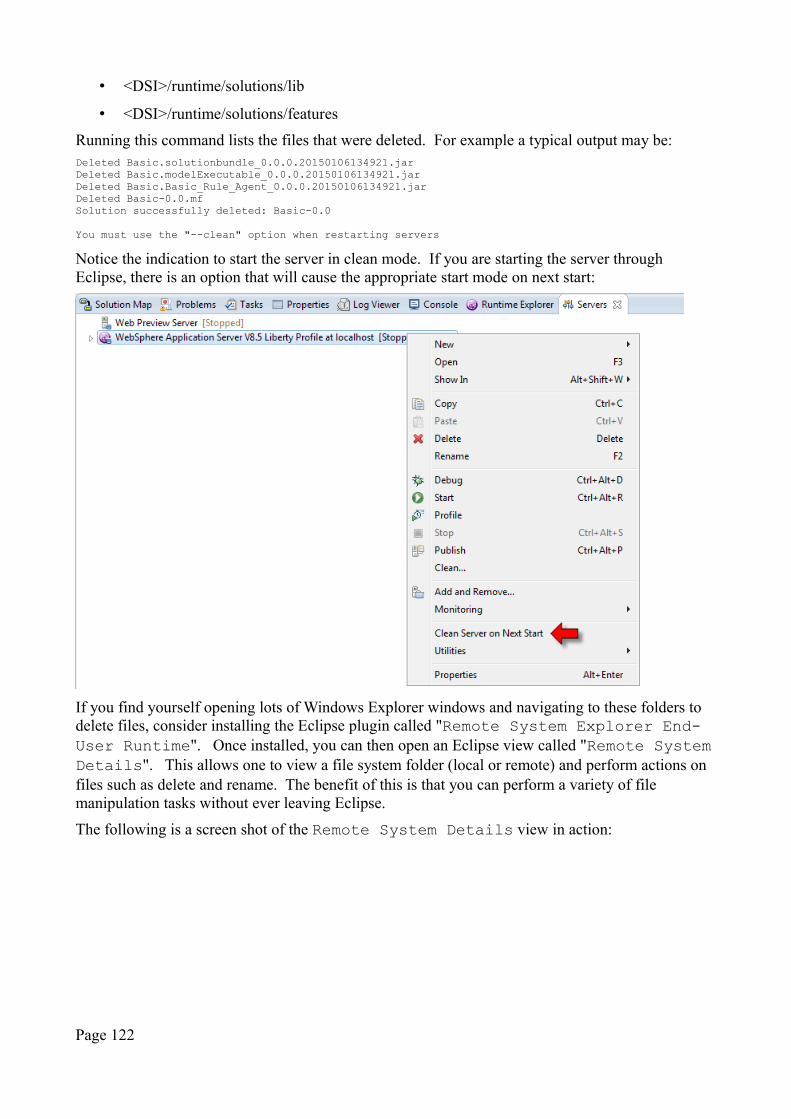
• <DSI>/runtime/solutions/lib
• <DSI>/runtime/solutions/features
Running this command lists the files that were deleted. For example a typical output may be:Deleted Basic.solutionbundle_0.0.0.20150106134921.jarDeleted Basic.modelExecutable_0.0.0.20150106134921.jarDeleted Basic.Basic_Rule_Agent_0.0.0.20150106134921.jarDeleted Basic-0.0.mfSolution successfully deleted: Basic-0.0
You must use the "--clean" option when restarting servers
Notice the indication to start the server in clean mode. If you are starting the server through Eclipse, there is an option that will cause the appropriate start mode on next start:
If you find yourself opening lots of Windows Explorer windows and navigating to these folders to delete files, consider installing the Eclipse plugin called "Remote System Explorer End-User Runtime". Once installed, you can then open an Eclipse view called "Remote SystemDetails". This allows one to view a file system folder (local or remote) and perform actions on files such as delete and rename. The benefit of this is that you can perform a variety of file manipulation tasks without ever leaving Eclipse.
The following is a screen shot of the Remote System Details view in action:
Page 122
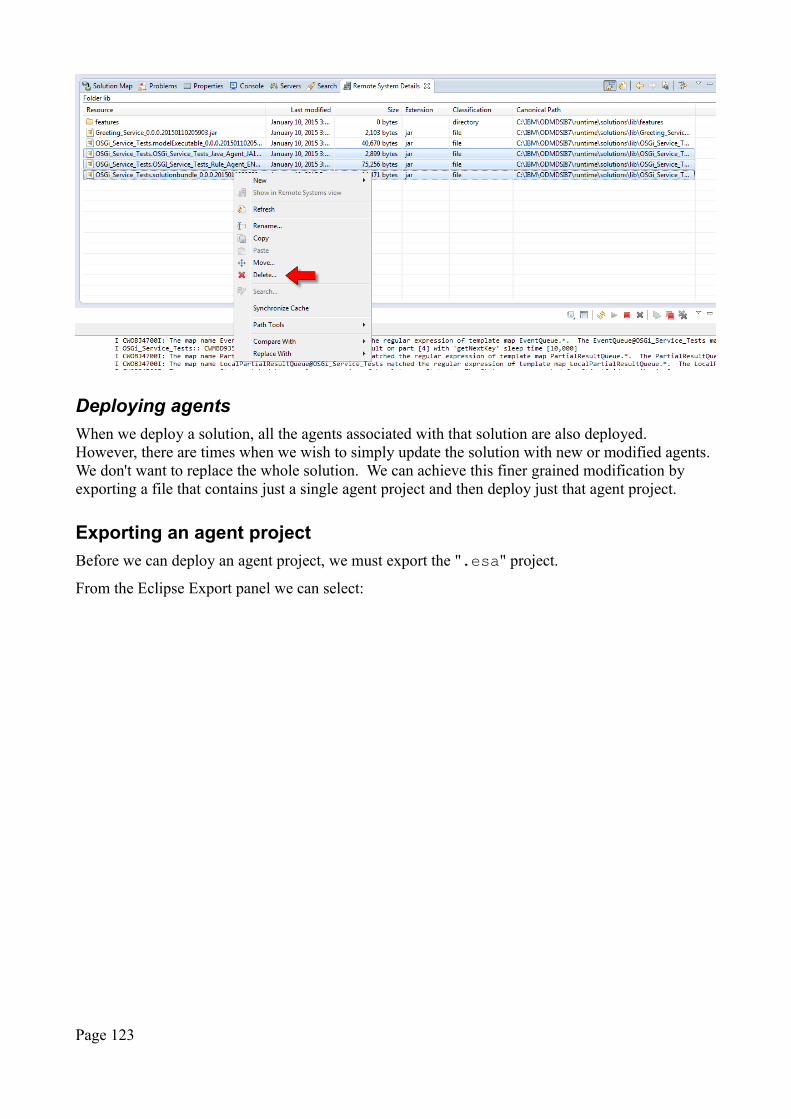
Deploying agents
When we deploy a solution, all the agents associated with that solution are also deployed. However, there are times when we wish to simply update the solution with new or modified agents. We don't want to replace the whole solution. We can achieve this finer grained modification by exporting a file that contains just a single agent project and then deploy just that agent project.
Exporting an agent project
Before we can deploy an agent project, we must export the ".esa" project.
From the Eclipse Export panel we can select:
Page 123
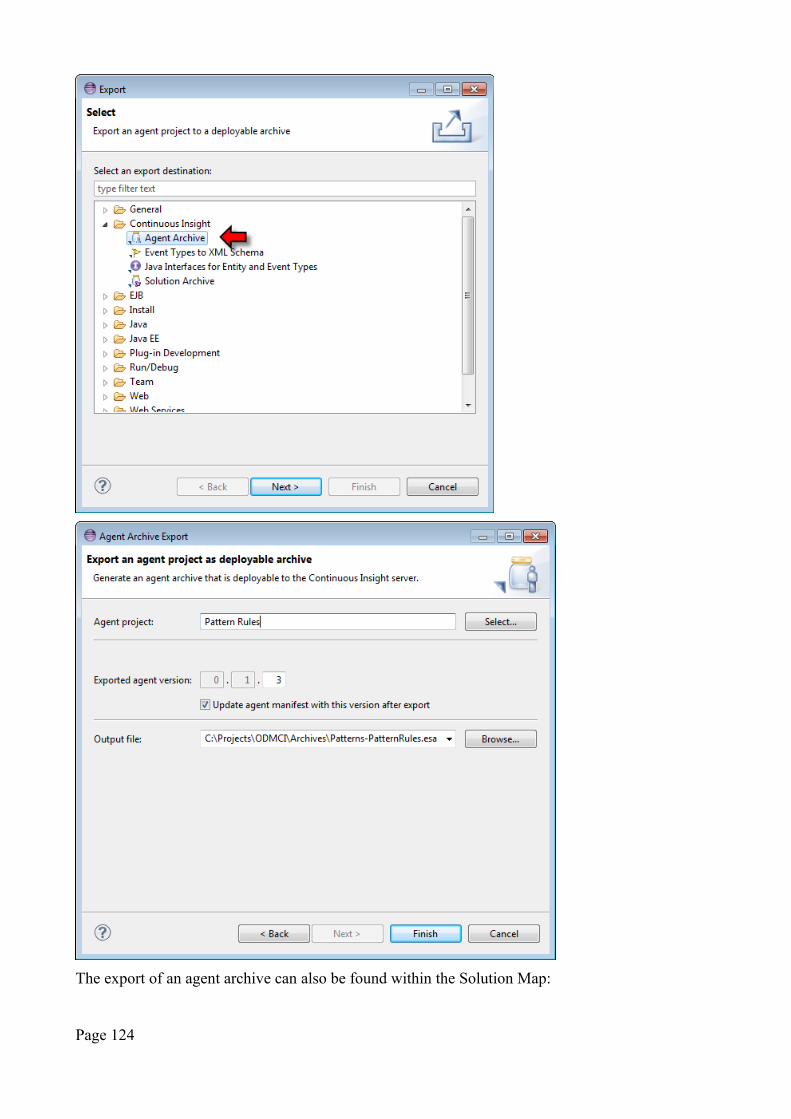
The export of an agent archive can also be found within the Solution Map:
Page 124
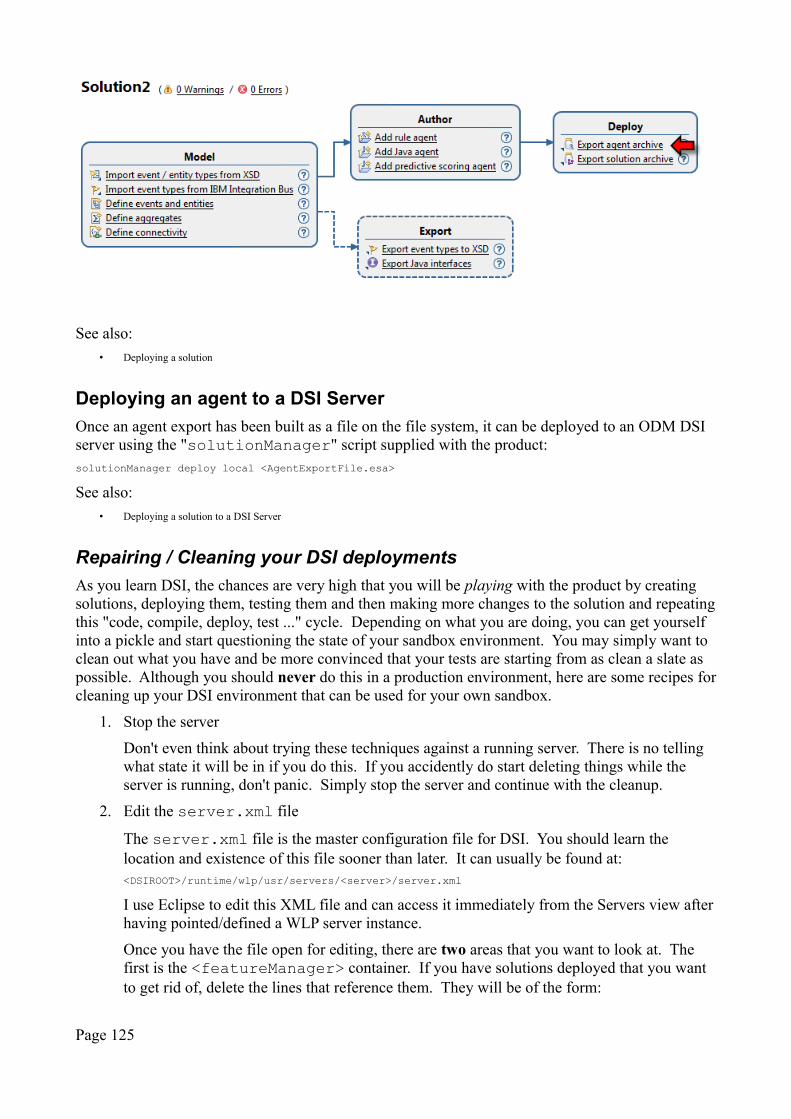
See also:
• Deploying a solution
Deploying an agent to a DSI Server
Once an agent export has been built as a file on the file system, it can be deployed to an ODM DSI server using the "solutionManager" script supplied with the product:solutionManager deploy local <AgentExportFile.esa>
See also:
• Deploying a solution to a DSI Server
Repairing / Cleaning your DSI deployments
As you learn DSI, the chances are very high that you will be playing with the product by creating solutions, deploying them, testing them and then making more changes to the solution and repeatingthis "code, compile, deploy, test ..." cycle. Depending on what you are doing, you can get yourself into a pickle and start questioning the state of your sandbox environment. You may simply want to clean out what you have and be more convinced that your tests are starting from as clean a slate as possible. Although you should never do this in a production environment, here are some recipes forcleaning up your DSI environment that can be used for your own sandbox.
1. Stop the server
Don't even think about trying these techniques against a running server. There is no telling what state it will be in if you do this. If you accidently do start deleting things while the server is running, don't panic. Simply stop the server and continue with the cleanup.
2. Edit the server.xml file
The server.xml file is the master configuration file for DSI. You should learn the location and existence of this file sooner than later. It can usually be found at:<DSIROOT>/runtime/wlp/usr/servers/<server>/server.xml
I use Eclipse to edit this XML file and can access it immediately from the Servers view afterhaving pointed/defined a WLP server instance.
Once you have the file open for editing, there are two areas that you want to look at. The first is the <featureManager> container. If you have solutions deployed that you want to get rid of, delete the lines that reference them. They will be of the form:
Page 125
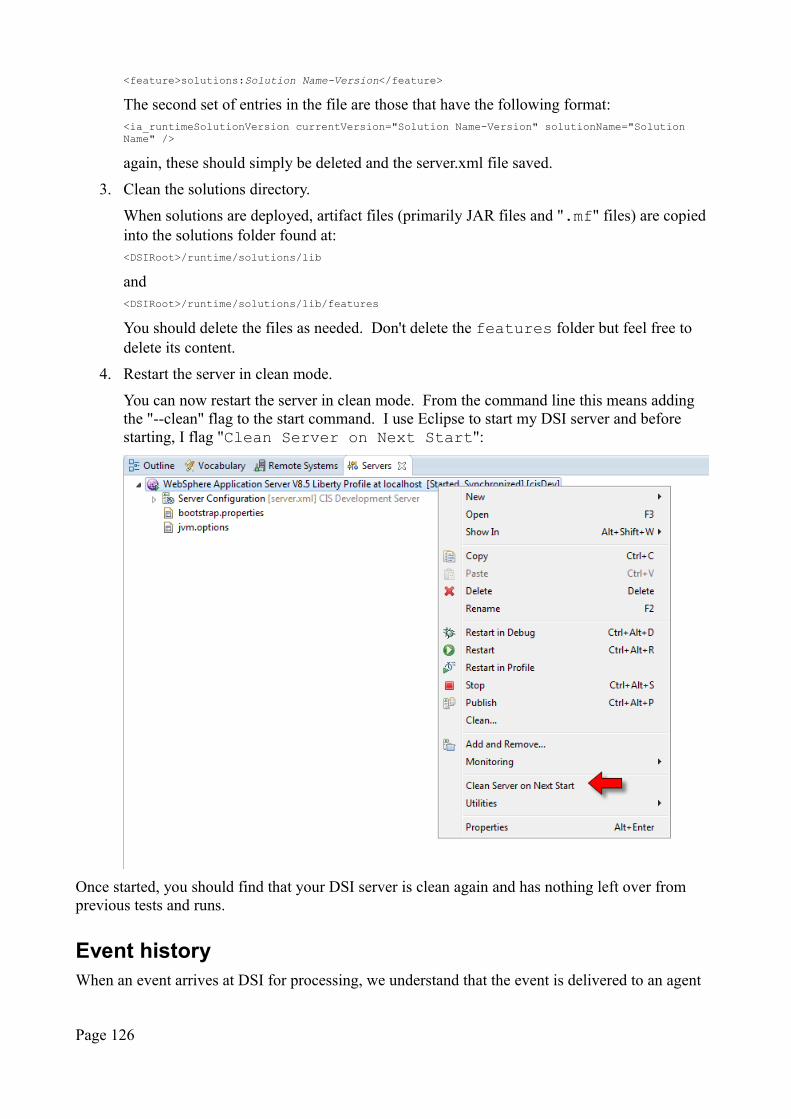
<feature>solutions:Solution Name-Version</feature>
The second set of entries in the file are those that have the following format:<ia_runtimeSolutionVersion currentVersion="Solution Name-Version" solutionName="Solution Name" />
again, these should simply be deleted and the server.xml file saved.
3. Clean the solutions directory.
When solutions are deployed, artifact files (primarily JAR files and ".mf" files) are copied into the solutions folder found at:<DSIRoot>/runtime/solutions/lib
and<DSIRoot>/runtime/solutions/lib/features
You should delete the files as needed. Don't delete the features folder but feel free to delete its content.
4. Restart the server in clean mode.
You can now restart the server in clean mode. From the command line this means adding the "--clean" flag to the start command. I use Eclipse to start my DSI server and before starting, I flag "Clean Server on Next Start":
Once started, you should find that your DSI server is clean again and has nothing left over from previous tests and runs.
Event historyWhen an event arrives at DSI for processing, we understand that the event is delivered to an agent
Page 126

and the agent determines what to do. What then happens to the event after processing?
The answer is that the events are stored in memory (RAM) for a period of time. These historic events are available for logic within Rule Agents. Note that these historic events are not available to Java Agents.
The default period of time is one year but this can be altered through the solution_properties.xml file.
The property is called "maxHorizon" for the solution as a whole and "maxHorizon_<AgentName>" for configuration based upon a specific agent.
Page 127

Deploying Connectivity ConfigurationsWhen we have built our solution, exported it and deployed it, we have not yet finished with our work. Although the solution has been deployed, the connectivity attributes have not been deployed.Additional and separate administration steps are required.
What we are required to do is to create an XML configuration file that can be used with Liberty. There are two ways to create this file. One is Eclipse environment driven and the other is commandline driven.
From the Eclipse environment, we can select "Export connectivity configuration" from the "Solution Map" view:
This produces a dialog from which we can select the solution that contains our connectivity definitions and the name of the XML file to contain our results:
The next page of the wizard allows us to select which definitions we wish to generate:
Page 128
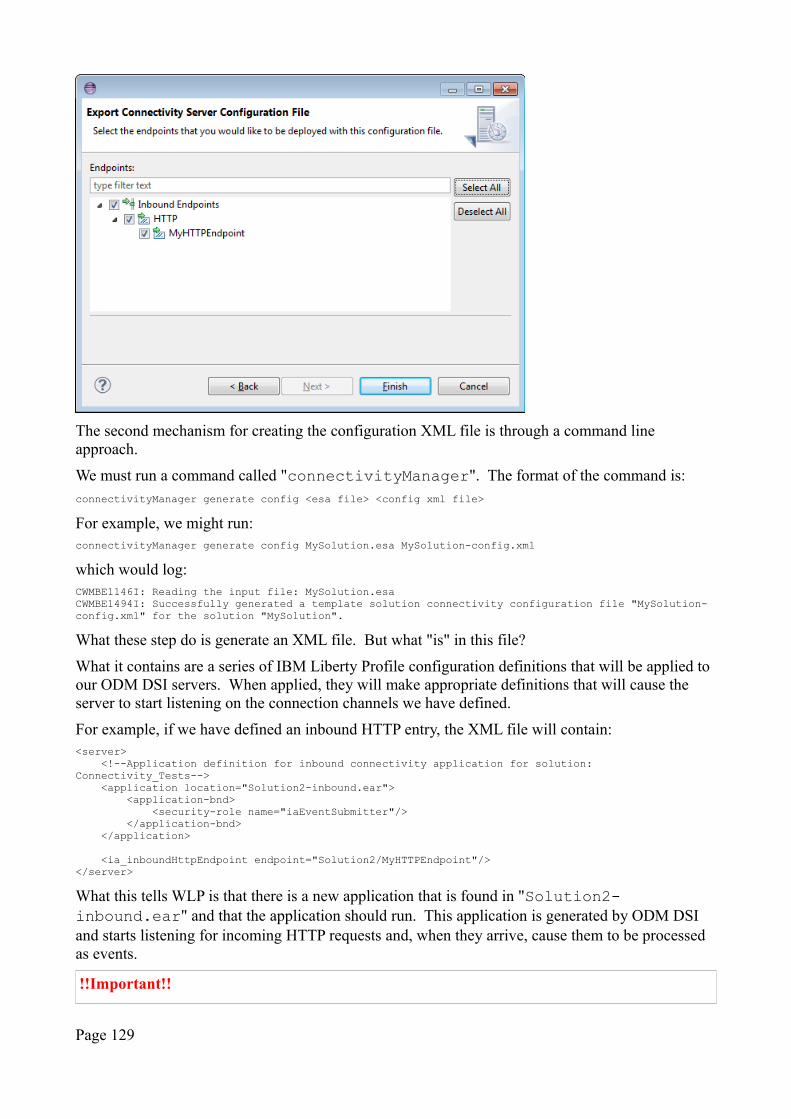
The second mechanism for creating the configuration XML file is through a command line approach.
We must run a command called "connectivityManager". The format of the command is:connectivityManager generate config <esa file> <config xml file>
For example, we might run:connectivityManager generate config MySolution.esa MySolution-config.xml
which would log:CWMBE1146I: Reading the input file: MySolution.esaCWMBE1494I: Successfully generated a template solution connectivity configuration file "MySolution-config.xml" for the solution "MySolution".
What these step do is generate an XML file. But what "is" in this file?
What it contains are a series of IBM Liberty Profile configuration definitions that will be applied to our ODM DSI servers. When applied, they will make appropriate definitions that will cause the server to start listening on the connection channels we have defined.
For example, if we have defined an inbound HTTP entry, the XML file will contain:<server> <!--Application definition for inbound connectivity application for solution: Connectivity_Tests--> <application location="Solution2-inbound.ear"> <application-bnd> <security-role name="iaEventSubmitter"/> </application-bnd> </application>
<ia_inboundHttpEndpoint endpoint="Solution2/MyHTTPEndpoint"/></server>
What this tells WLP is that there is a new application that is found in "Solution2-inbound.ear" and that the application should run. This application is generated by ODM DSI and starts listening for incoming HTTP requests and, when they arrive, cause them to be processed as events.
!!Important!!
Page 129
The XML file generated from the command line connectivityManager needs to be manuallyedited to uncomment the definitions. Why this is not performed for us by the command line tool isunknown.
Finally, the configuration needs to be deployed with the command:connectivityManager deploy local <esa file> <config xml file>
An example execution might be:connectivityManager deploy local MySolution.esa MySolution-config.xml --overwrite=true
which would log:CWMBE1146I: Reading the input file: MySolution.esaCWMBE1475I: The connectivity server configuration file for the solution "MySolution" contains the configuration required for the specified endpoints.CWMBE1148I: Writing to the output file: C:\Users\kolban\AppData\Local\Temp\MySolution-inbound.ear918150901037688396.tmpCWMBE1144I: Successfully copied the file from "C:\Users\kolban\AppData\Local\Temp\MySolution-inbound.ear918150901037688396.tmp" to "C:\IBM\ODMCI86\runtime\wlp\usr\servers\cisDev\apps\MySolution-inbound.ear".CWMBE1144I: Successfully copied the file from "MySolution-config.xml" to "C:\IBM\ODMCI86\runtime\wlp\usr\servers\cisDev\MySolution-config.xml".CWMBE1452I: Successfully deployed connectivity for the solution "MySolution".CWMBE1454I: Successfully activated connectivity for the solution "MySolution".
See also:
• Exporting a solution
Enabling ODM DSI to receive incoming JMS messages
To allow ODM DSI to receive incoming messages, we need to add a new feature to the WLP. The feature called "ia:iaConnectivityInboundJMS-1.0".
If this feature has not been enabled, attempting to deploy a connection configuration will result in:connectivityManager deploy local Solution2.esa Solution2-config.xmlCWMBE1146I: Reading the input file: Solution2.esaCWMBE1493W: The server is missing the connectivity feature "ia:iaConnectivityInboundJMS-1.0" required to support the solution "Solution2".CWMBE1476W: The connectivity server configuration file for the solution "Solution2" does not containthe configuration required for the specified endpoints.CWMBE1484E: The connectivity deployment was cancelled due to configuration warnings. Correct the problems or specify the option "--ignoreValidationWarnings=true".
If we define an inbound JMS entry, two sets of WLP definitions are found in the generated XML configuration file. One for binding to WLP JMS and one for binding to MQ JMS.
For example, for WLP JMS, the XML file will contains:<!--WebSphere Application Server default messaging provider activation specification--><jmsActivationSpec id="Solution2-inbound/in2ep/in2ep" authDataRef="Solution2-inbound/in2ep/in2ep-authData">
<properties.wasJms destinationRef="Solution2-inbound/in2ep/in2ep" /></jmsActivationSpec>
<!--Authentication alias for activation specification Solution2-inbound/in2ep/in2ep --><authData id="Solution2-inbound/in2ep/in2ep-authData" user="" password="" />
<!--WebSphere Application Server default messaging provider queue--><jmsQueue id="Solution2-inbound/in2ep/in2ep" jndiName="Solution2-inbound/in2ep/in2ep">
<properties.wasJms queueName="inputQ"/></jmsQueue>
Take note of the "queueName" property in the "jmsQueue" definition. This is the name of the
Page 130
messaging engine queue that will be watched for messages.
See also:
• WebSphere JMS Access
Enabling ODM DSI to send outgoing JMS messages
To enable ODM DSI to send outgoing JMS messages as the result of an "emit" action, we need to add a new feature to the WLP server.xml. This feature is called "ia:iaConnectivityOutboundJMS-1.0". Failure to add this feature will result in no messages appearing on the queues.
If we are using the internal JMS provider supplied with WLP, then we will need to configure that server and define the queues that are found upon it. These queues will then be mapped to the JMS concept of the queues.
Within the generated config XML file associated with the connectivity definition, we will need to uncomment or add entries similar to the following:<!--WebSphere Application Server default messaging provider connection factory--><jmsConnectionFactory jndiName="jms/qcf1">
<properties.wasJms remoteServerAddress="localhost:7276:BootstrapBasicMessaging" /></jmsConnectionFactory>
<!--WebSphere Application Server default messaging provider queue--><jmsQueue id="jms/q1" jndiName="jms/q1">
<properties.wasJms queueName="queue1" /></jmsQueue>
<ia_outboundJmsEndpoint endpoint="Solution2/out1ep" />
See also:
• WebSphere JMS Access
Enabling ODM DSI to receive incoming MQ messages
The connectivity definition for receiving incoming messages through MQ is identical to that for receiving messages from JMS. When the XML is generated for the Liberty profile, that is where different configurations come into play.
After running the command to generate the XML:connectivityManager generate config <esa file> <config xml file>
An example edited configuration file might be:<!--WebSphere MQ messaging provider activation specification--><jmsActivationSpec
authDataRef="MQ_Test-inbound/mq1Endpoint/mq1Endpoint-authData"id="MQ_Test-inbound/mq1Endpoint/mq1Endpoint"><properties.wmqJms
destinationRef="MQ_Test-inbound/mq1Endpoint/mq1Endpoint"transportType="CLIENT"hostName="localhost"port="1414"channel="SYSTEM.DEF.SVRCONN"queueManager="QM1" />
</jmsActivationSpec>
<!--Authentication alias for activation specification MQ_Test-inbound/mq1Endpoint/mq1Endpoint --><authData
id="MQ_Test-inbound/mq1Endpoint/mq1Endpoint-authData"user="kolban"password="password" />
<!--WebSphere MQ messaging provider queue-->
Page 131

<jmsQueueid="MQ_Test-inbound/mq1Endpoint/mq1Endpoint"jndiName="MQ_Test-inbound/mq1Endpoint/mq1Endpoint"><properties.wmqJms
baseQueueName="ToODMCI"baseQueueManagerName="QM1"/>
</jmsQueue>
One the deployment of this configuration has been performed and there are not errors in the log, we should see that the source queue is open for incoming messages:
See also:
• IBM MQ
• WebSphere MQ Access
Testing a solutionOnce a solution is built and deployed, the next logical thing we will want to do is test that solution. We have a number of ways to achieve this.
Building a Java client for test
One way to test a solution is to build a test client in the Java programming language. To perform this task you will need to be comfortable writing Java code and working in a Java programming environment.
When we built our DSI solution, a set of Java interfaces were constructed from our BOM models. These are contained in an ODM DSI project called "<Solution> - Java Interfaces". If we are building our client on the same Eclipse as we built our solution then we already have access to what we need. However, if we want to build and run our client in a different environment, we will need to export our Java interfaces.
Page 132
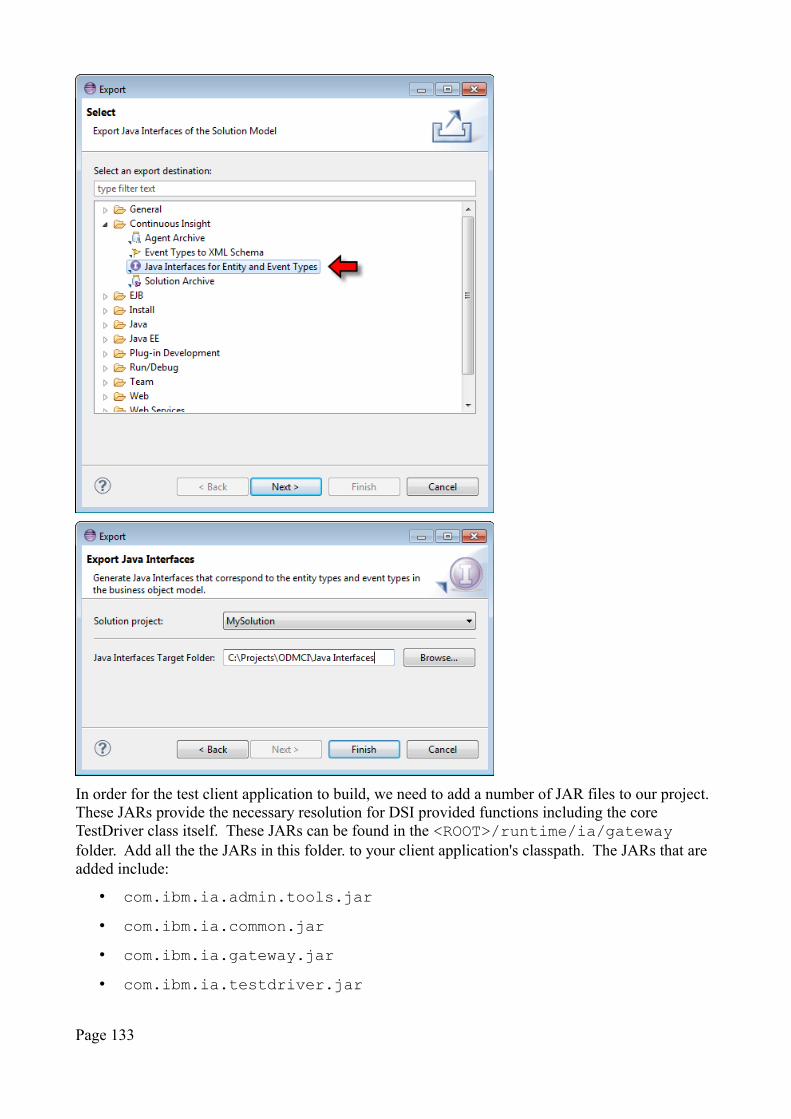
In order for the test client application to build, we need to add a number of JAR files to our project. These JARs provide the necessary resolution for DSI provided functions including the core TestDriver class itself. These JARs can be found in the <ROOT>/runtime/ia/gateway folder. Add all the the JARs in this folder. to your client application's classpath. The JARs that are added include:
• com.ibm.ia.admin.tools.jar
• com.ibm.ia.common.jar
• com.ibm.ia.gateway.jar
• com.ibm.ia.testdriver.jar
Page 133
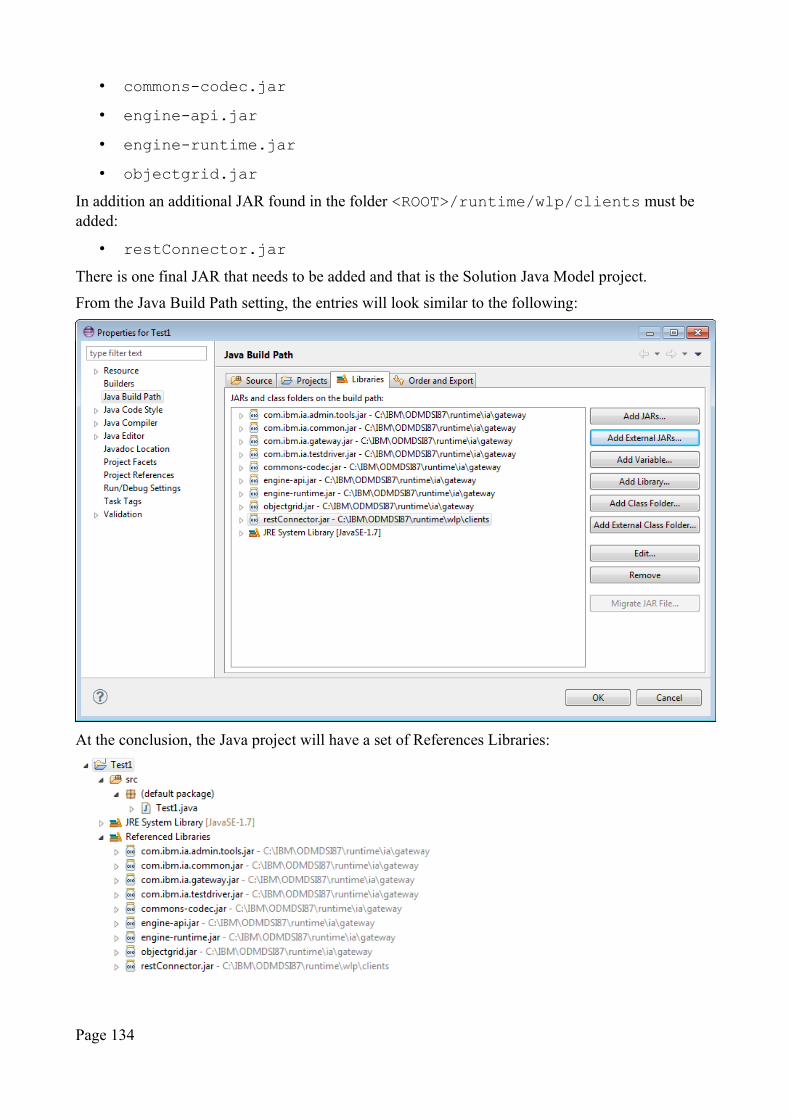
• commons-codec.jar
• engine-api.jar
• engine-runtime.jar
• objectgrid.jar
In addition an additional JAR found in the folder <ROOT>/runtime/wlp/clients must be added:
• restConnector.jar
There is one final JAR that needs to be added and that is the Solution Java Model project.
From the Java Build Path setting, the entries will look similar to the following:
At the conclusion, the Java project will have a set of References Libraries:
Page 134
With the project environment ready, we can now construct our test client. Create a Java class to host the test driver.
When the test driver runs, it needs information in order for it to operate. This information is supplied in the form of a set of name/value properties. These can be supplied either through a file or as a Java Properties object.
To run the test driver, we can build a properties file that describes how to connect to DSI. The nameof the properties file must be "testdriver.properties". The directory in which it is contained must be supplied in the Java runtime property called "testdriver_home". This can be added to the Java command line with:-Dtestdriver_home=<directory path>
An example properties file looks as follows:solutionname=MySolutioncatalogServerEndpoints=localhost:2815host=localhostport=9449username=testerpassword=testertrustStoreLocation=C:\\IBM\\ODMDSI87\\runtime\\wlp\\usr\\servers\\cisDev\\resources\\security\\key.jkstrustStorePassword=testerdisableSSLHostnameVerification=true
The port numbers for your environment can be found in the configuration file described here:
• Changing port numbers
If you fail to point to the testdriver.properties, an error similar to the following will be presented:
The complete list of properties is:
Property Name Description
solutionName The name of the solution
catalogServerEndpoints
host The hostname or IP address of the server running DSI.
port The HTTPs port number on which DSI is listening.
connectTimeout
username
password
trustStorePassword The password for the Java Key Store security keys file. The default for this is "tester".
trustStoreLocation The location of the Java Key Store file that contains the security keys needed to contact DSI. The default for this is <DSIRoot>/runtime/wlp/usr/servers/<Server Name>/resources/security/key.jks.
disableSSLHostnameVerification
logLevel One of:• OFF
Page 135
• SEVERE• WARNING• INFO• FINE• FINER• FINEST
As an alternative to supplying a properties file and a pointer to that file, one can supply a Java Properties object instantiated and populated with the correct values. This can be passed as a parameter to the constructor of the TestDriver. For example:Properties connectionProperties = new Properties();connectionProperties.setProperty("host", "localhost");connectionProperties.setProperty("port", "9449");connectionProperties.setProperty("solutionName", "MySolution");connectionProperties.setProperty("catalogServerEndpoints", "localhost:2815");connectionProperties.setProperty("disableSSLHostnameVerification", "true");connectionProperties.setProperty("trustStoreLocation", "C:\\IBM\\ODMDSI87\\runtime\\wlp\\usr\\servers\\cisDev\\resources\\security\\key.jks");connectionProperties.setProperty("trustStorePassword", "tester");connectionProperties.setProperty("username", "tester");
connectionProperties.setProperty("password", "tester");TestDriver testDriver = new TestDriver(connectionProperties);
Personally, I prefer this methods when building personal tests as it is one less set of artifacts (properties files and directory pointers) that I have to worry about. However, it does necessarily mean that the code has to be changed if you change environments or pass it to someone else. Use your judgement on which style is better for yourself.
TestDriver Methods
The core of the Java test client is an IBM supplied class called com.ibm.ia.TestDriver. This class provides all the functions one needs to write such a program. Full documentation on these methods can be found in the product documentation references. The class has the following methods:
addDebugReceiver(DebugReceiver)
Register a receiver for server transmitted debug information. A DebugReceiver object is passedas a parameter. This is an instance of a class that implements com.ibm.ia.testdriver.DebugReceiver. This interface has one method defined as:void addDebugInfo(DebugInfo instance, String sourceAgent)
This is method is invoked by the framework when the DSI runtime tells the TestDriver that something happened. IBM provides a sample implementation of this interface that queues the debug items for subsequent examination. This sample class is called:com.ibm.ia.testdriver.IADebugReceiver
An example of usage would be:IADebugReceiver receiver = new IADebugReceiver();testDriver.addDebugReceiver(receiver);
Now we can look at what an instance of DebugInfo contains. It has the following methods:
• getAgentName() - The name of the agent that published the event.
Page 136
• getDebugNote() - The note associated with the event.
• getEventId() - The id of the event. The full event can be retrieve using the TestDriver.getAgentEvent() method.
• getSolutionName() - The name of the solution.
• toString() - Convert the DebugInfo to a string. An example would be:DebugInfo : Solution [Solution1] Agent [solution1.solution1_java_agent_1.JavaAgent1] debugNote [*] eventID [A7FB4AAD7D2D408A5611E4C4C8FA7867] agentEvent [com.kolban.EVENT2]
Some setup is also required in the DSI server before debug information is returned. Specifically, wemust set up the debugPort property on which the server is listening. For example:propertyManager set debugPort=6543
The property called "debugservers" should be set to the DSI server against which we will listenfor debug messages. It has the format "host:port".
In addition, the debugagentslist property should name the agents for which publish events should be caught. This can also be "*" to indicate that we will examine events from all agents.
See also:
• getAgentEvent(DebugInfo) - Retrieve an event from a DebugInfo instance.
• removeDebugReceiver(r) - Remove a previously added debug receiver.
connect()
Connect the TestDriver to the DSI server. The properties used for connections are the current properties associated with the instance of the TestDriver. The solution identified in the current properties is used as the solution to work against.
See also:
• disconnect()
connect(timeout)
Connect the TestDriver to the DSI server supplying a timeout. A value of 0 means use no timeout value.
connect(solutionName)
Connect the TestDriver to the DSI server supplying the solution name. The supplied solution name takes precedence over any solution currently associated with the TestDriver through its properties.
See also:
• disconnect()
connect(solutionName, timeout)
Connect the TestDriver to the DSI server supplying the solution name and timeout.
See also:
• disconnect()
Page 137
createRelationship(entity, key)
Create a relationship object populated with the entity type and key. Note that this does NOT create any new entities but rather simply creates a new Relationship object.
createRelationship(t)
Create a relationship object populated with the entity type and key derived from the entity object instance. Note that this does NOT create any new entities but rather simply creates a new Relationship object.
deleteAllEntities()
Delete all the entities for the given solution. This effectively resets the solution to an empty state discarding all the entities.
See also:
• loadEntities(entities)
• loadEntity(entity)
deleteAllEntities(entityType)
Delete all entities for a given entity type. Note that the entity type is a String which includes both the package and the class name of the entity type. It is not a Java Class object.
See also:
• loadEntities(entities)
• loadEntity(entity)
deleteEntity(entityType, entityId)
Delete a specific entity given its type and id.
See also:
• loadEntities(entities)
• loadEntity(entity)
endTest()
disconnect()
Disconnect the TestDriver from the DSI server.
See also:
• connect()
fetchEntity(entityTypeClass, entitiyId)
This method retrieves an entity from the DSI server. If changes are made to the entity they are not written back to the DSI server until a call is made to updateEntity().
The input parameters to this method are:
• entityTypeClass – The Java Class type of the entity type to be retrieved.
Page 138

• entityId – The identifier for this instance of the entity.
See also:
• updateEntity(entity)
getAgentEvent(DebugInfo)
Retrieve the event associated with the DebugInfo record.
For example:DebugInfo db = …;Event e = testDriver.getAgentEvent(db);
See also:
• addDebugReceiver(DebugReceiver)
getConceptFactory(conceptFactoryClass)
Retrieve the concept factory object that is used to create instances of concepts, entities and events. The input parameter is the name of the ConceptFactory class. For example, if our BOM exists in the package "com.kolban" then the parameter to be passed to this method would be "com.kolban.ConceptFactory.class".
getEventFactory()
Retrieve an instance of EventFactory that can be used to create instances of events. It isn't clear when one would create events from an event factory vs creating events from a concept factory.
getModelSerializer()
Retrieve an instance of the Model Serializer that can be used to serialize entities and events to XMLdocuments.
See also:
• KnowledgeCenter – ModelSerializer – v8.7
getProductId()
Return a string representation of the name and version of the DSI product.
getProperties()
getProperty(property, def)
getRuntimeServers()
Retrieve a list of servers that comprise the DSI environment.
getSolutionGateway()
Retrieve the instance of the SolutionGateway object that is used by the TestDriver.
Page 139
getSolutionProperty()
isRuntimeReady()
isSolutionReady()
Testing seems to show that this is true when the TestDriver is connected and false when not connected. This can be used by tooling to determine if a connection is needed.
loadEntities(entities)
Load a list of entities into the ODM DSI runtime.
See also:
• loadEntity(entity)
• deleteAllEntities()
• deleteAllEntities(entityType)
• deleteEntity(entityType, entityId)
loadEntity(entity)
Load a single entity into the ODM DSI runtime.
The entity to be loaded can be created through the ConceptFactory.
See also:
• loadEntities(entities)
• deleteAllEntities()
• deleteAllEntities(entityType)
• deleteEntity(entityType, entityId)
removeDebugReceiver(r)
This method removes a debug receiver from the TestDriver. It is assumed that a previous call to addDebugReceiver() using the same receiver object was made. See the documentation for addDebugReceiver for more notes on using this capability.
See also:
• addDebugReceiver(DebugReceiver) - Add a debug receiver.
• getAgentEvent(DebugInfo)
resetSolutionState()
Resets the solution discarding any event history that may have previously been recorded.
Page 140
setGatewayMaxSubmitDelay()
setProperties()
setProperty()
startRecording()
Start recording processing information for display within Insight Inspector. Once called, the runtime will start recording information until requested to stop by a call to stopRecording(). A REST command can also be used to request a start.
See also:
• Using Insight Inspector
stopRecording()
Stop recording data that was previously requested by a call to startRecording(). Following astop, the data can be examined from the browser based Insight Inspector. A REST command can also be used to request a stop.
See also:
• Using Insight Inspector
submitEvent(event)
This method submits an event to the DSI server for processing. The parameter that is passed is an instance of an event.
toXMLBytes()
Serialize an Entity object to a Java OutputStream as an XML document.
toXMLString()
Serialize an entity to a String representing an XML document.
updateEntity(entity)
Having previously retrieved an entity, this methods will update it back in the DSI server.
See also:
• fetchEntity(entityTypeClass, entitiyId)
validateProperties()
Validate the properties. Not quite sure what that would mean.
Using the TestDriver
Let us now look at how to use this class to write a driver client.
We create an instance of the TestDriver through
Page 141
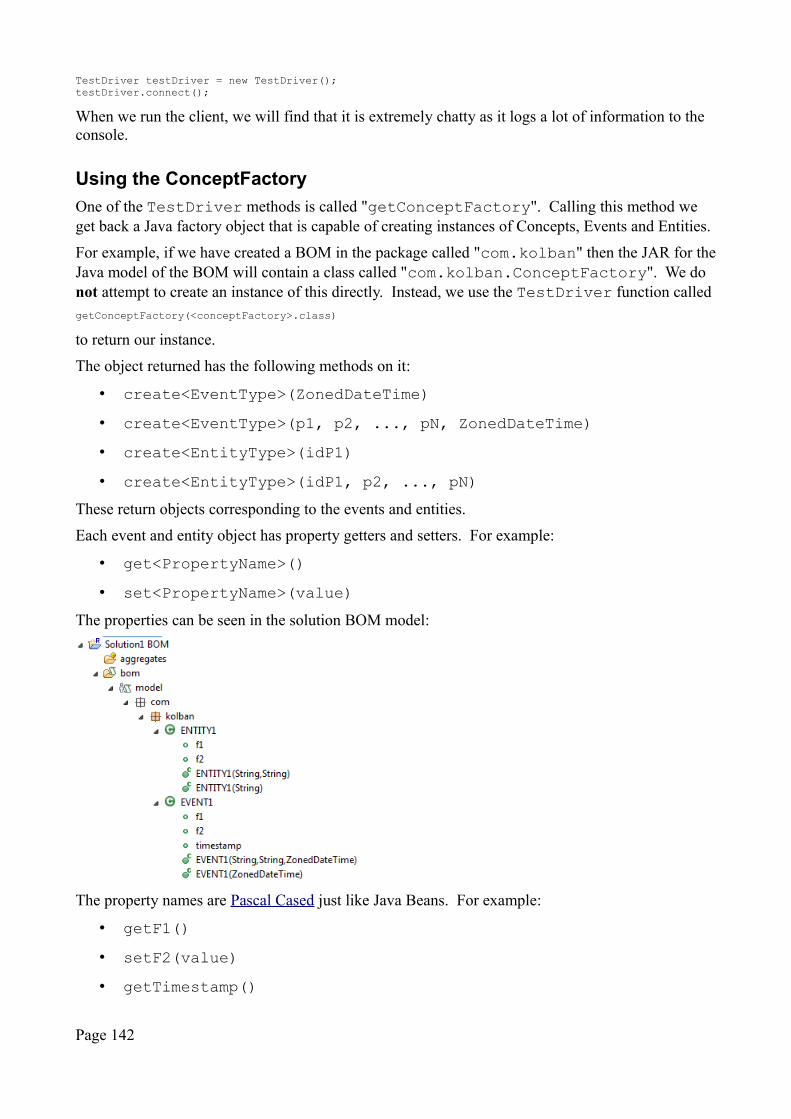
TestDriver testDriver = new TestDriver();testDriver.connect();
When we run the client, we will find that it is extremely chatty as it logs a lot of information to the console.
Using the ConceptFactory
One of the TestDriver methods is called "getConceptFactory". Calling this method we get back a Java factory object that is capable of creating instances of Concepts, Events and Entities.
For example, if we have created a BOM in the package called "com.kolban" then the JAR for theJava model of the BOM will contain a class called "com.kolban.ConceptFactory". We do not attempt to create an instance of this directly. Instead, we use the TestDriver function calledgetConceptFactory(<conceptFactory>.class)
to return our instance.
The object returned has the following methods on it:
• create<EventType>(ZonedDateTime)
• create<EventType>(p1, p2, ..., pN, ZonedDateTime)
• create<EntityType>(idP1)
• create<EntityType>(idP1, p2, ..., pN)
These return objects corresponding to the events and entities.
Each event and entity object has property getters and setters. For example:
• get<PropertyName>()
• set<PropertyName>(value)
The properties can be seen in the solution BOM model:
The property names are Pascal Cased just like Java Beans. For example:
• getF1()
• setF2(value)
• getTimestamp()
Page 142
Creating an instance of an entity
To create an instance of an entity, we get the factory object that creates entities and then we ask the factory to create an entityConceptFactory conceptFactory = testDriver.getConceptFactory(Conceptfactory.class);BO1 bo1 = conceptFactory.createBO1("xyz");bo1.setF2("f2Val");testDriver.loadEntity(bo1);
Creating an instance of an event
If we wish to create an event and submit it, we can do so similarly with:EventFactory eventFactory = testDriver.getEventFactory();SalesEvent salesEvent = eventFactory.createEvent(SalesEvent.class);salesEvent.setName("Cart1");salesEvent.setEventDateTime(ZonedDateTime.parse("2014-04-06T16:45:00"));testDriver.submitEvent(salesEvent);
Retrieving an entity
We can use the fetchEntity() method to retrieve a specific entity.
See also:
• fetchEntity(entityTypeClass, entitiyId)
Scripting tests with JavaScript
The Java programming language has had the ability to embed scripts within it for some time. However, with the arrival of Java 8, true first class support for JavaScript in the form of the "Nashorn" engine is bundled. Through this technology, one can execute JavaScript from within the context of a Java application. From a DSI perspective, this becomes interesting because we can now script TestDriver APIs from JavaScript.
Here is a complete example of a Java 8 hosted JavaScript client:var TestDriver = Java.type("com.ibm.ia.testdriver.TestDriver");var Properties = Java.type("java.util.Properties");var ConceptFactory = Java.type("com.kolban.ConceptFactory");var Ev1 = Java.type("com.kolban.Ev1");
var connectionProperties = new Properties();connectionProperties.setProperty("host", "localhost");connectionProperties.setProperty("port", "9449");connectionProperties.setProperty("solutionName", "MySolution");connectionProperties.setProperty("catalogServerEndpoints", "localhost:2815");connectionProperties.setProperty("disableSSLHostnameVerification", "true");connectionProperties.setProperty("trustStoreLocation","C:\\IBM\\ODMDSI87\\runtime\\wlp\\usr\\servers\\cisDev\\resources\\security\\key.jks");connectionProperties.setProperty("trustStorePassword", "tester");connectionProperties.setProperty("username", "tester");connectionProperties.setProperty("password", "tester");
var testDriver = new TestDriver(connectionProperties);testDriver.connect();testDriver.startRecording();testDriver.deleteAllEntities();
var bo1 = testDriver.getConceptFactory(ConceptFactory.class).createBO1("XYZ");bo1.setF2("Hi!");testDriver.loadEntity(bo1);
var eventFactory = testDriver.getEventFactory();var ev1 = eventFactory.createEvent(Ev1.class);ev1.setX1("AA");testDriver.submitEvent(ev1);
Page 143

testDriver.stopRecording();
Example of creating an entityvar ConceptFactory = Java.type("<Package Name>.ConceptFactory");
// Variable "testDriver" is initialized to your TestDriver instance.var conceptFactory = testDriver.getConceptFactory(ConceptFactory.class);var entity1 = conceptFactory.createENTITY1("xyz");entity1.setF2("f2Val");testDriver.loadEntity(entity1);print("Done!");
Example of creating an event
We may wish to create instance of entities through JavaScript. Here is an example of creating a single entity.var ConceptFactory = Java.type("com.kolban.ConceptFactory");var ZonedDateTime = Java.type("org.threeten.bp.ZonedDateTime");
var conceptFactory = testDriver.getConceptFactory(ConceptFactory.class);var event1 = conceptFactory.createEVENT1(ZonedDateTime.now());event1.setF1("XYZ");event1.setF2("ABC");testDriver.submitEvent(event1);print("Done!");
If we have many entities to create, another notion is that we can define the entities in Json and use a small piece of JavaScript to build the entities from the data. For example:var ConceptFactory = Java.type("aggregate_tests.ConceptFactory");
// Variable "testDriver" is initialized to your TestDriver instance.var conceptFactory = testDriver.getConceptFactory(ConceptFactory.class);testDriver.deleteAllEntities();
var data = [{ id: "Blue Widget", quantity: 5, description: "Blue Widgets"},{ id: "Red Widget", quantity: 6, description: "Red Widgets"},{ id: "Green Widget", quantity: 17, description: "Green Widgets"}];for (var i=0; i<data.length; i++) { var stockItem = conceptFactory.createStockItem(data[i].id); stockItem.setQuantity(data[i].quantity); stockItem.setDescription(data[i].description); testDriver.loadEntity(stockItem);}print("Done!");
See also:• loadEntity(entity)
Using Insight Inspector
Insight Inspector is a web based application that allows a developer or tester to view the execution history of a series of tests submitted to DSI through the TestDriver Java class. The high level overview of using this feature is as follows:
Page 144
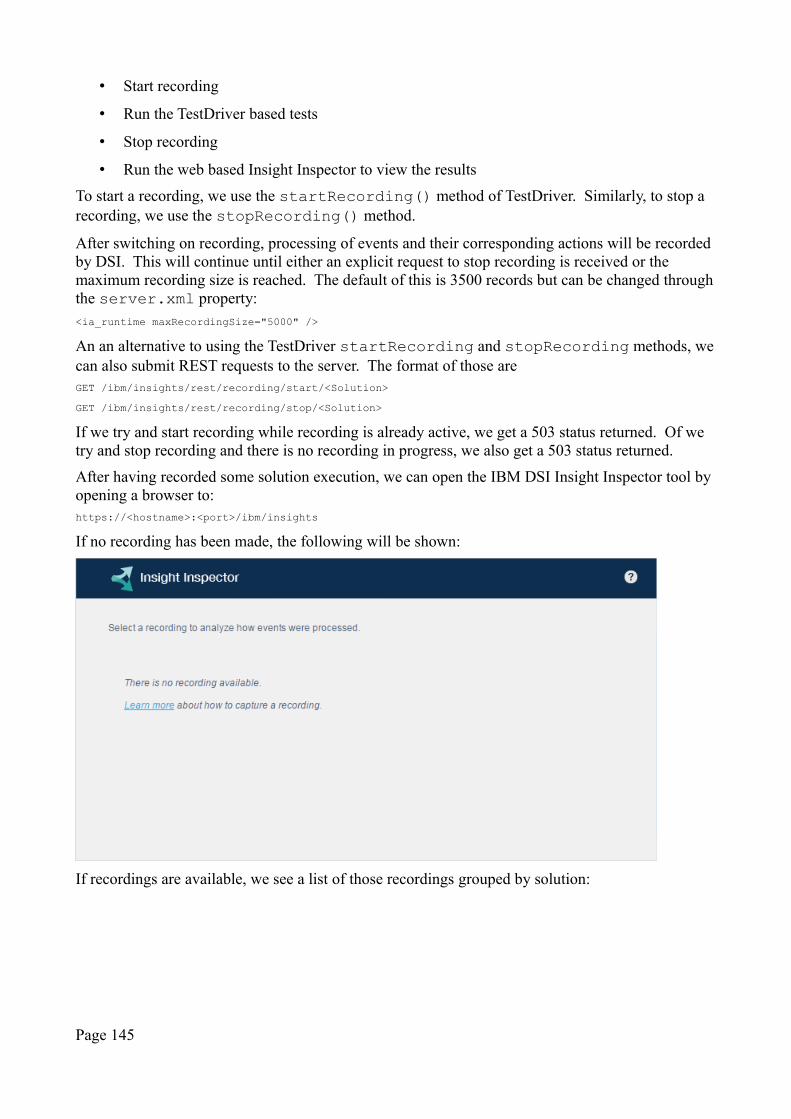
• Start recording
• Run the TestDriver based tests
• Stop recording
• Run the web based Insight Inspector to view the results
To start a recording, we use the startRecording() method of TestDriver. Similarly, to stop a recording, we use the stopRecording() method.
After switching on recording, processing of events and their corresponding actions will be recorded by DSI. This will continue until either an explicit request to stop recording is received or the maximum recording size is reached. The default of this is 3500 records but can be changed throughthe server.xml property:<ia_runtime maxRecordingSize="5000" />
An an alternative to using the TestDriver startRecording and stopRecording methods, wecan also submit REST requests to the server. The format of those areGET /ibm/insights/rest/recording/start/<Solution>
GET /ibm/insights/rest/recording/stop/<Solution>
If we try and start recording while recording is already active, we get a 503 status returned. Of we try and stop recording and there is no recording in progress, we also get a 503 status returned.
After having recorded some solution execution, we can open the IBM DSI Insight Inspector tool by opening a browser to:https://<hostname>:<port>/ibm/insights
If no recording has been made, the following will be shown:
If recordings are available, we see a list of those recordings grouped by solution:
Page 145
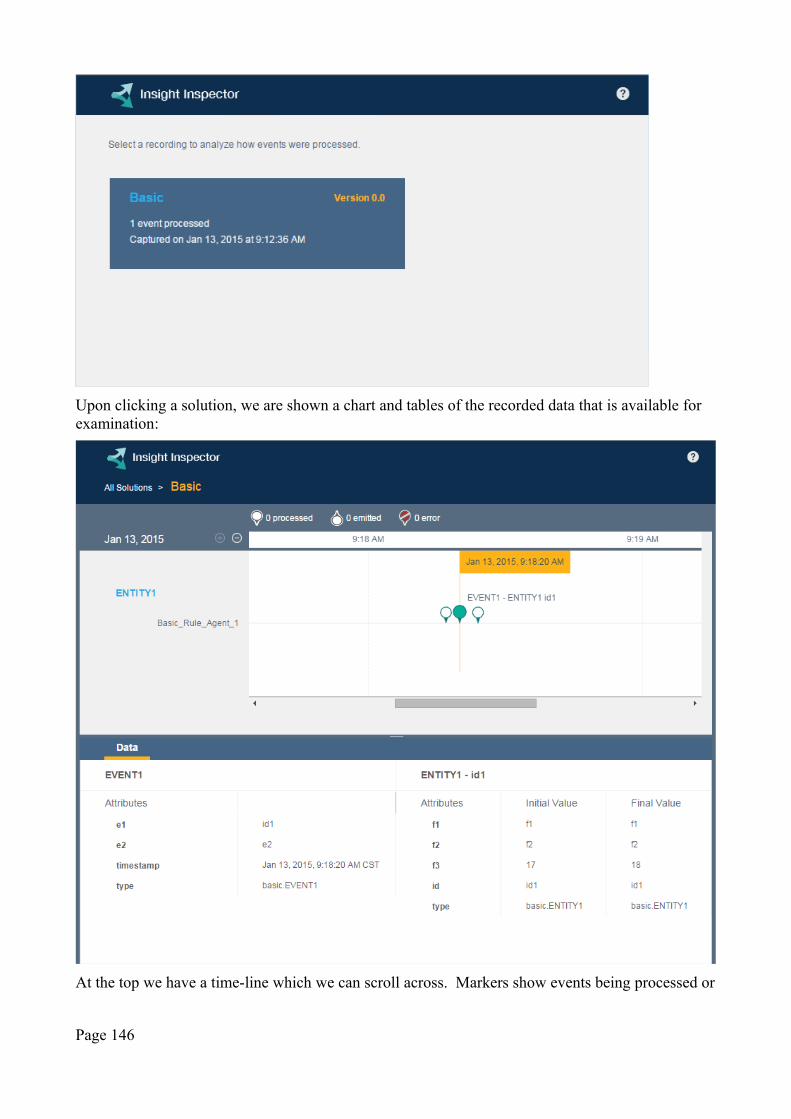
Upon clicking a solution, we are shown a chart and tables of the recorded data that is available for examination:
At the top we have a time-line which we can scroll across. Markers show events being processed or
Page 146
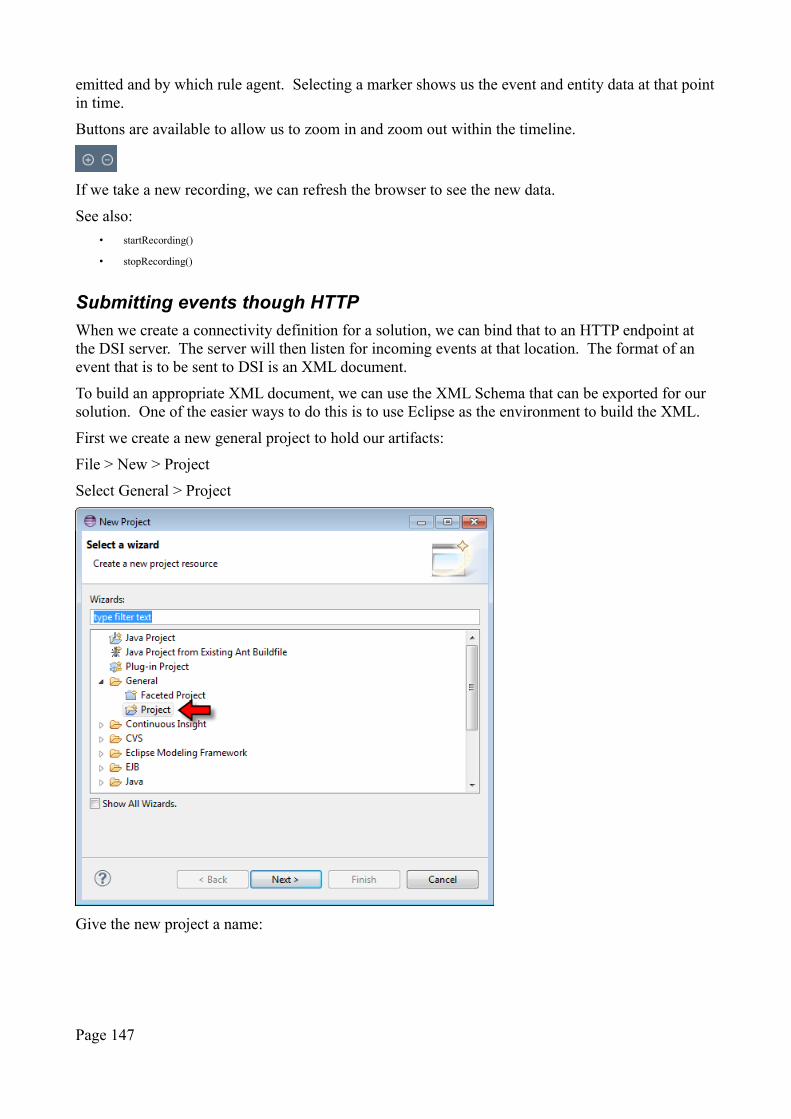
emitted and by which rule agent. Selecting a marker shows us the event and entity data at that pointin time.
Buttons are available to allow us to zoom in and zoom out within the timeline.
If we take a new recording, we can refresh the browser to see the new data.
See also:
• startRecording()
• stopRecording()
Submitting events though HTTP
When we create a connectivity definition for a solution, we can bind that to an HTTP endpoint at the DSI server. The server will then listen for incoming events at that location. The format of an event that is to be sent to DSI is an XML document.
To build an appropriate XML document, we can use the XML Schema that can be exported for our solution. One of the easier ways to do this is to use Eclipse as the environment to build the XML.
First we create a new general project to hold our artifacts:
File > New > Project
Select General > Project
Give the new project a name:
Page 147
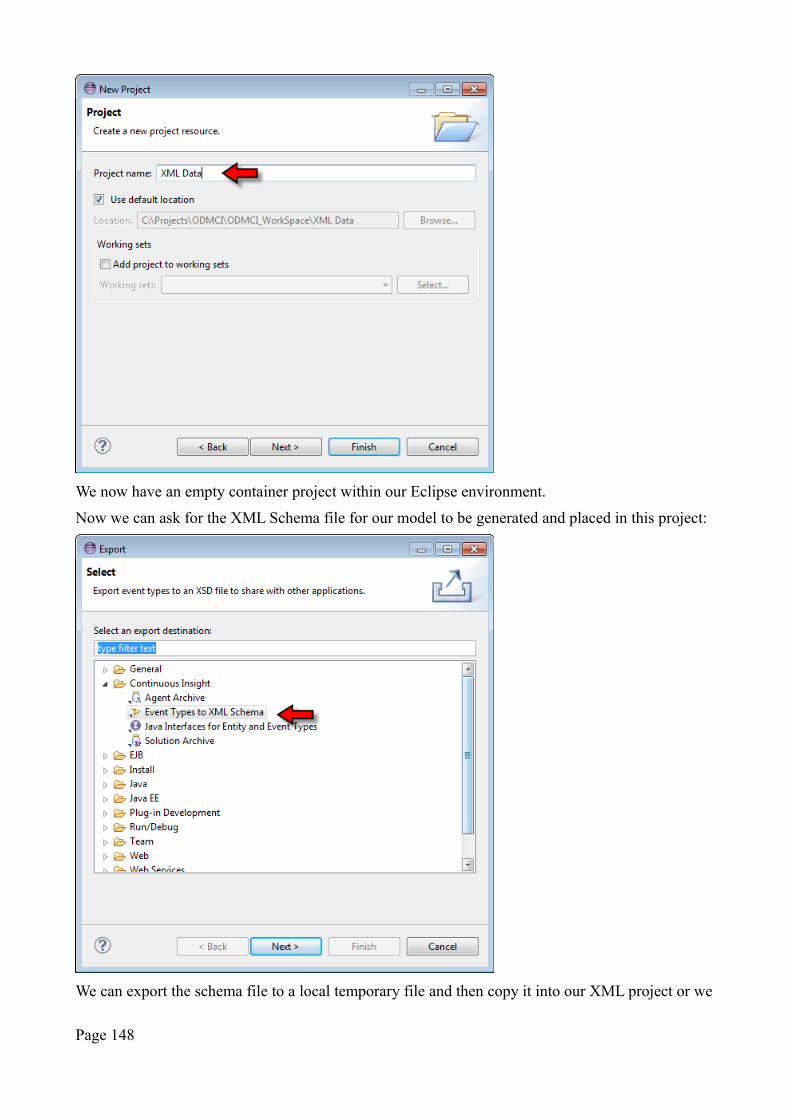
We now have an empty container project within our Eclipse environment.
Now we can ask for the XML Schema file for our model to be generated and placed in this project:
We can export the schema file to a local temporary file and then copy it into our XML project or we
Page 148
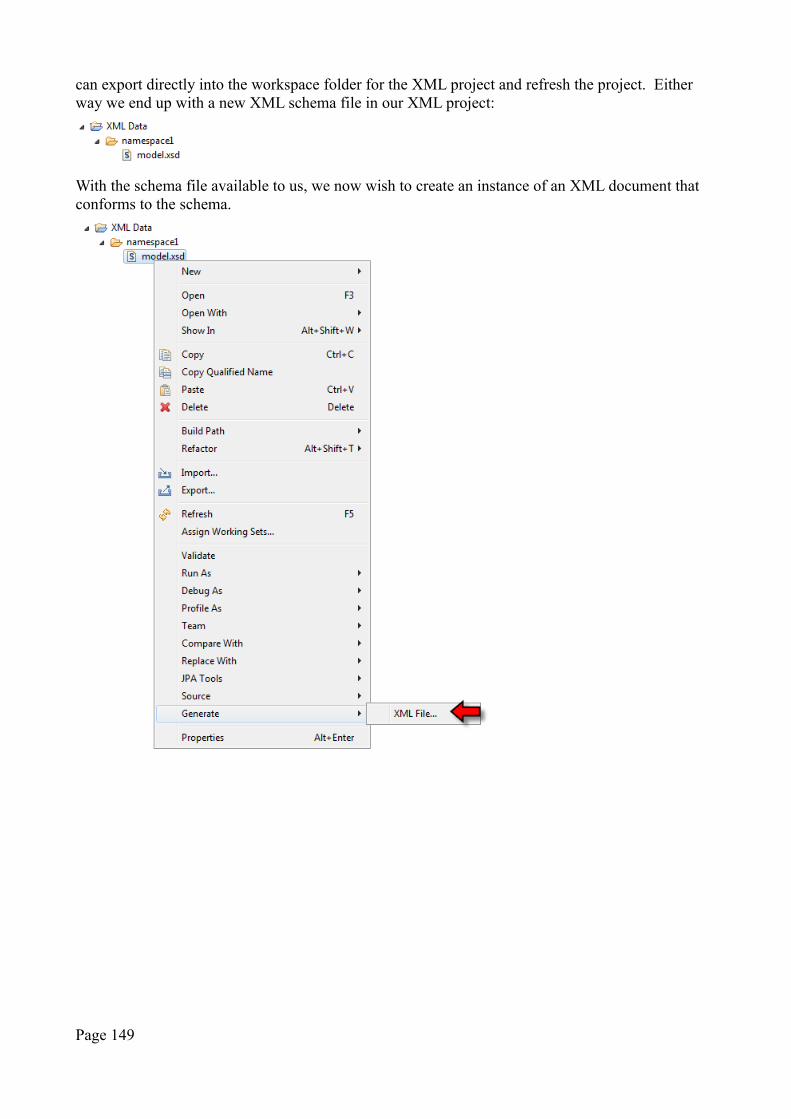
can export directly into the workspace folder for the XML project and refresh the project. Either way we end up with a new XML schema file in our XML project:
With the schema file available to us, we now wish to create an instance of an XML document that conforms to the schema.
Page 149
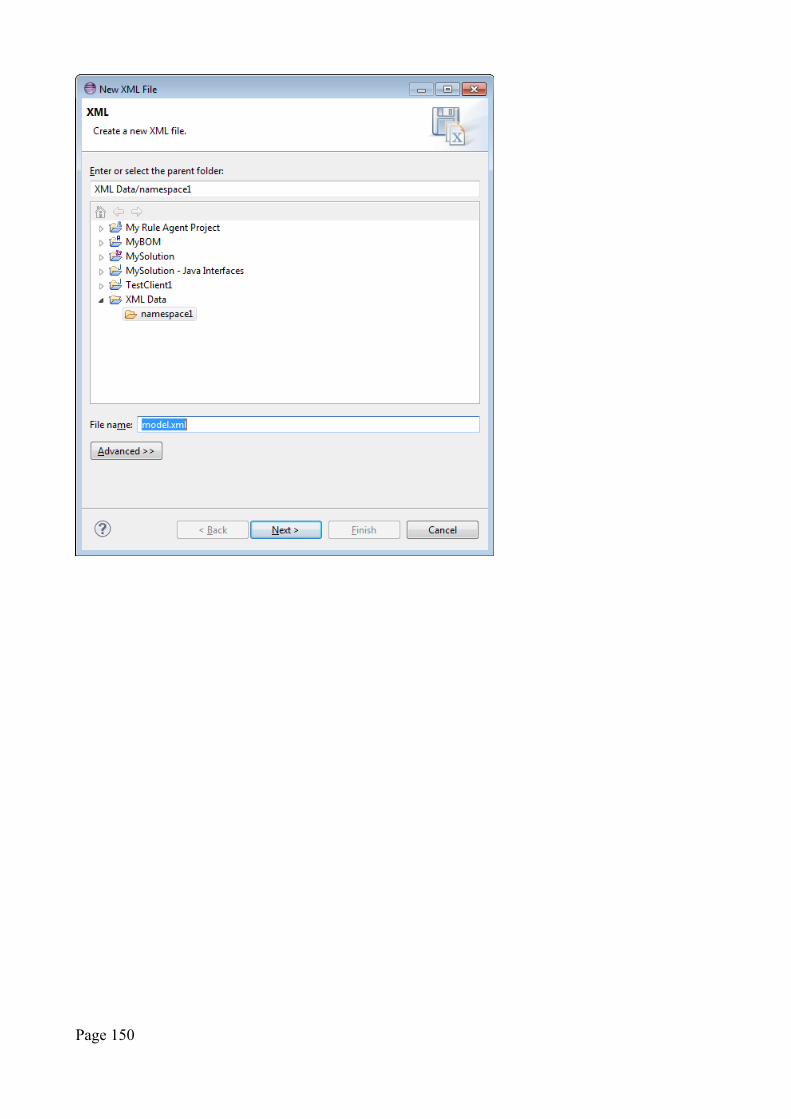
Page 150
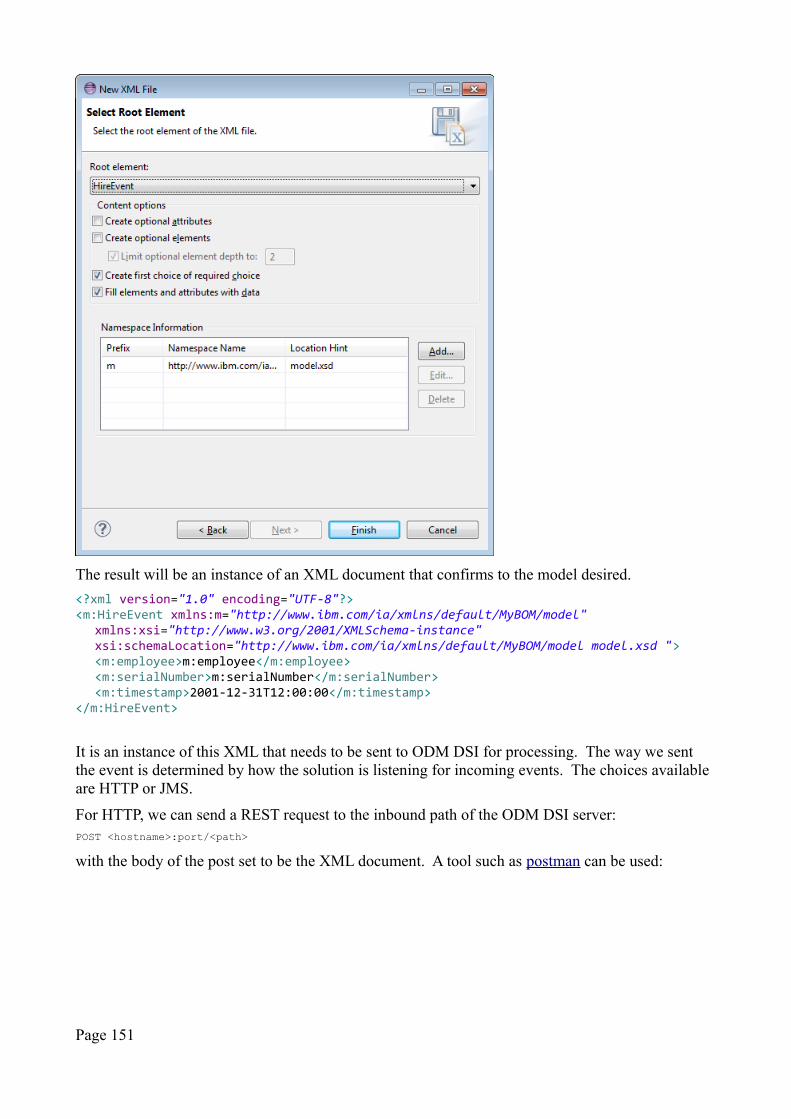
The result will be an instance of an XML document that confirms to the model desired.
<?xml version="1.0" encoding="UTF-8"?><m:HireEvent xmlns:m="http://www.ibm.com/ia/xmlns/default/MyBOM/model"
xmlns:xsi="http://www.w3.org/2001/XMLSchema-instance"xsi:schemaLocation="http://www.ibm.com/ia/xmlns/default/MyBOM/model model.xsd "><m:employee>m:employee</m:employee><m:serialNumber>m:serialNumber</m:serialNumber><m:timestamp>2001-12-31T12:00:00</m:timestamp>
</m:HireEvent>
It is an instance of this XML that needs to be sent to ODM DSI for processing. The way we sent the event is determined by how the solution is listening for incoming events. The choices available are HTTP or JMS.
For HTTP, we can send a REST request to the inbound path of the ODM DSI server:POST <hostname>:port/<path>
with the body of the post set to be the XML document. A tool such as postman can be used:
Page 151
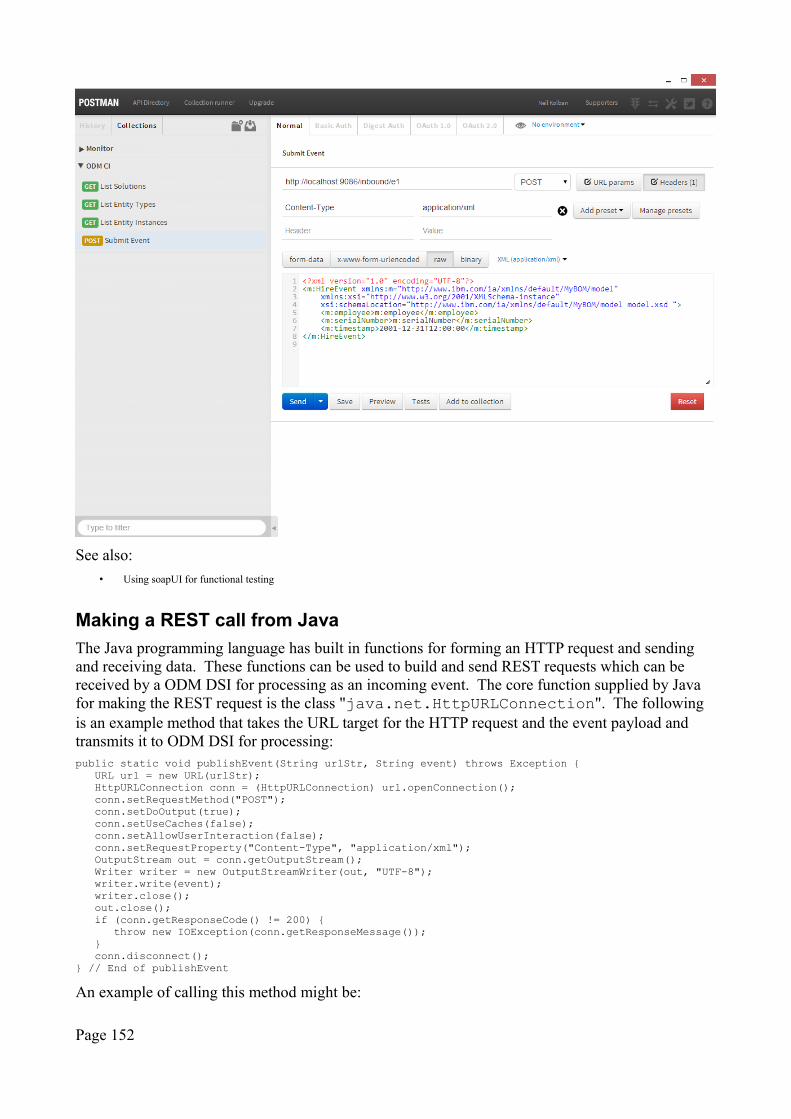
See also:
• Using soapUI for functional testing
Making a REST call from Java
The Java programming language has built in functions for forming an HTTP request and sending and receiving data. These functions can be used to build and send REST requests which can be received by a ODM DSI for processing as an incoming event. The core function supplied by Java for making the REST request is the class "java.net.HttpURLConnection". The following is an example method that takes the URL target for the HTTP request and the event payload and transmits it to ODM DSI for processing:public static void publishEvent(String urlStr, String event) throws Exception {
URL url = new URL(urlStr);HttpURLConnection conn = (HttpURLConnection) url.openConnection();conn.setRequestMethod("POST");conn.setDoOutput(true);conn.setUseCaches(false);conn.setAllowUserInteraction(false);conn.setRequestProperty("Content-Type", "application/xml");OutputStream out = conn.getOutputStream();Writer writer = new OutputStreamWriter(out, "UTF-8");writer.write(event);writer.close();out.close();if (conn.getResponseCode() != 200) {
throw new IOException(conn.getResponseMessage());}conn.disconnect();
} // End of publishEvent
An example of calling this method might be:
Page 152
public static void main(String args[]) {String event = "<?xml version='1.0' encoding='UTF-8'?>" +
"<m:XYZEvent xmlns:m='http://www.ibm.com/ia/xmlns/default/Solution2%20BOM/model'" +" xmlns:xsi='http://www.w3.org/2001/XMLSchema-instance'" +" xsi:schemaLocation='http://www.ibm.com/ia/xmlns/default/Solution2%20BOM/model model.xsd'>" +" <m:ABC>m:ABC</m:ABC>" + " <m:f1>m:f1</m:f1>" +" <m:f2>m:f2</m:f2>" +" <m:timestamp>2001-12-31T12:00:00</m:timestamp>" +"</m:XYZEvent>";
try {publishEvent("http://localhost:9086/Solution2/ep1", event);System.out.println("Event published");
} catch(Exception e) {e.printStackTrace();
}}
Submitting events through JMS
The Java Message Service (JMS) is the Java API and specification for reading and writing messagesto queue or topic based messaging environments. ODM DSI has the ability to "listen" for incomingmessages and on receipt of the message, treat its content as an event. The content of the message should be an XML document formatted for an event structure.
By using JMS, we can asynchronously deliver messages to ODM DSI without having to wait for ODM DSI to process them. This is a very loose coupling between an event producer and the consumer.
ODM DSI can receive events from a couple of JMS providers, namely the WAS JMS provider and the MQ JMS provider. Here we will start to describe what is required to send messages through JMS.
Configuring ODM DSI for JMS
First, we have to enable the WLP feature called "wasJmsServer-1.1". It is this feature which allows ODM DSI to be a JMS provider.
See also:
Writing an external JMS client to send events
Now let us assume that we have event data that, in our example, will be contained in a file. We nowwish to submit that JMS message to the ODM DSI server for processing. Here we will assume that the client we will use a stand-alone Java SE client.
To make this work, we need to use JAR files supplied by IBM to perform the JMS work. Unfortunately, WLP does not provide those. Instead, the only place (we know off) to get these JARs is from a full implementation of WAS.
Within a WAS install, we will find a directory called <WASROOT>/runtimes. Within that folder we will find a number of JARs but the two of interest to us are:
• com.ibm.ws.sib.client.thin.jms_8.5.0.jar
• com.ibm.jaxws.thinclient_8.5.0.jar
Next we built a Java project in Eclipse referencing these JARs. The JVM for this project must be the JVM supplied by WAS.
Page 153

Here now is the complete logic for sending a JMS message from a file:package com.kolban;import java.io.RandomAccessFile;import javax.jms.Connection;import javax.jms.MessageProducer;import javax.jms.Session;import javax.jms.TextMessage;import com.ibm.websphere.sib.api.jms.JmsConnectionFactory;import com.ibm.websphere.sib.api.jms.JmsFactoryFactory;import com.ibm.websphere.sib.api.jms.JmsQueue;
public class Test1 {public static void main(String[] args) {
Test1 test1 = new Test1();test1.run();
}
public void run() {try {
JmsFactoryFactory jff = JmsFactoryFactory.getInstance();JmsConnectionFactory jcf = jff.createConnectionFactory();jcf.setProviderEndpoints("localhost:7276");jcf.setBusName("any");JmsQueue queue = jff.createQueue("Default.Queue");Connection conn = jcf.createConnection();conn.start();
// Read the fileRandomAccessFile f = new RandomAccessFile("C:\\Projects\\ODMCI\\ODMCI_WorkSpace\\XML
Data\\Solution2\\XYZEvent.xml", "r");byte data[] = new byte[(int)f.length()];f.read(data);f.close();
Session session = conn.createSession(false, Session.AUTO_ACKNOWLEDGE);TextMessage tm = session.createTextMessage(new String(data));MessageProducer producer = session.createProducer(queue);producer.send(tm);conn.close();System.out.println("Done!");
} catch (Exception e) {e.printStackTrace();
}}
}
As you can see, there aren't many lines to it but it involves a whole lot of function. Some areas to note when reading it are:
• The setProviderEndpoints() method supplied the host and port on which ODM CI is running and listening for incoming external messages.
• We are creating the JMS connection and JMS queue not using JNDI as is commonly found with JMS applications as WLP doesn't support external JNDI access.
• The name of the JMS queue to which we are writing is called "Default.Queue". This is the default queue. The name of an alternate queue may be used but must match the definitions in the .cdef file.
Using soapUI for functional testing
A popular test tool is called "soapUI" which is has a free version available. The home page for soapUI is "http://www.soapui.org/". Installation images for the open source version can be found here "http://sourceforge.net/projects/soapui/files/". At the time of writing, soapUI 4.6.4 is the latest version. The edition of the tool that I downloaded was "SoapUI-x64-4.6.4.exe" which is a full installer.
Page 154
When sending requests, ensure to add "Content-Type: application/json" or "application/xml" to each request. Failure to do this seems to result in 200 OK response butwith no content.
See also:
• REST Requests
Page 155
OperationsODM DSI runs on top of the IBM WebSphere Liberty Profile (WLP) runtime platform. In order to operate ODM DSI a knowledge of WLP will help. ODM DSI expects some level of configuration to be performed against WLP to achieve certain tasks. These include:
• JMS configuration
Some of the scripts supplied by ODM DSI expect connections parameters. These can be supplied on the command line or placed in a properties file. The default properties file can be found at:<ROOT>/runtime/ia/etc/connection.properties
See also:• WebSphere Liberty
Creating a new server
If we wish to create a new server instance, we can run the command:server.bat create <serverName> --template=<templateName>
The list of templates can be found in the folder called:<DSI>/runtime/wlp/templates/servers
What you will find there will be templates for servers of type:
• cisCatalog
• cisContainer
• cisDev
• cisInbound
• cisOutbound
• defaultServer
These templates contain the bootstrap, jvm.options and server.xml (amongst other things) for the new Liberty server that will be created.
Starting and stopping the server
We can determine which servers are running with the serverManager isOnline command.
From within <ROOT>/runtime/wlp/bin we can execute:
to start the serverserver start cisDev
to stop the serverserverManager shutdown
Changing port numbers
Within the <Root>/runtime/wlp/usr/servers/cisDev directory is a file called
Page 156
"bootstrap.properties". Within this file we will find the port numbers for the server.
The defaults are:HTTP: 9080HTTPS: 9443listenerPort: 2809
In my sandbox, I changed these to:HTTP: 9086HTTPS: 9449listenerPort: 2815
Server administration properties
There are certain properties which are managed specially by the server and are changeable via the "propertyManager" command that can be found in the <DSI>/runtime/ia/bin folder. These properties include:
• solutionAutoStart
• maxEventProcessingThreads
• magAgentTransactionRetries
• engineCacheSize
• agentDisableSaveState
• debugPort
• logSuppressionThreshold
• logSuppressionThresholdPeriod
• logInitialSuppressionPeriod
• logMaxSuppressionPeriod
• logMaxTrackedMessages
The propertyManager command has options for get, set and list to work with the properties.
The "list" command lists the names of all the properties that can be changed.
Executing a "get" before a set may return a message that the property does not exist.
DSI JMX Access
IBM DSI provides a rich Managed Bean (Mbean) access to its operations via the Java JMX technologies. JMX provides a Java flavored mechanism for interacting with application components either locally (within the DSI server) or remotely over the network. It is WebSphere Liberty that provides the underlying JMX framework however DSI has plugged itself into that area nicely.
The JMX domain to which the DSI components belong is called "com.ibm.ia".
The primary beans of interest to us are:
Page 157
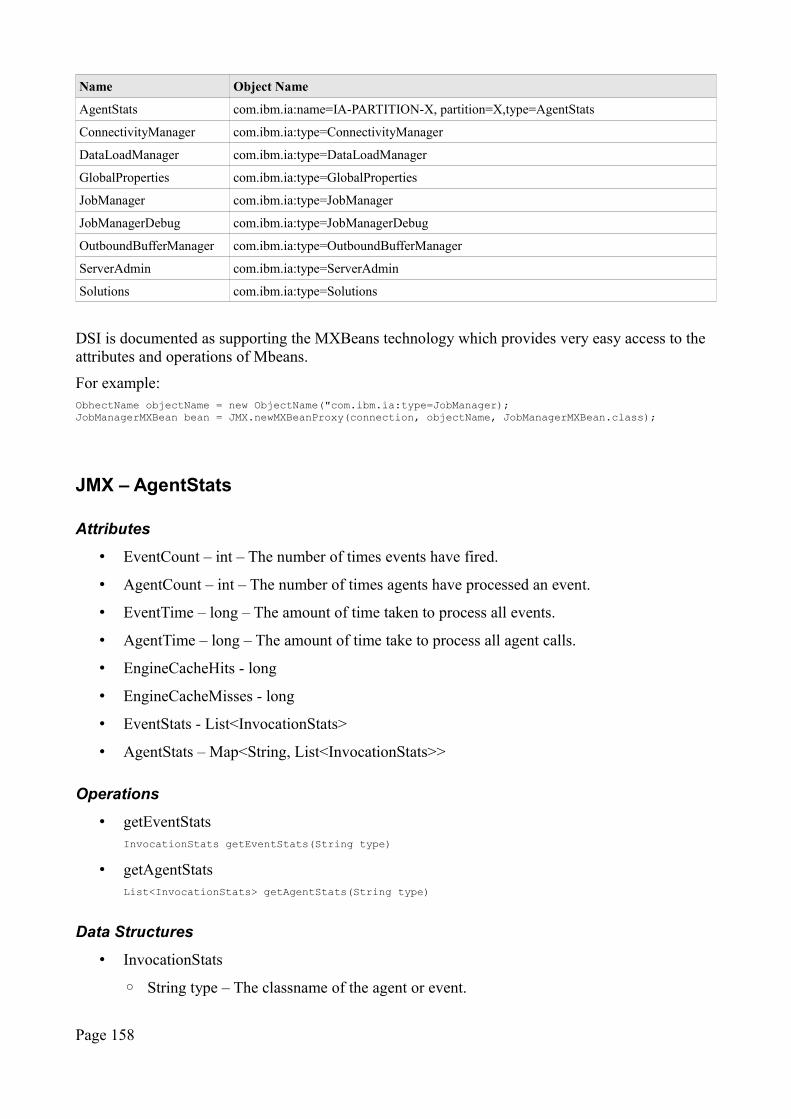
Name Object Name
AgentStats com.ibm.ia:name=IA-PARTITION-X, partition=X,type=AgentStats
ConnectivityManager com.ibm.ia:type=ConnectivityManager
DataLoadManager com.ibm.ia:type=DataLoadManager
GlobalProperties com.ibm.ia:type=GlobalProperties
JobManager com.ibm.ia:type=JobManager
JobManagerDebug com.ibm.ia:type=JobManagerDebug
OutboundBufferManager com.ibm.ia:type=OutboundBufferManager
ServerAdmin com.ibm.ia:type=ServerAdmin
Solutions com.ibm.ia:type=Solutions
DSI is documented as supporting the MXBeans technology which provides very easy access to the attributes and operations of Mbeans.
For example:ObhectName objectName = new ObjectName("com.ibm.ia:type=JobManager);JobManagerMXBean bean = JMX.newMXBeanProxy(connection, objectName, JobManagerMXBean.class);
JMX – AgentStats
Attributes
• EventCount – int – The number of times events have fired.
• AgentCount – int – The number of times agents have processed an event.
• EventTime – long – The amount of time taken to process all events.
• AgentTime – long – The amount of time take to process all agent calls.
• EngineCacheHits - long
• EngineCacheMisses - long
• EventStats - List<InvocationStats>
• AgentStats – Map<String, List<InvocationStats>>
Operations
• getEventStatsInvocationStats getEventStats(String type)
• getAgentStatsList<InvocationStats> getAgentStats(String type)
Data Structures
• InvocationStats
◦ String type – The classname of the agent or event.
Page 158
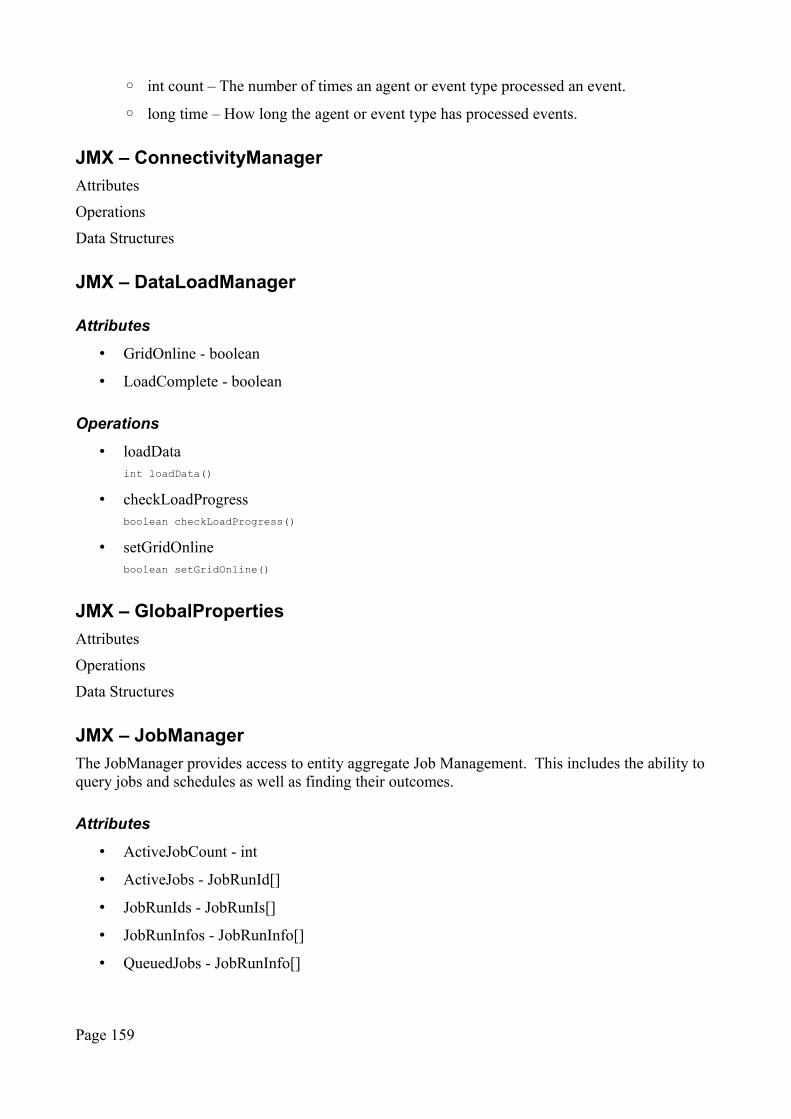
◦ int count – The number of times an agent or event type processed an event.
◦ long time – How long the agent or event type has processed events.
JMX – ConnectivityManager
Attributes
Operations
Data Structures
JMX – DataLoadManager
Attributes
• GridOnline - boolean
• LoadComplete - boolean
Operations
• loadDataint loadData()
• checkLoadProgressboolean checkLoadProgress()
• setGridOnlineboolean setGridOnline()
JMX – GlobalProperties
Attributes
Operations
Data Structures
JMX – JobManager
The JobManager provides access to entity aggregate Job Management. This includes the ability to query jobs and schedules as well as finding their outcomes.
Attributes
• ActiveJobCount - int
• ActiveJobs - JobRunId[]
• JobRunIds - JobRunIs[]
• JobRunInfos - JobRunInfo[]
• QueuedJobs - JobRunInfo[]
Page 159
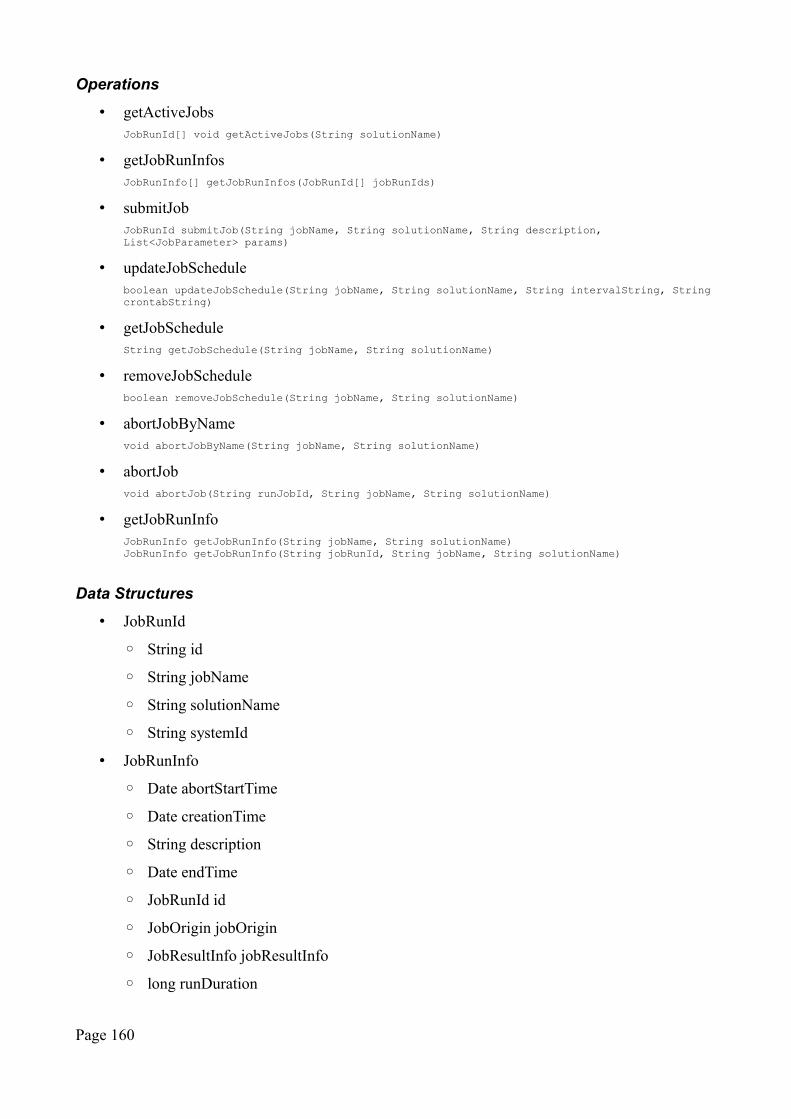
Operations
• getActiveJobsJobRunId[] void getActiveJobs(String solutionName)
• getJobRunInfosJobRunInfo[] getJobRunInfos(JobRunId[] jobRunIds)
• submitJobJobRunId submitJob(String jobName, String solutionName, String description, List<JobParameter> params)
• updateJobScheduleboolean updateJobSchedule(String jobName, String solutionName, String intervalString, StringcrontabString)
• getJobScheduleString getJobSchedule(String jobName, String solutionName)
• removeJobScheduleboolean removeJobSchedule(String jobName, String solutionName)
• abortJobByNamevoid abortJobByName(String jobName, String solutionName)
• abortJobvoid abortJob(String runJobId, String jobName, String solutionName)
• getJobRunInfoJobRunInfo getJobRunInfo(String jobName, String solutionName)JobRunInfo getJobRunInfo(String jobRunId, String jobName, String solutionName)
Data Structures
• JobRunId
◦ String id
◦ String jobName
◦ String solutionName
◦ String systemId
• JobRunInfo
◦ Date abortStartTime
◦ Date creationTime
◦ String description
◦ Date endTime
◦ JobRunId id
◦ JobOrigin jobOrigin
◦ JobResultInfo jobResultInfo
◦ long runDuration
Page 160
◦ Date startTime
◦ JobStatus status
◦ boolean abandoned
◦ boolean restart
• JobOrigin
◦ String name
• JobStatus
◦ Enum
▪ ABORTED
▪ ABORTING
▪ CANCELLED
▪ COMPLETED
▪ CREATED
▪ FAILED
▪ FAILED_SUBMISSION
▪ QUEUED
▪ RUNNING
▪ SKIPPED_AS_DUPE
▪ STARTING
▪ TIMED_OUT
• JobResultInfo
◦ JobRunId id
◦ String message
◦ String resultCode
JMX – OutboundBufferManager
Attributes
Operations
Data Structures
JMX – ServerAdmin
Attributes
Operations
Page 161
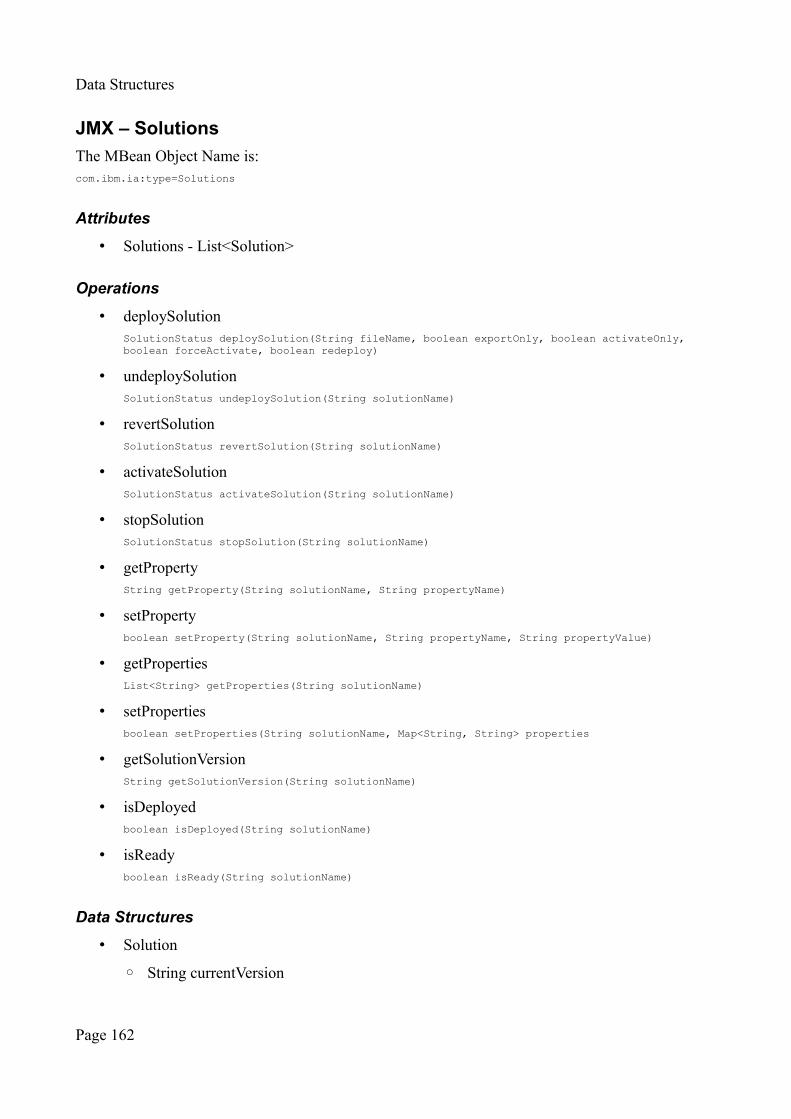
Data Structures
JMX – Solutions
The MBean Object Name is:com.ibm.ia:type=Solutions
Attributes
• Solutions - List<Solution>
Operations
• deploySolutionSolutionStatus deploySolution(String fileName, boolean exportOnly, boolean activateOnly, boolean forceActivate, boolean redeploy)
• undeploySolutionSolutionStatus undeploySolution(String solutionName)
• revertSolutionSolutionStatus revertSolution(String solutionName)
• activateSolutionSolutionStatus activateSolution(String solutionName)
• stopSolutionSolutionStatus stopSolution(String solutionName)
• getPropertyString getProperty(String solutionName, String propertyName)
• setPropertyboolean setProperty(String solutionName, String propertyName, String propertyValue)
• getPropertiesList<String> getProperties(String solutionName)
• setPropertiesboolean setProperties(String solutionName, Map<String, String> properties
• getSolutionVersionString getSolutionVersion(String solutionName)
• isDeployedboolean isDeployed(String solutionName)
• isReadyboolean isReady(String solutionName)
Data Structures
• Solution
◦ String currentVersion
Page 162

◦ String name
• SolutionStatus
◦ String message
◦ boolean success
Configuring the data as persistent
By default, when events arrive and entities are created, when the environment is stopped and restarted, it is restarted in a virgin state. This means that any previous knowledge that was known or learned is lost. There may be times when we wish maintain persistence of data between server starts and we can enable this capability but it comes at a cost. When there is no persistence enabled the operation of the server is as fast as possible. When we enable persistence, we are asking the system to perform an additional amount of work on our behalf. This can reduce throughput and increase resource utilization. As such, the decision to switch on persistence should be carefully thought through.
If persistence is enabled, then the data and state of ODM DSI is written to a database. The databasemust be configured as a Java EE datasource. A script is provide found at:<ROOT>/runtime/ia/persistence/sql/DB2/DB2Distrib.sql
which can be applied to a DB2 database to create the appropriate definitions in a target database. Although the file is oriented towards DB2, it appears to be pretty generic SQL and can thus be applied to most database systems. Although the data stored in the tables is black-box, we can list the different tables it creates. These are:
• ENTITIES
• OUTBOUNDEVENTS
• INBOUNDEVENTS
• JOBRESULTS
• EVENTQUERY
• JOBHISTORY
• RULESETS
• DELAYEDEVENTS
To enable persistence, we must edit a configuration file that belongs to objectgrid. This file can be found at:<ROOT>/runtime/wlp/usr/servers/<server name>/grids/objectgrid.xml
Within the file, find the line which reads:<objectGrid name="com.ibm.ia" initialStatus="ONLINE">
and change it to read:<objectGrid name="com.ibm.ia" initialStatus="PRELOAD">
In addition, we can now uncomment the lines which read:<bean id="Loader" osgiService="CISSQLManager" />
for each of the maps that we wish to persist.
These maps include:
Page 163
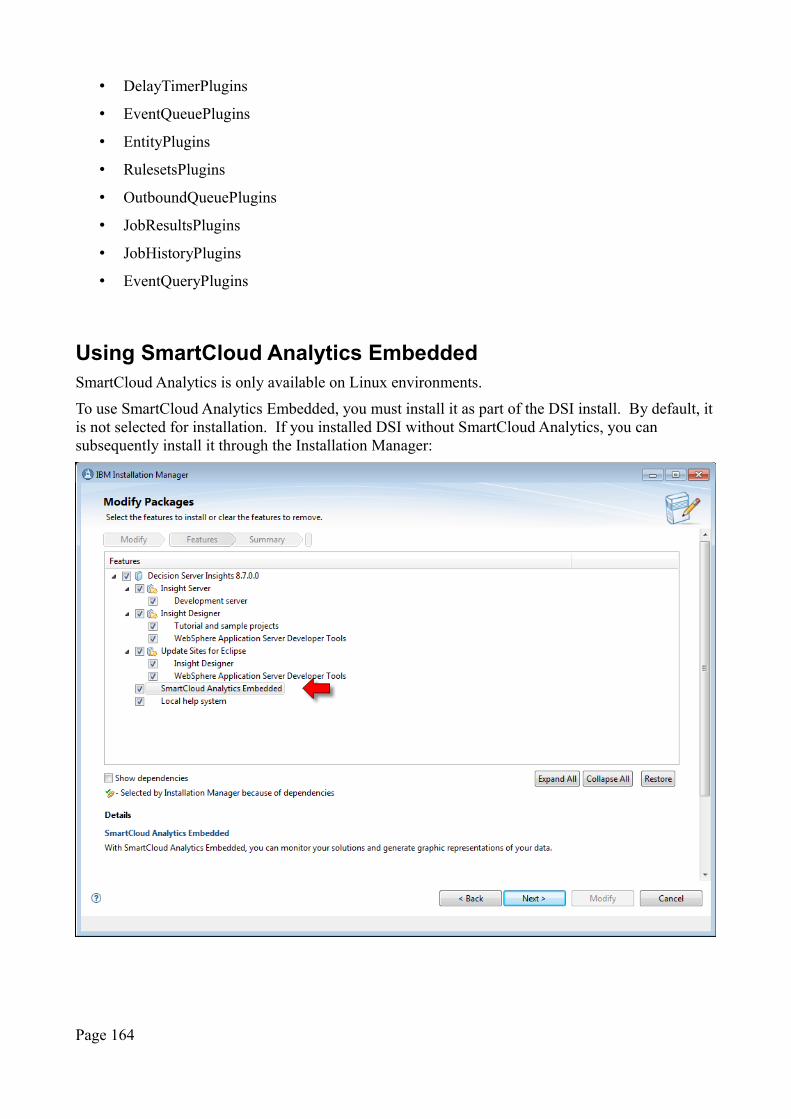
• DelayTimerPlugins
• EventQueuePlugins
• EntityPlugins
• RulesetsPlugins
• OutboundQueuePlugins
• JobResultsPlugins
• JobHistoryPlugins
• EventQueryPlugins
Using SmartCloud Analytics EmbeddedSmartCloud Analytics is only available on Linux environments.
To use SmartCloud Analytics Embedded, you must install it as part of the DSI install. By default, itis not selected for installation. If you installed DSI without SmartCloud Analytics, you can subsequently install it through the Installation Manager:
Page 164

Design ConsiderationsWhen building solutions, from time to time there will be considerations that may not be immediately obvious. This section captures some of them.
The processing of events
By now we should be comfortable with the notion that when an event arrives, it is at that point that agents are executed to process the event. Let us consider the notion that we may have multiple rulesthat are fired when a single event happens.
Here is an example. In our story, our entity represents "Stock" and our event represents a "Sale". When a sale happens, we want to reduce the stock quantity by the amount requested in thesale. Obviously, we can't have negative quantity so we only want to decrease the stock if we have enough stock to satisfy the sale. If we don't have enough stock, we want to emit a new event.
A first pass at this may have been:when a sale occursif the quantity of the sale details is at most the quantity of 'the stock item' then set the quantity of 'the stock item' to the quantity of 'the stock item' - the quantity of the sale details of this sale ;
This rule would reduce the quantity of the stock if we have enough stock on hand.
A second rule may read:when a sale occursif 'the stock item' is not null and the quantity of the sale details is more than the quantity of 'the stock item'then print "Not enough stock - transaction id is " + the transaction id ; emit a new no stock where the sale details is the sale details of 'this sale' , the transaction id is the transaction id of 'this sale' , the arrival date is the timestamp of 'this sale' ;
Sounds fine … however there is a fatal flaw in this design and that is that the rules are all fired for amatching event. Here is an example of when things go wrong.
Imagine the initial quantity of stock is "6" items. Now imagine that an order for "5" items arrive. When the first rule fires, the condition is true and the quantity is reduced to "1" (6-5). Now, the second rule fires but … the new current quantity in stock is now "1" and hence its condition is also true as it appears that we need "5" items but only have "1" on hand.
Our core mistake here was that rules can modify the state of an entity and when a rule is evaluated, it is the immediate and current value of the entity that is presented to the rule. If preceding rules have modified the entity's attributes then these new values will be seen by subsequent rules.
Is this an error? I think not … but it does mean that we have to be extremely cautious when thinking about rule conditions if rules can modify the values that those conditions depend upon.
For the rules outlined, we can solve the puzzle with an "else" construct giving us a working rule of:when a sale occursif the quantity of the sale details is at most the quantity of 'the stock item' then set the quantity of 'the stock item' to the quantity of 'the stock item' - the quantity of the sale details of this sale ;else
Page 165
print "Not enough stock - transaction id is " + the transaction id ; emit a new no stock where the sale details is the sale details of 'this sale' , the transaction id is the transaction id of 'this sale' , the arrival date is the timestamp of 'this sale' ;
The Business Rule LanguageWhen we create a Rule Agent, we are implementing rules using the Business Rule Language. We implement this language within the Eclipse editor. The syntax and rules of the language are rich and powerful. Here we will start to cover them in more detail.
The overall structure of a Rule is as follows:when[definitions][if]then[else]
Obviously the "when" part is required. There isn't much point in having an event driven rule if we don't associate it with an event to start it. Similarly, the "then" part is required. There isn't much point in having a Rule detect an event if that rule doesn't do anything with the notification.
See also:
• Rule Agents
Terms in scope
When writing rules, we have various terms in scope. These include:
• The fields in the incoming event. These can be referenced simply by the field names and thecontext of the event is assumed.
• The fields in the associated bound entity. These can be referenced simply by the field namesand the context of the entity is assumed.
• The event itself (this <Event>)
• The bound entity.
When using implicit context, we may end up with ambiguous phrasing For example, consider an Event with a property called "key" and an Entity with a property also called "key". In a phrase wecan now no longer use "the key" because we now no longer have a uniqueness of that phrase. Instead what we must do is further quality the reference. For example we could write "the key of myEvent" or "the key of myEntity".
The "when" part
Events can arrive at ODM DSI at any time. The "when" part of a rule declares that we wish to handle a specific event as part of this rule. In English, we can speak of responding to an externally originated event. We might say:
• when the phone rings then answer the call and have a conversation.
• when the doorbell rings then get up off the couch and answer the door.
• when the wife yells then immediately stop what you were doing and see what she wants.
In each of these cases, we are declaring a rule of logic to follow on the occasion of such an event
Page 166
happening. This is the nature of the "when" part of a rule.
The general syntax is:when <event> occurs [, called <varname>]
[where <condition>]
In its simplest form, we need only supply the name of the event to respond to:when the doorbell rings occurs
Within the remainder of the rule, we can refer to an implicitly created variable that holds the event that caused the processing to begin.
For example:when XXX occurs ...
then can refer to "this XXX" in our rule as the event that kicked us off. We can optionally define a new local variable to also hold this reference.when XXX occurs, called YYY ...
the "this XXX" and "YYY" refer to the same event and we can use both variables interchangeably.
Upon arrival of the event, we may immediately decide that we want to ignore it. Maybe we can determine this from the content of the payload. This concept is handled in the rules through the use of the "where" part. If the condition following "where" is false, any further processing is disregarded in this rule for this event instance.
For example to ignore payment overdue events that are less than five dollars, we could define:
when a payment overdue occurs where the amount of this payment overdue is more than 5 then
A second format of the "when" construct is the notion that we may wish to delay processing an event for a period of time. At first this sounds and feels odd. Why would we want to do that? Consider the following English language notions:
• when my neighbor borrows my lawnmower and two weeks have passed …
• when it has been a month since the last time I spoke to my boss …
• when it has been three days since I asked the question …
Each of these involves an event and a period of time passing.
The syntax of modeling this in ODM DSI is:when <event> has occurred <calendar duration> ago [, called <varname>]
When the event is finally processed, we must consider what the value of "now" will be? The semantics define it to be at least "the time the event was produced plus the calendar duration specified".
The "definitions" part
When we execute a rule, we can set up some variable definitions that can be used by the rule.
The general syntax of this is:definitions
set '<varname>' to <definition> [in <list> / from <object>] [where <test>*]
Page 167
The "if" part
The general syntax of this is:if
<condition>*
The "if" instruction evaluations a condition and performs a set of actions only if the condition is true. The "if" instruction is always used in conjunction with the "then" construct and sometimes with the "else" construct. The use of "if" is optional. If omitted, then the "then" instructions are always performed when a corresponding event occurs.
The "then" and "else" parts
The general syntax of this is:then
<action>*
andthen
<action>*else
<action>*
The "then" instruction is mandatory but the "else" part is optional and only used when an "if" instruction is present. The "then" instruction is the syntactic introduction of the statements to be executed when an event is recognized.
The action parts
An action is the performing of a set of instructions. Consider the following English language notions:
• Charge credit card $1000.
• Call the police.
• Send a thank you note.
• Tell my boss to "stuff this job".
These are actions that can be performed as result of a preceding event. Think of it as classic "cause and effect". When we define event based rules, we are actually describing a series of actions to perform when a previous event happens. The detection of the event is important but so is the description of the actions that we are to perform. Within DSI, we can declare a rich set of actions that can be performed.
The "set" action
Given that DSI is heavily stateful, one of the key actions that we might wish to perform after recognizing the arrival of an event is to modify the state of the system.
The general syntax of this is:set <variable> to <value>;
A special variant of this is:set <variable> to null;
Setting a variable's value to null effectively deletes any previous content that variable had. The
Page 168

previous content can no longer be accessed after this step. When the variable is the bound entity instance associated with an agent then that will terminate the relationship of the agent to the instance.
We can use arithmetic in numeric calculations:set <variable> to <variable> + 5;
See also:
• Variable values
The "emit" action
After having detected an event, we may wish to cause a new event to occur. Think of the following English language concepts:
• When my wife tells me she is pregnant tell my friends that I can't see them anymore.
• If my bank account is overdrawn tell my cable company to cancel HBO.
• When I heard thunder an hour before I want to go fishing, call my buddy to bring extra beer.
These new events can be directed back into DSI for further processing or they can be sent outbound from DSI to an external party to notify them that something has to be done.
The general syntax of this is:emit <an event>;
Typically, a new instance of an event is constructed here which includes its population. For example:emit a new MyEvent where
the key is "myKey",the field1 is "My Value";
See also:• Emitting an event
The "define" action
This action defines a local variable that exists only during the execution of the subsequent actions inthis rule. This can be extremely useful if the value assigned to the variable is complex and will be used more than once. It saves us having to redefine the value and saves the system from having to recompute it more than once.
The general syntax is:define <varname> as <value>;
See also:
• Variable values
The "print" action
When an action is performed, we may wish to record that it happened. This may be for debugging purposes or because we wish to alert an operator about some exceptional occurrence. We can do this by performing a "print" action that causes a piece of text to be logged in the DSI console log.Typically we would include a "print" action as one of a series of actions performed. We may wish to record a log entry either before or after (or both) some other important action. The writing of data into the log has no affect on the state of an DSI solution.
Page 169
The general syntax of this action is:print "<string>";
When performed, this action causes the specified string value to be written to the DSI console log. Examining the log we will find an entry that looks like:I CWMBD9751I: Rule Agent <Rule Agent Name> print: <string>
for each instance of the "print" action that is performed.
A special phrase called "the name of this rule" evaluates to a string representation of the current rule being evaluated.
The "clear" action
This action is used to remove all the members of a collection or remove a relationship between two objects.clear <object/list> of <collection of object>;
For example, if the property of an object called XYZ is called PQR that is a collection, we could code:clear the PQR of this XYZ;
The "add" action
This action is used to add an object to a collection of objects.add <object> to <collection of objects>.
For example, if the property of an object called XYZ is called PQR that is a collection, we could code:add a new ABC to PQR of XYZ;
The "remove" action
This action is used to remove an object from a collection of objects.remove <object> from <collection of objects>;
For example, if the property of an object called XYZ is called PQR that is a collection, we could code:remove 'myPQR' from PQR of XYZ;
The "for each" action
This action provides a for loop to iterate over a list. A set of actions can be performed for each member of that list.for each <object> [called <variable>,] in <list>:
- <action>*;
For example, to print out the timestamps of previous events we might use:when an EVENT1 occursdefinitions
set 'previous events' to all EVENT1s ; then print "The total number of EVENT1s seen has been: " + the number of EVENT1s; for each EVENT1 called myEvent, in 'previous events' : - print "Previous event was at : " + the timestamp of myEvent ;
Page 170
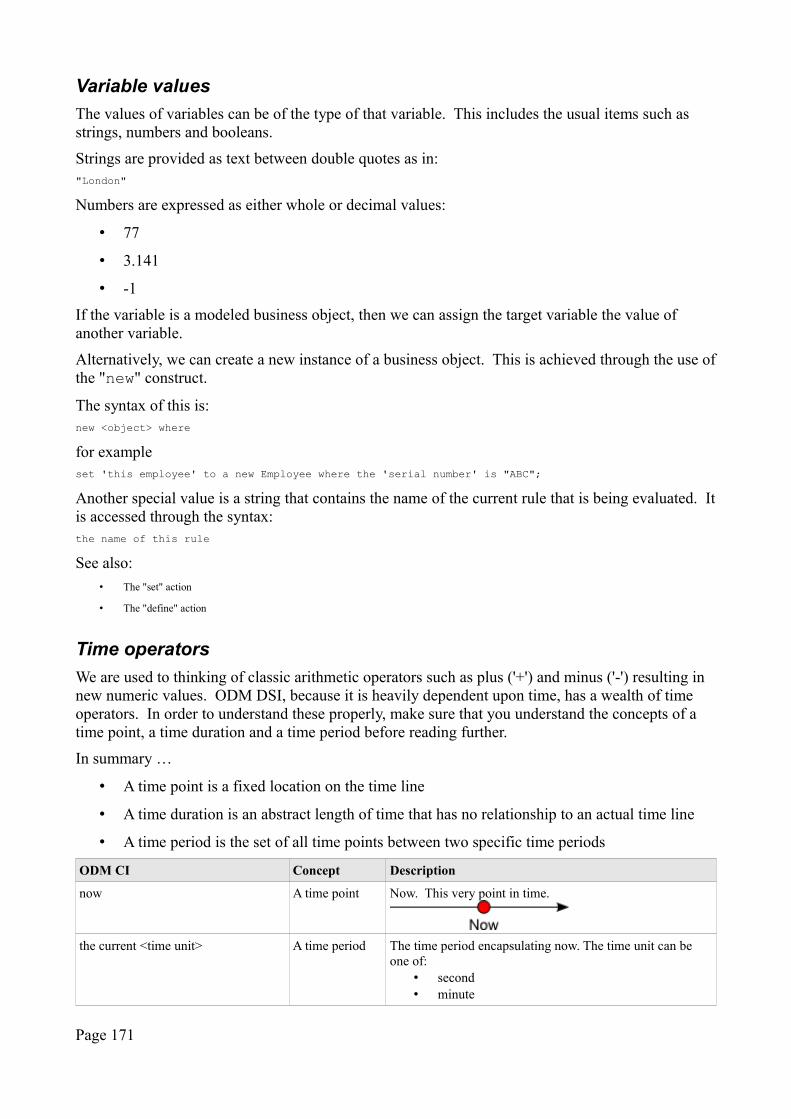
Variable values
The values of variables can be of the type of that variable. This includes the usual items such as strings, numbers and booleans.
Strings are provided as text between double quotes as in:"London"
Numbers are expressed as either whole or decimal values:
• 77
• 3.141
• -1
If the variable is a modeled business object, then we can assign the target variable the value of another variable.
Alternatively, we can create a new instance of a business object. This is achieved through the use ofthe "new" construct.
The syntax of this is:new <object> where
for exampleset 'this employee' to a new Employee where the 'serial number' is "ABC";
Another special value is a string that contains the name of the current rule that is being evaluated. Itis accessed through the syntax:the name of this rule
See also:
• The "set" action
• The "define" action
Time operators
We are used to thinking of classic arithmetic operators such as plus ('+') and minus ('-') resulting in new numeric values. ODM DSI, because it is heavily dependent upon time, has a wealth of time operators. In order to understand these properly, make sure that you understand the concepts of a time point, a time duration and a time period before reading further.
In summary …
• A time point is a fixed location on the time line
• A time duration is an abstract length of time that has no relationship to an actual time line
• A time period is the set of all time points between two specific time periods
ODM CI Concept Description
now A time point Now. This very point in time.
the current <time unit> A time period The time period encapsulating now. The time unit can be one of:
• second• minute
Page 171
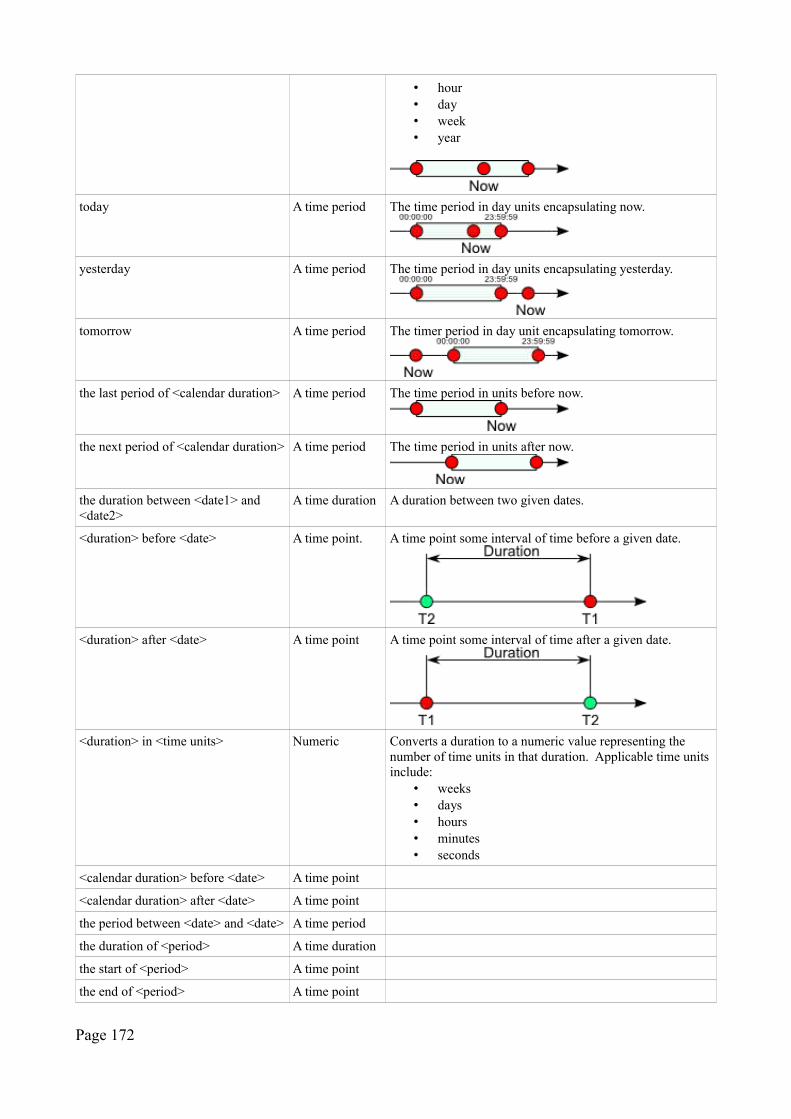
• hour• day• week• year
today A time period The time period in day units encapsulating now.
yesterday A time period The time period in day units encapsulating yesterday.
tomorrow A time period The timer period in day unit encapsulating tomorrow.
the last period of <calendar duration> A time period The time period in units before now.
the next period of <calendar duration> A time period The time period in units after now.
the duration between <date1> and <date2>
A time duration A duration between two given dates.
<duration> before <date> A time point. A time point some interval of time before a given date.
<duration> after <date> A time point A time point some interval of time after a given date.
<duration> in <time units> Numeric Converts a duration to a numeric value representing the number of time units in that duration. Applicable time units include:
• weeks• days• hours• minutes• seconds
<calendar duration> before <date> A time point
<calendar duration> after <date> A time point
the period between <date> and <date> A time period
the duration of <period> A time duration
the start of <period> A time point
the end of <period> A time point
Page 172
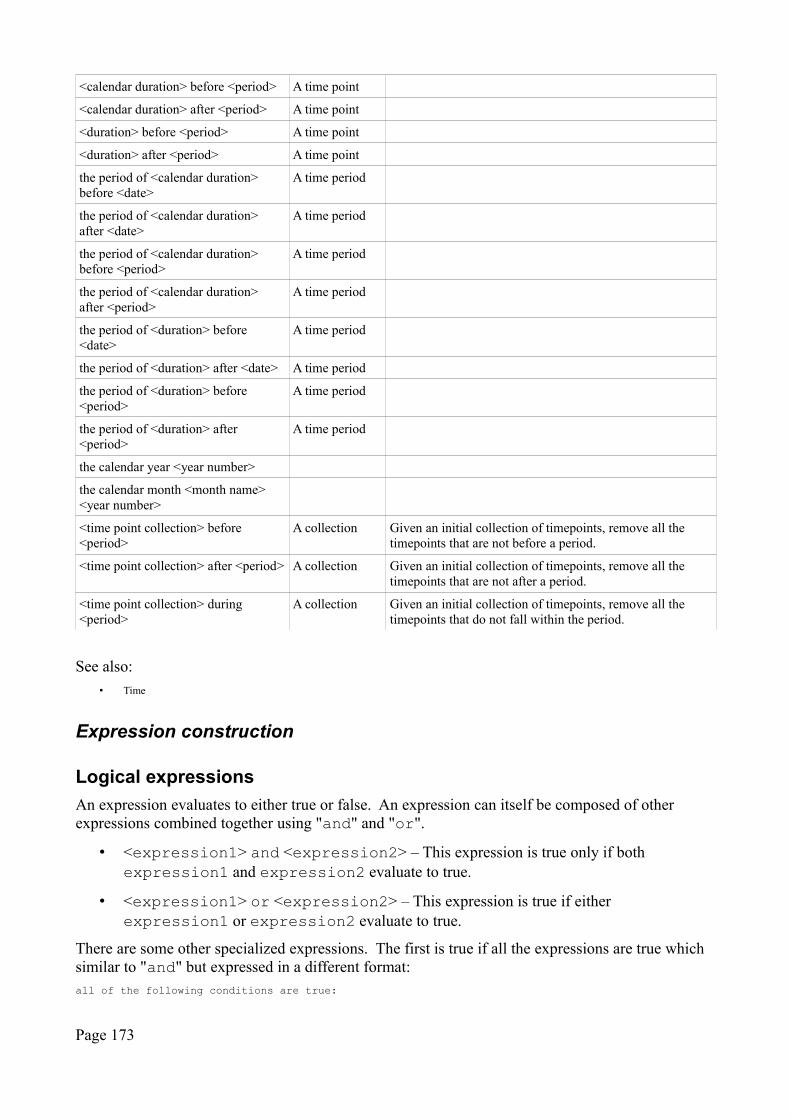
<calendar duration> before <period> A time point
<calendar duration> after <period> A time point
<duration> before <period> A time point
<duration> after <period> A time point
the period of <calendar duration> before <date>
A time period
the period of <calendar duration> after <date>
A time period
the period of <calendar duration> before <period>
A time period
the period of <calendar duration> after <period>
A time period
the period of <duration> before <date>
A time period
the period of <duration> after <date> A time period
the period of <duration> before <period>
A time period
the period of <duration> after <period>
A time period
the calendar year <year number>
the calendar month <month name> <year number>
<time point collection> before <period>
A collection Given an initial collection of timepoints, remove all the timepoints that are not before a period.
<time point collection> after <period> A collection Given an initial collection of timepoints, remove all the timepoints that are not after a period.
<time point collection> during <period>
A collection Given an initial collection of timepoints, remove all the timepoints that do not fall within the period.
See also:
• Time
Expression construction
Logical expressions
An expression evaluates to either true or false. An expression can itself be composed of other expressions combined together using "and" and "or".
• <expression1> and <expression2> – This expression is true only if both expression1 and expression2 evaluate to true.
• <expression1> or <expression2> – This expression is true if either expression1 or expression2 evaluate to true.
There are some other specialized expressions. The first is true if all the expressions are true which similar to "and" but expressed in a different format:all of the following conditions are true:
Page 173
- <condition>*,
The next is true if any one of the expressions are true which is similar to "or" but expressed in a different format:any of the following conditions are true:- <condition>*,
We can also negate a complete expression.its is not true that <expression>
We can also say that an expression is true if all of another set of expressions are false:
none of the following conditions are true:- <condition>*,
Numeric expressions
Numeric expressions describe relationships between numbers. In classic programming, we use symbols such as "=" and ">" but in rules, we express these concepts in words. Since we are so usedto the use of symbols, the following table illustrates the symbols first followed by the equivalent expressions as rules:
English DSI Expression
n1 = n2 <n1> equals <n2>or<n1> is <n2>
Both of these are equivalent to each other.
n1 != n2 <n1> does not equal <n2>
n1 >= n2 <n1> is at least <n2>
n1 >= n2 && n1 < n3 <n1> is at least <n2> and less than <n3>
n1 <= n2 <n1> is at most <n2>
n1 >= n2 && n1 <= n3 <n1> is between <n2> and <n3>
n1 < n2 <n1> is less than <n2>
n1 > n2 <n1> is more than <n2>
n1 > n2 && n1 <= n3 <n1> is more than <n2> and at most <n3>
n1 > n2 && n1 < n3 <n1> is strictly between <n2> and <n3>
String expressions
String expressions are true/false expressions that work against string data types. They can be used where an expression is valid.
Phrase Example
<text> is empty ""
<text> is not empty "ABC"
<text1> contains <text2> "ABCDEF" contains "BCD"
<text1> does not contain <text2> "ABCDEF" does not contain "XYZ"
<text1> starts with <text2> "ABCDEF" starts with "ABC"
<text1> does not start with <text2> "ABCDEF" does not start with "XYZ"
Page 174
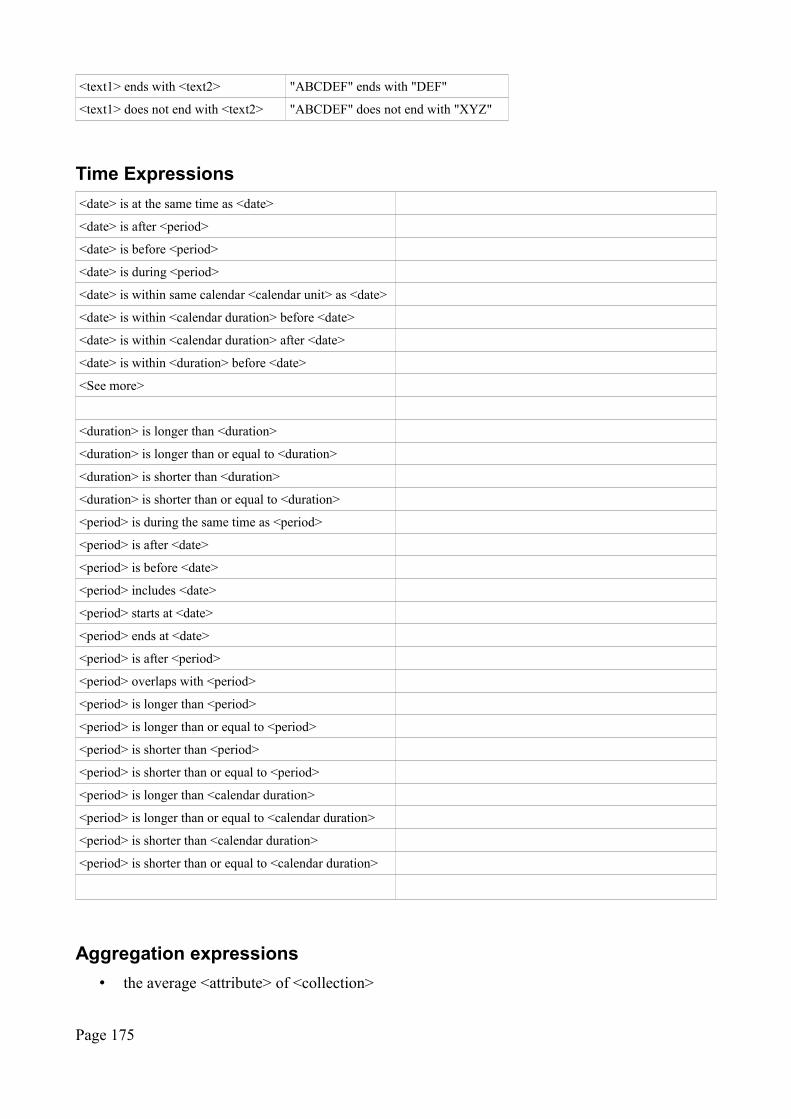
<text1> ends with <text2> "ABCDEF" ends with "DEF"
<text1> does not end with <text2> "ABCDEF" does not end with "XYZ"
Time Expressions
<date> is at the same time as <date>
<date> is after <period>
<date> is before <period>
<date> is during <period>
<date> is within same calendar <calendar unit> as <date>
<date> is within <calendar duration> before <date>
<date> is within <calendar duration> after <date>
<date> is within <duration> before <date>
<See more>
<duration> is longer than <duration>
<duration> is longer than or equal to <duration>
<duration> is shorter than <duration>
<duration> is shorter than or equal to <duration>
<period> is during the same time as <period>
<period> is after <date>
<period> is before <date>
<period> includes <date>
<period> starts at <date>
<period> ends at <date>
<period> is after <period>
<period> overlaps with <period>
<period> is longer than <period>
<period> is longer than or equal to <period>
<period> is shorter than <period>
<period> is shorter than or equal to <period>
<period> is longer than <calendar duration>
<period> is longer than or equal to <calendar duration>
<period> is shorter than <calendar duration>
<period> is shorter than or equal to <calendar duration>
Aggregation expressions
• the average <attribute> of <collection>
Page 175
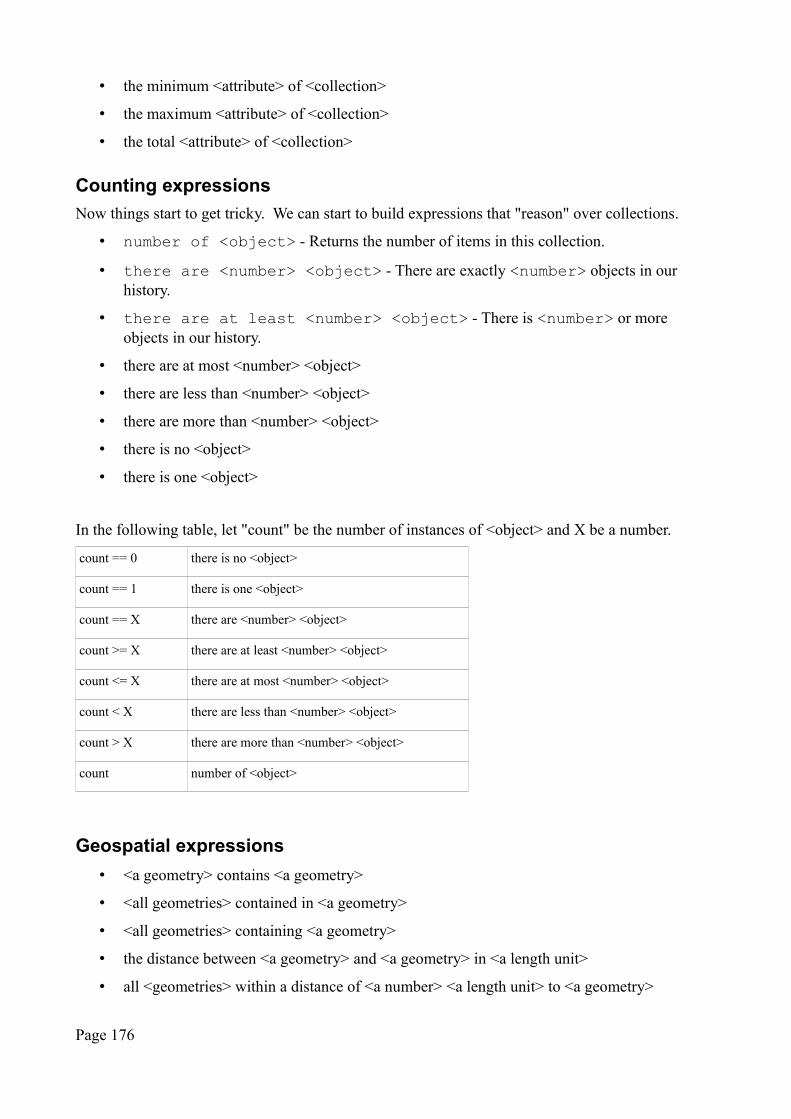
• the minimum <attribute> of <collection>
• the maximum <attribute> of <collection>
• the total <attribute> of <collection>
Counting expressions
Now things start to get tricky. We can start to build expressions that "reason" over collections.
• number of <object> - Returns the number of items in this collection.
• there are <number> <object> - There are exactly <number> objects in our history.
• there are at least <number> <object> - There is <number> or more objects in our history.
• there are at most <number> <object>
• there are less than <number> <object>
• there are more than <number> <object>
• there is no <object>
• there is one <object>
In the following table, let "count" be the number of instances of <object> and X be a number.
count == 0 there is no <object>
count == 1 there is one <object>
count == X there are <number> <object>
count >= X there are at least <number> <object>
count <= X there are at most <number> <object>
count < X there are less than <number> <object>
count > X there are more than <number> <object>
count number of <object>
Geospatial expressions
• <a geometry> contains <a geometry>
• <all geometries> contained in <a geometry>
• <all geometries> containing <a geometry>
• the distance between <a geometry> and <a geometry> in <a length unit>
• all <geometries> within a distance of <a number> <a length unit> to <a geometry>
Page 176
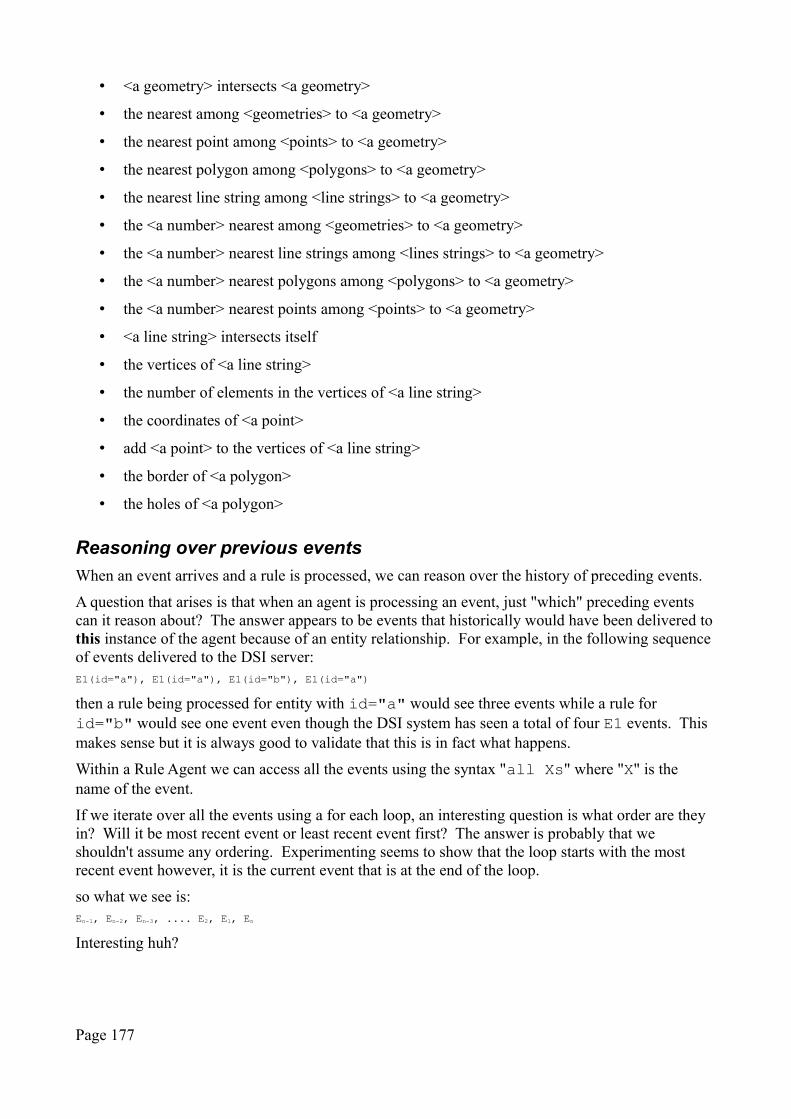
• <a geometry> intersects <a geometry>
• the nearest among <geometries> to <a geometry>
• the nearest point among <points> to <a geometry>
• the nearest polygon among <polygons> to <a geometry>
• the nearest line string among <line strings> to <a geometry>
• the <a number> nearest among <geometries> to <a geometry>
• the <a number> nearest line strings among <lines strings> to <a geometry>
• the <a number> nearest polygons among <polygons> to <a geometry>
• the <a number> nearest points among <points> to <a geometry>
• <a line string> intersects itself
• the vertices of <a line string>
• the number of elements in the vertices of <a line string>
• the coordinates of <a point>
• add <a point> to the vertices of <a line string>
• the border of <a polygon>
• the holes of <a polygon>
Reasoning over previous events
When an event arrives and a rule is processed, we can reason over the history of preceding events.
A question that arises is that when an agent is processing an event, just "which" preceding events can it reason about? The answer appears to be events that historically would have been delivered tothis instance of the agent because of an entity relationship. For example, in the following sequence of events delivered to the DSI server:E1(id="a"), E1(id="a"), E1(id="b"), E1(id="a")
then a rule being processed for entity with id="a" would see three events while a rule for id="b" would see one event even though the DSI system has seen a total of four E1 events. This makes sense but it is always good to validate that this is in fact what happens.
Within a Rule Agent we can access all the events using the syntax "all Xs" where "X" is the name of the event.
If we iterate over all the events using a for each loop, an interesting question is what order are they in? Will it be most recent event or least recent event first? The answer is probably that we shouldn't assume any ordering. Experimenting seems to show that the loop starts with the most recent event however, it is the current event that is at the end of the loop.
so what we see is:En-1, En-2, En-3, .... E2, E1, En
Interesting huh?
Page 177
The "then" construct and multiple possibilities
Consider the following rule:when an EVENT1 occursdefinitions
set myEvent to an EVENT1;then
print "Event instance: " + the e1 of myEvent + " that was seen at " + the timestamp of myEvent;
It might not be immediately clear what this means. Let us parse it apart piece by piece and see whatwe can find. It begins with an event trigger which basically says that the rule will never do anything until an instance of EVENT1 is seen.
We then have a most interesting definition statement. The statement reads:set myEvent to an EVENT1;
This feels unusual ... what does it mean? The way to interpret this is that we are setting the local variable called "myEvent" to an instance of a historic and previously processed EVENT1. Ahh ... you might say ... and your next question would sensibly be "but which historic event?" and here the answer gets very strange. The answer becomes "all of them ... one at a time".
If from a clean state, I send in an event EVENT1(e1="a", T=T1) then nothing would be loggedas we have not yet seen an event. If I send in a second event EVENT1(e1="b", T=T2), we would have a single print statement logged reading:Event instance: a that was seen at T1
If I send in a third event EVENT1(e1="c", T=T3), we would see two new print statements reading:Event instance: a that was seen at T1Event instance: b that was seen at T2
Pause here ... notice that we sent in one new event which caused the rule to be run once but yet we see two print statements.
Debugging a solutionHere are some tips and techniques for debugging a solution.
Always examine the messages.log file from the server. This can be found in the <ROOT>/runtime/wlp/user/servers/cisDev/logs directory. A good tool for tailing this file on Windows is logexpert or within Eclipse one can use "Log Viewer".
Some of the more interesting messages to look for include:
• I CWMBD9632I: No agent bindings found for posted event <EventName> - This says that a published event was not processed by any agent and was discarded. This may point to an agent that has been mis-configured to not listen for the correct event type.
We can use "print" statements in the action sections to log information for debugging. A special phrase called "the name of this rule" is the string representation of the current rule.
An important feature of the product is the ability to control trace flags. These can be set in the server.xml file using the <logging> entry. Switching on all aspects of trace is probably too much. Here are some suggested entries for different types of problems:
• com.ibm.ia.connectivity.inbound.*=fine – This will log the XML messages received for processing.
Page 178
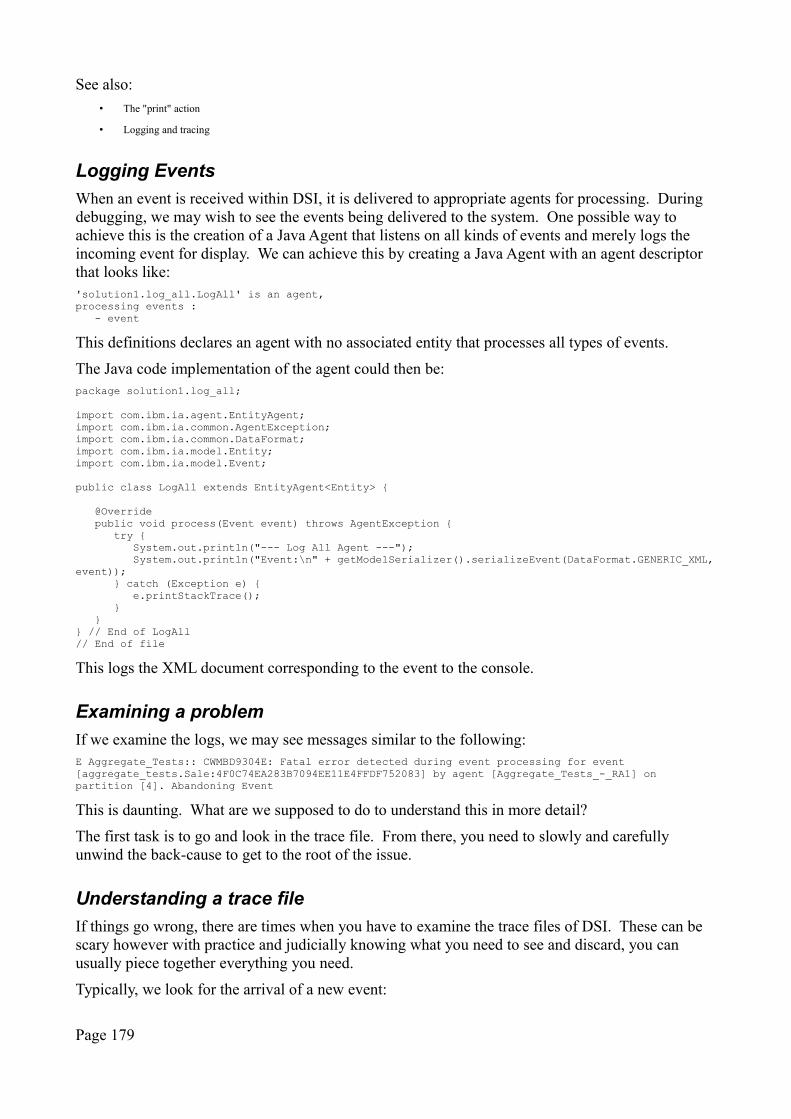
See also:
• The "print" action
• Logging and tracing
Logging Events
When an event is received within DSI, it is delivered to appropriate agents for processing. During debugging, we may wish to see the events being delivered to the system. One possible way to achieve this is the creation of a Java Agent that listens on all kinds of events and merely logs the incoming event for display. We can achieve this by creating a Java Agent with an agent descriptor that looks like:'solution1.log_all.LogAll' is an agent,processing events :
- event
This definitions declares an agent with no associated entity that processes all types of events.
The Java code implementation of the agent could then be:package solution1.log_all;
import com.ibm.ia.agent.EntityAgent;import com.ibm.ia.common.AgentException;import com.ibm.ia.common.DataFormat;import com.ibm.ia.model.Entity;import com.ibm.ia.model.Event;
public class LogAll extends EntityAgent<Entity> {
@Overridepublic void process(Event event) throws AgentException {
try {System.out.println("--- Log All Agent ---");System.out.println("Event:\n" + getModelSerializer().serializeEvent(DataFormat.GENERIC_XML,
event));} catch (Exception e) {
e.printStackTrace();}
}} // End of LogAll// End of file
This logs the XML document corresponding to the event to the console.
Examining a problem
If we examine the logs, we may see messages similar to the following:E Aggregate_Tests:: CWMBD9304E: Fatal error detected during event processing for event [aggregate_tests.Sale:4F0C74EA283B7094EE11E4FFDF752083] by agent [Aggregate_Tests_-_RA1] on partition [4]. Abandoning Event
This is daunting. What are we supposed to do to understand this in more detail?
The first task is to go and look in the trace file. From there, you need to slowly and carefully unwind the back-cause to get to the root of the issue.
Understanding a trace file
If things go wrong, there are times when you have to examine the trace files of DSI. These can be scary however with practice and judicially knowing what you need to see and discard, you can usually piece together everything you need.
Typically, we look for the arrival of a new event:
Page 179
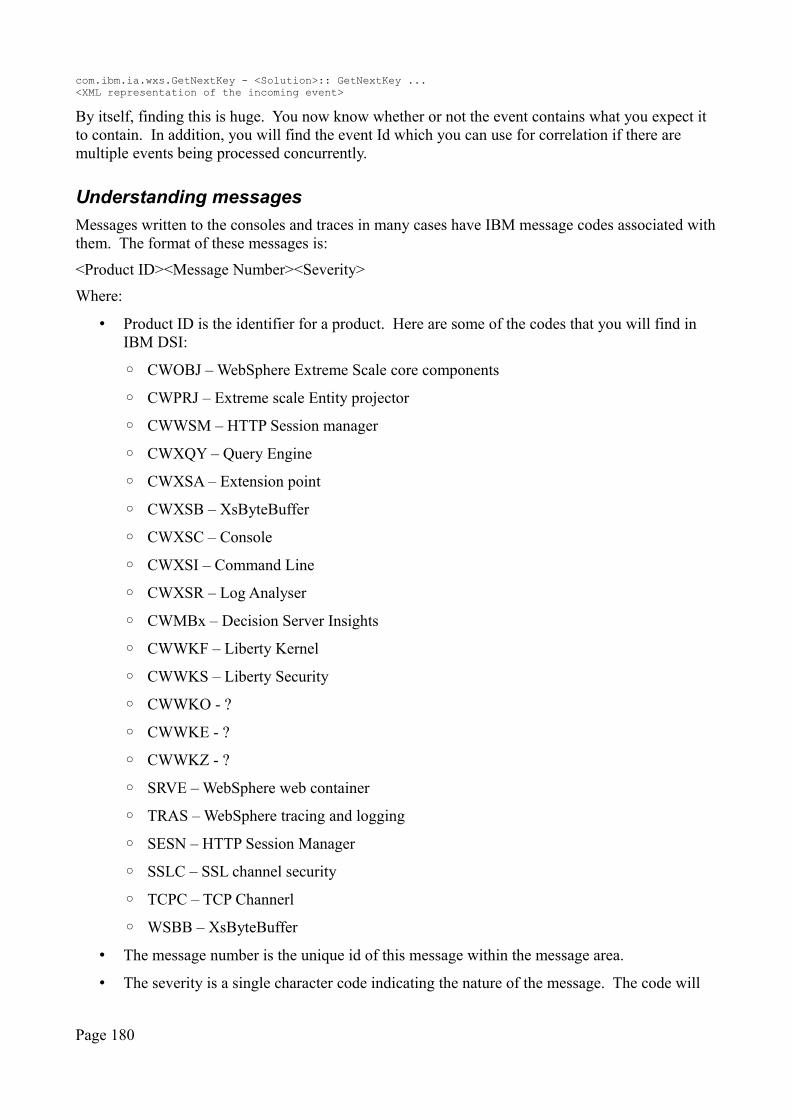
com.ibm.ia.wxs.GetNextKey - <Solution>:: GetNextKey ...<XML representation of the incoming event>
By itself, finding this is huge. You now know whether or not the event contains what you expect it to contain. In addition, you will find the event Id which you can use for correlation if there are multiple events being processed concurrently.
Understanding messages
Messages written to the consoles and traces in many cases have IBM message codes associated withthem. The format of these messages is:
<Product ID><Message Number><Severity>
Where:
• Product ID is the identifier for a product. Here are some of the codes that you will find in IBM DSI:
◦ CWOBJ – WebSphere Extreme Scale core components
◦ CWPRJ – Extreme scale Entity projector
◦ CWWSM – HTTP Session manager
◦ CWXQY – Query Engine
◦ CWXSA – Extension point
◦ CWXSB – XsByteBuffer
◦ CWXSC – Console
◦ CWXSI – Command Line
◦ CWXSR – Log Analyser
◦ CWMBx – Decision Server Insights
◦ CWWKF – Liberty Kernel
◦ CWWKS – Liberty Security
◦ CWWKO - ?
◦ CWWKE - ?
◦ CWWKZ - ?
◦ SRVE – WebSphere web container
◦ TRAS – WebSphere tracing and logging
◦ SESN – HTTP Session Manager
◦ SSLC – SSL channel security
◦ TCPC – TCP Channerl
◦ WSBB – XsByteBuffer
• The message number is the unique id of this message within the message area.
• The severity is a single character code indicating the nature of the message. The code will
Page 180
be one of:
◦ I – Informational
◦ W – Warning
◦ E – Error
GeometryDSI has special support for geometry. What this means is that we can reason about interesting geometrical knowledge such as:
• Distances between points
• Points enclosed within an area
The DSI support for these is based around some concepts that are related to geometry. These are:
• A point – a location in "coordinate space". For example, the X/Y coordinates of something on a graph or the latitude/longitude of a place on the Earth.
• A line string – An ordered sequence of points describing a line composed of smaller lines between each pair of consecutive points.
• A linear ring – A line string where the the first and last pairs of points are considered to forma line segment.
• A vertex - ???
• A polygon – A linear ring where we consider it to define not just the boundary but everything inside the boundary as well.
In addition, DSI provides knowledge of units of geometrical measurement including length and areaunits.
The geometry support is implemented within the product by a set of Java classes and interfaces under the package com.ibm.geolib. Some of the more important are:
• Point – A point in space
Warning … the data types in the geometry package are not serializable java objects.
A core class in our story is the com.ibm.geolib.GetSpatialService. From this class we have factories to create some of the base items:GeometryFactory geometryFactory = GeoSpatialService.getService().getGeometryFactory();
For example:Point point = geometryFactory.getPoint(longitude, latitude);
See also:
• Geospatial expressions
Custom Business Object ModelsWhen designing rules we make heavy usage of the concept of the "Business Object Model" or BOM. Within ODM DSI, the BOM is built for us through the definitions in the Business Model Definition ".bmd" files. There is actually more to this story and some additional power. The IBM ODM rules engine product allows customers to hand-create their own Business Object Models
Page 181
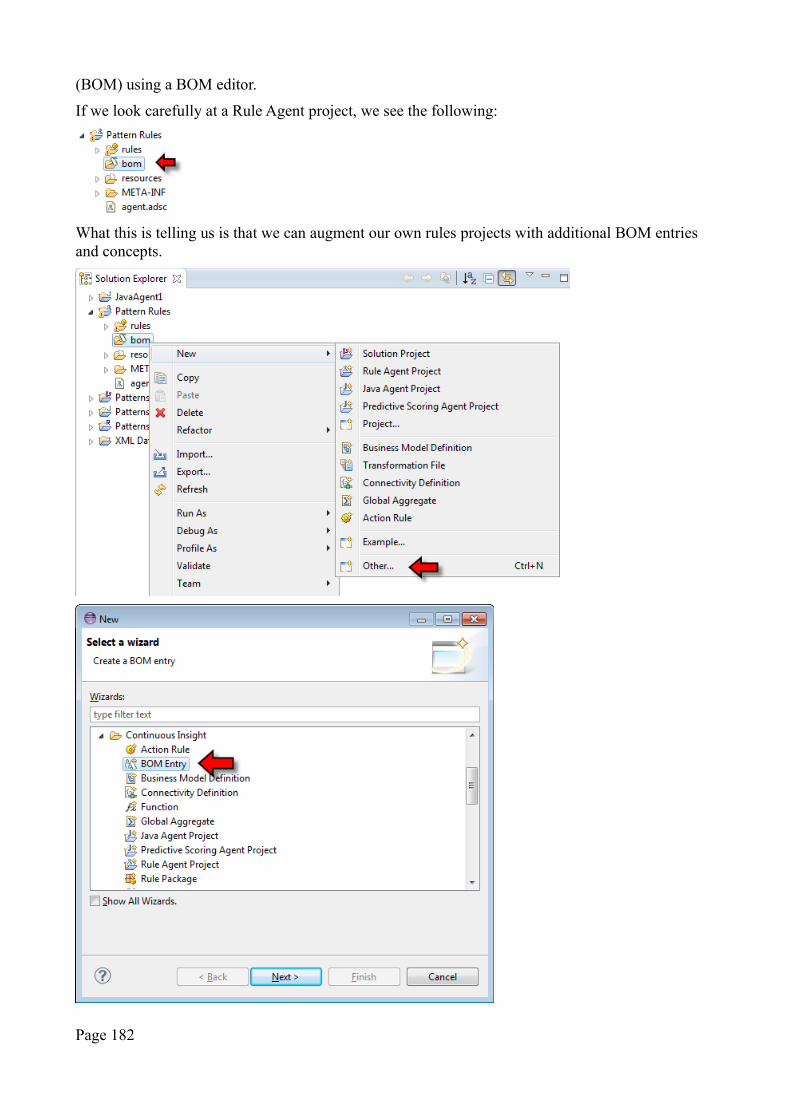
(BOM) using a BOM editor.
If we look carefully at a Rule Agent project, we see the following:
What this is telling us is that we can augment our own rules projects with additional BOM entries and concepts.
Page 182
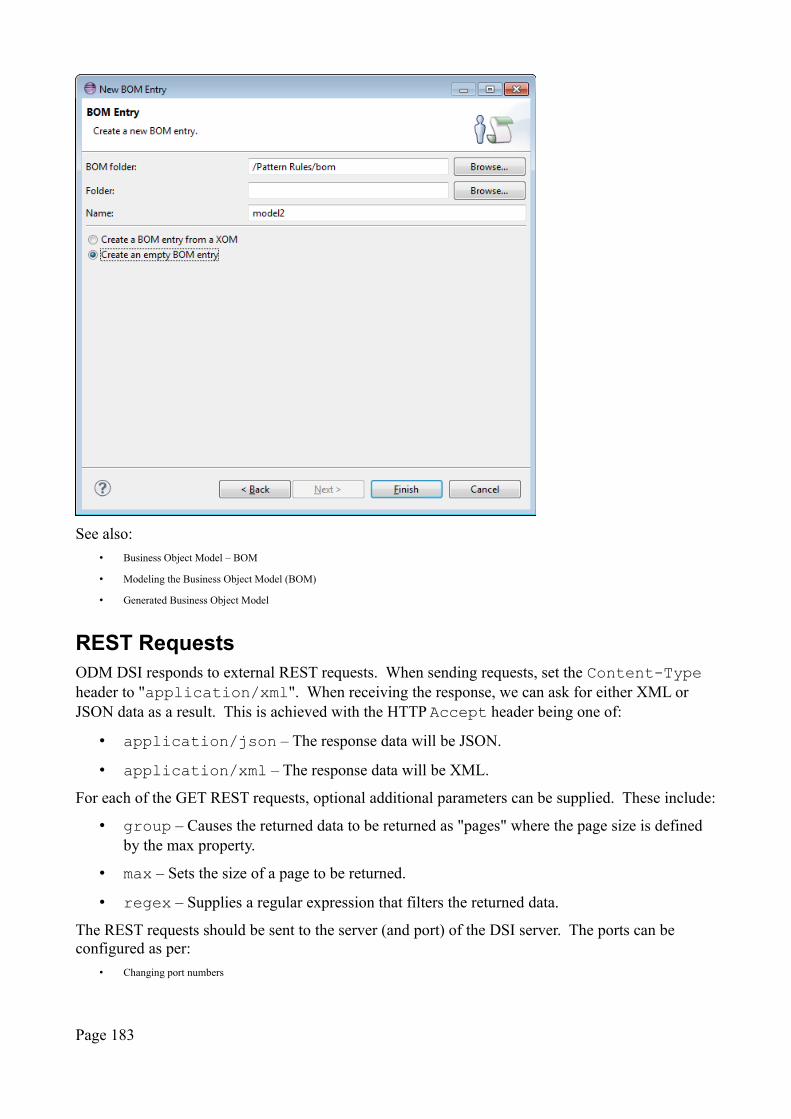
See also:
• Business Object Model – BOM
• Modeling the Business Object Model (BOM)
• Generated Business Object Model
REST RequestsODM DSI responds to external REST requests. When sending requests, set the Content-Type header to "application/xml". When receiving the response, we can ask for either XML or JSON data as a result. This is achieved with the HTTP Accept header being one of:
• application/json – The response data will be JSON.
• application/xml – The response data will be XML.
For each of the GET REST requests, optional additional parameters can be supplied. These include:
• group – Causes the returned data to be returned as "pages" where the page size is defined by the max property.
• max – Sets the size of a page to be returned.
• regex – Supplies a regular expression that filters the returned data.
The REST requests should be sent to the server (and port) of the DSI server. The ports can be configured as per:
• Changing port numbers
Page 183
REST – List solutions
In a running ODM DSI environment, there will likely be many solutions deployed. This REST requests returns a list of those solutions along with their versions. Only the active solutions are listed.GET /ibm/ia/rest/solutions
The response from such a request contains:{
solutions:[{
name:"FastTrackSolution",version:"FastTrackSolution-0.1"
},{
name:"MySolution",version:"MySolution-0.3"
}]
}
REST – List Entity Types
When a solution is deployed, there can be entity types defined in the BOM. This REST request liststhose types.GET /ibm/ia/rest/solutions/<solution name>/entity-types
The response from such a request contains:{ "$class" : "com.ibm.ia.admin.solution.EntityTypes", "entityTypes" : [
"com.kolban.Employee"],
"query" : "?solution=MySolution"}
Note that what is returned is literally a list of entity types. There is no data on their structure returned.
REST – List Entity Instances
Once events have been submitted to ODM DSI, it is likely that corresponding entity instances will have been created. A list of these entity instances can be retrieved through this REST call. The entities returns are those that are part of a named solution and those of the specific entity type.GET /ibm/ia/rest/solutions/<solution name>/entity-types/<entity type name>/entities
The "<entity type name>" property is the full package name of the entity type, for example "com.kolban.Employee".
The response from such a request contains:
{ "$class" : "Collection[com.kolban.Employee]", "entities" : [
{ "$class" : "com.kolban.Employee",
"$idAttrib": "serialNumber", "age" : null,
"firstName" : null, "jobTitle" : null,
"salary" : 0.0, "secondName" : null,
Page 184
"serialNumber" : "123"}
]}
Be cautious with entity attributes that are defined as enriched. Their values are not calculated and returned in the response. They will simply not appear in the returned data.
REST – Get an Entity Instance
Each entity contains one or more properties. This API call allows us to retrieve the details of the entity. The identity of the entity is defined by the solution in which is lives, the type of the entity specified as a full package name and the id of the entity which is the value of its key field.GET /ibm/ia/rest/solutions/<solution name>/entity-types/<entity type name>/entities/<entity id>
The response from such a request contains:{ "$class" : "com.kolban.Employee", "age" : null, "firstName" : null, "jobTitle" : null, "salary" : 0.0, "secondName" : null, "serialNumber" : "123"}
Of note in this object is a field called "$class" which contains the Java class name that represents this object.
REST – Update an Entity Instance
When an entity exists and is managed by ODM CI, we may wish to update the properties of that entity. We can do this through the following REST request. The payload body of the request contains the new values of the entity. The identity of the entity is supplied through its key field.PUT /ibm/ia/rest/solutions/<solution name>/entity-types/<entity type name>
The body of the PUT request contains an XML object of the form
<object xmlns:xsd="http://www.w3.org/2001/XMLSchema-instance"xmlns="http://www.ibm.com/ia/Entity" type="<entity type name>"><attribute name="<attribute>">
<null /></attribute><attribute name="<attribute>">
<string><Value></string></attribute>...
</object>
REST – Create an Entity Instance
An instance of an entity is commonly created by a rule upon the arrival of an event, however we have the opportunity to create an Entity directly using the following REST API call.POST /ibm/ia/rest/solutions/<solution name>/entity-types/<entity type name>/entities/<entity id>
Page 185
REST – Delete all Entity InstancesDELETE /ibm/ia/rest/solutions/<solution name>/entity-types/<entity type name>/entities
REST – Delete an Entity Instance
Since ODM DSI maintains entity instances, we might want to be able to delete them via REST. This REST request deletes a specific instance. The "entity id" property is the value of the key field for the entity.DELETE /ibm/ia/rest/solutions/<solution name>/entity-types/<entity type name>/entities/<entity id>
A HTTP response code of 404 means that we could not find the instance to delete. On success (200 OK), the response is the value of the entity before it was deleted.
REST – List aggregatesGET /ibm/ia/rest/solutions/<solution name>/aggregate
This will return a list of aggregates defined for the solution. Each entry in the list will be an object with a property named "defvar<Aggregate Name>" and have the current value of the aggregate.
For example:[
{"defvarmy$x95$aggregate": 5.0
}]
See also:
• Defining global aggregates
REST – Get aggregateGET /ibm/ia/rest/solutions/<solution name>/aggregate/<aggregate name>
This request will return a single named aggregate. What is returned is an object with the single property named for the aggregate with the aggregate value. For example:{
"defvarmy$x95$aggregate": 5.0}
See also:
• Defining global aggregates
REST Programming
REST is a straightforward technique providing web services through simple HTTP requests. The following are some notes on REST programming in different environments.
REST Programming in Java
From Java, we can use the HttpURLConnection() class to make REST requests. Since DSI seems to only respond to SSL requests, we need to define a trust store that contains the certificates. One way to do this is to grab the Java Key Store found at:<DSI>\runtime\wlp\usr\servers\cisDev\resources\security\key.jks
Page 186
and add the following to the Java runtime properties:-Djavax.net.ssl.trustStore=<DSI>\runtime\wlp\usr\servers\cisDev\resources\security\key.jks-Djavax.net.ssl.trustStorePassword=tester
The response data from DSI is best served in JSON. A relatively new specification for JSON processing in Java is available through JSR 353.
See:• JSON Processing: JSR 353 reference implementation
• JavaDoc on javax.json package
• JSR 353: Java API for JSON Processing
PatternsWhen we build out rules, the chances are high that the "flavor" of the rule has been written before. Let us look at the simplest rules:
• When the phone rings, answer it
• When I spill milk, clean it up
• When it is time for my TV show, sit down and watch it
Taking these as a whole, we see that despite their apparent differences, they are all very similar. They have the following in common:When X Event happens, then do Y Action
This is what we consider a pattern. In principle, all rules will conform to one or more patterns. Thefollowing describe some of the more common (and in some cases trivial) patterns that we come across. They may be used as future references should you need to implement something similar. Alternatively, they may be used as a study aid to ensure that you understand what is happening when you read them.
Perform an action when an X Event happens
In this pattern, when an "X Event" happens, we want to perform action.
when a X Event occurs then
print "An X Event has been detected";
Create a Bound Entity when an X Event happens
In this pattern, when an "X Event" happens, we want to create a bound instance of an ABC entity.We achieve this by using the "new" operator to create an instance of ABC and populate its properties.
when a X Event occurs if
'the ABC' is null then
print "Pattern 2 - Creating a new entity using key: " + the eventKey of this XEvent;
set 'the ABC' to a new ABC where
Page 187
the key is the eventKey of this X Event;else
print "Pattern 2 - The agent is already bound using key: " + the eventKey of this X Event;
Notice that we guard the action with a check to ensure that we are not already bound.
Delete a Bound Entity when a Y Event happens
In this pattern, when a "Y Event" happens, we want to delete the bound instance of an ABC entity. This is done by setting the bound variable to "null".
when a Y Event occurs if 'the ABC' is not null
thenprint "Pattern 3 - Deleting the Entity with key: " + the eventKey; set 'the ABC' to null;
Perform an action if a previous event happened within a time period
In this pattern, we perform an action as soon as we receive an event but only if a previous instance of the event has been seen within the last 10 seconds:
when a XYZ Event occursif
the number of XYZ Events during the last period of 10 seconds is more than 1then
print "We have already seen an XYZ event within the last period!";
Perform an action when a second X Event happens within a minute
In this pattern, when an "X Event" arrives and a previous "X Event" has happened less than a minute ago, then perform an action. Remember that the current event will be include in the set of events within a minute period so the number of events will be at least one.
when a X Event occursif the number of X Events after 60 seconds before now is more than 1then print the name of this rule + " Found more than one" ;orwhen a X Event occursif the number of X Events during the last period of 60 seconds is more than 1then print the name of this rule + " Found more than one" ;
Update a bound entity based on an event
When an event arrives, update the state of the entity based upon the content of the event. The entitycontains a field called "fieldABC1" and the event contains a field called "fieldX1". When an "X
Page 188
Event" arrives, we update ABC with the content of "X Event".
when a X Event occursthen set the fieldABC1 of 'the ABC' to the fieldX1;
Filter the handling of an event based on event content
When an event arrives, we don't always care about it. In this example, we filter the incoming eventsand perform an action only if they match a criteria:
when a X Event occurs where the fieldX1 is "Emit1"
thenprint "We found an Emit1";
Process an incoming event after a period of time
We can delay processing of an event for a configurable period of time. In this example, we delay processing an event for 10 seconds. This means that 10 seconds after the arrival of the event, it willbe processed.
whena XYZ Event has occurred 10 seconds ago
then print "An XYZ event happened 10 seconds ago";
Sources of EventsIn our journey so far we have considered only a couple of sources of events and how those can be delivered to ODM DSI. Specifically, we have looked at XML formatted data arriving over REST orJMS. Now we look at some additional sources of events and see how they can used in this arena.
Database table row updates
Consider a database which has tables contained within it. Each table holds rows of data. Now imagine that applications are inserting or updating these rows. If we could determine when a row isinserted (we will concentrate on inserted as updated will be similar) then that act of insertion could be considered an event. Further, the data content of the new row may be considered the event payload.
At a high level, this is what we wish to achieve:
Page 189
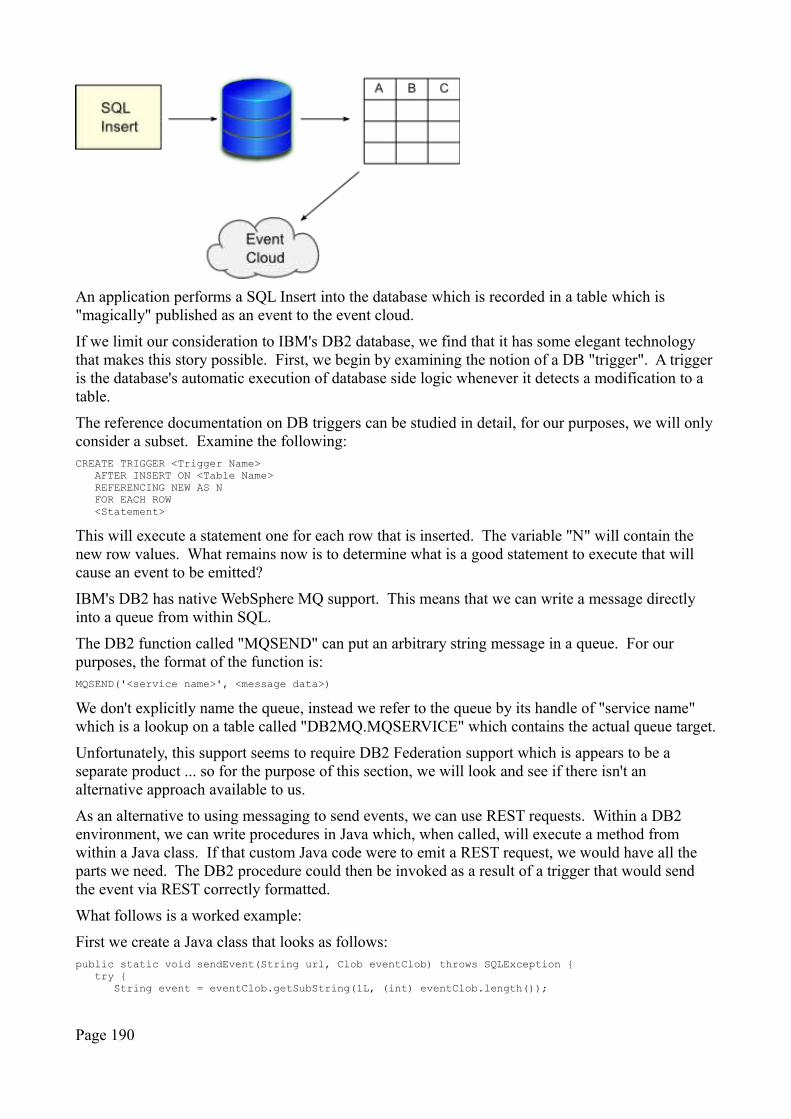
An application performs a SQL Insert into the database which is recorded in a table which is "magically" published as an event to the event cloud.
If we limit our consideration to IBM's DB2 database, we find that it has some elegant technology that makes this story possible. First, we begin by examining the notion of a DB "trigger". A triggeris the database's automatic execution of database side logic whenever it detects a modification to a table.
The reference documentation on DB triggers can be studied in detail, for our purposes, we will onlyconsider a subset. Examine the following:CREATE TRIGGER <Trigger Name>
AFTER INSERT ON <Table Name>REFERENCING NEW AS NFOR EACH ROW<Statement>
This will execute a statement one for each row that is inserted. The variable "N" will contain the new row values. What remains now is to determine what is a good statement to execute that will cause an event to be emitted?
IBM's DB2 has native WebSphere MQ support. This means that we can write a message directly into a queue from within SQL.
The DB2 function called "MQSEND" can put an arbitrary string message in a queue. For our purposes, the format of the function is:MQSEND('<service name>', <message data>)
We don't explicitly name the queue, instead we refer to the queue by its handle of "service name" which is a lookup on a table called "DB2MQ.MQSERVICE" which contains the actual queue target.
Unfortunately, this support seems to require DB2 Federation support which is appears to be a separate product ... so for the purpose of this section, we will look and see if there isn't an alternative approach available to us.
As an alternative to using messaging to send events, we can use REST requests. Within a DB2 environment, we can write procedures in Java which, when called, will execute a method from within a Java class. If that custom Java code were to emit a REST request, we would have all the parts we need. The DB2 procedure could then be invoked as a result of a trigger that would send the event via REST correctly formatted.
What follows is a worked example:
First we create a Java class that looks as follows:public static void sendEvent(String url, Clob eventClob) throws SQLException {
try {String event = eventClob.getSubString(1L, (int) eventClob.length());
Page 190
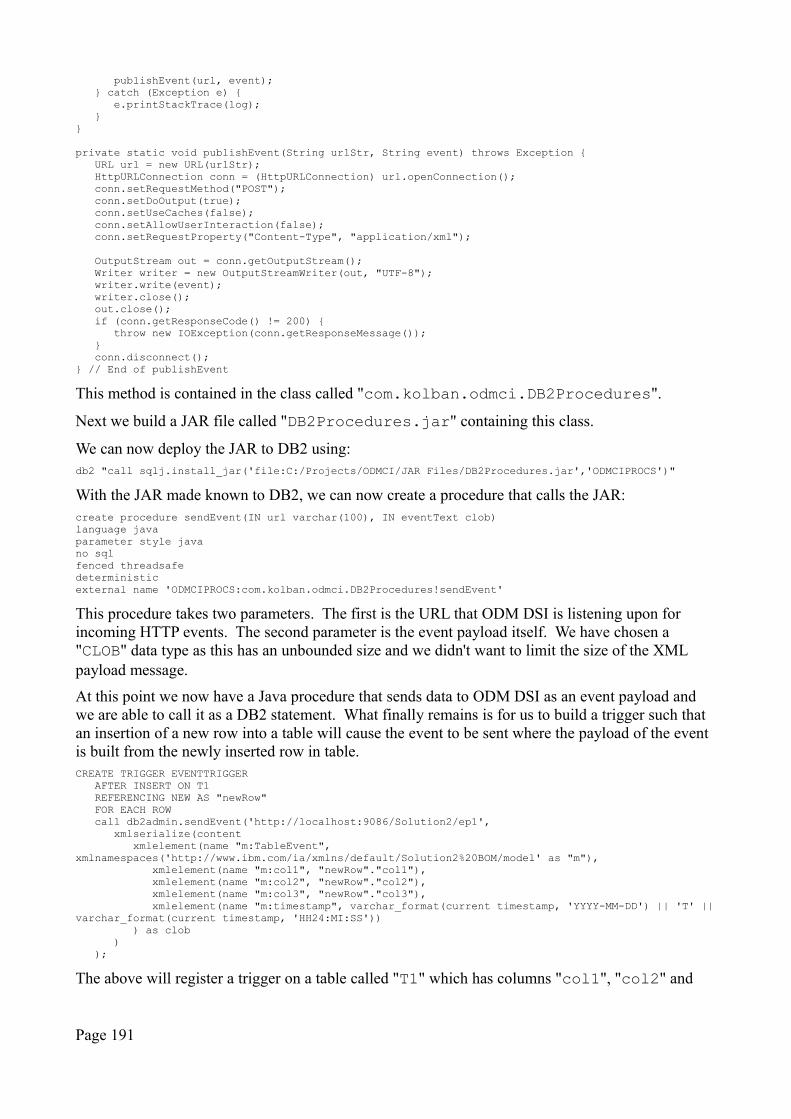
publishEvent(url, event);} catch (Exception e) {
e.printStackTrace(log);}
}
private static void publishEvent(String urlStr, String event) throws Exception {URL url = new URL(urlStr);HttpURLConnection conn = (HttpURLConnection) url.openConnection();conn.setRequestMethod("POST");conn.setDoOutput(true);conn.setUseCaches(false);conn.setAllowUserInteraction(false);conn.setRequestProperty("Content-Type", "application/xml");
OutputStream out = conn.getOutputStream();Writer writer = new OutputStreamWriter(out, "UTF-8");writer.write(event);writer.close();out.close();if (conn.getResponseCode() != 200) {
throw new IOException(conn.getResponseMessage());}conn.disconnect();
} // End of publishEvent
This method is contained in the class called "com.kolban.odmci.DB2Procedures".
Next we build a JAR file called "DB2Procedures.jar" containing this class.
We can now deploy the JAR to DB2 using:db2 "call sqlj.install_jar('file:C:/Projects/ODMCI/JAR Files/DB2Procedures.jar','ODMCIPROCS')"
With the JAR made known to DB2, we can now create a procedure that calls the JAR:create procedure sendEvent(IN url varchar(100), IN eventText clob)language javaparameter style javano sqlfenced threadsafedeterministicexternal name 'ODMCIPROCS:com.kolban.odmci.DB2Procedures!sendEvent'
This procedure takes two parameters. The first is the URL that ODM DSI is listening upon for incoming HTTP events. The second parameter is the event payload itself. We have chosen a "CLOB" data type as this has an unbounded size and we didn't want to limit the size of the XML payload message.
At this point we now have a Java procedure that sends data to ODM DSI as an event payload and we are able to call it as a DB2 statement. What finally remains is for us to build a trigger such that an insertion of a new row into a table will cause the event to be sent where the payload of the event is built from the newly inserted row in table.CREATE TRIGGER EVENTTRIGGER
AFTER INSERT ON T1REFERENCING NEW AS "newRow"FOR EACH ROWcall db2admin.sendEvent('http://localhost:9086/Solution2/ep1',
xmlserialize(contentxmlelement(name "m:TableEvent",
xmlnamespaces('http://www.ibm.com/ia/xmlns/default/Solution2%20BOM/model' as "m"),xmlelement(name "m:col1", "newRow"."col1"),xmlelement(name "m:col2", "newRow"."col2"),xmlelement(name "m:col3", "newRow"."col3"),xmlelement(name "m:timestamp", varchar_format(current timestamp, 'YYYY-MM-DD') || 'T' ||
varchar_format(current timestamp, 'HH24:MI:SS'))) as clob
));
The above will register a trigger on a table called "T1" which has columns "col1", "col2" and
Page 191
"col3".
See also:
• Writing DB2 Java Procedures and Functions
• DB2 Triggers
• DB2 and XML
• Making a REST call from Java
• developerWorks - Using MQSeries from DB2 Applications - 2001-08-06
IBM BPM
IBM BPM is IBM's Business Process Management product that can be used to build and execute business processes. Within this environment we can describe the sequence of steps that are executed for each instance of the process. As we navigate from step to step, we could imagine the issuance of events from BPM for examination.
There are as many different utilization’s of business processes as anyone could possible imagine. We will look at some simple ones.
Imagine a shopping process that is started when a consumer places items in a web based shopping cart. Upon submission, the process handles the order including warehousing (to ensure that the items requested are actually in stock), billing and shipping.
We seem to have a couple of ways in which IBM BPM can emit events for processing by ODM DSI. The first we will look at is the "Performance Data Warehouse".
Performance Data Warehouse
The Performance Data Warehouse (PDW) is a database with tables that is written to during the normal operation of IBM BPM. The data written can be thought of as a history of the BPM processes operations. This includes time stamps, the identity of which steps were executed and whoperformed any particular task.
What we would like to do is model an event or series of events after the data found here. When new records are written to the database by the operation of IBM BPM, we could execute a database trigger that would send the events onwards to ODM DSI for consumption.
Explicit Java Integration Service
Within a Liberty environment, we can write Java EE applications. These can be Servlets, JSPs, EJBs, MDBs and other types of applications. What if we wish to leverage those types of applications as event sources?
One way would be to use the publicly exposed event sources including HTTP and JMS. This wouldmean that our Java EE apps would either make REST requests or JMS message sends to deliver the events. ODM DSI provides an additional option based on the package called "com.ibm.ia.gateway".
To get things started, we examine "com.ibm.ia.gateway.GridConnectionFactory". This class has a static member called "createGridConnection" that returns us a "GridConnection" object.
From a GridConnection, we can perform two important functions:
Page 192
• getSolutions() - Returns a set of solutions deployed to the runtime.
• getSolutionGateway(String solutionName) – Returns a SolutionGateway object for the named solution.
It is the SolutionGateway object that is the key to the majority of our functions.
The SolutionGateway provides a variety of "submit()" methods that can be used to submit an event for ODM DSI processing. The event object passed must be created by an "EventFactory" object which can be obtained from the SolutionGateway's "getEventFactory()" method.
The EventFactory contains methods to create instances of events, parse them from XML and serialize them back to XML.
OSGiThroughout the documentation and usage of ODM DSI we see references to something called "OSGi". It is useful to spend a few moments discussing this.
First, we won't be covering OSGi in detail. It is far too big a subject and is covered in other books and materials. What we will be looking to capture here are the core notes on using OSGi with ODM DSI.
A simplistic way of thinking of the value of OSGi is that it encapsulates function in modules only exposing what is desired to be exposed and explicitly declaring what it needs.
Imagine the alternative. In Java today, I compile a file called com.kolban.MyThing.java and I get a new file called com.kolban.MyThing.class. This could then be used to construct instances of Java Objects. Great... that's easy enough. I can put this class file in a JAR with other class files and giveyou that JAR for usage. Great so far. Now, if you want to use MyThing do you have everything you need?
The answer by itself is unknown. You may find that the class expects other classes to be on the classpath. How do you find out? You run it till it fails. With OSGi, we explicitly declare ALL the expectations of the function and hence can't not know what we need in order to run it.
Versioning is another issue. What if you write a solution against MyThing at version 1and in version 2, I remove a method that was previously exposed. That is obviously not good practice on my part but it is perfectly legal from a Java language perspective. OSGi allows us to declare versions of dependencies. Try and include two versions of com.kolban.MyThing.class on one classpath and see how far you get.
The OSGi Bundle
When we build an ordinary JAR file we compose it as a series of compiled Java classes. These are then zipped together and the result is a JAR. In addition we can include resource files such as images. An OSGi bundle is essentially just a JAR file but with additional meta information that describes the packages exposed from the JAR and packages required for the JAR to operate.
If you also hear the term "module", this is the same thing as a bundle.
What makes a JAR a bundle is primarily extra information in the META-INF/MANIFEST.MF file.
Page 193

The additions include:
• Bundle-ManifestVersion – The syntax level of OSGi (the version of OSGi). This is currently the value "2".
• Bundle-SymbolicName – The unique identifier of the bundle in Java Package/Class format.
• Bundle-Version – The version of the bundle.
• Export-Package – The set of packages exposed to other bundles. These packages are "," separated if there are multiple.
• Import-Package – The set of packages required by this bundle.
• Bundle-Activator – The class that implements the activator for the bundle
• Bundle-ClassPath – The bundle internal classpath. This is where classes inside the bundle look for class resolution. This has a default of "." which means the root of the bundle JAR.
The pair of attributes Bundle-SymbolicName and Bundle-Version when brought together uniquely identify and distinguish a bundle.
Documentation entries which are optional include:
• Bundle-Name – The name of the bundle for users
• Bundle-Description
• Bundle-DocURL
• Bundle-Category
• Bundle-Vendor
• Bundle-ContactAddress
• Bundle-Copyright
•
See also:
• OSGi Alliance
Page 194
• OSGi JavaDoc – 4.3
• IBM redbook - Getting Started with the Feature Pack for OSGi Applications and JPA 2.0 – SG24-7911-00 – 2010-12-02
• OSGi in practice
• developerWorks - Build lightweight OSGi applications with Eclipse - 2011-10-25
The OSGi framework
Simply making bundles by themselves does not mean that we have an OSGi environment. Instead we need a framework that implements the OSGi environment which will be responsible for the lifecycle of bundles. Fortunately, for our story, Liberty provides exactly that. Liberty is a first classOSGi environment.
Bundle Activators
A Bundle Activator is a class which implements the BundleActivator interface. It provides a way for a bundle to interact with the lifecycle of the OSGi framework. This has two methods that need to be implemented:
• start(BundleContext) – Called when a bundle is installed and started.
• stop(BundleContext) – Called when a bundled is stopped.
Bundles which include activators must also specify additional information in the MANIFEST.MF including:
• Bundle-Activator
• Import-Package – Must include org.osgi.framework
The Bundle Context
The BundleContext object is passed into the BundleActivator via start and stop callbacks. It provides the hooks to allow the bundle (which provides the BundleActivator implementation) to work with the OSGi framework. Think of it as the context in which the bundle lives.
The Bundle object
Given that we (the programmers) create the bundle and it is the OSGi framework that manages the bundle, it seems strange that we should ask OSGi for information about the bundle that we just wrote. However, what we do want is knowledge about the bundle as known and see by OSGi. We may also want knowledge about bundles that we didn't author. Given a BundleContext, we can ask the context for a Bundle object instance. There are a few variants of "getBundle()" available on the BundleContext each of which return a Bundle object instance.
Given a Bundle object, we can ask for a rich set of actions to be performed relating to the lifecycle of that bundle.
There is a special Bundle object that represents the OSGi framework itself. It has a bundle id value of "0".
Bundle Listeners
A Bundle Listener is a class which implements the BundleListener interface.
Page 195

Working with services
A bundle can register itself with a service provider. This is typically performed within the bundle activator using:
• BundleContext -> registerService
A consumer can then find the service with:
• BundleContext -> getServiceReference
• BundleContext -> getService
In more detail, the BundleContext provides the following service methods:
• void addServiceListener(ServiceListener listener, String filter)
• void addServiceListener(ServiceListener listener)
• void removeServiceListener(ServiceListener listener)
• ServiceRegistration registerService(String class, Object service, Dictionary properties)
• ServiceRegistration registerService(String [] classes, Object service, Dictionary properties)
• ServiceReference[] getServiceReferences(String class, String filter)
• ServiceReference[] getAllServiceReferences(String class, String filter)
• ServiceReference getServiceReference(String class)
• Object getService(ServiceReference reference)
• boolean ungetService(ServiceReference reference)
Using registerService(), a bundle can offer itself up to the OSGi service registry for utilization. Theobject returned is a ServiceRegistration object which can be used to update the properties of a previously registered service. This also includes ServiceRegistration.unregister() which unregisters the service.
As a consumer of a service, one would user the getServiceReference() call to retrieve a ServiceReference object. Note that the ServiceReference is not the same as usable service itself. Inorder to get a handle to the target service one must make a call to getService() passing in the previously received ServiceReference.
When we are finished using a service, we can execute the ungetService() to tell the framework that we are done with our reference. This allows us to be good citizens.
The OSGi Blueprint component model
Dependency injection allows an application to use services without knowing where those services come from. Imagine, for example, the following Java Interface:public interface Greeting {
public void greet(String name);}
I can write a Java program that uses this interface pretty easily. For example:public void main() {
Greeting greeting;// Create a greeting ...greeting.greet("Bob Jones");
Page 196
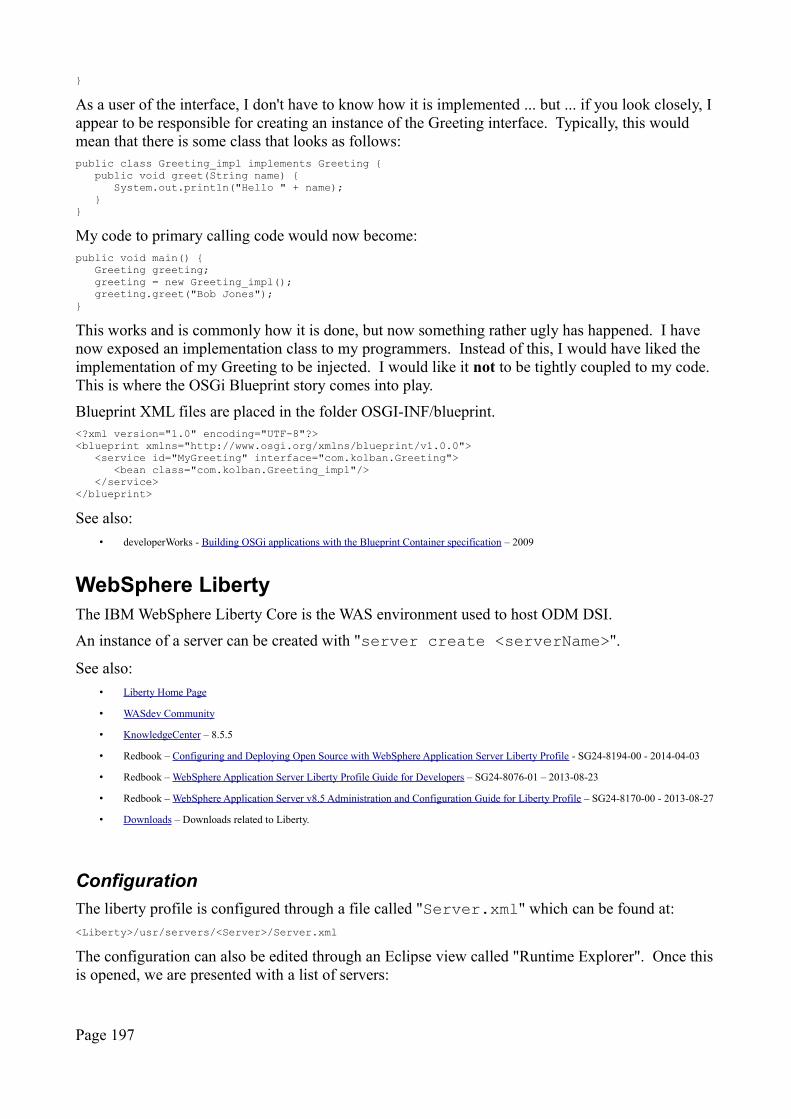
}
As a user of the interface, I don't have to know how it is implemented ... but ... if you look closely, I appear to be responsible for creating an instance of the Greeting interface. Typically, this would mean that there is some class that looks as follows:public class Greeting_impl implements Greeting {
public void greet(String name) {System.out.println("Hello " + name);
}}
My code to primary calling code would now become:public void main() {
Greeting greeting;greeting = new Greeting_impl();greeting.greet("Bob Jones");
}
This works and is commonly how it is done, but now something rather ugly has happened. I have now exposed an implementation class to my programmers. Instead of this, I would have liked the implementation of my Greeting to be injected. I would like it not to be tightly coupled to my code. This is where the OSGi Blueprint story comes into play.
Blueprint XML files are placed in the folder OSGI-INF/blueprint.<?xml version="1.0" encoding="UTF-8"?><blueprint xmlns="http://www.osgi.org/xmlns/blueprint/v1.0.0"> <service id="MyGreeting" interface="com.kolban.Greeting"> <bean class="com.kolban.Greeting_impl"/> </service></blueprint>
See also:
• developerWorks - Building OSGi applications with the Blueprint Container specification – 2009
WebSphere LibertyThe IBM WebSphere Liberty Core is the WAS environment used to host ODM DSI.
An instance of a server can be created with "server create <serverName>".
See also:
• Liberty Home Page
• WASdev Community
• KnowledgeCenter – 8.5.5
• Redbook – Configuring and Deploying Open Source with WebSphere Application Server Liberty Profile - SG24-8194-00 - 2014-04-03
• Redbook – WebSphere Application Server Liberty Profile Guide for Developers – SG24-8076-01 – 2013-08-23
• Redbook – WebSphere Application Server v8.5 Administration and Configuration Guide for Liberty Profile – SG24-8170-00 - 2013-08-27
• Downloads – Downloads related to Liberty.
Configuration
The liberty profile is configured through a file called "Server.xml" which can be found at:<Liberty>/usr/servers/<Server>/Server.xml
The configuration can also be edited through an Eclipse view called "Runtime Explorer". Once thisis opened, we are presented with a list of servers:
Page 197
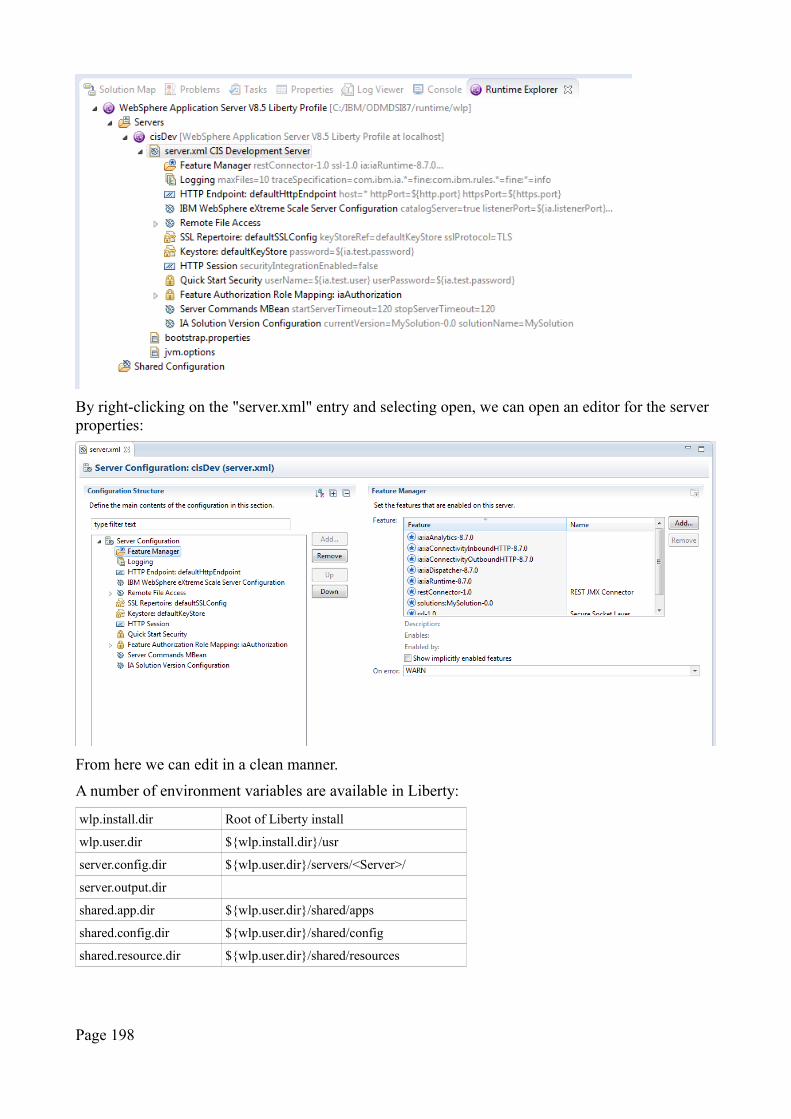
By right-clicking on the "server.xml" entry and selecting open, we can open an editor for the server properties:
From here we can edit in a clean manner.
A number of environment variables are available in Liberty:
wlp.install.dir Root of Liberty install
wlp.user.dir ${wlp.install.dir}/usr
server.config.dir ${wlp.user.dir}/servers/<Server>/
server.output.dir
shared.app.dir ${wlp.user.dir}/shared/apps
shared.config.dir ${wlp.user.dir}/shared/config
shared.resource.dir ${wlp.user.dir}/shared/resources
Page 198
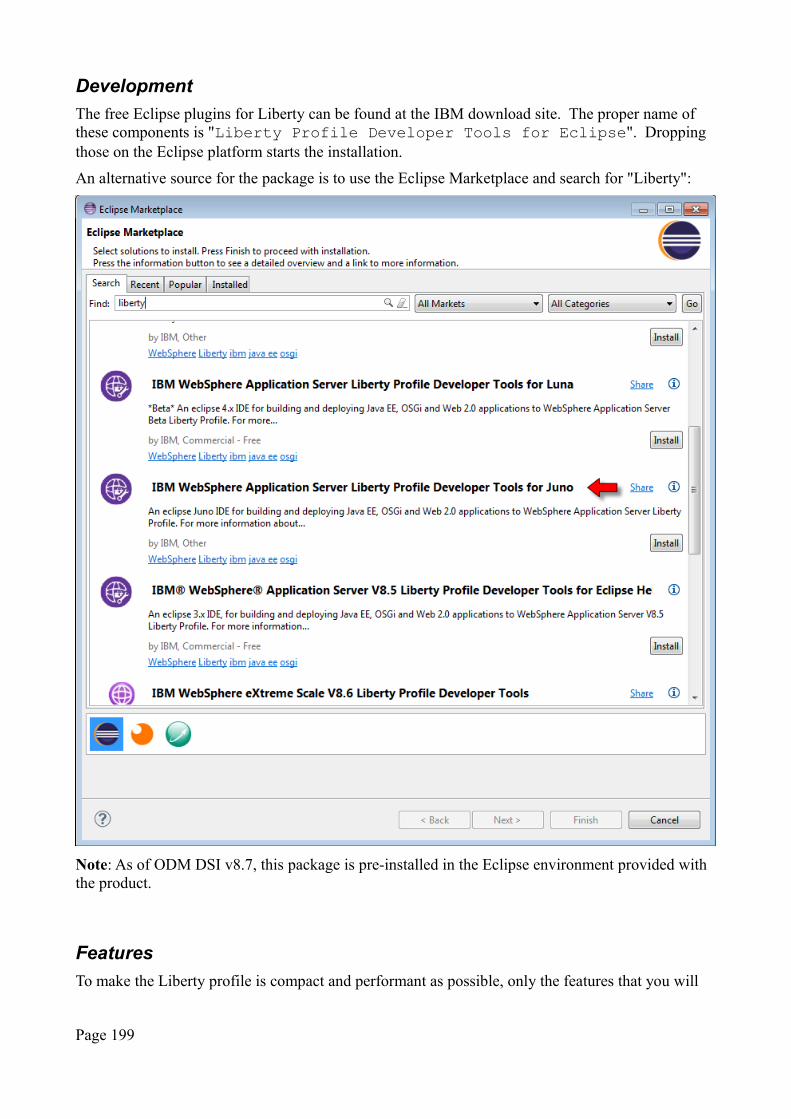
Development
The free Eclipse plugins for Liberty can be found at the IBM download site. The proper name of these components is "Liberty Profile Developer Tools for Eclipse". Dropping those on the Eclipse platform starts the installation.
An alternative source for the package is to use the Eclipse Marketplace and search for "Liberty":
Note: As of ODM DSI v8.7, this package is pre-installed in the Eclipse environment provided with the product.
Features
To make the Liberty profile is compact and performant as possible, only the features that you will
Page 199
use need be added to the server. These are defined in the <featureManager> element.
Deploying Applications
Applications can be deployed in a variety of ways. The commonly used ones are to drop the archive for the application in a known directory that is being monitored.
By default this is <ROOT>/runtime/wlp/usr/servers/<serverName>/dropins
Another is to explicitly define the application within the Server.xml file.
The Server.xml definition is called <application> which has the following properties:
• location
• id
• name
• type
• context-root
• autoStart
Security
SSL Security
When making HTTPS requests to a DSI server, the browser (or client) must trust the certificate presented by the DSI server. This means retrieving the DSI certificate and adding it to the trust store for the browser (client).
For Java clients, an excellent way to achieve this is through the Key Store Explorer tool.
Immediately after launch it looks as follows:
Page 200
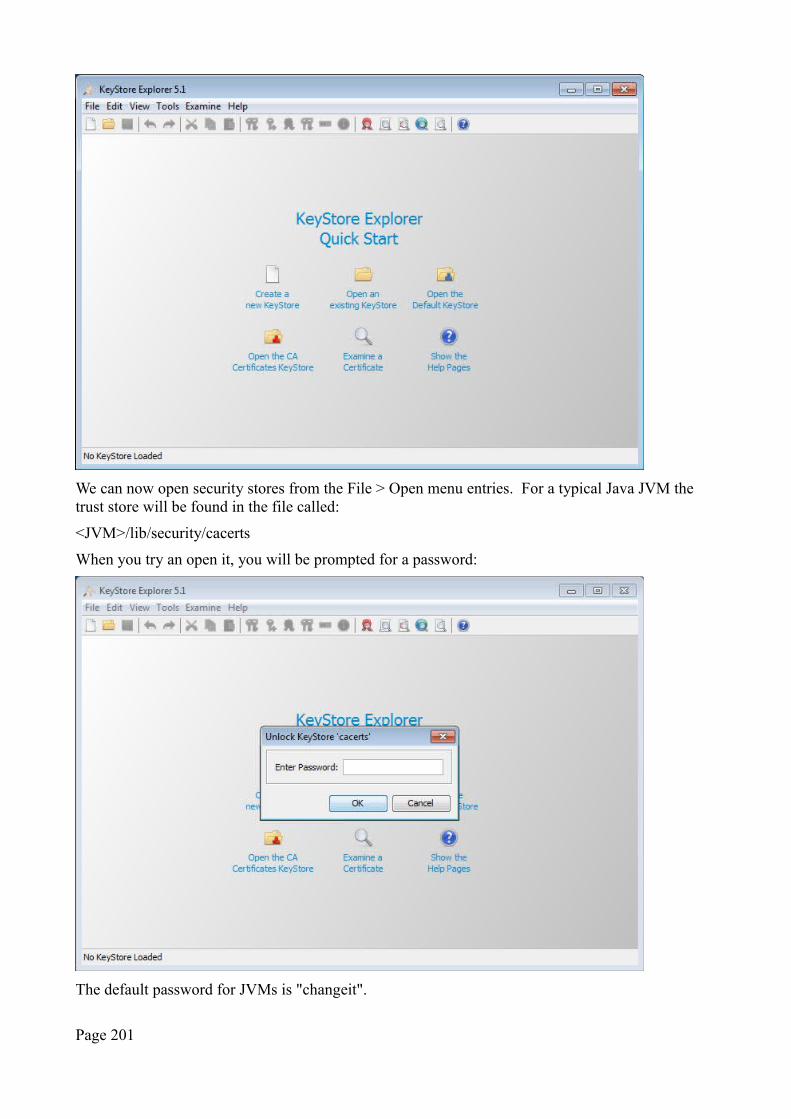
We can now open security stores from the File > Open menu entries. For a typical Java JVM the trust store will be found in the file called:
<JVM>/lib/security/cacerts
When you try an open it, you will be prompted for a password:
The default password for JVMs is "changeit".
Page 201
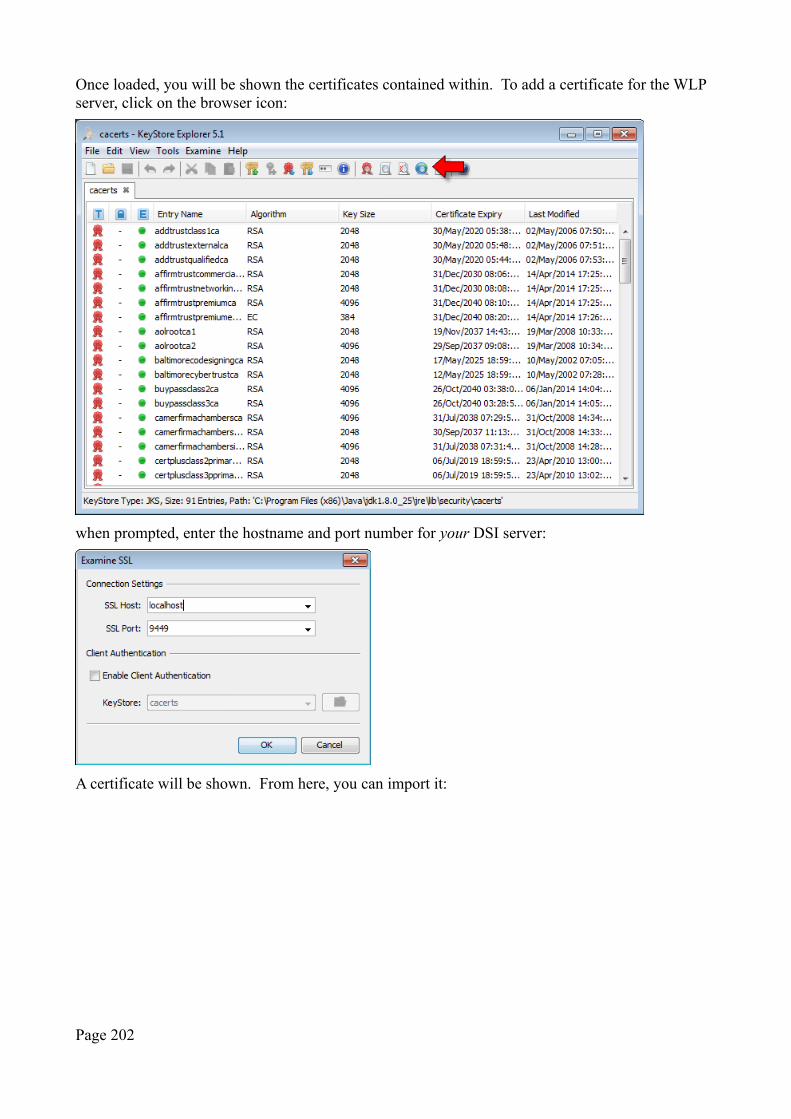
Once loaded, you will be shown the certificates contained within. To add a certificate for the WLP server, click on the browser icon:
when prompted, enter the hostname and port number for your DSI server:
A certificate will be shown. From here, you can import it:
Page 202
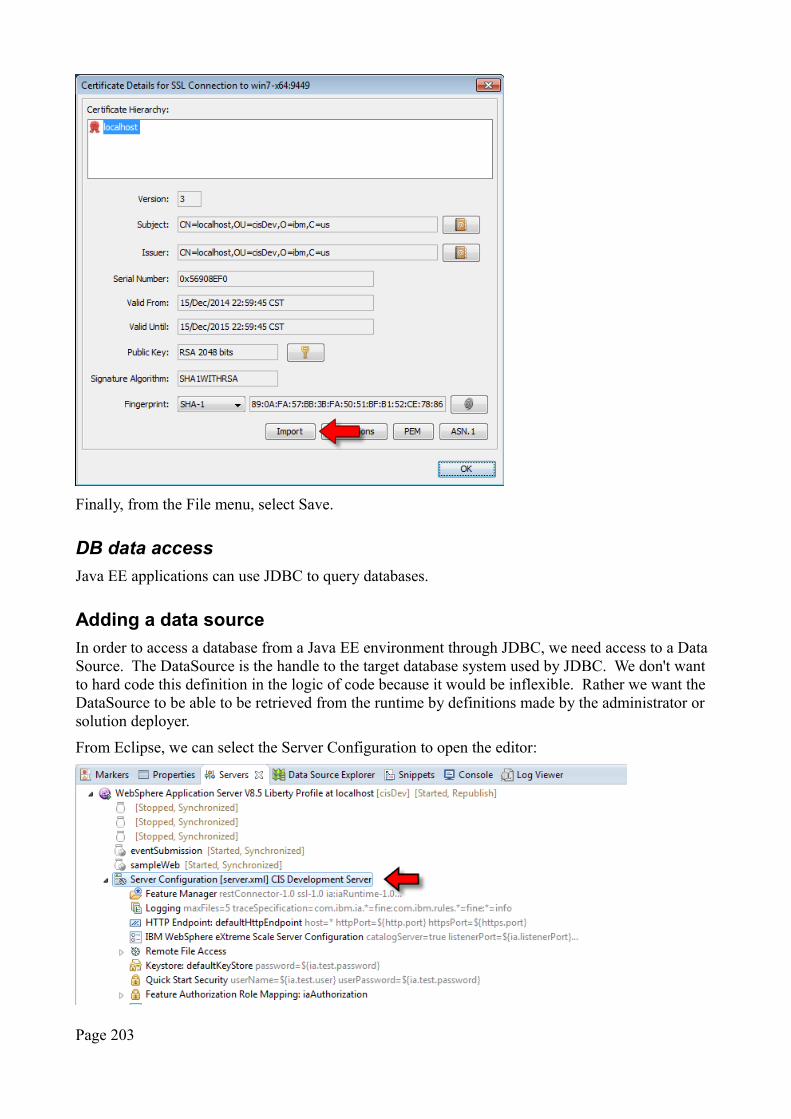
Finally, from the File menu, select Save.
DB data access
Java EE applications can use JDBC to query databases.
Adding a data source
In order to access a database from a Java EE environment through JDBC, we need access to a Data Source. The DataSource is the handle to the target database system used by JDBC. We don't want to hard code this definition in the logic of code because it would be inflexible. Rather we want the DataSource to be able to be retrieved from the runtime by definitions made by the administrator or solution deployer.
From Eclipse, we can select the Server Configuration to open the editor:
Page 203

From the Liberty developer tools, add a new element:
Select Data Source
Page 204
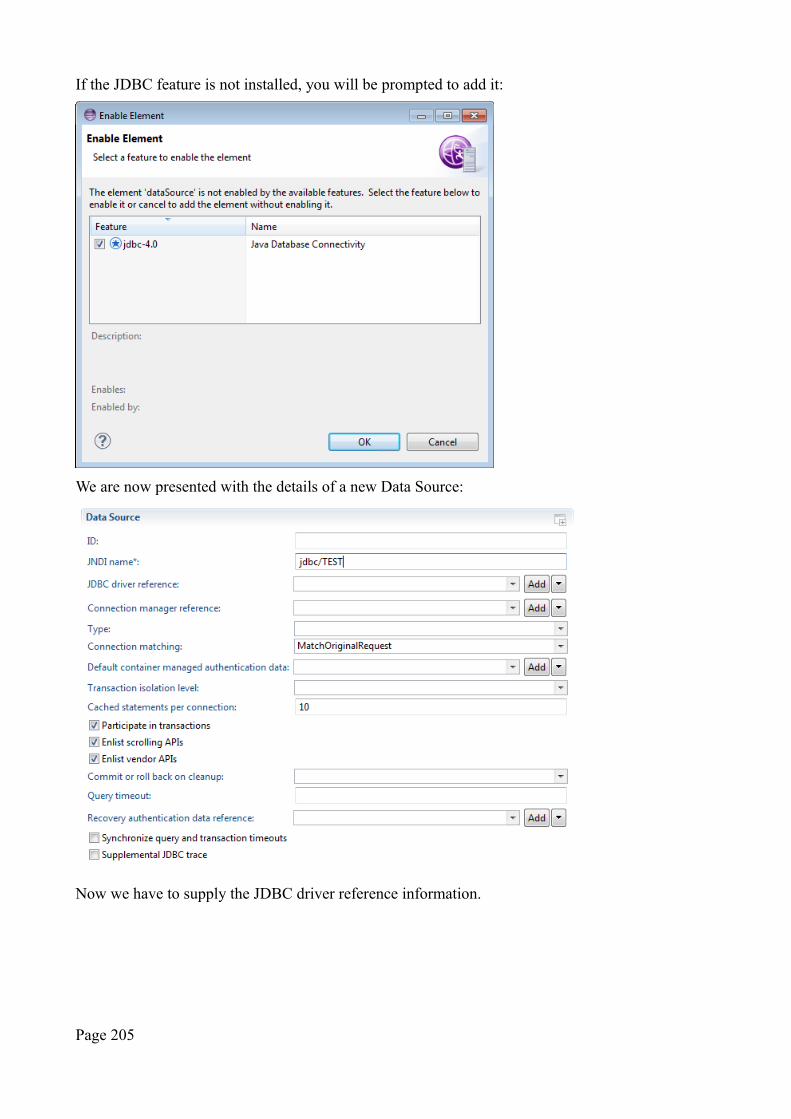
If the JDBC feature is not installed, you will be prompted to add it:
We are now presented with the details of a new Data Source:
Now we have to supply the JDBC driver reference information.
Page 205
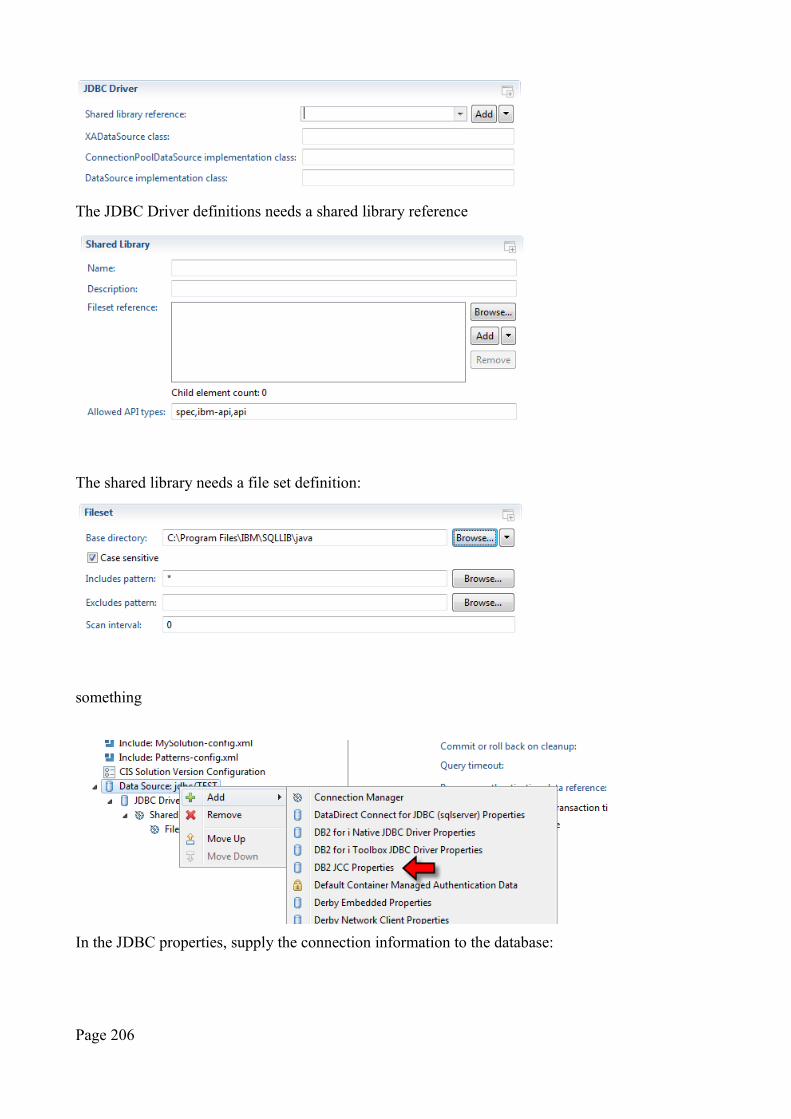
The JDBC Driver definitions needs a shared library reference
The shared library needs a file set definition:
something
In the JDBC properties, supply the connection information to the database:
Page 206
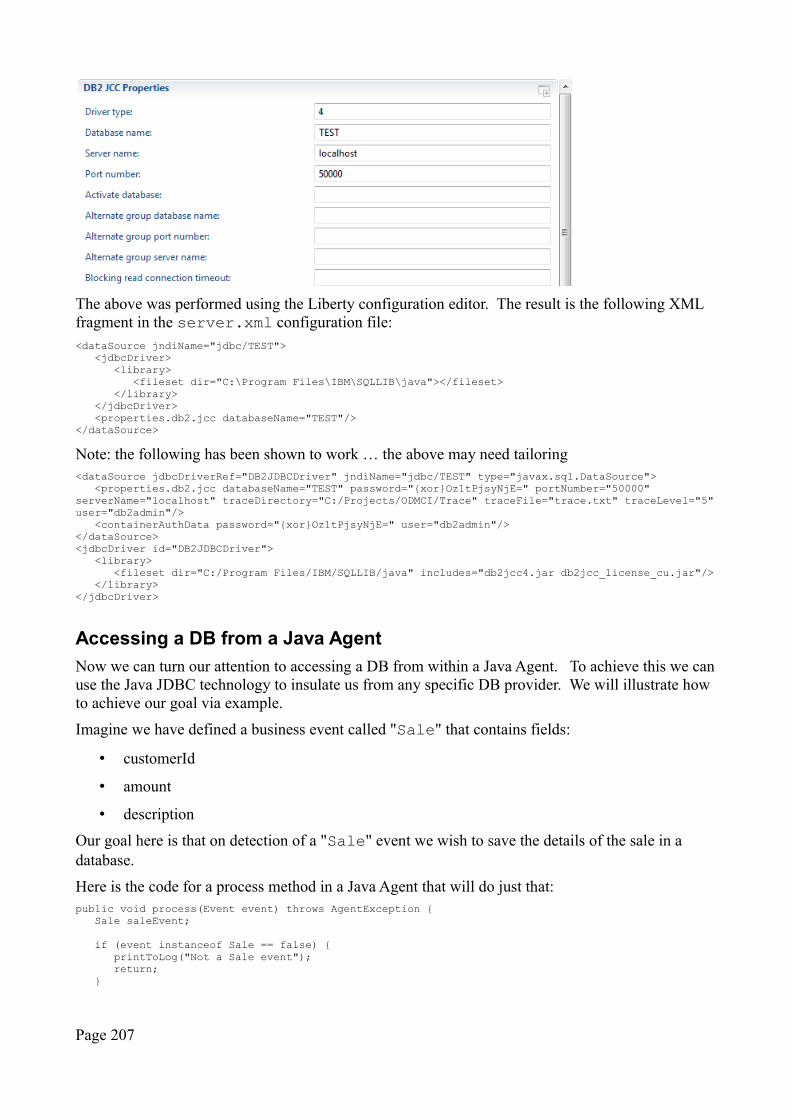
The above was performed using the Liberty configuration editor. The result is the following XML fragment in the server.xml configuration file:<dataSource jndiName="jdbc/TEST">
<jdbcDriver><library>
<fileset dir="C:\Program Files\IBM\SQLLIB\java"></fileset></library>
</jdbcDriver><properties.db2.jcc databaseName="TEST"/>
</dataSource>
Note: the following has been shown to work … the above may need tailoring<dataSource jdbcDriverRef="DB2JDBCDriver" jndiName="jdbc/TEST" type="javax.sql.DataSource">
<properties.db2.jcc databaseName="TEST" password="{xor}Oz1tPjsyNjE=" portNumber="50000" serverName="localhost" traceDirectory="C:/Projects/ODMCI/Trace" traceFile="trace.txt" traceLevel="5"user="db2admin"/>
<containerAuthData password="{xor}Oz1tPjsyNjE=" user="db2admin"/></dataSource><jdbcDriver id="DB2JDBCDriver">
<library> <fileset dir="C:/Program Files/IBM/SQLLIB/java" includes="db2jcc4.jar db2jcc_license_cu.jar"/>
</library></jdbcDriver>
Accessing a DB from a Java Agent
Now we can turn our attention to accessing a DB from within a Java Agent. To achieve this we canuse the Java JDBC technology to insulate us from any specific DB provider. We will illustrate how to achieve our goal via example.
Imagine we have defined a business event called "Sale" that contains fields:
• customerId
• amount
• description
Our goal here is that on detection of a "Sale" event we wish to save the details of the sale in a database.
Here is the code for a process method in a Java Agent that will do just that:public void process(Event event) throws AgentException {
Sale saleEvent;
if (event instanceof Sale == false) {printToLog("Not a Sale event");return;
}
Page 207
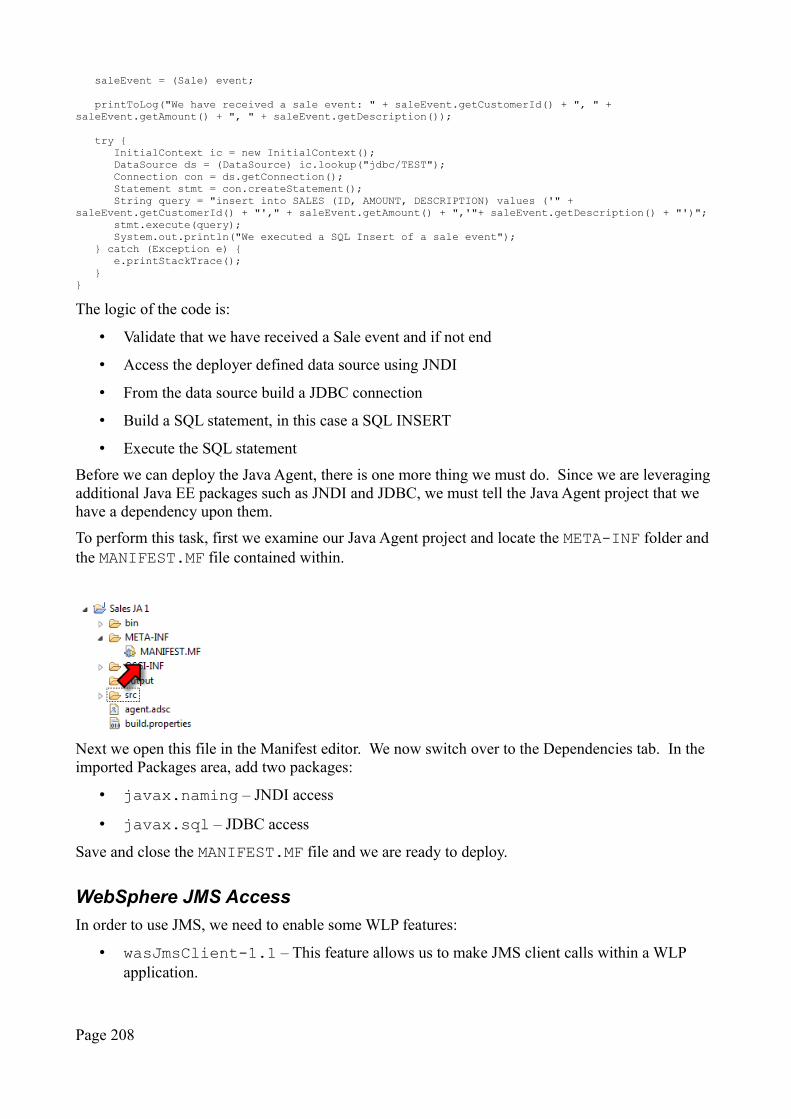
saleEvent = (Sale) event;
printToLog("We have received a sale event: " + saleEvent.getCustomerId() + ", " + saleEvent.getAmount() + ", " + saleEvent.getDescription());
try {InitialContext ic = new InitialContext();DataSource ds = (DataSource) ic.lookup("jdbc/TEST");Connection con = ds.getConnection();Statement stmt = con.createStatement();String query = "insert into SALES (ID, AMOUNT, DESCRIPTION) values ('" +
saleEvent.getCustomerId() + "'," + saleEvent.getAmount() + ",'"+ saleEvent.getDescription() + "')";stmt.execute(query);System.out.println("We executed a SQL Insert of a sale event");
} catch (Exception e) {e.printStackTrace();
}}
The logic of the code is:
• Validate that we have received a Sale event and if not end
• Access the deployer defined data source using JNDI
• From the data source build a JDBC connection
• Build a SQL statement, in this case a SQL INSERT
• Execute the SQL statement
Before we can deploy the Java Agent, there is one more thing we must do. Since we are leveraging additional Java EE packages such as JNDI and JDBC, we must tell the Java Agent project that we have a dependency upon them.
To perform this task, first we examine our Java Agent project and locate the META-INF folder and the MANIFEST.MF file contained within.
Next we open this file in the Manifest editor. We now switch over to the Dependencies tab. In the imported Packages area, add two packages:
• javax.naming – JNDI access
• javax.sql – JDBC access
Save and close the MANIFEST.MF file and we are ready to deploy.
WebSphere JMS Access
In order to use JMS, we need to enable some WLP features:
• wasJmsClient-1.1 – This feature allows us to make JMS client calls within a WLP application.
Page 208
• wasJmsServer-1.0 – This feature enables the JMS provider implemented inside WLP.
• jndi-1.0 – The Java Naming and Directory Service which is where JMS resources make themselves available.
With the inclusion of the wasJmsServer, we can now define queues in server.xml file.<messagingEngine>
<queue id="queue1" /></messagingEngine>
By default WLP's messaging engine listens on port 7276 for insecure connections and 7286 for secure connections. These will accept requests from any hosts.
A property called <wasJmsEndpoint> can be used to change these ports.
Now that we have an internal messaging engine that is hosting a queue, we need to define the corresponding JMS entries to refer to it from a JMS logical perspective.
First, we look at the JMS Queue Connection Factory.
This has a definition of:<jmsQueueConnectionFactory jndiName="jms/qcf1" />
Next we look at the JMS queue definition:<jmsQueue jndiName="jms/q1">
<properties.wasJms queueName="queue1" /></jmsQueue>
WebSphere MQ Access
A liberty application can interact with an MQ provider through JMS APIs. To allow this, two features of the liberty profile must be enabled:
• wmqJmsClient-1.1
• jndi-1.0
Next we must define a variable to specify the location of the MQ RAR file. This is normally found at <MQROOT>/java/lib/jca/wmq.jmsra.rar. A suitable definition might look like:<variable name="wmqJmsClient.rar.location" value="<MQROOT>/java/lib/jca/wmq.jmsra.rar" />
To define a JMS connection factory, the following can be used:<jmsConnectionFactory jndiName="jms/wmqCF">
<properties.wmqJmstransportType="CLIENT"hostName="localhost"port="1414"channel="SYSTEM.DEF.SVRCONN"queueManager="QM1"/>
</jmsConnectionFactory>
A queue definition can be:<jmsQueue id="jms/queue1" jndiName="jms/wmqQ1">
<properties.wmqJmsbaseQueueName="MDBQ"baseQueueManagerName="QM1"/>
</jmsQueue>
For message driven beans, we must supply an activation specification:<jmsActivationSpec id="JMSSample/JMSSampleMDB">
<properties.wmqJmsdestinationRef="jndi/MDBQ"transportType="CLIENT"
Page 209
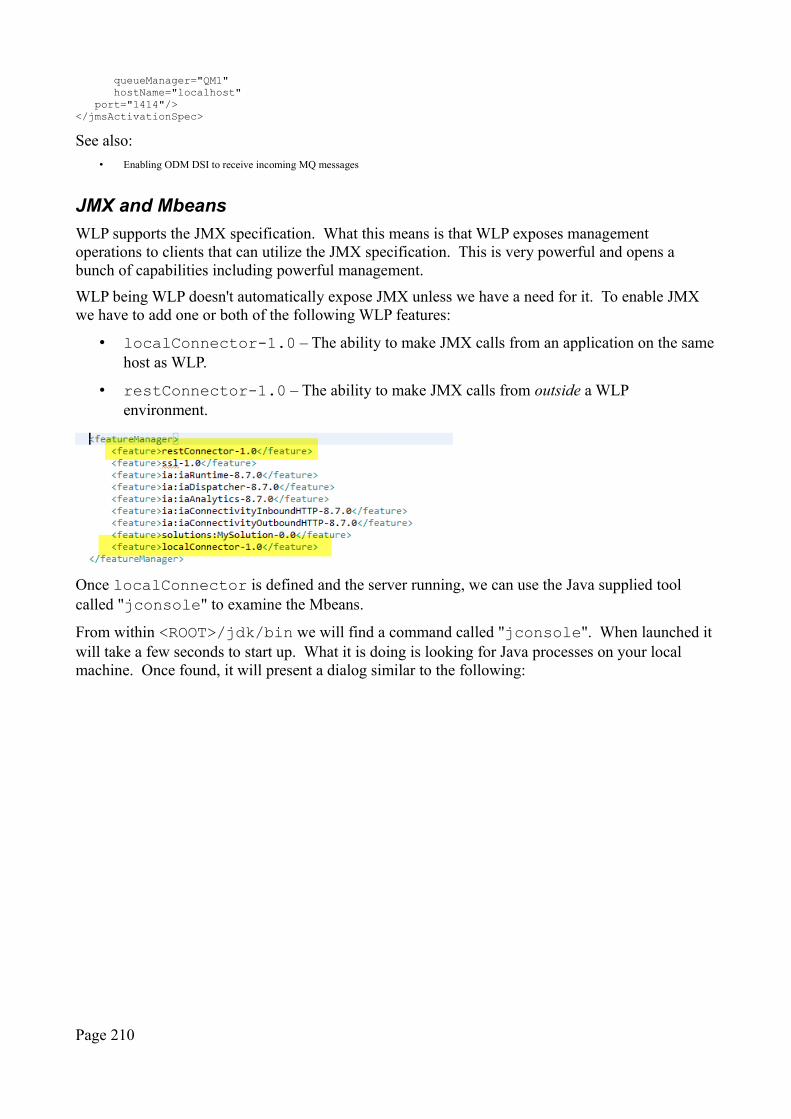
queueManager="QM1"hostName="localhost"
port="1414"/></jmsActivationSpec>
See also:
• Enabling ODM DSI to receive incoming MQ messages
JMX and Mbeans
WLP supports the JMX specification. What this means is that WLP exposes management operations to clients that can utilize the JMX specification. This is very powerful and opens a bunch of capabilities including powerful management.
WLP being WLP doesn't automatically expose JMX unless we have a need for it. To enable JMX we have to add one or both of the following WLP features:
• localConnector-1.0 – The ability to make JMX calls from an application on the samehost as WLP.
• restConnector-1.0 – The ability to make JMX calls from outside a WLP environment.
Once localConnector is defined and the server running, we can use the Java supplied tool called "jconsole" to examine the Mbeans.
From within <ROOT>/jdk/bin we will find a command called "jconsole". When launched it will take a few seconds to start up. What it is doing is looking for Java processes on your local machine. Once found, it will present a dialog similar to the following:
Page 210
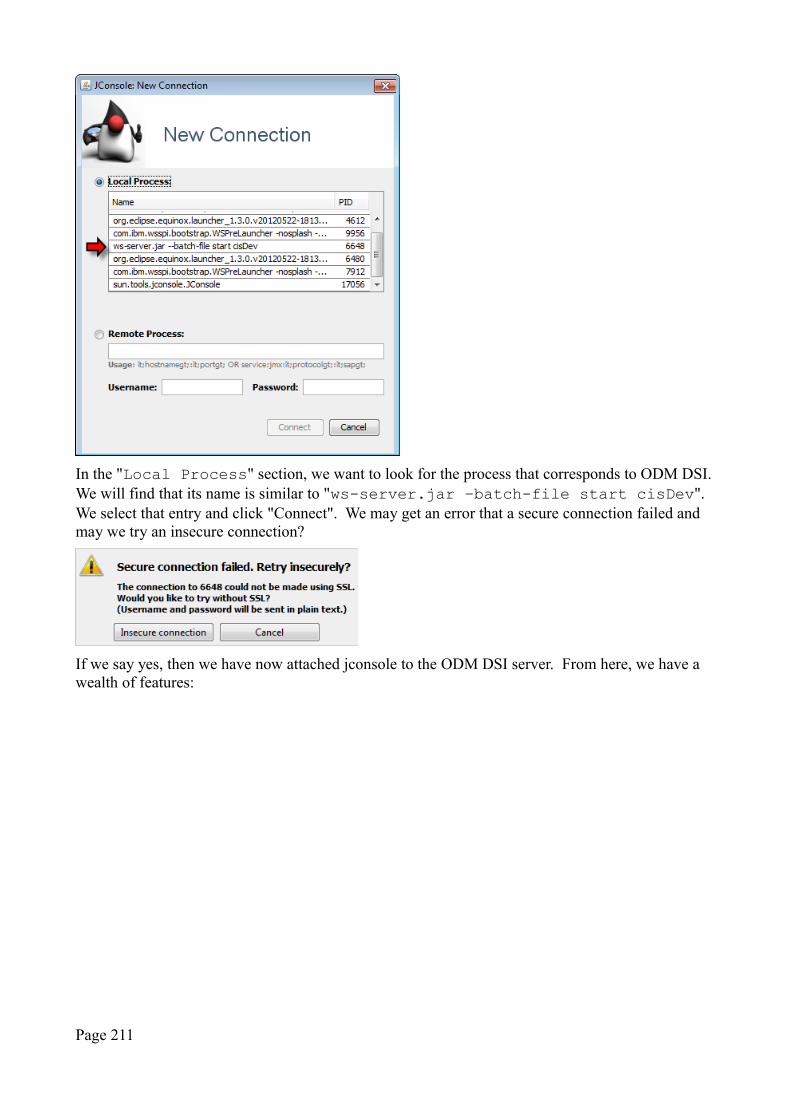
In the "Local Process" section, we want to look for the process that corresponds to ODM DSI. We will find that its name is similar to "ws-server.jar –batch-file start cisDev". We select that entry and click "Connect". We may get an error that a secure connection failed and may we try an insecure connection?
If we say yes, then we have now attached jconsole to the ODM DSI server. From here, we have a wealth of features:
Page 211
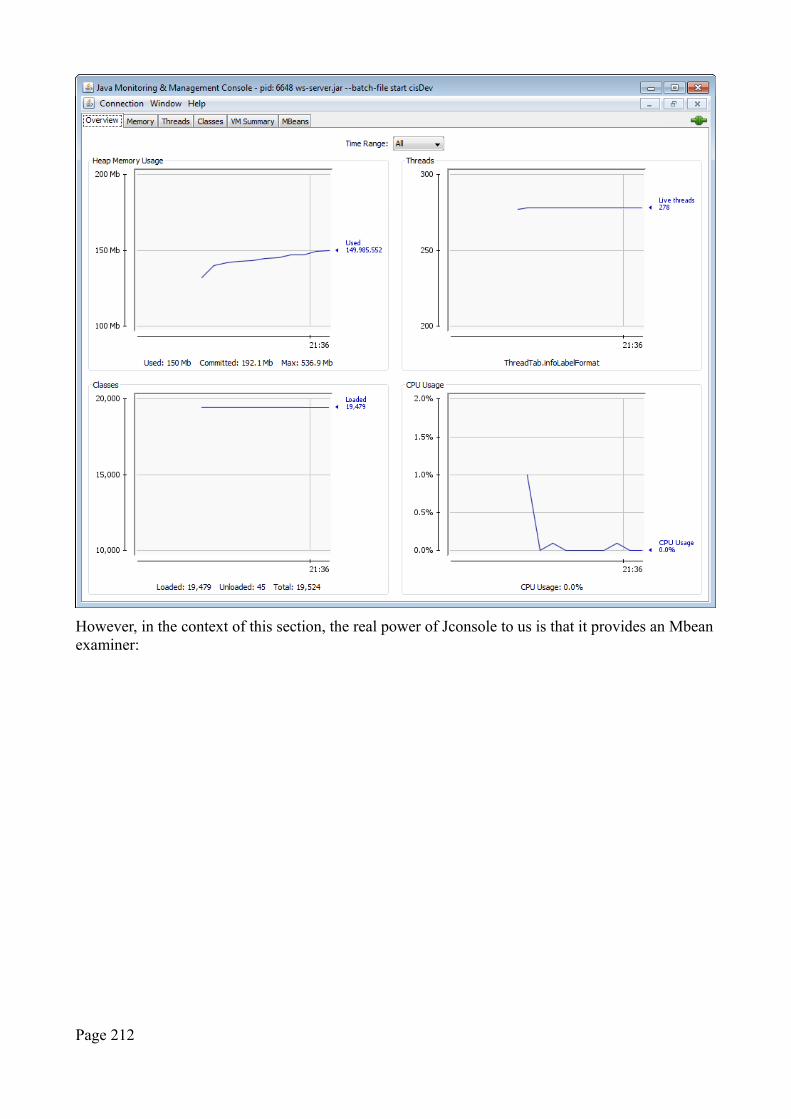
However, in the context of this section, the real power of Jconsole to us is that it provides an Mbeanexaminer:
Page 212
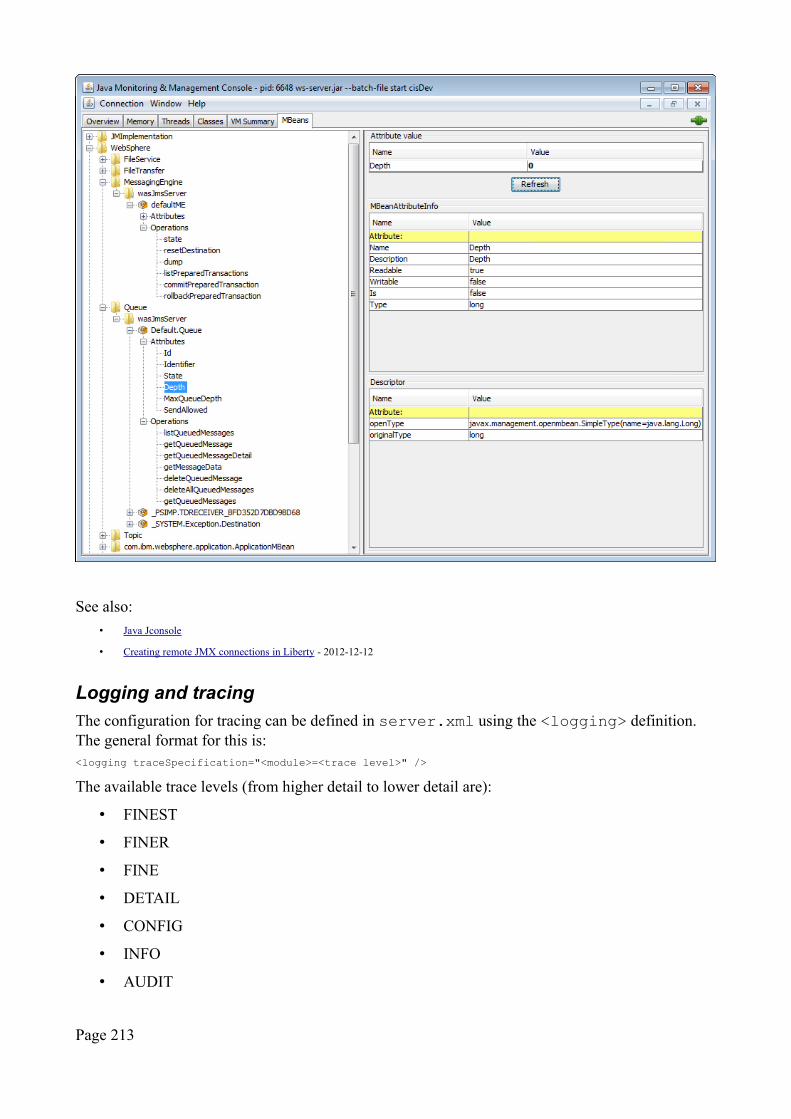
See also:
• Java Jconsole
• Creating remote JMX connections in Liberty - 2012-12-12
Logging and tracing
The configuration for tracing can be defined in server.xml using the <logging> definition. The general format for this is:<logging traceSpecification="<module>=<trace level>" />
The available trace levels (from higher detail to lower detail are):
• FINEST
• FINER
• FINE
• DETAIL
• CONFIG
• INFO
• AUDIT
Page 213
• WARNING
• SEVERE
• FATAL
• off – Logging is switched off
Be cautious on switching on too much trace as it can dramatically slow down your system's operations.
Experience seems to show that merely changing the server.xml file will cause WLP to re-read and honor trace setting changes.
During development, I choose to have the following trace entries switched on to fine:
• com.ibm.ws.config.xml.internal.ConfigRefresher
• com.ibm.ws.kernel.feature.internal.FeatureManager
• com.ibm.ia.runtime.SolutionProviderMgr
For special cases, the following trace flags may be useful:
• Aries.*=all:org.apache.aries.*=all – Useful for OSGi debugging but generates a LOT of stuff.
• ObjectGrid*
◦ ObjectGridReplication
◦ ObjectGridPlacement
◦ ObjectGridRouting
◦ … plus many more
If one switches on ALL trace, one will drown in information. Switching on "*=all" is not worth it. At a minimum, you are going to want to turn off:
• com.ibm.ws.objectgrid.*
• com.ibm.ws.xs.*
• com.ibm.ws.xsspi.*
See also:
• Extreme Scale Problem Determination PDF
Using the Admin Center
First, we must download and install the additional feature known as the Admin Center. We can do that from the command line with:featureManager install adminCenter-1.0 --when-file-exists=ignore
We will be prompted to accept the license.
After installation of the feature on your local machine, we can add the feature to the configuration properties of the WLP server to make it available at runtime:
Page 214
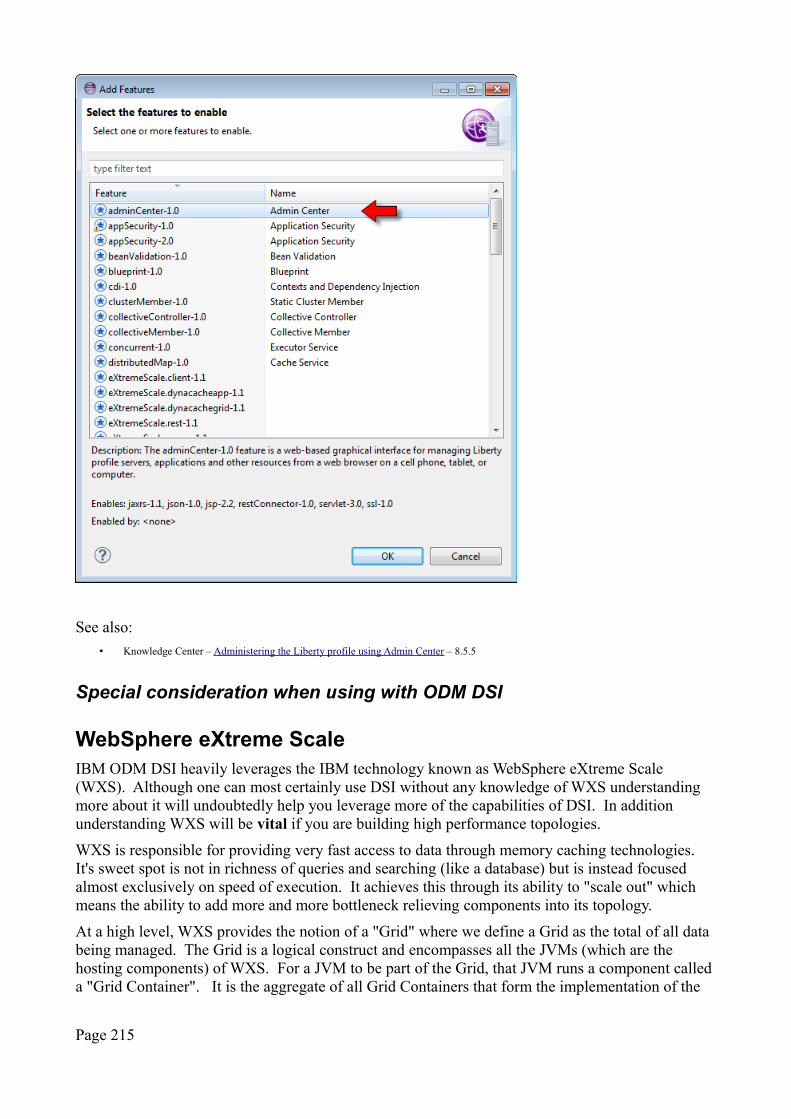
See also:
• Knowledge Center – Administering the Liberty profile using Admin Center – 8.5.5
Special consideration when using with ODM DSI
WebSphere eXtreme ScaleIBM ODM DSI heavily leverages the IBM technology known as WebSphere eXtreme Scale (WXS). Although one can most certainly use DSI without any knowledge of WXS understanding more about it will undoubtedly help you leverage more of the capabilities of DSI. In addition understanding WXS will be vital if you are building high performance topologies.
WXS is responsible for providing very fast access to data through memory caching technologies. It's sweet spot is not in richness of queries and searching (like a database) but is instead focused almost exclusively on speed of execution. It achieves this through its ability to "scale out" which means the ability to add more and more bottleneck relieving components into its topology.
At a high level, WXS provides the notion of a "Grid" where we define a Grid as the total of all data being managed. The Grid is a logical construct and encompasses all the JVMs (which are the hosting components) of WXS. For a JVM to be part of the Grid, that JVM runs a component called a "Grid Container". It is the aggregate of all Grid Containers that form the implementation of the
Page 215
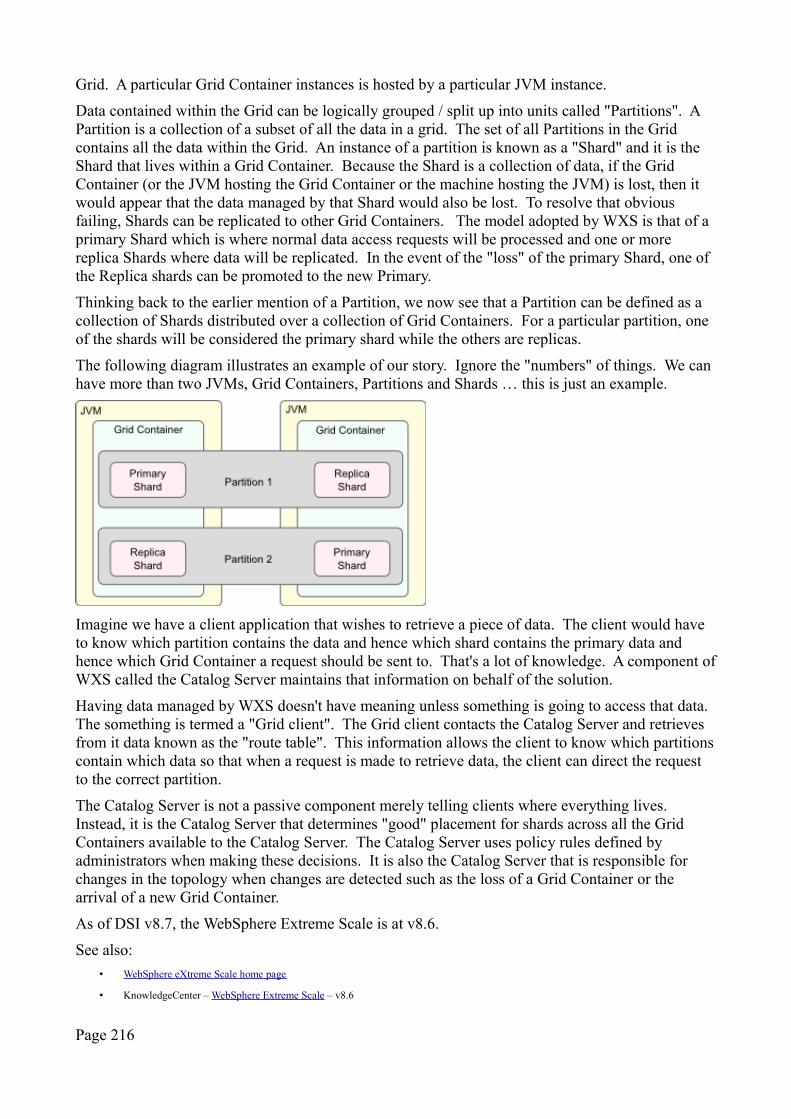
Grid. A particular Grid Container instances is hosted by a particular JVM instance.
Data contained within the Grid can be logically grouped / split up into units called "Partitions". A Partition is a collection of a subset of all the data in a grid. The set of all Partitions in the Grid contains all the data within the Grid. An instance of a partition is known as a "Shard" and it is the Shard that lives within a Grid Container. Because the Shard is a collection of data, if the Grid Container (or the JVM hosting the Grid Container or the machine hosting the JVM) is lost, then it would appear that the data managed by that Shard would also be lost. To resolve that obvious failing, Shards can be replicated to other Grid Containers. The model adopted by WXS is that of a primary Shard which is where normal data access requests will be processed and one or more replica Shards where data will be replicated. In the event of the "loss" of the primary Shard, one of the Replica shards can be promoted to the new Primary.
Thinking back to the earlier mention of a Partition, we now see that a Partition can be defined as a collection of Shards distributed over a collection of Grid Containers. For a particular partition, one of the shards will be considered the primary shard while the others are replicas.
The following diagram illustrates an example of our story. Ignore the "numbers" of things. We can have more than two JVMs, Grid Containers, Partitions and Shards … this is just an example.
Imagine we have a client application that wishes to retrieve a piece of data. The client would have to know which partition contains the data and hence which shard contains the primary data and hence which Grid Container a request should be sent to. That's a lot of knowledge. A component ofWXS called the Catalog Server maintains that information on behalf of the solution.
Having data managed by WXS doesn't have meaning unless something is going to access that data. The something is termed a "Grid client". The Grid client contacts the Catalog Server and retrieves from it data known as the "route table". This information allows the client to know which partitionscontain which data so that when a request is made to retrieve data, the client can direct the request to the correct partition.
The Catalog Server is not a passive component merely telling clients where everything lives. Instead, it is the Catalog Server that determines "good" placement for shards across all the Grid Containers available to the Catalog Server. The Catalog Server uses policy rules defined by administrators when making these decisions. It is also the Catalog Server that is responsible for changes in the topology when changes are detected such as the loss of a Grid Container or the arrival of a new Grid Container.
As of DSI v8.7, the WebSphere Extreme Scale is at v8.6.
See also:
• WebSphere eXtreme Scale home page
• KnowledgeCenter – WebSphere Extreme Scale – v8.6
Page 216
• Redbook – WebSphere eXtreme Scale v8.6 Key Concepts and Usage Scenarios – SG24-7683-01 - 2013
Client APIs
From an API perspective, there are a number of access mechanisms a client application can use to access the Grid.
ObjectMap API
In this model, the grid appears as a Java Map with the ability to put and get objects. This manifests itself as:
• map.put(key, value)
• map.get(key)
Entity Manager API
REST Data Service API
IBM DB2There is a wealth of material on using IBM DB2 found in manuals, articles and the interwebs and we will not try and replicate that here. However in this section, we will make notes on useful DB2 areas that may be of relevance to working with ODM DSI. These notes should not be considered definitive on the subjects but merely examples of the areas as potentially used by ODM DSI.
Writing DB2 Java Procedures and Functions
Write the Java class to be in a package. Define any routines you wish to call as public static methods within the class. For example:package com.kolban;import java.io.FileWriter;import java.sql.SQLException;
public class DB2TEST {public static void db2test() throws SQLException{
try{
FileWriter fw = new FileWriter("C:/temp/db2log.txt", true);fw.write("hello world\n");fw.close();
} catch(Exception e) {e.printStackTrace();
}}
}
Export the above as a JAR file. In this example we exported to db2test.jar. Next we followedthe instructions to import the JAR into DB2:db2 connect to TESTDB user db2admin using db2admindb2 "call sqlj.install_jar('file:C:/Projects/ODMCI/JAR Files/db2test.jar','TEST1')"
finally, we ran the SQL statement to create a stored procedure:drop procedure testp;create procedure testp()language java
Page 217
parameter style javano sqlfenced threadsafedeterministicexternal name 'TEST1:com.kolban.DB2TEST!db2test'
with this done, we now have a new stored procedure called "testp" which when called, will lookup the class called "DB2TEST" contained in the Java Package called "com.kolban" that is located in the JAR with handle "TEST1" and call the method called "db2test".
When debugging Java procedures, no solution has yet been found to find where the Java console might exist. The workaround has been to log to our own PrintWriter object.
See also:
• Deploying a JAR into DB2
• developerWorks - Solve common problems with DB2 UDB Java stored procedures - 2005-10-27
Deploying a JAR into DB2
Once a JAR file has been built which contains the routines we wish to call, we now have to deploy that JAR to DB2. This can be achieved from a command window using:db2 connect to <DB Name> user <user name> using <password>db2 "call sqlj.install_jar('file:<path to jar>', '<JAR handle>')"
You can't run the sqlj.install_jar command from a Data Studio environment.
To replace the JAR, use the command:db2 "call sqlj.replace_jar('file:<path to jar>', '<JAR handle>')"
after replacing a JAR, if the signatures have changed, we may wish to ask DB2 to refresh its classes:db2 "call sqlj.refresh_classes()"
To delete the JAR, use the command:db2 "call sqlj.remove_jar('<JAR handle>')"
See also:
• Writing DB2 Java Procedures and Functions
DB2 Triggers
The notion behind a trigger is that when a table is modified, we may wish to become aware of that modification and perform some action. This allows us to write functions that are executed when an external application modifies a table but without us having to re-code or otherwise interfere with theopertaion of that external application.CREATE TRIGGER <Trigger Name>
AFTER INSERT ON <Table Name>REFERENCING NEW AS <Variable Name>FOR EACH ROW<Statement>
DB2 and XML
Data within a table can be selected and formatted into an XML document. Let us start with the XMLSERIALIZE function. This function takes other XML data types and serializes the data to oneof the DB types of CHAR, VARCHAR or CLOB.
An example of usage is:
Page 218
XMLSERIALIZE( CONTENT <XML Expression> AS CLOB)
This will serialize the XML expression into a CLOB format.
Next we will look at the XMLELEMENT function. This returns an XML object. It is used to build an XML element.
As an example:xmlelement(name "X", 'Y')
will build the XML element <X>Y</X>. The first parameter is the name that the element will use. If we wish an element to have a namespace prefix, we would include that here. For example:xmlelement(name "m:X", 'Y')
would build the XML element <m:X>Y</X>.
If we wish to build a document tree, we can nest XMLELEMENTS inside each otherxmlelement(name "X", xmlelement(name "A", 'B'))
which will build:<X>
<A>B</A></X>
Within an XMLELEMENT, we can use the XMLNAMESPACES function to define a namespace for the elements.xmlelement(name "X", xmlnamespaces('http://kolban.com' as "K"), 'Y')
This will produce:<X xmlns:k="http://kolban.com>Y</X>
See also:
• developerWorks - DB2 Basics: An introduction to the SQL/XML publishing functions - 2005-11-03
• developerWorks - Overview of DB2’s XML Capabilities: An introduction to SQL/XML functions in DB2 UDB and the DB2 XML Extender - 2003-11-20
IBM Data StudioData studio is a free download for managing databases and building SQL.
IBM MQIBM's MQ product is an industry strength messaging and queuing platform including a runtime engine and a rich set of APIs. MQ can act as the source and destination of ODM DSI events as an alternative transport to using a JMS provider.
Page 219
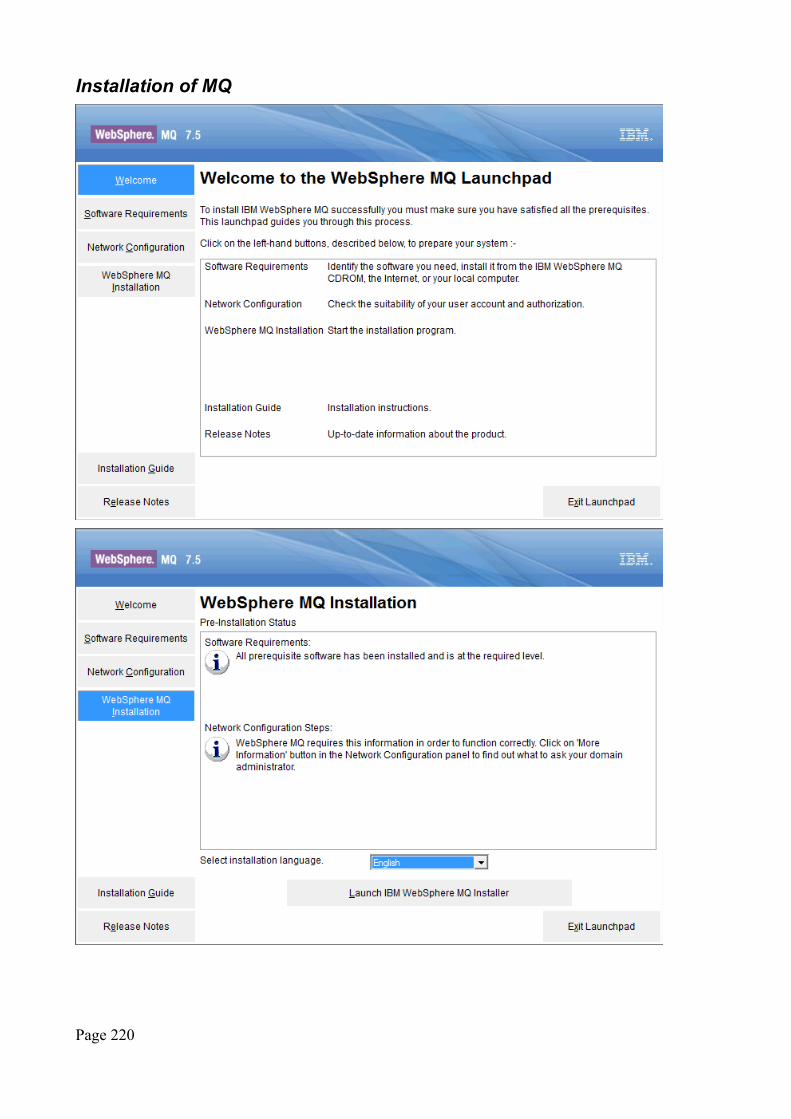
Installation of MQ
Page 220

Page 221
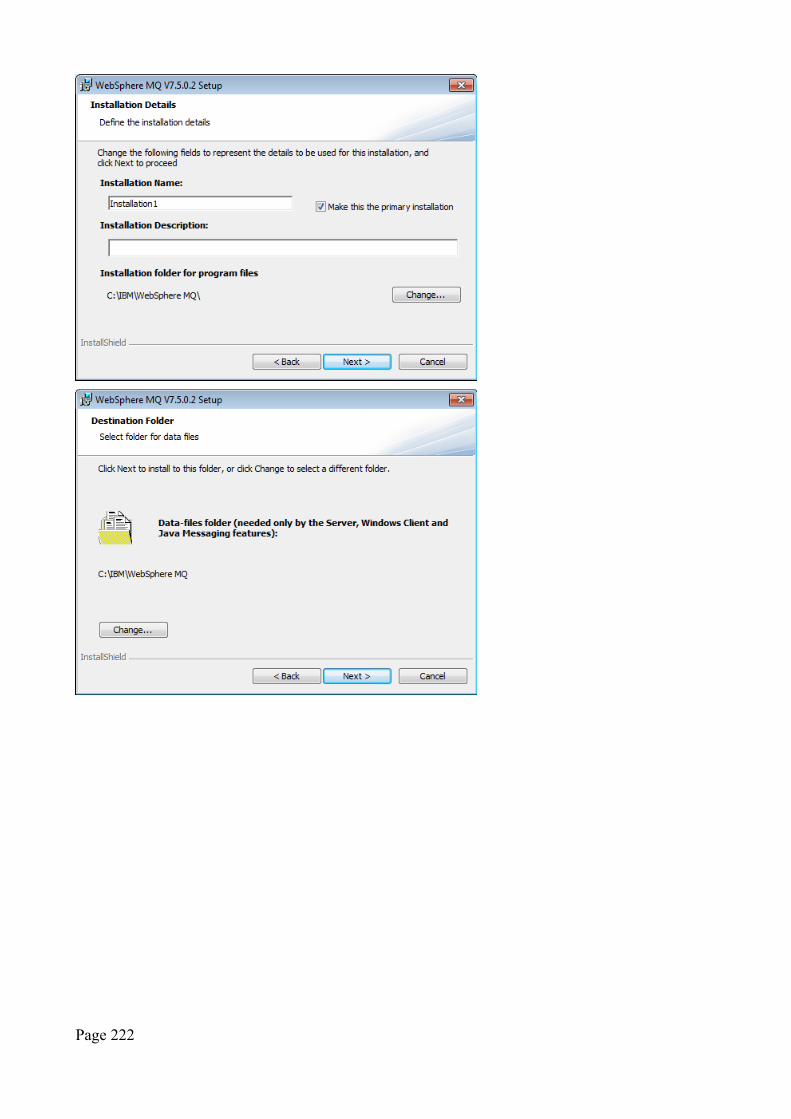
Page 222
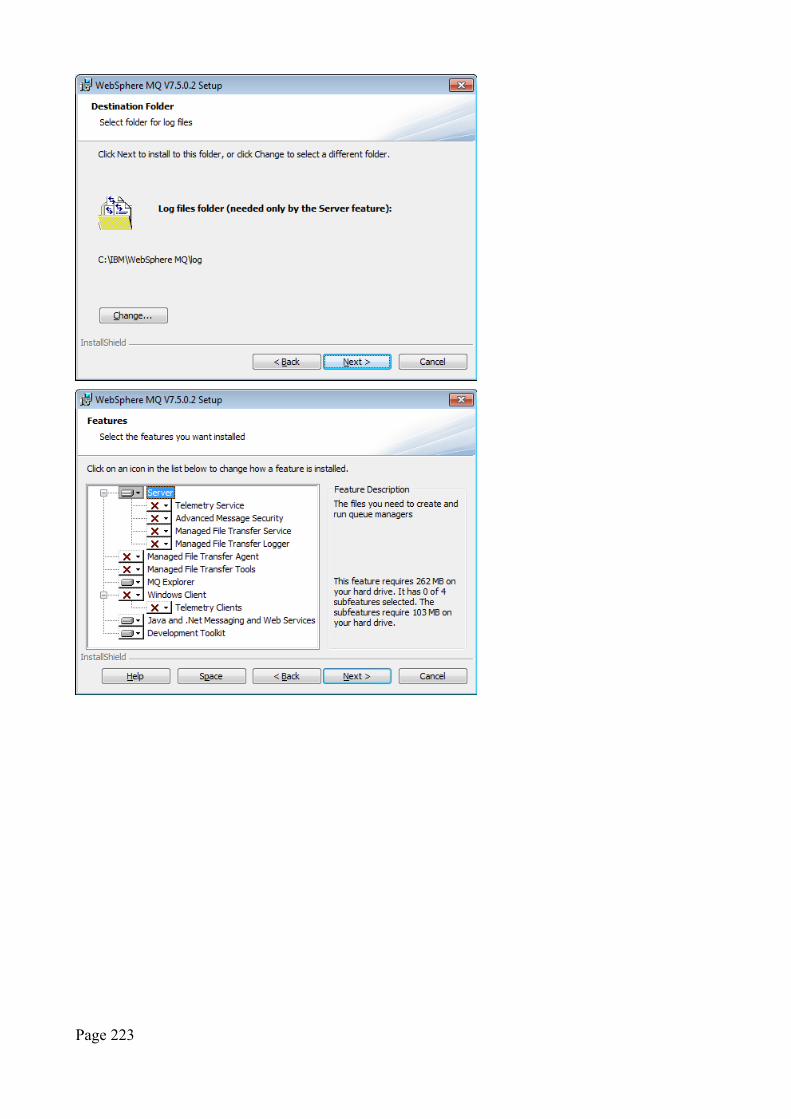
Page 223
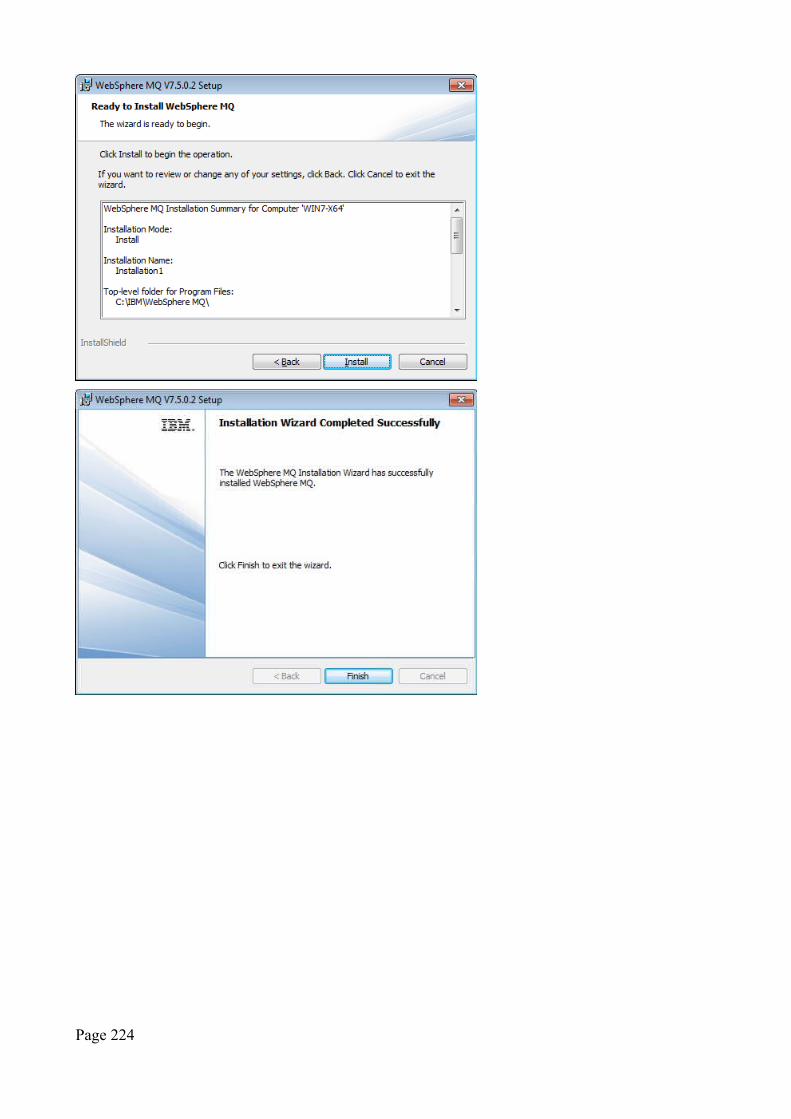
Page 224
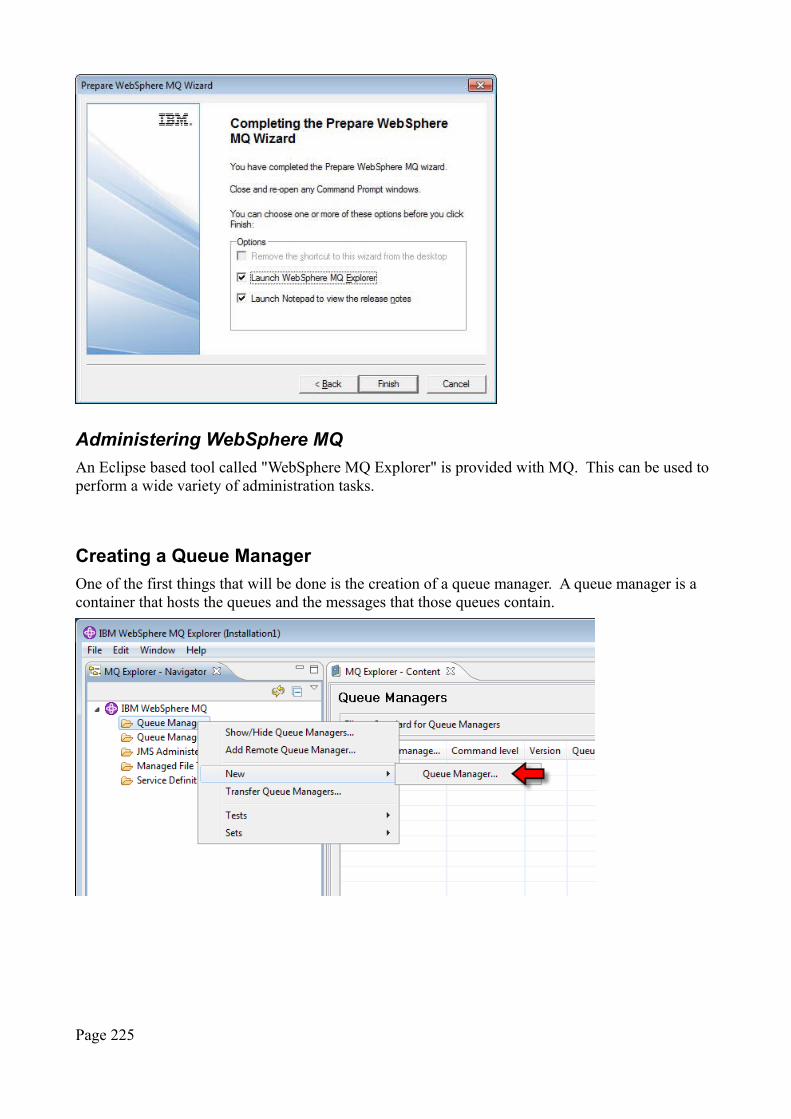
Administering WebSphere MQ
An Eclipse based tool called "WebSphere MQ Explorer" is provided with MQ. This can be used to perform a wide variety of administration tasks.
Creating a Queue Manager
One of the first things that will be done is the creation of a queue manager. A queue manager is a container that hosts the queues and the messages that those queues contain.
Page 225
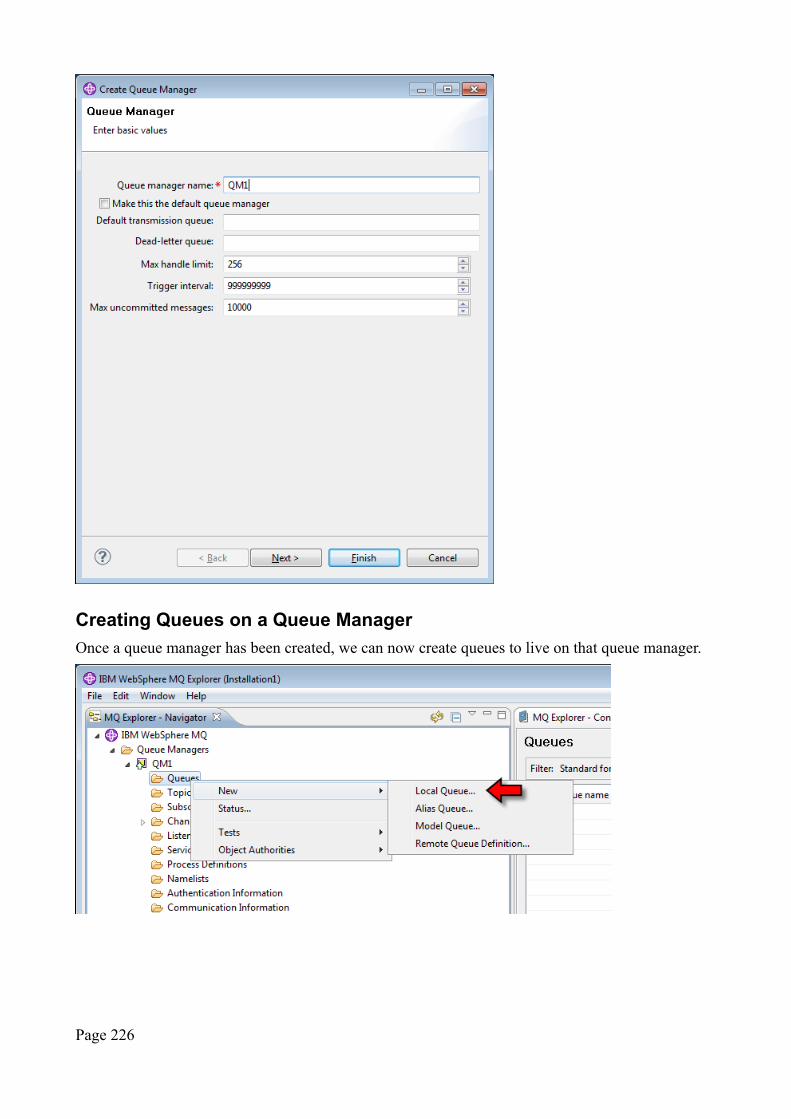
Creating Queues on a Queue Manager
Once a queue manager has been created, we can now create queues to live on that queue manager.
Page 226
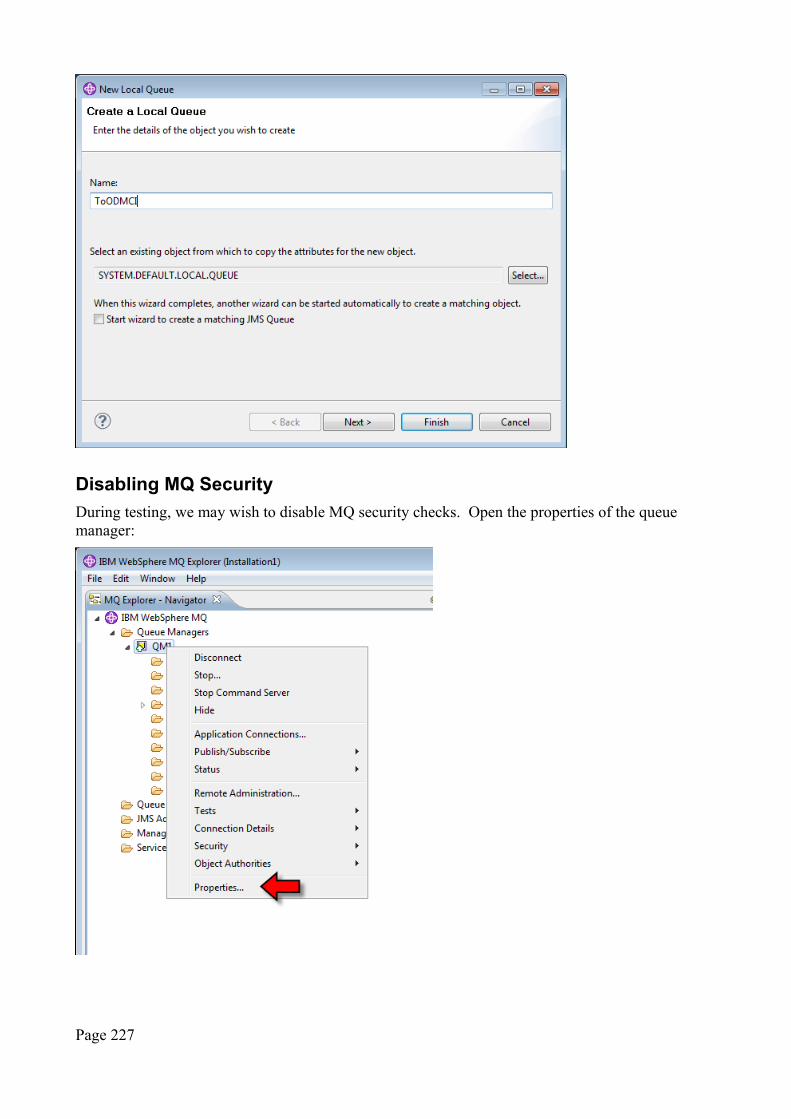
Disabling MQ Security
During testing, we may wish to disable MQ security checks. Open the properties of the queue manager:
Page 227
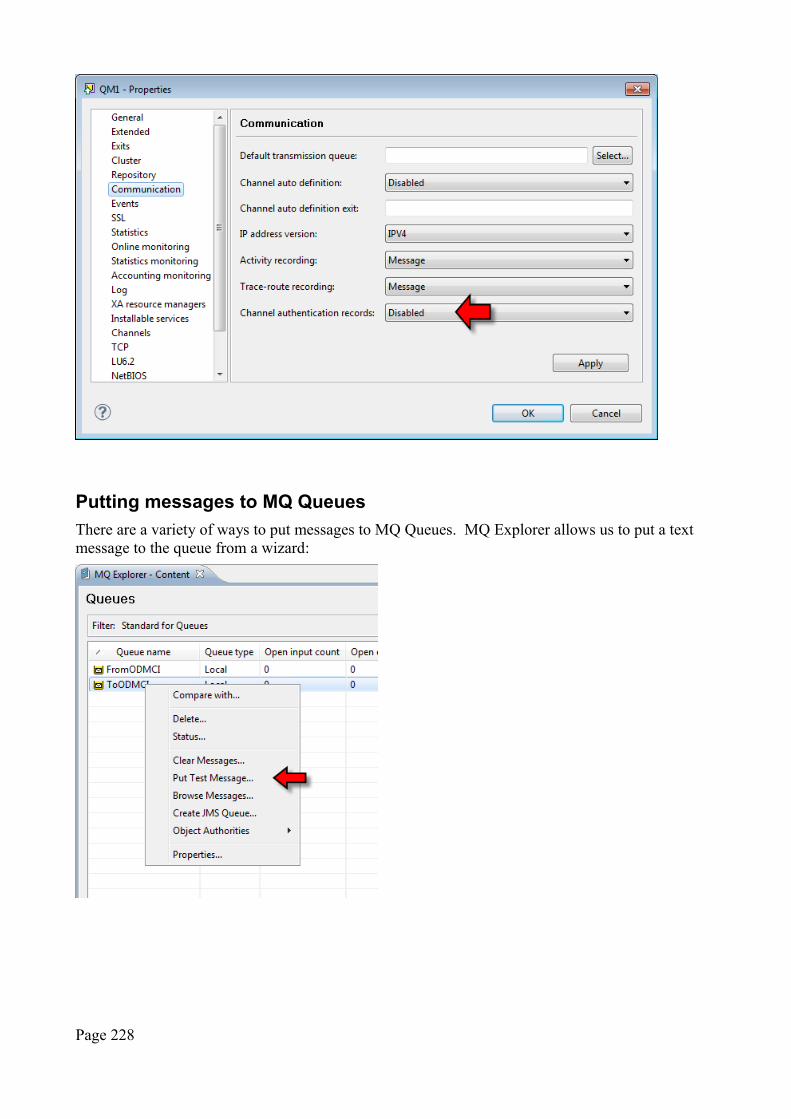
Putting messages to MQ Queues
There are a variety of ways to put messages to MQ Queues. MQ Explorer allows us to put a text message to the queue from a wizard:
Page 228
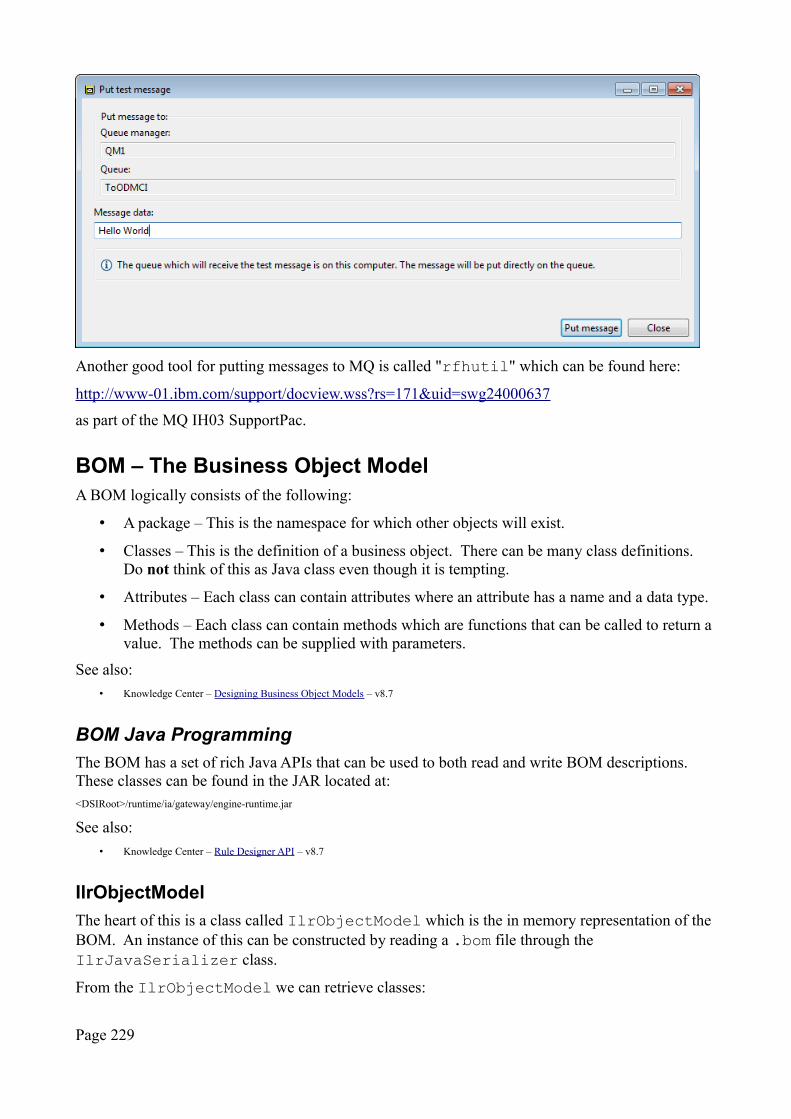
Another good tool for putting messages to MQ is called "rfhutil" which can be found here:
http://www-01.ibm.com/support/docview.wss?rs=171&uid=swg24000637
as part of the MQ IH03 SupportPac.
BOM – The Business Object ModelA BOM logically consists of the following:
• A package – This is the namespace for which other objects will exist.
• Classes – This is the definition of a business object. There can be many class definitions. Do not think of this as Java class even though it is tempting.
• Attributes – Each class can contain attributes where an attribute has a name and a data type.
• Methods – Each class can contain methods which are functions that can be called to return a value. The methods can be supplied with parameters.
See also:
• Knowledge Center – Designing Business Object Models – v8.7
BOM Java Programming
The BOM has a set of rich Java APIs that can be used to both read and write BOM descriptions. These classes can be found in the JAR located at:<DSIRoot>/runtime/ia/gateway/engine-runtime.jar
See also:
• Knowledge Center – Rule Designer API – v8.7
IlrObjectModel
The heart of this is a class called IlrObjectModel which is the in memory representation of the BOM. An instance of this can be constructed by reading a .bom file through the IlrJavaSerializer class.
From the IlrObjectModel we can retrieve classes:
Page 229

• Iterator<IlrClass> allClasses() – Iterate through all the classes.
• IlrClass getClass(String fullyQualifiedName) – Get the specific class.
IlrModelElement
A BOM model is made up from model elements. These are the lowest level of the core concepts. From elements come all the higher level items.
From an IlrModelElement, we can get:
• String getName() – The name of the element.
• IlrNamespace getEnclosingNamespace() – The namespace that the element lives within.
• String getFullyQualifiedName() – The string representation of name and namespace
• IlrObjectModel getObjectModel() – The object model that defines this element.
IlrNamespace
A namespace defines a scope used to enclose other items.
The IlrNamespace inherits from IlrModelElement and hence has a name and other attributes. Specific to IlrNamespace we have:
• IlrClass getClass(String name) – Obtain the class belonging to this namespaceby name.
• List getClasses() – Obtain a list of all the classes belonging to this namespace.
Page 230

IlrType
Methods include:
• String getDisplayName() – String of data type .. eg. "int" or "java.lang.String"
• String getRawName() – String of data type. Package names are removed.
IlrClass
An interface is a collection of attributes and methods.
Since IlrClass inherits from IlrModelElement we can obtain the class's name and namespace.
From the IlrClass we can work with attributes:
• List getAttributes() – Retrieve all the attributes defined in this class.
• Iterator allAttributes() – Iterate all the attributes in this class and in superclasses.
• Iterator allInheritedAttributes() – Iterate just the attributes in the superclasses.
From the IlrClass we can work with methods:
• List getMethods() – Retrieve all the methods defined in this class.
• Iterator allMethods() – Iterate all the methods in this class and in superclasses.
• Iterator allInheritedMethods() – Iterate just the methods in the superclasses.
Other methods include:
• String getDisplayName() – For a class, this is <namespace>.<name>.
• String getName() - For a class this is the class name with no namespace.
• String getFullyQualifiedName() - The fully qualified name of the class including namespace.
Page 231

See also:
• KnowledgeCenter – IlrClass – 8.7
IlrAttribute
This interface represents an attribute in a class.
Methods include:
• Field getNativeField() – Return a java.lang.reflect.Field field object or null.
• IlrType getAttributeType() – Return the type of this attribute.
• String getDisplayName() – For an attribute this is <namespace>.<name>.
• IlrClass getDeclaringClass() – Return the class which contains this attribute.
• String getPropertyValue(String) – Get the named property value.
See also:
• IlrClass
IlrDynamicActualValue
This class represents an actual value for a type.
Page 232
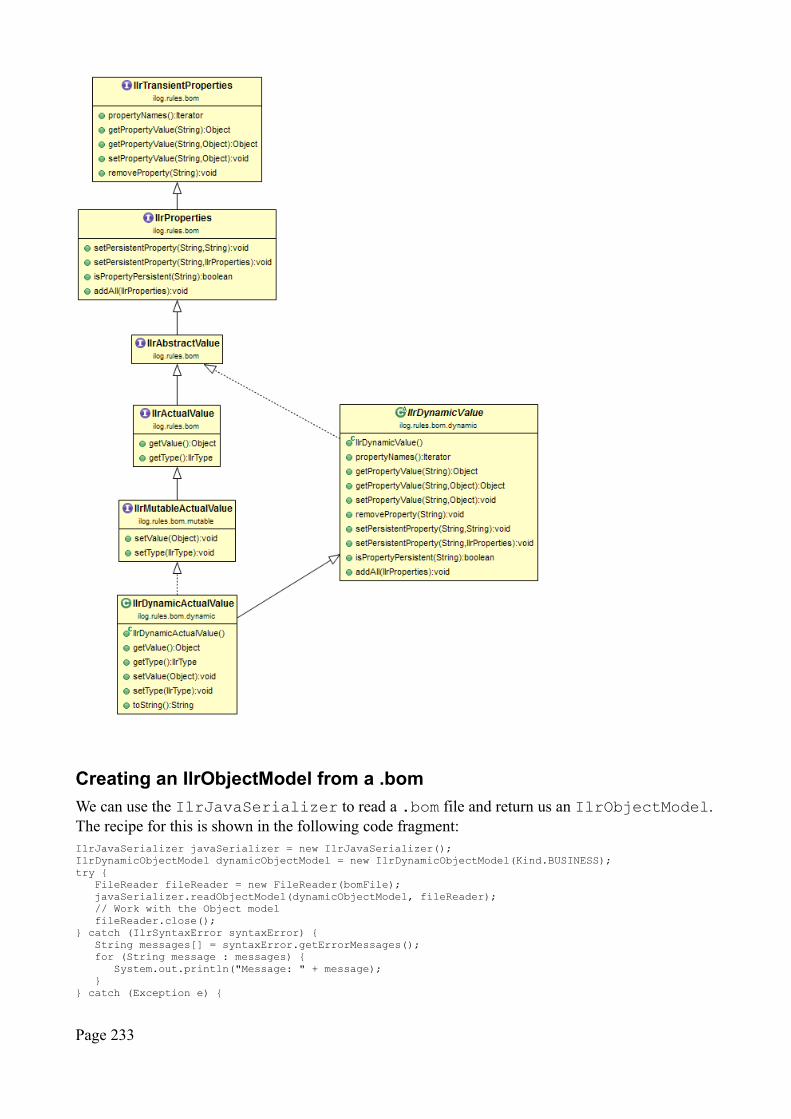
Creating an IlrObjectModel from a .bom
We can use the IlrJavaSerializer to read a .bom file and return us an IlrObjectModel.The recipe for this is shown in the following code fragment:IlrJavaSerializer javaSerializer = new IlrJavaSerializer();IlrDynamicObjectModel dynamicObjectModel = new IlrDynamicObjectModel(Kind.BUSINESS);try {
FileReader fileReader = new FileReader(bomFile);javaSerializer.readObjectModel(dynamicObjectModel, fileReader);// Work with the Object modelfileReader.close();
} catch (IlrSyntaxError syntaxError) {String messages[] = syntaxError.getErrorMessages();for (String message : messages) {
System.out.println("Message: " + message);}
} catch (Exception e) {
Page 233
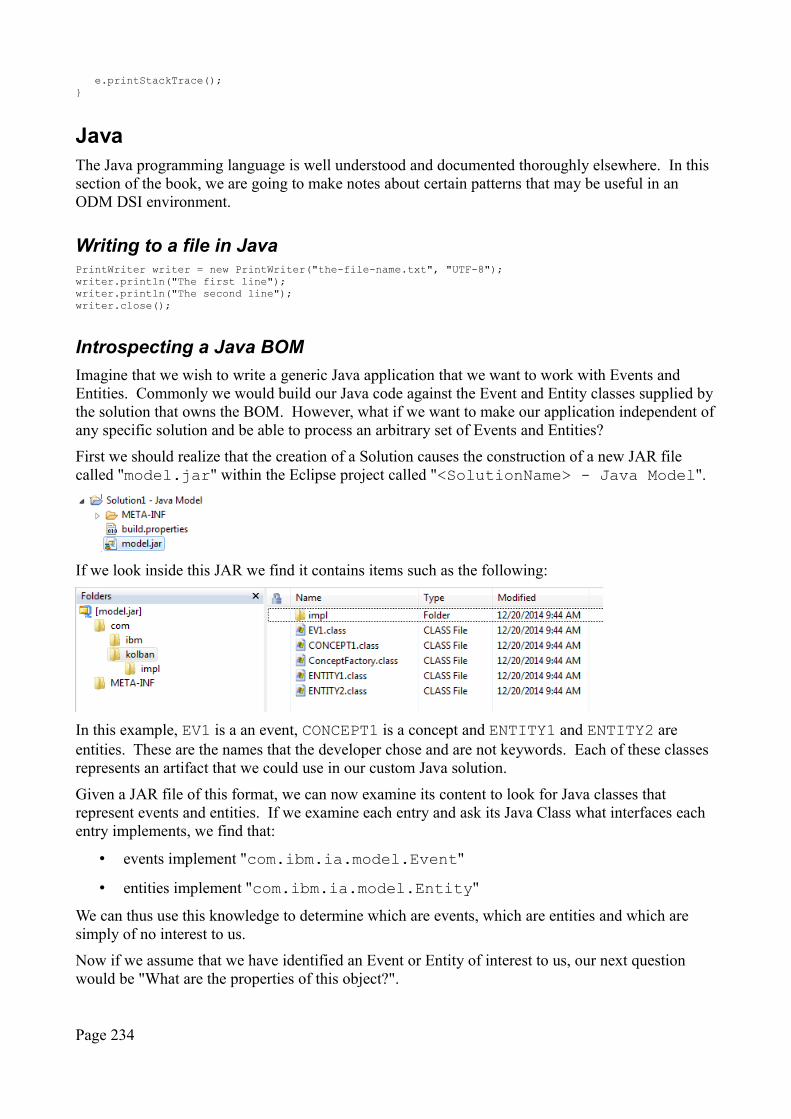
e.printStackTrace();}
JavaThe Java programming language is well understood and documented thoroughly elsewhere. In this section of the book, we are going to make notes about certain patterns that may be useful in an ODM DSI environment.
Writing to a file in JavaPrintWriter writer = new PrintWriter("the-file-name.txt", "UTF-8");writer.println("The first line");writer.println("The second line");writer.close();
Introspecting a Java BOM
Imagine that we wish to write a generic Java application that we want to work with Events and Entities. Commonly we would build our Java code against the Event and Entity classes supplied bythe solution that owns the BOM. However, what if we want to make our application independent ofany specific solution and be able to process an arbitrary set of Events and Entities?
First we should realize that the creation of a Solution causes the construction of a new JAR file called "model.jar" within the Eclipse project called "<SolutionName> - Java Model".
If we look inside this JAR we find it contains items such as the following:
In this example, EV1 is a an event, CONCEPT1 is a concept and ENTITY1 and ENTITY2 are entities. These are the names that the developer chose and are not keywords. Each of these classes represents an artifact that we could use in our custom Java solution.
Given a JAR file of this format, we can now examine its content to look for Java classes that represent events and entities. If we examine each entry and ask its Java Class what interfaces each entry implements, we find that:
• events implement "com.ibm.ia.model.Event"
• entities implement "com.ibm.ia.model.Entity"
We can thus use this knowledge to determine which are events, which are entities and which are simply of no interest to us.
Now if we assume that we have identified an Event or Entity of interest to us, our next question would be "What are the properties of this object?".
Page 234

We can use the Java Bean introspection capabilities to answer that question.
Assume we have a Java object of type "Class" that represents one of these objects, we can obtain its BeanInfo by using:BeanInfo beanInfo = Introspector.getBeanInfo(myObjectClass);
from the BeanInfo, we can now ask for the set of properties contained within it using:PropertyDescriptor propDesc[] = beanInfo.getPropertyDescriptors();
Now that we have the knowledge about what is contained within this model, how then should we create and populate instances? The answer is not to attempt to instantiate these directly. Instead weshould ask the DSI environment to do so for us.
See also:
• Java – BeanInfo
• Java – PropertyDescriptor
JavaScript fragments in Nashorn
Here is a collection of useful JavaScript fragments for working with Nashorn.
Dumping the methods of a classvar methods = myClass.getClass().getMethods();for (var i=0; i<methods.length; i++) {
var thisMethod = methods[i];print("Method Name: " + thisMethod.getName());
}
Java Dates and Times
Java has had date and time support since its original inception but has been refreshed with a new specification called "JSR 310: Date and Time API". The majority of DSI exposes or uses the data type called "ZonedDateTime".
See also:
• JSR 310: Date and Time API
• ThreeTen – Reference implementation
• JavaDoc for ThreeTen
• Java Tutorials – Trail: Date Time
Creating instances of ZonedDateTime
To create an instance of ZonedDateTime, the following can be used:ZonedDateTime.of(LocalDateTime.of(2015, 08, 25, 4, 15, 00), ZonedId.systemDefault());
Page 235

Eclipse
Installing Eclipse Marketplace
Eclipse Marketplace is a capability to look for and install new components into your Eclipse environment. By default, Eclipse Marketplace is not part of the distributed Eclipse. It can be manually installed from the Eclipse update site at:
http://download.eclipse.org/releases/juno
Page 236
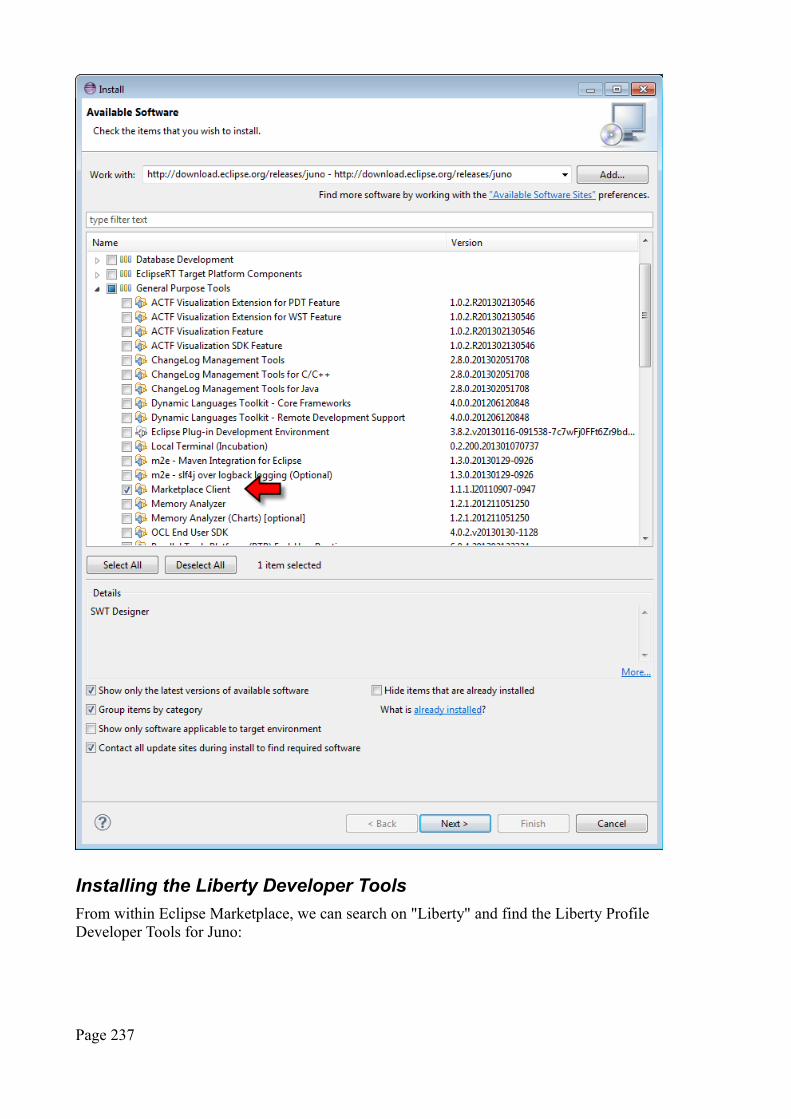
Installing the Liberty Developer Tools
From within Eclipse Marketplace, we can search on "Liberty" and find the Liberty Profile Developer Tools for Juno:
Page 237
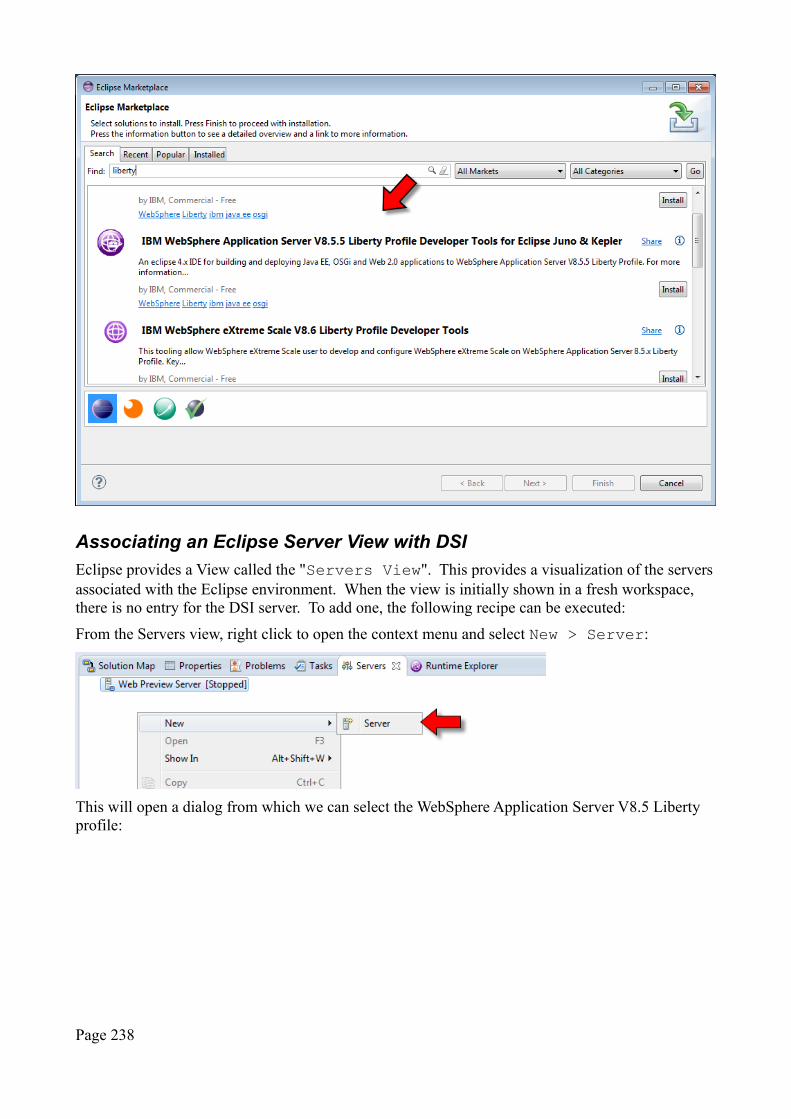
Associating an Eclipse Server View with DSI
Eclipse provides a View called the "Servers View". This provides a visualization of the serversassociated with the Eclipse environment. When the view is initially shown in a fresh workspace, there is no entry for the DSI server. To add one, the following recipe can be executed:
From the Servers view, right click to open the context menu and select New > Server:
This will open a dialog from which we can select the WebSphere Application Server V8.5 Liberty profile:
Page 238
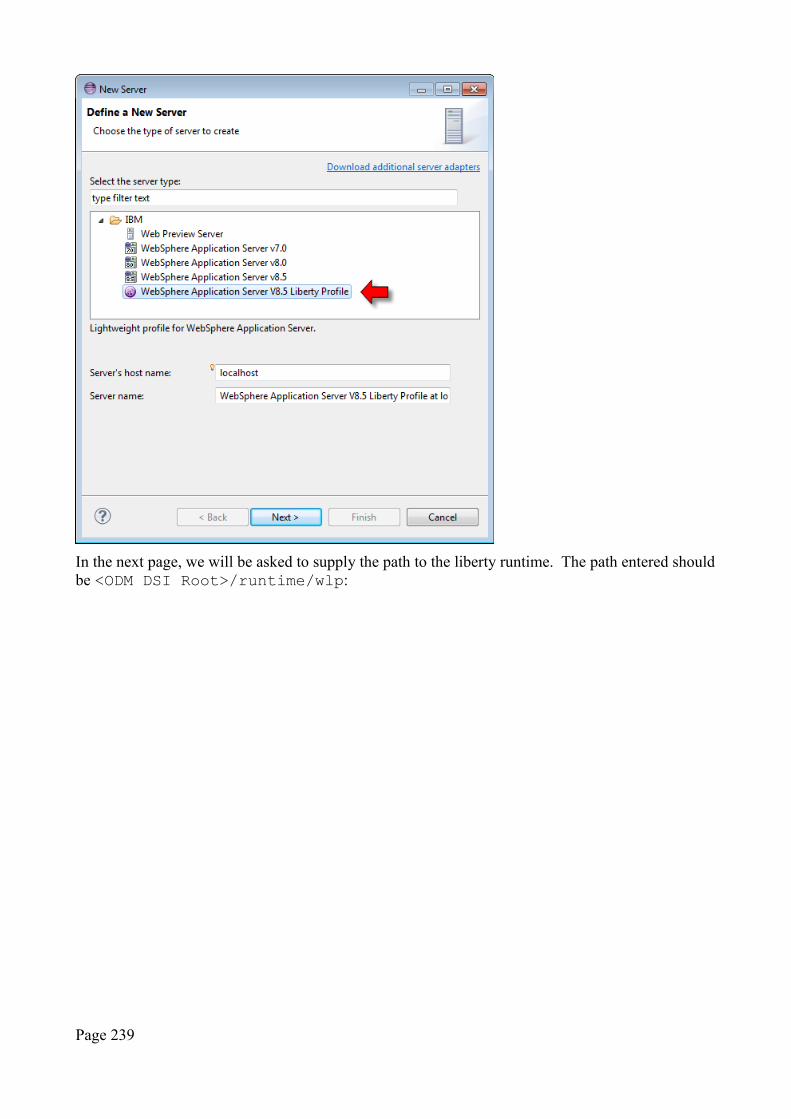
In the next page, we will be asked to supply the path to the liberty runtime. The path entered shouldbe <ODM DSI Root>/runtime/wlp:
Page 239
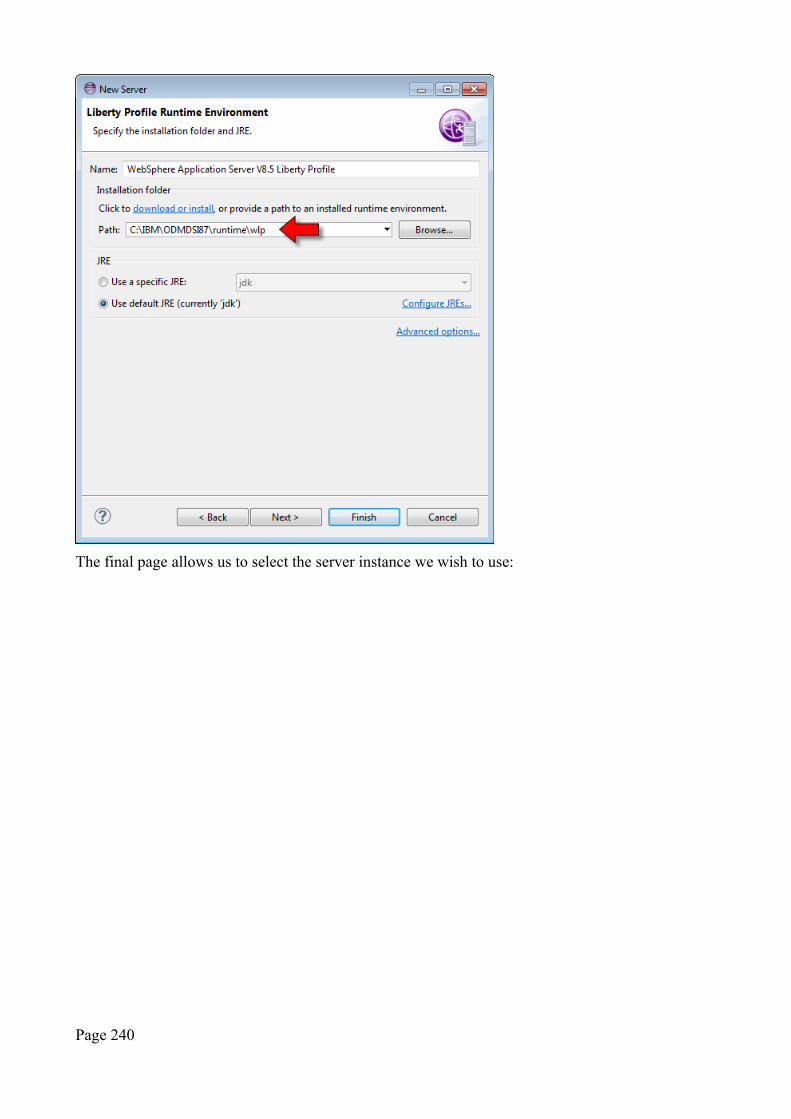
The final page allows us to select the server instance we wish to use:
Page 240
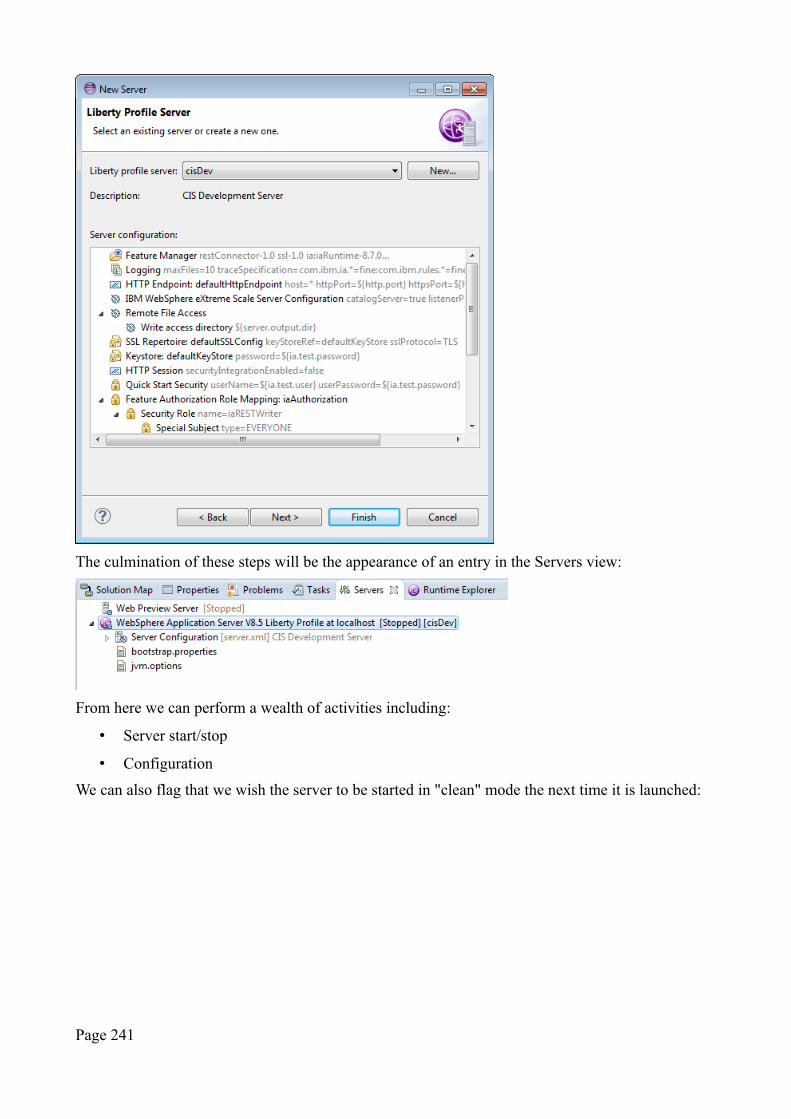
The culmination of these steps will be the appearance of an entry in the Servers view:
From here we can perform a wealth of activities including:
• Server start/stop
• Configuration
We can also flag that we wish the server to be started in "clean" mode the next time it is launched:
Page 241
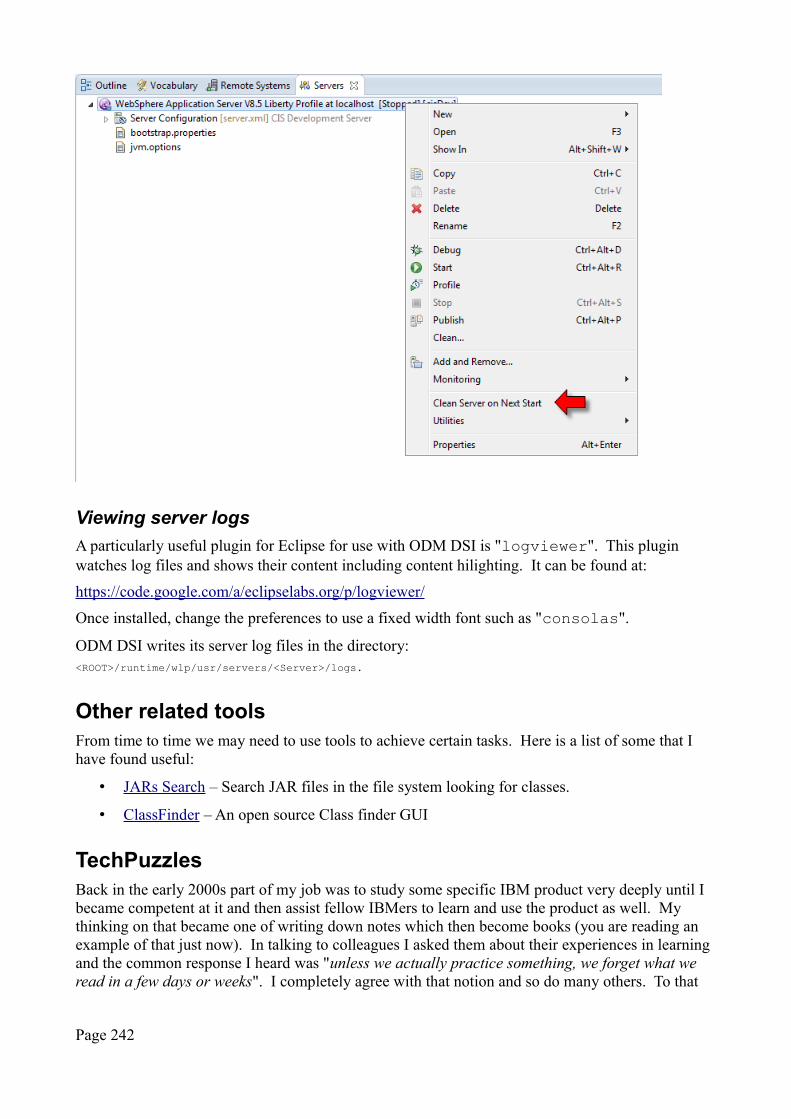
Viewing server logs
A particularly useful plugin for Eclipse for use with ODM DSI is "logviewer". This plugin watches log files and shows their content including content hilighting. It can be found at:
https://code.google.com/a/eclipselabs.org/p/logviewer/
Once installed, change the preferences to use a fixed width font such as "consolas".
ODM DSI writes its server log files in the directory:<ROOT>/runtime/wlp/usr/servers/<Server>/logs.
Other related toolsFrom time to time we may need to use tools to achieve certain tasks. Here is a list of some that I have found useful:
• JARs Search – Search JAR files in the file system looking for classes.
• ClassFinder – An open source Class finder GUI
TechPuzzlesBack in the early 2000s part of my job was to study some specific IBM product very deeply until I became competent at it and then assist fellow IBMers to learn and use the product as well. My thinking on that became one of writing down notes which then become books (you are reading an example of that just now). In talking to colleagues I asked them about their experiences in learning and the common response I heard was "unless we actually practice something, we forget what we read in a few days or weeks". I completely agree with that notion and so do many others. To that
Page 242
end a number of folks provide "tutorials" that are keyboard exercises where the student follows the bouncing ball and enters exactly what the tutorial asks. These are great … if one is super new at a product, being hand-held through getting something working is indispensable. However I believe that there are limitations to tutorials. Tutorials are extremely time consuming for their authors to create and as such, tutorials can't be expected to cover that many areas. Next is that a student's knowledge grows with time. After all, if he didn't improve after study and working tutorials then there would be something wrong. As a student's knowledge increases, the value of tutorials decreases. The student will follow the steps saying to himself "I know this already" before finally getting to any new materials. And lastly … what is to me the biggest point of all … tutorials inevitably get followed "parrot fashion". This means that a student can follow the instructions to get something working without actually thinking. If the student doesn't think, I could argue that there will be little retention of knowledge.
With these thoughts in mind, as I was sitting bored-mindless at a conference, I came up with an ideathat I called "TechPuzzles". The idea here is that a technical puzzle involving a product (DSI for example) is posed and the student has to use their knowledge and skills to solve it. The author of the puzzle flags it as requiring a certain level of skill in order for it to be solved within an hour (walking away from a completed puzzle in an hour or less is an essential goal). Possible skill levelswould be:
• Novice
• Competent
• Proficient
• Expert
• Master
A TechPuzzle would be a written puzzle which may be augmented with diagrams and code and/or data assets. The reader of the puzzle should be able to take that description and then go forth and attempt to solve it. This would engage the student in a far more interesting fashion.
However, there is much more to the TechPuzzle notion. As well as a puzzle being presented, each TechPuzzle will also have a potential solution. This solution is a full description (but not tutorial) of an answer to the TechPuzzle. It will include thinking as well as any necessary assets that would allow a student to get the solution running. In addition to having a solution provided, a forum thread accompanies each TechPuzzle where students can discuss amongst themselves questions and answers related to that specific puzzle. This will include monitoring by the TechPuzzle author for any questions.
The solution supplied with the TechPuzzle may not be the "best" solution and perhaps the students or others can suggest improvements or new ways of thinking.
TechPuzzles need to be produced on a regular and short basis such as once a week. A suggestion is to publish a new TechPuzzle on a Friday morning but withhold the solution until the publication of the next TechPuzzle one week later. This gives students who want to challenge themselves a week to try and come up with a solution on their own knowing that there is no published solution to act asa safety net. Of course, the student will always have a back catalog of puzzles to work with as desired so needn't work with the latest for the week and end up stuck and frustrated.
For DSI, the entry stakes into DSI TechPuzzles are:
• Ability to model data
• Ability to create rule projects
Page 243
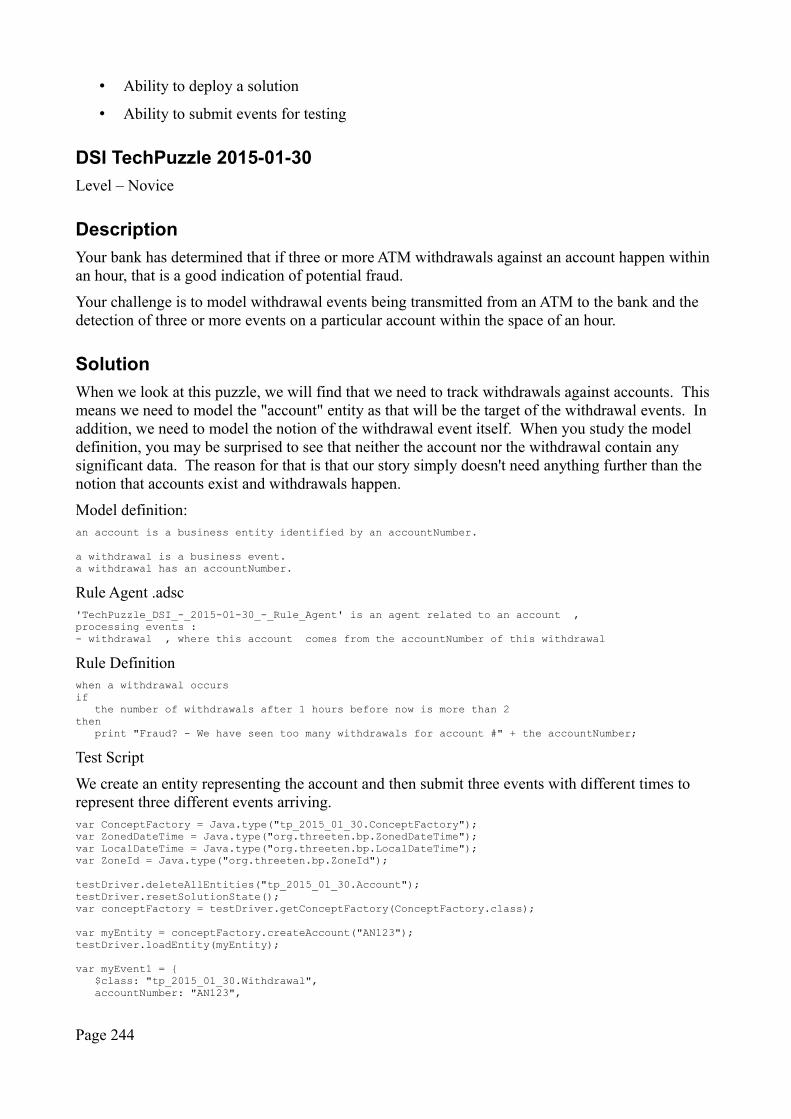
• Ability to deploy a solution
• Ability to submit events for testing
DSI TechPuzzle 2015-01-30
Level – Novice
Description
Your bank has determined that if three or more ATM withdrawals against an account happen within an hour, that is a good indication of potential fraud.
Your challenge is to model withdrawal events being transmitted from an ATM to the bank and the detection of three or more events on a particular account within the space of an hour.
Solution
When we look at this puzzle, we will find that we need to track withdrawals against accounts. This means we need to model the "account" entity as that will be the target of the withdrawal events. In addition, we need to model the notion of the withdrawal event itself. When you study the model definition, you may be surprised to see that neither the account nor the withdrawal contain any significant data. The reason for that is that our story simply doesn't need anything further than the notion that accounts exist and withdrawals happen.
Model definition:an account is a business entity identified by an accountNumber.
a withdrawal is a business event.a withdrawal has an accountNumber.
Rule Agent .adsc'TechPuzzle_DSI_-_2015-01-30_-_Rule_Agent' is an agent related to an account , processing events :- withdrawal , where this account comes from the accountNumber of this withdrawal
Rule Definitionwhen a withdrawal occurs if
the number of withdrawals after 1 hours before now is more than 2then
print "Fraud? - We have seen too many withdrawals for account #" + the accountNumber;
Test Script
We create an entity representing the account and then submit three events with different times to represent three different events arriving.var ConceptFactory = Java.type("tp_2015_01_30.ConceptFactory");var ZonedDateTime = Java.type("org.threeten.bp.ZonedDateTime");var LocalDateTime = Java.type("org.threeten.bp.LocalDateTime");var ZoneId = Java.type("org.threeten.bp.ZoneId");
testDriver.deleteAllEntities("tp_2015_01_30.Account");testDriver.resetSolutionState();var conceptFactory = testDriver.getConceptFactory(ConceptFactory.class);
var myEntity = conceptFactory.createAccount("AN123");testDriver.loadEntity(myEntity);
var myEvent1 = { $class: "tp_2015_01_30.Withdrawal", accountNumber: "AN123",
Page 244
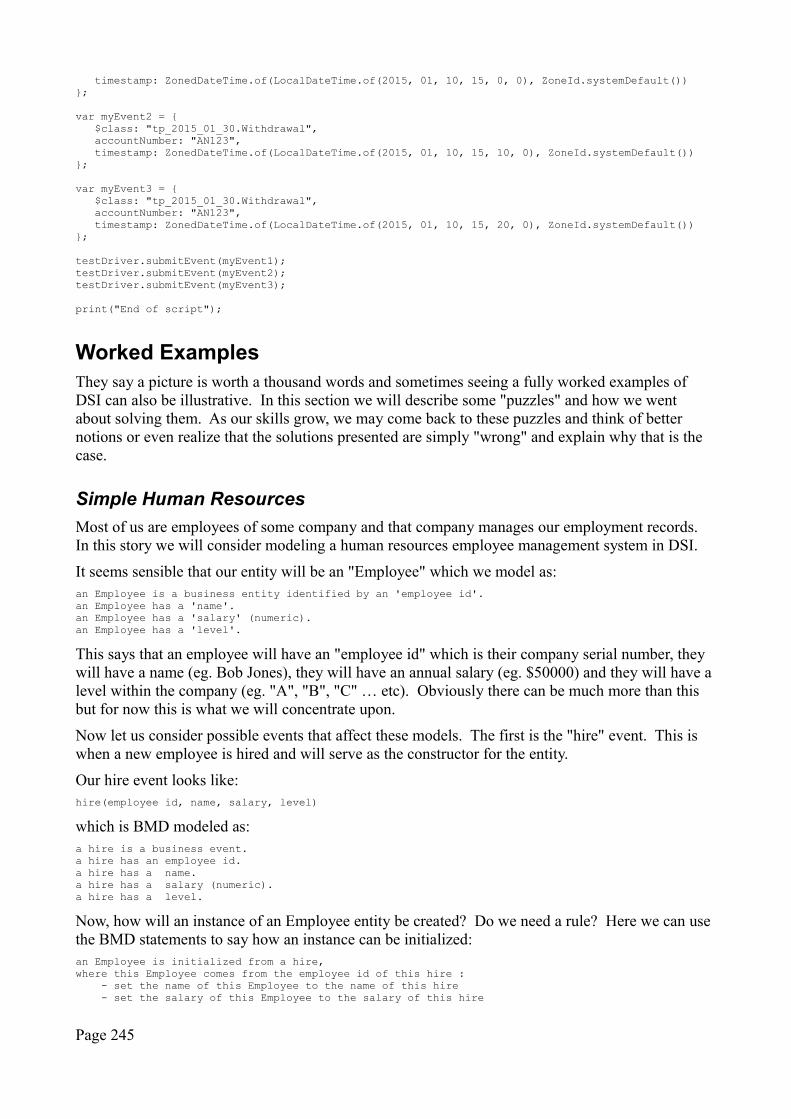
timestamp: ZonedDateTime.of(LocalDateTime.of(2015, 01, 10, 15, 0, 0), ZoneId.systemDefault())};
var myEvent2 = { $class: "tp_2015_01_30.Withdrawal", accountNumber: "AN123", timestamp: ZonedDateTime.of(LocalDateTime.of(2015, 01, 10, 15, 10, 0), ZoneId.systemDefault())};
var myEvent3 = { $class: "tp_2015_01_30.Withdrawal", accountNumber: "AN123", timestamp: ZonedDateTime.of(LocalDateTime.of(2015, 01, 10, 15, 20, 0), ZoneId.systemDefault())};
testDriver.submitEvent(myEvent1);testDriver.submitEvent(myEvent2);testDriver.submitEvent(myEvent3);
print("End of script");
Worked ExamplesThey say a picture is worth a thousand words and sometimes seeing a fully worked examples of DSI can also be illustrative. In this section we will describe some "puzzles" and how we went about solving them. As our skills grow, we may come back to these puzzles and think of better notions or even realize that the solutions presented are simply "wrong" and explain why that is the case.
Simple Human Resources
Most of us are employees of some company and that company manages our employment records. In this story we will consider modeling a human resources employee management system in DSI.
It seems sensible that our entity will be an "Employee" which we model as:an Employee is a business entity identified by an 'employee id'.an Employee has a 'name'.an Employee has a 'salary' (numeric).an Employee has a 'level'.
This says that an employee will have an "employee id" which is their company serial number, they will have a name (eg. Bob Jones), they will have an annual salary (eg. $50000) and they will have a level within the company (eg. "A", "B", "C" … etc). Obviously there can be much more than this but for now this is what we will concentrate upon.
Now let us consider possible events that affect these models. The first is the "hire" event. This is when a new employee is hired and will serve as the constructor for the entity.
Our hire event looks like:hire(employee id, name, salary, level)
which is BMD modeled as:a hire is a business event.a hire has an employee id.a hire has a name.a hire has a salary (numeric).a hire has a level.
Now, how will an instance of an Employee entity be created? Do we need a rule? Here we can use the BMD statements to say how an instance can be initialized:an Employee is initialized from a hire,where this Employee comes from the employee id of this hire : - set the name of this Employee to the name of this hire - set the salary of this Employee to the salary of this hire
Page 245
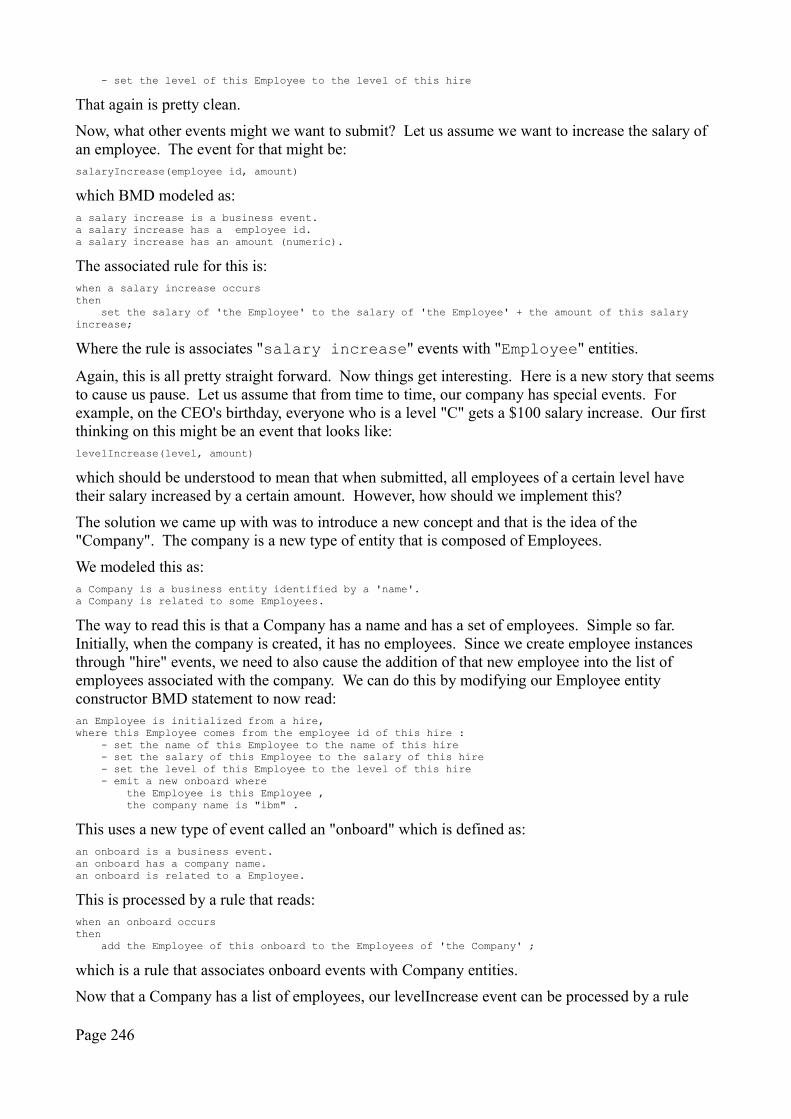
- set the level of this Employee to the level of this hire
That again is pretty clean.
Now, what other events might we want to submit? Let us assume we want to increase the salary of an employee. The event for that might be:salaryIncrease(employee id, amount)
which BMD modeled as:a salary increase is a business event.a salary increase has a employee id.a salary increase has an amount (numeric).
The associated rule for this is:when a salary increase occursthen set the salary of 'the Employee' to the salary of 'the Employee' + the amount of this salary increase;
Where the rule is associates "salary increase" events with "Employee" entities.
Again, this is all pretty straight forward. Now things get interesting. Here is a new story that seemsto cause us pause. Let us assume that from time to time, our company has special events. For example, on the CEO's birthday, everyone who is a level "C" gets a $100 salary increase. Our first thinking on this might be an event that looks like:levelIncrease(level, amount)
which should be understood to mean that when submitted, all employees of a certain level have their salary increased by a certain amount. However, how should we implement this?
The solution we came up with was to introduce a new concept and that is the idea of the "Company". The company is a new type of entity that is composed of Employees.
We modeled this as:a Company is a business entity identified by a 'name'.a Company is related to some Employees.
The way to read this is that a Company has a name and has a set of employees. Simple so far. Initially, when the company is created, it has no employees. Since we create employee instances through "hire" events, we need to also cause the addition of that new employee into the list of employees associated with the company. We can do this by modifying our Employee entity constructor BMD statement to now read:an Employee is initialized from a hire,where this Employee comes from the employee id of this hire : - set the name of this Employee to the name of this hire - set the salary of this Employee to the salary of this hire - set the level of this Employee to the level of this hire - emit a new onboard where the Employee is this Employee , the company name is "ibm" .
This uses a new type of event called an "onboard" which is defined as:an onboard is a business event.an onboard has a company name.an onboard is related to a Employee.
This is processed by a rule that reads:when an onboard occursthen add the Employee of this onboard to the Employees of 'the Company' ;
which is a rule that associates onboard events with Company entities.
Now that a Company has a list of employees, our levelIncrease event can be processed by a rule
Page 246
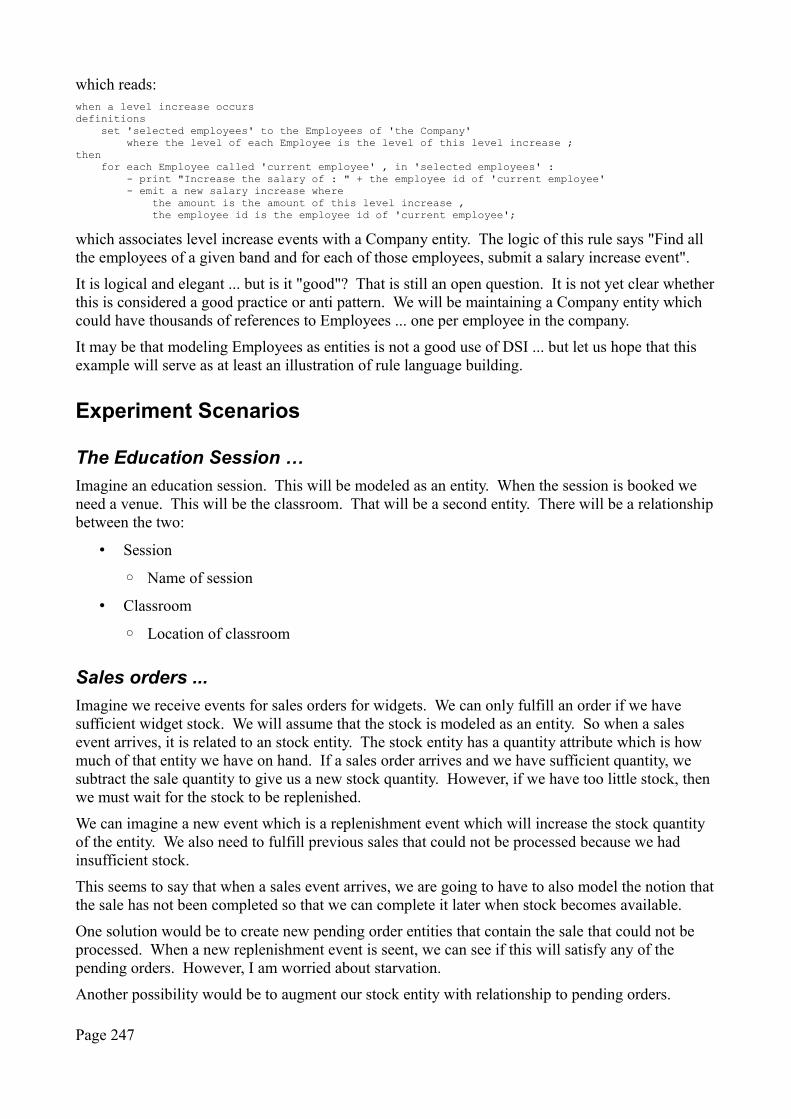
which reads:when a level increase occursdefinitions set 'selected employees' to the Employees of 'the Company' where the level of each Employee is the level of this level increase ;then for each Employee called 'current employee' , in 'selected employees' : - print "Increase the salary of : " + the employee id of 'current employee' - emit a new salary increase where the amount is the amount of this level increase , the employee id is the employee id of 'current employee';
which associates level increase events with a Company entity. The logic of this rule says "Find all the employees of a given band and for each of those employees, submit a salary increase event".
It is logical and elegant ... but is it "good"? That is still an open question. It is not yet clear whetherthis is considered a good practice or anti pattern. We will be maintaining a Company entity which could have thousands of references to Employees ... one per employee in the company.
It may be that modeling Employees as entities is not a good use of DSI ... but let us hope that this example will serve as at least an illustration of rule language building.
Experiment Scenarios
The Education Session …
Imagine an education session. This will be modeled as an entity. When the session is booked we need a venue. This will be the classroom. That will be a second entity. There will be a relationshipbetween the two:
• Session
◦ Name of session
• Classroom
◦ Location of classroom
Sales orders ...
Imagine we receive events for sales orders for widgets. We can only fulfill an order if we have sufficient widget stock. We will assume that the stock is modeled as an entity. So when a sales event arrives, it is related to an stock entity. The stock entity has a quantity attribute which is how much of that entity we have on hand. If a sales order arrives and we have sufficient quantity, we subtract the sale quantity to give us a new stock quantity. However, if we have too little stock, then we must wait for the stock to be replenished.
We can imagine a new event which is a replenishment event which will increase the stock quantity of the entity. We also need to fulfill previous sales that could not be processed because we had insufficient stock.
This seems to say that when a sales event arrives, we are going to have to also model the notion thatthe sale has not been completed so that we can complete it later when stock becomes available.
One solution would be to create new pending order entities that contain the sale that could not be processed. When a new replenishment event is seent, we can see if this will satisfy any of the pending orders. However, I am worried about starvation.
Another possibility would be to augment our stock entity with relationship to pending orders.
Page 247

Language puzzles …Here I collect Rule Agent language puzzles for which I yet have no solutions.
Collections
• Find the nth entry in a collection (eg. the first, the last, the last three ... etc).
• Find the earliest/latest date/time in a collection
Language general
• When would you use the 'set' action vs the 'define' action?
Things to do ...• 2014-04-14 – When we build a solution, we have the capability to create connection
definitions ... the notion here is to write a JAX-RS application which will receive an event over REST that contains the solution name as a parameter. For example:
POST /odmci/event/submit/<solution>Payload – The XML payload of the event
This will bypass the connectivity functions. It seems that we can use the "SolutionGateway"class to achieve the mechanical publications including parsing the incoming event message.
Page 248