web view · 2011-08-30do not take this instructions
TRANSCRIPT
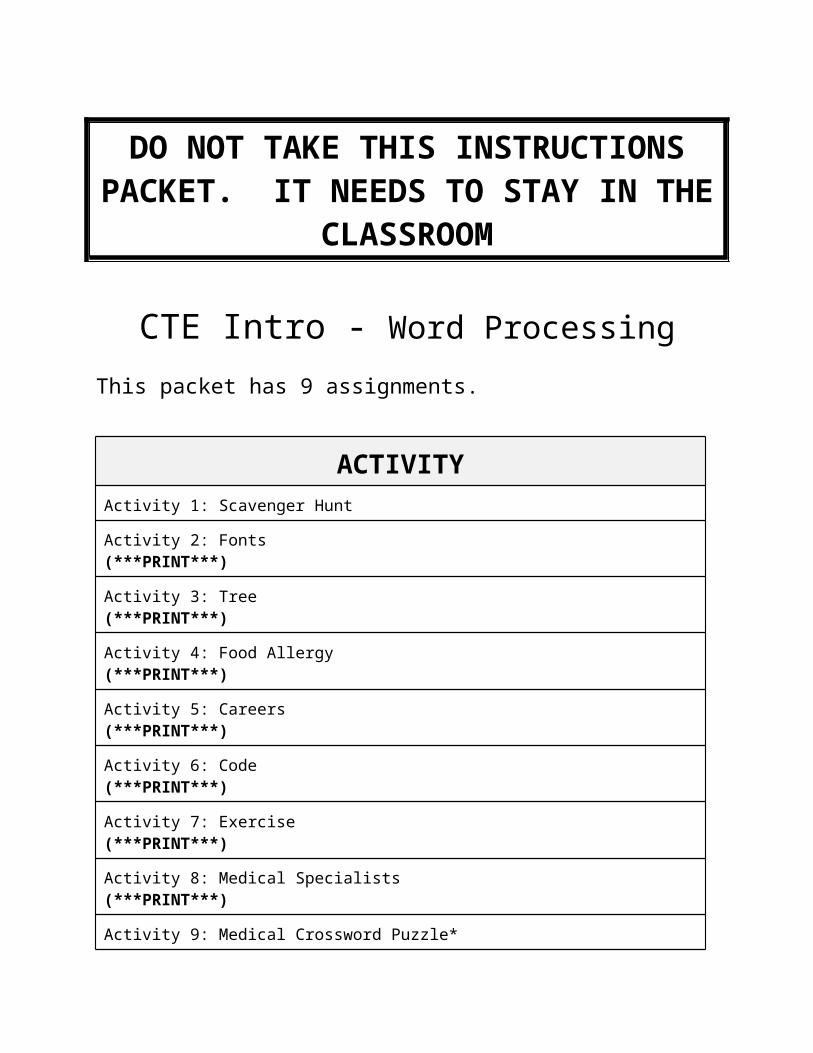
DO NOT TAKE THIS INSTRUCTIONS PACKET. IT NEEDS TO STAY IN THE
CLASSROOM
CTE Intro - Word Processing
This packet has 9 assignments.
ACTIVITYActivity 1: Scavenger Hunt
Activity 2: Fonts (***PRINT***)
Activity 3: Tree (***PRINT***)
Activity 4: Food Allergy (***PRINT***)
Activity 5: Careers (***PRINT***)
Activity 6: Code (***PRINT***)
Activity 7: Exercise (***PRINT***)
Activity 8: Medical Specialists (***PRINT***)
Activity 9: Medical Crossword Puzzle*
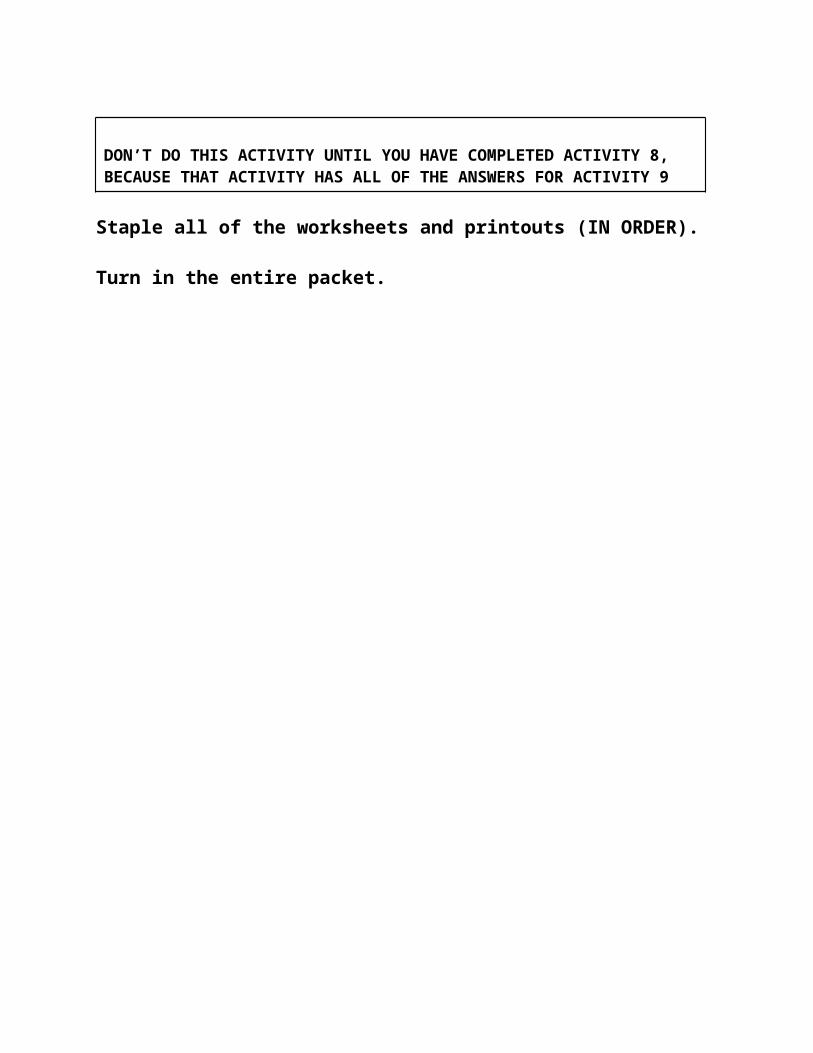
DON’T DO THIS ACTIVITY UNTIL YOU HAVE COMPLETED ACTIVITY 8, BECAUSE THAT ACTIVITY HAS ALL OF THE ANSWERS FOR ACTIVITY 9
Staple all of the worksheets and printouts (IN ORDER).
Turn in the entire packet.
WORD PROCESSING #1 ~ SCAVENGER HUNT
Open Word
Click on the Office Button Choose OPEN or click on the open folder iconNavigate to the folder where your teacher has put the Word Processing Unit Files.
1. Your job is to retrieve and open several documents from your computer. Read each poem, and then write down on the worksheet the clue word you find, then you will close and exit the file.
2. Each clue word will be underlined and be in bold. It will look like this: Clue. The clue word will then be the name of the next file you should retrieve.
3. READY? SET. . . GO!! You will find the first clue in the poem below. Remember, read the poem - then look for the BOLD and UNDERLINED WORD.
FOR SALEBy Shel Silverstein
One sister for sale!One sister for sale!
One crying and spying young sister for sale!I’m really not kidding,
So who’ll start the bidding?Do I hear a dollar?
A nickel?A penny?
Oh, isn’t there, isn’t there, isn’t there anyOne kid who will buy this old sister for sale,
This crying and spying young sister for sale?
5. To find your second clue, you must OPEN a FILE called “Crying” from your word processor. Open WORD, and then open “Crying” from the designated location for your Word Processing files.
7. Write down the clues on your worksheet as you open the files
8. Close all the files you opened.

WORD PROCESSINGASSIGNMENT # 2 ~ FILENAME: FONTS
1. Open Word
2. Click on the Office Button Choose OPEN or click on the open folder iconNavigate to the folder where your teacher has put the Word Processing Unit Files.Open the file called Fonts.
3. Create a Header with; your name on the left, the class period in the center, and insert the Date and Time on the right. (Find the Header icon on the Insert Ribbon) or double click the top margin.
Your Name Period # Current Date
4. Follow the directions on the LINE/FONT APPEARANCE sheet that appears on your screen. It must fit on one page.
5. Save the File1. Click on The Office Button and then Save As:2. Navigate to the folder where your teacher has shown you to save the files.3. Name the file: Fonts and click on the Save button.
6. Print click on the printer icon or the Office Button and then Print.
7. Close the File.

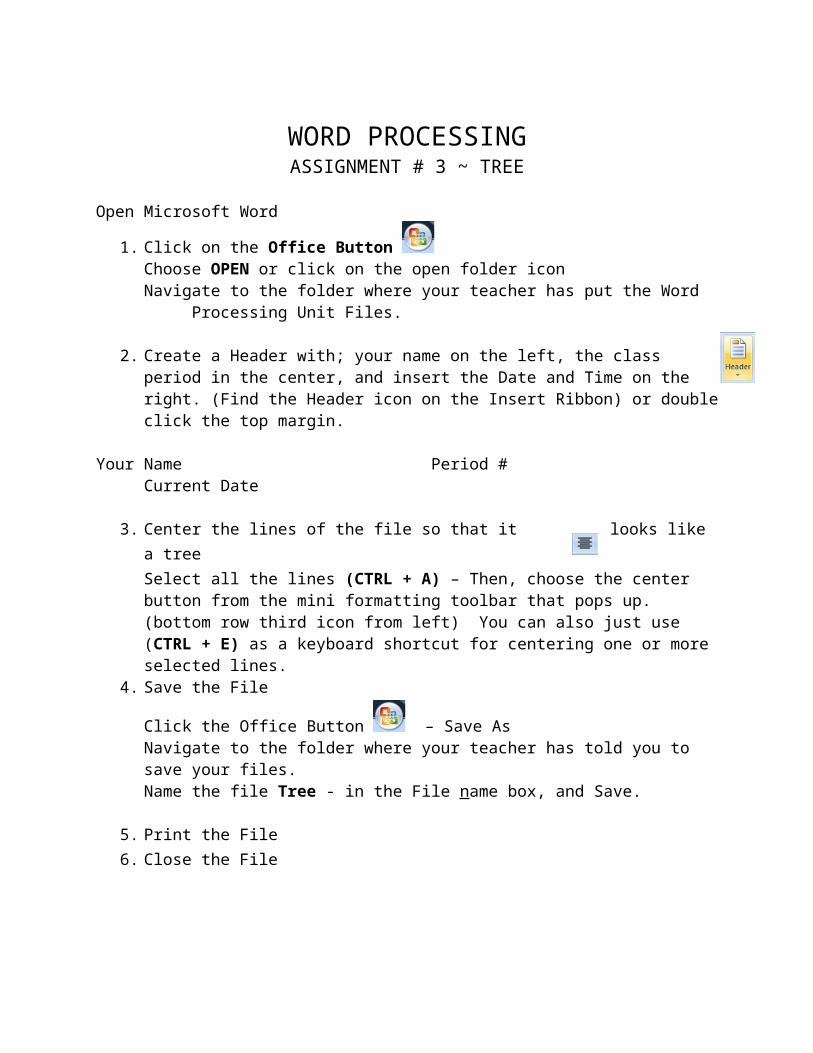
WORD PROCESSINGASSIGNMENT # 3 ~ TREE
Open Microsoft Word
1. Click on the Office Button Choose OPEN or click on the open folder iconNavigate to the folder where your teacher has put the Word Processing Unit Files.
2. Create a Header with; your name on the left, the class period in the center, and insert the Date and Time on the right. (Find the Header icon on the Insert Ribbon) or double click the top margin.
Your Name Period # Current Date
3. Center the lines of the file so that it looks like a treeSelect all the lines (CTRL + A) – Then, choose the center button from the mini formatting toolbar that pops up. (bottom row third icon from left) You can also just use (CTRL + E) as a keyboard shortcut for centering one or more selected lines.
4. Save the File
Click the Office Button – Save AsNavigate to the folder where your teacher has told you to save your files.Name the file Tree - in the File name box, and Save.
5. Print the File6. Close the File

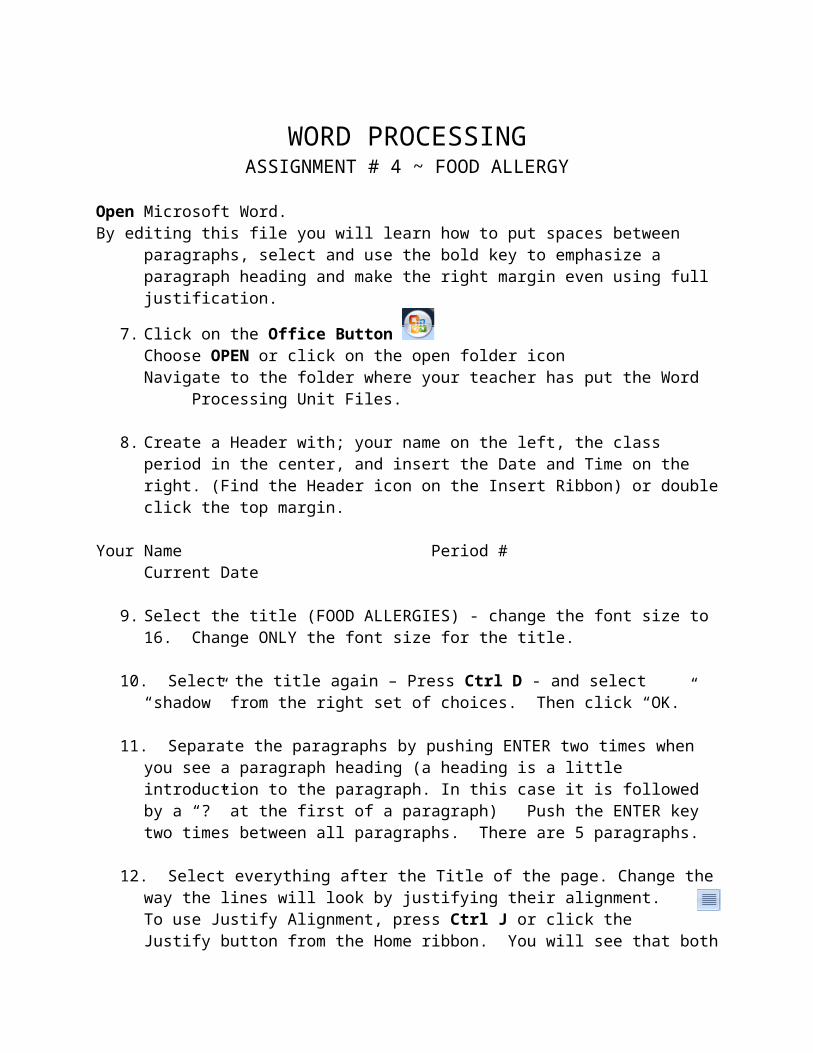
WORD PROCESSING ASSIGNMENT # 4 ~ FOOD ALLERGY
Open Microsoft Word.By editing this file you will learn how to put spaces between paragraphs, select and use the bold
key to emphasize a paragraph heading and make the right margin even using full justification.
7. Click on the Office Button Choose OPEN or click on the open folder iconNavigate to the folder where your teacher has put the Word Processing Unit Files.
8. Create a Header with; your name on the left, the class period in the center, and insert the Date and Time on the right. (Find the Header icon on the Insert Ribbon) or double click the top margin.
Your Name Period # Current Date
9. Select the title (FOOD ALLERGIES) - change the font size to 16. Change ONLY the font size for the title.
10. Select the title again – Press Ctrl D - and select “shadow” from the right set of choices. Then click “OK.”
11. Separate the paragraphs by pushing ENTER two times when you see a paragraph heading (a heading is a little introduction to the paragraph. In this case it is followed by a “?” at the first of a paragraph) Push the ENTER key two times between all paragraphs. There are 5 paragraphs.
12. Select everything after the Title of the page. Change the way the lines will look by justifying their alignment. To use Justify Alignment, press Ctrl J or click the Justify button from the Home ribbon. You will see that both the right and left sides of each paragraph, except for the last line, become straight, and are aligned with the right and left margins of the page.
13. Select each paragraph heading (the beginning sentence of each paragraph that ask a question), and BOLD each heading. You may press CTRL “B” or you may click on the “B” button on the Mini Formatting Toolbar.
14. Save as: FOOD in the folder where you save your files.
15. Print AND Close file
WORD PROCESSING ASSIGNMENT # 5 ~ FILENAME: CAREERS
Open Word
This file will teach you how to cut and paste paragraphs, put text into columns, how to center and bold the headings of each medical career and how to full justify the paragraphs.
16. Click on the Office Button Choose OPEN or click on the open folder iconNavigate to the folder where your teacher has put the Word Processing Unit Files.
17. Create a Header with; your name on the left, the class period in the center, and insert the Date and Time on the right. (Find the Header icon on the Insert Ribbon) or double click the top margin.
Your Name Period # Current Date
18. Center the title (CTRL E), make it bold with shadowshadow and change the font size to 16.(Remember how to do this? The keyboard shortcut is CTRL + D)
19. Cut and Paste medical career paragraphs and arrange them in alphabetical order:a. There are 7 medical career paragraphs. b. Select the paragraph that needs to be first (hint: the 1st one is Admitting Clerk or
Officer, the 2nd one is Genetic Counselor)c. Select the desired paragraph (all of it)
d. Click on the scissors Icon on the Home Ribbon or press CTRL + X - This removes (or cuts out) the paragraph and temporarily saves it to the paste function.
Move the cursor where you want this paragraph to be - then right click - then click on past (the icon that looks like a clipboard or CTRL+ V) and Voila! There is your paragraph.
e. Continue to move all medical career title paragraphs until they are in alphabetic order.
f. Be sure you push ENTER if you need spaces between paragraphs or BACKSPACE if you need to remove spaces.
Don’t even think of printing this activity yet because there’s a lot more to do.
20. Start below the title “Connection to Careers” and select all of the text that should be in columns. (See Answer Key) Make sure your selected text does NOT include the title,
just everything below it.
21. Click on the “Page Layout Ribbon” and click on the “columns” icon. Choose 2 columns from the popup menu.
22. Center and bold each medical career title within the columns.
23. Put the cursor on the first line after the Admitting Clerk or Officer title (the first paragraph) and press ENTER to provide a double space after the title and before the text of the paragraph. Do the same after each medical career title – there are seven titles.
24. After the 3rd paragraph (Medical Records Administrator), go to the “Page Layout Ribbon” and find the “Breaks” button. Click on it and choose a column break. This should send the next paragraph to the second column.
25. Highlight both columns (not the title) and Justify all of the paragraphs. You can do this by the keyboard shortcut CTRL + J) or by clicking on Justify on the Home Ribbon.
26. From the View Menu be sure to look in the zoom (magnifying glass icon) and choose Full Page and make sure it your document fits on ONE page...
27. If your document on the screen looks like the KEY then; SAVE as Careers
28. Click on the Print Preview Button and Print the Document.
29. CLOSE THE FILE.

WORD PROCESSINGASSIGNMENT # 6 ~ FILENAME: CODE
Open WordThis file will teach you how to Find and Replace words and letters.
30. Click on the Office Button Choose OPEN or click on the open folder iconNavigate to the folder where your teacher has put the Word Processing Unit Files.click on Code.
31. Create a Header with; your name on the left, the class period in the center, and insert the
Date and Time on the right. (Find the Header icon on the Insert Ribbon) or double click the top margin.
Your Name Period # Current Date32. Be sure your cursor is at the top of the screen - before any text–on a blank line above the
letter “Q”.33. Click on Replace at the far right side of the Home Ribbon – You will then get the find
and replace dialog box. (You can also get the find & replace dialog box by pressing Ctrl + H)
34. Type the number “1" in the box across from Find what...Press the TAB key.35. Type the letter “a” in the box across from Replace with.36. Click on “Replace All” and then OK. Replace All will search your document for all
number “1’s” and replace them with the letter “a”37. Use the above directions (6-9) as your find and replace the following numbers with the
correct letter in the box below:
2 e3 l4 r5 s6 w7 p8 h9 i
Correct the capitalization as necessary!
38. SAVE AS: Code.
39. PRINT PREVIEW and then Print
40. CLOSE FILE
WORD PROCESSING ASSIGNMENT #7 ~ FILENAME: EXERCISE
This exercise will teach you how to change size of font for entire document, change the symbol for another symbol (your choice), and put a border around the document.
1. Click on the Office Button 2. Choose OPEN or click on the open folder icon
Navigate to the folder where your teacher has put the Word Processing Unit Files.Open the file called “Exercise”
3. Create a Header with; your name on the left, the class period in the center, and insert the Date and Time on the right. (Find the Header icon on the Insert Ribbon) or double click the top margin.
Your Name Period # Current Date4. Center the title - Benefits of Daily Exercise- put it in bold and shadow and change the
font size to 16.5. Change the font size of the rest of the document to 10 pts. It makes quite a difference.
Select the entire document (Ctrl A) then change the font size to 10. If the text doesn’t all fit on ONE PAGE - then you will need to make the bottom or top margin smaller. (Page Layout – Margins)
6. To select a new symbol - a. Double Click on the 1st symbol OR delete it and click on the “Symbol” button
on the Insert Ribbon to Insert a new one. b. You may select another symbol from the “symbols” subset or any subset (other
good Fonts to use include “Webdings” and “Wingdings”) and insert it. Remember, this article is on exercise, so find an appropriate symbol. (Examples: )
d. Click on the symbol you want and click on “insert” then on “close”. That’s all there is to it!
e. Change all of the heart symbols to different symbols. Try to find a symbol that corresponds with that paragraph.
f. When all of the symbols are replaced then click on CLOSE.g. If all of the text in the document isn’t indented, push the TAB key to get it lined
up.7. Now for the border which will surround this document.
a. Go to Page Layout Ribbon and click on Page Borders.b. Make sure the “Page Border” Tab is selected.c. Choose the border you would like to use. Change the Border Style/Color, and
Size then when you’re satisfied click OK.f. There’s your border!
8. If you don’t like that border - click on Undo (It’s in the Upper Left corner next to save) or press Ctrl + Z and that will delete it....and then choose another border.
9. Save your file as Exercise. Print and Close the file.

WORD PROCESSINGASSIGNMENT #8 ~ MEDICAL SPECIALISTS
1. Open Word
Click on the Office Button Choose OPEN or click on the open folder iconNavigate to the folder where your teacher has put the Word Processing Unit Files.Open the file called MEDSPEC
2. Create a Header with; your name on the left, the class period in the center, and insert the Date and Time on the right. (Find the Header icon on the Insert Ribbon) or double click the top margin.
Your Name Period # Current Date
This file will teach you how to work inside of a table, how to sort the 1st row alphabetically, how to use the border/fill, how to center and bold the 1st row in the table - and hopefully a little about medical specialists.
3. Make the title look different:a. Put it in bold (Ctrl + B) and center it. (Ctrl + E)b. Select the title - Type Ctrl Dc. Then....choose Small Caps
4. Select the first row of the table with your mouse - (Name-Degree-Specialty) - drag mouse across (until it turns black) then bold and center this row
5. Sort the first column alphabetically . . .a. Select the entire table including the column headings. (Click on this symbol
which will appear in the upper left corner of the table) The whole table will be selected.
b. With the Table selected go to the Layout Ribbon then click Sort.c. Under “My list has” select header row. This is at the bottom of the sort box.d. First Sort by (Column 1) and by Text in ascending order.e. Then click on OK. f. You will see now that the table has changed and the medical specialists are now
arranged alphabetically.
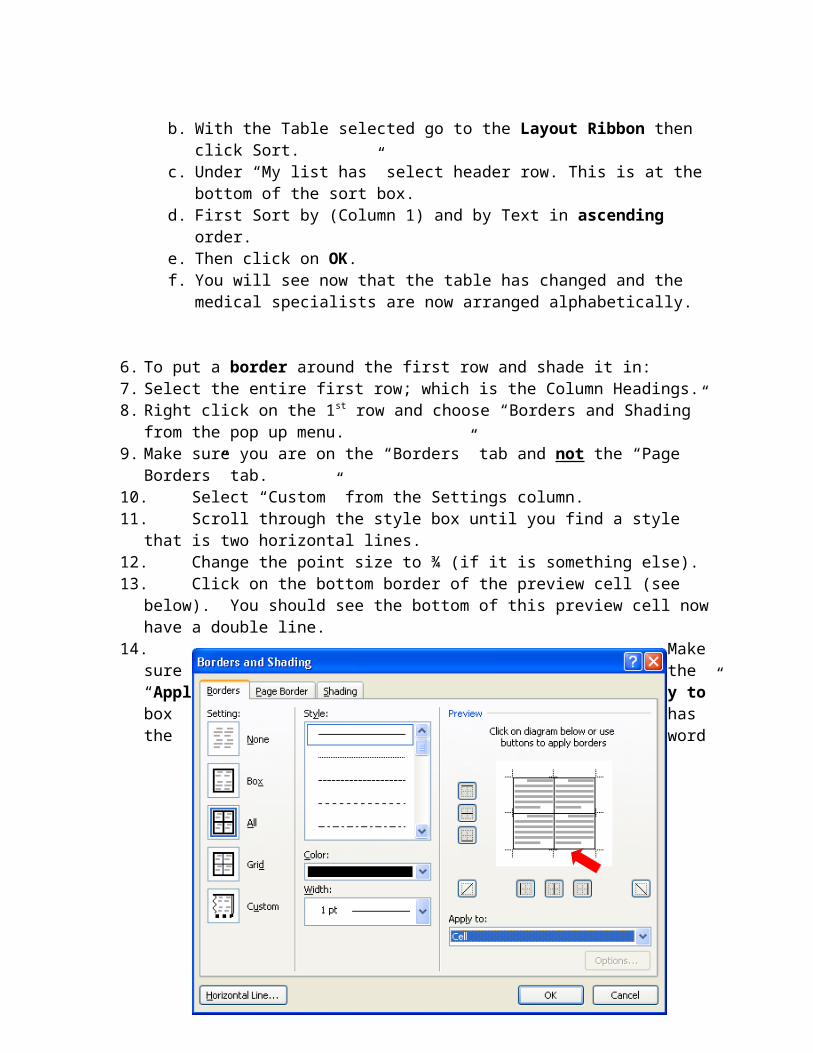
6. To put a border around the first row and shade it in:7. Select the entire first row; which is the Column Headings.8. Right click on the 1st row and choose “Borders and Shading” from the pop up menu.9. Make sure you are on the “Borders” tab and not the “Page Borders” tab.10. Select “Custom” from the Settings column.

11. Scroll through the style box until you find a style that is two horizontal lines.12. Change the point size to ¾ (if it is something else). 13. Click on the bottom border of the preview cell (see below). You should see the bottom
of this preview cell now have a double line. 14. Make sure the
“Apply to” box has the word “cell” in it. If not, click on it and change it to “cell”
15. While you’re still in this
borders/shading box, click on the “shading” tab at the top of the box.16. Find the “Patterns” area near the bottom left of the box. Select 5% Shading from the
“Styles” pull down box. Right now, it is “clear.”17. Then.......Click on OK.
18. Center the middle column (the Degree column)a. Select the Middle Column. (Drag your mouse down the middle column)b. Go to Layout and in the Alignment Tools choose Align Center.
19. Look in the whole page view. (View – Zoom – Whole Page) Make certain that the table stays on ONE PAGE.
20. If this activity goes on two pages, delete some spaces (where there is no text) until the text fits on just one page.
21. Save as: Medspec22. Print Preview and then Print23. Close the file and close Word

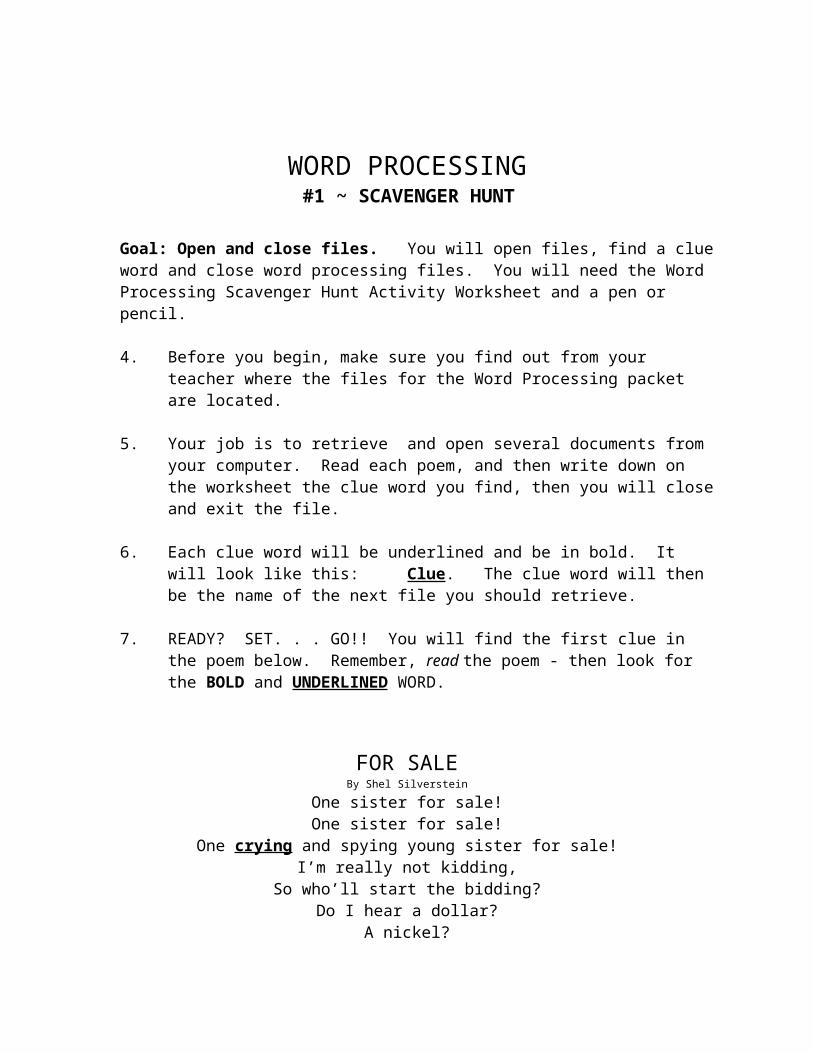
WORD PROCESSING #1 ~ SCAVENGER HUNT
Goal: Open and close files. You will open files, find a clue word and close word processing files. You will need the Word Processing Scavenger Hunt Activity Worksheet and a pen or pencil.
4. Before you begin, make sure you find out from your teacher where the files for the Word Processing packet are located.
5. Your job is to retrieve and open several documents from your computer. Read each poem, and then write down on the worksheet the clue word you find, then you will close and exit the file.
6. Each clue word will be underlined and be in bold. It will look like this: Clue. The clue word will then be the name of the next file you should retrieve.
7. READY? SET. . . GO!! You will find the first clue in the poem below. Remember, read the poem - then look for the BOLD and UNDERLINED WORD.
FOR SALEBy Shel Silverstein
One sister for sale!One sister for sale!
One crying and spying young sister for sale!I’m really not kidding,
So who’ll start the bidding?Do I hear a dollar?
A nickel?A penny?
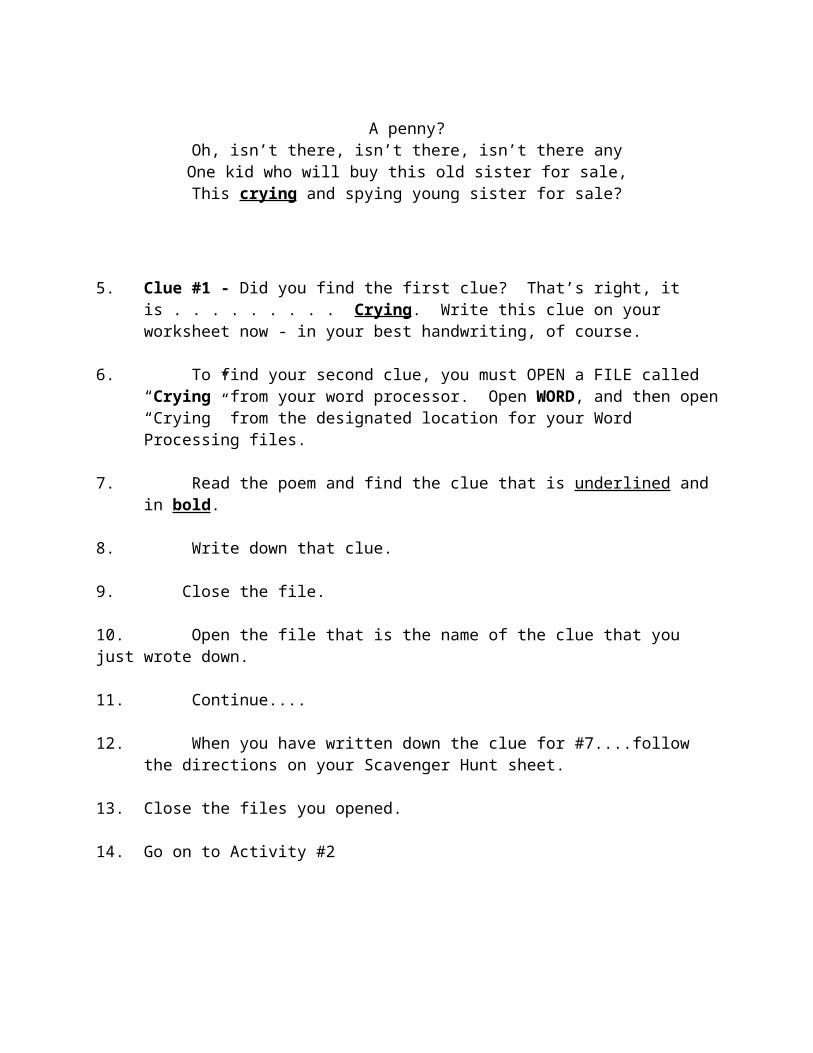
Oh, isn’t there, isn’t there, isn’t there anyOne kid who will buy this old sister for sale,
This crying and spying young sister for sale?
5. Clue #1 - Did you find the first clue? That’s right, it is . . . . . . . . . Crying. Write this clue on your worksheet now - in your best handwriting, of course.
6. To find your second clue, you must OPEN a FILE called “Crying” from your word
processor. Open WORD, and then open “Crying” from the designated location for your Word Processing files.
7. Read the poem and find the clue that is underlined and in bold.
8. Write down that clue.
9. Close the file.
10. Open the file that is the name of the clue that you just wrote down.
11. Continue....
12. When you have written down the clue for #7....follow the directions on your Scavenger Hunt sheet.
13. Close the files you opened.
14. Go on to Activity #2

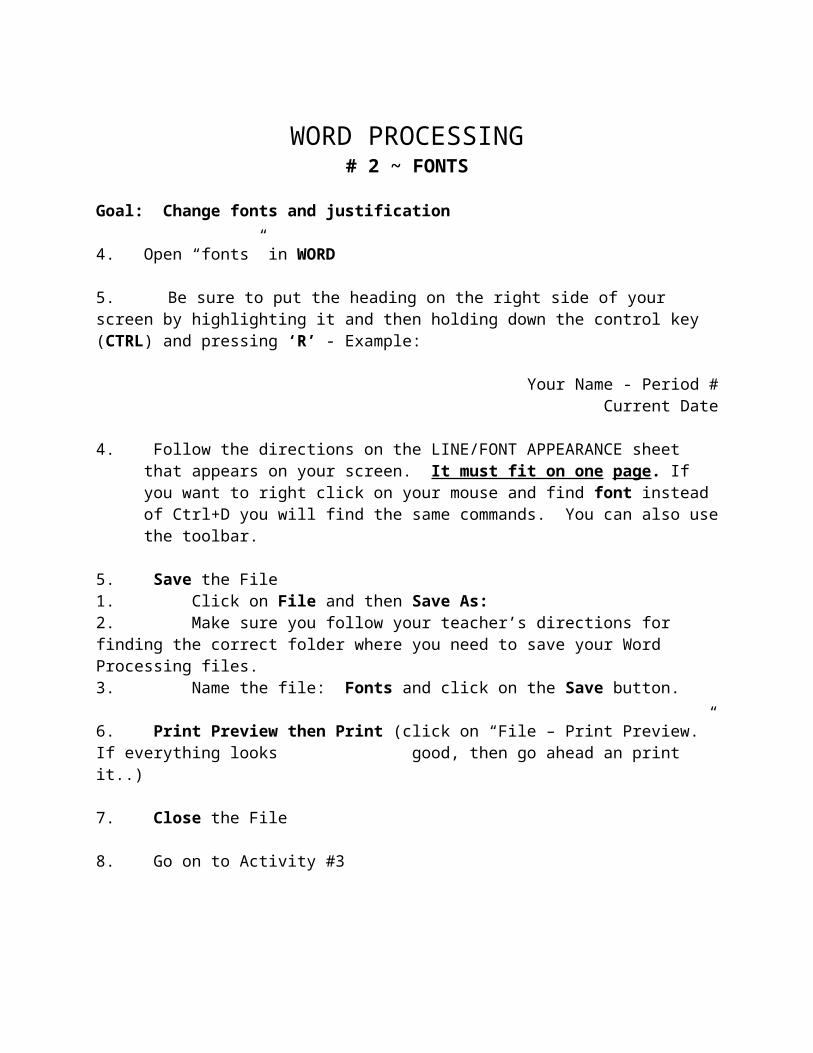
WORD PROCESSING# 2 ~ FONTS
Goal: Change fonts and justification
4. Open “fonts” in WORD
5. Be sure to put the heading on the right side of your screen by highlighting it and then holding down the control key (CTRL) and pressing ‘R’ - Example:
Your Name - Period #Current Date
4. Follow the directions on the LINE/FONT APPEARANCE sheet that appears on your screen. It must fit on one page. If you want to right click on your mouse and find font instead of Ctrl+D you will find the same commands. You can also use the toolbar.
5. Save the File1. Click on File and then Save As:2. Make sure you follow your teacher’s directions for finding the correct folder where you need to save your Word Processing files.3. Name the file: Fonts and click on the Save button.
6. Print Preview then Print (click on “File – Print Preview.” If everything looks good, then go ahead an print it..)
7. Close the File
8. Go on to Activity #3

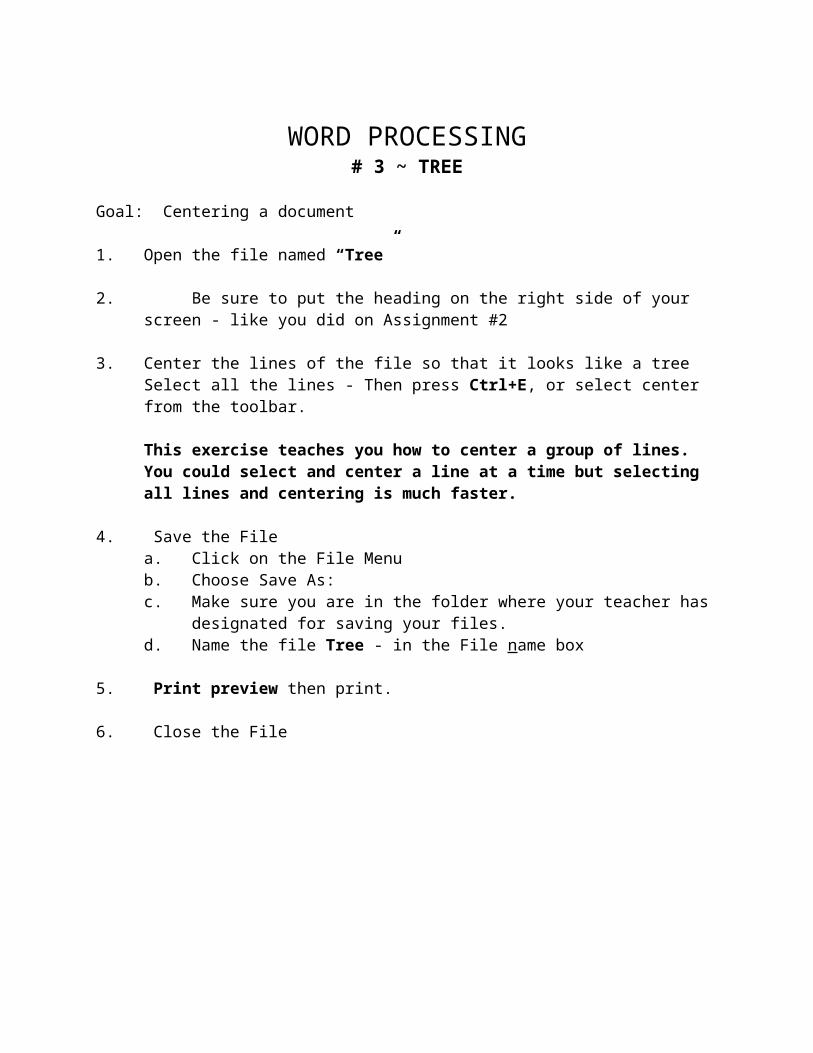
WORD PROCESSING# 3 ~ TREE
Goal: Centering a document
1. Open the file named “Tree”
2. Be sure to put the heading on the right side of your screen - like you did on Assignment #2
3. Center the lines of the file so that it looks like a treeSelect all the lines - Then press Ctrl+E, or select center from the toolbar.
This exercise teaches you how to center a group of lines. You could select and center a line at a time but selecting all lines and centering is much faster.
4. Save the Filea. Click on the File Menub. Choose Save As:c. Make sure you are in the folder where your teacher has designated for saving
your files.d. Name the file Tree - in the File name box
5. Print preview then print.
6. Close the File
WORD PROCESSING # 4 ~ FOOD ALLERGY
Goal: Change font size, shadow, centering, bold
1. Open “food” in WORD
2. Put heading with your name and period on the right side of your screen.
3. Select the title (FOOD ALLERGIES) - change the font size to 16. Change ONLY the font size for the title.
4. Select the title again – Press Ctrl D - and select “shadow” from the right set of choices. Then click “OK.”
5. Separate the paragraphs by pushing ENTER two times when you see a paragraph heading (a heading that is followed by a “?” Push the ENTER key one time between each paragraph. There are 5 paragraphs.
6. Put cursor at the top of the body of the text (after the title- example: What is a food allergy?) and change the way the lines will look by using FULL justification. To use full justification, push Ctrl+J and you will see that both the right and left margins are straight along with outside edges of the text. Or you can select FULL from the justification lines.
7. Select each paragraph heading (the beginning sentence of each paragraph that ask a question.....and change them to BOLD. You may push CTRL “B” or you may click on the “B” next to the font size arrow on the property bar.
8. Make certain that your name (heading) is properly in place. This should look like the key.
9. Save as: FOOD in the designated folder for saving your assignments.
10. Print Preview and Print (Make sure it looks right before you print.)
11. Close file
WORD PROCESSING # 5 ~ CAREERS
Goal: Cut and paste paragraphs, put text into columns, center, bold and justification.
1. Open “careers” in WORD

2. Type the heading with your name and period at the right side of your margin.
3. Center the title (CTRL+E), put it in bold, shadow, and change font size to 16
4. To cut and paste medical career paragraphs in alphabetical order:a. There are 7 medical career paragraphs. b. Select the paragraph that needs to be first (hint: the 1st one is Admitting
Clerk or Officer, the 2nd one is Genetic Counselor)c. Select the desired paragraph (all of it)
d. Click on the scissors Icon - This removes (or cuts out) the paragraph.e. Move the cursor where you want this paragraph to be - then right click - then
click on paste (or click on the icon that looks like a clipboard ) f. Voila! There is your paragraph.g. Continue to move all medical career title paragraphs until they are in
alphabetic order.h. Be sure you push ENTER if you need space between.i. Don’t even think of printing this activity yet because there’s a lot more to do.
5. Put the cursor in front of the first line of text (Admitting Clerk or Officer) after the title (Connection to Careers)- then Choose “Columns” from the “Format” pull-down menu or click on the columns Icon on the toolbar.
6. Select two columns.
7. At the bottom of the “columns” popup box, find the words “Apply to:” and select “This point on” from the box to the right of “Apply to:” This will change your document to be in two columns starting from this point. IMPORTANT!!! IF YOUR MAIN TITLE OR YOUR HEADING GET PUT IN A COLUMN, YOU NEED TO USE CTRL Z TO UNDO THIS AND MAKE SURE YOU PLACE YOUR CURSOR AFTER THE TITLE AND HEADING.
8. Put the cursor on the first line after the Admitting Clerk or Officer title - Select the rest of the document (everything below your heading and the document title) - Click Ctrl J and you’ll see that all text lines end evenly on the left and right margins. Be sure that all paragraphs are full justified.
9. Center and bold each medical career title within the column.
10. Put the cursor on the first line after the Admitting Clerk or Officer titles (the first paragraph) and push ENTER to allow a double space after the title and before the
text of the next paragraph. Do the same after each medical career title - the other six titles.
11. If any career title lines in the paragraph are not together, push ENTER or the DELETE key until the paragraphs are not split by the columns.
12. If your document on the screen looks exactly like the Answer KEY....be sure to look in the zoom (magnifying glass icon) and choose Full Page and make sure it fits on ONE page...
13. SAVE as Careers in the designated folder for saving your files.
14. Print Preview and then print.
15. CLOSE THE FILE.
WORD PROCESSING# 6 ~ CODE
Goal: Find and replace numbers and letters
1. Open “code”
2. Don’t put your heading on yet.
3. Click on the Edit pull down menu.
4. Click on Replace - You will then get a box. (You can also get the find & replace box by pushing Ctrl H)
5. Type the number “1" in the Find box...Push the TAB key.
6. Type the letter “a” in the Replace with box.
7. Click on “Replace All” and then OK.
8. Use the above directions as your find and replace the following numbers with the correct letter in the box below:
2 e
3 l
4 r
5 s
6 w
7 p
8 h
9 i
9. After you have searched and replaced all the numbers for letters, be sure to capitalize the letter “W” for Why, “A” for Answer and “S” for She.
10. NOW put your heading at the top as usual.
16. 11. SAVE as Code in the designated folder for saving your files.
12. Print preview and print
13. CLOSE FILE
WORD PROCESSING #7 ~ EXERCISE
Goal: Change size of font for entire document, change the ♥ symbol for another symbol (your choice), and put a border around the document.
1. Open “exercise”
2. Type the heading at the right side of your margin.
3. Center the title - Benefits of Daily Exercise- put it in bold and shadow and change the font size to 16.
4. This document will fit on one page when you are finished.
5. Change the font size from 12 to 10 - it makes quite a difference. Select the entire document (Ctrl A) then change the size to 10. Don’t change the font from Courier New. If the text doesn’t fit on ONE PAGE - then you may have to pull down the bottom margin line with your mouse.
6. To select a new symbol:a. Double Click on the 1st symbol ORb. Select “Symbol” from the “Insert” pull-down menu.c. The ♥ can be found in the “Miscellaneous Dingbats” subset of symbols. You
may select another symbol from this subset or any subset and insert it. Remember, this article is on exercise so find an appropriate symbol. (Examples: )
d. Click on the symbol you want and click on “insert” then on “close”. That’s all there is to it!
7. Change all of the heart symbols to different symbols. Try to find a symbol that corresponds with that paragraph.
8. When all of the symbols are replaced then click on CLOSE.a. If all of the text in the document isn’t indented, push the TAB key to get it all
lined up.
9. Now for the border which will surround this document.
10. Click on Borders and Shading on the “Format” pull down menu.
11. Click on the “Page Border” Tab.
12. Scroll down to a border that you would like to use.

13. Click on it
14. Click on OK
15. There’s your border!
16. If you don’t like that border - click on Undo (the curvy backward arrow on the Tool bar) or type Ctrl Z and that will delete it....and then choose another border.
17. Save your file as Exercise in the designated folder for saving your files.
18. Print preview and print.
19. Close the file
WORD PROCESSING#8 ~ MEDICAL SPECIALISTS
Goal: This activity will teach you how to work inside of a table, how to sort the 1st row alphabetically, how to use the border/fill, how to center and bold the 1st row in the table – and hopefully a little about medical specialists.
1. Open “medspec”
2. Be sure to put the heading on the right side of your screen
This file will teach you how to work inside of a table, how to sort the 1st row alphabetically, how to use the border/fill, how to center and bold the 1st row in the table - and hopefully a little about medical specialists.
3. To make the title look different: a. Put it in bold and center it
b. Select the title - Type Ctrl D c. Then....choose Small Caps
4. Select the first row of the table with your mouse - (Name-Degree-Specialty) - drag mouse across (it turns black) then bold and center this row
5. To sort the first column alphabetically . . .a. Select (drag your mouse down) the entire table including the column
headings. - the whole table will be black, but the right side should not have jagged edges. It should be a smooth black rectangle. If you get jagged edges (zebra stripes), you have dragged beyond the end of the box and you will need to do it again.
b. Click on the “Table” pull down menu.c. Click on Sort d. Click on “My list has header row” at the bottom of the sort box.e. Sort by Name and in ascending order.e. Then click on Sort. f. You will see now that the table has changed and the medical specialists are
now arranged alphabetically.
6. To put a border around the first row:a. Highlight the entire first row. (Name - Degree - Specialty)b. Bold that first row.c. Then right click on the 1st row and choose “Borders and Shading” from the
pop up menu.d. Make sure you are on the “Borders” tab and not the “Page Borders” tab.e. Select “Custom” from the Settings column.
f. Scroll through the style box until you find a style that is two horizontal lines.g. Change the point size to ¾ (if it is something else).h. Click on the bottom border of the preview cell (an icon on the left side of the
preview box). You should see the bottom of this preview cell now have a double line.
i. Make sure the “Apply to” box has the word “cell” in it. If not, click on it and change it to “cell”
j. While you’re still in this borders/shading box, click on the “shading” tab at the top of the box.
k. Select 5% Shading from the “Styles” pull down box that should say “Clear.”l. Then.......Click on OK.
7. To center the middle column (the Degree column)a. Drag your mouse down the middle column.b. Select center justification.
8. Look in the full page view. Make certain that the table stays on ONE PAGE. If this activity goes on two pages, delete some spaces (where there is no text) until the text fits on just one page.
9. Save as Medspec in the designated folder for saving your files.
10. Print preview and print
11. Close the file