1. survey authoring - pulse support. survey authoring ... o you can add additional new survey...
TRANSCRIPT

1
1. Survey Authoring Section 1 of this User Guide provides step-by-step instructions on how to author your survey. Surveys
can be created using questions and response choices you develop; copying content from existing
surveys in your library; and/or selecting content from the CEB, now Gartner library and available
benchmarks based on Gartner’s own research.
1.1 Create a New Survey: Getting Started
To create a new survey, you can use one of two methods:
a) Click Author on the navigation bar.
b) Alternatively, click the Author New Survey button on the upper right hand corner of your Home
page or the Manage Surveys page.
You will have the choice to create a survey from scratch or to copy and edit a previous survey. You will have
all the same options and functionality regardless of whether you start from scratch or copy from an existing
survey, but the latter is more efficient.

2
Click the Copy from Survey Library button to copy and edit existing surveys or
templates available in your survey library.
o Survey items, formatting, settings, and branching logic from the original survey
will be copied to this survey template; use them as is, or modify to meet your
needs.
o You can add additional new survey questions and information boxes to survey
templates.
o Your survey library contains surveys you have created in the past, surveys that
were specifically created for your company, and CEB, now Gartner’s
benchmarked survey templates.
Click the Create from Scratch button to start creating your own survey. This option
allows you to:
o Create new items (i.e., questions, information boxes, etc.);
o Copy / edit items from existing surveys in your account;
o Choose to use CEB, now Gartner’s benchmarked survey questions.
3
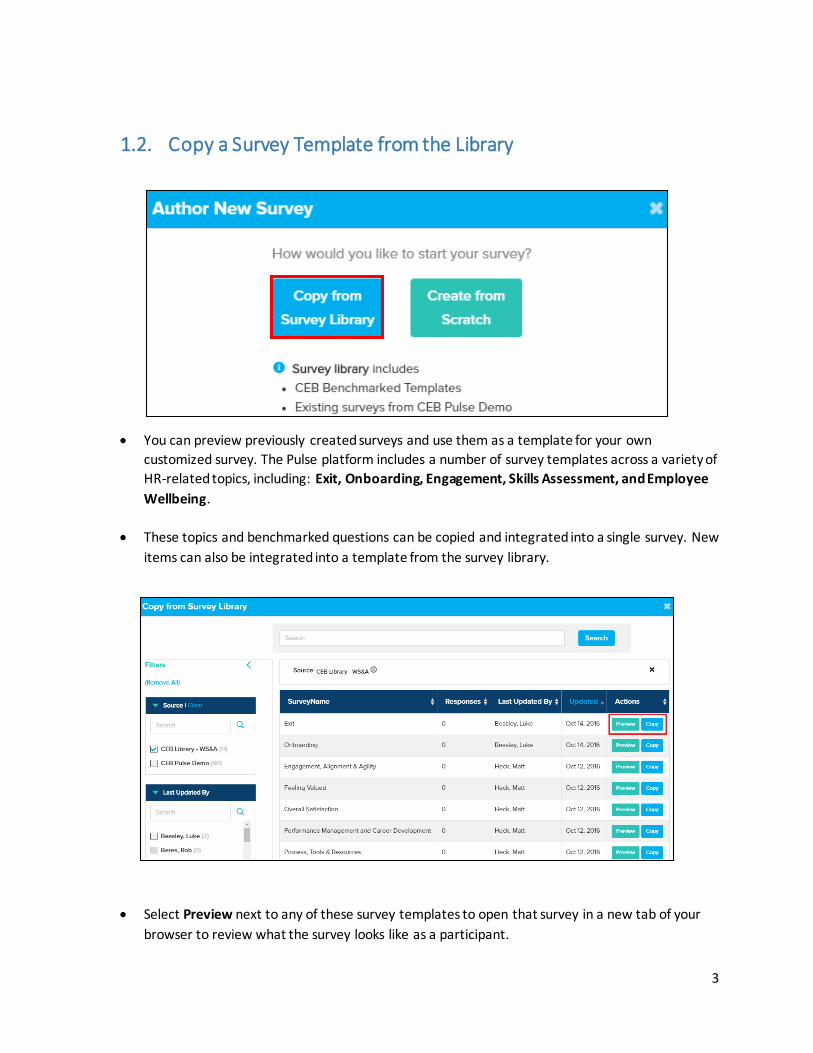
1.2. Copy a Survey Template from the Library
You can preview previously created surveys and use them as a template for your own
customized survey. The Pulse platform includes a number of survey templates across a variety of
HR-related topics, including: Exit, Onboarding, Engagement, Skills Assessment, and Employee
Wellbeing.
These topics and benchmarked questions can be copied and integrated into a single survey. New
items can also be integrated into a template from the survey library.
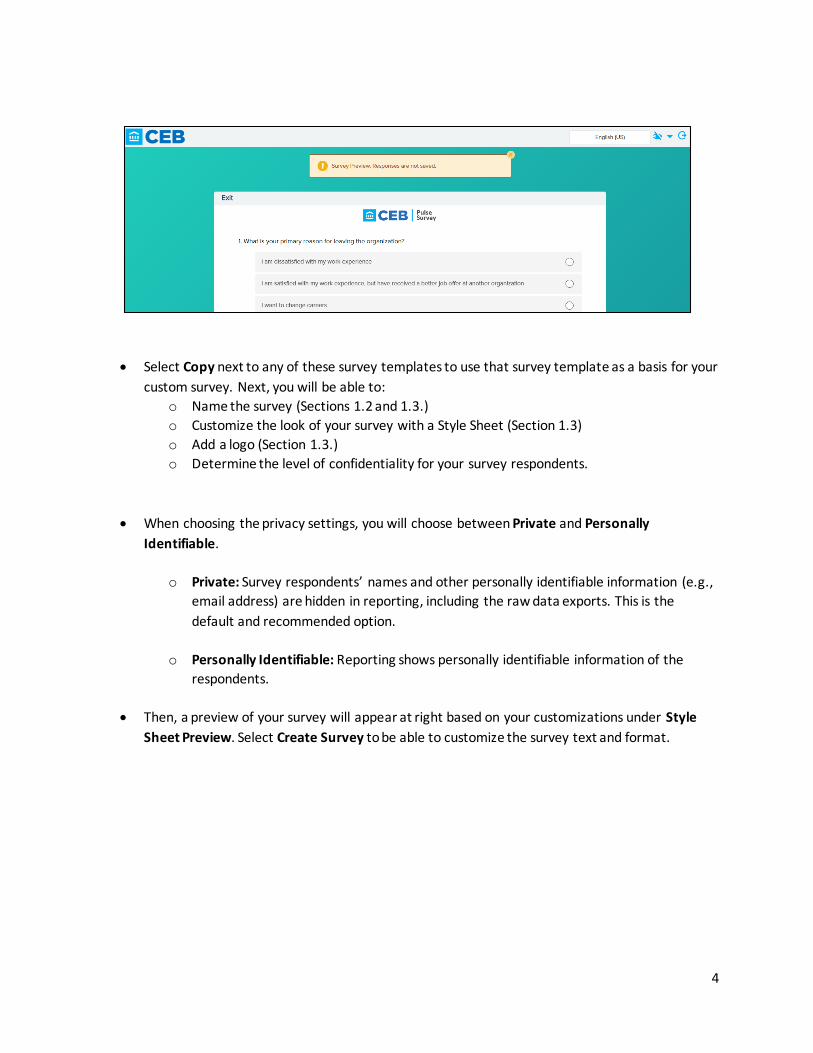
Select Preview next to any of these survey templates to open that survey in a new tab of your
browser to review what the survey looks like as a participant.
4
Select Copy next to any of these survey templates to use that survey template as a basis for your
custom survey. Next, you will be able to:
o Name the survey (Sections 1.2 and 1.3.)
o Customize the look of your survey with a Style Sheet (Section 1.3)
o Add a logo (Section 1.3.)
o Determine the level of confidentiality for your survey respondents.
When choosing the privacy settings, you will choose between Private and Personally
Identifiable.
o Private: Survey respondents’ names and other personally identifiable information (e.g.,
email address) are hidden in reporting, including the raw data exports. This is the
default and recommended option.
o Personally Identifiable: Reporting shows personally identifiable information of the
respondents.
Then, a preview of your survey will appear at right based on your customizations under Style
Sheet Preview. Select Create Survey to be able to customize the survey text and format.

5
1.3 Create a New Survey from Scratch
If you prefer to create a survey from scratch, go to Author New Survey and select Create from
Scratch.
Then you will be instructed to enter/select the following:

6
Survey Name: The name for your survey in your Pulse account. This will only be visible to survey
authors. Survey Names can have a maximum of 100 characters.
Display Name: The name of your survey as it appears to survey participants. Similar to the
Survey Name, the Display Name has a maximum of 100 characters.
Style Sheet: Select the color scheme template for your survey (either CEB Pulse Standard Style
Sheet or a Custom Style Sheet).
o To create a custom Style Sheet, access your Account Default settings under the main
Settings Tab.
o Style Sheets are listed under the Authoring Defaults section of this page.
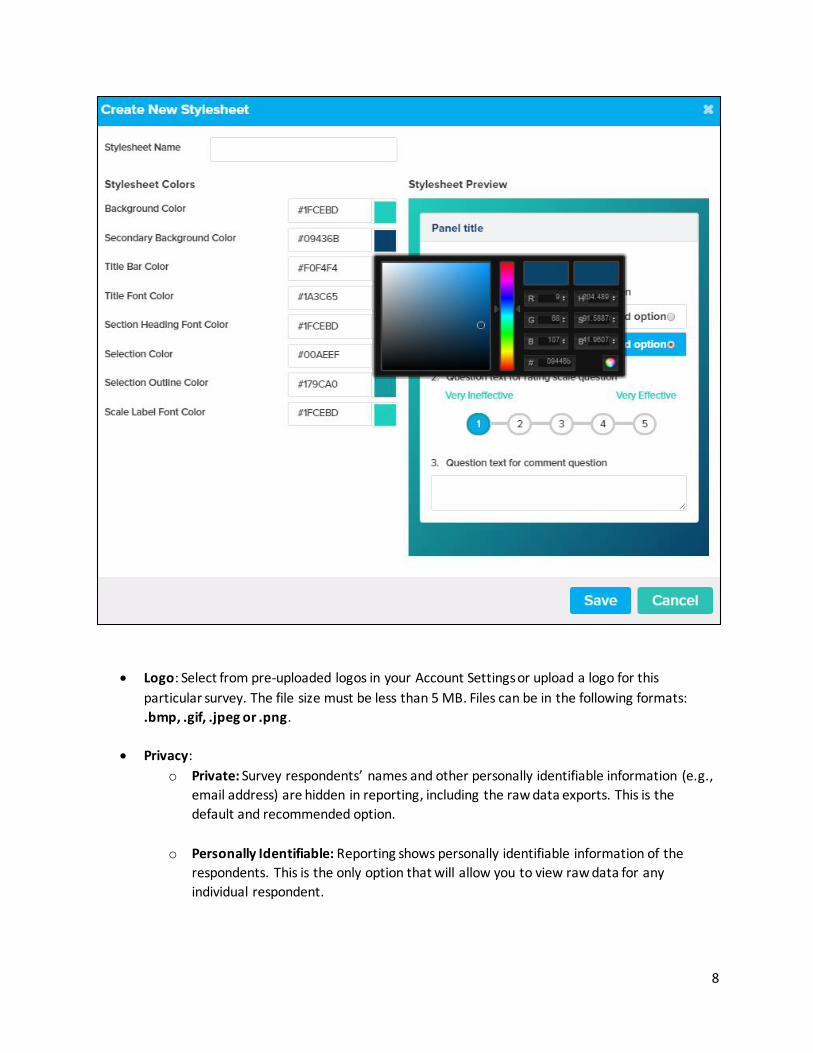
o Click Create New for a new Style Sheet or Edit Stylesheets to modify a previously
created Style Sheet.

7
o To customize the colors of your Style Sheet, enter HEX Codes (the 6 character alpha
numeric code) or drag your mouse over the colored square. This process applies to
both new and previously created spreadsheets. Click Save after naming and selecting
your colors for the Style Sheet.
8
Logo: Select from pre-uploaded logos in your Account Settings or upload a logo for this
particular survey. The file size must be less than 5 MB. Files can be in the following formats:
.bmp, .gif, .jpeg or .png.
Privacy:
o Private: Survey respondents’ names and other personally identifiable information (e.g.,
email address) are hidden in reporting, including the raw data exports. This is the
default and recommended option.
o Personally Identifiable: Reporting shows personally identifiable information of the
respondents. This is the only option that will allow you to view raw data for any
individual respondent.
9
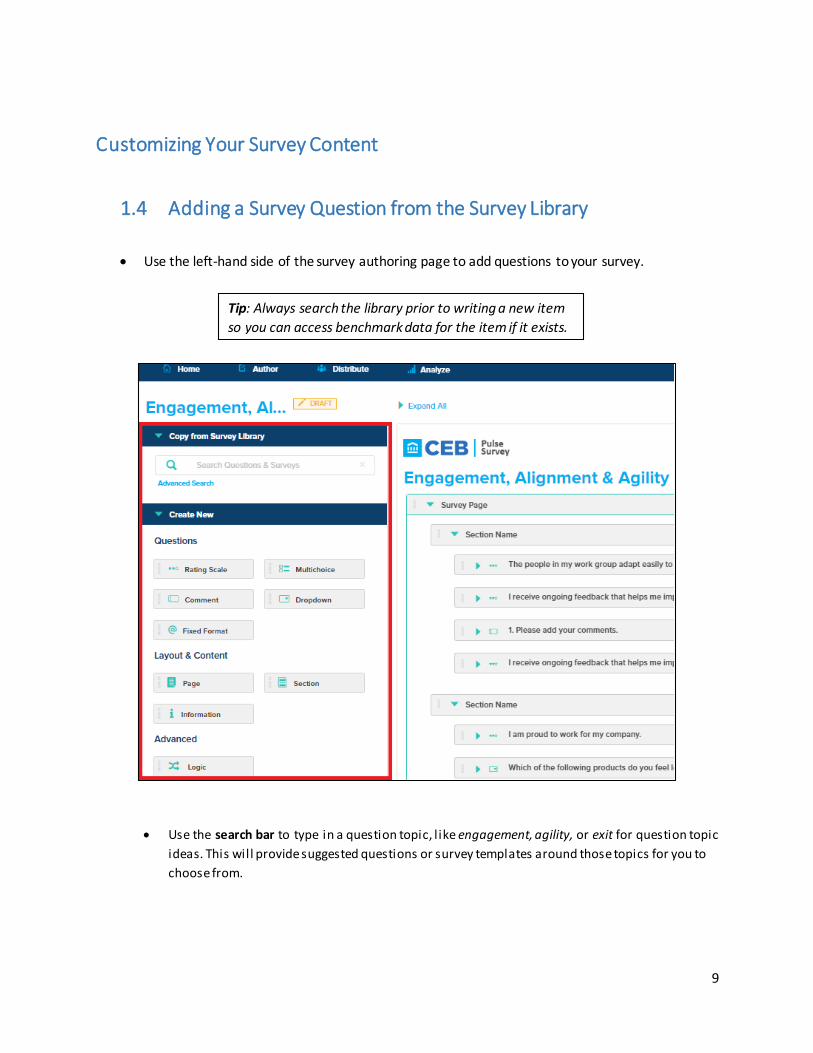
Customizing Your Survey Content
1.4 Adding a Survey Question from the Survey Library
Use the left-hand side of the survey authoring page to add questions to your survey.
Use the search bar to type in a question topic, l ike engagement, agility, or exit for question topic
ideas . This will provide suggested questions or survey templates around those topics for you to
choose from.
Tip: Always search the library prior to writing a new item
so you can access benchmark data for the item if it exists.

10
Selecting the checkbox will automatically add that question to the bottom of your survey, and c an
then be optionally edited at your discretion. Alternatively, you can drag the survey question to
where in the survey you would like it to appear.
Click Advanced Search to browse the question library.
Search by question type, category, benchmarked questions, or other questions used in previous
surveys.
o Benchmarked questions are labeled with the following icon: ( ).
11
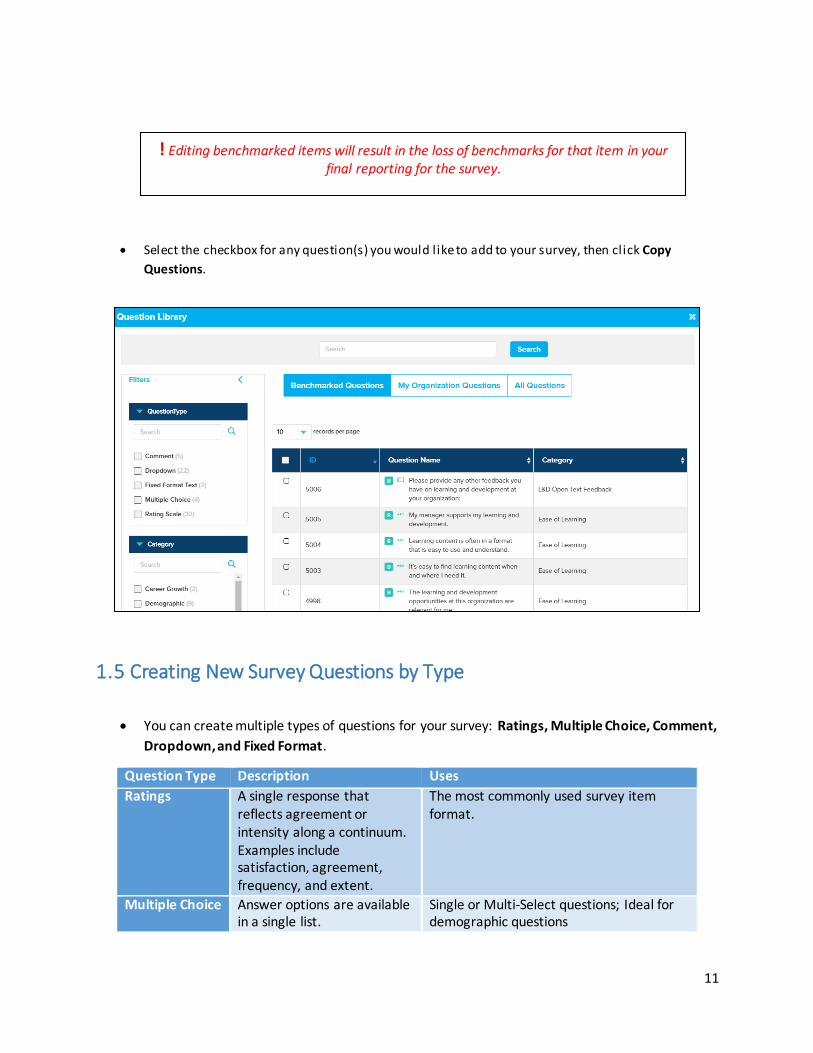
Select the checkbox for any question(s) you would like to add to your survey, then click Copy
Questions.
1.5 Creating New Survey Questions by Type
You can create multiple types of questions for your survey: Ratings, Multiple Choice, Comment,
Dropdown, and Fixed Format.
Question Type Description Uses
Ratings A single response that reflects agreement or intensity along a continuum. Examples include satisfaction, agreement, frequency, and extent.
The most commonly used survey item format.
Multiple Choice Answer options are available in a single list.
Single or Multi-Select questions; Ideal for demographic questions
! Editing benchmarked items will result in the loss of benchmarks for that item in your final reporting for the survey.
12
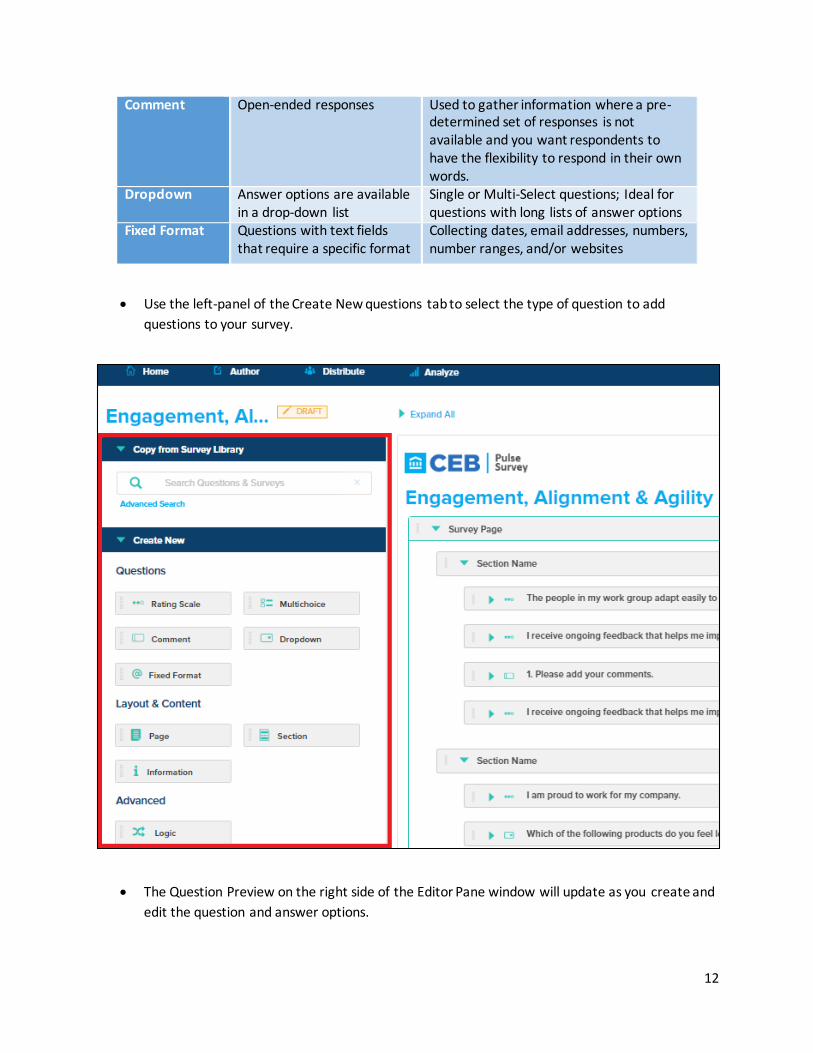
Comment Open-ended responses Used to gather information where a pre-determined set of responses is not available and you want respondents to have the flexibility to respond in their own words.
Dropdown Answer options are available in a drop-down list
Single or Multi-Select questions; Ideal for questions with long lists of answer options
Fixed Format Questions with text fields that require a specific format
Collecting dates, email addresses, numbers, number ranges, and/or websites
Use the left-panel of the Create New questions tab to select the type of question to add
questions to your survey.
The Question Preview on the right side of the Editor Pane window will update as you create and
edit the question and answer options.

13
The process for creating an item is largely the same across each item type with the following
steps:
1. Select your question type (e.g. Ratings, Multiple Choice, Comment, Dropdown, and
Fixed Format).
2. Select a category from the Category drop-down button under the Style drop-down.
Categories group questions into themes (e.g., empowerment, recognition, engagement,
agility). Reports provide scores summarizing for rating questions within categories.
Throughout the Analyze tab, results will be grouped together by category based on
those selections. Select the “demographic” category for questions intended for filtering
results.
Pre-designed categories are available to select. If none of the pre-designed
categories are relevant to your question, click Create new category to name
your own.
3. Enter your question content (see details below for more specifics by item type).
4. Under the Additional Options section of the Editor Pane, you have the ability to:
Add introduction text specific to the question, if relevant.
Mark the question as mandatory for a respondent to complete.
5. Add question numbers.
6. Additional options may be available that are specific to an item type, as described below.
Then click Save.
1.5.1 Creating Rating Scale and Ratings Scale Questions Click or drag and drop into the survey the Rating Scale button under Questions in the Create
New section on the survey authoring screen.
Tip: If you are going to require a response to a question, we recommend that you include
options for respondents who may not be able to answer an item or who may not want to
answer (e.g., Can’t rate, I prefer not to answer”).
Tip: Consider hiding item numbers if you are using branching for your surveys or if you
have written comment items.
14
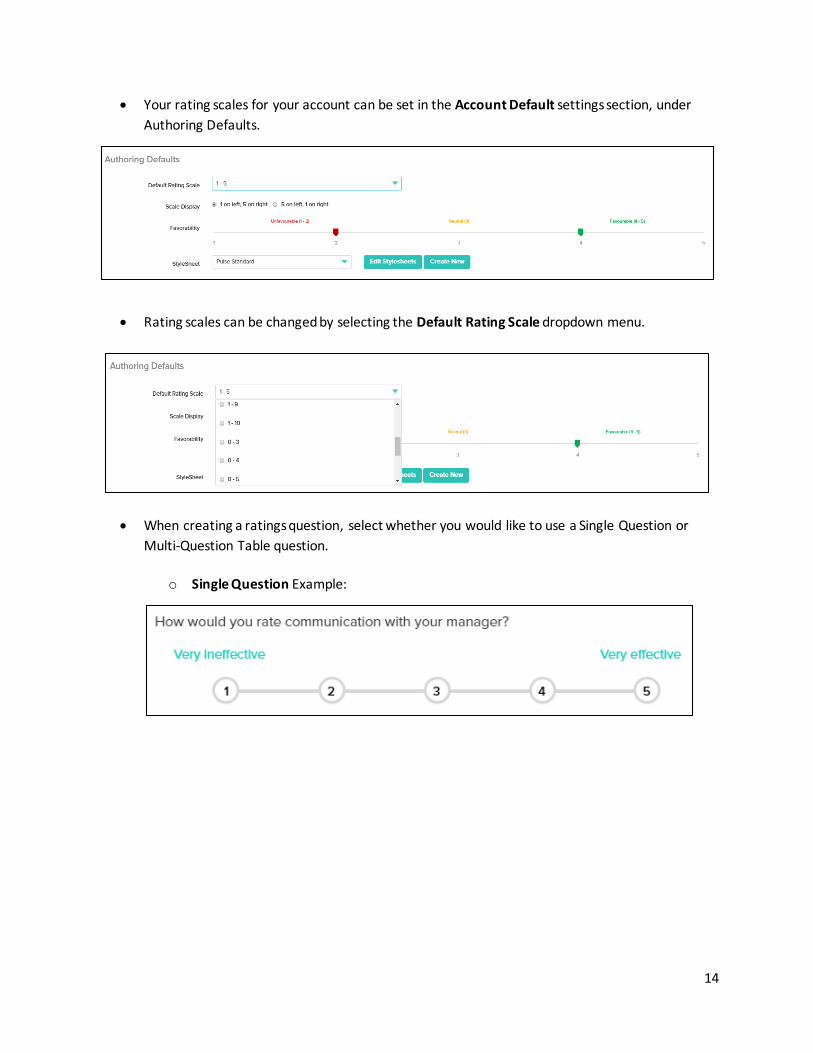
Your rating scales for your account can be set in the Account Default settings section, under
Authoring Defaults.
Rating scales can be changed by selecting the Default Rating Scale dropdown menu.
When creating a ratings question, select whether you would like to use a Single Question or
Multi-Question Table question.
o Single Question Example:
15
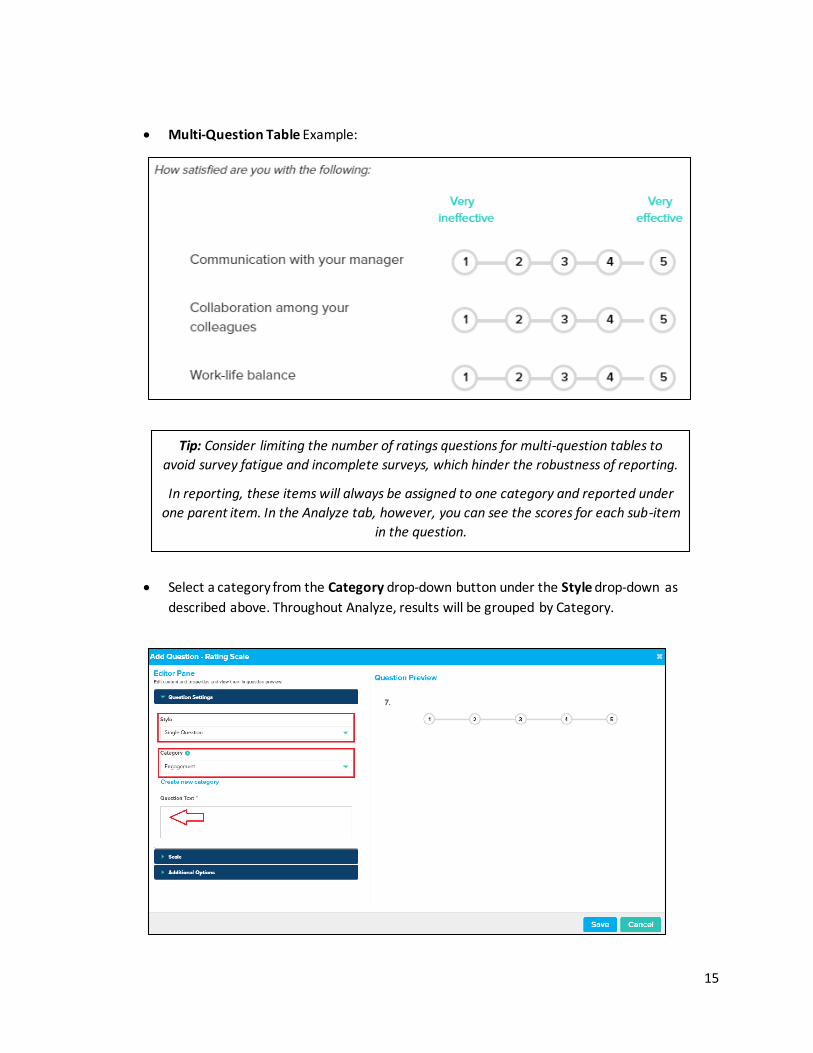
Multi-Question Table Example:
Select a category from the Category drop-down button under the Style drop-down as
described above. Throughout Analyze, results will be grouped by Category.
Tip: Consider limiting the number of ratings questions for multi-question tables to
avoid survey fatigue and incomplete surveys, which hinder the robustness of reporting.
In reporting, these items will always be assigned to one category and reported under
one parent item. In the Analyze tab, however, you can see the scores for each sub-item
in the question.

16
Enter the text for your question and the scales (e.g. Satisfaction).
Complete the standard Additional Options section of the Editor Pane as desired (Section 1.5):
Click Save to save this question and its formatting into the survey.
1.5.2 Creating Multiple Choice Questions
Click or drag and drop into the survey the Multichoice button under Questions in the Create
New section on the survey authoring screen.
Then, select whether you would like to use a Single Choice or Multi-Select question.
o Single Question Example:

17
To allow respondents to select multiple response options for these questions, check the box for
Allow Multi-Select under Additional Options.
You can set the minimum and maximum number of responses by clicking on the up/down
arrows on the left side of the Editor Pane.

18
Enter the text for your question and response options.
In the Additional Options section of the Editor Pane, you also have the ability to include a Not
Applicable answer option to your l ist of answer options. To fi lter respondents who selected Not
Applicable to a question in the Analyze tab, you can assign it a Category (under Question
Settings).
Click Save to save this question and its formatting into the survey.
1.5.3 Creating Comment Questions
Click or drag and drop into the survey the Comment button under Questions in the Create New
section on the survey authoring screen.
Then, select whether you would like to use a Long or Short Text Box:
o Long Text Box Example (3,000 character limit in response box):

19
o Short Text Box Example (1,000 character limit in response box):
After selecting your question style, select a category from the Category drop-down button
under the Style drop-down. Throughout Analyze, results will be grouped by Category.

20
Enter the text for your question.
In the Additional Options section of the Editor Pane, you also have the ability to designate the
number of available characters for participants’ responses. In Long Text Boxes, the character
l imit is 3,000. In Short Text Boxes, the character l imit is 1,000.
Click Save to save this question and its formatting into the survey.
1.5.4 Creating Dropdown Questions
Click or drag and drop into the survey the Dropdown button under Questions in the Create New
section on the survey authoring screen. An example Dropdown question is shown below:
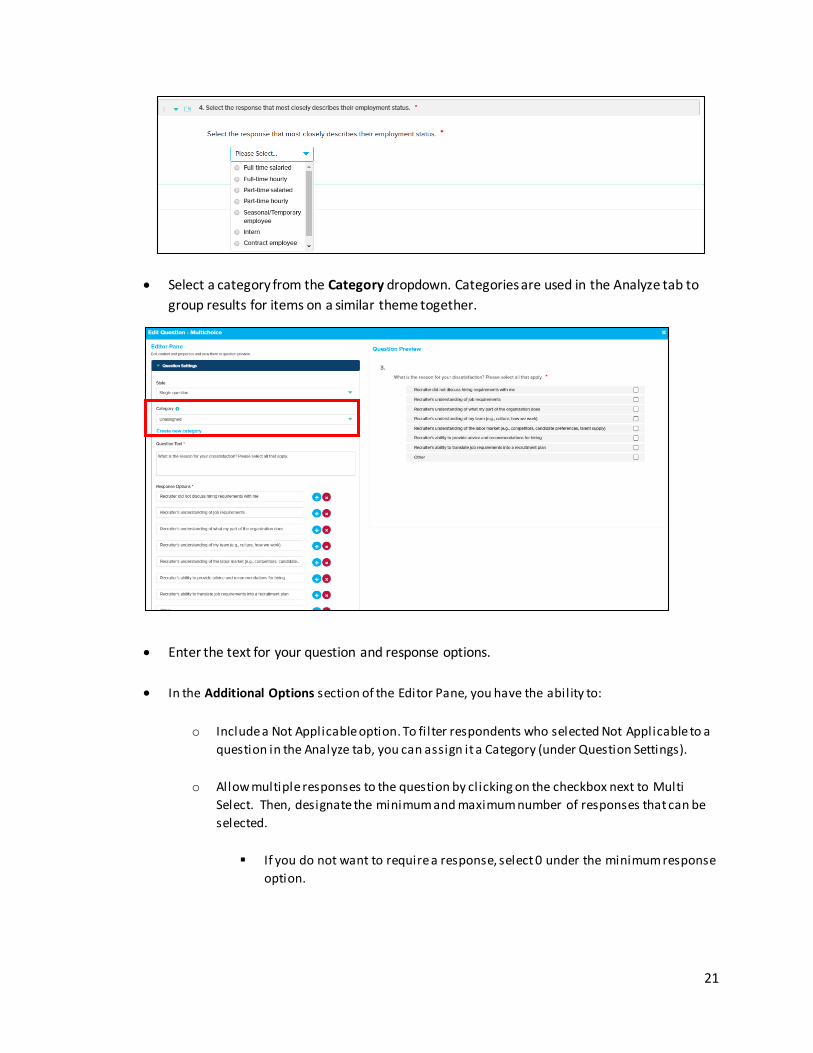
21
Select a category from the Category dropdown. Categories are used in the Analyze tab to
group results for items on a similar theme together.
Enter the text for your question and response options.
In the Additional Options section of the Editor Pane, you have the ability to:
o Include a Not Applicable option. To fi lter respondents who selected Not Applicable to a
question in the Analyze tab, you can assign it a Category (under Question Settings).
o Allow multiple responses to the question by clicking on the checkbox next to Multi
Select. Then, designate the minimum and maximum number of responses that can be
selected.
If you do not want to require a response, select 0 under the minimum response
option.

22
Click Save to save this question and its formatting into the survey.
1.5.5 Creating Fixed Format Questions
Click or drag and drop into the survey the Fixed Format button under Questions in the
Create New section on the survey authoring screen.
A Fixed Format question can have the following Styles: Email Address, Website, Date,
Number, and Number Range. A small text box generates for participants to enter their
answer.
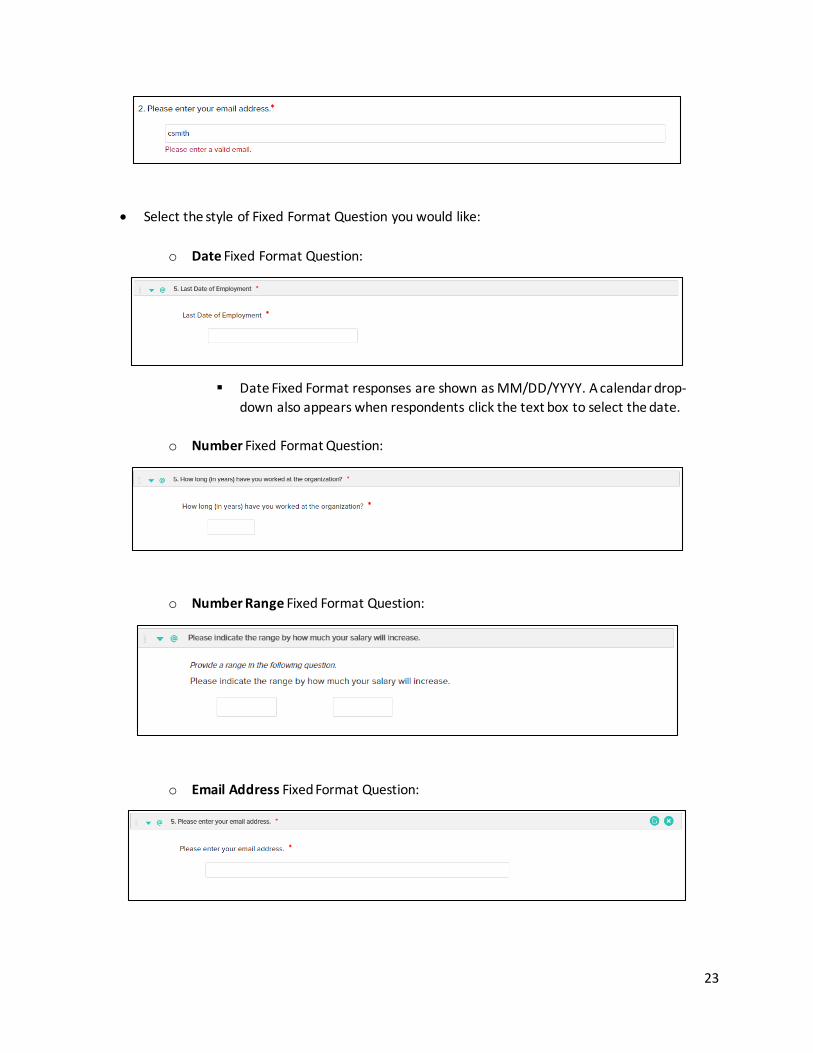
Error messages appear to participants for when information is entered incorrectly into the text
box. For email addresses, for example, the following error message generates:
23
Select the style of Fixed Format Question you would like:
o Date Fixed Format Question:
Date Fixed Format responses are shown as MM/DD/YYYY. A calendar drop-
down also appears when respondents click the text box to select the date.
o Number Fixed Format Question:
o Number Range Fixed Format Question:
o Email Address Fixed Format Question:
24
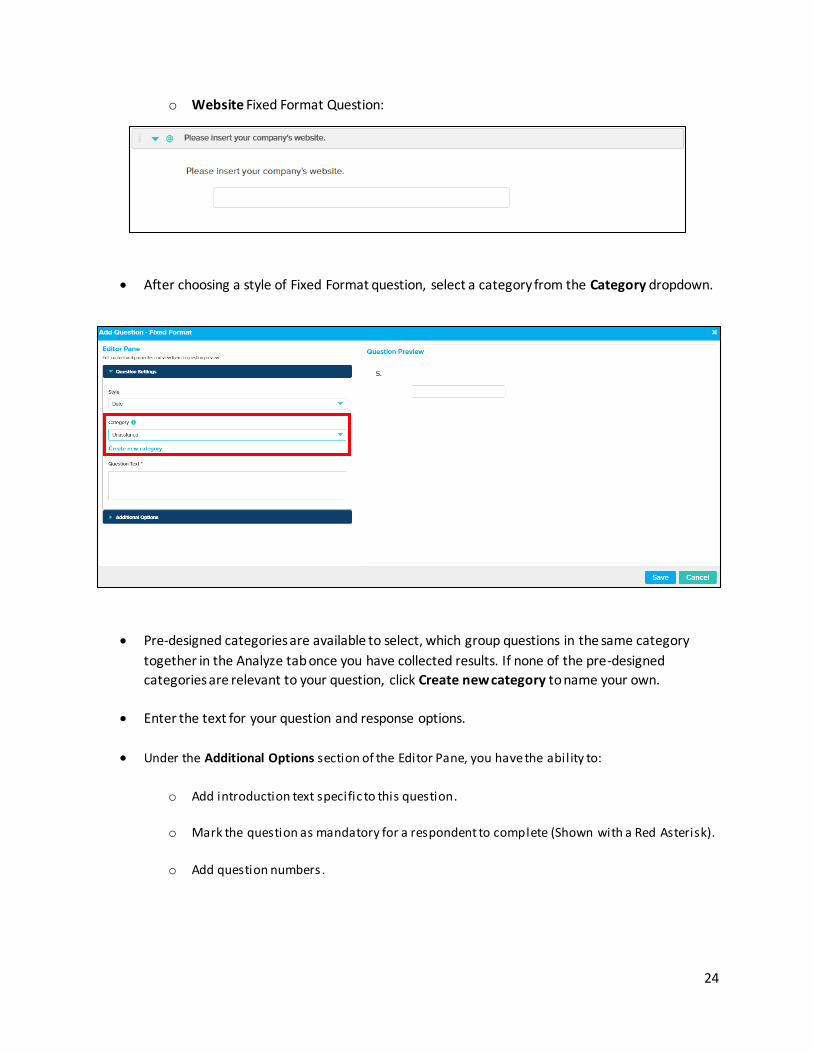
o Website Fixed Format Question:
After choosing a style of Fixed Format question, select a category from the Category dropdown.
Pre-designed categories are available to select, which group questions in the same category
together in the Analyze tab once you have collected results. If none of the pre-designed
categories are relevant to your question, click Create new category to name your own.
Enter the text for your question and response options.
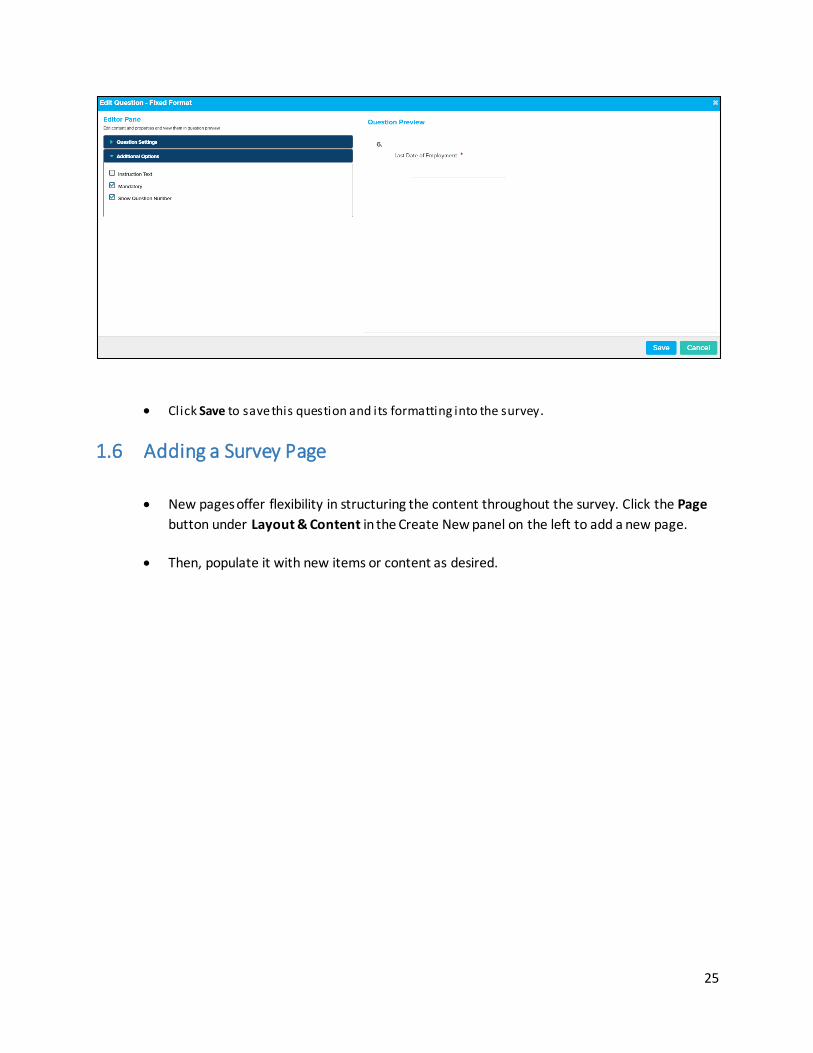
Under the Additional Options section of the Editor Pane, you have the ability to:
o Add introduction text specific to this question.
o Mark the question as mandatory for a respondent to complete (Shown with a Red Asterisk).
o Add question numbers .
25
Click Save to save this question and its formatting into the survey.
1.6 Adding a Survey Page
New pages offer flexibility in structuring the content throughout the survey. Click the Page
button under Layout & Content in the Create New panel on the left to add a new page.
Then, populate it with new items or content as desired.

26
1.7 Adding a Survey Section
Click the Section button in the Create New panel on the left under Layout & Content.
o You can also drag and drop the Section to your desired place on a page in the survey.
o Similar to adding new pages to your survey, new sections offer flexibility and
customization of how items are presented in the survey.
Then, populate it with new items or content as desired.

27
1.8 Adding Meta-Tags Meta-tags serve as text replacement. You can add a meta-tag to a question by clicking the < >
button in the Editor Pane. You can use demographics added to your company directory as
Meta-tags, such as Hire Date.
o Section 2 on Distribution provides more detail on Meta-tags when creating invitation,
reminder, and custom emails
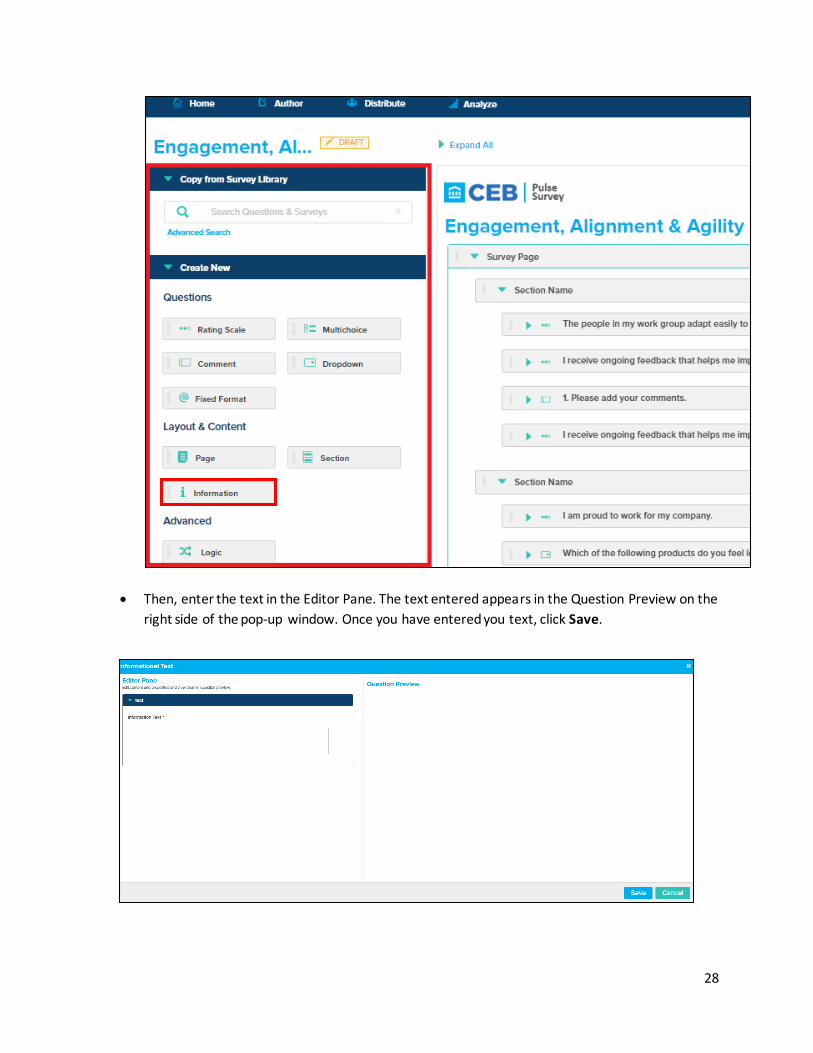
1.9 Adding an Information Text Box Information Text Boxes provide additional instructions for a section or question in a survey.
Click the Information button under Layout & Content in the Create New panel on the left.
28
Then, enter the text in the Editor Pane. The text entered appears in the Question Preview on the
right side of the pop-up window. Once you have entered you text, click Save.
29
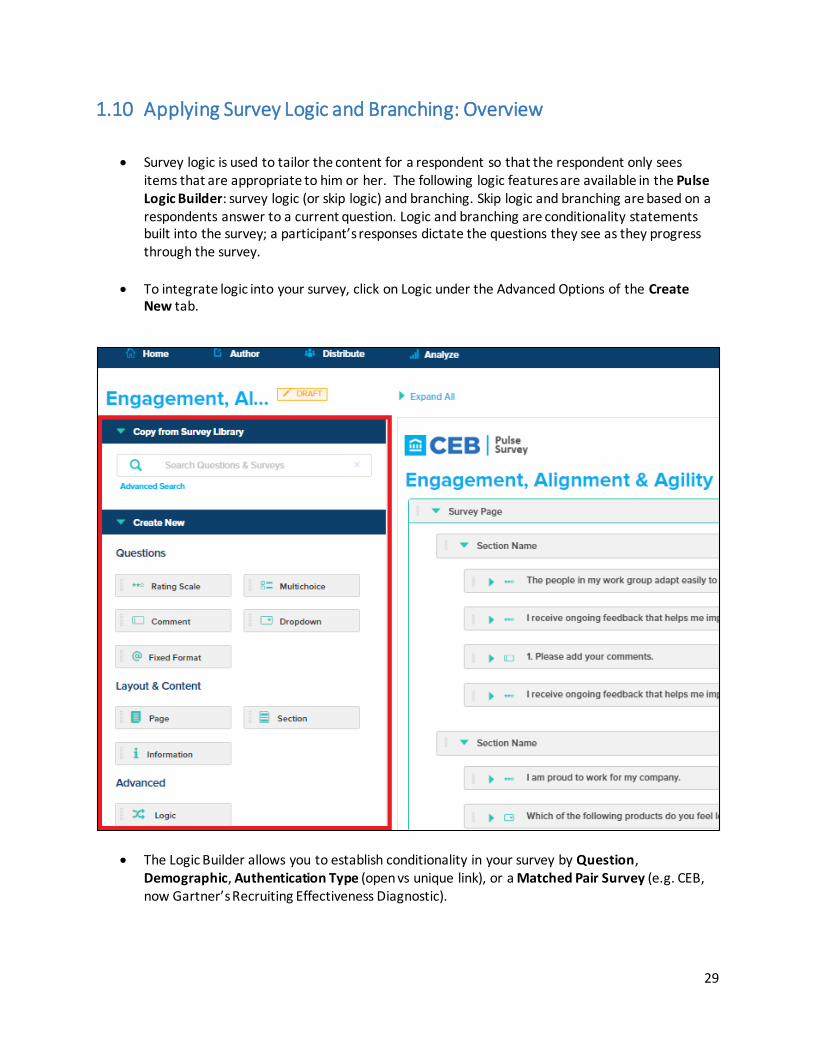
1.10 Applying Survey Logic and Branching: Overview
Survey logic is used to tailor the content for a respondent so that the respondent only sees items that are appropriate to him or her. The following logic features are available in the Pulse Logic Builder: survey logic (or skip logic) and branching. Skip logic and branching are based on a respondents answer to a current question. Logic and branching are conditionality statements built into the survey; a participant’s responses dictate the questions they see as they progress through the survey.
To integrate logic into your survey, click on Logic under the Advanced Options of the Create New tab.
The Logic Builder allows you to establish conditionality in your survey by Question, Demographic, Authentication Type (open vs unique link), or a Matched Pair Survey (e.g. CEB, now Gartner’s Recruiting Effectiveness Diagnostic).

30
1.10.1 Applying Survey Logic Logic can be set so that a participant would skip certain items based on their response to a
previous item. For example, if a respondent indicated that they were not satisfied with the tools and resources that they have to do their jobs, you might follow up with a list of tools and resources and ask them to indicate which are lacking. Respondents who responded favorably to the tools and resource items would skip this follow up item.
You may wish to have participants skip certain questions based on responses to a specific question, their demographics, how they receive the survey (Authentication Type), or if it is part of a Matched Pair survey.
You can establish multiple cases of logic within your survey by clicking on the icon in the Logic Builder.
Logic based on a Response to a Prior Survey Question To establish logic by the response to a question, open the Logic Builder and make sure Question
is selected.

31
From here, you can select which question(s) you would like to have hidden from participants based on their response.
Indicate the answer responses and questions that qualify for conditionality in the dropdown menus. Click Save.
Logic based on Demographic To establish logic based on a demographic, open the Logic Builder and make sure Demographic
is selected. Demographics are precoded in the survey.
From here, you can select which question you would like to have hidden from participants based on their demographic, such as Hire Date.

32
Indicate the demographic and questions that qualify for conditionality in the dropdown menus. Click Save to return to the survey.
Logic by Authentication Type To establish logic by Authentication Type, open the Logic Builder and make sure Authentication
Type is selected. Authentication Type refers to your distribution method for your survey (open or unique link). See Section 2 of this guide for more details on survey distribution types.
Create your conditionality by selecting the authentication type (Unique Link or Open Link) in the dropdown.
Select which questions are hidden from participants based on authentication type (Unique Link or Open Link) in the dropdown. Then click Save.
33
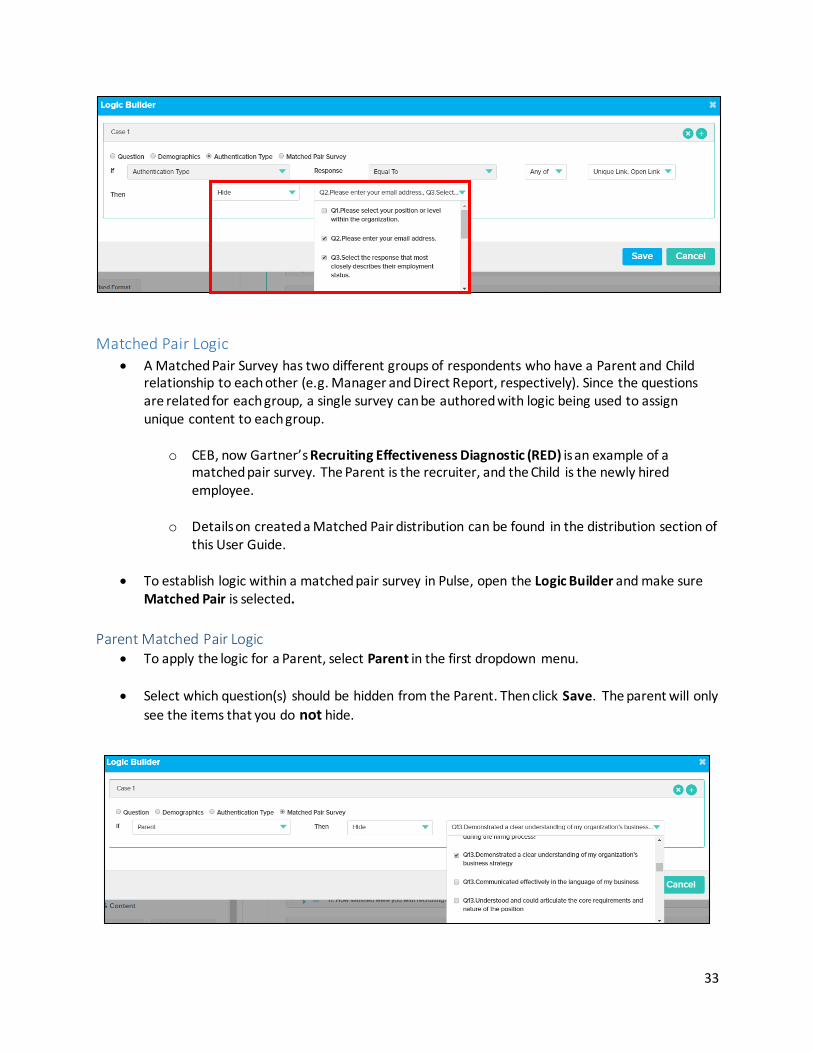
Matched Pair Logic A Matched Pair Survey has two different groups of respondents who have a Parent and Child
relationship to each other (e.g. Manager and Direct Report, respectively). Since the questions are related for each group, a single survey can be authored with logic being used to assign unique content to each group.
o CEB, now Gartner’s Recruiting Effectiveness Diagnostic (RED) is an example of a matched pair survey. The Parent is the recruiter, and the Child is the newly hired employee.
o Details on created a Matched Pair distribution can be found in the distribution section of this User Guide.
To establish logic within a matched pair survey in Pulse, open the Logic Builder and make sure Matched Pair is selected.
Parent Matched Pair Logic To apply the logic for a Parent, select Parent in the first dropdown menu.
Select which question(s) should be hidden from the Parent. Then click Save. The parent will only
see the items that you do not hide.

34
Child Matched Pair Logic To apply the logic for a Child, select Child in the first dropdown menu.
Select which question(s) should be hidden from the Child. Then click Save.
1.10.2 Applying Branching You can set branching, a form of survey logic, if you want different sets of participants to view
different items. The items that they will be presented can be set based on a participant’s
response.
o This differs from a matched pair survey, which in Pulse, sets the Parent-Child
relationships in the distribution. More details can be found in Section 2 of this user
guide on creating these relationships.
In Pulse, branching applies conditionality to questions. Drag the Logic icon to a specific question.
This will automatically set the logic to the question in your survey.
From here you can apply the conditionality, based on the participant’s response to the question.
Once these parameters have been set, click Save.
! Questions that are hidden from a Parent (e.g. Recruiter or Manager) in a matched
pair survey should be seen by the Child (e.g. Employee).
! Questions that are hidden from a Child (e.g. Employee) in a matched pair survey should be seen by the Parent (e.g. Recruiter or Manager).

35
1.11 Editing a Draft Survey When starting from a drafted survey, you can edit any survey component (e.g. answer options,
ranges, question text) by clicking the Edit ( ) icon on the top bar of the question. This opens
the Editor Pane.
Edit your items and click Save to close the Editor Pane.
1.12 Adding/Editing/Deleting Items from a Previously Published Survey For surveys which may require updates, such as Departure View, you can edit a previously
published survey. Possible edits include changes to demographics or additional questions.
Click the Author tab on the navigation bar. This opens the Manage Surveys page.
! CEB, now Gartner advises that all branching and logic should be applied at the end
of the authoring process a survey.
For Pulse Surveys, CEB, now Gartner recommends removing any question numbers from the survey when a survey contains logic and/or branching.
36
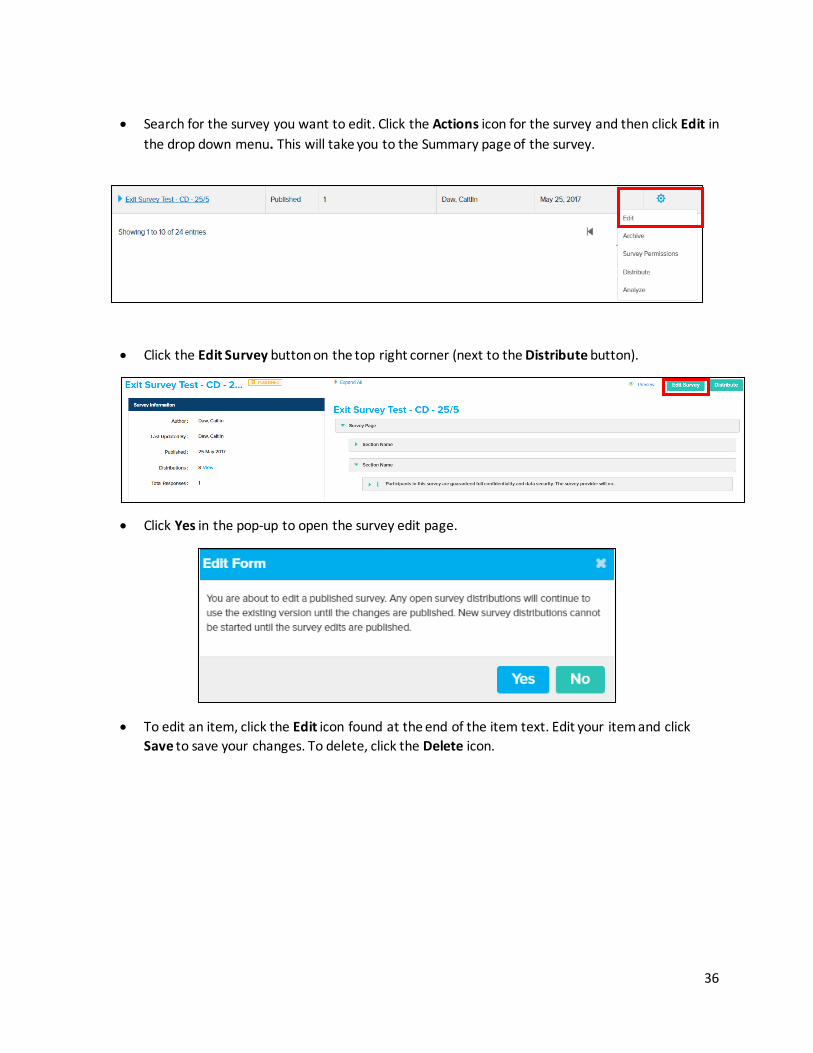
Search for the survey you want to edit. Click the Actions icon for the survey and then click Edit in
the drop down menu. This will take you to the Summary page of the survey.
Click the Edit Survey button on the top right corner (next to the Distribute button).
Click Yes in the pop-up to open the survey edit page.
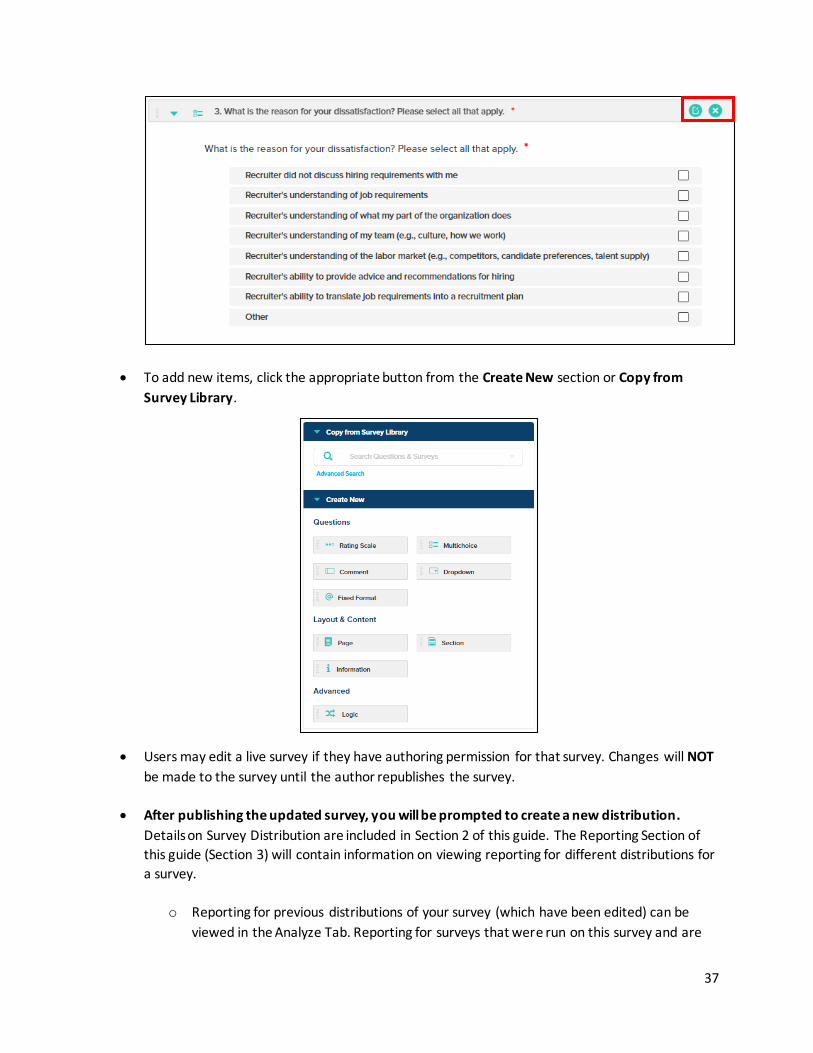
To edit an item, click the Edit icon found at the end of the item text. Edit your item and click
Save to save your changes. To delete, click the Delete icon.
37
To add new items, click the appropriate button from the Create New section or Copy from
Survey Library.
Users may edit a live survey if they have authoring permission for that survey. Changes will NOT
be made to the survey until the author republishes the survey.
After publishing the updated survey, you will be prompted to create a new distribution.
Details on Survey Distribution are included in Section 2 of this guide. The Reporting Section of
this guide (Section 3) will contain information on viewing reporting for different distributions for
a survey.
o Reporting for previous distributions of your survey (which have been edited) can be
viewed in the Analyze Tab. Reporting for surveys that were run on this survey and are
38
no longer collecting data.
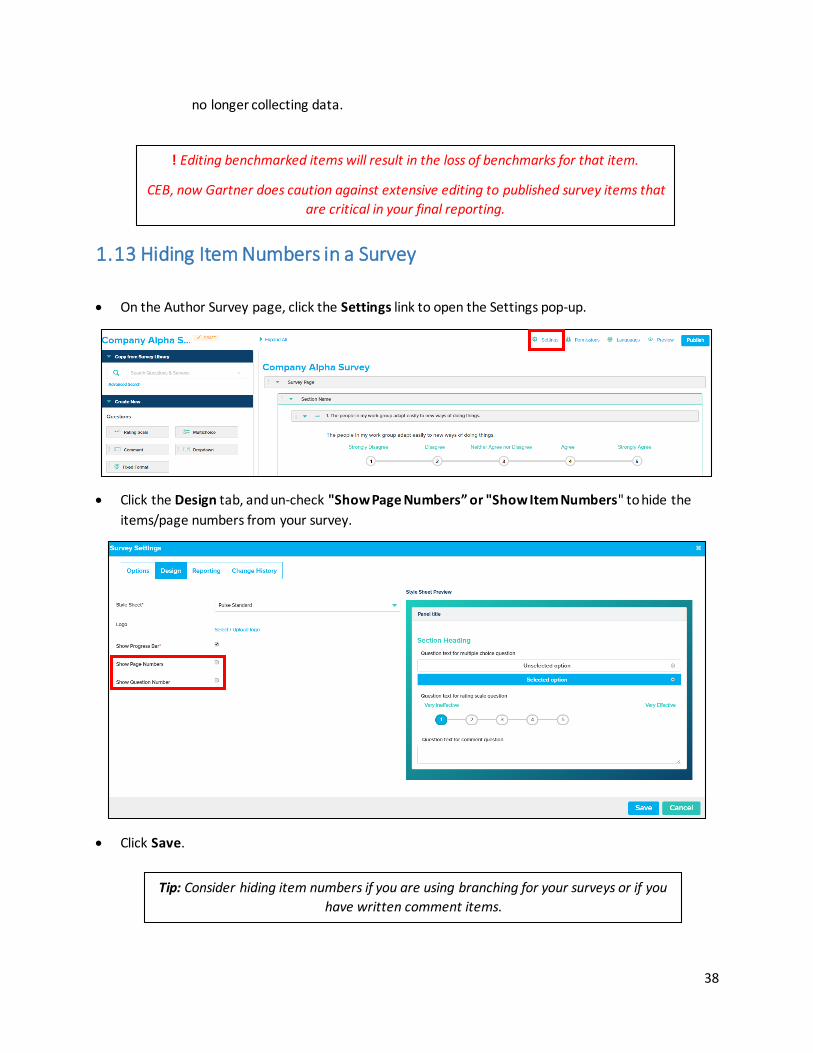
1.13 Hiding Item Numbers in a Survey
On the Author Survey page, click the Settings link to open the Settings pop-up.
Click the Design tab, and un-check "Show Page Numbers” or "Show Item Numbers" to hide the
items/page numbers from your survey.
Click Save.
! Editing benchmarked items will result in the loss of benchmarks for that item.
CEB, now Gartner does caution against extensive editing to published survey items that
are critical in your final reporting.
Tip: Consider hiding item numbers if you are using branching for your surveys or if you
have written comment items.
39
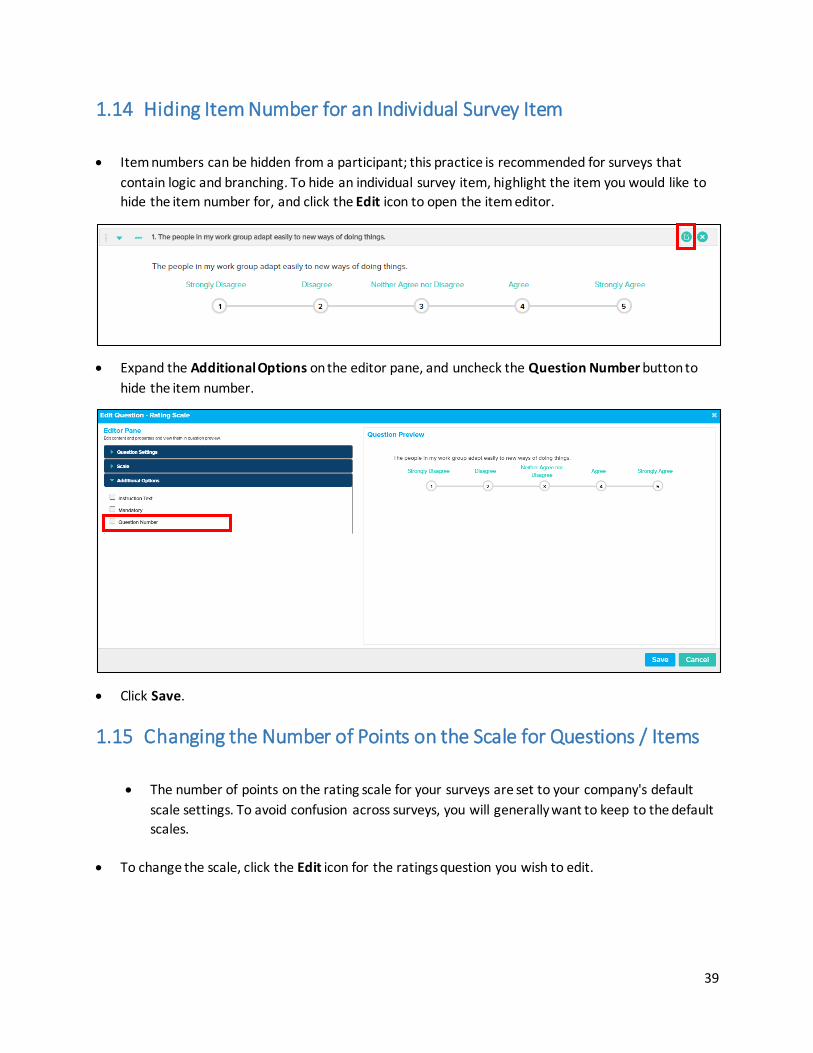
1.14 Hiding Item Number for an Individual Survey Item
Item numbers can be hidden from a participant; this practice is recommended for surveys that
contain logic and branching. To hide an individual survey item, highlight the item you would like to
hide the item number for, and click the Edit icon to open the item editor.
Expand the Additional Options on the editor pane, and uncheck the Question Number button to
hide the item number.
Click Save.
1.15 Changing the Number of Points on the Scale for Questions / Items
The number of points on the rating scale for your surveys are set to your company's default
scale settings. To avoid confusion across surveys, you will generally want to keep to the default
scales.
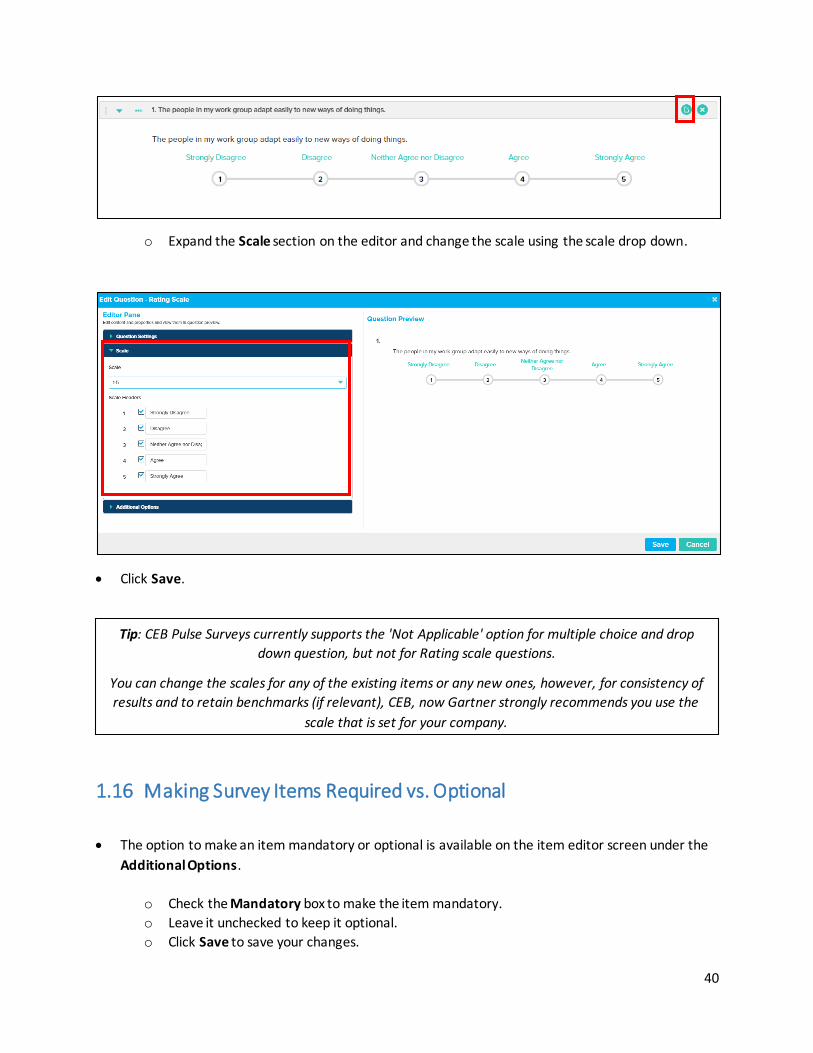
To change the scale, click the Edit icon for the ratings question you wish to edit.
40
o Expand the Scale section on the editor and change the scale using the scale drop down.
Click Save.
1.16 Making Survey Items Required vs. Optional
The option to make an item mandatory or optional is available on the item editor screen under the
Additional Options.
o Check the Mandatory box to make the item mandatory.
o Leave it unchecked to keep it optional.
o Click Save to save your changes.
Tip: CEB Pulse Surveys currently supports the 'Not Applicable' option for multiple choice and drop
down question, but not for Rating scale questions.
You can change the scales for any of the existing items or any new ones, however, for consistency of
results and to retain benchmarks (if relevant), CEB, now Gartner strongly recommends you use the
scale that is set for your company.

41
Mandatory items will have an * sign next to item text on the preview pane.
1.17 Setting Preferences for Font, Size, and Color of Item Text
The text formatting for your surveys will be set to your company's default settings. However,
you can update the formatting for each item easily.
As you click in the Question Text field to type, a text editor ribbon will appear automatically.
You can change the font, size, and color of text and its formatting (e.g. bold, italicize, and
underline).
Tip: We recommend that you include options for respondents who may not be able to answer an item or who may not want to answer an item (e.g., Can’t rate, I prefer not to answer”). However, please keep in mind that a “Not Applicable” response option is not supported for rating scale questions so
we discourage requiring responses to these items.

42
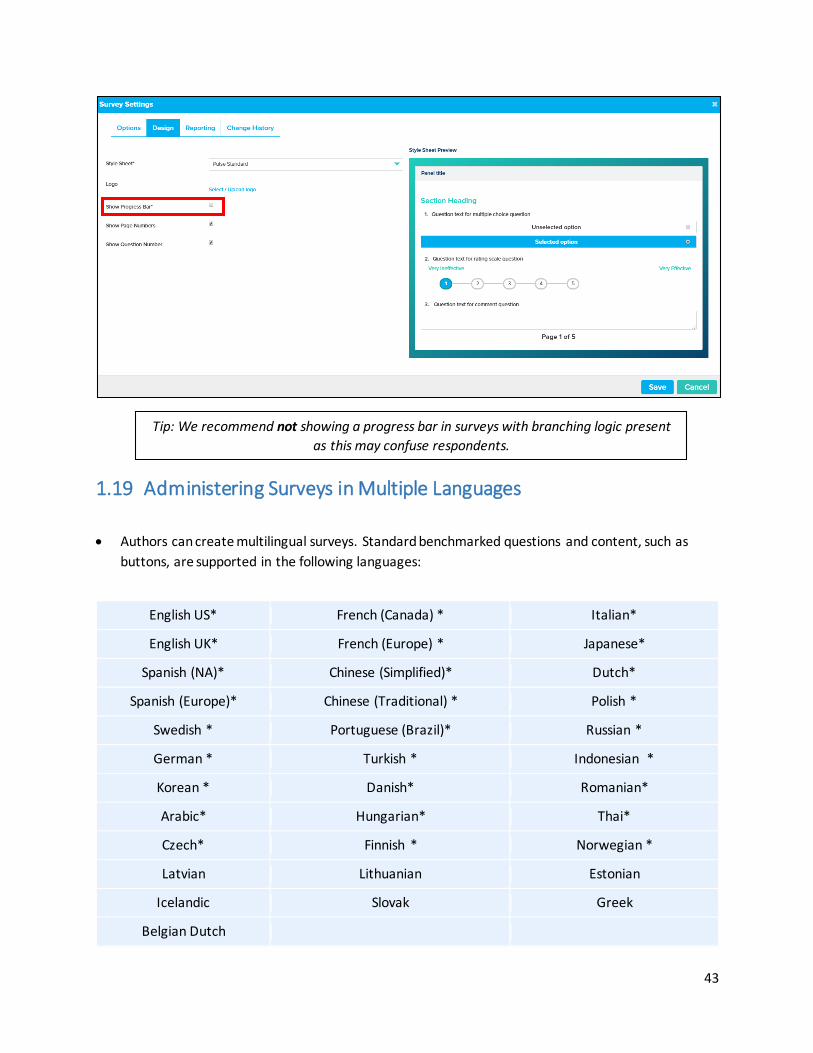
1.18 Adding a Progress Bar
Progress bars help respondents estimate the length of the survey. Progress is shown to survey
respondents in terms of the percentage of questions in a page vs. total number of questions in
the survey.
To add a progress bar follow these steps: click the Settings link to open the Settings pop-up.
Click the Design tab, and check the Show Progress Bar to show the progress bar, or uncheck it to hide the progress bar from your survey.
43
1.19 Administering Surveys in Multiple Languages
Authors can create multilingual surveys. Standard benchmarked questions and content, such as
buttons, are supported in the following languages:
English US* French (Canada) * Italian*
English UK* French (Europe) * Japanese*
Spanish (NA)* Chinese (Simplified)* Dutch*
Spanish (Europe)* Chinese (Traditional) * Polish *
Swedish * Portuguese (Brazil)* Russian *
German * Turkish * Indonesian *
Korean * Danish* Romanian*
Arabic* Hungarian* Thai*
Czech* Finnish * Norwegian *
Latvian Lithuanian Estonian
Icelandic Slovak Greek
Belgian Dutch
Tip: We recommend not showing a progress bar in surveys with branching logic present
as this may confuse respondents.

44
Respondents will automatically see the survey in their primary language, provided that the survey
translation exists that matches the primary language setting in the respondent’s web browser .
When they open the survey link, participants can also select the language they would prefer to take survey using the drop-down menu in the upper right hand corner of their browser.
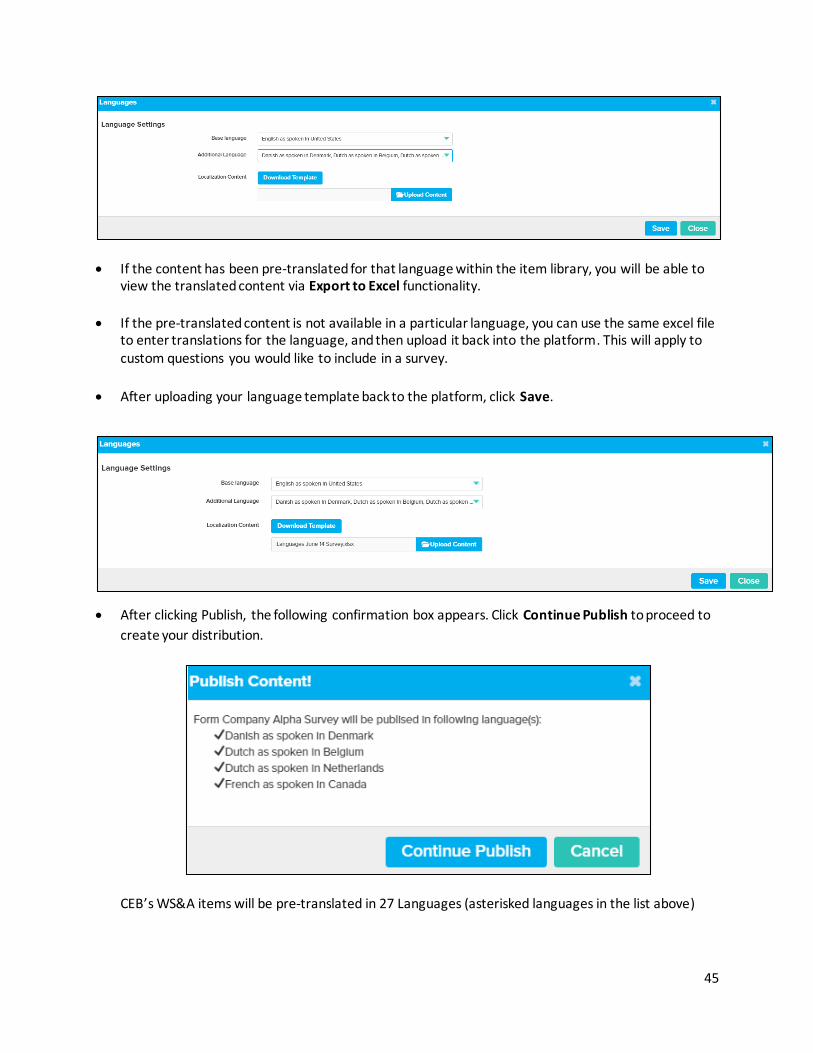
Click on the Languages link within the Author Survey page.
Select the language(s) in which you would like administer the survey in the drop-down menu.
After selecting the languages for your surveys, download the Excel template to insert the translations for your questions and answer options.
45
If the content has been pre-translated for that language within the item library, you will be able to view the translated content via Export to Excel functionality.
If the pre-translated content is not available in a particular language, you can use the same excel file to enter translations for the language, and then upload it back into the platform. This will apply to custom questions you would like to include in a survey.
After uploading your language template back to the platform, click Save.
After clicking Publish, the following confirmation box appears. Click Continue Publish to proceed to
create your distribution.
CEB’s WS&A items will be pre-translated in 27 Languages (asterisked languages in the list above)

46
1.20 Removing Languages from Pulse Surveys
Authors can remove previously selected languages from their surveys (Section 1.16).
Click the Author tab on the navigation bar. This opens the Manage Surveys page.
Search for the survey you want to edit. Click the Actions icon for the survey and then click Edit in
the drop down menu.
Click Edit Survey at the top right of the summary page for your survey.
Click on the Languages link within the Author Survey page.
! Removing a language from a survey will return to the default to English if the
respondent’s web server is consistent with that language.

47
In the pop-up window, click Remove Languages. In the drop-down menu, click the languages to
remove.
After selecting the language(s) to remove, you will receive a warning message, reminding you that
the selected language will no longer display to survey participants. Then, click Save.
1.21 Previewing and Testing Surveys before Deployment
We recommend that you preview and test the survey before publishing and distributing it. You
can preview a survey anytime during the survey authoring process.
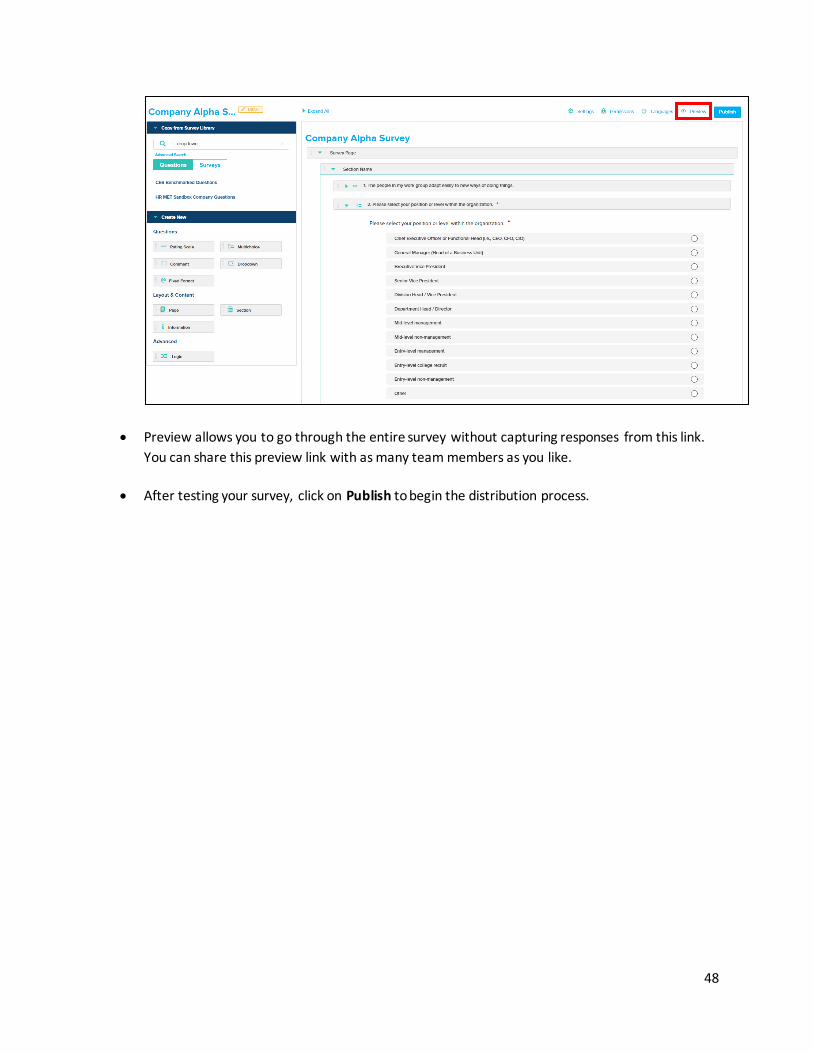
To preview your survey click on the Preview link on the top right hand corner of the survey
editor, next to the blue Publish button.
48
Preview allows you to go through the entire survey without capturing responses from this link.
You can share this preview link with as many team members as you like.
After testing your survey, click on Publish to begin the distribution process.