1 | pagesricare.com/yogawriteup.pdf · yamas are restraints and niyamas are observances.five...
TRANSCRIPT

1 | P a g e
2 | P a g e
Yogic practices for health and wellness Yoga brings the required balance in mind, body and soul. Its important principles are explained below - Yamas are restraints and Niyamas are observances. five niyamas- saucha (purity), santosha (contentment), tapas (ardour or austerity), svadhyaya (study of the Self) and Svara pranidhana (dedication to the Lord). Āsanas, capable of bringing about stability of body and mind. Prānāyāma: Pranayama cleanses and aerates the lungs, oxygenates the blood and purifies the nerves. Bandhas and Mudras are practices associated with Prānāyāma. Pratyāhara dissociation of one's consciousness (withdrawal) from the sense organs. Dhārana (inside the body and mind) which is usually understood as concentration. Dhyāna (meditation) and Samādhi (integration). Śaṭkarmas are detoxification procedures that are clinical in nature and help to remove the toxins accumulated in the body. Yuktāhāra advocates appropriate food and food habits for healthy living.
YOGA PROTOCOL
1. PRAYER : Aum Saṃgacchadhvaṃ saṃvadadhvaṃ / saṃ vo manāṃsi jānatām!! deva bhāgaṃ yathā pūrve / sañjānānā upāsate ||
May you move in harmony; may you speak in unison; let our mind be equanimous like in the beginning; let the divinity manifest in your sacred endeavours. 2. YOGA POSTURES
A. STANDING POSTURES (Warm up) 1. TĀDĀSANA (Palm Tree Posture) 2. Triyak Tadasan (Side-ways bending pose) 3. Trunk/spine twisting (KatishaktiVikasak / Katichakrasana) 4. KNEE MOVEMENT (Utkatasana) – Chair pose 5. VṚKŚĀSANA (The Tree Posture) 6. PĀDA-HASTĀSANA / Uttanasana (The Hands to Feet Posture) 7. Ardha-Chakrasana (The Half-Wheel Posture) 8. TRIKOṆĀSANA (The Triangle Posture)
B. SURYA NAMASKARA (SUN SALUTATION) C. NECK BENDING Stage - i : (Forward and Backward Bending) Stage - ii : (Right and Left bending) Stage - iii : (Right and Left Twisting) Stage - iv : Neck Rotation D. SITTING POSTURES 1. BHADRĀSANA (The Firm/ Auspicious Posture) – Butterfly pose 2. ARDHA USṬṚĀSANA (The Half Camel Posture) 3. ŚAŚĀNKĀSANA (The Hare/Rabbit Posture) 4. VAKRĀSANA (The Spinal Twist Posture) E. PRONE POSTURES 1. BHUJANGĀSANA (The Cobra Posture) 2. ŚALABHĀSANA (The Locust Posture) 3. MAKARĀSANA (The Crocodile Posture) F. SUPINE POSTURES 1. ŚETUBANDHĀSANA (The Bridge Posture) 2. PAVANAMUKTĀSANA (The Wind Releasing Posture) 3. ŚAVĀSANA (The Dead Body Posture) 3. PRANAYAM (Breathing exercises) 1. KAPĀLABHĀTI 2. NADIŚODHANA or ANULOMA VILOMA PR ṆĀYĀMA (Alternate Nostril Breathing) 3. BHRĀMARĪ PRĀNĀYĀMA (BHRĀMARĪ RECAKA) 4. DHYĀNA IN ŚAMBHAVĪ MUDRA (MEDITATION)
4. SANKALPA - Hame hamare man ko hamesha santulit rakhana hai, Isi main hi hamara atma vikas samaya hua hai. I commit, to make myself into a healthy, peaceful, joyful and loving human being. Through every action of mine, I will strive to create a peaceful and loving atmosphere around me. I strive to break the limitations of who I am right now and include the entire world as my own. I recognize the kinship of my own life with every other life. I recognize the unity of all there is.
5. Shantih Pātha (Prayer to end the session with) Aum Sarve Bhavantu Sukhinah - May All become Happy Sarve Santu Nirāmayah - May All be Free from Illness Sarve Bhadrani Paśyantu - May All See what is Auspicious Maa Kascit Duhkha Bhāg bhavet - May no one Suffer. Aum Shantih Shantih Shantih - Om Peace, Peace, Peace

3 | P a g e
What is Yoga?
YOGA is an art and science for healthy living. The word "Yoga" is derived from the Sanskrit root yuj meaning "to join", "to yoke" or "to unite". According to Yogic scriptures, the practice of Yoga leads to the union of individual consciousness with universal consciousness. According to modern scientists, everything in the universe is just a manifestation of the same quantum firmament. One who experiences this oneness of existence is said to be "in Yoga" and is termed as a yogi who has attained a state of freedom, referred to as mukti, nirvāna, kaivalya or moksha. "Yoga" also refers to an inner science comprising of a variety of methods through which human beings can achieve union between the body and mind to attain self-realisation. The aim of Yoga practice (sādhana) is to overcome all kinds of sufferings that lead to a sense of freedom in every walk of life with holistic health, happiness and harmony. Yoga is essentially a spiritual discipline based on an extremely subtle science which focuses on bringing harmony between mind and body. "Yoga is an invaluable gift of ancient Indian tradition to the human kind. It embodies unity of mind and body; thought and action; restraint and fulfilment; harmony between man and nature and a holistic approach to health and well-being. Yoga is not about exercise but to discover the sense of oneness with ourselves, the world and Nature. In Yoga Sutras, Sage Patanjali describes Yoga as 'chittavrittinirodhah'. This may be translated as the restraint (nirodhah) of mental (chitta) modifications (vrtti) or as suppression (nirodhah) of the fluctuations (vrtti) of consciousness (chitta). Yoga is the method by which the restless mind is calmed and the energy directed into constructive channels. As a mighty river which when properly harnessed by dams and canals, creates a vast reservoir of water, provides water for irrigation, prevents famine and provides abundant power for industry; similarly, the mind, when controlled, provides a reservoir of peace and generates abundant energy for human uplift. Yogic practices for health and wellness
The widely practiced Yoga sadhanas are: Yama, Niyama, Āsana, Prānāyāma, Pratyāhara, Dhārana, Dhyāna, Samādhi, Bandhas and Mudras, Shatkarmas, Yuktāhāra, etc. Yamas are restraints and Niyamas are observances. These are considered to be pre-requisites for further Yogic practices. Niyama are the rules of conduct that apply to individual discipline, while yama are universal in their application. The five niyamas listed by Sage Patanjali are: saucha (purity), santosha (contentment), tapas (ardour or austerity), svadhyaya (study of the Self) and Svara pranidhana (dedication to the Lord). Āsanas, capable of bringing about stability of body and mind, involve adopting various psycho-physical body patterns and giving one an ability to maintain a body position (a stable awareness of one's structural existence) for a considerable length of time. Prānāyāma: Pranayama cleanses and aerates the lungs, oxygenates the blood and purifies the nerves. But more important than the physical cleansing of the body is the cleansing of the mind of its disturbing emotions like hatred, passion, anger, lust, greed, delusion and pride. It consists of developing awareness of one's breathing followed by wilful regulation of respiration as the functional or vital basis of one's existence. It helps in developing awareness of one's mind and helps to establish control over the mind. In the initial stages, this is done by developing awareness of the "flow of in-breath and out-breath" (svāsa-prasvāsa) through nostrils, mouth and other body openings, its internal and external pathways and destinations. Later, this phenomenon is modified, through regulated, controlled and monitored inhalation (svāsa) leading to the awareness of the body space getting filled (puraka), the space(s) remaining in a filled state (kumbhaka) and it getting emptied (rechaka) during regulated, controlled and monitored exhalation (prasvāsa). Pratyāhara indicates dissociation of one's consciousness (withdrawal) from the sense organs, which connect with the external objects. Dhārana indicates broad-based field of attention (inside the body and mind) which is usually understood as concentration. Dhyāna (meditation) is contemplation (focussed attention inside the body and mind) and Samādhi (integration). Bandhas and Mudras are practices associated with Prānāyāma. They are viewed as the higher yogic practices that mainly adopt certain physical gestures along with control over breathing. This further facilitates control over mind and paves way for higher Yogic attainment. However, practice of dhyāna, which moves one towards self-realisation and leads one to transcendence, is considered the essence of Yoga Sādhana.
4 | P a g e
Śaṭkarmas are detoxification procedures that are clinical in nature and help to remove the toxins accumulated in the body. Yuktāhāra advocates appropriate food and food habits for healthy living.
GENERAL GUIDELINES FOR YOGA PRACTICE
A Yoga practitioner should follow the guiding principles given below while performing Yogic practices:
1. Without firm foundation a house cannot stand. Without the practice of the principles of yama and niyama, which lay down firm foundations for building character, there cannot be an integrated personality. Practice of Asanas without the backing of yama and niyama is mere acrobatics.
2. The qualities demanded from an aspirant are discipline, faith, tenacity and perseverance to
practice regularly without interruptions.
3. Cleanliness and evacuation: Before starting to practice asanas, the bladder should be emptied and the bowels evacuated. Topsy-turvy poses help bowel movements. If the student is constipated or it is not possible to evacuate the bowels before the practice of asanas, start with Sirsasana and Sarvangasana and their variations. Attempt other asanas only after evacuation. Never practice advanced asanas without having first evacuated the bowels.
4. Bath: Asanas come easier after taking a bath. After doing them, the body feels sticky due to perspiration and it is desirable to bathe some fifteen minutes later. Taking a bath or a shower both before and after practising asanas refreshes the body and mind.
5. Clothing: Light and comfortable cotton clothes are preferred to facilitate easy movement of the body.
6. Food: Asanas should preferably be done on an empty stomach. If this is difficult and if you feel weak, consume small amount of honey in lukewarm water, or a cup of tea or coffee, cocoa or milk may be taken before doing them. They may be practised without discomfort one hour after a very light meal. Allow at least four hours to elapse after a heavy meal before starting the practice. Food may be taken half an hour after completing the asanas.
7. Time: The best time to practise is either early in the morning or late in the evening. In the morning asanas do not come easily as the body is stiff. The mind, however, is fresh but its alertness and determination diminish as time goes by. The stiffness of the body is conquered by regular practice and one is able to do the asanas as well. In the evening, the body moves more freely than in the mornings, and the asanas come better and with greater ease. Practice in the morning makes one work better in one's vocation. In the evening, it removes the fatigue of the day's strain and makes one fresh and calm. Do all the asanas in the morning and stimulative asanas (like Shirsasana, Sarvangasana and their variations and Paschimottanasana) should be practised in the evening. Do not practice Asanas after being out in the hot sun for several hours. Asanas should be practiced in a clean airy place, free from insects and noise. Do not do Asanas on the bare floor or on an uneven surface, but on a folded blanket or yoga mat laid on a level floor.
8. Caution: No undue strain should be felt in the facial muscles, ears and eyes or in breathing during the practice. Yoga should not be performed in state of exhaustion, illness, in a hurry or in acute stressful conditions. In case of chronic disease /pain/ cardiac problems, a physician or a yoga therapist should be consulted prior to performing Yogic practices.
9. Closing of eyes: In the beginning, keep the eyes open. Then you will know what you are doing and where you go wrong. If you shut your eyes you will not be able to watch the requisite movements of the body or even the direction in which you are doing the pose. You can keep your eyes closed only when you are perfect in a particular asana for only then will you be able to adjust the bodily movements and feel the correct stretches.
10. Mirror: It’s better if you do asanas in front of a mirror. Keep it perpendicular to the floor and let it come down to ground level, for otherwise the poses will look slanting due to the angle of the mirror. You will not be able to observe the movements of placing the head and shoulders in the topsy-turvy poses unless the mirror reaches down to the floor. Use a mirror without a frame.
5 | P a g e
11. The Brain: During the practice of asanas, it is the body alone which should be active while the brain should remain passive, watchful and alert. If they are done with the brain, then you will not be able to see your own mistakes.
12. Breathing: In all the asanas, breathing should be done through the nostrils only and not through the mouth. Do not restrain the breath while in the process of the asana or while staying in it unless otherwise advised to do so. Follow the instructions regarding breathing given in the technique sections of the various asanas as described hereinafter.
13. Savasana: After completing the practice of asanas always lie down in Savasana for at least 10 to 15 minutes, as this will remove fatigue.
14. Suffering from Blood Pressure / dizziness - Do not start with Sirsasana and Sarvangasana if you suffer from dizziness or high blood pressure. First practise Paschimottanasana, Uttanasana, and AdhoMukhaSvanasana (mountain pose or inverted V) before attempting topsy-turvyposes like Sirsasana and Sarvangasana and after doing these poses repeat Paschimottanasana, AdhoMukhaSvanasana and Uttanasana in that order. All forward bending poses are beneficial for persons suffering from either high or low blood pressure but not for people suffering from backache.
15. Suffering from pus in ear / displaced retina: Those suffering from pus in the ears or displacement of the retina should not attempt / practice topsy-turvy poses, like Sirsasana or Sarvangasana.
16. For WOMEN: A Yoga experts should be consulted before doing Yogic practices during menstruation and pregnancy. (i) Menstruation: Avoid Asanas during the menstrual period. But if the flow is in excess
of normal, Konasana, BaddhaKonasana, Virasana, Janu-Sirsasana, Paschimottanasana and Uttanasana will be beneficial. Do not attempt topsy-turvy postures, like Sarvangasana, during the menstrual period.
(ii) Pregnancy: All the asanas can be practised during the first three months of pregnancy. All the standing poses and the forward bending asanas may be done with mild movements, for at this time the spine should be made strong and elastic and no pressure be felt on the abdomen. BaddhaKonasana and Upavistha Konasana may be practised throughout pregnancy at any time of the day (even after meals, but not forward bending postures immediately after meals), as these two asanas will strengthen the pelvic muscles and the back and also reduce labour pains considerably. Pranayama without retention/holding breath (kumbhaka) may be practised throughout pregnancy, as regular deep breathing will help considerably during labour.
(iii) After delivery: No asanas should be done during the first month after delivery.
Thereafter, they may be practised mildly. Gradually, increase the course as mentioned in the Appendix. Three months after delivery all asanas may be practised with comfort.
17. Effects of Asanas:
(i) Faulty practice causes discomfort and uneasiness within a few days. This is sufficient to show that one is going wrong. If you cannot find the fault yourself, it is better to approach a person who has practised well and get his guidance.
(ii) The right method of doing asanas brings lightness and an exhilarating feeling in the body as well as in the mind and a feeling of oneness of body, mind and soul.
(iii) Continuous practice will change the outlook of the practitioner. He will discipline himself in food, sex, cleanliness and character and will become a new man.
(iv) When one has mastered an asana, it comes with effortless ease and causes no discomfort. The bodily movements become graceful. While performing asanas, the practitioner’s body easily assumes numerous forms of life found in creation.
(v) Purity of blood is essential for well-being. While good habits like bathing purify the body externally, asana and pranayama cleanse it internally. The practice of asanas tones the entire body and removes the toxins and impurities caused by over-indulgence.
6 | P a g e
DURING THE PRACTICE • Practice sessions should start with a prayer or invocationas it creates a conducive environment
to relax the mind. • Yogic practices shall be performed slowly, in a relaxed manner, with awareness of the body
and breath. • Do not hold the breath unless it is specially mentioned to do so during the practice. • Breathing should be always done through the nostrils unless instructed otherwise. • Do not hold body tightly, or jerk the body at any point of time. • Perform the practices according to your own capacity. • It takes some time to get good results, so persistent and regular practice is very essential. • There are contra-indications/limitations for each Yoga practice and such contra-indications
should always be kept in mind. • Yoga session should end with meditation/ deep silence /Śhāntipaṭha.
HOW YOGA CAN HELP Yoga is essentially a path to liberation from all bondage. However, medical research in recent years has uncovered many physical and mental benefits that Yoga offers, corroborating the experiences of millions of practitioners. A small sampling of research shows that:
- Yoga is beneficial for physical fitness, musculo-skeletal functioning and cardio-vascular health. - It is beneficial in the management of diabetes, respiratory disorders, hypertension, hypotension
and many lifestyle-related disorders. - Yoga helps to reduce depression, fatigue, anxiety disorders and stress. - Yoga regulates menopausal symptoms. - In essence, Yoga is a process of creating a body and mind that are stepping-stones, not
hurdles, to an exuberant and fulfilling life.
YOGA PROTOCOL
1. PRAYER Yogic Practice shall start with a prayer or prayerful mood to enhance the benefits of practice. Aum Saṃgacchadhvaṃ saṃvadadhvaṃ saṃ vo manāṃsi jānatām deva bhāgaṃ yathā pūrve sañjānānā upāsate || May you move in harmony; may you speak in unison; let our mind be equanimous like in the beginning; let the divinity manifest in your sacred endeavours. 2. YOGA POSTURES A. STANDING POSTURES (Warm-up)
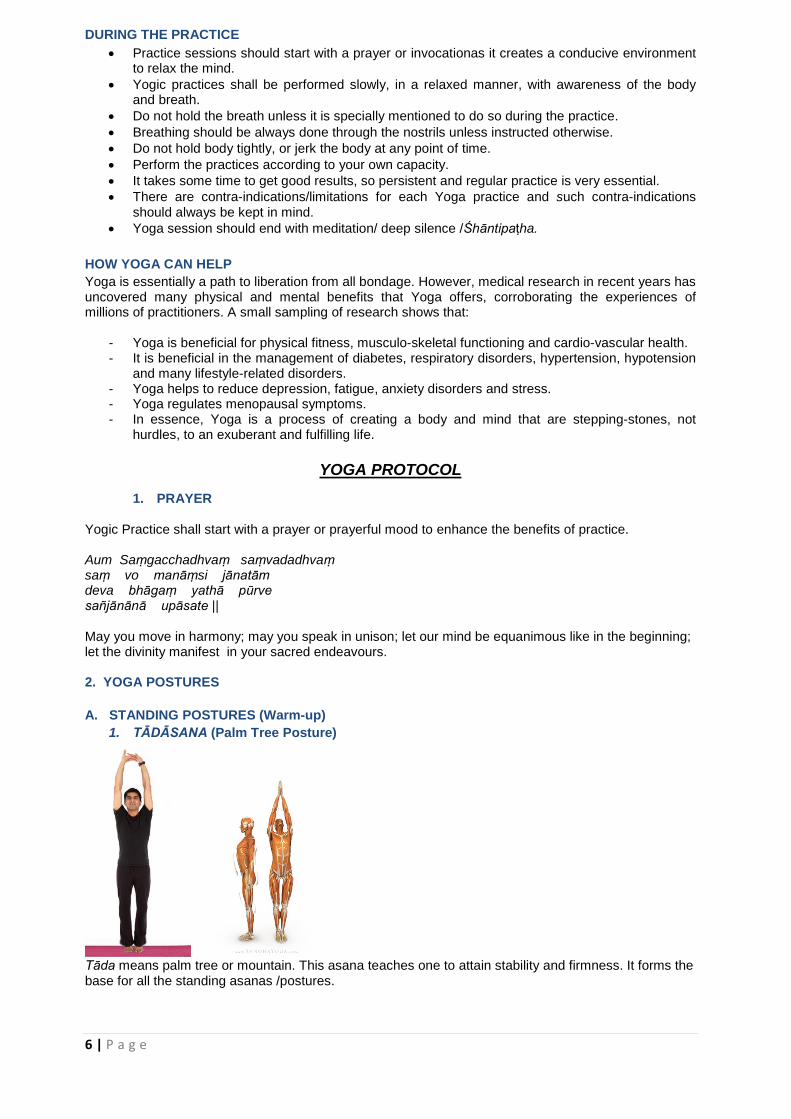
1. TĀDĀSANA (Palm Tree Posture)
Tāda means palm tree or mountain. This asana teaches one to attain stability and firmness. It forms the base for all the standing asanas /postures.
7 | P a g e
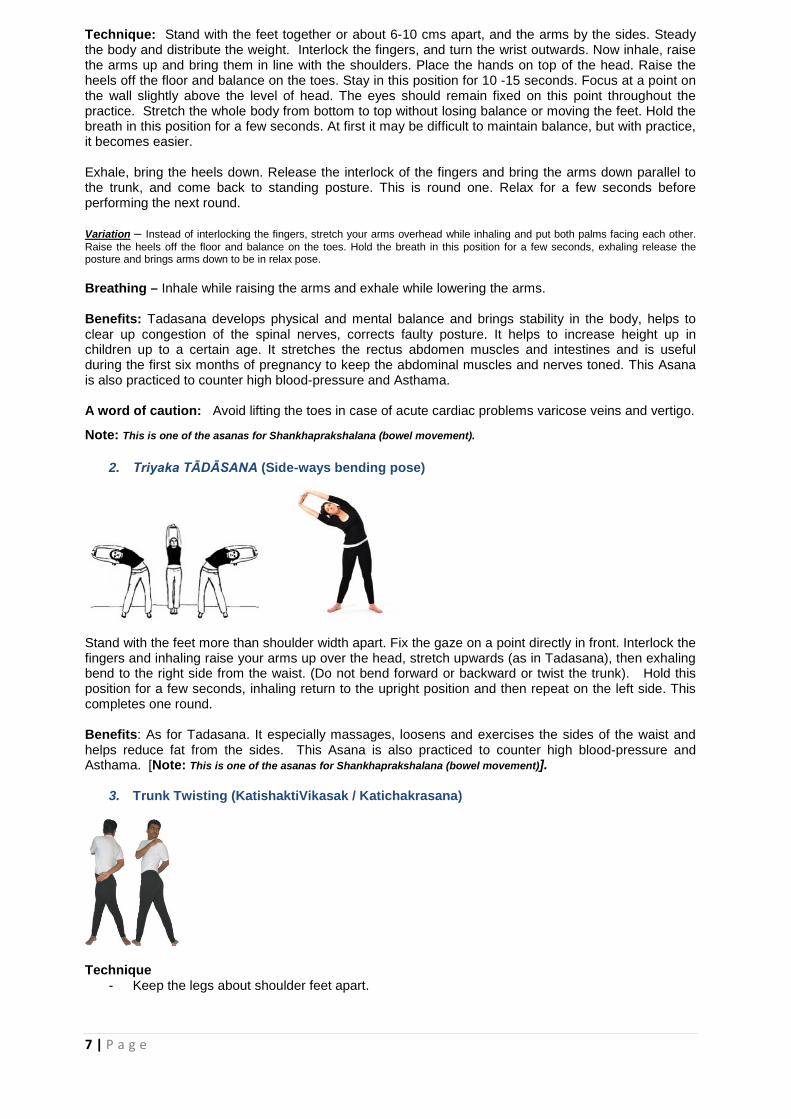
Technique: Stand with the feet together or about 6-10 cms apart, and the arms by the sides. Steady the body and distribute the weight. Interlock the fingers, and turn the wrist outwards. Now inhale, raise the arms up and bring them in line with the shoulders. Place the hands on top of the head. Raise the heels off the floor and balance on the toes. Stay in this position for 10 -15 seconds. Focus at a point on the wall slightly above the level of head. The eyes should remain fixed on this point throughout the practice. Stretch the whole body from bottom to top without losing balance or moving the feet. Hold the breath in this position for a few seconds. At first it may be difficult to maintain balance, but with practice, it becomes easier. Exhale, bring the heels down. Release the interlock of the fingers and bring the arms down parallel to the trunk, and come back to standing posture. This is round one. Relax for a few seconds before performing the next round. Variation – Instead of interlocking the fingers, stretch your arms overhead while inhaling and put both palms facing each other. Raise the heels off the floor and balance on the toes. Hold the breath in this position for a few seconds, exhaling release the posture and brings arms down to be in relax pose. Breathing – Inhale while raising the arms and exhale while lowering the arms. Benefits: Tadasana develops physical and mental balance and brings stability in the body, helps to clear up congestion of the spinal nerves, corrects faulty posture. It helps to increase height up in children up to a certain age. It stretches the rectus abdomen muscles and intestines and is useful during the first six months of pregnancy to keep the abdominal muscles and nerves toned. This Asana is also practiced to counter high blood-pressure and Asthama. A word of caution: Avoid lifting the toes in case of acute cardiac problems varicose veins and vertigo.
Note: This is one of the asanas for Shankhaprakshalana (bowel movement).
2. Triyaka TĀDĀSANA (Side-ways bending pose)
Stand with the feet more than shoulder width apart. Fix the gaze on a point directly in front. Interlock the fingers and inhaling raise your arms up over the head, stretch upwards (as in Tadasana), then exhaling bend to the right side from the waist. (Do not bend forward or backward or twist the trunk). Hold this position for a few seconds, inhaling return to the upright position and then repeat on the left side. This completes one round. Benefits: As for Tadasana. It especially massages, loosens and exercises the sides of the waist and helps reduce fat from the sides. This Asana is also practiced to counter high blood-pressure and Asthama. [Note: This is one of the asanas for Shankhaprakshalana (bowel movement)].
3. Trunk Twisting (KatishaktiVikasak / Katichakrasana)
Technique - Keep the legs about shoulder feet apart.

8 | P a g e
- While inhaling raise both the arms up to shoulder level then exhaling twist the body to the right. Bring the left hand to the right shoulder and wrap the right arm around the back, bringing the right hand around the left side of the waist. Look over the right shoulder as far as is comfortable.
- Keep the back of the neck straight and imagine the top of the spine is the fixed point around
which the head turns. Hold for two seconds, accentuate the twist, gently stretching the abdomen. Return to the starting position.
- Repeat on the other side to complete one round. Keep the feet firmly on the ground while
twisting. Relax the arms and back as much as possible throughout the practice. Do not strain. The movement should be relaxed and spontaneous.
- Perform the rotation smoothly, without jerking or stiffness. Practise 5 to 10 rounds. Breathing: Inhale raising the arms. Exhale twisting to the side.Inhale returning to the centre. Exhale while releasing the posture. Benefits: This asana tones the neck, shoulders, waist, back and hips. It is useful for correcting back stiffness and postural problems. The relaxation and twisting movement induces a feeling of lightness and may be used to relieve physical and mental tension at any time during the day. [Note: Do slowly with breathing. / Cardiac patients shall do with care. / Avoid this practice in case of severe back pain, vertebraland disc disorders, after abdominal surgery and during menstruation] This is one of the asanas for Shankhprakshalana (bowel movement)
4. Knee Movement (Utkatasana) – Chair pose
Utkata means powerful, fierce, uneven. This Asana is like sitting on an imaginary chair. Technique
- While inhaling stand in Tadasana, stretch arms straight over the head and join the palms - Exhale, bend the knees and lower the trunk till the thighs are parallel to the floor. In the final
pose, both arms and thighs should be parallel to the ground. - Do not bend forward, keep the chest as far back as possible and breathe normally. - Stay in the pose for a few seconds, 30 being sufficient. It is difficult to balance in this pose. - Inhale, straighten legs and lifting the body up and exhale while lowering the arms and come
back to normal standing pose (Tadasana) and relax.
Effects: The pose removes stiffness in the shoulders and corrects any minor deformities in the legs. The ankles become strong and the leg muscles develop evenly. The diaphragm is lifted up and this gives a gentle massage to the heart. The abdominal organs and the back are toned, and the chest is developed by being fully expanded. It strengthens knees and hip joints. A word of caution: Avoid this asana in case of acute conditions of arthritis.
5. VṚKŚĀSANA (The Tree Posture)
Vriḳśa means tree. The final position of this āsana resembles the shape of a tree, hence the name. Technique
- Stand with feet 2 inches apart. - Focus on a point in front. - Exhale, bend the right leg and place the foot on the inside of the left thigh. The heel should be
9 | P a g e
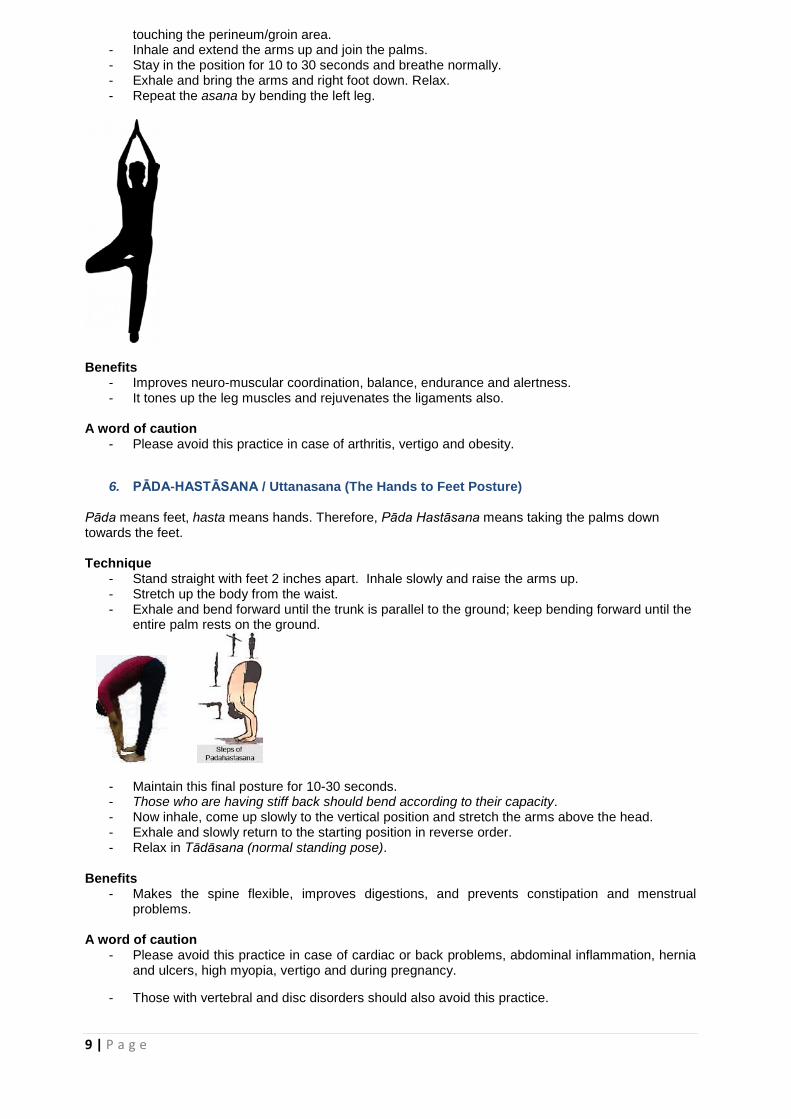
touching the perineum/groin area. - Inhale and extend the arms up and join the palms. - Stay in the position for 10 to 30 seconds and breathe normally. - Exhale and bring the arms and right foot down. Relax. - Repeat the asana by bending the left leg.
Benefits
- Improves neuro-muscular coordination, balance, endurance and alertness. - It tones up the leg muscles and rejuvenates the ligaments also.
A word of caution
- Please avoid this practice in case of arthritis, vertigo and obesity.
6. PĀDA-HASTĀSANA / Uttanasana (The Hands to Feet Posture)
Pāda means feet, hasta means hands. Therefore, Pāda Hastāsana means taking the palms down towards the feet. Technique
- Stand straight with feet 2 inches apart. Inhale slowly and raise the arms up. - Stretch up the body from the waist. - Exhale and bend forward until the trunk is parallel to the ground; keep bending forward until the
entire palm rests on the ground.
- Maintain this final posture for 10-30 seconds. - Those who are having stiff back should bend according to their capacity. - Now inhale, come up slowly to the vertical position and stretch the arms above the head. - Exhale and slowly return to the starting position in reverse order. - Relax in Tādāsana (normal standing pose).
Benefits - Makes the spine flexible, improves digestions, and prevents constipation and menstrual
problems. A word of caution
- Please avoid this practice in case of cardiac or back problems, abdominal inflammation, hernia and ulcers, high myopia, vertigo and during pregnancy.
- Those with vertebral and disc disorders should also avoid this practice.
10 | P a g e
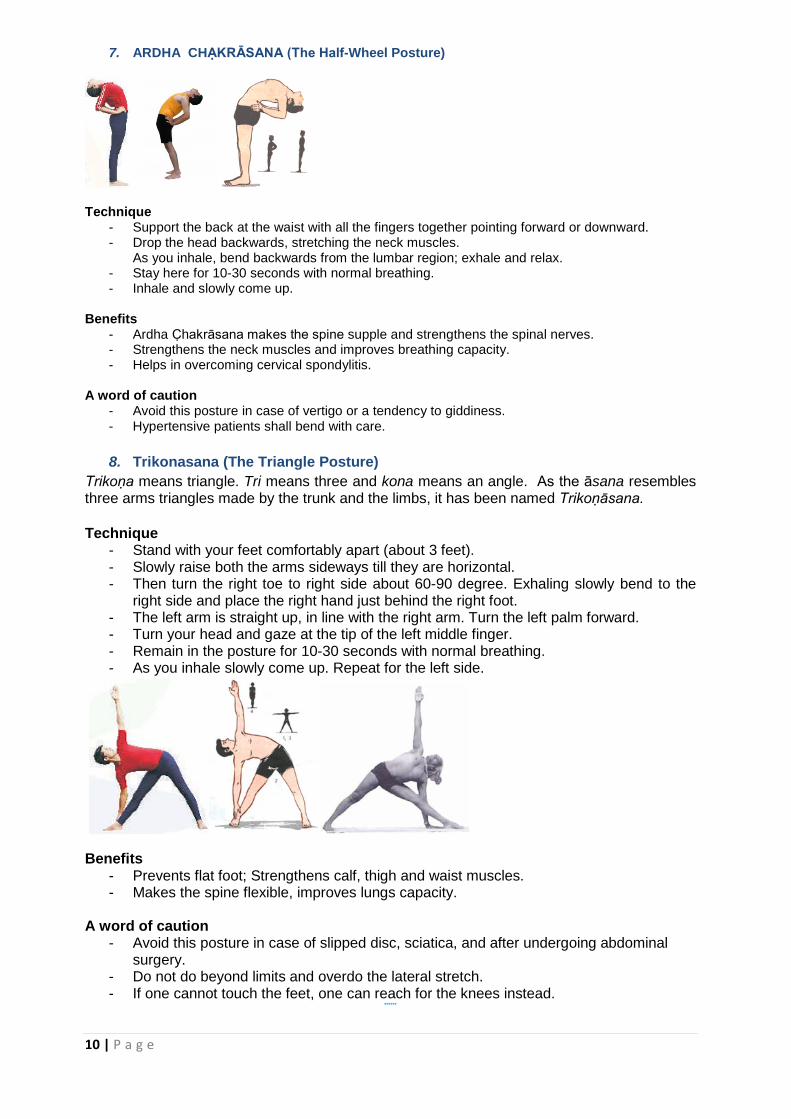
7. ARDHA CHẠKRĀSANA (The Half-Wheel Posture)
Technique - Support the back at the waist with all the fingers together pointing forward or downward. - Drop the head backwards, stretching the neck muscles.
As you inhale, bend backwards from the lumbar region; exhale and relax. - Stay here for 10-30 seconds with normal breathing. - Inhale and slowly come up.
Benefits
- Ardha Chakrāsana makes the spine supple and strengthens the spinal nerves. - Strengthens the neck muscles and improves breathing capacity. - Helps in overcoming cervical spondylitis.
A word of caution
- Avoid this posture in case of vertigo or a tendency to giddiness. - Hypertensive patients shall bend with care.
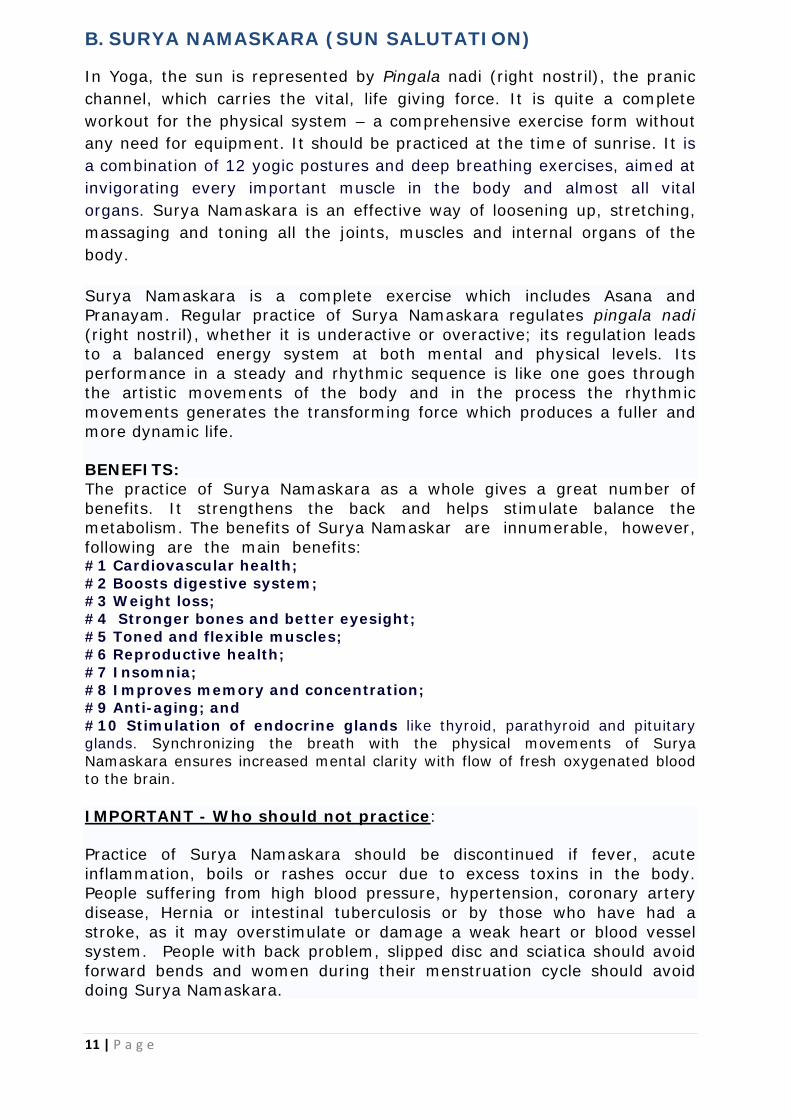
8. Trikonasana (The Triangle Posture)
Trikoṇa means triangle. Tri means three and kona means an angle. As the āsana resembles three arms triangles made by the trunk and the limbs, it has been named Trikoṇāsana. Technique
- Stand with your feet comfortably apart (about 3 feet). - Slowly raise both the arms sideways till they are horizontal. - Then turn the right toe to right side about 60-90 degree. Exhaling slowly bend to the
right side and place the right hand just behind the right foot. - The left arm is straight up, in line with the right arm. Turn the left palm forward. - Turn your head and gaze at the tip of the left middle finger. - Remain in the posture for 10-30 seconds with normal breathing. - As you inhale slowly come up. Repeat for the left side.
Benefits - Prevents flat foot; Strengthens calf, thigh and waist muscles. - Makes the spine flexible, improves lungs capacity.
A word of caution
- Avoid this posture in case of slipped disc, sciatica, and after undergoing abdominal surgery.
- Do not do beyond limits and overdo the lateral stretch. - If one cannot touch the feet, one can reach for the knees instead.
******
11 | P a g e
B. SURYA NAMASKARA (SUN SALUTATION)
In Yoga, the sun is represented by Pingala nadi (right nostril), the pranic channel, which carries the vital, life giving force. It is quite a complete workout for the physical system – a comprehensive exercise form without any need for equipment. It should be practiced at the time of sunrise. It is a combination of 12 yogic postures and deep breathing exercises, aimed at invigorating every important muscle in the body and almost all vital organs. Surya Namaskara is an effective way of loosening up, stretching, massaging and toning all the joints, muscles and internal organs of the body.
Surya Namaskara is a complete exercise which includes Asana and Pranayam. Regular practice of Surya Namaskara regulates pingala nadi (right nostril), whether it is underactive or overactive; its regulation leads to a balanced energy system at both mental and physical levels. Its performance in a steady and rhythmic sequence is like one goes through the artistic movements of the body and in the process the rhythmic movements generates the transforming force which produces a fuller and more dynamic life.
BENEFITS: The practice of Surya Namaskara as a whole gives a great number of benefits. It strengthens the back and helps stimulate balance the metabolism. The benefits of Surya Namaskar are innumerable, however, following are the main benefits: #1 Cardiovascular health; #2 Boosts digestive system; #3 Weight loss; #4 Stronger bones and better eyesight; #5 Toned and flexible muscles; #6 Reproductive health; #7 Insomnia; #8 Improves memory and concentration; #9 Anti-aging; and #10 Stimulation of endocrine glands like thyroid, parathyroid and pituitary glands. Synchronizing the breath with the physical movements of Surya Namaskara ensures increased mental clarity with flow of fresh oxygenated blood to the brain.
IMPORTANT - Who should not practice:
Practice of Surya Namaskara should be discontinued if fever, acute inflammation, boils or rashes occur due to excess toxins in the body. People suffering from high blood pressure, hypertension, coronary artery disease, Hernia or intestinal tuberculosis or by those who have had a stroke, as it may overstimulate or damage a weak heart or blood vessel system. People with back problem, slipped disc and sciatica should avoid forward bends and women during their menstruation cycle should avoid doing Surya Namaskara.

12 | P a g e
Process / Poses:
13 | P a g e
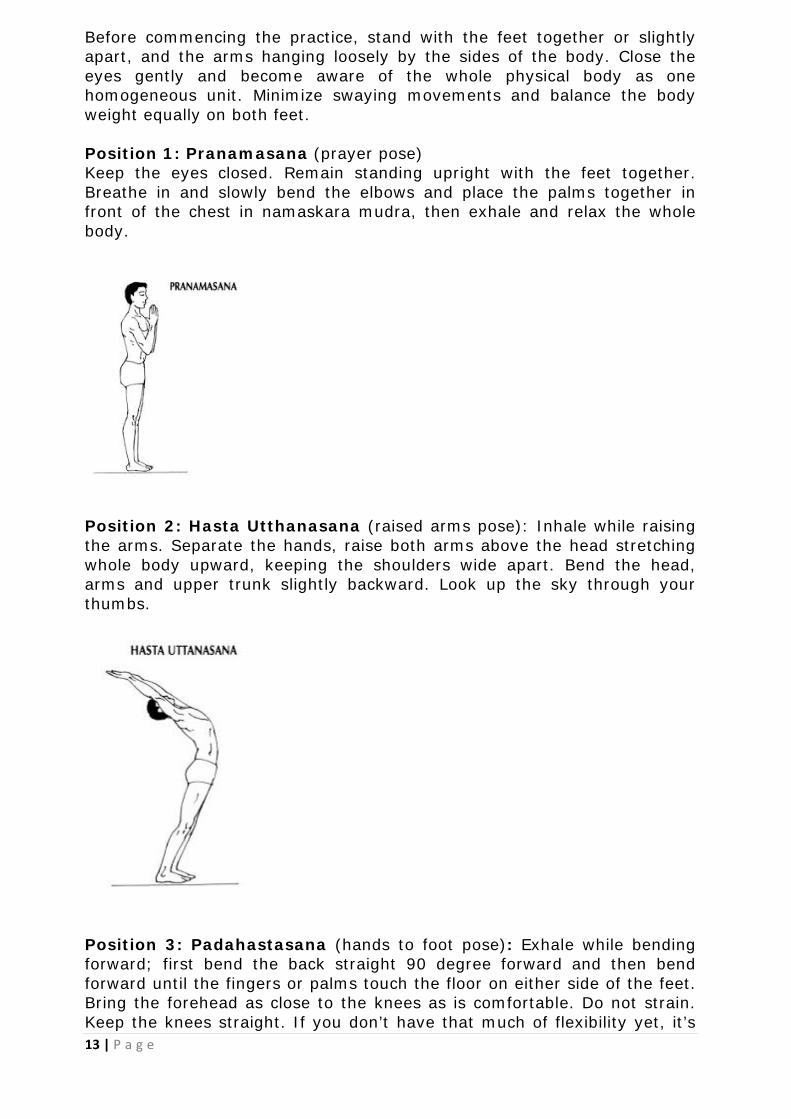
Before commencing the practice, stand with the feet together or slightly apart, and the arms hanging loosely by the sides of the body. Close the eyes gently and become aware of the whole physical body as one homogeneous unit. Minimize swaying movements and balance the body weight equally on both feet. Position 1: Pranamasana (prayer pose) Keep the eyes closed. Remain standing upright with the feet together. Breathe in and slowly bend the elbows and place the palms together in front of the chest in namaskara mudra, then exhale and relax the whole body.
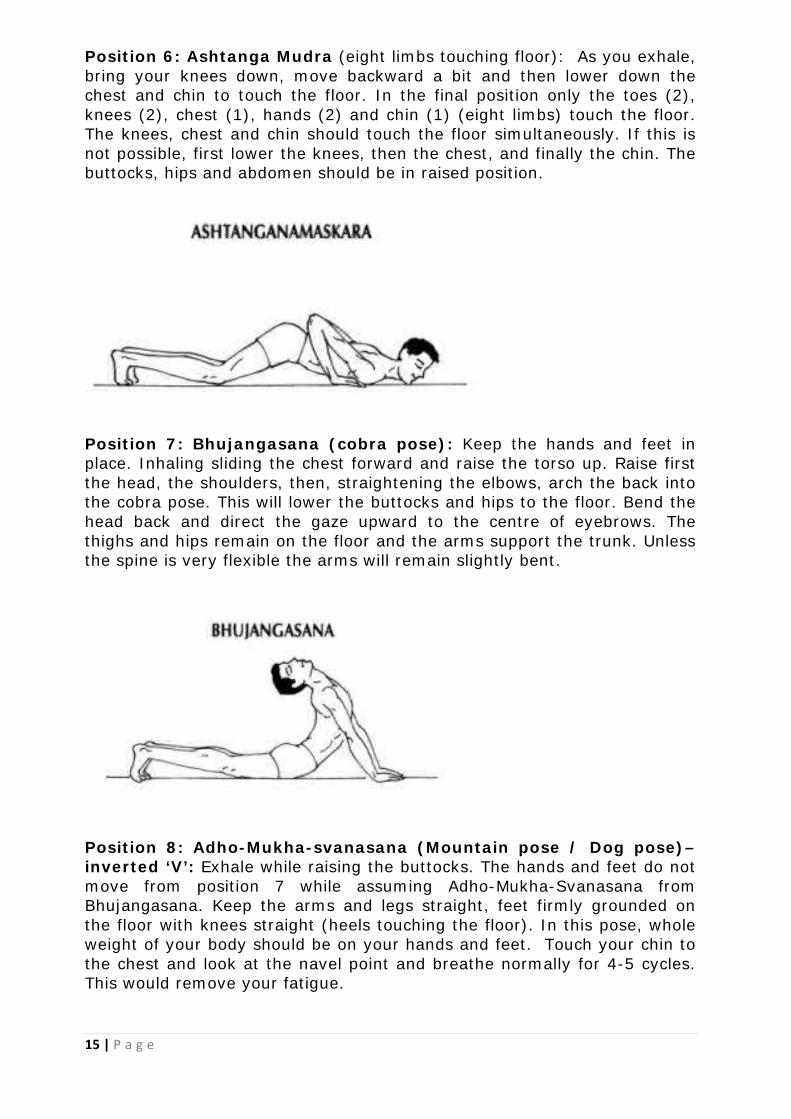
Position 2: Hasta Utthanasana (raised arms pose): Inhale while raising the arms. Separate the hands, raise both arms above the head stretching whole body upward, keeping the shoulders wide apart. Bend the head, arms and upper trunk slightly backward. Look up the sky through your thumbs.
Position 3: Padahastasana (hands to foot pose): Exhale while bending forward; first bend the back straight 90 degree forward and then bend forward until the fingers or palms touch the floor on either side of the feet. Bring the forehead as close to the knees as is comfortable. Do not strain. Keep the knees straight. If you don’t have that much of flexibility yet, it’s

14 | P a g e
okay to bend your knees to reach down, but keep your back as straight as possible, not rounded as fold down from the waist.
Position 4: Ashwa Sanchalanasana (equestrian pose): Inhale while stretching the right leg backward as far as is comfortable and grasp the floor with the toes, left foot firmly grounded on the floor. Place both hands on the floor beside the left feet, with both shoulders and left knee in one line. Keep the arms straight. In the final position, the weight of the body should be on both hands, the left foot, right knee and toes of the right foot. The head should be tilted backward, the back arched and the inner gaze directed upward to the eyebrow centre.
Position 5: Dandasana (plank pose): Retain your breath and take left leg back to form a plank position (this is also called Uttihita Chaturanga Dandasana), so that the whole body is in one straight line, balancing the whole body on four limbs - hands and toes, hands underneath your shoulders. Look ahead at the floor one foot away from you. Do not strain.
15 | P a g e
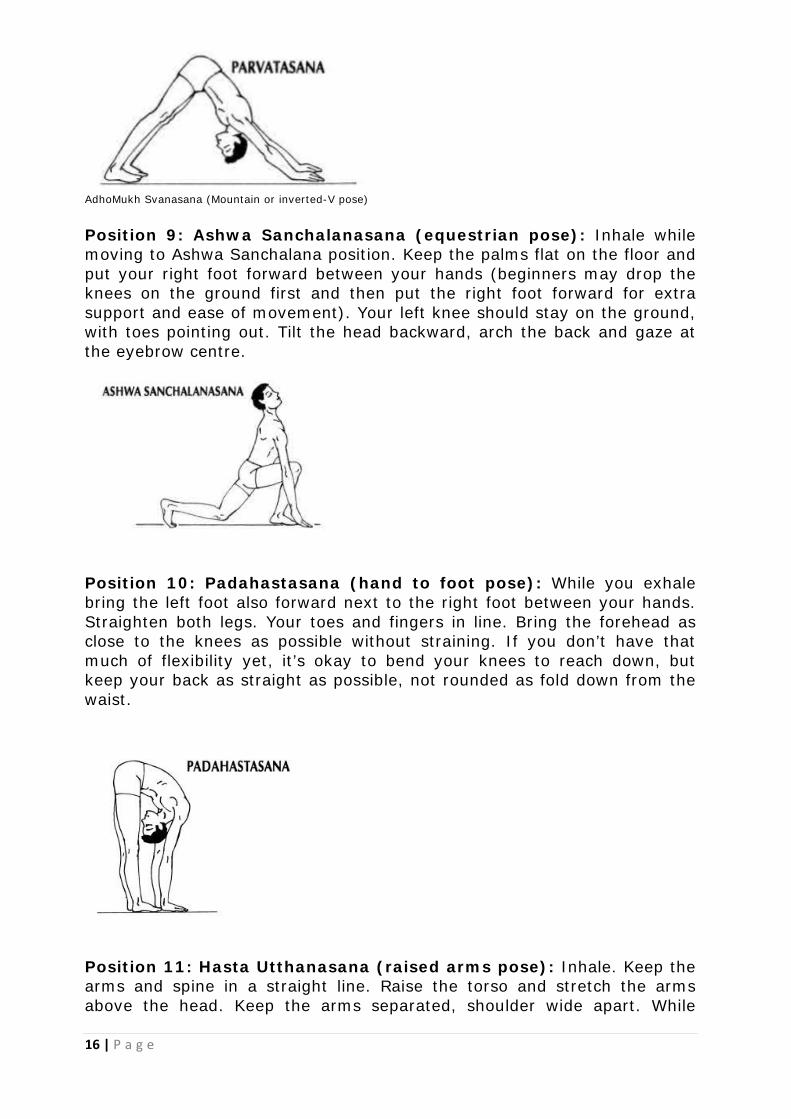
Position 6: Ashtanga Mudra (eight limbs touching floor): As you exhale, bring your knees down, move backward a bit and then lower down the chest and chin to touch the floor. In the final position only the toes (2), knees (2), chest (1), hands (2) and chin (1) (eight limbs) touch the floor. The knees, chest and chin should touch the floor simultaneously. If this is not possible, first lower the knees, then the chest, and finally the chin. The buttocks, hips and abdomen should be in raised position.
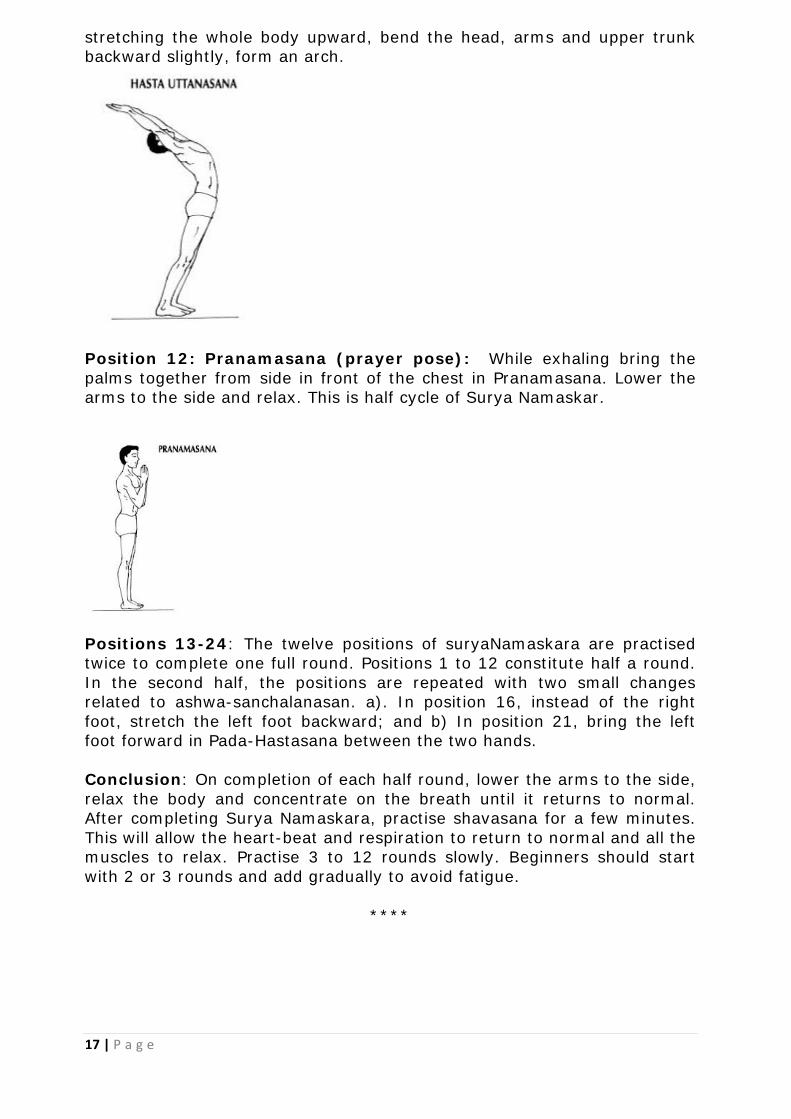
Position 7: Bhujangasana (cobra pose): Keep the hands and feet in place. Inhaling sliding the chest forward and raise the torso up. Raise first the head, the shoulders, then, straightening the elbows, arch the back into the cobra pose. This will lower the buttocks and hips to the floor. Bend the head back and direct the gaze upward to the centre of eyebrows. The thighs and hips remain on the floor and the arms support the trunk. Unless the spine is very flexible the arms will remain slightly bent.
Position 8: Adho-Mukha-svanasana (Mountain pose / Dog pose)– inverted ‘V’: Exhale while raising the buttocks. The hands and feet do not move from position 7 while assuming Adho-Mukha-Svanasana from Bhujangasana. Keep the arms and legs straight, feet firmly grounded on the floor with knees straight (heels touching the floor). In this pose, whole weight of your body should be on your hands and feet. Touch your chin to the chest and look at the navel point and breathe normally for 4-5 cycles. This would remove your fatigue.
16 | P a g e
AdhoMukh Svanasana (Mountain or inverted-V pose) Position 9: Ashwa Sanchalanasana (equestrian pose): Inhale while moving to Ashwa Sanchalana position. Keep the palms flat on the floor and put your right foot forward between your hands (beginners may drop the knees on the ground first and then put the right foot forward for extra support and ease of movement). Your left knee should stay on the ground, with toes pointing out. Tilt the head backward, arch the back and gaze at the eyebrow centre.
Position 10: Padahastasana (hand to foot pose): While you exhale bring the left foot also forward next to the right foot between your hands. Straighten both legs. Your toes and fingers in line. Bring the forehead as close to the knees as possible without straining. If you don’t have that much of flexibility yet, it’s okay to bend your knees to reach down, but keep your back as straight as possible, not rounded as fold down from the waist.
Position 11: Hasta Utthanasana (raised arms pose): Inhale. Keep the arms and spine in a straight line. Raise the torso and stretch the arms above the head. Keep the arms separated, shoulder wide apart. While
17 | P a g e
stretching the whole body upward, bend the head, arms and upper trunk backward slightly, form an arch.
Position 12: Pranamasana (prayer pose): While exhaling bring the palms together from side in front of the chest in Pranamasana. Lower the arms to the side and relax. This is half cycle of Surya Namaskar.
Positions 13-24: The twelve positions of suryaNamaskara are practised twice to complete one full round. Positions 1 to 12 constitute half a round. In the second half, the positions are repeated with two small changes related to ashwa-sanchalanasan. a). In position 16, instead of the right foot, stretch the left foot backward; and b) In position 21, bring the left foot forward in Pada-Hastasana between the two hands. Conclusion: On completion of each half round, lower the arms to the side, relax the body and concentrate on the breath until it returns to normal. After completing Surya Namaskara, practise shavasana for a few minutes. This will allow the heart-beat and respiration to return to normal and all the muscles to relax. Practise 3 to 12 rounds slowly. Beginners should start with 2 or 3 rounds and add gradually to avoid fatigue.
****
18 | P a g e
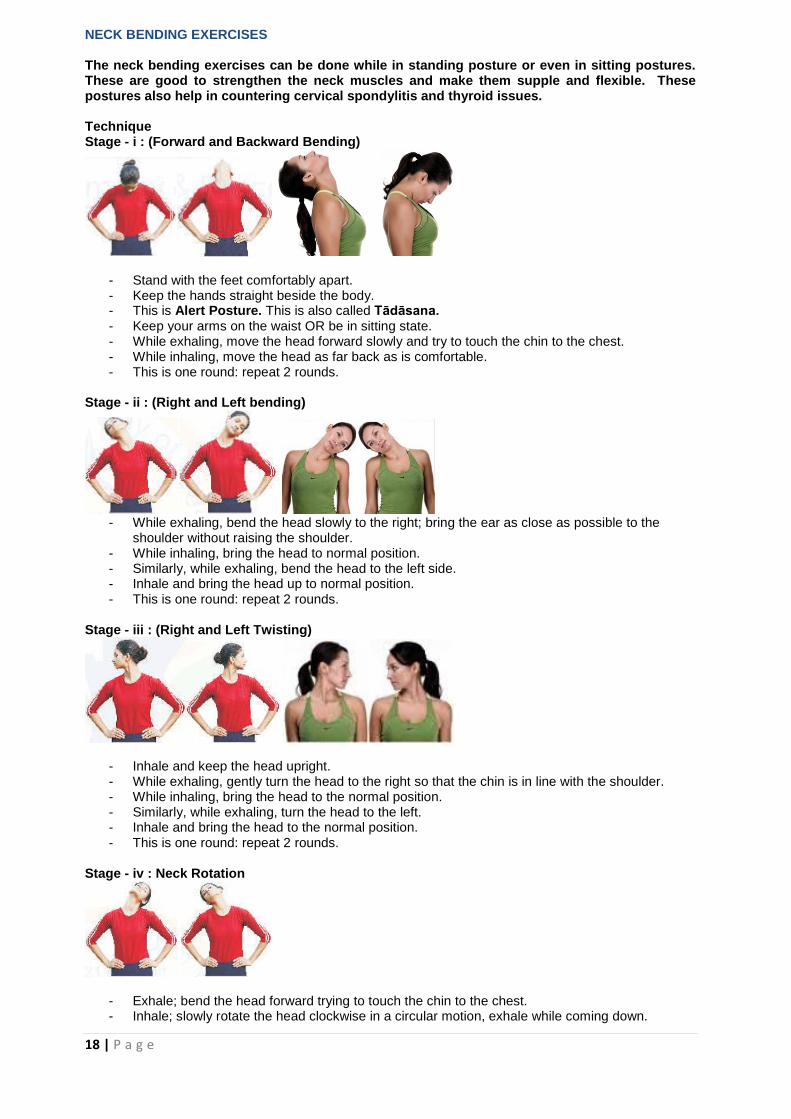
NECK BENDING EXERCISES
The neck bending exercises can be done while in standing posture or even in sitting postures. These are good to strengthen the neck muscles and make them supple and flexible. These postures also help in countering cervical spondylitis and thyroid issues. Technique Stage - i : (Forward and Backward Bending)
- Stand with the feet comfortably apart. - Keep the hands straight beside the body. - This is Alert Posture. This is also called Tādāsana. - Keep your arms on the waist OR be in sitting state. - While exhaling, move the head forward slowly and try to touch the chin to the chest. - While inhaling, move the head as far back as is comfortable. - This is one round: repeat 2 rounds.
Stage - ii : (Right and Left bending)
- While exhaling, bend the head slowly to the right; bring the ear as close as possible to the
shoulder without raising the shoulder. - While inhaling, bring the head to normal position. - Similarly, while exhaling, bend the head to the left side. - Inhale and bring the head up to normal position. - This is one round: repeat 2 rounds.
Stage - iii : (Right and Left Twisting)
- Inhale and keep the head upright. - While exhaling, gently turn the head to the right so that the chin is in line with the shoulder. - While inhaling, bring the head to the normal position. - Similarly, while exhaling, turn the head to the left. - Inhale and bring the head to the normal position. - This is one round: repeat 2 rounds.
Stage - iv : Neck Rotation
- Exhale; bend the head forward trying to touch the chin to the chest. - Inhale; slowly rotate the head clockwise in a circular motion, exhale while coming down.

19 | P a g e
- Do a full rotation. - Then rotate the head in anti-clockwise direction. Inhale; go backward and exhale, come down. - This is one round: repeat 2 rounds.
Note: - Move the head as far as possible. Do not over strain. Keep the shoulders relaxed and steady. - Feel the stretch around the neck and loosening up of the joints and muscles of the neck. - Can be practiced sitting in a chair. - People with neck pain can do the practice gently, especially when taking the head back to the
extent it is comfortable. Elderly people and persons with cervical spondylitis, high blood pressure may avoid these practices.
C. SITTING POSTURES
1. BHADRĀSANA (The Firm/ Auspicious Posture)
Bhadhra means firm or auspicious.
Bhadrasan pose Bhadrasan – variation pose
Technique
- Sit erect with the legs stretched out straight in the front. - Keep the hands beside the hips. This is Dandāsana. - Now put both soles of your feet together. - Exhale and clasp your hands together over your toes. Pull your heels as close
as possible up to perineum region. If your thighs are not touching or are not close to the floor, place a soft cushion underneath the knees for support. This is the final position.
- Keep moving your knees up and down. Stay here for some time, breathe normally and concentrate on your nose-tip.
Variation: Sit in Vajrasana (firm pose). Separate the knees as far as possible while keeping the toes in contact with the floor. Separate feet just enough to allow the buttocks and perineum to rest flat on the floor between the feet. Try to separate the knees further, but do not strain. Place your hands on the respective knees, palms downward. When the body is comfortable, practice nasikagra drishti (focus on the nose-tip). As the eyes become tired close them for a short time and resume nose-tip gazing. Benefits
- Keeps the body firm and stabilize the mind. - Keeps the knees and hip joints healthy. - Helps to relieve knee pain. - Acts on the abdominal organs and releases any tension in the abdomen. - Benefits women by relieving abdominal pain often experienced during
menstruation. A word of caution
- Avoid this practice in case of severe arthritis and sciatica. 2. ARDHA USṬṚĀSANA (The Half Camel Posture)
Usṭṛa means camel. The final version of this āsana resembles the hump of a camel. In this version, only the first stage (half) of the āsana is being practiced.

20 | P a g e
Technique - Sit in Viṣrmsana. - From Dandāsana fold your legs and sit on your heels. - Keep the thighs close and big toes touching. Place the hands on the knees. - The head and back should be straight. This is Vajrāsana. - Stand on your knees; Place the hands on the waist with fingers pointing
downward; Keep the elbows and shoulders parallel. - Inhaling bend the head back and stretch the neck muscles and the trunk
backwards as much as possible. As you exhale, relax. Keep the thighs perpendicular to the ground.
- Remain in the posture for 10-30 seconds with normal breathing. - Return with inhalation; sit in Vajrāsana.
Half-camel pose Variation - Full Camel Pose
Note/Variation:
- If you can reach the heels, you can place your hands on them with backward bend. This is Uṣtrāsana (full pose) [as in the picture above].
Benefits
- Relieves constipation and back pain. - Increases blood circulation to the head and cardiac region.
A word of caution
- In case of hernia and abdominal injuries, arthritis, vertigo and pregnancy, please avoid doing this āsana. 3. ŚAŚĀNKĀSANA (The Hare/Rabbit Posture)
Śaśaṇka means hare (rabbit).
Technique
- Sit in Vajrāsana. - Spread both the knees wide apart, keep the big toes touching. - Keep the palms between the knees. - Exhale and slowly stretch them full length. Bend forward and place the chin on
the ground. Keep the arms parallel. Look in front and maintain the posture. - Inhale stretch arms up straight overhead. Exhale and come back to Vajrāsan. - Stretch your legs back to Viṣrāmāsan
21 | P a g e
Benefits - It helps to reduce stress, anger etc. It tones up reproductive organs, relieves
constipation, improves digestion, relieves back pain and help fighting diabetes. A word of caution
- Please avoid this posture in case of acute backache. - Patients with osteoarthritis of the knees should exercise with caution or avoid
Vajrāsana.
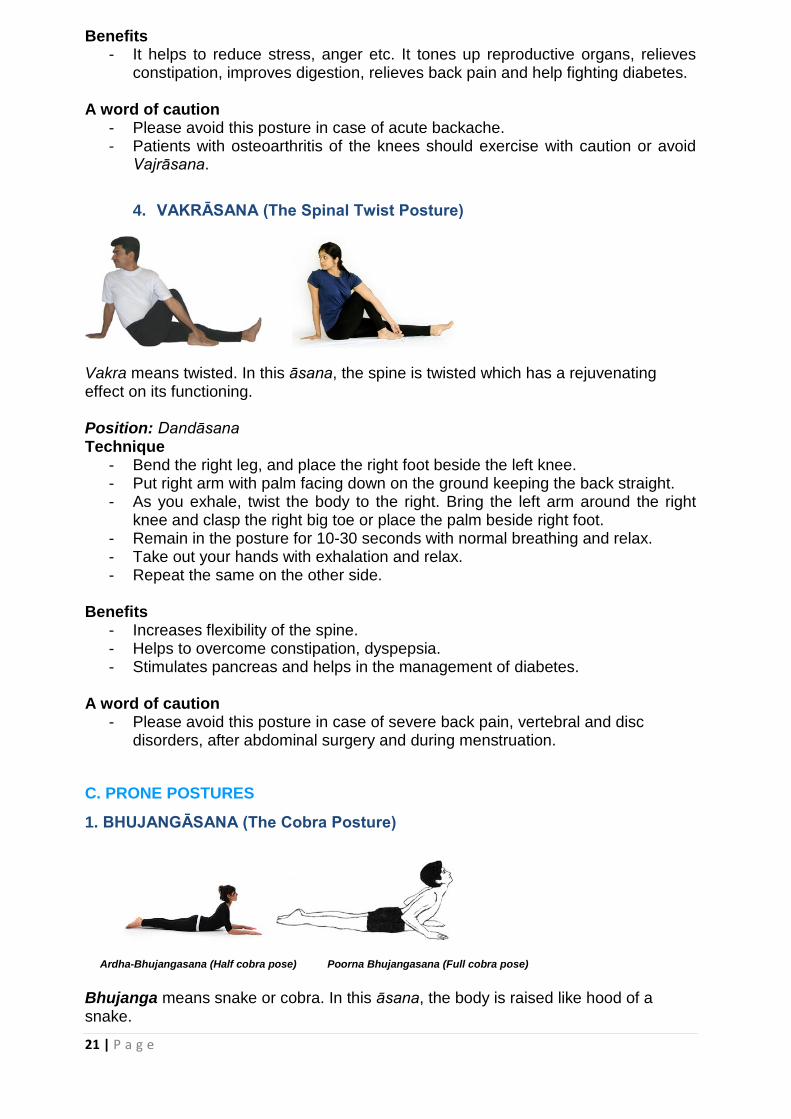
4. VAKRĀSANA (The Spinal Twist Posture)
Vakra means twisted. In this āsana, the spine is twisted which has a rejuvenating effect on its functioning. Position: Dandāsana Technique
- Bend the right leg, and place the right foot beside the left knee. - Put right arm with palm facing down on the ground keeping the back straight. - As you exhale, twist the body to the right. Bring the left arm around the right
knee and clasp the right big toe or place the palm beside right foot. - Remain in the posture for 10-30 seconds with normal breathing and relax. - Take out your hands with exhalation and relax. - Repeat the same on the other side.
Benefits
- Increases flexibility of the spine. - Helps to overcome constipation, dyspepsia. - Stimulates pancreas and helps in the management of diabetes.
A word of caution
- Please avoid this posture in case of severe back pain, vertebral and disc disorders, after abdominal surgery and during menstruation.
C. PRONE POSTURES
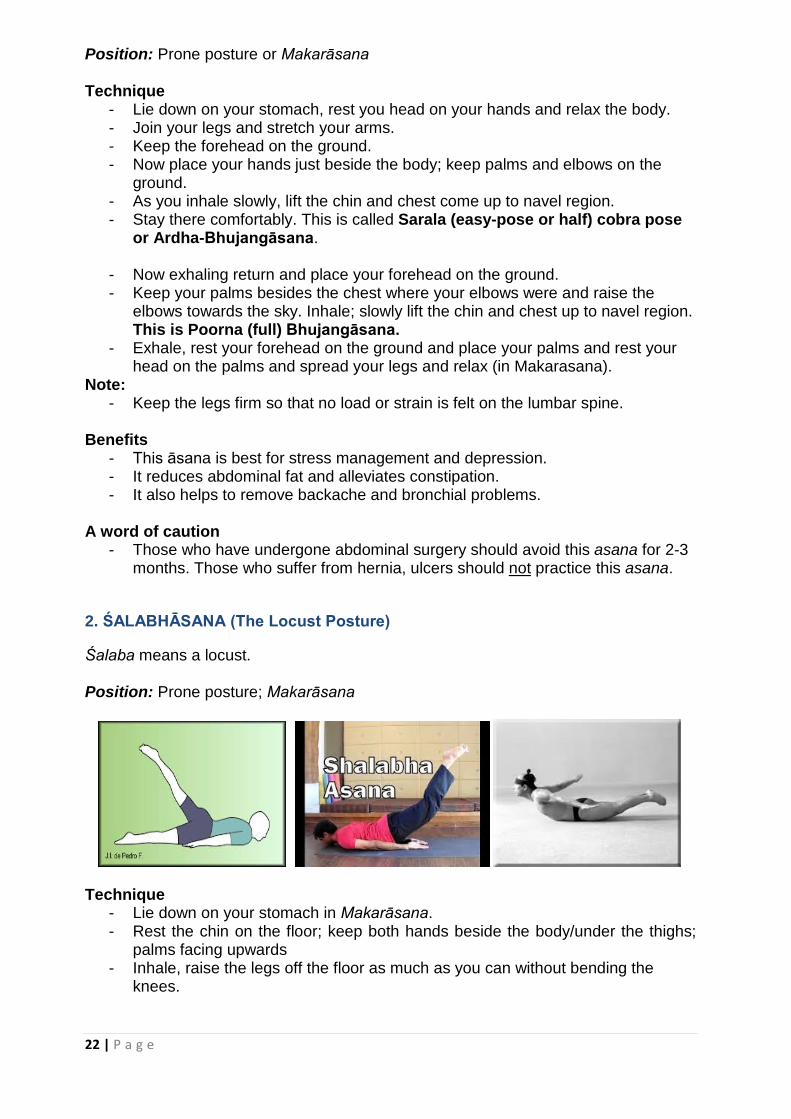
1. BHUJANGĀSANA (The Cobra Posture)
Ardha-Bhujangasana (Half cobra pose) Poorna Bhujangasana (Full cobra pose) Bhujanga means snake or cobra. In this āsana, the body is raised like hood of a snake.
22 | P a g e
Position: Prone posture or Makarāsana Technique
- Lie down on your stomach, rest you head on your hands and relax the body. - Join your legs and stretch your arms. - Keep the forehead on the ground. - Now place your hands just beside the body; keep palms and elbows on the
ground. - As you inhale slowly, lift the chin and chest come up to navel region. - Stay there comfortably. This is called Sarala (easy-pose or half) cobra pose
or Ardha-Bhujangāsana.
- Now exhaling return and place your forehead on the ground. - Keep your palms besides the chest where your elbows were and raise the
elbows towards the sky. Inhale; slowly lift the chin and chest up to navel region. This is Poorna (full) Bhujangāsana.
- Exhale, rest your forehead on the ground and place your palms and rest your head on the palms and spread your legs and relax (in Makarasana).
Note: - Keep the legs firm so that no load or strain is felt on the lumbar spine.
Benefits
- This āsana is best for stress management and depression. - It reduces abdominal fat and alleviates constipation. - It also helps to remove backache and bronchial problems.
A word of caution
- Those who have undergone abdominal surgery should avoid this asana for 2-3 months. Those who suffer from hernia, ulcers should not practice this asana.
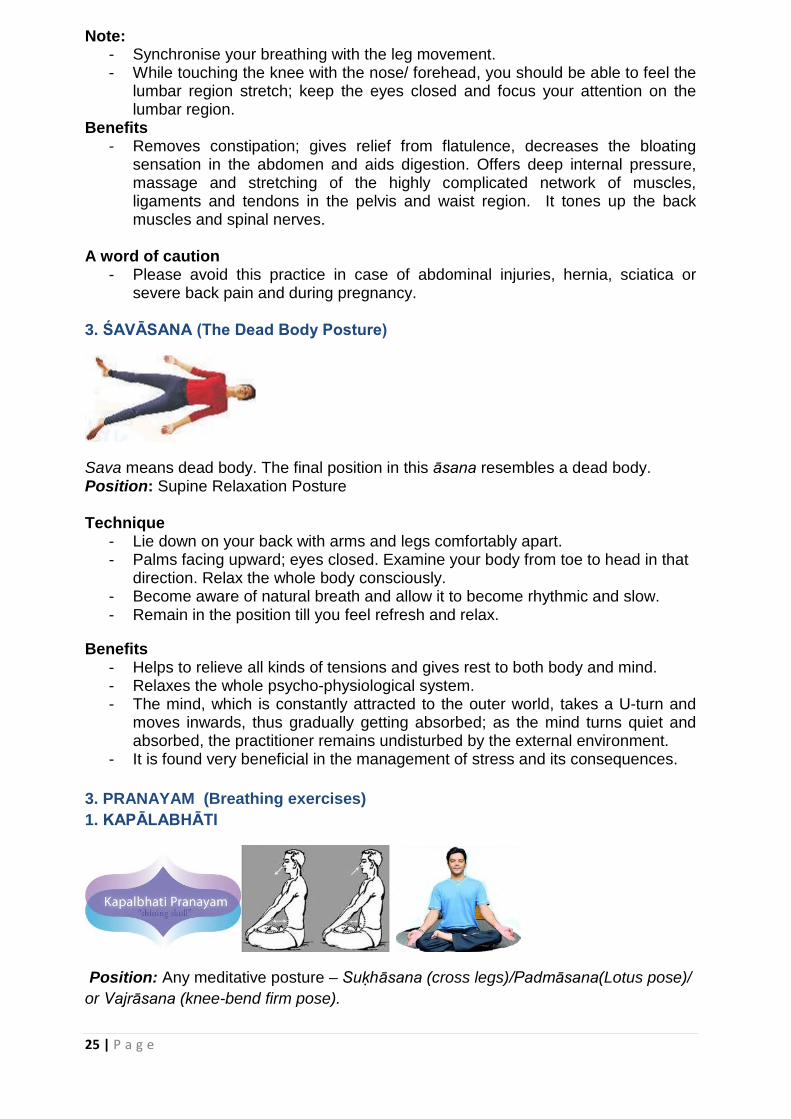
2. ŚALABHĀSANA (The Locust Posture)
Śalaba means a locust. Position: Prone posture; Makarāsana
Technique
- Lie down on your stomach in Makarāsana. - Rest the chin on the floor; keep both hands beside the body/under the thighs;
palms facing upwards - Inhale, raise the legs off the floor as much as you can without bending the
knees.

23 | P a g e
- If you raise one leg (start with left) and follow the move with the right one, it is ardha (half) Salabhasan. If you raise both legs together, it is full pose of Salabhasana.
- Extend the arms and legs well to ease the lift of the body off the floor. - Stay in this position for 10-20 seconds breathing normally. - Exhale, bring down the legs. Rest for a few seconds in Makarāsana.
Note:
- Pull up the knee caps and squeeze the buttocks to improve the posture. This āsana is more beneficial when performed after Bhujangāsana.
Benefits
- Helps in sciatica and lower backache. - Tones the hip muscles and those in the kidney region. - Reduces fat on the thighs and buttocks; good in weight management - Helps the abdominal organs aiding digestion
A word of caution - Cardiac patients should avoid this posture. Please proceed cautiously in case
of sever lower back pain. People with high blood pressure, peptic ulcers and hernia should also avoid this posture.
3. MAKARĀSANA (The Crocodile Posture) Makara means crocodile. In this āsana, the body resembles a crocodile. Position: Prone relaxation posture
Technique - Lie down on your stomach with the feet wide apart, feet pointing outward. - Bend both the arms and place the right hand on the left hand. - Place the forehead on your hands or turn your head to the side you like. - Keep the eyes closed. This is Makarāsana. - This asana is practiced for relaxation in all prone postures.
Benefits - Promotes relaxation of the lower back; Helps in recovery of back problems. - Indicated for all orthopaedic ailments. Indicated to counter stress and anxiety.
A word of caution
- Avoid this practice in case of low blood pressure, severe cardiac problems and pregnancy.
D. SUPINE POSTURES
1. ŚETUBANDHĀSANA (The Bridge Posture)
Setubandha means formation of bridge. In this posture, the body is positioned like a bridge, hence the name.

24 | P a g e
Position: Supine lying; Śavāsana.
Technique
- Bend both the legs at the knees and bring the heels near the buttocks. Keep a gap of about 10-12 inches. Hold both the ankles firmly with hands; keep the knees and feet in one straight line.
- Inhale; slowly raise your buttocks and trunk up as much as you can to form bridge. Remain in this position for 10-30 seconds, with normal breathing.
- Exhale slowly and return to the original position and relax in Śavāsana. Note
- In the final position, the shoulders and head remain in contact with the floor. - If required, in the final position, you can support your body at the waist with
your hands. Benefits
- Relieves depression and anxiety. Strengthens lower back muscles. - Stretches abdominal organs, improves digestion and helps to relieve
constipation. A word of caution
- People suffering from ulcers and hernia, and women in advanced stages of pregnancy should not practice this asana.
2. PAVANAMUKTĀSANA (The Wind Releasing Posture)
Pavan means wind and mukta means to release or to make free. As the name suggests, this asana is useful in removing wind or flatulence from the stomach and intestines. Position: Śavāsana Technique
- Lie down flat on the back. - Inhaling bend both the knees and bring the thighs to the chest. - Interlock the fingers and clasp the shin below knees. - Exhale; raise the head till your chin touches the knees and relax. - This is Pavanamuktāsana. (If done with bending one leg, it is called ardha (half) Pavanmuktasana) - Inhale bring the head back to the ground. Exhaling lower the legs to the floor.
Rest in Śavāsana
25 | P a g e
Note: - Synchronise your breathing with the leg movement. - While touching the knee with the nose/ forehead, you should be able to feel the
lumbar region stretch; keep the eyes closed and focus your attention on the lumbar region.
Benefits - Removes constipation; gives relief from flatulence, decreases the bloating
sensation in the abdomen and aids digestion. Offers deep internal pressure, massage and stretching of the highly complicated network of muscles, ligaments and tendons in the pelvis and waist region. It tones up the back muscles and spinal nerves.
A word of caution
- Please avoid this practice in case of abdominal injuries, hernia, sciatica or severe back pain and during pregnancy.
3. ŚAVĀSANA (The Dead Body Posture)
Sava means dead body. The final position in this āsana resembles a dead body. Position: Supine Relaxation Posture Technique
- Lie down on your back with arms and legs comfortably apart. - Palms facing upward; eyes closed. Examine your body from toe to head in that
direction. Relax the whole body consciously. - Become aware of natural breath and allow it to become rhythmic and slow. - Remain in the position till you feel refresh and relax.
Benefits - Helps to relieve all kinds of tensions and gives rest to both body and mind. - Relaxes the whole psycho-physiological system. - The mind, which is constantly attracted to the outer world, takes a U-turn and
moves inwards, thus gradually getting absorbed; as the mind turns quiet and absorbed, the practitioner remains undisturbed by the external environment.
- It is found very beneficial in the management of stress and its consequences. 3. PRANAYAM (Breathing exercises) 1. KAPĀLABHĀTI
Position: Any meditative posture – Suḳhāsana (cross legs)/Padmāsana(Lotus pose)/ or Vajrāsana (knee-bend firm pose).
26 | P a g e
Technique - Sit in any meditative posture. - Close the eyes and relax the whole body. - Inhale deeply through both nostrils, expand the chest. - Expel the breath with forceful contractions of the abdominal muscles and relax. - Do not strain. - Continue active/forceful exhalation and passive inhalation. - Complete 30 rapid breaths, then take a deep breath and exhale slowly. - This is one round of Kapālabhti. - Each round shall be followed by deep breathing. - Repeat 2 more rounds.
Breathing: Forceful exhalation by contracting the abdominal muscles, without any undue movements in the chest and shoulder region. Inhalation should be passive throughout the practice. Number of rounds: Beginners can practice up to 3 rounds of 20 breaths each. The count and rounds can be increased gradually over a period of time. Benefits
- Kapālabhāti purifies the frontal air sinuses; helps to overcome cough disorders. - It is useful in treating cold, rhinitis, sinusitis, asthma and bronchial infections. - It rejuvenates whole body, and keeps the face young and vibrant. - It balances and strengthens the nervous system and tones up the digestive
system. A word of caution
- Please avoid this practice in case of cardiac conditions and giddiness, high blood pressure, vertigo, chronic bleeding in the nose, epilepsy, migraine, stroke, hernia and gastric ulcers.
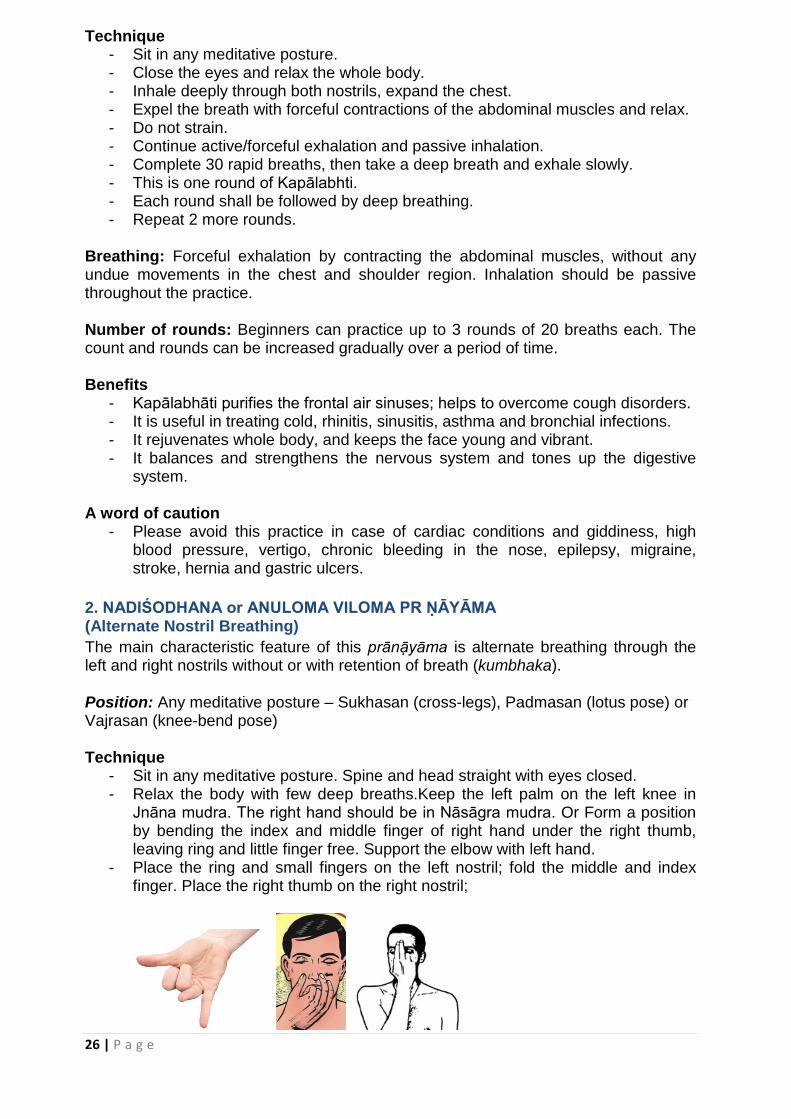
2. NADIŚODHANA or ANULOMA VILOMA PR ṆĀYĀMA (Alternate Nostril Breathing) The main characteristic feature of this prānāyāma is alternate breathing through the left and right nostrils without or with retention of breath (kumbhaka). Position: Any meditative posture – Sukhasan (cross-legs), Padmasan (lotus pose) or Vajrasan (knee-bend pose) Technique
- Sit in any meditative posture. Spine and head straight with eyes closed. - Relax the body with few deep breaths.Keep the left palm on the left knee in
Jnāna mudra. The right hand should be in Nāsāgra mudra. Or Form a position by bending the index and middle finger of right hand under the right thumb, leaving ring and little finger free. Support the elbow with left hand.
- Place the ring and small fingers on the left nostril; fold the middle and index finger. Place the right thumb on the right nostril;

27 | P a g e
- Start breathing in from the left nostril; then close the left nostril with the ring and little fingers; release the thumb from the right nostril and exhale through the right nostril.
- Next, inhale through the right nostril. At the end of inhalation, close the right nostril, open the left nostril and exhale through it. This complete process is one round of the Nādiśodhana or Anuloma Viloma Prānāyāma
- Repeat 5 rounds.
Ratio and timing - For beginners, the duration of inhalation and exhalation should be equal. - Gradually make 1:2; inhalation: exhalation
Breathing - Breathe should be slow, steady and controlled. It should not be forced or
restricted in any way. Benefits
- The main purpose of this prānāyāma is to purify the principal channels of carrying energy called (Sushumna Nadi– spinal cord); hence nourishes the whole body. Induces tranquillity and helps to improve concentration.
- Increases vitality and lowers the level of stress and anxiety - Improves eye-sight and cures bronchial disorders.
3. BHRĀMARĪ PRĀNĀYĀMA (BHRĀMARĪ RECAKA)
Bhrāmarī is derived from bhramara which means a black bee (humming bee). During the practice of this prānāyāma, the sound produced resembles the buzzing of a black bee. Position: Any meditative posture.
Sanmukhi mudra Bhramri Pranayam Pressing eardrums with index finger
Techniques: Type – I
- Sit in any meditative posture with eyes closed. - Inhale deeply through the nose. - Exhale slowly in a controlled manner through nose while making a deep, steady
humming sound such as that of black bee (if need be use the throat for creating humming sound). This is one round of Bhrāmarī prānāyāma.
- Repeat 5 rounds.
Type – II (with Sanmukhi Mudra) - Sit in any meditative posture with eyes closed. Inhale deeply through the nose. - Close the eyes with index fingers, nose with middle, mouth with ring (above
upper lip) and little fingers (below lower lip) and ears with respective thumbs as shown in the figure. This is also called Śanmukhi Mudra.
- Exhale slowly in a controlled manner while making a deep, steady humming sound such as that of black bee. This is one round of Bhrāmarī.
- Repeat 5 rounds.
28 | P a g e
Benefits
- The practice of Bhrāmarī relives stress and helps in alleviating anxiety, anger and hyperactivity. The resonance effect of humming sound creates a soothing effect on the mind and nervous system. It is a great tranquiliser; found good in the management of stress related disorders. It is a useful preparatory prānāyāma for concentration and meditation.
A word of caution - Please avoid this practice in case of nose and ear infections.
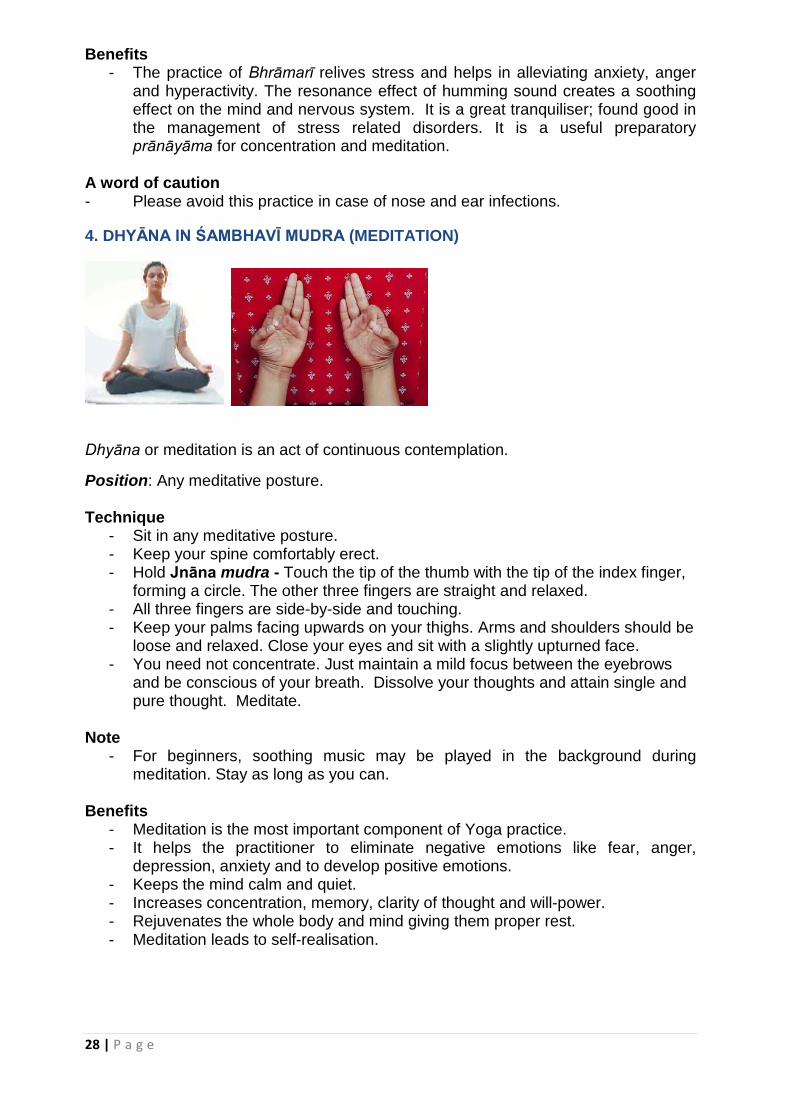
4. DHYĀNA IN ŚAMBHAVĪ MUDRA (MEDITATION)
Dhyāna or meditation is an act of continuous contemplation. Position: Any meditative posture. Technique
- Sit in any meditative posture. - Keep your spine comfortably erect. - Hold Jnāna mudra - Touch the tip of the thumb with the tip of the index finger,
forming a circle. The other three fingers are straight and relaxed. - All three fingers are side-by-side and touching. - Keep your palms facing upwards on your thighs. Arms and shoulders should be
loose and relaxed. Close your eyes and sit with a slightly upturned face. - You need not concentrate. Just maintain a mild focus between the eyebrows
and be conscious of your breath. Dissolve your thoughts and attain single and pure thought. Meditate.
Note
- For beginners, soothing music may be played in the background during meditation. Stay as long as you can.
Benefits
- Meditation is the most important component of Yoga practice. - It helps the practitioner to eliminate negative emotions like fear, anger,
depression, anxiety and to develop positive emotions. - Keeps the mind calm and quiet. - Increases concentration, memory, clarity of thought and will-power. - Rejuvenates the whole body and mind giving them proper rest. - Meditation leads to self-realisation.

29 | P a g e
4. SANKALPA
Hame hamare man ko hamesha santulit rakhana hai, Isi main hi hamara atma vikas samaya hua hai.
I commit, to make myself into a healthy, peaceful, joyful and loving human being. Through every action of mine, I will strive to create a peaceful and loving atmosphere around me. I strive to break the limitations of who I am right now and include the entire world as my own. I recognize the kinship of my own life with every other life. I recognize the unity of all there is.
5. Shantih Pātha (Prayer to end the session with)
Aum Sarve Bhavantu Sukhinah, Sarve Santu Nirāmayah Sarve Bhadrani Paśyantu, Maa Kascit Duhkha Bhāg bhavet Aum Shantih Shantih Shantih
May All become Happy, May All be Free from Illness. May All See what is Auspicious, May no one Suffer. Om Peace, Peace, Peace.
*******