1.1 encounter a spaceship - makeblockdownload.makeblock.com/scratch2.0theadventuresofmike.pdf ·...
TRANSCRIPT


1.1 Encounter a Spaceship
Intro
Mike, a student of Grade 5, is always looking forward to exploring the outer space.
One day, he comes across a spaceship on his way back home. What does this
spaceship look like? And what will happen to them?
Tasks
1. Get familiar with the interface of Scratch 2.0
2. Understand the features of each sprite and the backdrop
3. Learn to create a new sprite and backdrop.
Start Learning
Sprite is the actor in one piece of work. Scratch provides multiple ways of creating
sprites. Now, let's learn how to use Scratch!
1. Create Sprites
Tool Explanation
Choose a sprite from the Sprite Library
Create a new sprite
Import (upload) a sprite from local file
Create a sprite via taking photo
2. Rich Sprite Library
Click to choose a sprite from the Sprite Library. With the sprites being sorted
into different types, you can choose the wanted sprite according to the actual story.

★ Practice:
Import sprites "Mike.png" and "Spaceship.png" from local files.
3. Adjust the Size
After importing the sprites into the stage, you can use the following icons to adjust
the size of the sprite per needed.
★ Practice:
Try to adjust size of the sprite you choose.
☆ Explore
Right click the sprites to explore the other functions.
Tool Explanation
Copy
Delete
Zoom In
Zoom Out

4. Create Backdrop
Stage is the arena for sprites to move and act. You can add a backdrop on the stage
to make your story more interesting and vivid. Meanwhile, adding backdrop will also
expand the story to a further level. Now, let's try this out!
★ Practice:
Import the "Encounter.png" from the local file.
What You've Learnt?
Adventure Diary (Self-Assessment) Gas Station (Other's Assessment)
Tool Explanation
Four ways to create the backdrop:
Choose from the Backdrop Library;
Create a new backdrop;
Import backdrop from local files;
Take a photo as the backdrop
On the backdrop tag page, you can choose to add,
delete and change backdrop.


1.2 Locate the Coordinate
Intro
Mike is a fan for travel and exploration. To avoid losing the direction and continue his
adventure safely while in the wild, Mike needs to learn how to locate his coordinate.
Task
1. Know the concept of coordinate
2. Learn how to move to the designated position
Start Learning
1. Coordinate System
Every sprite has its/her/his own position on the stage. To manage them well, we
need to first get familiar with the coordinate system of the stage.
The central coordinate of the stage lies on (0,0), with the horizontal direction as
X-axis and vertical direction as Y. Divided by the central coordinate, the right part of
the X-axis is positive X-axis (+), left negative X-axis (-); the upper part of the Y-axis
divided by the central coordinate is positive Y-axis and the lower part Negative
Y-axis.
Knowing the coordinate systems is the essential step of operate the position of all
sprites on the stage.
2. Move to A Designated Position
Blocks Explanation Example
Control the operation of
the whole program

★ Practice:
Mike is not in a good mood today, so let's ask him to walk around the stage for some
relaxation. The coordinates of the 4 corners on the stage are: (-240,180),
(240,180), (240,-180), (-240,-180). Make sure Mike is not walking at a fast speed.
Achieve
Sprite Program Effect
Spaceship
Mike
Additional Training
Choose a backdrop, create a new sprite as Mike's friend and let them race with each
other. Let's see who will win the race.
Tips
You can use the Random Number Block for a race to make it more intense and
exciting. Come on and have a try! (Random Number Block: the block will randomly
choose a number in the available range)
Homework
Choose one sprite that you like and make it move!
Make the sprite to move
to a designated
coordinate
Make the sprite to move
to a specified
coordination in a certain
period of time

What You've Learnt?
Adventure Diary (Self-Assessment) Gas Station (Other's Assessment)

1.3 Self Introduction
Intro
One day, Mike was examining his little spaceship carefully when suddenly he found
that the spaceship can talk! Mike fixed the spaceship with the help of its voice
prompt. Now, what on earth that spaceship is capable to do? Let's hear their
conversation.
Tasks
1. Make the spaceship talk
2. Learn to change the appearance of the spaceship
Start Learning
1. Mike's Surprise
Communication via conversation between sprites is required in order to keep the
story going. Now let's realize this goal using the blocks from Scripts Module.
Block Explanation Example
Perform the next block
after waiting for a
designated period of
time
Enable the sprite to
speak
★ Practice
1. Make Mike to give a self-introduction
2. Let's name Mike's spaceship as "Mike No.1", how is it?
☆ Explore
Do you have any questions about Mike No.1? Let's ask Mike to help ask for the
answers!
2. Mike No.1
Block Explanation Example
Change the sprite's color
to the color number you
set
Change the sprite's color
based on its current color

★ Practice
Mike No.1 is an extraordinary spaceship which can change its color. Come on and
have a try.
1. Turn Mike No.1 into blue
2. Set the color No. of Mike No.1 to 60
3. Let Mike No.1 change its color randomly.
Achieve
Now that we know how to make Mike and Mike No.1 talk, how can we set them to
talk with each other? Remember, there will be a sequencing during the conversation.
Try to use "wait..secs" block to make it happen!
Sprite Program Effect
Mike
Space
ship
Tips
The conversation time and waiting time can be calculated roughly. After finishing
the program, you can also re-adjust the time accordingly to make the conversation
go smoothly.

Additional Training
While Mike has already known much about his spaceship, the latter hasn't got
familiar with Mike yet! Now, import "Mike's side face.png" and introduce yourself to
Mike No.1.
Sprite Program Effect
Mike's
side
face
Homework
Mike is a very hardworking boy who always has lots of questions. Today, he has
another new question: Why the spaceship can fly so fast? Can you help him to figure
out the answer? Share your achievements with your friends, won't you?
What You've Learnt?
Adventure Diary (Self-Assessment) Gas Station (Other's Assessment)

2.1 First Exploration
Intro
Mike is now good friends with Mike No.1, hence they want to start their first
exploration now! However, before setting out, it's necessary for Mike to learn the
basic driving skills as preparation. See, Mike is invited to the interior of Mike No.1 for
better understanding.
Task
1. Try to change the costume of the sprite using Paint editor.
Start Learning
1. Edit the Costume
Each sprite owns various costumes to enrich its forms while presenting on the stage.
First, let's learn the tools for creating costumes.
Tool Explanation
Choose "Costumes" to enter costume
editing mode.
Edit the name of different costumes to
avoid confusion.
Undo & Redo. You can undo the
previous step or redo the one which you
has undone.
Clear all
Add material from the Sprite Library.
After that, you can modify, combine or
perform other operation to diversify the
sprite.
Import material from local files.
Flip left-right & flip up-down.
Set the costume center. After setting
the costume center, the sprite will
rotate around this center every time it
needs to rotate or flip.
Convert the photo from bitmap to
vector diagram or vice versa.

Edit tool box for bitmap and vector
diagram.
Set the value of line
Choose color or pick up color you want.
Adjust the display of current costume
★ Practice
Use tool to import "Mike in Spaceship 1.png" and "Mike in Spaceship
2.png" to the costumes.
2. Add a Backdrop
Backdrop is where multiple sprites take actions. One Stage can consist multiple
backdrops. Different backdrop defines the time, the location, and other info of each
sprite to make the whole piece of work clear and complete.
Tool Explanation
Click Stage, choose the current object
as the stage.
Choose "Backdrops"

★ Practice
Add 2 backdrops for current stage:
1. local file "Take-off.png"
2. "stars" from the Backdrop Library
Additional Training
Try to use materials from the Costume Library to create the following 3 costumes:
What You've Learnt?
Adventure Diary (Self-Assessment) Gas Station (Other's Assessment)
Four ways of adding backdrop

2.2 Auto Fly
Intro
After careful study, Mike has already gained some knowledge about the interior of
Mike No.1. Today, Mike No.1 plans to show its new skill of auto fly to Mike. Why not
joining them?
Tasks
1. Auto-fly of Mike No.1
2. Let the spaceship fly to the outer space
Start Learning
1. Switch the Backdrops
In the previous section, we've imported 2 backdrops:
Switching the backdrops when the sprites enter into different scene will improve the
vitality of the work.
Block Explanation Example
Use this block to switch
backdrops when
multiple backdrops are
included on the stage.
★ Practice
Import another 2 backdrops, and switch over those 4 backdrops randomly
2. Switch Costumes
In the previous section, we've imported 2 costumes:

One sprite can only present one costume every time. However, you can achieve
switching among different costumes to realize various effects.
★ Practice
Try to switch costume using blocks mentioned above.
Achieve
Sprite Program Effect
Stage
Block Explanation Example
Switch among different
costumes.
Use this block to set the
rotation mode of the
sprite. E.g. if the sprite is
set to rotate randomly
while flying, it will be
more real and natural. Set
the sprite to flip left and
right while walking can
pretend it from reversing.
The sprite will bounce
back when on edge.
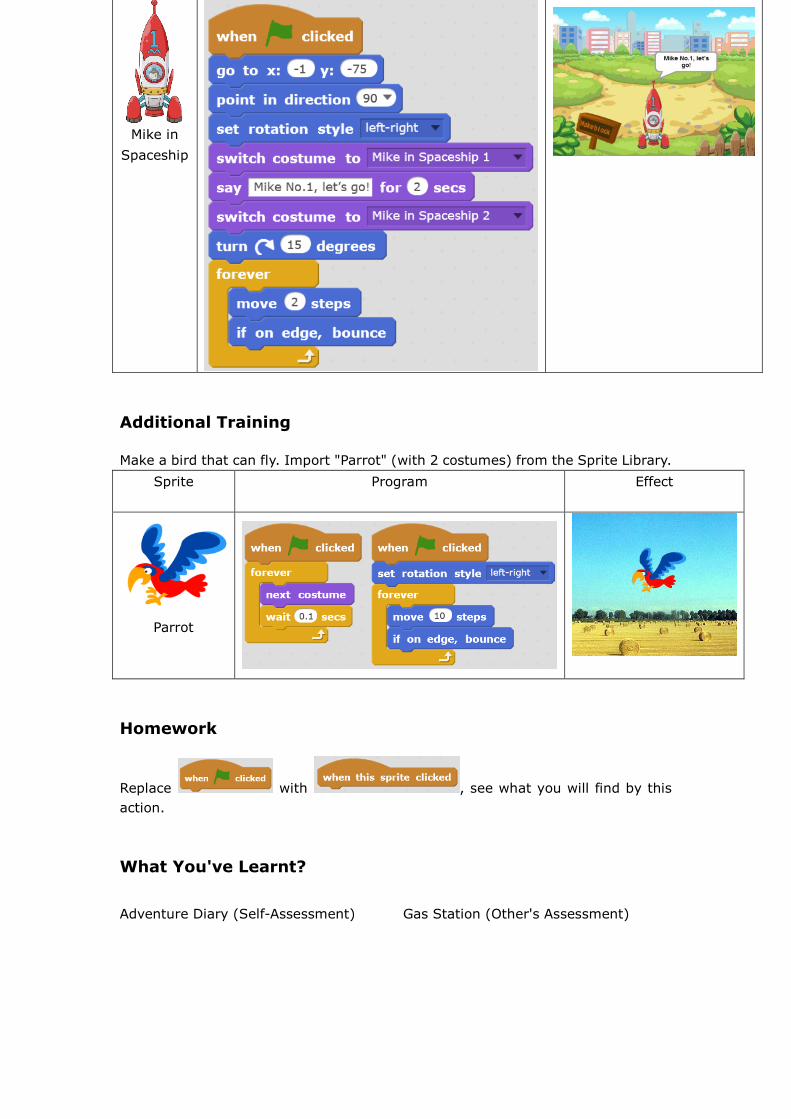
Mike in
Spaceship
Additional Training
Make a bird that can fly. Import "Parrot" (with 2 costumes) from the Sprite Library.
Sprite Program Effect
Parrot
Homework
Replace with , see what you will find by this
action.
What You've Learnt?
Adventure Diary (Self-Assessment) Gas Station (Other's Assessment)


2.3 Successful Flying
Intro
In the previous section, Mike No.1 took Mike to the outer space via auto driving.
Now Mike needs to learn to fly the spaceship himself, do you want to know how?
Task
1. Enable Mike to control the spaceship via keyboard and mouse
Start Learning
1. Control with Mouse
Make your work fun and interactive controlling the coordinate and movement with
mouse. Let's get started now!
Block Explanation Example
You can enable the
sprite to face towards
the cursor or towards
other sprites.
Make the sprite to move
to where the cursor is.
2. Control with Keyboard
Mike wants to control the flying of the spaceship with the arrow keys on the
keyboard. Use "when..key pressed" from Event Module to achieve this function.
★ Practice
Mike has just learnt some new skills of flying the spaceship. Let's practice: make the
spaceship fly 200 meters in the direction of value 90.
☆ Explore
1) Use arrow keys to control the spaceship to fly upwards, downwards, leftwards,
and rightwards.
2) Can you figure out how to control the flying speed?
Block Explanation Example
Choose the
corresponding keys to
control the program.
Adjusting the value here
will enable the sprite to
face different direction.

Achieve
1. Control the Spaceship with Mouse
Sprite Program Effect
Mike in
Spaceship
2. Control the Spaceship with Keyboard
Sprite Program Effect
Mike in
Spaceship
Stage
Additional Training
Let's play the game of "Catch Me If You Can"!
Sprite Program Effect

What You've Learnt?
Adventure Diary (Self-Assessment) Gas Station (Other's Assessment)
Cat
Mouse

3.1 Magical Pen
Intro
Mike wants to draw some graphic codes. However, he doesn't even know how to use
a pen!
Tasks
1. Teach Mike to learn how to use the pen, adjust the pen size, and adjust the color.
2. Create a rainbow lamp-pole.
Start Learning
1. Draw Lines
Use "Pen Down" block to draw lines
Block Explanation Example
Start using pen
Stop the pen
Clear all drawings
★ Practice
Draw a line with the length of 100 steps
☆ Explore
Try to draw a dotted line
2. Change Pen Size and Color
Block Explanation Example
Click the color square on
this block, click on any
color from the stage you
want, then the pen will
be set to the color you
pick.

★ Practice
Try to draw a line with 2 colors.
☆ Explore
Draw a rainbow line.
Achieve
Sprite Program Effect
Sprite1
Additional Training
Sprite Program Effect
Sprite1
Homework
1. Use a plane as your sprite and draw a colorful path.
2. Try to find out how to use Stamp
Set the size of the pen.

What You've Learnt?
Adventure Diary (Self-Assessment) Gas Station (Other's Assessment)

3.2 Polygon with Fun
Intro
Mike No.1 has transformed to a car which is going to enter into the Time Portal.
However, before it enters, it needs a code. Now, let's help Mike No.1 to enter the
portal!
Task
1. Get Mike familiar with all pen blocks. Use blocks like "Operators" to draw a
polygon in order to get ready for the opening of the Time Portal.
Start Learning
1. Draw a Square
Use pen with "Turn..degrees" block under Motion Module to draw interesting figures.
Block Explanation Example
Rotate the sprite 90
degrees to the right. Or
you can input any value
of rotation.
Turn the sprite 15
degrees to the left.
Repeat script contained
for 10 times. Or you can
input the times of
repeating you want.
★ Practice
Set the size of the pen to 3, then draw a ladder.

☆ Explore
Try to draw a square which is 100 steps on a side.
2. Draw a Regular Polygon
★ Practice
Draw a regular pentagon.
☆ Explore
Set the pen size to 5 and draw a red regular dodecagon which is 20 steps on a side.
Achieve
Sprite Program Effect
Block Explanation Example
Division. You can input
the equation directly
into the numeric boxes.
Subtraction
Mixed calculations

Sprite1
Tips
Repeat time equals to the sides of the regular polygon.
The length of the sides represents the moving steps.
With the sum of exterior angles of a polygon being 360 degrees, you can
calculate the rotation angle of your sprite by dividing 360 by the number of
sides.
Additional Training
Let's draw the following colorful circle!
Sprite Program Effect
Sprite1
Homework
Now you've learnt how to draw a circle, but do you know how to draw a semi-circle?
Come on and have a try!
What You've Learnt?
Adventure Diary (Self-Assessment) Gas Station (Other's Assessment)


3.3 Open the Time Portal
Intro
So far, Mike has already mastered the method of drawing. Today, he needs to
challenge himself to open the Time Portal.
Task
1. The code of passing the Time Portal is an arch made up of 18 five-pointed stars.
Mike needs to draw the arch using the knowledge he has. Let's cheer for him!
Start Learning
1. Draw a Five-Pointed Star
Draw a five-pointed star using Pen and Operator blocks.
★ Practice
Try to draw a five-pointed star which is 150 steps on a side.
2. Make a Block
Make a Block is the new function in Scratch 2.0. You can make and name a block
which consists often-used script of a sprite.
★ Practice:
Block Explanation Example
Subtraction
Mixed Calculations
Block Explanation Example
Choose "More Blocks"
under Scripts Module.
Click on "Make a Block"
and enter the name
"Five-Pointed Star".

Import the "Time Portal.png" from the local file.
Achieve
Sprite Program Effect
Mike
Additional Training
Try to draw a colorful multi-pointed star and a diagram made up of 5 five-pointed
stars in 5 different colors.
Sprite Program Effect
Sprite1
Tips
The formula of counting the rotation angle while drawing a multi-pointed star is:
180-(180/angle number of the multi-pointed star). And the number should be
always an odd.
What You've Learnt?
Adventure Diary (Self-Assessment) Gas Station (Other's Assessment)


4.1 Fly Mike No.1
Intro
Mike entered the Time Portal flying Mike No.1. In the portal, he saw a giant maze
which contained lots of obstacles that might stop Mike No.1 from passing through.
What we need to do now is help Mike No.1 avoid those obstacles.
Task
1. Manually control Mike No.1 and make it through the maze.
Start Learning
Use direction keys to control the flying of Mike No.1 in the maze.
Block Explanation Example
When "Up Arrow" is
pressed
The sprite will face
upwards
★ Practice
Make this happen: When the space key is pressed, Mike will talk to us.
☆ Explore
Import 2 photos: "Maze.png" and "Transformation.png"
Achieve
Sprite Program Effect
Transfo
rmatio
n

Additional Training
Create a "Keyboard Response Program": when a is pressed, the sprite will say
"You've pressed a", when b is pressed, the sprite will say "you've pressed b", and so
on.
Sprite Program Effect
Sprite1
Homework
Create 2 sprites on the same stage, one being controlled by direction keys and the
other one controlled by ASDW keys.
What You've Learnt?
Adventure Diary (Self-Assessment) Gas Station (Other's Assessment)

4.2 Pass Through the Maze with Tactics.
Intro
Mike No.1 is in the maze now. However, it requires carefulness and tactics to pass
through since it's an ultra complicated maze.
Task
1. Never touch the walls of the maze
2. Avoid the bat-guardians in the maze
3. Don't get struck by the lightning
4. Any issue mentioned above happens, Mike No.1 needs to get back to the starting
point.
Start Learning
1. Single Branch
It's required that Mike No.1 shouldn't touch any walls of the maze, but how do we
know whether Mike No.1 has touched the wall or not?
Block Explanation Example
Single Branch
Conditional-Block.
If it matches the
condition, then the
script contained
will be activated.
Condition
If the sprite
touches purple, it
will say a set
sentence.
★ Practice
If Mike touches black lines, he will say "It's black".
☆ Explore
When Mike No.1 is on the edge of the stage, it will say "There's no place to go."
2. Dual Branch
Block Explanation Example
Dual Branch
Conditional
Block. If it
matches the
condition,
then the script
contained will

★ Practice
Check whether the Up Key has been pressed.
☆ Explore
Press the Right Arrow key to draw a straight line.
3. Operators
Achieve
While Mike No.1 is moving in the maze, if it touches a black wall, a bat, or a lightning,
it will have to get back to its starting point.
Import "Bat2" and "Lightning" from the Sprite Library. (Lightning needs to be
adjusted to be in horizontal direction)
Sprite Program Effect
Bat2
be activated.
Otherwise, the
script in the
"Else" block
will be
activated.
Condition:
Whether the
space key has
been pressed.
Block Explanation Example
"..and.." block
means both of
the two
requirements
must be met.
"..or.." block
means either
of the 2
requirements
must be met.
"not.." block
means the
condition it
contains
should not be
met.

Lightning
Transformatio
n
Tips
Regarding the "touch or not" condition, we can use another simple way:
Homework
Challenge yourself to make an even more complicated maze with more obstacles.
What You've Learnt?
Adventure Diary (Self-Assessment) Gas Station (Other's Assessment)


4.3 Successful Escape
Intro
Mike is going to escape successfully soon with Mike No.1. What's waiting for them?
Challenges? Or more danger?
Task
1. Stop the program when Mike No.1 reaches the destination.
Start Learning
Block Explanation Example
Stop the whole
program
Condition
☆ Explore
Explore the function of every option by yourself.
Achieve
Let's create a sprite which represents the destination of the maze, and use it to
decide whether Mike No.1 has reached the destination.
Sprite Program Effect
End
What You've Learnt?
Adventure Diary (Self-Assessment) Gas Station (Other's Assessment)


5.1 The Forest of Change
Intro
After leaving the maze, Mike with Mike No.1 ventured into a forest. It's a magical
forest which kept changing itself into a wave, a desert, or a forest with beasts.
Task
1. Realize the effect of changing forest via switching different backdrops.
Start Learning
The goal of changing forest can be achieved by switching backdrops. Import local
file "forest.png", and import "desert" and "wave" from the Backdrop Library.
Block Explanation Example
Switch to different
backdrop.
★ Practice
1. Make the backdrop change once every 1 second.
2. Import "Forest.png" from local file.
3. Import "desert" and "Wave" from Backdrop Library.
☆ Explore
Challenge yourself to make this happen: switch to different backdrop according to
the corresponding different key.

Achieve
Switch to a different backdrop once every 5 seconds.
Block Program Effect
Forest
Additional Training
Design a program which can switch the backdrop using different keys.
Block Program Effect
Forest
Homework
In addition to using keys, try to use other methods of changing backdrops, e.g.

What You've Learnt?
Adventure Diary (Self-Assessment) Gas Station (Other's Assessment)

5.2 Smart Mike No.1
Intro
Mike No.1 is actually a smart spaceship which can transform into a ship when gets
flooded and transform to a magical carpet when in desert.
Task
1. Design a program to realize the goal of switching backdrops, and broadcasting
messages.
Start Learning
Broadcast function is to coordinate the interaction among multiple sprites. This
function requires both broadcast blocks and receive blocks.
★ Practice
1) Import 2 sprites, one of which is in charge of broadcasting and the other one
receiving.
2) Explore to find out the difference between and
.
☆ Explore
1) Import 3 sprites and enable them to pass messages in turn.
2) Think: Can the sprite which broadcasts the message receive its own message?
Achieve
When the backdrop is switched, inform Mike No.1 to change its costume. Create a
new sprite with 3 costumes: "Mike in Spaceship 1.png" (from local file), "sail-boat",
and "magiccarpet" from the library.
Sprite Program Effect
Block Explanation Example
Broadcast a
message to all
sprites.
Create a new message
Sprite A broadcast the message of
"Success".
Sprite B will perform the
corresponding script after
receiving "Success"
Receive a
message. This
is also the
initiative block
of the script.

Forest
Mike in Spaceship
1
Tips
In addition to broadcast blocks, you can also use to
achieve the same effect.
Homework
Use broadcast blocks to make the spaceship take off and land on.
What You've Learnt?
Adventure Diary (Self-Assessment) Gas Station (Other's Assessment)

5.3 Transformation of Mike No.1
Intro
Mike No.1 has encountered various trouble and harsh situations in the forest, what
should Mike do to deal with the problems?
Task
1. Write a program which enables Mike No.1 to receive messages and transform its
costume accordingly.
Start Learning
★ Practice
Program to achieve the goal of switching backdrops. Broadcast a message of
"Desert" and make Mike speak and transform after receiving the message.
Achieve
Sprite Program Effect
Mike in
Spaceship
Sprite Program Effect
Mike in
Spaceship

Additional Training
Program to realize the goal of switching backdrops via user's input. (Tips: Use
"ask..and wait" block)
Sprite Program Effect
Mike in
Spaceship
Homework
Add more backdrops and bring more changes to Mike No.1
What You've Learnt?
Adventure Diary (Self-Assessment) Gas Station (Other's Assessment)
按下按键
移动位置
按下按键

6.1 Dancing Indians
Intro
After arriving at the forest, Mike came across a bunch of friendly aborigine who were
celebrating a local festival. Mike was invited and became friends with them. Look,
Mike was dancing!
Task
1. Import the costumes of an aborigine and program him to dance.
Start Learning
Block Explanation Example
Switch costume to
costume...
Switch to the next
costume.
(Note: If the sprite's
current costume is its last
costume, the program will
switch the costume to the
first one automatically)
★ Practice
Upload multiple costumes and program a script which enables the costumes to
switch randomly.
Achieve
Program the aborigine to dance and walk simultaneously. Upload the sprite "Male

Aborigine.gif" and import "Tribe.png" from local file.
Note: the first costume of the male aborigine comes with white background. Use
"Fill with Color" to fill the background with "Transparent" .
Sprite Program Effect
Male
Aborigine
Additional Training
Design a "Z" dance as the opening and then enable the aborigine to dance and walk
simultaneously.
Sprite Program Effect
Male
Aborigine
(the red line represents
his path)
Homework
1. Design more opening dances, such as M shape, H shape, and add the subsequent
dance after the opening.
2. Upload "Female Aborigine.gif" and replicate more sprites to create a group dance!
What You've Learnt?
Adventure Diary (Self-Assessment) Gas Station (Other's Assessment)


6.2 Happy Performer
Intro
Having seen the gorgeous dance of those aborigines, Mike really wants to
accompany them. Now, let's learn how to play music!
Task
1. Teach Mike how to play music, both manually and automatically, and how to
import/export a list.
Start Learning
1. Scratch 2.0 Sound Module
Scratch 2.0 comes with sound module which enables us to play beautiful music.
Block Explanation Example
Scratch2.0 provides 21
types of instruments,
including piano, violin,
etc.
Set the beats
Set the volume
★ Practice
Choose one instrument you like and use to play 1, 2, 3,
4, 5, 6, 7 (do, re, mi, fa, so, la, ti).
☆ Explore
Program to control the playing via keyboard. See the below diagram which plays
"do".
2. Auto Play
Mike has known how to play a single note, but will him be able to auto play a song?
Let's first practice how to play the notes of "Twinkle, twinkle, little star, how I
wonder what you are". There are 2 ways:
1) Pile up single note

2) Make a List
List can store a great deal of data, thus we can save the consecutive notes into a list.
See the below diagram: Click "Data" - "Make a List" - name it as "Little Star", and
"Ok" to save.
Then you will see a list on the stage. Click "+" to add a note.
Block Explanation Example
Add data to the
list.
Delete .. from
the list.
Replace one
item from the
list.
Read one
specific item
from the list;
Get the length
of the list;
Determine
whether the list

contains a
specific item.
★ Practice
Upload "Mike.png".
Sprite Program Effect
Mike
Additional Training
We may find out that we are actually using the same blocks repeatedly except the
numbers may be different from each other. Can we find a way to eliminate these
reduplications by looping? Can we add a beat-list to make the playing smooth? (Tips:
create a new variable)
Sprite Program Effect
Mike
Tips
Click and to hide variable and list on the
stage.
Homework
Program to play the whole song of Twinkle Twinkle Little Star.

What You've Learnt?
Adventure Diary (Self-Assessment) Gas Station (Other's Assessment)

6.3 Carnival in the Forest
Intro
Exciting dance from the aborigines and the beautiful music played by Mike, how
wonderful it is! Let's make it happen in Scratch 2.0 now!
Tasks
1. Achieve auto-play via importing external txt file into the list
2. Use "ask.. and wait" block to achieve interaction between man and the
computer.
Start Learning
Here's the numbered musical notation of a cute song Ten Little Indians
Then let's create 2 txt files for notes and beats.
Import the 2 texts into the list.

★ Practice
Use what you've learnt from the last section to create an auto-play program.
Achieve
Sprite Program Program Concept
Mike
Tips
Use to adjust the tempo, and use to
change the instrument.
Additional Training
Use "ask... and wait" block to create an interactive program between man and the
computer.
Sprite Program Effect
Mike
Homework
Play another song using the list. You can also compose your own song!
What You've Learnt?
Adventure Diary (Self-Assessment) Gas Station (Other's Assessment)


7.1 Volcano of Candies
Intro
It's the harvest season for the aborigines when Mike arrived their land. There's a
dangerous volcano which kept spraying candies. Mike was asked by the aborigines
to help them collect those candies from the volcano. Of course, Mike said yes and
decided to go to the candy volcano flying Mike No.1.
Task
1. Design a volcano which can spray candies.
Start Learning
Block Explanation Example
Create clone for the
sprite you choose.
The cloned sprite is
called "Clone",
which inherits all
the attribute and
script of the
original sprite.
The Clone will start
operating from this
block. Each Clone
can possess
various of this
block.
Delete the Clone
when it is not
needed.
Achieve
Firstly, import backdrop "Candy Volcano.png" and then five sprites "Candy 1.png",
"Candy 2.png", "Candy 3.png", "Candy 4.png" and "Candy 5.png".
1. Let's use broadcast function to achieve the effect of volcano spraying candies.
Sprite Program Effect

Candy 1
Candy 2
Candy 3
Candy 4
Candy 5
2. Now we've achieve the effect of candies spurting one by one, but it's not quite
smooth and natural. For instance, the time interval between candy and candy is the

same; only one candy is spurted; or the order of candies always remains the same.
Meanwhile, we can find out that the logic behind all the 5 candies are basically the
same. To solve this issue, we need to use clone block. This time, we will use the 5
candies as the 5 costumes of a sprite, naming them as 1 to 5.
Sprite Program Effect
Candy
Tips
is different from . The former refers to
random number between 0 and 1 while the latter refers to a random number
(including decimal) between 0 and 1.
Additional Training
How to make one specified candy appears more times than the others? We can use
a list to change the frequency set by the "pick random..to..".
Sprite Program Effect

Candy
Homework
1. How to make the eruption of the volcano more frequent?
2. How to program the volcano to spray not only candies but also some other items?
What You've Learnt?
Adventure Diary (Self-Assessment) Gas Station (Other's Assessment)

7.2 Catch the Candies
Intro
Mike has arrived beside the volcano already and he wants to catch the candies by
controlling Mike No.1 with mouse.
Task
1. Design a program that enables the mouse to control Mike No.1 to catch candies.
Meanwhile, add scoring function.
Start Learning
1. Make the sprite move with the mouse
Sprite Explanation Example
There are total 3 ways
to control a sprite with
mouse. Compare the
similarities and
differences among the
3 methods.
2. Private Variable of a Clone
Block Explanation Example
While creating a
new variable,
"For all sprites"
refers to the
variable that can
be visited and
modified by all
sprites in this
program. Thus no
duplication of
names is allowed.

“For this sprite
only" refers to
the internal
variable of one
sprite that can be
only visited but
not modified by
the other sprites.
Thus the name
can be
duplicated. Pay
attention to the
changes of the
name of the
variables on the
stage.
When variable
"for the sprite
only" is used with
clone block,
every clone will
possess the
variable. In this
case, we call it
"the private
variable" of the
Clone. The initial
value of the
private variable
equals to the
then-value of the
Clone when the
Clone is created.
Achieve
1. Control the Spaceship with mouse
Import "Mike in Spaceship 2.png".

Sprite Program Effect
Mike in
Spaceship 2
2. Achieve the Functionality of Scoring
Assume every candy stands for different scores, 1 point for Candy 1, 2 points for
Candy 2, and so on. Then each clone of the candy requires a private variable to
represent its score. In the meantime, we also need an overall variable "for all
sprites".
Sprite Program Effect
Candy
Mike in
Spaceship 2
Additional Training
To get a point-deduction sprite, all we need is to do some modifications on the
program.

Sprite Program Effect
Candy
Homework
1. Achieve the effect of candies falling down and rotating simultaneously.
2. Utter a sound every time one candy is collected.
What You've Learnt?
Adventure Diary (Self-Assessment) Gas Station (Other's Assessment)

7.3 Harvest!
Intro
The eruption of the volcano will only last for 30 seconds. Mike needs to catch 20
candies in 30 seconds and bring them back to the camp of the aborigines, otherwise
he will fail his mission.
Task
1. Use Timer and Variable to control the program. Switch the backdrop when the
mission accomplished or failed.
Start Learning
Block Explanation Example
Timer is a variable for
counting time. The unit
here is second.
Rest the timer and
start counting again.
Achieve
Sprite Program Effect
Mike in
Spaceship 2
Candy

Stage
Tips
Tick before to turn on the timer on the stage.
Homework
Please design the animation after the stage receive the message of "Game Over" or
"Win". For instance, you can design like this: If the mission is accomplished, Mike
will go straight back to the camp; if he fails, there will be a text prompt on the
screen.
What You've Learnt?
Adventure Diary (Self-Assessment) Gas Station (Other's Assessment)

8.1 Magical Camera
Intro
Just now Mike saw a display screen inside of the Mike No.1. And now he wants to talk
to Mike No.1 thru it, do you know how?
Task
1. Realize the goal of video interaction
Start Learning
1. Video Interaction
Mike turned on the video and communicated with Mike No.1 through the display.
Let's first get familiar with the blocks we will use in this section.
Block Explanation Example
Turn on the camera
Set the transparency of
the camera from 0 to
100. 0 for
non-transparent and
100 stands for
completely
transparent.
The motion of the item
on the video.
★ Practice
Turn on your camera, and compare the effect when the transparency is set at 0, 50,
and 100.
☆ Explore
Can you find other methods to turn on the camera in Scratch 2.0?
2. Interact with Mike No.1
Sprite Animation Scratch Script
Space
ship
Click the green flag to turn on
the camera;
Set the transparency;
When the motion value of the
item/sprite on the video is
detected to be over 10, say
"Hi, I am Mike No.1".
My plan:
____________________
Events: When Green Flag is clicked
Looks: Say
Control: Repeat, if...then
Sensing: Turn video on, Set video
transparency to.., Video motion on
sprite
Operator: ..>..
My Script: ______________________

☆ Explore
Write the script according to the designed animation scene.
Tips
The motion detection function of the video can detect the moving speed and
direction of the user. It can be applied to the script of the stage or the sprite. This
function is realized by the principle of "optical flow". If you are interested in this, use
a searching engine to get more info.
Achieve
Import "Mike's side face.png", "Spaceship.png" and the backdrop "Encounter.png".
Sprite Program Effect
Space
ship
Additional Training
Achieve a more marvelous effect combining other blocks, e.g. If the motion is over
10, the spaceship will change its color.
Sprite Program Effect
Space
ship
Homework
1. Use the interaction function of video to create an electronic reading machine
which can read the pronunciation when a letter is touched.
2. Upload your work to the official website of Scratch, and share with others from all
over the world!

What You've Learnt?
Adventure Diary (Self-Assessment) Gas Station (Other's Assessment)

8.2 Catch the Candies
Intro
Mike's so happy that he finally learnt how to control Mike No.1 via video. Now he
wants to catch the rest of the candies by using this function.
Task
1. Enable Mike to control Mike No.1 by video, hence to realize the goal of catching
candies.
Start Learning
Design the script for the scenario of catching candies by hands in the video.
Sprite Animation Scene Scratch Script
Candy The number of the candy is 0 when
the green flag is clicked;
Turn on the video and set the
transparency at 50;
When the motion value of the sprite
on the video is detected to be over
30, hide itself and increase the
candy number to 1.
After 1 to 2 seconds, the sprite will
re-appear on the stage and repeat
the same process.
My plan______________________
Events: When Green Flag is
Clicked
Data: Variable
Looks: Hide, Show
Control: Repeat, If... then
Motion: Coordinate
Operator: Pick random ...
to .. , ..>..
Sensing: Turn video on, Set video
transparency to.., Video motion on
sprite
My Script___________________
● Share
Tell me, what's your most satisfied work?
☆ Explore
Try to create a game of catching candies by hand in video.
Achieve
Import "Candy 5.png"
Sprite Program Effect

Candy 5
If any candy is not collected within 2 seconds, it will disappear and one point will be
deducted.
Sprite Program Effect
Candy 5
Tips
The lower the motion value of the video is, the more sensitive the image is. Factors
including illumination, posture, obstacle will affect the value of the motion detection
from the video. Therefore our head portrait should stay away from the video area
and stay put while catching candies with hands.
Homework
1. Create more candies on the stage using the clone function
2. Program like this: Variety types of candies will appear on the stage and

corresponding points will be deducted if a "bad candy" is touched.
What You've Learnt?
Adventure Diary (Self-Assessment) Gas Station (Other's Assessment)

8.3 Avoid the Aliens
Intro
While Mike's collecting candies, the aliens showed up and attacked the tribe of the
aborigines. Mike now needs to avoid the UFO and flies Mike No.1 to the tribe.
Task
1. Enable Mike control the moving of Mike No.1 via video.
Start Learning
1. Video Interaction
Block Explanation Example
When the direction of
the sprite in the video is
Up and Right, then
positive value; Down
and Left, negative.
2. Mike No.1 Moves According to the Direction in the Video
Sprite Animation Scene Scratch Script
Mike
No.1
The spaceship will move to the starting
point and appear on the stage when the
green flag is clicked;
Turn on the video, set the transparency
at 50;
When the motion direction value is > 0,
change x by 3;
When the motion direction value is < 0,
change x by -3
Repeat;
My plan _________________
Event: When the Green
Flag is Clicked
Looks: Show
Motion: Coordinate
Sensing: Turn video on,
Set transparency, Video
direction on the sprite
Operator: >, <
Control: If...then..,
Repeat
My script
______________
☆ Explore
Create a script according to the designed animation scene.
Achieve
Import backdrop "attack.png", and sprite "UFO.png", "Mike in Spaceship 2.png".
Sprite Program Effect

Mike in
Spaceship 2
UFO
Tips
Edges refer to the 4 sides of the stage. If the UFO touches the top edge, it will hide
directly instead of moving downwards. Thus we should not put the aliens close to
the top edge at the beginning of the script.
Homework
1. Increase the frequency of the UFO.
2. Try other script (effect) for scene of the Spaceship bumping into the UFO.
What You've Learnt?
Adventure Diary (Self-Assessment) Gas Station (Other's Assessment)


9. Final Battle
Intro
After the perfect teamwork of Mike and all the aborigines, they finally drove those
aliens away with bombs and saved the whole tribe. To memorize the contribution of
Mike, they changed the name of their tribe to "Mike Tribe".
Task
1. Create the script according to the animation scene.
Process
1) Work out the theme of the game, and then decide the interaction way
2) Decide the backdrop and the sprite(s), and work out the design flow
3) Write the script according to the game flow
4) Repeatedly test to fix any errors or inadequacies
5) Publish your work piece and share with others.
Achieve
Before designing the program, we need to make a clear plan of the animation scene
for each sprite and the relevant script. Let's start with the animation scene!
1. Animation Scene
Scene 1 - In the tribe: Mike and the aborigines decide to fight against the aliens.
Scene 2 - Fighting: Mike flies Mike No.1 to fight against the aliens
Scene 3 - In the tribe: A big celebration!
2. Program Script
Import backdrop "Final Battle.png" and "Victor.png"; upload "Bomb.png", 2
"UFO.png", "Aborigine.png", "Mike.png", "Mike in Spaceship 2.png" from local file;
import 2 "Ball" from the Sprite Library; and draw a "Blood bar" manually:

For easy operation, we've already made 2 aliens.
Sprite Program Effect
Backdrop
Mike in
Spaceship 2

Bomb
UFO
UFO2
ball-a
ball-b
(Note: ball-b
will be
moving to
the UFO2)
Mike

Blood bar
The
Aborigine
Homework
Try to complete this game using clone function.
What You've Learnt?
Adventure Diary (Self-Assessment) Gas Station (Other's Assessment)