2. 3. procedures and processes - utdallas.edu · • how to code a purchase order in sciquest ......
TRANSCRIPT

create your future www.utdallas.edu
1. Introduction 2. New Responsibilities 3. Procedures and Processes 4. Inventory Control Procedures 5. Transactional Processes 6. Use of PeopleSoft User Role 7. Use of OnBase for Supporting Documentation

create your future www.utdallas.edu
Introduction • Capital assets are those assets with a value greater than $5000.00 and
Controlled Assets are those assets with a value greater than $500.00 to $4,999.99.
• All computers and tablets are considered controlled asset regardless of the cost due to containing sensitive information.
• The Asset Management (AM) module creates a record of all property that has been purchased, is in use, or has been disposed of by the University.
• Business processes such as annual inventory, updating critical record fields and transfer of assets will be involved during the asset lifecycle.
• University assets will be classified into 3 categories(MTD, Stationary, Off-site) to be validated.
• OnBase is the document imaging system used by the Property Department to store transactional documentation for department reference.

create your future www.utdallas.edu
New Responsibilities 1. Department Manager-Responsible official appointed
by the Dean or Department Head for each Area ID 2. Custodial Contact-Primary Area ID contact for
property administration 3. Custodian-Individual assigned responsibility for
University property 4. Property Administration-Responsible for assets from
purchase order to disposal

create your future www.utdallas.edu
Department Manager Responsibilities: • Responsible for the proper custody, maintenance and
safekeeping of UTD property assigned to his/her department.
• The department manager or his/her appointee can act as departmental property manager; however, responsibility for property rests with the department manager.
• Responsible for maintaining all documentation required to support departmental assets during their lifecycle.

create your future www.utdallas.edu
Custodial Contact Responsibilities: • Responsible for controlling, maintaining and monitoring all
Controlled and Capital assets that are assigned to their Area ID.
• Maintain the Custodian information for laptops and tablets. • Perform annual inventory, audits, transfer assets between
departments and submit Missing/Stolen Reports when necessary.
• Perform all duties assigned by the department manager to maintain property records and follow all procedures.

create your future www.utdallas.edu
Custodian Responsibilities: • Responsible for the proper custody, maintenance and
safekeeping of UTD property assigned for their use. • It is the responsibility of each user to report when an asset is
lost, missing, broken, or needs repairs

create your future www.utdallas.edu

create your future www.utdallas.edu
Property Administration Responsibilities LOGISTICS • Preview all purchase orders for
accuracy and make necessary corrections.
• Maintain asset records and update records when necessary.
• Conduct and coordinate annual Scan & Validate inventories.
• Track Missing and Stolen assets. • Transfer assets between departments. • Respond to emails in a timely manner. • Produce reports for departments as
requested. • Prepare inventory progress reports for
Provost and VP’S.
Distribution • Receive all freight into receiving
warehouse, tag and deliver them to departments.
• Maintain asset records and update records when necessary
• Pick up items from departments upon request and move them to Surplus.
• Respond to emails in a timely manner. • Responsible for the custody and
safekeeping of all items in Surplus until they are sold.

create your future www.utdallas.edu
Procedures and Processes • How to code a purchase order in SciQuest Account Codes starting with 8 are capital assets. Account Codes starting with 6 are expense or Controlled assets. • Identify all P-Card asset within 48 hours Email to [email protected] to inform of this purchase. Attach a copy of the receipt and the cost center that this unit will be charged to. • Provide the Custodian name and UTD employee ID upon receipt of laptop/
tablet by encrypted Email to Greg White [email protected] and Aaron Welch
[email protected], Employee ID’s must be sent by encrypted email for security reasons.

create your future www.utdallas.edu
Inventory Control Procedures • Mobile Technology Device(MTD) Validation • Stationary Asset Validation • Off-site Asset Validation • Scanning Options • Inventory Validation Email

create your future www.utdallas.edu
Asset Classification

create your future www.utdallas.edu
MTD Validation • A mobile asset validation Report will be sent prior to the beginning of your
inventory. • The report will contain tag number, location, asset description, model, serial
number, custodian name and UTD Employee ID. • You must have your computer set up to receive/send encrypted emails due
to this spreadsheet containing employee ID #’s. • Use the column New Custodian and New Employee ID numbers to make
necessary changes. • Type missing in new employee column if the asset is missing this year. • Custodian name should be the person’s proper legal name, I.E., no
nickname. • The report must be routed through the Dean, then submitted to Property in
excel format.

create your future www.utdallas.edu
Stationary Asset Validation • All stationary assets will be validated using the barcode scanner used by
the inventory staff or by department custodian if the department chooses to perform the inventory.
Off-site Asset Validation
• Off-site assets are assets owned by the University but stored and utilized at a location other than the University.
• Same procedures as MTD. • We need a permanent address, responsible University official and
employee ID. This can be done through e-mail with spreadsheet attached as well.
• Note: since employee name and UTD ID are needed, please ensure your email is sent encrypted.

create your future www.utdallas.edu
Scanning Options • The department has the option of having our inventory team perform the
scanning or doing the scanning themselves. • We recommend that the inventory team perform the inventory due to
being more proficient with the scanner and knowing all of the procedures. • If Scan and Validate team is used, departmental responsibility includes
facilitating entry into all areas
• An email will be sent to certify that your inventory is completed when all requirement for the annual inventory have been met.
• Please keep this email for your records.
Inventory Validation Email

create your future www.utdallas.edu
FY14 Cyclical Inventory Schedule

create your future www.utdallas.edu
Transactional Processes • Transfer of Assets • Turn into Surplus • Request Updates • Report Missing/Stolen Asset

create your future www.utdallas.edu
Transfer of Assets • We are no longer using most forms. All transfers will now be completed via email. • Send an email containing the tag number and short description to the property
departments and routed through your department head. • Once the department approves the transfer they forward the email to
[email protected], with the Department Manager copied. • Property will transfer the assets and send a confirmation email reply when transfer
is complete. • The transfer email will be kept in OnBase for future reference by both gaining and
losing department.

create your future www.utdallas.edu
Turn Assets into Surplus • All the requests will be completed via email for Technology Recovery items. • Send an email to [email protected] listing the tag number, description, area
ID and quantity. • We recommend you not remove the hard drive of the technology devices.
Please make a statement via email if you remove the hard drive. • Surplus will contact you to set up an appointment for pick up. • A confirmation email will be sent to you confirming pick up. • Keep these confirmation emails for your records. • Contact Surplus if you don’t receive a confirmation email. • We do not pick up assets other than Technology Recovery items (Desktop
Computers, Printers and Mobile Technology devices) • All other items must be picked up by Moving Services utilizing the existing pick
up form.

create your future www.utdallas.edu
Requesting Updates • We will process any request for updates as quickly as possible. • An email can be sent to [email protected], Greg White at
[email protected], Aaron Welch [email protected] and Rick Nelson at [email protected] for any request for updates, reports etc.
Report Missing/Stolen Asset • Missing/Stolen report is the only paper form still in use due to state requirements. • A police report must be filed and submitted with the assigned Missing/Stolen report
if an asset is suspected of being stolen. • A missing report will only need to be submitted the first year that the asset is
reported missing. • Each missing item must have its own missing report.
create your future www.utdallas.edu
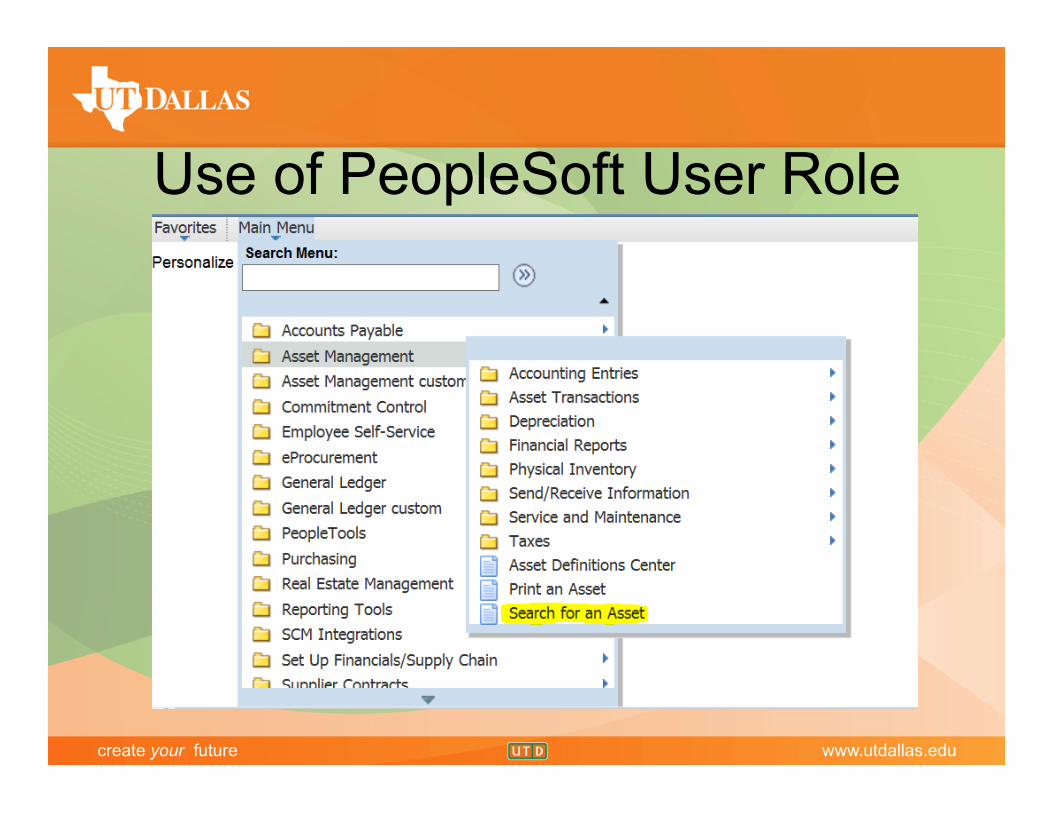
Use of PeopleSoft User Role

create your future www.utdallas.edu
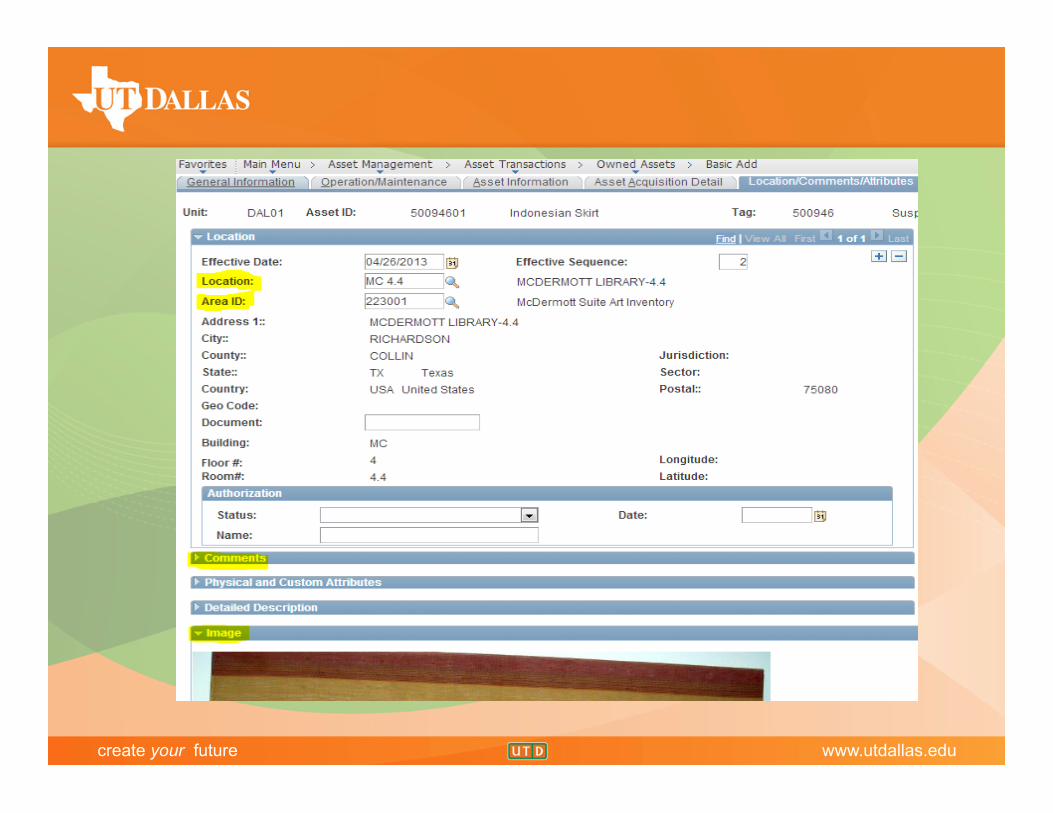
• The highlight features help you search for an asset from general to specific. • Area ID is the UTD Asset Department Contact.
• Location format: building name(3 digits) followed by the floor and room number. EX. ECS1.102 GH 1.102

create your future www.utdallas.edu
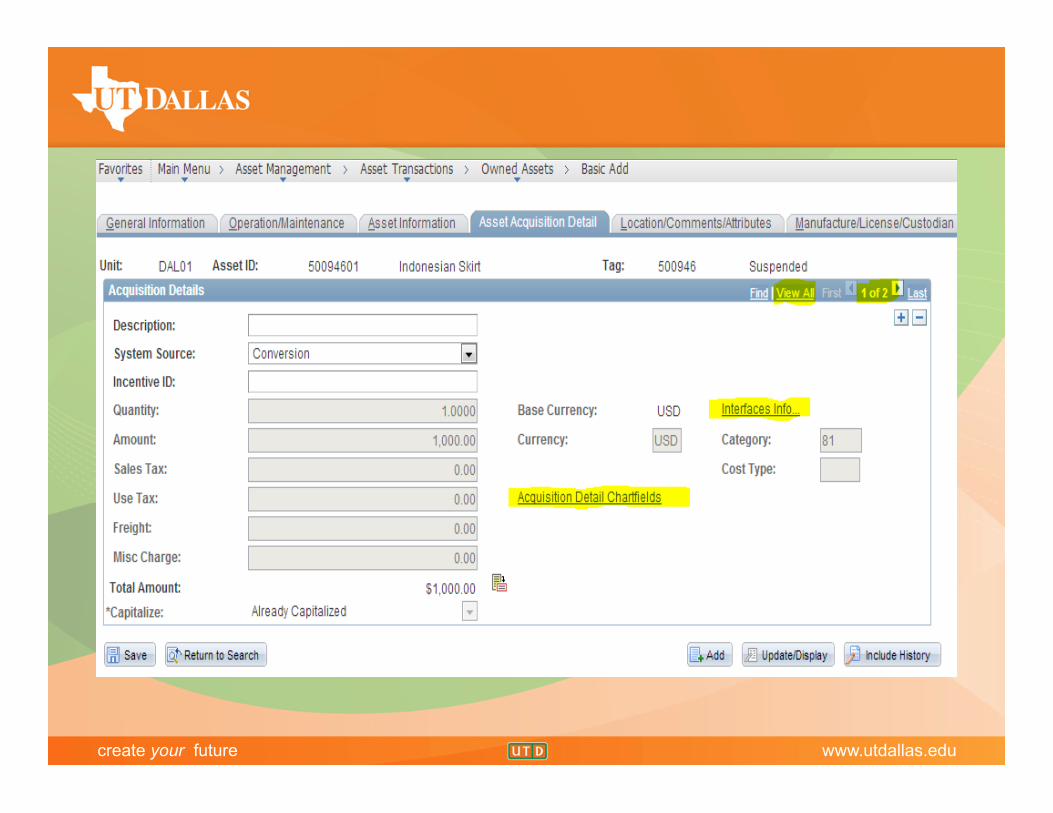
• You can retrieve more information (PO No, location, custodian) once you click the box and search the asset again.
• You can drill-down to a specific page of the selected asset.

create your future www.utdallas.edu

create your future www.utdallas.edu

create your future www.utdallas.edu
create your future www.utdallas.edu
create your future www.utdallas.edu

create your future www.utdallas.edu

create your future www.utdallas.edu
Asset Detail Report • Asset Detail Report is a custom page used by the Custodial Contact to get asset information as they are required to perform their property management responsibilities. • Set up your Run Control ID and Add.

create your future www.utdallas.edu
• Use the combination of Area ID, Location Code and Asset Type to pull out the asset data. • The default value of the Set ID should be DAL01. • Location Code can be specific or varied. • Three options for the asset type. (Blank, Desktop, Mobile)

create your future www.utdallas.edu

create your future www.utdallas.edu

create your future www.utdallas.edu
• An example to pull out the asset data. • Type the value and run.

create your future www.utdallas.edu
• Be sure the box is checked and click OK.

create your future www.utdallas.edu
• You will go back and get the Process Instance ID. • Click Process Monitor (Hyperlink).

create your future www.utdallas.edu
• Refresh until the Run Status is success and Distribution Status is posted. • Then click Details (Hyperlink).

create your future www.utdallas.edu
• Click the View Log/Trace( Hyperlink).

create your future www.utdallas.edu
• Click the Excel file( second file) to get the asset data report.

create your future www.utdallas.edu
Use of On Base for Supporting Documentation
Upon completion of this course, you should be familiar with the following areas: • Launching the Thick Client and Logging into
OnBase • Retrieving documents from OnBase • Performing advanced searches on documents • Working with Image documents • Printing and sharing documents • Enhancement feature • Security

create your future www.utdallas.edu
Logging into OnBase • Recognizing the client icon on the desktop • Logging into the Client through the Logon Window • Familiarizing yourself with OnBase Desktop and
Launching the Documents Retrieval Dialog Window

create your future www.utdallas.edu
Document Retrieval
Document Retrieval Dialog Window Layout • Document Type Groups • Document Types • Dates • Keyword

create your future www.utdallas.edu
Document Retrieval 1. Document Type Groups: • Document type groups are
groups defined by our organization
• A group is a general
heading for specific types of documents
• Ex. Inventory and Surplus
control

create your future www.utdallas.edu
Document Retrieval 2. Document Types: • Document types shown are
based on document type group
• Highlight the document type
name that you wish to search.
• Ex. Click Packing Slip

create your future www.utdallas.edu
Document Retrieval 3. Dates
• The Dates section provides options for narrowing your search to a specific date or date range

create your future www.utdallas.edu
Document Retrieval 4. Keywords • Highlight the document type
to display all associated keyword fields
• Ex. One keyword field
associated with Packing Slip is the P.O #.

create your future www.utdallas.edu
Retrieving Documents • Ex. Select ISC- Inventory
and Surplus Control Document Type Group
• Enter a date range of July 8, 2013 through July 20, 2013
• In the keyword section enter the Asset tag
• Click Find to invoke the retrieval process

create your future www.utdallas.edu
Document Search Results Hit List
• The document search result is divided into two frames: The left frame displays all of the searches that you have performed while logged into OnBase
• The search history clears and
resets if you log out and log back in
• The right frame lists each document and its description

create your future www.utdallas.edu
Working with Image Documents
Image documents overview • Image documents is
either scanned in by someone or imported directly

create your future www.utdallas.edu
Working with Image Documents
Area Zoom • Use selection method to
zoom in on an area. • Its called “rubberbanding” • Click the left mouse
button and then drag around a specific area of the document page that you wish to zoom in on.

create your future www.utdallas.edu
Working with Image Documents
Process: • Rotate right/left: Rotates the
document 90 degrees to the right or left
• Rotate 180: Rotates the image 180 degrees from its current position
• Save rotation: Allows you to save the rotation changes applied to the document
• Invert: Reverses the colors in the palette. For example black pixels become white and white pixels become black

create your future www.utdallas.edu
Creating Notes
• Open Document • Click the Attach Note
button • Double-click on the
note type to be created
• Enter the note’s text

create your future www.utdallas.edu
Printing Documents Three options to initiate printing. • Right click on the
document and Print Document
• Click on the Print Documents button from the toolbar
• Choose Print from the File menu

create your future www.utdallas.edu
Enhancement Feature • OnBase identifies and auto populates information to the left • PeopleSoft needs to have relevant information to feed from
• Security constantly updated in OnBase • Sensitive information obtained only by Specified users.
Security