2. cbs series - cosel
TRANSCRIPT

Applications Manual
2.1 Pin configuration 2.2 Do's and Don'ts for module
2.2.1 Isolation2.2.2 Mounting method2.2.3 External input capacitor2.2.4 Stress onto the pins2.2.5 Cleaning2.2.6 Soldering2.2.7 Safety standard
2.3 Connection method for standard use 2.3.1 Connection for standard use2.3.2 Input power source2.3.3 External fuse2.3.4 Primary Y capacitor CY
2.3.5 External capacitor on the input side Cin2.3.6 External capacitor on the output side Co2.3.7 Thermal considerations
2.4 Derating 2.4.1 Cooling
2.5 Protect circuit 2.5.1 Overvoltage protection2.5.2 Overcurrent protection2.5.3 Thermal protection
2.6 Adjustable voltage range 2.6.1 Output voltage decreasing by external resistor2.6.2 Output voltage increasing by external resistor2.6.3 Output voltage adjusting method by external potentiometer
2.7 Remote ON/OFF2.8 Remote sensing
2.8.1 When the remote sensing function is in use2.8.2 When the remote sensing function is not in use
2.9 Series operation 2.10 Parallel operation / Redundant operation2.11 EMC consideration
2.11.1 Line conducted noise2.11.2 Radiated noise2.11.3 Output noise
2. CBS seriespageB-1B-1B-1B-1B-2B-2B-2B-2B-3B-3B-3B-3B-4B-4B-5B-5B-5B-6B-6B-6B-6B-7B-7B-7B-7B-8B-8B-9B-9B-9B-10B-10B-11B-11B-11B-16B-16

Fig.2.1.1Pin configuration
Table 2.1.1Pin configuration and
function
* CBS50, CBS100 and CBS200: CASE / CBS350: NC
2.2.1 Isolation For receiving inspection, such as Hi-Pot test, gradually increase (decrease) the voltage for start(shut down). Avoid using Hi-Pot tester with the time because it may generate voltage a few times higher than the applied voltage, at ON/OFF of a timer.
2.2.2 Mounting methodThe unit can be mounted in any direction. When two or more power supplies are used side by side, position them with proper intervals to allow enough air ventilation. Aluminum base plate temperature around each power supply should not exceed the temperature range shown in derating curve. Avoid placing the DC input line pattern lay out underneath the unit, it will increase the line conducted noise. Make sure to leave an ample distance between the line pattern lay out and the unit. Also avoid placing the DC output line pattern underneath the unit because it may increase the output noise. Lay out the pattern away from the unit. High-frequency noise radiates directly from the unit to the atmosphere. Therefore, design the shield pattern on the printed wiring board and connect its one to CASE pin. The shield pattern prevents noise radiation.
Pin Pin Name Function Reference
1 +VIN +DC input 2.3 Connection method for standard use
2 RC Remote ON/OFF 2.7 Remote ON/OFF
3 CASE / NC * Wiring base plate 2.3 Connection method for standard use
4 -VIN -DC input 2.3 Connection method for standard use
5 +VOUT +DC output 2.3 Connection method for standard use
6 +S +Remote sensing 2.8 Remote sensing
7 TRM Adjustment of output voltage 2.6 Adjustment of output voltage
8 -S -Remote sensing 2.8 Remote sensing
9 -VOUT -DC output 2.3 Connection method for standard useMounting hole Mounting hole 2.3 Connection method for standard use
B-1
2.1 Pin configuration2.1 Pin configuration
2.1 Pin configuration2.2 Do's and Don'ts for module
Application Manual
CBS series

Option '-T' is available, as shown in Table 2.2.1
Table 2.2.1 Mounting hole
2.2.3 External input capacitorWhen the line impedance is high or the input voltage rise quickly at start-up (less than 10μs), install capacitor Cin between +VIN and -VIN input pins (within 50mm from pins).
2.2.4 Stress onto the pinsWhen excess stress or bending force is applied the pins of the power supply, the internal connection may be weakened. As shown in Fig.2.2.1 avoid applying stress of more than 39.2N (4kgf) on +VOUT/-VOUT pins and more than 19.6N (2kgf) to the other pins. The pins are soldered on PWB internally, therefore, do not pull or bend them with abnormal forces. Fix the unit on PWB (fixing fittings) to reduce the stress onto the pins.
Fig.2.2.1Stress onto the pins
2.2.5 Cleaning Clean it with a brash. Prevent fluid from getting inside the unit.Do not apply pressure to the lead and name plate with a brush or scratch it during the cleaning.After cleaning, dry them enough.
2.2.6 SolderingFlow soldering : 260°C less than 15 seconds.Soldering iron : 450°C less than 5 seconds (less than 26W).
Mounting holeStandard M3 tappedOptional : "-T" φ3.4 thru
B-2
Application Manual
CBS series

2.2.7 Safety standard This unit must be used as a component of the end-use equipment. The equipment does neither contain any basic nor double / reinforced insulation between input and output, and base plate. If the input voltage is greater than 60VDC, this has to be provided by the end-use equipment according to the final build in condition. Safety approved fuse must be externally installed on input side.
2.3.1 Connection for standard useIn order to use power supply, it is necessary to wire as shown in Fig.2.3.1. Short the following pins to turn on the power supply. Reference : 2.7
Fig.2.3.1Connection method for
standard use
Cin: External capacitor on the input sideCo: External capacitor on the output sideCY: Y capacitor
2.3.2 Input power source
CBS5024/10024/20024/35024 : less than 2Vp-pCBS5048/10048/20048/35048 : less than 4Vp-p
Make sure that the voltage fluctuation, including the ripple voltage, will not exceed the input voltage range. Use a front end unit with enough power, considering the start-up current Ip of this unit.
Fig.2.3.2Input voltage ripple
The specification of input ripple voltage is shown as below.Ripple voltage
B-3
2.1 Pin configuration2.3 Connection method for use
Application Manual
CBS series

Fig.2.3.3 Input current
characteristics
Reverse input voltage protection Avoid the reverse polarity input voltage. It will damage the power supply. It is possible to protect the unit from the reverse input voltage by installing an external diode as shown in Fig.2.3.4.
Fig.2.3.4 Reverse input voltage
protection
2.3.3 External fuseFuse is not built-in on input side. In order to protect the unit, install the normal-blow type fuse on input side. When the input voltage from a front end unit is supplied to multiple units, install a normal-blow type fuse in each unit.
Table 2.3.1Recommended fuse(normal-blow type)
2.3.4 Primary Y capacitor CY
Install a Y capacitor CY for low line-noise and for stable operation of the power supply.
Install a correspondence filter, if a noise standard meeting is required or if the surge voltage may be applied to the unit. Install a primary Y capacitor CY, with more than 4700pF, near the input pins (within 50mm from
the pins). When the total capacitance of the primary Y capacitor is more than 15000pF, the nominal value in the specification may not be met by the Hi-Pot test between input and output. In this case, capacitor should be installed between output and CASE pin. The total capacitance is not limited if Hi-pot test voltage between input and output is less than AC500V (1 minute).
1R8/2R5/03/05 12/15/24/286A 12A 20A
MODEL CBS5024 CBS10024CBS20024
CBS35024
25A 30A
MODEL CBS5048 CBS10048CBS20048
CBS3504803/05 12/15/24/28/48
Rated current
12A 20A
B-4
Rated current 3A 6A 10A
Application Manual
CBS series

2.3.5 External capacitor on the input side CinInstall an external capacitor Cin between +VIN and -VIN input pins for stable operation of the power supply.
Cin CBS50/100/20024 : more than 68μFCBS50/100/20048 : more than 33μFCBS35024 : more than 220μF x 2CBS35048 : more than 68μF x 2
Tc = -20 to +100°C : Electrolytic or Ceramic capacitorTc = -40 to +100°C : Ceramic capacitor
Cin is within 50mm from pins. Make sure that ripple current of Cin should be less than rate.
2.3.6 External capacitor on the output side CoInstall an external capacitor Co between +VOUT and -VOUT pins for stable operation of the power supply.Recommended capacitance of Co is shown in Table 2.3.2. Select the high frequency type capacitor. Output ripple and start-up waveform may be influenced by ESR/ESL of the capacitor and the wiring impedance. When output current change sharply, make sure that ripple current of Co should be less than rate. Install a capacitor Co near the output pins (within 50mm from the pins).
Table 2.3.2Recommendedcapacitance Co
2.3.7 Thermal considerationsOperate with the conduction cooling (e.g. heat radiation from the aluminum base plate to the attached heat sink).Reference : 8. Thermal considerations
Base plate temperature : Tc=-20 to +100°CVOUT 1.8V 2.5V 3.3V 5V 12V 15V 24V
CBS50 2200μF 470μF 220μF220μF
28V 32V 48V--
CBS200 2200μF 1000μF 470μF - 330μFCBS100 2200μF 470μF
220μF 220μF -
Base plate temperature : Tc=-40 to +100°C
CBS350 - 470μF -
VOUT 1.8V 2.5V 3.3V 5V 12V 15V 24VCBS50 2200μF x 2 470μF x 2 220μF x 2
220μF x 2
28V 32V 48V--
CBS200 2200μF x 2 1000μF x 2 470μF x 2 - 330μF x 2
CBS100 2200μF x 2 470μF x 2
220μF x 3 220μF -
B-5
CBS350 - 470μF x 3 -
Application Manual
CBS series

2.4.1 CoolingUse with the conduction cooling (e.g. heat radiation by conduction from the aluminum base plate to the attached heat sink). Derating curve based on the aluminum base plate temperature. In the hatched area, the specification of Ripple and Ripple Noise is different from other areas. Measuring point of aluminum base plate temperature is Point A at Fig.2.4.2.
Fig.2.4.1 Derating curve
for CBS50/100/200
Fig.2.4.2Derating curve
for CBS350
Fig.2.4.3Measuring point
2.5.1 Overvoltage protectionThe overvoltage protection circuit is built-in. The DC input should be turned off if overvoltage protection is activated. In this case, to recover from overvoltage protection turn the DC input power off for at least 1 second (*), and turn on or toggling Remote ON/OFF signal.*The recovery time varies depending on input voltage and input capacity.
Remarks :Please note that device inside the power supply might fail when voltage more than rated output voltage more than rated output voltage is applied to output terminal of the power supply. This could happen when the customer tests the overvoltage protection of the unit.
B-6
2.1 Pin configuration2.4 Derating
Base plate
+VIN
-VIN -VOUT
+VOUT
Tc measuring point A
2.1 Pin configuration2.5 Protect circuit
Tc measuring point B
Application Manual
CBS series
-40 -20 0 20 40 60
0
100
Load
fact
or [%
]
80 100 Measuring point A
Aluminum baseplate temperature [°C]Measuring point B35 55 75 95
50
2
CBS200 12,15,24,281Others(Except CBS350)2
1
(85)
80 100Aluminum baseplate temperature [°C]
40 6020
100
Load
fact
or [%
]
50
0
-40 -20 0
1(85.7)(83.3)
CBS35024121Others(in CBS350)2
2
(15)
(85)

2.5.2 Overcurrent protectionOvercurrent protection is built-in and activated at over 105% of the rated current.Overcurrent protection prevents the unit from short circuit and overcurrent condition. The unit automatically recovers when the fault condition is removed. When the overcurrent protection is activated, the average output current is reduced by intermittent operation of power supply.
2.5.3 Thermal protectionWhen the base plate temperature excess over 100°C, the thermal protection will be activated and simultaneously shut off the output. When this function is activated, remove all possible causes of overheat condition and cooldown the unit to the normal level temperature. By cycling the DC input power off for at least 1 second, or toggling Remote ON/OFF signal for at least 1 second. Overheat protection works around 120°C at the base plate.
Output voltage is adjustable by the external potentiometer.The adjustable range is 60 to 110% of the rated output voltage.When the input voltage is in the range of DC18 to 20V (CBS5024/10024/20024/35024), DC36 to 40V (CBS5048/10048/20048/35048), output voltage adjustment range is 60 to 105%. When the output voltage adjustment is not in leave use, TRM pin open.Do not set output voltage too high, overvoltage protection might be activated.
2.6.1 Output voltage decreasing by external resistorBy connecting the external resistor (RB) more than 1/10W, output voltage becomes adjustable to decrease as shown in Fig.2.6.1.
Fig.2.6.1Vo / Vn - RB
Characteristic
Fig.2.6.1 Vo / Vn - RB
B-7
2.1 Pin configuration2.6 Adjustable voltage range
1
10
100
1000
10000
50 60 70 80 90 100 110Vo/Vn [%]
RB
[kΩ
]
Application Manual
CBS series

2.6.2 Output voltage increasing by external resistorBy connecting the external resistor (RA) more than 1/10W, output voltage becomes adjustable to Increase as shown in Fig.2.6.2.
Fig.2.6.2Vo / Vn - RA
Characteristic
2.6.3 Output voltage adjusting method by external potentiometerBy connecting the external potentiometer (VR1) and resistors (R1, R2) more than 1/10W, outputvoltage becomes adjustable, as shown in Fig.2.6.3, recommended external parts are shown inTable 2.6.1.The wiring to the potentiometer should be as short as possible. The temperature coefficientbecomes worse, depending on the type of a resistor and potentiometer. Following parts arerecommended for the power supply.
Resistor : Metal film type, coefficient of less than ±100ppm/°CPotentiometer : Cermet type, coefficient less than ±300ppm/°C
Fig.2.6.3Output voltage control
circuit
Table 2.6.1 Recommended value
of external resistor
VOUTAdjustable range
VOUT ±5% VOUT ±10%R1 R2 R1 R2
1 1.8V 1.8kΩ 6.2kΩ 1.6kΩ 3.6kΩ2 2.5V 2.7kΩ 7.5kΩ 2.4kΩ 4.7kΩ3 3.3V 2.4kΩ
11kΩ
2.4kΩ
6.8kΩ
4 5V 5.6kΩ 5.6kΩ5 12V 18kΩ 18kΩ6 15V 24kΩ 24kΩ7 24V 43kΩ 39kΩ8 28V 51kΩ 47kΩ9 32V 56kΩ 56kΩ10 48V 82kΩ 82kΩ
B-8
Fig.2.6.2 Vo/Vn - RA
Application Manual
CBS series
1
10
100
1000
10000
95 100 105 110 115 120
Vo/Vn [%]
RA
[kΩ
]
2.5V3.3V5V
12V15V24V28V32V48V
1.8V

Remote ON/OFF circuit is built-in on input side.
Table 2.7.1Specification of
Remote ON/OFF
When RC is "Low" level, Sink current is 0.5mA typ. When Vcc is applied, use 3.5 ~ 7V.When remote ON/OFF function is not used, please short between RC and -VIN(-R : Open between RC and -VIN).
Fig.2.7.1RC connection
example
This function compensate line voltage drop.
2.8.1 When the remote sensing function is in use
Fig.2.8.1Connection when
the remote sensingis in use
ON/OFF logic Between RC and -VIN Output voltage
Standard Negative"L" level (0 - 1.2V) or short ON"H" level (3.5 - 7.0V) or open OFF
Optional-R Positive
"L" level (0 - 1.2V) or short OFF"H" level (3.5 - 7.0V) or open ON
B-9
2.1 Pin configuration2.7 Remote ON/OFF
Sink current
2.1 Pin configuration2.8 Remote sensing
Application Manual
CBS series

Twisted-pair wire or shield wire is recommended be used for sensing wire.Thick wire should be used for wiring between the power supply and a load. Line drop should beless than 0.3V. Voltage between +VOUT and -VOUT should be remain within the output voltageadjustment range.If output voltage is trimmed down below 60% of the rated output voltage, ripple and noise willincrease occasionally and/or over shoot occurs when start-up. External filter attach to the output is effective to reduce ripple and noise and remote ON/OFF iseffective to avoid over shoot when start-up.Output voltage might become unstable because of impedance of wiring and load condition whenlength of wire is exceeding 2m.
2.8.2 When the remote sensing function is not in use
Fig.2.8.2Connection when
the remote sensingis not in use
When the remote sensing function is not in use, Make sure that pins are shorted between +Sand +VOUT and between -S and -VOUT are connected.Connect between +S and +VOUT and between -S and -VOUT directly.No loop wiring.This power supply might become unstable by the noise coming from poor wiring.
Series operation is available by connecting the outputs of two or more power supplies, as shownFig.2.9.1. Output current in series connection should be lower than the lowest rated current ineach power supply.
Fig. 2.9.1Examples of serial
operation
B-10
2.1 Pin configuration2.9 Series operation
Application Manual
CBS series
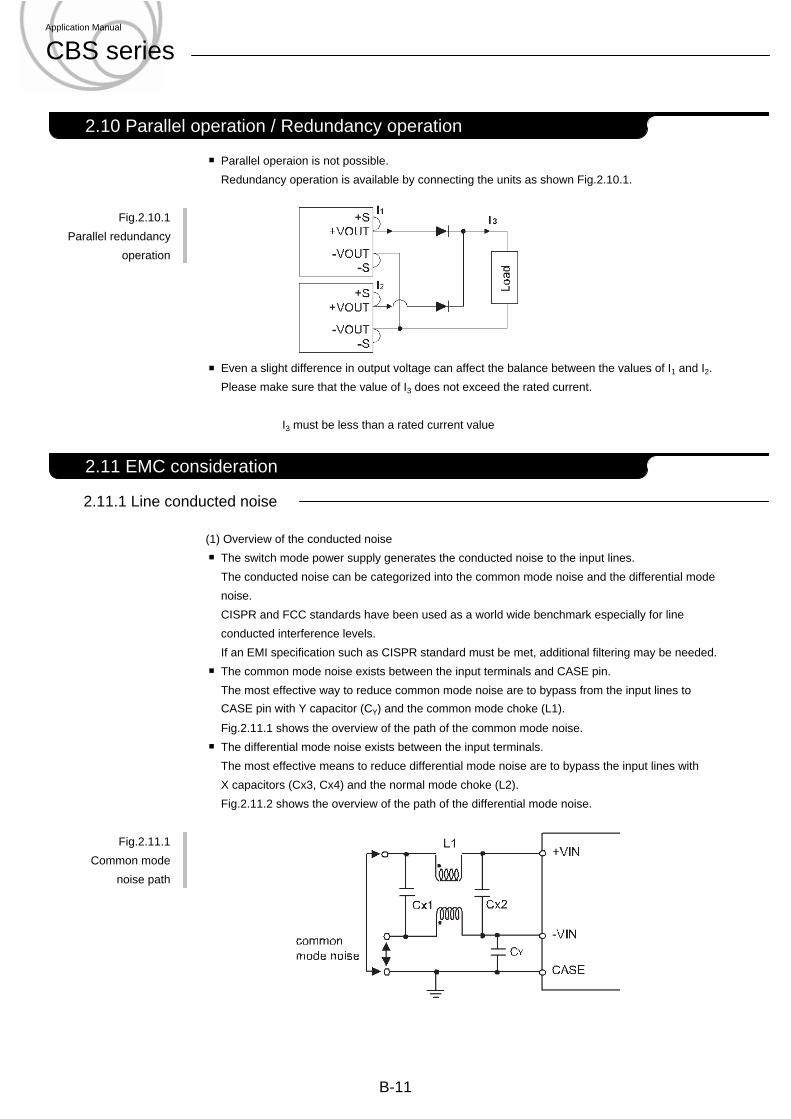
Parallel operaion is not possible.Redundancy operation is available by connecting the units as shown Fig.2.10.1.
Fig.2.10.1Parallel redundancy
operation
Even a slight difference in output voltage can affect the balance between the values of I1 and I2.Please make sure that the value of I3 does not exceed the rated current.
I3 must be less than a rated current value
2.11.1 Line conducted noise
(1) Overview of the conducted noiseThe switch mode power supply generates the conducted noise to the input lines. The conducted noise can be categorized into the common mode noise and the differential modenoise.CISPR and FCC standards have been used as a world wide benchmark especially for lineconducted interference levels.If an EMI specification such as CISPR standard must be met, additional filtering may be needed.The common mode noise exists between the input terminals and CASE pin.The most effective way to reduce common mode noise are to bypass from the input lines toCASE pin with Y capacitor (CY) and the common mode choke (L1).
Fig.2.11.1 shows the overview of the path of the common mode noise.The differential mode noise exists between the input terminals.The most effective means to reduce differential mode noise are to bypass the input lines withX capacitors (Cx3, Cx4) and the normal mode choke (L2).Fig.2.11.2 shows the overview of the path of the differential mode noise.
Fig.2.11.1Common mode
noise path
B-11
2.1 Pin configuration2.10 Parallel operation / Redundancy operation
2.1 Pin configuration2.11 EMC consideration
Application Manual
CBS series

Fig.2.11.2Differential mode
noise path
The CBS provide the normal mode choke (L3) to reduce the differential mode noise.Install the capacitor (Cx4) to reduce the differential mode noise.The most effective way to reduce the differential mode noise are to install since X capacitor(Cx3) and the normal mode choke (L2).The leakage inductance of the common mode choke (L1) works as the normal mode choke.The normal mode choke (L2) is not necessary.
(2) Recommended of noise-filterFig.2.11.3 shows the recommended circuit of noise-filter which meets CISPR Pub. 22 Class Aand the noise level.CBS2004805 : DC48V INPUT, 5V30A OUTPUT
Fig.2.11.3Recommended circuit
and noise level(CISPR Pub.22 Class A)
L1=3mH (SC-05-30J : NEC TOKIN) C1, C2=100V33μF (LXV series : NIPPON CHEMI-CON) C3, C4=AC250V4700pF (KH series : MURATA)C5=10V2200μF (LXZ series : NIPPON CHEMI-CON) C6=50V0.1μF (MDD21H104M : NITSUKO ELECTRONICS)
B-12
Application Manual
CBS series
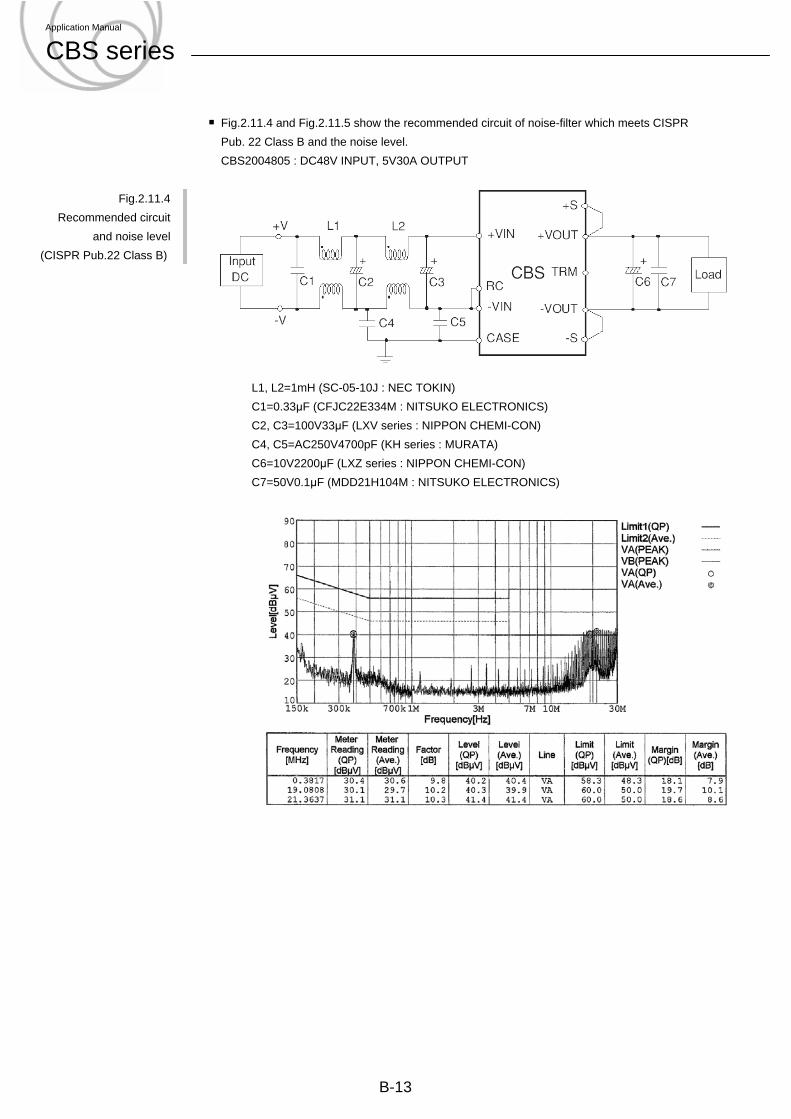
Fig.2.11.4 and Fig.2.11.5 show the recommended circuit of noise-filter which meets CISPRPub. 22 Class B and the noise level.CBS2004805 : DC48V INPUT, 5V30A OUTPUT
Fig.2.11.4Recommended circuit
and noise level(CISPR Pub.22 Class B)
L1, L2=1mH (SC-05-10J : NEC TOKIN)C1=0.33μF (CFJC22E334M : NITSUKO ELECTRONICS) C2, C3=100V33μF (LXV series : NIPPON CHEMI-CON) C4, C5=AC250V4700pF (KH series : MURATA) C6=10V2200μF (LXZ series : NIPPON CHEMI-CON)C7=50V0.1μF (MDD21H104M : NITSUKO ELECTRONICS)
B-13
Application Manual
CBS series

Fig.2.11.5Recommended circuit
and noise level(CISPR Pub.22 Class B)
L1, L2=1.3mH (ETQP6F1R3LFA : PANASONIC) C1, C2, C3, C4, C6, C7=100V3μF (CY55Y5P2A305M : NEC TOKIN)C5=100V220μF (KZE series : NIPPON CHEMI-CON) C8=10V2200μF (LXZ series : NIPPON CHEMI-CON) C9=50V0.1μF (MDD21H104M : NITSUKO ELECTRONICS)
B-14
Application Manual
CBS series

Fig.2.11.6 shows the recommended circuit of noise-filter which meets CISPR Pub. 22 Class Aand the noise level with two modules.CBS2004805 : DC48V INPUT, 5V30A OUTPUTCBS504812 : DC48V INPUT, 12V4.2A OUTPUT
Fig.2.11.6Recommended circuit
and noise level withtwo modules
(CISPR Pub.22 Class B)
L1=3mH (SC-05-30J : NEC TOKIN) C1, C2, C7=100V33μF (LXV series : NIPPON CHEMI-CON) C3, C4, C8=AC250V4700pF (KH series : MURATA) C5=10V2200μF (LXZ series : NIPPON CHEMI-CON) C6, C10=50V0.1μF (MDD21H104M : NITSUKO ELECTRONICS) C9=25V470μF (LXZ series : NIPPON CHEMI-CON)
B-15
Application Manual
CBS series
2.11.2 Radiated noiseHigh-frequency noise is radiated directly from the module, the input lines and the output lines tothe atmosphere.The noise-filter (EMC component) is required to reduce the radiated noise.The effective ways to reduce the radiated noise are to cover units with the metal plate or film.
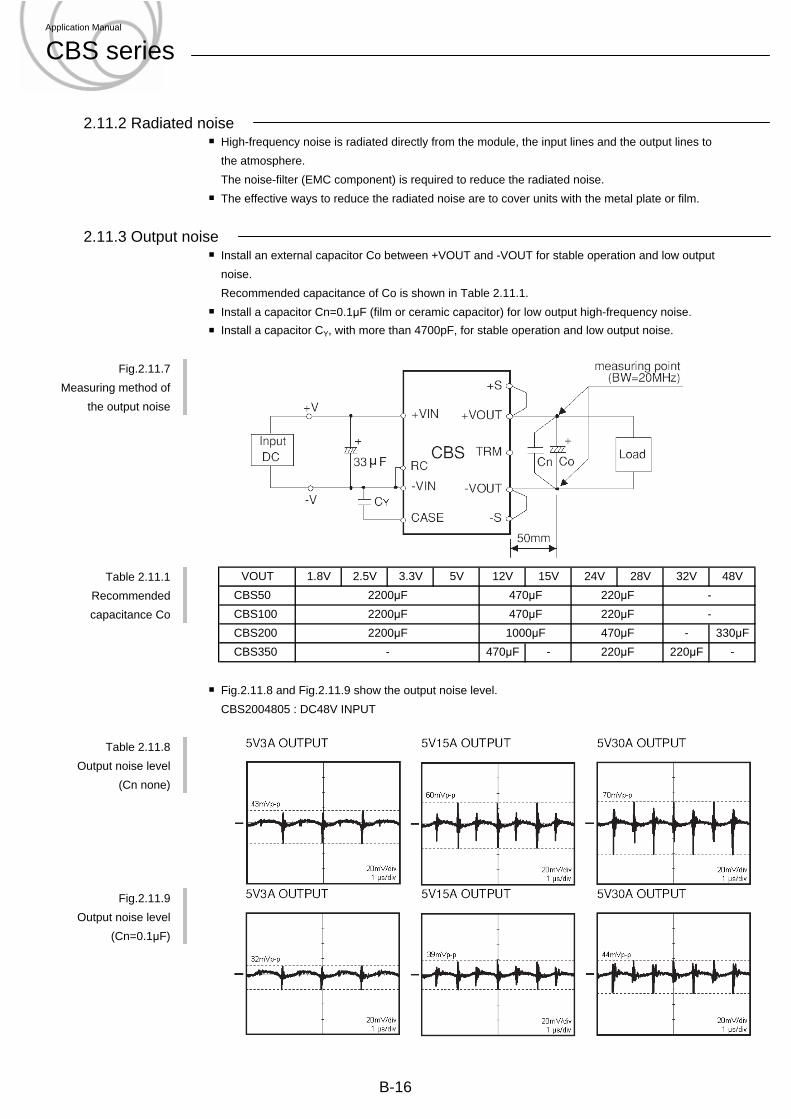
2.11.3 Output noiseInstall an external capacitor Co between +VOUT and -VOUT for stable operation and low outputnoise.Recommended capacitance of Co is shown in Table 2.11.1.Install a capacitor Cn=0.1μF (film or ceramic capacitor) for low output high-frequency noise.Install a capacitor CY, with more than 4700pF, for stable operation and low output noise.
Fig.2.11.7Measuring method of
the output noise
Table 2.11.1Recommendedcapacitance Co
Fig.2.11.8 and Fig.2.11.9 show the output noise level.CBS2004805 : DC48V INPUT
Table 2.11.8Output noise level
(Cn none)
Fig.2.11.9Output noise level
(Cn=0.1μF)
VOUT 1.8V 2.5V 3.3V 5V 12V 15V 24V 28V 32V 48VCBS50 2200μF 470μF 220μFCBS100 2200μF 470μF 220μF
2200μF 1000μF 470μF
--
- 330μFCBS350 - 470μF - 220μF 220μF -CBS200
B-16
Application Manual
CBS series