blairgemmer.comblairgemmer.com/docs/wolfbox/usermanual/hoot-user-manual.pdfpage 2 table of contents...
TRANSCRIPT


Page 1
©Department of Computer Science Social Science Building Room 401 University of Montana-Missoula
Missoula, MT 59812 Phone: (406) 243-2883
Fax: (406) 243-5139

Page 2
Table of Contents ..................................................................... 2 Safety Notices ............................................................................ 3
Preface ........................................................................................ 4 Installation ................................................................................. 5
Installing Hootd on the Box ........................................................ 5
Installing the Scheduler ................................................................ 5
Hoot Scheduler ......................................................................... 7
Making a Schedule ......................................................................... 7
Importing/Exporting Schedules ............................................... 13
Notes on the Scheduler .............................................................. 14
Hardware (The Black Box) .................................................... 15
Specifications ................................................................................ 15
Adding new Peripherals .............................................................. 16
Operating System......................................................................... 16
Troubleshooting Guide .......................................................... 17 System Limitations .................................................................. 18 Index ......................................................................................... 19 Reader Comment Form ......................................................... 20

Page 3
The cases are flame resistant, but the battery should not be exposed to high
temperatures or flame.
The batteries should be checked regularly for damage to the casing, bulging, or
excessive heat while operating.
They should not be submerged or exposed to water.
The power cables should be examined on the batteries and all components to
check for breaks or wear on the cables insulation. If there is any damage to the
insulation, do not use the cable.
Do not attempt to repair the battery or any cabling. The ARTiGO unit and
Tekkeon batteries can produce a high enough shock to kill and all safety
precautions should be followed to prevent death. The ARTiGO case will provide
protection from electric discharge caused by static electricity, but all components are
static sensitive so precautions should be taken if the case is removed.
Page 4
This project is cumulative effort of the 2010 class of Computer Science Seniors. Coming into 442, or Advanced Theory and Practice II, we knew we would be attempting to complete some kind of large software project, preferably with connotations and uses beyond our department. Happily, we were not disappointed. On the first day of class we discussed our options with Professor Joel Henry, who told us he had been approached by Dave Ausband of the Wildlife Biology Department to work on something that had been previously designed, but was not working with the specified requirements of his research. This, we learned, was a system to play sounds in the field and then record any answering sounds based on a schedule. The system he was trying to use to complete his research of wolves (frequently called the "wolf box") was unreliable, and yielded very mixed results in terms of success and failure. The device software was buggy, the scheduler did not work properly, the battery life of the box was miniscule, and the interface was very user-unfriendly. Thus, the CS 442 class was called in to see what we could do. Our first step was the scrapping of the old system, as we decided it was too buggy to make an attempt at code salvage. So work began and progressed very quickly, culminating in a working system with greater reliability, and way cooler documentation.

Page 5
1. Put Hootd folder on a flash drive 2. Move Hootd to desktop of device 3. Go into folder and execute install.sh
1. In Scheduler folder, Run Setup.exe:
2. Click Install:

Page 6
3. Installation Complete!
Page 7
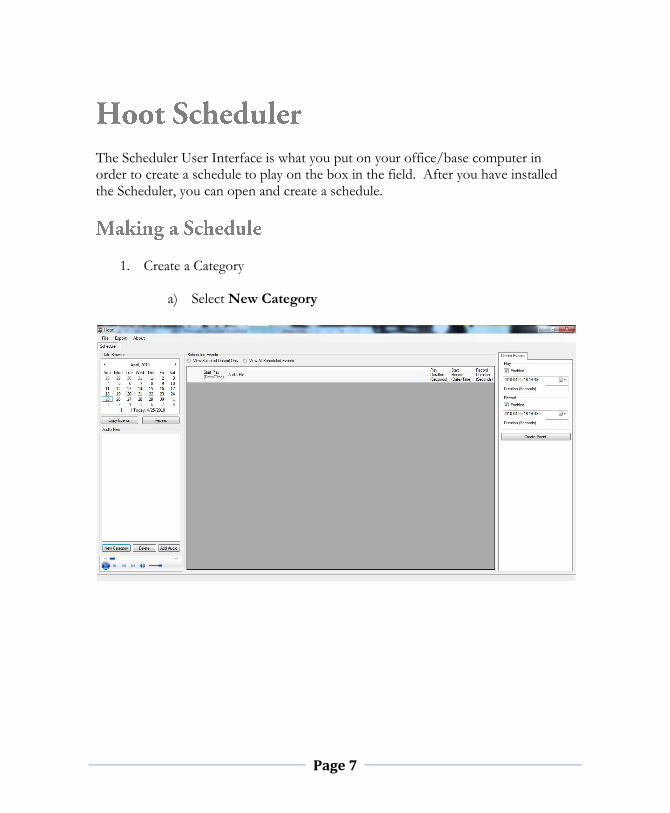
The Scheduler User Interface is what you put on your office/base computer in order to create a schedule to play on the box in the field. After you have installed the Scheduler, you can open and create a schedule.
1. Create a Category
a) Select New Category

Page 8
b) Enter name for category and select Submit
c) A new category will appear in the Audio Files tree on the left

Page 9
2. Add Audio a) Select a category from the Audio Files tree and select the Add
Audio button
b) In the dialog box that opens, select the files you want to add and
select Open
Page 10
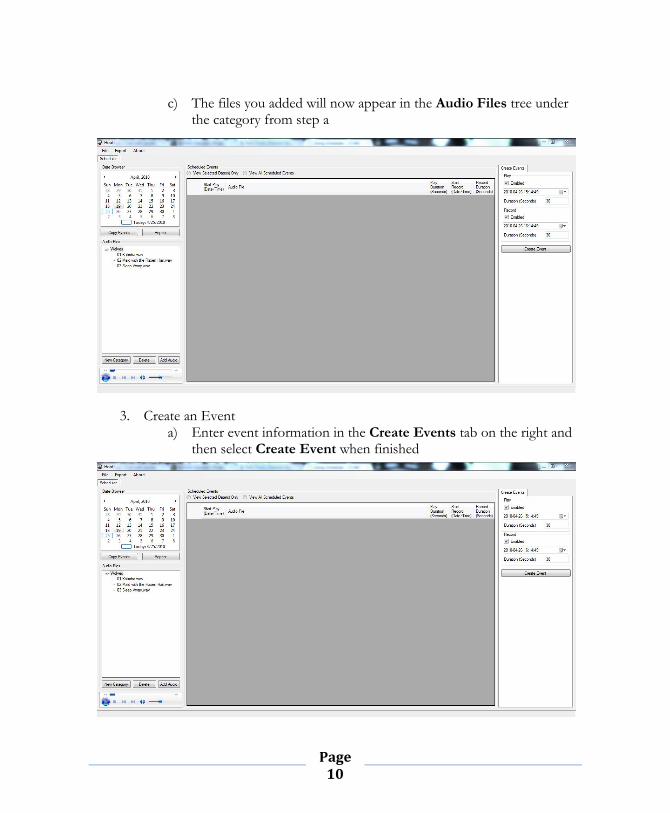
c) The files you added will now appear in the Audio Files tree under the category from step a
3. Create an Event
a) Enter event information in the Create Events tab on the right and then select Create Event when finished

Page 11
b) The event will now appear in the Scheduled Events list in the middle of the Scheduler with all the event information listed
4. View All Events: to view all events, select the View All Scheduled Events
option at the top of the Scheduled Events

Page 12
5. View Specific Event: to view specific events by date, select the View Selected Date(s) only, then select a date (or dates) from the calendar in the top left.
6. Copy/Paste an Event
a) To copy an event (or events), highlight a date or date range in the Date Browser in the upper left and select Copy Events
Page 13
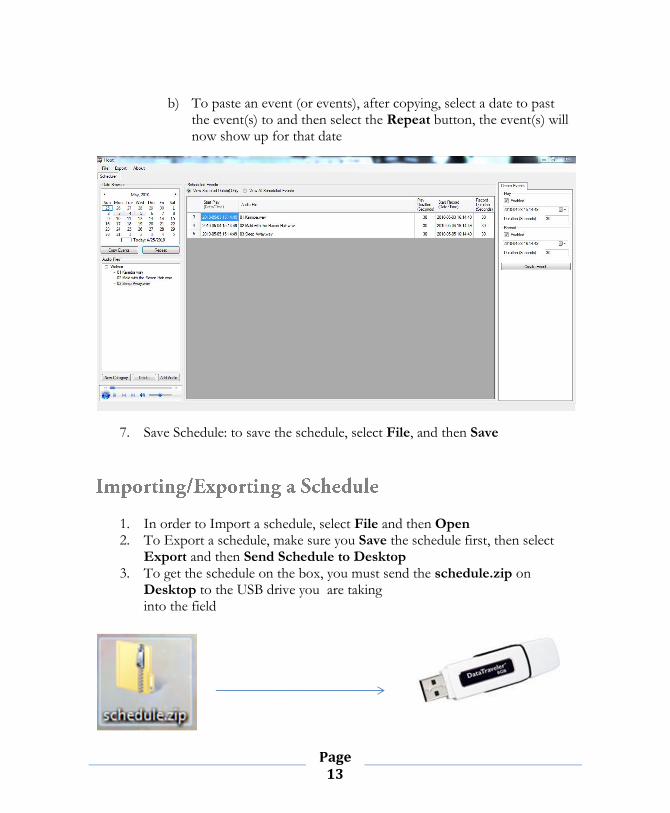
b) To paste an event (or events), after copying, select a date to past the event(s) to and then select the Repeat button, the event(s) will now show up for that date
7. Save Schedule: to save the schedule, select File, and then Save
1. In order to Import a schedule, select File and then Open 2. To Export a schedule, make sure you Save the schedule first, then select
Export and then Send Schedule to Desktop 3. To get the schedule on the box, you must send the schedule.zip on
Desktop to the USB drive you are taking into the field

Page 14
• Must create a category to add audio
• Must add audio to create an event
• Error messages handle any potential problems with schedule creation
• Inline editing/validation of event data is supported
• Delete an event by clicking on the left arrow next to an event and hitting the delete key on your keyboard
• To change the audio file associated with an event, select a new audio file from the Audio Files tree, then double click the event's audio file you want to update
• Can create play/record events mutually exclusive of one another or together in a single event
• Schedule.zip contains an .xml file of the events schedule and the associated audio files

Page 15
The hardware in this project is the original hardware provided us by Dave Ausband. While changing some of the hardware may have yielded a better final product in the long run, we did not have enough time to completely test a new product line, and thus decided to make the software work properly for what we were provided.
• Mainboard: ARTiGO Pico-ITX
• CPU: Via C7 1 GHz
• Ram: 1 GB DDR2 533 SODIMM
• Hard Drive: 80 GB 2.5 inch HD
• Internal Audio: VT1708 Via High Definition Audio 1 line in / 1 line out
• Display: Via Unichrome ProII graphics adapter with 1 VGA port
• Network: 10/100 Ethernet
• USB: 4 USB 2.0 ports
• Power Supply: 60 watts The unit has a 110V - 12VDC power adapter
• Batteries: The unit is using two Tekkeon MP3450 Lithium Ion batteries to provide 12VDC with 7.0A. The batteries can be charged using the ARTiGO power adapter. The batteries have an internal charge controller and lockouts prevent over charging. The battery is designed to control voltage output to maintain proper output voltage over the batteries usage.
• Speakers: The unit currently uses a 5 watt USB Yamaha speaker.
Figure 1- Photo of the interior of one of the units.

Page 16
To add new peripherals like microphone and speakers, simply plug them into the USB ports in the front of the box (see fig. 1) and turn on the box. Note: Box must be off before plugging in USB devices and USB devices must be inserted before turning box on. If you turn box on without USB devices inserted, the box will shut down and wait for you to reinsert the USB devices.
Fig. 1
The operating system is currently Ubuntu 9.10.

Page 17
- Insert guide to various sound messages here- To get to the graphical user interface of Ubuntu:
o Create a blank text document named “nostart” in main directory of USB key

Page 18
• Hardware – Battery life is low
• Software – GUI is Windows only
– Device Software for Debian Linux-Based OS’s only

Page 19