3 nato unclassified ft 201 sharepoint n
TRANSCRIPT

NATO UNCLASSIFIED
Sh
are
Po
int
20
13
Fun
ctio
nal
Ad
min
Mic
roso
ft
The SharePoint 2013 Functional Administrators Training has been developed by the CIS-Training Centre to train the NATO Staff in personalization and customization of their SharePoint Site areas for users based on specific criteria. Using MS-SharePoint 2013, you can set up Web sites to share information with others, manage documents from start to finish, and publish reports to help everyone make better decisions
SHAPE CIS Training Centre NCI Agency – E&T Service Line
065-44-7014 0032-65447014
NATO UNCLASSIFIED

SP 2013 Func Admin NATO UNCLASSIFIED
S.C.T.C. NATO UNCLASSIFIED 2
This page intentionally left blank.
Created by Mr Paul Kuijer
Training Manager
SHAPE CIS Training Centre
Created: 18 June 2014
Last Update: 30th March 2017

SP 2013 Func Admin NATO UNCLASSIFIED
S.C.T.C. NATO UNCLASSIFIED 3
SharePoint 2013 Func Admin
CONTENTS
1 INTRODUCTON TO SHAREPOINT 2013 .............................................................................. 7
1.1 WHAT IS SHAREPOINT 2013? .......................................................................................................... 7
1.2 SHAREPOINT 2013 GENERAL ........................................................................................................... 7
1.3 SUB SITES ........................................................................................................................................ 9
1.4 WEB PARTS.................................................................................................................................... 10
1.5 NEW SHAREPOINT 2013 APPS ....................................................................................................... 10
1.5.1 LIBRARY APPS ........................................................................................................................ 11
1.5.2 LIST APPS ............................................................................................................................... 11
2 NEW IN SHAREPOINT 2013 ................................................................................................. 13
2.1 GENERAL .......................................................................................................................................... 13
2.2 THE SHAREPOINT 2013 RIBBON .................................................................................................... 14
3 ACCESS THE SHAREPOINT PORTAL ............................................................................... 17
3.1 ACCESSING SHAREPOINT PORTALS .................................................................................................. 17
3.2 UNDERSTANDING THE TEAM SITE TEMPLATE ............................................................................... 18
3.3 PAGE LAYOUT ................................................................................................................................ 20
3.4 CHECKING OUT BEFORE EDITING .................................................................................................. 21
4 CREATE LIBRARY APPS ..................................................................................................... 23
4.1 CREATE DOCUMENT LIBRARY ....................................................................................................... 23
4.1.1 CHANGE DOCUMENT LIBRARY TITLE AND/OR DESCRIPTION ................................................ 26
4.1.2 CHANGE VERSIONING SETTINGS ........................................................................................... 27
4.1.3 ADD COLUMNS TO THE LIBRARY ........................................................................................... 28
4.1.4 UPLOAD FILES TO THE LIBRARY ............................................................................................. 30
4.1.5 MICROSOFT OFFICE WEB APPS .............................................................................................. 33
4.2 VIEWS IN DOCUMENT LIBRARIES .................................................................................................. 37
4.2.1 CREATE A PUBLIC VIEW ......................................................................................................... 37
4.2.2 DELETE A PUBLIC VIEW .......................................................................................................... 41

SP 2013 Func Admin NATO UNCLASSIFIED
S.C.T.C. NATO UNCLASSIFIED 4
4.2.3 DELETE THE DOCUMENT LIBRARY ......................................................................................... 42
4.3 CREATE ASSET LIBRARY ................................................................................................................. 43
4.3.1 UPLOAD MEDIA FILE .............................................................................................................. 45
4.3.2 DELETE MEDIA FILE ................................................................................................................ 50
4.3.3 DELETE ASSET LIBRARY .......................................................................................................... 51
4.4 CREATE PICTURE LIBRARY ............................................................................................................. 52
4.4.1 UPLOAD PICTURES TO THE PICTURE LIBRARY ....................................................................... 54
4.4.2 EDIT USING MS-PAINT ........................................................................................................... 56
4.4.3 DOWNLOAD PICTURE TO FOLDER ......................................................................................... 58
4.4.4 PICTURES SLIDES VIEW .......................................................................................................... 59
4.4.5 DELETE PICTURE FILE ............................................................................................................. 61
4.4.6 DELETE PICTURE LIBRARY ...................................................................................................... 62
4.5 CREATE REPORT LIBRARY .............................................................................................................. 63
4.5.1 UPLOAD REPORTS TO THE REPORT LIBRARY ......................................................................... 65
4.5.2 OPEN REPORTS WITHIN THE REPORT LIBRARY ...................................................................... 66
4.5.3 DELETE REPORT LIBRARY ....................................................................................................... 67
5 CREATE LIST APPS .............................................................................................................. 69
5.1 CREATE ANNOUNCEMENT LIST ..................................................................................................... 70
5.1.1 CREATE NEW ANNOUNCEMENT ............................................................................................ 72
5.1.2 DELETE ANNOUNCEMENTS LIST ............................................................................................ 74
5.2 CREATE CALENDAR LIST ................................................................................................................ 75
5.2.1 CREATE EVENTS ..................................................................................................................... 77
5.2.2 CONNECT CALENDAR TO MS-OUTLOOK ................................................................................ 79
5.2.3 DELETE CALENDAR LIST ......................................................................................................... 81
5.3 CREATE CONTACTS LIST ................................................................................................................ 82
5.3.1 CREATE CONTACTS USING MS-OUTLOOK .............................................................................. 83
5.3.2 DELETE CONTACTS LIST .......................................................................................................... 85
5.4 CREATE DISCUSSION BOARD LIST .................................................................................................. 86
5.4.1 POST A NEW DISCUSSION ...................................................................................................... 87

SP 2013 Func Admin NATO UNCLASSIFIED
S.C.T.C. NATO UNCLASSIFIED 5
5.4.2 RESPOND TO A DISCUSSION .................................................................................................. 88
5.4.3 SET AN ALERT ......................................................................................................................... 89
5.4.4 DELETE DISCUSSION BOARD .................................................................................................. 91
5.5 CREATE LINKS LIST ......................................................................................................................... 92
5.5.1 CREATE NEW LINK ................................................................................................................. 93
5.5.2 CHANGE THE ORDER OF YOUR LINKS .................................................................................... 94
5.5.3 DELETE LINKS LIST .................................................................................................................. 94
5.6 CREATE PROMOTED LINKS LIST ..................................................................................................... 95
5.6.1 CREATE NEW PROMOTED LINK ............................................................................................. 96
5.6.2 EDIT A PROMOTED LINK ........................................................................................................ 98
5.6.2 DELETE PROMOTED LINKS LIST .............................................................................................. 99
5.7 CREATE SURVEY LIST ................................................................................................................... 100
5.7.1 RESPOND TO A SURVEY ....................................................................................................... 107
5.7.2 REVIEW SURVEY RESPONSES ............................................................................................... 109
5.7.3 DELETE SURVEY LIST ............................................................................................................ 110
5.8 CREATE TASKS LIST ...................................................................................................................... 111
5.8.1 CREATE NEW TASK ............................................................................................................... 112
5.8.2 PREDECESSORS .................................................................................................................... 114
5.8.3 DELETE TASKS LIST ............................................................................................................... 116
5.9 IMPORT SPREADSHEET LIST ........................................................................................................ 117
5.9.1 ENTER NEW INFORMATION ................................................................................................. 120
5.9.2 DELETE SPREADSHEET LIST .................................................................................................. 122
6 CREATE PAGES .................................................................................................................. 123
6.1 GENERAL ..................................................................................................................................... 123
6.2 CREATE WIKI PAGE ...................................................................................................................... 124
6.2.1 EDIT TEXT ON YOUR WIKI PAGE........................................................................................... 126
6.2.2 INSERT PICTURE ................................................................................................................... 127
6.2.3 INSERT VIDEO ...................................................................................................................... 129
6.2.3 INSERT AND WORK WITH LINKS .......................................................................................... 131

SP 2013 Func Admin NATO UNCLASSIFIED
S.C.T.C. NATO UNCLASSIFIED 6
6.2.4 INSERT LINKS USING DOUBLE BRACKETS ............................................................................. 134
6.2.5 INSERT TABLE ....................................................................................................................... 136
6.3 WEB PARTS.................................................................................................................................. 139
6.3.1 INSERT EXISTING APP PART ................................................................................................. 140
6.3.2 INSERT NEW WEB PART ....................................................................................................... 145

SP 2013 Func Admin NATO UNCLASSIFIED
S.C.T.C. NATO UNCLASSIFIED 7
1 INTRODUCTON TO SHAREPOINT 2013
1.1 WHAT IS SHAREPOINT 2013?
SharePoint 2013 is a technology that enables organizations and business units of all sizes to
improve team productivity and to increase the efficiency of business processes. SharePoint
2013 gives you a powerful toolset for organizing content, managing documents, sharing
knowledge, providing robust collaboration environments, and finding information and people.
The social functionality in SharePoint 2013 allows you and your colleagues to build
communities, share thoughts and ideas, and to discover resources and knowledge in your
organization.
SharePoint 2013 helps staff members stay connected and productive by providing an
infrastructure and capabilities that allow easy access to people, documents, and information
that they need. With SharePoint 2013, the Functional Administrator can create websites to
share information and encourage collaboration with other users. You can access content
stored within a SharePoint site from a web browser and through client applications such as
MS-Office, running on multiple devices, such as a PC, a tablet, and a mobile phone.
1.2 SHAREPOINT 2013 GENERAL
SharePoint technology organises content in sites and sub sites. These Web contents are
presented using 2 technologies that work hand in hand. These are:
SharePoint Foundation 2013: The underlying software platform that delivers all the building-
block functionality of SharePoint. That includes apps, web pages, websites, and alerts.
SharePoint Server 2013: A set of applications that uses the building blocks of SharePoint
Foundation 2013 to deliver all the functionality mentioned previously.
SharePoint 2013 can be used to manage the knowledge and documents, the teamwork of
workgroups and supply and distribute sensible information to a certain group of users
according to the responsibility and authorization.
OVERVIEW
1.1 What is SharePoint 2013?
1.2 SharePoint 2013 General
1.3 Sub sites
1.4 Web Parts
1.5 New SharePoint 2013 Apps

SP 2013 Func Admin NATO UNCLASSIFIED
S.C.T.C. NATO UNCLASSIFIED 8
Within the SharePoint 2013 Portal the Functional Admin will be able to:
Set up permissions to document(s) and/or folder(s)
Add additional Web Parts to manage and customize their Divisional/Organizational
pages (add calendars, events, contacts, announcements, links or other information)
Create Sub sites used for Sections, Branches, Meetings, Images, WIKI page etc.
Add the new 2013 Apps (previously called List and Libraries)
Create different views within several Apps for all users or visitors to the site.

SP 2013 Func Admin NATO UNCLASSIFIED
S.C.T.C. NATO UNCLASSIFIED 9
1.3 SUB SITES
SharePoint sites provide places to capture and share ideas, information, communications,
and documents. A SharePoint site can have many subsites, the hierarchy of which, on web
servers, resembles the hierarchy of folders on file systems—it is a tree-like structure.
Similar to saving your files in folders on file systems, you can store your files within
SharePoint sites. However, SharePoint sites take file storage to a new level, providing
communities for team collaboration and making it easy for users to work together on
documents, tasks, contacts, events, calendars, wikis, and other items.
Templates, documents, lists, and other items on the portal can be associated with one or
more sub sites by using listings. Users can find information by browsing or searching the
relevant sub sites for those items.
Your sub site can contain:
Document-, Form-, Picture-, Report-, Slide and WIKI Page Libraries
Apps (aka Lists), Calendar, Tasks, Contacts, Discussion Board, Links etc.
Navigation elements (Browsing options)
Links
Images
Text

SP 2013 Func Admin NATO UNCLASSIFIED
S.C.T.C. NATO UNCLASSIFIED 10
1.4 WEB PARTS
Functional Administrators can personalize and customize the Sub sites for users based on
specific criteria. The Web Part is a part of your areas page that presents and organizes
information.
Using Web parts you can present information like an image, text, a list of documents,
calendars, events and other information. Web Parts are inserted in Web Part zones on Web
Part Pages.
1.5 NEW SHAREPOINT 2013 APPS
As you customize your site, you might decide to add information other than static text and
images. This information may be stored in lists or libraries, or in some other data source. You
can do this by adding components such as video, audio, app parts, and Web Parts. You can
insert these components on multiple pages, as well as insert them multiple times on the same
webpage.
App parts display the contents of list and library apps; each time that data in the list or library
apps changes, the changes are reflected in the app part. App parts can also be used to
display information from SharePoint apps, which are similar to the apps that you might use
with Facebook or LinkedIn, or on your Android phone or iPhone. You can add SharePoint
apps to your site from either your organization's app catalogue or from the Microsoft
SharePoint Store if you have connection to the Internet.
For example, you may want to show on your home page the weather forecast for your office
location. You could search the SharePoint Store for a weather app, which you would add to
your site. You could then add to your page the app part that came with the weather app, and
configure it to show the weather at your office location.

SP 2013 Func Admin NATO UNCLASSIFIED
S.C.T.C. NATO UNCLASSIFIED 11
1.5.1 LIBRARY APPS
Libraries are used to share files/documents with others. There are different kinds of libraries
depending on the kind of files that you are sharing. You can use a picture library to share
pictures or graphics, or use the Document library to share documents like Word, PowerPoint,
and Excel etc.
A library presents the information (contents) in a page that lists each file or folder and its
properties. To open the documents there is a hyperlink to each document. The library offers
options for adding files and folders, sorting and filtering, and changing the design of the
library.
Libraries can now be found in the Apps location.
1.5.2 LIST APPS
A List on the page is a Web Part that presents a collection of information you share with team
members. You can create a list of events, issues or contact persons on your areas page.
SharePoint offers the following set of built-in lists:
Links
Calendars
Announcements
Contacts
Events
Tasks
Issues
Lists can now be found in the Apps location.

SP 2013 Func Admin NATO UNCLASSIFIED
S.C.T.C. NATO UNCLASSIFIED 12
THIS PAGE INTENTIONALLY LEFT BLANK

SP 2013 Func Admin NATO UNCLASSIFIED
S.C.T.C. NATO UNCLASSIFIED 13
2 NEW IN SHAREPOINT 2013
2.1 GENERAL
In comparison with its predecessors, SharePoint 2013 products provide many new,
enhanced, and updated features, including many new social features and a new apps
model. SharePoint 2013 is built around five major pillars: Share, Organize, Discover, Build,
and Manage. The new and enhanced features and functionality in SharePoint pillars include
some of the following:
Video and rich media enhancements include embedding of video sources external to SharePoint, such as YouTube, and previewing videos directly from a search results page. Document libraries enhancements include a new callout feature for managing documents in a library, an ability to drag and drop files from your desktop or other location into a SharePoint library. Lists enhancements include the ability for inline editing of list items and list columns. The Sites page provides the ability to create new team sites and to follow those SharePoint sites that are important to you. The Tasks list timeline provides visual representation of the tasks.
Web content authoring enhancements include retaining all text formatting when copying content from Word, and drag-and-drop navigation editing. Site customization enhancements include a new Design Manager, a new theming experience, and an ability to configure your site for mobile devices. Workflows enhancement include new workflow architecture and major improvements to the experience of designing workflows and modelling more complex business logic and processes. Apps for SharePoint are small-scale, standalone applications that solve a specific end-user need or perform a specific task. SharePoint 2013 provides a new application model that supports the development, installation, management, and use of apps.
OVERVIEW
2.1 General
2.2 The SharePoint 2013 Ribbon

SP 2013 Func Admin NATO UNCLASSIFIED
S.C.T.C. NATO UNCLASSIFIED 14
2.2 THE SHAREPOINT 2013 RIBBON
In SharePoint 2013, the ribbon provides a consistent interface for accessing the commands
and tools that you require for the tasks that you want to accomplish, much like the ribbon in
other Office applications, such as Microsoft Word and Microsoft Excel. In a SharePoint site,
the ribbon appears across the top of a webpage and is designed to help you quickly locate
the most commonly used commands and tools for performing actions on pages, documents,
and lists.
Commands on the ribbon are organized in logical groups, displayed together under tabs that
provide titles for each group of commands that form a ribbon. Each ribbon relates to a type of
SharePoint site component that you are working with, such as a document library
For us NATO Users working with MS-Office 2010/2013, the Ribbon gives us the same feel
and touch as we are used to have from our MS-Office applications. The Ribbon makes it a lot
easier for the Functional Administrators to update or add features within their SharePoint
2013 Portal.
Below you see some samples of the SharePoint 2013 Ribbon.

SP 2013 Func Admin NATO UNCLASSIFIED
S.C.T.C. NATO UNCLASSIFIED 15
One of the many changes is the position of the Settings button, and the Ribbon not
being visible when the Browse tab is active. See the image below showing the
difference between SharePoint 2010 and the new 2013 version.

SP 2013 Func Admin NATO UNCLASSIFIED
S.C.T.C. NATO UNCLASSIFIED 16
Key points
SharePoint 2013 provides a powerful set of tools for information sharing and team collaboration.
SharePoint websites provide places to capture and share ideas, information, knowledge, documents, and communications.
You can access content stored within a SharePoint site from both a web browser and through client applications such as Office.
Access to a SharePoint site is controlled through a role-based system predicated on permission levels. The five default permission levels are Read, Contribute, Design, Full Control, and Limited.
SharePoint 2013 technology can be deployed as an on-premises SharePoint installation, or as a cloud SharePoint Online solution, or as a hybrid environment that combines on-premises and cloud models. The user experience is consistent across all types of deployment.
There are varying levels of integration between different versions of Office and SharePoint 2013, with Office 2013 having the closest integration.
SP 2013 Func Admin NATO UNCLASSIFIED
S.C.T.C. NATO UNCLASSIFIED 17
3 ACCESS THE SHAREPOINT PORTAL
3.1 ACCESSING SHAREPOINT PORTALS
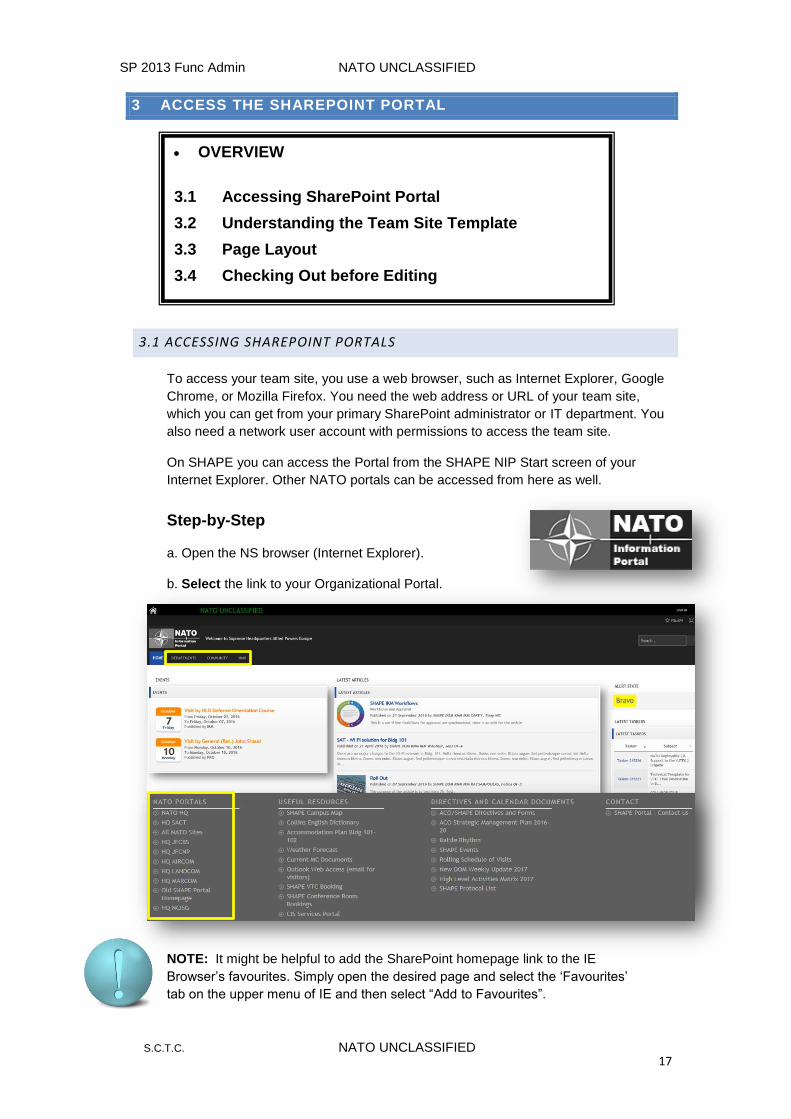
To access your team site, you use a web browser, such as Internet Explorer, Google
Chrome, or Mozilla Firefox. You need the web address or URL of your team site,
which you can get from your primary SharePoint administrator or IT department. You
also need a network user account with permissions to access the team site.
On SHAPE you can access the Portal from the SHAPE NIP Start screen of your
Internet Explorer. Other NATO portals can be accessed from here as well.
Step-by-Step
a. Open the NS browser (Internet Explorer).
b. Select the link to your Organizational Portal.
NOTE: It might be helpful to add the SharePoint homepage link to the IE
Browser’s favourites. Simply open the desired page and select the ‘Favourites’
tab on the upper menu of IE and then select “Add to Favourites”.
OVERVIEW
3.1 Accessing SharePoint Portal
3.2 Understanding the Team Site Template
3.3 Page Layout
3.4 Checking Out before Editing
3.4 Views
SP 2013 Func Admin NATO UNCLASSIFIED
S.C.T.C. NATO UNCLASSIFIED 18
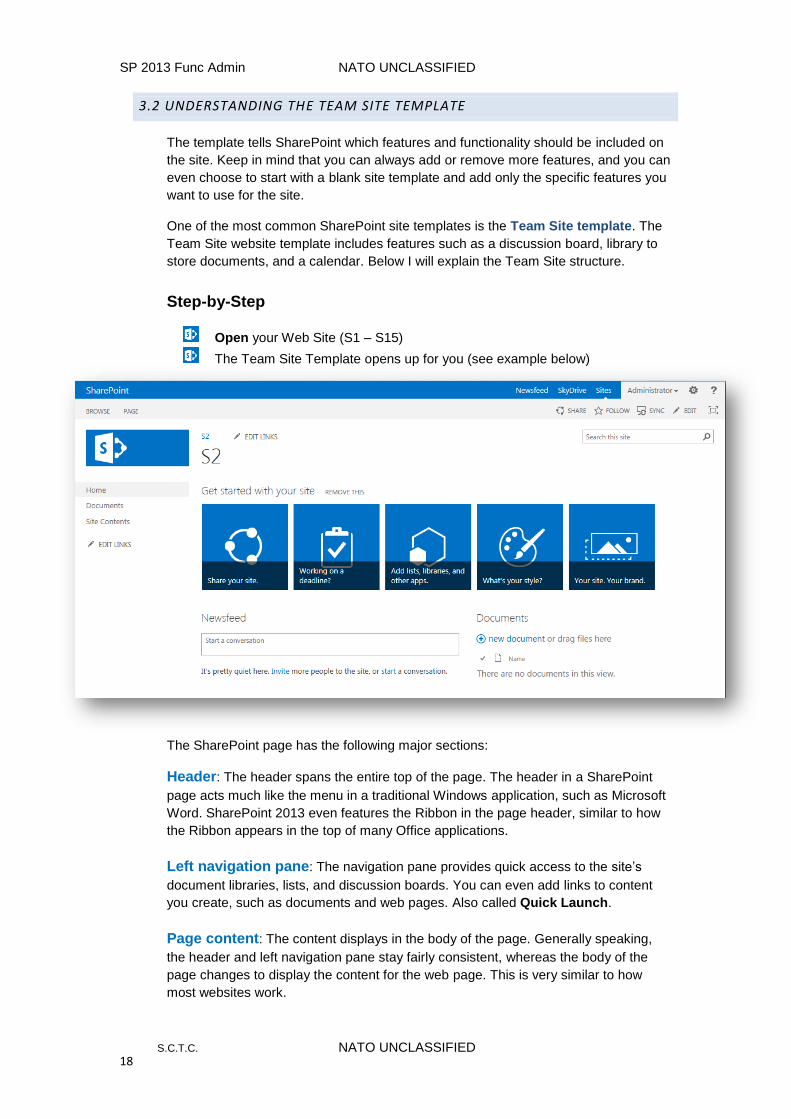
3.2 UNDERSTANDING THE TEAM SITE TEMPLATE
The template tells SharePoint which features and functionality should be included on
the site. Keep in mind that you can always add or remove more features, and you can
even choose to start with a blank site template and add only the specific features you
want to use for the site.
One of the most common SharePoint site templates is the Team Site template. The
Team Site website template includes features such as a discussion board, library to
store documents, and a calendar. Below I will explain the Team Site structure.
Step-by-Step
Open your Web Site (S1 – S15)
The Team Site Template opens up for you (see example below)
The SharePoint page has the following major sections:
Header: The header spans the entire top of the page. The header in a SharePoint
page acts much like the menu in a traditional Windows application, such as Microsoft
Word. SharePoint 2013 even features the Ribbon in the page header, similar to how
the Ribbon appears in the top of many Office applications.
Left navigation pane: The navigation pane provides quick access to the site’s
document libraries, lists, and discussion boards. You can even add links to content
you create, such as documents and web pages. Also called Quick Launch.
Page content: The content displays in the body of the page. Generally speaking,
the header and left navigation pane stay fairly consistent, whereas the body of the
page changes to display the content for the web page. This is very similar to how
most websites work.

SP 2013 Func Admin NATO UNCLASSIFIED
S.C.T.C. NATO UNCLASSIFIED 19
Get Started With Your Site
When you edit the default home page of a Team site, you're able to see that it
consists of three content areas, where each content area contains a Web Part or an
app part:
Get Started With Your Site: This Web Part displays a set of tiles with common
SharePoint actions that you might like to complete on a new Team site. As you move
your mouse over each title, a description of the task is displayed. You can remove
this Web Part by clicking Remove This.
Site Feed: This Web Part displays a Facebook-like newsfeed on your site, also
known as microblogging conversations. These conversations are stored in the
MicroFeed list app.
Documents: This app part displays the contents of the Documents library app.
REMOVE THE GET STARTED WEB PART
Step-by-Step
Click on the “REMOVE THIS” button
You can always add the Get Started Web Part from the Settings menu
again. See the message popping up below.

SP 2013 Func Admin NATO UNCLASSIFIED
S.C.T.C. NATO UNCLASSIFIED 20
3.3 PAGE LAYOUT
The presentation area’s default template provides 2 columns with a Header. The
presentation area, customisable by you (the Functional Administrator), can include a
number of different sub-sections (web parts) containing various types of information
(e.g. pictures, libraries, lists, etc.).
This is the business (information display) area
of the SharePoint portal. The local Functional
Administrator is able to completely customise
this space with a number of sections (web parts).
Within SharePoint 2013 it’s very easy to change
the Presentation Area Layout.
The procedures on how to change will be
explained in Chapter 6.
SP 2013 Func Admin NATO UNCLASSIFIED
S.C.T.C. NATO UNCLASSIFIED 21
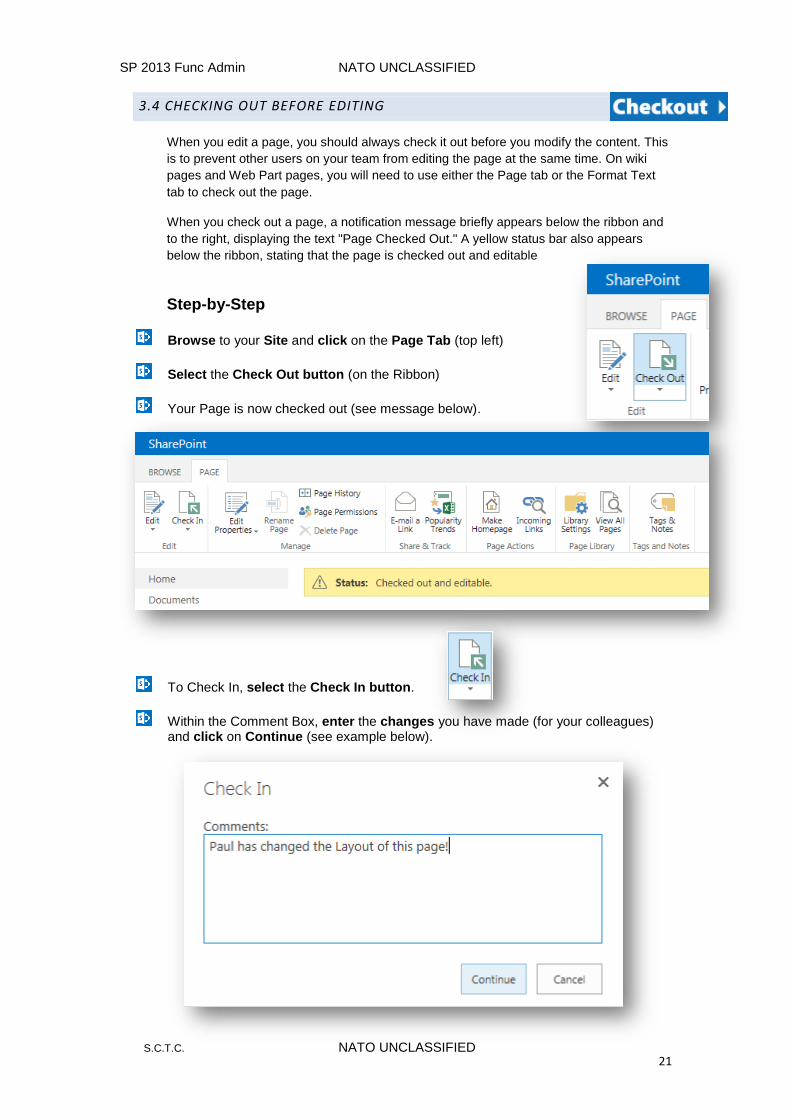
3.4 CHECKING OUT BEFORE EDITING
When you edit a page, you should always check it out before you modify the content. This
is to prevent other users on your team from editing the page at the same time. On wiki
pages and Web Part pages, you will need to use either the Page tab or the Format Text
tab to check out the page.
When you check out a page, a notification message briefly appears below the ribbon and
to the right, displaying the text "Page Checked Out." A yellow status bar also appears
below the ribbon, stating that the page is checked out and editable
Step-by-Step
Browse to your Site and click on the Page Tab (top left)
Select the Check Out button (on the Ribbon)
Your Page is now checked out (see message below).
To Check In, select the Check In button.
Within the Comment Box, enter the changes you have made (for your colleagues) and click on Continue (see example below).

SP 2013 Func Admin NATO UNCLASSIFIED
S.C.T.C. NATO UNCLASSIFIED 22

SP 2013 Func Admin NATO UNCLASSIFIED
S.C.T.C. NATO UNCLASSIFIED 23
4 CREATE LIBRARY APPS
4.1 CREATE DOCUMENT LIBRARY
For many file types, including documents and spread sheets, use a document library App.
A library is a location on a site where you can create, collect, update, and manage files with other team members. Each library displays a list of files and key information about the files, which helps people to use the files to work together.
You can use document libraries to store your documents on a SharePoint site, rather than on your local computer's hard drive or your personal folder (Z-drive on SHAPE NS), so that other employees can find and work with these documents more easily. Libraries are used to store files, whereas lists are used to store other types of content. Like lists, libraries contain metadata, so that you can easily filter, sort, and group items in the libraries.
Step-by-Step
Browse to your Site (Division, Branch or Section)
Click on Setting and select Add an App (or click on Site Contents and select Add an App) The window on the next page opens up for you.
OVERVIEW
4.1 Create Document Library
4.2 Views in Document Libraries
4.3 Create Asset Library
4.4 Create Picture Library
4.5 Create Report Library
4.6 Create …… Library

SP 2013 Func Admin NATO UNCLASSIFIED
S.C.T.C. NATO UNCLASSIFIED 24
On your Apps page, click on the Document Library Tile, or click on App Details first
to get more information about the App.
Click on Advanced Options and add a Name for your Document Library (use a
name that makes sense for your customers/colleagues)
Enter a description, select the Versioning History and select the default document template when creating a new document within the Library.

SP 2013 Func Admin NATO UNCLASSIFIED
S.C.T.C. NATO UNCLASSIFIED 25
Click on Create
The new Document Library has been created and opens up for you. (see below)
Now you can upload or create documents. Notice the New document option is used
to create a new MS-Office document! See example below.
Within you Site Contents window you can also see the newly created App with a
Green Icon next to the Tile.

SP 2013 Func Admin NATO UNCLASSIFIED
S.C.T.C. NATO UNCLASSIFIED 26
To change the Title and description show the Library on the Quick Launch Area, or to add additional columns to your Library, you can customize your Library Settings. Within this sub-chapter I will show you how to change the title, how to add additional columns and how to change the versioning options.
4.1.1 CHANGE DOCUMENT LIBRARY TITLE AND/OR DESCRIPTION
Step-by-Step
Open the Document Library.
On the Library Tab select Library Settings
Within General Settings select List name, description and navigation.
The following window opens up
Select yes to display the Library on the Quick Launch!
Make your changes as needed and select Save.
Your updated Title and Description will be available, and a link is shown on the Quick Launch List.

SP 2013 Func Admin NATO UNCLASSIFIED
S.C.T.C. NATO UNCLASSIFIED 27
4.1.2 CHANGE VERSIONING SETTINGS
Step-by-Step
Open the Document Library.
On the Library Tab select Library Settings
Within General Settings select Versioning settings See example besides
The following window opens up
Select if you would like to use Minor and/or Major Versions. Minor versions are not
indexed and can’t be seen by people outside your Organisation (Minor means Draft)
Select any other option available (example require documents checked out)
Click on OK.
SP 2013 Func Admin NATO UNCLASSIFIED
S.C.T.C. NATO UNCLASSIFIED 28
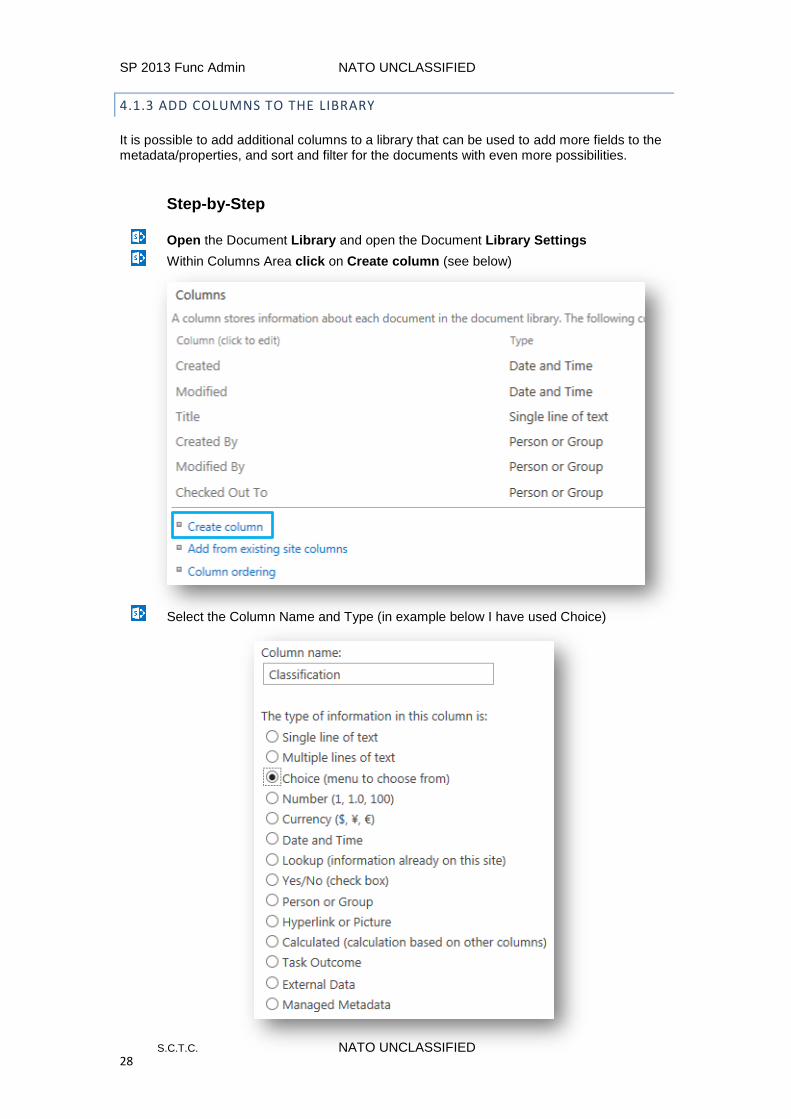
4.1.3 ADD COLUMNS TO THE LIBRARY
It is possible to add additional columns to a library that can be used to add more fields to the metadata/properties, and sort and filter for the documents with even more possibilities.
Step-by-Step
Open the Document Library and open the Document Library Settings
Within Columns Area click on Create column (see below)
Select the Column Name and Type (in example below I have used Choice)

SP 2013 Func Admin NATO UNCLASSIFIED
S.C.T.C. NATO UNCLASSIFIED 29
Depending on the Type you have various options available.
Below you see the options for the Choice Column
Add a Description, select to make it Mandatory, choose how to display, add default
values.
Click on OK to create the new column. See Library example below.

SP 2013 Func Admin NATO UNCLASSIFIED
S.C.T.C. NATO UNCLASSIFIED 30
4.1.4 UPLOAD FILES TO THE LIBRARY
There are several ways to add documents to a document library, including the following: Using the browser: to upload documents to the library via the SharePoint interface. Using File Explorer: to copy or move documents into the library, including dragging between your desktop, or any other location, and SharePoint. Using Drag and Drop: from any location into your Document Library (new in SP2013). In this chapter, you will use two methods: the browser and Drag and Drop.
USING THE BROWSER
Step-by-Step
Open the Document Library and click on new document link and select Upload
existing file.
Select Browse, navigate to the document to be uploaded, select it and click open.
The following window opens up
Enter (if needed) version comments, and click on OK.
The Metadata window opens up for you.
See on the following page.

SP 2013 Func Admin NATO UNCLASSIFIED
S.C.T.C. NATO UNCLASSIFIED 31
Add a Title if needed.
Select the Mandatory Classification Field.
Click on Save.
The document will be copied from the original location and saved within your
SharePoint 2013 Document Library.
NOTE: Documents that include special characters within the title can’t be
uploaded to any SharePoint Library. Don’t use #%& and other symbols within
titles of documents. See the error message below.

SP 2013 Func Admin NATO UNCLASSIFIED
S.C.T.C. NATO UNCLASSIFIED 32
USING DRAG AND DROP
Step-by-Step
Open the Document Library and open your Windows Explorer (Window + E)
Select the document(s) from you Windows Explorer and Drag and Drop the
documents on top of the Document Library within SharePoint.
The documents will be copied into the SharePoint Library.
You can follow the upload process and check at the end if the upload completed.
See example below:
You can click on DISMISS to remove the notification message.

SP 2013 Func Admin NATO UNCLASSIFIED
S.C.T.C. NATO UNCLASSIFIED 33
4.1.5 MICROSOFT OFFICE WEB APPS
Office Web Apps give you a browser-based viewing and editing experience by providing a representation of an Office document in the browser. For example, when you click a docu-ment stored in a SharePoint document library, the document opens directly in the browser. The document appearance in the browser is similar to how it appears in the Office client application. While an Office Web App provides lighter editing functionality than the associated Office client application, it provides the user an opportunity to open a document for editing in the associated client application by using a button within the Office Web App page. On a SharePoint site where Office Web Apps have been installed and configured, you can view and edit Office documents in the browser from anywhere you have a connection to your SharePoint site, including mobile devices. You can also create a new Office document from within your SharePoint Library that will be saved within the Library automatically. In this chapter, I will explain the following:
A. Document Preview
B. Edit uploaded document in Browser
C. Create New Office document within the Library
DOCUMENT PREVIEW
Step-by-Step
Open the Document Library and click on ellipse… button of the document to
preview. The preview opens up for you. See example of Word below.

SP 2013 Func Admin NATO UNCLASSIFIED
S.C.T.C. NATO UNCLASSIFIED 34
You can scroll through the document, print to Pdf or download a copy from the
Preview menu.
Print to PDF will create a PDF file that opens up in the Print window (possible to save
as PDF as well).
EDIT UPLOADED DOCUMENT IN BROWSER
Step-by-Step
Click on the document link (Title)
Your document opens up in a Browser View (see the PowerPoint example below)
Use the common navigation tools from PowerPoint, or Start Slideshow.

SP 2013 Func Admin NATO UNCLASSIFIED
S.C.T.C. NATO UNCLASSIFIED 35
To edit your document select Edit Presentation/Document or Workbook, and
select to Edit in PowerPoint/Word/Excel or in Web App. Web App has less
functionalities, but good for quick changes. See Edit windows below.
Below an example of Edit in MS-PowerPoint Web App.
Make any necessary changes and click on the File Tab
and select Exit to close the document including the changes
and return to your Document Library.
When finished editing in the Office application, click on Quick
Save (floppy top left), and close the Office application.

SP 2013 Func Admin NATO UNCLASSIFIED
S.C.T.C. NATO UNCLASSIFIED 36
CREATE NEW OFFICE DOCUMENT WITHIN THE LIBRARY
Step-by-Step
Within the Library click on the new document button
Select the document type to create.
Enter a name for the new document and click on OK. By default the document opens in the Web App application.
Create your document and when finished click on Save and Close the App.
SP 2013 Func Admin NATO UNCLASSIFIED
S.C.T.C. NATO UNCLASSIFIED 37
4.2 VIEWS IN DOCUMENT LIBRARIES
Views determine what information is presented to the user and in what format.
The SharePoint Functional Administrator can create public views that are available to
all users of a document-, Picture, Asset and any other library.
Creating a view in a library is a beneficial way of organizing content within a library. A
view can be created with filters based on the columns, providing an easy way to find
documents. If a library contains custom metadata (like Classification), you may want
your view to be created with a filter that shows a certain classification only.
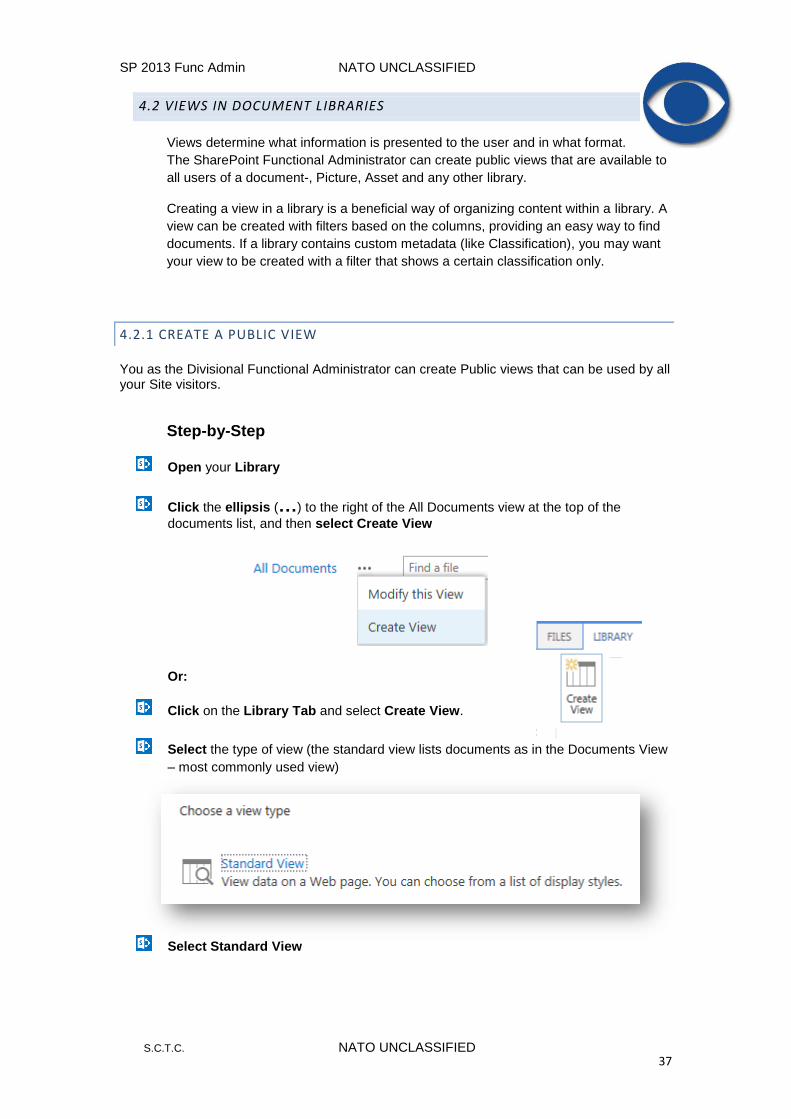
4.2.1 CREATE A PUBLIC VIEW
You as the Divisional Functional Administrator can create Public views that can be used by all your Site visitors.
Step-by-Step
Open your Library
Click the ellipsis (…) to the right of the All Documents view at the top of the
documents list, and then select Create View Or:
Click on the Library Tab and select Create View.
Select the type of view (the standard view lists documents as in the Documents View
– most commonly used view)
Select Standard View

SP 2013 Func Admin NATO UNCLASSIFIED
S.C.T.C. NATO UNCLASSIFIED 38
Specify the details for the selected view. First enter the title and specify if it should
be the default view for this library. See example below
Select the columns to be viewed and their position (see below)

SP 2013 Func Admin NATO UNCLASSIFIED
S.C.T.C. NATO UNCLASSIFIED 39
Select the sorting option if needed. See example below
Select the Filter options if needed. See below
Select if needed any of the other options available Group By – Totals – Style – Folders – Etc.
Click on OK. The new View is created.

SP 2013 Func Admin NATO UNCLASSIFIED
S.C.T.C. NATO UNCLASSIFIED 40
Below you see an example of a Public View (called Classification view)
This view only shows “NATO UNCLASSIFIED” documents.
The view below is the normal “All Documents” view. (Including any classification in
documents).
NOTE:
1. You can switch between views by clicking on the View Name.
2. You can modify any view by selecting the view, click on the ellipsis (…),
and select Modify this View.
SP 2013 Func Admin NATO UNCLASSIFIED
S.C.T.C. NATO UNCLASSIFIED 41
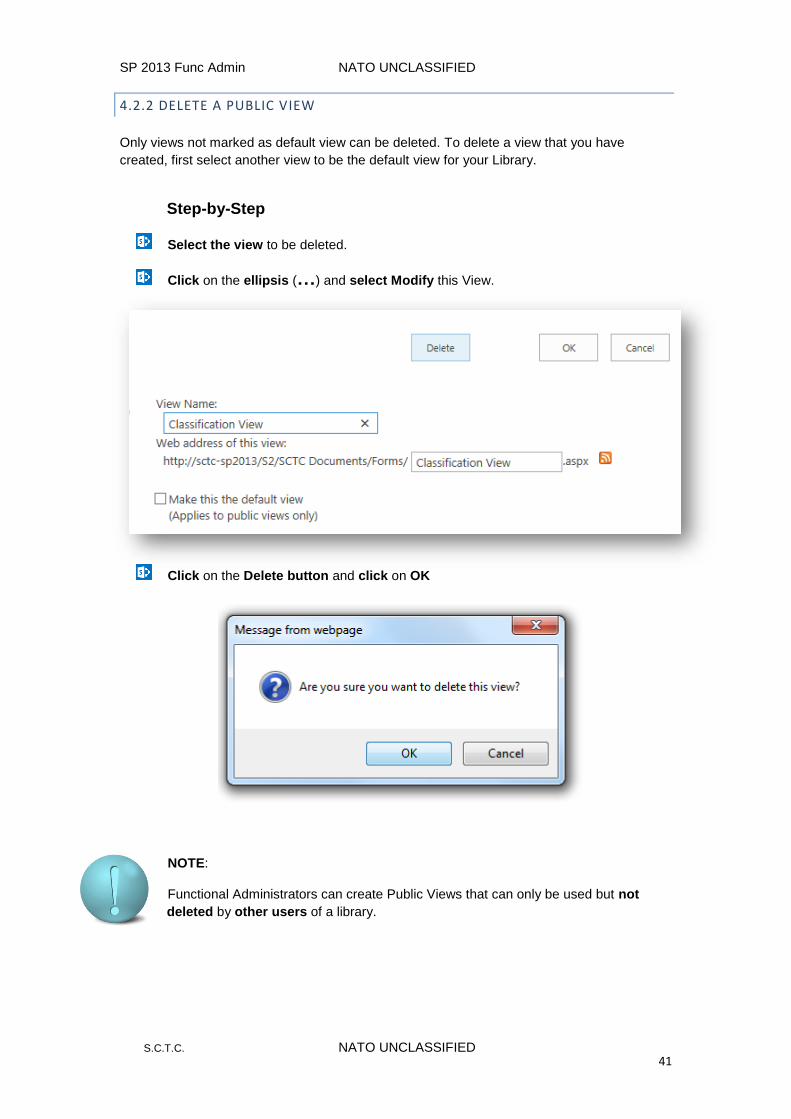
4.2.2 DELETE A PUBLIC VIEW
Only views not marked as default view can be deleted. To delete a view that you have
created, first select another view to be the default view for your Library.
Step-by-Step
Select the view to be deleted.
Click on the ellipsis (…) and select Modify this View.
Click on the Delete button and click on OK
NOTE:
Functional Administrators can create Public Views that can only be used but not
deleted by other users of a library.

SP 2013 Func Admin NATO UNCLASSIFIED
S.C.T.C. NATO UNCLASSIFIED 42
4.2.3 DELETE THE DOCUMENT LIBRARY
When a SharePoint library is no longer required or was perhaps created by mistake, you may
wish to delete this library. Deleting the library will delete all files within the library as well, so
deleting should be used with caution. If a list or a library is accidentally deleted, as with list
items and documents, it will be placed within the site Recycle Bin for 30 days (by default)
and can be restored.
Step-by-Step
Click on Site Contents
Click on the light blue part or the … of the App to
delete, and select REMOVE. See example below
Confirm the following message with OK.
Your Library has been removed/deleted.
NOTE:
You can also delete a library this way: Open Library to delete, click Library Tab,
select Library Settings, and select Delete this Document Library.

SP 2013 Func Admin NATO UNCLASSIFIED
S.C.T.C. NATO UNCLASSIFIED 43
4.3 CREATE ASSET LIBRARY
The Asset Management App in SharePoint 2013 provides a special central repository to store
and manage digital assets like image, audio, or video file. This enables organizations with
enhanced control over the digital assets and prevents unauthorized access to its contents by
effectively managing these assets.
The New 2013 Asset Library template comes with the following features:
Thumbnail–centric views: By default, the Asset Library uses a Thumbnails view, which
displays small thumbnails of the assets in the library. This view makes it easy to quickly
browse for images and video files.
Overlay callouts: In Thumbnails view, the name of the file is shown on a black overlay at
the bottom of the thumbnail. When you move your pointer over the thumbnail, this overlay
scrolls up, covers the thumbnail, and reveals clickable buttons. One button lets you select the
files, and the other opens a detail panel with more options.
Digital asset content types: The Asset Library is pre-configured to support content types
for image, video, and audio files. These content types include columns that enable you to
track metadata that is specific to rich media assets.
Automatic metadata extraction for image files: When you upload image files to an Asset
Library, any existing metadata for the file is extracted and promoted to any available
corresponding columns in the library. Automatic metadata extraction is supported for the
following image file types: BMP, GIF, ICO, JPEG, PNG, and TIFF.

SP 2013 Func Admin NATO UNCLASSIFIED
S.C.T.C. NATO UNCLASSIFIED 44
Step-by-Step
Browse to your Site (Division, Branch or Section)
Click on Setting and select Add an App
Within the Search window type “asset” and press enter. See below.
From within the Search results click on the Asset Library Tile.
Select Advanced Options.
Enter a Name, description and decide if you want to use versioning for this Asset Library (I don’t use it).
Select Create.
The new Asset Library has been created and opens up for you. (see next page)

SP 2013 Func Admin NATO UNCLASSIFIED
S.C.T.C. NATO UNCLASSIFIED 45
The following window opens up
Within you Site Contents window you can also see the newly created App with a
Green Icon next to the Tile.
NOTE: To show this library on the Quick Launch, select Library Tab, Library Settings, List Name, Title and …, and check Yes to display on the Quick Launch.
4.3.1 UPLOAD MEDIA FILE
To upload a media file there are several ways to do so. You can click on new Item link, use the File Tab or Drag and Drop to insert or upload media files. The Maximum file size within SharePoint 2013 is 250Mb. This could be different within your SharePoint Site.
Step-by-Step
Click on new Item to select a Media file from your computer.
or:
Open Files Tab, select New Document and click on
Image/Audio or Video, to select a video from your computer,
provide a link to a video or to provide a code to embed a video
from the web.
or:
Use the Drag and Drop method as seen before (page 32).

SP 2013 Func Admin NATO UNCLASSIFIED
S.C.T.C. NATO UNCLASSIFIED 46
In this example I will use the New Item button to upload a video file.
Click within the Asset Library on New Item
Browse for the file to upload, select the File and click on Open.
Select OK. The window below opens up for you.

SP 2013 Func Admin NATO UNCLASSIFIED
S.C.T.C. NATO UNCLASSIFIED 47
Within the opened dialog box you can add the following Metadata values.
1. Name
2. Description
3. Owner mail
4. Show download link or not
5. People seen in the video.
After altering your metadata, click on Save.
Your Video/Audio or image file has been uploaded. See below.

SP 2013 Func Admin NATO UNCLASSIFIED
S.C.T.C. NATO UNCLASSIFIED 48
Below you see the result after uploading several movies and a sound files.
Clicking a Tile of an image or sound file will open the Metadata window of the
selected file. Clicking a tile of a video will start the video in a small size window.
Image above appears after clicking the
Video Tile
Image on the left appears after
clicking the Audio Tile

SP 2013 Func Admin NATO UNCLASSIFIED
S.C.T.C. NATO UNCLASSIFIED 49
If you want to see the image in a full window, or play the movie or sound file, just click on the Tile and click on the small Thumbnail Preview. Or:
Click on the ellipsis (…) and select Play for Video’s / Audio file types or click on
the image. See example below for Audio.
Use the SharePoint Player controls to Pause, start, Mute sound or play Full screen.

SP 2013 Func Admin NATO UNCLASSIFIED
S.C.T.C. NATO UNCLASSIFIED 50
4.3.2 DELETE MEDIA FILE
To delete a media file follow these instructions.
Step-by-Step
Select the Checkbox(s) of the files to delete and click on the Delete button on the Files Tab Or:
Click on the ellipsis (…) button and select the Open Menu (…) button and select
Delete.

SP 2013 Func Admin NATO UNCLASSIFIED
S.C.T.C. NATO UNCLASSIFIED 51
4.3.3 DELETE ASSET LIBRARY
Follow the steps below to be able to delete an existing Asset Library.
Step-by-Step
Click on Site Contents
Click on the light blue part or the … of the App to delete, and select REMOVE.
See example below
Confirm the following message with OK.
Your Library has been removed/deleted.
NOTE:
You can also delete a library this way: Open Library to delete, click Library Tab,
select Library Settings, and select Delete this Document Library.

SP 2013 Func Admin NATO UNCLASSIFIED
S.C.T.C. NATO UNCLASSIFIED 52
4.4 CREATE PICTURE LIBRARY
To share a collection of digital pictures or graphics, use a picture library. Although pictures
can be stored in other types of SharePoint libraries, picture libraries have several advantages.
For example, from a picture library you can view pictures in a slide show, download pictures
to your computer, and edit pictures with compatible graphics programs, such as Microsoft
Paint. Consider creating a picture library if you want to store pictures of team events or
Divisional happenings.
Step-by-Step
Browse to your Site (Division, Branch or Section)
Click on Setting and select Add an App The window on the next page opens up for you.
Select the Picture Library Tile

SP 2013 Func Admin NATO UNCLASSIFIED
S.C.T.C. NATO UNCLASSIFIED 53
Enter a Name and click Create (or go to Advance to select versioning settings)
The following window opens up
Within you Site Contents window you can also see the newly created App with a
Green Icon next to the Tile.
NOTE: To show this library on the Quick Launch, select Library Tab, Library Settings, List Name, Title and …, and check Yes to display on the Quick Launch.
The next step is to upload images into the Library.

SP 2013 Func Admin NATO UNCLASSIFIED
S.C.T.C. NATO UNCLASSIFIED 54
4.4.1 UPLOAD PICTURES TO THE PICTURE LIBRARY
Below I will explain to you how to upload pictures. When uploading a single picture, you are required to enter more information. When uploading multiple pictures, you can add the additional information afterwards. You have the same upload options as seen before. New Picture, Files Tab and Upload and Drag and Drop as well. I will use the New Picture method.
Step-by-Step
Open the Picture Library
Click on new Picture to select a Picture file from your computer.
Browse to find the picture, select it and click on Open.
Select OK. The following window opens up.

SP 2013 Func Admin NATO UNCLASSIFIED
S.C.T.C. NATO UNCLASSIFIED 55
Fill in any metadata as needed (Title, Date Picture taken, etc.) See below.
Click on Save
The Image is saved within the Picture Library.
Below an example after uploading several images.
If you want to see the image in a full window, just click on the Tile and click on the
Preview.

SP 2013 Func Admin NATO UNCLASSIFIED
S.C.T.C. NATO UNCLASSIFIED 56
PICTURE LIBRARY SPECIALS
After creation of your Picture Library and uploading of pictures/images, there are several actions available like Edit, Delete, Download a Copy and a Slideshow view. In the following chapter I will show you how to edit (change) a photo, change the view of your Library, and how to download a copy.
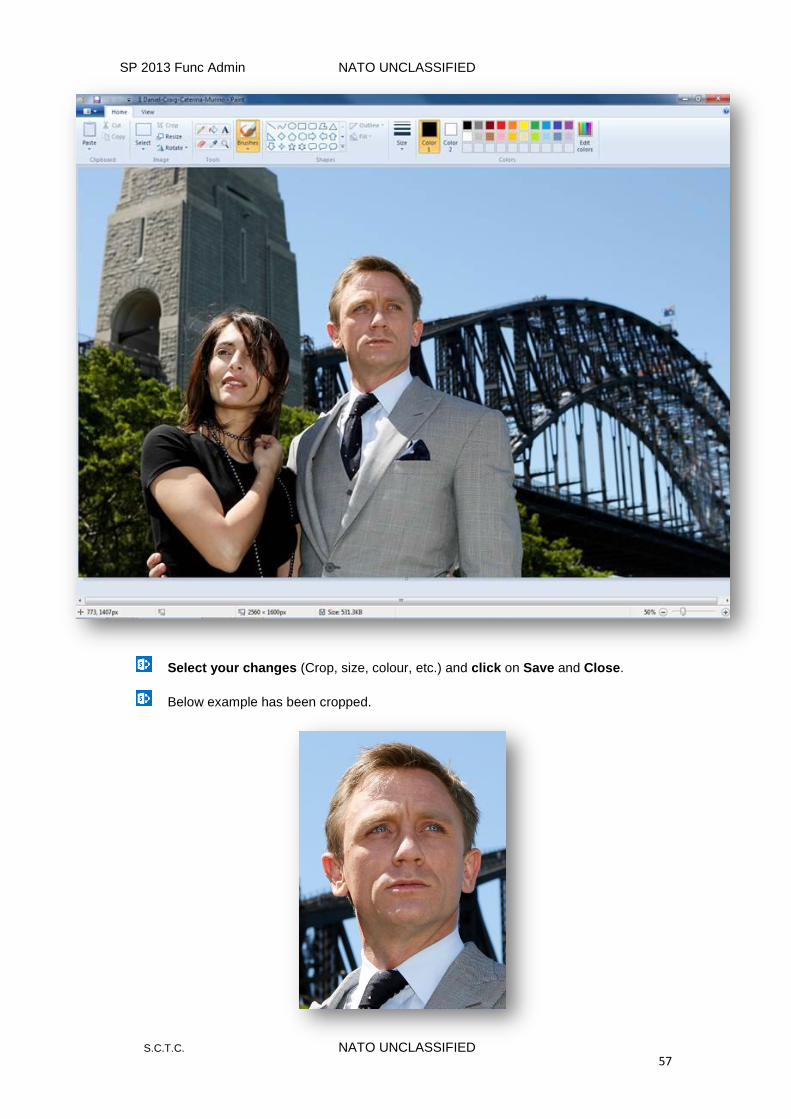
4.4.2 EDIT USING MS-PAINT
Step-by-Step
Open the Picture Library.
Hover over a picture and click on the ellipsis (…), and select EDIT. See below.
The MS-Paint opens up for you (see following page)
SP 2013 Func Admin NATO UNCLASSIFIED
S.C.T.C. NATO UNCLASSIFIED 57
Select your changes (Crop, size, colour, etc.) and click on Save and Close.
Below example has been cropped.

SP 2013 Func Admin NATO UNCLASSIFIED
S.C.T.C. NATO UNCLASSIFIED 58
4.4.3 DOWNLOAD PICTURE TO FOLDER
This option allows you to download a selected image from within SharePoint to a location of
your choice (folder, Memory Stick, Desktop etc.).
Step-by-Step
Within the Picture Library Hover over the picture to be downloaded and click on the
ellipsis (…) twice, and select download a Copy. See below
Select Save as and choose a place to save the downloaded picture into.

SP 2013 Func Admin NATO UNCLASSIFIED
S.C.T.C. NATO UNCLASSIFIED 59
4.4.4 PICTURES SLIDES VIEW
It is possible for you and your visitors to show all pictures within a Slideshow format that
allows you to click through a series of large versions of the photos.
Step-by-Step
Open the Picture Library
Select Slides View button. See below.
Clicking the Forward/Backwards button will open the next or previous picture in a
large view. See example below.
Click on Thumbnails view to go back to the default view.

SP 2013 Func Admin NATO UNCLASSIFIED
S.C.T.C. NATO UNCLASSIFIED 60
NOTE: To create a similar, automatic slide presentation on a page, you can insert the Picture Library Slideshow Web Part, which lets you control the duration of picture display, whether to display pictures in random or sequential order, and how to display certain picture. See Chapter Web Parts.
SP 2013 Func Admin NATO UNCLASSIFIED
S.C.T.C. NATO UNCLASSIFIED 61
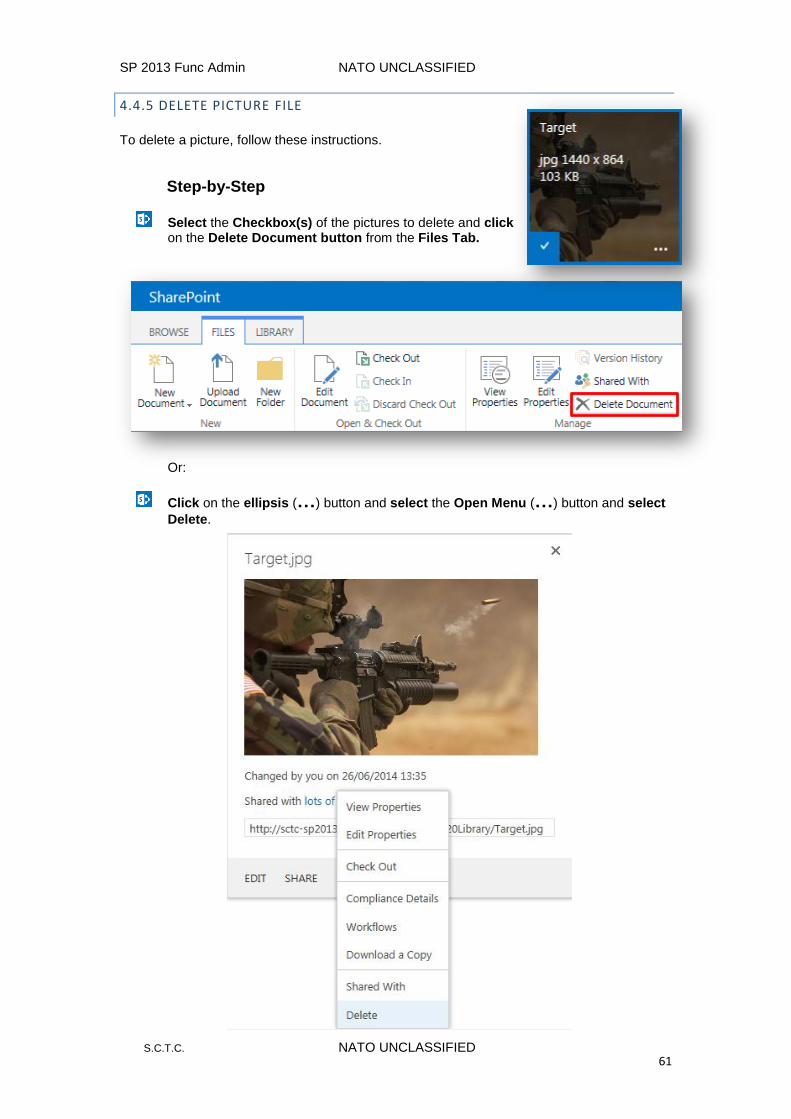
4.4.5 DELETE PICTURE FILE
To delete a picture, follow these instructions.
Step-by-Step
Select the Checkbox(s) of the pictures to delete and click on the Delete Document button from the Files Tab. Or:
Click on the ellipsis (…) button and select the Open Menu (…) button and select
Delete.
SP 2013 Func Admin NATO UNCLASSIFIED
S.C.T.C. NATO UNCLASSIFIED 62
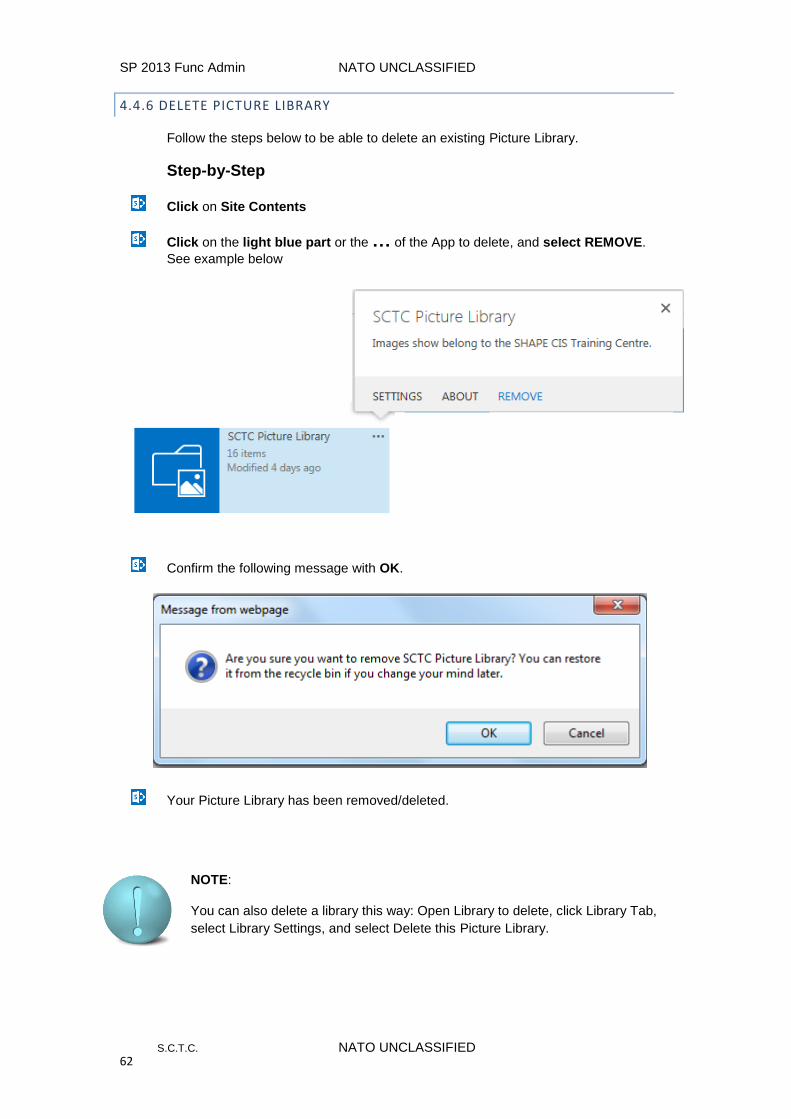
4.4.6 DELETE PICTURE LIBRARY
Follow the steps below to be able to delete an existing Picture Library.
Step-by-Step
Click on Site Contents
Click on the light blue part or the … of the App to delete, and select REMOVE.
See example below
Confirm the following message with OK.
Your Picture Library has been removed/deleted.
NOTE:
You can also delete a library this way: Open Library to delete, click Library Tab,
select Library Settings, and select Delete this Picture Library.

SP 2013 Func Admin NATO UNCLASSIFIED
S.C.T.C. NATO UNCLASSIFIED 63
4.5 CREATE REPORT LIBRARY
To simplify the creation, management and delivery of web pages, documents and key
performance indicators (KPI) of metrics and goals, use a report library. The report library is a
central place where you can create and save reports, such as Excel workbooks. When you
publish an Excel workbook to a reports library, it is single-click enabled to open in browser
view, which is a convenient way to see the workbook without adding it to a Web Parts Page.
Step-by-Step
Browse to your Site (Division, Branch or Section)
Click on Setting and select Add an App
Within the Search window type “report” and press enter. See below.
From within the Search results click on the Report Library Tile.
Select Advanced Options.
Enter a Name, description and decide if you want to use versioning for this Report Library (I use it). See example below.

SP 2013 Func Admin NATO UNCLASSIFIED
S.C.T.C. NATO UNCLASSIFIED 64
Enter a Name and click Create. The Report Library window opens up.
Within you Site Contents window you can also see the newly created App with a
Green New Icon next to the Tile.
NOTE: To show this library on the Quick Launch, select Library Tab, Library Settings, List Name, Title and …, and check Yes to display on the Quick Launch.
The next step is to upload Reports into the Library.
SP 2013 Func Admin NATO UNCLASSIFIED
S.C.T.C. NATO UNCLASSIFIED 65
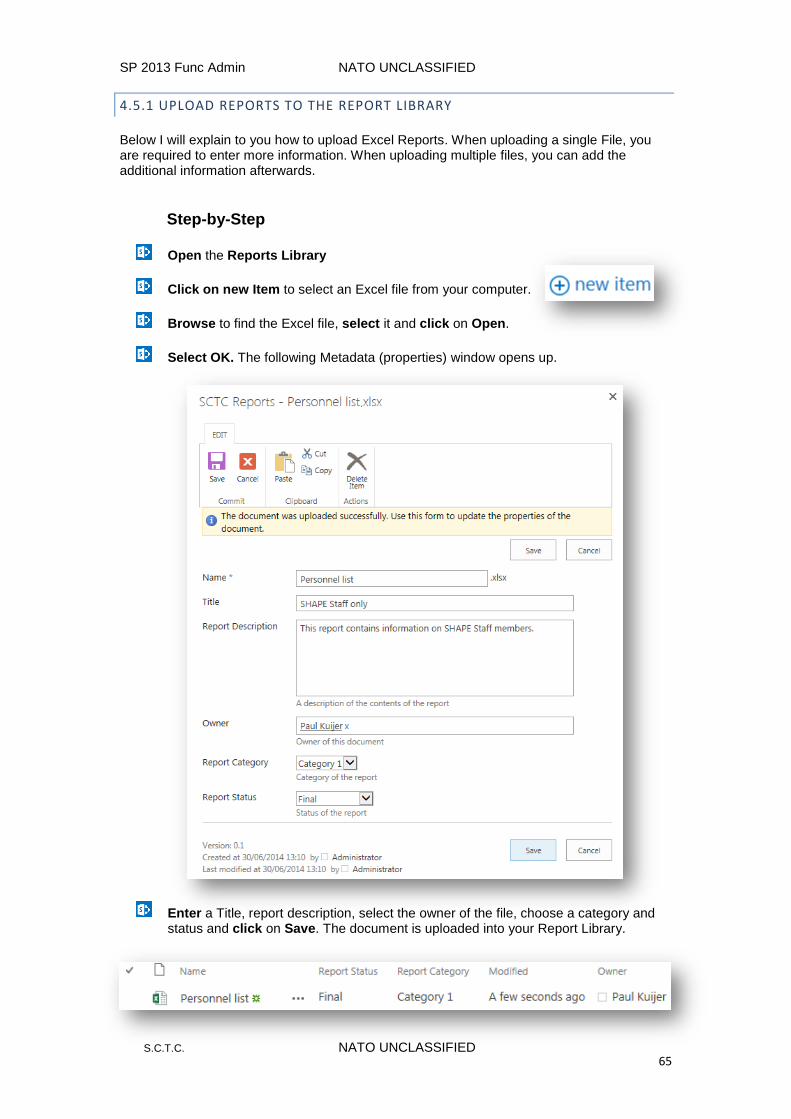
4.5.1 UPLOAD REPORTS TO THE REPORT LIBRARY
Below I will explain to you how to upload Excel Reports. When uploading a single File, you are required to enter more information. When uploading multiple files, you can add the additional information afterwards.
Step-by-Step
Open the Reports Library
Click on new Item to select an Excel file from your computer.
Browse to find the Excel file, select it and click on Open.
Select OK. The following Metadata (properties) window opens up.
Enter a Title, report description, select the owner of the file, choose a category and status and click on Save. The document is uploaded into your Report Library.

SP 2013 Func Admin NATO UNCLASSIFIED
S.C.T.C. NATO UNCLASSIFIED 66
4.5.2 OPEN REPORTS WITHIN THE REPORT LIBRARY
The Excel file is now single-click enabled to open in browser view.
Step-by-Step
Open the Reports Library
Click on top of the file name The window below opens up for you
The file is read only, but to edit you can click on Open in Excel. Update the info, click on Save and close Excel.
Additional options can be found in the File Tab (see below)
NOTE: The Report Library is set by default to create Minor versions of documents! Minor versions are not indexed and can’t be found if using the search function. To change versioning see page 27.

SP 2013 Func Admin NATO UNCLASSIFIED
S.C.T.C. NATO UNCLASSIFIED 67
4.5.3 DELETE REPORT LIBRARY
Follow the steps below to be able to delete an existing Report Library.
Step-by-Step
Click on Site Contents
Click on the light blue part or the … of the App to delete, and select REMOVE.
See example below
Confirm the following message with OK.
Your Picture Library has been removed/deleted.
NOTE:
You can also delete a library this way: Open Library to delete, click Library Tab,
select Library Settings, and select Delete this Document Library.
SP 2013 Func Admin NATO UNCLASSIFIED
S.C.T.C. NATO UNCLASSIFIED 68

SP 2013 Func Admin NATO UNCLASSIFIED
S.C.T.C. NATO UNCLASSIFIED 69
5 CREATE LIST APPS
Within this chapter I will show you how to create and use the most common used List
Apps.
A List on the page presents a collection of information you share with team members.
You can create a list of events, issues or contact persons on your areas page
OVERVIEW
5.1 Create Announcement List
5.2 Create Calendar List
5.3 Create Contacts List
5.4 Create Discussion Board List
5.5 Create Links List
5.6 Create Promoted Links
5.7 Create Survey List
5.8 Create Tasks List
5.9 Import Spreadsheet List
SP 2013 Func Admin NATO UNCLASSIFIED
S.C.T.C. NATO UNCLASSIFIED 70
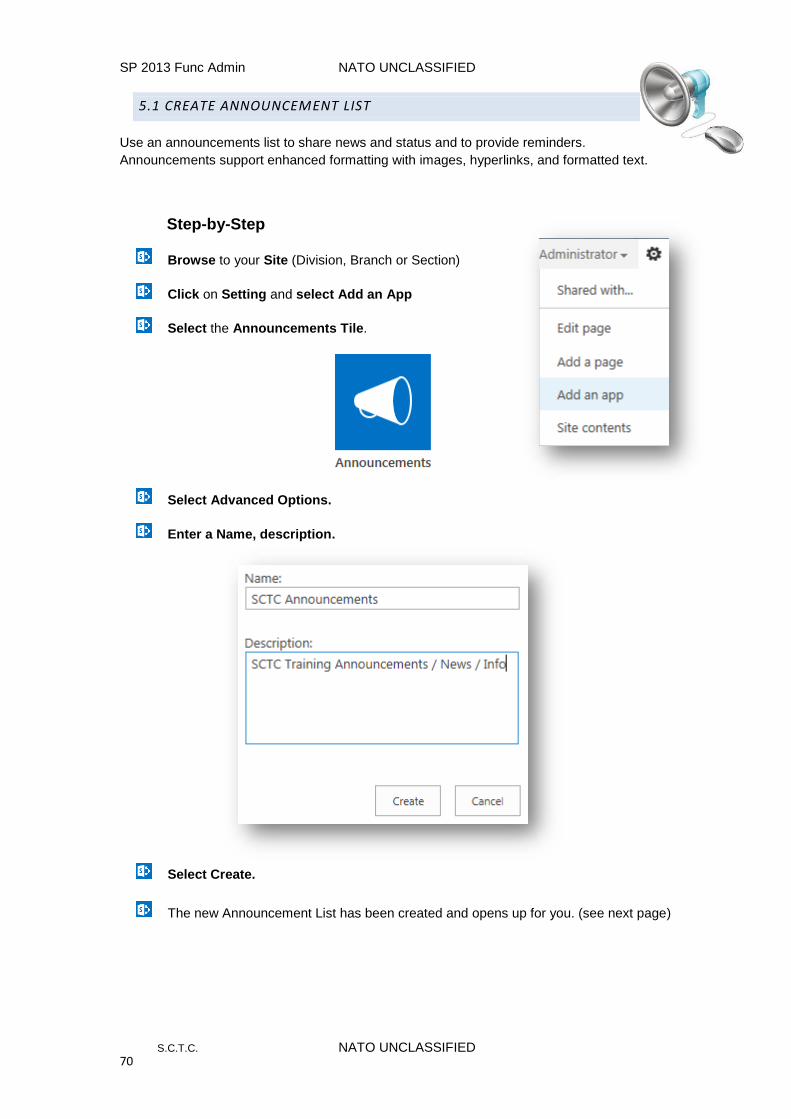
5.1 CREATE ANNOUNCEMENT LIST
Use an announcements list to share news and status and to provide reminders.
Announcements support enhanced formatting with images, hyperlinks, and formatted text.
Step-by-Step
Browse to your Site (Division, Branch or Section)
Click on Setting and select Add an App
Select the Announcements Tile.
Select Advanced Options.
Enter a Name, description.
Select Create.
The new Announcement List has been created and opens up for you. (see next page)

SP 2013 Func Admin NATO UNCLASSIFIED
S.C.T.C. NATO UNCLASSIFIED 71
The following window opens up
Within you Site Contents window you can also see the newly created App with a
Green Icon next to the Tile.
NOTE: To show this List on the Quick Launch, select List Tab, List Settings, List Name, Title and …, and check Yes to display on the Quick Launch.
SP 2013 Func Admin NATO UNCLASSIFIED
S.C.T.C. NATO UNCLASSIFIED 72
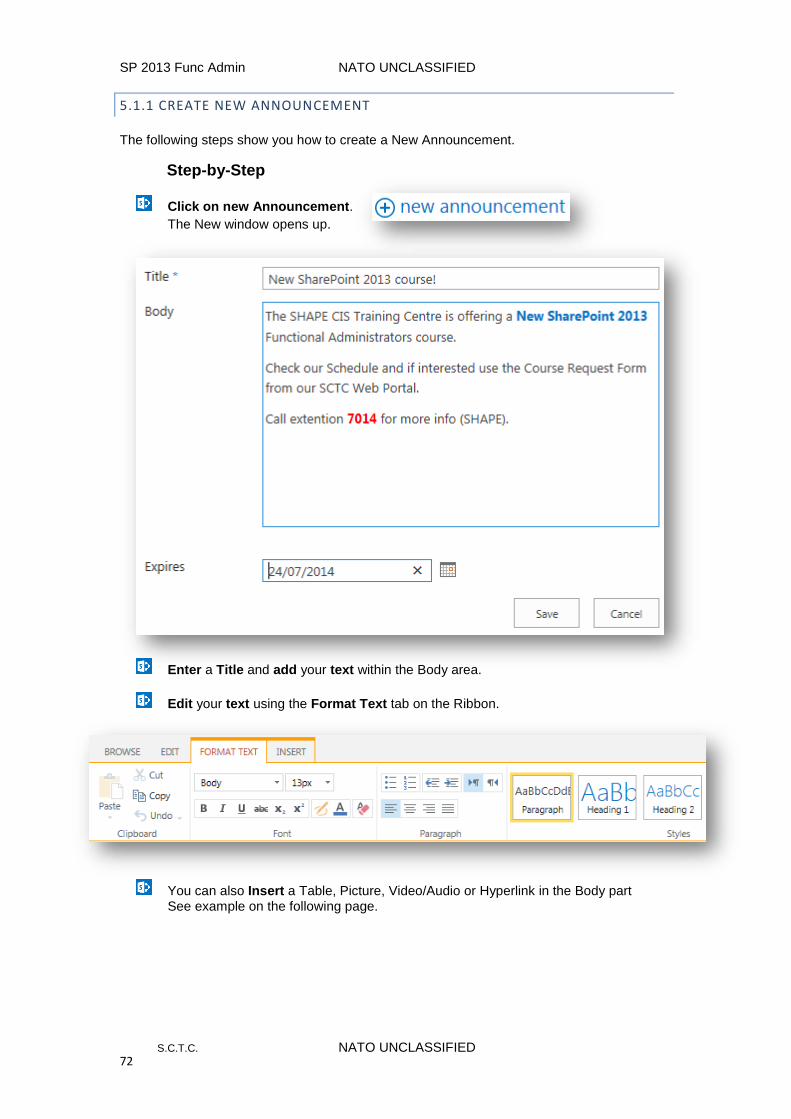
5.1.1 CREATE NEW ANNOUNCEMENT
The following steps show you how to create a New Announcement.
Step-by-Step
Click on new Announcement.
The New window opens up.
Enter a Title and add your text within the Body area.
Edit your text using the Format Text tab on the Ribbon.
You can also Insert a Table, Picture, Video/Audio or Hyperlink in the Body part See example on the following page.

SP 2013 Func Admin NATO UNCLASSIFIED
S.C.T.C. NATO UNCLASSIFIED 73
Enter an expire date (Announcement will be hidden from this list but still searchable)
Click on Save to save your new Announcement.

SP 2013 Func Admin NATO UNCLASSIFIED
S.C.T.C. NATO UNCLASSIFIED 74
5.1.2 DELETE ANNOUNCEMENTS LIST
Follow the steps below to be able to delete an existing Announcement List.
Click on Site Contents
Click on the light blue part or the … of the App to delete, and select REMOVE.
See example below
Confirm the following message with OK.
Your Announcement List has been removed/deleted.
NOTE:
You can also delete a List this way: Open List to delete, click List Tab, select List
Settings, and select Delete this List.
SP 2013 Func Admin NATO UNCLASSIFIED
S.C.T.C. NATO UNCLASSIFIED 75
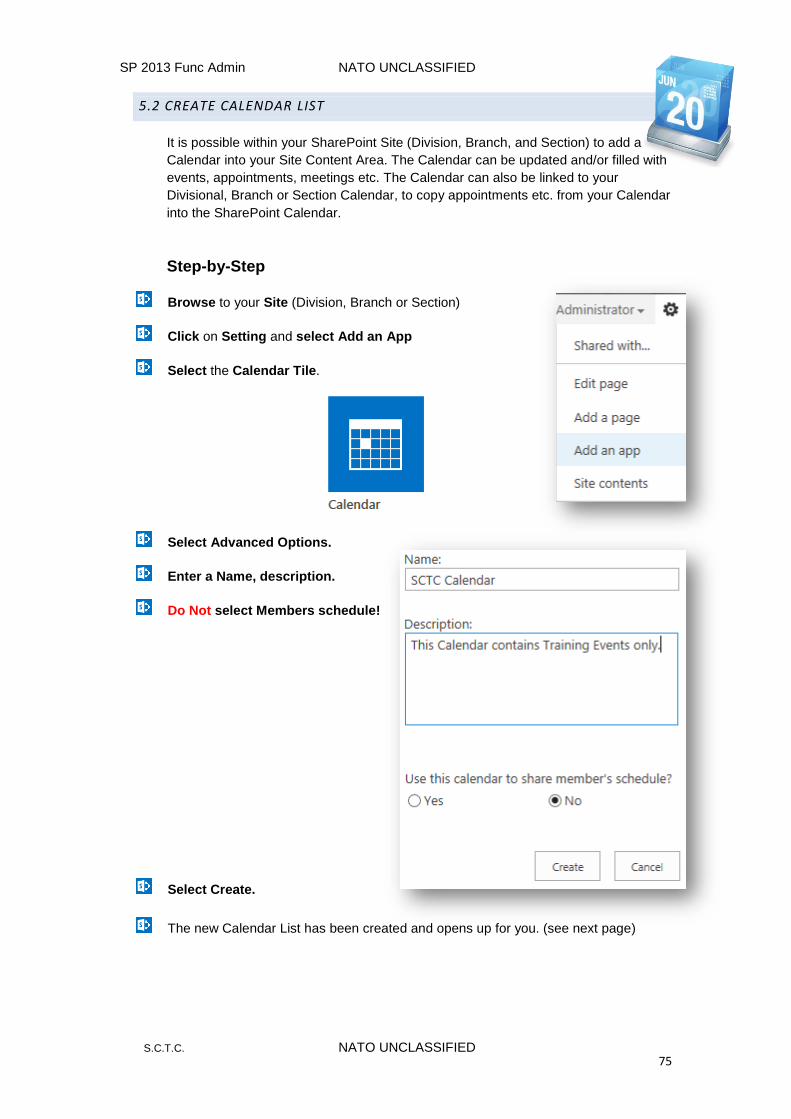
5.2 CREATE CALENDAR LIST
It is possible within your SharePoint Site (Division, Branch, and Section) to add a
Calendar into your Site Content Area. The Calendar can be updated and/or filled with
events, appointments, meetings etc. The Calendar can also be linked to your
Divisional, Branch or Section Calendar, to copy appointments etc. from your Calendar
into the SharePoint Calendar.
Step-by-Step
Browse to your Site (Division, Branch or Section)
Click on Setting and select Add an App
Select the Calendar Tile.
Select Advanced Options.
Enter a Name, description.
Do Not select Members schedule!
Select Create.
The new Calendar List has been created and opens up for you. (see next page)
SP 2013 Func Admin NATO UNCLASSIFIED
S.C.T.C. NATO UNCLASSIFIED 76
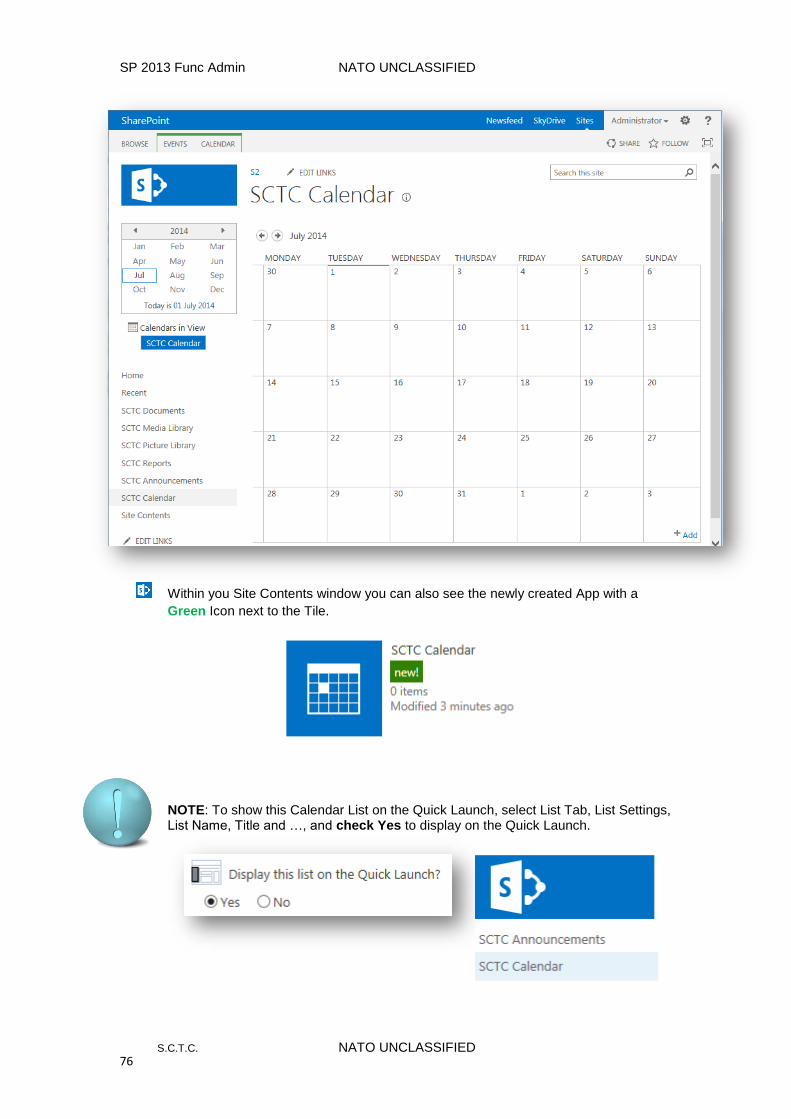
Within you Site Contents window you can also see the newly created App with a
Green Icon next to the Tile.
NOTE: To show this Calendar List on the Quick Launch, select List Tab, List Settings, List Name, Title and …, and check Yes to display on the Quick Launch.

SP 2013 Func Admin NATO UNCLASSIFIED
S.C.T.C. NATO UNCLASSIFIED 77
5.2.1 CREATE EVENTS
Follow the steps below to be able to insert an event/appointment within your Calendar.
Step-by-Step
Open the Calendar
Hover over a day and click on the Add button (see beside)
Or within the Daily View: Click on the Day, and double click on the Start time of your Event (similar like within MS-Outlook)
The New Item window opens up for you (see below)

SP 2013 Func Admin NATO UNCLASSIFIED
S.C.T.C. NATO UNCLASSIFIED 78
Fill in all Mandatory fields (Title, Start & End Time) and more if needed.
If needed you can select All Day Event, Recurrence etc.
You can also attach a file or even check the Spelling of your event
Click on Save.
The Event has been added into your Calendar. See example below.
Hovering over the Event shows some more detailed information.
Clicking on top of the Event will open the complete event. See below.
This will allow you to edit or Delete the Event.

SP 2013 Func Admin NATO UNCLASSIFIED
S.C.T.C. NATO UNCLASSIFIED 79
NOTE: On the Events and Calendar Tabs you have the functions available to
create new Events, or change the view of your Calendar.
5.2.2 CONNECT CALENDAR TO MS-OUTLOOK
To view and update a shared Calendar in the SharePoint Portal in MS-Outlook, you can
connect the SharePoint Calendar to MS-Outlook. It’s also then possible to copy any
appointments or events from the MS-Outlook Calendar into your SharePoint Calendar and
vice versa.
Step-by-Step
Open the Calendar
Within the Calendar Tab click on Connect to Outlook
Confirm the message popping up – click Allow (see below)

SP 2013 Func Admin NATO UNCLASSIFIED
S.C.T.C. NATO UNCLASSIFIED 80
Click on Yes to connect to Outlook
Your Outlook Calendar will open up showing you you’re personal (Divisional, Branch etc.) Calendar and your SP2013 Calendar next to each other. See example below.
Now you can Drag and Drop items from one Calendar into the other Calendar, to
copy events/appointments across.
If the message besides opens up, confirm with Yes.
You can re-name the Calendar (in Outlook) by right mouse on the Calendar name and select rename.
You can close Outlook, and after synchronisation (or pressing F-5) you will see the events within your SharePoint Calendar.

SP 2013 Func Admin NATO UNCLASSIFIED
S.C.T.C. NATO UNCLASSIFIED 81
5.2.3 DELETE CALENDAR LIST
Follow the steps below to be able to delete an existing Calendar List.
Click on Site Contents
Click on the light blue part or the … of the App to delete, and select REMOVE.
See example below
Confirm the following message with OK.
Your Calendar List has been removed/deleted.
NOTE: To change the Regional Settings of the Site from US to UK:
1. Click on Settings and select Site Settings
2. Under Site Administration select Regional Settings
3. Select English UK.
SP 2013 Func Admin NATO UNCLASSIFIED
S.C.T.C. NATO UNCLASSIFIED 82
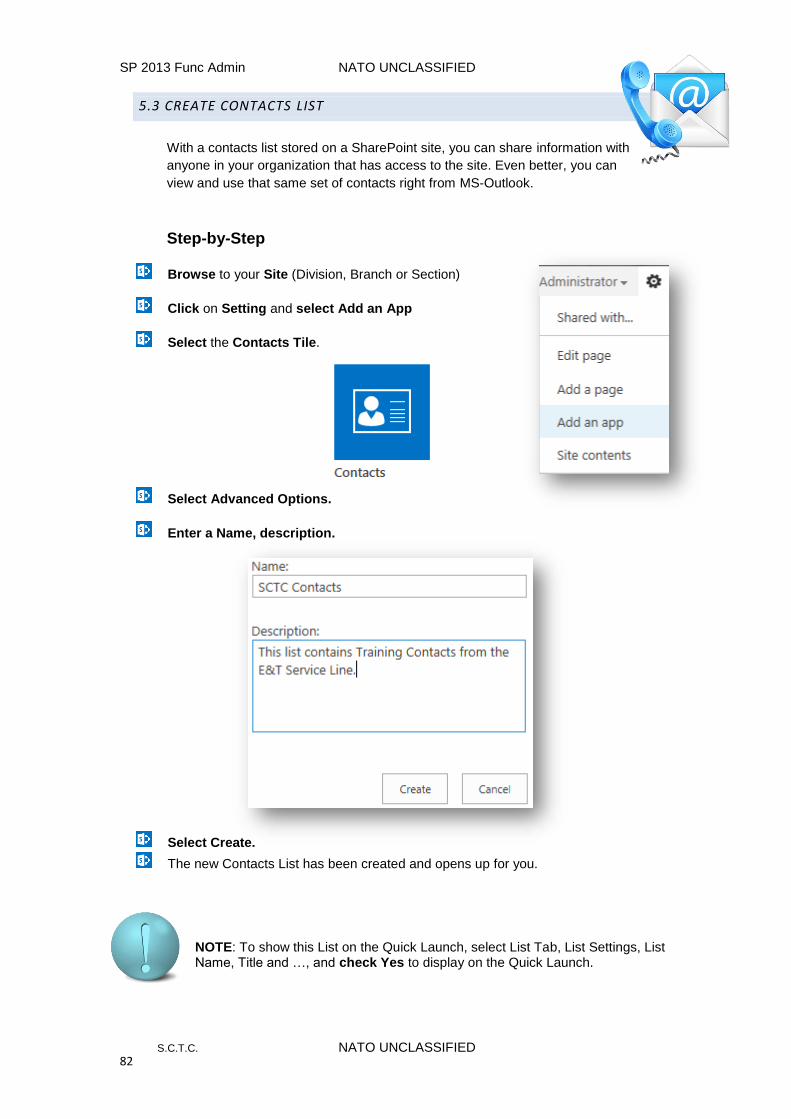
5.3 CREATE CONTACTS LIST
With a contacts list stored on a SharePoint site, you can share information with
anyone in your organization that has access to the site. Even better, you can
view and use that same set of contacts right from MS-Outlook.
Step-by-Step
Browse to your Site (Division, Branch or Section)
Click on Setting and select Add an App
Select the Contacts Tile.
Select Advanced Options.
Enter a Name, description.
Select Create.
The new Contacts List has been created and opens up for you.
NOTE: To show this List on the Quick Launch, select List Tab, List Settings, List Name, Title and …, and check Yes to display on the Quick Launch.

SP 2013 Func Admin NATO UNCLASSIFIED
S.C.T.C. NATO UNCLASSIFIED 83
5.3.1 CREATE CONTACTS USING MS-OUTLOOK
Follow the steps below to be able to copy and share Contacts using MS-Outlook.
Step-by-Step
Open the Contacts List
Within the List Tab select Connect to Outlook
Within the following window select Allow
Select Yes to connect to Outlook
Outlook will open up for you. See below.
Drag and Drop (Left Mouse) your Outlook Contacts into the new SharePoint
Contacts List.
All selected Contacts will be copied into SharePoint Contacts.
Rename your SP
Contacts list by
right mouse click on
the name and
select Rename.

SP 2013 Func Admin NATO UNCLASSIFIED
S.C.T.C. NATO UNCLASSIFIED 84
Close MS-Outlook and check the results on your SharePoint Contact List
Press F5 to refresh your SharePoint window. See example below.
Clicking the Contact name will allow you to see all details or to Edit or Delete the
Contact information.
NOTE: To add a new Contact within SharePoint, just click on Add new item and fill in
the blanks. After filling in the required fields click on Save.
Clicking the ellipsis … (next to the Name) will also allow you to View, Edit, export
or to Delete the Contact. See below.

SP 2013 Func Admin NATO UNCLASSIFIED
S.C.T.C. NATO UNCLASSIFIED 85
5.3.2 DELETE CONTACTS LIST
Follow the steps below to be able to delete your Contacts List.
Click on Site Contents
Click on the light blue part or the … of the App to delete, and select REMOVE.
See example below
Confirm the following message with OK.
Your Contacts List has been removed/deleted.

SP 2013 Func Admin NATO UNCLASSIFIED
S.C.T.C. NATO UNCLASSIFIED 86
5.4 CREATE DISCUSSION BOARD LIST
A discussion board (which is a list) is a place to share information and discuss
topics with other people. You can use discussion boards for a variety of purposes,
such as brainstorming goals for your project or discussing a common interest. When
you create a discussion topic or reply to an existing discussion, you can format your
text, insert a hyperlink or table, and link to a picture on the Web.
Step-by-Step
Browse to your Site (Division, Branch or Section)
Click on Setting and select Add an App
Select the Discussion Board Tile.
Select Advanced Options.
Enter a Name, description.
Select Create.
The new Discussion Board List has been created and opens up for you.
NOTE: To show this List on the Quick Launch, select List Tab, List Settings, List
Name, Title and …, and check Yes to display on the Quick Launch.

SP 2013 Func Admin NATO UNCLASSIFIED
S.C.T.C. NATO UNCLASSIFIED 87
5.4.1 POST A NEW DISCUSSION
Follow the steps below to be able to create a new Discussion.
Step-by-Step
Open the Discussion Board
Click on new discussion (or click on the Items Tab – New Item – Discussion)
The following window opens up.
Fill in the Subject and the Body text, format as needed.
Select the Question Checkbox if others need to be able to reply.
Click on Save.
The new Discussion has been published and is open for discussion.
SP 2013 Func Admin NATO UNCLASSIFIED
S.C.T.C. NATO UNCLASSIFIED 88
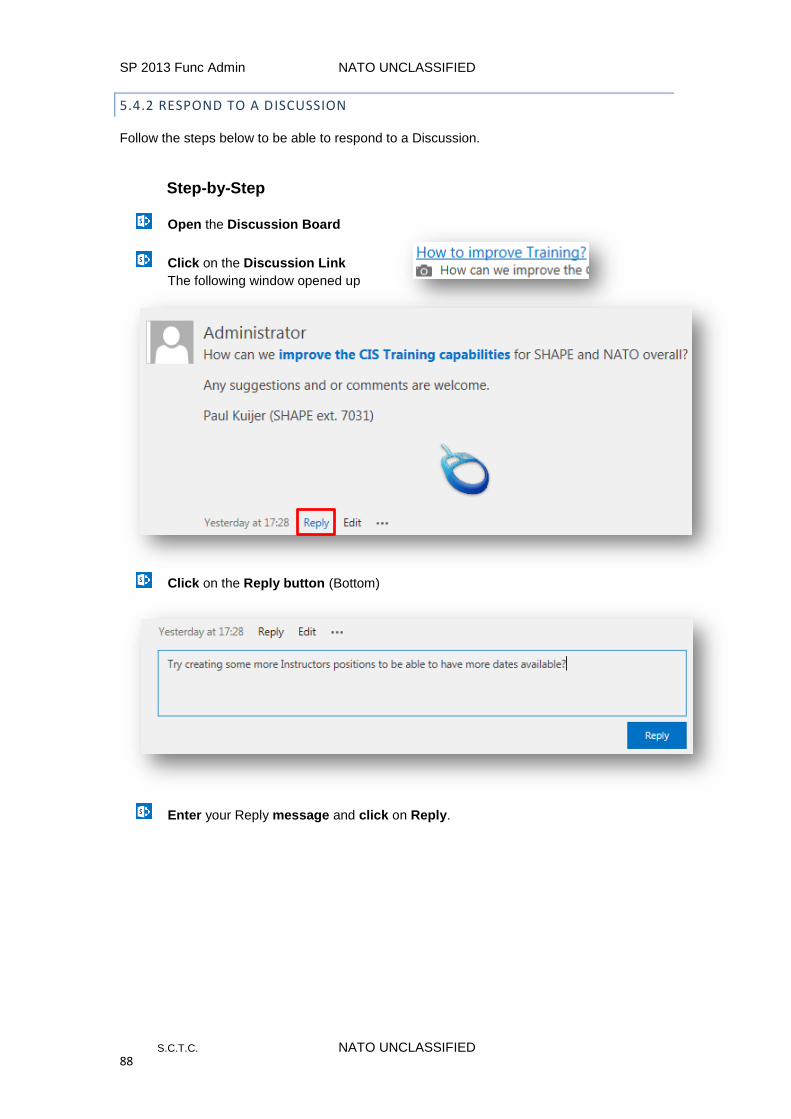
5.4.2 RESPOND TO A DISCUSSION
Follow the steps below to be able to respond to a Discussion.
Step-by-Step
Open the Discussion Board
Click on the Discussion Link
The following window opened up
Click on the Reply button (Bottom)
Enter your Reply message and click on Reply.

SP 2013 Func Admin NATO UNCLASSIFIED
S.C.T.C. NATO UNCLASSIFIED 89
All the replies are visible within the Discussion. See below.
The number of Replies are displayed on top of the opened discussion (see below)
5.4.3 SET AN ALERT
For not having to check your SharePoint Discussion Board constantly, to see if there are any
replies available, you can turn on an Alert. The Alert will send you an Outlook E-mail as soon
as a new reply or discussion has been added.
Step-by-Step
Open the Discussion Board
Select the Alert Me option from the ellipse… button
The following window opens up
See following page.

SP 2013 Func Admin NATO UNCLASSIFIED
S.C.T.C. NATO UNCLASSIFIED 90
Select your options, don’t forget to select New Items are added to receive a mail
when new replies have been posted.
Click on OK.
The Alert has been set, and you will receive a mail to confirm the Alert was successfully created and when a new Reply has been added. NOTE: To Delete an alert; Click on the Items Tab Alert Me button and select Manage My Alerts. Select the Checkbox(s) and click on Delete Selected Alerts.

SP 2013 Func Admin NATO UNCLASSIFIED
S.C.T.C. NATO UNCLASSIFIED 91
5.4.4 DELETE DISCUSSION BOARD
Follow the steps below to be able to delete your Discussion Board List.
Click on Site Contents
Click on the light blue part or the … of the App to delete, and select REMOVE.
See example below
Confirm the following message with OK.
Your Discussion Board List has been removed/deleted.

SP 2013 Func Admin NATO UNCLASSIFIED
S.C.T.C. NATO UNCLASSIFIED 92
5.5 CREATE LINKS LIST
The Links List will allow you to create Hyperlinks to Web pages or other
resources like File Folders, documents, Movies etc.
Step-by-Step
Browse to your Site (Division, Branch or Section)
Click on Setting and select Add an App
Select the Links Tile.
Select Advanced Options.
Enter a Name, description.
Select Create.
The new Links List has been created and opens up for you.
NOTE: To show this List on the Quick Launch, select List Tab, List Settings, List
Name, Title and …, and check Yes to display on the Quick Launch.

SP 2013 Func Admin NATO UNCLASSIFIED
S.C.T.C. NATO UNCLASSIFIED 93
5.5.1 CREATE NEW LINK
Follow the steps below to be able to create a new Link.
Step-by-Step
Open the Links List
Click on New Link
The window below opens up.
Enter the Url to the Webpage or DHS Document
Type a description and if needed notes.
Click on Save.
NOTE: To create a link to a shared document (SHAPE Forms – ACE Directives)
replace the http:// with file:// and paste the rest of the address behind. See below.
SP 2013 Func Admin NATO UNCLASSIFIED
S.C.T.C. NATO UNCLASSIFIED 94
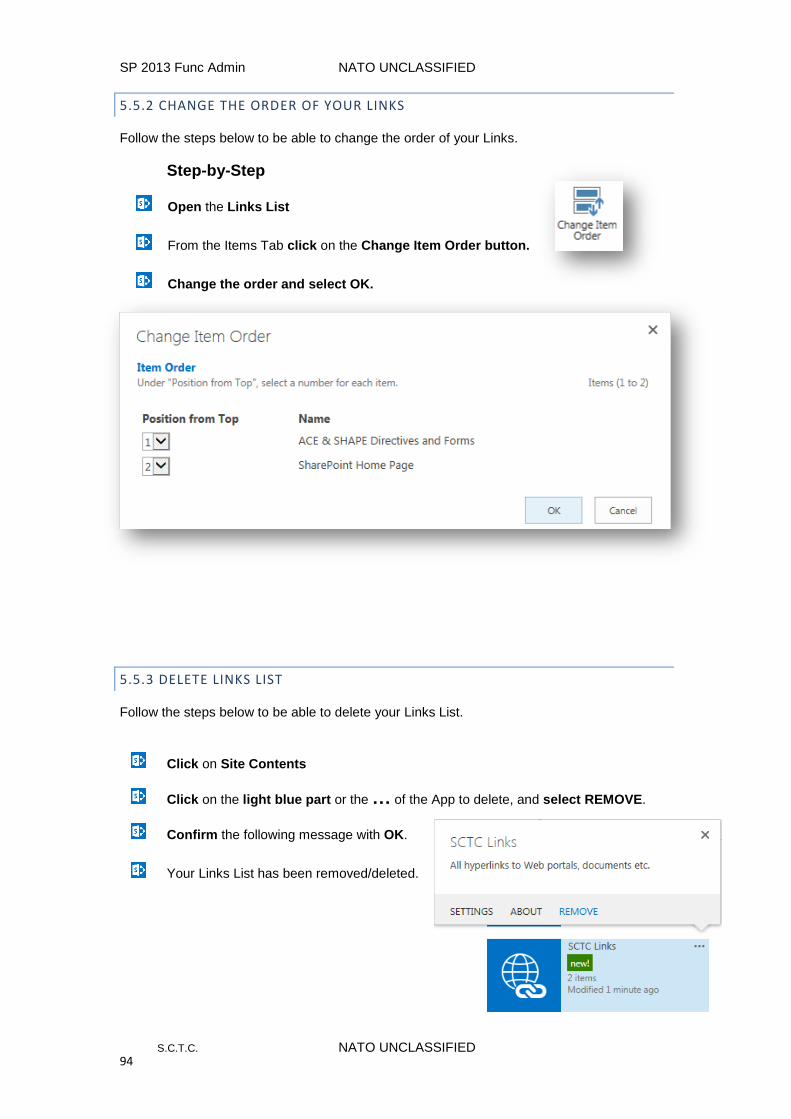
5.5.2 CHANGE THE ORDER OF YOUR LINKS
Follow the steps below to be able to change the order of your Links.
Step-by-Step
Open the Links List
From the Items Tab click on the Change Item Order button.
Change the order and select OK.
5.5.3 DELETE LINKS LIST
Follow the steps below to be able to delete your Links List.
Click on Site Contents
Click on the light blue part or the … of the App to delete, and select REMOVE.
Confirm the following message with OK.
Your Links List has been removed/deleted.
SP 2013 Func Admin NATO UNCLASSIFIED
S.C.T.C. NATO UNCLASSIFIED 95
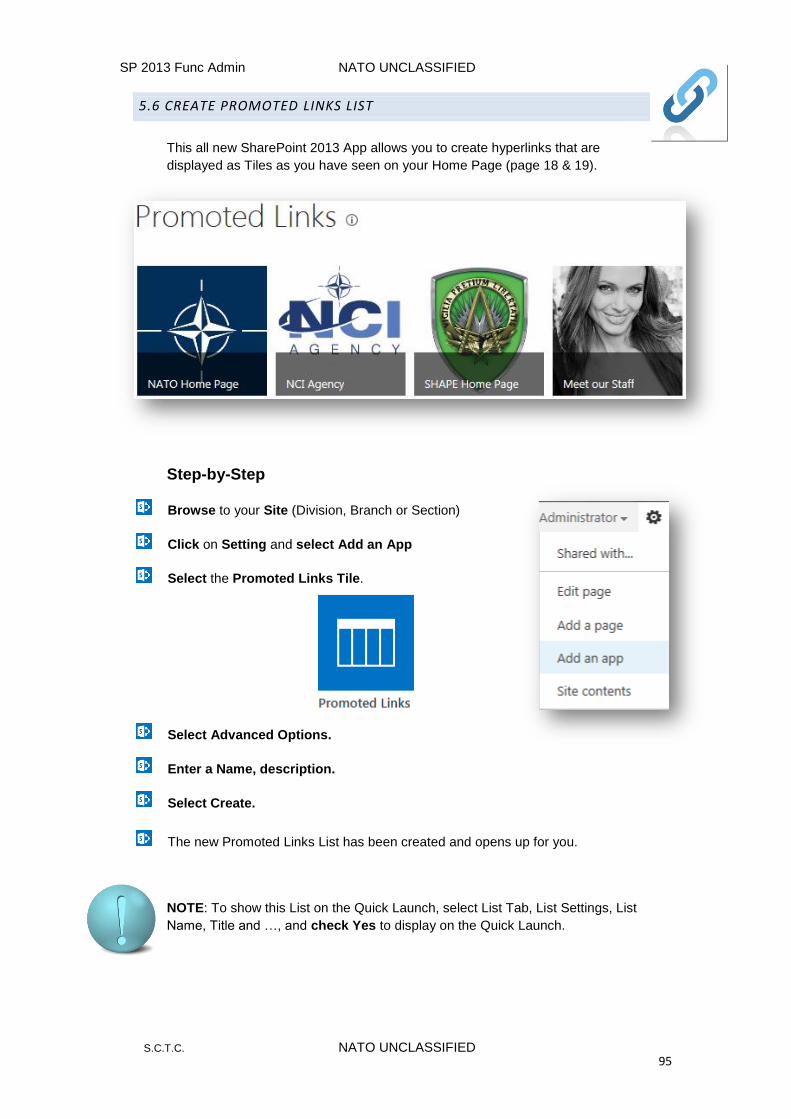
5.6 CREATE PROMOTED LINKS LIST
This all new SharePoint 2013 App allows you to create hyperlinks that are
displayed as Tiles as you have seen on your Home Page (page 18 & 19).
Step-by-Step
Browse to your Site (Division, Branch or Section)
Click on Setting and select Add an App
Select the Promoted Links Tile.
Select Advanced Options.
Enter a Name, description.
Select Create.
The new Promoted Links List has been created and opens up for you.
NOTE: To show this List on the Quick Launch, select List Tab, List Settings, List
Name, Title and …, and check Yes to display on the Quick Launch.

SP 2013 Func Admin NATO UNCLASSIFIED
S.C.T.C. NATO UNCLASSIFIED 96
5.6.1 CREATE NEW PROMOTED LINK
Before you create a new link, you will need to copy the Url from the web site you would like to
link to. If you would also like to have a picture filling the tile, you need to upload the picture
you want to use into your Picture Library.
A good idea would be to open a second tab on your Internet Explorer, from where you
can copy the Url and/or the path to the image to be used.
Step-by-Step
Open the Promoted Links List, and select All Promoted Links link.
Click on New Item
The window below opens up.

SP 2013 Func Admin NATO UNCLASSIFIED
S.C.T.C. NATO UNCLASSIFIED 97
There are 3 mandatory fields marked with the * symbol.
Enter a Title
Enter the Url to the Webpage and/or Background Image (use your 2nd tab).
Type a description. The description will pop up when you hover over the tile.
Within Launch Behaviour you select how the link should open up.
a. In Page Navigation: will open the link within the same Internet Explorer window
b. Dialog: will open the link within a small window (see image below)
c. New Tab: will open the link within a new additional Tab.
Select Save. Your link has been created (see below)
Create additional Links, and when finished click on the Tiles View button. See tiles below. Tiles View View when Hover over

SP 2013 Func Admin NATO UNCLASSIFIED
S.C.T.C. NATO UNCLASSIFIED 98
Clicking the Tile will open the web page in the selected Launch behaviour. Below example is the Dialog behaviour.
5.6.2 EDIT A PROMOTED LINK
Follow these steps to be able to edit/delete a promoted link.
Step-by-Step
Open the Promoted Links List, and click on the List Tab.
Change the View from Tiles to All Promoted Links.
Select the Checkbox in front of the link.
Click on the Items Tab and select Edit Item.
Make your changes and select Save.
Click on the Tiles View button.

SP 2013 Func Admin NATO UNCLASSIFIED
S.C.T.C. NATO UNCLASSIFIED 99
5.6.2 DELETE PROMOTED LINKS LIST
Follow the steps below to be able to delete your Promoted Links List.
Click on Site Contents
Click on the light blue part or the … of the App to delete, and select REMOVE.
Confirm the following message with OK.
Your Promoted Links List has been removed/deleted.

SP 2013 Func Admin NATO UNCLASSIFIED
S.C.T.C. NATO UNCLASSIFIED 100
5.7 CREATE SURVEY LIST
The Survey List will allow you to create an appraisal/evaluation/enquiry like
Customer Satisfactory or like an Evaluation form that can be filled in by Staff
members.
Before you create a survey, it is a good idea to map out the questions that you want
to ask and the type of answers that you want to receive. For example, do you want
someone to respond with their own words, enter a dollar amount, or choose from a
list? You should also decide whether questions are required or optional. In order for
people to respond to the survey, they must have Contribute permission to the
survey or to the site that contains the survey.
For this chapter I will create a Course Evaluation form as an example.
Step-by-Step
Browse to your Site (Division, Branch or Section)
Click on Setting and select Add an App
Select the Survey Tile.
Select Advanced Options.
Enter a Name, description.
Select Show names or not, and allow or not multiple responses.
Select Create.
The new Survey List has been created and opens up for you. See next page.
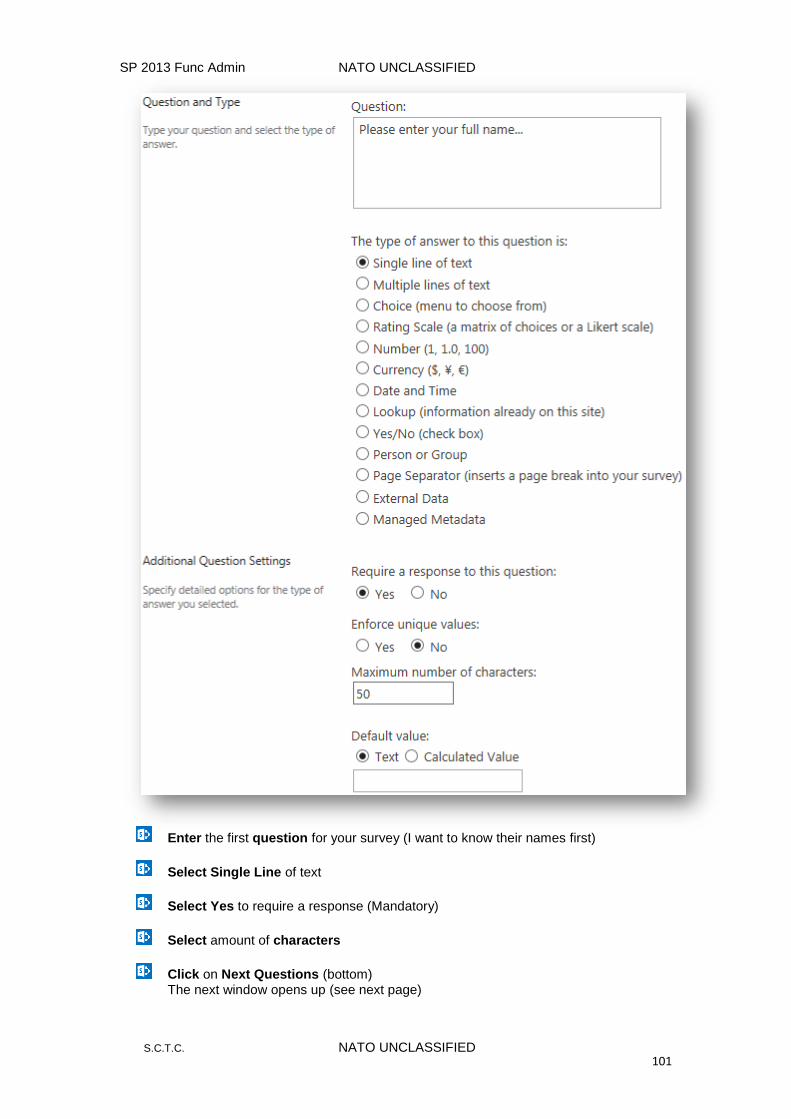
SP 2013 Func Admin NATO UNCLASSIFIED
S.C.T.C. NATO UNCLASSIFIED 101
Enter the first question for your survey (I want to know their names first)
Select Single Line of text
Select Yes to require a response (Mandatory)
Select amount of characters
Click on Next Questions (bottom) The next window opens up (see next page)

SP 2013 Func Admin NATO UNCLASSIFIED
S.C.T.C. NATO UNCLASSIFIED 102
Within this part I want to know if they have already filled in the survey. I will add an option afterword’s that if they select yes, they will be re-directed to the final window.
Enter your Question – example “Have you filled in this form before?”
Select Choice and require a response (mandatory)
Type the choices available (Yes and No).
Select Drop Down Menu
Leave everything else by default and click on Next Question
The following window opens up (see next page)

SP 2013 Func Admin NATO UNCLASSIFIED
S.C.T.C. NATO UNCLASSIFIED 103
This is the part where I will ask them specific questions and rate those as well.
Enter a Question (Please rate the questions below). Select Rating Scale (they will be able to select a number from 1 to 10). Select Require response (mandatory). Enter the sub-questions people have to answer
(see example above).
Select number range (I selected 10). Enter your Range Text (0 = Disagree, 5 = Uncertain,
10 = Agree). Select or de-select non applicable option. Click on Next Question.
The window on the next page opens up.

SP 2013 Func Admin NATO UNCLASSIFIED
S.C.T.C. NATO UNCLASSIFIED 104
Within this last question I offer an option to enter comments or suggestions.
Enter your Question (see example).
Select Multiple lines of text.
I will not require a response (if they have no comments, they are not forced to fill in)
Enter amount of rows for the comment box.
Click on Finish.
On the next page we will deal with Changing question order.

SP 2013 Func Admin NATO UNCLASSIFIED
S.C.T.C. NATO UNCLASSIFIED 105
Below you see the Survey Settings window opening up for you.
To re-order your questions click on Change the order of the questions. The following window opens up.
Re-order if needed and click on OK (I have changed question 1 with 2)
Next is to set up Branching Logic for the first question.

SP 2013 Func Admin NATO UNCLASSIFIED
S.C.T.C. NATO UNCLASSIFIED 106
Branching Logic
You can add branching logic to specific questions, so that the remaining questions in
the survey are relevant to the respondent. In our example I want the customer to
jump directly to the last question (Comment window) if they select in the first question
the answer “Yes I have filled in the form already”
To specify branching logic, you first create the survey, and then specify the logic for
the questions in the survey settings.
Step-by-Step
Within the Survey Settings Window click on the first question
Scroll down to the Branching Logic window (see below)
For Yes, select thanks for your input (the location to jump to if yes is selected)
For No, select Please enter your full name (the location to jump to if No is selected)
Click on OK
Your Survey is now ready to be used.
NOTE: To show this Survey List on the Quick Launch, select the Settings button,
Survey Settings, List Name, Title and …, and check Yes to display this Survey on the
Quick Launch.
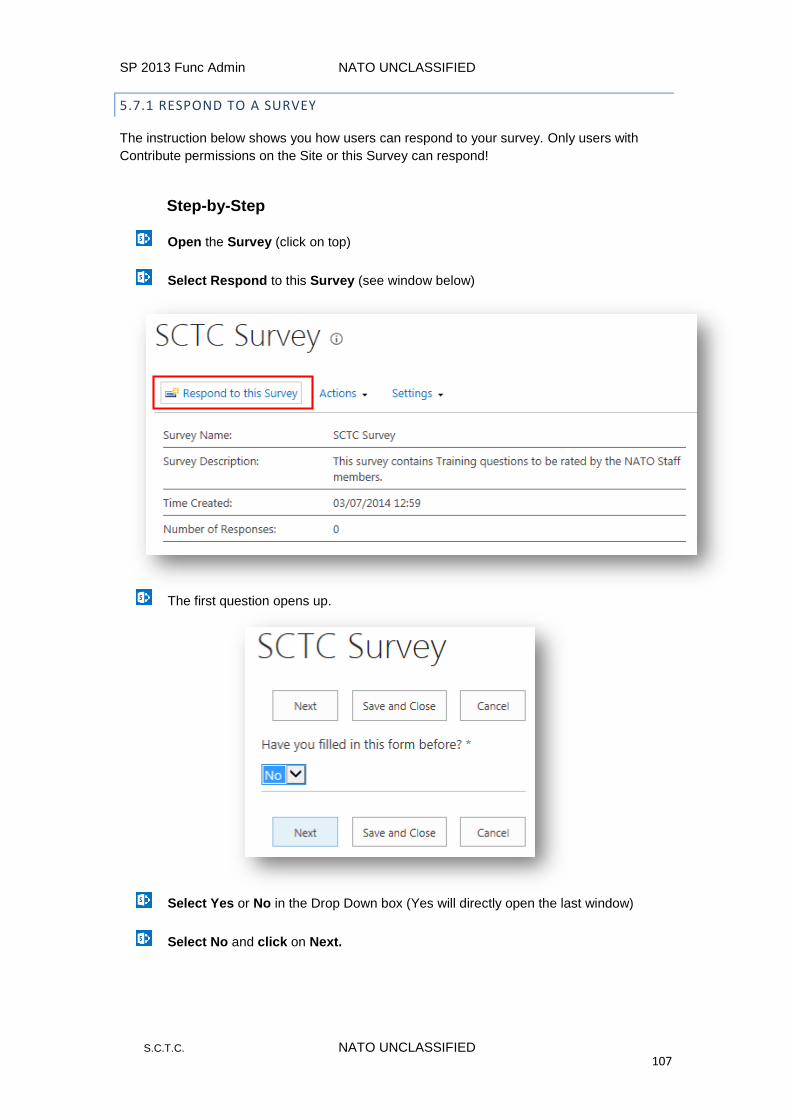
SP 2013 Func Admin NATO UNCLASSIFIED
S.C.T.C. NATO UNCLASSIFIED 107
5.7.1 RESPOND TO A SURVEY
The instruction below shows you how users can respond to your survey. Only users with
Contribute permissions on the Site or this Survey can respond!
Step-by-Step
Open the Survey (click on top)
Select Respond to this Survey (see window below)
The first question opens up.
Select Yes or No in the Drop Down box (Yes will directly open the last window)
Select No and click on Next.

SP 2013 Func Admin NATO UNCLASSIFIED
S.C.T.C. NATO UNCLASSIFIED 108
The next window opens up.
Enter your Full Name
Rate the questions by selecting the corresponding radio buttons
Click on Next (if Branching logic has been used for this question)
Enter comments if needed and click on Finish.

SP 2013 Func Admin NATO UNCLASSIFIED
S.C.T.C. NATO UNCLASSIFIED 109
5.7.2 REVIEW SURVEY RESPONSES
The instruction below shows you how you can Review given responses. Manually and/or
Graphically.
Step-by-Step
Open the Survey (click on top)
Click on Graphical Summary of responses Next window opens up.
NOTE: Clicking show all responses will open a window allowing you to see all
responses separately.

SP 2013 Func Admin NATO UNCLASSIFIED
S.C.T.C. NATO UNCLASSIFIED 110
5.7.3 DELETE SURVEY LIST
Follow the steps below to be able to delete an existing Survey List.
Click on Site Contents
Click on the light blue part or the … of the App to delete, and select REMOVE.
Confirm the following message with OK.
Your Survey List has been removed/deleted.
NOTE: You can also delete using the Settings button, select Survey Settings and
click on Delete this survey.

SP 2013 Func Admin NATO UNCLASSIFIED
S.C.T.C. NATO UNCLASSIFIED 111
5.8 CREATE TASKS LIST
The Task List can be used to track a task or group of tasks of work items that
you or your team (Division, Branch, Section) needs to complete. This module can
also be connected (linked) to Outlook, and has new 2013 features included.
Step-by-Step
Browse to your Site (Division, Branch or Section)
Click on Setting and select Add an App
Select the Tasks Tile.
Select Advanced Options.
Enter a Name, description.
Select Create.
The new Tasks List has been created and opens up for you. See below.

SP 2013 Func Admin NATO UNCLASSIFIED
S.C.T.C. NATO UNCLASSIFIED 112
5.8.1 CREATE NEW TASK
Follow the steps below to create new tasks.
Step-by-Step
Open the Tasks List
Click on New Task
The following window opens up.
Fill in all details and assign it to the owner of the task
Click on SHOW MORE, if more information needs to be added.
Click on Save
The new task has been created. See example on following page

SP 2013 Func Admin NATO UNCLASSIFIED
S.C.T.C. NATO UNCLASSIFIED 113
The owner of the Task has received an e-mail with all instructions including a link to
the Task.
Clicking the ellipse… button will allow you to see more details (days left), and
options to add this task to the Timeline or create Subtasks.
Below you see an example after creating 3 subtasks and add them to the Timeline.

SP 2013 Func Admin NATO UNCLASSIFIED
S.C.T.C. NATO UNCLASSIFIED 114
5.8.2 PREDECESSORS
Within a single project tasks list, there may be a certain order to how tasks, including
summary tasks and subtasks, need to be completed. For example, if you’re building a house,
the foundation needs to be completed before the walls can go up, and the walls have to be up
before the roof can go on. You can represent this order by using the Predecessors column.
Follow the steps below to edit an existing Task using Predecessors.
Step-by-Step
Open the Tasks List and select the Task
Click on Edit Item and select Show More.
Within the Window that opens select you’re Predecessors from the Left sight.
Select and click on Add to create Predecessors.
Click on Save
NOTE: You need to modify the All Task View, and select the Predecessor checkbox. Explained in Chapter 4.2. See example on the following page

SP 2013 Func Admin NATO UNCLASSIFIED
S.C.T.C. NATO UNCLASSIFIED 115
In the example the Main Task has to wait until the Sub
Tasks have completed
Final Sub Task (Plan courses) has to wait until the Sub
Task (create PE’s) has been completed.
Sub Tasks (create Layout and PE’s) are not depending
on any other sub-task.
Clicking on the Sub Tasks within the Timeline will
pop up more information regarding the task.
See below.

SP 2013 Func Admin NATO UNCLASSIFIED
S.C.T.C. NATO UNCLASSIFIED 116
5.8.3 DELETE TASKS LIST
Follow the steps below to be able to delete an existing Tasks List.
Click on Site Contents
Click on the light blue part or the … of the App to delete, and select REMOVE.
Confirm the following message with OK.
Your Survey List has been removed/deleted.

SP 2013 Func Admin NATO UNCLASSIFIED
S.C.T.C. NATO UNCLASSIFIED 117
5.9 IMPORT SPREADSHEET LIST
This feature allows you to upload and publish information from an
Excel Spreadsheet directly into a SharePoint List. Easy to filter and Sort. The
List will not be linked to the Excel Spreadsheet. It is purely a copy of the data
from Excel into SharePoint.
Step-by-Step
Browse to your Site (Division, Branch or Section)
Click on Settings and select Add an App
Select the Import Spreadsheet Tile.
Enter a Name and Description
Select your Excel file (browse) and click on Import (see example on next page)

SP 2013 Func Admin NATO UNCLASSIFIED
S.C.T.C. NATO UNCLASSIFIED 118
If the document doesn’t open immediately, check the bottom of your screen. It’s possible that the Excel icon is blinking. Click on top to open Excel
Excel Opens up.
Within Range Type, select Range of Cells
Click inside the Select Range field, and select the range of cells you want to copy into the SharePoint List (Left mouse click on cell A-1 and drop on top of all other to be included cells). Always include the Heading!
Select Import to add the information into SharePoint
The Excel data is now shown within your List on SharePoint (see next page)

SP 2013 Func Admin NATO UNCLASSIFIED
S.C.T.C. NATO UNCLASSIFIED 119
NOTE: To show this List on the Quick Launch, select List Tab, List Settings, List Name, Title and …, and check Yes to display on the Quick Launch.

SP 2013 Func Admin NATO UNCLASSIFIED
S.C.T.C. NATO UNCLASSIFIED 120
5.9.1 ENTER NEW INFORMATION
Follow the steps below to add new Information into the imported Excel Spreadsheet.
Step-by-Step
Open your SharePoint Spreadsheet List.
Select New Item (or click on the Items Tab and select New Item).
The following window opens up
You can enter all details in the same order as the original Excel Spreadsheet.
Upload and attach a file if needed.
Click on Save
The new information has been added (see below)

SP 2013 Func Admin NATO UNCLASSIFIED
S.C.T.C. NATO UNCLASSIFIED 121
NOTE: To change the number column (including decimal symbol) into a normal
number, follow these brief instructions:
1. Open Spread sheet
2. Select List Tab - List Settings
3. Select column to be changed
4. Select Single Line of Text and click on OK 2 times.
NOTE: To add a Mail column, follow these brief instructions:
1. Open Spread sheet
2. Select List Tab - List Settings
3. Select add from existing site columns and select Email
See window below.
4. Click on OK.

SP 2013 Func Admin NATO UNCLASSIFIED
S.C.T.C. NATO UNCLASSIFIED 122
5.9.2 DELETE SPREADSHEET LIST
Follow the steps below to be able to delete an existing Spreadsheet List.
Click on Site Contents
Click on the light blue part or the … of the App to delete, and select REMOVE.
Confirm the following message with OK.
Your Import Spreadsheet List has been removed/deleted.

SP 2013 Func Admin NATO UNCLASSIFIED
S.C.T.C. NATO UNCLASSIFIED 123
6 CREATE PAGES
6.1 GENERAL
A website is a collection of webpages. The types of pages that you can create depend on the
site that has been created by your organization (maybe different for NCIA, SHAPE, ACT etc.).
Most users will be familiar with Team sites within a Microsoft SharePoint 2013 installation.
When a new Team site is created, SharePoint creates a Wiki page library, named Site
Pages, where the webpages are stored and new pages can be created. You will find it easy to
add content to these pages and to modify the layout of the page using the browser. Wiki
pages should be used when you wish to share content that does not require an approval
mechanism and the site contains many content authors.
Pages that display the contents of lists or libraries use Web Part pages. Such pages can be
changed using the browser, but many users do not find the mechanism of changing such
pages easy. Using the browser, these pages can only contain app parts and Web Parts. The
addition of static text and images is possible only by adding Web Parts, such as the Content
Editor Web Part (CEWP) or the Image Web Part.
Both wiki pages and Web Part pages can contain app parts and Web Parts. I will show you
within this course how to create Wiki Pages and add/manage Web Parts.
OVERVIEW
6.1 General
6.2 Create Wiki Page
6.3 Web Parts

SP 2013 Func Admin NATO UNCLASSIFIED
S.C.T.C. NATO UNCLASSIFIED 124
6.2 CREATE WIKI PAGE
You might have heard that “wiki” is the Hawaiian word for quick. Speed and flexibility are
undeniably the foundation of wiki design. Wiki pages are informal, open for editing by almost
anyone in the organization, and, by that token, are often considered works in progress.
In SharePoint, wiki pages are everywhere, by default. On many new sites you create, the
home page is now a wiki page. On team sites, all new pages that you create are wiki pages
by default.
Step-by-Step
Browse to your Site (Division, Branch or Section)
Click on Setting and select Add a Page.
Enter a name for the new Page
Select Create.
The new Wiki Page has been created and opens up for you. See below.

SP 2013 Func Admin NATO UNCLASSIFIED
S.C.T.C. NATO UNCLASSIFIED 125
The default layout just contains 1 column.
To change the Layout click on the Text Layout button.
Select the Layout to be used for your new page.
I will use for this example the two columns with header layout.
Add some text in the Title Area.
Click the Save button.
You’re page is stored within the Site Content – Site Pages App
NOTE: To see a Link on the Top Bar:
1. Copy Url to the page first
2. On your Site click on Edit Links
3. Click on Add a Link
4. Paste Url and Enter a Name
5. Click on OK, and click on Save.

SP 2013 Func Admin NATO UNCLASSIFIED
S.C.T.C. NATO UNCLASSIFIED 126
6.2.1 EDIT TEXT ON YOUR WIKI PAGE
Follow the steps below to be able to enter and edit text. You will see that most editing
features for text come straight from MS-Office, including the Live Preview feature (first see
what your get and then select).
Step-by-Step
On your Page select the Edit button (top right, or Page tab and select Edit)
Click in the column where you want to add text
Start typing your text or copy and paste existing text from another location.
You can now use the Format Text tab to customize your text.
Select your text and use the Font group or Paragraph group to format. Use your MS-Office skills to do so.
Select your text and click on the Styles button to add a special style to your text Below I have used the Heading 1 style to the whole sentence.
To save our work so far click on Save.

SP 2013 Func Admin NATO UNCLASSIFIED
S.C.T.C. NATO UNCLASSIFIED 127
6.2.2 INSERT PICTURE
Follow the steps below to be able to insert and edit Pictures or even ClipArt’s.
Step-by-Step
Click in the column where you want to insert a picture.
Open the Insert Tab and click on the Picture button and select From Computer.
Browse for the image to insert, select it, click open and leave Site Assets selected
and click on OK.
The Picture is inserted (see below).
The Image has been inserted in its original size.
Change the size by dragging the corners to a smaller size.

SP 2013 Func Admin NATO UNCLASSIFIED
S.C.T.C. NATO UNCLASSIFIED 128
Now you can also use the new Image Tab to customize your picture.
See the examples below using
Image Styles.
Just select the Image Styles and position you prefer (Live Preview).
You can also select a predefined size for your image in Horizontal and Vertical Size.
Keep Lock Aspect Ratio select!
To save our work so far click on the arrow below the Save button and select Save
and Keep Editing. (I want to continue editing the page).
Images/pictures can also be inserted in columns that already contain text.

SP 2013 Func Admin NATO UNCLASSIFIED
S.C.T.C. NATO UNCLASSIFIED 129
6.2.3 INSERT VIDEO
The Insert Video or Audio possibility is a new feature within SharePoint 2013.
Step-by-Step
Click in the column where you want to insert a video.
Open the Insert Tab and click on the Video button, and select
From Computer.
Browse for the Video to insert, select it, click Open and leave Site Assets selected
and click on OK.
The Video is inserted within a Media Web Part (see below).
The Media Web Part will not show any image from the video by default. It uses the same style for any video inserted.
You can now change the Media Settings using new SharePoint 2013 features.

SP 2013 Func Admin NATO UNCLASSIFIED
S.C.T.C. NATO UNCLASSIFIED 130
Select Change Image if you would like to replace the selected Preview image. Use an image from your Site or from your computer. See example below.
Within the Properties group select a Title for your Web Part, and choose to start the video automatically (when opening this page), and to play it over again when finished.
Select a Dark or Light style for your Web Part
Click on the Page Tab and select Save.
You’re video will start automatically if this options was selected.

SP 2013 Func Admin NATO UNCLASSIFIED
S.C.T.C. NATO UNCLASSIFIED 131
6.2.3 INSERT AND WORK WITH LINKS
Follow the steps below to be able to insert and edit Links (hyperlinks). Links will allow you to
link to items within the Site, to documents, pictures and movies on Shared locations.
Step-by-Step
Click in the column where to insert a Link, or select a Picture or Text to be linked.
Open the Insert Tab and click on the Link button, select From SharePoint.
The following new 2013 window opens up.
Browse within any SharePoint List or Library, select the item and click on Insert.
The link is inserted (see example below)

SP 2013 Func Admin NATO UNCLASSIFIED
S.C.T.C. NATO UNCLASSIFIED 132
HOW TO FIND THE URL ADDRESS OF A DOCUMENT OR WEBPAGE?
Make sure that the document to link to is on a shared location. This could be your
DHS Document Library, the Central Records (J) drive, or any other shared folder.
Step-by-Step
Copy the path to the DOCUMENT
o Open Windows Explorer, browse to document, right mouse on top,
Properties, Security, copy complete path including File extension).
o Browse to DHS Document, right mouse on top, Properties, copy the full
address (URL).
Paste the address (file path) into Address field, and add file:// in front
See example below.
Step-by-Step
Copy the path to a WEBPAGE
o Open Internet Explorer, browse to the Web page, right mouse on top of
the Url and select Copy.
Paste the address (file path) into Address field.

SP 2013 Func Admin NATO UNCLASSIFIED
S.C.T.C. NATO UNCLASSIFIED 133
LINK TOOLS
After inserting a link, you will have a special tab available called Link Tools. Below I
will show you the Link Tools options available.
Step-by-Step
Within Edit Mode, click on your Link
Click on the Link Tab (see below)
OPTIONS ARE:
Open the Link in a new tab (link will not open within same window)
Display the document icon (document type symbol – Word, PowerPoint, Excel).
Description (text that pops up when hovering over the hyperlink).
Remove Link (Text will remain; only link will be removed).

SP 2013 Func Admin NATO UNCLASSIFIED
S.C.T.C. NATO UNCLASSIFIED 134
6.2.4 INSERT LINKS USING DOUBLE BRACKETS
Follow the steps below to be able to insert hyperlinks using the Double Brackets feature. This
allows you to create quick and easy links to items within your SharePoint Site. You can link to
pages, Lists, Libraries, documents etc.
Step-by-Step
Click in the column where to insert a Link(s).
Type “Double Brackets” [[
The following opens up
Select the page to link (Course Info or Home) to or click on View: to View a list of all
items available in your Libraries or Lists. See example below.
Select the List or Library and click on Enter. Brackets will be closed.

SP 2013 Func Admin NATO UNCLASSIFIED
S.C.T.C. NATO UNCLASSIFIED 135
To link to one particular item within a List or Library follow these steps.
Step-by-Step
Type “Double Brackets” [[
Select List, and click on the Library or List to see the contents.
Below an example after selecting my Document Library.
Click on the document to link to, and press Enter.
Brackets are automatically closed (see example below).
You’re links have been created.
Click on the Save button to leave the Edit mode.
Now you can test your double bracket links.
NOTE: To change the name of the links go back to Edit your page, and change only
the part of the name behind the | line.

SP 2013 Func Admin NATO UNCLASSIFIED
S.C.T.C. NATO UNCLASSIFIED 136
6.2.5 INSERT TABLE
Follow the steps below to be able to insert a table directly into your Wiki page.
Step-by-Step
Click in the column where to create a Table.
From the Insert Tab, click on the Table button
Select by hovering over the amount of columns and rows you need See below
Click left mouse to create the table See result below
Enter your text as done within MS-Office.

SP 2013 Func Admin NATO UNCLASSIFIED
S.C.T.C. NATO UNCLASSIFIED 137
CUSTOMIZE THE TABLE To further customize the table (add columns and rows, change the height, merge cells and change the Design, you can use the 2 additional tabs on the Ribbon.
Step-by-Step
Select your Table.
Select Table Layout Tab
ADD ROWS OR COLUMNS
To add rows or columns, select the cell where to add something and select insert
above or below to insert a row, or insert Left or Right to insert a new column.
DELETE ROW OR COLUMN
To delete a row or column; select a cell within the row or column to be deleted, click
on Delete and select the item to be deleted.
MERGE CELLS
To merge cells to one large cell, click on the left cell and select Merge Cells – Merge
Right or Left as needed. Repeat for merging multiple cells.
CHANGE WIDTH OR HEIGHT
Select a cell and increase or decrease the column width or height.
NOTE: To create links to E-mail addresses, insert text (ea. Mail) select the text
and click Insert Link from Address or click CTRL + K simultaneously. Within
the address field type mailto: including the persons e-mail address.
mailto:[email protected]

SP 2013 Func Admin NATO UNCLASSIFIED
S.C.T.C. NATO UNCLASSIFIED 138
Select the Design Tab
TABLE STYLE OPTIONS
Select if your Table needs a Header- Footer- First Column or Last Column style.
Click on Styles and Hover over the given options.
Check out the Live Preview of the Styles available.
Select the Preferred Style
Click on Save
The example below uses Table Style 4, inserted
and merged top row, changed colour and size of the
title.

SP 2013 Func Admin NATO UNCLASSIFIED
S.C.T.C. NATO UNCLASSIFIED 139
6.3 WEB PARTS
Web Parts are actually containers for Data. You can create new Web parts or show existing
Lists (Calendar, Contacts, and Slide Library etc.) or Library features on any of your pages.
Web- and App Parts are one of the basic building blocks of pages on SharePoint sites. They
enable you to customize a SharePoint page to display content or business data from many
sources on the same page. You can also create new Web Parts when needed.
On the example below I have inserted existing Web/App parts like the Document Library and
the Media Library.
Within the following chapter I will show you how to insert existing App parts to make them
visible on your page.

SP 2013 Func Admin NATO UNCLASSIFIED
S.C.T.C. NATO UNCLASSIFIED 140
6.3.1 INSERT EXISTING APP PART
Follow the steps below to be able to insert an existing App part on your page. In the example
below I will insert an existing Calendar
Step-by-Step
Click in the column where to Insert the existing App part
Within the Insert Tab click on the App Part button
The following window opens up
Select the App Part to insert and click on Add.
The Existing App Part (Calendar) has been inserted into your page.
Whenever the original location changes (add calendar items, upload pictures and/or documents) it will also change on your Web page.
On the following page you can see the inserted Calendar App part

SP 2013 Func Admin NATO UNCLASSIFIED
S.C.T.C. NATO UNCLASSIFIED 141
The Existing App Part (Calendar) has been inserted into your page.
To make changes to the App Part Properties click on the Web Part Tab (on the
Ribbon).
To Delete the Web Part you click on Delete.
To further customize the App/Web part click on the Web Part Properties button.
The window on the following page opens up for you.

SP 2013 Func Admin NATO UNCLASSIFIED
S.C.T.C. NATO UNCLASSIFIED 142
Within List Views you can select how to view
your Calendar.
Click on the + symbol to expand the
Appearance, the Layout or to see more Advanced options.
Expand the Appearance options (see below)

SP 2013 Func Admin NATO UNCLASSIFIED
S.C.T.C. NATO UNCLASSIFIED 143
Change the Title (if needed)
Select your Height and Width (not really
useful! – only changes the outside window)
Chrome State: Specifies whether the entire
Web Part appears on the page when a user
opens the Web Part Page. By default, the
chrome state is set to Normal and the entire
Web Part appears. Only the title bar appears
when the state is set to Minimized.
Chrome Type: Specifies whether the title bar
and border of the Web Part frame are
displayed.
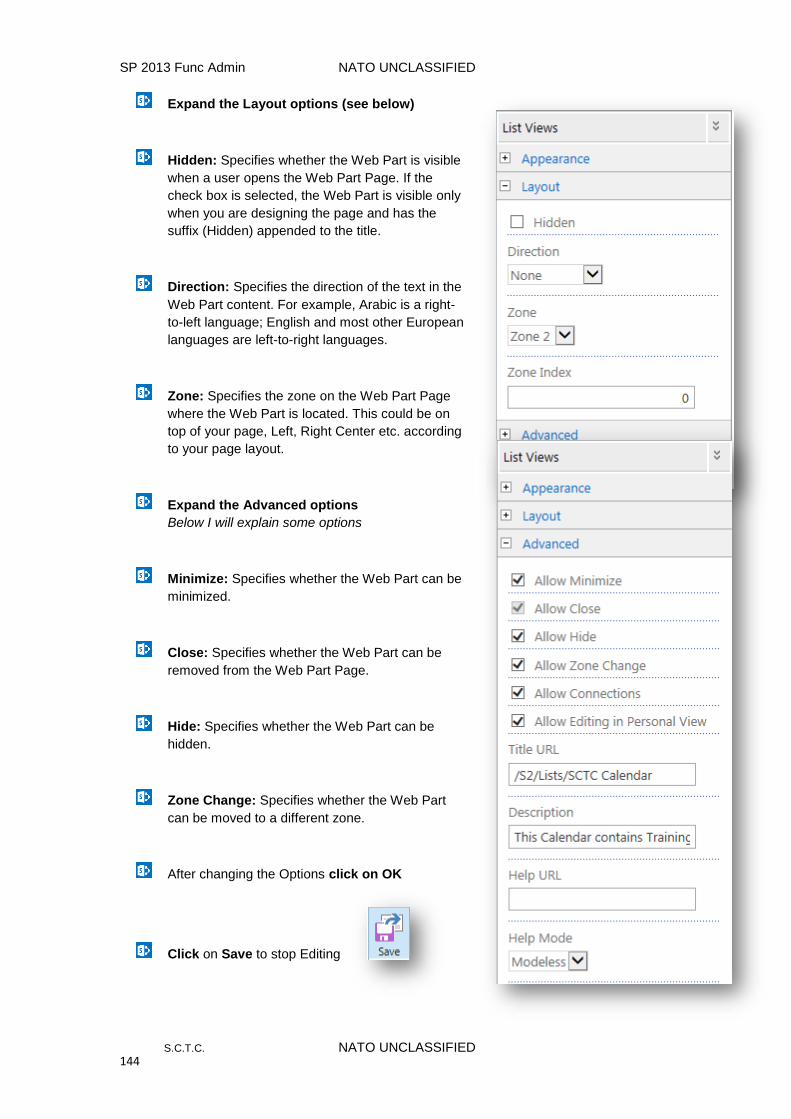
SP 2013 Func Admin NATO UNCLASSIFIED
S.C.T.C. NATO UNCLASSIFIED 144
Expand the Layout options (see below)
Hidden: Specifies whether the Web Part is visible
when a user opens the Web Part Page. If the
check box is selected, the Web Part is visible only
when you are designing the page and has the
suffix (Hidden) appended to the title.
Direction: Specifies the direction of the text in the
Web Part content. For example, Arabic is a right-
to-left language; English and most other European
languages are left-to-right languages.
Zone: Specifies the zone on the Web Part Page
where the Web Part is located. This could be on
top of your page, Left, Right Center etc. according
to your page layout.
Expand the Advanced options
Below I will explain some options
Minimize: Specifies whether the Web Part can be
minimized.
Close: Specifies whether the Web Part can be
removed from the Web Part Page.
Hide: Specifies whether the Web Part can be
hidden.
Zone Change: Specifies whether the Web Part
can be moved to a different zone.
After changing the Options click on OK
Click on Save to stop Editing

SP 2013 Func Admin NATO UNCLASSIFIED
S.C.T.C. NATO UNCLASSIFIED 145
6.3.2 INSERT NEW WEB PART
Follow the steps below to be able to insert a New Web part on your page. In the example
below I will insert a new Web Part called Picture Library Slideshow.
Step-by-Step
Click in the column where to Insert the new Web part
Within the Insert Tab click on the Web Part button The following window opens up
Scroll to the Media and Content Category and select Picture Library Slideshow.
Click on Add
Click on the Web Part Menu button and select Edit Web Part. (see example below)
Select your Web Part settings, and click on OK.
See results on the following page.

SP 2013 Func Admin NATO UNCLASSIFIED
S.C.T.C. NATO UNCLASSIFIED 146
NOTE; to delete a WIKI Page, click on the Page Tab and select Delete Page

SP 2013 Func Admin NATO UNCLASSIFIED
S.C.T.C. NATO UNCLASSIFIED 147
The image shown here contains 2 new Web Parts. The top one is the Search-Driven Content – Picture feature, showing any picture from the current Site. The lower part shows you the Search-Driven Content – Video feature, showing any video on your Site. .

SP 2013 Func Admin NATO UNCLASSIFIED
S.C.T.C. NATO UNCLASSIFIED 148
Our Courses are available to any NATO staff member whose organization has a Service
Level Agreement (SLA) with NCI Agency.
For problems: Use the F1 button (help for application problems)
Call NCN 626-3177 (NCIA Centralized Service Desk) for PC or telephone technical problems only.
For application info: For more Win 10 and Office 2016 information: On the SHAPE NIP – CIS Services Portal – Booking Systems & Request – Request Help on ...
On NR-AIS (REACH): visit NCIA Intranet – A-Z links – Education and training for NCI Agency staff – SCTC – CBT Training.
For courses: Visit our NS-Web page: SHAPE NIP – CIS Services Portal - Booking Systems – Request a course.
NCI Agency personnel need to contact their Organizational Training Coordinators/Poc’s.
Visit the S.C.T.C. Webpage on the Internet: www.shape2day.com – Community - Education – SHAPE CIS Training Centre.
Call the SHAPE-CIS-Training on ext. 7014.
For more NCIA info: Visit the (internet) web page on www.ncia.nato.int or visit the SHAPE page on www.shape2day.com
Last update 30th March 2017.