30204 50625a manual bwc manual - amazon s3€¦ · heater - fuse, circuit breaker, plug receptacle,...
TRANSCRIPT

Save this manual for future referenceManual 238-50625-00A
SERVICEMANUAL
Troubleshooting Guideand Instructions for Service
(To be performed ONLY byqualified service providers)
Models Coveredby This Manual:
UCG100H199*NUCG100H199*XUCG100H270*NUCG100H270*X(*) Denotes Warranty Years
Gas Water Heaters
Ultra Low NOx Atmospheric Vent Models

Table of Contents
The Bradford White
2
Page Service ProcedureIntroduction 3 - - -How to use this manual 4 - - -Tool required for service 4 - - -Features 5 - - -Specifications 6 - - -Sequence of Operation 8 - - -Troubleshooting 10 - - -Thermostat Circuit, Testing & Replacement 27 ICombustion System Testing and Replacement 31 IIBurner Tube Inspection & Replacement 35 IIIGas Valve Replacement 37 IVBlower Testing and Replacement 38 VFlame Sensor Testing and Replacement 40 VISpark Rod Replacement 42 VIIIgnition Module/Control Board Replacement 43 VIIITransformer Replacement 44 IXAnode Inspection and Replacement 45 XDisplay Module Replacement 46 XIBlocked Vent Switch Inspection and Replacement 47 XIIHeater Service Report 48 - - -Parts List 49 - - -Glossary of Terms 52 - - -
2

The Bradford White Ultra Low NOx Atmospheric Vent Water Heater uses a ultra low NOx premix power burner located at the top of the water heater to direct a turbulent flame down into the water backed combustion chamber. This turbulence causes a thorough mixing of gas and air for optimum combustion. The combustion gases then travel through a two pass flue system keeping the gases moving at a high velocity. The combination of high turbulence and velocity results in an optimum transfer of heat from the flue gases into the water.
Burner operation is controlled using an electronic ignition module. The module monitors the status of the electronic thermostat, blocked vent limit switch, flame sensor to control output voltage to blower motor, spark rod and gas valve. The module contains programming which determines the sequence of operation and timings for purge periods, trial for ignition, flame sensing and lockout. The module will also provide diagnostic information to help in determining the cause of system lockouts.
The contents in this manual are detailed informational tools to assist in the proper diagnosis of the Ultra Low NOx Atmospheric Vent Water Heater operational faults. Please read this service manual completely and record as much information regarding the Ultra Low NOx Atmospheric Vent Water Heater operation and installation specifics related to any concerns.
The Bradford White Ultra Low NOx Atmospheric Vent Water Heater is designed to deliver a remarkable amount of hot water at 82% thermal efficient in a quiet running unit with a top exhaust vent connection that allows for installation in existing locations. While this unit is vented atmospherically there is no damper required to maintain heat loss during off cycle. Several technologically advanced design features are incorporated in the design that will require additional knowledge on the part of the qualified service provider. The information in this manual will instruct service and maintenance professionals on the function, proper diagnosis and repair of The Bradford White Ultra Low NOx Atmospheric Vent Water Heater.
3
3

It is intended for this manual to be used by qualified service personal for the primary purpose of troubleshooting analysis and repair of the Bradford White Ultra Low NOX Atmospheric Vent Water Heater. Understanding the sequence of operation section of this manual will contribute greatly to troubleshooting this product.
A “Service Report” is shown towards the end of this manual. Completing this form will assist in the troubleshooting efforts. Should you need to call for technical support, please provide the information shown on this form to the support technician to insure accurate troubleshooting.
Troubleshooting begins with “System Observation” to determine failure mode as indicated by the LED status of the ignition module. Troubleshooting continues with “Failure Modes and Probable cause” directing the service provider to a series of test procedures to determine root cause of failure. Component replacement procedures directly follow the test procedures for a given component.
Contact Technical support immediately if diagnosis is not determined using the methods described in this service manual.
Manometer: Two types available, a liquid “U” tube type or a digital (magna-helic)type. This device is used to measure gas and/or air pressures andvacuum.
Multi-Meter: A digital type is strongly recommended. This device is used to measureelectrical values. The meter you select must have the capability tomeasure volts AC, volts DC, Amps, micro-amps and ohms.
Thermometer: Used to measure water temperature. An accurate thermometer isrecommended.
Water Pressure Gage: Used to measure water supply pressure. Also used to determine tankpressure by adapting to the drain valve of the heater.
Jumper Leads: A length of wire (12" min.) with alligator clip at both ends.
Various Hand Tools: Pipe wrench, channel locks, open end wrench set, 12" crescent wrench,Allen wrench set, torx bit set, screw drivers (common & Phillips), longreach (12") magnetic tip Phillips head screw driver #2 tip, ¼" nut driver,pliers (common & needle nose), socket set including a 1-1/16 deep wellsocket, wire cutters, wire strippers, wire crimpers, torpedo level, smallshop vac, step ladder, and flashlight.
4
4

Attractive digital water heater display on control panel for setting and displaying the temperature setpoint. Pressing temperature UP and DOWN buttons changes the temperature setpoint. Same water heater display used on all models. Temperature format may be displayed in °F or °C.Single control board with plug in wiring controls temperature, ignition, and blower operation.Reduced number of parts for servicing and wiring.Plug in wiring reduces chance of miswirng.Burner ignition with direct spark ignition - A high voltage spark jumps from the spark rod to the burner surface to ignite the gas.Water heater display will show diagnostic codes in the event the water heater needs servicing. Aids in diagnosing and servicing the water heater.Water heater display can show previous error code history to further aid in servicing the water heater.
Features of Honeywell Integrated Control System
5
5

6
6
G
C
E D
AF
K
B
J
H
7 3/4

7
Power supply Dedicated 120 VAC, 60 Hz, 15A
Thermostat Sensor 11,900 Ohms @ 70°F, ECO opens @ 207°F Max. Redundant sensor for ECO. Sensor inside a dry well for easy replacement of sensor.
Spark Rod Igniter 0.22" nominal gap to the burner surface.
Flame Sensor Output Minimum 1 micro amp, Typical range 5 to 30 micro amps.
Control DisplayDigital display, 24 volts. Temperature Range: 70-180 deg. F. Used to set tank temperature (deg. F or deg. C), show operating status, Display error codes, error code history, limit maximum setpoint temperature.
Control Board Operates from 24 volt from transformer. Controls tank temperature, ignition functions, combustion blower. See ignition timings in sequence of operation for Integrated Control.
Gas Valve Negative regulation, 24 VAC, ½" PSI max., 4.5" W.C. Minimum running inlet.
Transformer 120VAC primary, 24VAC secondary, 40VA.
Blocked Vent Safety Switch Normally closed, opens @ 240°F, manual reset.
Blower 120VAC, 60Hz, .6-1 amps, 6400 RPM.
Approved Gas Type Natural or Propane. Gas supply must match the gas type listed on the water heater rating label.
Venting SystemAtmospherically Vented, Type B venting system or approved chimney. Follow the current National Fuel Gas Code requirements or in Canada, the Natural Gas and Propane Installation Code.
Gas Supply Minimum ¾”NPT for 300,000 BTU’s/hr. and below. Minimum 1" NPT for 399,999 BTU’s/hr. (schedule 40 black iron pipe recommended)
Minimum Clearancefor Servicing 18" from the top, 24" from the front, 4" from sides and rear
Maximum Water SupplyPressure 150 PSI
Gas Pressure (Nat.& L.P.) 14.0" W.C. maximum static, 4.5" W.C. minimum running (recommend 7.0" W.C. min running)
Combustion Levels CO2: 10-11%, CO: less then 0.04 percent (400 PPM) air free
7

For models with Honeywell Integrated ControlSystem w/ Direct Spark Ignition
Thermostat calls for heat.
Combustion blower starts.
Blower pre-purge period of 30 seconds.
Trial for Ignition. (5 seconds, 3 trials).Flame establishing period (3 seconds), gas valve opens, sparks from spark rod to burner surface to ignite the gas.
Burner on, flame proving period (2 seconds). Requires a minimum of 1 microamp through flame sense rod to prove flame per specs on page 7.
If the blocked vent safety switch contacts (normally closed) are open after being energized, then the ignition sequence will not start and an error code 26 (Safety switch circuit opened) will be shown on the display.
Steady State Operation: Burner continues to operate until:Thermostat circuit opens, gas valve closes, blower continues to operate for 30 second post-purge period.
If the normally closed blocked vent safety switch opens, the gas valve closes, the blower post-purges, then shuts off with error code 26 displayed in a lockout condition.
Thermostat satisfied.
Gas valve closes, burner extinguished.
Blower post purge for 30 seconds.
1
2
3
5
6
7
8
4
8
8

For models with Honeywell Integrated ControlSystem w/ Direct Spark Ignition
The system will go into lock out mode for the following reasons:
1. ERROR CODE 26If the blocked vent safety switch mounted on the draft hood should open, the gas valve will close, the blower will post-purge and error code 26 will appear on the display. The lockout condition will reset once the problem is corrected and the switch reset. Refer to “Vent Safety Switch Testing and Replacement” in this Service Manual.
2. ERROR CODE 62 or 63Control board will go into “Soft Lockout” if the main burner cannot be lit or fails to prove flame after 3 ignition trials. The water heater display indicates a lockout condition by showing an error code number (62 or 63) with “Service Needed” in the control display window. Refer to error codes in the diagnostic section of this Service Manual. In a “Soft Lockout” condition, the control will wait for 60 minutes and then make 3 more attempts to light the main burners. Soft lockout reset is accomplished by depressing the lower right button under “Reset” for 3 seconds.
3. ERROR CODE 65If the top of the tank should exceed 207°F, then the high limit control will shut off the burner and the water heater will go into a “Hard Lockout”. Error code 65 will be shown in the water heater display. The control can only be reset in the “Service Mode”, which is detailed in the “Troubleshooting” section of this Service Manual.
Lockout Conditions (Complete list of error codes is listed on the unit)
CONNECTION/WIRING DIAGRAM
9
9

System ObservationFor models with Direct Spark Ignition
Water Heater Fault: Water heater does not operateDisplay Error Code: Water heater display does not operate - blank display
Check main power supply to water heater - fuse, circuit breaker, plug
receptacle, line cord or wiring to water heater.
Check to make sure switch on front of control panel is in the ON position
Verify Primary voltage at thecontrol board.
Verify Secondary voltage at the control board.
Check wires for proper termination to control display.
Are wire terminations connected properly to control display?
N
Y
CAUTIONUse caution not to damage connectors when
making voltage measurements or jumping terminals
WARNING120 volt potential exposure. Use caution
making voltage checks to avoid personal injury.
Is 24VAC present between RED and BLACK wire pin connections on the back of
Control Display?
1 2 38
6
5
4
3
1
1 2
1
4
1
3
321
15
3
P2P4P5 P7P3
CONTROL BOARD
P10P9J1
Refer to Control Board illustration. Voltage at primary pins P2(1) & P2(3)will be 110-120. If not, check Line In
pins P3(1) & P3(4). Check line cord with volt meter. Replace line cord if
defective.
Refer to Control Board illustration. Voltage at secondary pins P4(1) & P4(2) will be 24VAC. If not, replace transformer or wire harness.
Does water heater display operate? Does the combustion blower start to
operate? Increase thermostat setting if tank is warm.
Is 24VAC present between E-COM screw terminals P9(2) & P9(3) on
the Control Board.
Y
N
Replace Control Display.
N
Display Operates - See next page
10
Y
Make proper wire terminations
NReplace Control Board
Y Check wire harness for
proper continuity
Y
Y
Y
Y
N
N
10

System ObservationFor models with Direct Spark Ignition
Does combustion blower operate?Refer to Control Board illustration. Measure voltage between
terminals P7(3) & P7(5) on the “inducer” output (make sure the control display shows “heating” in the status mode, if not increase
the setpoint). Is there 110-120 VAC?
Replace control board if display shows “heating” and no voltage is
present to the blower harness. Make sure there are no error codes for the
temperature sensors (following sections) before replacing control
board.
Check the voltage at the connection to the blower. Is 110-120 VAC present?
Can sparking be seen/heard at the spark rod to the burner?
Does Main Burner Light?
Error code #62 on display. See main burner lights, no flame signal in
section “Combustion System Testing and Replacement”
Does burner continue until thermostat set point is reached? See setting
display in Service Mode and displaying temperature sensors.
Error code #63 on display. (see “Combustion System Testing and
Replacement”)
Does blower post-purge for 30 seconds?
System okay
N
Y
N
N
N
Y
Y
Y
Y
From previous page
N
CAUTIONUse caution not to damage connectors when making
voltage measurements or jumping terminals
WARNING120 volt potential exposure. Use caution
making voltage checks to avoid personal injury.
1 2 38
6
5
4
3
1
1 2
1
4
1
3
321
15
3
P2P4P5 P7P3
CONTROL BOARD
P10P9J1
Y
Replace wire harness.Replace blower.N
Remove high voltage wire connected at the spark rod and hold approximately ¼" from metal ground with insulated pliers during
the ignition cycle (3 second spark trial period).Is there spark to ground?
NCheck resistance of high voltage cable.
Resistance should be 0-1 ohms. If resistance is high, replace spark cable. If spark cable is good, replace Control
Board.
Check continuity of spark rod to burner.(see section “Spark Rod Replacement”)
Y
Y
11
Check to see if control display shows any other error codes (26, vent safety switch, or 65, high limit). If so, refer to the
appropriate section for testing and replacement.
11

Accessing Service Mode on Control DisplayFor models with Honeywell Integrated Control
The display has a “service mode” for changing the maximum setpoint and accessing information in aiding servicing of the water heater. This procedure is for service and installation personnel only. To enter the Service Mode, follow the steps illustrated below:
Step 1: Press “Select” and “Temperature Up” buttons together and hold for 3 seconds until “Max Setpoint” is shown in the display.
Step 2: Pressing “Select” button will change display to next mode
SELECT SET
Status
°F
idleOperational
WaterTemp
The following is the sequence of modes available in “Service Mode” by pressing the “Select” button:
Error Code Number (Display/Reset). This is only shown if there is an operating error in the “User Mode”.
SELECT Lockout RESET
Status Service Needed
Error Code Shownin Water Heater Display
12
SELECT SET
Status
idle
Operational
"Max Setpoint"next to TemperatureSetpoint value.
MaxSetpoint
12

Accessing Service Mode on Control DisplayFor models with Honeywell Integrated Control
1. Max Setpoint (Display/Change)
2. Tank Sensor Temperature Displayed Water Temperature Average.
SELECT SET
Status
°F
idle
Water Temp
Operational
13
SELECT SET
Status
°F
idle
Operational
Max Setpoint value inWater Heater Display
MaxSetpoint
3. Flame Current of Burner Flame Sensor (Displays only in the Heating Cycle)
SELECT SET
Status
Heating
Operational
Flame Current
A
13

Accessing Service Mode on Control DisplayFor models with Honeywell Integrated Control
4. Setpoint (Display/Change)
SELECT SET
Status
°F
idle
setpoint
Operational
5. °F/°C (Display/Change)
SELECT SET
Status
°F/C°
idle
Operational
°F setpoint
6. Differential (Display only - shows the differential of the thermostat)
SELECT SET
Status
°F
idle
Differential
Operational
14
14

Accessing Service Mode on Control DisplayFor models with Honeywell Integrated Control
7. Software Version (Display only)
8. Error Code History (Displays if there are present error codes or up to 10 previous error codes see page 22). Water Heater Display will show a “--“ if there are no error codes.
SELECT SET
Status
idle
Operational
To change the Maximum Setpoint Limit (Max Setpoint) for the temperature setpoint:
Step 1: In service mode press the “Select” button until “Max Setpoint” is displayed.
WARNINGSetting the water temperature to the maximum set point can result in scalding hot water delivered to the faucets. It is highly recommended that the maximum setpoint be adjusted to the lowest temperature possible for the needs of the installation. Make sure the water heater control display is not in a public area that can result in the temperature settings being improperly adjusted.
15
SELECT SET
Status
idle
Operational
Soft
SELECT SET
Status
°F
idle
Max
Operational
Setpoint
15

Accessing Service Mode on Control DisplayFor models with Honeywell Integrated Control
Step 2: Press “Set” button to enter setting mode. “Max Setpoint” will flash to indicate setting mode.
Step 3: Press the “UP” or “DOWN” buttons to change the maximum setpoint value. This will limit the maximum setpoint the user can select. Note: The maximum setpoint is approximately 180°F.
Step 4: Press “Set” button to confirm new “Max Setpoint” value and stop setting mode.
"Max Setpoint" stops flashing
SELECT SET
Status
°F
idleOperational
MaxSetpoint
SELECT SET
Status
°F
idleOperational
MaxSetpoint
"Max Setpoint" continues to flashwhile making adjustments
16
SELECT SET
Status
°F
idle
Operational
MaxSetpoint
"Max Setpoint" Flashes
16

Accessing Service Mode on Control DisplayFor models with Honeywell Integrated Control
Step 5: 30 Seconds after the last button press, the Water Heater Display will go back to “User Mode”. It will read “Max Setpoint” without showing a temperature value if the temperature setpoint is at the maximum setting. The Water Heater Display can be set back to the “User Mode” immediately by pressing both the “Temperature Up” and “Select” buttons together for 3 seconds.
SELECT SET
Statusidle
Operational
MaxSetpoint
Exiting Service Mode
Display of Water Temperature:
Step 1: In Service Mode, Press the “Select” button until “Water Temp” is displayed in the upper right section of the water heater display. This is the reading for the sensor.
17
SELECT SET
Status
°F
idle
Operational
Lower Sensor
17

Accessing Service Mode on Control DisplayFor models with Honeywell Integrated Control
To Display Flame Sense Current of the Flame Sensor:
The flame sense current is available only when the burners are in operation. Step 1: Make sure the status displays “Heating” or draw enough hot water to start the burners. Step 2: Enter the “Service Mode” described previously. Step 3: Press the “Select” button until a number value is displayed with “Flame Current” to the right of the number. The value displayed is in microamps ( A).
SELECT SET
Status Operational
FlameCurrent
Heating
A
To Display and Change Temperature Setpoint:
Step 1: In “Service Mode” press the “Select” button until “Setpoint” is shown in the water heater display
SELECT SET
Status
°F
idle
setpoint
Operational
18
18

Accessing Service Mode on Control DisplayFor models with Honeywell Integrated Control
Step 2: Press the “Set” button to enter the setting mode. “Setpoint” will flash in the water heater display.
SELECT SET
Status
°F
idle
setpoint
Operational
Step 3: To raise the temperature setpoint, press the “Temperature Up” button until the desired temperature is shown on the water heater display.
SELECT SET
Status
°F
idle
setpoint
Operational
Step 4: To lower the temperature setpoint, press the “Temperature Down” button until the desired temperature is shown on the water heater display.
WARNINGSetting the water temperature to the maximum set point can result in scalding hot water delivered to the faucets. It is highly recommended that the maximum setpoint be adjusted to the lowest temperature possible for the needs of the installation. Make sure the water heater control display is not in a public area that can result in the temperature settings being improperly adjusted.
NOTICEThe maximum temperature that can be set in the Water Heater Display is limited to the “Max Setpoint” described
previously. To change the “Max Setpoint”, refer to the procedure “To Change the Maximum Setpoint Limit…" described previously under “Accessing the Service Mode on the Water Heater Display”.
SELECT SET
Status
°F
idle
setpoint
Operational
"Setpoint" Flashes
19
19

Accessing Service Mode on Control DisplayFor models with Honeywell Integrated Control
Step 5: When the desired setpoint is reached on the water heater display, press the “Set” button to confirm the new setpoint. “Setpoint” stops flashing in the water heater display.
SELECT SET
Status
°F
idle
setpoint
Operational
To Display and Change Temperature Format (°F/°C):
To Change Temperature Format in Display from °F to °C or °C to °F:
Step 1: While in “Service Mode”, press “Select” button until “°F/°C” is shown in the upper right portion of the water heater display.
SELECT SET
Status
idle
Operational
°F °F/C°
Step 2: Press “Set” button to change temperature format. “°F/°C” symbol will flash in the water heater display.
SELECT SET
Status
idle
Operational
°F °F/C°
20
20

Accessing Service Mode on Control DisplayFor models with Honeywell Integrated Control
Step 3a: Press “Temperature Up” button to change temperature format to °C
SELECT SET
Statusidle
Operational
°C °F/C°
Step 3b: Press “Temperature Down” button to change temperature format to °F
SELECT SET
Status
idle
Operational
°F °F/C°
Step 4: Press “Set” button to confirm °F or °C format. °F/°C will stop flashing
SELECT SET
Status
°F
idleOperational
°F °F/C°
21
21

Accessing Service Mode on Control DisplayFor models with Honeywell Integrated Control
Step 5: Pressing “Select” button will return display to setpoint in format selected (°F or °C) immediately
SELECT SET
Status
°F
idle
Operational
Lower Sensor
Error Codes and Error History Display:
If there is an operating problem with the water heater, an error code number will appear on the water heater display with “Service Needed” to the right of the “Status” indicator. The error code label is located under the Water Heater Display and the following section in this Service Manual explains the error codes with corrective actions to repair the water heater.
SELECT SET
idleService Needed
Example of Error Code in the Display
Error Code History:
In “Service Mode” pressing the “Select” button after the “Software Version” (item 8 in the previously described sequence of service modes) will show an error code history, if there have been any previous operating problems with the water heater. If the display shows --, there is not a current error code.The Water Heater Display will provide up to 10 previous error codes. The oldest error code will be stored in code index #1 and the most recent in code index #10.
22
22

Accessing Service Mode on Control DisplayFor models with Honeywell Integrated Control
To view previous error codes:
Step 1: In “Service Mode press the “Select” button until the next display after the “Software Version”. If there are no current error codes, the display will show -- .
SELECT SET
Status
°F
idleOperational
Step 2: Press the “Temperature Down” button to select the error code index, starting with the most recent error code “10”.
SELECT SET
Statusidle
Operational
Step 3: Press the “Select” button to view the error code for “code 10”. If there is a number displayed, note what the number is. The label next to the water heater display will identify the code number. If no number is displayed with only a “--“ inthe water heater display, then there has not been an error code for error code index 10.
SELECT SET
Status
idle
Operational
23
23

Accessing Service Mode on Control DisplayFor models with Honeywell Integrated Control
Step 4: Press the “Temperature Down” button to change to the previous code index, code #9.
SELECT SET
Statusidle
Operational
Step 5: Press the “Select” button for code index #9 to view if there are any code numbers.
SELECT SET
Status
idleOperational
Step 6: Continue pressing the “Temperature Down” button to change to the next error code index and press “Select” to view the error code number, if any, for that index number. Continue on to index #1, the oldest error code index. The water heater display will store up to 10 error codes with the oldest code starting in code index #1 with the most recent code in code index #10.
Step 7: 10 seconds after the last button press, the Water Heater Display will revert back to the current error code display. To exit Service Mode, either wait 30 seconds or press Temperature Up button and Select Button for 3 seconds.
SELECT SET
Status
°F
idle
setpoint
Operational
Exiting Service Mode24
24

Error Code DefinitionsFor models with Honeywell Integrated Control
ERROR CODE DEFINITIONS
If the water heater has an operating problem, there will be a number in the water heater display with “Service Needed” shown below the error code number. Note the error code and the definition in the chart below. This label appears on the control box under the water heater display. The following sections will provide instructions for servicing each error code.
25
25

Resetting Error CodesFor models with Honeywell Integrated Control
WARNINGThe following procedure is for service and installation personnel only. Resetting lockout
conditions without correcting the malfunction can result in a hazardous condition.
If an error code is displayed (except for #4, low flame sense current), the water heater will be in a “lockout condition” with the water heater display showing the error code number and “Service Needed” in the status section of the display window. Error codes 62 (maximum number of retries detected) and 63 (maximum number if ignition recycles detected) are “Soft Lockouts” in which the control can be reset in the “User Mode” by pressing the lower right button under “Lockout Reset” shown in the lower right portion of the display. The control will also go through 3 attempts to relight the burners every hour in the soft lockout condition.
All other error codes will put the water heater into a “Hard Lockout” condition, in which the water heater will not operate and cannot be reset in the “User Mode”. To reset a hard lockout, first enter the “Service Mode” described earlier by pressing both the “Temperature Up” and “Select Buttons” at the same time for 3 seconds. Then press the lower right button under “Lockout Reset” in the water heater display and hold for 3 seconds.
Lockout RESETSELECT
Status Service needed
Error Code Shown inWater Heater Display
Press for 2 seconds
SELECT SET
Status Service Needed
SELECT Lockout RESET
Status Service Needed
Error Code Shown inWater Heater Display
Step 1: Press for 3 secondsto enter service mode.
Step 2: Press for 3 seconds toreset control in service mode.
Resetting Error Codes in Hard Lockout Condition
26
26

IMPORTANT NOTE: This procedure assumes a cool tank
WARNING120 volt potential exposure. Use caution making voltage checks
to avoid personal injury.
CAUTIONUse caution not to damage
connectors when making voltage measurements or jumping
terminals
WARNINGDo not reset the display from the hard lockout
state without correcting the cause of theoverheating condition
Check continuity of wire harness to sensor. Resistance of harness should be close to 0 ohms. Replace wire harness if high resistance
is measured (over 0.5 ohms) Check wires for intermittent connections, shorts, frayed insulation. Replace if necessary
Turn power ON to water heater.Run water heater through heating cycle and verify proper operation.
Sensor temperature can be viewed when burner shuts off (see section on viewing the display in “Service Mode”).
Turn power “OFF”.Draw water to cool tank below 120 °F
Check sensor. Sensor is held in place with a clip fastened to the well (see photo). Check sensor wire for potential damage or breaks in the
wire insulation. Is the sensor fully inserted into the well?Check Sensor Resistance(See Sensor Resistance
Testing, following section)
Y
N
Condition: Water Heater Not OperatingDisplay shows error code “65”
High Water Temperature (over 200 °F)
If wire harness is O.K., check sensor resistance detailed in “Appendix - A: sensor resistance at various temperatures” at the end of the thermostat testing and replacement section. Replace sensor if
needed.
Unplug or disconnect electrical power to the water heater
Condition: Water Heater Not OperatingDisplay shows error code “32”
( Sensor Reading Faulty)
Continued on next page
If sensor clip is damaged replace clip. Replace sensor if damaged.
27
Sensor clip shown installed properly
Sensor shown fully inserted into well
Checking continuity of sensor (disconnected at Control
Board)
27

Condition: Water Heater Not OperatingDisplay shows error code “65”
High Water Temperature (over 200 °F)(Continued from previous page)
Once cause of overheating condition has been diagnosedand corrected, the control may be reset
Reconnect and switch on power to the water heater.Enter service mode on the water heater display (see illustration)Press button under “Lockout Reset” and hold for 3 seconds.Set thermostat to the desired setting.Water heater will start.Monitor temperatures for one complete heating cycle making sure the maximum tank temperature remains well below 200 °F
WARNINGDo not operate water heater without
verifying that the overheating condition has been corrected.
28
28

°F 0 1 2 3 4 5 6 7 8 940 26109 25400 24712 24045 23399 22771 22163 21573 21000 2044550 19906 19383 18876 18383 17905 17440 16990 16553 16128 1571560 15314 14925 14548 14180 13823 13477 13140 12812 12494 1218570 11884 11592 11308 11032 10763 10502 10248 10000 9760 952680 9299 9078 8862 8653 8449 8250 8057 7869 7685 750790 7333 7165 7000 6839 6683 6531 6383 6238 6098 5961100 5827 5697 5570 5446 5326 5208 5094 4982 4873 4767110 4663 4562 4464 4368 4274 4183 4094 4006 3922 3839120 3758 3679 3602 3527 3453 3382 3312 3244 3177 3112130 3048 2986 2925 2866 2808 2752 2697 2643 2590 2538140 2488 2439 2391 2344 2298 2253 2209 2166 2124 2083150 2043 2004 1966 1928 1891 1856 1820 1786 1753 1720160 1688 1656 1625 1595 1566 1537 1509 1481 1454 1427170 1402 1376 1351 1327 1303 1280 1257 1235 1213 1191180 1170 1150 1129 1110 1090 1071 1053 1035 1017 999190 982 965 949 933 917 901 886 871 857 842200 828 814 801 788 775 762 749 737 725 713
In Degrees F
APPENDIX - ASensor Resistance at Various Temperatures
Example: If temperature of sensor is 84°F, then the resistance through the sensor would be 8449 (see shaded area).NOTE: Sensor resistance increases as the temperature falls.
Be Careful When Making Voltage Measurements or Jumping TerminalsNot to Damage or Deform Connectors or Connector Pins.
Be Careful When Making Voltage Measurements or Jumping TerminalsNot to Damage or Deform Connectors or Connector Pins.
Draw Water From The T&P Valve. Compare Temperature With Temperature Ohms Chart Below.
29
29

Thermostat Sensor (Thermister) Replacement Procedure
Step 1. Position main power switch to “OFF”
Step 2. Disconnect (unplug) water heater from120 volt power source.
Step 3. Un-latch and remove top surround coverfrom top of heater.
Step 4. Unclip sensor connector from control board and remove harness from control panel (see picture).
Step 5. Unclip sensor from well and pull sensor to remove, do not remove well (see picture).
Step 6. Install new sensor assembly into well and reinstall senor clip.
Step 7. Reconnect the sensor connector to the control board and route the wire harness through the same path that it was removed.
Step 8. Restore 120 volt power supply. Confirm proper operation following the lighting instructions on the lighting instruction label or the lighting instruction located in the installation and operating instruction manual.
Step 9. Replace surround cover on top of heater.
WARNING120 volt potential exposure. Isolate the
appliance and reconfirm power is disconnected using a multi-meter.
30
Sensor clip shown installed properly
Sensor shown fully inserted into well
Remove sensor connector from control board
30

Does inlet gas pressure drop more than 2" W.C. during burner ignition?
Adjust gassupply regulator
Inadequately sized regulator.
Y
N
N
Y
N
Y
N
Verify Minimum Gas Supply Piping Requirements of: Minimum ¾" NPT. (Schedule 40 black Iron Pipe recommended).
Reconfigure gas supply piping
Y
Observe burner operation through the sight glass located on the combustion insert mounting flange. Normal burner operation should ignite smoothly, without evidence of coughing or huffing upon ignition. The burner flame should be a blue flame near the burner surface in a uniform flame pattern. Occasional yellow or white streaks are normal.
Inlet gaspressure tap
Venturiadjustment
Does main burner Light?
Remove high voltage wire connected at the spark rod and hold approximately ¼" from metal ground with insulated pliers during the ignition
cycle (3 second spark trial period).Is there spark to ground?
Y
N Check spark gap to burner(see “Spark Rod Gap
Inspection”)
Check resistance of high voltage cable. Resistance should be 0-1 ohms.
If resistance is high, replace spark cable. If spark cable is good, replace
Control Board.
N
Y
Can Sparking be seen/heard at the spark rod
to the burner?
Proceed to next page
With manometer, check inlet gas pressure. Is it stable
between 7" & 14" W.C. static?(heater not running)
(see illustrations at right)
Is gas supply pressure regulator adjustable tomaintain proper and
stable setting?
Y
N
WARNING120 volt potential
exposure. Use cautionmaking voltage checks to
avoid personal injury.
WARNINGRemoving screw from
inlet gas pressure tap will immediately allow gas to flow from pressure tap.
Note: Models using metal fiber mesh burner a red glow from the burner surface is normal.
31
Check continuity of spark rod. Is
reading 0-1 Ohm?
Y NReplace Spark Rod
(see “Spark Rod Gap Inspection and
Replacement”
CHECK SPARK ROD RESISTANCE
Meter probe
Meter probe
Spark Rod
Volt meter set toOHM setting
Voltmeter set to OHM setting
Spark Rod
31

Refer to control board illustration,is there 24VAC between P5(5) and P5(8) (blue and brown wires) during the flame establishing period?
(Note: Control Display must show “Heating” for operating status)
Y
ReplaceControl Board
N
Replace Rectifier harness and/or
gas valve.(see “Gas Valve
Replacement Procedure”)
N
Y
Does burner stay lit?
Can you hear or feel gas valve energize?
Does burner light smoothly, without
evidence of coughing or huffing?
Y
N
Check for obstruction at inlet of gas valve.
Is inlet free of obstruction?
Check flame sensor,Is there 1 to 5 micro amps (min.) during 1.5 second
flame proving period?(Value may be displayed on
the control display by accessing “Service Mode”)
N
Y
Continued fromprevious page
N
Call for technical support
Clear obstruction
Observe burner operation through the sight glass located on the combustion insert mounting flange. Normal burner operation should ignite smoothly, without evidence of coughing or huffing upon ignition. The burner flame should be a blue flame near the burner surface in a uniform flame pattern. Occasional yellow or white streaks are normal.
Y
Does burner operate normaly until thermostat is
satisfied?
N
System OK
Y
Turn VENTURI set screw clockwise until its bottomed out. Turn screw counter-clockwise 4 turns from bottom. (Note: Venturi adjustment for 199,999
& 270,000 input models)
Replace flame sensor (see “Flame Sensor
Replacement Procedure”)
Inspect burner tube, (see “Burner Tube Inspection”)
N
Y
N
WARNING120 volt potential exposure. Isolate the
appliance and reconfirm power is disconnected using a multi-meter.
Y
Venturiadjustment
Inlet gaspressure tap
32
1 2 38
6
5
4
3
1
1 2
1
4
1
3
321
15
3
P2P4P5 P7P3
CONTROL BOARD
P10P9J1
FlameSense Rod
CHECK FLAME SENSE ROD MICROAMPS
Multimeter set tomicroamp ( A) setting
Flame Sense Terminal
32
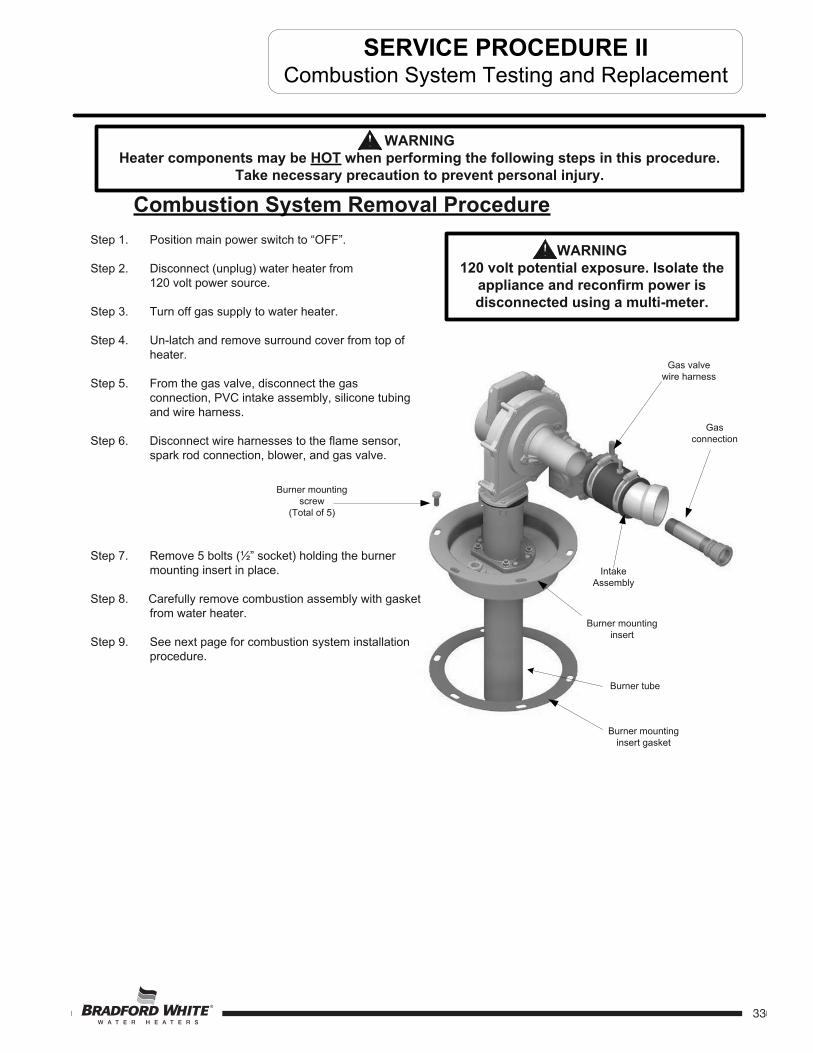
Gas valvewire harness
Gasconnection
Burner mountinginsert
Burner mountingscrew
(Total of 5)
Burner tube
Burner mountinginsert gasket
Step 1. Position main power switch to “OFF”.
Step 2. Disconnect (unplug) water heater from120 volt power source.
Step 3. Turn off gas supply to water heater.
Step 4. Un-latch and remove surround cover from top ofheater.
Step 5. From the gas valve, disconnect the gasconnection, PVC intake assembly, silicone tubingand wire harness.
Step 6. Disconnect wire harnesses to the flame sensor, spark rod connection, blower, and gas valve.
Step 7. Remove 5 bolts (½” socket) holding the burner mounting insert in place.
Step 8. Carefully remove combustion assembly with gasketfrom water heater.
Step 9. See next page for combustion system installation procedure.
Combustion System Removal Procedure
WARNING120 volt potential exposure. Isolate the
appliance and reconfirm power is disconnected using a multi-meter.
WARNINGHeater components may be HOT when performing the following steps in this procedure.
Take necessary precaution to prevent personal injury.
33
Intake Assembly
33

Gas valvewire harness
Gasconnection
Burner mountinginsert
Burner mountingscrew
(Total of 5)
Burner tube
Burner mountinginsert gasket
Intake Assembly
Combustion System Replacement Procedure
Step 1. Fully inspect burner gasket for the following:a) Tears d) Dirt or debrisb) Missing material e) Other imperfections that would inhibit proper sealc) Cracks
If gasket is NOT affected by any of the above, gasket replacement is not required.
Step 2. Install combustion system using new gasket or fully inspected gasket from step 1.Secure the combustion at the burner mounting insert using the bolts from step 7on previous page. Tighten the nuts evenly
Step 3. Reconnect high voltage cable to spark rod, flame sensor, blower and gas valve.
Step 4. Reconnect intake assembly, gas supply and silicone tubing to gas valve. Turn on gassupply to heater and check for gas leaks, repair any gas leaks found.
Step 5. Restore 120 volt power supply to water heater and confirm proper operation followingthe lighting instructions on the lighting instruction label or the lighting instruction locatedin the installation and operating instruction manual.
Step 6. Replace surround cover on top of water heater.
34
34

Burner Tube Removal Procedure
WARNING120 volt potential exposure. Isolate the
appliance and reconfirm power is disconnected using a multi-meter.
WARNINGHeater components may be HOT when performing the following steps in this procedure.
Take necessary precaution to prevent personal injury.
35
Step 1. Position main power switch to “OFF”.
Step 2. Disconnect (unplug) water heater from120 volt power source.
Step 3. Turn off gas supply to water heater.
Step 4. Un-latch & remove surround cover from top ofheater.
Step 5. From the gas valve, disconnectthe gas connection, intake assembly,wire harness and silicone tubing.
Step 6. Disconnect wire harness fromblower assembly.
Step 7. Remove the two screws holdingeach the direct spark igniter andflame sensor in place (long reachmagnetic Phillips screw driver).Carefully remove direct spark igniter and flame sensor from combustionassembly.
Step 8. Remove the 4 nuts (7/16" wrench) holdingthe burner transition in place. Lift the blower/gasvalve transition assembly from burner mountinginsert, remove gasket and set aside.
Step 9. Remove burner tube from burnermounting insert. See next page forburner tube inspection procedure.
BURNER FLANGE GASKET
GAS VALVEWIRE
HARNESS
GASCONNECTIO
N
SPARK ROD
BURNER TUBE
BURNER MOUNTING
INSERT
FLAMESENSOR
MOUNTING NUTS
TRANSITIONTUBE
35

Burner Tube InspectionStep 1. a) Outer fiber mesh should be uniform with no tears or deterioration.
b) Gently squeeze burner tube, Burner tube should feel firm without any soft areasaround the sides or at the bottom.
c) Visually inspect inside burner tube, Burner tube should be intact with no areas ofdeterioration. Ports should be free of any debris.
Step 2. If burner tube is affected by any of the above, replacement is required. Refer to burnertube replacement procedure below.
Burner Tube Replacement Procedure
Step 1. Fully inspect burner flange gaskets, igniter and flame sensor gaskets for the following:a) Tears d) Dirt or debrisb) Missing material e) Other imperfections that would inhibit proper sealc) Cracks
If gaskets are NOT affected by any of the above, gasket replacement is not required.
Step 2. Install burner tube with gaskets into mounting assembly. Be sure gasket surfaces are freeof debris.
Step 3. Reinstall the burner transition with combustion assembly attached with the nuts that were removed from step 8 on previous page. Tighten the nuts evenly.
Step 4. Carefully reinstall flame sensor with gasket and direct spark igniter (DSI) with gasket and secure withscrews from step 7 on previous page. .
Step 5. Reconnect wire harnesses to the flame sensor, spark rod connection, blower and gas valve.
Step 6. Reconnect the intake assembly, gas supply and silicone tubing to gas valve. Turn on gassupply to heater and check for gas leaks, repair any gas leaks found.
Step 7. Restore 120 volt power supply to water heater and confirm proper operation followingthe lighting instructions on the lighting instruction label or the lighting instruction locatedin the installation and operating instruction manual.
Step 8. Replace surround cover on top of water heater.
WARNINGHeater components may be HOT when performing the following steps in this procedure.
Take necessary precaution to prevent personal injury.
36
36

Gas Valve Replacement Procedure
WARNING120 volt potential exposure. Isolate the
appliance and reconfirm power is disconnected using a multi-meter.
37
Gas valveassembly
Blower / gas valvegasket
Blower
Venturimounting flange
Gas valvemounting screws
(2 places)
Venturi inlet
Gas valvewire harness
Step 1. Position main power switch to “OFF”.
Step 2. Disconnect (unplug) water heater from120 volt power source.
Step 3. Turn off gas supply to water heater.
Step 4. Un-latch & remove surround cover from top ofheater.
Step 5. From the gas valve, disconnectthe gas connection, intake assembly,wire harness and silicone tubing.
Step 6. Remove the 2 gas valve mounting screws (Torx bit) located at the
2:00 O-clock & 8:00 O-clock position on the venturi mounting flange
and remove gas valve from water heater.
Step 7. Remove any residual gasket material from blower and venturi mounting flange.
Step 8. Install new gas valve with new gasket provided. Secure gas valve in place using screws from step 6.
Step 9. Reconnect PVC venting, gas supply, silicone tubing & wire harness to gas valve. Turn on gas supply to heater and check for gas leaks, repair any gas leaks found.
Step 10. Restore 120 volt power supply to water heater and confirm proper operation following the lighting instructions on the lighting
instruction label or the lighting instruction located in the installation and operating instruction manual.
Step 11. Replace surround cover on top ofwater heater.
37

Is the blocked vent switch in the normal
closed position?
Does blowerenergize?
(For Direct Spark Ignition models,
ensure control display shows “Heating”, raise temperature setpoint if
necessary)
Is there 120VAC across the white and
black wires at the blower?
Replace blower.(see “Blower Replacement Procedure”)
Y
NRefer to ignition module/control board illustration.Is there 120VAC between
P7(5) and P7(3)?
Repair/replace wire harness.
Y
N
N
N
Is there 120VAC across the white and
black wires at location P2 the transformer ?
Y
N
Correct safety circuit problem per safety circuit
trace(section “Blocked Vent
Safety Switch Testing”).
Y
Y
Is there 120VAC across the white and
black wires at location P3 on the control
board ?(see photo at bottom)
N
NRefer to ignition module/control boardillustration.
Is there 120VAC between P7(5) and P7(3)?
Y
Replaceignition module/control board.
Call technical support.
Check amp draw through BLACK wire lead from
control board to blower. Is there .6 to 3.0 amps?
Replace blower.(see “Blower Replacement
Procedure”)
N
Y Is Blower wheel secured to blower motor shaft?
N
Y
Determinepowersource
problemand
correct
38
1 2 38
6
5
4
3
1
1 2
1
4
1
3
321
15
3
P2P4P5 P7P3
CONTROL BOARD
P10P9J1
DIRECT SPARK IGNITION MODELS
Black wire leading from control board to blower
looped through amprobe.
Call technical support.
Y
38

Blower Replacement ProcedureWARNING
120 volt potential exposure. Isolate the appliance and reconfirm power is disconnected using a multi-meter.
39
Step 9. Remove any residual gasket materialfrom venturi mounting flange and transition flange.
Step 10. Install new blower with new gasketprovided. Secure blower in place usingscrews from step 8.
Step 11. Reconnect gas valve assembly to blowerwith new gasket provided. Secure gasvalve in place using screws from step 7.
Step 12. Reconnect intake vent andgas line to gas valve assembly andcheck for gas leaks repair any leaks found.
Step 13. Reconnect wire harness to blower assembly, restore 120 volt power supply & Gas supplyto water heater and confirm proper operation following the lighting instructions on thelighting instruction label or the lighting instructions located in the installation and operatinginstruction manual.
Step 14. Replace surround cover on top of water heater.
Step 1. Position main power switch to “OFF”.
Step 2. Disconnect (unplug) water heater from120 volt power source.
Step 3. Turn off gas supply to water heater.
Step 4. Un-latch & remove surround cover from top ofheater.
Step 5. Disconnect wire harness from blower.
Step 6. Disconnect intake vent and gas supply from gas valve assembly.
Step 7. Remove the 2 gas valve mounting screws (Torx bit) located at the
3:00 O-clock & 7:00 O-clock position on the venturi mounting flange.
Step 8. Remove The 4 blower flange mounting screws (5/32 Allen wrench) and remove blower from transition flange.
Gas valveassembly
Blower / gas valvegasket
Blower
Venturimounting flange
Gas valvemounting screws
2 places.
Blower / transitiongasket
Blower flangemounting screws
Transitionflange
Venturi inlet
39

With flame sensor Disconnectedfrom ignition module, check
continuity to ground.Is there continuity to ground?
N
Y
Flame Sensor Testing Procedure
Refer to illustration below, is therea minimum of 1 micro amp during1.5 second flame proving period?
Y
N
Is flame sensor freeof oxidation?
Clean or replaceflame sensor.
(see “Flame Sensor Replacement Procedure”)
N
Is ceramic of flame sensor cracked?
Replace flame sensor.(see “Flame Sensor
Replacement Procedure”)
Y
N
Flame sensing circuit OKY
Refer to ignition module/control board illustration.(24 volts should maintain beyond the
1.5 second flame proving period.)Is there 24VAC between P5(5) and P5(8)?
Y
N
Call fortechnical support
Replace flame sensor with gasket
and/or wire lead.(see “Flame Sensor
Replacement Procedure”)
Remove flame sensor from water heater.Check continuity from tip of flame sensor
to end of wire lead.Is there continuity?
N
Y
WARNING120 volt potential exposure. Use caution
making voltage checks to avoid personal injury. Flame sensor may be
too hot to handle, take necessary precautions
40
Volt meter set toMicro amps setting
( A)
Meter probe
Meter probe
Flame sensorterminal on
control board.
Flame sensorterminal
1 2 38
6
5
4
3
1
1 2
1
4
1
3
321
15
3
P2P4P5 P7P3
CONTROL BOARD
P10P9J1
DIRECT SPARK IGNITION MODELS
40

Flame Sensor Replacement Procedure
Step 4. Disconnect wire lead from flame sensor.
Step 5. Remove the 2 sensor mounting screws (magnetictip, long reach Phillips screw driver) and removeflame sensor & gasket from transition baseflange.
Step 6. Remove any residual gasket material fromtransition base flange.
Step 8. Reconnect flame sensor wire.
Step 7. Install new flame sensor with new gasket providedusing screws from step 5. Arrange flame sensor withhook towards burner.
Step 1. Position main power switch to “OFF”
Step 2. Disconnect (unplug) water heaterfrom 120 volt power source.
Step 3. Un-latch & remove surround coverfrom top of heater.
WARNING120 volt potential exposure. Isolate the
appliance and reconfirm power is disconnected using a multi-meter.
41
Flamesensor
Blower tube
Step 9. Restore 120 volt power supply to water heater and confirm proper operation following thelighting instructions on the lighting instruction label or the lighting instructions located inthe installation and operating instruction manual.
Step 10. Replace surround cover on top ofwater heater.
Transitionbase flange
Flame sensormounting screws
Flame sensor
Flame sensorgasket
Arrange hookof sensor
towards burner
41

42
Spark Rod Replacement Procedure
Step 4. Disconnect wire lead from spark rod.
Step 5. Remove the 2 mounting screws (magnetictip, long reach Phillips screw driver) and removespark rod & gasket from transition baseflange.
Step 6. Remove any residual gasket material fromtransition base flange.
Step 7. Install new spark rod with new gasket provided using screws from step 5. Arrange spark rod with hook towards burner (Off-center mounting hole only allow installation one way).
Step 1. Position main power switch to “OFF”
Step 2. Disconnect (unplug) water heater from 120 volt power source.
Step 3. Un-latch & remove surround cover from top of heater.
Step 8. Restore 120 volt power supply to water heater and confirm proper operation following thelighting instructions on the lighting instruction label or the lighting instructions located inthe installation and operating instruction manual.
Step 9. Replace surround cover on top ofwater heater.
WARNING120 volt potential exposure. Isolate the
appliance and reconfirm power is disconnected using a multi-meter.
Off-centermounting
hole
Spark Rod
Spark Rod
Spark RodGasket
Transitionbase flange
Spark RodMounting Screws
42

Control Board ReplacementStep 1. Position main power switch to “OFF”
Step 2. Disconnect (unplug) water heater from 120volt power source.
Step 3. Un-latch and remove top surround coverfrom top of water heater.
Step 4. Locate control board.
Step 5. Carefully disconnect all wire connections fromcontrol board (Identify all wire connections)
Step 6. Depress tabs on the top of control first then tilt the control forward.
Step 7. Unhook the tabs on the control out of the slots on the control panel and remove control.
Step 8. Replace control board and all wire connections.
Step 9. Restore 120 volt power supply to waterheater and confirm proper operation followingthe lighting instructions on the lighting instruction label or the lighting instructionlocated in the installation and operatinginstruction manual.
Step 10. Replace surround cover on top of water heater.
WARNING120 volt potential exposure. Isolate the
appliance and reconfirm power is disconnected using a multi-meter.
Bottom tabs will unlatch after top
tabs are removed
Control Board
43
Identify wires for proper re-connection
Push down top tabs then
push out
43

Transformer Replacement Procedure WARNING120 volt potential exposure. Isolate the
appliance and reconfirm power is disconnected using a multi-meter.
44
Step 1. Position main power switch to “OFF”
Step 2. Disconnect (unplug) water heater from 120volt power source.
Step 3. Un-latch and remove top surround coverfrom top of water heater.
Step 4. Disconnect primary leads (black & white & green) and secondary leads (blue & yellow) from the control board.
Step 5. Remove the 2 nuts ( 11/32 nut driver) holding the transformer in place and remove transformer from control panel. (see photo right)
Step 6. Install new transformer and secure inplace with nuts from step 5.
Step 8. Reconnect primary and secondary wires from transformer to control board.
Step 9. Restore 120 volt power supply to waterheater and confirm proper operation followingthe lighting instructions on the lighting instruction label or the lighting instructionlocated in the installation and operatinginstruction manual.
Step 10. Replace surround cover on top of water heater.
Step 5Remove transformer
mounting nuts
44

Anode inspection and replacement
Step 1. Position main power switch to “OFF”
Step 2. Disconnect (unplug) water heater from 120volt power source.
Step 3. Turn off water supply and drain water heater.
Step 4. Locate (see photo below) and remove anode rods from heater (1-1/16 hex socket).
Step 5. Visually inspect anode rod. Anode rod should show signs of depletion, this is normal. Ifthe depletion is ½ of the original diameter (approximately ¾" diameter), replacement isrecommended. If any of the steel core of the anode is exposed, replacement isrecommended.
Step 6. Upon completion of inspection or subsequent replacement, apply thread sealing tape or otherthread compound to threads of anode and reinstall into heater. Restore water supplyand check for and repair any leaks found.
Step 7. Restore 120 volts to water heater and verify proper heater operation following theinstructions on the lighting instruction label or the lighting instruction located in theinstallation and operating instruction manual.
WARNINGHeater components and stored water may be HOT when performing the following steps in
this procedure. Take necessary precaution to prevent personal injury.
45
Top of water heater.Anodes located under
plastic covers by the inlet and outlet water
connections.
Cut Access hole thru insulation.After removing insulation you will
have access to the anodes
45

Display Module Replacement
Step 1. Position main power switch to “OFF”
Step 2. Disconnect (unplug) water heater from 120volt power source.
Step 3. Remove four screws that hold the display into the enclosure (shown on the right).
Step 4. After removing the screw pull the display out of the enclosure.
Step 5. Once the display is removed disconnect the two mating plugs.
Step 6. Connect in new display and replace into the enclosure.
Step 7. Use the four screws from step 3 and reinstall the display onto the enclosure.
Step 8. Restore 120 volt power supply to waterheater and confirm proper operation followingthe lighting instructions on the lighting instruction label or the lighting instructionlocated in the installation and operatinginstruction manual.
WARNING120 volt potential exposure. Isolate the
appliance and reconfirm power is disconnected using a multi-meter.
Display and Enclosure
Disconnect
46
46

47
Blocked Vent Switch should be installed on the lip of the drafthood
Step 1. First determine is the “Blocked Vent Switch” was installed correctly on the drafthood (see picture right).
Step 2. When Error Code 26 is present you first must determine if there is a blocked vent condition present. If so, clear the obstruction and reset the switch then continue with normal operation.
Step 3. If the switch is tripped and there is no obstruction in the venting there could have been an extended down draft that tripped the switch. The down draft could have been caused by damage vent termination. Contact your plumbing professional to correct this issue.
Step 4. When no blockage or downdraft issues are present check the continuity of the switch (see photo below). If there is no continuity present even when switch is reset the blocked vent switch assembly needs to be replaced.
Step 5. If blocked vent switch assembly is functioning correctly check to see if the wire harness has any signs of damage. Replace harness if any signs of damage exist.
Step 6. Restore water heater to use and confirm proper operation following the lighting instructions on the lighting instruction label or the lighting instructionlocated in the installation and operatinginstruction manual.
Set voltmeter to Ohms setting.
The switch should be very close to 0
ohms
47

48
Date
Model Number
Serial Number
Venting:
Horizontal length
Vent 6", 7" or 8"
Vertical length
Line Voltage PolarityLow Voltage
Electrical:
Size & material
Distance from meterto water heater
Gas Line:
Static
Manifold
Running Inlet
Gas Pressure:
Spark Rod Resistance: Flame Sense Micro -Amps:
Venturi:
Setting from Bottom in Turns
Combustion: CO2 CO
Installation Site Contact Name & Phone Number
Service Provider
Phone Number
Installation Site Name & Address:
Flame Sense Resistance:___________
Error Codes on Control Display (Direct Spark Ignition): __________________________________
Number of elbows
48
49
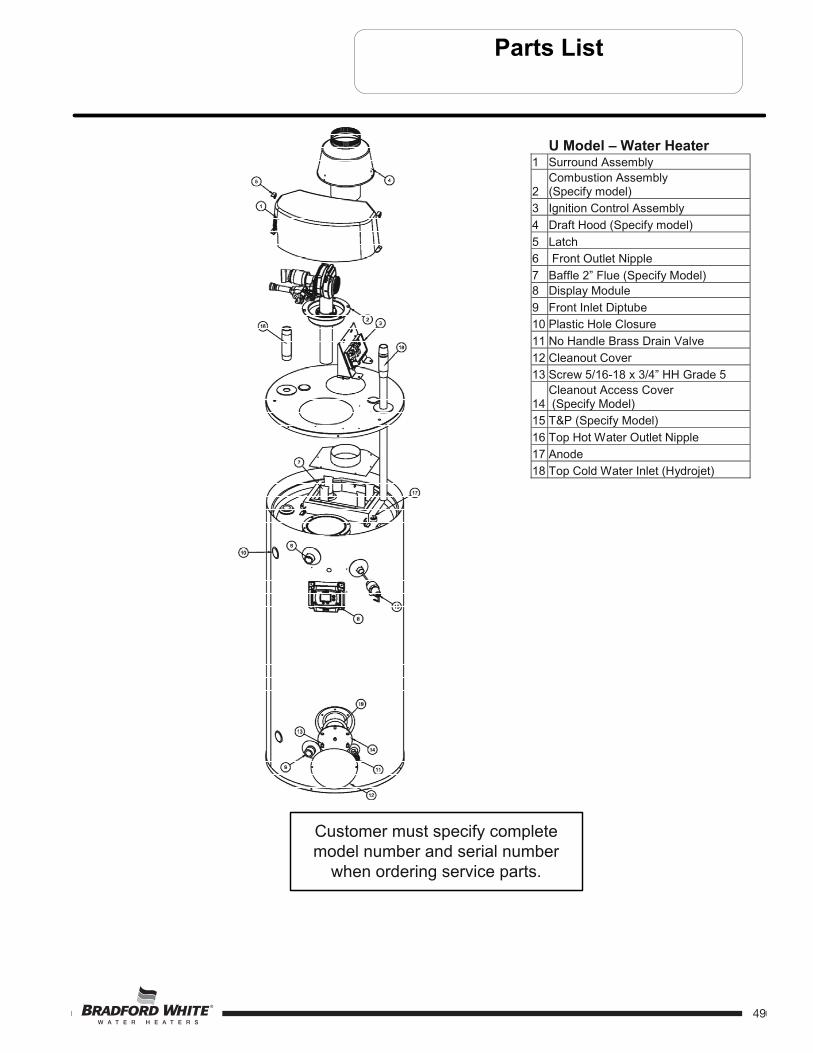
Customer must specify complete model number and serial number
when ordering service parts.
U Model – Water Heater 1 Surround Assembly
2Combustion Assembly (Specify model)
3 Ignition Control Assembly
4 Draft Hood (Specify model)
5 Latch 6 Front Outlet Nipple
7 Baffle 2” Flue (Specify Model) 8 Display Module
9 Front Inlet Diptube 10 Plastic Hole Closure
11 No Handle Brass Drain Valve
12 Cleanout Cover 13 Screw 5/16-18 x 3/4” HH Grade 5
14Cleanout Access Cover (Specify Model)
15 T&P (Specify Model)
16 Top Hot Water Outlet Nipple
17 Anode 18 Top Cold Water Inlet (Hydrojet)
49

50
Customer must specify complete model number and serial number
when ordering service parts.
Combustion Assembly
1Combustion Assembly (Specify model) 14 Igniter – Direct Spark Ignition
2Blower/Gas Valve Assembly (Specify model) 15 Burner (Specify Model)
3 Burner Assembly (Specify model) 16 Sight Glass4 Blower – (Specify model) 17 Burner Mount Plate
5 Venturi Gasket 18 ¾” to ½” Reducer Bushing 6 Transition Tube 19 Nipple 7 Gasket Blower Transition 20 Gas Valve (Specify Model) 8 Gasket Burner (Specify Model) 21 Venturi (Specify Model) 9 1/4 – 20 Nut
10 Screw 8-32 x ¼” RHCR 11 Gasket Flame Sense 12 Gasket Igniter 13 Sensor – Flame Sense
50

Customer must specify complete model number and serial number when
ordering service parts.51
51

NOTES
AC Alternating CurrentBTU/H British Thermal UnitsCO Carbon MonoxideCO2 Carbon DioxideDC Direct CurrentDSI Direct Spark IgnitionECO Energy Cut OffGFI Ground fault interruptGPM Gallons per MinuteHSI Hot Surface IgniterHz HertzLED Light Emitting DiodeNOx Oxides of NitrogenNPT National Pipe ThreadPSI Pounds per Square InchRPM Revolutions per MinuteVA Volt AmpsVAC Volts Alternating CurrentW.C. Inches of Water Column°C Degrees Centigrade°F Degrees Fahrenheit
A Micro Amp
52
52

NOTES
53
53

NOTES
54
54

NOTES
54
55
