3d lut & cdl - teradekcdn.teradek.com/public/colr/docs/teradek_colr_quick_start_guide_… · a:...
TRANSCRIPT
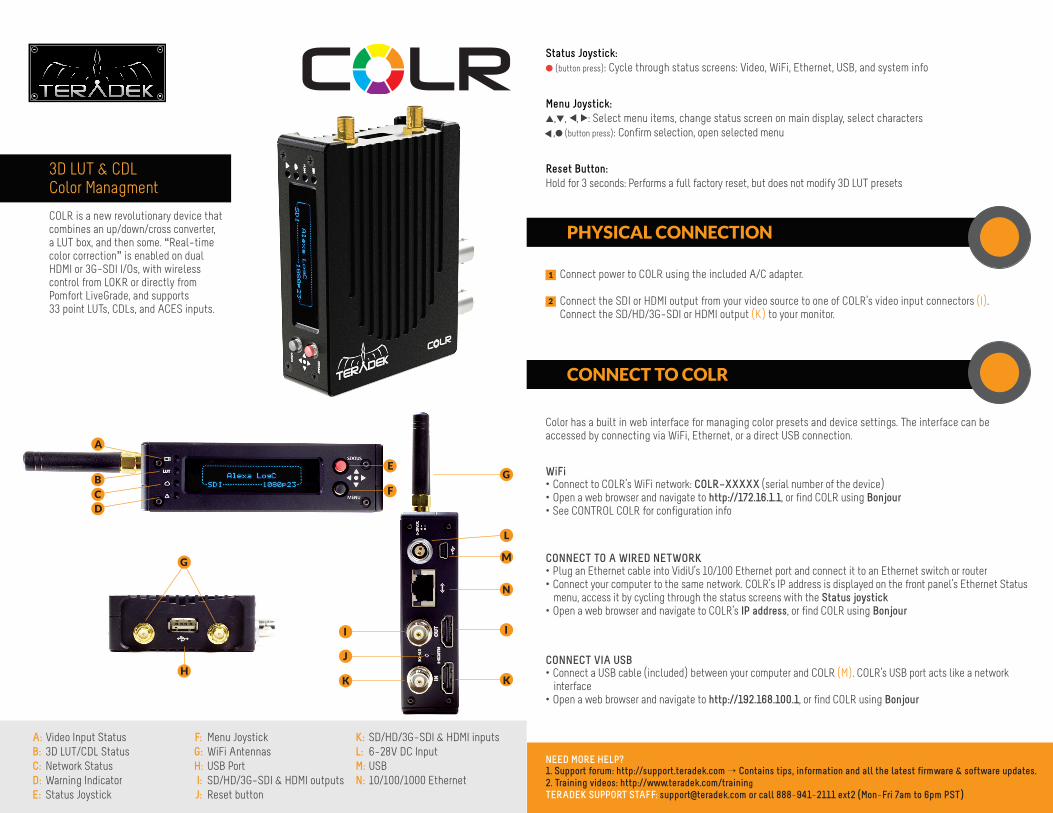
A: Video Input StatusB: 3D LUT/CDL StatusC: Network StatusD: Warning Indicator E: Status Joystick
F: Menu JoystickG: WiFi Antennas H: USB Port I: SD/HD/3G−SDI & HDMI outputs J: Reset button
K: SD/HD/3G−SDI & HDMI inputsL: 6−28V DC Input M: USB N: 10/100/1000 Ethernet
NEED MORE HELP?1. Support forum: http://support.teradek.com → Contains tips, information and all the latest firmware & software updates. 2. Training videos: http://www.teradek.com/training TERADEK SUPPORT STAFF: [email protected] or call 888−941−2111 ext2 (Mon−Fri 7am to 6pm PST)
3D LUT & CDL Color Managment
COLR is a new revolutionary device that combines an up/down/cross converter, a LUT box, and then some. “Real−time color correction” is enabled on dual HDMI or 3G−SDI I/Os, with wireless control from LOKR or directly from Pomfort LiveGrade, and supports 33 point LUTs, CDLs, and ACES inputs.
EG
L
M
N
I
K
F
A
B
CD
I
K
J
H
Status Joystick:● (button press): Cycle through status screens: Video, WiFi, Ethernet, USB, and system info
Menu Joystick:▲,▼, ▲, ▲ : Select menu items, change status screen on main display, select characters ,● (button press): Confirm selection, open selected menu
Reset Button:Hold for 3 seconds: Performs a full factory reset, but does not modify 3D LUT presets
▲
Connect power to COLR using the included A/C adapter.
Connect the SDI or HDMI output from your video source to one of COLR’s video input connectors (I). Connect the SD/HD/3G−SDI or HDMI output (K) to your monitor.
1
2
PHYSICAL CONNECTION
CONNECT TO COLR
Color has a built in web interface for managing color presets and device settings. The interface can be accessed by connecting via WiFi, Ethernet, or a direct USB connection.
WiFi
CONNECT VIA USB
CONNECT TO A WIRED NETWORK
• Connect to COLR’s WiFi network: COLR−XXXXX (serial number of the device)• Open a web browser and navigate to http://172.16.1.1, or find COLR using Bonjour • See CONTROL COLR for configuration info
• Connect a USB cable (included) between your computer and COLR (M). COLR’s USB port acts like a network interface• Open a web browser and navigate to http://192.168.100.1, or find COLR using Bonjour
• Plug an Ethernet cable into VidiU’s 10/100 Ethernet port and connect it to an Ethernet switch or router • Connect your computer to the same network. COLR’s IP address is displayed on the front panel’s Ethernet Status menu, access it by cycling through the status screens with the Status joystick • Open a web browser and navigate to COLR’s IP address, or find COLR using Bonjour
G
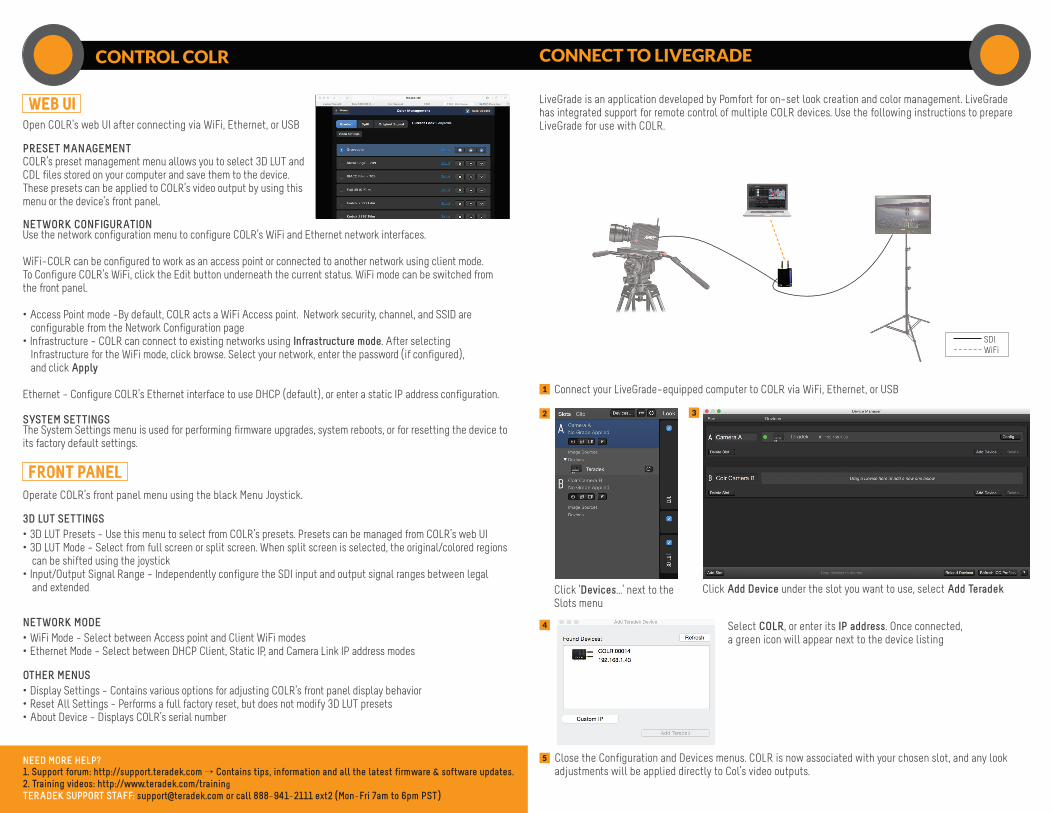
LiveGrade is an application developed by Pomfort for on−set look creation and color management. LiveGrade has integrated support for remote control of multiple COLR devices. Use the following instructions to prepare LiveGrade for use with COLR.
NEED MORE HELP?1. Support forum: http://support.teradek.com → Contains tips, information and all the latest firmware & software updates. 2. Training videos: http://www.teradek.com/training TERADEK SUPPORT STAFF: [email protected] or call 888−941−2111 ext2 (Mon−Fri 7am to 6pm PST)
CONNECT TO LIVEGRADECONTROL COLR
Connect your LiveGrade−equipped computer to COLR via WiFi, Ethernet, or USB
Click ‘Devices...’ next to the Slots menu
Click Add Device under the slot you want to use, select Add Teradek
Select COLR, or enter its IP address. Once connected, a green icon will appear next to the device listing
Close the Configuration and Devices menus. COLR is now associated with your chosen slot, and any look adjustments will be applied directly to Col’s video outputs.
WEB UI
FRONT PANEL
Open COLR’s web UI after connecting via WiFi, Ethernet, or USB
Operate COLR’s front panel menu using the black Menu Joystick.
PRESET MANAGEMENT
3D LUT SETTINGS
NETWORK MODE
OTHER MENUS
SYSTEM SETTINGS
NETWORK CONFIGURATION
COLR’s preset management menu allows you to select 3D LUT and CDL files stored on your computer and save them to the device. These presets can be applied to COLR’s video output by using this menu or the device’s front panel.
• 3D LUT Presets − Use this menu to select from COLR’s presets. Presets can be managed from COLR’s web UI• 3D LUT Mode − Select from full screen or split screen. When split screen is selected, the original/colored regions can be shifted using the joystick• Input/Output Signal Range − Independently configure the SDI input and output signal ranges between legal and extended
• WiFi Mode − Select between Access point and Client WiFi modes• Ethernet Mode − Select between DHCP Client, Static IP, and Camera Link IP address modes
• Display Settings − Contains various options for adjusting COLR’s front panel display behavior• Reset All Settings − Performs a full factory reset, but does not modify 3D LUT presets• About Device − Displays COLR’s serial number
The System Settings menu is used for performing firmware upgrades, system reboots, or for resetting the device to its factory default settings.
Use the network configuration menu to configure COLR’s WiFi and Ethernet network interfaces. WiFi−COLR can be configured to work as an access point or connected to another network using client mode.To Configure COLR’s WiFi, click the Edit button underneath the current status. WiFi mode can be switched from the front panel.
• Access Point mode −By default, COLR acts a WiFi Access point. Network security, channel, and SSID are configurable from the Network Configuration page• Infrastructure − COLR can connect to existing networks using Infrastructure mode. After selecting Infrastructure for the WiFi mode, click browse. Select your network, enter the password (if configured), and click Apply
Ethernet − Configure COLR’s Ethernet interface to use DHCP (default), or enter a static IP address configuration. 1
2
4
5
3
WiFiSDI