3d modelling: blender - up and running
TRANSCRIPT

3d modelling:
Blender - Up and running
The small print
PrerequisitesTime in the workshop is precious – it is an opportunity for you to interact with the workshop leader and other participants through questions and discussions and to share your experiences and concerns. To make the most of this time we sometimes ask you to carry out learning activities ahead of the workshop so that everyone comes into the class with the same basic knowledge. We keep this prior learning to a minimum and often make use of online videos. Online videos provided through ‘Molly’ can be accessed by University members anytime, anywhere, through a browser or app.
Your course booking will tell you if any prior learning activity is required. If you don’t have an environment where you can do this learning, you can come along to one of our ‘quiet’ sessions. These are scheduled every week in normal term-time, and are a quiet space where you can work through ‘Molly’ videos or other workshop resources. If you turn up for a workshop without having done the prior learning, the workshop leader may suggest that you come back on another session.
CopyrightCarl Wenczek makes this booklet and the accompanying slides available under a Creative Commons licence (BY-NC-SA: Attribution-NonCommercial-ShareAlike). The Oxford University crest and logo and IT Services logo are copyright of the University of Oxford and may only be used by members of the University in accordance with the University’s branding guidelines.
About the workshop designerCarl Wenczek is a very experienced architectural illustrator and an expert in 3d modelling and 2d imaging. He is a Director of his own small company and over the last 18 years has built long lasting relationships with his clients, creating 100’s of illustrations and helping them convey their ideas and designs.
Running parallel to his commercial work, Carl is also a part-time lecturer in multimedia and has been teaching at Oxford University’s IT Services for the last 17 years, delivering courses in Photoshop, Illustrator, InDesign, After Effects, Blender, GIMP, Inkscape and digital photography.
Carl also coaches Paddlesport (kayaking, canoeing and stand up paddling) and Indoor Climbing. These sports are often coached in demanding and dynamic environments and require strong leadership skills and a calm persona!
Revision history
Version Date Author Comments
1.0 November 2019 Carl Wenczek First version2.0 May 2020 Carl Wenczek Adapted to workshop format, added and updated further information
About this workshop
Does your research paper or departmental website need eye-catching 3d visuals? Do you have information that could be presented attractively in 3d?
What you will learnThis workshop covers 3d modelling and basic animation using the free 3d modelling application, Blender. This is a follow-on workshop to 3d modelling: Kick-off and assumes you have a firm understanding of the basics of using a 3d modelling application. We will be creating our own 3d models.
What you need to knowYou must either have been on the 3d modelling: Kick-off course first, or have a firm understanding of the basics of using 3d modelling applications.
This workshop will cover:
• Build and edit 3d models• Create and edit materials• Set up and adjust lights and the camera• Create a simple animation
If you need to review these activities, Molly is a great place to get guidance. There is an activity with relevant Molly videos in the IT Learning Portfolio: visit skills.it.ox.ac.uk/it-learning-portfolio and search for “Blender”.
The resources you needSample documents that you can use to experiment with will be made available, but you may like to bring along your own.
Unless you have been told otherwise, in classroom workshops there will be a computer available for you to use with Blender installed.
You can use your own computer with your preferred app installed if you want to – just bear in mind that I am not an expert in every app (although I am sure that between us we will be able to sort out most problems!)
Contents
The small print
About this workshop
Learning Objective 01 - Introduction and the interface
Learning Objective 02 - Setting Preferences
Learning Objective 03 - Renderer and render settings
Learning Objective 04 - Revision exercise
Exercise 01 - Table
Learning Objective 05 - Vertex, edge and face
Learning Objective 06 - Edit Mode
Learning Objective 07 - Normals
Learning Objective 08 - Modelling with faces
Exercise 02 - Vase
Learning Objective 09 - Smoothing
Learning Objective 10 - Modelling with Bezier Curves
Learning Objective 11 - Lathing
Exercise 03 - Wine glass
Exercise 04 - Bringing it all together
Learning Objective 12 - Animation
Further information
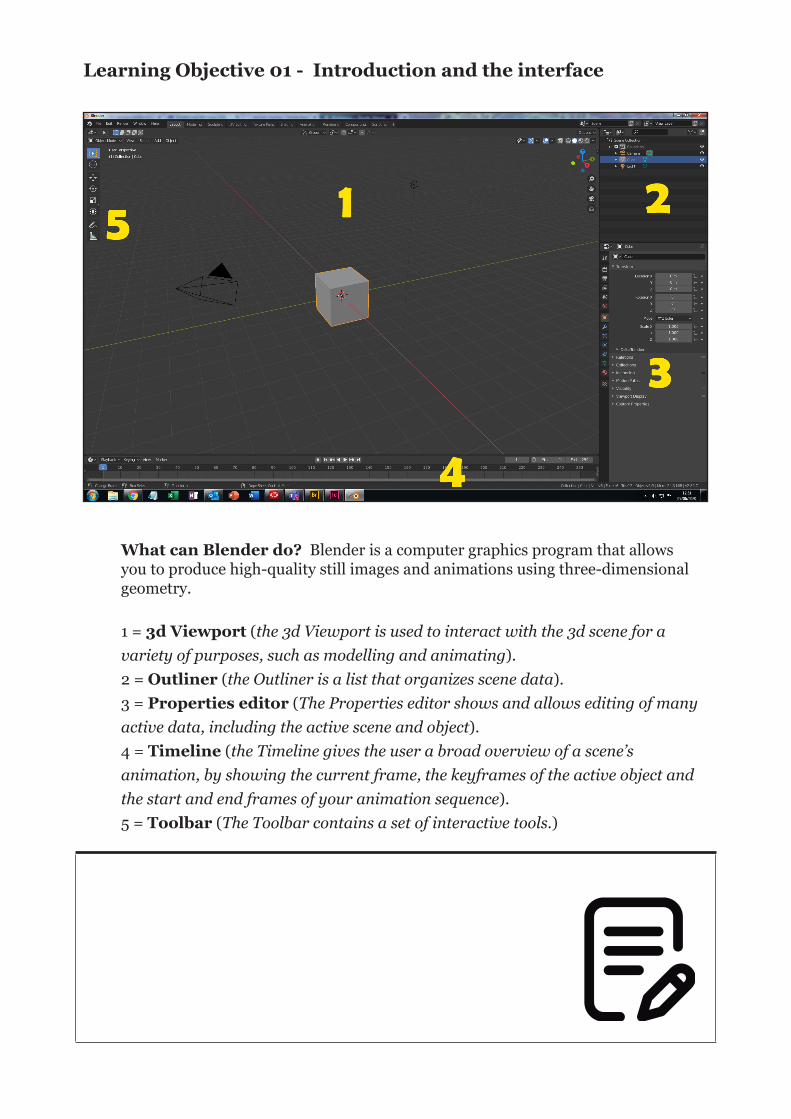
Learning Objective 01 - Introduction and the interface
What can Blender do? Blender is a computer graphics program that allows you to produce high-quality still images and animations using three-dimensional geometry.
1 = 3d Viewport (the 3d Viewport is used to interact with the 3d scene for a variety of purposes, such as modelling and animating).2 = Outliner (the Outliner is a list that organizes scene data).3 = Properties editor (The Properties editor shows and allows editing of many active data, including the active scene and object).4 = Timeline (the Timeline gives the user a broad overview of a scene’s animation, by showing the current frame, the keyframes of the active object and the start and end frames of your animation sequence).5 = Toolbar (The Toolbar contains a set of interactive tools.)
Learning Objective 02 - Setting preferences
The Blender Preferences dialog contains settings to control how Blender behaves.
Task
• Choose Edit>Preferences...
Options are listed to the left of the preferences dialog box.
• Choose the following preferences:
Viewport>3D Viewport Axis>Interactive Navigation
Navigation>Zoom to Mouse Position
Keymap>Industry Compatible (from dropdown menu at the top)
System>Undo Steps
Save & Load>Auto Save>Timer (mins)
File Paths>
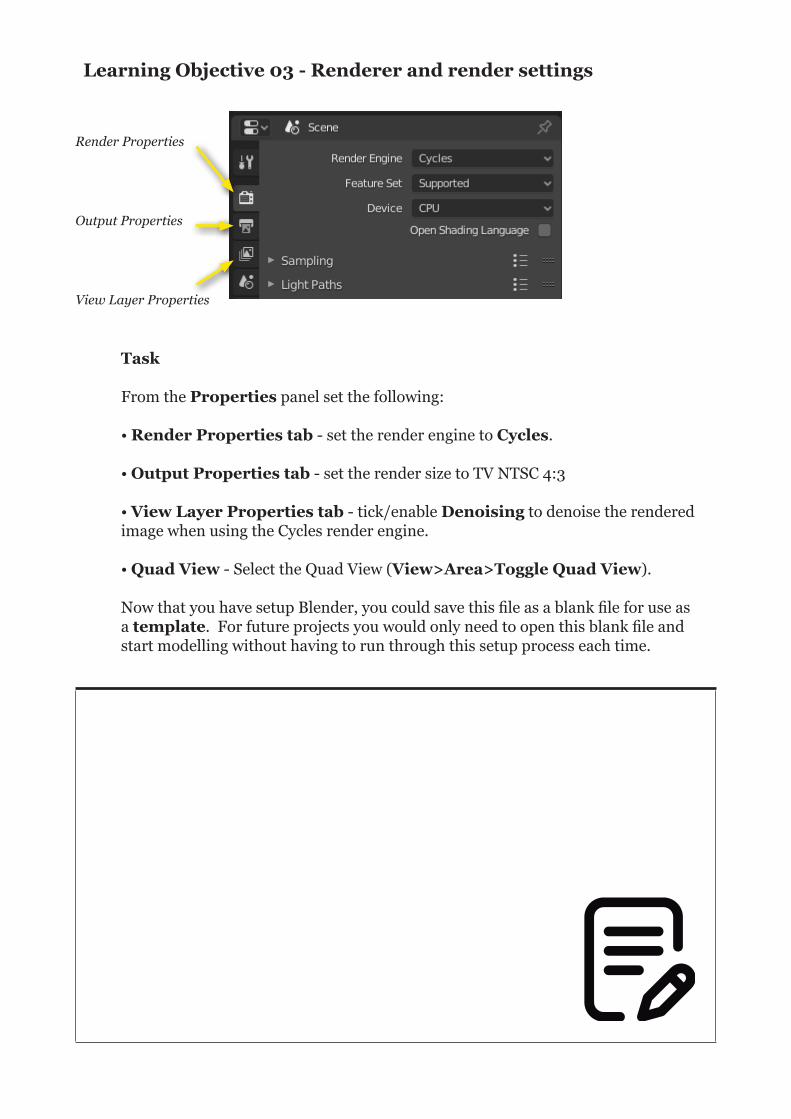
Render Properties
Output Properties
View Layer Properties
Learning Objective 03 - Renderer and render settings
Task
From the Properties panel set the following:
• Render Properties tab - set the render engine to Cycles.
• Output Properties tab - set the render size to TV NTSC 4:3
• View Layer Properties tab - tick/enable Denoising to denoise the rendered image when using the Cycles render engine.
• Quad View - Select the Quad View (View>Area>Toggle Quad View).
Now that you have setup Blender, you could save this file as a blank file for use as a template. For future projects you would only need to open this blank file and start modelling without having to run through this setup process each time.
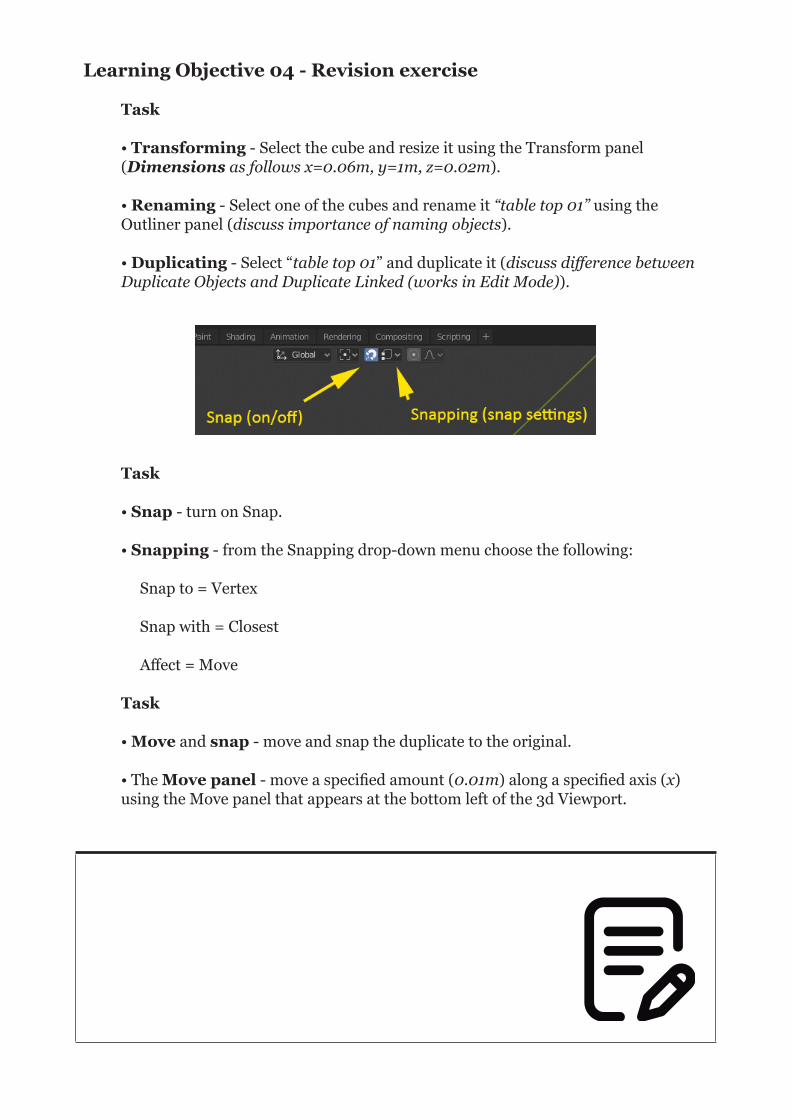
Learning Objective 04 - Revision exercise
Task
• Transforming - Select the cube and resize it using the Transform panel (Dimensions as follows x=0.06m, y=1m, z=0.02m).
• Renaming - Select one of the cubes and rename it “table top 01” using the Outliner panel (discuss importance of naming objects).
• Duplicating - Select “table top 01” and duplicate it (discuss difference between Duplicate Objects and Duplicate Linked (works in Edit Mode)).
Task
• Snap - turn on Snap.
• Snapping - from the Snapping drop-down menu choose the following:
Snap to = Vertex
Snap with = Closest
Affect = Move
Task
• Move and snap - move and snap the duplicate to the original.
• The Move panel - move a specified amount (0.01m) along a specified axis (x) using the Move panel that appears at the bottom left of the 3d Viewport.
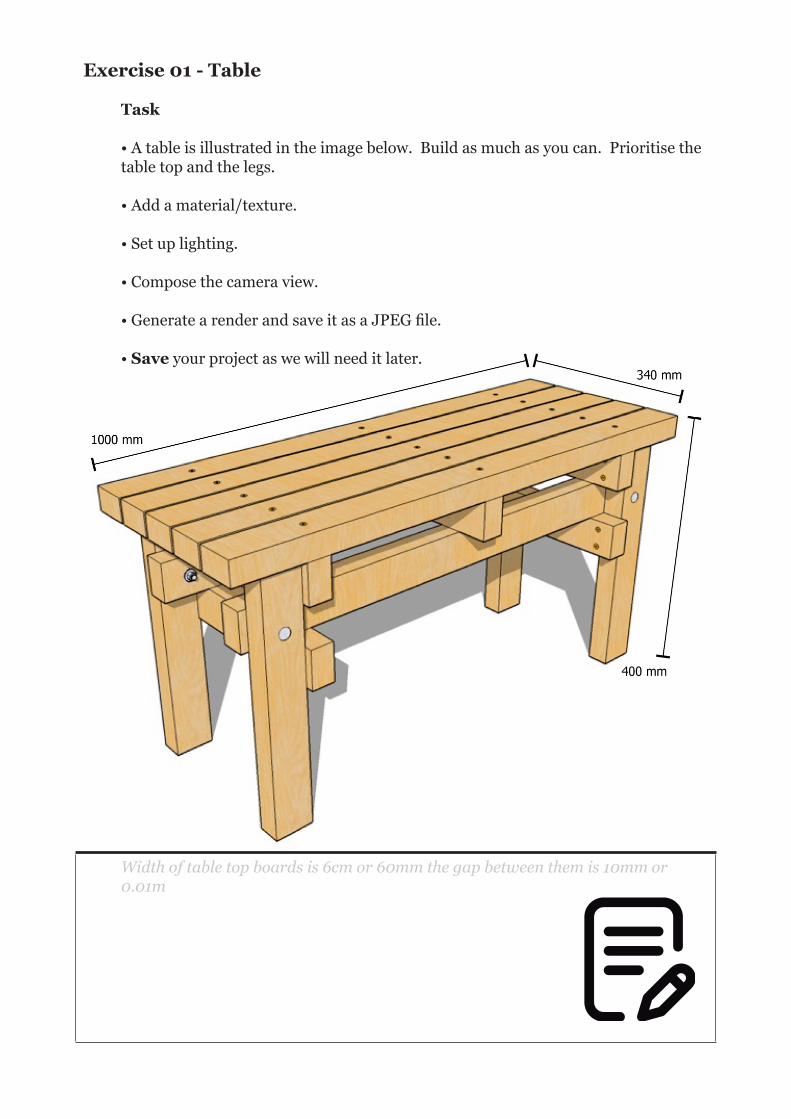
Exercise 01 - Table
Task
• A table is illustrated in the image below. Build as much as you can. Prioritise the table top and the legs.
• Add a material/texture.
• Set up lighting.
• Compose the camera view.
• Generate a render and save it as a JPEG file.
• Save your project as we will need it later.
Width of table top boards is 6cm or 60mm the gap between them is 10mm or 0.01m
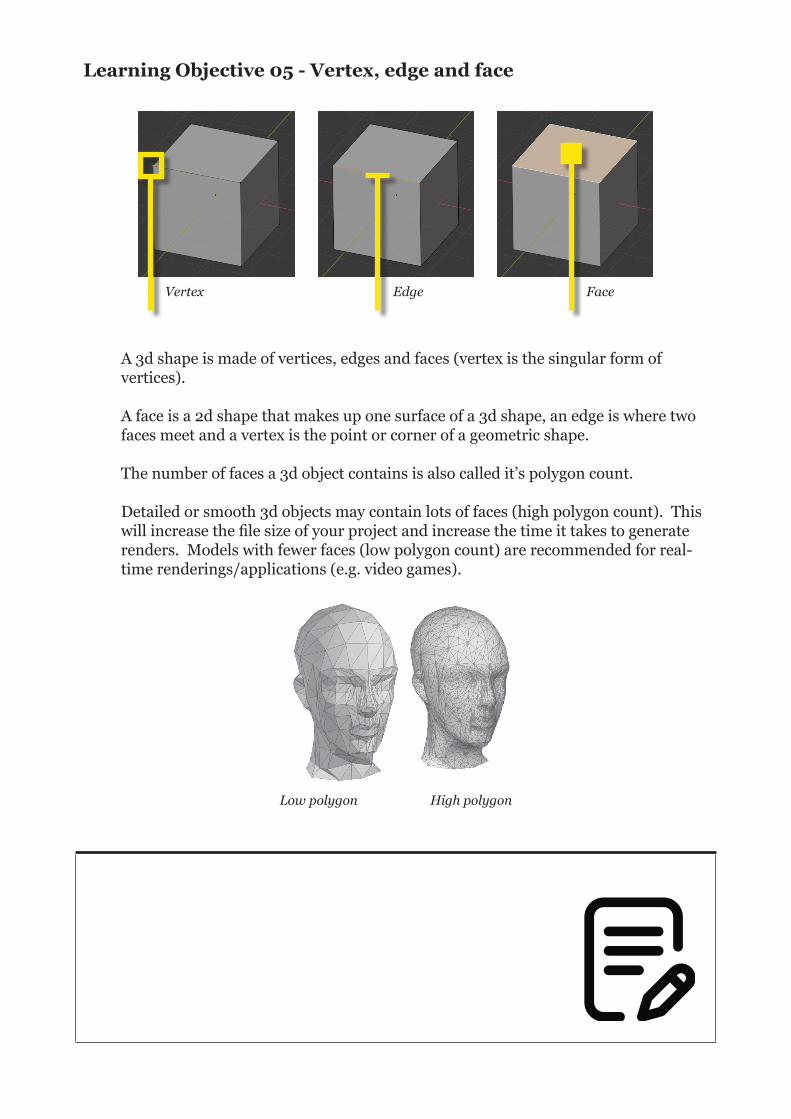
Vertex Edge Face
Low polygon High polygon
Learning Objective 05 - Vertex, edge and face
A 3d shape is made of vertices, edges and faces (vertex is the singular form of vertices).
A face is a 2d shape that makes up one surface of a 3d shape, an edge is where two faces meet and a vertex is the point or corner of a geometric shape.
The number of faces a 3d object contains is also called it’s polygon count.
Detailed or smooth 3d objects may contain lots of faces (high polygon count). This will increase the file size of your project and increase the time it takes to generate renders. Models with fewer faces (low polygon count) are recommended for real-time renderings/applications (e.g. video games).
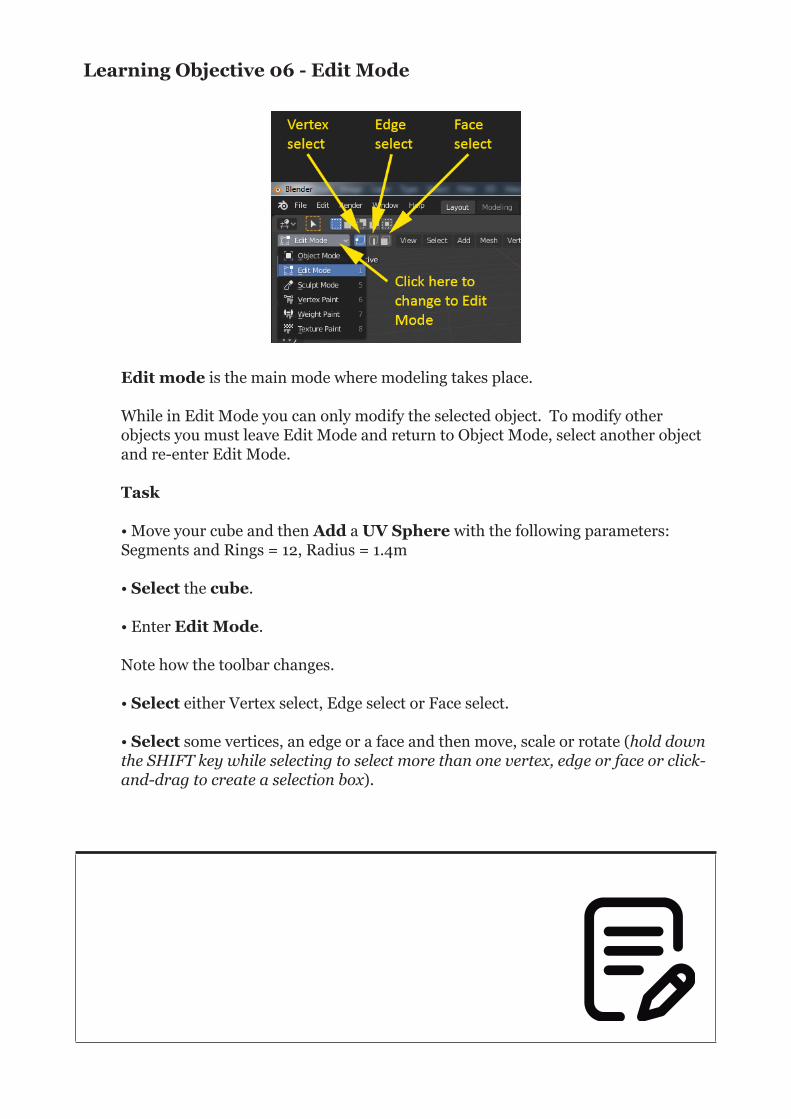
Learning Objective 06 - Edit Mode
Edit mode is the main mode where modeling takes place.
While in Edit Mode you can only modify the selected object. To modify other objects you must leave Edit Mode and return to Object Mode, select another object and re-enter Edit Mode.
Task
• Move your cube and then Add a UV Sphere with the following parameters: Segments and Rings = 12, Radius = 1.4m
• Select the cube.
• Enter Edit Mode.
Note how the toolbar changes.
• Select either Vertex select, Edge select or Face select.
• Select some vertices, an edge or a face and then move, scale or rotate (hold down the SHIFT key while selecting to select more than one vertex, edge or face or click-and-drag to create a selection box).
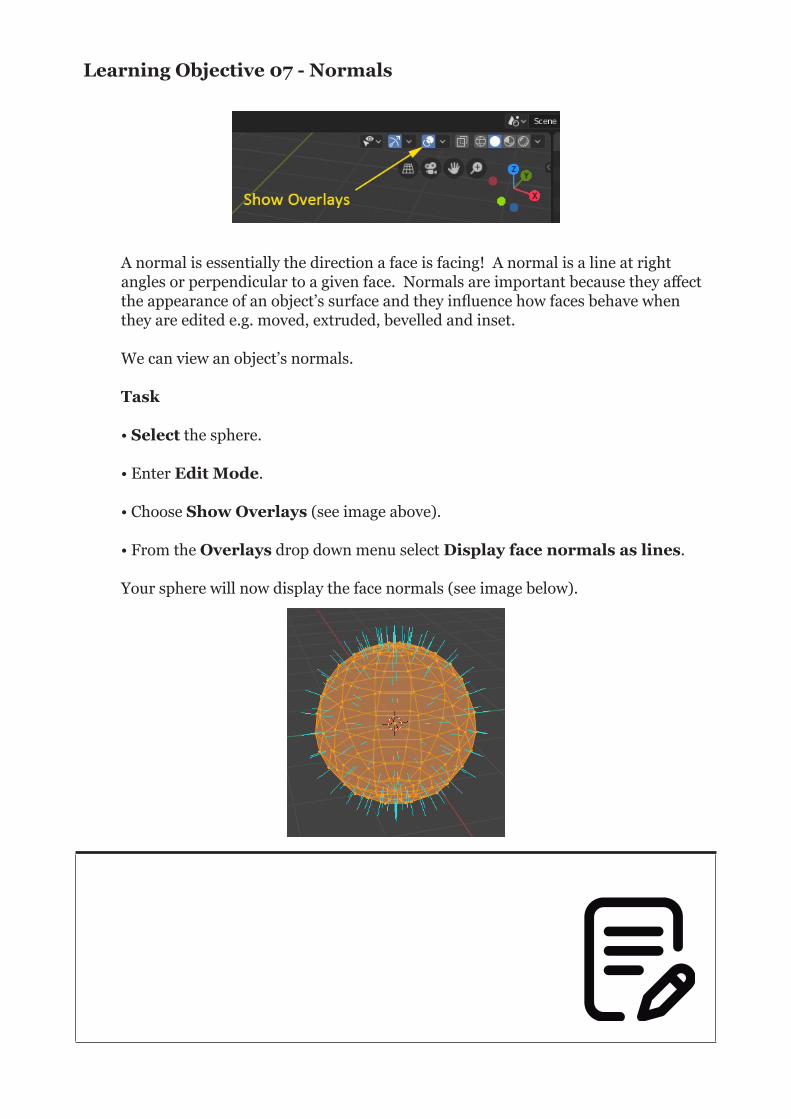
Learning Objective 07 - Normals
A normal is essentially the direction a face is facing! A normal is a line at right angles or perpendicular to a given face. Normals are important because they affect the appearance of an object’s surface and they influence how faces behave when they are edited e.g. moved, extruded, bevelled and inset.
We can view an object’s normals.
Task
• Select the sphere.
• Enter Edit Mode.
• Choose Show Overlays (see image above).
• From the Overlays drop down menu select Display face normals as lines.
Your sphere will now display the face normals (see image below).
Learning Objective 08 - Modelling with faces
Blender’s primary method of modelling is akin to sculpting. We have already practiced sculpting our models by moving, scaling and rotating vertices, edges and faces.
Now we will examine this method in more detail by looking at how we can extrude, inset and bevel faces.
But first let’s reinforce how normals affect this process.
Task
• Select the sphere.
• Enter Edit Mode.
• Select Face select (see Learning Objective 06).
• Select a face.
• Set the Tranformation orientation to Normal and then select the Move tool and move the face along it’s normal (along the blue, z-axis).
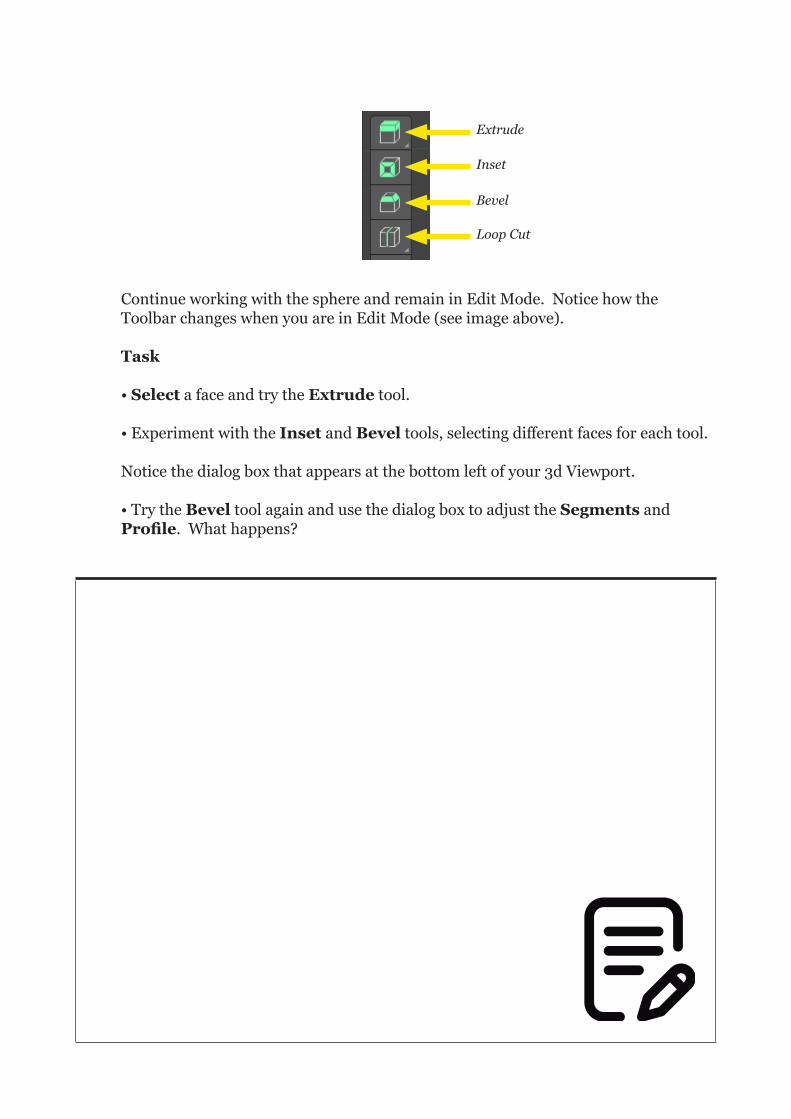
Extrude
Inset
Bevel
Loop Cut
Continue working with the sphere and remain in Edit Mode. Notice how the Toolbar changes when you are in Edit Mode (see image above).
Task
• Select a face and try the Extrude tool.
• Experiment with the Inset and Bevel tools, selecting different faces for each tool.
Notice the dialog box that appears at the bottom left of your 3d Viewport.
• Try the Bevel tool again and use the dialog box to adjust the Segments and Profile. What happens?

Exercise 02 - Vase
Task
• Start a new, general file.
• Delete the cube.
• Begin by adding a cylinder with the following parameters: Vertices = 16, Radius = 0.1m, Depth = 0.1m.
• Extrude the top faces at least 4 times to achieve the successive bands.
• Scale the vertices to create the profile (you will need to change Viewport Shading to wire edges).
• Extrude the top faces down to make the vase hollow.
• Add a material, set up lighting, compose view and generate and save a render.
• Save your project as we will need it later.
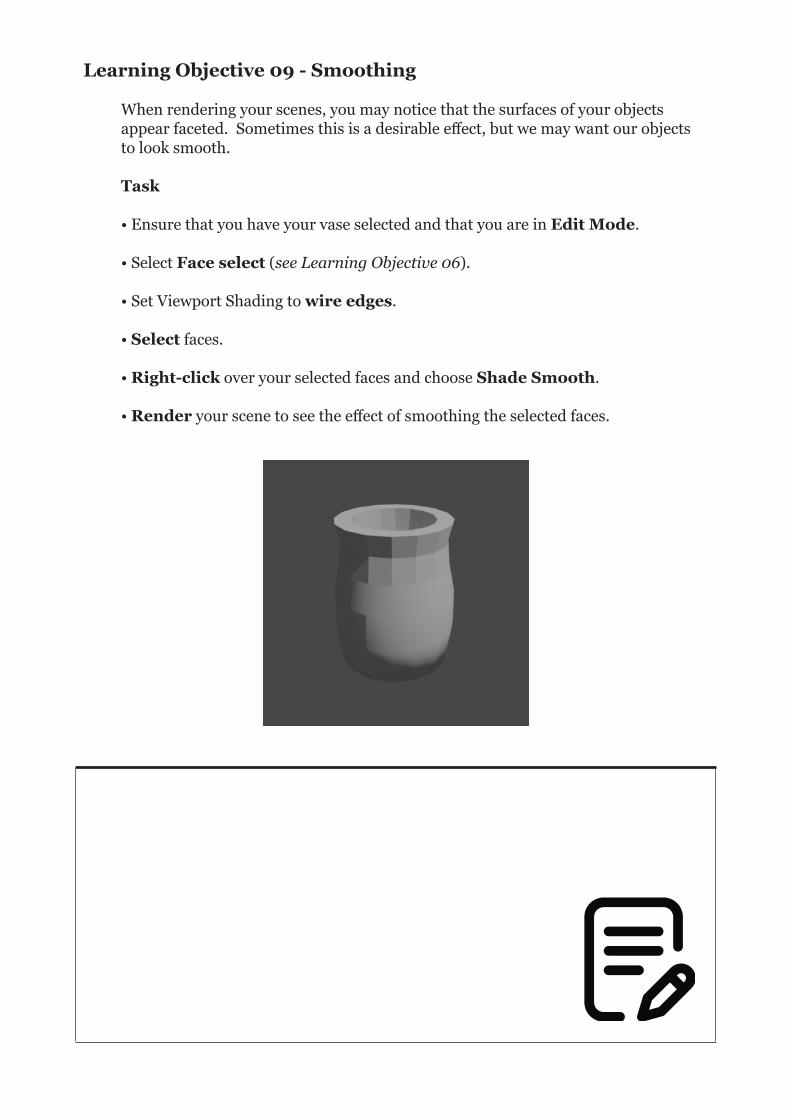
Learning Objective 09 - Smoothing
When rendering your scenes, you may notice that the surfaces of your objects appear faceted. Sometimes this is a desirable effect, but we may want our objects to look smooth.
Task
• Ensure that you have your vase selected and that you are in Edit Mode.
• Select Face select (see Learning Objective 06).
• Set Viewport Shading to wire edges.
• Select faces.
• Right-click over your selected faces and choose Shade Smooth.
• Render your scene to see the effect of smoothing the selected faces.
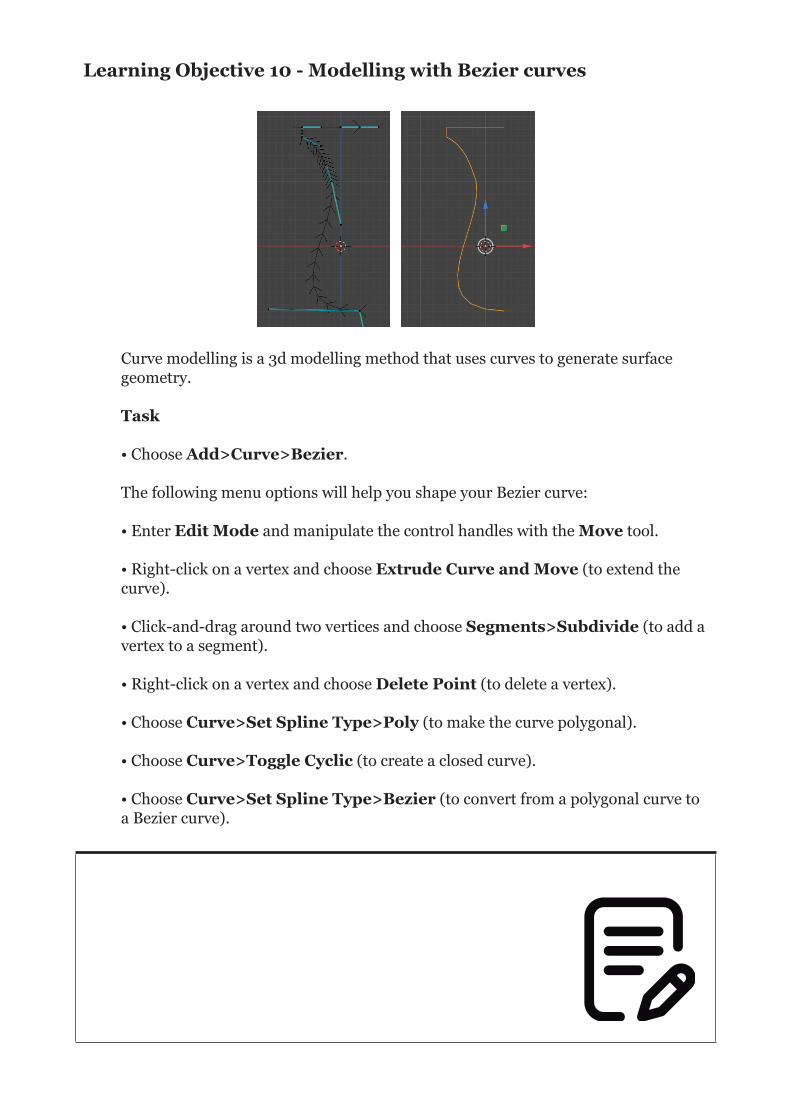
Learning Objective 10 - Modelling with Bezier curves
Curve modelling is a 3d modelling method that uses curves to generate surface geometry.
Task
• Choose Add>Curve>Bezier.
The following menu options will help you shape your Bezier curve:
• Enter Edit Mode and manipulate the control handles with the Move tool.
• Right-click on a vertex and choose Extrude Curve and Move (to extend the curve).
• Click-and-drag around two vertices and choose Segments>Subdivide (to add a vertex to a segment).
• Right-click on a vertex and choose Delete Point (to delete a vertex).
• Choose Curve>Set Spline Type>Poly (to make the curve polygonal).
• Choose Curve>Toggle Cyclic (to create a closed curve).
• Choose Curve>Set Spline Type>Bezier (to convert from a polygonal curve to a Bezier curve).
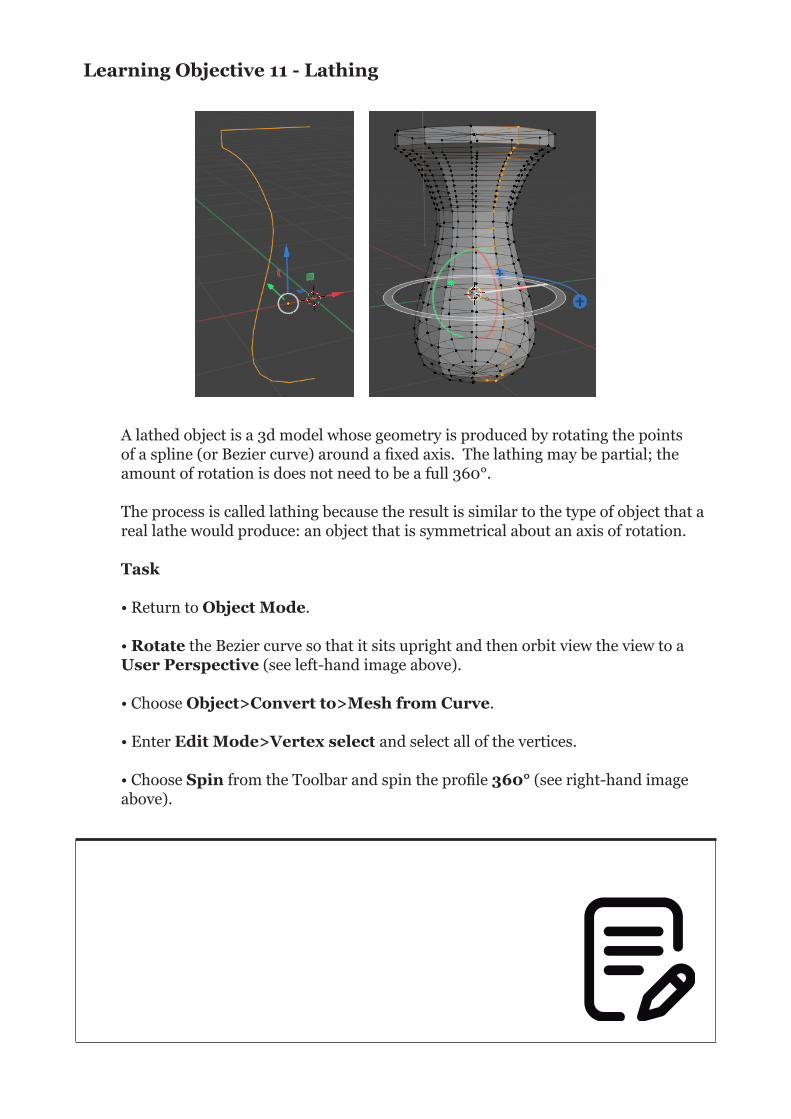
Learning Objective 11 - Lathing
A lathed object is a 3d model whose geometry is produced by rotating the points of a spline (or Bezier curve) around a fixed axis. The lathing may be partial; the amount of rotation is does not need to be a full 360°.
The process is called lathing because the result is similar to the type of object that a real lathe would produce: an object that is symmetrical about an axis of rotation.
Task
• Return to Object Mode.
• Rotate the Bezier curve so that it sits upright and then orbit view the view to a User Perspective (see left-hand image above).
• Choose Object>Convert to>Mesh from Curve.
• Enter Edit Mode>Vertex select and select all of the vertices.
• Choose Spin from the Toolbar and spin the profile 360° (see right-hand image above).
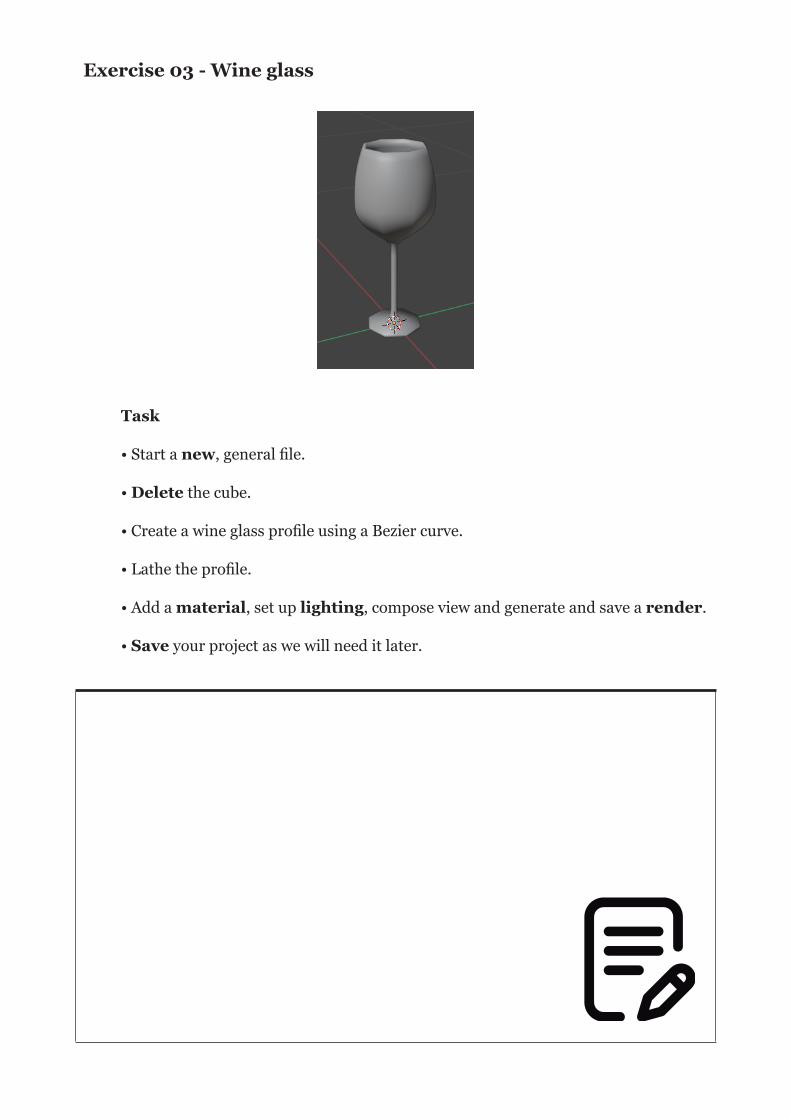
Exercise 03 - Wine glass
Task
• Start a new, general file.
• Delete the cube.
• Create a wine glass profile using a Bezier curve.
• Lathe the profile.
• Add a material, set up lighting, compose view and generate and save a render.
• Save your project as we will need it later.
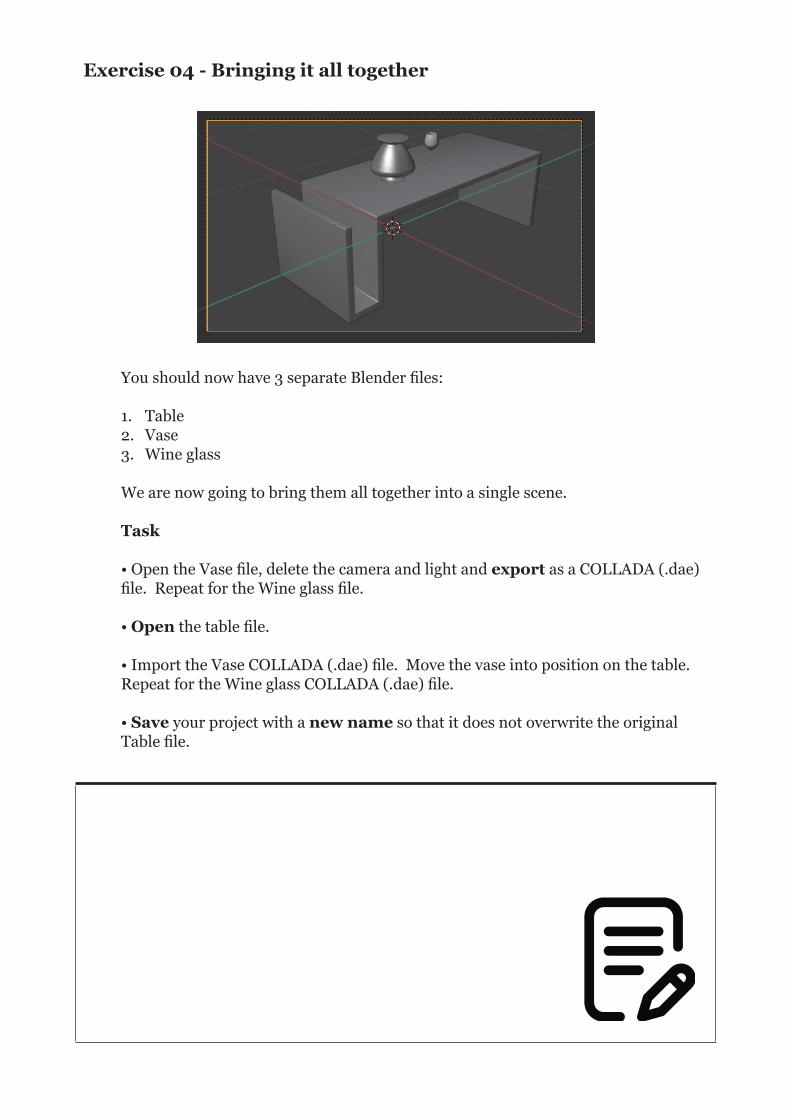
Exercise 04 - Bringing it all together
You should now have 3 separate Blender files:
1. Table2. Vase3. Wine glass
We are now going to bring them all together into a single scene.
Task
• Open the Vase file, delete the camera and light and export as a COLLADA (.dae) file. Repeat for the Wine glass file.
• Open the table file.
• Import the Vase COLLADA (.dae) file. Move the vase into position on the table. Repeat for the Wine glass COLLADA (.dae) file.
• Save your project with a new name so that it does not overwrite the original Table file.
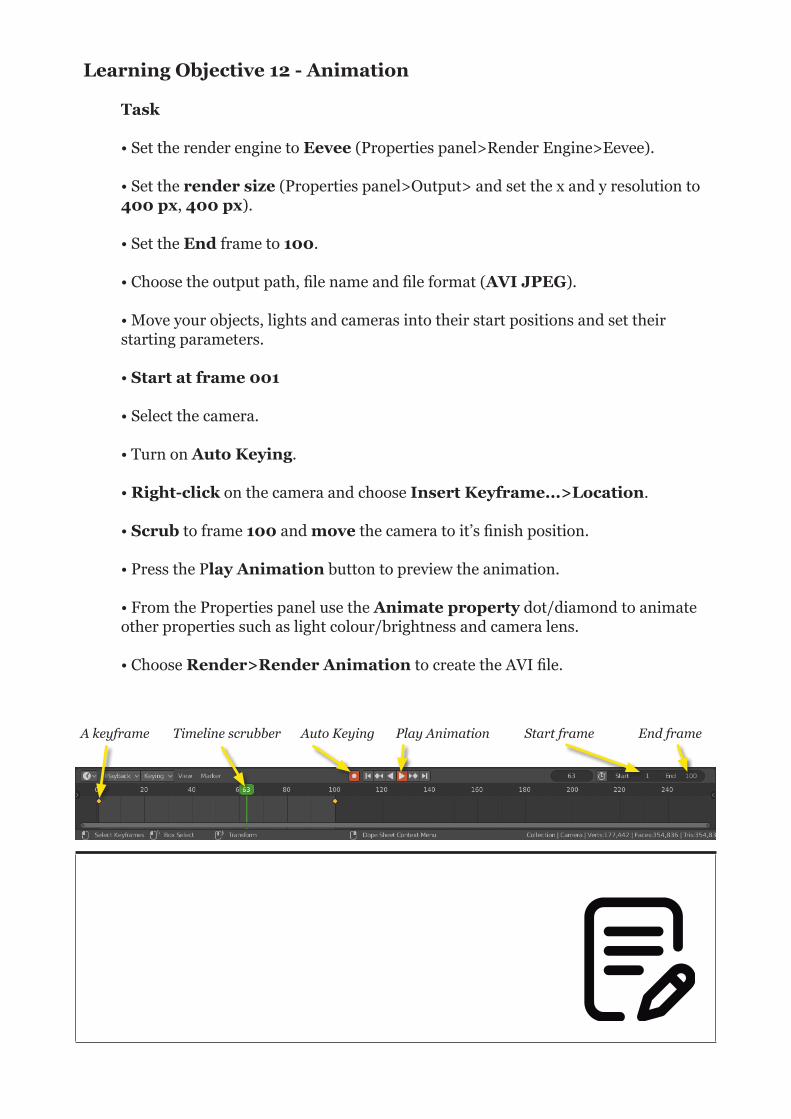
A keyframe Timeline scrubber Auto Keying Play Animation Start frame End frame
Learning Objective 12 - Animation
Task
• Set the render engine to Eevee (Properties panel>Render Engine>Eevee).
• Set the render size (Properties panel>Output> and set the x and y resolution to 400 px, 400 px).
• Set the End frame to 100.
• Choose the output path, file name and file format (AVI JPEG).
• Move your objects, lights and cameras into their start positions and set their starting parameters.
• Start at frame 001
• Select the camera.
• Turn on Auto Keying.
• Right-click on the camera and choose Insert Keyframe...>Location.
• Scrub to frame 100 and move the camera to it’s finish position.
• Press the Play Animation button to preview the animation.
• From the Properties panel use the Animate property dot/diamond to animate other properties such as light colour/brightness and camera lens.
• Choose Render>Render Animation to create the AVI file.
Further information
Getting extra help
Course ClinicsThe IT Learning Centre offers bookable clinics where you can get pre- or post-course advice. Contact us using [email protected].
Study Videos from MollyMolly is our collection of self-service courses and resources. This includes providing LinkedIn Learning video-based courses free to all members of the University. Visit skills.it.ox.ac.uk/molly and sign in with your Single Sign-On (SSO) credentials.
Some courses recommend pre- and/or post-course activities to support your learning. You can watch these online videos anywhere, anytime, and even download them onto a tablet or smartphone for off line viewing.
If you need a quiet place to work through learning activities away from distractions, the IT Learning Centre offers ‘quiet’ sessions where you can book a place. These are scheduled frequently during normal term times.
About the IT Learning Portfolio onlineMany of the resources used in the IT Learning Centre courses and workshops are made available as Open Educational Resources (OER) via our Portfolio website at skills.it.ox.ac.uk/it-learning-portfolio.
Find the pre-course activity for this course in the IT Learning Portfolio: visit skills.it.ox.ac.uk/it-learning-portfolio and search for “Blender”.
About the IT Learning CentreThe IT Learning Centre delivers over 100 IT-related teacher-led courses, which are provided in our teaching rooms and online, and we give you access to thousands of on-line self-service courses through Molly (powered by LinkedIn Learning).
Our team of teachers have backgrounds in academia, research, business and education and are supported by other experts from around the University and beyond.
Our courses are open to all members of the University at a small charge. Where resources allow, we can deliver closed courses to departments and colleges, which can be more cost-effective than signing up individually. We can also customize courses to suit your needs.
Our fully equipped suite of seven teaching and training rooms are usually available for hire for your own events and courses. For more information, contact us at [email protected].

About IT Customer ServicesThe IT Learning Centre is part of the Customer Services Group. The group provides the main user support services for the department, assisting all staff and students within the University as well as retired staff and other users of University IT services.
It supports all the services offered by IT Services plus general IT support queries from any user, working in collaboration with local IT support units.
The Customer Services Group also offers a data back-up service; an online shop; and a PC maintenance scheme. Customer Services is further responsible for desktop computing services – for staff and in public/shared areas – throughout UAS and the Bodleian Libraries.