3de (3d-object-editor) - armed...
TRANSCRIPT

3DE (3D-Object-Editor) by Silola
Version Beta 1.0
Short Description:
The 3DE is a realtime-object-editor which enables you to place objects of all kinds in realtime.Each object will be saved in a project. The projects can be saved at the touch of a button and thus they areavailable at any time.
To process the data of a project, the 3DE can generate out of a projectthree file-types: SQF, SQM, VIS
Content:
The 3DE brings along following files (all included in the Zip-file):
MAP_3DE.pbo The AddOn fileArmAExt The ArmAExtDLL-folder3DE_Liesmich.pdf The German readme3DE_Readme.pdf The English readmeOED_Templates A folder for VisitorOED_Import_Templates.vis A script for VisitorOED_Import_Objects.vis A script for VisitorOED_Smooth_Roads.vis A script for Visitor
Installation:
Copy the MAP_3DE.pbo in a AddOn-folder (mod-folder) of your choice, e.g. @Mapfact >>> AddOns.Ensure that the mod-folder will be loaded at the start of ArmA.
Please copy the ArmAExt folder in your ArmA mainfolder.
If you have Visitor installed and want to import 3DE-Projects to Visitor, copy the folderOED_Templates in the workfolder of Visitor (Standard drive: P)Copy the Visitor-scripts "OED_Import_Templates.vis ", "OED_Import_Objects.vis " and "OED_Smooth_Roads.vis "in the script-folder of Visitor. (Topic Visitor-Import)
Its strongly recommended to download and install the addons MAP_EU and MAP_Services,because the objects in MAP_EU are especially configured for 3DE.
You find everything else under "First Steps"
Summary Of Content:
Page Topic Page Topic1 Short Description, Content, Summary Of Content 13 3DE-Console (Page 2)2 First Steps (Page 1) 14 Brush-Function (Single)3 First Steps (Page 2) 15 Brush-Function (Multi)4 ArmAExt.DLL 16 Brush-Function (Path)5 Project-Level 17 Multi-Selector + Delete-Brush6 Data-Pool-Level 18 Single-Selector7 Object-Level (Page 1) 19 Visitor-Import (Page 1)8 Object-Level (Page 2) 20 Visitor-Import (Page 2)9 Object-Level (Selecting and copying of objects) 21 Important Informations
10 Favourites-Level 22 Useradvice & Credits11 Options12 3DE-Console (Page 1)

It is important that you start ArmA with the run.bat, which is located in the ArmAExt folder.To customize the start of ArmA to your need (catchword modfolders) you must edit the run.bat(right click >> Edit). You can find a detailed description under the topic ArmAExt.DLL
If your virus-scanner gives you an alarm as soon as you open the ArmAExt-folder, it is no problem because ArmAExt does not contain any virus or other harmful components. You can unscrupulously allow file access:http://www.flashpoint1985.com/cgi-bin/ikonboard311/ikonboard.cgi?s=78f42fd4a467fa1732898995759b1ba4;act=ST;f=70;t=66596;st=15
The 3DE is started with the action-menu of a specific Unit.A double click on the Map in the mission-editor will open the units dialogue.
There you must select the following unit to place:
Side CivilianClass MAP: 3DE
This unit must, in any case be defined as Player, not as AI.
As soon as you start the mission you get the action menu entry "Start 3DE",with it the 3DE-Editor is started.
After a short initialisation the 3DE will show up with this dialogue:
The first thing you need to do, in some cases, is to adjust the screen proportions, which are in standard at 16:9.To do this you can press the key [F12] until you find the right setting for your screen.You have following Options:: [16:10], [16:9], [4:3]
That followed you have to end with the [ESC] key and start over again to get back the changes.
It is important that you also have the same screen proportions which are the same as set in the ArmA video-options.
After that you should get used to the camera controls:Hold down the left mouse button and move your mouse. The camera then will move in the according direction.Please be aware that the 3DE-Camera only transfers horizontal and vertical mouse movements.
First Steps (Part 1)
With the mouse wheel you can zoom in or out on the current position.The more you zoom out the faster you can move the camera. If you zoom in close you only can do minimalcamera movement. Press and hold [shift] to change the camera FOV (field of view).With [backspace] you can reset the POV-value to its default setting.
To pan/tilt the camera you must press and hold the right mouse button and move the mouse.You can hide or show the whole dialogue if you press the [application key] (left of the right ctrl key).With the [M] key you can open/close the map. The map will help you to get fast to a certain position.To do this you just need to double click on the desired position on the map.
To get you player to the Position of the camera press [insert]. To move the camera to your player you press [home].
You can always close the 3DE with the key [ESC], to e.g. to examine your work directly in place.The 3DE then can be started again with the action entry. You wont lose any objects or data.
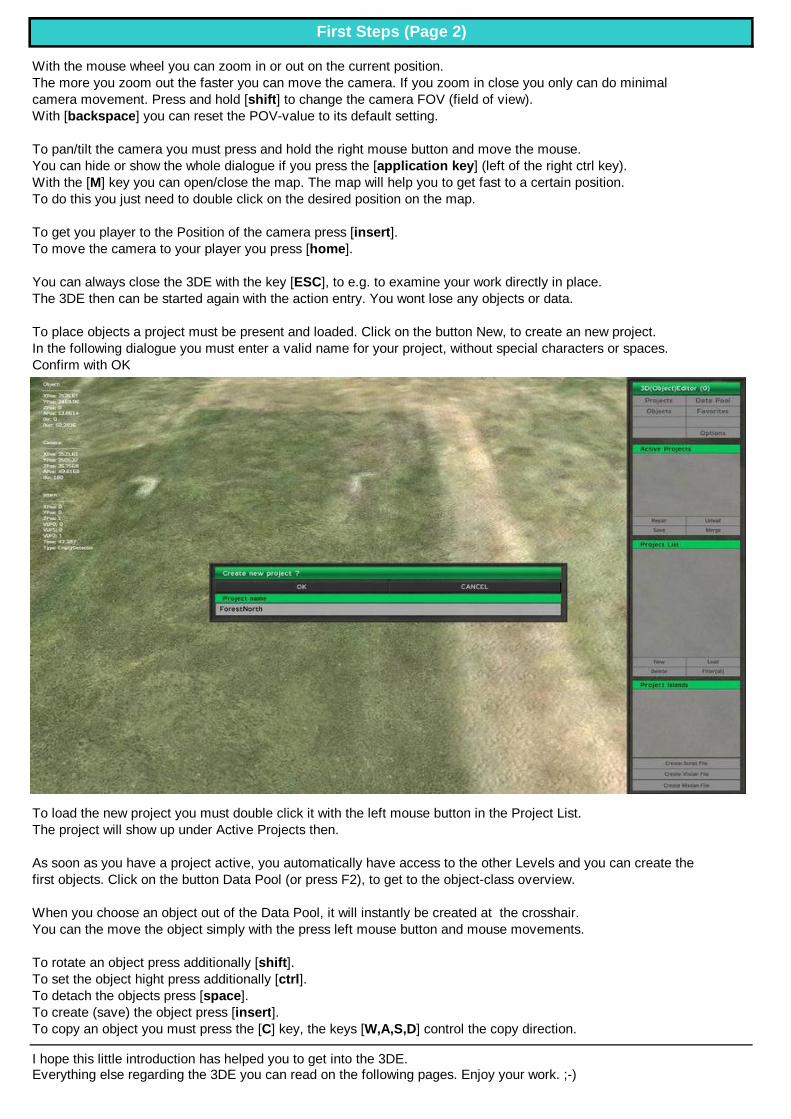
To place objects a project must be present and loaded. Click on the button New, to create an new project.In the following dialogue you must enter a valid name for your project, without special characters or spaces.Confirm with OK
To load the new project you must double click it with the left mouse button in the Project List.The project will show up under Active Projects then.
As soon as you have a project active, you automatically have access to the other Levels and you can create thefirst objects. Click on the button Data Pool (or press F2), to get to the object-class overview.
When you choose an object out of the Data Pool, it will instantly be created at the crosshair.You can the move the object simply with the press left mouse button and mouse movements.
To rotate an object press additionally [shift].To set the object hight press additionally [ctrl].To detach the objects press [space].To create (save) the object press [insert].To copy an object you must press the [C] key, the keys [W,A,S,D] control the copy direction.
I hope this little introduction has helped you to get into the 3DE.Everything else regarding the 3DE you can read on the following pages. Enjoy your work. ;-)
First Steps (Page 2)

General Information:To save an load projects with the 3DE, and to generate the SQF and Visitor-scripts you must have ArmA Extended Dll installed.
This small addon from Voyager allows the 3DE to save all relevantdata in external files.
Please be aware that this Addon is requiered to use the 3DE. Following a short description how ArmA Extended Dllis embeded into the 3DE:
First you need to copy the folder "ArmAExt " into your ArmA-directory.This folder is included in the download.
Information:Caution, it can occur that your anti-virus softwear gives alarm on the file "run.exe". This file is absolutly harmless and unobjectionable and has nothing to do with a virus or something in that way !!!You can look this up in the offical forums under following link:http://www.flashpoint1985.com/cgi-bin/ikonboard311/ikonboard.cgi?s=78f42fd4a467fa1732898995759b1ba4;act=ST;f=70;t=66596;st=15
You must allow access for this file in your Anti-Virus software, or let it ignore the file. In worst case you must deactivate your anti-virus software.
Data Structure:In the folder "ArmAExt " you can find the folder "files " which is empty at thebeginning. The 3DE will place all files in this folder, for example project files,Visitor-scripts, SQF-files and also the mission-files.
As well projects as also Visitor-, SQF- and mission-files will be saved directly in the folder "files". All other files are saved in the following described folders:
In the folder "OED_Basic " are following files:"OED_Islands " The islands are registerd here."OED_Settings " In this the settings are saved."OED_Projects_* " The projects of each island are saved here.
The folder "OED_Favorite " saves you favourites."OED_Favorites " The favourites are registerd here."StreetMud " A favourite file from the 3DE (example)
Following files ar in the folder "OED_Prefab " :"OED_Prefabs " The prefabs are registerd here."Camp1 " A prefab-file form the 3DE (examlpe).
Start:ArmA Extended DLL is executed with "run.bat" ( ) Arma will be started automatically with it.
To have influcene on the start of ArmA, you must edit the file "run.bat" (right click > Edit).
Here are some examples how your "run.bat" could look like:
Just ArmA (without addons and without Queens Gambit):run "..\arma.exe" -nosplash
ArmA with Queens Gambit:run "..\arma.exe" -mod=DBE1 -nosplash
ArmA with Queens Gambit and three additonal mod-folders:run "..\arma.exe" -mod=DBE1;@Mapfact;@ArmaEffects;@Sound -nosplash
ArmAExt.DLL

This List shows all islands on which you have created projects.
A change of the island in this list, means simultaneously Project Islands a change of projects.
It is possible to load every project on any desired island,but that makes not much sense, because the saved positions are not matching.
This list shows all projects of the selected island.
Project List Each entry in this list is linked to a file.This means that if you create a new project,a file for this project will be created.
This list contains all loaded projects. Only loaded projectscan be edited.
Active Projects To load a project you only need to double click on it in the Project List.
If more than one project is loaded, always the project which is markedin the List is active.
New Use this Button to create an new project. A valid projectname must be provided in the following dialog. Then the projects shows up in the "Project List".
Load With this Button a selected project can be loaded. The Name of the selected project is shownin the following Dialog. Caution, this method loads a project object by object and takes longer to load.The "doubleclick" to load a project is easyer and quicker.
Delete The selectes project and the project-file will be deletet.Caution, a deleted project can not be restored. It is recommended to save completed projects,just copy the project-file and archive it.
Filter Filter[all] Shows all projects in the project list.Filter[vis] Shows all projects in the project list, which have not generated a Visitor-script.Filter[sqf] Shows all projects in the project list, which have not generated a SQF-script.Filter[sqm] Shows all projects in the project list, which have not generated a SQM-file.
Repair On rare occasions, a project will save false P3D-Data.If that happens the repair-function corrects these errors in a project. Afterwards the project must be saved again.
Unload With this function a loaded project can be unloaded, and the included objects will be deleted.When you use this function you should save your projects before, so that all changes in the projectcan be considerd.
Save This function saves the current project. (bigger projects need more time).Merge If you want to merge e.g. two or three smaller projects you can do this with
this function. All active projects will be saved in a new project.Create This function creates out of your project a script-file with the same name, Script file which can directly be use in your mission. A rhomb (#) before the filename
creates a script-file out of all active projectsCreate This function creates out of your project a Visitor-script with the same name.Visitor file This script is needed for the import in Visitor. A rhomb (#) before the
filename creates on large Visitor-file out of all activ projects.Create This function creates out of your project a mission-file (.sqm) with the same name.Mission file A rhomb (#) before the filename creates on large mission-file out of all activ projects.
This file can be found in the files-folder. (don't forget to rename)Misc Caution in the standard settings only 1000 objects can be saved per project.
This limitation can be changed (up to max. 3000). You can see how many object your project contains in the main bar of the editor.
Project-Level
A
B
C
C
B
A

This list shows all superordinate object classes of all loaded PBO's,which where loaded with ArmA.
Object Classes (Caution: not all objects are suited for 3DE)
A right click on the list shows you an submenu with following functions: Assorting of the Entry's by config-entry or by name.
All object-types of the currently selected Class are shown here.To show or hide the Object Type Icons, you can simplydouble click on Object Types.
Object TypesA right click on the list shows you an submenu with following functions: Add the selected Object to the favoritlist*.Show or hide the Symbols.* see favourites / Prefabs
The assets of the BoundingBox of an active object areshown here.
Object Box
Objects Press this button to list all available static objects.
Vehicles This button lists all objects of the "Class Vehicle" type.Caution! Only unmanned types can be placed.
Custom With this button you can view all object-classes, which you want to see.Therefore it is a kind of custom object-class filter.
Edit This Switch can be used to configure the custom-list.
Show This shows the various Values of an Object out of its config.ConfigValues
Again all With a double click on an object-class,
superordinate object- this dialogue opens.
classes are listed, With it you can set and save
in the custom-settings. specified maker-options
per object-class.
A double click on an entry,
adds the corresponding object- Caution, the settings will not work
class to your custom- until the 3DE hast been restarted.
list or removes it.
The setting "Marker-Shape" will
have influence on the Visitor-Import.
Added classes are
marked blue. Rectangle >>> ArtificialTemplates
Ellipse >>> NaturalTemplates
Data-Pool-Level
A
B
C
A
C
B
C
A
B

The M Object Groups list shows all superodinated objects-groups.You can create as much objects-groups of this kind as you want.
M Object Groups Each M Object Group then again can take any numberof K Objects Groups.
Each K Object Groups can take any number of objects. An object limitation per K Object Group can be set in the options
K Object Groups
The Object List shows all objects of the selected K Object Group
Object List The following submenu is shown upon a right click on the list.
Deselect > All Deselect all selected objects.
Select > All Select all objects
Select > Type Select all objects of this type.
Copy > Selected Copy all selected objects in a new group.
Create > Prefab Save all objects of the group as prefab.
Add Adds a new superordinate object-group to the actual M Object Group.M Groups
Merge Merges all objects from all K Object Groups into an new group.
Add Add an empty K Object Group to the actual M Object Group.K Groups
Del Deletes the selected K Object Group and all objects saved in it.
Delete Deleting of SINGLE or MULTIPLE selected objects.
Cut / Insert Selected objects can be cut with this function (they are then marked white) and can be reinserted into an other or new group with insert.
Show Detailed data of the active K Object Group can be displayed with Show Data.Data In addition it is possible to give each object an Init-line with this dialogue. (see page 2).
Replace The replace-function replaces one determined object-type with an other object-type.This function works global on all loaded projects. (Details look page 2)
If you click with the left mouse button on the Headbar of the object-list (objects from group)Misc you can choose between 3 different display forms of the object-list:
1. object-type + icon + object-rotation2. object-type + icon3. object-type
Object-Level (Page 1)
A
B
C
A
C
B

Show Data shows detailed informations of the active K Object Group.The entry-field Init line can be used to enter object-orientated Commands and/or Scripts.The switches at the bottom of the dialogue have following sense:
SetThis Adds the init line to thecurrent object.
SetAll Adds the init line to all objectsof the list.
DelThis Deletes the init line of thecurrent object.
DelAll Deletes the init line of all objects.
ExecThis Executes the current init line (for this the init line must not be"SetThis").
ExecAll Executes the saved init linesof all objects instantly.
To refer to an object, you must use the variable _obj e.g.: _obj setdammage 1Strings must be set in double ""quotation marks"":: hint format[""%1"",getdaqmmage _obj]
Caution, to save a init line for a SQM-file you must refer with the variable this !!!Example: this setdammage 1;hint format[""%1"",getdammage this]
The replace-function replaces one determined object-type with an other object-type.This function works global on all loaded projects.
When you press the repleace-button this dialogue will show up:
The current object-type is listed in the datafield "Current Object".
If you want to save this object-type into a seperate object-group, you can do this with the button "Build own object group.
All objects of the active project, which meet this object type,will be saved in one own object-group.
The dialouge will be cloesed after that and no further actions are possible.
If you want to replace the current object-type, choose the new objectin the Data-Pool, and decide on which level the replacement shouldbe done:
Replace in all Project Replacement in all loaded projects.
Replace in this Project Replacement only in the current project.
Replace in M Object Group Replacement in all K Object Groups of a M Object Group
Replace in K Object Group Replacement only in the current K Object Group.
Replace selected objects Replacement only of the selected objects.
Object-Level (Page 2)
Select /copy objects
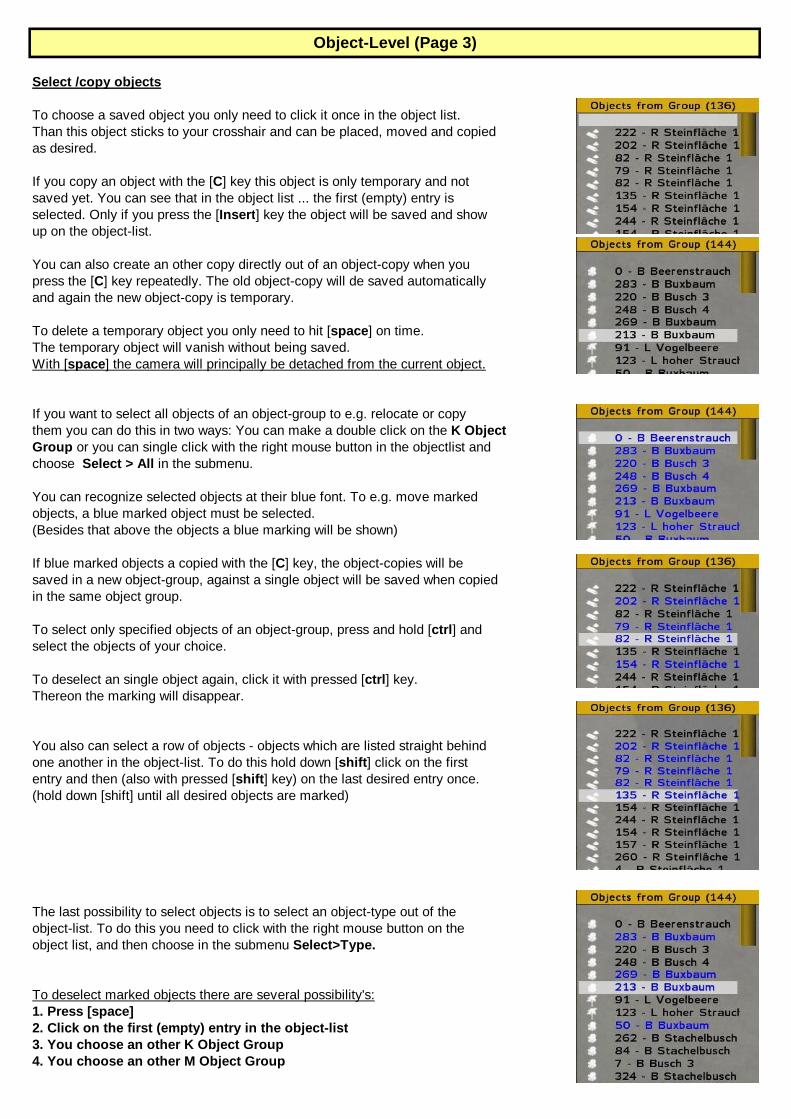
To choose a saved object you only need to click it once in the object list.Than this object sticks to your crosshair and can be placed, moved and copiedas desired.
If you copy an object with the [C] key this object is only temporary and not saved yet. You can see that in the object list ... the first (empty) entry is selected. Only if you press the [Insert] key the object will be saved and showup on the object-list.
You can also create an other copy directly out of an object-copy when you press the [C] key repeatedly. The old object-copy will de saved automatically and again the new object-copy is temporary.
To delete a temporary object you only need to hit [space] on time.The temporary object will vanish without being saved.With [space] the camera will principally be detached from the current object.
If you want to select all objects of an object-group to e.g. relocate or copythem you can do this in two ways: You can make a double click on the K Object Group or you can single click with the right mouse button in the objectlist andchoose Select > All in the submenu.
You can recognize selected objects at their blue font. To e.g. move marked objects, a blue marked object must be selected.(Besides that above the objects a blue marking will be shown)
If blue marked objects a copied with the [C] key, the object-copies will besaved in a new object-group, against a single object will be saved when copiedin the same object group.
To select only specified objects of an object-group, press and hold [ctrl] andselect the objects of your choice.
To deselect an single object again, click it with pressed [ctrl] key.Thereon the marking will disappear.
You also can select a row of objects - objects which are listed straight behindone another in the object-list. To do this hold down [shift] click on the firstentry and then (also with pressed [shift] key) on the last desired entry once.(hold down [shift] until all desired objects are marked)
The last possibility to select objects is to select an object-type out of the object-list. To do this you need to click with the right mouse button on the object list, and then choose in the submenu Select>Type.
To deselect marked objects there are several possibility's:1. Press [space]2. Click on the first (empty) entry in the object-list3. You choose an other K Object Group4. You choose an other M Object Group
Object-Level (Page 3)

There are two kinds of favourites on the favourite-level.On one side there are the favourites themselves,and then there are the prefabs.
SelectionTo change between those two types simply click the particularentry in the list Selection.
This List shows all of your saved favourites or all of your saved prefabs,
It makes sense to give favourites and prefabs small tags,List to prevent that there will be the same name.
E.g. F_**** for favourites and P_**** for prefabs.
The first entry in the favourite-list Default_F represents alwaysthe standard favourites. This favourites can't be deleted or extended,because they will automatically be filled by your project
They include all object-types which are use in your project.
The Items list shows all objects of a favouriteItems or all objects of a prefab.
If favourites is selected, you can use the button Add to create a new favourite. Thereby only the name of the new favourite will be saved.
Add To save objects in a selected favourite list you must do the following:(Favourites)
Change to the Data Pool level and select the desired object and add it through the submenu (right mouse button) Add to Favourites to the favourites list.You can repeat this action as much as you want for any other objects until youfavourites list is filled with all objects of your choice.
As soon as you select a Favourite from the list, all included object-types will be transferred automatically in the favourite-list on object-level.(see Console >>> Favourite-Level)
If the prefabs are selected you can insert a prefab at the current position.Insert For this a prefab must be selected in the list.(Prefabs)
A prefab is an accumulation of different objects whichcan be included in any project.E.g. a small base could be saved an then used any time in a project.
A prefab will always go in a new object-group, in theM Object Group which is selected at that time.
A prefab will be created when you right click in the Object List on object-levelan then select the function (right mouse button) Create > Prefab.All objects of this object-group will be saved as prefab.
A favourite or a prefab will be deleted with the button Del Del depending on the current selection.
With the button Delete a singe object will be deleted out of a favourite or a prefab.Delete
This feature is not implemented yet.
Favourite-Level
A
B
C
A
C
B

In this list you see all available Options,which the 3DE offers you.
Select a option of your choice to see the possible valuesOptions of that option or to change them.
In the list Values you see all possible Values of a desired option.
Just select a value to set it.Values
With the button Save Options your settings are stored.
Screen edge moving Determines how fast the camera moves when you get your mouse pointer on the edge of the screen. The value 0 disables this feature.
Project limit Sets the maximum number of objects stored in a single project. Caution, weaker PC should use a lower value as a precaution.
Object limit per group This value determines how much objects will maximal be stored in a object-group.This feature is only relevant if the brush is used.
Mouse move factor This value is used to determine how fast your camera will move around an object(rotate) or a position if you press and hold the right mouse button.Mouse move factor This value determines how fast you move the camera or an object over the (move) landscape if you press and hold the left mouse button.Mouse move factor This value determines how fast your camera will zoom in or out on an object,(zoom) if you use the mouse wheel.Quick move factor If no object is selected you can use the [ctrl] key to accelerate the camera movement.
This value defines the acceleration factor.Maximum zoom With this value you can define how far your camera will zoom out (max).
Draw marker This parameter determines if for each object a maker will be drawn or not.
Show boundingbox You can define here on which distance to an object the BoundingBox will be shown.
Selector info The selector-info will be shown as soon as you place the single-selector above an object. You can either see the Model-Name or the Class-Name.
Show infobox The info-box is shown in the left upper corner of the screen (white writing).If you want to hide the info-box, you can do that with this Option.
Show loading screen If you load a project with the "slow" method a grey coloured background will beshown. With this option you can turn this background off.
Show messagebox (sec.) The messagebox shows in the lower right of the screen informations on various actions. You can define how long this text will be shown on the screen.
View Distance Like the name tells you can define with this option the view distance for the Editor. The view distance will be adapted on every restart of the 3DE.
Options
A
B
Save Options
A
B
The console opens automatically if you activate the object-level.In the upper left corner is a small button, with this you can move the console on any desierd position.A left click on this button and the console will detach from its current position an you can move it with the mouseto its new position. Click a second time on the button to fix the console on its new position.The position of the console will remain for all 3DE-sessions the same.
The console has 3 different levels, which can be reached with the vertical placed buttons:
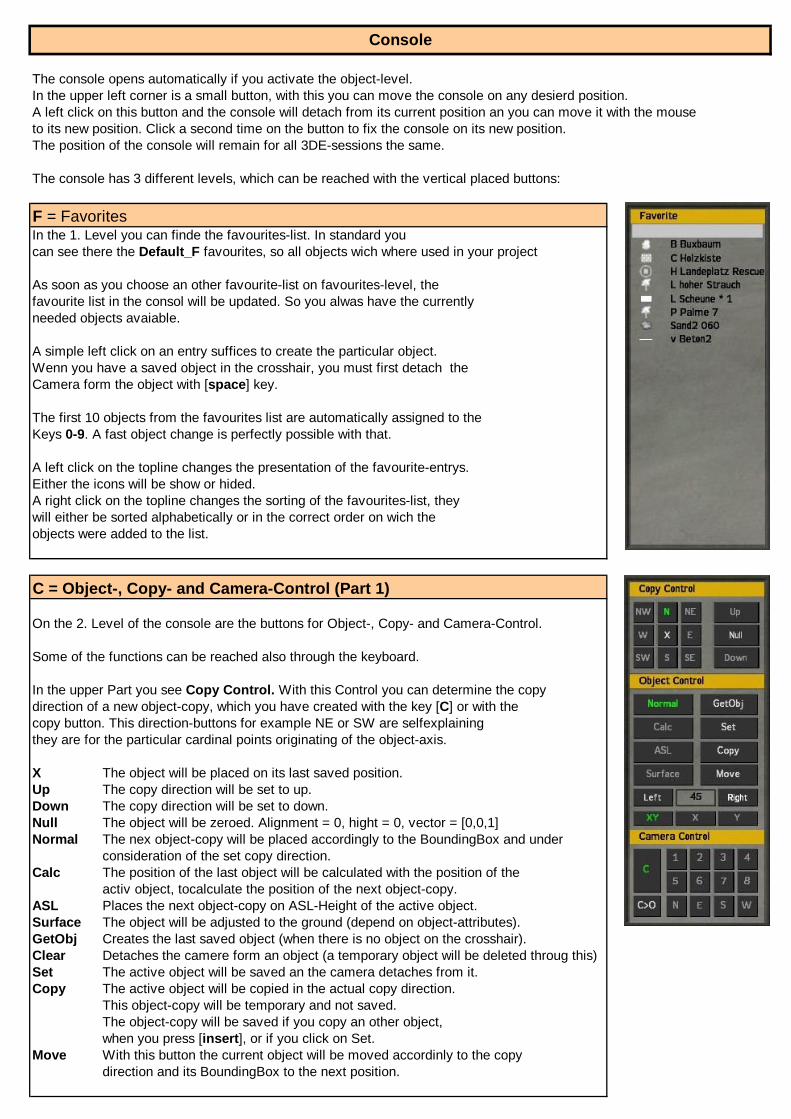
F = FavoritesIn the 1. Level you can finde the favourites-list. In standard youcan see there the Default_F favourites, so all objects wich where used in your project
As soon as you choose an other favourite-list on favourites-level, the favourite list in the consol will be updated. So you alwas have the currentlyneeded objects avaiable.
A simple left click on an entry suffices to create the particular object.Wenn you have a saved object in the crosshair, you must first detach the Camera form the object with [space] key.
The first 10 objects from the favourites list are automatically assigned to the Keys 0-9. A fast object change is perfectly possible with that.
A left click on the topline changes the presentation of the favourite-entrys.Either the icons will be show or hided.A right click on the topline changes the sorting of the favourites-list, they will either be sorted alphabetically or in the correct order on wich the objects were added to the list.
C = Object-, Copy- and Camera-Control (Part 1)
On the 2. Level of the console are the buttons for Object-, Copy- and Camera-Control.
Some of the functions can be reached also through the keyboard.
In the upper Part you see Copy Control. With this Control you can determine the copy direction of a new object-copy, which you have created with the key [C] or with thecopy button. This direction-buttons for example NE or SW are selfexplaining they are for the particular cardinal points originating of the object-axis.
X The object will be placed on its last saved position.Up The copy direction will be set to up.Down The copy direction will be set to down.Null The object will be zeroed. Alignment = 0, hight = 0, vector = [0,0,1]Normal The nex object-copy will be placed accordingly to the BoundingBox and under
consideration of the set copy direction.Calc The position of the last object will be calculated with the position of the
activ object, tocalculate the position of the next object-copy.ASL Places the next object-copy on ASL-Height of the active object.Surface The object will be adjusted to the ground (depend on object-attributes).GetObj Creates the last saved object (when there is no object on the crosshair).Clear Detaches the camere form an object (a temporary object will be deleted throug this)Set The active object will be saved an the camera detaches from it.Copy The active object will be copied in the actual copy direction.
This object-copy will be temporary and not saved.The object-copy will be saved if you copy an other object,when you press [insert], or if you click on Set.
Move With this button the current object will be moved accordinly to the copy direction and its BoundingBox to the next position.
Console

C = Object-, Copy- and Camera-Control (Part 2)Left The active object will be rotated left accrodingly to the set value.Right The active object will be rotated right accrodingly to the set value.45 The value on wich the active object will be roteted left or right.
A object also can be rotated when the [crtl] key is pressed. But this will be free handed, thus it is inaccurate. With this button it is possible to rotate an object exactly 90° Degree.Advice: For street segments a value of 10° is optim al!!
XY The active object can be moved on both object-axis.X The active object can only be moved on its X-axis.
Advice: A right click on this button shows you its X-axis.Y The active object can only be moved on its Y-axis.
Advice: A right click on this button shows you its Y-axis.
C The camera will look on the object center.1,2,3,4 The camera will look on the upper BoungingBox edges.5,6,7,8 The camera will look on the lower BoungingBox edges.C>O The camera can be adjusted on the active object.O>C The active object can be adjusted on the camera.N,E,S,W The alignment buttons for the choosen alignment method.
S = Specialfunctions, Aligment and Objectgroup-modificationBrush Opens the 3 differend Brush-types:Select With this Brush you can move and copy objects.Create With this Brush you can create object in three different ways.Delete With this Brush you can delete objects in all loaded projects.Hint: For each type of Brush there is a full description.
Pos > Player The camera will jump on the position of the player.Player > Pos The player will be moved to the current position of the camera.Select Player The player will be marked as an object an can be moved, rotated
and placed in higeht, but not copied.DTime + The day time will be shifted clockwise.DTime - The day time will be shifted counter-clockwise.
ASL All objects will be placed on ASL-hight.Reference is the 1. object in the group.
N,E,S,W All objects in the active object-group will be aligned in the determind direction (object-cooridinates). Reference is the 1. object in the group.For measuring in the aligment the BoundingBox will be used.Advice: A right click on this button will show the direction.
DIS With this button you can set the distance between all objects.Reference is the 1. object in the group.
D All objects of the group will be rotated equally.X All objects of the group will be moved continuously on their X-axis.
Reference is the 1. object in the group.Y All objects of the group will be moved continuously on their Y-axis.
Reference is the 1. object in the group.Z All objects of the group will be moved continuously on their Z-axis.
Reference is the 1. object in the group.Exa The standard (exact) mode for the functions: DIS, D, X, Y, ZRan The random mode for the functions: DIS, D, X, Y, ZCur This mode is only avaiable with the DIS function.
The objects will be placed in a curve with this function.The 1. and 2. object are the reference-objects. The 1. object can be movewith mouse, the 2. object will be rotated with the slider. consequential the following position will be calculated.
Reset Resets all objects of an object-group to theirlast saved position.
Save Save the current positions of all objects of an object-group.
A reset to the old position is impossbile after a save.
The Value in this Entryfield sets the factor for the slider..

The Brush "Create" / Single Mode
This Brush is a powerful tool with its many functions. There are 2 possibility's to open this Brush.Either you press the [B] key or you click in the console (Level C) the button "Brush > Create".(You should pick a object which you want to place with the Brush-function for the data pool before.)
As soon as the Brush is active, the object will stick to the mouse cursor and you can move it "free hand".Of course you can manipulate your object with the keys [shift] or [ctrl] in this mode.A click with the left mouse button on a position will create an object-copy which will be saved instantly.This process can be repeated as often as you wish.
To get into the Brush-menu you need to double click with the right mouse button. In fig. 1 you see this Brush menu with its settings.
On the left side you again see the favourites-list, with which you can comfortably switch between the various objects.To select several objects for the Brush ( the Brush then will selecta object randomly ) you must double click on the entry in thefavourites-list. The Favourite will show up in blue (fig. 2)
The more objects you select on this way, more diversified objectplacement can be don with the Brush.To unselected a object you need to double click it again.The blue marking will be deleted.
If you want to select all object in the favourites-list you just need to clickon the Button Select. An other click on Select will undo the selection.
For each selected object you can define a Randomfactor,to raise the possibility of placing for a certain object.A simple right click raises the factor for an object (you can do this several times), a double left click will lower it.In fig.2 you see some selected objects with different Randomfactors (numbers in front of the name).
On the right side of the Brush-menu you find different Settings.The brush gives you three different Modes. (the active mode is shown in the topbar).
Single-Brush: Places single objects with a left click.Multi-Brush: Places multiple objects with a left click.Path-Brush: Places multiple objects between 2 positions.
The upper three settings are the same for each mode:
Direction Defines the factor for random rotation of the objects.Height Defines the factor for random hight of the objects. (level down)Vector Defines the factor for random vector-settings (tilt) of the objects.
(Caution, the vector-values will not be transmitted to Visitor)
To set a value you just need to click with the left mouse button in one of the value-fields.The more left you click the lower the value will be resp. the more you click right the value will be higher.A double click with the left mouse button sets the value to 100%. A simple right click will reduce it to 0%.
To close the Brush-menu right click besides the Brush-menu.Then you can place a object with every left click. A right click will generate a new object. ;-)
Remind: You open the Brush-menu with a double right click.To end the Brush-function, press [B] or as an alternative [space].
Brush-Functions
fig. 1
fig. 2
fig. 3

The Brush "Create" / Multi Mode
An other Mode for the Brush is the Multi Mode. In this mode you can place multiple Objects with a single click. You can access this mode if you click on the button Multi.
In this mode you have three further options:R (1-50) The radius in which the objects will be created.C (1-100) The number of objects which will be created in the radius.D (0-10) The distance on which objects try to avoid other objects.
This option is experimental and can only be used partially.
In Multi Mode the button Create is active.This function generates the Brush with the current settings.Every time you change the settings you should click create again,so the changes can take effect. You then will see directlyhow the changes affect the Brush.
The Multi Mode also uses the favourites-list. If several objects are marked (fig. 4)the brush is created out of these objects.You can press the button create as often as you want, until you satisfied with the Settingsand object composition. The created objects will stay temporary for the moment.
When you satisfied with the settings, click with the right mouse button once besides the dialogue,to close the brush menu. The objects should then follow your mouse pointer. ;-)
A simple left click on any desired position will create a copy of all objects form the brush and saves them directly.The Brush-objects will be repositioned after every copying action. Depending on the settings they will be rotated,set to a new hight and possibly the vector-value will be changed.
This function, "new position" can also be done manually with a right click.To close the Brush just press [B] oder as an alternative [space]
The Brush "Create" / PathThe third mode of the Brush is the Path-function. In this mode objects will be placed along a certain path.The path will be defined through the placement of two objects.
Click on the button Path to see the settings for the Path-function. As usualthe first three settings remain the same like in the other two modes.
Following settings are especial for Path (fig. 5):
PositionX The objects get a random variance on the X-axis of the path.
PositionY The objects get a random variance on the Y-axis of the path.
Scale X The random variance on the X-axis of the path will be scaledon a defined factor.With this it is possible to create a very wide path.
The random variance on the X- and Y-axis is dependant on the BoundingBox of the Object.To generate small objects on a wide path you need to use the Scale X settings.
If you have done all settings you again need to right click beneath the dialogue, so the settings window is closed.To draw the path now you must now fix the first object in the desired position (simple left click).After that the second object sticks to your Mouse, a blue line shows the path between the two objects.
In standard the 3DE generates the objects in the distance of the BoundingBox on the path. If you wantto define your own distance, you need to move the second object in the desired distance to the first object, and the press [insert]. A hint box in the lower left will show you the new distance between the objects.With the keys [pgup] and [pgdown] you also can set the alignment between the objects to one an other.
fig. 4
fig. 5

The Brush-Types "SingleSelector, MultiSelector + Delete-Brush"
These 3 Brush-types have one thing in common: They use a Type of "scanner" to acquire objects.The area of the scanner is always a circle and is shown through several coloured staffs. Each Brush-type has its own colour, like you can see in the following pictures:
Advice: The Brush-types can only process objects which are loaded through a project. Objects which are already integrated into the island, can't be manipulated any more !!!
The acquisition area can be adjusted for each Brush-type with the arrow-keys:
The arrow keys up and down adjust the areahight, left and right the arearadius:
Advice: You can reset the arearadius and hight with [X].
The MultiSelector and also the DeleteBrush can acquire several objects.The acquired objects are marked through a yellow resp. a green pointabove their BoundingBox.
When you have selected an object with the DeleteBrushyou can delete these objects with a simple left click.You also can press and hold the left mouse buttonand move it above certain objects.
To end the DeleteBrush you must press the key [L] again.In the following dialogue you can confirm the deletion or restore the deleted objects. :-)
With the MultiSelector you can move selected objects on their position.Just do a left click when the objects are selected and then movethe marked objects with the mouse.
With the up and down arrowkeys you can move the marked objects up and down. Rotating of the objects is not possible in this mode.
To save the new Position of the objects you must left click again and then end the MultiSelector with the key [O].
The MultiSelector has another function:
As soon as you have selected objects, you don't press the left mousebutton, but you press the [C] key once, to copy the marked objects.
The 3DE changes then automatically to the object-level, where you can find the copied objects in a new created object-group which you then can use further.
Brush-Functions (Part 2)
SingleSelector = [ T ] Key
select ...
MultiSelector = [ O ] Key DeleteBrush = [ L ] Key
delete ...
move ...
select ...
copy ...

The SingleSelector can be accessed through a double click (when no other function is active).As an alternative you can press the key [T] to activate it.
If the SingleSelector has found an object, the BoundingBoxof that object will be marked in light blue.
Additionally a small text field will show the classnameor the modelname.You can choose between those two in the Options.
If you left click on a selected object,the 3DE will automatically change to the object-groupin which the object is stored and selects it.
Another very useful function is "getting data" of an other object. his means you can get for your current object the orientation or ASL-hight form an other object.
This function can be used as following:(Example as shown in the fig.)
Given that you have a wall out of several parts,and the exact orientation of that wall is not know to you.
And you have a pole which you want to place at the wall,but with the same orientation as the wall.
Then select the pole first and activate the Selector with [T].
Next move the Selector over a wallsegment, until it is selected (light blue markings).Yet double click right and you see the Selector Menu.
The Selector Menu will show you a list with several options for "getting Data".
Just try the different entry, to see what happens.If you want to reset the object on its old position, click on the button Reset. If you want to save a new position press Save.
To close the Selector Menu, you just need to click right once besides the menu.
Another Advise: You should set the Selector-area in the run-up to approximately the size of the object you want to select.
For large objects the selector often needs also to fit the hight of the object.With some practise this shouldn't be a problem for you to select the majority of the objects with the selector.

Comment:
To import objects out of an 3DE-project to Visitor, a few preparations need to be done,because it is not possible to import any desired object just like that.
To import an object into Visitor, a so called "Template" of your island must be available.Unfortunately there is no possibility to create such "Templates" with a script, so we need to outsmart Visitor.
First 2x240 Template-Dummy's will be imported from a supplied PEW-file.These Dummy's are so to speak placeholders for the objects which will come later out of your 3DE-project (*.vis).
Then the first import process comes, with it the dummy's will be overwritten with the object-data form your project.
After that process is completed, the second import-process will be started.With it all objects from your 3DE-project will be created in Visitor.
Preparations (Assuming that Visitor is installed to drive P:)
Copy the included folder "OED_Templates" in the workdirectoryof Visitor (in general drive P). In this folder a prepared PEW-file can be found,which is used to import the Template-Dummy's.In addition all (p3d) Dummy's are in this folder.
Also you need to copy following scripts in the scriptfolder of Visitor:
OED_Import_Templates.visOED_Import_Objects.visOED_Smooth_Roads.vis
These scripts are also included in the download.
The Visitor-Scripts which you create with the 3DE, should be copied in the Visitor scriptfolder (perhaps in a sub folder), too. Because Visitor searchesin standard in these folders for scripts.
Execution (Page 1)
The first step is now, to import the Template-Dummy's to your island-project.As said this necessary, so Visitor can overwrite these Dummy'swith the objects from your projects.
In Visitor chose the entry "Import Templates" from the menu "Project".In the following dialogue you must navigate in the folder "OED_Templates".After a double click on the file "OED_Import_Templates.pew" 480Dummy-Templates will be loaded in your island-project. (fig. 1)
You can recognize if the Dummy import was successful, when you cansee the Dummy-Templates in the window "Panel of objects" under "Natural Objects" and "Artificial Objects" (fig. 2)
Next comes the first import-process of your Visitor-scripts, which will replacethe Template-Dummy's with your objects:Open the script "OED_Import_Templates.vis" at the Script-Panel and executeit with a click on "Run". In the following dialogue you need to navigate to yourVisitor-script, which you have generated in 3DE, and click "OK".
After this process Visitor shows you how much new objects (Templates)have been imported. You can repeat this import-process for furtherVisitor-scripts or you can continue with the final Import-process.
Visitor Import
Drive P: (example)
Visitor script-directory
The content of thefolder OED_Templates:
1x pew for import
+ several hundred dummy-objects

Execution (Page 2)Caution, after you have imported all templates of your Visitor-scriptsyou must imperative save your island, close it and then reload it.
This step is necessary because the imported Templates are else notregistered correctly in Visitor and can cause false positions forobjects at the import.
Advice:If you want the imported objects to have e.g. random scaling you mustdo the settings before you import the objects. The settings must onlybe done once for each Template, because all following Import-actionswill use this values.
The last step is the import of your objects into Visitor:Open the script "OED_Import_Objects.vis" at the Script-Panel and executeit with a click on "Run". In the following dialogue navigate again to your Visitor-scripts, which you have created with 3DE and click on "Ok".
While the import you perhaps see how the objects are created.At the end of this process, a dialogue shows you the number of objectswhich have been imported.
This process can be repeated for all other Visitor-scripts,provided that they have undergone the first Import-process.
A small Overview of all steps:
1. Import Dummy's (Project > Import Templates > \OED_Templates\pew-file)
2. Import templates of your Visitor-files (OED_Import_Templates.vis)3. Save, close and reload your island.4. If necessary change the settings of the (imported) templates e.g. scaling5. Import objects of your Visitor-files. (OED_Import_Objects.vis)
Before you save your island you should take a brief view withthe Bulldozer on your objects. If you detect majorerrors you can always close your island without saving and repeatthe last import-process with corrected data.
Misc
There is also the Visitor-script "OED_Smooth_Roads.vis", which enables you to adjust the terrain to roads. This script is not optimized yet,but still provides satisfactory results.
To apply the script to a roadobject, these roadobjects needto be selected in Visitor. With the Script-Panel youcan then open the script "OED_Smooth_Roads.vis" and execute it.
The following dialogue resembles the dialogue of the original-script and also the settings are identical.
Just try around until you satisfied with the results ;-)If necessary you must do last adjustments directly in Visitor.
Advice:Please always pay attention that you have enough Dummy's available,you can see them in the "Panel of Objects" in the category's "Natural objects"and "Artificial Objects". If the number of Dummy's is critical, you need to repeatthe first step, to get again enough Dummy's at your disposal.
The Teplate-list "Natural objects" ...
after the import of the dummy-templates ...
and before the import of the Teplates of a 3DE-project.
The Teplate-list"Natural objects" …
after the import of the Templates from a 3DE-project.
Abb. 1
Abb. 2

Topic Tip3DE There are problems with the placing of objects on or near water.
The position will not be hold or saved exactly, because of the animated water.Accordingly these objects must be adjusted afterwards in Visitor.
3DE Occasionally a placed object will not be recorded and saved by the 3DE.This object will not be shown in the objects list, but you can delete theobject if you target it with the selector and press [DEL].
Visitor If there are problems with importing objects, please verify that you have enough Template-Dummy's in your Map. These dummy's are consumed according to theobject diversity. You must be then import new Template-Dummy's (see also subject Visitor)
3DE Place you player away form you construction project, to not compromise your sessionif you player struck dead by an falling object. ;-)Not saved project data can be lost through that.
3DE The Objectlimit doesn't work when copying in an active project!This is no error, but will be recognized when you try to place a new object.
3DE Sometimes it makes sense to use the "slow loading" function, to detect e.g. miss placed objectsbecause in this mode the camera follows the objectsThe loading speed can be influenced with the right/left mouse button.
ArmAExtDLL In the ArmAExDLL-folder there is a folder called "Cache". You should regularly empty this folder if there are files. This files will probably be created when ArmA is used improperly, e.g. on a crash.
Visitor The function Pitch & Bank, the tilting of objects, will not be regarded on Visitor-import.It would be nice if BIS would give later this script-function. ;-)
Visitor If you want to import a object into Visitor, for example with a random scaleation, you only need to set this up in the according template, before the object-import.So you must first import the templates of your project, then set up the parameters of the templates and then import the objects.The once adjusted parameters for a template, will remain for all further import-actions.
3DE If the 3DE should malfunction for whatever reasons or execute a function not correct,you should first try to close the dialogue with ESC, and restart it again.In the worst case you must end the 3DE-Session and restart it.
3DE Objects with a roadmap can't always be placed optimal respectively it can occur that these objects influence other objects.The 3DE has no function to correct this issue.
ArmAExtDLL In the files-folder of ArmAExtDLL there is a directory OED_Files. These folderwill be filled by and by with project-scripts. On the name you can recognize which script belongs to which object. These script-names got a consecutive numbering ID at the end. On principle you only need the project scripts with the higher ID-number.You can regularly delete scripts with lower numbers, without objections
3DE Caution, when you give names e.g. for projects, favourites prefabs ect. pleasedo not use special characters or spaces in the name !!!!
Important informations

The 3DE is a unofficial AddOn, please send no complaints to BIS or their Publisher. Caution, the use of the 3DE is explicit at your own risk!!
The 3DE uses following external programmparts:
ArmA Extended Dll v1.00 Author: Voyagerhttp://[email protected]
Get Pitch and Bank Author: General Barron & vektorboson & [email protected] Set Pitch and Bank
Thanks to the whole 3DE team: MCPXXL, Lester + Sgt.Ace.Thank you very much for the support and many great hours !!!
A special thanks goes also to "Drake Starkiller", without grumbling he has done the English translation. Thank you very much !!!
And of course a big thanks to BIS, whose work "Armed Assault" is thebasis for this 3DE-Project.
Much fun with the 3DE [email protected]
20.08.2008
Useradvice
Credits