3.design and implementation
TRANSCRIPT

50
2 Programming in Alice: Design and Implementation In this chapter, we begin an introduction to programming using an “objects- first” approach. Every 3D object in Alice is an object! Writing a program to animate 3D objects in a virtual world is naturally all about objects and the actions objects can perform. From a practical viewpoint, writing a program is somewhat like working with word problems in a math course. In word problems, we first read the word problem (a description of the situation) and decide how to go about solving the problem (what steps need to be done) and then we solve it (write a solution). Similarly, in writing an animation program we first read a scenario (a description of the story, game, or simulation) and decide how to go about creating the animation (design a storyboard) and then we write the program code (implementation). Section 1 begins with scenarios and storyboards as a methodology for designing programs. Visual storyboards were chosen because they are the design tool used by professional animators in animation film studios. Textual storyboards were chosen because they provide an algorithmic (step-by-step) structure. The lines of text in a textual storyboard are similar to pseudocode – a loose version of the instruc tions that will eventually become program code. Section 2 presents the basics of creating a simple program in Alice. The idea is to use the storyboard as a guide for writing lines of code in Alice’s drag-and-drop editor. We can focus on the step-by-step solution because Alice will automatically take care of all the details of syntax (sentence structure and punctuation). In an animation, some actions must take place in sequence and other actions simultaneously. This means the program code must be structured to tell Alice which actions to Do in order and which actions to Do together. Note to instructors: We highly recommend that chapters 2 and 3 be covered in sequence. If you are using this text to teach/learn Alice in a non-“problem-solving” approach, you may skip section 1 of this chapter. However, storyboards will be used throughout the rest of the text as providing a framework in which to discuss design from an algorithmic, problem-solving perspective. You may choose to use a different design framework (perhaps using the UML or a more traditional version of pseudocode) – this may be done safely, without impacting the content.

51
2-1 Scenarios and Storyboards (Design) Creating a computer program that animates objects in a virtual world is a two-step process. The first step is design (planning ahead) and the second step is implementation (writing the animation program). This section introduces the design step. Design is an important part of constructing programs for animation. A design is a “plan ahead” strategy and takes practice to master. While the programs presented in the first few chapters of this text are reasonably clear-cut, we think it is advisable to start building good designs early on. Then, when programs begin to get more complicated, the time invested in learning how to design good program solutions will pay great dividends. Two Design Components A design consists of two components, a scenario and a storyboard. A scenario is a problem statement that describes the overall animation in terms of what problem is to be solved or what lesson is to be taught. Cartoons and feature- length animated films begin with a scenario created by professional writers. Sometimes, a scenario is called “the story.” As used here, in addition to the traditional meaning of “story,” a “story” can be a lesson to teach, a game to play, or a simulation to demonstrate. At Pixar, Disney, and other major animation studios, animators break down a long scenario into sequences of many short scenarios. For each scenario, a storyboard is created to depict the sequence of scenes. The storyboard may consist of dozens of scene sketches, drawn by animation artists or generated by computer animation specialists using computer software. Figure 2-1-1 illustrates an example of a storyboard in Pixar’s ….
Figure 2-1-1. Example from Pixar

52
Scenario – provides description and information As presented in chapter 1, a new Alice world is a simple scene of green grass and blue sky. To create an initial scene for an animation, character objects and background scenery are added and positioned in the world. But, before objects are added and positioned in the scene, answers to the following questions must be given:
1. What story is to be told? 2. What objects are needed? The objects include characters that play leading roles in the
story as well as background scenery such as islands, mountains, and lakes. 3. What actions are to take place?
A scenario provides the information needed to answer these questions. That is, a scenario gives all necessary details for setting up the initial scene and then planning the storyboard sequence for the animation.
Scenario Example Suppose you have recently been sitting at home, having missed another day of classes because of a winter snowstorm that dropped 2 feet of snow on the ground. You see some children outdoors creating snow-people. You are daydreaming about a dance you recently attended. Being a very creative person, your imagination gets carried away and the two scenes blend together:
Several snow-people are outdoors, on a snow-covered landscape. A DJ is playing the song “Let it snow.” A snowman is trying to meet a snowwoman who is talking with a group of her friends (other snowwomen.) He “makes eyes” at her, trying to get her attention. But, alas, she is not interested in dancing with him. She gives him a cold shoulder and turns back to talk with her friends.
From this scenario, we have answers to the questions posed in the previous paragraph. This scenario tells a sad story about a snowman’s unsuccessful attempt to flirt with a snowwoman at a winter dance. The objects are snow-people and the background scenery should depict a winter scene. The actions are the snowman making eyes at the snowwoman and the snowwoman giving the snowman a cold shoulder. Visual Storyboard4 A visual storyboard breaks down a scenario into a sequence of major scenes with transitions between scenes. Each sketch represents a state of the animation – sort of a snapshot of the scene. Each snapshot is associated with objects in certain positions, colors, sizes, and poses. When one or more transitions (changes) occur in the animation, the transition leads to the next scene (state).
4 “Storyboard” is an animation term. In other areas of computer science, the term “state-transition-diagram” is used to refer to
what we will describe here as a storyboard.
53
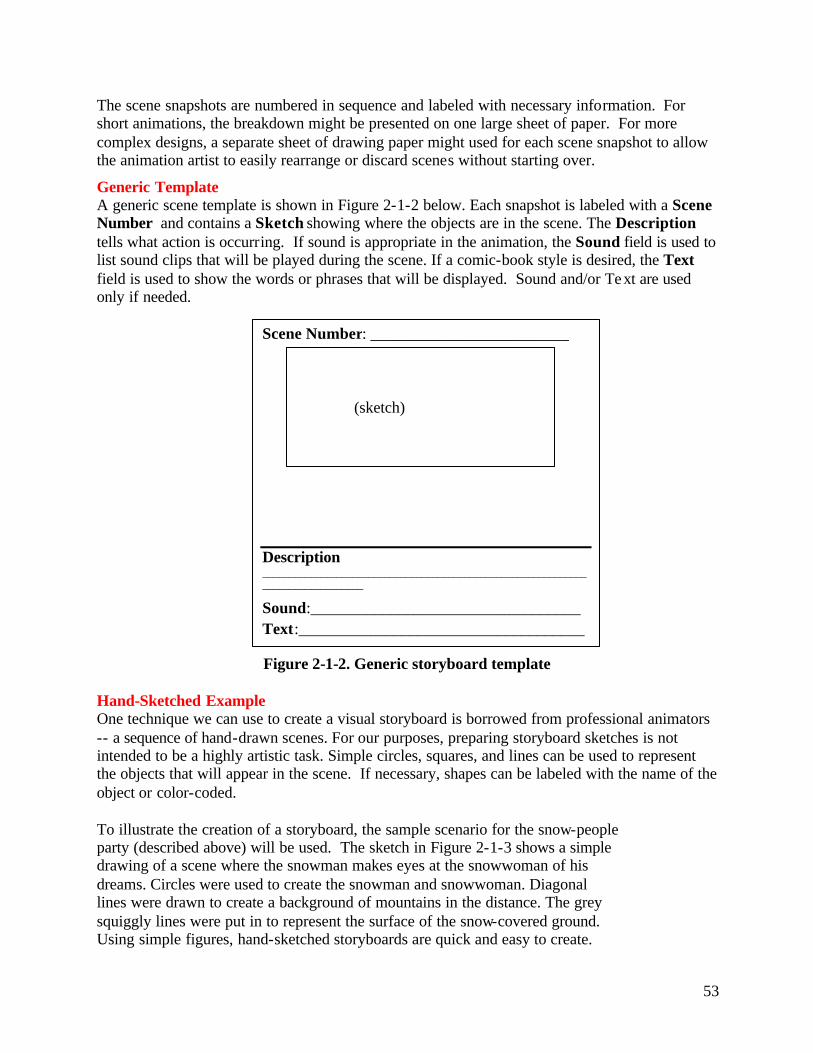
The scene snapshots are numbered in sequence and labeled with necessary information. For short animations, the breakdown might be presented on one large sheet of paper. For more complex designs, a separate sheet of drawing paper might used for each scene snapshot to allow the animation artist to easily rearrange or discard scenes without starting over.
Generic Template A generic scene template is shown in Figure 2-1-2 below. Each snapshot is labeled with a Scene Number and contains a Sketch showing where the objects are in the scene. The Description tells what action is occurring. If sound is appropriate in the animation, the Sound field is used to list sound clips that will be played during the scene. If a comic-book style is desired, the Text field is used to show the words or phrases that will be displayed. Sound and/or Text are used only if needed.
Figure 2-1-2. Generic storyboard template Hand-Sketched Example One technique we can use to create a visual storyboard is borrowed from professional animators -- a sequence of hand-drawn scenes. For our purposes, preparing storyboard sketches is not intended to be a highly artistic task. Simple circles, squares, and lines can be used to represent the objects that will appear in the scene. If necessary, shapes can be labeled with the name of the object or color-coded. To illustrate the creation of a storyboard, the sample scenario for the snow-people party (described above) will be used. The sketch in Figure 2-1-3 shows a simple drawing of a scene where the snowman makes eyes at the snowwoman of his dreams. Circles were used to create the snowman and snowwoman. Diagonal lines were drawn to create a background of mountains in the distance. The grey squiggly lines were put in to represent the surface of the snow-covered ground. Using simple figures, hand-sketched storyboards are quick and easy to create.
Scene Number: _________________________ (sketch) Description ________________________________________________________________________________
Sound:__________________________________ Text:____________________________________

54
Figure 2-1-3. Hand-drawn sketch Scene-editor-generated Example A second technique, also borrowed from professional animators, is to create a visual storyboard using Alice’s scene editor to add objects to a world and then patiently arrange the objects in various poses. As each successive scene is created, a screen capture is made and sent to the printer. The sketches shown in Figures 2-1-4(a) through 2-1-4(c) illustrate a scene-editor-generated storyboard for the beginning of the snow party animation. Naturally, scene-editor-generated sketches for a storyboard are more impressive than hand-drawn sketches. (This is the technique we used to prepare visual illustrations for the figures in chapters throughout this book.) But, the hand-sketched drawings are much faster and easier to put together. Textual Storyboard While professional animation artists use visual storyboards as part of their project development process, not everyone has the inclination to make dozens of sketches, either hand-drawn or computer-generated. A textual storyboard is a good alternative to visual storyboards. A textual storyboard looks something like a "to-do list." While sketched and computer-generated storyboards provide a visual representation of the sequence of scenes, a textual storyboard allows us to prepare a planned structure for writing program code. To take advantage of each of these strengths, both visual and textual storyboards are used in this book.
Scene Number: ____________2_____________
Description __Snowman’s eyes roll up and down_________
_______________________________________
Sound:____Let It Snow____________________ Text:______None________________________

55
(a) Scene 1 (b) Scene 2
(c) Scene 3
Figures 2-1-4 (a)-(c). Scene-editor-generated storyboard scenes
Scene Number: _______1_________
Description The initial scene. The snowman is interested in meeting the snow woman on the left
Sound:__Let it snow____ Text:____none_________
Scene Number: _2___________
Description: The snowman tries to get the snow woman’s attention Sound: Let it snow Text: Ahem….
Scene Number: __3______
Description: The snow woman notices the snowman. Sound: Let it Snow Text: none

56
Textual Storyboard Example A textual storyboard for the snow-people winter party is illustrated in Figure 2-1-5. An important point that should be mentioned about textual storyboards is that one textual storyboard may encompass more than one scene from a visual storyboard. For instance, the Figure 2-1-5 textual storyboard includes the actions shown in all three sequential scenes of the visual storyboard in Figures 2-1-4(a) through (c).
Figure 2-1-5. Snow-people textual storyboard
The lines of text in the textual storyboard provide an ordered list of actions that will take place in the animation. Notice that the textual storyboard has two lines that are displayed in italics. These lines are for organizing the actions – some actions are to be done in order (one at a time), others are to be done together (simultaneously). Indentation is used to make the storyboard easy to read. The snowman makes eyes at the snowwoman at the same time that he says “Hey there!” But, the snowwoman’s actions are done in sequence. After the snowman performs his actions, the snowwoman turns around to see who said “Hey there!” In Computer Science terminology, a textual storyboard is called an algorithm – a list of actions to perform a task or solve a problem. Evaluate and Revise Once a storyboard has been designed, it is a good idea to take an objective look at the design to decide what might be changed. Evaluate the storyboard by answering these questions:
• Does the action flow from scene to scene, as the story unfolds? • Do any transitions need to be added between scenes to blend one scene to the next? • Did you overlook some essential part of the story? • Is there something about the story that should be changed?
The important idea is that the storyboard is not written in concrete. We should be willing to modify plans to get a better effect or to fix something that doesn't seem to work as expected. Warning!!!!!! An alarm must be sounded about storyboards. It is quite possible to create a storyboard only to discover that the animation tool being used does not support some of the special effects that were planned. This happens to everybody – no matter how well you think you have planned and no matter how sophisticated the animation tool may be. Such situations require (1) revision of the storyboard, or (2) writing new program code to create new animated actions. Writing program code is the topic of the next section of this chapter.
Do the following steps in order 1) Snowman point at the snowwoman 2) Do the following steps together a) Snowman calls out to the snowwoman b) Snowman makes eyes at the snowwoman
3) Snowwoman’s head turns to see who is calling her.
…

57
2-1 Exercises
1. Create your own scenario.
In many of the exercises in this text, you will be given a scenario as part of the assigned exercise. But soon, you will likely want to be creative in a project where you dream up some animation on your own. To help you prepare for such a creative project, this assignment is to create your own scenario. A scenario is a general description of the scene and the animation that is to unfold. In this chapter, the scenario was a party scene involving snow-people.
Here are some ideas to help you in thinking about designing your own animation: Think about things you have recently read or seen on television. Daydream. Talk with friends to brainstorm ideas. Jot down quick notes, or doodle. Consider the following: Who is the intended audience? What do you want to say to this audience? What do you want this audience to experience, what story do you want to tell, what lesson do you want to teach? Would you like to create a game-like animation or a simulation that allows the user to control the animation?
One good way to make up your own scenario is to work with a teammate. In working with another person, you can brainstorm ideas. Or, if you write the scenario by yourself, you can still exchange scenarios with another person to give each other feedback. You can combine ideas from two or three different sources and come up with something new. Or you can take something you have seen and give it a different ending or a different interpretation.
Write a scenario that is at least 4 or 5 sentences. Be sure the scenario includes information that answers the questions presented in this chapter section.
2. Creating a Storyboard In each of the following, you are asked to create a storyboard for the scenario you created in question 1 above. While the scenario is a verbal description of what will happen in an animation, a storyboard is a plan or a design for how the animation will be written. A storyboard can be either a sequence of sketches or it may be a textual to-do-list.

58
(a) Create a visual storyboard for the scenario you created in exercise 1 above. The visual storyboard can be hand-sketched or scene-editor-generated. This visual storyboard should create a sketch using the generic storyboard template for each major scene. See Figure 2-1-4(a) through (c) as an example.
(b) Create a textual storyboard (to-do list) for the scenario you created in exercise 1 above.
3. Creating a Storyboard from a given scenario Create a storyboard for one (your choice) of the following scenarios:
(a) A scenario for a child’s game: Alice, the white rabbit, and the Cheshire cat enjoy a game of musical chairs in a tea party scene. Every so often, one of the characters yells "switch" and they all run around the table to stand beside the next chair. After each switch, a chair is tipped over and the character standing next to it is eliminated from the game. The last character left is the winner of the game.
(b) A scenario for a video game: A jet fighter plane is returning to the carrier deck after a training mission. The plane makes a half-circle around the carrier to get into position for landing and then gradually descends toward the carrier. Of course the carrier is in motion, so the plane has to continually adjust its descent to finally land on the deck. After the plane touches down on the carrier, it continues across the deck to finally come to a halt.

59
2-2 A First Program In the previous section, we learned how to design an animation using a scenario and a storyboard. Now, we are ready to look at how an animation program can be written. This step in building an animation is called implementation. What is a Program? A program is a list of actions (instructions). We can think of an Alice program as being somewhat like a script for a theatrical play. A theatrical script tells a story by describing the actions to be taken and the words to be delivered by actors on stage. In a similar manner, an Alice program prescribes the actions to be taken and the sound and text to be used by objects in a virtual world.
Create an Initial Scene An ancient Chinese proverb is "The longest journey begins with a single step." Let’s begin our journey by implementing the Snow-people animation described in the previous section. Recall that a snowman is interested in meeting a snowwoman. He flirts with her (makes eyes at her), but she isn’t interested in meeting him, so she turns away. The first step is to create the initial scene. To a new world, several snowmen and snowwomen (found in the People collection in the local gallery) are added. Then, a wintry backdrop (Sets and Skies collection of the local gallery) is added, and the ground is turned white. The initial scene is shown in Figure 2-2-1.
Figure 2-2-1. Snow-people initial scene
Program Code Editor Once the initial scene has been set up, the instructions that make up the program code must be written. Alice provides a program code editor -- the large yellow rectangle at the lower right of the main Alice window, as shown in Figure 2-2-2. The instructions for a program are entered in the editor. Once a program is written, we would like to run the animation many times without having to write the program again. As such, it is necessary to save (“store”) the instructions that make up the program in a file. At a later time, the file can be reopened and run again.

60
Figure 2-2-2. Program code editor at lower right of the main window
World.my first method As seen in Figure 2-2-2, the tab for the editing area is labeled World.my first method. A method is a segment of code in a program that performs a specific task. Alice automatically uses the name World.my first method for the first editing pane. Actually, any name can be made-up and used for a method name. But, we will just use the name World.my first method for this example. The Snow-people world is a simple program and all the program code can be written in World.my first method. By default, when the Play button is pressed in Alice, the World.my first method will execute.
What instructions are needed? The program code editor (hereafter referred to as "the editor") will be used to write the instructions for the Snow-people program. What instructions must be written and in what order? This is where the storyboard is used to help plan the instructions and the order. A complete version of the textual storyboard for the Snow-people animation is shown in Figure 2-2-3.
Do in order 1) Snow man looks at the snow woman 2) Do together Snowman calls out to the snowwoman Snowman makes eyes at the snowwoman
3) Snowwoman turns to see who is calling her.
4) Do together Snowwoman blushes (her head turns red)
Snowwoman turns back to her friends 5) Snowwoman’s face turns back to white

61
Figure 2-2-3. Snow-people storyboard The program should probably consist of several move and turn instructions. Of course, the first step is where the program begins. It seems reasonable to begin by making the snowman look at the snowwoman. A point at instruction can used to make the snowman appear to look at the snowwoman. Then, a say instruction can be used to make the snowman call out to the snowwoman as he raises and lowers his eyes. Clearly, these actions must occur in a specific sequence. Sequential versus Simultaneous actions Pause to consider that some actions occur sequentially (one after the other) but other actions occur simultaneously (at the same time). In this example, the snowman should look (point) at the snowwoman before calling out to her. This seems too obvious; but Alice must be told to Do these instructions in order. Also, the snowman is to call out to the snowwoman while raising and lowering his eyes at the same time. To make the snowman call out to the snowwoman at the same time he is raising and lowering his eyes, Alice must be told to Do these actions together.
Do in order To tell Alice to do instructions in sequential order, a Do in order block is created in the editor and instructions are placed within the block. The Do in order tile is dragged into the editor, as seen in Figure 2-2-4.
Figure 2-2-4. Placing a Do in order block in the editor

62
The instructions to perform the animation will now be placed within the Do in order block. The first instruction is to make snowman point at (look at) the snowwoman. The snowman is selected in the object tree (in the upper left hand side of the Alice window). Then, in the snowman’s methods tab (located in the details pane immediately below the object tree), the point at instruction is selected and dragged into the Do in order, as shown in Figure 2-2-5.
Figure 2-2-5. Adding a point at instruction The point at instruction requires a parameter, namely which object the snowman should point at. (A parameter is an item of information that must be supplied so Alice can execute the action.) In this example, the snowwoman is selected as the object to point at. The result is illustrated below.

63
Do together The next step in the storyboard requires two things to occur at once: the snowman saying “Hey there” to the snowwoman, and the snowman raising and lowering his eyes. A Do together block is dragged into the Do in order, as shown in Figure 2-2-6. The result of this modification is the Do together block is nested within the Do in order block. Note that nesting the Do together inside the Do in order just happens to be the best way to animate this example. A Do together does not have to be inside a Do in order. These two coding blocks can work together or can work separately in many different combinations. It is also worthwhile to notice the horizontal black line in Figure 2-2-6. The black line indicates where the Do together instruction will be dropped.
Figure 2-2-6. Adding a Do together (inside the Do in order) The result should appear as illustrated below:
Now, instructions can be dragged into the Do together block to make the snowman say “Hey there” and flirt (raising and lowering his eyes). The say instruction is easy -- just drag the

64
instruction into the Do together block, and select a “Hey there” string. The resulting code appears below:
Issuing instructions for the snowman’s eyes is more complicated. A mouse click on the key to the left of the snowman in the object tree allows access to the snowman’s parts. Then, a mouse click on the key to the left of the snowman’s head, allows access to the snowman’s eyes, as shown in Figure 2-2-7.
Figure 2-2-7. Accessing the snowman’s eyes
It is now possible to drag instructions into the editor to move the snowman’s eyes up 0.04 meters and then down 0.04 meters, producing the code shown below. Note that the direction of movement is required, as is the distance (which is entered by selecting Other, and then entering a value of 0.04 on the calculator). How did we know to use 0.04 meters as the distance? Well, we didn’t. We just tried several different distance values until we finally found one that worked to

65
give us the best effect. This is an example of a trial and error strategy. While we always recommend good planning strategies, sometimes trial and error is useful tool.
Time out for Testing and Debugging Whenever several lines of code have been written, it is generally a good idea to test it. So, to test the instructions, as written thus far, the Play button is clicked. The snowman turns to point at the snowwoman, and the snowman says “Hey there!!!” but his eyes don’t move up and down. In fact, they do not appear to move at all! The reason they do not move is that the program has a bug. (Errors in computer programs are generally referred to as bugs.) The problem is that the snowman has been given instructions to move his eyes up and down at the same time. These two animation instructions effectively cancel each other out, and the snowman’s eyes do not move at all! To fix this problem, it is necessary to place the moving of the snowman’s eyes within a Do in order block, as illustrated below.
Now, when this program is run, the snowman’s eyes move up and down! There is one other useful observation to make. Animation instructions in Alice, by default, require one second to run. Normally, within a Do together block, it is desirable that all of the instructions take the same amount of time. Since the snowman saying “Hey there!!!” takes one second, it is desirable that the moving of his eyes up and down also requires one second for both instructions. Thus, it is desirable that moving his eyes up (and moving his eyes down) each require ½ a second. To change the duration of an animation instruction, we click on more…(to the right of the instruction where the duration is to be changed), select the duration option, and change its value to ½, as shown in Figure 2-2-8.

66
Figure 2-2-8. Changing the duration of an instruction
Completing the animation It is still necessary to complete the final three steps described in the storyboard. The third step is for the snowwoman to turn her head to the right. An instruction to turn the snowwoman’s head 0.40 of a revolution to the right is added to the code, as shown below.

67
The fourth step requires the snowwoman to blush (her head turns red) as she turns her head back to her snow friends. Another Do together block will be required for this step. Making the snowman’s head change color is slightly different from other instructions we have used so far. To change the color of the snowwoman’s head, the color property must be changed directly. To do so, we first select the snowwoman’s head in the object tree. Then, the property tab is clicked in the details pane, and finally the color tile is dragged into the Do together block, where a value of Red is selected, as illustrated in Figure 2-2-9.
Figure 2-2-9. Changing color
The resulting code is illustrated below.

68
Finally, the last step of this animation may be added – where the snowwoman’s head returns to a white color. The resulting code for the entire animation is listed below.
Technical Note It may seem a bit strange that the fifth animation step should be to set the color of the snowwoman’s head back to white, when her head and body originally had a somewhat pinkish appearance. The reason has to do with the original form of 3D models. In the process of preparing the 3D models for the gallery, the models are textured and painted in the 3D rendering software. By default, each model in the gallery is registered with Alice as having a white color (in other words, Alice has not painted another color over the model). Changing the snowwoman’s head to red causes red to be painted over the surface of her head. Changing the color of her head back to white returns her head to the color it was originally, as specified by the model in the gallery.

69
2-2 Exercises Reminder: Each time an animation is completed, be sure to save the world. A good way to remember which file contains a particular world is to name the file using the name of exercise. 1 Circling Fish Create an island world with a fish in the water. Position the fish and the camera point of view so the scene appears as illustrated below.
Use the program code editor to write a program that has the fish swim around in a circle in front of the island. Next, have the fish swim around the island. Finally, have the fish jump out of the water and then dive down into the water. The final scene should look somewhat like the initial scene, with the fish back in roughly the same position where it started. 2 Penguin Gets Cookie Create a world having the initial scene as shown in the picture below. Write a program to animate the penguin so it waddles to the stool to get a cookie someone left on top of the stool. Have the penguin show its thanks by waving its wings.

70
3. Open Door Create a world having Alice standing in front of a closed door. Have Alice turn to face the door, turn the knob, open it, and walk through it. Then have her face the camera and wave.
4 Magnet Fun Create a world where Alice has a magnet held out in her right hand. Add five metal objects of your choice to the world and one by one have Alice point the magnet at each object. As Alice points the magnet toward an object, have the object move toward the magnet. Have the last object be very large (like a car) so when Alice points at it, she instead is pulled towards the object while saying "Whoah" or "Yikes". (HINT: Consult Tips & Techniques 1 for how to use the vehicle property. This will help in making the magnet move as Alice’s hand moves.)

71
2 Summary This chapter introduced the fundamental concepts of programming in Alice. We began with an examination of design. The design tools include a scenario (description of the story, game, or simulation) and a storyboard. A scenario helps us set the stage – that is, it tells us what objects will be used and what actions they will perform. A storyboard breaks down a scenario into a sequence of scenes that provide a sense of the order in which actions will take place. Some actions in a program will take place in sequence (one after the other) and some actions simultaneously. Once prepared, a storyboard is used as a guide for implementation (writing the program code). Important concepts in this chapter
• A scenario is a problem statement that describes the overall animation in terms of what problem is to be solved, what lesson is to be taught, what game played, or what simulation demonstrated.
• A storyboard can be visual or textual. • A visual storyboard is a sequence of hand-drawn or computer-generated sketches that
break down a scenario into a sequence of major scenes with transitions between scenes. • Each sketch represents a state of the animation – sort of a snapshot of the scene –
showing the position, color, size, and other properties of objects in the scene. • A textual storyboard is somewhat like a to-do list, providing an algorithmic list of steps
that describe sequential and/or simultaneous actions. • A program consists of lines of code that specify the actions objects are to perform. • All 3D characters in Alice are objects. We have them move about their virtual world by
dragging their action instructions (methods) into the editor. • In Alice, program code is structured in Do in order and Do together blocks to tell Alice
which instructions are to be executed in order and which are to be executed simultaneously.

72
Tips & Techniques 2 Style Most animation instructions end with a list of options named "more…," as seen in the example below.
When more… is clicked, a pop-up menu appears. An important option is style. This allows the programmer to specify the way in which one animation instruction blends into the next instruction. The options are gently (begin and end gently), abruptly, begin gently (and end abruptly), and end gently (and begin abruptly). To get the right degree of “smoothness” of the animation, it is often worthwhile to experiment with style. Sound If your computer has a sound card, it is easy to use sound files with virtual worlds. Alice uses either MP3 or WAV sound files. The use of sound is not a requirement for most animations. But, in some worlds the use of sound enhances the effect of an animation. In the world shown in Figure T-2-1, a fan dancer is performing a dance accompanied by the sounds of a koto (a traditional Japanese musical instrument).
Figure T-2-1. Fan Dance
The first step in using a sound file is to import the sound into Alice. A sound can be imported into the properties list for the entire World or for a specific object, as illustrated in Figure T-2-2. In this world, the sound is intended only to accompany the fan dancer. So, we will import the sound file for the fan dancer.

73
Figure T-2-2. Sounds In both World and Object details
To import the sound file, click on the import sound tile in the fan dancer’s detail pane. A file selection box appears. Navigate to the directory where your sound files have been stored and then select the sound file to be used, as shown in Figure T-2-3. Note that it may be necessary to navigate through several folders on your computer to find the sound file to import. Once the file has been selected, click on the Import button. The name of the sound file will automatically appear in the list of imported files for the object, as seen in Figure T-2-4. The green arrow next to the name of the sound file is a preview button and can be clicked to test the sound file.
Figure T-2-3. FileSelection

74
Figure T-2-4. Imported Sound Files To play the sound as part of an animation, select playSound from the object's methods in the details area. Then, drag it into the method editor and then select the name of the sound clip, as seen in Figure T-2-5. The time needed to play the entire sound will automatically appear in the instruction (circled in black). If the time is too long, you can clip the sound by selecting a shorter duration (circled in blue).
Figure T-2-5. Writing an Instruction to Play a Sound Clip
point at and onlyAffectYaw A common action in animations is to move one object toward another object. The first step is to make the object that will be doing the moving turn and point at the object to which it will be moving. For example, in Figure T-2-6, the rowers in the lifeboat want to row towards the lighthouse on the island.

75
Figure T-2-6. Lighthouse and Boat Initial Scene
The point at instruction seems to be the logical statement to use to aim the boat at the lighthouse location.
While this instruction does turn the lifeboat towards the lighthouse, it also has the unfortunate effect of tipping the boat so it seems to be sinking on one end, as seen in Figure T-2-6.
Figure T-2-6. lifeBoat tips on point at Instruction
The tipping of the lifeboat is due the boat being aimed at the center of the lighthouse, which is higher in elevation than the boat. To avoid this effect, Alice provides onlyAffectYaw for the point at instruction. To use onlyAffectYaw, click on more (at the end of the instruction) and select onlyAffectYaw à true, as in Figure T-2-7. Selecting a true value for onlyAffectYaw allows an object to point at another object without affecting the pitch (forward-back orientation).

76
Figure T-2-7. Selecting onlyAffectYaw à true
Clipboards This tip is not an animation tip at all. But, it makes programming in Alice much more pleasant so it is being shared as a tip. Suppose a particular animation sequence (an individual animation instruction or a collection of animation instructions) is something that you would like to copy or cut-and-paste. Control-C and Control-V (for those working on Windows computers) do not work in Alice. This is where the clipboards, illustrated in Figure T-2-8, come into play.
Figure T-2-8. The clipboards
To copy instructions from one location to another, left-click on the instruction or the instruction block. (Note than an instruction block is several instructions within a Do in order or within a Do together.) Then, drag the instructions to the clipboard. The copied-to clipboard changes color, as illustrated in Figure T-2-9. The color change is a visual clue indicating that copied instructions are now on the clipboard. Once instructions have been copied to the clipboard, you can use the mouse to drag the selected instructions to one of the clipboards.

77
Figure T-2-9. A clipboard in use
Note: If instructions have been previously copied to that clipboard, copying a new set of instructions to the same clipboard will overwrite (destroy) what was already on the clipboard. As seen by As described in chapter 1, each object in Alice has its own sense of orientation. This is exactly what is expected in a 3D animation environment. But, sometimes an object’s sense of orientation can lead to rather surprising results when an animation is being run. Suppose we have a helicopter on a pilot training mission, as shown in Figure T-2-10.
Figure T-2-10. Training Mission
We write code to roll the helicopter left and then move up:

78
Running the animation, we see that the result is not exactly what we had in mind. When the helicopter moves upward, it does so from its own sense of orientation, as seen in Figure T-2-11.
Figure T-2-11. Up – from the helicopter’s orientation
What we had expected, however, was an upward movement with respect to the ground. One way to make it easier to write code where we want to use an orientation of one object to guide the movements of another object is to use asSeenBy. In this example, we clicked on more… at the end of the instruction and then selected asSeenBy à Ground.
The resulting code, shown below, gives the desired movement.