4-h 269 baking is fun!
TRANSCRIPT

University of Nebraska - LincolnDigitalCommons@University of Nebraska - LincolnNebraska 4-H Clubs: Historical Materials andPublications 4-H Youth Development
1987
4-H 269 Baking is Fun!Linda S. BoecknerUniversity of Nebraska-Lincoln, [email protected]
Follow this and additional works at: https://digitalcommons.unl.edu/a4hhistory
This Article is brought to you for free and open access by the 4-H Youth Development at DigitalCommons@University of Nebraska - Lincoln. It hasbeen accepted for inclusion in Nebraska 4-H Clubs: Historical Materials and Publications by an authorized administrator ofDigitalCommons@University of Nebraska - Lincoln.
Boeckner, Linda S., "4-H 269 Baking is Fun!" (1987). Nebraska 4-H Clubs: Historical Materials and Publications. 360.https://digitalcommons.unl.edu/a4hhistory/360

r-e;_y-! 6 5.33 r & & 11/l../ /1..
no. at.R 9 R02134 40805
• Nebraska Cooperative Extension
Baking /s Fun!
19 f7 4-H 269
"
Issued in furtherance of Cooperative Extension work, Acts of May 8 and June 30, 1914, in cooperation with the ,~ U.S. Department of Agriculture. Leo E. Lucas, Director of Cooperative Extension, University of Nebraska, ~ • • ·~
Institute of Agriculture and Natural Resources. : ~ · ' ...... N •• ~ ..
Cooperative Extension provides information and educationaJ programs to all people without regard to race, color, national origin, sex or handicap.

Baking Is Fun!
by Linda Boeckner, Extension Nutrition Specialist
Have you ever thought that baking cookies, muffins, biscuits or bread might become a lost art? Imagine if baked products only came from the store rather than hot and fresh from your oven! When you bake, there is a lot happening to each ingredient. It's almost like a little science experiment in each baked item. The first baking project, Baking Is Fun!, will lead you on an adventure of discovery and decision-making. You will learn about basic baking skills as you:
• practice measuring; • identify the right kinds of baking equipment; • read and follow directions; • follow safety rules; • experiment with baking ingredients and baking methods;
and • decide the qualities of cooki~s, biscuits, muffins or quick
bread.
In this project you will also explore the world of baked products. You will :
• interview an older person about baked products in years past;
• display how baked products fit into your way of eating; • learn about baked items from other countries; and • describe how baked products can be part of healthy eating.
You will get into the kitchen and practice baking skills . You can share your experiences with others by giving a presentation or exhibit at the fair.
Most of all, this project is for you to enjoy. You should feel good about your kitchen experiences. So brush your hair out of the way, wash your hands and let's get started!
To finish this project you should be able to use basic baking skills to make at least four baked items .
2

Lesson 1------------------------------------------------
Kitchen Review In Road to Good Cooking you learned about the tools used in
cooking. When you bake, many of the same tools or equipment are used . Let's review these tools and go on a scavenger hunt for them. Here are the rules:
1. Find the items on the list below. 2. Check the items off the list with your 4-H leader or parent. 3. As you check each item, describe how you use it in cook
ing or baking.
TOOLS FOR GOOD BAKING
___ rubber scraper ___ pie plate ___ paring knife ___ pancake turner ___ pastry brush ___ muffin pan ___ 13 x 9 baking pan ___ cookie sheet ___ measuring spoons ___ rubber spatula
___ flour sifter ___ rolling pin ___ mixing bowls ___ wire whisk ___ liquid measuring cup ___ wooden spoon ___ table knife ___ dry measuring cups ___ egg beater ___ biscuit cutter
f\re there any items you couldn't find?
Do you know how to use all of the items? If you have questions, now is the time to ask! ·
Making The Measure
Measuring correctly is important to successful baking. When you measure the right way you are one step closer to a good product. Try matching the following ingredients with the correct measuring technique.
__ Flour, sifted
__ Sifted flour
__ Granulated sugar
__ Salt, baking powder or
a. Spoon into dry measuring cup, level with straight edge of spatula
b. Cut using markings on wrapping and soften for use
soda, spices, cream of c . Pour into measuring spoon tartar held over small cup or bowl
__ Vanilla or liquid flavorings
3
d. Stir, spoon into dry measuring cup, level with straight edge of spatula, then sift
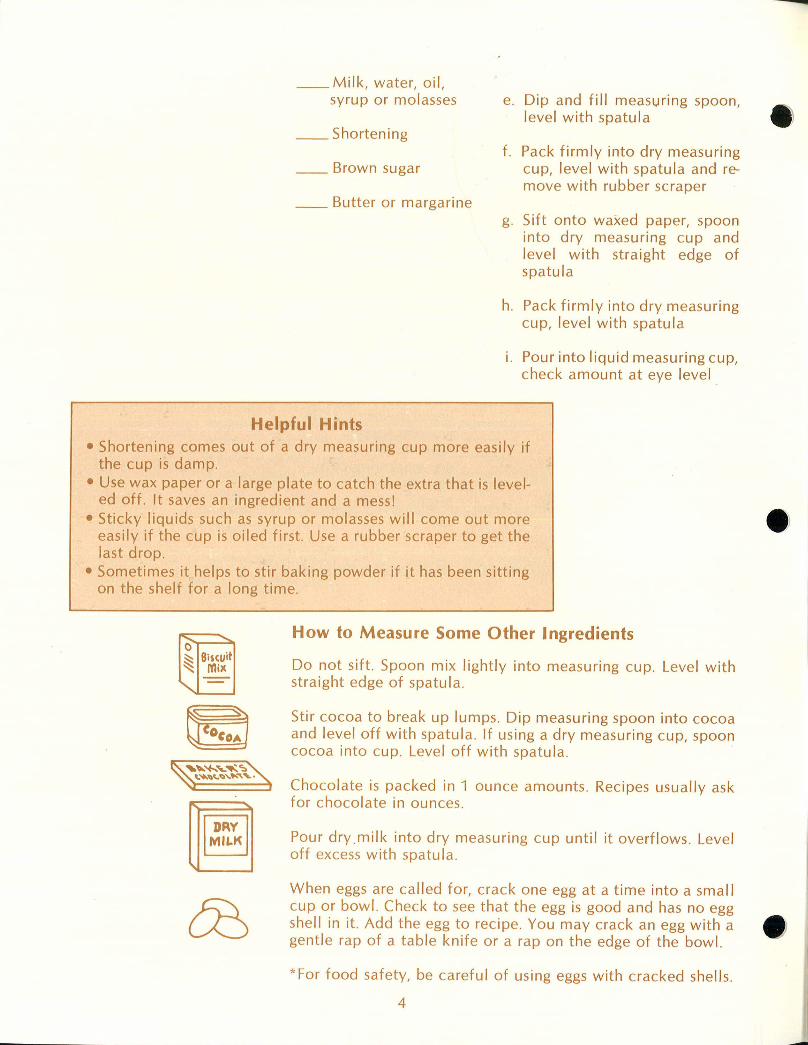
__ Milk, water, oil, syrup or molasses
__ Shortening
__ Brown sugar
__ Butter or margarine
Helpful Hints
e. Dip and fill measuring spoon, level with spatula
f. Pack firmly into dry measuring cup, level with spatula and remove with rubber scraper
g. Sift onto waxed paper, spoon into dry measuring cup and level with straight edge of spatula
h. Pack firmly into dry measuring cup, level with spatula
1. Pour into liquid measuring cup, check amount at eye level
• Shortening comes out of a dry measuring cup more easily if the cup is damp.
• Use wax paper or a large plate to catch the extra that is leveled off. It saves an ingredient and a mess!
• Sticky liquids such as syrup or molasses will come out more easily if the cup is oiled first. Use a rubber scraper to get the last drop.
• Sometimes it helps to stir baking powder if it has been sitting on the shelf for a long time.
How to Measure Some Other Ingredients
Do not sift. Spoon mix lightly into measuring cup. Level with straight edge of spatula.
Stir cocoa to break up lumps. Dip measuring spoon into cocoa and level off with spatula . If using a dry measuring cup, spoon cocoa into cup. Level off with spatula.
Chocolate is packed in 1 ounce amounts. Recipes usually ask for chocolate in ounces .
Pour dry milk into dry measuring cup until it overflows. Level off excess with spatula .
When eggs are called for, crack one egg at a time into a small cup or bowl. Check to see that the egg is good and has no egg shell in it. Add the egg to recipe. You may crack an egg with a gentle rap of a table knife or a rap on the edge of the bowl.
* For food safety, be careful of using eggs with cracked shells.
4
-

Hint
3 tablespoons of cocoa can be used for 1 ounce of chocolate. Cocoa has less fat than chocolate.
Math Skills Before you start, here are some measures for you to know:
3 teaspoons = 1 tablespoon (15 ml) 4 tablespoons = 1/4 cup (60 ml) 5 tablespoons +
1 teaspoon 8 tablespoons 16 tablespoons 2 cups 4 cups 4 quarts
= 1/3 cup (80 ml) = 1/2 cup (125 ml) = 1 cup (250 ml) = 1 pint (500 ml) = 1 quart (1000 ml) = 1 gallon (3.8 liters)
Sometimes a recipe will call for liquid ounces. There are 8 fluid ounces to a cup.
A quart has _____ fluid ounces.
A recipe calls for 1/2 tablespoon. How many teaspoons is that?
1/2 cup has ____ fluid ounces.
1/2 gallon is _____ quarts or _____ cups.
REMEMBER YOUR KITCHEN RULES
Courtesy
• Ask to use the kitchen.
• Clean up after yourself so that someone else wil l have the pleasure of coming into a neat clean kitchen.
Cleanliness and Safety
• Work clean and be clean . Keep your hair out of the way . Wear an apron.
• Wash your hands with soap and hot water.
• Have an older person close by. Let them show you oven safety and knife safety. Use a cutting board when you use a sharp knife.
5

Organization
• When finished with cutting boards, wash with hot sudsy water.
• Don't lick your fingers or your stirring spoons . Use a tasting spoon if you must taste .
• Wipe up spills right away.
• Use hot pads (pot holders) for hot pans from the oven .
• Use electric mixers safely. Have an older person demonstrate the following points:
- Put beaters into food . Then turn on motor. - Turn off motor before scraping the sides of bowls . - Turn off motor before lifting beaters out of food . - Unplug electric mixer before removing beaters from the
mixer.
• Turn off all equipment when fini shed with it.
• Store foods in airtight containers .
Think of a factory line as you get organized. A good factory line knows what it is doing. It has all of the equipment and materials at the places where they will be needed .
Helpful Hints for Organization
• Read the recipe through before starting • Cather all of your ingredients • Get your mixing and baking equipment ready
\LET'S EXPERIMENT! What Kind of Baking Pan Should I Usel
Materials Needed
1 shiny pie pan or small baking pan 1 dark-dull pie pan or baking pan 1 roll of refrigerated cookie dough that was bought at the
store 1 slicing knife -1 cutting board timer or clock
6

Directions
1. Place oven rack in center of oven. 2. Preheat oven to temperature on cookie package. 3. Slice eight even slices of cookies from the roll. 4. Place four cookies on the shiny pan and four cookies on the
dark-dull pan. 5. Bake the shiny pan of cookies first. Place near center of the
oven. Bake until light brown and done. WATCH TIME CLOSELY. Remove from oven. Leave cookies on pan to cool.
The shiny cookies baked for _____ minutes.
6. Bake the dark-dull pan of cookies for the same number of minutes as the cookies baked on the shiny pan. Remove from oven. Leave cookies on pan to cool.
What are the differences in color between the two cookies? Check top and bottom.
What is the difference in the feel of the cookies? Break cookies in half.
Which pan do you prefer for your cookies? _______ _
Dark, dull metal pans keep more heat in them than bright, shiny pans. Shiny pans reflect heat. Cookies baked on dark, dull pans brown faster. They may have a thicker bottom crust and be dry.
On the other hand, aluminum foil pans may be too shiny and lightweight to give really good baking results.
7

Lesson 2 -----------------------------------------------
Do I Like Baked Products? Fruits
& Vegetables
Milk & Dairy
The things you bake will fit into your daily food plan nicely. From the Bread and Cereal Group we eat baked foods such as bread, muffins or biscuits. They provide energy and some vitamins and minerals. Some bakery choices like bran muffins, whole wheat bread and others will give you fiber . Fiber adds a little texture to foods.
Other baked items like cookies or cakes fit better into the Fifth Food Group. They are sweeter and have more fat in them. They also give lots of energy.
Foods with too much fat or sugar could replace other foods that would give you energy plus vitamins and minerals. You need to be careful that you don't overdo the Fifth Food Group.
Did You Know .....
• At least 9000 years ago wheat was harvested in the Fertile Crescent? • Bread that is soft but sturdy enough to be sliced is a modern food? • For years, India has had a flat bread called chapatis? Scotland's flat bread is made of oat flour . Round, chewy cakes of rye flour came from Scandinavian countries . Welshmen have eaten "haidd", a shallow, chewy bread of barley flour. Of course, there's the Me xi can torti II a, too! • Before ovens were made, it was easier to flatten balls of dough so they could be baked on heated stones.
8
I --

What is Your Baking History?
Be a reporter for a short time. Interview a grandparent or older person you know about baking when they were young. Ask WHY, HOW, WHEN, WHO and WHAT. Get as complete a story as you can . Write it here.
Art Time
Use your art skill for another fun project to tell others about your favorite baked items . Gather pictures of baked foods that you enjoy. Use magazines, old posters, catalogs, old books or other sources . Make a collage by pasting or gluing the pictures on lightweight cardboard or heavy paper. Tell others about these foods as you show your artwork.
9
Lesson J _______________________ _
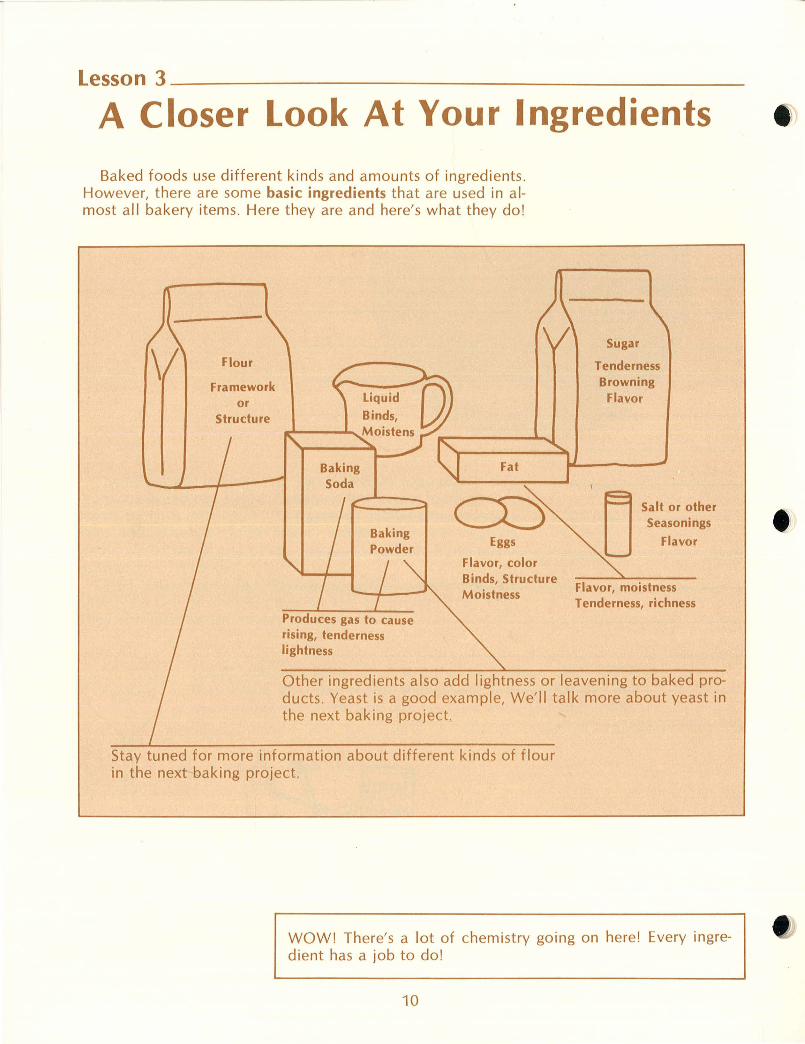
A Closer Look At Your Ingredients
Baked foods use different kinds and amounts of ingredients. However, there are some basic ingredients that are used in almost all bakery items. Here they are and here's what they do!
Flour
Framework or
Structure
Produces gas to cause rising, tenderness lightness
Eggs
Flavor, color Binds, Structure Moistness
Sugar
Tenderness Browning
Flavor
Salt or other Seasonings
Flavor
Flavor, moistness Tenderness, richness
Other ingredients also add lightness or leavening to baked products. Yeast is a good example, We'll talk more about yeast in the next baking project.
Stay tuned for more information about different kinds of flour in the next baking project.
WOW! There's a lot of chemistry going on here! Every ingredient has a job to do!
10

I LET'S EXPERIMENT! Rising to the Occasion
Once a baker was in a hurry. The recipe needed baking powder. Baking soda was used instead. They are both used as leavening agents (to add I ightness and cause the product to "rise"). Will the baker's project be a success?
Materials Needed 3 glass cups or small saucers measuring spoons baking powder baking soda lemon juice water
Directions
1. Measure 1/2 teaspoon of baking powder into one glass cup. Measure 1/2 teaspoon of baking soda in each of the other two cups.
2. Add 1 teaspoon of water to baking powder. What happened?
3. Add 1 teaspoon of water to container of baking soda. What happened?
4. Add 1 teaspoon of lemon juice to the other container of soda. What happened?
Do· you think the baker's food product will be okay?
What might have happened to it? _________ _
Leavening agents like baking powder and baking soda form gas bubbles in the batter. The gas bubbles make the batter rise. Baking powder plus a liquid such as water or fresh milk will form gas bubbles as soon as they are mixed . Baking soda will form the gas bubbles best when just a I ittle bit of acid is present. Ingredients that help baking soda are sour milk, sour cream, buttermilk, brown sugar, molasses or cream of tartar. Lemon juice or vinegar, two common acids, are often used to make fresh milk sour.
Rule of Thumb: Don't get in a hurry! Be sure you use the leavening agent that is written in the recipe.
11

Lesson 4------------------------
The World of Cookies Cookie lovers are found around the world . Have you ever
eaten langue du chat (France), speculaas (Netherlands), jumbles and rocks (England), lebkuchen (Germany), buneolos (Mexico), or spritz (Sweden)? They are all cookies from other countries . Do you know any that are special from another country?
If you ask for a biscuit in Australia or England, you will get a cookie!
Not all cookies are sweet. In fact the Chinese are not great sweet lovers. Some people say the fortune cookie was made to satisfy the sweet tooth of Americans!
d ~v
Cookies come in all sizes and shapes in the United States. There are bars, drop, formed, rolled, refrigerator and filled cookies. Cookies are really tiny cakes that have less liquid and more fat for the amount of flour than cakes .
Let's put a cookie together from the beginning.
Most cookies are mixed like a cake. The fat (shortening, butter or margarine) is creamed.
Then sugar and eggs are added. When finished, the creamed mixture is light and fluffy.
If you use an electric mixer for this, be sure to follow the safety rules .
The dry ingredients are sifted and then added.
If cookie sheets are to be used, try using shiny ones. Edges on cookie sheets help you take them in and out of the oven more easily. Read the recipe to see if you should grease it.
To grease a cookie sheet, use a clean paper towel or clean fingertips to spread the fat evenly over the sheet. Butter or margarine may cause your product to burn. Shortening is okay. A baking spray also can be used.
Cookies should be placed in the middle of the oven for best baking.
12

Consumer's Choice
Let's see how you like the following cookies.
Refrigerated Cookie Roll } Cookie Mix Purchased in the grocery store Ready-to-eat Cookies Homemade Cookies
1. Make each of the cookies according to the following directions . 2. Record the time it took to make each cookie on the chart below. 3. Record the price per cookie. Check with your leader. 4. Rate each cookie for quality. See the quality standards on page 15.
Time to make
Start Finish Total
Roll & Slice Cookie
Cookie Mix
Ready-to-eat Cookies
Cookie Recipe
What cookie is your favorite? ____________ _ What do you like about it? _____________ _
Refrigerated Cookie Roll
Price
1. Follow directions Utensils Needed
Quality
on package. Cookie sheet, slicing knife, cutting board, pancake turner, timer or clock, cooling racks
Cookie Mix
1. Follow directions Materials Needed on package.
13
Mixing bowl and spoon, liquid measuring cup, egg (as suggested on package directions), 2 teaspoons, cookie sheet, rubber scraper, pancake turner, timer or clock, cooling racks

Ready-to-eat Cookies 1. Place cookies on plate, ready to taste
Homemade Cookies
SN ICKERDOODLES
About 6 dozen
Ingredients
3 cups all-purpose flour 2 teaspoons cream of tartar 1 teaspoon baking soda 1/4 teaspoon salt 1/2 cup margarine, softened 1/2 cup shortening 1 1/2 cup granulated sugar 2 eggs 2 tablespoons sugar 2 teaspoons cinnamon
Directions:
Utensils
dry measuring cups measuring spoons flour sifter large mixing bowl, small bowl mixing spoon or electric mixer rubber scraper cookie sheet(s) 2 teaspoons spatula or pancake turner cooling racks timer or clock
1. Adjust oven rack to center of oven. Set oven for 400°F. 2. Measure the flour, cream of tartar, baking soda, and salt
into the flour sifter. Sift the mixture onto waxed paper and set aside.
3. Cream shortening and margarine in mixing bowl until smooth and creamy. Gradually add the granulated sugar and beat until light and fluffy.
4. Add the eggs to the shortening-sugar mixture and beat until well mixed.
5. Carefully stir in the flour mixture until the flour disappears. 6. Mix the 2 tablespoons sugar and 2 teaspoons cinnamon
together in a small bowl. 7. With the teaspoons, dip a teaspoonful of cookie dough. Roll
into small 1" ball. Roll the ball in sugar-cinnamon mixture. Place cookie balls on an ungreased cookie sheet, about 2 inches apart. Make cookies about the same size so they will bake evenly.
8. Bake for 8-10 minutes or until done. Cookies are done when they are firm and edges are light brown.
9. Remove from oven. Take cookies from pan with pancake turner. Place on cooling racks or paper towels.
14

WHAT'S A GOOD COOKIE
Look
Same size and shape Delicate brown on top
and bottom Ingredients evenly
mixed
Feel
Drop/Bar Cookie: soft, chewy and tender
Refrigerator Cookie: crisp, crunchy
Rolled Cookie: crisp outside, moist and tender inside
Now we have more choices than ever. We can make our own cookies or buy cookies from the store in rolls that we slice and bake, boxes that we mix and bake or bags that we open and eat!
Taste
Sweet, not overly strong
Be careful! There's a lot of energy in those cookies. You can easily get too many.
Think about this! A sugar cookie recipe used 1 cup of fat to make 48 cookies. One cup of fat equals tablespoons of fat or teaspoons of fat. How many teaspoons of fat does each cookie have? Circle the correct answer.
1/4 teaspoon 1/2 teaspoon 1 teaspoon 2 teaspoons
DID YOU KNOW ........ .
For each cup of sugar in a recipe you can substitute 1/4 cup of nonfat dry milk for 1/4 cup of sugar. That cuts sugar a little. It also adds vitamins and minerals .
Other good things to bake!
Ingredients
1/4 cup brown sugar 1/4 cup oil 1 cup water 1/2 teaspoon salt
GRANOLA
NOT a cookie but still good to eat About 8 cups
1 tablespoon vanilla 8 cups rolled oats 1 cup wheat germ 1 cup raisins
15
Utensils
large mixing bowl and spoon
dry measuring cups measuring spoons liquid measuring
cup
shallow baking pan timer or clock hot pads/pot
holders

Directions
1. Adjust oven rack to center of oven. Set oven to 275°F. 2. Mix brown sugar, oil, water, salt, and vanilla in mixing bowl. 3. Stir in rolled oats. 4. Spread thinly in shallow baking pan. 5. Bake for 45-60 minutes or until light brown. Stir every 15 minutes of
baking. 6. Remove from oven and cool. 7. Add wheat germ and raisins to cooled mixture. Place in covered
container. Put it in the refrigerator if you plan to keep it longer than a week.
OATMEAL-CARROT-RAISIN BARS
What makes these bars different from other cookie bars?
24 bars
Ingredients
1/2 cup all purpose flour 1/2 cup whole wheat
flour 1 teaspoon baking
powder 1/2 cup oatmeal 1/4 cup wheat germ 1/3 cup margarine 1/2 cup brown sugar 2 eggs 1/2 teaspoon vanilla 3/4 cup carrots, shredded 1/2 cup raisins
Directions
Utensils
mixing bowls small sauce pan dry measuring cups measuring spoons wooden spoons or
electric mixer 9 x 9" baking pan cooling rack timer or clock hot pads/pot holders
1. Adjust oven rack to center of oven. Set oven at 350°F. 2. Lightly oil a 9 x 9" baking pan. 3. Stir together flour, baking powder, oatmeal and wheat germ
in a bowl. Set aside. 4. In a mixing bowl, cream sugar, margarine, egg and vanilla
until light and fluffy. 5. Add shredded carrots and mix well. 6. Stir the dry ingredients into the creamed mixture. 7. Fold in raisins. 8. Pour mixture into oiled baking pan. Bake for 25-30 minutes. 9. Remove from oven. Cool on cooling rack. Cut into 24 bars.
16

SUPER COOKIES
Ingredients
1 cup sifted allpurpose flour
1/2 teaspoon baking soda
1/2 teaspoon baking powder
1/2 teaspoon salt 1 teaspoon cinnamon 1/2 cup margarine 1/2 cup brown sugar 1/2 cup granulated
sugar 1 egg 1 teaspoon vanilla 1 tablespoon milk 1 cup quick cooking
oatmeal
Directions
3 Dozen
Utensils
Optional: mixing bowls dry measuring cups
1/2 cup chocolate measuring spoons chips wooden spoons or 1 cup coconut electric mixer 1/2 cup raisins teaspoons
cookie sheet(s) cooling rack timer or clock spatula or pancake turner hot pads/pot
holders
1. Adjust oven rack to center of oven. Set oven to 350°F. 2. Sift together the flour, baking soda, baking powder, salt and
cinnamon in a bowl. Set aside. 3. Cream margarine, brown sugar and granulated sugar until
light and fluffy. 4. Add the egg, vanilla and milk to the creamed mixture and
beat until well mixed. 5. Stir in the sifted flour mixture until thoroughly mixed. 6. Add the oatmeal and any of the desired optional ingredients. 7. Drop by teaspoonfuls on ungreased cookie sheet. 8. Bake until lightly brown - about 10-12 minutes. 9. Remove from oven. Remove cookies from cookie sheet and
place on cooling rack.
17

Lesson 5------------------------
Welcome To Biscuit Baking
Biscuits, muffins, waffles, pancakes, coffee cakes, popovers and scones are all quick bread mixtures. They are "quick" because they use fast-acting leavening agents like baking powder or baking soda instead of yeast. They all rise quickly and should be light in texture.
Quick breads are mixed in different ways . Some are pour batters. Waffles, pancakes and popovers have
a thin batter. It's ready to pour. Some are drop batters. Drop batters are thick . They need to
be spooned into the baking pan . Muffins and coffee cakes are examples.
Others are soft dough mixtures . They are rolled or shaped by hand . Biscuits and scones are soft dough mixtures .
Biscuit Method of Mixing
e a fJ
Mix together dry ingredients
Cut shortening into dry ingredients with pastry blender or two forks . Mixture should look like big crumbs.
Pastry blender helps to mix the shortening just right.
Add liquid to make a soft dough. Stir lightly with a fork .
~Put onto floured surface and knead 10-12 times.
To Knead:
1. Rub a little flour into your hands and kneading surface. Press dough on surface.
2. Pick up edge that is away from you and fold top over toward you.
3. With heel of your hand, push dough lightly down. 4. Turn dough 1/4 turn and repeat steps.
After the dough is mixed and kneaded, you roll it out with a rolling pin until you get the right thickness. Biscuits are then cut using a biscuit cutter and placed on an ungreased baking sheet to bake.
18
I

As a bread product, biscuits give energy and some vitamins and minerals (especially B vitamins). They have more fat in them than other breads so you probably wouldn't want biscuits for every meal .
Biscuits usually are made with shortening, which helps to make the biscuits light and flaky. To stay healthy, people often are asked to eat less total fat. When fat is eaten, it is wise to use fewer solid fats like lard, shortening, butter and stick margarines. Instead use oils or soft margarines. Let's see if it works with biscuits.
I LET'S EXPERIMENT I -Biscuits
Materials Needed
mixing bowls measuring cups, dry and liquid measuring spoons pastry blender or two forks biscuit cutter
Directions
1. Make the biscuits below.
rolling pin floured surface flour sifter baking sheets timer or clock
2. Using What's A Good Biscuit, rate the biscuits you made. Use the Rating Box on the next page.
Ingredients
Traditional Biscuit 12 biscuits
2 cups all-purpose flour 1/2 teaspoon salt 1 tablespoon baking powder 1/4 cup shortening 3/4 cup milk
Directions
1. Adjust oven rack to middle of the oven. Set oven temperature to 450°F.
2. Measure flour, salt and baking powder and sift together into mixing bowl.
3. Add shortening. Mix with pastry blender or two forks until mixture looks like big crumbs.
4. Add milk to make a soft dough. Use a fork to mix lightly. 5. Put onto floured surface and knead 10-12 times. 6. Roll out to 1/2" thickness. 7. Dip biscuit cutter into flour and then cut biscuits. 8. Place biscuits about 2" apart on ungreased baking sheet. 9. Bake for 12-15 minutes until lightly brown.
10. Remove from oven and let cool on protected surface.
19

Biscuit with Oil
Ingredients
2 cups all-purpose flour 1/2 teaspoon salt
12 biscuits
1 tablespoon baking powder 1/4 cup vegetable oil 2/3 cup milk
Directions
1. Adjust oven rack to middle of the oven. Set oven temperature to 450°F.
2. Measure flour, salt and baking powder and sift together into mixing bowl.
3. Add oil and milk to flour. Stir lightly with fork until soft dough forms.
4. Put onto floured surface and knead 10-12 times . 5. Roll out to 1/2" thickness. 6. Dip biscuit cutter into flour and then cut biscuits. 7. Place biscuits about 2" apart on ungreased baking sheet. 8. Bake for 12-15 minutes until lightly browned. 9. Remove from oven and let cool on protected surface.
20
I

Rate Your Biscuits Write your comments in the spaces below
Look Feel
Traditional Biscuit
Biscuit with Oil
Which biscuit is better?
What do you think about biscuits made with oil?
What was good about making the biscuits? _______ _
What could be improved the next time you make biscuits? __
WHAT'S A GOOD BISCUIT
Look
Pale, golden brown Flat top, slightly rough Straight sides Creamy white inside
21
Feel
Crisp crust Thin crust on top
and bottom Moist, even crumb Flaky
Taste
Taste
Mild Delicate
(not fatty or bitter)

Lesson 6-----------------------
Time For Drop Batters
Corn muffins, blueberry, whole wheat, bran and banana muffi ns. Cinnamon-apple and cheese muffins and more. There's a muffin for everyone.
The nice thing about muffins is you can eat one all by yourself!
Several years ago muffin pans were called gem pans. Do you suppose it was because muffins are a real gem to eat?
Remember, muffins come from a drop batter. They are usually made with the muffin method of mixing. Here's how to do it!
• Stir together dry ingredients
• Mix together liquid ingredients
Add liquid all at once to dry ingredients. Stir just until all of the flour is moistened.
Fill muffin cups 2/3 full. Muffin pans should be oiled unless a non-stick surface is used.
This muffin method of mixing can be used for pour batters, too, like pancakes and waffles.
Pl~in muffins are okay, but think what a muffin could be if oatmeal , corn meal, cheese, apples, raisins or blueberries were added . Each muffin would be a powerhouse of energy with added vitamins, minerals and fiber. They taste good, too.
Muffin Making Materials Needed
mixing bowl wooden spoon measuring cups, dry and liquid measuring spoons
22
muffin pan rubber spatula fork cooling rack
flour sifter
I

Ingredients 12 muffins
2 cups sifted all-purpose flour 3 teaspoons baking powder 2 tablespoons granulated sugar 1 teaspoon salt
Directions
1/3 cup vegetable oil 1 egg, well beaten 1 1/4 cups milk
1. Adjust oven rack to center of oven. Set oven to 425°F. 2. Lightly oil muffin cups unless you use a non-stick muffin
pan. 3. Measure and sift together flour, baking powder, granulated
sugar and salt. Make a well in flour mixture. Set aside in mixing bowl.
4. Measure and combine oil, well-beaten egg and milk. 5. Add liquid ingredients all at once to flour mixture. Stir only
enough to dampen the flour. Batter should be lumpy. 6. Fill muffin cups 2/3 full with the batter. 7. Bake for 20 to 25 minutes until lightly browned. 8. Remove from oven and let cool. When cool, remove from
muffin pan.
Spicy Apple Muffins 12 muffins
Ingredients
1 1/2 cups whole wheat ·flour 1/2 cup brown sugar, packed 1/2 teaspoon baking soda 1 teaspoon cinnamon
Directions
1/4 cup vegetable oil 1 egg, slightly beaten 1 teaspoon vanilla 3/4 cup milk 1 cup apple,
peeled and chopped
1. Adjust oven rack to center of oven. Set oven to 375°F. 2. Lightly oil muffin cups unless you use a non-stick muffin
pan. 3. Peel and chop apple. Measure and set aside. 4. Measure and mix whole wheat flour, brown sugar, baking
soda and cinnamon. Make a well in flour mixture and set aside in mixing bowl.
5. Measure and combine oil, egg, milk and vanilla. 6. Add liquid ingredients all at once to flour mixture. Stir only
enough to dampen the flour. Batter should be lumpy. 7. Stir in chopped apple. 8. Fill muffin cups 2/3 full with the batter. 9. Bake for 20-25 minutes.
10. Remove from oven and let cool. When cool remove from muffin pan.
23

Oatmeal Muffins
12 muffins
Ingredients
3/4 cup whole wheat flour 3/4 cup all-purpose flour 1 cup uncooked oatmeal 1 tablespoon baking powder 1 tablespoon granulated sugar 1 teaspoon cinnamon 1/4 teaspoon salt 1 egg, slightly beaten 1 cup skim milk 3 tablespoons vegetable oil
Directions
Utensils
mixing bowl mixing spoon measuring cups,
dry and liquid muffin pan rubber scraper cooling rack timer or clock
1. Adjust rack to center of oven. Turn oven to 400°F. 2. Stir flour before measuring, but do not sift it. 3. Measure and mix flour, oatmeal baking powder, sugar,
cinnamon and salt together in a mixing bowl. 4. Mix egg, skim milk and oil together. 5. Add liquid mixture to dry ingredients; stir only until all dry
ingredients are moistened. 6. Spoon into muffin cups until 2/3 to 3/4 cup full. 7. Put into oven. Bake for 15-20 minutes. Muffins will spring
back with a light touch. 8. Remove from oven. Set on cooling rack. 9. Remove muffins from pan when cool.
BE A FOOD EDITOR Today you are a food editor who tastes foods and writes an
evaluation of them. Write a review of your muffins. Use "What's A Good Muffin" to help you with your story .
24

WHAT'S A GOOD MUFFIN
Look
Rough & pebbly top Thin crust Same size and shape Golden brown No holes or tunnels
Feel Taste
Tender, moist Mild, delicate Not dry or tough Even texture Medium size crumb
to slightly sweet It should taste like
the ingredients
Muffin making can be tricky! If you mix too long or the ingredients aren't measured correctly, your muffin won't look right. The right oven temperature is also very important for good muffins.
Did You Know? Quick loaf breads are first cousins to muffins because you
can use the same mixing method . Keep your eyes out for quick loaf bread recipes . Here's one to try.
Honey Dutch Bread 1 loaf
Ingredients
2 cups unsifted all-purpose flour
1/4 cup brown sugar, packed 1 tablespoon baking powder 1 teaspoon baking soda 2 teaspoons cinnamon 1/4 teaspoon nutmeg 1/4 teaspoon cloves 1/4 teaspoon salt 1 cup buttermilk 1 egg, well beaten 1/4 cup honey
Directions
Utensils
mixing bowl wooden spoon measuring cups, liquid and dry measuring spoons . rubber spatula one 9 x 5" loaf pan cooling rack timer or clock
1. Adjust oven rack to center of oven . Set oven to 350°F. 2. Lightly oil 9 x 5" loaf pan. 3. Measure and mix together the flour, brown sugar, baking
powder, baking soda, cinnamon, nutmeg, cloves and salt. Make a well in flour mixture and set aside.
4. Measure and combine buttermilk, egg .and honey. 5. Add liquid ingredients all at once to flour mixture. Stir until
all flour is dampened. 6. Put into lightly oiled loaf pan. 7. Bake for 45-60 minutes. Crust will be very firm when bread is
done. 8. Remove from oven. Take out of pan to cool.
25

Lesson 7------------------------------------------------
Let's Wrap It Up Try a Tasting Party. The ticket to enter is a favorite muffin or
quick loaf bread that you have made. Invite family members or friends to come, too.
• Set up a table for tasting .
• Place your baked items on the table.
• Begin tasting. Write down your comments . (Have your 4-H leader review the tasting rules.)
• Discuss the results of your tasting party.
What are the good qualities you found? What flavors did you really like? Were there any unusual items?
Tasting Comments Here ---------------
Here's an Idea - Start a recipe collection .
The next time you find a recipe that you like, write it down for your recipe collection. Keep your recipe in a file box or notebook that you can take to the kitchen ,
26

---
4-H Baking Skills Baking Is Fun (Level 1)
Be able to check off 32 of 40 skills listed before you move to the next project.
Skills New Skills I Knew Learned
Preparation
Know at least 10 baking terms, (mix, melt, sift) Identify uses for at least 15 baking tools Follow a recipe Know how to organize equipment and ingredients Measure liquid ingredients
Measure dry ingredients Measure solid fat Sift flour Know basic measuring equivalents (i.e. 1 tablespoon --
3 teaspoons) Mix cookie dough
Mix quick bread loaf or plain muffin Mix and knead biscuits Roll biscuits Tell difference between biscuit made with oil and biscuit made
with shortening Make a variety of muffins
Know at least three ways to make cookies Evaluate quality of:
cookies biscuits muffins
Know the use for each ingredient in a baking recipe Know the definition of a leavening agent Use correct baking pans
Nutrition
Know the food groups that apply to products Know the nutritional value of products Know at least one way to improve nutritional quality of bakery
items
27
Skills to Learn or Improve

New Skills to Skills Skills Learn or I Knew Learned Improve
Food Safety and Sanitation
Store foods so they are safe and have good quality Wear clean, washable clothes when preparing food Wash dishes and equipment when finished Keep hands, nails and equipment clean during preparation
Use pot holders or hot pads Know importance of an older person in the kitchen when using
a mixer, range, knife and so forth Know how to use a knife and cutting board Know how to use an electric mixer
Consumer Choices
Use food labels Be able to compare prices Evaluate time and money spent on homemade vs . convenience
bakery items Know how to figure cost of a bakery item Identify key rules for tasting and judging bakery products
Meal Planning
Know how bakery items fit into meals and snack plans Use a variety of bakery products in meals and snacks Know the history of some of your favorite bakery products Identify various types of bakery items from other countries
28