5_using ecognition developer in quick map mode — ecognition community
TRANSCRIPT
14/12/13 Using eCognition Developer in Quick Map Mode — eCognition Community
community.ecognition.com/home/using-ecognition-developer-in-quick-map-mode 1/17
View Edit History
Using eCognition Developer in Quick Map Mode
TABLE OF CONTENTS
1. Using eCognition Developer in Quickmap Mode
1. Purpose
2. Workflow
3. GUI framework
1. Building a solution
2. Defining action parameters
3. Loading and saving analysis settings as solutions
4. Running a solution
4. Use Segmentation Actions
1. Segmentation (Quadtree)
2. Segmentation (Multiresolution)
3. Segmentation (Merge Objects)
5. Use Classification Actions
1. Classification (Optimal Box Classifier)
2. Classification (Clutterremoval)
3. Classification (Nearest Neighbor)
4. Classification (Brightness Threshold)
6. Export Data
1. Export (Points)
2. Export (Polygons)
Using eCognition Developer in Quickmap Mode
PurposeThe Quickmap Mode is designed to allow a user solving simple analysis tasks without having
to get involved with ruleset development. main steps in analyzing an image are creating
objects, classifying objects and exporting results. For each of these steps, a small assortment
of actions is available. These actions can be combined freely utilizing the Analysis Builder
framework offered by the Definiens Architect and Developer products. Using the Quickmap
Mode, the user can either build a new analysis, starting with data only, or he can build on
existing Definiens projects.
Actions ▼
14/12/13 Using eCognition Developer in Quick Map Mode — eCognition Community
community.ecognition.com/home/using-ecognition-developer-in-quick-map-mode 2/17
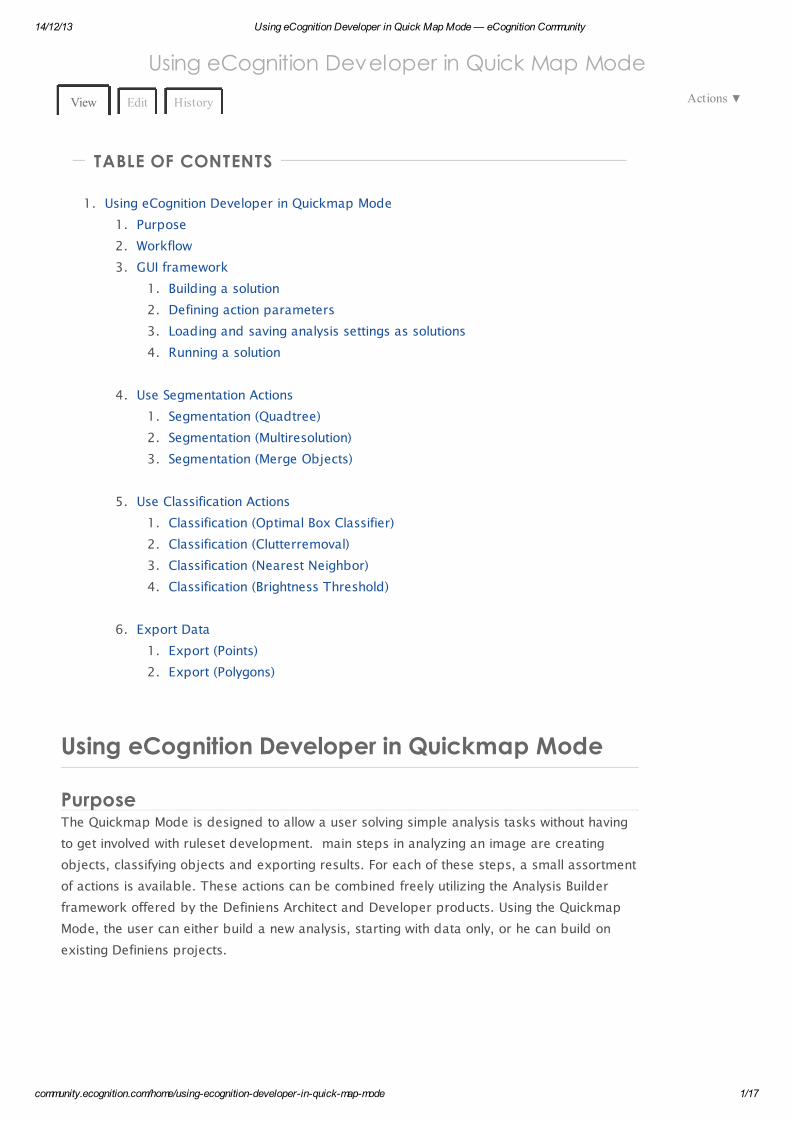
Figure: Quickmap Mode GUI
WorkflowThe Quickmap Mode supports two basic workflows. The user can either start with new data
or build on existing Definiens projects.
Workflow 1: Start with new data
When starting with new data, the first thing which needs to be done is creating a new project.
Once data is loaded, the first action needs to be a segmentation action which actually
generates an object level. This can be either the quadtree or the multiresolution
segmentation. Once an image object level is generated, a classification action can be added.
This can be the nearest neighbor, the optimal box or the brightness threshold action. From
there you can merge areas, continue classifying, resegment areas or simply export results.
Workflow 2: Build on existing project
Working with an existing project allows segmenting and classifying just as with new data only
with the difference, that you can start classifying right away if image objects are available.
When working with existing projects some points need to be considered:
Make sure that first, the action library is opened and then the project is loaded.
Opening an action library after the project will delete all existing levels and results.
Only classes which are flagged “display always” are displayed in the action dropdown
menus. If classes exist which are not displayed, you need to change this accordingly or
ask the ruleset developer to do so.
GUI frameworkThe Quickmap Mode is operated within the Application Builder framework. If you start
Definiens Developer in the Quickmap Mode, the application is automatically opened.
14/12/13 Using eCognition Developer in Quick Map Mode — eCognition Community
community.ecognition.com/home/using-ecognition-developer-in-quick-map-mode 3/17
To open the library in eCognition developer when running in Ruleset Mode, go to Library >
Open Action Library and open the action library stored in the bin\application folder of you
eCognition 8 installation:
eCognition 8.0\bin\applications\QuickMapMode\ActionLibrary.
Building a solutionWhen building a solution the following operations are necessary:
Add action
Press the (+) symbol to add an action.
Remove action
Press the (-) symboil to remove an action.
Change action sequence
Use the ^ symbol to change the action sequence.
Defining action parametersAction parameters can be defined in the parameter field of an action. Various GUI
components are available, which can be set by inserting values, pressing buttons or moving
sliders. The individual parameters are explained in the section which details the individual
actions.
Loading and saving analysis settings as solutionsYou can save the analysis settings in the Analysis Builder as a solution file (extension .dax)
and load them again.
Figure: Architect Toolbar
Save Solution
1. To save the analysis settings, do one of the following:
Click the Save Solution to a File button on the Architect toolbar.
Choose Library > Save Solution on the main menu bar.
Alternatively, you can encrypt the solution by using one of the following:
Click the Save Solution Read-only button on the Architect toolbar.
Choose Library > Save Solution Read-only on the main menu bar.
2. Enter a file name and a directory location and click OK.
Load Solution
Load an already existing solution with all analysis settings from a solution file
(extension .dax) to the Analysis Builder window.
1. To load a solution, do one of the following:
Click the Load a Solution From File button on the Architect toolbar.
14/12/13 Using eCognition Developer in Quick Map Mode — eCognition Community
community.ecognition.com/home/using-ecognition-developer-in-quick-map-mode 4/17
Choose Library > Load Solution on the main menu bar.
To use a Solution that was built with another Action Library, open the Action Library
before opening your solution.
2. Select the desired file and click OK. The solution is displayed in the Analysis
Running a solutionThere are different ways to run a solution or components of a solution. You can either utilize
buttons implemented in the individual actions or use the Architect toolbar functions. All
functions implemented with the individual actions will be explained with the respective
actions. Below is an overview of the functions offered by the Architect toolbar.
Figure: Architect Toolbar
Run selected action
Click the Run selected action button to run a selected action. This button is used to execute
an action after the definition is set.
Run solution until selected action
Click the Run solution until selected action button to delete the existing status and rerun the
entire solution until the selected action. If you build on existing projects you should not use
this button, since all existing objects and results are removed.
Execute solution
Click the Execute solution button to delete the existing status and run the entire solution. If
you build on existing projects you should not use this button, since all existing objects and
results are removed.
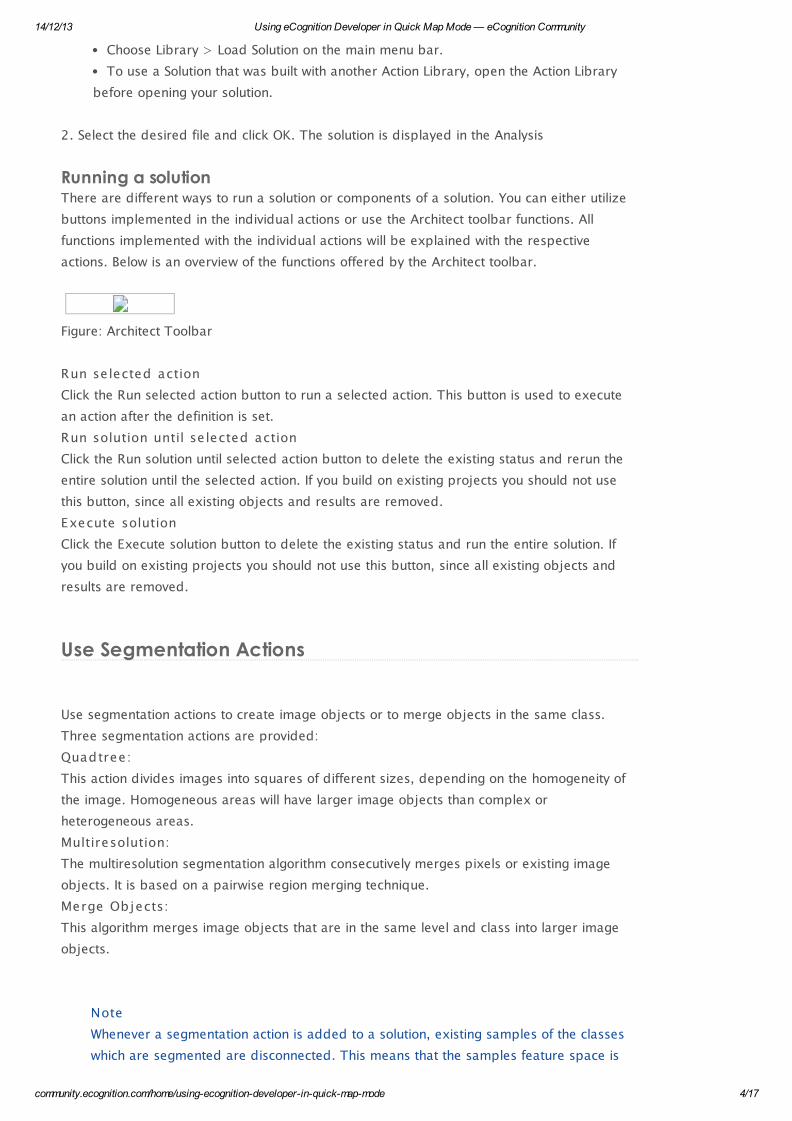
Use Segmentation Actions
Use segmentation actions to create image objects or to merge objects in the same class.
Three segmentation actions are provided:
Quadtree:
This action divides images into squares of different sizes, depending on the homogeneity of
the image. Homogeneous areas will have larger image objects than complex or
heterogeneous areas.
Multiresolution:
The multiresolution segmentation algorithm consecutively merges pixels or existing image
objects. It is based on a pairwise region merging technique.
Merge Objects:
This algorithm merges image objects that are in the same level and class into larger image
objects.
Note
Whenever a segmentation action is added to a solution, existing samples of the classes
which are segmented are disconnected. This means that the samples feature space is
14/12/13 Using eCognition Developer in Quick Map Mode — eCognition Community
community.ecognition.com/home/using-ecognition-developer-in-quick-map-mode 5/17
stored, but the physical sample object is removed. For the user this means the sample
cannot be removed any more.
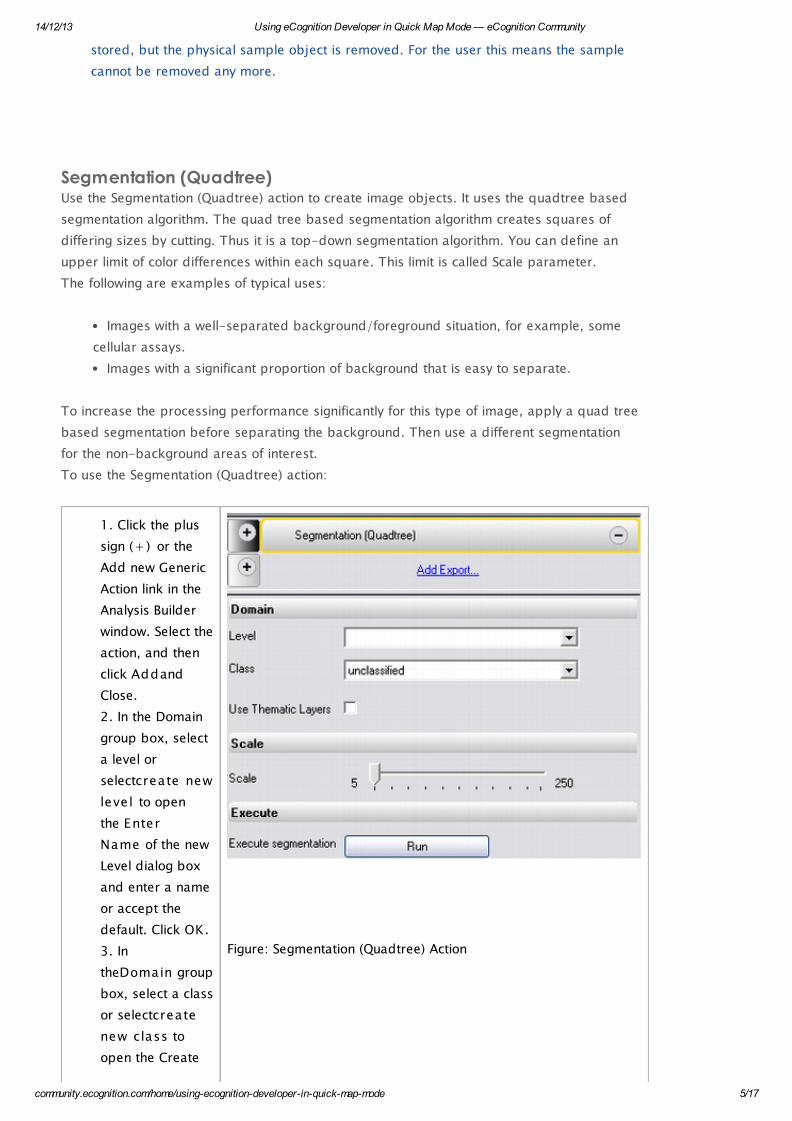
Segmentation (Quadtree)Use the Segmentation (Quadtree) action to create image objects. It uses the quadtree based
segmentation algorithm. The quad tree based segmentation algorithm creates squares of
differing sizes by cutting. Thus it is a top-down segmentation algorithm. You can define an
upper limit of color differences within each square. This limit is called Scale parameter.
The following are examples of typical uses:
Images with a well-separated background/foreground situation, for example, some
cellular assays.
Images with a significant proportion of background that is easy to separate.
To increase the processing performance significantly for this type of image, apply a quad tree
based segmentation before separating the background. Then use a different segmentation
for the non-background areas of interest.
To use the Segmentation (Quadtree) action:
1. Click the plus
sign (+) or the
Add new Generic
Action link in the
Analysis Builder
window. Select the
action, and then
click Addand
Close.
2. In the Domain
group box, select
a level or
selectcreate new
level to open
the Enter
Name of the new
Level dialog box
and enter a name
or accept the
default. Click OK .
3. In
theDomain group
box, select a class
or selectcreate
new class to
open the Create
Figure: Segmentation (Quadtree) Action
14/12/13 Using eCognition Developer in Quick Map Mode — eCognition Community
community.ecognition.com/home/using-ecognition-developer-in-quick-map-mode 6/17
New Class dialog
box and enter a
name or accept
the default.
Click OK .
4. Select theUse
Thematic
Layers if you
want to include
thematic data.
5. Use the slider
in the Scalearea
to select the scale
of objects. A
higher scale will
tend to create
larger objects.
6. Move your
mouse over fields
in the Analysis
Builder window to
see descriptions
in the Description
area.
7. Run the action
by clicking Run
8. Alternatively
you can run the
action by clicking
onAnalysis >
Run Selected
Action in the
main menu bar.
After running the
action, you can see the
resulting image objects
by clicking in the
project view or by
clicking the Show or
Hide Outlinesbutton
to see all image
objects outlined.
Segmentation (Multiresolution)Use the Segmentation (Multiresolution) action to create image objects. It uses the
multiresolution segmentation algorithm. The multiresolution segmentation algorithm
consecutively merges pixels or existing image objects. Thus it is a bottom-up segmentation
14/12/13 Using eCognition Developer in Quick Map Mode — eCognition Community
community.ecognition.com/home/using-ecognition-developer-in-quick-map-mode 7/17
algorithm based on a pairwise region merging technique.
Multiresolution segmentation is an optimization procedure which, for a given number of image
objects, minimizes the average heterogeneity and maximizes their respective homogeneity.
The following are examples of typical uses:
Extracting features which are characterized not purely by their color but also by
certain shape homogeneity.
Extracting land cover or man made features from remote sensing imagery.
To use the Segmentation
(Multiresolution) action:
1. Click the plus
sign(+) or the Add
new Generic Action link
in the Analysis Builder
window. Select
Segmentation
(Multiresolution) in
the Add Action dialog
box; then click Add
and Close.
2. In
the Domaingroup
box, select an Input
Level, and an Output
Level using the drop-
down arrows for the
Level fields.
3. Choose from the
available values or
select create new level
to open the Enter
Name of the new
Level dialog box and
enter a name or accept
the default. Click OK . If
the output level equals
the input level, the
input level will be re-
segmented.
4. Select a Class in
theDomain group
box. Select from the
available values or
select create new class
to open the Create
Figure: Segmentation (Multiresolution) Action.
14/12/13 Using eCognition Developer in Quick Map Mode — eCognition Community
community.ecognition.com/home/using-ecognition-developer-in-quick-map-mode 8/17
New Class dialog
box, name a new
class, select a color
and click OK.
5. Select the Use
Thematic
Layerscheckbox if you
want to include
thematic data.
6. Use the Scale slider
in the Settings area to
select the scale of
objects. A higher scale
will tend to create
larger objects.
7. Use the Color slider
in the Settings area to
determine the weight
of color as a
parameters in the
segmentation result.
Higher values will tend
to produce results with
greater emphasis on
the color of image
objects.
8. Move your mouse
over fields in the
Analysis Builder
window to see
descriptions in the
Description area.
9. Run the action by
clicking Run
10. Alternatively you
can run the action by
clicking on Analysis >
Run Selected
Actionin the main
menu bar.
After running the action, you can see the resulting image objects by clicking in the project
view or by clicking the Show or Hide Outlines button to see all image objects outlined.
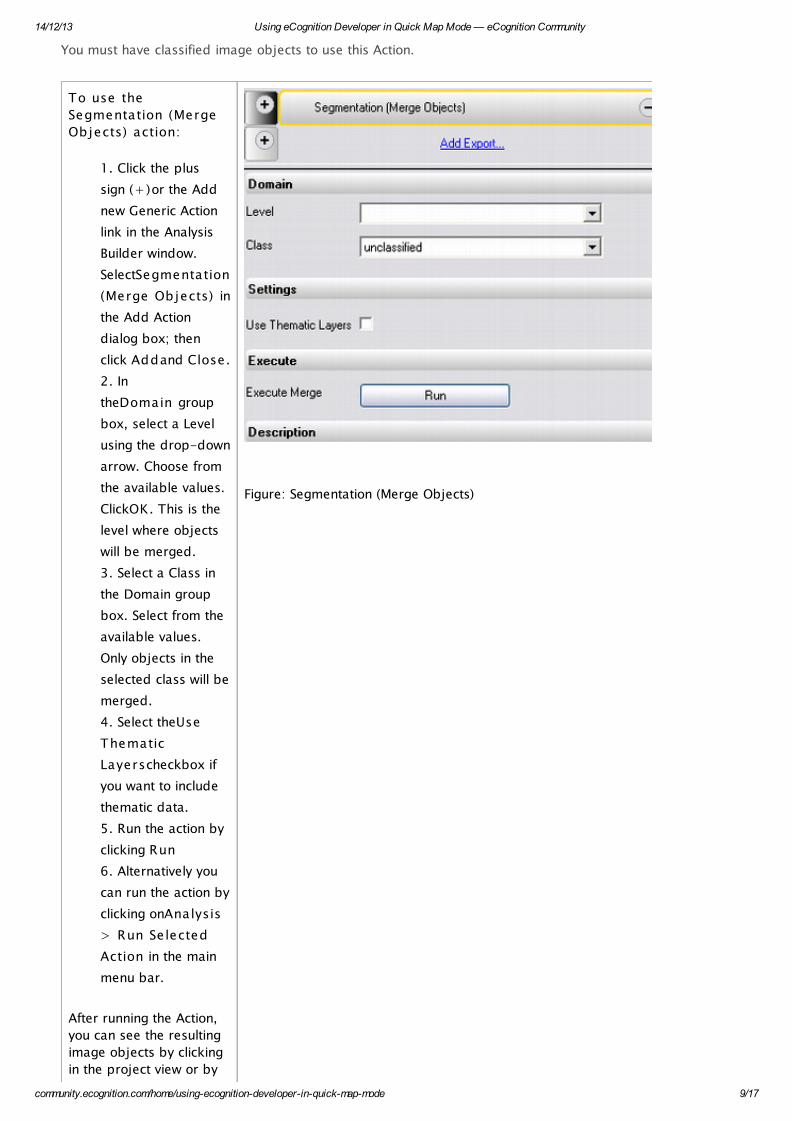
Segmentation (Merge Objects)Use the Segmentation (Merge Objects) action to merge objects that are in the same class into
larger objects.
14/12/13 Using eCognition Developer in Quick Map Mode — eCognition Community
community.ecognition.com/home/using-ecognition-developer-in-quick-map-mode 9/17
You must have classified image objects to use this Action.
To use the
Segmentation (Merge
Objects) action:
1. Click the plus
sign (+)or the Add
new Generic Action
link in the Analysis
Builder window.
SelectSegmentation
(Merge Objects) in
the Add Action
dialog box; then
click Addand Close .
2. In
theDomain group
box, select a Level
using the drop-down
arrow. Choose from
the available values.
ClickOK . This is the
level where objects
will be merged.
3. Select a Class in
the Domain group
box. Select from the
available values.
Only objects in the
selected class will be
merged.
4. Select theUse
Thematic
Layerscheckbox if
you want to include
thematic data.
5. Run the action by
clicking Run
6. Alternatively you
can run the action by
clicking onAnalysis
> Run Selected
Action in the main
menu bar.
After running the Action,
you can see the resulting
image objects by clicking
in the project view or by
Figure: Segmentation (Merge Objects)
14/12/13 Using eCognition Developer in Quick Map Mode — eCognition Community
community.ecognition.com/home/using-ecognition-developer-in-quick-map-mode 10/17
clicking the Show or Hide
Outlines button to see all
image objects outlined.
Use Classification ActionsUse classification actions to classify image objects based on samples or on thresholds. Four
classification algorithms are available:
Optimal Box
The Optimal Box classifier is a sample based classification algorithm. Based on user defined
samples, the best feature set for separating the two input classes is derived and the
classification is performed.
Nearest Neighbor
The Nearest Neighbor classifier is a sample based classification algorithm. Based on user
defined samples, a nearest neighbor algorithm combined with predefined feature sets is
used to assign objects to classes.
Brightness Threshold
This action classifies objects based on a brightness threshold. Objects darker than a defined
threshold are labeled with the defined class.
Clutter removal
The Clutter Removal action assigns and merges objects below a defined size threshold to the
predominant class in the surrounding. This action is not a pure classification action. It
performs both a classification and a merge.
Note
You must first run a Segmentation Action to create image objects befor being able to
run classification actions
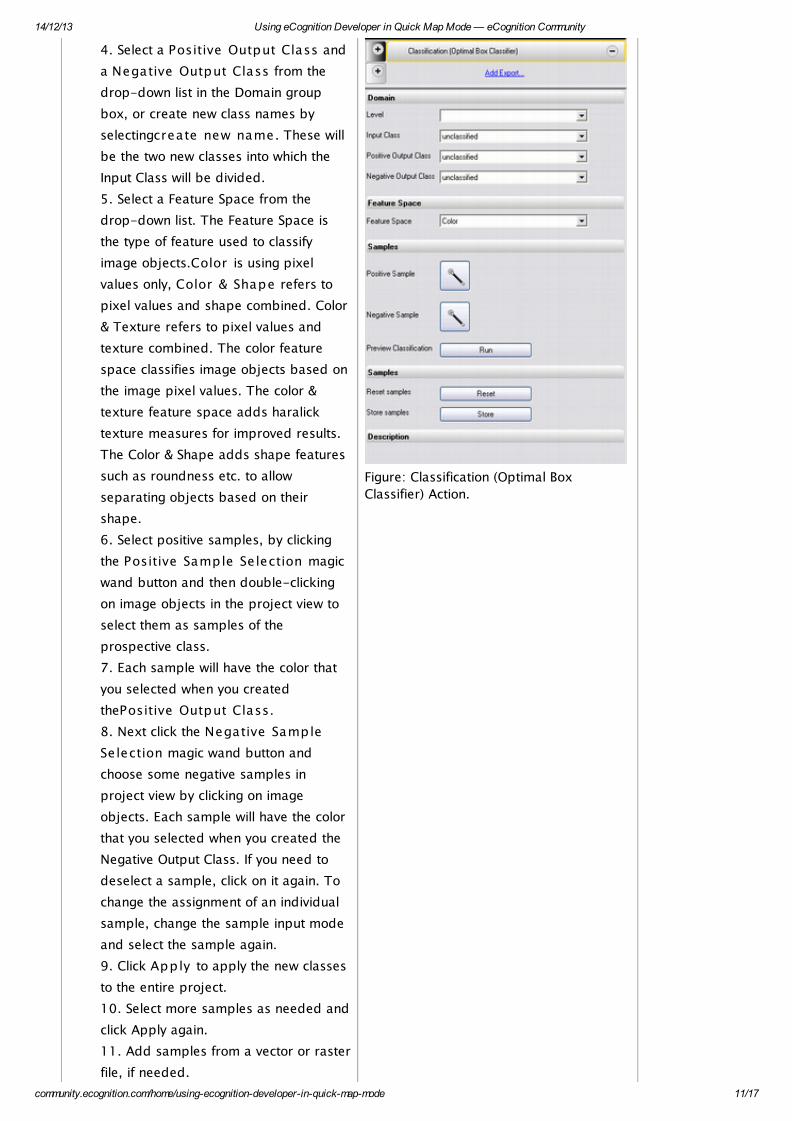
Classification (Optimal Box Classifier)Use the Classification Box (Optimal Box Classifier) action to classify image objects based on
samples.
To use the Classification Box (Optimal
Box Classifier) action:
1. Click the plus sign (+) in the Analysis
Builder window, select Classification
(Optimal Box Classifier) in the Add
Action dialog box and click Add and
Close to add it.
2. In the Domain group box, select a
Level where image objects that you want
to classify exist.
3. Select an Input Class from the
drop-down list in the Domain group
box. These are the image objects that
will be classified.
14/12/13 Using eCognition Developer in Quick Map Mode — eCognition Community
community.ecognition.com/home/using-ecognition-developer-in-quick-map-mode 11/17
4. Select a Positive Output Class and
a Negative Output Class from the
drop-down list in the Domain group
box, or create new class names by
selectingcreate new name . These will
be the two new classes into which the
Input Class will be divided.
5. Select a Feature Space from the
drop-down list. The Feature Space is
the type of feature used to classify
image objects.Color is using pixel
values only, Color & Shape refers to
pixel values and shape combined. Color
& Texture refers to pixel values and
texture combined. The color feature
space classifies image objects based on
the image pixel values. The color &
texture feature space adds haralick
texture measures for improved results.
The Color & Shape adds shape features
such as roundness etc. to allow
separating objects based on their
shape.
6. Select positive samples, by clicking
the Positive Sample Selection magic
wand button and then double-clicking
on image objects in the project view to
select them as samples of the
prospective class.
7. Each sample will have the color that
you selected when you created
thePositive Output Class.
8. Next click the Negative Sample
Selection magic wand button and
choose some negative samples in
project view by clicking on image
objects. Each sample will have the color
that you selected when you created the
Negative Output Class. If you need to
deselect a sample, click on it again. To
change the assignment of an individual
sample, change the sample input mode
and select the sample again.
9. Click Apply to apply the new classes
to the entire project.
10. Select more samples as needed and
click Apply again.
11. Add samples from a vector or raster
file, if needed.
Figure: Classification (Optimal Box
Classifier) Action.
14/12/13 Using eCognition Developer in Quick Map Mode — eCognition Community
community.ecognition.com/home/using-ecognition-developer-in-quick-map-mode 12/17
12. Click Reset All Samples button to
delete all samples and start over.
13. Once the results are satisfying, save
the solution .
Samples can be trained in an iterative
mode using several input images. To
do so, do the following:
1. Train the action on one image set,
save the solution and open a second
image.
2. Run all steps of the solution until the
classification step you want to train.
3. Add samples
4. Once the results are satisfying, save
the solution
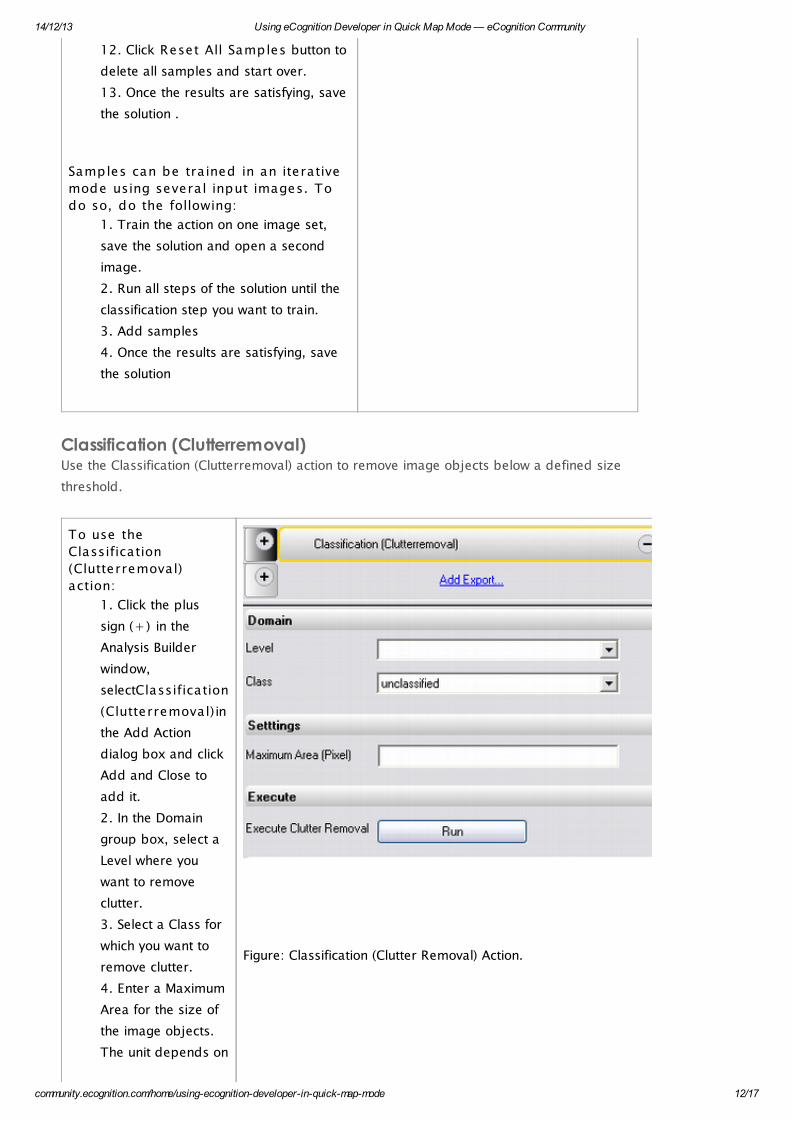
Classification (Clutterremoval)Use the Classification (Clutterremoval) action to remove image objects below a defined size
threshold.
To use the
Classification
(Clutterremoval)
action:
1. Click the plus
sign (+) in the
Analysis Builder
window,
selectClassification
(Clutterremoval) in
the Add Action
dialog box and click
Add and Close to
add it.
2. In the Domain
group box, select a
Level where you
want to remove
clutter.
3. Select a Class for
which you want to
remove clutter.
4. Enter a Maximum
Area for the size of
the image objects.
The unit depends on
Figure: Classification (Clutter Removal) Action.
14/12/13 Using eCognition Developer in Quick Map Mode — eCognition Community
community.ecognition.com/home/using-ecognition-developer-in-quick-map-mode 13/17
the setting used
when the scene was
imported.
5. Run the action by
going toAnalysis >
Run Selected
Actionin the main
menu bar. The
objects in the
selected class will be
removed.
6. To preserve the
classification, save
the solution or apply
a new segmentation.
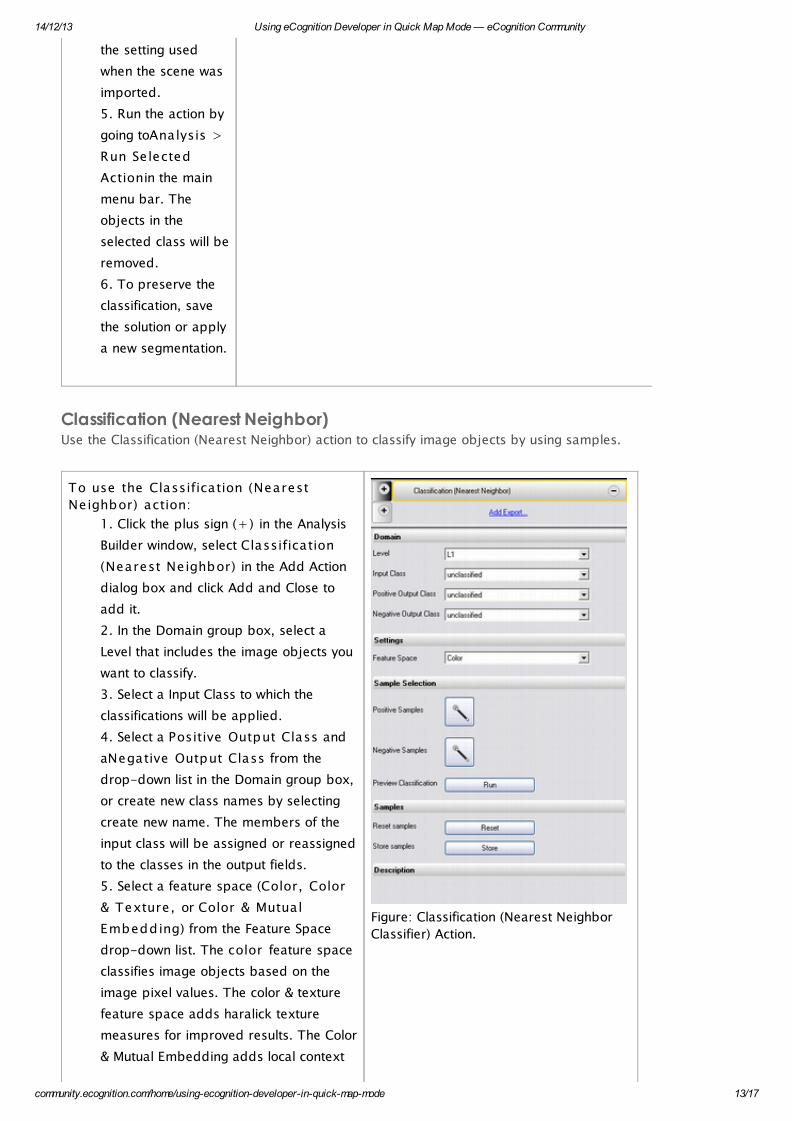
Classification (Nearest Neighbor)Use the Classification (Nearest Neighbor) action to classify image objects by using samples.
To use the Classification (Nearest
Neighbor) action:
1. Click the plus sign (+) in the Analysis
Builder window, select Classification
(Nearest Neighbor) in the Add Action
dialog box and click Add and Close to
add it.
2. In the Domain group box, select a
Level that includes the image objects you
want to classify.
3. Select a Input Class to which the
classifications will be applied.
4. Select a Positive Output Class and
aNegative Output Class from the
drop-down list in the Domain group box,
or create new class names by selecting
create new name. The members of the
input class will be assigned or reassigned
to the classes in the output fields.
5. Select a feature space (Color, Color
& Texture, or Color & Mutual
Embedding) from the Feature Space
drop-down list. The color feature space
classifies image objects based on the
image pixel values. The color & texture
feature space adds haralick texture
measures for improved results. The Color
& Mutual Embedding adds local context
Figure: Classification (Nearest Neighbor
Classifier) Action.

14/12/13 Using eCognition Developer in Quick Map Mode — eCognition Community
community.ecognition.com/home/using-ecognition-developer-in-quick-map-mode 14/17
to the color feature space. It allows
separating areas by context, which
cannot be distinguished on color alone.
6. Select positive samples, by clicking
thePositive Sample Selection magic
wand button and then double-clicking on
image objects in the project view to
select them as samples of the
prospective class. Each sample will have
the color that you selected when you
created the Positive Output Class.
7. Next click the Negative Sample
Selection magic wand button and
choose some negative samples in project
view by clicking on image objects.
8. Click the Preview Classification-
Run button to preview the resulting
classifications.
9. Click the Reset button to delete all
samples and start over.
10. To finalize the classification, save the
solution or add another segmentation
action.
Classification (Brightness Threshold)Use the Classification (Brightness Threshold) action to classify objects based on brightness.
To use the
Classification
(Brightness Threshold)
action:
1. Click the plus
sign (+) in the
Analysis Builder
window and
selectClassification
(Brightness
Threshold) in the
Add Action dialog
box. Click Addand
Close.
2. In the Domain
group box, select a
Level using the
drop-down arrow.
Choose from the
available values or
select create new
14/12/13 Using eCognition Developer in Quick Map Mode — eCognition Community
community.ecognition.com/home/using-ecognition-developer-in-quick-map-mode 15/17
level to open the
Enter Name of the
new Level dialog box
and enter a name or
accept the default.
ClickOK .
3. Select an Input
Class using the
drop-down arrow.
4. Select an Output
Class using the
drop-down arrow.
Choose from the
available values or
select create new to
open the Create
New Class dialog
box and enter a
name and color or
accept the default.
Click OK .
5. In the Settings
area, move the
Threshold slider to
select a brightness
threshold. Objects
with brightness up to
the selected
threshold will be
classified.
6. In the Preview
group box, click
the Test
Classification-
Run button to
preview the
classification. The
classified objects
display in the
project view.
7. Click the Reset
Classification-
Run button to delete
the classifications if
needed.
8. To preserve the
classification, save
the solution or apply
a new segmentation.
Figure: Classification (Brightness Threshold) Action
14/12/13 Using eCognition Developer in Quick Map Mode — eCognition Community
community.ecognition.com/home/using-ecognition-developer-in-quick-map-mode 16/17
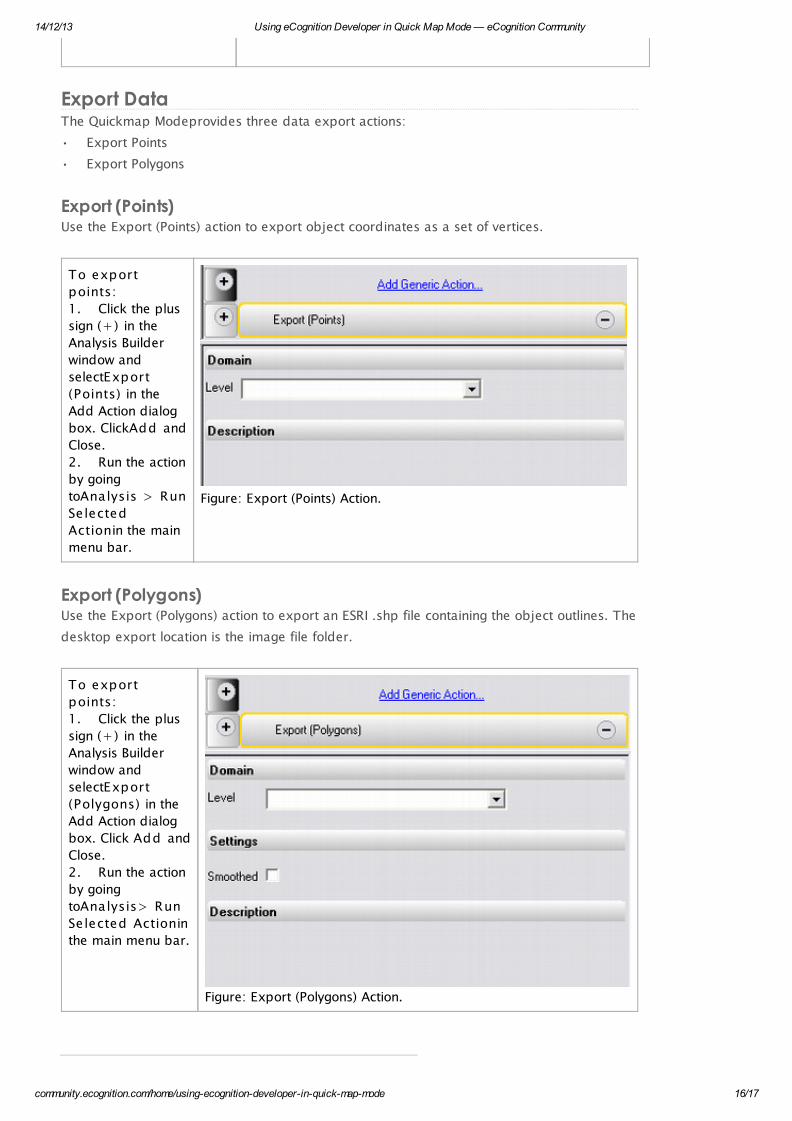
Export DataThe Quickmap Modeprovides three data export actions:
• Export Points
• Export Polygons
Export (Points)Use the Export (Points) action to export object coordinates as a set of vertices.
To export
points:
1. Click the plus
sign (+) in the
Analysis Builder
window and
selectExport
(Points) in the
Add Action dialog
box. ClickAdd and
Close.
2. Run the action
by going
toAnalysis > Run
Selected
Actionin the main
menu bar.
Figure: Export (Points) Action.
Export (Polygons)Use the Export (Polygons) action to export an ESRI .shp file containing the object outlines. The
desktop export location is the image file folder.
To export
points:
1. Click the plus
sign (+) in the
Analysis Builder
window and
selectExport
(Polygons) in the
Add Action dialog
box. Click Add and
Close.
2. Run the action
by going
toAnalysis> Run
Selected Actionin
the main menu bar.
Figure: Export (Polygons) Action.

14/12/13 Using eCognition Developer in Quick Map Mode — eCognition Community
community.ecognition.com/home/using-ecognition-developer-in-quick-map-mode 17/17