6201 model: hd2 electric stimulator tens + ems manual carefully to learn the correct operation ......
TRANSCRIPT

Instruction ManualInstruction Manual
Electric StimulatorTENS + EMS
Model: HD26201
HD2 is an advanced, professional model; consulting with
a medical professional before use is recommended.
GBIntroduction
Dear user, thank you for choosing Hivox's TENS & EMS HD2 Electric Stimulator. Please read
the manual carefully to learn the correct operation of this equipment. Understanding the
operation will enable you to discover and enjoy the benefits of HD2 for a long time.
HIVOX HD2 is a TENS & EMS combined unit, offering you two independent channels with
four electrode pads. It is innovative, featuring widely applicable functions for various
wellness-improving purposes: relieving pain, maintaining physical fitness, revitalizing
muscle, and alleviating fatigue. Its diverse built-in programs can conveniently match your
individual, specific needs. All programs come with default settings that can be used directly;
also, customized settings are conveniently available through short-cut keys, even during
treatment/stimulation. You will find HD2, despite its diverse, powerful functions, very
easy to use; in just a few minutes, you can navigate the unit without much help from this
user manual.
What is TENS used for?
TENS, Transcutaneous Electrical Nerve Stimulation, has been clinically approved as an
effective, drug-free, side-effect-free treatment of relieving physical pains. TENS units
emit controlled micro electric currents called impulses through skin to interact with nerves/
acupuncture points and relieve pains in mainly four categories: (1) chronic-illness-caused,
(2) post-operation-caused, (3) sport-injury-caused, and (4) female-nature-related. The
pain relieving/distracting effect comes from two ways: (1) to block the nerve pathway
transmitting pain signals and (2) to stimulate the brain to release natural pain killer
endorphin. Overall, high frequency pulses are effective in blocking the nerve pathway
and low frequency pulses effective in inducing the secretion of endorphin.
What is EMS used for?
EMS, Electrical Muscle Stimulation/Neuromuscular Muscle Stimulation, has also been widely
applied for improving one's well-being: sport, rehabilitation, anti-stress, cell
revitalization...etc. The enclosed program charts (Page I~III) can easily help you to find
appropriate programs for your needs. Besides, the featuring Masseur Touch Technology
embedded is able to deliver human massaging comfort to relieve muscle stiffness and
fatigue. Moreover, customized settings are only few keystrokes away for matching your
individual characteristics.
For more information about Hivox TENS & EMS HD series, please visit our website at
http://www.hivox-biotek.com/eng-pro-islim.htm or contact our customer service for fur-
ther assistance.

Knee Flexors
Adductors
Qudriceps
Ankle
Pectoral Muscles
Deltoid
Large Dorsals
Biceps
Elbow
Wrist
Abdominal Muscles
Sore Shoulder
Migraine
PMS
Neck Pain
Trapezium
Lumbar Region
External Abdominal Obligue
Deltoid
Triceps
Large Dorsals
Plantar Flexors
Buttocks
Hamstrings
(Biceps Femoris)
Upper Back Pain
Sciatica
Sciatica
Arthritis At Joints
Pain Types
Sore Muscles
Illustrations of Muscle & Pain
I

1 2 3 4
5 6 7 8
9 10 11 12
13 14 15 16
17 18 19 20
21 22 23
24 25 26 27
28 29 30 31
32
Illustrations of Pad Positions & Combinations
IINote: Pads linked by a bracket are to be connected to the same color-coded wires.

pg
Pro
g.
No.
Reaso
nable
are
as
of
applica
tion
Indic
ati
ons
Poss
ible
ele
ctro
de
posi
tion
Cyc
le 1
Cyc
le 2
Cyc
le 3
Cyc
le 4
Cyc
le 5
Cyc
le 6
Cyc
le 7
Cyc
le 8
Wid
th
(µs)
Fre-
quen
cy
(Hz)
On
Tim
e
(sec
.)
Off
Tim
e
(sec
.)
Wid
th
(µs)
Fre-
quen
cy
(Hz)
On
Tim
e
(sec
.)
Off
Tim
e
(sec
.)
Wid
th
(µs)
Fre-
quen
cy
(Hz)
On
Tim
e
(sec
.)
Off
Tim
e
(sec
.)
Wid
th
(µs)
Fre-
quen
cy
(Hz)
On
Tim
e
(sec
.)
Off
Tim
e
(sec
.)
1 +
11
Nec
k pa
in,
tens
ion
head
ache
02,
05250
430
0250
430
0250
530
0250
530
0
250
620
0250
620
0250
830
0250
830
0
2 +
12
Back
pai
n10
, 11
, 12
, 13
,
14,
19
250
630
0250
630
0250
820
0250
820
0
250
1020
0250
1020
0
3 +
13
Shou
lder
pai
n04
, 09
, 21
250
210
0250
48
025
06
60
4 +
14
Pain
as
a re
sult
of
rheu
mat
oid
arth
riti
s
See
note
250
60
20
0250
7020
0250
80
30
0250
80
30
0
5 +
15
Lum
bar
pain
05250
80
20
0250
80
20
0250
75
40
250
1020
0
250
704
0250
65
40
6 +
16
Men
stru
al p
ain
20250
40
30
0250
45
30
0250
55
30
0250
60
30
0
7 +
17
Pain
pro
gram
me
ISe
e no
te250
430
0250
420
0250
630
0250
620
0
250
830
0250
820
0250
1030
0250
1020
0
8 +
18
Kne
e pa
in
Ank
le j
oint
pai
n,
caps
ular
inj
urie
s
26,
30250
40
50
250
610
0250
50
50
9 +
19
(Burs
t)
Pain
pro
gram
me
IISe
e no
te250
75
0,2
50,2
5250
20,5
0
10 +
20
(Burs
t)
Pain
pro
gram
me
IIISe
e no
te250
100
0,2
50,2
5
On-T
ime (
sec.
) =
Cyc
le s
wit
ch-o
n t
ime in s
eco
nds
(contr
acti
on)
- O
ff-T
ime (
sec.
) =
Cyc
le s
wit
ch-o
ff t
ime in s
eco
nds
(rela
xati
on)
Note
: E
lect
rode p
osi
tion is
suppose
d t
o s
urr
ound t
he p
ainfu
l ar
ea.
W
ith p
ainfu
l m
usc
le g
roups,
the e
lect
rodes
are g
rouped r
ound t
he m
usc
le a
ffect
ed.
In c
ase o
f jo
int
pai
n,
the
join
t on t
he f
ront/
rear
sid
e o
f th
e j
oin
t an
d,
if e
lect
rode d
ista
nce
s perm
it,
on t
he r
ight
and left
sid
es
of
the j
oin
t, s
hould
be s
urr
ounded w
ith e
lect
rodes.
Min
imal
ele
ctro
de d
ista
nce
should
not
be less
than
5 c
m a
nd n
ot
exc
eed 1
5 cm
. Se
e f
igure
no.
26,
27 a
nd 3
0 fo
r kn
ee a
nd a
nkl
e j
oin
t.
Burs
t pro
gram
mes
are s
uit
able
for
all si
tes
whic
h s
hould
be t
reat
ed w
ith a
n a
ltern
atin
g si
gnal
pat
tern
(to
ensu
re m
inim
um
hab
ituat
ion).
pg
Pro
g.
No.
Reaso
nable
are
as
of
applica
tion
Indic
ati
ons
Poss
ible
ele
ctro
de
posi
tion
Cyc
le 1
Cyc
le 2
Cyc
le 3
Cyc
le 4
Cyc
le 5
Cyc
le 6
Cyc
le 7
Cyc
le 8
Wid
th
(µs)
Fre-
quen
cy
(Hz)
On
Tim
e
(sec
.)
Off
Tim
e
(sec
.)
Wid
th
(µs)
Fre-
quen
cy
(Hz)
On
Tim
e
(sec
.)
Off
Tim
e
(sec
.)
Wid
th
(µs)
Fre-
quen
cy
(Hz)
On
Tim
e
(sec
.)
Off
Tim
e
(sec
.)
Wid
th
(µs)
Fre-
quen
cy
(Hz)
On
Tim
e
(sec
.)
Off
Tim
e
(sec
.)
1 +
11
Shou
lder
mus
cles
04,
09,
21250
30
51
250
1015
1250
50
51
2 +
12
Mid
dle
and
low
er t
rape
zius
mus
cle,
lat
tisi
mus
dor
si
mus
cle,
nec
k m
uscl
es
02,
09,
10,
11
12,
16,
17
250
430
1250
420
1250
530
1250
520
1
250
630
1250
620
1
3 +
13
Back
mus
cula
ture
nea
r sp
inal
colu
mn,
Pro
g. I
14,
15,
19250
210
1250
410
1250
610
1
4 +
14
Fron
t an
d ba
ck u
pper
arm
mus
cula
ture
(in
clud
ing
bice
ps),
fro
nt a
nd b
ack
low
er
arm
mus
cula
ture
05,
06,
18,
22250
430
1250
430
1250
430
1250
530
1
250
530
1
5 +
15
Stra
ight
and
tra
nsve
rse
abdo
min
al m
uscu
latu
re
07250
615
1250
815
1250
1015
1
6 +
16
Back
mus
cula
ture
nea
r sp
inal
colu
mn,
Pro
g. II
14,
15,
19250
220
1250
220
1250
130
1250
130
1
7 +
17
Back
mus
cula
ture
nea
r sp
inal
colu
mn,
Pro
g. II
I
14,
15,
19250
430
1250
420
1250
630
1250
620
1
250
830
1250
820
1
8 +
18
Post
erio
r m
uscu
latu
re28
250
20
51
250
65
1250
30
51
9 +
19
Fron
t an
d ba
ck u
pper
thi
gh
mus
cula
ture
29250
20
51
250
68
1250
25
51
10 +
20
Fron
t an
d ba
ck low
er t
high
mus
cula
ture
25,
27250
25
51
250
68
1250
35
51
On-T
ime (
sec.
) =
Cyc
le s
wit
ch-o
n t
ime in s
eco
nds
(contr
acti
on)
- O
ff-T
ime (
sec.
) =
Cyc
le s
wit
ch-o
ff t
ime in s
eco
nds
(rela
xati
on)
TEN
S P
RO
GR
AM
S
III-
2
III-
1
EM
S P
RO
GR
AM
S

GBM
ASSA
GE P
RO
GR
AM
SPr
og.
Cycle
1Cy
cle 2
Cycle
3Cy
cle 4
No.
Cycle
5Cy
cle 6
Cycle
7Cy
cle 8
Widt
hRa
teOn
Tim
eOf
f Tim
eW
idth
Rate
On Ti
me
Off T
ime
Widt
hRa
teOn
Tim
eOf
f Tim
eWidt
hRa
teOn
Tim
eOf
f Tim
e
(µs)
(Hz)
Sec.
Sec.
(µs)
(Hz)
Sec.
Sec.
(µs)
(Hz)
Sec.
Sec.
(µs)
(Hz)
Sec.
Sec.
125
08
6025
060
250m
s25
0ms
250
1560
250
6025
0ms
250
6060
225
011
060
250
7025
0ms
250m
s25
080
250m
s25
0ms
250
9060
3030
325
05
150
250
1015
025
015
150
250
20~8
0~20
Hz
425
020
50
250
305
025
040
50
250
505
0
250
605
025
075
50
250
905
025
011
05
0
525
020
600
250
3060
025
040
600
250
5060
0
250
6060
025
075
600
250
9060
025
011
060
0
620
Hz 4
0µs~
250µ
s~40
µs20
08
300
725
06
0
825
025
0
925
080
0
1025
010
00
1. Dangers, Warnings & Cautions!!!
• Warnings1. Do not use this unit near the heart, around the mouth, or on diseased skin.
2. Do not use this unit in places with high humidity such as the bathroom.
3. May need to use under the supervision of a physical therapist.
4. For external use only.
5. Long-term stimulation at the same electrode site may cause skin discomfort.
Consult a dermatologist if skin discomfort persists.
6. Consult a doctor before you use this TENS & EMS device if you receive other
medical treatments.
7. Do not disassemble or remodel this unit.
8. Consult your local authorities for proper battery disposal.
9. Supervision and medical consultancy recommended if you are under age 16.
• Cautions1. If the unit is not functioning properly or causes discomfort, stop using.
2. If you want to move the electrode pads to other regions of your body, make
sure the unit is paused.
3. Do not attach the pads to other people during stimulation/treatment.
4. Use only for the specific pain problem diagnosed by the physician.
5. Do not use this unit while sleeping or driving.
6. Be careful not to allow any metal object, such as belt buckle or necklace
coming into contact with the electrode pads during stimulation.
7. Do not use this unit to treat one region for pain relief longer than 30 minutes.
Do Not Use HD2 With Following Conditions:• More then 3 months into pregnancy
• Metal plates or pace maker implanted
• Epileptic
• Diabetic
• Malignant tumor diagnosed
• High fever
• Abnormal high blood pressure
3
III-
3
Stimu
lation
Type
Tap a
nd gr
asp m
assa
ge
Knea
d and
gras
p mas
sage
Tap m
assa
ge
Side o
f han
d/pr
essin
g mas
sage
Side o
f han
d/pr
essin
g mas
sage
Vibra
tory
mas
sage
Tap m
assa
ge (s
witch
betw
een
electr
odes
)
Massa
ge je
t (sw
itch
betw
een
electr
odes
)
Pres
sure
mas
sage
jet
(switc
h be
twee
n ele
ctrod
es)
Comb
inatio
n pro
gram
me
(switc
h be
twee
n ele
ctrod
es)

GB GB
•Lead wires
( Color-coded lead wires--
blue for channel 1 & green
for channel 2)
•Belt clip•Electrode pads (4.5x4.5cm)
CH2+
CH2-
CH1-
CH1+
MENU
�
�
ENTER
UP
�
�
DOWN
2.Names of Components
• Names of Components
54
1
5
6
8
9
7
4
10
13
2 3
11
12
Remark
Function Keys Function Remark
* Intensity level could only be adjusted while HD2 stimulating
* A short beep is sounded when a valid key is pressed; two short beeps are sounded when an invalid key
is accessed.
R
LCD Display Icons Description
1 Indicating stimulating modes
2 Intensity indicator iconThe more the shade,the stronger the intensity
3 The numbers display correspondently whileselecting programs or setting up cycles
4 Only appears when battery is low
5 The number indicates total treatment timewhile users setting it.During stimulation, the number shown in thissection indicates the remaining time.
6 This icon is displayed and animated when padsare disconnected from wires duringstimulation.
7 While setting up the device, it indicates thefrequency of the first cycleWhile HD2 is stimulating it indicates thefrequency of current running cycle
8 Power on/off, Start/Stop Stimulation
9 Mode/Program selection/ Go back to previousmenu layer
10 Confirms Mode/Program/Treatment time
11 Increase Pulse rate (Hz)/Treatment time,Program selection
12 Decrease Pulse rate (Hz)/Treatment time,Program selection
13 Increase/Decrease correspondent channelsintensity
Press to power on and 3 secondsto power off.
During stimulation, press DOWNto decrease intensity levels ofboth channels together

GB GB
1. Press and slide away the battery cover on the back
of HD2. Insert batteries with correct polarity
positions; close back the battery cover.(Fig 1)
2. Place the electrode pads properly on the target area
and connect the color-coded leadwires to electrodes.
(Fig 2) You may want to refer to pad position illus-
trations on page I & II.
3. Refer to Fig 3-1 to connect the plug and socket. (To
disconnect, refer to Fig 3-2 to snap it out.)
4. Refer to the stimulation program charts beginning
page III and find a desirable TENS program according
to your need.
7
3.Quick Start
6
Fig 2
Fig 4 Fig 5 Fig 6
Fig 1
Fig 3-2
Fig 3-1
5. Hold down for 3 seconds to turn on HD 2. (Fig 4)
6. Press MENU repeatedly to move the LCD submenu in-
dicator to TENS (flashing when selected) and press
ENTER to confirm. (Fig 4)
7. Press �/�to select the preferred TENS program from
program #1 and #18 and confirm it by pressing ENTER.
(Fig 5)
8. Press to begin treatment and stimulation.
9. Access the pulse strength keys CH1+, CH1-, CH2+, and
CH2- to adjust the stimulation intensity levels per
channel. (Fig 6)
10. Pause the treatment stimulation anytime by pressing
. Press again to resume treatment.

GB GB
1. Hold down the key until the iSlim HD 2 is turned on.
2. Press MENU to select a submenu of TENS, EMS, or MASSAGE,
followed with confirmation by ENTER.
* Basic operation for TENS, EMS and MASSAGE programs1~10
1. In TENS, EMS or MASSAGE submenu, press� /� to choose one
of the first 10 TENS, EMS or MASSAGE programs that is flashing.
(Fig 1 & 2)
2. Press ENTER to confirm your program selection. (You can press
MENU to return to the LCD screen of main menu if you would
like change your selection of the treatment program or
submenu.)(Fig 3 & 4)
3. To set up/change total treatment time, press to pause the
stimulation. Press MENU to return to the treatment program
selection screen and press ENTER to setup/change total treat-
ment time.
4. Press to start the program. During stimulation, access the
CH keys to modify pulse intensity level.
TENS, EMS & MASSAGEThere are 20 programs in TENS & EMS submenu, and 10 in MASSAGE. You can
adjust program operation time and pulse strength for each channel individually.
Further, TENS & EMS programs 11~20 are also adjustable in terms of pulse rate
(HZ). Please refer to charts TENS (page III1-2) and EMS (page III-3) for parameter
setting and suggested applications.
Fig 1
Fig 2
4. Operation Procedures
Fig 4
Fig 5
Fig 3
Fig 6
Fig 7
Fig 8
* Advanced operation for TENS/EMS programs 11~20
1. After press ENTER to confirm TENS/EMS program 11~20, pulse
rate (HZ) setting flashes while C1 is displayed. (Fig. 7)
2. Setup desired pulse rate using� /� then press ENTER to con-
firm and move to the next cycle setting. (to end setting total
number of cycle, set pulse rate HZ to 0)
3. To setup/change total treatment time using � /�(Fig. 8) to
setup desired treatment time then press ENTER to confirm
4. Press to start stimulation
**Note 1:When the Hz of a cycle is set as "0", all the Hz settings for
the later cycles will move up by one cycle.
***Note 2: When the skin-pad detection goes off, treatment stimu-
lation will be paused. Also at the same time, there will be audio
and visual signals at presence. Check immediately if (1) the lead
wire is properly connected to the device body, (2) electrode pads
are connected to the lead-wires, and (3) electrodes are attached
properly on the skin. For more info, please refer to Section 5 Main-
tenance & Troubleshooting.
98
GB GB
10 11
5. Matenance & Disposal
1.Storage of the HD2 unit
(1) Keep the unit away from children.
(2) Remove the batteries if the unit will not be used for more than 10 days.
(3) Disconnect lead wires and electrode pads after each use.
(4) Reapply the protective film back to the electrode pad after each use.
(5) Do not store the unit under high temperature, high humidity, direct sunlight exposed
environment or where there are a lot dusts or corrosive gas.
2. Care for the electrode pads
(1) Clean the sticky surface of the electrode pads with a damp, lint-free cloth if it gets
dirty or less sticky.
(2) Always store the electrode pads in a cool, airy area away from direct sun light.
(3) Be sure the skin is clean before the electrode pads are placed.
(4) Always store the electrode pads with the protective film inside the provided zip polybag.
3. Care for the lead wires
(1) Avoid bending or pulling the lead wires.
(2) Snapping out the lead wire buttons from the electrode pads by holding the buttons,
not the wire.
(3) Do not connect the lead wires to snap-on electrode pads other than those supplied.
(4) Disconnect the lead wires from the electrode pads after each use.
4. Cleaning for the HD 2 unit
(1) Remove the battery from the battery bay and unplug the lead wires when you clean.
(2) Wipe off the smudge spots with a damp cloth (absorbed with lukewarm, soapy water
if necessary).
(3) Make sure there is no water seeping into the unit.
(4) Always keep the plug and socket dry when cleaning.
(5) Alcohol based cleaning agents or any abrasive cleaning agents are NOT recommended.
5. How to lengthen the life cycle of the lead-wire plug and socket?
(1) Be sure to connect and disconnect the plug and socket according to directions stated
on page 6.
(2) Do not twist the plug when it is connected to the socket.
(3) Make sure there is no objects stuck in the socket before connecting the plug
(4) Never poke the aligned metal wires on the socket or plug
Disposal
Batteries and this unit must NOT be disposed in household waste. Return them to public
collection points or shops selling batteries or devices of the same kind according to local
regulations. In case of any confusion, consult with your local environmental protection
agency.
1. Turn off the device by pressing and holding .
2. Open battery cover and remove the battery in the middle.
3. Press and hold the key and the�key simutaneously while
reinstalling the battery.
4. Keep holding the two keys after the battery is reinstalled until
a long beep sounded. (approximately in 10 seconds)
5. Close the battery cover afterwards.
Restore Factory PresetsBe cautioned that saved data will be restored to factory settings without any
prompting.

GB GB
1. The units fails to turn on.
(1) Press the key again and hold it down for 3 seconds.
(2) Check if the batteries are properly in place with good connection.
(3) Replace batteries if there is no improvement after (1) and (2) both fail.
2. The electrode pads are not sticky as before.
Clean the sticky surface with a damp, lint-free cloth; let them air dry and try them on. If
they still do not attach firmly, replace with new pads.
3. The unit beeps abnormally during treatment.
(1) Pause the program by pressing . Check if lead wires are connected securely with
the pads. Check if the pads are attached firmly on the treated area.
(2) If the beeping persists, replace the batteries with new ones.
4. The stimulation is not felt.
(1) If there is a warning beeping sound, follow procedures above.
(2) Press again to restart the program.
(3) Make sure electrode pads are not overlapped.
(4) Increase the pulse intensity gradually.
(5) Pause the program and make sure the lead wire plug is connected firmly in the socket.
5. The skin of treated area turns red.
Stop treating that area immediately; wait until the skin restores to its healthy state. If
irritation persists, consult with a dermatologist.
6. The battery icon begin to flash.
Continue to use the unit until the battery icon is the only item remaining on the LCD
screen; then replace the batteries.
7. The LCD displays are not clear or even broken.
Turn off the unit and replace batteries for further checking. If not improving, send the
unit to local dealers for further checking for electronic malfunction.
8. The lead wire plug are not firmly connected to the socket.
Remove the plug according to directions on page 6; check if there are any foreign objects
stuck in the plug or socket. If the plug is broken, check with the store where you bought
the unit for replacing the lead wires.
9. The stimulation is uncomfortable.
(1) Press � to decrease intensity if the stimulation is too strong.
(2) If not improving, press to pause the treatment. Check if the electrode pads are
placed properly according to recommended illustrations on page II and III. Make ad-
justment if necessary.
(3) If (2) does not help, check if the electrode pads are worn out. Worn pads can not
distribute current evenly across the skin, which may lead to irritating stimulation. In
such a case, replace the electrode pads.
10. The belt clip can not hold tightly the unit in position.
(1) Make sure the unit is held at the right position with the belt clip.
(2) Check the belt material and size; some belts work better with the supplied belt clip
than others.
6. Troubleshooting
12 13
1514
(WA
RN
ING
: If
you a
re IN
EXPERIE
NC
ED
wit
h a
dvance
d T
EN
S/EM
S d
evic
es,
consu
ltin
g w
ith a
pro
fess
ional
thera
pis
t is
reco
mm
ended f
or
pro
gra
m p
ara
mete
r adju
stm
ents
.
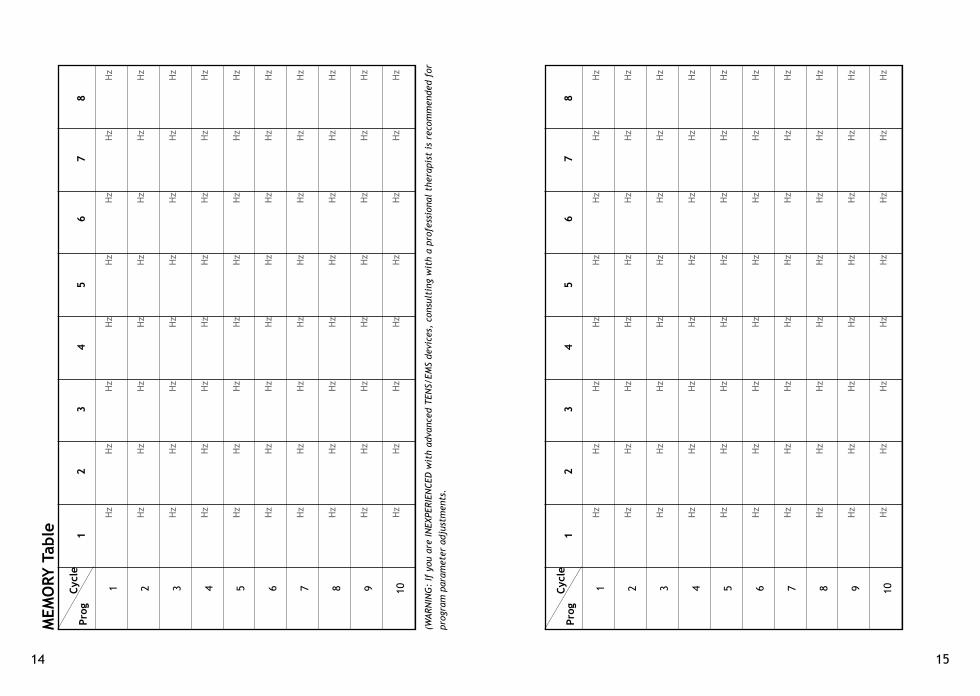
MEM
ORY
Table
C
ycle
12
34
56
78
1 2 3 4 5 6 7 8 9 10
Hz
Hz
Hz
Hz
Hz
Hz
Hz
Hz
Hz
Hz
Hz
Hz
Hz
Hz
Hz
Hz
Hz
Hz
Hz
Hz
Hz
Hz
Hz
Hz
Hz
Hz
Hz
Hz
Hz
Hz
Hz
Hz
Hz
Hz
Hz
Hz
Hz
Hz
Hz
Hz
Hz
Hz
Hz
Hz
Hz
Hz
Hz
Hz
Hz
Hz
Hz
Hz
Hz
Hz
Hz
Hz
Hz
Hz
Hz
Hz
Hz
Hz
Hz
Hz
Hz
Hz
Hz
Hz
Hz
Hz
Hz
Hz
Hz
Hz
Hz
Hz
Hz
Hz
Hz
Hz
Pro
g C
ycle
12
34
56
78
1 2 3 4 5 6 7 8 9 10
Hz
Hz
Hz
Hz
Hz
Hz
Hz
Hz
Hz
Hz
Hz
Hz
Hz
Hz
Hz
Hz
Hz
Hz
Hz
Hz
Hz
Hz
Hz
Hz
Hz
Hz
Hz
Hz
Hz
Hz
Hz
Hz
Hz
Hz
Hz
Hz
Hz
Hz
Hz
Hz
Hz
Hz
Hz
Hz
Hz
Hz
Hz
Hz
Hz
Hz
Hz
Hz
Hz
Hz
Hz
Hz
Hz
Hz
Hz
Hz
Hz
Hz
Hz
Hz
Hz
Hz
Hz
Hz
Hz
Hz
Hz
Hz
Hz
Hz
Hz
Hz
Hz
Hz
Hz
Hz
Pro
g

(WA
RN
ING
: If
you a
re IN
EXPERIE
NC
ED
wit
h a
dvance
d T
EN
S/EM
S d
evic
es,
consu
ltin
g w
ith a
pro
fess
ional
thera
pis
t is
reco
mm
ended f
or
pro
gra
m p
ara
mete
r adju
stm
ents
.
MEM
ORY
Table
C
ycle
12
34
56
78
1 2 3 4 5 6 7 8 9 10
Hz
Hz
Hz
Hz
Hz
Hz
Hz
Hz
Hz
Hz
Hz
Hz
Hz
Hz
Hz
Hz
Hz
Hz
Hz
Hz
Hz
Hz
Hz
Hz
Hz
Hz
Hz
Hz
Hz
Hz
Hz
Hz
Hz
Hz
Hz
Hz
Hz
Hz
Hz
Hz
Hz
Hz
Hz
Hz
Hz
Hz
Hz
Hz
Hz
Hz
Hz
Hz
Hz
Hz
Hz
Hz
Hz
Hz
Hz
Hz
Hz
Hz
Hz
Hz
Hz
Hz
Hz
Hz
Hz
Hz
Hz
Hz
Hz
Hz
Hz
Hz
Hz
Hz
Hz
Hz
Pro
g C
ycle
12
34
56
78
1 2 3 4 5 6 7 8 9 10
Hz
Hz
Hz
Hz
Hz
Hz
Hz
Hz
Hz
Hz
Hz
Hz
Hz
Hz
Hz
Hz
Hz
Hz
Hz
Hz
Hz
Hz
Hz
Hz
Hz
Hz
Hz
Hz
Hz
Hz
Hz
Hz
Hz
Hz
Hz
Hz
Hz
Hz
Hz
Hz
Hz
Hz
Hz
Hz
Hz
Hz
Hz
Hz
Hz
Hz
Hz
Hz
Hz
Hz
Hz
Hz
Hz
Hz
Hz
Hz
Hz
Hz
Hz
Hz
Hz
Hz
Hz
Hz
Hz
Hz
Hz
Hz
Hz
Hz
Hz
Hz
Hz
Hz
Hz
Hz
Pro
g
1716

GB Product Specifications
Power AAA battery x 3
Pulse rate 1 ~ 120 Hz
Pulse width 40-250µS
Output voltage Max. 90 Vpp, based on 500 Ohm load +--10%
Treatment time 5 ~ 90 minutes, 5 minutes per interval
Pulse strength 0 ~ 15 stages adjustable
Operation environment 10 ~ 40°C, 30 ~ 85% RH
Storage environment -10 ~ 50°C, 10 ~ 95% RH
Transport environment -10 ~ 50°C, 35 ~ 85% RH
Size 130 x 70 x 28 mm
Applicable Electrical Range for the Electrode Pads
Pulse rate 1~150 Hz
Pulse strength 1~150 V
Pulse width 100µS ~ 500 mS
Note: This device comlies with the electromagnetic compatibility requirement of EN 60601-1-2 as
specified in EEC Directive 93/42/EEC.
*** Don’t try to repair the device. There are no user serviceable parts inside.
*** Always use the specified accessories in the manual. The use of other parts not approved by the
manufacturer may be hazardous.

©All rights reserved 2007. 450-0801A MADE IN TAIWAN