6th grade mams yearbook
DESCRIPTION
creation of 6th gradeMAMS yearbookTRANSCRIPT

Investigator’s Name________________________________Date/Time of Investigation_____________________
Fingerprint AnalysisDebriefing:
WHY USE FINGERPRINTS IN A CRIMINAL INVESTIGATION?
According to most professional criminal investigators, fingerprints obey three fundamental principles. These principles are as follows:
1. A fingerprint is an individual characteristic. It is yet to be found that prints taken from different individuals possess identical ridge characteristics.
2. A finger print will remain unchanged during an individual’s lifetime.3. Fingerprints have general characteristic ridge patterns that permit them to be
systematically classified.
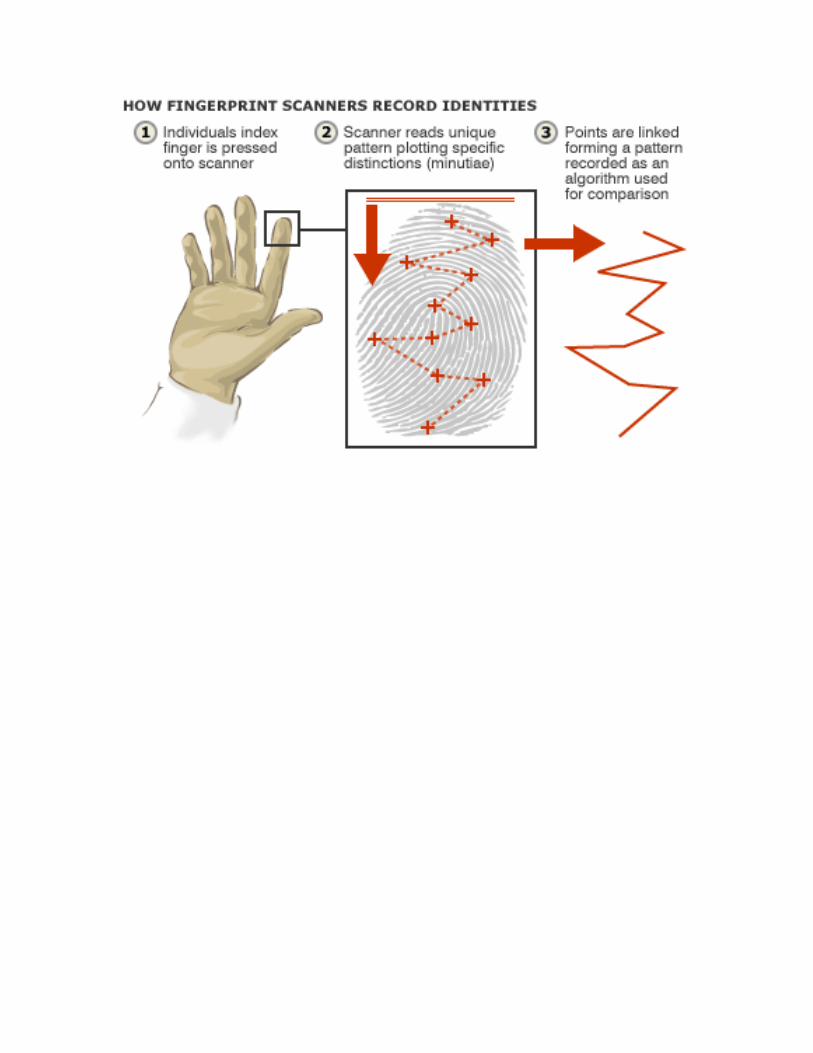
The individuality of any finger print is based not upon the general shape or pattern that if forms, but instead upon its ridge structure and specific characteristics (also known as minutiae). The recognition of these ridges, their relative number, and the approximate location of them, on the observed print, are the special characteristics that make the fingerprint a specific identifying characteristic of each individual. There are at least 150 individual ridge characteristics on the average fingerprint. IF between 10 and 16 specific points of reference for any two corresponding fingerprints identically compare, a match is assumed.
In a judicial proceeding, a point-by-point comparison must be graphically demonstrated for at least 12 different, but corresponding, points in order to prove the identity of a specific person. An example of typical point by point comparison is shown in the drawing below:
IDENTIFICATION OF PRINT CHARACTERISTICS
There are the three specific classes for all Fingerprints based upon their general visual pattern. These are loops, whorls, and arches. Approximately 60% of the total population have loops, 35% have whorls, and 5% have arches. The three major groups are also subcategorized based upon smaller differences existing between the patterns with in the specific group. These subcategories are as follows:
I. ARCH II. LOOP III. WHORL
a. Plain arch a. Ulnar loop a. Plain whorlb. Tented arch b. Radial loop b. Central pocket whorl
c. Double loopd. Accidental whorl
Examples of each of these subcategories are illustrated as follows:
Of the two types of arches, the PLAIN ARCH is the simplest of all fingerprint patterns. It is formed by ridges entering from one side of the print and existing on the opposite side. These ridges tend to rise at the center of the pattern, forming a wavelike structure. The TENTED ARCH is similar, but instead of rising smoothly at the center, there is either a sharp up thrust or spike, or the ridges meet at an angel that is less than 90 degrees. Arches do not have type lines, deltas or cores.

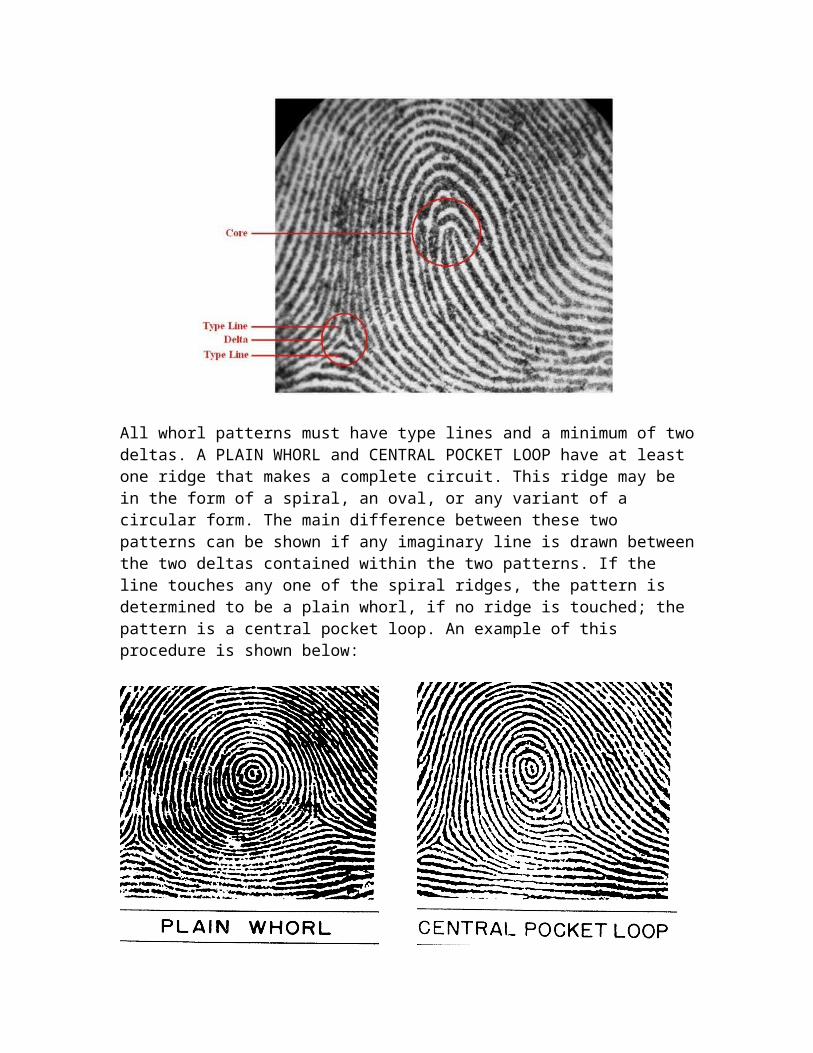
TYPE LINES are two diverging ridges usually coming into and spitting around an obstruction, such as a loop. A DELTA is the ridge point nearest the type line divergence. The CORE is the approximate center of the pattern. Examples of these characteristics areshown below:
A loop must have one or more ridges entering from one side of the print, recurving, and exiting from the same side. If a loop opens toward the little finger, it is called an ULNAR LOOP; if it opens toward the thumb, it is a RADIAL LOOP. The patterned area of any loop is surrounded by TYPE LINES.
All whorl patterns must have type lines and a minimum of two deltas. A PLAIN WHORL and CENTRAL POCKET LOOP have at least one ridge that makes a complete circuit. This ridge may be in the form of a spiral, an oval, or any variant of a circular form. The main difference between these two patterns can be shown if any imaginary line is drawn between the two deltas contained within the two patterns. If the line touches any one of the spiral ridges, the pattern is determined to be a plain whorl, if no ridge is touched; the pattern is a central pocket loop. An example of this procedure is shown below:

The DOUBLE LOOP is made of any two loops combined into one fingerprint. Any print classified as ACIDNETAL either contains two or more patterns (not including the plain arch) or the pattern is not covered by other categories i.e., a combination loop, and a plain whorl or a plain whorl or a loop and tented arch. Examples of these are below:
HOW PRINTS ARE USED IN A CRIMINAL INVESTIGATION
When the police or FBI book a person suspected of having committed a crime, the suspect’s fingerprints are taken and kept on file. These are DIRECT or INKED FINGERPRINTS. Using modern computer technology, a set of prints can be run through scanning devices and matched with a possible suspect within minutes;
The term LATENT PRINT (hidden print) is a misnomer but often used inclusively. There are actually three kinds of CRIME SCENE prints. These are:
1. VISIBLE PRINTS which are prints made by fingers touching a surface after the ridges have been in contact with a colored material such as blood, paint, grease or ink.
2. PLASTIC PRINTS which are ridge impressions left on a soft material such as putty, wax, soap, or dust.
3. True LATENT PRINTS which are invisible print impressions caused by the perspiration on the ridges on one’s skin coming in contact with a surface and making an invisible impression on it. Perspiration contains water, slat, amino acids, or oils and easily allows impressions to be made.
The method used for obtaining latent prints depends on the type of surface to be examined, the manner in which the prints were left, and the quantity of material left behind. After the prints have been photographed, lifted and taken to the crime lab, they are then compared to the prints of all persons known to be at the scene of the crime or who had access to the crime scene. This procedure eliminates all but the criminal’s prints.
The most common techniques used to find latent or hidden fingerprints include:
a. Dusting with Carbon Powder on white or light colored surfaces.
b. Dusting with Laconide Powder for black surfaces.
c. Dusting with Aluminum Powder for hard or ark colored surfaces as well as
d. Mirrors and metal surfaces.
e. Use of cyanoacrylate (super-glue) fuming.
f. Use of Iodine fuming techniques.
g. Use of ninhydrin.
h. Use of Silver Nitrate.
i. Use of Gentian Violet.
j. Use of Laser technology.
Investigation on Following Pages: Set up investigation B and D on the first day- both need to be exposed overnight. Complete your MO sheets on first day. You and your partners may need to split up to get everything done.

A. Dusting for and Lifting Prints from a Smooth, Non-porous Surface:
Materials:
Exhibit A Dusting Powders (Aluminum and Carbon black)Dusting brush Cellophane tapeIndex card Magnifying glassMO sheets Newspaper**This procedure should be done over a sheet of Newspaper to facilitate clean up afterward.
Procedure:
1. Obtain a brush for dusting the print. Make sure it is clean and the bristles are separated from each other. Use a different brush for each powder.
2. Various dusting powders can be used depending on the type of surface to be examined. Use very fine carbon black powder on a white or transparent surface. Use a white powder like Lanconide for prints on dark surfaces. Aluminum powder can be used on either type of surface. Use either the carbon black or aluminum powder to dust for the print on the slide.
CAUTION: Metallic dust can be harmful to the lungs if inhaled!!!
3. Distribute the powder evenly over the surface that contains the print. If possible pick up the object that carries the print and tap the edge of the object to uniformly distribute the dusting powder.
4. After all of the print is developed, remove the excess powder by blowing the dust form the surface or by gently brushing it away. Blowing the dust off the surface usually works better than the brushes supplied in the kit. If you do blow the dust off, be careful not to inhale any of the dust between attempts. If you elect to use the brush o remove excess powder, be careful not to destroy the print with too hard a brush stroke.
5. If a camera is available, try to photograph the print.
6. To lift the print from the slide tot eh index card, unroll about 5” to 6” of tape and place the end to the right of the thumbprint on the slide and allow the tape to cover the whole print. Slide a thumb over the tape and smooth it down over the print to force out air bubbles.
7. The print can be removed by pulling up on the roll end of the tape and the n placing it on the fingerprint card in the same manner as the tape was placed over the latent print. Make sure the tape is secure. Cut the tape from the roll.
8. Everyone in the group should observe the print under the magnifying glass and compare it to the right thumbprints on the MO’s. Identify the owner of the print and record this on the student data sheet.

B. Using Ninhydrin to Develop a Print of Paper:
Ninhydrin reacts with the amino acids in the perspiration on the print to forma a pink or purple compound. The reaction of ninhydrin with amino acid is shown below. The blue colored substance (Ruhemann’s Purple) is formed by the reaction of some of the ninhydrin with its reduction product, hydrindatin, and ammonia.
Materials:
Exhibit B ninhydrin solutionTweezers brushMO sheets Magnifying glassCotton ball
Procedure:
CAUTION: Do the following in a well- ventilated area. The acetone used in preparing the ninhydrin solution is volatile and flammable. Keep this solution away from open flames.
1. Tape the top of Exhibit B to a paper towel.
2. Dip the tip of the ninhydrin solution and carefully dab this liquid over the fingerprint area. Do not use too much pressure since that will destroy the print. Cotton wads held with tweezers can also be used to dab the liquid onto the fingerprint area.
3. Allow the paper to dry. It may take 2-3 hours to develop. Tape the dry paper to the student data sheet. Observe the print under the magnifying glass and determine the identify of the person who left the print. Record your conclusion on your data sheet.
NOTE: If the print does not develop, expose the paper to fumes from ammonia (by opening a bottle of concentrated ammonia and holding the paper with the print over the bottle opening.

C. Using Iodine Crystals to Develop A Print on Paper:
The dusting process used in Part A cannot be used to develop a print on paper, because the water from the perspiration spreads out and the print appears smeared. Exposing the print to iodine crystals will develop the print. The oily material on the print absorbs the iodine vapor and produces a violet to purple brown fingerprint.
Materials:
Exhibit C iodine crystals in a screw top jarMO sheets tweezersRoll of cellophane tape
Procedure:
1. Cut a piece of tape about 1” long and place ½ of it on the tope of Exhibit C. Open the jar containing the iodine crystals and quickly tape the paper to the lid so that the paper hangs down in the jar (see Figure below). Replace the lid and allow the print to come in contact with the iodine vapor for about 3-5 minutes or until the print is visible.
2. Once you can see the developed print, use tweezers to remove the paper form the jar. Be sure to quickly replace the lid on the jar.
3. Observe the print under the magnifying glass. Determine the identity of the person who left the print and record your conclusion on the data sheet.
4. the developed print may disappear since the iodine will continue to sublimate to “save” the print, completely immerse the paper in the fixer solution. This will “fix” the print for a few weeks.

D. Using Cryanoacrylate to Visualize Prints (only 1 per group)
CAUTION: Super glue will adhere to your skin and possibly ruin the object being examined.
Materials:
Exhibit D foilString Aquarium or large jar
Procedure:
1. Obtain a large container
2. Make a small aluminum bowl from the foils and center in the bottom of your container.
3. Add 10-15 drops of super glue spread evenly across the bottom of the foil bowl. (BE CAREFUL-DO NOT SPILL THE SUPER GLUE)
4. Suspend the spoon (Exhibit D) by a string in the container. It should not touch the bottom or sides of the container. Cover the jar tightly with foil and place a heavy object such as a book over the container to ensure fumes do not escape.
5. In a few hours, permanent prints should appear.
6. Identify the print as before and record the results on the student data sheet.
E. Identifying a Direct Print
Occasionally a criminal will leave behind a print that is clearly visible. Prints like these can be made by colored material that was on the person’s fingers. Substances that leave usable direct prints include soot, inks, blood, paints, facial make up and dyes. Usable direct prints can also be left on materials like window putty or clay that is soft enough to retain the image after the impression is made.