7” widescreen tft lcd color monitor - · pdf file7” widescreen tft lcd color...
TRANSCRIPT
7” Widescreen TFT LCD Color Monitor
Owner’s/Installation Manual
MMOODDEELL HHVVMM770022© 2005 Directed Electronics, N81702 08-05
OO WW NN EE RR ’’ SS GG UU II DD EE
IINNSSTTAALLLLAATTIIOONN GGUUIIDDEE
22 © 2005 Directed Electronics—all rights reserved
NNOONN--TTRRAANNSSFFEERRAABBLLEE LLIIMMIITTEEDD OONNEE YYEEAARR CCOONNSSUUMMEERR WWAARRRRAANNTTYY
Directed Electronics, Inc. (Directed) promises to the original purchaser that the new automotive video moni-tor and/or source unit(s) (the Product), excluding accessories, that is purchased and installed from a Directedauthorized dealer more than ninety (90) days after the purchase of a new vehicle is warranted for a period ofone (1) year from date of purchase of the Product.
Directed promises to the original purchaser that all video accessories will be free from defects in materi-als and workmanship under normal use and condition for a period of ninety (90) days after the date of pur-chase. A sales receipt and/or warranty registration card is required to provide proof of date of purchase of theProduct or accessories.
Should the Product prove to be defective during the applicable warranty period, the Product will be repairedor replaced with a new or comparable reconditioned part(s), at Directed's election. To obtain warranty service,the Product must be returned to a Directed authorized dealer along with proof of purchase and proof of instal-lation by an Authorized Directed Dealer.
Note: This warranty does not cover labor costs for the removal and/or reinstallation of the Product. IN ORDERFOR THIS WARRANTY TO BE VALID, YOUR PRODUCT MUST BE SHIPPED WITH PROOF OF PUR-CHASE AND INSTALLATION BY AN AUTHORIZED DIRECTED DEALER. ALL PRODUCTS RECEIVED BYDIRECTED FOR WARRANTY REPAIR WITHOUT PROOF OF DIRECTED DEALER INSTALLATION WILLBE DENIED.
This warranty is non-transferable and does not apply to any Product that has been modified or used in amanner contrary to its intended purpose, and does not cover damage to the Product caused by installation orremoval of the Product. This warranty is VOID if the product has not been purchased from an authorizedDirected dealer or has been damaged by accident or unreasonable use, negligence, acts of God, neglect,improper service or other causes not arising out of defect in materials or construction. This warranty does notcover the elimination of externally generated static or noise, or the correction of antenna problems or weaktelevision reception, damage to tapes, video games, software, camcorders, discs, speakers, accessories orvehicle electrical systems, cosmetic damage or damage due to negligence, misuse, abuse, failure to followoperating instructions, accidental spills or customer applied cleaners, damage due to environmental causessuch as floods, airborne fallout, chemicals, salt, hail, windstorms, lightning or extreme temperatures, damagedue to accidents, road hazards, fire, theft, loss or vandalism, damage due to improper connection to equip-ment of another manufacturer, modification of existing equipment, use of a faulty tape cartridge or cleaning ofthe VCR head, or Product which has been opened or tampered with for any reason or which has been dam-aged due to alteration or service performed by anyone other than Directed Electronics, Inc.
ALL WARRANTIES INCLUDING BUT NOT LIMITED TO EXPRESS WARRANTY, IMPLIED WARRANTY,WARRANTY OF MERCHANTABILITY, FITNESS FOR PARTICULAR PURPOSE, AND WARRANTY OFNON-INFRINGEMENT OF INTELLECTUAL PROPERTY ARE EXPRESSLY EXCLUDED TO THE MAXIMUMEXTENT ALLOWED BY LAW, AND DIRECTED NEITHER ASSUMES NOR AUTHORIZES ANY PERSON TOASSUME FOR IT ANY LIABILITY IN CONNECTION WITH THE SALE OF THE PRODUCT. DIRECTED HASABSOLUTELY NO LIABILITY FOR ANY AND ALL ACTS OF THIRD PARTIES INCLUDING ITS LICENSEDDEALERS OR INSTALLERS. IN NO EVENT WILL DIRECTED ELECTRONICS, INC. BE LIABLE FOR ANYINCIDENTAL, SPECIAL OR CONSEQUENTIAL DAMAGES (INCLUDING LOSS OF PROFITS), BY PUR-CHASING THIS PRODUCT, THE CONSUMER AGREES AND CONSENTS THAT ALL DISPUTESBETWEEN THE CONSUMER AND DIRECTED SHALL BE RESOLVED IN ACCORDANCE WITH CALIFOR-NIA LAWS IN SAN DIEGO COUNTY, CALIFORNIA.
Some states do not allow limitation on how long an implied warranty lasts. In such states, the limitations orexclusions of this Limited Warranty may not apply. Some states do not allow the exclusion or limitation of inci-dental or consequential damages. In such states, the exclusion or limitation of this Limited Warranty may notapply to you. This Limited Warranty gives you specific legal rights, and you may have other rights which varyfrom state to state.
920-0001 Directed Video, 1 year Warranty Rev 11-04 Directed Video 1 year RSE warranty 11-17-04.doc

TTaabbllee ooff CCoonntteennttssNon-Transferable Limited One Year Consumer Warranty . . . . . . . . . . . . . . . . . .2Important Notes . . . . . . . . . . . . . . . . . . . . . . . . . . . . . . . . . . . . . . . . . . . .4Introduction . . . . . . . . . . . . . . . . . . . . . . . . . . . . . . . . . . . . . . . . . . . . . . .5Features . . . . . . . . . . . . . . . . . . . . . . . . . . . . . . . . . . . . . . . . . . . . . . . . . .5What is Included . . . . . . . . . . . . . . . . . . . . . . . . . . . . . . . . . . . . . . . . . . . .6System Description . . . . . . . . . . . . . . . . . . . . . . . . . . . . . . . . . . . . . . . . . .6Battery Replacement . . . . . . . . . . . . . . . . . . . . . . . . . . . . . . . . . . . . . . . . .7Operation . . . . . . . . . . . . . . . . . . . . . . . . . . . . . . . . . . . . . . . . . . . . . . . . .8
Power On/Off ........................................................................................8Mute....................................................................................................8Menu (Adjustments) ...............................................................................8
Headrest Housing/Bezel Installation . . . . . . . . . . . . . . . . . . . . . . . . . . . . . . .9Headrest Installation . . . . . . . . . . . . . . . . . . . . . . . . . . . . . . . . . . . . . . . .11Typical Wiring Diagram . . . . . . . . . . . . . . . . . . . . . . . . . . . . . . . . . . . . . . .12Multiple A/V Input Selector . . . . . . . . . . . . . . . . . . . . . . . . . . . . . . . . . . . .13
Connecting a monitor to multiple sources................................................13Troubleshooting . . . . . . . . . . . . . . . . . . . . . . . . . . . . . . . . . . . . . . . . . . . .15Specifications . . . . . . . . . . . . . . . . . . . . . . . . . . . . . . . . . . . . . . . . . . . . .16Notes . . . . . . . . . . . . . . . . . . . . . . . . . . . . . . . . . . . . . . . . . . . . . . . . . . .19
© 2005 Directed Electronics—all rights reserved 33
44 © 2005 Directed Electronics—all rights reserved
IImmppoorrttaanntt NNootteess1. Before operating your LCD Monitor system, please read these instructions carefully.2. Retain this manual for future reference.3. Do not remove any WARNING stickers on the unit.4. Do not use any chemical solvent, cleaning agent or corrosive detergent to clean
away dirt on the surface of the screen. Doing so may cause irreversible dam-age to the surface of the LCD screen. To clean off dirt or fingerprints, it is rec-ommended that a soft-damp lens-cleaning cloth be used.
5. Using spare parts from another manufacturer may cause permanent damage tothe unit.
6. Avoid installing the monitor screen in a position that is exposed to direct sun-light and hot air vents.
7. Install the unit in a dry location, avoid condensation.8. Ensure that all wiring is properly connected before operating the unit.9. Should the LCD panel break, avoid contact with the broken glass or fluid leaking
out from the enclosure. If you come into contact, flush and clean the affectedareas with plenty of water. Seek medical attention immediately.
10. When operating the monitor, avoid touching or pressing on the LCD screen.Excessive force will damage the LCD screen.
11. When installing this unit in a vehicle, ensure that the installation and use ofthis unit is in compliance with local vehicle rules and regulations.
12. Before replacing a blown fuse, turn the unit off and disconnect all power. Ensurethe replacement fuse is of the same rating (5A) of the fuse being replaced.
13. If during operation the unit overheats or malfunctions, turn off the power andcontact your dealer. Do NOT disassemble the unit, there are no user servicea-ble parts in the unit.
14. Ensure that no foreign objects are in the unit when the LCD screen is closed.15. The battery (CR2025) in the remote control has a useful lifetime of approxi-
mately 6-months. To ensure proper and reliable operation, replace the batteryin a timely manner.
16. When the unit is used in conjunction with a radio/TV tuner, reception qualitywill vary depending on the geographic location and weather conditions.
17. The rated operating temperature range of the unit is 32º–92º F. Cool or warmthe vehicle to within this temperature range prior to unit operation.
18. The picture viewing quality of this LCD is dependent on the installed location.Adjust the brightness control and/or the angle of the screen to achieve theoptimum visual quality.

IInnttrroodduuccttiioonnCongratulations on your purchase of the world’s finest video entertainment system.At Directed we are committed to bringing you the most technologically advancedproducts available. We are pleased that you chose a Directed Video product. Throughyears of critical testing and hand craftsmanship, we have created a wide range ofvideo entertainment products for your viewing pleasure.
This system incorporates the use of on screen display menu controls that allows youto configure the system to suit your own personal preferences. For your listening flex-ibility, audio can be heard by optional infrared (wireless) headphones.
To view other great products from Directed Electronics, please visit the DirectedVideo page at www.directed.com.
FFeeaattuurreessHigh definition, low reflection TFT LCD screen – 1440 (W) X 234 (H)16:9 wide screen ratio (full, 4:3, or wide selectable)All functions can be operated from the remote control (power, volume, source select, etc.)OSD (On Screen Display) of all functionsBrightness, color, and tint controls providedInvert image control (Up/Down, Left/Right)One-touch dimmer controlStereo audio outputLow power consumption (750 mA at 12VDC)Input voltage tolerance (9VDC–16VDC)External A/V input2-ch IR wireless stereo headphoneFront headphone stereo outputPAL/NTSC manual select
© 2005 Directed Electronics—all rights reserved 55

66
WWhhaatt iiss IInncclluuddeedd7” TFT LCD Color Monitor Mounting hardware package
Headrest housing EV sponge
Headrest bezel DIN to RCA cable (for A/V input)
Remote Control Unit/battery
SSyysstteemm DDeessccrriippttiioonn
MMOONNIITTOORR
1. Headphone jack2. Volume up/down buttons3. Wireless headphone IR transmitter4. Menu—changes the viewing aspect ratio (Full, 4:3, or Wide)5. Power On/Off button6. Remote control IR sensor receiver7. DIN jack for external audio/video input
RREEMMOOTTEE CCOONNTTRROOLL
8. POWER On/Off button9. MENU/UP/DOWN/LEFT/RIGHT—use to adjust selected Menu setting
10. MODE—use to select 4:3 or 16:9 picture display.
MONITOR REMOTE CONTROL
1 2 3 4 5 6 7
8 9 10 11
12
13
14
© 2005 Directed Electronics—all rights reserved
11. SOURCE—select the video source (AV1/AV2).12. DIM—dims the LCD screen13. MUTE—mutes the audio14. MENU—displays the menu screen. Each press advances through each of the
menus
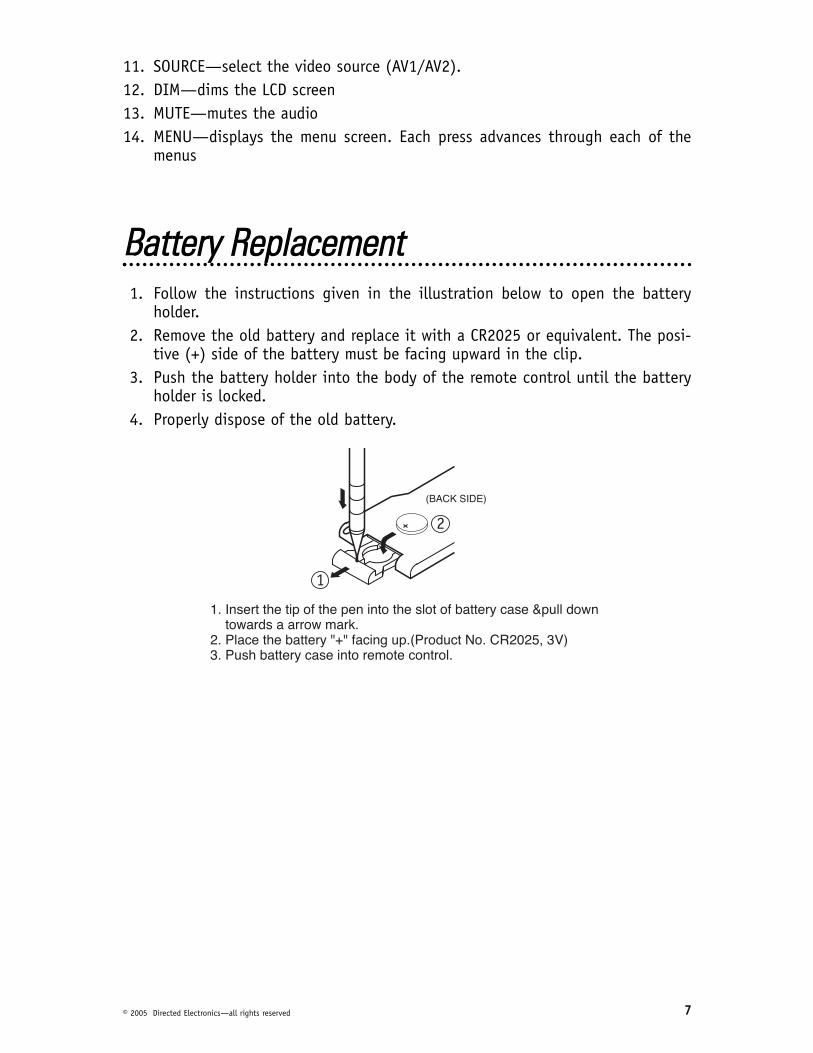
BBaatttteerryy RReeppllaacceemmeenntt1. Follow the instructions given in the illustration below to open the battery
holder.2. Remove the old battery and replace it with a CR2025 or equivalent. The posi-
tive (+) side of the battery must be facing upward in the clip.3. Push the battery holder into the body of the remote control until the battery
holder is locked.4. Properly dispose of the old battery.
1
2
77© 2005 Directed Electronics—all rights reserved

88
OOppeerraattiioonn
PPOOWWEERR OONN//OOFFFF
1. Press the POWER button on the LCD screen, or press the POWER button on theremote control to turn the monitor on/off.
2. The Directed Electronics logo will display for 2-seconds.
MMUUTTEE
Press the MENU button on the LCD monitor and hold it for 2-seconds to mute theaudio, press again and hold it for 2-seconds to restore the audio.
Also you can use the MUTE button on the remote. Press to mute the audio, pressagain to restore the audio
NNOOTTEE:: The power on/off button on the monitor does not mute the audio when thereis an A/V input selector (VS102), in which case the button selects the A/V input.
Press the SEL button on the remote control to the mute the audio, press again torestore audio.
NNOOTTEE:: The MENU button on the monitor does not mute the audio when there is anA/V input selector, in which case the MENU button selects the A/V input.
MMEENNUU ((AADDJJUUSSTTMMEENNTTSS))
1. Press the MENU button on the remote to display the following:
MENU
Bright 31Contrast 31Color 31Tint 31Screen 16:9Bass 0Treble 0IR ch1
© 2005 Directed Electronics—all rights reserved
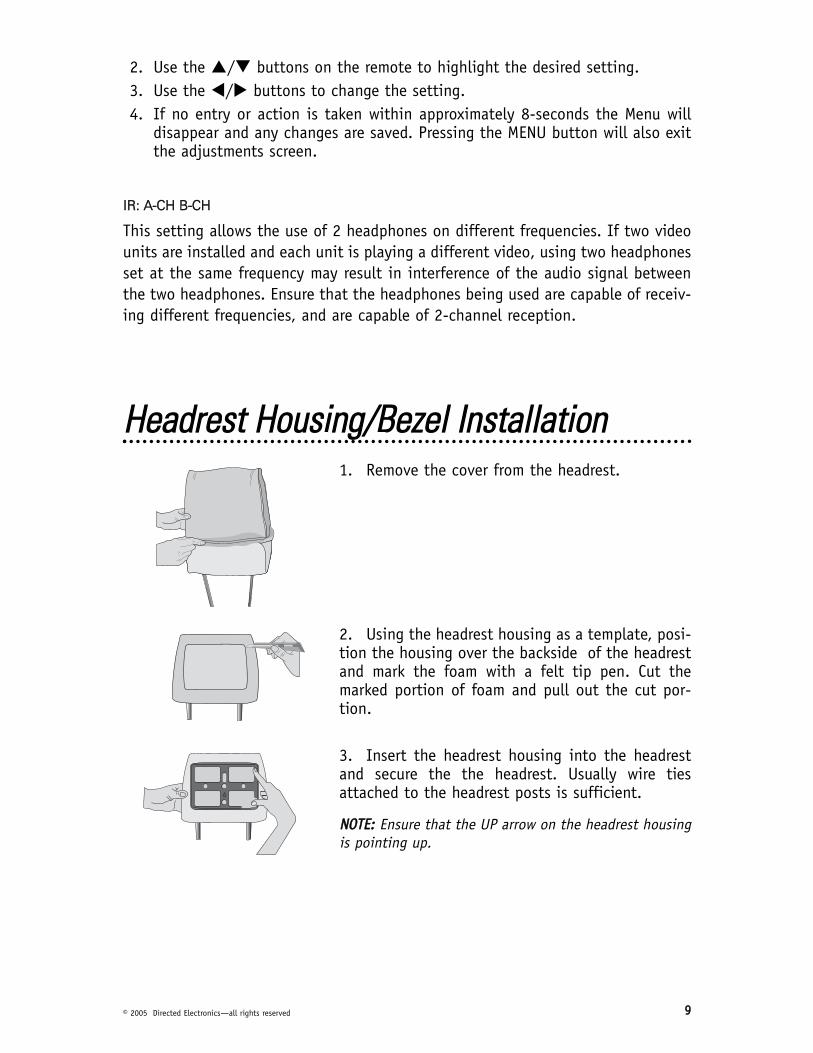
2. Use the / buttons on the remote to highlight the desired setting.3. Use the / buttons to change the setting.4. If no entry or action is taken within approximately 8-seconds the Menu will
disappear and any changes are saved. Pressing the MENU button will also exitthe adjustments screen.
IIRR:: AA--CCHH BB--CCHH
This setting allows the use of 2 headphones on different frequencies. If two videounits are installed and each unit is playing a different video, using two headphonesset at the same frequency may result in interference of the audio signal betweenthe two headphones. Ensure that the headphones being used are capable of receiv-ing different frequencies, and are capable of 2-channel reception.
HHeeaaddrreesstt HHoouussiinngg//BBeezzeell IInnssttaallllaattiioonn1. Remove the cover from the headrest.
2. Using the headrest housing as a template, posi-tion the housing over the backside of the headrestand mark the foam with a felt tip pen. Cut themarked portion of foam and pull out the cut por-tion.
3. Insert the headrest housing into the headrestand secure the the headrest. Usually wire tiesattached to the headrest posts is sufficient.
NNOOTTEE:: Ensure that the UP arrow on the headrest housingis pointing up.
99© 2005 Directed Electronics—all rights reserved
1100
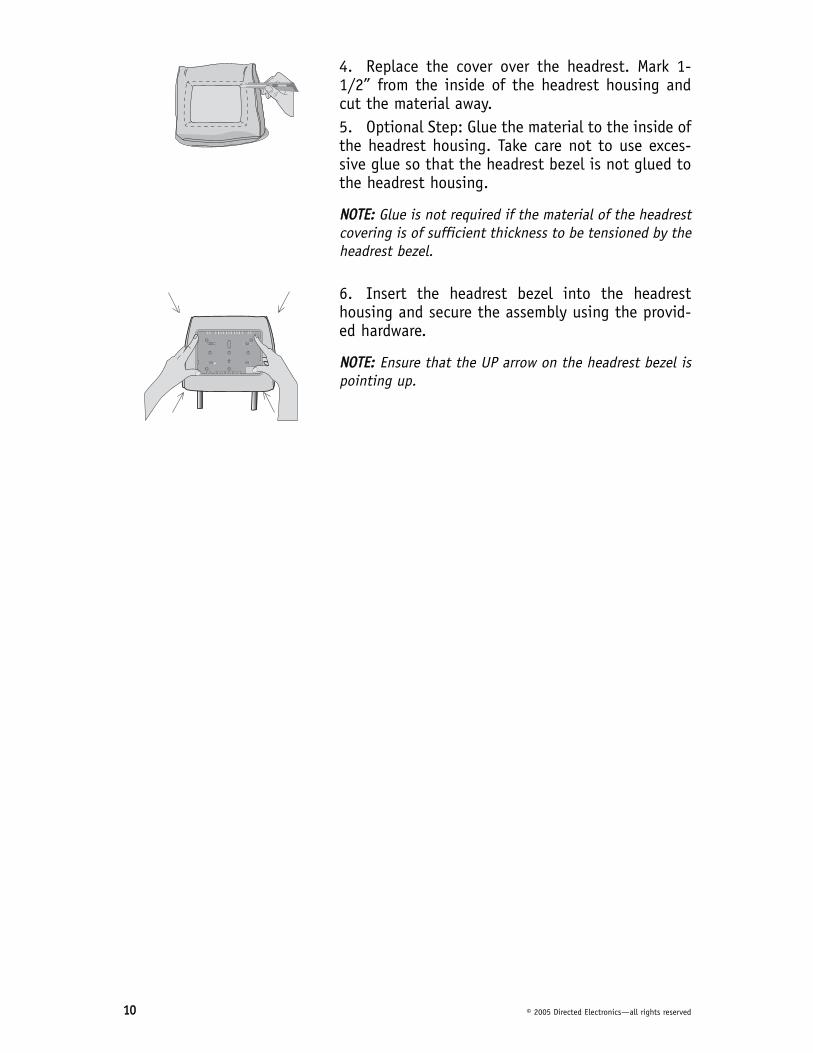
4. Replace the cover over the headrest. Mark 1-1/2” from the inside of the headrest housing andcut the material away.5. Optional Step: Glue the material to the inside ofthe headrest housing. Take care not to use exces-sive glue so that the headrest bezel is not glued tothe headrest housing.
NNOOTTEE:: Glue is not required if the material of the headrestcovering is of sufficient thickness to be tensioned by theheadrest bezel.
6. Insert the headrest bezel into the headresthousing and secure the assembly using the provid-ed hardware.
NNOOTTEE:: Ensure that the UP arrow on the headrest bezel ispointing up.
© 2005 Directed Electronics—all rights reserved

HHeeaaddrreesstt IInnssttaallllaattiioonn1. Unplug the DIN cable from the monitor.
2. Connect the LCD screen’s 8-pin DIN plug intothe 8-pin DIN plug of the headrest.NNOOTTEE:: When assembling the cable, match the arrows ateach end of the connector.
NNOOTTEE:: Feed and orient the connector assembly behindthe shroud mount in the lower right hand corner. Youmay have to feed some of the DIN cable up into theheadrest to accomplish this positioning.
3. Position the monitor over the mounting shroudand apply even pressure to each corner of the mon-itor until the internal clips lock the monitor inplace.
NNOOTTEE:: Do not press on the LCD screen as this will dam-age the screen.
4. Tape the end of the DIN plug to prevent dam-age to the pins. Then feed this cable from the hol-low post of the headrest down through the seatback and connect it to the cable from the DVD play-er.
NNOOTTEE:: Ensure the cable does not entangle or interferewith the seat positioning/adjusting mechanism.
5-pin adaptercable
8-pin mainDIN cable
1111© 2005 Directed Electronics—all rights reserved
1122
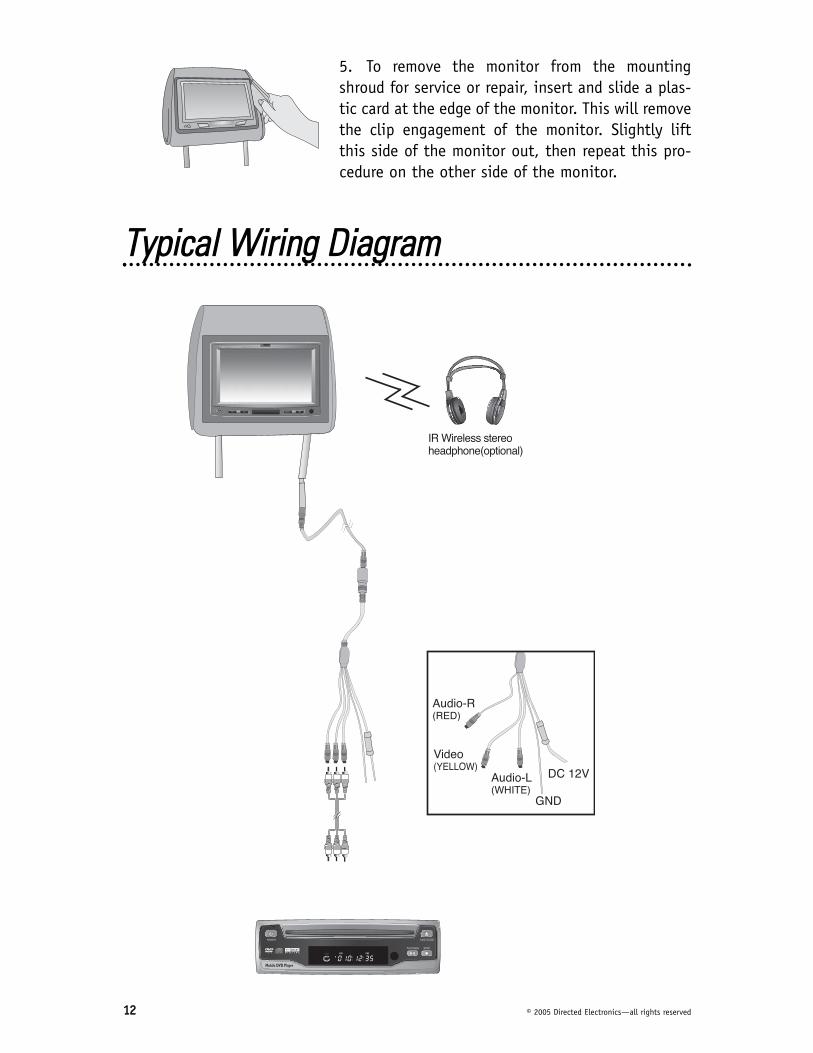
5. To remove the monitor from the mountingshroud for service or repair, insert and slide a plas-tic card at the edge of the monitor. This will removethe clip engagement of the monitor. Slightly liftthis side of the monitor out, then repeat this pro-cedure on the other side of the monitor.
TTyyppiiccaall WWiirriinngg DDiiaaggrraamm
© 2005 Directed Electronics—all rights reserved
MMuullttiippllee AA//VV IInnppuutt SSeelleeccttoorrRefer to diagram on the next page for the discussion that follows:
CCOONNNNEECCTTIINNGG AA MMOONNIITTOORR TTOO MMUULLTTIIPPLLEE SSOOUURRCCEESS
When the monitor(s) power is turned on the input source will appear in the upperright hand corner (AV1, AV2, etc.). Press the SOURCE button on the remote toswitch between the available sources for that monitor.
NNOOTTEE:: If PARKING is displayed on the screen, it means that this monitor(s) will notdisplay video until the parking brake is set (vehicle parked).
NNOOTTEE:: You cannot change sources on video output 3 using the source selector, Onlythe remote will switch #3 output between the 3 video inputs.
For operating convienence, when the system is connected to several other deviceswhich have their own remotes, you can use those remotes through the HVM702 tooperate the other devices. This is done by connecting the Remote Eye IR interfacecable from the other devices to the R(emote) Sensor Input at the VS102 videoselector.
1133© 2005 Directed Electronics—all rights reserved

1144
VS102
© 2005 Directed Electronics—all rights reserved

TTrroouubblleesshhoooottiinnggUse the following chart to assist in troubleshooting the system.
PPRROOBBLLEEMM SSOOLLUUTTIIOONN
Power will not turn onCheck connections to the powersupply and other devices.
No picture or soundCheck connections of externaldevice.
Have picture, but no soundCheck if the volume is set to low. Ifin A/V mode, check audio connec-tions.
Remote control does not workAvoid using the product understrong & direct sunlight. Replacethe battery in the remote control.
Intermittent audio Power supply voltage is too low.
TV picture appear to shakes whiledriving
Bad reception. Check antenna andtry reception in a better area.
No audio from headphone
Ensure the Power is switched on atthe headphone. Replace thebatteries in the headphone. Checkto ensure the frequency of theheadphone is the same as set up inthe monitor. Check the volumelevel setting on the headphone.
1155© 2005 Directed Electronics—all rights reserved

1166
SSppeecciiffiiccaattiioonnss
NNOOTTEE:: Specifications are subject to change without notice.
Power 12VDC (9–16VDC)
Power consumption 750mA Maximum @ 12VDC
Power consumption (stand-by) 50mA
Video type PAL/NTSC
Video input level 1Vp-p, 75 ohm (composite)
IR frequency (left/right)A-ch 2.3 MHz/2.8MHz
B-ch 3.2 MHz/3.8MHz
IR range1m ±30º
1m ±15º
Headphone stereo output 0.5 watts - 16 ohms/channel
Actual screen size 155 (W) X 880 (H) mm
Dimensions 189.4 (W) X 126.5 (H) X 35 (D) mm
Weight 536 ±3 grams
Remote control battery lithium battery CR2025, 3V
© 2005 Directed Electronics—all rights reserved

1177© 2005 Directed Electronics—all rights reserved

1188 © 2005 Directed Electronics—all rights reserved

NNootteess____________________________________________________________________________________________________________________________________________________________________________________________________________________________________________________________________________________________________________________________________________________________________________________________________________________________________________________________________________________________________________________________________________________________________________________________________________________________________________________________________________________________________________________________________________________________________________________________________________________________________________________________________________________________________________________________________________________________________________________________________________________________________________________________________________________________________________________________________________________________________________________
© 2005 Directed Electronics—all rights reserved 1199

Directed ElectronicsVista, CA 92081
www.directed.com© 2005 Directed Electronics—All rights reserved
N81702 08-05
TThhee ccoommppaannyy bbeehhiinndd tthhiiss ssyysstteemm iiss DDiirreecctteedd EElleeccttrroonniiccss..
Since its inception, Directed has had one purpose, to provide consumers with the finest vehicle security, car stereoproducts, rear seat entertainment, and accessories available. The recipient of more than 20 patents in the field ofadvanced electronic technology, Directed is ISO 9001 registered.
Quality Directed Electronics products are sold and serviced throughout North America and around the world.
Call ((880000)) 227744--00220000 for more information about our products and services.
Directed® is committed to delivering world-class quality products
and services that excite and delight our customers.