8 objectives - georgia southern university-armstrong...
TRANSCRIPT

8
Advanced Swing Components
Objectives
• Use JList to select single or multiple items in a list.
• Use JComboBox to select a single item from a combo box.
• Use JTable to display and process tables.
• Use JTree to display data in a tree hierarchy.
• Learn how to create custom renderers for JList, JComboBox, JTable, and JTree.
• Learn how to create custom editors for JComboBox, JTable, and JTree.
360

Introduction
In the preceding three chapters, you learned how to use Swing components, containers, layout managers, menus, tool bars, and dialog boxes. This chapter will show you how to work with some of the complex Swing components. You will learn how to use JList, JComboBox, JTable, and JTree to create advanced graphical user interfaces.
JList
A list is a component that enables you to choose one or more items. It is useful in limiting a range of choices and avoids the cumbersome validation of data input. JList is the Swing version of list. Functionally it is similar to a set of check boxes or radio buttons, but the selectable items are placed in a list and are chosen by clicking on the items themselves. Figure 8.1 shows an example of JList.
Figure 8.1
SwingSet2 demonstrates the features of JList.
JList doesn't support scrolling directly. To create a scrollable list, you need to create a JScrollPane and add an instance of JList to the scroll pane. An instance of JList can be created using its default constructor or one of the following three constructors:
• public JList(ListModel dataModel)
• public JList(Object[] listData)
361
• public JList(Vector listData)
If you have a list of a fixed number of string items, you can simply create it as follows:
String[] listData = {"Item 1", "Item 2", "Item 3"};
JList jlst = new JList(listData);
JList supports three selection modes: single selection, single-interval selection, and multiple-interval selection. Single selection allows only one item to be selected. Single-interval selection allows multiple selections, but the selected items must be contiguous. Multiple-interval selection is the most flexible, because it allows selections of any items at a given time.
JList has the following useful properties:
• cellRenderer: An object used to render the cells in a list. By default, an instance of DefaultListCellRenderer is used to display items in a list that can display strings or icons. Using custom cell renderer is introduced in the section, "List Cell Renderers."
• listData: A write-only property used to set an array or a vector of objects for the list.
• fixedCellHeight: The height of a list cell. All the cells in a list have the same height. If this property is not specified, the tallest item in the list dictates the cell height for all the cells.
• fixedCellWidth: The width of a list cell. All the cells in a list have the same width. If this property is not specified, the widest item in the list dictates the cell width for all the cells.
• model: An object that maintains the data for the list. List models must be used explicitly when adding or deleting items in a list. List models are introduced in the section "List Models."
• prototypeCellValue: An object whose cell size dictates the cell size of the list.
• selectedIndex: An int value indicating the index of the selected item in the list.
• selectedIndices: An array of int values representing the indices of the selected items in the list.
• selectedValue: The first selected value in the list.
• selectedValues: An array of objects representing selected values in the list. This property is read-only.
362

• selectionBackground: The background color for selected cells.
• selectionForeground: The foreground color for selected cells.
• selectionMode: One of the three values (SINGLE_SELECTION, SINGLE_INTERVAL_SELECTION, MULTIPLE_INTERVAL_SELECTION) that indicate whether single items, single-interval items, or multiple-interval items can be selected.
• selectionModel: An object that tracks list selection. List-selection models are rarely used explicitly. List-selection models are discussed in the section "List-Selection Models."
• visibleRowCount: The preferred number of rows in the list that can be displayed without a scroll bar. The default value is 8.
JList generates javax.swing.event.ListSelectionEvent to notify the listeners of the selections. The listener must implement the valueChanged handler to process the event.
Example 8.1 Simple List Demo
This example creates a list of a fixed number of items displayed as strings. The example allows you to set a selection mode dynamically from a combo box, as shown in Figure 8.2. When you select an item or multiple items, the item values are displayed in a status label below the list.
Figure 8.2
You can choose single selection, single-interval selection, or multiple-interval selection in a list.
Here are the steps to complete the project:
1. Create a new project named listdemo.jpr and a new applet named TestList.java using the Applet wizard.
2. In the UI designer of TestList.java, drop a JPanel to the north of the applet to create jpSelectionMode. Drop a JScrollPane
363

to the center of the applet, and drop a JList to the scroll pane to create jList1. Drop a JLabel to the south of the applet to create jlblStatus.
3. Set layout of jpSelectionMode to BorderLayout. Drop a JLabel and a JComboBox to jpSelectionMode, and rename the combo box to jcboSelectionMode.
4. Create an array of strings named countries for the names of several countries. Add countries to the list using the following method:
jList1.setListData(countries);
5. Add three items "SINGLE_SELECTION," SINGLE_INTERVAL_SELECTION," and "MULTIPLE_INTERVAL_SELECTION" to the combo box using the addItem() method.
6. Generate the ActionEvent handler for the combo box, and implement it to set a selection mode for the list, as shown in Listing 8.1.
7. Generate the ListSelectionEvent handler for the list, and implement it to display the selected items in the label, as shown in Listing 8.1.
Listing 8.1: TestList.java
package listdemo;
import java.awt.*;
import java.awt.event.*;
import javax.swing.*;
import javax.swing.event.*;
public class TestList extends JApplet {
boolean isStandalone = false;
JScrollPane jScrollPane1 = new JScrollPane();
JList jList1 = new JList();
JPanel jpSelectionMode = new JPanel();
JComboBox jcboSelectionMode = new JComboBox();
JLabel jlblStatus = new JLabel();
JLabel jLabel1 = new JLabel();
BorderLayout borderLayout1 = new BorderLayout();
// Create an array of strings for country names
String[] countries = {"United States", "United Kingdom", "China",
"Germany", "France", "Canada"};
/**Initialize the applet*/
public void init() {
try {
364

jbInit();
}
catch(Exception e) {
e.printStackTrace();
}
}
/**Component initialization*/
private void jbInit() throws Exception {
this.setSize(new Dimension(400, 300));
jList1.setListData(countries);
jList1.addListSelectionListener(
new javax.swing.event.ListSelectionListener() {
public void valueChanged(ListSelectionEvent e) {
jList1_valueChanged(e);
}
});
jpSelectionMode.setLayout(borderLayout1);
jcboSelectionMode.addActionListener(
new java.awt.event.ActionListener() {
public void actionPerformed(ActionEvent e) {
jcboSelectionMode_actionPerformed(e);
}
});
jlblStatus.setText("Status");
jLabel1.setText("Choose Selection Mode");
this.getContentPane().add(jScrollPane1, BorderLayout.CENTER);
jScrollPane1.getViewport().add(jList1, null);
this.getContentPane().add(jpSelectionMode, BorderLayout.NORTH);
jpSelectionMode.add(jLabel1, BorderLayout.WEST);
jpSelectionMode.add(jcboSelectionMode, BorderLayout.CENTER);
this.getContentPane().add(jlblStatus, BorderLayout.SOUTH);
// Add selection modes to the combo box
jcboSelectionMode.addItem("SINGLE_SELECTION");
jcboSelectionMode.addItem("SINGLE_INTERVAL_SELECTION");
jcboSelectionMode.addItem("MULTIPLE_INTERVAL_SELECTION");
}
/**Handle item selection from a combo box*/
void jcboSelectionMode_actionPerformed(ActionEvent e) {
String selectedMode =
(String)jcboSelectionMode.getSelectedItem();
if (selectedMode.equals("SINGLE_SELECTION"))
jList1.setSelectionMode(ListSelectionModel.SINGLE_SELECTION);
else if (selectedMode.equals("SINGLE_INTERVAL_SELECTION"))
jList1.setSelectionMode(
ListSelectionModel.SINGLE_INTERVAL_SELECTION);
if (selectedMode.equals("MULTIPLE_INTERVAL_SELECTION"))
jList1.setSelectionMode(
ListSelectionModel.MULTIPLE_INTERVAL_SELECTION);
}
365

/**Handle item selection in the list*/
void jList1_valueChanged(ListSelectionEvent e) {
int[] indices = jList1.getSelectedIndices();
Object[] selectedItems = jList1.getSelectedValues();
String display = "";
for (int i=0; i<indices.length; i++) {
display += (String)selectedItems[i] + " ";
}
jlblStatus.setText(display);
}
}
Example Review The program creates an array of strings and sets the array as listData in the list. The list is placed in a scroll pane so that you can scroll it when the number of items in the list exceeds the viewing area.
When the user selects an item in the list, the valueChanged handler is executed, which gets the selected items and displays all the items in the label.
The example enables you to specify selection mode from a combo box. When you choose SINGLE_SELECTION, only one item can be selected at a given time. When you choose SINGLE_INTERVAL_SELECTION, multiple consecutive items can be selected all together by holding down the SHIFT key. When you choose MULTIPLE_INTERVAL_SELECTION, you can choose any number of items anywhere in the list by holding down the CTRL key.
List Models
The previous example constructs a list with a fixed set of strings. If you want to add new items or delete existing items from the list, you have to use a list model. This section introduces list models.
The JList class delegates the responsibilities of storing and maintaining data to its data model. The JList class itself does not have the methods for adding or removing items from the list. These methods are supported in the list model.
All list models implement the ListModel interface, which defines the registration methods for ListDataEvent. The instances of ListDataListener are notified when the items in the list are modified. ListModel also defines the methods getSize and getElementAt. The getSize method returns the length of the list, and the getElementAt method returns the element at the specified index.
366

AbstractListModel implements the ListModel and Serializable interfaces. AbstractListModel implements the registration methods in the ListModel, but does not implement the methods getSize and getElementAt.
DefaultListModel extends AbstractListModel and implements the two methods getSize and getElementAt, which are not implemented by AbstractListModel. The relationship among ListModel, AbstractListModel, and DefaultListModel is shown in Figure 8.3.
ListModel
getElementAt(index: int): Object getSize(): int addListDataListener(l: ListDataListener): void removeListDataListener(l: ListDataListener)
AbstractListModel
DefaultListModel
+add(index: int, element: Object): void +addElement(element: Object): void +capacity(): int +clear(): void +contains(element: Object): boolean +copyInto(anArray: Object[]): void +elementAt(index: int): void +elements():Enumeration +ensureCapacity(minCapacity: int): void +firstElement():Object +get(index: int): Object +getElementAt(index: int): Object +getSize():int +indexOf(element: Object): int +indexOf(element: Object, index: int): int +insertElementAt(obj: Object, index: int): void +isEmpty(): boolean +lastElement():Object +lastIndexOf(element: Object): int +lastIndexOf(element: Object, index: int): int +remove(index: int): Object +removeAllElements():void +removeElement(obj: Object): boolean +removeElementAt(index: int): void +removeRange(fromIndex: int, toIndex: int): void +set(index: int, element: Object): Object +setElementAt(obj: Object, index: int): void +setSize(newSize: int): void +size():int +toArray():Object[] +trimToSize(): void
Figure 8.3
DefaultListModel is a concrete implementation of ListModel.
The methods in DefaultListModel are similar to those in the java.util.Vector class. You use the add method to insert an element to the list, use the remove method to remove the element from the list, use the clear method to clear the list, and use the getSize method to return the number of elements in the list, and the getElementAt method to retrieve an element. In fact, the DefaultListModel stores data in an instance of Vector, which is essentially a resizable array. Swing components were developed
367

before the Java Collections Framework. In the future implementation, Vector may be replaced by java.util.ArrayList.
Example 8.2 List Model Demo
This example creates a list using a list model and allows the user to add and delete items in the list. A sample run of the program is shown in Figure 8.4.
Figure 8.4
You can add elements and remove elements in a list using list models.
Here are the steps to complete the project:
1. Reopen project listdemo.jpr and create a new applet named TestListModel.java using the Applet wizard.
2. In the UI designer of TestListModel.java, drop a JPanel to the north of the applet to create jpSettings. Drop a JScrollPane to the center of the applet, and drop a JList to the scroll pane to create jList1. Drop a JLabel to the south of the applet to create jlblStatus.
3. Set layout of jpSettings to BorderLayout, and drop a JPanel to the north and a JPanel to the south of jpSettings to create jpAdd and jpRemove. Set layout of jpAdd and jpRemove to BorderLayout. Drop a JLabel, a JTextField, and a JButton to the east, center, and west of jpAdd, and rename the text field and button to jtfNewItem and jbtAdd. Drop a JLabel, a JComboBox, and a JButton to the east, center, and west of jpRemove, and rename the combo box and button to jcboSelectionMode and jbtRemove.
4. Switch to the source pane to create an instance of DefaultListModel named listModel, and add items to the model using listModel.addElement(), as shown in Listing 8.2. Add three items "SINGLE_SELECTION," SINGLE_INTERVAL_SELECTION," and "MULTIPLE_INTERVAL_SELECTION" to the combo box jcboSelectionMode.
368

5. Switch to the UI designer and set the model property of jList1 to listModel.
6. Generate the ActionEvent handlers for the combo box, the Add New Item button, and the Remove Selected Item button, and implement these handlers for setting a selection mode, adding a new element, and deleting elements in the list, as shown in Listing 8.2.
7. Generate the ListSelectionEvent handler for the list and implement it to display the selected items in the label, as shown in Listing 8.2.
Listing 8.2: TestListModel.java
package listdemo;
import java.awt.*;
import java.awt.event.*;
import javax.swing.*;
import javax.swing.event.*;
public class TestListModel extends JApplet {
boolean isStandalone = false;
JScrollPane jScrollPane1 = new JScrollPane();
JList jList1 = new JList();
JPanel jpSettings = new JPanel();
JLabel jLabel1 = new JLabel();
JTextField jtfNewItem = new JTextField();
JButton jbtAdd = new JButton();
JButton jbtRemove = new JButton();
JPanel jpAdd = new JPanel();
JPanel jpRemove = new JPanel();
JComboBox jcboSelectionMode = new JComboBox();
BorderLayout borderLayout1 = new BorderLayout();
BorderLayout borderLayout2 = new BorderLayout();
BorderLayout borderLayout3 = new BorderLayout();
JLabel jlblStatus = new JLabel();
JLabel jLabel2 = new JLabel();
// Create a list model
DefaultListModel listModel = new DefaultListModel();
/**Initialize the applet*/
public void init() {
try {
jbInit();
}
catch(Exception e) {
e.printStackTrace();
}
}
/**Component initialization*/
369

private void jbInit() throws Exception {
this.setSize(new Dimension(400, 300));
jLabel1.setText("Enter a New Item");
jbtAdd.setText("Add New Item");
jbtAdd.addActionListener(new java.awt.event.ActionListener() {
public void actionPerformed(ActionEvent e) {
jbtAdd_actionPerformed(e);
}
});
jbtRemove.setText("Remove Selected Item");
jbtRemove.addActionListener(
new java.awt.event.ActionListener() {
public void actionPerformed(ActionEvent e) {
jbtRemove_actionPerformed(e);
}
});
jList1.setModel(listModel);
jList1.addListSelectionListener(
new javax.swing.event.ListSelectionListener() {
public void valueChanged(ListSelectionEvent e) {
jList1_valueChanged(e);
}
});
jpAdd.setLayout(borderLayout1);
jpSettings.setLayout(borderLayout2);
jpRemove.setLayout(borderLayout3);
jcboSelectionMode.addActionListener(
new java.awt.event.ActionListener() {
public void actionPerformed(ActionEvent e) {
jcboSelectionMode_actionPerformed(e);
}
});
jlblStatus.setText("Status");
jLabel2.setText("Choose Selection Mode");
this.getContentPane().add(jScrollPane1, BorderLayout.CENTER);
jScrollPane1.getViewport().add(jList1, null);
this.getContentPane().add(jpSettings, BorderLayout.NORTH);
jpSettings.add(jpRemove, BorderLayout.SOUTH);
jpRemove.add(jcboSelectionMode, BorderLayout.CENTER);
jpRemove.add(jbtRemove, BorderLayout.EAST);
jpRemove.add(jLabel2, BorderLayout.WEST);
jpSettings.add(jpAdd, BorderLayout.NORTH);
jpAdd.add(jLabel1, BorderLayout.WEST);
jpAdd.add(jtfNewItem, BorderLayout.CENTER);
jpAdd.add(jbtAdd, BorderLayout.EAST);
this.getContentPane().add(jlblStatus, BorderLayout.SOUTH);
// Add items to the list model
listModel.addElement("United States");
listModel.addElement("United Kingdom");
listModel.addElement("China");
listModel.addElement("Germany");
listModel.addElement("France");
370

listModel.addElement("Canada");
// Add selection modes to the combo box
jcboSelectionMode.addItem("SINGLE_SELECTION");
jcboSelectionMode.addItem("SINGLE_INTERVAL_SELECTION");
jcboSelectionMode.addItem("MULTIPLE_INTERVAL_SELECTION");
}
/**Add an element to the list*/
void jbtAdd_actionPerformed(ActionEvent e) {
listModel.addElement(jtfNewItem.getText());
}
/**Removing elements from the list*/
void jbtRemove_actionPerformed(ActionEvent e) {
int selectedIndices[] = jList1.getSelectedIndices();
for (int i=0; i<selectedIndices.length; i++) {
listModel.removeElementAt(selectedIndices[i] - i);
}
}
/**Choose a selection mode*/
void jcboSelectionMode_actionPerformed(ActionEvent e) {
String selectedMode =
(String)jcboSelectionMode.getSelectedItem();
if (selectedMode.equals("SINGLE_SELECTION"))
jList1.setSelectionMode(ListSelectionModel.SINGLE_SELECTION);
else if (selectedMode.equals("SINGLE_INTERVAL_SELECTION"))
jList1.setSelectionMode(
ListSelectionModel.SINGLE_INTERVAL_SELECTION);
if (selectedMode.equals("MULTIPLE_INTERVAL_SELECTION"))
jList1.setSelectionMode(
ListSelectionModel.MULTIPLE_INTERVAL_SELECTION);
}
/**Select items in the list*/
void jList1_valueChanged(ListSelectionEvent e) {
int[] indices = jList1.getSelectedIndices();
Object[] selectedItems = jList1.getSelectedValues();
String display = "";
for (int i=0; i<indices.length; i++) {
display += " " + (String)selectedItems[i];
}
jlblStatus.setText(display);
}
}
Example Review The program creates listModel, which is an instance of DefaultListModel and uses the model to manipulate data
371

in the list. The model enables you to add and remove items in the list,
To add an element, the user enters the new element in the text field, and clicks the Add New Item button to add the element to the model. The model notifies the list's UI delegate to display the new element in the list.
To remove elements, the user specifies a selection mode, selects the elements, and clicks the Remove Selected Item to remove the item(s) from the model. The getSelectedIndices() method returns the indices of all selected items in strict order. Whenever an item is removed from the list, the indices of the items are immediately rearranged. Thus, the current index of ith item to remove is selectedIndices[i] - i, as shown in Listing 8.2.
List Selection Models
Unlike most Swing components, JList has two models: a list model and a list selection model. List models handle data management, and list selection models deal with data selection. A list selection model must implement the ListModelSelection interface, which defines constants for three selection modes (SINGLE_SELECTION, SINGLE_INTERVAL_SELECTION, and MULTIPLE_INTERVAL_SELECITON), and registration methods for ListSectionListener. It also defines the methods for adding and removing selection intervals, and the access methods for the properties, such as selectionMode, anchorSelectionIndex, leadSelectionIndex, and valueIsAdjusting.
By default, an instance of JList uses DefaultListSelectionModel, which is a concrete implementation of ListSelectionModel. Usually, you do not need to provide custom list selection model, because the DefaultListSelectionModel class is sufficient in most cases. Unlike the list data model, you do not need to access the list selection model directly, because most of the methods you need from the list selection model are also defined in Jlist.
List Cell Renderers
The previous example displays items as strings in a list. JList is very flexible and versatile, and it can be used to display images and drawings in addition to simple text. This section introduces list cell renderers for displaying graphics.
In addition to delegating data storage and processing to list models, JList delegates the rendering of the list cells to list cell renderers. All list cell renderers implement the ListCellRenderer interface, which defines a single method getListCellRendererComponent as follows:
372

public Component getListCellRendererComponent
(JList list, Object value, int index, boolean isSelected,
boolean cellHasFocus)
This method is passed with a list, the value associated with the cell, the index of the value, and the information regarding whether the value is selected and the cell has the focus. The component returned from the method is painted on the cell in the list.
By default, JList uses DefaultListCellRenderer to render its cells. The DefaultListCellRenderer class implements ListCellRenderer, extends JLabel, and can display either a string or an icon, but not both in the same cell. You can create custom renderer by implementing ListCellRenderer.
Example 8.3 List Cell Renderer Demo
This example creates a list of countries and displays the country flag and the country name in the list, as shown in Figure 8.5. When a country is selected in the list, its flag is displayed in a panel next to the list.
Figure 8.5
The image and the text are displayed in the list cell.
The program requires a custom list cell renderer to display an image and a text in the same cell. Often you need to create a new list model that provides additional information for rendering the cell. In this example, each item has an image and a label, which should be stored in the list model for use by the list cell renderer as well as by the users of the list. The new list model named MyListModel is given in Listing 8.3.
Listing 8.3: MyListModel.java
373

package listdemo;
import javax.swing.*;
import java.awt.*;
public class MyListModel extends DefaultListModel {
public MyListModel(String[] name, Image[] image) {
for (int i=0; i<name.length; i++) {
addElement(new Object[] {name[i], image[i]});
}
}
/**Override the getName method in DefaultListModel*/
public String getName(Object value) {
Object[] array = (Object[])value;
return (String)array[0];
}
/**Override the getImage method in DefaultListModel*/
public Image getImage(Object value) {
Object[] array = (Object[])value;
return (Image)array[1];
}
}
The MyListModel class extends DefaultListModel and is constructed with an array of country names and country flag images. Each pair consisting of a country name and a country flag image is stored as an array object in the list model. The getName(value) method returns the country name for the specified object value, and the getImage(value) method returns the country flag image for the specified object value. These two methods are used by the list cell renderer to obtain the name and image of the value of the cell.
The custom list cell renderer that displays the image and the name is given in Listing 8.4.
Listing 8.4: MyListCellRenderer.java
package listdemo;
import java.awt.*;
import javax.swing.*;
import javax.swing.border.*;
import imageviewerdemo.ImageViewer;
public class MyListCellRenderer implements ListCellRenderer {
JPanel listCellPanel = new JPanel();
ImageViewer imageViewer = new ImageViewer();
JLabel jlbl = new JLabel(" ", JLabel.LEFT);
Border lineBorder =
BorderFactory.createLineBorder(Color.black, 1);
374
Border emptyBorder =
BorderFactory.createEmptyBorder(2, 2, 2, 2);
public MyListCellRenderer() {
listCellPanel.setOpaque(true);
jlbl.setPreferredSize(new Dimension(100, 60));
listCellPanel.setLayout(new BorderLayout());
listCellPanel.add(imageViewer, BorderLayout.CENTER);
listCellPanel.add(jlbl, BorderLayout.EAST);
}
/**Implement this method in ListCellRenderer*/
public Component getListCellRendererComponent
(JList list, Object value, int index, boolean isSelected,
boolean cellHasFocus) {
MyListModel listModel =
(MyListModel)list.getModel();
String country = listModel.getName(value);
Image image = listModel.getImage(value);
jlbl.setText(country);
imageViewer.setImage(image);
if (isSelected) {
listCellPanel.setForeground(list.getSelectionForeground());
listCellPanel.setBackground(list.getSelectionBackground());
}
else {
listCellPanel.setForeground(list.getForeground());
listCellPanel.setBackground(list.getBackground());
}
if (cellHasFocus)
listCellPanel.setBorder(lineBorder);
else
listCellPanel.setBorder(emptyBorder);
return listCellPanel;
}
}
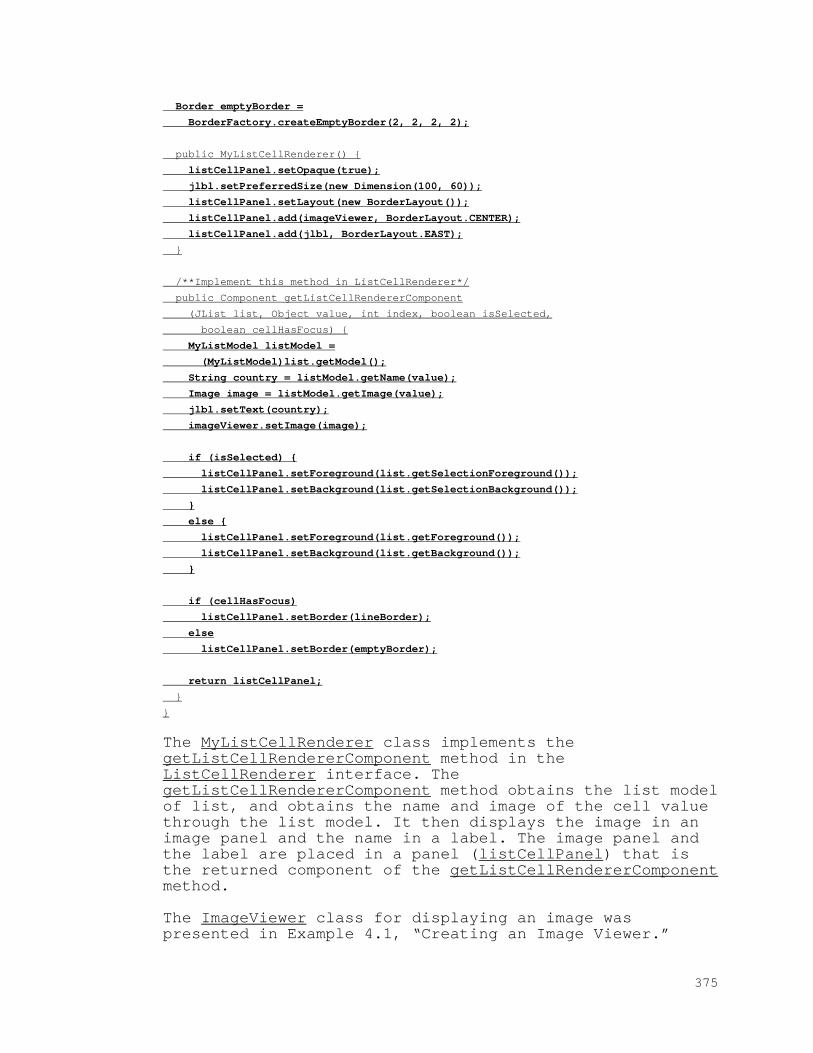
The MyListCellRenderer class implements the getListCellRendererComponent method in the ListCellRenderer interface. The getListCellRendererComponent method obtains the list model of list, and obtains the name and image of the cell value through the list model. It then displays the image in an image panel and the name in a label. The image panel and the label are placed in a panel (listCellPanel) that is the returned component of the getListCellRendererComponent method.
The ImageViewer class for displaying an image was presented in Example 4.1, “Creating an Image Viewer.”
375

Finally, let us construct the main program that utilizes the custom list model and custom list cell renderer in a list. Here are the steps to complete the project:
1. Reopen project listdemo.jpr and create a new applet named TestListCellRenderer.java using the Applet wizard.
2. In the UI designer of TestListCellRenderer.java, drop a JSplitPanel to the center of the applet. Drop a JScrollPane to the left part of the split pane and a JList to the scroll pane to create jList1. Drop an ImageViewer to the right part of the split pane to create imageViewer1.
3. Switch to the source pane to create images for the flags of several countries, as shown in Listing 8.5. Create an instance of MyListModel named listModel, and set the model property of jList1 to this instance. Create an instance of MyListCellRenderer, and set the cellRenderer property of jList1 to this instance.
4. Generate the ListSelectionEvent handler (valueChanged for the list, and implement it to display the selected flag in imageViewer1.
Listing 8.5: TestListCellRenderer.java
package listdemo;
import java.awt.*;
import java.awt.event.*;
import java.applet.*;
import javax.swing.*;
import javax.swing.event.*;
import imageviewerdemo.ImageViewer;
public class TestListCellRenderer extends JApplet {
boolean isStandalone = false;
JSplitPane jSplitPane1 = new JSplitPane();
JScrollPane jScrollPane1 = new JScrollPane();
JList jList1 = new JList();
ImageViewer imageViewer1 = new ImageViewer();
MyListModel listModel;
// Create a list cell renderer
ListCellRenderer myListCellRenderer = new MyListCellRenderer();
/**Initialize the applet*/
public void init() {
try {
jbInit();
}
catch(Exception e) {
e.printStackTrace();
}
376

}
/**Component initialization*/
private void jbInit() throws Exception {
this.setSize(new Dimension(400, 300));
jList1.setFixedCellHeight(65);
jList1.setFixedCellWidth(150);
jList1.addListSelectionListener(
new javax.swing.event.ListSelectionListener() {
public void valueChanged(ListSelectionEvent e) {
jList1_valueChanged(e);
}
});
jSplitPane1.setContinuousLayout(true);
this.getContentPane().add(jSplitPane1, BorderLayout.NORTH);
jSplitPane1.add(jScrollPane1, JSplitPane.TOP);
jSplitPane1.add(imageViewer1, JSplitPane.BOTTOM);
jScrollPane1.getViewport().add(jList1, null);
// Create images
Image imageUS = ImageViewer.createImage(
"/image/us.gif", this);
Image imageFrance = ImageViewer.createImage(
"/image/fr.gif", this);
Image imageUK = ImageViewer.createImage(
"/image/uk.gif", this);
Image imageGermany = ImageViewer.createImage(
"/image/germany.gif", this);
Image imageIndia = ImageViewer.createImage(
"/image/india.gif", this);
Image imageNorway = ImageViewer.createImage(
"/image/norway.gif", this);
Image imageChina = ImageViewer.createImage(
"/image/china.gif", this);
Image imageCanada = ImageViewer.createImage(
"/image/ca.gif", this);
Image imageDenmark = ImageViewer.createImage(
"/image/denmark.gif", this);
// Create a list model
listModel = new MyListModel(
new String[]
{"United States", "France", "United Kingdom", "Germany",
"India", "Norway", "China", "Canada", "Denmark"},
new Image[]
{imageUS, imageFrance, imageUK, imageGermany, imageIndia,
imageNorway, imageChina, imageCanada, imageDenmark});
// Set list model
jList1.setModel(listModel);
// Set list cell renderer
jList1.setCellRenderer(myListCellRenderer);
}
377

/**Handle list selection event*/
void jList1_valueChanged(ListSelectionEvent e) {
Image image = listModel.getImage(jList1.getSelectedValue());
imageViewer1.setImage(image);
}
}
Example Review The example consists of four classes: MyListModel, MyListCellRenderer, ImageViewer, and TestListCellRenderer. The MyListModel class is responsible for storing data that includes image and text for the list. The MyListCellRenderer class is responsible for rendering the cell with image and text. The ImageViewer class displays an image in the panel. The TestListCellRenderer class tests the list with the custom list cell renderer.
When you choose a country in the list, the list selection event handler is invoked. This handler obtains the list model for the list, uses the list model to retrieve the country's flag image, and displays the image in the image panel on the right side of the split pane.
The getListCellRendererComponent method in MyListCellRenderer is passed with parameters list, value, index, isSelected, and isFocused. The list is used to obtain the list model. The value determines the image and name of the country displayed in the cell. If the cell is selected, the background and foreground of the cell are set to the list's selection background and foreground. If the cell is focused, the cell's border is set to the line border; otherwise, it is set to the empty border. The empty border serves as divider between the cells.
NOTE: The images may not be displayed immediately, because it takes time to load them. You can use image tracker techniques to ensure that the images are loaded before they are displayed. Tracking loading images is introduced in Chapter 16, "Multimedia," in my Introduction to Java Programming with JBuilder 4 book.
TIP: The label’s preferred size is set to 100 by 60 in the MyListCellRenderer class so it will be limited to 100 by 60 and the rest of the space in the cell renderer is allocated to the image.
JComboBox
378

A combo box is a component similar to a list. Both combo box and list are used for selecting items from a list. A combo box allows the user to select one item at a time, while a list permits multiple selections. A combo box displays a drop-down list contained in a popup menu when the combo box is clicked. The selected item can be edited in the cell as if it were a text field.
The constructors of JComboBox are similar to those of JList. An instance of JComboBox can be created using its default constructor or one of the following three constructors:
• public JComboBox(ComboBoxModel model)
• public JComboBox(Object[] objectArray)
• public JComboBox(Vector vector)
The following properties of JComboBox are often useful:
• actionCommand: An action command string associated with the JComboBox.
• editable: A boolean value indicating whether the combo box can be edited. The default value is false.
• itemCount: The number of items in the combo box. This property is read-only.
• maximumRowCount: The maximum number of rows that can be seen without scrolling. The default value is 8.
• model: An object that maintains the data for the list. Combo box models must be used explicitly to add or delete items in a combo box.
• popupVisible: A boolean value indicating whether the popup menu that contains the list is displayed. The default value is false, which means that the user has to click the combo box to display the popup menu.
• renderer: An instance of the class that implements the ListCellRenderer interface. The renderer is responsible for rendering the cell in the combo box.
• selectedIndex: The index of the selected item in the combo box.
• selectedItem: The current selected object in the combo box.
Like JList, the JComboBox class delegates the responsibilities of storing and maintaining data to its data model. All combo box models implement the ComboBoxModel interface, which extends the ListModel interface and defines the getSelectedItem and
379

setSelectedItems methods for retrieving and setting a selected item. The methods for adding and removing items are defined in the MutableComboBoxModel interface, which extends ComboBoxModel.
When an instance of JComboBox is created without explicitly specifying a model, an instance of DefaultComboBoxModel is used. The DefaultComboBoxModel class extends AbstractListModel and implements MutableComboBoxModel. Recall that the DefaultListModel class also extends AbstractListModel. So DefaultComboBoxModel and DefaultListModel share many common methods.
Unlike JList, the JComboBox class has the methods for adding or removing items from the list. The following methods are useful in operating a JComboBox object:
• public void addItem(Object item)
Adds the item of any object into the combo box. • public Object getItemAt(int index)
Returns an item from the combo box at the specified index. • public void removeItem(Object anObject)
Removes an item from the item list. • public void removeAllItems()
Removes all items from the item list.
Combo boxes render cells exactly like lists, because the combo box items are displayed in a list contained in a popup menu.
JComboBox can generate ActionEvent and ItemEvent among many other events. Whenever a new item is selected, JComboBox generates ItemEvent twice, one for deselecting the previously selected item, and the other for selecting the currently selected item. JComboBox generates an ActionEvent after generating ItemEvent.
Example 8.4 Combo Box Demo
This example creates a combo box that contains a list of countries and displays the country flag and the country name in the list cell, as shown in Figure 8.6. When a country is selected in the list, its flag is displayed in a panel below to the combo box.
380

Figure 8.6
The image and the text are displayed in the list cell of a combo box.
This example is similar to Example 8.3. A custom data model named MyComboBoxModel is created to store data (flag image and country name), as shown in Listing 8.6. A custom cell renderer, named MyComboBoxRenderer, is created to render the cells, as shown in Listing 8.7. These two classes are almost identical to the data model and list renderer in Example 8.3, except for the following differences:
• MyComboBoxModel extends DefaultComboBoxModel, but MyListModel extends DefaultListModel.
• The data model obtained from the list parameter in the getListCellRendererComponent method is casted to MyComboBoxModel, while the data model in MyListCellRenderer is casted to MyListModel.
Listing 8.6: MyComboBoxModel.java
package comboboxdemo;
import javax.swing.*;
import java.awt.*;
public class MyComboBoxModel extends DefaultComboBoxModel {
public MyComboBoxModel(String[] name, Image[] image) {
for (int i=0; i<name.length; i++) {
addElement(new Object[] {name[i], image[i]});
}
}
/**Override this method in DefaultComoboBoxModel*/
public String getName(Object value) {
381

Object[] array = (Object[])value;
return (String)array[0];
}
/**Override this method in DefaultComoboBoxModel*/
public Image getImage(Object value) {
Object[] array = (Object[])value;
return (Image)array[1];
}
}
Listing 8.7: MyComboBoxRenderer.java
package comboboxdemo;
import java.awt.*;
import javax.swing.*;
import javax.swing.border.*;
import imageviewerdemo.ImageViewer;
public class MyComboBoxRenderer implements ListCellRenderer {
JPanel listCellPanel = new JPanel();
ImageViewer imageViewer = new ImageViewer();
JLabel jlbl = new JLabel(" ", JLabel.LEFT);
Border lineBorder =
BorderFactory.createLineBorder(Color.black, 1);
Border emptyBorder =
BorderFactory.createEmptyBorder(2, 2, 2, 2);
public MyComboBoxRenderer() {
jlbl.setPreferredSize(new Dimension(100, 60));
listCellPanel.setLayout(new BorderLayout());
listCellPanel.add(imageViewer, BorderLayout.CENTER);
listCellPanel.add(jlbl, BorderLayout.EAST);
}
/**Override this method in ListCellRenderer*/
public Component getListCellRendererComponent
(JList list, Object value, int index, boolean isSelected,
boolean cellHasFocus) {
MyComboBoxModel listModel =
(MyComboBoxModel)list.getModel();
String country = listModel.getName(value);
Image image = listModel.getImage(value);
jlbl.setText(country);
imageViewer.setImage(image);
if (isSelected) {
listCellPanel.setForeground(list.getSelectionForeground());
listCellPanel.setBackground(list.getSelectionBackground());
}
else {
listCellPanel.setForeground(list.getForeground());
listCellPanel.setBackground(list.getBackground());
382

}
if (cellHasFocus)
listCellPanel.setBorder(lineBorder);
else
listCellPanel.setBorder(emptyBorder);
return listCellPanel;
}
}
Let us construct the main program that utilizes the custom combo box model and custom combo box cell renderer in a combo box. Here are the steps to complete the project:
1. Create a new project comboboxdemo.jpr, and create a new applet named TestComboBox.java using the Applet wizard.
2. In the UI designer of TestComboBox.java, drop an ImageViewer to the center of the applet to create imageViewer1, and drop a JComboBox to create jcboCountires.
3. Switch to the source pane to create images for the flags of several countries, as shown in Listing 8.8. Create an instance of MyComboBoxModel named comboBoxModel, and set the model property of jcboCountries to this instance. Create an instance of MyComboBoxRenderer, and set the renderer property of jcboCountries to this instance.
4. Generate the ActionEvent handler for the combo box, and implement it to display the selected flag in imageViewer1.
Listing 8.8: TestComboBox.java
package comboboxdemo;
import java.awt.*;
import java.awt.event.*;
import java.applet.*;
import javax.swing.*;
import imageviewerdemo.ImageViewer;
public class TestComboBox extends JApplet {
boolean isStandalone = false;
ImageViewer imageViewer1 = new ImageViewer();
JComboBox jcboCountires = new JComboBox();
MyComboBoxModel comboBoxModel;
// Create a list cell renderer
MyComboBoxRenderer myComboBoxRenderer = new MyComboBoxRenderer();
/**Initialize the applet*/
public void init() {
383
try {
jbInit();
}
catch(Exception e) {
e.printStackTrace();
}
}
/**Component initialization*/
private void jbInit() throws Exception {
this.setSize(new Dimension(400,300));
jcboCountires.addActionListener(
new java.awt.event.ActionListener() {
public void actionPerformed(ActionEvent e) {
jcboCountires_actionPerformed(e);
}
});
this.getContentPane().add(imageViewer1, BorderLayout.CENTER);
this.getContentPane().add(jcboCountires, BorderLayout.NORTH);
// Create images
Image imageUS = ImageViewer.createImage(
"/image/us.gif", this);
Image imageFrance = ImageViewer.createImage(
"/image/fr.gif", this);
Image imageUK = ImageViewer.createImage(
"/image/uk.gif", this);
Image imageGermany = ImageViewer.createImage(
"/image/germany.gif", this);
Image imageIndia = ImageViewer.createImage(
"/image/india.gif", this);
Image imageNorway = ImageViewer.createImage(
"/image/norway.gif", this);
Image imageChina = ImageViewer.createImage(
"/image/china.gif", this);
Image imageCanada = ImageViewer.createImage(
"/image/ca.gif", this);
Image imageDenmark = ImageViewer.createImage(
"/image/denmark.gif", this);
// Create a list model
comboBoxModel = new MyComboBoxModel(
new String[]
{"United States", "France",
"United Kingdom", "Germany",
"India", "Norway", "China", "Canada", "Denmark"},
new Image[]
{imageUS, imageFrance, imageUK, imageGermany, imageIndia,
imageNorway, imageChina, imageCanada, imageDenmark});
// Set list model
jcboCountires.setModel(comboBoxModel);
384
// Set list cell renderer
jcboCountires.setRenderer(myComboBoxRenderer);
}
/**Handle the combo box selection*/
void jcboCountires_actionPerformed(ActionEvent e) {
Image image = comboBoxModel.getImage(
jcboCountires.getSelectedItem());
imageViewer1.setImage(image);
}
}
Example Review If you don't need to provide custom methods in the data model, you can simply use the DefaultComboBoxModel, which is used by all the combo boxes if no data model is explicitly specified. In fact, you don't need the combo box data model as much as you need the list data model for JList, because JComboBox directly supports the methods for adding and removing items in the combo box, but JList does not contain those methods.
Each combo box has a default cell renderer that displays string or icon, but not both at the same time. To display a combination of images, drawings, and text, you need to create a custom renderer.
This example creates a custom data model to hold country names and flag images, and to provide the methods for getting names and images. The methods are used in the custom renderer for displaying images and names in cells in the combo box. The combo box renderer is the same as the list box renderer. They all implement the ListCellRenderer interface. In fact, a combo box cell is displayed in a list contained in a popup menu.
Editing Combo Boxes
Unlike lists, combo boxes can be edited. By default, a combo box is not editable. To make a combo box editable, set its editable property to true. Editing only affects the current item and does not change the contents of the list. Editing changes are lost after another item in the combo box is selected. To make changes permanent, you have to implement the ActionEvent handler to replace the current item with the modified item.
Example 8.5 Editing in a Combo Box
This example creates a simple Web browser to render HTML files. The program lets the user enter a URL in a combo box and save it. When the user presses the Enter key after entering the URL or selects an existing URL from the combo
385

box, the HTML file is displayed in an editor pane, as shown in Figure 8.7.
***Same as Fig 8.6 in radjb3 page 339
Figure 8.7
You can enter a URL in the combo box and display the HTML file in an editor pane.
Here are the steps to complete the project:
1. Reopen the project comboboxdemo.jpr, and create a new applet named EditingComboBox.java.
2. In the UI designer of EditingComboBox.java, drop a JScrollPane to the center of the applet, and drop a JEditorPane to the scroll pane and rename it jep. Drop a JPanel to the north of the applet to create jpURL.
3. Set layout of jpURL to BorderLayout. Drop a JLabel to the west of jpURL, and drop a JComboBox to the center of jpURL to create jcboURL. Set editable of jcboURL to True.
3. Generate an ActionEvent handler for jcboURL, and implement the handler to display the contents at URL in the editor pane, and add the URL to combo box, as shown in Listing 8.9.
4. Generate a hyperlink event handler for the editor pane, and implement it to display the content of the hyperlink in the editor pane, as shown in Listing 8.9.
Listing 8.9: EditingComboBox.java
package comboboxdemo;
import java.awt.*;
import java.awt.event.*;
import java.applet.*;
import javax.swing.*;
import javax.swing.event.*;
import java.io.IOException;
import java.net.URL;
public class EditingComboBox extends JApplet {
boolean isStandalone = false;
JScrollPane jScrollPane1 = new JScrollPane();
JEditorPane jep = new JEditorPane();
JPanel jPanel1 = new JPanel();
JLabel jLabel1 = new JLabel();
JComboBox jcboURL = new JComboBox();
BorderLayout borderLayout1 = new BorderLayout();
386

/**Initialize the applet*/
public void init() {
try {
jbInit();
}
catch(Exception e) {
e.printStackTrace();
}
}
/**Component initialization*/
private void jbInit() throws Exception {
this.setSize(new Dimension(400,300));
jep.setText("jEditorPane1");
jep.addHyperlinkListener(
new javax.swing.event.HyperlinkListener() {
public void hyperlinkUpdate(HyperlinkEvent e) {
jep_hyperlinkUpdate(e);
}
});
jLabel1.setText("URL");
jPanel1.setLayout(borderLayout1);
jcboURL.setEditable(true);
jcboURL.addActionListener(new java.awt.event.ActionListener() {
public void actionPerformed(ActionEvent e) {
jcboURL_actionPerformed(e);
}
});
this.getContentPane().add(jScrollPane1, BorderLayout.CENTER);
this.getContentPane().add(jPanel1, BorderLayout.NORTH);
jPanel1.add(jLabel1, BorderLayout.WEST);
jPanel1.add(jcboURL, BorderLayout.CENTER);
jScrollPane1.getViewport().add(jep, null);
}
/**Handle combo box action*/
void jcboURL_actionPerformed(ActionEvent e) {
jcboURL.addItem(jcboURL.getSelectedItem());
try {
// Display the HTML file
jep.setPage(new URL((String)(jcboURL.getSelectedItem())));
}
catch (IOException ex) {
System.out.println(ex);
}
}
/**Process hyperlinks in the HTML file*/
void jep_hyperlinkUpdate(HyperlinkEvent e) {
try {
jep.setPage(e.getURL());
}
catch (IOException ex) {
387

System.out.println(ex);
}
}
}
Example Review To enable editing, the editable property of the combo box must be true. By default, editable is false.
The user enters a URL of the HTML file in the combo box and presses the Enter key to fire an ActionEvent. The ActionEvent handler stores the URL and displays the URL in the editor pane. You can also select a URL from the combo box.
JTable
JTable is a Swing component that displays data in rows and columns in a two-dimensional grid. Figure 8.8 shows the Swing table in the SwingSet demo.
Figure 8.8
The SwingSet demo demonstrates the features of JTable.
JTable doesn't directly support scrolling. To create a scrollable table, you need to create a JScrollPane and add an instance of JTable to the scroll pane. If a table is not placed in a scroll pane, its column header will not be visible, because the column header is placed in the header of the view port of a Scroll pane.
388

JTable has three different models: a table model, a column model, and a list-selection model. The table model is for storing and processing data. The column model deals with column management. The list-selection model is the same used by JList for selecting rows, columns and cells in a table.
Like JList and JComboBox, JTable has renderers and editors. JTable has many features that make it possible to customize its rendering and editing. JTable also provides many convenient easy-to-use renderers and editors.
There are seven constructors in the JTable class. The builder tool always uses the default constructor to create an instance of JTable. The following constructor constructs a table from a two-dimensional array representing data and an array representing column names:
public JTable(Object[][] rowData, Object[] columnNames)
For instance, the following statements construct a table as shown in Figure 8.9.
// Create table column names
String[] columnNames =
{"Title", "Author", "Publisher", "In-stock"};
// Create table data
Object[][] data = {
{"Introduction to Java Programming", "Y. Daniel Liang",
"Que Education & Training", new Boolean(false)},
{"Introduction to Java Programming, Second Edition",
"Y. Daniel Liang", "Que Education & Training",
new Boolean(true)},
{"Introduction to Java Programming, Thrid Edition",
"Y. Daniel Liang", "Prentice Hall", new Boolean(true)},
{"Introduction to Java Programming With Visual J++ 6",
"Y. Daniel Liang", "Prentice Hall", new Boolean(true)},
{"Introduction to Java Programming with JBuilder 3",
"Y. Daniel Liang", "Prentice Hall", new Boolean(true)},
{"Rapid Java Application Development Using JBuilder 3",
"Y. Daniel Liang", "Prentice Hall", new Boolean(true)},
{"Rapid Java Application Development Using JBuilder 4 and 5",
"Y. Daniel Liang", "Prentice Hall", new Boolean(true)},
{" Introduction to Java Programming with JBuilder 4",
"Y. Daniel Liang", "Prentice Hall", new Boolean(true)},
};
// Create a table
JTable jTable1 = new JTable(data, columnNames);
389
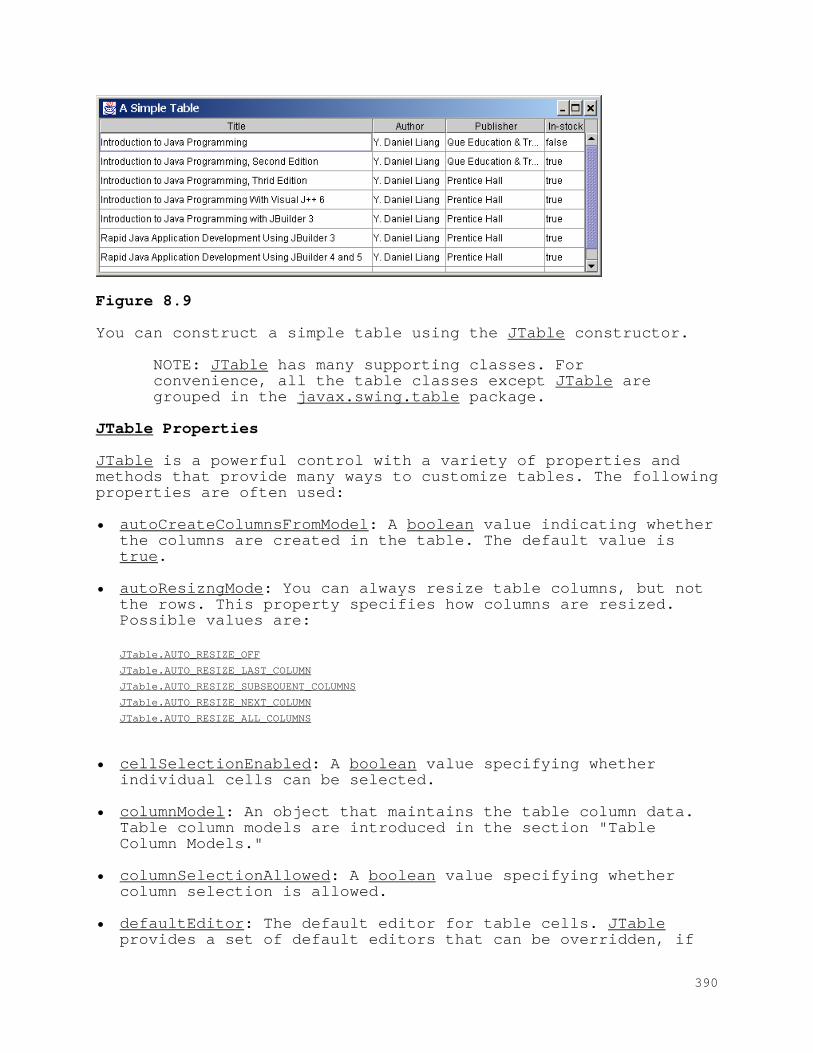
Figure 8.9
You can construct a simple table using the JTable constructor.
NOTE: JTable has many supporting classes. For convenience, all the table classes except JTable are grouped in the javax.swing.table package.
JTable Properties
JTable is a powerful control with a variety of properties and methods that provide many ways to customize tables. The following properties are often used:
• autoCreateColumnsFromModel: A boolean value indicating whether the columns are created in the table. The default value is true.
• autoResizngMode: You can always resize table columns, but not the rows. This property specifies how columns are resized. Possible values are:
JTable.AUTO_RESIZE_OFF
JTable.AUTO_RESIZE_LAST_COLUMN
JTable.AUTO_RESIZE_SUBSEQUENT_COLUMNS
JTable.AUTO_RESIZE_NEXT_COLUMN
JTable.AUTO_RESIZE_ALL_COLUMNS
• cellSelectionEnabled: A boolean value specifying whether individual cells can be selected.
• columnModel: An object that maintains the table column data. Table column models are introduced in the section "Table Column Models."
• columnSelectionAllowed: A boolean value specifying whether column selection is allowed.
• defaultEditor: The default editor for table cells. JTable provides a set of default editors that can be overridden, if
390

desired. The editors are introduced in the section "Table Renderers and Editors."
• defaultRenderer: The default renderer for table cells. JTable provides a set of default renderers that can be overridden, if desired. The renderers are introduced in the section "Table Renderers and Editors."
• editingColumn: The column of the cell that is currently being edited.
• editingRow: The row of the cell that is currently being edited.
• gridColor: The color used to draw grid lines.
• intercellSpacing: A dimension that represents the horizontal and vertical margins between cells.
• model: An object that maintains the table data. Table models are introduced in the section "Table Models."
• rowHeight: Row height of the table. The default value is 16 pixels.
• rowMargin: The vertical margin between rows.
• rowCount: The number of rows in a table.
• rowSelectionAllowed: A boolean value specifying whether the rows can be selected.
• selectionBackground: The background color of selected cells.
• selectionForeground: The foreground color of selected cells.
• selectionMode: Specifying how table cells can be selected. This property is write-only. The possible values are:
ListSelectionModel.SINGLE_SELECTION
ListSelectionModel.SINGLE_INTERVAL_SELECTION
ListSelectionModel.MULTIPLE_INTERVAL_SELECTION
• selectionModel: An object that tracks the selection of table cells. Table selection model is the same as the list selection model.
• showGrid: A boolean value indicating whether the grid lines are displayed. The defualt value is true.
• showHorizontalGrid: A boolean value indicating whether the horizontal grid lines are displayed. The default value is true.
391

• showVerticalGrid: A boolean value indicating whether the vertical grid lines are displayed. The default value is true.
• tableHeader: An instance of JTableHeader that is displayed in the header of the view port in a scroll pane. Table header is usually specified as an array of strings in the table model.
Example 8.6 Testing Table Properties
This example demonstrates the use of several JTable properties. The example creates a table and allows the user to choose an Auto Resize Mode, specify the row height and margin, and indicate whether the grid is shown. A sample run of the program is shown in Figure 8.10.
Figure 8.10
You can specify an auto-resizing mode, row height, and row margin of the table, and specify whether to show grid in the table.
Here are the steps to complete the project:
1. Create a new project named tabledemo.jpr, and create a new applet named TestTable.java.
2. In the UI designer of TestTable.java, drop a JScrollPane to the center of the applet, and drop a JTable to the scroll pane to create jTable1. Drop a JPanel to north of the applet to create jpProperties.
3. Set layout of jpProperties to BorderLayout. Drop a JPanel to the north of jpProperties to create jpAutoResizeMode. Drop a JPanel to the south of jpProperties to create jpRowGrid.
392
4. Set layout of jpAutoResizingMode to BorderLayout. Drop a JLabel to the west of jpAutoResizingMode, and drop a JComboBox to the center of jpAutoResizingMode to create jcboAutoResizingMode.
5. Set layout of jpRowGrid to FlowLayout with left alignment. Drop a JLabel, a JTextField, a JLabel, a JTextField, and a JCheckBox to jpRowGrid. Set text of the labels to rowHeight and rowMargin. Rename the text fields to jtfRowHeight and jtfRowMargin. Rename the check box to jchkShowGrid.
6. Initialize the table with table data and column header. Add five auto resizing modes to the combo box.
7. Generate and implement the code for handling combo box selection, for obtaining and using values in the text fields, and for checking and unchecking the showGrid check box, as shown in Listing 8.10.
Listing 8.10: TestTable.java
package tabledemo;
import java.awt.*;
import java.awt.event.*;
import java.applet.*;
import javax.swing.*;
import java.util.*;
public class TestTable extends JApplet {
boolean isStandalone = false;
JScrollPane jScrollPane1 = new JScrollPane();
// Create table column names
String[] columnNames =
{"Title", "Author", "Publisher", "In-stock"};
// Create table data
Object[][] data = {
{"Introduction to Java Programming", "Y. Daniel Liang",
"Que Education & Training", new Boolean(false)},
// Omitted for brevity
};
// Create a table
JTable jTable1 = new JTable(data, columnNames);
JPanel jpProperties = new JPanel();
JPanel jpRowGrid = new JPanel();
JPanel jpAutoResizeMode = new JPanel();
JLabel jLabel1 = new JLabel();
JComboBox jcboAutoResizeMode = new JComboBox();
BorderLayout borderLayout1 = new BorderLayout();
BorderLayout borderLayout3 = new BorderLayout();
FlowLayout flowLayout1 = new FlowLayout();
393

JLabel jLabel2 = new JLabel();
JTextField jtfRowHeight = new JTextField();
JLabel jLabel3 = new JLabel();
JTextField jtfRowMargin = new JTextField();
JCheckBox jchkShowGrid = new JCheckBox();
/**Initialize the applet*/
public void init() {
try {
jbInit();
}
catch(Exception e) {
e.printStackTrace();
}
}
/**Component initialization*/
private void jbInit() throws Exception {
this.setSize(new Dimension(400,300));
jTable1.setRowHeight(40);
jLabel1.setText("autoResizeMode");
jpAutoResizeMode.setLayout(borderLayout3);
jpRowGrid.setLayout(flowLayout1);
jpProperties.setLayout(borderLayout1);
jcboAutoResizeMode.addActionListener(
new java.awt.event.ActionListener() {
public void actionPerformed(ActionEvent e) {
jcboAutoResizeMode_actionPerformed(e);
}
});
jLabel2.setText("rowHeight");
jtfRowHeight.setColumns(8);
jtfRowHeight.addActionListener(
new java.awt.event.ActionListener() {
public void actionPerformed(ActionEvent e) {
jtfRowHeight_actionPerformed(e);
}
});
jLabel3.setText("rowMargin");
jtfRowMargin.setCaretPosition(0);
jtfRowMargin.setColumns(8);
jtfRowMargin.addActionListener(
new java.awt.event.ActionListener() {
public void actionPerformed(ActionEvent e) {
jtfRowMargin_actionPerformed(e);
}
});
jchkShowGrid.setText("showGrid");
jchkShowGrid.addActionListener(
new java.awt.event.ActionListener() {
public void actionPerformed(ActionEvent e) {
jchkShowGrid_actionPerformed(e);
}
});
394

flowLayout1.setAlignment(FlowLayout.LEFT);
this.getContentPane().add(jScrollPane1, BorderLayout.CENTER);
this.getContentPane().add(jpProperties, BorderLayout.NORTH);
jpProperties.add(jpAutoResizeMode, BorderLayout.NORTH);
jpAutoResizeMode.add(jLabel1, BorderLayout.WEST);
jpAutoResizeMode.add(jcboAutoResizeMode, BorderLayout.CENTER);
jpProperties.add(jpRowGrid, BorderLayout.SOUTH);
jpRowGrid.add(jLabel2, null);
jpRowGrid.add(jtfRowHeight, null);
jpRowGrid.add(jLabel3, null);
jpRowGrid.add(jtfRowMargin, null);
jpRowGrid.add(jchkShowGrid, null);
jScrollPane1.getViewport().add(jTable1, null);
// Add auto resize modes to jcboAutoResizeMode
jcboAutoResizeMode.addItem("AUTO_RESIZE_OFF");
jcboAutoResizeMode.addItem("AUTO_RESIZE_LAST_COLUMN");
jcboAutoResizeMode.addItem("AUTO_RESIZE_SUBSEQUENT_COLUMNS");
jcboAutoResizeMode.addItem("AUTO_RESIZE_NEXT_COLUMN");
jcboAutoResizeMode.addItem("AUTO_RESIZE_ALL_COLUMNS");
}
/**Choose auto resize mode*/
void jcboAutoResizeMode_actionPerformed(ActionEvent e) {
String selectedItem =
(String)jcboAutoResizeMode.getSelectedItem();
if (selectedItem.equals("AUTO_RESIZE_OFF"))
jTable1.setAutoResizeMode(JTable.AUTO_RESIZE_OFF);
else if (selectedItem.equals("AUTO_RESIZE_LAST_COLUMN"))
jTable1.setAutoResizeMode(JTable.AUTO_RESIZE_LAST_COLUMN);
else if (selectedItem.equals("AUTO_RESIZE_SUBSEQUENT_COLUMNS"))
jTable1.setAutoResizeMode(
JTable.AUTO_RESIZE_SUBSEQUENT_COLUMNS);
else if (selectedItem.equals("AUTO_RESIZE_NEXT_COLUMN"))
jTable1.setAutoResizeMode(JTable.AUTO_RESIZE_NEXT_COLUMN);
else if (selectedItem.equals("AUTO_RESIZE_ALL_COLUMNS"))
jTable1.setAutoResizeMode(JTable.AUTO_RESIZE_ALL_COLUMNS);
}
/**Set row height*/
void jtfRowHeight_actionPerformed(ActionEvent e) {
int rowHeight = new Integer(
jtfRowHeight.getText().trim()).intValue();
jTable1.setRowHeight(rowHeight);
}
/**Set row margin*/
void jtfRowMargin_actionPerformed(ActionEvent e) {
int rowMargin = new Integer(
jtfRowMargin.getText().trim()).intValue();
jTable1.setRowMargin(rowMargin);
}
395

/**Set showGrid property*/
void jchkShowGrid_actionPerformed(ActionEvent e) {
jTable1.setShowGrid(jchkShowGrid.isSelected());
}
}
Example Review Initially, each column in the table occupies the same width (75 pixels). You can resize the columns, but not the rows. There are five options for resizing columns: AUTO_RESIZE_OFF, AUTO_RESIZE_LAST_COLUMN, AUTO_RESIZE_SUBSEQUENT_COLUMNS, AUTO_RESIZE_NEXT_COLUMN, and AUTO_RESIZE_ALL_COLUMNS. With AUTO_RESIZE_OFF, resizing a column does not affect the widths of the other columns. With AUTO_RESIZE_LAST_COLUMN, resizing a column affects the width of the last column. With AUTO_RESIZE_SUBSEQUENT_COLUMNS, resizing a column affects the widths of all the sequent columns. With AUTO_RESIZE_NEXT_COLUMN, resizing a column affects the width of the next columns. With AUTO_RESIZE_ALL_COLUMNS, resizing a column affects the widths of all the columns.
The rowHeight and rowMargin are the properties in the JTable class. To set the width and margin for columns, you need to use the TableColumn class and the table's column model, which are introduced in the sections, " Table Column Models," and "The TableColumn Class."
JTable does not provide methods for manipulating data such as adding or removing rows and columns. Those methods are defined in the table models and table column models.
Table Models
Like JList and JComboBox, JTable delegates data storing and processing to its table data model. A table data model must implement the TableModel interface, which defines the methods for registering table model listener, for manipulating cells, and for obtaining row count, column count, column class, and column name.
The AbstractTableModel class provides default implementations for most of the methods in TableModel. It takes care of the management of listeners and provides some conveniences for generating TableModelEvents and dispatching them to the listeners. To create a concrete TableModel, you can simply extend AbstractTableModel and implement the following three methods at least:
• public int getRowCount();
• public int getColumnCount();
396

• public Object getValueAt(int row, int column);
The DefaultTableModel class extends AbstractTableModel and implements these three methods. Additionally, DefaultTableModel provides concrete storage for data. The data are stored in a vector. Each element in the vector is an array of objects, each of which represents an individual cell value.
The following methods in DefaultTableModel for accessing and modifying data are often useful:
// For processing cells
public Object getValueAt(int row, int column)
public void setValueAt(Object value, int row, int column)
public boolean isCellEditable(int row, int column)
// For processing columns
public void addColumn(Object columnName)
public void addColumn(Object columnName, Object[] columnData)
public void addColumn(Object columnName, Vector columnData)
public int getColumnCount()
public Class getColumnClass(int column)
public String getColumnName()
// For processing rows
public void addRow(Object[] rowData)
public void addRow(Vector rowData)
public int getRowCount()
public void insertRow(int index, Object[] rowData)
public void insertRow(int index, Vector rowData)
public void moveRow(int startIndex, int endIndex, int toIndex)
An instance of DefaultTableModel can be constructed using the following constructors:
public DefaultTableModel()
public DefaultTableModel(int numRows, int numColumns)
public DefaultTableModel(Object[] columnNames, int numRows)
public DefaultTableModel(Object[][] data, object[] columnNames)
public DefaultTableModel(Vector columnNames, int numRows)
public DefaultTableModel(Vector data, Vector columnNames)
Table Column Models
Table column models manage columns in a table. You can use column models to select, add, move, and remove table columns. A table column model must implement the TableColumnModel interface, which defines the methods for registering table column model listener, for accessing and manipulating columns.
The DefaultTableColumnModel class is a concrete implementation of TableColumnModel. The DefaultTableColumnModel class stores its columns in a vector and contains an instance of ListSelectionModel for selecting columns.
397

The following methods in DefaultColumnModel for manipulating and selecting columns are often useful:
// For manipulating columns
public void addColumn(TableColumn tableColumn)
public void removeTableColumn(TableColumn tableColumn)
public void moveColumn(int fromIndex, int toIndex)
public int getColumnMargin()
public void setColumnMargin(int newMargin)
public TableColumn getColumn(int columnIndex)
public int getColumnCount()
public int getColumnIndex(Object columnIdentifier)
public Enumeration getColumns()
public int getTotalColumnWidth()
// For selecting columns
public boolean getColumnSelectionAllowed()
public void setColumnSelectionAllowed(boolean flag)
public int getSelectedColumnCount()
public int getSelectedColumns()
public ListSelectionModel getSelectionModel()
public void setSelectionModel(ListSelectionModel newModel)
The TableColumn Class
The column model deals with all the columns in a table. The TableColumn class is used to represent an individual column in the table. An instance of TableColumn for a specified column can be obtained using the getColumn(index) method in TableColumnModel, or the getColumn(columnIdentifier) method in JTable.
The following methods in TableColumn are used for manipulating column width and specifying cell renderer, cell editor, and header renderer.
// Column width, max width, min width, and preferred width
public int getWidth()
public void setWidth(int width)
public int getMaxWidth()
public void setMaxWidth(int maxWidth)
public int getMinWidth()
public void setMinWidth(int minWidth)
public int getPreferredWidth()
public void setPreferredWidth(int minWidth)
// Resizes the column to fit the width of its header cell
public void sizeWidthToFit()
// Renderers and editors for the cells in the column
public TableCellEditor getCellEditor()
public void setCellEditor(TableCellEditor anEditor)
public TableCellRenderer getCellRenderer()
public void setCellRenderer(TableCellRenderer aRenderer)
398

public TableCellRenderer getHeaderRenderer()
public void setHeaderRenderer(TableCellRenderer aRenderer)
Example 8.7 Using Table Models
This example demonstrates the use of table models, table column models, list selection models, and the TableColumn class. The program allows the user to choose selection mode and selection type, and to add or remove rows and columns, as shown in Figure 8.11.
Figure 8.11
You can add or remove rows and columns in a table.
Here are the steps to complete the project:
1. Reopen project tabledemo.jpr, and create a new applet named TestDefaultTableModels.java.
2. In the UI designer of TestDefaultTableModels.java, drop a JScrollPane to the center of the applet, and drop a JTable to the scroll pane to create jTable1. Drop a JPanel to north of the applet to create jpOperations.
3. Set layout of jpOperations to BorderLayout. Drop a JPanel to the center of jpOperations to create jpSelections. Drop a JPanel to the east of jpOperations to create jpAddRemove.
4. Set layout of jpSelections to BorderLayout. Drop a JPanel to the north of jpSelections to create jpSelectionMode, and drop a JPanel to the south of jpSelections to create jpSelectionType.
5. Set layout of jpSelectionMode to BorderLayout. Drop a JLabel to the west of jpSelectionMode, and drop a JComboBox to the center of jpSelectionMode.
399

6. Set layout of jpSelectionType to FlowLayout with left alignment. Drop a JCheckBox three times into jpSelectionType to create jchkCells, jchkColumns, and jchkRows.
7. Set layout of jpAddRemove to GridLayout with two rows and two columns. Drop a JButton four times to create jbtAddRow, jbtAddColumn, jbtDeleteRow, and jbtDeleteColumn.
8. Drop a JPanel to the south of the applet. Drop a JButton to the panel. Set the button’s text to “Save Table to a File.” Drop a JFileChooser to the UI node in the component tree to create jFileChooser1.
9. Create an instance, named tableModel, of DefaultTableModel with table data and column, as shown in Listing 8.11, and set the model property of jTable1 to tableModel.
10. Generate the ActionEvent handlers for combo box, check boxes, and buttons, and implement the handlers for choosing a selection mode, choosing selection types, adding or removing rows and columns, and saving the current contents of the table to a file, as shown in Listing 8.11.
Listing 8.11: TestDefaultTableModels.java
package tabledemo;
import java.awt.*;
import java.awt.event.*;
import java.applet.*;
import javax.swing.*;
import javax.swing.table.*;
import java.util.*;
import java.io.*;
public class TestDefaultTableModels extends JApplet {
boolean isStandalone = false;
JScrollPane jScrollPane1 = new JScrollPane();
JTable jTable1 = new JTable();
JPanel jpOperations = new JPanel();
JPanel jpSelections = new JPanel();
JPanel jpSelectionType = new JPanel();
JPanel jpSelectionMode = new JPanel();
JLabel jLabel1 = new JLabel();
JComboBox jcboSelectionMode = new JComboBox();
BorderLayout borderLayout1 = new BorderLayout();
BorderLayout borderLayout2 = new BorderLayout();
BorderLayout borderLayout3 = new BorderLayout();
JCheckBox jchkCells = new JCheckBox();
JCheckBox jchkColumns = new JCheckBox();
JCheckBox jchkRows = new JCheckBox();
FlowLayout flowLayout1 = new FlowLayout();
// Create table column names
400
String[] columnNames =
{"Title", "Author", "Publisher", "In-stock"};
// Create table data
Object[][] data = {
{"Introduction to Java Programming", "Y. Daniel Liang",
"Que Education & Training", new Boolean(false)},
// Omitted for brevity
};
// Create table model
DefaultTableModel tableModel =
new DefaultTableModel(data, columnNames);
JPanel jpAddRemove = new JPanel();
JButton jbtDeleteColumn = new JButton();
JButton jbtDeleteRow = new JButton();
JButton jbtAddColumn = new JButton();
JButton jbtAddRow = new JButton();
GridLayout gridLayout1 = new GridLayout();
JPanel jPanel1 = new JPanel();
JButton jbtSave = new JButton();
JFileChooser jFileChooser1 = new JFileChooser();
/**Initialize the applet*/
public void init() {
try {
jbInit();
}
catch(Exception e) {
e.printStackTrace();
}
}
/**Component initialization*/
private void jbInit() throws Exception {
this.setSize(new Dimension(452, 294));
jTable1.setModel(tableModel);
jTable1.setRowHeight(40);
jLabel1.setText("Selection Mode");
jpSelectionMode.setLayout(borderLayout3);
jpSelectionType.setLayout(flowLayout1);
jpSelections.setLayout(borderLayout1);
jpOperations.setLayout(borderLayout2);
jcboSelectionMode.addActionListener(
new java.awt.event.ActionListener() {
public void actionPerformed(ActionEvent e) {
jcboSelectionMode_actionPerformed(e);
}
});
jchkCells.setText("Cells");
jchkCells.addActionListener(
new java.awt.event.ActionListener() {
public void actionPerformed(ActionEvent e) {
401

jchkCells_actionPerformed(e);
}
});
jchkColumns.setText("Columns");
jchkColumns.addActionListener(
new java.awt.event.ActionListener() {
public void actionPerformed(ActionEvent e) {
jchkColumns_actionPerformed(e);
}
});
jchkRows.setText("Rows");
jchkRows.addActionListener(
new java.awt.event.ActionListener() {
public void actionPerformed(ActionEvent e) {
jchkRows_actionPerformed(e);
}
});
flowLayout1.setAlignment(FlowLayout.LEFT);
jbtDeleteColumn.setText("Delete Column");
jbtDeleteColumn.addActionListener(
new java.awt.event.ActionListener() {
public void actionPerformed(ActionEvent e) {
jbtDeleteColumn_actionPerformed(e);
}
});
jbtDeleteRow.setText("Delete Row");
jbtDeleteRow.addActionListener(
new java.awt.event.ActionListener() {
public void actionPerformed(ActionEvent e) {
jbtDeleteRow_actionPerformed(e);
}
});
jbtAddColumn.setText("Add Column");
jbtAddColumn.addActionListener(
new java.awt.event.ActionListener() {
public void actionPerformed(ActionEvent e) {
jbtAddColumn_actionPerformed(e);
}
});
jbtAddRow.setText("Add Row");
jbtAddRow.addActionListener(
new java.awt.event.ActionListener() {
public void actionPerformed(ActionEvent e) {
jbtAddRow_actionPerformed(e);
}
});
jpAddRemove.setLayout(gridLayout1);
gridLayout1.setColumns(2);
gridLayout1.setRows(2);
jbtSave.setText("Save Table to a File");
jbtSave.addActionListener(new java.awt.event.ActionListener() {
public void actionPerformed(ActionEvent e) {
jbtSave_actionPerformed(e);
}
402

});
this.getContentPane().add(jScrollPane1, BorderLayout.CENTER);
jScrollPane1.getViewport().add(jTable1, null);
this.getContentPane().add(jpOperations, BorderLayout.NORTH);
jpOperations.add(jpSelections, BorderLayout.CENTER);
jpSelections.add(jpSelectionMode, BorderLayout.NORTH);
jpSelectionMode.add(jLabel1, BorderLayout.WEST);
jpSelectionMode.add(jcboSelectionMode, BorderLayout.CENTER);
jpSelections.add(jpSelectionType, BorderLayout.CENTER);
jpSelectionType.add(jchkCells, null);
jpSelectionType.add(jchkColumns, null);
jpSelectionType.add(jchkRows, null);
jpOperations.add(jpAddRemove, BorderLayout.EAST);
jpAddRemove.add(jbtAddRow, null);
jpAddRemove.add(jbtAddColumn, null);
jpAddRemove.add(jbtDeleteRow, null);
jpAddRemove.add(jbtDeleteColumn, null);
this.getContentPane().add(jPanel1, BorderLayout.SOUTH);
jPanel1.add(jbtSave, null);
// Add selection modes to jcboSelectionMode
jcboSelectionMode.addItem("SINGLE_SELECTION");
jcboSelectionMode.addItem("SINGLE_INTERVAL_SELECTION");
jcboSelectionMode.addItem("MULTIPLE_INTERVAL_SELECTION");
}
/**Choose a selection mode*/
void jcboSelectionMode_actionPerformed(ActionEvent e) {
String selectedItem =
(String)jcboSelectionMode.getSelectedItem();
if (selectedItem.equals("SINGLE_SELECTION"))
jTable1.setSelectionMode(ListSelectionModel.SINGLE_SELECTION);
else if (selectedItem.equals("SINGLE_INTERVAL_SELECTION"))
jTable1.setSelectionMode(
ListSelectionModel.SINGLE_INTERVAL_SELECTION);
else if (selectedItem.equals("MULTIPLE_INTERVAL_SELECTION"))
jTable1.setSelectionMode(
ListSelectionModel.MULTIPLE_INTERVAL_SELECTION);
}
/**Cell selection enabled*/
void jchkCells_actionPerformed(ActionEvent e) {
jTable1.setCellSelectionEnabled(
jchkCells.isSelected());
}
/**Column selection enabled*/
void jchkColumns_actionPerformed(ActionEvent e) {
jTable1.setColumnSelectionAllowed(
jchkColumns.isSelected());
}
/**Row selection enabled*/
403

void jchkRows_actionPerformed(ActionEvent e) {
jTable1.setRowSelectionAllowed(
jchkRows.isSelected());
}
/**Add a new row*/
void jbtAddRow_actionPerformed(ActionEvent e) {
tableModel.addRow(new Object[]{
" ", " ", " ", new Boolean(false)});
}
/**Add a new column*/
void jbtAddColumn_actionPerformed(ActionEvent e) {
tableModel.addColumn(new String("New Column"),
new Object[] {"1", "2", "3", "4", "5", "6", "7"});
}
/**Remove the selected row*/
void jbtDeleteRow_actionPerformed(ActionEvent e) {
tableModel.removeRow(jTable1.getSelectedRow());
}
/**Remove the selected column*/
void jbtDeleteColumn_actionPerformed(ActionEvent e) {
DefaultTableColumnModel tableColumnModel =
(DefaultTableColumnModel)jTable1.getColumnModel();
int selectedColumn = jTable1.getSelectedColumn();
tableColumnModel.removeColumn(
tableColumnModel.getColumn(selectedColumn));
}
void jbtSave_actionPerformed(ActionEvent e) {
if (jFileChooser1.showSaveDialog(this) ==
JFileChooser.APPROVE_OPTION) {
save(jFileChooser1.getSelectedFile());
}
}
/**Save file with specified File instance*/
private void save(File file) {
try {
// Write table to the specified file
BufferedWriter out = new BufferedWriter(new FileWriter(file));
String header = "";
// Write header to the file
for (int i=0; i<jTable1.getColumnCount(); i++)
header += jTable1.getColumnName(i) + '\t';
out.write(header);
out.newLine();
// Write rows to the file
for (int i=0; i<jTable1.getRowCount(); i++) {
for (int j=0; j<jTable1.getColumnCount(); j++) {
404

out.write(jTable1.getValueAt(i, j).toString() + '\t');
}
out.newLine();
}
out.close();
}
catch (IOException ex) {
ex.printStackTrace();
}
}
}
Example Review The table selection model is the same as the list selection mode. You can choose to select a single object, objects in a single interval, or objects in multiple intervals. The objects can be cells, columns, or rows. The selectable object types can be specified using the following JTable boolean properties:
• cellSelectionAllowed
• columnSelectionAllowed
• rowSelectionAllowed
When you click the Add Row button, a new row is appended to the table. When you click the Add Column button, a new column entitled "New Column" is appended to the table. To delete a row, first select a row, then click the Delete Row button. To delete a column, first select a column, then click the Delete Column button. The program only deletes one row or one column at a time, you can modify the handlers to enable the deleting of multiple rows and columns.
When you click the Save Table to a File button, a file save dialog box is displayed. You can choose or specify a filename, then click OK to save the current contents of the table to a file.
Some of the methods defined in the table model and in the table column model are also defined in the table model or in the JTable class for convenience. For instance, the getColumnCount() method is defined in JTable, TableModel, and TableColumnModel, the addColumn() method defined in the column model is also defined in the table model, and the getColumn() method defined in the column model is also defined in the JTable class.
NOTE: Due to a bug, the TableModel and TableColumnModel are not synchronized. If you add or
405

delete a column from the TableColumnModel, the change is not effected in the TableModel. However, the change does take place in JTable. Always use the methods from the JTable methods as much as possible. For example, to get the column count, use the getColumnCount method from the JTable class instead of from the TableColumnModel class. Therefore, in the save method in this example, jTable1.getColumnCount() was used instead of tableModel.getColumnCount().
Table Renderers and Editors
Table cells are painted by cell renderers. By default, a cell object's string representation is displayed and the string can be edited as it was in a text field. JTable maintains a set of predefined renderers and editors, listed in Table 8.1, which can be specified to replace default string renderers and editors.
Table 8.1 Predefined renderers and editors for tables
Class Renderer Editor
Object JLabel (left aligned) JTextField
Date JLabel (right aligned) JTextField
Number JLabel (right aligned) JTextField
ImageIcom JLabel (center aligned)
Boolean JCheckBox (center aligned) JCheckBox (center aligned)
The predefined renderers and editors are automatically located and loaded to match the class return from the getColumnClass() method in the table model. To use a predefined renderer or editor for a class other than String, you need to create your own table model by extending a subclass of TableModel. In your table model class, you need to override the getColumnClass() method to return the class of the column as follows:
public Class getColumnClass(int column) {
return getValueAt(0, column).getClass();
}
Example 8.8 Using Predefined Table Renderers and Editors
This example demonstrates using predefined table renderers and editors for boolean values, dates, and image icons, as shown in Figure 8.12.
406

Figure 8.12
JTable uses predefined renderers and editors for boolean values, dates, and image icons.
Here are the steps to complete the project:
1. Reopen project tabledemo.jpr. Create a new class named MyTableModel that extends DefaultTableModel, as shown in Listing 8.12. Create a new applet named TestPredefinedTableRendererEditor.java using the Applet wizard.
2. In the UI designer of TestPredefinedTableRendererEditor.java, drop a JScrollPane to the center of the applet and drop a JTable to the scroll pane to create jTable1.
3. Create an instance, named tableModel, of MyTableModel with table data and column, as shown in Listing 8.13 and set the model property of jTable1 to tableModel.
Listing 8.12: MyTableModel.java
package tabledemo;
import javax.swing.*;
import javax.swing.table.*;
import java.util.*;
public class MyTableModel extends DefaultTableModel {
public MyTableModel(Object[][] data, Object[] columnNames) {
super(data, columnNames);
}
/**Override this method to return a class for the column*/
407

public Class getColumnClass(int column) {
return getValueAt(0, column).getClass();
}
/**Override this method to return true if cell is editable*/
public boolean isCellEditable(int row, int column) {
Class columnClass = getColumnClass(column);
return columnClass != ImageIcon.class &&
columnClass != Date.class;
}
}
Listing 8.13: TestPredefinedTableRendererEditor.java
package tabledemo;
import java.awt.*;
import java.awt.event.*;
import java.applet.*;
import javax.swing.*;
import java.util.*;
import imageviewerdemo.ImageViewer;
public class TestPredefinedTableRendererEditor extends JApplet {
boolean isStandalone = false;
JScrollPane jScrollPane1 = new JScrollPane();
JTable jTable1 = new JTable();
// Create table column names
String[] columnNames =
{"Title", "Author", "Publisher", "Date Published", "In-stock",
"Book Photo"};
/**Initialize the applet*/
public void init() {
try {
jbInit();
}
catch(Exception e) {
e.printStackTrace();
}
}
/**Component initialization*/
private void jbInit() throws Exception {
// Create images
ImageIcon intro1eImageIcon = ImageViewer.createImageIcon(
"/image/intro1e.gif", this);
// Create image icons, omitted for brevity
// Create table data
Object[][] data = {
408

{"Introduction to Java Programming", "Y. Daniel Liang",
"Que Education & Training",
new GregorianCalendar(1998, 1-1, 6).getTime(),
new Boolean(false), intro1eImageIcon},
// Omitted for brevity
};
// Create table model
MyTableModel tableModel = new MyTableModel(data, columnNames);
this.setSize(new Dimension(400,300));
jTable1.setModel(tableModel);
jTable1.setRowHeight(40);
this.getContentPane().add(jScrollPane1, BorderLayout.CENTER);
jScrollPane1.getViewport().add(jTable1, null);
}
}
Example Review The example creates two classes: MyTableModel and TestPredefinedTableRendererEditor. MyTableModel is an extension of DefaultTableModel. The purpose of MyTableModel is to override the default implementation of the getColumnClass() method to return the class of the column, so that an appropriate predefined JTable can be used for the column. By default, getColumnClass() returns Object.class.
MyTableModel also overrides the isCellEditable() method. By default, isCellEditable() returns true. You can override it to prohibit editing of a cell. This example does not allow the user to edit image icons and dates. For a cell to be editable, both isCellEditable() in the table model and isEditing in JTable class must be true.
The TestPredefinedTableRendererEditor class creates a table model using MyTableModel. JTable assigns a predefined cell renderer and a predefined editor to the cell, whose class is specified in the getColumnClass() method in MyTableModel.
Custom Table Renderers and Editors
Predefined renderers and editors are convenient and easy to use, but their functions are limited. The predefined image icon renderer displays the image icon in a label. The image icon cannot be scaled. If you want the whole image to fit in a cell, you need to create a custom renderer.
A custom renderer can be created by extending the DefaultTableCellRenderer, which is a default implementation for the TableCellRender interface. The custom renderer must override
409

the getTableCellRendererComponent() to return a component for rendering the table cell.
The getTableCellRendererComponent() is defined as follows:
public Component getTableCellRendererComponent
(JTable table, Object value, boolean isSelected,
boolean isFocused, int row, int column)
This method signature is very similar to the getListCellRendererComponent() method used to create custom list cell renderers. Their implementations are similar too. The following class MyImageCellRenderer, shown in Listing 8.14, creates a renderer for displaying image icons in a panel.
Listing 8.14:
package tabledemo;
import javax.swing.*;
import javax.swing.table.*;
import imageviewerdemo.ImageViewer;
import java.awt.*;
public class MyImageCellRenderer extends DefaultTableCellRenderer {
/**Override this method in DefaultTableCellRenderer*/
public Component getTableCellRendererComponent
(JTable table, Object value, boolean isSelected,
boolean isFocused, int row, int column) {
Image image = ((ImageIcon)value).getImage();
ImageViewer imageViewer = new ImageViewer(image);
return imageViewer;
}
}
You can also create a custom editor. JTable provides the DefaultCellEditor class, which can be used to edit cell in a text field, a check box, or a combo box. To use it, simply create a text field, a check box, or a combo box, and pass it to DefaultCellEditor's constructor to create an editor.
Example 8.9 Using Custom Table Renderers and Editors
This example demonstrates using custom table renderers to display image icons and using a custom combo editor to edit items. A sample run of the program is shown in Figure 8.13
410

Figure 8.13
A custom renderer displays a scaled image, and a custom editor edits the Publisher column using a combo box.
Here are the steps to complete the project:
1. Reopen project tabledemo.jpr. Create a new class named MyImageCellRenderer that extends DefaultTableCellRenderer, as shown in Listing 8.14. Create a new applet named TestCustomTableRendererEditor.java using the Applet wizard.
2. In the UI designer of TestCustomTableRendererEditor.java, drop a JScrollPane to the center of the applet, and drop a JTable to the scroll pane to create jTable1.
3. Switch to the source pane to create an instance, named tableModel, of MyTableModel with table data and column names, and set the model property of jTable1 to tableModel.
4. Create an instance of MyImageCellRenderer and set it as the cell renderer for the Book Cover column.
5. Create an instance of JComboBox and add three publisher names, as shown in Listing 8.15. Pass the combo box to the constructor of DefaultCellEditor to create a custom editor and set it as the cell editor for the Publisher column.
Listing 8.15: TestCustomTableRendererEditor.java
package tabledemo;
import java.awt.*;
import java.awt.event.*;
import java.applet.*;
import javax.swing.*;
import javax.swing.table.*;
import java.util.*;
411

import imageviewerdemo.ImageViewer;
public class TestCustomTableRendererEditor extends JApplet {
boolean isStandalone = false;
JScrollPane jScrollPane1 = new JScrollPane();
JTable jTable1 = new JTable();
/**Initialize the applet*/
public void init() {
try {
jbInit();
}
catch(Exception e) {
e.printStackTrace();
}
}
/**Component initialization*/
private void jbInit() throws Exception {
// Create images
ImageIcon intro1eImageIcon = ImageViewer.createImageIcon(
"/image/intro1e.gif", this);
// Create other images omitted for brevity
// Create table data
Object[][] data = {
{"Introduction to Java Programming", "Y. Daniel Liang",
"Que Education & Training",
new GregorianCalendar(1998, 1-1, 6).getTime(),
new Boolean(false), intro1eImageIcon},
// Omitted for brevity
};
// Create table model
MyTableModel tableModel = new MyTableModel(data, columnNames);
this.setSize(new Dimension(400,300));
jTable1.setModel(tableModel);
jTable1.setRowHeight(40);
this.getContentPane().add(jScrollPane1, BorderLayout.CENTER);
jScrollPane1.getViewport().add(jTable1, null);
// Set custom renderer for displaying images
TableColumn bookCover = jTable1.getColumn("Book Cover");
bookCover.setCellRenderer(new MyImageCellRenderer());
// Create a combo box for publishers
JComboBox jcboPublishers = new JComboBox();
jcboPublishers.addItem("Prentice Hall");
jcboPublishers.addItem("Que Eduacation & Training");
jcboPublishers.addItem("McGraw-Hill");
// Set combo box as the editor for the publisher column
412

TableColumn publisherColumn = jTable1.getColumn("Publisher");
publisherColumn.setCellEditor(
new DefaultCellEditor(jcboPublishers));
}
}
Example Review This example uses the same table model (MyTableModel) that was created in the previous example. By default, image icons are displayed using the predefined image icon renderer. To use MyImageCellRenderer to display the image, you have to explicitly specify the MyImageCellRenderer renderer for the Book Cover column. Likewise, you have to explicitly specify the combo box editor for the Publisher column; otherwise the default editor would be used.
When you edit a cell in the Publisher column, a combo box of three items is displayed. When you select an item from the box, it is displayed in the cell. You did not write the code for handling selections. The selections are handled by the DefaultCellEditor class.
When you resize the Book Cover column, the image is resized to fit into the whole cell. With the predefined image renderer, you can only see part of the image if the cell is smaller than the image.
Table Events
Table events are fired by table models, table column models, and table selection models whenever changes are made to these models. The JTable class does not fire table events. Table models fire TableModelEvent when table data are changed. Table column models fire TableColumnModelEvent when columns are added, removed, or moved, or the column selection changes. Table selection models fire ListSelectionEvent when the selection changes.
To listen for these events, a listener must be registered with an appropriate model and implement the correct listener interface. The following example demonstrates using these events.
Example 8.10 Using Table Events
This example demonstrates handling table events. The program displays messages on a label when a row or a column is selected, when a cell is edited, or when a column is removed. Figure 8.14 is a sample run of the example.
413

Figure 8.14
Table event handlers display table events on a text area.
Here are the steps to complete the project:
1. Reopen project tabledemo.jpr. Create a new applet named TestTableEvents.java using the Applet wizard.
2. In the UI designer of TestTableEvents.java, drop a JSplitPane to the center of the applet and set its orientation to VERTICAL. Drop a JScrollPane to the top of the split pane, and drop a JTable to the scroll pane to create jTable1. Drop a JScrollPane to the bottom of the split pane, and drop a JTextArea to the scroll pane to create jtaMessage. Drop a JButton to the north of the applet to create jbtDeleteColumn.
3. Switch to the Content pane to create an instance named tableModel of MyTableModel with table data and column names, and set the model property of jTable1 to tableModel. Create an instance named tableColumnModel obtained from jTable1.getColumnModel(). Create an instance named selectionModel obtained from jTable1.getSelectionModel().
4. Switch to the UI designer. In the component tree, select tableModel in the Other node. In the Events page of the component inspector for tableModel, double-click the value field of tableChanged item to generate the handler for table model changed event. Implement the handler to display the changes in the text area, as shown in Listing 8.16.
5. Select tableModel in the Other node in the component tree. In the Events page of the component inspector for tableColumnModel, double-click the value field of columnRemoved item to generate the handler for column removed event. Implement the handler to display the remove column index in the text area, as shown in Listing 8.16.
414

6. Select selectionModel in the Other node in the component tree. In the Events page of the component inspector for selectionModel, double-click the value field of valueChanged item to generate the handler for selection event. Implement the handler to display the selected row and column in the text area, as shown in Listing 8.16.
7. Double-click the Delete Selected Column button to generate a handler for button action. Implement the handler to delete the currently selected column, as shown in Listing 8.16.
Listing 8.16: TestTableEvents.java
package tabledemo;
import java.awt.*;
import java.awt.event.*;
import java.applet.*;
import javax.swing.*;
import javax.swing.table.*;
import javax.swing.event.*;
import java.util.*;
import imageviewerdemo.ImageViewer;
public class TestTableEvents extends JApplet {
boolean isStandalone = false;
JSplitPane jSplitPane1 = new JSplitPane();
JScrollPane jScrollPane1 = new JScrollPane();
JButton jbtDeleteColumn = new JButton();
JScrollPane jScrollPane2 = new JScrollPane();
JTextArea jtaMessage = new JTextArea();
JTable jTable1 = new JTable();
// Table model
MyTableModel tableModel;
// Table column model
TableColumnModel tableColumnModel;
// Table selection model
ListSelectionModel selectionModel;
/**Initialize the applet*/
public void init() {
try {
jbInit();
}
catch(Exception e) {
e.printStackTrace();
}
}
/**Component initialization*/
private void jbInit() throws Exception {
415

// Create table column names
String[] columnNames =
{"Title", "Author", "Publisher", "Date Published", "In-stock",
"Book Cover"};
// Create images
ImageIcon intro1eImageIcon = ImageViewer.createImageIcon(
"/image/intro1e.gif", this);
// Create other images, omitted for brevity
// Create table data
Object[][] data = {
{"Introduction to Java Programming", "Y. Daniel Liang",
"Que Education & Training",
new GregorianCalendar(1998, 1-1, 6).getTime(),
new Boolean(false), intro1eImageIcon},
// Omitted for brevity
};
// Create table model
tableModel = new MyTableModel(data, columnNames);
// Create table column model
tableColumnModel = jTable1.getColumnModel();
// Create table selection model
ListSelectionModel selectionModel = jTable1.getSelectionModel();
this.setSize(new Dimension(400,300));
jTable1.setColumnSelectionAllowed(true);
jTable1.setModel(tableModel);
jTable1.setRowHeight(40);
selectionModel.addListSelectionListener(
new javax.swing.event.ListSelectionListener() {
public void valueChanged(ListSelectionEvent e) {
selectionModel_valueChanged(e);
}
});
tableModel.addTableModelListener(
new javax.swing.event.TableModelListener() {
public void tableChanged(TableModelEvent e) {
tableModel_tableChanged(e);
}
});
jbtDeleteColumn.setText("Delete Selected Column");
jbtDeleteColumn.addActionListener(
new java.awt.event.ActionListener() {
public void actionPerformed(ActionEvent e) {
jbtDeleteColumn_actionPerformed(e);
}
});
tableColumnModel.addColumnModelListener(
new javax.swing.event.TableColumnModelListener() {
416

public void columnAdded(TableColumnModelEvent e) {
}
public void columnMarginChanged(ChangeEvent e) {
}
public void columnMoved(TableColumnModelEvent e) {
}
public void columnRemoved(TableColumnModelEvent e) {
tableColumnModel_columnRemoved(e);
}
public void columnSelectionChanged(ListSelectionEvent e) {
}
});
this.getContentPane().add(jbtDeleteColumn, BorderLayout.NORTH);
this.getContentPane().add(jSplitPane1, BorderLayout.CENTER);
jSplitPane1.setOrientation(JSplitPane.VERTICAL_SPLIT);
jSplitPane1.add(jScrollPane1, JSplitPane.TOP);
jScrollPane1.getViewport().add(jTable1);
jSplitPane1.add(jScrollPane2, JSplitPane.BOTTOM);
jScrollPane2.getViewport().add(jtaMessage);
}
/**Handle table change events*/
void tableModel_tableChanged(TableModelEvent e) {
jtaMessage.append("Table changed: First row " + e.getFirstRow()
+ " and last row " + e.getLastRow() + " Type " +
e.getType() + '\n');
}
/**Handle column removed event*/
void tableColumnModel_columnRemoved(TableColumnModelEvent e) {
jtaMessage.append("Column " + jTable1.getSelectedColumn() +
" removed " + '\n');
}
/**Handle selection events*/
void selectionModel_valueChanged(ListSelectionEvent e) {
jtaMessage.append("Selected column " +
jTable1.getSelectedColumn() + " and row " +
jTable1.getSelectedRow() + '\n');
}
/**Handle deleting a selected column*/
void jbtDeleteColumn_actionPerformed(ActionEvent e) {
int selectedColumn = jTable1.getSelectedColumn();
tableColumnModel.removeColumn(
tableColumnModel.getColumn(selectedColumn));
}
}
Example Review
417

This example creates a table model for the table, and gets the default table column model and default selection model from the table. To make those model instances visible in the component tree, they are declared as data members of the class. The event handlers for the models are created from the Events page in the Component Inspector.
When a row or a column is selected, a ListSelecitonEvent is fired by selectionModel, which invokes the handler to display the selected row and column in the text area. When the contents or the structure of the table is changed, a TableModelEvent is fired by tableModel, which invokes the handler to display the last row, last column, and event type in the text area. When a column is deleted by clicking the Delete Selected Column button, a ColumnModelEvent is fired by tableColumnModel, which invokes the handler to display the index of the deleted column.
JTree
JTree is a Swing component that displays data in a treelike hierarchy. Figure 8.15 shows the Swing tree in the SwingSet demo.
Figure 8.15
The SwingSet demo demonstrates the features of JTree.
All the nodes displayed in the tree are in the form of a hierarchical indexed list. Tree can be used to navigate
418

structured data with hierarchical relationships. The JBuilder navigation pane, structure pane, and component tree are examples of displaying items as nodes in a treelike structure. A node can have child nodes. A node is called a leaf if it has no children; a node with no parent is called the root of its tree. A tree may consist of many subtrees, each node acting as the root for its own subtree.
A nonleaf node can be expanded or collapsed by double-clicking on the node or on the node's handle in front of the node. The handle usually has a visible sign to indicate whether the node is expanded or collapsed. For example, on Windows, the + symbol indicates that the node is collapsed and the - symbol indicates that it is expanded.
Like JTable, JTree is a very complex component with many supporting interfaces and classes. JTree is in the javax.swing package, but its supporting classes are all included in the javax.swing.tree package. These supporting classes are DefaultMutableTreeNode, DefaultTreeModel, TreeSelectionModel, DefaultTreeCellEditor, DefaultTreeCellRenderer, and TreePath.
While JTree displays the tree, the data representation of the tree is handled by the DefaultMutableTreeNode class, which provides operations for creating nodes, for examining and modifying a node's parent and children, and also for examining the tree to which the node belongs. While the DefaultMutableTreeNode represents a node, the DefaultTreeModel represents the entire tree. Unlike the ListModel or TableModel, the tree model does not directly store or manage tree data. Tree data are stored and managed by the DefaultMutableTreeNode class. To create a tree model, you first create an instance of DefaultMutableTreeNode to represent the root of the tree, and then create an instance of DefaultTreeModel fitted with the root.
The TreeSelectionModel class handles tree node selection. The DefaultTreeCellRenderer class provides a default tree node renderer that can display a label and/or an icon in a node. The DefaultTreeCellEditor can be used to edit the cells in a text field. The TreePath class is a support class that represents a set of nodes in a path.
JTree has the following useful properties:
• cellEditor: An object that is used to edit the cell in a tree node. By default, an instance of DefaultCellEditor is used to edit the cells in a text field. Using custom tree cell renderer is introduced in the section, "Tree Node Rendering and Editing."
• cellRenderer: An object that is used to render the cells in a tree node. By default, an instance of DefaultTreeCellRenderer is used to display nodes in a tree, which can display strings
419

or icons. Using custom tree cell renderer is introduced in the section, "Tree Node Rendering and Editing."
• editable: A boolean value indicating whether the cell is editable. The default value is false.
• model: An instance of TreeModel.
• rootVisible: A boolean value indicating whether the root is displayed in the tree. The default value is true.
• rowHeight: The height of the row for the node displayed in the tree. The default height is 16 pixels.
• selectionModel: An instance of TreeSelectionModel.
Creating Trees
JTree doesn't directly support scrolling. To create a scrollable tree, you need to create a JScrollPane and add an instance of JTree to the scroll pane.
There are several constructors that can be used to create a JTree. You can create a JTree with an array of objects, a vector, or a hash table. The builder tool always uses the default constructor to create an instance of JTree with a default tree model. The default tree is shown in Figure 8.16, because the default tree model is defined in the getDefaultTreeModel method of the JTree class as follows:
// Excerpted from JTree.java
protected static TreeModel getDefaultTreeModel() {
DefaultMutableTreeNode root = new DefaultMutableTreeNode("JTree");
DefaultMutableTreeNode parent;
parent = new DefaultMutableTreeNode("colors");
root.add(parent);
parent.add(new DefaultMutableTreeNode("blue"));
parent.add(new DefaultMutableTreeNode("violet"));
parent.add(new DefaultMutableTreeNode("red"));
parent.add(new DefaultMutableTreeNode("yellow"));
parent = new DefaultMutableTreeNode("sports");
root.add(parent);
parent.add(new DefaultMutableTreeNode("basketball"));
parent.add(new DefaultMutableTreeNode("soccer"));
// Omitted for brevity
return new DefaultTreeModel(root);
}
420
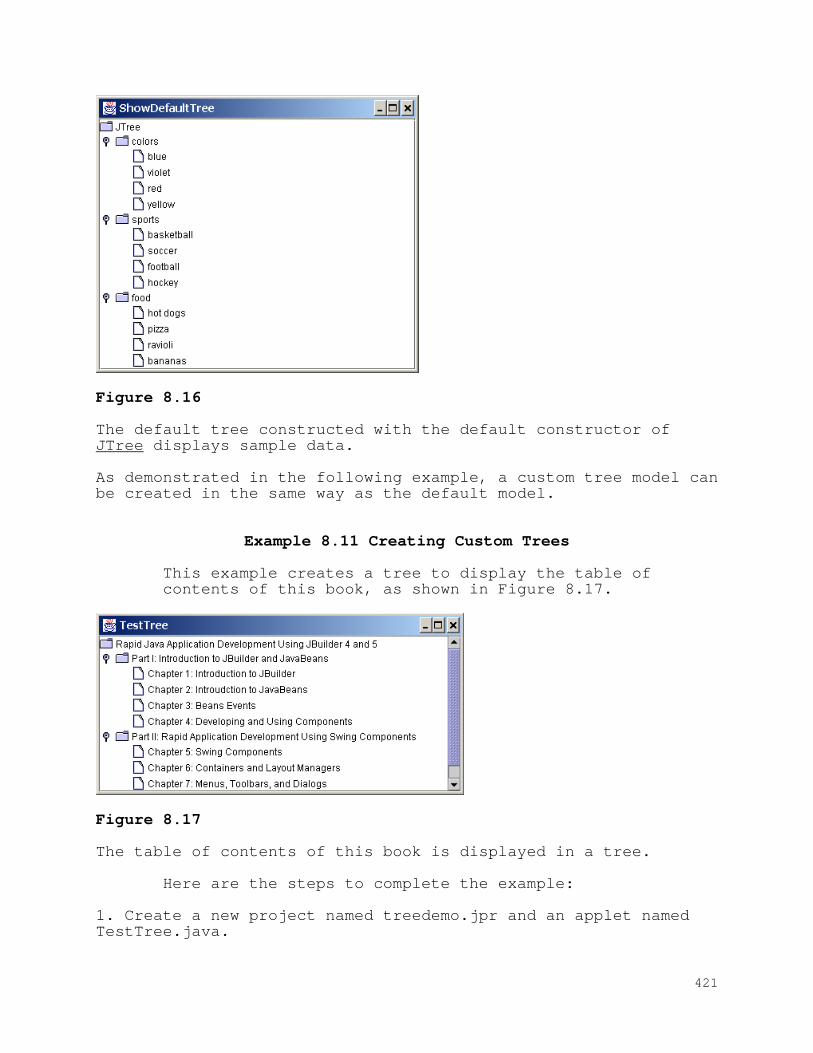
Figure 8.16
The default tree constructed with the default constructor of JTree displays sample data.
As demonstrated in the following example, a custom tree model can be created in the same way as the default model.
Example 8.11 Creating Custom Trees
This example creates a tree to display the table of contents of this book, as shown in Figure 8.17.
Figure 8.17
The table of contents of this book is displayed in a tree.
Here are the steps to complete the example:
1. Create a new project named treedemo.jpr and an applet named TestTree.java.
421

2. In the UI designer of TestTree.java, drop a JScrollPane to the center of the applet, and drop a JTree to the scroll pane to create jTree1.
3. Create a method named createTreeModel() to create a tree model, as shown in Listing 8.17. Declare and create an instance of TreeModel named treeModel. Set the model property of jTree1 to treeModel.
Listing 8.17: TestTree.java
package treedemo;
import java.awt.*;
import java.awt.event.*;
import java.applet.*;
import javax.swing.*;
import javax.swing.tree.*;
public class TestTree extends JApplet {
boolean isStandalone = false;
JScrollPane jScrollPane1 = new JScrollPane();
JTree jTree1 = new JTree();
DefaultTreeModel treeModel;
/**Initialize the applet*/
public void init() {
try {
jbInit();
}
catch(Exception e) {
e.printStackTrace();
}
}
/**Component initialization*/
private void jbInit() throws Exception {
// Create a tree model and set the tree model in jTree1
treeModel = createTreeModel();
jTree1.setModel(treeModel); // Set this value manually
this.setSize(new Dimension(400,300));
this.getContentPane().add(jScrollPane1, BorderLayout.CENTER);
jScrollPane1.getViewport().add(jTree1, null);
}
/**Create a tree model*/
private DefaultTreeModel createTreeModel() {
DefaultMutableTreeNode root = new DefaultMutableTreeNode
("Rapid Java Application Development Using JBuilder 4 and 5");
DefaultMutableTreeNode parent = new DefaultMutableTreeNode
("Part I: Introduction to JBuilder and JavaBeans");
root.add(parent);
422
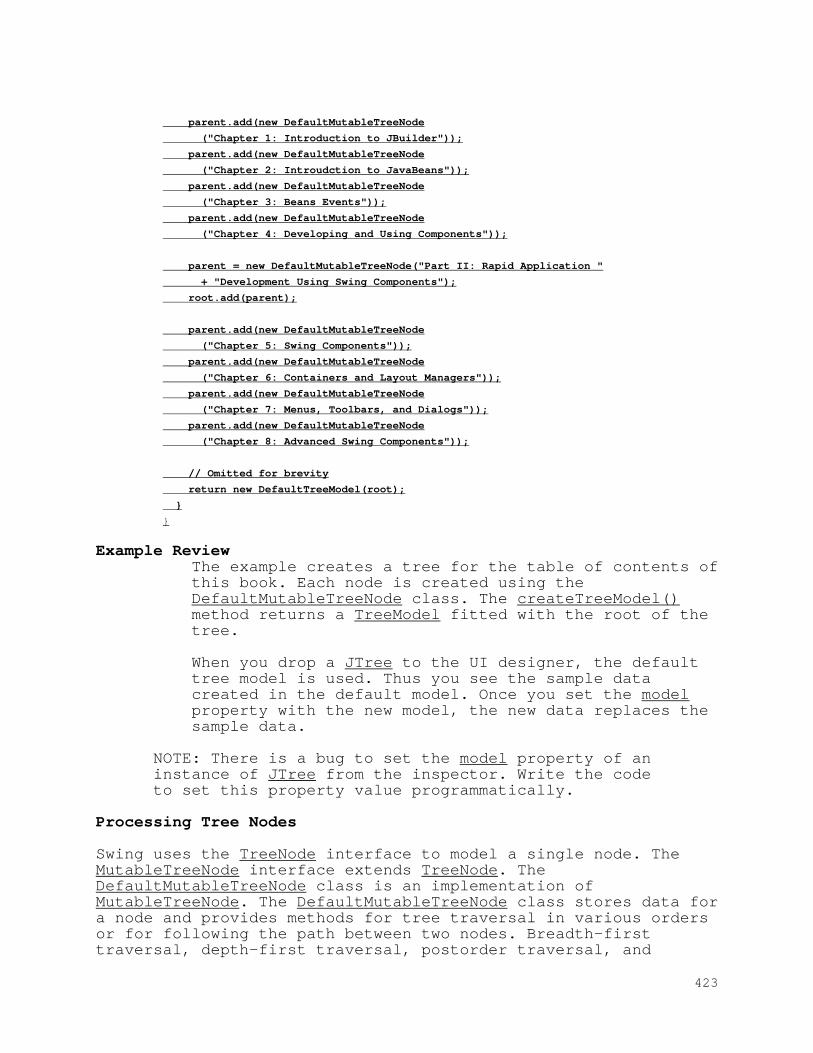
parent.add(new DefaultMutableTreeNode
("Chapter 1: Introduction to JBuilder"));
parent.add(new DefaultMutableTreeNode
("Chapter 2: Introudction to JavaBeans"));
parent.add(new DefaultMutableTreeNode
("Chapter 3: Beans Events"));
parent.add(new DefaultMutableTreeNode
("Chapter 4: Developing and Using Components"));
parent = new DefaultMutableTreeNode("Part II: Rapid Application "
+ "Development Using Swing Components");
root.add(parent);
parent.add(new DefaultMutableTreeNode
("Chapter 5: Swing Components"));
parent.add(new DefaultMutableTreeNode
("Chapter 6: Containers and Layout Managers"));
parent.add(new DefaultMutableTreeNode
("Chapter 7: Menus, Toolbars, and Dialogs"));
parent.add(new DefaultMutableTreeNode
("Chapter 8: Advanced Swing Components"));
// Omitted for brevity
return new DefaultTreeModel(root);
}
}
Example Review The example creates a tree for the table of contents of this book. Each node is created using the DefaultMutableTreeNode class. The createTreeModel() method returns a TreeModel fitted with the root of the tree.
When you drop a JTree to the UI designer, the default tree model is used. Thus you see the sample data created in the default model. Once you set the model property with the new model, the new data replaces the sample data.
NOTE: There is a bug to set the model property of an instance of JTree from the inspector. Write the code to set this property value programmatically.
Processing Tree Nodes
Swing uses the TreeNode interface to model a single node. The MutableTreeNode interface extends TreeNode. The DefaultMutableTreeNode class is an implementation of MutableTreeNode. The DefaultMutableTreeNode class stores data for a node and provides methods for tree traversal in various orders or for following the path between two nodes. Breadth-first traversal, depth-first traversal, postorder traversal, and
423

preorder traversal are supported. These traversals are often used in algorithm design and are popular topics in data structures course.
The following methods in DefaultMutableTreeNode are often useful:
// The useful methods in DefaultMutableTreeNode
public TreeNode getParent() // Return the parent node
public Enumeration children() // Get all children
public boolean isLeaf() // Is the node a leaf
public Enumeration breadthFirstEnumeration()
public Enumeration depthFirstEnumeration()
public Enumeration preorderEnumeration()
public Enumeration postOrderEnumeration()
The last four methods create and return an enumeration that traverses the subtree rooted at this node in breadth-first order, depth-first order, preorder, or postorder, respectively. For example, the following code displays the nodes in breadth-first traversal order:
Enumeration bf = root.breadthFirstEnumeration();
while (bf.hasMoreElements()) {
System.out.print(bf.nextElement().toString());
}
Swing uses the TreePath class to represent a path between an ancestor and a descendant in the tree. Instances of TreePath are often instantiated by Swing classes. For instance, the getLeadSelectionPath() method in the TreeSelectionModel returns the path from the root to the selected node. There are many ways to extract the nodes from a tree path. Often you use the getLastPathComponent() method to obtain the last node in the path, and then get all the nodes in the path upward through the link using the getParent() method.
The selection of tree nodes is defined in the TreeSelectionModel interface. The DefaultTreeSelectionModel class is an implementation of the TreeSelectionModel, which maintains an array of TreePath objects representing the current selection. The last TreePath selected, called the lead path, can be obtained using the getLeadSelectionPath() method. To obtain all the selection path, use the getSelectionPaths() method, which returns an array of tree paths.
TreeSelectionModel supports three selection modes: contigous selection, discontiguous selection, and single selection. Single selection allows only one item to be selected. Contiguous selection allows multiple selections, but the selected items must be contiguous. Discontigous selection is the most flexible; it allows any item to be selected at a given time. The default tree selection mode is discontiguous. To set a selection mode, use the setSelectionMode() method in TreeSelectionModel. The constants for the three modes are the following:
424

• CONTIGUOUS_TREE_SELECTION
• DISCONTIGUOUS_TREE_SELECTION
• SINGLE_TREE_SELECTION
The TreeModel interface defines operations for inserting or removing tree nodes. The DefaultTreeModel class is a concrete implementation of TreeModel. To insert or remove a node, use the following methods:
public void insertNodeInto(MutableTreeNode newNode,
MutablTreeNode parent,
int index)
public void removeNodeFromParent(MutableTreeNode theNode)
Example 8.12 Adding and Removing Nodes
This example uses the classes DefaultMutableTreeNode, TreePath, DefaultTreeSelectionModel, and DefaultTreeModel. The example enables the user to add or remove nodes from a tree, as shown in Figure 8.18.
Figure 8.18
You can add or remove nodes dynamically in a tree.
Here are the steps to complete the example:
1. Reopen the project treedemo.jpr and create an applet named ProcessTree.java using the Applet wizard.
2. In the UI designer of ProcessTree.java, drop a JScrollPane to the center of the applet, and drop a JTree to the scroll pane to
425

create jTree1. Drop a JPanel to create jpButtons, and add two buttons named jbtAdd and jbtRemove into jpButtons.
3. Declare and obtain the tree model and selection model from jTree1 using the getModel() and getSelectionModel() methods. Set the selection mode to single selection.
4. Generate and implement the code for handling jbtAdd and jtbRemove, as shown in Listing 8.18.
Listing 8.18: ProcessTree.java
package treedemo;
import java.awt.*;
import java.awt.event.*;
import java.applet.*;
import javax.swing.*;
import javax.swing.tree.*;
public class ProcessTree extends JApplet {
boolean isStandalone = false;
JScrollPane jScrollPane1 = new JScrollPane();
JTree jTree1 = new JTree();
JPanel jpButtons = new JPanel();
JButton jbtAdd = new JButton();
JButton jbtRemove = new JButton();
// Get selection model
TreeSelectionModel selectionModel = jTree1.getSelectionModel();
// Get tree model
DefaultTreeModel treeModel = (DefaultTreeModel)jTree1.getModel();
/**Initialize the applet*/
public void init() {
try {
jbInit();
}
catch(Exception e) {
e.printStackTrace();
}
}
/**Component initialization*/
private void jbInit() throws Exception {
this.setSize(new Dimension(400,300));
jbtAdd.setText("Insert a Child Node");
jbtAdd.addActionListener(new java.awt.event.ActionListener() {
public void actionPerformed(ActionEvent e) {
jbtAdd_actionPerformed(e);
}
});
jbtRemove.setText("Remove the Selected Node");
426

jbtRemove.addActionListener(
new java.awt.event.ActionListener() {
public void actionPerformed(ActionEvent e) {
jbtRemove_actionPerformed(e);
}
});
this.getContentPane().add(jScrollPane1, BorderLayout.CENTER);
this.getContentPane().add(jpButtons, BorderLayout.NORTH);
jpButtons.add(jbtAdd, null);
jpButtons.add(jbtRemove, null);
jScrollPane1.getViewport().add(jTree1, null);
// Set single selection
selectionModel.setSelectionMode(
TreeSelectionModel.SINGLE_TREE_SELECTION);
}
void jbtAdd_actionPerformed(ActionEvent e) {
// Get the selection path
TreePath path = selectionModel.getLeadSelectionPath();
// Get the last node in the path
DefaultMutableTreeNode treeNode =
(DefaultMutableTreeNode)path.getLastPathComponent();
// Enter a new node
String nodeName = JOptionPane.showInputDialog(
this, "Enter a name for this new node", "Add a Child",
JOptionPane.QUESTION_MESSAGE);
// Insert the new node as a child of treeNode
treeModel.insertNodeInto(new DefaultMutableTreeNode(nodeName),
treeNode, treeNode.getChildCount());
}
void jbtRemove_actionPerformed(ActionEvent e) {
// Get the selection path
TreePath path = selectionModel.getLeadSelectionPath();
// Get the last node in the path
DefaultMutableTreeNode treeNode =
(DefaultMutableTreeNode)path.getLastPathComponent();
if (treeNode == treeModel.getRoot()) {
JOptionPane.showMessageDialog(this, "Cannot remove the root");
}
else
// Remove the selected node
treeModel.removeNodeFromParent(treeNode);
}
}
Example Review
427

The example creates a tree using the default constructor. The getModel() method returns the tree model, and the getSelectionModel() method obtains the tree selection model. The methods for inserting and removing nodes are provided in the tree model, and the tree selection model can be used to find the selected path using the getLeadSelectionPath() method. The selected node is the last node in the lead path, which can be found using the getLastPathComponent() method.
To insert a node, first select a parent in the tree, then click the Insert a Child Node button, which displays an input dialog box to receive the new node name. The new node is added as a child of the selected node.
To remove a node, first select the node in the tree, then click the Remove the Selected Node button. If you attempt to remove the root, a message dialog is displayed to alert you that the root cannot be removed.
Tree Node Rendering and Editing
Like all the advanced Swing components, JTree delegates node rendering to a renderer. The DefaultTreeCellRenderer interface defines how cells are rendered, which is implemented by the DefaultTreeCellRenderer class. The DefaultTreeCellRenderer class maintains three icon properties named leafIcon, openIcon, and closedIcon for leaf nodes, expanded nodes, and collapsed nodes. It also provides colors for text and background. The following code sets new leaf, open and closed icons, and new background selection color in the tree.
DefaultTreeCellRenderer renderer =
(DefaultTreeCellRenderer)jTree1.getCellRenderer();
renderer.setLeafIcon(leafImageIcon);
renderer.setOpenIcon(openImageIcon);
renderer.setClosedIcon(closedImageIcon);
renderer.setBackgroundSelectionColor(Color.red);
NOTE: The default leaf, open icon, and closed icon are dependent on the look-and-feel. For instance, on Windows look-and-feel, the open icon is -, and the closed icon is +.
JTree comes with a default cell editor. If the JTree's editable property is true, the default editor activates a text field for editing when the node is clicked three times. By default, this property is set to False. To create a custom editor, you need to extend the DefaultCellEditor class, which is the same class you used in table cell editing. You can use a text field, a check box, or a combo box, and pass it to DefaultCellEditor's constructor to create an editor. The following code uses a combo
428

box for editing colors. The combo box editor is shown in Figure 8.19.
// Customize editor
JComboBox jcboColor = new JComboBox();
jcboColor.addItem("red");
jcboColor.addItem("green");
jcboColor.addItem("blue");
jcboColor.addItem("yellow");
jcboColor.addItem("orange");
jTree1.setCellEditor(new DefaultCellEditor(jcboColor));
jTree1.setEditable(true);
***Same as Fig 8.18 in radjb3 p380
Figure 8.19
You can supply a custom editor for editing tree nodes.
There are two annoying problems with the editor created in the preceding code. First, the editor is activated with just one mouse click. Second, the editor overlaps the node's icon, as shown in Figure 8.19. The first problem can be fixed by creating a subclass of DefaultCellEditor that overrides the isCellEditable() method, which returns true if the mouse click count is 3. The second problem can be fixed using the DefaultTreeCellEditor as follows. The new editor is shown in Figure 8.20.
jTree1.setCellEditor
(new DefaultTreeCellEditor(jTree1,
new DefaultTreeCellRenderer(),
new DefaultCellEditor(jcboColor)));
***Same as Fig 8.19 in radjb3 p381
Figure 8.20
The DefaultTreeCellEditor displays an editor that does not overlap a node's icon.
Tree Events
JTree can fire TreeSelectionEvent and TreeExpansionEvent among many other events. Whenever a new node is selected, JTree fires a TreeSelectionEvent. Whenever a node is expanded or collapsed, JTree fires a TreeExpansionEvent. To handle the tree selection event, a listener must implement the TreeSelectionListener interface, which contains a single handler named valueChanged() method. TreeExpansionListener contains two handlers named
429

treeCollapsed() and treeExpanded() for handling node expansion or node closing.
The following code displays a selected node:
void jTree1_valueChanged(TreeSelectionEvent e) {
TreePath path = e.getNewLeadSelectionPath();
TreeNode treeNode = (TreeNode)path.getLastPathComponent();
System.out.println("The selected node is " + treeNode.toString());
}
Chapter Summary
This chapter introduced four advanced Swing components: JList, ComboBox, JTable, and JTree. You learned how to use their data models to store and process data, and how to use selection models to handle data selection, renderer classes to display views, and the editor class to edit cells in these components.
Review Questions
8.1 Does JList have a method, such as addItem(), for adding an item to a list? How do you add items to a list? Can JList display icons and custom GUI objects in a list? Can a list item be edited? How do you initialize data in a list? How do you specify the maximum number of visible rows in a list without scrolling? How do you specify the height of a list cell? How do you specify the horizontal margin of list cells?
8.2 How do you create a list model? How do you add items to a list model? How do you remove items from a list model?
8.3 What are the three list-selection modes? Can you set the selection modes directly in an instance of JList? How do you obtain the selected item(s)?
8.4 How do you create a custom list cell renderer?
8.5 What is the handler for handling the ListSelectionEvent?
8.6 Can multiple items be selected from a combo box? Can a combo box item be edited? How do you specify the maximum number of visible rows in a combo box without scrolling? Can you specify the height of a combo box cell using a method in JComboBox? How do you obtain the selected item in a combo box?
8.7 How do you add or remove items from a combo box?
8.8 Why is the cell renderer for a combo box the same as the renderer for a list?
8.9 How do you initialize a table? Can you specify the maximum number of visible rows in a table without scrolling? How do you
430

specify the height of a table cell? How do you specify the horizontal margin of table cells?
8.10 How do you modify table contents? How do you add or remove a row? How do you add or remove a column?
8.11 What is auto resizing of a table column? How many types of auto resizing are available?
8.12 What are the properties to show grids, horizontal grids, and vertical grids? What are the properties to specify the table row height, vertical margin, and horizontal margin?
8.13 What are the default table renderers and editors? How do you create a custom table cell renderer and editor?
8.14 How do you create a tree? How do you specify the row height of a tree node? How do you obtain the default tree model and tree selection model from an instance of JTree?
8.15 How do you initialize data in a tree using TreeModel? How do you add a child to an instance of DefaultMutableTreeNode?
8.16 How do you add or remove a node from a tree?
8.17 How do you obtain a selected tree node?
Programming Exercises
8.1 Create a program that shows a list of geometrical shapes along with a label in an instance of JList, as shown in Figure 8.21. Display the selected figure in a panel when selecting a figure from the list. The figures are represented in the FigurePanel class in Example 7.3, "Using JTabbedPane."
Figure 8.21
The list displays geometrical shapes and their names.
431

8.2 Create a program that shows a list of geometrical shapes along with a label in a combo box, as shown in Figure 8.22. This exercise may share the list cell renderer with the preceding exercise.
Figure 8.22
The combo box contains a list of geometrical shapes and the shape names.
8.3 Create a table for student records. Each record consists of name, birthday, class status, in-state, and a photo, as shown in Figure 8.23. The name is of the String type; birthday is of the Date type; class status is one of the following five values: Freshman, Sophomore, Junior, Senior, and Graduate; in-state is a boolean value indicating whether the student is a resident of the state; and photo is an image icon. The program enables the user to add, remove, or edit a record. Use the default editors for name, birthday, and in-state. Supply a combo box as custom editor for class status.
Figure 8.23
The table displays student records and supports add, remove, and edit operations.
8.4 Modify Example 8.11 as follows:
432

• Run it in the look-and-feel of Motif, Metal, or Windows.
• Display the nodes in breadth-first order, depth-first order, preorder, and postorder.
• Set custom icons for leaf, open, and closed nodes, and create custom editors for choosing colors in a combo box.
• Display a paragraph in a text area for each node in the tree, as shown in Figure 8.24.
Figure 8.24
The content of the node is displayed in a text area when a node is clicked.
8.5 Suppose a table is stored in a text file. The first line in the file is the header, and each remaining lines correspond to rows in the table. The elements are separated by the Tab characters. Write a program to display the table using the JTable component.
8.6 Modify Example 8.10, “Using Table Events,” to delete a row or a column by pressing the DELETE key.
8.7 Modify Example 8.12, “Adding and Removing Nodes,” to add a new child node by pressing the INSERT key, and delete a node by pressing the DELETE key.
8.8 Create a custom tree node renderer that uses a combo box to choose colors, as shown in Figure 8.20. Display the combo box upon three consecutive mouse clicks on the node.
8.9 Modify Example 8.3, “List Cell Renderer Demo,” and Example 8.4, “Combo Box Demo,” to share the same renderer class as follows:
433

• Create an interface named ImageModel as follows:
public interface ImageModel {
public String getName(Object value);
public Image getImage(Object value);
}
• Modify MyListModel to implement the ImageModel interface.
• Modify MyComboBoxModel to implement the ImageModel interface.
• Modify MyListCellRenderer.java to replace MyListModel by ImageModel.
• You should be able to run TestListCellRenderer with no changes.
• In the TestComboBox class, change any reference to MyComboBoxRenderer to MyListCellRenderer. Now TestComboBox and TestListCellRenderer share the same renderer.
8.10 In Exercise 4.8, you created a chart model (ChartModel) and two views (PieChart and BarChart). Create a controller to enable the user to modify the data, as shown in Figure 8.25. You will see the changes take effect in the pie chart view and bar chart vier. Your exercise consists of the following classes:
• The controller named ChartController. This class uses a table to display data. You can modify the data in the table. Click the Insert button to insert a new row above the selected row in the table, click the the Delete button to delete the selected row in the table, and click the Update button to update the changes you made in the table.
• The class MyTableModel. This class extends DefualtTableModel to override the getColumnClass method so that you can use the JTable’s default editor for numerical values.
• The classes ChartModel, PieChart, and BarChart from Exercise 4.8.
• The main class Exercise8_10. This class creates an user interface with a controller, and two buttons View Pie Chart and View Bar Chart. Click the View Pie Chart button to pop up a frame to display a pie chart and click the View Bar Chart button to pop up a frame to display a bar chart.
434

Figure 8.25
You can modify the data in the controller. The views are synchronized with the controller.
435