8th grade - studentorg for science ... wind turbines generate electricity by using the wind to ......
TRANSCRIPT

8thGradeSpring2016Lessonplans
VanderbiltStudentVolunteersforScience
http://studentorgs.vanderbilt.edu/vsvs/

VOLUNTEERINFORMATIONTeamMemberContactInformation
Name:PhoneNumber:_
Name:PhoneNumber:_
Name:PhoneNumber:_
Name:PhoneNumber:_
Name:PhoneNumber:_
Teacher/SchoolContactInformation
SchoolName:_________________________________________TimeinClassroom:_______________________
Teacher’sName:_______________________________________PhoneNumber:__________________________
VSVSINFORMATIONVSVSDirector:PatTellinghuisen 615-343-4379(W),615-297-5809(H)[email protected] VSVSOffice:StevensonCenter5233
Co-Presidents: ArulitaGupta [email protected]
AmandaJurewicz [email protected]: NuryLee [email protected]
VanderbiltProtectionofMinorsPolicy:http://www.vanderbilt.edu/meetatvanderbilt/wp-content/uploads/Minors-Policy-Risk-management.pdfBeforeYouGo:§ Thelessonsareonlineat:http://studentorgs.vanderbilt.edu/vsvs/§ Emailtheteacherpriortothefirstlesson.§ Setadeadlinetimeforyourteam.Thismeansifateammemberdoesn’tshowupbythistime,youwillhavetoleavethembehindtogettotheschoolontime.
§ Don’tdropoutfromyourgroup.Ifyouhaveproblems,emailPatoroneoftheco-presidents,andwewillworktohelpyou.Don’tletdownthekidsorthegroup!
§ Ifyourgrouphasanyproblems,letusknowASAP.
PickinguptheKit:§ KitsarepickedupanddroppedoffintheVSVSLab,StevensonCenter5233.§ TheVSVSLabisopen8:30am–4:00pm(earlierifyouneeddryiceorliquidN2).§ Assignatleastonememberofyourteamtopickupthekiteachweek.§ Kitsshouldbepickedupatleast30minutesbeforeyourclassroomtime.§ Ifyouarescheduledtoteachat8am,pickupthekitthedaybefore.§ Therearetwo20minuteparkingspotsintheloadingdockbehindStevensonCenter.Pleasedonotusethehandicapspaces–youwillgetaticket.
Whileyou’rethere–Justrelaxandhavefun!

FEBRUARYSUN MON TUES WED THU FRI SAT
1 2 3 4 5TeamLeaderTraining
6
7TeamLeaderTraining
8 9
10
11 12 13
14 15SomeTeams
GoOut
16 17
18 19
20
21
22AllTeamsGo
Out
23 24 25 26 27
28 29AllTeamsGoOut
MARCHSUN MON TUES WED THU FRI SAT 1
2
3 4
5
6 7 8 9 10 11 12
13 14 15 16 17 18
19
20 21 22 23 24
25
26
27
28
29
30 31
APRILSUN MON TUES WED THU FRI SAT
1
2
3 4
5 6 7 8 9
10 11
12
13 14 15 16
17 18
19 20 21 22 23
24
25
26 27
28 29 30
Training
Training(Grades6,7,8)
Training(Grades5&6)
Training

CLASSROOMETIQUETTEFollowMetroSchools’DressCode!
§ Nominiskirts,shorts,ortanktops.§ Tuckinshirtsifyoucan.§ Pleasedressappropriately.
Metrostudentstandardattireguideline:http://jtmoorems.mnps.org/pages/JohnTrotwoodMooreMiddle/About_Our_School/8998762518461552450/Dress_Code
COLLEGEQ&ASESSIONVSVSmembersshouldbecandidabouttheirexperiencesandemphasizetheroleofhardworkandasolidbodyofcourseworkinhighschoolasameanstogettocollege.• Emailtheteacherpriortothefirstlesson.
o Theymaywanttohavethestudentswritedownquestionspriortoyourlesson.o Theymayalsowanttohavearoleinfacilitatingthediscussion.
• Finishtheexperimentofthedayandopenupthefloortothestudents.• Remindthemofyouryearsandmajorsandaskiftheyhavespecificquestionsaboutcollegelife.• Iftheyareshy,startbyexplainingthingsthataredifferentincollege.
o Choosingyourownschedule,dormlife,extracurricularactivities,etc.o Emphasizethehardworkingattitude.
Thefollowingaresomesamplequestions(posedbystudents):• Whenisbedtimeincollege?Doesyourmomstillhavetowakeyouupincollege?• Howmuchdoescollegecost?• Whatdoyoueatincollegeandcanyoueatinclassincollege?• Howmuchhomeworkdoyouhaveincollege?
DIRECTIONSTOSCHOOLSH.G.HILLMIDDLESCHOOL:150DAVIDSONRD 615-353-2020HGHillSchoolwillbeontherightacrosstherailroadlines.HEADMAGNETSCHOOL:1830JOJOHNSONAVE 615-329-8160TheparkinglotonthelefttotheJohnstonAve.JOHNEARLYMIDDLESCHOOL:1000CASSSTREET 615-291-6369GoingdowntheCassStreet,theschoolisontheright.J.T.MOOREMIDDLESCHOOL:4425GRANNYWHITEPIKE 615-298-8095FromLoneOak,theparkinglotisontheright,andtheentrance intotheschoolfacesLoneOak,butisclosertoGrannyWhite.MEIGSMIDDLESCHOOL:417RAMSEYSTREET 615-271-3222GoingdownRamseyStreet,Meigsisontheleft.ROSEPARKMAGNETSCHOOL:10259thAveSouth 615-291-6405Theschoolislocatedontheleftandtheparkingisoppositetheschool,orbehindit(preferred).WESTENDMIDDLESCHOOL:3529WESTENDAVE 615-298-8425Parkingisbesidethesoccerfield,oranywhereyoucanfindaplace.Enterthroughthesidedoor.WRIGHTMIDDLESCHOOL:180MCCALLSTREET 615-333-5189GoingdownMccallStreet,WrightMiddleSchoolisontheleft.EASTLITERATUREMAGNETSCHOOL:110GallatinAvenue 615-262-6947GoingdownGallatinAvenue,EastLiteratureMagnetSchoolisontheleft.

VANDERBILT STUDENT VOLUNTEERS FOR SCIENCE
http://studentorgs.vanderbilt.edu/vsvs
Electromagnetism Spring 2016
(Adapted from Student Guide for Electric Snap Circuits by Elenco Electronic Inc.) Goals: 0807.12.2 Produce an electromagnet using a bar magnet and a wire coil. 0807.12.3 Experiment with an electromagnet to determine how to vary its strength. Materials 10 sets (of 2) D-batteries in holder 10 bags containing 1 set of 2 nails wrapped with copper wire (1 nail has 50 coils and the other 10 coils) 1 bag of 10 paper clips 2 single alligator clips, 1 double alligator clip, 1 push switch 10 bags containing: 1 case Iron fillings (white paper glued beneath for better visibility) 1 bag containing pair of paper clips attached to each other 10 magnets 10 bags containing circuit boards with: 4 # 2 snaps 1 # 1snap 1 # 3 snaps 1 electromagnet coil 1 switch 1 red and 1 black lead 1 iron rod and grommet 1 battery holder with batteries 10 voltmeter/ammeter 10 simple motors 36 Observation sheet 20 circuit diagrams 1. Before the lesson: In the car ride, read through this quiz together as a team. Make sure each team member has read the lesson and has a fundamental understanding of the material.
1. Why does the needle of a compass point North? 2. How is an electromagnet different from a regular magnet? 3. How can we make a current to flow using magnets and no battery? 4. Explain how a motor works.
2. During the Lesson: Here are some Fun Facts for the lesson Wind turbines generate electricity by using the wind to turn their blades. These drive magnets around inside coils of electric wire
Electromagnets are used in junk yards to pick up cars and other heavy metal objects
Your Notes: ______________________________________________________________________________
______________________________________________________________________________
______________________________________________________________________________
______________________________________________________________________________
Electromagnetics are used in home circuit breakers, doorbells, magnetic door locks, amplifiers, telephones, loudspeakers, PCs, medical imaging, tape recorders
Magnetic levitation trains use very strong electromagnets to carry the train on a cushion of magnetic repulsion. Floating reduces friction and allows the train to run more efficiently.
Unpacking the Kit II. Making an Electromagnet Using Batteries, a Nail and Copper Wire. 10 sets (of 2) D-batteries in holder, 10 bags containing sets (of 2) nails wrapped with copper wire (1 nail has 50 coils and the other 10 coils), 1 bag of 10 paper clips, 2 single alligator clips, 1 double alligator clip, 1 push switch 36 Observation sheet III. Comparing Properties of Magnets and Electromagnet 10 bags containing: 2paper clips (paired), 1 case Iron fillings (white paper glued beneath for better visibility) 10 magnets 10 circuit boards with: 4 # 2 snaps, 1 # 1snap, 1 # 3 snaps. 1 electromagnet, 1 battery holder with batteries, 1 switch 1 red and 1 black lead, Iron rod 20 circuit diagrams (2 per group) IV. Making Electricity with Magnets and Coil Add 10 voltmeter/ammeters – M6’s V. Applications of Electromagnets - Using Electricity and an Electromagnet to make a Motor 10 simple motors I Introduction A. What is a Magnet?
Ask students to tell you what they know about magnets. Make sure the following information is included: All magnets have the same properties:
All magnets have 2 magnetic poles. The poles in the bar magnet are at the ends. One pole is labeled N
The poles are the places where its magnetism is strongest. Same poles repel each other:
If the N pole is brought close to the N pole of a second magnet they will repel each other, the same is true for 2 S poles brought together.

Your Notes: ______________________________________________________________________________
______________________________________________________________________________
______________________________________________________________________________
______________________________________________________________________________
Opposite poles attract each other. If the N pole of one magnet is brought close to the S pole of another magnet, they will attract each other.
All magnets have a magnetic field, which can be visualized using iron filings.
B. What is an electromagnet? Ask students if they know what an electromagnet is and accept answers. An electromagnet is made by wrapping copper (the metallic reddish-colored) wire into a coil. It generates a magnetic field when an electric current passes through the wire. An iron rod placed inside the coil will increase the magnetic force. Magnetic fields are produced by moving electric charges
Explain that an electromagnet is a magnet that works only when an electric current passes through it (e.g. when it is connected to a battery). Electromagnets differ from permanent magnets in that they have an inducible or temporary magnetic field. Their magnetic field can be turned off by removing the electric current.
Divide class into 10 groups. II. Making an Electromagnet Using Batteries, a Nail and Copper Wire. 10 bags containing: 1 set of 2 nails wrapped with copper wire (1 nail has 50 coils and the other 10 coils) 1 bag of 10 paper clips 2 single alligator clips, 1 double alligator clip,
1 push switch Tell students to:
1. Look at the 2 nails – one has 50 coils of copper wire, and the other has only 10. Tell students that they will be testing the strength of the 2 electromagnets by finding out how many paper clips each one can hold.
2. Take the nail with the 50 coils and test the nail to make sure it is not magnetized by attempting to pick up a paperclip with the nail. If the nail does pick up the paper clip, have the students carefully tap it on the table until it becomes demagnetized and no longer picks up the paper clip.

Your Notes: ______________________________________________________________________________
______________________________________________________________________________
______________________________________________________________________________
______________________________________________________________________________
3. Have students look at the diagram on the Instruction Sheet and make the circuit by: a. Snapping the 2 wires containing snaps onto the switch. b. Clipping one of these wires to the metal bar protruding from the battery holder, using
the alligator clip. c. Clipping the other wire to one of the ends of the copper coil on the nail, using the
alligator clip. d. Take the 3rd wire (with alligator clips on both ends) and clip one end onto the other
metal bar on the battery holder and the remaining end of the copper wire coil. e. Ask students what they need to do to complete the circuit (press and hold the switch). f. Tell students to press the switch and to try to pick up a paper clip with the tip of the
nail. g. Warn students not to hold switch too long as the batteries can become very hot
and drained. h. Tell students to see how many paper clips they can hang from the nail while the circuit
is complete. i. What happens when the circuit is broken? j. Repeat the test with the nail with 50 coils.
Collect all battery holders, etc. III. Comparing Properties of Magnets and ElectromagnetMaterials
10 paired paper clips 10 cases Iron fillings (white paper glued beneath for better visibility) 10 circuit boards with:
4 # 2 snaps, 1 # 1snap, 1 # 3 snaps, 1 battery holder with batteries, 1 electromagnet, 1 switch, 1 red and 1 black lead, Iron rod
10 bar magnets Give each group one electromagnetism circuit board kit, one bar magnet, paired paper clips and 1 case iron fillings. Have students connect battery holder, switch, and electromagnet using black and red jumper wires and insert iron core rod into the center of the electromagnet.
Explanation: Tell students to examine the electromagnet from the kit and notice that this commercial electromagnet has copper wire that is coiled many more times compared with the nail used in the previous experiment. The iron core rod replaces the nail in the previous experiment. Ask students to predict if this electromagnet will be stronger or weaker than the one they made with the nail and wire? Why?
The snap circuit electromagnet should be stronger, since it has more coils.

Your Notes: ______________________________________________________________________________
______________________________________________________________________________
______________________________________________________________________________
______________________________________________________________________________
A. Testing the Magnetic attractiveness of the magnet and electromagnet 1. Move the magnet towards the paper clip. Is the paper clip attracted to the magnet? – yes 2. Testing the electromagnet:
Dangle the paired paper clips close to the top of the iron rod in the electromagnet. Is there any attraction? No.
3. Press and hold the switch down and repeat step 3. Is there any magnetic attraction? Yes, the paper clip is attracted to the electromagnet.
4. Release the switch to OFF and notice what happens. The paper clip is no longer attracted.
5. Place the paper clip near the rod under the electromagnet and notice what happens when the switch is turned ON. The paper clip is attracted to the electromagnet when the
switch is on.
Explanation: Explain to students that all materials have tiny particles with magnetic charges, which are usually so well balanced that you do not notice them. A magnet is a material that concentrates the magnetic charges at opposite ends (the poles). In an electromagnet, the electric current that flows in the wire has a tiny magnetic field. By looping a long wire into a coil the tiny magnetic field is concentrated into a large one. The strength of the magnetic field depends on how much current is flowing in the wire and how many loops of wire are present.
2. Comparing the magnetic fields of magnets and electromagnets Gently shake the iron filings pack so that the filings are spread evenly and thinly Place the magnet underneath the pack and notice how the filings produce a distinct pattern. The pattern you see shows the magnetic field of the magnet. The field has areas of strong and weak magnetism. How is the magnetic field around the electromagnet similar to that found around a magnet? Place the iron filings container above the electromagnet and turn the switch on. What happens to the filings?
A similar pattern is formed, but much weaker

Your Notes: ______________________________________________________________________________
______________________________________________________________________________
______________________________________________________________________________
______________________________________________________________________________
IV. Making Electricity with Magnets and Coil Show students the meter and tell them that it is capable of measuring both current (as an ammeter) and voltage (as a voltmeter).
Voltage is measured in volts (V). Current is measured in amperes (A) or milliamps (mA, 1/1000 of an ampere).
Build the circuit shown in figure 2 on the Instruction sheet. (Do not place the rod into the core yet.)
Figure 2 Figure 3 Figure 4 1. Set the meter to the middle setting, 0.5mA. (The current produced by the circuit you have built will be very small, and will not be detected with the 50mA setting.) 2. Place the board flat on the table surface (you are going to be looking for small movements in the meter needle, so the board needs to be stable). 3. Hold the bar magnet against the coil (vertically or horizontally) and move it up and down or across back and forth (see figures 3 & 4 below). Observe the meter needle while moving the magnet. Very small movements will be detected. 4. Place the iron core rod into the coil and repeat. The meter needle movement will be larger. 5. Place the magnet on the top of the rod and use it to move the rod up and down. • The movement of the meter needle indicates that a small current is being produced. • Remember that NO batteries are being used – the electric current has been induced by the movement
of the bar magnet and copper wire coil. • Moving the bar magnet changes the magnetic field around the coil. This change produces an electric
current. Alternatively, the coil could be moved instead of the magnet, and an electric current would still be produced.

Your Notes: ______________________________________________________________________________
______________________________________________________________________________
______________________________________________________________________________
______________________________________________________________________________
V. Applications of Electromagnets - Using Electricity and an Electromagnet to make a Motor. Pass out the assembled motors. Tell students to look at the motor and identify the following parts: a permanent magnet, an electromagnet. copper wire, and a battery. Point out the copper supports that connect the battery to the coil. Point out that the copper wire is covered with an enamel coating for insulation. Tell students to look closely at the 2 straight ends of the copper coil. Both ends have had the enamel coating stripped from one side of the wire (it does not have the same shiny copper color as the other side). The coated side will not conduct electricity, whereas the stripped side will allow a current to flow through the coil. Tell students to:
1. Place the straightened wires from the coil into the U of the copper supports. The shiny (insulated) side must be facing UP.
2. Give the coil a gentle tap. If it spins continuously, the student has succeeded in making a motor. 3. If the coil does not spin, have the student tap it in the other direction.
Optional: 4. Flip the magnet over (a different pole will now be facing up). Repeat steps 1-3. What happens?
Explanation: We know that an electromagnet has a magnetic field when an electrical current flows through it. Magnets also have permanent magnetic fields. The 2 magnetic fields can attract or repel each other. The motor works because electricity flows through the coil and a magnetic field is formed. The magnetic fields from the magnet and electromagnet repel each other and the coil pushes away from the magnet with enough force to turn it around. As the coil rotates around, the coated side makes contact with the copper supports and breaks the electrical circuit. Momentum carries the coil around to its starting position, where the stripped wire now comes back into contact with the copper supports. The circuit is again completed, so the magnetic field in the electromagnet is created again, and the coil continues to spin. Motors are commonly used to convert electricity to mechanical energy, as in wind mills, hydroelectric dams and other kinds of turbines. Lesson written by Pat Tellinghuisen, Coordinator of VSVS, Vanderbilt University Leandra Fernandez, VSVS Lab Worker, Vanderbilt University
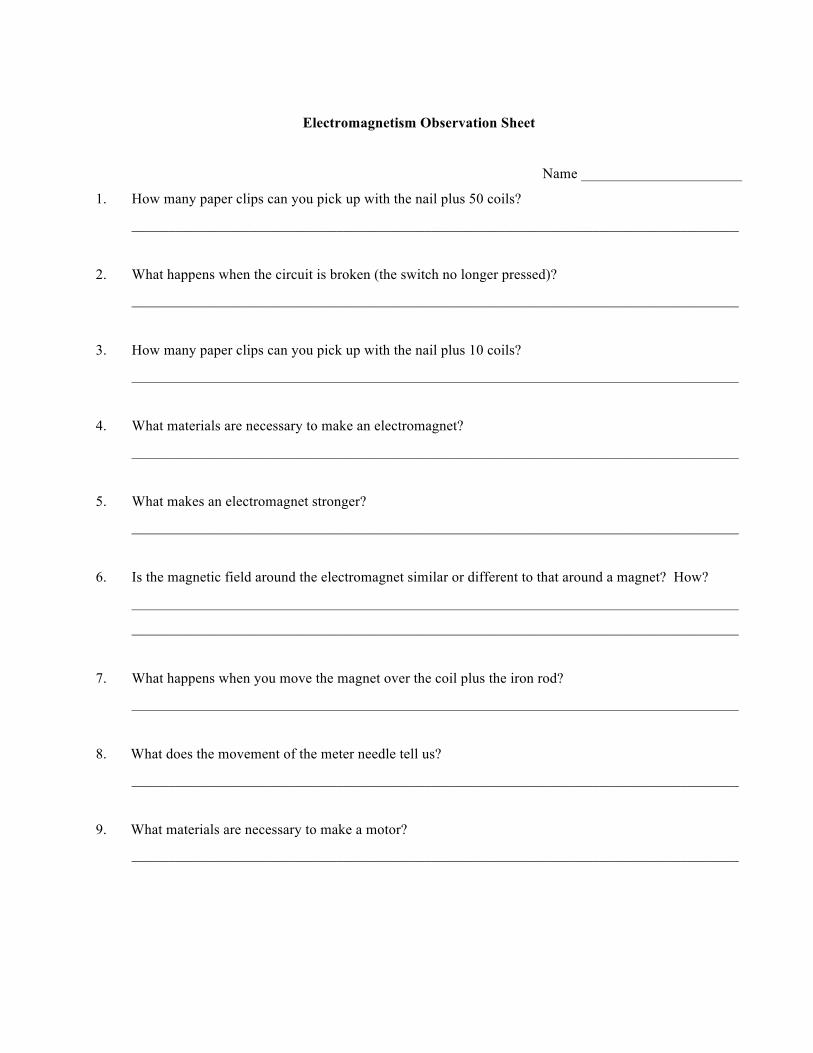
Electromagnetism Observation Sheet
Name ______________________
1. How many paper clips can you pick up with the nail plus 50 coils?
___________________________________________________________________________________
2. What happens when the circuit is broken (the switch no longer pressed)?
___________________________________________________________________________________
3. How many paper clips can you pick up with the nail plus 10 coils?
___________________________________________________________________________________
4. What materials are necessary to make an electromagnet?
___________________________________________________________________________________
5. What makes an electromagnet stronger?
___________________________________________________________________________________
6. Is the magnetic field around the electromagnet similar or different to that around a magnet? How?
___________________________________________________________________________________
___________________________________________________________________________________
7. What happens when you move the magnet over the coil plus the iron rod?
___________________________________________________________________________________
8. What does the movement of the meter needle tell us?
___________________________________________________________________________________
9. What materials are necessary to make a motor?
___________________________________________________________________________________

VANDERBILT STUDENT VOLUNTEERS FOR SCIENCE http://studentorgs.vanderbilt.edu/vsvs
Nanotechnology and Magnetism Mini Lesson for Spring 2016
Goal: To introduce students to nanotechnology and new magnetic products.TN state standards: Embedded Technology and Engineering for all grades Complete teacher/school information on first page of manual. 1. Make sure the teacher knows Pat Tellinghuisen’s home and office numbers (front of manual). 2. Exchange/agree on lesson dates and lesson order (any changes from the given schedule need to be given to Pat in writing via email). 3. Since this is your first visit to the class, take a few minutes to introduce yourselves. Mention you will be coming three more times to teach them a science lesson. Lesson Outline: I. Introduction
A. Reviewing Magnetism B. Magnets Have Poles C. Magnets can be Permanent or Temporary D. Magnets have fields (shown by iron filings).
II. Magnetism and Nanotechnology III. Nanoscience Materials 8 pieces of lodestone (magnetite, a form of iron oxide, formula Fe3O4) 16 small petri dishes of iron filings 16 vials of iron oxide powder in liquid 16 vials of iron oxide powder 8 vials of ferrofluid 16 wand magnets 16 floating ring magnet sets 8 plastic 3-dimensional magnetic field generators 16 plastic bags containing 5 large paper clips 16 handouts showing temporary and permanent magnets in sheet protectors 16 “How Big Is Your Hand?” worksheets in sheet protectors and Nanosized objects on reverse size 1. Before the lesson: In the car ride, read through this quiz together as a team. Make sure each team member has read the lesson and has a fundamental understanding of the material. Nanotechnology and Magnetism Lesson Quiz 1. What is a magnetic field? 2. How is ferrofluid a unique material? 3. What is nanoscience? 4. What is the difference between permanent and temporary magnets? 2. During the Lesson: Here are some Fun Facts for the lesson: The Earth has a magnetic field because there is iron and nickel in the Earth’s core. Earth’s magnetic field switches direction every 450,000 years on average. This means that a compass would someday point towards the South Pole.
Your Notes: ________________________________________________________________________
________________________________________________________________________
________________________________________________________________________
________________________________________________________________________
The iron in our blood cannot be magnetized because it’s attached to a protein in your blood cells. Jupiter’s magnetic field is the largest single structure in our solar system besides the Sun. Many scientists believe birds use Earth’s magnetic field as a kind of GPS when they migrate. Unpacking the Kit For Part I. Introduction B. Magnets have Poles, Activity 1 16 wand magnets, 16 ring magnets on a pole C. Magnets can be permanent or temporary, Activity 2 16 wand magnets from above, 16 bags containing 5 large paper clips 16 handouts showing temporary and permanent magnets (in sheet protectors) D. Magnets have fields (shown by iron filings), Activity 3 16 wand magnets (from above), 16 petri dishes of iron filings, 8 pieces of lodestone 16 vials containing iron oxide powder, 8 plastic 3-dimensional magnetic field generators - Remove bar magnet from plastic container and place on top of red lid before handing out to students. For Part II. Magnetism and Nanotechnology 16 Handouts - “How Big Is Your Hand?” and Nanosized objects on reverse size. Activity 4: 16 vials of iron oxide powder in liquid, 8 vials of ferrofluid, 16 magnetic wands (from above) I. Introduction Man has been fascinated by magnetic properties since 600 B.C. (One story tells of a Greek shepherd boy called Magnes who discovered that the iron tip on his staff was mysteriously attracted to a rock.) This rock was a naturally occurring magnetic rock called lodestone. Lodestone is also called magnetite and is a mineral containing the compound iron oxide, chemical formula Fe3O4. NOTE: Fe3O4 is not the same as red “rust,” which is Fe2O3. Up until about 30 years ago, magnetic materials were known only in the solid form. Tell students that they are going to investigate a new magnetic liquid called ferrofluid and compare its properties with regular magnets.
A. Reviewing Magnetism Ask students to tell you what they know about magnets. Students should know:
• Magnets have north and south poles. • The south poles on 2 magnets will repel each other. The north poles on 2 magnets will
repel each other. • The north and south pole on 2 magnets will attract each other. • Magnets have invisible “force” fields extending around them. These “force” fields allow
attractions and repulsions to occur without the magnets actually touching.

Your Notes: ________________________________________________________________________
________________________________________________________________________
________________________________________________________________________
________________________________________________________________________
• Some magnets are permanently magnetic, and some magnets are just temporarily magnetic.
• This attraction and repulsion is called magnetism. B. Magnets have Poles Materials for each group of 4:
2 wand magnets 1 floating ring magnets set
Activity 1 Divide the class into groups of 4 – each pair in the group will do the 2 activities.
a) Tell 2 members of the group to look at the wand magnets and find the labeled north (N) and south (S) poles. Each student will take turns holding the two magnets, one in each hand. Tell students to observe what happens when the two N-poles are brought together (they will repel each other) and when an N-pole and an S-pole are brought together (they will attract each other).
b) Tell the other 2 members of the group to use the disc magnets on a pole and arrange them so that they all float (repel each other). They will start with the magnet in the base having its N pole facing up.
c) Pairs then exchange tasks. d) Write the observations on the board.
Collect floating ring magnets but leave the wand magnets with the group. C. Magnets can be permanent or temporary. Materials per group of 4:
2 wand magnets 2 bags containing 5 large paper clips
16 handouts showing temporary and permanent magnets Activity 2 1. Ask students if they think that the paper clips are attracted to each other, like the 2 magnetic
wands. Tell students to test their hypothesis (they should not be). 2. Tell students to use the magnet to pick up a paper clip.
Ask the students if they know why the paper clip is attracted to the magnet. Only materials containing metals iron, cobalt or nickel are attracted to magnets. These 3 elements are called ferromagnetic (which means they are attracted to a magnet). Most metals (aluminum, copper, lead, silver, gold, etc.) are NOT attracted to a magnet. The prefix ferro comes from the Latin word for iron.
3. Adjust the first paper clip so that it hangs down from the end of the wand. Tell students to keep the paper clip attracted to the magnet and to pick up another paper clip so that it hangs from the first. Tell students that the first paper clip is now magnetic by induction.
4. Try adding a 3rd and 4th paper clip, one at a time, to the bottom clip. 5. Remove the paper clips from the magnet and place on the desk top. 6. Ask students if the paper clips are still magnetic. Tell students to use one of the paper clips
and try to pick up other paper clips (without using the magnet).
Your Notes: ________________________________________________________________________
________________________________________________________________________
________________________________________________________________________
________________________________________________________________________
7. Tell students that some magnets are permanently magnetic and some magnets are just temporarily magnetic.
The wand magnet is a permanent magnet. The paper clips are temporary magnets. Temporary magnets become magnetized in a strong magnetic field but quickly lose their magnetism when the field is removed. Activity 2b Use several paperclips to make a chain and hang it from the wand magnet. Ask students what they think will happen when you remove the wand magnet. Holding onto the first paperclip, slowly remove the wand magnet. Some paperclips may remain attracted to each other. Eventually they will fall. The wand magnet (permanent magnet) is strong enough to magnetize the paperclips by aligning the dipoles, or tiny magnets within the paperclip, as shown below. They will remain aligned for a short period until jolted.
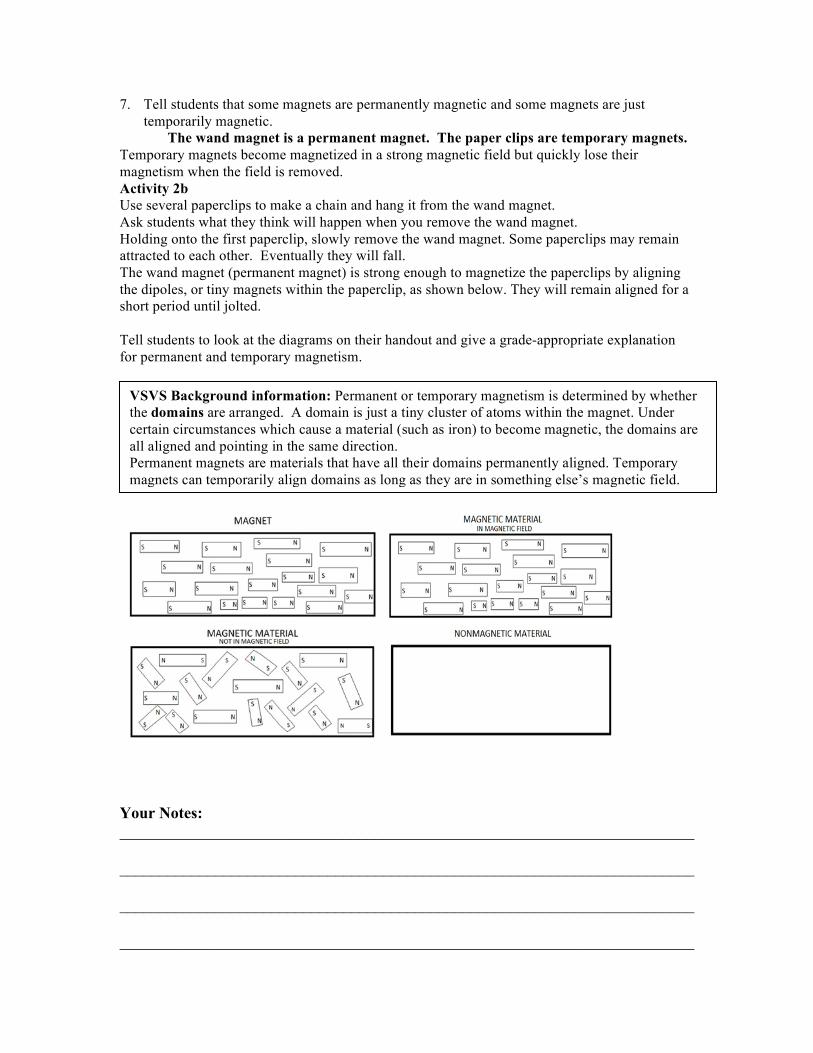
Tell students to look at the diagrams on their handout and give a grade-appropriate explanation for permanent and temporary magnetism.
VSVS Background information: Permanent or temporary magnetism is determined by whether the domains are arranged. A domain is just a tiny cluster of atoms within the magnet. Under certain circumstances which cause a material (such as iron) to become magnetic, the domains are all aligned and pointing in the same direction. Permanent magnets are materials that have all their domains permanently aligned. Temporary magnets can temporarily align domains as long as they are in something else’s magnetic field.
Your Notes: ________________________________________________________________________
________________________________________________________________________
________________________________________________________________________
________________________________________________________________________
D. Activity 3 : Magnets have fields (shown by iron filings). Materials:
16 wand magnets 16 petri dishes of iron filings 8 pieces of lodestone 16 vials containing iron oxide powder 8 plastic 3-dimensional magnetic field generators
Remove bar magnet from plastic container and place on top of red lid before handing out to students.
Pass out lodestone, iron oxide powder and petri dishes. 1. Tell students to move the wand magnet around the petri dish of iron filings. Ask students to describe what is happening.
Answers might include: the wand magnet makes the iron filings follow it, spikes may form, the filings are attracted to the magnet, etc.
Iron filings can be used to study the pattern formed by the lines of force in the magnetic field around a magnet. The iron filings have been magnetized by induction. They organize themselves into little magnets that point north and south. 2. Tell students to shake iron filings gently so that they cover the bottom of the petri dish in a
thin layer. Place the wand magnet underneath the petri dish and observe the pattern formed. Tell students to twist the wand magnet around in a circle and watch how the positions of the iron filings change. Tell students that there is an invisible pattern of force around every magnet. This force is called a magnetic field. The patterns that can be seen with the iron filings are called lines of force.
3. Tell students to move the lodestone around the petri dish. What happens? Place the lodestone underneath the dish and observe if there are lines of force patterns.
Is lodestone a permanent or temporary magnet? Permanent. 4. What happens when the vial containing iron oxide is placed underneath the petri dish? Nothing happens – the powder is not a magnet.
What happens when the wand magnet is placed near the vial of iron oxide? The iron oxide moves to align with the magnetic field. Which items are permanent magnets and which are temporary? The wand magnet and lodestone are permanent magnets. The iron filings, paper clips and iron oxide powder (in the vial) are temporary magnets.
Your Notes: ________________________________________________________________________
________________________________________________________________________
________________________________________________________________________
________________________________________________________________________
Tell students that the iron oxide powder has the same formula as the lodestone (Fe3O4). On the macroscale, magnetite, in the form of lodestone, is permanently magnetic. On the nanoscale, magnetite powder is paramagnetic, meaning that it’s magnetic only in the presence of a magnet.
5. Pass out the plastic 3-dimensional magnetic field generators. Make sure the bar magnets are sitting on top of the plastic container instead of inside it. Students need to keep the inner tube inside the outer casing.
Tell students that the plastic containers are filled with iron filings, just like the petri dishes. Tell the students to gently insert the bar magnet into the center of the plastic container, put the lid on and gently rotate the container. What happens?
The iron filings will be attracted to the bar magnet and should form spikes around the ends.
The accumulation of the iron filings follows the magnetic field lines in 3 dimensions.
II. Magnetism and Nanotechnology Ask students if they have ever seen a liquid that is magnetic.
Tell students that magnetizing a fluid is impossible, because the molecules in liquids have a lot of freedom to move around.
Tell students that nanotechnology takes advantage of special properties at the nanoscale to create new materials and devices.
Hold a vial of the ferrofluid up so that students can see it. Tell them that the black material is called ferrofluid and that ferrofluid is a unique material that acts like a magnetic solid and like a liquid.
Important Idea: At the nanoscale, many ordinary materials have different and unusual properties, compared with the same material at the macro level. III. Nanoscience Ask students if they know what nanoscience is.
Nanoscale science, or nanoscience, focuses on things that are measured in nanometers, including atoms and molecules. In the field of nanotechnology, scientists and engineers make new materials and tiny devices.
Hand out the “How Big Is Your Hand?” worksheet and Nanosized objects (1 per pair).
VSVS Background information only: Ferrofluid is made of tiny (about 10 nm), nanometer-sized particles of coated magnetite (iron oxide) suspended in liquid. Ferrofluids were developed by NASA as a way to control the flow of liquid fuels in space. (How could you keep a liquid in place in outer space where there is no gravity?)

Your Notes: ________________________________________________________________________
________________________________________________________________________
________________________________________________________________________
________________________________________________________________________
Tell students to:
1. Look at the scale. 2. Place their hand against the ruler and read off how many nanometers your hand
measures. One meter is a billion nanometers. (A meter is a little longer than a yard.) Or, a nanometer is a billionth of a meter. That’s really tiny! Nanometers are used to measure things that are too small to see. So a person who is a little over three feet tall measures one billion nanometers. A person 6 feet tall is nearly 2 billion nanometers. Tell students to look at the reverse side, showing the sizes of different objects, measured in nanometers. The pictures are designed to show students ways to think about how small a nanometer is. There are 3 categories:
1. Macroscale objects – objects we can see with our eyes. 2. Microscale objects – we need tools like microscopes 3. Nanoscale objects – we cant see them with just our eyes. We need special
tools to make images of them.
Why is nanoscience important? Nanoscience has begun changing products that we use in everyday life, like sunscreen, household appliances, tennis balls, paints, video game consoles, and bandages. Background Information on Ferrofluids: Lodestone, the black iron oxide powder and ferrofluid are all made from magnetite (Fe3O4).
But the lodestone and the powder do not have ferrofluid’s unusual properties.
Ferrofluids are unique in that they have the magnetic properties of a solid but also the fluid properties of a liquid. The nanoparticles are not affected by gravity, which means they will not settle out. They also become denser in the presence of a magnetic field. When there is no magnet around, ferrofluid acts like a liquid. The magnetite particles move freely in the fluid. When there’s a magnet nearby, the particles are temporarily magnetized. They form structures within the fluid, causing the ferrofluid to act more like a solid. When the magnet is removed, the particles are demagnetized and ferrofluid acts like a liquid again.

Your Notes: ________________________________________________________________________
________________________________________________________________________
________________________________________________________________________
________________________________________________________________________
Activity 4: CAUTION: DO NOT OPEN VIAL. DO NOT SHAKE THE VIAL. Pass out the vials of ferrofluid and iron oxide in liquid. The wand magnets will be used again. Tell them to investigate the magnetic properties of the iron oxide in the liquid (lodestone powder in liquid). Hold the vial horizontally and place the wand magnet above the vial. Describe what happens. Some of the black liquid moves. The powder clumps. Tell students to pick up the vial of ferrofluid.
1. Ask students if the black material is like a solid or liquid. 2. Hold the vial horizontally and place the wand magnet above the vial. Describe what
happens. The ferrofluid should form spikes. 3. Move the magnet around the vial, including on top of it. Describe what happens. The
liquid should move around the vial with the magnet. 4. Put the flat side of the magnet on top of the vial so that spikes appear. Gradually move
the magnet up and away from the vial. What happens? Gravity finally takes over. 5. Ask students what the spikes are showing. The spikes are a result of the ferrofluid trying
to follow the magnetic lines of force. Tell students to turn the magnet onto its side – what happens to the spikes?
Ask students:
1. Does the ferrofluid behave in the same way as the iron oxide powder in the liquid? In both, something in the vial was attracted to the magnet, but in the vial with iron oxide and liquid, some of the solid did not move. The iron oxide clumps more than the ferrofluid. The magnetite particles in the ferrofluid do not clump together because of the smaller size of the particles and because a surfactant has been added.
2. What is considered to be “nano” about ferrofluid? The size of the magnetic particles is on the nanoscale (10nm), which allows ferrofluid to have its unique properties.
Uses for Ferrofluids Ferrofluid is used in seals in computer hard drives and other rotating shaft motors and in loudspeakers to dampen vibrations. Ferrofluids are also used in developing MRI images and in experimental cancer treatments. In the future, ferrofluids may be used to carry medications to specific locations in the body. Lesson written by Pat Tellinghuisen, Coordinator of VSVS, Vanderbilt University Jen Ruddock, VSVS Lab Worker, Vanderbilt University

Handout

VANDERBILT STUDENT VOLUNTEERS FOR SCIENCE http://studentorgs.vanderbilt.edu/vsvs
Stratigraphy Spring 2016
Goal: To introduce students to the geological time scale, fossils, sedimentary rock columns, index fossils, and column correlation methods. Fits Tennessee standards GLE 0807.5.6 Lesson Outline: I. Sedimentary Rock Layers/Columns
A. Sedimentary Rocks B. Creating a Model of Sedimentary Layers C. Explaining the Column D. Index Fossils and Radioactive Dating E. Finding the Ages of the Layers in Our Column
II. Stratigraphy (Correlating Columns) Materials 1 cylinder containing the string timeline 10 plates 10 column containers (jars containing water) 10 jars of sand (to represent different types of rocks):
Jar 1: White sand containing black rocks Jar 2: Orange sand containing white rocks Jar 3: Black sand Jar 4: White sand containing white rocks Jar 5: Tan sand containing white rocks and tan/red rocks
10 models of rock layers/fossils encased in boxes 36 observation sheets 20 sets of 3 stratigraphic sequences 20 stratigraphic columns compiled from National Park sequences 20 Handouts with Column Diagram, 1. Before the lesson: In the car ride, read through this quiz together as a team. Make sure each team member has read the lesson and has a fundamental understanding of the material. Stratigraphy Lesson Quiz
1. How do sedimentary rocks form? 2. What is the age of a fossil relative to the rock in which it is found? 3. Which layer in a stratigraphic column is typically the oldest? 4. Explain how you can compare two different stratigraphic columns from different parts of the world. 5. Give an example of an index fossil and explain how it can be used as such.
2. During the Lesson: Here are some fun facts for the lesson 1. Nashville sits in a valley surrounded by limestone layers. Fossils can be seen embedded in the
limestone.
Your Notes: ______________________________________________________________________________
______________________________________________________________________________
______________________________________________________________________________
______________________________________________________________________________
2. Evidence for the asteroid that killed the dinosaurs is seen in various stratigraphic columns. There is a worldwide layer of iridium dated back to the time when the dinosaurs were wiped out. Iridium is more common in meteorites than it is on Earth.
3. Trilobites are commonly used as index fossils to determine the ages of certain landmarks. They are great for determining the movement of plate tectonics. Scientists today are still unsure of why the trilobites went extinct.
Unpacking the Kit IB. Creating a Model of Sedimentary Layers 1 box containing materials for demonstrating the layering:
1 plate 1 column container 2 bottles of water
Jars 1-5 of sand, with different colors of sand representing different types of sedimentary rock and different stones representing fossils:
For students: 10 plates, 10 column containers (jars containing water), 10 jars of sand (to represent different types of rocks):
Jar 1: White sand containing black rocks Jar 2: Orange sand containing white rocks Jar 3: Black sand Jar 4: White sand containing white rocks Jar 5: Tan sand containing white rocks and tan/red rocks
36 observation sheets 20 Handouts with Column Diagram, ID. Index Fossils and Radioactive Dating 10 models of rock layers/fossils encased in boxes IIA. Stratigraphy (Correlating Columns) 20 sets of colored stratigraphic columns (National Park Sequences) IIB. Correlating Stratigraphic Columns 20 sets of 3 stratigraphic sequences For Part III. Timeline of the Earth 1 cylinder containing the string timeline I. Sedimentary Rock Layers/Columns A. Reviewing Sedimentary Rocks • Q. Ask students what they know about sedimentary rocks. If these answers aren’t given, go over them
briefly: o Most sedimentary rocks are formed from sediments deposited in oceans, lakes or rivers. o Sediments form layers that pile on top of each other, which compress over time to create
rock. o Types of sedimentary rock include sandstone, limestone, and shale.
Your Notes: ______________________________________________________________________________
______________________________________________________________________________
______________________________________________________________________________
______________________________________________________________________________
• Q. Ask for a show of hands of which students have seen rock layers on the sides of the highway while driving around Nashville – this is sedimentary rock! Ask if anyone knows what type of rock this is.
o Limestone • Tell students that we are going to create a model of sedimentary rock layers. B. Creating a Model of Sedimentary Layers • Set up at the front of the class the apparatus to create the sedimentary rock column demonstration
Materials for VSVS demo 1 plate 1 column container 1 bottle of water 1 set of numbered jars of sand, with different colors of sand representing different types of sedimentary rock and different stones representing fossils:
§ Jar 1: White sand containing black and white stones. § Jar 2: Orange sand containing white stones. § Jar 3: Black sand. § Jar 4: White sand containing white stones. § Jar 5: Tan sand containing white and tan/red stones.
Materials for students, per group: 1 plate, 1 column containers (jars containing water), 1 set of jars of sand (1-5, to represent different types of rocks):
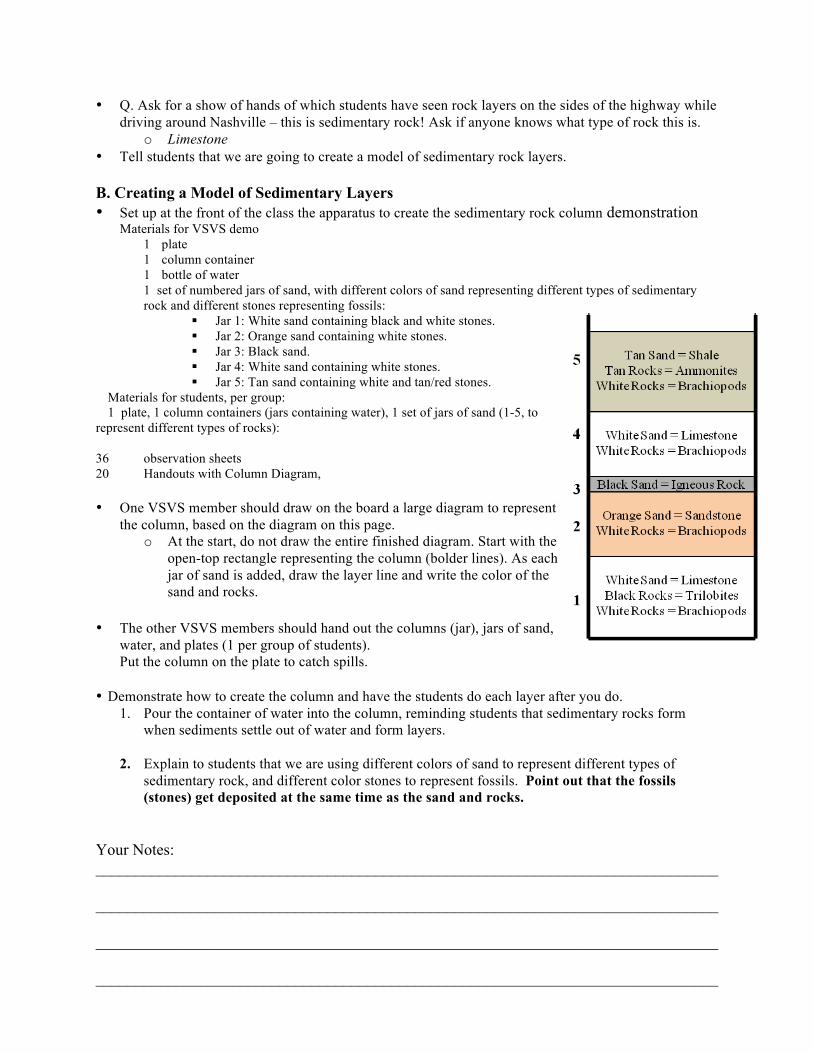
36 observation sheets 20 Handouts with Column Diagram, • One VSVS member should draw on the board a large diagram to represent
the column, based on the diagram on this page. o At the start, do not draw the entire finished diagram. Start with the
open-top rectangle representing the column (bolder lines). As each jar of sand is added, draw the layer line and write the color of the sand and rocks.
• The other VSVS members should hand out the columns (jar), jars of sand,
water, and plates (1 per group of students). Put the column on the plate to catch spills.
• Demonstrate how to create the column and have the students do each layer after you do. 1. Pour the container of water into the column, reminding students that sedimentary rocks form
when sediments settle out of water and form layers.
2. Explain to students that we are using different colors of sand to represent different types of sedimentary rock, and different color stones to represent fossils. Point out that the fossils (stones) get deposited at the same time as the sand and rocks.

Your Notes: ______________________________________________________________________________
______________________________________________________________________________
______________________________________________________________________________
______________________________________________________________________________
3. Pour all of the sand and rocks from container #1 into the column. Wait until each layer settles (~30 seconds) before pouring the next layer. Make sure students are adding the jars of sand to the column in the correct order (#1 first ...)
4. When settled, pour all of container #2’s contents into the column and wait for it to settle. Then container #3’s contents, and so forth until all 5 containers are used. Make sure to update the drawing on the board as new layers are added.
C. Explaining the Column • Q. Ask students to describe what happened when they poured each layer of sand.
o Sand settles through the water to make a flat layer at the bottom of the column. o This is similar to sediment settling out of water to form layers; over millions of years the
sediment is compressed and turns into rock. o Explain that sediment is deposited in horizontal layers, and it stays that way unless something
disturbs it. o Have students answer Question 1 on their observation sheet.
1. Sediments settle and form rocks in ___horizontal_______layers.
o Fossils are deposited at the same time the rock material is deposited. Therefore the ages of the fossil and rock in which it is found are the same.
o Have students answer Question 2 on their observation sheet. 2. What is the age of a fossil relative to the rock in which it is found? The same__________
• Tell students to imagine that the process of creating their sand columns took millions of years to
occur. • Tell students that different rock layers represent different periods of time.
o Q. Ask students which layer is the oldest in the column. § The bottom layer; it was deposited first and other layers were deposited on top of it.
o Q. Ask students which layer is the oldest in the column. § The top layer; it was deposited last, on top of all other layers.
o How old are the middle layers? (You can’t tell for sure! But they are older than the top layer and younger than the bottom layer.)
o Have students answer Question 3 on their observation sheet.
#3. Older layers are __at the bottom_____ in a column of sedimentary layers, while younger layers ____are at the top_______________________.
o Fossils succeed each other in a definite order – the oldest fossils in a series of layers will be in
the lowest layer.

Your Notes: ______________________________________________________________________________
______________________________________________________________________________
______________________________________________________________________________
______________________________________________________________________________
D. Index Fossils and Radioactive Dating Pass out 1 model of rock layers/fossils encased in boxes plus the “Column Analysis” worksheet to each group of students. Have them hold the model beside their sand column and tell them that the model has the same pattern of layers from the sand column. The fossils in the box model are real and are represented by different colored pebbles in their columns.
• Explain that the second column (called Stratigraphic Column) on the worksheet is the way geologists
would represent such a column and that the key on the bottom of the page shows what each symbol means.
• Tell students names of type of rock and fossils in each layer. o Top layer: ammonites and brachiopods in shale o Bottom layer: trilobites in limestone o Middle layers 2 and 4: brachiopods in limestone or sandstone o Middle #3: Igneous rocks
• Tell students that fossils are often incorporated into sedimentary rocks. The sediment that buries
them later forms into rocks with the fossils inside.
Using Index Fossils to find the Age of Rock Layers • Tell students that in real sedimentary rocks, some fossils are found in many layers, while some are
found in only one layer. o Q. Ask students which type of fossil, one found in many layers or one found in only one
layer, would be more useful for identifying the age of a rock layer. (A tough question – give them hints and walk them to the answer if necessary!)

Your Notes: ______________________________________________________________________________
______________________________________________________________________________
______________________________________________________________________________
______________________________________________________________________________
A. Fossils found only in one rock layer can be used for identifying the age of the rock layer. If a fossil is found in many different layers, the age of the layers can’t be identified using fossils.
• Tell students that fossils that are only found in one layer, and can be used for identification/rock
dating purposes, are called index fossils. • Have the students answer Question 4 on their observation sheet.
#4. __Index fossils___________________ are fossils found in only 1 layer of sedimentary rock and can be used for identification/rock dating purposes.
• Q. Ask students which fossil(s) in their column would be considered index fossils, and which would
not be considered index fossil(s) • A. Ammonites and trilobites are only found in one layer, so they would be considered index fossils;
brachiopods are found in all layers, so the brachiopod is not an index fossil. Using Absolute Dating with Radioactive Elements to find the Age of Rock Layers Tell students to look at layer # 3 in their column – the thin black layer.
A. When there is a dark, skinny layer in a sedimentary rock column, it is usually the result of lava or volcanic ash interrupting a sedimentary rock layer – it is an igneous rock, not a sedimentary rock.
B. Igneous rocks contain radioactive elements like uranium, rubidium, thorium, and potassium – scientists can use these elements to determine the exact age of these rocks.
E. Finding the Ages of the Layers in our Column • Tell students they are now going to use their model to determine the ages of the “rock” layers. As
they go through the column, layer-by-layer, point out what rock types and fossils are represented in the columns. The answers for the rock types and fossils are already given on the worksheet. The students will be asked to determine the ages (relative or absolute) of each layer.
A. The black layer (third layer from the top) is an igneous rock. How can we find the age of this layer? By using absolute dating with radioactive elements. In this hypothetical case, we will say that this layer is 250 million years old. Tell students to enter this data on their worksheet.
• Ask students how an igneous rock might get into a sedimentary layer? o Answers should include volcanic ash settling out many miles away from an erupting
volcano, lava flows above ground, or magma intruding into rock layers below the surface.

Your Notes: ______________________________________________________________________________
______________________________________________________________________________
______________________________________________________________________________
______________________________________________________________________________
Two layers contain index fossils. Which layers are these? The tan layer (on top) and the white layer on the bottom both contain fossils that aren’t found in any other layers. Ammonites and Trilobites are index fossils and scientists know how old they are (over a range of time). So how can we find the ages of these layers?
Ammonites (in the tan layer on top) lived from 100 million years ago until 65 million years ago – this is the range in which this rock was deposited in.
Tell students to enter this data for the top layer (100-65 MY old, and circle Relative dating with index fossils).
Trilobites (in the white layer on bottom) lived from 540 million years ago until 490 million years ago – this is the range in which this rock was deposited in.
Tell students to enter this data for the bottom layer (540 - 490 MY old, and circle Relative dating with index fossils).
How do we find the dates the other two layers were deposited in?
Relative dating. We know that the white layer second from the top must have been deposited between the top layer (100 million years ago) and the third layer (250 million years ago) The orange layer (fourth from the top) must have been deposited between the bottom layer (490 million years ago) and the third layer (250 million years ago). Tell students to enter this data for layers 2 and 4.
II. Stratigraphy (Correlating Columns) • Tell students that sedimentary rock layers often stretch across entire continents. Sometimes these
layers are connected; however, often layers have been removed in some locations by erosion, and some are buried under other layers and can’t be seen by us yet.
A. National Park Rock Sequences • Pass out a set of colored stratigraphic columns (paper-clipped together) to students. • Tell students that these columns represent actual sedimentary layers taken from the National Parks
(Graphic A); they have been cut from the stratigraphic columns in Graphic B, on Handout #1.) o Have students separate the columns and put them at their correct National Park locations on
the map (Graphic A) in Handout #1. Tell them that although erosion has affected each location differently, they all still show some of the same layers.
o Have them put the complete, paper-clipped columns back together and collect them from the students.
For VSVS Information only: Most igneous rocks can be dated radiometrically because they contain unstable radioactive elements that decay. Carbon-14, uranium-238, rubidium-87, thorium, potassium are the most common (isotopic) elements studied. Igneous rocks can be given a numerical age by radiometric dating methods.

Your Notes: ______________________________________________________________________________
______________________________________________________________________________
______________________________________________________________________________
______________________________________________________________________________
Map of National Parks (Graphic A)
National Park Correlations (Graphic B)
B. Correlating Stratigraphic Columns • Pass out the set of 3 stratigraphic sequences to each student. Tell students to imagine that these are 3
sequences of rocks found in different places around the US. o Tell students to find in sequences A and B at least 2 layers whose index fossils and rock types
match. o Emphasize that the depth of the layers does not have to be the same. o Students should place the sequences side-by-side with matching layers touching. o Have them repeat the process with sequences B and C. o This can get tricky, so VSVS members should walk around and help students with the task.
Your Notes: ______________________________________________________________________________
______________________________________________________________________________
______________________________________________________________________________
______________________________________________________________________________
• Pass out the longer laminated strip (1 per pair) and tell the students that this geological column is the one they have just compiled from their short sequences. This can tell us a lot more about the geologic history of the earth than the individual columns can.
• Q. Which short strip has the oldest rocks exposed and how do we know? o Location A, because it contains the oldest fossils and has the bottom layers in the geological
columns. o These layers still exist at locations B and C, they just haven’t been exposed yet.
• Q. Which short strip has the youngest rocks exposed and how do we know?
o Location C, because it has the top layers in the geological column. o These layers are missing at locations A and B because of erosion.
• VSVS members should collect the columns and answer any questions the students have. III. Timeline of the Earth (If time permits – do as much as time allows) A. Introduction • Q. Ask the class if anyone knows how old the earth is.
o 4.6 billion years old, or 4600 million years old. Write the number out in full on the board so they understand how much time this is (4,600,000,000).
• Tell students that the timeline of earth’s history is called the geologic time scale. We will show them
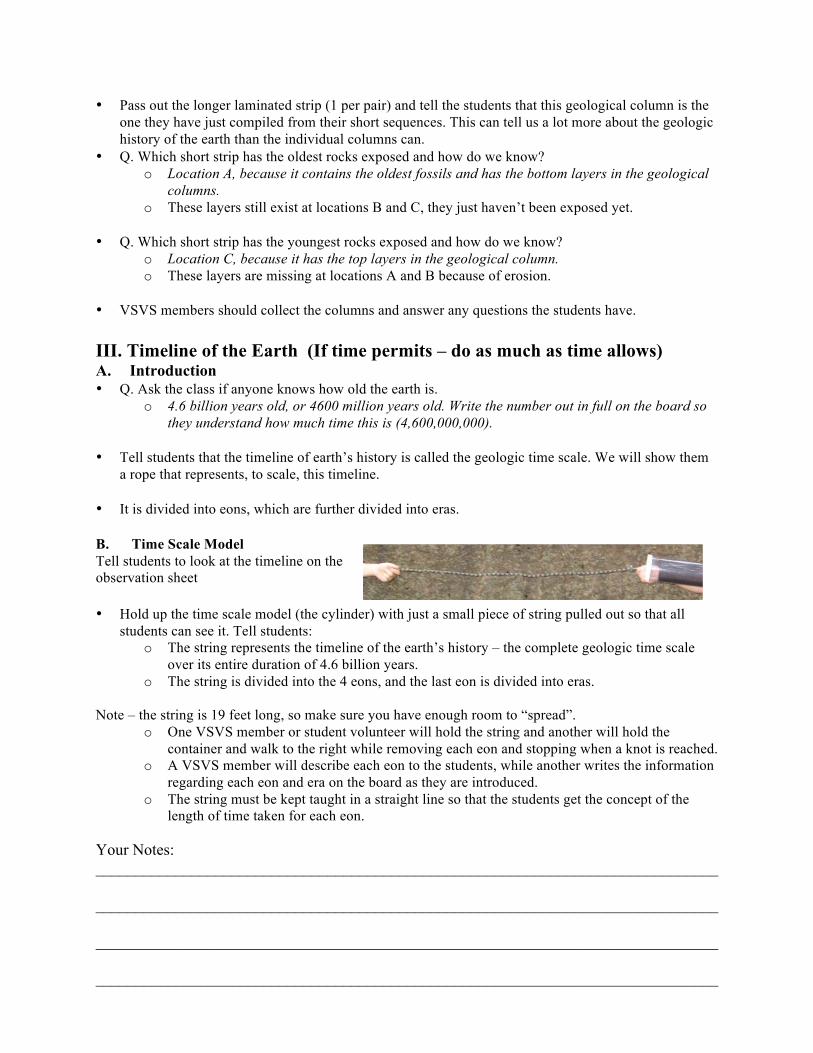
a rope that represents, to scale, this timeline. • It is divided into eons, which are further divided into eras. B. Time Scale Model Tell students to look at the timeline on the observation sheet • Hold up the time scale model (the cylinder) with just a small piece of string pulled out so that all
students can see it. Tell students: o The string represents the timeline of the earth’s history – the complete geologic time scale
over its entire duration of 4.6 billion years. o The string is divided into the 4 eons, and the last eon is divided into eras.
Note – the string is 19 feet long, so make sure you have enough room to “spread”.
o One VSVS member or student volunteer will hold the string and another will hold the container and walk to the right while removing each eon and stopping when a knot is reached.
o A VSVS member will describe each eon to the students, while another writes the information regarding each eon and era on the board as they are introduced.
o The string must be kept taught in a straight line so that the students get the concept of the length of time taken for each eon.

Your Notes: ______________________________________________________________________________
______________________________________________________________________________
______________________________________________________________________________
______________________________________________________________________________
• Hadeon Eon o Pull the first (camouflage-colored) section of the string out, and stop as soon as you get to the
first knot (between color changes). Tell students: o This is the Hadeon Eon, from 4.6-3.8 billion years ago. o No living organisms during this time, but the oldest known rocks existed (found in the
Canadian Rocky Mountains).
Archean Eon • Pull the second (tan) segment of the string until the second knot is reached. Tell students:
o This is the Archean Eon, from 3.8-2.5 billion years ago. o The first single-cellular organisms lived during this time (fossils found in Australia).
Proterozoic Eon • Pull the third (white) segment of the string until the third knot is reached. Tell students:
o This is the Proterozoic Eon, from 2.5 billion years ago to 540 million years ago. o The first multi-cellular organisms lived during this time (fossils found in Michigan)
Phanerozoic Eon, • Pull out and display the black end of the string. Tell students:
o This is the Phanerozoic Eon, from 540 million years ago to now. o Plants, fish, and animals came to exist as we know them today during this time. o This last eon is subdivided into 3 smaller time intervals called eras.
C. Looking at the Phanerozoic Eon Timeline • Tell students to look at the Phanerozoic Eon time line. Focus students’ attention on the black
(Phanerozoic Eon) section of the rope.

Your Notes: ______________________________________________________________________________
______________________________________________________________________________
______________________________________________________________________________
______________________________________________________________________________
o The different colors (pink, green and yellow) show the different eras. The colored string twisted around the black cord corresponds with these eras on the placemat.
o The organisms shown lived and thrived on earth during the time periods their boxes overlap with; both fossil and living pictures are displayed.
• Tell students that each era ends with the extinction of a large amount of animals on earth.
o Q. Ask students if they know what extinction means. § When the last remaining members of a species have died out.
• Point to the pink section of the timescale, and identify it as the Paleozoic Era. Tell students:
o Simple animals called invertebrates dominated the earth in this era. Pictures of different types of invertebrates (trilobites, ammonites, crinoids, and brachiopods) can be seen on the timeline; point them out to the students. Emphasize that the earliest trilobite is an index fossil.
o Early fish, land plants, and reptiles develop but are not common yet. o 90% of all species of animals went extinct at the end of this era. (Emphasize to students the
magnitude of this extinction – tell them to imagine 90% of animals on earth dying.) (If students ask why – scientists are still investigating!)
• Point to the green section of the timescale, and identify it as the Mesozoic Era. Tell students:
o Dinosaurs and other reptiles dominated the earth in this era. o Small mammals, birds, flowering plants, and flies also were commono 50% of all species of animals went extinct at the end of this era. (If students ask why, tell
them that most scientists agree that it was due to impact of a large meteorite near Mexico.) o The later ammonites are index fossils
• Point to the yellow section of the time scale as the Cenozoic Era. Tell students:
o This era continues up until todayMammals dominate the earth in this era.
o Q. Ask students if they’ve thought about how long humans have existed in the geologic time scale.
§ Humans have only existed in the very last knot of the rope (the dangling skeleton). This is an extremely short time in the history of the earth.
Lesson written by: Pat Tellinghuisen, Coordinator of VSVS, Vanderbilt University Courtney Luckabaugh, Lab Manager of VSVS, Vanderbilt University Edited by: Kyle Broach, VSVS Training Committee, Vanderbilt University Lucas Loffredo, VSVS Training Committee, Vanderbilt University We gratefully acknowledge the assistance of Dr. Molly Miller, Professor Emeritus of Earth & Environmental Sciences, Vanderbilt University. Reference: Chernicoff, S., & Whitney, D. (2007). Geology: An Introduction to Physical Geology. Upper Saddle River, New Jersey: Pearson

Geological Column Stratigraphic Sequences
A B C

Grand Canyon
Match up columns to these maps:

Observation Sheet 1. Sediments settle and form rocks in ___________________ layers. 2. What is the age of a fossil relative to the rock in which it is found? __________ 3. Older layers are ______________________ in a column of sedimentary layers, while younger layers are _______________________. 4. _____________________ are fossils found in only 1 layer of sedimentary rock that is used for identification/rock dating purpose
Expansion of Phanerozoic Eon:
Eon: Hadean Eon Archean Eon Proterozoic Eon Phanerozoic Eon
Years: 4.6-3.8 billion years ago
3.8-2.5 billion years ago
2.5 billion years ago – million years ago
540 million years ago – mow
Major Events:
Era: Paleozoic Era Mesozoic Era Cenozoic Era Dominant
Organisms:

Answers - Observation Sheet 1. Sediments settle and form rocks in _horizontal__________________ layers. 2. What is the age of a fossil relative to the rock in which it is found? The same.__________ 3.Older layers are at the bottom in a column of sedimentary layers, while younger layers are at the top. 4.. __Index fossils__ are fossils found in only 1 layer of sedimentary rock that is used for identification/rock dating purpose

Name _______________________________________ PLACE PLASTIC COLUMN ON DIAGRAM BELOW
Rock Type Fossils Present Age How Age was Determined (Circle Answer)
Shale Ammonites Brachiopods
Absolute Dating (Radiometric) Relative Dating with Index Fossils Relative Dating
Limestone Brachiopods
Absolute Dating (Radiometric) Relative Dating with Index Fossils Relative Dating
Igneous Rock None
Absolute Dating
Sandstone Brachiopods
Absolute Dating (Radiometric) Relative Dating with Index Fossils Relative Dating
Limestone Trilobites Brachiopods
Absolute Dating (Radiometric) Relative Dating with Index Fossils Relative Dating
KEY:
Rock Types
Sandstone Shale Limestone Igneous Rock 250 MYBP
Ammonites 100 – 65 MYBP
Fossils
Brachiopods 510 MYBP - Today
Trilobite 540-490 MYBP
Stratigraphic Column
5
4 3 2 1
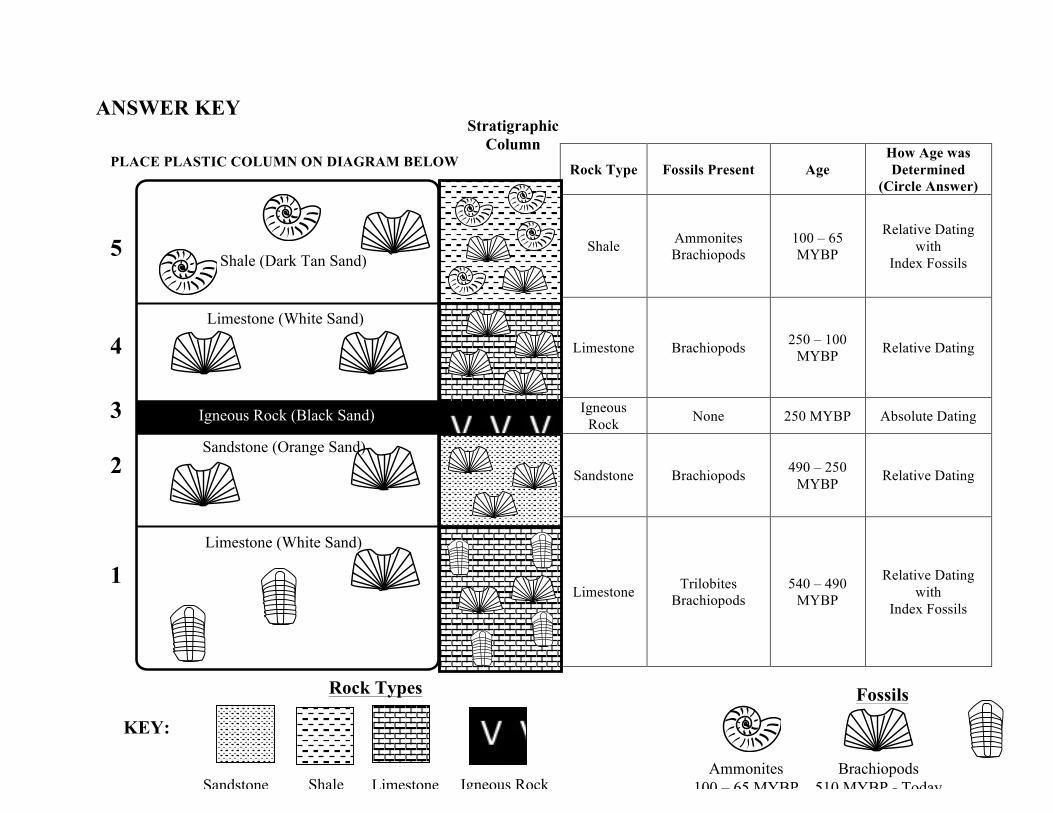
ANSWER KEY
PLACE PLASTIC COLUMN ON DIAGRAM BELOW
Rock Type Fossils Present Age How Age was Determined
(Circle Answer)
Shale Ammonites Brachiopods
100 – 65 MYBP
Relative Dating with
Index Fossils
Limestone Brachiopods 250 – 100 MYBP Relative Dating
Igneous Rock None 250 MYBP Absolute Dating
Sandstone Brachiopods 490 – 250 MYBP Relative Dating
Limestone Trilobites Brachiopods
540 – 490 MYBP
Relative Dating with
Index Fossils
KEY:
Rock Types
Sandstone Shale Limestone Igneous Rock 250 MYBP
Ammonites 100 – 65 MYBP
Fossils
Brachiopods 510 MYBP - Today
Stratigraphic Column
5
4 3 2 1
Limestone (White Sand)
Limestone (White Sand)
Shale (Dark Tan Sand)
Igneous Rock (Black Sand)
Sandstone (Orange Sand)
VANDERBILT STUDENT VOLUNTEERS FOR SCIENCE http://studentorgs.vanderbilt.edu/vsvs
SURVIVOR A Game of Traits and Natural Selection
Spring 2016 Goal: To explain how the environment helps determine what traits certain species possess. Curriculum Alignment: TN State Standards
- GLE 0807.5.3 Analyze how structural, behavioral, and physiological adaptations within a population enable it to survive in a given environment.
- SPI 0807.5.3 Analyze data on levels of variation within a population to make predictions about survival under particular environmental conditions. NGSS Framework
- LS4.B Natural Selection - LS4.C Adaptation
Outline I. Introduction
a. What is a trait? b. What is natural selection?
II. Activity Students will make their creature and will identify its traits. III. Activity Students will play the game SURVIVOR (15-20 minutes) IV. What Creatures Survived?
Students will look at score sheet and describe what happened to their creature (5 minutes). What traits were most advantageous to survival? (3-5 minutes) Instructor will define and explain natural selection (3-5 minutes) Instructor will give an example of natural selection (3-5 minutes)
V. Review
Materials Needed: 8 sets of Crazy Trait creature parts 1 set of Crazy Trait creature pictures (8 total) with traits listed http://jtmoorems.mnps.org/pages/JohnTrotwoodMooreMiddle/About_Our_School/8998762518461552450/Dress_Code 4 bags of 24 green poker chips and 4 bags 24 red poker chips 8 sets of 3 laminated parts sheets 1 binder containing:
16 Handouts of pictures of light-colored and dark-colored peppered moths 1 set of SURVIVOR scenarios (#1-#11) Ppt, 36 Observation sheets
1. Before the lesson: In the car ride, read through this quiz together as a team. Make sure each team member has read the lesson and has a fundamental understanding of the material. Survivor Lesson Quiz 1. What is a trait? 2. What is natural selection? 3. What is an adaptation? 4. How do students determine if their creature went extinct at the end of the survivor game? 5. How will students determine whether individual traits were beneficial or not?

Your Notes: ______________________________________________________________________________
______________________________________________________________________________
______________________________________________________________________________
______________________________________________________________________________
I. INTRODUCTION Ask students what they know about Charles Darwin.
• English naturalist born in the 1800’s • Studied different forms of life around the world. • Darwin proposed his theory of natural selection • Concluded that organisms changed over time to better survive in their specific environments. • “I have called this principle, by which each slight variation, if useful, is preserved, by the term
Natural Selection.” - Charles Darwin, On the Origin of Species a. What is a Trait? Ask the class the following:
1. Why do people look different from each other? Answer: Because of differences in traits. 2. Ask students to define the word “trait”.
Answers should include: Traits are mostly physical characteristics or features that organisms have, e.g., hair color. A trait can be passed on to the offspring.
Examples of Traits: o Hair color Eye color Skin color Height Weight o Hitchhiker’s thumb Left/right handed Ability to curl the tongue o Morton’s toe Attached/unattached earlobes Nose shape Hair texture
3. Ask students, “Why are there variations in a physical characteristic?” For example, there are many differences in hair colors (brown, red, blonde, etc.).
Traits are influenced by genes. Genes carry information about traits which our parents have and pass down to us. Different combinations of genes influence an individual’s features. These variations help make a person unique. For example, there are different versions of a gene which influence hair color. Parents will pass down different variations of a gene to their children, causing each of them to possibly have a different hair color.
• Traits, however, aren’t only influenced by genes. How we live in the environment also determines our traits. For example, height and weight are influenced both by the genes we have from our parents and by what we eat.
b. What is Natural Selection? Ask students what they know about Natural Selection. Answers should include:
• It is the process by which an organism’s traits are passed on or selected based on their environment.
• Some organisms have traits that allow them to better survive in their environment. For example, an arctic fox is white, which allows it to blend into its surroundings (snowy tundra). This “camouflage” makes it easier for the fox to hunt its prey, thus improving his chances of survival.
• The organisms that manage to survive then reproduce, passing on the genes for their advantageous traits to their offspring.

Your Notes: ______________________________________________________________________________
______________________________________________________________________________
______________________________________________________________________________
______________________________________________________________________________
• If a gene leads to a trait that gives a significant enough advantage to the organism, then the organisms with that gene will eventually out-populate those without the gene
• This is why people describe the theory of natural selection as “the survival of the fittest”. Examples of Natural selection: Tell the students that you are going to show them a real-world example of natural selection.
• Tell students to look at the handout of pictures of the peppered moths • Prior to the 1800’s, the peppered moth, found in England, was mostly light-colored.
Dark colored moths were rare. • The peppered moth liked to hang out on tree trunks. Industrial waste created during the
Industrial Revolution darkened tree trunks where these peppered moths lived. • Light-colored moths were spotted easily by predatory birds on the dark tree trunks and
were eaten before they could reproduce. • In contrast, the dark-colored moths blended in better with the dark tree trunks, making it
more difficult for the birds to spot them. Thus, the dark-colored moths survived and reproduced.
Other Natural selection examples: • Some insects have become immune to pesticides e.g. DDT is no longer effective in
preventing malaria in some places • Rat snakes come in a huge variety of colors depending on their environment. • The most colorful peacock tails are the most effective at attracting a mate, so the tails got
larger and more colorful and became what we are familiar with today. • Deer mice started out dark brown to blend in with the forest, but those mice that moved
to sandy desert in Nebraska adapted to become a light brown in order to blend in. The darker mice were killed by predators.
• When nylon was invented in the 1940’s, bacteria evolved that were able to eat the nylon. • All humans used to become lactose intolerant as they became adults. However, when
cows were domesticated, most humans acquired the ability to consume lactose in adulthood.
c. Traits that help organisms to survive in a specific environment are called
adaptations. An adaptation is an inherited trait that helps an organism survive. Examples of adaptations:
• Lizards with tails that fall off to escape predators • Bats use sonar to hunt at night • Milkweed produces a toxic substance to deter predators • Spiders spin webs to catch prey • Opossums play dead to avoid predators • Rosebushes have thorns

Your Notes: ______________________________________________________________________________
______________________________________________________________________________
______________________________________________________________________________
______________________________________________________________________________
II. ACTIVITY – STUDENTS MAKE THEIR CREATURES. Divide class into 8 groups. 1. Give each group a numbered Crazy Traits Creature picture with its traits. 2. Tell the group to build their creature according to the traits on the picture. The group’s creature
MUST be the same as in the picture. 3. After the creatures have been built, pass out the SURVIVOR Student Handout worksheet. 4. Tell students to circle the trait variations of their creature.
Ask each group to give ONE example of a trait variation that they think will be beneficial and ONE example of a trait variation that they think will be detrimental to the survival of their creature. Record these answers on the board.
Some examples might be: Trait Variation Beneficial for: Detrimental for:
Leg Length Long Can run fast Cannot hide in grassland Short Can hide in grassland Cannot run very fast
Wings Wings Can fly away Are easily damaged No Wings Not in the way when
walking through bushes Cannot fly away
Foot Shape Talon Can climb structures Cannot swim in water Webbed Can swim in water Cannot climb structures
Tail Length Short Allows you to be nimble Cannot swat flies Long Can be used to fight the
enemy Makes a lot of noise when sneaking up on prey
Arm Length Short Short arms are stronger Cannot reach food high off the ground
Long Arms slow you down running thru bush
Can reach food high off the ground
“Hand” Shape Claw Can pick up nuts
Trait Variation1 Variation2 Variation3LegLength Short Long Wings Absent Present FootShape Webbed Talon TailLength Short Long ArmLength Short Long AntennaShape Knob Star AntennaLength Short Long BeakShape Trumpet Crusher “Hand”Shape Claw Paw EarShape Mouse Elephant SkinColor Red Purple BlueEyeColor Red Green Stop-and-Go

Your Notes: ______________________________________________________________________________
______________________________________________________________________________
______________________________________________________________________________
______________________________________________________________________________
Paw Can dig holes to lie in to keep cool
Cannot pick up nuts
Antenna Shape Star Knob
Antenna Length Short Safe from lightning strikes Cannot pick up cell phone signals
Long Can detect enemy Can be struck by lightning Beak Shape Crusher Can crush hard nuts Cannot suck up nectar
Trumpet Can suck up worms Cannot crush hard nuts Ear Shape Mouse Easy to keep clean Has lousy hearing
Elephant Has very good hearing Ears stick out and can be seen by predators
Skin Color Red Can hide in a field of red flowers
Scares off fish
Blue Blends with water so difficult for seagulls to find you for supper
Purple Scares off fish Eye Color Red
Green Red and Green
III. Activity
• Students will now play the game of SURVIVOR. • Explain that this game simulates how different creatures will “survive” in different
environments. • There are eleven scenarios that depict an environmental situation. • In each situation, one variation of a trait will help some creatures survive and the other
variation(s) of the trait will not help the others. It is important that the VSVS volunteers read the scenarios in sequential order (1, 2, 3…). The game is carefully scripted to have desired outcomes!
The Rules: • All teams start with zero chips. • A scenario is read by a VSVS member. Each creature possesses a trait that is either an
advantage or disadvantage under the change in the environment. o Creatures that possess the advantageous variation will reproduce, represented by a
green chip. o Creatures that possess the disadvantageous variation will get a red chip. o After each scenario, pass out a red or green chip to the groups.
• At the end of the game, students with more green chips than red chips have survived, but those with more red chips than green chips have gone extinct.
• The students will also keep track of the scores of each individual trait on the tally sheet.
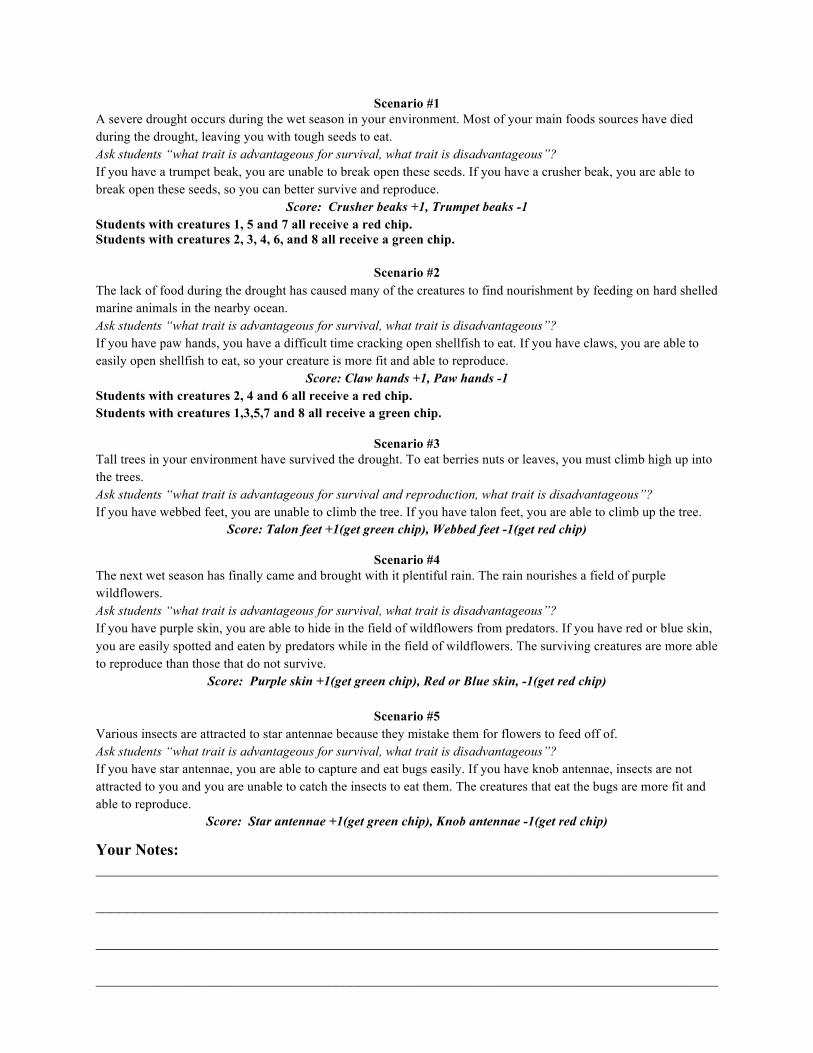
Your Notes: ______________________________________________________________________________
______________________________________________________________________________
______________________________________________________________________________
______________________________________________________________________________
Scenario #1 A severe drought occurs during the wet season in your environment. Most of your main foods sources have died during the drought, leaving you with tough seeds to eat. Ask students “what trait is advantageous for survival, what trait is disadvantageous”? If you have a trumpet beak, you are unable to break open these seeds. If you have a crusher beak, you are able to break open these seeds, so you can better survive and reproduce.
Score: Crusher beaks +1, Trumpet beaks -1 Students with creatures 1, 5 and 7 all receive a red chip. Students with creatures 2, 3, 4, 6, and 8 all receive a green chip.
Scenario #2
The lack of food during the drought has caused many of the creatures to find nourishment by feeding on hard shelled marine animals in the nearby ocean. Ask students “what trait is advantageous for survival, what trait is disadvantageous”? If you have paw hands, you have a difficult time cracking open shellfish to eat. If you have claws, you are able to easily open shellfish to eat, so your creature is more fit and able to reproduce.
Score: Claw hands +1, Paw hands -1 Students with creatures 2, 4 and 6 all receive a red chip. Students with creatures 1,3,5,7 and 8 all receive a green chip.
Scenario #3
Tall trees in your environment have survived the drought. To eat berries nuts or leaves, you must climb high up into the trees. Ask students “what trait is advantageous for survival and reproduction, what trait is disadvantageous”? If you have webbed feet, you are unable to climb the tree. If you have talon feet, you are able to climb up the tree.
Score: Talon feet +1(get green chip), Webbed feet -1(get red chip)
Scenario #4 The next wet season has finally came and brought with it plentiful rain. The rain nourishes a field of purple wildflowers. Ask students “what trait is advantageous for survival, what trait is disadvantageous”? If you have purple skin, you are able to hide in the field of wildflowers from predators. If you have red or blue skin, you are easily spotted and eaten by predators while in the field of wildflowers. The surviving creatures are more able to reproduce than those that do not survive.
Score: Purple skin +1(get green chip), Red or Blue skin, -1(get red chip)
Scenario #5 Various insects are attracted to star antennae because they mistake them for flowers to feed off of. Ask students “what trait is advantageous for survival, what trait is disadvantageous”? If you have star antennae, you are able to capture and eat bugs easily. If you have knob antennae, insects are not attracted to you and you are unable to catch the insects to eat them. The creatures that eat the bugs are more fit and able to reproduce.
Score: Star antennae +1(get green chip), Knob antennae -1(get red chip)

Your Notes: ______________________________________________________________________________
______________________________________________________________________________
______________________________________________________________________________
______________________________________________________________________________
Scenario #6 Global warming has caused the sea level to rise. The high water levels have flooded your environment. Ask students “what trait is advantageous for survival, what trait is disadvantageous”? If you have talon feet, you are able easily climb to higher ground to dry land. If you have webbed feet, you are not able to climb to dry land. Those creatures that climb to higher ground have safer places to reproduce and care for their young.
Talon feet +1(get green chip), Webbed feet -1(get red chip)
Scenario #7 A new factory is being built in your habitat, destroying much of your resources such as shelter and food. Ask students “what trait is advantageous for survival, what trait is disadvantageous”? If you have wings, you are able to fly to a new habitat to find resources, providing more food for you and your offspring. If you do not have wings, you must walk a long distance to find resources.
Score: Wings +1(get green chip), No wings -1(get red chip)
Scenario #8 You have found a new habitat. While searching for food one day, you need to reach high for leaves in the trees. Ask students “what trait is advantageous for survival, what trait is disadvantageous”? If you have long arms, you are able to reach the leaves, and stay fit so that you can reproduce. If you have short arms, you cannot get close enough to the tree leaves.
Score: Longs arms +1(get green chip), Short arms -1(get red chip)
Scenario #9 A large forest fire is engulfing your environment. A member of your clan transmits a high frequency sound to warn you about the danger. Ask students “what trait is advantageous for survival, what trait is disadvantageous”? If you have elephant ears, you are able to clearly hear the warning, and survive on to reproduce. If you have mouse ears, you are not able to hear the warning.
Score: Elephant ears +1(get green chip), Mouse ears -1(get red chip)
Scenario #10 The forest fire is quickly consuming your habitat and you must escape. Ask students “what trait is advantageous for survival, what trait is disadvantageous”? If you have wings, you are able to quickly escape the fire and survive on to reproduce. If you do not have wings, you are not able to escape the fire.
Score: Wings +1(get green chip), No wings -1(get red chip)
Scenario #11 An abundance of acorns has fallen to the ground. Ask students “what trait is advantageous for survival, what trait is disadvantageous”? If you have a crusher beak, you can join in the feast, and you have plenty of energy to reproduce.
Score: Crusher Beak +1(get green chip), Trumpet Beak -1 (get red chip)

Your Notes: ______________________________________________________________________________
______________________________________________________________________________
______________________________________________________________________________
______________________________________________________________________________
IV. WHAT CREATURES SURVIVED? § Tell students to pair up a red chip with a green chip – they are effectively cancelling 1
advantageous trait with 1 disadvantageous trait. § Set aside the paired chips. The remaining chips (all 1 color now) give you your final “score”. § Report these totals to a VSVS member who will write them on the board. The totals should look
like the following chart.
FinalscoreCreature1 1(redchip)Creature2 3greenchipsCreature3 9greenchipsCreature4 1redchipCreature5 7redchipsCreature6 7greenchipsCreature7 1redchipCreature8 11greenchips
§ Tell students that if a creature is holding only red chips, (and therefore had a negative final score),
it has gone extinct. One group member should stand holding its extinct creatures for the class to see.
§ If the creature is holding only green chips (and therefore had a positive score), that creature survived and reproduced. One group member should stand holding its survivor creature for the class to see.
§ Pass out Handout #1 showing the scores of the creatures. Tell students that:
• all creatures with negative scores (and therefore extinct) are on the 1st row • all creatures with positive scores (and therefore alive and thriving) are on the 2nd row,
§ Tell students to look at the pictures AND the tally sheet and ask which traits were the most
advantageous to survival? a. Students should reach the conclusion that “creatures” went extinct if their traits
were not advantageous in the environment. On the other hand, traits which were advantageous helped the “creature” survive.
b. Students should conclude that the most advantageous traits are the crusher beak, talon feet, and wings. Each of these traits gave a best, positive net score at the end of the game of +2.
c. On the other hand, those with a trumpet beak, webbed feet, and no wings received the worst, overall net score for each of these traits.

Your Notes: ______________________________________________________________________________
______________________________________________________________________________
______________________________________________________________________________
______________________________________________________________________________
d. When food was scarce, it was helpful to have a crusher beak that allows a creature to eat ‘hardy’ foods such as seeds and nets.
e. Having Talon feet allowed a creature to scale certain objects. f. Those with wings have greater mobility, allowing them to explore new habitats
or escape from predators. Explain that the students simulated natural selection. Remind students of the definition of natural selection. a. The environment selects for certain traits. Creatures that had these advantageous traits
would survive and reproduce. § Ask the students which of the creatures do they think will be best suited to survive in the future.
(Tell students to look at both the tally sheet and the score sheet). According to natural selection, the creatures whose traits are selected for in the environment will pass their traits on.
§ Looking at past events (the scenarios in the game), it would seem that creatures who have a crusher beak, talon feet, or wings will be best suited to the environment.
§ Since Creatures 3, 6, and 8 all have these traits, we would assume they would be the fittest to survive in the future. (In the SURVIVOR game, Creatures 3, 6, and 8 had the best score).
b. In turn, the creatures that reproduced passed on genes to their children for traits which would help them survive. Remind students that these traits are called adaptations.
Ask the following questions to the class to conclude the lesson:
a. What is a trait? Answer: Traits are mostly physical characteristics or features that you have, which can differ between people
b. By what is a trait influenced? Answer: Genes and environment c. What is natural selection? Answer: The process by which an organism’s traits are passed on or
selected based on their environment d. How does natural selection work? Answer: Variations in a trait that allow an organism to survive
better are passed down to the organism’s offspring e. How does environment influence survival? Answer: Organisms with traits that help them survive
in an environment are selected for, and organisms with traits that do not help them survive in an environment are selected against
f. What is an adaptation? Answer: A trait that helps an organism survive in a specific environment Lesson written by: Pat Tellinghuisen, VSVS director, Vanderbilt University Leandra Fernandez, Undergraduate Lab Assistant for VSVS, Vanderbilt University Jason Wong, Undergraduate Lab Assistant for VSVS, Vanderbilt University

Observation Sheet Circle the Traits your creature has.
Trait Variation 1 Variation 2 Variation 3 Leg Length Short Long Wings Absent Present Foot Shape Webbed Talon Tail Length Short Long Arm Length Short Long Antenna Shape Knob Star Antenna Length Short Long Beak Shape Trumpet Crusher “Hand” Shape Claw Paw Ear Shape Mouse Elephant Skin Color Red Purple Blue Eye Color Red Green Stop-and-Go
Tally Chart For each scenario, give a +1 or -1 in the tally box for the appropriate trait. At the end add up the net score.
Trait Variation Tally Net Score Leg Length Long
Short Wings Wings
No Wings Foot Shape Talon
Webbed Tail Length Short
Long Arm Length Short
Long “Hand” Shape Claw
Paw Antenna Shape Star
Knob Antenna Length Short
Long Beak Shape Crusher
Trumpet Ear Shape Mouse
Elephant Skin Color Red
Blue Purple
Eye Color Red Green Red and Green

Tally Sheet (Answer Key) For each scenario, give a +1 or -1 in the tally box for the appropriate trait. At the end add up the overall score in the tally box.
Trait Variation Tally Net Score Leg Length Long
Short Wings Wings +1 +1 +2
No Wings -1 -1 -2 Foot Shape Talon +1 +1 +2
Webbed -1 -1 -2 Tail Length Short
Long Arm Length Short -1 -1
Long +1 +1 “Hand” Shape Claw +1 +1
Paw -1 -1 Antenna Shape Star +1 +1
Knob -1 -1 Antenna Length Short
Long Beak Shape Crusher +1 +1 +2
Trumpet -1 -1 -2 Ear Shape Mouse -1 -1
Elephant +1 +1 Skin Color Red -1 -1
Blue -1 -1 Purple +1 +1
Eye Color Red Green Red and Green
* Bolded traits are ‘important’ traits in the environment.
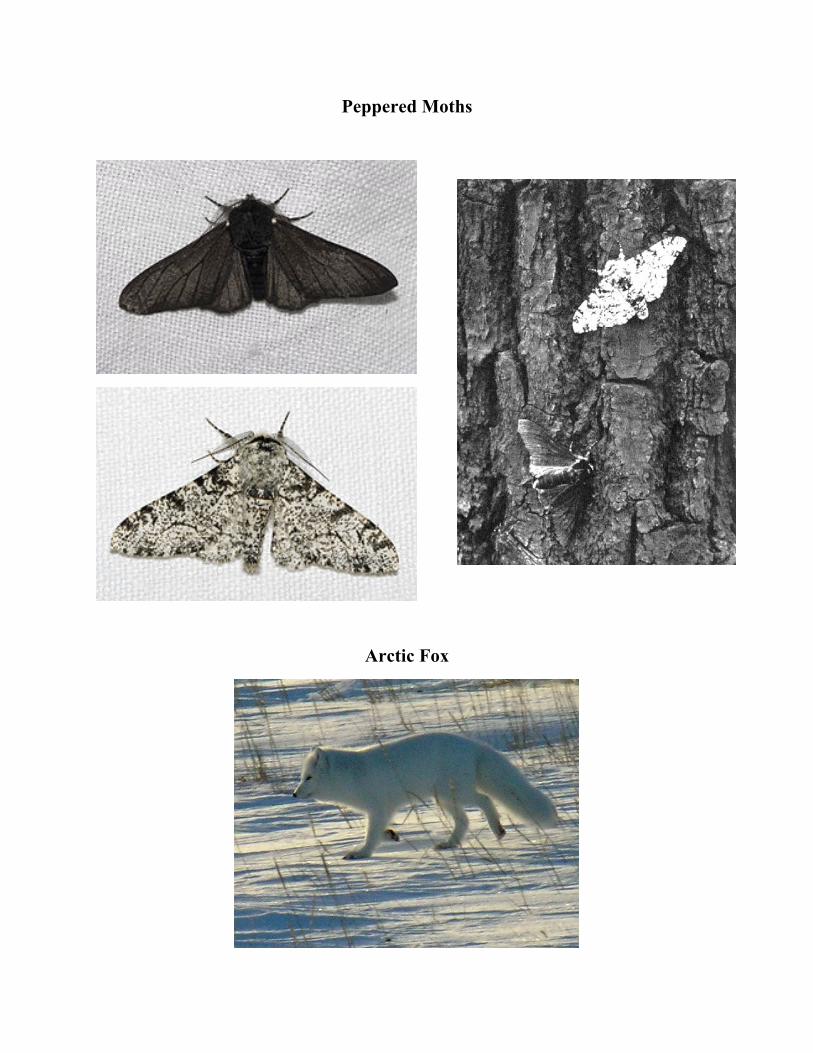
Peppered Moths
Arctic Fox