8x8 virtual office phone system setup guide -...
TRANSCRIPT

Virtual Office accOunt Manager Phone System Setup Guide
8x8 Virtual Office
Phone System Setup Guide
May 2013
Effective May 10, 2013, the Privileges tab in the top navigation bar of the Account Manager was renamed My Account. Privileges
and User Profiles can now be found in the My Account tab.

Contents
introduction . . . . . . . . . . . . . . . . . . . . . . . . . . . . . . 3
System requirements . . . . . . . . . . . . . . . . . . . . . . 4Supported Operating Systems . . . . . . . . . . . . . . . . . . . . . . . . . . . . . . . . . . . . . . . . 4
Required Plug-ins . . . . . . . . . . . . . . . . . . . . . . . . . . . . . . . . . . . . . . . . . . . . . . . . . . . . . 4
Supported Browsers . . . . . . . . . . . . . . . . . . . . . . . . . . . . . . . . . . . . . . . . . . . . . . . . . . 4
Required Firewall Ports . . . . . . . . . . . . . . . . . . . . . . . . . . . . . . . . . . . . . . . . . . . . . . . 4
Minimum System Requirements . . . . . . . . . . . . . . . . . . . . . . . . . . . . . . . . . . . . . . 4
Bandwidth Recommendations . . . . . . . . . . . . . . . . . . . . . . . . . . . . . . . . . . . . . . . . 4
login Procedure . . . . . . . . . . . . . . . . . . . . . . . . . . . 5
account Manager Home Page . . . . . . . . . . . . . . . 6Call Logs . . . . . . . . . . . . . . . . . . . . . . . . . . . . . . . . . . . . . . . . . . . . . . . . . . . . . . . . . . . . . . . 7
Billing Summary . . . . . . . . . . . . . . . . . . . . . . . . . . . . . . . . . . . . . . . . . . . . . . . . . . . . . . . 7
Phone System Setup . . . . . . . . . . . . . . . . . . . . . . . . . . . . . . . . . . . . . . . . . . . . . . . . . . 7
Corporate Directory . . . . . . . . . . . . . . . . . . . . . . . . . . . . . . . . . . . . . . . . . . . . . . . . . . . 8
Account Updates . . . . . . . . . . . . . . . . . . . . . . . . . . . . . . . . . . . . . . . . . . . . . . . . . . . . . . 8
How Do I? . . . . . . . . . . . . . . . . . . . . . . . . . . . . . . . . . . . . . . . . . . . . . . . . . . . . . . . . . . . . . 9
configuring Your 8x8 Phone Service . . . . . . . . . 9
Phone System Setup . . . . . . . . . . . . . . . . . . . . . .10Number Transfer . . . . . . . . . . . . . . . . . . . . . . . . . . . . . . . . . . . . . . . . . . . . . . . . . . . . .10
Request a Number Transfer . . . . . . . . . . . . . . . . . . . . . . . . . . . . . . . . . . . . . . . . . .11
User Profiles . . . . . . . . . . . . . . . . . . . . . . . . . . . . . . . . . . . . . . . . . . . . . . . . . . . . . . . . .14
Using the User Profile Configuration Tool . . . . . . . . . . . . . . . . . . . . . . . . . . . .15
Assigning a User to an Extension . . . . . . . . . . . . . . . . . . . . . . . . . . . . . . . . . . . .16
Configuring Extensions . . . . . . . . . . . . . . . . . . . . . . . . . . . . . . . . . . . . . . . . . . . . . .17
Configuring Individual Extensions. . . . . . . . . . . . . . . . . . . . . . . . . . . . . . . . . . . .18
Call Forwarding . . . . . . . . . . . . . . . . . . . . . . . . . . . . . . . . . . . . . . . . . . . . . . . . . . . . . . .23
Extension User Call Forwarding Basic Setup . . . . . . . . . . . . . . . . . . . . . . . . .25
Email Notification to Extension Users . . . . . . . . . . . . . . . . . . . . . . . . . . . . . . .28
call routing . . . . . . . . . . . . . . . . . . . . . . . . . . . . . .29Ring Groups . . . . . . . . . . . . . . . . . . . . . . . . . . . . . . . . . . . . . . . . . . . . . . . . . . . . . . . . . .29
Virtual and Toll-Free Numbers . . . . . . . . . . . . . . . . . . . . . . . . . . . . . . . . . . . . . . .33
Auto Attendant . . . . . . . . . . . . . . . . . . . . . . . . . . . . . . . . . . . . . . . . . . . . . . . . . . . . . .35
About Auto Attendant Profiles . . . . . . . . . . . . . . . . . . . . . . . . . . . . . . . . . . . . . .38
Why Create More Than One Profile?. . . . . . . . . . . . . . . . . . . . . . . . . . . . . . . . . .38
additional features . . . . . . . . . . . . . . . . . . . . . . .44Music and Message on Hold . . . . . . . . . . . . . . . . . . . . . . . . . . . . . . . . . . . . . . . . .44
Allowing Extension User Access . . . . . . . . . . . . . . . . . . . . . . . . . . . . . . . . . . . . .45
account Manager Privileges and roles . . . . . .45
add new administrator . . . . . . . . . . . . . . . . . . .46

3
Virtual Office accOunt Manager Phone System Setup Guide
Introduction
Now that you’ve activated your phones (see the Preparing Your Network and Installing Your Phones guide), the next step in setting up your new
8x8 phone service is to log into your online 8x8 Account Manager. The 8x8 Account Manager is the simple way for phone system administrators
to manage their company’s 8x8 Virtual Office phone system.
Using the 8x8 Account Manager, phone system administrators can perform tasks such as:
•Creating and editing User Profiles
•Assigning users, configuring and managing extensions
•Managing phone system features such as the Auto Attendant, Ring Groups, Music-on-Hold, and more
•Transferring phone numbers to 8x8 service
•Updating your payment methods
•Checking order status
•Opening and tracking support cases
4
Virtual Office accOunt Manager Phone System Setup Guide
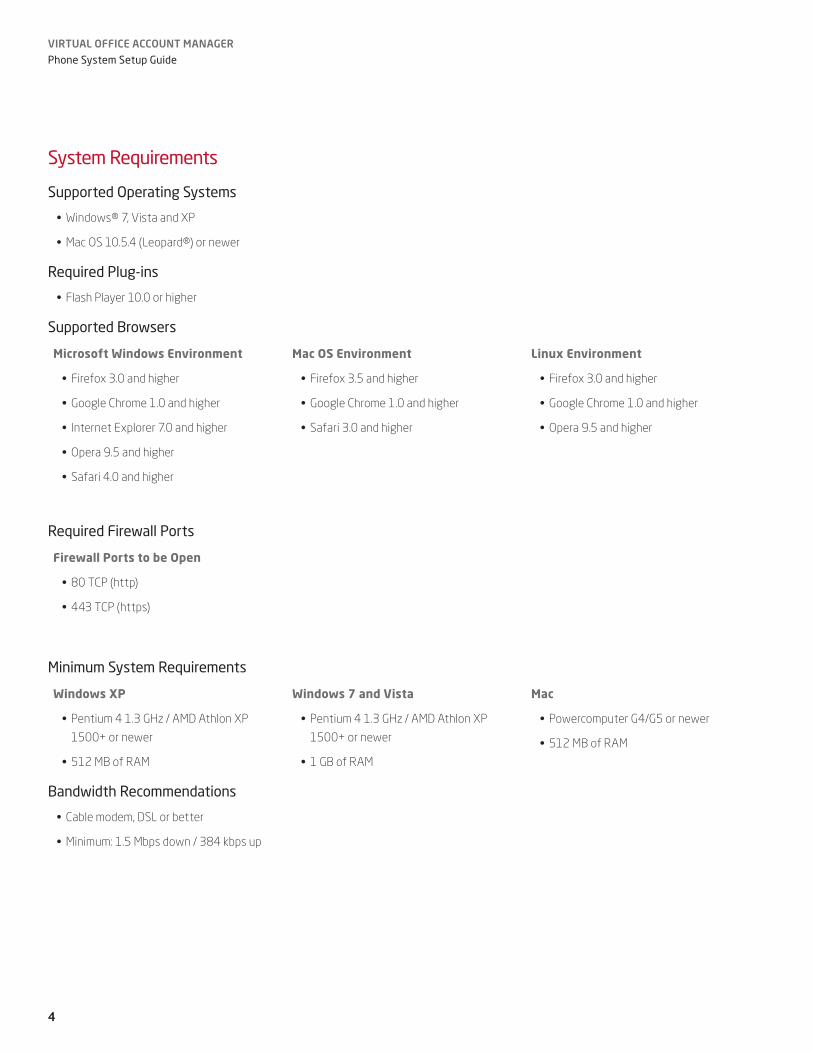
System Requirements
Supported Operating Systems
•Windows® 7, Vista and XP
•Mac OS 10.5.4 (Leopard®) or newer
Required Plug-ins
•Flash Player 10.0 or higher
Supported Browsers
Microsoft Windows Environment
•Firefox 3.0 and higher
•Google Chrome 1.0 and higher
• Internet Explorer 7.0 and higher
•Opera 9.5 and higher
•Safari 4.0 and higher
Mac OS Environment
•Firefox 3.5 and higher
•Google Chrome 1.0 and higher
•Safari 3.0 and higher
Linux Environment
•Firefox 3.0 and higher
•Google Chrome 1.0 and higher
•Opera 9.5 and higher
Required Firewall Ports
Firewall Ports to be Open
•80 TCP (http)
•443 TCP (https)
Minimum System Requirements
Windows XP
•Pentium 4 1.3 GHz / AMD Athlon XP
1500+ or newer
•512 MB of RAM
Windows 7 and Vista
•Pentium 4 1.3 GHz / AMD Athlon XP
1500+ or newer
•1 GB of RAM
Mac
•Powercomputer G4/G5 or newer
•512 MB of RAM
Bandwidth Recommendations
•Cable modem, DSL or better
•Minimum: 1.5 Mbps down / 384 kbps up

5
Virtual Office accOunt Manager Phone System Setup Guide
Login Procedure
1. Go to www.8x8.com.
2. Click Sign-In.
3. Select Account Manager.
4. Enter your 8x8 login and password.

6
Virtual Office accOunt Manager Phone System Setup Guide
Account Manager Home Page
On the Account Manager home page your username and email address is displayed at the top center, your company name and main number is
displayed in the top right corner.
The home page provides a snapshot of your Virtual Office system. At a glance you can see the status of different tasks and select various
options.

7
Virtual Office accOunt Manager Phone System Setup Guide
Call Logs
Displays the number of incoming and outgoing calls based on the selected interval.
Billing Summary
Summarizes your current charges for 8x8 Virtual Office phone service.
Phone System Setup
When you first purchase 8x8 Virtual Office, an 8x8 technical installation representative will walk you through all your setup tasks over the
phone. If you do not have a scheduled appointment and need assistance you can request an appointment. To schedule or view appointment
details, click Installation Appointment(s).

8
Virtual Office accOunt Manager Phone System Setup Guide
Corporate Directory
All your numbers in one convenient location. You’re able to easily search for users’ contact information, detect users’ presence or availability and
call or chat with users.
Account Updates
Order Status provides the status of orders placed in the last 30 days at a glance. To view the status of earlier orders, click View All and then
select or search for the desired order.
Number Transfer Status displays pending number transfer requests. To view the status of all number transfers, click View All.
8x8 Network Alerts displays information about any 8x8 system or network updates.

9
Virtual Office accOunt Manager Phone System Setup Guide
How Do I?
Quick access to popular Help topics. You can also access help information using the Help link at the top of each page.
Configuring Your 8x8 Phone Service
Most systems can be set up in 3 steps:
1. Phone System Setup
• Initiating number transfer
•Activating phones and creating User Profiles
•Assigning users, and configuring extensions
2. Routing Calls
•Creating Ring Groups
•Editing Virtual and Toll-Free Numbers (add-on option)
•Setting up the Auto Attendant
3. Additional Features
•Selecting your music and message on hold options
To get started, click Setup Features in the Phone System Setup box on the home page.

10
Virtual Office accOunt Manager Phone System Setup Guide
Phone System Setup
Number Transfer
With 8x8, you can transfer your existing phone numbers to your new 8x8 Virtual Office phone service. Using the Account Manager, you can
check the status of numbers being transferred, continue or cancel current number transfer requests and begin the number transfer process for
additional phone numbers.

11
Virtual Office accOunt Manager Phone System Setup Guide
Request a Number Transfer
To request a number transfer:
1. Click Phone System on the top navigation bar
2. Under the Phone System menu on the left, click Number Transfer. You are now on the Number Transfer main page.
3. Click Print Number Transfer Checklist and review instructions to ensure you have all required information ready before you start the
number transfer process.
4. When you have gathered all required information, click the Begin Number Transfer button.
5. Answer the four questions on the Begin Number Transfer page.
6. Click Continue.

12
Virtual Office accOunt Manager Phone System Setup Guide
7. Enter the number of service locations for the phone numbers.
To continue, click Next.
Note: At any time if you want to complete the number transfer request later, click Save for Later.
8. Enter the service address and service provider information for the number you want to transfer.
To continue, click Next.

13
Virtual Office accOunt Manager Phone System Setup Guide
9. Enter or cut and paste the numbers you want to transfer.
Note: you must separate the numbers with commas, tabs or line breaks.
To continue, click Next.
10. Click the drop-down arrow to select a temporary number for each of the numbers you are transferring. Use the and buttons to add
and delete phone numbers.
To continue, click Next.
11. Review the information you provided to ensure it is correct. To edit any of the information, click Back.
To continue, click Next.

14
Virtual Office accOunt Manager Phone System Setup Guide
12. Review the Letter of Authorization carefully. We recommend you print it for your records using the provided button. If you agree to all
terms in the letter, click I Agree.
Click the Phone System icon to return to the Phone System Setup page
User Profiles
A User Profile is required to give a user access to your 8x8 system. A User Profile must be created before assigning a user to an extension or
granting administrative privileges to your Account Manager.
You only need to create one User Profile per individual. A User Profile can be assigned to multiple extensions or features. It is important that a
user’s profile remains current, especially the user’s email address. The following User Profile fields are mandatory:
•First Name
• Last Name
•Email Address
•Username Note: When creating a new User Profile, by default the Username is the email address. The system administrator has the
flexibility to change the Username to something other than the email address.
In addition to the above mandatory fields, the following fields are available and can be used or not used at the phone system administrator’s
discretion:
•Nickname- When this field is used, the nickname replaces the first name
• Job Title
•Department
• Location
•3 customizable fields

15
Virtual Office accOunt Manager Phone System Setup Guide
Using the User Profile Configuration Tool
1. Click My Account on the top navigation bar.
2. Click User Profiles
3. To hide or unhide available User Profile fields in the User Profile chart, click Edit Viewable/Hidden Fields
4. Check or uncheck the fields to display
5. Click Save
Customizable Fields
Phone system administrators can create up to three customizable fields.
To use the customizable field(s):
•Click Edit Viewable/Hidden Fields
•Check the box next to a Custom Field
•Name the field by typing in the adjacent Header Label box
•Click Save
Create and Edit User Profiles
You can create User Profiles one at a time or in bulk.
To create an individual User Profile:
1. Click Create New User Profile
2. Enter user information. Mandatory fields are: First Name, Last Name, Email Address and User Name (by default User Name is email
address).
3. Click Save
Note: For phone extensions that will not be assigned to a specific individual but instead will be located in a specific area like the front lobby,
conference room, etc., create a User Profile for each area. Example: Enter “Front” as a First Name and “Lobby” as the Last Name, and
enter the email address for the person responsible for maintaining the extension settings (usually the Primary System Administrator)
To edit a User Profile, click Edit in the Action Column for the User Profile you want to edit.
To create or edit multiple User Profiles:
1. Click Download CSV Template
Note: If using customizable fields, before downloading the template make sure that you have labeled the field by following the
Customizable Fields instructions above.
2. Download and open the file
3. Enter information for new User Profiles or edit information for current profiles.
Important: Do not make any changes to the 8x8 Internal ID column
4. Once you have made all your changes save the file to your computer hard drive

16
Virtual Office accOunt Manager Phone System Setup Guide
5. On the User Profile page click Upload CSV Template, then Proceed
6. Click Add, then locate the file you just saved and click Open, then Upload
7. Verify that the new information is correct and then click Submit
Disabling a User Profile
To disable a User Profile click Disable in the Action Column. Disabling a User Profile will remove the profile from all extensions or features the
User Profile has been assigned to. (Caution: Once a User Profile has been disabled you can enable it once again. However, you will manually have
to reassign the User Profile to an extension or other feature.) To maintain historical reporting, you are unable to delete a User Profile completely
from your system.
Assigning a User to an Extension
If you have not already installed and activated your phones, please see the Preparing Your Network and Installing Your Phones guide. To assign a
user to an extension, you must first create a User Profile. Once the User Profile is created:
1. Click Phone System on the top navigation bar
2. From the Phone System home page click View All Extensions
3. Click the Edit link next to the extension you want to edit
4. You are now on the Edit Extensions landing page. Use the Expand and Collapse icons to view and edit the Extension Information
pane
5. Click Select User Profile link
6. Click the Select link next to the User Profile you want to assign to the extension
7. You can continue to configure the extension using the Configure Individual Extension directions below or click Save at the bottom of the
page to update user profile assignment.
To remove a User Profile from an extension, click Clear User Profile. Clearing a User Profile will reset the extension back to the default
unassigned state. Note: clearing a User Profile only removes the user from the extension and the User Profile will still be active and available to
other features that it is assigned to. To disable a User Profile and to remove it from all your system features, see “Disabling a User Profile” on
page 16 in the User Profile section of this guide.
17
Virtual Office accOunt Manager Phone System Setup Guide
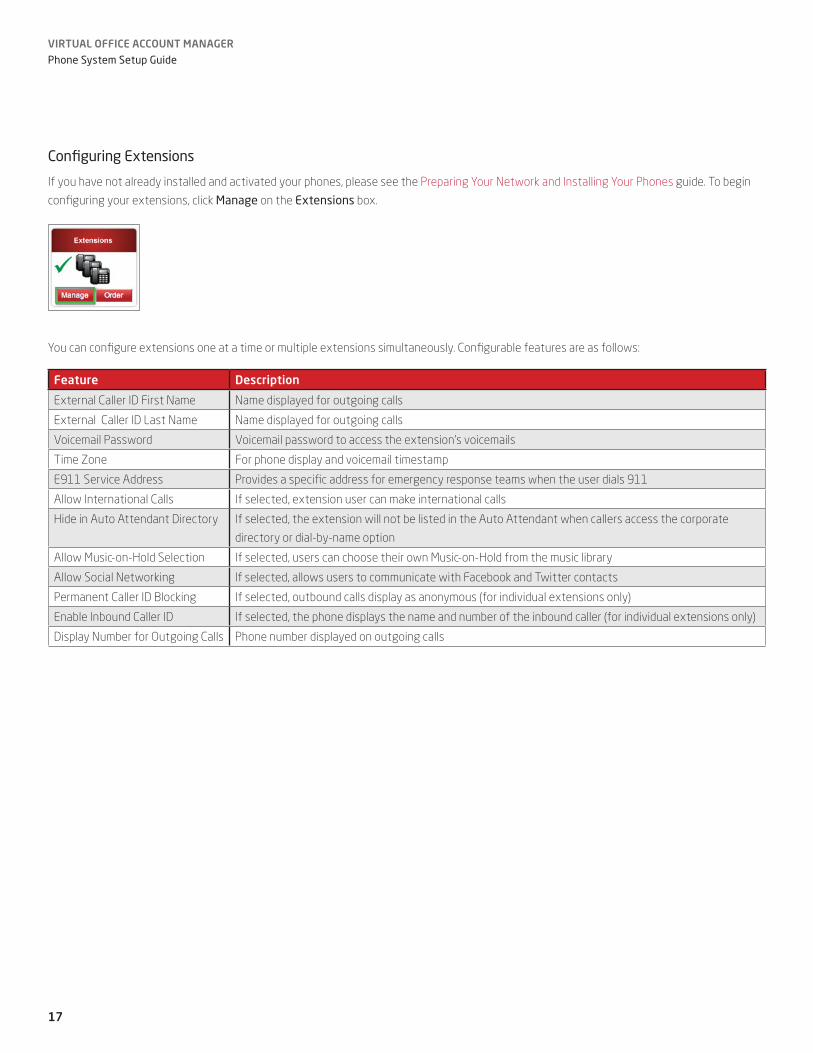
Configuring Extensions
If you have not already installed and activated your phones, please see the Preparing Your Network and Installing Your Phones guide. To begin
configuring your extensions, click Manage on the Extensions box.
You can configure extensions one at a time or multiple extensions simultaneously. Configurable features are as follows:
feature Description
External Caller ID First Name Name displayed for outgoing calls
External Caller ID Last Name Name displayed for outgoing calls
Voicemail Password Voicemail password to access the extension’s voicemails
Time Zone For phone display and voicemail timestamp
E911 Service Address Provides a specific address for emergency response teams when the user dials 911
Allow International Calls If selected, extension user can make international calls
Hide in Auto Attendant Directory If selected, the extension will not be listed in the Auto Attendant when callers access the corporate
directory or dial-by-name option
Allow Music-on-Hold Selection If selected, users can choose their own Music-on-Hold from the music library
Allow Social Networking lf selected, allows users to communicate with Facebook and Twitter contacts
Permanent Caller ID Blocking If selected, outbound calls display as anonymous (for individual extensions only)
Enable Inbound Caller ID If selected, the phone displays the name and number of the inbound caller (for individual extensions only)
Display Number for Outgoing Calls Phone number displayed on outgoing calls

18
Virtual Office accOunt Manager Phone System Setup Guide
Configuring Individual Extensions
Selecting and editing individual extensions is available through Manage Extensions.
Once you have selected a User Profile for an extension, you can continue configuring the extension using the steps below.
Use the Expand and Collapse icons to view and edit the following panes:
Note: the panes displayed will vary depending on whether the selected extension is Basic, Virtual, Fax, Shared, Unlimited, Unlimited Pro,
etc. If you are editing a shared extension, see the Shared Lines section for additional details.
•Extension Information
•Extension Settings
•Voicemail Settings
•Virtual Office Pro Information
•Call Forwarding
•Extension Membership Display
•Communication Preferences
Enabling/Disabling Virtual Office Online
By default Virtual Office Online is enabled for all unlimited, global and metered Virtual Office extensions. Virtual Office Online and Virtual Office
Desktop are web-based tools that allow extension users to manage and use their phone features online, including accessing the corporate
directory and call forwarding settings, from any computer. A username and password is required to log into these features.

19
Virtual Office accOunt Manager Phone System Setup Guide
Extension Information
The Extension Information pane lets you assign a User Profile to an extension, enable or disable Virtual Office Online and edit extension caller ID
settings.
1. Click the Expand icon to display the Extension Information pane.
2. Enter, select or deselect these options for individual extensions:
•Assign User Profiles
•Extension Caller ID Phone Number
•External Caller ID First Name
•External Caller ID Last Name
•Time Zone
3. Click Save Changes at the bottom of the screen.
20
Virtual Office accOunt Manager Phone System Setup Guide
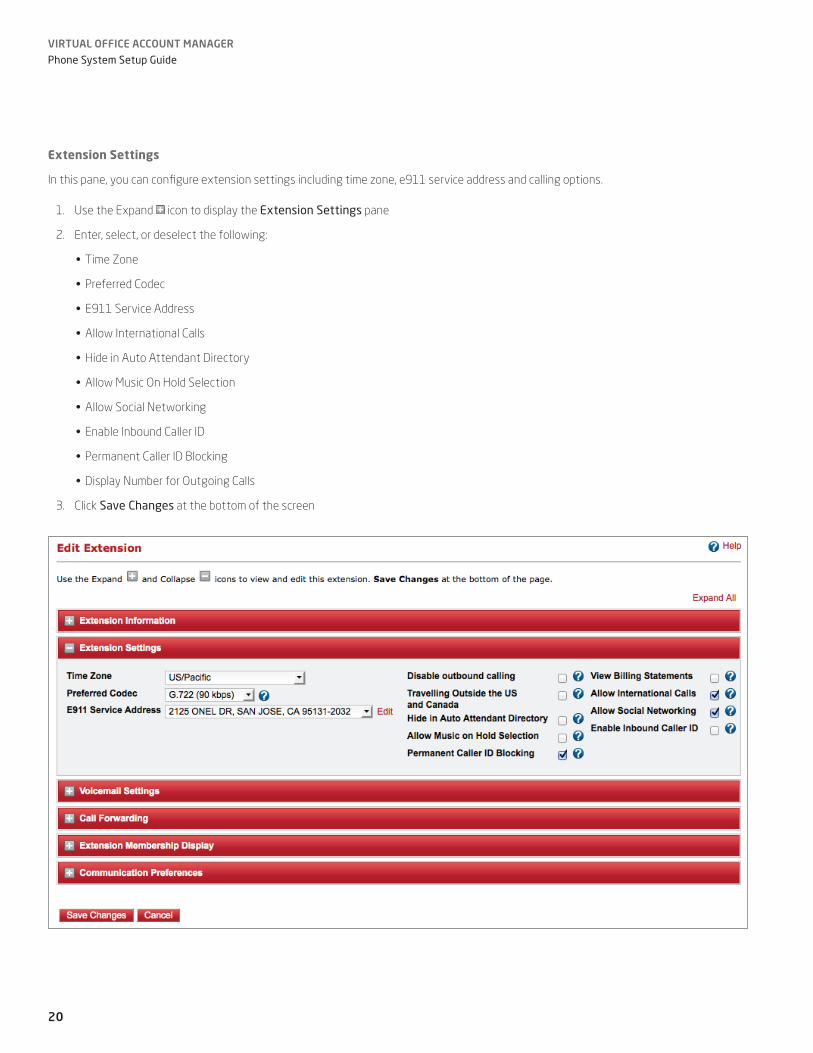
Extension Settings
In this pane, you can configure extension settings including time zone, e911 service address and calling options.
1. Use the Expand icon to display the Extension Settings pane
2. Enter, select, or deselect the following:
•Time Zone
•Preferred Codec
•E911 Service Address
•Allow International Calls
•Hide in Auto Attendant Directory
•Allow Music On Hold Selection
•Allow Social Networking
•Enable Inbound Caller ID
•Permanent Caller ID Blocking
•Display Number for Outgoing Calls
3. Click Save Changes at the bottom of the screen

21
Virtual Office accOunt Manager Phone System Setup Guide
Voicemail Settings
In this pane, you can edit the extension’s Voicemail Password, and set up email notification options.
You can update the following items:
•Voicemail Password. (Passwords must be numeric digits only)
•Voicemail Notification via Email
– Disabled will deactivate this feature
– Enabled with Audio: sends email notification of voicemail messages with an attached audio file
– Enabled: sends email notification of voicemail messages only
•Voicemail-to-Email Address. (This is the email address where users will receive notification of voicemail messages)

22
Virtual Office accOunt Manager Phone System Setup Guide
Virtual Office Pro Information
If you are updating an extension with Virtual Office Pro, you will configure Call Recording and Internet Fax in this pane.
1. Select your preferred options for the individual extension:
•Call Recording
•Call Recording Mode
•Play announcement when calls are recorded
•Allow user to purchase additional dial-in numbers for Virtual Meeting.
Note: these can be domestic, international, or toll-free numbers
•Choose Internet Fax numbers for their Virtual Office Online account
2. Click Save Changes at the bottom of the screen.

23
Virtual Office accOunt Manager Phone System Setup Guide
Call Forwarding
As the phone system administrator you can setup the extension’s call forwarding rules, or the extension user can do it themselves in Virtual
Office Online.
Phone System Administrator Call Forwarding Basic Setup
Call forwarding allows you to create rules to determine when and where calls should be forwarded, if the extension is busy or the phone is not
answered. Important terms to be familiar with:
•Forward to Auto Attendant: calls are answered by the Auto Attendant. Callers can select from available options, such as “press 1 to leave a
message; press 0 to reach an operator.”
•Forward to Voicemail: callers are forwarded to voicemail, where they will hear a greeting and/or be able to leave a message.
•Forward to One Number Access (ONA): calls can be forwarded to one or up to four destinations either sequentially or simultaneously. If a
call is not answered at any of the target destinations, it will then be forwarded to voicemail.
•Forward to External Number or Internal Extension: when you select this option, a field appears in the Phone Number column where you
can enter the number you would like the calls forwarded to.

24
Virtual Office accOunt Manager Phone System Setup Guide
•Sequential and Simultaneous Ring Distribution: This sets how your forwarded calls will be distributed through your phone system. The
“sequential” option rings selected phones one at a time based on the order you have listed. You can set the number of seconds the system
will ring each phone. The “simultaneous” option rings all your selected phones at the same time.
•Call Screening: When call screening is enabled, the caller must record his/her name before the 8x8 system tries to locate you. You will then
be able to listen to the name and have the option to answer the call or not. If you decline, the call will go to voicemail.
1. Select the desired options for these call forwarding conditions:
•Always Forward
Note: if you select Always Forward, all other forwarding options will be disabled. To re-enable them, deselect this option.
•Busy Forward
•No Answer Forward
Note: you can also select a delay time, in seconds, for this feature. The default is 15 seconds.
• Internet Outage Forward
2. If you select One Number Access:
•Select whether the Ring Distribution will be Sequential or Simultaneous.
•Select whether Call Screening will be Disabled or Enabled.
•Enter the first number where your calls will be forwarded
Note: The number could be a phone number, extension number, ring group number, call queue number etc.
•Click the Add button to enter more phone numbers.
•Select the Voicemail Password Required checkbox if you want to ensure that only you can answer forwarded calls at the target
destinations
Note: selecting this option means you must enter your voicemail password before you can answer the call.
•Enter the number of seconds the phone will ring before forwarding to the next destination or to voicemail. The default is 20 seconds.

25
Virtual Office accOunt Manager Phone System Setup Guide
Extension User Call Forwarding Basic Setup
Users can set up their own call forwarding rules in their Virtual Office Online accounts. When you, as a phone system administrator, use the
Account Manager to edit an extension that already has call forwarding rules, you can either click Revert to Basic Call Forwarding or Manage
Call Forwarding.
Revert to Basic Call Forwarding: Deletes the user’s rules and allows you to set up basic call forwarding by following the steps in the
Call Forwarding section.

26
Virtual Office accOunt Manager Phone System Setup Guide
Manage Call Forwarding: Allows you to log in as the user and manage rules using the advanced options in Virtual Office Online.
See the Virtual Office Online User Guide for more information.
Extension Membership Display: This is a display-only information pane with no editable fields. It provides details about the extension’s Auto
Attendant, Call Queue (optional feature), and Ring Group settings.
Once you are finished with your edits, click Save Changes,
Click the Phone System icon to return to the Phone System Setup page

27
Virtual Office accOunt Manager Phone System Setup Guide
Editing Multiple Extensions Simultaneously:
1. Click Phone System on the top navigation bar.
2. Under Manage Extensions, click Edit Multiple Extensions.
3. Using the gray navigation bar, configure the following options for all extensions, as desired.
•Caller ID First Name
•Caller ID Last Name
28
Virtual Office accOunt Manager Phone System Setup Guide
•Voicemail Password
•Enter Voicemail-to-Email address individually. (Note: voicemail email notifications will be sent to this address.)
•Hide in Auto Attendant
•Make International Calls
•Allow Social Networking
•Music on Hold
•Display Number for Outgoing Calls
•Time Zone
•E911 Service Address
4. After entering a name or password, click the checkbox to apply the change to the entire column.
5. Click Save to apply your changes.
Note: There are additional extension features that can be configured by the phone administrator or by the individual extension user.
Email Notification to Extension Users
Once you assign a user to an extension, an email is automatically sent to the user with information regarding their new extension.
•First-time extension users with Virtual Office Online enabled also receive instructions for creating their login password.
•First-time extension users who do not have Virtual Office Online enabled receive an email alert but are not instructed to create a password.
(Admins have the option to disable access to Virtual Office Online.)
•Existing extension users who already have a username and password to your PBX should use their existing credentials to log into the new
extension.

29
Virtual Office accOunt Manager Phone System Setup Guide
Call Routing
Ring Groups
Ring Groups enable multiple extensions to answer incoming calls. To create a Ring Group, click Manage on the Ring Group icon
Or click Ring Groups in the Phone System menu on the left.
This takes you to the Ring Group main page.
Create Ring Groups
1. Click Create Ring Group.

30
Virtual Office accOunt Manager Phone System Setup Guide
2. Enter a Ring Group Name and select a Ring Group Extension.
Note: if you would like Virtual Office to suggest an extension number for the Ring Group, click the icon next to Ring Group Extension.

31
Virtual Office accOunt Manager Phone System Setup Guide
Add Extensions to a Ring Group
1. On the Ring Groups main page, select the group you want to add an extension to and click Edit.
2. On the Edit Ring Group page, under Ring Group Extensions:
•Click the drop-down arrow to select an extension number.
•Click the and buttons to add and delete extensions.
32
Virtual Office accOunt Manager Phone System Setup Guide
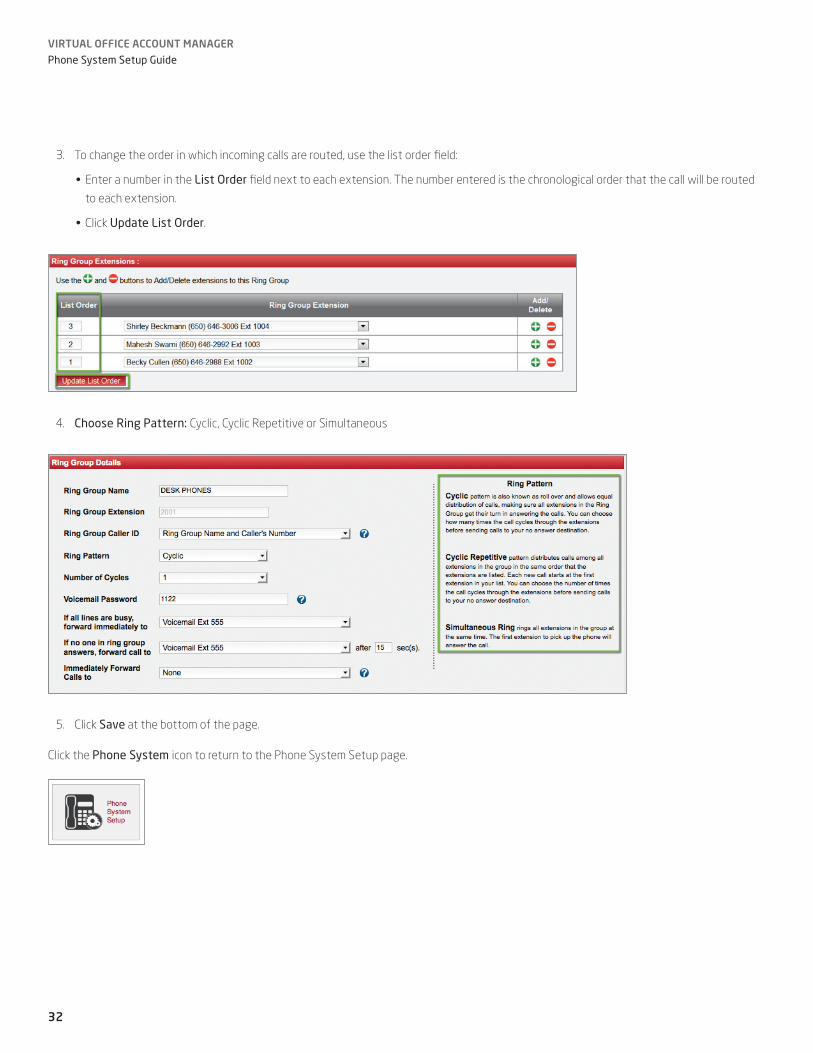
3. To change the order in which incoming calls are routed, use the list order field:
•Enter a number in the List Order field next to each extension. The number entered is the chronological order that the call will be routed
to each extension.
•Click Update List Order.
4. Choose Ring Pattern: Cyclic, Cyclic Repetitive or Simultaneous
5. Click Save at the bottom of the page.
Click the Phone System icon to return to the Phone System Setup page.
33
Virtual Office accOunt Manager Phone System Setup Guide
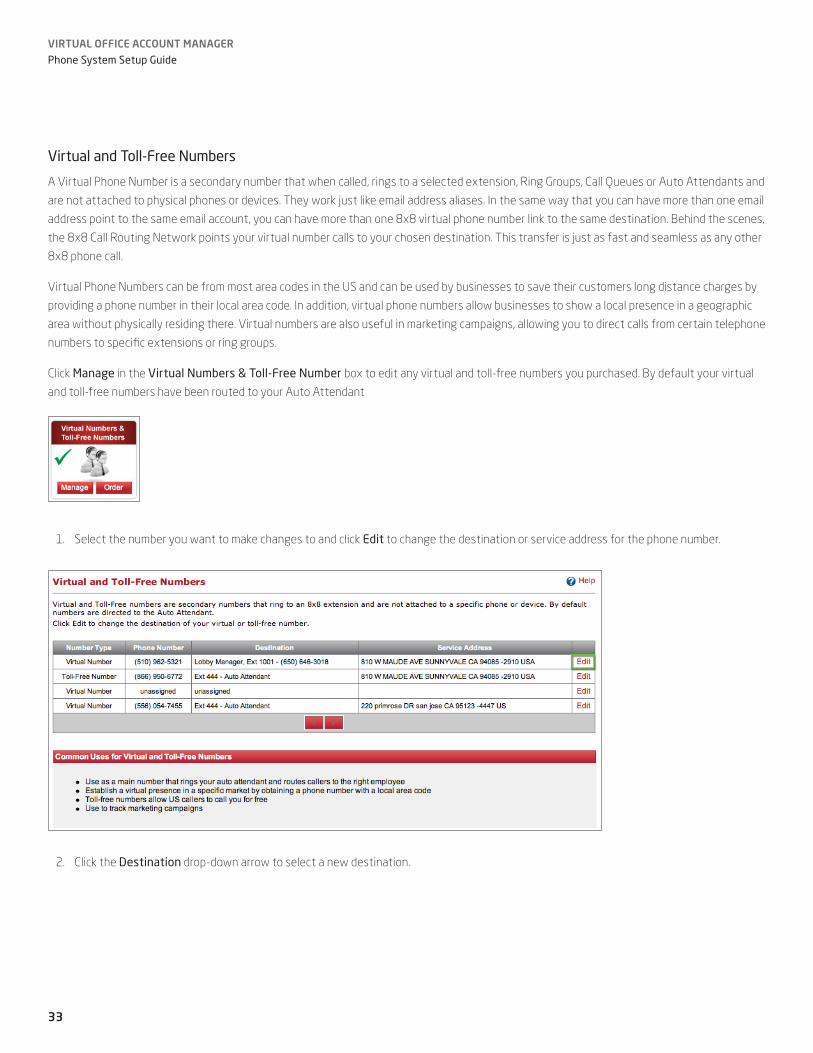
Virtual and Toll-Free Numbers
A Virtual Phone Number is a secondary number that when called, rings to a selected extension, Ring Groups, Call Queues or Auto Attendants and
are not attached to physical phones or devices. They work just like email address aliases. In the same way that you can have more than one email
address point to the same email account, you can have more than one 8x8 virtual phone number link to the same destination. Behind the scenes,
the 8x8 Call Routing Network points your virtual number calls to your chosen destination. This transfer is just as fast and seamless as any other
8x8 phone call.
Virtual Phone Numbers can be from most area codes in the US and can be used by businesses to save their customers long distance charges by
providing a phone number in their local area code. In addition, virtual phone numbers allow businesses to show a local presence in a geographic
area without physically residing there. Virtual numbers are also useful in marketing campaigns, allowing you to direct calls from certain telephone
numbers to specific extensions or ring groups.
Click Manage in the Virtual Numbers & Toll-Free Number box to edit any virtual and toll-free numbers you purchased. By default your virtual
and toll-free numbers have been routed to your Auto Attendant
1. Select the number you want to make changes to and click Edit to change the destination or service address for the phone number.
2. Click the Destination drop-down arrow to select a new destination.

34
Virtual Office accOunt Manager Phone System Setup Guide
3. Enter or select any changes to the service address in the appropriate fields.
Note: Fields marked with * must be filled in.
4. Click Confirm to save your changes.
Click the Phone System icon to return to the Phone System Setup page

35
Virtual Office accOunt Manager Phone System Setup Guide
Auto Attendant
Auto Attendant is a service that acts as an automated receptionist and processes your incoming calls. Callers are able to self-direct their call by
choosing menu options. An Auto Attendant gives you flexibility to manage a simple call flow or create a “large company” call flow to multiple
departments and complex call trees. You set the rules, program which keys callers select to route themselves to the appropriate destination, and
create the menu recordings. The 8x8 Auto Attendant also gives you the flexibility to create different call flow scenarios, and call profiles, based
on day, date and time. Each 8x8 PBX phone system comes with one Auto Attendant identified as extension number 444. You also have the
option of purchasing additional auto attendants.
To configure your Auto Attendant, click on the Auto Attendant box on the Phone System Setup page.
Or click Auto Attendant in the Phone System menu on the left.

36
Virtual Office accOunt Manager Phone System Setup Guide
Create Auto Attendant Profile
By creating multiple profiles for Auto Attendant, your company can quickly switch between recordings and menu options based on different
scenarios.
1. Click Create Auto Attendant Profile
2. Review the Auto Attendant Profile Overview, and complete the Auto Attendant Worksheet.
(Important Tip: Use the Auto Attendant worksheet before you begin configuring your Auto Attendant. The worksheet will help you outline
how you want your inbound calls to be directed when they reach the Auto Attendant. Preparing beforehand will make this process a lot
easier.)

37
Virtual Office accOunt Manager Phone System Setup Guide

38
Virtual Office accOunt Manager Phone System Setup Guide
3. Click Continue
FYI:
About Auto Attendant Profiles
Use a profile to define how your auto attendant will behave when calls come in. A Profile lets you define phone menu options, business
schedules, and recordings to create a complete set of instructions for your auto attendant. Within one profile, you can specify options
for business hours, after-business hours, holidays and more.
Why Create More Than One Profile?
Most businesses only need one auto attendant profile, however there are two common reasons for creating more:
•Stage and test new recordings, schedules and menu options before you push a completely new auto attendant live.
•Businesses may want different auto attendant behavior for different days of the week, days of the year like holiday, or seasons.
Each profile can have completely different recordings, hours, menu options, etc. Just create a profile for each scenario and alternate
between them as needed.
Note: Each Auto Attendant comes with a system default profile. This system default profile is overridden when you activate a new
profile on your Auto Attendant.
4. Enter your Profile Name and Time Zone. Extension number 444 is reserved exclusively for your Auto Attendant.
Click Next

39
Virtual Office accOunt Manager Phone System Setup Guide
5. Choose whether you want to define your business hours or have the same phone menus and recordings all day, every day (24/7).
• If you chose Define Business Hours skip to Define Business Hours section
• If you chose 24/7 Business Hours click Next and proceed to Step 6
24/7 Business Hours:
6. Enter your phone menu rules:
•Under Press, click the drop-down arrow and select a key.
•Enter a description of the function that key will enable.
•Under Call Routing, click the drop-down arrow and select a function for the key you selected.
•Click the button to add additional options for this menu or button to delete key settings.
•Use the Menu Recording Script box to draft the script for this menu recording. You will have the opportunity to record or upload your
recording after the profile is created.

40
Virtual Office accOunt Manager Phone System Setup Guide
7. When you have finished configuring all your phone menu rules, click Create Profile.
8. To upload and create menu recordings for your profile skip to the Upload a Recording and Create Your Own Menu Recording sections.
Define Business Hours
Define Business Hours allows you to have separate menu options and recordings for normal business hours, non-business hours, lunch hour and
holidays etc.
1. Click the drop-down arrows to define your business hours for each day of the week.
Note: After hours are displayed automatically based on your business hours selections
2. Optional: Enter hours and dates for Lunch Hour, Business Hour Exceptions, and Holiday Hours.

41
Virtual Office accOunt Manager Phone System Setup Guide
3. Click Next.
4. Enter your phone menu rules for Business Hours:
•Under Press, click the drop-down arrow and select a key.
•Enter a description of the function that key will enable.
•Under Call Routing, click the drop-down arrow and select a function for the key you selected.
•Click the and buttons to add and delete key settings.
•Use the Menu Recording Script box to draft the script for this menu recording. You will have the opportunity to create or upload a menu
recording after the profile is created.
5. When you have finished configuring your Business Hours menu, click Next.
6. As appropriate, repeat steps 1-4 above to configure menus for After Hours, Lunch Hours and Holiday Hours. When complete click
Create Profile.
Upload a Recording
Once you have created an Auto Attendant Profile you now can create or upload recordings for each menu.
To upload a recording, proceed to Step 1. To create a new menu recording skip to Create Your Own Menu Recording.
1. To upload an .au, .wav, .vox or .mp3 file from your computer:
•Click Upload under the appropriate menu

42
Virtual Office accOunt Manager Phone System Setup Guide
•Click the Add button.
•Select the audio file you want to upload.
•Click Upload
•Review the Electronic Signature text, and click I Agree.
•When the dialog box appears confirming that you have successfully uploaded the greeting, click OK.
2. To test your new recording and menu options, click the Test Menu icon and follow prompts.
Create Your Own Menu Recording
1. To record a menu:
•Optional: Click Edit/Print Script under the appropriate menu heading to draft or edit a previously written script. Click Print to have a hard
copy of the script available while you are recording your menu.
•Click Record
•Enter your 10-digit phone number and click Start Recording
•When the dialog box appears confirming that the system is calling your phone number, click OK.

43
Virtual Office accOunt Manager Phone System Setup Guide
The system will call you at the number you entered. When the phone rings, answer it and follow the voice prompts to record your menu recording.
•Click Done Recording when you are finished.
•When the dialog box appears confirming that you successfully recorded your greeting, click OK.
2. To test your new recording and menu options, click the Test Menu icon and follow prompts.
Activating Your New Auto Attendant Profile
1. Return to the main Auto Attendant page.
2. Locate the profile you created and edited in the list.
3. Click Turn On to activate your profile.
You have successfully configured your Auto Attendant.
Click the Phone System icon to return to the Phone System Setup page.

44
Virtual Office accOunt Manager Phone System Setup Guide
Additional Features
Music and Message on Hold
As an administrator, you can choose the default music for your phone system from 10 options provided by 8x8 or upload your own licensed
music/message on hold, and manage the choices your extension users can select to customize their individual extensions. Extension users can
make their selection by logging into their Virtual Office Online account.
Note: By default your phone system is preset to Rites of Spring.
From the Phone System Setup page, click the Music on Hold Manage button. This takes you to the Music on Hold Library.
1. Review the music listed. To hear a sample, click Play.
2. When you have made your selection, click Select in the Status column. Your selection will show a icon in the Status column.
Note: Your selection becomes the default music for the phone system.

45
Virtual Office accOunt Manager Phone System Setup Guide
3. When the dialog box appears confirming your selection, click OK.
4. Click Save.
Allowing Extension User Access
1. In order for extension users to access Music/Message On Hold in Virtual Office Online, you must check the Music on Hold box in their
extension configuration settings. See the Extension Configuration section.
2. Check the Extension User Access box(es) to give users the choice of selecting that file.
3. Click Save
For instructions on uploading licensed music and message files and configuring advanced features like Shared Lines, Calls Queues, and
Switchboard, see the Account Manager User Guide.
Account Manager Privileges and Roles
Other individuals can be given permission to access the Account Manager and assign him/her access to one or more of the following sections:
•Phone System
•Billing
•Reporting
•Orders
•Privileges
•Support Management
Important! Every phone system must maintain one designated primary administrator user account with privileges in all the above categories.
This administrator’s access cannot be edited or revoked.
The primary administrator and users with full privileges can access any administrative area. When a user with limited privileges logs into the
Account Manager, they only have access to the areas you have granted permission. For example, an accountant who is only granted Billing and
Orders privileges will see just those tabs in the Account Manager navigation bar.

46
Virtual Office accOunt Manager Phone System Setup Guide
Add New Administrator
To grant administrator privileges to an individual, you must first create a User Profile for them. See the User Profile section for directions.
1. Click My Account on the top navigation bar.
2. Click Privileges.
3. To copy another administrator’s privileges for the new administrator, click Copy.
To select the new administrator’s privileges manually, click Add New Admin.
4. Select a User Profile.

47
Virtual Office accOunt Manager Phone System Setup Guide
5. Select the administrative privileges for the user. By clicking on a link, like Phone System Service, more options specific to that function
becomes available.
6. If you have multiple PBXs, select which PBX these administrative privileges will apply to.
7. Click Add
8. When the dialog box appears confirming that the new administrator has been added, click OK.
9. The new administrator now appears in the list of administrators on the main Privileges page.

Virtual Office accOunt Manager Phone System Setup Guide
NASDAQ: EGHTwww.8x8.com
© 2013. The 8x8, Inc. logo is a registered trademark of 8x8, Inc. 8x8, Inc. is a publicly traded company. PM451/1011v4
The ChampionFor Business
Communications