a guide to scratch-building the tryworks for model
TRANSCRIPT

A Guide to Scratch-building the Tryworks for Model Shipways Charles W. Morgan kit
Written by Gerald Spargo

Introduction:
When I started building the Charles W. Morgan, my original plan was to build it just the way the plans instructed. Well that didn't happen. The first deck furnishing I built was the tryworks. I started building it by the instructions given. Then decided that it shouldn't be to difficult to build it brick-by-brick just like the original. Figured I'd give it a try. Well....it turned out quite well, so thought I would draw-up some plans along with instructions, and let others have a try at it. So therefore that is what this PDF is about, how I built the tryworks for the Charles W. Morgan.
These instructions can also be applied to any whaling ship. One will just have to scale the plans to fit.
Building the Base
To begin with, you get two thin sheets of basswood in the kit. Mostly I used the smallest sheet (1/32”x 2”x 24”) for most of the building that I did in this kit, and I have run out. For this reason I have made a slight change in the plan to help save you some of this sheet stock. I used the 1/32” (.75 mm) thick sheet for the entire base structure. The change I made is, instead of using this small sheet for the Floor Base; use the 1/16” (1.5 mm) thick sheet instead.
First of all cut all four sides, and four corner braces. Glue the four sides and the corner braces together, being sure to keep it square while it dries. After this is dry, cut the floor base to fit, and install it .5 mm below the top edge of the base. The reason is that this is half the thickness of the bricks, and we want the bricklaying to start below the surface. The total size of the base should be a 45 x 45 mm square. You can either butt the joints together as in the diagram, or miter them; the choice is up to you.
Now that you have that finished, it’s time to cut the bricks. If I figured correctly, it took approximately 450 brick to build this. OK, this is the tricky part. The bricks are 1 x 2 x 4 mm; you do not get strips this size in the kit. So, what you need to do is take 1/16”x 3/32” strips and sand them down to the correct size. If you have built ships before, then you may have some extra strips that are already the correct size. To cut them to the length of (4 mm long) I used a chopper, you may not have one of these. So, you will need to set up some way of cutting these to length, and you have to make sure the edges are cut square. I’ve included a small indication of how to do this on the diagram. Once you have something in place, then, do not make any adjustments to it until the bricklaying is finished.

Card stock is to be used for spacing in-between the bricks. Have plenty on hand, because it doesn’t take long for the piece of card to get glue clogged up on it. The more glue that gets on the card, the wider the spaces become, we don’t want that to happen. Once the bricks are cut, the first ones to be laid in place are the bricks for the front row. Now the bricks will rise above the top edge of the base. For this front row, you will need to sand the bricks down flush with this edge. Now remember, the front row has a space between the baseboard and the brick. Once the front row is finished you can lay the first layer of brick around the inside of the base, right up against the baseboard. Do not sand these bricks flush. The back part of the base where it rises in height, does not get any bricks, it is left open for now. __________________________________________________ Brick-by-Brick
Now that the base is complete, you can start laying the brick. For now we’ll only go up 7 brick high. The bricks are 2mm wide, so in order to get the spacing between the bricks, card-stock cut into 1 mm strips will be glued to the back half of the rows of brick, as shown in diagram #2, leaving a 1mm gap in front of it. These strips are only glued to the top surface, there is no need to leave the strips in the end spaces. Make sure the rows run straight up and down. Work on one row at a time, cause you may need to do some light sanding to make the brick flush on top, but they do not necessarily need to be flush on the outer surface. If it’s to perfect, then it won’t look realistic. Caution: You will find that as you build these walls, they become very weak, so be very, very careful.
Pay attention to diagram #3 as you lay the front rows. From corner to door opening should be 13mm. The door openings should be 4 mm. Because of the oddness of size, I did not continue with the same bricklaying arrangement in-between the openings as I did on the outer sides. The diagram shows how I did this. Once you get row 7 finished, hopefully you’ll be very close to 9 mm high. Use a strip of 1/64”x1/16” brass that is supplied with the kit, and form them to fit in the doorway, top and sides only. The top of the strip should be flush with the 7th row of brick. After the brass strips are in place then lay another row of brick.
Now things begin to change slightly. As you can see in diagram #2, the next 3 rows of brick in the front, are 3 mm wide instead of 2 mm. The reason for this is that, the top four rows of brick step back 1 mm each successive row. We still need that 1 mm space in front, so we need to make these wider to accommodate for the stepping. You will also have to accommodate for this on the sides as well. The very top row will be normal.
Now we have to prepare for the top plate. On the inside of the walls there is to be a 1x2 mm strip glued to the second row of brick from the top. Make a mark from the inside surface of the back wall inward 3 mm. Place a 2x2 mm support brace at this mark. This is to support 2 different sections on the top.

You should be able to lay a brick from the back wall to the middle of the support brace, and still have enough room left over to support the top plate. Once the braces are in place, use an old paintbrush and apply a coat of carpenters glue on the inside surface of the walls, make sure you don’t close up the outside gaps. After this dries, paint the inside lower half black. Believe me you’ll be glad you did this ahead of time. Now lay that top row of brick, on the support braces, being sure to space them. If done correctly, the holes for the smoke stacks will automatically be in place.
Cut the top plate to fit inside the remaining opening in the top. Use the 1/16” thick sheet of basswood for this, but don’t glue it in place yet. Next glue the cauldrons together, glue the 4 halves together, and then glue both cauldrons to each other. Turn the cauldrons upside down, and center them on the top plate. Trace around them to get the cutout line. Now, when you cut the opening in the top plate, try to cut it at an angle. So when the cauldrons are set inside the cutout, they won’t fall through. Once you get them to set together good, and then glue the cauldrons to the plate. If it will make you feel more secure, you can glue footpads to the floor base for the cauldrons to rest on when put in place, make sure you paint these black. When you’re ready, then glue the top plate in place. Now you add the trim pieces to the top. 1x1 mm trim sets on top of the brick around the top plate, and the back edge of the plate, and 1x2 mm trim on the back and sides of the back row of brick, as shown in the top view in diagram #3.
____________________________________________________
Finishing it up:
Now you get to fill-in the gaps between the bricks. But, before you can do that, stain the baseboards walnut, and you need to paint the brick. I suggest using enamel paint for this. I used acrylic, what a mistake that was! But after you get the brick painted, and it is dry, use sparkling to fill-in the gaps, wipe off the excess, and let it thoroughly dry. After the Spackle is dry, paint the 1x2 mm trim around the top row of brick, black. Add the lid to the back duck pen, and either paint it or stain it.
Smoke stacks. You can either use the kit-supplied chimneys, or make them, but the choice is yours. The way that I made mine was to use .005 thick 36-gauge copper. Cut strips 42 mm long and at least 20 mm wide. These should go all the way to the floor base and still have about 21 mm sticking out the top. Wrap the copper around a strip of wood 1/8”x 3/16” (3x5 mm). Now this is not the best way to do this, but I glued this together with CA glue.The next thing is to cut 4 thin narrow 4 mm strips. One of these is wrapped around the stacks just above the bricks, and another one half way up. A note about the upper strip; if you want to make and include the basket that hangs in between the stacks, then you need to leave a gap big enough for the copper
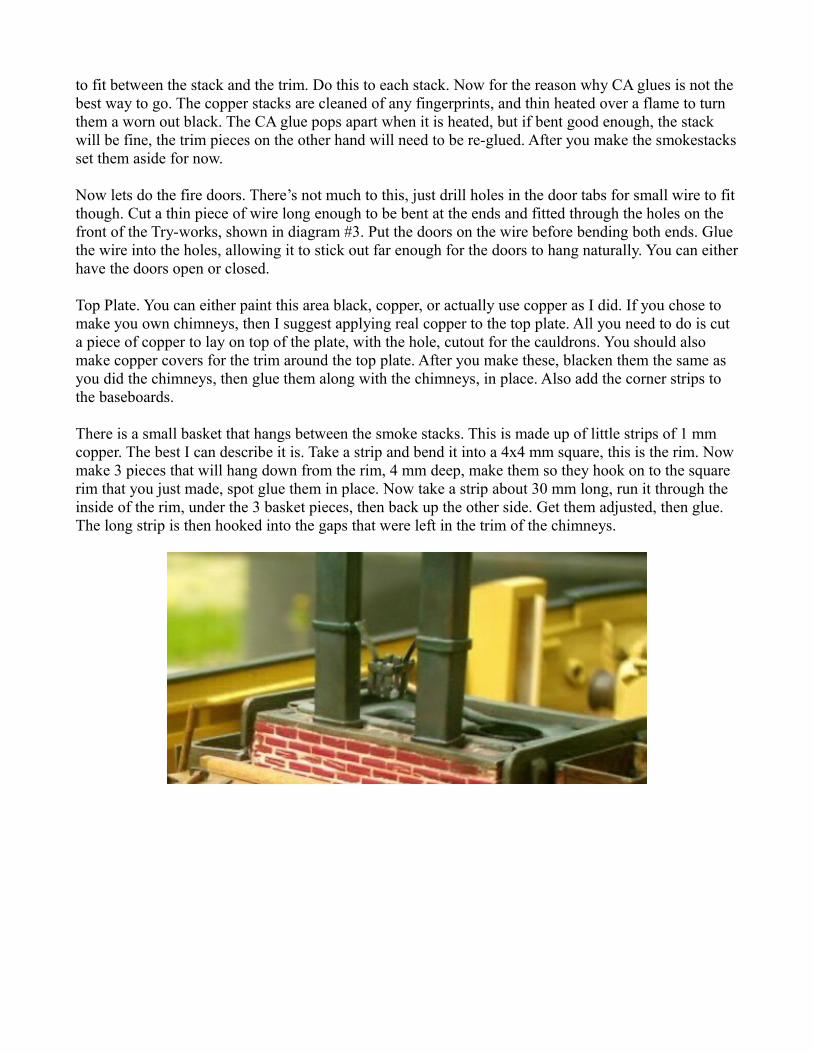
to fit between the stack and the trim. Do this to each stack. Now for the reason why CA glues is not the best way to go. The copper stacks are cleaned of any fingerprints, and thin heated over a flame to turn them a worn out black. The CA glue pops apart when it is heated, but if bent good enough, the stack will be fine, the trim pieces on the other hand will need to be re-glued. After you make the smokestacks set them aside for now.
Now lets do the fire doors. There’s not much to this, just drill holes in the door tabs for small wire to fit though. Cut a thin piece of wire long enough to be bent at the ends and fitted through the holes on the front of the Try-works, shown in diagram #3. Put the doors on the wire before bending both ends. Glue the wire into the holes, allowing it to stick out far enough for the doors to hang naturally. You can either have the doors open or closed.
Top Plate. You can either paint this area black, copper, or actually use copper as I did. If you chose to make you own chimneys, then I suggest applying real copper to the top plate. All you need to do is cut a piece of copper to lay on top of the plate, with the hole, cutout for the cauldrons. You should also make copper covers for the trim around the top plate. After you make these, blacken them the same as you did the chimneys, then glue them along with the chimneys, in place. Also add the corner strips to the baseboards.
There is a small basket that hangs between the smoke stacks. This is made up of little strips of 1 mm copper. The best I can describe it is. Take a strip and bend it into a 4x4 mm square, this is the rim. Now make 3 pieces that will hang down from the rim, 4 mm deep, make them so they hook on to the square rim that you just made, spot glue them in place. Now take a strip about 30 mm long, run it through the inside of the rim, under the 3 basket pieces, then back up the other side. Get them adjusted, then glue. The long strip is then hooked into the gaps that were left in the trim of the chimneys.

Build Photos:
