a stitch for every occasion - the barony of atenveldt!baronyofatenveldt.org/uploads/library/stitch...
TRANSCRIPT

A Stitch for Every Occasion
How to decide which stitches to use
Mistress Ealasaid nic Suibhne
Kingdom of Atenveldt Copyright @2006 by Mary Elizabeth Jenkins All rights reserved

Knowing how to do the various embroidery stitches is only half of the process of creating an
embroidery. One must decide which stitches to use for the various motifs in the design. There
are several things to take into consideration when making this decision. The size of the area to
be covered and the texture of the item being represented will have the greatest influence on
which stitches to use. Some stitches cover the ground fabric quickly; some stitches only work
nicely on small areas. Some stitches create a smooth surface; others create a uneven, highly
textured surface.
What follows is discussion of various stitches and the best use to be made with them. Like our
ancestors before us, it is good practice to make a sampler, using each of the stitches. You will
then have something to refer to that will help you select the combination of stitches that will
create an embroidery that pleases you.
Stem Stitch, also known as Outline Stitch
This is a good stitch to outline motifs, as its alternate name suggests. It can also be used to fill in
a motif, creating a gently textured surface. When rows are worked back and forth, first from
right to left, the next row from left to right, it can almost look like knitting. This is a good stitch
to use if you want a texture similar to wool fabric. It also would be the stitch to use to represent
fur, especially short, smooth fur, or human hair. By mixing two or more shades of brown, it is an
excellent choice to represent wood grain.
Because the stem stitch creates a thin line of thread on the fabric, it does not cover ground
quickly. If you are not in a hurry, however, it is a very versatile stitch, allowing you to “paint”
with your embroidery floss, creating quite intricate highlights and shadows.
For complex designs that I am going work using Long & Short stitches, I will frequently outline
the design in stem stitch first. This gives a defined edge to each motif, and provides guidance for
the Long & Short Stitches in what direction they should flow.
Stem Stitch, worked in two shades of gold
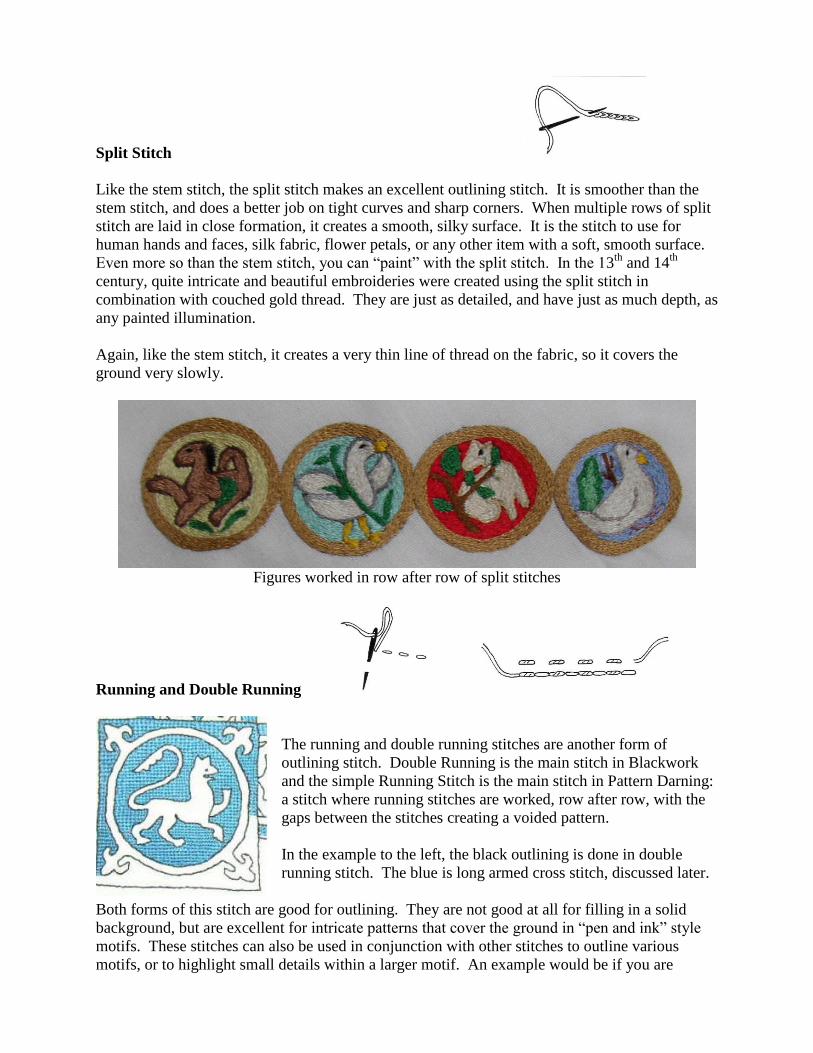
Split Stitch
Like the stem stitch, the split stitch makes an excellent outlining stitch. It is smoother than the
stem stitch, and does a better job on tight curves and sharp corners. When multiple rows of split
stitch are laid in close formation, it creates a smooth, silky surface. It is the stitch to use for
human hands and faces, silk fabric, flower petals, or any other item with a soft, smooth surface.
Even more so than the stem stitch, you can “paint” with the split stitch. In the 13th
and 14th
century, quite intricate and beautiful embroideries were created using the split stitch in
combination with couched gold thread. They are just as detailed, and have just as much depth, as
any painted illumination.
Again, like the stem stitch, it creates a very thin line of thread on the fabric, so it covers the
ground very slowly.
Figures worked in row after row of split stitches
Running and Double Running
The running and double running stitches are another form of
outlining stitch. Double Running is the main stitch in Blackwork
and the simple Running Stitch is the main stitch in Pattern Darning:
a stitch where running stitches are worked, row after row, with the
gaps between the stitches creating a voided pattern.
In the example to the left, the black outlining is done in double
running stitch. The blue is long armed cross stitch, discussed later.
Both forms of this stitch are good for outlining. They are not good at all for filling in a solid
background, but are excellent for intricate patterns that cover the ground in “pen and ink” style
motifs. These stitches can also be used in conjunction with other stitches to outline various
motifs, or to highlight small details within a larger motif. An example would be if you are

embroidering a human figure, and the sleeve of their tunic is being lost against the body of the
tunic because they are the same color. You can outline the edges of the sleeve with a double
running stitch to create a subtle dark line that separates the sleeve from the tunic.
Chain Stitch
The chain stitch creates a highly
textured surface. As the name
suggests, it is excellent to represent
chains, ropes, or rough fur. This stitch
can be worked very tightly, for fur or
rope, or with each stitch very open and
airy, for chain or chain maille.
The chain stitch can also be used to
outline a design. It has enough texture
to make a plain outlined motif quite
interesting, with no need for filling. You can also sprinkle individual chain links, which results
in what looks like tear drops. Individual links worked in a circle, with the points inward, will
create a flower (this is known as the Lazy Daisy stitch).
Satin Stitch
As the name suggests, the satin stitch creates a smooth, satiny surface. This stitch only works
well when covering a fairly narrow area. I would not use satin stitch to cover anything wider
than half an inch. It is excellent for small flower petals as well as for stems and small leaves. It
also works well for scrolling vines or the intricate roundels and arches that frequently enclosed
motifs in medieval embroidery.
Flowers worked in satin stitch, scrolling lines worked
in stem stitch, DMC Gold metallic thread.
Embroidery designed by Baroness Ann Bushnell

To create a slightly domed effect, work the chain stitch lengthwise on the narrow area to be
covered, then work the satin stitch widthwise over the chain. You can also use long & short
stitches to fill the area that is to be covered with satin stitches.
If the edges of your satin stitch are not as smooth as you would like, you can disguise that flaw
by outlining the area with a stem stitch, or by couching a thread over the edges. Gold or silver
thread/cord makes an excellent edging, adding a bit of sparkle to the work.
Long & Short
The Long & Short stitch is excellent for covering large
areas. It covers the ground fabric much quicker than the
stem or split stitch can. The stitches can be very regimented
and always run parallel to the edges of the design, or they
can flow and curve and a follow the natural contours of each
motif in the design.
If worked very carefully with fine threads, perhaps even
having each row split the previous stitches (in the manner of
the split stitch), you can achieve a smooth, velvety texture.
Used in this manner, it is perfect for flower petals, or to
represent fabric.
When worked without splitting and using a heavier thread,
you get a more textured surface, excellent for fur, grass, tree
bark, carpeting, course fabric.
In order to keep your stitches flowing in the direction you
wish them to go, I find it very helpful to draw guidelines on
the fabric. Especially if you are wanting to keep your
stitches parallel and straight. I draw a grid, with the lines no
more than an inch apart.
Outlined in stem, filled in long & short

Couching
Couching is a very old technique, and a very versatile one. You can quickly cover fabric by
couching a thick cord, such as gold or silver cording or a heavy yarn, with a thinner thread.
Couching requires the use of two threads, the laid thread and the couching thread. The laid
thread is the (usually) heavier yarn or cord that will lay on the fabric. The couching thread is the
(usually) thinner thread that will hold the laid thread down with a series of small stitches.
There is one technique of couching, known as Bokhara, in which the laid thread is also used as
the couching thread, in a technique that is a cross between couching and the satin stitch. This
creates a basket weave type texture.
The couching stitches themselves can be invisible, or can form a pattern on top of the laid
threads. There are two methods of making the couching thread invisible. One is to use
underside couching and pull the couching thread all the way through to the back of the fabric
(along with a bit of the laid thread). Another way is to choose a couching thread that is very thin
and the same color as the laid thread. If you are careful to give a slight slant to the couching
thread, and to match that slant to the twist in the plies of the laid thread, the couching thread will
all but disappear into the laid thread.
gold thread couched with red silk gold thread couched with gold silk
blue background is split stitch
To form a pattern with your couching thread, choose a color that will contrast with your laid
threads. As you make the small stitches over the laid thread, line the stitches up to create lines,
zigzags or diamond patterns. It helps if you draw the pattern on the fabric before you start
couching. Since you couch one thread at a time, you can always see the drawn pattern and can
tell where the next stitch should be placed.

Couching soft but heavy yarns with a lighter weight yarn, or linen thread, can create very
interesting textures, depending on the types of yarn you use. The nest below is worked in three
different weights of handspun yarns, couched with dark brown linen thread. The wool was spun
by Lady Aoife.
Couching can be used to make a simple scrolling or wavy pattern on a cuff or hem, or can be
used to completely cover the background of an intricate design. Even a couple of simple straight
lines of couched thread, metallic or otherwise, can be quite effective decoration.
Cross Stitch, Long Armed Cross
The Cross Stitch, in medieval embroidery, is used
sparingly, either as a simple border, or in
conjunction with the tent stitch to cover the ground.
The Long Armed Cross stitch was used as a ground
cover, especially in voided work, where the
background is filled in and the motifs are left
uncovered.
During the 15th
century, voided work was popular in
several cultures. It was known as Reserva in Spain,
Voided or Italian Work in Italy.

Laid & Couched (Bayeaux Stitch)
Laid & Couched is an excellent choice to cover large areas. It is not a smooth stitch, but has a
very interesting texture, which can be altered by how closely you place the couched threads over
the laid one. Whereas couching uses two threads, this stitch uses three separate threads:
The laid threads are similar to the satin stitch: they are laid across the fabric. Unlike satin
stitches, they may be a long as you wish them to
be.
The couched threads are placed across the laid
threads, at a right angle. This thread is couched
down by the third thread, the couching thread.
The "couched thread" here is the same as the "laid
thread" in the description of plain couching (see
above).
Usually, the couched thread and it's couching
thread are the same color. They may, however,
be a difference color than the bottom level laid
threads.
In the best known example of this style of
embroidery, The Bayeaux Embroidery, stem
stitch was used for those details too small for laid
and couching. If you need to turn sharp corners
or tight curves, you can work the laid stitches in
segments and simply couch one of the couched
threads over the place where the edges of two
such segments meet.
The lion to the left is outlined in stem stitch and
filled in with the laid & couched work. The
colored bands are outlined in two rows of stem
stitch.

Herringbone, Blanket, Feather, Ossenstitch
There are quite a variety of stitches that create a pattern that stands alone quite nicely.
The Herringbone was used quite a bit worked over seams, to
both decorate and add strength,
as is the Ossenstitch :
The Blanket (or Buttonhole) Stitch,
when worked over a cut edge, strengthens
the edge as it decorates. When the stitches
are worked close together, it is called
the buttonhole stitch.
The feather stitch is a quick and easy way to add a delicate decoration to fabric.