accelerated math software manual - comal isd to's/miscellaneous... · contents. . . . . ii...
TRANSCRIPT
Learn how to:
Manage libraries and objective lists
Set up and manage the Assignment Book
Print and score student assignments
Set preferences for page layout, TOPS Report, and AccelScan™
Customize and print Accelerated Math reports
•
•
•
•
•
Math Management Software
Software Manual

Renaissance LearningPO Box 8036Wisconsin Rapids, WI 54495-8036
Telephone: (800) 338-4204(715) 424-3636Outside the US: 1.715.424.3636Fax: (715) 424-4242
Email (general questions): [email protected] (technical questions): [email protected] Site: www.renlearn.com
Copyr ight Not ice
Copyright © 2010 by Renaissance Learning, Inc. All Rights Reserved.
This publication is protected by US and international copyright laws. It is unlawful to duplicate or reproduce any copyrighted material without authorization from the copyright holder. This document may be reproduced only by staff members in schools that have a license for Accelerated Math, Renaissance Place Edition software. For more information, contact Renaissance Learning, Inc., at the address above.
2Know!, the Accelerated logo, Accelerated Math, Accelerated Reader, AccelScan, MathFacts in a Flash, NEO, NEO 2, Renaissance, Renaissance Learning, the Renaissance Learning logo, Renaissance Place, Renaissance Receiver, and Renaissance Responder are trademarks of Renaissance Learning, Inc., and its subsidiaries, registered, common law, or pending registration in the United States and in other countries.
Macintosh and Safari are registered trademarks of Apple Inc., registered in the US and other countries.
Internet Explorer and Windows are registered trademarks of Microsoft Corporation in the United States and/or other countries.
Adobe and Flash are registered trademarks of Adobe Systems Incorporated in the United States and/or other countries.
Firefox is a registered trademark of the Mozilla Foundation.
This product includes software developed by the Apache Software Foundation (www.apache.org/).
This product includes software developed by the OpenSSL Project for use in the OpenSSL Toolkit (www.openssl.org/).
As technology advances, it becomes necessary for software companies to drop support for older operating systems and third-party software. It is the responsibility of customers to keep their computers, networks, operating systems, and third-party software up-to-date and functional. Although Renaissance Learning will not discontinue support for older products immediately, we will continue to evaluate system requirements and do our best to provide advance notice when it becomes necessary to raise our requirements.
3/2010 AMRP
CONTENTS
Welcome to Acce lera ted Math . . . . . . . . . . . . . . . . . . . 1How It Works in Your Classroom . . . . . . . . . . . . . . . . . . . . . . . . . . . . . . . . . . . . . . . . 1
Programs You Will Use . . . . . . . . . . . . . . . . . . . . . . . . . . . . . . . . . . . . . . . . . . . . . . . . . 2Accelerated Math Software . . . . . . . . . . . . . . . . . . . . . . . . . . . . . . . . . . . . . . . . . . . . . . . . . .2
Renaissance Place Real Time Management System. . . . . . . . . . . . . . . . . . . . . . . . . . . . . .2
AccelScan Software . . . . . . . . . . . . . . . . . . . . . . . . . . . . . . . . . . . . . . . . . . . . . . . . . . . . . . . .3
Renaissance Responder Software . . . . . . . . . . . . . . . . . . . . . . . . . . . . . . . . . . . . . . . . . . . .3
Tools to Help You with Accelerated Math . . . . . . . . . . . . . . . . . . . . . . . . . . . . . . . . . 3Manuals and Other Documents . . . . . . . . . . . . . . . . . . . . . . . . . . . . . . . . . . . . . . . . . . . . . .3
Help in the Software . . . . . . . . . . . . . . . . . . . . . . . . . . . . . . . . . . . . . . . . . . . . . . . . . . . . . . .4
Live Chat Support . . . . . . . . . . . . . . . . . . . . . . . . . . . . . . . . . . . . . . . . . . . . . . . . . . . . . . . . .4
Resources . . . . . . . . . . . . . . . . . . . . . . . . . . . . . . . . . . . . . . . . . . . . . . . . . . . . . . . . . . . . . . . .4
Need More Help?. . . . . . . . . . . . . . . . . . . . . . . . . . . . . . . . . . . . . . . . . . . . . . . . . . . . . . 5
Get t ing Star ted . . . . . . . . . . . . . . . . . . . . . . . . . . . . . 6Checking Software Requirements . . . . . . . . . . . . . . . . . . . . . . . . . . . . . . . . . . . . . . . . 6
Logging In and Changing Your Password. . . . . . . . . . . . . . . . . . . . . . . . . . . . . . . . . . 7
Setting Up the Accelerated Math Software. . . . . . . . . . . . . . . . . . . . . . . . . . . . . . . . . 8Setup Checklist . . . . . . . . . . . . . . . . . . . . . . . . . . . . . . . . . . . . . . . . . . . . . . . . . . . . . . . . . . . .8
Navigating the Software . . . . . . . . . . . . . . . . . . . . . . . . . . . . . . . . . . . . . . . . . . . . . . . . 9
Switching Roles and Schools . . . . . . . . . . . . . . . . . . . . . . . . . . . . . . . . . . . . . . . . . . . . 9
Logging Out and Closing the Software . . . . . . . . . . . . . . . . . . . . . . . . . . . . . . . . . . . . 9
Set t ing Up the Scanner . . . . . . . . . . . . . . . . . . . . . . 10Connecting the Scanner to the Computer. . . . . . . . . . . . . . . . . . . . . . . . . . . . . . . . . 10
Installing the AccelScan Software . . . . . . . . . . . . . . . . . . . . . . . . . . . . . . . . . . . . . . . 11Downloading the Software . . . . . . . . . . . . . . . . . . . . . . . . . . . . . . . . . . . . . . . . . . . . . . . . . 11
Installing the Scanning Software on Windows Computers . . . . . . . . . . . . . . . . . . . . . . . 12
Installing the Scanning Software on Macintosh Computers . . . . . . . . . . . . . . . . . . . . . . 14
AccelScan Software Updates . . . . . . . . . . . . . . . . . . . . . . . . . . . . . . . . . . . . . . . . . . . 17Software Updates in Versions 1.42 and 1.43 . . . . . . . . . . . . . . . . . . . . . . . . . . . . . . . . . . . 17
Software Updates in Version 2.x . . . . . . . . . . . . . . . . . . . . . . . . . . . . . . . . . . . . . . . . . . . . 17
iAccelerated MathSoftware Manual
C O N T E N T S
. . .
. .
Using the Renaissance Responder Program . . . . . . . 18Setting Up the Renaissance Receiver and Using Responders or NEO 2Laptops . . . . . . . . . . . . . . . . . . . . . . . . . . . . . . . . . . . . . . . . . . . . . . . . . . . . . . . . . . . . . 18
Installing the Renaissance Responder Software . . . . . . . . . . . . . . . . . . . . . . . . . . . 18Downloading the Software . . . . . . . . . . . . . . . . . . . . . . . . . . . . . . . . . . . . . . . . . . . . . . . . . 18
Installing the Renaissance Responder Software on Windows Computers . . . . . . . . . 20
Installing the Renaissance Responder Software on Macintosh Computers . . . . . . . . . 21
Librar ies . . . . . . . . . . . . . . . . . . . . . . . . . . . . . . . . . 24What Are Libraries? . . . . . . . . . . . . . . . . . . . . . . . . . . . . . . . . . . . . . . . . . . . . . . . . . . 24
How to Install Your Accelerated Math Libraries . . . . . . . . . . . . . . . . . . . . . . . . . . . 24
Viewing Library Information . . . . . . . . . . . . . . . . . . . . . . . . . . . . . . . . . . . . . . . . . . . 25
Printing the Library Guide or Scope and Sequence. . . . . . . . . . . . . . . . . . . . . . . . . 26
Adding Libraries for a School. . . . . . . . . . . . . . . . . . . . . . . . . . . . . . . . . . . . . . . . . . . 27
Removing Libraries for a School . . . . . . . . . . . . . . . . . . . . . . . . . . . . . . . . . . . . . . . . 28
Object ives . . . . . . . . . . . . . . . . . . . . . . . . . . . . . . . . 29What Are Objectives? . . . . . . . . . . . . . . . . . . . . . . . . . . . . . . . . . . . . . . . . . . . . . . . . . 29
What Are Objective Lists? . . . . . . . . . . . . . . . . . . . . . . . . . . . . . . . . . . . . . . . . . . . . . 29
Shared Objective Lists Versus My Lists . . . . . . . . . . . . . . . . . . . . . . . . . . . . . . . . . . 29Shared Lists . . . . . . . . . . . . . . . . . . . . . . . . . . . . . . . . . . . . . . . . . . . . . . . . . . . . . . . . . . . . .29
My Lists (Private Lists) . . . . . . . . . . . . . . . . . . . . . . . . . . . . . . . . . . . . . . . . . . . . . . . . . . . .30
Creating Objective Lists . . . . . . . . . . . . . . . . . . . . . . . . . . . . . . . . . . . . . . . . . . . . . . . 30Creating an Objective List Starting from the Libraries Page. . . . . . . . . . . . . . . . . . . . . .30
Creating an Objective List Starting from the Assignment Book or ExtendedResponse Page . . . . . . . . . . . . . . . . . . . . . . . . . . . . . . . . . . . . . . . . . . . . . . . . . . . . . . . . . . .32
Adding Objectives by Library . . . . . . . . . . . . . . . . . . . . . . . . . . . . . . . . . . . . . . . . . . . . . . .33
Adding Objectives by Searching by Objective Name . . . . . . . . . . . . . . . . . . . . . . . . . . . .35
Adding Objectives by Searching by State Standard Code . . . . . . . . . . . . . . . . . . . . . . . .36
Importing Objective Lists . . . . . . . . . . . . . . . . . . . . . . . . . . . . . . . . . . . . . . . . . . . . . . 37
Viewing an Objective List . . . . . . . . . . . . . . . . . . . . . . . . . . . . . . . . . . . . . . . . . . . . . . 38
Exporting Objective Lists . . . . . . . . . . . . . . . . . . . . . . . . . . . . . . . . . . . . . . . . . . . . . . 39
Choosing an Objective List for a Class . . . . . . . . . . . . . . . . . . . . . . . . . . . . . . . . . . . 40
Copying an Objective List . . . . . . . . . . . . . . . . . . . . . . . . . . . . . . . . . . . . . . . . . . . . . . 42
Adding Objectives to a List or Removing Them from a List . . . . . . . . . . . . . . . . . . 43
Changing the Order of Objectives in a List . . . . . . . . . . . . . . . . . . . . . . . . . . . . . . . . 48
Marking Objectives Related to Specific Standards . . . . . . . . . . . . . . . . . . . . . . . . . 50
Editing Objective List Information . . . . . . . . . . . . . . . . . . . . . . . . . . . . . . . . . . . . . . 51
Deleting Objective Lists . . . . . . . . . . . . . . . . . . . . . . . . . . . . . . . . . . . . . . . . . . . . . . . 52
iiAccelerated MathSoftware Manual
C O N T E N T S
. . .
. .
The Assignment Book . . . . . . . . . . . . . . . . . . . . . . . 53How Students Master Objectives in the Assignment Book. . . . . . . . . . . . . . . . . . . 53
Viewing the Assignment Book for a Class. . . . . . . . . . . . . . . . . . . . . . . . . . . . . . . . . 54
Assigning Objectives to Students in the Assignment Book. . . . . . . . . . . . . . . . . . . 55
Transferring Student Data from One Class to Another. . . . . . . . . . . . . . . . . . . . . . 57
Assignment Book Symbols . . . . . . . . . . . . . . . . . . . . . . . . . . . . . . . . . . . . . . . . . . . . . 58
Intervene . . . . . . . . . . . . . . . . . . . . . . . . . . . . . . . . . . . . . . . . . . . . . . . . . . . . . . . . . . . 59
Mastery Criteria . . . . . . . . . . . . . . . . . . . . . . . . . . . . . . . . . . . . . . . . . . . . . . . . . . . . . . 61Mastery Criteria Defined. . . . . . . . . . . . . . . . . . . . . . . . . . . . . . . . . . . . . . . . . . . . . . . . . . . 61
How to Change the Mastery Criteria for an Objective . . . . . . . . . . . . . . . . . . . . . . . . . . .62
Printing Assignments . . . . . . . . . . . . . . . . . . . . . . . . . . . . . . . . . . . . . . . . . . . . . . . . . 65Types of Assignments . . . . . . . . . . . . . . . . . . . . . . . . . . . . . . . . . . . . . . . . . . . . . . . . . . . . .65
Make Sure You Have the Renaissance Place Print Plug-In . . . . . . . . . . . . . . . . . . . . . . .66
How to Print a Practice . . . . . . . . . . . . . . . . . . . . . . . . . . . . . . . . . . . . . . . . . . . . . . . . . . . .68
How to Print an Exercise. . . . . . . . . . . . . . . . . . . . . . . . . . . . . . . . . . . . . . . . . . . . . . . . . . .69
How to Print a Test . . . . . . . . . . . . . . . . . . . . . . . . . . . . . . . . . . . . . . . . . . . . . . . . . . . . . . . 71
How to Print a Diagnostic Test. . . . . . . . . . . . . . . . . . . . . . . . . . . . . . . . . . . . . . . . . . . . . . 73
Student Capacity Limit . . . . . . . . . . . . . . . . . . . . . . . . . . . . . . . . . . . . . . . . . . . . . . . . 75
Reprinting Assignments . . . . . . . . . . . . . . . . . . . . . . . . . . . . . . . . . . . . . . . . . . . . . . . 75How to Reprint an Assignment for One Student . . . . . . . . . . . . . . . . . . . . . . . . . . . . . . . 75
How to Reprint an Assignment for More Than One Student . . . . . . . . . . . . . . . . . . . . . 77
Deleting Assignments . . . . . . . . . . . . . . . . . . . . . . . . . . . . . . . . . . . . . . . . . . . . . . . . . 78How to Delete an Assignment for One Student . . . . . . . . . . . . . . . . . . . . . . . . . . . . . . . .78
How to Delete an Assignment for More Than One Student . . . . . . . . . . . . . . . . . . . . . .79
Scoring Assignments . . . . . . . . . . . . . . . . . . . . . . . . . . . . . . . . . . . . . . . . . . . . . . . . . . 80How to Score Assignments Using AccelScan . . . . . . . . . . . . . . . . . . . . . . . . . . . . . . . . . 80
How to Score Assignments in the Assignment Book . . . . . . . . . . . . . . . . . . . . . . . . . . . .82
Rescoring Assignments. . . . . . . . . . . . . . . . . . . . . . . . . . . . . . . . . . . . . . . . . . . . . . . . 83
Putting Objectives on Hold. . . . . . . . . . . . . . . . . . . . . . . . . . . . . . . . . . . . . . . . . . . . . 84
Resetting Objectives . . . . . . . . . . . . . . . . . . . . . . . . . . . . . . . . . . . . . . . . . . . . . . . . . . 86
Viewing a Sample Problem or Worked Example for an Objective. . . . . . . . . . . . . 88
Unassigning Objectives. . . . . . . . . . . . . . . . . . . . . . . . . . . . . . . . . . . . . . . . . . . . . . . . 89
Viewing Student Details . . . . . . . . . . . . . . . . . . . . . . . . . . . . . . . . . . . . . . . . . . . . . . . 91
Printing Reports from the Assignment Book . . . . . . . . . . . . . . . . . . . . . . . . . . . . . . 93How to Print the Diagnostic or Status of the Class Report in the AssignmentBook. . . . . . . . . . . . . . . . . . . . . . . . . . . . . . . . . . . . . . . . . . . . . . . . . . . . . . . . . . . . . . . . . . . .93
How to Print the TOPS Report in the Assignment Book . . . . . . . . . . . . . . . . . . . . . . . . .94
Copying Settings from One Class to Another . . . . . . . . . . . . . . . . . . . . . . . . . . . . . . 95
Using the Math Glossary. . . . . . . . . . . . . . . . . . . . . . . . . . . . . . . . . . . . . . . . . . . . . . . 97
iiiAccelerated MathSoftware Manual
C O N T E N T S
. . .
. .
Using Renaissance Responders or NEO 2 Laptopswi th Acce lera ted Math RP . . . . . . . . . . . . . . . . . . . . 99
How to Start a Session . . . . . . . . . . . . . . . . . . . . . . . . . . . . . . . . . . . . . . . . . . . . . . . . 99
How Students Use the Renaissance Responder or NEO 2 Laptop toEnter Their Answers . . . . . . . . . . . . . . . . . . . . . . . . . . . . . . . . . . . . . . . . . . . . . . . . . 100
How to End a Session . . . . . . . . . . . . . . . . . . . . . . . . . . . . . . . . . . . . . . . . . . . . . . . . 101
Using Renaissance Home Connect wi th Acce lera tedMath RP . . . . . . . . . . . . . . . . . . . . . . . . . . . . . . . . . 102
How to Make Sure a Computer Has Adobe Flash Player and AdobeReader. . . . . . . . . . . . . . . . . . . . . . . . . . . . . . . . . . . . . . . . . . . . . . . . . . . . . . . . . . . . . 102
How Students Use Renaissance Home Connect to Complete Practicesand Exercises . . . . . . . . . . . . . . . . . . . . . . . . . . . . . . . . . . . . . . . . . . . . . . . . . . . . . . . 103
How Students View Their Accelerated Math Progress in RenaissanceHome Connect . . . . . . . . . . . . . . . . . . . . . . . . . . . . . . . . . . . . . . . . . . . . . . . . . . . . . . 107
How Students View Worked Examples in Renaissance Home Connect . . . . . . . 110
How Students Use the Math Glossary. . . . . . . . . . . . . . . . . . . . . . . . . . . . . . . . . . . 114
Differences between Renaissance Home Connect and Parent Login . . . . . . . . . 116Renaissance Home Connect . . . . . . . . . . . . . . . . . . . . . . . . . . . . . . . . . . . . . . . . . . . . . . . 116
Parent Access to Renaissance Place RT. . . . . . . . . . . . . . . . . . . . . . . . . . . . . . . . . . . . . . 116
Extended Response Ass ignments . . . . . . . . . . . . . . . 117Symbols on the Extended Response Pages. . . . . . . . . . . . . . . . . . . . . . . . . . . . . . . 117
How Extended Response Assignments Work . . . . . . . . . . . . . . . . . . . . . . . . . . . . 117
Viewing the Extended Response Page for a Class . . . . . . . . . . . . . . . . . . . . . . . . . 118
Printing or Reprinting Extended Response Assignments. . . . . . . . . . . . . . . . . . . 119
Scoring or Rescoring Extended Response Assignments . . . . . . . . . . . . . . . . . . . . 121
Transferring Extended Response Assignment Data from Other Classes . . . . . . 122
Viewing Extended Response Problems. . . . . . . . . . . . . . . . . . . . . . . . . . . . . . . . . . 122
Printing Reports from the Extended Response Page . . . . . . . . . . . . . . . . . . . . . . 123How to Print the Extended Response Diagnostic or Status Report . . . . . . . . . . . . . . . 123
How to Print the TOPS Report on the Extended Response Page . . . . . . . . . . . . . . . . . 124
Deleting Extended Response Assignments. . . . . . . . . . . . . . . . . . . . . . . . . . . . . . . 126
Teams and Goals . . . . . . . . . . . . . . . . . . . . . . . . . . . 127About Goals . . . . . . . . . . . . . . . . . . . . . . . . . . . . . . . . . . . . . . . . . . . . . . . . . . . . . . . . 127
Setting Goals . . . . . . . . . . . . . . . . . . . . . . . . . . . . . . . . . . . . . . . . . . . . . . . . . . . . . . . 127
ivAccelerated MathSoftware Manual
C O N T E N T S
. . .
. .
About Teams and Team Sets . . . . . . . . . . . . . . . . . . . . . . . . . . . . . . . . . . . . . . . . . . 128
Adding Team Sets . . . . . . . . . . . . . . . . . . . . . . . . . . . . . . . . . . . . . . . . . . . . . . . . . . . 129
Adding Teams to a Set. . . . . . . . . . . . . . . . . . . . . . . . . . . . . . . . . . . . . . . . . . . . . . . . 130
Assigning Students to Teams . . . . . . . . . . . . . . . . . . . . . . . . . . . . . . . . . . . . . . . . . . 131How to Automatically Divide Students Among Teams . . . . . . . . . . . . . . . . . . . . . . . . . 131
How to Manually Select Students for Each Team . . . . . . . . . . . . . . . . . . . . . . . . . . . . . 131
How to Change the Students on a Team . . . . . . . . . . . . . . . . . . . . . . . . . . . . . . . . . . . . . 133
Editing Team Set Names and Owners. . . . . . . . . . . . . . . . . . . . . . . . . . . . . . . . . . . 134
Editing Team Names. . . . . . . . . . . . . . . . . . . . . . . . . . . . . . . . . . . . . . . . . . . . . . . . . 135
Deleting Teams from Sets. . . . . . . . . . . . . . . . . . . . . . . . . . . . . . . . . . . . . . . . . . . . . 136
Deleting Team Sets . . . . . . . . . . . . . . . . . . . . . . . . . . . . . . . . . . . . . . . . . . . . . . . . . . 137
Printing Reports from the Teams & Goals Page. . . . . . . . . . . . . . . . . . . . . . . . . . . 137
Reports . . . . . . . . . . . . . . . . . . . . . . . . . . . . . . . . . . 139About Renaissance Place and Accelerated Math Reports. . . . . . . . . . . . . . . . . . . 139
Using Accelerated Math Reports . . . . . . . . . . . . . . . . . . . . . . . . . . . . . . . . . . . . . . . 140Check for Adobe Reader before You Generate Reports . . . . . . . . . . . . . . . . . . . . . . . . .140
Printing Accelerated Math Reports . . . . . . . . . . . . . . . . . . . . . . . . . . . . . . . . . . . . . . . . .140
About Reporting Parameter Groups . . . . . . . . . . . . . . . . . . . . . . . . . . . . . . . . . . . . . . . . 144
Report Descriptions . . . . . . . . . . . . . . . . . . . . . . . . . . . . . . . . . . . . . . . . . . . . . . . . . 145
Diagnostic Export . . . . . . . . . . . . . . . . . . . . . . . . . . . . . . . . . . . . . . . . . . . . . . . . . . . 152
Engaged Time . . . . . . . . . . . . . . . . . . . . . . . . . . . . . . . . . . . . . . . . . . . . . . . . . . . . . . 152
Parent Reports . . . . . . . . . . . . . . . . . . . . . . . . . . . . . . . . . . . . . . . . . . . . . . . . . . . . . . 153How to Give Parents Direct Access to the Accelerated Math Parent Reports . . . . . . . 153
How Parents Print Reports . . . . . . . . . . . . . . . . . . . . . . . . . . . . . . . . . . . . . . . . . . . . . . . . 153
Preferences . . . . . . . . . . . . . . . . . . . . . . . . . . . . . . . 155Changing Classroom Preferences . . . . . . . . . . . . . . . . . . . . . . . . . . . . . . . . . . . . . . 155
How to Change the Class Marking Periods Preference . . . . . . . . . . . . . . . . . . . . . . . . . 155
How to Change the Extended Response Preference . . . . . . . . . . . . . . . . . . . . . . . . . . . 156
How to Change the Page Layout Preference . . . . . . . . . . . . . . . . . . . . . . . . . . . . . . . . . . 157
How to Change the Practice Preference. . . . . . . . . . . . . . . . . . . . . . . . . . . . . . . . . . . . . . 158
How to Change the Printing Preference . . . . . . . . . . . . . . . . . . . . . . . . . . . . . . . . . . . . . 159
How to Change the Renaissance Home Connect Preference (If Available). . . . . . . . .160
How to Change the Scoring Preference . . . . . . . . . . . . . . . . . . . . . . . . . . . . . . . . . . . . . . 161
How to Change the TOPS Report Preference . . . . . . . . . . . . . . . . . . . . . . . . . . . . . . . . . 163
Changing the General Preference (a User Preference) . . . . . . . . . . . . . . . . . . . . . 164
vAccelerated MathSoftware Manual

C O N T E N T S
. . .
. .
Appendix A: Capabi l i t ies . . . . . . . . . . . . . . . . . . . . . 165User Groups in the Software . . . . . . . . . . . . . . . . . . . . . . . . . . . . . . . . . . . . . . . . . . 165
Capabilities for All Renaissance Place RT Programs. . . . . . . . . . . . . . . . . . . . . . . 167
Accelerated Math Capabilities . . . . . . . . . . . . . . . . . . . . . . . . . . . . . . . . . . . . . . . . . 171
Index . . . . . . . . . . . . . . . . . . . . . . . . . . . . . . . . . . . 172
viAccelerated MathSoftware Manual
WELCOME TO ACCELERATED MATH
Accelerated Math Renaissance Place (RP) Edition is a computer-based system that manages and monitors students’ mathematics practice from first grade through calculus.
Accelerated Math automatically performs these essential tasks:
• Prints assignments for each student
• Scores students’ work and gives immediate feedback
• Gives you diagnostic information each day through individual student and class reports
• Tells you which mathematics objectives students have mastered and which ones are giving them difficulty
Accelerated Math will help you individualize instruction and student work in your classroom.
How I t Works in Your C lassroom
A typical Accelerated Math classroom operates something like this:
1. You assign objectives to students in the Accelerated Math Assignment Book.
2. You provide instruction on Accelerated Math objectives.
3. In Accelerated Math, you print an individualized practice assignment for each student based on the objectives you assigned.
4. Students work on the printed practice assignments. They may record their answers on Accelerated Math scan cards and then feed their scan cards into the scanner, or they may enter their answers on a Renaissance Responder, on a NEO 2 laptop, or in Renaissance Home Connect (if it’s available) for automatic scoring.
5. Accelerated Math scores each student’s work, and prints both a TOPS Report and the student’s next practice assignment.
6. The student reworks any problems missed, and you and the student discuss the TOPS Report and any corrections.
7. When the student meets the practice mastery criteria for an objective (see page 61), you print a test for that student.
8. Students work on their printed tests, recording their answers on Accelerated Math scan cards for AccelScan scoring or entering them with a Renaissance Responder or NEO 2 laptop for automatic scoring.
9. Accelerated Math scores the tests, and you and the student discuss the TOPS Report and any corrections.
10. When the student meets the test mastery criteria, the objective is mastered. Review problems from the objective will start appearing on practices two weeks after this.
The TOPS Report and the next assignment are
printed automatically. When students submit an assignment, the TOPS Report tells them their scores, the answers they missed, and the specific objectives they need more practice on. The next practice assignment may provide additional practice on objectives that need more work and on new objectives to replace those mastered.
1Accelerated MathSoftware Manual
W E L C O M E T O A C C E L E R A T E D M A T H
Programs You Will Use
. . .
. .
Programs You Wi l l Use
Accelerated Math RP has four components: the Accelerated Math software, the Renaissance Place Management system, the AccelScan software, and the Renaissance Responder software.
Accelerated Math Sof tware
The Accelerated Math software—accessible from the Renaissance Place Home page—will manage the program in your classrooms and keep track of students’ progress.
Renaissance Place Real T ime Management System
The Renaissance Place Real Time management system—also accessible from the Renaissance Place RT Home page—lets you view and manage district, school, student, teacher, parent, course, and class information in the Renaissance Place RT database, which is shared by all Renaissance Place RT software used in your district or school. The tasks you can perform in the management program depend on your user level. For example, administrators have more management tasks to perform than teachers. Sample tasks may include:
• Adding, editing, or deleting courses and classes, and assigning teachers and students to them
• Selecting a different school year to work in
• Viewing student information or clearing a lock if a student’s login is denied
What You’ll Use Accelerated Math to Do See Page
Get tips, manuals, and other documents to help you use Accelerated Math in your classroom
3
View information about libraries 25
Create objective lists if you want to make your own instead of using the ones that were automatically created for each library
30
Choose an objective list for each class 40
Assign objectives to students 55
Print assignments 65
Score assignments 80
View information about students’ work on objectives 91
Create teams 128
Set goals 127
Print reports 93
Set preferences 155
For information on installing and registering your
Accelerated Math software, see the Renaissance Place Installation Guide. If Renaissance Learning hosts Renaissance Place RT for your district or school, the software will be installed and registered for you.
For information on the Renaissance Place RT
management system, see the Renaissance Place Real Time Software Manual or click Help in the software.
2Accelerated MathSoftware Manual
W E L C O M E T O A C C E L E R A T E D M A T H
Tools to Help You with Accelerated Math
. . .
. .
• Downloading software needed to run Renaissance Place programs
• Printing reports with data from multiple Renaissance Place programs
AccelScan Sof tware
The AccelScan software is the link between Accelerated Math and the scanner. It reads students’ answers on their scan cards and automatically scores their work. Instructions for setting up the scanner and installing the AccelScan software begin on page 11.
Renaissance Responder Sof tware
The Renaissance Responder software allows you to have students use either Renaissance Responders or NEO 2 laptops to enter their answers to Accelerated Math assignments. These answers are then scored automatically. (To set up the Renaissance Receiver and Renaissance Responders, see the 2Know! Setup and Resource Guide. For more about the Responder SmartApplet on NEO 2, see the NEO 2 Quick Guide.) To install the Renaissance Responder software for Accelerated Math, see page 18.
Tools to He lp You wi th Acce lera ted Math
You’ll find many tools in the software to help you learn how to use Accelerated Math:
• Manuals and other documents
• Help in the software
• Live Chat Support
• Resources
Manuals and Other Documents
To find the software manuals and other useful documents, click Manuals in the upper-right corner of any page. Clicking that link lists the documents available for the Renaissance Learning programs installed on your server. For Accelerated Math, you’ll find these documents helpful:
Document What It Gives You
Accelerated Math Software Manual
• General information about the program• Step-by-step instructions for working with the program
Accelerated Math Software Tips for Getting Started
• Helpful hints to get you started using the program
Renaissance Place Real Time Software Manual
• Procedures for managing all school and district information• Instructions for consolidating data and generating custom
reports
How to Read a Math Implementation Report
• Information to help you interpret data in the Renaissance Place Implementation Progress and Status Reports
3Accelerated MathSoftware Manual
W E L C O M E T O A C C E L E R A T E D M A T H
Tools to Help You with Accelerated Math
. . .
. .
Help in the Sof tware
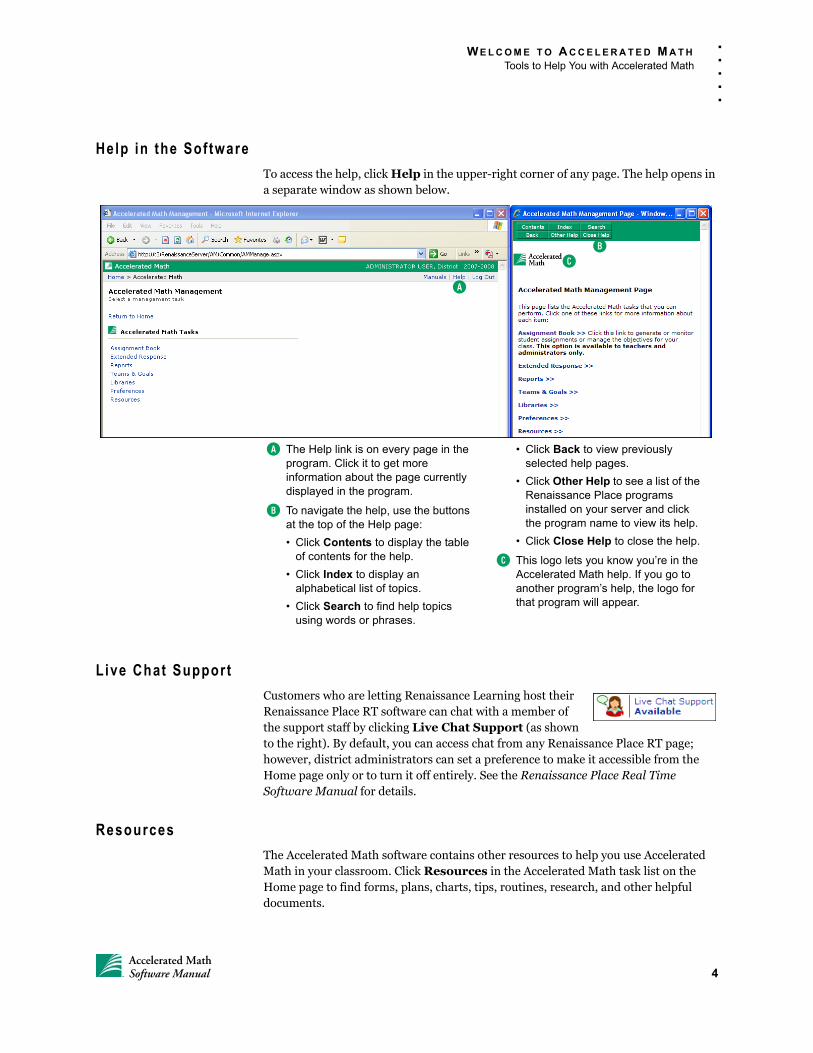
To access the help, click Help in the upper-right corner of any page. The help opens in a separate window as shown below.
Live Chat Support
Customers who are letting Renaissance Learning host their Renaissance Place RT software can chat with a member of the support staff by clicking Live Chat Support (as shown to the right). By default, you can access chat from any Renaissance Place RT page; however, district administrators can set a preference to make it accessible from the Home page only or to turn it off entirely. See the Renaissance Place Real Time Software Manual for details.
Resources
The Accelerated Math software contains other resources to help you use Accelerated Math in your classroom. Click Resources in the Accelerated Math task list on the Home page to find forms, plans, charts, tips, routines, research, and other helpful documents.
A
CB
A The Help link is on every page in the program. Click it to get more information about the page currently displayed in the program.
B To navigate the help, use the buttons at the top of the Help page:
• Click Contents to display the table of contents for the help.
• Click Index to display an alphabetical list of topics.
• Click Search to find help topics using words or phrases.
• Click Back to view previously selected help pages.
• Click Other Help to see a list of the Renaissance Place programs installed on your server and click the program name to view its help.
• Click Close Help to close the help.
C This logo lets you know you’re in the Accelerated Math help. If you go to another program’s help, the logo for that program will appear.
4Accelerated MathSoftware Manual
W E L C O M E T O A C C E L E R A T E D M A T H
Need More Help?
. . .
. .
Need More Help?
• Knowledge Base: Search the Renaissance Learning Knowledge Base on the Web at support.renlearn.com/techkb/ for technical support information.
• Email: Send general questions to [email protected]; send technical questions to [email protected].
• Phone: Call (800) 338-4204 for assistance. Outside the US, call 1.715.424.3636.
• Renaissance Training Center: Visit the training center on the Web at http://www.renlearn.com/Profdevel/PD/. This site has webinars, quick sessions, and on-demand sessions to help you learn to use the software and implement it effectively in your classroom.
5Accelerated MathSoftware Manual
GETTING STARTED
Checking Sof tware Requi rements
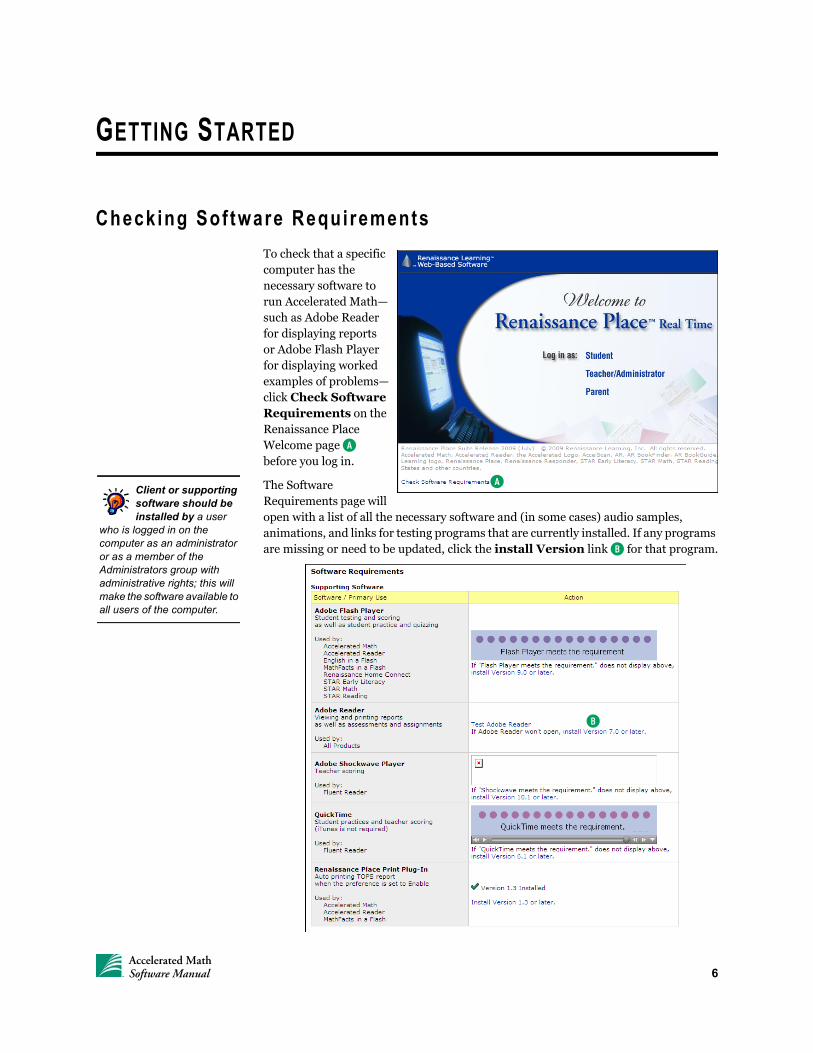
To check that a specific computer has the necessary software to run Accelerated Math—such as Adobe Reader for displaying reports or Adobe Flash Player for displaying worked examples of problems—click Check Software Requirements on the Renaissance Place Welcome page A before you log in.
The Software Requirements page will open with a list of all the necessary software and (in some cases) audio samples, animations, and links for testing programs that are currently installed. If any programs are missing or need to be updated, click the install Version link B for that program.
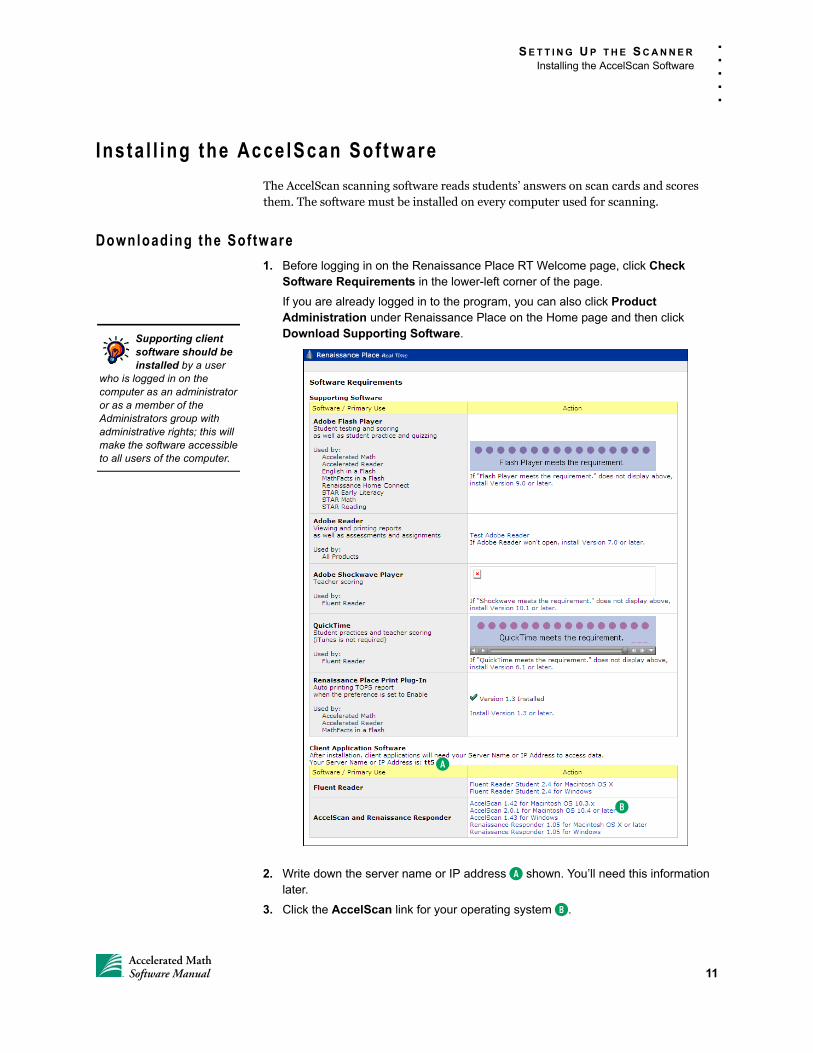
AClient or supporting software should be installed by a user
who is logged in on the computer as an administrator or as a member of the Administrators group with administrative rights; this will make the software available to all users of the computer.
B
6Accelerated MathSoftware Manual
G E T T I N G S T A R T E D
Logging In and Changing Your Password
. . .
. .
For the most up-to-date software, hardware, and operating system requirements for Accelerated Math, visit www.renlearn.com/requirements.
If you are planning to use AccelScan scanners with Accelerated Math, you need to install the AccelScan scanning software; see page 11. If you are planning to use Renaissance Responders with Accelerated Math, you will need the Renaissance Responder program; see page 18.
Logging In and Changing Your Password
Use these instructions to log in to Renaissance Place RT, change your password—either by choice or when the software requires it—and access the Accelerated Math program.
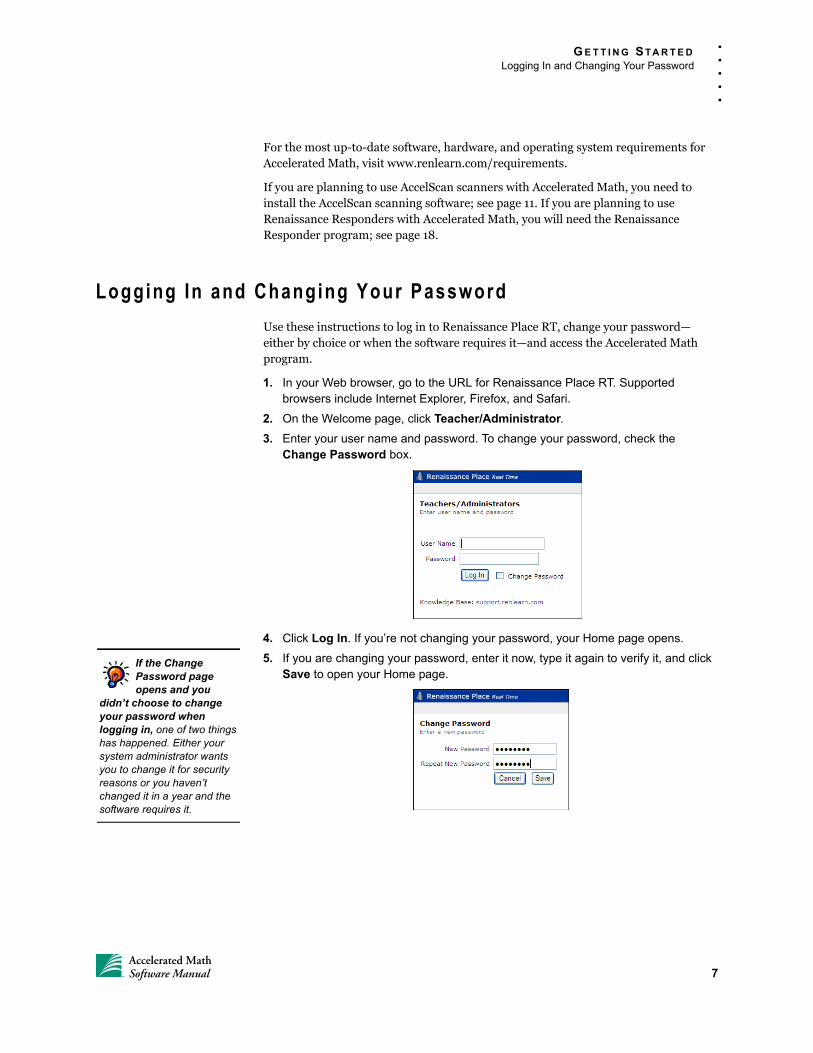
1. In your Web browser, go to the URL for Renaissance Place RT. Supported browsers include Internet Explorer, Firefox, and Safari.
2. On the Welcome page, click Teacher/Administrator.
3. Enter your user name and password. To change your password, check the Change Password box.
4. Click Log In. If you’re not changing your password, your Home page opens.
5. If you are changing your password, enter it now, type it again to verify it, and click Save to open your Home page.
If the Change Password page opens and you
didn’t choose to change your password when logging in, one of two things has happened. Either your system administrator wants you to change it for security reasons or you haven’t changed it in a year and the software requires it.
7Accelerated MathSoftware Manual
G E T T I N G S T A R T E D
Setting Up the Accelerated Math Software
. . .
. .
Set t ing Up the Acce lera ted Math Sof tware
Much of the preliminary setup for Accelerated Math will occur before you log in the first time. For example, the software will probably be installed and registered on a central server in your district or school for you to access.
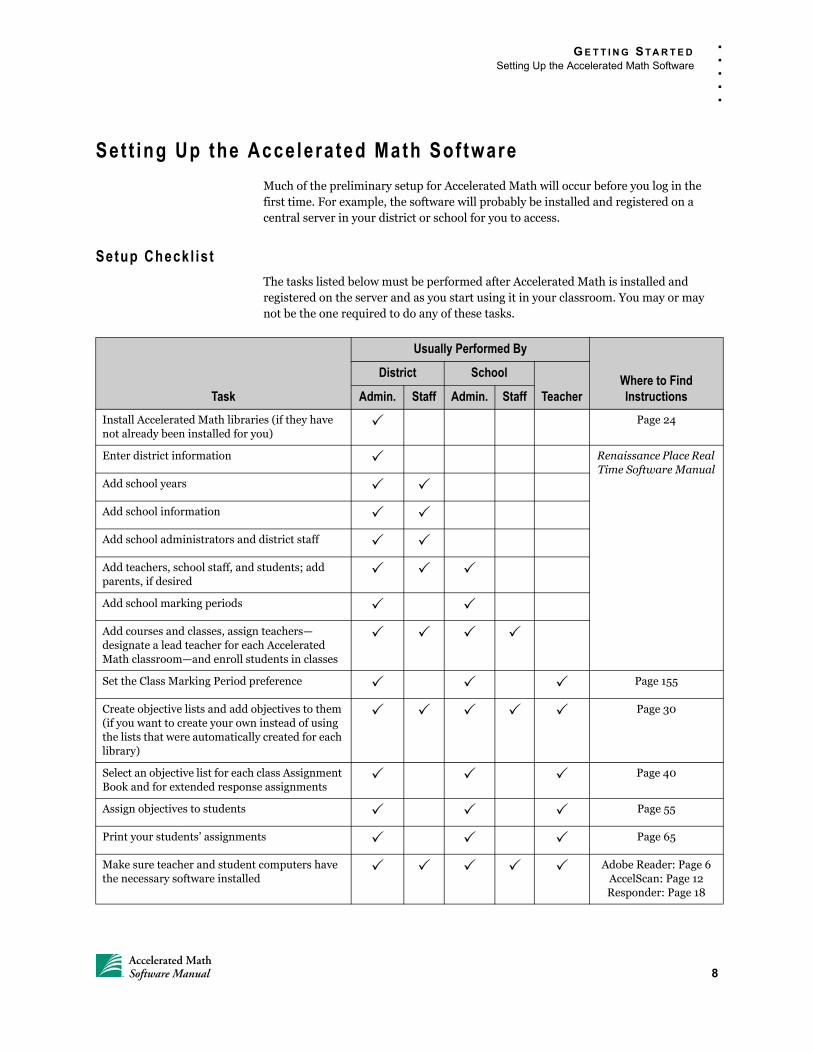
Setup Checkl is t
The tasks listed below must be performed after Accelerated Math is installed and registered on the server and as you start using it in your classroom. You may or may not be the one required to do any of these tasks.
Task
Usually Performed By
Where to Find Instructions
District School
TeacherAdmin. Staff Admin. Staff
Install Accelerated Math libraries (if they have not already been installed for you)
Page 24
Enter district information Renaissance Place Real Time Software Manual
Add school years
Add school information
Add school administrators and district staff
Add teachers, school staff, and students; add parents, if desired
Add school marking periods
Add courses and classes, assign teachers— designate a lead teacher for each Accelerated Math classroom—and enroll students in classes
Set the Class Marking Period preference Page 155
Create objective lists and add objectives to them (if you want to create your own instead of using the lists that were automatically created for each library)
Page 30
Select an objective list for each class Assignment Book and for extended response assignments
Page 40
Assign objectives to students Page 55
Print your students’ assignments Page 65
Make sure teacher and student computers have the necessary software installed
Adobe Reader: Page 6 AccelScan: Page 12Responder: Page 18
8Accelerated MathSoftware Manual
G E T T I N G S T A R T E D
Navigating the Software
. . .
. .
Navigat ing the Sof tware
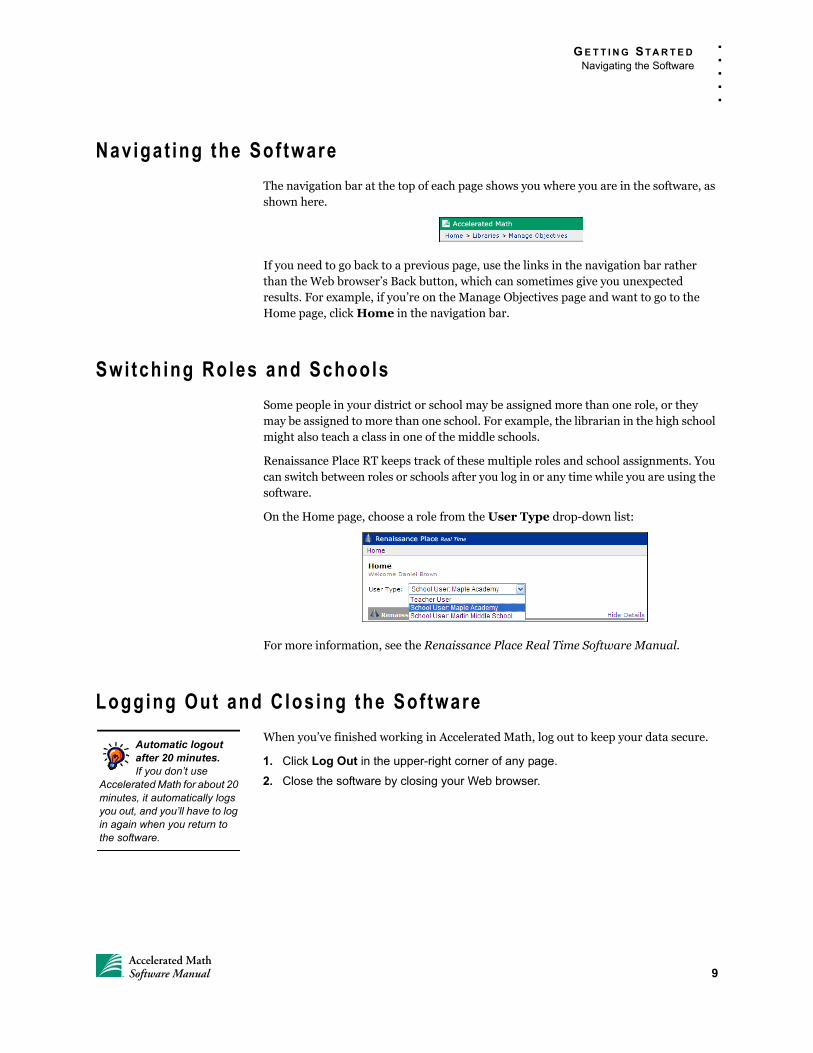
The navigation bar at the top of each page shows you where you are in the software, as shown here.
If you need to go back to a previous page, use the links in the navigation bar rather than the Web browser’s Back button, which can sometimes give you unexpected results. For example, if you’re on the Manage Objectives page and want to go to the Home page, click Home in the navigation bar.
Swi tch ing Roles and Schools
Some people in your district or school may be assigned more than one role, or they may be assigned to more than one school. For example, the librarian in the high school might also teach a class in one of the middle schools.
Renaissance Place RT keeps track of these multiple roles and school assignments. You can switch between roles or schools after you log in or any time while you are using the software.
On the Home page, choose a role from the User Type drop-down list:
For more information, see the Renaissance Place Real Time Software Manual.
Logging Out and Clos ing the Sof tware
When you’ve finished working in Accelerated Math, log out to keep your data secure.
1. Click Log Out in the upper-right corner of any page.
2. Close the software by closing your Web browser.
Automatic logout after 20 minutes.If you don’t use
Accelerated Math for about 20 minutes, it automatically logs you out, and you’ll have to log in again when you return to the software.
9Accelerated MathSoftware Manual

SETTING UP THE SCANNER
The AccelScan scanner reads and scores scan cards containing students’ answers for their assignments.
Connect ing the Scanner to the Computer
You’ll connect the scanner to a computer that has the Accelerated Math software running on it.
1. AccelScan models 2110, 2210, and 1100 Serial: Plug the round connector on the AccelScan power cable into the matching port on the AccelScan, and plug the scanner into an electrical outlet.
AccelScan model 1100 USB: You received a power cord and a power supply box with a cable attached. Connect the power cord to the power supply box. Then, plug the small round connector into the AccelScan, and plug the power cord into an electrical outlet.
2. Connect the data cable coming from the AccelScan to the matching port on your computer. If the data cable has a USB connector, attach it to your computer’s USB port. If not, do the following:
• For Windows Computers: Attach the 9-pin serial port adapter to the end of the AccelScan cable and then attach the cable to your computer.
• For Macintosh Computers: Connect the data cable to an 8-pin female serial port on your computer, such as the printer or modem port.
3. For AccelScan model 1100 USB, see the user’s guide that came with your scanner to install the AccelScan drivers.
4. Follow the steps in the next section to install and set up the scanner software.
Check system requirements. Before you connect the scanner
to the computer, check the system requirements at www.renlearn.com/requirements.
10Accelerated MathSoftware Manual
S E T T I N G U P T H E S C A N N E R
Installing the AccelScan Software
. . .
. .
Ins ta l l ing the Acce lScan Sof tware
The AccelScan scanning software reads students’ answers on scan cards and scores them. The software must be installed on every computer used for scanning.
Downloading the Sof tware
1. Before logging in on the Renaissance Place RT Welcome page, click Check Software Requirements in the lower-left corner of the page.
If you are already logged in to the program, you can also click Product Administration under Renaissance Place on the Home page and then click Download Supporting Software.
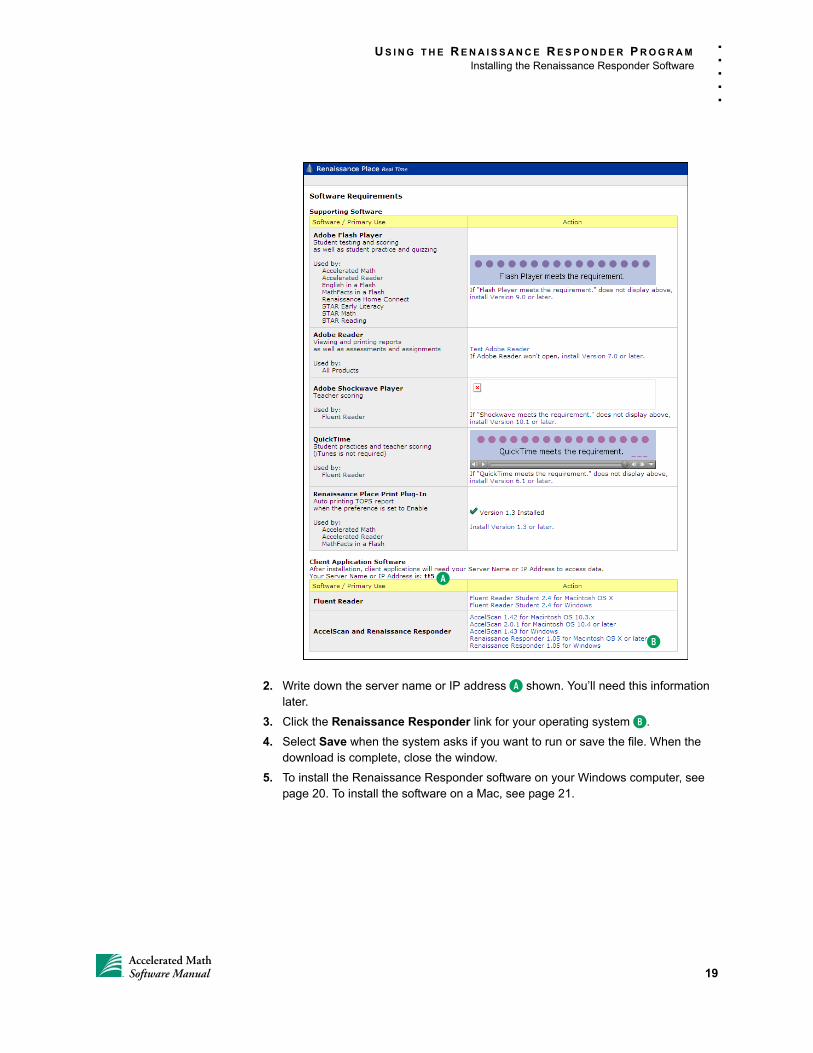
2. Write down the server name or IP address A shown. You’ll need this information later.
3. Click the AccelScan link for your operating system B.
Supporting client software should be installed by a user
who is logged in on the computer as an administrator or as a member of the Administrators group with administrative rights; this will make the software accessible to all users of the computer.
B
A
11Accelerated MathSoftware Manual
S E T T I N G U P T H E S C A N N E R
Installing the AccelScan Software
. . .
. .
4. Select Save when the system asks if you want to run or save the file. If you are using a Macintosh computer and it asks you whether to unstuff the file, choose to unstuff it. When the download is complete, close the window.
5. To install the scanning software on your Windows computer, continue with the steps below. To install the software on a Macintosh computer, see page 14.
Insta l l ing the Scanning Sof tware on Windows Computers
1. Close any programs you have open on your computer.
2. Double-click the AccelScanInstaller1.43Win.exe file that you just downloaded.
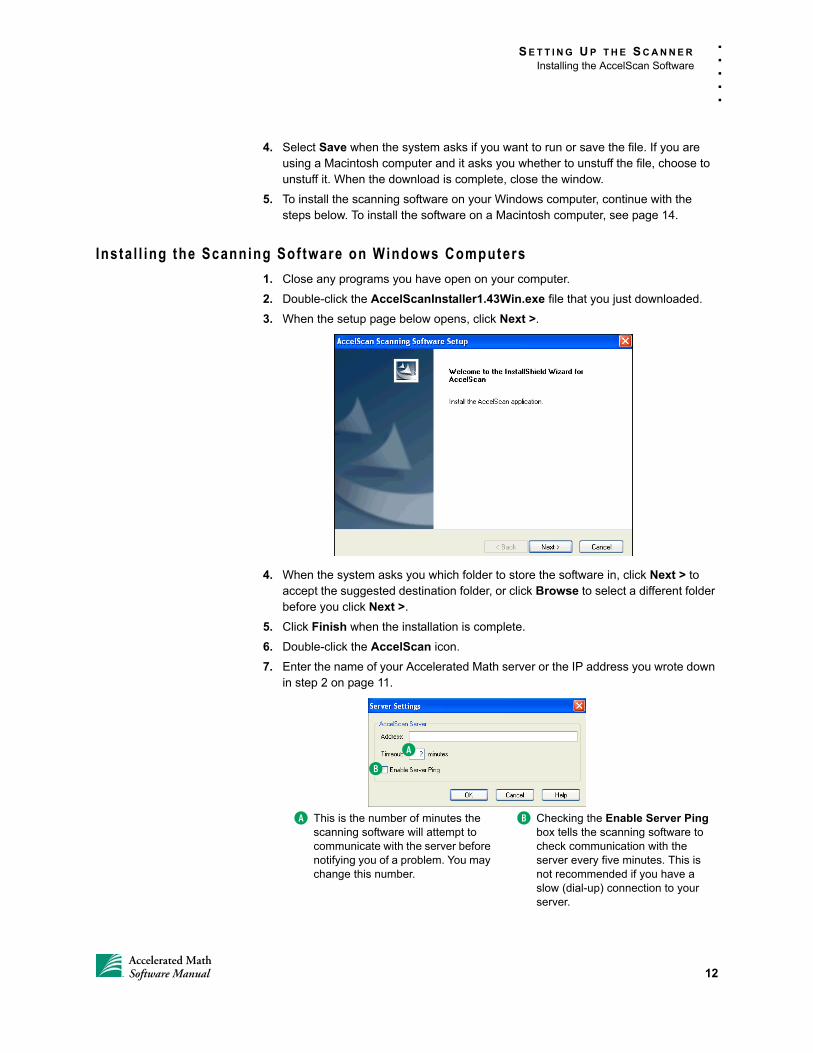
3. When the setup page below opens, click Next >.
4. When the system asks you which folder to store the software in, click Next > to accept the suggested destination folder, or click Browse to select a different folder before you click Next >.
5. Click Finish when the installation is complete.
6. Double-click the AccelScan icon.
7. Enter the name of your Accelerated Math server or the IP address you wrote down in step 2 on page 11.
A
B
A This is the number of minutes the scanning software will attempt to communicate with the server before notifying you of a problem. You may change this number.
B Checking the Enable Server Ping box tells the scanning software to check communication with the server every five minutes. This is not recommended if you have a slow (dial-up) connection to your server.
12Accelerated MathSoftware Manual
S E T T I N G U P T H E S C A N N E R
Installing the AccelScan Software
. . .
. .
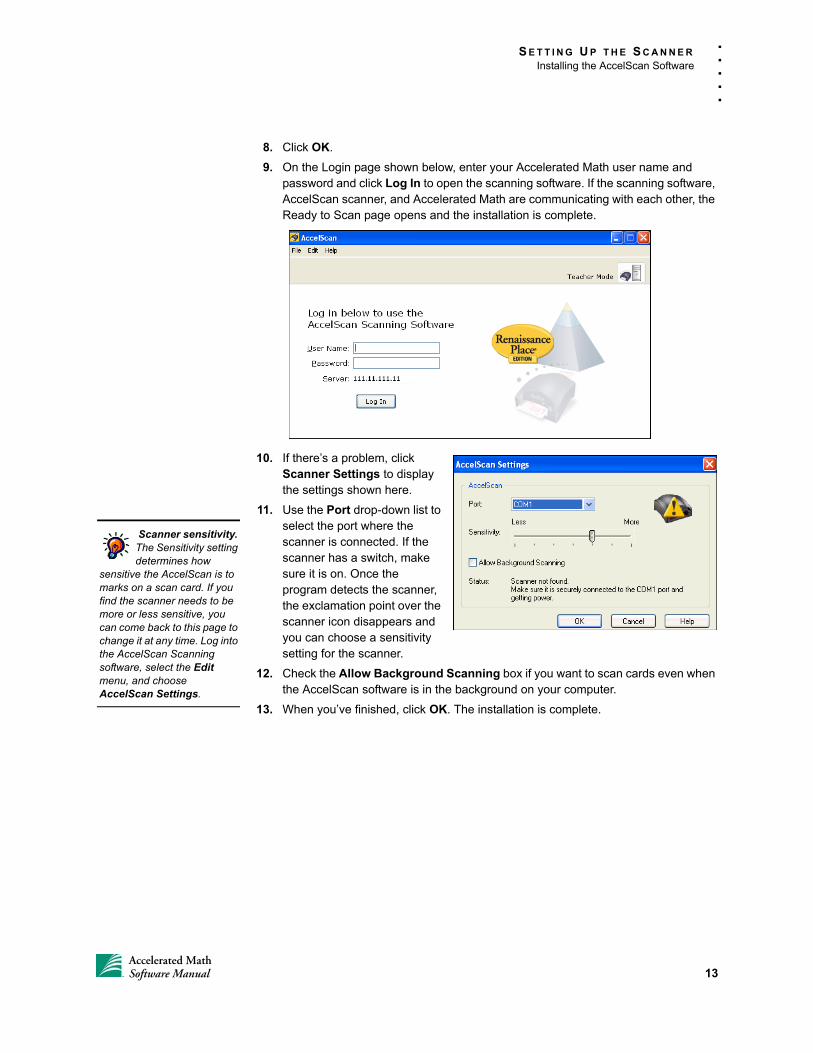
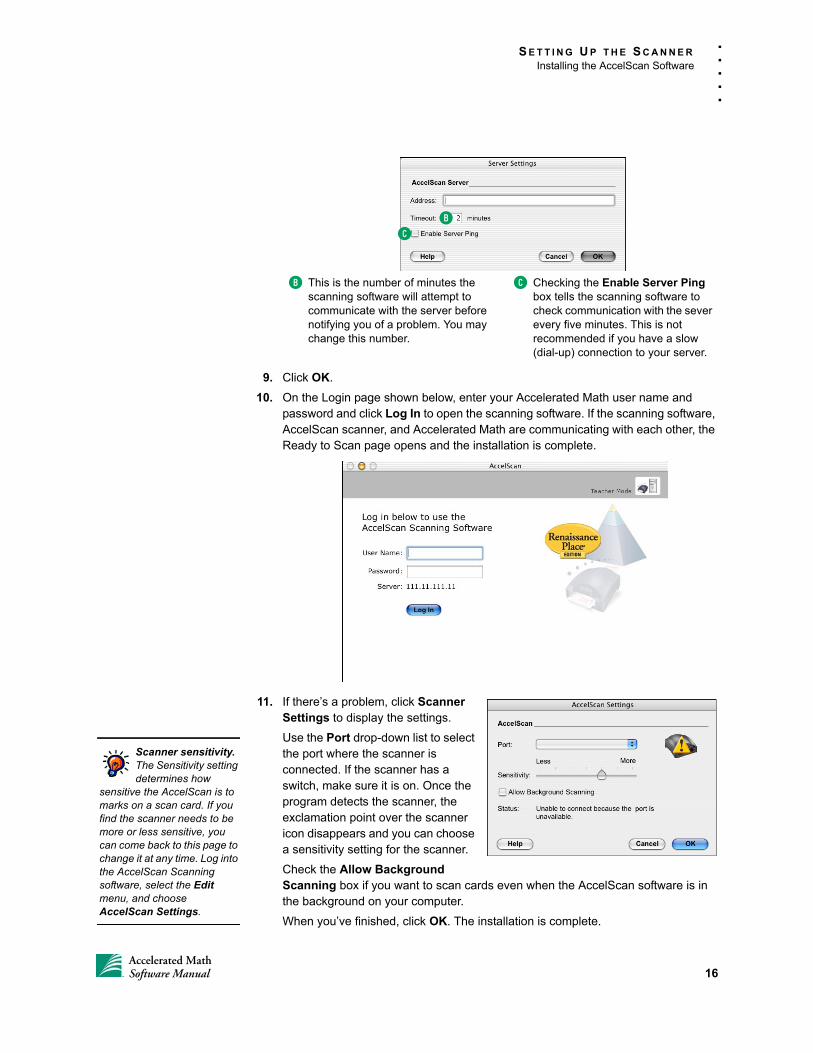
8. Click OK.
9. On the Login page shown below, enter your Accelerated Math user name and password and click Log In to open the scanning software. If the scanning software, AccelScan scanner, and Accelerated Math are communicating with each other, the Ready to Scan page opens and the installation is complete.
10. If there’s a problem, click Scanner Settings to display the settings shown here.
11. Use the Port drop-down list to select the port where the scanner is connected. If the scanner has a switch, make sure it is on. Once the program detects the scanner, the exclamation point over the scanner icon disappears and you can choose a sensitivity setting for the scanner.
12. Check the Allow Background Scanning box if you want to scan cards even when the AccelScan software is in the background on your computer.
13. When you’ve finished, click OK. The installation is complete.
Scanner sensitivity. The Sensitivity setting determines how
sensitive the AccelScan is to marks on a scan card. If you find the scanner needs to be more or less sensitive, you can come back to this page to change it at any time. Log into the AccelScan Scanning software, select the Edit menu, and choose AccelScan Settings.
13Accelerated MathSoftware Manual
S E T T I N G U P T H E S C A N N E R
Installing the AccelScan Software
. . .
. .
Insta l l ing the Scanning Sof tware on Macintosh Computers
Installing Version 2.x on Macintosh OS 10.4–10.5 Computers1. Close any programs you have open on your computer.
2. Double-click the AccelScan 2.0.dmg file that you downloaded. The volume will open.
3. Double-click the AccelScan package file.
4. Click Continue on the Welcome panel of the Install AccelScan assistant.
5. Click the drive where you want to install the software. Then, click Continue.
6. Click Install on the next panel.
7. Enter the administrator user name and password when the program asks for this information; then, click OK.
8. An alert will tell you that you must restart your computer after installation. Click Continue Installation.
9. Click Restart when the installation is complete. Your computer will restart.
You may have extra steps to perform to install the OS 10 scanner driver. Follow the instructions and restart the computer after installation.
10. Open the Applications folder on the drive where you installed the software. Then, double-click AccelScan in that folder.
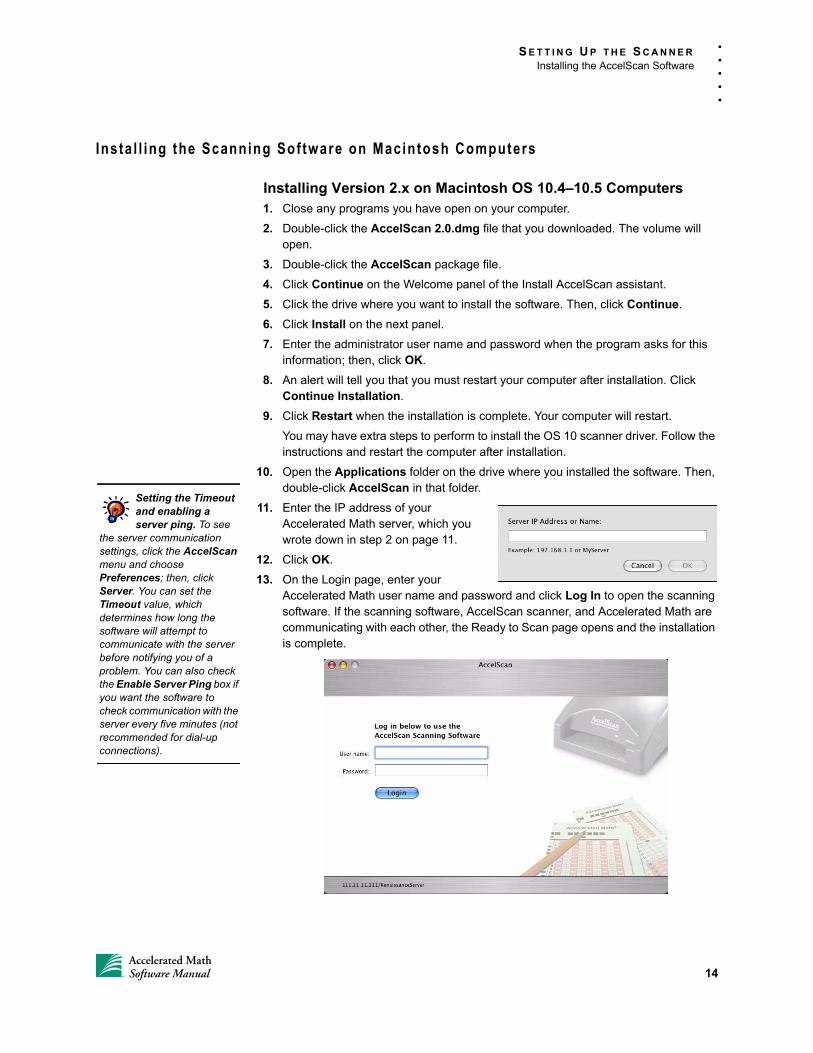
11. Enter the IP address of your Accelerated Math server, which you wrote down in step 2 on page 11.
12. Click OK.
13. On the Login page, enter your Accelerated Math user name and password and click Log In to open the scanning software. If the scanning software, AccelScan scanner, and Accelerated Math are communicating with each other, the Ready to Scan page opens and the installation is complete.
Setting the Timeout and enabling a server ping. To see
the server communication settings, click the AccelScan menu and choose Preferences; then, click Server. You can set the Timeout value, which determines how long the software will attempt to communicate with the server before notifying you of a problem. You can also check the Enable Server Ping box if you want the software to check communication with the server every five minutes (not recommended for dial-up connections).
14Accelerated MathSoftware Manual
S E T T I N G U P T H E S C A N N E R
Installing the AccelScan Software
. . .
. .
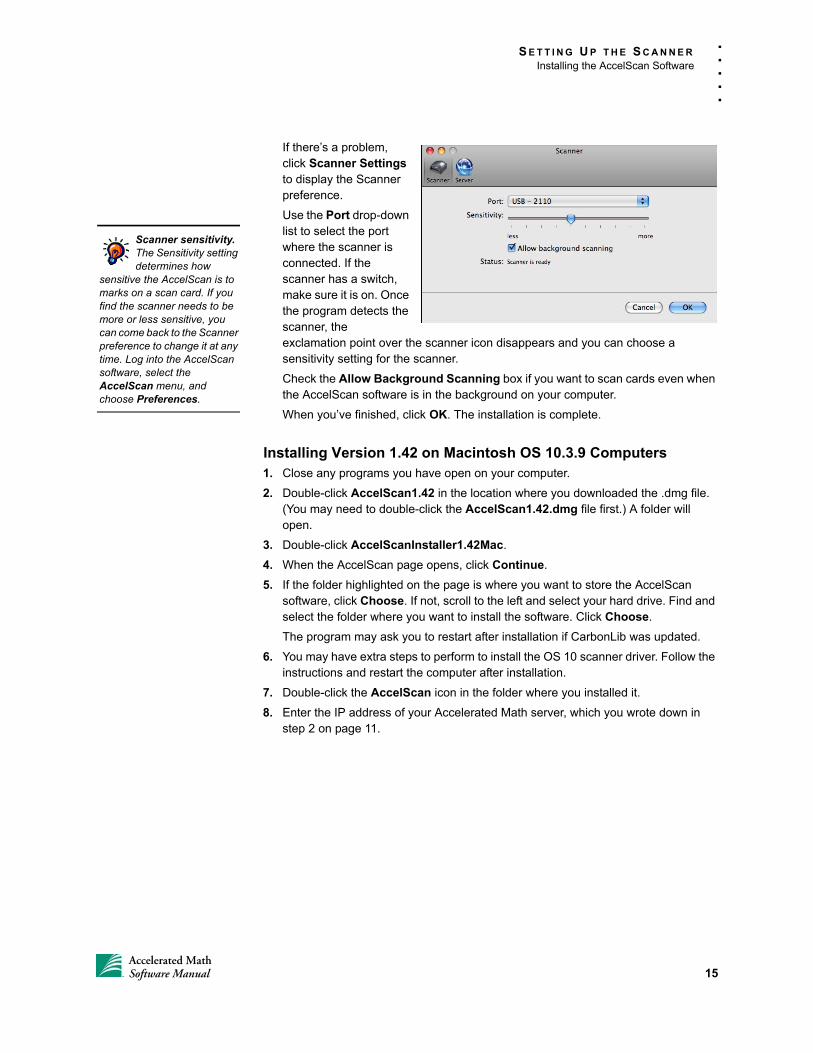
If there’s a problem, click Scanner Settings to display the Scanner preference.
Use the Port drop-down list to select the port where the scanner is connected. If the scanner has a switch, make sure it is on. Once the program detects the scanner, the exclamation point over the scanner icon disappears and you can choose a sensitivity setting for the scanner.
Check the Allow Background Scanning box if you want to scan cards even when the AccelScan software is in the background on your computer.
When you’ve finished, click OK. The installation is complete.
Installing Version 1.42 on Macintosh OS 10.3.9 Computers1. Close any programs you have open on your computer.
2. Double-click AccelScan1.42 in the location where you downloaded the .dmg file. (You may need to double-click the AccelScan1.42.dmg file first.) A folder will open.
3. Double-click AccelScanInstaller1.42Mac.
4. When the AccelScan page opens, click Continue.
5. If the folder highlighted on the page is where you want to store the AccelScan software, click Choose. If not, scroll to the left and select your hard drive. Find and select the folder where you want to install the software. Click Choose.
The program may ask you to restart after installation if CarbonLib was updated.
6. You may have extra steps to perform to install the OS 10 scanner driver. Follow the instructions and restart the computer after installation.
7. Double-click the AccelScan icon in the folder where you installed it.
8. Enter the IP address of your Accelerated Math server, which you wrote down in step 2 on page 11.
Scanner sensitivity. The Sensitivity setting determines how
sensitive the AccelScan is to marks on a scan card. If you find the scanner needs to be more or less sensitive, you can come back to the Scanner preference to change it at any time. Log into the AccelScan software, select the AccelScan menu, and choose Preferences.
15Accelerated MathSoftware Manual
S E T T I N G U P T H E S C A N N E R
Installing the AccelScan Software
. . .
. .
9. Click OK.
10. On the Login page shown below, enter your Accelerated Math user name and password and click Log In to open the scanning software. If the scanning software, AccelScan scanner, and Accelerated Math are communicating with each other, the Ready to Scan page opens and the installation is complete.
11. If there’s a problem, click Scanner Settings to display the settings.
Use the Port drop-down list to select the port where the scanner is connected. If the scanner has a switch, make sure it is on. Once the program detects the scanner, the exclamation point over the scanner icon disappears and you can choose a sensitivity setting for the scanner.
Check the Allow Background Scanning box if you want to scan cards even when the AccelScan software is in the background on your computer.
When you’ve finished, click OK. The installation is complete.
BC
B This is the number of minutes the scanning software will attempt to communicate with the server before notifying you of a problem. You may change this number.
C Checking the Enable Server Ping box tells the scanning software to check communication with the sever every five minutes. This is not recommended if you have a slow (dial-up) connection to your server.
Scanner sensitivity. The Sensitivity setting determines how
sensitive the AccelScan is to marks on a scan card. If you find the scanner needs to be more or less sensitive, you can come back to this page to change it at any time. Log into the AccelScan Scanning software, select the Edit menu, and choose AccelScan Settings.
16Accelerated MathSoftware Manual
S E T T I N G U P T H E S C A N N E R
AccelScan Software Updates
. . .
. .
AccelScan Sof tware Updates
Software Updates in Vers ions 1 .42 and 1 .43
Your AccelScan software automatically checks for updates when you start the program. If updates are available, follow the instructions in the messages you see.
Software Updates in Vers ion 2 .x
The AccelScan software automatically checks for updates when you start the program. However, you can also check for updates while running the program by clicking the AccelScan menu and choosing Check for Updates.
When an update is available, you will see a message about the update. You can click a link in the message to see more information about the update.
If the update is optional, the message will include an Ignore button. You can click Ignore to continue using the AccelScan software without installing the update. When you choose to ignore an update, the software will not bring it to your attention again when it automatically checks for updates, but you will see it again if you choose to check for updates yourself using the item in the AccelScan menu.
To download and install an update, click Download. Double-click the file that you downloaded to begin installing the update.
17Accelerated MathSoftware Manual
USING THE RENAISSANCE RESPONDER PROGRAM
If your class has a Renaissance Receiver and either Renaissance Responders or NEO 2 laptops, students can use the Responders or NEO 2 laptops to enter their answers for Accelerated Math assignments.
Set t ing Up the Renaissance Receiver and Using Responders or NEO 2 Laptops
To find out how to connect your Renaissance Receiver and start using Renaissance Responders, refer to the 2Know! Setup and Resource Guide.
To find out more about the Responder SmartApplet on NEO 2 laptops, refer to the NEO 2 Quick Guide.
Ins ta l l ing the Renaissance Responder Sof tware
Before you can use Renaissance Responders or NEO 2 laptops with Accelerated Math, you must install the Renaissance Responder client software on each computer that has a Renaissance Receiver.
Downloading the Sof tware
1. Before logging in on the Renaissance Place RT Welcome page, click Check Software Requirements in the lower-left corner of the page.
If you are a district or school administrator or teacher and you are already logged in to the program, you can also click Product Administration under Renaissance Place on the Home page and then click Download Supporting Software.
Supporting client software should be installed by a user
who is logged in on the computer as an administrator or as a member of the Administrators group with administrative rights; this will make the software accessible to all users of the computer.
18Accelerated MathSoftware Manual
U S I N G T H E R E N A I S S A N C E R E S P O N D E R P R O G R A M
Installing the Renaissance Responder Software
. . .
. .
2. Write down the server name or IP address A shown. You’ll need this informationlater.
3. Click the Renaissance Responder link for your operating system B.
4. Select Save when the system asks if you want to run or save the file. When the download is complete, close the window.
5. To install the Renaissance Responder software on your Windows computer, see page 20. To install the software on a Mac, see page 21.
B
A
19Accelerated MathSoftware Manual
U S I N G T H E R E N A I S S A N C E R E S P O N D E R P R O G R A M
Installing the Renaissance Responder Software
. . .
. .
Insta l l ing the Renaissance Responder Sof tware on Windows Computers
1. Close any programs you have open on your computer.
2. Double-click the file that you just downloaded (either ResponderInstaller1.05WinUS.msi or ResponderInstaller1.6WinUS.msi).
3. When the Renaissance Responder Setup Wizard opens, click Next >.
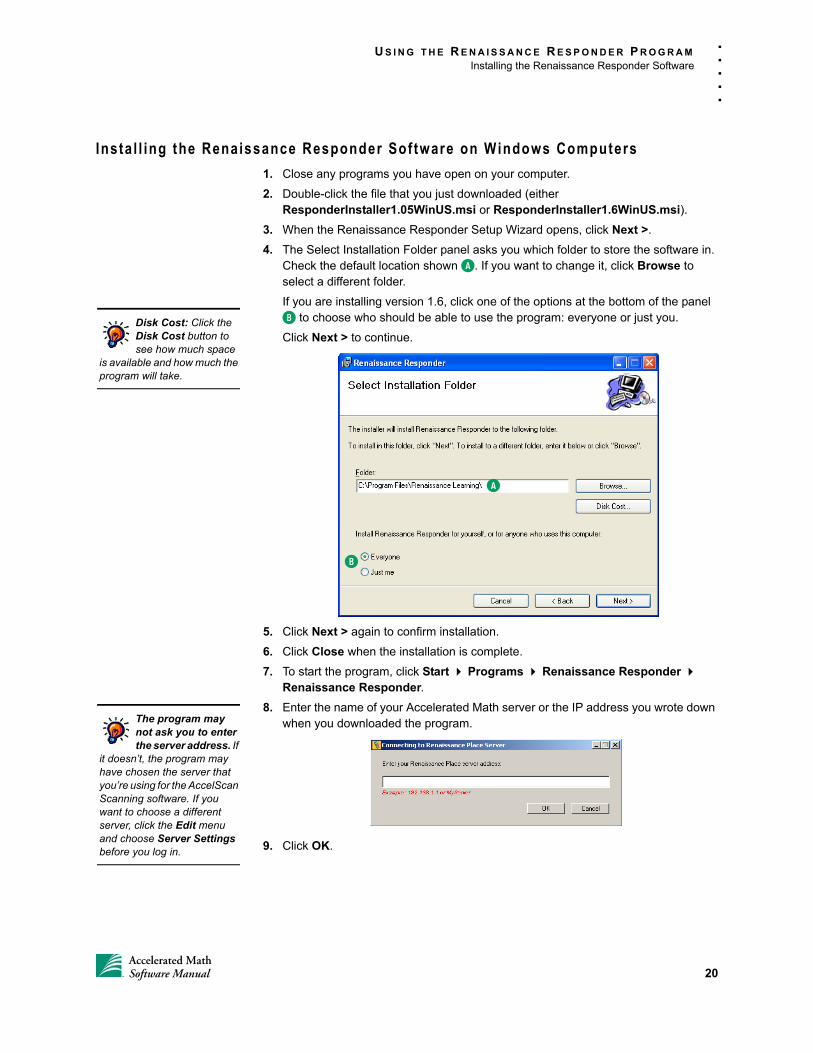
4. The Select Installation Folder panel asks you which folder to store the software in. Check the default location shown A. If you want to change it, click Browse to select a different folder.
If you are installing version 1.6, click one of the options at the bottom of the panel B to choose who should be able to use the program: everyone or just you.
Click Next > to continue.
5. Click Next > again to confirm installation.
6. Click Close when the installation is complete.
7. To start the program, click Start Programs Renaissance Responder Renaissance Responder.
8. Enter the name of your Accelerated Math server or the IP address you wrote down when you downloaded the program.
9. Click OK.
Disk Cost: Click the Disk Cost button to see how much space
is available and how much the program will take.
A
B
The program may not ask you to enter the server address. If
it doesn’t, the program may have chosen the server that you’re using for the AccelScan Scanning software. If you want to choose a different server, click the Edit menu and choose Server Settings before you log in.
20Accelerated MathSoftware Manual
U S I N G T H E R E N A I S S A N C E R E S P O N D E R P R O G R A M
Installing the Renaissance Responder Software
. . .
. .
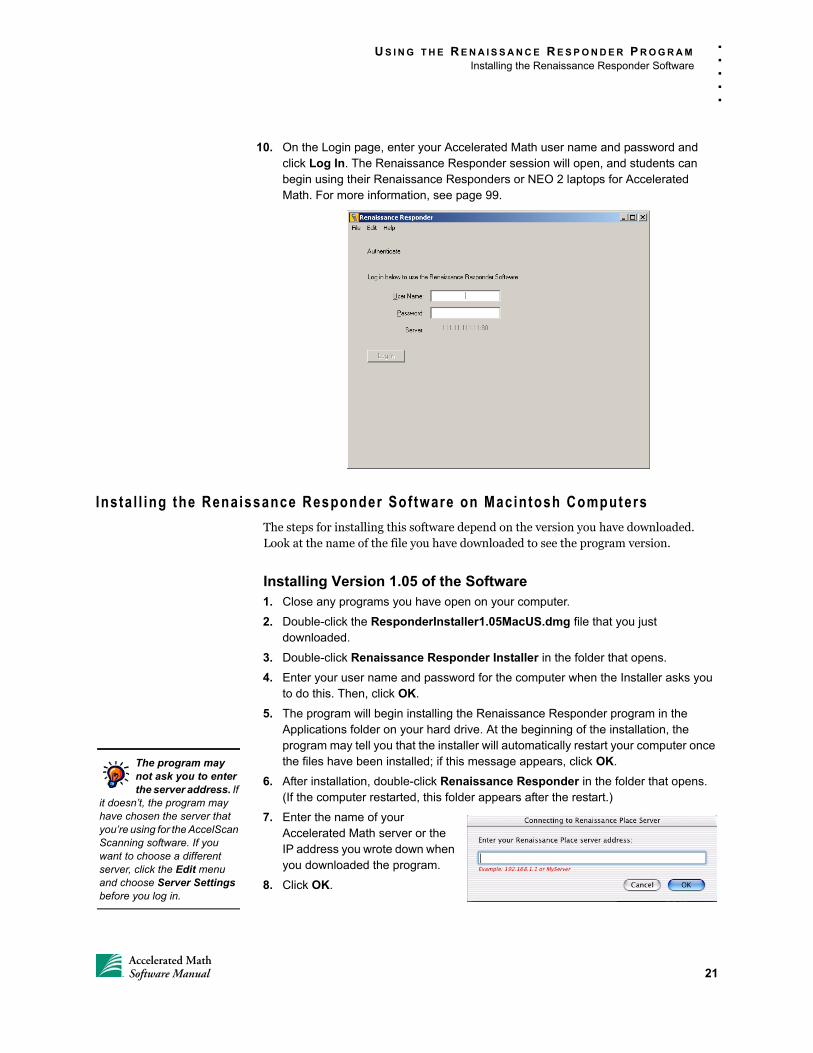
10. On the Login page, enter your Accelerated Math user name and password and click Log In. The Renaissance Responder session will open, and students can begin using their Renaissance Responders or NEO 2 laptops for Accelerated Math. For more information, see page 99.
Insta l l ing the Renaissance Responder Sof tware on Macintosh Computers
The steps for installing this software depend on the version you have downloaded. Look at the name of the file you have downloaded to see the program version.
Installing Version 1.05 of the Software1. Close any programs you have open on your computer.
2. Double-click the ResponderInstaller1.05MacUS.dmg file that you just downloaded.
3. Double-click Renaissance Responder Installer in the folder that opens.
4. Enter your user name and password for the computer when the Installer asks you to do this. Then, click OK.
5. The program will begin installing the Renaissance Responder program in the Applications folder on your hard drive. At the beginning of the installation, the program may tell you that the installer will automatically restart your computer once the files have been installed; if this message appears, click OK.
6. After installation, double-click Renaissance Responder in the folder that opens. (If the computer restarted, this folder appears after the restart.)
7. Enter the name of your Accelerated Math server or the IP address you wrote down when you downloaded the program.
8. Click OK.
The program may not ask you to enter the server address. If
it doesn’t, the program may have chosen the server that you’re using for the AccelScan Scanning software. If you want to choose a different server, click the Edit menu and choose Server Settings before you log in.
21Accelerated MathSoftware Manual
U S I N G T H E R E N A I S S A N C E R E S P O N D E R P R O G R A M
Installing the Renaissance Responder Software
. . .
. .
9. On the Login page, enter your Accelerated Math user name and password and click Log In. The Renaissance Responder program will start, and students can begin using their Renaissance Responders or NEO 2 laptops for Accelerated Math. For more information, see page 99.
Installing Version 1.6 of the Software1. Close any programs you have open on your computer.
2. Double-click the ResponderInstaller1.6MacUS.dmg file that you just downloaded.
3. If you are installing version 1.6, double-click the Renaissance Responder volume that appears.
4. Double-click the Renaissance Responder US package in the Renaissance Responder volume.
5. Click Continue in the Install Renaissance Responder assistant.
6. Click the drive where you want to install the software if necessary. Then, click Continue.
7. Click Install.
8. Enter your user name and password for the computer when the Installer asks you to do this. Then, click OK.
9. A message will tell you that installing the software requires you to restart your computer. To continue, click Continue Installation.
10. The program will begin installing the Renaissance Responder program in the Applications folder on your hard drive. When the process is finished, click Restart.
11. After the computer restarts, open the Applications folder on the computer’s hard drive and open the Renaissance Responder folder; then, double-click Renaissance Responder to start the program.
22Accelerated MathSoftware Manual
U S I N G T H E R E N A I S S A N C E R E S P O N D E R P R O G R A M
Installing the Renaissance Responder Software
. . .
. .
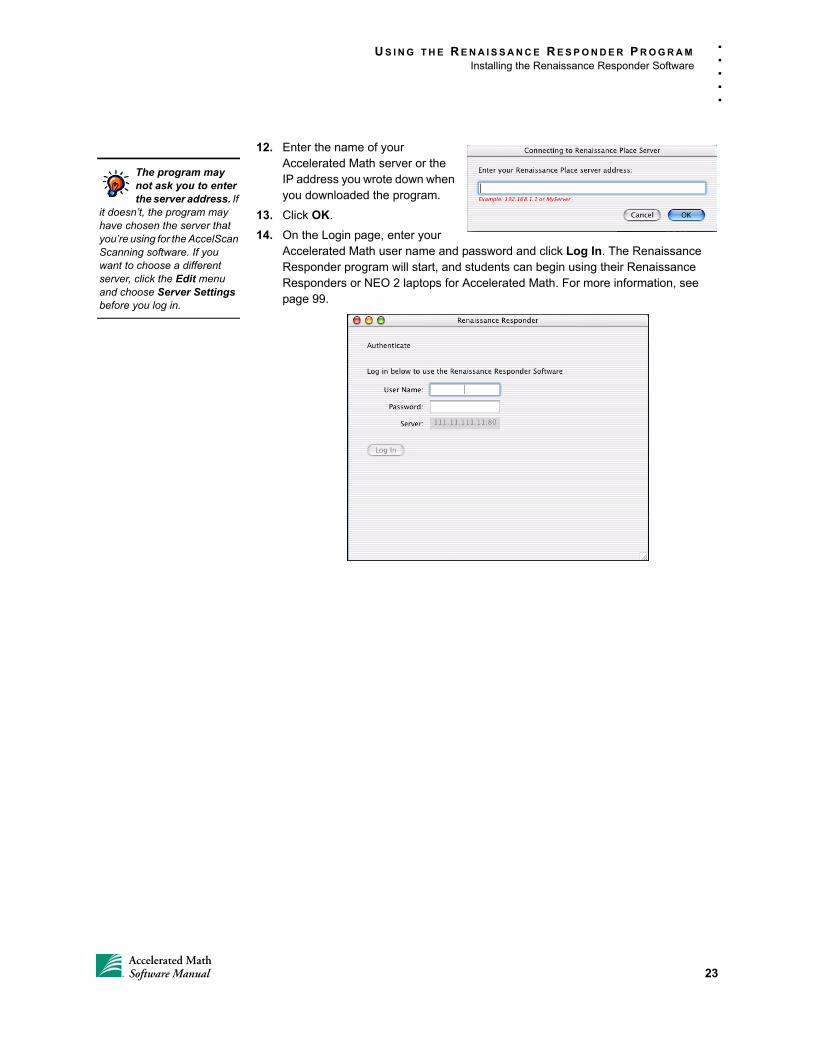
12. Enter the name of your Accelerated Math server or the IP address you wrote down when you downloaded the program.
13. Click OK.
14. On the Login page, enter your Accelerated Math user name and password and click Log In. The Renaissance Responder program will start, and students can begin using their Renaissance Responders or NEO 2 laptops for Accelerated Math. For more information, see page 99.
The program may not ask you to enter the server address. If
it doesn’t, the program may have chosen the server that you’re using for the AccelScan Scanning software. If you want to choose a different server, click the Edit menu and choose Server Settings before you log in.
23Accelerated MathSoftware Manual
LIBRARIES
What Are L ibrar ies?
Accelerated Math libraries are the source of the problems on students’ Accelerated Math assignments and tests. Within each library, closely related problems are grouped by objective. Libraries include the objectives for a specific grade level, math subject, state requirements, or textbook. They are designed to follow common curriculum guidelines and the content of widely used math textbooks.
Accelerated Math has two types of libraries:
• Standard libraries are the source of the objectives and problems in class Assignment Books.
• Extended response libraries provide challenging problems and projects that emphasize problem-solving and higher-order thinking skills. They are used to generate extended response assignments. (See page 117.)
You received at least one library with Accelerated Math; if you purchased a subscription, you received a full set of Accelerated Math libraries, which are installed by Renaissance Learning or your server administrator. If Renaissance Learning does not host your server, your server administrator can follow the instructions below to install libraries.
When libraries are installed, Accelerated Math automatically creates an objective list for each library; the list includes all objectives from the library in the default order. After the libraries are installed, teachers can either create objective lists (see page 30) or select one of the lists that were created automatically (see page 40).
How to Insta l l Your Acce lera ted Math L ibrar ies
If Renaissance Learning hosts your Renaissance Place RT server, we install your libraries for you. If not, your server administrator must follow these steps at the server to install libraries after Accelerated Math has been installed and registered. This process may take some time.
1. Insert your Accelerated Math Libraries CD into the server.
2. If the Accelerated Math Content Installer starts automatically, go to step 3. If not, view the contents of the CD and double-click AMContentInstaller.exe.
To see the objectives in your libraries, refer to the
Library Guide and Scope and Sequence for each library. To print these documents, see page 26.
24Accelerated MathSoftware Manual
L I B R A R I E S
Viewing Library Information
. . .
. .
3. In the Accelerated Math Content Installer, click Install.
4. The program will show you the progress as it installs each library. When installation is complete, click Exit.
5. If you received more than one Libraries CD, repeat the steps above for each CD.
Viewing L ibrary In format ion
Follow these steps to see a list of your installed libraries.
1. Click Libraries in the list of Accelerated Math tasks on the Home page.
2. Select your school from the School drop-down list if necessary A. (Different schools may have different libraries.)
Who Can Do This?
District Administrator
District Staff
School Administrator
School Staff
Teachers
To change capabilities, see page 165.
A
C
B
A Choose a school. Each school may own different libraries.
B The links on the left side of this page allow you to add libraries, manage or view objective lists, and print reports.
C Click a library name to see more information about that library, such as the classes using the library, the available documents, and the standards associated with the library.
25Accelerated MathSoftware Manual
L I B R A R I E S
Printing the Library Guide or Scope and Sequence
. . .
. .
Pr int ing the L ibrary Guide or Scope and Sequence
Each standard library has a Library Guide and a Scope and Sequence:
• Library Guides include each topic and objective in the library and sample problems for each objective.
• The Scope and Sequence lists the topics and objectives in the library.
Extended Response libraries also have Scope and Sequences, but they do not have Library Guides.
To view or print the documents for a library, follow these steps:
1. View the list of libraries for your school. See page 25.
2. Click the name of the library you want to view.
3. Click the name of the library document that you want to print A. The document will open in Adobe Reader or the Macintosh OS 10 Preview program.
4. If the document opens in Adobe Reader, click the Adobe Reader buttons to save or print it. (Do not use the browser’s print option.) If the document opens in the Macintosh Preview program, click the File menu and choose Print.
5. When you’ve finished, click Return to Libraries.
Who Can Do This?
District Administrator
District Staff
School Administrator
School Staff
Teachers
To change capabilities, see page 165.
You need Adobe Reader to view or print these
documents. (On Macintosh computers, you can use the Preview program instead.) To find out if your computer has Adobe Reader, click Check Software Requirements on the Welcome page before you log in to the software. For detailed instructions, see page 140.
A
26Accelerated MathSoftware Manual
L I B R A R I E S
Adding Libraries for a School
. . .
. .
Adding L ibrar ies for a School
Normally, Accelerated Math automatically adds the libraries for each school as you install them. However, if you’ve removed libraries from a school, and you want to add them again, follow the steps below.
1. View the list of libraries for the school. See page 25.
2. Click Add Libraries.
3. If necessary, choose a different school from the School drop-down list A.
4. Check the box next to each library you want to add for the school (if any are available) B.
5. Click Add C.
6. Click Done to go back to the Libraries page.
Who Can Do This?
District Administrator
District Staff
School Administrator
School Staff
Teachers
To change capabilities, see page 165.
A
B
C
27Accelerated MathSoftware Manual
L I B R A R I E S
Removing Libraries for a School
. . .
. .
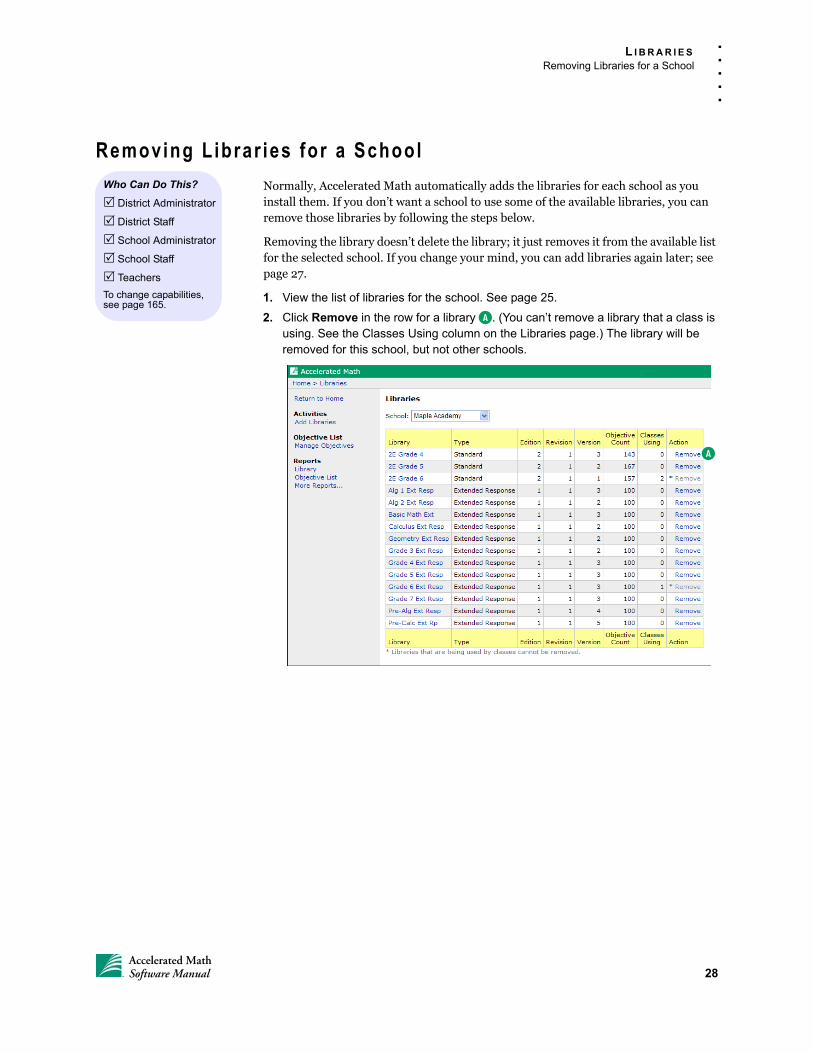
Removing L ibrar ies for a School
Normally, Accelerated Math automatically adds the libraries for each school as you install them. If you don’t want a school to use some of the available libraries, you can remove those libraries by following the steps below.
Removing the library doesn’t delete the library; it just removes it from the available list for the selected school. If you change your mind, you can add libraries again later; see page 27.
1. View the list of libraries for the school. See page 25.
2. Click Remove in the row for a library A. (You can’t remove a library that a class is using. See the Classes Using column on the Libraries page.) The library will be removed for this school, but not other schools.
Who Can Do This?
District Administrator
District Staff
School Administrator
School Staff
Teachers
To change capabilities, see page 165.
A
28Accelerated MathSoftware Manual
OBJECTIVES
What Are Object ives?
Objectives are closely related problems that focus on a skill within a specific math topic. Accelerated Math groups problems into objectives. Teachers assign objectives to students, and students work to master these objectives (see page 53). On assignments, Accelerated Math chooses problems from the assigned objectives.
Objectives from standard libraries are used in class Assignment Books. Objectives from extended response libraries are used on the Extended Response page for your classes.
The next few sections describe how to create lists of objectives and how to select a list for your class. Before you create objective lists, you may want to review the Scope and Sequence or Library Guide for each library; see page 26.
What Are Object ive L is ts?
Teachers, administrators, or other staff can set up objective lists that include the objectives they’d like their students to work on. You can also use the objective lists that were automatically created for each library when the libraries were installed; these lists include all objectives from the library in the default order.
You must choose a list to use in the Assignment Book or Extended Response page for each Accelerated Math class. You can use the same list for more than one class to save time or to ensure that your classes are working on the same material.
The person who creates an objective list is the owner of that list, but you can change the owner later; see page 51.
You can export objective lists (see page 39), and other teachers can import them for use in their classes (see page 37).
Shared Object ive L is ts Versus My L is ts
When a school or district administrator creates an objective list, he or she can choose whether to share the list or leave it in the My Lists (private) category.
Shared L ists
Shared objective lists can be selected and used by others for their classes. When a district or program administrator creates a shared objective list, any teacher in any school can select and use that list. When a school administrator creates a list, any
Share objective lists to avoid duplication. Teachers who use the
same objectives can use the same objective list in their classes.
29Accelerated MathSoftware Manual
O B J E C T I V E S
Creating Objective Lists
. . .
. .
teacher in that administrator’s school can use the list. Teachers cannot share the lists they create.
Shared lists that were created by the district or program administrator can only be changed by that administrator. Shared lists that were created by a school administrator can be changed by that school administrator or the district administrator.
My Lists (Pr ivate L is ts)
Any teacher or administrator can create a private objective list (My Lists). These objective lists cannot be selected or changed by other teachers, but they may be changed by the owner. District administrators can change anyone’s private lists; school administrators can change private lists created within their school.
Creat ing Object ive L is ts
You can create objective lists from the Libraries page, a class Assignment Book, or a class Extended Response page. If you create an objective list starting from a class Assignment Book, the list will be automatically selected for that class. If you create a list starting from the Libraries page, it will not be automatically selected for any class. (See page 40 to choose a list for a class.)
If another class already has an objective list that you would like to use, you can select that objective list (see page 40). If it is not available to you on this server, the other class can export it (see page 39) and you can import it (see page 37).
Creat ing an Object ive L is t Start ing f rom the L ibrar ies Page
1. Click Libraries in the list of Accelerated Math tasks on the Home page.
2. Select your school from the School drop-down list if the drop-down list is available.
3. Click Manage Objectives on the left side of the page.
4. Click Create New List on the left side of the page.
Do you need to create objective lists? If you plan to
use all objectives from just one library in the default order, you can simply use one of the lists that were automatically created.
Who Can Do This?
District Administrator
District Staff
School Administrator
School Staff
Teachers
To change capabilities, see page 165.
30Accelerated MathSoftware Manual
O B J E C T I V E S
Creating Objective Lists
. . .
. .
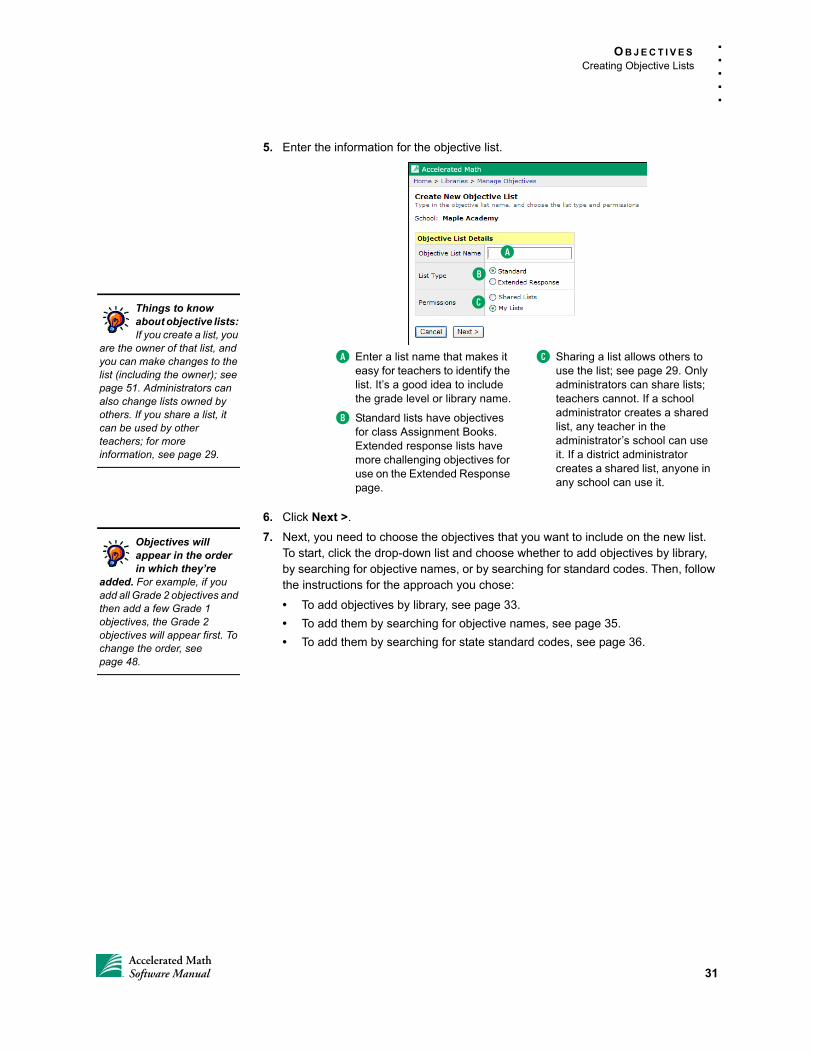
5. Enter the information for the objective list.
6. Click Next >.
7. Next, you need to choose the objectives that you want to include on the new list. To start, click the drop-down list and choose whether to add objectives by library, by searching for objective names, or by searching for standard codes. Then, follow the instructions for the approach you chose:
• To add objectives by library, see page 33.
• To add them by searching for objective names, see page 35.
• To add them by searching for state standard codes, see page 36.
Things to know about objective lists: If you create a list, you
are the owner of that list, and you can make changes to the list (including the owner); see page 51. Administrators can also change lists owned by others. If you share a list, it can be used by other teachers; for more information, see page 29.
A
B
C
A Enter a list name that makes it easy for teachers to identify the list. It’s a good idea to include the grade level or library name.
B Standard lists have objectives for class Assignment Books. Extended response lists have more challenging objectives for use on the Extended Response page.
C Sharing a list allows others to use the list; see page 29. Only administrators can share lists; teachers cannot. If a school administrator creates a shared list, any teacher in the administrator’s school can use it. If a district administrator creates a shared list, anyone in any school can use it.
Objectives will appear in the order in which they’re
added. For example, if you add all Grade 2 objectives and then add a few Grade 1 objectives, the Grade 2 objectives will appear first. To change the order, see page 48.
31Accelerated MathSoftware Manual
O B J E C T I V E S
Creating Objective Lists
. . .
. .
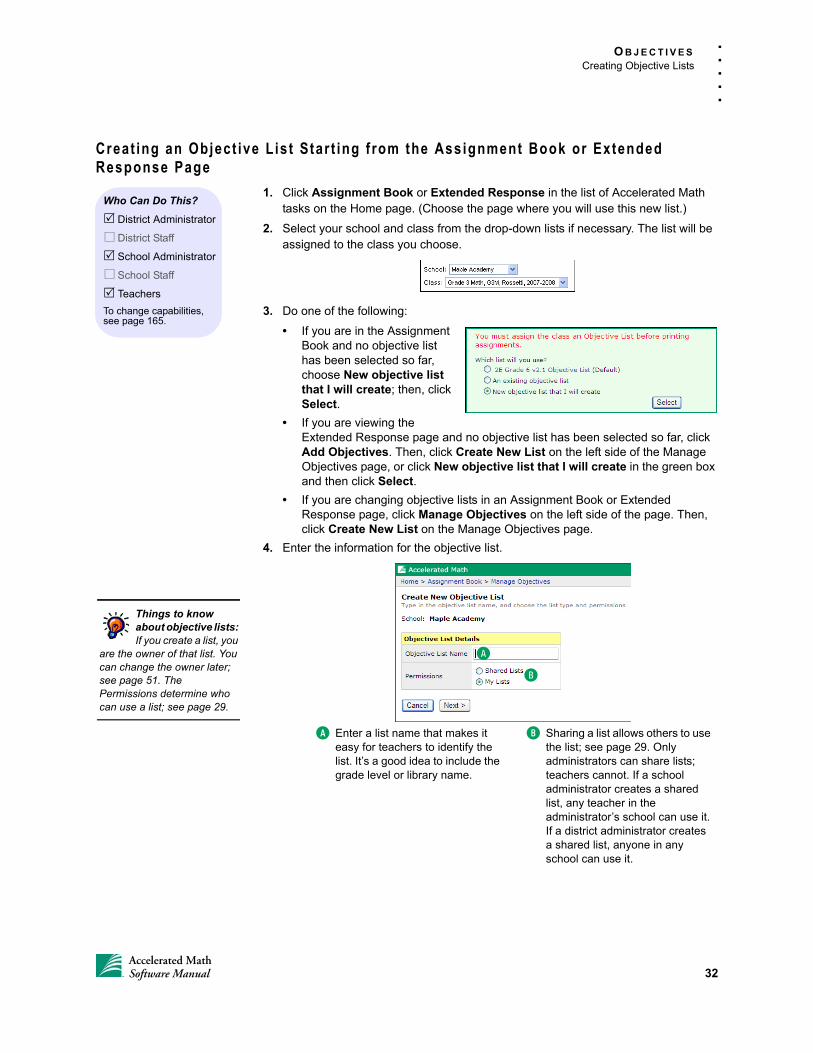
Creat ing an Object ive L is t Star t ing f rom the Assignment Book or Extended Response Page
1. Click Assignment Book or Extended Response in the list of Accelerated Math tasks on the Home page. (Choose the page where you will use this new list.)
2. Select your school and class from the drop-down lists if necessary. The list will be assigned to the class you choose.
3. Do one of the following:
• If you are in the Assignment Book and no objective list has been selected so far, choose New objective list that I will create; then, click Select.
• If you are viewing the Extended Response page and no objective list has been selected so far, click Add Objectives. Then, click Create New List on the left side of the Manage Objectives page, or click New objective list that I will create in the green box and then click Select.
• If you are changing objective lists in an Assignment Book or Extended Response page, click Manage Objectives on the left side of the page. Then, click Create New List on the Manage Objectives page.
4. Enter the information for the objective list.
Who Can Do This?
District Administrator
District Staff
School Administrator
School Staff
Teachers
To change capabilities, see page 165.
Things to know about objective lists: If you create a list, you
are the owner of that list. You can change the owner later; see page 51. The Permissions determine who can use a list; see page 29.
A
B
A Enter a list name that makes it easy for teachers to identify the list. It’s a good idea to include the grade level or library name.
B Sharing a list allows others to use the list; see page 29. Only administrators can share lists; teachers cannot. If a school administrator creates a shared list, any teacher in the administrator’s school can use it. If a district administrator creates a shared list, anyone in any school can use it.
32Accelerated MathSoftware Manual
O B J E C T I V E S
Creating Objective Lists
. . .
. .
5. Click Next >.
6. Next, you need to choose the objectives that you want to include on the new list. To start, click the drop-down list and choose whether to add objectives by library, by searching for objective names, or by searching for standard codes. Then, follow the instructions for the approach you chose:
• To add objectives by library, see the instructions below.
• To add them by searching for objective names, see page 35.
• To add them by searching for state standard codes, see page 36.
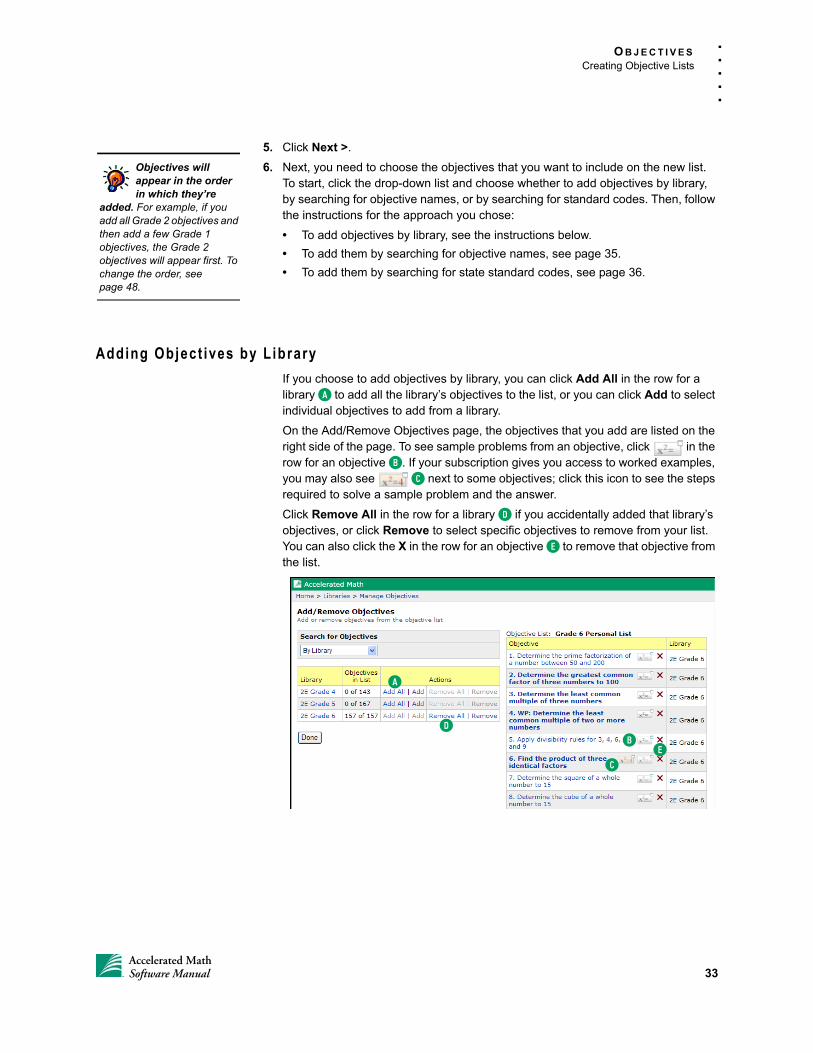
Adding Object ives by L ibrary
If you choose to add objectives by library, you can click Add All in the row for a library A to add all the library’s objectives to the list, or you can click Add to select individual objectives to add from a library.
On the Add/Remove Objectives page, the objectives that you add are listed on the right side of the page. To see sample problems from an objective, click in the row for an objective B. If your subscription gives you access to worked examples, you may also see C next to some objectives; click this icon to see the steps required to solve a sample problem and the answer.
Click Remove All in the row for a library D if you accidentally added that library’s objectives, or click Remove to select specific objectives to remove from your list. You can also click the X in the row for an objective E to remove that objective from the list.
Objectives will appear in the order in which they’re
added. For example, if you add all Grade 2 objectives and then add a few Grade 1 objectives, the Grade 2 objectives will appear first. To change the order, see page 48.
A
B
CE
D
33Accelerated MathSoftware Manual
O B J E C T I V E S
Creating Objective Lists
. . .
. .
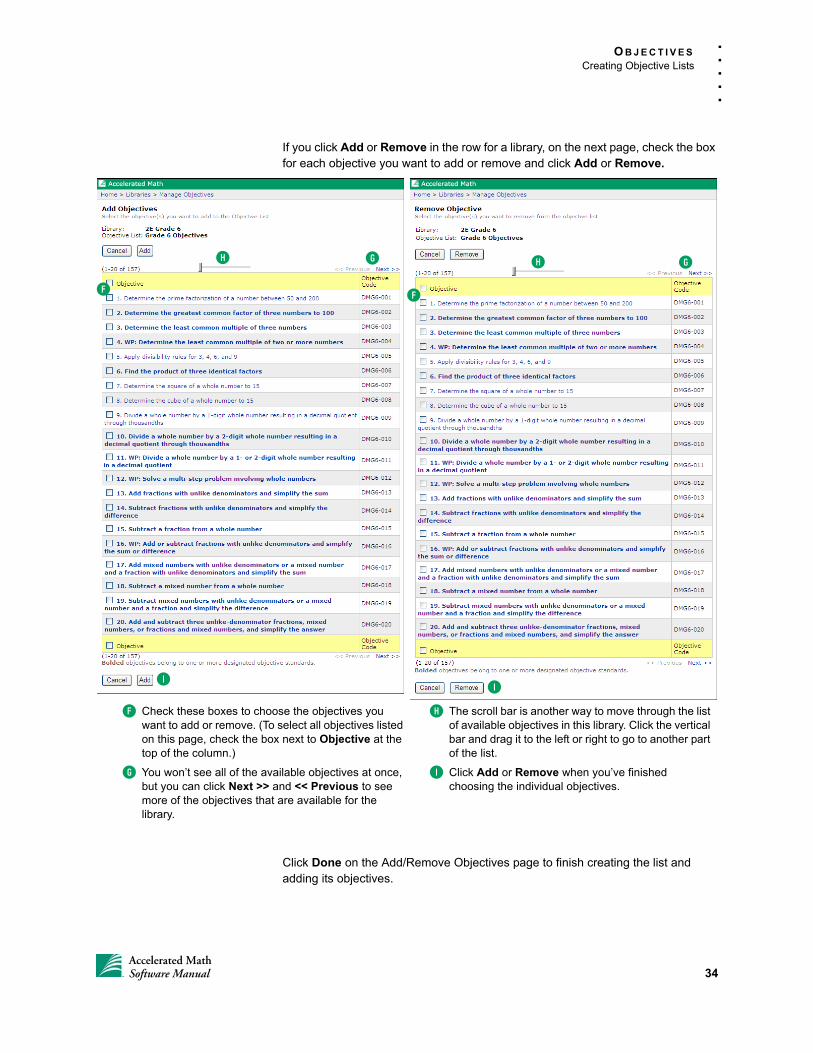
If you click Add or Remove in the row for a library, on the next page, check the box for each objective you want to add or remove and click Add or Remove.
Click Done on the Add/Remove Objectives page to finish creating the list and adding its objectives.
F
GH
I
F
GH
I
F Check these boxes to choose the objectives you want to add or remove. (To select all objectives listed on this page, check the box next to Objective at the top of the column.)
G You won’t see all of the available objectives at once, but you can click Next >> and << Previous to see more of the objectives that are available for the library.
H The scroll bar is another way to move through the list of available objectives in this library. Click the vertical bar and drag it to the left or right to go to another part of the list.
I Click Add or Remove when you’ve finished choosing the individual objectives.
34Accelerated MathSoftware Manual
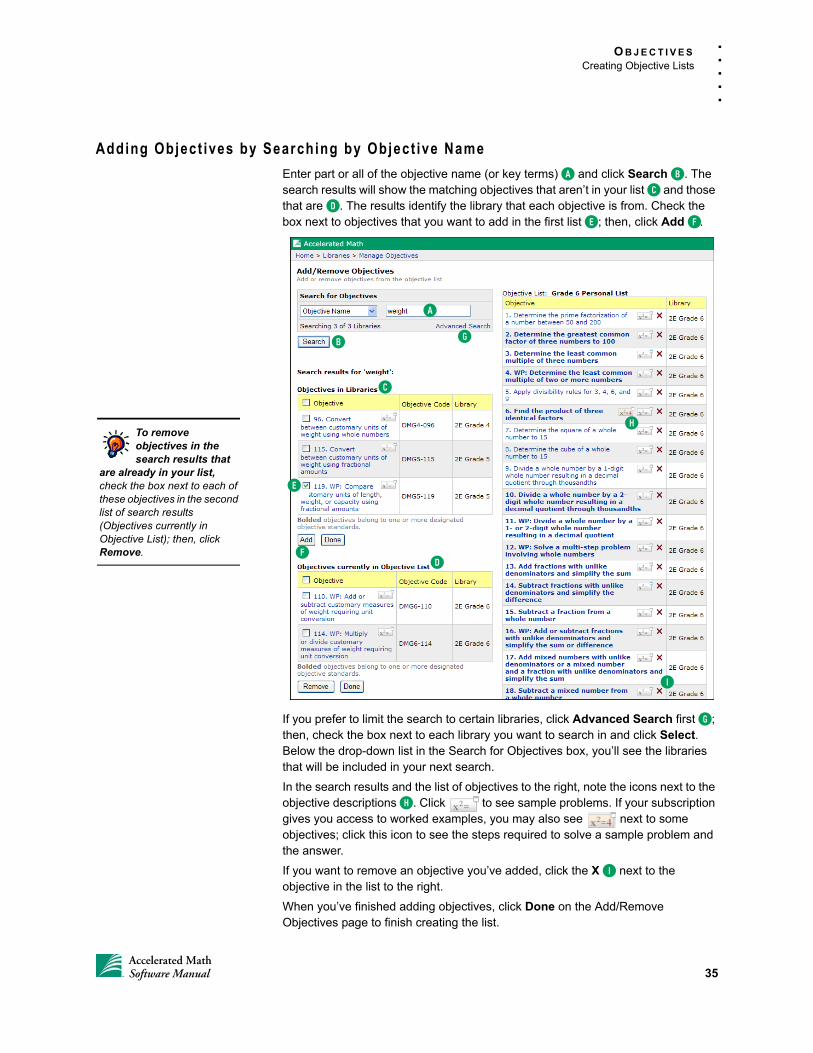
O B J E C T I V E S
Creating Objective Lists
. . .
. .
Adding Object ives by Searching by Object ive Name
Enter part or all of the objective name (or key terms) A and click Search B. The search results will show the matching objectives that aren’t in your list C and those that are D. The results identify the library that each objective is from. Check the box next to objectives that you want to add in the first list E; then, click Add F.
If you prefer to limit the search to certain libraries, click Advanced Search first G; then, check the box next to each library you want to search in and click Select. Below the drop-down list in the Search for Objectives box, you’ll see the libraries that will be included in your next search.
In the search results and the list of objectives to the right, note the icons next to the objective descriptions H. Click to see sample problems. If your subscription gives you access to worked examples, you may also see next to some objectives; click this icon to see the steps required to solve a sample problem and the answer.
If you want to remove an objective you’ve added, click the X I next to the objective in the list to the right.
When you’ve finished adding objectives, click Done on the Add/Remove Objectives page to finish creating the list.
To remove objectives in the search results that
are already in your list, check the box next to each of these objectives in the second list of search results (Objectives currently in Objective List); then, click Remove.
A
B
C
D
E
F
G
H
I
35Accelerated MathSoftware Manual

O B J E C T I V E S
Creating Objective Lists
. . .
. .
Adding Object ives by Searching by State Standard Code
Enter the standard tag code A and click Search B. The search results will show the matching objectives that aren’t in your list C and those that are D. The results identify the library that each objective is from. Check the box next to objectives that you want to add in the first list E; then, click Add F.
If you prefer to limit the search to certain libraries, click Advanced Search first G; then, check the box next to each library you want to search in and click Select. Below the drop-down list in the Search for Objectives box, you’ll see the libraries that will be included in your next search.
In the search results and the list of objectives to the right, note the icons next to the objective descriptions H. Click to see sample problems. If your subscription gives you access to worked examples, you may also see next to some objectives; click this icon to see the steps required to solve a sample problem and the answer.
If you want to remove an objective you’ve added, click the X I next to the objective in the list to the right.
To remove objectives in the search results that
are already in your list, check the box next to each of these objectives in the second list of search results (Objectives currently in Objective List); then, click Remove.
A
B
C
E
D
G
H
I
36Accelerated MathSoftware Manual
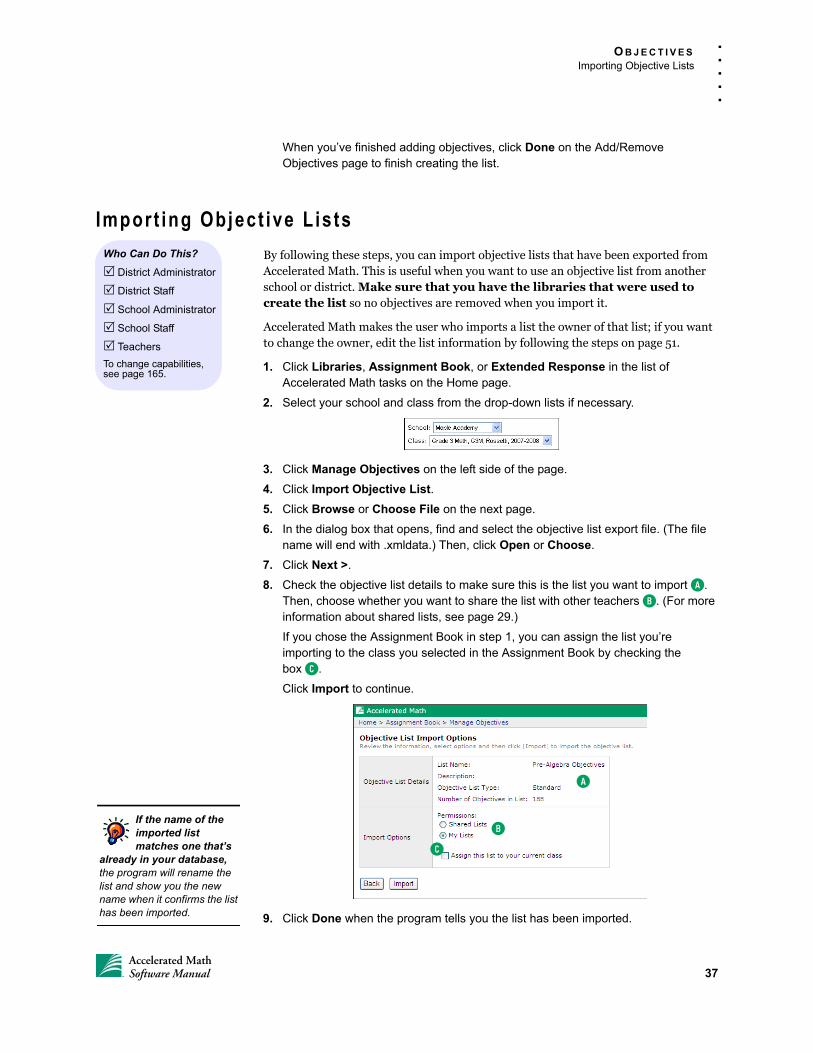
O B J E C T I V E S
Importing Objective Lists
. . .
. .
When you’ve finished adding objectives, click Done on the Add/Remove Objectives page to finish creating the list.
Impor t ing Object ive L is ts
By following these steps, you can import objective lists that have been exported from Accelerated Math. This is useful when you want to use an objective list from another school or district. Make sure that you have the libraries that were used to create the list so no objectives are removed when you import it.
Accelerated Math makes the user who imports a list the owner of that list; if you want to change the owner, edit the list information by following the steps on page 51.
1. Click Libraries, Assignment Book, or Extended Response in the list of Accelerated Math tasks on the Home page.
2. Select your school and class from the drop-down lists if necessary.
3. Click Manage Objectives on the left side of the page.
4. Click Import Objective List.
5. Click Browse or Choose File on the next page.
6. In the dialog box that opens, find and select the objective list export file. (The file name will end with .xmldata.) Then, click Open or Choose.
7. Click Next >.
8. Check the objective list details to make sure this is the list you want to import A. Then, choose whether you want to share the list with other teachers B. (For more information about shared lists, see page 29.)
If you chose the Assignment Book in step 1, you can assign the list you’re importing to the class you selected in the Assignment Book by checking thebox C.
Click Import to continue.
9. Click Done when the program tells you the list has been imported.
Who Can Do This?
District Administrator
District Staff
School Administrator
School Staff
Teachers
To change capabilities, see page 165.
A
B
C
If the name of the imported list matches one that’s
already in your database, the program will rename the list and show you the new name when it confirms the list has been imported.
37Accelerated MathSoftware Manual
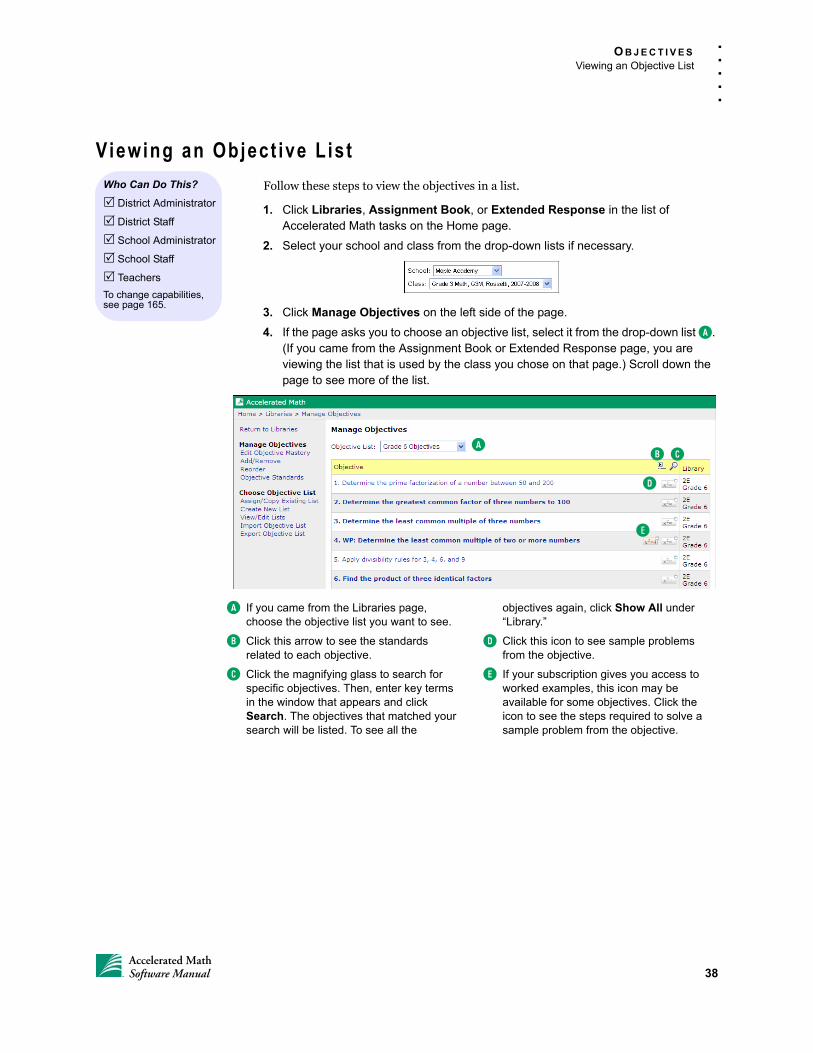
O B J E C T I V E S
Viewing an Objective List
. . .
. .
Viewing an Object ive L is t
Follow these steps to view the objectives in a list.
1. Click Libraries, Assignment Book, or Extended Response in the list of Accelerated Math tasks on the Home page.
2. Select your school and class from the drop-down lists if necessary.
3. Click Manage Objectives on the left side of the page.
4. If the page asks you to choose an objective list, select it from the drop-down list A. (If you came from the Assignment Book or Extended Response page, you are viewing the list that is used by the class you chose on that page.) Scroll down the page to see more of the list.
Who Can Do This?
District Administrator
District Staff
School Administrator
School Staff
Teachers
To change capabilities, see page 165.
A
D
B C
E
A If you came from the Libraries page, choose the objective list you want to see.
B Click this arrow to see the standards related to each objective.
C Click the magnifying glass to search for specific objectives. Then, enter key terms in the window that appears and click Search. The objectives that matched your search will be listed. To see all the
objectives again, click Show All under “Library.”
D Click this icon to see sample problems from the objective.
E If your subscription gives you access to worked examples, this icon may be available for some objectives. Click the icon to see the steps required to solve a sample problem from the objective.
38Accelerated MathSoftware Manual
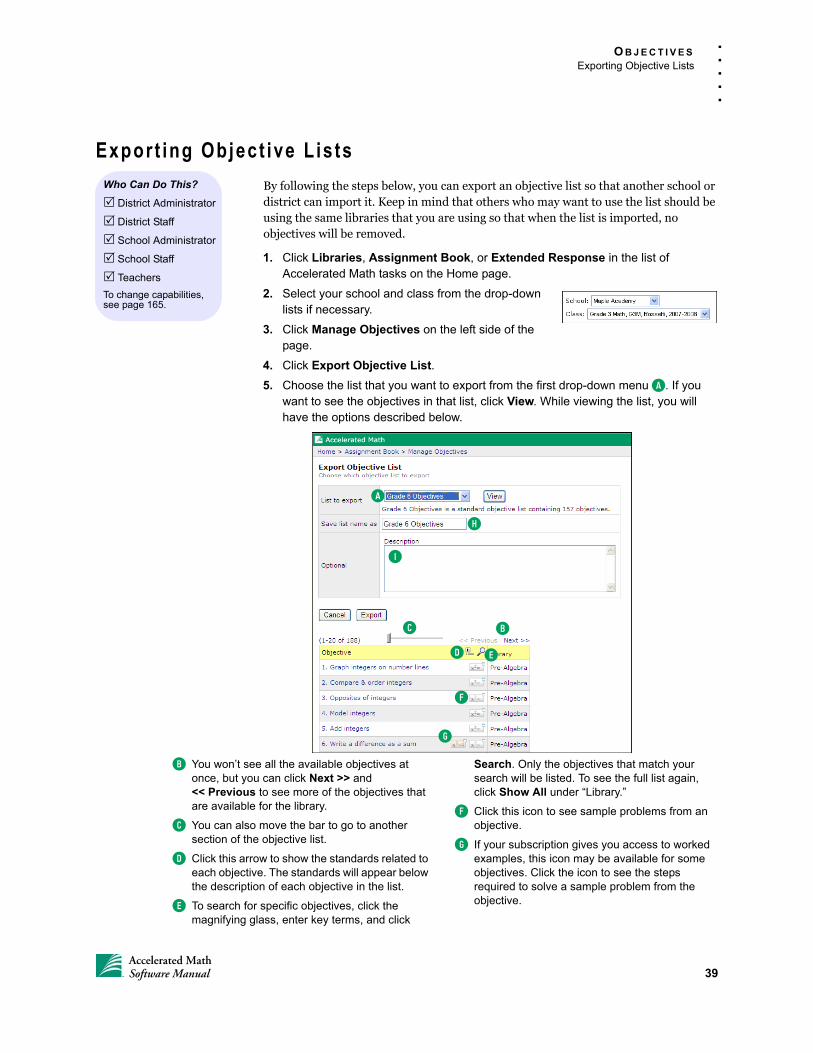
O B J E C T I V E S
Exporting Objective Lists
. . .
. .
Export ing Object ive L is ts
By following the steps below, you can export an objective list so that another school or district can import it. Keep in mind that others who may want to use the list should be using the same libraries that you are using so that when the list is imported, no objectives will be removed.
1. Click Libraries, Assignment Book, or Extended Response in the list of Accelerated Math tasks on the Home page.
2. Select your school and class from the drop-down lists if necessary.
3. Click Manage Objectives on the left side of the page.
4. Click Export Objective List.
5. Choose the list that you want to export from the first drop-down menu A. If you want to see the objectives in that list, click View. While viewing the list, you will have the options described below.
Who Can Do This?
District Administrator
District Staff
School Administrator
School Staff
Teachers
To change capabilities, see page 165.
BC
H
I
A
D E
F
G
B You won’t see all the available objectives at once, but you can click Next >> and<< Previous to see more of the objectives that are available for the library.
C You can also move the bar to go to another section of the objective list.
D Click this arrow to show the standards related to each objective. The standards will appear below the description of each objective in the list.
E To search for specific objectives, click the magnifying glass, enter key terms, and click
Search. Only the objectives that match your search will be listed. To see the full list again, click Show All under “Library.”
F Click this icon to see sample problems from an objective.
G If your subscription gives you access to worked examples, this icon may be available for some objectives. Click the icon to see the steps required to solve a sample problem from the objective.
39Accelerated MathSoftware Manual
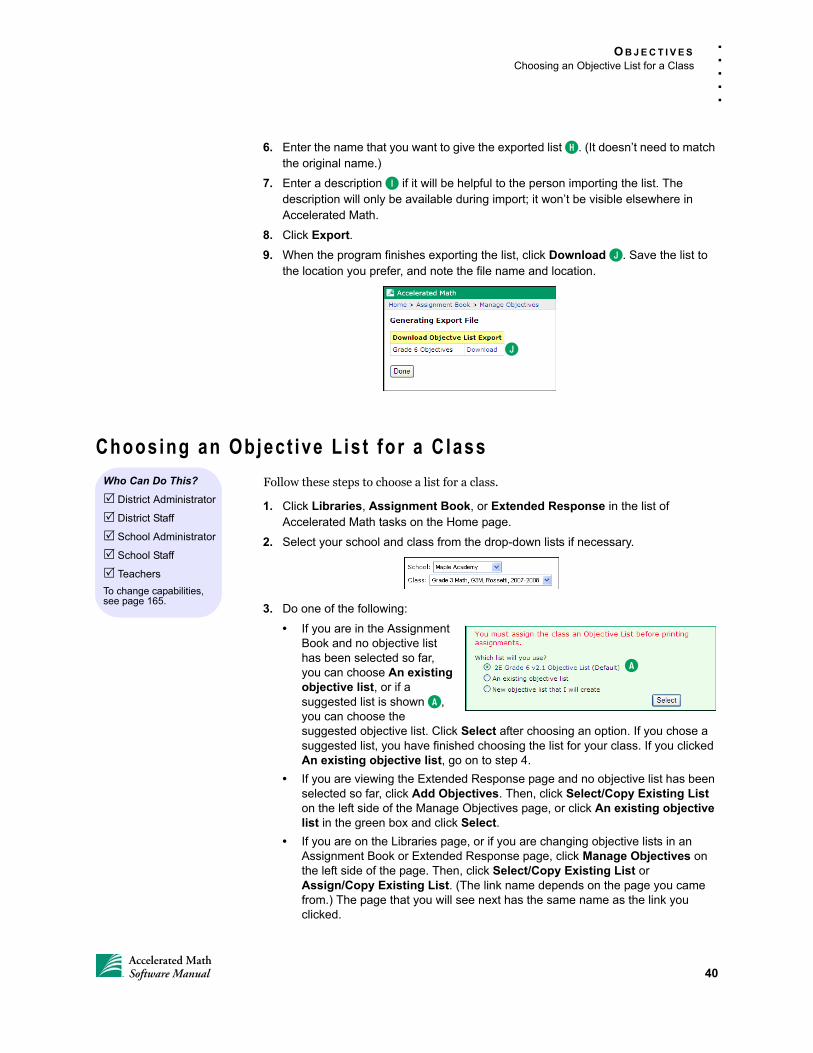
O B J E C T I V E S
Choosing an Objective List for a Class
. . .
. .
6. Enter the name that you want to give the exported list H. (It doesn’t need to match the original name.)
7. Enter a description I if it will be helpful to the person importing the list. The description will only be available during import; it won’t be visible elsewhere in Accelerated Math.
8. Click Export.
9. When the program finishes exporting the list, click Download J. Save the list to the location you prefer, and note the file name and location.
Choosing an Object ive L is t for a C lass
Follow these steps to choose a list for a class.
1. Click Libraries, Assignment Book, or Extended Response in the list of Accelerated Math tasks on the Home page.
2. Select your school and class from the drop-down lists if necessary.
3. Do one of the following:
• If you are in the Assignment Book and no objective list has been selected so far, you can choose An existing objective list, or if a suggested list is shown A, you can choose the suggested objective list. Click Select after choosing an option. If you chose a suggested list, you have finished choosing the list for your class. If you clicked An existing objective list, go on to step 4.
• If you are viewing the Extended Response page and no objective list has been selected so far, click Add Objectives. Then, click Select/Copy Existing List on the left side of the Manage Objectives page, or click An existing objective list in the green box and click Select.
• If you are on the Libraries page, or if you are changing objective lists in an Assignment Book or Extended Response page, click Manage Objectives on the left side of the page. Then, click Select/Copy Existing List or Assign/Copy Existing List. (The link name depends on the page you came from.) The page that you will see next has the same name as the link you clicked.
J
Who Can Do This?
District Administrator
District Staff
School Administrator
School Staff
Teachers
To change capabilities, see page 165.
A
40Accelerated MathSoftware Manual
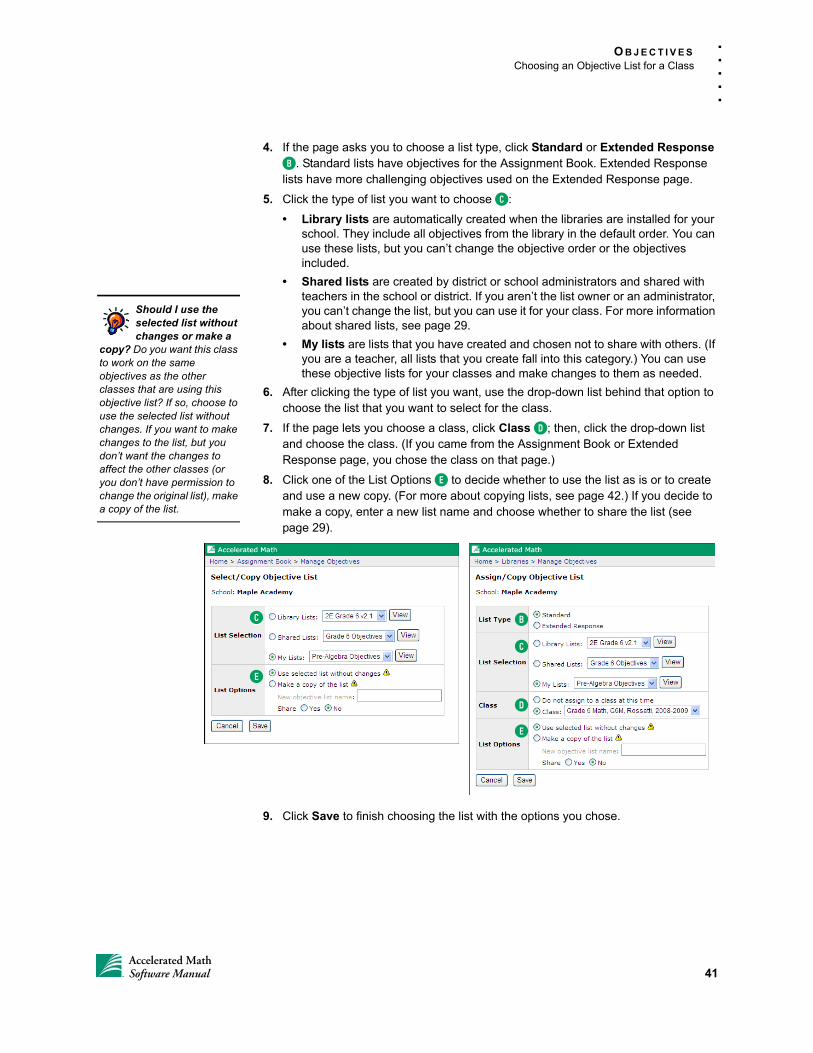
O B J E C T I V E S
Choosing an Objective List for a Class
. . .
. .
4. If the page asks you to choose a list type, click Standard or Extended Response B. Standard lists have objectives for the Assignment Book. Extended Response lists have more challenging objectives used on the Extended Response page.
5. Click the type of list you want to choose C:
• Library lists are automatically created when the libraries are installed for your school. They include all objectives from the library in the default order. You can use these lists, but you can’t change the objective order or the objectives included.
• Shared lists are created by district or school administrators and shared with teachers in the school or district. If you aren’t the list owner or an administrator, you can’t change the list, but you can use it for your class. For more information about shared lists, see page 29.
• My lists are lists that you have created and chosen not to share with others. (If you are a teacher, all lists that you create fall into this category.) You can use these objective lists for your classes and make changes to them as needed.
6. After clicking the type of list you want, use the drop-down list behind that option to choose the list that you want to select for the class.
7. If the page lets you choose a class, click Class D; then, click the drop-down list and choose the class. (If you came from the Assignment Book or Extended Response page, you chose the class on that page.)
8. Click one of the List Options E to decide whether to use the list as is or to create and use a new copy. (For more about copying lists, see page 42.) If you decide to make a copy, enter a new list name and choose whether to share the list (see page 29).
9. Click Save to finish choosing the list with the options you chose.
Should I use the selected list without changes or make a
copy? Do you want this class to work on the same objectives as the other classes that are using this objective list? If so, choose to use the selected list without changes. If you want to make changes to the list, but you don’t want the changes to affect the other classes (or you don’t have permission to change the original list), make a copy of the list.
C
E
B
C
D
E
41Accelerated MathSoftware Manual
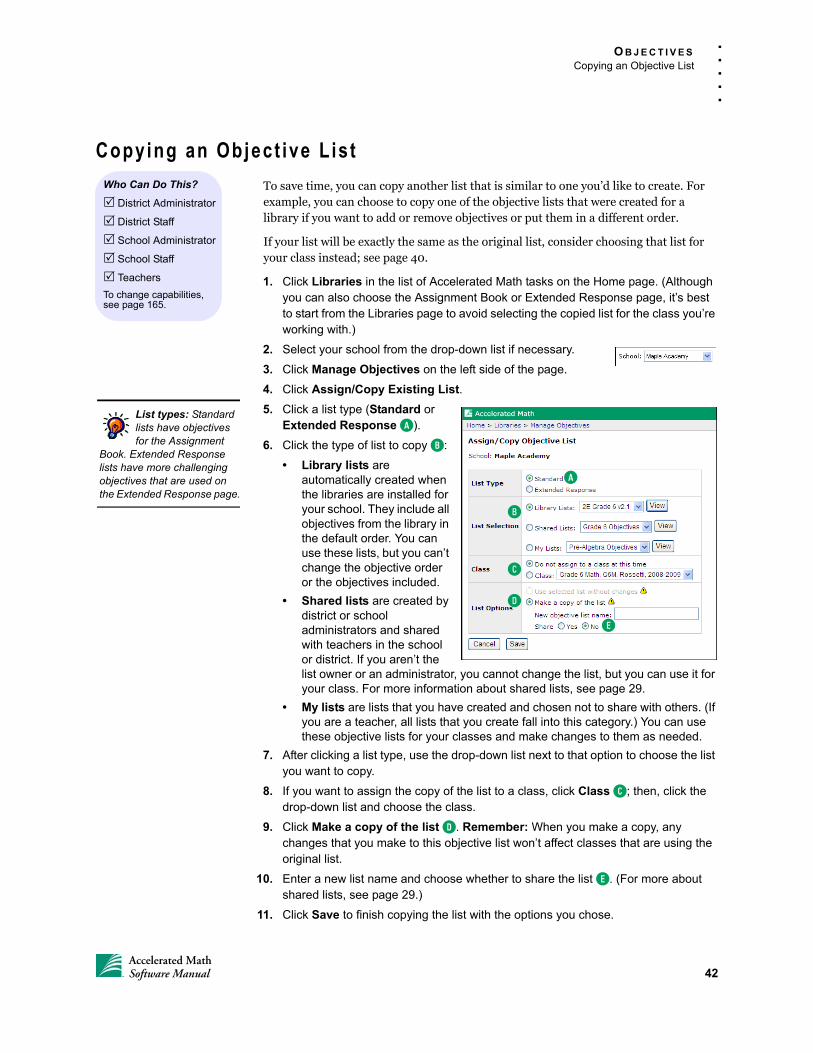
O B J E C T I V E S
Copying an Objective List
. . .
. .
Copying an Object ive L is t
To save time, you can copy another list that is similar to one you’d like to create. For example, you can choose to copy one of the objective lists that were created for a library if you want to add or remove objectives or put them in a different order.
If your list will be exactly the same as the original list, consider choosing that list for your class instead; see page 40.
1. Click Libraries in the list of Accelerated Math tasks on the Home page. (Although you can also choose the Assignment Book or Extended Response page, it’s best to start from the Libraries page to avoid selecting the copied list for the class you’re working with.)
2. Select your school from the drop-down list if necessary.
3. Click Manage Objectives on the left side of the page.
4. Click Assign/Copy Existing List.
5. Click a list type (Standard or Extended Response A).
6. Click the type of list to copy B:
• Library lists are automatically created when the libraries are installed for your school. They include all objectives from the library in the default order. You can use these lists, but you can’t change the objective order or the objectives included.
• Shared lists are created by district or school administrators and shared with teachers in the school or district. If you aren’t the list owner or an administrator, you cannot change the list, but you can use it for your class. For more information about shared lists, see page 29.
• My lists are lists that you have created and chosen not to share with others. (If you are a teacher, all lists that you create fall into this category.) You can use these objective lists for your classes and make changes to them as needed.
7. After clicking a list type, use the drop-down list next to that option to choose the list you want to copy.
8. If you want to assign the copy of the list to a class, click Class C; then, click the drop-down list and choose the class.
9. Click Make a copy of the list D. Remember: When you make a copy, any changes that you make to this objective list won’t affect classes that are using the original list.
10. Enter a new list name and choose whether to share the list E. (For more about shared lists, see page 29.)
11. Click Save to finish copying the list with the options you chose.
Who Can Do This?
District Administrator
District Staff
School Administrator
School Staff
Teachers
To change capabilities, see page 165.
A
B
C
D
E
List types: Standard lists have objectives for the Assignment
Book. Extended Response lists have more challenging objectives that are used on the Extended Response page.
42Accelerated MathSoftware Manual

O B J E C T I V E S
Adding Objectives to a List or Removing Them from a List
. . .
. .
Adding Object ives to a L is t or Removing Them f rom a L is t
After an objective list has been created, you may decide to add more objectives or to remove objectives that you don’t want to use for your classes. If you are using one of the objective lists that was created automatically for each library, you cannot add or remove objectives; however, you can make a copy of the list (see page 42) and add or remove objectives in the new copy of the list.
Follow these steps to add objectives to a list or remove them from a list:
1. Click Libraries, Assignment Book, or Extended Response in the list of Accelerated Math tasks on the Home page.
2. Select your school and class from the drop-down lists if necessary.
3. Click Manage Objectives on the left side of the page.
4. If the page asks you to choose an objective list, select it from the drop-down list. (If you came from the Assignment Book or Extended Response page, you are changing the list that is used by the class you chose on that page.)
5. Click Add/Remove. (If the link is not available, you are not the list owner or an administrator, or you’ve chosen one of the lists that was generated automatically for each library.)
6. Next, you need to choose the objectives that you want to add or remove. To start, click the drop-down list and choose whether to add objectives by library, by searching for objective names, or by searching for standard codes. Then, follow the instructions for the approach you chose:
• To add objectives by library, see page 44.
• To add them by searching for objective names, see page 46.
• To add them by searching for state standard codes, see page 47.
Who Can Do This?
District Administrator
District Staff
School Administrator
School Staff
Teachers
To change capabilities, see page 165.
Objectives will appear in the order in which they’re
added. For example, if you add all Grade 2 objectives and then add a few Grade 1 objectives, the Grade 2 objectives will appear first. To change the order, see page 48.
43Accelerated MathSoftware Manual
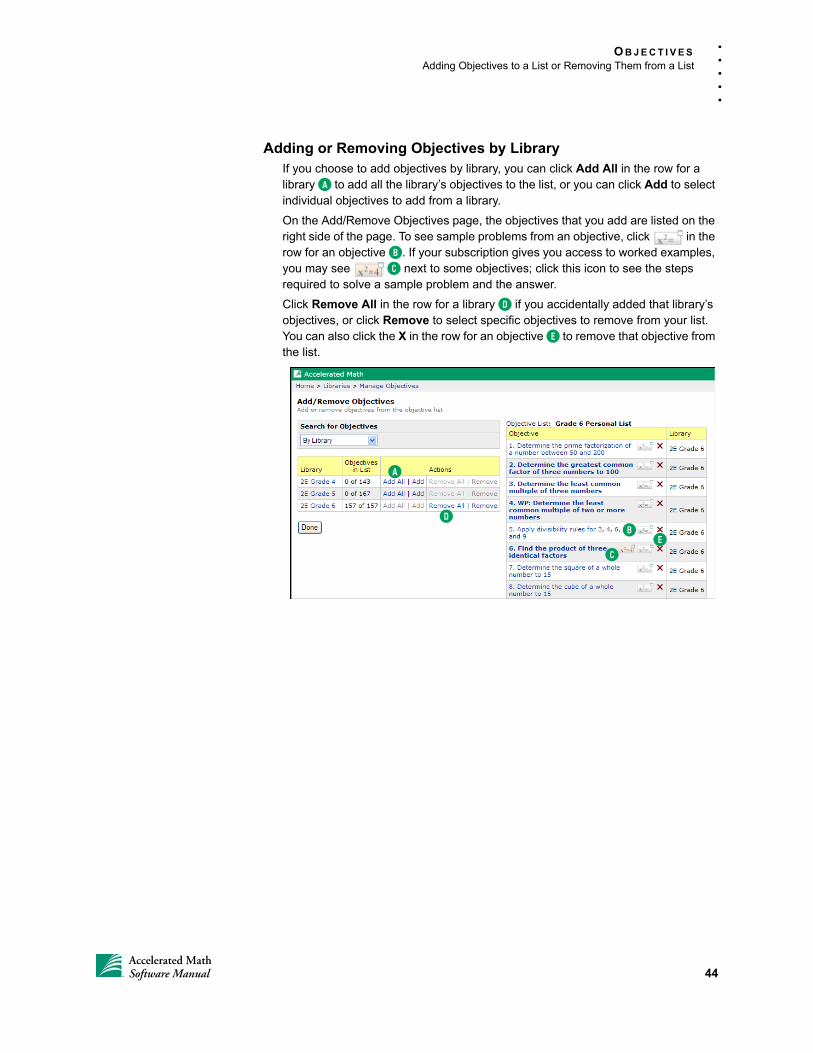
O B J E C T I V E S
Adding Objectives to a List or Removing Them from a List
. . .
. .
Adding or Removing Objectives by LibraryIf you choose to add objectives by library, you can click Add All in the row for a library A to add all the library’s objectives to the list, or you can click Add to select individual objectives to add from a library.
On the Add/Remove Objectives page, the objectives that you add are listed on the right side of the page. To see sample problems from an objective, click in the row for an objective B. If your subscription gives you access to worked examples, you may see C next to some objectives; click this icon to see the steps required to solve a sample problem and the answer.
Click Remove All in the row for a library D if you accidentally added that library’s objectives, or click Remove to select specific objectives to remove from your list. You can also click the X in the row for an objective E to remove that objective from the list.
A
B
CE
D
44Accelerated MathSoftware Manual
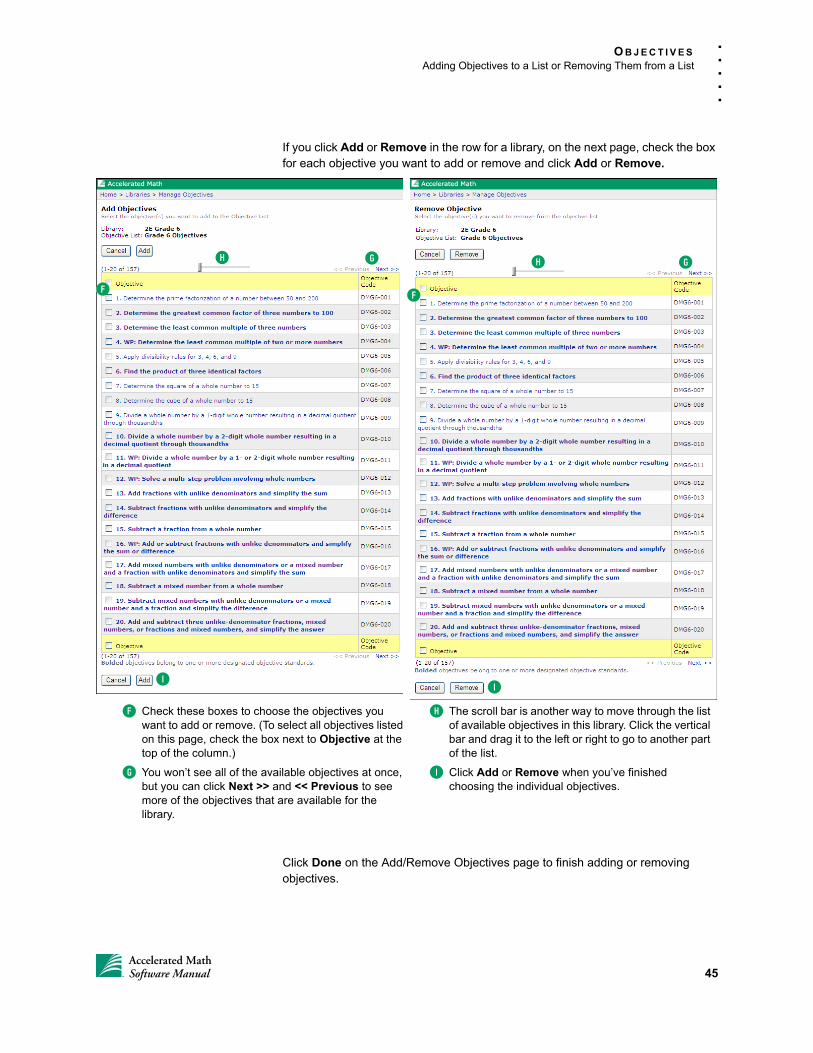
O B J E C T I V E S
Adding Objectives to a List or Removing Them from a List
. . .
. .
If you click Add or Remove in the row for a library, on the next page, check the box for each objective you want to add or remove and click Add or Remove.
Click Done on the Add/Remove Objectives page to finish adding or removing objectives.
F
GH
I
F
GH
I
F Check these boxes to choose the objectives you want to add or remove. (To select all objectives listed on this page, check the box next to Objective at the top of the column.)
G You won’t see all of the available objectives at once, but you can click Next >> and << Previous to see more of the objectives that are available for the library.
H The scroll bar is another way to move through the list of available objectives in this library. Click the vertical bar and drag it to the left or right to go to another part of the list.
I Click Add or Remove when you’ve finished choosing the individual objectives.
45Accelerated MathSoftware Manual

O B J E C T I V E S
Adding Objectives to a List or Removing Them from a List
. . .
. .
Adding or Removing Objectives by Searching by Objective NameEnter part or all of the objective name (or key terms) A and click Search B. The search results will show the matching objectives that aren’t in your list C and those that are D. The results identify the library that each objective is from. Check the box next to each objective that you want to add in the first list E; then, clickAdd F.
If you prefer to limit the search to certain libraries, click Advanced Search first G; then, check the box next to each library you want to search in and click Select. Below the drop-down list in the Search for Objectives box, you’ll see the libraries that will be included in your next search.
In the search results and the list of objectives to the right, note the icons next to the objective descriptions H. Click to see sample problems. If your subscription gives you access to worked examples, you may also see next to some objectives; click this icon to see the steps required to solve a sample problem and the answer.
If you want to remove an objective you’ve added, click the X I next to the objective in the list to the right.
When you’ve finished adding objectives, click Done on the Add/Remove Objectives page.
To remove objectives in the search results that
are already in your list, check the box next to each of these objectives in the second list of search results (Objectives currently in Objective List); then, click Remove.
A
B
C
DF
G
H
E
I
46Accelerated MathSoftware Manual
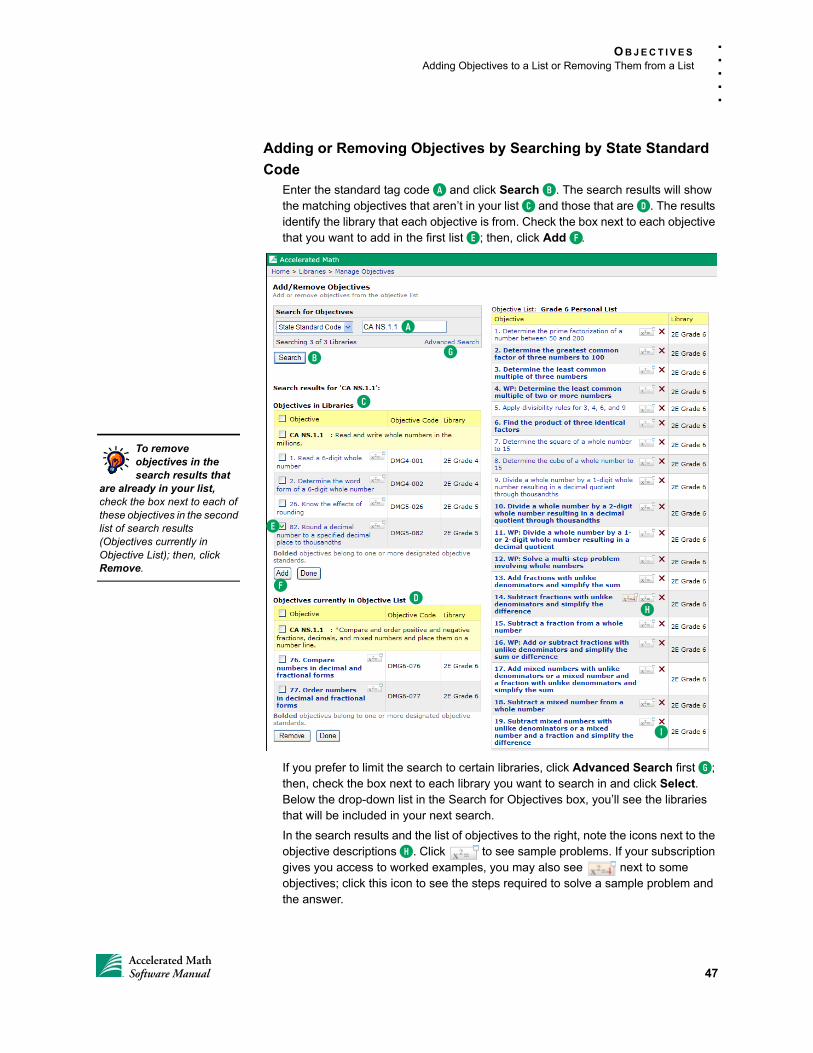
O B J E C T I V E S
Adding Objectives to a List or Removing Them from a List
. . .
. .
Adding or Removing Objectives by Searching by State Standard
CodeEnter the standard tag code A and click Search B. The search results will show the matching objectives that aren’t in your list C and those that are D. The results identify the library that each objective is from. Check the box next to each objective that you want to add in the first list E; then, click Add F.
If you prefer to limit the search to certain libraries, click Advanced Search first G; then, check the box next to each library you want to search in and click Select. Below the drop-down list in the Search for Objectives box, you’ll see the libraries that will be included in your next search.
In the search results and the list of objectives to the right, note the icons next to the objective descriptions H. Click to see sample problems. If your subscription gives you access to worked examples, you may also see next to some objectives; click this icon to see the steps required to solve a sample problem and the answer.
To remove objectives in the search results that
are already in your list, check the box next to each of these objectives in the second list of search results (Objectives currently in Objective List); then, click Remove.
A
B
C
D
G
H
F
E
I
47Accelerated MathSoftware Manual
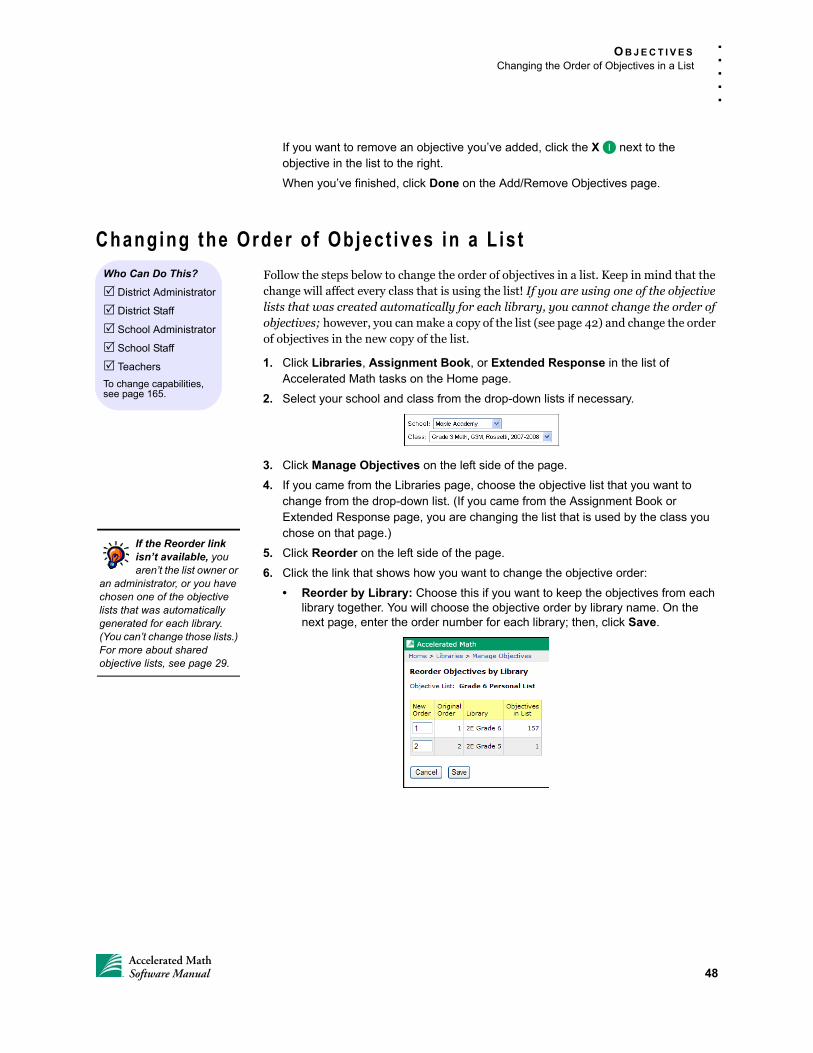
O B J E C T I V E S
Changing the Order of Objectives in a List
. . .
. .
If you want to remove an objective you’ve added, click the X I next to the objective in the list to the right.
When you’ve finished, click Done on the Add/Remove Objectives page.
Changing the Order o f Object ives in a L is t
Follow the steps below to change the order of objectives in a list. Keep in mind that the change will affect every class that is using the list! If you are using one of the objective lists that was created automatically for each library, you cannot change the order of objectives; however, you can make a copy of the list (see page 42) and change the order of objectives in the new copy of the list.
1. Click Libraries, Assignment Book, or Extended Response in the list of Accelerated Math tasks on the Home page.
2. Select your school and class from the drop-down lists if necessary.
3. Click Manage Objectives on the left side of the page.
4. If you came from the Libraries page, choose the objective list that you want to change from the drop-down list. (If you came from the Assignment Book or Extended Response page, you are changing the list that is used by the class you chose on that page.)
5. Click Reorder on the left side of the page.
6. Click the link that shows how you want to change the objective order:
• Reorder by Library: Choose this if you want to keep the objectives from each library together. You will choose the objective order by library name. On the next page, enter the order number for each library; then, click Save.
Who Can Do This?
District Administrator
District Staff
School Administrator
School Staff
Teachers
To change capabilities, see page 165.
If the Reorder link isn’t available, you aren’t the list owner or
an administrator, or you have chosen one of the objective lists that was automatically generated for each library. (You can’t change those lists.) For more about shared objective lists, see page 29.
48Accelerated MathSoftware Manual
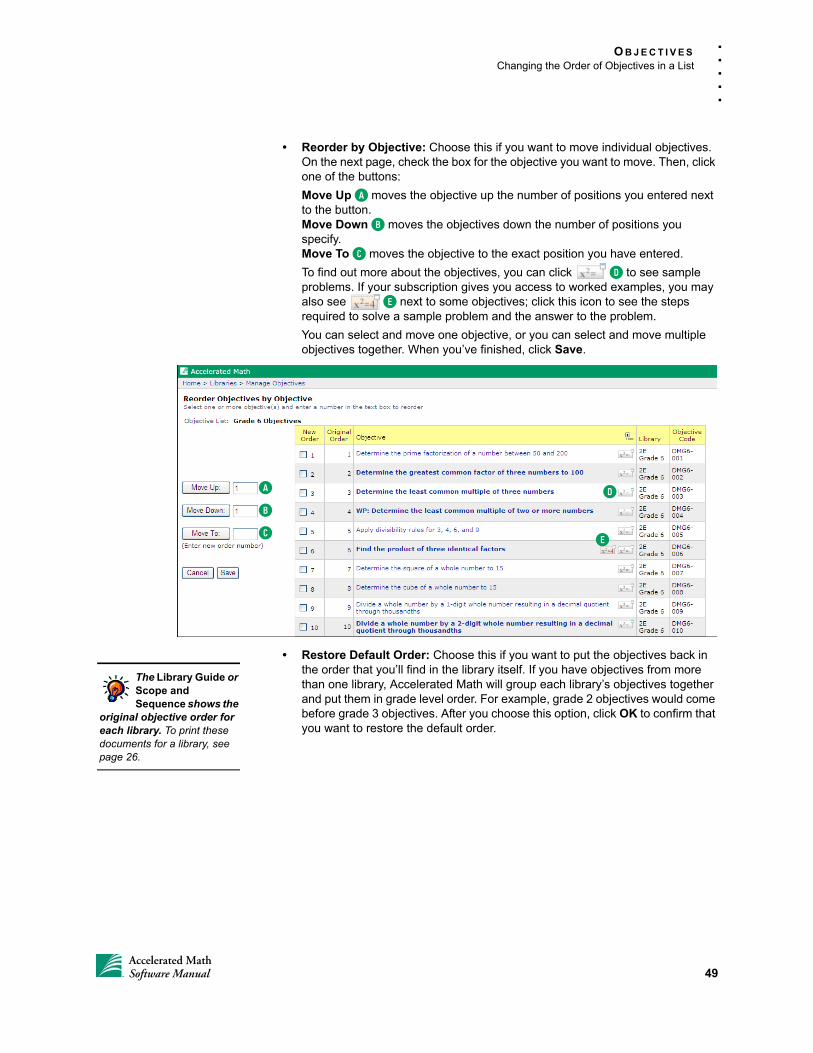
O B J E C T I V E S
Changing the Order of Objectives in a List
. . .
. .
• Reorder by Objective: Choose this if you want to move individual objectives. On the next page, check the box for the objective you want to move. Then, click one of the buttons:
Move Up A moves the objective up the number of positions you entered next to the button.Move Down B moves the objectives down the number of positions you specify.Move To C moves the objective to the exact position you have entered.
To find out more about the objectives, you can click D to see sample problems. If your subscription gives you access to worked examples, you may also see E next to some objectives; click this icon to see the steps required to solve a sample problem and the answer to the problem.
You can select and move one objective, or you can select and move multiple objectives together. When you’ve finished, click Save.
• Restore Default Order: Choose this if you want to put the objectives back in the order that you’ll find in the library itself. If you have objectives from more than one library, Accelerated Math will group each library’s objectives together and put them in grade level order. For example, grade 2 objectives would come before grade 3 objectives. After you choose this option, click OK to confirm that you want to restore the default order.
A
B
C
D
E
The Library Guide or Scope and Sequence shows the
original objective order for each library. To print these documents for a library, see page 26.
49Accelerated MathSoftware Manual
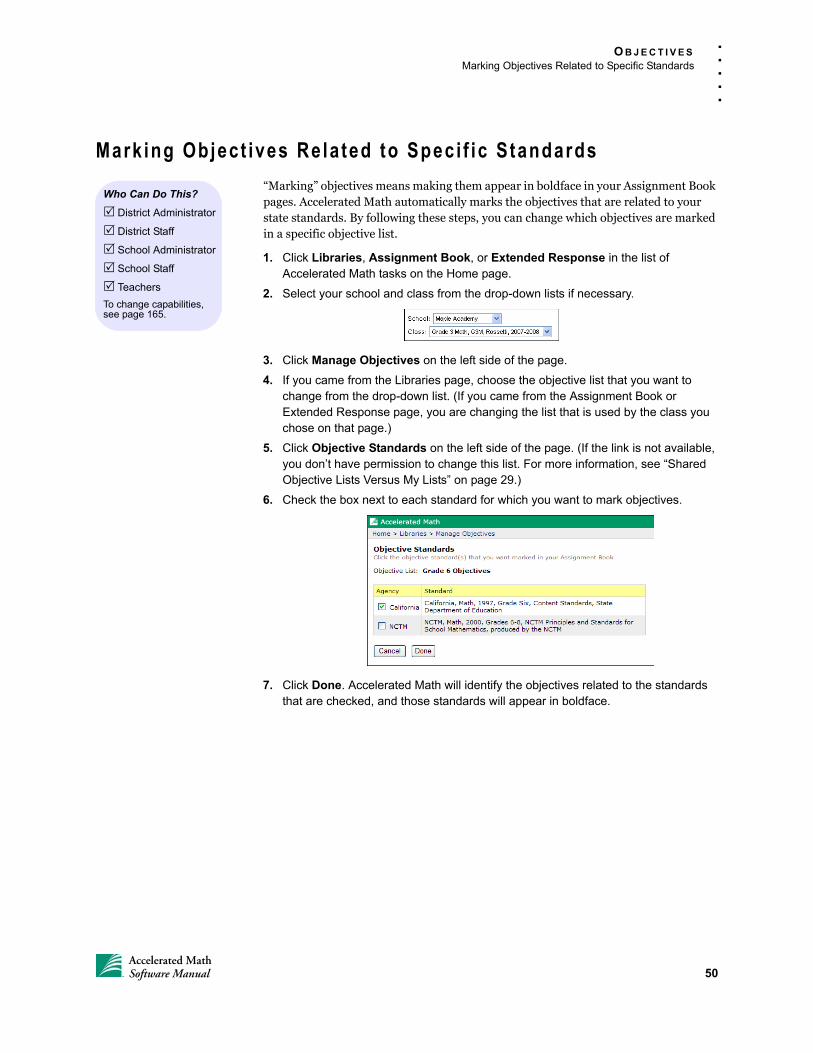
O B J E C T I V E S
Marking Objectives Related to Specific Standards
. . .
. .
Mark ing Object ives Rela ted to Speci f ic Standards
“Marking” objectives means making them appear in boldface in your Assignment Book pages. Accelerated Math automatically marks the objectives that are related to your state standards. By following these steps, you can change which objectives are marked in a specific objective list.
1. Click Libraries, Assignment Book, or Extended Response in the list of Accelerated Math tasks on the Home page.
2. Select your school and class from the drop-down lists if necessary.
3. Click Manage Objectives on the left side of the page.
4. If you came from the Libraries page, choose the objective list that you want to change from the drop-down list. (If you came from the Assignment Book or Extended Response page, you are changing the list that is used by the class you chose on that page.)
5. Click Objective Standards on the left side of the page. (If the link is not available, you don’t have permission to change this list. For more information, see “Shared Objective Lists Versus My Lists” on page 29.)
6. Check the box next to each standard for which you want to mark objectives.
7. Click Done. Accelerated Math will identify the objectives related to the standards that are checked, and those standards will appear in boldface.
Who Can Do This?
District Administrator
District Staff
School Administrator
School Staff
Teachers
To change capabilities, see page 165.
50Accelerated MathSoftware Manual
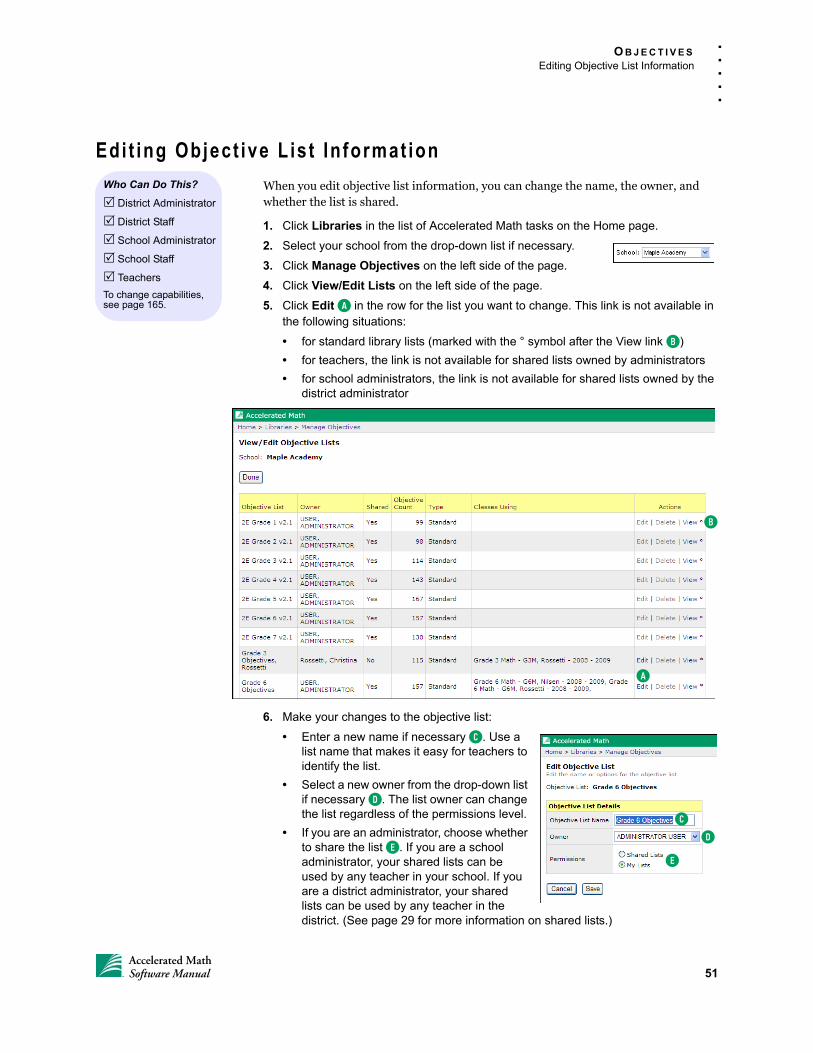
O B J E C T I V E S
Editing Objective List Information
. . .
. .
Edi t ing Object ive L is t In format ion
When you edit objective list information, you can change the name, the owner, and whether the list is shared.
1. Click Libraries in the list of Accelerated Math tasks on the Home page.
2. Select your school from the drop-down list if necessary.
3. Click Manage Objectives on the left side of the page.
4. Click View/Edit Lists on the left side of the page.
5. Click Edit A in the row for the list you want to change. This link is not available in the following situations:
• for standard library lists (marked with the ° symbol after the View link B)
• for teachers, the link is not available for shared lists owned by administrators
• for school administrators, the link is not available for shared lists owned by the district administrator
6. Make your changes to the objective list:
• Enter a new name if necessary C. Use a list name that makes it easy for teachers to identify the list.
• Select a new owner from the drop-down list if necessary D. The list owner can change the list regardless of the permissions level.
• If you are an administrator, choose whether to share the list E. If you are a school administrator, your shared lists can be used by any teacher in your school. If you are a district administrator, your shared lists can be used by any teacher in the district. (See page 29 for more information on shared lists.)
Who Can Do This?
District Administrator
District Staff
School Administrator
School Staff
Teachers
To change capabilities, see page 165.
A
B
C
D
E
51Accelerated MathSoftware Manual
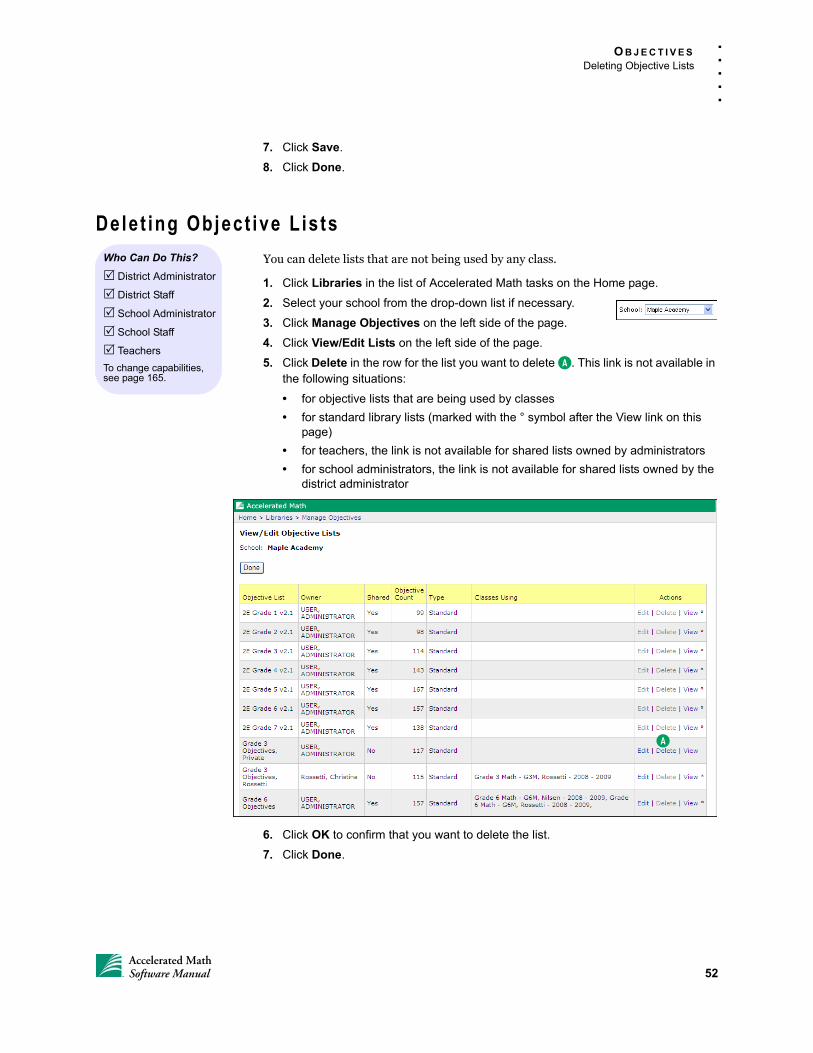
O B J E C T I V E S
Deleting Objective Lists
. . .
. .
7. Click Save.
8. Click Done.
Delet ing Object ive L is ts
You can delete lists that are not being used by any class.
1. Click Libraries in the list of Accelerated Math tasks on the Home page.
2. Select your school from the drop-down list if necessary.
3. Click Manage Objectives on the left side of the page.
4. Click View/Edit Lists on the left side of the page.
5. Click Delete in the row for the list you want to delete A. This link is not available in the following situations:
• for objective lists that are being used by classes
• for standard library lists (marked with the ° symbol after the View link on this page)
• for teachers, the link is not available for shared lists owned by administrators
• for school administrators, the link is not available for shared lists owned by the district administrator
6. Click OK to confirm that you want to delete the list.
7. Click Done.
Who Can Do This?
District Administrator
District Staff
School Administrator
School Staff
Teachers
To change capabilities, see page 165.
A
52Accelerated MathSoftware Manual
THE ASSIGNMENT BOOK
The Assignment Book is where you assign most student work and monitor student progress. This chapter will tell you how to manage student work.
How Students Master Object ives in the Assignment Book
1. The teacher assigns objectives to students. See page 55.
2. The teacher prints practices (page 68) or exercises (page 69) for the students. The status of the objectives on these assignments changes to Working (two green arrows ).
3. The students finish the practices or exercises.
4. Students complete the assignments and scan cards or enter their answers using the Responder or NEO 2 (see page 99) or Renaissance Home Connect (see page 103). If they use scan cards, students can use AccelScan to scan their answers for scoring (see page 80), or teachers can score the assignments manually in Accelerated Math (see page 82). The status of the objectives depends on how many problems the students answered correctly (see Mastery Criteria on page 61). If students need more practice, the status is Ready to Work (one green arrow ); if they answered most or all problems correctly, the status is Ready to Test (one yellow arrow ).
5. When a student is ready to test, the teacher prints the test (see page 71), and the objective’s status changes to Testing (two yellow arrows ).
6. The student completes the test.
7. The student scores the test using AccelScan (page 80) or Responders or NEO 2 laptops (see page 99), or the teacher scores it manually in Accelerated Math (page 82). If the student needs to try again, the objective status changes back to Ready to Test. If the student answered most or all problems correctly, the status is Mastered ( ). (The mastery criteria determine when students have mastered the objective; see page 61.)
8. Two weeks after a student masters an objective, Accelerated Math starts including review problems on practices. The mastery criteria determine when a student has answered enough review problems correctly; at that point, the status changes to Reviewed ( ), and the student’s practices and tests will not include any more problems from the objective.
Intervene: If the status of an objective changes to Intervene,
the student needs more help with the objective; see page 59.
Scoring Preference: The Scoring preference for each
class determines which assignments students can score themselves or which they can complete using the Responder or NEO 2. See page 161.
53Accelerated MathSoftware Manual
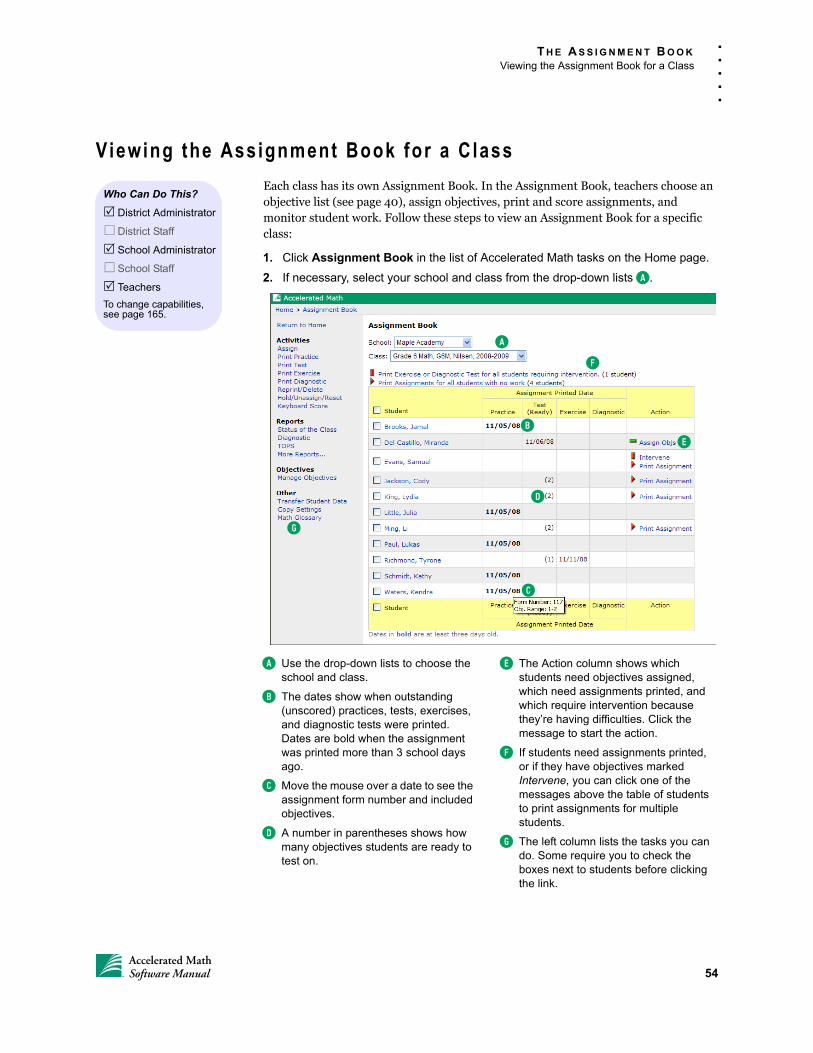
T H E A S S I G N M E N T B O O K
Viewing the Assignment Book for a Class
. . .
. .
Viewing the Assignment Book for a C lass
Each class has its own Assignment Book. In the Assignment Book, teachers choose an objective list (see page 40), assign objectives, print and score assignments, and monitor student work. Follow these steps to view an Assignment Book for a specific class:
1. Click Assignment Book in the list of Accelerated Math tasks on the Home page.
2. If necessary, select your school and class from the drop-down lists A.
Who Can Do This?
District Administrator
District Staff
School Administrator
School Staff
Teachers
To change capabilities, see page 165.
A
B
C
D
F
G
E
A Use the drop-down lists to choose the school and class.
B The dates show when outstanding (unscored) practices, tests, exercises, and diagnostic tests were printed. Dates are bold when the assignment was printed more than 3 school days ago.
C Move the mouse over a date to see the assignment form number and included objectives.
D A number in parentheses shows how many objectives students are ready to test on.
E The Action column shows which students need objectives assigned, which need assignments printed, and which require intervention because they’re having difficulties. Click the message to start the action.
F If students need assignments printed, or if they have objectives marked Intervene, you can click one of the messages above the table of students to print assignments for multiple students.
G The left column lists the tasks you can do. Some require you to check the boxes next to students before clicking the link.
54Accelerated MathSoftware Manual
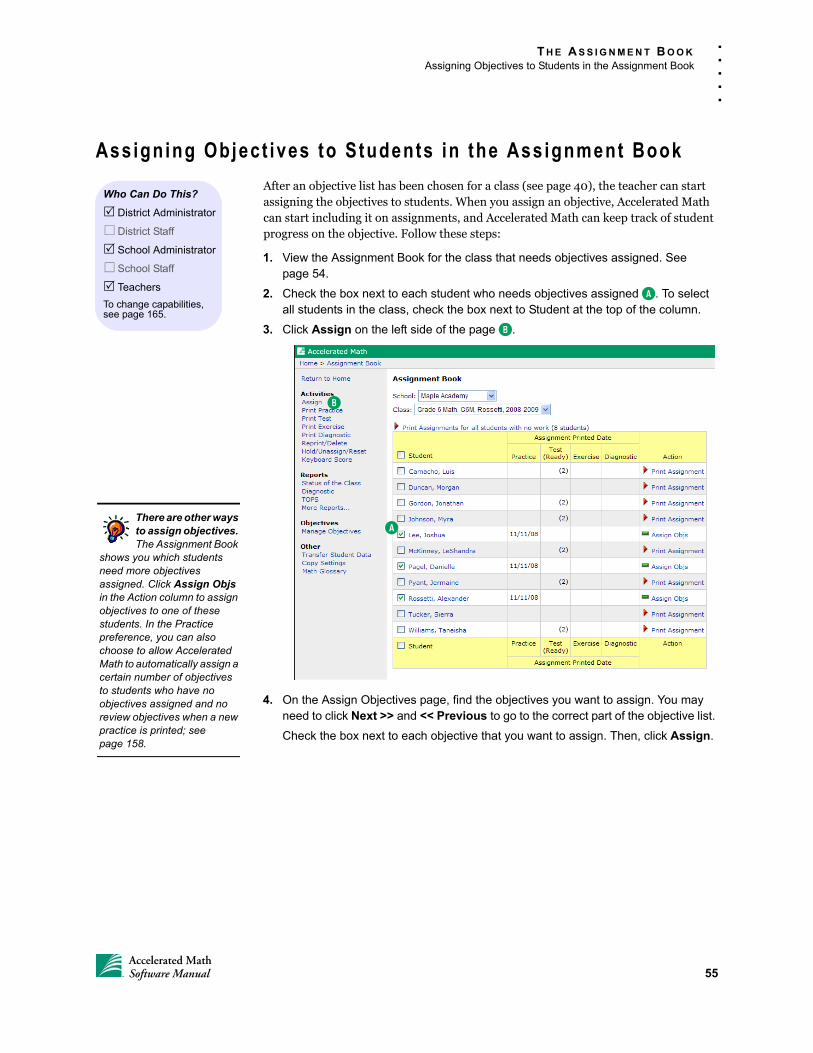
T H E A S S I G N M E N T B O O K
Assigning Objectives to Students in the Assignment Book
. . .
. .
Assigning Object ives to Students in the Ass ignment Book
After an objective list has been chosen for a class (see page 40), the teacher can start assigning the objectives to students. When you assign an objective, Accelerated Math can start including it on assignments, and Accelerated Math can keep track of student progress on the objective. Follow these steps:
1. View the Assignment Book for the class that needs objectives assigned. See page 54.
2. Check the box next to each student who needs objectives assigned A. To select all students in the class, check the box next to Student at the top of the column.
3. Click Assign on the left side of the page B.
4. On the Assign Objectives page, find the objectives you want to assign. You may need to click Next >> and << Previous to go to the correct part of the objective list.
Check the box next to each objective that you want to assign. Then, click Assign.
Who Can Do This?
District Administrator
District Staff
School Administrator
School Staff
Teachers
To change capabilities, see page 165.
A
B
There are other ways to assign objectives. The Assignment Book
shows you which students need more objectives assigned. Click Assign Objs in the Action column to assign objectives to one of these students. In the Practice preference, you can also choose to allow Accelerated Math to automatically assign a certain number of objectives to students who have no objectives assigned and no review objectives when a new practice is printed; see page 158.
55Accelerated MathSoftware Manual

T H E A S S I G N M E N T B O O K
Assigning Objectives to Students in the Assignment Book
. . .
. .
5. The objectives that you’ve assigned are now marked with the Assigned symbol. Click Done to go back to the Assignment Book.
Page with one student selected
Page with multiple students selected
E
G
C
H
H
G
C
D
IJ
F
EF
J
I
C The symbols show you the status of objectives that have already been assigned. Move your mouse over a symbol to see its name, or click Legend to see the name of all symbols.
D If you chose more than one student, to choose the same objective for all students, check the box at the top of a column. Move your mouse over the objective number to see a description.
E If you chose one student, the objective descriptions are shown next to the boxes. If you chose more than one, you can scroll through a list of descriptions at the top of the page. Click to see sample problems.
F If your subscription gives you access to worked examples, this icon may be available for some
objectives. Click the icon to see the steps required to solve a sample problem from the objective.
G If you want to assign another group of objectives, you can go to another part of the list by moving the scroll bar (if you chose one student) or using the drop-down list (if you chose multiple students).
H You can also click Next >> to go to the next group of objectives or << Previous to go back.
I Click this arrow to see the standards related to each objective.
J Click the magnifying glass to search for specific objectives. Then, enter key terms in the window that opens and click Search. The objectives that matched your search will be listed. To see all the objectives again, click Show All under “Library.”
56Accelerated MathSoftware Manual
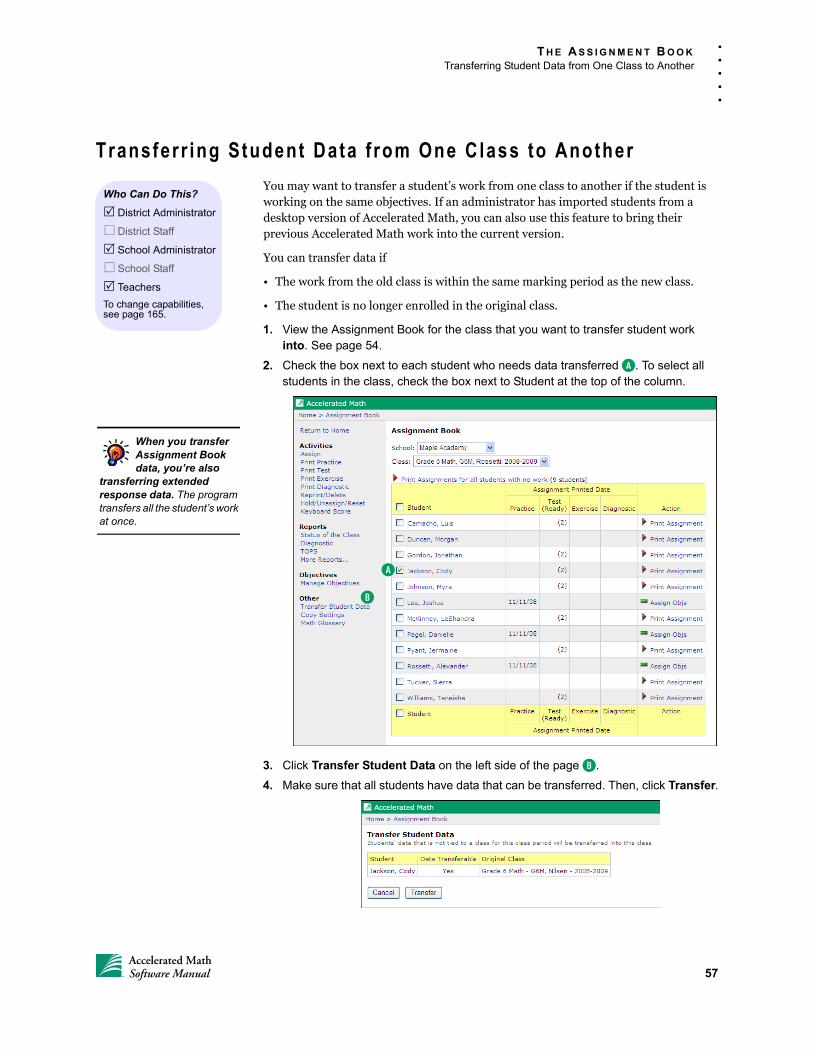
T H E A S S I G N M E N T B O O K
Transferring Student Data from One Class to Another
. . .
. .
Transferr ing Student Data f rom One Class to Another
You may want to transfer a student’s work from one class to another if the student is working on the same objectives. If an administrator has imported students from a desktop version of Accelerated Math, you can also use this feature to bring their previous Accelerated Math work into the current version.
You can transfer data if
• The work from the old class is within the same marking period as the new class.
• The student is no longer enrolled in the original class.
1. View the Assignment Book for the class that you want to transfer student work into. See page 54.
2. Check the box next to each student who needs data transferred A. To select all students in the class, check the box next to Student at the top of the column.
3. Click Transfer Student Data on the left side of the page B.
4. Make sure that all students have data that can be transferred. Then, click Transfer.
Who Can Do This?
District Administrator
District Staff
School Administrator
School Staff
Teachers
To change capabilities, see page 165.
When you transfer Assignment Book data, you’re also
transferring extended response data. The program transfers all the student’s work at once.
B
A
57Accelerated MathSoftware Manual

T H E A S S I G N M E N T B O O K
Assignment Book Symbols
. . .
. .
Assignment Book Symbols
These symbols appear on the pages where you assign objectives, print assignments, and monitor student progress:
Symbol Name What It Means
Assigned The objective is assigned to the student(s), but no assignment has been printed for this objective.
Ready to Work (green)
The student has completed and scored at least one practice or exercise that includes the objective. However, the student hasn’t met the practice mastery criteria (see page 61). The student needs a new practice or exercise that includes the objective. The student is not ready to test.
Working (green)
The student is working on a practice or exercise that includes the objective. The assignment has not been scored.
Ready to Test (yellow)
The student has met the practice mastery criteria (see page 61), so he or she is ready to test on this objective. A test has not yet been printed.
Testing (yellow)
The student is working on a test that includes this objective. The test has not been scored.
Mastered The student has met the test mastery criteria (see page 61) and has mastered the objective. Two weeks after the student masters the objective, review problems will begin appearing on the student’s practices.
Intervene The student has worked many problems for an objective without progressing. This symbol means the student needs more help. For more information, see page 59.
Diagnosing The student is working on a diagnostic test. Diagnostic tests allow students to master objectives without completing practice mastery requirements first. Teachers can use these tests for objectives that they believe their students already understand well.
Reviewed The student has met all mastery requirements for practice, testing, and review. The student has finished the objective. Accelerated Math will no longer include the objective on the student’s assignments unless you manually choose it for exercises.
Hold The teacher has put the objective on hold (see page 84). To make the objective available again, assign it (see page 55). If the student was already working on the objective when you put it on hold, when you assign it, the objective will return to its previous status. (Intervene objectives return to the Assigned status.)
Review: Two weeks after students master objectives, they’ll see
review problems on their practices. To change the percentage of practice problems that can be review problems, see page 158.
58Accelerated MathSoftware Manual
T H E A S S I G N M E N T B O O K
Intervene
. . .
. .
In tervene
The status for an objective changes to Intervene ( ) if
• Students work three times the required number of practice problems without meeting the practice mastery criteria (see page 61). Practice problems appear on practices and exercises.
• Students work twice the required number of test problems without meeting the test mastery criteria.
• Students work twice the required number of review problems without meeting the review mastery criteria.
Intervene means the student needs more help with this objective. Accelerated Math will not include the objective on more assignments unless you take action. We recommend that you discuss the objective with your student and re-teach the information if necessary.
When the student is ready to work on the objective again, click Intervene in the Assignment Book and remove the Intervene status by doing one of the following:
• If the objective changed to Intervene while the student was working on practices or exercises, click Print Exercise on the Intervene page to print an exercise that includes the objective (A on the next page). Then, check the objectives to include in the exercise C and click Next >. On the next page, choose the answer format (assisted-response or free-response) and enter the number of objectives to include; then, click Print. The status of the objective will change to Working.
• If the objective changed to Intervene while the student was working on tests or review problems, click Print Diagnostic on the Intervene page to print a diagnostic test that includes the objective B. Then, check the objectives to include in the diagnostic test C and click Next >. On the next page, choose the answer format; then, click Print. The status of the objective will change to Diagnosing.
Accelerated Math will once again monitor the student’s progress on the objective, and it will include the objective on future assignments.
Mastery Criteria and Intervene. The mastery criteria sets
both the number of problems required and the number students must answer correctly. For more information, see page 61.
59Accelerated MathSoftware Manual
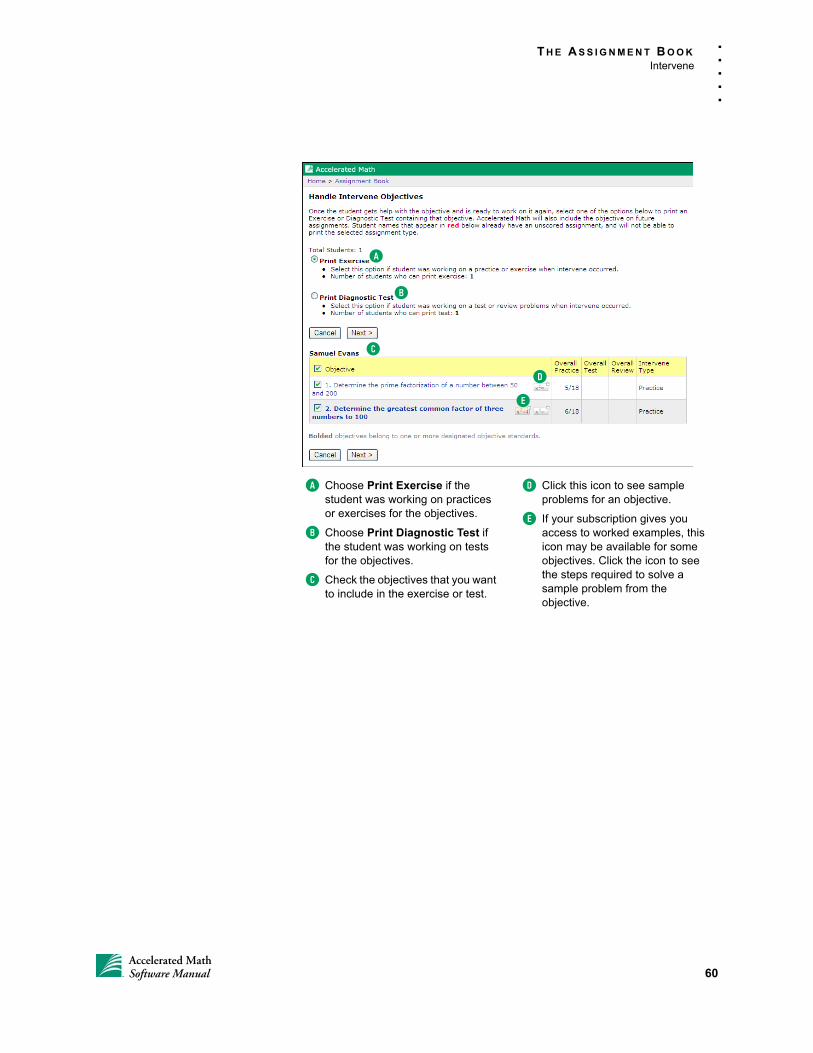
T H E A S S I G N M E N T B O O K
Intervene
. . .
. .
A
B
C
D
E
A Choose Print Exercise if the student was working on practices or exercises for the objectives.
B Choose Print Diagnostic Test if the student was working on tests for the objectives.
C Check the objectives that you want to include in the exercise or test.
D Click this icon to see sample problems for an objective.
E If your subscription gives you access to worked examples, this icon may be available for some objectives. Click the icon to see the steps required to solve a sample problem from the objective.
60Accelerated MathSoftware Manual
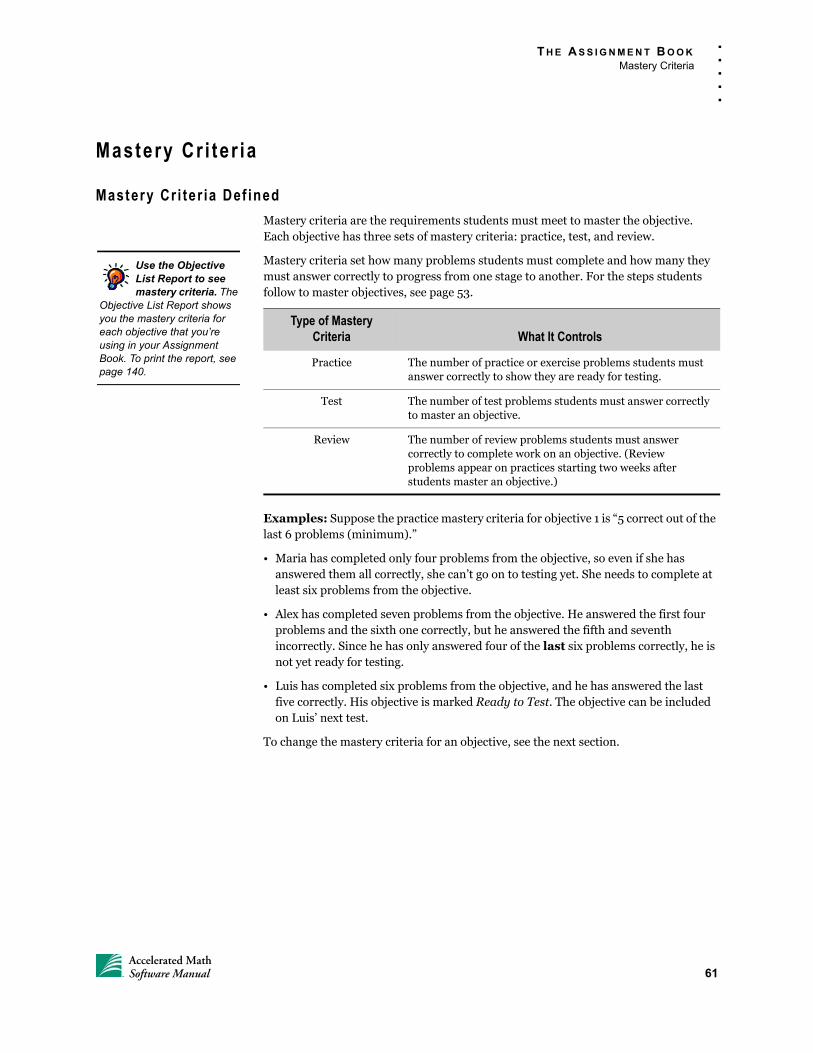
T H E A S S I G N M E N T B O O K
Mastery Criteria
. . .
. .
Mastery Cr i ter ia
Mastery Cr i ter ia Def ined
Mastery criteria are the requirements students must meet to master the objective. Each objective has three sets of mastery criteria: practice, test, and review.
Mastery criteria set how many problems students must complete and how many they must answer correctly to progress from one stage to another. For the steps students follow to master objectives, see page 53.
Examples: Suppose the practice mastery criteria for objective 1 is “5 correct out of the last 6 problems (minimum).”
• Maria has completed only four problems from the objective, so even if she has answered them all correctly, she can’t go on to testing yet. She needs to complete at least six problems from the objective.
• Alex has completed seven problems from the objective. He answered the first four problems and the sixth one correctly, but he answered the fifth and seventh incorrectly. Since he has only answered four of the last six problems correctly, he is not yet ready for testing.
• Luis has completed six problems from the objective, and he has answered the last five correctly. His objective is marked Ready to Test. The objective can be included on Luis’ next test.
To change the mastery criteria for an objective, see the next section.
Type of Mastery Criteria What It Controls
Practice The number of practice or exercise problems students must answer correctly to show they are ready for testing.
Test The number of test problems students must answer correctly to master an objective.
Review The number of review problems students must answer correctly to complete work on an objective. (Review problems appear on practices starting two weeks after students master an objective.)
Use the Objective List Report to see mastery criteria. The
Objective List Report shows you the mastery criteria for each objective that you’re using in your Assignment Book. To print the report, see page 140.
61Accelerated MathSoftware Manual
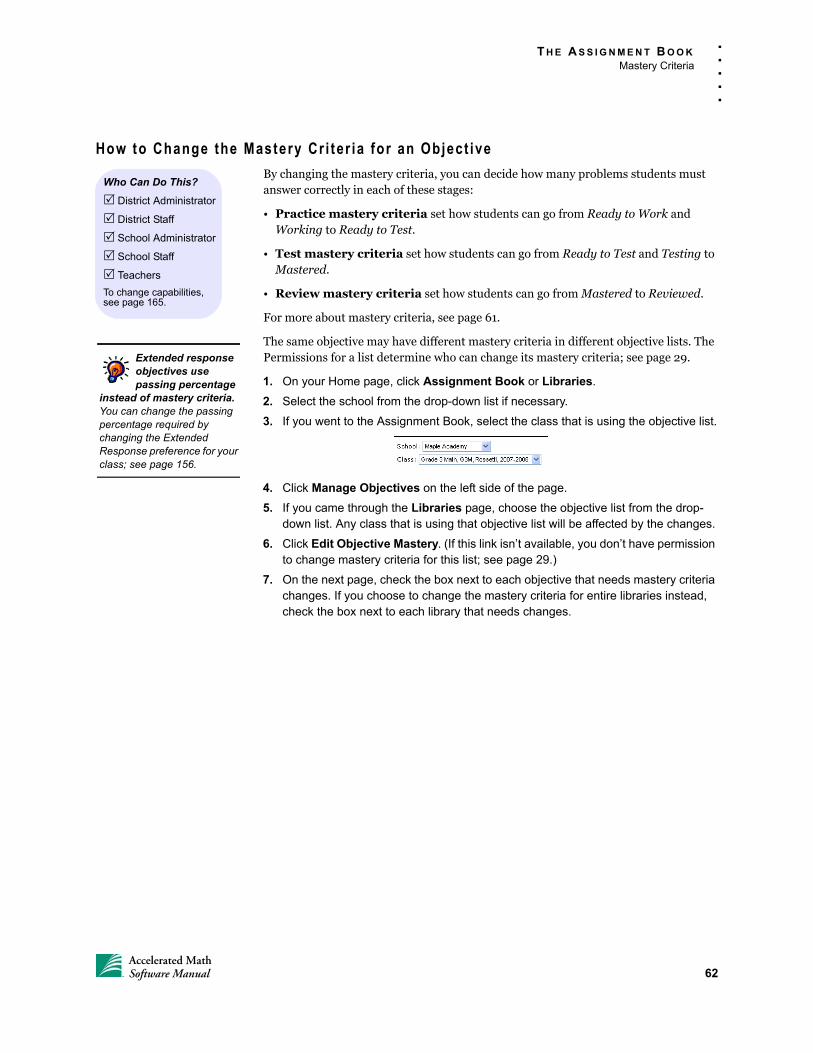
T H E A S S I G N M E N T B O O K
Mastery Criteria
. . .
. .
How to Change the Mastery Cr i ter ia for an Object ive
By changing the mastery criteria, you can decide how many problems students must answer correctly in each of these stages:
• Practice mastery criteria set how students can go from Ready to Work and Working to Ready to Test.
• Test mastery criteria set how students can go from Ready to Test and Testing to Mastered.
• Review mastery criteria set how students can go from Mastered to Reviewed.
For more about mastery criteria, see page 61.
The same objective may have different mastery criteria in different objective lists. The Permissions for a list determine who can change its mastery criteria; see page 29.
1. On your Home page, click Assignment Book or Libraries.
2. Select the school from the drop-down list if necessary.
3. If you went to the Assignment Book, select the class that is using the objective list.
4. Click Manage Objectives on the left side of the page.
5. If you came through the Libraries page, choose the objective list from the drop-down list. Any class that is using that objective list will be affected by the changes.
6. Click Edit Objective Mastery. (If this link isn’t available, you don’t have permission to change mastery criteria for this list; see page 29.)
7. On the next page, check the box next to each objective that needs mastery criteria changes. If you choose to change the mastery criteria for entire libraries instead, check the box next to each library that needs changes.
Who Can Do This?
District Administrator
District Staff
School Administrator
School Staff
Teachers
To change capabilities, see page 165.
Extended response objectives use passing percentage
instead of mastery criteria. You can change the passing percentage required by changing the Extended Response preference for your class; see page 156.
62Accelerated MathSoftware Manual
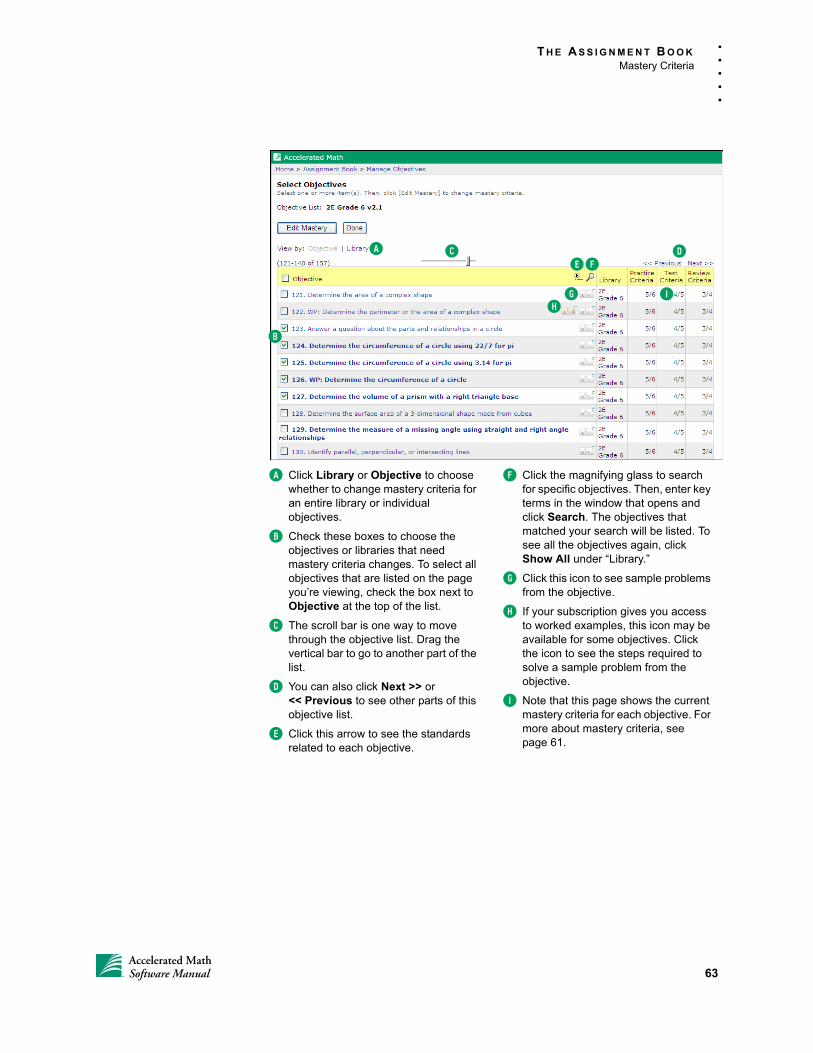
T H E A S S I G N M E N T B O O K
Mastery Criteria
. . .
. .
A C D
I
B
FE
GH
A Click Library or Objective to choose whether to change mastery criteria for an entire library or individual objectives.
B Check these boxes to choose the objectives or libraries that need mastery criteria changes. To select all objectives that are listed on the page you’re viewing, check the box next to Objective at the top of the list.
C The scroll bar is one way to move through the objective list. Drag the vertical bar to go to another part of the list.
D You can also click Next >> or<< Previous to see other parts of this objective list.
E Click this arrow to see the standards related to each objective.
F Click the magnifying glass to search for specific objectives. Then, enter key terms in the window that opens and click Search. The objectives that matched your search will be listed. To see all the objectives again, click Show All under “Library.”
G Click this icon to see sample problems from the objective.
H If your subscription gives you access to worked examples, this icon may be available for some objectives. Click the icon to see the steps required to solve a sample problem from the objective.
I Note that this page shows the current mastery criteria for each objective. For more about mastery criteria, see page 61.
63Accelerated MathSoftware Manual

T H E A S S I G N M E N T B O O K
Mastery Criteria
. . .
. .
8. Click Edit Mastery.
9. Check the box next to each type of criteria that you want to change. Then, enter the new numbers for the criteria. If you prefer to go back to the original (default) criteria for this objective, click Default.
10. Click Save.
11. If you want to change the mastery criteria for other objectives or libraries, repeat steps 7 through 10. If you have finished, click Done.
Whose mastery criteria am I changing? Your
changes affect any class that is using the objective list. However, they don’t affect classes that are using other lists, even if they’re using the same objectives.
64Accelerated MathSoftware Manual
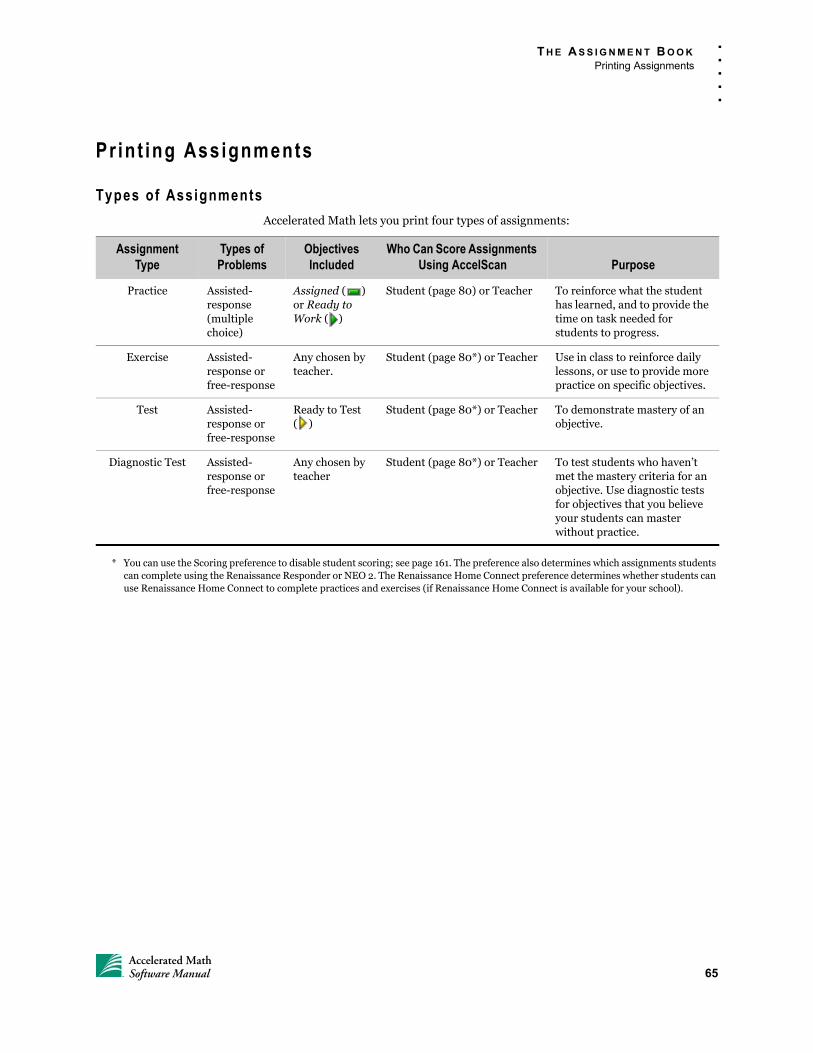
T H E A S S I G N M E N T B O O K
Printing Assignments
. . .
. .
Pr int ing Assignments
Types of Assignments
Accelerated Math lets you print four types of assignments:
* You can use the Scoring preference to disable student scoring; see page 161. The preference also determines which assignments students can complete using the Renaissance Responder or NEO 2. The Renaissance Home Connect preference determines whether students can use Renaissance Home Connect to complete practices and exercises (if Renaissance Home Connect is available for your school).
Assignment Type
Types of Problems
Objectives Included
Who Can Score Assignments Using AccelScan Purpose
Practice Assisted-response (multiple choice)
Assigned ( ) or Ready to Work ( )
Student (page 80) or Teacher To reinforce what the student has learned, and to provide the time on task needed for students to progress.
Exercise Assisted-response or free-response
Any chosen by teacher.
Student (page 80*) or Teacher Use in class to reinforce daily lessons, or use to provide more practice on specific objectives.
Test Assisted-response or free-response
Ready to Test ( )
Student (page 80*) or Teacher To demonstrate mastery of an objective.
Diagnostic Test Assisted-response or free-response
Any chosen by teacher
Student (page 80*) or Teacher To test students who haven’t met the mastery criteria for an objective. Use diagnostic tests for objectives that you believe your students can master without practice.
65Accelerated MathSoftware Manual
T H E A S S I G N M E N T B O O K
Printing Assignments
. . .
. .
Make Sure You Have the Renaissance Place Pr int P lug- In
If you have not changed the Printing preference for your classes (see page 159), each computer that you will use to print assignments must have the Renaissance Place Print Plug-In installed. Follow the steps below to download and install the plug-in.
Your first step depends on what you have already done in the software:
If You Are Viewing the Assignment Book or Extended Response
Page1. Click the red Install Plug-In message on the Assignment Book or Extended
Response page.
2. A knowledge base article will open. In this article, click the HERE link for your operating system. Save the file.
3. Follow the instructions in the article to install the plug-in.
If You Have Tried to Print an Assignment Without the Plug-In1. Click the message that appeared on the View Assignment page.
2. A knowledge base article will open. In this article, click the HERE link for your operating system. Save the file.
3. Follow the instructions in the article to install the plug-in.
If You Are Somewhere Else in the Software1. If you have not yet logged in, click Check Software Requirements on the
Renaissance Place RT Welcome page.
If you are logged in but you have not yet tried to print an assignment, click Product Administration under the Renaissance Place tasks on your Home page. Then, click Download Supporting Software.
Who Can Do This?
District Administrator
District Staff
School Administrator
School Staff
Teachers
To change capabilities, see page 165.
Supporting client software should be installed by a user
who is logged in on the computer as an administrator or as a member of the Administrators group with administrative rights; this will make the software accessible to all users of the computer.
66Accelerated MathSoftware Manual
T H E A S S I G N M E N T B O O K
Printing Assignments
. . .
. .
2. On the bottom of the list of Supporting Software, click install Version A for the Renaissance Place Print Plug-In if it is shown as not being installed.
3. A knowledge base article will open. In this article, click the HERE link for your operating system. Save the file.
4. Follow the instructions in the article to install the plug-in.
A
67Accelerated MathSoftware Manual
T H E A S S I G N M E N T B O O K
Printing Assignments
. . .
. .
How to Pr int a Pract ice
1. View the Assignment Book for the class that needs practices. See page 54.
2. Do one of the following:
• To print a practice for one student who needs work, click Print Assignment in the row for that student A. On the page that appears next, click the Practice option and click Next >.
• To print a practice for all students in the class who have no work, click Print Assignments for all students with no work above the list of students B. On the page that opens next, click the Practice option and click Next >.
• If you want to choose specific students to print practices for, check the box next to each of these students C. To select all students in the class, check the box next to Student at the top of the column. Then, click Print Practice on the left side of the page D.
3. Note the available practice objectives on the right side of the page; then, click the assignment size that you want to print.
Who Can Do This?
District Administrator
District Staff
School Administrator
School Staff
Teachers
To change capabilities, see page 165.
C
DB
A
Install Plug-In message. If you see this message in red on
your Assignment Book page, you need the Renaissance Place Print Plug-In to print assignments. (See page 66.)
Student Capacity Limit: If you have reached the student
capacity limit for Accelerated Math, you can’t print assignments for students who haven’t already completed Accelerated Math work. This page will show you which students can’t receive assignments.
E
F
E Small assignments should take students about 10 minutes to complete, medium about 20 minutes, and large about 30 minutes. The Practice preference sets the sizes; see page 158.
F These are the objectives each student can practice. If any students have an outstanding (unscored) practice, the practice won’t be printed for them.
68Accelerated MathSoftware Manual
T H E A S S I G N M E N T B O O K
Printing Assignments
. . .
. .
4. Click Print.
5. The assignment will either print directly or open in Adobe Reader. The Printing preference (page 159) sets how assignments are printed for your class.
• If you are previewing the assignment, click the Adobe Reader print button (not the browser’s print function) to print the assignments.
• If you are printing assignments directly to the printer, Accelerated Math will notify you when the assignments have been printed.
How to Pr int an Exerc ise
1. View the Assignment Book for the class that needs exercises. See page 54.
2. Do one of the following:
• To print an exercise for one student who needs work, click Print Assignment in the row for that student A. On the page that opens next, click the Exercise option and click Next >.
• To print an exercise for all students in the class who have no work, click Print Assignments for all students with no work above the list of students B. On the page that opens next, click the Exercise option and click Next >.
• If you want to choose specific students to print exercises for, check the box next to each of these students C. To select all students in the class, check the box next to Student at the top of the column. Then, click Print Exercise on the left side of the page D.
3. Use the Answer Format drop-down list (E on the next page) to choose the type of problems you want to include: Assisted-Response (multiple-choice) or Free-Response. If you choose free-response, an answer key will be printed with the assignments. (Free-response problems can’t be completed using Responders, NEO 2, or Renaissance Home Connect.)
4. Enter the number of problems to include from each objective on the exercise F.
If you don’t have the print plug-in, you will see a message on the
View Assignment page. See page 66 for more information.
Who Can Do This?
District Administrator
District Staff
School Administrator
School Staff
Teachers
To change capabilities, see page 165.
Install Plug-In message. If you see this message in red on
your Assignment Book page, you need the Renaissance Place Print Plug-In to print assignments. (See page 66.)
A
BD
C
B
Student Capacity Limit: If you have reached the student
capacity limit for Accelerated Math, you can’t print assignments for students who haven’t already completed Accelerated Math work. This page will show you which students can’t receive assignments.
69Accelerated MathSoftware Manual
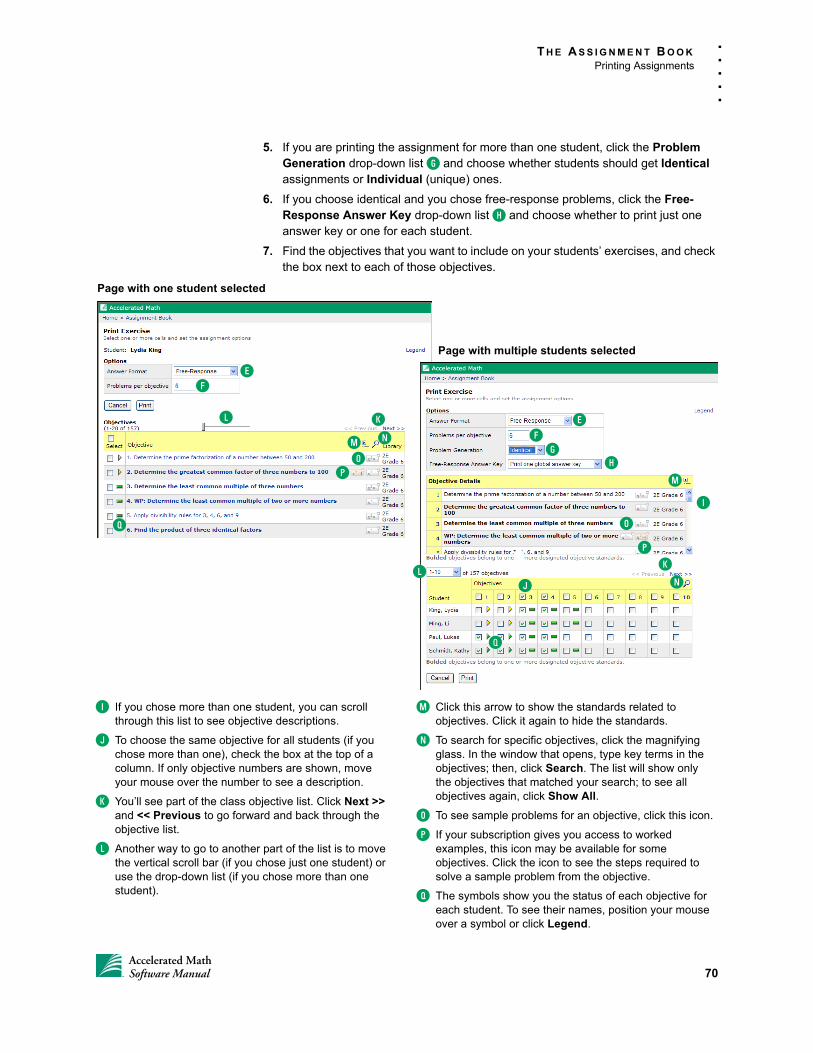
T H E A S S I G N M E N T B O O K
Printing Assignments
. . .
. .
5. If you are printing the assignment for more than one student, click the Problem Generation drop-down list G and choose whether students should get Identical assignments or Individual (unique) ones.
6. If you choose identical and you chose free-response problems, click the Free-Response Answer Key drop-down list H and choose whether to print just one answer key or one for each student.
7. Find the objectives that you want to include on your students’ exercises, and check the box next to each of those objectives.
EF
GH
Page with one student selected
Page with multiple students selected
I
K
EF
KL
Q
J
Q
L
O
O
P
M
N
M N
P
I If you chose more than one student, you can scroll through this list to see objective descriptions.
J To choose the same objective for all students (if you chose more than one), check the box at the top of a column. If only objective numbers are shown, move your mouse over the number to see a description.
K You’ll see part of the class objective list. Click Next >> and << Previous to go forward and back through the objective list.
L Another way to go to another part of the list is to move the vertical scroll bar (if you chose just one student) or use the drop-down list (if you chose more than one student).
M Click this arrow to show the standards related to objectives. Click it again to hide the standards.
N To search for specific objectives, click the magnifying glass. In the window that opens, type key terms in the objectives; then, click Search. The list will show only the objectives that matched your search; to see all objectives again, click Show All.
O To see sample problems for an objective, click this icon.
P If your subscription gives you access to worked examples, this icon may be available for some objectives. Click the icon to see the steps required to solve a sample problem from the objective.
Q The symbols show you the status of each objective for each student. To see their names, position your mouse over a symbol or click Legend.
70Accelerated MathSoftware Manual
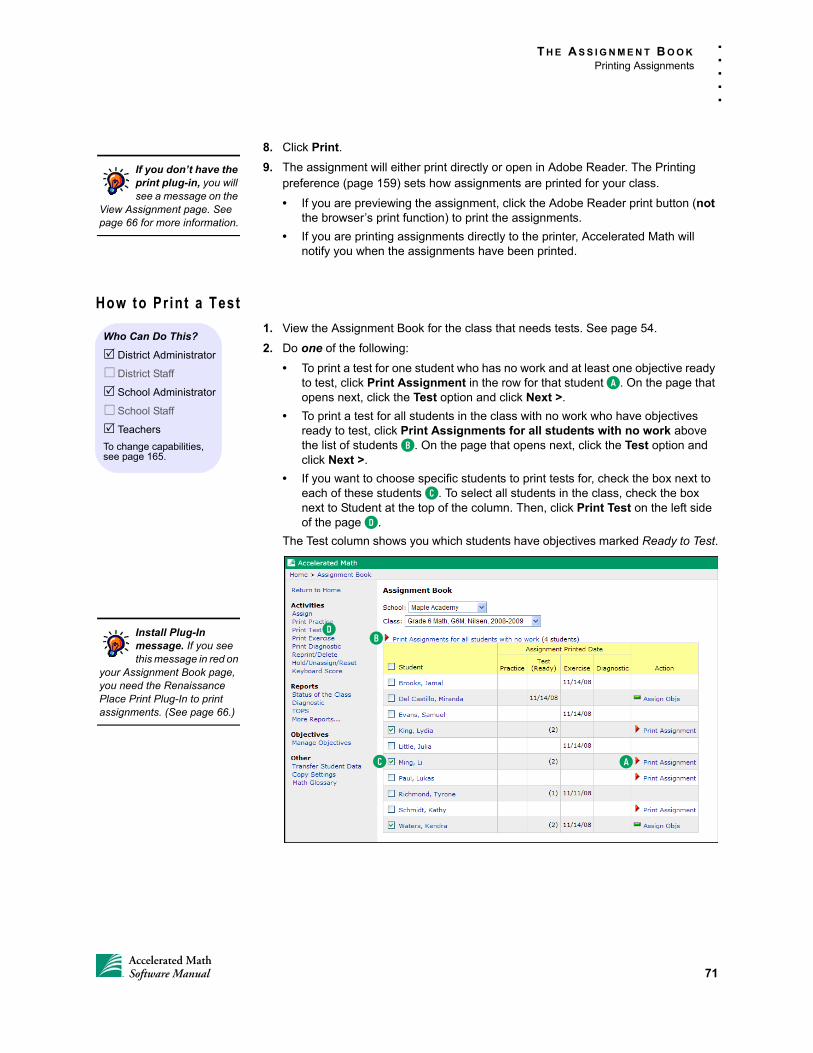
T H E A S S I G N M E N T B O O K
Printing Assignments
. . .
. .
8. Click Print.
9. The assignment will either print directly or open in Adobe Reader. The Printing preference (page 159) sets how assignments are printed for your class.
• If you are previewing the assignment, click the Adobe Reader print button (not the browser’s print function) to print the assignments.
• If you are printing assignments directly to the printer, Accelerated Math will notify you when the assignments have been printed.
How to Pr int a Test
1. View the Assignment Book for the class that needs tests. See page 54.
2. Do one of the following:
• To print a test for one student who has no work and at least one objective ready to test, click Print Assignment in the row for that student A. On the page that opens next, click the Test option and click Next >.
• To print a test for all students in the class with no work who have objectives ready to test, click Print Assignments for all students with no work above the list of students B. On the page that opens next, click the Test option and click Next >.
• If you want to choose specific students to print tests for, check the box next to each of these students C. To select all students in the class, check the box next to Student at the top of the column. Then, click Print Test on the left side of the page D.
The Test column shows you which students have objectives marked Ready to Test.
If you don’t have the print plug-in, you will see a message on the
View Assignment page. See page 66 for more information.
Who Can Do This?
District Administrator
District Staff
School Administrator
School Staff
Teachers
To change capabilities, see page 165.
Install Plug-In message. If you see this message in red on
your Assignment Book page, you need the Renaissance Place Print Plug-In to print assignments. (See page 66.)
DB
C A
71Accelerated MathSoftware Manual
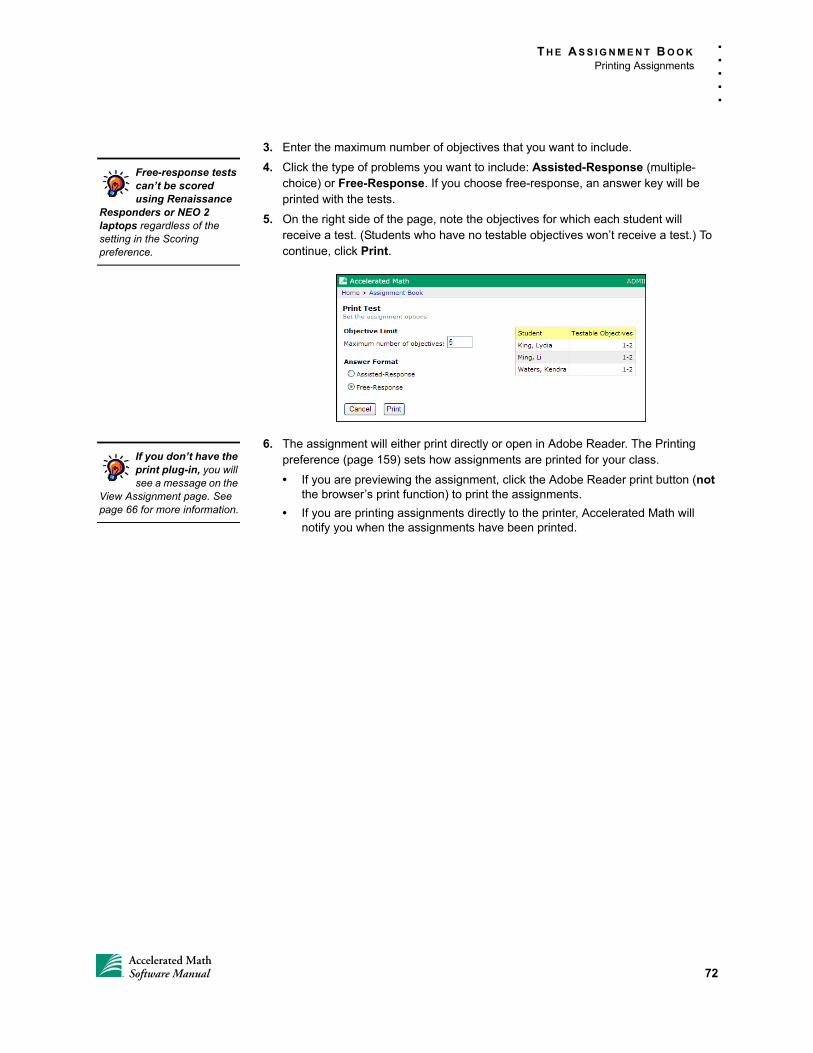
T H E A S S I G N M E N T B O O K
Printing Assignments
. . .
. .
3. Enter the maximum number of objectives that you want to include.
4. Click the type of problems you want to include: Assisted-Response (multiple-choice) or Free-Response. If you choose free-response, an answer key will be printed with the tests.
5. On the right side of the page, note the objectives for which each student will receive a test. (Students who have no testable objectives won’t receive a test.) To continue, click Print.
6. The assignment will either print directly or open in Adobe Reader. The Printing preference (page 159) sets how assignments are printed for your class.
• If you are previewing the assignment, click the Adobe Reader print button (not the browser’s print function) to print the assignments.
• If you are printing assignments directly to the printer, Accelerated Math will notify you when the assignments have been printed.
Free-response tests can’t be scored using Renaissance
Responders or NEO 2 laptops regardless of the setting in the Scoring preference.
If you don’t have the print plug-in, you will see a message on the
View Assignment page. See page 66 for more information.
72Accelerated MathSoftware Manual
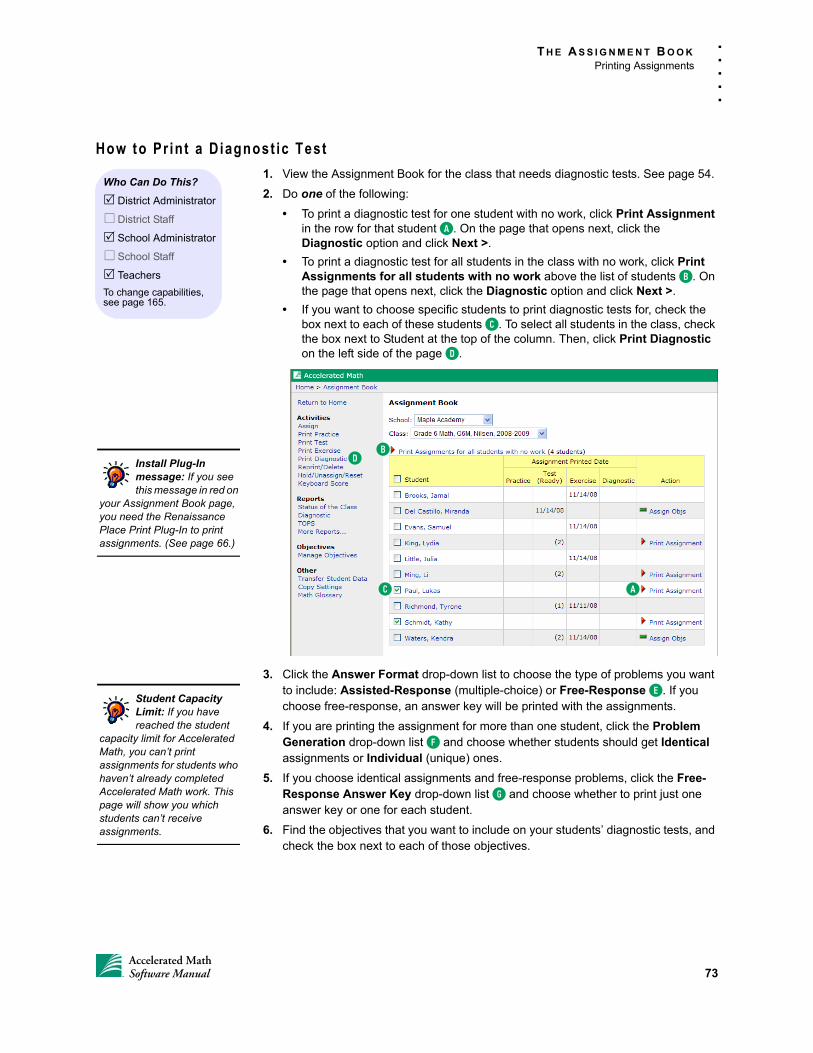
T H E A S S I G N M E N T B O O K
Printing Assignments
. . .
. .
How to Pr int a Diagnost ic Test
1. View the Assignment Book for the class that needs diagnostic tests. See page 54.
2. Do one of the following:
• To print a diagnostic test for one student with no work, click Print Assignment in the row for that student A. On the page that opens next, click the Diagnostic option and click Next >.
• To print a diagnostic test for all students in the class with no work, click Print Assignments for all students with no work above the list of students B. On the page that opens next, click the Diagnostic option and click Next >.
• If you want to choose specific students to print diagnostic tests for, check the box next to each of these students C. To select all students in the class, check the box next to Student at the top of the column. Then, click Print Diagnostic on the left side of the page D.
3. Click the Answer Format drop-down list to choose the type of problems you want to include: Assisted-Response (multiple-choice) or Free-Response E. If you choose free-response, an answer key will be printed with the assignments.
4. If you are printing the assignment for more than one student, click the Problem Generation drop-down list F and choose whether students should get Identical assignments or Individual (unique) ones.
5. If you choose identical assignments and free-response problems, click the Free-Response Answer Key drop-down list G and choose whether to print just one answer key or one for each student.
6. Find the objectives that you want to include on your students’ diagnostic tests, and check the box next to each of those objectives.
Who Can Do This?
District Administrator
District Staff
School Administrator
School Staff
Teachers
To change capabilities, see page 165.
Install Plug-In message: If you see this message in red on
your Assignment Book page, you need the Renaissance Place Print Plug-In to print assignments. (See page 66.)
D
C A
B
Student Capacity Limit: If you have reached the student
capacity limit for Accelerated Math, you can’t print assignments for students who haven’t already completed Accelerated Math work. This page will show you which students can’t receive assignments.
73Accelerated MathSoftware Manual

T H E A S S I G N M E N T B O O K
Printing Assignments
. . .
. .
P
age with one student selectedPage with multiple students selected
EF
G
E
JK
K J
I
P
H
M
N
N
P
L M
O
L
O
H If you chose more than one student, you can scroll through this list to see objective descriptions.
I To choose the same objective for all students (if you chose more than one), check the box at the top of a column. If only objective numbers are shown, move your mouse over the number to see a description.
J You’ll see part of the class objective list. Click Next >> and << Previous to go forward and back through the objective list.
K Another way to go to another part of the list is to move the vertical scroll bar (if you chose just one student) or use the drop-down list (if you chose more than one student).
L Click this arrow to show the standards related to objectives. Click it again to hide the standards.
M To search for specific objectives, click the magnifying glass. In the window that opens, type key terms in the objectives; then, click Search. The list will show only the objectives that matched your search; to see all objectives again, click Show All.
N To see sample problems for an objective, click this icon.
O If your subscription gives you access to worked examples, this icon may be available for some objectives. Click the icon to see the steps required to solve a sample problem from the objective.
P The symbols show you the status of each objective for each student. To see their names, position your mouse over a symbol or click Legend.
74Accelerated MathSoftware Manual
T H E A S S I G N M E N T B O O K
Student Capacity Limit
. . .
. .
7. Click Print.
8. The assignment will either print directly or open in Adobe Reader. The Printing preference (page 159) sets how assignments are printed for your class.
• If you are previewing the assignment, use the Adobe Reader button (not the browser’s print function) to print the assignments.
• If you are printing assignments directly to the printer, Accelerated Math will notify you when the assignments have been printed.
Student Capaci ty L imi t
Your Accelerated Math student capacity limit determines how many students can receive Accelerated Math assignments during your subscription. Your school or district purchased this capacity with the software. Each student that has received at least one Accelerated Math assignment counts toward your student capacity limit.
If you delete students, make them inactive, or unenroll them from their Accelerated Math schools, the students will no longer count toward the Accelerated Math student capacity limit.
If you reach your student capacity limit, you cannot print assignments for students who have not yet received an Accelerated Math assignment during this period. Accelerated Math will notify you that you have reached the student capacity limit.
If you need to expand the limit, contact Renaissance Learning to purchase the expansion. You will receive a new subscription code. (If Renaissance Learning hosts your server, we will enter the code for you.) To enter the new code (if necessary), or to manage student capacity, see the Renaissance Place Real Time Software Manual.
Repr int ing Assignments
How you reprint assignments depends on whether you are reprinting for one student or more than one student. See the steps below and on the next page.
How to Repr int an Assignment for One Student
1. View the Assignment Book for the class that needs assignments reprinted. See page 54.
2. Click the student’s name in the Assignment Book.
3. On the Student Detail page, click Reprint in the row for the Outstanding Assignment that you need to reprint A. (You can reprint outstanding/unscored assignments, but not scored assignments.)
If you don’t have the print plug-in, you will see a message on the
View Assignment page. See page 66 for more information.
Who Can Do This?
District Administrator
District Staff
School Administrator
School Staff
Teachers
To change capabilities, see page 165.
75Accelerated MathSoftware Manual
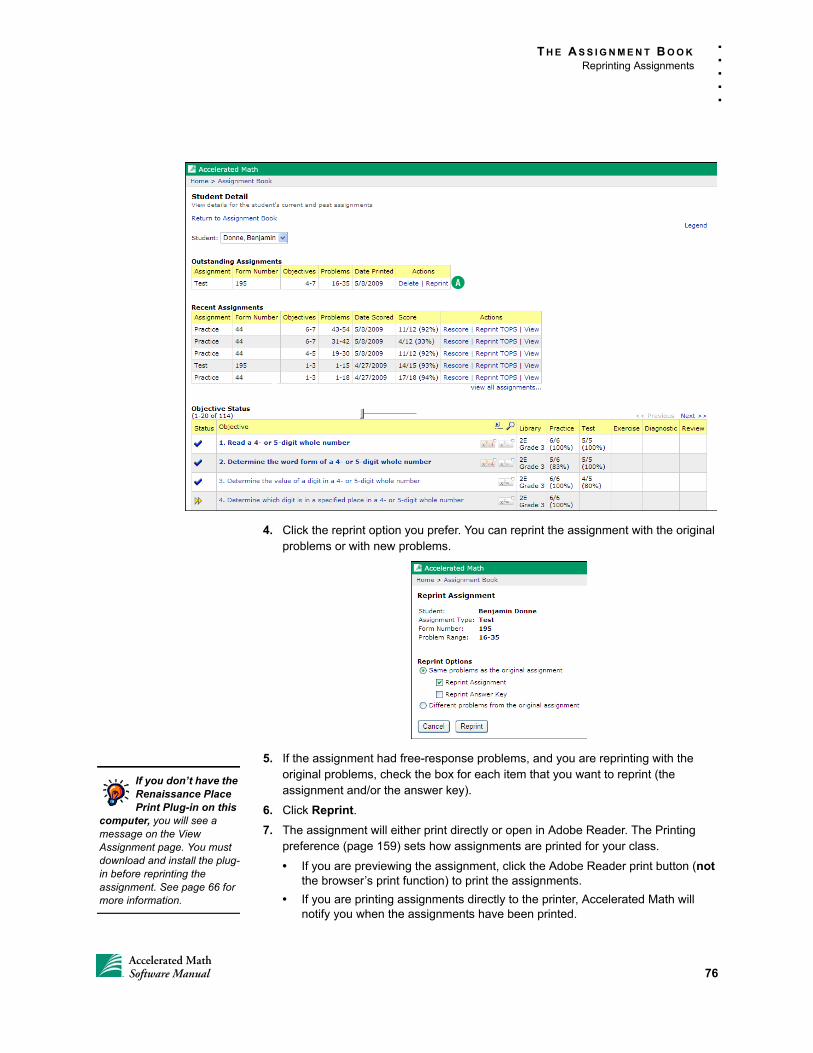
T H E A S S I G N M E N T B O O K
Reprinting Assignments
. . .
. .
4. Click the reprint option you prefer. You can reprint the assignment with the original problems or with new problems.
5. If the assignment had free-response problems, and you are reprinting with the original problems, check the box for each item that you want to reprint (the assignment and/or the answer key).
6. Click Reprint.
7. The assignment will either print directly or open in Adobe Reader. The Printing preference (page 159) sets how assignments are printed for your class.
• If you are previewing the assignment, click the Adobe Reader print button (not the browser’s print function) to print the assignments.
• If you are printing assignments directly to the printer, Accelerated Math will notify you when the assignments have been printed.
A
If you don’t have the Renaissance Place Print Plug-in on this
computer, you will see a message on the View Assignment page. You must download and install the plug-in before reprinting the assignment. See page 66 for more information.
76Accelerated MathSoftware Manual
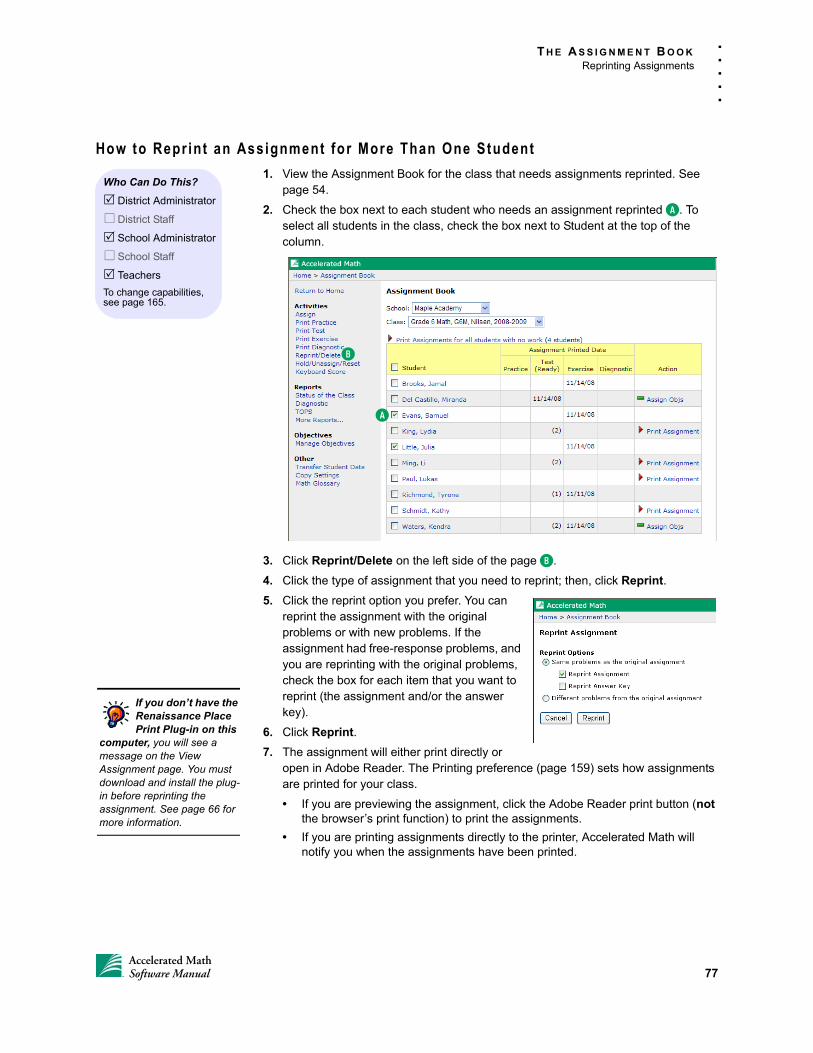
T H E A S S I G N M E N T B O O K
Reprinting Assignments
. . .
. .
How to Repr int an Assignment for More Than One Student
1. View the Assignment Book for the class that needs assignments reprinted. See page 54.
2. Check the box next to each student who needs an assignment reprinted A. To select all students in the class, check the box next to Student at the top of the column.
3. Click Reprint/Delete on the left side of the page B.
4. Click the type of assignment that you need to reprint; then, click Reprint.
5. Click the reprint option you prefer. You can reprint the assignment with the original problems or with new problems. If the assignment had free-response problems, and you are reprinting with the original problems, check the box for each item that you want to reprint (the assignment and/or the answer key).
6. Click Reprint.
7. The assignment will either print directly or open in Adobe Reader. The Printing preference (page 159) sets how assignments are printed for your class.
• If you are previewing the assignment, click the Adobe Reader print button (not the browser’s print function) to print the assignments.
• If you are printing assignments directly to the printer, Accelerated Math will notify you when the assignments have been printed.
Who Can Do This?
District Administrator
District Staff
School Administrator
School Staff
Teachers
To change capabilities, see page 165.
A
B
If you don’t have the Renaissance Place Print Plug-in on this
computer, you will see a message on the View Assignment page. You must download and install the plug-in before reprinting the assignment. See page 66 for more information.
77Accelerated MathSoftware Manual
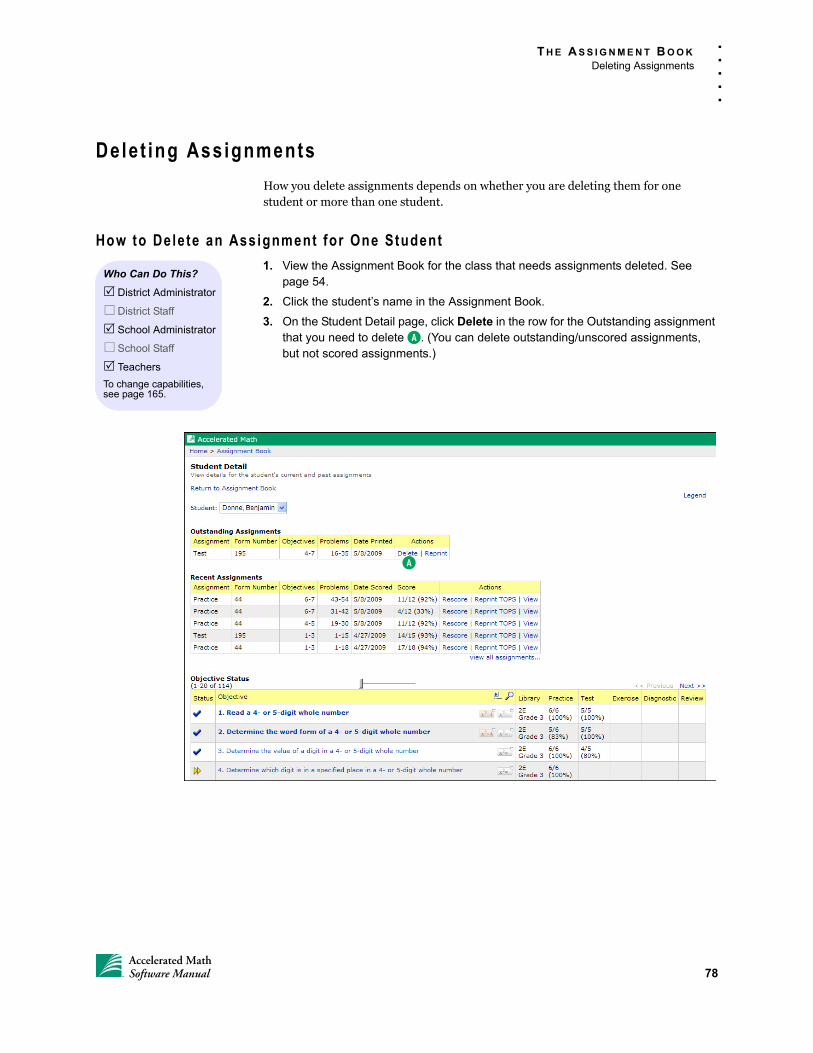
T H E A S S I G N M E N T B O O K
Deleting Assignments
. . .
. .
Delet ing Assignments
How you delete assignments depends on whether you are deleting them for one student or more than one student.
How to Delete an Assignment for One Student
1. View the Assignment Book for the class that needs assignments deleted. See page 54.
2. Click the student’s name in the Assignment Book.
3. On the Student Detail page, click Delete in the row for the Outstanding assignment that you need to delete A. (You can delete outstanding/unscored assignments, but not scored assignments.)
Who Can Do This?
District Administrator
District Staff
School Administrator
School Staff
Teachers
To change capabilities, see page 165.
A
78Accelerated MathSoftware Manual
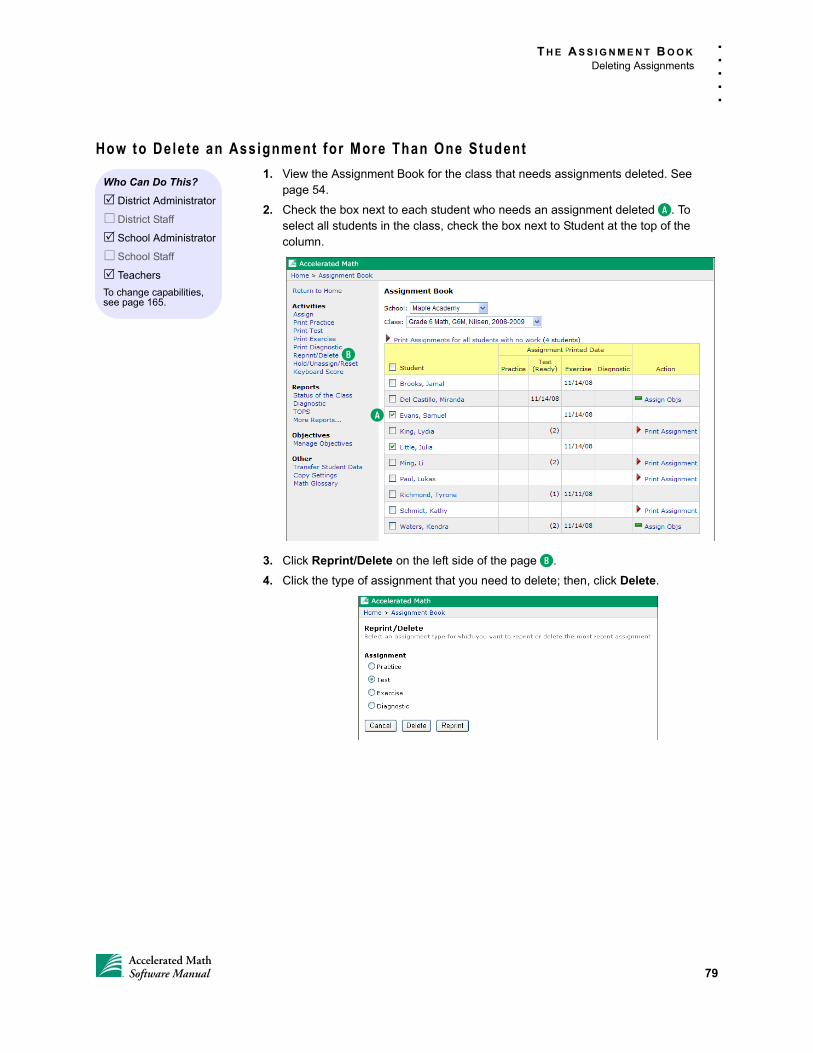
T H E A S S I G N M E N T B O O K
Deleting Assignments
. . .
. .
How to Delete an Assignment for More Than One Student
1. View the Assignment Book for the class that needs assignments deleted. See page 54.
2. Check the box next to each student who needs an assignment deleted A. To select all students in the class, check the box next to Student at the top of the column.
3. Click Reprint/Delete on the left side of the page B.
4. Click the type of assignment that you need to delete; then, click Delete.
Who Can Do This?
District Administrator
District Staff
School Administrator
School Staff
Teachers
To change capabilities, see page 165.
A
B
79Accelerated MathSoftware Manual
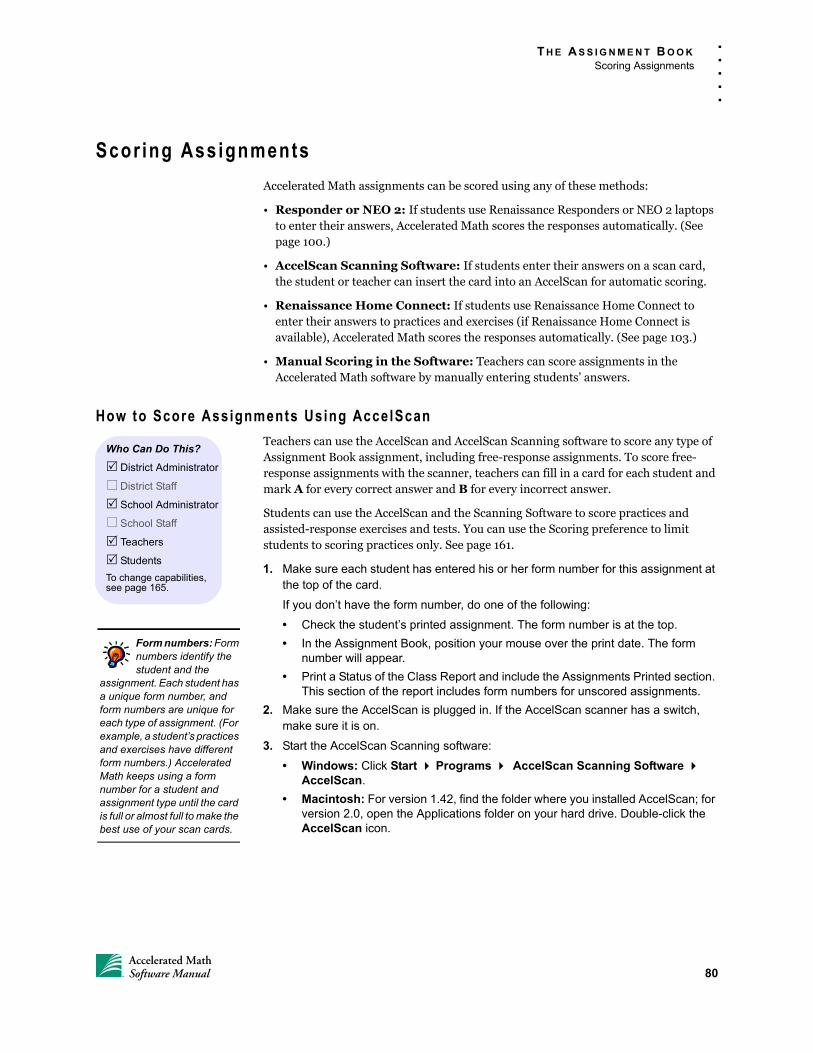
T H E A S S I G N M E N T B O O K
Scoring Assignments
. . .
. .
Scor ing Assignments
Accelerated Math assignments can be scored using any of these methods:
• Responder or NEO 2: If students use Renaissance Responders or NEO 2 laptops to enter their answers, Accelerated Math scores the responses automatically. (See page 100.)
• AccelScan Scanning Software: If students enter their answers on a scan card, the student or teacher can insert the card into an AccelScan for automatic scoring.
• Renaissance Home Connect: If students use Renaissance Home Connect to enter their answers to practices and exercises (if Renaissance Home Connect is available), Accelerated Math scores the responses automatically. (See page 103.)
• Manual Scoring in the Software: Teachers can score assignments in the Accelerated Math software by manually entering students’ answers.
How to Score Assignments Using AccelScan
Teachers can use the AccelScan and AccelScan Scanning software to score any type of Assignment Book assignment, including free-response assignments. To score free-response assignments with the scanner, teachers can fill in a card for each student and mark A for every correct answer and B for every incorrect answer.
Students can use the AccelScan and the Scanning Software to score practices and assisted-response exercises and tests. You can use the Scoring preference to limit students to scoring practices only. See page 161.
1. Make sure each student has entered his or her form number for this assignment at the top of the card.
If you don’t have the form number, do one of the following:
• Check the student’s printed assignment. The form number is at the top.
• In the Assignment Book, position your mouse over the print date. The form number will appear.
• Print a Status of the Class Report and include the Assignments Printed section. This section of the report includes form numbers for unscored assignments.
2. Make sure the AccelScan is plugged in. If the AccelScan scanner has a switch, make sure it is on.
3. Start the AccelScan Scanning software:
• Windows: Click Start Programs AccelScan Scanning Software AccelScan.
• Macintosh: For version 1.42, find the folder where you installed AccelScan; for version 2.0, open the Applications folder on your hard drive. Double-click the AccelScan icon.
Who Can Do This?
District Administrator
District Staff
School Administrator
School Staff
Teachers
Students
To change capabilities, see page 165.
Form numbers: Form numbers identify the student and the
assignment. Each student has a unique form number, and form numbers are unique for each type of assignment. (For example, a student’s practices and exercises have different form numbers.) Accelerated Math keeps using a form number for a student and assignment type until the card is full or almost full to make the best use of your scan cards.
80Accelerated MathSoftware Manual
T H E A S S I G N M E N T B O O K
Scoring Assignments
. . .
. .
4. Enter your user name and password, even if students will be scoring their own assignments. Then, click Log In. When the software has detected the scanner, you will see a Ready to scan message.
If the software is not ready to scan, click Scanner Settings, make sure the correct port is selected, and click OK.
5. If students will scan their own cards, click (version 1.42–1.43) or (version 2.0). This puts the software in Student Mode.
6. For AccelScan model 2110 (shown) or 2210: Insert the card face up, with the form number going into the scanner first as shown to the right.
For AccelScan model 1100 USB: Insert the card face down, with the form number going into the scanner first.
For AccelScan model 1100 Serial: Insert the card face up, with the form number going into the scanner first.
7. The scanner will scan the answers on the card, and the software will score the assignment and print the TOPS Report. If the scored assignment was a practice, the software may also print the student’s next practice (see the Scoring preference on page 161). The scanner will eject the card.
8. When your students have finished scoring assignments, click Log Out.
In Student Mode, students can’t access program settings, and
the Scoring preference limits what students can score; see page 161. To exit Student Mode in version 1.42–1.43 of the software, click the File menu and choose Teacher Mode. To exit Student Mode in version 2.x, click the button again. You must enter your user name and password when you exit Student Mode.
Messages during scoring. The software will notify you if it finds
a problem during scoring. The most common problems are incorrect form numbers on the card, answers marked next to the wrong problem numbers, multiple answers marked for the same problem, or stray marks on the card. Read the message in the software. If necessary, click Score again, or click Cancel.
81Accelerated MathSoftware Manual
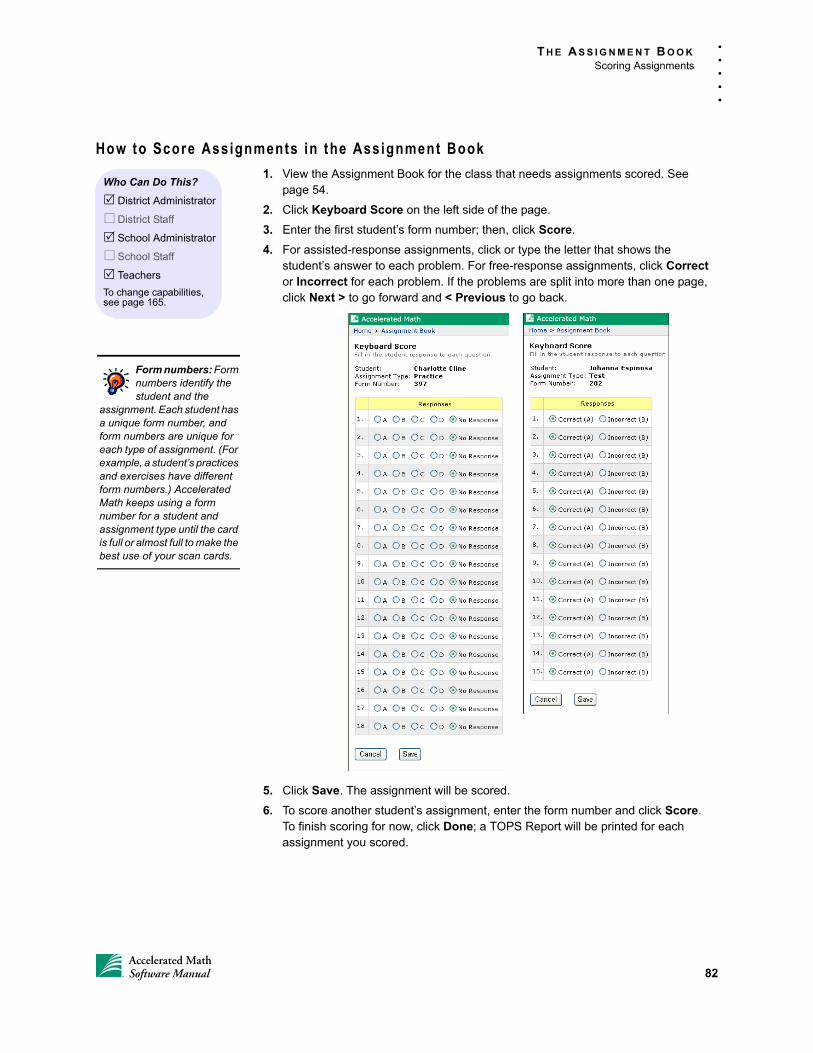
T H E A S S I G N M E N T B O O K
Scoring Assignments
. . .
. .
How to Score Assignments in the Assignment Book
1. View the Assignment Book for the class that needs assignments scored. See page 54.
2. Click Keyboard Score on the left side of the page.
3. Enter the first student’s form number; then, click Score.
4. For assisted-response assignments, click or type the letter that shows the student’s answer to each problem. For free-response assignments, click Correct or Incorrect for each problem. If the problems are split into more than one page, click Next > to go forward and < Previous to go back.
5. Click Save. The assignment will be scored.
6. To score another student’s assignment, enter the form number and click Score.To finish scoring for now, click Done; a TOPS Report will be printed for each assignment you scored.
Who Can Do This?
District Administrator
District Staff
School Administrator
School Staff
Teachers
To change capabilities, see page 165.
Form numbers: Form numbers identify the student and the
assignment. Each student has a unique form number, and form numbers are unique for each type of assignment. (For example, a student’s practices and exercises have different form numbers.) Accelerated Math keeps using a form number for a student and assignment type until the card is full or almost full to make the best use of your scan cards.
82Accelerated MathSoftware Manual
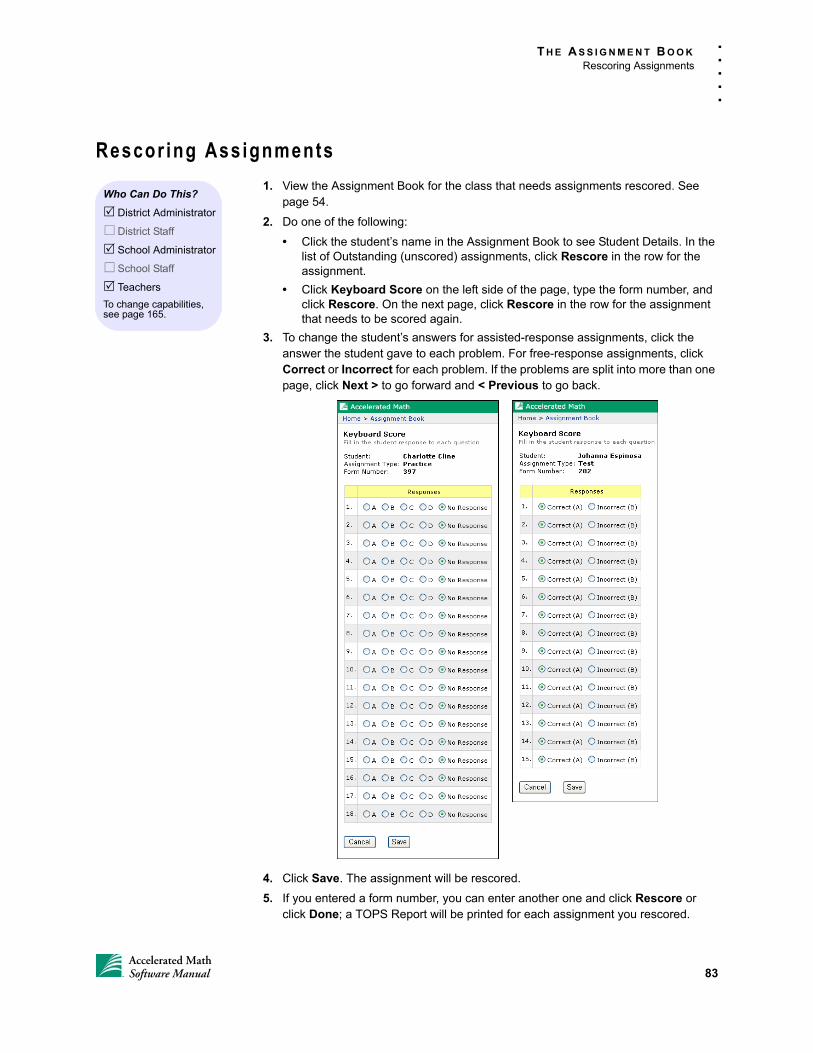
T H E A S S I G N M E N T B O O K
Rescoring Assignments
. . .
. .
Rescor ing Assignments
1. View the Assignment Book for the class that needs assignments rescored. See page 54.
2. Do one of the following:
• Click the student’s name in the Assignment Book to see Student Details. In the list of Outstanding (unscored) assignments, click Rescore in the row for the assignment.
• Click Keyboard Score on the left side of the page, type the form number, and click Rescore. On the next page, click Rescore in the row for the assignment that needs to be scored again.
3. To change the student’s answers for assisted-response assignments, click the answer the student gave to each problem. For free-response assignments, click Correct or Incorrect for each problem. If the problems are split into more than one page, click Next > to go forward and < Previous to go back.
4. Click Save. The assignment will be rescored.
5. If you entered a form number, you can enter another one and click Rescore or click Done; a TOPS Report will be printed for each assignment you rescored.
Who Can Do This?
District Administrator
District Staff
School Administrator
School Staff
Teachers
To change capabilities, see page 165.
83Accelerated MathSoftware Manual
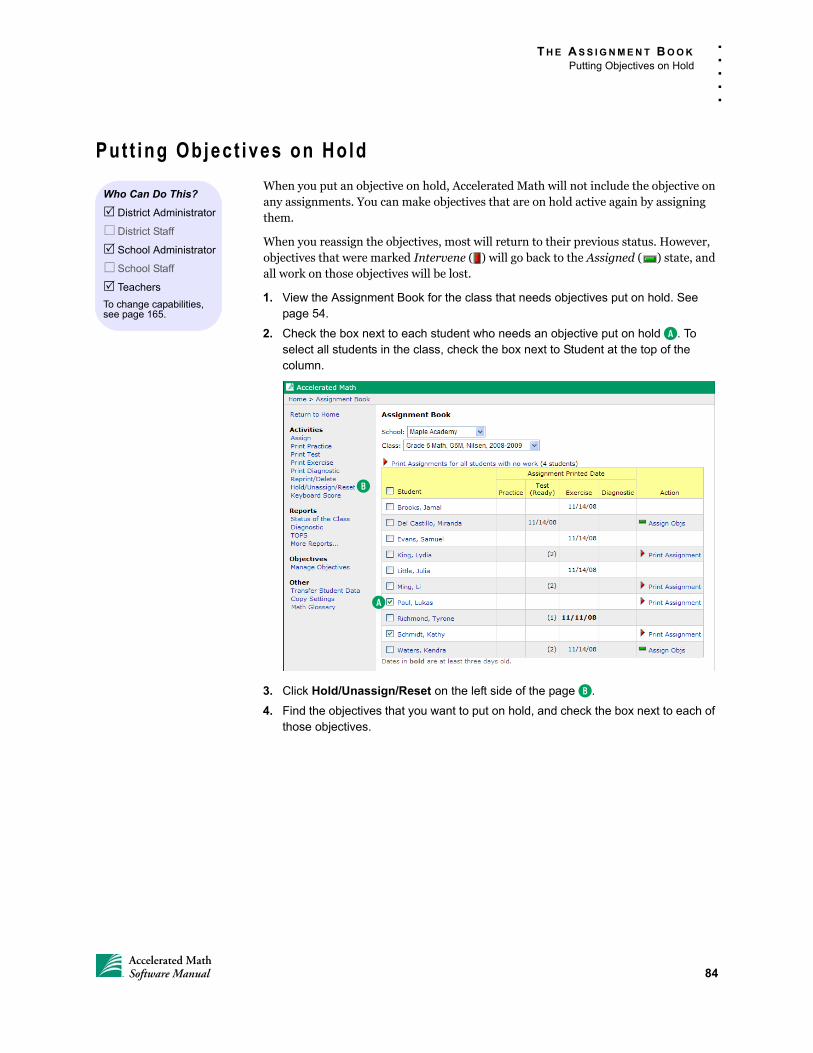
T H E A S S I G N M E N T B O O K
Putting Objectives on Hold
. . .
. .
Put t ing Object ives on Hold
When you put an objective on hold, Accelerated Math will not include the objective on any assignments. You can make objectives that are on hold active again by assigning them.
When you reassign the objectives, most will return to their previous status. However, objectives that were marked Intervene ( ) will go back to the Assigned ( ) state, and all work on those objectives will be lost.
1. View the Assignment Book for the class that needs objectives put on hold. See page 54.
2. Check the box next to each student who needs an objective put on hold A. To select all students in the class, check the box next to Student at the top of the column.
3. Click Hold/Unassign/Reset on the left side of the page B.
4. Find the objectives that you want to put on hold, and check the box next to each of those objectives.
Who Can Do This?
District Administrator
District Staff
School Administrator
School Staff
Teachers
To change capabilities, see page 165.
A
B
84Accelerated MathSoftware Manual
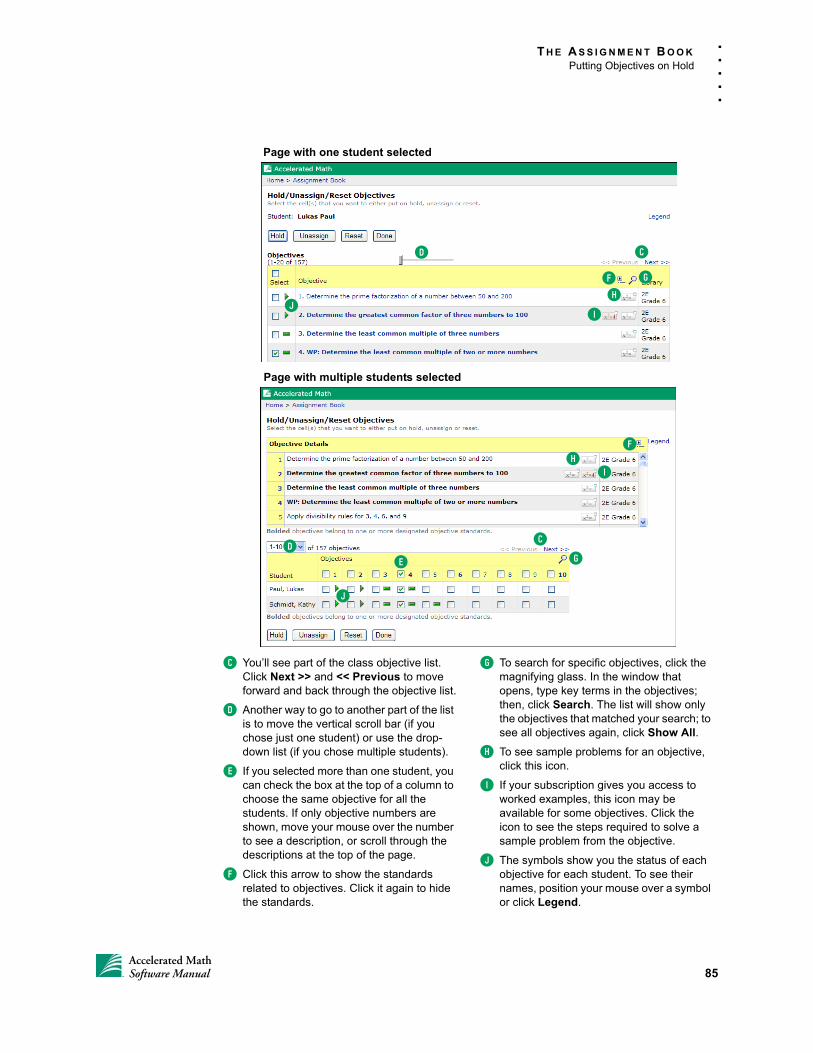
T H E A S S I G N M E N T B O O K
Putting Objectives on Hold
. . .
. .
Page with one student selected
Page with multiple students selected
D
D
C
C
G
H
HJ
F G
I
F
I
E
J
C You’ll see part of the class objective list. Click Next >> and << Previous to move forward and back through the objective list.
D Another way to go to another part of the list is to move the vertical scroll bar (if you chose just one student) or use the drop-down list (if you chose multiple students).
E If you selected more than one student, you can check the box at the top of a column to choose the same objective for all the students. If only objective numbers are shown, move your mouse over the number to see a description, or scroll through the descriptions at the top of the page.
F Click this arrow to show the standards related to objectives. Click it again to hide the standards.
G To search for specific objectives, click the magnifying glass. In the window that opens, type key terms in the objectives; then, click Search. The list will show only the objectives that matched your search; to see all objectives again, click Show All.
H To see sample problems for an objective, click this icon.
I If your subscription gives you access to worked examples, this icon may be available for some objectives. Click the icon to see the steps required to solve a sample problem from the objective.
J The symbols show you the status of each objective for each student. To see their names, position your mouse over a symbol or click Legend.
85Accelerated MathSoftware Manual
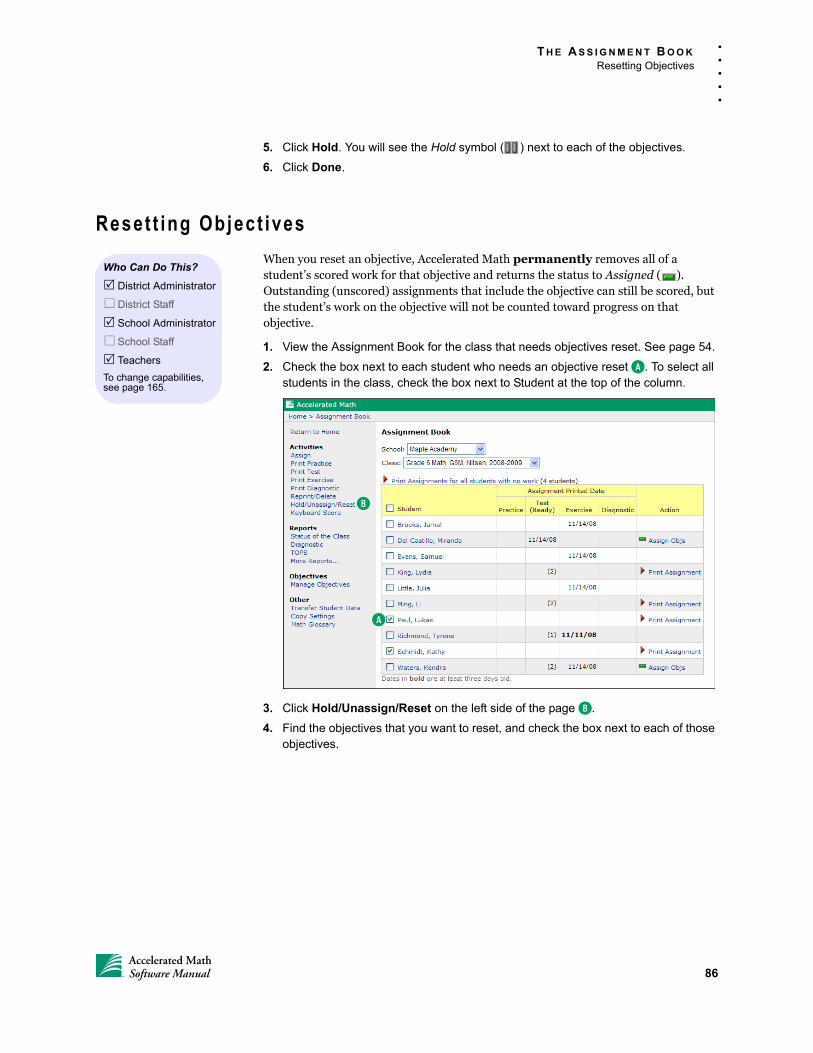
T H E A S S I G N M E N T B O O K
Resetting Objectives
. . .
. .
5. Click Hold. You will see the Hold symbol ( ) next to each of the objectives.
6. Click Done.
Reset t ing Object ives
When you reset an objective, Accelerated Math permanently removes all of a student’s scored work for that objective and returns the status to Assigned ( ). Outstanding (unscored) assignments that include the objective can still be scored, but the student’s work on the objective will not be counted toward progress on that objective.
1. View the Assignment Book for the class that needs objectives reset. See page 54.
2. Check the box next to each student who needs an objective reset A. To select all students in the class, check the box next to Student at the top of the column.
3. Click Hold/Unassign/Reset on the left side of the page B.
4. Find the objectives that you want to reset, and check the box next to each of those objectives.
Who Can Do This?
District Administrator
District Staff
School Administrator
School Staff
Teachers
To change capabilities, see page 165.
A
B
86Accelerated MathSoftware Manual

T H E A S S I G N M E N T B O O K
Resetting Objectives
. . .
. .
Page with one student selected
Page with multiple students selected
D
D
C
C
G
H
HJ
F G
I
F
I
E
J
C You’ll see part of the class objective list. Click Next >> and << Previous to move forward and back through the objective list.
D Another way to go to another part of the list is to move the vertical scroll bar (if you chose just one student) or use the drop-down list (if you chose multiple students).
E If you selected more than one student, you can check the box at the top of a column to choose the same objective for all the students. If only objective numbers are shown, move your mouse over the number to see a description, or scroll through the descriptions at the top of the page.
F Click this arrow to show the standards related to objectives. Click it again to hide the standards.
G To search for specific objectives, click the magnifying glass. In the window that opens, type key terms in the objectives; then, click Search. The list will show only the objectives that matched your search; to see all objectives again, click Show All.
H To see sample problems for an objective, click this icon.
I If your subscription gives you access to worked examples, this icon may be available for some objectives. Click the icon to see the steps required to solve a sample problem from the objective.
J The symbols show you the status of each objective for each student. To see their names, position your mouse over a symbol or click Legend.
87Accelerated MathSoftware Manual
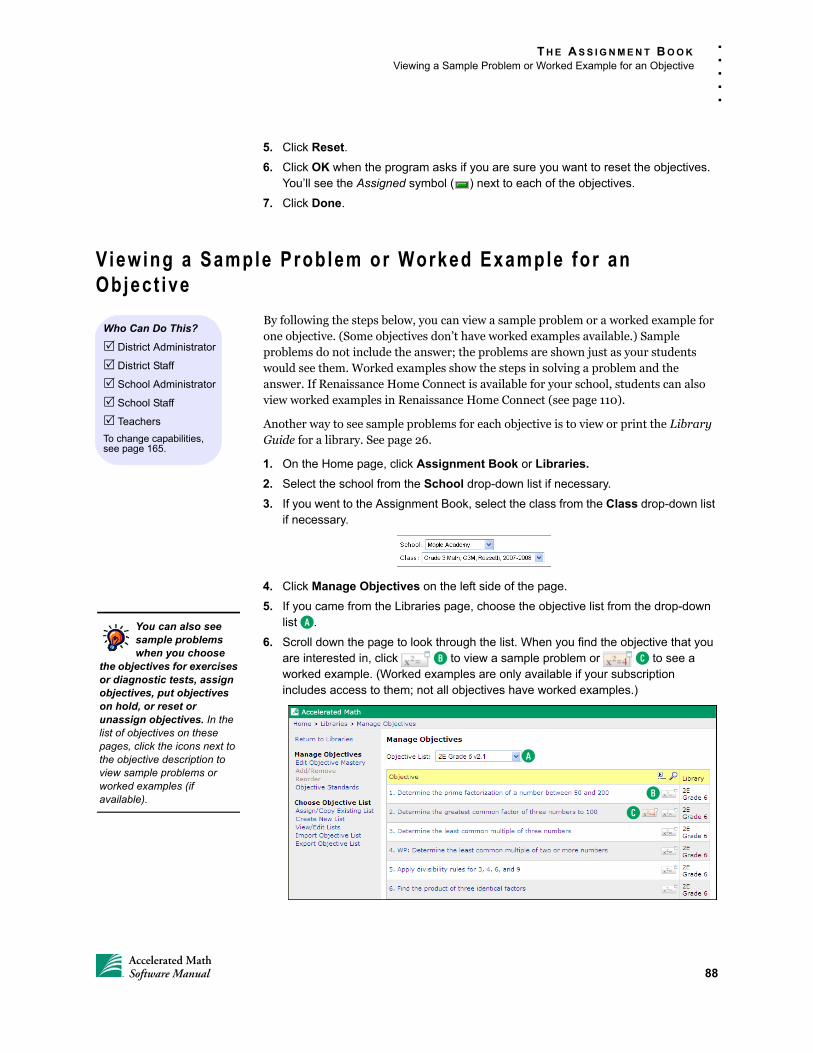
T H E A S S I G N M E N T B O O K
Viewing a Sample Problem or Worked Example for an Objective
. . .
. .
5. Click Reset.
6. Click OK when the program asks if you are sure you want to reset the objectives. You’ll see the Assigned symbol ( ) next to each of the objectives.
7. Click Done.
Viewing a Sample Problem or Worked Example for an Object ive
By following the steps below, you can view a sample problem or a worked example for one objective. (Some objectives don’t have worked examples available.) Sample problems do not include the answer; the problems are shown just as your students would see them. Worked examples show the steps in solving a problem and the answer. If Renaissance Home Connect is available for your school, students can also view worked examples in Renaissance Home Connect (see page 110).
Another way to see sample problems for each objective is to view or print the Library Guide for a library. See page 26.
1. On the Home page, click Assignment Book or Libraries.
2. Select the school from the School drop-down list if necessary.
3. If you went to the Assignment Book, select the class from the Class drop-down list if necessary.
4. Click Manage Objectives on the left side of the page.
5. If you came from the Libraries page, choose the objective list from the drop-down list A.
6. Scroll down the page to look through the list. When you find the objective that you are interested in, click B to view a sample problem or C to see a worked example. (Worked examples are only available if your subscription includes access to them; not all objectives have worked examples.)
Who Can Do This?
District Administrator
District Staff
School Administrator
School Staff
Teachers
To change capabilities, see page 165.
You can also see sample problems when you choose
the objectives for exercises or diagnostic tests, assign objectives, put objectives on hold, or reset or unassign objectives. In the list of objectives on these pages, click the icons next to the objective description to view sample problems or worked examples (if available).
A
B
C
88Accelerated MathSoftware Manual
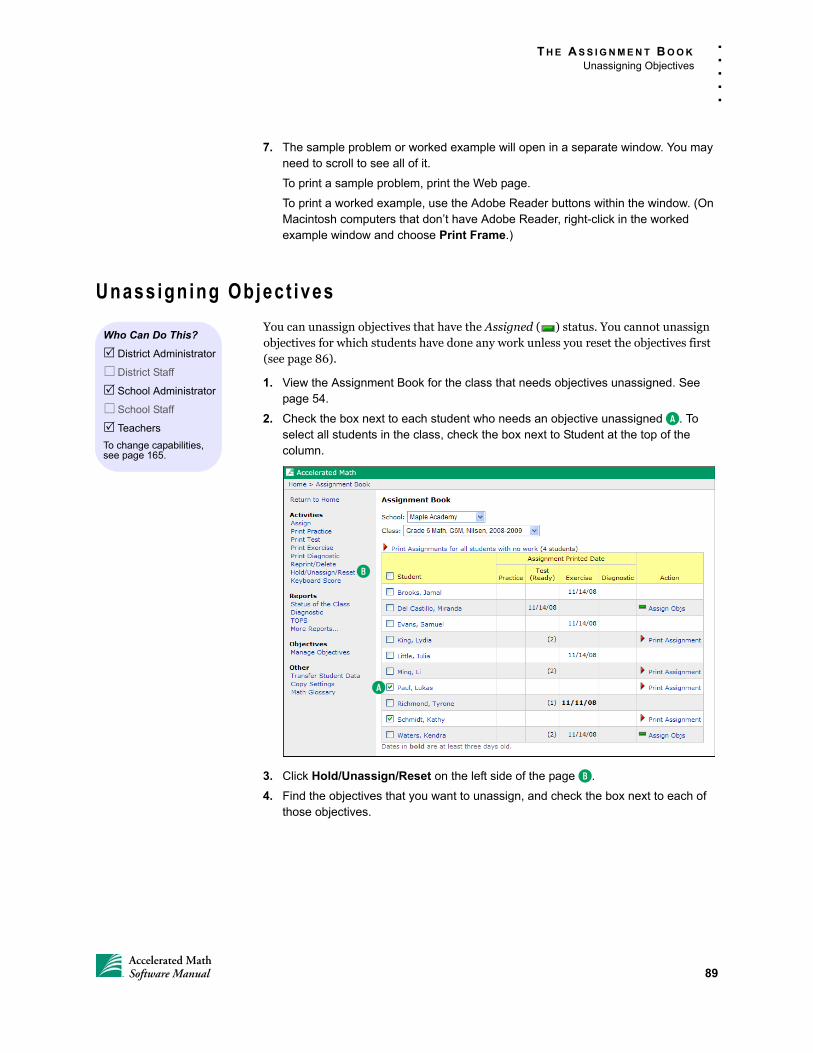
T H E A S S I G N M E N T B O O K
Unassigning Objectives
. . .
. .
7. The sample problem or worked example will open in a separate window. You may need to scroll to see all of it.
To print a sample problem, print the Web page.
To print a worked example, use the Adobe Reader buttons within the window. (On Macintosh computers that don’t have Adobe Reader, right-click in the worked example window and choose Print Frame.)
Unassigning Object ives
You can unassign objectives that have the Assigned ( ) status. You cannot unassign objectives for which students have done any work unless you reset the objectives first (see page 86).
1. View the Assignment Book for the class that needs objectives unassigned. See page 54.
2. Check the box next to each student who needs an objective unassigned A. To select all students in the class, check the box next to Student at the top of the column.
3. Click Hold/Unassign/Reset on the left side of the page B.
4. Find the objectives that you want to unassign, and check the box next to each of those objectives.
Who Can Do This?
District Administrator
District Staff
School Administrator
School Staff
Teachers
To change capabilities, see page 165.
A
B
89Accelerated MathSoftware Manual

T H E A S S I G N M E N T B O O K
Unassigning Objectives
. . .
. .
Page with one student selected
Page with multiple students selected
D
D
C
C
G
H
HJ
F G
I
F
I
E
J
C You’ll see part of the class objective list. Click Next >> and << Previous to move forward and back through the objective list.
D Another way to go to another part of the list is to move the vertical scroll bar (if you chose just one student) or use the drop-down list (if you chose multiple students).
E If you selected more than one student, you can check the box at the top of a column to choose the same objective for all the students. If only objective numbers are shown, move your mouse over the number to see a description, or scroll through the descriptions at the top of the page.
F Click this arrow to show the standards related to objectives. Click it again to hide the standards.
G To search for specific objectives, click the magnifying glass. In the window that opens, type key terms in the objectives; then, click Search. The list will show only the objectives that matched your search; to see all objectives again, click Show All.
H To see sample problems for an objective, click this icon.
I If your subscription gives you access to worked examples, this icon may be available for some objectives. Click the icon to see the steps required to solve a sample problem from the objective.
J The symbols show you the status of each objective for each student. To see their names, position your mouse over a symbol or click Legend.
90Accelerated MathSoftware Manual
T H E A S S I G N M E N T B O O K
Viewing Student Details
. . .
. .
5. Click Unassign. All symbols will be removed for these objectives.
6. Click Done.
Viewing Student Deta i ls
When you view student details, you can see students’ outstanding assignments, the assignments they recently completed, and their status for every objective in the Assignment Book.
1. View the Assignment Book for the class. See page 54.
2. Click the student’s name in the Assignment Book to see the Student Detail page. See the next page for an example and for more information about the options available when you view student details.
If the program tells you some objectives could not be
unassigned, you chose some objectives that have not yet been assigned. This can happen when you select an objective at the top of the column, and some students have never had the objective assigned.
Who Can Do This?
District Administrator
District Staff
School Administrator
School Staff
Teachers
To change capabilities, see page 165.
91Accelerated MathSoftware Manual
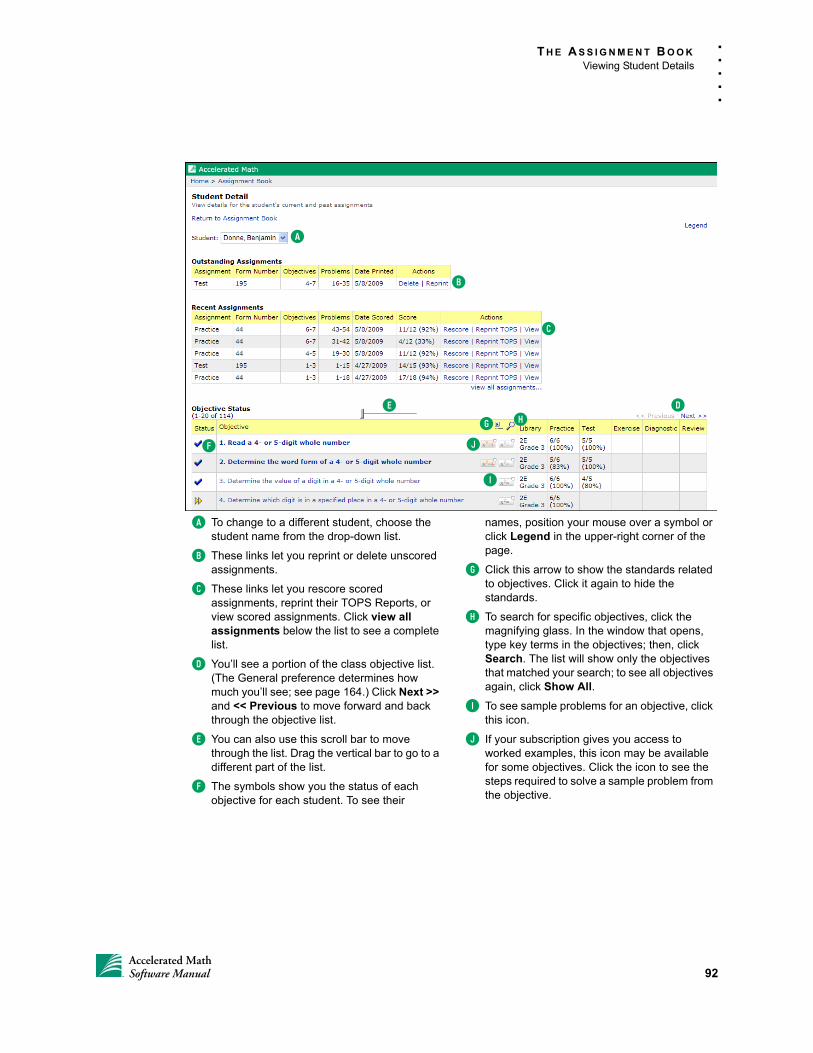
T H E A S S I G N M E N T B O O K
Viewing Student Details
. . .
. .
A
B
C
DE
F
I
G H
J
A To change to a different student, choose the student name from the drop-down list.
B These links let you reprint or delete unscored assignments.
C These links let you rescore scored assignments, reprint their TOPS Reports, or view scored assignments. Click view all assignments below the list to see a complete list.
D You’ll see a portion of the class objective list. (The General preference determines how much you’ll see; see page 164.) Click Next >> and << Previous to move forward and back through the objective list.
E You can also use this scroll bar to move through the list. Drag the vertical bar to go to a different part of the list.
F The symbols show you the status of each objective for each student. To see their
names, position your mouse over a symbol or click Legend in the upper-right corner of the page.
G Click this arrow to show the standards related to objectives. Click it again to hide the standards.
H To search for specific objectives, click the magnifying glass. In the window that opens, type key terms in the objectives; then, click Search. The list will show only the objectives that matched your search; to see all objectives again, click Show All.
I To see sample problems for an objective, click this icon.
J If your subscription gives you access to worked examples, this icon may be available for some objectives. Click the icon to see the steps required to solve a sample problem from the objective.
92Accelerated MathSoftware Manual

T H E A S S I G N M E N T B O O K
Printing Reports from the Assignment Book
. . .
. .
Pr int ing Repor ts f rom the Ass ignment Book
How to Pr int the Diagnost ic or Status of the Class Report in the Assignment Book
1. View the Assignment Book for the class. See page 54.
2. Click the name of the report (Diagnostic or Status of the Class) on the left side of the page.
3. The Report Progress page will open until the report is ready. Then, the report will open in Adobe Reader, either within your browser window or a separate window.
Who Can Do This?
District Administrator
District Staff
School Administrator
School Staff
Teachers
To change capabilities, see page 165.
B
C
A
A Use the Adobe Reader buttons to save or print the report. Do not use the browser’s print function. If the report opened in the Macintosh OS 10 Preview program, click the File menu and choose Print.
B These links let you customize the report or choose a different Accelerated Math report.
C Click Assignment Book in the navigation bar at the top to go back to your class Assignment Book.You can also print
these reports from the Reports page.
See page 140.
93Accelerated MathSoftware Manual

T H E A S S I G N M E N T B O O K
Printing Reports from the Assignment Book
. . .
. .
How to Pr int the TOPS Report in the Assignment Book
1. View the Assignment Book for the class. See page 54.
2. Check the box next to each student who needs a TOPS Report reprinted A. To select all students in the class, check the box next to Student at the top of the column.
3. Click TOPS on the left side of the page B.
4. If you chose just one student, the next page will show you the assignments that the student has completed. Click Reprint in the row for the assignment C. If you chose more than one student, go to the next step; Accelerated Math will print each student’s most recent TOPS Report.
Who Can Do This?
District Administrator
District Staff
School Administrator
School Staff
Teachers
To change capabilities, see page 165.
BA
C
94Accelerated MathSoftware Manual
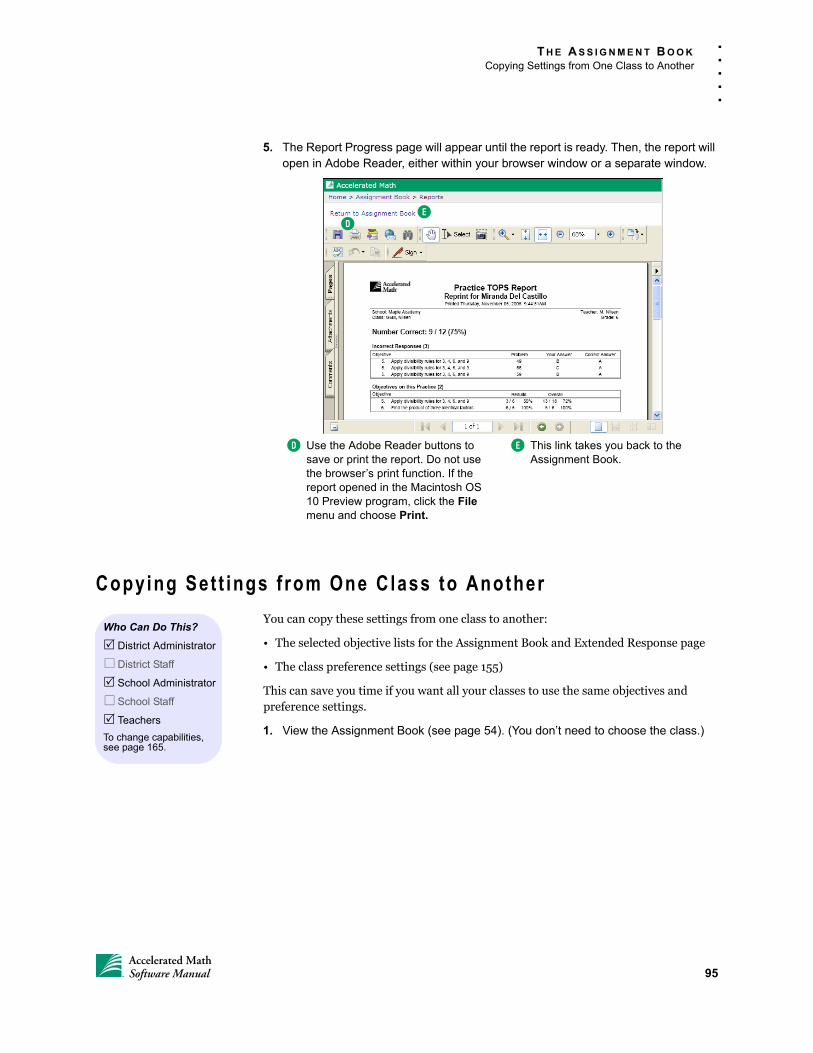
T H E A S S I G N M E N T B O O K
Copying Settings from One Class to Another
. . .
. .
5. The Report Progress page will appear until the report is ready. Then, the report will open in Adobe Reader, either within your browser window or a separate window.
Copying Set t ings f rom One Class to Another
You can copy these settings from one class to another:
• The selected objective lists for the Assignment Book and Extended Response page
• The class preference settings (see page 155)
This can save you time if you want all your classes to use the same objectives and preference settings.
1. View the Assignment Book (see page 54). (You don’t need to choose the class.)
ED
D Use the Adobe Reader buttons to save or print the report. Do not use the browser’s print function. If the report opened in the Macintosh OS 10 Preview program, click the File menu and choose Print.
E This link takes you back to the Assignment Book.
Who Can Do This?
District Administrator
District Staff
School Administrator
School Staff
Teachers
To change capabilities, see page 165.
95Accelerated MathSoftware Manual
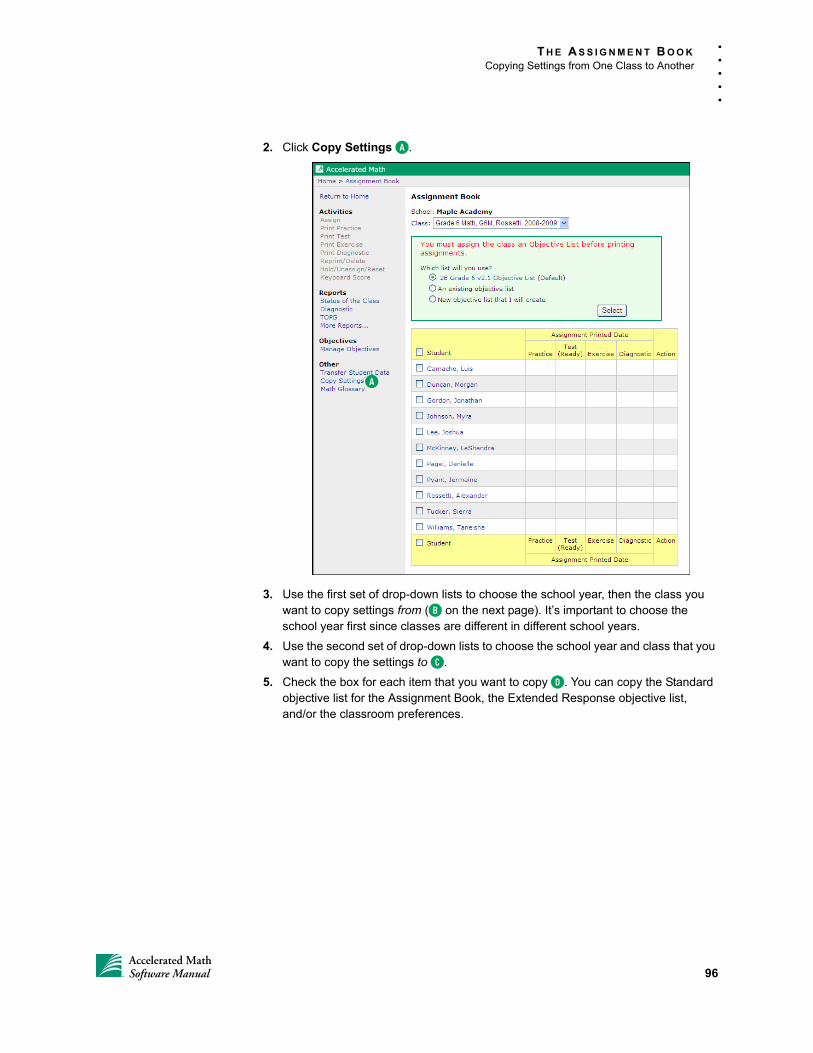
T H E A S S I G N M E N T B O O K
Copying Settings from One Class to Another
. . .
. .
2. Click Copy Settings A.
3. Use the first set of drop-down lists to choose the school year, then the class you want to copy settings from (B on the next page). It’s important to choose the school year first since classes are different in different school years.
4. Use the second set of drop-down lists to choose the school year and class that you want to copy the settings to C.
5. Check the box for each item that you want to copy D. You can copy the Standard objective list for the Assignment Book, the Extended Response objective list, and/or the classroom preferences.
A
96Accelerated MathSoftware Manual
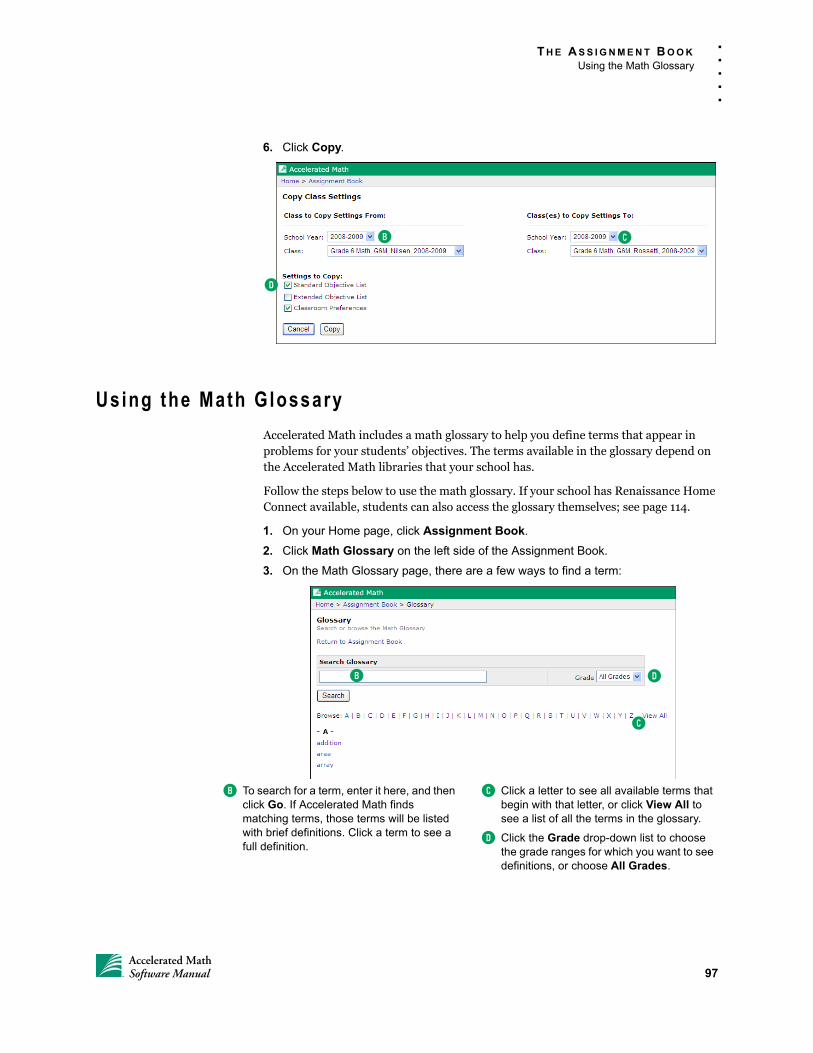
T H E A S S I G N M E N T B O O K
Using the Math Glossary
. . .
. .
6. Click Copy.
Using the Math Glossary
Accelerated Math includes a math glossary to help you define terms that appear in problems for your students’ objectives. The terms available in the glossary depend on the Accelerated Math libraries that your school has.
Follow the steps below to use the math glossary. If your school has Renaissance Home Connect available, students can also access the glossary themselves; see page 114.
1. On your Home page, click Assignment Book.
2. Click Math Glossary on the left side of the Assignment Book.
3. On the Math Glossary page, there are a few ways to find a term:
B C
D
B D
C
B To search for a term, enter it here, and then click Go. If Accelerated Math finds matching terms, those terms will be listed with brief definitions. Click a term to see a full definition.
C Click a letter to see all available terms that begin with that letter, or click View All to see a list of all the terms in the glossary.
D Click the Grade drop-down list to choose the grade ranges for which you want to see definitions, or choose All Grades.
97Accelerated MathSoftware Manual
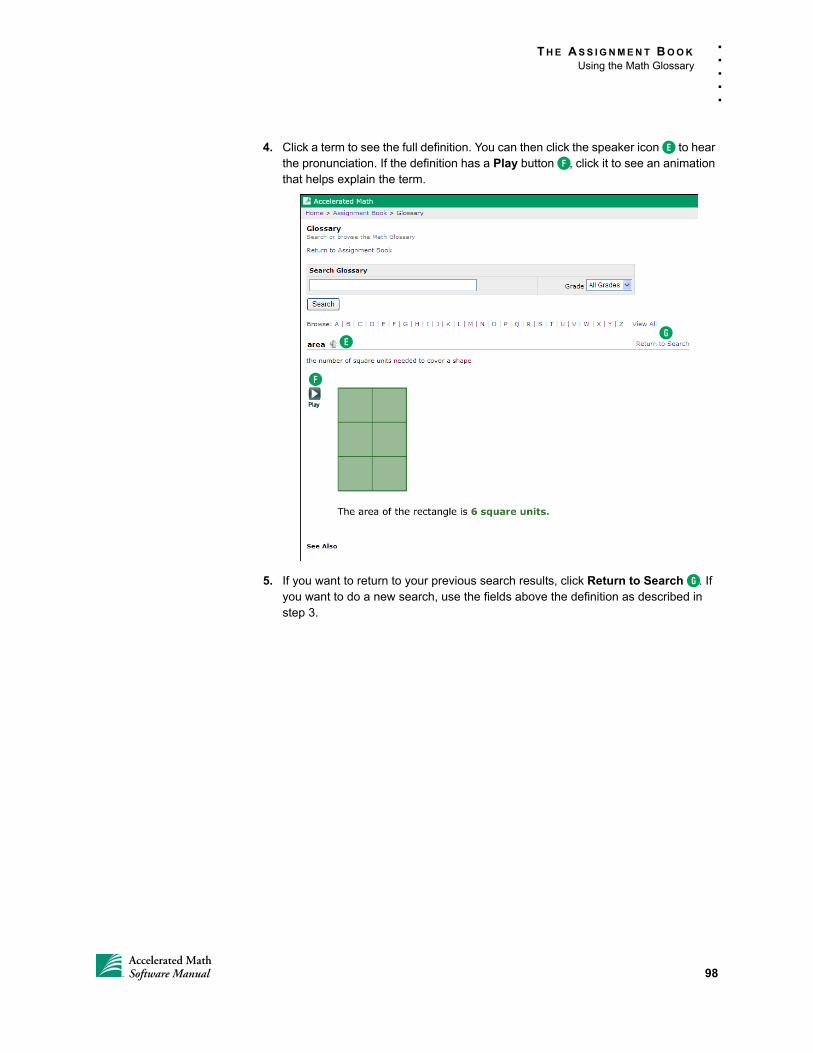
T H E A S S I G N M E N T B O O K
Using the Math Glossary
. . .
. .
4. Click a term to see the full definition. You can then click the speaker icon E to hear the pronunciation. If the definition has a Play button F, click it to see an animation that helps explain the term.
5. If you want to return to your previous search results, click Return to Search G. If you want to do a new search, use the fields above the definition as described in step 3.
F
EG
98Accelerated MathSoftware Manual
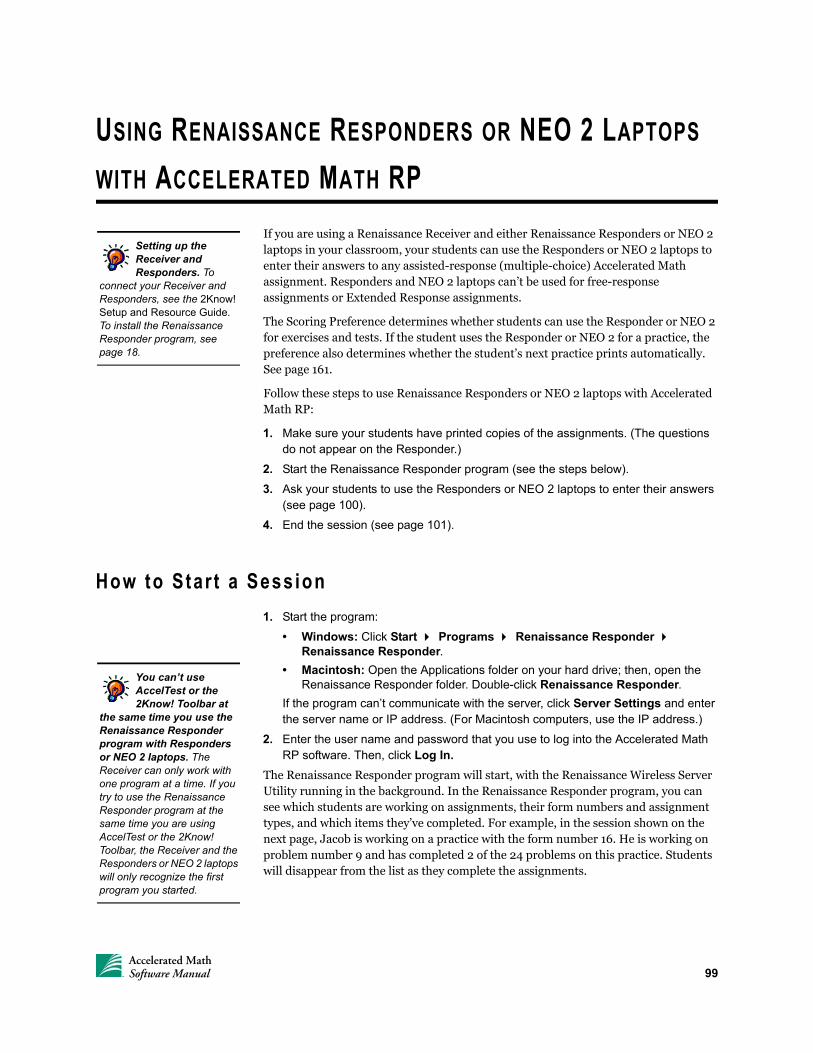
USING RENAISSANCE RESPONDERS OR NEO 2 LAPTOPS
WITH ACCELERATED MATH RP
If you are using a Renaissance Receiver and either Renaissance Responders or NEO 2 laptops in your classroom, your students can use the Responders or NEO 2 laptops to enter their answers to any assisted-response (multiple-choice) Accelerated Math assignment. Responders and NEO 2 laptops can’t be used for free-response assignments or Extended Response assignments.
The Scoring Preference determines whether students can use the Responder or NEO 2 for exercises and tests. If the student uses the Responder or NEO 2 for a practice, the preference also determines whether the student’s next practice prints automatically. See page 161.
Follow these steps to use Renaissance Responders or NEO 2 laptops with Accelerated Math RP:
1. Make sure your students have printed copies of the assignments. (The questions do not appear on the Responder.)
2. Start the Renaissance Responder program (see the steps below).
3. Ask your students to use the Responders or NEO 2 laptops to enter their answers (see page 100).
4. End the session (see page 101).
How to Star t a Sess ion
1. Start the program:
• Windows: Click Start Programs Renaissance Responder Renaissance Responder.
• Macintosh: Open the Applications folder on your hard drive; then, open the Renaissance Responder folder. Double-click Renaissance Responder.
If the program can’t communicate with the server, click Server Settings and enter the server name or IP address. (For Macintosh computers, use the IP address.)
2. Enter the user name and password that you use to log into the Accelerated Math RP software. Then, click Log In.
The Renaissance Responder program will start, with the Renaissance Wireless Server Utility running in the background. In the Renaissance Responder program, you can see which students are working on assignments, their form numbers and assignment types, and which items they’ve completed. For example, in the session shown on the next page, Jacob is working on a practice with the form number 16. He is working on problem number 9 and has completed 2 of the 24 problems on this practice. Students will disappear from the list as they complete the assignments.
Setting up the Receiver and Responders. To
connect your Receiver and Responders, see the 2Know! Setup and Resource Guide. To install the Renaissance Responder program, see page 18.
You can’t use AccelTest or the 2Know! Toolbar at
the same time you use the Renaissance Responder program with Responders or NEO 2 laptops. The Receiver can only work with one program at a time. If you try to use the Renaissance Responder program at the same time you are using AccelTest or the 2Know! Toolbar, the Receiver and the Responders or NEO 2 laptops will only recognize the first program you started.
99Accelerated MathSoftware Manual
U S I N G R E N A I S S A N C E R E S P O N D E R S O R N E O 2 L A P T O P S W I T H A C C E L E R A T E D M A T H R PHow Students Use the Renaissance Responder or NEO 2 Laptop to Enter Their Answers
. . .
. .
How Students Use the Renaissance Responder or NEO 2 Laptop to Enter The i r Answers
1. If you are using a Renaissance Responder, press and hold On/Off on the Responder for a few seconds to turn it on.
If you are using a NEO 2, press on/off to start it. Then, press applets. Use the arrow keys to move the cursor down next to Responder; then, press enter.
2. If you are using a Renaissance Responder and the Responder shows a student name and asks for a PIN (personal identification number), have the student enter the PIN that you are using with AccelTest. Although Accelerated Math does not use this information, the PIN must be entered if you have assigned an owner to the Responder.
3. If you are using a Renaissance Responder, with Join Session highlighted in the main menu, press Select.
4. The Responder or NEO 2 will either show you a list of Receivers or ask if you want to stay connected to a specific one.
If it shows you a list, use the arrow buttons to move to the server you want to choose. When it is highlighted, press Select or Enter.
If it asks if you want to stay connected to a specific server, press yes (True) on the Renaissance Responder or Y for yes on NEO 2, or press no (False) on the Responder or N for no on NEO 2. After entering your answer, press Enter.
5. Enter your form number. Then, press Enter.
6. If the Responder or NEO 2 tells you to wait until your assignment is retrieved, press Enter again.
Do you have more than one Receiver with the same
name? This can make it hard for students to choose the right one. To find out how to change the name of one Receiver, see the 2Know! Setup and Resource Guide or the NEO 2 Quick Guide.
100Accelerated MathSoftware Manual
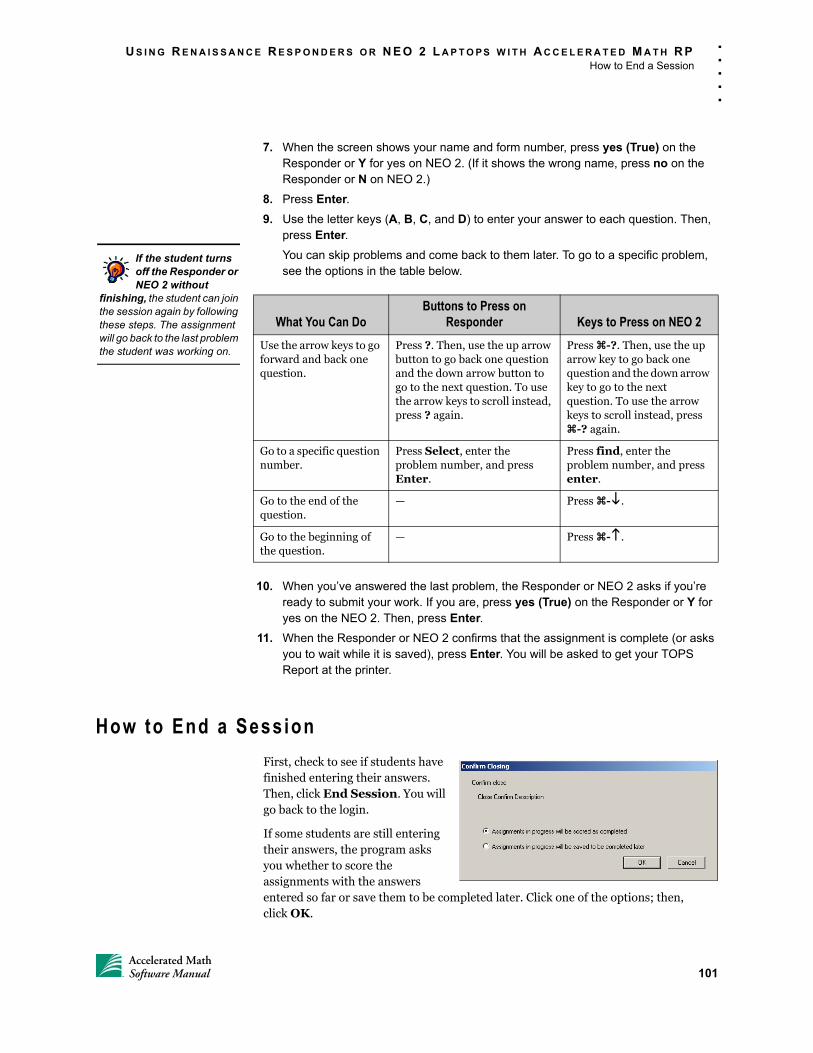
U S I N G R E N A I S S A N C E R E S P O N D E R S O R N E O 2 L A P T O P S W I T H A C C E L E R A T E D M A T H R PHow to End a Session
. . .
. .
7. When the screen shows your name and form number, press yes (True) on the Responder or Y for yes on NEO 2. (If it shows the wrong name, press no on the Responder or N on NEO 2.)
8. Press Enter.
9. Use the letter keys (A, B, C, and D) to enter your answer to each question. Then, press Enter.
You can skip problems and come back to them later. To go to a specific problem, see the options in the table below.
10. When you’ve answered the last problem, the Responder or NEO 2 asks if you’re ready to submit your work. If you are, press yes (True) on the Responder or Y for yes on the NEO 2. Then, press Enter.
11. When the Responder or NEO 2 confirms that the assignment is complete (or asks you to wait while it is saved), press Enter. You will be asked to get your TOPS Report at the printer.
How to End a Sess ion
First, check to see if students have finished entering their answers. Then, click End Session. You will go back to the login.
If some students are still entering their answers, the program asks you whether to score the assignments with the answers entered so far or save them to be completed later. Click one of the options; then,click OK.
What You Can DoButtons to Press on
Responder Keys to Press on NEO 2
Use the arrow keys to go forward and back one question.
Press ?. Then, use the up arrow button to go back one question and the down arrow button to go to the next question. To use the arrow keys to scroll instead, press ? again.
Press -?. Then, use the up arrow key to go back one question and the down arrow key to go to the next question. To use the arrow keys to scroll instead, press -? again.
Go to a specific question number.
Press Select, enter the problem number, and press Enter.
Press find, enter the problem number, and press enter.
Go to the end of the question.
— Press -.
Go to the beginning of the question.
— Press -.
If the student turns off the Responder or NEO 2 without
finishing, the student can join the session again by following these steps. The assignment will go back to the last problem the student was working on.
101Accelerated MathSoftware Manual
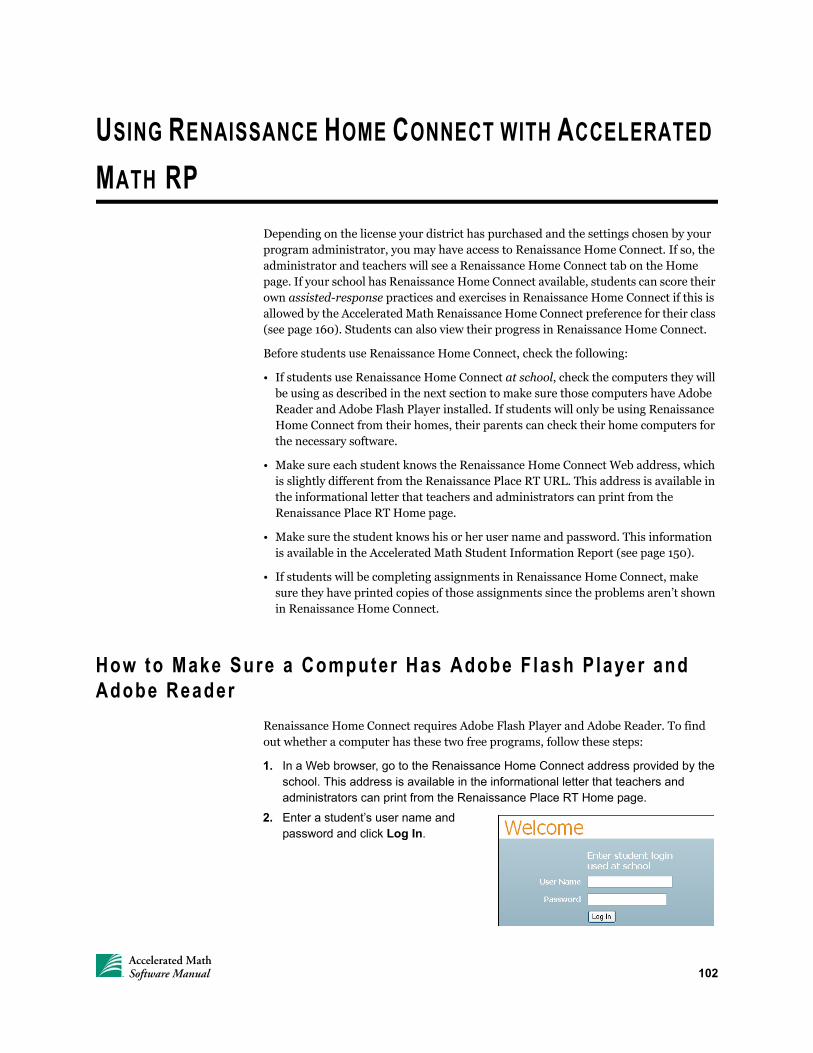
USING RENAISSANCE HOME CONNECT WITH ACCELERATED
MATH RP
Depending on the license your district has purchased and the settings chosen by your program administrator, you may have access to Renaissance Home Connect. If so, the administrator and teachers will see a Renaissance Home Connect tab on the Home page. If your school has Renaissance Home Connect available, students can score their own assisted-response practices and exercises in Renaissance Home Connect if this is allowed by the Accelerated Math Renaissance Home Connect preference for their class (see page 160). Students can also view their progress in Renaissance Home Connect.
Before students use Renaissance Home Connect, check the following:
• If students use Renaissance Home Connect at school, check the computers they will be using as described in the next section to make sure those computers have Adobe Reader and Adobe Flash Player installed. If students will only be using Renaissance Home Connect from their homes, their parents can check their home computers for the necessary software.
• Make sure each student knows the Renaissance Home Connect Web address, which is slightly different from the Renaissance Place RT URL. This address is available in the informational letter that teachers and administrators can print from the Renaissance Place RT Home page.
• Make sure the student knows his or her user name and password. This information is available in the Accelerated Math Student Information Report (see page 150).
• If students will be completing assignments in Renaissance Home Connect, make sure they have printed copies of those assignments since the problems aren’t shown in Renaissance Home Connect.
How to Make Sure a Computer Has Adobe F lash P layer and Adobe Reader
Renaissance Home Connect requires Adobe Flash Player and Adobe Reader. To find out whether a computer has these two free programs, follow these steps:
1. In a Web browser, go to the Renaissance Home Connect address provided by the school. This address is available in the informational letter that teachers and administrators can print from the Renaissance Place RT Home page.
2. Enter a student’s user name and password and click Log In.
102Accelerated MathSoftware Manual
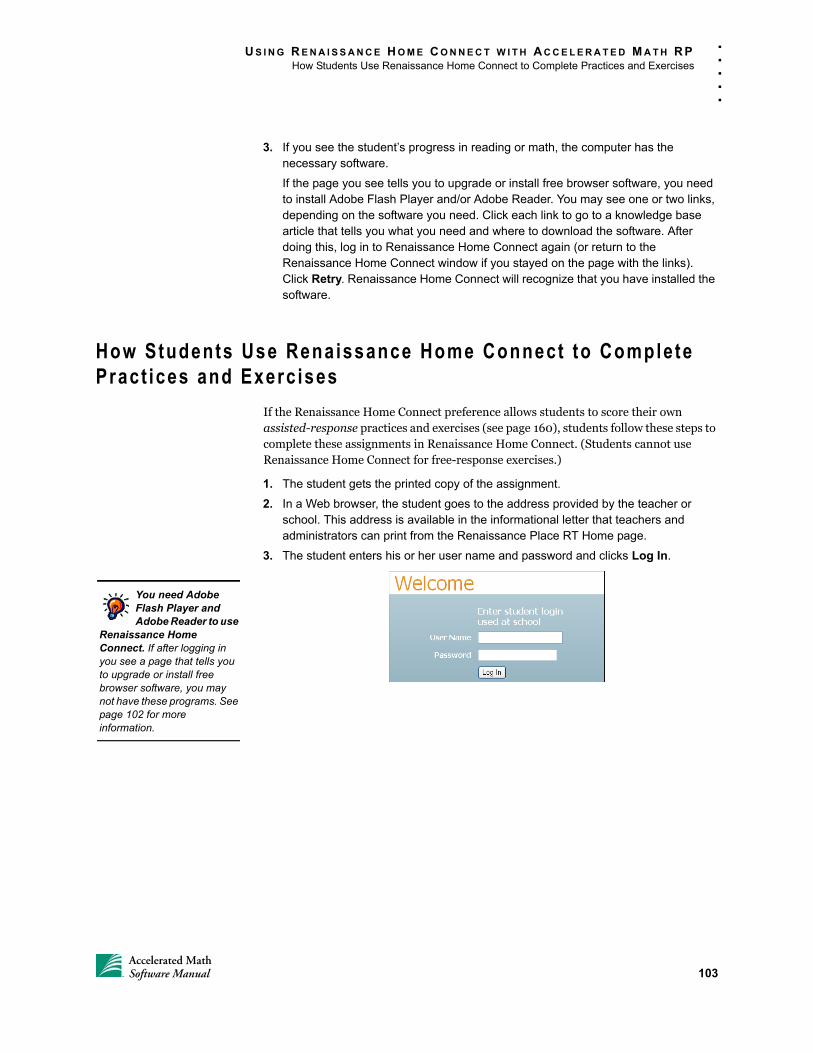
U S I N G R E N A I S S A N C E H O M E C O N N E C T W I T H A C C E L E R A T E D M A T H R PHow Students Use Renaissance Home Connect to Complete Practices and Exercises
. . .
. .
3. If you see the student’s progress in reading or math, the computer has the necessary software.
If the page you see tells you to upgrade or install free browser software, you need to install Adobe Flash Player and/or Adobe Reader. You may see one or two links, depending on the software you need. Click each link to go to a knowledge base article that tells you what you need and where to download the software. After doing this, log in to Renaissance Home Connect again (or return to the Renaissance Home Connect window if you stayed on the page with the links). Click Retry. Renaissance Home Connect will recognize that you have installed the software.
How Students Use Renaissance Home Connect to Complete Pract ices and Exerc ises
If the Renaissance Home Connect preference allows students to score their own assisted-response practices and exercises (see page 160), students follow these steps to complete these assignments in Renaissance Home Connect. (Students cannot use Renaissance Home Connect for free-response exercises.)
1. The student gets the printed copy of the assignment.
2. In a Web browser, the student goes to the address provided by the teacher or school. This address is available in the informational letter that teachers and administrators can print from the Renaissance Place RT Home page.
3. The student enters his or her user name and password and clicks Log In.
You need Adobe Flash Player and Adobe Reader to use
Renaissance Home Connect. If after logging in you see a page that tells you to upgrade or install free browser software, you may not have these programs. See page 102 for more information.
103Accelerated MathSoftware Manual

U S I N G R E N A I S S A N C E H O M E C O N N E C T W I T H A C C E L E R A T E D M A T H R PHow Students Use Renaissance Home Connect to Complete Practices and Exercises
. . .
. .
4. On the math tab in Renaissance Home Connect, on the Accelerated Math tab, the student clicks Practices and Exercises A.
A
104Accelerated MathSoftware Manual
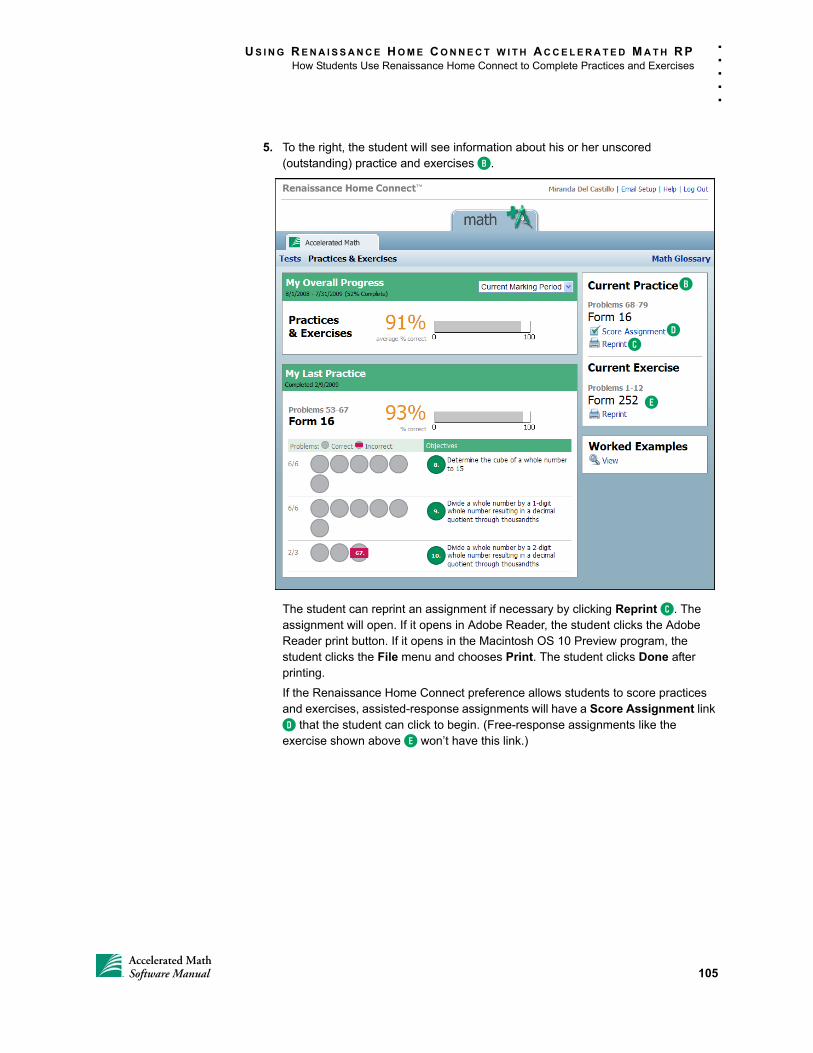
U S I N G R E N A I S S A N C E H O M E C O N N E C T W I T H A C C E L E R A T E D M A T H R PHow Students Use Renaissance Home Connect to Complete Practices and Exercises
. . .
. .
5. To the right, the student will see information about his or her unscored (outstanding) practice and exercises B.
The student can reprint an assignment if necessary by clicking Reprint C. The assignment will open. If it opens in Adobe Reader, the student clicks the Adobe Reader print button. If it opens in the Macintosh OS 10 Preview program, the student clicks the File menu and chooses Print. The student clicks Done after printing.
If the Renaissance Home Connect preference allows students to score practices and exercises, assisted-response assignments will have a Score Assignment link D that the student can click to begin. (Free-response assignments like the exercise shown above E won’t have this link.)
B
CD
E
105Accelerated MathSoftware Manual
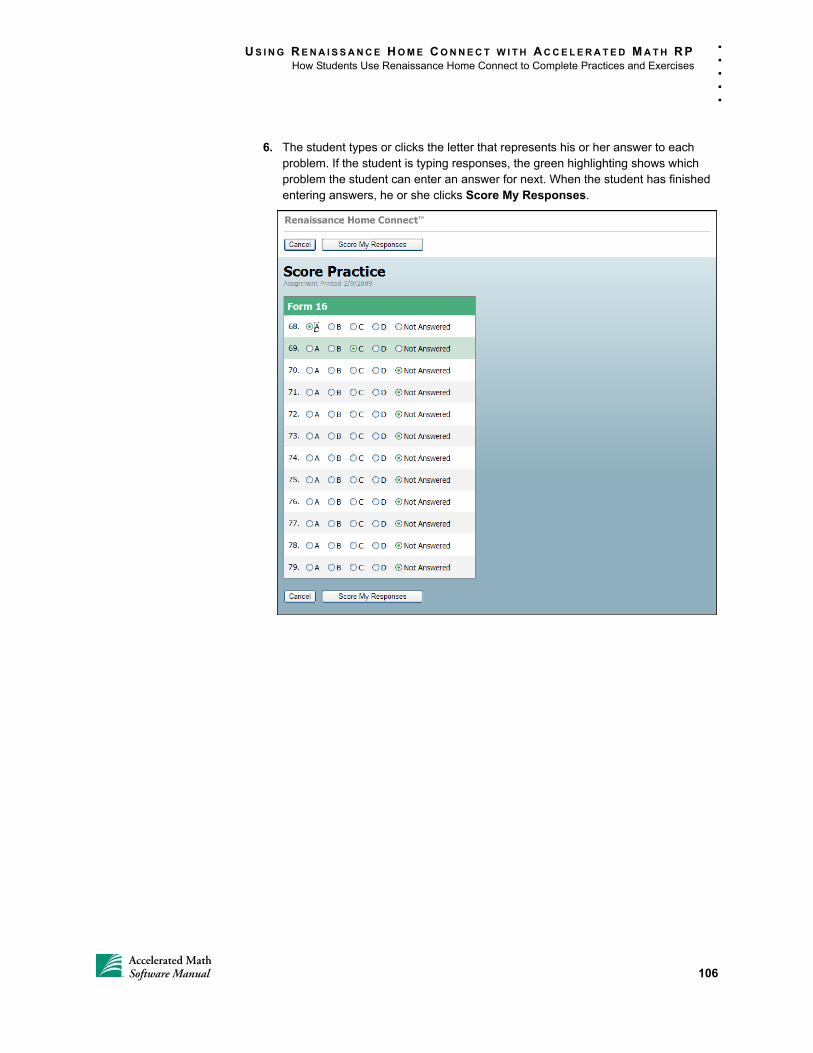
U S I N G R E N A I S S A N C E H O M E C O N N E C T W I T H A C C E L E R A T E D M A T H R PHow Students Use Renaissance Home Connect to Complete Practices and Exercises
. . .
. .
6. The student types or clicks the letter that represents his or her answer to each problem. If the student is typing responses, the green highlighting shows which problem the student can enter an answer for next. When the student has finished entering answers, he or she clicks Score My Responses.
106Accelerated MathSoftware Manual
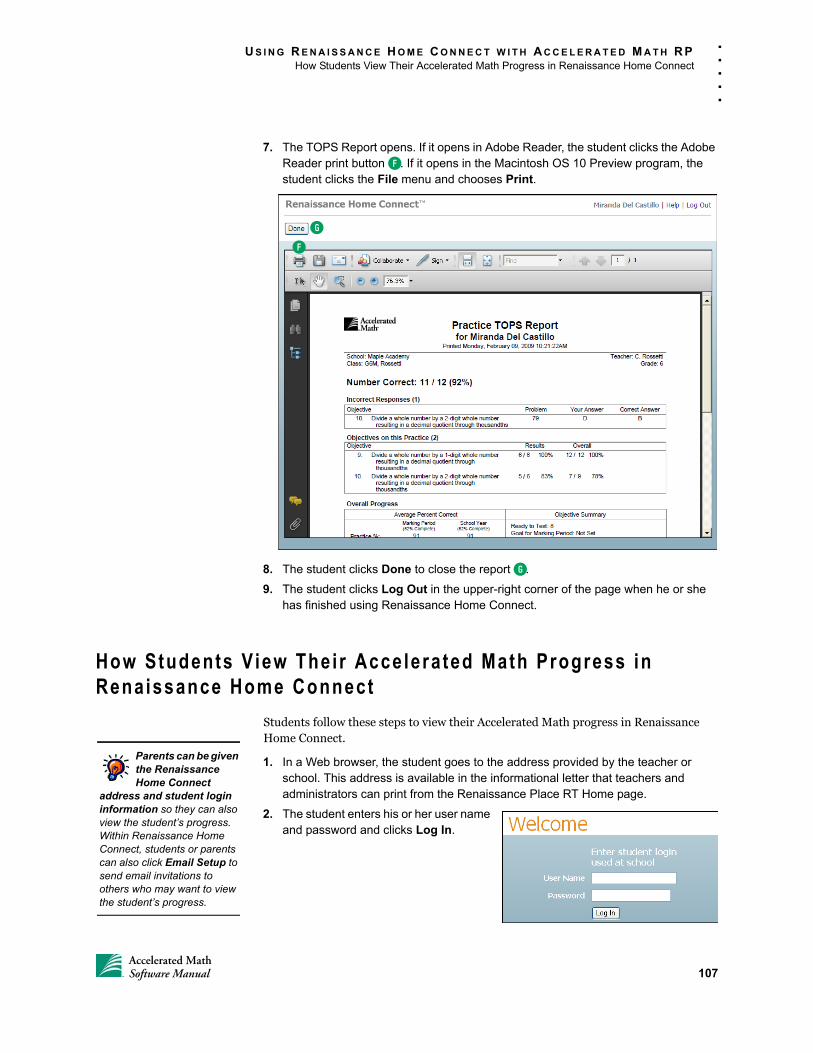
U S I N G R E N A I S S A N C E H O M E C O N N E C T W I T H A C C E L E R A T E D M A T H R PHow Students View Their Accelerated Math Progress in Renaissance Home Connect
. . .
. .
7. The TOPS Report opens. If it opens in Adobe Reader, the student clicks the Adobe Reader print button F. If it opens in the Macintosh OS 10 Preview program, the student clicks the File menu and chooses Print.
8. The student clicks Done to close the report G.
9. The student clicks Log Out in the upper-right corner of the page when he or she has finished using Renaissance Home Connect.
How Students V iew Thei r Acce lera ted Math Progress in Renaissance Home Connect
Students follow these steps to view their Accelerated Math progress in Renaissance Home Connect.
1. In a Web browser, the student goes to the address provided by the teacher or school. This address is available in the informational letter that teachers and administrators can print from the Renaissance Place RT Home page.
2. The student enters his or her user name and password and clicks Log In.
F
G
Parents can be given the Renaissance Home Connect
address and student login information so they can also view the student’s progress. Within Renaissance Home Connect, students or parents can also click Email Setup to send email invitations to others who may want to view the student’s progress.
107Accelerated MathSoftware Manual
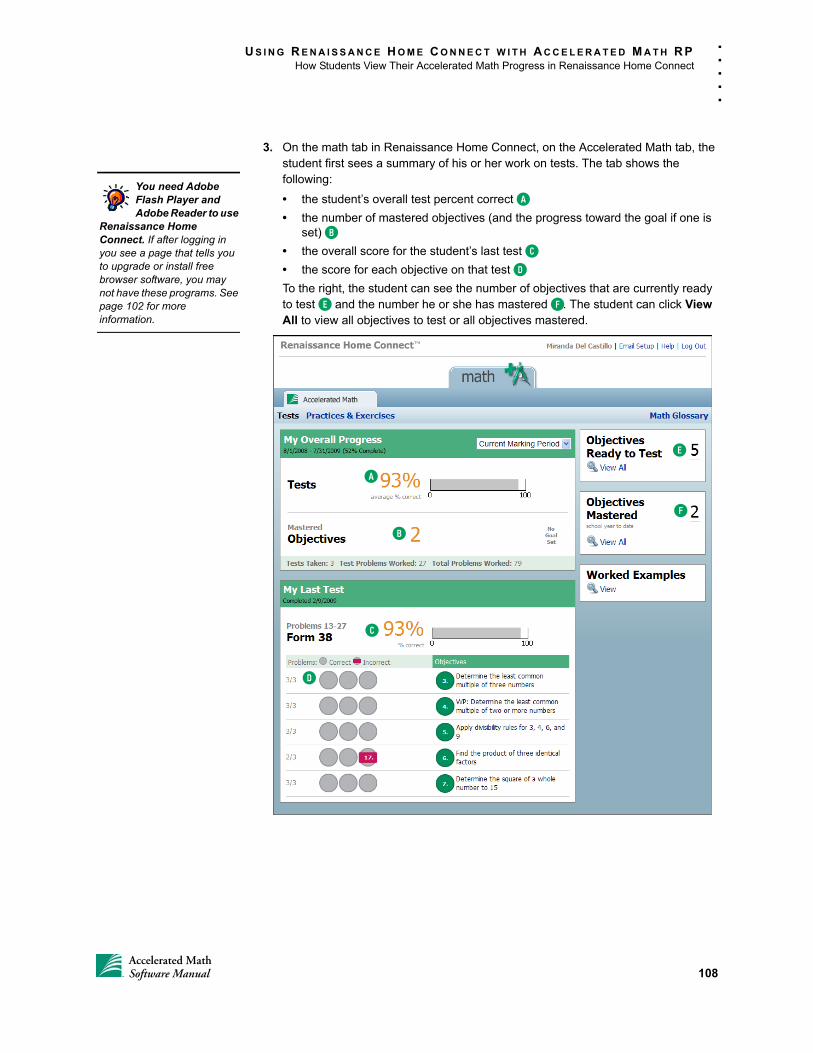
U S I N G R E N A I S S A N C E H O M E C O N N E C T W I T H A C C E L E R A T E D M A T H R PHow Students View Their Accelerated Math Progress in Renaissance Home Connect
. . .
. .
3. On the math tab in Renaissance Home Connect, on the Accelerated Math tab, the student first sees a summary of his or her work on tests. The tab shows the following:
• the student’s overall test percent correct A
• the number of mastered objectives (and the progress toward the goal if one is set) B
• the overall score for the student’s last test C
• the score for each objective on that test D
To the right, the student can see the number of objectives that are currently ready to test E and the number he or she has mastered F. The student can click View All to view all objectives to test or all objectives mastered.
You need Adobe Flash Player and Adobe Reader to use
Renaissance Home Connect. If after logging in you see a page that tells you to upgrade or install free browser software, you may not have these programs. See page 102 for more information.
A
B
C
D
E
F
108Accelerated MathSoftware Manual
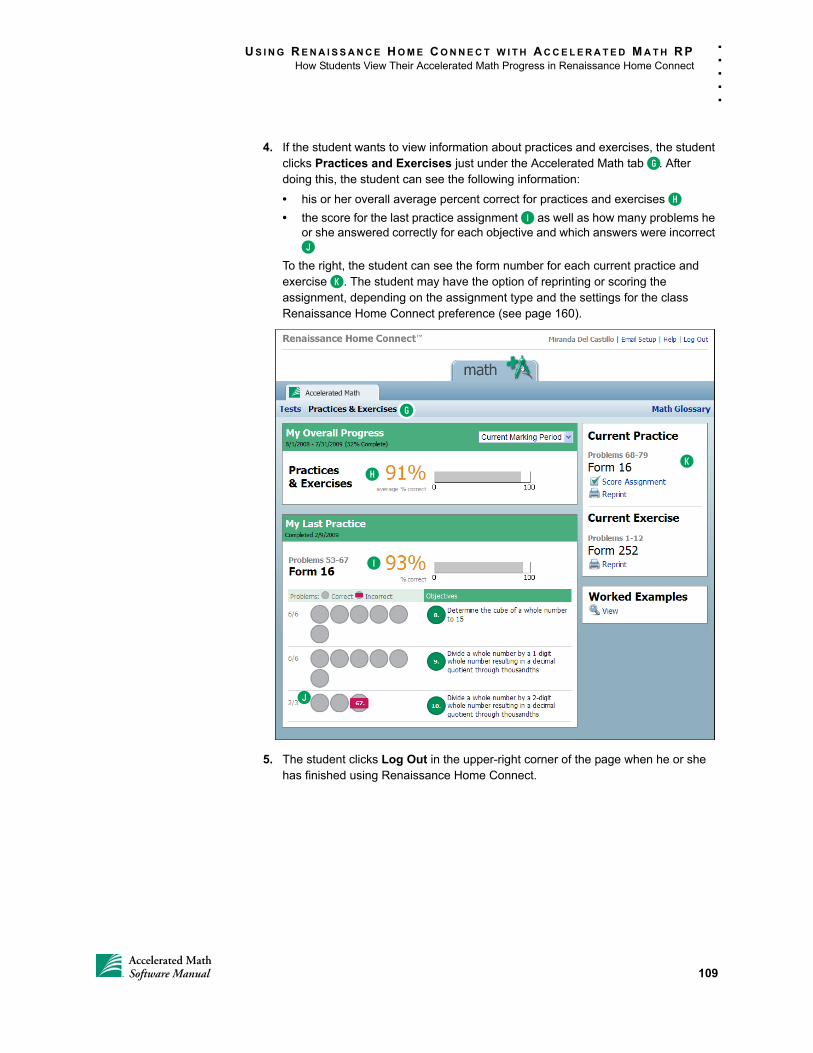
U S I N G R E N A I S S A N C E H O M E C O N N E C T W I T H A C C E L E R A T E D M A T H R PHow Students View Their Accelerated Math Progress in Renaissance Home Connect
. . .
. .
4. If the student wants to view information about practices and exercises, the student clicks Practices and Exercises just under the Accelerated Math tab G. After doing this, the student can see the following information:
• his or her overall average percent correct for practices and exercises H
• the score for the last practice assignment I as well as how many problems he or she answered correctly for each objective and which answers were incorrect J
To the right, the student can see the form number for each current practice and exercise K. The student may have the option of reprinting or scoring the assignment, depending on the assignment type and the settings for the class Renaissance Home Connect preference (see page 160).
5. The student clicks Log Out in the upper-right corner of the page when he or she has finished using Renaissance Home Connect.
K
G
H
I
J
109Accelerated MathSoftware Manual
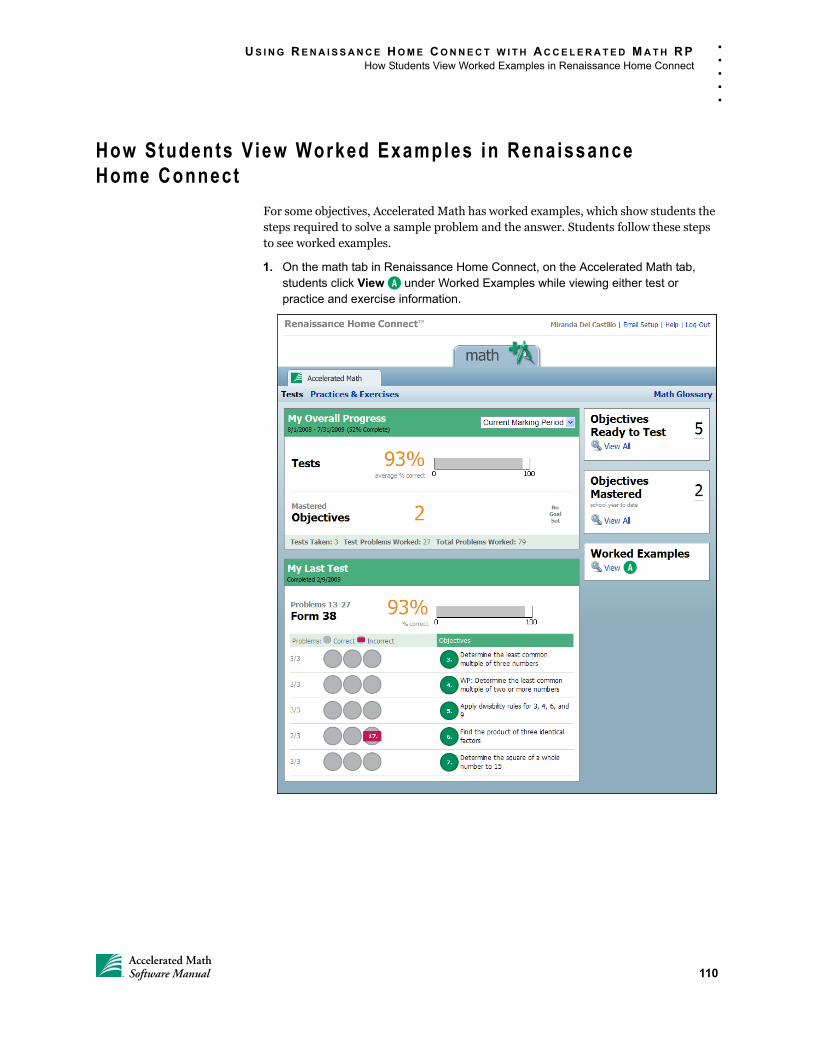
U S I N G R E N A I S S A N C E H O M E C O N N E C T W I T H A C C E L E R A T E D M A T H R PHow Students View Worked Examples in Renaissance Home Connect
. . .
. .
How Students V iew Worked Examples in RenaissanceHome Connect
For some objectives, Accelerated Math has worked examples, which show students the steps required to solve a sample problem and the answer. Students follow these steps to see worked examples.
1. On the math tab in Renaissance Home Connect, on the Accelerated Math tab, students click View A under Worked Examples while viewing either test or practice and exercise information.
A
110Accelerated MathSoftware Manual

U S I N G R E N A I S S A N C E H O M E C O N N E C T W I T H A C C E L E R A T E D M A T H R PHow Students View Worked Examples in Renaissance Home Connect
. . .
. .
2. The Worked Examples page shows the objectives from the student’s last practice, but the student can use the drop-down lists to find other objectives. When the student finds an objective for which he or she wants to see a worked example, the student clicks the objective name.
3. When students find an objective that they’d like to see a worked example for, they click the objective name. Not all objectives have worked examples; only objective names that are links have them.
B
C
B Use this drop-down list to choose whether to see objectives from your practices, exercises, or tests, objectives you’ve mastered, or all objectives.
C When this drop-down list is available, use it to choose whether
to see objectives from your last or current practice or exercise, objectives from your last test, or objectives that you are ready to take a test for. The options available depend on what you chose in the first drop-down list.
111Accelerated MathSoftware Manual
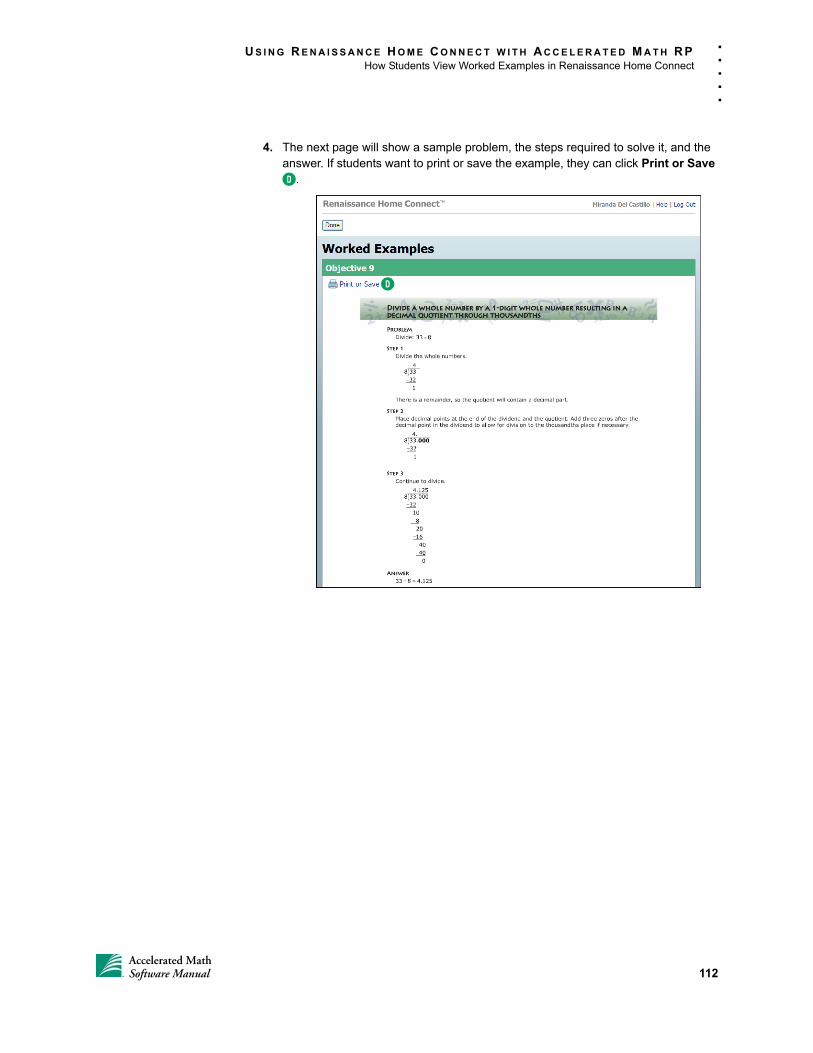
U S I N G R E N A I S S A N C E H O M E C O N N E C T W I T H A C C E L E R A T E D M A T H R PHow Students View Worked Examples in Renaissance Home Connect
. . .
. .
4. The next page will show a sample problem, the steps required to solve it, and the answer. If students want to print or save the example, they can click Print or Save D.
D
112Accelerated MathSoftware Manual
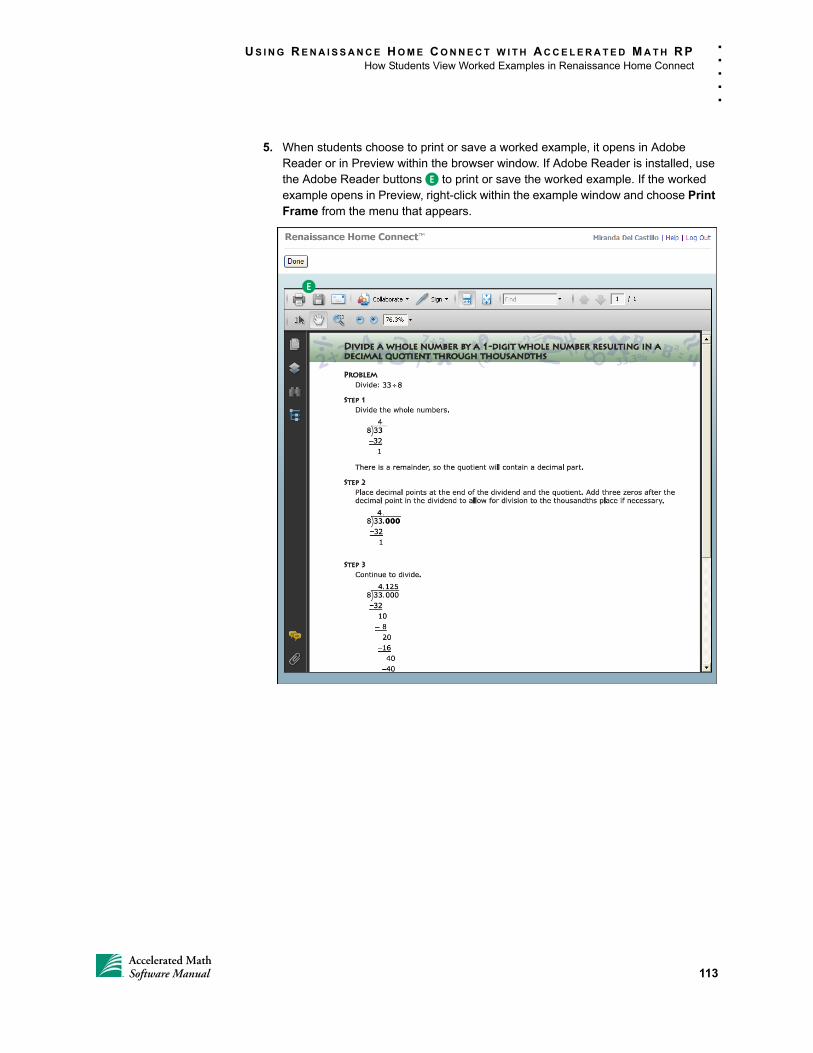
U S I N G R E N A I S S A N C E H O M E C O N N E C T W I T H A C C E L E R A T E D M A T H R PHow Students View Worked Examples in Renaissance Home Connect
. . .
. .
5. When students choose to print or save a worked example, it opens in Adobe Reader or in Preview within the browser window. If Adobe Reader is installed, use the Adobe Reader buttons E to print or save the worked example. If the worked example opens in Preview, right-click within the example window and choose Print Frame from the menu that appears.
E
113Accelerated MathSoftware Manual
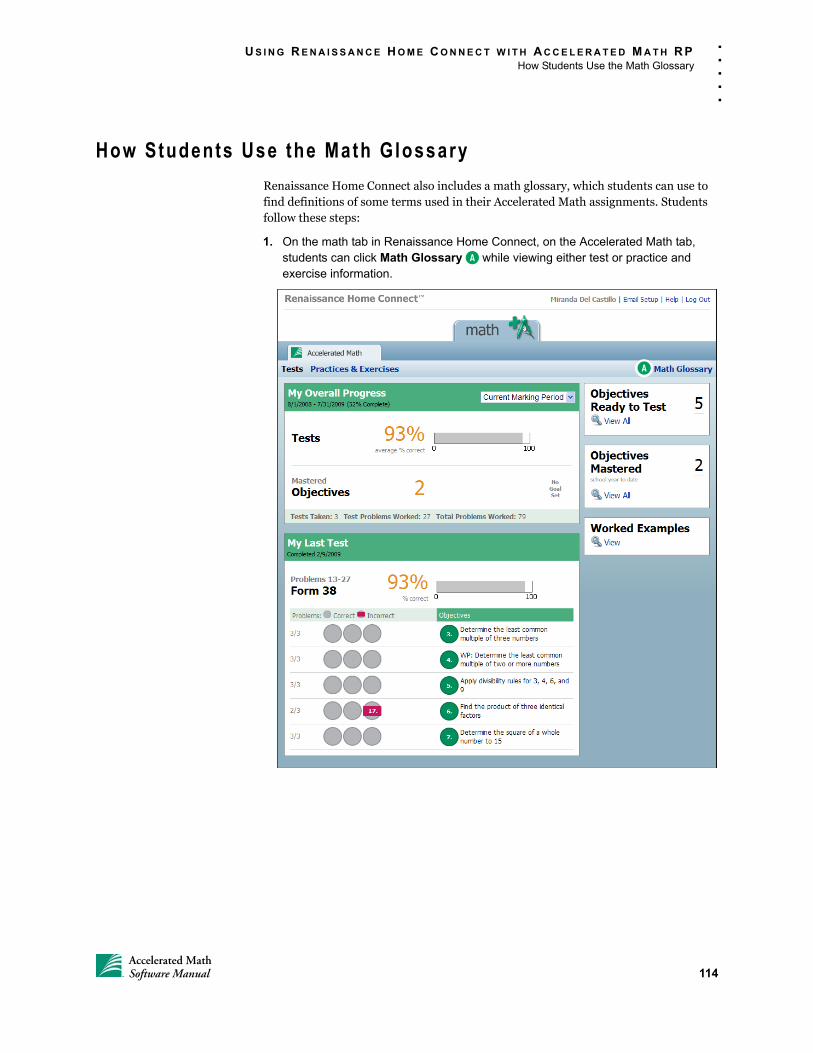
U S I N G R E N A I S S A N C E H O M E C O N N E C T W I T H A C C E L E R A T E D M A T H R PHow Students Use the Math Glossary
. . .
. .
How Students Use the Math Glossary
Renaissance Home Connect also includes a math glossary, which students can use to find definitions of some terms used in their Accelerated Math assignments. Students follow these steps:
1. On the math tab in Renaissance Home Connect, on the Accelerated Math tab, students can click Math Glossary A while viewing either test or practice and exercise information.
A
114Accelerated MathSoftware Manual

U S I N G R E N A I S S A N C E H O M E C O N N E C T W I T H A C C E L E R A T E D M A T H R PHow Students Use the Math Glossary
. . .
. .
2. On the Math Glossary page, there are a few ways to find a term:
3. Click a term to see the full definition. You can then click the speaker icon E to hear the pronunciation. If the definition has a Play button F, click it to see an animation that helps explain the term.
B
D
C
B To search for a term, enter it here, and then click Go. If Accelerated Math finds matching terms, those terms will be listed with brief definitions. Click a term to see a full definition.
C Click a letter to see all available terms that begin with that letter, or click
View All to see a list of all the terms in the glossary.
D Click the Grade drop-down list to choose the grade ranges for which you want to see definitions, or choose All Grades.
F
EG
115Accelerated MathSoftware Manual

U S I N G R E N A I S S A N C E H O M E C O N N E C T W I T H A C C E L E R A T E D M A T H R PDifferences between Renaissance Home Connect and Parent Login
. . .
. .
4. If you want to see the results of your previous search again, click Return to Search (G on the previous page). If not, click Done to go back to the progress screens in Renaissance Home Connect.
Di f ferences between Renaissance Home Connect and Parent Login
Renaissance Home Connect and Parent Access are two services school districts may offer to their students, parents, and guardians.
Renaissance Home Connect
• Renaissance Home Connect is used by students, but may also be used by parents or to send updates to others.
• The school district decides if Renaissance Home Connect will be used or not.
• A district administrator enables or disables Renaissance Home Connect.
• Renaissance Home Connect uses a unique URL/Web address (different from the one used by parents to log in to Renaissance Place RT).
• Teachers send an informational letter home with students to help students and parents get started.
• Parents or students may specify up to six email addresses to receive updates on the student’s progress.
• Students use to view their Accelerated Math progress, view sample problems, and use the math glossary. (They can also use it to view Accelerated Reader progress and to search for books, and they can use it to practice MathFacts in a Flash skills.)
Parent Access to Renaissance Place RT
• This option is used by parents only.
• The school district decides if Parent Access will be used or not, mainly by deciding whether to add parents and provide them with their login information. For some districts, the Parent login link may be removed upon request.
• A district or school administrator can add parents to the program and/or allow parents to request access (as long as the parents have the correct server address).
• Parents go to the same URL/Web address that teachers, administrators, staff, and students use in school (different from the one used by Renaissance Home Connect). However, parents do not see the information that school personnel see.
• Parents access reports of student progress in each program.
• If a parent has more than one child in the school district, Parent Access provides information about each child.
116Accelerated MathSoftware Manual
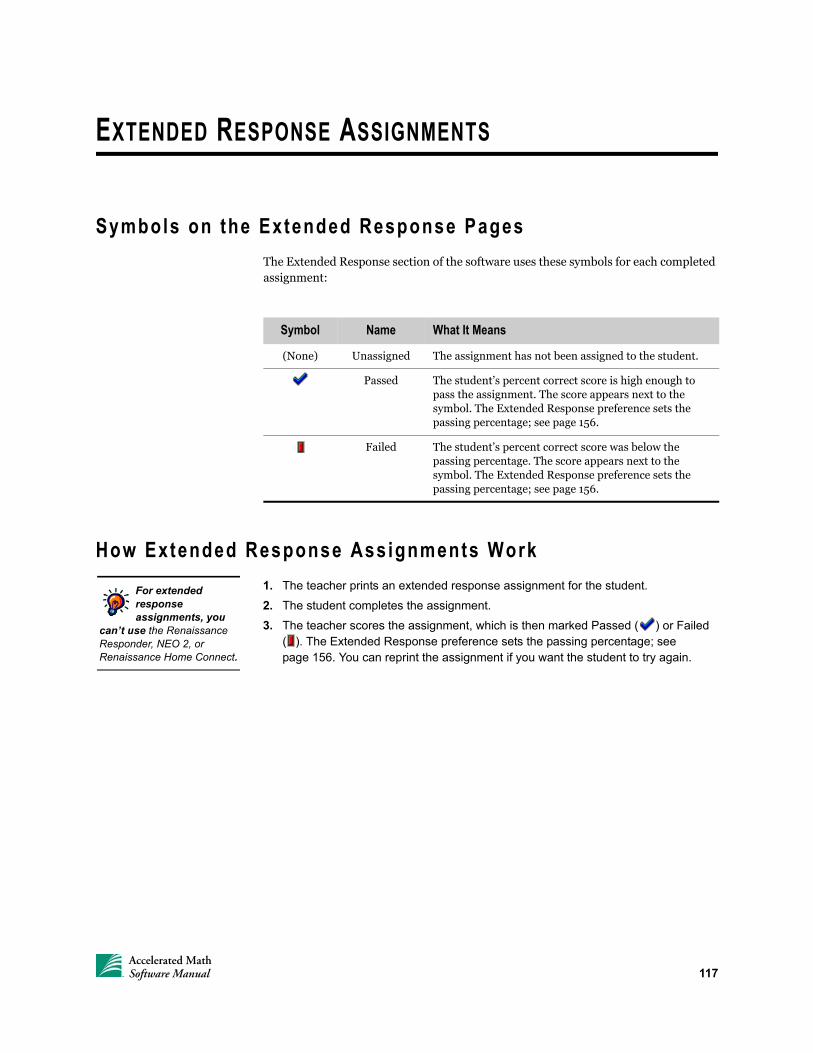
EXTENDED RESPONSE ASSIGNMENTS
Symbols on the Extended Response Pages
The Extended Response section of the software uses these symbols for each completed assignment:
How Extended Response Assignments Work
1. The teacher prints an extended response assignment for the student.
2. The student completes the assignment.
3. The teacher scores the assignment, which is then marked Passed ( ) or Failed ( ). The Extended Response preference sets the passing percentage; see page 156. You can reprint the assignment if you want the student to try again.
Symbol Name What It Means
(None) Unassigned The assignment has not been assigned to the student.
Passed The student’s percent correct score is high enough to pass the assignment. The score appears next to the symbol. The Extended Response preference sets the passing percentage; see page 156.
Failed The student’s percent correct score was below the passing percentage. The score appears next to the symbol. The Extended Response preference sets the passing percentage; see page 156.
For extended response assignments, you
can’t use the Renaissance Responder, NEO 2, or Renaissance Home Connect.
117Accelerated MathSoftware Manual
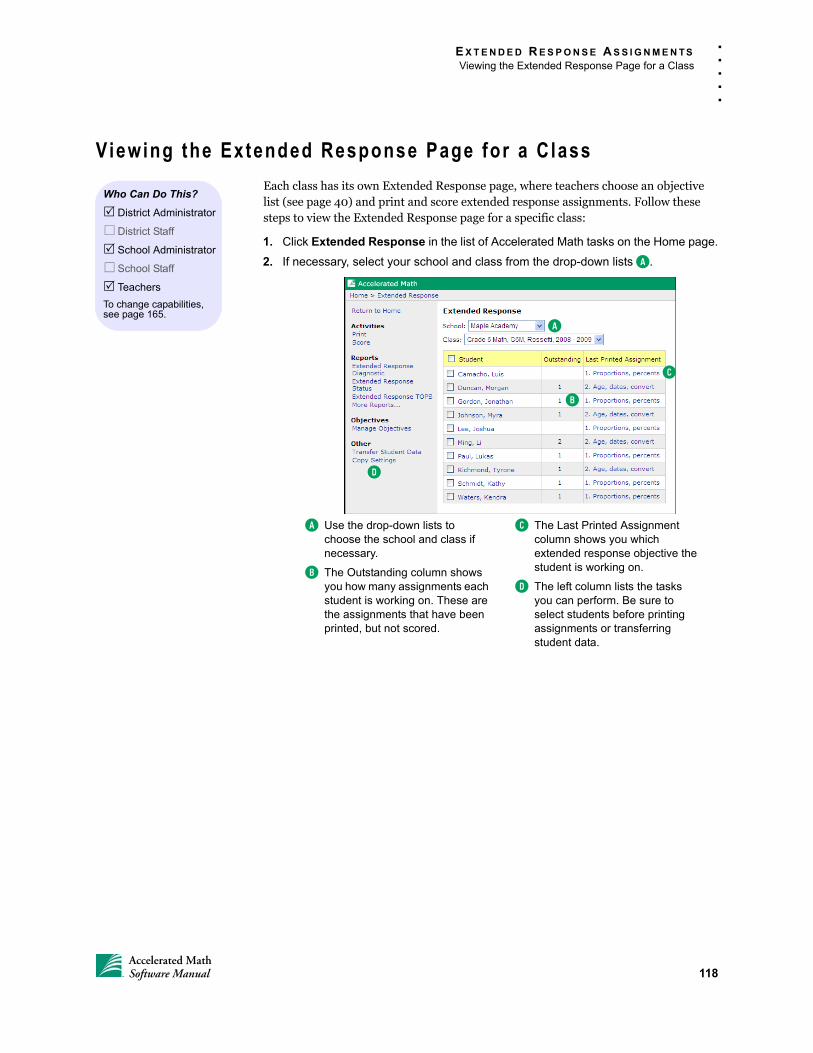
E X T E N D E D R E S P O N S E A S S I G N M E N T S
Viewing the Extended Response Page for a Class
. . .
. .
Viewing the Extended Response Page for a C lass
Each class has its own Extended Response page, where teachers choose an objective list (see page 40) and print and score extended response assignments. Follow these steps to view the Extended Response page for a specific class:
1. Click Extended Response in the list of Accelerated Math tasks on the Home page.
2. If necessary, select your school and class from the drop-down lists A.
Who Can Do This?
District Administrator
District Staff
School Administrator
School Staff
Teachers
To change capabilities, see page 165.
A
B
C
D
A Use the drop-down lists to choose the school and class if necessary.
B The Outstanding column shows you how many assignments each student is working on. These are the assignments that have been printed, but not scored.
C The Last Printed Assignment column shows you which extended response objective the student is working on.
D The left column lists the tasks you can perform. Be sure to select students before printing assignments or transferring student data.
118Accelerated MathSoftware Manual
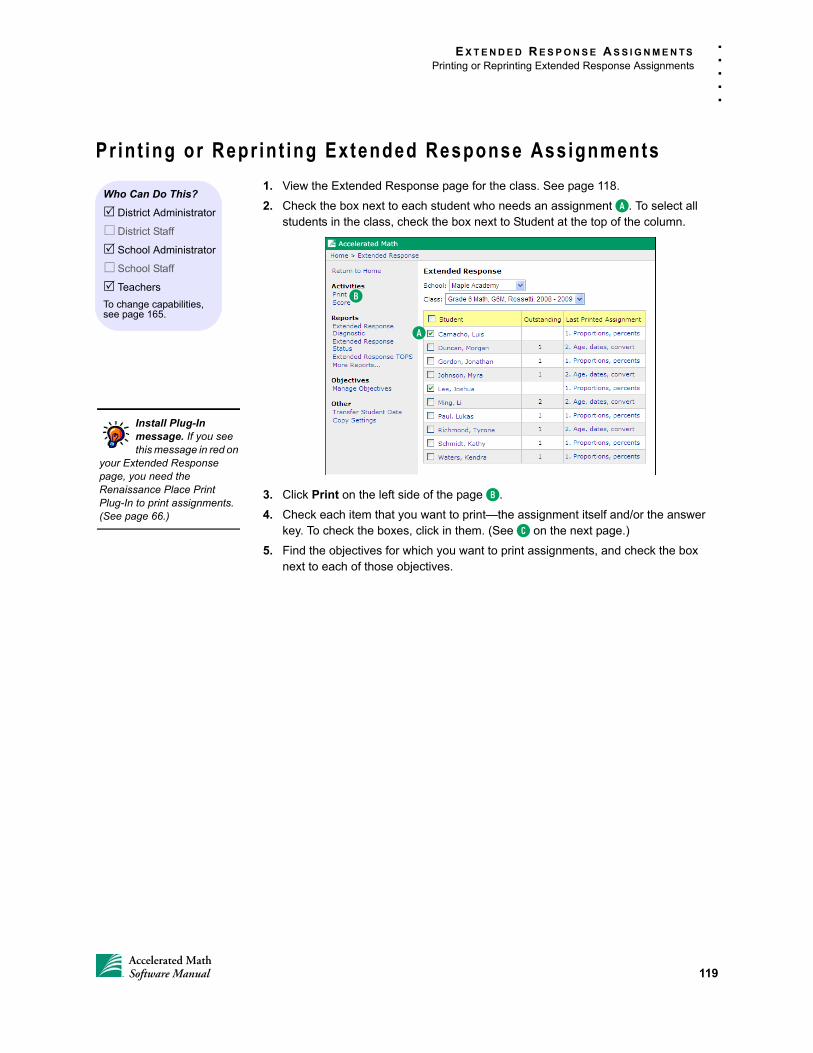
E X T E N D E D R E S P O N S E A S S I G N M E N T S
Printing or Reprinting Extended Response Assignments
. . .
. .
Pr int ing or Repr in t ing Extended Response Assignments
1. View the Extended Response page for the class. See page 118.
2. Check the box next to each student who needs an assignment A. To select all students in the class, check the box next to Student at the top of the column.
3. Click Print on the left side of the page B.
4. Check each item that you want to print—the assignment itself and/or the answer key. To check the boxes, click in them. (See C on the next page.)
5. Find the objectives for which you want to print assignments, and check the box next to each of those objectives.
Who Can Do This?
District Administrator
District Staff
School Administrator
School Staff
Teachers
To change capabilities, see page 165.
A
B
Install Plug-In message. If you see this message in red on
your Extended Response page, you need the Renaissance Place Print Plug-In to print assignments. (See page 66.)
119Accelerated MathSoftware Manual
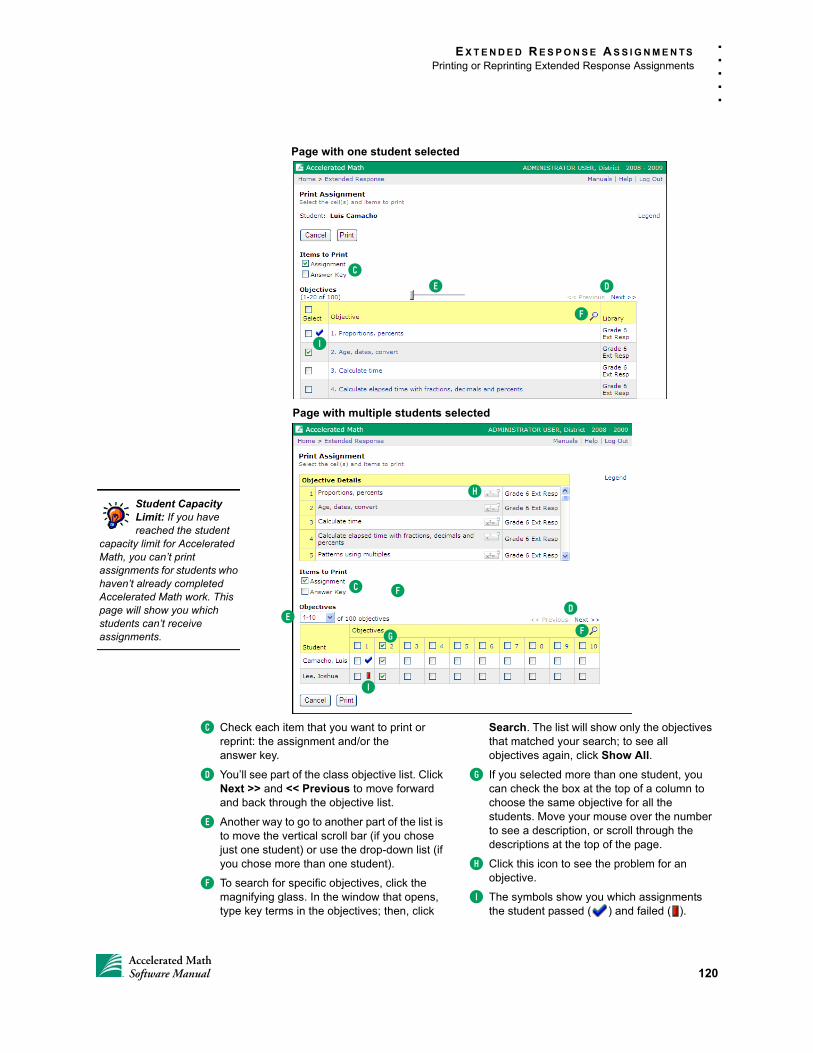
E X T E N D E D R E S P O N S E A S S I G N M E N T S
Printing or Reprinting Extended Response Assignments
. . .
. .
Student Capacity Limit: If you have reached the student
capacity limit for Accelerated Math, you can’t print assignments for students who haven’t already completed Accelerated Math work. This page will show you which students can’t receive assignments.
Page with one student selected
Page with multiple students selected
C
C
D
D
E
E
F
F
FG
H
I
I
C Check each item that you want to print or reprint: the assignment and/or theanswer key.
D You’ll see part of the class objective list. Click Next >> and << Previous to move forward and back through the objective list.
E Another way to go to another part of the list is to move the vertical scroll bar (if you chose just one student) or use the drop-down list (if you chose more than one student).
F To search for specific objectives, click the magnifying glass. In the window that opens, type key terms in the objectives; then, click
Search. The list will show only the objectives that matched your search; to see all objectives again, click Show All.
G If you selected more than one student, you can check the box at the top of a column to choose the same objective for all the students. Move your mouse over the number to see a description, or scroll through the descriptions at the top of the page.
H Click this icon to see the problem for an objective.
I The symbols show you which assignments the student passed ( ) and failed ( ).
120Accelerated MathSoftware Manual
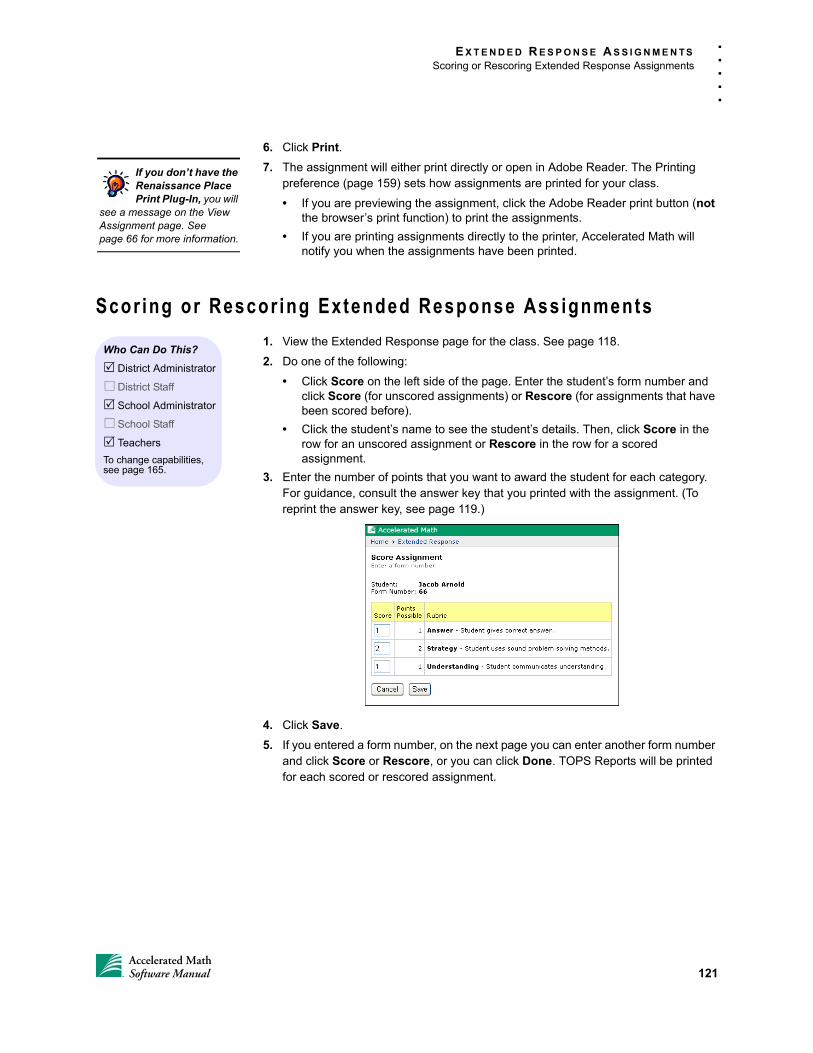
E X T E N D E D R E S P O N S E A S S I G N M E N T S
Scoring or Rescoring Extended Response Assignments
. . .
. .
6. Click Print.
7. The assignment will either print directly or open in Adobe Reader. The Printing preference (page 159) sets how assignments are printed for your class.
• If you are previewing the assignment, click the Adobe Reader print button (not the browser’s print function) to print the assignments.
• If you are printing assignments directly to the printer, Accelerated Math will notify you when the assignments have been printed.
Scor ing or Rescor ing Extended Response Assignments
1. View the Extended Response page for the class. See page 118.
2. Do one of the following:
• Click Score on the left side of the page. Enter the student’s form number and click Score (for unscored assignments) or Rescore (for assignments that have been scored before).
• Click the student’s name to see the student’s details. Then, click Score in the row for an unscored assignment or Rescore in the row for a scored assignment.
3. Enter the number of points that you want to award the student for each category. For guidance, consult the answer key that you printed with the assignment. (To reprint the answer key, see page 119.)
4. Click Save.
5. If you entered a form number, on the next page you can enter another form number and click Score or Rescore, or you can click Done. TOPS Reports will be printed for each scored or rescored assignment.
If you don’t have the Renaissance Place Print Plug-In, you will
see a message on the View Assignment page. See page 66 for more information.
Who Can Do This?
District Administrator
District Staff
School Administrator
School Staff
Teachers
To change capabilities, see page 165.
121Accelerated MathSoftware Manual
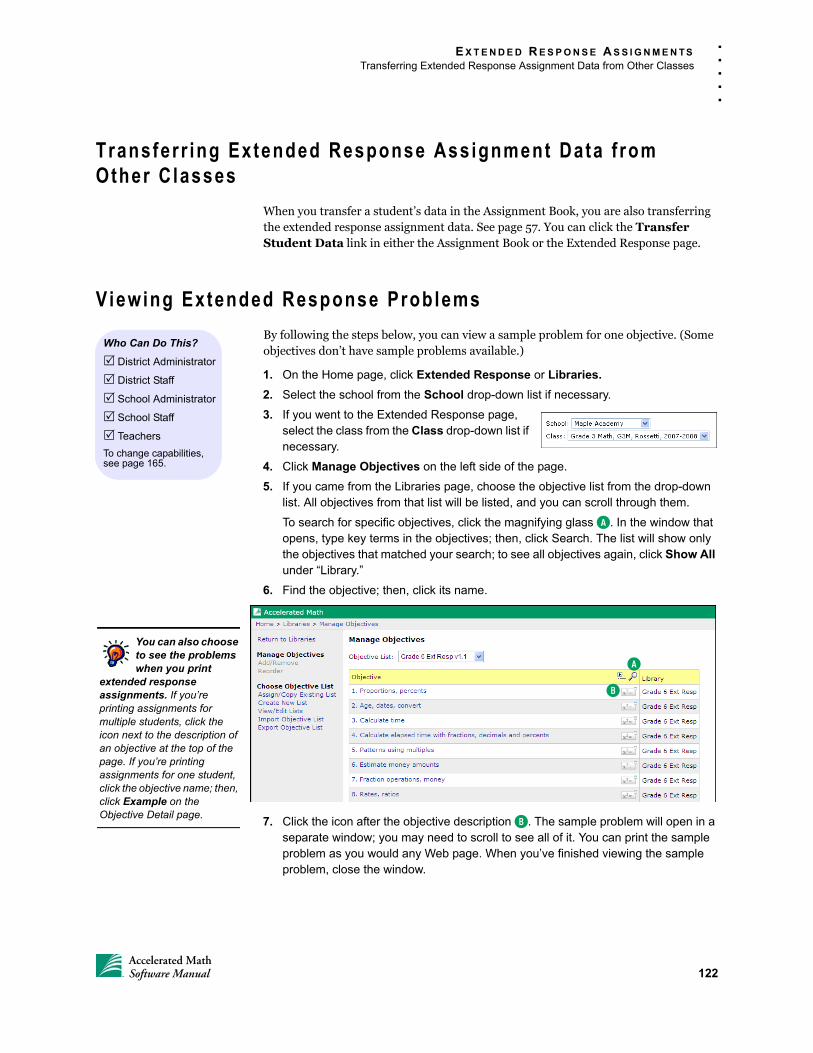
E X T E N D E D R E S P O N S E A S S I G N M E N T S
Transferring Extended Response Assignment Data from Other Classes
. . .
. .
Transferr ing Extended Response Assignment Data f romOther C lasses
When you transfer a student’s data in the Assignment Book, you are also transferring the extended response assignment data. See page 57. You can click the Transfer Student Data link in either the Assignment Book or the Extended Response page.
Viewing Extended Response Problems
By following the steps below, you can view a sample problem for one objective. (Some objectives don’t have sample problems available.)
1. On the Home page, click Extended Response or Libraries.
2. Select the school from the School drop-down list if necessary.
3. If you went to the Extended Response page, select the class from the Class drop-down list if necessary.
4. Click Manage Objectives on the left side of the page.
5. If you came from the Libraries page, choose the objective list from the drop-down list. All objectives from that list will be listed, and you can scroll through them.
To search for specific objectives, click the magnifying glass A. In the window that opens, type key terms in the objectives; then, click Search. The list will show only the objectives that matched your search; to see all objectives again, click Show All under “Library.”
6. Find the objective; then, click its name.
7. Click the icon after the objective description B. The sample problem will open in a separate window; you may need to scroll to see all of it. You can print the sample problem as you would any Web page. When you’ve finished viewing the sample problem, close the window.
Who Can Do This?
District Administrator
District Staff
School Administrator
School Staff
Teachers
To change capabilities, see page 165.
You can also choose to see the problems when you print
extended response assignments. If you’re printing assignments for multiple students, click the icon next to the description of an objective at the top of the page. If you’re printing assignments for one student, click the objective name; then, click Example on the Objective Detail page.
A
B
122Accelerated MathSoftware Manual
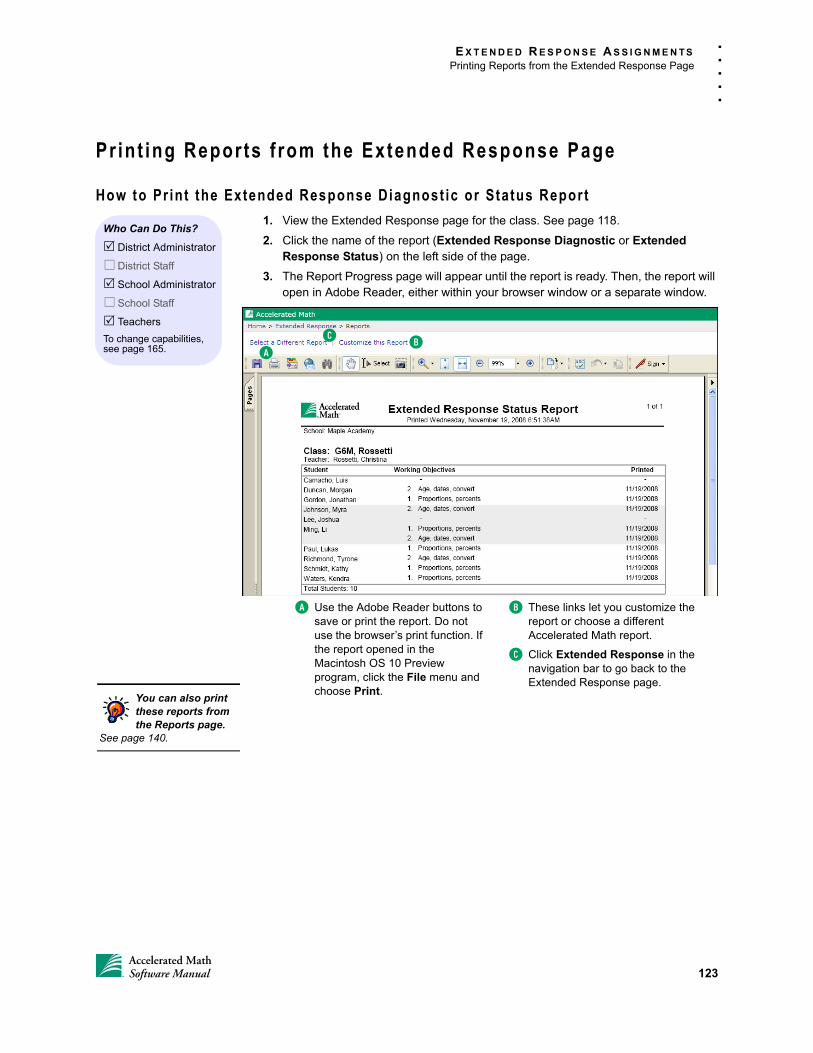
E X T E N D E D R E S P O N S E A S S I G N M E N T S
Printing Reports from the Extended Response Page
. . .
. .
Pr int ing Repor ts f rom the Extended Response Page
How to Pr int the Extended Response Diagnost ic or Status Repor t
1. View the Extended Response page for the class. See page 118.
2. Click the name of the report (Extended Response Diagnostic or Extended Response Status) on the left side of the page.
3. The Report Progress page will appear until the report is ready. Then, the report will open in Adobe Reader, either within your browser window or a separate window.
Who Can Do This?
District Administrator
District Staff
School Administrator
School Staff
Teachers
To change capabilities, see page 165.
BA
C
A Use the Adobe Reader buttons to save or print the report. Do not use the browser’s print function. If the report opened in the Macintosh OS 10 Preview program, click the File menu and choose Print.
B These links let you customize the report or choose a different Accelerated Math report.
C Click Extended Response in the navigation bar to go back to the Extended Response page.
You can also print these reports from the Reports page.
See page 140.
123Accelerated MathSoftware Manual
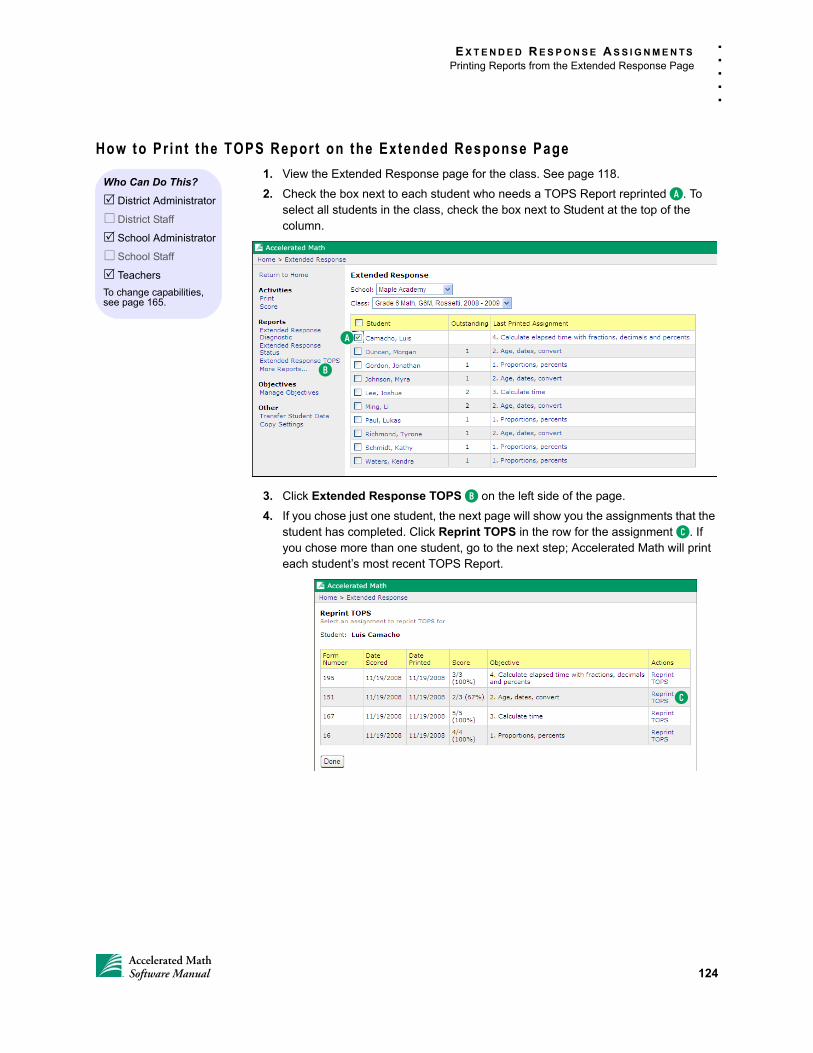
E X T E N D E D R E S P O N S E A S S I G N M E N T S
Printing Reports from the Extended Response Page
. . .
. .
How to Pr int the TOPS Report on the Extended Response Page
1. View the Extended Response page for the class. See page 118.
2. Check the box next to each student who needs a TOPS Report reprinted A. To select all students in the class, check the box next to Student at the top of the column.
3. Click Extended Response TOPS B on the left side of the page.
4. If you chose just one student, the next page will show you the assignments that the student has completed. Click Reprint TOPS in the row for the assignment C. If you chose more than one student, go to the next step; Accelerated Math will print each student’s most recent TOPS Report.
Who Can Do This?
District Administrator
District Staff
School Administrator
School Staff
Teachers
To change capabilities, see page 165.
A
B
C
124Accelerated MathSoftware Manual
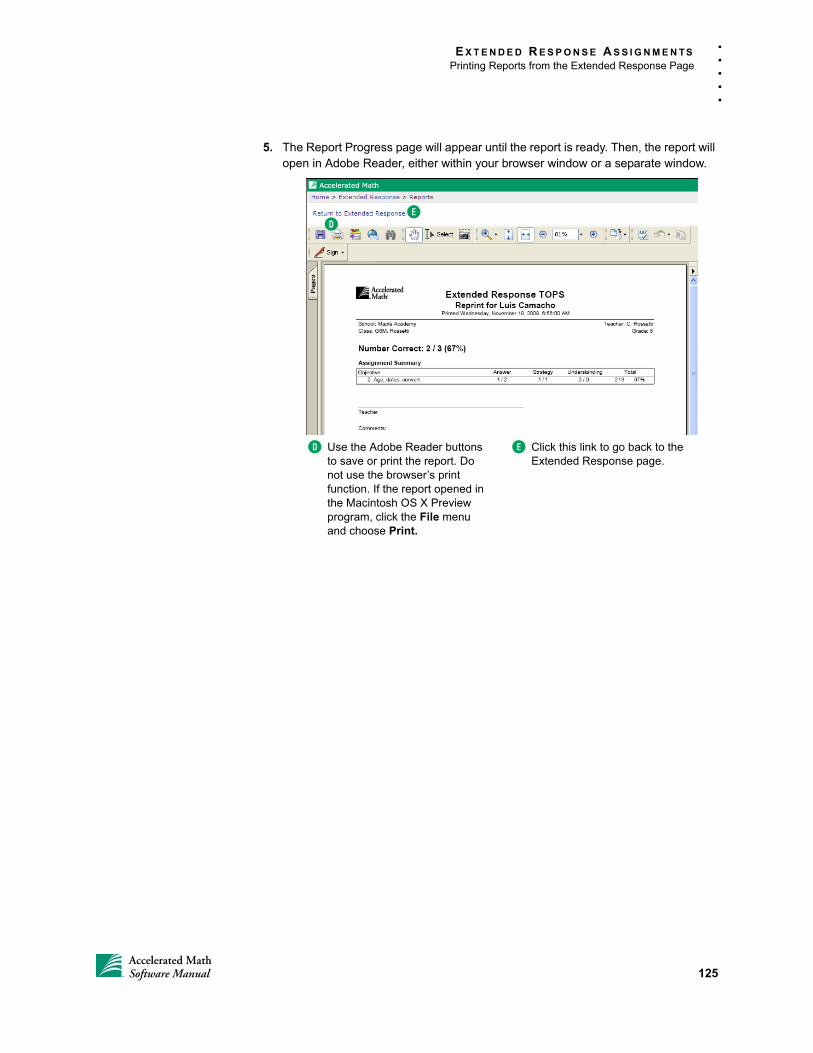
E X T E N D E D R E S P O N S E A S S I G N M E N T S
Printing Reports from the Extended Response Page
. . .
. .
5. The Report Progress page will appear until the report is ready. Then, the report will open in Adobe Reader, either within your browser window or a separate window.
ED
D Use the Adobe Reader buttons to save or print the report. Do not use the browser’s print function. If the report opened in the Macintosh OS X Preview program, click the File menu and choose Print.
E Click this link to go back to the Extended Response page.
125Accelerated MathSoftware Manual
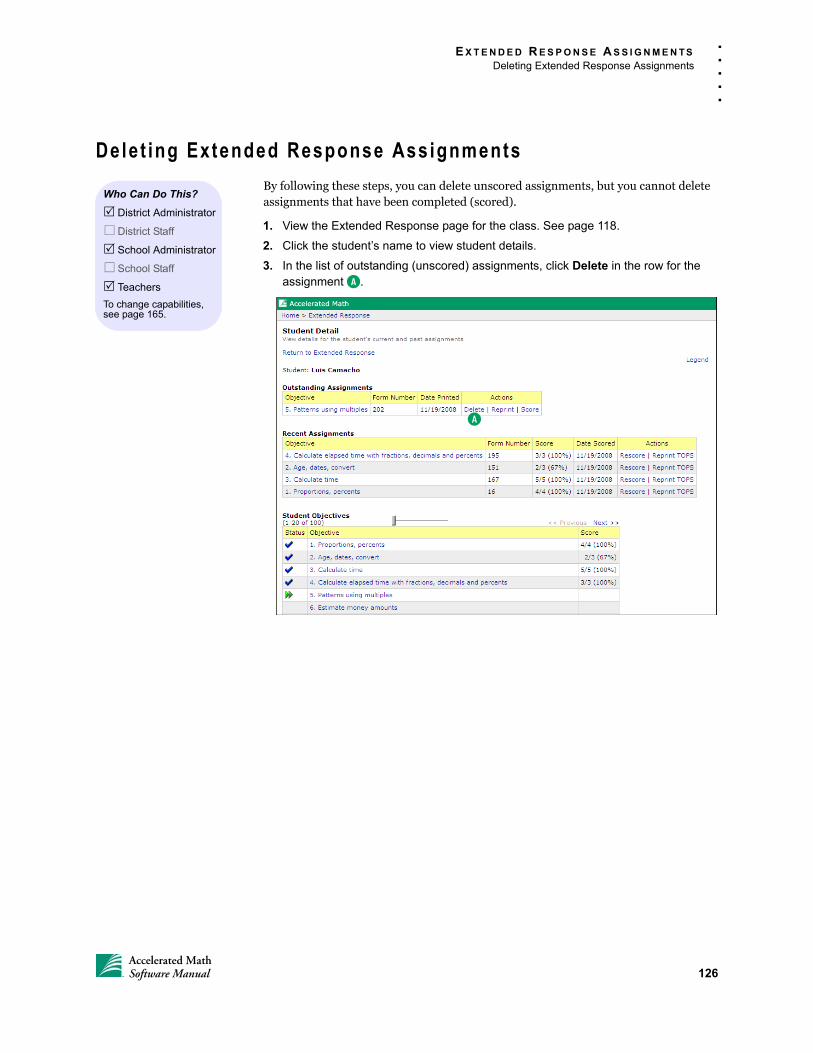
E X T E N D E D R E S P O N S E A S S I G N M E N T S
Deleting Extended Response Assignments
. . .
. .
Dele t ing Extended Response Assignments
By following these steps, you can delete unscored assignments, but you cannot delete assignments that have been completed (scored).
1. View the Extended Response page for the class. See page 118.
2. Click the student’s name to view student details.
3. In the list of outstanding (unscored) assignments, click Delete in the row for the assignment A.
Who Can Do This?
District Administrator
District Staff
School Administrator
School Staff
Teachers
To change capabilities, see page 165.
A
126Accelerated MathSoftware Manual
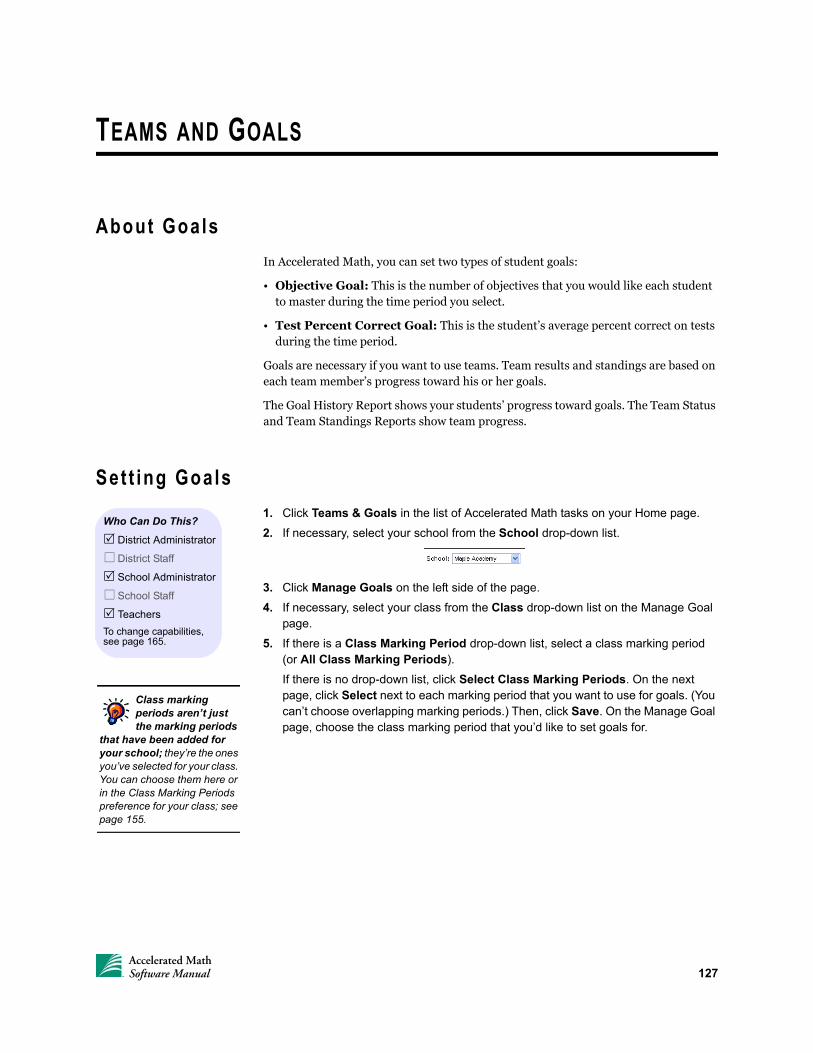
TEAMS AND GOALS
About Goals
In Accelerated Math, you can set two types of student goals:
• Objective Goal: This is the number of objectives that you would like each student to master during the time period you select.
• Test Percent Correct Goal: This is the student’s average percent correct on tests during the time period.
Goals are necessary if you want to use teams. Team results and standings are based on each team member’s progress toward his or her goals.
The Goal History Report shows your students’ progress toward goals. The Team Status and Team Standings Reports show team progress.
Set t ing Goals
1. Click Teams & Goals in the list of Accelerated Math tasks on your Home page.
2. If necessary, select your school from the School drop-down list.
3. Click Manage Goals on the left side of the page.
4. If necessary, select your class from the Class drop-down list on the Manage Goal page.
5. If there is a Class Marking Period drop-down list, select a class marking period (or All Class Marking Periods).
If there is no drop-down list, click Select Class Marking Periods. On the next page, click Select next to each marking period that you want to use for goals. (You can’t choose overlapping marking periods.) Then, click Save. On the Manage Goal page, choose the class marking period that you’d like to set goals for.
Who Can Do This?
District Administrator
District Staff
School Administrator
School Staff
Teachers
To change capabilities, see page 165.
Class marking periods aren’t just the marking periods
that have been added for your school; they’re the ones you’ve selected for your class. You can choose them here or in the Class Marking Periods preference for your class; see page 155.
127Accelerated MathSoftware Manual
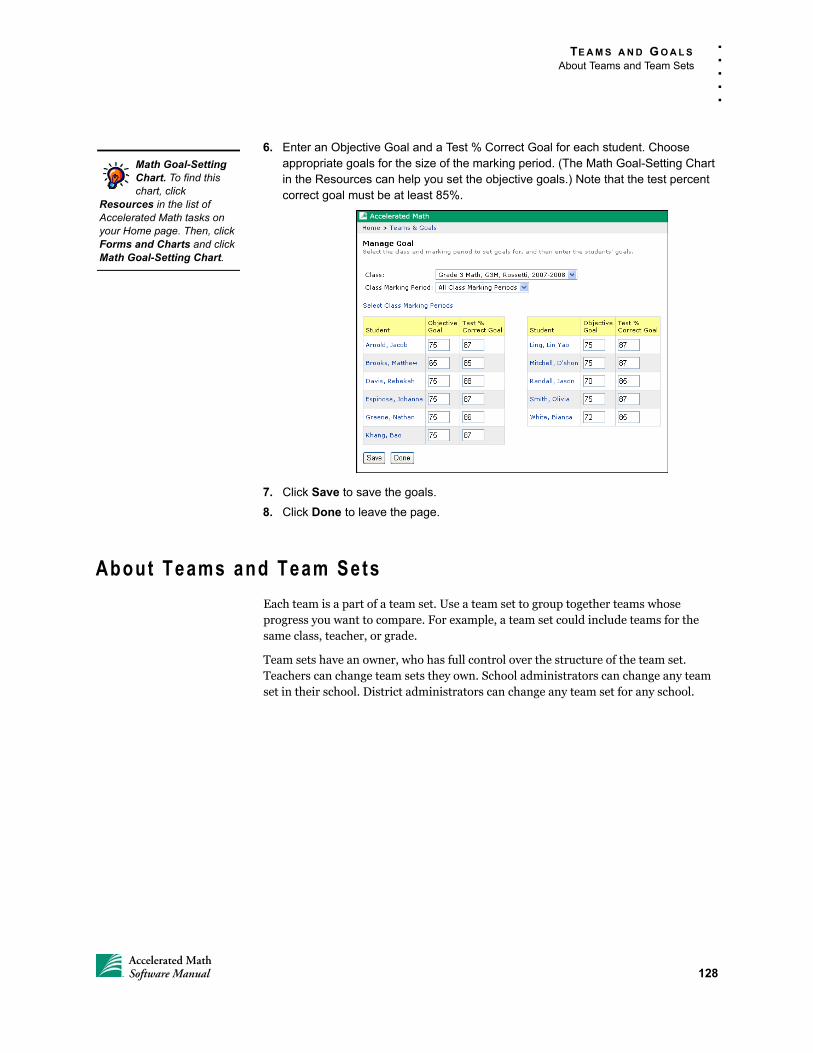
TE A M S A N D G O A L S
About Teams and Team Sets
. . .
. .
6. Enter an Objective Goal and a Test % Correct Goal for each student. Choose appropriate goals for the size of the marking period. (The Math Goal-Setting Chart in the Resources can help you set the objective goals.) Note that the test percent correct goal must be at least 85%.
7. Click Save to save the goals.
8. Click Done to leave the page.
About Teams and Team Sets
Each team is a part of a team set. Use a team set to group together teams whose progress you want to compare. For example, a team set could include teams for the same class, teacher, or grade.
Team sets have an owner, who has full control over the structure of the team set. Teachers can change team sets they own. School administrators can change any team set in their school. District administrators can change any team set for any school.
Math Goal-Setting Chart. To find this chart, click
Resources in the list of Accelerated Math tasks on your Home page. Then, click Forms and Charts and click Math Goal-Setting Chart.
128Accelerated MathSoftware Manual
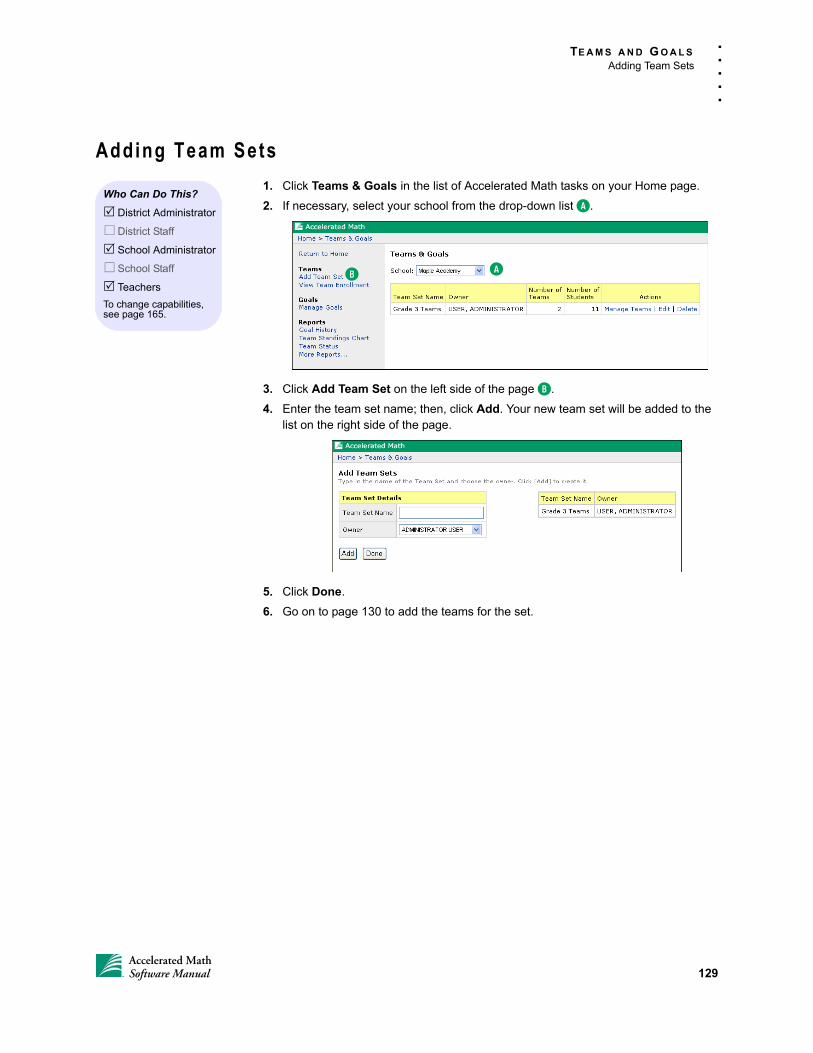
TE A M S A N D G O A L S
Adding Team Sets
. . .
. .
Adding Team Sets
1. Click Teams & Goals in the list of Accelerated Math tasks on your Home page.
2. If necessary, select your school from the drop-down list A.
3. Click Add Team Set on the left side of the page B.
4. Enter the team set name; then, click Add. Your new team set will be added to the list on the right side of the page.
5. Click Done.
6. Go on to page 130 to add the teams for the set.
Who Can Do This?
District Administrator
District Staff
School Administrator
School Staff
Teachers
To change capabilities, see page 165.
AB
129Accelerated MathSoftware Manual
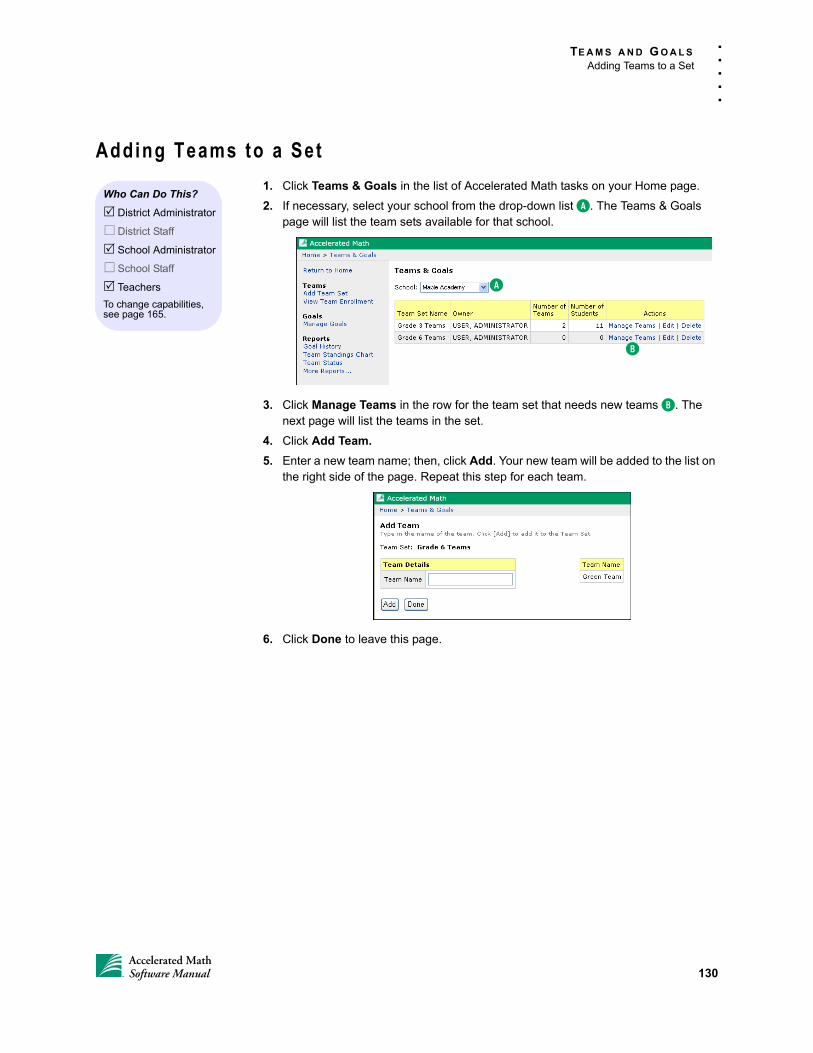
TE A M S A N D G O A L S
Adding Teams to a Set
. . .
. .
Adding Teams to a Set
1. Click Teams & Goals in the list of Accelerated Math tasks on your Home page.
2. If necessary, select your school from the drop-down list A. The Teams & Goals page will list the team sets available for that school.
3. Click Manage Teams in the row for the team set that needs new teams B. The next page will list the teams in the set.
4. Click Add Team.
5. Enter a new team name; then, click Add. Your new team will be added to the list on the right side of the page. Repeat this step for each team.
6. Click Done to leave this page.
Who Can Do This?
District Administrator
District Staff
School Administrator
School Staff
Teachers
To change capabilities, see page 165.
A
B
130Accelerated MathSoftware Manual
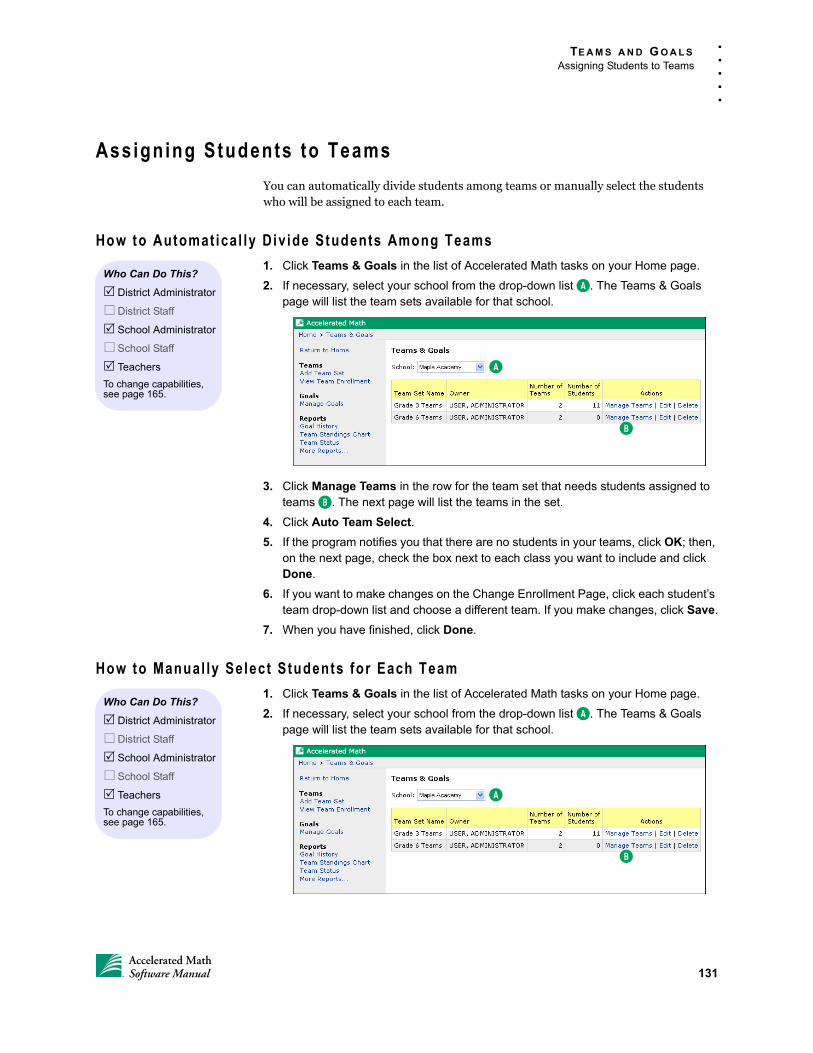
TE A M S A N D G O A L S
Assigning Students to Teams
. . .
. .
Assigning Students to Teams
You can automatically divide students among teams or manually select the students who will be assigned to each team.
How to Automat ical ly Div ide Students Among Teams
1. Click Teams & Goals in the list of Accelerated Math tasks on your Home page.
2. If necessary, select your school from the drop-down list A. The Teams & Goals page will list the team sets available for that school.
3. Click Manage Teams in the row for the team set that needs students assigned to teams B. The next page will list the teams in the set.
4. Click Auto Team Select.
5. If the program notifies you that there are no students in your teams, click OK; then, on the next page, check the box next to each class you want to include and click Done.
6. If you want to make changes on the Change Enrollment Page, click each student’s team drop-down list and choose a different team. If you make changes, click Save.
7. When you have finished, click Done.
How to Manual ly Select Students for Each Team
1. Click Teams & Goals in the list of Accelerated Math tasks on your Home page.
2. If necessary, select your school from the drop-down list A. The Teams & Goals page will list the team sets available for that school.
Who Can Do This?
District Administrator
District Staff
School Administrator
School Staff
Teachers
To change capabilities, see page 165.
A
B
Who Can Do This?
District Administrator
District Staff
School Administrator
School Staff
Teachers
To change capabilities, see page 165.
A
B
131Accelerated MathSoftware Manual
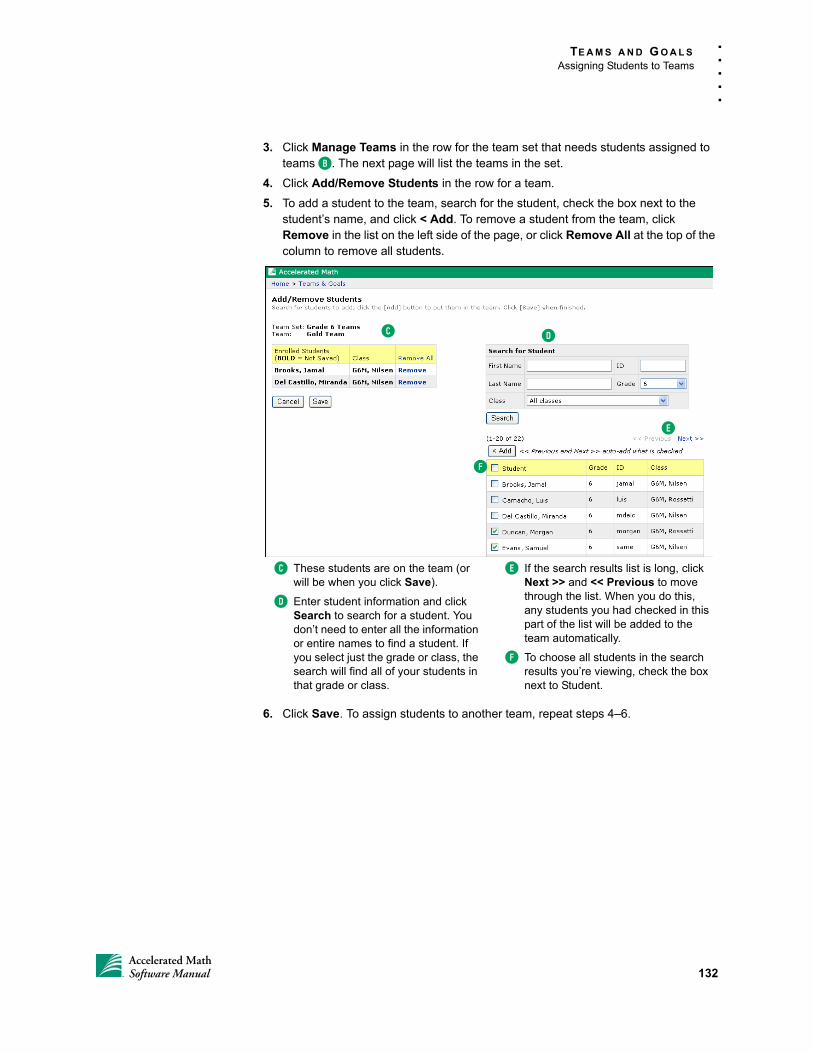
TE A M S A N D G O A L S
Assigning Students to Teams
. . .
. .
3. Click Manage Teams in the row for the team set that needs students assigned to teams B. The next page will list the teams in the set.
4. Click Add/Remove Students in the row for a team.
5. To add a student to the team, search for the student, check the box next to the student’s name, and click < Add. To remove a student from the team, click Remove in the list on the left side of the page, or click Remove All at the top of the column to remove all students.
6. Click Save. To assign students to another team, repeat steps 4–6.
C D
E
F
C These students are on the team (or will be when you click Save).
D Enter student information and click Search to search for a student. You don’t need to enter all the information or entire names to find a student. If you select just the grade or class, the search will find all of your students in that grade or class.
E If the search results list is long, click Next >> and << Previous to move through the list. When you do this, any students you had checked in this part of the list will be added to the team automatically.
F To choose all students in the search results you’re viewing, check the box next to Student.
132Accelerated MathSoftware Manual
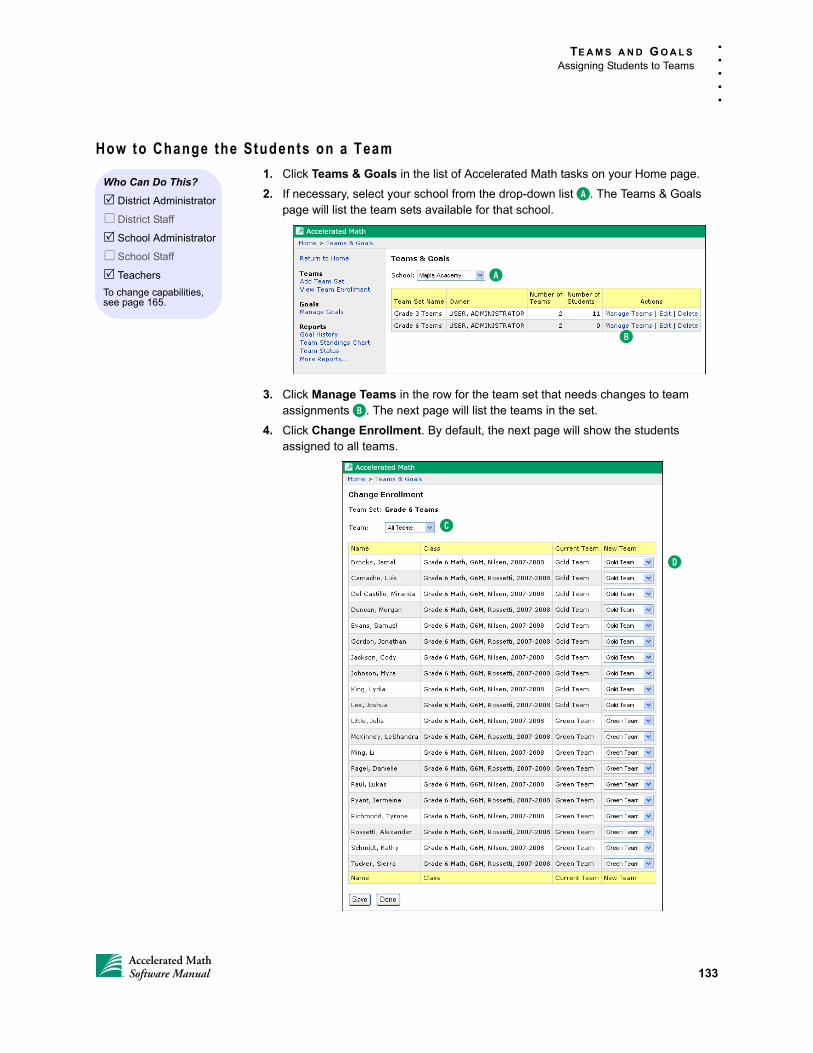
TE A M S A N D G O A L S
Assigning Students to Teams
. . .
. .
How to Change the Students on a Team
1. Click Teams & Goals in the list of Accelerated Math tasks on your Home page.
2. If necessary, select your school from the drop-down list A. The Teams & Goals page will list the team sets available for that school.
3. Click Manage Teams in the row for the team set that needs changes to team assignments B. The next page will list the teams in the set.
4. Click Change Enrollment. By default, the next page will show the students assigned to all teams.
Who Can Do This?
District Administrator
District Staff
School Administrator
School Staff
Teachers
To change capabilities, see page 165.
A
B
C
D
133Accelerated MathSoftware Manual
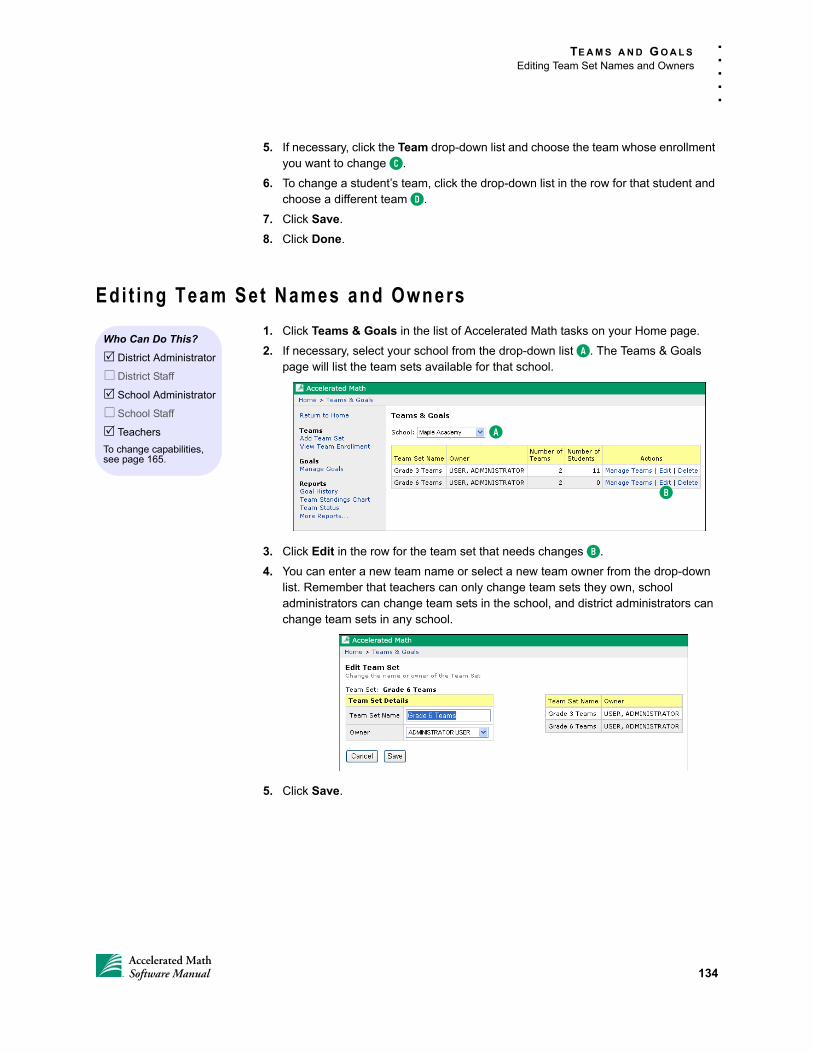
TE A M S A N D G O A L S
Editing Team Set Names and Owners
. . .
. .
5. If necessary, click the Team drop-down list and choose the team whose enrollment you want to change C.
6. To change a student’s team, click the drop-down list in the row for that student and choose a different team D.
7. Click Save.
8. Click Done.
Edi t ing Team Set Names and Owners
1. Click Teams & Goals in the list of Accelerated Math tasks on your Home page.
2. If necessary, select your school from the drop-down list A. The Teams & Goals page will list the team sets available for that school.
3. Click Edit in the row for the team set that needs changes B.
4. You can enter a new team name or select a new team owner from the drop-down list. Remember that teachers can only change team sets they own, school administrators can change team sets in the school, and district administrators can change team sets in any school.
5. Click Save.
Who Can Do This?
District Administrator
District Staff
School Administrator
School Staff
Teachers
To change capabilities, see page 165.
A
B
134Accelerated MathSoftware Manual
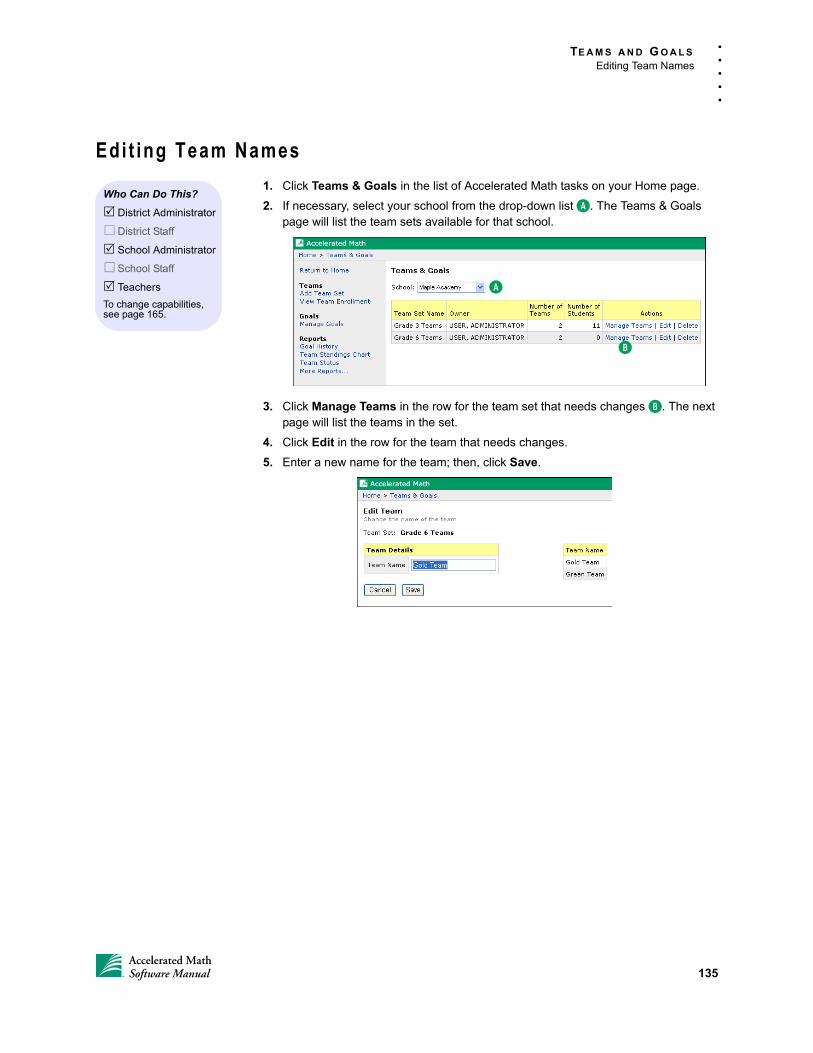
TE A M S A N D G O A L S
Editing Team Names
. . .
. .
Edi t ing Team Names
1. Click Teams & Goals in the list of Accelerated Math tasks on your Home page.
2. If necessary, select your school from the drop-down list A. The Teams & Goals page will list the team sets available for that school.
3. Click Manage Teams in the row for the team set that needs changes B. The next page will list the teams in the set.
4. Click Edit in the row for the team that needs changes.
5. Enter a new name for the team; then, click Save.
Who Can Do This?
District Administrator
District Staff
School Administrator
School Staff
Teachers
To change capabilities, see page 165.
A
B
135Accelerated MathSoftware Manual
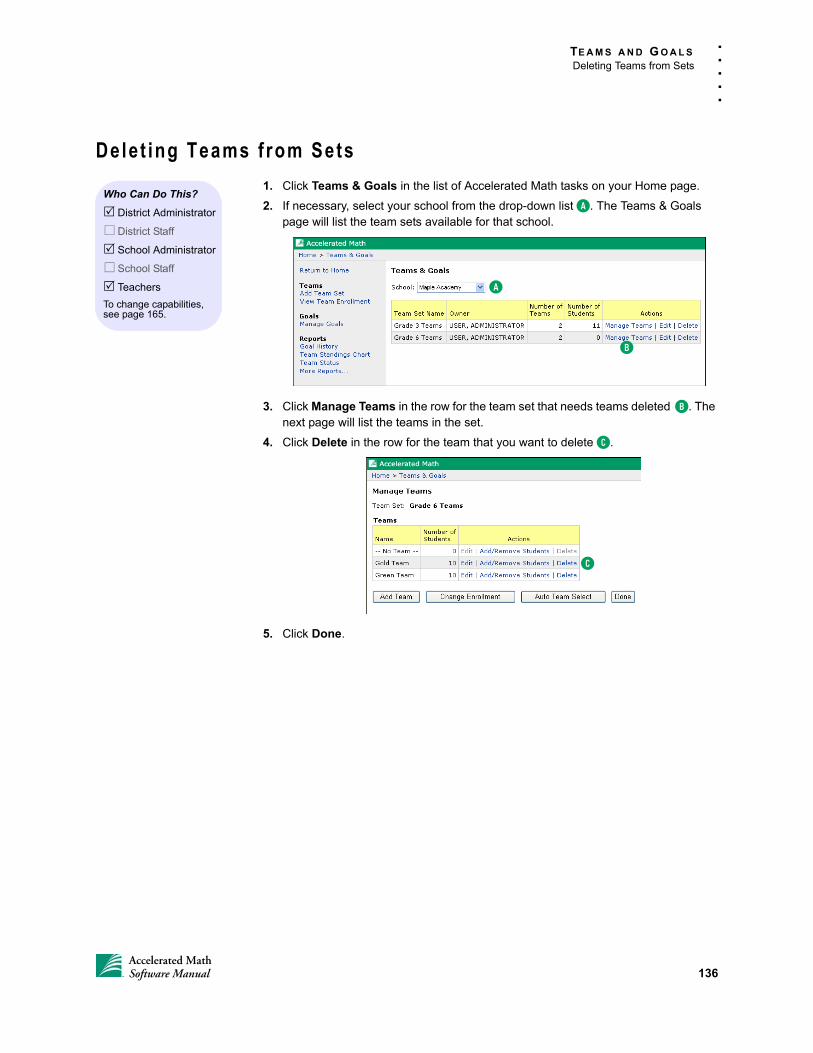
TE A M S A N D G O A L S
Deleting Teams from Sets
. . .
. .
Delet ing Teams f rom Sets
1. Click Teams & Goals in the list of Accelerated Math tasks on your Home page.
2. If necessary, select your school from the drop-down list A. The Teams & Goals page will list the team sets available for that school.
3. Click Manage Teams in the row for the team set that needs teams deleted =B. The next page will list the teams in the set.
4. Click Delete in the row for the team that you want to delete C.
5. Click Done.
Who Can Do This?
District Administrator
District Staff
School Administrator
School Staff
Teachers
To change capabilities, see page 165.
A
B
C
136Accelerated MathSoftware Manual
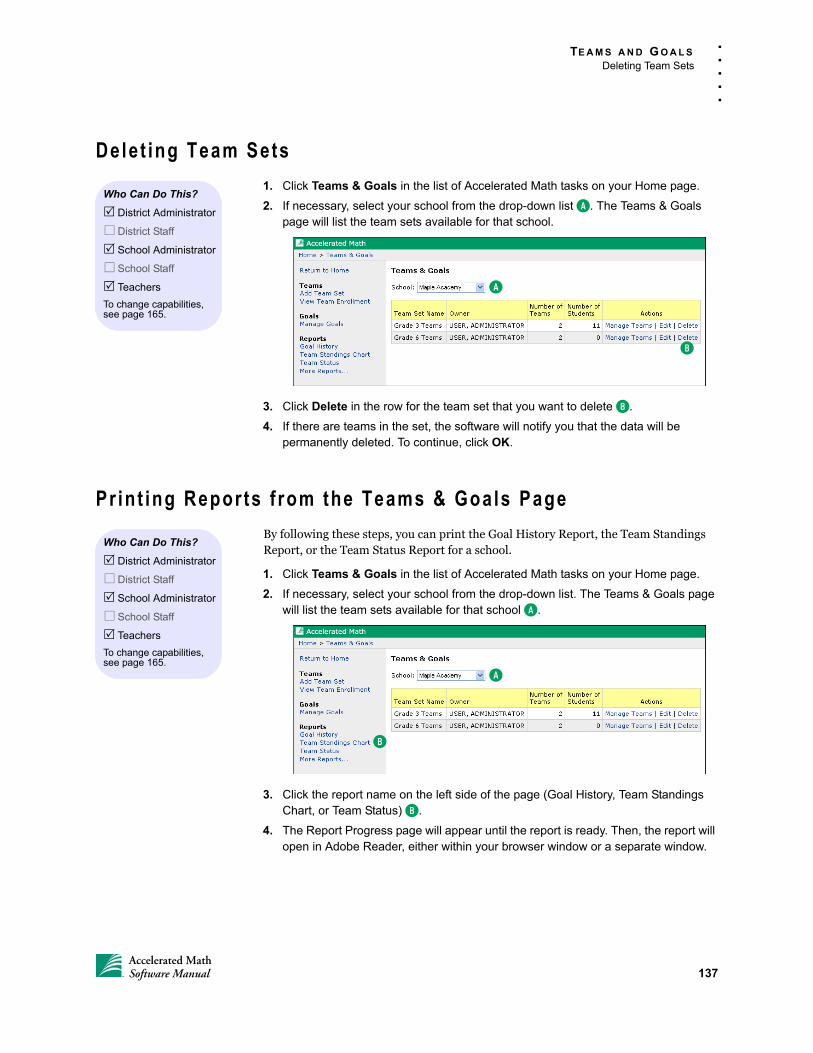
TE A M S A N D G O A L S
Deleting Team Sets
. . .
. .
Delet ing Team Sets
1. Click Teams & Goals in the list of Accelerated Math tasks on your Home page.
2. If necessary, select your school from the drop-down list A. The Teams & Goals page will list the team sets available for that school.
3. Click Delete in the row for the team set that you want to delete B.
4. If there are teams in the set, the software will notify you that the data will be permanently deleted. To continue, click OK.
Pr int ing Repor ts f rom the Teams & Goals Page
By following these steps, you can print the Goal History Report, the Team Standings Report, or the Team Status Report for a school.
1. Click Teams & Goals in the list of Accelerated Math tasks on your Home page.
2. If necessary, select your school from the drop-down list. The Teams & Goals page will list the team sets available for that school A.
3. Click the report name on the left side of the page (Goal History, Team Standings Chart, or Team Status) B.
4. The Report Progress page will appear until the report is ready. Then, the report will open in Adobe Reader, either within your browser window or a separate window.
Who Can Do This?
District Administrator
District Staff
School Administrator
School Staff
Teachers
To change capabilities, see page 165.
A
B
Who Can Do This?
District Administrator
District Staff
School Administrator
School Staff
Teachers
To change capabilities, see page 165.
A
B
137Accelerated MathSoftware Manual
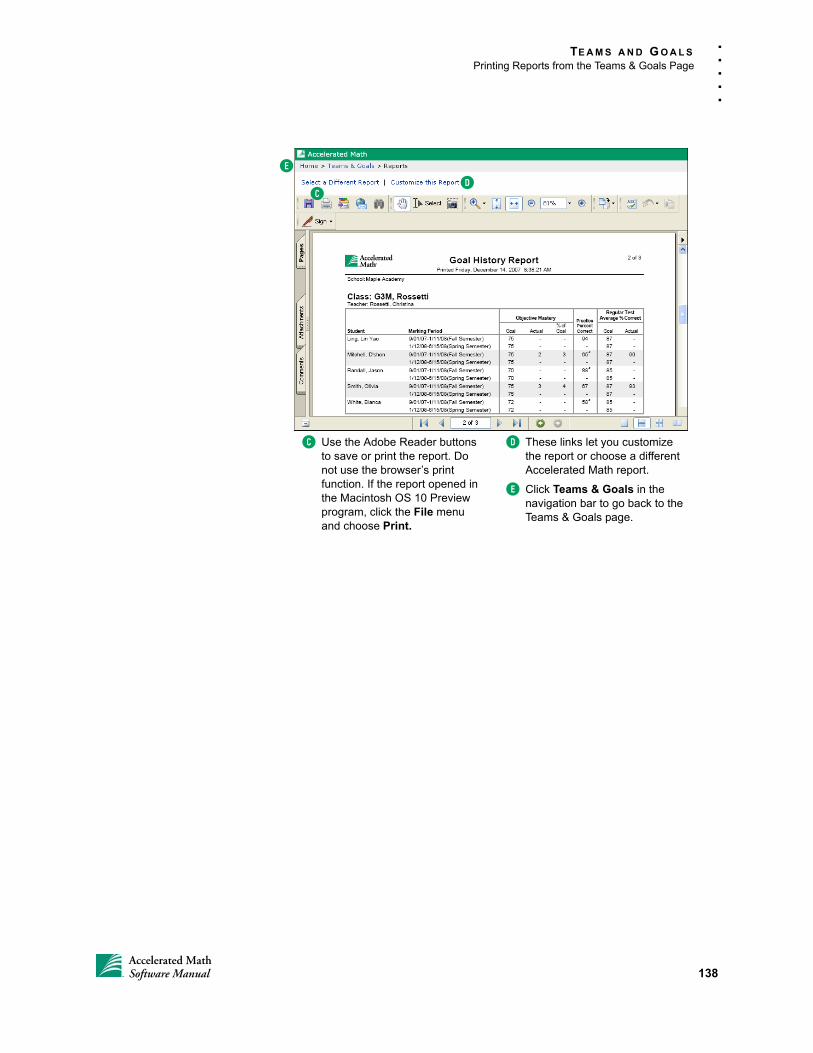
TE A M S A N D G O A L S
Printing Reports from the Teams & Goals Page
. . .
. .
E
DC
C Use the Adobe Reader buttons to save or print the report. Do not use the browser’s print function. If the report opened in the Macintosh OS 10 Preview program, click the File menu and choose Print.
D These links let you customize the report or choose a different Accelerated Math report.
E Click Teams & Goals in the navigation bar to go back to the Teams & Goals page.
138Accelerated MathSoftware Manual
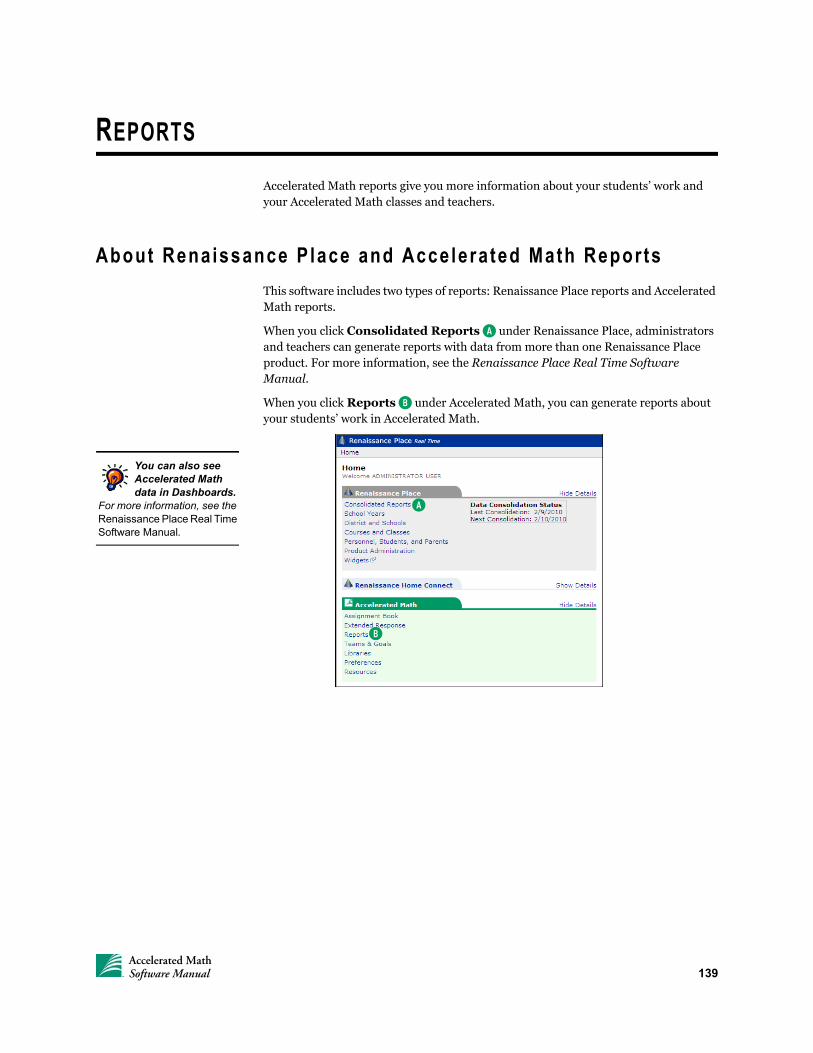
REPORTS
Accelerated Math reports give you more information about your students’ work and your Accelerated Math classes and teachers.
About Renaissance P lace and Accelera ted Math Repor ts
This software includes two types of reports: Renaissance Place reports and Accelerated Math reports.
When you click Consolidated Reports A under Renaissance Place, administrators and teachers can generate reports with data from more than one Renaissance Place product. For more information, see the Renaissance Place Real Time Software Manual.
When you click Reports B under Accelerated Math, you can generate reports about your students’ work in Accelerated Math.
You can also see Accelerated Math data in Dashboards.
For more information, see the Renaissance Place Real Time Software Manual.
B
A
139Accelerated MathSoftware Manual
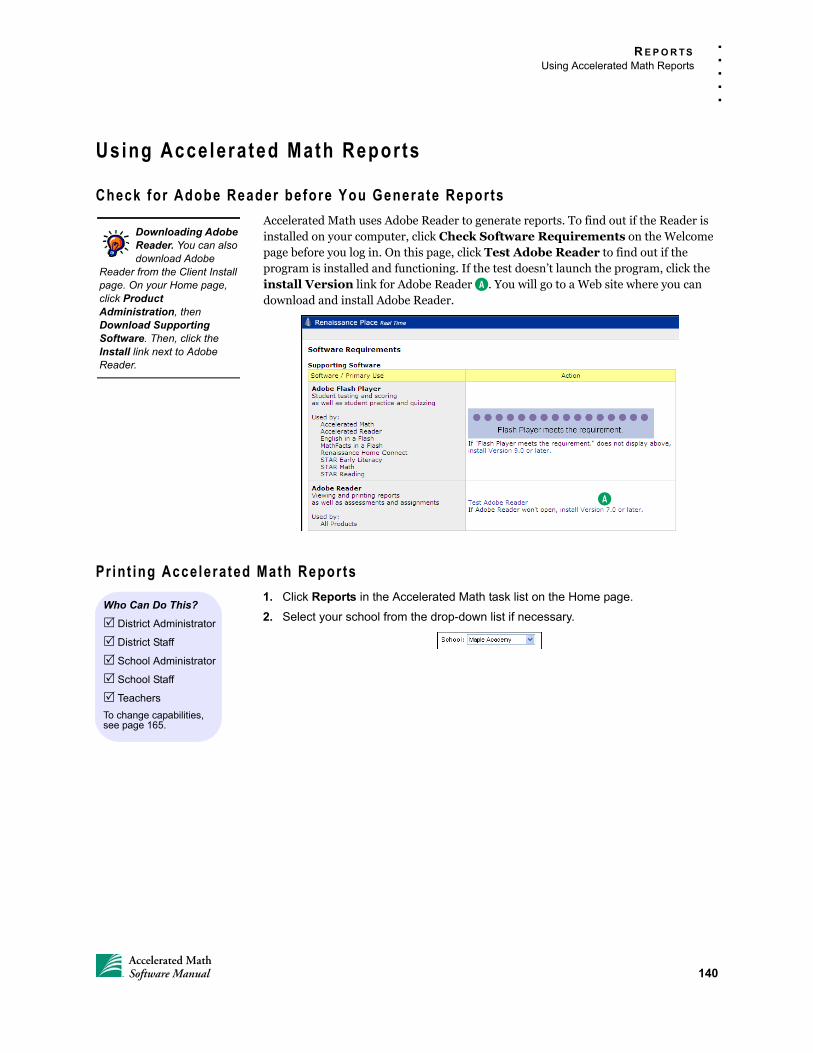
R E P O R T S
Using Accelerated Math Reports
. . .
. .
Using Accelera ted Math Repor ts
Check for Adobe Reader before You Generate Reports
Accelerated Math uses Adobe Reader to generate reports. To find out if the Reader is installed on your computer, click Check Software Requirements on the Welcome page before you log in. On this page, click Test Adobe Reader to find out if the program is installed and functioning. If the test doesn’t launch the program, click the install Version link for Adobe Reader A. You will go to a Web site where you can download and install Adobe Reader.
Print ing Accelerated Math Reports
1. Click Reports in the Accelerated Math task list on the Home page.
2. Select your school from the drop-down list if necessary.
Downloading Adobe Reader. You can also download Adobe
Reader from the Client Install page. On your Home page, click Product Administration, then Download Supporting Software. Then, click the Install link next to Adobe Reader.
A
Who Can Do This?
District Administrator
District Staff
School Administrator
School Staff
Teachers
To change capabilities, see page 165.
140Accelerated MathSoftware Manual
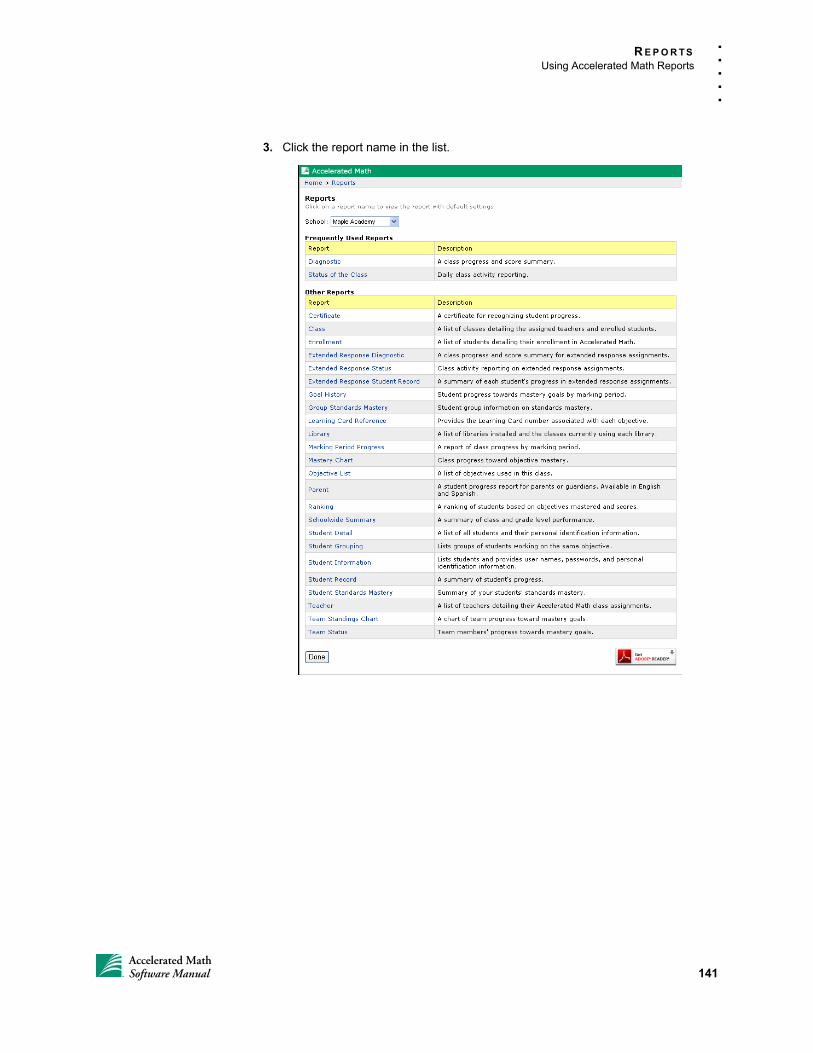
R E P O R T S
Using Accelerated Math Reports
. . .
. .
3. Click the report name in the list.
141Accelerated MathSoftware Manual
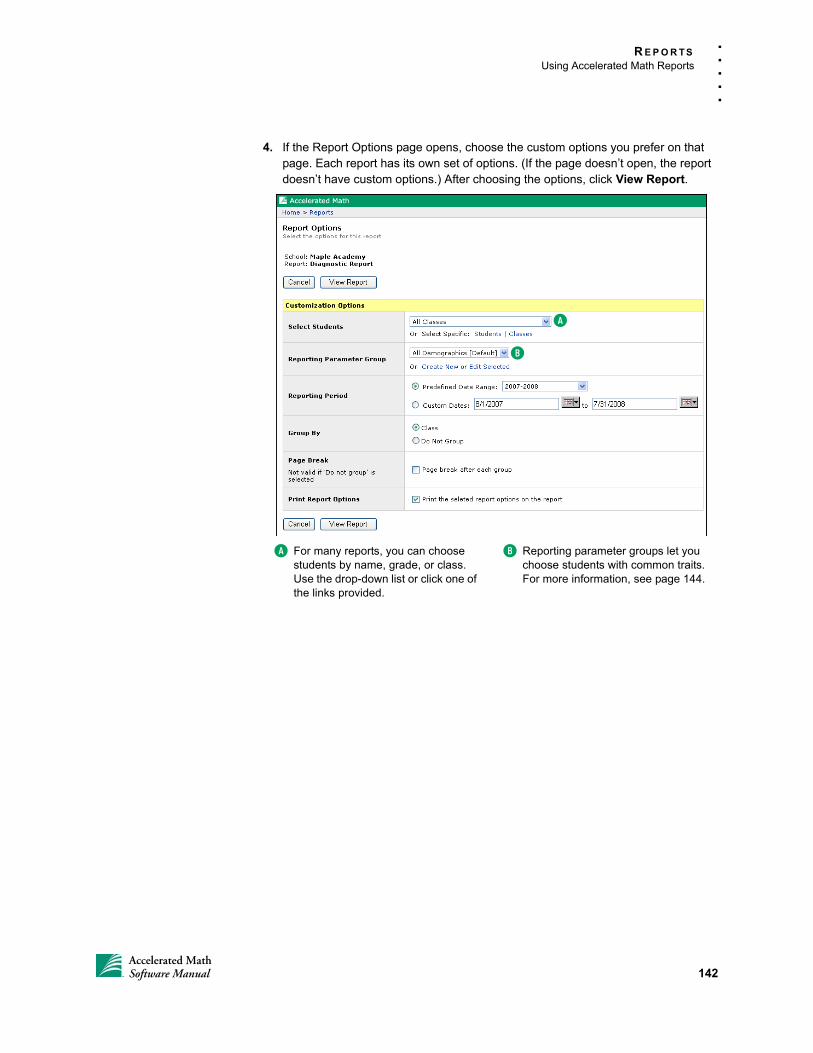
R E P O R T S
Using Accelerated Math Reports
. . .
. .
4. If the Report Options page opens, choose the custom options you prefer on that page. Each report has its own set of options. (If the page doesn’t open, the report doesn’t have custom options.) After choosing the options, click View Report.
A
B
A For many reports, you can choose students by name, grade, or class. Use the drop-down list or click one of the links provided.
B Reporting parameter groups let you choose students with common traits. For more information, see page 144.
142Accelerated MathSoftware Manual
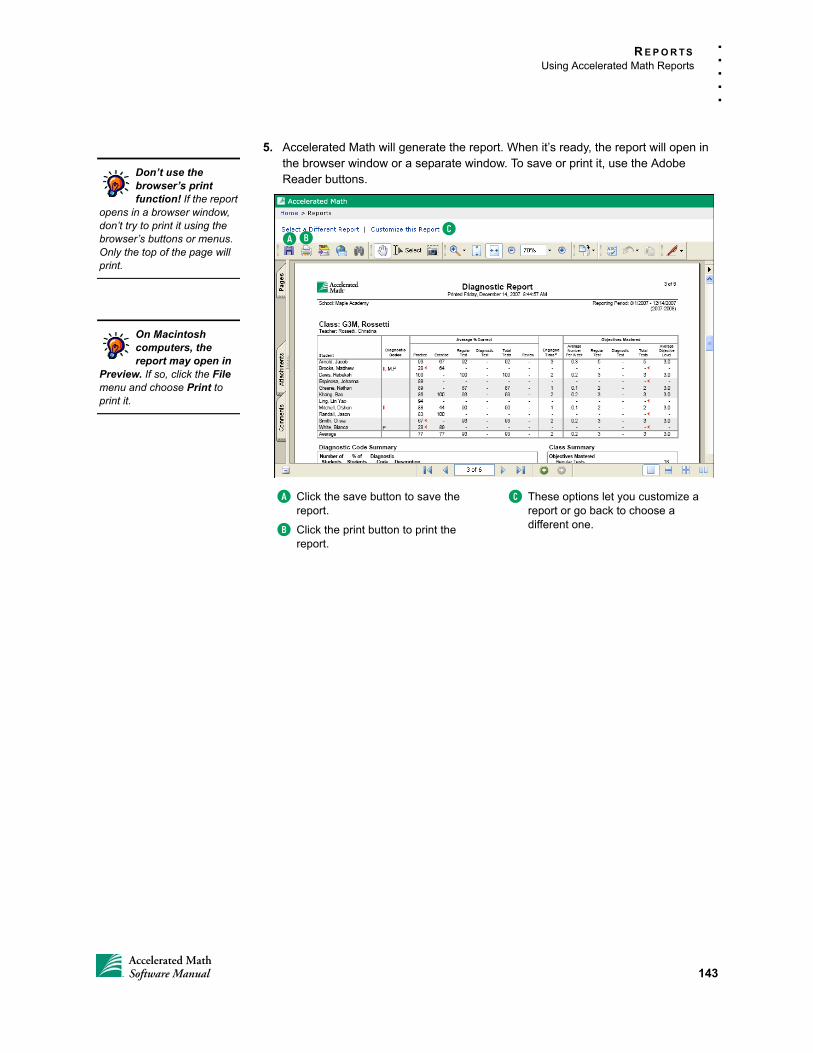
R E P O R T S
Using Accelerated Math Reports
. . .
. .
5. Accelerated Math will generate the report. When it’s ready, the report will open in the browser window or a separate window. To save or print it, use the Adobe Reader buttons.
Don’t use the browser’s print function! If the report
opens in a browser window, don’t try to print it using the browser’s buttons or menus. Only the top of the page will print.
On Macintosh computers, the report may open in
Preview. If so, click the File menu and choose Print to print it.
CA B
A Click the save button to save the report.
B Click the print button to print the report.
C These options let you customize a report or go back to choose a different one.
143Accelerated MathSoftware Manual

R E P O R T S
Using Accelerated Math Reports
. . .
. .
About Report ing Parameter Groups
Reporting parameter groups let you limit reports to students with common traits. For some reports that have custom options, you can choose a reporting parameter group from a drop-down list. You can also create or change a group by clicking Create New or Edit Selected; this page will open:
A
B
C
A By entering an Enroll Date, you select students enrolled in the school before the date you specify.
B You can specify each student’s ethnicity, gender, language, and grade when you add the student or edit his or her information. See the Renaissance Place Real Time Software Manual.
C You can assign characteristics to students separately. You can also add your own custom characteristics and assign them to students. See the Renaissance Place Real Time Software Manual.
144Accelerated MathSoftware Manual
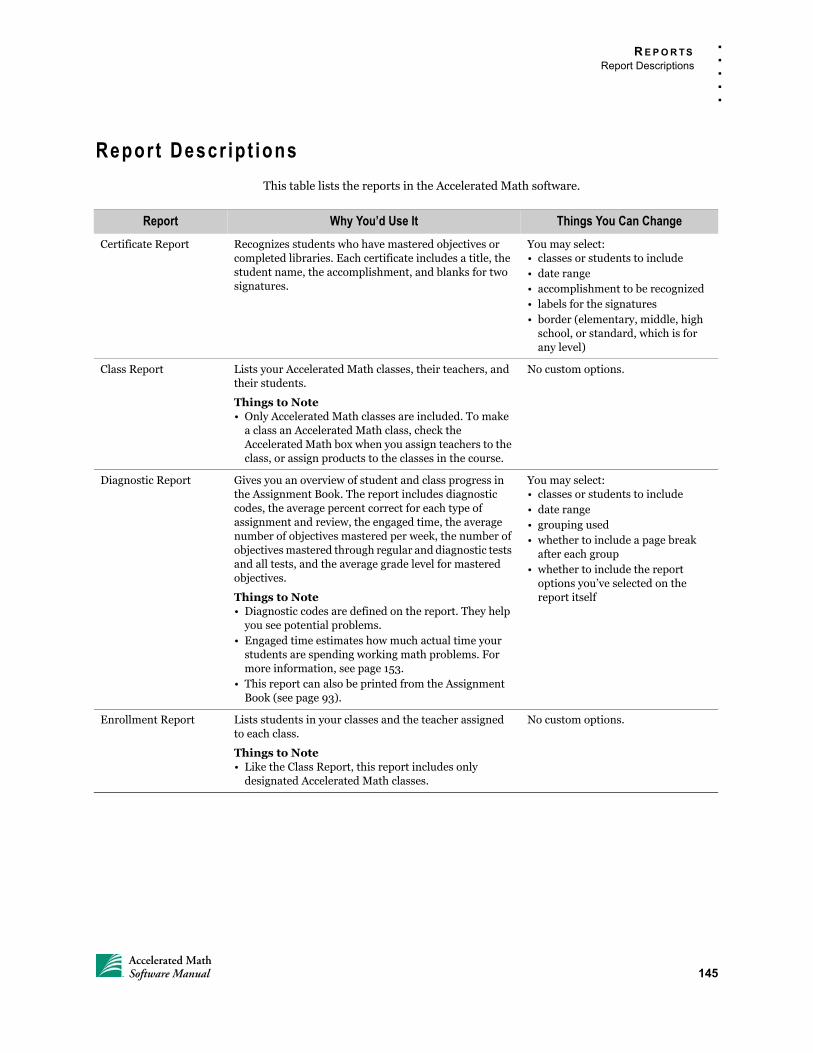
R E P O R T S
Report Descriptions
. . .
. .
Report Descr ip t ions
This table lists the reports in the Accelerated Math software.
Report Why You’d Use It Things You Can Change
Certificate Report Recognizes students who have mastered objectives or completed libraries. Each certificate includes a title, the student name, the accomplishment, and blanks for two signatures.
You may select:• classes or students to include• date range• accomplishment to be recognized• labels for the signatures• border (elementary, middle, high
school, or standard, which is for any level)
Class Report Lists your Accelerated Math classes, their teachers, and their students.
Things to Note• Only Accelerated Math classes are included. To make
a class an Accelerated Math class, check the Accelerated Math box when you assign teachers to the class, or assign products to the classes in the course.
No custom options.
Diagnostic Report Gives you an overview of student and class progress in the Assignment Book. The report includes diagnostic codes, the average percent correct for each type of assignment and review, the engaged time, the average number of objectives mastered per week, the number of objectives mastered through regular and diagnostic tests and all tests, and the average grade level for mastered objectives.
Things to Note• Diagnostic codes are defined on the report. They help
you see potential problems.• Engaged time estimates how much actual time your
students are spending working math problems. For more information, see page 153.
• This report can also be printed from the Assignment Book (see page 93).
You may select:• classes or students to include• date range• grouping used• whether to include a page break
after each group• whether to include the report
options you’ve selected on the report itself
Enrollment Report Lists students in your classes and the teacher assigned to each class.
Things to Note• Like the Class Report, this report includes only
designated Accelerated Math classes.
No custom options.
145Accelerated MathSoftware Manual
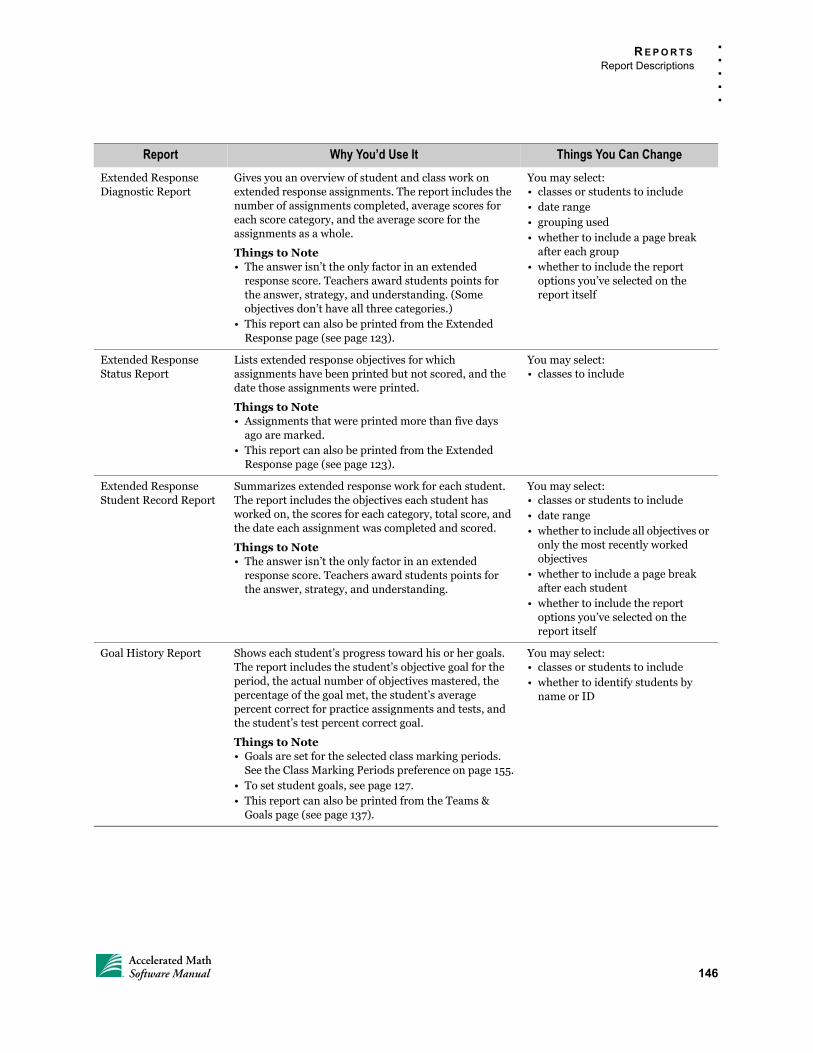
R E P O R T S
Report Descriptions
. . .
. .
Extended Response Diagnostic Report
Gives you an overview of student and class work on extended response assignments. The report includes the number of assignments completed, average scores for each score category, and the average score for the assignments as a whole.
Things to Note• The answer isn’t the only factor in an extended
response score. Teachers award students points for the answer, strategy, and understanding. (Some objectives don’t have all three categories.)
• This report can also be printed from the Extended Response page (see page 123).
You may select:• classes or students to include• date range• grouping used• whether to include a page break
after each group• whether to include the report
options you’ve selected on the report itself
Extended Response Status Report
Lists extended response objectives for which assignments have been printed but not scored, and the date those assignments were printed.
Things to Note• Assignments that were printed more than five days
ago are marked.• This report can also be printed from the Extended
Response page (see page 123).
You may select:• classes to include
Extended Response Student Record Report
Summarizes extended response work for each student. The report includes the objectives each student has worked on, the scores for each category, total score, and the date each assignment was completed and scored.
Things to Note• The answer isn’t the only factor in an extended
response score. Teachers award students points for the answer, strategy, and understanding.
You may select:• classes or students to include• date range• whether to include all objectives or
only the most recently worked objectives
• whether to include a page break after each student
• whether to include the report options you’ve selected on the report itself
Goal History Report Shows each student’s progress toward his or her goals. The report includes the student’s objective goal for the period, the actual number of objectives mastered, the percentage of the goal met, the student’s average percent correct for practice assignments and tests, and the student’s test percent correct goal.
Things to Note• Goals are set for the selected class marking periods.
See the Class Marking Periods preference on page 155.• To set student goals, see page 127.• This report can also be printed from the Teams &
Goals page (see page 137).
You may select:• classes or students to include• whether to identify students by
name or ID
Report Why You’d Use It Things You Can Change
146Accelerated MathSoftware Manual
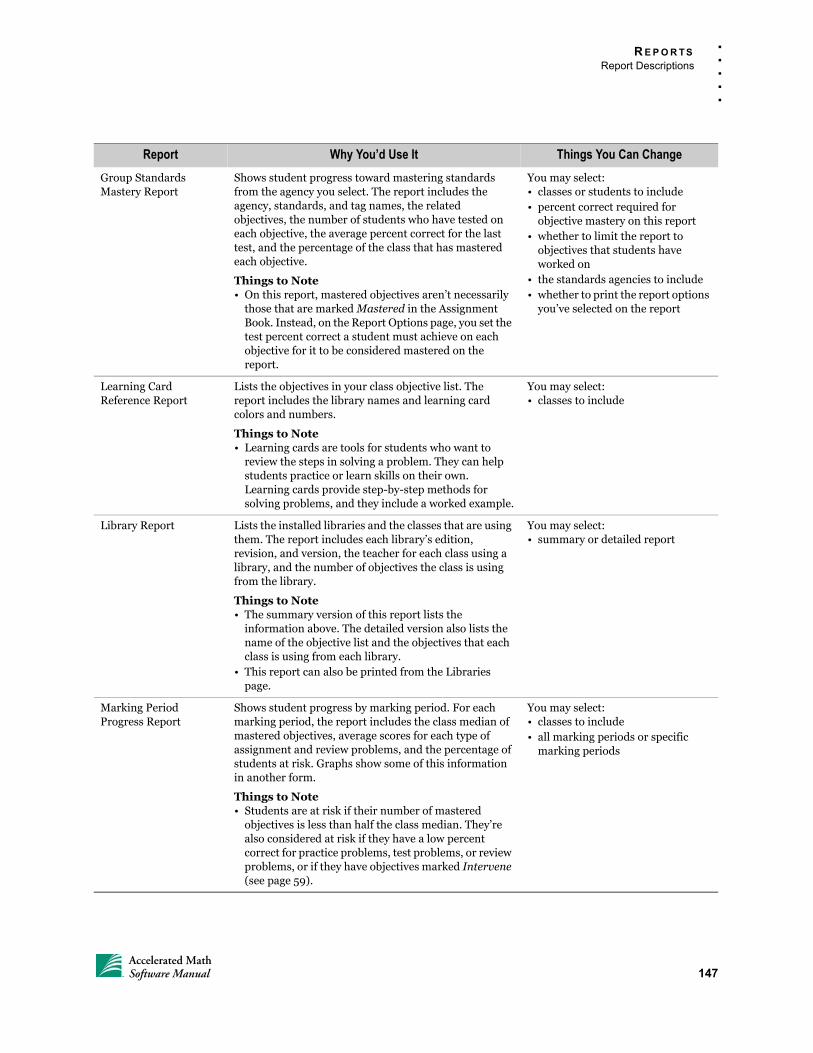
R E P O R T S
Report Descriptions
. . .
. .
Group Standards Mastery Report
Shows student progress toward mastering standards from the agency you select. The report includes the agency, standards, and tag names, the related objectives, the number of students who have tested on each objective, the average percent correct for the last test, and the percentage of the class that has mastered each objective.
Things to Note• On this report, mastered objectives aren’t necessarily
those that are marked Mastered in the Assignment Book. Instead, on the Report Options page, you set the test percent correct a student must achieve on each objective for it to be considered mastered on the report.
You may select:• classes or students to include• percent correct required for
objective mastery on this report• whether to limit the report to
objectives that students have worked on
• the standards agencies to include• whether to print the report options
you’ve selected on the report
Learning Card Reference Report
Lists the objectives in your class objective list. The report includes the library names and learning card colors and numbers.
Things to Note• Learning cards are tools for students who want to
review the steps in solving a problem. They can help students practice or learn skills on their own. Learning cards provide step-by-step methods for solving problems, and they include a worked example.
You may select:• classes to include
Library Report Lists the installed libraries and the classes that are using them. The report includes each library’s edition, revision, and version, the teacher for each class using a library, and the number of objectives the class is using from the library.
Things to Note• The summary version of this report lists the
information above. The detailed version also lists the name of the objective list and the objectives that each class is using from each library.
• This report can also be printed from the Libraries page.
You may select:• summary or detailed report
Marking Period Progress Report
Shows student progress by marking period. For each marking period, the report includes the class median of mastered objectives, average scores for each type of assignment and review problems, and the percentage of students at risk. Graphs show some of this information in another form.
Things to Note• Students are at risk if their number of mastered
objectives is less than half the class median. They’re also considered at risk if they have a low percent correct for practice problems, test problems, or review problems, or if they have objectives marked Intervene (see page 59).
You may select:• classes to include• all marking periods or specific
marking periods
Report Why You’d Use It Things You Can Change
147Accelerated MathSoftware Manual
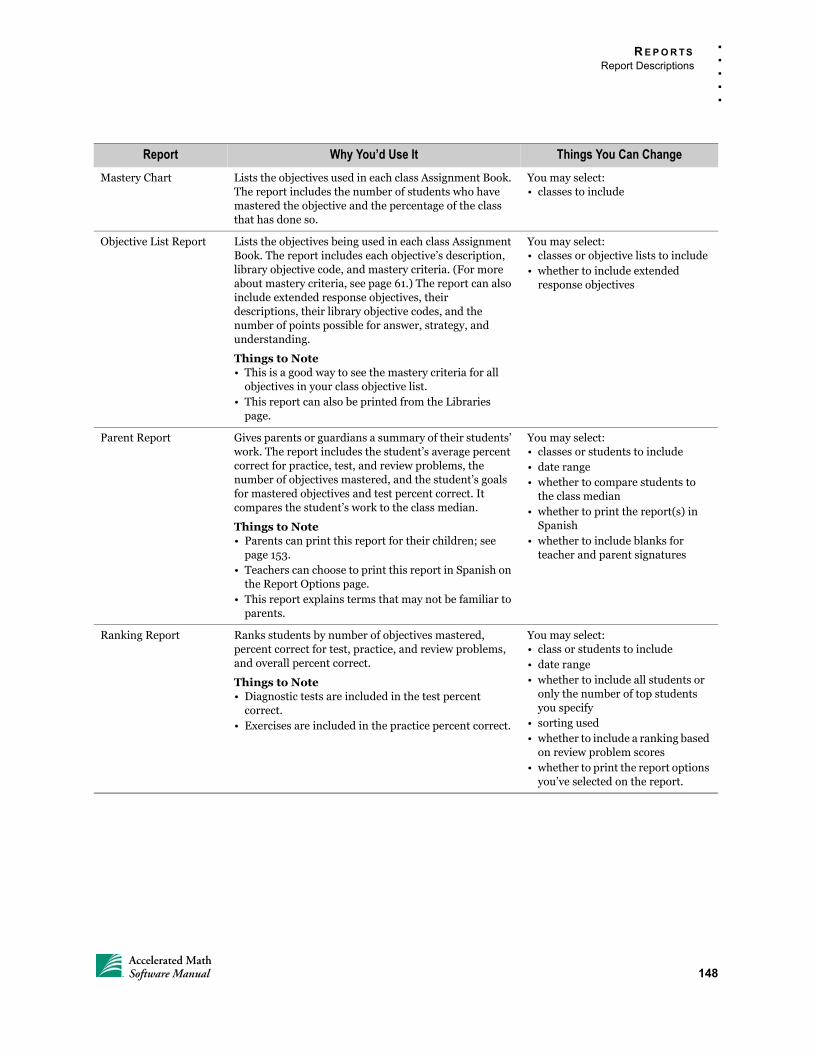
R E P O R T S
Report Descriptions
. . .
. .
Mastery Chart Lists the objectives used in each class Assignment Book. The report includes the number of students who have mastered the objective and the percentage of the class that has done so.
You may select:• classes to include
Objective List Report Lists the objectives being used in each class Assignment Book. The report includes each objective’s description, library objective code, and mastery criteria. (For more about mastery criteria, see page 61.) The report can also include extended response objectives, their descriptions, their library objective codes, and the number of points possible for answer, strategy, and understanding.
Things to Note• This is a good way to see the mastery criteria for all
objectives in your class objective list.• This report can also be printed from the Libraries
page.
You may select:• classes or objective lists to include• whether to include extended
response objectives
Parent Report Gives parents or guardians a summary of their students’ work. The report includes the student’s average percent correct for practice, test, and review problems, the number of objectives mastered, and the student’s goals for mastered objectives and test percent correct. It compares the student’s work to the class median.
Things to Note• Parents can print this report for their children; see
page 153.• Teachers can choose to print this report in Spanish on
the Report Options page.• This report explains terms that may not be familiar to
parents.
You may select:• classes or students to include• date range• whether to compare students to
the class median• whether to print the report(s) in
Spanish• whether to include blanks for
teacher and parent signatures
Ranking Report Ranks students by number of objectives mastered, percent correct for test, practice, and review problems, and overall percent correct.
Things to Note• Diagnostic tests are included in the test percent
correct.• Exercises are included in the practice percent correct.
You may select:• class or students to include• date range• whether to include all students or
only the number of top students you specify
• sorting used• whether to include a ranking based
on review problem scores• whether to print the report options
you’ve selected on the report.
Report Why You’d Use It Things You Can Change
148Accelerated MathSoftware Manual
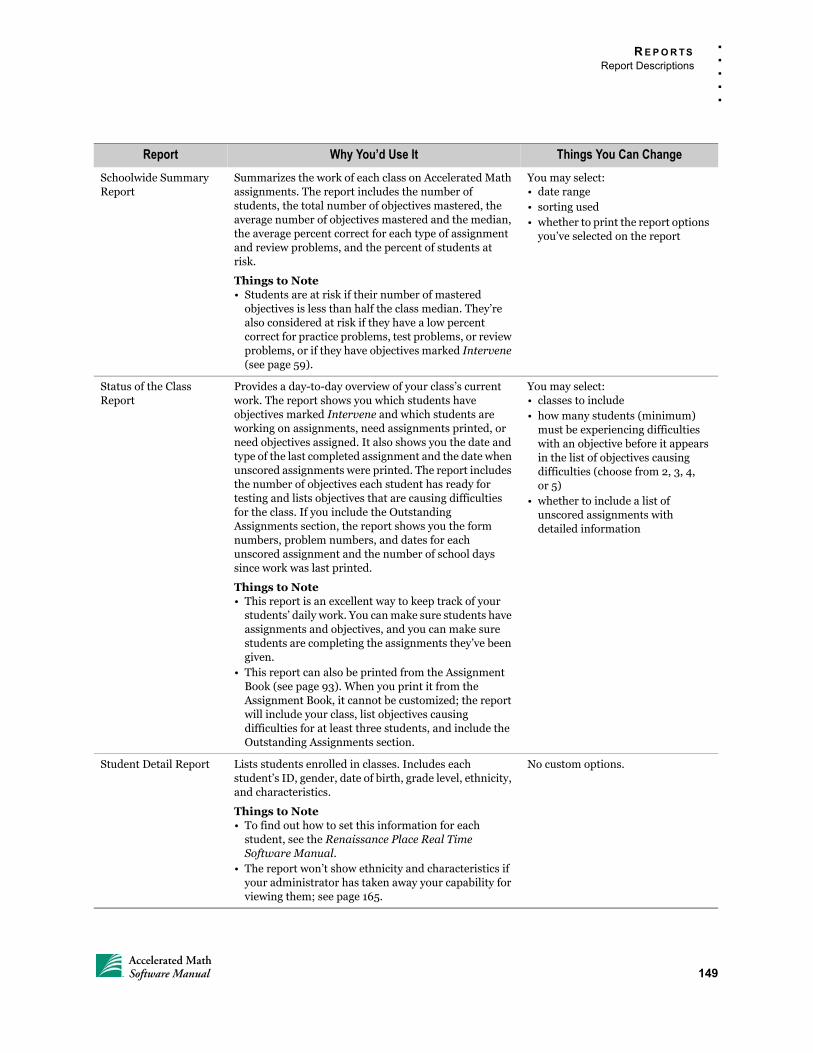
R E P O R T S
Report Descriptions
. . .
. .
Schoolwide Summary Report
Summarizes the work of each class on Accelerated Math assignments. The report includes the number of students, the total number of objectives mastered, the average number of objectives mastered and the median, the average percent correct for each type of assignment and review problems, and the percent of students at risk.
Things to Note• Students are at risk if their number of mastered
objectives is less than half the class median. They’re also considered at risk if they have a low percent correct for practice problems, test problems, or review problems, or if they have objectives marked Intervene (see page 59).
You may select:• date range• sorting used• whether to print the report options
you’ve selected on the report
Status of the Class Report
Provides a day-to-day overview of your class’s current work. The report shows you which students have objectives marked Intervene and which students are working on assignments, need assignments printed, or need objectives assigned. It also shows you the date and type of the last completed assignment and the date when unscored assignments were printed. The report includes the number of objectives each student has ready for testing and lists objectives that are causing difficulties for the class. If you include the Outstanding Assignments section, the report shows you the form numbers, problem numbers, and dates for each unscored assignment and the number of school days since work was last printed.
Things to Note• This report is an excellent way to keep track of your
students’ daily work. You can make sure students have assignments and objectives, and you can make sure students are completing the assignments they’ve been given.
• This report can also be printed from the Assignment Book (see page 93). When you print it from the Assignment Book, it cannot be customized; the report will include your class, list objectives causing difficulties for at least three students, and include the Outstanding Assignments section.
You may select:• classes to include• how many students (minimum)
must be experiencing difficulties with an objective before it appears in the list of objectives causing difficulties (choose from 2, 3, 4,or 5)
• whether to include a list of unscored assignments with detailed information
Student Detail Report Lists students enrolled in classes. Includes each student’s ID, gender, date of birth, grade level, ethnicity, and characteristics.
Things to Note• To find out how to set this information for each
student, see the Renaissance Place Real Time Software Manual.
• The report won’t show ethnicity and characteristics if your administrator has taken away your capability for viewing them; see page 165.
No custom options.
Report Why You’d Use It Things You Can Change
149Accelerated MathSoftware Manual
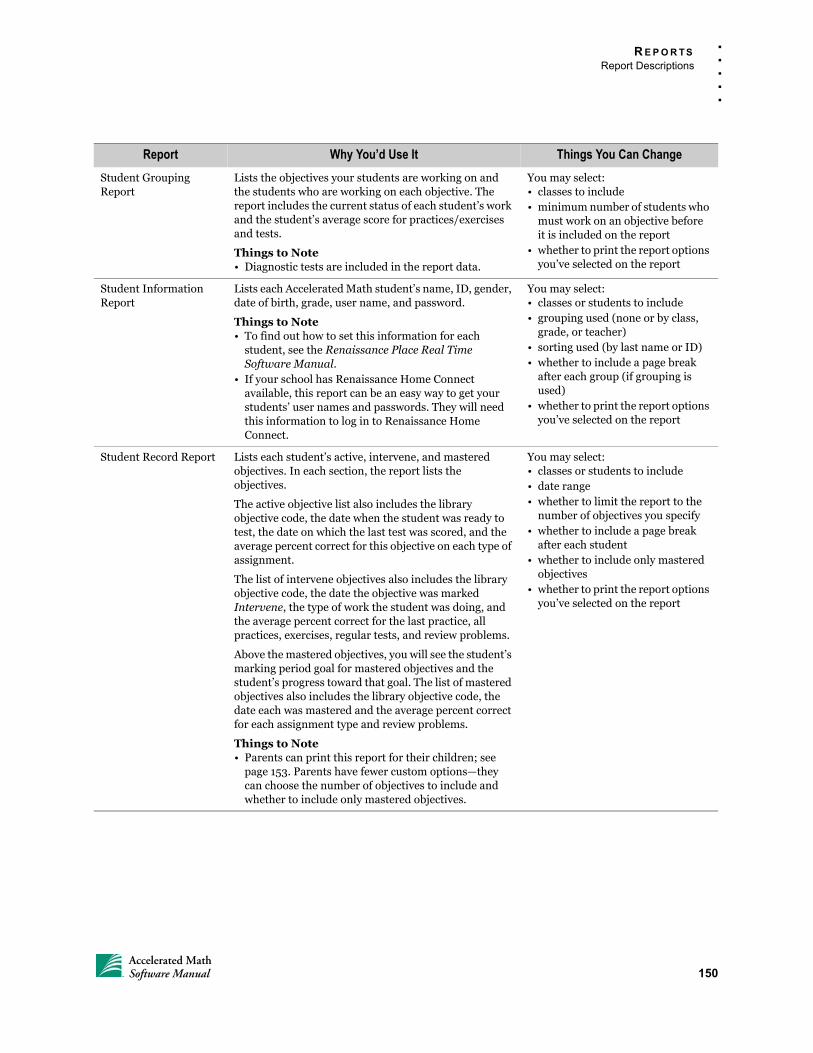
R E P O R T S
Report Descriptions
. . .
. .
Student Grouping Report
Lists the objectives your students are working on and the students who are working on each objective. The report includes the current status of each student’s work and the student’s average score for practices/exercises and tests.
Things to Note• Diagnostic tests are included in the report data.
You may select:• classes to include• minimum number of students who
must work on an objective before it is included on the report
• whether to print the report options you’ve selected on the report
Student Information Report
Lists each Accelerated Math student’s name, ID, gender, date of birth, grade, user name, and password.
Things to Note• To find out how to set this information for each
student, see the Renaissance Place Real Time Software Manual.
• If your school has Renaissance Home Connect available, this report can be an easy way to get your students’ user names and passwords. They will need this information to log in to Renaissance Home Connect.
You may select:• classes or students to include• grouping used (none or by class,
grade, or teacher)• sorting used (by last name or ID)• whether to include a page break
after each group (if grouping is used)
• whether to print the report options you’ve selected on the report
Student Record Report Lists each student’s active, intervene, and mastered objectives. In each section, the report lists the objectives.
The active objective list also includes the library objective code, the date when the student was ready to test, the date on which the last test was scored, and the average percent correct for this objective on each type of assignment.
The list of intervene objectives also includes the library objective code, the date the objective was marked Intervene, the type of work the student was doing, and the average percent correct for the last practice, all practices, exercises, regular tests, and review problems.
Above the mastered objectives, you will see the student’s marking period goal for mastered objectives and the student’s progress toward that goal. The list of mastered objectives also includes the library objective code, the date each was mastered and the average percent correct for each assignment type and review problems.
Things to Note• Parents can print this report for their children; see
page 153. Parents have fewer custom options—they can choose the number of objectives to include and whether to include only mastered objectives.
You may select:• classes or students to include• date range• whether to limit the report to the
number of objectives you specify• whether to include a page break
after each student• whether to include only mastered
objectives• whether to print the report options
you’ve selected on the report
Report Why You’d Use It Things You Can Change
150Accelerated MathSoftware Manual
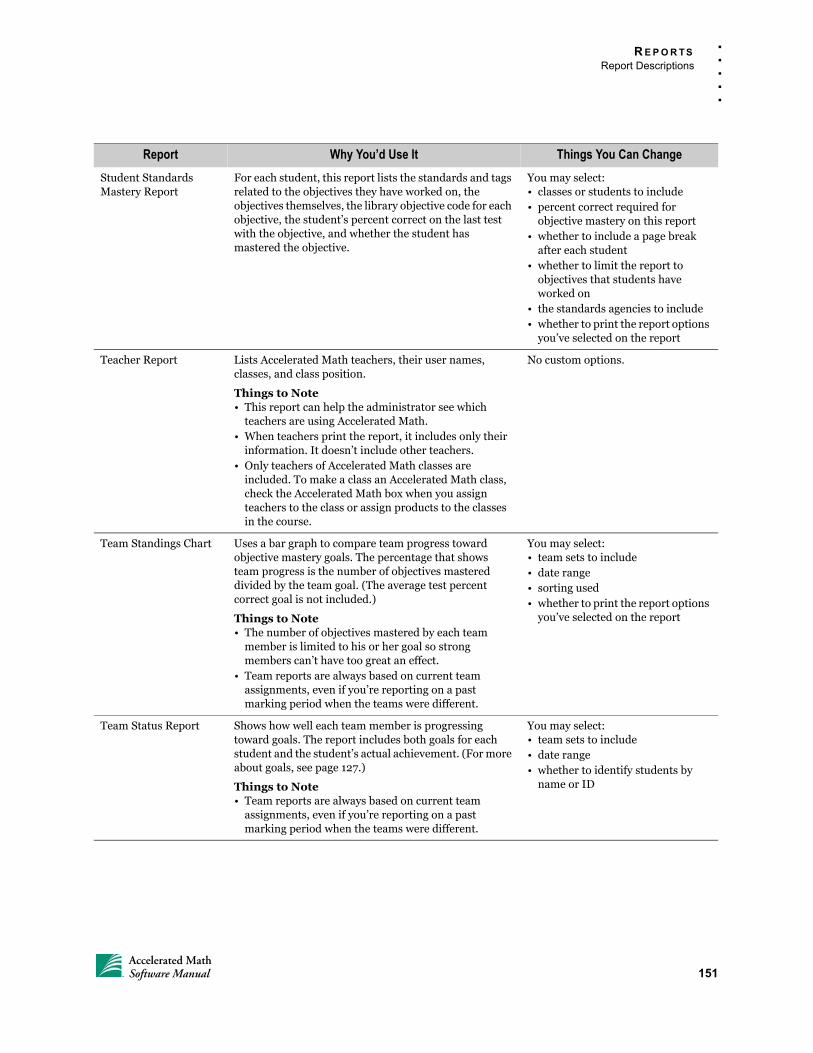
R E P O R T S
Report Descriptions
. . .
. .
Student Standards Mastery Report
For each student, this report lists the standards and tags related to the objectives they have worked on, the objectives themselves, the library objective code for each objective, the student’s percent correct on the last test with the objective, and whether the student has mastered the objective.
You may select:• classes or students to include• percent correct required for
objective mastery on this report• whether to include a page break
after each student• whether to limit the report to
objectives that students have worked on
• the standards agencies to include• whether to print the report options
you’ve selected on the report
Teacher Report Lists Accelerated Math teachers, their user names, classes, and class position.
Things to Note• This report can help the administrator see which
teachers are using Accelerated Math.• When teachers print the report, it includes only their
information. It doesn’t include other teachers.• Only teachers of Accelerated Math classes are
included. To make a class an Accelerated Math class, check the Accelerated Math box when you assign teachers to the class or assign products to the classes in the course.
No custom options.
Team Standings Chart Uses a bar graph to compare team progress toward objective mastery goals. The percentage that shows team progress is the number of objectives mastered divided by the team goal. (The average test percent correct goal is not included.)
Things to Note• The number of objectives mastered by each team
member is limited to his or her goal so strong members can’t have too great an effect.
• Team reports are always based on current team assignments, even if you’re reporting on a past marking period when the teams were different.
You may select:• team sets to include• date range• sorting used• whether to print the report options
you’ve selected on the report
Team Status Report Shows how well each team member is progressing toward goals. The report includes both goals for each student and the student’s actual achievement. (For more about goals, see page 127.)
Things to Note• Team reports are always based on current team
assignments, even if you’re reporting on a past marking period when the teams were different.
You may select:• team sets to include• date range• whether to identify students by
name or ID
Report Why You’d Use It Things You Can Change
151Accelerated MathSoftware Manual
R E P O R T S
Diagnostic Export
. . .
. .
Diagnost ic Expor t
Use the Diagnostic Export in Renaissance Place RT to provide Diagnostic Report data to Renaissance Learning. You can also use the export file to import information into spreadsheets or other databases.
For more information and for instructions, see the Renaissance Place Real Time Software Manual.
Engaged T ime
The Engaged Time calculation appears on the Diagnostic Report. This shows how much actual time students are likely spending working problems for Accelerated Math objectives. This is how Engaged Time is calculated:
TOPS Report Shows the results for an individual assignment. The report includes the student’s score and the objectives included. Unless you’re reprinting the report, it also includes a summary of work for the class marking period and school year. The report may also show which problems the student answered incorrectly; for assisted-response assignments, it may show the correct answer for each of these problems.
Things to Note• This report prints automatically after assignments,
and it can be reprinted from the Assignment Book (see page 94) or Extended Response page (see page 124).
• Marking period results are based on the class marking periods. See the Class Marking Periods preference on page 155. School year results are based on the duration of the class.
Not customizable when you print it, but you can set the TOPS Report preference for your class to control what’s included; see page 163.
Report Why You’d Use It Things You Can Change
Days off set in Renaissance Place RT can affect the
value used for the number of school days in the reporting period. Keep this in mind if your administrator has entered days off for your school in Renaissance Place RT.
(number of objectives mastered) × (50 minutes per objective)
number of school days in the reporting period
152Accelerated MathSoftware Manual
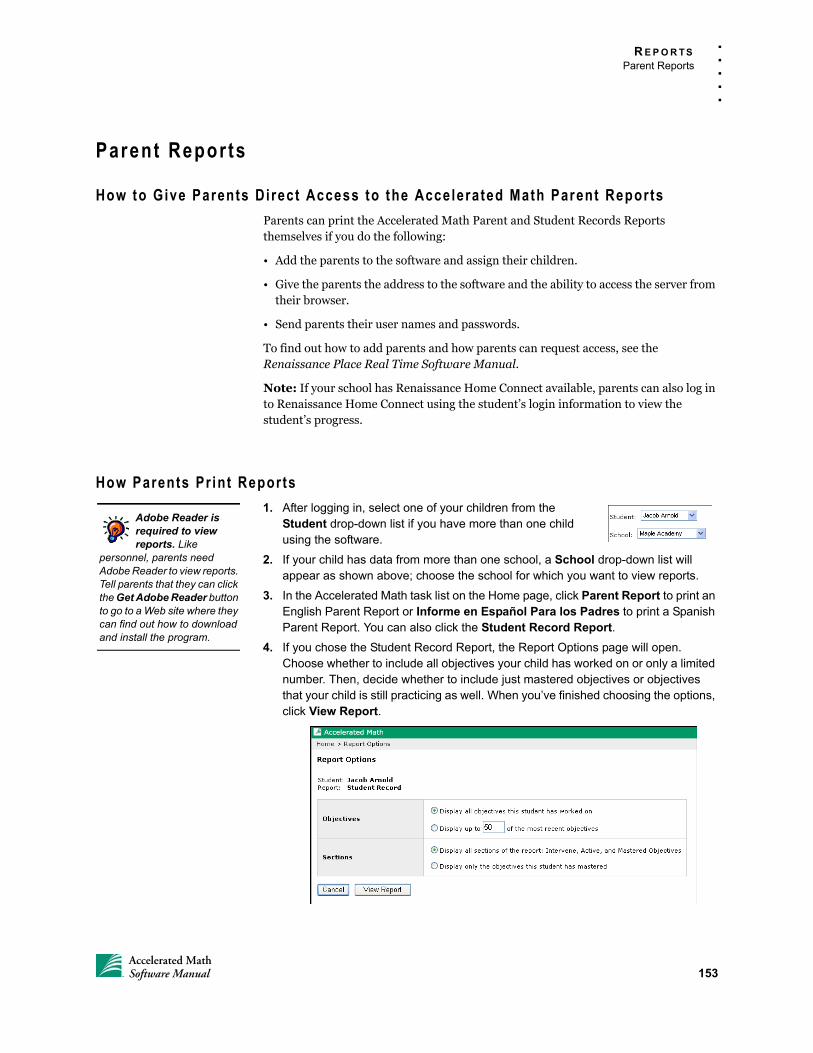
R E P O R T S
Parent Reports
. . .
. .
Parent Repor ts
How to Give Parents Di rect Access to the Accelerated Math Parent Reports
Parents can print the Accelerated Math Parent and Student Records Reports themselves if you do the following:
• Add the parents to the software and assign their children.
• Give the parents the address to the software and the ability to access the server from their browser.
• Send parents their user names and passwords.
To find out how to add parents and how parents can request access, see the Renaissance Place Real Time Software Manual.
Note: If your school has Renaissance Home Connect available, parents can also log in to Renaissance Home Connect using the student’s login information to view the student’s progress.
How Parents Pr int Reports
1. After logging in, select one of your children from the Student drop-down list if you have more than one child using the software.
2. If your child has data from more than one school, a School drop-down list will appear as shown above; choose the school for which you want to view reports.
3. In the Accelerated Math task list on the Home page, click Parent Report to print an English Parent Report or Informe en Español Para los Padres to print a Spanish Parent Report. You can also click the Student Record Report.
4. If you chose the Student Record Report, the Report Options page will open. Choose whether to include all objectives your child has worked on or only a limited number. Then, decide whether to include just mastered objectives or objectives that your child is still practicing as well. When you’ve finished choosing the options, click View Report.
Adobe Reader is required to view reports. Like
personnel, parents need Adobe Reader to view reports. Tell parents that they can click the Get Adobe Reader button to go to a Web site where they can find out how to download and install the program.
153Accelerated MathSoftware Manual
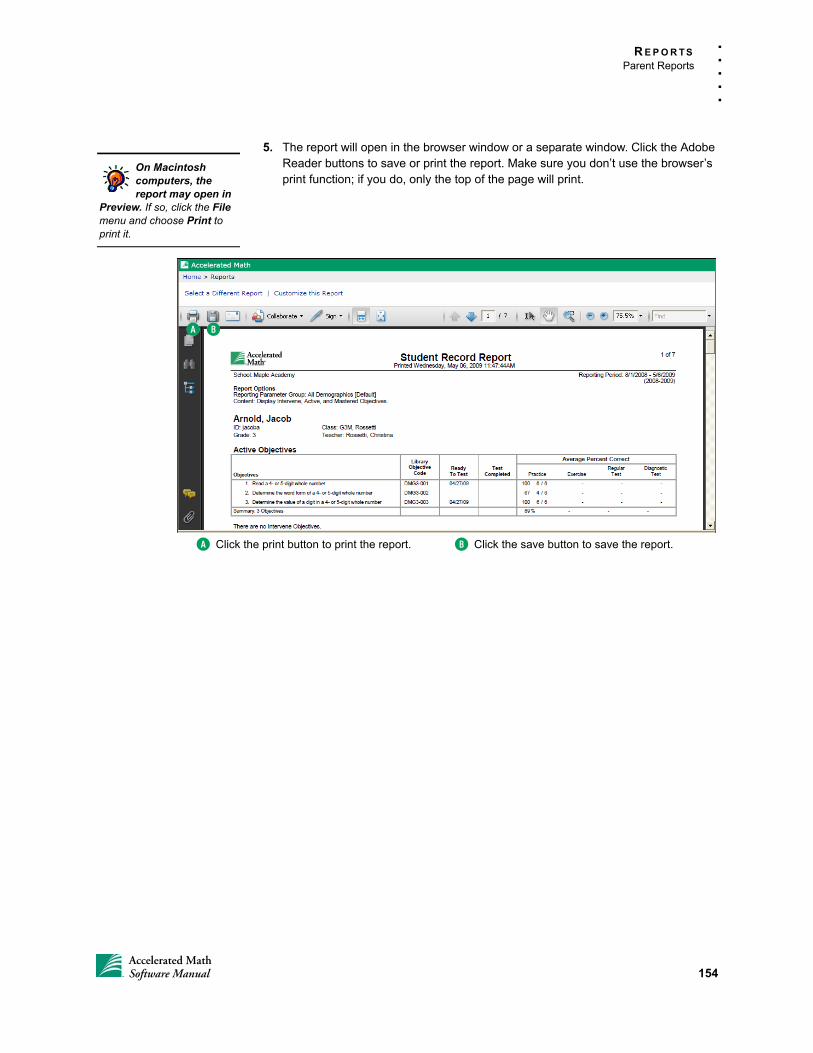
R E P O R T S
Parent Reports
. . .
. .
5. The report will open in the browser window or a separate window. Click the Adobe Reader buttons to save or print the report. Make sure you don’t use the browser’s print function; if you do, only the top of the page will print.
On Macintosh computers, the report may open in
Preview. If so, click the File menu and choose Print to print it.
BA
A Click the print button to print the report. B Click the save button to save the report.
154Accelerated MathSoftware Manual
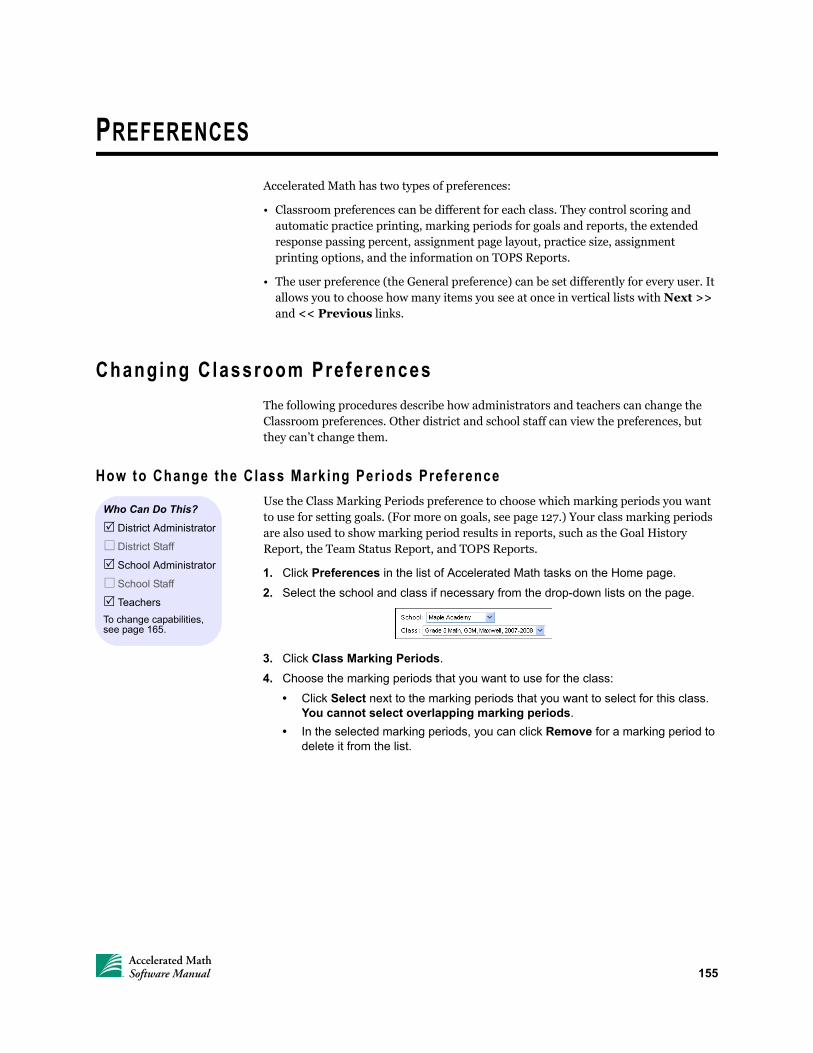
PREFERENCES
Accelerated Math has two types of preferences:
• Classroom preferences can be different for each class. They control scoring and automatic practice printing, marking periods for goals and reports, the extended response passing percent, assignment page layout, practice size, assignment printing options, and the information on TOPS Reports.
• The user preference (the General preference) can be set differently for every user. It allows you to choose how many items you see at once in vertical lists with Next >> and << Previous links.
Changing Classroom Preferences
The following procedures describe how administrators and teachers can change the Classroom preferences. Other district and school staff can view the preferences, but they can’t change them.
How to Change the Class Mark ing Per iods Preference
Use the Class Marking Periods preference to choose which marking periods you want to use for setting goals. (For more on goals, see page 127.) Your class marking periods are also used to show marking period results in reports, such as the Goal History Report, the Team Status Report, and TOPS Reports.
1. Click Preferences in the list of Accelerated Math tasks on the Home page.
2. Select the school and class if necessary from the drop-down lists on the page.
3. Click Class Marking Periods.
4. Choose the marking periods that you want to use for the class:
• Click Select next to the marking periods that you want to select for this class. You cannot select overlapping marking periods.
• In the selected marking periods, you can click Remove for a marking period to delete it from the list.
Who Can Do This?
District Administrator
District Staff
School Administrator
School Staff
Teachers
To change capabilities, see page 165.
155Accelerated MathSoftware Manual
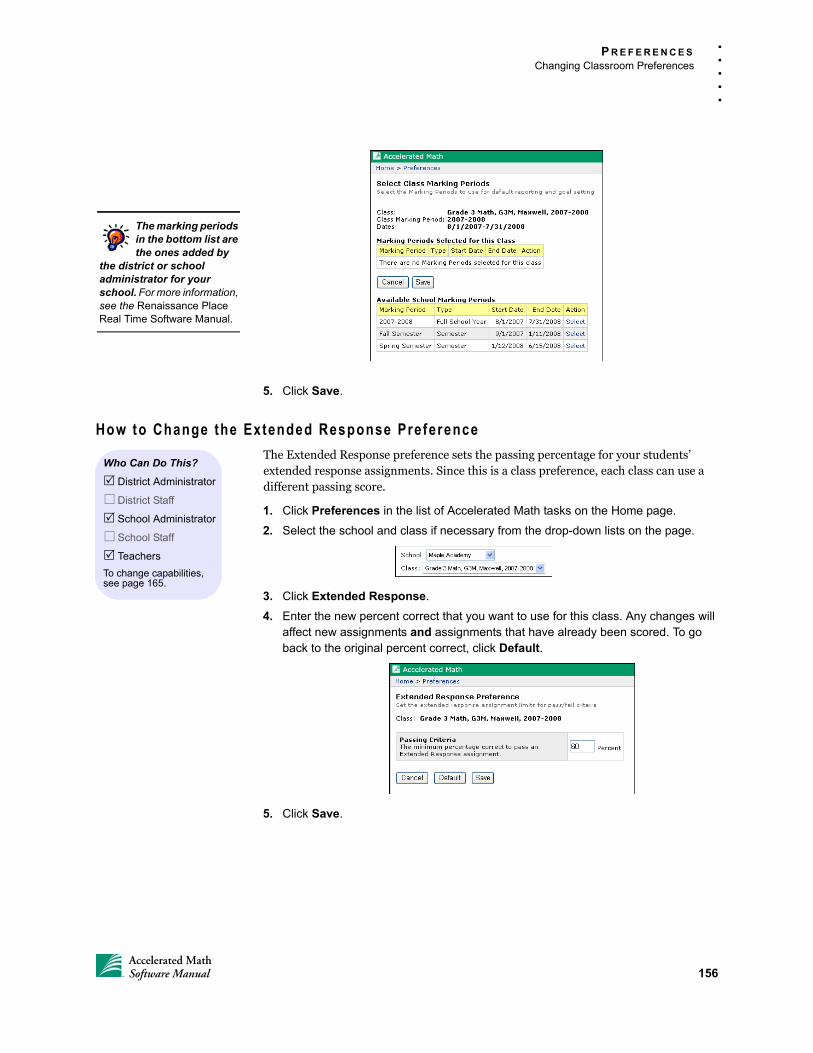
P R E F E R E N C E S
Changing Classroom Preferences
. . .
. .
5. Click Save.
How to Change the Extended Response Preference
The Extended Response preference sets the passing percentage for your students’ extended response assignments. Since this is a class preference, each class can use a different passing score.
1. Click Preferences in the list of Accelerated Math tasks on the Home page.
2. Select the school and class if necessary from the drop-down lists on the page.
3. Click Extended Response.
4. Enter the new percent correct that you want to use for this class. Any changes will affect new assignments and assignments that have already been scored. To go back to the original percent correct, click Default.
5. Click Save.
The marking periods in the bottom list are the ones added by
the district or school administrator for your school. For more information, see the Renaissance Place Real Time Software Manual.
Who Can Do This?
District Administrator
District Staff
School Administrator
School Staff
Teachers
To change capabilities, see page 165.
156Accelerated MathSoftware Manual
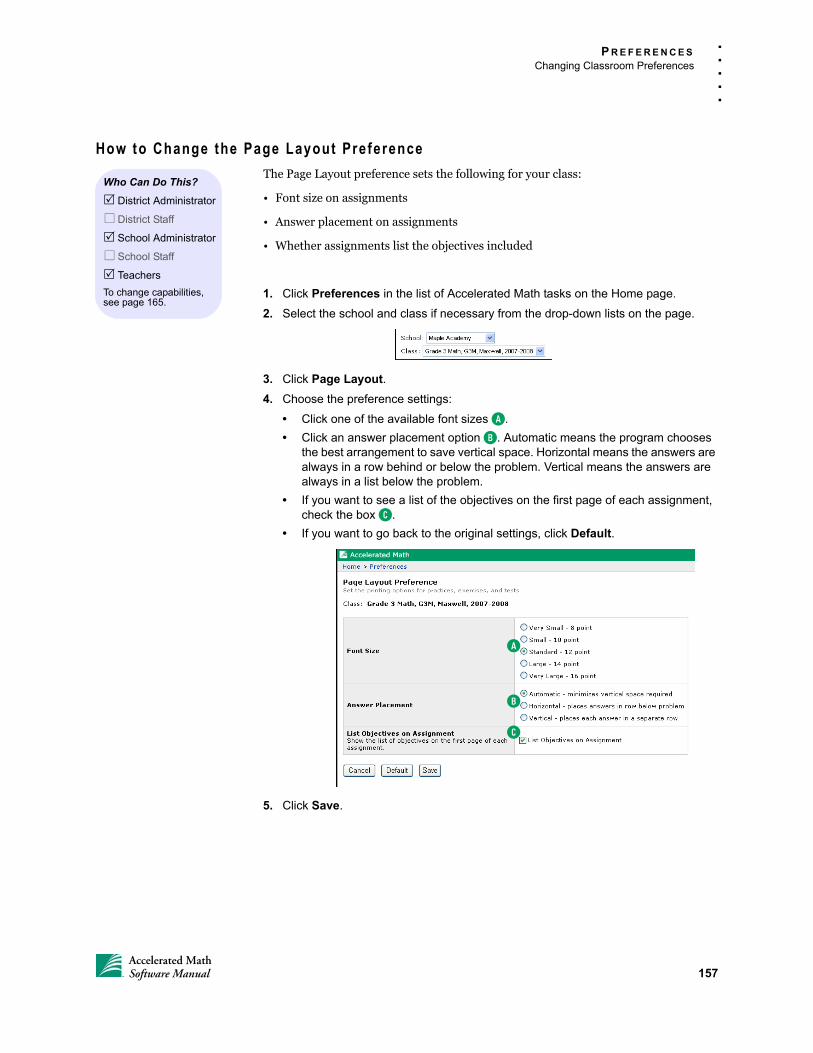
P R E F E R E N C E S
Changing Classroom Preferences
. . .
. .
How to Change the Page Layout Preference
The Page Layout preference sets the following for your class:
• Font size on assignments
• Answer placement on assignments
• Whether assignments list the objectives included
1. Click Preferences in the list of Accelerated Math tasks on the Home page.
2. Select the school and class if necessary from the drop-down lists on the page.
3. Click Page Layout.
4. Choose the preference settings:
• Click one of the available font sizes A.
• Click an answer placement option B. Automatic means the program chooses the best arrangement to save vertical space. Horizontal means the answers are always in a row behind or below the problem. Vertical means the answers are always in a list below the problem.
• If you want to see a list of the objectives on the first page of each assignment, check the box C.
• If you want to go back to the original settings, click Default.
5. Click Save.
Who Can Do This?
District Administrator
District Staff
School Administrator
School Staff
Teachers
To change capabilities, see page 165.
A
B
C
157Accelerated MathSoftware Manual
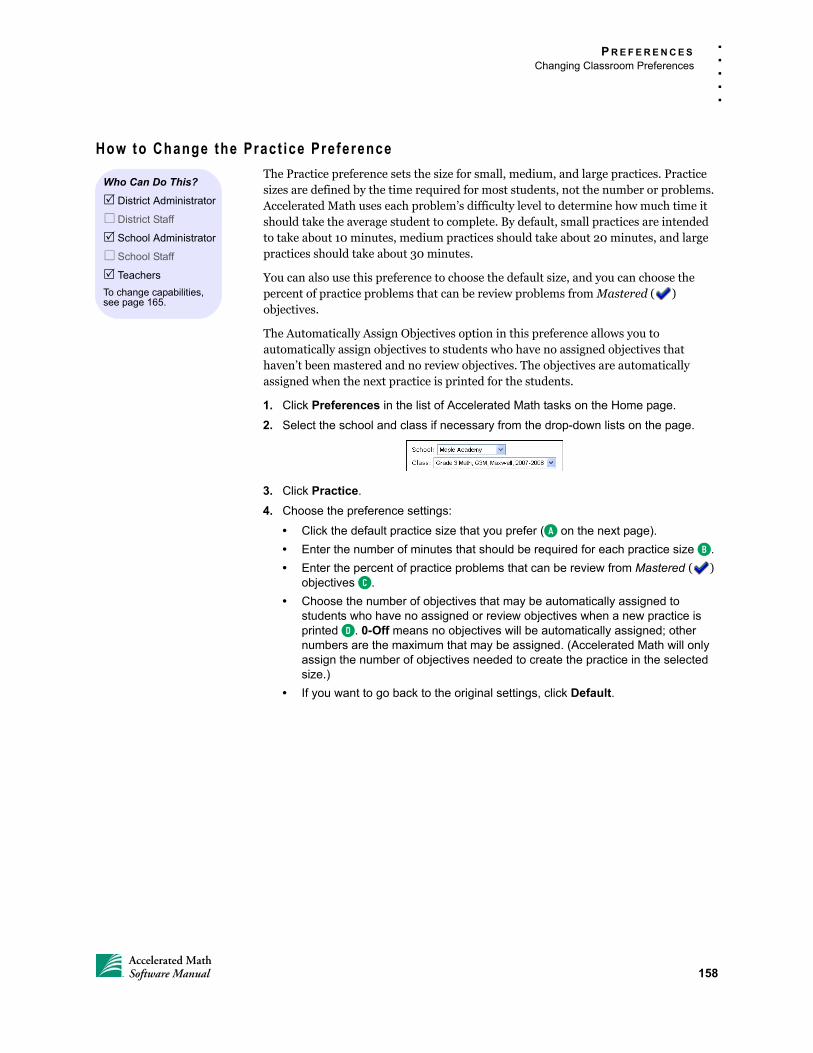
P R E F E R E N C E S
Changing Classroom Preferences
. . .
. .
How to Change the Pract ice Preference
The Practice preference sets the size for small, medium, and large practices. Practice sizes are defined by the time required for most students, not the number or problems. Accelerated Math uses each problem’s difficulty level to determine how much time it should take the average student to complete. By default, small practices are intended to take about 10 minutes, medium practices should take about 20 minutes, and large practices should take about 30 minutes.
You can also use this preference to choose the default size, and you can choose the percent of practice problems that can be review problems from Mastered ( ) objectives.
The Automatically Assign Objectives option in this preference allows you to automatically assign objectives to students who have no assigned objectives that haven’t been mastered and no review objectives. The objectives are automatically assigned when the next practice is printed for the students.
1. Click Preferences in the list of Accelerated Math tasks on the Home page.
2. Select the school and class if necessary from the drop-down lists on the page.
3. Click Practice.
4. Choose the preference settings:
• Click the default practice size that you prefer (A on the next page).
• Enter the number of minutes that should be required for each practice size B.
• Enter the percent of practice problems that can be review from Mastered ( ) objectives C.
• Choose the number of objectives that may be automatically assigned to students who have no assigned or review objectives when a new practice is printed D. 0-Off means no objectives will be automatically assigned; other numbers are the maximum that may be assigned. (Accelerated Math will only assign the number of objectives needed to create the practice in the selected size.)
• If you want to go back to the original settings, click Default.
Who Can Do This?
District Administrator
District Staff
School Administrator
School Staff
Teachers
To change capabilities, see page 165.
158Accelerated MathSoftware Manual
P R E F E R E N C E S
Changing Classroom Preferences
. . .
. .
5. Click Save.
How to Change the Pr int ing Preference
The Printing preference determines how assignments are printed for your class. You can enable or disable these features:
• Duplex (double-sided) printing.
• Preview before printing. When you enable preview, assignments will open in Adobe Reader before you print them, just as reports do. If Preview is not selected, Accelerated Math sends assignments directly to the default printer for the computer you’re using.
• Embed fonts. Embedding fonts includes them in the assignment file just in case these fonts are not available on your computer or printer. By default, this option is checked so that all fonts are embedded; this helps prevent problems printing special characters, which are used on many assignments. If special characters are printed incorrectly on assignments because the fonts aren’t available, students can be confused and may be unable to complete the assignments correctly. If the viewing and printing of special characters is not a problem at your school, you can remove the check mark to print assignments more quickly.
1. Click Preferences in the list of Accelerated Math tasks on the Home page.
2. Select the school and class if necessary from the drop-down lists on the page.
3. Click Printing.
A
B
C
D
Who Can Do This?
District Administrator
District Staff
School Administrator
School Staff
Teachers
To change capabilities, see page 165.
159Accelerated MathSoftware Manual

P R E F E R E N C E S
Changing Classroom Preferences
. . .
. .
4. Choose the Printing preference settings:
• Check the Enable duplex printing box if you want to print assignments double-sided.
• Check the second box if you want to preview the assignment before you print it.
• Leave the third box checked if you want to embed fonts in assignments, or remove the check mark if you need to print assignments more quickly.
• If you want to go back to the original settings, click Default. This will remove the check marks from the first two preferences and check the third preference.
5. Click Save.
How to Change the Renaissance Home Connect Preference ( I f Avai lab le)
If Renaissance Home Connect is available for your school (see page 102), this preference is also available. (You will not see the preference if Renaissance Home Connect is not available.) The Renaissance Home Connect preference sets whether students can score their own assisted-response practices and exercises within Renaissance Home Connect. Follow these steps to change the preference:
1. Click Preferences in the list of Accelerated Math tasks on the Home page.
2. Select the school and class if necessary from the drop-down lists on the page.
3. Click Renaissance Home Connect.
4. If the box is checked A, students can score their own practices and exercises within Renaissance Home Connect. To do this, they refer to the printed copy of their assignments and click or type their answers within Renaissance Home
If you choose to use duplex printing on WIndows
computers, you must set up your printer to print duplex by default in the printer properties.
Who Can Do This?
District Administrator
District Staff
School Administrator
School Staff
Teachers
To change capabilities, see page 165.
160Accelerated MathSoftware Manual
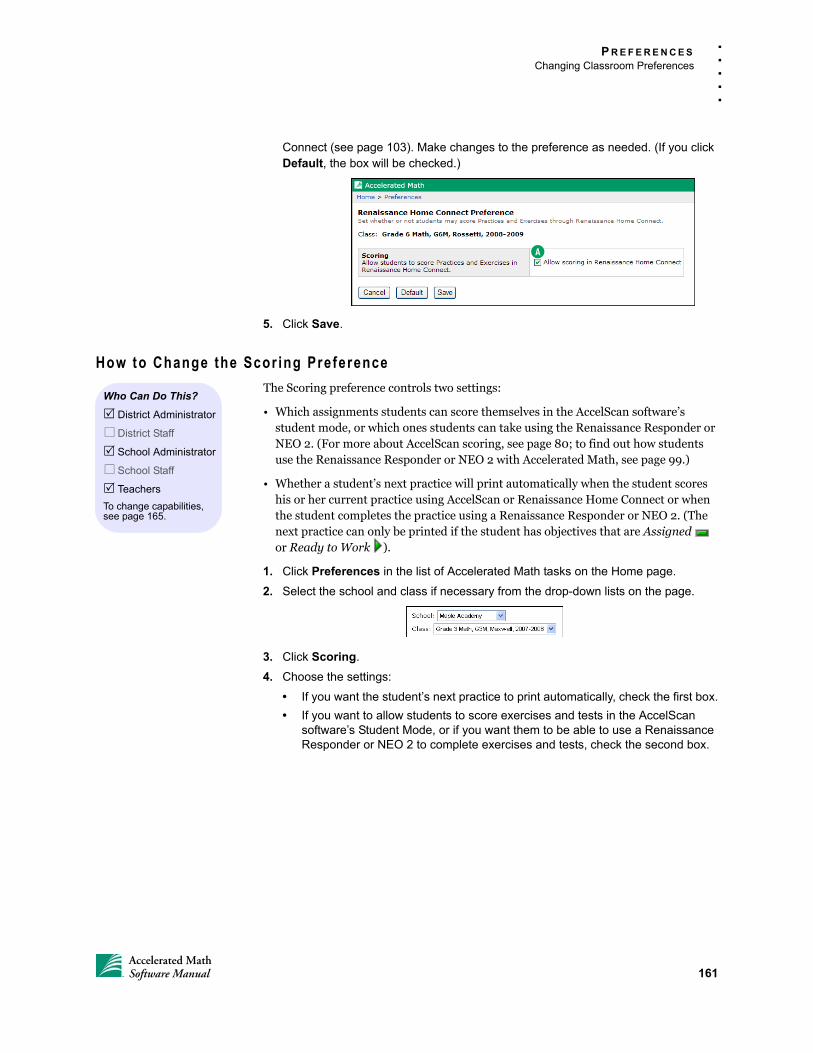
P R E F E R E N C E S
Changing Classroom Preferences
. . .
. .
Connect (see page 103). Make changes to the preference as needed. (If you click Default, the box will be checked.)
5. Click Save.
How to Change the Scor ing Preference
The Scoring preference controls two settings:
• Which assignments students can score themselves in the AccelScan software’s student mode, or which ones students can take using the Renaissance Responder or NEO 2. (For more about AccelScan scoring, see page 80; to find out how students use the Renaissance Responder or NEO 2 with Accelerated Math, see page 99.)
• Whether a student’s next practice will print automatically when the student scores his or her current practice using AccelScan or Renaissance Home Connect or when the student completes the practice using a Renaissance Responder or NEO 2. (The next practice can only be printed if the student has objectives that are Assigned or Ready to Work ).
1. Click Preferences in the list of Accelerated Math tasks on the Home page.
2. Select the school and class if necessary from the drop-down lists on the page.
3. Click Scoring.
4. Choose the settings:
• If you want the student’s next practice to print automatically, check the first box.
• If you want to allow students to score exercises and tests in the AccelScan software’s Student Mode, or if you want them to be able to use a Renaissance Responder or NEO 2 to complete exercises and tests, check the second box.
A
Who Can Do This?
District Administrator
District Staff
School Administrator
School Staff
Teachers
To change capabilities, see page 165.
161Accelerated MathSoftware Manual
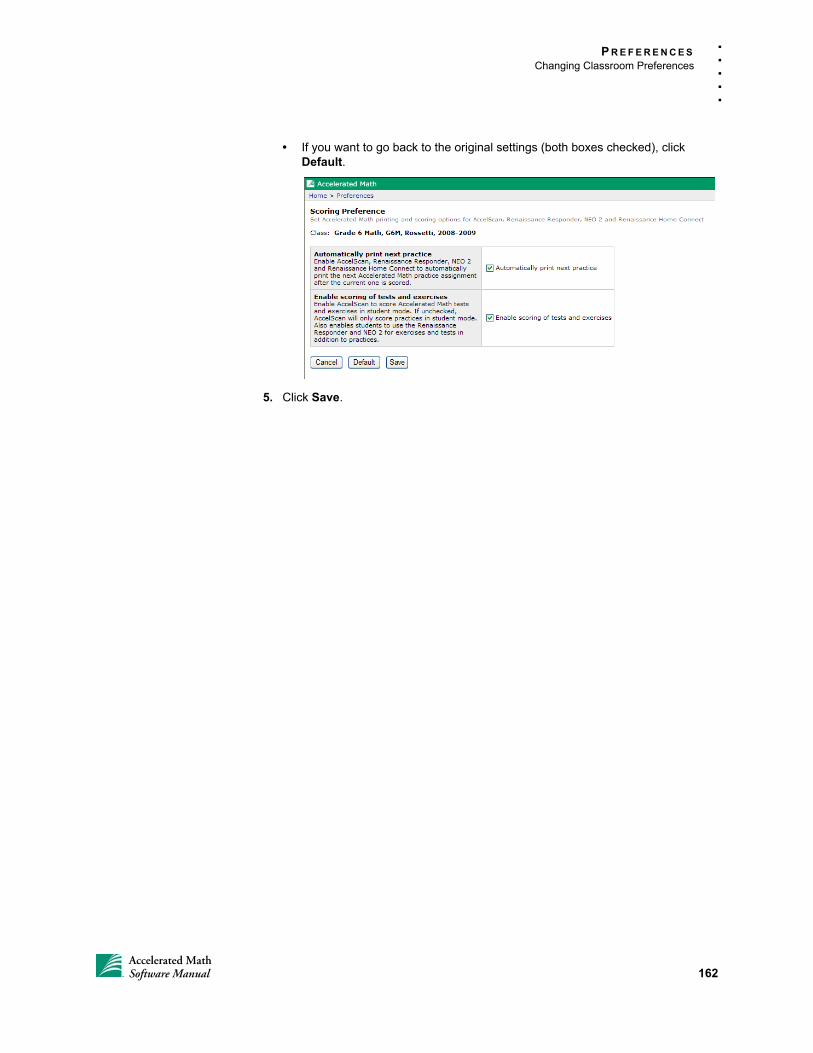
P R E F E R E N C E S
Changing Classroom Preferences
. . .
. .
• If you want to go back to the original settings (both boxes checked), click Default.
5. Click Save.
162Accelerated MathSoftware Manual
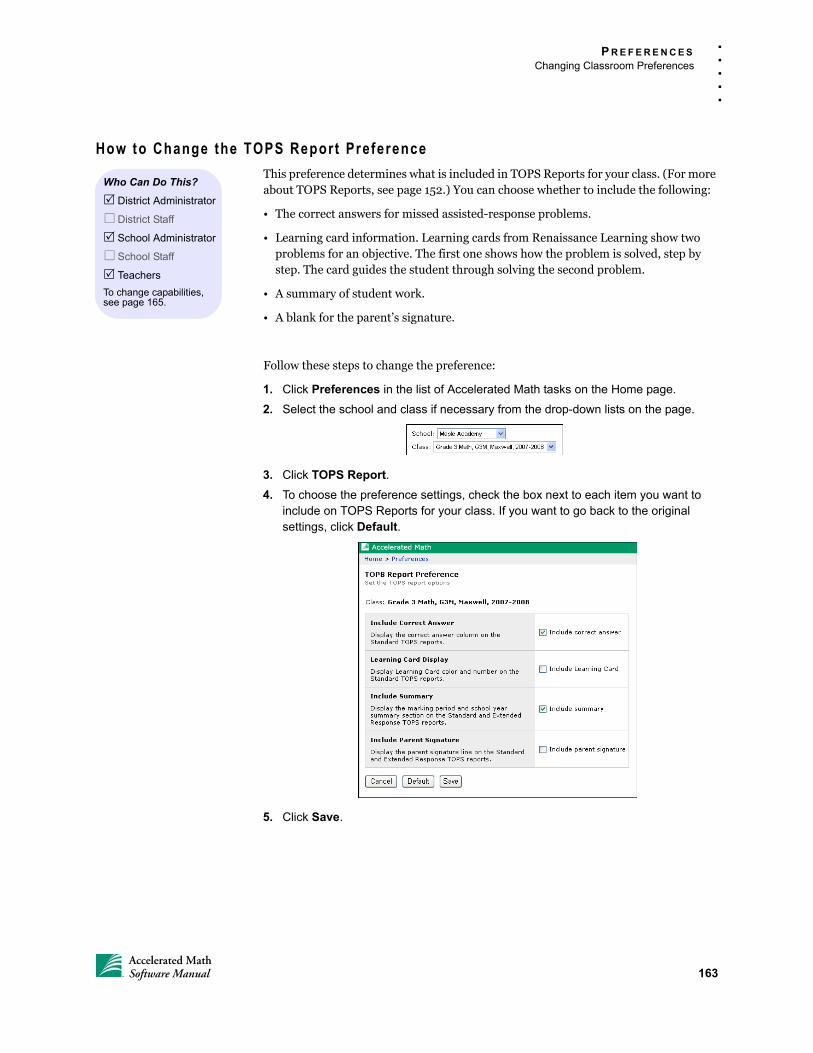
P R E F E R E N C E S
Changing Classroom Preferences
. . .
. .
How to Change the TOPS Report Preference
This preference determines what is included in TOPS Reports for your class. (For more about TOPS Reports, see page 152.) You can choose whether to include the following:
• The correct answers for missed assisted-response problems.
• Learning card information. Learning cards from Renaissance Learning show two problems for an objective. The first one shows how the problem is solved, step by step. The card guides the student through solving the second problem.
• A summary of student work.
• A blank for the parent’s signature.
Follow these steps to change the preference:
1. Click Preferences in the list of Accelerated Math tasks on the Home page.
2. Select the school and class if necessary from the drop-down lists on the page.
3. Click TOPS Report.
4. To choose the preference settings, check the box next to each item you want to include on TOPS Reports for your class. If you want to go back to the original settings, click Default.
5. Click Save.
Who Can Do This?
District Administrator
District Staff
School Administrator
School Staff
Teachers
To change capabilities, see page 165.
163Accelerated MathSoftware Manual
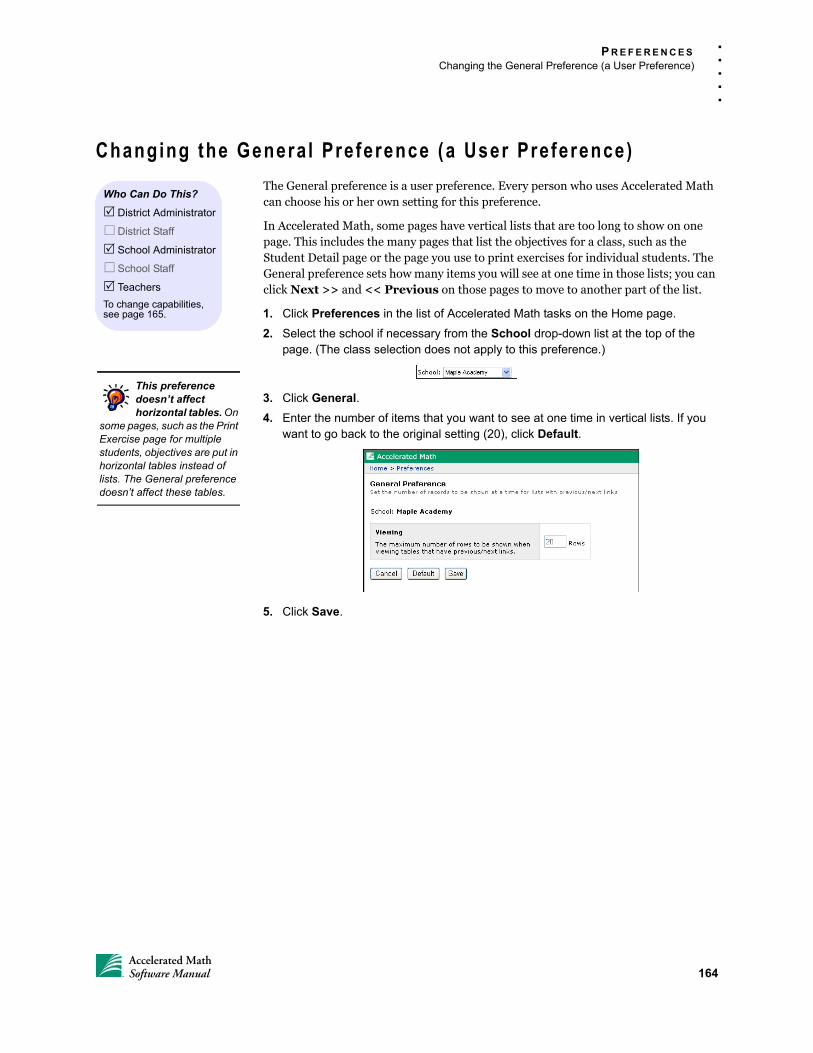
P R E F E R E N C E S
Changing the General Preference (a User Preference)
. . .
. .
Changing the Genera l Preference (a User Preference)
The General preference is a user preference. Every person who uses Accelerated Math can choose his or her own setting for this preference.
In Accelerated Math, some pages have vertical lists that are too long to show on one page. This includes the many pages that list the objectives for a class, such as the Student Detail page or the page you use to print exercises for individual students. The General preference sets how many items you will see at one time in those lists; you can click Next >> and << Previous on those pages to move to another part of the list.
1. Click Preferences in the list of Accelerated Math tasks on the Home page.
2. Select the school if necessary from the School drop-down list at the top of the page. (The class selection does not apply to this preference.)
3. Click General.
4. Enter the number of items that you want to see at one time in vertical lists. If you want to go back to the original setting (20), click Default.
5. Click Save.
Who Can Do This?
District Administrator
District Staff
School Administrator
School Staff
Teachers
To change capabilities, see page 165.
This preference doesn’t affect horizontal tables. On
some pages, such as the Print Exercise page for multiple students, objectives are put in horizontal tables instead of lists. The General preference doesn’t affect these tables.
164Accelerated MathSoftware Manual
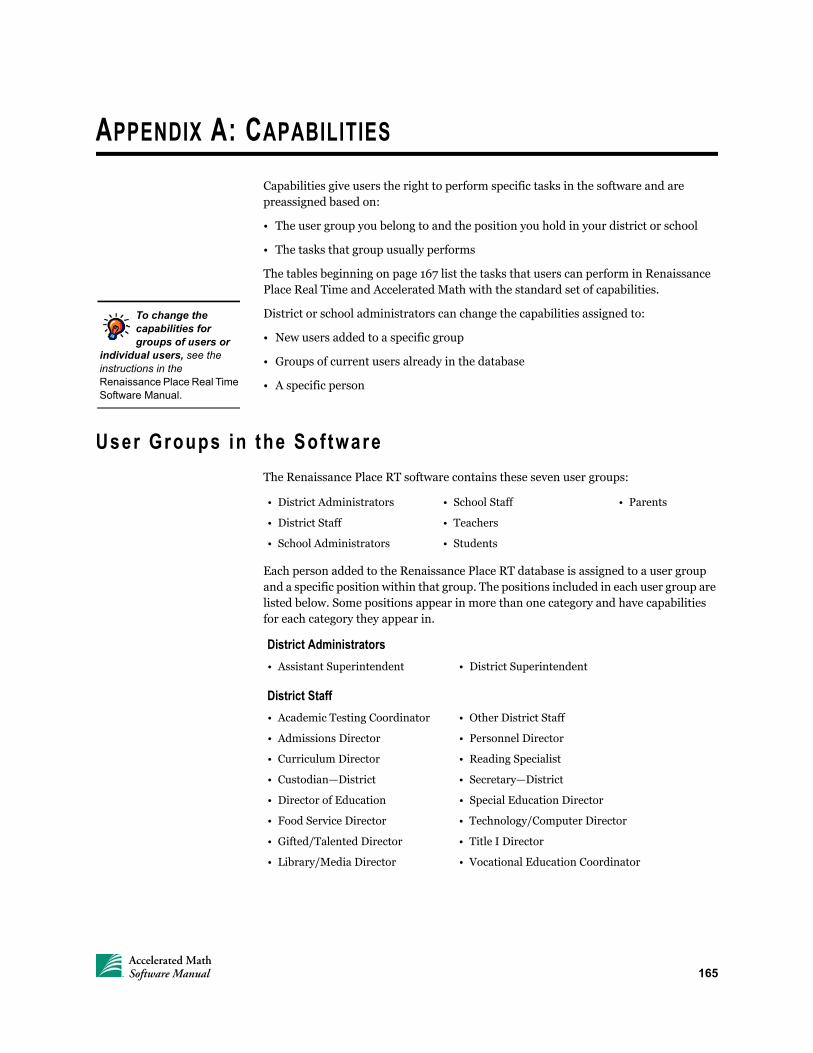
APPENDIX A: CAPABILITIES
Capabilities give users the right to perform specific tasks in the software and are preassigned based on:
• The user group you belong to and the position you hold in your district or school
• The tasks that group usually performs
The tables beginning on page 167 list the tasks that users can perform in Renaissance Place Real Time and Accelerated Math with the standard set of capabilities.
District or school administrators can change the capabilities assigned to:
• New users added to a specific group
• Groups of current users already in the database
• A specific person
User Groups in the Sof tware
The Renaissance Place RT software contains these seven user groups:
Each person added to the Renaissance Place RT database is assigned to a user group and a specific position within that group. The positions included in each user group are listed below. Some positions appear in more than one category and have capabilities for each category they appear in.
• District Administrators • School Staff • Parents
• District Staff • Teachers
• School Administrators • Students
District Administrators
• Assistant Superintendent • District Superintendent
District Staff
• Academic Testing Coordinator • Other District Staff
• Admissions Director • Personnel Director
• Curriculum Director • Reading Specialist
• Custodian—District • Secretary—District
• Director of Education • Special Education Director
• Food Service Director • Technology/Computer Director
• Gifted/Talented Director • Title I Director
• Library/Media Director • Vocational Education Coordinator
To change the capabilities for groups of users or
individual users, see the instructions in the Renaissance Place Real Time Software Manual.
165Accelerated MathSoftware Manual
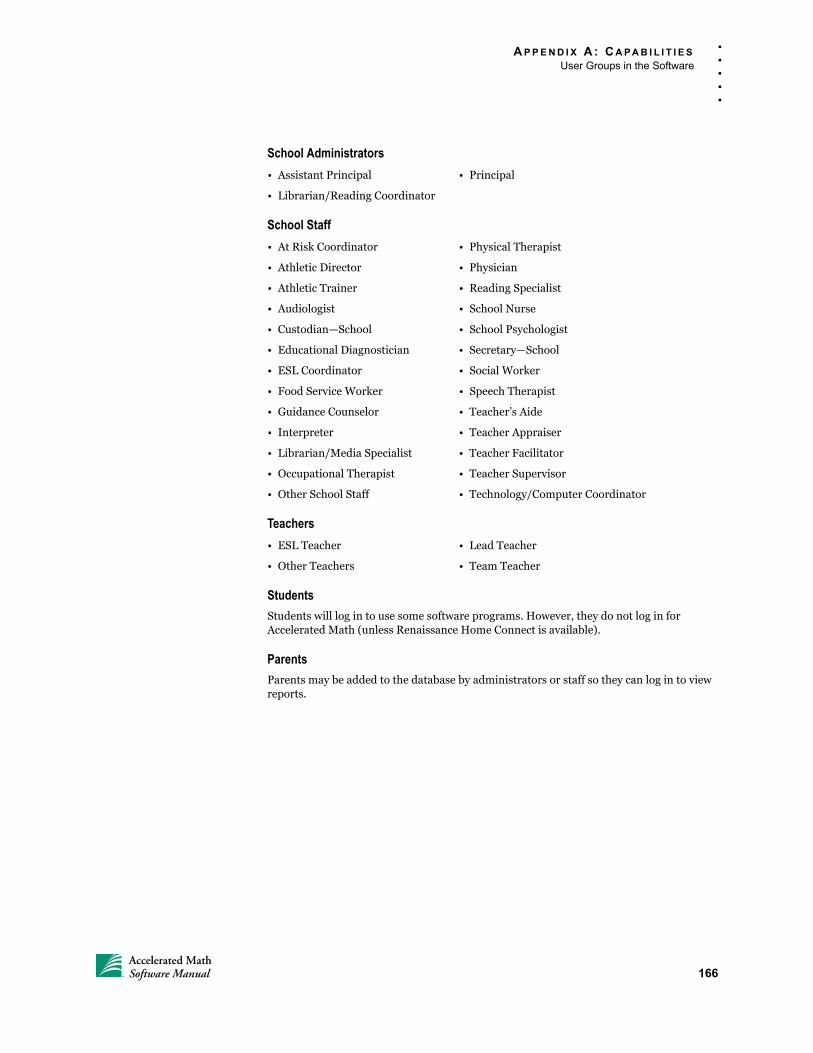
A P P E N D I X A : C A P A B I L I T I E S
User Groups in the Software
. . .
. .
School Administrators
• Assistant Principal • Principal
• Librarian/Reading Coordinator
School Staff
• At Risk Coordinator • Physical Therapist
• Athletic Director • Physician
• Athletic Trainer • Reading Specialist
• Audiologist • School Nurse
• Custodian—School • School Psychologist
• Educational Diagnostician • Secretary—School
• ESL Coordinator • Social Worker
• Food Service Worker • Speech Therapist
• Guidance Counselor • Teacher’s Aide
• Interpreter • Teacher Appraiser
• Librarian/Media Specialist • Teacher Facilitator
• Occupational Therapist • Teacher Supervisor
• Other School Staff • Technology/Computer Coordinator
Teachers
• ESL Teacher • Lead Teacher
• Other Teachers • Team Teacher
Students
Students will log in to use some software programs. However, they do not log in for Accelerated Math (unless Renaissance Home Connect is available).
Parents
Parents may be added to the database by administrators or staff so they can log in to view reports.
166Accelerated MathSoftware Manual
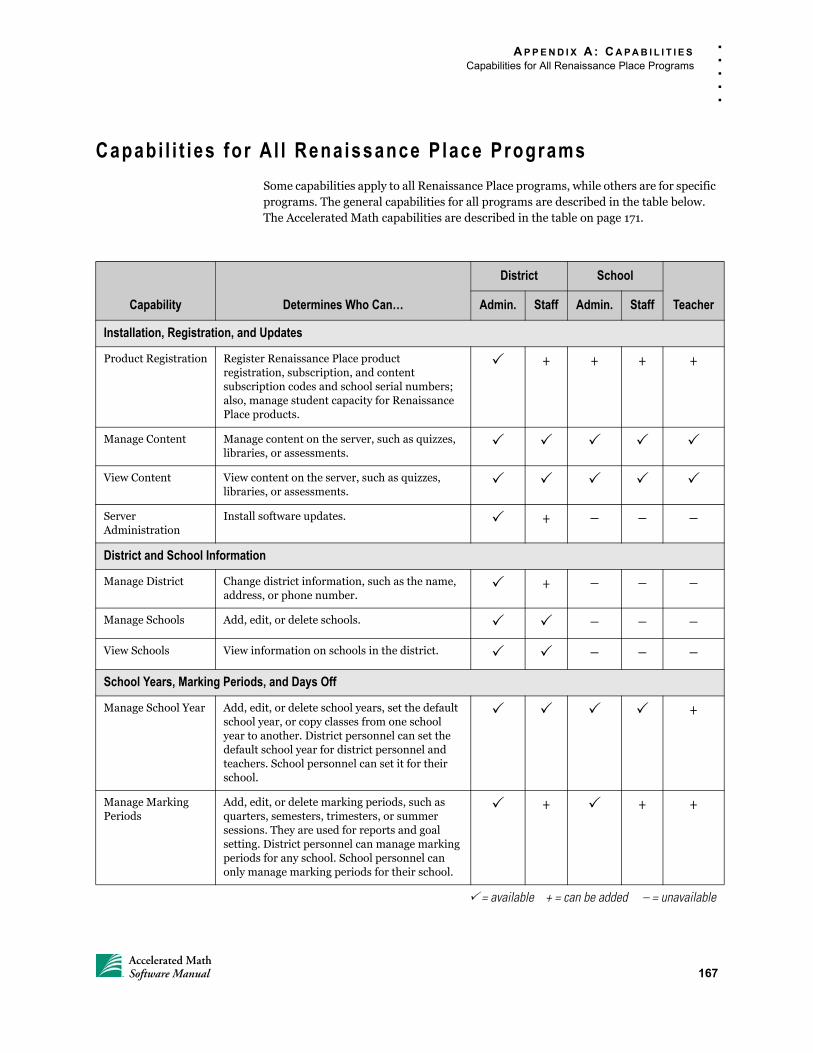
A P P E N D I X A : C A P A B I L I T I E S
Capabilities for All Renaissance Place Programs
. . .
. .
Capabi l i t ies for A l l Renaissance P lace Programs
Some capabilities apply to all Renaissance Place programs, while others are for specific programs. The general capabilities for all programs are described in the table below. The Accelerated Math capabilities are described in the table on page 171.
Capability Determines Who Can…
District School
TeacherAdmin. Staff Admin. Staff
Installation, Registration, and Updates
Product Registration Register Renaissance Place product registration, subscription, and content subscription codes and school serial numbers; also, manage student capacity for Renaissance Place products.
+ + + +
Manage Content Manage content on the server, such as quizzes, libraries, or assessments.
View Content View content on the server, such as quizzes, libraries, or assessments.
Server Administration
Install software updates. + – – –
District and School Information
Manage District Change district information, such as the name, address, or phone number.
+ – – –
Manage Schools Add, edit, or delete schools. – – –
View Schools View information on schools in the district. – – –
School Years, Marking Periods, and Days Off
Manage School Year Add, edit, or delete school years, set the default school year, or copy classes from one school year to another. District personnel can set the default school year for district personnel and teachers. School personnel can set it for their school.
+
Manage Marking Periods
Add, edit, or delete marking periods, such as quarters, semesters, trimesters, or summer sessions. They are used for reports and goal setting. District personnel can manage marking periods for any school. School personnel can only manage marking periods for their school.
+ + +
= available + = can be added – = unavailable
167Accelerated MathSoftware Manual
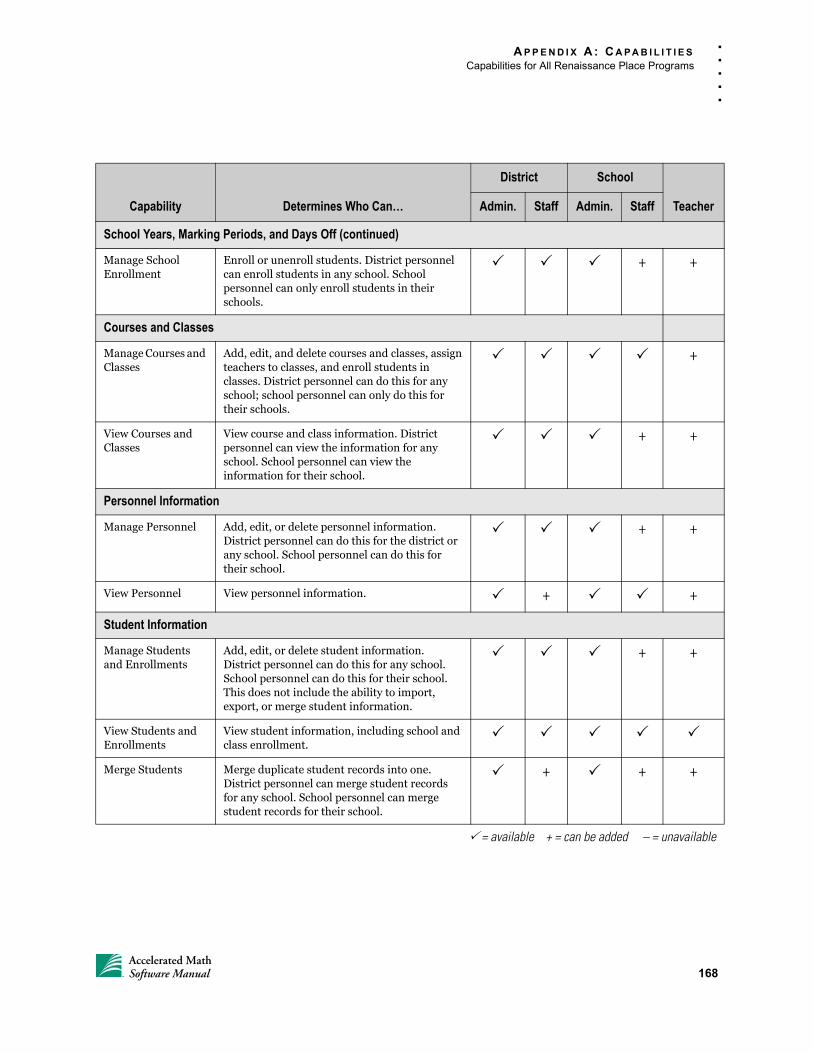
A P P E N D I X A : C A P A B I L I T I E S
Capabilities for All Renaissance Place Programs
. . .
. .
Capability Determines Who Can…
District School
TeacherAdmin. Staff Admin. Staff
School Years, Marking Periods, and Days Off (continued)
Manage School Enrollment
Enroll or unenroll students. District personnel can enroll students in any school. School personnel can only enroll students in their schools.
+ +
Courses and Classes
Manage Courses and Classes
Add, edit, and delete courses and classes, assignteachers to classes, and enroll students in classes. District personnel can do this for any school; school personnel can only do this for their schools.
+
View Courses and Classes
View course and class information. District personnel can view the information for any school. School personnel can view the information for their school.
+ +
Personnel Information
Manage Personnel Add, edit, or delete personnel information. District personnel can do this for the district or any school. School personnel can do this for their school.
+ +
View Personnel View personnel information. + +
Student Information
Manage Students and Enrollments
Add, edit, or delete student information. District personnel can do this for any school. School personnel can do this for their school. This does not include the ability to import, export, or merge student information.
+ +
View Students and Enrollments
View student information, including school and class enrollment.
Merge Students Merge duplicate student records into one. District personnel can merge student records for any school. School personnel can merge student records for their school.
+ + +
= available + = can be added – = unavailable
168Accelerated MathSoftware Manual
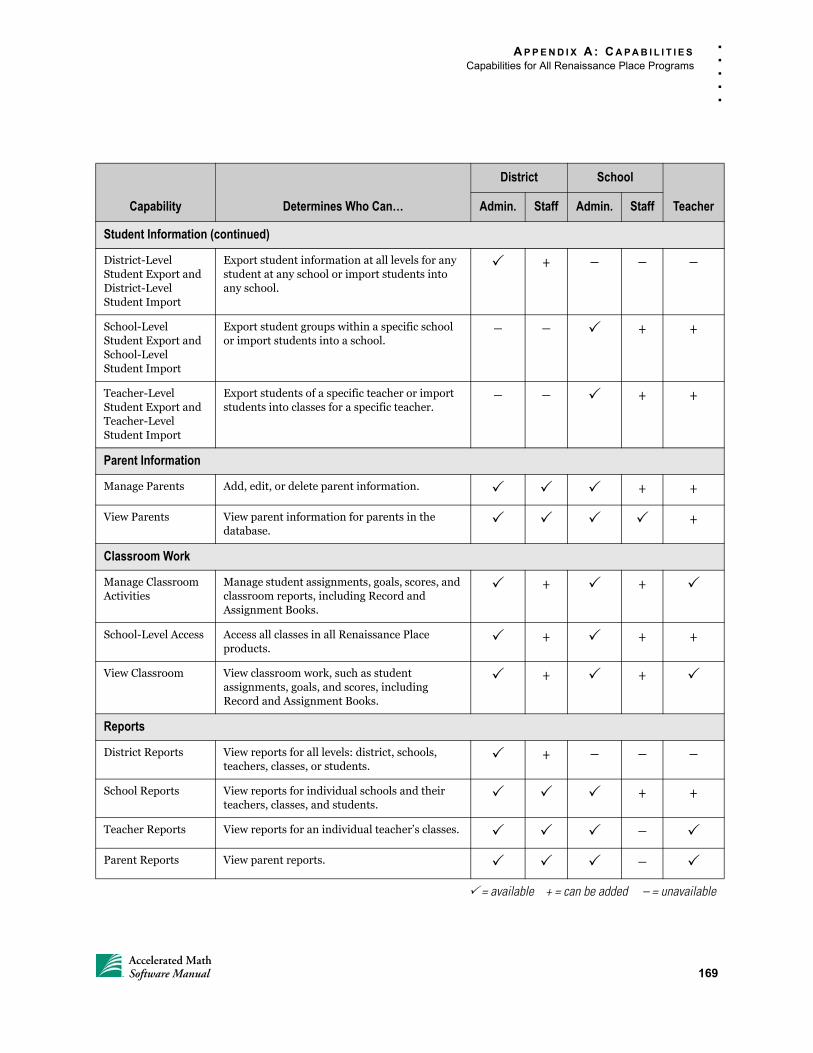
A P P E N D I X A : C A P A B I L I T I E S
Capabilities for All Renaissance Place Programs
. . .
. .
Capability Determines Who Can…
District School
TeacherAdmin. Staff Admin. Staff
Student Information (continued)
District-Level Student Export and District-Level Student Import
Export student information at all levels for any student at any school or import students into any school.
+ – – –
School-Level Student Export and School-Level Student Import
Export student groups within a specific school or import students into a school.
– – + +
Teacher-Level Student Export and Teacher-Level Student Import
Export students of a specific teacher or import students into classes for a specific teacher.
– – + +
Parent Information
Manage Parents Add, edit, or delete parent information. + +
View Parents View parent information for parents in the database.
+
Classroom Work
Manage Classroom Activities
Manage student assignments, goals, scores, and classroom reports, including Record and Assignment Books.
+ +
School-Level Access Access all classes in all Renaissance Place products.
+ + +
View Classroom View classroom work, such as student assignments, goals, and scores, including Record and Assignment Books.
+ +
Reports
District Reports View reports for all levels: district, schools, teachers, classes, or students.
+ – – –
School Reports View reports for individual schools and their teachers, classes, and students.
+ +
Teacher Reports View reports for an individual teacher’s classes. –
Parent Reports View parent reports. –
= available + = can be added – = unavailable
169Accelerated MathSoftware Manual
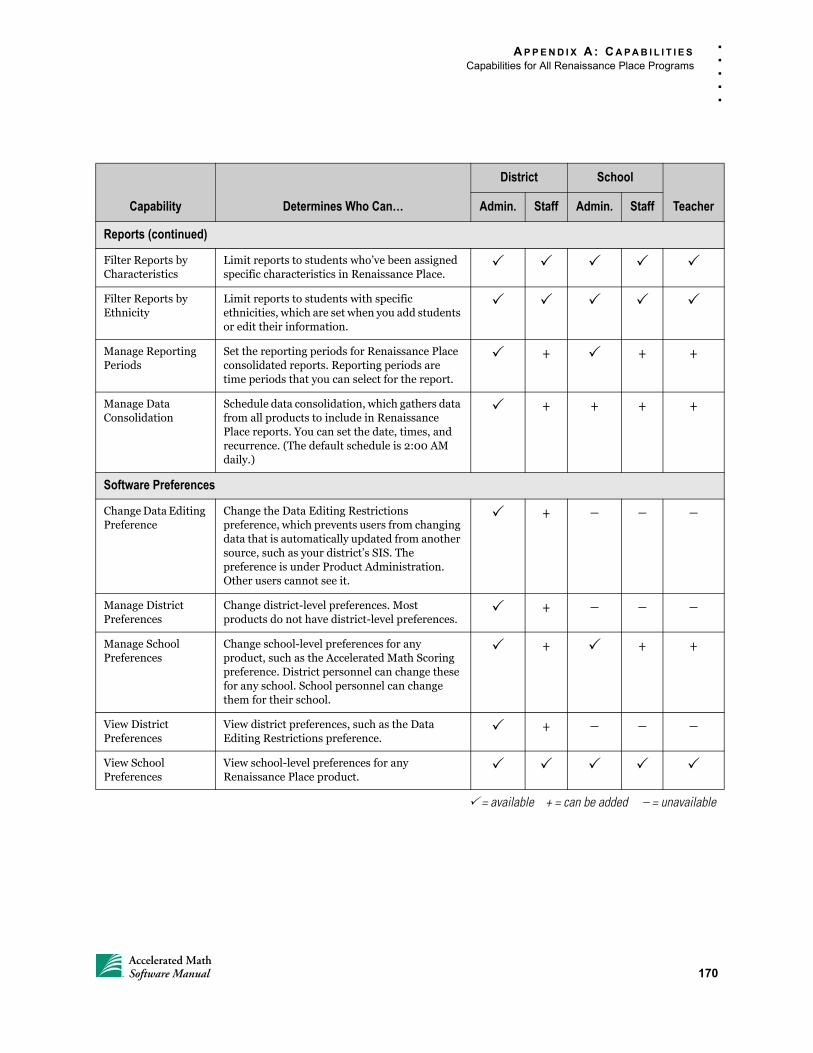
A P P E N D I X A : C A P A B I L I T I E S
Capabilities for All Renaissance Place Programs
. . .
. .
Capability Determines Who Can…
District School
TeacherAdmin. Staff Admin. Staff
Reports (continued)
Filter Reports by Characteristics
Limit reports to students who’ve been assigned specific characteristics in Renaissance Place.
Filter Reports by Ethnicity
Limit reports to students with specific ethnicities, which are set when you add students or edit their information.
Manage ReportingPeriods
Set the reporting periods for Renaissance Place consolidated reports. Reporting periods are time periods that you can select for the report.
+ + +
Manage Data Consolidation
Schedule data consolidation, which gathers data from all products to include in Renaissance Place reports. You can set the date, times, and recurrence. (The default schedule is 2:00 AM daily.)
+ + + +
Software Preferences
Change Data Editing Preference
Change the Data Editing Restrictions preference, which prevents users from changing data that is automatically updated from another source, such as your district’s SIS. The preference is under Product Administration. Other users cannot see it.
+ – – –
Manage District Preferences
Change district-level preferences. Most products do not have district-level preferences.
+ – – –
Manage School Preferences
Change school-level preferences for any product, such as the Accelerated Math Scoring preference. District personnel can change these for any school. School personnel can change them for their school.
+ + +
View District Preferences
View district preferences, such as the Data Editing Restrictions preference.
+ – – –
View School Preferences
View school-level preferences for any Renaissance Place product.
= available + = can be added – = unavailable
170Accelerated MathSoftware Manual
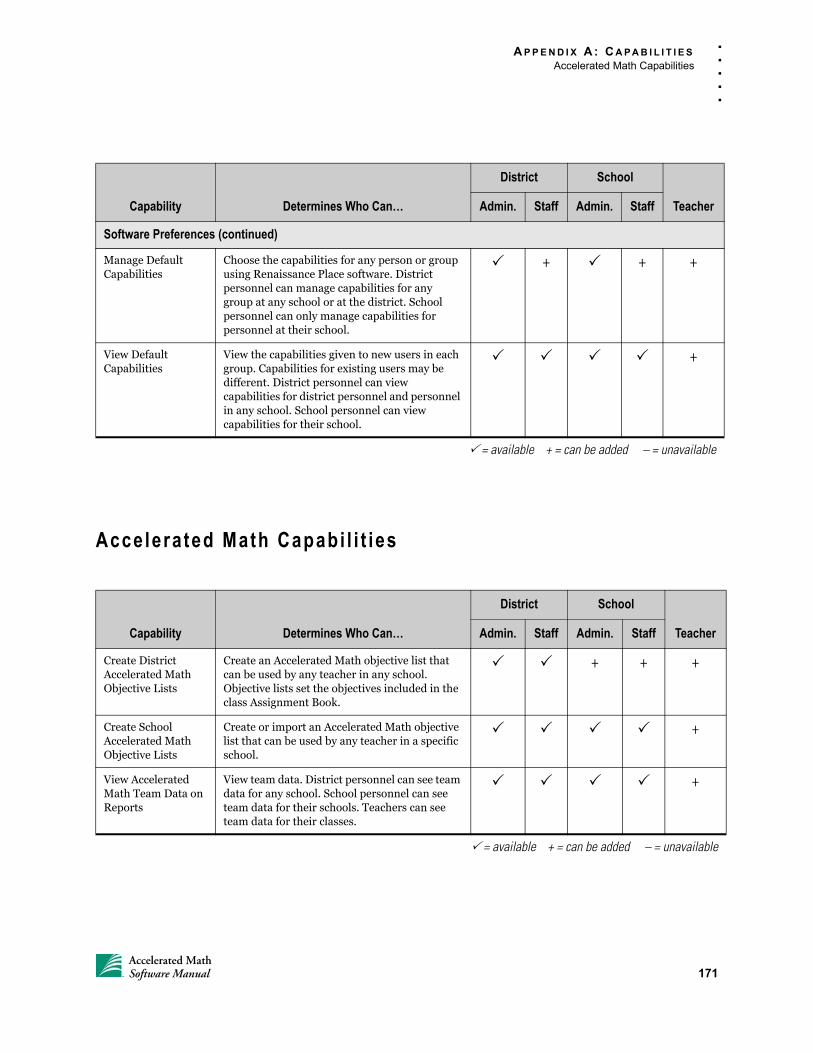
A P P E N D I X A : C A P A B I L I T I E S
Accelerated Math Capabilities
. . .
. .
Accelera ted Math Capabi l i t ies
Capability Determines Who Can…
District School
TeacherAdmin. Staff Admin. Staff
Software Preferences (continued)
Manage Default Capabilities
Choose the capabilities for any person or group using Renaissance Place software. District personnel can manage capabilities for any group at any school or at the district. School personnel can only manage capabilities for personnel at their school.
+ + +
View Default Capabilities
View the capabilities given to new users in each group. Capabilities for existing users may be different. District personnel can view capabilities for district personnel and personnel in any school. School personnel can view capabilities for their school.
+
Capability Determines Who Can…
District School
TeacherAdmin. Staff Admin. Staff
Create District Accelerated Math Objective Lists
Create an Accelerated Math objective list that can be used by any teacher in any school. Objective lists set the objectives included in the class Assignment Book.
+ + +
Create School Accelerated Math Objective Lists
Create or import an Accelerated Math objective list that can be used by any teacher in a specific school.
+
View Accelerated Math Team Data on Reports
View team data. District personnel can see team data for any school. School personnel can see team data for their schools. Teachers can see team data for their classes.
+
= available + = can be added – = unavailable
= available + = can be added – = unavailable
171Accelerated MathSoftware Manual
INDEX
Numer ics2Know! classroom response system, 18
AAccelScan
installing software, 11scoring assignments with, 80setup, 10software, 3software updates, 17
Acrobat Reader, 140Adding libraries for a school, 27Adding objectives to an objective list, 43Adding team sets, 129Adding teams to a set, 130Adobe Reader, 140Allow background scanning, 13, 15, 16Answer placement on assignments, 157Assigned, 58Assigning objectives to students, 55Assigning students to teams, 131Assignment Book, 53
Assigned, 58assigning objectives to students, 55copying class settings, 95deleting assignments, 78Diagnosing, 58Hold, 58Intervene, 58Mastered, 58mastering objectives, 53printing assignments, 65printing reports, 93printing TOPS Reports, 94putting objectives on hold, 84Ready to Test, 58Ready to Work, 58reprinting assignments, 75rescoring assignments, 83resetting objectives, 86Reviewed, 58scoring assignments, 80
student details, 91symbols, 58Testing, 58transferring student data to another class, 57unassigning objectives, 89viewing, 54Working, 58
Assignmentsanswer placement, 157appearance of, 157completing in Renaissance Home Connect, 103completing with NEO 2, 99completing with Renaissance Responders, 99deleting, 78diagnostic test, 65exercise, 65extended response, 117font size, 157layout, 157outstanding, 91practice, 65printing, 65reprinting in Assignment Book, 75rescoring extended response, 121rescoring in Assignment Book, 83scoring in the Assignment Book, 80test, 65text size, 157types, 65unscored, 91viewing scored, 92
BBack, 9Background scanning, 13, 15, 16
CCapabilities, 165
Accelerated Math, 171Renaissance Place, 167user groups, 165
172Accelerated MathSoftware Manual
. . . . .
I N D E X
Capacity, 75Certificate Report, 145Changing mastery criteria for objectives, 62Changing students on a team, 133Changing the order of objectives in lists, 48Changing your password, 7Characters printing incorrectly on assignments, 159Chat support, 4Check software requirements, 6Checking for updates to AccelScan software, 17Choosing an objective list for a class, 40Choosing the school to work in, 9Class Marking Periods preference, 155Class Report, 145Classes
choosing an objective list for, 40copying settings, 95goals, 127preferences, 155transferring student data, 57viewing Assignment Book, 54viewing extended response assignments, 118
Classroom preferences, 155Class Marking Periods, 155Extended Response, 156Page Layout, 157Practice, 158Printing, 159Renaissance Home Connect, 160Scoring, 161TOPS Report, 163
Closing the software, 9Connecting AccelScan, 10Copying class settings, 95Copying classroom preference settings, 95Copying objective lists, 42Creating objective lists, 30Customizing reports, 141
DDeleting assignments, 78Deleting extended response assignments, 126Deleting objective lists, 52Deleting objectives from objective lists, 43Deleting team sets, 137Deleting teams from sets, 136Diagnosing, 58
Diagnostic export, 152Diagnostic Report, 145Diagnostic test, 65
printing, 73District administrators, 165District staff, 165Double-sided printing, 159Downloading Adobe Reader, 140Duplex printing, 159
EEditing objective lists, 51Editing team names, 135Editing team set names and owners, 134Embedding fonts in assignments, 159Enable server ping, 12, 16Ending a Renaissance Responder session, 101Engaged time, 152Enrollment Report, 145Examples of problems, 88
sample problems, 88worked examples, 88
Exercise, 65printing, 69
Exiting the software, 9Export, diagnostic, 152Exporting objective lists, 39Extended response assignments, 117, 123
deleting, 126Diagnostic Report, 146libraries, 24preference for passing percentage, 156printing assignments, 119problems, viewing, 122reprinting assignments, 119rescoring assignments, 121scoring assignments, 121Status Report, 146Student Record Report, 146transferring, 122viewing assignments for class, 118
FFonts
embedding in assignments, 159size on assignments, 157
173Accelerated MathSoftware Manual
. . . . .
I N D E X
GGeneral preference, 164Glossary, 97, 114
in Renaissance Home Connect, 114in the Assignment Book, 97
Goal History Report, 146Goals, 127
objectives mastered, 128setting, 127test percent correct, 128
Group Standards Mastery Report, 147
HHelp, 4Hold, 58, 84Home Connect, 102
completing practice assignments in, 103parent access vs. Renaissance Home Connect, 116preference, 160viewing Accelerated Math progress in, 107
How Accelerated Math works, 1How to Read a Math Implementation Report, 3
IImporting objective lists, 37Installing Accelerated Math, 2Installing AccelScan software, 11Installing libraries, 24Installing Renaissance Responder Client software, 18Intervene, 58, 59
KKeyboard scoring, 82
LLearning Card Reference Report, 147Libraries
adding for a school, 27defined, 24extended response, 24installing, 24
printing Library Guide and Scope and Sequence, 26removing for a school, 28standard, 24viewing information, 25
Library Guide, 26Library Report, 147Live Chat Support, 4Logging out, 9
MManual for Accelerated Math, 3Manual scoring, 82Marking Period Progress Report, 147Mastered, 58Mastering objectives, 53Mastery Chart, 148Mastery criteria, 61
changing, 62practice, 61review, 61test, 61
Math glossary, 97, 114in Renaissance Home Connect, 114in the Assignment Book, 97
My lists (private lists), 29
NNavigation bar, 9NEO 2, 18
ending a session, 101how to enter answers to assignments, 100starting a session, 99using with Accelerated Math, 99
OObjective lists, 29
adding objectives to, 43changing objective order, 48choosing for a class, 40copying, 42creating, 30deleting, 52deleting objectives from, 43
174Accelerated MathSoftware Manual

. . . . .
I N D E X
editing, 51exporting, 39importing, 37marking objectives for certain standards, 50my lists (private), 29permissions, 29removing objectives from, 43shared, 29viewing, 38
Objectives, 29assigning to students, 55changing mastery criteria, 62changing order in list, 48defined, 29exporting lists, 39goals, 128how students master, 53importing lists, 37marking for standards, 50mastering, 53putting on hold, 84resetting, 86unassigning, 89viewing lists, 38viewing sample problems, 88viewing worked examples, 88
Order of objectives, changing, 48Outstanding assignments, 91
PPage Layout preference, 157Parent Report, 148
how parents can print it, 153Parents, 166
giving access to reports, 153parent access vs. Renaissance Home Connect, 116printing reports, 153
Password, changing, 7Permissions for objective lists, 29Plug-in for printing, 66Practice, 65
printing, 68Practice mastery criteria, 61Practice preference, 158Practice size (minutes), 158Preferences, 155
Class Marking Periods, 155
Classroom, 155Extended Response, 156General, 164Page Layout, 157Practice, 158Printing, 159Renaissance Home Connect, 160Scoring, 161TOPS Report, 163
Previewing assignments before printing, 159Previous page, 9Print plug-in, 66Printing assignments, 65
diagnostic tests, 73double-sided, 159exercises, 69extended response assignments, 119practices, 68tests, 71
Printing Library Guides, 26Printing preference, 159Printing reports, 123, 140
from the Extended Response page, 123from the Teams and Goals page, 137in the Assignment Book, 93parents, 153
Printing Scope and Sequence, 26Printing TOPS Reports in the Assignment Book, 94Programs that come with Accelerated Math, 2
RRanking Report, 148Ready to Test, 58Ready to Work, 58Removing libraries for a school, 28Removing objectives from objective lists, 43Renaissance Home Connect, 102
completing practice assignments in, 103parent access vs. Renaissance Home Connect, 116preference, 160viewing Accelerated Math progress in, 107
Renaissance Placecapabilities, 167management system, 2print plug-in, 66reports, 139software manual, 3
175Accelerated MathSoftware Manual
. . . . .
I N D E X
Renaissance Responder, 18ending a session, 101how to enter answers to assignments, 100installing software, 18starting a session, 99using with Accelerated Math, 99
Renaissance Responder Client Software, installing, 18Reordering objectives, 48Reporting parameter groups, 144Reports, 139, 140
Certificate, 145Class, 145custom options, 145customizing, 141descriptions, 145Diagnostic, 145Enrollment, 145Extended Response Diagnostic, 146Extended Response Status, 146Extended Response Student Record, 146for parents, 153Goal History, 146Group Standards Mastery, 147how parents print, 153Learning Card Reference, 147Library, 147Marking Period Progress, 147Mastery Chart, 148Parent, 148printing, 140printing from Extended Response page, 123printing from Teams and Goals page, 137printing in Assignment Book, 93Ranking, 148reporting parameter groups, 144Schoolwide Summary, 149Status of the Class, 149Student Detail, 149Student Grouping, 150Student Information, 150Student Record, 150Student Standards Mastery, 151Teacher, 151Team Standings Chart, 151Team Status, 151TOPS, 152
Reprinting assignments in the Assignment Book, 75Reprinting extended response assignments, 119Requirements, 6
Rescoring assignments in the Assignment Book, 83Rescoring extended response assignments, 121Resetting objectives, 86Resources for Accelerated Math, 4Responder, 18
ending a session, 101how to enter answers to assignments, 100installing software, 18starting a session, 99using with Accelerated Math, 99
Responder software, installing, 18Review mastery criteria, 61Reviewed, 58Roles, switching, 9
SSample problems, 88Scanner setup, 10Scanner software, installing, 11School administrators, 166School staff, 166School, choosing, 9Schoolwide Summary Report, 149Scope and Sequence, 26Scored assignments, viewing, 92Scoring assignments in the Assignment Book, 80
using AccelScan, 80using manual keyboard entry, 82using Renaissance Home Connect, 103using Responders or NEO 2, 100
Scoring extended response assignments, 121Scoring preference, 161Server ping, 12, 16Setting goals for students, 127Setting up Accelerated Math, 8Shared objective lists, 29Software manual for Accelerated Math, 3Software requirements, 6Software Tips for Accelerated Math, 3Standard libraries, 24Standards, marking related objectives, 50Starting a Renaissance Responder session, 99Status of the Class Report, 149Student capacity limit, 75Student Detail Report, 149Student details, 91Student Grouping Report, 150
176Accelerated MathSoftware Manual

. . . . .
I N D E X
Student Information Report, 150Student Record Report, 150
how parents can print it, 153Student Standards Mastery Report, 151Students, 166
assigning objectives to, 55deleting assignments, 78goals, 127limit for Accelerated Math assignments, 75transferring data from one class to another, 57unassigning objectives, 89
Switching roles, 9Symbols in Assignment Book, 58System requirements, 6
TTeacher Report, 151Teachers, 166Team sets, 128
adding, 129adding teams, 130assigning students to teams, 131changing team membership, 133deleting, 137deleting teams from, 136editing names and owners, 134editing team names, 135owners, 134
Team Standings Chart, 151Team Status Report, 151Teams, 127, 128
adding sets, 129adding to a set, 130assigning students to, 131changing student members, 133deleting, 136deleting sets, 137editing names, 135
Test, 65printing, 71
Test mastery criteria, 61Test percent correct goal, 128Testing, 58Timeout, 9, 12, 16TOPS Report, 94, 152
preference, 163printing from Extended Response page, 124printing in Assignment Book, 94
TOPS Report preference, 163Transferring extended response assignment data, 122Transferring student data from one class to another, 57
UUnassigning objectives in the Assignment Book, 89Unscored assignments, 91Updating AccelScan software, 17User groups, 165User manual for Accelerated Math, 3User preference, General, 164User type, 9
VViewing a class Assignment Book, 54Viewing extended response problems, 122Viewing library information, 25Viewing objective lists, 38Viewing sample problems for objectives, 88Viewing scored assignments, 92Viewing student details, 91Viewing student progress in Renaissance Home Connect,
107Viewing worked examples for objectives, 88
WWorked examples, 88Working, 58
177Accelerated MathSoftware Manual

178Accelerated MathSoftware Manual

2911 Peach Street, Wisconsin Rapids, WI 54494(800) 338-4204
Email: [email protected]: www.renlearn.com