accurate model partsamp.rokket.biz/docs/penknife_models_1940s.pdf · accurate model parts ... the...
TRANSCRIPT


Accurate Model Parts
Penknife Models From The 1940s Page 2
Contents
Part I Introduction
Part II 1/120th
Penknife Models
Part III 1/24th
Spitfire
Part IV Later Projects
Appendix The Halibag
Part I – Introduction
any model-makers begin building their first kits at a tender age. They may have been
encouraged by parents who recognise the benefits of model-making for a growing child. In
the process of following step by step instructions, the youngster can develop creativity and
organisational skills, together with an ability to operate in a methodical manner.
My own interest in model-making and aviation was handed to down to me from my father
John Martindale. I was taught from an early age how to build and paint models, partly so that I
would break my own planes rather than his. By the age of twelve or so, with scores of 1/72nd
planes
under my belt, I built a much larger model: a 1/24th
scale Airfix Spitfire Mk.1a.
A little later I was surprised to learn that my grandfather, J. H. Martindale, had also built his
own version of R. J. Mitchell‟s fighter in 1/24th
scale. When I was shown the hand-carved
scratchbuilt wooden model I could see it was a generational leap beyond my own plastic Spitfire. It
changed my whole perception of model-making, showing me there was a whole world beyond
simple kit-bashing.
The main focus of this article is the scratchbuilt wooden Spitfire built by my grandfather in
1944 / 1945. His 1/120th
scale hand-carved wooden aircraft models and a few of his other projects
are also included. Photos of my own Spitfire – an average model built using a very fine modern kit
– are included to act as a comparison between modern kits and the penknife models.
Part II – 1/120th
Penknife Models
y grandfather John Henry Martindale - known as Jack - grew up in the small coal mining
village of Waterhouses in County Durham in the north of England. He worked as a
draughtsman in the plant drawing office of Babcock & Wilcox, a boiler manufacturer in the town of
Renfrew in the west of Scotland.
When war was declared in 1939, men employed in reserved occupations were not allowed to
enlist because the loss of their skills would create shortages in industrial areas. Although Jack
applied for exception from reserved occupation, he was declined. As a result, he was not permitted
to join the armed forces and remained in his job in the drawing office. He was involved in the
drawings for shells and, it is believed, also the holders for the Hedgehog anti-submarine mortar.
Fitted to convoy escorts, the Hedgehog was an effective weapon against German U-boats.
Following his daytime shift, Jack served in the evening as an ambulance driver for the
Renfrew Air Raid Post. One of the main aerodromes during the formative years of civilian aviation
in Scotland, the airfield at Renfrew was used for military purposes during the war. The River Clyde,
which lies to the north of the town of Renfrew, was home to a multitude of shipyards and important
dockyard facilities in the Glasgow area. Naturally the Clyde yards were a target for German bombs,
as were the factories in the surrounding areas. The decimation of the town of Clydebank during the
Clydebank Blitz of March 1941 is well known. But other towns such as Renfrew and Greenock
were also badly damaged in this period. Jack drove an ambulance during all of the major raids in
M
M

Accurate Model Parts
Penknife Models From The 1940s Page 3
Above: A selection of RAF twin-engine aircraft built in 1/120th
scale. The Vickers Wellington (top) and the
Handley Page Hampden (right) were both used in RAF raids against Germany in the early war period. The
American built Lockheed Hudson (left) was used in the coastal reconnaissance and light bombing roles.
Below left: The Westland Lysander (top) - now minus its port undercarriage leg – was used for special
missions behind enemy lines. Biplane fighters were antiquated by the beginning of hostilities yet the
Gloster Gladiator (left) was used in various theatres in World War II. The Supermarine Spitfire (bottom
right) needs no introduction.
Below right: The four-engine Short Sunderland flying boat was used throughout the war, most notably
against U-boats in the Battle Of The Atlantic. During the early war years, the red, white and blue insignia
on the tail extended all the way upwards.
Renfrew, possibly the raids in neighbouring Paisley, and certainly the next day after the Clydebank
Blitz.
Thankfully the
Luftwaffe raids did
not occur every night,
allowing Jack quiet
periods when he
would have time to
spare. During such
periods he would take
the opportunity to
carve 1/120th
scale
wooden model
aircraft with his
penknife.

Accurate Model Parts
Penknife Models From The 1940s Page 4
Above: The Junkers 87 Stuka (top) dive bomber is readily identifiable
due to its inverted gull wings. The twin-engine Heinkel 111 (right) was
a mainstay of Luftwaffe bomber operations in the early war years. The
Messerschmitt Bf 109 (bottom) was a classic German fighter, produced
in very large numbers throughout the war. At the time these models
were carved, these were enemy aircraft.
In total, Jack built eleven 1/120th
scale model aircraft; these featured rotating metal propellers
and, in several cases, retractable undercarriage. The plexiglass on the canopies and turrets are all
natural wood. The British aircraft were finished in the brown and green camouflage colours
favoured by the RAF at the beginning of the war. Using a very steady hand, Jack was adept at
painting the roundels and tail insignia. Given the scale of the models – 1/120th
– the roundels are
rather small, as are models themselves.
Included in the set of eleven models are three Luftwaffe aircraft. Jack was beset by some
obvious difficulties when
building these models, mainly
related to a lack of research
material. These were enemy
aircraft after all. He was not
able to download plans or
photos, nor could he take
photographs at a Berlin air
show. Nowadays one would
have to be marooned on a
desert island to be restricted to
a similar lack of resources.
Of the eleven models, the
Messerschmitt Bf 109 is the
one model where visual
discrepancies can be
distinguished. This is almost
certainly related the dearth of
resources available to Jack
during his research stages.
In the modern modelling
scene, manufacturers such as
Xtracolor produce paints
specifically matched to
original paint colours.
Modellers can use German
RLM70 or RAF Dark Green (BS641) direct from the tin without needing to mix any paints.
Aviation modellers with a few German aircraft on the shelves may know the Luftwaffe camouflage
colours (RLM70/71/65) off by heart. The penknife modeller had no chance of identifying these
colours, let alone buying such paints readily mixed. In 1940, even the Luftwaffe may have needed
to mix paints rather than buy their own colours off the shelf. The upper surfaces of the penknife
models were finished in an overall dark green which is a reasonable shade for the two greens used
in the Luftwaffe splinter camouflage.
Early in the war, Jack did have one opportunity to see German camouflage colours with his
own eyes. He watched a Heinkel 111 drop its payload on the Rolls Royce factory in Hillington,
which was employed at that time to produce Merlin engines for Spitfires. Raids by Heinkels on
British targets were, unfortunately, far from rare. Yet what made this mission noteworthy was that it
was a lone strike, conducted in broad daylight at low level. Following the release of the bombs by
the daring Luftwaffe crew, Jack witnessed the roof of the factory lift up and then crash down. The
lone bomber then turned at low level and flew directly over the house in which Jack was residing.
The bomber was low enough for Jack to see the bomb aimer in the “greenhouse” section at the front
of the fuselage. Jack did not use this opportunity to study Luftwaffe colours, or the shape of the
bomber, preferring rather sensibly to dive under the bed!

Accurate Model Parts
Penknife Models From The 1940s Page 5
Right: The models as they appear today.
Below: A placard was produced for the show.
(J. H. Martindale)
Below: The last of the 1/120th
scale penknife models is the Handley Page Halifax. The serial painted on the
Halifax – L7242 - reflects the date on which the model was completed – 7th
February 1942. Although they are
solid wood within a wood housing, all three turrets rotate. And, despite the small size of the model, the four
propellers turn and the main undercarriage legs retract into the nacelles.
Right: A period
photograph
showing all but
one of the 1/120th
scale wooden
models. This
photograph may
have been taken at
the Babcock &
Wilcox show.
(J. H. Martindale)
Ten of the
penknife models
were exhibited at
a Babcock &
Wilcox show,
probably held to
display artefacts
built by
employees of the
company. Although the exact date of the show is unknown, the absence of the Halifax provides a
clue as to the approximate date of the show. Since the Halifax was completed in February 1942, as
the last of the
penknife models, the
date of the Babcock
show may have been
in very early 1942 or
perhaps mid-to-late
1941.

Accurate Model Parts
Penknife Models From The 1940s Page 6
Above right: On this placard introducing the Spitfire, the F.B. denotes a fighter bomber, while VB indicates that
the model is a Mk.Vb. Introduced in 1941, the Mk.Vs replaced the Mk.Is and Mk.IIs which served in the Battle of
Britain. The Mk.Vb carried two 20mm Hispano cannon and four .303” Browning machine guns.
(J. H. Martindale)
Below: This 1/24th
Spitfire was not built from an Airfix or Trumpeter kit. Carved around 1944 / 1945, a period in
which Spitfires were still battling the Luftwaffe, it contains control wires within the fuselage and wings. These
wires allow the control surfaces to be manipulated via controls in the cockpit.
Part III – 1/24th
Spitfire
owards the end of the war, perhaps in 1944, a
much more ambitious aircraft model was started:
a 1/24th
scale Spitfire Mk.Vb. It may have taken a
year or more to build, finishing in around 1945 or so.
The jump from 1/120th
to 1/24th
scale allowed a
very impressive feature to be incorporated into the
Spitfire - fully functioning control surfaces. This was
achieved using control wires within the wings and
fuselage. These wires linked the rudder, ailerons and
elevators to the appropriate controls in the cockpit.
T

Accurate Model Parts
Penknife Models From The 1940s Page 7
Left: The key to the
movable surfaces are the
control wires, which can
be discerned in this
photo.
Right: Movement of the
control column (the
golden ring in the
cockpit area) to the left
or right moves the
ailerons accordingly.
Similarly, the elevators
move up or down when
the control column is
pulled back or forward.
Right: A Spitfire pilot gained access to the
cockpit via the hinged door on the port
side. On the model, a hinge on the bottom
surface allows the door to be opened and
closed. There is a rectangle on the port
side, just below the canopy. At the top of
the rectangle there is a slot in which the
canopy sits. After moving the canopy to
the closed position, the access door is then
moved up to the closed position; at this
point the rectangle slides forward over the
top of the access door, thus allowing for a
nice snug fit to all the parts in this area of
the model.
When I was told me that the control surfaces worked on my granddad‟s Spit, I erroneously
assumed that they functioned in the same way as my Airfix kit. However, when my father began a
demonstration he did not wiggle the rudder. Instead he reached for a pen and began prodding inside
the cockpit. By pressing down upon the rudder pedals, he was able to move the rudder to the right
or left. Similarly, by manipulating the control column he could make the elevators and ailerons
move. As a young modeller this was about the coolest thing I had ever seen. How on earth had
granddad managed that?
The following movable features are present on the model:
Movable control surfaces (ailerons, elevators, rudder)
Retractable undercarriage legs
Main undercarriage wheels rotate
Tailwheel assembly rotates
Tailwheel rotates
Radiator flap moves
Access door on port side has a hinge, allowing door to be open or closed
Canopy slides between open or closed position
Propeller rotates

Accurate Model Parts
Penknife Models From The 1940s Page 8
Left: The main resource
for the model was very
likely this three-view plan
in The Aeroplane Spotter.
(The Aeroplane Spotter,
Volume III. No.63, 30 July
1942)
With all these movable control surfaces, Jack would say “If you could train a mouse to fly it
could as all the controls were there”.
Due to the identical scale - 1/24th
- the Spitfire may be mistaken for an Airfix or Trumpeter kit
at first glance. The dissimilarity of the model to its plastic brethren is appreciated when it is realised
that hand carved sectional components, movable objects and control wires have been incorporated.
The model actually consists of several separate wooden sections, constructed with such precision
that the joins between sections can only be discerned by very close inspection. Quite obviously a
degree of skill was employed to produce these sections with such exacting standards. The eleven
1/120th
scale penknife models would have been ideal practice, allowing him to build up experience
of carving wood to the shapes and silhouettes in the three-view plans. Yet the incorporation of
several sections and control wires meant that the Spitfire was quite an advance in terms of
craftsmanship from his previous penknife models.
The finished model captures the aesthetics of Mitchell‟s famous fighter nicely. Yet there is
one aspect of the model that looks inaccurate at first glance: the propeller blades look a little too
long for a Spitfire. Not surprisingly, this flaw resulted from the lack of resource materials available
at the time of construction. One of the first stages in scratchbuilding is to obtain a set of accurate
and reliable plans. But how on earth does a model-maker in 1944 obtain a set of plans for a Spitfire
Mk.Vb? The Spitfires were operational so naturally detailed plans would not be released for public
consumption.
As he served in the Renfrew Air Raid Post, it was necessary for Jack to learn how to spot
enemy aircraft. He became a member of The National Association of Spotters‟ Clubs, which was
formed to provide large numbers of aircraft spotters who would identify the approach of enemy
planes. The spotters were housed within observation posts throughout Britain. When incoming
aircraft were identified as enemy, the spotters would report their movements so that RAF fighters
could be scrambled to intercept. The observation posts were located along coastlines and in towns
and cities. Spotters were also situated near factories so that fellow workers and civilians could be
warned to take cover when the enemy approached.
The ability to determine whether aircraft were friendly or hostile was obviously of prime
importance. Spotters studied aircraft recognition, often in the form of three-view plans. The wartime
magazine The Aeroplane Spotter was formed to help spotters – as well as anti-aircraft gunners and
RAF air crew - to learn the silhouettes of both friendly and hostile aircraft. Plane spotting would
become a popular pastime after the war ended. Yet it began in wartime with a purely functional
purpose, that of training a whole legion of personnel who could identify incoming aircraft as hostile
or friendly.
The main resources for the Spitfire (and indeed the 1/120th
scale aircraft) were the three-view
profiles and photographs within The Aeroplane Spotter. The front cover of the Volume III No.63
edition, dated 30th
July 1942, includes a photo of three Spitfire Mk.Vbs, with the lead aircraft
sporting the codes squadron SN-M. Included in this edition of the magazine is a three-view plan of
the Spitfire Mk.Vb. This three-view acted as the main plan for the 1/24th
scale model, while the
photo adorning the cover was used as the primary resource for painting and markings.
Although somewhat basic, these three-views may have been generally accurate with regard to
shape and profile. Yet an important detail is missing from the three-view profile: the propeller
blades. The propeller blade length cannot be discerned from the front

Accurate Model Parts
Penknife Models From The 1940s Page 9
Above: Marking, codes and serials
were all faithfully copied from this
photo on the front page of The
Aeroplane Spotter. The model‟s serial,
N821, faithfully copies the serial in the
magazine photo rather than the true
serial, EN821. The same aircraft and
squadron codes were used by Tamiya
in one of their 1/48th scale kits.
(The Aeroplane Spotter, Volume III.
No.63, 30 July 1942)
Right: Delivered in the spring of 1942,
EN821 served initially in 243
Squadron in Ouston, County Durham,
the same county where Jack was born
and raised. The Spitfire was lost on D-
Day, when it was hit by an enemy
aircraft and dived into the sea near Le
Havre.
cover photo, which shows the Spitfire in flight. Without such information, Jack was presumably
forced to make his best guess at the true length. This would explain why the blades are too long on
a model which is, in other areas, exemplary.
Readers who are familiar with RAF serials will recognise that the serial on the model - N821 -
is missing a digit. This is because it faithfully copies the photo in The Aeroplane Spotter. Jack
would not have knowledge of RAF serials so he could not have known that the real serial was
EN821. Close inspection of this photo reveals the absence of serials on the other two Spitfires. It is
likely that the photo was censored, with the serials being omitted or altered so that prying German
eyes could not keep track of Spitfire production batches.
The Spitfire was painted in dark green and dark grey upper surfaces, with sky on the
undersurfaces, spinner and tail band. Determining accurate colours would have been impossible
given the few resources at his disposal were in black and white. Despite this, and the difficulty in
sourcing paints, Jack did manage to apply paint colours that are a reasonable match for the RAF
camouflage colours. The sky-painted area along the leading edge should have been yellow but of
course there was no way of determining the true colour from a black and white photo. As for the
national markings, squadron codes and serial, these were obviously painted by hand. Decals were
not available in 1945!

Accurate Model Parts
Penknife Models From The 1940s Page 10
Above: The undercarriage is
retractable on the model. A hinge at
the base allows the leg to be
lowered. A pin near the base can be
extended onto the leg, thus allowing
the undercarriage leg to be locking
in place. The wheels also rotate.
Above: After the model had been dropped,
Jack made sure that it would be kept safe
and sound in a custom made wooden box
with a pale green formica lid.
Left: Instructions were written to ensure the
safekeeping of the model. Note the message
“Please treat with care” at the bottom.
Preserved with requisite care, the Spitfire
holds pride of place as the family heirloom.
(J. H. Martindale)
There is a certain irony regarding
the minor flaws on the model. They
provide an understanding of the
restrictions regarding resource and
building materials, and by doing so it
becomes even more impressive that a
model could be completed under such
limitations.
At some point during the building
of the Spitfire, an incident occurred.
While housecleaning, my grandmother
made a slight error that resulted in the
work-in-progress Spitfire being dropped
on the floor. In the ensuing damage, the
control surfaces ceased to function.
During the rebuilding job, which took
several months, the wooden sections had to be taken apart,
and the wires and control surface rebuilt.
God only knows what my granddad must have said
when he returned home to find his beloved Spitfire broken.
Thankfully divorce proceedings were not initiated. But even
forty years later it was a very sore point!

Accurate Model Parts
Penknife Models From The 1940s Page 11
Above: The author‟s pre-teenaged rendition of Airfix‟s
1/24th
Spitfire Mk.1a. As an infant modeller I was rather
pleased with my big Spitfire and its moveable control
surfaces. Only later did I find out that my dear old
granddad had outdone me on the 1/24th
Spitfire building
front!
Top right: The author‟s 1/32nd
Tamiya Mk.IX. The kit is well
engineered, beautifully moulded,
very detailed and easy to build. Other
than brass wire and rod added to the
Merlin engine, no aftermarket
products were added to the model.
Right: The Mk.IX was weathered
using Mig pigments, post shading,
dry brushing and washes. A whole
range of modelling products is
currently available to weather
models.
First of the many?
In 1970 Airfix stunned the modelling world
with their Spitfire “Superkit” release. The
choice of subject – Spitfire Mk.1a – was not at
all surprising but the scale, 1/24th
, was
something quite extraordinary at the time. Due
to the impressive size and enduring popularity
of the Spitfire, many thousands of kits must
have been built since the early 70s.
Is it possible that the penknife model of
the 1940s was the very first 1/24th
Spitfire?
Rather than the “First Of The Few” the
penknife Spitfire may have been the first of
the many!
Modern kits
In late 2009, the Japanese
manufacturer Tamiya released a 1/32nd
Spitfire Mk.IX to universal acclaim.
Some enthusiasts have suggested it to
be the best injection-moulded kit yet
released. Certainly it is vastly superior
in quality, accuracy and detail to kits
of past decades. In some areas the fit
of some parts is so good that glue is
not required to keep some parts
together. The thickness of the cowlings
is remarkable, being far thinner than
was previously possible. With such a
well engineered kit, even a moderately
skilled modeller (such as the author!)
can build of fine example of a Spitfire
Mk.IX without requiring any
aftermarket support.

Accurate Model Parts
Penknife Models From The 1940s Page 12
Above right: The Mk.IX had an improved Merlin engine,
which greatly enhanced performance over the Mk.Vb.
The main external difference is that the Mk.IX had six
exhaust stubs per side and a four-bladed propeller, as
opposed to the three exhaust stubs and three-bladed
propeller on earlier variants.
Right: One imaginative part of the Tamiya kit relates to
the removable cowlings. Small magnets are glued to
engine parts to allow the cowlings to be held in place
without glue.
The 1/24th
penknife Mk.Vb of 1945, the 1/24th
Airfix Mk.1a of 1970, and the 1/32nd
Tamiya
Mk.IX of 2012 all represent three eras of modelling:
The penknife model of 1945 represents ingenuity, craftsmanship, skill and dedication. The
highest standards were necessary to make even a reasonable depiction of the chosen subject.
Research material was very slim. Nothing was available: every detail had to be researched and
built by hand. A truly unique model was created using the purest form of model-making.
The Airfix kit of 1970 provided the opportunity to build a large Spitfire without having to
scratchbuild the entire aircraft. Aftermarket sets and alternative decals were not readily
available so the modeller of that era was much more au fair with scratchbuilding details. Parts
did not fit together nicely so there was a more than casual acquaintance with model filler and
sanding.
The Tamiya kit of 2012 represents the ultimate in plastic model engineering to date. With this
kit the modeller can build a fantastic example OOB (out-of-box) without any scratchbuilding.
Time is not usually spent filling, sanding or making new seat harnesses. Rather it is in
sourcing and applying aftermarket sets, and adding small details to improve the model even
further. The talented modern modeller also knows how to find information on the internet and
how to communicate with others on forums. The best modellers utilise a variety of advanced
weathering techniques to good effect.
The gradual increase in the availability and quality of model kits has had an impact upon the
individual skills utilised by the modeller. The models on IPMS shelves today are far more accurate
reproductions than in previous decades. But it could easily be argued that the advances in kit
engineering have lowered the skills required by modellers to produce decent models. Put simply, a
modeller with fewer skills can now build a more accurate model in far fewer hours than was
possible in previous decades. But this does not necessarily mean all modern modellers are less
talented or less skilled.
The particular steps required to construct a model has changed over the years. For example,
the ability to handpaint aircraft serials was
previously very important until the
introduction of decals made this skill
redundant. Yet new skills, such as the ability
to apply small photo-etch details with
precision, or how to work with resin, have
become more common. Although the
methods of construction have changed,
certain core traits - ingenuity, the striving for
accuracy, and detailed craftsmanship –
continue to be employed in model-making.
Accurate Model Parts
Penknife Models From The 1940s Page 13
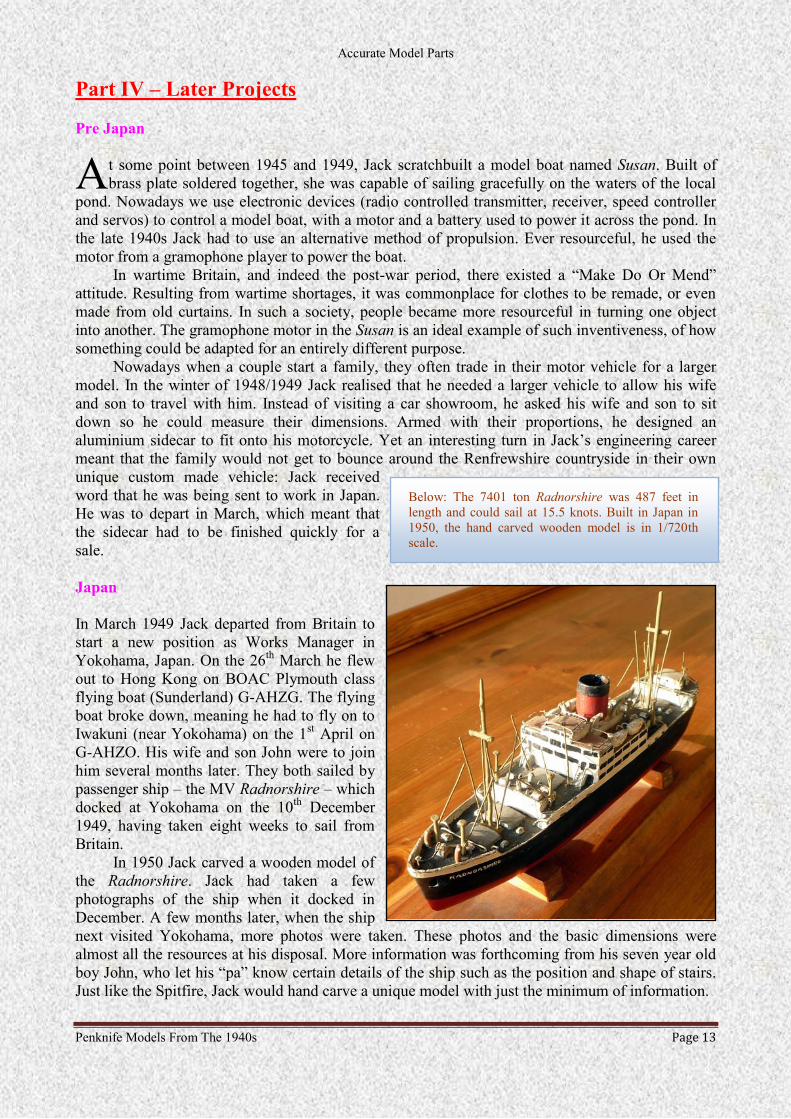
Below: The 7401 ton Radnorshire was 487 feet in
length and could sail at 15.5 knots. Built in Japan in
1950, the hand carved wooden model is in 1/720th
scale.
Part IV – Later Projects
Pre Japan
t some point between 1945 and 1949, Jack scratchbuilt a model boat named Susan. Built of
brass plate soldered together, she was capable of sailing gracefully on the waters of the local
pond. Nowadays we use electronic devices (radio controlled transmitter, receiver, speed controller
and servos) to control a model boat, with a motor and a battery used to power it across the pond. In
the late 1940s Jack had to use an alternative method of propulsion. Ever resourceful, he used the
motor from a gramophone player to power the boat.
In wartime Britain, and indeed the post-war period, there existed a “Make Do Or Mend”
attitude. Resulting from wartime shortages, it was commonplace for clothes to be remade, or even
made from old curtains. In such a society, people became more resourceful in turning one object
into another. The gramophone motor in the Susan is an ideal example of such inventiveness, of how
something could be adapted for an entirely different purpose.
Nowadays when a couple start a family, they often trade in their motor vehicle for a larger
model. In the winter of 1948/1949 Jack realised that he needed a larger vehicle to allow his wife
and son to travel with him. Instead of visiting a car showroom, he asked his wife and son to sit
down so he could measure their dimensions. Armed with their proportions, he designed an
aluminium sidecar to fit onto his motorcycle. Yet an interesting turn in Jack‟s engineering career
meant that the family would not get to bounce around the Renfrewshire countryside in their own
unique custom made vehicle: Jack received
word that he was being sent to work in Japan.
He was to depart in March, which meant that
the sidecar had to be finished quickly for a
sale.
Japan
In March 1949 Jack departed from Britain to
start a new position as Works Manager in
Yokohama, Japan. On the 26th
March he flew
out to Hong Kong on BOAC Plymouth class
flying boat (Sunderland) G-AHZG. The flying
boat broke down, meaning he had to fly on to
Iwakuni (near Yokohama) on the 1st April on
G-AHZO. His wife and son John were to join
him several months later. They both sailed by
passenger ship – the MV Radnorshire – which
docked at Yokohama on the 10th
December
1949, having taken eight weeks to sail from
Britain.
In 1950 Jack carved a wooden model of
the Radnorshire. Jack had taken a few
photographs of the ship when it docked in
December. A few months later, when the ship
next visited Yokohama, more photos were taken. These photos and the basic dimensions were
almost all the resources at his disposal. More information was forthcoming from his seven year old
boy John, who let his “pa” know certain details of the ship such as the position and shape of stairs.
Just like the Spitfire, Jack would hand carve a unique model with just the minimum of information.
A

Accurate Model Parts
Penknife Models From The 1940s Page 14
Below: An atmospheric shot of the Radnorshire docking at Yokohama on the 10th
December 1949.
(John Martindale)
Right: When in Japan, Jack bought and built these
Japanese model train kits. These were soldered
together and were quite different to later Japanese kits.
In time Japan would become world leaders in plastic
models.
Right: Another inventive piece is the stainless steel rose. The
rose and petals are cut and bent with a great degree of skill.
The passenger ship was built in 1948 at the Caledon
shipyards in Dundee, Scotland. Launched as the Achilles, she was
owned by the shipping company Alfred Holt. This company owned
several subsidiary companies, including the Blue Funnel Line, Glen
Line and Shire Line. The Blue Funnel Line ships, which had blue
and black funnels, were named after Greek gods and goddesses.
Ships in the Shire Line were named after Welsh shires, while ships
in the Glen line were named after Scottish glens. She would
transfer a few times between these subsidiaries in the years to
come.
She started her career in the Blue Funnel Line, under the
name as Achilles. In 1949 she transferred to the Shire Line and was
re-named Radnorshire, which is a county in Wales. At this time the
Radnorshire sported a red and black funnel. In 1963 she reverted to
the Blue Funnel Line and was given another Greek name,
Asphalion. From 1966 she sailed under a Dutch subsidiary as Polyphemus before reverting back to
Asphalion in 1972. In 1975 she was sold and re-named Gulf Anchor. The ship was finally broken up
in Hong Kong in April 1979.
Post Japan
In 1952 Jack returned to Britain with his wife, eldest son
John, and infant son Peter, who had been born during their
stay in Japan. In subsequent years, Jack built a number of
interesting objects. Ever present in his garage, he would use
his engineering skills, imagination and resourcefulness to
build unique pieces. His wood carving skills, utilised with
great care on the Spitfire, were used again on a horse‟s
head profile. A different medium – stainless steel - was
used in two of his most enduring works: the rose and also
the family.
Each project began with inspirational thinking: a
spark of initiative formed a unique concept; then followed
ingenuity and craftsmanship; finally there was the precision
to finish the piece with exacting standards.

Accurate Model Parts
Penknife Models From The 1940s Page 15
Above: How to be a cool granddad.
Build a wheelbarrow for your
grandson‟s 4th
birthday and paint
his initials on the front. The
Spitfire and penknife models are
reasonably good but the
wheelbarrow is a work of genius!
(John Martindale)
Right: Three generations of model-making. The most
unique is obviously the hand carved 1/120th scale
Halifax. The top model is a 1/72nd scale Handley Page
Hampden made by my father John, who built it to
represent a Hampden which crashed on the Scottish hills.
The 1/72nd scale Vampire, in Iraqi markings, was made
by the author using a mix of old and new: an old Frog kit
with modern Xtracolor paints and aftermarket decals.
(John Martindale)
Above: This Junkers Jumo engine valve belonged to a Heinkel
111 which ditched into the Moray Firth in March 1941. In
August 1975 one of the engines was raised in a recovery
operation known as Operation Whitehills. Jack mounted this
valve on a plaque for his son John, who took part in the recovery.
A similar valve was presented to the Luftwaffe pilot, Lt Col
Hatto Kuhn, who last saw his aircraft when he jumped off it into
a dinghy in the dark Moray Firth.
Left: Always resourceful, Jack built these family
figures using stainless steel cutlery. The man,
woman, child and dog contain three aspects that
permeate all of his projects. Firstly is concept: a
unique idea that is simple yet strikingly effective.
Secondly is the Make Do And Mend philosophy: old
cutlery was used as the source. Thirdly is
craftsmanship: it is finished with precision and care.
(Peter Martindale)

Accurate Model Parts
Penknife Models From The 1940s Page 16
Above: The Halibag on
her current garage
perch, with the
aluminium arrow
beneath pointing to
North.
Above right: The Halibag just prior to her 2010 refit.
Right: Taken down from the garage, the Halibag was cleaned and
sanded. Fitted in the year 2000, the Matchbox transparencies are no
longer transparent.
Appendix – The Halibag
y father John also built aircraft models, one of which is known as
the “Halibag”. The habitat of the Halibag is not the top table at an
IPMS model show nor even a display cabinet. Instead it has “flown” as
an outdoor model since 1973.
As a boy, John always liked a wooden model displayed in the
garden of his father‟s friend. When he bought his first property in 1973,
he had the opportunity to make and display his own outdoor plane model.
In November of 1973, John built a 1/72nd scale Handley Page Halifax B
Mk.III from (probably) an Airfix kit. The Mk.III Halifax – or „Halibag‟
as they were sometimes known – was the version with Hercules engines,
Perspex nose and rectangular tail fins. The model was finished in a
Coastal Command aircraft of 518 Squadron, which flew meteorological
sorties from an airfield on the Scottish island of Tiree.
Building the „Halibag‟ model was straightforward. But how would
he mount the model onto his wooden hut? The solution was found the
very next day when strolling around the neighbourhood. As he walked
on a road to a church, John spotted a U-shaped piece of aluminium
tubing lying beside a strip of steel with a J-shaped rod welded to it. The
ideal shape and size for his purposes, the aluminium was retrieved from
the roadside and taken home. It took a matter of minutes to cut the U-
section and secure it to the wooden piece that had already been inserted within the underside of the
Halibag fuselage.
The Halibag was built as part of a weathervane. The compass points N, E, S and W were
originally part of the vane, along with an aluminium arrow pointing to North. The aluminium for
the arrow did not come from roadside debris this time. Instead it was sourced from pieces of a
Luftwaffe Heinkel 111, which crashed into Cairnsmore of Fleet (one of the Solway Hills in
southern Scotland) in the early 1940s.
The aircraft model - together with the U-shaped aluminium support – was designed to rotate
in the wind. During a storm one winter, the securing nut rotated along with the aircraft.
Unfortunately this led to the nut unscrewing itself from the bolt. The Halibag then went for a real
flight across the garden, subsequently followed by a crash landing. The nose cone, which fell off in
this little prang, was found weeks later when the snow
thawed.
When we moved to another property, the Halibag flew
from the house eave. This house was situated on the side of a
hill, fully exposed to the north-west wind. During a
particularly bad storm the Halibag went for another little
flight. This time the crash landing did not go so well. The
model bowled along the length of the garden, shedding bits as
it went. There were multiple breakages and the starboard
wing was severed near the outboard engine. The model was
glued back together again and swiftly re-mounted on the hut.
M

Accurate Model Parts
Penknife Models From The 1940s Page 17
Above: The old fuselage roundels were
revealed during her 2010 refit. The Halibag
currently sports a temperate Coastal
Command scheme of Dark Sea Grey and Dark
Slate Grey camouflage upper surfaces and
white underneath.
Below: Now that‟s icing!
(John Martindale)
During this period the model was so exposed to the wind that the propeller blades fell off due
to wear. New propellers were made from beer cans, Secured with a nail to the engine, the blades
were purposefully twisted to ensure they spun in the wind. On some nights, while sitting a good
distance away at the dinner table, the propellers could be heard as they spun around in the wind.
Such exposure to the north-westerly winds could not be tolerated without some resulting damage.
By the 1980s the fuselage itself had cracked open. Taking advantage of squatters‟ rights, spiders
took up permanent residence in the fuselage.
When we moved to a new house in the mid-1980s the Halibag was mounted on the garage,
where it is had remained until the present day. Every ten years or so the model is tidied up and
repainted. In the year 2000 or so, with the 27-year old
Halibag showing signs of her age, I was tasked with
repairing the model. A split on the top of the fuselage,
and another down the port fuselage, were glued and
filled. All the holes were plugged up with model filler
to make it spider proof. The transparencies – nose
cone, cockpit and rear turret – were all replaced using
parts from a Matchbox Halifax kit. New decals,
presumably from the Matchbox kit, were applied.
The next major refit took place in 2010. On this
occasion Cyanoacrylate glue (Zap-A-Cap) was used to
repair the old fuselage split. Rather than Humbrol
filler, car body filler was used throughout for more
strength; extra filler was added around the join where
the horizontal surfaces meet the fuselage, and where
the stabilisers meet the rudders.
The extra strength was useful during the storm
of 3rd
January 2012. With gusts of over 90 mph, and a
scale of 72nd
scale, the crew of the Halibag were
subjected to some wind sheer (90X72!). Yet the model
remained steadfast throughout. The plastic is a little
brittle, and some wear is evident, but I suppose
injection-moulded kits models are not really designed
to be left outdoors in the Scottish rain for 38 years.
Sources
http://www.air-britain.com/ab.html
http://www.historyofwar.org/articles/weapons_spitfire_mkV.html
http://www.merchantnavyofficers.com/nsmo4.html
http://www.shipspotting.com/gallery/photo.php?lid=1404281
Acknowledgements
Many thanks to John and Peter Martindale for supplying photographs and information.
Copyright © Dougie Martindale / Accurate Model Parts, 2012