activity summary sheet - slmta
TRANSCRIPT
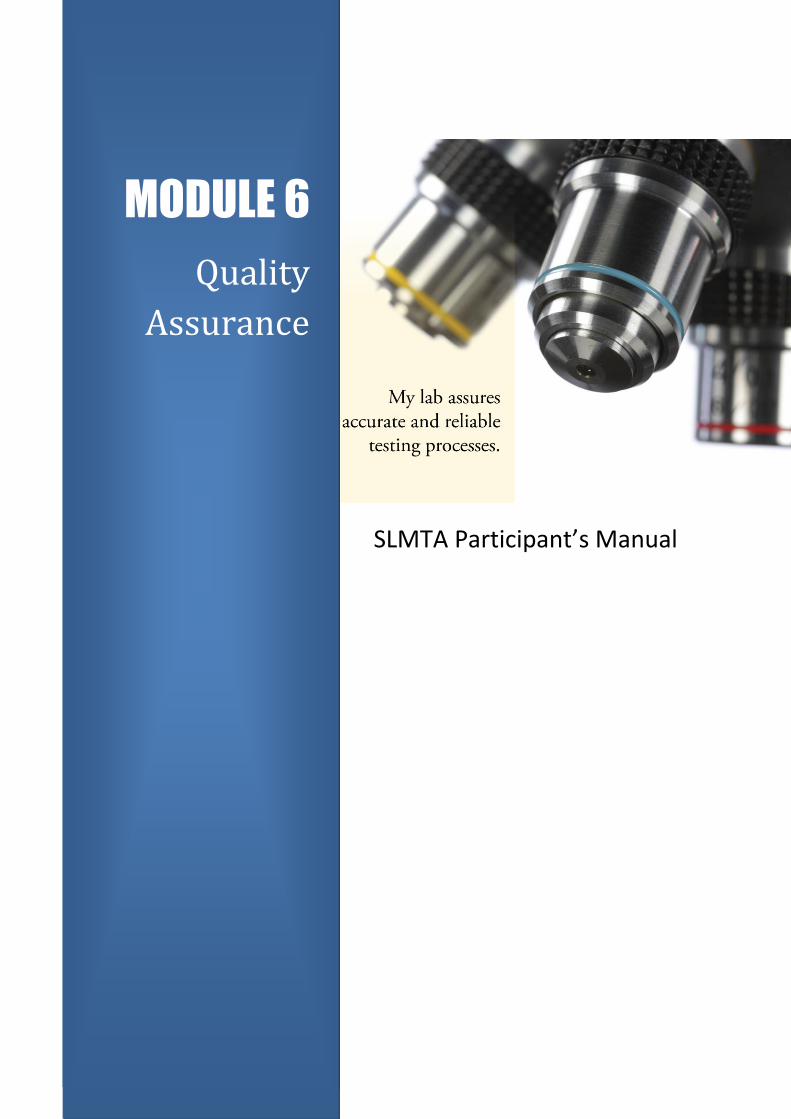
MODULE 6
Quality
Assurance
MODULE 6
Quality
Assurance
SLMTA Participant’s Manual
TTAABBLLEE OOFF CCOONNTTEENNTTSS
NOTE: Print this document single-sided and in color if possible.
Activity: Using Standard Operating Procedures 1
Activity: Is QC That Important? 12
Activity: Is There More to QC Than Just Plotting the Data? 23
SLMTA MODULE 6 1
AACCTTIIVVIITTYY SSUUMMMMAARRYY SSHHEEEETT
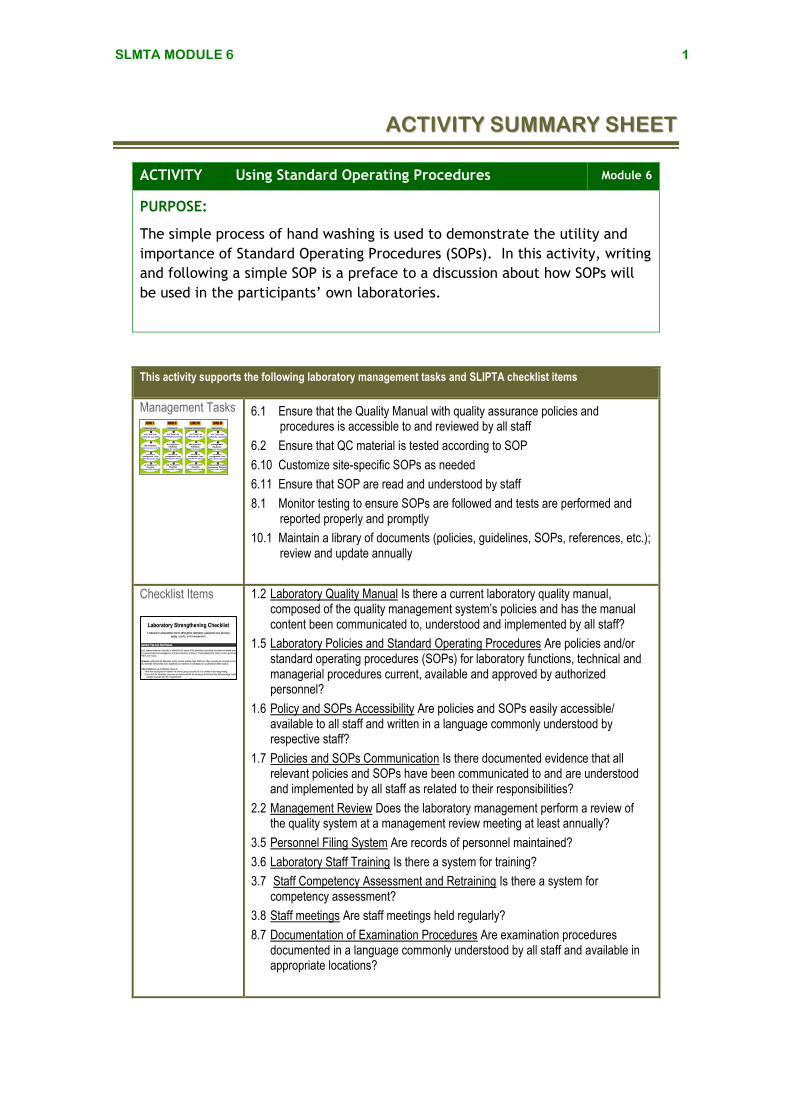
ACTIVITY Using Standard Operating Procedures Module 6
PURPOSE:
The simple process of hand washing is used to demonstrate the utility and
importance of Standard Operating Procedures (SOPs). In this activity, writing
and following a simple SOP is a preface to a discussion about how SOPs will
be used in the participants’ own laboratories.
This activity supports the following laboratory management tasks and SLIPTA checklist items
Management Tasks 6.1 Ensure that the Quality Manual with quality assurance policies and procedures is accessible to and reviewed by all staff
6.2 Ensure that QC material is tested according to SOP
6.10 Customize site-specific SOPs as needed
6.11 Ensure that SOP are read and understood by staff
8.1 Monitor testing to ensure SOPs are followed and tests are performed and reported properly and promptly
10.1 Maintain a library of documents (policies, guidelines, SOPs, references, etc.); review and update annually
Checklist Items
1.2 Laboratory Quality Manual Is there a current laboratory quality manual, composed of the quality management system’s policies and has the manual content been communicated to, understood and implemented by all staff?
1.5 Laboratory Policies and Standard Operating Procedures Are policies and/or standard operating procedures (SOPs) for laboratory functions, technical and managerial procedures current, available and approved by authorized personnel?
1.6 Policy and SOPs Accessibility Are policies and SOPs easily accessible/ available to all staff and written in a language commonly understood by respective staff?
1.7 Policies and SOPs Communication Is there documented evidence that all relevant policies and SOPs have been communicated to and are understood and implemented by all staff as related to their responsibilities?
2.2 Management Review Does the laboratory management perform a review of the quality system at a management review meeting at least annually?
3.5 Personnel Filing System Are records of personnel maintained?
3.6 Laboratory Staff Training Is there a system for training?
3.7 Staff Competency Assessment and Retraining Is there a system for competency assessment?
3.8 Staff meetings Are staff meetings held regularly?
8.7 Documentation of Examination Procedures Are examination procedures documented in a language commonly understood by all staff and available in appropriate locations?
SLMTA MODULE 6 2
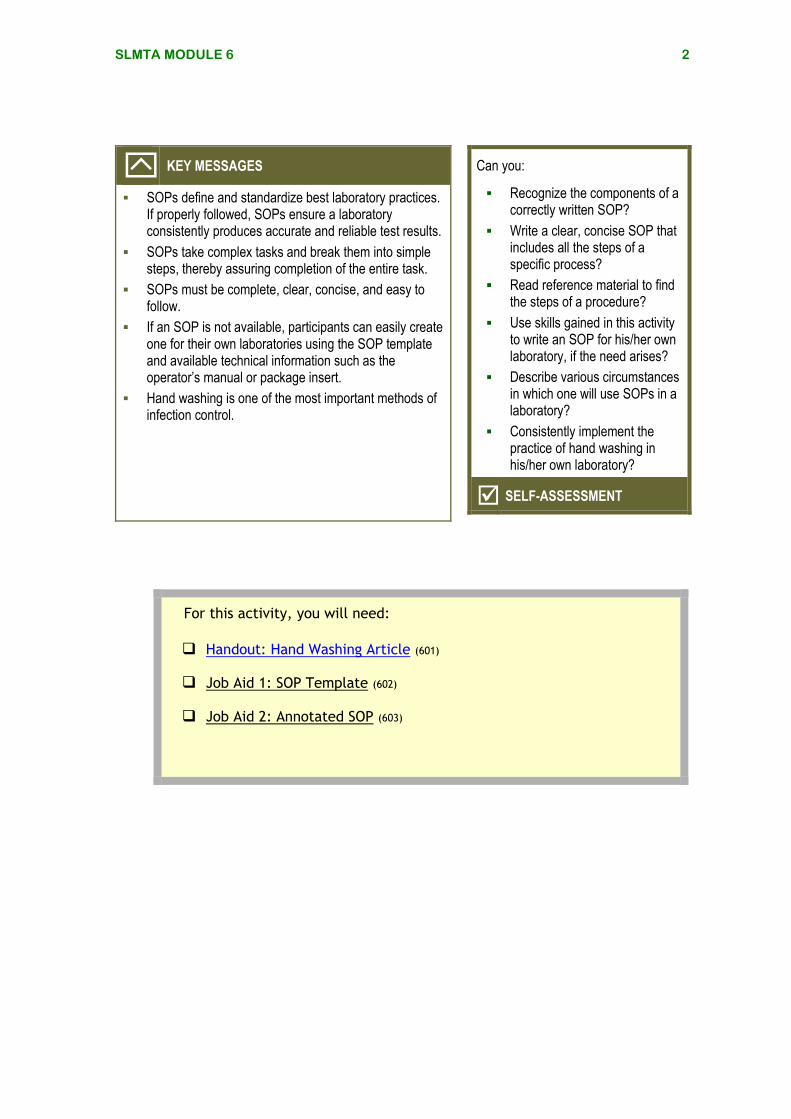
KEY MESSAGES SOPs define and standardize best laboratory practices.
If properly followed, SOPs ensure a laboratory consistently produces accurate and reliable test results.
SOPs take complex tasks and break them into simple steps, thereby assuring completion of the entire task.
SOPs must be complete, clear, concise, and easy to follow.
If an SOP is not available, participants can easily create one for their own laboratories using the SOP template and available technical information such as the operator’s manual or package insert.
Hand washing is one of the most important methods of infection control.
Can you:
Recognize the components of a correctly written SOP?
Write a clear, concise SOP that includes all the steps of a specific process?
Read reference material to find the steps of a procedure?
Use skills gained in this activity to write an SOP for his/her own laboratory, if the need arises?
Describe various circumstances in which one will use SOPs in a laboratory?
Consistently implement the practice of hand washing in his/her own laboratory?
SELF-ASSESSMENT
For this activity, you will need:
Handout: Hand Washing Article (601)
Job Aid 1: SOP Template (602)
Job Aid 2: Annotated SOP (603)

SLMTA MODULE 6 3
Hand Washing Article601
AN EASY WAY TO PREVENT INFECTION
Hand washing is a simple habit that can help keep you healthy. Learn the benefits of good hand hygiene, when to wash your hands and how to clean them properly. Hand washing is a simple habit, something most people do without thinking. Yet hand washing, when done properly, is one of the best ways to avoid getting sick. This simple habit requires only soap and warm water or an alcohol-based hand sanitizer — a cleanser that doesn't require water. Do you know the benefits of good hand hygiene and when and how to wash your hands properly? The dangers of not washing your hands Despite the proven health benefits of hand washing, many people don't practice this habit as often as they should — even after using the toilet. Throughout the day you accumulate germs on your hands from a variety of sources, such as direct contact with people, contaminated surfaces, foods, even animals and animal waste. If you don't wash your hands frequently enough, you can infect yourself with these germs by touching your eyes, nose or mouth. And you can spread these germs to others by touching them or by touching surfaces that they also touch, such as doorknobs. Infectious diseases that are commonly spread through hand-to-hand contact include the common cold, flu and several gastrointestinal disorders, such as infectious diarrhea. While most people will get over a cold, the flu can be much more serious. Some people with the flu, particularly older adults and people with chronic medical problems, can develop pneumonia. The combination of the flu and pneumonia, in fact, is the eighth-leading cause of death among Americans. Inadequate hand hygiene also contributes to food-related illnesses, such as salmonella and E. coli infection. According to the Centers for Disease Control and Prevention (CDC), as many as 76 million Americans get a food-borne illness each year. Of these, about 5,000 die as a result of their illness. Others experience the annoying signs and symptoms of nausea, vomiting and diarrhea. MORE ON THIS TOPIC * Germs: Understand and protect against bacteria, viruses and infection * E. coli: Dangers of eating raw or undercooked foods Good hand-washing techniques include washing your hands with soap and water or using an alcohol-based hand sanitizer. Antimicrobial wipes or towelettes are just as effective as soap and water in cleaning your hands but aren't as good as alcohol-based sanitizers. Antibacterial soaps have become increasingly popular in recent years. However, these soaps are no more effective at killing germs than is regular soap. Using antibacterial soaps may lead to the development of bacteria that are resistant to the products' antimicrobial agents — making it even harder to kill these germs in the future. In general, regular soap is fine. The combination of scrubbing your hands

SLMTA MODULE 6 4
with soap — antibacterial or not — and rinsing them with water loosens and removes bacteria from your hands. Proper hand-washing techniques Proper hand washing with soap and water Follow these instructions for washing with soap and water:
Wet your hands with warm, running water and apply liquid soap or use clean bar soap. Lather well.
Rub your hands vigorously together for at least 15 to 20 seconds. Scrub all surfaces, including the backs of your hands, wrists, between your
fingers and under your fingernails. Rinse well. Dry your hands with a clean or disposable towel. Use a towel to turn off the faucet.
When should you wash your hands? Although it's impossible to keep your bare hands germ-free, there are times when it's critical to wash your hands to limit the transfer of bacteria, viruses and other microbes. Always wash your hands:
After using the toilet After changing a diaper — wash the diaper-wearer's hands, too After touching animals or animal waste Before and after preparing food, especially before and immediately after
handling raw meat, poultry or fish Before eating After blowing your nose After coughing or sneezing into your hands Before and after treating wounds or cuts Before and after touching a sick or injured person After handling garbage Before inserting or removing contact lenses When using public restrooms, such as those in airports, train stations, bus
stations and restaurants [Use with permission from Mayo Clinic, October 2, 2009] On the web at http://www.mayoclinic.com/health/hand-washing/HQ00407#
SLMTA MODULE 6 5
SOP Template602
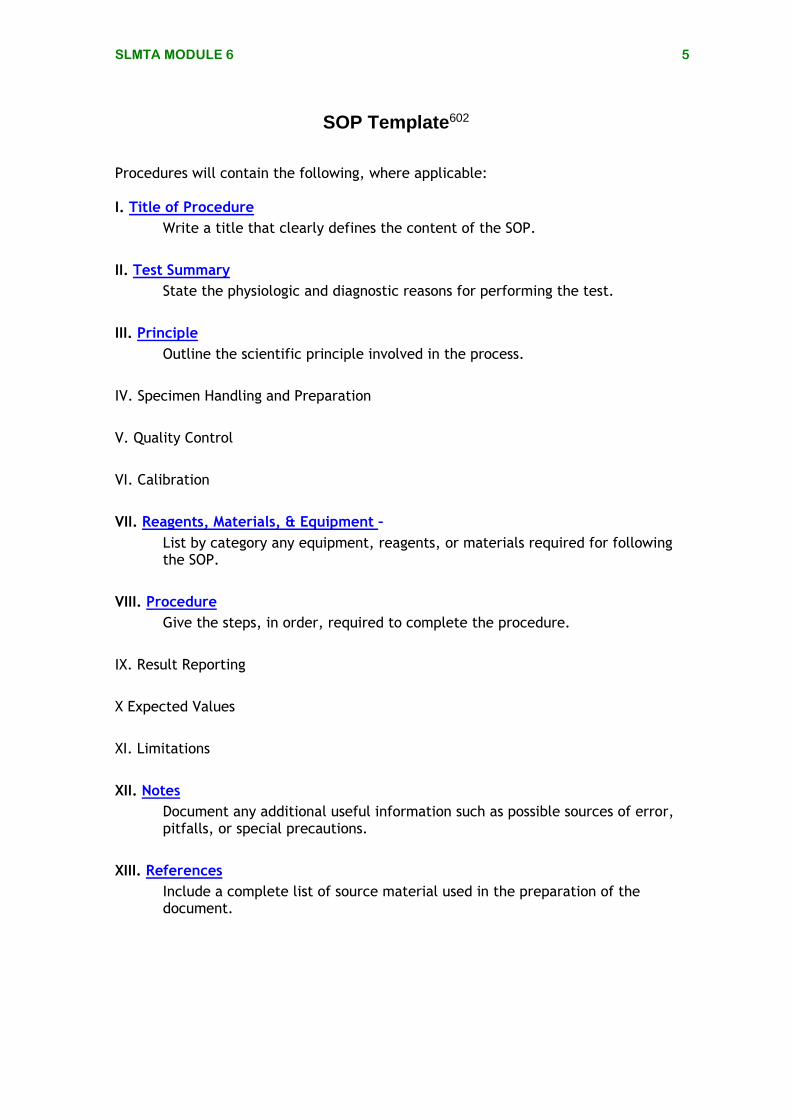
Procedures will contain the following, where applicable: I. Title of Procedure
Write a title that clearly defines the content of the SOP.
II. Test Summary
State the physiologic and diagnostic reasons for performing the test.
III. Principle
Outline the scientific principle involved in the process.
IV. Specimen Handling and Preparation
V. Quality Control
VI. Calibration
VII. Reagents, Materials, & Equipment –
List by category any equipment, reagents, or materials required for following the SOP.
VIII. Procedure
Give the steps, in order, required to complete the procedure.
IX. Result Reporting
X Expected Values
XI. Limitations
XII. Notes
Document any additional useful information such as possible sources of error, pitfalls, or special precautions.
XIII. References
Include a complete list of source material used in the preparation of the document.

SLMTA MODULE 6 6
Annotated SOP603
Cape Clinic Laboratory Policy & Procedure Manual
Policy # GC12\v03 Page 1 of 6
Section: General Chemistry Procedure Manual
Title: Creatinine in Serum by IL 300 Plus Analyzer Procedure
Written by: Anne Lugo, BLS Original Date: June 3, 2006
Approved by: H. Grady Hines, PhD
Revision Date: May 28, 2008
Annual Review Date: September 1, 2009
Creatinine in Serum by IL 300 Plus Analyzer Procedure
Test Summary: Creatinine is produced as a waste product through the conversion of creatine to phosphocreatine. Because most of the creatinine is produced in the muscles, the amount of creatinine is proportional to the patient’s muscle mass. Serum creatinine is useful in the evaluation of kidney function and in monitoring renal dialysis. Principle: Creatinine is measured as a fixed timed chemical reaction using picrate (Jaffe reaction) in an alkaline environment to form an orange-red product. The increase in absorbance at 510 nm due to the orange-red complex is proportional to the creatinine concentration in the sample.
Specimen Handling and Preparation: Serum is the specimen of choice. The serum may be stored for 1 day at 2-8’C. Quality Control: SeraChem 1 and SeraChem 2 are used for quality control. Both controls will be run each day of use and anytime new reagent, regardless of lot number, is added to the system throughout the day. If testing extends longer than 8 hours, this will be deemed as a second shift and both controls must be analyzed.
SeraChem Preparation
1. Gently tap bottle on counter top. Remove cap and slowly remove stopper without spilling its contents
2. Add 5.0 ml of dH20 and replace stopper
3. Gently swirl reconstituted material until all lyophilized contents are dissolved.
The title is concise, descriptive, and, if applicable, inclusive of the type of specimen.
The test summary captures the physiologic and diagnostic reasoning underlying the performance
of the test.
The scientific principle involved in the testing is outlined. Chemical reactions, specimens, and/or organisms
involved are indicated.
Conditions for patient preparation, preferred specimen type, amount of specimen, type of collection container, and any special specimen handling requirements (i.e. timing, transport, storage) are noted.
Quality control materials are listed. Instructions for preparing, storing, testing, evaluating results, and troubleshooting are included. The appropriate uses, expected results and safety precautions for these materials are also noted.
SOP Document Control Plan Document control, an essential component, can be handled in several ways. In this example, the use of a complete standardized header that appears on the first page and a reduced header that appears on subsequent pages is one method. Another alternative is the use of a signatory cover page. The chosen method must include the document’s title, version number, number of pages, authority for use, and laboratory name. There should be a written policy/procedure regarding document control that addresses creation, approval of use, distribution, revisions, periodic review, and discontinuation.
SLMTA MODULE 6 7
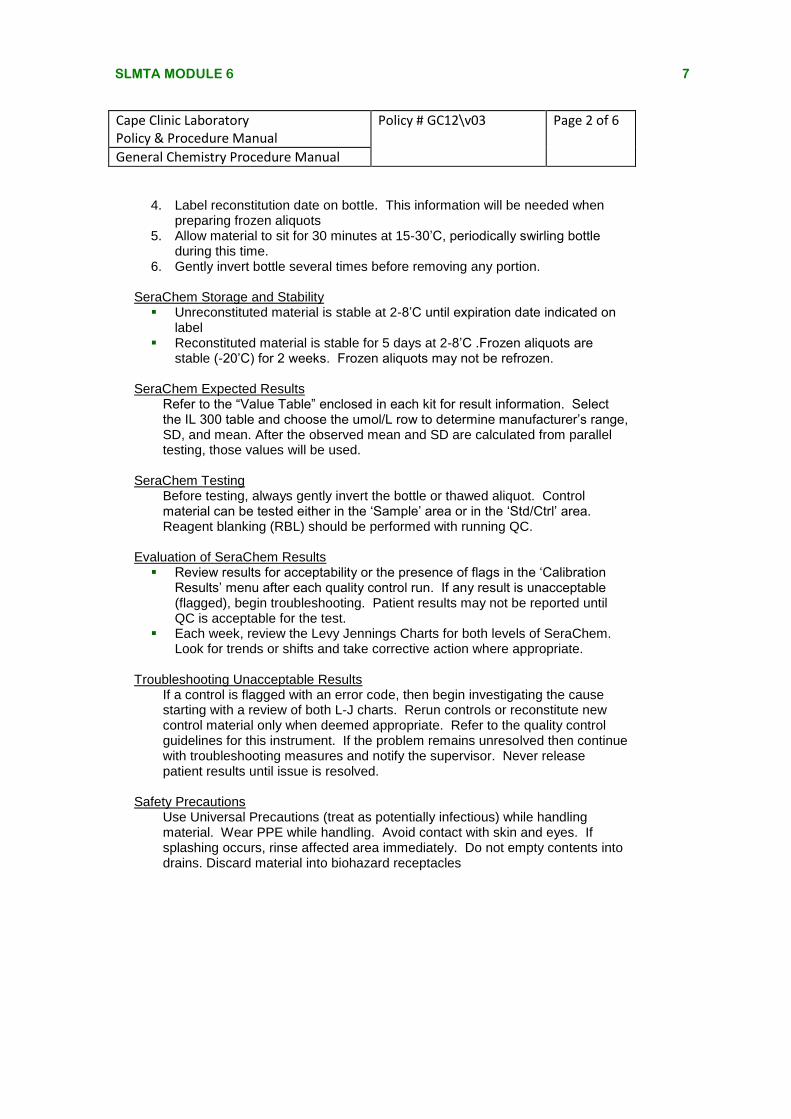
4. Label reconstitution date on bottle. This information will be needed when
preparing frozen aliquots 5. Allow material to sit for 30 minutes at 15-30’C, periodically swirling bottle
during this time. 6. Gently invert bottle several times before removing any portion.
SeraChem Storage and Stability Unreconstituted material is stable at 2-8’C until expiration date indicated on
label Reconstituted material is stable for 5 days at 2-8’C .Frozen aliquots are
stable (-20’C) for 2 weeks. Frozen aliquots may not be refrozen.
SeraChem Expected Results Refer to the “Value Table” enclosed in each kit for result information. Select the IL 300 table and choose the umol/L row to determine manufacturer’s range, SD, and mean. After the observed mean and SD are calculated from parallel testing, those values will be used.
SeraChem Testing
Before testing, always gently invert the bottle or thawed aliquot. Control material can be tested either in the ‘Sample’ area or in the ‘Std/Ctrl’ area. Reagent blanking (RBL) should be performed with running QC.
Evaluation of SeraChem Results Review results for acceptability or the presence of flags in the ‘Calibration
Results’ menu after each quality control run. If any result is unacceptable (flagged), begin troubleshooting. Patient results may not be reported until QC is acceptable for the test.
Each week, review the Levy Jennings Charts for both levels of SeraChem. Look for trends or shifts and take corrective action where appropriate.
Troubleshooting Unacceptable Results
If a control is flagged with an error code, then begin investigating the cause starting with a review of both L-J charts. Rerun controls or reconstitute new control material only when deemed appropriate. Refer to the quality control guidelines for this instrument. If the problem remains unresolved then continue with troubleshooting measures and notify the supervisor. Never release patient results until issue is resolved.
Safety Precautions
Use Universal Precautions (treat as potentially infectious) while handling material. Wear PPE while handling. Avoid contact with skin and eyes. If splashing occurs, rinse affected area immediately. Do not empty contents into drains. Discard material into biohazard receptacles
Cape Clinic Laboratory Policy & Procedure Manual
Policy # GC12\v03 Page 2 of 6
General Chemistry Procedure Manual
SLMTA MODULE 6 8
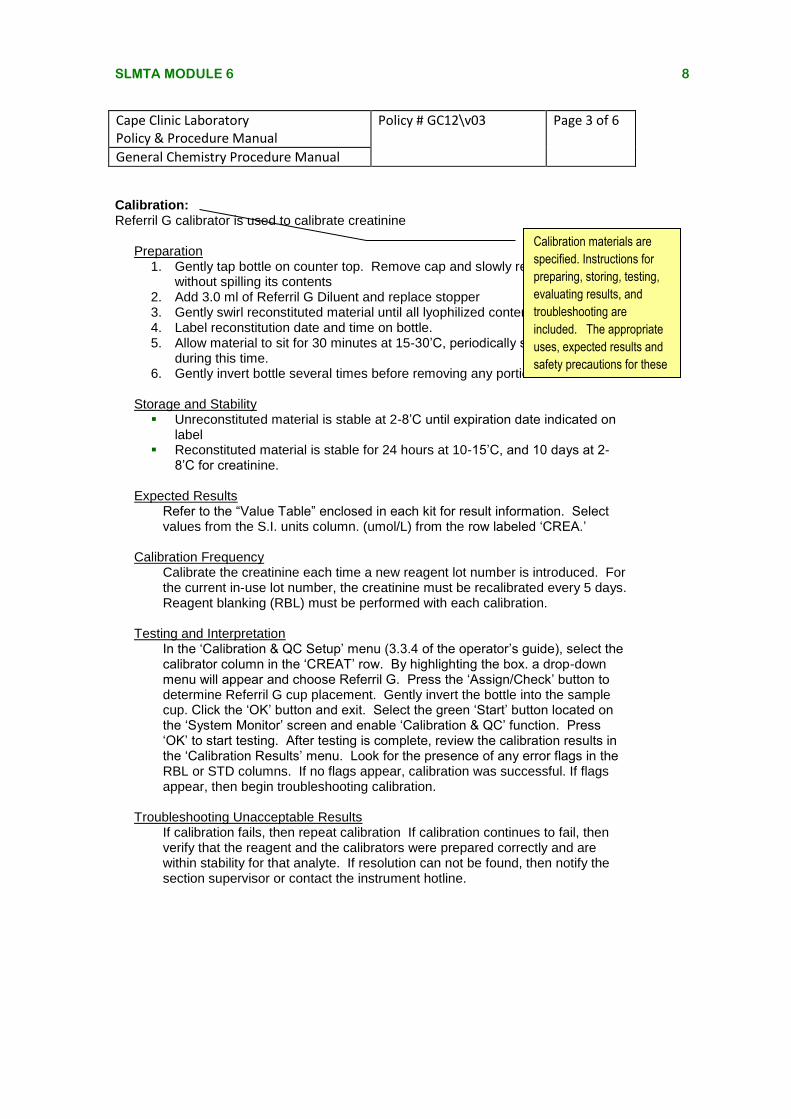
Calibration: Referril G calibrator is used to calibrate creatinine
Preparation 1. Gently tap bottle on counter top. Remove cap and slowly remove stopper
without spilling its contents 2. Add 3.0 ml of Referril G Diluent and replace stopper 3. Gently swirl reconstituted material until all lyophilized contents are dissolved. 4. Label reconstitution date and time on bottle. 5. Allow material to sit for 30 minutes at 15-30’C, periodically swirling bottle
during this time. 6. Gently invert bottle several times before removing any portion
Storage and Stability Unreconstituted material is stable at 2-8’C until expiration date indicated on
label Reconstituted material is stable for 24 hours at 10-15’C, and 10 days at 2-
8’C for creatinine.
Expected Results Refer to the “Value Table” enclosed in each kit for result information. Select values from the S.I. units column. (umol/L) from the row labeled ‘CREA.’
Calibration Frequency Calibrate the creatinine each time a new reagent lot number is introduced. For the current in-use lot number, the creatinine must be recalibrated every 5 days. Reagent blanking (RBL) must be performed with each calibration.
Testing and Interpretation
In the ‘Calibration & QC Setup’ menu (3.3.4 of the operator’s guide), select the calibrator column in the ‘CREAT’ row. By highlighting the box. a drop-down menu will appear and choose Referril G. Press the ‘Assign/Check’ button to determine Referril G cup placement. Gently invert the bottle into the sample cup. Click the ‘OK’ button and exit. Select the green ‘Start’ button located on the ‘System Monitor’ screen and enable ‘Calibration & QC’ function. Press ‘OK’ to start testing. After testing is complete, review the calibration results in the ‘Calibration Results’ menu. Look for the presence of any error flags in the RBL or STD columns. If no flags appear, calibration was successful. If flags appear, then begin troubleshooting calibration.
Troubleshooting Unacceptable Results If calibration fails, then repeat calibration If calibration continues to fail, then verify that the reagent and the calibrators were prepared correctly and are within stability for that analyte. If resolution can not be found, then notify the section supervisor or contact the instrument hotline.
Cape Clinic Laboratory Policy & Procedure Manual
Policy # GC12\v03 Page 3 of 6
General Chemistry Procedure Manual
Calibration materials are
specified. Instructions for
preparing, storing, testing,
evaluating results, and
troubleshooting are
included. The appropriate
uses, expected results and
safety precautions for these
materials are also noted.
SLMTA MODULE 6 9
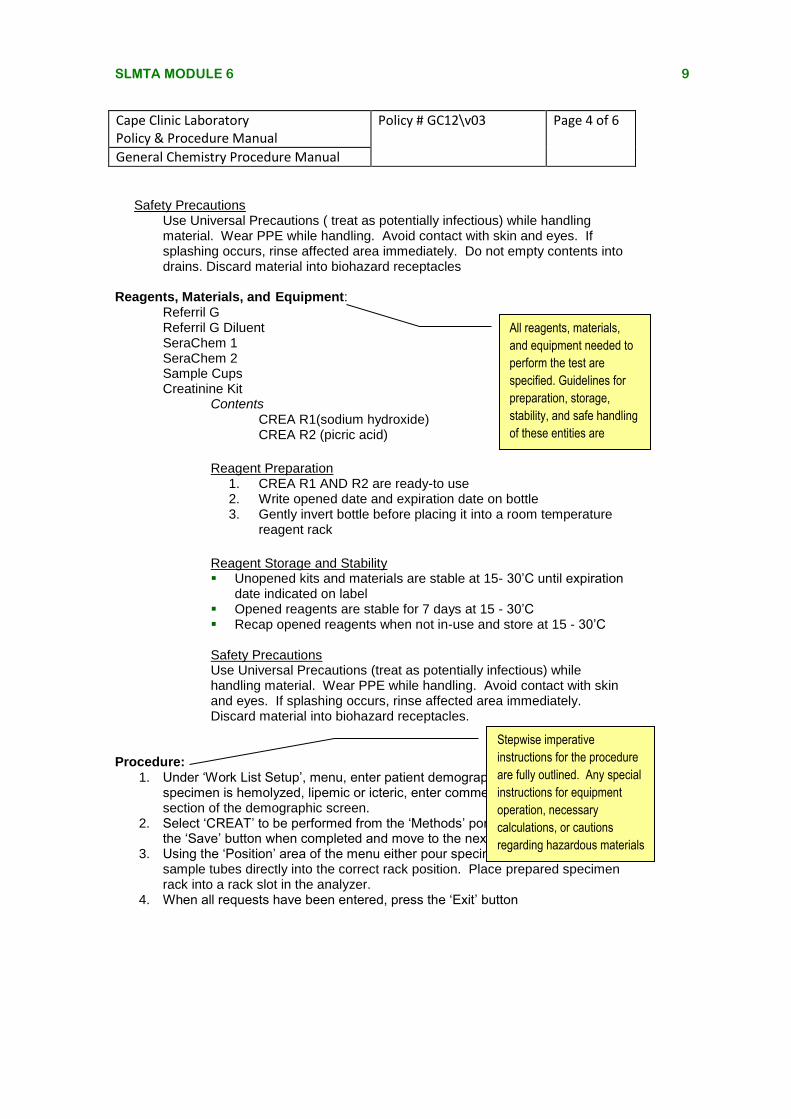
Safety Precautions Use Universal Precautions ( treat as potentially infectious) while handling material. Wear PPE while handling. Avoid contact with skin and eyes. If splashing occurs, rinse affected area immediately. Do not empty contents into drains. Discard material into biohazard receptacles
Reagents, Materials, and Equipment: Referril G Referril G Diluent SeraChem 1 SeraChem 2 Sample Cups Creatinine Kit Contents CREA R1(sodium hydroxide) CREA R2 (picric acid)
Reagent Preparation
1. CREA R1 AND R2 are ready-to use 2. Write opened date and expiration date on bottle 3. Gently invert bottle before placing it into a room temperature
reagent rack
Reagent Storage and Stability Unopened kits and materials are stable at 15- 30’C until expiration
date indicated on label Opened reagents are stable for 7 days at 15 - 30’C Recap opened reagents when not in-use and store at 15 - 30’C
Safety Precautions Use Universal Precautions (treat as potentially infectious) while handling material. Wear PPE while handling. Avoid contact with skin and eyes. If splashing occurs, rinse affected area immediately. Discard material into biohazard receptacles.
Procedure: 1. Under ‘Work List Setup’, menu, enter patient demographic information. If
specimen is hemolyzed, lipemic or icteric, enter comments under ‘Notes’ section of the demographic screen.
2. Select ‘CREAT’ to be performed from the ‘Methods’ portion of the menu. Press the ‘Save’ button when completed and move to the next sample request.
3. Using the ‘Position’ area of the menu either pour specimen aliquots or place sample tubes directly into the correct rack position. Place prepared specimen rack into a rack slot in the analyzer.
4. When all requests have been entered, press the ‘Exit’ button
Cape Clinic Laboratory Policy & Procedure Manual
Policy # GC12\v03 Page 4 of 6
General Chemistry Procedure Manual
Stepwise imperative
instructions for the procedure
are fully outlined. Any special
instructions for equipment
operation, necessary
calculations, or cautions
regarding hazardous materials
are noted.
All reagents, materials,
and equipment needed to
perform the test are
specified. Guidelines for
preparation, storage,
stability, and safe handling
of these entities are
included.
SLMTA MODULE 6 10
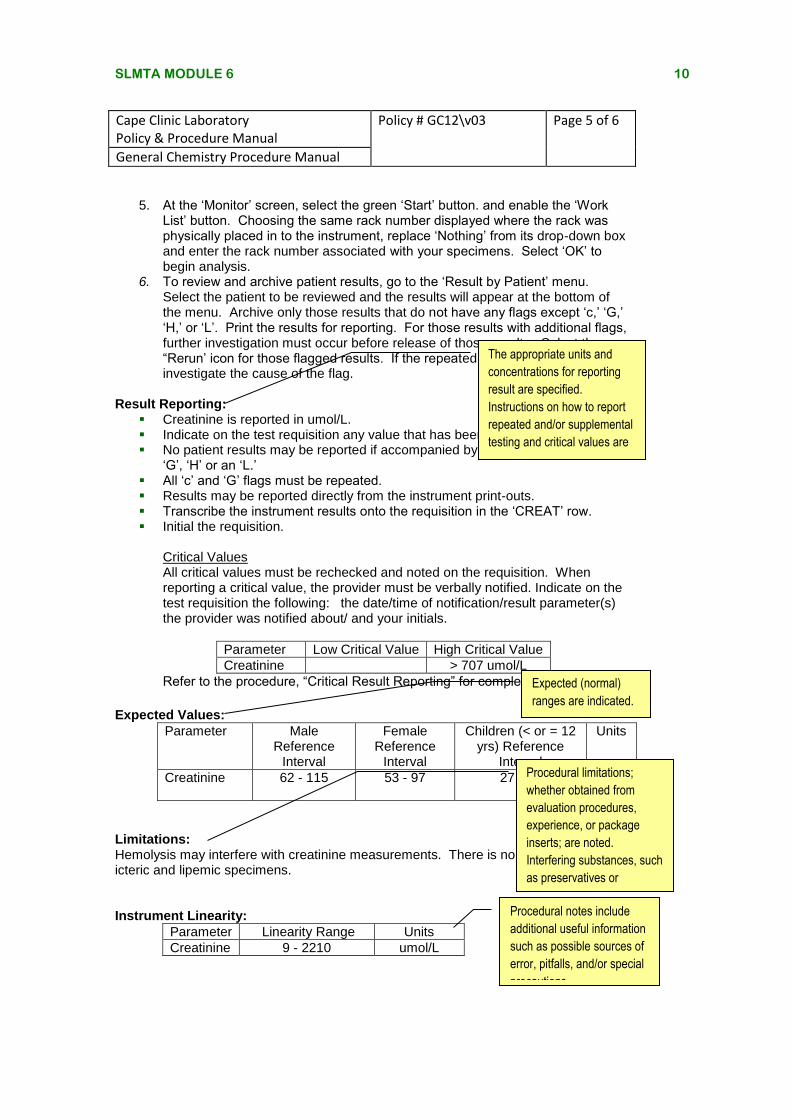
5. At the ‘Monitor’ screen, select the green ‘Start’ button. and enable the ‘Work List’ button. Choosing the same rack number displayed where the rack was physically placed in to the instrument, replace ‘Nothing’ from its drop-down box and enter the rack number associated with your specimens. Select ‘OK’ to begin analysis.
6. To review and archive patient results, go to the ‘Result by Patient’ menu. Select the patient to be reviewed and the results will appear at the bottom of the menu. Archive only those results that do not have any flags except ‘c,’ ‘G,’ ‘H,’ or ‘L’. Print the results for reporting. For those results with additional flags, further investigation must occur before release of those results. Select the “Rerun’ icon for those flagged results. If the repeated result remains flagged, investigate the cause of the flag.
Result Reporting: Creatinine is reported in umol/L. Indicate on the test requisition any value that has been repeated. No patient results may be reported if accompanied by a flag other than a ‘c’,
‘G’, ‘H’ or an ‘L.’ All ‘c’ and ‘G’ flags must be repeated. Results may be reported directly from the instrument print-outs. Transcribe the instrument results onto the requisition in the ‘CREAT’ row. Initial the requisition.
Critical Values All critical values must be rechecked and noted on the requisition. When reporting a critical value, the provider must be verbally notified. Indicate on the test requisition the following: the date/time of notification/result parameter(s) the provider was notified about/ and your initials.
Parameter Low Critical Value High Critical Value
Creatinine > 707 umol/L
Refer to the procedure, “Critical Result Reporting” for complete details.
Expected Values:
Parameter Male Reference
Interval
Female Reference
Interval
Children (< or = 12 yrs) Reference
Interval
Units
Creatinine 62 - 115 53 - 97 27 - 62 umol/L
Limitations: Hemolysis may interfere with creatinine measurements. There is no interference with icteric and lipemic specimens. Instrument Linearity:
Parameter Linearity Range Units
Creatinine 9 - 2210 umol/L
Cape Clinic Laboratory Policy & Procedure Manual
Policy # GC12\v03 Page 5 of 6
General Chemistry Procedure Manual
The appropriate units and
concentrations for reporting
result are specified.
Instructions on how to report
repeated and/or supplemental
testing and critical values are
presented.
Expected (normal)
ranges are indicated.
Procedural limitations;
whether obtained from
evaluation procedures,
experience, or package
inserts; are noted.
Interfering substances, such
as preservatives or
medications, are indicated.
Procedural notes include
additional useful information
such as possible sources of
error, pitfalls, and/or special
precautions.
SLMTA MODULE 6 11
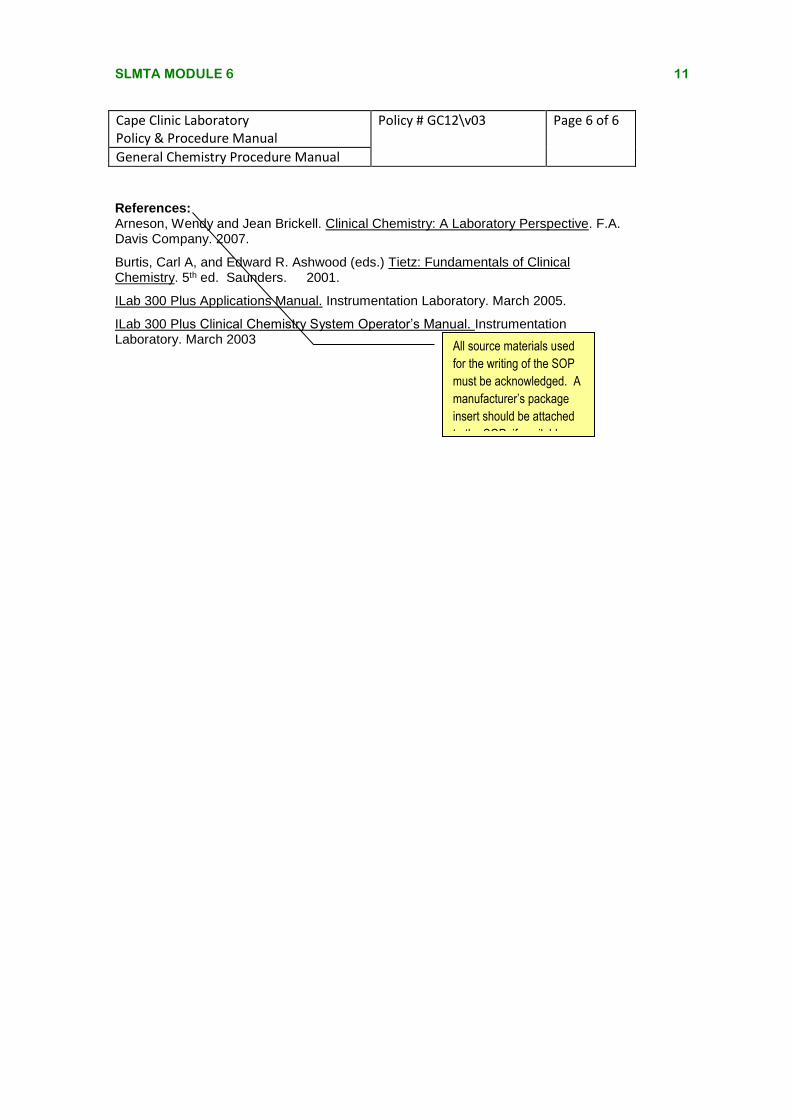
References: Arneson, Wendy and Jean Brickell. Clinical Chemistry: A Laboratory Perspective. F.A. Davis Company. 2007.
Burtis, Carl A, and Edward R. Ashwood (eds.) Tietz: Fundamentals of Clinical Chemistry. 5th ed. Saunders. 2001.
ILab 300 Plus Applications Manual. Instrumentation Laboratory. March 2005.
ILab 300 Plus Clinical Chemistry System Operator’s Manual. Instrumentation Laboratory. March 2003
Cape Clinic Laboratory Policy & Procedure Manual
Policy # GC12\v03 Page 6 of 6
General Chemistry Procedure Manual
All source materials used
for the writing of the SOP
must be acknowledged. A
manufacturer’s package
insert should be attached
to the SOP, if available.
SLMTA MODULE 6 12
AACCTTIIVVIITTYY SSUUMMMMAARRYY SSHHEEEETT
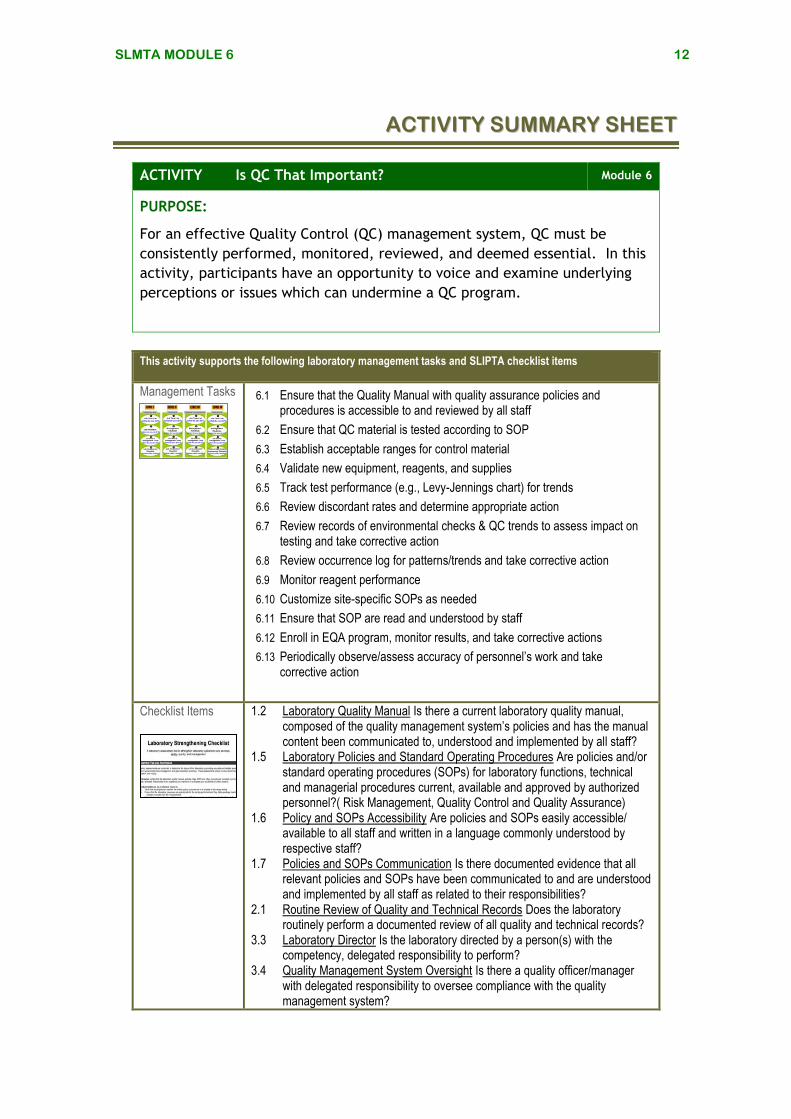
ACTIVITY Is QC That Important? Module 6
PURPOSE:
For an effective Quality Control (QC) management system, QC must be
consistently performed, monitored, reviewed, and deemed essential. In this
activity, participants have an opportunity to voice and examine underlying
perceptions or issues which can undermine a QC program.
This activity supports the following laboratory management tasks and SLIPTA checklist items
Management Tasks 6.1 Ensure that the Quality Manual with quality assurance policies and procedures is accessible to and reviewed by all staff
6.2 Ensure that QC material is tested according to SOP
6.3 Establish acceptable ranges for control material
6.4 Validate new equipment, reagents, and supplies
6.5 Track test performance (e.g., Levy-Jennings chart) for trends
6.6 Review discordant rates and determine appropriate action
6.7 Review records of environmental checks & QC trends to assess impact on testing and take corrective action
6.8 Review occurrence log for patterns/trends and take corrective action
6.9 Monitor reagent performance
6.10 Customize site-specific SOPs as needed
6.11 Ensure that SOP are read and understood by staff
6.12 Enroll in EQA program, monitor results, and take corrective actions
6.13 Periodically observe/assess accuracy of personnel’s work and take corrective action
Checklist Items
1.2 Laboratory Quality Manual Is there a current laboratory quality manual, composed of the quality management system’s policies and has the manual content been communicated to, understood and implemented by all staff?
1.5 Laboratory Policies and Standard Operating Procedures Are policies and/or standard operating procedures (SOPs) for laboratory functions, technical and managerial procedures current, available and approved by authorized personnel?( Risk Management, Quality Control and Quality Assurance)
1.6 Policy and SOPs Accessibility Are policies and SOPs easily accessible/ available to all staff and written in a language commonly understood by respective staff?
1.7 Policies and SOPs Communication Is there documented evidence that all relevant policies and SOPs have been communicated to and are understood and implemented by all staff as related to their responsibilities?
2.1 Routine Review of Quality and Technical Records Does the laboratory routinely perform a documented review of all quality and technical records?
3.3 Laboratory Director Is the laboratory directed by a person(s) with the competency, delegated responsibility to perform?
3.4 Quality Management System Oversight Is there a quality officer/manager with delegated responsibility to oversee compliance with the quality management system?
SLMTA MODULE 6 13
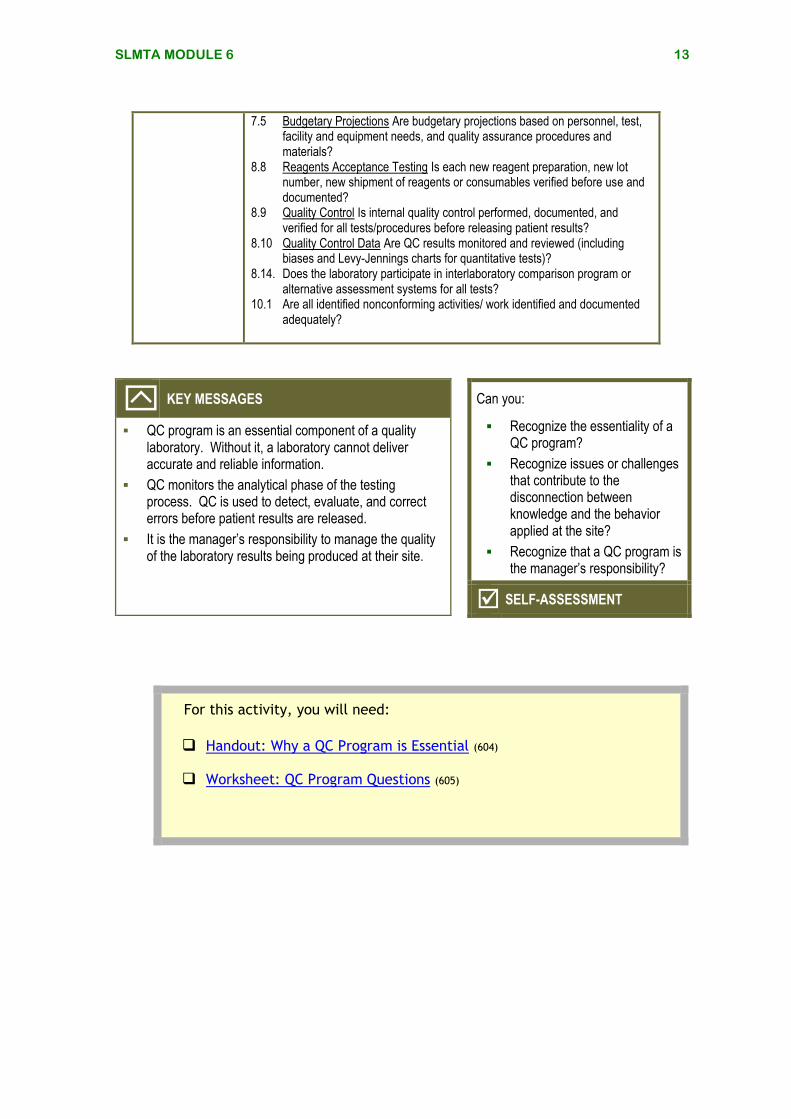
7.5 Budgetary Projections Are budgetary projections based on personnel, test, facility and equipment needs, and quality assurance procedures and materials?
8.8 Reagents Acceptance Testing Is each new reagent preparation, new lot number, new shipment of reagents or consumables verified before use and documented?
8.9 Quality Control Is internal quality control performed, documented, and verified for all tests/procedures before releasing patient results?
8.10 Quality Control Data Are QC results monitored and reviewed (including biases and Levy-Jennings charts for quantitative tests)?
8.14. Does the laboratory participate in interlaboratory comparison program or alternative assessment systems for all tests?
10.1 Are all identified nonconforming activities/ work identified and documented adequately?
KEY MESSAGES QC program is an essential component of a quality
laboratory. Without it, a laboratory cannot deliver accurate and reliable information.
QC monitors the analytical phase of the testing process. QC is used to detect, evaluate, and correct errors before patient results are released.
It is the manager’s responsibility to manage the quality of the laboratory results being produced at their site.
Can you:
Recognize the essentiality of a QC program?
Recognize issues or challenges that contribute to the disconnection between knowledge and the behavior applied at the site?
Recognize that a QC program is the manager’s responsibility?
SELF-ASSESSMENT
For this activity, you will need:
Handout: Why a QC Program is Essential (604)
Worksheet: QC Program Questions (605)

SLMTA MODULE 6 14
Why a QC Program is Essential604
Possible Reasons or Excuses for Not Performing QC
Counter-argument in Support of a QC Program
Cost
QC material is too expensive.
Costs must be understood in the context of quality. There are expenses incurred with a QC program. For many of us, we see QC as expensive especially when we compare the cost of the item to its quantity or size. However, to strive for high quality patient testing, management of high quality laboratory testing systems must include the use of QC processes and procedures. Not only are QC programs worth the expense, they add a cost-savings value for the long term by preventing errors and eliminating waste. When considering costs, the overall cost within the healthcare system must take into account the many hidden costs attributed to inaccurate and unreliable laboratory information. Costs associated with incorrect laboratory results include the following:
o delays in necessary care, o unnecessary care, o inadequate patient management, o inappropriate medical investigation of
nonexistent disease, o complications from unnecessary
treatment, o improper utilization of medications.
If quality improves, waste is reduced, which in turn reduces cost.
Increased costs will make the test too expensive for some (most) patients.
No result will always be better than a wrong result. However, accurate laboratory information is vital. Laboratory services are essential for disease diagnosis, treatment, surveillance, and outbreak investigations in the country’s health system. Availability of diagnostic laboratory confirmation allows the provider to use evidence-based medicine instead of relying on presumptive/empirically-drawn diagnosis to: o differentiate between diseases
indistinguishable by clinical syndrome, o direct appropriate antimicrobial therapy
(inappropriate antimicrobial therapy results in increased drug resistance),
o improve patient care, o conduct accurate infectious disease
surveillance, o direct the country’s public health care policy,
one that is based upon the true disease
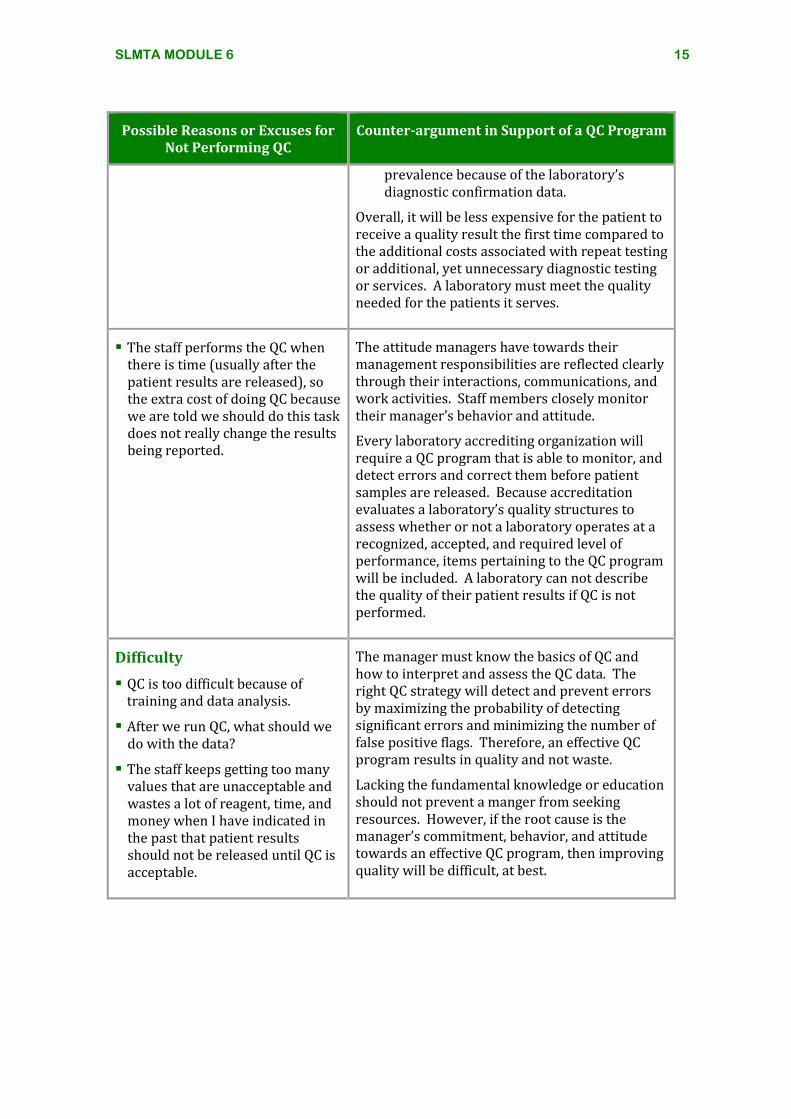
SLMTA MODULE 6 15
Possible Reasons or Excuses for Not Performing QC
Counter-argument in Support of a QC Program
prevalence because of the laboratory’s diagnostic confirmation data.
Overall, it will be less expensive for the patient to receive a quality result the first time compared to the additional costs associated with repeat testing or additional, yet unnecessary diagnostic testing or services. A laboratory must meet the quality needed for the patients it serves.
The staff performs the QC when there is time (usually after the patient results are released), so the extra cost of doing QC because we are told we should do this task does not really change the results being reported.
The attitude managers have towards their management responsibilities are reflected clearly through their interactions, communications, and work activities. Staff members closely monitor their manager’s behavior and attitude.
Every laboratory accrediting organization will require a QC program that is able to monitor, and detect errors and correct them before patient samples are released. Because accreditation evaluates a laboratory’s quality structures to assess whether or not a laboratory operates at a recognized, accepted, and required level of performance, items pertaining to the QC program will be included. A laboratory can not describe the quality of their patient results if QC is not performed.
Difficulty
QC is too difficult because of training and data analysis.
After we run QC, what should we do with the data?
The staff keeps getting too many values that are unacceptable and wastes a lot of reagent, time, and money when I have indicated in the past that patient results should not be released until QC is acceptable.
The manager must know the basics of QC and how to interpret and assess the QC data. The right QC strategy will detect and prevent errors by maximizing the probability of detecting significant errors and minimizing the number of false positive flags. Therefore, an effective QC program results in quality and not waste.
Lacking the fundamental knowledge or education should not prevent a manger from seeking resources. However, if the root cause is the manager’s commitment, behavior, and attitude towards an effective QC program, then improving quality will be difficult, at best.
SLMTA MODULE 6 16
Possible Reasons or Excuses for Not Performing QC
Counter-argument in Support of a QC Program
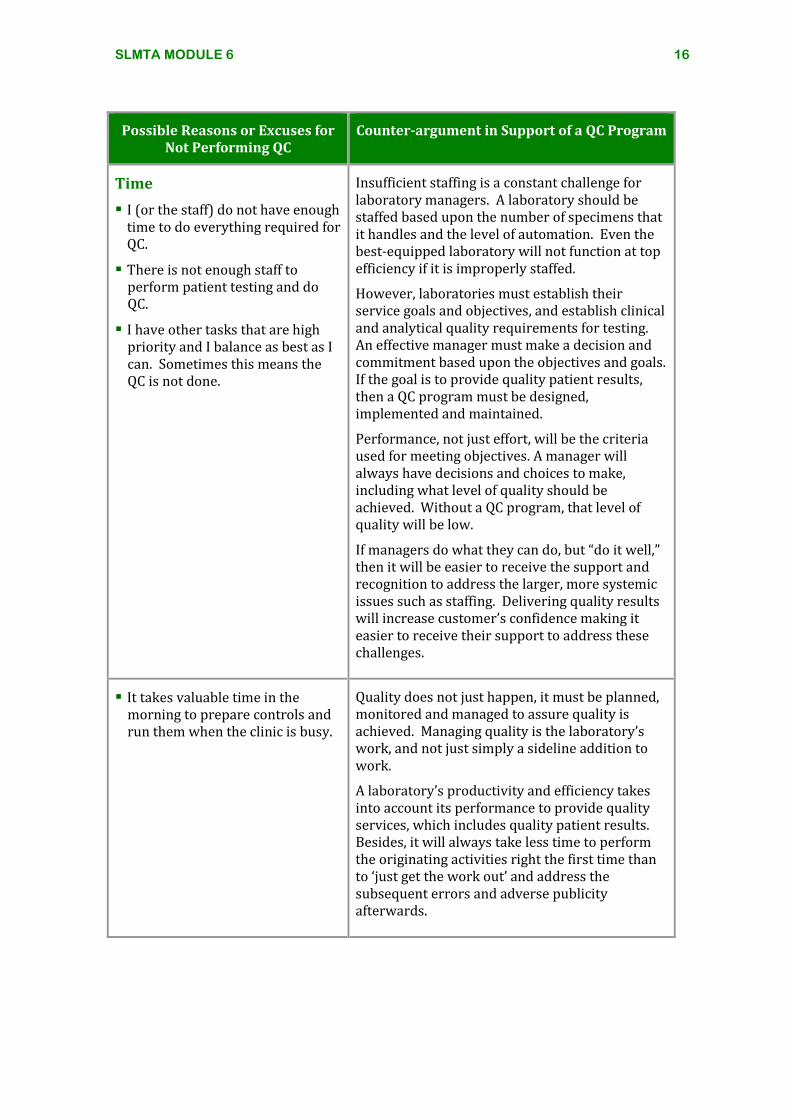
Time
I (or the staff) do not have enough time to do everything required for QC.
There is not enough staff to perform patient testing and do QC.
I have other tasks that are high priority and I balance as best as I can. Sometimes this means the QC is not done.
Insufficient staffing is a constant challenge for laboratory managers. A laboratory should be staffed based upon the number of specimens that it handles and the level of automation. Even the best-equipped laboratory will not function at top efficiency if it is improperly staffed.
However, laboratories must establish their service goals and objectives, and establish clinical and analytical quality requirements for testing. An effective manager must make a decision and commitment based upon the objectives and goals. If the goal is to provide quality patient results, then a QC program must be designed, implemented and maintained.
Performance, not just effort, will be the criteria used for meeting objectives. A manager will always have decisions and choices to make, including what level of quality should be achieved. Without a QC program, that level of quality will be low.
If managers do what they can do, but “do it well,” then it will be easier to receive the support and recognition to address the larger, more systemic issues such as staffing. Delivering quality results will increase customer’s confidence making it easier to receive their support to address these challenges.
It takes valuable time in the morning to prepare controls and run them when the clinic is busy.
Quality does not just happen, it must be planned, monitored and managed to assure quality is achieved. Managing quality is the laboratory’s work, and not just simply a sideline addition to work.
A laboratory’s productivity and efficiency takes into account its performance to provide quality services, which includes quality patient results. Besides, it will always take less time to perform the originating activities right the first time than to ‘just get the work out’ and address the subsequent errors and adverse publicity afterwards.

SLMTA MODULE 6 17
Possible Reasons or Excuses for Not Performing QC
Counter-argument in Support of a QC Program
If I perform the instrument maintenance and QC, then I can test only 80 patients instead of 100. Are you saying those 20 patients’ results are not important?
Refer to the second bulleted point under “Cost.”
The providers get angry when the results are delayed because the QC is unacceptable.
Customers are already complaining about the wait time for their tests.
Doing it faster won’t satisfy the customer’s needs if the test is inaccurate. Listening to the voice of the customer does not mean doing exactly what the customer says. We need to hear the words and then interpret/translate to understand and fix the problem. A customer will never say, “Just give me the wrong result if it is quicker.”
Customers will always demand faster turn-around-times, while simultaneously inferring that it must be a quality result. It is the laboratory’s responsibility to deliver the quality in conformance to the requirements of their customers. Additionally, incorrect test results erode the customer’s confidence with laboratory services.
Supplies/Facility
Consumables reagents/supplies that could have been used for patient testing are no longer available if used for QC, and I will run out of supplies.
We must meet the quality needed for the patient results we report. The use of reagents and supplies for QC testing must be understood in the context of quality. This consumption for QC is to prevent problems and provide quality results. Additionally, the costs of poor quality results in waste to other healthcare areas; waste of time and effort by physicians and nurses, and waste of resources that were unnecessarily consumed (i.e. medications, occupied hospital beds, etc).
I have insufficient storage space (or equipment such as refrigerators) for QC material.
Sufficient storage space is a challenge for many laboratories. However, even when laboratories receive QC material with test kits stored at room temperature, the QC is not performed or monitored as should be.
In those instances, the challenge can become a convenient excuse. Essentially, there are 2 actions, excuses or performance. If a laboratory has QC material available for only some of the tests offered, then design, implement, and maintain a QC program for these tests. Create the needed polices and procedures for a QC
SLMTA MODULE 6 18
Possible Reasons or Excuses for Not Performing QC
Counter-argument in Support of a QC Program
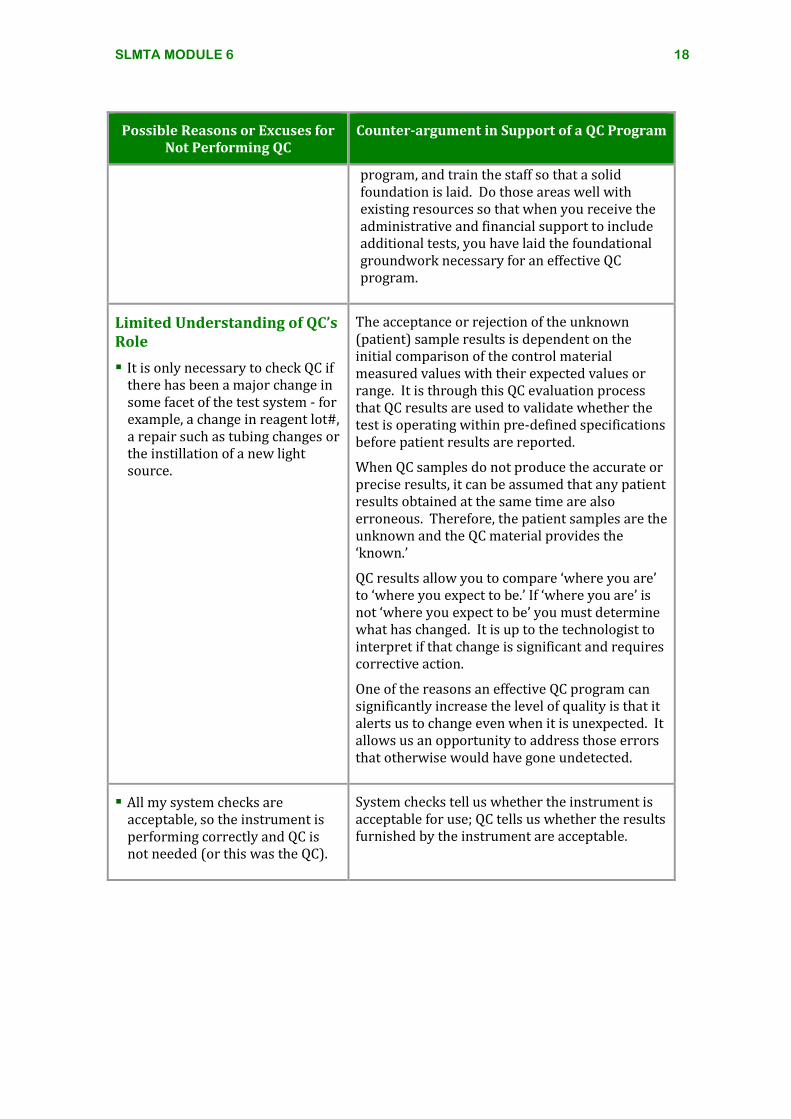
program, and train the staff so that a solid foundation is laid. Do those areas well with existing resources so that when you receive the administrative and financial support to include additional tests, you have laid the foundational groundwork necessary for an effective QC program.
Limited Understanding of QC’s Role
It is only necessary to check QC if there has been a major change in some facet of the test system - for example, a change in reagent lot#, a repair such as tubing changes or the instillation of a new light source.
The acceptance or rejection of the unknown (patient) sample results is dependent on the initial comparison of the control material measured values with their expected values or range. It is through this QC evaluation process that QC results are used to validate whether the test is operating within pre-defined specifications before patient results are reported.
When QC samples do not produce the accurate or precise results, it can be assumed that any patient results obtained at the same time are also erroneous. Therefore, the patient samples are the unknown and the QC material provides the ‘known.’
QC results allow you to compare ‘where you are’ to ‘where you expect to be.’ If ‘where you are’ is not ‘where you expect to be’ you must determine what has changed. It is up to the technologist to interpret if that change is significant and requires corrective action.
One of the reasons an effective QC program can significantly increase the level of quality is that it alerts us to change even when it is unexpected. It allows us an opportunity to address those errors that otherwise would have gone undetected.
All my system checks are acceptable, so the instrument is performing correctly and QC is not needed (or this was the QC).
System checks tell us whether the instrument is acceptable for use; QC tells us whether the results furnished by the instrument are acceptable.
SLMTA MODULE 6 19
Possible Reasons or Excuses for Not Performing QC
Counter-argument in Support of a QC Program
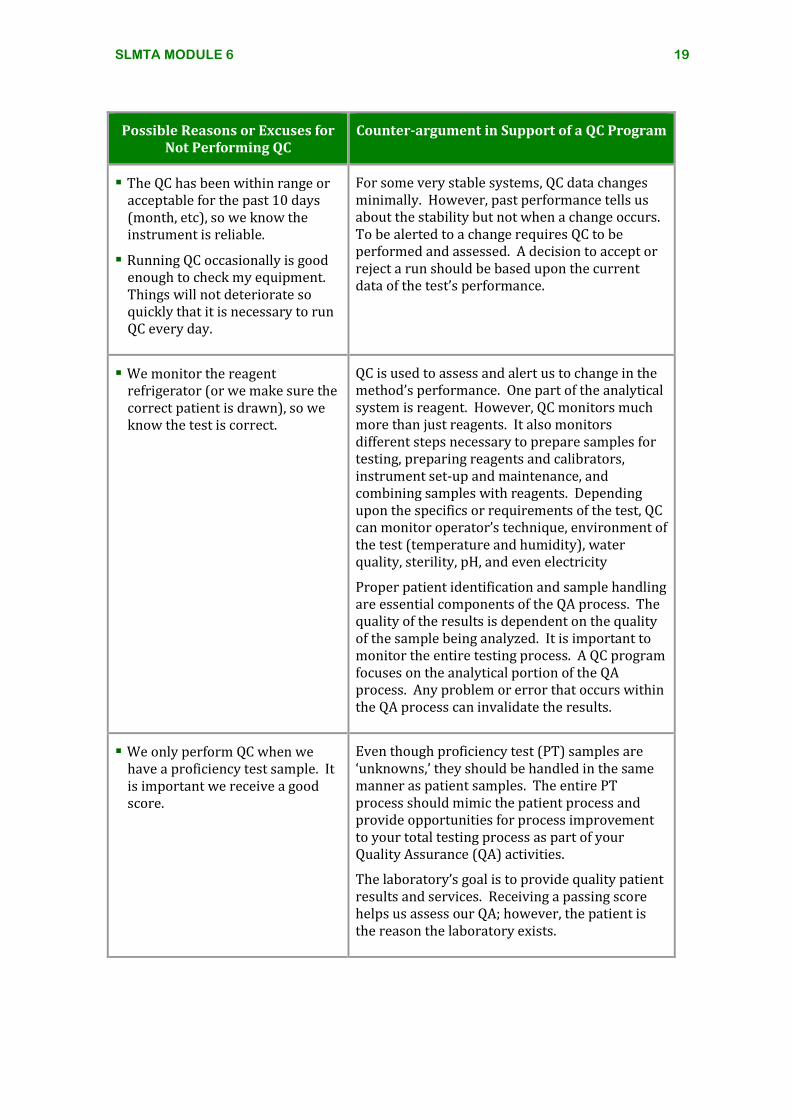
The QC has been within range or acceptable for the past 10 days (month, etc), so we know the instrument is reliable.
Running QC occasionally is good enough to check my equipment. Things will not deteriorate so quickly that it is necessary to run QC every day.
For some very stable systems, QC data changes minimally. However, past performance tells us about the stability but not when a change occurs. To be alerted to a change requires QC to be performed and assessed. A decision to accept or reject a run should be based upon the current data of the test’s performance.
We monitor the reagent refrigerator (or we make sure the correct patient is drawn), so we know the test is correct.
QC is used to assess and alert us to change in the method’s performance. One part of the analytical system is reagent. However, QC monitors much more than just reagents. It also monitors different steps necessary to prepare samples for testing, preparing reagents and calibrators, instrument set-up and maintenance, and combining samples with reagents. Depending upon the specifics or requirements of the test, QC can monitor operator’s technique, environment of the test (temperature and humidity), water quality, sterility, pH, and even electricity
Proper patient identification and sample handling are essential components of the QA process. The quality of the results is dependent on the quality of the sample being analyzed. It is important to monitor the entire testing process. A QC program focuses on the analytical portion of the QA process. Any problem or error that occurs within the QA process can invalidate the results.
We only perform QC when we have a proficiency test sample. It is important we receive a good score.
Even though proficiency test (PT) samples are ‘unknowns,’ they should be handled in the same manner as patient samples. The entire PT process should mimic the patient process and provide opportunities for process improvement to your total testing process as part of your Quality Assurance (QA) activities.
The laboratory’s goal is to provide quality patient results and services. Receiving a passing score helps us assess our QA; however, the patient is the reason the laboratory exists.
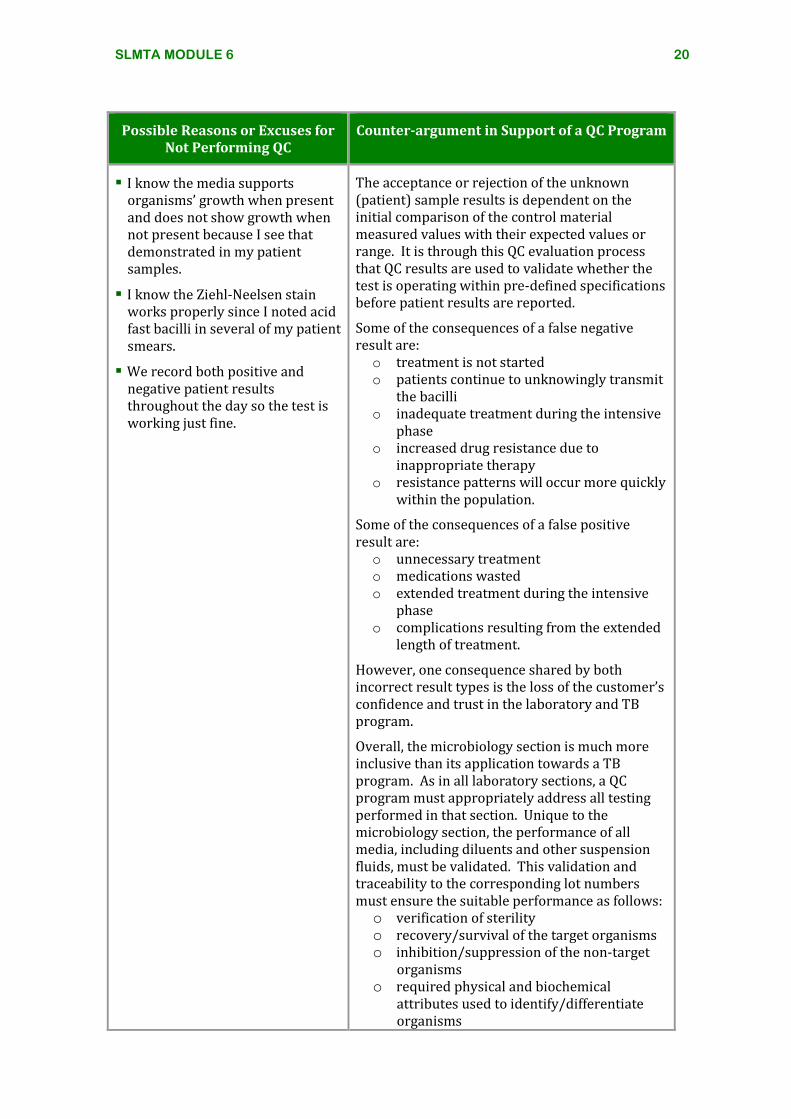
SLMTA MODULE 6 20
Possible Reasons or Excuses for Not Performing QC
Counter-argument in Support of a QC Program
I know the media supports organisms’ growth when present and does not show growth when not present because I see that demonstrated in my patient samples.
I know the Ziehl-Neelsen stain works properly since I noted acid fast bacilli in several of my patient smears.
We record both positive and negative patient results throughout the day so the test is working just fine.
The acceptance or rejection of the unknown (patient) sample results is dependent on the initial comparison of the control material measured values with their expected values or range. It is through this QC evaluation process that QC results are used to validate whether the test is operating within pre-defined specifications before patient results are reported.
Some of the consequences of a false negative result are: o treatment is not started o patients continue to unknowingly transmit
the bacilli o inadequate treatment during the intensive
phase o increased drug resistance due to
inappropriate therapy o resistance patterns will occur more quickly
within the population.
Some of the consequences of a false positive result are: o unnecessary treatment o medications wasted o extended treatment during the intensive
phase o complications resulting from the extended
length of treatment.
However, one consequence shared by both incorrect result types is the loss of the customer’s confidence and trust in the laboratory and TB program.
Overall, the microbiology section is much more inclusive than its application towards a TB program. As in all laboratory sections, a QC program must appropriately address all testing performed in that section. Unique to the microbiology section, the performance of all media, including diluents and other suspension fluids, must be validated. This validation and traceability to the corresponding lot numbers must ensure the suitable performance as follows: o verification of sterility o recovery/survival of the target organisms o inhibition/suppression of the non-target
organisms o required physical and biochemical
attributes used to identify/differentiate organisms
SLMTA MODULE 6 21
Possible Reasons or Excuses for Not Performing QC
Counter-argument in Support of a QC Program
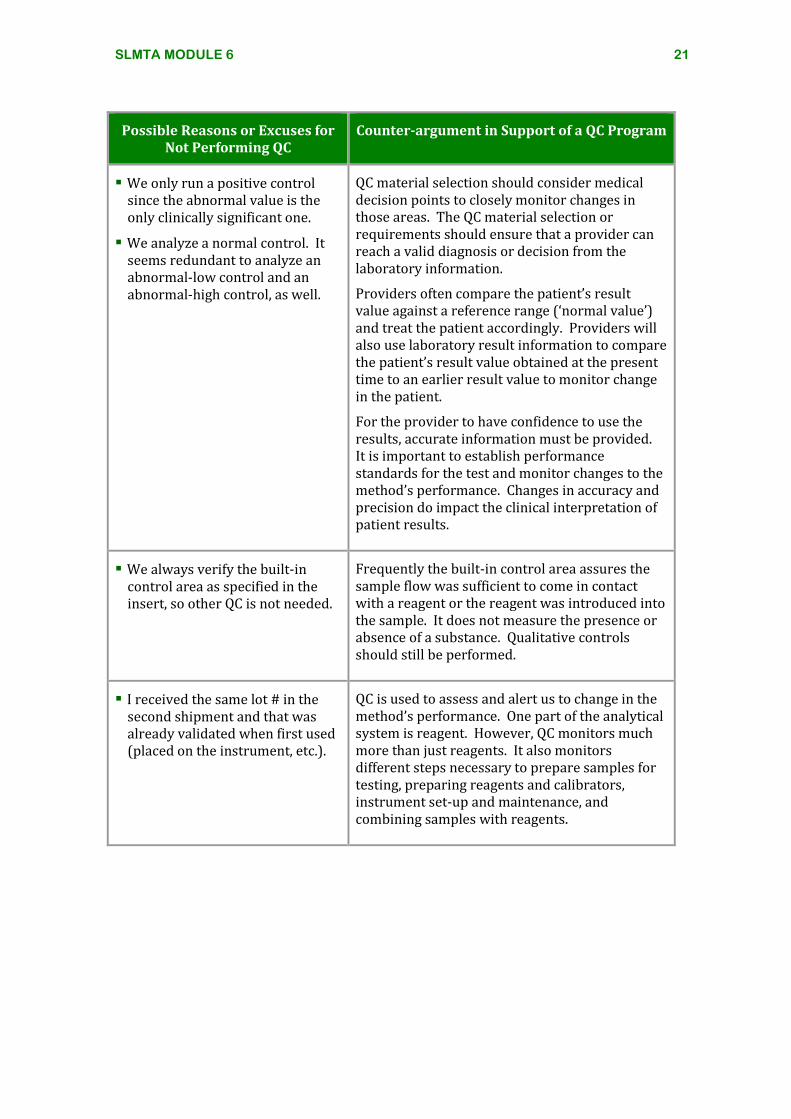
We only run a positive control since the abnormal value is the only clinically significant one.
We analyze a normal control. It seems redundant to analyze an abnormal-low control and an abnormal-high control, as well.
QC material selection should consider medical decision points to closely monitor changes in those areas. The QC material selection or requirements should ensure that a provider can reach a valid diagnosis or decision from the laboratory information.
Providers often compare the patient’s result value against a reference range (‘normal value’) and treat the patient accordingly. Providers will also use laboratory result information to compare the patient’s result value obtained at the present time to an earlier result value to monitor change in the patient.
For the provider to have confidence to use the results, accurate information must be provided. It is important to establish performance standards for the test and monitor changes to the method’s performance. Changes in accuracy and precision do impact the clinical interpretation of patient results.
We always verify the built-in control area as specified in the insert, so other QC is not needed.
Frequently the built-in control area assures the sample flow was sufficient to come in contact with a reagent or the reagent was introduced into the sample. It does not measure the presence or absence of a substance. Qualitative controls should still be performed.
I received the same lot # in the second shipment and that was already validated when first used (placed on the instrument, etc.).
QC is used to assess and alert us to change in the method’s performance. One part of the analytical system is reagent. However, QC monitors much more than just reagents. It also monitors different steps necessary to prepare samples for testing, preparing reagents and calibrators, instrument set-up and maintenance, and combining samples with reagents.
SLMTA MODULE 6 22
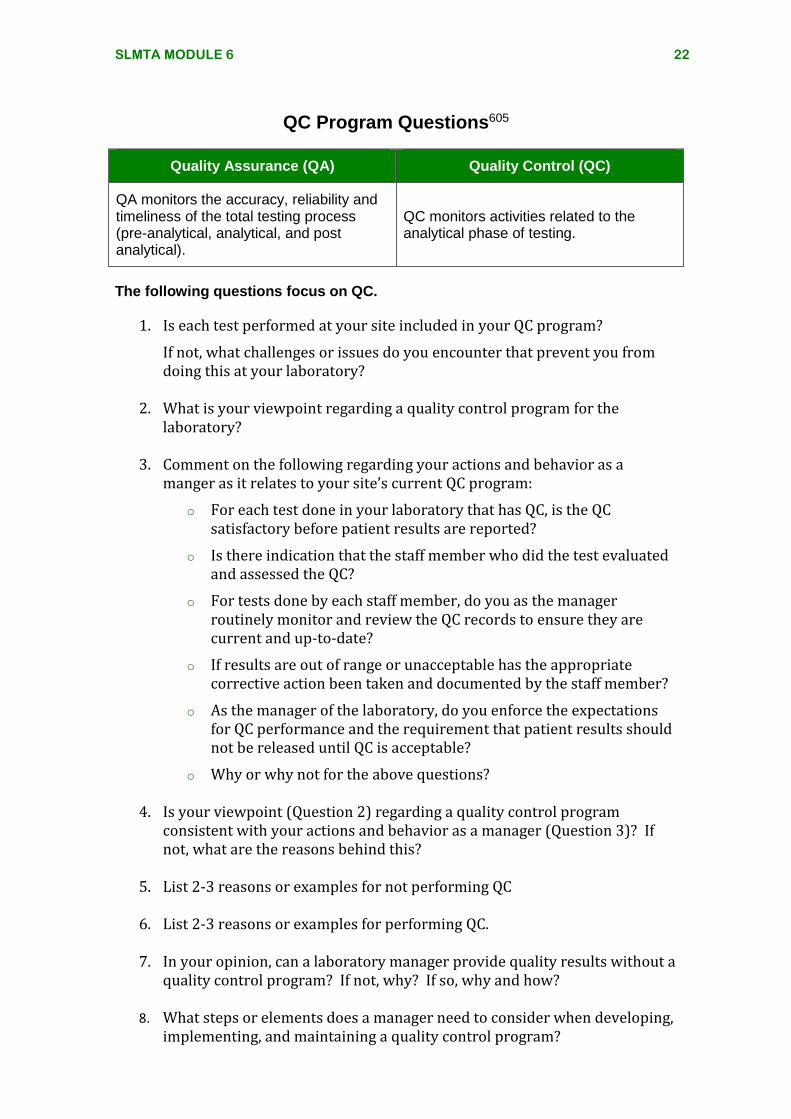
QC Program Questions605
Quality Assurance (QA) Quality Control (QC)
QA monitors the accuracy, reliability and timeliness of the total testing process (pre-analytical, analytical, and post analytical).
QC monitors activities related to the analytical phase of testing.
The following questions focus on QC.
1. Is each test performed at your site included in your QC program?
If not, what challenges or issues do you encounter that prevent you from doing this at your laboratory?
2. What is your viewpoint regarding a quality control program for the
laboratory?
3. Comment on the following regarding your actions and behavior as a manger as it relates to your site’s current QC program:
o For each test done in your laboratory that has QC, is the QC satisfactory before patient results are reported?
o Is there indication that the staff member who did the test evaluated and assessed the QC?
o For tests done by each staff member, do you as the manager routinely monitor and review the QC records to ensure they are current and up-to-date?
o If results are out of range or unacceptable has the appropriate corrective action been taken and documented by the staff member?
o As the manager of the laboratory, do you enforce the expectations for QC performance and the requirement that patient results should not be released until QC is acceptable?
o Why or why not for the above questions?
4. Is your viewpoint (Question 2) regarding a quality control program consistent with your actions and behavior as a manager (Question 3)? If not, what are the reasons behind this?
5. List 2-3 reasons or examples for not performing QC
6. List 2-3 reasons or examples for performing QC.
7. In your opinion, can a laboratory manager provide quality results without a
quality control program? If not, why? If so, why and how?
8. What steps or elements does a manager need to consider when developing, implementing, and maintaining a quality control program?
SLMTA MODULE 6 23
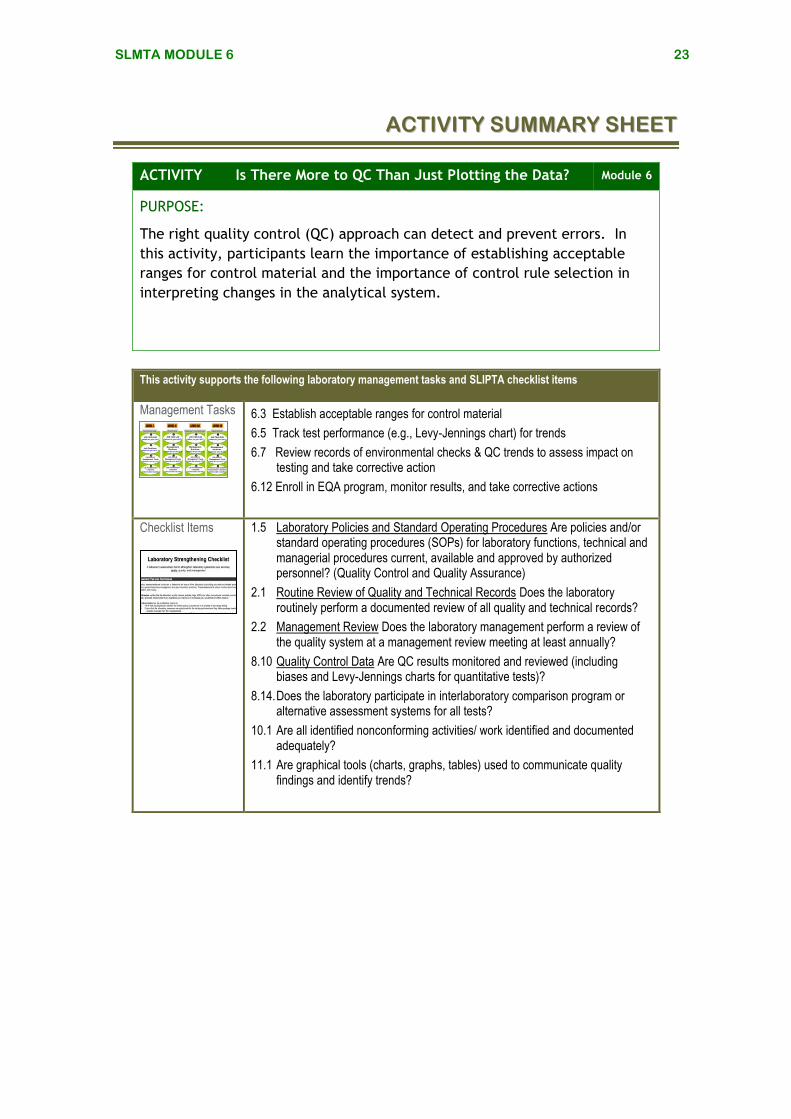
AACCTTIIVVIITTYY SSUUMMMMAARRYY SSHHEEEETT
ACTIVITY Is There More to QC Than Just Plotting the Data? Module 6
PURPOSE:
The right quality control (QC) approach can detect and prevent errors. In
this activity, participants learn the importance of establishing acceptable
ranges for control material and the importance of control rule selection in
interpreting changes in the analytical system.
This activity supports the following laboratory management tasks and SLIPTA checklist items
Management Tasks 6.3 Establish acceptable ranges for control material
6.5 Track test performance (e.g., Levy-Jennings chart) for trends
6.7 Review records of environmental checks & QC trends to assess impact on testing and take corrective action
6.12 Enroll in EQA program, monitor results, and take corrective actions
Checklist Items
1.5 Laboratory Policies and Standard Operating Procedures Are policies and/or standard operating procedures (SOPs) for laboratory functions, technical and managerial procedures current, available and approved by authorized personnel? (Quality Control and Quality Assurance)
2.1 Routine Review of Quality and Technical Records Does the laboratory routinely perform a documented review of all quality and technical records?
2.2 Management Review Does the laboratory management perform a review of the quality system at a management review meeting at least annually?
8.10 Quality Control Data Are QC results monitored and reviewed (including biases and Levy-Jennings charts for quantitative tests)?
8.14. Does the laboratory participate in interlaboratory comparison program or alternative assessment systems for all tests?
10.1 Are all identified nonconforming activities/ work identified and documented adequately?
11.1 Are graphical tools (charts, graphs, tables) used to communicate quality findings and identify trends?

SLMTA MODULE 6 24
KEY MESSAGES Each laboratory must establish acceptable ranges for
their control material based upon the calculated mean and SD.
It is important to use the calculated mean and SD on the QC chart to apply QC rules and strategy.
The selection of QC rules will influence the probability of detecting significant changes in the system.
Can you:
Recognize the importance of establishing QC ranges specific to their instrument?
Plot QC data onto a Levy-Jennings Chart?
Recognize how graphical charts are easier to interpret and assess the method’s stability?
Recognize the role QC rule selection plays in interpreting control results?
SELF-ASSESSMENT
For this activity, you will need:
Worksheet 1: Normal Control (606)
Worksheet 2: Data Points (607)
Worksheet 3: L-J Charts (608)
Job Aid 1: PT General Guidelines (609)
Job Aid 2: PT Checklist (610)
SLMTA MODULE 6 25
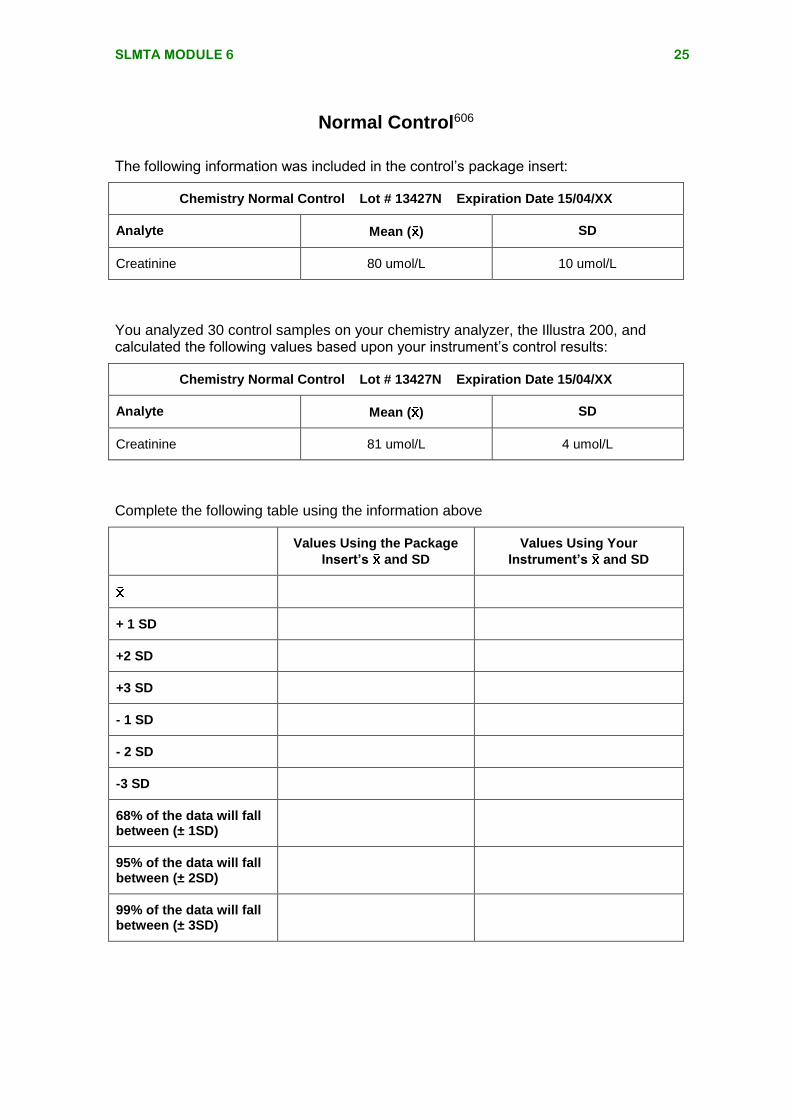
Normal Control606
The following information was included in the control’s package insert:
Chemistry Normal Control Lot # 13427N Expiration Date 15/04/XX
Analyte Mean ( ) SD
Creatinine 80 umol/L 10 umol/L
You analyzed 30 control samples on your chemistry analyzer, the Illustra 200, and calculated the following values based upon your instrument’s control results:
Chemistry Normal Control Lot # 13427N Expiration Date 15/04/XX
Analyte Mean ( ) SD
Creatinine 81 umol/L 4 umol/L
Complete the following table using the information above
Values Using the Package
Insert’s and SD
Values Using Your
Instrument’s and SD
+ 1 SD
+2 SD
+3 SD
- 1 SD
- 2 SD
-3 SD
68% of the data will fall between (± 1SD)
95% of the data will fall between (± 2SD)
99% of the data will fall between (± 3SD)
SLMTA MODULE 6 26
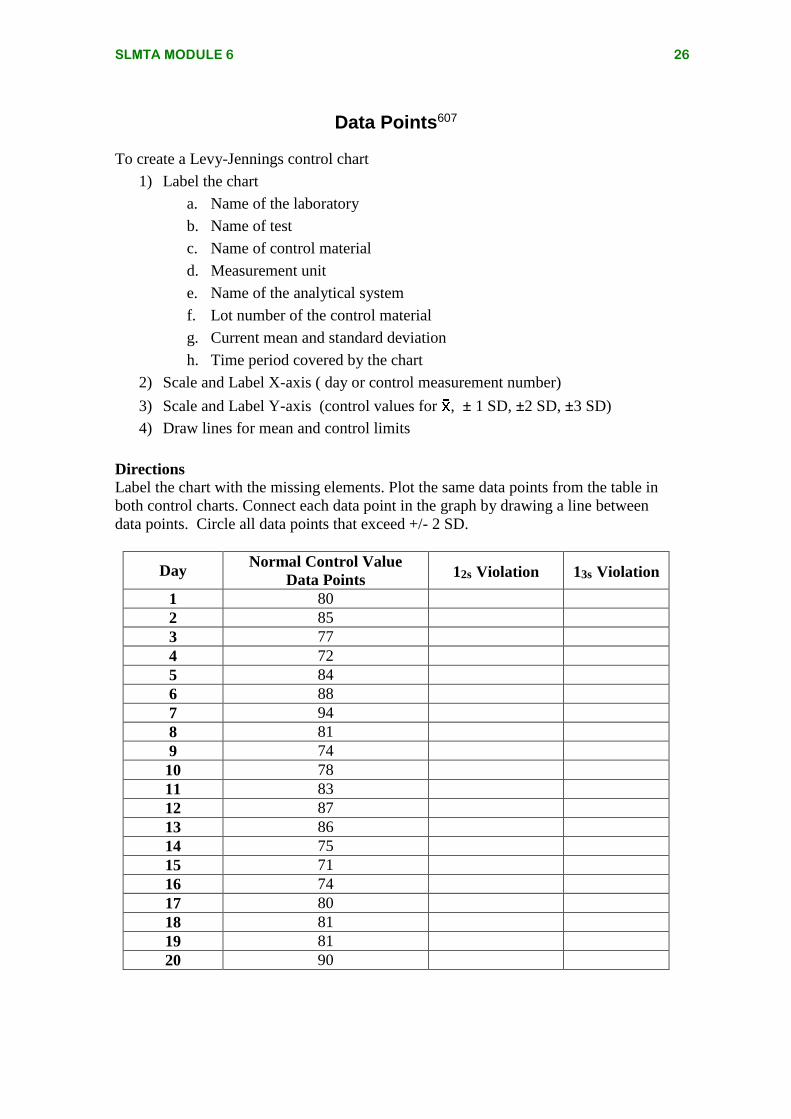
Data Points607
To create a Levy-Jennings control chart
1) Label the chart
a. Name of the laboratory
b. Name of test
c. Name of control material
d. Measurement unit
e. Name of the analytical system
f. Lot number of the control material
g. Current mean and standard deviation
h. Time period covered by the chart
2) Scale and Label X-axis ( day or control measurement number)
3) Scale and Label Y-axis (control values for , ± 1 SD, ±2 SD, ±3 SD)
4) Draw lines for mean and control limits
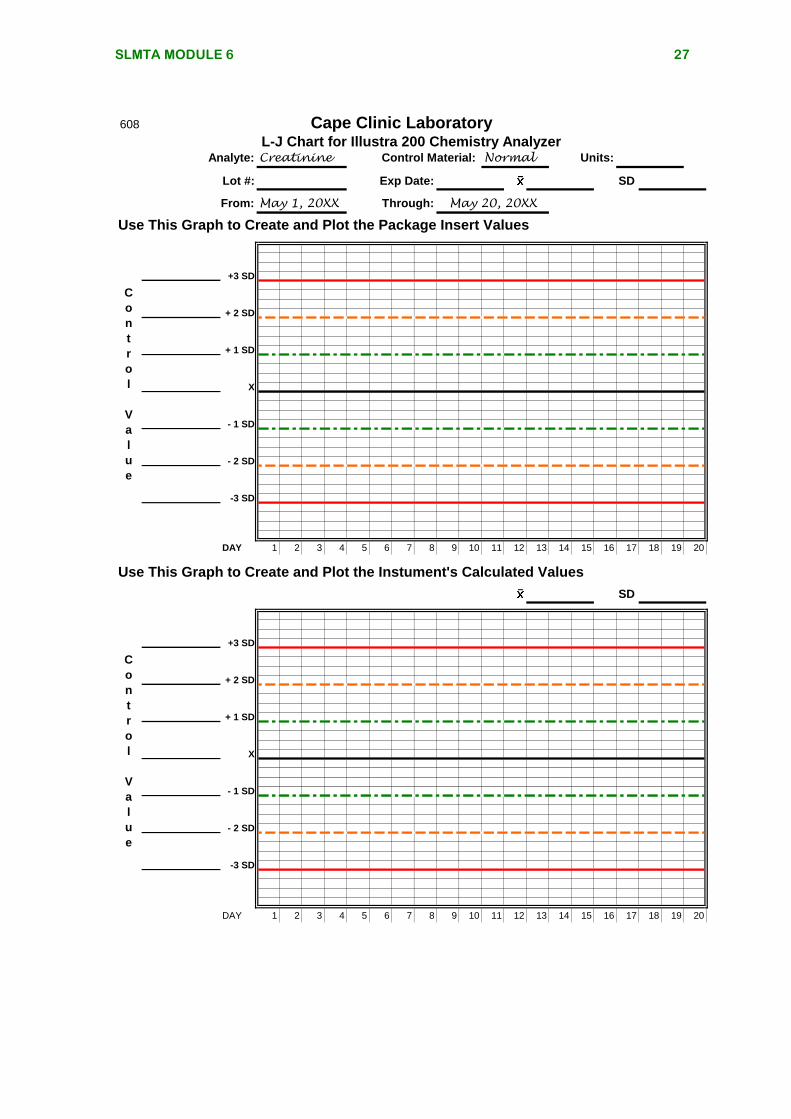
Directions
Label the chart with the missing elements. Plot the same data points from the table in
both control charts. Connect each data point in the graph by drawing a line between
data points. Circle all data points that exceed +/- 2 SD.
Day Normal Control Value
Data Points 12s Violation 13s Violation
1 80
2 85
3 77
4 72
5 84
6 88
7 94
8 81
9 74
10 78
11 83
12 87
13 86
14 75
15 71
16 74
17 80
18 81
19 81
20 90
SLMTA MODULE 6 27
608 Cape Clinic LaboratoryL-J Chart for Illustra 200 Chemistry Analyzer
Analyte:
Lot #: SD
Use This Graph to Create and Plot the Package Insert Values
+3 SD
+ 2 SD
+ 1 SD
X
- 1 SD
- 2 SD
-3 SD
DAY 1 2 3 4 5 6 7 8 9 10 11 12 13 14 15 16 17 18 19 20
SD
+3 SD
+ 2 SD
+ 1 SD
X
- 1 SD
- 2 SD
-3 SD
DAY 1 2 3 4 5 6 7 8 9 10 11 12 13 14 15 16 17 18 19 20
Exp Date:
Units:Creatinine Control Material: Normal
C
o
n
t
r
o
l
V
a
l
u
e
From: May 1, 20XX Through:
C
o
n
t
r
o
l
V
a
l
u
e
Use This Graph to Create and Plot the Instument's Calculated Values
May 20, 20XX
SLMTA MODULE 6 28
General Guidelines for Proficiency Testing609
Laboratory proficiency testing (PT) is an essential element of laboratory quality assurance. Proficiency testing is an independent and unbiased assessment of the performance of all aspects of the laboratory, both human and hardware. Proficiency testing provides an assessment of the validity of testing in your laboratory. Handling Your PT Survey Pre-analytical
Note the date of receipt for your shipment Immediately inspect and reconcile the contents of your shipment with
the accompanying paperwork Are all required specimens available? Is the quality and appearance of the specimens acceptable?
o Store the shipment properly o Note due date of results o Reconstitute specimens with volumetric pipettes and correct
diluent o Mix samples well before analyzing
Analytical Analyze specimens at correct temperature. If shipment was stored in
the refrigerator, specimens may need to come to room temperature before testing.
Always refer to your survey instructions for storage and specimen handling.
Analyze PT specimens in the same fashion as patient specimens Rotate testing responsibility for PT specimens between all laboratory
personnel that are routinely performing the analysis in your laboratory
Perform PT analysis well before due date of results Post-Analytical
Assure that your laboratory’s results are reported according to the PT provider’s instructions
Review results for clerical errors on answer sheet Retain a copy of answer sheet for your records. Attach all raw data
and the instrument print-out to the answer sheet. If possible, retain specimens in freezer for confirmatory testing if
needed Receipt of Results
Review your results with your peer grouping Have Laboratory Director and Supervisor review and sign results Review results with testing personnel. Retain a copy for competency
assessment and place into personnel record Investigate any failed responses and complete an EQA Failure
Checklist assessment. Follow-up with remedial actions if indicated
SLMTA MODULE 6 29
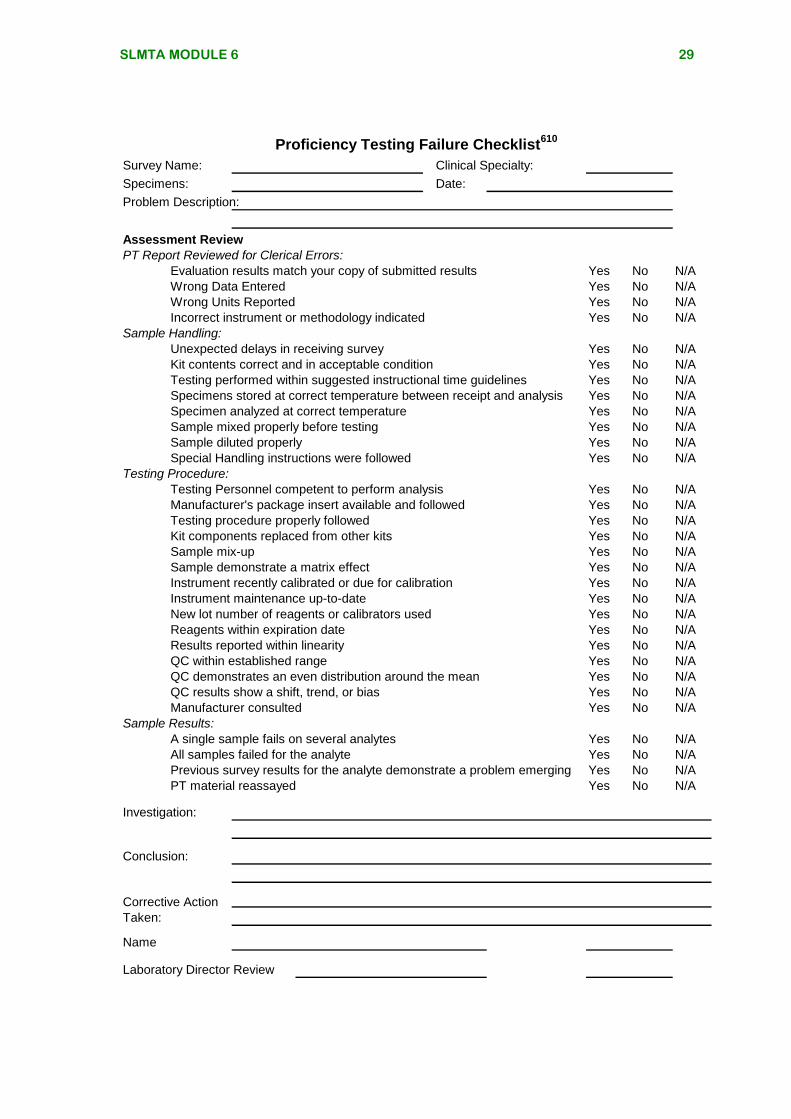
Proficiency Testing Failure Checklist610
Survey Name: Clinical Specialty:
Specimens: Date:
Problem Description:
Assessment Review
PT Report Reviewed for Clerical Errors:
Evaluation results match your copy of submitted results Yes No N/A
Wrong Data Entered Yes No N/A
Wrong Units Reported Yes No N/A
Incorrect instrument or methodology indicated Yes No N/A
Sample Handling:
Unexpected delays in receiving survey Yes No N/A
Kit contents correct and in acceptable condition Yes No N/A
Testing performed within suggested instructional time guidelines Yes No N/A
Specimens stored at correct temperature between receipt and analysis Yes No N/A
Specimen analyzed at correct temperature Yes No N/A
Sample mixed properly before testing Yes No N/A
Sample diluted properly Yes No N/A
Special Handling instructions were followed Yes No N/A
Testing Procedure:
Testing Personnel competent to perform analysis Yes No N/A
Manufacturer's package insert available and followed Yes No N/A
Testing procedure properly followed Yes No N/A
Kit components replaced from other kits Yes No N/A
Sample mix-up Yes No N/A
Sample demonstrate a matrix effect Yes No N/A
Instrument recently calibrated or due for calibration Yes No N/A
Instrument maintenance up-to-date Yes No N/A
New lot number of reagents or calibrators used Yes No N/A
Reagents within expiration date Yes No N/A
Results reported within linearity Yes No N/A
QC within established range Yes No N/A
QC demonstrates an even distribution around the mean Yes No N/A
QC results show a shift, trend, or bias Yes No N/A
Manufacturer consulted Yes No N/A
Sample Results:
A single sample fails on several analytes Yes No N/A
All samples failed for the analyte Yes No N/A
Previous survey results for the analyte demonstrate a problem emerging Yes No N/A
PT material reassayed Yes No N/A
Investigation:
Conclusion:
Name
Laboratory Director Review
Corrective Action
Taken: