additional information about the battle with the friar has...
TRANSCRIPT

BACKGROUND, Centuries ago, the Arch Magi Orta was a master all things arcane. Orta’s power was matched only by a desire to gain more. Such was his greed that he searched other realms seeking ways to increase his already vast supply of magic. Using some kind of portal, he ventured to other realms seeking to steal that which he could not purchase. Most of these realms were no match for Orta and were quickly looted. One realm, however, was in the middle of a great war. Orta witnessed devastation, the likes of which he’d never before seen. Great was the pain and suffering in this place, but this was not his fight, so he and returned home. Evil follows evil, or so they say, and unbeknownst to Orta, he was followed. This new Horde of evil could not believe it’s great fortune. For here was a new realm of great beauty and wealth. Legends say that a great battle took place, a battle between the Horde and Orta. Little is known about the battle or the evil Horde. History shows no account of Orta after the battle. What is known is the location of Orta’s Mound. HISTORY, Orta was a neutral evil arch mage who was obsessed with power. This obsession often put him at odds with those who could not defend themselves. Orta used a Well of Many Worlds to enter the world of Dar-Khazad. In those days, Dar-Khazad was losing a terrible war against the Mingland Horde. When he saw the devastation of Dar-Khazad, Orta decided to return home before he was noticed. Unfortunately, he was observed and followed back to the world or Oerth, by Horde Friar Palon and his horde followers. Palon was amazed by the beauty and wealth of Oerth and decided to attack Orta that evening. Friar Palon and his Horde followers attacked Orta, but Orta was a wizard of great power and was able to fend off the initial attack. As wave after wave of Horde creatures attacked, Orta realized he needed help so he teleported to the Cloud Palace of St. Krill Vesner seeking help. To his dismay, St. Vesner was not home, so he plead his case to Krill’s wife Melody, a powerful wizard in her own right. Melody dispatched the palace’s guards, and . . . Additional information about the battle with the Friar has been hidden you may invent your own version of the battle and the fate of the Friar

ORTA’S MOUND Orta’s mound is a medium-sized hillock of stone that overlooks Lake Quag. Due to the terrain in the area, Orta’s mound is not easy to get to by land and is most easily accessible by taking a boat across Lake Quag. However, the keep lies about ¾ the way up the hillock, which is surrounded by steep cliffs on all four sides. The way up to the keep is a rickety set of wood stairs that follow the side of the cliff. Orta’s mound is a 3 level complex that hides a great evil. The current inhabitants of Orta’s Mound do not know the history behind the sword, the door, or what is trapped within, but Alex, their leader, has gifted insight and has elected not to disturb the door or the sword. While Alex, Morgan, Keisha, and Shelvina have cleared and inhabited the first 2 levels of the complex, they ventured into level 3 of the complex far enough to see a set of rune carved steel gray doors that are being held closed by some type of holy power that is being radiated from a sword that has been plunged, tip first, into the floor a few feet in front of the door. The door is engraved with warnings written in the common tongue. “Do not release the evil contained here. Stephen Strong” “Great was the battle that stopped the Pryor. Canyo Strong” “Do not wake that which sleeps. Eli the Iceman” “Held behind these doors is a minion of the Horde. Beware!! Kamos Dagi”

Background
3
THE ADVENTURE
Phase 1: The party has come into possession of a note (See Visual Aid) that speaks of Darkness
and The Light. The party must travel, most likely by teleporting, to the City of Traft to discover
the Cairn. If they ask around, they will discover 3 likely locations of the clue, The Willow Hills
cemetery, the Peaceful Sleep cemetery, and the Catacombs. The Willow Hills Cemetery is on the
outside of Traft to the north of the city. The Peaceful Sleep cemetery is in the center of town, and
the Catacombs are west of Traft about a day’s travel.
Phase 2: After leaving the City of Traft, the party must hire a boat to take them across the lake,
which will be a 3 or 4 day trip.
Phase 3: After arriving across the lake, the party must travel inland to the Bastian of evil knows
as Orta’s Mound. When they arrive at Orta’s Mound they will be surprised to discover an old
keep that is being renovated by a group of low level adventures: Alex Swift, a paladin or Tyr,
Morgan a Ranger, Keisha a Priestess of Odin, and Shelvina an Elven Mage. These adventurers
have hired a group of labors to help with the construction of the keep. Alex is against letting the
party enter the ruins as there is great evil imprisoned on the 3rd level of the complex and he fears
that if the party disturbs it, the evil will be unleashed upon the world.
There is a secret passage to the 3rd level and it was discovered by one of the labors a few days
ago. This man Kimba Rymer, will show the party the secret entrance of a fee of 100 gp’s.
NOTES:
PEACEFUL SLEEP CEMETERY
The Peaceful Sleep Cemetery is located in the center of Traft. The cemetery in protected by a 5
feet tall stone wall that is in good repair. The cemetery is well groomed.
NOTES:
Orta’s Mound
4
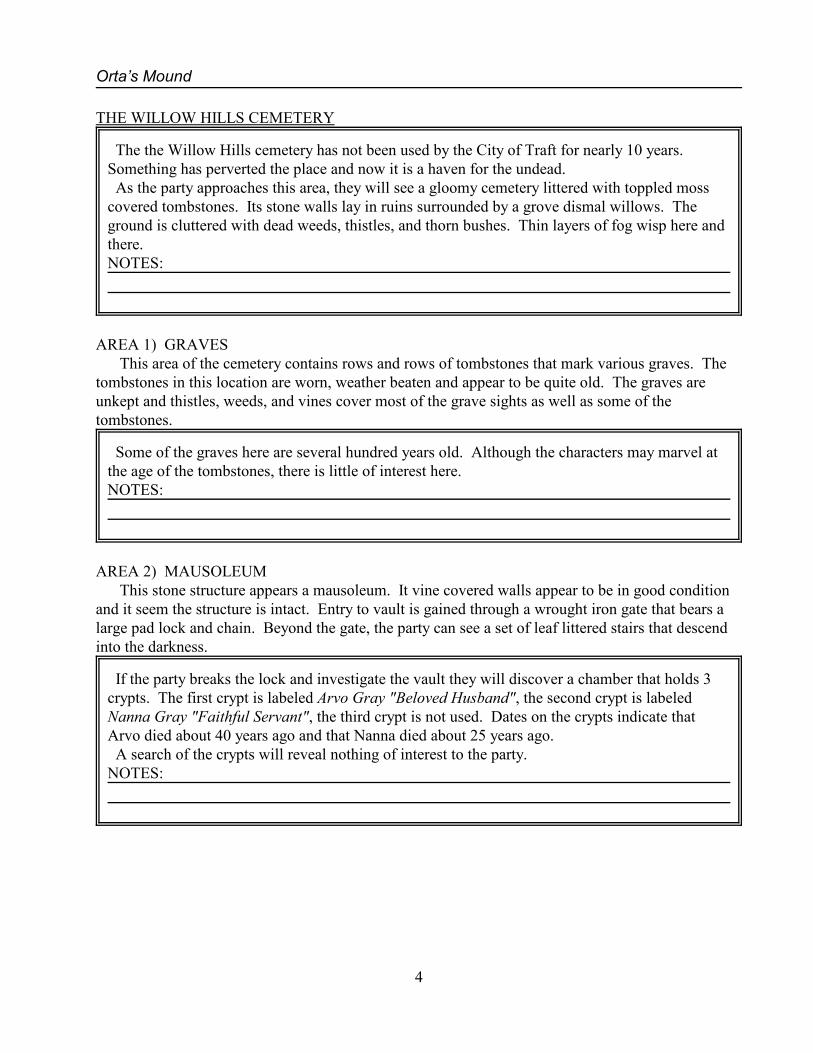
THE WILLOW HILLS CEMETERY
The the Willow Hills cemetery has not been used by the City of Traft for nearly 10 years.
Something has perverted the place and now it is a haven for the undead.
As the party approaches this area, they will see a gloomy cemetery littered with toppled moss
covered tombstones. Its stone walls lay in ruins surrounded by a grove dismal willows. The
ground is cluttered with dead weeds, thistles, and thorn bushes. Thin layers of fog wisp here and
there.
NOTES:
AREA 1) GRAVES
This area of the cemetery contains rows and rows of tombstones that mark various graves. The
tombstones in this location are worn, weather beaten and appear to be quite old. The graves are
unkept and thistles, weeds, and vines cover most of the grave sights as well as some of the
tombstones.
Some of the graves here are several hundred years old. Although the characters may marvel at
the age of the tombstones, there is little of interest here.
NOTES:
AREA 2) MAUSOLEUM
This stone structure appears a mausoleum. It vine covered walls appear to be in good condition
and it seem the structure is intact. Entry to vault is gained through a wrought iron gate that bears a
large pad lock and chain. Beyond the gate, the party can see a set of leaf littered stairs that descend
into the darkness.
If the party breaks the lock and investigate the vault they will discover a chamber that holds 3
crypts. The first crypt is labeled Arvo Gray "Beloved Husband", the second crypt is labeled
Nanna Gray "Faithful Servant", the third crypt is not used. Dates on the crypts indicate that
Arvo died about 40 years ago and that Nanna died about 25 years ago.
A search of the crypts will reveal nothing of interest to the party.
NOTES:

Willow Hills Cemetery
5
AREA 3) GRAVES (EL 7)
This area of the cemetery contains rows and rows of tombstones that mark various graves. The
tombstones in this location are worn, weather beaten and appear to be quite old. The graves are
unkept and thistles, weeds, and vines cover most of the grave sights as well as some of the
tombstones.
Some of the graves here are several hundred years old. Lurking in this area of the cemetery,
hidden in the fog, are 2 Wraiths which will attack the party as they investigate the graves.
WRAITHS (2): 35 Hp’s, 5d12 HD, Mv: Fly 60 ft., Ac:15 (+3 Dex, +2 Deflection), Touch: 15,
Flat-Footed: 12, Medium Undead, Base Attack: +2, Grapple: N/A, Space: 5 ft., Reach: 5 ft., Att:
Incorporeal Touch +5 Melee, Dam: Incorporeal Touch 1-4 plus 1-6 Constitution Drain.
Initiative: +7 (+3 Dex, +4 Improved Initiative). CR: 5. Abilities: Str: -, Dex: 16, Con: -, Int:
14, Wis: 14, Cha: 15. SA: Constitution Drain; anyone struck must make a Fortitude save (DC:
14) or take 1-6 Constitution Drain, Create Spawn. SQ: Darkvision 60 ft, Daylight
Powerlessness, Incorporeal Traits, +2 Turn Resistance, Undead Traits, +2 Turn Resistance,
Unnatural Aura. Alignment: Lawful Evil. Skills: Diplomacy: +6, Hide: +11, Intimidate: +10,
Listen: +12, Search: +10, Sense Motive: +8, Spot: +12, Survival: +2 (+4 following tracks).
Feats: Alertness, Blind-Fight, Combat Reflexes, Improved Initiative. Saves: Fort +1, Ref: +4,
Will: +6. Critical: Incorporeal Touch 20/x2. Wraiths are found on page 258 of the Monster
Manual.
NOTES:
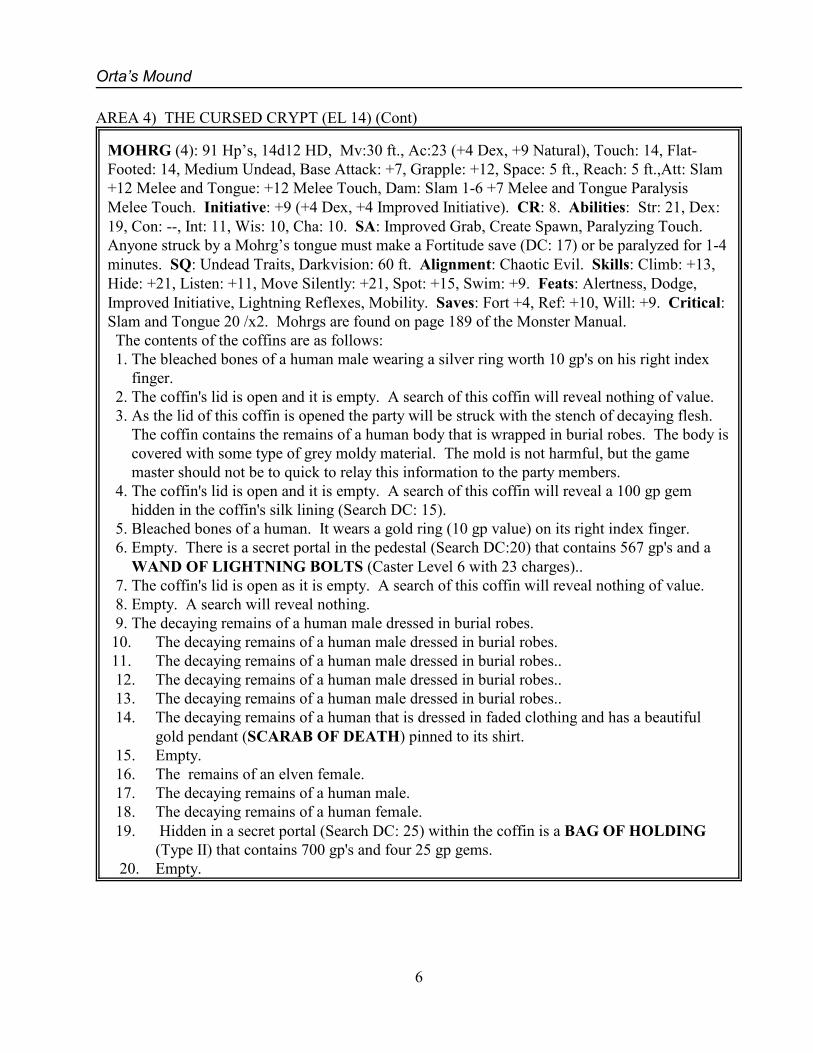
AREA 4) THE CURSED CRYPT (EL 14)
This area is marked only by a large iron door that is set into the ground; similar to that of a fruit
cellar. Once the door is opened the party will see a set of stair leading downward.
The stairs descend to a depth of about the fifty feet. The corridor seem safe enough although the
walls are slightly cracked and the roots of various trees can be seen dangling from some of the
cracks. The air here is humid and musty and it seem that no one has traveled this corridor for quite
sometime.
The stairs end at a large padlocked stone door. Once the door is opened, the party will see a
large crypt with several coffins setting upon stone pedestals, all the lids of the coffins are closed.
The air of death permeates this cursed place. As the party looks into this chamber they will see
several of the coffins beginning to open.
CREATURES: There are a total of 20 coffins setting on stone pedestals. Trapped in this chamber
are 4 Mohrgs which will attack as soon as the room is entered..
Orta’s Mound
6
AREA 4) THE CURSED CRYPT (EL 14) (Cont)
MOHRG (4): 91 Hp’s, 14d12 HD, Mv:30 ft., Ac:23 (+4 Dex, +9 Natural), Touch: 14, Flat-
Footed: 14, Medium Undead, Base Attack: +7, Grapple: +12, Space: 5 ft., Reach: 5 ft.,Att: Slam
+12 Melee and Tongue: +12 Melee Touch, Dam: Slam 1-6 +7 Melee and Tongue Paralysis
Melee Touch. Initiative: +9 (+4 Dex, +4 Improved Initiative). CR: 8. Abilities: Str: 21, Dex:
19, Con: --, Int: 11, Wis: 10, Cha: 10. SA: Improved Grab, Create Spawn, Paralyzing Touch.
Anyone struck by a Mohrg’s tongue must make a Fortitude save (DC: 17) or be paralyzed for 1-4
minutes. SQ: Undead Traits, Darkvision: 60 ft. Alignment: Chaotic Evil. Skills: Climb: +13,
Hide: +21, Listen: +11, Move Silently: +21, Spot: +15, Swim: +9. Feats: Alertness, Dodge,
Improved Initiative, Lightning Reflexes, Mobility. Saves: Fort +4, Ref: +10, Will: +9. Critical:
Slam and Tongue 20 /x2. Mohrgs are found on page 189 of the Monster Manual.
The contents of the coffins are as follows:
1. The bleached bones of a human male wearing a silver ring worth 10 gp's on his right index
finger.
2. The coffin's lid is open and it is empty. A search of this coffin will reveal nothing of value.
3. As the lid of this coffin is opened the party will be struck with the stench of decaying flesh.
The coffin contains the remains of a human body that is wrapped in burial robes. The body is
covered with some type of grey moldy material. The mold is not harmful, but the game
master should not be to quick to relay this information to the party members.
4. The coffin's lid is open and it is empty. A search of this coffin will reveal a 100 gp gem
hidden in the coffin's silk lining (Search DC: 15).
5. Bleached bones of a human. It wears a gold ring (10 gp value) on its right index finger.
6. Empty. There is a secret portal in the pedestal (Search DC:20) that contains 567 gp's and a
WAND OF LIGHTNING BOLTS (Caster Level 6 with 23 charges)..
7. The coffin's lid is open as it is empty. A search of this coffin will reveal nothing of value.
8. Empty. A search will reveal nothing.
9. The decaying remains of a human male dressed in burial robes.
10. The decaying remains of a human male dressed in burial robes.
11. The decaying remains of a human male dressed in burial robes..
12. The decaying remains of a human male dressed in burial robes..
13. The decaying remains of a human male dressed in burial robes..
14. The decaying remains of a human that is dressed in faded clothing and has a beautiful
gold pendant (SCARAB OF DEATH) pinned to its shirt.
15. Empty.
16. The remains of an elven female.
17. The decaying remains of a human male.
18. The decaying remains of a human female.
19. Hidden in a secret portal (Search DC: 25) within the coffin is a BAG OF HOLDING
(Type II) that contains 700 gp's and four 25 gp gems.
20. Empty.
Willow Hills Cemetery
7
AREA 4) THE CURSED CRYPT (EL 14) (Cont)
NOTES:
AREA 5) GRAVES
This area of the cemetery contains rows and rows of tombstones that mark various graves. The
tombstones in this location are worn, weather beaten and appear to be quite old. The graves are
unkept and thistles, weeds, and vines cover most of the grave sights as well as some of the
tombstones.
Some of the graves here are several hundred years old. Although the characters may marvel at
the age of the tombstones, there is little of interest here.
NOTES:
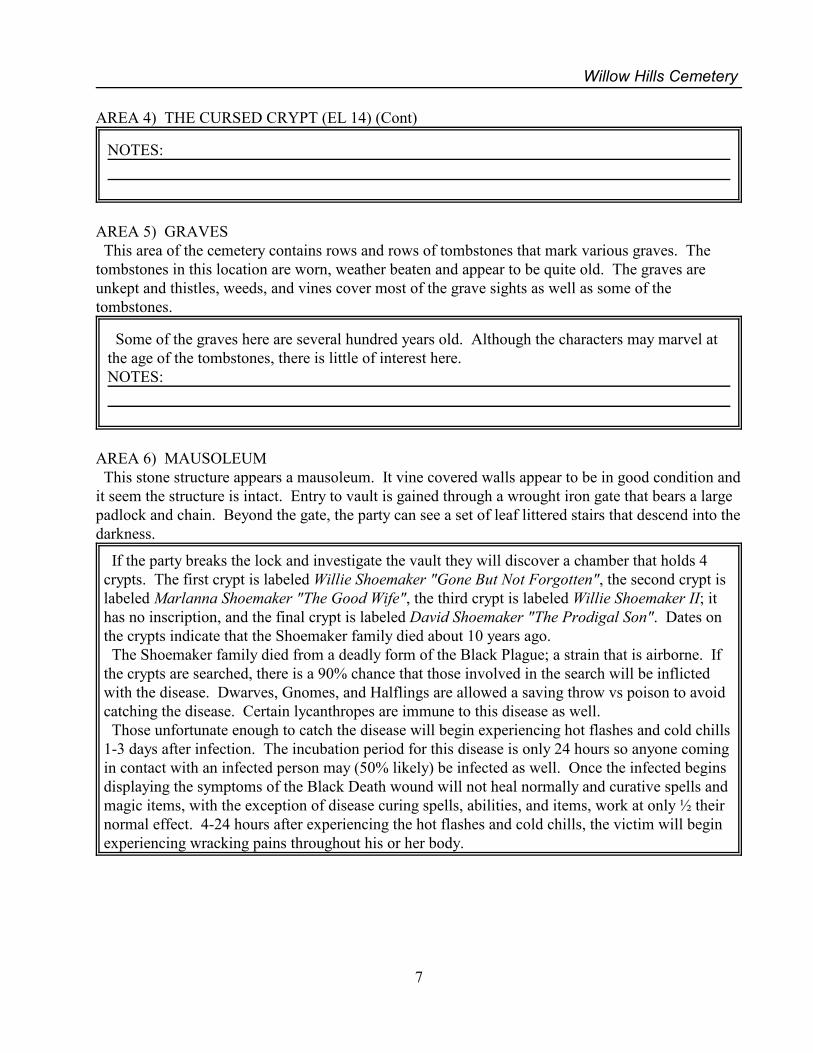
AREA 6) MAUSOLEUM
This stone structure appears a mausoleum. It vine covered walls appear to be in good condition and
it seem the structure is intact. Entry to vault is gained through a wrought iron gate that bears a large
padlock and chain. Beyond the gate, the party can see a set of leaf littered stairs that descend into the
darkness.
If the party breaks the lock and investigate the vault they will discover a chamber that holds 4
crypts. The first crypt is labeled Willie Shoemaker "Gone But Not Forgotten", the second crypt is
labeled Marlanna Shoemaker "The Good Wife", the third crypt is labeled Willie Shoemaker II; it
has no inscription, and the final crypt is labeled David Shoemaker "The Prodigal Son". Dates on
the crypts indicate that the Shoemaker family died about 10 years ago.
The Shoemaker family died from a deadly form of the Black Plague; a strain that is airborne. If
the crypts are searched, there is a 90% chance that those involved in the search will be inflicted
with the disease. Dwarves, Gnomes, and Halflings are allowed a saving throw vs poison to avoid
catching the disease. Certain lycanthropes are immune to this disease as well.
Those unfortunate enough to catch the disease will begin experiencing hot flashes and cold chills
1-3 days after infection. The incubation period for this disease is only 24 hours so anyone coming
in contact with an infected person may (50% likely) be infected as well. Once the infected begins
displaying the symptoms of the Black Death wound will not heal normally and curative spells and
magic items, with the exception of disease curing spells, abilities, and items, work at only ½ their
normal effect. 4-24 hours after experiencing the hot flashes and cold chills, the victim will begin
experiencing wracking pains throughout his or her body.

Orta’s Mound
8
AREA 6) MAUSOLEUM (Cont)
Combat during this period of time is extremely difficult; all attack roll are made at -6, all damage
rolls are made at -4, the victim gains no armor class bonus for high dexterity, and the victim's
armor class is reduced by an additional 3 places. After the wracking pains begin, death occurs
within 1-10 hours (victim loses a proportional amount of Hp's per hour). Normal and magical
healing, with the exception of disease curing items, have no effect.
NOTES:
AREA 7) RITUAL SLAB
This area appears as a large stone slab with bronze urns positioned at each corner. Portions of the
slabs are engraved with indecipherable writings, glyphs and sigils.
This area of the cemetery is were the gypsies usually perform their religious ceremony. This act
of purification is performed every decade by the gypsies. The gypsies believe the ritual of
purification helps the souls of their ancestors find their way to the their deity.
There is little of interest for the party here.
NOTES:
AREA 8) MAUSOLEUM (EL 9)
This stone structure appears a mausoleum. It vine covered walls appear to be in good condition
and it seem the structure is intact. A wrought iron gate has been broken from its hinges and lies on
the ground several feet from the door. To the right and left of the door's threshold is a stone urn that
is entwined with vines and weeds.
Beyond the door's threshold, the party can see a set of leaf littered stairs that descend into the
darkness. As the party looks about two spectral figures emerge from the mausoleum.
Dwelling in the mausoleum are 2 Spectres. These creatures will attack the party for one round
then use their flying ability and greater speed to retreat into the safety of the vault.
If the party enters the vault they will discover a chamber that holds 2 coffins. The Spectres will
make their stand here.

Willow Hills Cemetery
9
AREA 8) MAUSOLEUM (EL 9) (Cont)
SPECTRES (2): 45 Hp’s each, 7d12 HD, Mv:40 ft, Fly 80 ft. (Perfect), Ac:15 (+3 Dex, +2
Deflection), Touch: 15, Flat-Footed: 13, Medium Undead (Incorporeal), Base Attack: +3, Grapple:
N/A, Space: 5 ft., Reach: 5 ft., Att: Incorporeal Touch +6 Melee, Dam: Incorporeal Touch 1-8 plus
Energy Drain. Initiative: +7 (+3 Dex, +4 Improved Initiative). CR: 7. Abilities: Str: -, Dex: 16,
Con: -, Int: 14, Wis: 14, Cha: 15. Alignment: Lawful Evil. SA: Energy Drain Create Spawn. SQ:
Darkvision 60 ft, Incorporeal Traits, +2 Turn Resistance, Undead Traits, Unnatural Aura, Sunlight
Powerlessness. Skills: Hide: +13, Intimidate +12, Knowledge (Religion) +12, Listen +14, Search
+12, Spot +14, Survival +2 (+4 following tracks). Feats: Alertness, Blind-Fight, Improved
Initiative. Saves: Fort +2, Ref: +5, Will: +7. Critical: Incorporeal Touch 20/x2. Spectres are
found on page 232 of the Monster Manual.
TREASURE: If the Spectres are defected, the party will find the following treasure in the coffins:
a VIAL OF REMOVE DISEASE POTION, a VIAL OF HEROISM POTION (Brewed at 8th
Level), and 600 gp's
NOTES:
AREA 9) GRAVES
This area of the cemetery contains rows and rows of tombstones that mark various graves. The
tombstones in this location are worn, weather beaten and appear to be quite old. The graves are
unkept and thistles, weeds, and vines cover most of the grave sights as well as some of the
tombstones.
Some of the graves here are several hundred years old. Although the characters may marvel at
the age of the tombstones, there is little of interest here.
NOTES:

Orta’s Mound
10
AREA 10) GRAVES AND THE SPAWN OF KYUSS (EL 9)
This area of the cemetery contains rows and rows of tombstones that mark various graves. The
tombstones in this location are worn, weather beaten and appear to be quite old. The graves are
unkept and thistles, weeds, and vines cover most of the grave sights as well as some of the
tombstones.
CREATURES: This are of the cemetery is home to several Spawn of Kyuss. There are a total of
6 Spawn of Kyuss in the pack.
SPAWN OF KYUSS (6): 39 Hp’s each, 4d12+3 HD, Mv:30 ft, Ac:11 (-1 Dex, +2 Natural),
Touch: 9, Flat-Footed: 11, Medium Undead, Space: 5 ft., Reach: 5 ft., Att: Slam +6 Melee or
Touch +6 Melee, or Kyuss’s Gift +1 Ranged Touch, Dam: Slam 1-6 +6 Melee plus Kyuss’s Gift.
Initiative: -1 (-1 Dex). CR: 5. Abilities: Str: 18, Dex: 9, Con: -, Int: 6, Wis: 11, Cha: 15.
Alignment: Chaotic Evil. SA: Create Spawn, Fear Aura, Kyuss’s Gift. SQ: Curative
Transformation, Fast Healing 5, Darkvision 60 ft, +2 Turn Resistance, Undead Traits. Skills:
Hide: +5, Jump: +10, Move Silently: +5, Spot +6. Feats: Toughness. Saves: Fort +1, Ref: +0,
Will: +4. Critical: Slam, Touch, and Ranged Touch 20/x2. Spawn of Kyuss are found on page
186 of the Monster Manual II.
TREASURE: Scattered about the graves is the Spawn of Kyuss’s treasure, which consist of:
1,000 cp's, a SCROLL w /Remove Paralysis, Spell Immunity, and Dispel Evil (Written at 13th
level).
Some of the graves here are several hundred years old. Although the characters may marvel at
the age of the tombstones, there is little else of interest here.
NOTES:
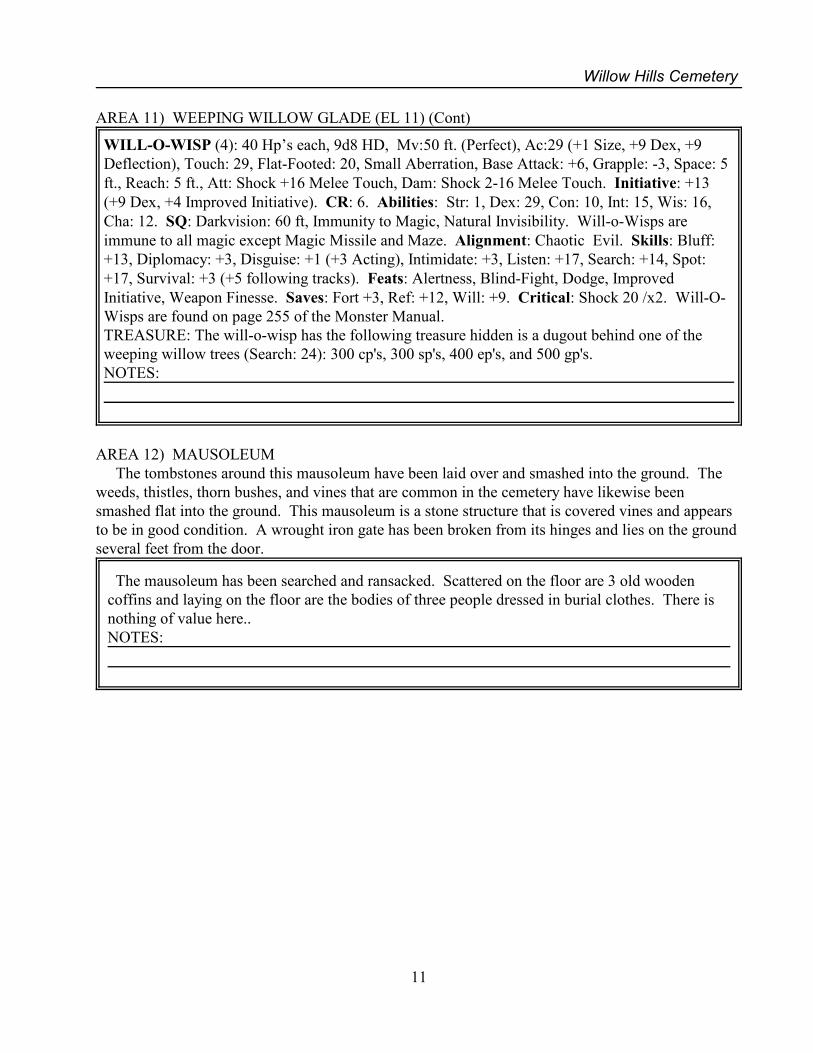
AREA 11) WEEPING WILLOW GLADE (EL 11)
This area contains a grove of vine covered weeping willows. The ground here is covered with
weeds, thistles, and vines and thin layers of fog can be seen here and there.
If the party approaches this area in the night, they will see small globes of light flickering in the
trees. The small globes of light are will-o-wisps. The true danger of this portion of the cemetery
come from a Choke Creeper vine that is entwined through the entire area.
ASSASSIN VINES (4): 32 Hp's each, 4d8+12 HD, Mv: 5 ft., Ac:15 (-1 Size, +6 Natural),
Touch: 9, Flat-Footed: 15, Large Plant, Base Attack: +3, Grapple: +12, Space: 10 ft., Reach: 10
ft. (20 ft. with Vine), Att: Slam +7 Melee, Dam: Slam 1-6 +7 Melee. Initiative: +0. CR: 3.
Abilities: Str: 20, Dex: 10, Con: 16, Int: -, Wis: 13, Cha: 9. SA: Constrict for 1-6 +7, Entangle,
Improved Grab. SQ: Blindsight 30 ft, Camouflage, Immunity to Electricity, Low-Light Vision,
Plant Traits, Resistance to Cold 10 and Fire 10. Alignment: Neutral. Saves: Fort +7, Ref: +1,
Will: +2. Critical: Slam 20/x2. Assassin Vines are found on page 20 of the Monster Manual.
Willow Hills Cemetery
11
AREA 11) WEEPING WILLOW GLADE (EL 11) (Cont)
WILL-O-WISP (4): 40 Hp’s each, 9d8 HD, Mv:50 ft. (Perfect), Ac:29 (+1 Size, +9 Dex, +9
Deflection), Touch: 29, Flat-Footed: 20, Small Aberration, Base Attack: +6, Grapple: -3, Space: 5
ft., Reach: 5 ft., Att: Shock +16 Melee Touch, Dam: Shock 2-16 Melee Touch. Initiative: +13
(+9 Dex, +4 Improved Initiative). CR: 6. Abilities: Str: 1, Dex: 29, Con: 10, Int: 15, Wis: 16,
Cha: 12. SQ: Darkvision: 60 ft, Immunity to Magic, Natural Invisibility. Will-o-Wisps are
immune to all magic except Magic Missile and Maze. Alignment: Chaotic Evil. Skills: Bluff:
+13, Diplomacy: +3, Disguise: +1 (+3 Acting), Intimidate: +3, Listen: +17, Search: +14, Spot:
+17, Survival: +3 (+5 following tracks). Feats: Alertness, Blind-Fight, Dodge, Improved
Initiative, Weapon Finesse. Saves: Fort +3, Ref: +12, Will: +9. Critical: Shock 20 /x2. Will-O-
Wisps are found on page 255 of the Monster Manual.
TREASURE: The will-o-wisp has the following treasure hidden is a dugout behind one of the
weeping willow trees (Search: 24): 300 cp's, 300 sp's, 400 ep's, and 500 gp's.
NOTES:
AREA 12) MAUSOLEUM
The tombstones around this mausoleum have been laid over and smashed into the ground. The
weeds, thistles, thorn bushes, and vines that are common in the cemetery have likewise been
smashed flat into the ground. This mausoleum is a stone structure that is covered vines and appears
to be in good condition. A wrought iron gate has been broken from its hinges and lies on the ground
several feet from the door.
The mausoleum has been searched and ransacked. Scattered on the floor are 3 old wooden
coffins and laying on the floor are the bodies of three people dressed in burial clothes. There is
nothing of value here..
NOTES:
Orta’s Mound
12
THE CATACOMBS
The Catacombs, or so they are called are not catacombs at all. They are burial mounds and are
located about a day from traft. The area of the burial mounds covers about an acre of ground and
is surrounded by a rusty, 8 feet tall wrought iron fence. Although the fence is rusty, it seems quite
sturdy. The area of the burial cairn is unkept with tall grass and clumps of brush and small trees
scattered about. Entrance to the burial cairn is gained through a locked iron gate (Open locks
DC:15). There are a total of 7 cairn here.
NOTES:
MOUND 1) THE CRYPT
As with all burial mounds here, this mound is completely covered with grass and other vegetation
on on 3 sides. The remaining side is a light gray marble block wall that is weathered and has stained
over the years. Set into the wall is a stone door that is locked with a huge padlock. Over the door is
an inscription that reads “Vechor”.
If the door to this burial mound is opened (Open Locks DC:15), the party will find a crypt. A 10
foot wide corridor runs the length of the mound. Looking down the corridor, the party can see
several crypts. The floor here is covered with a thin layer of dust and thick cobwebs can be seen
hanging from the ceiling as well as in the corners.
There are a total of 6 crypts in the mound, but only 4 have names associated with them. The
names are as follows: Easan, Yagno, Zkakata, and Tsien.
If the individual crypts are searched, the party will find nothing of interest.
NOTES:
MOUND 2) THE CRYPT (EL 8)
This burial mound is completely covered with grass and other vegetation on on 3 sides. The
remaining side is a light gray marble block wall that is weathered and has stained over the years. Set
into the wall is an iron door that is locked. Over the door is an inscription that reads “Hensley”.
If the door to this burial mound is opened (Open Locks DC:20), the party will find a crypt. A 10
foot wide corridor runs the length of the mound. Looking down the corridor, the party can see
several crypts.
CREATURES: Trapped in this burial mound are 2 Bonedrinkers. They will use their pouch
ability to attack the first person to open the door.
The Catacombs
13
MOUND 2) THE CRYPT (EL 8) (Cont)
BONEDRINKERS (2): 93 Hp’s, 11d12+22 HD, Mv: 30 ft, Ac: 17 (+3 Dex, +4 Natural), Touch:
13, Flat-Footed: 14, Medium Undead, Base Attack: +5, Grapple: +14, Space: 5 ft., Reach: 5 ft. (10
ft. w/Tentacles), Att: 2 Tentacles +10 Melee and 2 Claws +5 Melee, Dam: 2 Tentacles 1-10 +5
Melee and 2 Claws 1-8 +2 Melee. Initiative: +3 (+3 Dex). CR: 6. Abilities: Str:21, Dex: 16,
Con: -, Int: 8, Wis: 14, Cha: 15. Alignment: Chaotic Evil. SA: Bonedrink, Improved Grab,
Pounce. Bonedrink (Su); Once a Bonedrinker has successfully grappled an opponent, it can begin
to drink its bones. To do this, the Bonedrinker must make a successful grapple check. if it pins its
foe, it fastens onto the creature with its horrendous fangs. it then secretes a painful toxin into the
victim that deals 1d6 points of Constitution damage. Each round the pin is maintained, the
bonedrinker deals an additional 1d6 points of Constitution damage. Creatures reduced to 0
Constitution die, as the majority of their bones become too brittle to support their bodies and they
collapse into a sack of loose flesh. Creatures without bones or Constitution scores are immune to
the Constitution-damaging effects of the bonedrink ability. Improved Grab (Ex): To use this
ability, a bonedrinker must hit with a tentacle attack. it can then attempt to start a grapple as a free
action without provoking attacks of opportunity. If it wins the grapple check, it establishes a hold
and deals automatic claw or tentacle damage to the grappled victim. It can deal automatic claw or
tentacle damage in each subsequent round that it maintains the grapple, and a bonedrinker that has
successfully pinned an opponent can begin to drink its bones (see Bonedrink, above).
Bonedrinkers have a +4 racial bonus on grapple checks. Pounce (Ex): If a bonedrinker charges, it
can make a full attack in the same round. SQ: DR 5/Silver and Good, Darkvision 60 ft.,
Resistance to Cold 10, Fire 10, and Sonic 10, Scent, Undead Traits, Unholy Toughness. Skills:
Hide: +13, Listen: +13, Move Silently: +17, Spot: +13. Feats: Cleave, Combat Reflexes,
Improved Natural Attack (Claw), Power Attack. Saves: Fort +3, Ref: +6, Will: +9. Critical: 2
Tentacles and 2 Claws 20/x2. Bonedrinkers are found on page 18 of the Monster Manual III.
There are a total of 6 crypts in the mound, 2 of the crypts have been opened the other four remain
sealed and have names associated with them. The names are as follows: Edward, Douglas, and
Sheryl, Lisa.
TREASURE: If the individual crypts are searched, the party will the two open crypts contain a
total of 1,000 cp’s
NOTES:
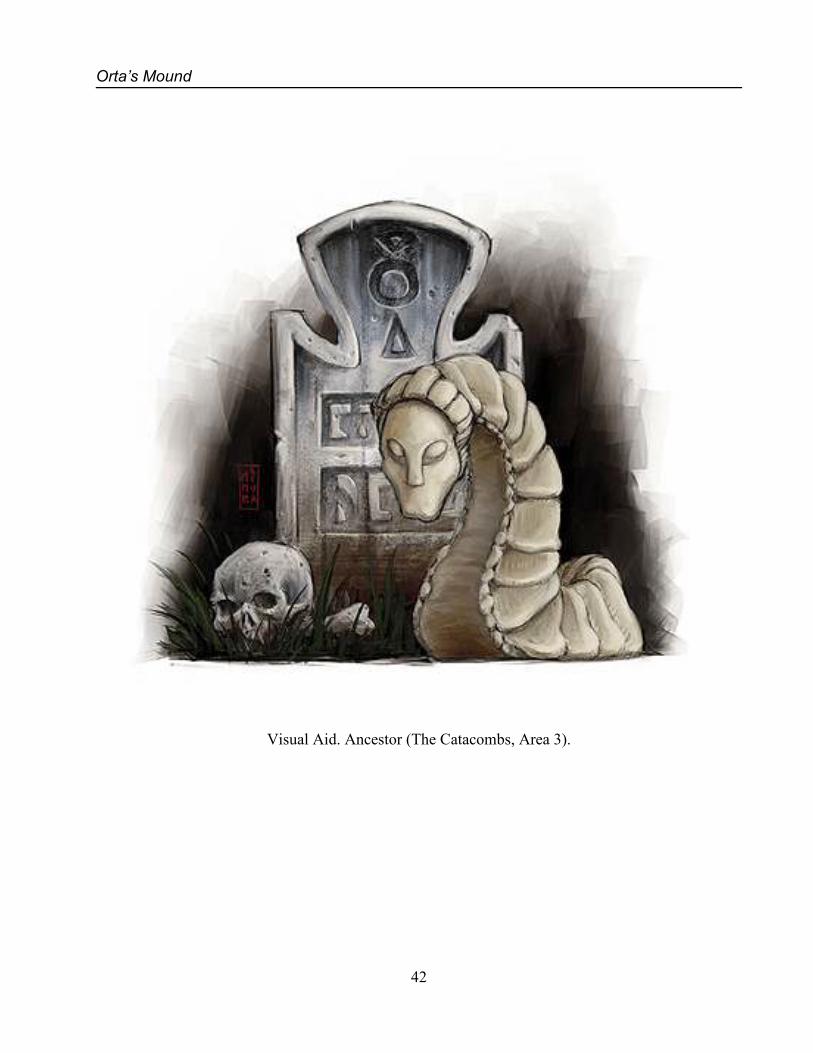
MOUND 3) THE GRAVECRAWLER (EL 16)
This burial mound is completely covered with grass and other vegetation on on 3 sides. The
remaining side is a light gray marble block wall that is weathered and has stained over the years.
There is no door on this crypt and there is no inscription over the door.
As the party approaches this mound (about 10 ft. away), a voice from within will say “For your
own safety I must ask that you come no closer”. This mound is the home to a female
Gravecrawler who will welcome the opportunity to talk with the party.

Orta’s Mound
14
MOUND 3) THE GRAVECRAWLER (EL 16) (Cont)
Like all Gravecrawlers, she would rather be venerated than fought and will take no hostile
actions against the group.
She will give typical responses like those listed below:
“This mound is harmful to your kind.” “I have dwelt here long years.” “My years are as
numerous as the hair on your head.” “My kind are not given names, but you may call me Many,
for I share the memories of many.” “I am known as an Ancestor.” “My kind does not seek the
company of others.”
If asked about Parkington Lane, Many will freely share this information with the group. She will
also say that some things are best left buried. If spoken to with respect, she will answer a variety
of questions.
GRAVECRAWLER (1): 162 Hp's each, 25d12 HD, Mv:20 ft., Burrow: 20 ft., Ac:17 (+1 Size,
+2 Dex, +4 Natural), Touch: 13, Flat-Footed: 15, Small Undead, Base Attack: +4, Grapple: +15,
Space: 5 ft., Reach: 5 ft., Att: Bite +13 Melee, Dam: Bite 1-4 Melee plus 1-4 Constitution Drain.
Initiative: +2 (+2 Dex). CR: 16. Abilities: Str: 10, Dex: 15, Con: --, Int: 6, Wis: 11, Cha: 11.
SA: Calcifying Aura, Constitution Drain. Calcifying Aura (Su): The presence of a Gravecrawler
is enough to cause flesh (living or dead) to harden and calcify, turning slowly into stone. This
effect is a 30-foot-radius emanation centered on the gravecrawler, and it is always active. Every
creature within the area must make a Fortitude save (DC: 22) each round or take 1d2 points of
Constitution damage. (Unlike die drain from its bite, the loss from the Gravecrawlers calcifying
aura is restored at the rate of 1 point per day). A character brought to a Constitution score of 0 in
this manner turns completely to stone. A gravecrawler is immune to its own calcifying aura and to
those of others of its kind. Constitution Drain (Su): Any creature bitten by a Gravecrawler must
make a Fortitude save (DC: 22) or permanently lose ld4 points of Constitution (or twice that
amount on a critical hit). The gravecrawler heals 5 points of damage (10 on a critical hit)
whenever it drains Constitution, gaining any excess as temporary hit points. A creature affected
by his Constitution drain finds parts of its flesh turned to hard, brittle stone. At 0 Constitution, the
target becomes a stone statue. A Gravecrawler is immune to its own Constitution drain and to
those of others of its kind. SQ: Burrow, Speak with Dead, SR: 30, Tremorsense, Turn Resistance
+6, Undead Traits. Burrow (Ex): Gravecrawlers can move through stone, dirt, and earth, leaving
no indication of their passage. A Move Earth spell cast on an area containing a burrowing
gravecrawler flings the creature back 30 feet and stuns it for 1 round, unless it succeeds at a
Fortitude save (DC: 22). Speak with Dead (Su): At will, a Gravecrawler can produce an effect
like that of a Speak with Dead spell (caster level 20th), except that it can be used to communicate
with only one corpse per week. This ability does not allow communication with calcified remains.
Alignment: Neutral. Skills: Balance: +4, Bluff: +5, Diplomacy: +12, Escape Artist: +10, Hide:
+21, Intimidate: +2, Jump: +2, Knowledge History: +20, Knowledge Local: +20, Knowledge
Undead: +20, Listen: +7, Sense Motive: +5, Spot: +2, Tumble: +7. Feats: Alertness, Blind- Fight,
Combat Reflexes, Dodge, Improved Critical (Bite), Iron Will, Mobility, Skill Focus (Knowledge
[History]), Skill Focus (Knowledge [Local]), Skill Focus (Knowledge [Undead]). Saves: Fort +8,
Ref: +10, Will: +16. Critical: Bite 19-20/x2. Gravecrawlers are found in the Monster Manual II
on page 118.

The Catacombs
15
MOUND 3) THE GRAVECRAWLER (EL 16) (Cont)
TREASURE: Hidden in a secret portal (Search DC: 25) is the Gravecrawler’s treasure; 3,000 gp’s,
a gold crown worth 1,500 gp’s, 2 paintings worth 250 gp’s each, a gold dragon comb worth 1,050
gp’s and a solver ewer worth 55 gps’
NOTES:
MOUND 4) THE CRYPT
As with all burial mounds here, this mound is completely covered with grass and other vegetation
on on 3 sides. The remaining side is a light gray marble block wall that is weathered and has stained
over the years. Set into the wall is a stone door that is locked with a huge padlock. Over the door is
an inscription that reads “Miller”.
If the door to this burial mound is opened (Open Locks DC:15), the party will find a crypt. A 10
foot wide corridor runs the length of the mound. Looking down the corridor, the party can see
several crypts. The floor here is covered with a thin layer of dust and thick cobwebs can be seen
hanging from the ceiling as well as in the corners.
There are a total of 6 crypts in the mound, but only 5 have names associated with them. The
names are as follows: Roy, Delores, Kevin, Betty, and Mary.
If the individual crypts are searched, the party will find nothing of interest.
NOTES:
MOUND 5) THE CRYPT
As with all burial mounds here, this mound is completely covered with grass and other vegetation
on on 3 sides. The remaining side is a light gray marble block wall that is weathered and has stained
over the years. Set into the wall is a stone door that is locked with a huge padlock. Over the door is
an inscription that reads “Lane”.
If the door to this burial mound is opened (Open Locks DC:15), the party will find a crypt. A 10
foot wide corridor runs the length of the mound. Looking down the corridor, the party can see
several crypts. The floor here is covered with a thin layer of dust and thick cobwebs can be seen
hanging from the ceiling as well as in the corners.
There are a total of 6 crypts in the mound, but only 1 has a name associated with them. The
names is: Parkington.
If the Parkington’s crypt is search, the party will discover a map clutched in his hand. The map
leads to Orta’s mound. Those searching the remaining crypts, will discover nothing of interest.
NOTES:

Orta’s Mound
16
MOUND 6) THE CRYPT
As with all burial mounds here, this mound is completely covered with grass and other vegetation
on on 3 sides. The remaining side is a light gray marble block wall that is weathered and has stained
over the years. Set into the wall is a stone door that is locked with a huge padlock. There is no
inscription over the door.
If the door to this burial mound is opened (Open Locks DC:15), the party will find a crypt. A 10
foot wide corridor runs the length of the mound. Looking down the corridor, the party can see
several crypts. The floor here is covered with a thin layer of dust and thick cobwebs can be seen
hanging from the ceiling as well as in the corners.
There are a total of 6 crypts in the mound, but only 2 have names, but the names have been
scratched out.
CREATURE: This crypt is the lair of 2 Crimson Deaths who will attack when the crypt is entered.
CRIMSON DEATHS (2): 84 Hp’s each, 13d12 HD, Fly 30 ft. (Perfect), Ac:17 (+5 Dex, +2
Deflection), Touch: 17, Flat-Footed: 12, Medium Undead (Incorporeal), Space: 5 ft., Reach: 5 ft.,
Att: 2 Incorporeal Touches +11 Melee, Dam: Blood Drain 1-4 points of Constitution Damage.
Initiative: +9 (+5 Dex, +4 Improved Initiative). CR: 11. Abilities: Str: -, Dex: 21, Con: -, Int:
17, Wis: 15, Cha: 14. Alignment: Neutral Evil. SA: Blood Drain Seize. SQ: Darkvision 60 ft,
Incorporeal Traits, Lift, Undead Traits. Skills: Concentration: +14, Hide: +21, Intuit Direction:
+7, Listen +20, Search +13, Spot +20. Feats: Alertness, Blind-Fight, Combat Reflexes, Dodge,
Expertise, Improved Initiative, Lightning Reflexes, Mobility, Spring Attack. Saves: Fort +4, Ref:
+11, Will: +10. Critical: Incorporeal Touch 20/x2. Crimson Deaths are found on page 53 of the
Monster Manual II.
If the individual crypts are searched, the party will find nothing of interest.
NOTES:
MOUND 7) THE CRYPT
As with all burial mounds here, this mound is completely covered with grass and other vegetation
on on 3 sides. The remaining side is a light gray marble block wall that is weathered and has stained
over the years. Set into the wall is an opening, but no door is present. There is no inscription over
the door.
The floor here is littered with old leaves and other debris.
There are a total of 6 crypts in the mound, but none are sealed. Those searching the remaining
crypts, will discover nothing of interest.
NOTES:

ARRIVING AT LAKE SHORE When the party completes the journey across Lake Quag, the captain of the boat is surprised to find a dock and a boat at the shore. The dock is of new construction and the boat is large enough to carry supplies from Traft to this location. ORTA’S MOUND After traveling inward for a day, the party comes across Orta’s mound. Orta’s mound is a medium-sized hillock of stone about 300 feet tall that overlooks Lake Quag. The entire mound is about 3/4 mile across. Due to the terrain in the area, Orta’s mound is not easy to get to by land and is most easily accessible by taking a boat across Lake Quag. However, the keep lies about ¾ the way up the hillock, which is surrounded by steep cliffs on all four sides. The way up to the keep is a set of wood stairs that follow the side of the cliff. Atop the mound, not visible to those on the ground, is a small keep that is being rebuilt. DUNGEON ENTRY This entry chamber is empty except for a glowing sword that has been plunged, tip fist, into the floor a few feet in front of a set of rune carved steel gray doors. It appears that the doors are being held closed by some type of energy that is being radiated from a sword. The door is enraged with several sets of rune, but they are small in nature and will require close inspection to be read. The rune cared doors are engraved with warnings written in the common tongue. “Do not release the evil contained here. Stephen Strong” “Great was the battle that stopped the Friar. Canyo Strong” “Do not wake that which sleeps. Eli the Iceman” “Held behind these doors the Horde sleeps. Beware!! Kamos Dagi”.
The remainder of the adventure is reserved only for those brave or foolhardy enough to remove the sword. Sorry!!

Orta’s Mound
28
Alex Swift
ALEX SWIFT (Human Paladin): 44 Hp's, 5d10+4 (5th Level Paladin of Try), Mv: 20 ft., Ac:20 (+4
Dex, +4 Chain Shirt, +2 Ring of Protection), Touch: 16, Flat-Footed: 16, Medium-Sized Human,
Space: 5 ft., Reach: 5 ft., Att: +2 Long Sword +10 Melee, Dam: +2 Long Sword 1-8 +12 Melee.
Initiative: +1 (+1 Dex). CR: 5. Abilities: Str: 18, Dex: 18, Con: 12, Int: 10, Wis: 9, Cha: 8.
Alignment: Lawful Good. Skills: Hide: +7, Listen: +4, Move Silently: +5, Spot: +4. Feats:
Alertness, Weapon Focus (War Hammer), Power Attack (Always active), Cleave, Weapon
Specialization (War Hammer). Saves: Fort +7, Ref: +2, Will: +0. Critical: +2 Long Sword19-
20/x2. Alex wields a +2 LONG SWORD and wears a +2 RING OF PROTECTION and a gold
necklace worth 50 gp’s. He is dressed in Chain Shirt and carries a VIAL OF HEROISM POTION
(Brewed at 7th Level).
Keisha
FEMALE HUMAN CLERIC (Keisha): 30 Hp’s, 5th Level Cleric Of Pelor, Mv: 30 ft. Ac: 16 (+2
Dex, +2 Leather Armor), Touch: 12, Flat-Footed: 14, Medium-Size Human (5 ft, 5 in. tall), Space:
5 ft., Reach: 5 ft., Att: Light Mace +2 Melee, Dam Light Mace 1-6 +4 Melee. Initiative: +2 (+2
Dex). CR: 5. Abilities: Str: 14, Dex:12, Con 10, Int 12, Wis 16, Cha 16. Alignment: Lawful
Good. Skills: Concentration: +4, Diplomacy: +7, Heal: +6, Knowledge Religion: +6, Spellcraft: +3.
Feats: Brew Potion (3rd Level), Craft Wand (1st Cleric), Scribe Scroll (1st Level Human). Saves: Fort
+7, Ref +5, Will +9. In times of battle, Keisha is dressed in a suit of +2 LEATHER ARMOR and a
+2 CLOAK OF RESISTANCE. She carries a Light Mace, a WAND OF DETECT EVIL (20
charges; command word “Hedgel”), and a Healer’s Bag. Keisha has the following spells in memory
(Domains are Good and Healing, base save DC = 13 + spell level):
0 Level (5): Detect Magic, Light, Detect Poison, Guidance, Virtue
1st Level (5): Protection from Evil, Shield of Faith, Bless, Detect Undead, Remove Fear
2nd Level (4): Aid, Lesser Restoration, Spiritual Weapon, Speak with Animals
3rd Level (3): Magic Circle Against Evil, Searing Light, Protection from Elements.
Gordon Jones
HUMAN ROGUE (Gordon Jones): 36 Hp's, 6d6+12 HD (6th Level Rogue), Mv: 30 ft., Ac:19 (+4
Dex, +2 Leather Armor, +1 Ring of Protection), Touch: 15, Flat-Footed: 13, Medium-Sized
Human, Space: 5 ft., Reach: 5 ft., Att: Dagger +12 Melee or Short Bow +9 Ranged, Dam: Dagger 1-
4 +1 Melee or Short Bow 1-6 Ranged. Initiative: +6 (+6 Dex). CR: 4. Abilities: Str: 10, Dex: 18,
Con: 14, Int: 10, Wis: 9, Cha: 8. Alignment: Neutral Good. SQ: Darkvision: 60 ft. Skills:
Appraise: +9, Balance: +15, Climb: +9, Escape Artist: +15, Hide: +19, Jump +11, Listen: +9, Move
Silently: +19, Open Lock: +15, Tumble: +17. Feats: Acrobatic, Point Blank Shot, Weapon Finesse
(Dagger), Sneak Attack +3d6 (5th Bonus), Trap Finding (1st Bonus), Evasion (2nd Bonus), Trap Sense
+2 (6th Bonus), Uncanny Dodge. Saves: Fort +7, Ref: +2, Will: +0. Critical: Dagger 19-20/x2.
Gordon is dressed in a Suit of Leather Armor, wields a +1 DAGGER in battle and wears a +1 RING
OF PROTECTION. In addition Gordon has a Short Bow, a Quiver of 20 Arrows, a Set of
Masterwork Thieves’ Picks and Tools. He carries 3-18 gp's as treasure and wears a necklace worth
75 gp's.

NPCs
29
Morgan
MORGAN: 33 Hp's, 6th Level Human Ranger, Mv: 20 ft., Ac:19 (+3 Banded-Mail, +1 Dex, +2
Heavy Steel Shield, +1 Ring of Protection), Att: Masterwork Long Sword +8 Melee, Dam:
Masterwork Long Sword 1-8 +3 Melee, Initiative: +8 (+4 Dex, +4 Improved Initiative). CR: 2.
Str:17, Dex: 18, Con: 16, Int: 12, Wis: 12, Cha: 11. Skills: Climb: +9, Craft: (Weapon Smithing)
+7, Handle Animal: +6, Intimidate: +6. Feats: Improved Initiative (Human Bonus), Weapon Focus
[1st Fighter (Long Sword)], Power Attack (2nd Fighter), Cleave (3rd Level). Saves: Fort +3, Ref: +1,
Will: +0. Critical: Long Sword 19-20/x2. Riot is dressed in a suit of Banded Mail and Large Heavy
Steel Shield and is armed with a Masterwork Long Sword, a Masterwork Short Sword, and a
Dagger. He wears a +1 RING OF PROTECTION and a +1 CLOAK OF RESISTANCE.
Shelvina Quibel
SHELVINA QUIBEL: 18 Hp's, 5th Level Sorcerer, Initiative +7 (+4 Dex, +4 Improved Initiative),
Mv: 30 ft., Ac: 15 (+3 Dex, Bracers of Armor +1, +1 Ring of Protection), Att: Dagger +1 Melee,
Dam: Dagger 1-4 +1 Melee. CR: 6. Str: 12, Dex: 17, Con: 15, Int: 18, Wis: 14, Cha: 14. Skills:
Bluff: +8, Concentration: +8, Hide: +6, Knowledge (Arcana) +10, Listen: +4, Spell Craft: +10, Spot:
+4. Feats: Combat Casting (Bonus Human), Summon Familiar (Bonus Sorcerer), Improved
Initiative (1st Level), Spell Focus [3rd Level (Evocation)]. Saves: Fort +3, Ref: +4, Will: +5.
Lightning is wearing a set of BRACERS OF ARMOR +1, a +1 RING OF PROTECTION. The
save DC against Shelvina’s spells is DC 14 + spell level or DC 15+ spell level for Evocation spells.
He has the following spells in memory:
0 Level (6): Acid Splash, Ghost Sound, Prestidigitation, Ray of Frost, Read Magic, Resistance.
1st Level (6): Color Spray, Mage Armor, Magic Missile, Protection from Good, Shield, Sleep.

Illustrations
35
Visual Aid. Wraith (Willow Hills Cemetery, Area 4).

Orta’s Mound
36
Visual Aid. Mohrg (Willow Hills Cemetery, Area 4).

Illustrations
37
Visual Aid. Spectres (Willow Hills Cemetery, Area 8).

Orta’s Mound
38
Visual Aid. Spawn of Kyuss (Willow Hills Cemetery, Area 10).

Illustrations
39
Visual Aid. Will-O-Wisp (Willow Hills Cemetery, Area 12).

Orta’s Mound
40
Visual Aid. Assassin Vine (Willow Hills Cemetery, Area 12).

Illustrations
41
Visual Aid. Bonedrinker (The Catacombs, Area 1).
Orta’s Mound
42
Visual Aid. Ancestor (The Catacombs, Area 3).

Illustrations
43
Visual Aid. The Tomb of Parkington Lane (The Catacombs, Area 5).

Orta’s Mound
44
Visual Aid. Crimson Death (The Catacombs, Area 6).

Illustrations
45
Hence was a great battle between the forces of good and utterDestruction. Great was the power of Destruction, but manywere the servants of good and strong was their resolve. Tested, they were, but The Light protected them. For, TheLight holds back Destruction and Destruction cannot prevailagainst it. But the The Light has been lost and forgottenfrom the memory of men. The Cairn of Traft holds thesecret to The Light for it’s location lies beneath Parkington
Lane.

Orta’s Mound
46
Visual Aid. Symbol on Door (Area 1).

Orta’s Mound
58
Willow Hills Cemetery.

Illustrations
59
Visual Aid. Peaceful Sleep Cemetery (Player’s Map).

Orta’s Mound
60
Visual Aid. Orta’s Mound Player’s Map.