adn2913 (rev. b) - analog devices · data sheet adn2913 rev. b document feedback ... programmable...
TRANSCRIPT

Continuous Rate 6.5 Mbps to 8.5 Gbps Clock and Data Recovery IC with Integrated Limiting Amp/EQ
Data Sheet ADN2913
Rev. B Document Feedback Information furnished by Analog Devices is believed to be accurate and reliable. However, no responsibility is assumed by Analog Devices for its use, nor for any infringements of patents or other rights of third parties that may result from its use. Specifications subject to change without notice. No license is granted by implication or otherwise under any patent or patent rights of Analog Devices. Trademarks and registered trademarks are the property of their respective owners.
One Technology Way, P.O. Box 9106, Norwood, MA 02062-9106, U.S.A. Tel: 781.329.4700 ©2013–2017 Analog Devices, Inc. All rights reserved. Technical Support www.analog.com
FEATURES Serial data input: 6.5 Mbps to 8.5 Gbps No reference clock required Exceeds SONET/SDH requirements for jitter transfer/
generation/tolerance Quantizer sensitivity: 6.3 mV typical (limiting amplifier mode) Optional limiting amplifier, equalizer (EQ), and 0 dB EQ inputs Programmable jitter transfer bandwidth to support G.8251 OTN Programmable slice level Sample phase adjust (5.65 Gbps or greater) Output polarity invert Programmable LOS threshold via I2C I2C interface to access optional features Loss of signal (LOS) alarm (limiting amplifier mode only) Loss of lock (LOL) indicator PRBS generator/detector Application aware power
352 mW at 8.5 Gbps, equalizer mode, no clock output 380 mW at 6.144 Gbps, limiting amplifier mode,
no clock output 340 mW at 622 Mbps, 0 dB EQ mode, no clock output
Power supplies: 1.2 V, flexible 1.8 V to 3.3 V, and 3.3 V 4 mm × 4 mm, 24-lead LFCSP
APPLICATIONS SONET/SDH OC-1/OC-3/OC-12/OC-48 and all associated
FEC rates 1GE, 1GFC, 2GFC, 4GFC, 8GFC, CPRI OS/L.6 up to OS/L.60 Any rate regenerators/repeaters
GENERAL DESCRIPTION The ADN2913 provides the receiver functions of quantization, signal level detection, and clock and data recovery for continuous data rates from 6.5 Mbps to 8.5 Gbps. The ADN2913 automatically locks to all data rates without the need for an external reference clock or programming. ADN2913 jitter performance exceeds all jitter specifications required by SONET/SDH, including jitter transfer, jitter generation, and jitter tolerance.
The ADN2913 provides manual or automatic slice adjust and manual sample phase adjusts. Additionally, the user can select a limiting amplifier, equalizer, or 0 dB EQ at the input. The equalizer is adaptive or it can be manually set.
The receiver front-end loss of signal (LOS) detector circuit indicates when the input signal level falls below a user-programmable threshold. The LOS detection circuit has hysteresis to prevent chatter at the LOS output. In addition, the input signal strength can be read through the I2C registers.
The ADN2913 also supports pseudorandom binary sequence (PRBS) generation, bit error detection, and input data rate readback features.
The ADN2913 is available in a compact 4 mm × 4 mm, 24-lead lead frame chip scale package (LFCSP). All ADN2913 specifica-tions are defined over the ambient temperature range of −40°C to +85°C, unless otherwise noted.
FUNCTIONAL BLOCK DIAGRAM
LOS
THR
ESH
LOSDETECT
I2C REGISTERS
LA
0dB EQ
VCC
FLOAT
VCM
I2CI2C
CML
EQ
DATAINPUT
SAMPLER
SAMPLEPHASE
ADJUST
RXD
TXD
CLK
DDR
RXCK
FREQUENCYACQUISITION
AND LOCKDETECTOR
FIFO
CML
DOWNSAMPLERAND LOOP
FILTER
PHASESHIFTER
DCO
CLOCK
÷2÷NLOS
PIN
NIN
SCK SDA LOL
DATA RATE
REFCLKP/REFCLKN
(OPTIONAL)DATOUTP/DATOUTN
CLKOUTP/CLKOUTN
1177
7-00
1
ADN2913
2
50Ω50Ω
SLIC
EA
DJU
ST
I2C_ADDR
Figure 1.

ADN2913 Data Sheet
Rev. B | Page 2 of 35
TABLE OF CONTENTS Features .............................................................................................. 1 Applications ....................................................................................... 1 General Description ......................................................................... 1 Functional Block Diagram .............................................................. 1 Revision History ............................................................................... 2 Specifications ..................................................................................... 3
Jitter Specifications ....................................................................... 5 Output and Timing Specifications ............................................. 6 Timing Diagrams .......................................................................... 8
Absolute Maximum Ratings ............................................................ 9 Thermal Characteristics .............................................................. 9 ESD Caution .................................................................................. 9
Pin Configuration and Function Descriptions ........................... 10 Typical Performance Characteristics ........................................... 11 I2C Interface Timing and Internal Register Descriptions ......... 13
Register Map ............................................................................... 14 Theory of Operation ...................................................................... 20 Functional Description .................................................................. 22
Frequency Acquisition ............................................................... 22
Limiting Amplifier ..................................................................... 22 Slice Adjust .................................................................................. 22 Edge Select ................................................................................... 22 Loss of Signal (LOS) Detector .................................................. 23 Passive Equalizer ........................................................................ 24 0 dB EQ ........................................................................................ 24 Lock Detector Operation .......................................................... 26 Harmonic Detector .................................................................... 26 Output Disable and Squelch ..................................................... 27 I2C Interface ................................................................................ 27 Reference Clock (Optional) ...................................................... 27 Additional Features Available via the I2C Interface ............... 29 Input Configurations ................................................................. 31
Applications Information .............................................................. 34 Transmission Lines..................................................................... 34 Soldering Guidelines for Lead Frame Chip Scale Package ... 34
Outline Dimensions ....................................................................... 35 Ordering Guide .......................................................................... 35
REVISION HISTORY 8/2017—Rev. A to Rev. B Changed CP-24-14 to CP-24-7 .................................... Throughout Updated Outline Dimensions ....................................................... 34 Changes to Ordering Guide .......................................................... 34 2/2016—Rev. 0 to Rev. A Changes to Figure 5 ........................................................................ 10 Changes to Table 7 .......................................................................... 15 Updated Outline Dimensions ....................................................... 33 Changes to Ordering Guide .......................................................... 33 12/2013—Revision 0: Initial Version

Data Sheet ADN2913
Rev. B | Page 3 of 35
SPECIFICATIONS TA = TMIN to TMAX, VCC = VCCMIN to VCCMAX, VCC1 = VCC1MIN to VCC1MAX, VDD = VDDMIN to VDDMAX, VEE = 0 V, input data pattern: PRBS 223 − 1, ac-coupled, I2C register default settings, unless otherwise noted.
Table 1. Parameter Test Conditions/Comments Min Typ Max Unit DATA RATE SUPPORT RANGE 0.0065 8.5 Gbps INPUT—DC CHARACTERISTICS
Peak-to-Peak Differential Input1 PIN − NIN 1.0 V Input Resistance Differential 95 100 105 Ω
0 dB EQ PATH—CML INPUT Input Voltage Range At PIN or NIN, dc-coupled, RX_TERM_FLOAT = 1
(float) 0.5 VCC V
Input Common-Mode Level DC-coupled (see Figure 33), 600 mV p-p differential, RX_TERM_FLOAT = 1 (float)
0.65 VCC − 0.15 V
Differential Input Sensitivity OC-48 22 mV p-p 8GFC2 Jitter tolerance scrambled pattern (JTSPAT),
ac-coupled, RX_TERM_FLOAT = 0 (VCM = 1.2 V), BER = 1 × 10⁻¹²
200 mV p-p
LIMITING AMPLIFIER INPUT PATH Differential Input Sensitivity
OC-48 BER = 1 × 10⁻¹⁰ 6.3 mV p-p 8GFC2 JTSPAT, BER = 1 × 10⁻¹² 8.3 mV p-p
EQUALIZER INPUT PATH Differential Input Sensitivity 15 inch FR-4, 100 Ω differential transmission line,
adaptive equalizer (EQ) on
8GFC2 JTSPAT, BER = 1 × 10⁻¹² 115 mV p-p INPUT—AC CHARACTERISTICS
S11 At 7.5 GHz, differential return loss, see Figure 14 −12 dB LOSS OF SIGNAL (LOS) DETECT
Loss of Signal Detect 10 mV p-p Loss of signal minimum program value 5 mV p-p Loss of signal maximum program value 128 mV p-p Hysteresis (Electrical) 5.7 dB LOS Assert Time AC-coupled3 135 μs LOS Deassert Time AC-coupled3 110 μs
LOSS OF LOCK (LOL) DETECT DCO Frequency Error for LOL Assert With respect to nominal, data collected in lock to
reference (LTR) mode 1000 ppm
DCO Frequency Error for LOL Deassert With respect to nominal, data collected in LTR mode 250 ppm LOL Assert Response Time 10.0 Mbps 10 ms
2.5 Gbps 51 μs 8.5 Gbps, JTSPAT 25 μs ACQUISITION TIME
Lock to Data (LTD) Mode 10.0 Mbps 24 ms 2.5 Gbps 0.5 ms 8.5 Gbps, JTSPAT 0.5 ms Optional LTR Mode4 6.0 ms
DATA RATE READBACK ACCURACY Coarse Readback ±5 % Fine Readback In addition to reference clock accuracy ±100 ppm

ADN2913 Data Sheet
Rev. B | Page 4 of 35
Parameter Test Conditions/Comments Min Typ Max Unit POWER SUPPLY VOLTAGE
VCC 1.14 1.2 1.26 V VDD 2.97 3.3 3.63 V VCC1 1.62 1.8 3.63 V
POWER SUPPLY CURRENT Limiting amplifier mode, clock output enabled VCC 1.25 Gbps 277.1 311.0 mA 3.125 Gbps 256.2 288.3 mA 4.25 Gbps 270.1 304.0 mA 6.144 Gbps 303.1 340.4 mA 8GFC,2 JTSPAT 319.1 359.5 mA VDD 1.25 Gbps 7.24 8.28 mA 3.125 Gbps 7.21 8.21 mA 4.25 Gbps 7.23 8.33 mA 6.144 Gbps 7.26 8.17 mA 8GFC,2 JTSPAT 7.20 8.1 mA VCC1 1.25 Gbps 35.6 46.8 mA 3.125 Gbps 19.0 24.1 mA 4.25 Gbps 22.2 28.2 mA 6.144 Gbps 19.4 24.6 mA 8GFC,2 JTSPAT 22.2 28.4 mA
TOTAL POWER DISSIPATION Clock Output Enabled Limiting amplifier mode, 1.25 Gbps 420.4 mW
Limiting amplifier mode, 3.125 Gbps 365.5 mW Limiting amplifier mode, 4.25 Gbps 388 mW Limiting amplifier mode, 6.144 Gbps 422.5 mW Limiting amplifier mode, 8GFC,2 JTSPAT 446.6 mW
Clock Output Disabled Equalizer mode, 8.5 Gbps 352 mW Limiting amplifier mode, 6.144 Gbps 380 mW 0 dB EQ mode, 622 Mbps 340 mW OPERATING TEMPERATURE RANGE −40 +85 °C 1 See Figure 34. 2 Fibre Channel Physical Interface-4 standard, FC-PI-4, Rev 8.00, May 21, 2008. 3 When ac-coupled, the LOS assert and deassert times are dominated by the RC time constant of the ac coupling capacitor and the 100 Ω differential input termination
of the ADN2913 input stage. 4 This typical acquisition specification applies to all selectable reference clock frequencies in the range of 11.05 MHz to 176.8 MHz.

Data Sheet ADN2913
Rev. B | Page 5 of 35
JITTER SPECIFICATIONS TA = TMIN to TMAX, VCC = VCCMIN to VCCMAX, VCC1 = VCC1MIN to VCC1MAX, VDD = VDDMIN to VDDMAX, VEE = 0 V, input data pattern: PRBS 223 − 1, ac-coupled to 100 Ω differential termination load, I2C register default settings, unless otherwise noted.
Table 2. Parameter Test Conditions/Comments Min Typ Max Unit
PHASE-LOCKED LOOP CHARACTERISTICS Jitter Transfer Bandwidth (BW)1
8GFC2 1242 1676 kHz OC-48 TRANBW[2:0] = 4 (default) 663 896 kHz OTN mode, TRANBW[2:0] = 1 157 181 kHz OC-12 175 kHz OC-3 44 kHz
Jitter Peaking 8GFC2 20 kHz to 80 MHz 0.004 0.021 dB OC-48 20 kHz to 10 MHz 0.004 0.023 dB OC-12 0.01 dB OC-3 0.01 dB
Jitter Generation 8GFC2 Unfiltered 0.005 UI rms Unfiltered 0.044 UI p-p OC-48 12 kHz to 20 MHz 0.0025 UI rms Unfiltered 0.0046 UI rms 12 kHz to 20 MHz 0.0156 UI p-p Unfiltered 0.0276 UI p-p OC-12 12 kHz to 5 MHz 0.0007 UI rms Unfiltered 0.0011 UI rms
12 kHz to 5 MHz 0.0038 UI p-p Unfiltered 0.0076 UI p-p
OC-3 12 kHz to 1.3 MHz 0.0002 UI rms Unfiltered 0.0003 UI rms
12 kHz to 1.3 MHz 0.0008 UI p-p Unfiltered 0.0018 UI p-p Jitter Tolerance TRANBW[2:0] = 4 (default)
8GFC,2 JTSPAT Sinusoidal Jitter at 340 kHz 6.7 UI p-p Sinusoidal Jitter at 5.098 MHz 0.53 UI p-p Sinusoidal Jitter at 80 MHz 0.59 UI p-p Rx Jitter Tracking Test3 Voltage modulation amplitude (VMA) = 170 mV p-p at 100 MHz,
425 mV p-p at 100 MHz, 170 mV p-p at 2.5 GHz, and 425 mV p-p at 2.5 GHz excitation frequency4
510 kHz, 1 UI 10−12 <10−12 BER 100 kHz, 5 UI 10−12 <10−12 BER
OC-48 600 Hz 1528 UI p-p 6 kHz 378 UI p-p 100 kHz 16.6 UI p-p 1 MHz 0.70 UI p-p 20 MHz 0.63 UI p-p
OC-12 30 Hz 193 UI p-p 300 Hz 44 UI p-p 25 kHz 19.2 UI p-p 250 kHz 0.82 UI p-p 5 MHz 0.60 UI p-p

ADN2913 Data Sheet
Rev. B | Page 6 of 35
Parameter Test Conditions/Comments Min Typ Max Unit OC-3 30 Hz 50.0 UI p-p
300 Hz 24.0 UI p-p 6500 Hz 14.4 UI p-p 65 kHz 0.80 UI p-p 1.3 MHz 0.61 UI p-p 1 Jitter transfer bandwidth is programmable by adjusting TRANBW[2:0] in the DPLLA register (Address 0x10). 2 Fibre Channel Physical Interface-4 standard, FC-PI-4, Rev 8.00, May 21, 2008. 3 Conditions of FC-PI-4, Rev 8.00, Table 27, 800-DF-EL-S apply. 4 Must have zero errors during the tests for an interval of time that is ≤10−12 BER to pass the tests.
OUTPUT AND TIMING SPECIFICATIONS TA = TMIN to TMAX, VCC = VCCMIN to VCCMAX, VCC1 = VCC1MIN to VCC1MAX, VDD = VDDMIN to VDDMAX, VEE = 0 V, input data pattern: PRBS 223 − 1, ac-coupled to 100 Ω differential termination load, I2C register default settings, unless otherwise noted.
Table 3. Parameter Test Conditions/Comments Min Typ Max Unit CML OUTPUT CHARACTERISTICS
Data Differential Output Swing 8GFC,1 DATA_SWING[3:0] setting = 0xC (default) 540 600 666 mV p-p 8GFC,1 DATA_SWING[3:0] setting = 0xF (maximum) 662 725 778 mV p-p
8GFC,1 DATA_SWING[3:0] setting = 0x4 (minimum 190 214 245 mV p-p
Clock Differential Output Swing 8GFC,1 CLOCK_SWING[3:0] setting = 0xC (default) 426 518 588 mV p-p
8GFC,1 CLOCK_SWING[3:0] setting = 0xF (maximum) 489 603 680 mV p-p
8GFC, CLOCK_SWING[3:0] setting = 0x4 (minimum) 166 213 245 mV p-p Output High Voltage VOH, dc-coupled VCC − 0.05 VCC −
0.025 VCC V
Output Low Voltage VOL, dc-coupled VCC − 0.36 VCC − 0.325
VCC − 0.29
V
CML OUTPUT TIMING CHARACTERISTICS Rise Time 20% to 80%, at 8GFC,1 DATOUTN/DATOUTP 20.4 33.1 44 ps
20% to 80%, at 8GFC,1 CLKOUTN/CLKOUTP 23.1 29.7 35.8 ps
Fall Time 80% to 20%, at 8GFC,1 DATOUTN/DATOUTP 23 34.2 46.8 ps
80% to 20%, at 8GFC,1 CLKOUTN/CLKOUTP 25 31.3 37.1 ps
Setup Time, Full Rate Clock tS (see Figure 2) 0.5 UI Hold Time, Full Rate Clock tH (see Figure 2) 0.5 UI Setup Time, Half Rate/DDR Clock tS (see Figure 3) 0.5 UI Hold Time, Half Rate/DDR Clock tH (see Figure 3) 0.5 UI
I2C INTERFACE DC CHARACTERISTICS LVTTL Input High Voltage VIH 2.0 V Input Low Voltage VIL 0.8 V Input Current VIN = 0.1 × VDD or VIN = 0.9 × VDD −10.0 +10.0 µA Output Low Voltage VOL, IOL = 3.0 mA 0.4 V
I2C INTERFACE TIMING See Figure 22 SCK Clock Frequency 400 kHz SCK Pulse Width High tHIGH 600 ns SCK Pulse Width Low tLOW 1300 ns Start Condition Hold Time tHD;STA 600 ns Start Condition Setup Time tSU;STA 600 ns Data Setup Time tSU;DAT 100 ns Data Hold Time tHD;DAT 300 ns SCK/SDA Rise/Fall Time tR/tF 20 + 0.1 Cb
2 300 ns Stop Condition Setup Time tSU;STO 600 ns Bus Free Time Between Stop and
Start Conditions tBUF 1300 ns

Data Sheet ADN2913
Rev. B | Page 7 of 35
Parameter Test Conditions/Comments Min Typ Max Unit LVTTL DC INPUT CHARACTERISITICS
(I2C_ADDR Pin)
Input Voltage High VIH 2.0 V Low VIL 0.8 V
Input Current High IIH, VIN = 2.4 V 5 µA Low IIL, VIN = 0.4 V −5 µA
LVTTL DC OUTPUT CHARACTERISITICS (LOS/LOL Pins)
Output Voltage High VOH, IOH = +2.0 mA 2.4 V Low VOL, IOL = −2.0 mA 0.4 V
REFERENCE CLOCK CHARACTERISTICS Optional LTR mode Input Compliance Voltage
(Common-Mode Voltage Referred to Ground)
VCM (no input offset, no input current), see Figure 30, ac-coupled input
0.55 1.0 V
Minimum Input Drive See Figure 30, ac-coupled, differential input 100 mV p-p diff Reference Frequency 11.05 176.8 MHz Required Accuracy3 AC-coupled, differential input 100 ppm
1 Fibre Channel Physical Interface-4 standard, FC-PI-4, Rev 8.00, May 21, 2008. 2 Cb is the total capacitance of one bus line in picofarads (pF). If mixed with high speed (HS) mode devices, faster rise/fall times are allowed (refer to the Philips
I2C Bus Specification, Version 2.1). 3 Required accuracy in dc-coupled mode is guaranteed by design as long as the clock common-mode voltage output matches the reference clock common-
mode voltage range.

ADN2913 Data Sheet
Rev. B | Page 8 of 35
TIMING DIAGRAMS
1177
7-00
2
CLKOUTP
DATOUTP/DATOUTN
tStH
Figure 2. Data to Clock Timing (Full Rate Clock Mode)
1177
7-00
3
CLKOUTP
DATOUTP/DATOUTN
tHtS
Figure 3. Data to Clock Timing (Half Rate Clock/DDR Mode)
1177
7-00
4
DATOUTP
DATOUTN
DATOUTP – DATOUTN0V
VSE1
1VSE = SINGLE-ENDED VOLTAGE2VDIFF = DIFFERENTIAL-ENDED VOLTAGE
VSE
VDIFF2
Figure 4. Single-Ended vs. Differential Output Amplitude Relationship

Data Sheet ADN2913
Rev. B | Page 9 of 35
ABSOLUTE MAXIMUM RATINGS Table 4. Parameter Rating Supply Voltage (VCC = 1.2 V) 1.26 V Supply Voltage (VDD and VCC1 = 3.3 V) 3.63 V Maximum Input Voltage (REFCLKP/REFCLKN,
NIN/PIN) 1.26 V
Minimum Input Voltage (REFCLKP/REFCLKN, NIN/PIN)
VEE − 0.4 V
Maximum Input Voltage (SDA, SCK, I2C_ADDR) 3.63 V Minimum Input Voltage (SDA, SCK, I2C_ADDR) VEE − 0.4 V Maximum Junction Temperature 125°C Storage Temperature Range −65°C to +150°C Lead Temperature (Soldering, 10 sec) 300°C
Stresses at or above those listed under Absolute Maximum Ratings may cause permanent damage to the product. This is a stress rating only; functional operation of the product at these or any other conditions above those indicated in the operational section of this specification is not implied. Operation beyond the maximum operating conditions for extended periods may affect product reliability.
THERMAL CHARACTERISTICS Thermal Resistance
Thermal resistance is specified for the worst-case conditions, that is, a device soldered in a circuit board for surface-mount packages, for a 4-layer board with the exposed pad soldered to VEE.
Table 5. Thermal Resistance Package Type θJA
1 θJB2 θJC
3 Unit 24-Lead LFCSP 45 5 11 °C/W 1 Junction to ambient. 2 Junction to board. 3 Junction to case.
ESD CAUTION
ADN2913 Data Sheet
Rev. B | Page 10 of 35
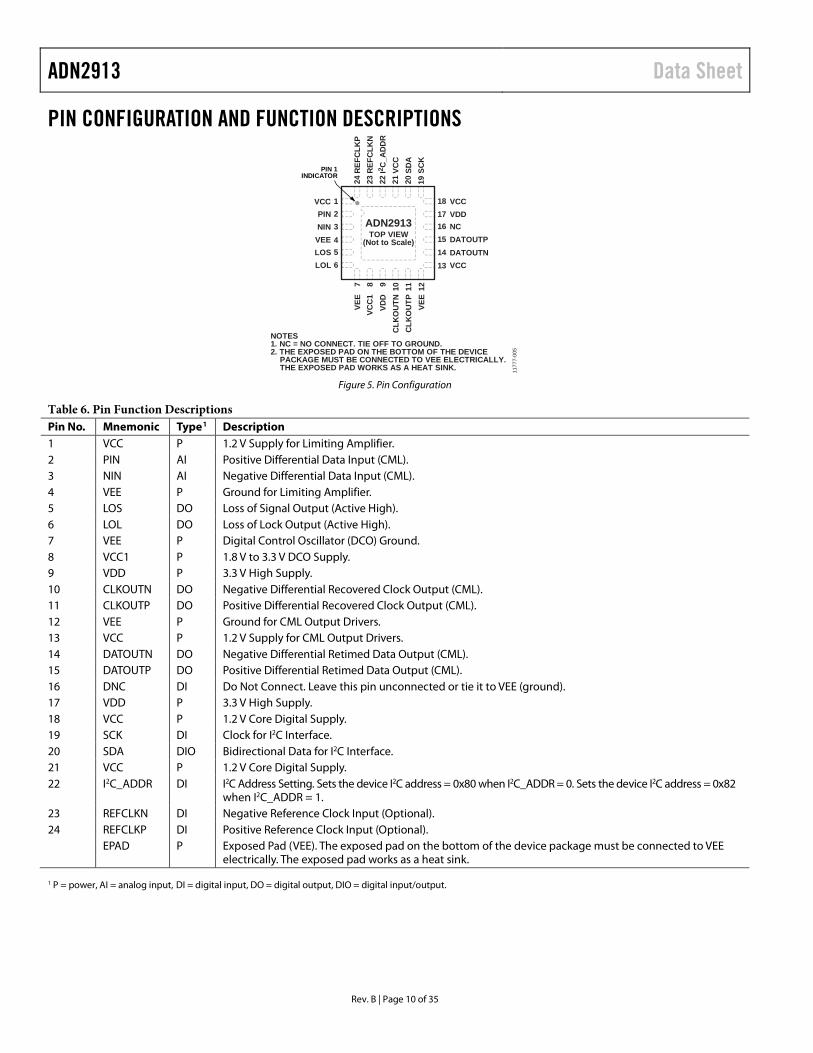
PIN CONFIGURATION AND FUNCTION DESCRIPTIONS
1177
7-00
5
NOTES1. NC = NO CONNECT. TIE OFF TO GROUND.2. THE EXPOSED PAD ON THE BOTTOM OF THE DEVICE PACKAGE MUST BE CONNECTED TO VEE ELECTRICALLY. THE EXPOSED PAD WORKS AS A HEAT SINK.
21
3456
181716151413LOL
LOSVEENINPIN
VCC
VCCDATOUTNDATOUTPNCVDDVCC
8 9 10 117VC
C1
VDD
CLK
OU
TNC
LKO
UTP
12VE
E
VEE
20 1921SD
ASC
K
VCC
22I2
C_A
DD
R23
REF
CLK
N24
REF
CLK
P
ADN2913TOP VIEW
(Not to Scale)
PIN 1INDICATOR
Figure 5. Pin Configuration
Table 6. Pin Function Descriptions Pin No. Mnemonic Type1 Description 1 VCC P 1.2 V Supply for Limiting Amplifier. 2 PIN AI Positive Differential Data Input (CML). 3 NIN AI Negative Differential Data Input (CML). 4 VEE P Ground for Limiting Amplifier. 5 LOS DO Loss of Signal Output (Active High). 6 LOL DO Loss of Lock Output (Active High). 7 VEE P Digital Control Oscillator (DCO) Ground. 8 VCC1 P 1.8 V to 3.3 V DCO Supply. 9 VDD P 3.3 V High Supply. 10 CLKOUTN DO Negative Differential Recovered Clock Output (CML). 11 CLKOUTP DO Positive Differential Recovered Clock Output (CML). 12 VEE P Ground for CML Output Drivers. 13 VCC P 1.2 V Supply for CML Output Drivers. 14 DATOUTN DO Negative Differential Retimed Data Output (CML). 15 DATOUTP DO Positive Differential Retimed Data Output (CML). 16 DNC DI Do Not Connect. Leave this pin unconnected or tie it to VEE (ground). 17 VDD P 3.3 V High Supply. 18 VCC P 1.2 V Core Digital Supply. 19 SCK DI Clock for I2C Interface. 20 SDA DIO Bidirectional Data for I2C Interface. 21 VCC P 1.2 V Core Digital Supply. 22 I2C_ADDR DI I2C Address Setting. Sets the device I2C address = 0x80 when I2C_ADDR = 0. Sets the device I2C address = 0x82
when I2C_ADDR = 1. 23 REFCLKN DI Negative Reference Clock Input (Optional). 24 REFCLKP DI Positive Reference Clock Input (Optional). EPAD P Exposed Pad (VEE). The exposed pad on the bottom of the device package must be connected to VEE
electrically. The exposed pad works as a heat sink. 1 P = power, AI = analog input, DI = digital input, DO = digital output, DIO = digital input/output.

Data Sheet ADN2913
Rev. B | Page 11 of 35
TYPICAL PERFORMANCE CHARACTERISTICS TA = 25°C, VCC = 1.2 V, VCC1 = 1.8 V, VDD = 3.3 V, VEE = 0 V, input data pattern: PRBS 215 − 1, ac-coupled inputs and outputs, unless otherwise noted.
1177
7-00
6
19.6ps/DIV
57m
V/D
IV
Figure 6. Output Eye Diagram at 8GFC
1k
0.1
1
10
100
100 1k 10k 100k 1M 10M 100M
1177
7-00
7
JITT
ER A
MPL
ITU
DE
(UI)
JITTER FREQUENCY (Hz)
ADN2913SONET MASK
Figure 7. Jitter Tolerance: 8GFC
1k
0.1
1
10
100
10 100 1k 10k 100k 1M 10M 100M
1177
7-00
8
JITT
ER A
MPL
ITU
DE
(UI)
JITTER FREQUENCY (Hz)
EQUIPMENT LIMITADN2913
SONET MASK
Figure 8. Jitter Tolerance: OC-48
1177
7-00
9
66.9ps/DIV
67.6
mV/
DIV
Figure 9. Output Eye Diagram at OC-48
5
–40
–25
–5
–35
–15
0
1k 10k 100k 1M 10M 100M
1177
7-01
0
JITT
ER T
RA
NSF
ER (d
B)
FREQUENCY (Hz)
–20
–30
–10
ADN2913SONET MASK
Figure 10. Jitter Transfer: 8GFC (TRANBW[2:0] = 4)
5
–25
–15
–5
–20
–10
0
1k 10k 100k 1M 10M 100M
1177
7-01
1
JITT
ER T
RA
NSF
ER (d
B)
FREQUENCY (Hz)
ADN2913SONET MASK
Figure 11. Jitter Transfer: OC-48

ADN2913 Data Sheet
Rev. B | Page 12 of 35
1k
0.1
1
10
100
10 100 1k 10k 100k 1M 10M
1177
7-01
2
JITT
ER A
MPL
ITU
DE
(UI)
JITTER FREQUENCY (Hz)
EQUIPMENT LIMITADN2913
SONET MASK
Figure 12. Jitter Tolerance: OC-12
100
0.1
1
10
10 100 1k 10k 100k 1M 10M
1177
7-01
3
JITT
ER A
MPL
ITU
DE
(UI)
JITTER FREQUENCY (Hz)
EQUIPMENT LIMITADN2913
SONET MASK
Figure 13. Jitter Tolerance: OC-3
0
–40
–15
–5
–20
–25
–30
–35
–10
1M 10M 100M 1G 10G 100G
1177
7-01
4
LOG
MA
GN
ITU
DE
(dB
)
FREQUENCY (Hz)
Figure 14. Typical S11 Spectrum Performance
4.15
4.20
4.25
4.30
4.35
4.40
4.45
4.50
4.55
4.60
4.65
4.70
155.52M 622.08M 2.4880G 2.6670G
SENS
ITIV
ITY
(mV
p-p
DIFF
)
DATA RATE (bps) 1177
7-01
7
Figure 15. Sensitivities of SONET/SDH Data Rates (BER = 10−10)
0
0.0001
0.0002
0.0003
0.0004
0.0005
0.0006
0 2 4 6 8 10 12 14 16
BER
EQ SETTING 1177
7-01
8
Figure 16. BER in Equalizer Mode vs. EQ Compensation at 8GFC (Measured with an 8GFC Signal of 400 mV p-p diff, on 15-Inch FR4 Traces,
with Variant EQ Compensation, Including Adaptive EQ)
0
1
2
3
4
5
6
7
8
9
SENS
ITIV
ITY
(mV
p-p
DIFF
)
DATARATE (bps)
100.
00M
614.
40M
1.06
25G
1.25
00G
2.12
50G
3.21
50G
4.25
00G
6.14
40G
8.50
00G
1177
7-01
9
Figure 17. Sensitivities of non-SONET/SDH Data Rates (BER = 10−12)

Data Sheet ADN2913
Rev. B | Page 13 of 35
I2C INTERFACE TIMING AND INTERNAL REGISTER DESCRIPTIONS
1177
7-02
01
SLAVE ADDRESS[6:0]
SET BYPIN 22
MSB = 1 0 = W1 = R
R/WCTRL.
0 0 0 0 0 x x
Figure 18. Slave Address Configuration
1177
7-02
1
S SLAVE ADDR, LSB = 0 (W) A(S) A(S) A(S)DATASUBADDR A(S) PDATA
S = START BIT P = STOP BITA(S) = ACKNOWLEDGE BY SLAVE A(M) = ACKNOWLEDGE BY MASTER
Figure 19. I2C Write Data Transfer
1177
7-02
2
S
S = START BIT P = STOP BITA(S) = ACKNOWLEDGE BY SLAVE A(M) = ACKNOWLEDGE BY MASTER
A(M) = NO ACKNOWLEDGE BY MASTER
SSLAVE ADDR, LSB = 0 (W) SLAVE ADDR, LSB = 1 (R)A(S) A(S)SUBADDR A(S) DATA A(M) DATA PA(M)
Figure 20. I2C Read Data Transfer
1177
7-02
3
START BIT
S
STOP BIT
PACKACKWR ACK
D0D7A0A7A5A6
SLAVE ADDR[4:0]
SLAVE ADDRESS SUBADDRESS DATA
SUBADDR[6:1] DATA[6:1]
SCK
SDA
Figure 21. I2C Data Transfer Timing
1177
7-02
4
tBUFSDA
S S P S
SCK
tF
tLOW
tR tF
tHD;STA
tHD;DAT
tSU;DAT
tHIGH tSU;STA
tSU;STO
tHD;STA
tR
Figure 22. I2C Interface Timing Diagram
ADN2913 Data Sheet
Rev. B | Page 14 of 35
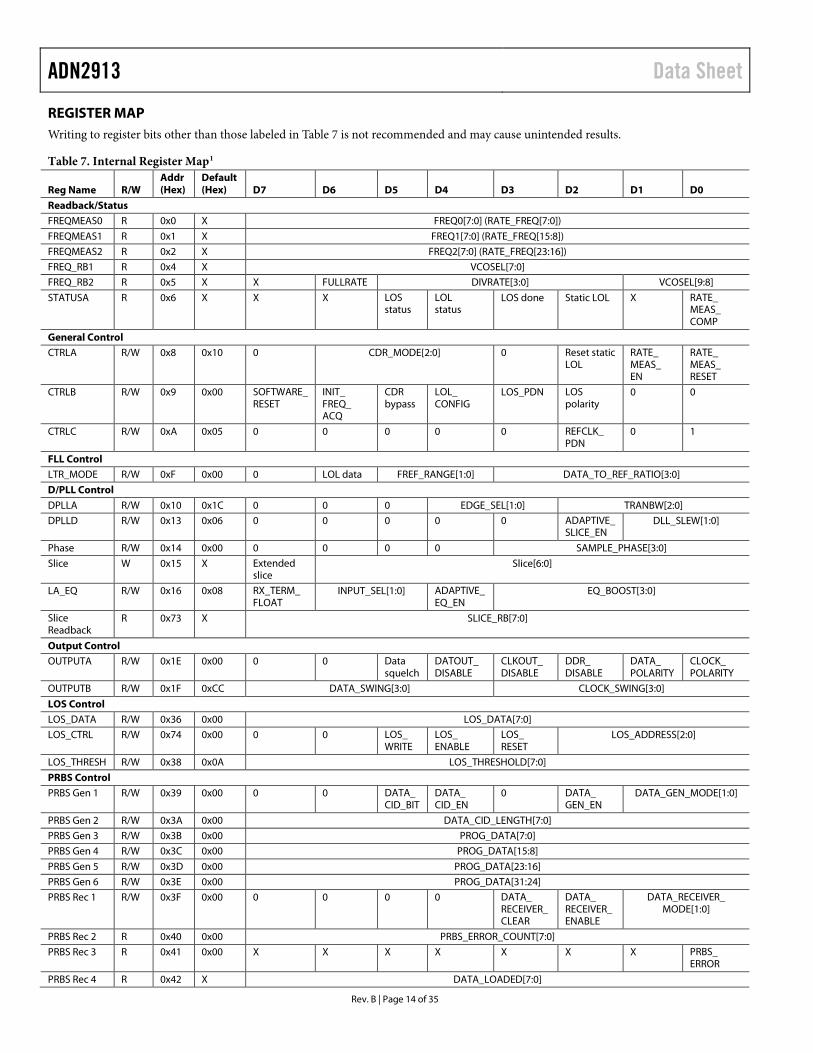
REGISTER MAP Writing to register bits other than those labeled in Table 7 is not recommended and may cause unintended results.
Table 7. Internal Register Map1
Reg Name R/W Addr (Hex)
Default (Hex) D7 D6 D5 D4 D3 D2 D1 D0
Readback/Status FREQMEAS0 R 0x0 X FREQ0[7:0] (RATE_FREQ[7:0])
FREQMEAS1 R 0x1 X FREQ1[7:0] (RATE_FREQ[15:8])
FREQMEAS2 R 0x2 X FREQ2[7:0] (RATE_FREQ[23:16])
FREQ_RB1 R 0x4 X VCOSEL[7:0]
FREQ_RB2 R 0x5 X X FULLRATE DIVRATE[3:0] VCOSEL[9:8]
STATUSA R 0x6 X X X LOS status
LOL status
LOS done Static LOL X RATE_ MEAS_ COMP
General Control CTRLA R/W 0x8 0x10 0 CDR_MODE[2:0] 0 Reset static
LOL RATE_ MEAS_ EN
RATE_ MEAS_ RESET
CTRLB R/W 0x9 0x00 SOFTWARE_ RESET
INIT_ FREQ_ ACQ
CDR bypass
LOL_ CONFIG
LOS_PDN LOS polarity
0 0
CTRLC R/W 0xA 0x05 0 0 0 0 0 REFCLK_ PDN
0 1
FLL Control LTR_MODE R/W 0xF 0x00 0 LOL data FREF_RANGE[1:0] DATA_TO_REF_RATIO[3:0]
D/PLL Control
DPLLA R/W 0x10 0x1C 0 0 0 EDGE_SEL[1:0] TRANBW[2:0]
DPLLD R/W 0x13 0x06 0 0 0 0 0 ADAPTIVE_ SLICE_EN
DLL_SLEW[1:0]
Phase R/W 0x14 0x00 0 0 0 0 SAMPLE_PHASE[3:0]
Slice W 0x15 X Extended slice
Slice[6:0]
LA_EQ R/W 0x16 0x08 RX_TERM_ FLOAT
INPUT_SEL[1:0] ADAPTIVE_ EQ_EN
EQ_BOOST[3:0]
Slice Readback
R 0x73 X SLICE_RB[7:0]
Output Control OUTPUTA R/W 0x1E 0x00 0 0 Data
squelch DATOUT_ DISABLE
CLKOUT_ DISABLE
DDR_ DISABLE
DATA_ POLARITY
CLOCK_ POLARITY
OUTPUTB R/W 0x1F 0xCC DATA_SWING[3:0] CLOCK_SWING[3:0]
LOS Control LOS_DATA R/W 0x36 0x00 LOS_DATA[7:0]
LOS_CTRL R/W 0x74 0x00 0 0 LOS_ WRITE
LOS_ ENABLE
LOS_ RESET
LOS_ADDRESS[2:0]
LOS_THRESH R/W 0x38 0x0A LOS_THRESHOLD[7:0]
PRBS Control PRBS Gen 1 R/W 0x39 0x00 0 0 DATA_
CID_BIT DATA_ CID_EN
0 DATA_ GEN_EN
DATA_GEN_MODE[1:0]
PRBS Gen 2 R/W 0x3A 0x00 DATA_CID_LENGTH[7:0]
PRBS Gen 3 R/W 0x3B 0x00 PROG_DATA[7:0]
PRBS Gen 4 R/W 0x3C 0x00 PROG_DATA[15:8]
PRBS Gen 5 R/W 0x3D 0x00 PROG_DATA[23:16]
PRBS Gen 6 R/W 0x3E 0x00 PROG_DATA[31:24]
PRBS Rec 1 R/W 0x3F 0x00 0 0 0 0 DATA_ RECEIVER_ CLEAR
DATA_ RECEIVER_ ENABLE
DATA_RECEIVER_ MODE[1:0]
PRBS Rec 2 R 0x40 0x00 PRBS_ERROR_COUNT[7:0]
PRBS Rec 3 R 0x41 0x00 X X X X X X X PRBS_ ERROR
PRBS Rec 4 R 0x42 X DATA_LOADED[7:0]

Data Sheet ADN2913
Rev. B | Page 15 of 35
Reg Name R/W Addr (Hex)
Default (Hex) D7 D6 D5 D4 D3 D2 D1 D0
PRBS Rec 5 R 0x43 X DATA_LOADED[15:8]
PRBS Rec 6 R 0x44 X DATA_LOADED[23:16]
PRBS Rec 7 R 0x45 X DATA_LOADED[31:24]
ID/Revision REV R 0x48 0x54 REV[7:0]
ID R 0x49 0x15 ID[7:0]
HI_CODE R 0x20 0xA8 Reserved
LO_CODE R 0x21 0x00 Reserved 1 X means don’t care.
Table 8. Status Register, STATUSA (Address 0x6) Bits Bit Name Bit Description D5 LOS status 0 = no loss of signal 1 = loss of signal D4 LOL status 0 = locked 1 = frequency acquisition mode D3 LOS done 0 = LOS action not completed 1 = LOS action completed D2 Static LOL 0 = no LOL event since last reset 1 = LOL event since last reset; clear using reset static LOL bit, Bit D2 in Register 0x8 D0 RATE_MEAS_COMP Rate measurement complete 0 = frequency measurement incomplete 1 = frequency measurement complete; clear using RATE_MEAS_RESET bit, Bit D0 in Register 0x8
Table 9. Control Register, CTRLA (Address 0x8) Bits Bit Name Bit Description D7 Reserved to 0. D6:D4 CDR_MODE[2:0] CDR modes. 001 = lock to data (LTD). 011 = lock to reference (LTR). 000, 010, 1xx = reserved. D3 Reserved to 0. D2 Reset static LOL Set to 1 to clear static LOL (Bit D2 in Register 0x6). D1 RATE_MEAS_EN Fine data rate measurement enable. Set to 1 to initiate a rate measurement. D0 RATE_MEAS_RESET Rate measurement reset. Set to 1 to clear a rate measurement.

ADN2913 Data Sheet
Rev. B | Page 16 of 35
Table 10. Control Register, CTRLB (Address 0x9) Bits Bit Name Bit Description D7 SOFTWARE_RESET Software reset. Write a 1 followed by a 0 to reset the device. D6 INIT_FREQ_ACQ Initiate frequency acquisition. Write a 1 followed by a 0 to initiate a frequency acquisition
(optional). D5 CDR bypass CDR bypass. 0 = CDR enabled. 1 = CDR bypassed. D4 LOL_CONFIG LOL configuration. 0 = normal LOL. 1 = static LOL. D3 LOS_PDN LOS power-down. 0 = normal LOS. 1 = LOS powered down. D2 LOS polarity LOS polarity. 0 = active high LOS pin. 1 = active low LOS pin. D1:D0 Reserved to 0.
Table 11. Control Register, CTRLC (Address 0xA) Bits Bit Name Bit Description D7:D3 Reserved to 0. D2 REFCLK_PDN Reference clock power-down. Write a 0 to enable the reference clock. D1 Reserved to 0. D0 Reserved to 1.
Table 12. Lock to Reference Clock Mode Programming Register, LTR_MODE (Address 0xF) Bits Bit Name Bit Description D7 Reserved to 0 D6 LOL data LOL data 0 = valid recovered clock vs. reference clock during tracking 1 = valid recovered clock vs. data during tracking D5:D4 FREF_RANGE[1:0] fREF range 00 = 11.05 MHz to 22.1 MHz 01 = 22.1 MHz to 44.2 MHz 10 = 44.2 MHz to 88.4 MHz 11 = 88.4 MHz to 176.8 MHz D3:D0 DATA_TO_REF_RATIO[3:0] Data to reference ratio1 (N ≥ 2(N − 1), where N is the decimal equivalent of the binary code) 0000 = 1/2 0001 = 1 0010 = 2 0011 = 4 0100 = 8 … 1010 = 512 1 Data ÷ DIV_fREF, where DIV_fREF is the divided down reference referred to the 11.05 MHz to 22.1 MHz band (see the Reference Clock (Optional) section). Data Rate/2(LTR_MODE[3:0] − 1) = REFCLK/2LTR_MODE[5:4]

Data Sheet ADN2913
Rev. B | Page 17 of 35
Table 13. D/PLL Control Register, DPLLA (Address 0x10) Bits Bit Name Bit Description D7:D5 Reserved to 0. D4:D3 EDGE_SEL[1:0] Edge for phase detection. See the Edge Select section for more information. 00 = rising and falling edge data. 01 = rising edge data. 10 = falling edge data. 11 = rising and falling edge data. D2:D0 TRANBW[2:0] Transfer bandwidth. Scales the transfer bandwidth. Default value is 4, resulting in the 8GFC
default BW shown in Table 2. See the Transfer Bandwidth section for more information. Transfer BW = Default BW × (TRANBW[2:0]/4)
Table 14. D/PLL Control Register, DPLLD (Address 0x13) Bits Bit Name Bit Description D7:D3 Reserved to 0. D2 ADAPTIVE_SLICE_EN Adaptive slice enable. 1 = enables automatic slice adjust. D1:D0 DLL_SLEW[1:0] DLL slew. Sets the BW of the DLL. See the DLL Slew section for more information.
Table 15. Phase Control Register, Phase (Address 0x14) Bits Bit Name Bit Description D7:D4 Reserved to 0. D3:D0 SAMPLE_PHASE[3:0] Adjust the phase of the sampling instant for data rates above 5.65 Gbps in steps of 1/32 UI. This
register is in twos complement format. See the Sample Phase Adjust section for more information.
Table 16. Slice Level Control Register, Slice (Address 0x15) Bits Bit Name Bit Description D7 Extended slice Extended slice enable. 0 = normal slice mode. 1 = extended slice mode. D6:D0 Slice[6:0] Slice is a digital word that sets the input threshold. See the Slice Adjust section for more information.
When slice[6:0] = 0000000, the slice function is disabled.
Table 17. Input Stage Programming Register, LA_EQ (Address 0x16) Bits Bit Name Bit Description D7 RX_TERM_FLOAT Rx termination float. 0 = termination common-mode driven. 1 = termination common-mode floated (VCC = 1.2 V). D6:D5 INPUT_SEL[1:0] Input stage select. 00: limiting amplifier. 01: equalizer. 10: 0 dB EQ. 11: undefined. D4 ADAPTIVE_EQ_EN Enable adaptive EQ. 0 = manual EQ control. 1 = adaptive EQ enabled. D3:D0 EQ_BOOST[3:0] Equalizer gain. These bits set the EQ gain. See the Passive Equalizer section for more information.

ADN2913 Data Sheet
Rev. B | Page 18 of 35
Table 18. Output Control Register, OUTPUTA (Address 0x1E) Bits Bit Name Bit Description D7:D6 Reserved to 0 D5 Data squelch Squelch 0 = normal data 1 = squelch data D4 DATOUT_DISABLE Data output disable 0 = data output enabled 1 = data output disabled D3 CLKOUT_DISABLE Clock output disable 0 = clock output enabled 1 = clock output disabled D2 DDR_DISABLE Double data rate 0 = DDR clock enabled 1 = DDR clock disabled D1 DATA_POLARITY Data polarity 0 = normal data polarity 1 = flip data polarity D0 CLOCK_POLARITY Clock polarity 0 = normal clock polarity 1 = flip clock polarity

Data Sheet ADN2913
Rev. B | Page 19 of 35
Table 19. Output Swing Register, OUTPUTB (Address 0x1F) Bits Bit Name Bit Description D7:D4 DATA_SWING[3:0] Adjust data output amplitude. Step size is approximately 50 mV differential. Default register value is 0xC. Typical differential data output amplitudes are 0x1 = invalid. 0x2 = invalid. 0x3 = invalid. 0x4 = 200 mV. 0x5 = 250 mV. 0x6 = 300 mV. 0x7 = 345 mV. 0x8 = 390 mV. 0x9 = 440 mV. 0xA = 485 mV. 0xB = 530 mV. 0xC = 575 mV. 0xD = 610 mV. 0xE = 640 mV. 0xF = 655 mV. D3:D0 CLOCK_SWING[3:0] Adjust clock output amplitude. Step size is approximately 50 mV differential. Default register value is 0xC. Typical differential clock output amplitudes are 0x1 = invalid. 0x2 = invalid. 0x3 = invalid. 0x4 = 200 mV. 0x5 = 250 mV. 0x6 = 300 mV. 0x7 = 345 mV. 0x8 = 390 mV. 0x9 = 440 mV. 0xA = 485 mV. 0xB = 530 mV. 0xC = 575 mV. 0xD = 610 mV. 0xE = 640 mV. 0xF = 655 mV.

ADN2913 Data Sheet
Rev. B | Page 20 of 35
THEORY OF OPERATION The ADN2913 implements clock and data recovery for data rates between 6.5 Mbps and 8.5 Gbps. A front end is configurable to either amplify or equalize the nonreturn-to-zero (NRZ) input waveform to full-scale digital logic levels, or to bypass a full digital logic signal.
The user can choose one of three input stages to process the data: a high gain limiting amplifier with better than 10 mV sensitivity, a high-pass passive equalizer with up to 10 dB of boost at 5 GHz, or a 0 dB EQ buffer with 600 mV sensitivity.
An on-chip LOS detector works with the high sensitivity limiting amplifier. The default threshold for the LOS detector is the sensitivity of the device, with a maximum threshold level of 128 mV p-p. The limiting amplifier slice threshold can use a factory trim setting, a user defined threshold set by the I2C interface, or an adjusted level for the best eye opening at the phase detector.
When the input signal is corrupted due to FR-4 or other impairments in the printed circuit board (PCB) traces, a passive equalizer can be one of the signal integrity options. The equalizer high frequency boost is configurable through the I2C registers. A user enabled adaptation is included that automatically adjusts the equalizer to achieve the widest eye opening. The equalizer can be manually set for any data rate, but adaptation is available only at data rates greater than 5.5 Gbps.
When a signal is presented to the clock and data recovery (CDR) system, the ADN2913 acts as a delay-locked and phase-locked loop (PLL) circuit for clock recovery and data retiming from an NRZ encoded data stream. Input data is sampled by a high speed clock. A digital downsampler accommodates data rates spanning three orders of magnitude. Downsampled data is applied to a binary phase detector (see Figure 23).
The phase of the input data signal is tracked by two separate feedback loops. A high speed delay-locked loop (DLL) path combines a digital integrator with a digitally controlled phase shifter (PSH) on the DCO clock to track the high frequency components of jitter.
A separate PLL composed of a digital integrator and DCO tracks the low frequency components of jitter. The initial frequency of the DCO is set by a third loop that compares the DCO frequency with the input data frequency. This third loop also sets the decimation ratio of the digital downsampler.
The delay-locked and PLLs together track the phase of the input data. For example, when the clock lags the input data, the phase detector drives the DCO to a higher frequency and decreases the delay of the clock through the phase shifter; both of these actions serve to reduce the phase error between the clock and data. Because the loop filter is an integrator, the static phase error is driven to zero.
Another view of the circuit is that the phase shifter implements the zero required for frequency compensation of a second-order PLL. This zero is placed in the feedback path and, therefore, does not appear in the closed-loop transfer function. Because this circuit has no zero in the closed-loop transfer, jitter peaking is eliminated.
The combination of the delay-locked and PLLs simultaneously provide wideband jitter tolerance and narrow-band jitter filtering. The simplified block diagram in Figure 23 shows that Z(s)/X(s) is a second-order low-pass jitter transfer function that provides excellent filtering. The low frequency pole is formed by dividing the gain of the PLL by the gain of the DLL, where the upsampling and zero-order hold in the DLL has a gain approaching N at the transfer bandwidth of the loop. Note that the jitter transfer has no zero, unlike an ordinary second-order PLL. This means that the main PLL loop has no jitter peaking, making the circuit ideal for signal regenerator applications, where jitter peaking in a cascade of regenerators can contribute to hazardous jitter accumulation.
The error transfer, e(s)/X(s), has the same high-pass form as an ordinary PLL up to the slew rate limit of the DLL with a binary phase detector. This transfer function can be optimized to give excellent wideband jitter tolerance because the jitter transfer function, Z(s)/X(s), provides the narrow-band jitter filtering.
PSH
Z(s) RECOVEREDCLOCK
KDLLI – z–1
KDCOs
I – z–N
I – z–1
KPLL × TRANBWI – z–1
N
N
DELAY-LOCKED LOOP (DLL)
PHASE-LOCKED LOOP (PLL)
ZERO-ORDER HOLDSAMPLE CLOCK
INPUTDATA
÷NBINARYPHASE
DETECTOR
X(s)
=KPLL × TRANBW – KDCO
s × N × PSH × KDLL + KPLL × TRANBW × KDCO
Z(s)X(s) 11
777-
025
Figure 23. CDR Jitter Block Diagram
Data Sheet ADN2913
Rev. B | Page 21 of 35
The delay-locked and PLLs contribute to overall jitter tolerance. At low frequencies of input jitter on the data signal, the integrator in the loop filter provides high gain to track large jitter amplitudes with small phase error. In this case, the oscillator is frequency modulated and jitter is tracked as in an ordinary PLL. The amount of low frequency jitter that can be tracked is a function of the DCO tuning range. A wider tuning range gives larger tolerance of low frequency jitter. The internal loop control word remains small for small jitter frequency so that the phase shifter remains close to the center of the range and, thus, contributes little to the low frequency jitter tolerance.
At medium jitter frequencies, the gain and tuning range of the DCO are not large enough to track input jitter. In this case, the DCO control word becomes large and saturates. As a result, the DCO frequency remains at an extreme of the tuning range.
The size of the DCO tuning range, therefore, has only a small effect on the jitter tolerance. The DLL control range is now larger; therefore, the phase shifter tracks the input jitter. An infinite range phase shifter is used on the clock. Consequently, the minimum range of timing mismatch between the clock at the data sampler and the retiming clock at the output is limited by the depth of the FIFO to 32 UI.
There are two ways to acquire the data rate. The default mode is for the frequency to lock to the input data, where a finite state machine extracts frequency measurements from the data to program the DCO and loop division ratio so that the sampling frequency matches the data rate to within 250 ppm. The PLL is enabled, driving this frequency difference to 0 ppm. The second mode is to lock to the reference, in which case the user provides a reference clock between 11.05 MHz and 176.8 MHz. Division ratios must be written to a serial port register.
ADN2913 Data Sheet
Rev. B | Page 22 of 35
FUNCTIONAL DESCRIPTION FREQUENCY ACQUISITION The ADN2913 acquires the frequency from the input data over a range of data frequencies from 6.5 Mbps to 8.5 Gbps. The lock detector circuit compares the frequency of the DCO and the frequency of the incoming data. When these frequencies differ by more than 1000 ppm, the LOL pin is asserted and a new frequency acquisition cycle is initiated. The DCO frequency is reset to the lowest point of the range, and the internal division rate is set to the lowest value of N = 1, which is the highest octave of data rates. The frequency detector then compares this sampling rate frequency to the data rate frequency and either increases N by a factor of 2 if the sampling rate frequency is greater than the data rate frequency, or increases the DCO frequency if the data rate frequency is greater than the sampling rate frequency. Initially, the DCO frequency is incremented in large steps to aid fast acquisition. As the DCO frequency approaches the data frequency, the step size is reduced until the DCO frequency is within 250 ppm of the data frequency, at which point LOL is deasserted.
When LOL is deasserted, the frequency-locked loop is turned off. The PLL or DLL pulls in the DCO frequency until the DCO frequency equals the data frequency.
LIMITING AMPLIFIER The limiting amplifier has differential inputs (PIN and NIN) that are each internally terminated with 50 Ω to an on-chip voltage reference (VCM = 0.95 V typically). The inputs must be ac-coupled. Input offset is factory trimmed to achieve better than 10 mV p-p typical sensitivity with minimal drift. The limiting amplifier can be driven differentially or single-ended. DC coupling of the limiting amplifier is not possible because the user must supply a common-mode voltage to exactly match the internal common-mode voltage; otherwise, the internal 50 Ω termination resistors absorb the difference in common-mode voltages.
Another reason that the limiting amplifier cannot be dc-coupled is that the factory trimmed input offset becomes invalid. The offset is adjusted to zero by differential currents from the slice adjust DAC (see Figure 1). With ac coupling, all of the current goes to the 50 Ω termination resistors on the ADN2913. However, with dc coupling, this current is shared with the external drive circuit, and calibration of the offset is lost. In addition, the slice adjust must have all the current from the slice adjust DAC go to the resistors; otherwise, the calibration is lost (see the Slice Adjust section).
SLICE ADJUST The quantizer slicing level can be offset by ±100 mV in 1.6 mV steps or by ±15 mV in 0.24 mV steps to mitigate the effect of amplified spontaneous emission (ASE) noise or duty cycle distortion. The quantizer slice adjust level is set by the slice[6:0] bits in Register 0x15.
Accurate control of the slice threshold requires the user to read back the factory trimmed offset, which is stored as a 7-bit number in the slice readback register (Register 0x73). Use Table 20 to decode the measured offset of the device, where an LSB corresponds to 0.24 mV.
Table 20. Program Slice Level, Normal Slice Mode (Extended Slice = 0) Slice[6:0] Decimal Value Offset 0000000 0 Slice function disabled 0000001 1 −15 mV … … … 1000000 64 0 mV … … … 1111111 127 +14.75 mV
The amount of offset required for manual slice adjustment is determined by subtracting the offset of the device from the desired slice adjust level. Use Table 20 or Table 21 to determine the code word to be written to the slice register.
An extended slice with coarser granularity for each LSB step is found in Table 21. Setting the extended slice bit (Bit 7) = 1 in Register 0x15 scales the full-scale range of the slice adjust by a factor of 6.
Table 21. Program Slice Level, Extended Slice Mode (Extended Slice = 1) Slice[6:0] Decimal Value Offset 0000000 128 Slice function disabled 0000001 129 −100 mV … … … 1000000 192 0 mV … … … 1111111 255 +100 mV
When manual slice is desired, disable the dc offset loop, which drives duty cycle distortion on the data to 0. Adaptive slice is disabled by setting ADAPTIVE_SLICE_EN = 0 in Register 0x13.
EDGE SELECT A binary, or Alexander phase, detector drives both the DLL and PLL at all division rates. Duty cycle distortion on the received data leads to a dead band in the phase detector transfer function if phase errors are measured on both rising and falling data transitions. This dead band leads to jitter generation of unknown spectral composition whose peak-to-peak amplitude is potentially large.
The recommended usage of the device when the dc offset loop is disabled is to compute phase errors exclusively on either the rising data edges with EDGE_SEL[1:0] (Bits[D4:D3] in Register 0x10) = 1 (decimal) or falling data edges with EDGE_SEL[1:0] = 2. The alignment of the clock to the rising data edges with EDGE_ SEL[1:0] = 1 is represented by the top two curves in Figure 24.

Data Sheet ADN2913
Rev. B | Page 23 of 35
Duty cycle distortion with narrow 1s moves the significant sampling instance where data is sampled to the right of center. The alignment of the clock to the falling data edges with EDGE_SEL[1:0] = 2 is represented by the first and third curves in Figure 24. The significant sampling instance moves to the left of center. Sample phase adjustment for rates above 5.65 Gbps can move the significant sampling instance to the center of the narrow 1 (or narrow 0) for best jitter tolerance.
EDGE_SEL[1:0] = 1
EDGE_SEL[1:0] = 2
1177
7-02
6
CLK1
CLK2
DATA
Figure 24. Phase Detector Timing
DLL Slew
Jitter tolerance beyond the transfer bandwidth of the CDR is determined by the slew rate of the DLL implementing a delta modulator on phase. Setting DLL_SLEW[1:0] = 2 (the default value) in Register 0x13, configures the DLL to track 0.75 UI p-p jitter at the highest frequency breakpoint in the SONET/SDH jitter tolerance mask. This frequency scales with the rate as fp4 = Rate (Hz)/2500 (for example, 1.0 MHz for OC-48). Peak-to-peak tracking in UI at fp4 obeys the expression (1 + DLL_SLEW)/4 UI p-p.
In some applications, full SONET/SDH jitter tolerance is not needed. In this case, DLL_SLEW[1:0] can be set to 0, giving lower jitter generation on the recovered clock and better high frequency jitter tolerance.
Sample Phase Adjustment
The phase of the sampling instant can be adjusted using the I2C interface when the devices operate at data rates of 5.65 Gbps or higher by writing to SAMPLE_PHASE[3:0] (Bits[D3:D0] in Register 0x14). This feature allows the user to adjust the sampling instant to improve the BER and jitter tolerance. Although the default sampling instant chosen by the CDR is sufficient in most applications, when dealing with degraded input signals, the BER and jitter tolerance performance can be improved by manually adjusting the phase.
A total adjustment range of 0.5 UI is available, with 0.25 UI in each direction, in increments of 1/32 UI. SAMPLE_PHASE[3:0] is a twos complement number. The relationship between data and the sampling clock is shown in Figure 26.
Transfer Bandwidth
The transfer bandwidth can be adjusted using the I2C interface by writing to TRANBW[2:0] in Register 0x10. The default value is 4. When set to values below 4, the transfer bandwidth is reduced. When set to values above 4, the transfer bandwidth is increased. The resulting transfer bandwidth is based on the following formula:
×=
402)( ]:TRANBW[BWTransferDefaultBWTransfer
For example, at OC-48, the default transfer bandwidth is 650 kHz. The resulting transfer bandwidth when TRANBW[2:0] is changed is
TRANBW[2:0] = 1: transfer BW = 162.5 kHz TRANBW[2:0] = 2: transfer BW = 325 kHz TRANBW[2:0] = 3: transfer BW = 487.5 kHz TRANBW[2:0] = 4: transfer BW = 650 kHz (default) TRANBW[2:0] = 5: transfer BW = 812.5 kHz TRANBW[2:0] = 6: transfer BW = 975 kHz TRANBW[2:0] = 7: transfer BW = 1137.5 kHz
Reducing the transfer bandwidth is commonly used in OTN applications. Never set TRANBW[2:0] = 0 because this value makes the CDR open loop. Also, note that setting TRANBW[2:0] to a value greater than 4 may cause a slight increase in jitter generation and potential jitter peaking.
LOSS OF SIGNAL (LOS) DETECTOR The receiver front-end LOS detector circuit detects when the input signal level falls below a user adjustable threshold.
There is typically 6 dB of electrical hysteresis on the LOS detector to prevent chatter on the LOS pin. Therefore, if the input level falls below the programmed LOS threshold, causing the LOS pin to assert, the LOS pin is not deasserted until the input level increases to 6 dB (2×) above the LOS threshold (see Figure 25).
1177
7-02
7
HYSTERESIS
LOS OUTPUT
INPUT LEVEL
LOS THRESHOLD
t
INPU
T VO
LTA
GE
(VD
IFF)
Figure 25. LOS Detector Hysteresis

ADN2913 Data Sheet
Rev. B | Page 24 of 35
1177
7-02
8
DATA
CLOCK
NOTES1. PHASE REFERS TO SAMPLE_PHASE[3:0]
PHASE = 4PHASE = 7
PHASE = –4PHASE = –8
PHASE = 0(DEFAULT)
Figure 26. Data vs. Sampling Clock
The LOS detector and the slice level adjust can be used simulta-neously on the ADN2913. Therefore, any offset added to the input signal by the slice[6:0] bits does not affect the LOS detector measurement of the absolute input level.
LOS Power-Down
By default, the LOS detector is enabled and consumes power. The LOS detector is placed in a low power mode by setting LOS_PDN = 1 (Bit D3 in Register 0x9).
LOS Threshold
The LOS threshold has a range between 0 mV and 128 mV and is set by writing the number of millivolts (mV) to Register 0x36 followed by toggling the LOS_ENABLE bit in Register 0x74 while LOS_ADDRESS is set to 1. The following is a procedure for writing the LOS threshold:
1. Write 0x21 to LOS_CTRL (Register 0x74). 2. Write the desired threshold in millivolts to LOS_DATA
(Register 0x36). 3. Write 0x31 to LOS_CTRL (Register 0x74). 4. Write 0x21 to LOS_CTRL (Register 0x74).
The LOS threshold can be set to a value between 0 mV and 63 mV in 1 mV steps and from 64 mV to 128 mV in 2 mV steps. In the lower range, all of the bits are active, giving 1 mV/LSB resolution, where Bit D0 is the LSB. In the upper range, Bit D0 is disabled (that is, D0 = 0), making Bit D1 the LSB and resulting in 2 mV/LSB resolution.
The LOS_CTRL register contains the necessary address and write enable bits to program this LOS threshold.
Signal Strength Measurement
The LOS detector measures and digitizes the peak-to-peak amplitude of the received signal. A single shot measurement is taken by writing the following sequence of bytes to LOS_CTRL at Address 0x74: 0x7, 0x17, 0x7. When LOS_ENABLE goes low, the peak-to-peak amplitude in millivolts is loaded into LOS_ DATA[7:0] (Register 0x36). The contents of LOS_DATA change only when LOS_ENABLE (Bit D4 in Register 0x74) is toggled low to high to low while LOS_ADDRESS[2:0] (Bits[D2:D0] in Register 0x74) is set to 7.
PASSIVE EQUALIZER A passive equalizer is available at the input to equalize large signals that have undergone distortion due to PCB traces, vias, or connectors. The adaptive EQ functions only at data rates greater than 5.5 Gbps. Therefore, at rates less than 5.5 Gbps, the EQ must be manually set.
The equalizer can be manually set using the LA_EQ register (Register 0x16). An adaptive loop is also available to optimize the EQ setting based on characteristics of the received eye at the phase detector. If the channel is known in advance, set the EQ manually to obtain the best performance; however, the adaptive EQ finds the best setting in most cases.
Table 22 lists typical EQ settings for several trace lengths. The values in Table 22 are based on measurements taken on a test board with simple FR-4 traces. Table 23 lists the typical maximum reach in inches of FR-4 of the EQ at several data rates. If a real channel includes lossy connectors or vias, the FR-4 reach length is lower. For any real-world system, it is highly recommended to test several EQ settings with the real channel to ensure the best signal integrity.
Table 22. EQ Settings vs. Trace Length on FR-4 Trace Length (Inches) Typical EQ Setting 6 10 10 12 15 14 20 to 30 15
Table 23. Typical EQ Reach on FR-4 vs. Maximum Data Rates Supported Maximum Data Rate (Gbps) Typical EQ Reach on FR-4 (Inches) 4 30 8 20 10 15 11 10
0 dB EQ The 0 dB EQ path connects the input signal directly to the digital logic inside the ADN2913. The 0 dB EQ is useful at lower data rates where the signal is large (therefore, the limiting amplifier is not needed and power can be saved by deselecting the limiting amplifier) and unimpaired (therefore, the equalizer is not needed). The signal swing of the internal digital circuit is 600 mV p-p differential, the minimum signal amplitude that must be provided as the input in 0 dB EQ mode.
In 0 dB EQ mode, the internal 50 Ω termination resistors can be configured in one of two ways, either floated or tied to VCC = 1.2 V (see Figure 31 and Table 27). By setting the RX_TERM_FLOAT bit (Bit D7 in Register 0x16) to 1, these 50 Ω termination resistors are floated internal to the ADN2913 (see Figure 35). By setting the RX_TERM_FLOAT bit to 0, these 50 Ω termination resistors are connected to VCC = 1.2 V (see Figure 36). In both termination

Data Sheet ADN2913
Rev. B | Page 25 of 35
cases, the user must ensure a valid common-mode voltage on the input.
When the termination is floated, the two 50 Ω resistors are a purely differential termination. The input must conform to the range of signals shown in Figure 33.
When the termination is connected to a 1.2 V VCC power supply (see Figure 36 and Figure 37), the common-mode voltage is created by the driver circuit and the 50 Ω resistors on the ADN2913. For example, the driver can be an open-drain switched current (see Figure 36), and the 50 Ω resistors return this current to VCC. In Figure 36, the common-mode voltage is created by both the current and the resistors.

ADN2913 Data Sheet
Rev. B | Page 26 of 35
In this case, ensure that the current is a minimum of 6 mA, which gives a single-ended swing of 300 mV or a differential swing of 600 mV p-p differential, with VCM = 1.05 V (see Figure 33). The maximum current is 10 mA, which gives a single-ended 500 mV swing and differential 1.0 V p-p, with VCM = 0.95 V (see Figure 34).
Another possibility is to back terminate the switched current driver, as shown in Figure 37, with the two VCC supplies having the same potential. In this example, the current is returned to VCC by the two 50 Ω resistors in parallel, or 25 Ω, so that the minimum current is 12 mA and the maximum current is 20 mA.
LOCK DETECTOR OPERATION The lock detector on the ADN2913 has three modes of opera-tion: normal mode, LOL detector operation using a reference clock (LTR mode), and static LOL mode.
Normal Mode
In normal mode, the ADN2913 is a continuous rate CDR that locks onto any data rate from 6.5 Mbps to 8.5 Gbps without the use of a reference clock as an acquisition aid. In this mode, the lock detector monitors the frequency difference between the DCO and the input data frequency, and deasserts the loss of lock signal, which appears on LOL, Pin 6, when the DCO is within 250 ppm of the data frequency. This enables the digital PLL (D/PLL), which pulls the DCO frequency in the remaining amount and acquires phase lock. If the input frequency error exceeds 1000 ppm (0.1%), the loss of lock signal is reasserted and control returns to the frequency loop, which begins a new frequency acquisition. The LOL pin remains asserted until the DCO locks onto a valid input data stream to within 250 ppm frequency error. This hysteresis is shown in Figure 27.
1177
7-02
9
LOL
0–250 250 1000 fDCO ERROR(ppm)
–1000
1
Figure 27. Transfer Function of LOL
LOL Detector Operation Using a Reference Clock (LTR Mode)
In lock to reference (LTR) mode, a reference clock is used as an acquisition aid to lock the ADN2913 DCO. LTR mode is enabled by setting CDR_MODE[2:0] to 3 (Bits[D6:D4] in Register 0x8). The user must also write to FREF_RANGE[1:0] and DATA_TO_REF_RATIO[3:0] (Bits[D5:D0] in Register 0xF) to set the reference frequency range and the divide ratio of the data rate with respect to the reference frequency. Finally, the reference clock power-down to the reference clock buffer must be deasserted by writing a 0 to REFCLK_PDN (Bit D2 in Register 0xA). To maintain fastest acquisition, keep Bit D0 in Register 0xA set to 1.
For more information, see the Reference Clock (Optional) section. In LTR mode, the lock detector monitors the difference in fre-quency between the divided down DCO and the divided down reference clock. The loss of lock signal, which appears on LOL (Pin 6), is deasserted when the DCO is within 250 ppm of the desired frequency. This enables the D/PLL, which pulls in the DCO frequency by the remaining amount with respect to the input data and acquires phase lock. If the frequency error exceeds 1000 ppm (0.1%), the loss of lock signal is reasserted and control returns to the frequency loop, which reacquires lock with respect to the reference clock. The LOL pin remains asserted until the DCO frequency is within 250 ppm of the desired frequency. This hysteresis is shown in Figure 27.
Static LOL Mode
The ADN2913 implements a static LOL feature that indicates whether a loss of lock condition has occurred and remains asserted, even if the ADN2913 regains lock, until the static LOL bit (Bit D2 in Register 0x6) is manually reset. If a loss of lock condition occurs, this bit is internally asserted to logic high. The static LOL bit remains high even after the ADN2913 reacquires lock to a new data rate. This bit can be reset by writing 1, followed by 0, to the reset static LOL bit (Bit D2 in Register 0x8). When reset, the static LOL bit remains deasserted until another loss of lock condition occurs.
Writing a 1 to LOL_CONFIG (Bit D4 in Register 0x9) causes the LOL pin, Pin 6, to become a static LOL indicator. In this mode, the LOL pin mirrors the contents of the static LOL bit (Bit D2 in Register 0x6) and has the functionality described previously. The LOL_CONFIG bit (Bit D4 in Register 0x9) defaults to 0. In this mode, the LOL pin operates in the normal operating mode; that is, it is asserted only when the ADN2913 is in acquisition mode and is deasserted when the ADN2913 has reacquired lock.
HARMONIC DETECTOR The ADN2913 provides a harmonic detector that detects whether the input data has changed to a lower harmonic of the data rate than the one that the sampling clock is currently locked onto. For example, if the input data instantaneously changes from OC-12, 622.08 Mbps, to an OC-3, 155.52 Mbps bit stream, this change can be perceived as a valid OC-12 bit stream because the OC-3 data pattern is exactly 4× slower than the OC-12 pattern. Therefore, if the change in data rate is instantaneous, a 101 pattern at OC-3 is perceived by the ADN2913 as a 111100001111 pattern at OC-12. If the change to a lower harmonic is instantaneous, a typical inferior CDR may remain locked at the higher data rate.
The ADN2913 implements a harmonic detector that automati-cally identifies whether the input data has switched to a lower harmonic of the data rate than the DCO is currently locked onto. When a new harmonic is identified, the LOL pin is asserted, and a new frequency acquisition is initiated. The ADN2913 automatically locks onto the new data rate, and the LOL pin is deasserted.

Data Sheet ADN2913
Rev. B | Page 27 of 35
The time to detect a lock to harmonic is
216 × (Td/ρ)
where: 1/Td is the new data rate. For example, if the data rate is switched from OC-12 to OC-3, then Td = 1/155.52 MHz. ρ is the data transition density. Most coding schemes seek to ensure that ρ = 0.5, for example, PRBS and 8B/10B.
When the ADN2913 is placed in lock to reference mode, the harmonic detector is disabled.
OUTPUT DISABLE AND SQUELCH The ADN2913 has two types of output disable/squelch. The DATOUTP/DATOUTN and CLKOUTP/CLKOUTN outputs can be disabled by setting DATOUT_DISABLE and CLKOUT_ DISABLE (Bits[D4:D3] in Register 0x1E) high, respectively. When an output is disabled, it is fully powered down, saving approximately 30 mW per output. Disabling DATOUTP/ DATOUTN also disables the CLKOUTP/CLKOUTN outputs, saving a total of about 60 mW of power.
If it is desired to set the data output while leaving the clock on, the output data can be squelched by setting the data squelch bit (Bit D5 in Register 0x1E) high. In this mode, the data driver remains powered, but the data itself is forced to a value of 0 (or 1, depending on the setting of DATA_POLARITY (Bit D1 in Register 0x1E).
I2C INTERFACE The ADN2913 supports a 2-wire, I2C-compatible serial bus driving multiple peripherals. Two inputs, serial data (SDA) and serial clock (SCK), carry information between any devices con-nected to the bus. Each slave device is recognized by a unique address. The slave address consists of the seven MSBs of an 8-bit word. The upper six bits (Bits[6:1]) of the 7-bit slave address are factory programmed to 100000. The LSB of the slave address (Bit 0) is set by Pin 22, I2C_ADDR. The LSB of the word specifies either a read or write operation (see Figure 18). Logic 1 corresponds to a read operation, whereas Logic 0 corresponds to a write operation.
To control the device on the bus, the use the following protocol:
1. The master initiates a data transfer by establishing a start condition, defined as a high to low transition on SDA while SCK remains high. This indicates that an address/data stream follows.
2. All peripherals respond to the start condition and shift the next eight bits (the 7-bit address and the R/W bit). The bits are transferred from MSB to LSB.
3. The peripheral that recognizes the transmitted address responds by pulling the data line low during the ninth clock pulse. This is known as an acknowledge bit.
4. All other devices withdraw from the bus at this point and maintain an idle condition. In the idle condition, the device monitors the SDA and SCK lines waiting for the start condition and the correct transmitted address.
The R/W bit determines the direction of the data. Logic 0 on the LSB of the first byte means that the master writes information to the peripheral. Logic 1 on the LSB of the first byte means that the master reads information from the peripheral.
The ADN2913 acts as a standard slave device on the bus. The data on the SDA pin is eight bits long, supporting the 7-bit addresses plus the R/W bit. The ADN2913 has subaddresses to enable the user accessible internal registers (see Table 7).
The ADN2913, therefore, interprets the first byte as the device address and the second byte as the starting subaddress. Auto-increment mode is supported, allowing data to be read from or written to the starting subaddress and each subsequent address without manually addressing the subsequent subaddress. A data transfer is always terminated by a stop condition. The user can also access any unique subaddress register on a one-by-one basis without updating all registers.
Stop and start conditions can be detected at any stage of the data transfer. If these conditions are asserted out of sequence with normal read and write operations, they cause an immedi-ate jump to the idle condition. During a given SCK high period, issue one start condition, one stop condition, or a single stop condition followed by a single start condition. If an invalid subad-dress is issued by the user, the ADN2913 does not issue an acknowledge and returns to the idle condition. If the user exceeds the highest subaddress while reading back in auto-increment mode, the highest subaddress register contents continue to be output until the master device issues a no acknowledge. This indicates the end of a read. In a no acknowledge condition, the SDA line is not pulled low on the ninth pulse. See Figure 20 and Figure 19 for sample read and write data transfers, respectively, and Figure 21 for a more detailed timing diagram.
REFERENCE CLOCK (OPTIONAL) A reference clock is not required to perform clock and data recovery with the ADN2913. However, support for an optional reference clock is provided. The reference clock can be driven differentially or single-ended. If the reference clock is not used, float both the REFCLKP and REFCLKN pins.
Two 50 Ω series resistors present a differential load between REFCLKP and REFCLKN. Common mode is internally set to 0.56 × VCC by a resistor divider between VCC and VEE. See Figure 28, Figure 29, and Figure 30 for sample configurations.
The reference clock input buffer accepts any differential signal with a peak-to-peak differential amplitude of greater than 100 mV. The phase noise and duty cycle of the reference clock are not critical, and 100 ppm accuracy is sufficient.

ADN2913 Data Sheet
Rev. B | Page 28 of 35
50Ω50Ω
VCC/2
REFCLKP
REFCLKN
ADN2913
1177
7-03
0
BUFFER24
23
REFCLK
Figure 28. DC-Coupled, Differential REFCLKx Configuration
50Ω50Ω
VCC/2
VCC
REFCLKP
OUTREFCLKN
ADN2913
1177
7-03
1
BUFFER24
23
CLKOSC
Figure 29. AC-Coupled, Single-Ended REFCLKx Configuration
50Ω50Ω
VCC/2
REFCLKP
REFCLKN
ADN2913
1177
7-03
2
BUFFER24
23
REFCLK
Figure 30. AC-Coupled, Differential REFCLKx Configuration
The reference clock can be used either as an acquisition aid for the ADN2913 to lock onto data, or to measure the frequency of the incoming data to within 0.01%. The modes are mutually exclusive because, in the first use, the user can force the device to lock onto only a known data rate; in the second use, the user can measure an unknown data rate.
Lock to reference mode is enabled by writing a 3 to CDR_ MODE[2:0] (Bits[D6:D4] in Register 0x8). An on-chip clock buffer must be powered on by writing a 0 to REFCLK_PDWN (Bit D2 in Register 0xA). Fine data rate readback mode is enabled by writing a 1 to RATE_MEAS_EN (Bit D1 in Register 0x8). Enabling lock to reference and data rate readback at the same time causes an indeterminate state and is not supported.
Using the Reference Clock to Lock Onto Data
In LTR mode, the ADN2913 locks onto a frequency derived from the reference clock according to the following equation:
Data Rate/2(LTR_MODE[3:0] − 1) = REFCLK/2LTR_MODE[5:4]
The user must know exactly what the data rate is and provide a reference clock that is a function of this rate. The ADN2913 can still be used as a continuous rate device in this configuration if the user can provide a reference clock that has a variable frequency (see the AN-632 Application Note).
The reference clock can have a frequency from 11.05 MHz to 176.8 MHz. By default, the ADN2913 expects a reference clock of between 11.05 MHz and 22.1 MHz. If the reference clock is between 22.1 MHz and 44.2 MHz, 44.2 MHz and 88.4 MHz, or between 88.4 MHz and 176.8 MHz, the user must configure the ADN2913 to use the correct reference frequency range by setting the two bits of FREF_RANGE[1:0] (Bits[5:4] in Register 0xF).
Table 24. LTR_MODE Register Settings
FREF_RANGE[1:0] Bits Range (MHz) DATA_TO_REF_ RATIO[3:0] Bits Ratio
00 11.05 to 22.1 0000 2−1 01 22.1 to 44.2 0001 20 10 44.2 to 88.4 N 2n − 1 11 88.4 to 176.8 1010 29
The user can specify a fixed integer multiple of the reference clock to lock onto using DATA_TO_REF_RATIO[3:0] (Bits[D3:D0] in Register 0xF), as follows:
DATA_TO_REF_RATIO[3:0] = data rate ÷ DIV_fREF
where DIV_fREF represents the divided down reference referred to the 11.05 MHz to 22.1 MHz band.
For example, if the reference clock frequency is 38.88 MHz and the input data rate is 622.08 Mbps, then FREF_RANGE[1:0] is set to 01 to give a divided down reference clock of 19.44 MHz. DATA_TO_REF_RATIO[3:0] is set to 0110, that is, 6, because
622.08 Mbps/19.44 MHz = 2(6 − 1)
If the ADN2913 is operating in lock to reference mode and the user changes the reference frequency, that is, the fREF range or the fREF ratio (Bits[D5:D4] or Bits[D3:D0], respectively, in Register 0xF), this change must be followed by writing a low to high to low transition to the INIT_FREQ_ACQ bit (Bit D6 in Register 0x9) to initiate a new lock to reference command.
By default in lock to reference clock mode, when lock has been achieved and the ADN2913 is in tracking mode, the frequency of the DCO is compared to the frequency of the reference clock. If this frequency error exceeds 1000 ppm, lock is lost, LOL is asserted, and the device relocks to the reference clock while continuing to output a stable clock.
An alternative configuration is enabled by setting LOL data (Bit D6 in Register 0xF) = 1. In this configuration, when the device is in tracking mode, the frequency of the DCO is compared to the frequency of the input data rather than the frequency of the reference clock. If the frequency error exceeds 1000 ppm, lock is lost, LOL is asserted, and the device relocks to the reference clock while continuing to output a stable clock.

Data Sheet ADN2913
Rev. B | Page 29 of 35
Using the Reference Clock to Measure Data Frequency
The user can also provide a reference clock to measure the recovered data frequency. In this case, the ADN2913 compares the frequency of the incoming data to the incoming reference clock and returns a ratio of the two frequencies to 0.01% (100 ppm). The accuracy error of the reference clock is added to the accuracy error of the ADN2913 data rate measurement. For example, if a 100 ppm accuracy reference clock is used, the total accuracy of the measurement is 200 ppm.
The reference clock can range from 11.05 MHz to 176.8 MHz. Prior to reading back the data rate using the reference clock, the FREF_RANGE[1:0] bits (Bits[D5:D4] in Register 0xF) must be set to the appropriate frequency range with respect to the reference clock being used, according to Table 24. A fine data rate readback is then executed as follows:
1. Apply the reference clock. 2. Write a 0 to REFCLK_PDN (Bit D2 in Register 0xA) to
enable the reference clock circuit. 3. Write to FREF_RANGE[1:0] (Bits[D5:D4] in Register 0xF)
to select the appropriate reference clock frequency circuit. 4. Write a 1 to RATE_MEAS_EN (Bit D1 in Register 0x8). This
enables the fine data rate measurement capability of the ADN2913. This bit is level sensitive and does not need to be reset to perform subsequent frequency measurements.
5. Write a low to high to low transition to RATE_MEAS_ RESET (Bit D0 in Register 0x8). This initiates a new data rate measurement.
6. Read back RATE_MEAS_COMP (Bit D0 in Register 0x6). If the bit is 0, the measurement is not complete. If it is 1, the measurement is complete and the data rate can be read back on RATE_FREQ[23:0], FULLRATE, and DIVRATE[3:0] (see Table 7). The approximate time for a data rate measurement is given in Equation 2.
Use the following equation to determine the data rate:
]:DIVRATE[FULLRATE]:LTR[REFLCLK
DATARATEf]:FREQ[RATE
f 03745 2222)023_(
××××
= (1)
where: fDATARATE is the data rate (Mbps). RATE_FREQ[23:0] is from FREQ2[7:0] (most significant byte), FREQ1[7:0], and FREQ0[7:0] (least significant byte). See Table 7. fREFCLK is the reference clock frequency (MHz). FULLRATE = FREQ_RB2[6]. DIVRATE[3:0] = FREQ_RB2[5:2].
MSB LSB
D23 to D16 D15 to D8 D7 to D0 FREQ2[7:0] FREQ1[7:0] FREQ0[7:0]
Consider the example of a 1.25 Gbps (GbE) input signal and a reference clock source of 32 MHz at the PIN/NIN and REFCLKP/ REFCLKN ports, respectively. In this case, FREF_RANGE[1:0] (Bits[D5:D4] in Register 0xF) = 01 and the reference frequency falls into the range of 22.1 MHz to 44.2 MHz.
After following Step 1 through Step 6, the readback value of RATE_FREQ[23:0] is 0x13880, which is equal to 8 × 10⁴. The readback value of FULLRATE (Bit D6 in Register 0x5) is 1, and the readback value of DIVRATE[3:0] (Bits[D5:D2] in Register 0x5) is 2. Inserting these values into Equation 1 yields
((8 × 104) × (32 × 106))/(21 × 27 × 21 × 22) = 1.25 Gbps
If subsequent frequency measurements are required, keep RATE_MEAS_EN (Bit D1 in Register 0x8) set to 1. It does not need to be reset. The measurement process is reset by writing a 1 followed by a 0 to RATE_MEAS_RESET (Bit D0 in Register 0x8). This initiates a new data rate measurement. Follow Step 2 through Step 6 to read back the new data rate. Note that a data rate readback is valid only if the LOL pin is low. If LOL is high, the data rate readback is invalid.
Initiating a frequency measurement by writing a low to high to low transition into RATE_MEAS_RESET (Bit D0 in Register 0x8) also resets the RATE_MEAS_COMP bit (Bit D0 in Register 0x6). The approximate time to complete a frequency measurement from RATE_MEAS_RESET being written with a low to high to low transition to when the RATE_MEAS_COMP bit returns high is given by
REFCLK
LTR
fTimetMeasuremen
]4:5[11 22 ×= (2)
LOS Configuration
The LOS detector output, LOS (Pin 5), can be configured to be either active high or active low. If LOS polarity (Bit 2 in Register 0x9) is set to Logic 0 (default), the LOS pin is active high when a loss of signal condition is detected.
ADDITIONAL FEATURES AVAILABLE VIA THE I2C INTERFACE Coarse Data Rate Readback
The data rate can be read back over the I2C interface to approx-imately ±5% without using an external reference clock according to the following formula:
]:DIVRATE[FULLRATEDCOf
Data 0322 ×= (3)
where FULLRATE = FREQ_RB2[6]. DIVRATE[3:0] = FREQ_RB2[5:2]. fDCO is the frequency of the DCO, derived as shown in Table 25.

ADN2913 Data Sheet
Rev. B | Page 30 of 35
Four oscillator cores defined by VCOSEL[9:8] (Bits[D1:D0] in Register 0x5) span the highest octave of data rates according to Table 25.
Table 25. DCO Center Frequency vs. VCOSEL[9:8] Core = VCOSEL[9:8]
Min Frequency (MHz) = Min_f(core)
Max Frequency (MHz) = Max_f(core)
0 5570 7105 1 7000 8685 2 8610 10,330 3 10,265 11,625
fDCO is determined from VCOSEL[9:0] (Bits[D7:D0] in Register 0x4, and Bits[D1:D0] in Register 0x5), according to the following formula:
fDCO =
]:VCOSEL[corefMincorefMax
corefMin 07256
)(_)(_)(_ ×
−+
Worked Example
Read back the contents of the FREQ_RB1 and FREQ_RB2 registers. For example, with an OC-48 signal presented to the PIN/NIN ports,
FREQ_RB1 = 0xCD FREQ_RB2 = 0x46 FULLRATE (FREQ_RB2[6]) = 1 DIVRATE[3:0] (FREQ_RB2[5:2]) = 1 VCOSEL[9:8] core (FREQ_RB2[1:0]) = 2
Then
fDCO =
Mbps32.9987205256
Mbps8610Mbps300,10Mbps8610 =×
−+
and
Mbps84.249622Mbps34.9987
11 =×
=dataf
Initiate Frequency Acquisition
A frequency acquisition can be initiated by writing a 1 followed by a 0 to INIT_FREQ_ACQ (Bit D6 in Register 0x9). This initiates a new frequency acquisition while keeping the ADN2913 in the operating mode that was previously programmed in Register 0x8, Register 0x9, and Register 0xA (CTRLA, CTRLB, and CTRLC registers, respectively).
PRBS Generator/Receiver
The ADN2913 has an integrated PRBS generator and detector for system testing purposes. The device is configurable as either a PRBS detector or a PRBS generator.
The following steps configure the PRBS detector:
1. Set DATA_RECEIVER_ENABLE (Bit D2 in Register 0x3F) to 1 and set DATA_RECEIVER_MODE[1:0] (Bits[D1:D0] in Register 0x3F) according to the desired PRBS pattern (0 = PRBS7; 1 = PRBS15; 2 = PRBS31). Setting DATA_ RECEIVER_MODE[1:0] to 3 leads to a one-shot sampling of recovered data into DATA_LOADED[15:0].
2. Set DATA_RECEIVER_CLEAR (Bit D3 in Register 0x3F) to 1 followed by 0 to clear PRBS_ERROR and PRBS_ERROR_COUNT[7:0].
3. States of PRBS_ERROR (Bit D1 in Register 0x41) and PRBS_ERROR_COUNT[7:0] (Bits[D7:D0] in Register 0x40) can be frozen by setting DATA_RECEIVER_ENABLE (Bit D2 in Register 0x3F) to 0.
The following steps configure the PRBS generator:
1. Set DATA_GEN_EN (Bit D2 in Register 0x39) = 1 to enable the PRBS generator and set DATA_GEN_MODE[1:0] (Bits[D1:D0] in Register 0x39) for the desired PRBS output pattern (0 = PRBS7; 1 = PRBS15; 2 = PRBS31). An arbitrary 32-bit pattern stored as PROG_DATA[31:0] is activated by setting DATA_GEN_MODE[1:0] to 3.
2. Strings of consecutive identical digits (CIDs) of sensed DATA_CID_ BIT (Bit D5 in Register 0x39) can be introduced in the generator by setting DATA_CID_EN (Bit D4 in Register 0x39) set to 1. The length of CIDs is 8 × DATA_CID_LENGTH, which is set via Bits[D7:D0] in Register 0x3A.
Table 26. PRBS Settings PRBS Pattern DATA_GEN_MODE[1:0] PRBS Polynomial PRBS7 00 1 + X6 + X7 PRBS15 01 1 + X14 + X15 PRBS31 10 1 + X28 + X31 PROG_DATA[31:0] 11 N/A
Double Data Rate Mode
The default output clock mode is a double data rate (DDR) clock, where the output clock frequency is one-half the data rate. DDR mode allows direct interfacing to FPGAs that support clocking on both rising and falling edges. Setting DDR_DISABLE (Bit D2 in Register 0x1E) = 1 enables full data rate mode. Full data rate mode is not supported for data rates in the highest octave between 5.6 Gbps and 8.5 Gbps.
CDR Bypass Mode
The CDR in the ADN2913 can be bypassed by setting the CDR bypass bit (Bit D5 in Register 0x9) = 1. In this mode, the ADN2913 feeds the input directly through the input amplifiers to the output buffer, bypassing the CDR. The CDR bypass path is intended for use in testing or debugging a system. Use the CDR bypass path at data rates at or below 3.0 Gbps only.

Data Sheet ADN2913
Rev. B | Page 31 of 35
Disable Output Buffers
The ADN2913 provides the option of disabling the output buffers for power savings. The clock output buffer can be disabled by setting Bit CLKOUT_DISABLE (Bit D3 in Register 0x1E) = 1. This setting reduces the total output power by 30 mW. For a total of 60 mW of power savings, such as in a low power standby mode, both the CLKOUT and DATOUT buffers can be disabled together by setting DATOUT_DISABLE (Bit D4 in Register 0x1E) = 1.
INPUT CONFIGURATIONS The ADN2913 input stage can work with the signal source in an ac-coupled or dc-coupled configuration. The ADN2913 supports one of the following input modes: limiting amplifier, equalizer, or 0 dB EQ. The ADN2913 can be configured to use any required input configuration through the I2C bus. Figure 31 shows a block diagram of the input stage circuit.
The input signal path is configurable with the INPUT_SEL[1:0] bits (Bits[D6:D5] in Register 0x16). Table 27 shows the INPUT_SEL[1:0] bits and the input signal configuration.
LOSDETECT
LA
BYPASS
VCC
FLOATVREF
INPUT_SEL[1:0]RX_TERM_FLOAT
EQ
LOS
PIN
NIN
2
50Ω50Ω2.9kΩ2.9kΩ
1177
7-03
3
SL
ICE
AD
JUS
T
Figure 31. Input Stage Block Diagram
Table 27. Input Signal Configuration Selected Input INPUT_SEL[1:0] RX_TERM_FLOAT = 0 RX_TERM_FLOAT = 1 Limiting Amplifier 00 VREF Not defined Equalizer 01 VREF Not defined 0 dB EQ (0 dB Buffer) 10 VCC Float Not Defined 11 Not defined Not defined

ADN2913 Data Sheet
Rev. B | Page 32 of 35
Choosing AC Coupling Capacitors
AC coupling capacitors at the inputs (PIN, NIN) and outputs (DATOUTP, DATOUTN) of the ADN2913 must be chosen such that the device works properly over the full range of data rates used in the application. When choosing the capacitors, the time constant formed with the two 50 Ω resistors in the signal path must be considered. When a large number of consecutive identical digits (CIDs) are applied, the capacitor voltage can droop due to baseline wander (see Figure 32), causing pattern dependent jitter (PDJ).
The user must determine how much droop is acceptable and choose an ac coupling capacitor based on that amount of droop. The amount of PDJ can then be approximated based on the capacitor selection. The actual capacitor value selection may require some trade-offs between droop and PDJ.
For example, assuming that 2% droop is acceptable, the maximum differential droop is 4%.
Normalizing to V p-p,
Droop = Δ V = 0.04 V = 0.5 V p-p (1 − e−t/τ)
Therefore,
τ = 12t
where: τ is the RC time constant (C is the ac coupling capacitor, R = 100 Ω seen by C). t is the total discharge time.
t = nΤ
where: n is the number of CIDs. T is the bit period.
Calculate the capacitor value by combining the equations for τ and t.
C = 12nT/R
When the capacitor value is selected, the PDJ can be approximated as
PDJps p-p = 0.5tR(1 − e(−nT/RC)/0.6
where: PDJps p-p is the amount of pattern dependent jitter allowed, <0.01 UI p-p typical. tR is the rise time, which is equal to 0.22/BW; BW ≈ 0.7 (bit rate).
Note that this expression for tR is accurate only for the inputs. The output rise time for the ADN2913 is ~30 ps regardless of data rate.
NOTES1. DURING THE DATA PATTERNS WITH HIGH TRANSITION DENSITY, THE DIFFERENTIAL DC VOLTAGE AT V1 AND V2 IS ZERO.
2. WHEN THE TIA OUTPUTS CONSECUTIVE IDENTICAL DIGITS, V1 AND V1b ARE DRIVEN TO DIFFERENT DC LEVELS. V2 AND V2b DISCHARGE TO THE VREF LEVEL, WHICH EFFECTIVELY INTRODUCES A DIFFERENTIAL DC OFFSET ACROSS THE AC COUPLING CAPACITORS.
3. WHEN THE BURST OF DATA STARTS AGAIN, THE DIFFERENTIAL DC OFFSET ACROSS THE AC COUPLING CAPACITORS IS APPLIED TO THE INPUT LEVELS, CAUSING A DC SHIFT IN THE DIFFERENTIAL INPUT. THIS SHIFT IS LARGE ENOUGH SUCH THAT ONE OF THE STATES, EITHER HIGH OR LOW, DEPENDING ON THE LEVELS OF V1 AND V1b WHEN THE TIA BEGAN DETECTING AND OUTPUTTING A CID DATA SYSTEM, IS CANCELLED OUT. THE QUANTIZER DOES NOT RECOGNIZE THIS AS A VALID STATE.
4. THE DC OFFSET SLOWLY DISCHARGES UNTIL THE DIFFERENTIAL INPUT VOLTAGE EXCEEDS THE SENSITIVITY OF THE ADN2913. THE QUANTIZER RECOGNIZES BOTH HIGH AND LOW STATES AT THIS POINT.
V1
V1b
V2
V2b
VDIFF
VDIFF = V2 – V2bVTH = ADN2913 QUANTIZER THRESHOLD
2 3 41
VREF
VTH
CDRVREF
50Ω
50Ω
PIN
NIN
ADN2913
COUT
DATOUTP
DATOUTN
CIN
V2
V2b
V1
V1b
TIA
VCC
1177
7-03
5
2
Figure 32. Example of Baseline Wander

Data Sheet ADN2913
Rev. B | Page 33 of 35
DC-Coupled Application
The inputs to the ADN2913 can also be dc-coupled. This can be necessary in burst mode applications with long periods of CIDs and where baseline wander cannot be tolerated. If the inputs to the ADN2913 are dc-coupled, care must be taken not to violate the input range and common-mode level requirements of the ADN2913 (see Figure 33 and Figure 34). If dc coupling is required, and the output levels of the transimpedance amplifier (TIA) do not adhere to the levels shown in Figure 33 and Figure 34, level shifting and/or attenuation must occur between the TIA outputs and the ADN2913 inputs.
1.2V
0.9V600mV p-p,DIFF
600mV p-p,DIFF
VCM = 1.05V
VCM = 0.65VINPUT (V)
0.8V
0.5V
1177
7-03
9
Figure 33. Minimum Allowed DC-Coupled Input Levels
1.2V
0.7V1.0V p-p,DIFF
1.0V p-p,DIFF
VCM = 0.95V
VCM = 0.75VINPUT (V)
1.0V
0.5V
1177
7-04
0
Figure 34. Maximum Allowed DC-Coupled Input Levels
Figure 35 shows 0 dB EQ mode with 50 Ω termination resistors floated internal to the ADN2913.
50Ω
50Ω50Ω
ADN2913VCC
TIA
PIN
NINTIA
1177
7-03
6
Figure 35. DC-Coupled Application, 0 dB EQ Input
(Rx Termination Float Mode)
Figure 36 shows the default dc-coupled configuration when using the 0 dB EQ input. The two terminations are connected directly to VCC in a normal CML fashion, giving a common mode that is set by the dc signal strength from the driving chip. The 0 dB EQ input has a high common-mode range and can tolerate VCM up to and including VCC.
Figure 37 shows back terminated mode. The switched current driver is back terminated, with the two VCC supplies having the same potential.
See the 0 DB EQ section for more information.
50Ω
50Ω50ΩVCC
ADN2913
PIN
I
NIN
1177
7-03
7
Figure 36. DC-Coupled Application, 0 dB EQ Input (Normal Mode)
50Ω
50Ω50Ω
50Ω50ΩVCC
VCC
ADN2913
PIN
I
NIN
1177
7-03
8
Figure 37. DC-Coupled Application, 0 dB EQ Input (Back Terminated Mode)

ADN2913 Data Sheet
Rev. B | Page 34 of 35
APPLICATIONS INFORMATION TRANSMISSION LINES Use of 50 Ω transmission lines is required for all high frequency input and output signals to minimize reflections: PIN, NIN, CLKOUTP, CLKOUTN, DATOUTP, and DATOUTN (also REFCLKP and REFCLKN, if using a high frequency reference clock, such as 155 MHz). The PIN and NIN input traces must be matched in length, and the CLKOUTP, CLKOUTN, DATOUTP, and DATOUTN output traces must match in length to avoid skew between the differential traces.
The high speed inputs (PIN and NIN) are each internally termi-nated with 50 Ω to an internal reference voltage (see Figure 31). As with any high speed, mixed-signal circuit, take care to keep all high speed digital traces away from sensitive analog nodes.
The high speed outputs (DATOUTP, DATOUTN, CLKOUTP, and CLKOUTN) are internally terminated with 50 Ω to VCC.
SOLDERING GUIDELINES FOR LEAD FRAME CHIP SCALE PACKAGE The lands on the 24-lead LFCSP are rectangular. The PCB pad for the lands is 0.1 mm longer than the package land length, and 0.05 mm wider than the package land width. Center the land on the pad to ensure that the solder joint size is maximized. The bottom of the lead frame chip scale package has a central exposed pad. The pad on the PCB must be at least as large as this exposed pad. The user must connect the exposed pad to VEE using plugged vias to prevent solder from leaking through the vias during reflow. This ensures a solid connection from the exposed pad to VEE.
It is highly recommended to include as many vias as possible when connecting the exposed pad to VEE. This minimizes the thermal resistance between the die and VEE, and minimizes the die temperature. It is recommended that the vias be connected to a VEE plane, or planes, rather than a signal trace, to improve heat dissipation, as shown in Figure 38.
Placing an external VEE plane on the backside of the board opposite the ADN2913 provides an additional benefit because this allows easier heat dissipation into the ambient environment.
1177
7-03
4
Figure 38. Connecting Vias to VEE

Data Sheet ADN2913
Rev. B | Page 35 of 35
OUTLINE DIMENSIONS
0.50BSC
0.500.400.30
0.300.250.18
COMPLIANT TO JEDEC STANDARDS MO-220-WGGD.
BOTTOM VIEWTOP VIEW
SIDE VIEW
EXPOSEDPAD
4.104.00 SQ3.90
0.800.750.70
0.20 REF
0.25 MIN
3.16 MIN
COPLANARITY0.08
PIN 1INDICATOR
2.652.50 SQ2.45
1
24
712
13
18
19
6
0.05 MAX0.02 NOM
PKG
-004
462
08-1
0-20
17-A
SEATINGPLANE
PIN 1INDIC ATOR AREA OPTIONS(SEE DETAIL A)
DETAIL A(JEDEC 95)
FOR PROPER CONNECTION OFTHE EXPOSED PAD, REFER TOTHE PIN CONFIGURATION ANDFUNCTION DESCRIPTIONSSECTION OF THIS DATA SHEET.
Figure 39. 24-Lead Lead Frame Chip Scale Package [LFCSP]
4 mm × 4 mm Body and 0.75 mm Package Height (CP-24-7)
Dimensions shown in millimeters
ORDERING GUIDE Model1 Temperature Range Package Description Package Option Ordering Quantity ADN2913ACPZ −40°C to +85°C 24-Lead LFCSP CP-24-7 490 ADN2913ACPZ-RL7 −40°C to +85°C 24-Lead LFCSP, 7” Tape and Reel CP-24-7 1500 EVALZ-ADN2913 Evaluation Board 1 Z = RoHS Compliant Part.
I2C refers to a communications protocol originally developed by Philips Semiconductors (now NXP Semiconductors).
©2013–2017 Analog Devices, Inc. All rights reserved. Trademarks and registered trademarks are the property of their respective owners. D11777-0-8/17(B)