adobe flash cs3 - reference - multiwingspan · when you load up flash cs3 and choose to create a...
TRANSCRIPT
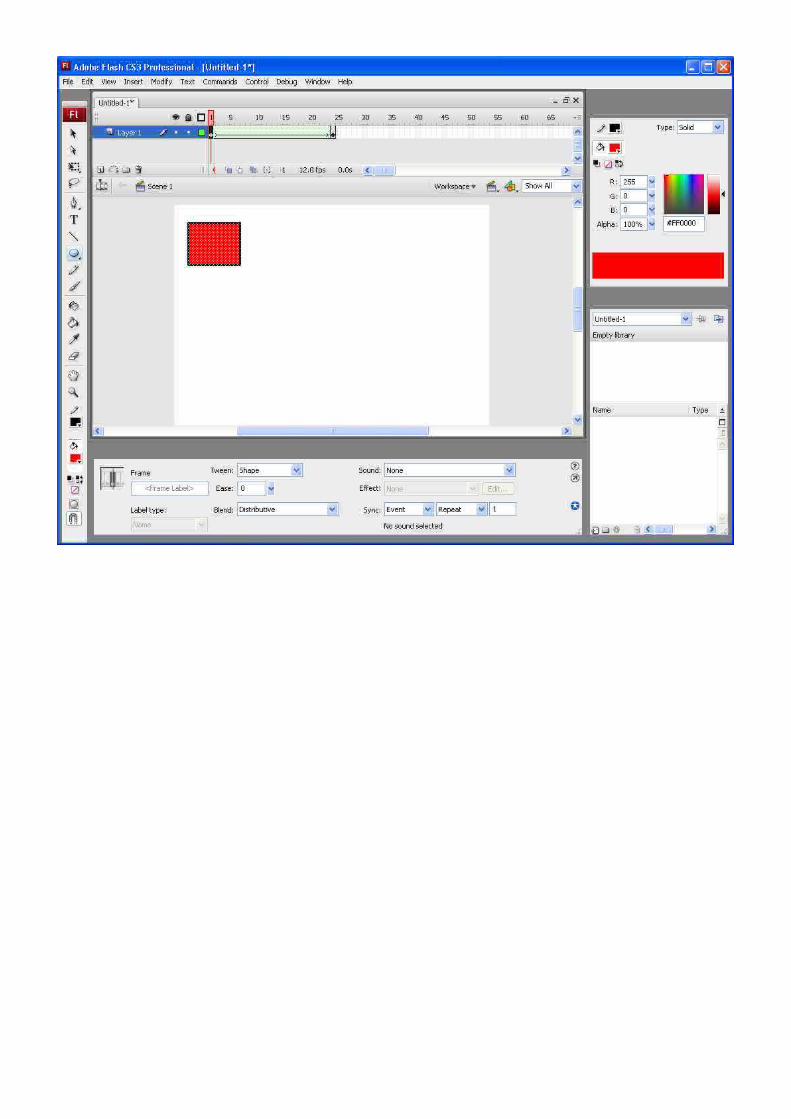
Adobe Flash CS3 – ReferenceFlash CS3 Application Window
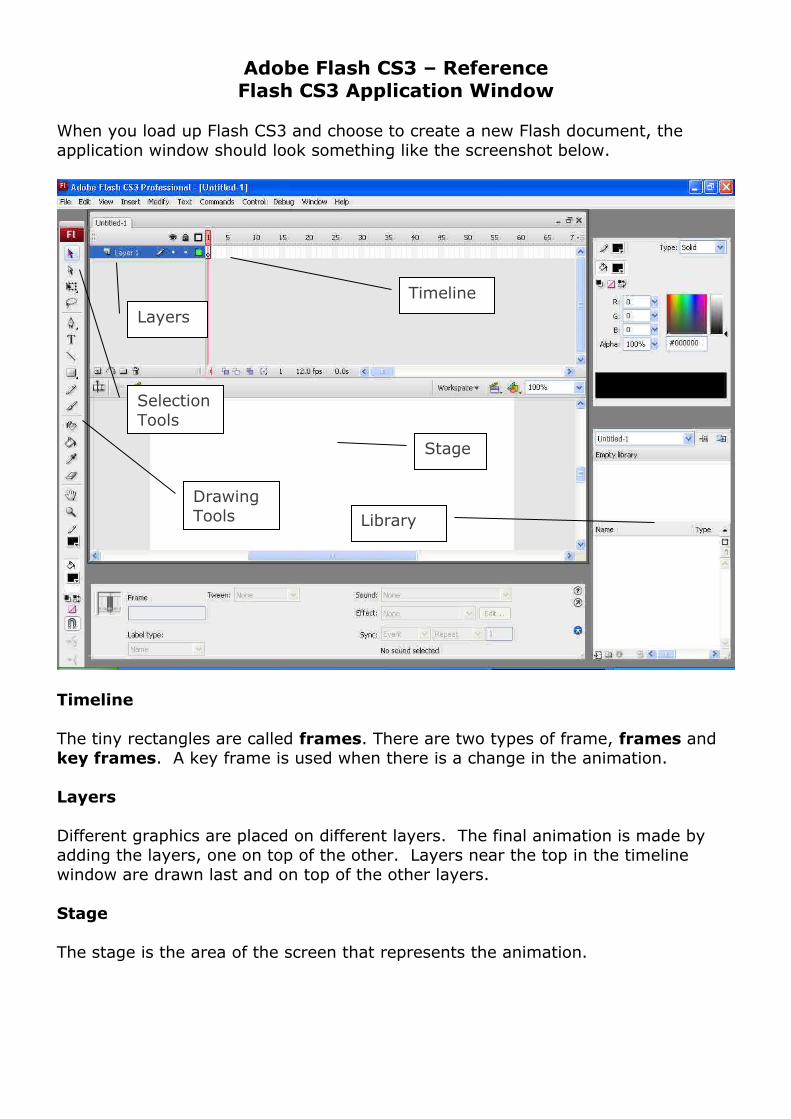
When you load up Flash CS3 and choose to create a new Flash document, the application window should look something like the screenshot below.
Timeline
The tiny rectangles are called frames. There are two types of frame, frames and key frames. A key frame is used when there is a change in the animation.
Layers
Different graphics are placed on different layers. The final animation is made by adding the layers, one on top of the other. Layers near the top in the timeline window are drawn last and on top of the other layers.
Stage
The stage is the area of the screen that represents the animation.
LayersTimeline
Stage
Selection Tools
Drawing Tools Library
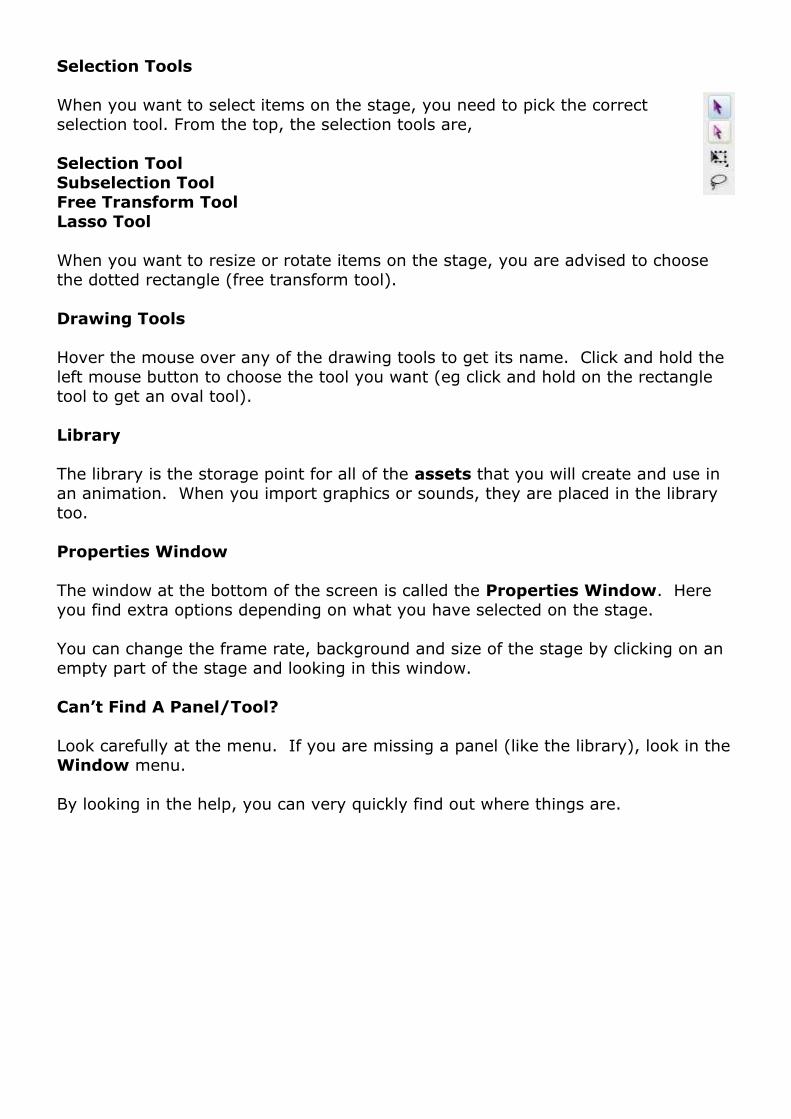
Selection Tools
When you want to select items on the stage, you need to pick the correct selection tool. From the top, the selection tools are,
Selection ToolSubselection ToolFree Transform ToolLasso Tool
When you want to resize or rotate items on the stage, you are advised to choose the dotted rectangle (free transform tool).
Drawing Tools
Hover the mouse over any of the drawing tools to get its name. Click and hold the left mouse button to choose the tool you want (eg click and hold on the rectangle tool to get an oval tool).
Library
The library is the storage point for all of the assets that you will create and use in an animation. When you import graphics or sounds, they are placed in the library too.
Properties Window
The window at the bottom of the screen is called the Properties Window. Here you find extra options depending on what you have selected on the stage.
You can change the frame rate, background and size of the stage by clicking on an empty part of the stage and looking in this window.
Can’t Find A Panel/Tool?
Look carefully at the menu. If you are missing a panel (like the library), look in the Window menu.
By looking in the help, you can very quickly find out where things are.
Adobe Flash CS3 – ReferenceShape Tweens
With a shape tween, you draw a shape at one specific time and change that shape, or draw another one, at a later point in time. Flash works out what the shape should look like in between the two shapes you have.
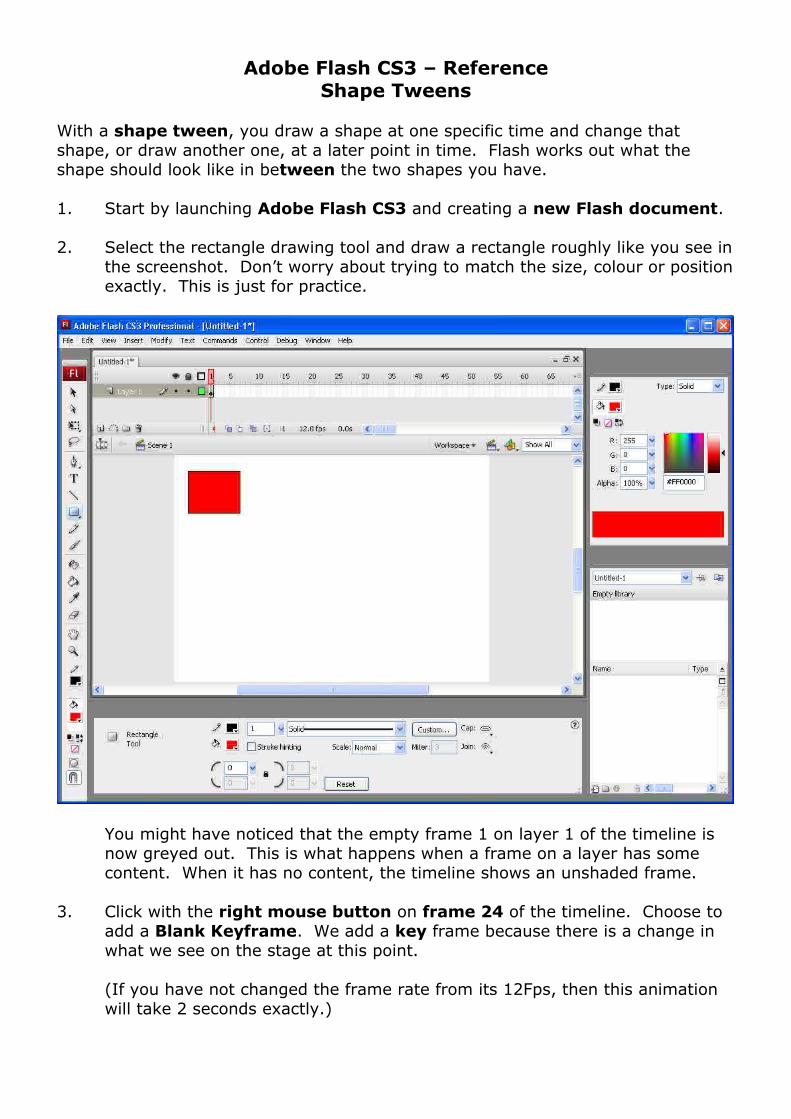
1. Start by launching Adobe Flash CS3 and creating a new Flash document.
2. Select the rectangle drawing tool and draw a rectangle roughly like you see in the screenshot. Don’t worry about trying to match the size, colour or position exactly. This is just for practice.
You might have noticed that the empty frame 1 on layer 1 of the timeline is now greyed out. This is what happens when a frame on a layer has some content. When it has no content, the timeline shows an unshaded frame.
3. Click with the right mouse button on frame 24 of the timeline. Choose to add a Blank Keyframe. We add a key frame because there is a change in what we see on the stage at this point.
(If you have not changed the frame rate from its 12Fps, then this animation will take 2 seconds exactly.)
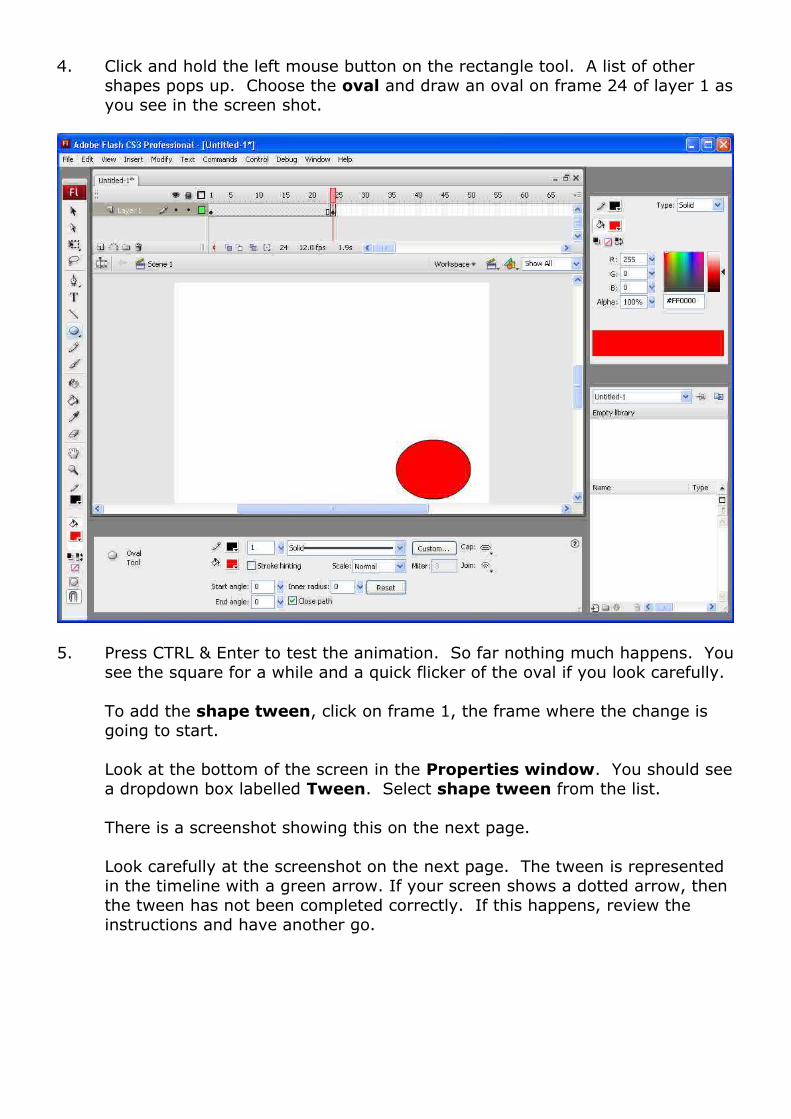
4. Click and hold the left mouse button on the rectangle tool. A list of other shapes pops up. Choose the oval and draw an oval on frame 24 of layer 1 as you see in the screen shot.
5. Press CTRL & Enter to test the animation. So far nothing much happens. You see the square for a while and a quick flicker of the oval if you look carefully.
To add the shape tween, click on frame 1, the frame where the change is going to start.
Look at the bottom of the screen in the Properties window. You should see a dropdown box labelled Tween. Select shape tween from the list.
There is a screenshot showing this on the next page.
Look carefully at the screenshot on the next page. The tween is represented in the timeline with a green arrow. If your screen shows a dotted arrow, then the tween has not been completed correctly. If this happens, review the instructions and have another go.
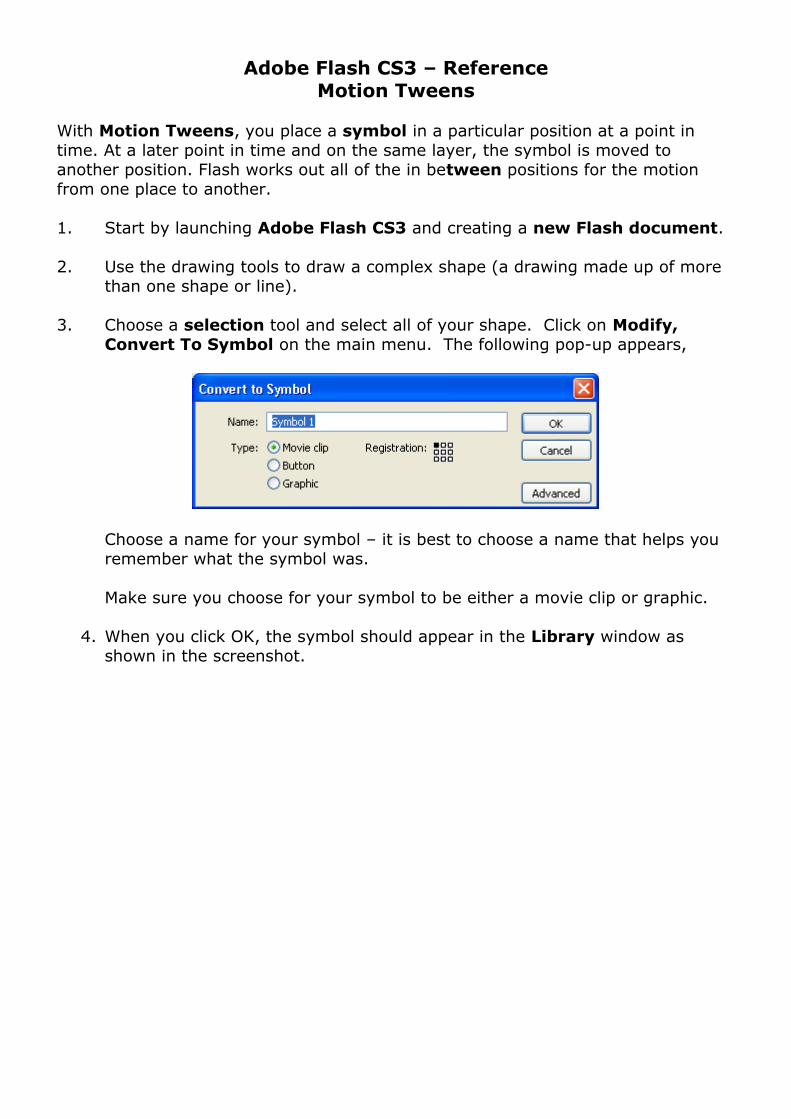
Adobe Flash CS3 – ReferenceMotion Tweens
With Motion Tweens, you place a symbol in a particular position at a point in time. At a later point in time and on the same layer, the symbol is moved to another position. Flash works out all of the in between positions for the motion from one place to another.
1. Start by launching Adobe Flash CS3 and creating a new Flash document.
2. Use the drawing tools to draw a complex shape (a drawing made up of more than one shape or line).
3. Choose a selection tool and select all of your shape. Click on Modify, Convert To Symbol on the main menu. The following pop-up appears,
Choose a name for your symbol – it is best to choose a name that helps you remember what the symbol was.
Make sure you choose for your symbol to be either a movie clip or graphic.
4. When you click OK, the symbol should appear in the Library window as shown in the screenshot.
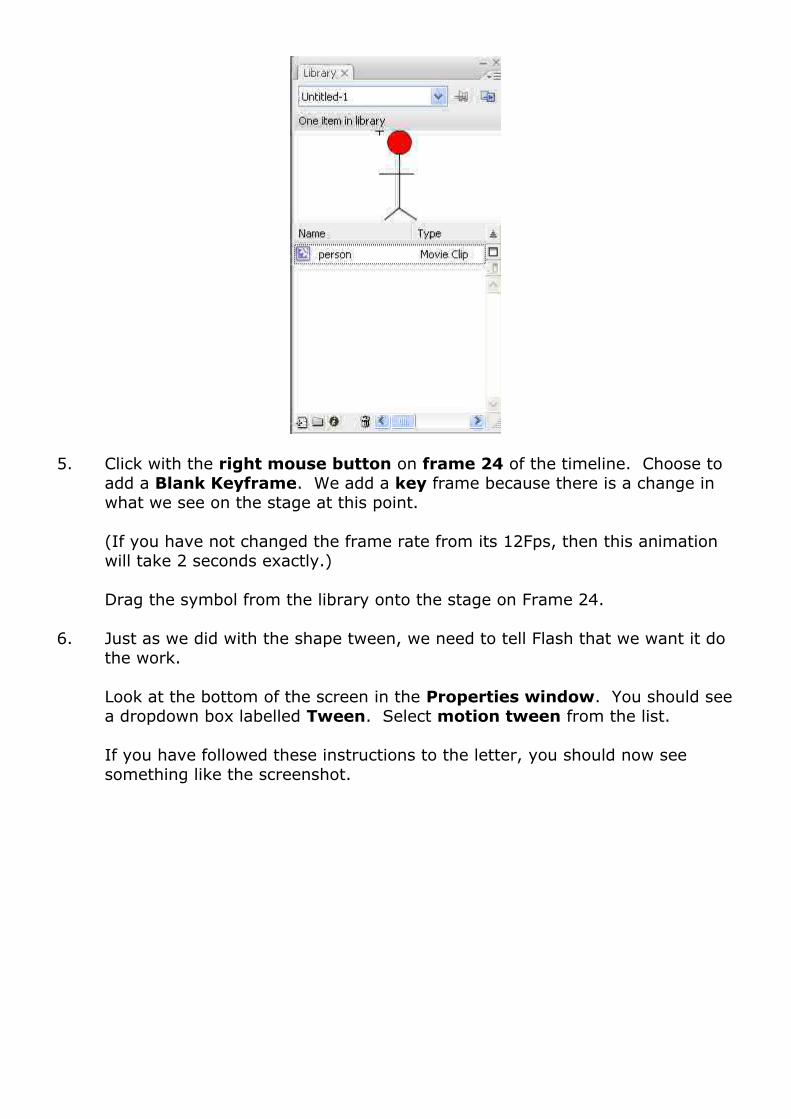
5. Click with the right mouse button on frame 24 of the timeline. Choose to add a Blank Keyframe. We add a key frame because there is a change in what we see on the stage at this point.
(If you have not changed the frame rate from its 12Fps, then this animation will take 2 seconds exactly.)
Drag the symbol from the library onto the stage on Frame 24.
6. Just as we did with the shape tween, we need to tell Flash that we want it do the work.
Look at the bottom of the screen in the Properties window. You should see a dropdown box labelled Tween. Select motion tween from the list.
If you have followed these instructions to the letter, you should now see something like the screenshot.
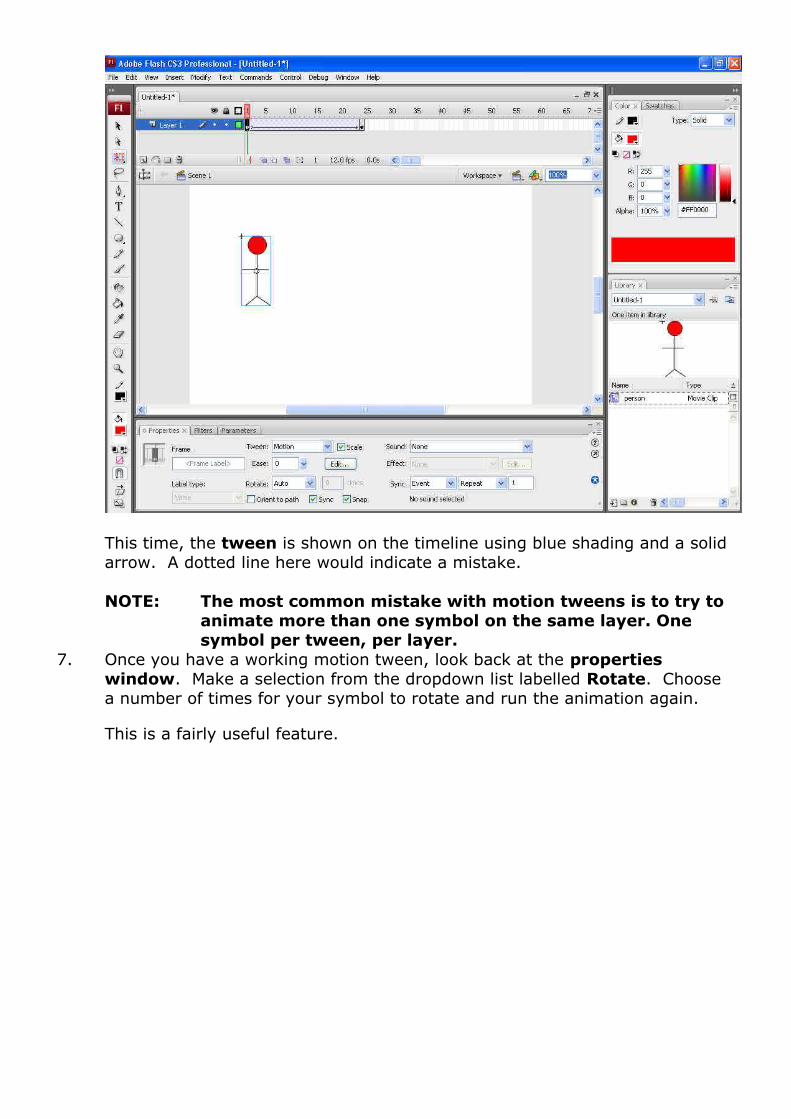
This time, the tween is shown on the timeline using blue shading and a solid arrow. A dotted line here would indicate a mistake.
NOTE: The most common mistake with motion tweens is to try to animate more than one symbol on the same layer. One symbol per tween, per layer.
7. Once you have a working motion tween, look back at the properties window. Make a selection from the dropdown list labelled Rotate. Choose a number of times for your symbol to rotate and run the animation again.
This is a fairly useful feature.
Adobe Flash CS3 – ReferenceMotion Guide Layers
When we create a motion tween, Flash animates our symbol in a straight line between the two positions where we place the symbol. By using a motion guide layer, we can control the path that the symbol takes across the stage.
1. Create a new flash document. Add a symbol and create a motion tween to make the symbol move from one place on the stage to another.
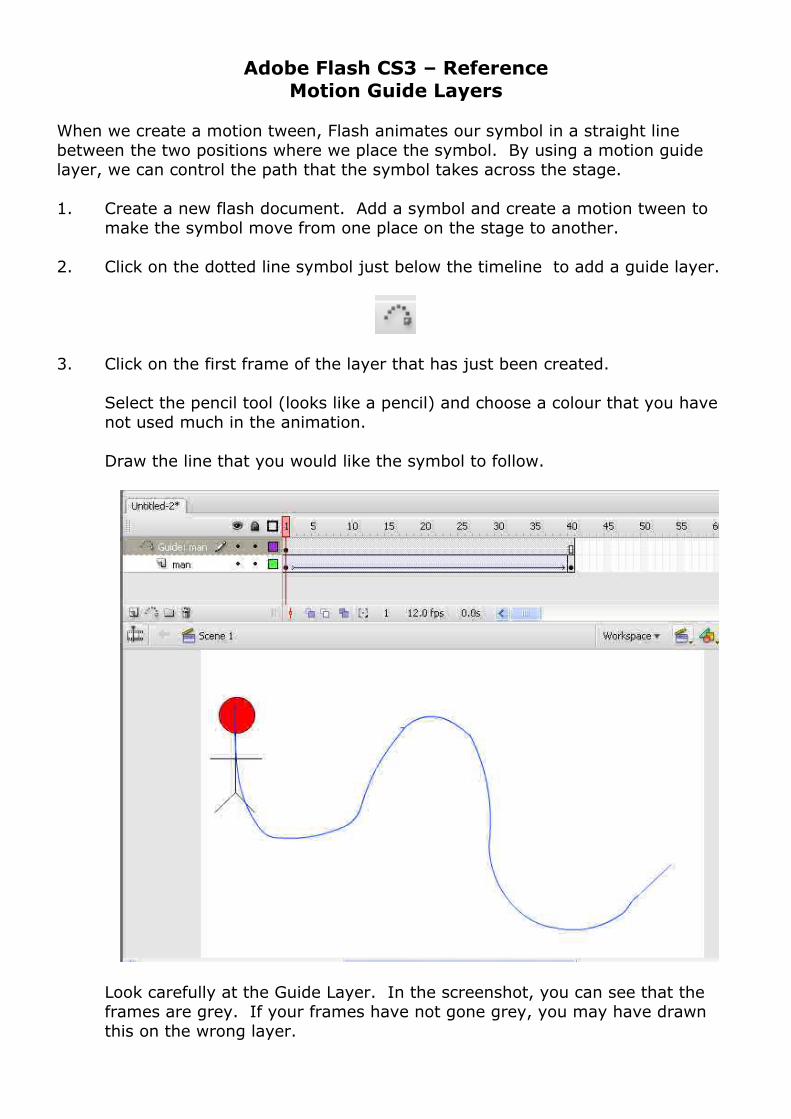
2. Click on the dotted line symbol just below the timeline to add a guide layer.
3. Click on the first frame of the layer that has just been created.
Select the pencil tool (looks like a pencil) and choose a colour that you have not used much in the animation.
Draw the line that you would like the symbol to follow.
Look carefully at the Guide Layer. In the screenshot, you can see that the frames are grey. If your frames have not gone grey, you may have drawn this on the wrong layer.
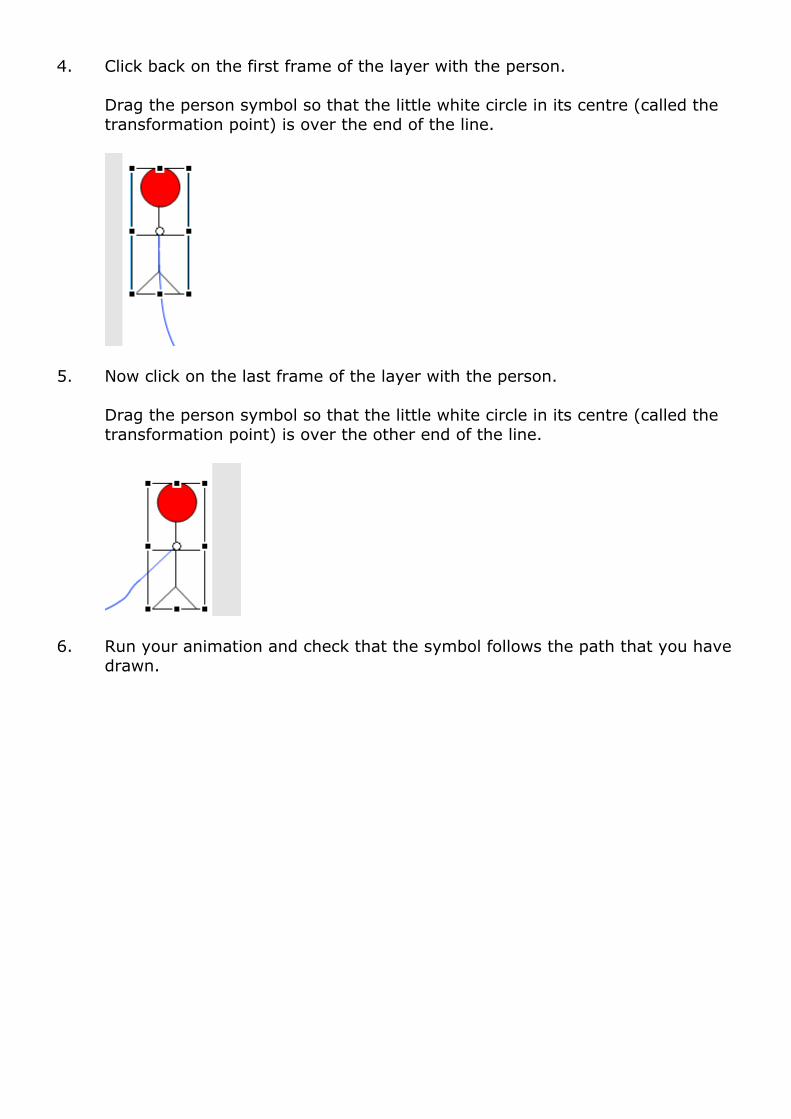
4. Click back on the first frame of the layer with the person.
Drag the person symbol so that the little white circle in its centre (called the transformation point) is over the end of the line.
5. Now click on the last frame of the layer with the person.
Drag the person symbol so that the little white circle in its centre (called the transformation point) is over the other end of the line.
6. Run your animation and check that the symbol follows the path that you have drawn.
Adobe Flash CS3 – ReferenceLooped Animations
Your animation has a timeline. We add frames and keyframes to the timeline so that we can specify what should happen at every point in our animation.
Symbols also have their own timeline. Shape tweens and motion tweens can be used within the symbol’s own timeline to make a symbol with some animation built in.
1. Start by launching Adobe Flash CS3 and creating a new Flash document.
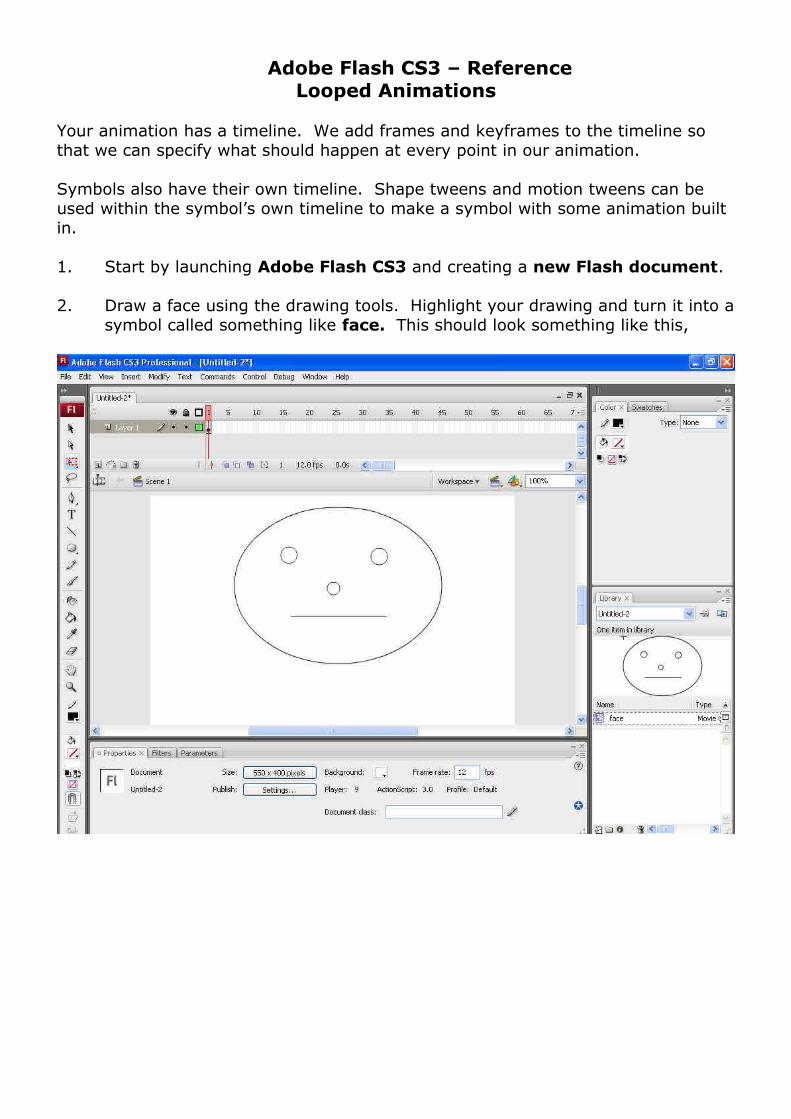
2. Draw a face using the drawing tools. Highlight your drawing and turn it into a symbol called something like face. This should look something like this,
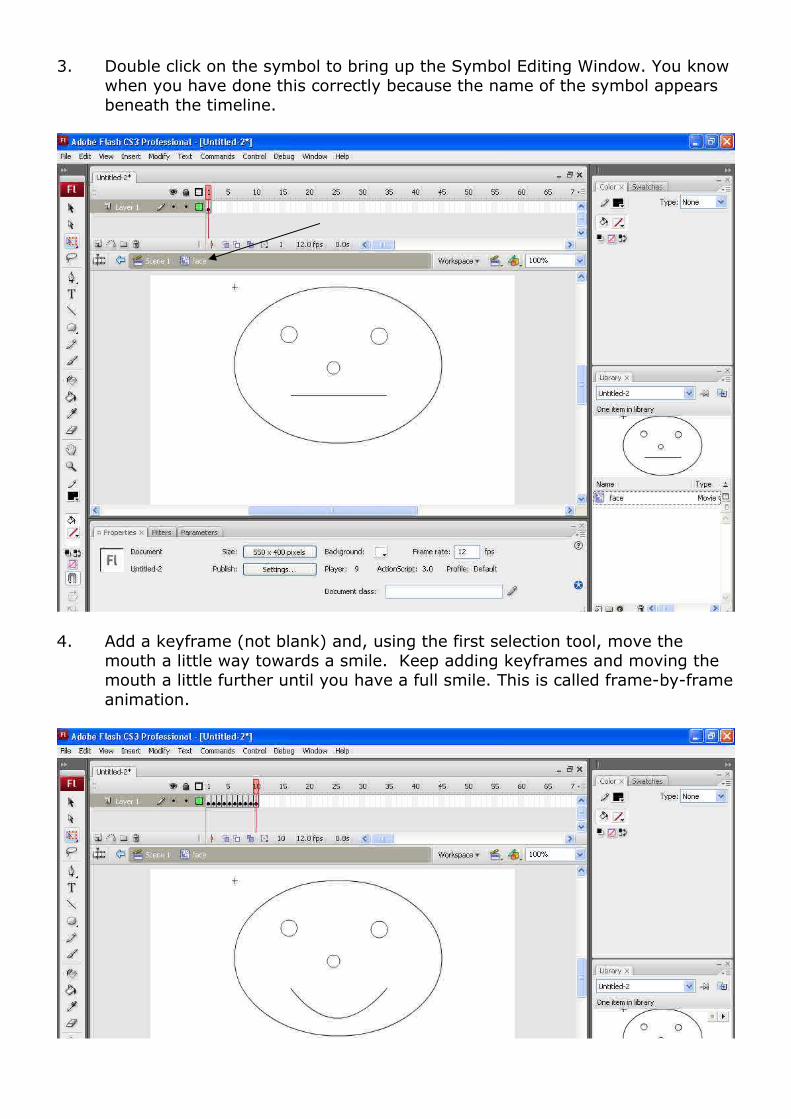
3. Double click on the symbol to bring up the Symbol Editing Window. You know when you have done this correctly because the name of the symbol appears beneath the timeline.
4. Add a keyframe (not blank) and, using the first selection tool, move the mouth a little way towards a smile. Keep adding keyframes and moving the mouth a little further until you have a full smile. This is called frame-by-frame animation.

5. When you have finished, click on the words Scene 1 to return to the main timeline.
Even if you have only one frame on the main timeline with this symbol on it, the face will smile.
6. Your last job would be to deal with how the face moves back from smiling to the starting position so that the animation doesn’t look so jerky.
Adobe Flash CS3 – ReferenceTransformation Point
1. Copy the Kick ball.fla sample file to your user space. Launch Adobe Flash CS3 and open this document.
2. You will see that a symbol has already been included for the foot. You will need to make a symbol for the ball later on. You should also see that there are 2 layers on our timeline. One layer is going to be used to animate the foot, the other layer is to animate the ball. The layers have been named for you.
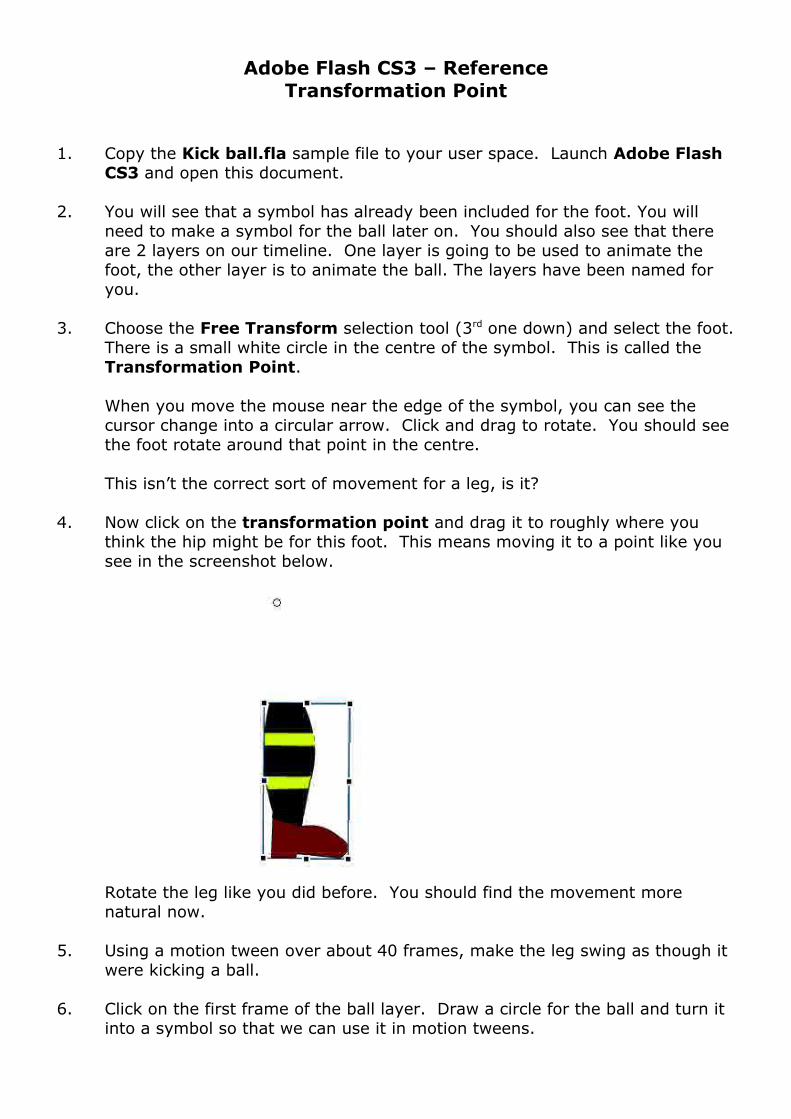
3. Choose the Free Transform selection tool (3rd one down) and select the foot. There is a small white circle in the centre of the symbol. This is called the Transformation Point.
When you move the mouse near the edge of the symbol, you can see the cursor change into a circular arrow. Click and drag to rotate. You should see the foot rotate around that point in the centre.
This isn’t the correct sort of movement for a leg, is it?
4. Now click on the transformation point and drag it to roughly where you think the hip might be for this foot. This means moving it to a point like you see in the screenshot below.
Rotate the leg like you did before. You should find the movement more natural now.
5. Using a motion tween over about 40 frames, make the leg swing as though it were kicking a ball.
6. Click on the first frame of the ball layer. Draw a circle for the ball and turn it into a symbol so that we can use it in motion tweens.

7. Use a motion tween to make the ball move when kicked. You will have to make the ball start moving when, and only when, the foot makes contact with it.
8. Test your animation and make any adjustments you think are necessary.
Adobe Flash CS3 – ReferenceMasking & Mask Layers
A mask layer is used to let Flash know which parts of a layer you would like to show.
1. Copy the mask.fla file to your user space and then launch Flash and open the document.
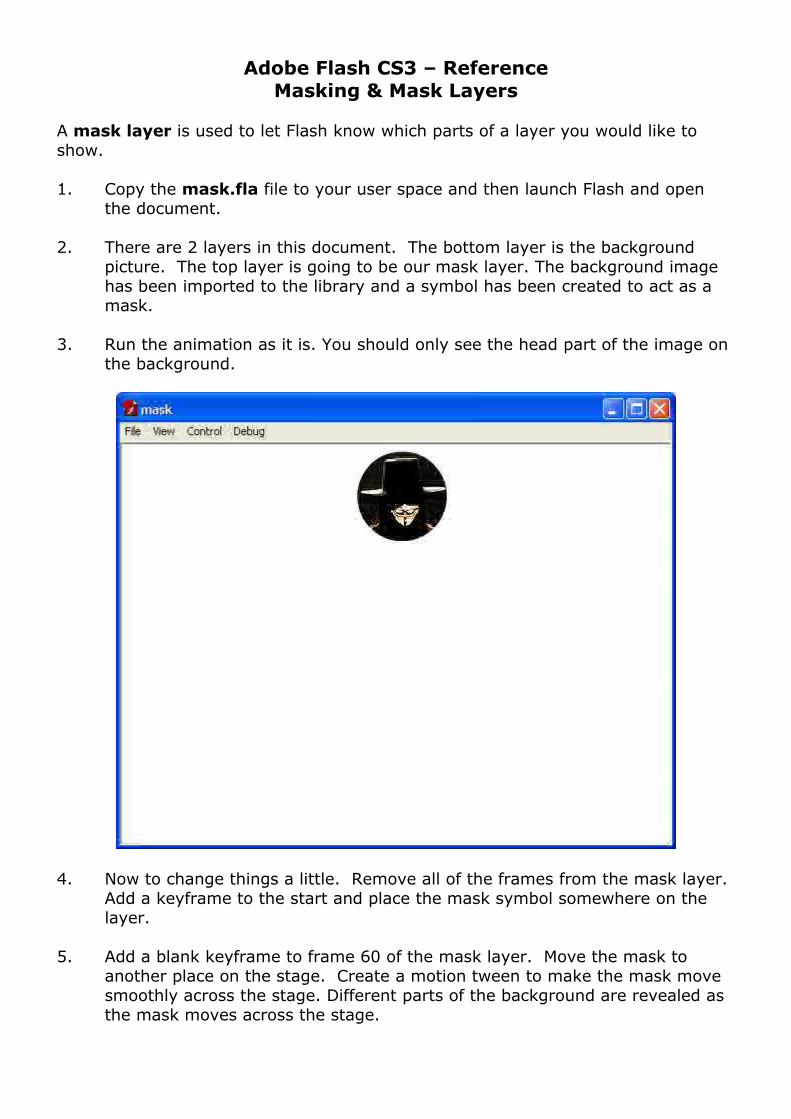
2. There are 2 layers in this document. The bottom layer is the background picture. The top layer is going to be our mask layer. The background image has been imported to the library and a symbol has been created to act as a mask.
3. Run the animation as it is. You should only see the head part of the image on the background.
4. Now to change things a little. Remove all of the frames from the mask layer. Add a keyframe to the start and place the mask symbol somewhere on the layer.
5. Add a blank keyframe to frame 60 of the mask layer. Move the mask to another place on the stage. Create a motion tween to make the mask move smoothly across the stage. Different parts of the background are revealed as the mask moves across the stage.
Adobe Flash CS3 – ReferenceKaleidoscope Project (Masking)
1. Creating The Mask Shape
Start a new Flash document and draw yourself a circle using the drawing tools.
It’s quite difficult to divide the circle into segments by eye. We can be a bit more precise. First we need to know the dimensions of the circle. Choose the free transform tool and select the circle shape. Set its height and width to the same round number (eg 200 pixels).
The width or height of the circle is its diameter. The radius of the circle is half this figure. Now draw a line from the exact centre of the circle to the perimeter. Select this line and move the transformation point to the centre of the circle.
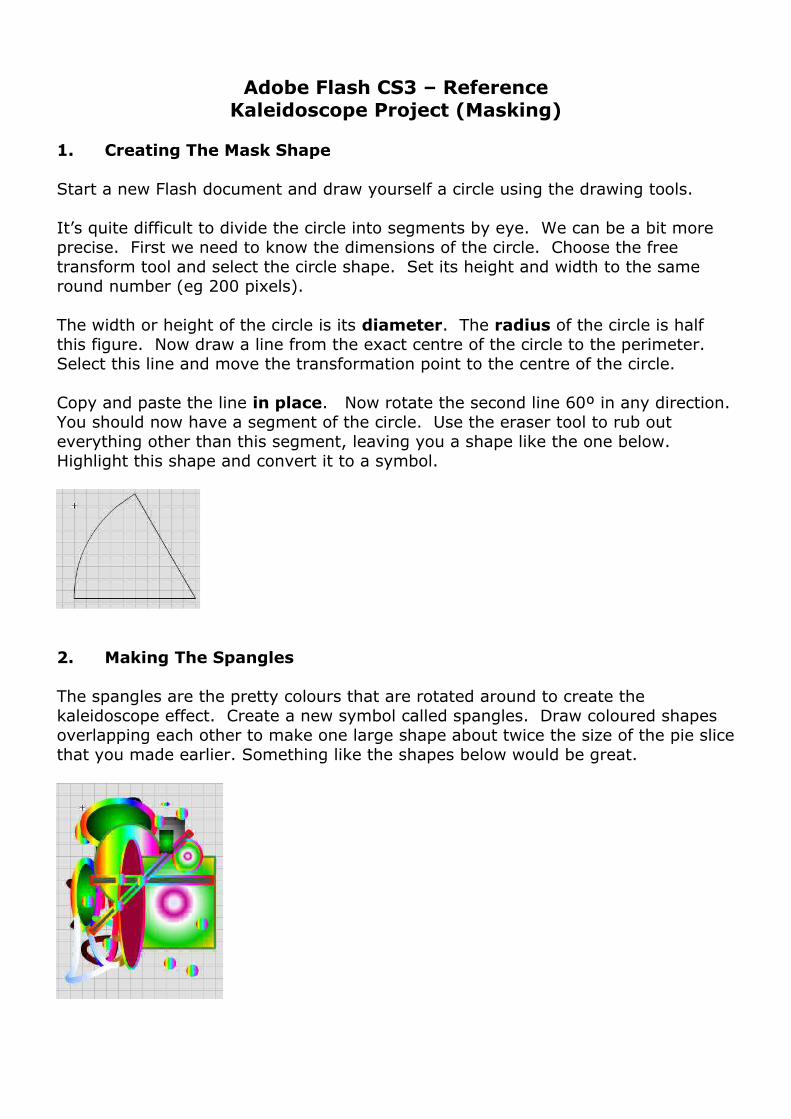
Copy and paste the line in place. Now rotate the second line 60º in any direction. You should now have a segment of the circle. Use the eraser tool to rub out everything other than this segment, leaving you a shape like the one below. Highlight this shape and convert it to a symbol.
2. Making The Spangles
The spangles are the pretty colours that are rotated around to create the kaleidoscope effect. Create a new symbol called spangles. Draw coloured shapes overlapping each other to make one large shape about twice the size of the pie slice that you made earlier. Something like the shapes below would be great.
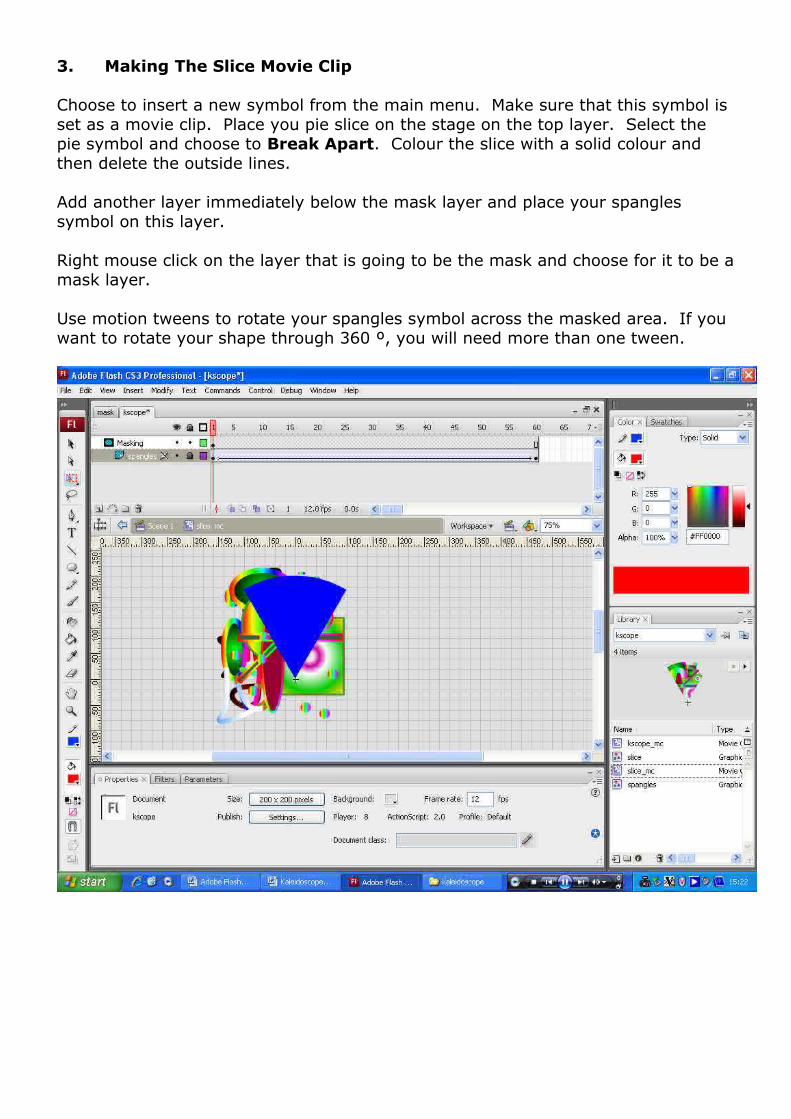
3. Making The Slice Movie Clip
Choose to insert a new symbol from the main menu. Make sure that this symbol is set as a movie clip. Place you pie slice on the stage on the top layer. Select the pie symbol and choose to Break Apart. Colour the slice with a solid colour and then delete the outside lines.
Add another layer immediately below the mask layer and place your spangles symbol on this layer.
Right mouse click on the layer that is going to be the mask and choose for it to be a mask layer.
Use motion tweens to rotate your spangles symbol across the masked area. If you want to rotate your shape through 360 º, you will need more than one tween.
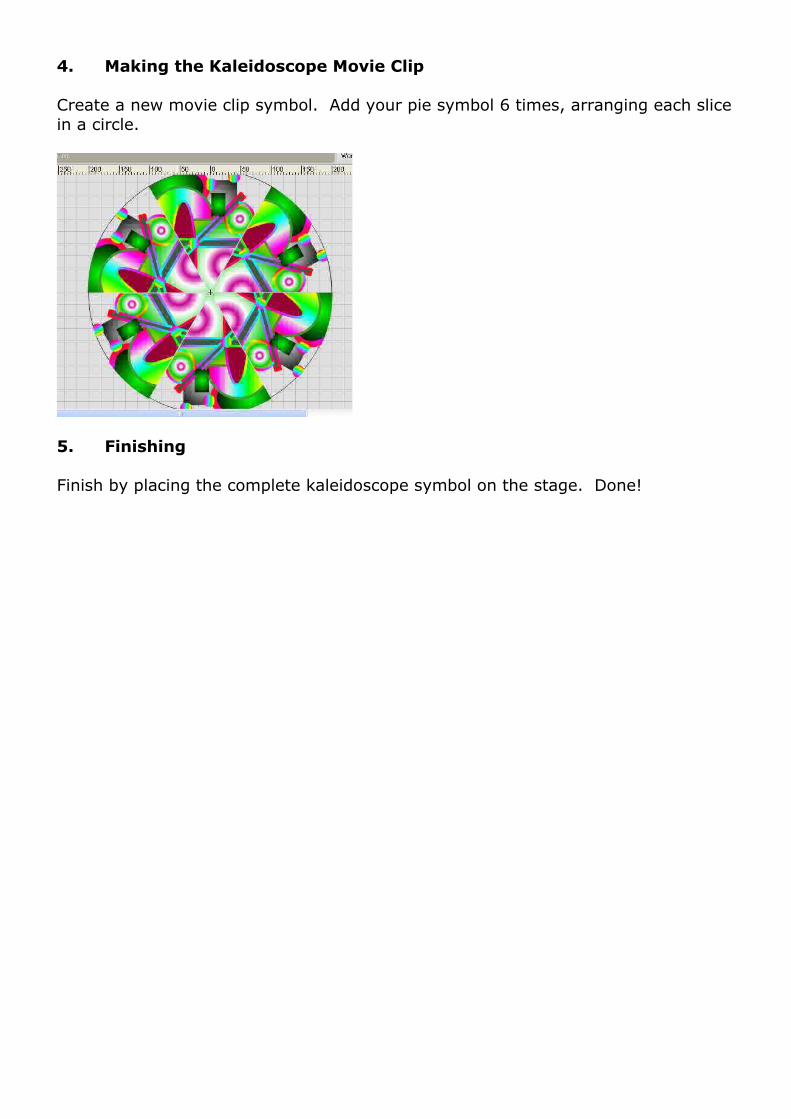
4. Making the Kaleidoscope Movie Clip
Create a new movie clip symbol. Add your pie symbol 6 times, arranging each slice in a circle.
5. Finishing
Finish by placing the complete kaleidoscope symbol on the stage. Done!