adobe indesign essentials - images.ruceci.comimages.ruceci.com/pdfs/wtgaibook.pdf · adobe indesign...
TRANSCRIPT

ADOBE INDESIGN®
ESSENTIALS
Copyright, National Seminars Training
2
Introduction
WTGAI0312
The goal of this webinar is to demonstrate ways to increase the efficiency and organization ofAdobe InDesign. Focus will be on the system and workflow techniques that will help cutdevelopment time by up to 20 percent.
After attending this webinar, the goal is not to go slower; it’s to be able to do more in the sameamount of time. When you get more efficient, you have more time to be creative. If, forexample, you’re paid by the hour, you’ll make more money. And most studies show that whenyou know what you’re doing and how to do it, your projects will be better.
3WTGAI0312
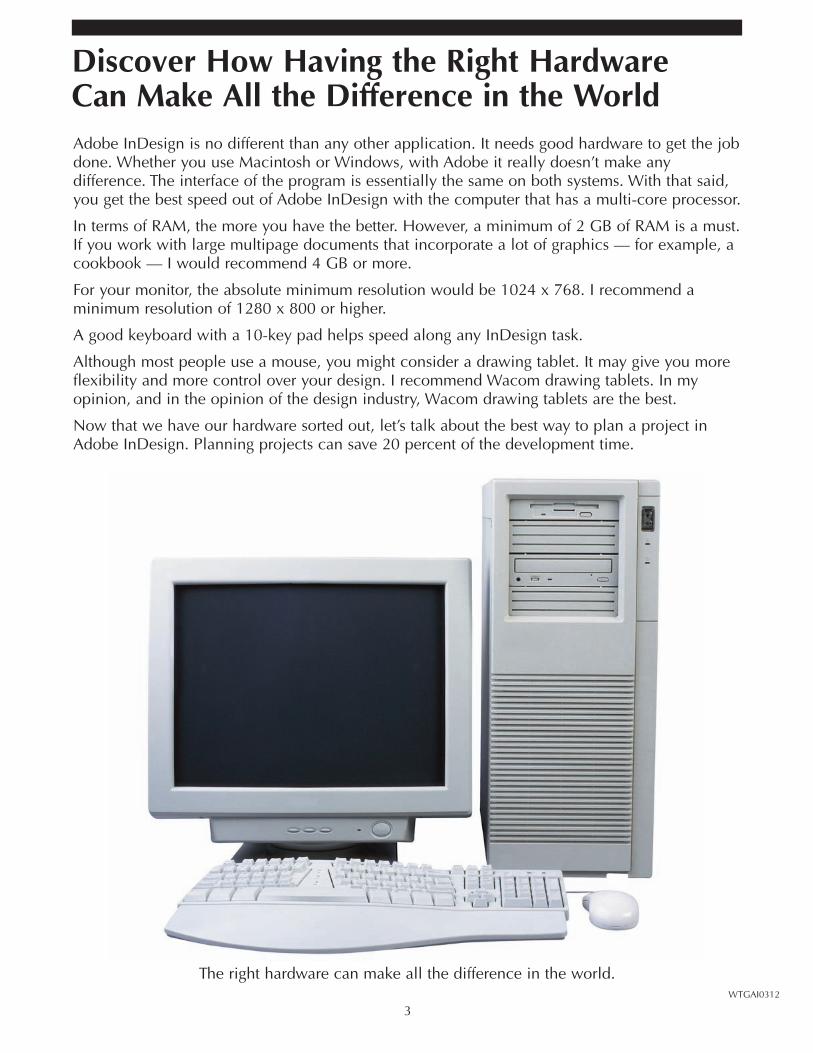
Discover How Having the Right Hardware Can Make All the Difference in the WorldAdobe InDesign is no different than any other application. It needs good hardware to get the jobdone. Whether you use Macintosh or Windows, with Adobe it really doesn’t make anydifference. The interface of the program is essentially the same on both systems. With that said,you get the best speed out of Adobe InDesign with the computer that has a multi-core processor.
In terms of RAM, the more you have the better. However, a minimum of 2 GB of RAM is a must.If you work with large multipage documents that incorporate a lot of graphics — for example, acookbook — I would recommend 4 GB or more.
For your monitor, the absolute minimum resolution would be 1024 x 768. I recommend aminimum resolution of 1280 x 800 or higher.
A good keyboard with a 10-key pad helps speed along any InDesign task.
Although most people use a mouse, you might consider a drawing tablet. It may give you moreflexibility and more control over your design. I recommend Wacom drawing tablets. In myopinion, and in the opinion of the design industry, Wacom drawing tablets are the best.
Now that we have our hardware sorted out, let’s talk about the best way to plan a project inAdobe InDesign. Planning projects can save 20 percent of the development time.
The right hardware can make all the difference in the world.
4
Learn the Secrets of Planning a Project andHaving That Dream Become a Reality
WTGAI0312
Your boss comes into the office and has this brilliant idea for the creation of a companynewsletter. Once the boss gives you this information, he or she leaves you to your own devices.So what are those devices? Success in any project involves proper planning.
Stage I: The Software
Adobe InDesign may not be the only application you need to get the job done. You may beinvolved in graphics, illustrations, photos, and text. Therefore, you might use Adobe Photoshopand Illustrator and Microsoft Word and Excel. Whatever the programs, Adobe InDesign will bethe final step. The applications we use will help us create the final product.
Stage II: The Initial Plan
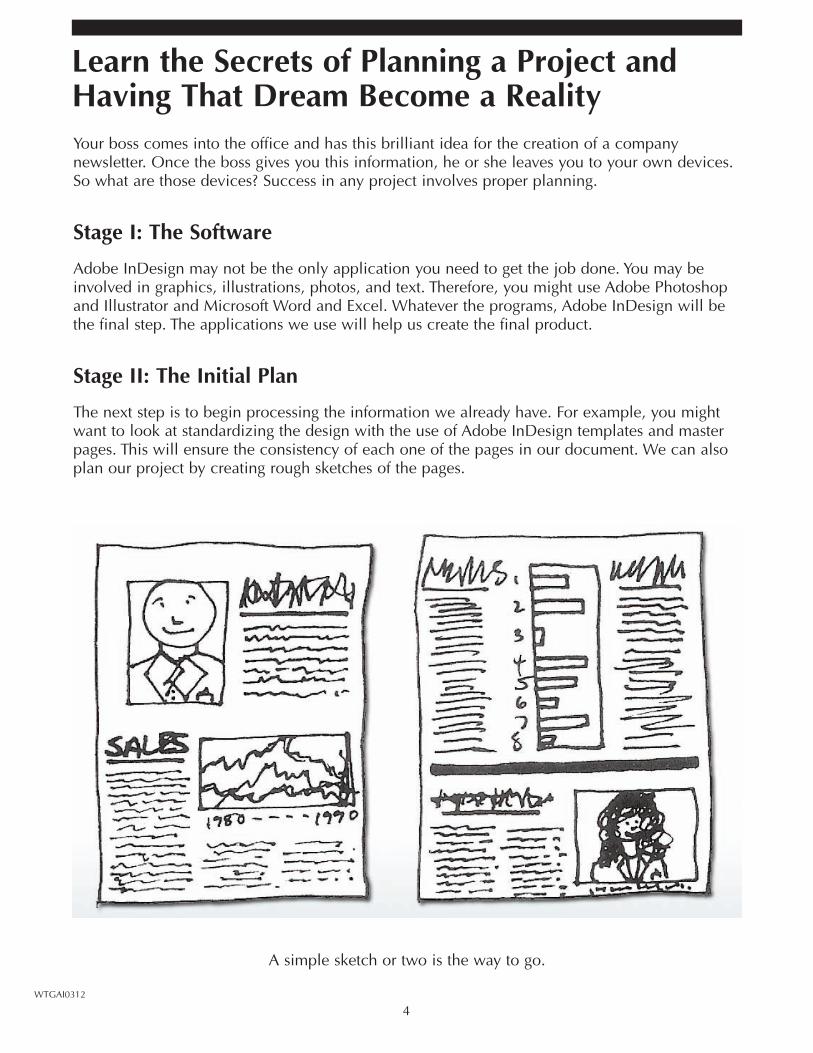
The next step is to begin processing the information we already have. For example, you mightwant to look at standardizing the design with the use of Adobe InDesign templates and masterpages. This will ensure the consistency of each one of the pages in our document. We can alsoplan our project by creating rough sketches of the pages.
A simple sketch or two is the way to go.
5WTGAI0312
Learn the Secrets of Planning a Project andHaving That Dream Become a Reality, continuedStage III: The Big FiveAsk yourself these questions:
1. Who is the intended audience?
2. What are the stated goals?
3. When is this project due?
4. Where will it be distributed?
5. Why are you doing it?
6
Understand the Difference Between What YouSee on the Screen and What You Get WhenYou Print by Utilizing InDesign’s PowerfulPreview Features
WTGAI0312
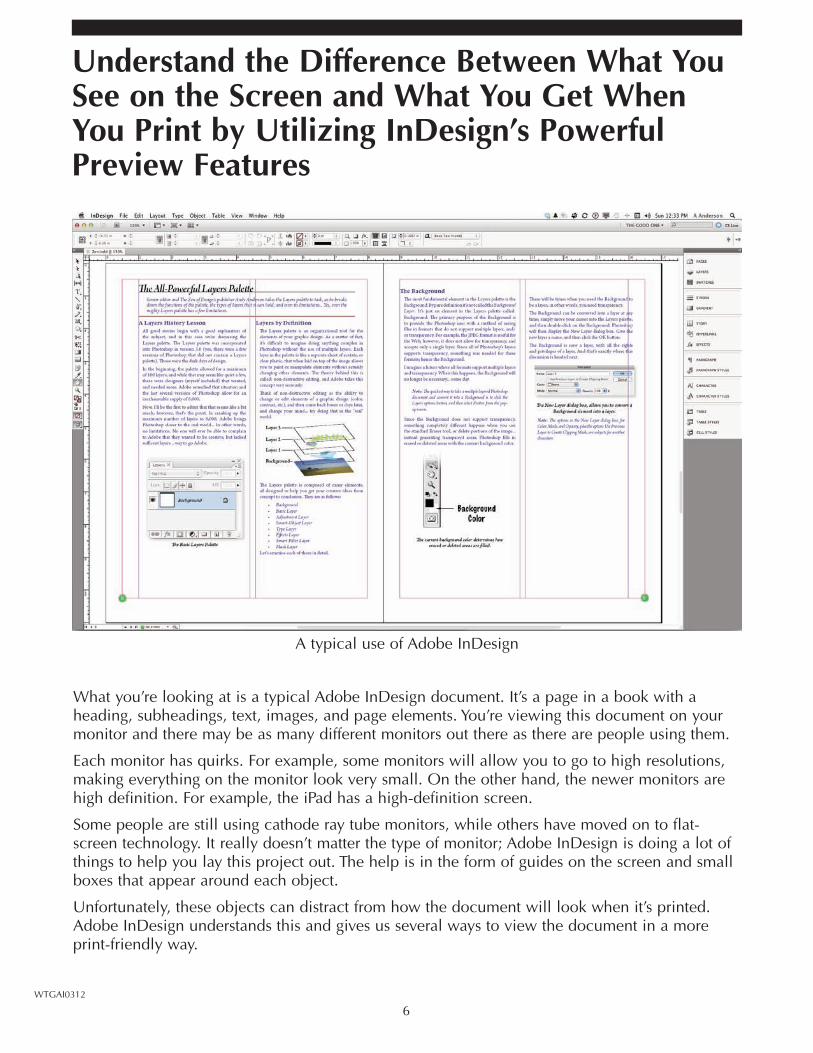
A typical use of Adobe InDesign
What you’re looking at is a typical Adobe InDesign document. It’s a page in a book with aheading, subheadings, text, images, and page elements. You’re viewing this document on yourmonitor and there may be as many different monitors out there as there are people using them.
Each monitor has quirks. For example, some monitors will allow you to go to high resolutions,making everything on the monitor look very small. On the other hand, the newer monitors arehigh definition. For example, the iPad has a high-definition screen.
Some people are still using cathode ray tube monitors, while others have moved on to flat-screen technology. It really doesn’t matter the type of monitor; Adobe InDesign is doing a lot ofthings to help you lay this project out. The help is in the form of guides on the screen and smallboxes that appear around each object.
Unfortunately, these objects can distract from how the document will look when it’s printed.Adobe InDesign understands this and gives us several ways to view the document in a moreprint-friendly way.
7WTGAI0312
Understand the Difference Between What YouSee on the Screen and What You Get WhenYou Print by Utilizing InDesign’s PowerfulPreview Features, continued
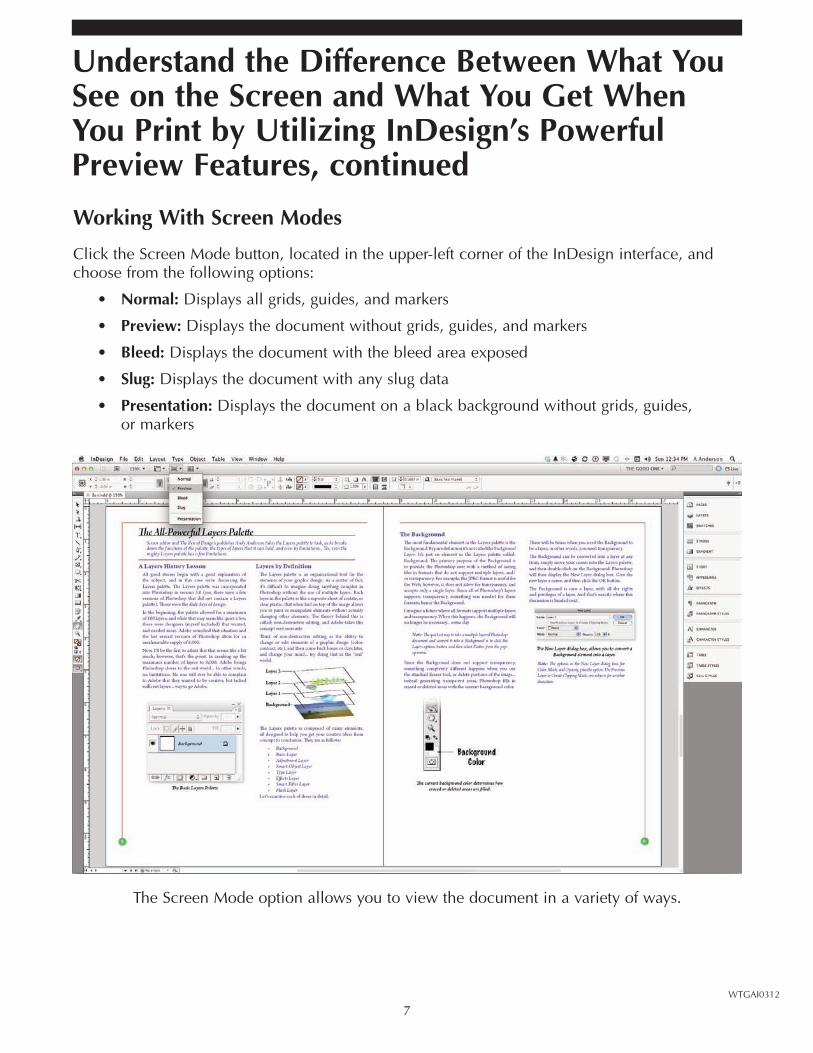
Working With Screen Modes
Click the Screen Mode button, located in the upper-left corner of the InDesign interface, andchoose from the following options:
• Normal: Displays all grids, guides, and markers
• Preview: Displays the document without grids, guides, and markers
• Bleed: Displays the document with the bleed area exposed
• Slug: Displays the document with any slug data
• Presentation: Displays the document on a black background without grids, guides, or markers
The Screen Mode option allows you to view the document in a variety of ways.
8
Understand the Difference Between What YouSee on the Screen and What You Get WhenYou Print by Utilizing InDesign’s PowerfulPreview Features, continued
WTGAI0312
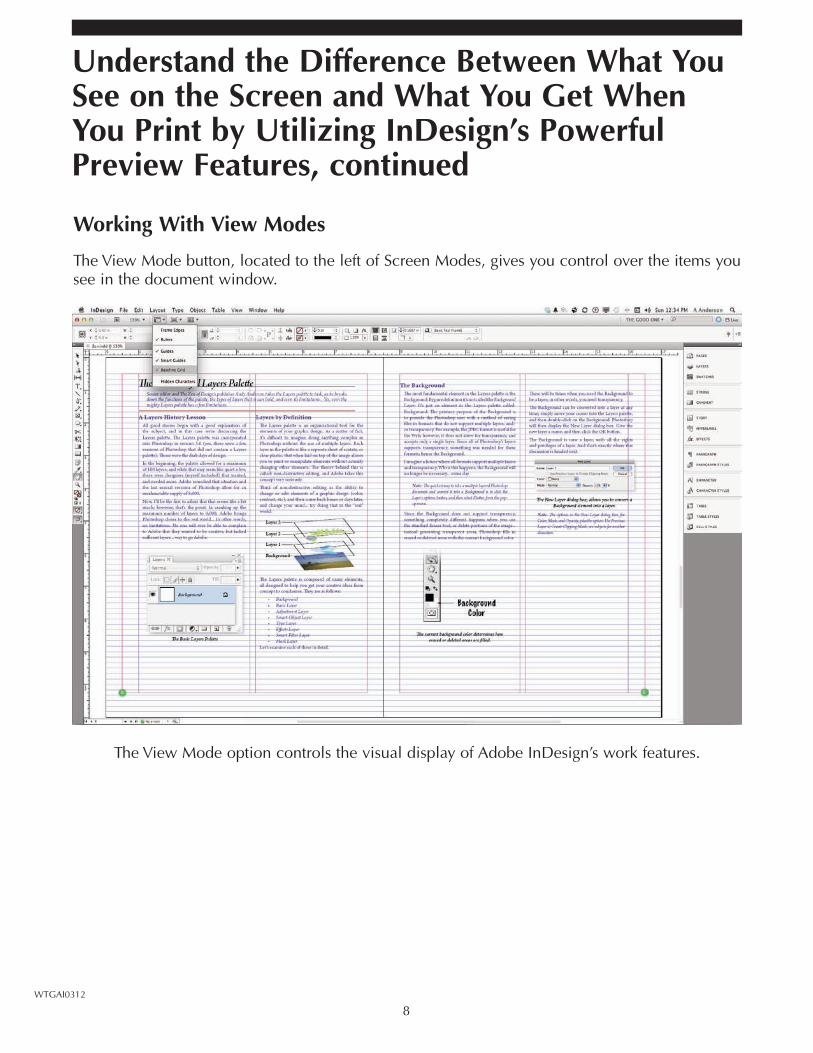
Working With View Modes
The View Mode button, located to the left of Screen Modes, gives you control over the items yousee in the document window.
The View Mode option controls the visual display of Adobe InDesign’s work features.
9WTGAI0312
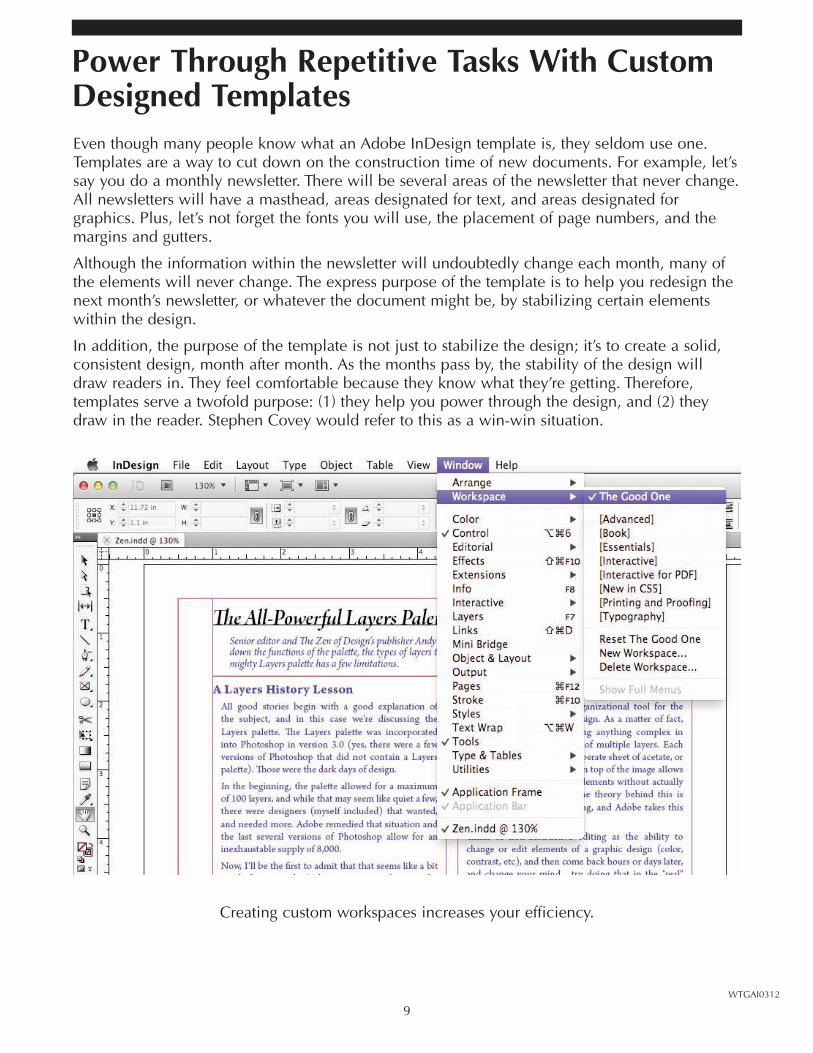
Power Through Repetitive Tasks With CustomDesigned TemplatesEven though many people know what an Adobe InDesign template is, they seldom use one.Templates are a way to cut down on the construction time of new documents. For example, let’ssay you do a monthly newsletter. There will be several areas of the newsletter that never change.All newsletters will have a masthead, areas designated for text, and areas designated forgraphics. Plus, let’s not forget the fonts you will use, the placement of page numbers, and themargins and gutters.
Although the information within the newsletter will undoubtedly change each month, many ofthe elements will never change. The express purpose of the template is to help you redesign thenext month’s newsletter, or whatever the document might be, by stabilizing certain elementswithin the design.
In addition, the purpose of the template is not just to stabilize the design; it’s to create a solid,consistent design, month after month. As the months pass by, the stability of the design willdraw readers in. They feel comfortable because they know what they’re getting. Therefore,templates serve a twofold purpose: (1) they help you power through the design, and (2) theydraw in the reader. Stephen Covey would refer to this as a win-win situation.
Creating custom workspaces increases your efficiency.

10
Power Through Repetitive Tasks With CustomDesigned Templates, continued
WTGAI0312
Working With Master Pages
Master pages work well with templates. If used correctly, they become the stabilizing elementsof any Adobe InDesign document. For example, an excellent way to utilize master pages wouldbe for items such as page numbers and repeating page elements. Create a master page byfollowing these steps:
1. Open the Pages panel.
2. Click the Page Options button, located in theupper-right portion of the Pages panel.
3. Select New Master.
4. Give the master page a descriptive name.
5. Select the master page by double-clicking onits icon in the Pages panel.
6. Add any element to the master page that willbe repeated on the pages in your document.
Applying a Master Page
1. Select the page to which you want to applythe master page.
2. Open the Pages panel.
3. Drag the master page onto the document page.
Modifying a Master Page
1. Select the master page you want to modify.
2. Make any changes that you feel are necessary.
3. The changes will be automatically applied toany pages that use that master page.
Master pages make repetitive page details a snap.
11WTGAI0312
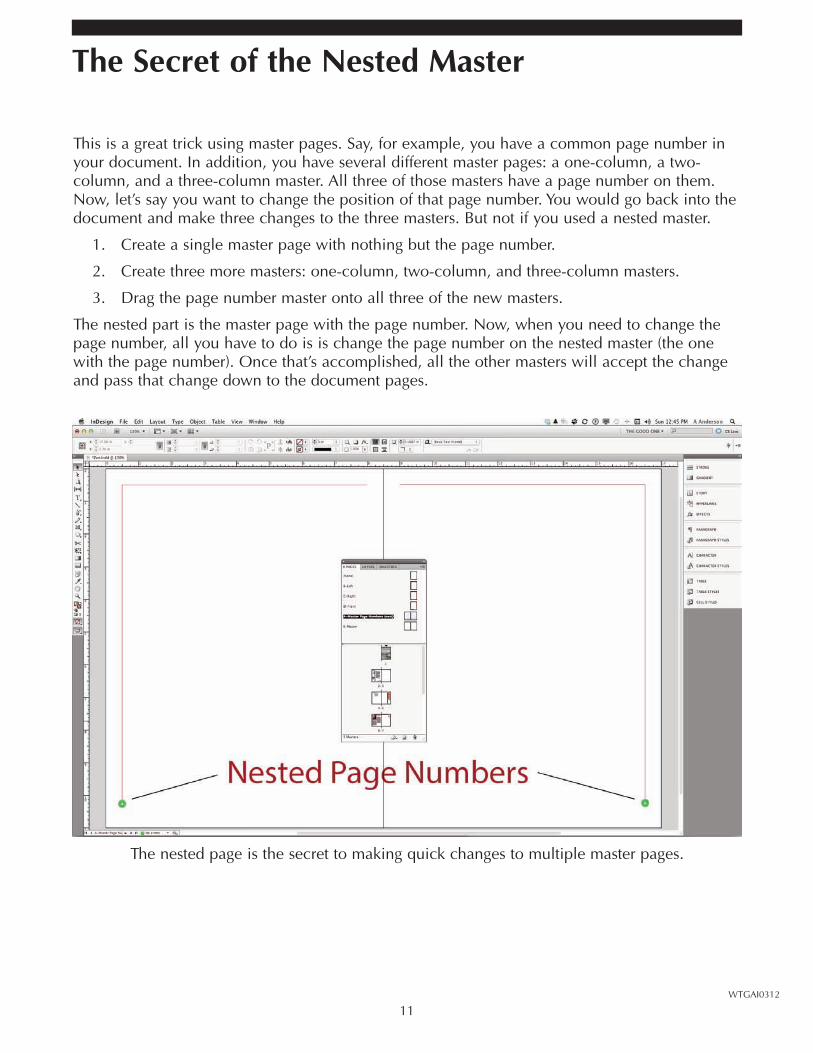
The Secret of the Nested Master
This is a great trick using master pages. Say, for example, you have a common page number inyour document. In addition, you have several different master pages: a one-column, a two-column, and a three-column master. All three of those masters have a page number on them.Now, let’s say you want to change the position of that page number. You would go back into thedocument and make three changes to the three masters. But not if you used a nested master.
1. Create a single master page with nothing but the page number.
2. Create three more masters: one-column, two-column, and three-column masters.
3. Drag the page number master onto all three of the new masters.
The nested part is the master page with the page number. Now, when you need to change thepage number, all you have to do is is change the page number on the nested master (the onewith the page number). Once that’s accomplished, all the other masters will accept the changeand pass that change down to the document pages.
The nested page is the secret to making quick changes to multiple master pages.

12
Discover How Fonts Play a Major Role in theReadability and Mood of Your Documents
WTGAI0312
Fonts are more than just for reading; they help generate a mood for documents. In addition,there are fonts that are designed purely for reading and some fonts that are designed purely fordisplay. If you’re looking for some interesting fonts to use in your designs, here are two sites thatoffer a variety of fonts, and many of them are free:
1. ifonts.com
2. dafonts.com
These two sites offer many descriptive types of fonts. For example, they have a font calledToolTime, and it spells out the letters of the alphabet with power tools. While that may seem abit strange, it might be just the font you need for a headline to help attract attention.
Font Categories
Besides very graphically descriptive fonts (like ToolTime), we can look at fonts and divide theminto two major categories: serif and sans serif.
1. Serif: Serif fonts are reading fonts. They are designed to make it very easy for the eye toread them at small sizes, such as 8, 9, 10, or 11 points.
2. Sans serif: Sans serif fonts are display fonts. They are designed to grab your attention.Therefore, they should be used for headlines and subheads. In most cases you would notuse a sans serif font for a reading font. On paper you should never size a sans serif fontbelow 14 points.
One of the questions asked in the production of a typical newsletter is: How many differentfonts should I use? The answer that most style guides will give is two: one reading font, or serif,and one display font, or sans serif.
Examples of serif fonts (good for reading):
• Minion Pro
• Arno Pro
• ITC Benquiat
Examples of sans serif fonts (good for display):
• Avenir Std
• Syntax
• Charlotte Sans
13WTGAI0312
Learn How to Create Character and ParagraphStyles to Power Through Complex DesignsOne of the most underused yet powerful features of Adobe InDesign is the ability to createparagraph styles and character styles. When you create a paragraph or character style, you’reessentially creating a template for text. For example, let’s say you generate a paragraph of textusing the Times New Roman font at 11 points and left aligned. That’s more than doable;however, that is not the default style for Adobe InDesign.
Later in the day, you want to create another paragraph so you begin typing. Unfortunately,you’re not typing in your new style. What you get is the default InDesign style.
We could make this more complicated, for example by adding leading, kerning, tracking, andparagraph separation controls to that paragraph. It would take a lot of work to change that oneparagraph into our new style. That’s where character and paragraph styles come into play.
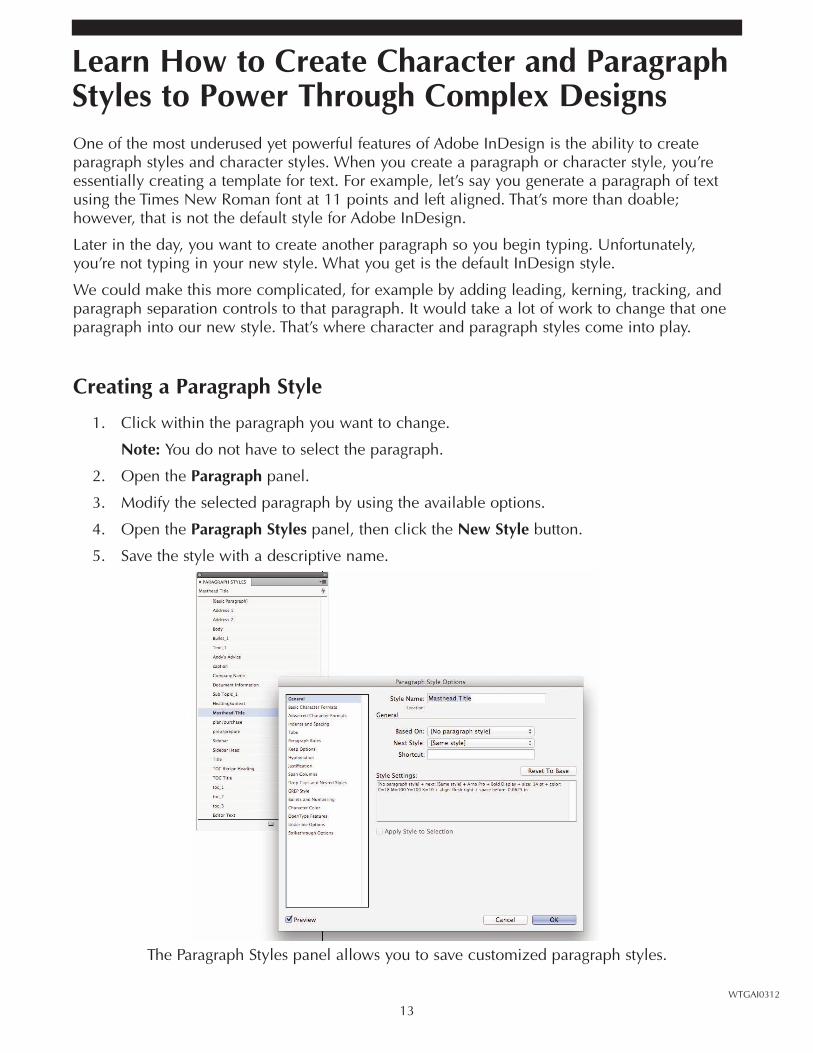
Creating a Paragraph Style
1. Click within the paragraph you want to change.
Note: You do not have to select the paragraph.
2. Open the Paragraph panel.
3. Modify the selected paragraph by using the available options.
4. Open the Paragraph Styles panel, then click the New Style button.
5. Save the style with a descriptive name.
The Paragraph Styles panel allows you to save customized paragraph styles.
14
Learn How to Create Character and Paragraph Stylesto Power Through Complex Designs, continued
WTGAI0312
Apply a Paragraph Style
1. Click within the paragraph that you want to modify.
2. Open the Paragraph panel, then simply click on the desired style.
Remember that paragraph styles control the entire paragraph, and a paragraph is defined as anygroup of words or sentences that exist between two carriage returns. When you apply aparagraph style, you are applying the changes to all of the text within that single paragraph. Itdoes not matter if you select the paragraph; you just need to be in the paragraph.
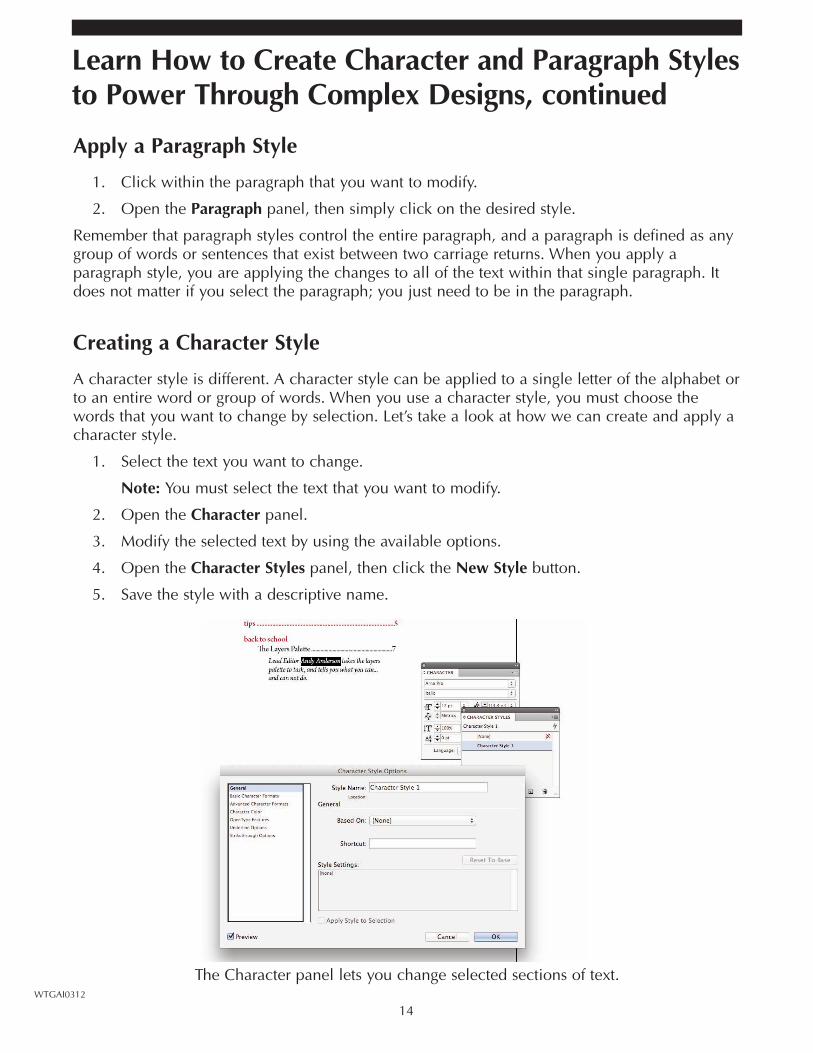
Creating a Character Style
A character style is different. A character style can be applied to a single letter of the alphabet orto an entire word or group of words. When you use a character style, you must choose thewords that you want to change by selection. Let’s take a look at how we can create and apply acharacter style.
1. Select the text you want to change.
Note: You must select the text that you want to modify.
2. Open the Character panel.
3. Modify the selected text by using the available options.
4. Open the Character Styles panel, then click the New Style button.
5. Save the style with a descriptive name.
The Character panel lets you change selected sections of text.
15WTGAI0312
Learn How to Create Character and Paragraph Stylesto Power Through Complex Designs, continued
Apply a Character Style
1. Select the text that you want to modify.
2. Open the Character panel, then click on the desired style.
The Bottom Line
Styles serve several valuable purposes in a design.
• Efficiency: When you create a paragraph or character style, you are only one click awayfrom applying that style to the document.
• Consistency: Character styles and paragraph styles are created with user-defined values.When you apply the styles to text, you can be assured the changes to the text will matchexactly the values you entered.
• Experimentation: Let’s say you use a character style of italics, and you have applied thatcharacter style of italics to text throughout the newsletter. You decide you don’t want touse italics: you want an oblique. All you have to do is reopen the style, change the italicto an oblique, and then click Apply. The entire document, wherever that style was used,will change to oblique.
Character and paragraph styles are a powerful yet underused part of this amazing application.Don’t forget you have them.
16
Understand the Different InDesign Workspacesand How You Can Use Them to Your Advantage
WTGAI0312
Another way to gain some control over InDesign and therefore speed up your workflow is tocreate custom workspaces. Most programs will allow you to control the workspace. Whencreating a custom workspace, ask yourself the following questions:
• How do I use the program?
• What are the panels that I use most often?
• How can I combine them into a specific workspace that will increase my productivityand efficiency?
That’s what workspaces are all about.
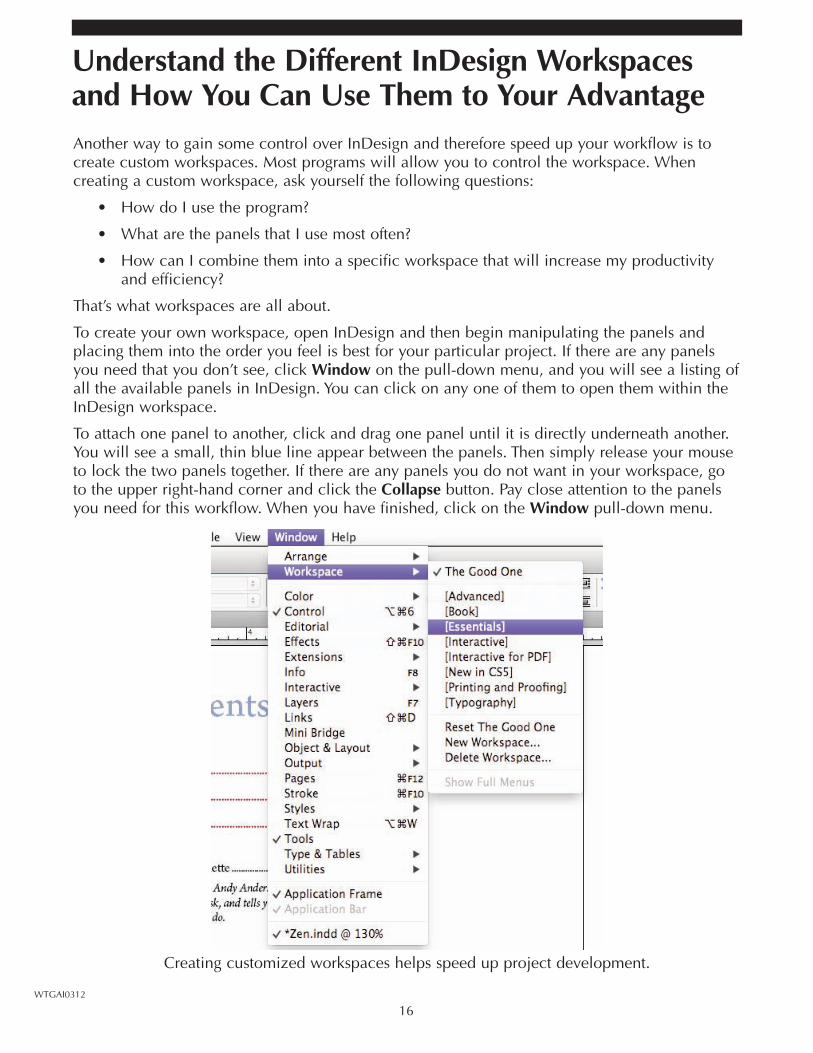
To create your own workspace, open InDesign and then begin manipulating the panels andplacing them into the order you feel is best for your particular project. If there are any panelsyou need that you don’t see, click Window on the pull-down menu, and you will see a listing ofall the available panels in InDesign. You can click on any one of them to open them within theInDesign workspace.
To attach one panel to another, click and drag one panel until it is directly underneath another.You will see a small, thin blue line appear between the panels. Then simply release your mouseto lock the two panels together. If there are any panels you do not want in your workspace, goto the upper right-hand corner and click the Collapse button. Pay close attention to the panelsyou need for this workflow. When you have finished, click on the Window pull-down menu.
Creating customized workspaces helps speed up project development.

17WTGAI0312
Discover the Power Shortcuts Experts Use toGet the Job Done Quickly and EfficientlyKeyboard shortcuts are an amazing way in any program to get faster with what you do. A studyshowed that using shortcut keys can save you up to one hour in every eight. Adobe InDesignhas over 400 shortcut keys. That’s a lot to memorize, and InDesign may not be the onlyapplication you use. For example, you might be using Adobe Photoshop and Illustrator orMicrosoft Word. Each of these programs has hundreds of shortcut keys. None of us wants tomemorize all of them, but there are 12 to 14 shortcut keys per program that, if used correctly,can help you save one hour out of every eight.
So, how do we get to the shortcut keys, and how do we learn the ones that will save us themost time? Open Adobe InDesign and then click the Edit pull-down menu. At the bottom of thelist you will see an item for Keyboard Shortcuts. Select it. When you select that item you willsee a listing of every single shortcut that is available within Adobe InDesign.
The Keyboard Shortcuts option gives you total control over InDesign shortcuts.
18
Discover the Power Shortcuts Experts Use to Getthe Job Done Quickly and Efficiently, continued
WTGAI0312
As you work you need to keep an eye on which pull-down menus you use over and over again.For example, let’s say you constantly go to the File menu and select Open. It’s possible thatmight be one of the shortcut keys you need to learn. After a few weeks, you should see a patterndeveloping. That pattern will show you the pull-down menu items you use and the shortcut keysyou need to memorize. As the weeks go on, you begin to incorporate those shortcut keys intoyour workflow, and as you do you begin saving time.
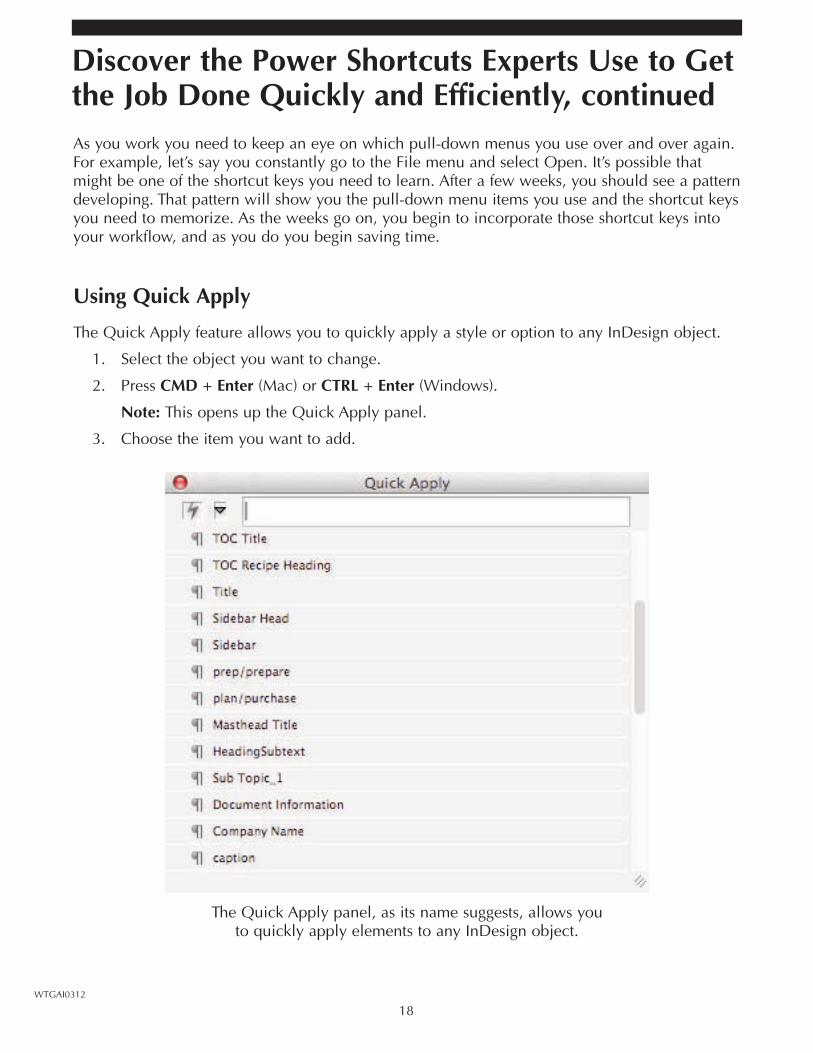
Using Quick Apply
The Quick Apply feature allows you to quickly apply a style or option to any InDesign object.
1. Select the object you want to change.
2. Press CMD + Enter (Mac) or CTRL + Enter (Windows).
Note: This opens up the Quick Apply panel.
3. Choose the item you want to add.
The Quick Apply panel, as its name suggests, allows you to quickly apply elements to any InDesign object.
19WTGAI0312
Reduce Workspace Clutter by Controlling Exactly WhatAppears in Photoshop’s Pull-Down Menu System
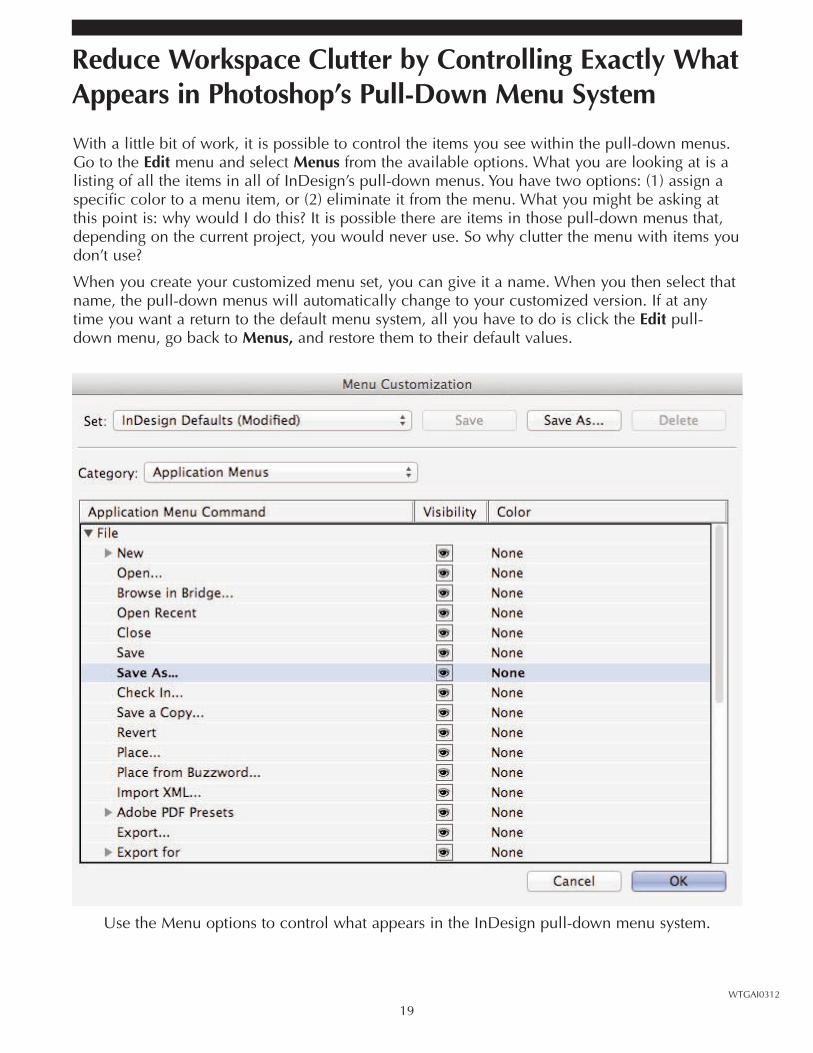
With a little bit of work, it is possible to control the items you see within the pull-down menus.Go to the Edit menu and select Menus from the available options. What you are looking at is alisting of all the items in all of InDesign’s pull-down menus. You have two options: (1) assign aspecific color to a menu item, or (2) eliminate it from the menu. What you might be asking atthis point is: why would I do this? It is possible there are items in those pull-down menus that,depending on the current project, you would never use. So why clutter the menu with items youdon’t use?
When you create your customized menu set, you can give it a name. When you then select thatname, the pull-down menus will automatically change to your customized version. If at anytime you want a return to the default menu system, all you have to do is click the Edit pull-down menu, go back to Menus, and restore them to their default values.
Use the Menu options to control what appears in the InDesign pull-down menu system.
20
Save Time by Using InDesign’s Powerful Built-in Features to Create Everything From a Printed Document to a PDF
WTGAI0312
The purpose of Adobe InDesign is to create a workable document for output. InDesign gives youmany powerful tools to create output that fits your needs. Let’s start with a simple print. Selectthe File menu, then choose Print from the available options. Understand that all print dialogboxes will be different; they correspond to your specific printer and your operating system.
1. General: General items of control, such as number of copies, page range to print, andlayering options
2. Setup: Options such as orientation, scaling, and the choice to print thumbnails arelocated here
3. Marks and Bleed: Controls the type of printer’s marks and codes printed with the document
4. Output: Controls the output in the form of color, trapping, and screening of the document
5. Graphics: Defines the quality of the graphics
6. Color Management: An important part of the InDesign workflow, Color Managementcontrols how your document’s colors are sent to the printer
7. Advanced: Manages bitmap, OPI (Open Prepress Interface), and transparency options forthe document
8. Summary: Contains a summary of all the changes made using the previous options

21WTGAI0312
Save Time by Using InDesign’s Powerful Built-in Features to Create Everything From a Printed Document to a PDF, continued
The Print dialog box gives you total control over any Adobe InDesign document.
22
Save Time by Using InDesign’s Powerful Built-in Features to Create Everything From a Printed Document to a PDF, continued
WTGAI0312
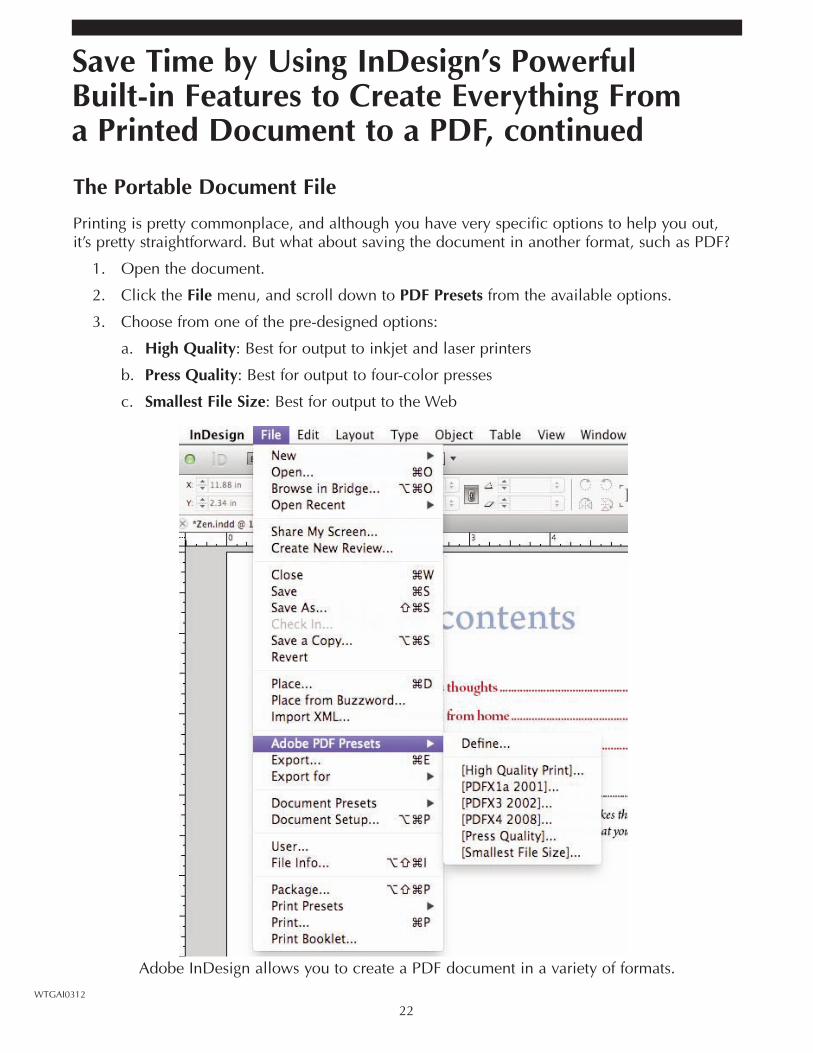
The Portable Document File
Printing is pretty commonplace, and although you have very specific options to help you out,it’s pretty straightforward. But what about saving the document in another format, such as PDF?
1. Open the document.
2. Click the File menu, and scroll down to PDF Presets from the available options.
3. Choose from one of the pre-designed options:
a. High Quality: Best for output to inkjet and laser printers
b. Press Quality: Best for output to four-color presses
c. Smallest File Size: Best for output to the Web
Adobe InDesign allows you to create a PDF document in a variety of formats.

23WTGAI0312
Save Time by Using InDesign’s Powerful Built-in Features to Create Everything From a Printed Document to a PDF, continued
Additional Export OptionsGo to the File menu, scroll down to Export, and choose from the following options:
• Buzzword: Online word processor
• Dreamweaver: Converts the document for use in Adobe Dreamweaver
• ePub: Prepares the document for viewing on reader devices, like iPad and Nook
When it comes to output options, Adobe InDesign has exactly what you need.