adobe indesign - @cctchsartgraphcomm.weebly.com/uploads/3/0/1/1/3011480/wkbk_indesign.pdf · adobe...
TRANSCRIPT
AdobeInDesign
Essentials

InDesign Essentials, Douglas Mitchell, 2008 All Rights Reserved©
InDesign Essentials2
Douglas MitchellADM Enterprises, Inc.8737 Larwin LaneOrlando, FL 32817407.616.0854 virtual407.671.1178 [email protected] www.trainingbrain.com
Adobe Certified Instructor• Photoshop, Illustrator, InDesign, PDF Export
Olympus Training Partner
Seminar Instructor & Professor• Adobe Certified Instructor• Free Paper Associations Eight States• Int’l Student Media Festival• Apple, Olympus, Adobe Education & Corporate• Mac & Windows Academy• Digital Media Academy• Int’l Academy of Design & Technology College – Professor• Professional Photographers of America• NAPP Tour – National Association of Photoshop Professionals• Graphics of America, Print Expo, Printing Association Florida• International Television Association• Thunder Lizard and many more• NASA, Airforce, Navy, AAA, Red Lobster, Florida Hospital
Author: Video Training Series, Books• Training Videos: Current: Photoshop CS3, Illustrator CS3, InDesign CS3 Past: Premiere, Director, QuarkXPress, Intro to Multimedia• Book: Digital Cameras & Photo Editing for Teachers & Students using Olympus & Photoshop Elements• Book: Adobe Illustrator CS3, Just Show Me What To Do
Multimedia Production• Books, flyers, brochures, newsletters, postcards, biz cards• Video, Interactive CD & DVD presentations, animation• Digital photography and photo editing• Print management, color correction• Web template design & production
AdobeCertified
Instructor
PhotoshopIllustratorInDesignAcrobat

InDesign Essentials, Douglas Mitchell, 2008 All Rights Reserved©
InDesign Essentials3

InDesign Essentials, Douglas Mitchell, 2008 All Rights Reserved©
InDesign Essentials4
Contents
Create a New Document – Size, Margins .....................................................................5Add Type in a Frame – All Page Elements Use a Frame ..............................................6Working with Frames – Resize, Move, Options .............................................................7Apply Text Attributes ......................................................................................................8Add Photos, Graphic, Artwork – with Place Command .................................................9Working with Guides & Grids .........................................................................................10Draw Lines – Stroke, Shapes, Color, Gap Color ...........................................................11Add Borders – Uses Frame Stroke................................................................................12Working with Layers – Allows Stacking Order (front, next, back) ..................................13Adobe PDF – Characteristics ........................................................................................14Export to PDF – CMYK Press, Web, Presentations ......................................................15Global Preferences & Defaults Setup ............................................................................16Palettes Setup, Tools, Keyboard Shortcuts ...................................................................17Links Management ........................................................................................................18Spell Checker ................................................................................................................19Autocorrect Spelling ......................................................................................................20Library – Images, Art, Type, Objects, Pages .................................................................21InDesign Help ................................................................................................................22Gradients – Create, Change, Manage...........................................................................23Typography ....................................................................................................................24Leading ..........................................................................................................................24Typography (continued) .................................................................................................25Text Threading ...............................................................................................................26Text Threading – continued ...........................................................................................27Master Pages ................................................................................................................28Insert Special Characters ..............................................................................................29Glyphs Palette – World of Icons, Symbols & More from Any Font ................................30Ellipse Text Frame .........................................................................................................31Text Frame Options .......................................................................................................31Pen Tool .........................................................................................................................32Auto Page Numbers & Sections ....................................................................................33Star Burst.......................................................................................................................34Text Wrap Palette ..........................................................................................................35Drop Caps .....................................................................................................................36TOC Example – Cover Tea Company ...........................................................................37TOC Example – Teapots Page ......................................................................................38TOC Example – Information Page: Head & Sub-Heads to TOC ...................................39Table of Contents – TOC ...............................................................................................40Table of Contents – TOC (continued) ............................................................................41Table of Contents – TOC (continued) ............................................................................42Table of Contents – TOC (continued) ............................................................................43Table of Contents – TOC (continued) ............................................................................44Tables – Creation & Editing ...........................................................................................45

InDesign Essentials, Douglas Mitchell, 2008 All Rights Reserved©
InDesign Essentials5
Create a New Document – Size, Margins
1 New Document > File > New > Document > to create Business Card 1 Document Preset > Default 2 Number of Pages 3 Facing Pages > OFF 4 Page size > Letter > Default 5 Columns s1 > Default (always have at least 1 column) 6 Margins > Non-printing guides for layout positioning > Left .75 (3) hole punch.
2 Save or Save As 1 File > Save As > MyBizCard.indd
3 Setting Views 1 Zoom Tool > Double click on tool to 100% 2 Hand Tool > Double click on Hand tool > Fit To Screen Size Hold option/alt (first) + space bar > hand tool > move screen. 3 Command +/- > Window Remains Same Size Command/control 1 = 100%. Command/control 2 = 200%. Command/control 0 = Fit to Monitor

InDesign Essentials, Douglas Mitchell, 2008 All Rights Reserved©
InDesign Essentials6
Add Type in a Frame – All Page Elements Use a Frame
1 Draw a text frame (all frames can contain text or graphics or both) 1 Select the Text Tool > Click drag a frame from upper left corner to lower right corner. 2 See text cursor, start typing or copy/paste or Type menu > Fill with Placeholder Text. 3 Start over: Undo Command > Edit Menu > Undo (command/control Z). 4 Note: Frames snap to margin or guides. 5 Use Options Bar on top to format text and paragraph.
A = formats text attributes
Paragraph Sign = formats paragraph attributes
2 Drawframesusingrectangletoolforphotosafariflyertype 1 Draw Frames Name Contact Information Employment skills, advertising, etc. Logo Background (Master Page) 4 Left Align Frame 3 > Options Bar.
3 Select a word or a sentence 1 Select one word > double click. 2 Select sentence > triple click Tip: Double click first word, then single click once that word to select next word, repeat. 3 Select paragraph > four clicks. 4 Select All > com/ctrl A.
(continued next page)

InDesign Essentials, Douglas Mitchell, 2008 All Rights Reserved©
InDesign Essentials7
Working with Frames – Resize, Move, Options
1 Resize a frame > select handles with selection tool 1 Can use Options Bar to set exact dimensions. 2 IMPORTANT: Set the Reference Point (point from which scale occurs).
2 Move the page on screen 1 Use Hand Tool. 2 Tip: Hand Tool > press > opt/alt + space bar (press opt/alt FIRST).
3 Show Hidden Characters > Type menu > Show Hidden Characters 1 See word spaces as dots. 2 See hard returns as paragraph symbols. 3 See soft return symbol (shift return). 4 See end of text as Pound Sign.
4 Note: add columns to text frame 1 Select frame with Text tool. 2 Choose Object Menu > Text Frame Options > Columns (or use options bar).

InDesign Essentials, Douglas Mitchell, 2008 All Rights Reserved©
InDesign Essentials8
Apply Text Attributes
1 Select a word or a sentence 1 Select one word > double click. 2 Select sentence > triple click Tip: Double click first word, then single click once that word to select next word, repeat. 3 Select paragraph > four clicks. 4 Select All > com/ctrl A.
2 Apply type attributes using options bar 1 Select type. 2 Attributes are applied to the selected type. 3 Select the “A” Icon on Options Bar (far left). 3 Choose type attributes from the Options Bar. Font and font style. Size and leading (Auto is good place to start). Kerning: space between TWO letters, numbers, symbols. Space can be increased or decreased. Tracking: space between more than two letters, numbers, symbols. Creates space on the selected type. Space can be increased or decreased.
3 Paragraphs 1 Press Return Key. This creates a new line of type below and creates a new paragraph. 2 Press Shift Return. This creates a new line of type BELOW — BUT KEEPS it as the same paragraph. 3 View paragraph symbol markers > Type menu > Show Hidden Characters. 4 Line space (or leading) is the space between the top type line and the one under it.
4 Apply spacing between lines using space after option (this is a very useful tool). 1 Click anywhere inside the paragraph ABOVE, applying space pushes bottom line down.

InDesign Essentials, Douglas Mitchell, 2008 All Rights Reserved©
InDesign Essentials9
Add Photos, Graphic, Artwork – with Place Command
1 Place photo, graphic, logo, artwork (.psd, .jpg, .pdf, .ai, .eps, .tif, .png) 1 File menu > Place (see Files in Links Palette) 2 Turn Off > Show Import Options.
3 Selected Frames > contents will be replaced when placed. 4 See icon and click on page. 5 Use Page Grid > View menu > Grids & Guides > Show Document Grid. 6 Use Selection tool to move element on page. 7 Use Arrow Key to nudge with each click (up/down, left/right).
2 Scale photos and artwork, also called resize 1 Select frame. 2 Use Options Bar on top
3 Turn on the Constrain Proportions Lock. 4 Choose the reference point (center is chosen above, scales from this point). 5 Enter new Percent, press return or enter (key pad).

InDesign Essentials, Douglas Mitchell, 2008 All Rights Reserved©
InDesign Essentials10
Working with Guides & Grids
1 Create guides on separate layer > hide and show easily
2 Change margin guides position > Layout menu
3 Ruler guides 1 Create guides on a layer. 2 Change zero point setting. 3 Reset ruler zero point. 4 Hide/show guides > com/ctrl ; (semi-colon) 5 Bleed to edge 1/8 inch is standard. 6 Delete guides (double click selection arrow > window runs).
4 Grids 1 Setup Grids in Preferences (com/ctrl K). 2 Tip: use either .5 or .25 and 1 increment. 3 Turn Off > Grids In Back. 4 Hide/show grids > com/ctrl ‘ (apostrophe)
5 Layout Adjustment > command > auto adjusts new margins 1 Layout menu > Layout Adjustment. 2 Enable ON allows objects to auto adjust when changing margins.

InDesign Essentials, Douglas Mitchell, 2008 All Rights Reserved©
InDesign Essentials11
Draw Lines – Stroke, Shapes, Color, Gap Color
1 Line Tool > select > click drag > shift to constrain 1 Tip: Drag guides from rulers > com/ctrl R > lines snap to guides. 2 Tip: Stroke palette > double click on line tool. 3 Tip: Use Transform palette > double click rotation tool. 4 Straight or diagonal line > shift to constrain. 5 Move > select > nudge > use arrow keys. 6 Increase line width by stroke weight > stroke palette. 7 Resize line > select drag handles > see transform palette next.
2 Stroke palette with options 1 Type options (various line designs). 2 Cap settings > butt cap, round cap, projecting cap. 3 Start and End: adds graphics: circle solid, triangle wide, etc. 4 Gap color shows color between dashes.
3 Color > Swatches palette 1 Stroke applies color to line types.
4 Transform palette or Rotate tool 1 Resize line: check Reference Point first (Options Bar). 2 Reposition line by X and Y numbers. 3 Rotate uses Reference Point in Options Bar. 4 Skew by degrees.

InDesign Essentials, Douglas Mitchell, 2008 All Rights Reserved©
InDesign Essentials12
Add Borders – Uses Frame Stroke
1 Create a line or border 1 Lines or borders are strokes on the following: rectangle, pencil, Pen tool path. 2 Select Rectangle tool. 3 Draw a frame around edges of document. 4 Tip: Rectangle elements select as a solid object, even though it looks transparent. 5 Tip: while on the Selection tool, press Command key Mac or Control key Windows and Click to select an underlying element.
2 Open Stroke and Swatches palette 1 Border thickness is called a stroke. 2 Strokes create line weight (thickness). Stroke weight is measured in points. Reference: 72 points in one inch. 3 Choose Stroke icon (versus Fill icon). 4 Use Stroke palette to apply stroke weight in points. Example: 20 pt. 5 Choose > Type of Stroke (graphic style). Example: Wavy 6 Choose > Gap Color. 7 Create new color under Swatch palette options. New Color Swatch Choose: Color Type: Process Choose: Color Mode: CMYK

InDesign Essentials, Douglas Mitchell, 2008 All Rights Reserved©
InDesign Essentials13
Working with Layers – Allows Stacking Order (front, next, back)
1 Layer 1 is default layer (blue) 1 Open Layers palette > Window menu. 2 Layer 1 is the default layer. 3 All elements will be created on layer 1 by default, until another layer is created.
2 Create a new layer and move graphics to layer 1 Click on New Layer icon (next to trash icon). 2 Select the Border. See a square to right of layer. This represents selected element. 3 Drag square to new layer (creates stacking order). 4 Stacking order means top most element appears closest to the eye. Layers are easiest to control stacking. 5 Stacking order can be changed using Object menu > Arrange. Bring to Front Bring Forward Send Backward Send to Back
3 Name a layer & select a color 1 Double click on layer to name/color.

InDesign Essentials, Douglas Mitchell, 2008 All Rights Reserved©
InDesign Essentials14
Adobe PDF – Characteristics
1 Adobe PDF – Portable Document Format AboutPDFfiles 1 All PDF files can be viewed FREE with Adobe Acrobat READER. All new computers come with Acrobat READER installed. Latest versions of Acrobat READER can be updated free from Adobe at:
http://www.adobe.com/products/acrobat/readstep2.html
2 PDF files are viewed with Acrobat READER or Acrobat Pro.
3 PDF can be printed, if printing option is left ON.
4 PDF files embeds fonts, graphics, movies, sounds, URL’s, email, hypertext links.
5 Acrobat Reader v.6, or later is required to play PDF files with movies/sounds.
6 PDF files can be placed into InDesign documents, just like photos/graphics.
7 PDF files cannot be edited inside InDesign. 8 PDF files can be edited using Acrobat Pro – to some extent.
Editing is not the same as native application.
9 Copy/paste from PDF file using Acrobat Pro.
10 PDF files are “known” by all printers, PDF prints easier/quicker than other file formats.
11 PDF files can contain bookmarks, thumbnails, URL, email live links.
12 PDF files make great presentations. All you need is Acrobat Reader.
13 PDF file sizes can be very small for web and presentations.
14 PDF files are easily created as export most any application.
Continued Next Page > Export PDF from InDesign

InDesign Essentials, Douglas Mitchell, 2008 All Rights Reserved©
InDesign Essentials15
Export to PDF – CMYK Press, Web, Presentations
1 Export PDF from InDesign 1 Save the current document > File menu > Save. 2 Choose File menu > Export > choose PDF format in the pop up menu. Tip: Be careful, this sometimes format comes up as Tagged Text format automatically. Be sure to select > Adobe PDF2 Adobe PDF Preset 1 Use: Web Viewing (for web and presentations). 2 Turn ON Bookmarks > under Include. Applying this setting modifies the default options for Web Viewing. Therefore, Web Viewing (modified) appears under Preset. 3 Compatibility: choose Acrobat 8 (PDF 1.7). 4 Pages: All or Range (hyphen is a range, comma allows series of pages) 5 Always REVIEW the PDF after Export — what you see is what you get. If something is missing, Export again.
For CMYK PressCompatibility: Acrobat 4 (PDF 1.3)

InDesign Essentials, Douglas Mitchell, 2008 All Rights Reserved©
InDesign Essentials16
Global Preferences & Defaults Setup
1 Setglobaldefaults(preferences)forallnewfiles—nofilesareopen 1 All NEW files will now open with new global settings (preferences).
2 File > Preferences 1 Units & Increments. 2 Preferences > Guides. 3 Preferences > Dictionaries > choose language.
3 Layout Menu > Margins 1 Reminder > B&W laser printer edge cuts off at .25. 2 Layout menu > ruler guides. 3 View threshold > below % guide disappears.
4 Paragraph Styles Palette > create default text attributes 1 Create New Style Button > set font, size, align, indents, tabs, hyphens off/on, characters, colors.
InDesign Essentials, Douglas Mitchell, 2008 All Rights Reserved©
InDesign Essentials17
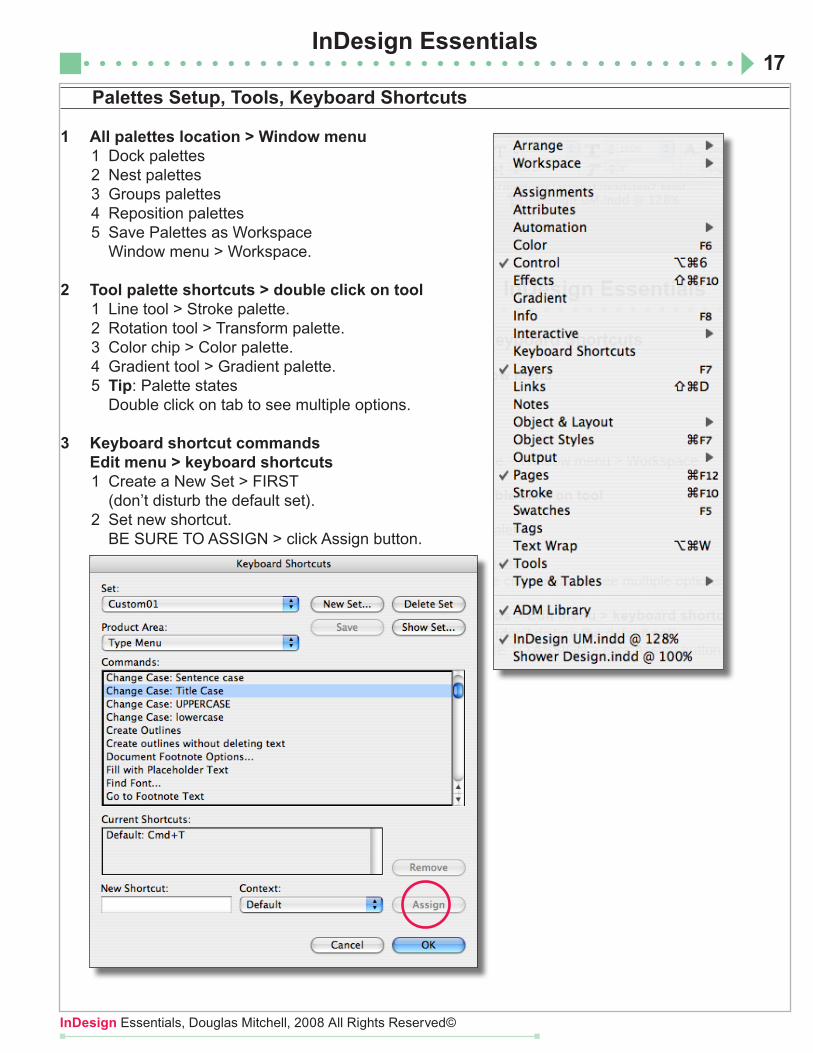
Palettes Setup, Tools, Keyboard Shortcuts
1 All palettes location > Window menu 1 Dock palettes 2 Nest palettes 3 Groups palettes 4 Reposition palettes 5 Save Palettes as Workspace Window menu > Workspace.
2 Tool palette shortcuts > double click on tool 1 Line tool > Stroke palette. 2 Rotation tool > Transform palette. 3 Color chip > Color palette. 4 Gradient tool > Gradient palette. 5 Tip: Palette states Double click on tab to see multiple options.
3 Keyboard shortcut commands Edit menu > keyboard shortcuts 1 Create a New Set > FIRST (don’t disturb the default set). 2 Set new shortcut. BE SURE TO ASSIGN > click Assign button.

InDesign Essentials, Douglas Mitchell, 2008 All Rights Reserved©
InDesign Essentials18
Links Management
1 Overview of Links palette 1 Open Links palette > Window menu > Links. 2 Placed objects are linked to files on hard drive. 3 Cannot move files from folder once linked. If files are moved from Linked folder link appears with Red Ball with question mark (it’s missing).
2 Linkproblemsshowuponopeningafile
3 Links Changed Shows a Yellow Caution Triangle 1 Caution icon means linked file was changed. 2 Changes to files are NOT automatically updated. 3 Select palette option, choose Update Link.
4 Changestooriginalfile 1 Changes are stored in auto Recover Folder moment to moment.
5 Placed text updates 1 Caution: if you update a outdated text link it will delete ALL current formatting. 2 Warning box comes up and tells you. 3 Can revert if accidently updated. 4 Usually best to embed text > takes little memory.
6 Embed links in palette option menu 1 Becomes permanent part of file. 2 This is good for text > small file size. 3 Increases file size by amount of file.
7 Copyandpastedtextisautomaticallyembeddedtofile
8 Edit original > inside application 1 Select file in Links palette > choose Edit original > open application.
9 Update link > palette menu 1 Graphics will be updated. 2 Shift select for multiples updates.

InDesign Essentials, Douglas Mitchell, 2008 All Rights Reserved©
InDesign Essentials19
Spell Checker
1 What can you spell check 1 Selected range of text. 2 All text in a story or a text frame (Story). 3 From insertion point to end of story (To End of Story). 4 All stories in a document (Document). 5 All stories in all open documents (All Documents).
2 What does spell check report 1 Highlights misspelled or unknown words. 2 Words typed twice. 3 Possible capitalization errors.
3 How to check spelling > Edit menu 1 Narrow the search, click inside a text frame. 2 Select text to check only that text. 3 Select one or more text frame with selection tool to check multiple stories. 4 Choose Search Mode Type from popup menu at bottom of dialogue box. 5 Standard controls > Start > Change > Change All > Ignore.

InDesign Essentials, Douglas Mitchell, 2008 All Rights Reserved©
InDesign Essentials20
Autocorrect Spelling
1 Autocorrect – add or remove words in dictionary 1 Choose InDesign menu > Preferences > Autocorrect. 2 Add button. Click Add button to enter a new Misspelled word combination. Tip: Copy/paste your misspelled word into Misspelled Word box.

InDesign Essentials, Douglas Mitchell, 2008 All Rights Reserved©
InDesign Essentials21
Library – Images, Art, Type, Objects, Pages
1 Libraries 1 Library is a collection elements by types. 2 Element types are defined by InDesign as: Images (any pixel files formats, tif, jpg, pct, etc.) EPS (vector artwork, including Illustrator file format). PDF (Adobe Acrobat files saved as PDF). Geometry (lines). Page (all objects on a single page). Text (text frames with format retained).
2 New Library 1 Choose File menu > New > Library. 2 Name and save (.indl suffix)
3 Open New Existing Library 1 Choose File menu > Open.
4 Adding objects or pages to Libraries 1 Click drag elements into library. 2 Automatically saves elements. 3 Photos, artwork elements are linked files. Linked files cannot be moved. 4 Group multiple elements using shift. Drag selected items to library. 5 Use Library Options menu to: Add item Add items on Page (all items) Add items on Page as Separate Objects
5 Info button 1 Select Item in Library, click Info Icon. 2 Tip: Double click on icon to get info box.
6 Search for items 1 Click on Binoculars Icon

InDesign Essentials, Douglas Mitchell, 2008 All Rights Reserved©
InDesign Essentials22
InDesign Help
1 Help features 1 Help is easy and handy, it is the manual and lots more. 2 Choose Help menu > InDesign Help.
2 Index 1 Use Key Words. 2 Listing alphabetically. 3 Plus means, open for more. 4 Minus means, close. 5 Arrows for next and previous.
3 Contents 1 Organized by Major topics.
4 Search 1 Use key word (color printing).
5 Bookmarks 1 Open Page on Web, then bookmark as web page.
6 Print button 1 Click print button upper right.

InDesign Essentials, Douglas Mitchell, 2008 All Rights Reserved©
InDesign Essentials23
Gradients – Create, Change, Manage
1 Create Gradients using Swatches Palettes – colors must be saved as swatches 1 Gradients are applied as stroke and/or fill. 2 Open Swatches palette > Window menu. 3 Create two saved colors or use existing color swatches.
2 New Gradient 1 Must be two saved colors in swatches palettes. 2 Select one color marker before selecting a Stop Color. 3 Choose first Stop Color as swatches, pick a swatch color. 4 Choose second Stop Color as swatches, pick a swatch color. If CMYK color is used, all Stop Colors should be CMYK. If Spot color is used, all Stop Colors should be Spot Color. Do not mix color types (no Spot to CMYK). 5 Tip: Trumatch colors found under Color Mode when creating a new swatch is a great choice for creating CMYK gradients.

InDesign Essentials, Douglas Mitchell, 2008 All Rights Reserved©
InDesign Essentials24
Typography
1 Six steps typography 1 Set initial type size visually. 2 Set initial leading > space between lines. 3 Set initial tracking > space between words. 4 Tweak word spacing using kerning > space between letters, numbers, pairs. 5 Tweak word sizing by horizontal or vertical scale. 6 Special characters and drop caps.
2 Open Characters & Paragraph palettes > com/ctrl T
3 Turn on > Show Hidden Characters > Type menu 1 See word spaces, paragraphs, soft paragraphs, tabs
4 Type size 1 Commands > make typography visual joy 2 Shift + com/ctrl > greater than and less than signs 3 Default increase by 2 points 4 Preferences > Increments change to 1 point 5 Select palette > use arrows 6 Shift arrow = 10 graduations
Leading
1 Base line 1 Based on distance between baseline on top to baseline on bottom. 2 Baseline formed at bottom of X-height. 3 Auto leading > 120% > size plus 20%. 4 Manual leading (also called vertical spacing). 5 Using commands > select type > opt/alt up/down arrows keys.

InDesign Essentials, Douglas Mitchell, 2008 All Rights Reserved©
InDesign Essentials25
Typography (continued)
1 Optical margin alignment 1 Aligns punctuation marks to offset margin and look more aligned. Quotes, dashes, commas. 2 Type menu > Story > Optical alignment on > key point size.
2 Horizontal spacing
3 Tracking 1 Adding equal distance between letters and words. 2 Using commands > select type > opt/alt left/right arrows keys.
4 Kerning 1 Add space between two pairs > letters, numbers, characters, combos. 2 Em space > point size squared. 3 Fraction of that space > 1/50th default. 4 Change > Preferences > increments > 1/100th. 5 Metric kerning > you do it > wider than optic. 6 Optical kerning > InDesign looks at best option. 7 Hanging punctuation.
4 Scaling type
5 Horizontal scaling 1 Scale by percent > 150% Head. 2 All characters receive amount. 3 Select palette > use arrows. 4 Shift arrow = 10 graduations.
6 Vertical scaling 1 Scale by percent > 130%.

InDesign Essentials, Douglas Mitchell, 2008 All Rights Reserved©
InDesign Essentials26
Text Threading
1 TextThreadingdefined 1 Fancy way of saying, flowing of text from one text frame to another. 2 Text can flow on one page only or from page to page.
2 Create text frame columns 1 Layout menu > margins & columns.
3 Place text > File menu > Place
4 Place text options 1 Retain format. 2 Convert quotes. 3 Show import options > for more detail.
5 Place icon symbols 1 Text icon > seen first. 2 Text icon changes to white near guide. 3 Flows margin to margin.
6 How text threading works 1 Flow text from one frame to another. 2 Toggle between text tool selection arrow > com/ctrl. 3 Red cross in the outport means more text in frame. 4 Selection arrow > click red cross > text thread icon appears. 5 Click drag to form new frame size or click on existing frame. 6 Once text flowed > see blue direction arrow inside inport.
7 Semi-Autotextflow>savetime 1 Opt/alt for semi-auto flow.
8 Autotextflow>flowalltextautomatically 1 shift key for auto flow. 2 Text flows to current page> opens new pages as needed.
9 Show > text threads 1 Text threads are connecting lines between frames. 2 View menu > hide and show text threads.
(continued)

InDesign Essentials, Douglas Mitchell, 2008 All Rights Reserved©
InDesign Essentials27
Text Threading – continued
10 Flow text from page to page 1 Navigator palette > Window menu > or use Hand tool. 2 Select Outport > draw new frame.
11 Managing threaded text frames 1 Delete a threaded text frame. Select text frame > delete > text flows backward or forward, nothing lost.
2 Copy and paste a frame to another page > select tool. Copies ONLY visible contents of selected frame. Copy ALL content from first frame > go to first frame > copy contents.
3 Copy text frame > select > Opt/alt drag > copies. 4 Cut/copy, then paste that frame to another page. Use select tool. IMPORTANT: Cut command ONLY takes the visible contents of selected frame. It does not cut hidden text below frame.

InDesign Essentials, Douglas Mitchell, 2008 All Rights Reserved©
InDesign Essentials28
Master Pages
1 What is a Master Page > Pages palette (top section above line) 1 Master page acts like a background under any document page (saran wrap). 2 Used Master Page for repeated objects on many pages such as: page numbers, borders, backgrounds, logos, artwork, headlines, text frames. 3 Master Page A is default > Pages palette. Master Page A is APPLIED to all NEW pages automatically. Any page can change it’s Master or have NO Master. 4 Unlimited numbers of master pages can be created.
2 Draw Elements on Master Pages > frames 1 Draw rectangle > it is initially unassigned. 2 Assign frame > as text frame. 3 Assign frame > object menu > content > text. 4 Add type > add EPS logo file > to master page.
3 Apply Master Pages 1 Drag master page onto page any page. 2 Palette Option menu > select page > select master > apply master to pages. 3 Show and Hide > master page items > view menu. 4 NONE > drag none to a page none icon.
4 Overriding Master Page Items (IMPORTANT) 1 Select master page item. 2 Shift + command/control > selection tool > on master page item. 3 Still master page item after change > will update basic changes. 4 Remove Overrides on a page. 5 Remove Selected Override > palette menu > move logo > remove override. 6 Remove All Local Overrides > make sure NO selections.
5 Create new Master Pages 1 Copy > master page A > drag to icon or duplicate under menu. 2 Name it > master options > palette options. 3 New master page B > palette options menu. 4 Save existing page as master. Select page > save as master > palette options.
6 Change Master Page > from another master page 1 Drag desired Master Page onto the receiving page, it automatically changes.

InDesign Essentials, Douglas Mitchell, 2008 All Rights Reserved©
InDesign Essentials29
Insert Special Characters
1 Insert Special Characters 1 Insert Special Character > Type menu. 2 Insert Special Character > contact sensitive menus > control/right mouse.
2 See what’s going on inside paragraph 1 Show Hidden Characters > Type menu.
3 Insert Special Character > Type menu 1 Insert cursor at desired point. 2 Choose Type menu > Insert Special Character.
4 Space between characters 1 Regular space with the space bar. 2 Em space > point size squared > think cap letter M. 3 En space > 1/2 Em space. 4 Thin Space. 5 Hair Space > smallest space.
5 Insertspaceonthefly 1 Contact Sensitive menu > ctrl/right mouse. 2 Measurements of space. 3 Copy/paste three to see comparisons.
6 Glyphs palette 1 Choose Window > Type & Tables > Glyphs. 2 Insert cursor.
7 Auto page numbers on master pages 1 Draw a frame > type: Page (optional) 2 Insert Special Character > Markers > Current Page Number 3 Facing pages need auto pages on left and right.

InDesign Essentials, Douglas Mitchell, 2008 All Rights Reserved©
InDesign Essentials30
Glyphs Palette – World of Icons, Symbols & More from Any Font
1 Glyphs palette 1 Choose Window > Type & Tables > Glyphs or Type menu > Glyphs. 2 Insert cursor in text frame. 3 Select the Font at the bottom. 4 Single click the larger or smaller icons to view. 5 Double click on Glyph character to enter into text frame. 6 Backspace to delete character from text frame.

InDesign Essentials, Douglas Mitchell, 2008 All Rights Reserved©
InDesign Essentials31
Ellipse Text Frame
1 Ellipse tool > drag > shift to constrain 1 Transform palette > double click on rotation tool. 2 Stroke and fill > double click on line tool for palette. 3 Apply Colors > swatches palettes.
Text Frame Options
1 Text frame options > Object menu 1 Columns 2 Inset Spacing 3 Vertical Justification

InDesign Essentials, Douglas Mitchell, 2008 All Rights Reserved©
InDesign Essentials32
Pen Tool
1 How to draw with the Pen Tool 1 Pen tool creates vector frames, which can contain text or graphics.
2 Learn to draw with Pen Tool 1 Set up Pen tool for drawing. 2 Weight > dip pen in ink first to stroke > double click on line tool. 3 Color > F5 for color swatches. 4 Guides > com/ctrl R > rulers > lock guides > view menu.
3 Quick review straight lines 1 Click > set anchor point > shift > constrain to straight line. 2 Anchor points support segments > segments create paths. 3 Select tool > move > resize. 4 Add graphic at start and/or end of line > stroke palette. 5 Change line dimensions > direct select tool > transform palette.
4 Selection process 1 Selection arrow> it’s whole. 2 Direct Selection arrow > it’s parts.
5 Diagonal line 1 Paths are open or closed.
6 Learn to draw curves 1 Bell Shape Template. 2 Switching Controls Template. 3 Maze Practice Template

InDesign Essentials, Douglas Mitchell, 2008 All Rights Reserved©
InDesign Essentials33
Auto Page Numbers & Sections
1 Apply Auto Page Numbers to ALL pages > use Master Pages 1 Go to a Master Page > Window menu > Pages. 2 Draw text frame to contain page number and description. 3 Apply Auto Page Numbering (frame must be on a Master Page). Click inside the new text frame with the Type tool. Type the word – Page and add one space. Choose > Type > Insert Special Character > Auto Page Number.
2 Numbering&SectionoptionstodefinemultiplesectionsonMasterPage 1 A Section defines a range of page numbers and the number style on a Master Page. 2 Section page numbers are auto numbering of page styles on a master page frame.
3 DefaultSectionMarkerisappliedtofirstpage(seetriangleicon) 1 Double click on triangle to open or go to palette options. 2 Default Style for numbers: 1, 2, 3, 4 (use pop up to choose other styles). 3 Default Page Numbering Starts at 1. 4 Sections Styles > show up in Pages palette by default. Change Page Style to Absolute Numbering > Preferences > General.
4 Section Marker – create a section label 1 must have text frame long enough to contain text label. 2 Must Insert > section label > tells it to hold the section marker. 3 Contact sensitive menu > insert special character > section. 4 Start section. 5 Insert section marker > non master page applied. Text frame big enough. Insert > section marker > special character. Insert > auto page number > special character.
5 To Turn off section numbers 1 Open Options > Uncheck > Start Section.

InDesign Essentials, Douglas Mitchell, 2008 All Rights Reserved©
InDesign Essentials34
Star Burst
1 Polygon Tool > creates a text frame 1 Select polygon tool. Double click on tool for options. Opt/Alt click on page for dialogue box. 2 Set stroke/fill colors. 3 Set stroke weight. 4 Set Miter Limit.
2 Transform palette 1 Scale tool > double click to size. 2 Set reference point in options bar.
3 Text > inside polygon 1 Text tool > little tricky inside polygon. 2 Text frame options > leading > 1st baseline. 3 Center align. 4 Vertical scale (150%). 5 Edit vectors > zoom > direct selection.

InDesign Essentials, Douglas Mitchell, 2008 All Rights Reserved©
InDesign Essentials35
Text Wrap Palette
1 Wrap around object shape 1 Clipping Path applied to the placed image from Photoshop. 2 Text in back > graphic in front > select graphic. 3 Open > Text Wrap Palette > Object menu. 4 Select > Wrap Around Object Shape. 5 Set > Inset values > .05. 6 Adjust anchor points if needed to tweak.
2 Special effect > invert 1 Wrap within the shape of object. 2 Resize text frame > OVER object. 3 Choose > Wrap Around Object Shape > then click Invert option on.
3 Jump object
4 Jump to next column
5 Ignore text wrap > don’t wrap 1 Select text frame 2 Object menu > Frame Options > bottom ignore

InDesign Essentials, Douglas Mitchell, 2008 All Rights Reserved©
InDesign Essentials36
Drop Caps
1 Drop Caps via Paragraph palette 1 Easiest way via paragraph styles. 2 Paragraph palette > type menu > paragraph. 3 Turn on > Show Hidden Characters > Type menu.
2 Paragraph style > easiest to apply > mouse click 1 Paragraph style > Type menu > NO selections. 2 New paragraph style > name it > Drop Caps.
3 Other paragraph settings 1 Hyphenation > Off. 2 Basic character formats. 3 Advanced character formats.
4 Drop Caps 1 Set > Drop Caps. 2 Composer > allows line break control for hyphens. 3 Number lines (0-25). 4 Number characters (0-150). 5 Apply Settings > Preview test.
5 Kern > zoom to see 1 Adjust space between caps and first words. 2 Insert cursor > Select 100. 3 Commands > Opt/alt right arrow > Show palette.

InDesign Essentials, Douglas Mitchell, 2008 All Rights Reserved©
InDesign Essentials37
TOC Example – Cover Tea Company
2007 Premium Tea Catalog
Welcome to the
EXPEDITION TEA COMPANY™Take an extraordinary adventure into the world of tea. EXPEDITION TEA COMPANY™ carries an extensive array of teas from all the major tea growing regions with some of the very best these estates have to o�er. Choose from our selection of teas, gift collections, teapots, or learn how to make your tea drinking experience more enjoyable.
Loose Leaf TeasBrowse our wide selection of premium loose leaf teas from around the world including black, green, oolong, white, rooibos and chai. Try a few samples or stock up on your favorite.
TeapotsView our collection of teapots, chosen to satisfy every taste including ceramic, cast-iron Tetsubin, stainless, silver-plate, Kyusu, and more
Tea Gift CollectionsOur tea collections are packaged in golden tins within a felt-lined keepsake wooden box with a leather handle and brass latches. Give it as a gift to your favorite tea lover or to yourself!
Tea AccessoriesTea timers, tea bags, tea strainers, scoops and a variety of other tea things to make your tea time absolutely perfect.
EXPEDITION TEA COMPANY™[email protected] phone: (206) 463-9292 fax: (206) 299-9165
InDesign Essentials, Douglas Mitchell, 2008 All Rights Reserved©
InDesign Essentials38
TOC Example – Teapots Page
Page 12 E T C™
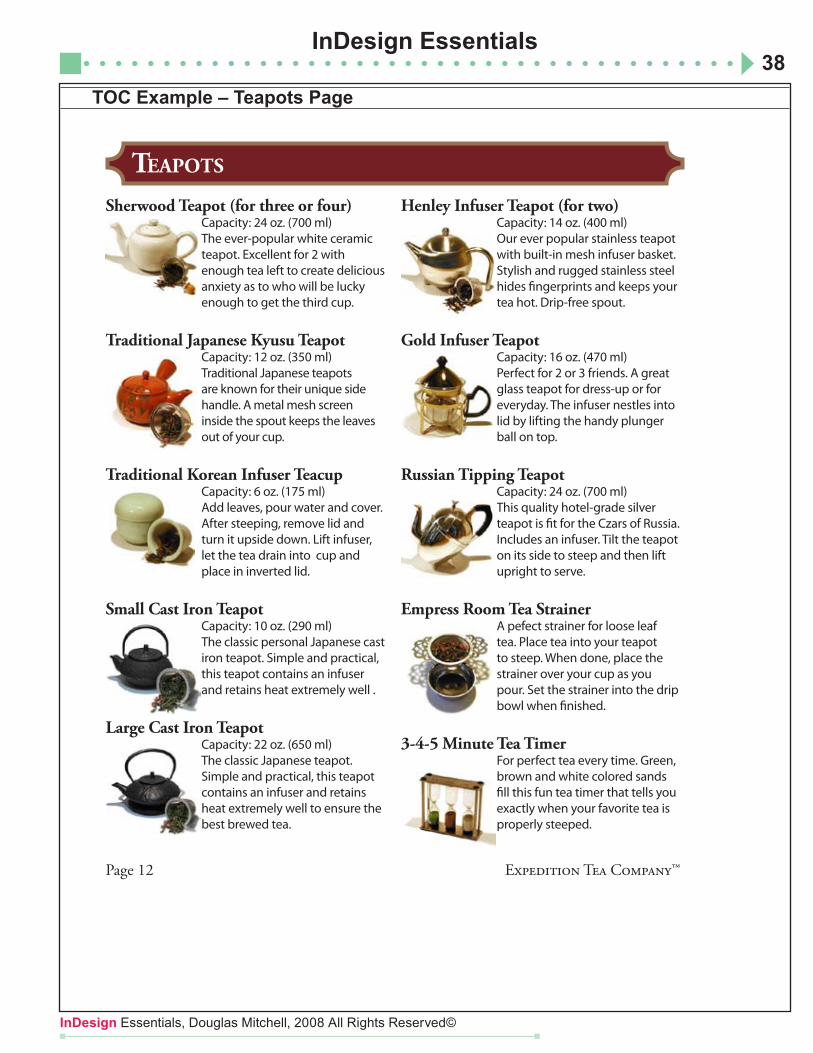
Sherwood Teapot (for three or four)Capacity: 24 oz. (700 ml)The ever-popular white ceramic teapot. Excellent for 2 with enough tea left to create delicious anxiety as to who will be lucky enough to get the third cup.
Traditional Japanese Kyusu Teapot Capacity: 12 oz. (350 ml) Traditional Japanese teapots are known for their unique side handle. A metal mesh screen inside the spout keeps the leaves out of your cup.
Traditional Korean Infuser TeacupCapacity: 6 oz. (175 ml)Add leaves, pour water and cover. After steeping, remove lid and turn it upside down. Lift infuser, let the tea drain into cup and place in inverted lid.
Small Cast Iron TeapotCapacity: 10 oz. (290 ml) The classic personal Japanese cast iron teapot. Simple and practical, this teapot contains an infuser and retains heat extremely well .
Large Cast Iron TeapotCapacity: 22 oz. (650 ml) The classic Japanese teapot. Simple and practical, this teapot contains an infuser and retains heat extremely well to ensure the best brewed tea.
Henley Infuser Teapot (for two)Capacity: 14 oz. (400 ml)Our ever popular stainless teapot with built-in mesh infuser basket. Stylish and rugged stainless steel hides �ngerprints and keeps your tea hot. Drip-free spout.
Gold Infuser TeapotCapacity: 16 oz. (470 ml)Perfect for 2 or 3 friends. A great glass teapot for dress-up or for everyday. The infuser nestles into lid by lifting the handy plunger ball on top.
Russian Tipping Teapot Capacity: 24 oz. (700 ml)This quality hotel-grade silver teapot is �t for the Czars of Russia. Includes an infuser. Tilt the teapot on its side to steep and then lift upright to serve.
Empress Room Tea StrainerA pefect strainer for loose leaf tea. Place tea into your teapot to steep. When done, place the strainer over your cup as you pour. Set the strainer into the drip bowl when �nished.
3-4-5 Minute Tea TimerFor perfect tea every time. Green, brown and white colored sands �ll this fun tea timer that tells you exactly when your favorite tea is properly steeped.
TEAPOTS

InDesign Essentials, Douglas Mitchell, 2008 All Rights Reserved©
InDesign Essentials39
TOC Example – Information Page: Head & Sub-Heads to TOC
E T C™ Page 13
About USEXPEDITION TEA COMPANY™ was started by a small group of folks who not only love tea, but who are also fascinated by the regional di�erences in teas, teapots, accessories and the rituals that surrounded this great beverage.
More than Just the TeaWe are committed to providing you not only with the best teas, but also to infuse your life with the story behind the tea. This might include information about the history, health bene�ts, rituals, accessories, environmental in�uence as well as ways to improve not only your own experience with tea but that of others as well. Tea is more than just a great beverage.
Ask UsOur sta� includes a professionally certi�ed Grade Three Tea Specialist (Specialty Tea Institute). We love to suggest teas based on what you currently like to help expand your options. Or tell you the history of a particular teapot. And we’ll certainly be drinking a cup of one of our favorites while we do the research.
Contacting USIf you have any questions about this privacy statement, the practices of this site, or your dealings with this website, you can contact:
EXPEDITION TEA COMPANY™Customer ServiceP.O. Box 13428Burton, WA 98013phone: (206) 463-9292fax: (206) [email protected]
Shipping InformationWe ship our products via USPS Priority Mail. Shipping rates are as follows:Free shipping for orders $75 and overFor orders up to $9.99 . . . . . . . . . . . . . . . . . . . . . $3.85For orders up to $39.99 . . . . . . . . . . . . . . . . . . . . $6.85For orders up to $74.99 . . . . . . . . . . . . . . . . . . . $10.85
Orders are typically shipped the next day, ensuring a prompt and timely delivery of all your packages.
Delivery TimeWe ship orders to the forty-eight contiguous US states via the US Priority Mail. Customers will usually receive their order in 2-5 days. We do not o�er next day or 2-day shipping at the moment. We will have these options available in the near future. We apologize for any inconvenience this may cause.
Free ShippingOrders of $75 or more addressed to a physical location within the United States qualify for free Priority Mail shipping.
International OrdersWe can ship tea orders to most countries. Delivery outside of the United States takes 1 to 6 weeks to arrive. Email us for shipping and pricing details at [email protected].
Return PolicyWe want you to be happy with your purchase. If for any reason you are not, please e-mail us at [email protected] to arrange for a return and full refund of your purchase.
We will give you a full refund for unopened tea or exchange it. We will deduct the shipping amount if applicable.
INFORMATION
InDesign Essentials, Douglas Mitchell, 2008 All Rights Reserved©
InDesign Essentials40
Table of Contents – TOC
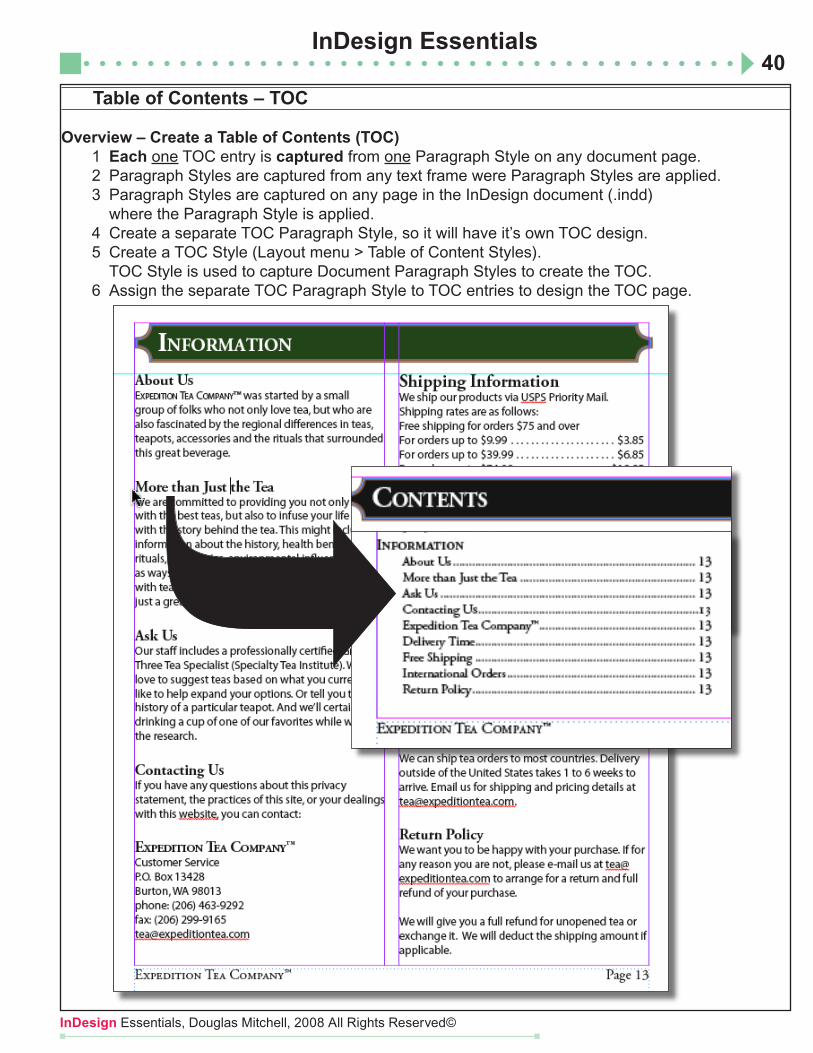
Overview – Create a Table of Contents (TOC) 1 Each one TOC entry is captured from one Paragraph Style on any document page. 2 Paragraph Styles are captured from any text frame were Paragraph Styles are applied. 3 Paragraph Styles are captured on any page in the InDesign document (.indd) where the Paragraph Style is applied. 4 Create a separate TOC Paragraph Style, so it will have it’s own TOC design. 5 Create a TOC Style (Layout menu > Table of Content Styles). TOC Style is used to capture Document Paragraph Styles to create the TOC. 6 Assign the separate TOC Paragraph Style to TOC entries to design the TOC page.

InDesign Essentials, Douglas Mitchell, 2008 All Rights Reserved©
InDesign Essentials41
Table of Contents – TOC (continued)
1 Create Paragraph Styles – for Document 1 Create Paragraph Styles for the document from Paragraph Styles Palette 2 Common names: Title, Head, Subhead, Body, Caption. 3 Specific names: Master Head (for Master Pages).

InDesign Essentials, Douglas Mitchell, 2008 All Rights Reserved©
InDesign Essentials42
Table of Contents – TOC (continued)
2 Apply Paragraph Styles to Document Paragraphs 1 IMPORTANT: ensure that ALL paragraphs, within the document, have an applied paragraph style – be consistent (example: head, subhead, body). Including: return key, returns. 2 Apply Paragraph Styles to document paragraphs from Paragraph Styles Palette. 3 Apply Style to (1) paragraph: Type tool – click ANYWHERE within one paragraph, then choose the style from the Paragraph Styles palette. 4 Apply Style to multiple paragraphs: Type tool – drag select any number of paragraphs, then choose the style from the Paragraph Styles palette.
3 Create Paragraph Styles – for Table of Contents (TOC) 1 Duplicate the existing Paragraph Style, drag to new document icon bottom of palette. 2 Keep the name, but add TOC as a suffix (ex: Body, Body TOC). 3 Naming makes it easy to use the right styles to create the TOC. 4 Change the look and feel easily, by changing any of the style options.

InDesign Essentials, Douglas Mitchell, 2008 All Rights Reserved©
InDesign Essentials43
Table of Contents – TOC (continued)4 Create a Table of Contents Style 1 Layout menu > Table of Contents Styles. 2 TOC Style: Type a name. 3 Title: Blank, use a custom frame. 4 MOST IMPORTANT > Include Paragraph Styles: Other Styles: select the FIRST Paragraph Style to appear on TOC, click Add button. TOC will find (capture) ALL occurrences of each listed Paragraph Style, to place into TOC. Other Styles: select the SECOND Paragraph Style to appear on TOC, click Add button. 5 Include Paragraph Styles: Select entry, choose the Entry Style from menu. Menu will list TOC Paragraph Styles. This will design the look and feel of TOC text. 6 Page Number: choose after entry, assign leader dot to tab in Paragraph Style.

InDesign Essentials, Douglas Mitchell, 2008 All Rights Reserved©
InDesign Essentials44
Table of Contents – TOC (continued)
5 Make Changes – Document Paragraph Styles 1 Open any Paragraph Style and make a change. 2 Changes effect ALL paragraphs that are controlled by that Paragraph Style.
6 Make Changes – TOC Paragraph Styles 1 IMPORTANT: click Type tool WITHIN any paragraph on the TOC page. 2 Open the Paragraph Style from the palette, double click, then make changes. 3 Changes effect ALL paragraphs that are controlled that TOC Paragraph Style. 4 Turn the Preview check box Off/On or click into another box to Preview the changes.

InDesign Essentials, Douglas Mitchell, 2008 All Rights Reserved©
InDesign Essentials45
Tables – Creation & Editing
1 Table overview – creating & editing tables 1 Table are constructed as a unit inside a text frame. 2 Select whole or parts of a table to make edits: add color, change dimensions, delete, change, merge.
2 Table parts (Table Construction) 1 Text Frame Must create a table inside a text frame. 2 Table Construction Columns, rows, cells, headers, footers. Column strokes/fills. Row strokes/fills. Cells strokes/fills (depends on selection).
3 Select parts of table 1 Select WHOLE table. Click most upper left cell, see angle arrow icon. 2 Select PARTS of table. Click on EDGE of cell, see straight arrow icon. Drag straight arrow to select multiple cells (and columns or rows). 3 Table Borders 4 Cells (select one cell) 5 Cells (select multiple cells).
4 Drawatextframe—alltablesworkinsideaframe 1 Draw a text frame rectangle. 2 IMPORTANT: ALL tables START inside a text FRAME.
5 Select text tool, click inside text frame
6 Table menu > Insert table
7 Merge multiple cells into ONE. 1 Select cells > Table menu > Merge. 2 Use for Header or Title.
8 Cell font styles – options bar 1 Change like text styles, select text add styles, use Options Bar
9 Merge Cells 1 Merge Cells takes two or more cells in the same ROW and converts them to ONE cell. This is useful to create centered titles. 2 NOTE: Select ONE row at a time to merge cells in that line ONLY. Otherwise, two or more selected cells will become ONE.