ait ? i iy basic instruction =>
TRANSCRIPT
é
Ye ee es
is
Kk MLC. piv It | SY of -
), ce 1 ”
oe ES i ie Me iis en tel ade hy t Wi : ‘ Vow Aa \ ait ? i iy
n , yw i i ,
aera
i j Mir
ee idan prcap ty, | PPY
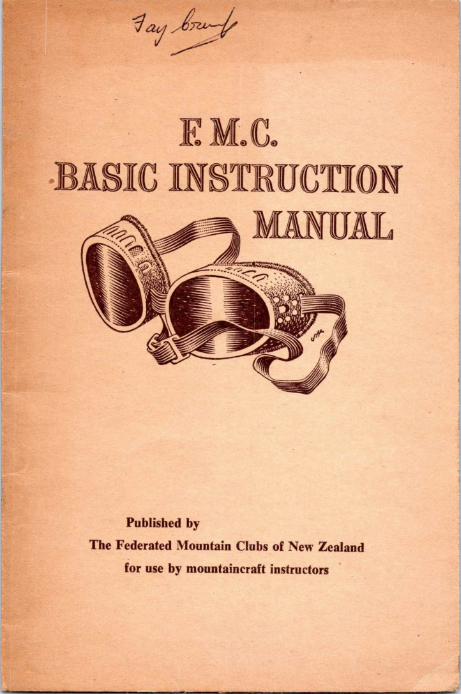
BASIC INSTRUCTION => MANUAL i
jj ji j
* aS -
Published by
The Federated Mountain Clubs of New Zealand
for use by mountaincraft instructors

CONTENTS
tirocschon =e
Section One
Equipment _.....
Rock Climbing
Snow Climbing __.....
Ice Climbing __......
Glacier Travel _.....
Section Two
Suggested Syllabus
Definitions _........
Instruction Aids
Bibliography __ ......
trees
weeree
seeeee
weeeee
eereee
seeeee
rere
eeewee
erence
eeeeee
weeeee
11
18
20
26
31
31
31
~
72 ———ooooOovVvOOVvc—_—_—.Emlhle_ nn EEO EE EOE EE EEE

F.M.C. Basic Mountaincraft Manual for Instructors
1963 INTRODUCTION
In November 1961, the Federated Mountain Clubs organ- ised a refresher course for club instructors at Mount Ruapehu. Mountaineers from both North and South Islands attended and the main endeavour was to ascertain that the soundest possible techniques were being demonstrated throughout the country. Though much was achieved at this first meeting, it was
realised that considerable doubt still existed in the minds of many over certain aspects of technique and it became obvious that a lot could be gained from further discussion, testing and comparisons.
Accordingly, at Easter 1962 and in February 1963, two further meetings were held at which some of the country’s best available instructors came closer to unanimity. These meetings were supplemented by the circulation of instruction notes to the acknowledged authorities and in this manner, the expanded notes herein were formed.
It must be stressed that trainees should be made to prac- tise, practise, practise. Belays must be tested under increasingly severe loads so that the correct reactions become automatic. Again and again it has been proved in the preparation of this manual that the importance of realis- tic practise cannot be over emphasised to instructors and trainees alike. This applies in particular to the section on crevasse rescuing where the written explanation might sound complicated, but if the ropes and slings are set out in their positions inside a hut and then in a crevasse the purpose of each detail becomes clearer and in a real rescue the sequence of events is smooth and efficient.
Although it is felt these are the most acceptable techniques for the instruction of novice climbers (and others) at the pre- sent, better methods will undoubtedly evolve with the passage
2

of time and with the introduction of improved equipment. For this reason persons reading this manual are urged to note the date of publication and be fully aware of the danger of teaching out of date methods.
It must be emphasized that real competence can only be gained from experience. Instruction classes can give valuable advice, stimulate interest, and teach the technique of the sport. Procedures can be explained which will eliminate much of the laborious trial and error method. The wisdom of a graduated approach can also be suggested—but trainees should con- stantly be reminded that the essential requirement for com- petence is experience—gained from trips to high and low hills, under all sorts of snow, ice, rock and weather condi- tions, experience in camps, valley travel, in rivers, and by association with others who frequent the hills. Good instruc- tion can provide a sound foundation and point the way, the rest is over to the man himself.
Acknowledgement
As explained in the Introduction these notes arise from re- fresher instructor courses which have been organised by F.M.C. The following have been responsible for these tech- nical instruction notes. Wynne Croll, who produced the original draft, John Harrison for drawings, and L. D. (Bill) Bridge for the organisation side of F.M.C. training.
John Harrison, Norman Hardie, Wynne Croll, Arnold Heine, Phil Gardiner, Wally Romanes, Gordon Hassell and Bill Bridge checked, corrected and made suggestions which were included in this final text.
Jack Ede, Graham McCallum, Doug. Ball, Earle Riddi- ford, Brian Hearfield, Peter Farrell, Jim Finch, Tony Nolan and many others assisted by advice during training week-ends.
Thanks are also expressed to the Hon. Minister of Internal Affairs for financial assistance, to Norman Hardie for typing, to Dr W. S. Simpson for information on nylon rope, to Rua- pehu Ski Club, N.Z.A.C., and Tararua Club for the use of huts and lodges used on training and demonstration week- ends.
Section One The detailed notes in this section are not intended to give
complete coverage of all aspects of climbing techniques such as holds, step cutting, etc. This information is already well covered in the literature listed in the bibliography. Further no mention is made of warning calls or commands but emphasis is made that these should be short clear and to the point.
This section has been written to suit New Zealand require- ments and is designed for the modern climber who uses nylon ropes, karabiners and rubber soled boots. These items of equipment and others have contributed to great advances in climbing achievements, but for the safe and efficient use of these modern aids our techniques have now been brought up to date.
EQUIPMENT
Gloves
Mittens are best for the well known reason of warmth under extreme conditions. In the event of holding a fall, par- ticularly by the dynamic principle, it is not uncommon to burn the hand to some extent. This is usually due to taking too firm a grip of the rope. Mittens or gloves should be worn for all belaying.
Waistloop
The long length of manilla line of about 3/16 inch dia- meter wrapped five or so times round the waist is favoured for more than one reason. Certainly it is more comfortable in the event of a fall . It is good practice to make one pass from the front over a shoulder, under the loops at the rear and back over the other shoulder, tying on at the front. This is especially desirable when travelling in crevasse coun- try. The karabiner must be clipped over all the body loop cords and thus can slide round on the loops. (The single end- less loop has been known to cause a non-locking karabiner to open under a fall.) The continuous length is readily adjust-
able to fit comfortably over any variety of clothing. It is made of manilla because in an anchored waist belay the live rope
4
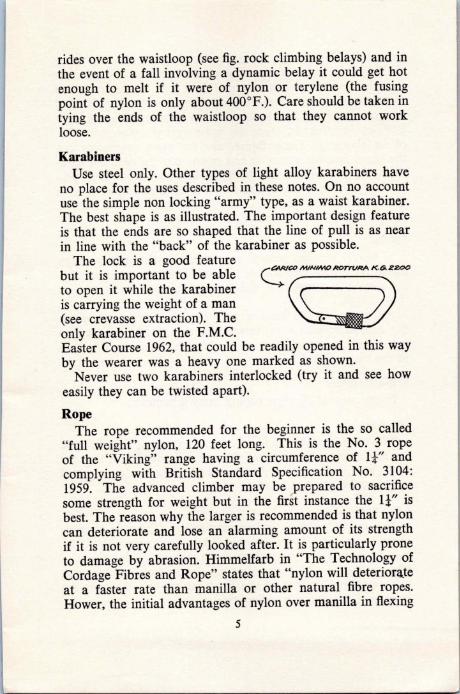
rides over the waistloop (see fig. rock climbing belays) and in
the event of a fall involving a dynamic belay it could get hot
enough to melt if it were of nylon or terylene (the fusing
point of nylon is only about 400°F.). Care should be taken in
tying the ends of the waistloop so that they cannot work
loose.
Karabiners
Use steel only. Other types of light alloy karabiners have no place for the uses described in these notes. On no account use the simple non locking “army” type, as a waist karabiner. The best shape is as illustrated. The important design feature is that the ends are so shaped that the line of pull is as near in line with the “back” of the karabiner as possible.
The lock is a good feature but it is important to be able to open it while the karabiner is carrying the weight of a man (see crevasse extraction). The only karabiner on the F.M.C. Easter Course 1962, that could be readily opened in this way
by the wearer was a heavy one marked as shown.
Never use two karabiners interlocked (try it and see how
easily they can be twisted apart).
Gags: MIMMO ROTTURA K.G. ZZO0
Rope
The rope recommended for the beginner is the so called
“full weight” nylon, 120 feet long. This is the No. 3 rope
of the “Viking” range having a circumference of 13” and
complying with British Standard Specification No. 3104:
1959. The advanced climber may be prepared to sacrifice
some strength for weight but in the first instance the 1}” is
best. The reason why the larger is recommended is that nylon
can deteriorate and lose an alarming amount of its strength
if it is not very carefully looked after. It is particularly prone
to damage by abrasion. Himmelfarb in “The Technology of
Cordage Fibres and Rope” states that “nylon will deteriorate
at a faster rate than manilla or other natural fibre ropes.
Hower, the initial advantages of nylon over manilla in flexing
5

as well as in strength are so great that, despite the more rapid rate of deterioration, nylon retains its advantage over manilla rope or any other natural fibre rope.” In an exposure test to weather in a sub-tropical climate nylon lost 7 1% of its strength in the first six months whereas manilla lost only 32% of its strength. Over the same period nylon lost 37% of its elasticity. These figures are for gross exposures but the trend is quite alarming and points out the need for care- ful storage. Nylon should be stored in a cool dark place, pre- ferably dry. In a storage test over twenty-one months in a ship’s hold nylon showed no loss of strength whereas manilla suffered an estimated strength loss of 13%.
Pitons
It should become general practice for each party to carry pitons. For general climbing the following are recommended per rope. Two rock (one short and thin, one longer), two ice (both long). 7
All pitons should have a hole in the body of the piton big enough to take a karabiner direct. A smaller hole carry- ing a steel ring is not as satisfactory because the ring gets in the way while driving.
Piton Hammer
Every rope of climbers should carry a hammer.
Ice Axe
The most experienced ice climbers have rarely felt the need for more than a medium weight axe. It is important that the shaft be tested regularly by standing on the shaft supported at the spike and the head.
Crampons
Ten or 12 pointers are recommended. There is a move towards the use of 12 pointers. Any crampons should be bought with care, particularly with regard to length. The front points should not project too far in front of the boot, neither should the toe of the boot project too far over the front vertical points in either style.
6
Slings
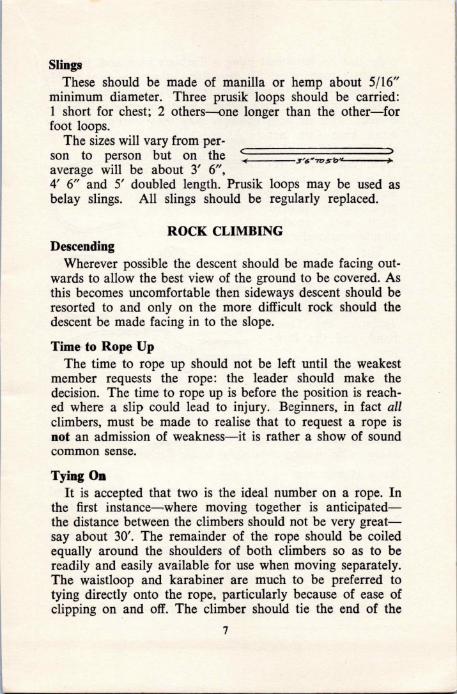
These should be made of manilla or hemp about 5/16” minimum diameter. Three prusik loops should be carried: 1 short for chest; 2 others—one longer than the other—for foot loops.
The sizes will vary from per- son to person but on the average will be about 3’ 6”, 4’ 6” and 5’ doubled length. Prusik loops may be used as belay slings. All slings should be regularly replaced.
TS EE EE SE OS eS ENTS 65°05 8 OO
ROCK CLIMBING Descending
Wherever possible the descent should be made facing out- wards to allow the best view of the ground to be covered. As this becomes uncomfortable then sideways descent should be resorted to and only on the more difficult rock should the descent be made facing in to the slope.
Time to Rope Up
The time to rope up should not be left until the weakest member requests the rope: the leader should make the decision. The time to rope up is before the position is reach- ed where a slip could lead to injury. Beginners, in fact all climbers, must be made to realise that to request a rope is not an admission of weakness—it is rather a show of sound common sense.
Tying On
It is accepted that two is the ideal number on a rope. In the first instance—where moving together is anticipated— the distance between the climbers should not be very great— say about 30’. The remainder of the rope should be coiled equally around the shoulders of both climbers so as to be readily and easily available for use when moving separately. The waistloop and karabiner are much to be preferred to tying directly onto the rope, particularly because of ease of clipping on and off. The climber should tie the end of the
7
eee... Sawa

rope into his karabiner using a Tarbuck knot and, winding the spare rope round his shoulders, attach the rope to his karabiner at the required point using an overhand knot. When moving separately, greater length of rope will be re- quired. One or both climbers may then unclip the over- hand knot (but not the Tarbuck), unwind rope, and either re- main tied on to the end of the rope or retie at the desired point with another simple overhand knot.
The basic knots taught for roping up should be simple and few in number. Those recommended are the Tarbuck, the Over- hand, and the Bow- line.
It would avoid con- fusion if these knots only were taught to beginners for tying on
the rope. Of the three the one most used in the situation where a fall could occur (when climbers would be more likely to be moving separately) is the Tarbuck.
Rope Management
As stated under “tying on,” spare rope should be wound round the shoulders. This should be done more often than has been taught in the past so that climbers moving together can keep close but need not be hindered by a lot of rope held in the hand. Only about three or four folds should be held. Folds have defiinite advantage over coils, the most notable being that in time of emergency properly managed folds can be let out in a controlled manner without any change of grip, thus providing a useful stopping force (see
8
9

belaying). The natural reaction when a fall occurs is to hold
on to the folds or coils in the hand. If coils are held this can
easily result in a coil snagging round the fingers.
Running Belays
A sling and karabiner placed over a projecting rock pro-
vides a good running belay giving a useful protection to the
leader. The live rope should not be passed directly round a
projection of rock. On difficult rock the leader should go
to the trouble of producing a running belay with a piton
and karabiner should no natural belay be available.
Pitons
Rock pitons are available in many and various forms
but the most generally useful are the medium thin ones with
a hole on the head to take a karabiner. Ideally the piton should be driven into a crack with the
piton hammer so that as it penetrates the “ping” increases
in pitch with every blow and it is firmly home as the eye
approaches rock level. The karabiner should not be attached
until after driving.
The Anchor
No belay should be taken without an anchor unless the
belayer can sit in a “bucket” seat so that there is no pos-
sible chance of him being pulled off. In all other cases an
anchor should be found, either a knob of rock to tie on to or
a piton. If neither can be used then it is no place for a begin-
ner. To tie on to an anchor the belayer should take the
rope from his Tarbuck round the anchor point, then tie on to
his karabiner with an overhand knot, taking up the loop
thus formed so that it is tight when he is in his belay stance.
Further adjustment can be made with the Tarbuck (see
illustration). The object is to pass the live rope above his
anchor loop and waist loop but at the same time keep it as
low down as possible. The same principle is used for both
standing and sitting belays but the sitting belay is to be pre-
ferred. This should be the only belay system taught. The
shoulder belay system, in particular, is not considered at all
9
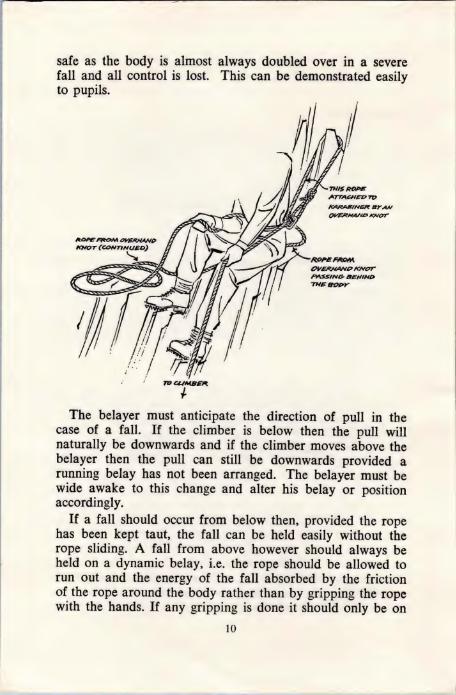
safe as the body is almost always doubled over in a severe fall and all control is lost. This can be demonstrated easily to pupils.
KARABINER BY AN
OQVERHANDE KNOT
ROPE FROM OVERHAND
KNOT (CONTINUED)
ROPE FROM Y QVERHAND KNOT
a LA ty < PASS. NN (<a BEH (/ ND ( QFN SY THE BODY ‘ <a
a< z SSS
ee /
<a Muli 1] ie
‘
The belayer must anticipate the direction of pull in the case of a fall. If the climber is below then the pull will naturally be downwards and if the climber moves above the belayer then the pull can still be downwards provided a running belay has not been arranged. The belayer must be wide awake to this change and alter his belay or position accordingly.
If a fall should occur from below then, provided the rope has been kept taut, the fall can be held easily without the rope sliding. A fall from above however should always be held on a dynamic belay, i.e. the rope should be allowed to run out and the energy of the fall absorbed by the friction of the rope around the body rather than by gripping the rope with the hands. If any gripping is done it should only be on
10

the dead rope. On no account should the active rope be wound round the arm. The live rope should not be gripped but its direction only guided between the legs of the belayer. This dynamic belay should be practised with a bag of wet wood or stones thrown from above to simulate a falling body, the aim being to let three feet or more of rope run out between the tightening of the rope and bringing the victim to rest.
The leader must never go to the limit of the rope so that the belayer has always several feet in hand which could be let out during the application of a dynamic belay in the case of a fall occurring.
SNOW CLIMBING
Many of the general notes under “when to tie on,” etc., of the Rock Climbing paragraphs also apply here.
Holding the Ice Axe
The ice axe should always be held pick to the rear (see stopping a slide) and in the uphill hand (see belays on the move).
Step Kicking
In soft snow the sequence is to smash the foot into the snow, then relax the weight, thus firming the step before the full weight is placed on it. Pupils should be made to practise kicking steps while moving in all directions. Begin- ners often tend to place steps too far apart particularly when ascending. All subsequent climbers should make every attempt to leave steps in better condition than they found them.
Stepcutting
Stepcutting should be mastered by a pupil before he is taught about crampons. Crampons can give a complete sense of security and can lead to sloppy practices if intro- duced too early. Unless this sequence of instruction is car- ried out the loss of crampons on a climb could lead to disaster. However, crampons must still be introduced in the early stages and these limitations emphasized. Steps should
11
be cut in the sequence that seems most comfortable. It is not good policy to cut steps without both feet firmly placed. A rhythmic swing of the axe will enable a person to cut faster for longer periods without frequent resting. Cut steps one up and one forward. Good steps for descending in are the test.
The Turn
Cut a “bucket” step into which both feet can be comfort- ably placed and in which the climber can turn facing in to the slope and from which the next steps can be cut.
Descending
The normal method of step placing when descending is one down, one across, but sometimes, in a narrow couloir for instance, it may be found preferable to pass the uphill leg behind the other, the downhill leg. Demonstration will quickly prove this point.
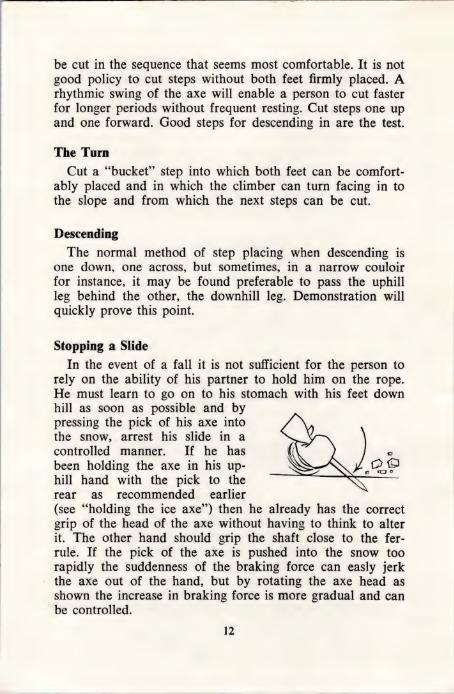
Stopping a Slide
In the event of a fall it is not sufficient for the person to rely on the ability of his partner to hold him on the rope. He must learn to go on to his stomach with his feet down hill as soon as possible and by pressing the pick of his axe into the snow, arrest his slide in a controlled manner. If he has been holding the axe in his up- hill hand with the pick to the rear aS recommended = earlier (see “holding the ice axe”) then he already has the correct grip of the head of the axe without having to think to alter it. The other hand should grip the shaft close to the fer- rule. If the pick of the axe is pushed into the snow too rapidly the suddenness of the braking force can easly jerk
- the axe out of the hand, but by rotating the axe head as shown the increase in braking force is more gradual and can be controlled.
12
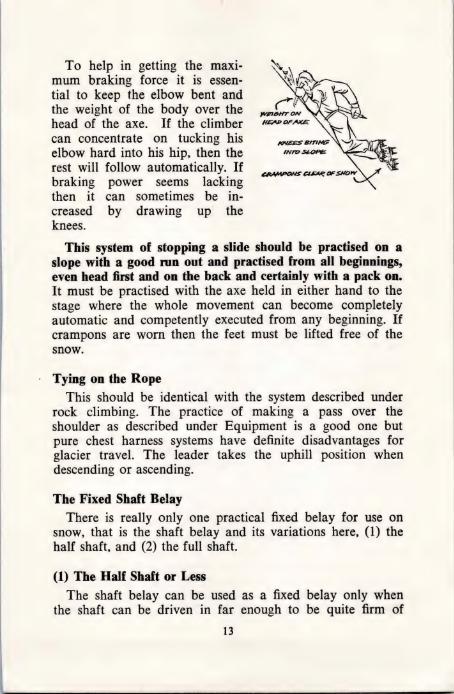
To help in getting the maxi- mum braking force it is essen- tial to keep the elbow bent and the weight of the body over the head of the axe. If the climber can concentrate on tucking his elbow hard into his hip, then the rest will follow automatically. If braking power seems lacking then it can sometimes be in- creased by drawing up _ the knees.
This system of stopping a slide should be practised on a slope with a good run out and practised from all beginnings, even head first and on the back and certainly with a pack on. It must be practised with the axe held in either hand to the stage where the whole movement can become completely automatic and competently executed from any beginning. If crampons are worn then the feet must be lifted free of the snow.
Tying on the Rope
This should be identical with the system described under rock climbing. The practice of making a pass over the shoulder as described under Equipment is a good one but pure chest harness systems have definite disadvantages for glacier travel. The leader takes the uphill position when descending or ascending.
The Fixed Shaft Belay
There is really only one practical fixed belay for use on snow, that is the shaft belay and its variations here, (1) the half shaft, and (2) the full shaft.
(1) The Half Shaft or Less
The shaft belay can be used as a fixed belay only when the shaft can be driven in far enough to be quite firm of
13
———Saaaaaa een
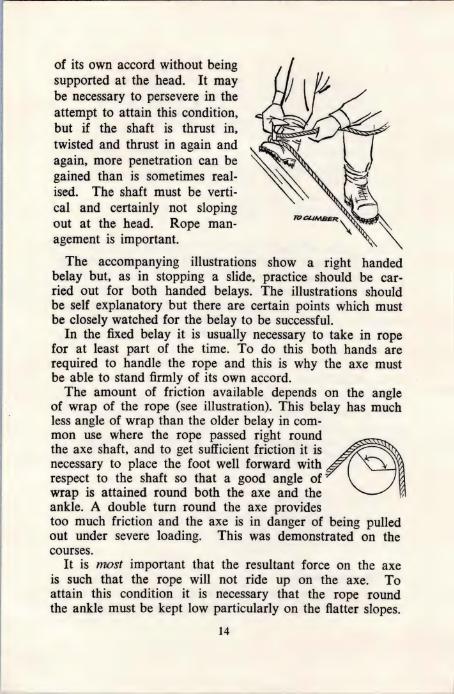
of its own accord without being supported at the head. It may be necessary to persevere in the
attempt to attain this condition, but if the shaft is thrust in,
twisted and thrust in again and
again, more penetration can be
gained than is sometimes real- ised. The shaft must be verti- cal and certainly not sloping out at the head. Rope man-
agement is important.
The accompanying illustrations show a right handed belay but, as in stopping a slide, practice should be car- ried out for both handed belays. The illustrations should be self explanatory but there are certain points which must be closely watched for the belay to be successful.
In the fixed belay it is usually necessary to take in rope for at least part of the time. To do this both hands are required to handle the rope and this is why the axe must be able to stand firmly of its own accord.
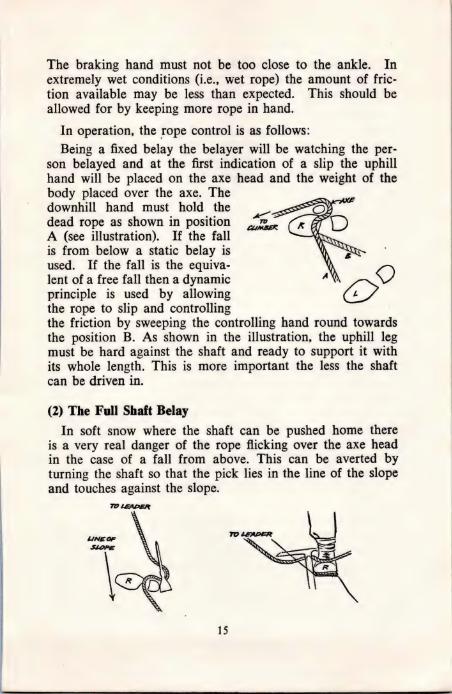
The amount of friction available depends on the angle of wrap of the rope (see illustration). This belay has much less angle of wrap than the older belay in com- mon use where the rope passed right round the axe shaft, and to get sufficient friction it is necessary to place the foot well forward with respect to the shaft so that a good angle of’ wrap is attained round both the axe and the ankle. A double turn round the axe provides too much friction and the axe is in danger of being pulled out under severe loading. This was demonstrated on the courses.
It is most important that the resultant force on the axe is such that the rope will not ride up on the axe. To attain this condition it is necessary that the rope round the ankle must be kept low particularly on the flatter slopes.
14
The braking hand must not be too close to the ankle. In extremely wet conditions (i.e., wet rope) the amount of fric- tion available may be less than expected. This should be allowed for by keeping more rope in hand.
In operation, the rope control is as follows:
Being a fixed belay the belayer will be watching the per- son belayed and at the first indication of a slip the uphill hand will be placed on the axe head and the weight of the body placed over the axe. The downhill hand must hold the dead rope as shown in position A (see illustration). If the fall is from below a static belay is used. If the fall is the equiva- lent of a free fall then a dynamic principle is used by allowing the rope to slip and controlling the friction by sweeping the controlling hand round towards the position B. As shown in the illustration, the uphill leg must be hard against the shaft and ready to support it with its whole length. This is more important the less the shaft can be driven in.
(2) The Full Shaft Belay
In soft snow where the shaft can be pushed home there is a very real danger of the rope flicking over the axe head in the case of a fall from above. This can be averted by turning the shaft so that the pick lies in the line of the slope and touches against the slope.

If the shaft belay cannot be used because the snow is too hard then the stage has been reached where ice techniques apply.
Rope Handling
There are many systems of rope handling in common use but most have their faults. The simple systems here recommended have the advantage of avoiding confusion. Folds are recommended rather than coils.
The Leader
The leading climber should pass the rope direct from his waist to the second. In the case of a fall by the second he must plunge his axe firmly into the snow and with his weight well over the axe, brace himself for the load. The leader may carry one or two folds if he so desires but on no account should he pass the live rope round his axe.
The Second
Rope sequence when moving together is recommended as follows: From the waistloop to the folds in the free down- hill hand passing round the shaft of the axe and thence to the leader (see illustration). The rope passes the top of the axe shaft where it is held in position by the uphill hand. The way the rope enters and leaves the folds is important. From the waist- loop it enters from the rear of the folds, and from the folds it leaves from the front of the hand (see illu- stration).
The Second’s Shaft Belay on the Move
The second will be watching the leader in most cases and will have advance visual warning of a fall. At the first indication he should sharply and firmly smash the shaft of his axe in as far as it will go and at the same instant the loop round the top of the shaft is let fall to snow level. As in the case of the leader’s belay the stance is then very similar to
16
that assumed in the fixed shaft belay. Because of the ad- vanced visual warning the second has time to assume this stance before the rope tightens. When the rope tightens the second conducts the belay exactly as if it were a fixed dynamic belay, the only difference being that instead of the dead rope being snaked out on the snow and ready for run- ning through the belay, the dead rope is here held in folds in the downhill hand. In operation the dynamic braking occurs in a series of jerks interspaced with free runout of the rope due to the folds.
The belay on the move as applied by either the leader or the second on the rope is capable of holding with a pene- tration of only a very few inches provided plenty of weight is applied over the top of the shaft and the shaft is sup- ported by the uphill leg and foot.
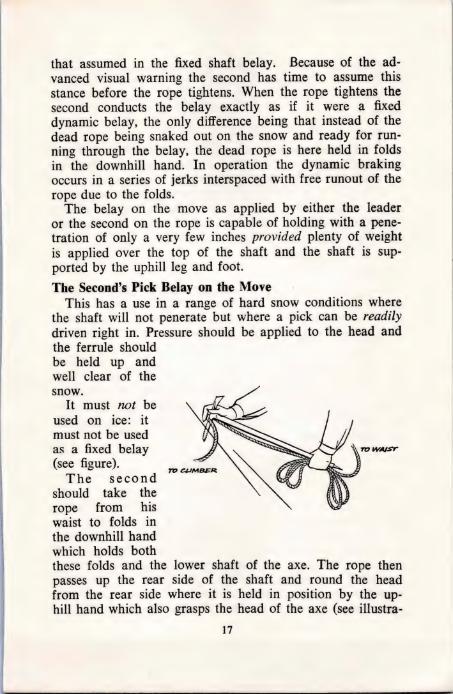
The Second’s Pick Belay on the Move This has a use in a range of hard snow conditions where
the shaft will not penerate but where a pick can be readily driven right in. Pressure should be applied to the head and the ferrule should be held up and well clear of the snow.
It must not be used on ice: it must not be used as a fixed belay (see figure). The second
should take the rope from his waist to folds in the downhill hand which holds both these folds and the lower shaft of the axe. The rope then passes up the rear side of the shaft and round the head from the rear side where it is held in position by the up- hill hand which also grasps the head of the axe (see illustra-
17
tion). The climber moves with the shaft held across his body and with the pick ready to plunge into the snow. The pick is commonly touched on the surface of steep snow as a steady.
General
In instruction and practice it is essential that all belay techniques should be practised under successively increas- ing loads and finally under severe strain.
It should be recognised that when one climber is directly above another, adequate safeguards cannot be taken. When this is unavoidable, the leader should stop and safeguard himself, while the second transfers the rope to the correct uphill side of the axe.
Crampons
There are few controversial issues which need detailing in this report. Steps are still necessary when wearing cramp- ons on steeper frozen snow and on ice. In snow which is near melting, balling up on crampons can occur and should be watched for, and can be knocked off by a smart tap on the side of the foot with the ice axe shaft. This need not inter- rupt the rhythm of movement at all. On no account can glissading in crampons be condoned, the greater danger being that a small change of under snow texture can easily tip up the glissader and crampons could easily be dangerous in an uncontrolled slide.
ICE CLIMBING Stepcutting
In stepcutting with the pick more care is required in the placing of individual strokes. In all conditions it is wise to place the horizontal strokes forming the bottom of a step first, followed by the downward stroke to chip out the body of the step. In many cases if this is not done the ice under the step is fractured and either the whole step falls out or worse still is unstable and collapses under the climber’s weight. As in all stepcutting the aim is to produce each step with as few strokes as possible. Practise as for stepkicking.
18
Bent Pick This is almost always the result of the pick not being
strictly in line with the direction of swing of the axe.
Belay on the Move The same belay as advocated under “snow climbing-shaft
belay on the move” is used so long as it is possible to get the shaft or spike to penetrate sufficiently. Only practice will show the small degree of penetration needed for the belay to be successful. This belay can hold (and will hold) pro- vided it is operated as a dynamic belay and care is taken to get plenty of weight over the axe. A good sharp spike is a help. If it is not possible to get a satisfactory belay in this manner then the climbers should not be moving together except in situations where a fall could not have serious consequences.
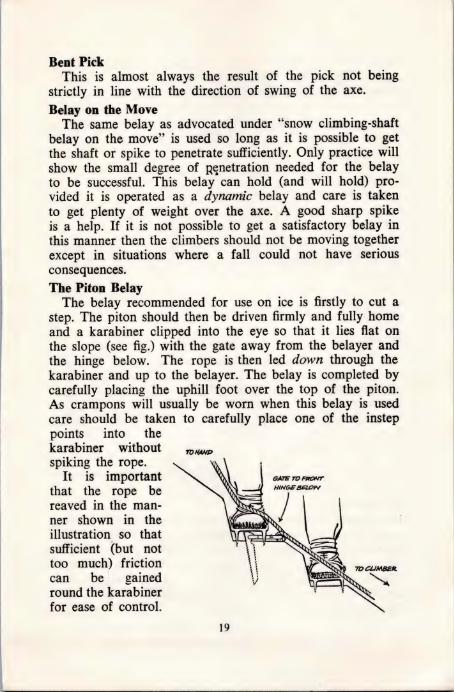
The Piton Belay The belay recommended for use on ice is firstly to cut a
step. The piton should then be driven firmly and fully home and a karabiner clipped into the eye so that it lies flat on the slope (see fig.) with the gate away from the belayer and the hinge below. The rope is then led down through the karabiner and up to the belayer. The belay is completed by carefully placing the uphill foot over the top of the piton. As crampons will usually be worn when this belay is used care should be taken to carefully place one of the instep points into the karabiner without spiking the rope.
It is important that the rope be reaved in the man- ner shown in the illustration so that sufficient (but not too much) friction
can be _ gained round the karabiner for ease of control.
19

When the load first comes on, the rope should be held at right angles to the slope. As more friction is required the belayer should lean uphill and if necessary guide the rope into the karabiner from over his uphill boot or even wrap the rope round the upper side of his uphill leg.
GLACIER TRAVEL
Ideally two people should not travel alone in any alpine terrain but particularly in crevasse country. In the event of a fall into a crevasse where the fallen person is even slightly injured, the chances of his survival are slim indeed unless help is quickly forthcoming.
Roping Up
Ideally there should be two ropes of two people, each pair on a 120 foot rope. Each person should tie the end of the rope into his karabiner with a Tarbuck knot, wind 40 feet of rope about his — shoulders, form an _ over- hand knot and clip that into his karabiner. The two climbers will thus have 40 feet of rope between them. In other situations there is some merit in the rope being attached to a chest harness but in gracier travel it is most desirable to tie on at the waist. Each climber should tie his short prusik loop on the live rope so that if the rope between the climbers’ waists be taut, he can just keep the loop taut also with his hand in it and his arm fully outstretched (see illustration).
20
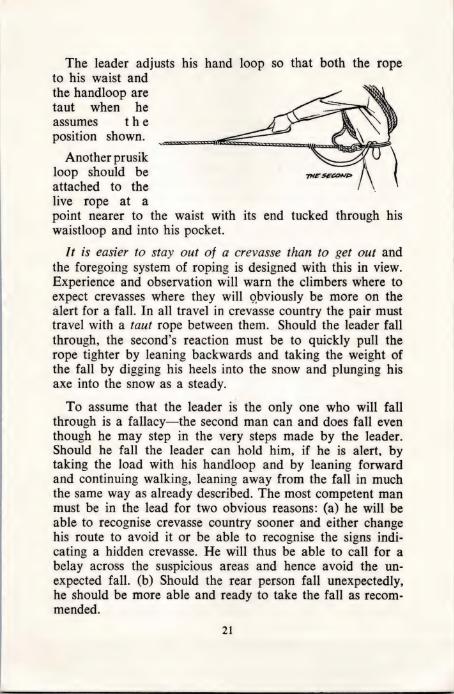
The leader adjusts his hand loop so that both the rope to his waist and the handloop are taut when he assumes the position shown.
Another prusik loop should be attached to the live rope at a point nearer to the waist with its end tucked through his waistloop and into his pocket.
It is easier to stay out of a crevasse than to get out and
the foregoing system of roping is designed with this in view. Experience and observation will warn the climbers where to expect crevasses where they will obviously be more on the alert for a fall. In all travel in crevasse country the pair must travel with a taut rope between them. Should the leader fall through, the second’s reaction must be to quickly pull the rope tighter by leaning backwards and taking the weight of the fall by digging his heels into the snow and plunging his axe into the snow as a Steady.
To assume that the leader is the only one who will fall through is a fallacy—the second man can and does fall even though he may step in the very steps made by the leader. Should he fall the leader can hold him, if he is alert, by taking the load with his handloop and by leaning forward and continuing walking, leaning away from the fall in much the same way as already described. The most competent man must be in the lead for two obvious reasons: (a) he will be able to recognise crevasse country sooner and either change his route to avoid it or be able to recognise the signs indi- cating a hidden crevasse. He will thus be able to call for a belay across the suspicious areas and hence avoid the un- expected fall. (b) Should the rear person fall unexpectedly, he should be more able and ready to take the fall as recom- mended.
21
By following the foregoing system it is generally possible to hold a fallen person before he has fallen further than his shoulders on most occasions and before he has fallen further than his waist on many. There is little difficulty in getting out of a crevasse provided penetration is no more than this. The amount of tension required to hold a person on the rope is amazingly little provided he is held before he has fallen any distance -(c.f. the leader falling from above in rock climbing). The reason why a chest harness is not recom- mended for use in crevasse country should now be very apparent—it means that the person would have so much further to fall before the rope can tighten. For the same rea- son folds should not be carried, nor any attempt be made to use a dynamic belay system.
As soon as penetration exceeds the shoulder level the dif- ficulties have begun in earnest. The life expectancy of a per- son hanging from his waist is much less than is generally realised. Within two minutes most people will lose con- sciousness and at the end of ten minutes most people will be dead. The first thing is to relieve the weight from the waist- loop. The fallen person can readily do this by stepping into the prusik foot loop bound on to the live rope as soon as possible. If he happens to be injured then he must be lowered on to a ledge if available or other drastic and im- mediate measures taken to relieve the strain from his waist. This is even more important than getting him out.
Extraction From Crevasses
There are several methods available for when the fallen person has dropped well into the crevasse.
(a) The simplest and most effective is also the easiest to manipulate. It presupposes that the fallen climber is un- injured. (1) The fallen climber takes his weight off his waist- loop by stepping into the prusik foot loop pre-attached to his live rope. (2) The man above, having held the fallen man, now takes the strain on his waist loop, plunges his ice axe into the snow as far as it will go and ties his longer prusik loop (pre-attached) to the rope as described under “roping up” and ties this round the axe shaft using two half
22
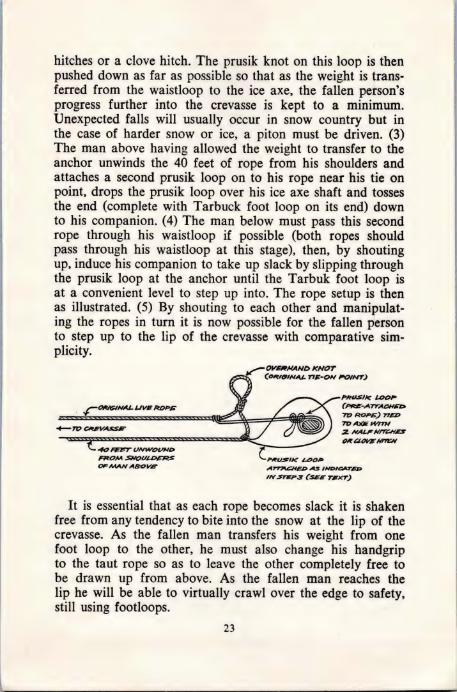
hitches or a clove hitch. The prusik knot on this loop is then pushed down as far as possible so that as the weight is trans- ferred from the waistloop to the ice axe, the fallen person’s progress further into the crevasse is kept to a minimum. Unexpected falls will usually occur in snow country but in the case of harder snow or ice, a piton must be driven. (3) The man above having allowed the weight to transfer to the anchor unwinds the 40 feet of rope from his shoulders and attaches a second prusik loop on to his rope near his tie on point, drops the prusik loop over his ice axe shaft and tosses the end (complete with Tarbuck foot loop on its end) down to his companion. (4) The man below must pass this second rope through his waistloop if possible (both ropes should pass through his waistloop at this stage), then, by shouting up, induce his companion to take up slack by slipping through the prusik loop at the anchor until the Tarbuk foot loop is at a convenient level to step up into. The rope setup is then as illustrated. (5) By shouting to each other and manipulat- ing the ropes in turn it is now possible for the fallen person to step up to the lip of the crevasse with comparative sim- plicity.
7” OVERHAND KNOT CORIGINAL TIE-ON POINT)
PRUSIic LOOP (PRE-ATTACHED
OF MAN ABOVE ATTACHED AS INDICATED IN STEPS (SEE TEXT)
It is essential that as each rope becomes slack it is shaken free from any tendency to bite into the snow at the lip of the crevasse. As the fallen man transfers his weight from one foot loop to the other, he must also change his handgrip to the taut rope so as to leave the other completely free to be drawn up from above. As the fallen man reaches the lip he will be able to virtually crawl over the edge to auety still using footloops.
23

When a second party is available for assistance this method
can be simplified by the use of two axes for belays. A
fourth person can help tremendously by relaying shouted in-
structions and maintaining a pack frame or axe shaft under
the ropes at the lip of the crevasse.
(b) The so called “classical”
method, using two or _ three
prusik loops. This is so well
known as to need little detail
in notes of this nature. The loops
should be tied on so as to pro-
vide support as shown.
This system means that a lot
of unnecessary and complicated
effort is required of the fallen
climber while the man above
does little to help. However, it
can be shown that at somewhere about 25 feet down, or less
(depending on the diameter of the rope), the two rope
system is not useful due to the stretch in the rope between
loaded and unloaded condition being more than a con-
venient step interval. In this case method (b) must be used to bring the fallen person up to a con- venient level before method (a) is brought into use.
Method (b) has the serious dis- advantage that it is not possible to free the rope from biting in at the top of the crevasse and that consequently it is very difficult for the fallen person to climb over the lip.
24
PRUSIK KNOT
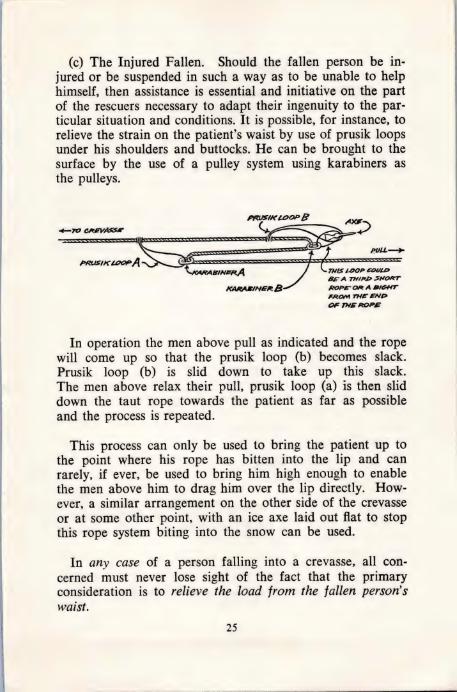
(c) The Injured Fallen. Should the fallen person be in- jured or be suspended in such a way as to be unable to help himself, then assistance is essential and initiative on the part of the rescuers necessary to adapt their ingenuity to the par- ticular situation and conditions. It is possible, for instance, to relieve the strain on the patient’s waist by use of prusik loops under his shoulders and buttocks. He can be brought to the surface by the use of a pulley system using karabiners as the pulleys.
BE A THIRD SHORT KARABINER B ROPE OR A BIGHT
FROM THE ENP OF THE ROPE
In operation the men above pull as indicated and the rope will come up so that the prusik loop (b) becomes slack. Prusik loop (b) is slid down to take up this slack. The men above relax their pull, prusik loop (a) is then slid down the taut rope towards the patient as far as possible and the process is repeated.
This process can only be used to bring the patient up to the point where his rope has bitten into the lip and can rarely, if ever, be used to bring him high enough to enable the men above him to drag him over the lip directly. How- ever, a Similar arrangement on the other side of the crevasse or at some other point, with an ice axe laid out flat to stop this rope system biting into the snow can be used.
In any case of a person falling into a crevasse, all con- cerned must never lose sight of the fact that the primary consideration is to relieve the load from the fallen person’s
waist.
25
Section Two SUGGESTED SYLLABUS FOR A COMPREHENSIVE
COURSE OF INSTRUCTION ON BASIC MOUNTAINCRAFT
To assist instructors, this suggested syllabus is included to cover the general as well as the more detailed topics of a series of lectures and demonstrations. This list has been used with few modifications by Tararua Club instructors for seven- teen years and it has been found to be a useful guide when directing a full instruction course. The sequence and emphasis can be altered. However, this does form a useful check list for the covering of a very broad field, and the course can be condensed to suit local needs. NOTE: This can be adapted to make a shorter course by
deleting lectures *.
Lecture 1. Approach to the Mountains
Introduction and purpose of the course. Necessity for sound technique. General topographical survey. Suggested progressive programme. Explanation of types of suitable trips. Fitness—general and day to day. Climbing for pleasure. Spirit of the sport—companionship. Team effort and responsibility.
Lecture 2. Rockclimbing I
Clothing. Boots and nailing. Rhythm of movement. Balance—reason for boulder hopping. Hand holds described. Length of reach. Footholds described. Length of step. Friction grips. Movement on rock. Problems of loose rock. Ropes and knots. Care of rope. When to rope. Handling of
rope.
26
Movement on rock with rope. Exposure explained. Definition of rockclimbing terms. Warnings and movement commands.
Demonstration 1. Rock I
Demonstration of hand holds followed by practice. Demonstration of footholds followed by practice. Demonstration of boulder hopping followed by practice. Demonstration of balanced climbing followed by practice. Rhythm explained and demonstrated. Knots and roping up. Handling of rope-folds, tension,
observation. Care of rope. Boulder hopping with rope. Easy climbing (continued movement) with rope on.
Lecture 3. Rockclimbing II
Display of rockclimbing film (optional). Explanation of belays—all types. Explanation of anchors and when used. Explanation of stances and pitches. Continuous movement with rope. Moving one at a time when roped. Precautions—falling rock, loose rock, wet rock, ice glazed
rock, Special techniques—A’Cheval, cracks, hand traverses, chim-
neys, double-roping, prusik knots explained. Climbing with a pack. Spells to relieve tension. Climbing with an ice-axe, slings.
Demonstration 2. Rock II
Demonstration of belays followed by practice. Demonstration of anchors followed by practice. Continuous climbing using correct rope technique. Climbing one at a time using correct rope drill. Climbing one at a time practising lessons learnt—on easy
pitches. Commands—warnings.
27
Demonstration 3. Rock Ill A general refresher of lessons learnt. Practice climbs—average grade only. Demonstration of double roping followed by practice. Demonstration of prusik knots followed by practice.
Lecture 4. Snowclimbing I Equipment—snowglasses, snow cream, ice-axe, boots, cloth-
ing, pack. Marching rations. Snow types. Movement—rhythm and balance. Step kicking and plugging for ascent and descent and
traverse.
Pigeon holing—elementary. Safing. Arresting a fall. When to rope. Movement on mountain using rope (exclude reference to
belay and anchor in this lecture).
Lecture 5. Snowclimbing II Step cutting. Belays and anchors—need for good rope drill. Snow conditions when above used. Avalanche danger and explanation. Glaciers and ice types—snow covered glaciers. Party movement on glaciers. Prusik knots—foot nooses. Gravel covered ice. Glissading—explanation of method and when used. Precautions: Weather, the time factor, condition of peak,
frozen scoria, frozen gravel. Warnings and commands. Crampons—brief reference and explanation only.
Demonstration 4. Snow I Movement on snow. Step kicking, elementary pigeon holing. Balance—walking technique, foot movement, rhythm. Handling of ice-axe according to slope and snow type.
28
Arresting falls. Safing and warnings. Handling rope. Step cutting demonstration and Bec comer steps, move-
ment in steps.
Introduction only to belays and anchors.
Lecture 6. Snow and Ice Climbing III
Crampons—detailed instruction in their use. Step cutting in ice, hand holds. Use of pitons for ice belays, ice anchors. Schrunds, snow-bridges, cornices. Exposure explained. Route finding. Condition of the peak.
Demonstration 5. Snow II
Resumé of Demonstration 4. Step cutting practice. Demonstration of belaying and anchoring followed by
practice. Demonstration of arresting a fall followed by practice. Demonstration of glissading followed by practice. Practice in continuous climbing. Practice in climbing one at a time. Short climb putting technique into practice.
*Lecture 7. Organisation of a Major Climbing Trip
Preliminary survey. Transport, finance. Detailed survey. Tentative programme. Equipment and consideration of weight to be carried. Menus, balanced diet, food lists. Packing and preparation. Duty rosta. Fine points of successful leading. Accidents and safety precautions. Wash up—reports, route guides.
29
Lecture 8. High Camps and Alpine Cooking
When to use. Sub Alpine—below snowline, shelter—caves precautions. Above snowline—precautions, necessity for shelter. Alpine tents. Snow caves—methods, tools, design, time, slope, types of
snow, insulation, Li-los, keeping gear dry. Igloos—method and when used. Alpine cooking—primuses and fuel, water supply, pressure
cookers and billies. Rations for climbing. Suitable menus.
Demonstration 6. Snow Caving and Snow III
Snow caving demonstration and practice. Alpine cooking demonstration and practice. Demonstration and practice of crampon climbing. Demonstration of glacier travel and foot loops. Demonstration of special techniques—snow bridges and
cornices. Short climbs putting technique into practice. Crevasse extraction explained—three methods—prusik, two
rope and injured climber.
Demonstration 7. Snow IV
Two days continuous climbing putting technique into prac- tice. (All members of the course to take turns as leader and second man.)
*Lecture 9. River Crossings.
Display of film. River types. Where to cross, clothing worn. Crossing methods—mutual support, fixed hand rail, use of
ice axe, pole method, rope noose method. Crossing on horses, walking wires and cages. Boulder hopping. Precautions.
30

*Demonstration 8. River Crossings
Demonstration of clothing. Demonstration of foot movement. General technique. Mutual support crossing, fixed hand rail crossing, crossing
using ice axe, crossing using poles. The rope noose method.
DEFINITIONS Anchor—the system by which the belayer safeguards himself by
tying himself on to the mountain. It may be to a protruding knob of rock or to a piton.
Belay—the system of rope management used by the stabilized person to arrest the fall of his partner.
Fixed belay—one in which the belayer is stationary and readied to arrest the fall of his partner, as opposed to belay on the move.
Static belay—belay where the fallen person’s advance is arrested and no rope is allowed to slide out.
Dynamic belay—belay where the fallen person’s advance is arrested with the rope sliding out in a controlled, steady manner, the energy of fall being absorbed by friction over a definite period of time.
Ice Climbing—climbing on a surface where snow techniques fail to be safe (includes climbing on frozen snow).
Active or live rope—the rope from the belay to the climber pro- tected by that belay.
Inactive or dead rope—that portion of rope between the belay system and the belayer.
INSTRUCTION AIDS The following films are available from the National Film Lib-
rary, Wellington:— “Snowcraft,” directed by M. Bowie. ““Rockclimbing,” directed by R. Naylor. “Bushcraft,” directed by L. D. Bridge. “Rockclimbing,” by British Army Commandos.
There is also a film strip on rockclimbing directed by R. Naylor.
BIBLIOGRAPHY “Mountaincraft,” by Geoffrey Winthrop Young. “On Climbing,” by Charles Evans. ‘“‘Mountaineering—The Freedom of the Hills,” by Harvey
Manning. This excellent book is published by “The Mountaineers,” Seattle, Washington (1960), price 7.50 dollars. 430 pp.
“Teach Yourself Mountaineering”—Teach Yourself Series. “Safety in The Mountains,” published by Federated Moun-
tain Clubs of N.Z. Edited by Brian Mason.
31
Owe nn nrraorsE eee


Pr
aven R