all about merit marks (part 1)
TRANSCRIPT

ALL ABOUT MERIT MARKS (part 1)
This document describes the merit mark process and how to use DB2000 to submit merit marks. DB2000 is now the only approved way to prepare and submit merit mark recommendations. Merit Marks A merit mark is the only means the squadron has for recognizing or rewarding members for contributing to the goals of USPS. Annually around November 15th, each responsible officer recommends those members reporting to him, whom he feels warrant such recognition. The MM component of DB2000 is used for creating, maintaining, and tracking merit mark recommendations. The integration of merit mark processing with the organization’s database in DB2000 simplifies the merit mark data entry process. Furthermore, DB2000 has the ability to import an existing merit mark file from a prior year to kick-start your efforts. Writing Recommendations: Merit marks are awarded on the basis of substantial personal efforts and/or results on the behalf of USPS. Please familiarize yourself with Chapter 16 of the USPS Operations Manual.
If you recommend
someone who:
Include this in your recommendation:
Taught courses:
Name of Course (e.g. AP)
Number of class SESSIONS taught
Number of class SESSIONS proctored
Above to be shown in Educational Columns
In certain instances, some explanation of exact duties may help — use the
Valuable Service box
Attended meetings:
Attending meetings is a privilege of membership and does not count
towards a merit mark unless attending in official capacity and/or reporting
to the members such as an officer, committee chairman making a report,
delegate to a district conference or national meeting, etc.
Took part in
committee
meetings:
How many meetings were held?
How many meetings were attended by the member?
What did the member do as a member of the committee other than attend?
Words such as the following need further explanation:
Worked, Assisted, Participated, Helped
Served.
Describe the ACTIONS!!
Describe the RESULTS!!
Served on
telephone
committee:
How many persons called?
How often were calls made?
Served on
Cooperative
Charting
How many TRIPS were made?
How many REPORTS were submitted? NOT CREDITS RECEIVED.

committee:
Served on
Rendezvous
committee:
Did they plan the rendezvous (check locations, contact marinas, etc.)?
Did they help in docking or tying-up boats?
Did they cook, serve, clean-up, buy food? (NOT DONATE)
Served on
Publication
committee:
Did they write articles?
Did they print, assemble, staple?
Did they put on labels, stamps, mail?
Served on Rules
committee:
Were bylaws reviewed?
Were bylaws revised?
How many meetings were held?
How many meetings did the member attend?
Served on
Executive
committee:
How many meetings were held?
How many meetings did the member attend?
For what purpose was the member at the meeting?
How did the member participate?
Served on
Membership
committee:
How many meetings were held?
How many meetings did the member attend?
Did the person perform any interviews? How many?
Worked the Boat
Shows:
How many meetings were held?
How many meetings did the member attend?
Did the person perform any interviews? How many?
Served as Port
Captain:
How many inquiries were received?
How much work or time was required to answer the inquiries?
Served as
Chaplain:
How many meetings were held?
How many meetings did the member attend and give invocations or
benedictions?
Did the member conduct any services for the members?
Served as Law
Officer:
What was done?
Were any legal papers prepared?
What specific legal advice was given?
Served on Auditing
Committee:
Was an audit done and was it presented to the membership?
How many meetings were held?
How many meetings were attended?
Merit Mark submissions are limited in the amount of data you can provide. Just 2 courses taught or proctored and 438 characters in the Valuable Service Performed. The Area Monitor does not want to wade through an epistle.
ALL ABOUT MERIT MARKS (part 2)
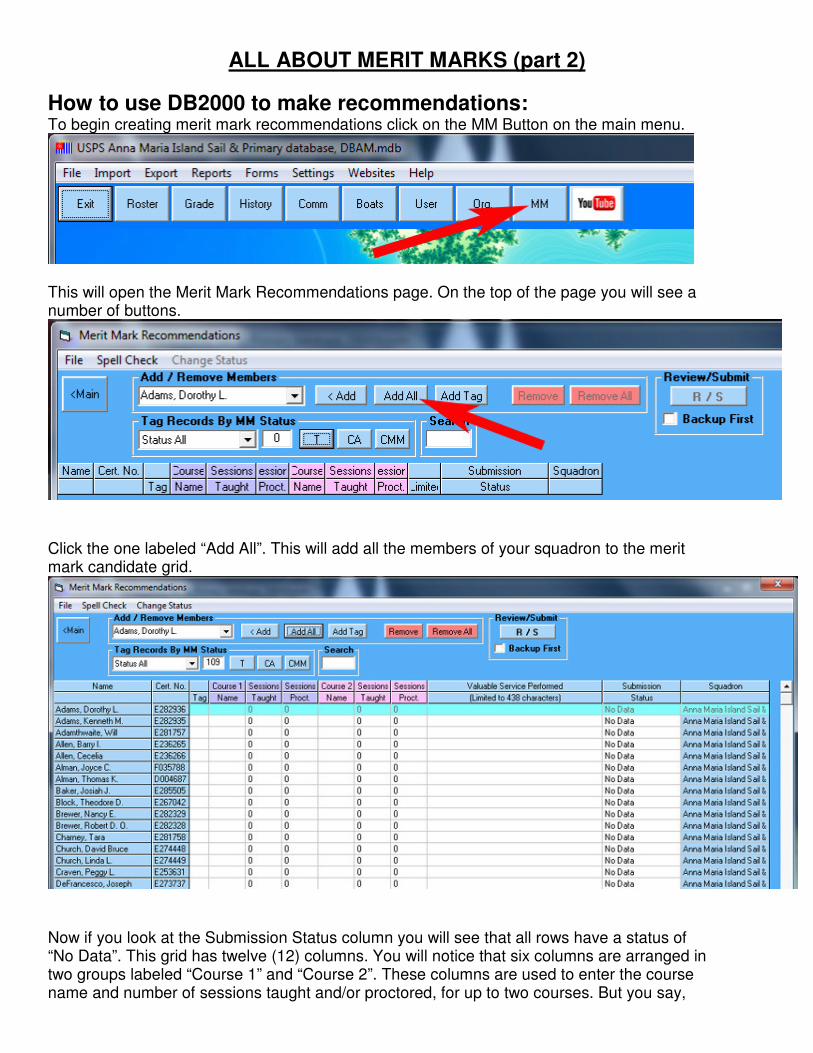
How to use DB2000 to make recommendations: To begin creating merit mark recommendations click on the MM Button on the main menu.
This will open the Merit Mark Recommendations page. On the top of the page you will see a number of buttons.
Click the one labeled “Add All”. This will add all the members of your squadron to the merit mark candidate grid.
Now if you look at the Submission Status column you will see that all rows have a status of “No Data”. This grid has twelve (12) columns. You will notice that six columns are arranged in two groups labeled “Course 1” and “Course 2”. These columns are used to enter the course name and number of sessions taught and/or proctored, for up to two courses. But you say,

“What do I do with a member who has taught more than two courses”? The answer is, you ignore the course(s) beyond two which have the least number of sessions taught or proctored.
It is not necessary to write a novella describing everything someone has done during the year. It is only necessary to provide sufficient information to convey to the Chief (Area Monitor) why you are recommending this member for a merit mark. If you are using the two columns to enter course taught data for a member, then do this. Begin by high-lighting the Course Name cell either by clicking in it or by using the up/down and left/right arrow keys to navigate to it. When the cell background turns from white to turquoise it means the cell is selected. To open the cell for data entry either double-click in it or press Enter/Return when the cell is selected.
When the Course Name cell is open, a pull down list will appear. Select the appropriate course name in the list by clicking on it. This will close the list and move the course name abbreviation into the cell. If you make a mistake, just do it again. Remember to do the course name before attempting to enter a number for courses taught or proctored. Once the course name has been entered, select the appropriate cell to enter a number for sessions taught and/or proctored. Again the background will become turquoise when the cell is selected. Open the cell in the same manner as previously described. Use the up and down arrows on the control which appears to enter a number. When you have entered the correct number of sessions, close the cell either by pressing enter/return or by double-clicking in the pink area.
The column entitled “Valuable Service Performed” is used to describe other types of service performed. Select the cell for the record you are working on and double click or press Enter, the cell background will turn pink. You may now enter your recommendation text. Press Enter/Return or double-click to close the cell.
If a member has only taught or proctored courses and has no other valuable service it is a good idea to add some further description in the valuable service cell. Some Area Monitors have been known to disapprove if not. You will notice that the valuable service is limited to 438 characters. No matter how productive a member may have been you don't have to include everything. Use abbreviations to conserve characters. Hrs instead of Hours for example. If spell checking is
available (you have Microsoft Word installed) it is a good idea to enter your abbreviations into the dictionary. then if you run a spell check they will not b flagged as a spelling errors.
As you finish entering data into a cell you will notice that the Submission Status for that member changes from “No Data” to “No Recommendation”. When you have finished entering all of your merit mark data for all members, it is appropriate to remove the records for members who did not do anything. Their submission status will be “No Data”. Use the

Change Status menu, and select the “Remove All No Data” option. The records will be removed from the merit mark grid. Next we need to change the submission status for the remaining records. At this time they should all have a submission status of “No Recommendation” and we want to change that to “Original”. Using the same Change Status menu, select the “Change All No recommendation to Original” option.
When you are ready to submit your recommendation you need to Click the Review/Submit button top right on form. This will open a new dialog window.
Some time ago it was decided that DB2000 would be the only way of submitting merit mark recommendations which is done electronically. First check the data displayed to make sure its correct. If for example the Submitting Officer is missing or incorrect it probably means that DB2000 doesn't know who the commander is. To correct this leave the merit mark pages and return to the main screen. Open the Roster Grid make sure the SQ_Rank field is selected to Cdr, or D/C for a district, submission. Make sure no other member has this rank and remove if so. DB 2000 will use the first one it finds.
Once all the data on the submittal form is correct you can submit to the Area Monitor. You may not be the commander but have prepared the recommendations for the commander. Before you submit you can send a draft copy to the commander (or anyone else for that matter) for approval.
In addition to Original submissions you can also process Resubmissions, Supplementary and Retroactive submissions. A Supplementary is sent after the Original if you forgot someone. A Resubmission is sent if a recommendation was rejected and you want to provide more info for reconsideration.
A Retroactive is sent when someone in a previous year was overlooked. They must be sent from the commander of the year in question. If these all exist in the same MM list they must be submitted separately by selecting the appropriate type of submission.

For convenience, merit mark recommendations can be printed. This is done from the main screen under the Reports Menu. Printed lists cannot be used for submission. If sent they will be ignored.
After the area monitor has processed your recommendations you will receive an email with a file attached containing the results.
It will be a list of certificate numbers followed by A for accepted X for rejected Save the attachment to a location where you can find it again. ...\My Documents\DB2000v3 is a good choice. This file can be imported into the DB2000 merit mark grid.
Open the file menu and select Submission Status Update. Find the file from the resulting dialog and click Open
The submission status column will be updated. You may wish to consider a Resubmittal submission at this time.

ALL ABOUT MERIT MARKS (part 3)
How to submit your recommendations: When you are ready to submit your recommendations click the Review/Submit button on the Merit Mark grid.
First select the Type of Submission and make sure the commander is correctly identified. Next select either Send Draft To or Submit to Area Monitor. The process is the same for either. This puts you on line and the web page below appears.

Read the instructions on the page so you understand what is needed. Notice that the path to the submission file is indicated. Click on Choose File and in the resulting dialog find the file.

Notice that the path indicated on the web page is on the file dialog, the first part at the top of the form. Scroll down the files until you find the one needed and then click Open. Now on the web page click SubmitMM. You will get a response.
The response above is for submitting a draft but the response for area monitor is similar.
Tip: If you want to send the email to two persons you can do it by typing ;[email protected] Where indicated below. Don't forget the leading semicolon.

ALL ABOUT MERIT MARKS (part 4)
Cooperative Merit Mark recommendations:
Preparing MM recommendations, especially for a big squadron, can be very large task. Apart from the actual preparation, it may be difficult to know everyone that is eligible or what it was that they did. A way to resolve this is to make each committee chairman and bridge officer responsible for the members in their own committee or department. Each will use DB2000 to prepare their recommendations after which they are saved and emailed to the Merit Mark Chairman.
After preparation select "File/Save MM File"
When naming the file you must keep the first part up to and including the underscore. In the example MMAM_ The date is auto-inserted as a suggestion. It is a good idea to add something that identifies the sender. MMAM_061116_jkg We don't want different senders generating MM files having the same name. Next email or get the file to your Merit Mark chairman

Importing Merit Mark Files:
Now we move to the Merit Mark Chairman's computer. Your Cooperative MM file has been received and now it must be imported into the master MM list that will be submitted to the Area Monitor.
From the File menu select Import MM File. This will bring up the Import Options dialog.
Import Options
1. Select from one of overwriting, adding new records or appending to existing records. Appending is the default and used for most importing.
2. If appended records exceed the maximum permitted length, a dialog will pop up to allow editing. By checking the "Preview" box this dialog will be shown for each record. This slows things down, but it is thorough.
3. Tagging changed records allows them to be more readily found after import. This option deletes any pre-existing tags.
4. If members are found in the import file that are not present in the current database, they may be added as affiliated members if desired. "Optionally" will ask for each unmatched one found.
Click “OK”, this will bring up the Windows file dialog, find the file to be imported. The file may be anywhere in the computer but it is recommended that MM files be kept in the "Documents/DB200v3" folder. DB2000 will open this folder by default. Select the file and click "Open" and its content will be added to the master list.
As the import examines each record in the file, if you have existing courses and the imported file contains more DB2000 shows a dialog from which you can decide which to use.

If you elected to view the append text or if the combined length exceed 438 characters a dialog will show allowing you to edit and combine what you want
The import record and the existing record are shown and the user can cut copy and paste from these into the edited record area below.
Alternatively, clicking the "Join" button will join the two texts into the Edited area where the editing can be done to both at the same time..
The "Clear" button clears the edited record only.
Important: Before closing, be sure to choose the text area which is to be used for the MM recommendation

When all records have been examined the data will now be added to the merit mark list.