all access routes secured - pulsesecure.net
TRANSCRIPT

1
Pulse Connect Secure is available as either a physical appliance or as a virtual appliance in the company network. It controls the access of users from external networks to the existing services. Optionally, it is also possible to operate the product in a private or public cloud (AWS or Azure). In order for all users to be able to access their organisation’s resources at all times, the solution offers an extensive feature set. These include the protection of ap-plications and data that are located at various locations, including SaaS applications such as Office 365.
In addition to that, there is also the client-free access via a web inter-face, the integration of services such as Active Directory and LDAP as well as support for two-factor authentication, SAML 2.0, PKI and IAM respectively digital certifi-cates. A built-in host checker, which ensures that the connecting device complies with the company’s se-curity requirements, is also part of the scope of features. To this end, the system classifies the endpoint devices prior to authentication on
the basis of pre-defined policies and only allows access if the conditions within the policies are satisfied.
In addition, there is also secure ac-cess to the virtual desktop interface (VDI) from leading manufacturers, such as Citrix XenApp/XenDesk-top and VMware Horizon, granu-lar auditing to ensure compliance, the integration of mobile device management products (MDM) and a universal client for both remote and onsite use to ensure smooth roaming. The solution is managed through an intuitive, centralized web interface.
In practice, Pulse Connect Secure works as a layer 3, 4 and 7 SSL VPN with granular access control and as an application VPN that tun-
nels the traffic between specific ap-plications to certain targets. There is also IPSec/IKEv2 support for mobile devices. In addition, there are also spilt tunnelling features, authentications using hardware to-ken, smart cards, soft token, one-time passwords and certificates as well as RDP, Telnet and SSH ses-sions on the basis of HTML5. A granular SSL cipher configuration is equally possible.
The testIn the test, we installed a virtual PCS appliance in our network, con-figured it, and then accessed our backend services using the VPN it provided. In addition, we also took a close look at the authentica-tion with a local user account and a time-based one-time password
Testing: Pulse Connect Secure 9.0R1
All access routes securedDr. Götz Güttich
With Pulse Connect Secure, Pulse Secure provides an enterprise-class VPN for mobile devices and desktops under Android, Chrome OS, iOS, Linux, macOS and Windows.
Pulse Connect Secure (PCS)is built to ensure easy, protected access from any endpoint to corporate applications, data, and services whether existing in the data center or in the
private cloud, public cloud or SaaS. In our test laboratory, we looked at how user friendly and comprehensive this solution is for hybrid IT secure access.
2
with Google Authenticator, the host checking feature, as well as enter-prise onboarding. We also worked with various connection sets and analysed the configuration tool with its scope of functions and its wizards.
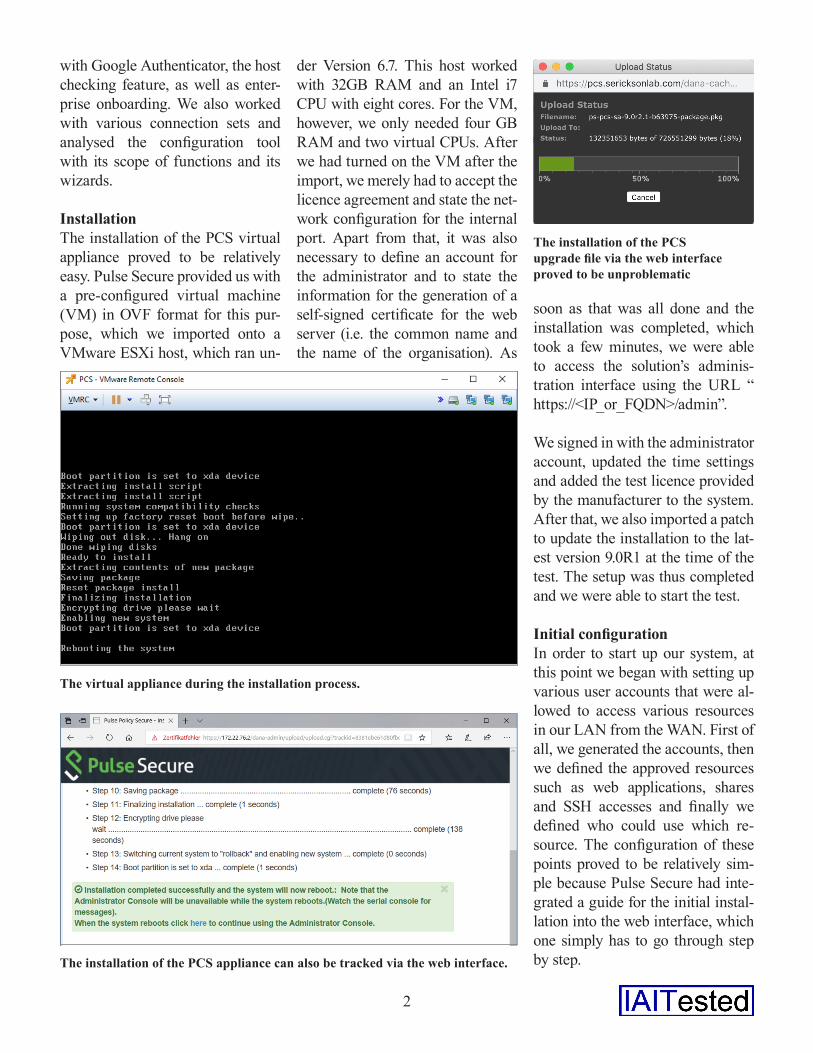
InstallationThe installation of the PCS virtual appliance proved to be relatively easy. Pulse Secure provided us with a pre-configured virtual machine (VM) in OVF format for this pur-pose, which we imported onto a VMware ESXi host, which ran un-
der Version 6.7. This host worked with 32GB RAM and an Intel i7 CPU with eight cores. For the VM, however, we only needed four GB RAM and two virtual CPUs. After we had turned on the VM after the import, we merely had to accept the licence agreement and state the net-work configuration for the internal port. Apart from that, it was also necessary to define an account for the administrator and to state the information for the generation of a self-signed certificate for the web server (i.e. the common name and the name of the organisation). As
soon as that was all done and the installation was completed, which took a few minutes, we were able to access the solution’s adminis-tration interface using the URL “ https://<IP_or_FQDN>/admin”.
We signed in with the administrator account, updated the time settings and added the test licence provided by the manufacturer to the system. After that, we also imported a patch to update the installation to the lat-est version 9.0R1 at the time of the test. The setup was thus completed and we were able to start the test.
Initial configurationIn order to start up our system, at this point we began with setting up various user accounts that were al-lowed to access various resources in our LAN from the WAN. First of all, we generated the accounts, then we defined the approved resources such as web applications, shares and SSH accesses and finally we defined who could use which re-source. The configuration of these points proved to be relatively sim-ple because Pulse Secure had inte-grated a guide for the initial instal-lation into the web interface, which one simply has to go through step by step.
The virtual appliance during the installation process.
The installation of the PCS appliance can also be tracked via the web interface.
The installation of the PCS upgrade file via the web interface proved to be unproblematic

3
The first configuration step com-prises of defining an authentication server. A default local authentica-tion server is already created, but more may be created if needed. At this point, besides a local authen-tication whereby the user data is stored directly on the PCS appli-ance, the system also supports Mi-crosoft Active Directory, as well as authentications through NIS, ACE, LDAP, RADIUS, SiteMinder, SAML, MDM services and many more.
In the test, we started by setting up a local authentication server di-rectly on the appliance. During the configuration of this server, the ad-ministrators are able, among other things, to stipulate the length and the composition of the passwords used by the users. In addition, they are also in a position where neces-sary to prohibit users from chang-ing their password. During the defi-nition of the local authentication server, in the test, we also set up the first two user accounts straight away with names and passwords, whereby there were no surprises. The user roleThe next step involved the defini-tion of the user role. With the user roles, Pulse Connect Secure defines
session parameters such as session settings, personalisation settings (such as user bookmarks that in-dicate approved resources) and access functions. With the access functions, the user role merely de-fines which resources a user can use such as SSH accesses or web appli-cations. It does not, however, define which specific servers the user can communicate with; we configured this policy later on in the scope of the resource profiles.
In the test, we gave our user role a name, then defined the policy: web access through SSH should be ap-proved with a specified timeout. Ad-ditional resources the system offers at this point include NFS Shares, Telnet, terminal services, virtual desktops, VPN tunnel, HTML5 and other. In the scope of defining the role, administrators are also in a position to stipulate whether the us-
ers are allowed to use roaming (i.e. whether changing the access point during work is allowed) or not.
The user authentication realmThe next configuration step deals with the user authentication realm. We used the previously set-up local authentication as the authentication server for this realm. In addition, at this point in time, we also defined our role mapping rules. These lay down, for example, which user role is allotted to which user. In our case, we generated a rule that the user “gg” was able to work with the user role we had just generated. The role mapping rules do not only work with user names, but also enable the allocation of roles using certificates or expressions of a character string. The system is thus very flexible.
The resource profilesAs soon as were finished with the definition of our authentication realm, we turned to the configu-ration of our resource profiles. As already mentioned, these define which specific resources the users can access. In the test, we first of all generated a resource profile that approved access to the PRTG mon-itoring server by Paessler working on our local network. As this is managed through a web interface, we selected the resource type “Web App” at this point.
For our web app rules, it was nec-essary to state a name as well as an URL to be used and to allot the rule to our user role. Apart from that, the staff responsible have to state a type; at this point, the fol-lowing are available, among others: “Custom”, “Citrix”, “OWA”, “Lotus
The user login after completion of the initial PCS configuration.
The Pulse Secure solution after up-loading files onto a Windows Share.
4
Notes” and “SharePoint”. After that was done, we were able to connect to the external interface of the PCS with the help of a test client under Windows 10, log in with a previous-ly set-up test user account and then access the PRTG server in the local network.
Further bookmarksIn the same way, we then also add-ed to the system the addressed SSH access to a Linux server in the lo-cal network and a Windows Share. With the share, the appliance asked for the access data for logging into the share after the connection was established, after which we were able to use the files stored in it. This can be prevented using single sign-on functions that the product also offers. More on that later. All things considered, the entire process for setting up client-free accesses is quite straightforward and well-ex-plained. In the test, it only took us half an hour to configure the system up to this point.
Working with a second authentication serverAfter completing the initial config-uration, we set about refining our settings. To this end, we changed the user authentication such that besides stating the user name and password, the Google Authentica-tor also came into operation. To do this, we first imported the Google Authenticator app onto a smart-phone (Huawei P9 under Android 7). We then defined a new authen-tication server of type “Google Authenticator” under “Authentica-tion”. No other configuration was necessary. Where necessary, the administrators can also limit the
number of authentication attempts allowed and other settings.
After that was done, we opened the configuration of our authentication realm and added the new server to it. The configuration of additional authentication servers thus proved to be very simple as we did not have to do any additional configuration with it.
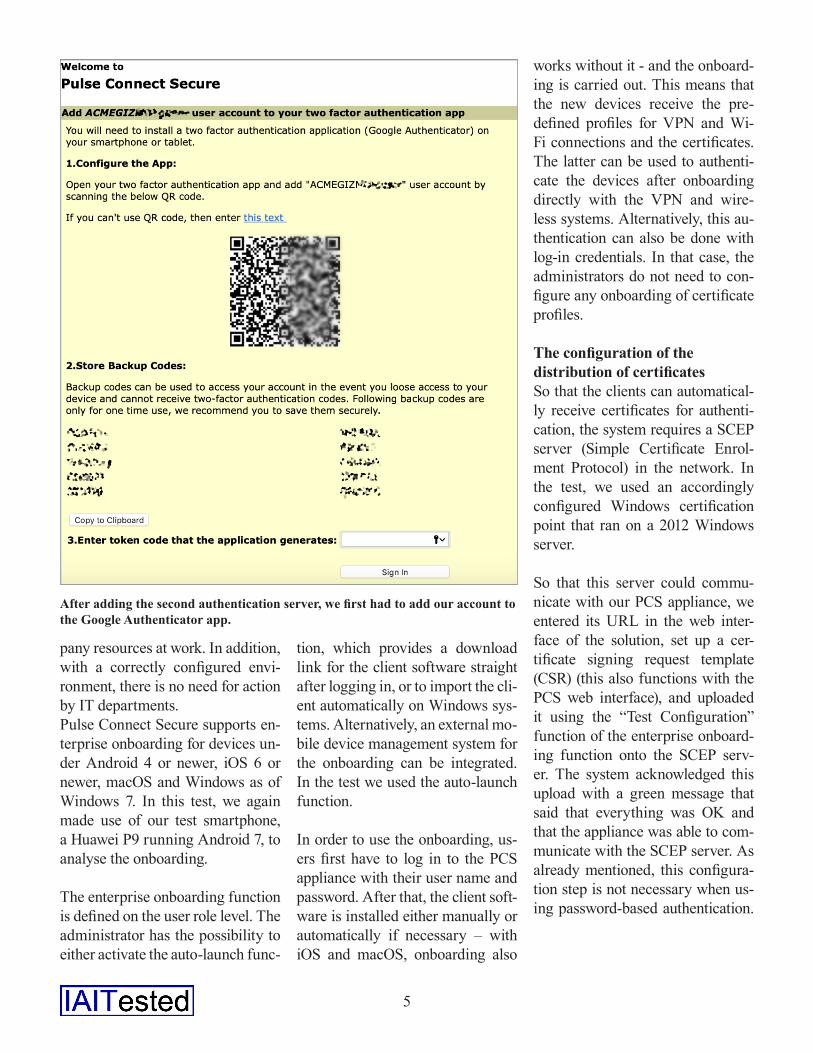
We now logged ourselves in again to the PCS appliance with our user credentials. The web interface then did not present us the website with the links to the approved resources as before but presented a QR code that we had to scan with our test smartphone, in order to add the account for the PCS access in the authenticator app. After that, the app showed us a numerical code
that changed regularly, and which would be entered after logging in with the user credentials in the web interface as a second authentication step to satisfy the access policy to the approved resources. In the test, PCS worked as expected.
Enterprise onboardingIn the next phase of the test, we as-sessed the enterprise onboarding function. Enterprise onboarding means that devices that establish a connection with the system are pro-vided access to the corporate envi-ronment in an easy way and on-go-ing access is further managed by PCS. Specifically, the users can log into the PCS solution with a new device and they then automatically receive Wi-Fi and VPN connection definitions or certificate profiles with which they then use the com-
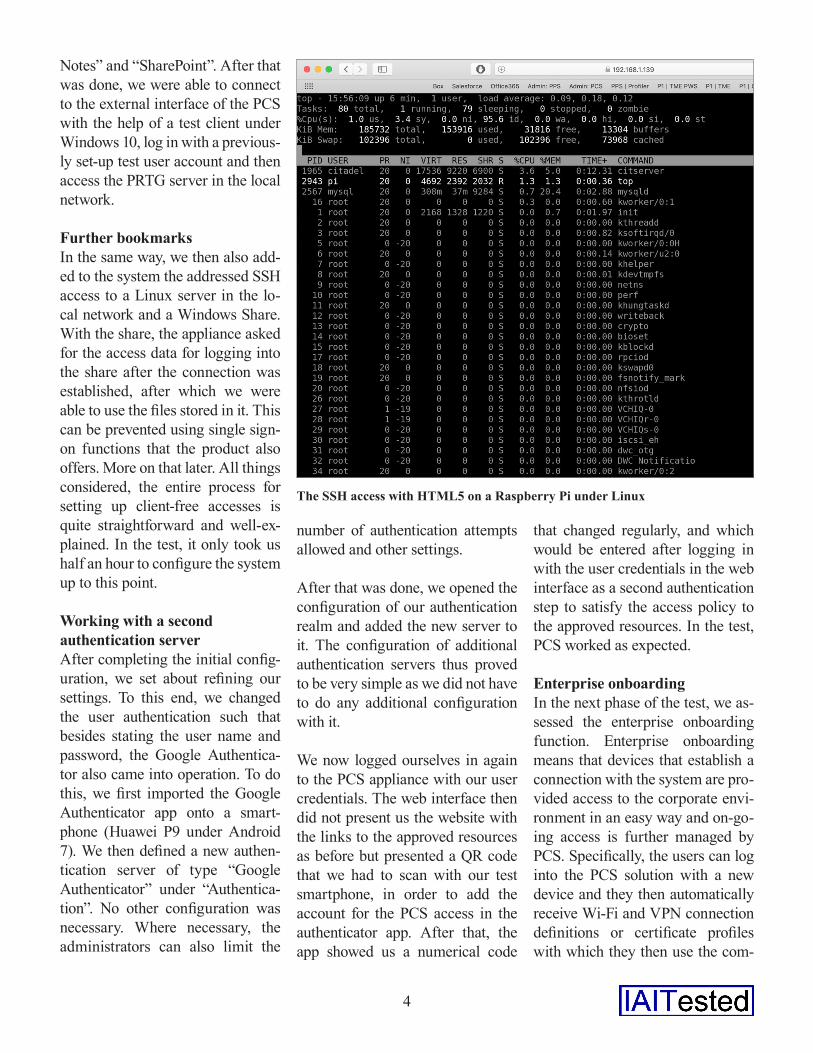
The SSH access with HTML5 on a Raspberry Pi under Linux
5
pany resources at work. In addition, with a correctly configured envi-ronment, there is no need for action by IT departments.Pulse Connect Secure supports en-terprise onboarding for devices un-der Android 4 or newer, iOS 6 or newer, macOS and Windows as of Windows 7. In this test, we again made use of our test smartphone, a Huawei P9 running Android 7, to analyse the onboarding.
The enterprise onboarding function is defined on the user role level. The administrator has the possibility to either activate the auto-launch func-
tion, which provides a download link for the client software straight after logging in, or to import the cli-ent automatically on Windows sys-tems. Alternatively, an external mo-bile device management system for the onboarding can be integrated. In the test we used the auto-launch function.
In order to use the onboarding, us-ers first have to log in to the PCS appliance with their user name and password. After that, the client soft-ware is installed either manually or automatically if necessary – with iOS and macOS, onboarding also
works without it - and the onboard-ing is carried out. This means that the new devices receive the pre-defined profiles for VPN and Wi-Fi connections and the certificates. The latter can be used to authenti-cate the devices after onboarding directly with the VPN and wire-less systems. Alternatively, this au-thentication can also be done with log-in credentials. In that case, the administrators do not need to con-figure any onboarding of certificate profiles.
The configuration of the distribution of certificatesSo that the clients can automatical-ly receive certificates for authenti-cation, the system requires a SCEP server (Simple Certificate Enrol-ment Protocol) in the network. In the test, we used an accordingly configured Windows certification point that ran on a 2012 Windows server.
So that this server could commu-nicate with our PCS appliance, we entered its URL in the web inter-face of the solution, set up a cer-tificate signing request template (CSR) (this also functions with the PCS web interface), and uploaded it using the “Test Configuration” function of the enterprise onboard-ing function onto the SCEP serv-er. The system acknowledged this upload with a green message that said that everything was OK and that the appliance was able to com-municate with the SCEP server. As already mentioned, this configura-tion step is not necessary when us-ing password-based authentication.
After adding the second authentication server, we first had to add our account to the Google Authenticator app.

6
Irrespective of the authentication method used in the company, the administrators always have to set up a VPN connection for the mo-bile users that log in via enterprise onboarding to be able to access the network via VPN. These VPN pro-files are configured under “Users/Enterprise Onboarding”. Essential-ly, such a profile comprises a name, the server URL (the VPN server was the PCS itself in our test), the user role with the mapping rules and the authentication method, i.e. passwords or certificates.
For the password-based authenti-cation, our configuration was com-pleted and we were able to log in to the PCS appliance with the help of our Android device’s browser - whereby the PCS appliance offered a link to install the Pulse client as expected. After we had imported this software, the system performed the onboarding and established the connection. After that, we accessed the network via VPN without any problems. It works in a similar way under Windows.
In order to use the certificate-based authentication for our VPN connec-tion, we had to do a little bit more work and set up a “Certificate Pro-file”. To do so, we changed over to “Users/Enterprise Onboarding/Certificate Profiles” and generat-ed a corresponding entry. Again, this needs a name. In addition, the responsible staff have to state for which type of client the profile should be valid (Android, iOS, ma-cOS and Windows). The system would also like to know where the certificates comes from. Here, there are three different options: “Import
and User Global Certificate” means that the global certificate of the Pulse Connect Secure solution is being used for the authentication of the client device. With “Import and User CA Certificate”, the system uses a predefined certificate that has to be imported and downloaded onto the clients. This makes sense when working with Wi-Fi profiles for example. The last option “Gen-erate per User Certificate”, is what we used in the test. In this case, the SCEP server and the CSR template are used to generate a certificate for every client. To complete the con-figuration, we stated the previously defined CSR template to be used and defined for which user roles the profile was to be valid. Once we finished this configuration, we were able to use the onboarding function with certificates.
The host checkerIt was now time to take a close look at the scope of functions of the host
checker. As previously mentioned, this feature checks whether required security settings and applications are working on the device such as antivirus software and firewall, and also analyses the operating system version, the patch level, the browser type and many other requirements. Furthermore, it also conducts a vulnerability assessment to rule out successful malware compro-mise. If an endpoint turns out to be non-compliant, the host checker has means to try to remediate the issue by updating the software compo-nents affected. If that is not suc-cessful, the end device can then be moved into quarantine. Alternative-ly, it will be allowed limited access, depending on the configuration, or will be completely blocked.
In order to test the host checking function, we generated a corre-sponding rule via the configura-tion tool under “Authentication/Endpoint Security/Host Checker”,
The PCS management interface after the successful addition of the SCEP server tour configuration.

7
which was meant to ensure that a firewall was active on our Win-dows 10 client. First of all, we had to give this rule a name and also select the firewall product that was installed on the client. Pulse Se-cure has already integrated a large number of supported firewalls in the security market making the se-lection fast and simple. In the scope of defining the rule, we were also able to make sure that the system constantly monitored the client and was thus able to recognise whether the firewall was activated or deacti-vated not only when logging in but also during ongoing operation (post connection).
In the next step, we activated the rule within the user authentication realm. As soon as the rule was ac-tive, we logged into the security appliance with the test client, after which the Pulse Secure host check-er installed itself as expected and did not let us into the network until
the check was successfully com-pleted. Connection setsA connection set defines the way the client may establish connec-tions, depending, for example, on the user role used or the place the client is at. A device, which is al-ready in the LAN can, for example, with the help of connection sets, be allowed direct access to the Internet through the company router where-by the same client is forced to con-duct all Internet traffic via a VPN connection into the head office if it connects from outside using an un-protected Wi-Fi connection.
The connection sets can be config-ured under “Users > Pulse Secure Client > Connections”. In this case as well, the administrators must first assign a name, and can then set various parameters such as whether log-in details may be stored, wheth-er the users can trust unknown cer-tificates and so on.
As soon as all of this information has been provided, the next step is the configuration of the connec-tions associated with the connec-tion set. Various parameters are also available here for configura-tion. Connections can, for exam-ple, be restricted to the server that provided the configuration and it is also possible to allow the users to modify the connections.
The further configuration param-eters include, for example, an au-tomatic connection set-up and an automatic reconnect function after a timeout, which worked faultless-
ly in the test. Equally of interest are also the “Location Awareness Rules”, which enable a client to de-termine its current location. If, for example, a certain computer is ac-cessible with a physical interface, the client can thus assume that it is a LAN connection. Alternative-ly, the location can be determined, amongst others, through a certain DNS server.
If the system recognises that the conditions laid down in the location awareness rules are fulfilled, it will then try to establish an automatic connection. If they are no longer fulfilled, the connection is discon-nected. In this way, connections can be set up using various connection definitions for different scenarios.
Always-on VPNFor our test connection set, we con-figured with the wizard provided for that purpose, which we will look at in more detail shortly, as well as an always-on VPN that guided all traffic from the connected clients through our PCS appliance. This way, the system ensures – as pre-viously addressed – that the clients do not establish direct connections with the Internet via open or poten-tially unsecured networks, which could then be attacked. When working with the always-on VPN in the test, there were no difficulties and the client systems were able to establish a connection with the In-ternet via the Pulse Secure appli-ance without any difficulty.
In this context it makes sense to briefly address “Always-on VPN with Lockdown Mode enabled” option. If an Always-on-VPN with
When enterprise onboarding is acti-vated, the user under Android is given an installation link for the Pulse app after the first login.

8
Lockdown Mode is used, the lat-ter makes sure that the user has no means of changing anything con-figuration or behaviour-related by way of, for example, modifying the settings or deactivating the tunnel.
Where necessary, exceptions can be defined for the Always-on-VPN with Lockdown Mode. Pulse Secire
has already set up build-in excep-tions for the services or protocols DHCP, DNS, Kerberos, LDAP, SNMP and Portmappers. Option-ally, the administrators also have the opportunity to add their own entries. In the test, we added one exception for SSH traffic; in do-ing so, one can define the direction (inbound/outbound, similar to the
definition of a firewall rule, and say whether the solution should allow a programme or a TCP of a UDP port. Under “Custom”, further set-tings can be made where necessary such as the permitted IP ranges.
At this point equally of interest: The captive portal direction. This func-tion ensures that the client system recognises when it connects using a hotspot. If this is the case, the set-up of all connections happens after Internet access is in place.
The configuration wizardsThe management tool provides a variety of support to help the ad-ministrators with the configuration of different functions. The first of these serves the step-by-step con-figuration of the always-on VPNs just mentioned, and we used it in the test for that purpose without there being any difficulties.
In the first step of the wizard, the system asked us about the connec-tion set to be used for the VPN con-nection. After that, we were able to define whether the users could establish and cut off VPN connec-tions and whether the individual connections should be secured via the lockdown mode. After that, we were able to configure additional exceptions for the lockdown mode, after which the definition of the VPN was completed and we were able to use it in operation.
The second wizard helped gener-ate user access policies. This allow end users to access the approved resources via the PCS appliance in the way we manually set them up at the beginning of the test. Here,
PCS onboarding of a Windows system
Before the actual onboarding takes place, the users have to confirm that every-thing is above board.
The Pulse Secure host checker at work.

9
the administrator is led through the configuration step by step. The wizard appears somewhat more ef-ficient than the documentation for the initial configuration we first used, as it simultaneously helped defines host checker rules where we required. We would recommend re-lying on the wizard where possible when conducting a new installation.
FQDN split tunnellingWe will briefly cover the split-tun-nelling function that Pulse Connect Secure provides. Split tunnelling is nothing unusual with certain IP addresses or address ranges. It can be used with many products to con-trol access to certain subnetworks
using specified tunnels. With the Pulse Secure solution, however, this does not only work with IP address-es, but also with FQDN resources (Fully Qualified Domain Name). The product thus enables IT staff to create a rule very simply, which allows the users direct access to the website www.salesforce.com, for example, or similar. There were no difficulties with this in the test.
Single sign onEqually worth mentioning is also the single sign-on function brief-ly described earlier. It makes sure that users, who have already been authenticated, can use approved re-sources without having to sign on
to them again. We used this feature in the test to, amongst other things, make sure that after logging in, we were not forced to have to enter our credentials again for approval when accessing the Windows Share via our bookmark we prior defined. To do this, we change over to the definition of the share and select-ed the entry “Show ALL autopol-icy types”. After that, the system displayed the option of stating the predefined credentials for the share. After that, we were able to directly access the approval as a user with-out any further action. The config-uration of this single sign-on func-tion proved to be very simple.
The configuration managementLast but not least, we took a close look at the options for importing, ex-porting and pushing configurations. In PPS, administrators can export the system configuration, the local user accounts and the configuration of the administration network. To do so, they have to issue passwords for the respective backup files. The configurations, once secured in this
If the predefined rules are not satisfied, access to the network will be denied.
The FQDN split tunnelling rules are created quickly and easily.A VPN connection running from an Android device

10
way, are then imported while enter-ing this password. At the same time, the administrator can instruct the PCS appliances to abstain from im-porting certain details such as the IP address or the certificates used. In this way, configurations can be output to different target systems quickly and simply.
Optionally, it is even possible to ex-port and import the data via XML files, and to state precisely which information should end up in the configuration file and which should not. This gives administrators great degree of flexibility when dealing with the configurations and made a huge positive impression on us in the test.
The same applies to the push func-tion, which can be used within a company for simple configuration management. It puts the adminis-trators in a position of being able to push parts of the configuration from a running system to one or several target systems. To do so, the target systems must be running
with the same software version or one newer than the source system. Pushing thus also works over sever-al versions. This way, configuration changes can be distributed in the network quickly and simply.
ConclusionThe Pulse Connect Secure VPN appliance is perfectly suited to es-tablish secure means of access to company resources via any kind of connection, whatsoever. In our test, the solution was able to score high-ly across a very large scope of func-tions. In our tests, we covered the client-free and client-based access options, the enterprise onboarding, the host checker, the connection sets, and the FQDN split tunnel-ling – we found these comprehen-sive features to offer administrators highly flexible configuration op-tions.
Despite the vast range of appli-cations, data stores, and services, Pulse Connect Secure proved to be relatively straight forward to be set up and managed. Both the wizards
and the extensive documentation are helpful with this. In the test, it was easy to integrate our appliance into the vendor’s central cloud-based management tool Pulse One. Administrators looking for an ef-ficient solution for securing access to their company resources should definitely take a look at Pulse Pol-icy Secure.
Pulse Connect Secure earns our IAIT Test Recommended rating.
About the Author and Test LabGötz Güttich is the founder and head of the IAIT Test Labora-tory based in Cologne, Germany. Dr. Güttich has been working in the IT sector since 1996 and has con-ducted extensive testing for leading German network publications. The lab provides independent product tests and analysis for IT profes-sionals as well as consulting proj-ects in the areas of security, net-working, storage, cloud and other IT solutions.
The FQDN split tunnelling rules are created quickly and easily.