altavault backup to cloud setup and administration - … · · 2017-11-18organizations apply...
TRANSCRIPT
AltaVault Backup to Cloud Setup andAdministration
November 2017 | SL10337 Version 1.5.3
AltaVault Backup to Cloud Setup and Administration2 © 2017 NetApp, Inc. All rights reserved. NetApp Proprietary
1 IntroductionThis lab uses the virtual appliance version of AltaVault (formerly SteelStore). The AltaVault virtual appliance(AVA-v) is available for lab and proof of concept testing, and can be downloaded from the NetApp support site.AVA-v is available for both VMware vSphere ESXi and Microsoft Hyper-V. The AVA-v used in this lab is the samesoftware that is used in production environments.
A complete set of documentation that describes how the appliance operates is available on the NetApp supportsite. It includes installation, administration, and command-line guides. The AltaVault OST Plugin is a separatesection on the support site for both the documentation and the software downloads. The OST plug-in must matchthe AltaVault software version.
Supported backup applications, cloud storage
Note: Whenever you deploy the virtual appliance, before powering the VM on, create a second VMDK foruse as the data (cache) disk.
AltaVault Appliance
The AltaVault appliance is an instance of the virtual AltaVault cloud integrated storage appliance. The virtualappliance offers the full functionality of a typical system used in production including a web based GUI that isaccessed using the Firefox browser on the Jumphost. It is also possible to access the command line interface(CLI) of the AltaVault appliance through SSH with the PuTTy application on the Jumphost. The model used in thislab is the AVA-v8.
NetBackup Server
A NetBackup 7.7.3 Server is accessed using remote desktop from the Jumphost. NetBackup is running on aWindows 2008R2 VM, and supports connectivity through Open Storage Technology (OST) APIs.
CommVault IntelliSnap for NetApp (NetApp SnapProtect)
A CommVault IntelliSnap for NetApp (CI4N) v11sp7 is installed as part of this lab, and is accessed using remotedesktop from the Jumphost. The CommCell server enables backup software, that provides snapshot managmentof NetApp Storage. Integrating with AltaVault is seamless.
OpenStack Swift
OpenStack Swift is configured on an Ubuntu 14.04 LTS virtual machine. The OpenStack identity service,Keystone, is also installed on this VM. The OpenStack dashboard, Horizon, is not installed because it hasdependency on other OpenStack components. Horizon requires image service (Glance), compute (Nova), andnetworking (Neutron) which are not installed.
NetApp StorageGRID Webscale
A suite of StorageGRID Webscale 10.3.0 is included in this lab as a private target for AltaVault. StorageGRIDWebscale provides a software-defined object storage solution for large archives and media repositories to helporganizations apply intelligent policy-driven data mangement for a hybrid cloud. Combined with AltaVault, thissolution enables customers to efficiently store, manage, and retrieve their data in a secure and encrypted solutionfor a hybrid cloud enviornment.
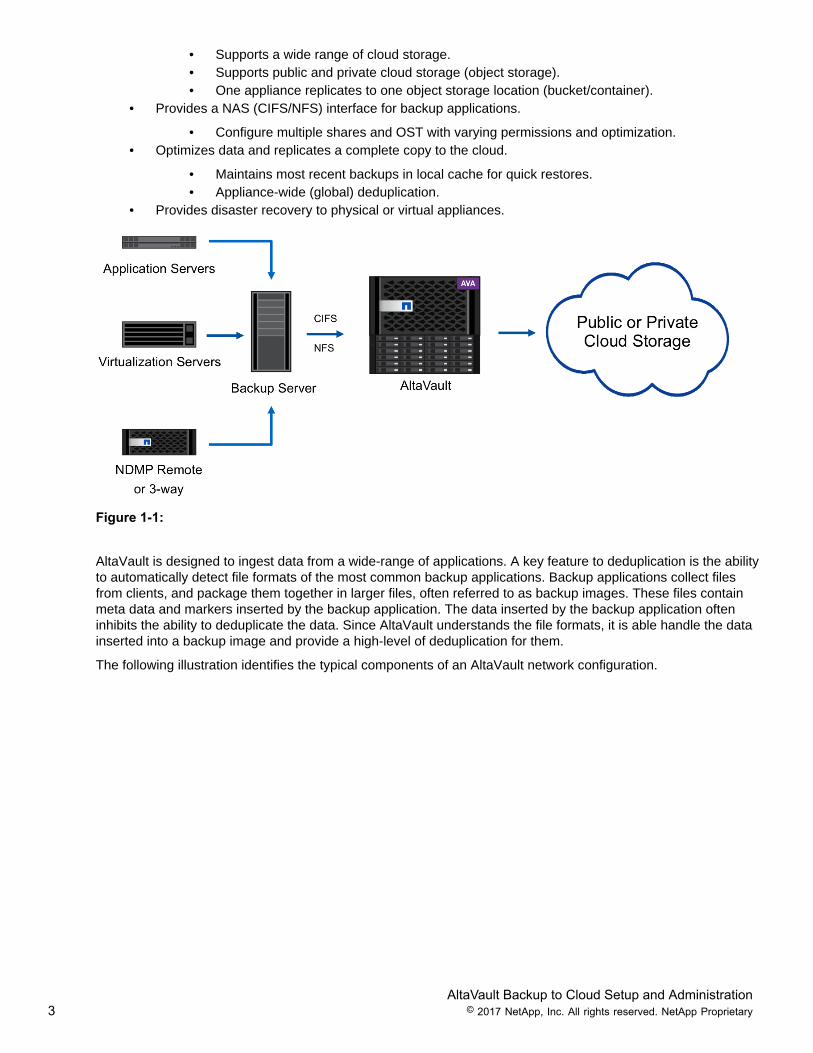
1 AltaVault OverviewAltaVault is a cloud integrated backup appliance that interfaces with backup applications through a NAS (CIFS/NFS) interface on the front end. Data written to the appliance through SMB/NFS/OST and SnapMirror is highlyoptimized using variable segment size deduplication and compression. After optimization, the data is encryptedand stored in the cache (local disk). As soon as the data is stored in the cache, an asynchronous processreplicates the data to a cloud storage service.
Benefits of AltaVault
Here are some key benefits that AltaVault provides:
• Optimized for managing data in cloud storage services.
AltaVault Backup to Cloud Setup and Administration3 © 2017 NetApp, Inc. All rights reserved. NetApp Proprietary
• Supports a wide range of cloud storage.• Supports public and private cloud storage (object storage).• One appliance replicates to one object storage location (bucket/container).
• Provides a NAS (CIFS/NFS) interface for backup applications.
• Configure multiple shares and OST with varying permissions and optimization.• Optimizes data and replicates a complete copy to the cloud.
• Maintains most recent backups in local cache for quick restores.• Appliance-wide (global) deduplication.
• Provides disaster recovery to physical or virtual appliances.
Figure 1-1:
AltaVault is designed to ingest data from a wide-range of applications. A key feature to deduplication is the abilityto automatically detect file formats of the most common backup applications. Backup applications collect filesfrom clients, and package them together in larger files, often referred to as backup images. These files containmeta data and markers inserted by the backup application. The data inserted by the backup application ofteninhibits the ability to deduplicate the data. Since AltaVault understands the file formats, it is able handle the datainserted into a backup image and provide a high-level of deduplication for them.
The following illustration identifies the typical components of an AltaVault network configuration.
AltaVault Backup to Cloud Setup and Administration4 © 2017 NetApp, Inc. All rights reserved. NetApp Proprietary
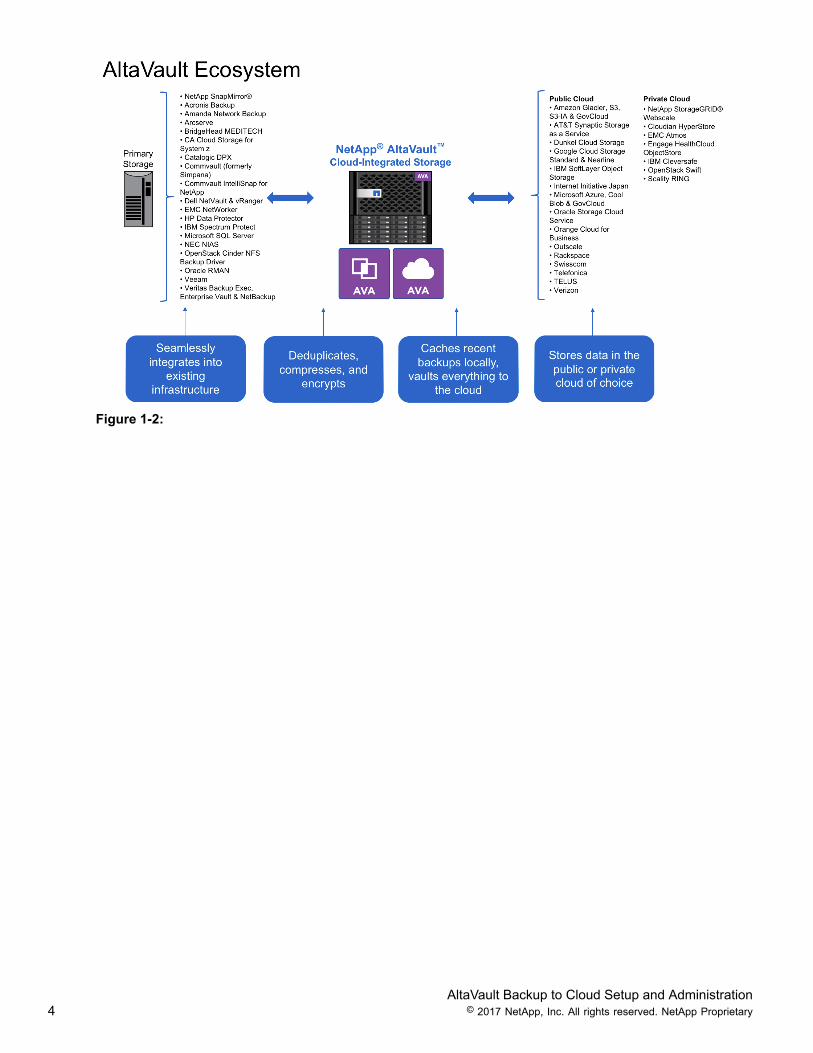
Figure 1-2:
AltaVault Backup to Cloud Setup and Administration5 © 2017 NetApp, Inc. All rights reserved. NetApp Proprietary
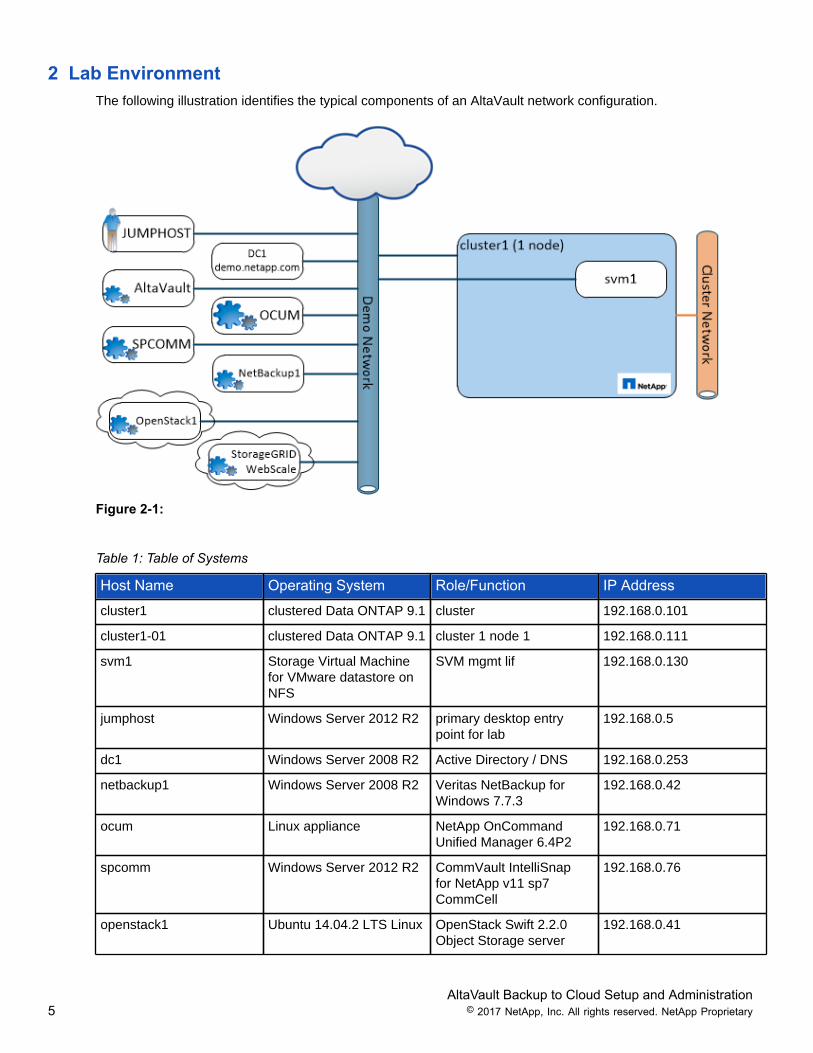
2 Lab EnvironmentThe following illustration identifies the typical components of an AltaVault network configuration.
Figure 2-1:
Table 1: Table of Systems
Host Name Operating System Role/Function IP Address
cluster1 clustered Data ONTAP 9.1 cluster 192.168.0.101
cluster1-01 clustered Data ONTAP 9.1 cluster 1 node 1 192.168.0.111
svm1 Storage Virtual Machinefor VMware datastore onNFS
SVM mgmt lif 192.168.0.130
jumphost Windows Server 2012 R2 primary desktop entrypoint for lab
192.168.0.5
dc1 Windows Server 2008 R2 Active Directory / DNS 192.168.0.253
netbackup1 Windows Server 2008 R2 Veritas NetBackup forWindows 7.7.3
192.168.0.42
ocum Linux appliance NetApp OnCommandUnified Manager 6.4P2
192.168.0.71
spcomm Windows Server 2012 R2 CommVault IntelliSnapfor NetApp v11 sp7CommCell
192.168.0.76
openstack1 Ubuntu 14.04.2 LTS Linux OpenStack Swift 2.2.0Object Storage server
192.168.0.41
AltaVault Backup to Cloud Setup and Administration6 © 2017 NetApp, Inc. All rights reserved. NetApp Proprietary
Host Name Operating System Role/Function IP Address
altavault AVA-V virtual appliance NetApp AltaVault 4.3.1 192.168.0.75
sgntp SUSE Linux Enterprise 10SP3
Network Time Protocolserver for SGWS
192.168.0.9
sgdc1s3 SUSE Linux Enterprise 11 StorageGRID Webscale10.3 Storage Node 3
192.168.0.8
sgdc1s2 SUSE Linux Enterprise 11 StorageGRID Webscale10.3 Storage Node 2
192.168.0.7
sgdc1s1 SUSE Linux Enterprise 11 StorageGRID Webscale10.3 Storage Node 1
192.168.0.6
sgdc1g1 SUSE Linux Enterprise 11 StorageGRID Webscale10.3 Gateway Node
192.168.0.11
sgdc1arc1 SUSE Linux Enterprise 11 StorageGRID Webscale10.3 Archive Node
192.168.0.12
sgdc1adm1 SUSE Linux Enterprise 11 StorageGRID Webscale10.3 Admin Node
192.168.0.10
sgdc1nas SUSE Linux Enteprise 11 StorageGRID Webscale10.3 NAS node
192.168.0.14
Table 2: User IDs and Passwords
Host Name User ID Password Comments
jumphost DEMO\Administrator Netapp1! Domain Administrator
cluster1 admin Netapp1! Same for individual clusternodes
svm1 vsadmin Netapp1! svm administrator
openstack1 stack Netapp1! openstack rootadministrator
openstack1 SSaccount Netapp1 swift user account
ocum admin or Administrator Netapp1! OnCommand UnifiedManager Administrator
sgws Vendor Netapp1! StorageGRID WebscaleVendor MaintenanceAdmin
altavault admin Netapp1! AltaVault Administrator
spcomm admin Netapp1! CommCell Admin ConsoleLocal Administrator
AltaVault Backup to Cloud Setup and Administration7 © 2017 NetApp, Inc. All rights reserved. NetApp Proprietary
3 Lab ActivitiesThis lab contains the following activities and tasks:
• Navigating and Configuring the AltaVault User Interface on page 7• Select and Configure a Cloud Target on page 11 Pick one
• Configure Cloud Settings to OpenStack Swift on page 11• Configure Cloud Settings to StorageGRID Webscale on page 23• Configure Cloud Settings using S3 on page 36
• Configure Backup Sources on page 44 Pick at least one
• Configure Veritas NetBackup OST to Backup to AltaVault on page 44• Configure CommVault IntelliSnap for NetApp to Backup to AltaVault on page 98• Configure NetApp ONTAP for SnapMirror Backup to AltaVault on page 134
• Restore Data from AltaVault on page 148
• Restore data using NetBackup on page 148• Restore data using IntelliSnap on page 158• Restore data from ONTAP SnapShots created by SnapMirror destination of AltaVault on
page 169• AltaVault Disaster Recovery on page 171
• Administer the AltaVault Appliance on page 183
• Review AltaVault Reports on page 184• AltaVault Operations Tasks on page 186• Using the AltaVault Command Line Interface on page 191
• Review Cloud Target Configurations on page 193 Optional
• Review OpenStack Swift Configuration on page 194• Review the NetApp StorageGRID WebScale Configuration on page 198
3.1 Navigating and Configuring the AltaVault User InterfaceIn this lab, a basic configuration of the AltaVault appliance has already been performed. User configuration beginswhere you access the appliance from the web GUI.
A typical initial configuration includes the following steps:
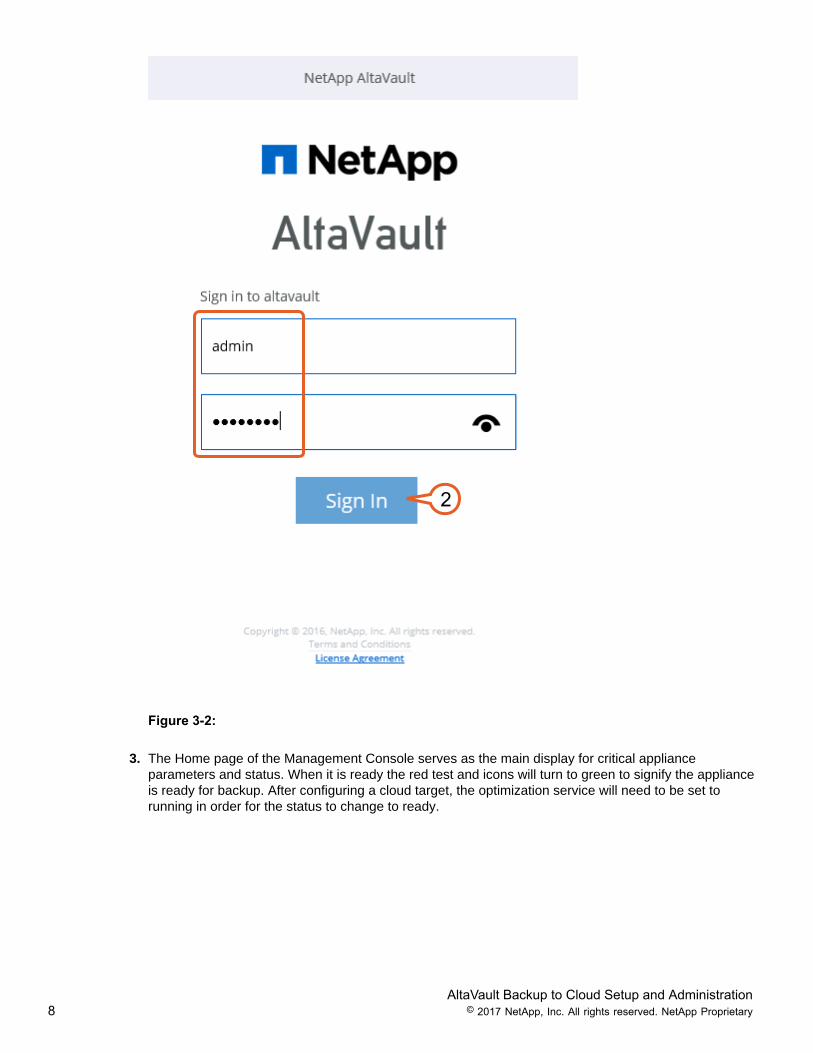
3.1 Login and Initial ConfigurationLogin to the AltaVault GUI setup wizard to configure the items necessary to get the AltaVault “Healthy” – cloudsettings, and encryption key.
1. Launch the IE web browser from the AltaVault Login shortcut on the desktop of the Jumphost.
Figure 3-1:
2. Enter the credentials: username admin, and password Netapp1!.
AltaVault Backup to Cloud Setup and Administration8 © 2017 NetApp, Inc. All rights reserved. NetApp Proprietary
2
Figure 3-2:
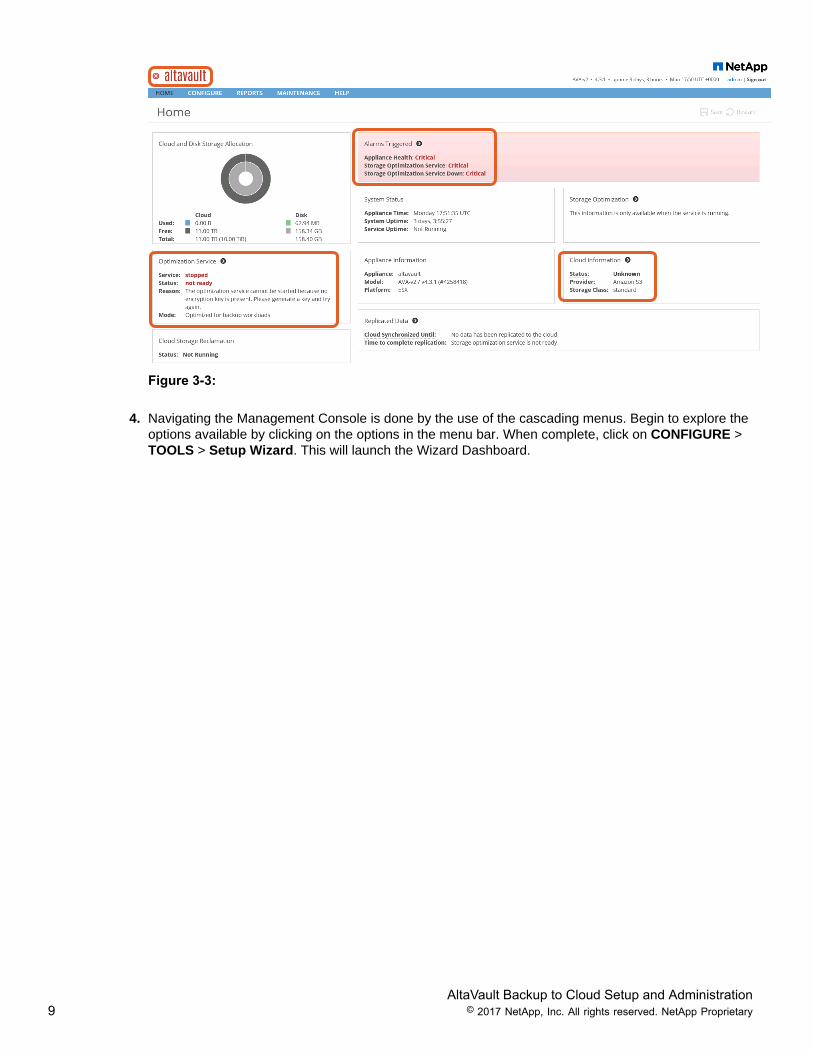
3. The Home page of the Management Console serves as the main display for critical applianceparameters and status. When it is ready the red test and icons will turn to green to signify the applianceis ready for backup. After configuring a cloud target, the optimization service will need to be set torunning in order for the status to change to ready.
AltaVault Backup to Cloud Setup and Administration9 © 2017 NetApp, Inc. All rights reserved. NetApp Proprietary
Figure 3-3:
4. Navigating the Management Console is done by the use of the cascading menus. Begin to explore theoptions available by clicking on the options in the menu bar. When complete, click on CONFIGURE >TOOLS > Setup Wizard. This will launch the Wizard Dashboard.

AltaVault Backup to Cloud Setup and Administration10 © 2017 NetApp, Inc. All rights reserved. NetApp Proprietary
4
Figure 3-4:
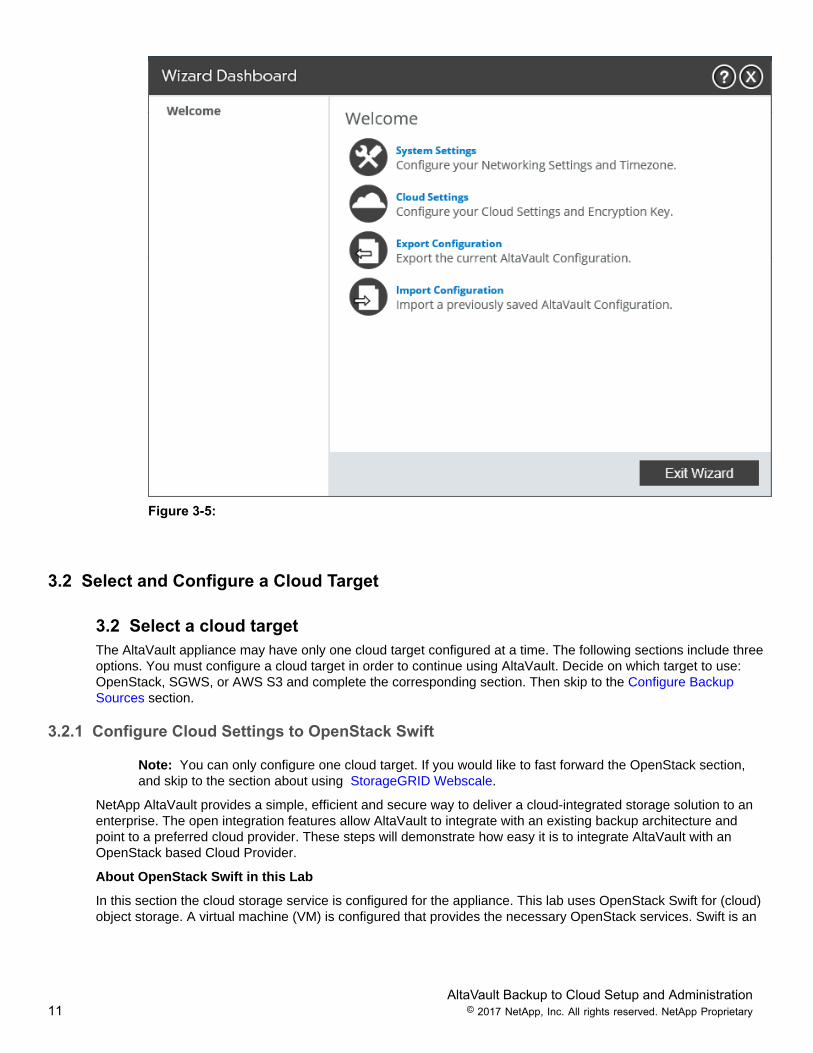
5. The Wizard Dashboard appears after you log into the appliance for the first time. The settings availablein the wizards are all available from the menu bar, however the Wizards allow for a more simplifiedconfiguraiton experience. For the purposes of lab, the networking and timezone settings configuredfrom the System Settings wizard have been pre-configured. The lab demonstration will continue with theCloud Settings Wizard.
AltaVault Backup to Cloud Setup and Administration11 © 2017 NetApp, Inc. All rights reserved. NetApp Proprietary
Figure 3-5:
3.2 Select and Configure a Cloud Target
3.2 Select a cloud targetThe AltaVault appliance may have only one cloud target configured at a time. The following sections include threeoptions. You must configure a cloud target in order to continue using AltaVault. Decide on which target to use:OpenStack, SGWS, or AWS S3 and complete the corresponding section. Then skip to the Configure BackupSources section.
3.2.1 Configure Cloud Settings to OpenStack Swift
Note: You can only configure one cloud target. If you would like to fast forward the OpenStack section,and skip to the section about using StorageGRID Webscale.
NetApp AltaVault provides a simple, efficient and secure way to deliver a cloud-integrated storage solution to anenterprise. The open integration features allow AltaVault to integrate with an existing backup architecture andpoint to a preferred cloud provider. These steps will demonstrate how easy it is to integrate AltaVault with anOpenStack based Cloud Provider.
About OpenStack Swift in this Lab
In this section the cloud storage service is configured for the appliance. This lab uses OpenStack Swift for (cloud)object storage. A virtual machine (VM) is configured that provides the necessary OpenStack services. Swift is an

AltaVault Backup to Cloud Setup and Administration12 © 2017 NetApp, Inc. All rights reserved. NetApp Proprietary
object storage service in OpenStack. Keystone, the OpenStack authentication service, is also configured. Theother OpenStack services are not required to provide object storage, and are not installed.
Horizon, the web GUI for administration in OpenStack is not installed as it requires additional components.Configuration and administration of OpenStack is, therefore, done using the CLI. For this lab, the basicconfiguration for a AltaVault account and tenant is already done, so there are no changes required for Swift. Formore information on configuring Swift and Keystone see the sections at the end of this guide.
Note: Horizon could be installed; however, it requires other OpenStack services to be running on thesystem that are not installed. For more information refer to the OpenStack web site.
Each cloud storage vendor or service has unique settings that allow access and inform the AltaVault appliancehow to communicate with the storage service. For OpenStack Swift, there are 3 options for the type of informationthat can be entered. It is required to choose one of the 3 options, and which one depends on which type ofcredentials were supplied by the administrator of the storage service.
The options for OpenStack are:
• Access Key ID / Secret Key.• Username / Password.• Username / API Access Key.
This lab uses Username / Password credentials.
• The deployment guides for AltaVault located on the Field Portal, as well as the deployment guide inthe user documentation, describe each of the supported cloud storage services and the options forconfiguring them.
• It should be possible to copy and paste values from the lab guide into the lab session. If you experiencea problem with the copy and paste function, there is a text file located in the administrator’s documentsfolder on the Jumphost that you can use to cut and paste inside the lab environment.
OpenStack Swift Configuration Details: Cloud Settings
Note: You can copy and paste the settings from a text file that has a shortcut on the Jumphost desktop.
Parameter Value
Provider OpenStack Object Storage (Swift)
Authentication Username / Password
Username SSaccount
Password Netapp1
Tenant ID 3eabe7b1bb614e75895703417b62f640
Authentication URL Path /v2.0/tokens
Web Protocol http
Hostname openstack1.demo.netapp.com
Bucketname sstest1
Port 5000
Enable Archiving? No
Enable Cloud Deduplication? leave checked (default)
Enable Cloud CA Certificate? leave unchecked (default)
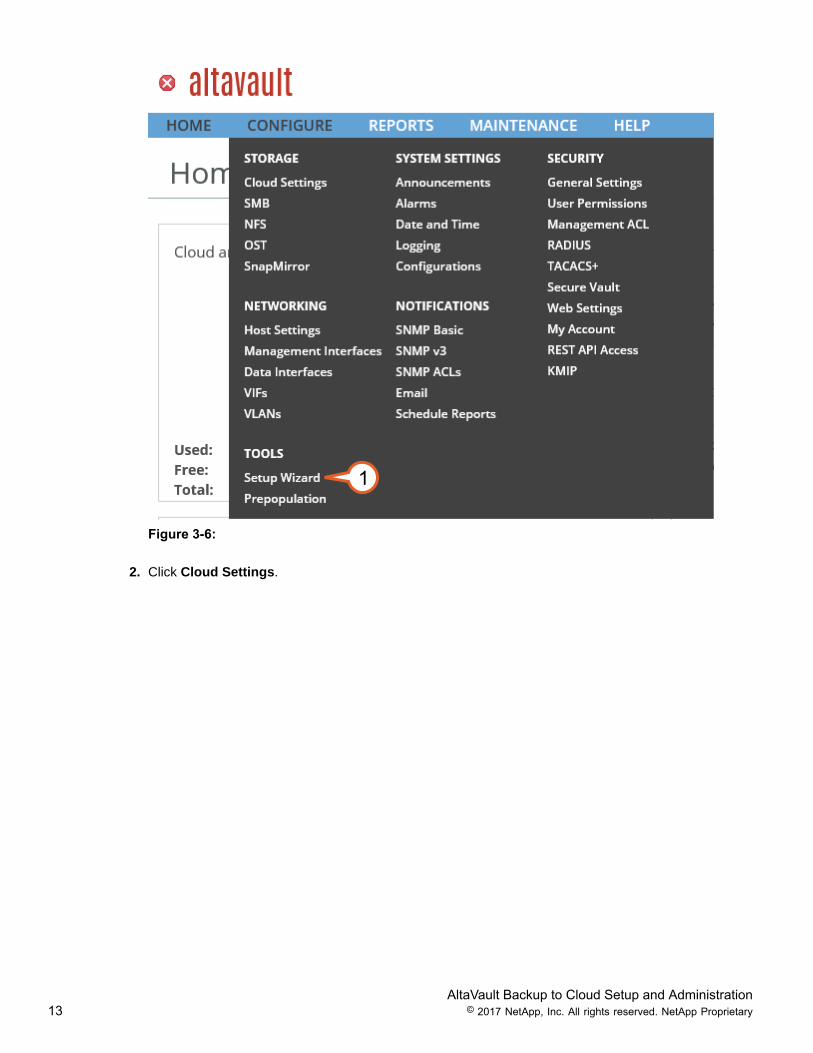
1. Click CONFIGURE > TOOLS > Setup Wizard.
AltaVault Backup to Cloud Setup and Administration13 © 2017 NetApp, Inc. All rights reserved. NetApp Proprietary
1
Figure 3-6:
2. Click Cloud Settings.

AltaVault Backup to Cloud Setup and Administration14 © 2017 NetApp, Inc. All rights reserved. NetApp Proprietary
2
Figure 3-7:
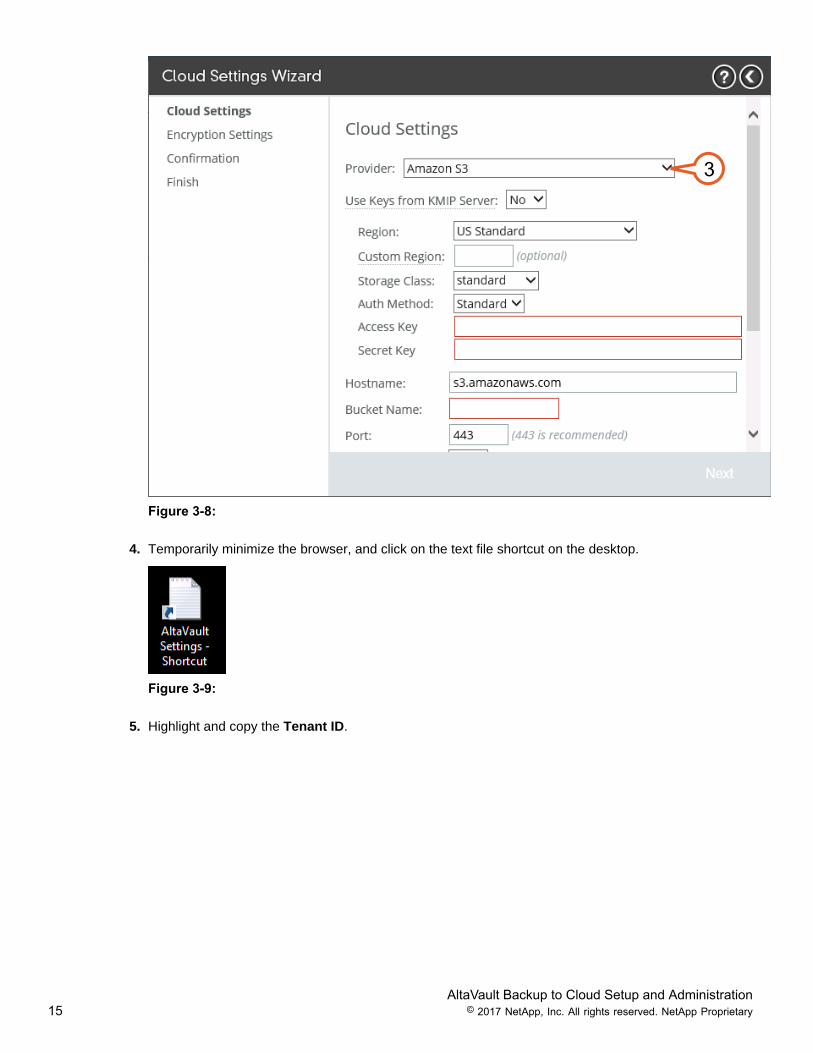
3. Click the drop down arrow for Provider to reveal the list, and select OpenStack Object Storage (Swift).
AltaVault Backup to Cloud Setup and Administration15 © 2017 NetApp, Inc. All rights reserved. NetApp Proprietary
3
Figure 3-8:
4. Temporarily minimize the browser, and click on the text file shortcut on the desktop.
Figure 3-9:
5. Highlight and copy the Tenant ID.
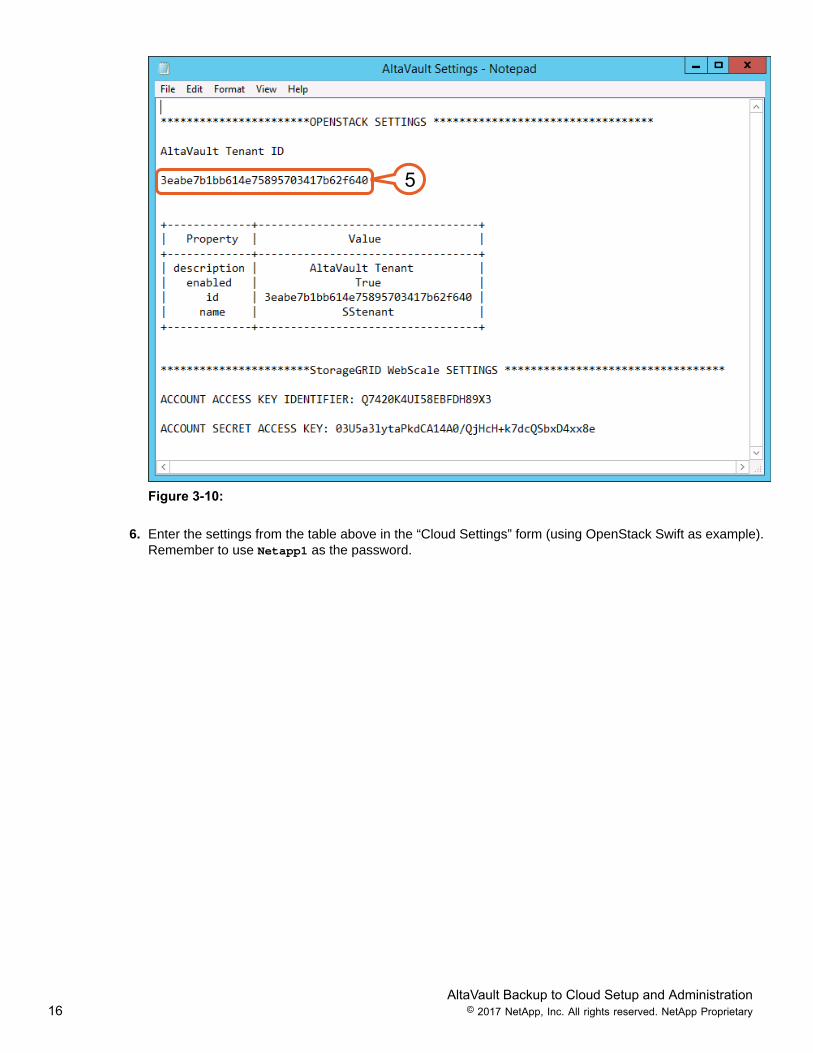
AltaVault Backup to Cloud Setup and Administration16 © 2017 NetApp, Inc. All rights reserved. NetApp Proprietary
5
Figure 3-10:
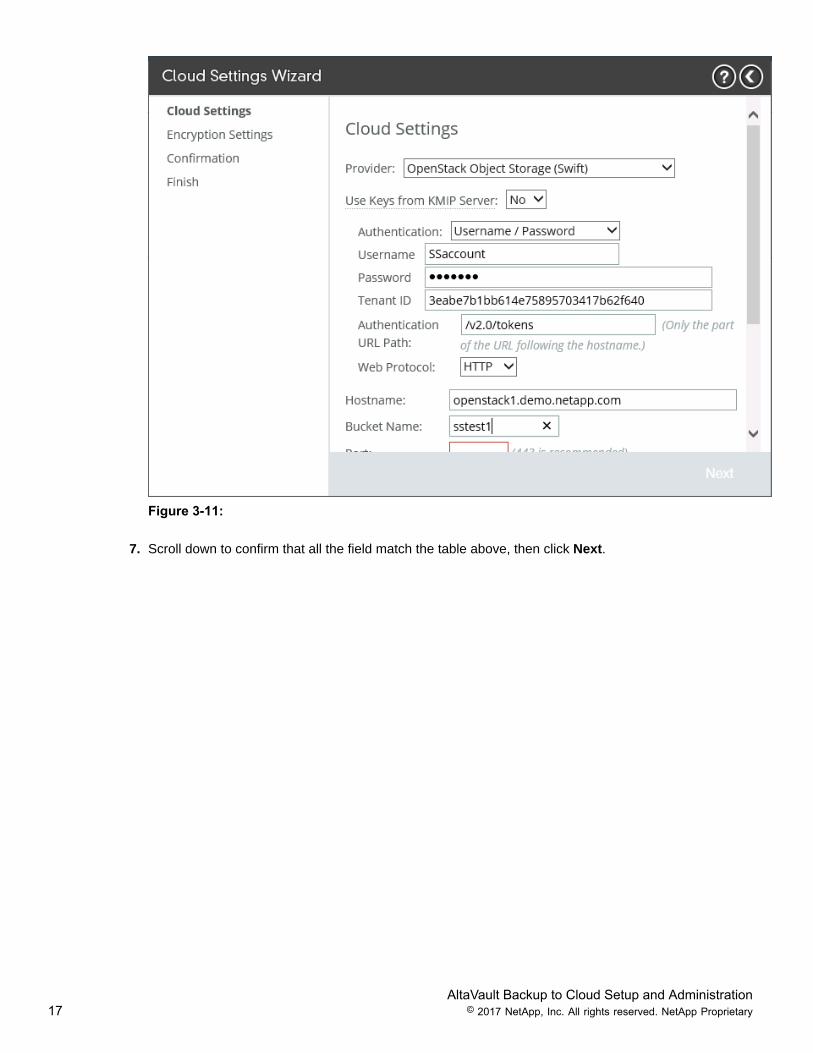
6. Enter the settings from the table above in the “Cloud Settings” form (using OpenStack Swift as example).Remember to use Netapp1 as the password.
AltaVault Backup to Cloud Setup and Administration17 © 2017 NetApp, Inc. All rights reserved. NetApp Proprietary
Figure 3-11:
7. Scroll down to confirm that all the field match the table above, then click Next.
AltaVault Backup to Cloud Setup and Administration18 © 2017 NetApp, Inc. All rights reserved. NetApp Proprietary
7
Figure 3-12:
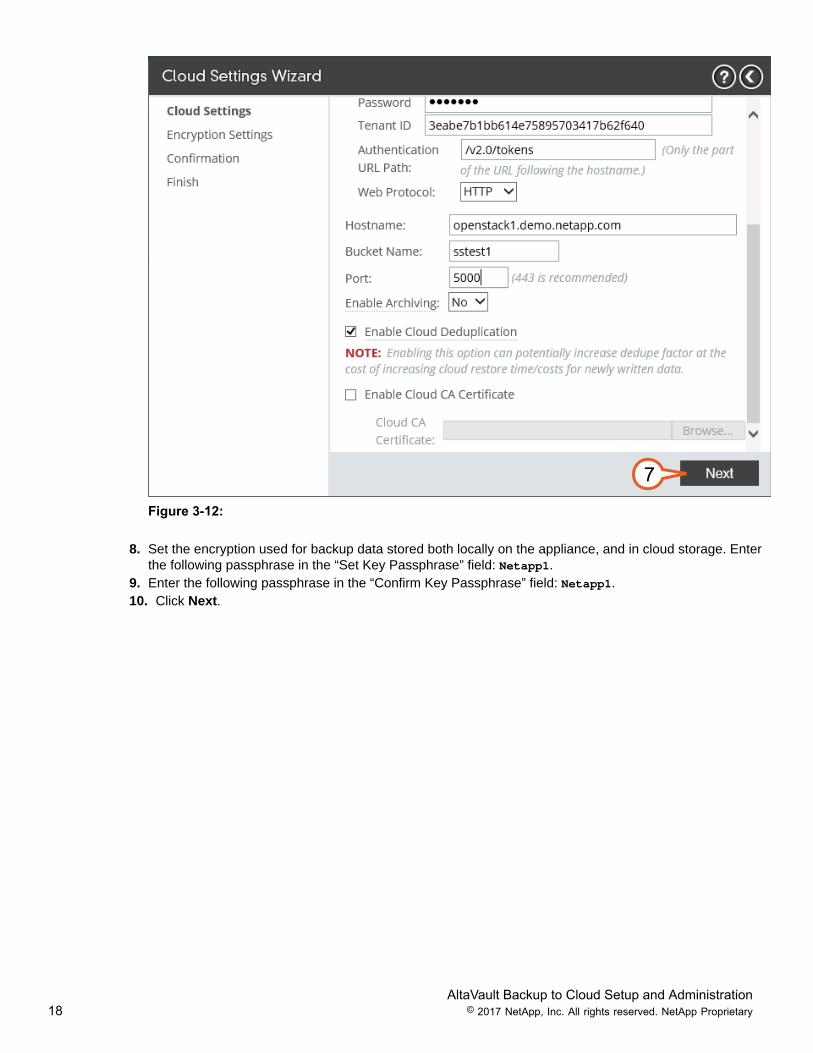
8. Set the encryption used for backup data stored both locally on the appliance, and in cloud storage. Enterthe following passphrase in the “Set Key Passphrase” field: Netapp1.
9. Enter the following passphrase in the “Confirm Key Passphrase” field: Netapp1.10. Click Next.

AltaVault Backup to Cloud Setup and Administration19 © 2017 NetApp, Inc. All rights reserved. NetApp Proprietary
8
9
10
Figure 3-13:
11. The confirmation dialog is shown with a summary. The optimization service must start afterwards, soleave the check box selected to automatically start it. Review the values in the table and if correct, clickSave and Apply.

AltaVault Backup to Cloud Setup and Administration20 © 2017 NetApp, Inc. All rights reserved. NetApp Proprietary
11
Figure 3-14:
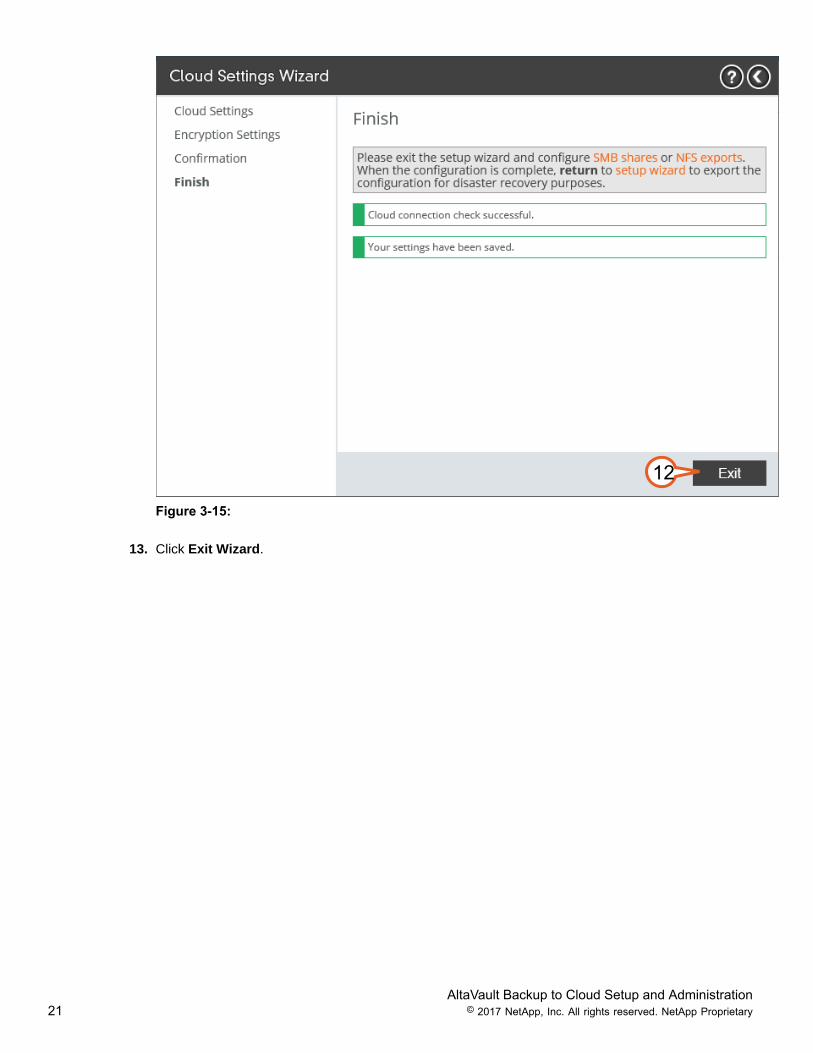
12. Click Exit.
AltaVault Backup to Cloud Setup and Administration21 © 2017 NetApp, Inc. All rights reserved. NetApp Proprietary
12
Figure 3-15:
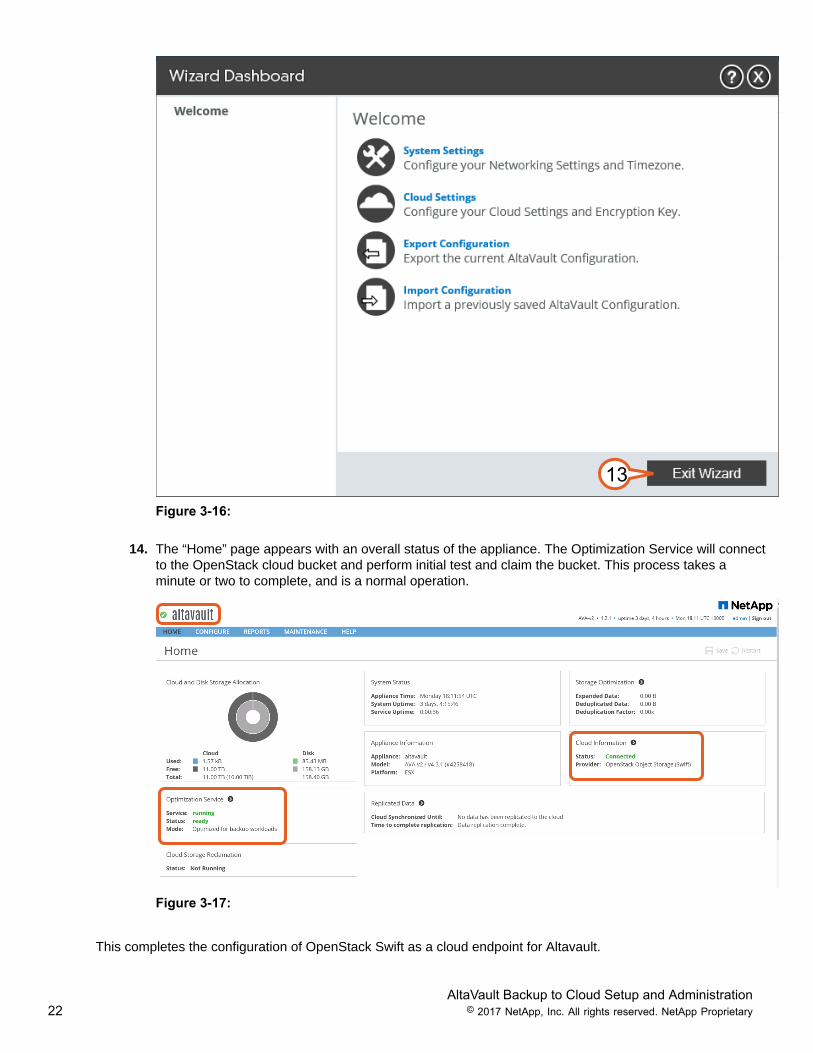
13. Click Exit Wizard.
AltaVault Backup to Cloud Setup and Administration22 © 2017 NetApp, Inc. All rights reserved. NetApp Proprietary
13
Figure 3-16:
14. The “Home” page appears with an overall status of the appliance. The Optimization Service will connectto the OpenStack cloud bucket and perform initial test and claim the bucket. This process takes aminute or two to complete, and is a normal operation.
Figure 3-17:
This completes the configuration of OpenStack Swift as a cloud endpoint for Altavault.
AltaVault Backup to Cloud Setup and Administration23 © 2017 NetApp, Inc. All rights reserved. NetApp Proprietary
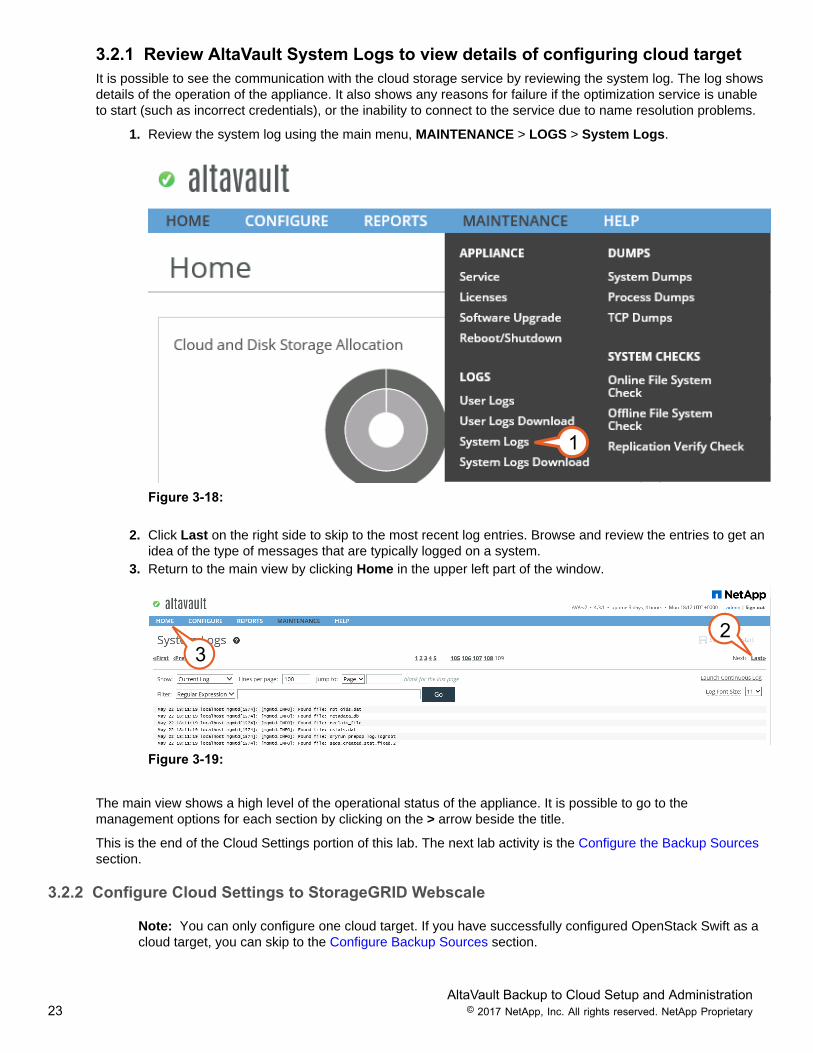
3.2.1 Review AltaVault System Logs to view details of configuring cloud targetIt is possible to see the communication with the cloud storage service by reviewing the system log. The log showsdetails of the operation of the appliance. It also shows any reasons for failure if the optimization service is unableto start (such as incorrect credentials), or the inability to connect to the service due to name resolution problems.
1. Review the system log using the main menu, MAINTENANCE > LOGS > System Logs.
1
Figure 3-18:
2. Click Last on the right side to skip to the most recent log entries. Browse and review the entries to get anidea of the type of messages that are typically logged on a system.
3. Return to the main view by clicking Home in the upper left part of the window.
23
Figure 3-19:
The main view shows a high level of the operational status of the appliance. It is possible to go to themanagement options for each section by clicking on the > arrow beside the title.
This is the end of the Cloud Settings portion of this lab. The next lab activity is the Configure the Backup Sourcessection.
3.2.2 Configure Cloud Settings to StorageGRID Webscale
Note: You can only configure one cloud target. If you have successfully configured OpenStack Swift as acloud target, you can skip to the Configure Backup Sources section.
AltaVault Backup to Cloud Setup and Administration24 © 2017 NetApp, Inc. All rights reserved. NetApp Proprietary
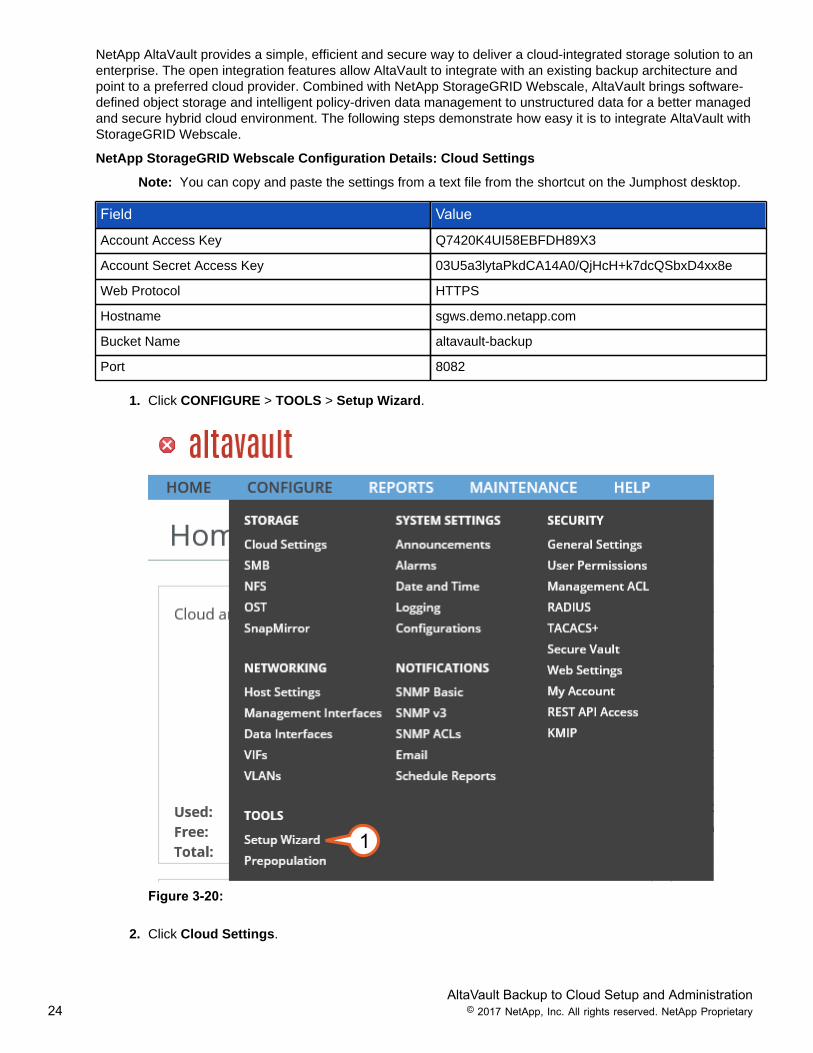
NetApp AltaVault provides a simple, efficient and secure way to deliver a cloud-integrated storage solution to anenterprise. The open integration features allow AltaVault to integrate with an existing backup architecture andpoint to a preferred cloud provider. Combined with NetApp StorageGRID Webscale, AltaVault brings software-defined object storage and intelligent policy-driven data management to unstructured data for a better managedand secure hybrid cloud environment. The following steps demonstrate how easy it is to integrate AltaVault withStorageGRID Webscale.
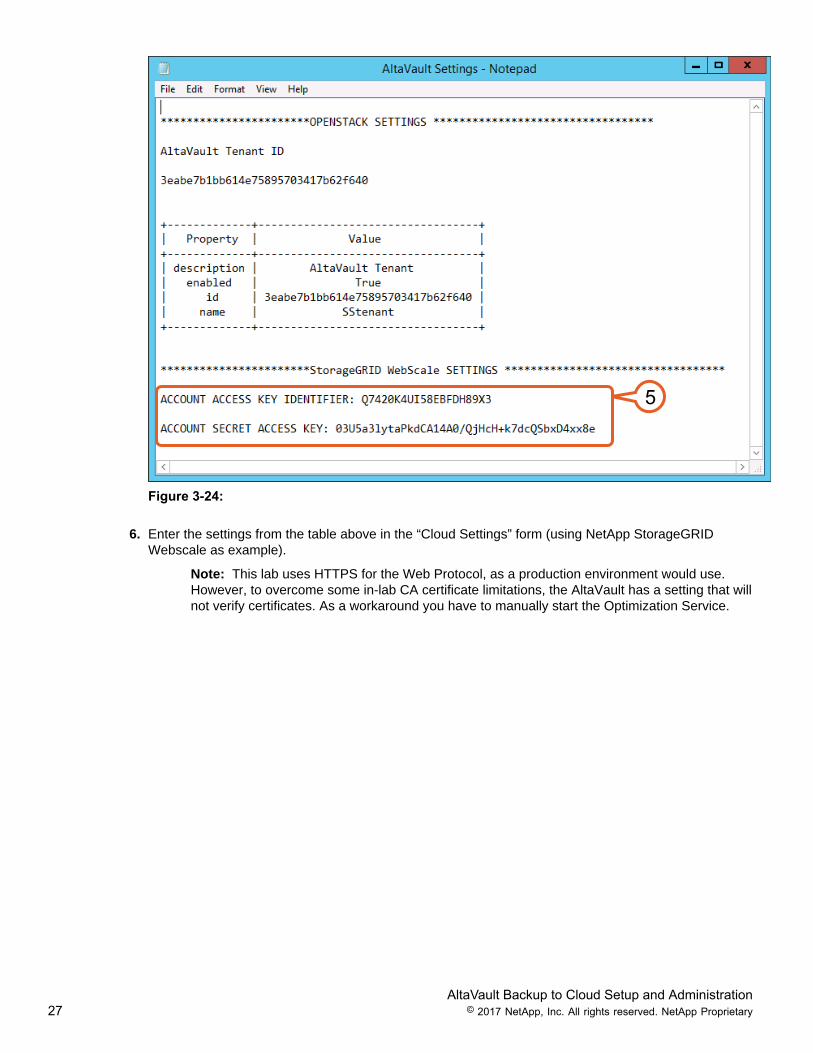
NetApp StorageGRID Webscale Configuration Details: Cloud Settings
Note: You can copy and paste the settings from a text file from the shortcut on the Jumphost desktop.
Field Value
Account Access Key Q7420K4UI58EBFDH89X3
Account Secret Access Key 03U5a3lytaPkdCA14A0/QjHcH+k7dcQSbxD4xx8e
Web Protocol HTTPS
Hostname sgws.demo.netapp.com
Bucket Name altavault-backup
Port 8082
1. Click CONFIGURE > TOOLS > Setup Wizard.
1
Figure 3-20:
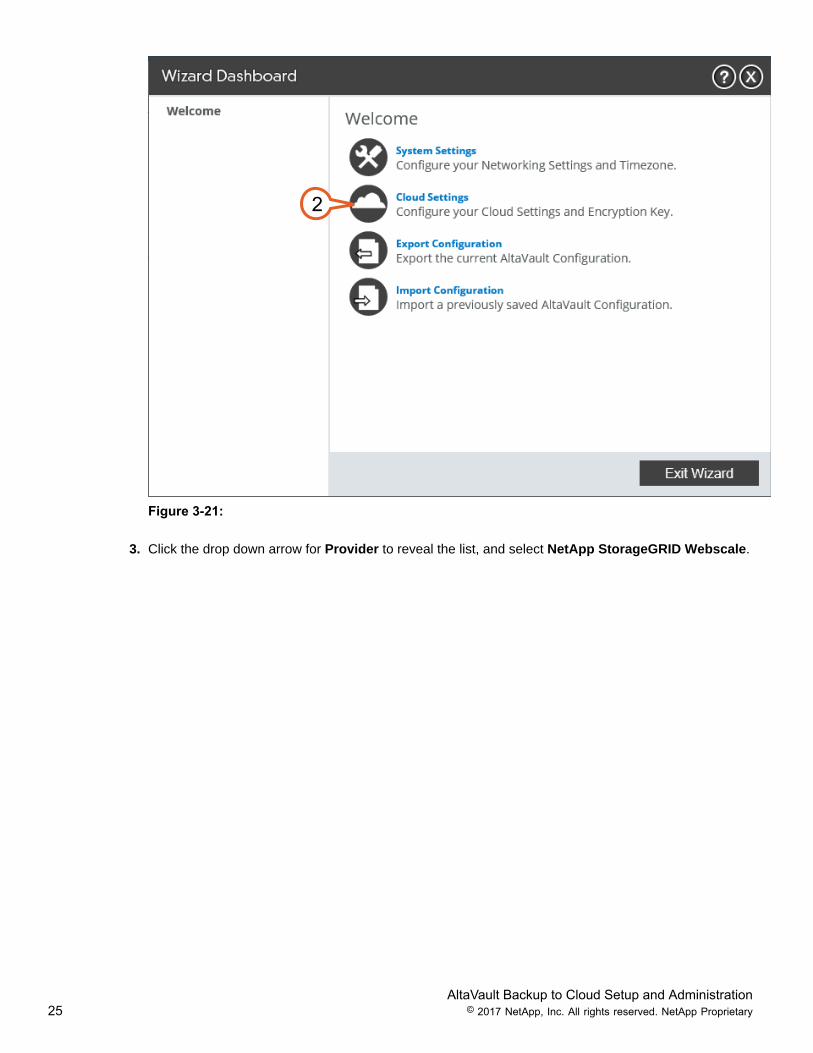
2. Click Cloud Settings.
AltaVault Backup to Cloud Setup and Administration25 © 2017 NetApp, Inc. All rights reserved. NetApp Proprietary
2
Figure 3-21:
3. Click the drop down arrow for Provider to reveal the list, and select NetApp StorageGRID Webscale.
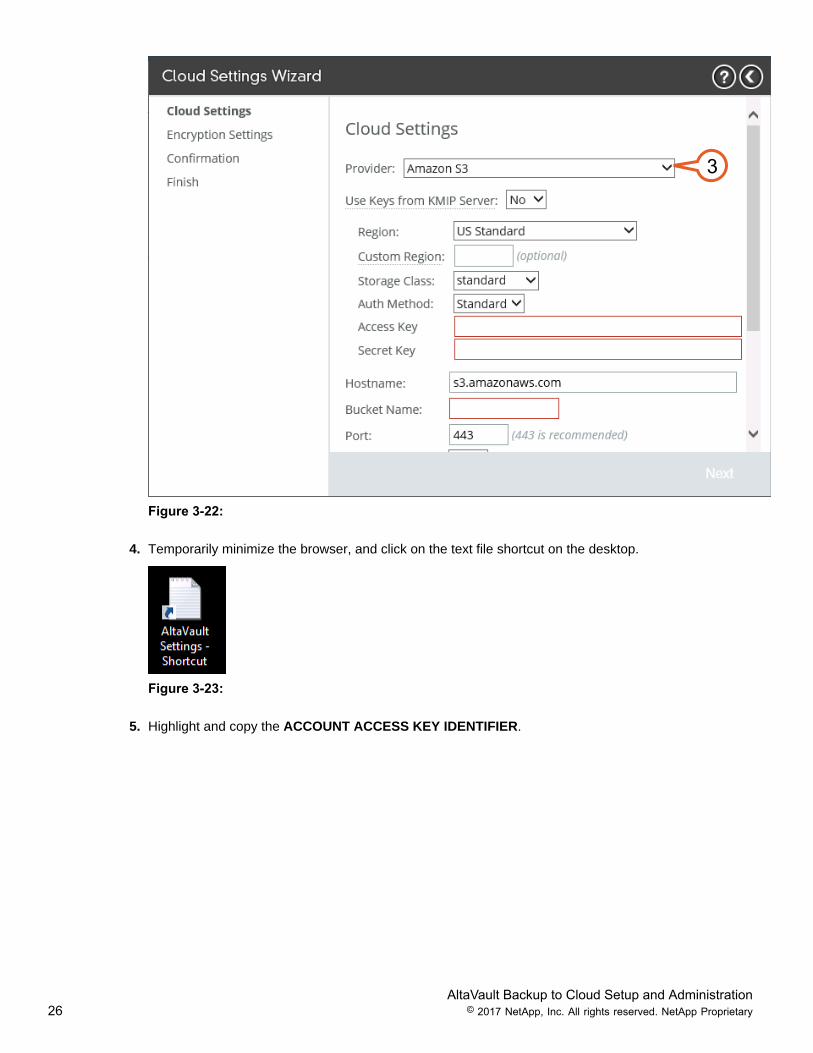
AltaVault Backup to Cloud Setup and Administration26 © 2017 NetApp, Inc. All rights reserved. NetApp Proprietary
3
Figure 3-22:
4. Temporarily minimize the browser, and click on the text file shortcut on the desktop.
Figure 3-23:
5. Highlight and copy the ACCOUNT ACCESS KEY IDENTIFIER.
AltaVault Backup to Cloud Setup and Administration27 © 2017 NetApp, Inc. All rights reserved. NetApp Proprietary
5
Figure 3-24:
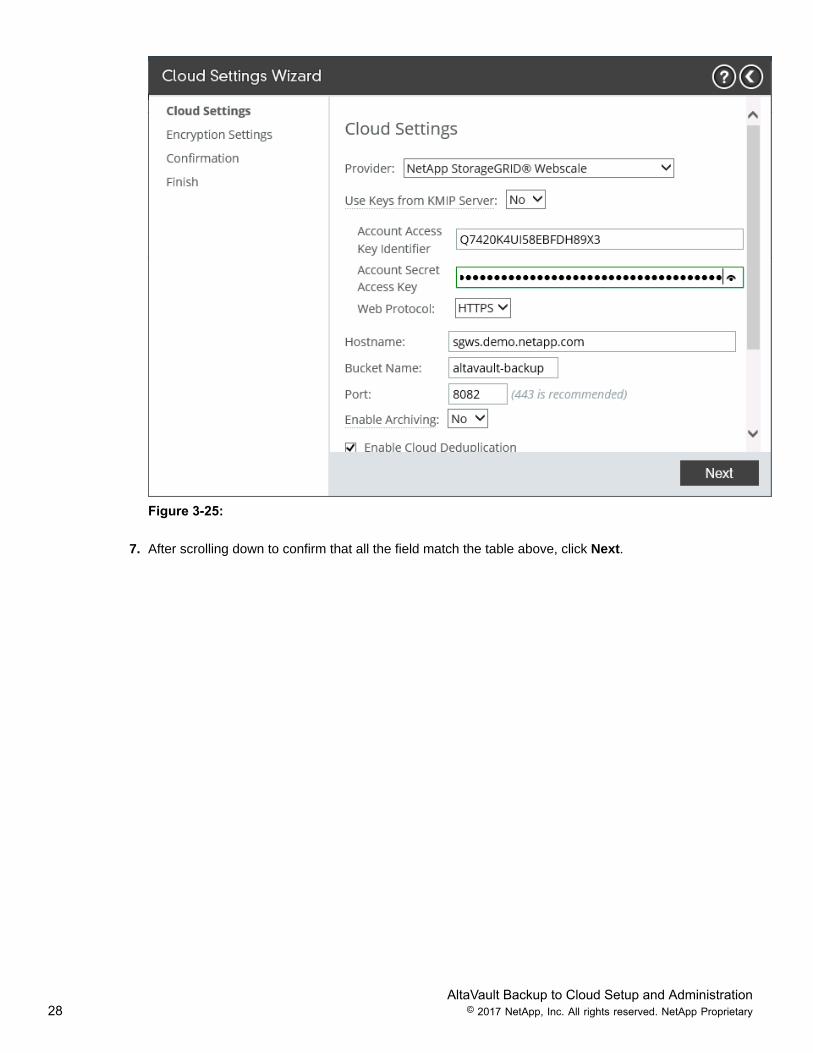
6. Enter the settings from the table above in the “Cloud Settings” form (using NetApp StorageGRIDWebscale as example).
Note: This lab uses HTTPS for the Web Protocol, as a production environment would use.However, to overcome some in-lab CA certificate limitations, the AltaVault has a setting that willnot verify certificates. As a workaround you have to manually start the Optimization Service.
AltaVault Backup to Cloud Setup and Administration28 © 2017 NetApp, Inc. All rights reserved. NetApp Proprietary
Figure 3-25:
7. After scrolling down to confirm that all the field match the table above, click Next.
AltaVault Backup to Cloud Setup and Administration29 © 2017 NetApp, Inc. All rights reserved. NetApp Proprietary
7
Figure 3-26:
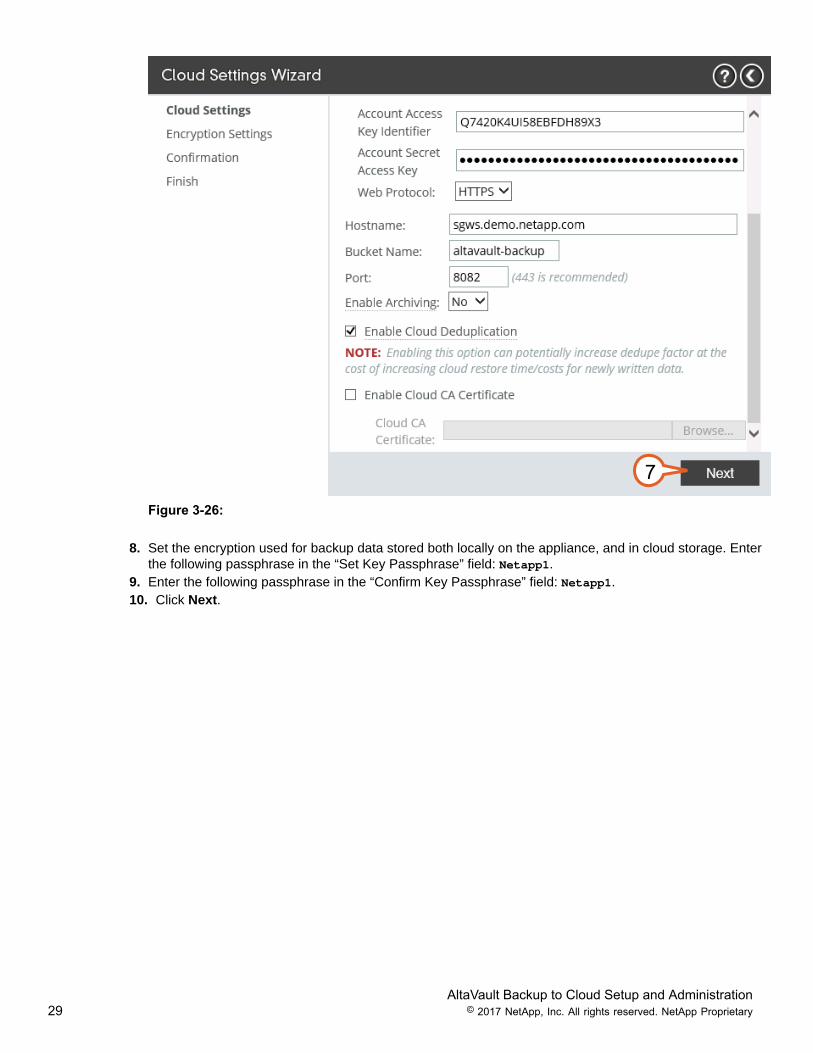
8. Set the encryption used for backup data stored both locally on the appliance, and in cloud storage. Enterthe following passphrase in the “Set Key Passphrase” field: Netapp1.
9. Enter the following passphrase in the “Confirm Key Passphrase” field: Netapp1.10. Click Next.
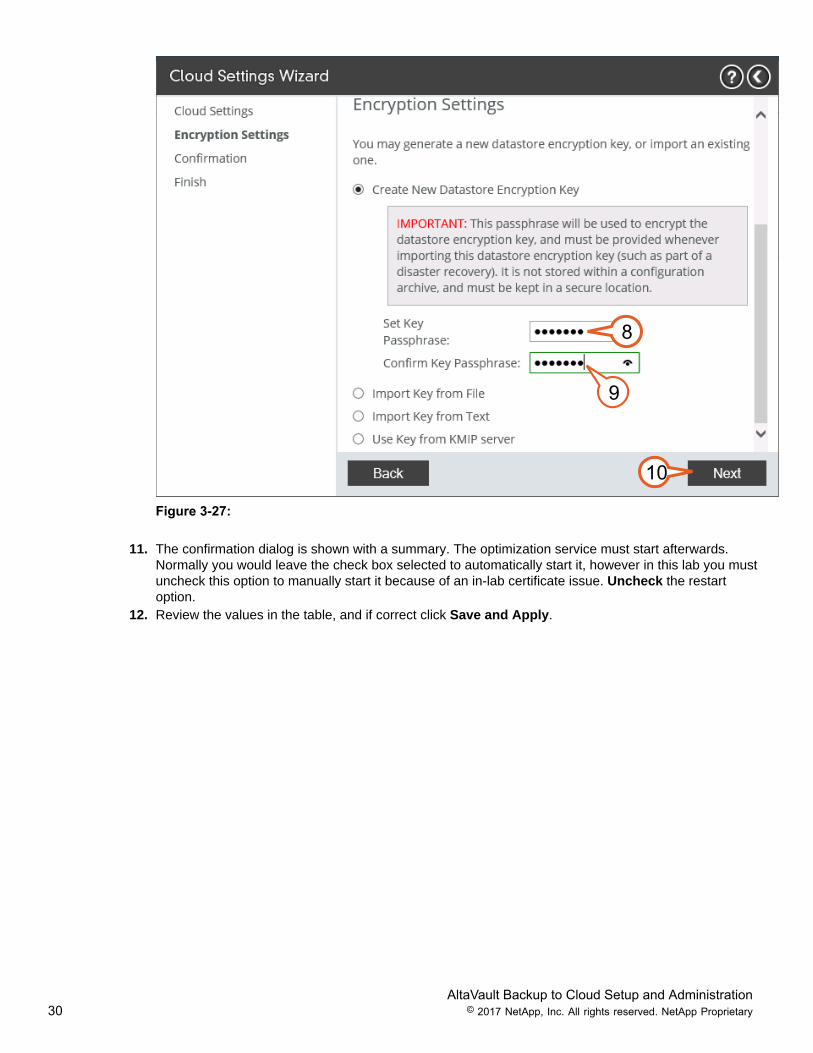
AltaVault Backup to Cloud Setup and Administration30 © 2017 NetApp, Inc. All rights reserved. NetApp Proprietary
8
9
10
Figure 3-27:
11. The confirmation dialog is shown with a summary. The optimization service must start afterwards.Normally you would leave the check box selected to automatically start it, however in this lab you mustuncheck this option to manually start it because of an in-lab certificate issue. Uncheck the restartoption.
12. Review the values in the table, and if correct click Save and Apply.
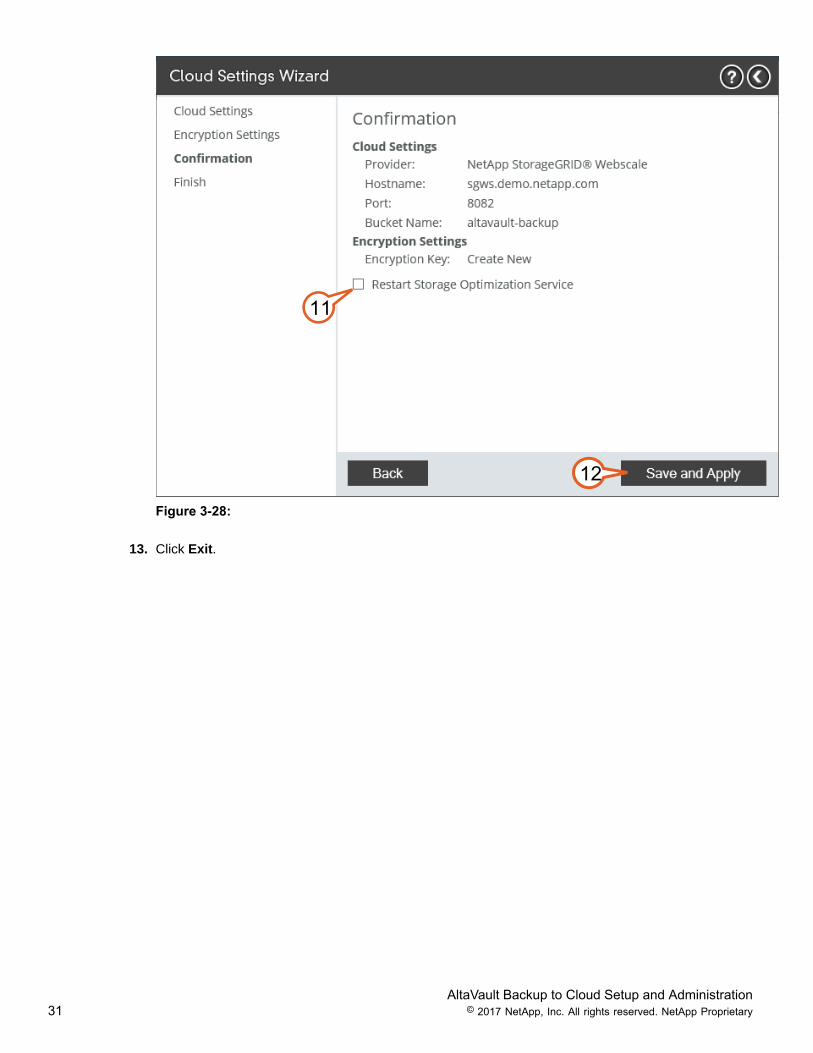
AltaVault Backup to Cloud Setup and Administration31 © 2017 NetApp, Inc. All rights reserved. NetApp Proprietary
11
12
Figure 3-28:
13. Click Exit.
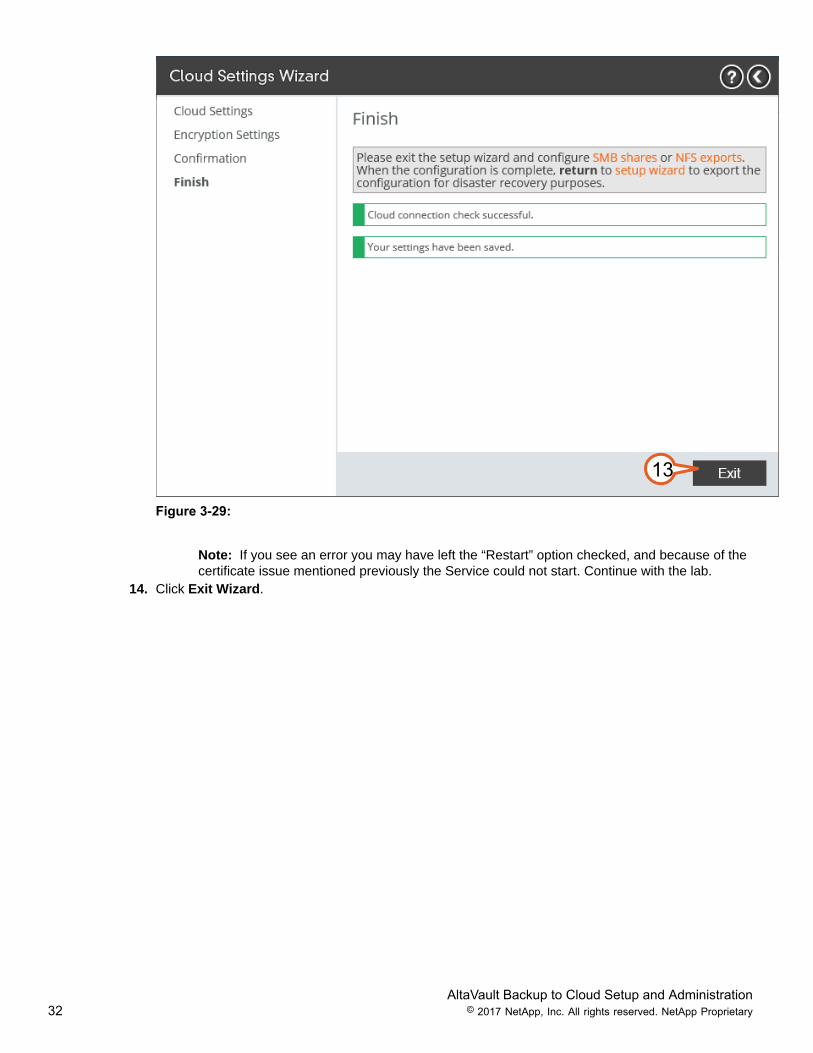
AltaVault Backup to Cloud Setup and Administration32 © 2017 NetApp, Inc. All rights reserved. NetApp Proprietary
13
Figure 3-29:
Note: If you see an error you may have left the “Restart” option checked, and because of thecertificate issue mentioned previously the Service could not start. Continue with the lab.
14. Click Exit Wizard.
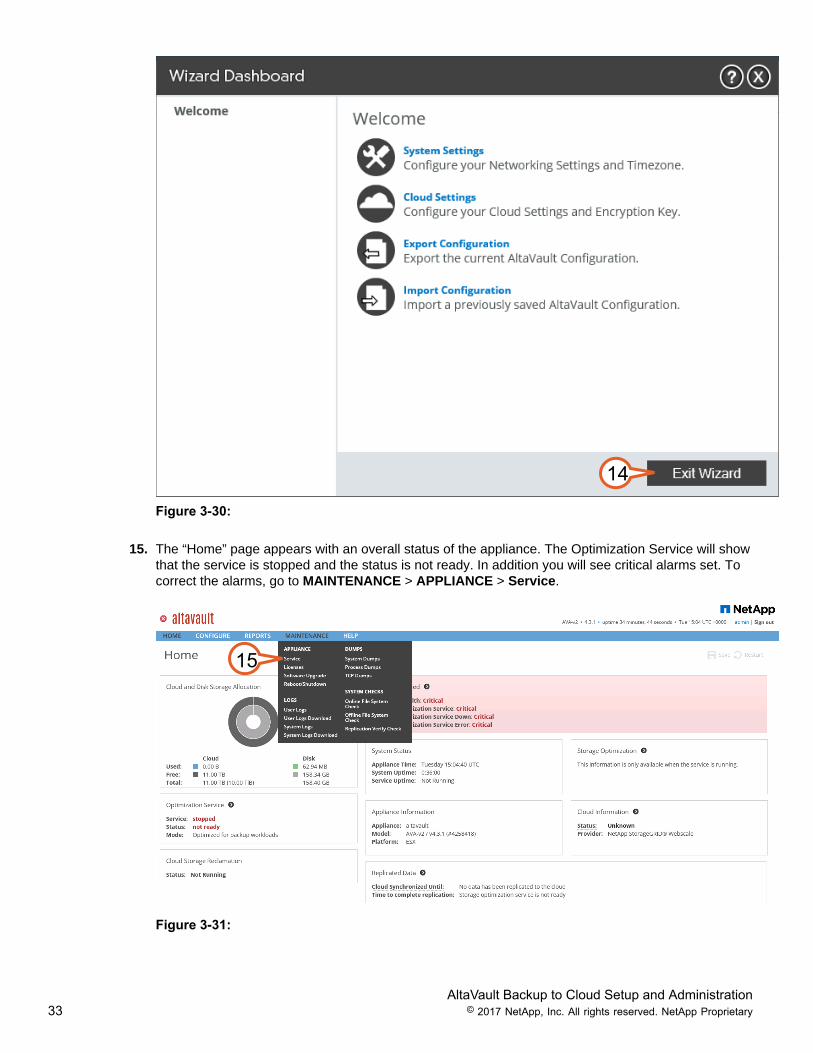
AltaVault Backup to Cloud Setup and Administration33 © 2017 NetApp, Inc. All rights reserved. NetApp Proprietary
14
Figure 3-30:
15. The “Home” page appears with an overall status of the appliance. The Optimization Service will showthat the service is stopped and the status is not ready. In addition you will see critical alarms set. Tocorrect the alarms, go to MAINTENANCE > APPLIANCE > Service.
15
Figure 3-31:
AltaVault Backup to Cloud Setup and Administration34 © 2017 NetApp, Inc. All rights reserved. NetApp Proprietary
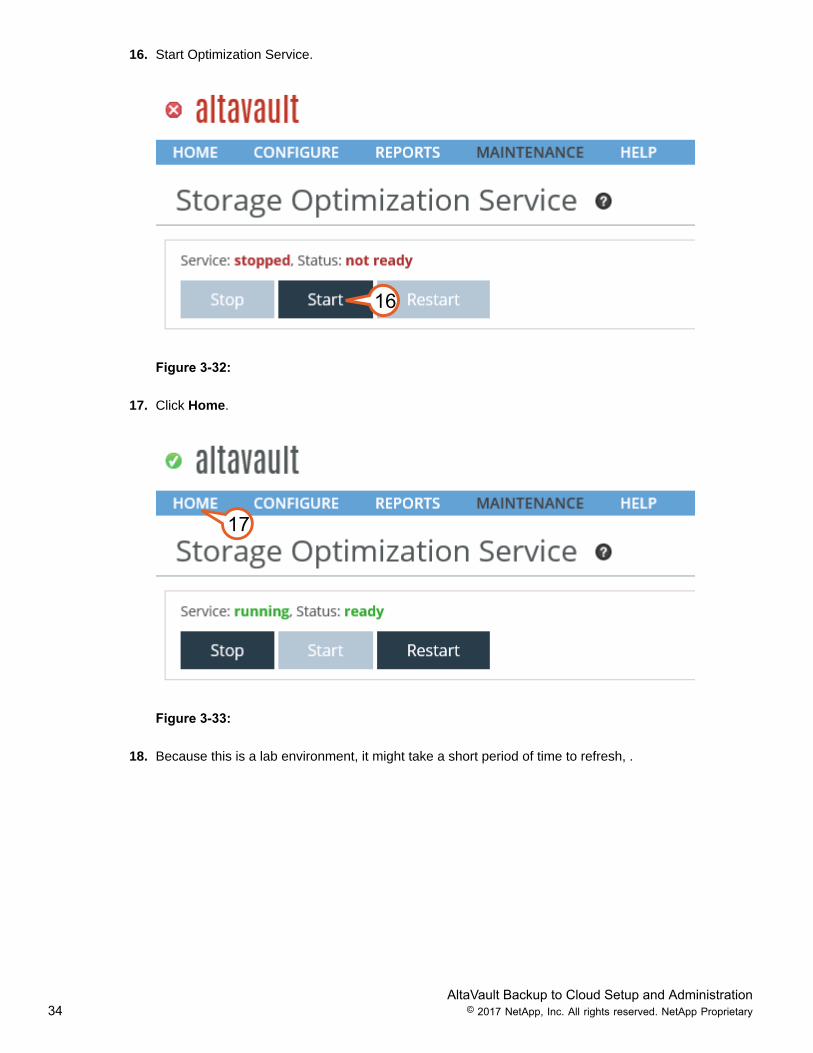
16. Start Optimization Service.
16
Figure 3-32:
17. Click Home.
17
Figure 3-33:
18. Because this is a lab environment, it might take a short period of time to refresh, .
AltaVault Backup to Cloud Setup and Administration35 © 2017 NetApp, Inc. All rights reserved. NetApp Proprietary
Figure 3-34:
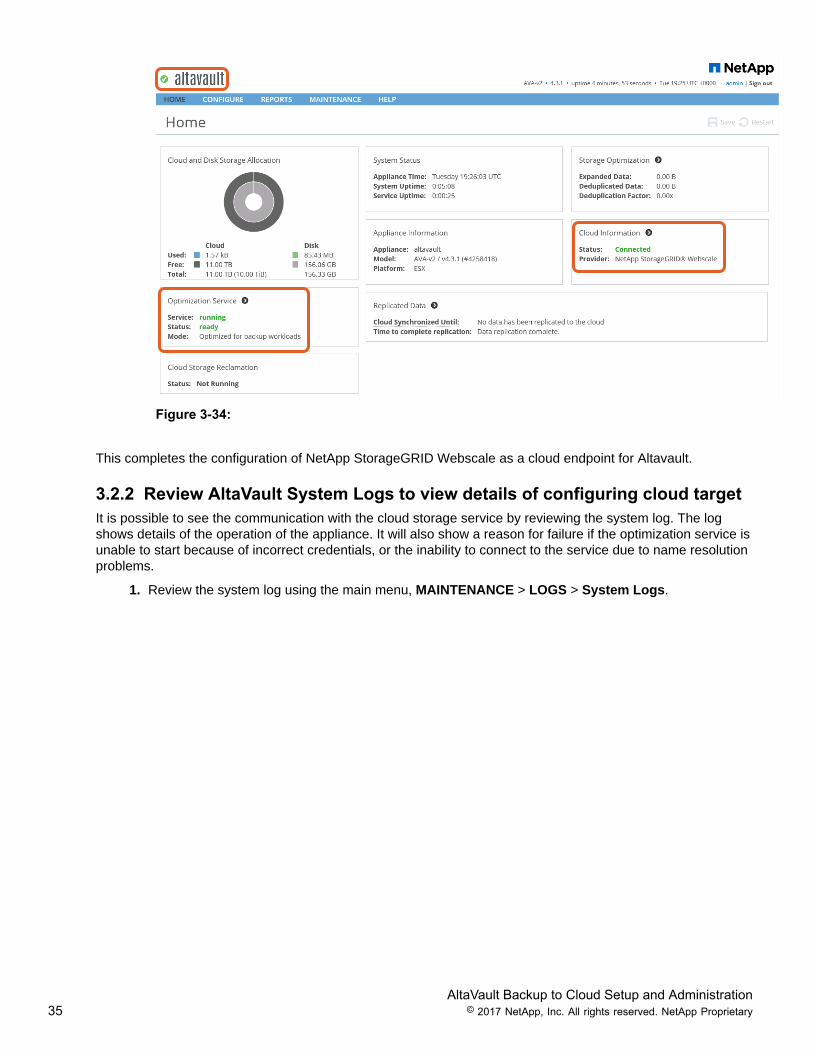
This completes the configuration of NetApp StorageGRID Webscale as a cloud endpoint for Altavault.
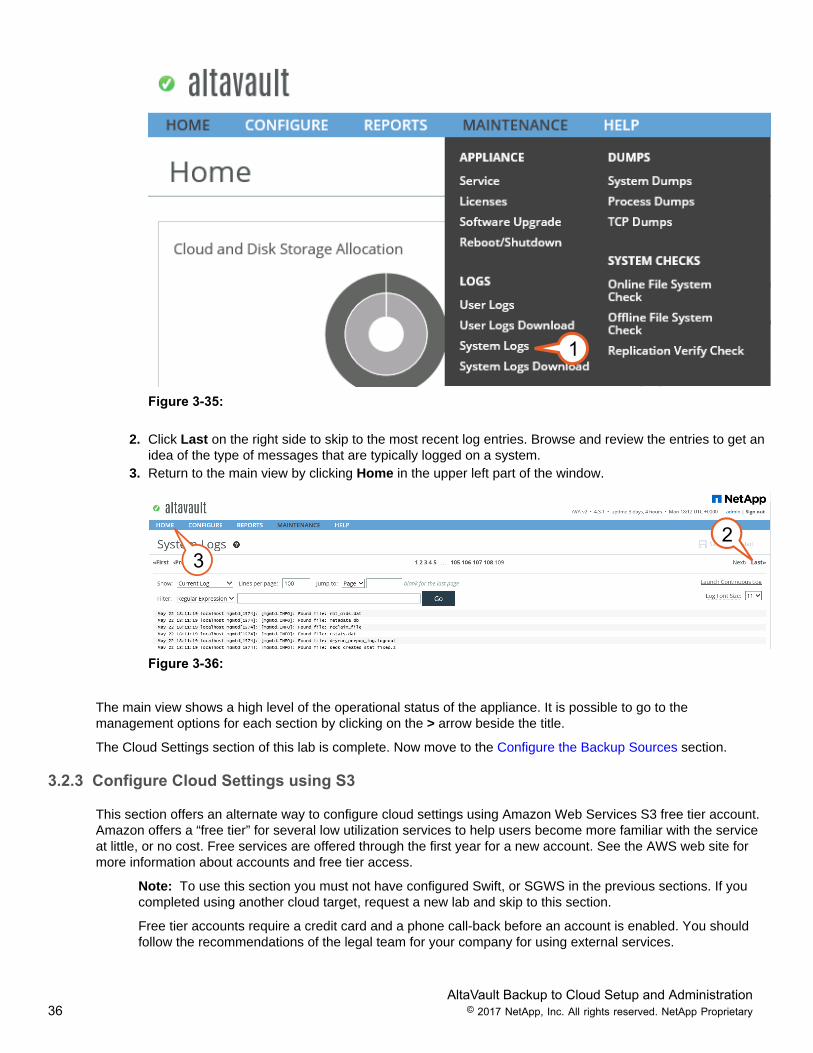
3.2.2 Review AltaVault System Logs to view details of configuring cloud targetIt is possible to see the communication with the cloud storage service by reviewing the system log. The logshows details of the operation of the appliance. It will also show a reason for failure if the optimization service isunable to start because of incorrect credentials, or the inability to connect to the service due to name resolutionproblems.
1. Review the system log using the main menu, MAINTENANCE > LOGS > System Logs.
AltaVault Backup to Cloud Setup and Administration36 © 2017 NetApp, Inc. All rights reserved. NetApp Proprietary
1
Figure 3-35:
2. Click Last on the right side to skip to the most recent log entries. Browse and review the entries to get anidea of the type of messages that are typically logged on a system.
3. Return to the main view by clicking Home in the upper left part of the window.
23
Figure 3-36:
The main view shows a high level of the operational status of the appliance. It is possible to go to themanagement options for each section by clicking on the > arrow beside the title.
The Cloud Settings section of this lab is complete. Now move to the Configure the Backup Sources section.
3.2.3 Configure Cloud Settings using S3
This section offers an alternate way to configure cloud settings using Amazon Web Services S3 free tier account.Amazon offers a “free tier” for several low utilization services to help users become more familiar with the serviceat little, or no cost. Free services are offered through the first year for a new account. See the AWS web site formore information about accounts and free tier access.
Note: To use this section you must not have configured Swift, or SGWS in the previous sections. If youcompleted using another cloud target, request a new lab and skip to this section.
Free tier accounts require a credit card and a phone call-back before an account is enabled. You shouldfollow the recommendations of the legal team for your company for using external services.
AltaVault Backup to Cloud Setup and Administration37 © 2017 NetApp, Inc. All rights reserved. NetApp Proprietary
Use these basic steps for testing access. Do not use these procedures to set up a product environment.Consult with your organizations expert for AWS services, review AWS documentation and determine thebest solution for creating and maintain a secure cloud account with policies that follow company legalrequirements.
Overall steps
1. Create a new account to get free tier.2. Create a bucket to store data.3. Create an account for the appliance.4. Save access credentials.5. Assign access permissions to allow user full access to bucket.
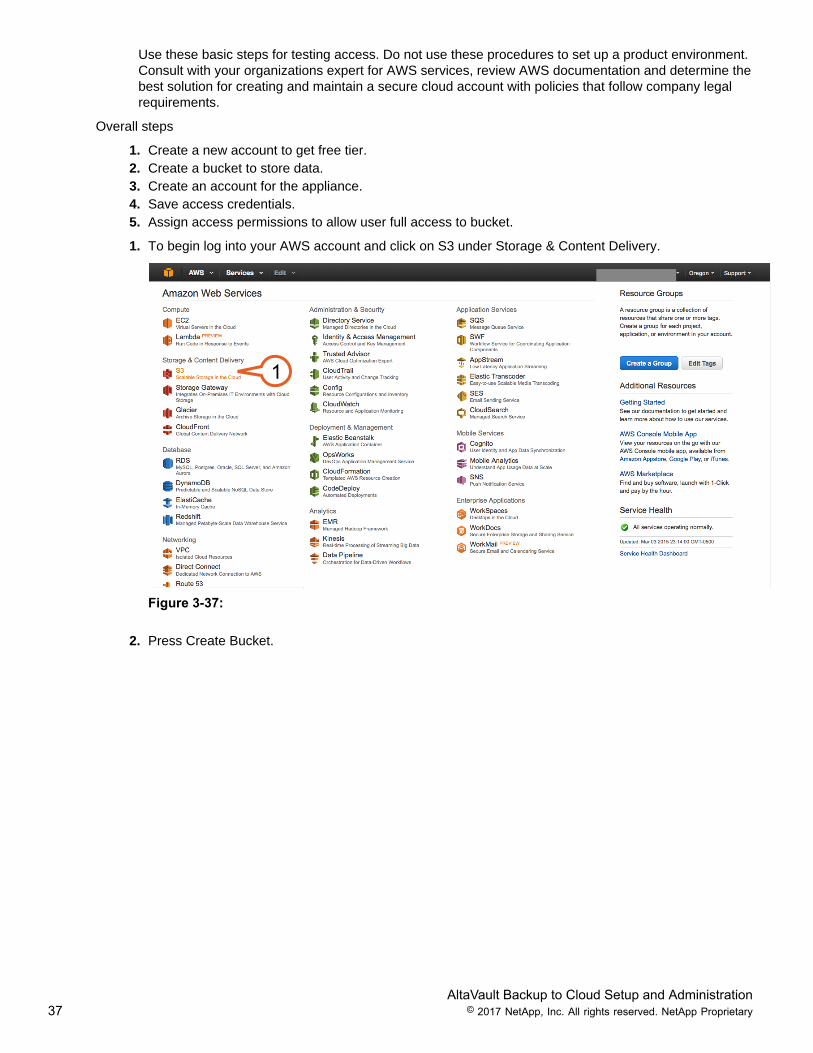
1. To begin log into your AWS account and click on S3 under Storage & Content Delivery.
1
Figure 3-37:
2. Press Create Bucket.
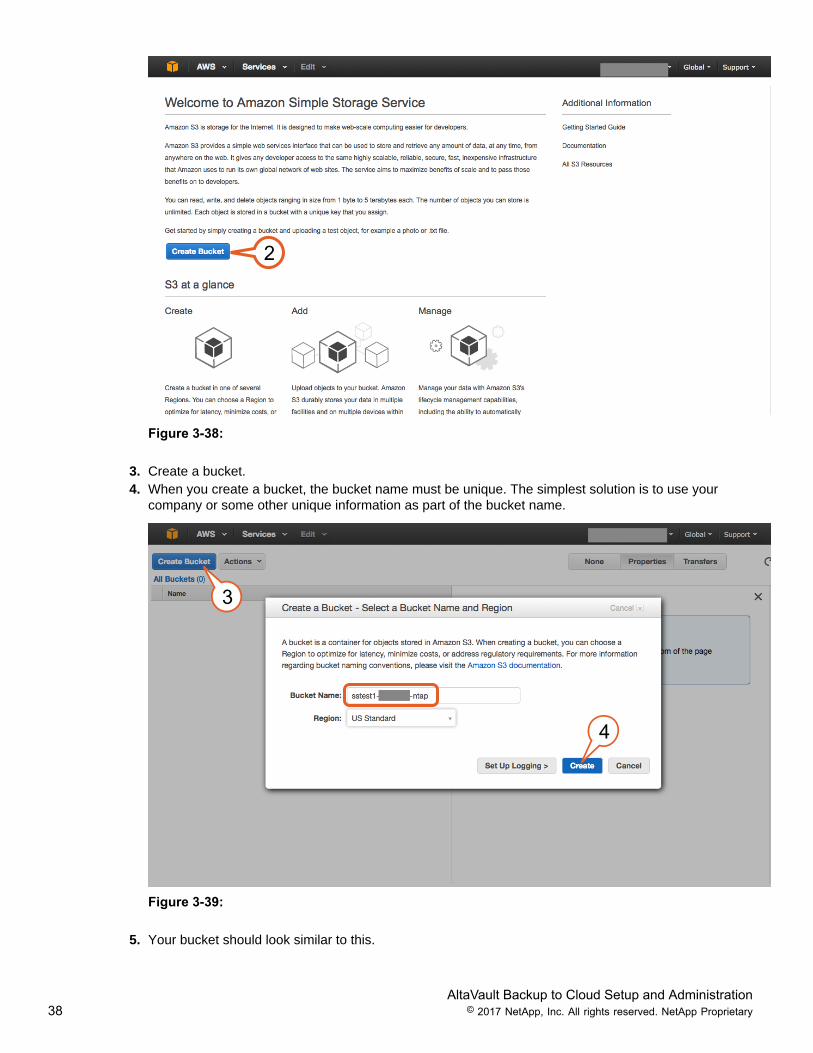
AltaVault Backup to Cloud Setup and Administration38 © 2017 NetApp, Inc. All rights reserved. NetApp Proprietary
2
Figure 3-38:
3. Create a bucket.4. When you create a bucket, the bucket name must be unique. The simplest solution is to use your
company or some other unique information as part of the bucket name.
3
4
Figure 3-39:
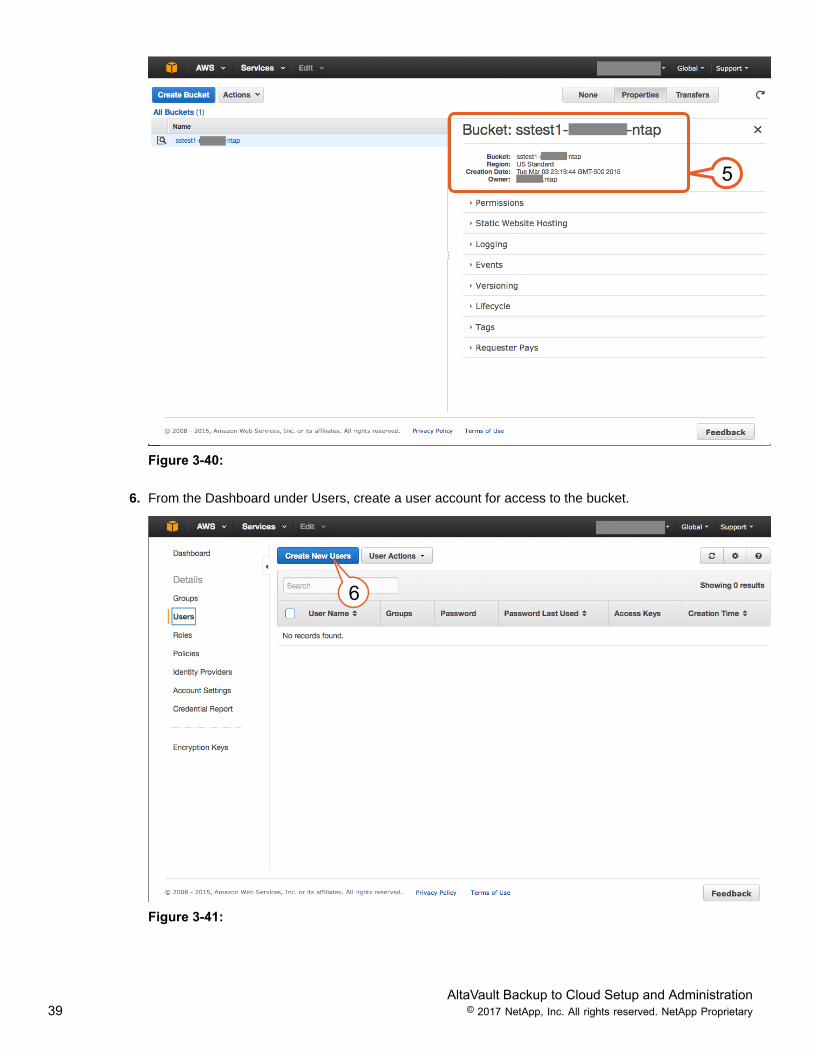
5. Your bucket should look similar to this.
AltaVault Backup to Cloud Setup and Administration39 © 2017 NetApp, Inc. All rights reserved. NetApp Proprietary
5
Figure 3-40:
6. From the Dashboard under Users, create a user account for access to the bucket.
6
Figure 3-41:
AltaVault Backup to Cloud Setup and Administration40 © 2017 NetApp, Inc. All rights reserved. NetApp Proprietary
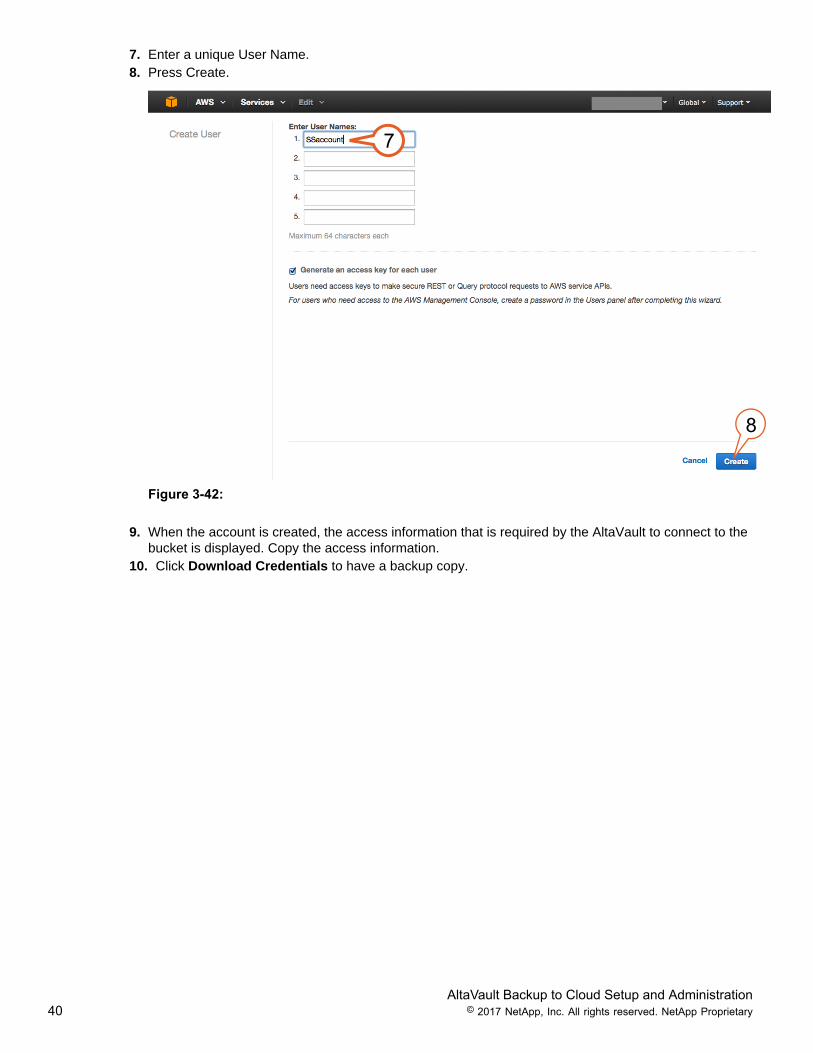
7. Enter a unique User Name.8. Press Create.
7
8
Figure 3-42:
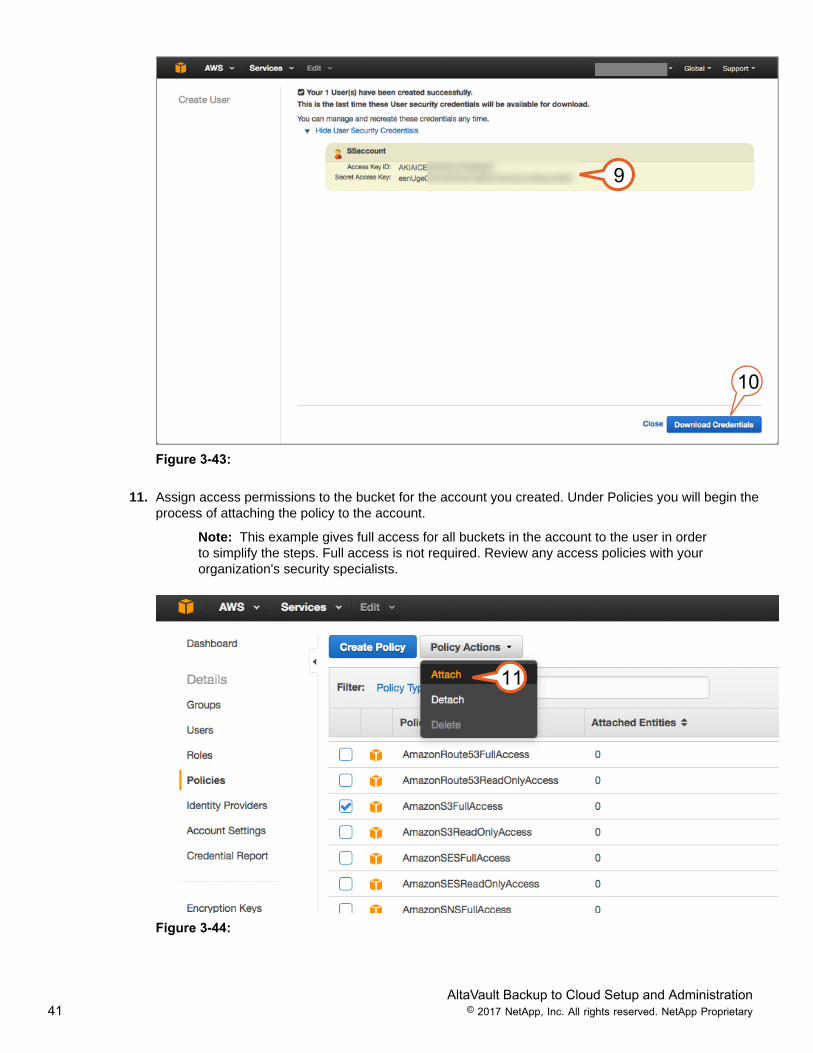
9. When the account is created, the access information that is required by the AltaVault to connect to thebucket is displayed. Copy the access information.
10. Click Download Credentials to have a backup copy.
AltaVault Backup to Cloud Setup and Administration41 © 2017 NetApp, Inc. All rights reserved. NetApp Proprietary
9
10
Figure 3-43:
11. Assign access permissions to the bucket for the account you created. Under Policies you will begin theprocess of attaching the policy to the account.
Note: This example gives full access for all buckets in the account to the user in orderto simplify the steps. Full access is not required. Review any access policies with yourorganization's security specialists.
11
Figure 3-44:
AltaVault Backup to Cloud Setup and Administration42 © 2017 NetApp, Inc. All rights reserved. NetApp Proprietary
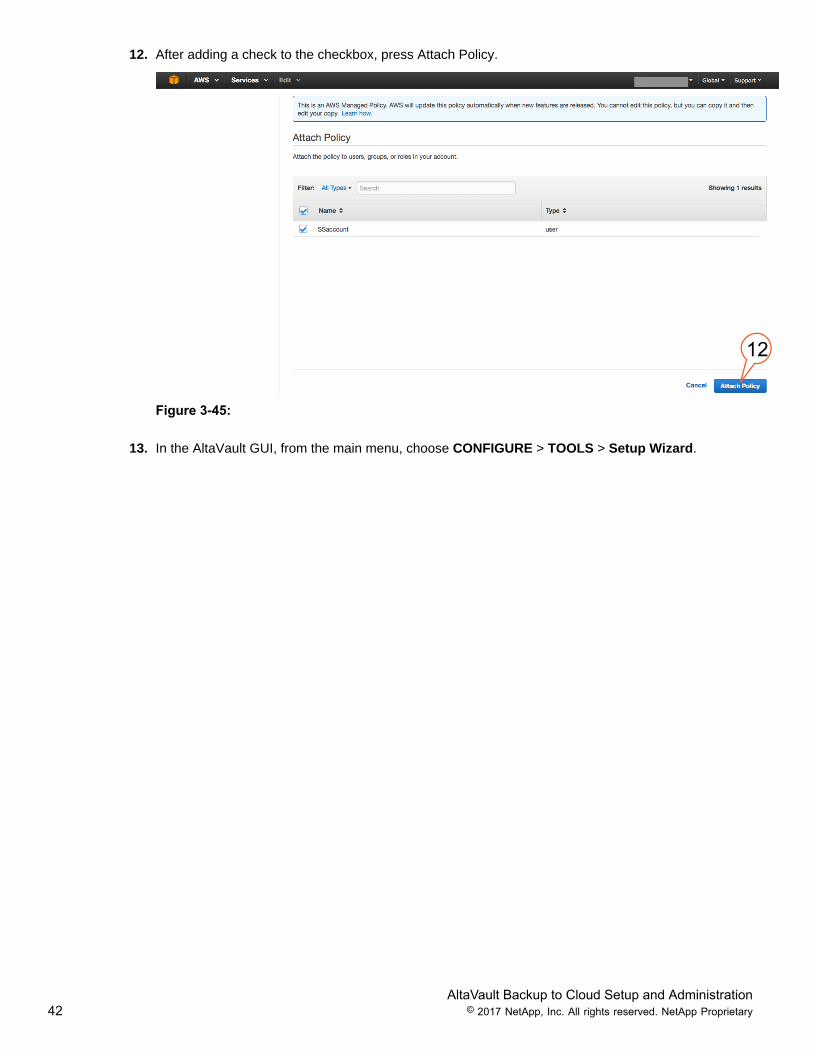
12. After adding a check to the checkbox, press Attach Policy.
12
Figure 3-45:
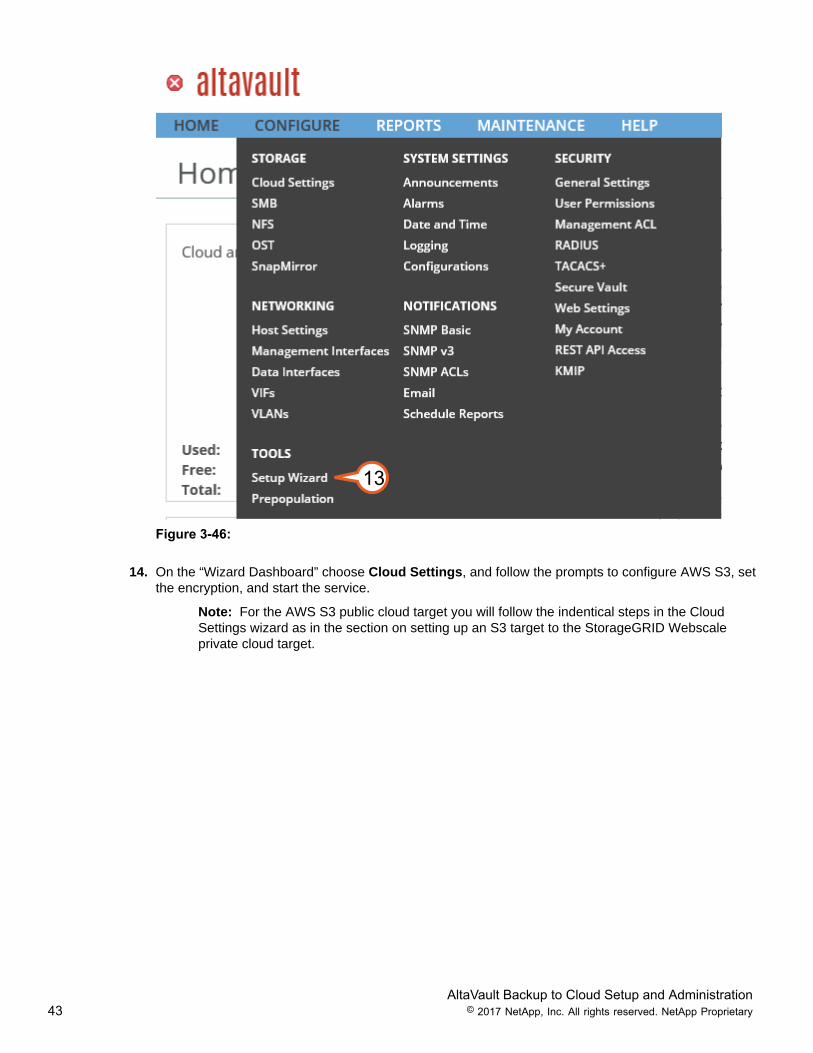
13. In the AltaVault GUI, from the main menu, choose CONFIGURE > TOOLS > Setup Wizard.
AltaVault Backup to Cloud Setup and Administration43 © 2017 NetApp, Inc. All rights reserved. NetApp Proprietary
13
Figure 3-46:
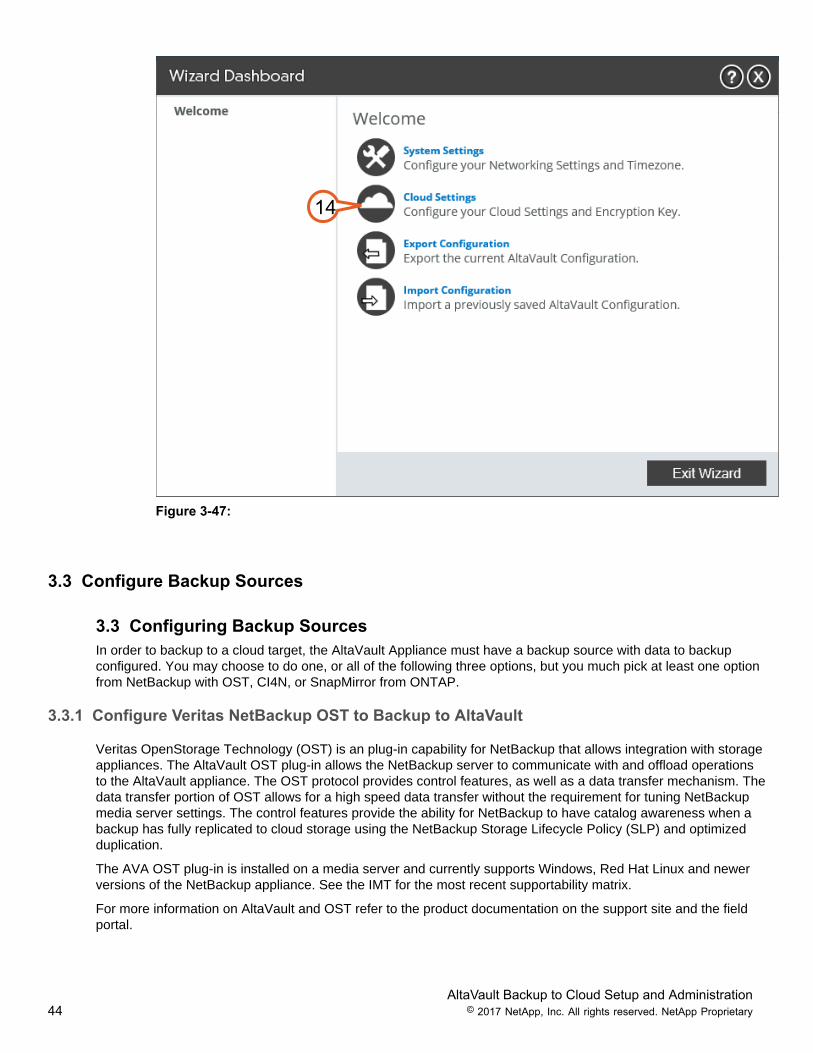
14. On the “Wizard Dashboard” choose Cloud Settings, and follow the prompts to configure AWS S3, setthe encryption, and start the service.
Note: For the AWS S3 public cloud target you will follow the indentical steps in the CloudSettings wizard as in the section on setting up an S3 target to the StorageGRID Webscaleprivate cloud target.
AltaVault Backup to Cloud Setup and Administration44 © 2017 NetApp, Inc. All rights reserved. NetApp Proprietary
14
Figure 3-47:
3.3 Configure Backup Sources
3.3 Configuring Backup SourcesIn order to backup to a cloud target, the AltaVault Appliance must have a backup source with data to backupconfigured. You may choose to do one, or all of the following three options, but you much pick at least one optionfrom NetBackup with OST, CI4N, or SnapMirror from ONTAP.
3.3.1 Configure Veritas NetBackup OST to Backup to AltaVault
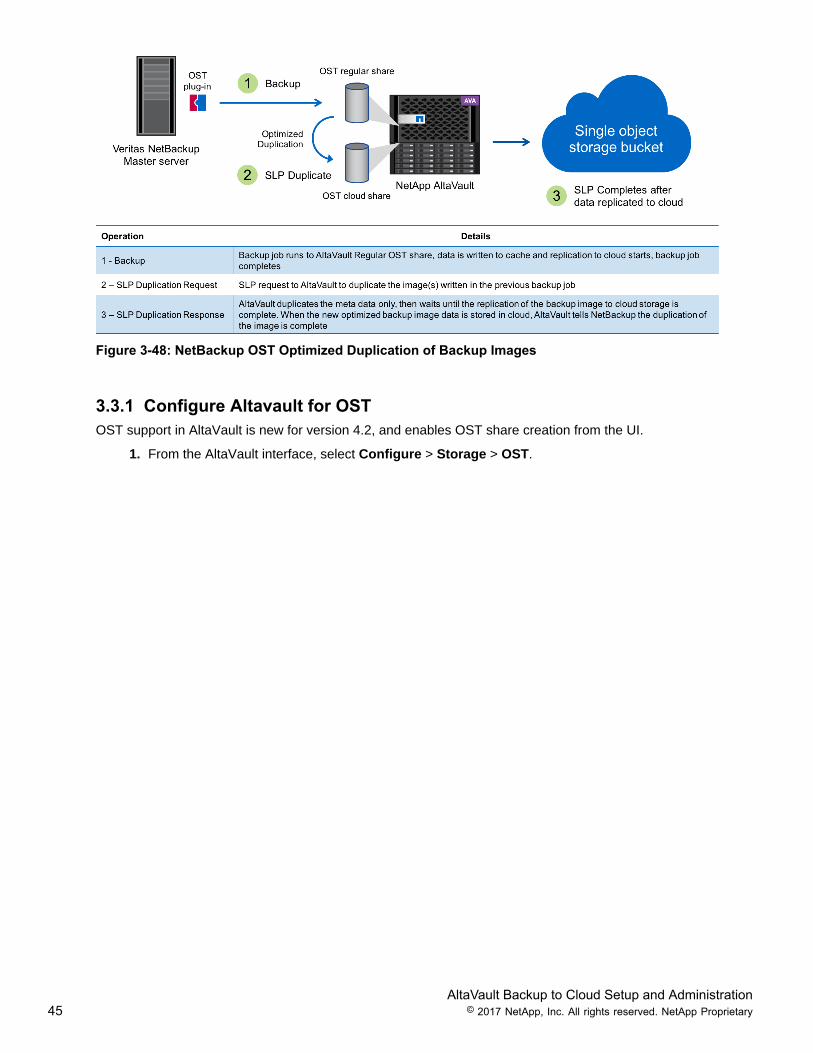
Veritas OpenStorage Technology (OST) is an plug-in capability for NetBackup that allows integration with storageappliances. The AltaVault OST plug-in allows the NetBackup server to communicate with and offload operationsto the AltaVault appliance. The OST protocol provides control features, as well as a data transfer mechanism. Thedata transfer portion of OST allows for a high speed data transfer without the requirement for tuning NetBackupmedia server settings. The control features provide the ability for NetBackup to have catalog awareness when abackup has fully replicated to cloud storage using the NetBackup Storage Lifecycle Policy (SLP) and optimizedduplication.
The AVA OST plug-in is installed on a media server and currently supports Windows, Red Hat Linux and newerversions of the NetBackup appliance. See the IMT for the most recent supportability matrix.
For more information on AltaVault and OST refer to the product documentation on the support site and the fieldportal.
AltaVault Backup to Cloud Setup and Administration45 © 2017 NetApp, Inc. All rights reserved. NetApp Proprietary
Figure 3-48: NetBackup OST Optimized Duplication of Backup Images
3.3.1 Configure Altavault for OSTOST support in AltaVault is new for version 4.2, and enables OST share creation from the UI.
1. From the AltaVault interface, select Configure > Storage > OST.
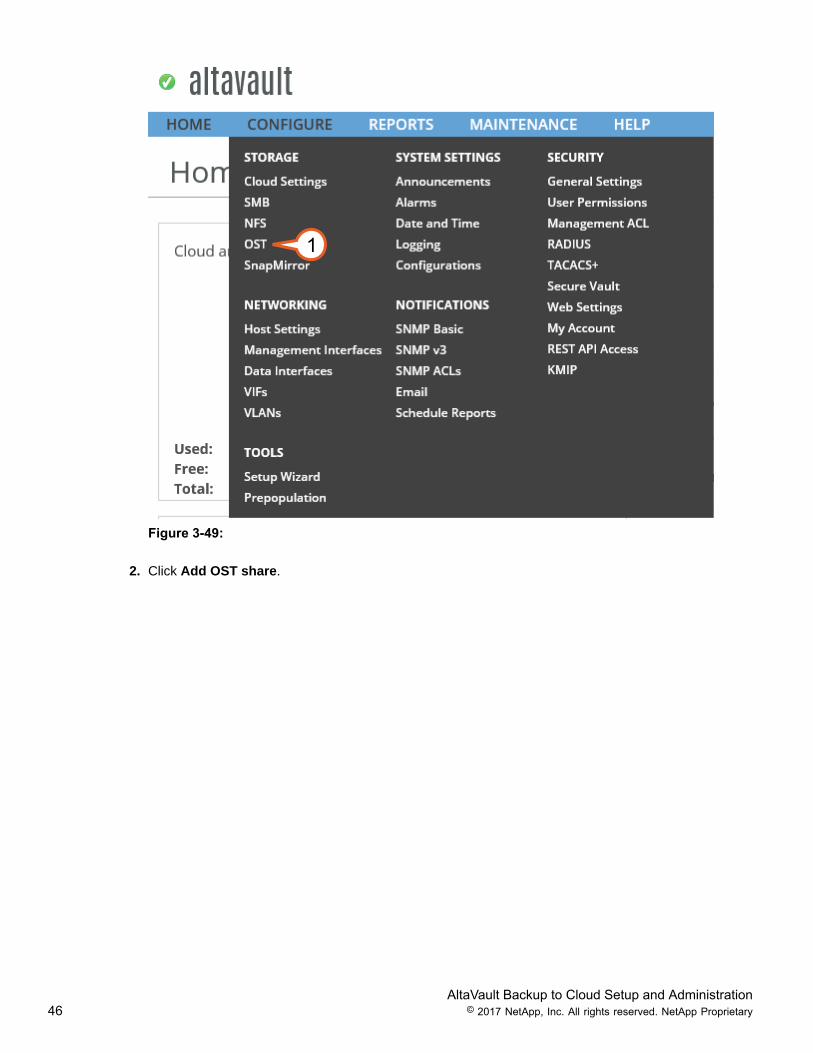
AltaVault Backup to Cloud Setup and Administration46 © 2017 NetApp, Inc. All rights reserved. NetApp Proprietary
1
Figure 3-49:
2. Click Add OST share.
AltaVault Backup to Cloud Setup and Administration47 © 2017 NetApp, Inc. All rights reserved. NetApp Proprietary
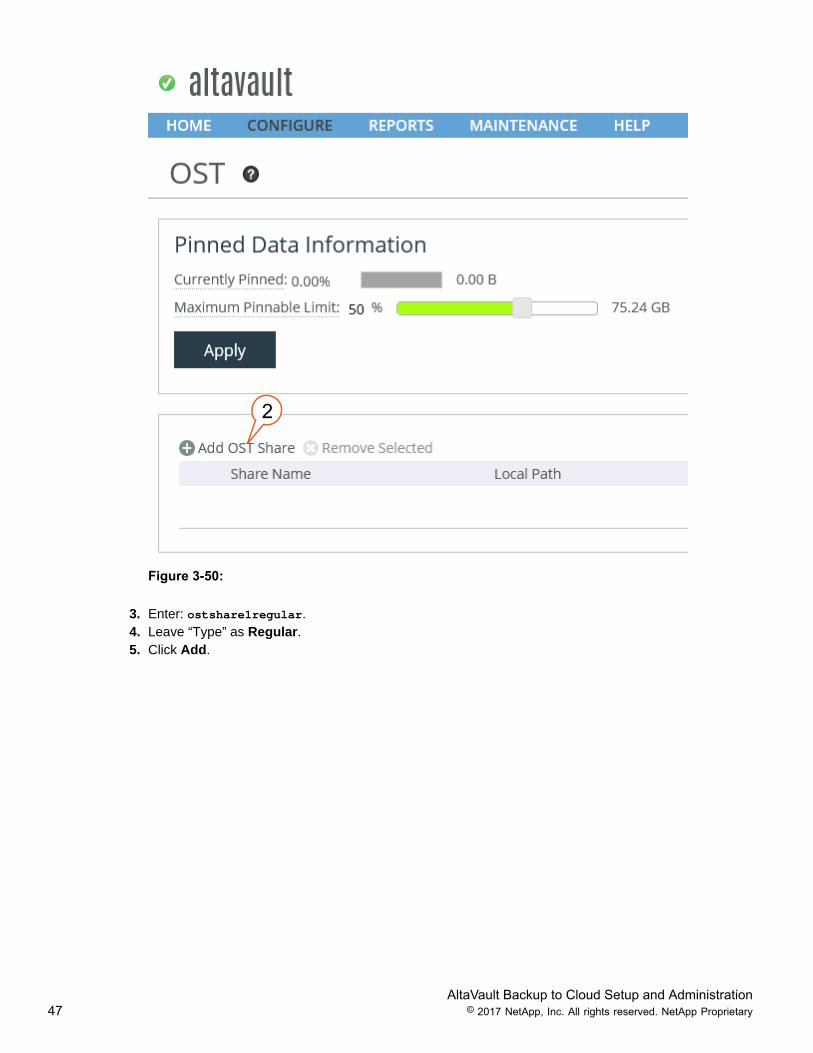
2
Figure 3-50:
3. Enter: ostshare1regular.4. Leave “Type” as Regular.5. Click Add.
AltaVault Backup to Cloud Setup and Administration48 © 2017 NetApp, Inc. All rights reserved. NetApp Proprietary
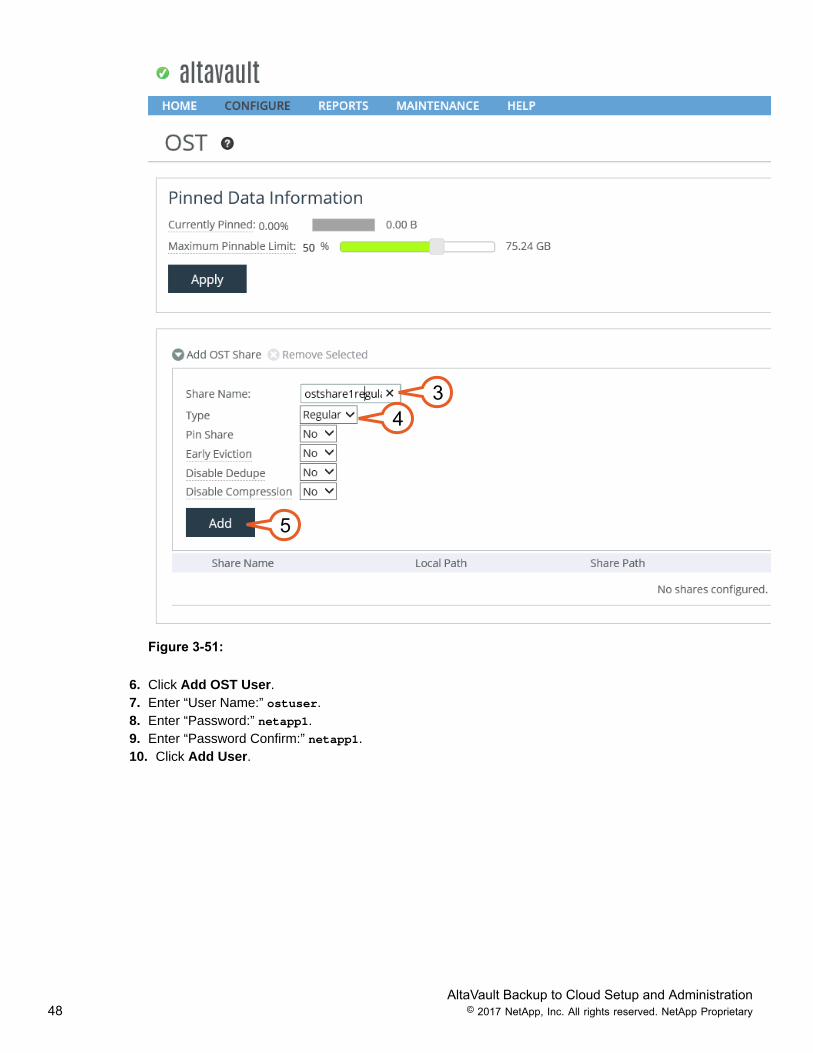
34
5
Figure 3-51:
6. Click Add OST User.7. Enter “User Name:” ostuser.8. Enter “Password:” netapp1.9. Enter “Password Confirm:” netapp1.10. Click Add User.
AltaVault Backup to Cloud Setup and Administration49 © 2017 NetApp, Inc. All rights reserved. NetApp Proprietary
6
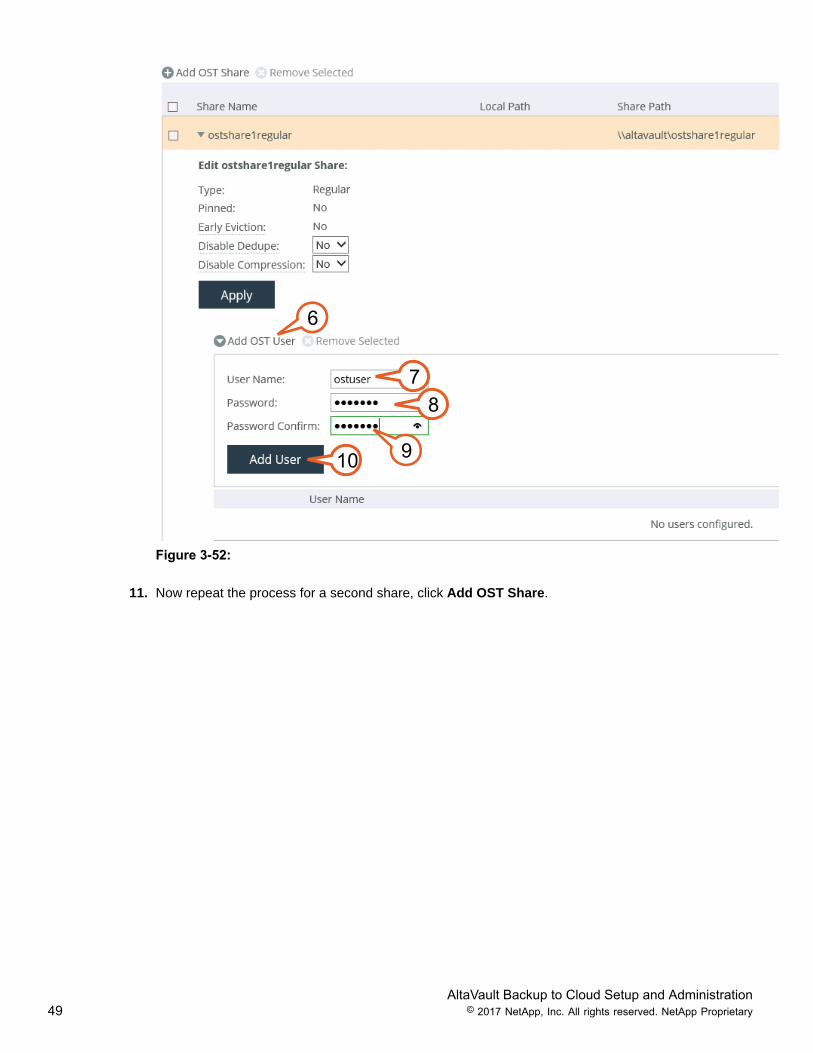
78
910
Figure 3-52:
11. Now repeat the process for a second share, click Add OST Share.
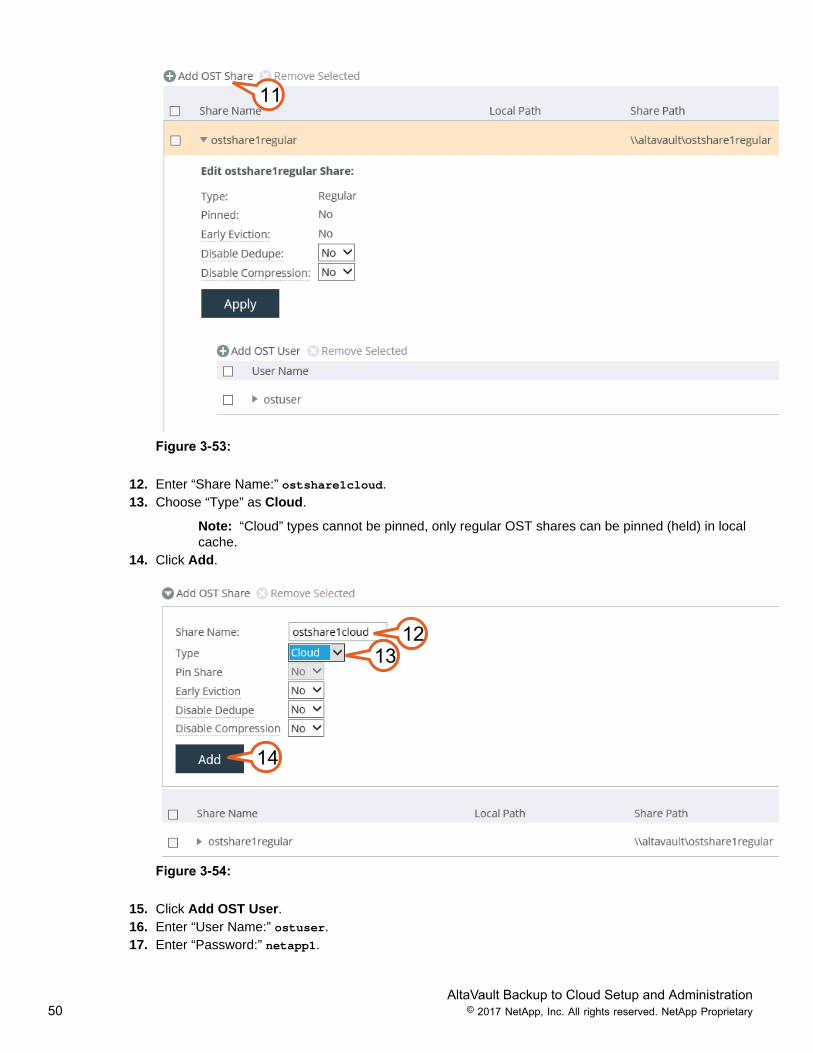
AltaVault Backup to Cloud Setup and Administration50 © 2017 NetApp, Inc. All rights reserved. NetApp Proprietary
11
Figure 3-53:
12. Enter “Share Name:” ostshare1cloud.13. Choose “Type” as Cloud.
Note: “Cloud” types cannot be pinned, only regular OST shares can be pinned (held) in localcache.
14. Click Add.
1213
14
Figure 3-54:
15. Click Add OST User.16. Enter “User Name:” ostuser.17. Enter “Password:” netapp1.
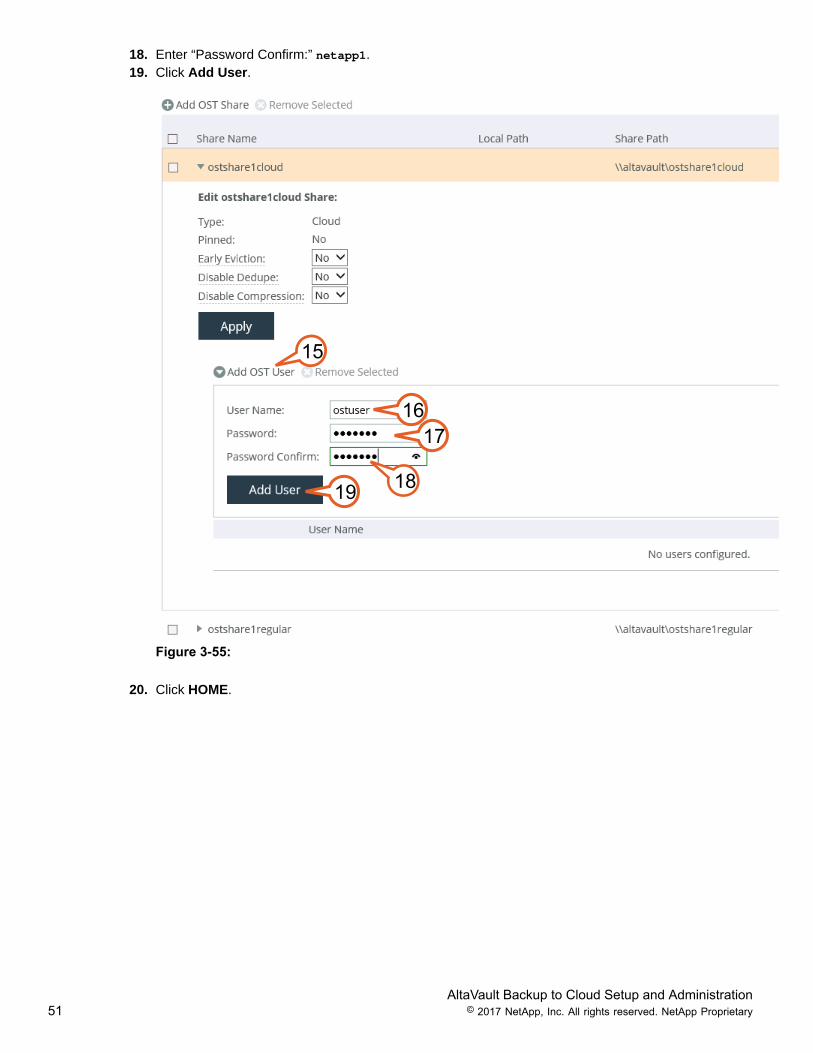
AltaVault Backup to Cloud Setup and Administration51 © 2017 NetApp, Inc. All rights reserved. NetApp Proprietary
18. Enter “Password Confirm:” netapp1.19. Click Add User.
15
1617
1819
Figure 3-55:
20. Click HOME.
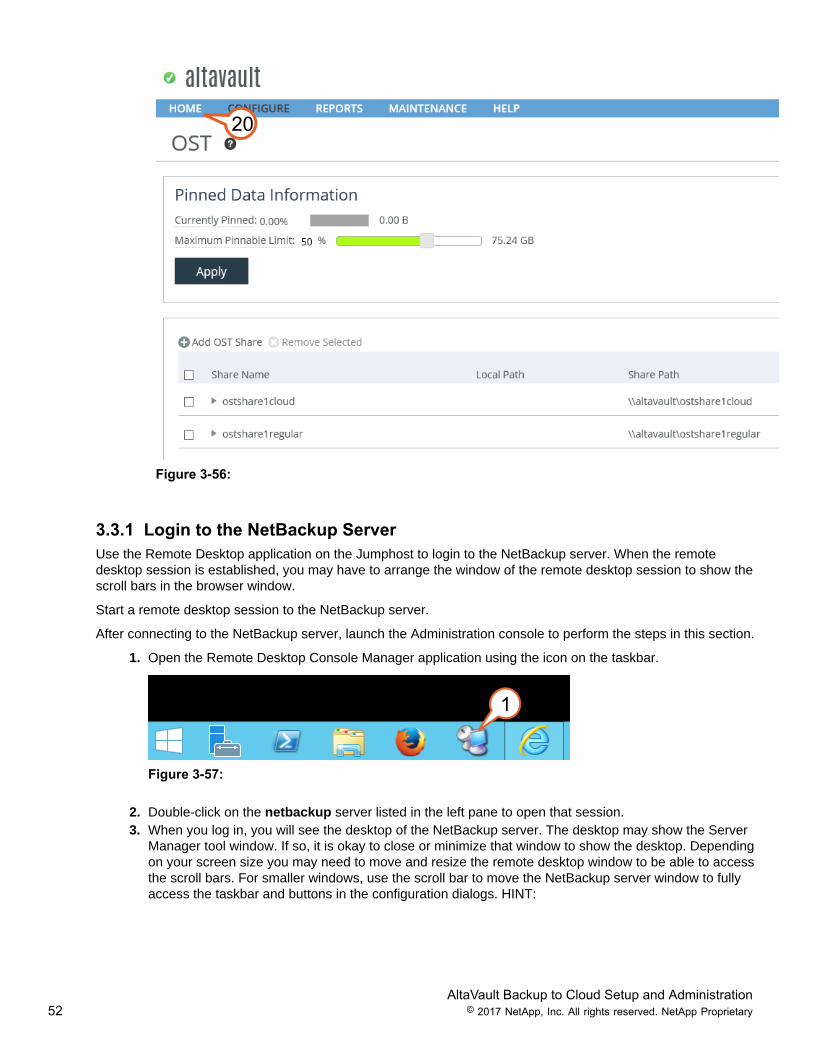
AltaVault Backup to Cloud Setup and Administration52 © 2017 NetApp, Inc. All rights reserved. NetApp Proprietary
20
Figure 3-56:
3.3.1 Login to the NetBackup ServerUse the Remote Desktop application on the Jumphost to login to the NetBackup server. When the remotedesktop session is established, you may have to arrange the window of the remote desktop session to show thescroll bars in the browser window.
Start a remote desktop session to the NetBackup server.
After connecting to the NetBackup server, launch the Administration console to perform the steps in this section.
1. Open the Remote Desktop Console Manager application using the icon on the taskbar.
1
Figure 3-57:
2. Double-click on the netbackup server listed in the left pane to open that session.3. When you log in, you will see the desktop of the NetBackup server. The desktop may show the Server
Manager tool window. If so, it is okay to close or minimize that window to show the desktop. Dependingon your screen size you may need to move and resize the remote desktop window to be able to accessthe scroll bars. For smaller windows, use the scroll bar to move the NetBackup server window to fullyaccess the taskbar and buttons in the configuration dialogs. HINT:
AltaVault Backup to Cloud Setup and Administration53 © 2017 NetApp, Inc. All rights reserved. NetApp Proprietary
Tip: To maximize, make sure you are in full screen on the Remote Desktop Connection Managerbefore you connect to the server. If you are already connected, log off, then maximize RDCMANand reconnect for full resolution.
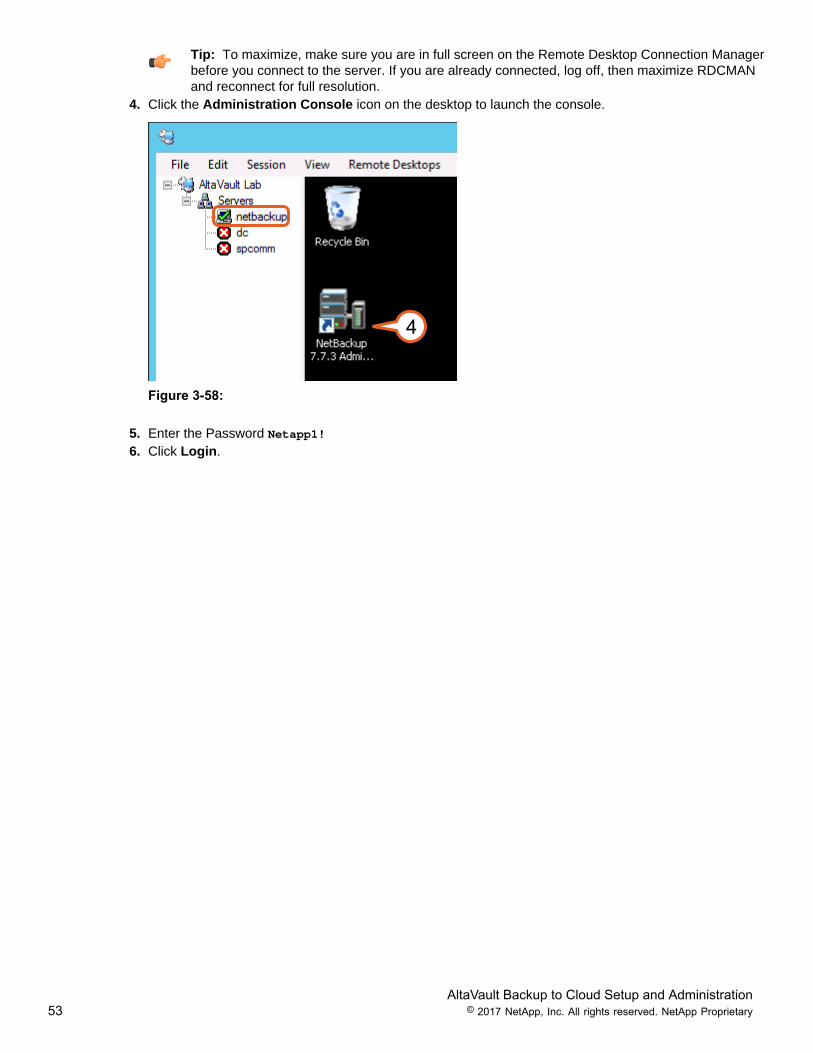
4. Click the Administration Console icon on the desktop to launch the console.
4
Figure 3-58:
5. Enter the Password Netapp1!6. Click Login.
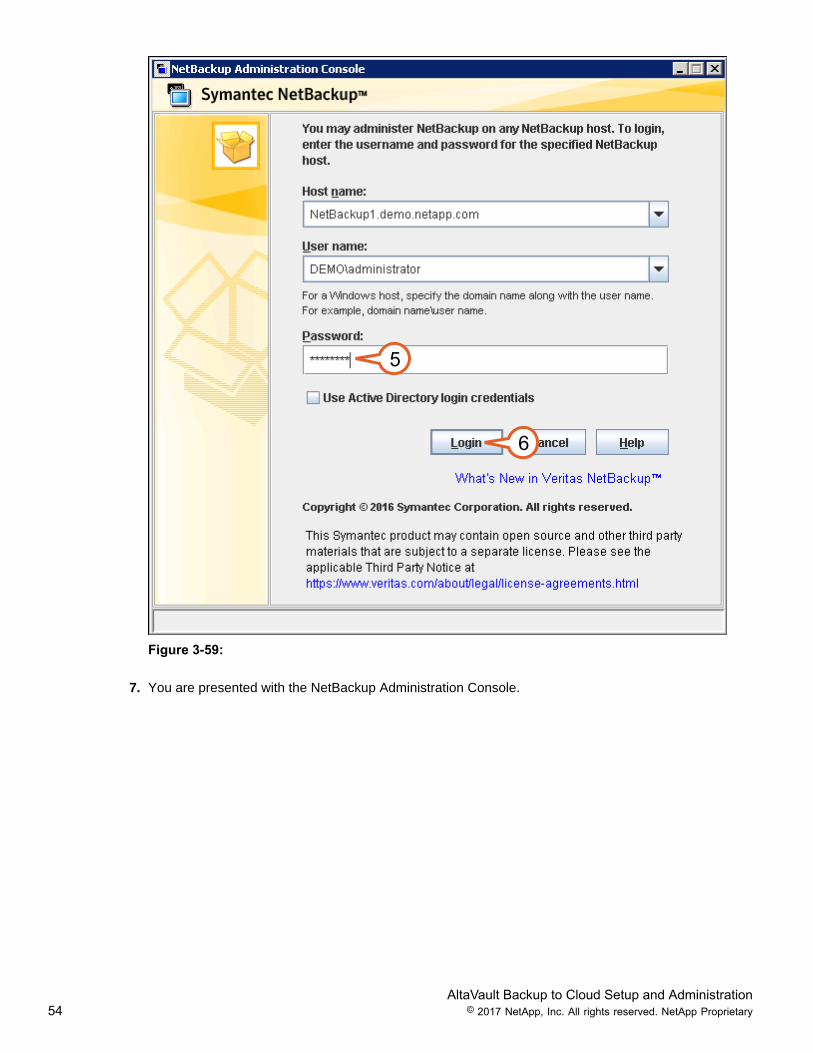
AltaVault Backup to Cloud Setup and Administration54 © 2017 NetApp, Inc. All rights reserved. NetApp Proprietary
5
6
Figure 3-59:
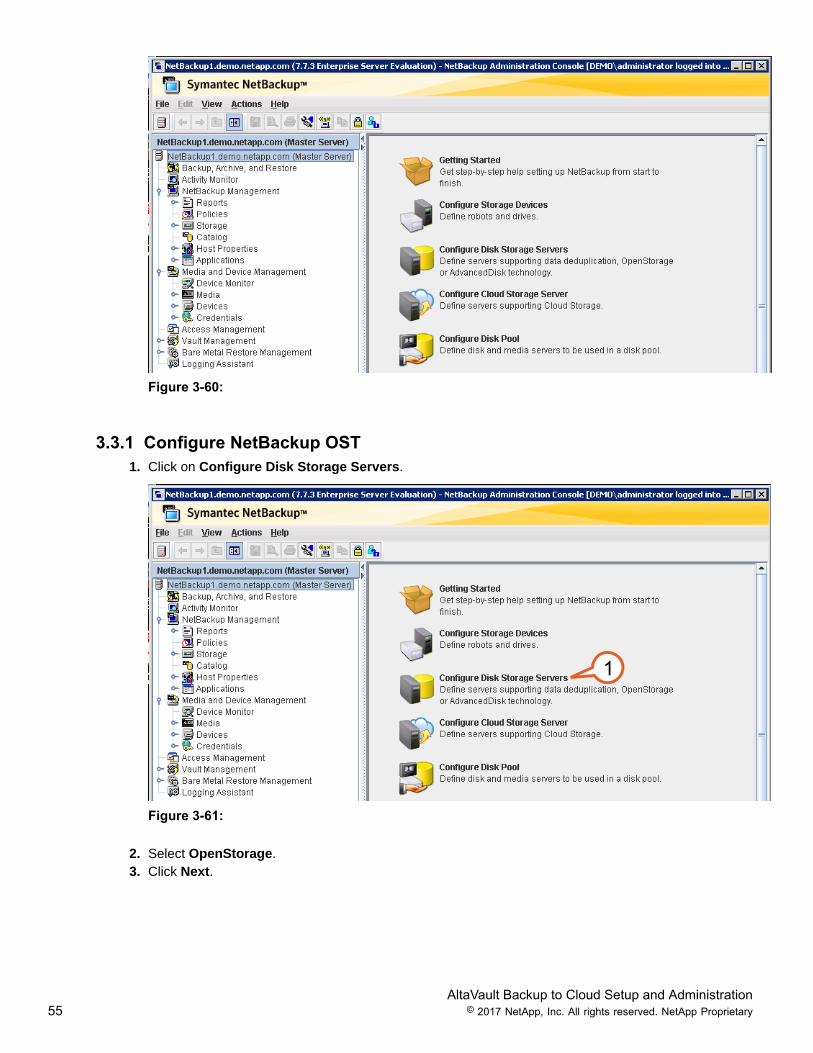
7. You are presented with the NetBackup Administration Console.
AltaVault Backup to Cloud Setup and Administration55 © 2017 NetApp, Inc. All rights reserved. NetApp Proprietary
Figure 3-60:
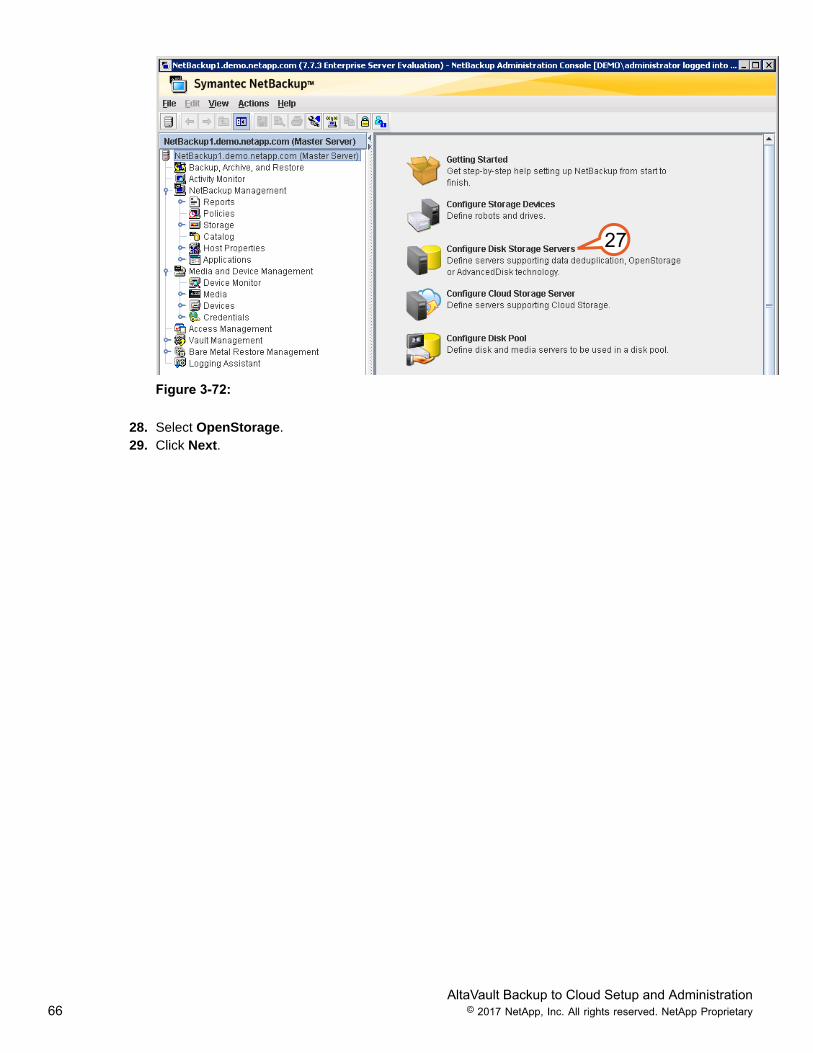
3.3.1 Configure NetBackup OST1. Click on Configure Disk Storage Servers.
1
Figure 3-61:
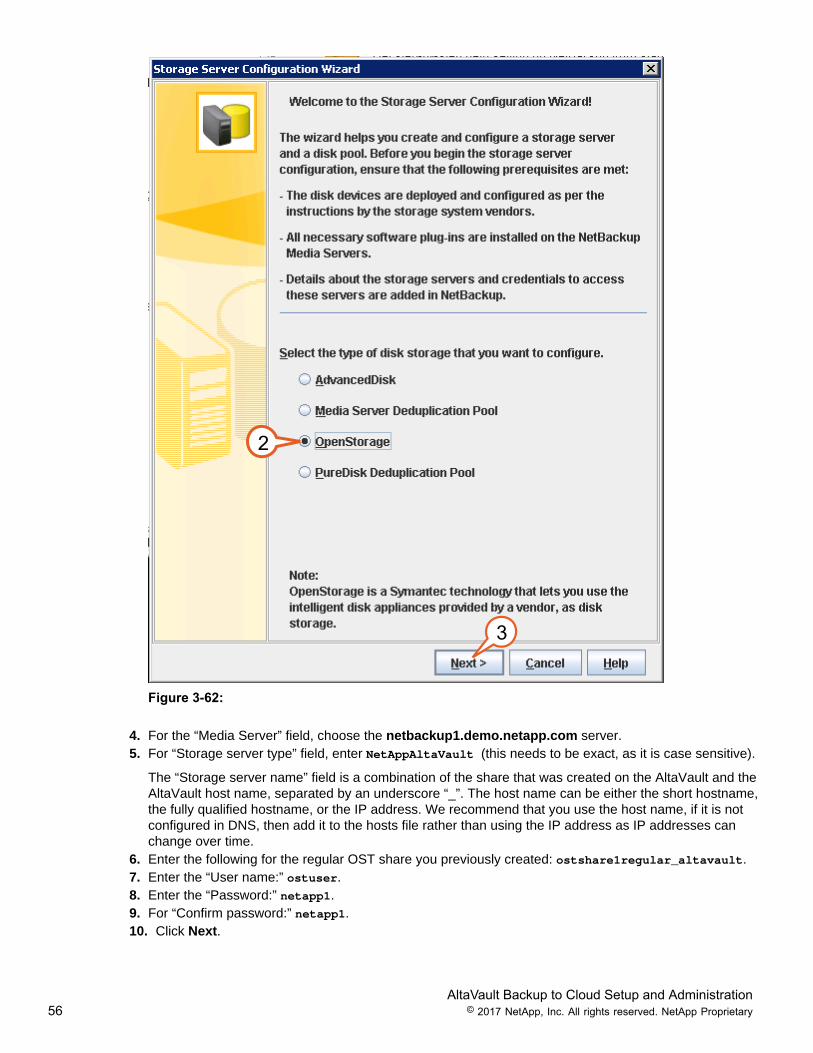
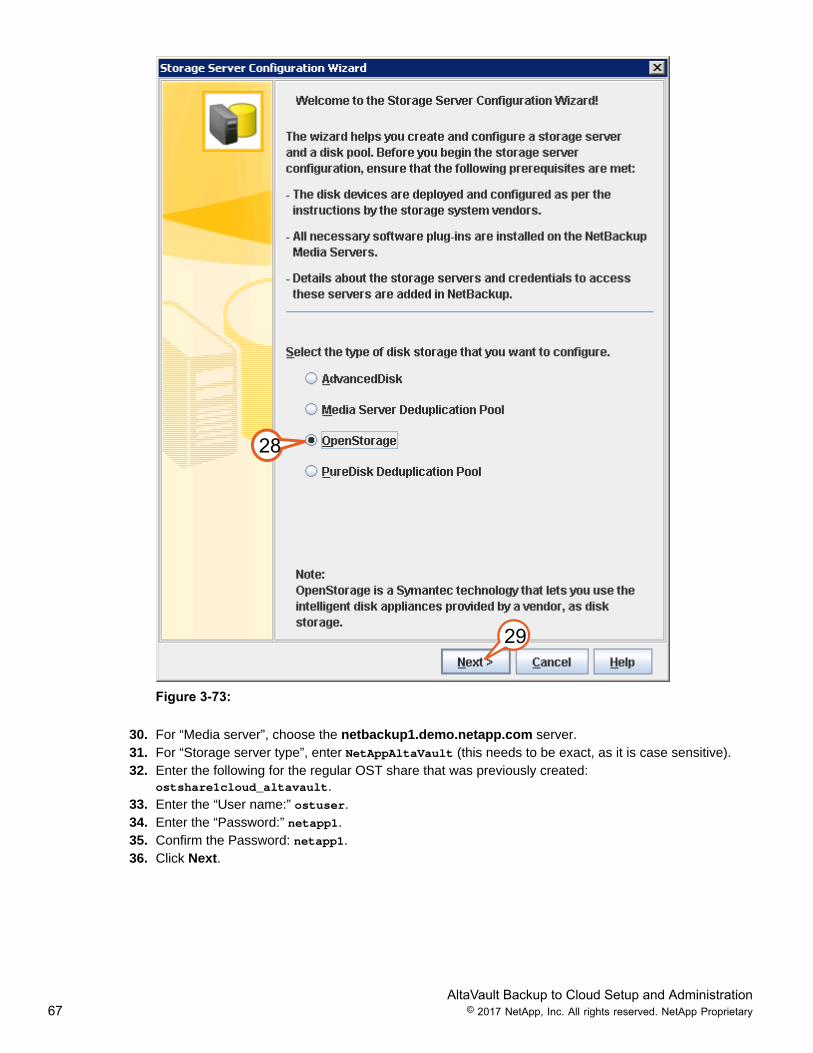
2. Select OpenStorage.3. Click Next.
AltaVault Backup to Cloud Setup and Administration56 © 2017 NetApp, Inc. All rights reserved. NetApp Proprietary
2
3
Figure 3-62:
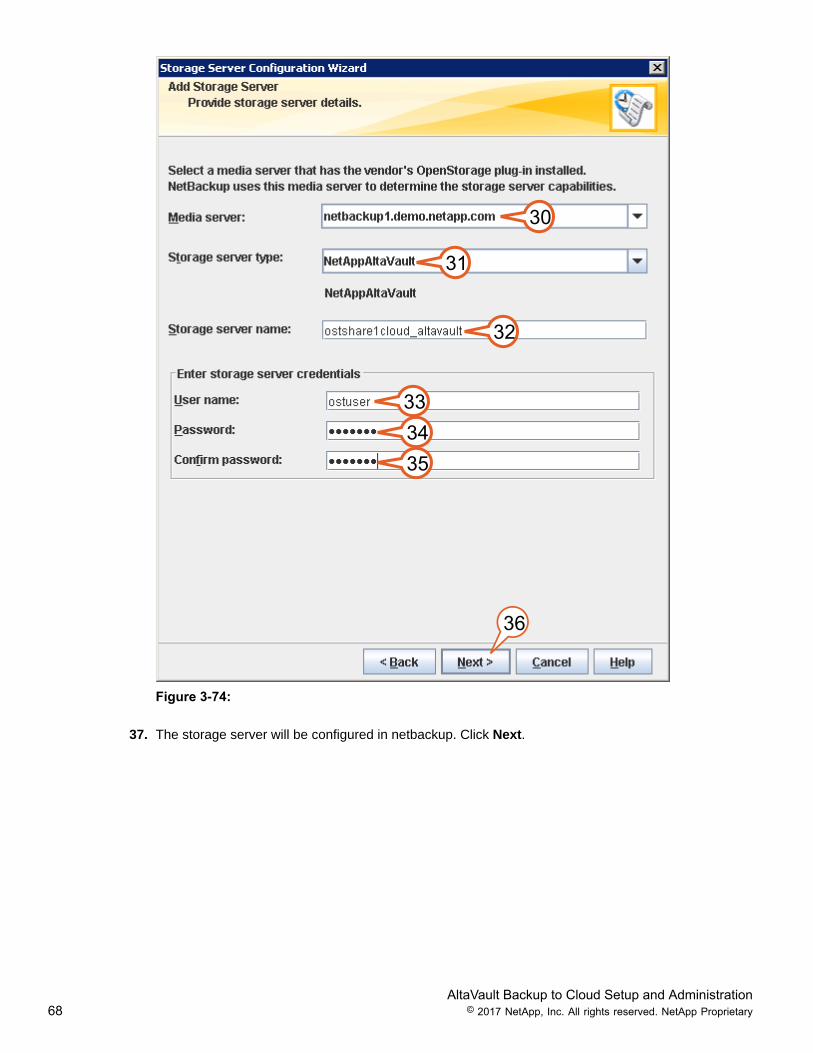
4. For the “Media Server” field, choose the netbackup1.demo.netapp.com server.5. For “Storage server type” field, enter NetAppAltaVault (this needs to be exact, as it is case sensitive).
The “Storage server name” field is a combination of the share that was created on the AltaVault and theAltaVault host name, separated by an underscore “_”. The host name can be either the short hostname,the fully qualified hostname, or the IP address. We recommend that you use the host name, if it is notconfigured in DNS, then add it to the hosts file rather than using the IP address as IP addresses canchange over time.
6. Enter the following for the regular OST share you previously created: ostshare1regular_altavault.7. Enter the “User name:” ostuser.8. Enter the “Password:” netapp1.9. For “Confirm password:” netapp1.10. Click Next.
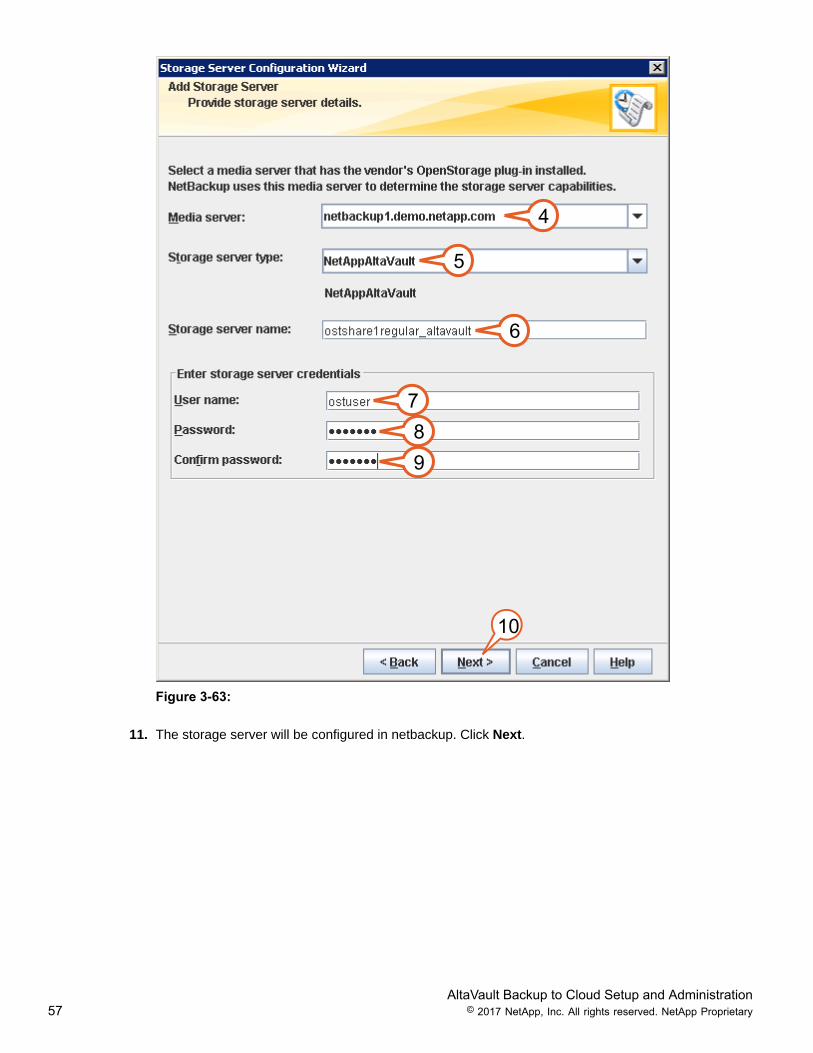
AltaVault Backup to Cloud Setup and Administration57 © 2017 NetApp, Inc. All rights reserved. NetApp Proprietary
4
5
6
789
10
Figure 3-63:
11. The storage server will be configured in netbackup. Click Next.
AltaVault Backup to Cloud Setup and Administration58 © 2017 NetApp, Inc. All rights reserved. NetApp Proprietary
11
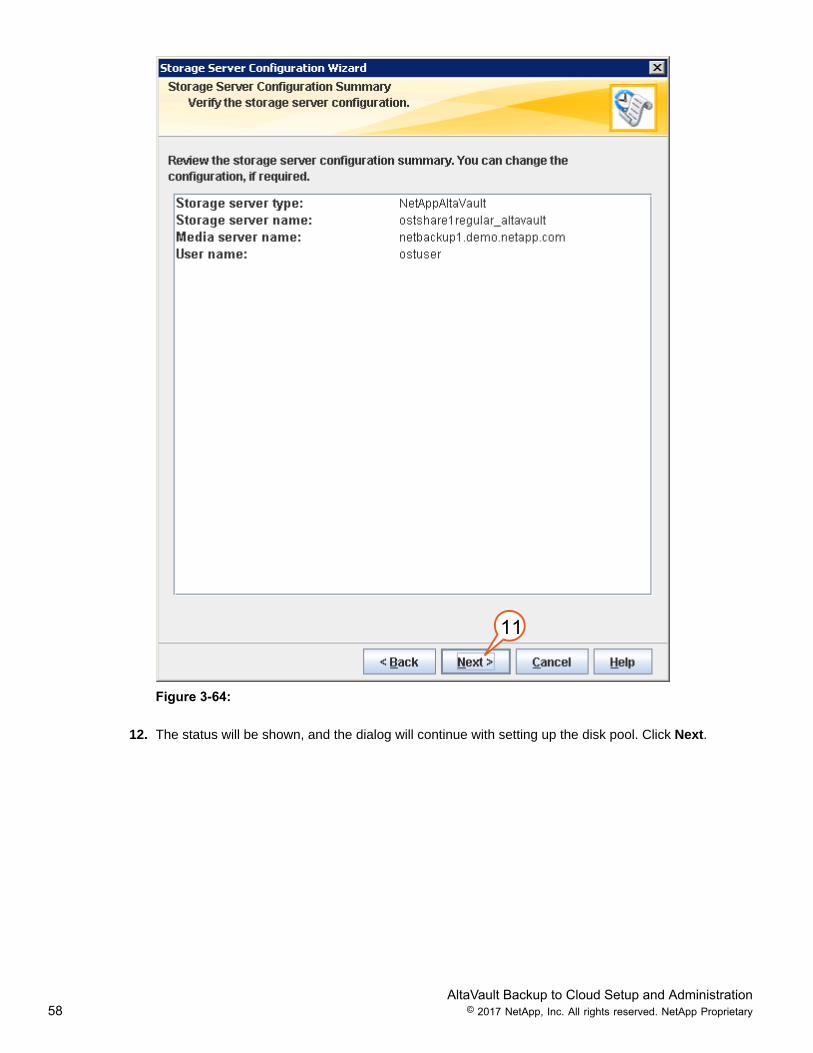
Figure 3-64:
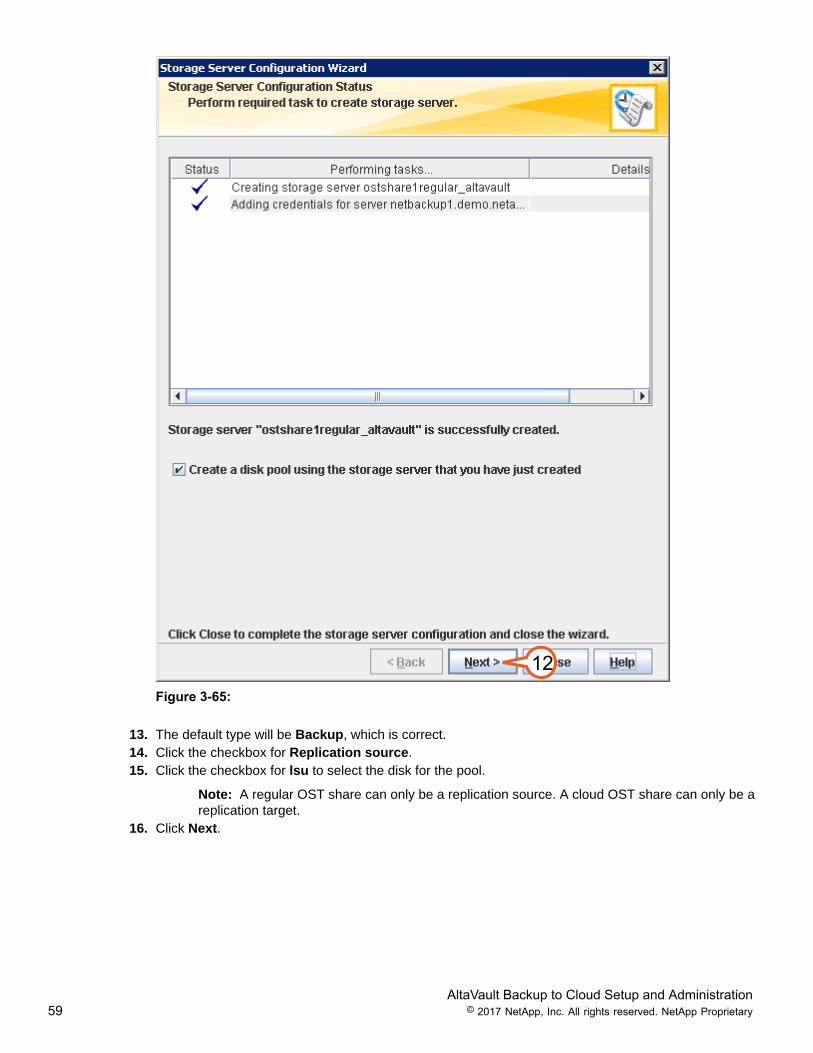
12. The status will be shown, and the dialog will continue with setting up the disk pool. Click Next.
AltaVault Backup to Cloud Setup and Administration59 © 2017 NetApp, Inc. All rights reserved. NetApp Proprietary
12Figure 3-65:
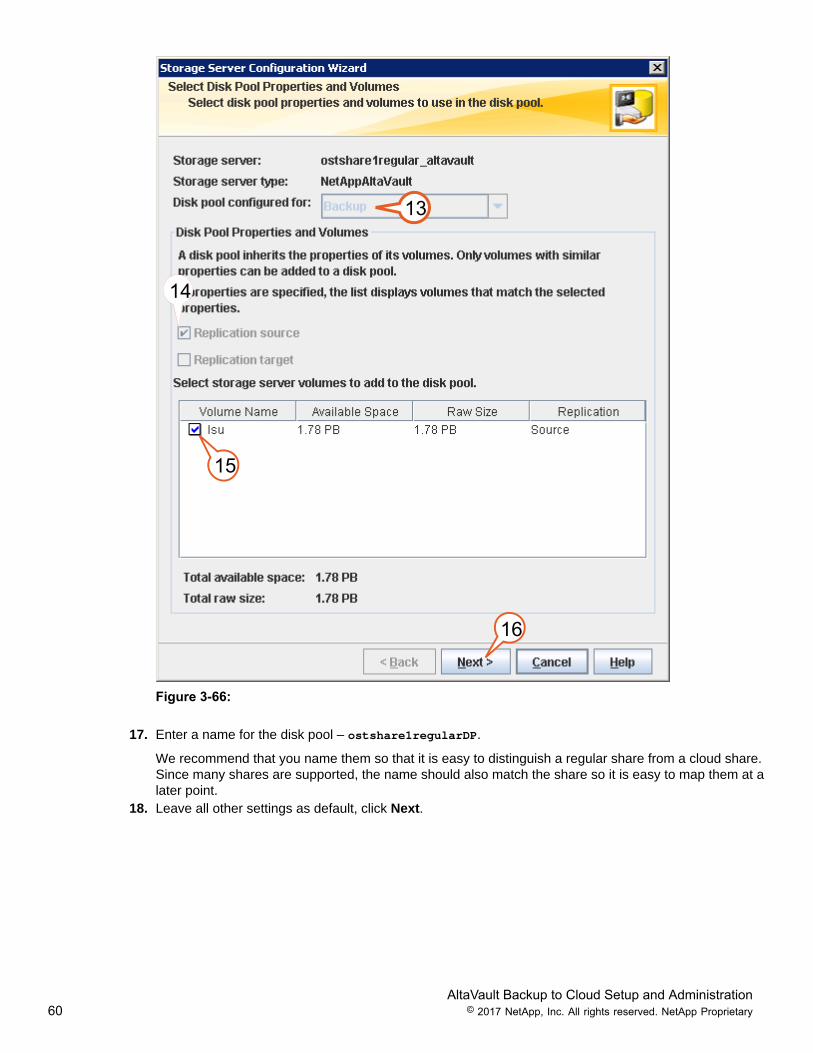
13. The default type will be Backup, which is correct.14. Click the checkbox for Replication source.15. Click the checkbox for lsu to select the disk for the pool.
Note: A regular OST share can only be a replication source. A cloud OST share can only be areplication target.
16. Click Next.
AltaVault Backup to Cloud Setup and Administration60 © 2017 NetApp, Inc. All rights reserved. NetApp Proprietary
13
14
15
16
Figure 3-66:
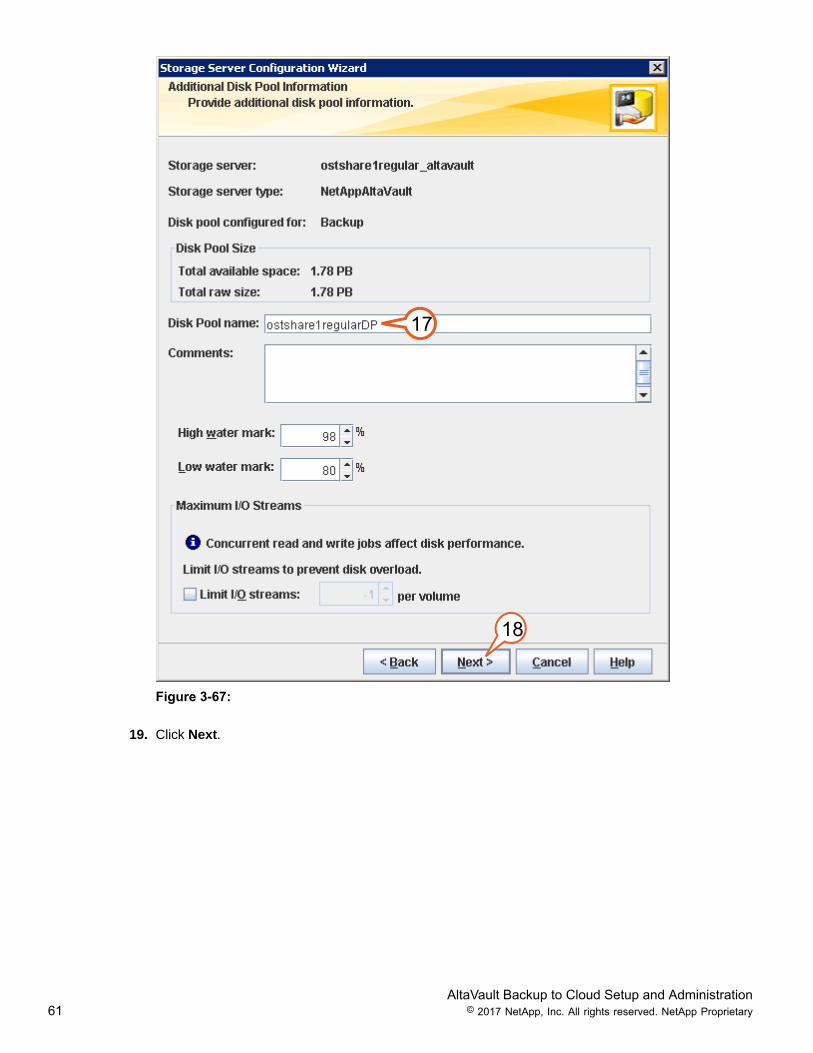
17. Enter a name for the disk pool – ostshare1regularDP.
We recommend that you name them so that it is easy to distinguish a regular share from a cloud share.Since many shares are supported, the name should also match the share so it is easy to map them at alater point.
18. Leave all other settings as default, click Next.
AltaVault Backup to Cloud Setup and Administration61 © 2017 NetApp, Inc. All rights reserved. NetApp Proprietary
17
18
Figure 3-67:
19. Click Next.
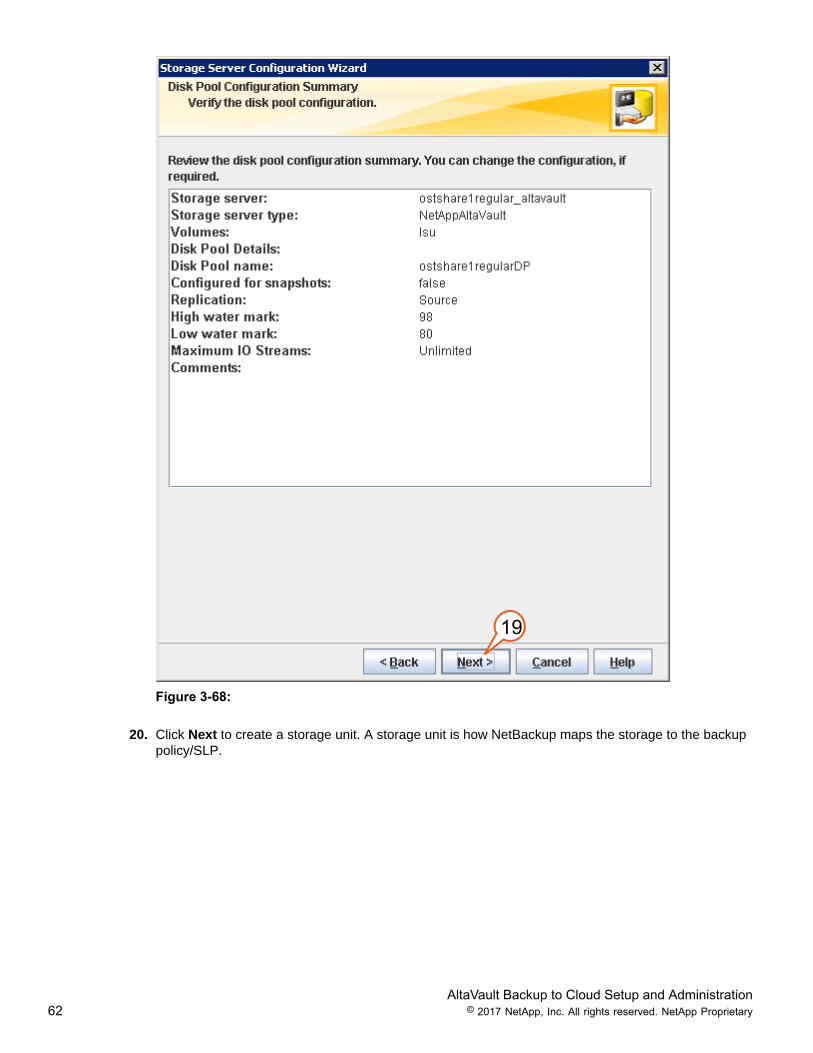
AltaVault Backup to Cloud Setup and Administration62 © 2017 NetApp, Inc. All rights reserved. NetApp Proprietary
19
Figure 3-68:
20. Click Next to create a storage unit. A storage unit is how NetBackup maps the storage to the backuppolicy/SLP.
AltaVault Backup to Cloud Setup and Administration63 © 2017 NetApp, Inc. All rights reserved. NetApp Proprietary
20
Figure 3-69:
21. Use the default name for the storage unit.22. Leave the default, or choose Only use the selected media servers:, and select the
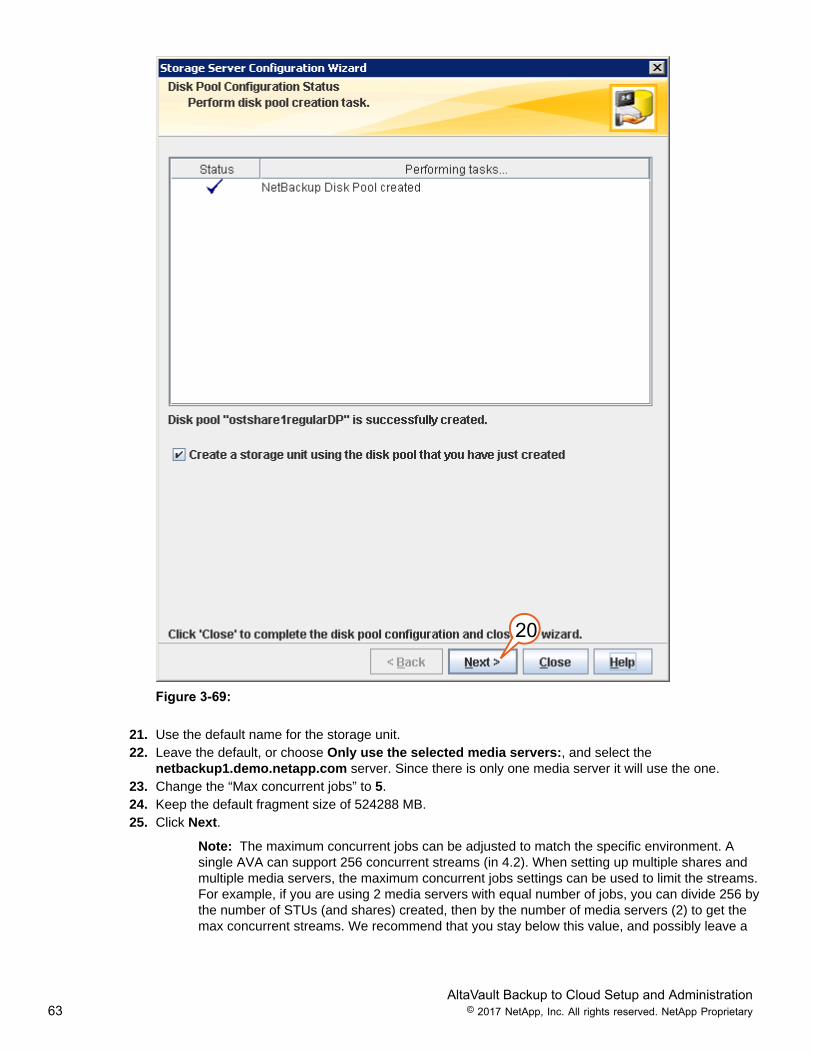
netbackup1.demo.netapp.com server. Since there is only one media server it will use the one.23. Change the “Max concurrent jobs” to 5.24. Keep the default fragment size of 524288 MB.25. Click Next.
Note: The maximum concurrent jobs can be adjusted to match the specific environment. Asingle AVA can support 256 concurrent streams (in 4.2). When setting up multiple shares andmultiple media servers, the maximum concurrent jobs settings can be used to limit the streams.For example, if you are using 2 media servers with equal number of jobs, you can divide 256 bythe number of STUs (and shares) created, then by the number of media servers (2) to get themax concurrent streams. We recommend that you stay below this value, and possibly leave a
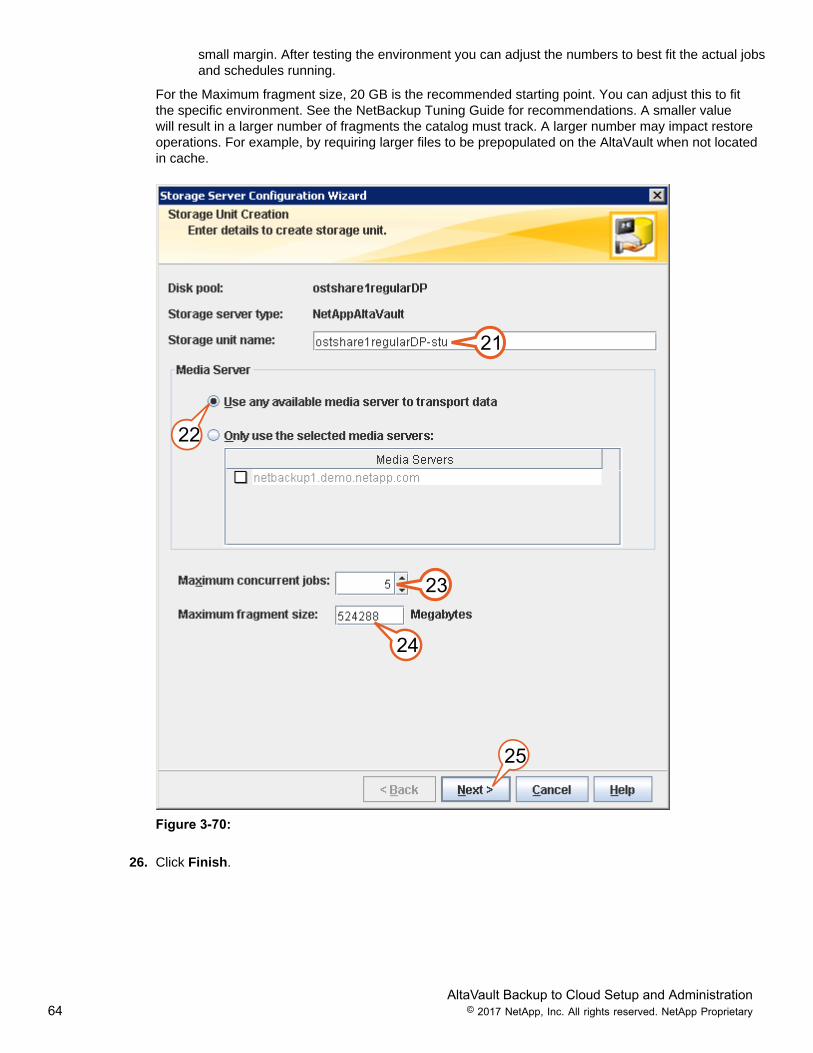
AltaVault Backup to Cloud Setup and Administration64 © 2017 NetApp, Inc. All rights reserved. NetApp Proprietary
small margin. After testing the environment you can adjust the numbers to best fit the actual jobsand schedules running.
For the Maximum fragment size, 20 GB is the recommended starting point. You can adjust this to fitthe specific environment. See the NetBackup Tuning Guide for recommendations. A smaller valuewill result in a larger number of fragments the catalog must track. A larger number may impact restoreoperations. For example, by requiring larger files to be prepopulated on the AltaVault when not locatedin cache.
21
22
23
24
25
Figure 3-70:
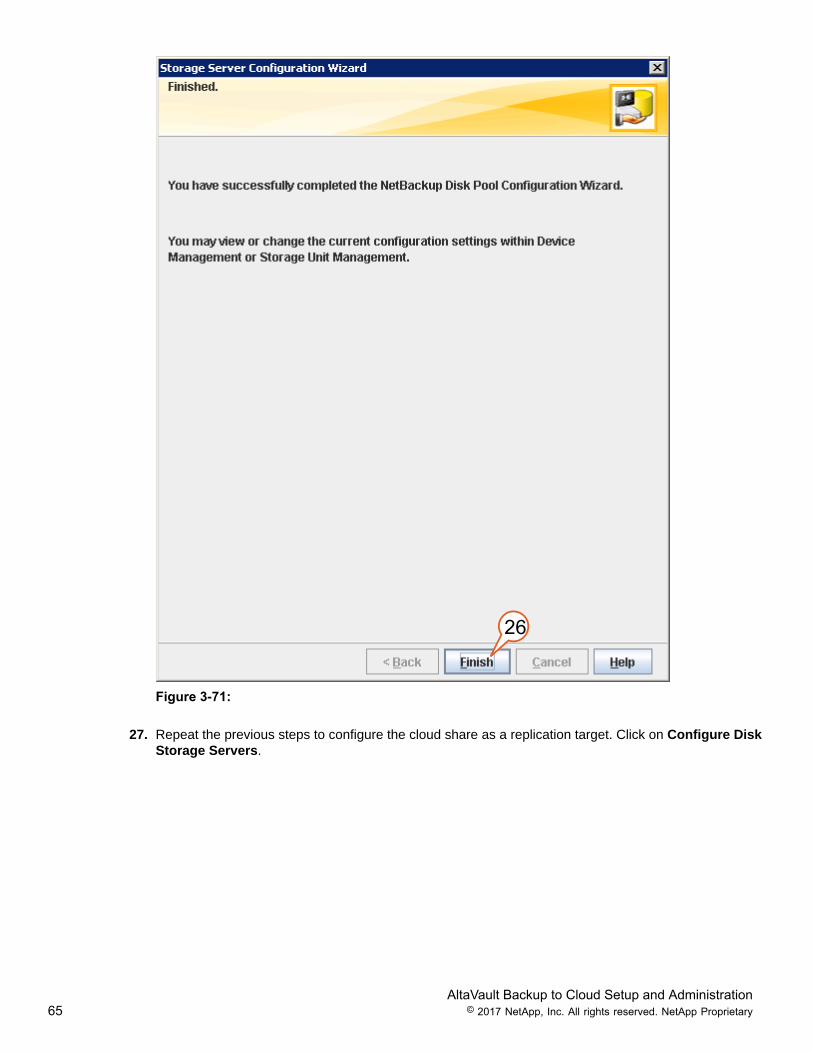
26. Click Finish.
AltaVault Backup to Cloud Setup and Administration65 © 2017 NetApp, Inc. All rights reserved. NetApp Proprietary
26
Figure 3-71:
27. Repeat the previous steps to configure the cloud share as a replication target. Click on Configure DiskStorage Servers.
AltaVault Backup to Cloud Setup and Administration66 © 2017 NetApp, Inc. All rights reserved. NetApp Proprietary
27
Figure 3-72:
28. Select OpenStorage.29. Click Next.
AltaVault Backup to Cloud Setup and Administration67 © 2017 NetApp, Inc. All rights reserved. NetApp Proprietary
28
29
Figure 3-73:
30. For “Media server”, choose the netbackup1.demo.netapp.com server.31. For “Storage server type”, enter NetAppAltaVault (this needs to be exact, as it is case sensitive).32. Enter the following for the regular OST share that was previously created:
ostshare1cloud_altavault.33. Enter the “User name:” ostuser.34. Enter the “Password:” netapp1.35. Confirm the Password: netapp1.36. Click Next.
AltaVault Backup to Cloud Setup and Administration68 © 2017 NetApp, Inc. All rights reserved. NetApp Proprietary
30
31
32
333435
36
Figure 3-74:
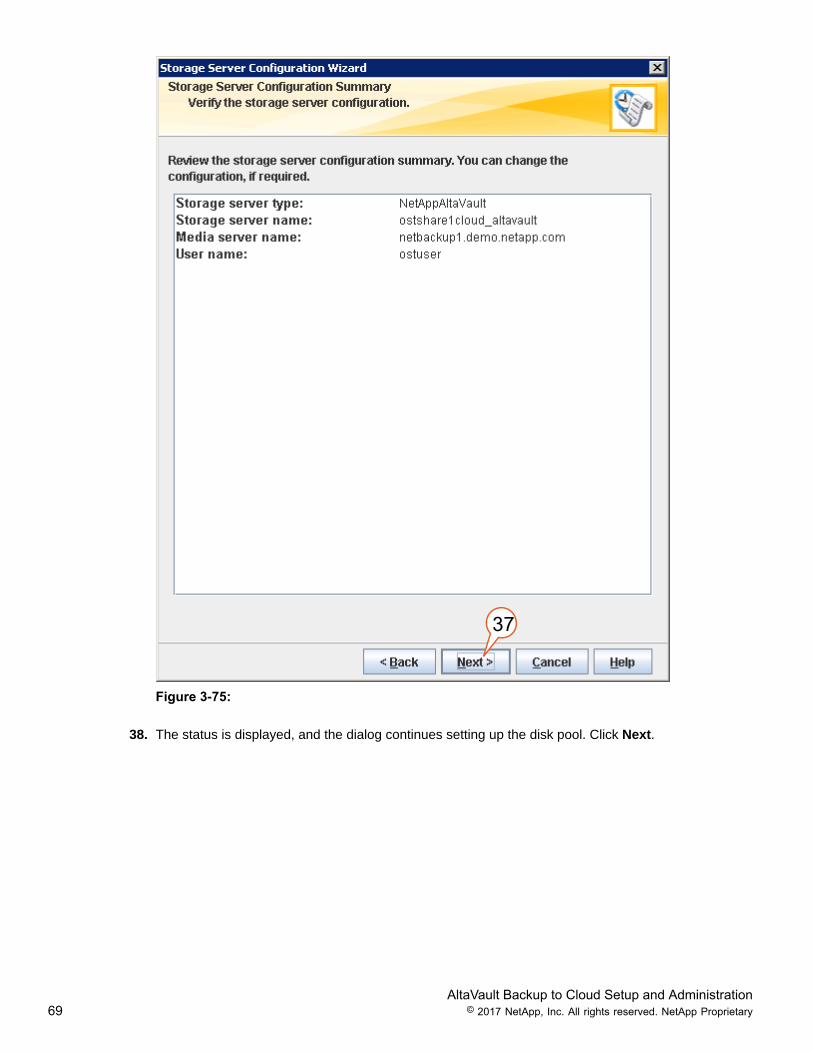
37. The storage server will be configured in netbackup. Click Next.
AltaVault Backup to Cloud Setup and Administration69 © 2017 NetApp, Inc. All rights reserved. NetApp Proprietary
37
Figure 3-75:
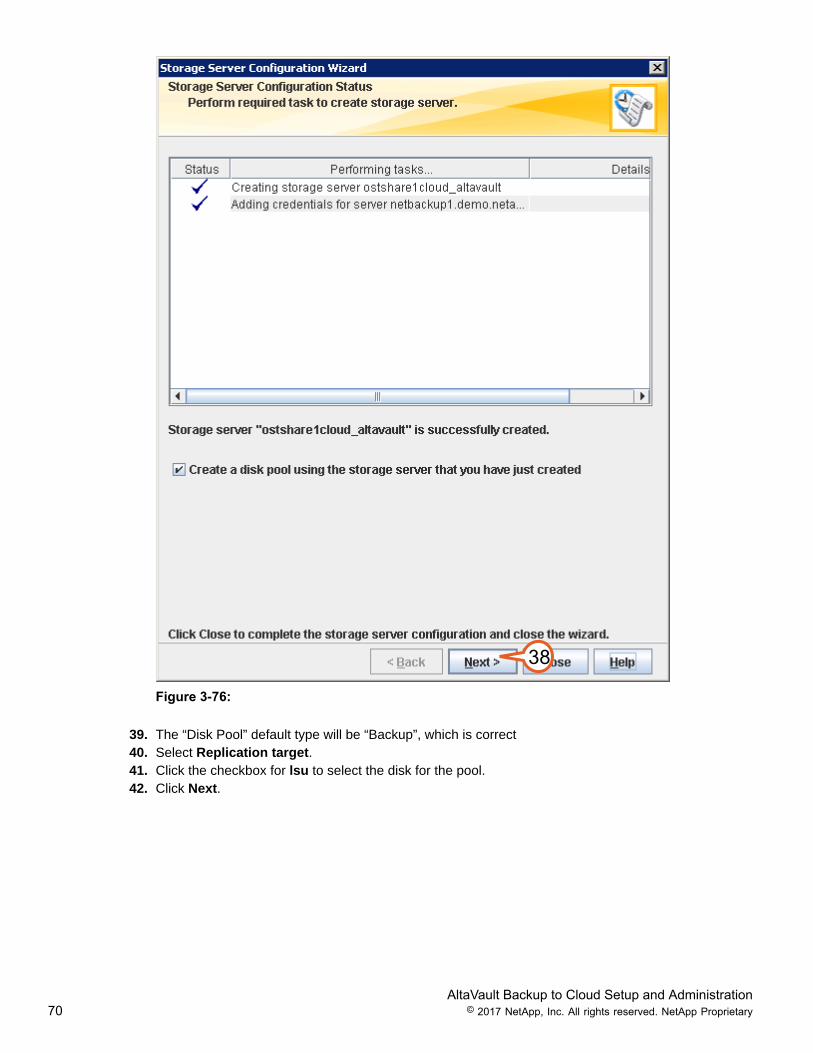
38. The status is displayed, and the dialog continues setting up the disk pool. Click Next.
AltaVault Backup to Cloud Setup and Administration70 © 2017 NetApp, Inc. All rights reserved. NetApp Proprietary
38
Figure 3-76:
39. The “Disk Pool” default type will be “Backup”, which is correct40. Select Replication target.41. Click the checkbox for lsu to select the disk for the pool.42. Click Next.

AltaVault Backup to Cloud Setup and Administration71 © 2017 NetApp, Inc. All rights reserved. NetApp Proprietary
39
40
41
42
Figure 3-77:
43. Enter the “Disk Pool name” as ostshare1cloudDP.44. Leave all other settings as default, and click Next.

AltaVault Backup to Cloud Setup and Administration72 © 2017 NetApp, Inc. All rights reserved. NetApp Proprietary
43
44
Figure 3-78:
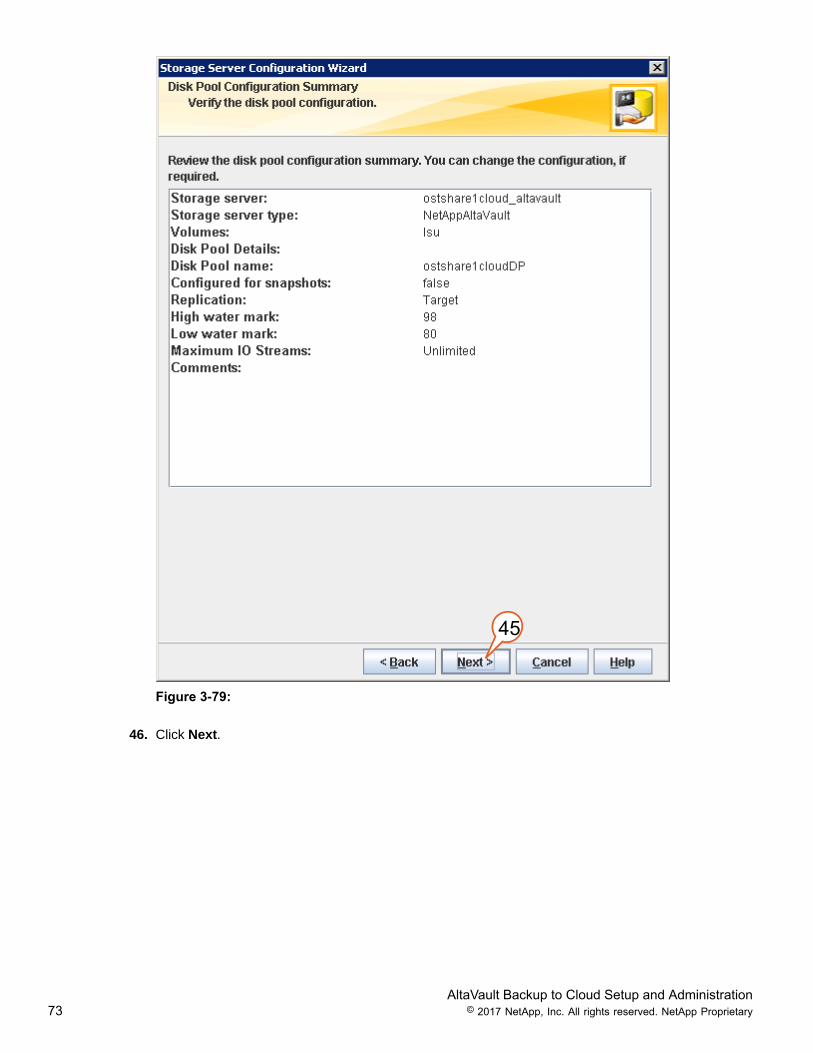
45. Click Next.
AltaVault Backup to Cloud Setup and Administration73 © 2017 NetApp, Inc. All rights reserved. NetApp Proprietary
45
Figure 3-79:
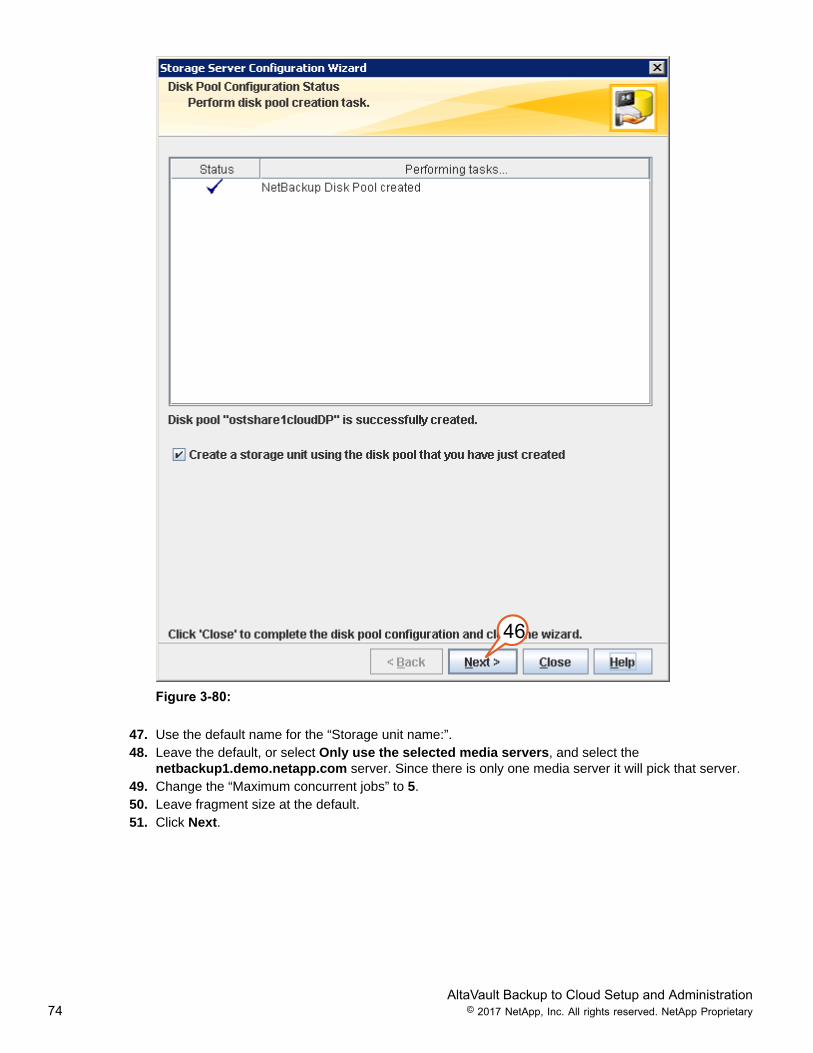
46. Click Next.
AltaVault Backup to Cloud Setup and Administration74 © 2017 NetApp, Inc. All rights reserved. NetApp Proprietary
46
Figure 3-80:
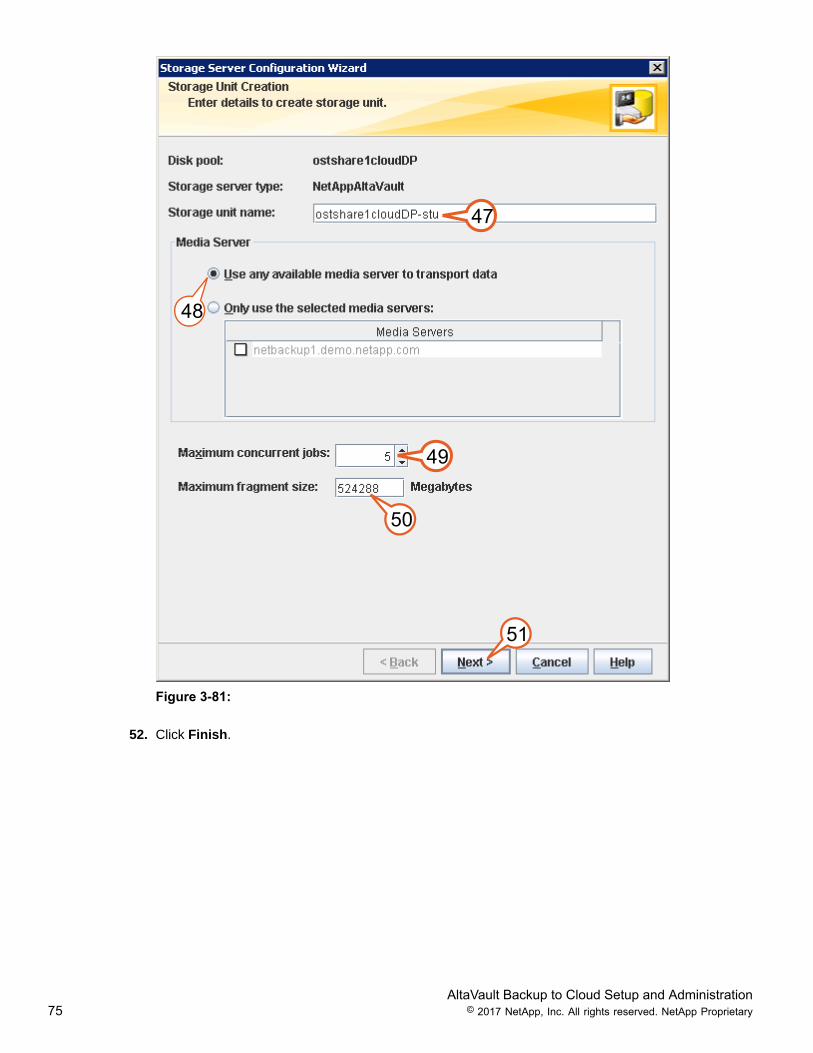
47. Use the default name for the “Storage unit name:”.48. Leave the default, or select Only use the selected media servers, and select the
netbackup1.demo.netapp.com server. Since there is only one media server it will pick that server.49. Change the “Maximum concurrent jobs” to 5.50. Leave fragment size at the default.51. Click Next.
AltaVault Backup to Cloud Setup and Administration75 © 2017 NetApp, Inc. All rights reserved. NetApp Proprietary
47
48
49
50
51
Figure 3-81:
52. Click Finish.

AltaVault Backup to Cloud Setup and Administration76 © 2017 NetApp, Inc. All rights reserved. NetApp Proprietary
52
Figure 3-82:
3.3.1 Create a Storage Lifecycle Policy (SLP)1. In the left pane, expand Storage.2. Right click on Storage Lifecycle Policies, and choose New Storage Lifecycle Policy....
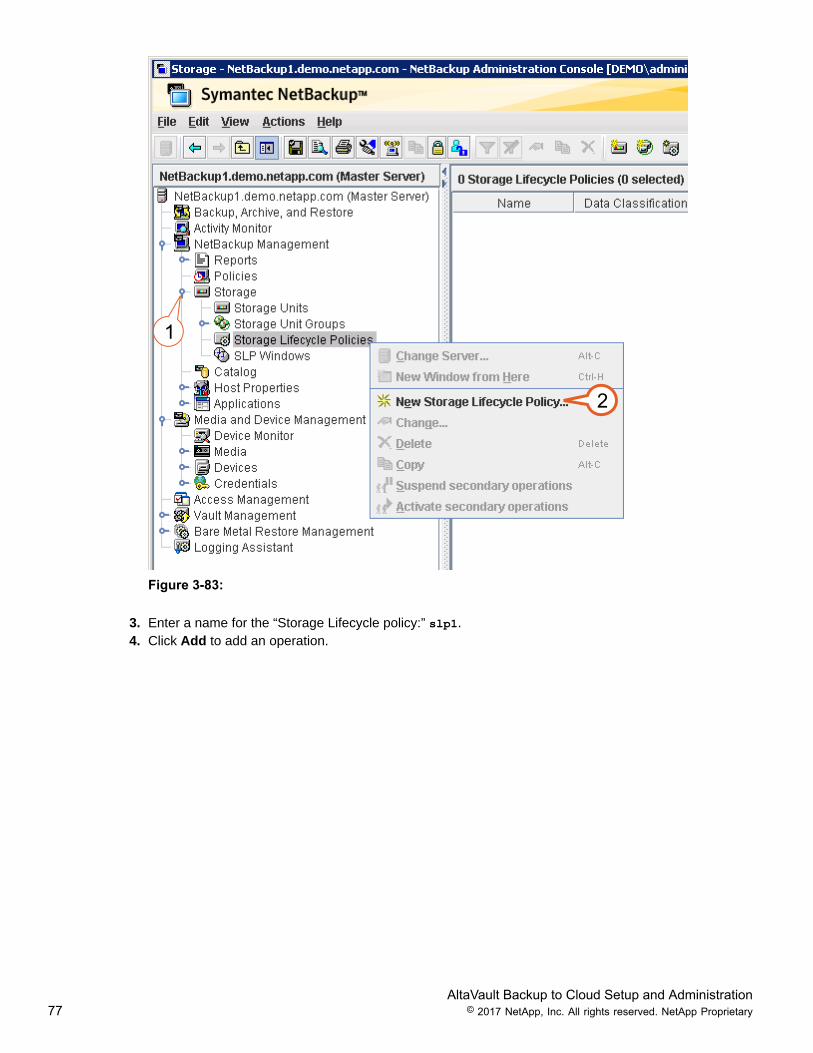
AltaVault Backup to Cloud Setup and Administration77 © 2017 NetApp, Inc. All rights reserved. NetApp Proprietary
1
2
Figure 3-83:
3. Enter a name for the “Storage Lifecycle policy:” slp1.4. Click Add to add an operation.
AltaVault Backup to Cloud Setup and Administration78 © 2017 NetApp, Inc. All rights reserved. NetApp Proprietary
3
4
Figure 3-84:
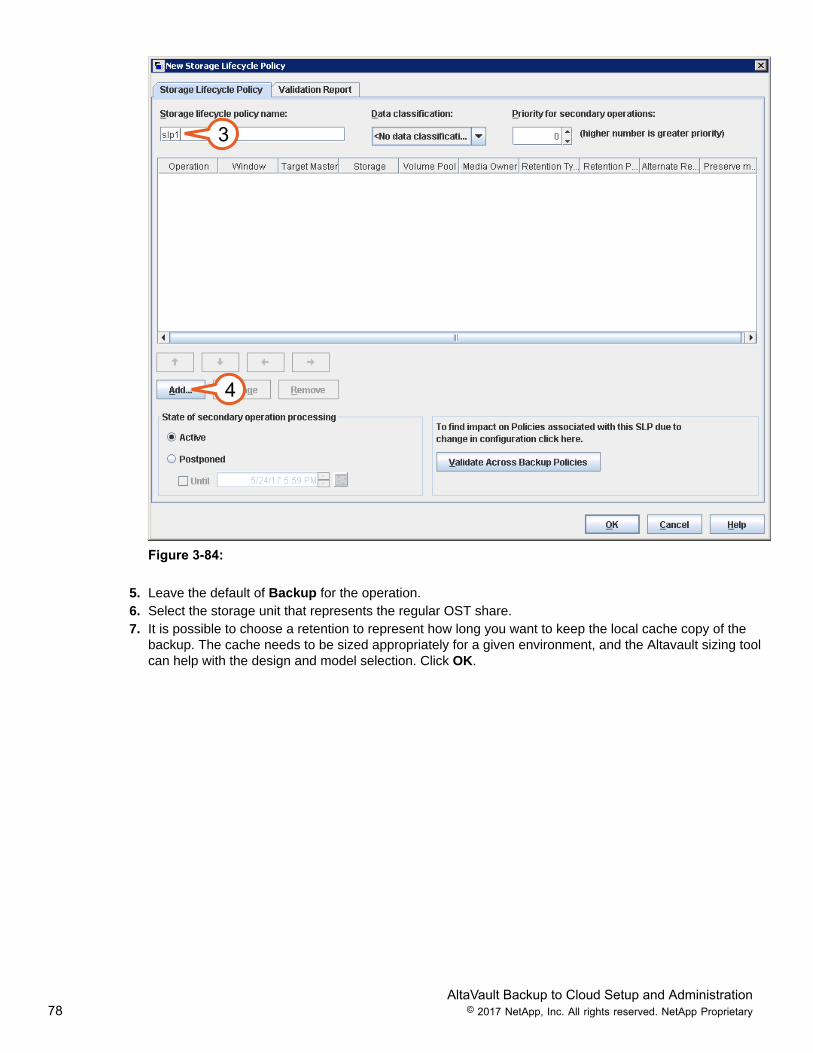
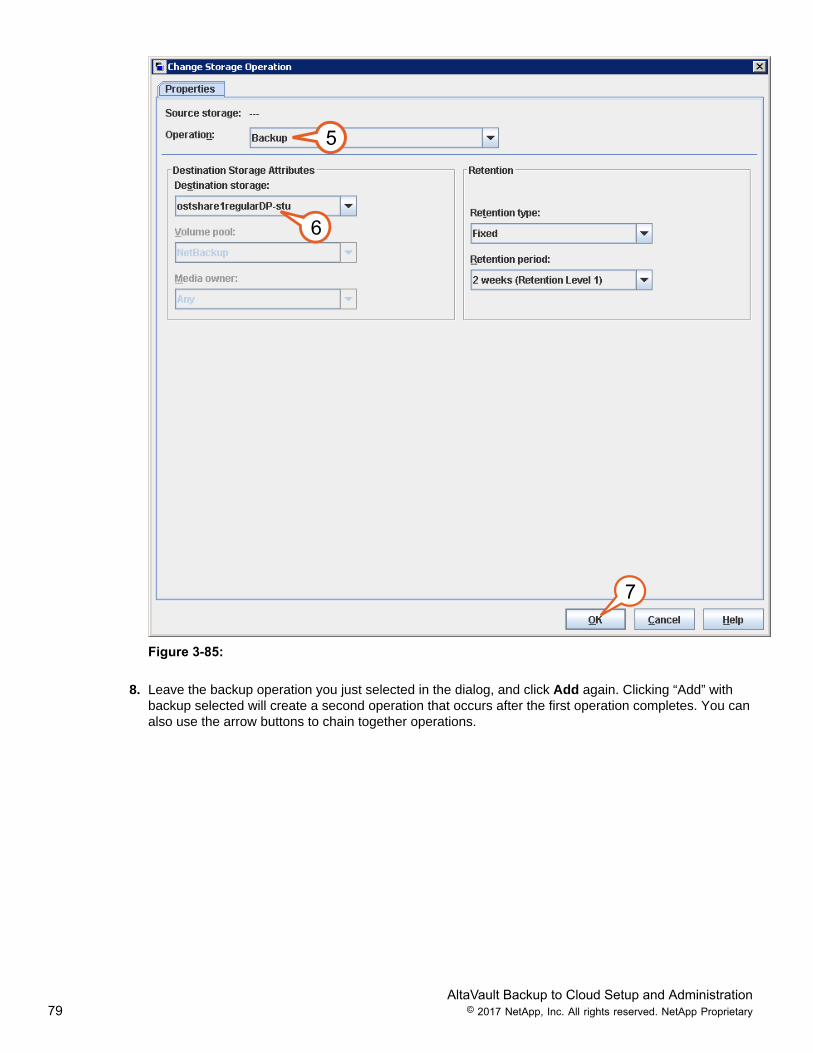
5. Leave the default of Backup for the operation.6. Select the storage unit that represents the regular OST share.7. It is possible to choose a retention to represent how long you want to keep the local cache copy of the
backup. The cache needs to be sized appropriately for a given environment, and the Altavault sizing toolcan help with the design and model selection. Click OK.
AltaVault Backup to Cloud Setup and Administration79 © 2017 NetApp, Inc. All rights reserved. NetApp Proprietary
5
6
7
Figure 3-85:
8. Leave the backup operation you just selected in the dialog, and click Add again. Clicking “Add” withbackup selected will create a second operation that occurs after the first operation completes. You canalso use the arrow buttons to chain together operations.
AltaVault Backup to Cloud Setup and Administration80 © 2017 NetApp, Inc. All rights reserved. NetApp Proprietary
8
Figure 3-86:
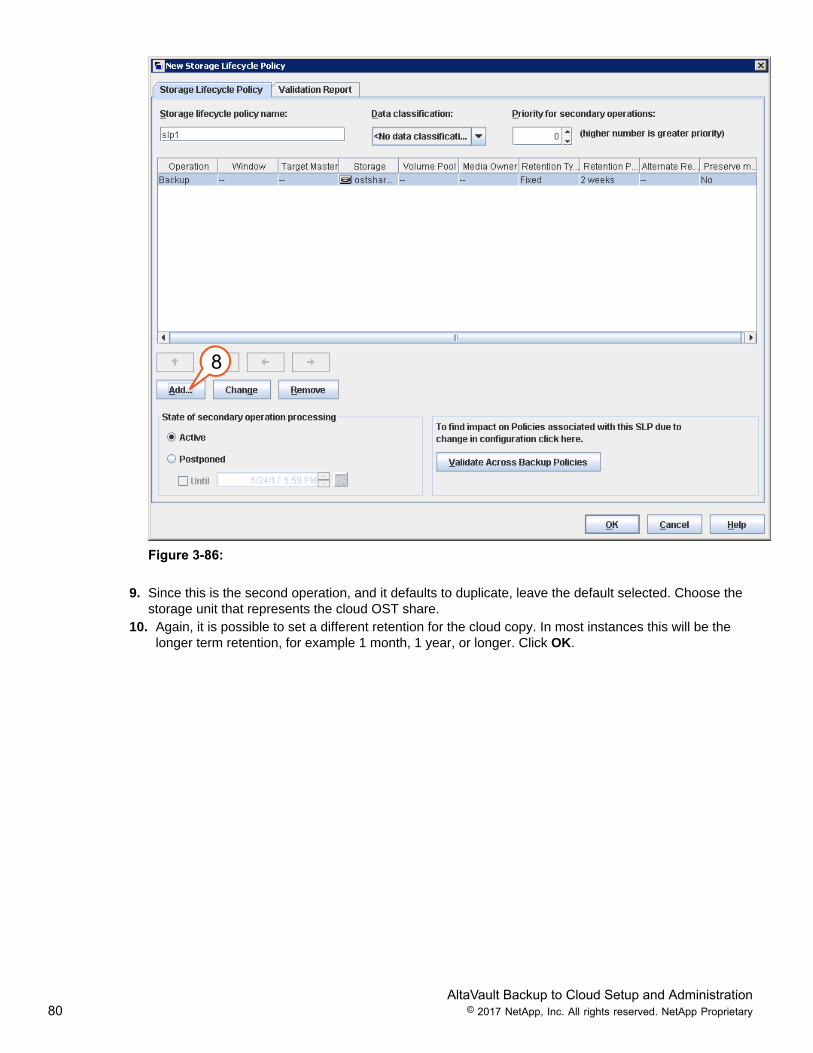
9. Since this is the second operation, and it defaults to duplicate, leave the default selected. Choose thestorage unit that represents the cloud OST share.
10. Again, it is possible to set a different retention for the cloud copy. In most instances this will be thelonger term retention, for example 1 month, 1 year, or longer. Click OK.

AltaVault Backup to Cloud Setup and Administration81 © 2017 NetApp, Inc. All rights reserved. NetApp Proprietary
9
10
Figure 3-87:
11. The SLP is now configured correctly to perform a backup to the regular OST share, then a duplicationto the cloud share. Click OK.
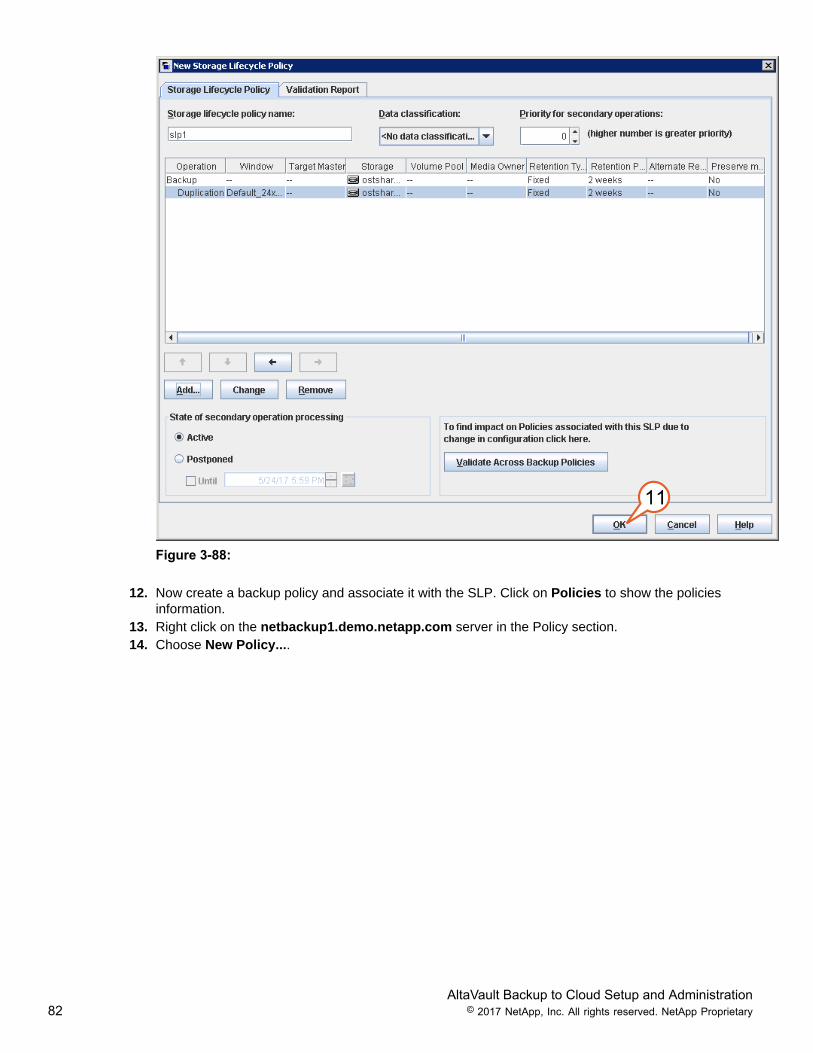
AltaVault Backup to Cloud Setup and Administration82 © 2017 NetApp, Inc. All rights reserved. NetApp Proprietary
11
Figure 3-88:
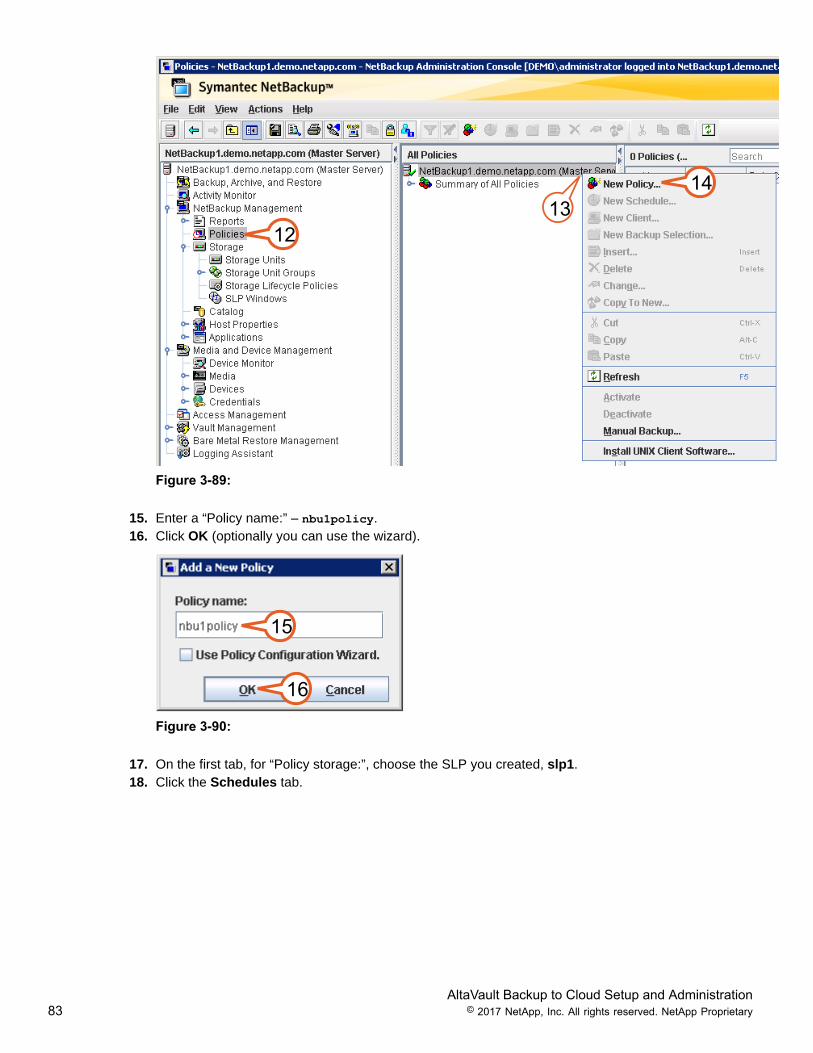
12. Now create a backup policy and associate it with the SLP. Click on Policies to show the policiesinformation.
13. Right click on the netbackup1.demo.netapp.com server in the Policy section.14. Choose New Policy....
AltaVault Backup to Cloud Setup and Administration83 © 2017 NetApp, Inc. All rights reserved. NetApp Proprietary
1213
14
Figure 3-89:
15. Enter a “Policy name:” – nbu1policy.16. Click OK (optionally you can use the wizard).
15
16
Figure 3-90:
17. On the first tab, for “Policy storage:”, choose the SLP you created, slp1.18. Click the Schedules tab.
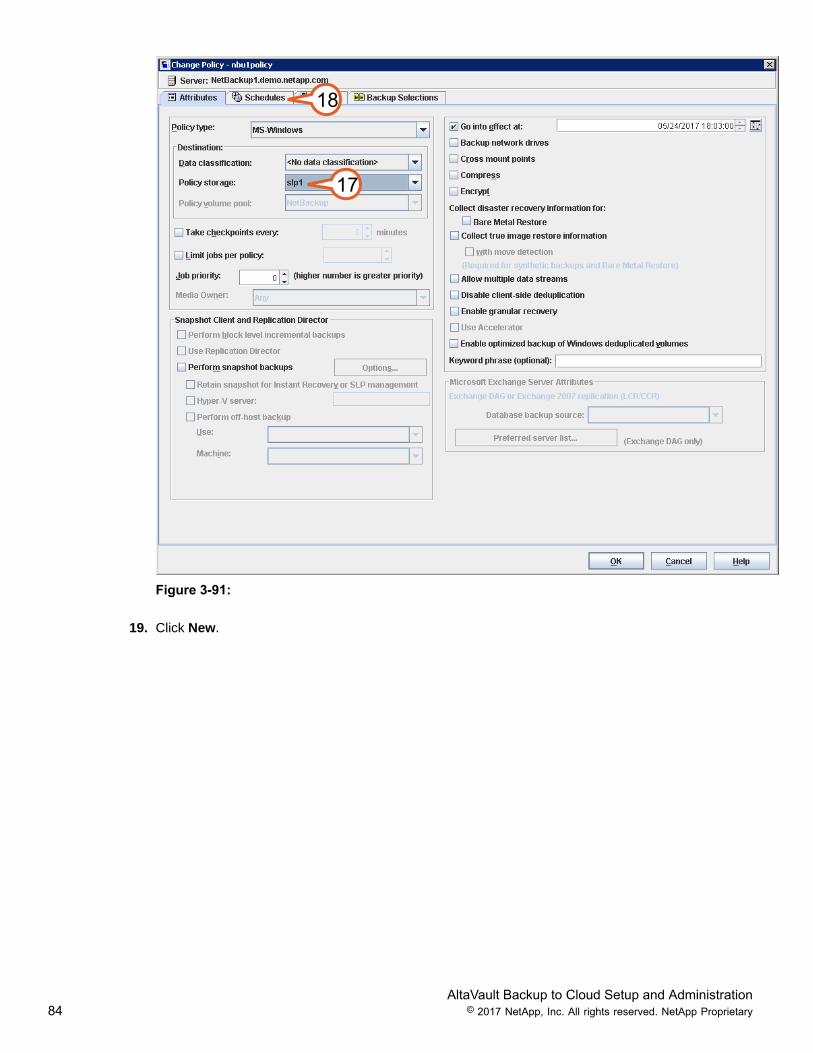
AltaVault Backup to Cloud Setup and Administration84 © 2017 NetApp, Inc. All rights reserved. NetApp Proprietary
17
18
Figure 3-91:
19. Click New.
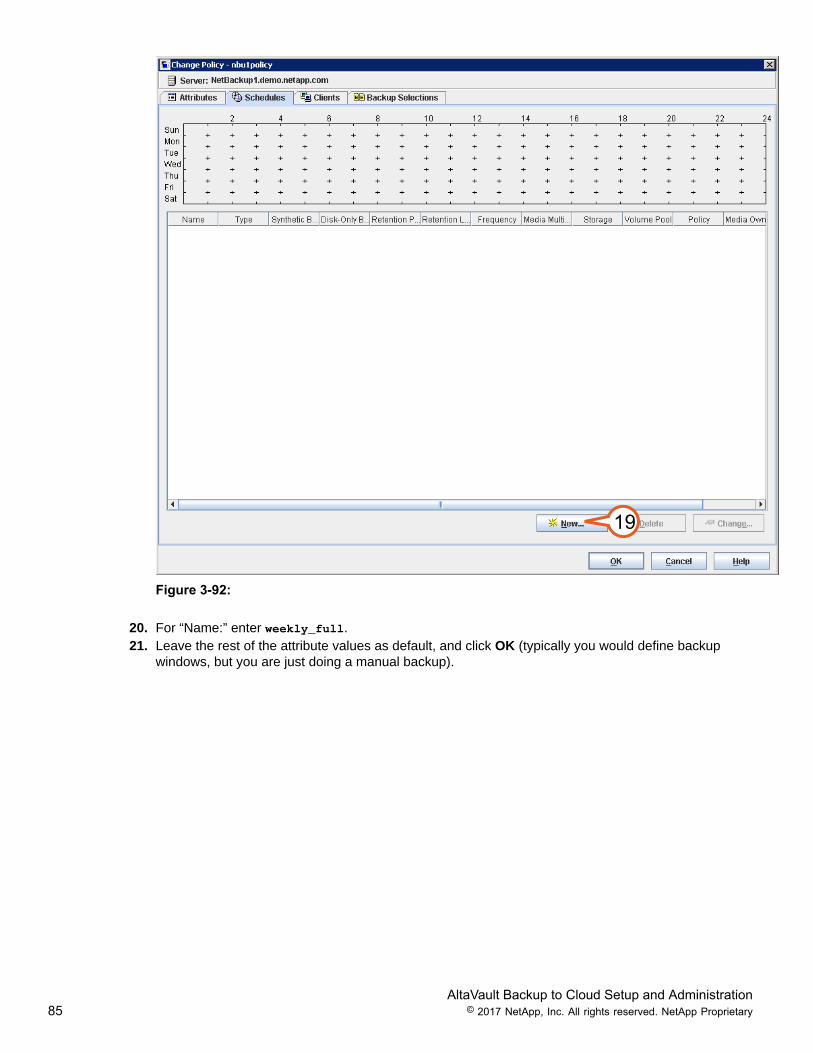
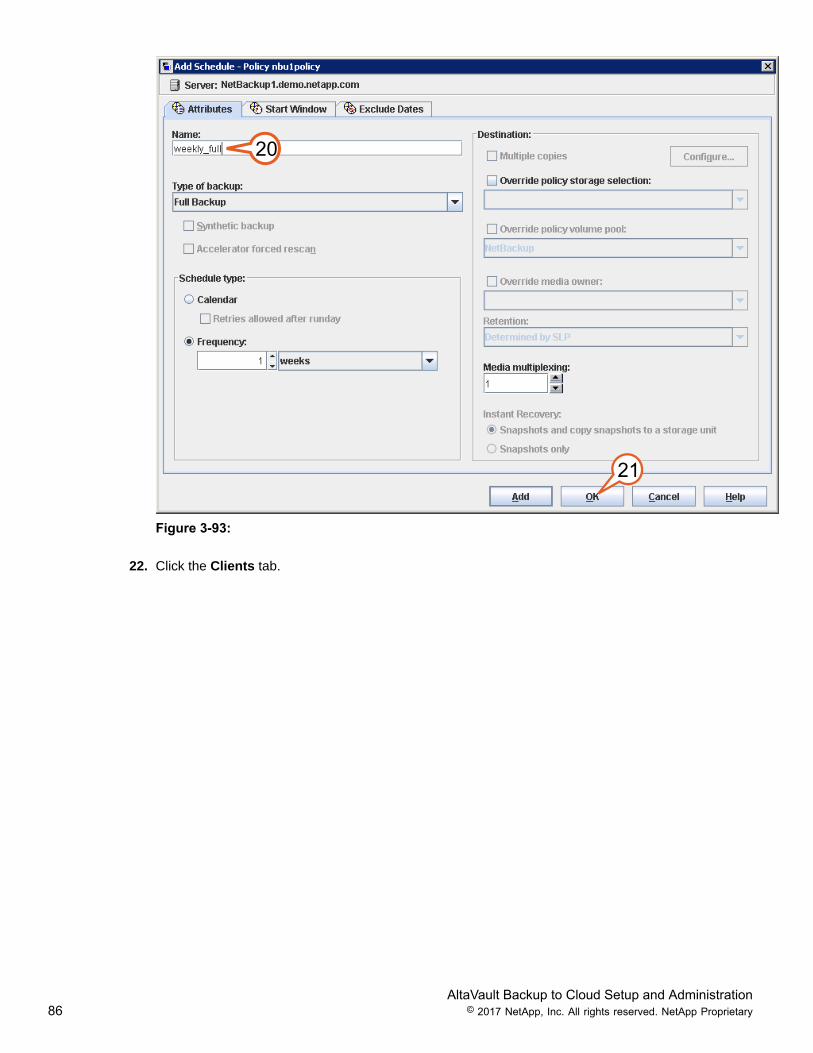
AltaVault Backup to Cloud Setup and Administration85 © 2017 NetApp, Inc. All rights reserved. NetApp Proprietary
19
Figure 3-92:
20. For “Name:” enter weekly_full.21. Leave the rest of the attribute values as default, and click OK (typically you would define backup
windows, but you are just doing a manual backup).
AltaVault Backup to Cloud Setup and Administration86 © 2017 NetApp, Inc. All rights reserved. NetApp Proprietary
20
21
Figure 3-93:
22. Click the Clients tab.

AltaVault Backup to Cloud Setup and Administration87 © 2017 NetApp, Inc. All rights reserved. NetApp Proprietary
22
Figure 3-94:
23. Click New.
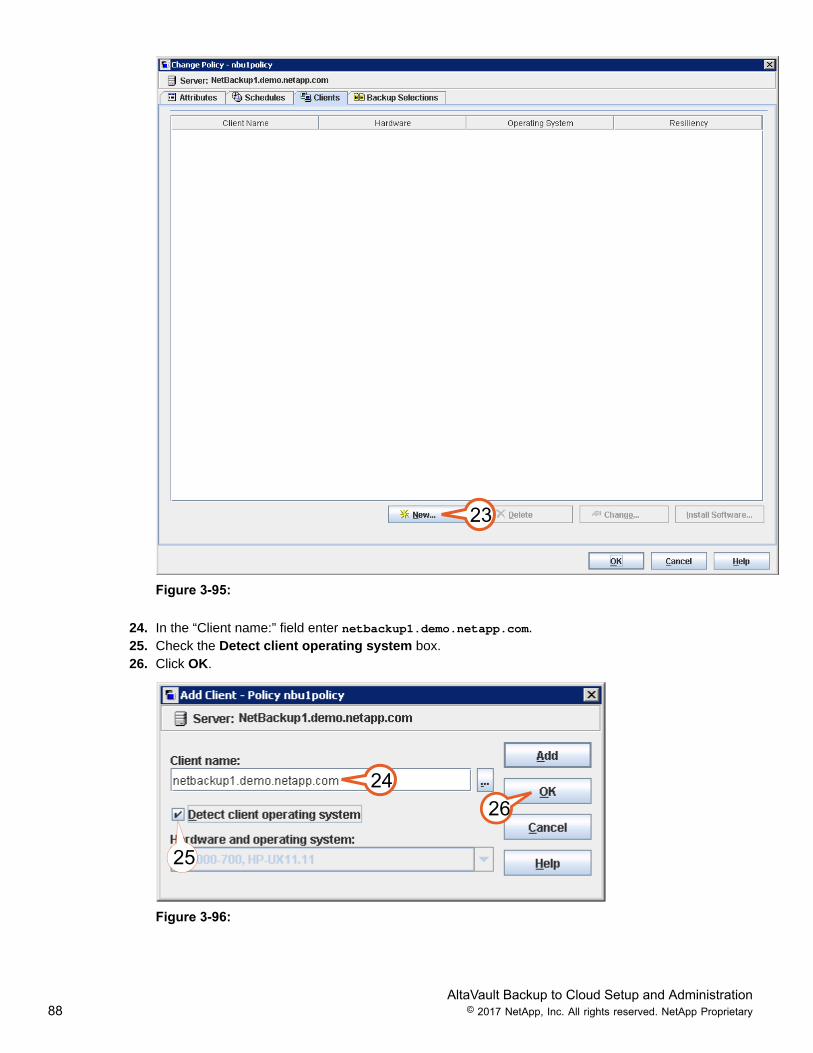
AltaVault Backup to Cloud Setup and Administration88 © 2017 NetApp, Inc. All rights reserved. NetApp Proprietary
23
Figure 3-95:
24. In the “Client name:” field enter netbackup1.demo.netapp.com.25. Check the Detect client operating system box.26. Click OK.
24
25
26
Figure 3-96:
AltaVault Backup to Cloud Setup and Administration89 © 2017 NetApp, Inc. All rights reserved. NetApp Proprietary
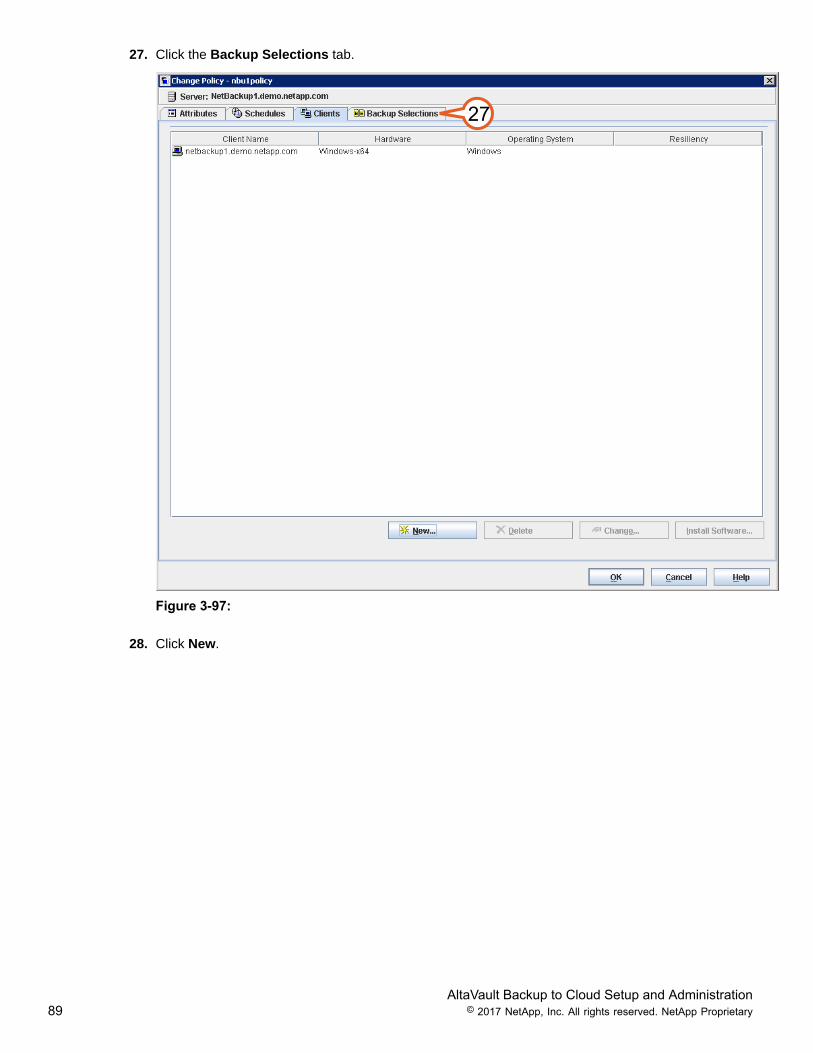
27. Click the Backup Selections tab.
27
Figure 3-97:
28. Click New.
AltaVault Backup to Cloud Setup and Administration90 © 2017 NetApp, Inc. All rights reserved. NetApp Proprietary
28
Figure 3-98:
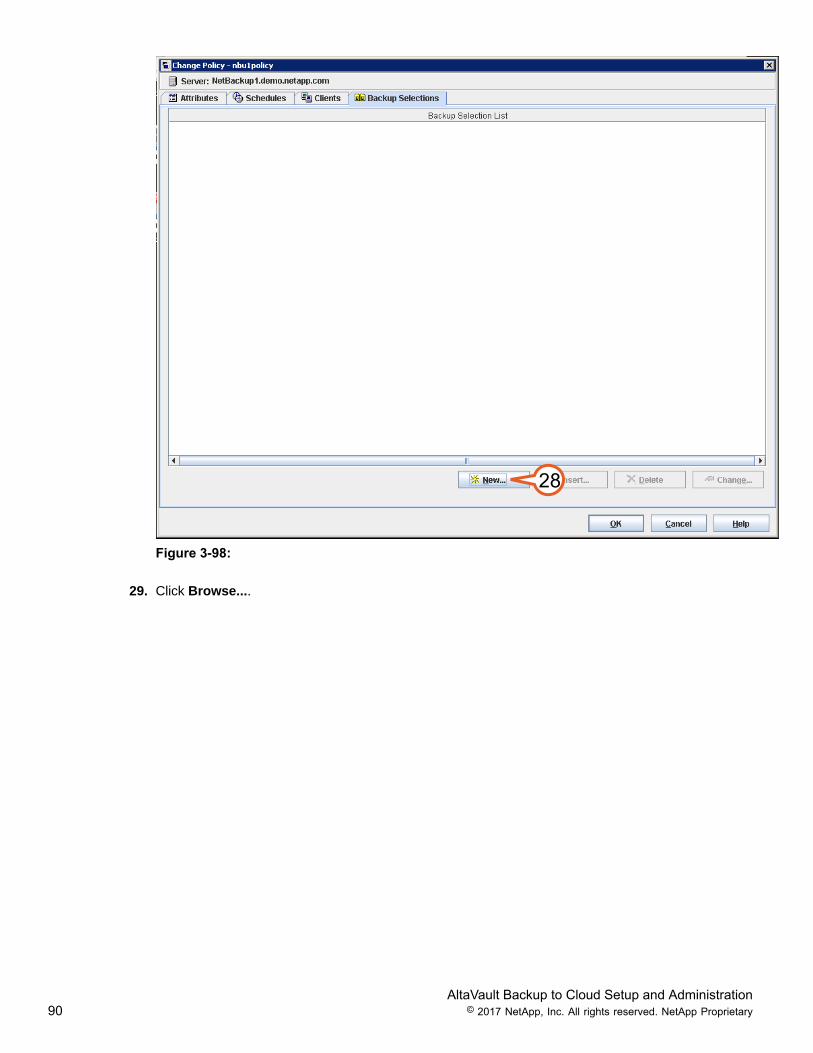
29. Click Browse....
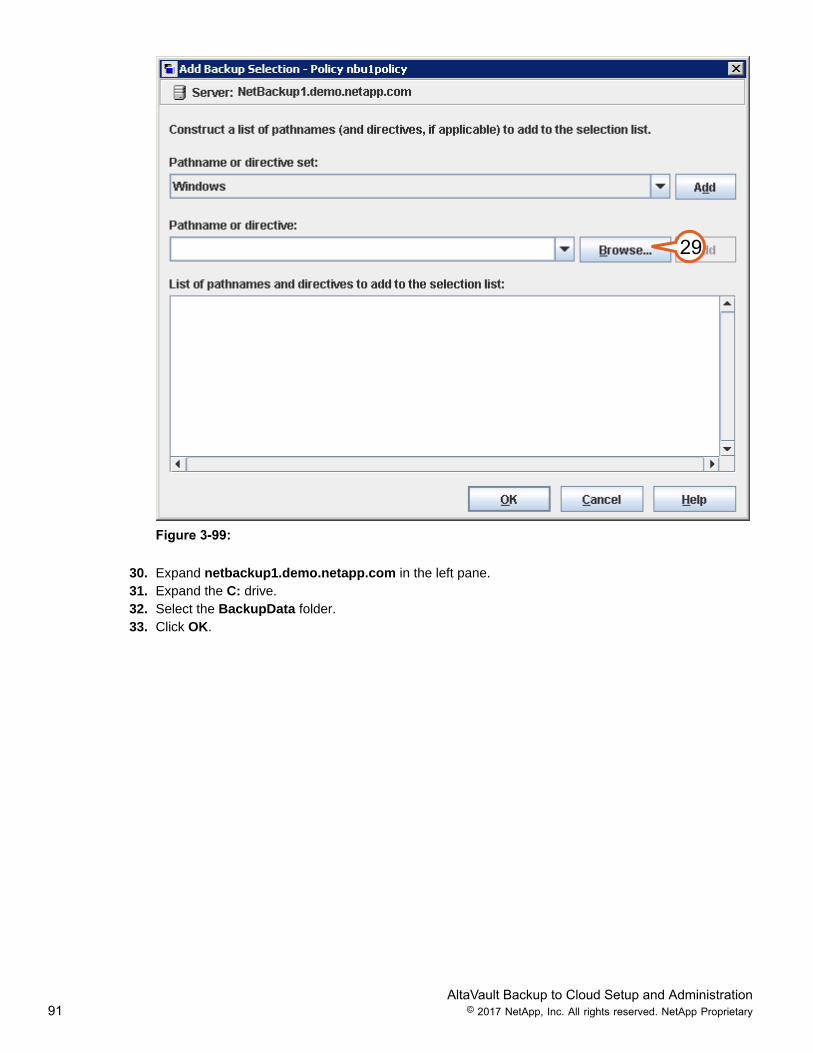
AltaVault Backup to Cloud Setup and Administration91 © 2017 NetApp, Inc. All rights reserved. NetApp Proprietary
29
Figure 3-99:
30. Expand netbackup1.demo.netapp.com in the left pane.31. Expand the C: drive.32. Select the BackupData folder.33. Click OK.
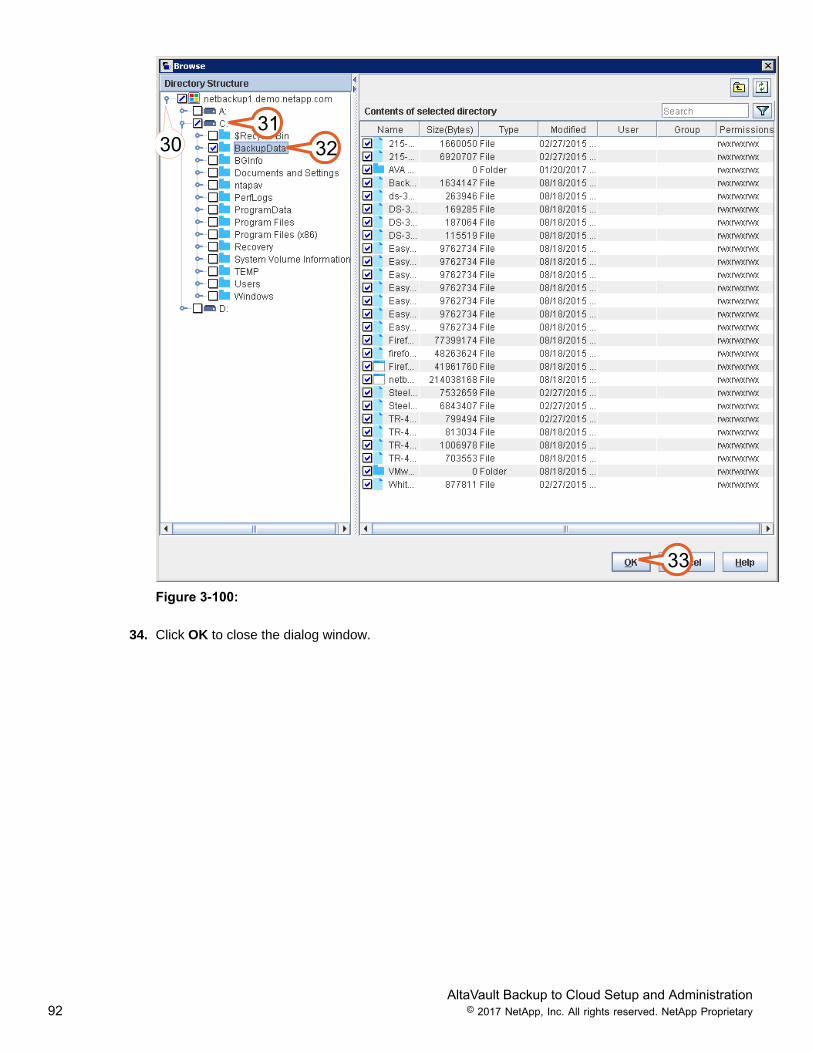
AltaVault Backup to Cloud Setup and Administration92 © 2017 NetApp, Inc. All rights reserved. NetApp Proprietary
3031
32
33
Figure 3-100:
34. Click OK to close the dialog window.
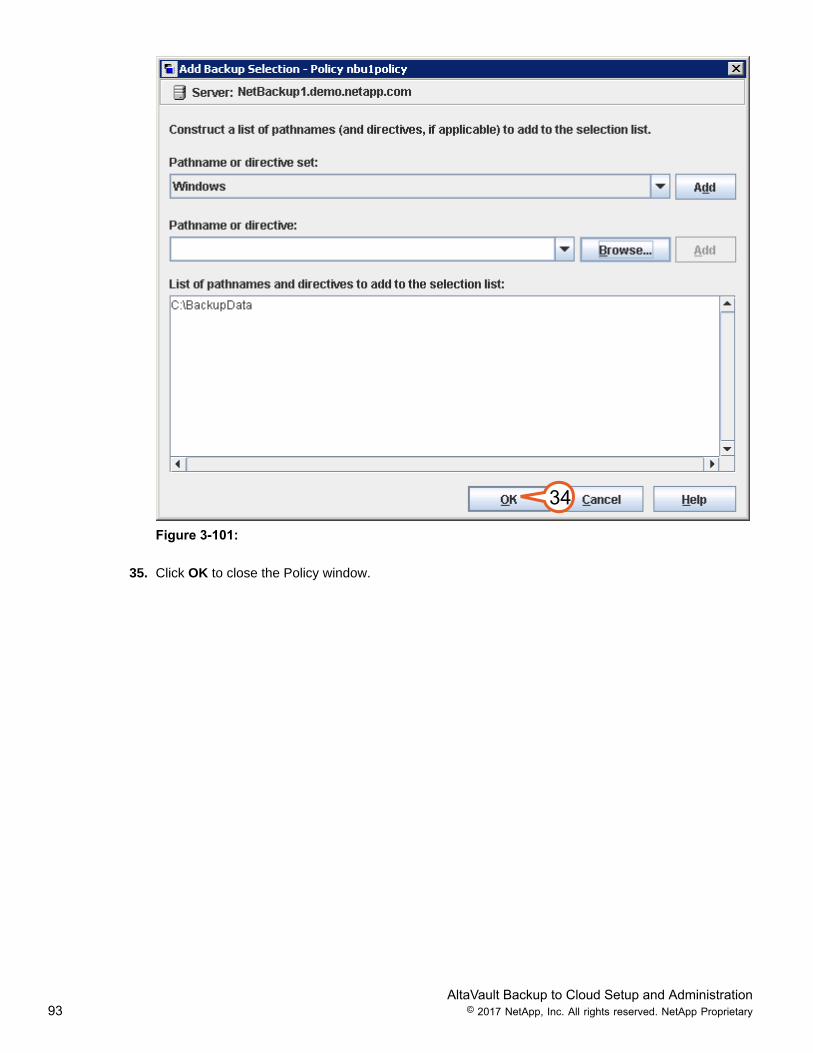
AltaVault Backup to Cloud Setup and Administration93 © 2017 NetApp, Inc. All rights reserved. NetApp Proprietary
34
Figure 3-101:
35. Click OK to close the Policy window.
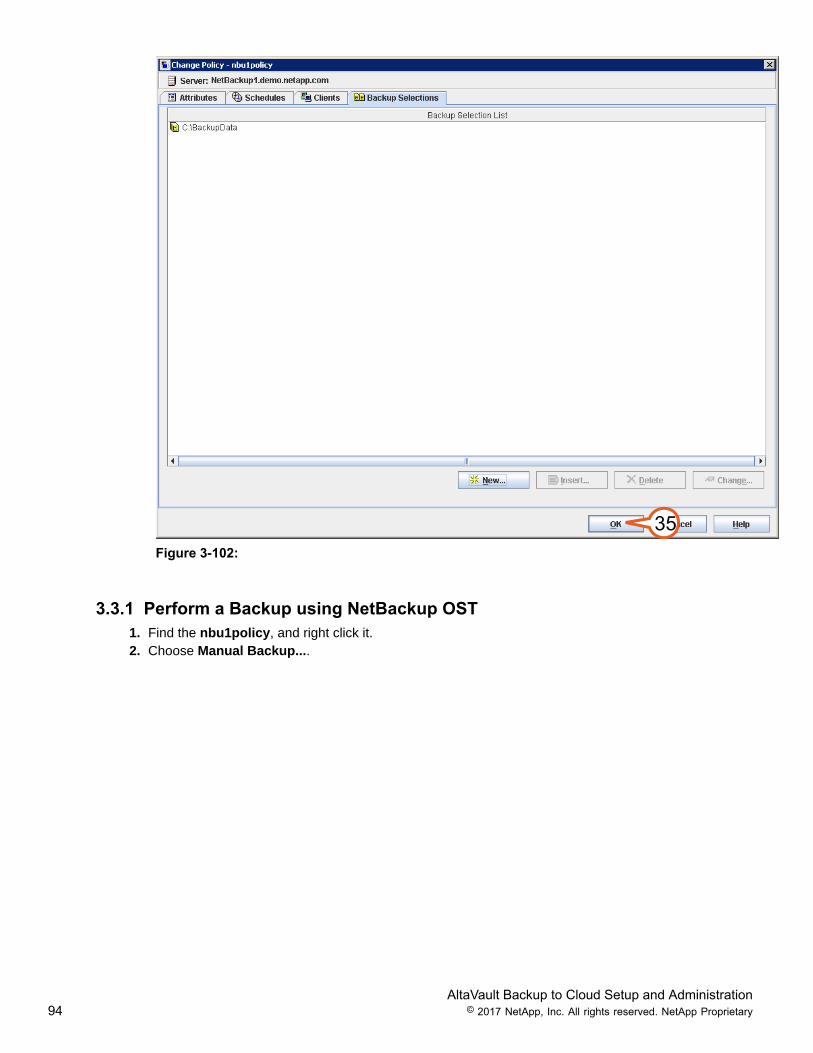
AltaVault Backup to Cloud Setup and Administration94 © 2017 NetApp, Inc. All rights reserved. NetApp Proprietary
35Figure 3-102:
3.3.1 Perform a Backup using NetBackup OST1. Find the nbu1policy, and right click it.2. Choose Manual Backup....
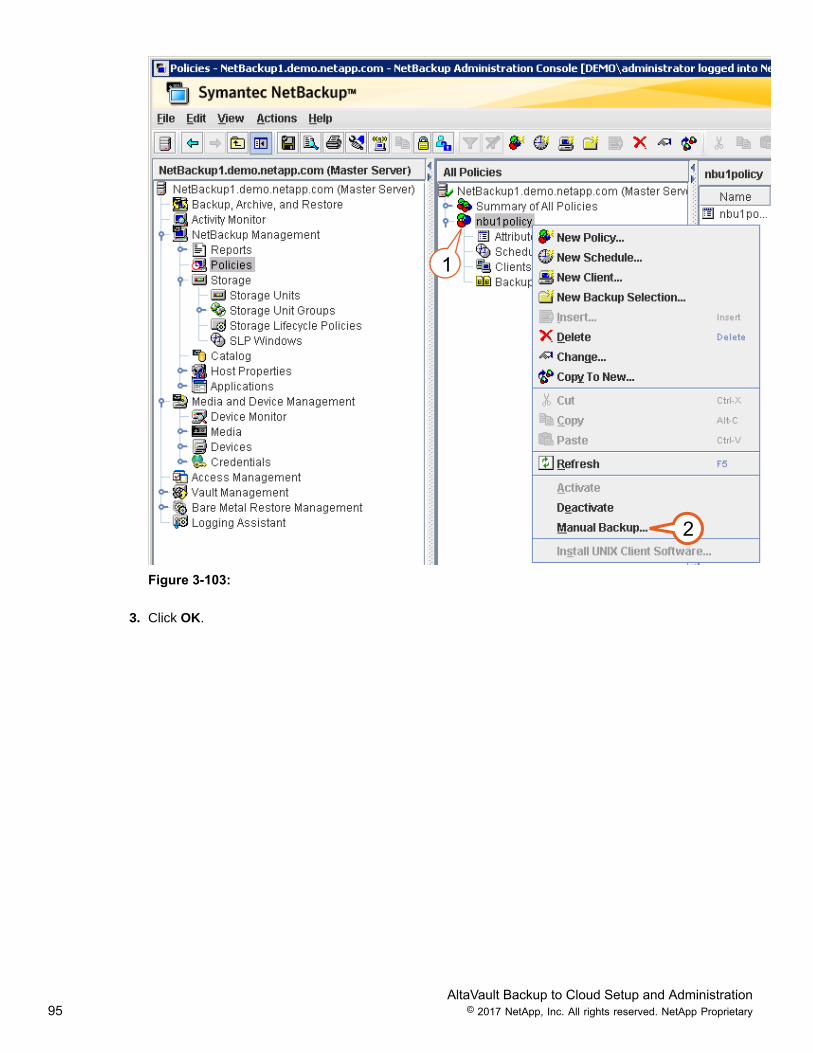
AltaVault Backup to Cloud Setup and Administration95 © 2017 NetApp, Inc. All rights reserved. NetApp Proprietary
1
2
Figure 3-103:
3. Click OK.
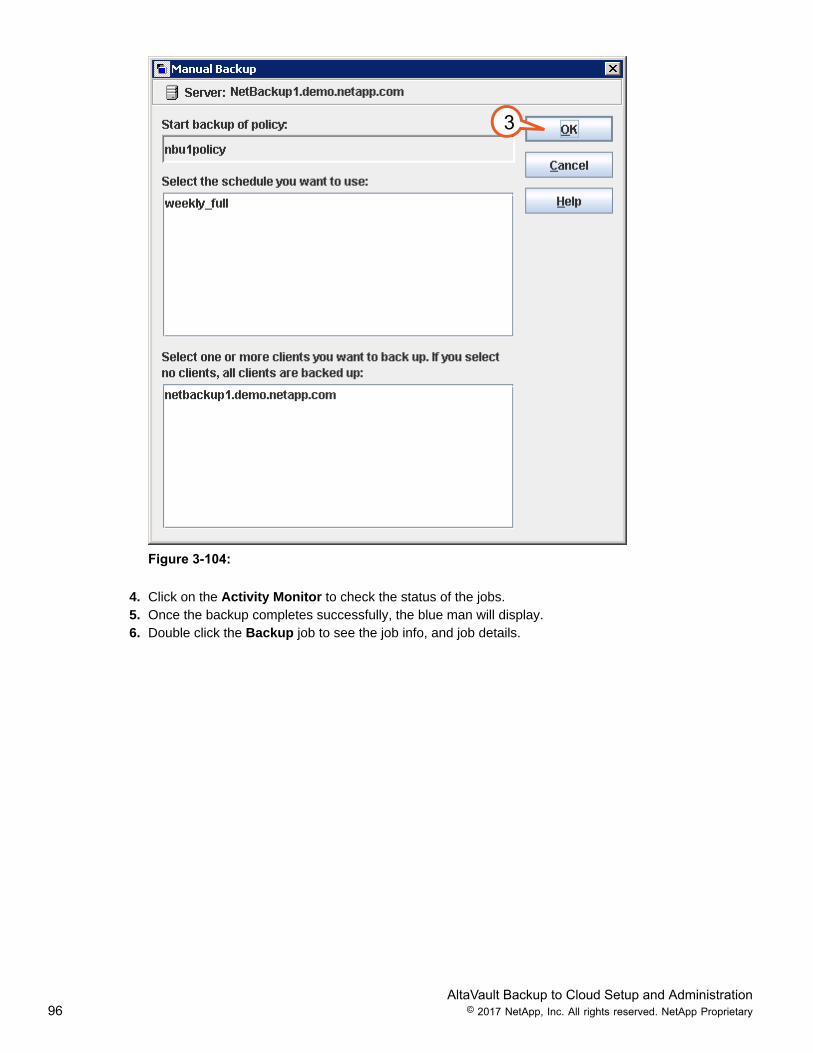
AltaVault Backup to Cloud Setup and Administration96 © 2017 NetApp, Inc. All rights reserved. NetApp Proprietary
3
Figure 3-104:
4. Click on the Activity Monitor to check the status of the jobs.5. Once the backup completes successfully, the blue man will display.6. Double click the Backup job to see the job info, and job details.
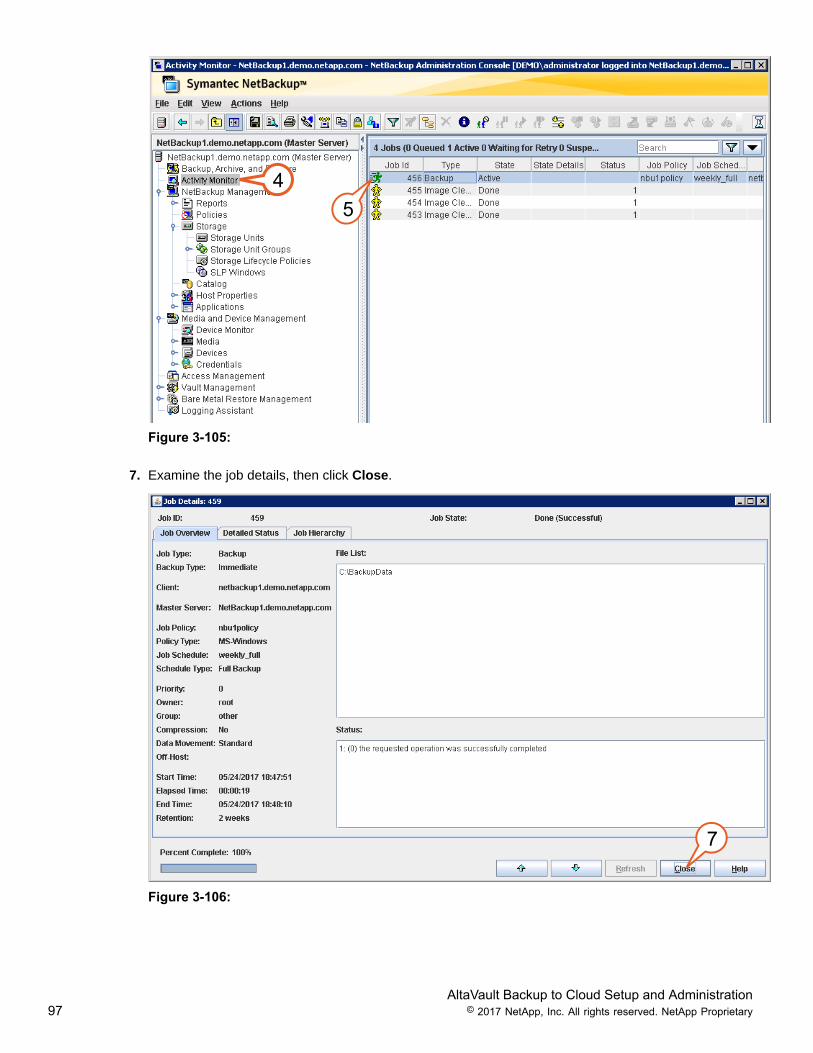
AltaVault Backup to Cloud Setup and Administration97 © 2017 NetApp, Inc. All rights reserved. NetApp Proprietary
45
Figure 3-105:
7. Examine the job details, then click Close.
7
Figure 3-106:
AltaVault Backup to Cloud Setup and Administration98 © 2017 NetApp, Inc. All rights reserved. NetApp Proprietary
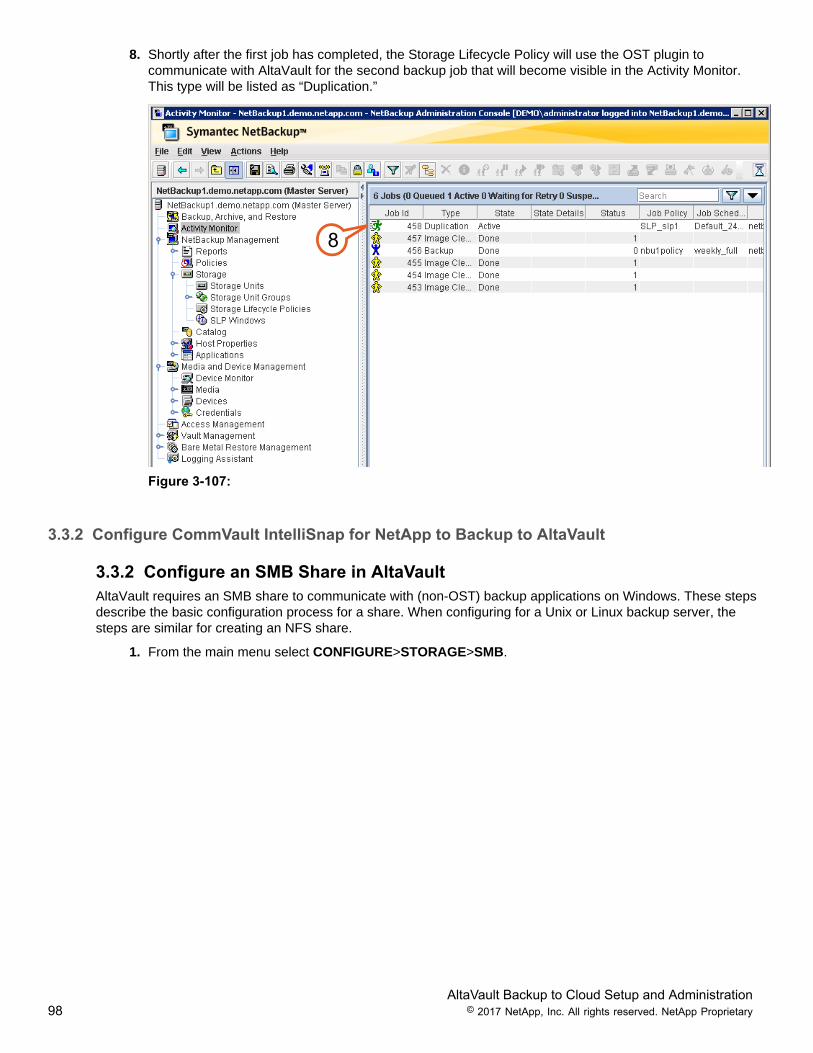
8. Shortly after the first job has completed, the Storage Lifecycle Policy will use the OST plugin tocommunicate with AltaVault for the second backup job that will become visible in the Activity Monitor.This type will be listed as “Duplication.”
8
Figure 3-107:
3.3.2 Configure CommVault IntelliSnap for NetApp to Backup to AltaVault
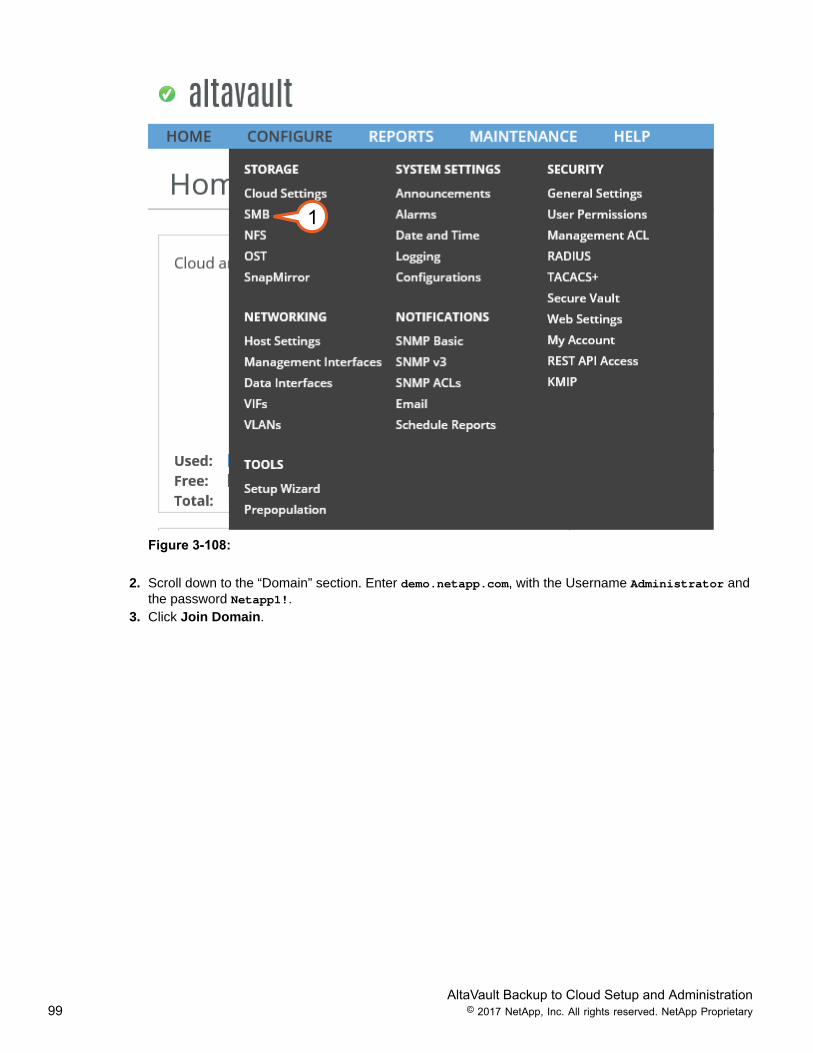
3.3.2 Configure an SMB Share in AltaVaultAltaVault requires an SMB share to communicate with (non-OST) backup applications on Windows. These stepsdescribe the basic configuration process for a share. When configuring for a Unix or Linux backup server, thesteps are similar for creating an NFS share.
1. From the main menu select CONFIGURE>STORAGE>SMB.
AltaVault Backup to Cloud Setup and Administration99 © 2017 NetApp, Inc. All rights reserved. NetApp Proprietary
1
Figure 3-108:
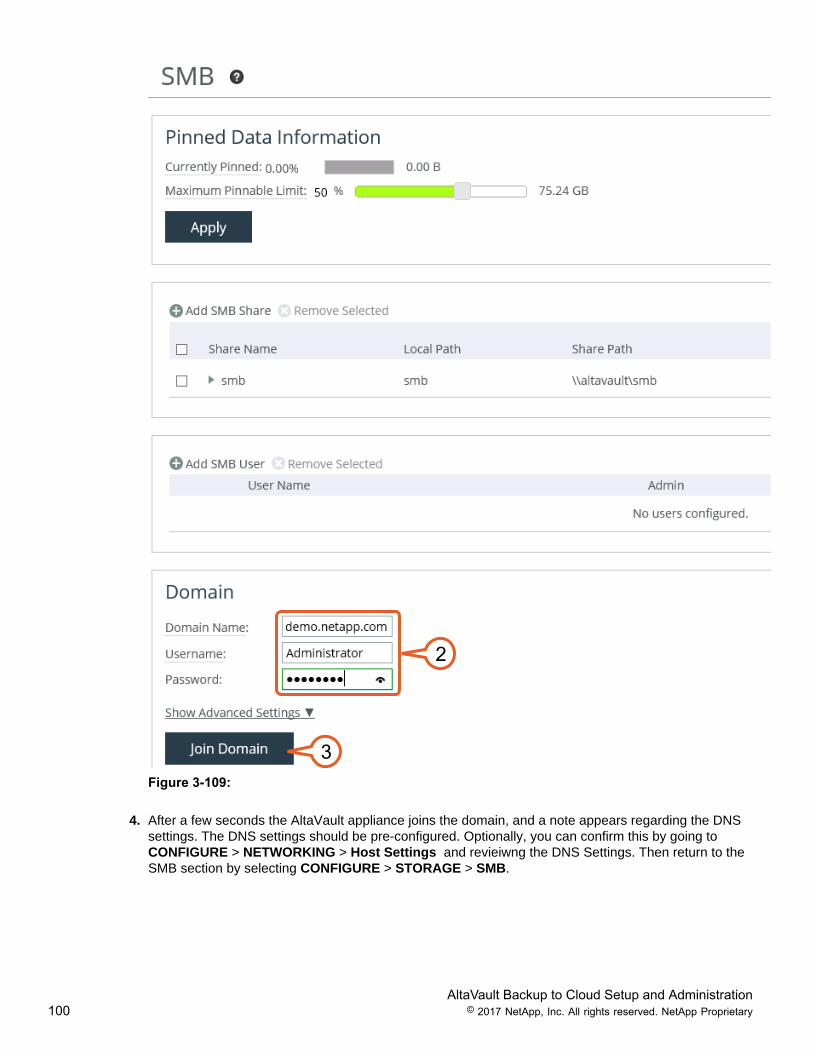
2. Scroll down to the “Domain” section. Enter demo.netapp.com, with the Username Administrator andthe password Netapp1!.
3. Click Join Domain.
AltaVault Backup to Cloud Setup and Administration100 © 2017 NetApp, Inc. All rights reserved. NetApp Proprietary
2
3Figure 3-109:
4. After a few seconds the AltaVault appliance joins the domain, and a note appears regarding the DNSsettings. The DNS settings should be pre-configured. Optionally, you can confirm this by going toCONFIGURE > NETWORKING > Host Settings and revieiwng the DNS Settings. Then return to theSMB section by selecting CONFIGURE > STORAGE > SMB.
AltaVault Backup to Cloud Setup and Administration101 © 2017 NetApp, Inc. All rights reserved. NetApp Proprietary
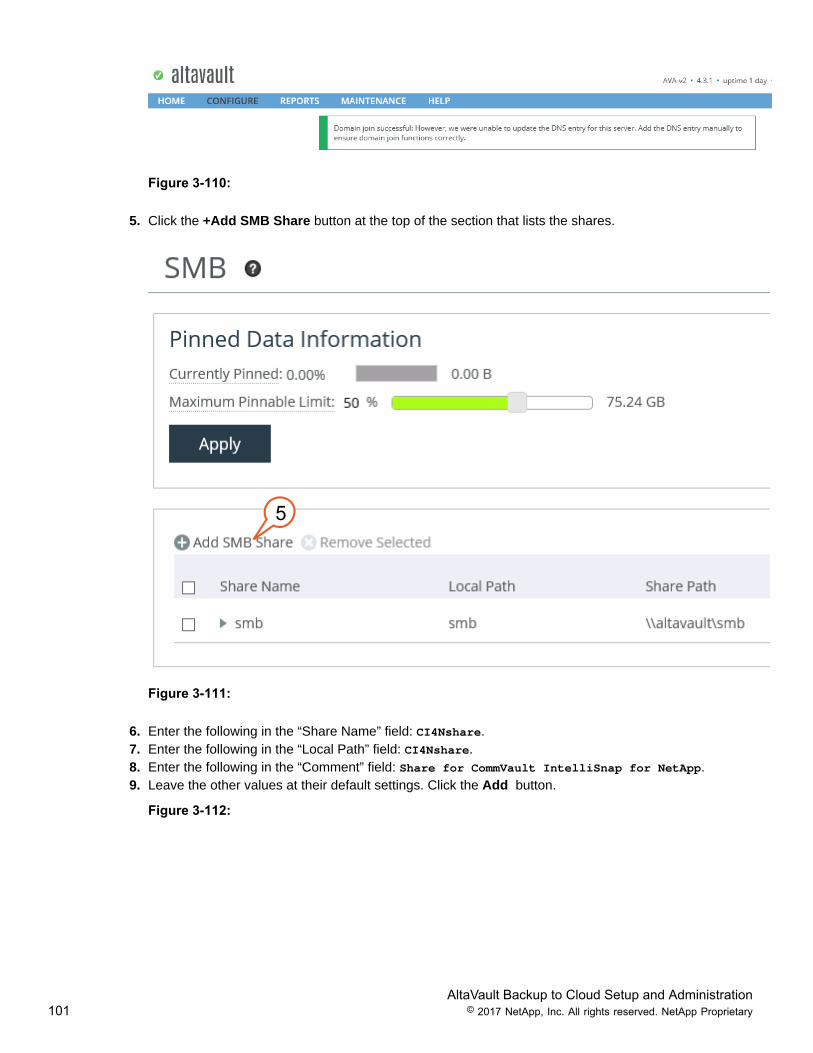
Figure 3-110:
5. Click the +Add SMB Share button at the top of the section that lists the shares.
5
Figure 3-111:
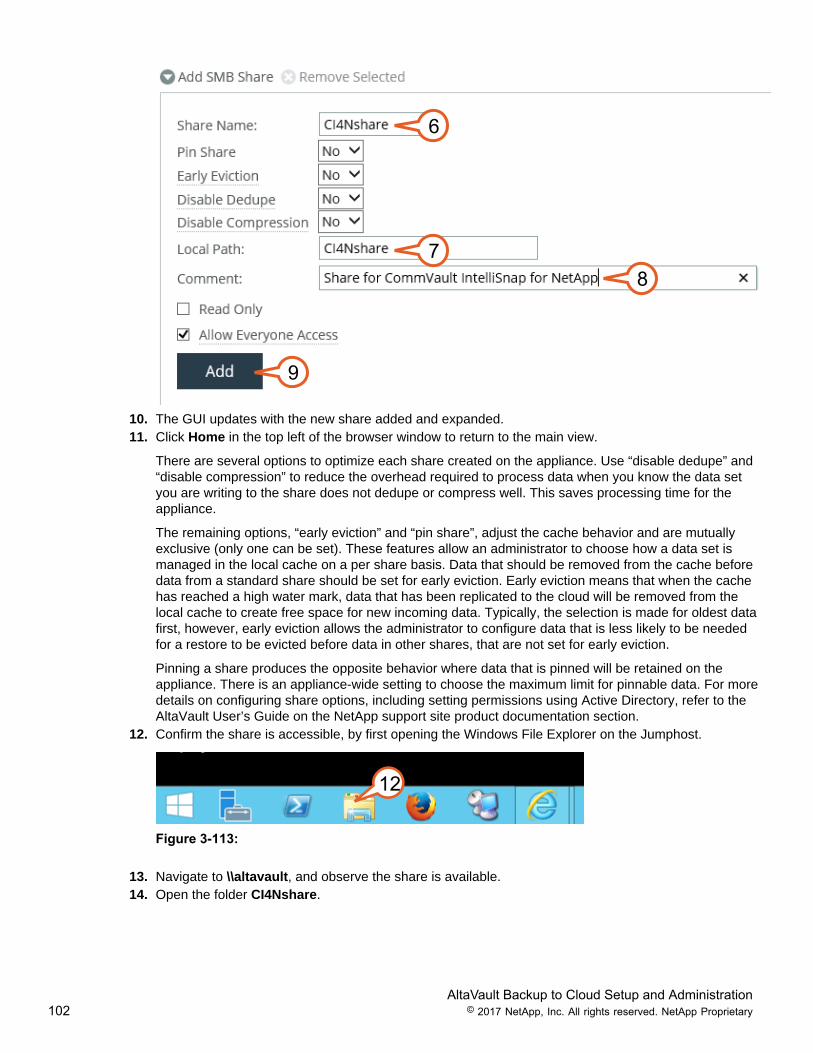
6. Enter the following in the “Share Name” field: CI4Nshare.7. Enter the following in the “Local Path” field: CI4Nshare.8. Enter the following in the “Comment” field: Share for CommVault IntelliSnap for NetApp.9. Leave the other values at their default settings. Click the Add button.
Figure 3-112:
AltaVault Backup to Cloud Setup and Administration102 © 2017 NetApp, Inc. All rights reserved. NetApp Proprietary
6
78
9
10. The GUI updates with the new share added and expanded.11. Click Home in the top left of the browser window to return to the main view.
There are several options to optimize each share created on the appliance. Use “disable dedupe” and“disable compression” to reduce the overhead required to process data when you know the data setyou are writing to the share does not dedupe or compress well. This saves processing time for theappliance.
The remaining options, “early eviction” and “pin share”, adjust the cache behavior and are mutuallyexclusive (only one can be set). These features allow an administrator to choose how a data set ismanaged in the local cache on a per share basis. Data that should be removed from the cache beforedata from a standard share should be set for early eviction. Early eviction means that when the cachehas reached a high water mark, data that has been replicated to the cloud will be removed from thelocal cache to create free space for new incoming data. Typically, the selection is made for oldest datafirst, however, early eviction allows the administrator to configure data that is less likely to be neededfor a restore to be evicted before data in other shares, that are not set for early eviction.
Pinning a share produces the opposite behavior where data that is pinned will be retained on theappliance. There is an appliance-wide setting to choose the maximum limit for pinnable data. For moredetails on configuring share options, including setting permissions using Active Directory, refer to theAltaVault User’s Guide on the NetApp support site product documentation section.
12. Confirm the share is accessible, by first opening the Windows File Explorer on the Jumphost.
12
Figure 3-113:
13. Navigate to \\altavault, and observe the share is available.14. Open the folder CI4Nshare.

AltaVault Backup to Cloud Setup and Administration103 © 2017 NetApp, Inc. All rights reserved. NetApp Proprietary
13
14
Figure 3-114:
15. Right-click, and create a text file. (Example name: “Test File for SMB Share write operation.txt”).
15Figure 3-115:
16. Give the file a specific name, as you will reference it in the DR section later in this document.
3.3.2 Connect to SnapProtect CommCell Server1. Launch the Remote Desktop Manager.
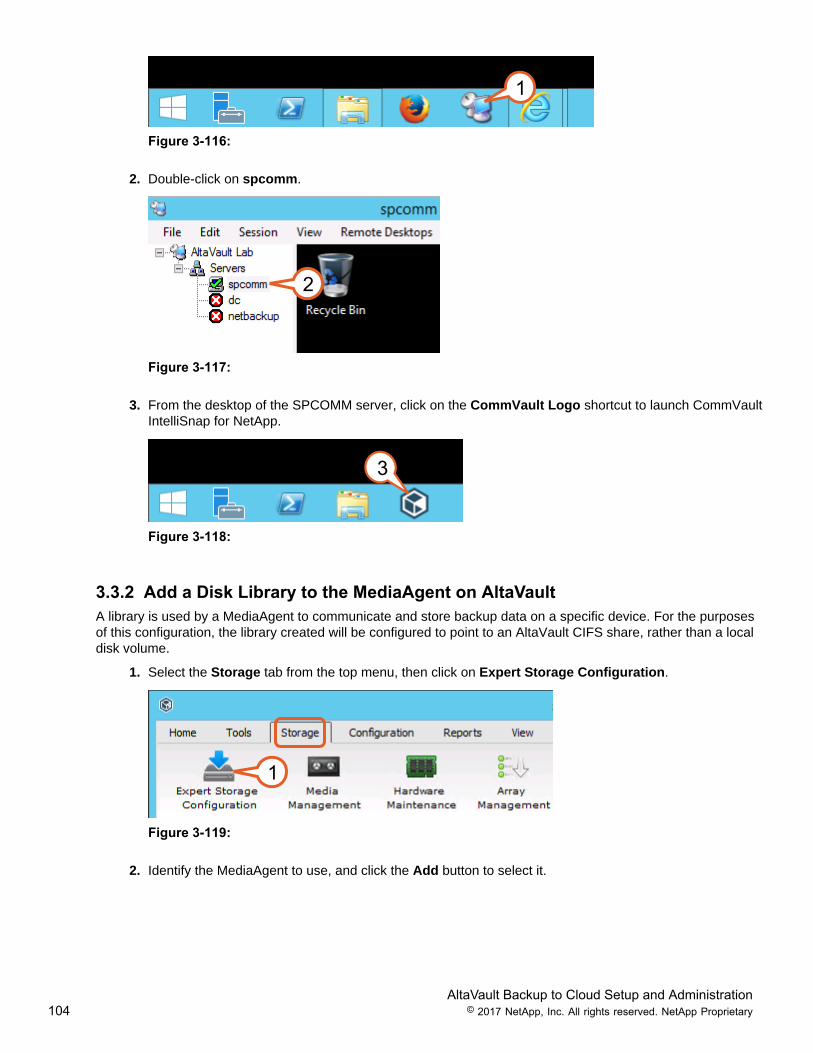
AltaVault Backup to Cloud Setup and Administration104 © 2017 NetApp, Inc. All rights reserved. NetApp Proprietary
1
Figure 3-116:
2. Double-click on spcomm.
2
Figure 3-117:
3. From the desktop of the SPCOMM server, click on the CommVault Logo shortcut to launch CommVaultIntelliSnap for NetApp.
3
Figure 3-118:
3.3.2 Add a Disk Library to the MediaAgent on AltaVaultA library is used by a MediaAgent to communicate and store backup data on a specific device. For the purposesof this configuration, the library created will be configured to point to an AltaVault CIFS share, rather than a localdisk volume.
1. Select the Storage tab from the top menu, then click on Expert Storage Configuration.
1
Figure 3-119:
2. Identify the MediaAgent to use, and click the Add button to select it.
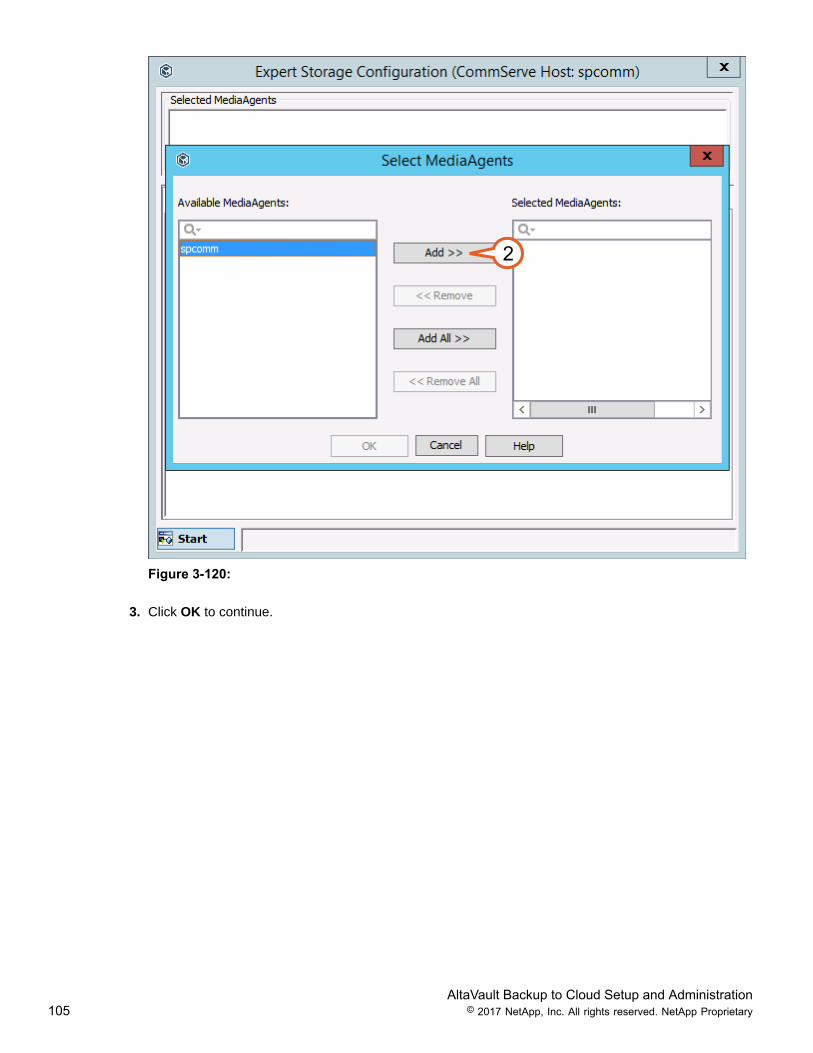
AltaVault Backup to Cloud Setup and Administration105 © 2017 NetApp, Inc. All rights reserved. NetApp Proprietary
2
Figure 3-120:
3. Click OK to continue.
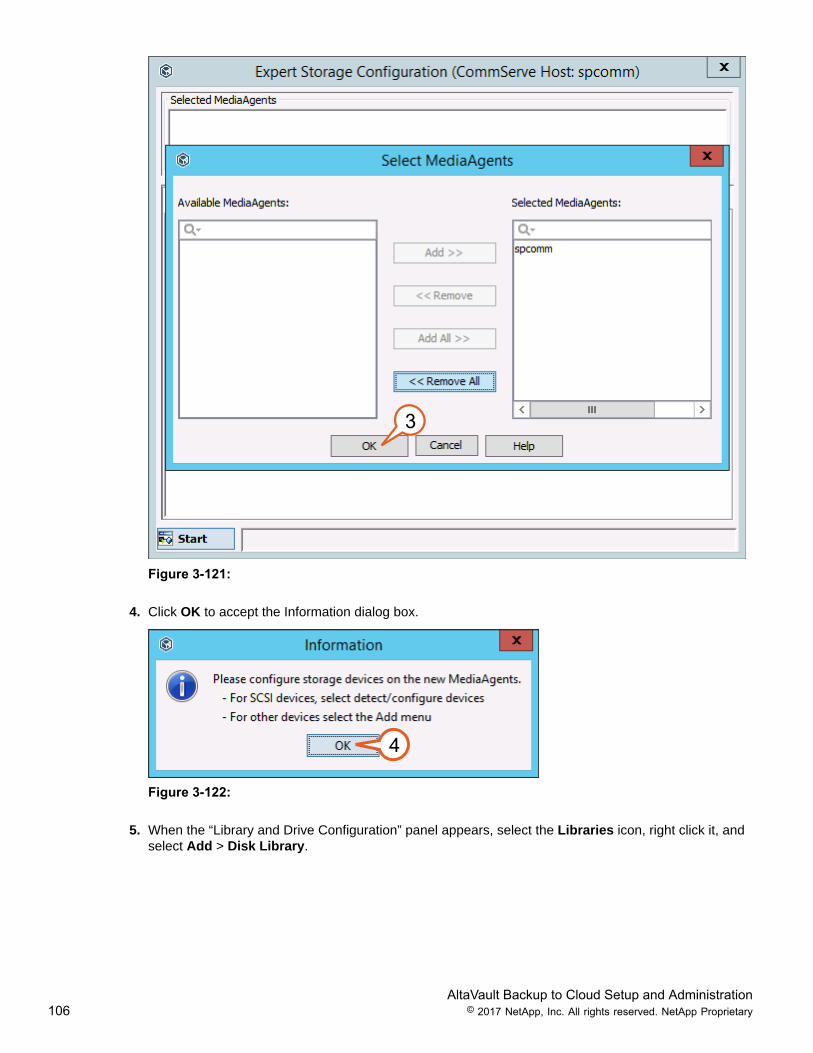
AltaVault Backup to Cloud Setup and Administration106 © 2017 NetApp, Inc. All rights reserved. NetApp Proprietary
3
Figure 3-121:
4. Click OK to accept the Information dialog box.
4
Figure 3-122:
5. When the “Library and Drive Configuration” panel appears, select the Libraries icon, right click it, andselect Add > Disk Library.
AltaVault Backup to Cloud Setup and Administration107 © 2017 NetApp, Inc. All rights reserved. NetApp Proprietary
5
Figure 3-123:
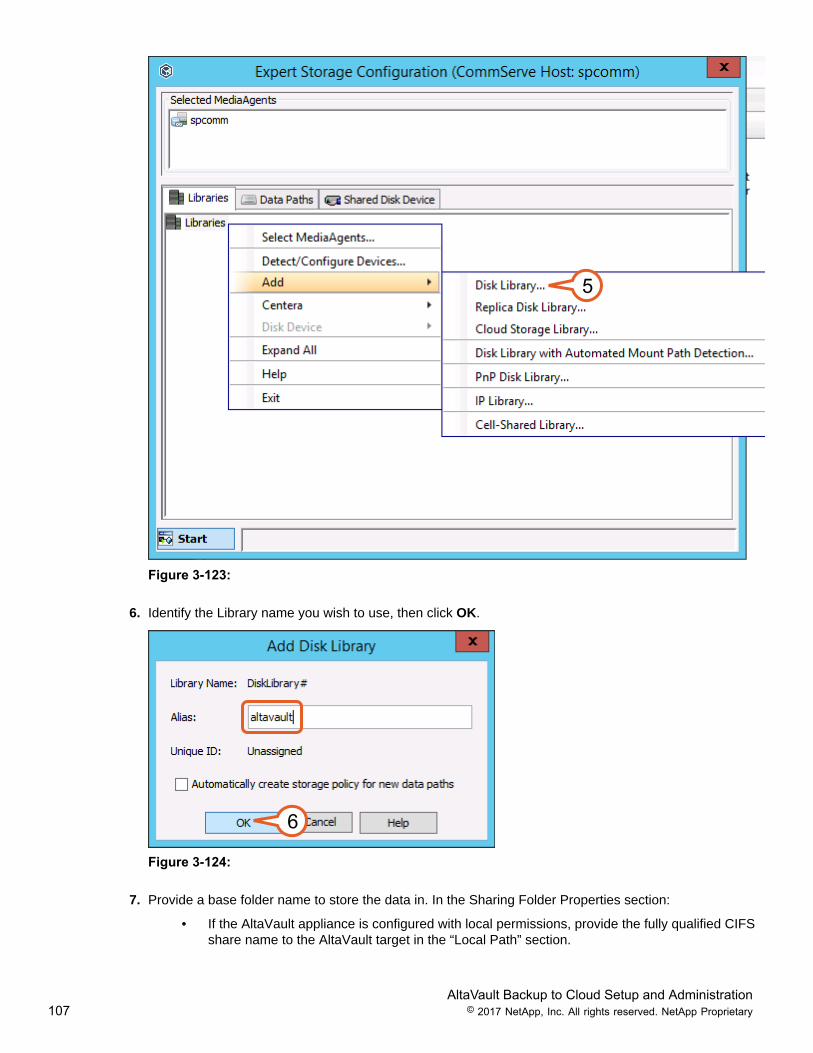
6. Identify the Library name you wish to use, then click OK.
6
Figure 3-124:
7. Provide a base folder name to store the data in. In the Sharing Folder Properties section:
• If the AltaVault appliance is configured with local permissions, provide the fully qualified CIFSshare name to the AltaVault target in the “Local Path” section.
AltaVault Backup to Cloud Setup and Administration108 © 2017 NetApp, Inc. All rights reserved. NetApp Proprietary
• If the AltaVault appliance is configured with Active Directory, select the Network Path sectioninstead. Provide Windows login credentials, and the fully qualified CIFS share name to theAltaVault target.
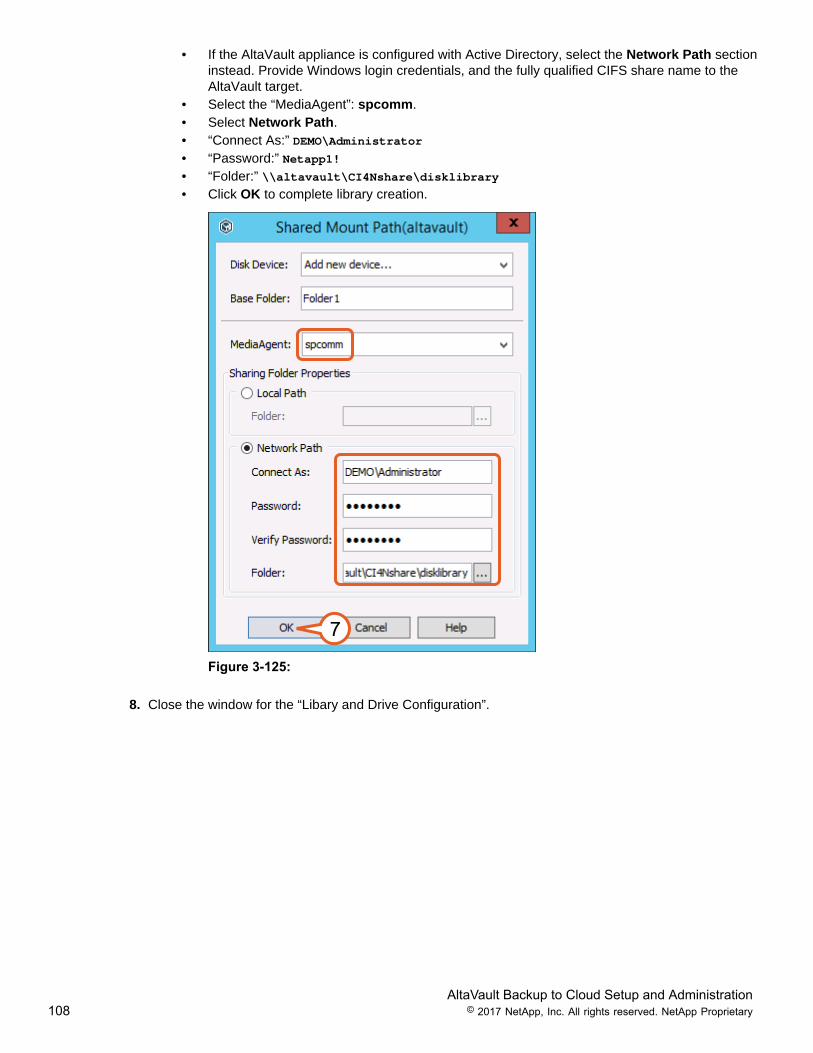
• Select the “MediaAgent”: spcomm.• Select Network Path.• “Connect As:” DEMO\Administrator• “Password:” Netapp1!• “Folder:” \\altavault\CI4Nshare\disklibrary• Click OK to complete library creation.
7
Figure 3-125:
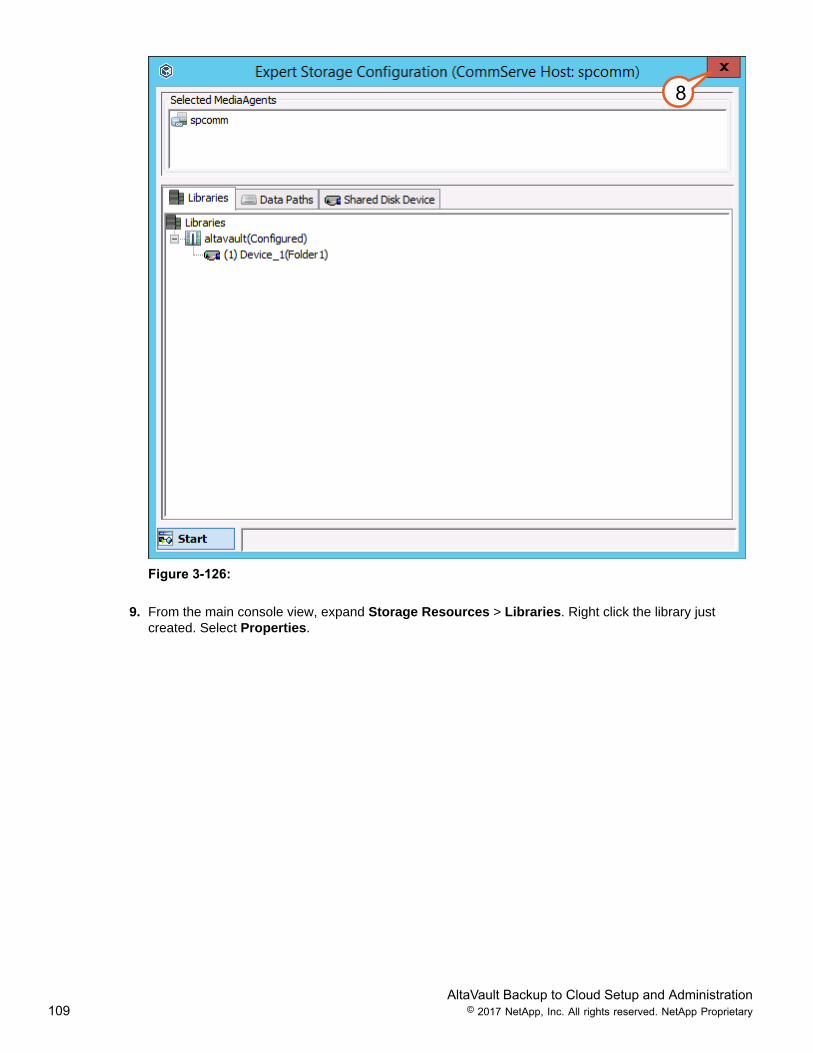
8. Close the window for the “Libary and Drive Configuration”.
AltaVault Backup to Cloud Setup and Administration109 © 2017 NetApp, Inc. All rights reserved. NetApp Proprietary
8
Figure 3-126:
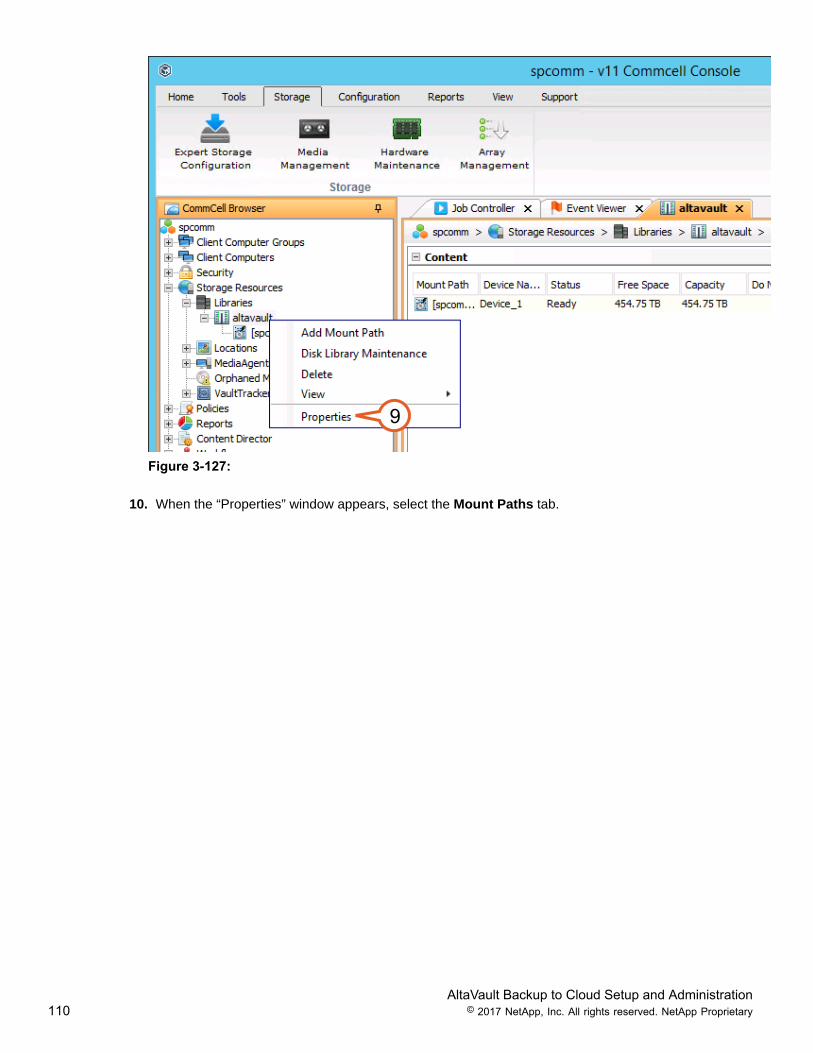
9. From the main console view, expand Storage Resources > Libraries. Right click the library justcreated. Select Properties.
AltaVault Backup to Cloud Setup and Administration110 © 2017 NetApp, Inc. All rights reserved. NetApp Proprietary
9
Figure 3-127:
10. When the “Properties” window appears, select the Mount Paths tab.
AltaVault Backup to Cloud Setup and Administration111 © 2017 NetApp, Inc. All rights reserved. NetApp Proprietary
10
Figure 3-128:
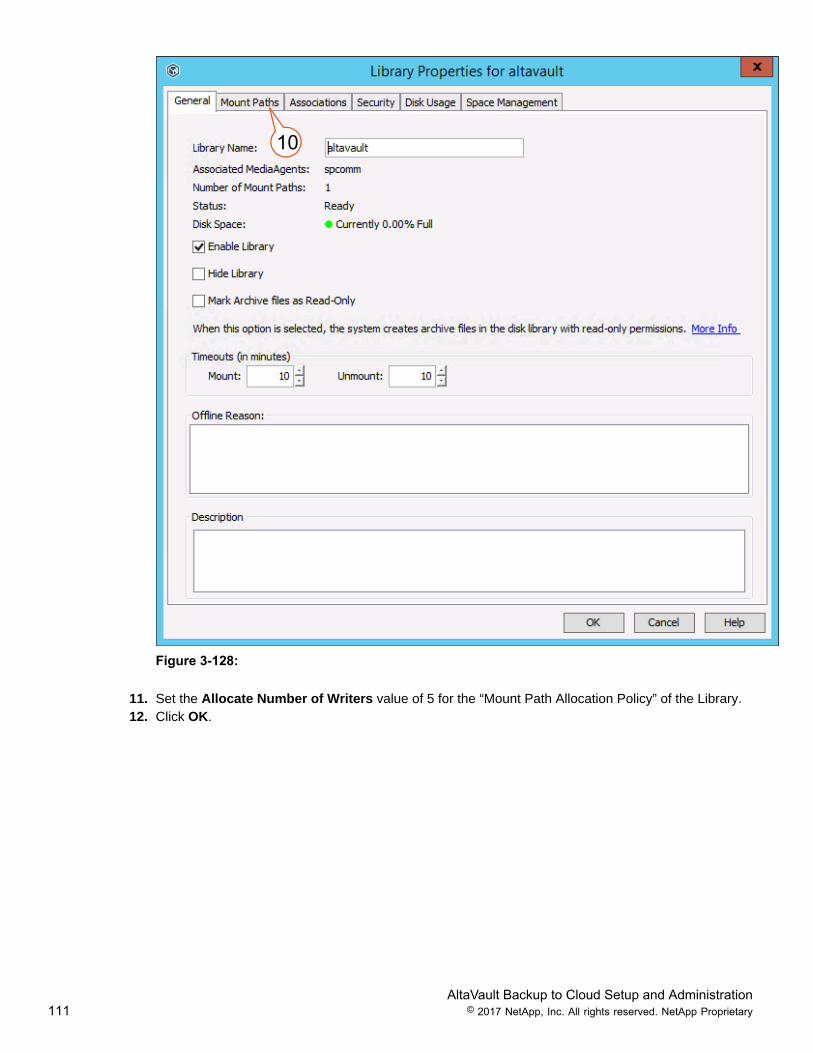
11. Set the Allocate Number of Writers value of 5 for the “Mount Path Allocation Policy” of the Library.12. Click OK.
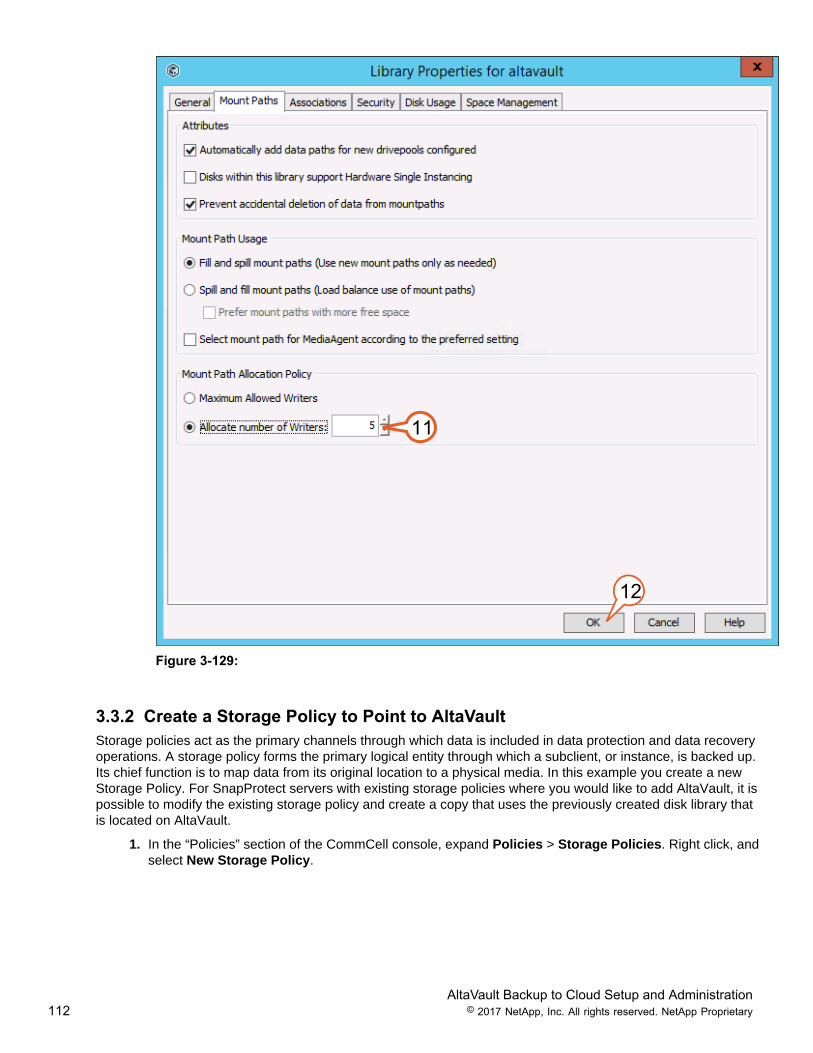
AltaVault Backup to Cloud Setup and Administration112 © 2017 NetApp, Inc. All rights reserved. NetApp Proprietary
11
12
Figure 3-129:
3.3.2 Create a Storage Policy to Point to AltaVaultStorage policies act as the primary channels through which data is included in data protection and data recoveryoperations. A storage policy forms the primary logical entity through which a subclient, or instance, is backed up.Its chief function is to map data from its original location to a physical media. In this example you create a newStorage Policy. For SnapProtect servers with existing storage policies where you would like to add AltaVault, it ispossible to modify the existing storage policy and create a copy that uses the previously created disk library thatis located on AltaVault.
1. In the “Policies” section of the CommCell console, expand Policies > Storage Policies. Right click, andselect New Storage Policy.

AltaVault Backup to Cloud Setup and Administration113 © 2017 NetApp, Inc. All rights reserved. NetApp Proprietary
1
Figure 3-130:
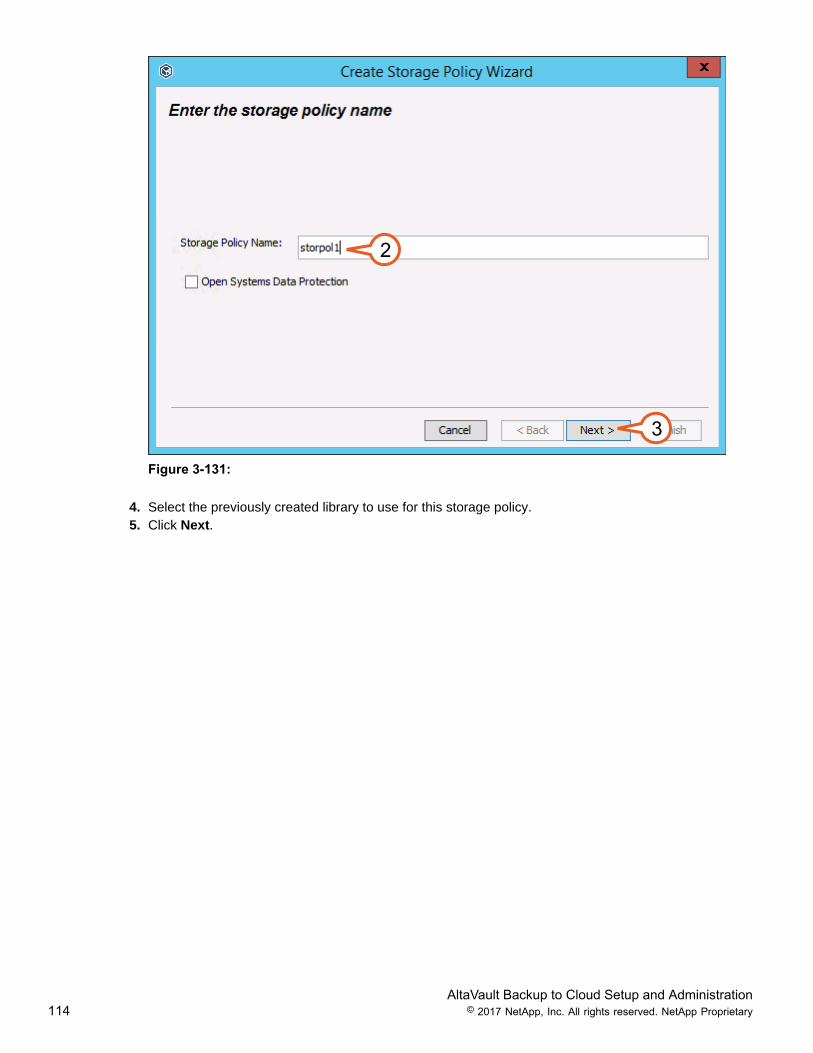
2. Provide a unique storage policy name.3. Click Next.
AltaVault Backup to Cloud Setup and Administration114 © 2017 NetApp, Inc. All rights reserved. NetApp Proprietary
2
3
Figure 3-131:
4. Select the previously created library to use for this storage policy.5. Click Next.

AltaVault Backup to Cloud Setup and Administration115 © 2017 NetApp, Inc. All rights reserved. NetApp Proprietary
4
5
Figure 3-132:
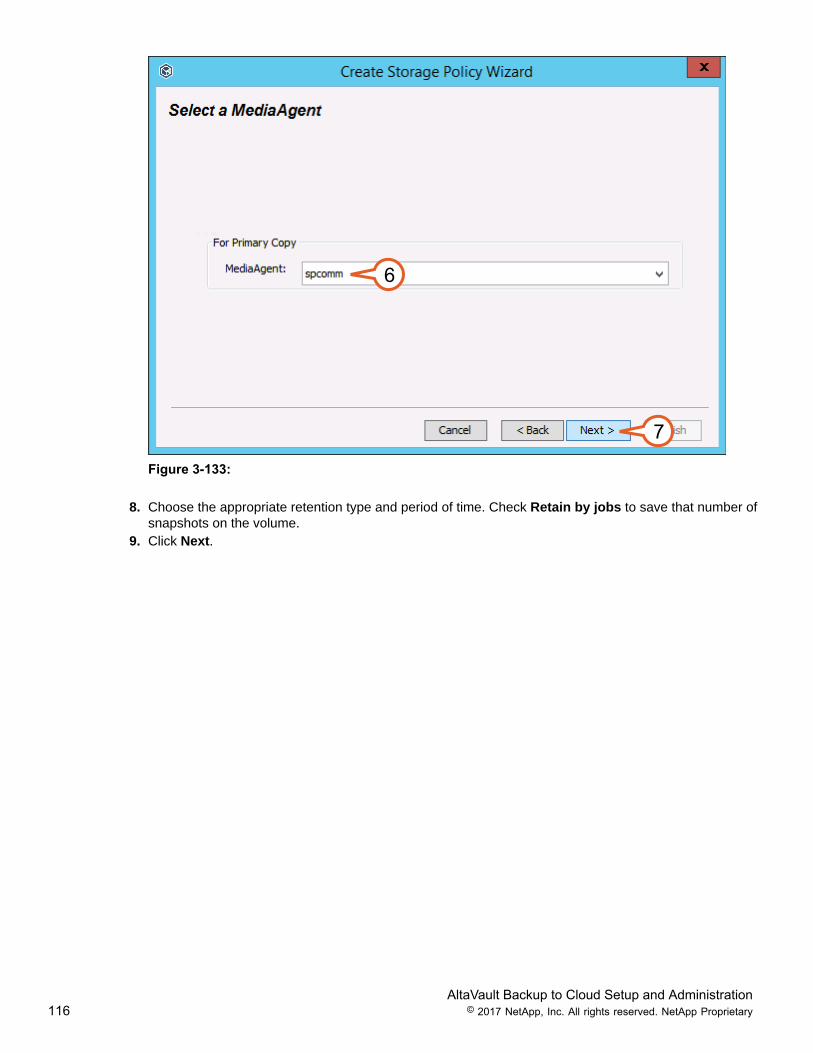
6. Select the “MediaAgent” from the drop down list.7. Click Next.
AltaVault Backup to Cloud Setup and Administration116 © 2017 NetApp, Inc. All rights reserved. NetApp Proprietary
6
7
Figure 3-133:
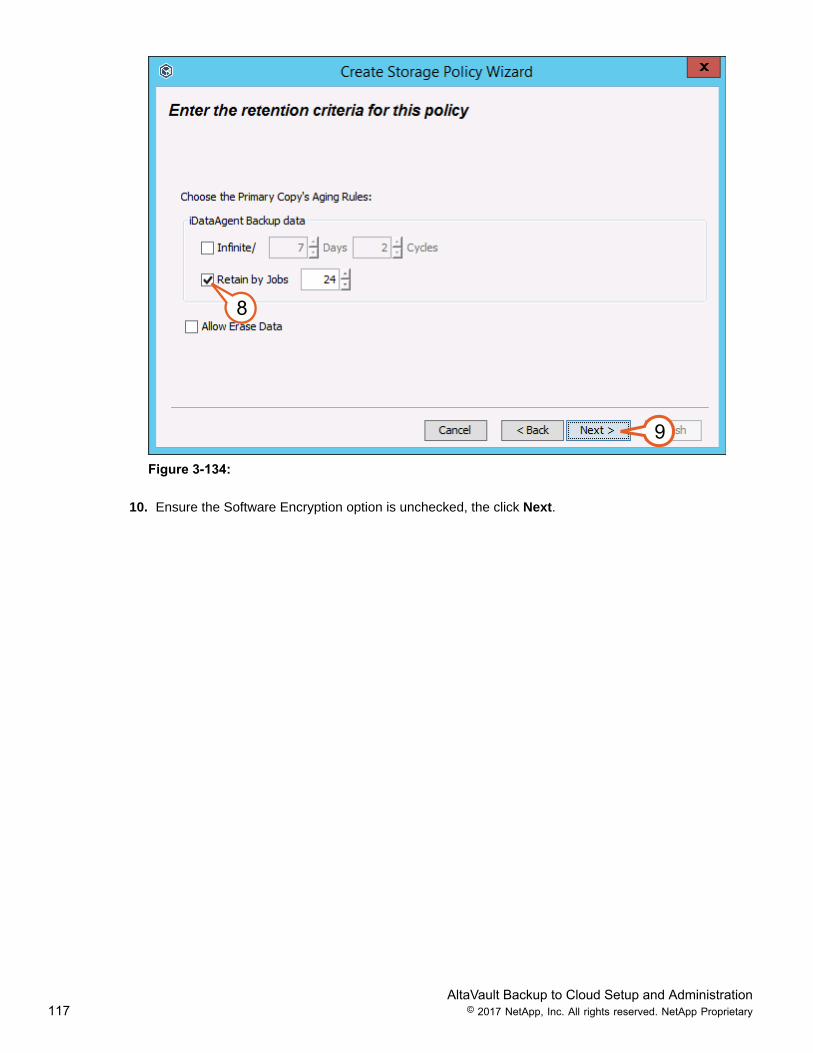
8. Choose the appropriate retention type and period of time. Check Retain by jobs to save that number ofsnapshots on the volume.
9. Click Next.
AltaVault Backup to Cloud Setup and Administration117 © 2017 NetApp, Inc. All rights reserved. NetApp Proprietary
8
9
Figure 3-134:
10. Ensure the Software Encryption option is unchecked, the click Next.

AltaVault Backup to Cloud Setup and Administration118 © 2017 NetApp, Inc. All rights reserved. NetApp Proprietary
10
Figure 3-135:
11. If prompted for Deduplication, Uncheck the Yes checkbox to disable deduplication. You will not needCI4N to manage the deduplication since it is handled by ONTAP.
12. Click Next.
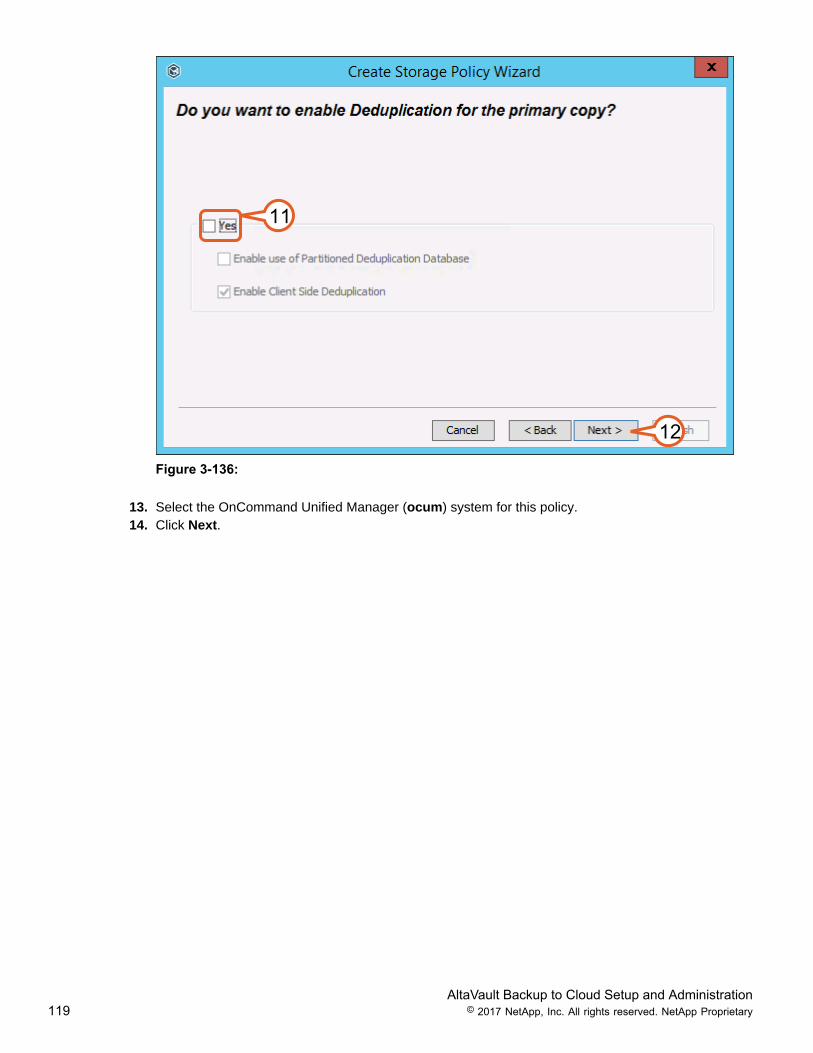
AltaVault Backup to Cloud Setup and Administration119 © 2017 NetApp, Inc. All rights reserved. NetApp Proprietary
12
11
Figure 3-136:
13. Select the OnCommand Unified Manager (ocum) system for this policy.14. Click Next.
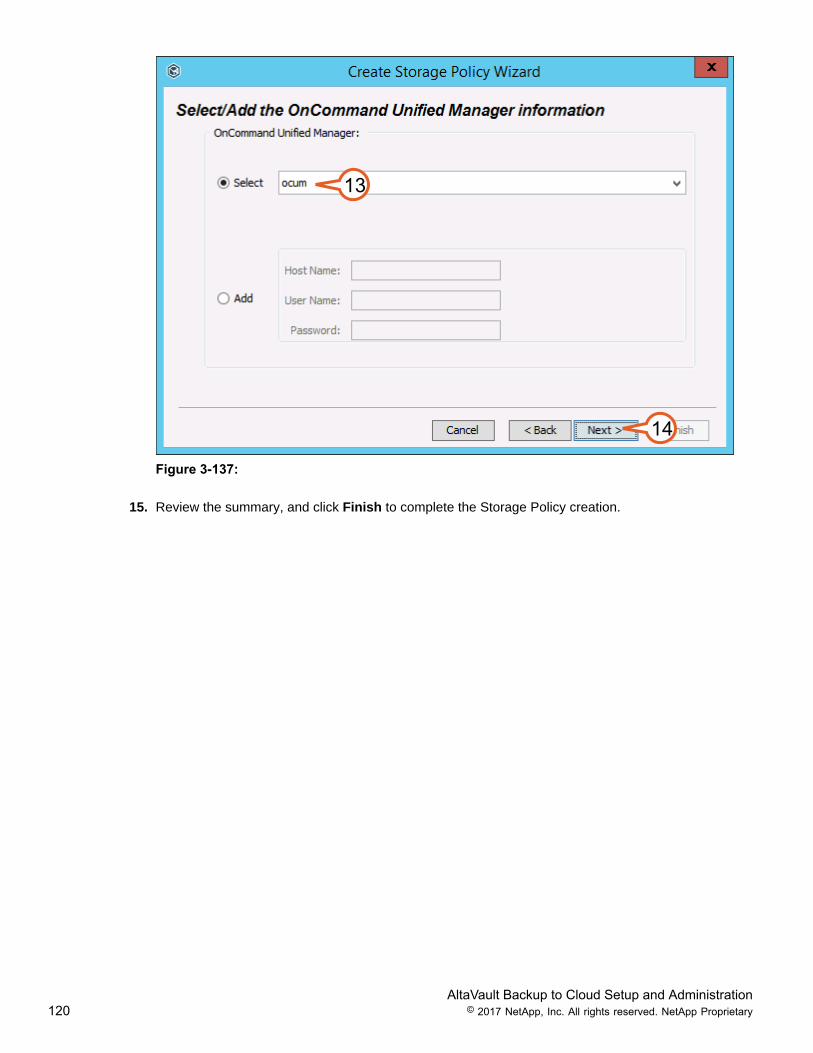
AltaVault Backup to Cloud Setup and Administration120 © 2017 NetApp, Inc. All rights reserved. NetApp Proprietary
13
14
Figure 3-137:
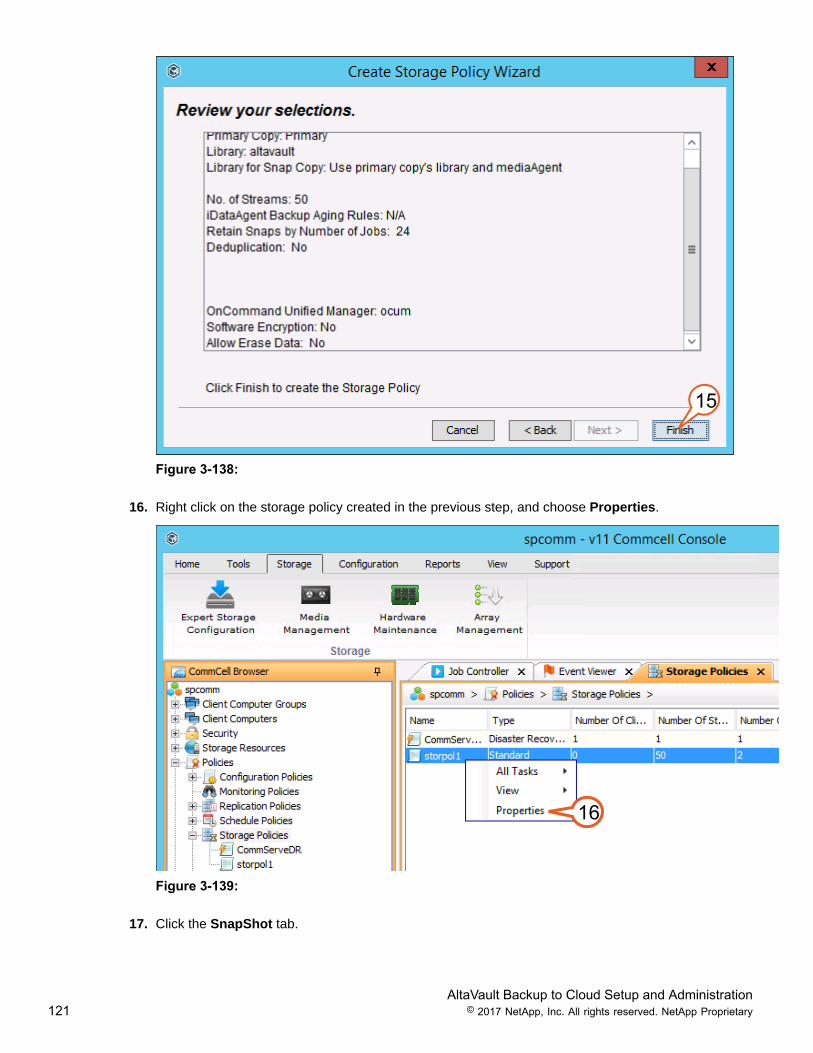
15. Review the summary, and click Finish to complete the Storage Policy creation.
AltaVault Backup to Cloud Setup and Administration121 © 2017 NetApp, Inc. All rights reserved. NetApp Proprietary
15
Figure 3-138:
16. Right click on the storage policy created in the previous step, and choose Properties.
16
Figure 3-139:
17. Click the SnapShot tab.
AltaVault Backup to Cloud Setup and Administration122 © 2017 NetApp, Inc. All rights reserved. NetApp Proprietary
17
Figure 3-140:
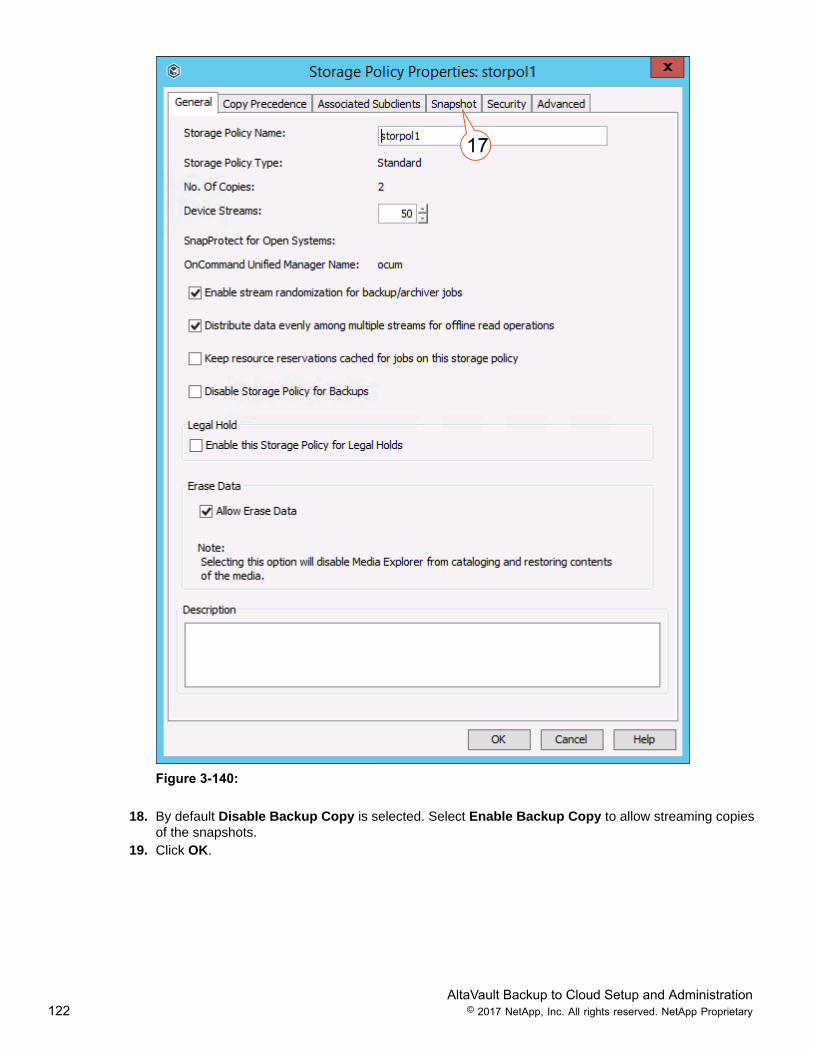
18. By default Disable Backup Copy is selected. Select Enable Backup Copy to allow streaming copiesof the snapshots.
19. Click OK.
AltaVault Backup to Cloud Setup and Administration123 © 2017 NetApp, Inc. All rights reserved. NetApp Proprietary
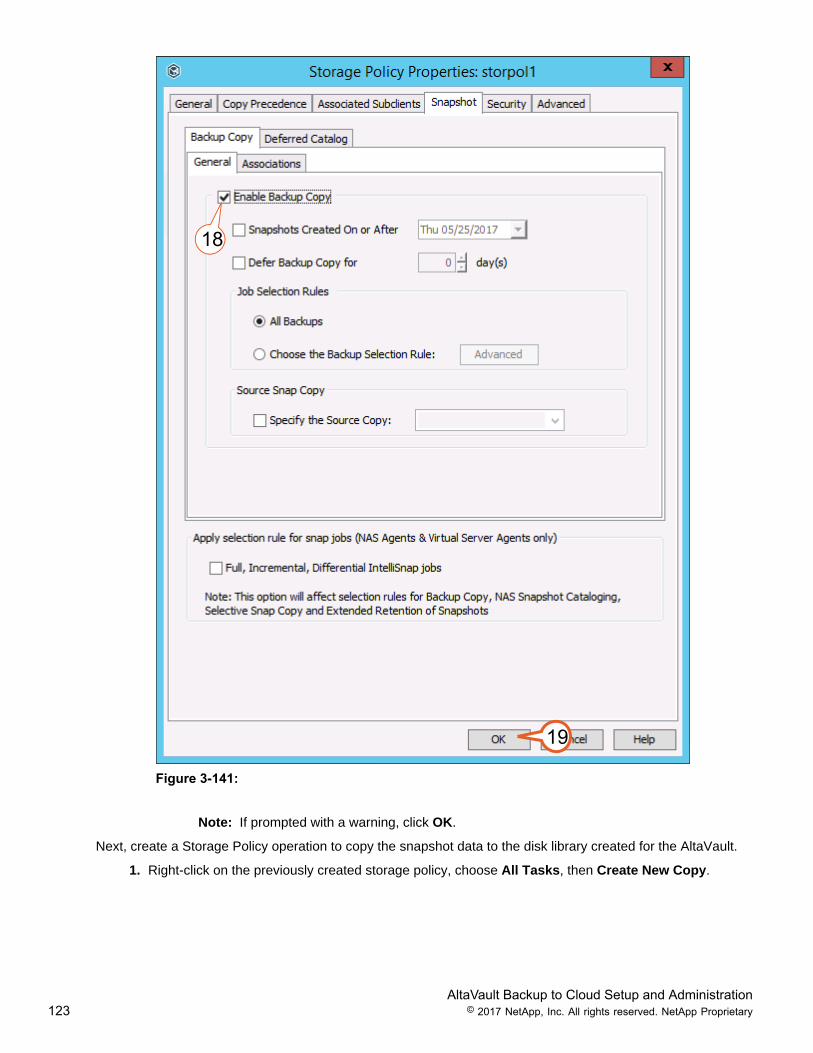
18
19
Figure 3-141:
Note: If prompted with a warning, click OK.
Next, create a Storage Policy operation to copy the snapshot data to the disk library created for the AltaVault.
1. Right-click on the previously created storage policy, choose All Tasks, then Create New Copy.

AltaVault Backup to Cloud Setup and Administration124 © 2017 NetApp, Inc. All rights reserved. NetApp Proprietary
1
Figure 3-142:
2. Enter a name for the copy, for example: ava-copy.3. Add a check next to Enable Inline Copy option. (If prompted with a warning, click OK).4. From the drop down menus choose the “Library:” that was created for the AltaVault share.5. From the drop down menus choose the “MediaAgent:” that will perform the copy.6. Click the Retention tab.
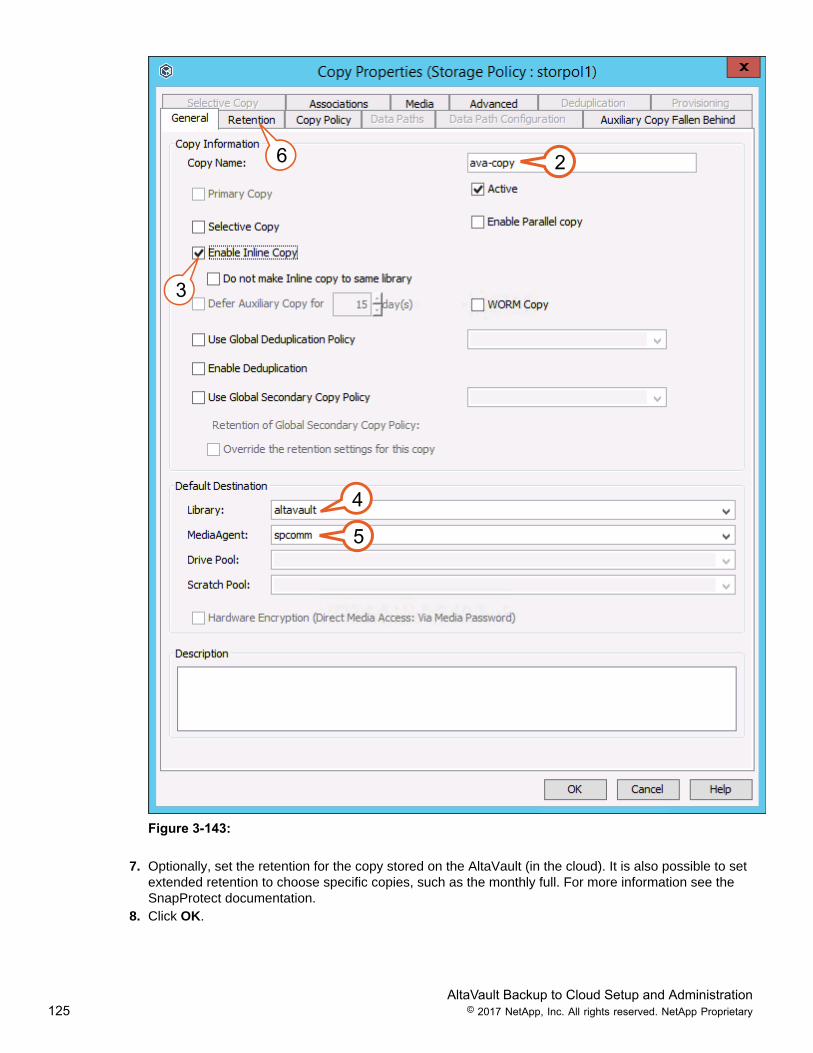
AltaVault Backup to Cloud Setup and Administration125 © 2017 NetApp, Inc. All rights reserved. NetApp Proprietary
2
3
5
4
6
Figure 3-143:
7. Optionally, set the retention for the copy stored on the AltaVault (in the cloud). It is also possible to setextended retention to choose specific copies, such as the monthly full. For more information see theSnapProtect documentation.
8. Click OK.
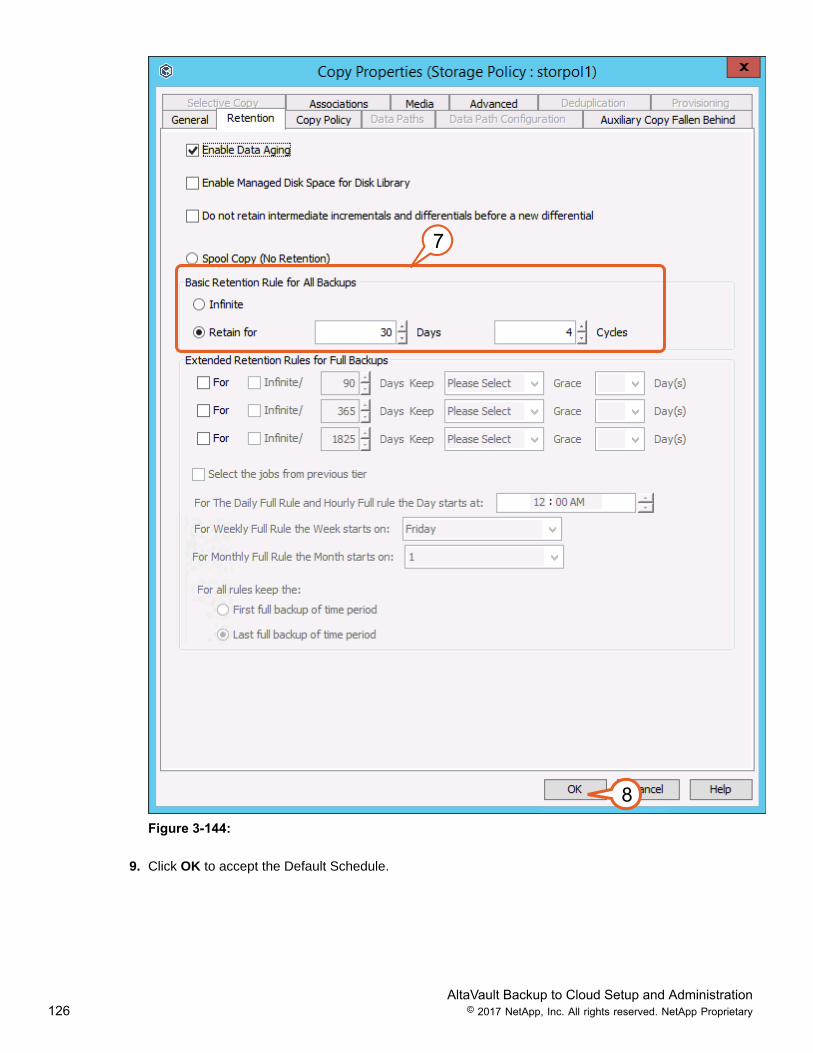
AltaVault Backup to Cloud Setup and Administration126 © 2017 NetApp, Inc. All rights reserved. NetApp Proprietary
7
8Figure 3-144:
9. Click OK to accept the Default Schedule.
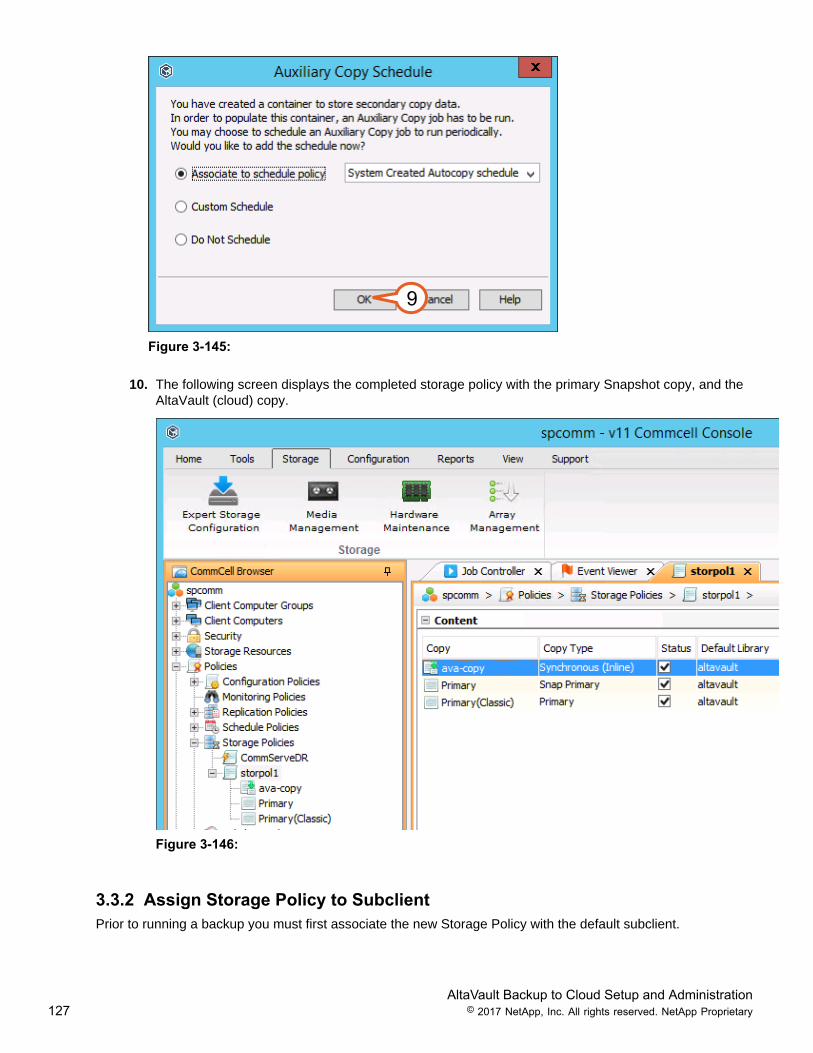
AltaVault Backup to Cloud Setup and Administration127 © 2017 NetApp, Inc. All rights reserved. NetApp Proprietary
9
Figure 3-145:
10. The following screen displays the completed storage policy with the primary Snapshot copy, and theAltaVault (cloud) copy.
Figure 3-146:
3.3.2 Assign Storage Policy to SubclientPrior to running a backup you must first associate the new Storage Policy with the default subclient.
AltaVault Backup to Cloud Setup and Administration128 © 2017 NetApp, Inc. All rights reserved. NetApp Proprietary
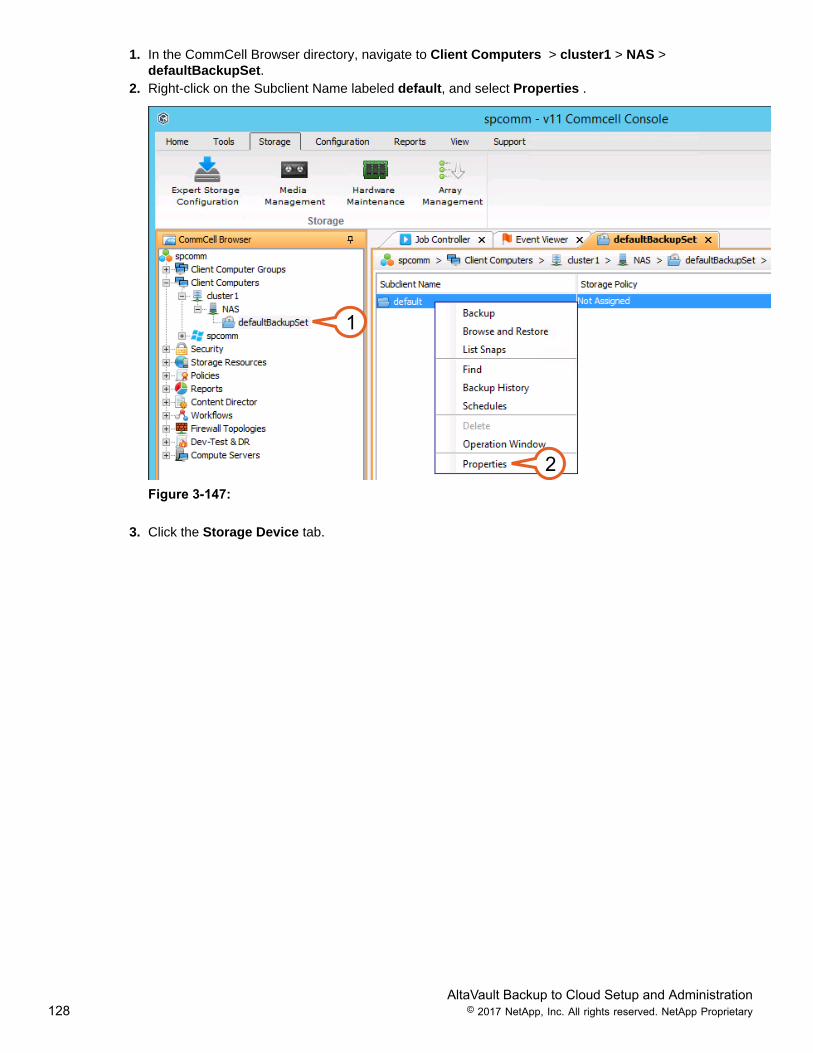
1. In the CommCell Browser directory, navigate to Client Computers > cluster1 > NAS >defaultBackupSet.
2. Right-click on the Subclient Name labeled default, and select Properties .
1
2Figure 3-147:
3. Click the Storage Device tab.

AltaVault Backup to Cloud Setup and Administration129 © 2017 NetApp, Inc. All rights reserved. NetApp Proprietary
3
Figure 3-148:
4. In the sub-tab for Data Storage Policy, select the “Storage Policy:” created in the previous section5. Click OK.
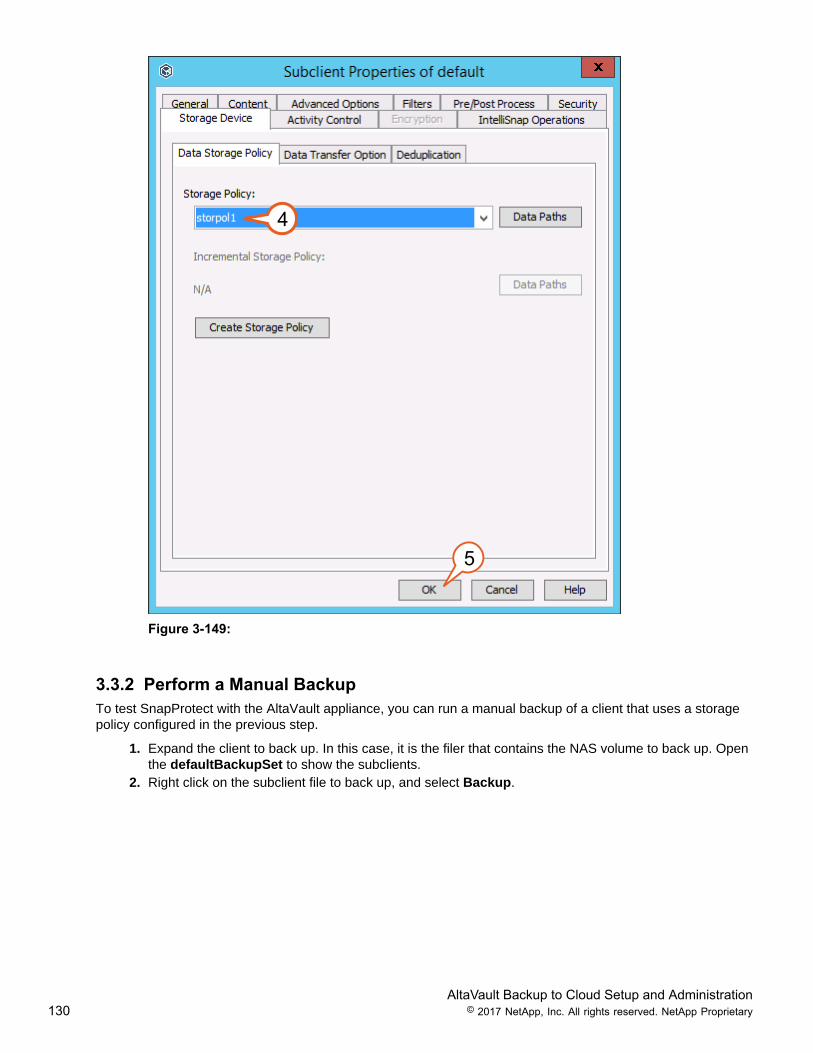
AltaVault Backup to Cloud Setup and Administration130 © 2017 NetApp, Inc. All rights reserved. NetApp Proprietary
4
5
Figure 3-149:
3.3.2 Perform a Manual BackupTo test SnapProtect with the AltaVault appliance, you can run a manual backup of a client that uses a storagepolicy configured in the previous step.
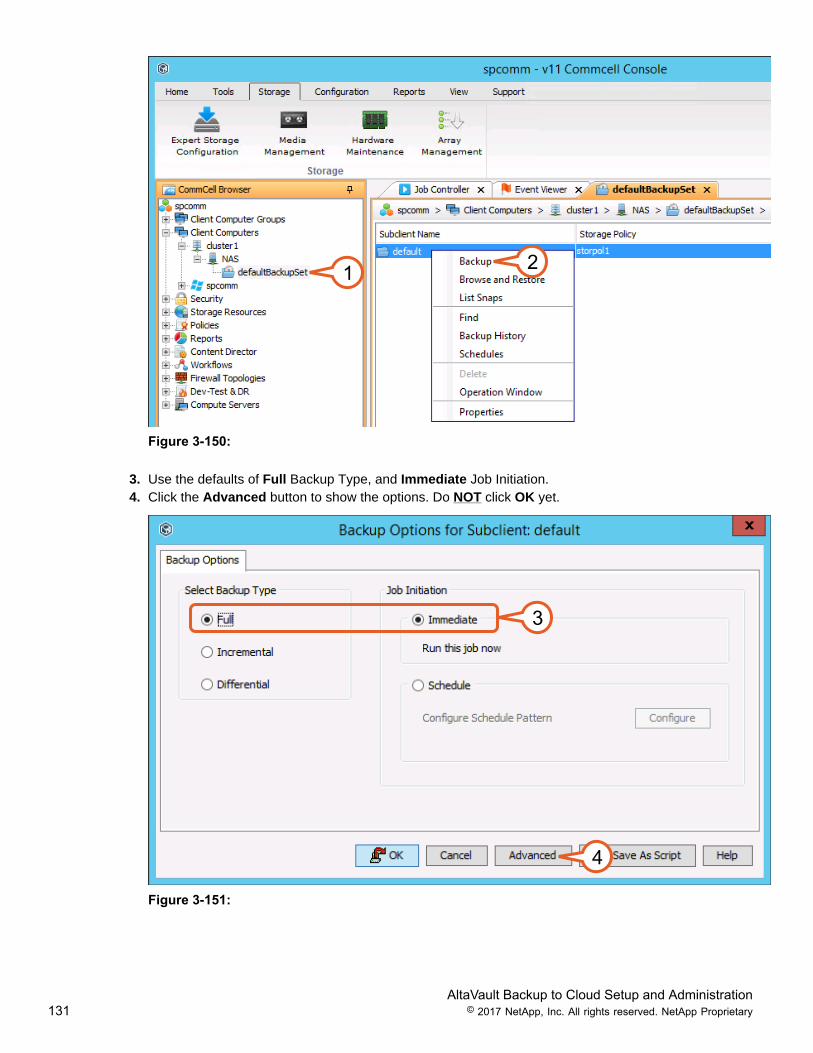
1. Expand the client to back up. In this case, it is the filer that contains the NAS volume to back up. Openthe defaultBackupSet to show the subclients.
2. Right click on the subclient file to back up, and select Backup.
AltaVault Backup to Cloud Setup and Administration131 © 2017 NetApp, Inc. All rights reserved. NetApp Proprietary
1 2
Figure 3-150:
3. Use the defaults of Full Backup Type, and Immediate Job Initiation.4. Click the Advanced button to show the options. Do NOT click OK yet.
3
4
Figure 3-151:
AltaVault Backup to Cloud Setup and Administration132 © 2017 NetApp, Inc. All rights reserved. NetApp Proprietary
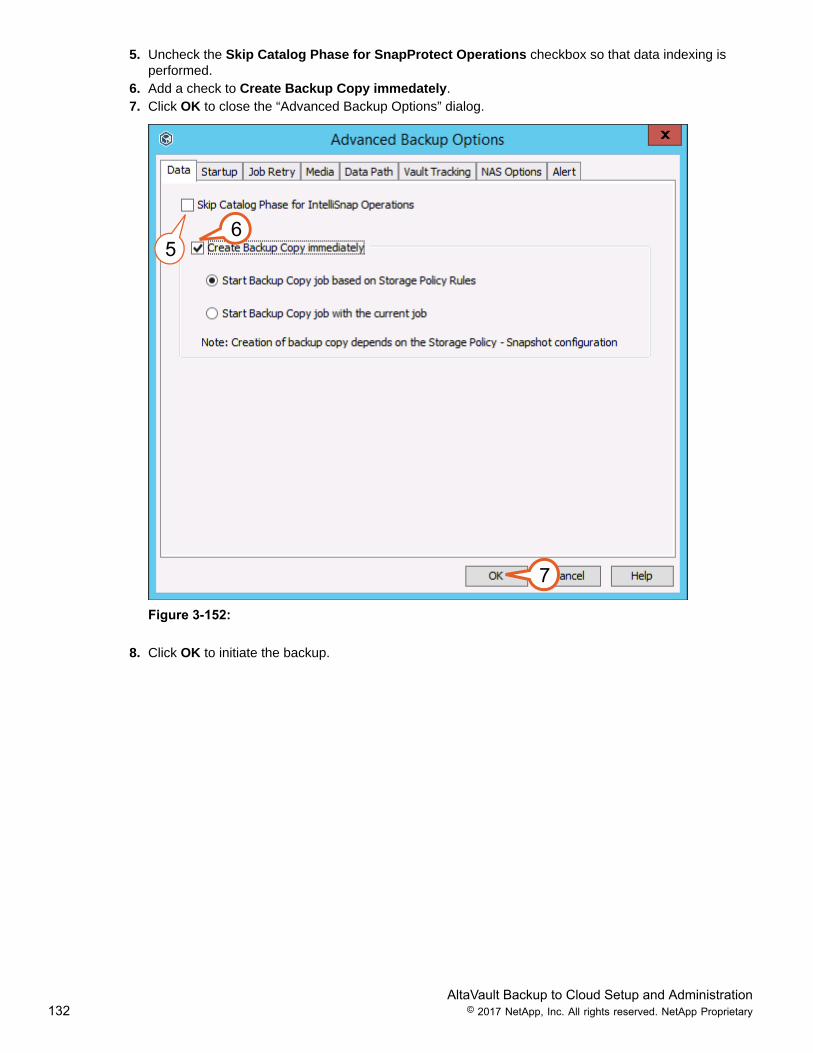
5. Uncheck the Skip Catalog Phase for SnapProtect Operations checkbox so that data indexing isperformed.
6. Add a check to Create Backup Copy immedately.7. Click OK to close the “Advanced Backup Options” dialog.
56
7
Figure 3-152:
8. Click OK to initiate the backup.
AltaVault Backup to Cloud Setup and Administration133 © 2017 NetApp, Inc. All rights reserved. NetApp Proprietary
8
Figure 3-153:
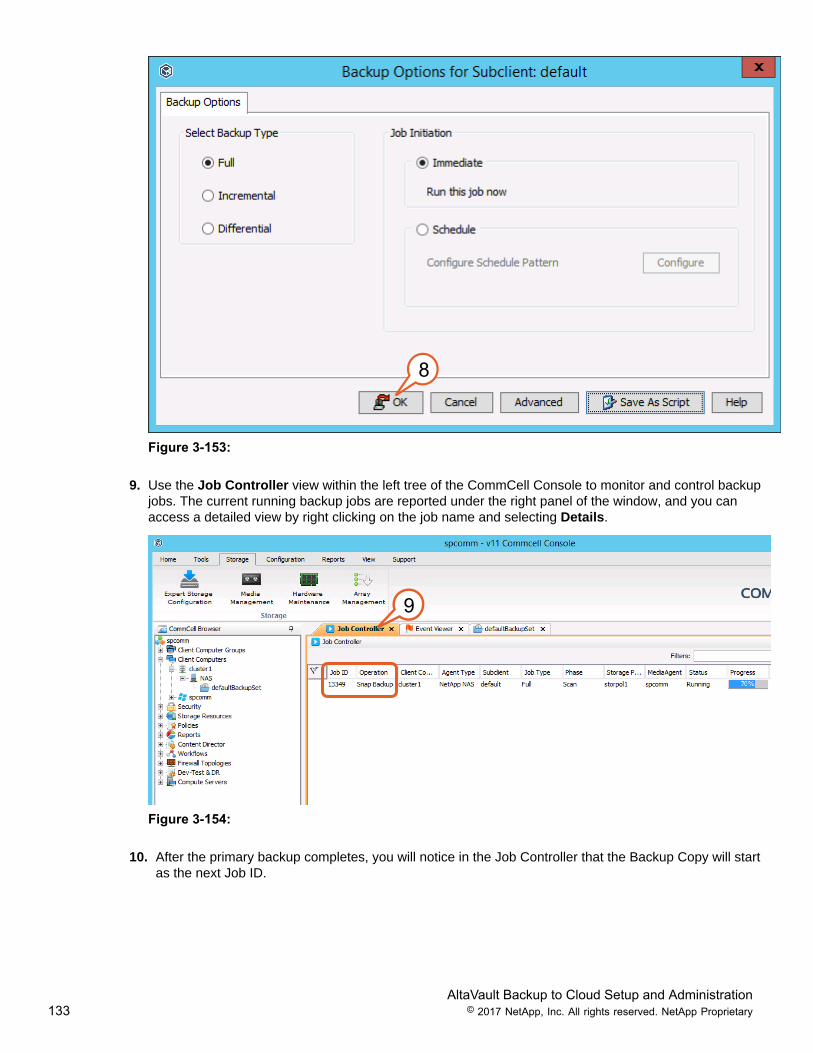
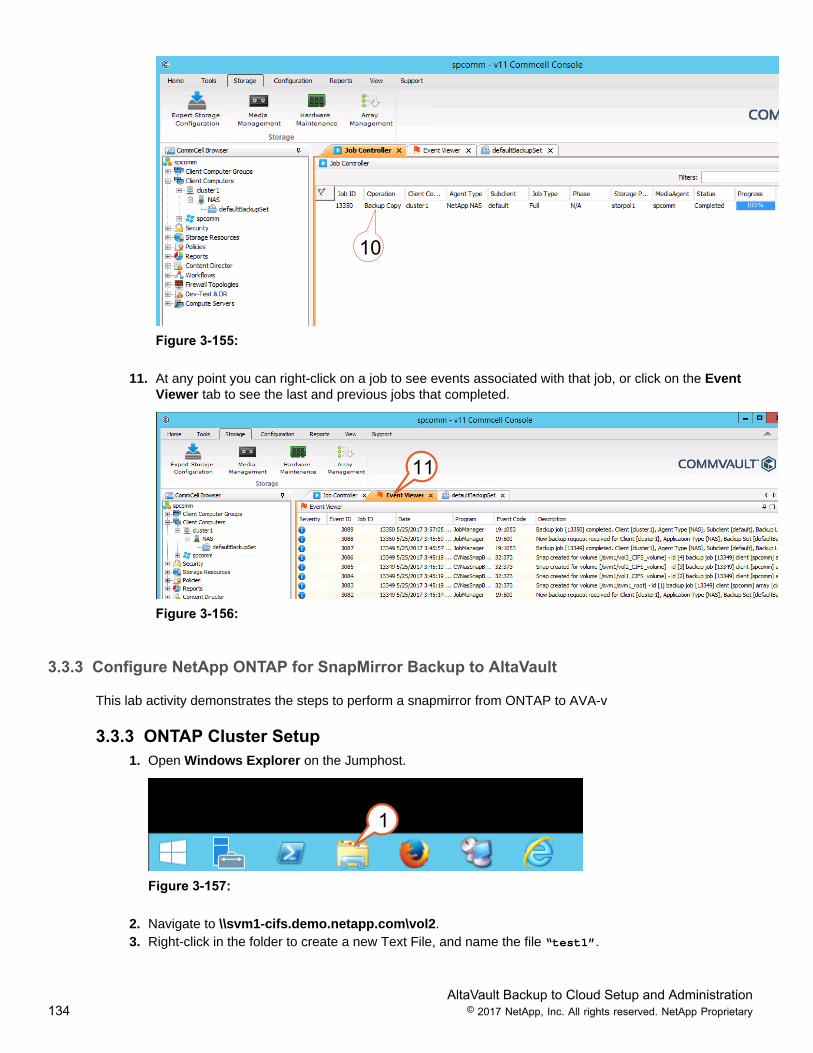
9. Use the Job Controller view within the left tree of the CommCell Console to monitor and control backupjobs. The current running backup jobs are reported under the right panel of the window, and you canaccess a detailed view by right clicking on the job name and selecting Details.
9
Figure 3-154:
10. After the primary backup completes, you will notice in the Job Controller that the Backup Copy will startas the next Job ID.
AltaVault Backup to Cloud Setup and Administration134 © 2017 NetApp, Inc. All rights reserved. NetApp Proprietary
10
Figure 3-155:
11. At any point you can right-click on a job to see events associated with that job, or click on the EventViewer tab to see the last and previous jobs that completed.
11
Figure 3-156:
3.3.3 Configure NetApp ONTAP for SnapMirror Backup to AltaVault
This lab activity demonstrates the steps to perform a snapmirror from ONTAP to AVA-v
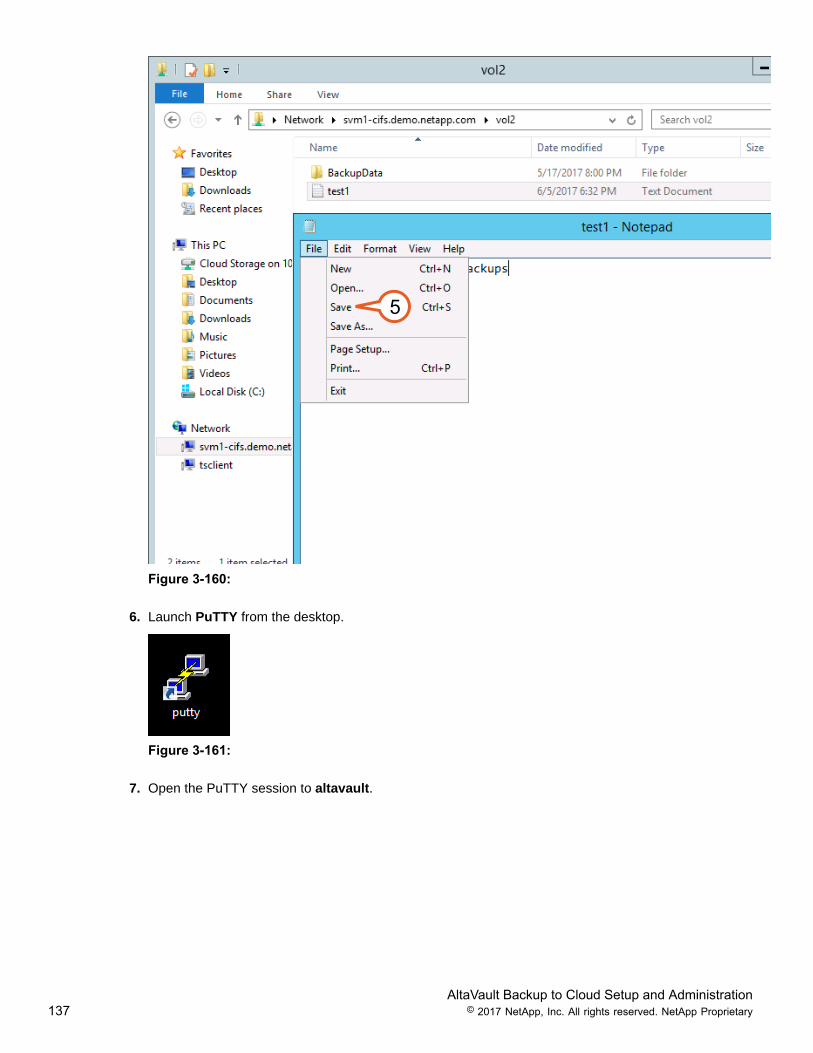
3.3.3 ONTAP Cluster Setup1. Open Windows Explorer on the Jumphost.
1
Figure 3-157:
2. Navigate to \\svm1-cifs.demo.netapp.com\vol2.3. Right-click in the folder to create a new Text File, and name the file “test1”.

AltaVault Backup to Cloud Setup and Administration135 © 2017 NetApp, Inc. All rights reserved. NetApp Proprietary
2
3
Figure 3-158:
4. Enter This is test 1 before backups to test1.
AltaVault Backup to Cloud Setup and Administration136 © 2017 NetApp, Inc. All rights reserved. NetApp Proprietary
4
Figure 3-159:
5. Save and close the file.
AltaVault Backup to Cloud Setup and Administration137 © 2017 NetApp, Inc. All rights reserved. NetApp Proprietary
5
Figure 3-160:
6. Launch PuTTY from the desktop.
Figure 3-161:
7. Open the PuTTY session to altavault.
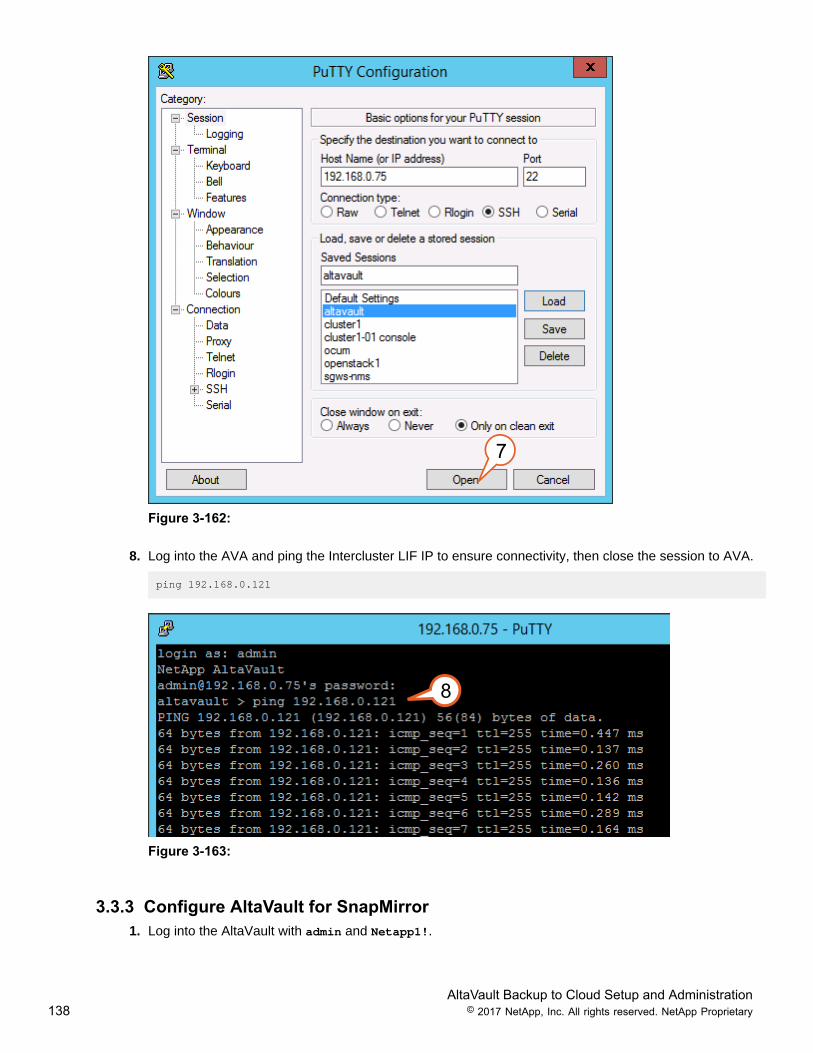
AltaVault Backup to Cloud Setup and Administration138 © 2017 NetApp, Inc. All rights reserved. NetApp Proprietary
7
Figure 3-162:
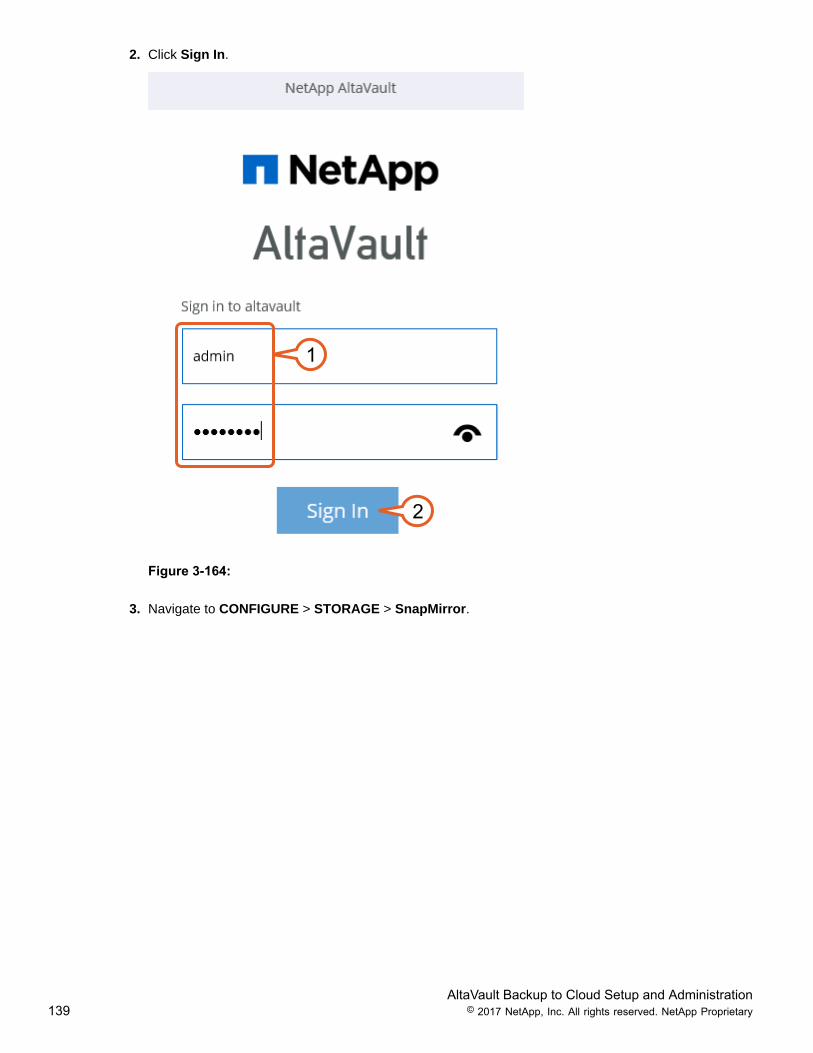
8. Log into the AVA and ping the Intercluster LIF IP to ensure connectivity, then close the session to AVA.
ping 192.168.0.121
8
Figure 3-163:
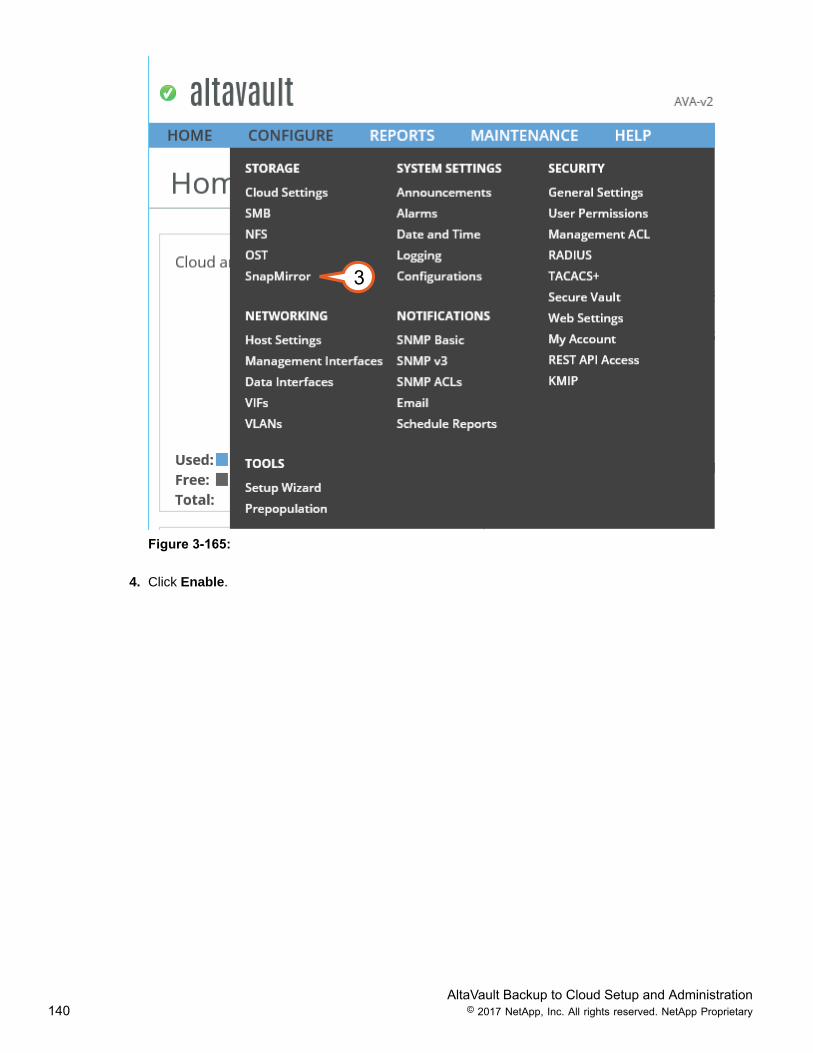
3.3.3 Configure AltaVault for SnapMirror1. Log into the AltaVault with admin and Netapp1!.
AltaVault Backup to Cloud Setup and Administration139 © 2017 NetApp, Inc. All rights reserved. NetApp Proprietary
2. Click Sign In.
1
2
Figure 3-164:
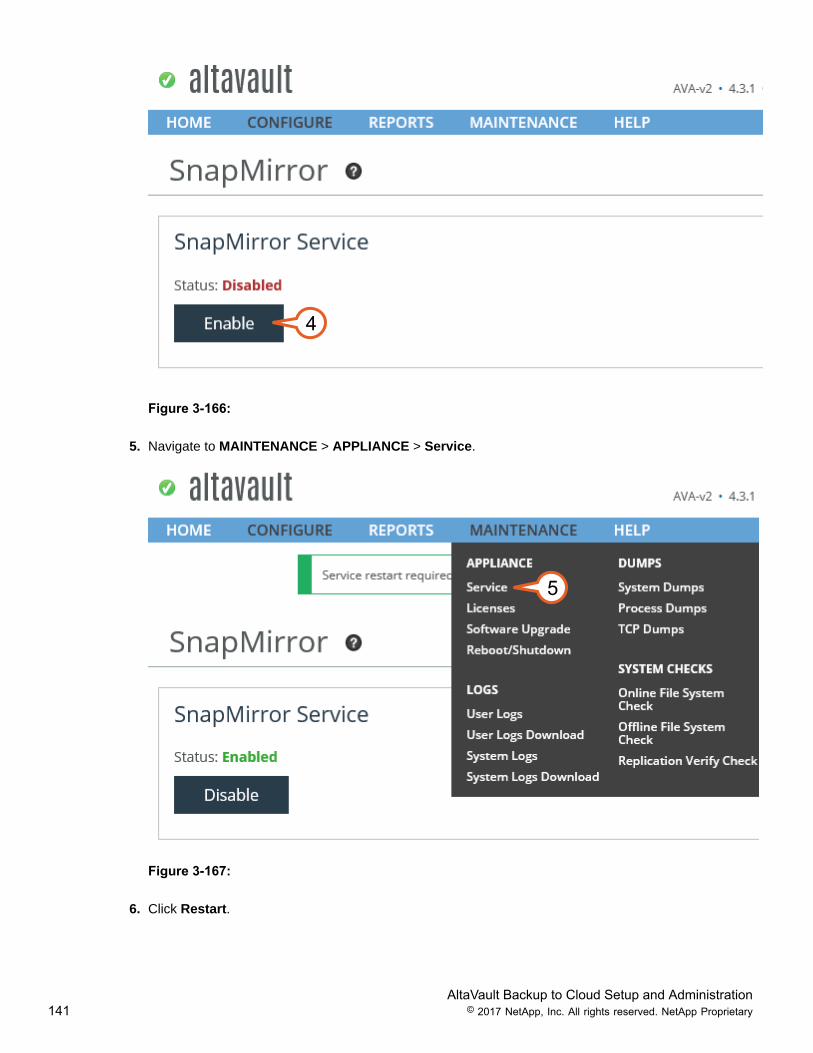
3. Navigate to CONFIGURE > STORAGE > SnapMirror.
AltaVault Backup to Cloud Setup and Administration140 © 2017 NetApp, Inc. All rights reserved. NetApp Proprietary
3
Figure 3-165:
4. Click Enable.
AltaVault Backup to Cloud Setup and Administration141 © 2017 NetApp, Inc. All rights reserved. NetApp Proprietary
4
Figure 3-166:
5. Navigate to MAINTENANCE > APPLIANCE > Service.
5
Figure 3-167:
6. Click Restart.
AltaVault Backup to Cloud Setup and Administration142 © 2017 NetApp, Inc. All rights reserved. NetApp Proprietary
6
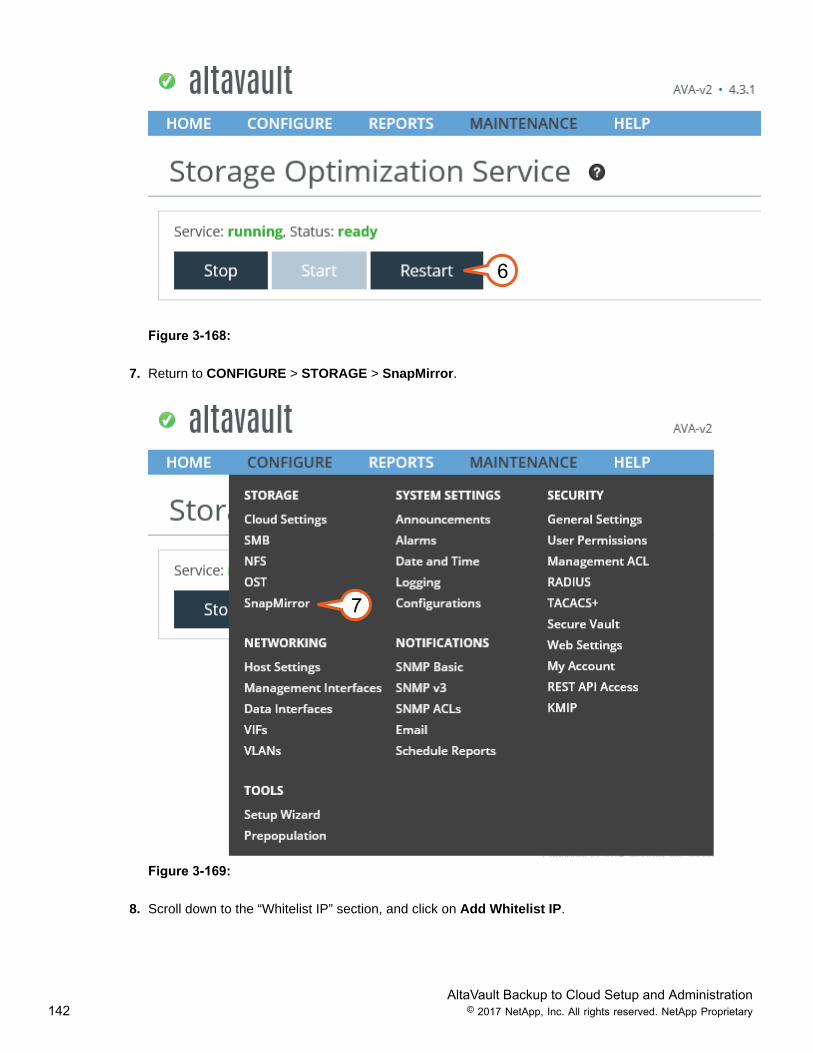
Figure 3-168:
7. Return to CONFIGURE > STORAGE > SnapMirror.
7
Figure 3-169:
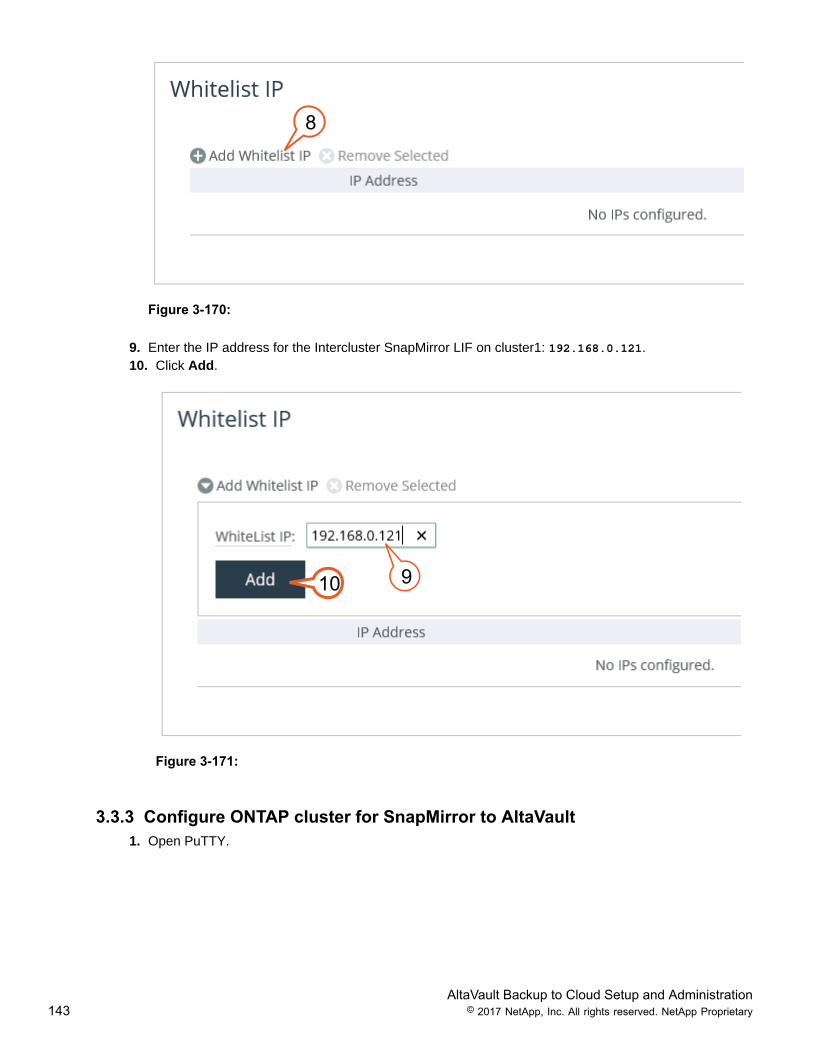
8. Scroll down to the “Whitelist IP” section, and click on Add Whitelist IP.
AltaVault Backup to Cloud Setup and Administration143 © 2017 NetApp, Inc. All rights reserved. NetApp Proprietary
8
Figure 3-170:
9. Enter the IP address for the Intercluster SnapMirror LIF on cluster1: 192.168.0.121.10. Click Add.
910
Figure 3-171:
3.3.3 Configure ONTAP cluster for SnapMirror to AltaVault1. Open PuTTY.
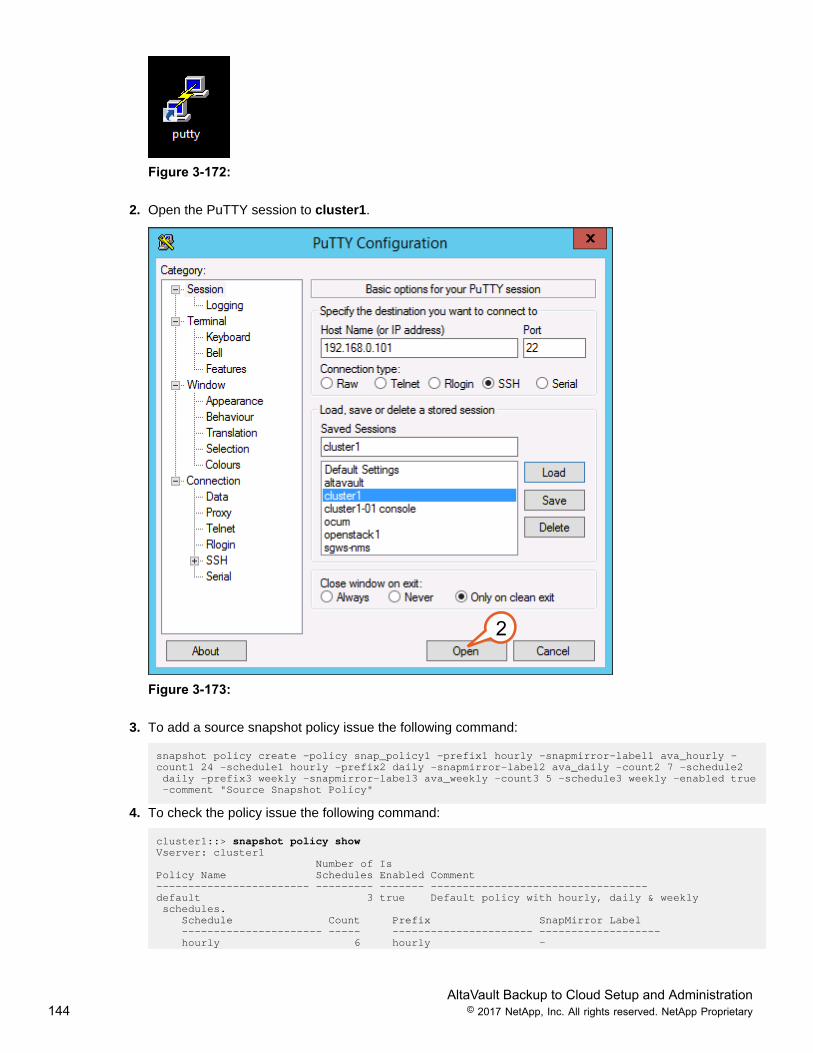
AltaVault Backup to Cloud Setup and Administration144 © 2017 NetApp, Inc. All rights reserved. NetApp Proprietary
Figure 3-172:
2. Open the PuTTY session to cluster1.
2
Figure 3-173:
3. To add a source snapshot policy issue the following command:
snapshot policy create -policy snap_policy1 -prefix1 hourly -snapmirror-label1 ava_hourly -count1 24 -schedule1 hourly -prefix2 daily -snapmirror-label2 ava_daily -count2 7 -schedule2 daily -prefix3 weekly -snapmirror-label3 ava_weekly -count3 5 -schedule3 weekly -enabled true -comment "Source Snapshot Policy"
4. To check the policy issue the following command:
cluster1::> snapshot policy showVserver: cluster1 Number of IsPolicy Name Schedules Enabled Comment------------------------ --------- ------- ----------------------------------default 3 true Default policy with hourly, daily & weekly schedules. Schedule Count Prefix SnapMirror Label ---------------------- ----- ---------------------- ------------------- hourly 6 hourly -
AltaVault Backup to Cloud Setup and Administration145 © 2017 NetApp, Inc. All rights reserved. NetApp Proprietary
daily 2 daily daily weekly 2 weekly weekly
default-1weekly 3 true Default policy with 6 hourly, 2 daily & 1 weekly schedule. Schedule Count Prefix SnapMirror Label ---------------------- ----- ---------------------- ------------------- hourly 6 hourly - daily 2 daily - weekly 1 weekly -
none 0 false Policy for no automatic snapshots. Schedule Count Prefix SnapMirror Label ---------------------- ----- ---------------------- ------------------- - - - -
snap_policy1 3 true Source Snapshot Policy Schedule Count Prefix SnapMirror Label ---------------------- ----- ---------------------- ------------------- hourly 24 hourly ava_hourly daily 7 daily ava_daily weekly 5 weekly ava_weekly
4 entries were displayed.
5. To assign the policy to the source volume issue the following command and press y:
cluster1::> volume modify -volume vol2_CIFS_volume -snapshot-policy snap_policy1
Warning: You are changing the Snapshot policy on volume vol2_CIFS_volume to snap_policy1. Any Snapshot copies on this volume from the previous policy will not be deleted by this new Snapshot policy. Do you want to continue? {y|n}: y
Volume modify successful on volume vol2_CIFS_volume of Vserver svm1.
6. To add a new SnapMirror policy issue the following command:
snapmirror policy create ava_policy1 -vserver svm1 -type vault -comment "AVA Vault Policy"
7. To add a rule to the policy for hourly retention issue the following command:
snapmirror policy add-rule -vserver svm1 ava_policy1 -snapmirror-label ava_hourly -keep 8
8. To add a rule to the policy for daily retention issue the following command:
snapmirror policy add-rule -vserver svm1 ava_policy1 -snapmirror-label ava_daily -keep 100
9. To add a rule to the policy for weekly retention issue the following command:
snapmirror policy add-rule -vserver svm1 ava_policy1 -snapmirror-label ava_weekly -keep 50
10. Create a SnapMirror relationship between the cluster and altavault. Assign the previously createdsnapmirror policy, otherwise the xdp default is used, by issuing the following command:
snapmirror create -source-path svm1:/vol/vol2_CIFS_volume -destination-path 192.168.0.75:/share/svm1_vol2 -type XDP -policy ava_policy1 -schedule hourly
11. To display the status issue the following command:
cluster1::> snapmirror show ProgressSource Destination Mirror Relationship Total LastPath Type Path State Status Progress Healthy Updated----------- ---- ------------ ------- -------------- --------- ------- --------svm1:vol2_CIFS_volume XDP 192.168.0.75:/share/svm1_vol2 Uninitialized Idle - true -
12. To initialize the SnapMirror relationship and begin transferring data, issue the following command:
snapmirror initialize -source-path svm1:/vol/vol2_CIFS_volume -destination-path 192.168.0.75:/share/svm1_vol2
AltaVault Backup to Cloud Setup and Administration146 © 2017 NetApp, Inc. All rights reserved. NetApp Proprietary
13. To display the status issue the following command:
cluster1::> snapmirror show ProgressSource Destination Mirror Relationship Total LastPath Type Path State Status Progress Healthy Updated----------- ---- ------------ ------- -------------- --------- ------- --------svm1:vol2_CIFS_volume XDP 192.168.0.75:/share/svm1_vol2 Uninitialized Transferring 0B true 06/05 18:48:34
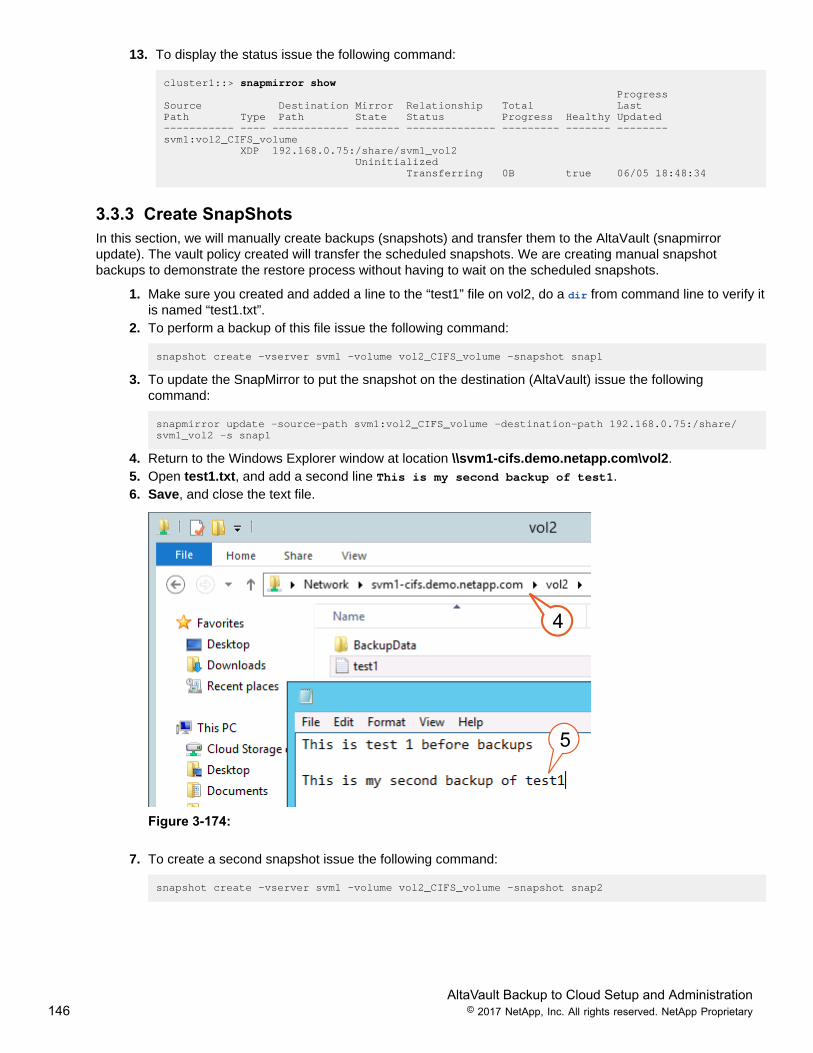
3.3.3 Create SnapShotsIn this section, we will manually create backups (snapshots) and transfer them to the AltaVault (snapmirrorupdate). The vault policy created will transfer the scheduled snapshots. We are creating manual snapshotbackups to demonstrate the restore process without having to wait on the scheduled snapshots.
1. Make sure you created and added a line to the “test1” file on vol2, do a dir from command line to verify itis named “test1.txt”.
2. To perform a backup of this file issue the following command:
snapshot create -vserver svm1 -volume vol2_CIFS_volume -snapshot snap1
3. To update the SnapMirror to put the snapshot on the destination (AltaVault) issue the followingcommand:
snapmirror update -source-path svm1:vol2_CIFS_volume -destination-path 192.168.0.75:/share/svm1_vol2 -s snap1
4. Return to the Windows Explorer window at location \\svm1-cifs.demo.netapp.com\vol2.5. Open test1.txt, and add a second line This is my second backup of test1.6. Save, and close the text file.
4
5
Figure 3-174:
7. To create a second snapshot issue the following command:
snapshot create -vserver svm1 -volume vol2_CIFS_volume -snapshot snap2
AltaVault Backup to Cloud Setup and Administration147 © 2017 NetApp, Inc. All rights reserved. NetApp Proprietary
8. To perform a SnapMirror update to move the new snapshot to the destination (AltaVault) issue thefollowing command:
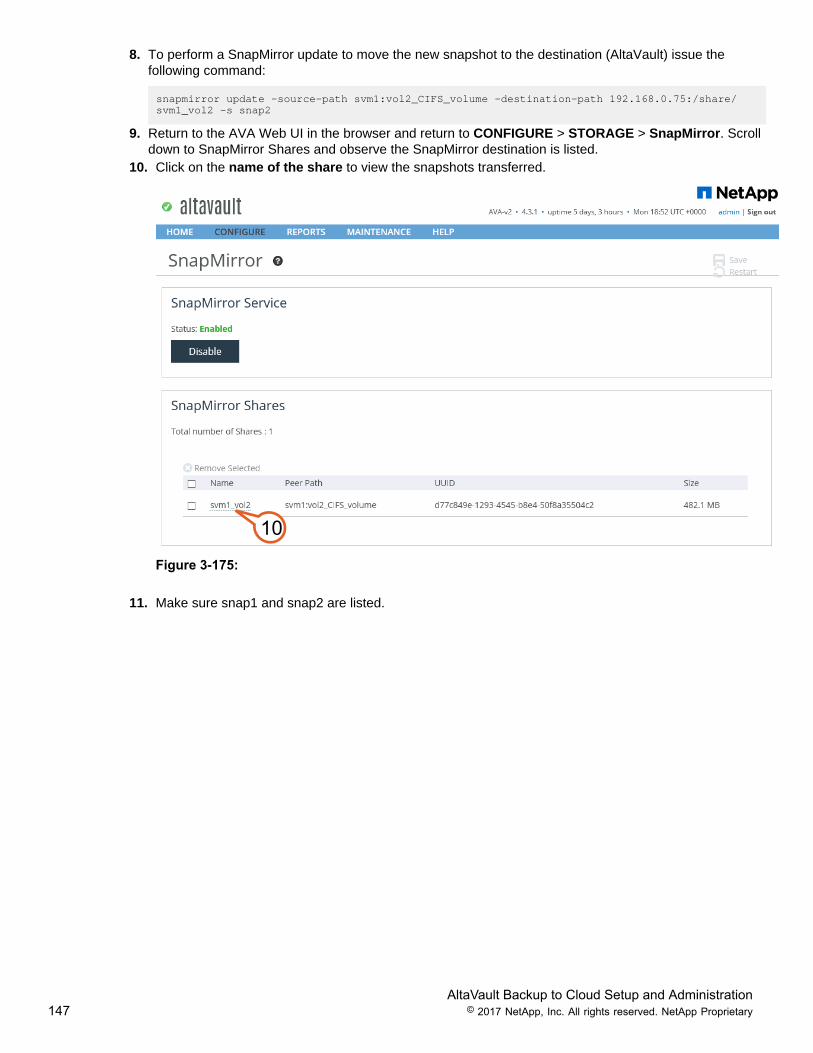
snapmirror update -source-path svm1:vol2_CIFS_volume -destination-path 192.168.0.75:/share/svm1_vol2 -s snap2
9. Return to the AVA Web UI in the browser and return to CONFIGURE > STORAGE > SnapMirror. Scrolldown to SnapMirror Shares and observe the SnapMirror destination is listed.
10. Click on the name of the share to view the snapshots transferred.
10
Figure 3-175:
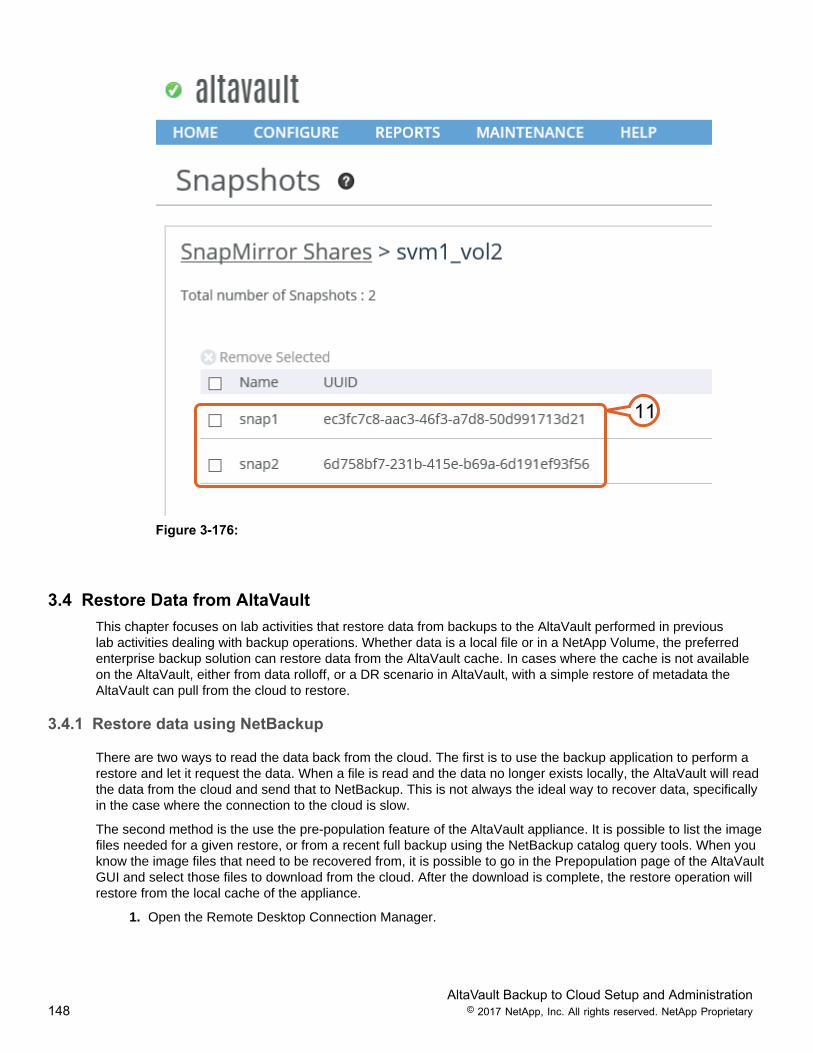
11. Make sure snap1 and snap2 are listed.
AltaVault Backup to Cloud Setup and Administration148 © 2017 NetApp, Inc. All rights reserved. NetApp Proprietary
11
Figure 3-176:
3.4 Restore Data from AltaVaultThis chapter focuses on lab activities that restore data from backups to the AltaVault performed in previouslab activities dealing with backup operations. Whether data is a local file or in a NetApp Volume, the preferredenterprise backup solution can restore data from the AltaVault cache. In cases where the cache is not availableon the AltaVault, either from data rolloff, or a DR scenario in AltaVault, with a simple restore of metadata theAltaVault can pull from the cloud to restore.
3.4.1 Restore data using NetBackup
There are two ways to read the data back from the cloud. The first is to use the backup application to perform arestore and let it request the data. When a file is read and the data no longer exists locally, the AltaVault will readthe data from the cloud and send that to NetBackup. This is not always the ideal way to recover data, specificallyin the case where the connection to the cloud is slow.
The second method is the use the pre-population feature of the AltaVault appliance. It is possible to list the imagefiles needed for a given restore, or from a recent full backup using the NetBackup catalog query tools. When youknow the image files that need to be recovered from, it is possible to go in the Prepopulation page of the AltaVaultGUI and select those files to download from the cloud. After the download is complete, the restore operation willrestore from the local cache of the appliance.
1. Open the Remote Desktop Connection Manager.
AltaVault Backup to Cloud Setup and Administration149 © 2017 NetApp, Inc. All rights reserved. NetApp Proprietary
1
Figure 3-177:
2. Enter session to NetBackup server.
2
Figure 3-178:
3. From the NetBackup Server, open Windows Explorer.
3
Figure 3-179:
4. Confirm that the folder “C:\Restore” does not exist on the NetBackup server.
4
Figure 3-180:

AltaVault Backup to Cloud Setup and Administration150 © 2017 NetApp, Inc. All rights reserved. NetApp Proprietary
5. Open the Backup Archive and Restore console.
5
Figure 3-181:
6. Click Select for Restore.
A window opens showing the list of backups done. If a dialog is shown saying that there are not backupsfor this client, navigate to File > Specify NetBackup Machines > Policy Type to add the client nameyou entered when creating the policy. NetBackup is hostname specific; if you gave the short name it willsee the fully qualified name as a different client.
6
Figure 3-182:
7. Expand the C: drive in the All Folders window pane (bottom left section) to locate a file to restore.8. Check the box next to the BackupData folder.9. From the main menu choose Actions > Restore.
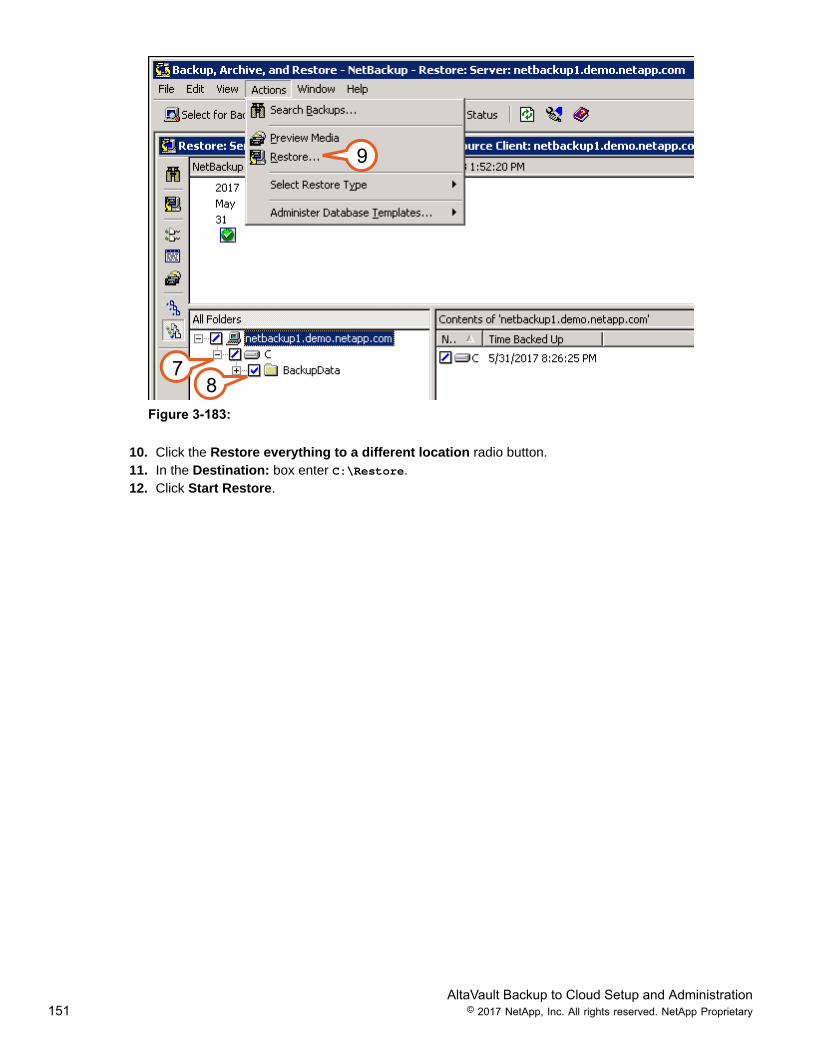
AltaVault Backup to Cloud Setup and Administration151 © 2017 NetApp, Inc. All rights reserved. NetApp Proprietary
78
9
Figure 3-183:
10. Click the Restore everything to a different location radio button.11. In the Destination: box enter C:\Restore.12. Click Start Restore.
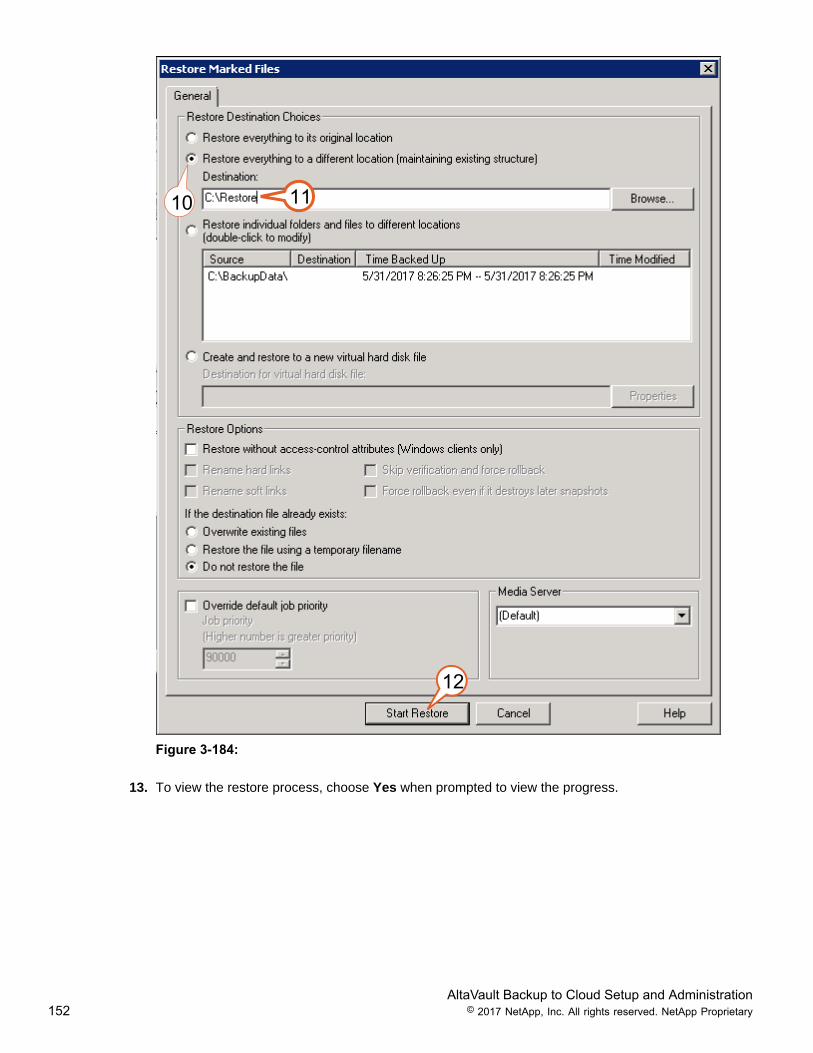
AltaVault Backup to Cloud Setup and Administration152 © 2017 NetApp, Inc. All rights reserved. NetApp Proprietary
10 11
12
Figure 3-184:
13. To view the restore process, choose Yes when prompted to view the progress.
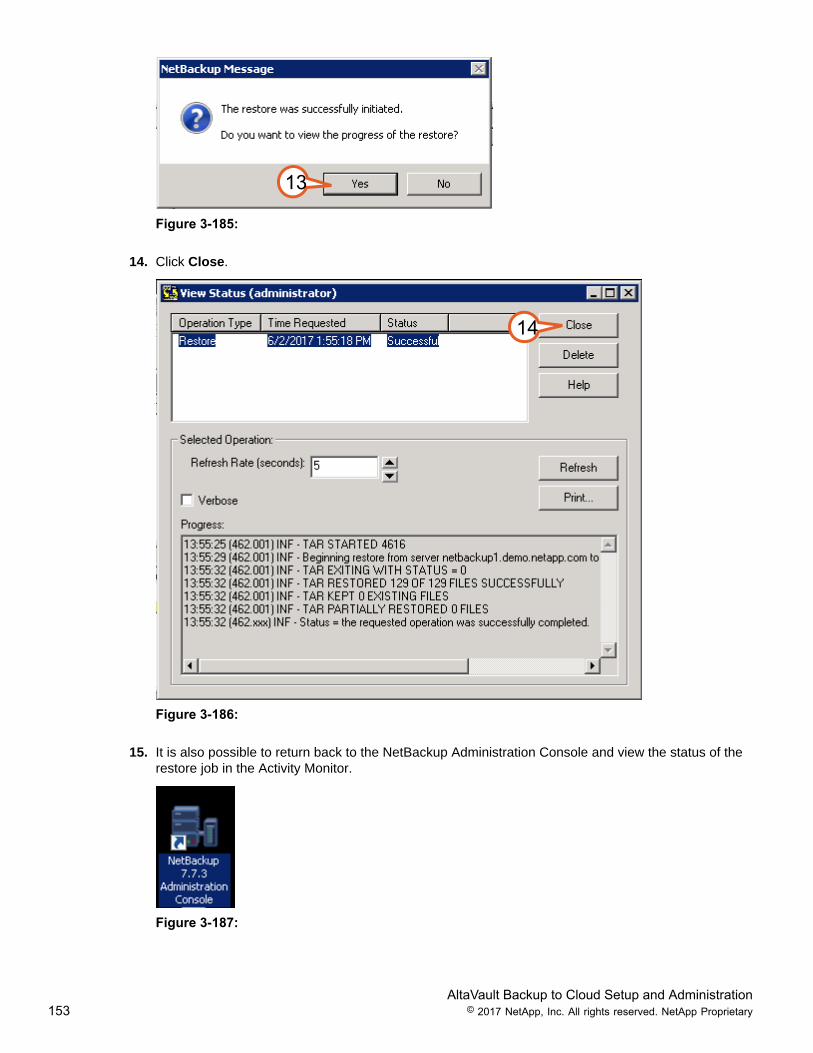
AltaVault Backup to Cloud Setup and Administration153 © 2017 NetApp, Inc. All rights reserved. NetApp Proprietary
13
Figure 3-185:
14. Click Close.
14
Figure 3-186:
15. It is also possible to return back to the NetBackup Administration Console and view the status of therestore job in the Activity Monitor.
Figure 3-187:
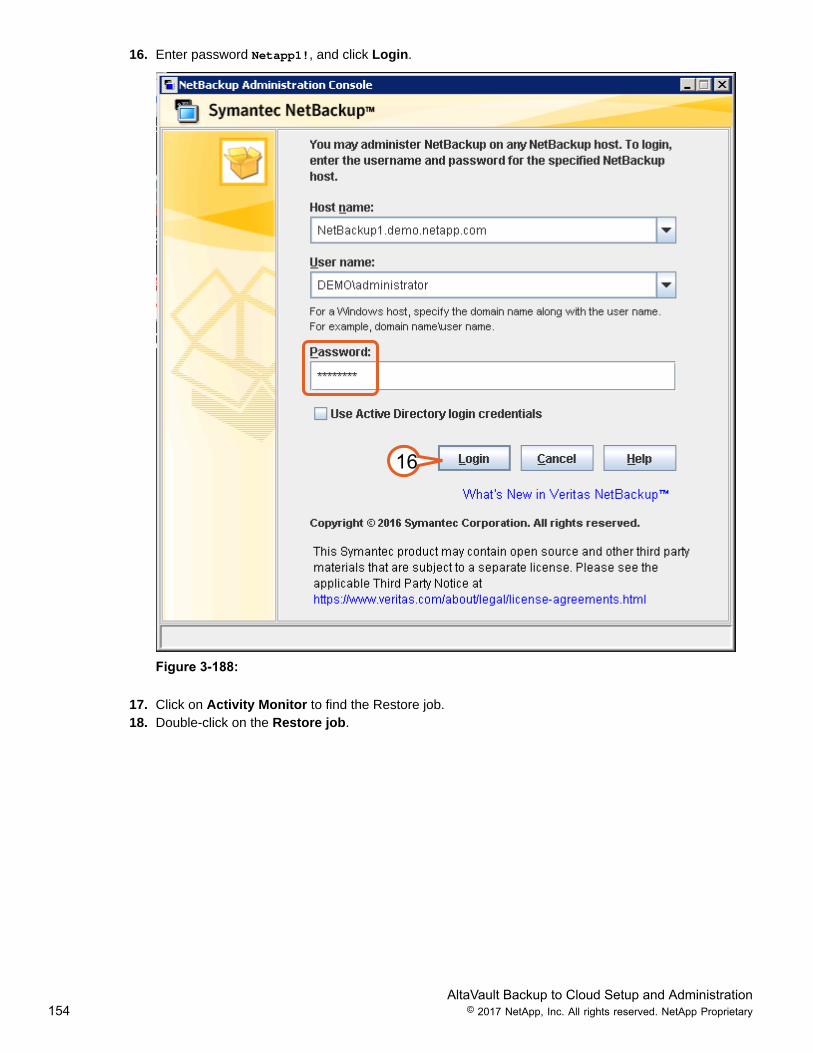
AltaVault Backup to Cloud Setup and Administration154 © 2017 NetApp, Inc. All rights reserved. NetApp Proprietary
16. Enter password Netapp1!, and click Login.
16
Figure 3-188:
17. Click on Activity Monitor to find the Restore job.18. Double-click on the Restore job.
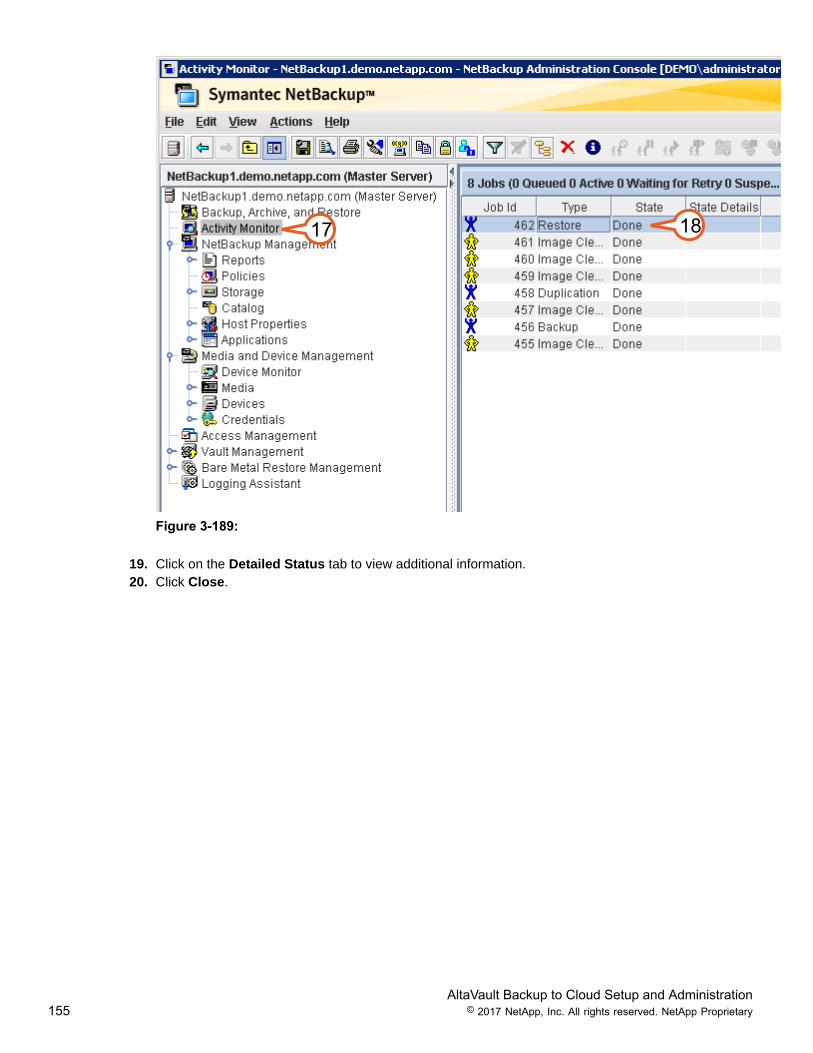
AltaVault Backup to Cloud Setup and Administration155 © 2017 NetApp, Inc. All rights reserved. NetApp Proprietary
17 18
Figure 3-189:
19. Click on the Detailed Status tab to view additional information.20. Click Close.
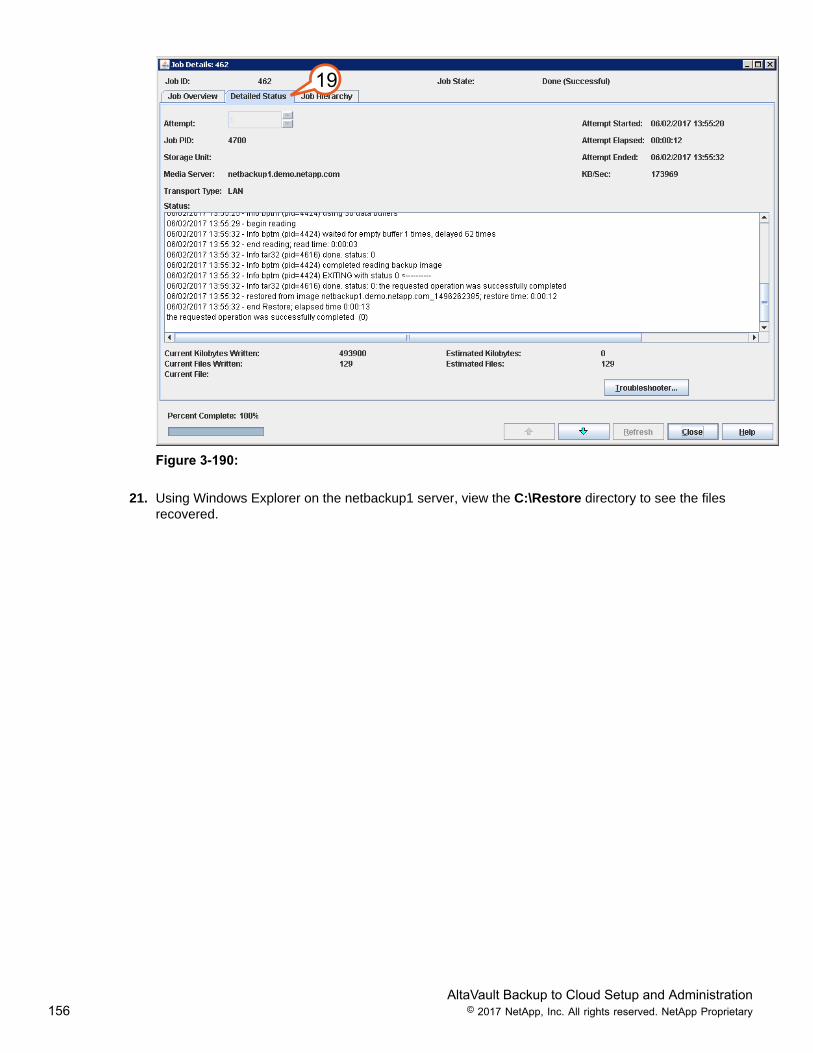
AltaVault Backup to Cloud Setup and Administration156 © 2017 NetApp, Inc. All rights reserved. NetApp Proprietary
19
Figure 3-190:
21. Using Windows Explorer on the netbackup1 server, view the C:\Restore directory to see the filesrecovered.
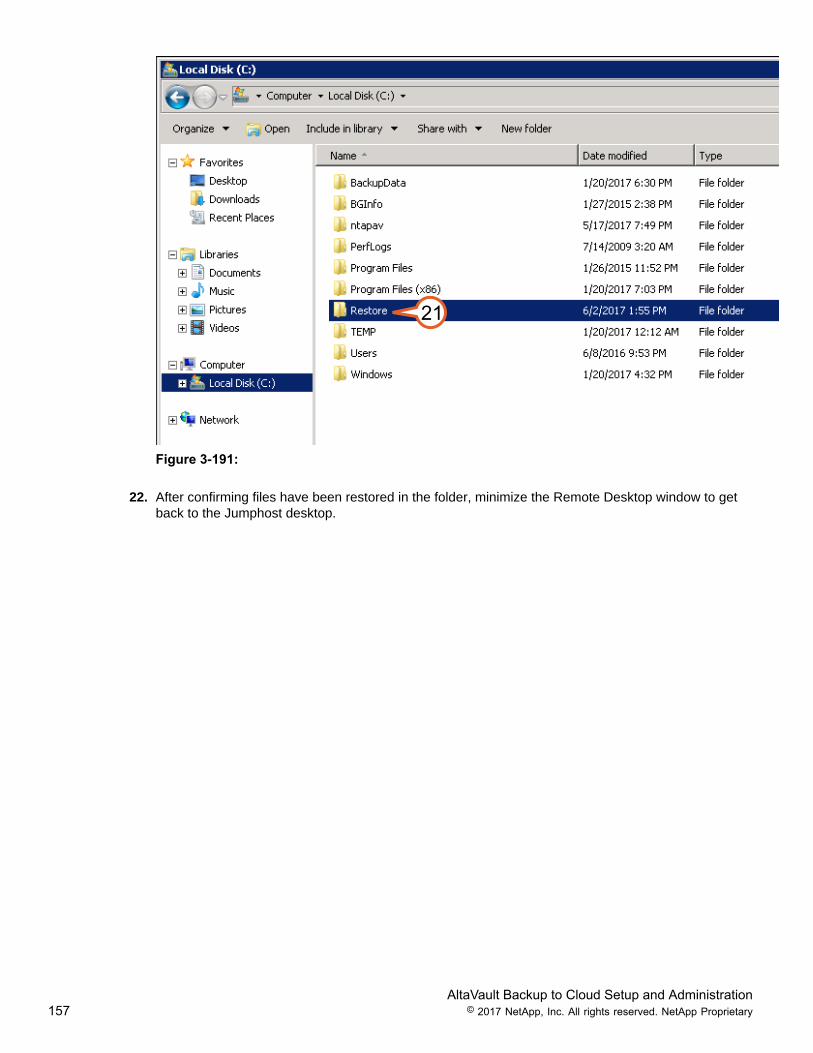
AltaVault Backup to Cloud Setup and Administration157 © 2017 NetApp, Inc. All rights reserved. NetApp Proprietary
21
Figure 3-191:
22. After confirming files have been restored in the folder, minimize the Remote Desktop window to getback to the Jumphost desktop.
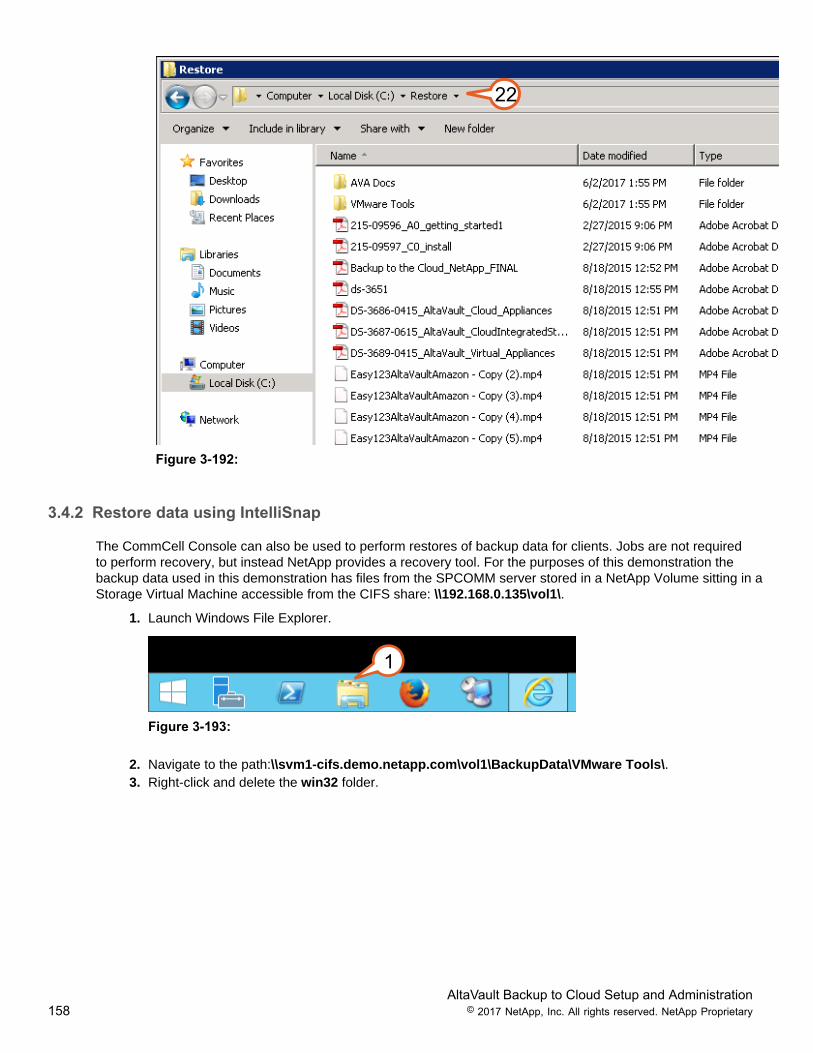
AltaVault Backup to Cloud Setup and Administration158 © 2017 NetApp, Inc. All rights reserved. NetApp Proprietary
22
Figure 3-192:
3.4.2 Restore data using IntelliSnap
The CommCell Console can also be used to perform restores of backup data for clients. Jobs are not requiredto perform recovery, but instead NetApp provides a recovery tool. For the purposes of this demonstration thebackup data used in this demonstration has files from the SPCOMM server stored in a NetApp Volume sitting in aStorage Virtual Machine accessible from the CIFS share: \\192.168.0.135\vol1\.
1. Launch Windows File Explorer.
1
Figure 3-193:
2. Navigate to the path:\\svm1-cifs.demo.netapp.com\vol1\BackupData\VMware Tools\.3. Right-click and delete the win32 folder.
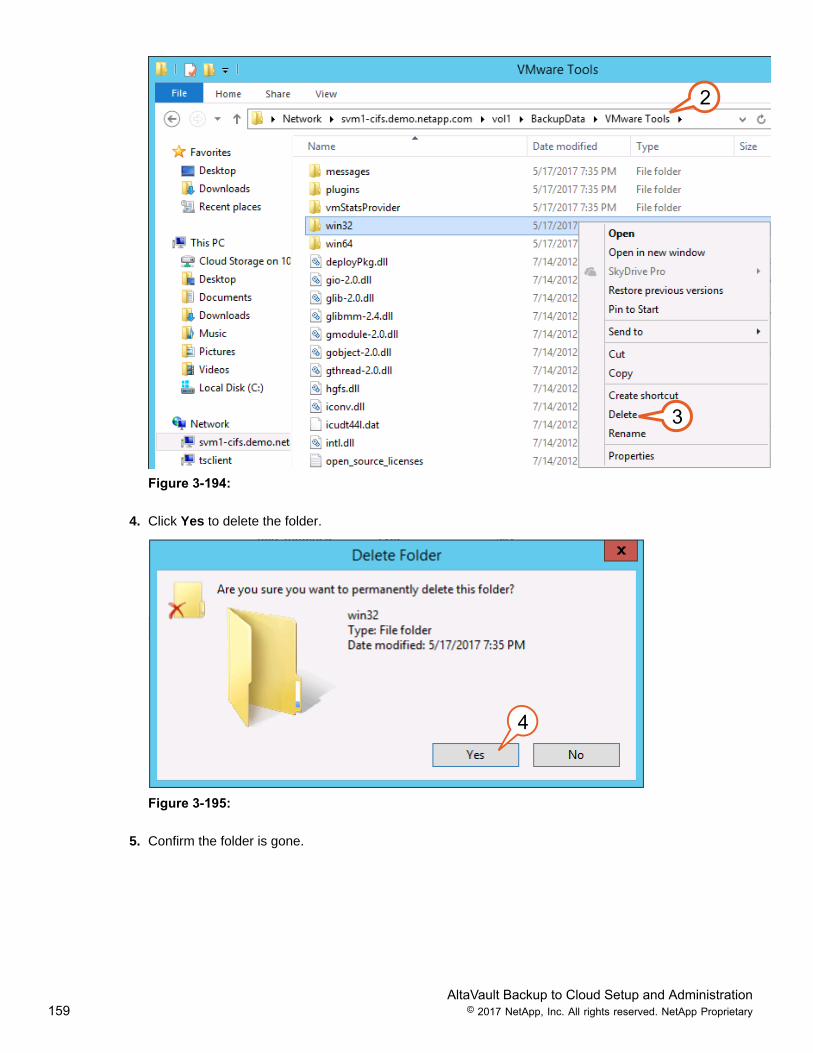
AltaVault Backup to Cloud Setup and Administration159 © 2017 NetApp, Inc. All rights reserved. NetApp Proprietary
2
3
Figure 3-194:
4. Click Yes to delete the folder.
4
Figure 3-195:
5. Confirm the folder is gone.
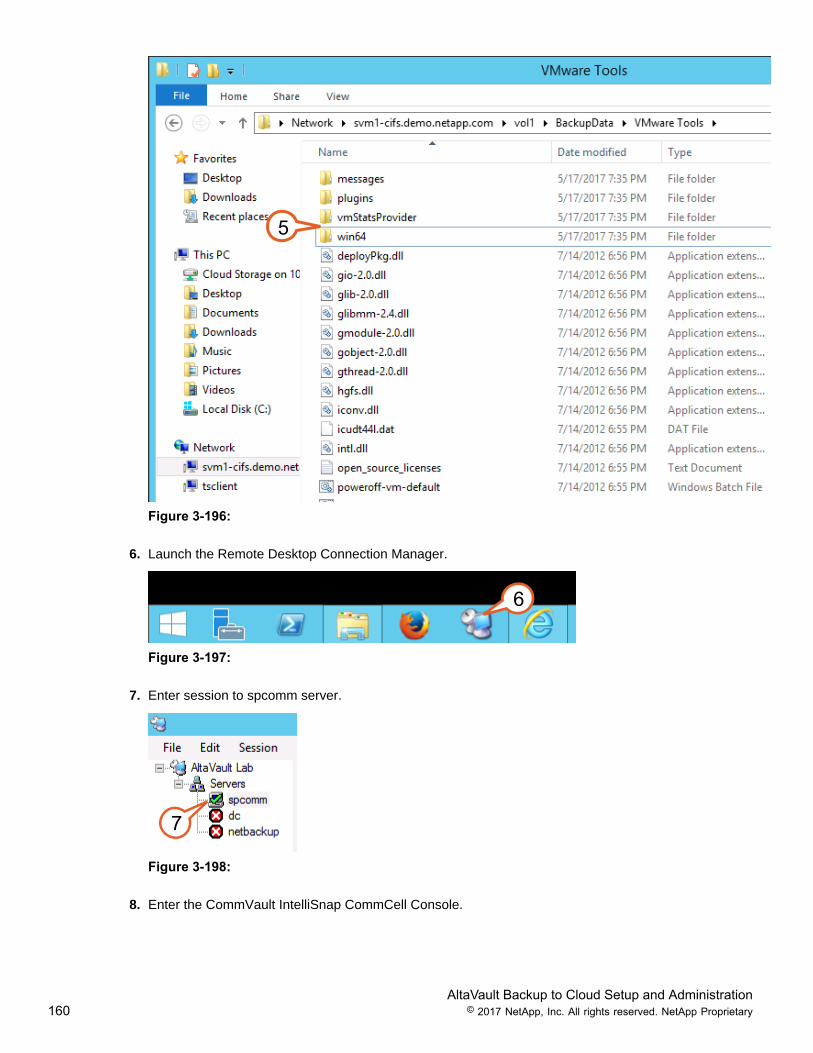
AltaVault Backup to Cloud Setup and Administration160 © 2017 NetApp, Inc. All rights reserved. NetApp Proprietary
5
Figure 3-196:
6. Launch the Remote Desktop Connection Manager.
6
Figure 3-197:
7. Enter session to spcomm server.
7
Figure 3-198:
8. Enter the CommVault IntelliSnap CommCell Console.
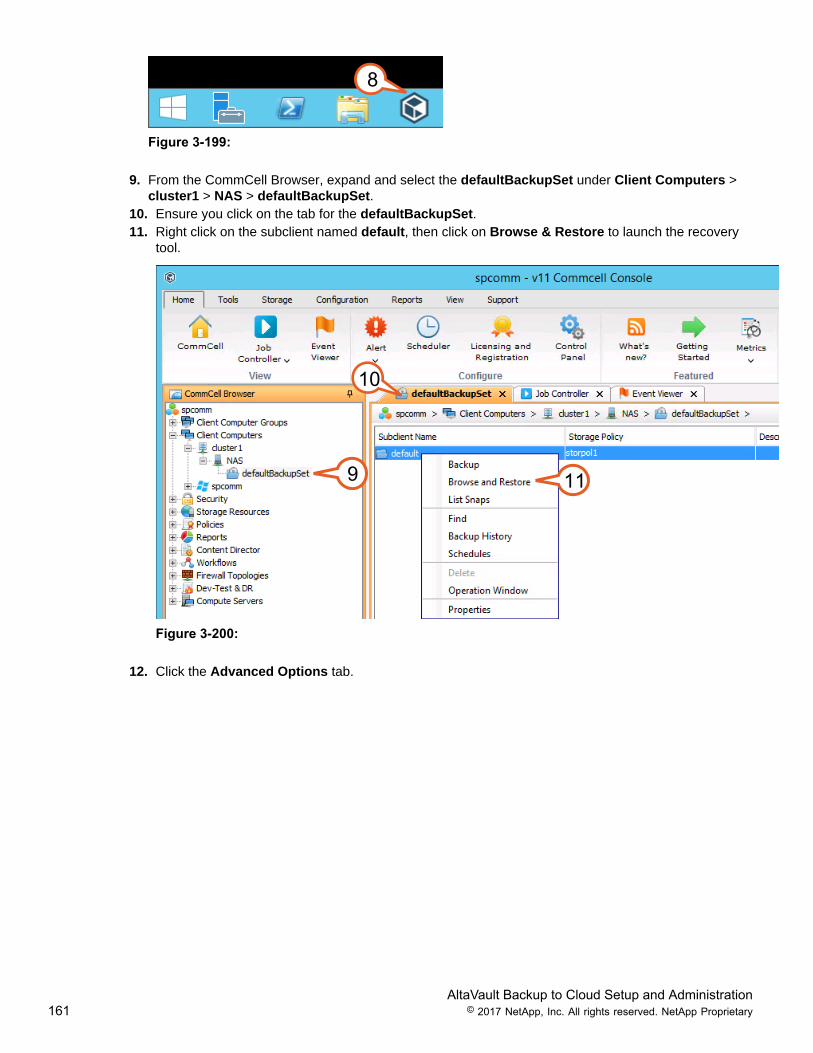
AltaVault Backup to Cloud Setup and Administration161 © 2017 NetApp, Inc. All rights reserved. NetApp Proprietary
8
Figure 3-199:
9. From the CommCell Browser, expand and select the defaultBackupSet under Client Computers >cluster1 > NAS > defaultBackupSet.
10. Ensure you click on the tab for the defaultBackupSet.11. Right click on the subclient named default, then click on Browse & Restore to launch the recovery
tool.
9
10
11
Figure 3-200:
12. Click the Advanced Options tab.
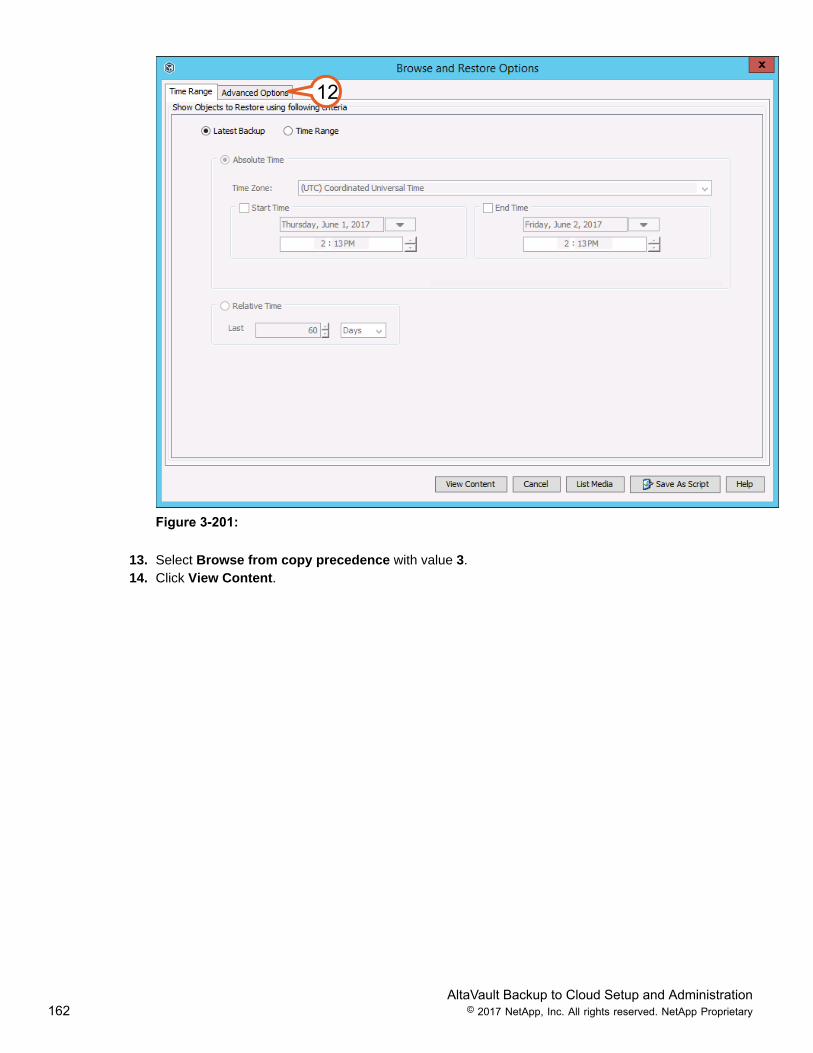
AltaVault Backup to Cloud Setup and Administration162 © 2017 NetApp, Inc. All rights reserved. NetApp Proprietary
12
Figure 3-201:
13. Select Browse from copy precedence with value 3.14. Click View Content.
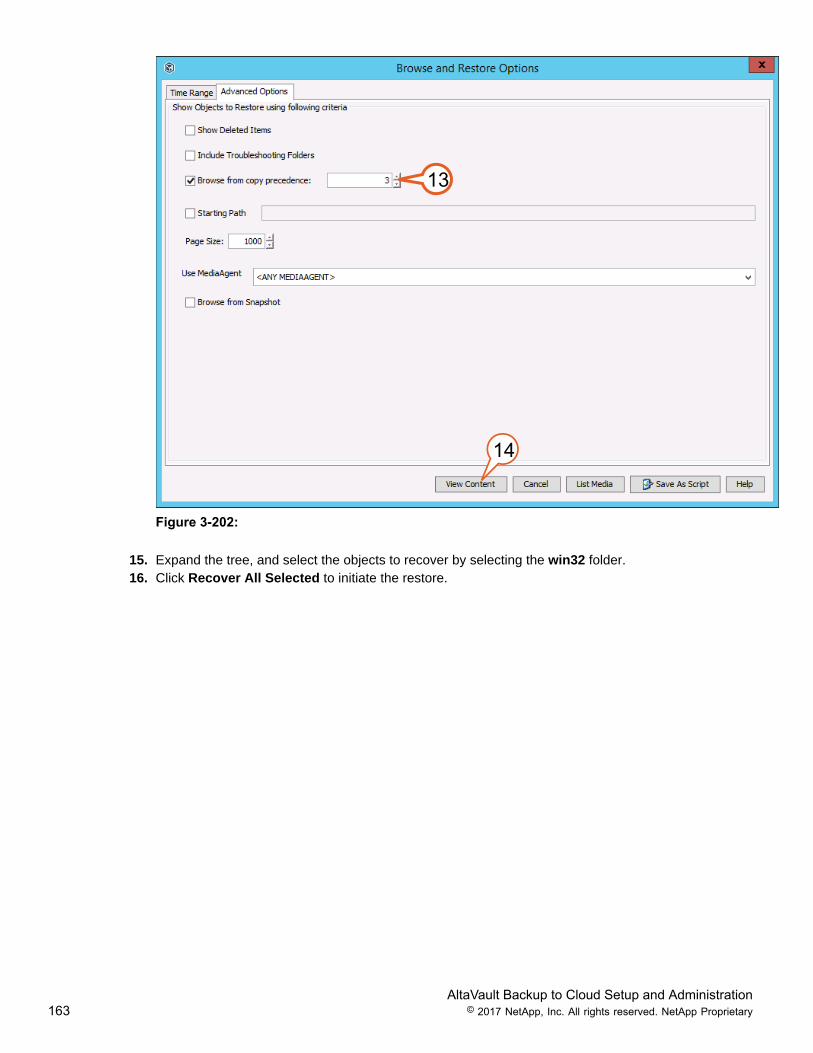
AltaVault Backup to Cloud Setup and Administration163 © 2017 NetApp, Inc. All rights reserved. NetApp Proprietary
13
14
Figure 3-202:
15. Expand the tree, and select the objects to recover by selecting the win32 folder.16. Click Recover All Selected to initiate the restore.

AltaVault Backup to Cloud Setup and Administration164 © 2017 NetApp, Inc. All rights reserved. NetApp Proprietary
15
16
Figure 3-203:
17. Change the “Destination client” to spcomm.18. Specify the destination path by clicking Browse.
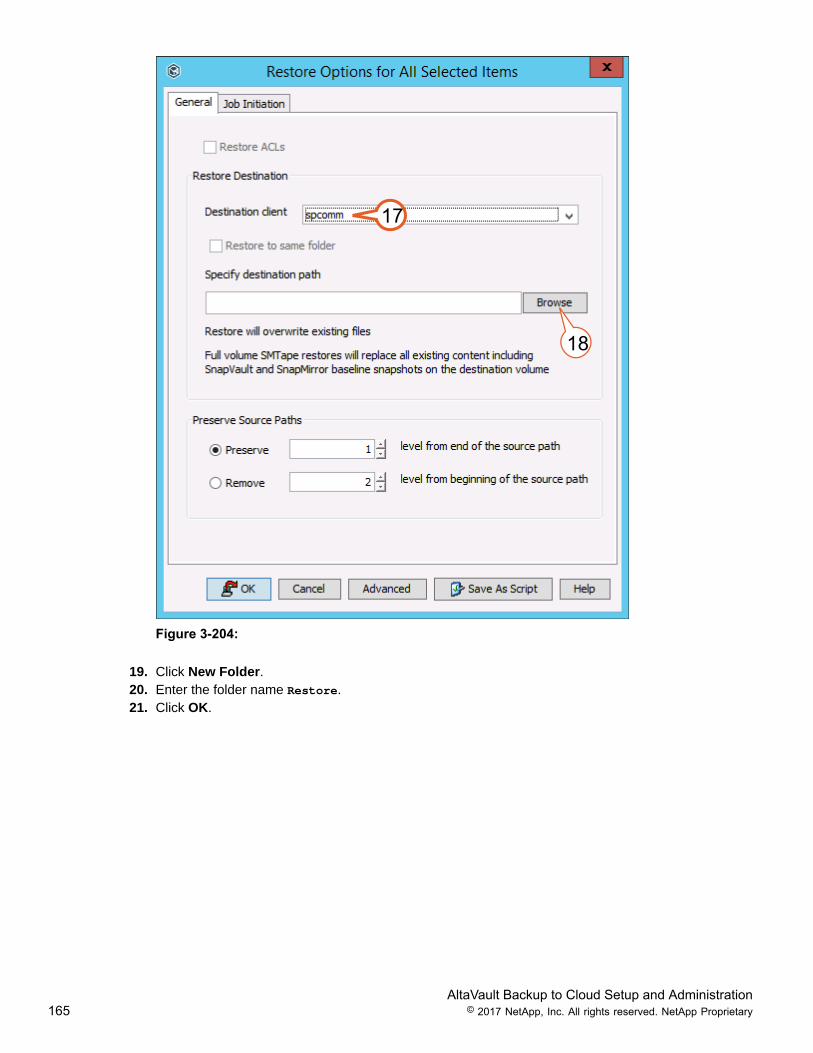
AltaVault Backup to Cloud Setup and Administration165 © 2017 NetApp, Inc. All rights reserved. NetApp Proprietary
17
18
Figure 3-204:
19. Click New Folder.20. Enter the folder name Restore.21. Click OK.

AltaVault Backup to Cloud Setup and Administration166 © 2017 NetApp, Inc. All rights reserved. NetApp Proprietary
20
19
21
Figure 3-205:
22. Click OK.
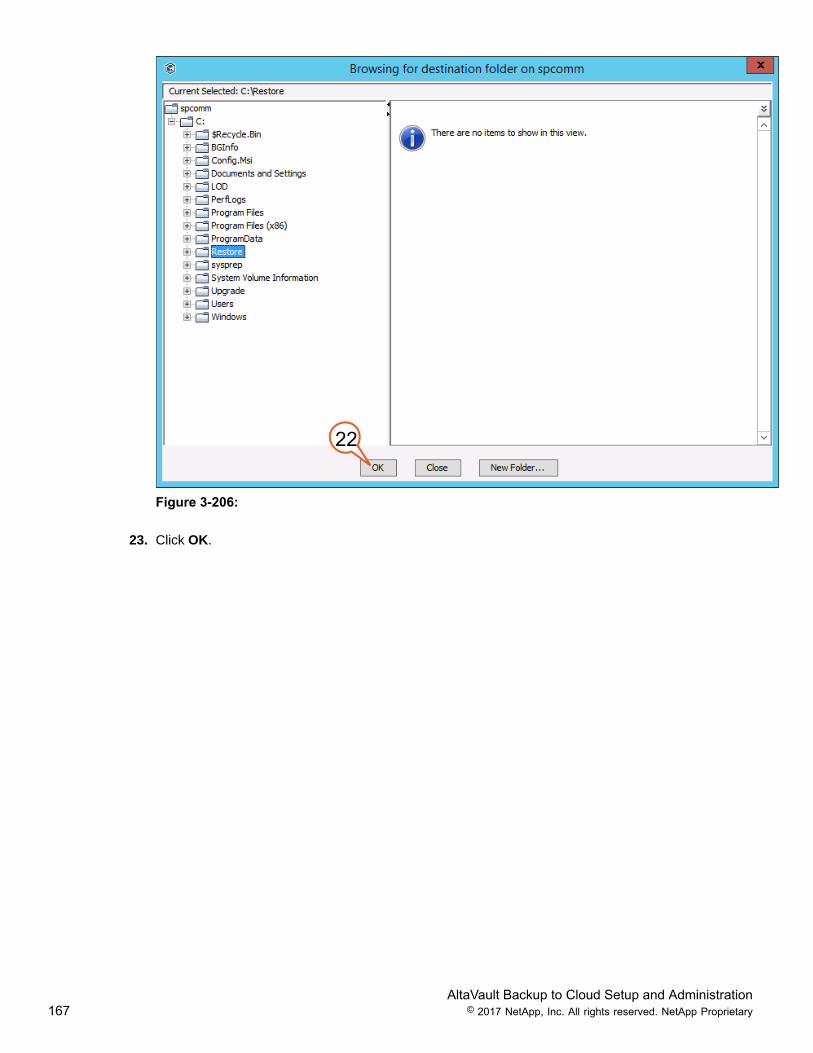
AltaVault Backup to Cloud Setup and Administration167 © 2017 NetApp, Inc. All rights reserved. NetApp Proprietary
22
Figure 3-206:
23. Click OK.
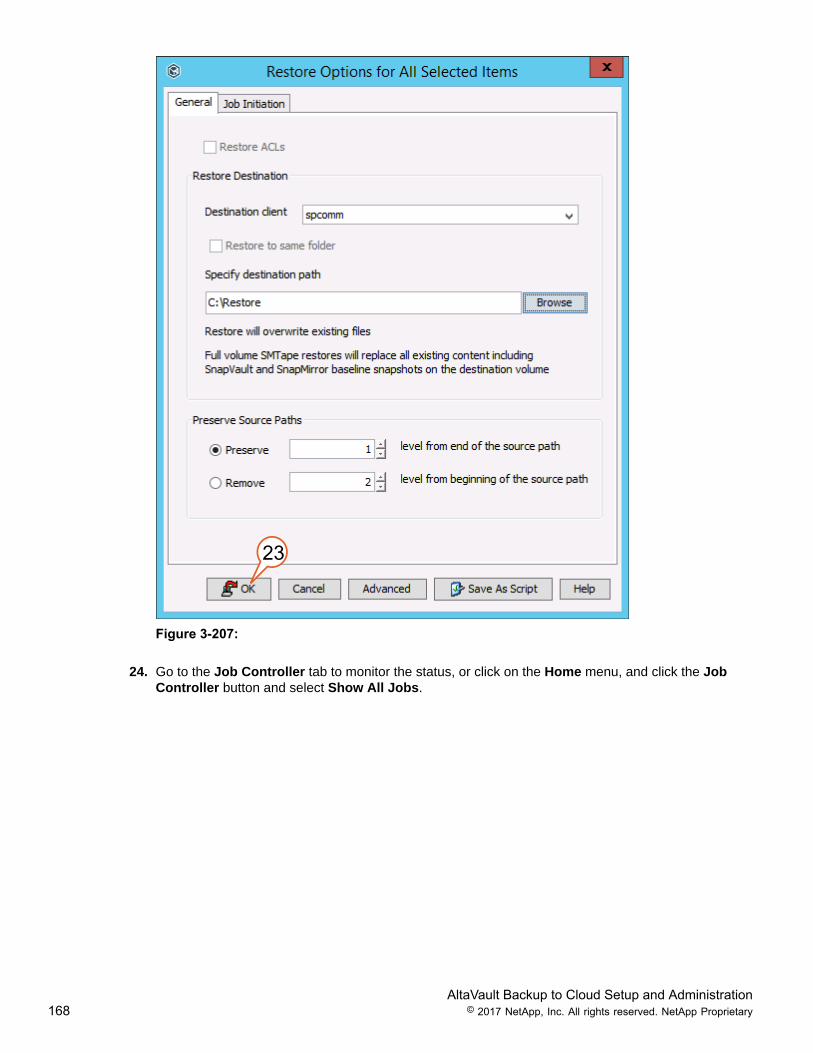
AltaVault Backup to Cloud Setup and Administration168 © 2017 NetApp, Inc. All rights reserved. NetApp Proprietary
23
Figure 3-207:
24. Go to the Job Controller tab to monitor the status, or click on the Home menu, and click the JobController button and select Show All Jobs.
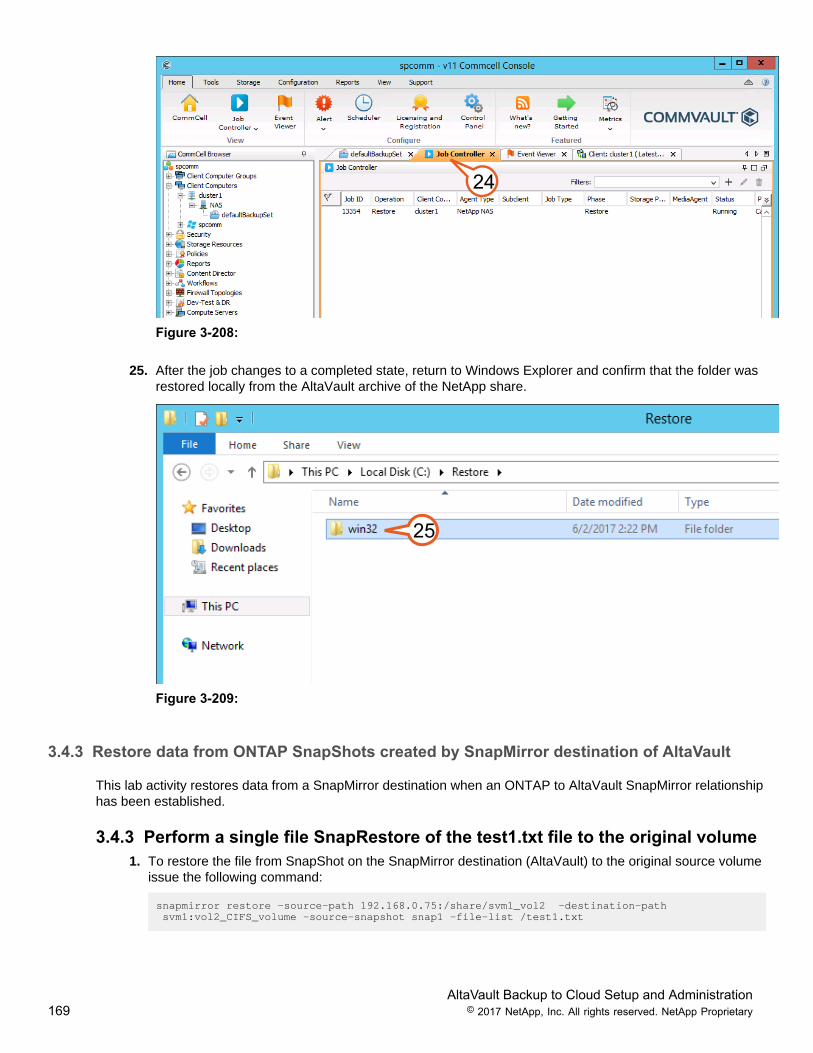
AltaVault Backup to Cloud Setup and Administration169 © 2017 NetApp, Inc. All rights reserved. NetApp Proprietary
24
Figure 3-208:
25. After the job changes to a completed state, return to Windows Explorer and confirm that the folder wasrestored locally from the AltaVault archive of the NetApp share.
25
Figure 3-209:
3.4.3 Restore data from ONTAP SnapShots created by SnapMirror destination of AltaVault
This lab activity restores data from a SnapMirror destination when an ONTAP to AltaVault SnapMirror relationshiphas been established.
3.4.3 Perform a single file SnapRestore of the test1.txt file to the original volume1. To restore the file from SnapShot on the SnapMirror destination (AltaVault) to the original source volume
issue the following command:
snapmirror restore -source-path 192.168.0.75:/share/svm1_vol2 -destination-path svm1:vol2_CIFS_volume -source-snapshot snap1 -file-list /test1.txt
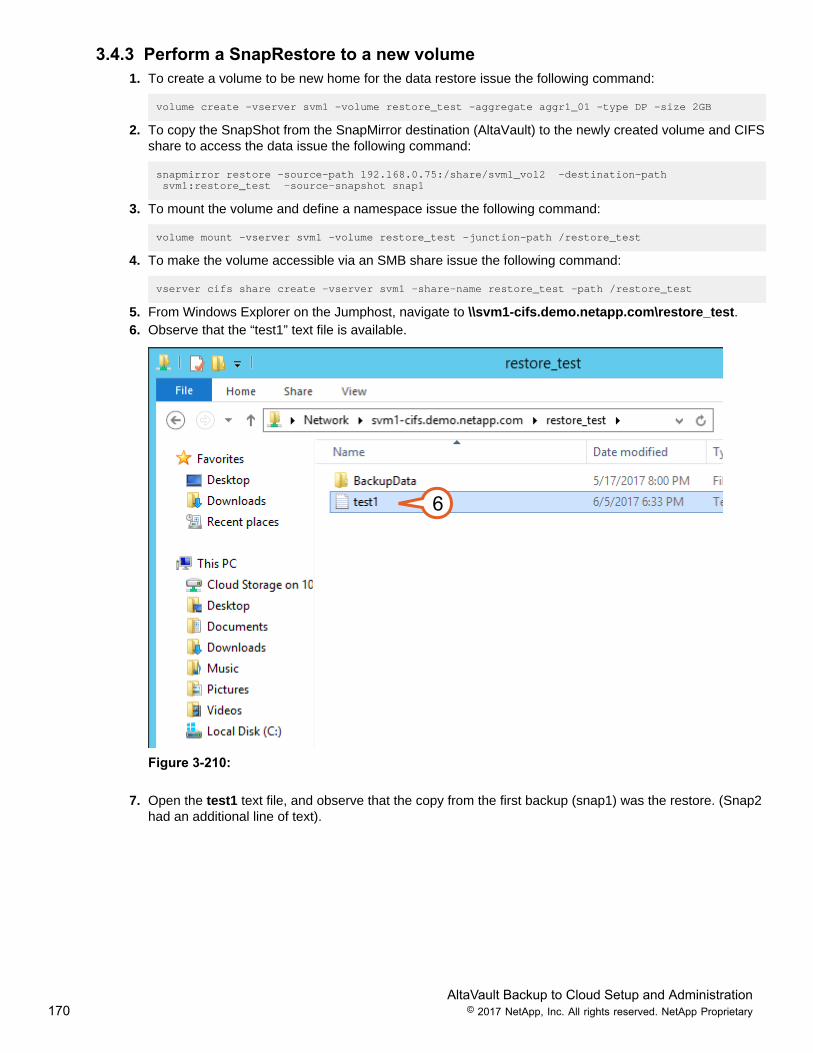
AltaVault Backup to Cloud Setup and Administration170 © 2017 NetApp, Inc. All rights reserved. NetApp Proprietary
3.4.3 Perform a SnapRestore to a new volume1. To create a volume to be new home for the data restore issue the following command:
volume create -vserver svm1 -volume restore_test -aggregate aggr1_01 -type DP -size 2GB
2. To copy the SnapShot from the SnapMirror destination (AltaVault) to the newly created volume and CIFSshare to access the data issue the following command:
snapmirror restore -source-path 192.168.0.75:/share/svm1_vol2 -destination-path svm1:restore_test -source-snapshot snap1
3. To mount the volume and define a namespace issue the following command:
volume mount -vserver svm1 -volume restore_test -junction-path /restore_test
4. To make the volume accessible via an SMB share issue the following command:
vserver cifs share create -vserver svm1 -share-name restore_test -path /restore_test
5. From Windows Explorer on the Jumphost, navigate to \\svm1-cifs.demo.netapp.com\restore_test.6. Observe that the “test1” text file is available.
6
Figure 3-210:
7. Open the test1 text file, and observe that the copy from the first backup (snap1) was the restore. (Snap2had an additional line of text).
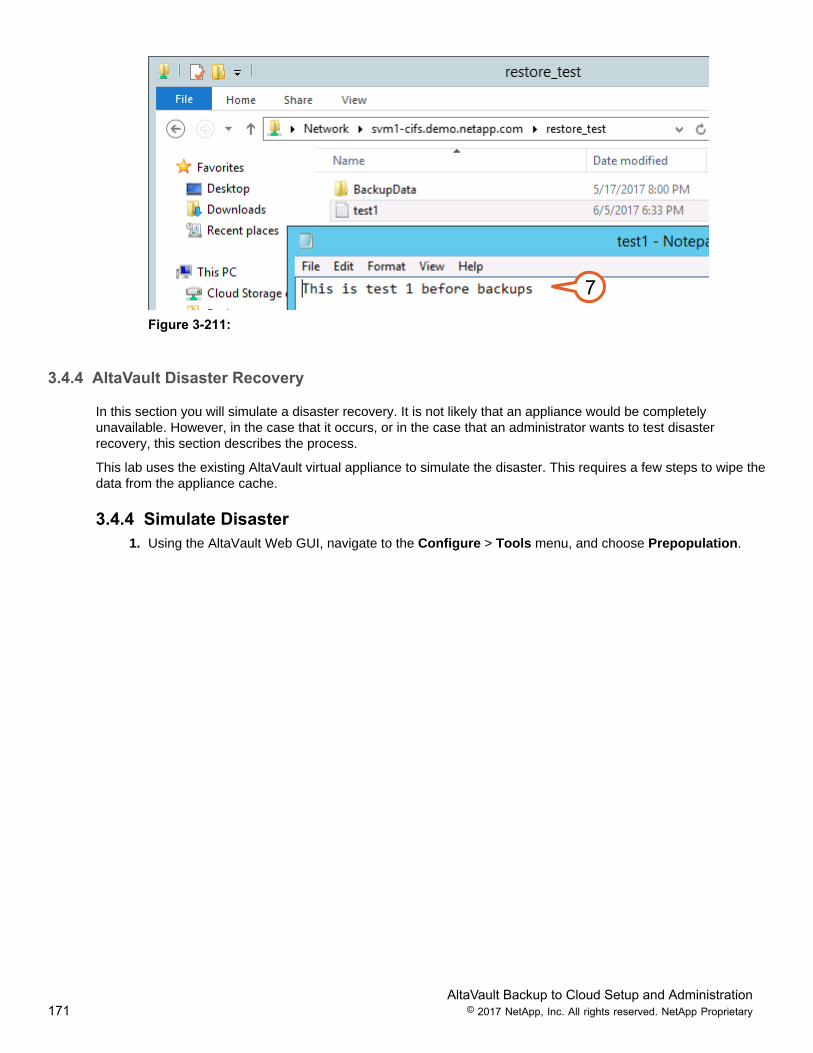
AltaVault Backup to Cloud Setup and Administration171 © 2017 NetApp, Inc. All rights reserved. NetApp Proprietary
7
Figure 3-211:
3.4.4 AltaVault Disaster Recovery
In this section you will simulate a disaster recovery. It is not likely that an appliance would be completelyunavailable. However, in the case that it occurs, or in the case that an administrator wants to test disasterrecovery, this section describes the process.
This lab uses the existing AltaVault virtual appliance to simulate the disaster. This requires a few steps to wipe thedata from the appliance cache.
3.4.4 Simulate Disaster1. Using the AltaVault Web GUI, navigate to the Configure > Tools menu, and choose Prepopulation.
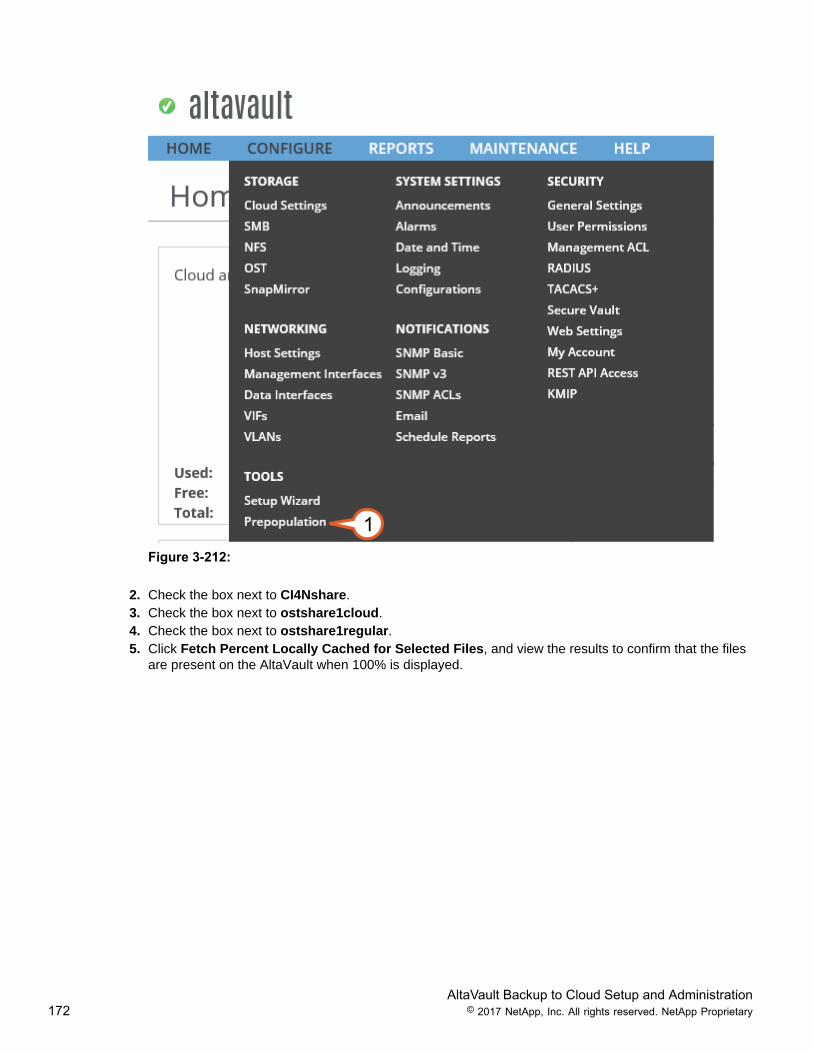
AltaVault Backup to Cloud Setup and Administration172 © 2017 NetApp, Inc. All rights reserved. NetApp Proprietary
1Figure 3-212:
2. Check the box next to CI4Nshare.3. Check the box next to ostshare1cloud.4. Check the box next to ostshare1regular.5. Click Fetch Percent Locally Cached for Selected Files, and view the results to confirm that the files
are present on the AltaVault when 100% is displayed.
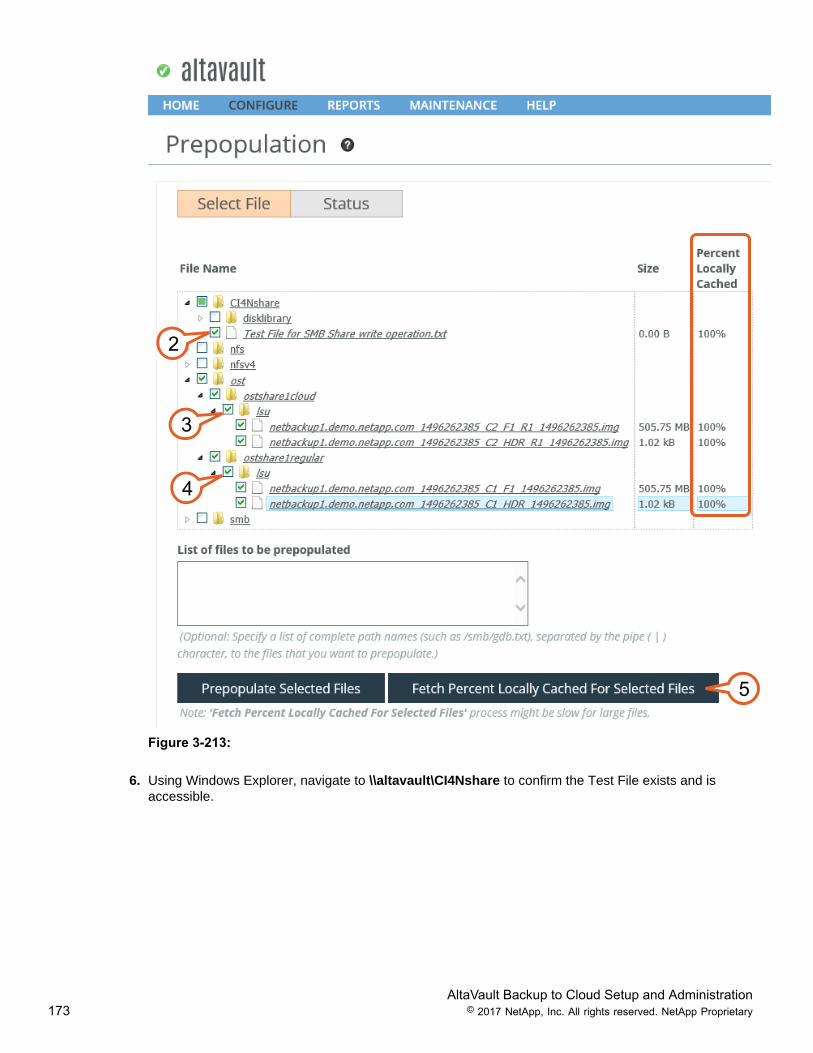
AltaVault Backup to Cloud Setup and Administration173 © 2017 NetApp, Inc. All rights reserved. NetApp Proprietary
2
3
4
5
Figure 3-213:
6. Using Windows Explorer, navigate to \\altavault\CI4Nshare to confirm the Test File exists and isaccessible.
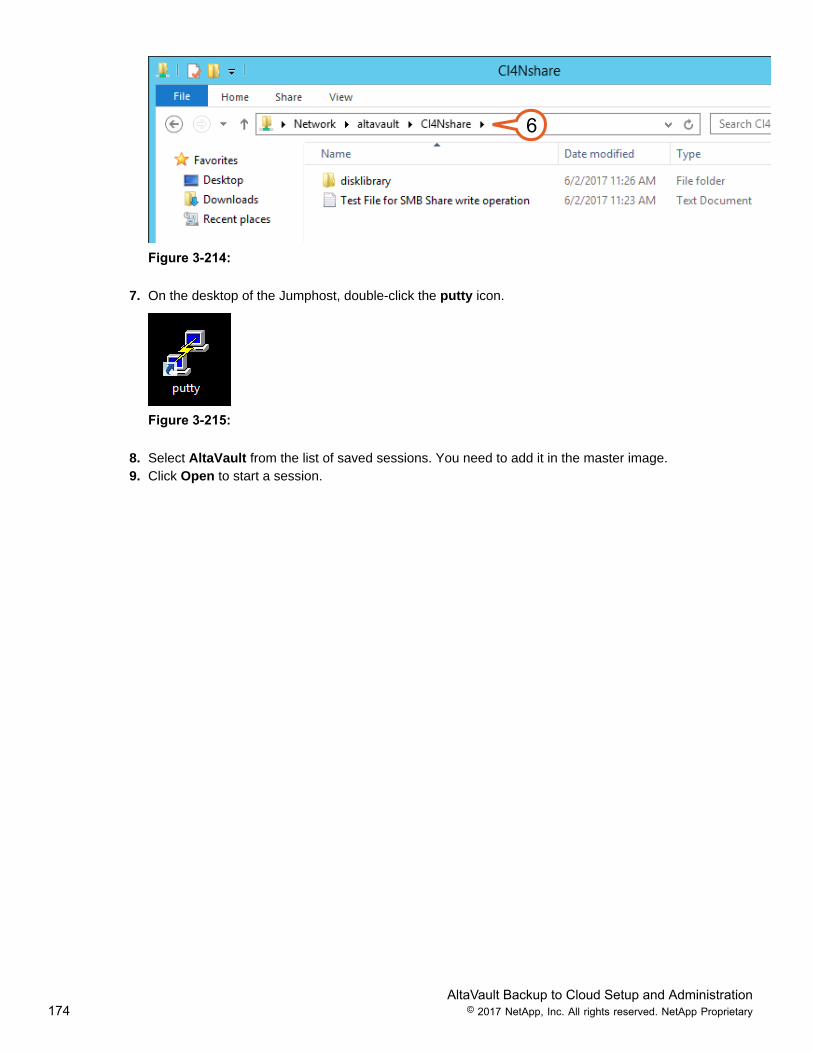
AltaVault Backup to Cloud Setup and Administration174 © 2017 NetApp, Inc. All rights reserved. NetApp Proprietary
6
Figure 3-214:
7. On the desktop of the Jumphost, double-click the putty icon.
Figure 3-215:
8. Select AltaVault from the list of saved sessions. You need to add it in the master image.9. Click Open to start a session.
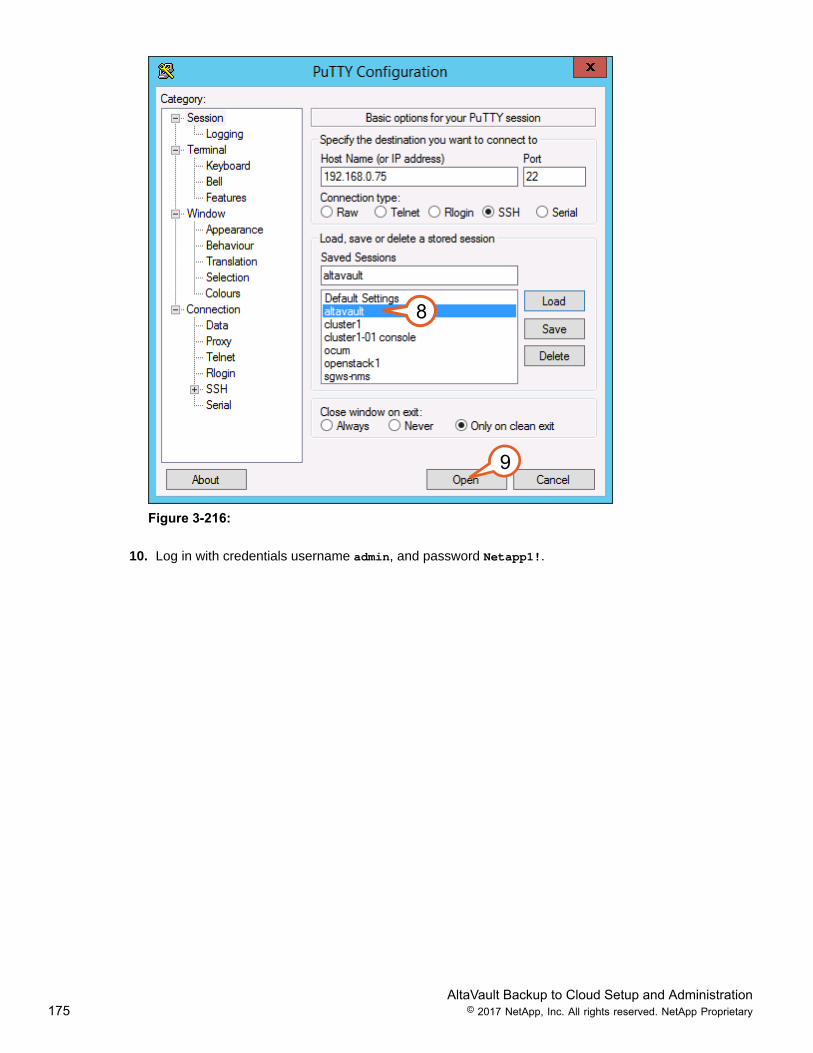
AltaVault Backup to Cloud Setup and Administration175 © 2017 NetApp, Inc. All rights reserved. NetApp Proprietary
8
9
Figure 3-216:
10. Log in with credentials username admin, and password Netapp1!.
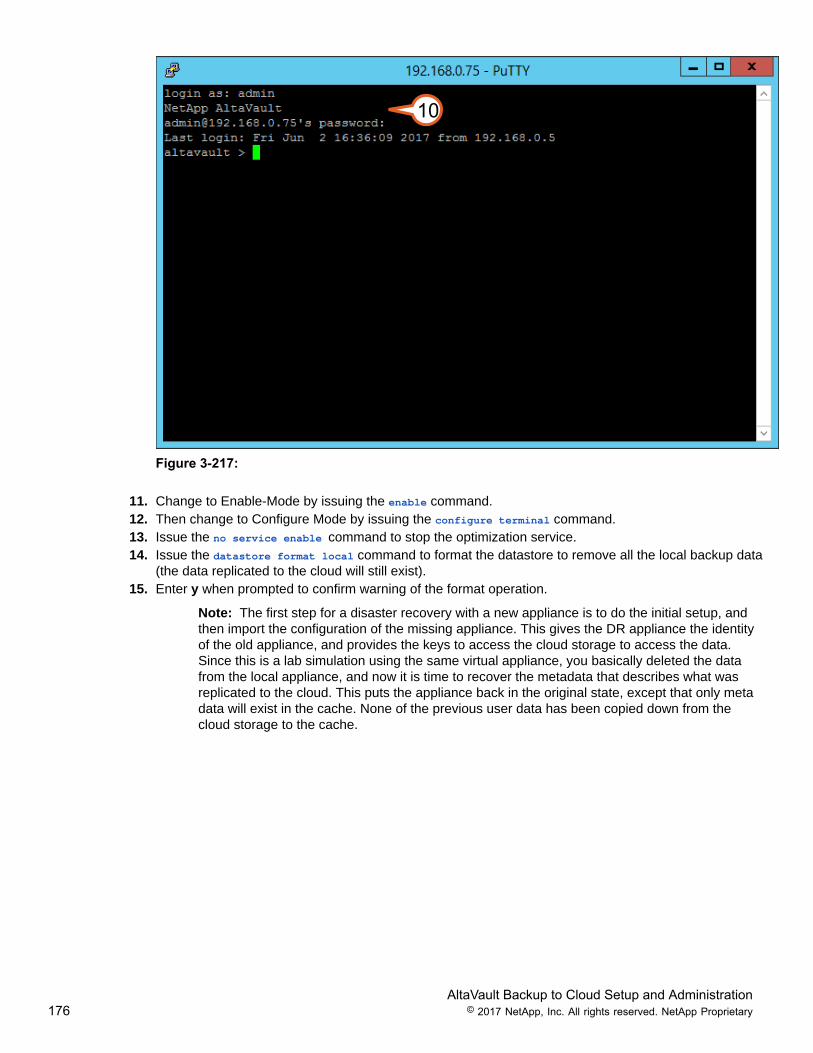
AltaVault Backup to Cloud Setup and Administration176 © 2017 NetApp, Inc. All rights reserved. NetApp Proprietary
10
Figure 3-217:
11. Change to Enable-Mode by issuing the enable command.12. Then change to Configure Mode by issuing the configure terminal command.13. Issue the no service enable command to stop the optimization service.14. Issue the datastore format local command to format the datastore to remove all the local backup data
(the data replicated to the cloud will still exist).15. Enter y when prompted to confirm warning of the format operation.
Note: The first step for a disaster recovery with a new appliance is to do the initial setup, andthen import the configuration of the missing appliance. This gives the DR appliance the identityof the old appliance, and provides the keys to access the cloud storage to access the data.Since this is a lab simulation using the same virtual appliance, you basically deleted the datafrom the local appliance, and now it is time to recover the metadata that describes what wasreplicated to the cloud. This puts the appliance back in the original state, except that only metadata will exist in the cache. None of the previous user data has been copied down from thecloud storage to the cache.
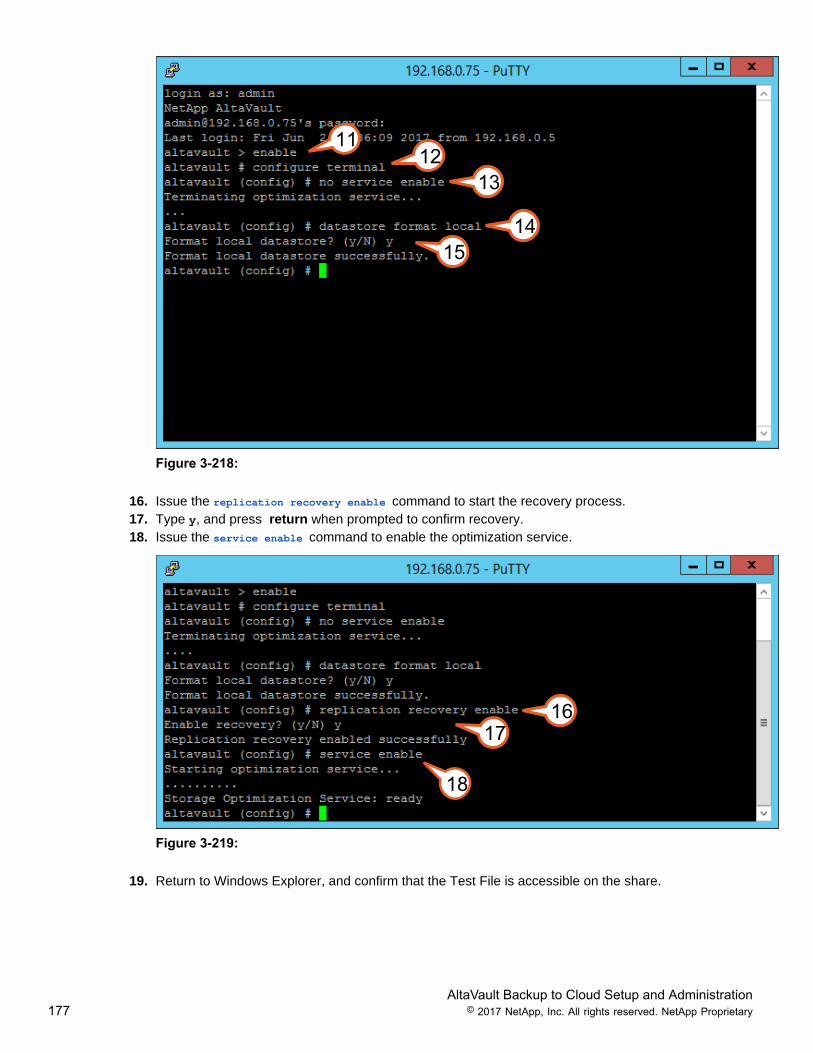
AltaVault Backup to Cloud Setup and Administration177 © 2017 NetApp, Inc. All rights reserved. NetApp Proprietary
1112
13
1415
Figure 3-218:
16. Issue the replication recovery enable command to start the recovery process.17. Type y, and press return when prompted to confirm recovery.18. Issue the service enable command to enable the optimization service.
1617
18
Figure 3-219:
19. Return to Windows Explorer, and confirm that the Test File is accessible on the share.
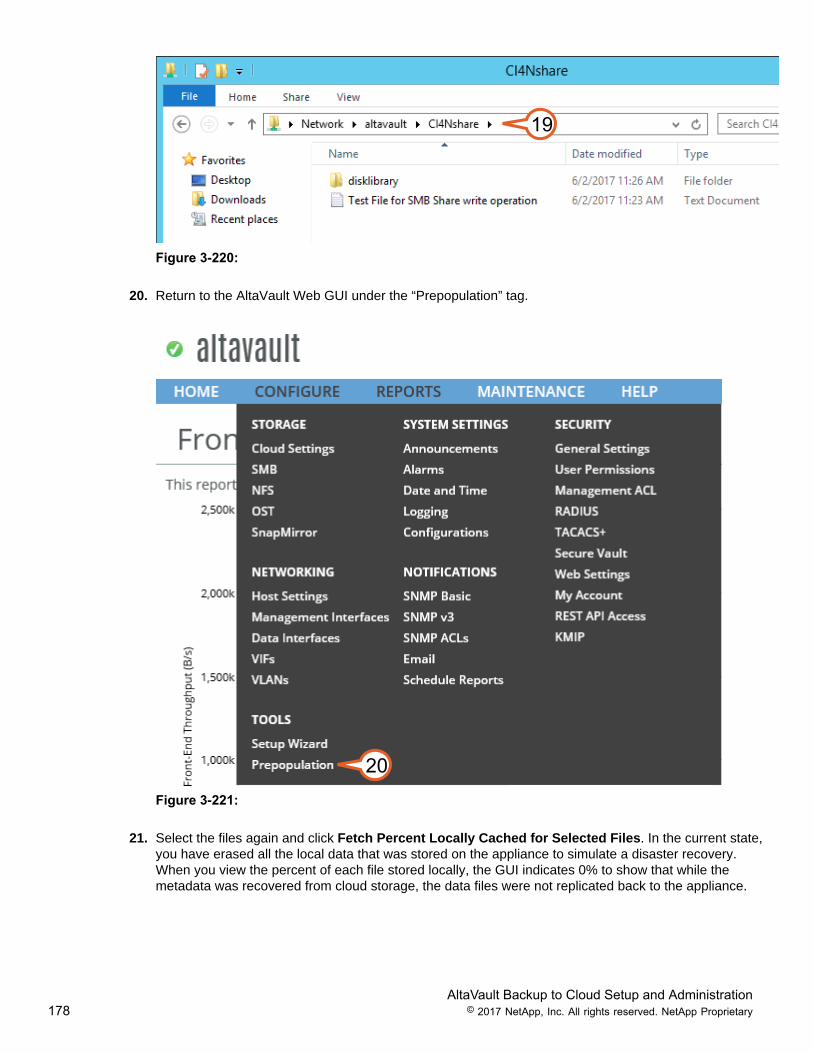
AltaVault Backup to Cloud Setup and Administration178 © 2017 NetApp, Inc. All rights reserved. NetApp Proprietary
19
Figure 3-220:
20. Return to the AltaVault Web GUI under the “Prepopulation” tag.
20Figure 3-221:
21. Select the files again and click Fetch Percent Locally Cached for Selected Files. In the current state,you have erased all the local data that was stored on the appliance to simulate a disaster recovery.When you view the percent of each file stored locally, the GUI indicates 0% to show that while themetadata was recovered from cloud storage, the data files were not replicated back to the appliance.
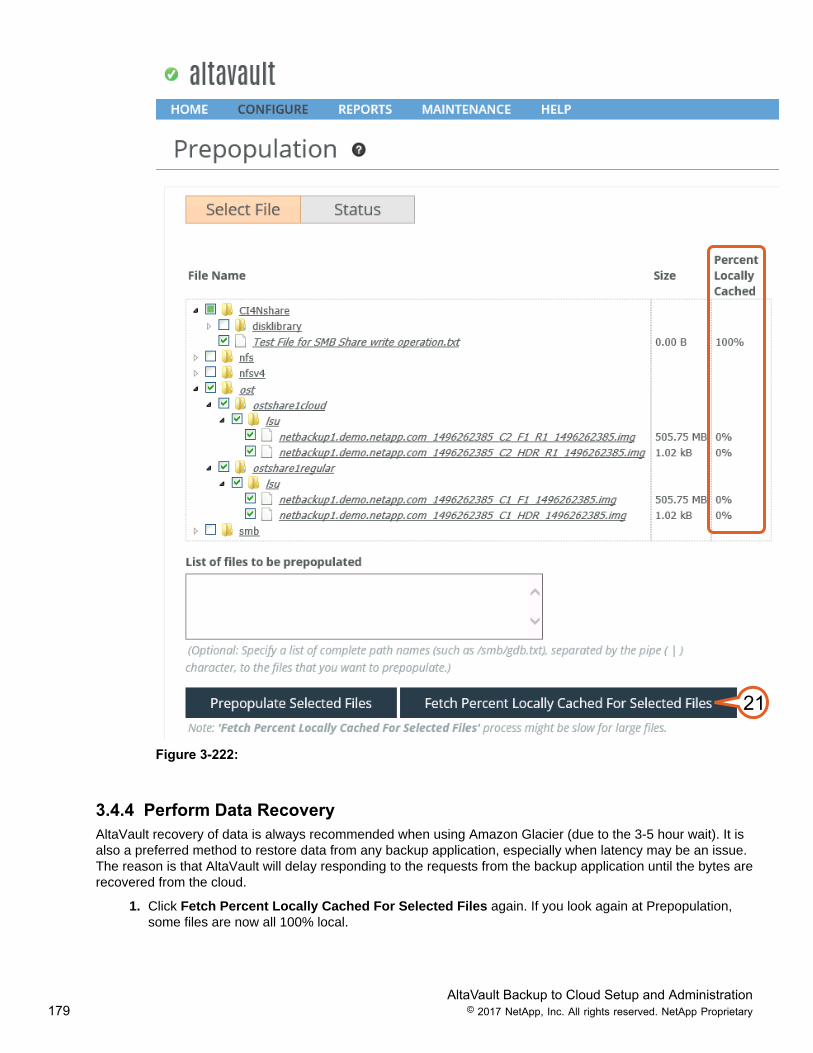
AltaVault Backup to Cloud Setup and Administration179 © 2017 NetApp, Inc. All rights reserved. NetApp Proprietary
21
Figure 3-222:
3.4.4 Perform Data RecoveryAltaVault recovery of data is always recommended when using Amazon Glacier (due to the 3-5 hour wait). It isalso a preferred method to restore data from any backup application, especially when latency may be an issue.The reason is that AltaVault will delay responding to the requests from the backup application until the bytes arerecovered from the cloud.
1. Click Fetch Percent Locally Cached For Selected Files again. If you look again at Prepopulation,some files are now all 100% local.
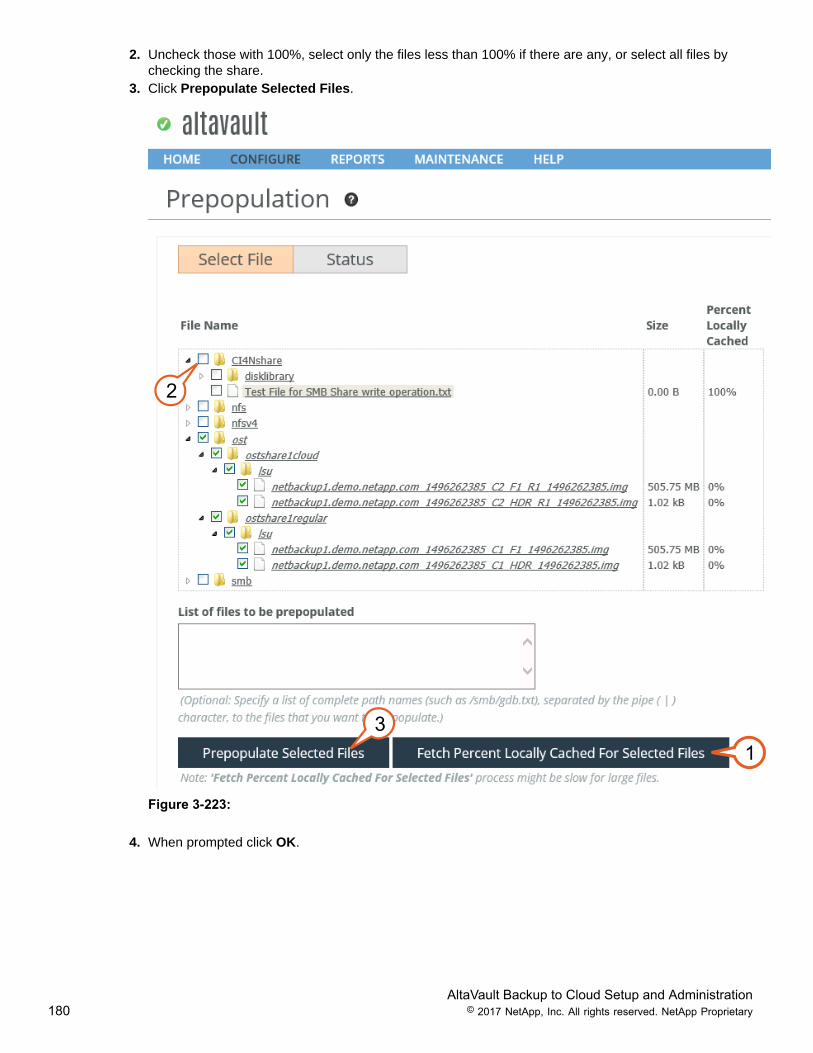
AltaVault Backup to Cloud Setup and Administration180 © 2017 NetApp, Inc. All rights reserved. NetApp Proprietary
2. Uncheck those with 100%, select only the files less than 100% if there are any, or select all files bychecking the share.
3. Click Prepopulate Selected Files.
1
2
3
Figure 3-223:
4. When prompted click OK.
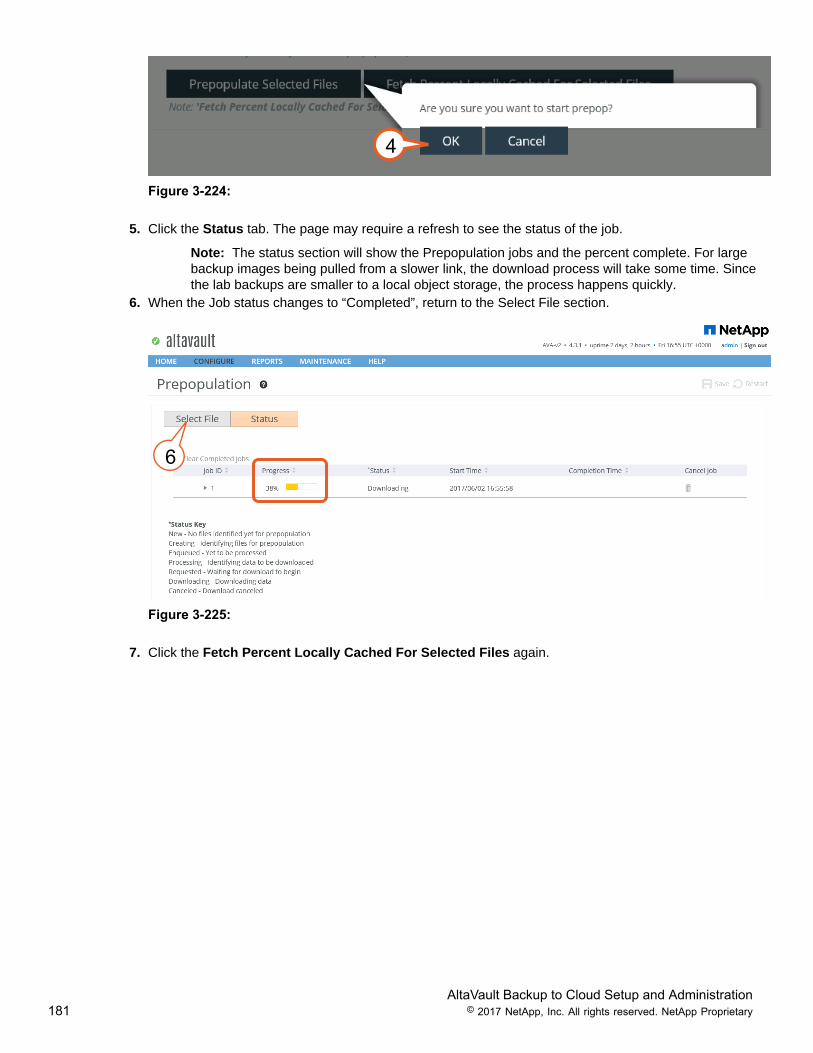
AltaVault Backup to Cloud Setup and Administration181 © 2017 NetApp, Inc. All rights reserved. NetApp Proprietary
4
Figure 3-224:
5. Click the Status tab. The page may require a refresh to see the status of the job.
Note: The status section will show the Prepopulation jobs and the percent complete. For largebackup images being pulled from a slower link, the download process will take some time. Sincethe lab backups are smaller to a local object storage, the process happens quickly.
6. When the Job status changes to “Completed”, return to the Select File section.
6
Figure 3-225:
7. Click the Fetch Percent Locally Cached For Selected Files again.
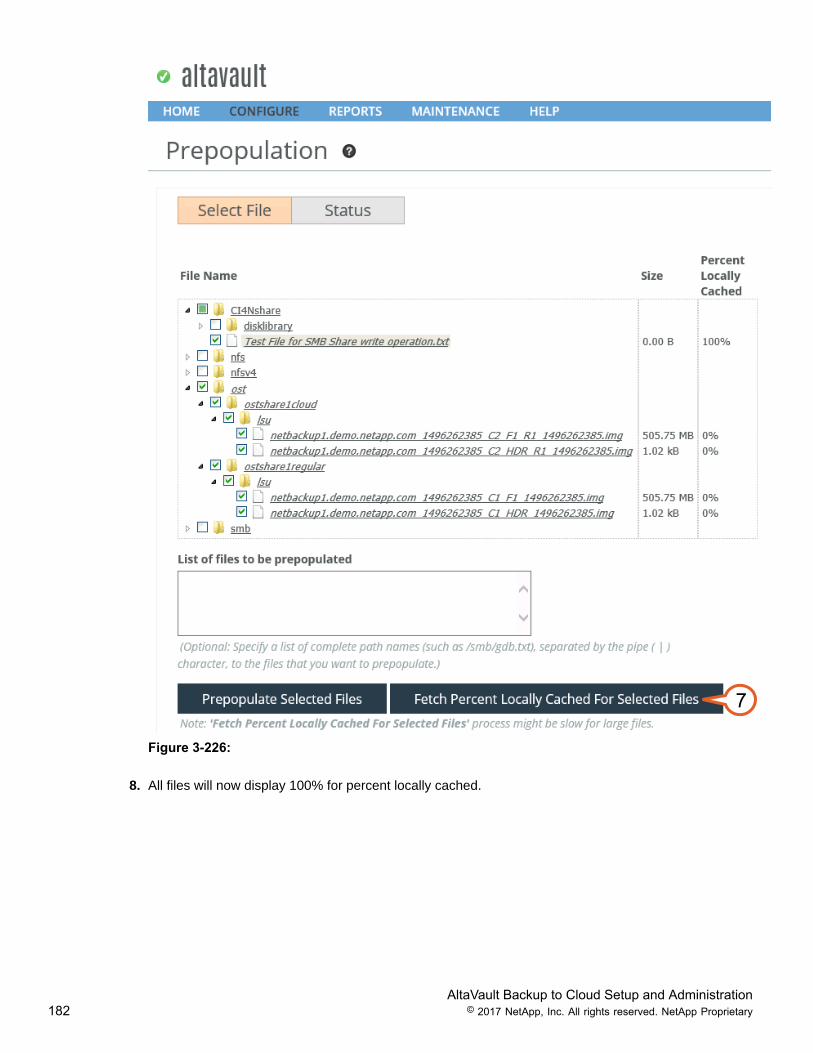
AltaVault Backup to Cloud Setup and Administration182 © 2017 NetApp, Inc. All rights reserved. NetApp Proprietary
7
Figure 3-226:
8. All files will now display 100% for percent locally cached.
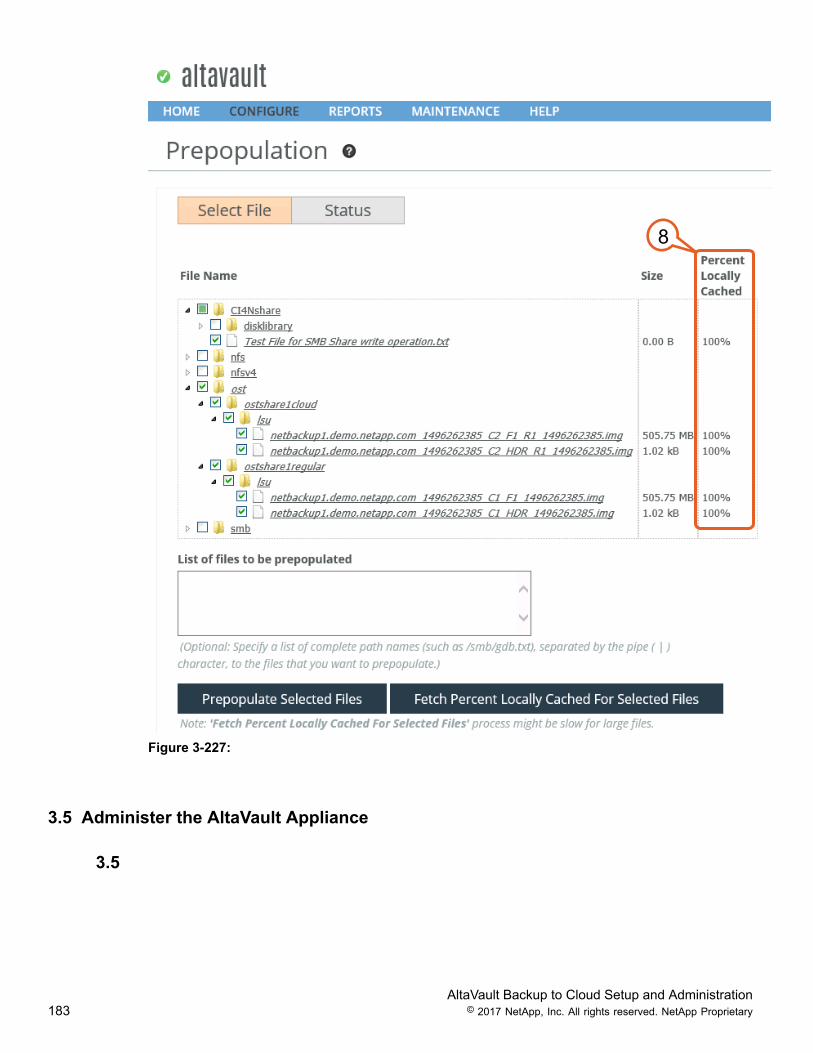
AltaVault Backup to Cloud Setup and Administration183 © 2017 NetApp, Inc. All rights reserved. NetApp Proprietary
8
Figure 3-227:
3.5 Administer the AltaVault Appliance
3.5
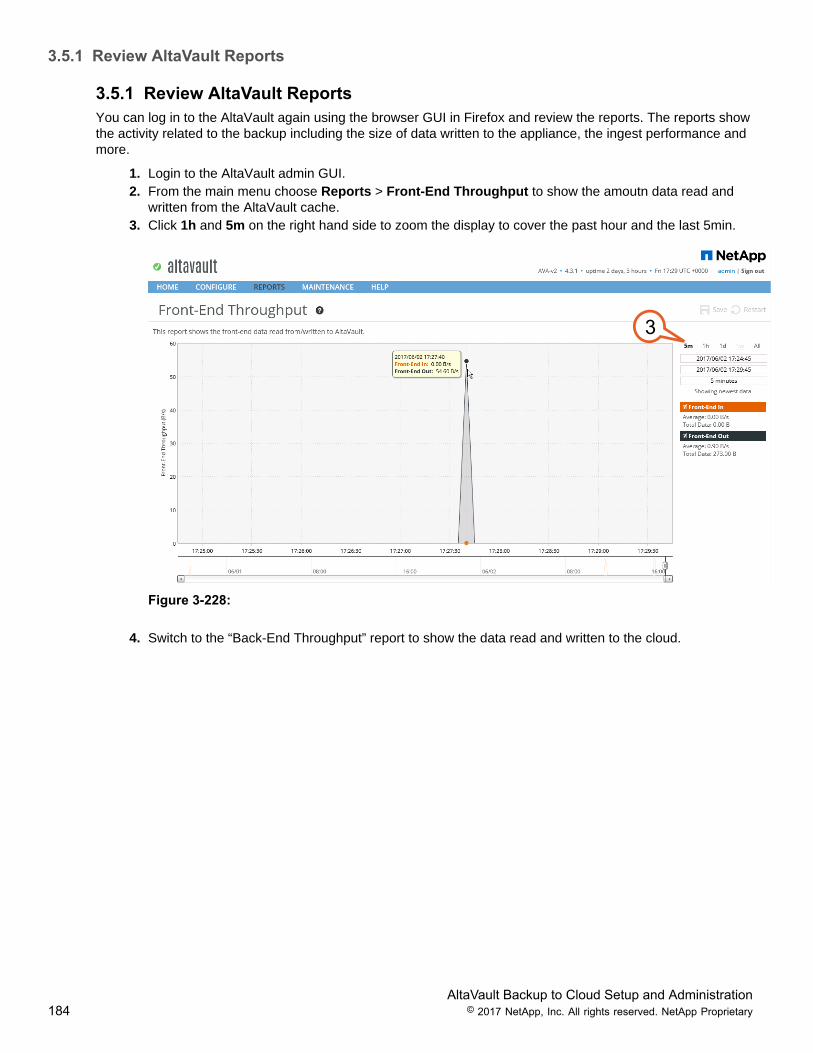
AltaVault Backup to Cloud Setup and Administration184 © 2017 NetApp, Inc. All rights reserved. NetApp Proprietary
3.5.1 Review AltaVault Reports
3.5.1 Review AltaVault ReportsYou can log in to the AltaVault again using the browser GUI in Firefox and review the reports. The reports showthe activity related to the backup including the size of data written to the appliance, the ingest performance andmore.
1. Login to the AltaVault admin GUI.2. From the main menu choose Reports > Front-End Throughput to show the amoutn data read and
written from the AltaVault cache.3. Click 1h and 5m on the right hand side to zoom the display to cover the past hour and the last 5min.
3
Figure 3-228:
4. Switch to the “Back-End Throughput” report to show the data read and written to the cloud.
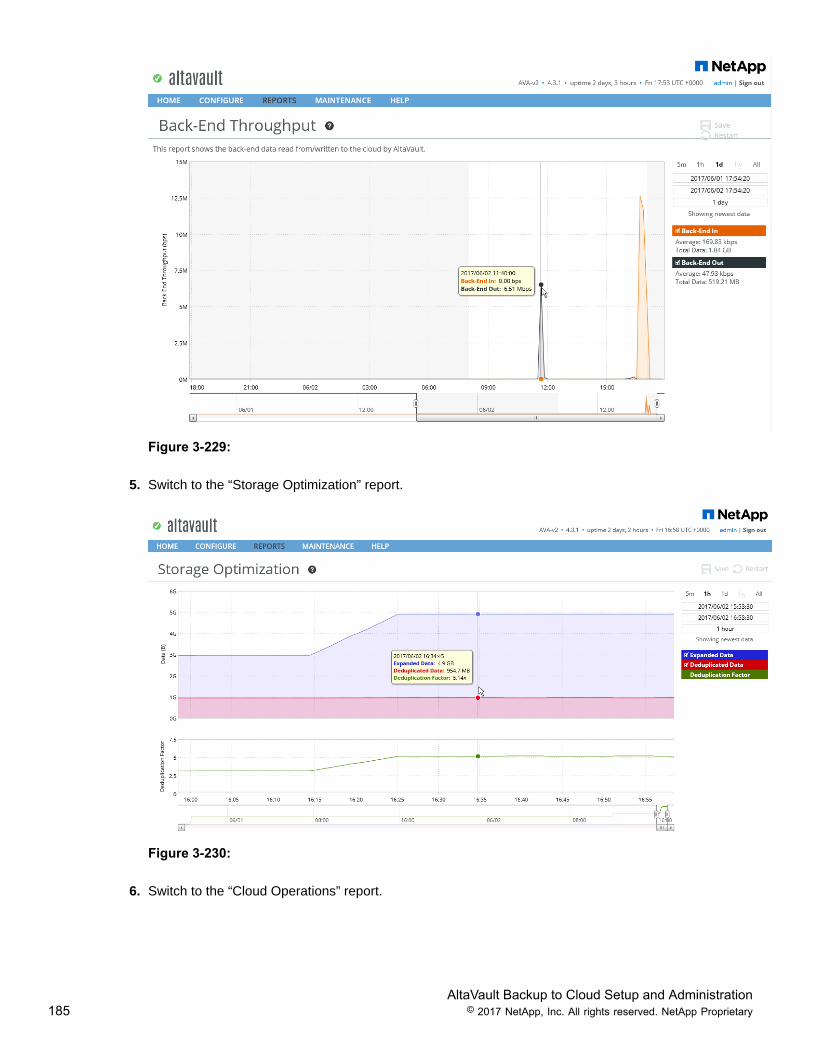
AltaVault Backup to Cloud Setup and Administration185 © 2017 NetApp, Inc. All rights reserved. NetApp Proprietary
Figure 3-229:
5. Switch to the “Storage Optimization” report.
Figure 3-230:
6. Switch to the “Cloud Operations” report.
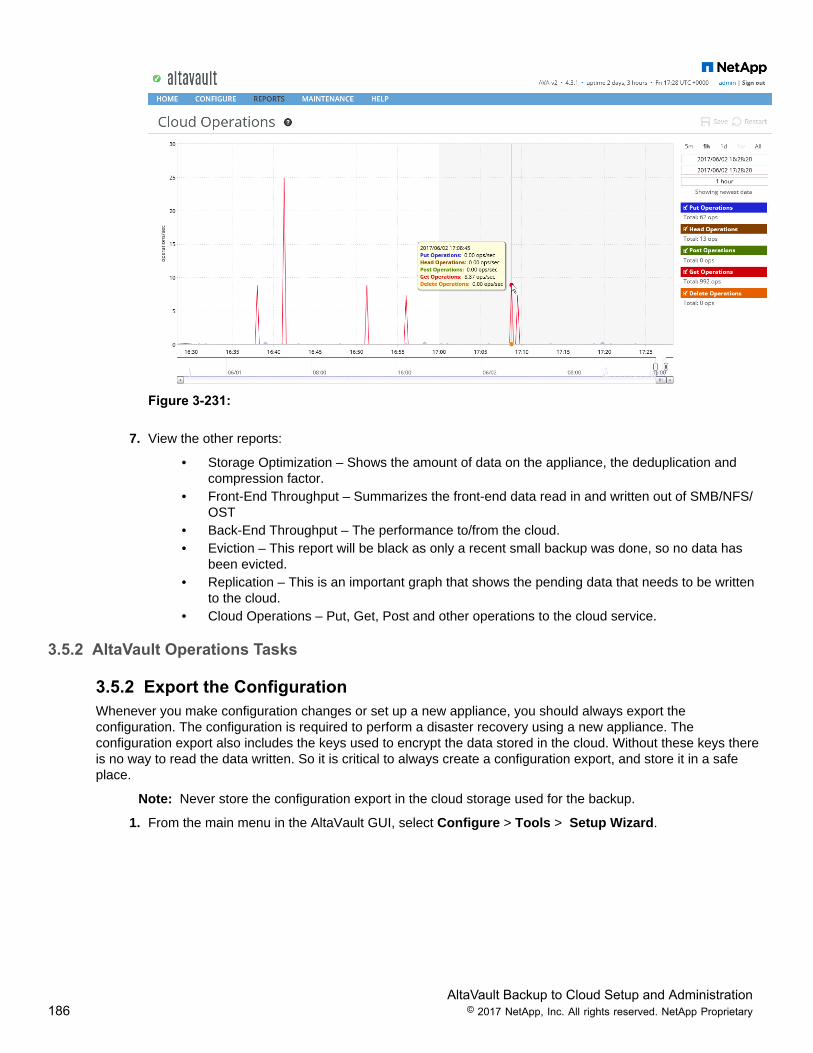
AltaVault Backup to Cloud Setup and Administration186 © 2017 NetApp, Inc. All rights reserved. NetApp Proprietary
Figure 3-231:
7. View the other reports:
• Storage Optimization – Shows the amount of data on the appliance, the deduplication andcompression factor.
• Front-End Throughput – Summarizes the front-end data read in and written out of SMB/NFS/OST
• Back-End Throughput – The performance to/from the cloud.• Eviction – This report will be black as only a recent small backup was done, so no data has
been evicted.• Replication – This is an important graph that shows the pending data that needs to be written
to the cloud.• Cloud Operations – Put, Get, Post and other operations to the cloud service.
3.5.2 AltaVault Operations Tasks
3.5.2 Export the ConfigurationWhenever you make configuration changes or set up a new appliance, you should always export theconfiguration. The configuration is required to perform a disaster recovery using a new appliance. Theconfiguration export also includes the keys used to encrypt the data stored in the cloud. Without these keys thereis no way to read the data written. So it is critical to always create a configuration export, and store it in a safeplace.
Note: Never store the configuration export in the cloud storage used for the backup.
1. From the main menu in the AltaVault GUI, select Configure > Tools > Setup Wizard.
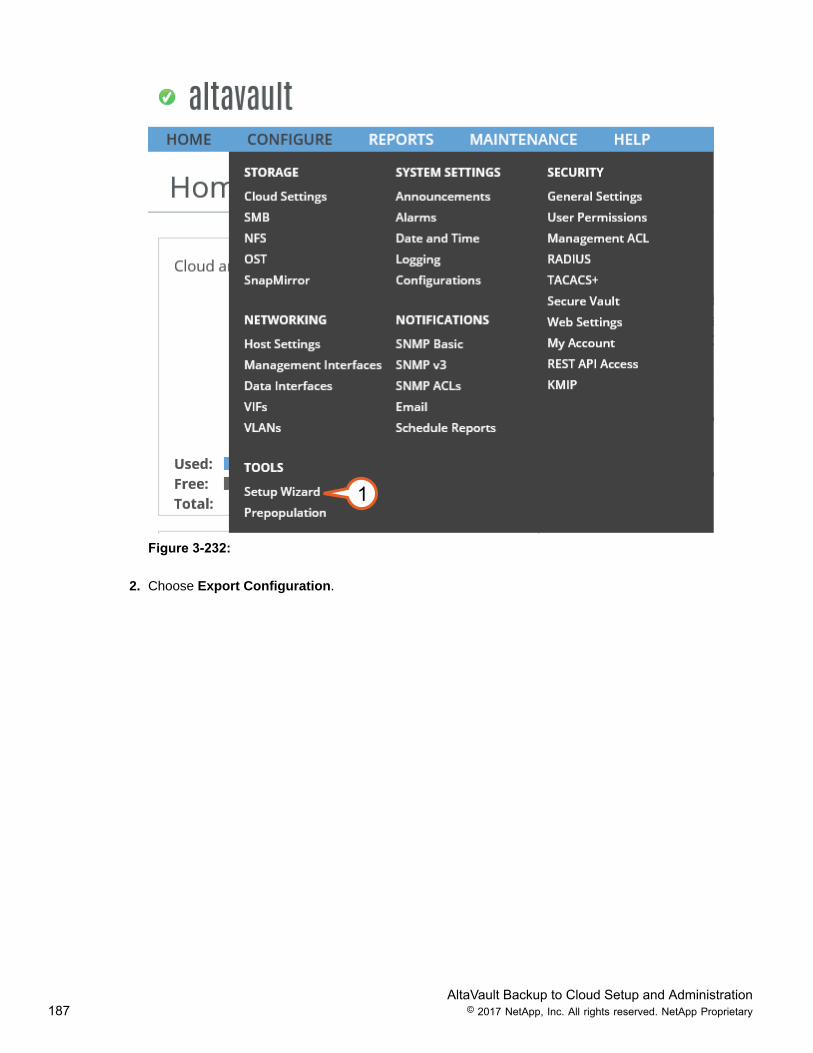
AltaVault Backup to Cloud Setup and Administration187 © 2017 NetApp, Inc. All rights reserved. NetApp Proprietary
1
Figure 3-232:
2. Choose Export Configuration.
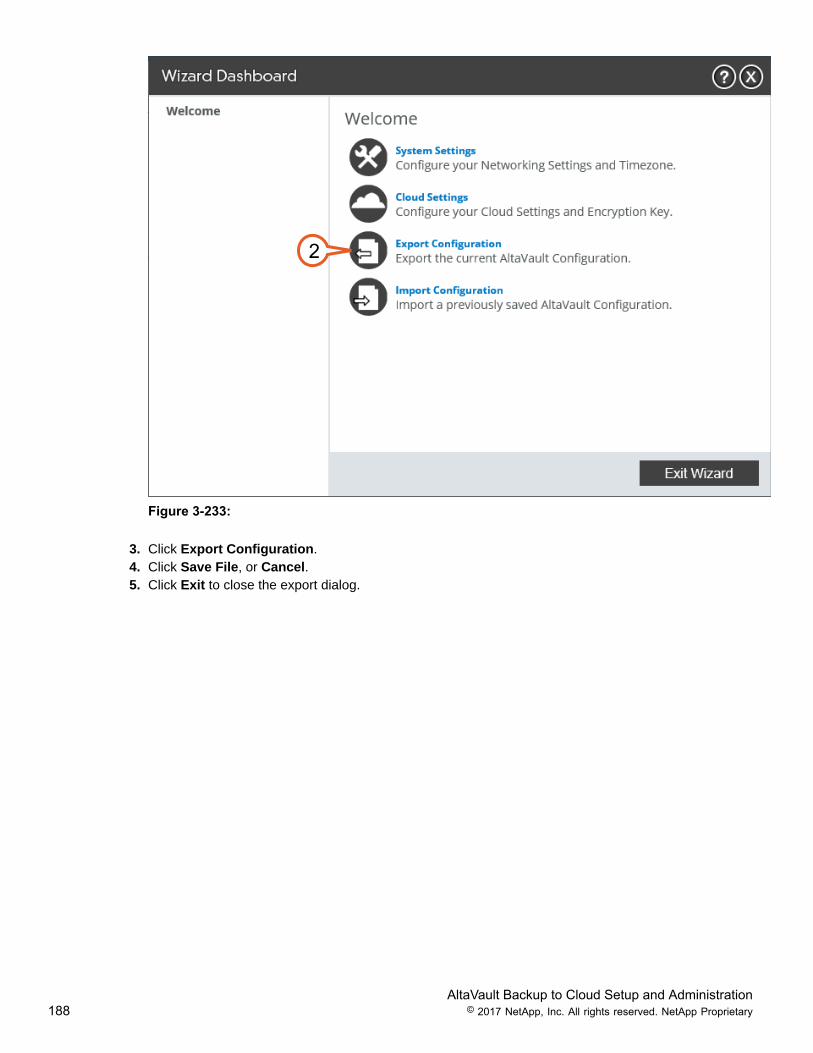
AltaVault Backup to Cloud Setup and Administration188 © 2017 NetApp, Inc. All rights reserved. NetApp Proprietary
2
Figure 3-233:
3. Click Export Configuration.4. Click Save File, or Cancel.5. Click Exit to close the export dialog.

AltaVault Backup to Cloud Setup and Administration189 © 2017 NetApp, Inc. All rights reserved. NetApp Proprietary
3
4
5
Figure 3-234:
6. Click Exit Wizard to return to the main view.
3.5.2 Reboot or Shutdown ApplianceWhenever you shut down a virtual appliance, always use the GUI to perform the shutdown. The virtual appliancedoes not have hypervisor tools installed to allow a clean shutdown.
1. From the main menu, choose Maintenance > Appliance > Reboot/Shutdown.
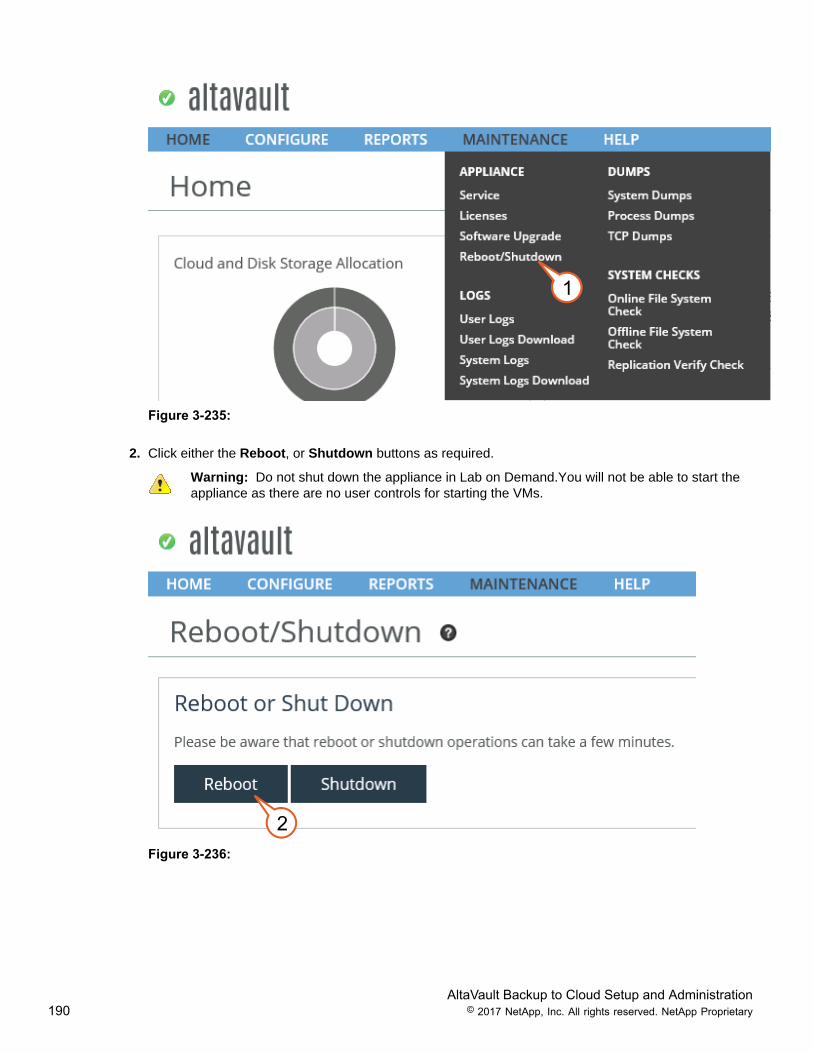
AltaVault Backup to Cloud Setup and Administration190 © 2017 NetApp, Inc. All rights reserved. NetApp Proprietary
1
Figure 3-235:
2. Click either the Reboot, or Shutdown buttons as required.
Warning: Do not shut down the appliance in Lab on Demand.You will not be able to start theappliance as there are no user controls for starting the VMs.
2Figure 3-236:
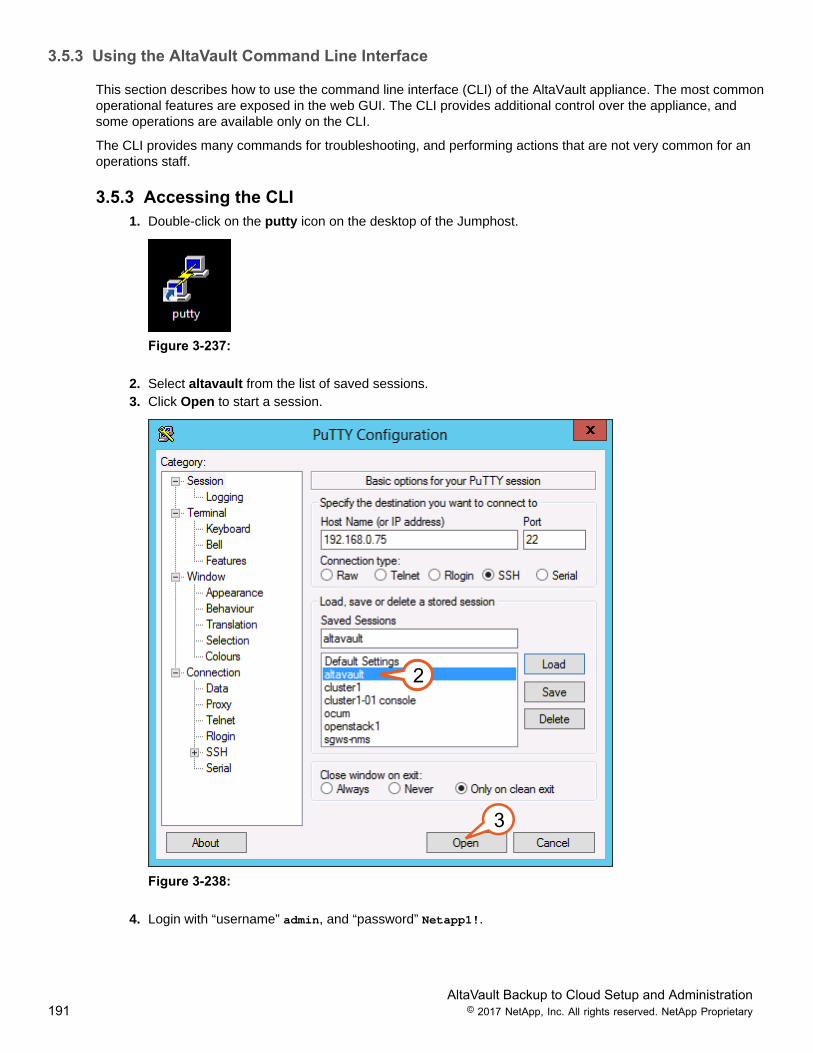
AltaVault Backup to Cloud Setup and Administration191 © 2017 NetApp, Inc. All rights reserved. NetApp Proprietary
3.5.3 Using the AltaVault Command Line Interface
This section describes how to use the command line interface (CLI) of the AltaVault appliance. The most commonoperational features are exposed in the web GUI. The CLI provides additional control over the appliance, andsome operations are available only on the CLI.
The CLI provides many commands for troubleshooting, and performing actions that are not very common for anoperations staff.
3.5.3 Accessing the CLI1. Double-click on the putty icon on the desktop of the Jumphost.
Figure 3-237:
2. Select altavault from the list of saved sessions.3. Click Open to start a session.
2
3
Figure 3-238:
4. Login with “username” admin, and “password” Netapp1!.
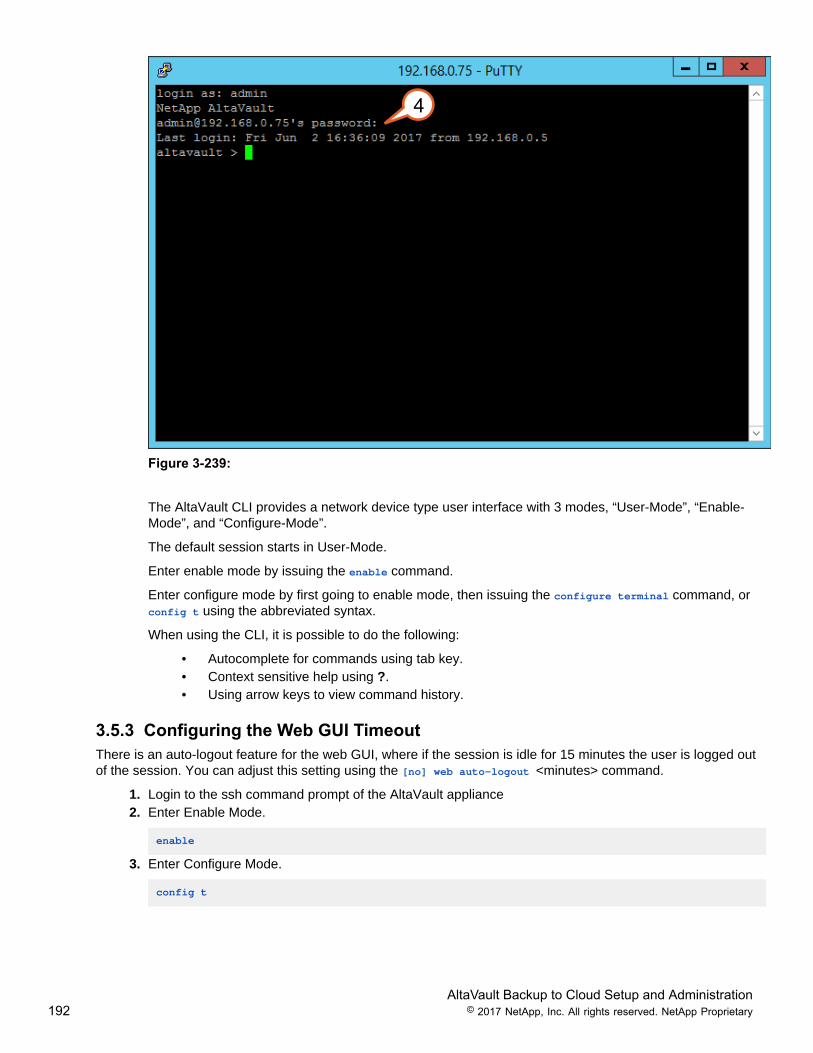
AltaVault Backup to Cloud Setup and Administration192 © 2017 NetApp, Inc. All rights reserved. NetApp Proprietary
4
Figure 3-239:
The AltaVault CLI provides a network device type user interface with 3 modes, “User-Mode”, “Enable-Mode”, and “Configure-Mode”.
The default session starts in User-Mode.
Enter enable mode by issuing the enable command.
Enter configure mode by first going to enable mode, then issuing the configure terminal command, orconfig t using the abbreviated syntax.
When using the CLI, it is possible to do the following:
• Autocomplete for commands using tab key.• Context sensitive help using ?.• Using arrow keys to view command history.
3.5.3 Configuring the Web GUI TimeoutThere is an auto-logout feature for the web GUI, where if the session is idle for 15 minutes the user is logged outof the session. You can adjust this setting using the [no] web auto-logout <minutes> command.
1. Login to the ssh command prompt of the AltaVault appliance2. Enter Enable Mode.
enable
3. Enter Configure Mode.
config t
AltaVault Backup to Cloud Setup and Administration193 © 2017 NetApp, Inc. All rights reserved. NetApp Proprietary
4. Set the web auto logout to 60 minutes.
web auto-logout 60
5. Make the change persistent.
configuration write
3.5.3 Viewing SharesUsing the show cifs shares and show nfs commands, it is possible to view the active shares and options for them.
Example:
altavault # show cifs sharesShare: share1Path: /share1Comment:Read only: noPinned: noNo Dedup: noNo Compression: noEarly Eviction: noShare: johnbradenPath: /jbradenComment:Read only: noPinned: noNo Dedup: noNo Compression: noEarly Eviction: noShare: cifsPath: /cifsComment: Default CIFS shareRead only: noPinned: noNo Dedup: noNo Compression: noEarly Eviction: noaltavault #
3.5.3 Reboot or Shutdown the ApplianceIssue the # reload command to reboot the appliance.
Shutdown the appliance.
Warning: Do not shut down the appliance in Lab on Demand. You will not be able to start the appliance,as there are no user controls for starting the VMs.
# reload halt
3.5.3 Saving the Configuration# configuration write
3.6 Review Cloud Target Configurations
3.6
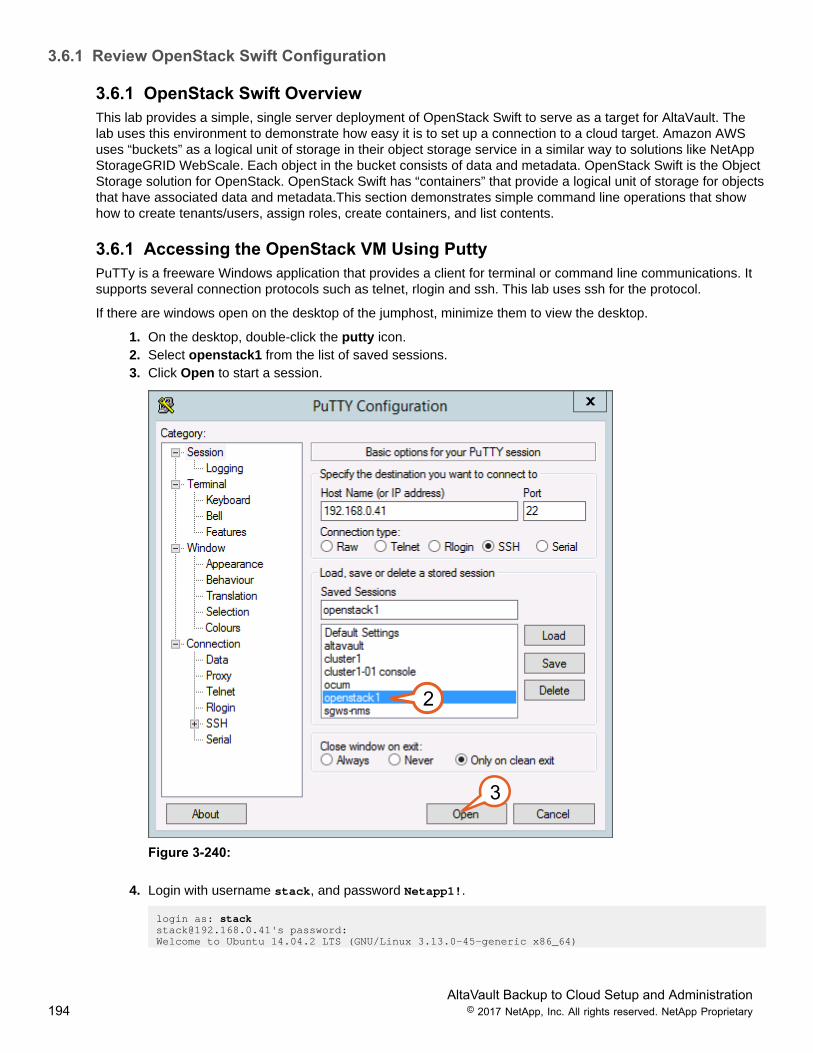
AltaVault Backup to Cloud Setup and Administration194 © 2017 NetApp, Inc. All rights reserved. NetApp Proprietary
3.6.1 Review OpenStack Swift Configuration
3.6.1 OpenStack Swift OverviewThis lab provides a simple, single server deployment of OpenStack Swift to serve as a target for AltaVault. Thelab uses this environment to demonstrate how easy it is to set up a connection to a cloud target. Amazon AWSuses “buckets” as a logical unit of storage in their object storage service in a similar way to solutions like NetAppStorageGRID WebScale. Each object in the bucket consists of data and metadata. OpenStack Swift is the ObjectStorage solution for OpenStack. OpenStack Swift has “containers” that provide a logical unit of storage for objectsthat have associated data and metadata.This section demonstrates simple command line operations that showhow to create tenants/users, assign roles, create containers, and list contents.
3.6.1 Accessing the OpenStack VM Using PuttyPuTTy is a freeware Windows application that provides a client for terminal or command line communications. Itsupports several connection protocols such as telnet, rlogin and ssh. This lab uses ssh for the protocol.
If there are windows open on the desktop of the jumphost, minimize them to view the desktop.
1. On the desktop, double-click the putty icon.2. Select openstack1 from the list of saved sessions.3. Click Open to start a session.
2
3
Figure 3-240:
4. Login with username stack, and password Netapp1!.
login as: [email protected]'s password:Welcome to Ubuntu 14.04.2 LTS (GNU/Linux 3.13.0-45-generic x86_64)
AltaVault Backup to Cloud Setup and Administration195 © 2017 NetApp, Inc. All rights reserved. NetApp Proprietary
* Documentation: https://help.ubuntu.com/
System information as of Fri Aug 12 09:05:45 PDT 2016
System load: 0.0 Processes: 99 Usage of /: 6.3% of 31.13GB Users logged in: 0 Memory usage: 1% IP address for eth0: 192.168.0.41 Swap usage: 0%
Graph this data and manage this system at: https://landscape.canonical.com/
202 packages can be updated.105 updates are security updates.
Last login: Mon Feb 23 05:17:55 2015stack@openstack1:~$
The client for OpenStack can use environment variables for authentication to the managementendpoints. There are 2 files in the stack user’s home directory that contain environment variables for theadmin user and the SSaccount user.
5. Issue the source ./admin-openrc.sh command to load the admin environment variables.
stack@openstack1:~$ source ./admin-openrc.shstack@openstack1:~$
3.6.1 OpenStack Administration
3.6.1 Listing usersTo list users in OpenStack issue the keystone user-list command.
stack@openstack1:~$ keystone user-list+----------------------------------+-----------+---------+------------------+| id | name | enabled | email |+----------------------------------+-----------+---------+------------------+| f7fcd9fe19314e3ba965c4d15db2c65f | SSaccount | True | root@stack-1 || 01b3b9b076684036b51be8321cf188e8 | admin | True | stack@openstack1 || a5cbac35df334075ac7e904c8666724a | swift | True | root@openstack1 |+----------------------------------+-----------+---------+------------------+stack@openstack1:~$
3.6.1 Listing tenantsTo list tenants in OpenStack issue the keystone tenant-list command.
stack@openstack1:~$ keystone tenant-list+----------------------------------+----------+---------+| id | name | enabled |+----------------------------------+----------+---------+| 3eabe7b1bb614e75895703417b62f640 | SStenant | True || 04af154ad7e14968a3972b04978535f5 | admin | True || 845075ca1b45498896a798bc9ba2ffc4 | service | True |+----------------------------------+----------+---------+stack@openstack1:~$
3.6.1 Listing rolesTo list roles in OpenStack issue the keystone role-list command.
stack@openstack1:~$ keystone role-list+----------------------------------+---------------+| id | name |+----------------------------------+---------------+| 4cf0741bfedf47e899cf21b21e8b820f | _member_ || 2065626d35804f7d94fc76594758a45e | admin || 14e0710c860e407caac89647ddb89485 | swiftoperator |+----------------------------------+---------------+
AltaVault Backup to Cloud Setup and Administration196 © 2017 NetApp, Inc. All rights reserved. NetApp Proprietary
stack@openstack1:~$
3.6.1 Creating a new user and tenantTo add a new user and allow that user to access swift, issue the following commands.
keystone user-create --name=johnbraden --pass=Netapp1 --email=jbraden@stackkeystone tenant-create --name=johnbraden --description="Johns Tenant"keystone user-role-add --user=johnbraden --tenant=johnbraden --role=swiftoperator
stack@openstack1:~$ keystone user-create --name=johnbraden --pass=Netapp1 --email=jbraden@stack+----------+----------------------------------+| Property | Value |+----------+----------------------------------+| email | jbraden@stack || enabled | True || id | 790bd122c65d435e80eb2e025e42aea0 || name | johnbraden || username | johnbraden |+----------+----------------------------------+stack@openstack1:~$stack@openstack1:~$ keystone tenant-create --name=johnbraden --description="Johns Tenant"+-------------+----------------------------------+| Property | Value |+-------------+----------------------------------+| description | Johns Tenant || enabled | True || id | 1db3d4b58e2445c48f19829146b1a304 || name | johnbraden |+-------------+----------------------------------+stack@openstack1:~$stack@openstack1:~$ keystone user-role-add --user=johnbraden --tenant=johnbraden --role=swiftoperatorstack@openstack1:~$stack@openstack1:~$ keystone user-list+----------------------------------+------------+---------+------------------+| id | name | enabled | email |+----------------------------------+------------+---------+------------------+| f7fcd9fe19314e3ba965c4d15db2c65f | SSaccount | True | root@stack-1 || 01b3b9b076684036b51be8321cf188e8 | admin | True | stack@openstack1 || 790bd122c65d435e80eb2e025e42aea0 | johnbraden | True | jbraden@stack || a5cbac35df334075ac7e904c8666724a | swift | True | root@openstack1 |+----------------------------------+------------+---------+------------------+stack@openstack1:~$
3.6.1 Creating a container (bucket)Swift refers to a directory style object as a container. Bucket is the Amazon terminology, however, they aresometimes used interchangeably. To create a container in Swift, use the swift post <container_name> command.
stack@openstack1:~$ swift post democntstack@openstack1:~$
3.6.1 Listing containers for a userBefore listing containers for a user, you need to set the environment variables for the user.
To view the containers created by the SSaccount user, issue the source ./ss-openrc.sh command to load theenvironment variables for that user.
Then, issue the swift list command to list the contents for the user in swift.
stack@openstack1:~$ source ./ss-openrc.shstack@openstack1:~$ swift listdemocntsstest1stack@openstack1:~$
In this example there is only one container (bucket) named “sstest1”. This is the container that was used toconfigure the AltaVault appliance.
AltaVault Backup to Cloud Setup and Administration197 © 2017 NetApp, Inc. All rights reserved. NetApp Proprietary
3.6.1 Viewing files in a containerTo see the files in a container, perform the same list command using the container name. In this example, thecontainer holds the files created by the AltaVault appliance when the backups were performed. You can seethere are several files that are common to all AltaVault appliances such as “megastore.guid”, which is the file thatcontains the ID of the appliance that owns the container or bucket.
The .slab files contain the user data that was deduped from the share. The .lm files contain the metadata thatdescribes how to recreate a file from the data contained in the slabs. A slab file is a group of segments from thededuplication process that are packaged together and written to the cloud storage service.
swift list <container_name>
stack@openstack1:~$ swift list sstest10000000000000000.lm0000000000000000.rbtmd0000000000000001.lm0000000000000001.rbtmd0000000000000007.lm0000000000000007.rbtmd0000000000000008.lm0000000000000008.rbtmd0000000000000009.lm0000000000000009.rbtmd000000000000000A.lm000000000000000A.rbtmd000000000001.slab000000000002.slab000000000003.slab000000000004.slab|||000000000069.slab00000000006A.slab00000000006B.slabFEFFFFFFFFFF.slabinfo.yamlmegastore.guidrbt_oids.datstats.datstack@openstack1:~$
3.6.1 Viewing permissions for a containerThe swift stat command provides the status of the tenant associated with the user. If it is entered withoutadditional parameters, it shows a general status of the tenant, including how many containers have been createdand how much data has been written to the tenant.
If you supply a container as a parameter, it will list details about the container, including the permissions on thecontainer.
stack@openstack1:~$ swift stat sstest1 Account: AUTH_3eabe7b1bb614e75895703417b62f640 Container: sstest1 Objects: 124 Bytes: 439231621 Read ACL: SSaccount Write ACL: SSaccount Sync To: Sync Key: Accept-Ranges: bytesX-Storage-Policy: Policy-0 X-Timestamp: 1424500431.67006 X-Trans-Id: txdec64eaba51a4d3cbb924-0057b215be Content-Type: text/plain; charset=utf-8stack@openstack1:~$
AltaVault Backup to Cloud Setup and Administration198 © 2017 NetApp, Inc. All rights reserved. NetApp Proprietary
3.6.1 Other OpenStack Administration CommandsIt is possible to test upload and download of files using the swift command.
The swift upload democnt test.txt command will upload a file in the current directory called “test.txt” to thecontainer called “democnt”.
The swift download democnt command will download all the files in the container “democnt”.
For additional commands and parameters, issue the swift --help keystone --help command to view the helptext.
3.6.2 Review the NetApp StorageGRID WebScale Configuration
1. Launch the link to open the NetApp StorageGRID Webscale Network Management System.
Figure 3-241:
2. Click Continue to this website to bypass the security certificate warning.
2
Figure 3-242:
3. Login using the credentials “username” Vendor, and “password” Netapp1!.4. Click Sign In.
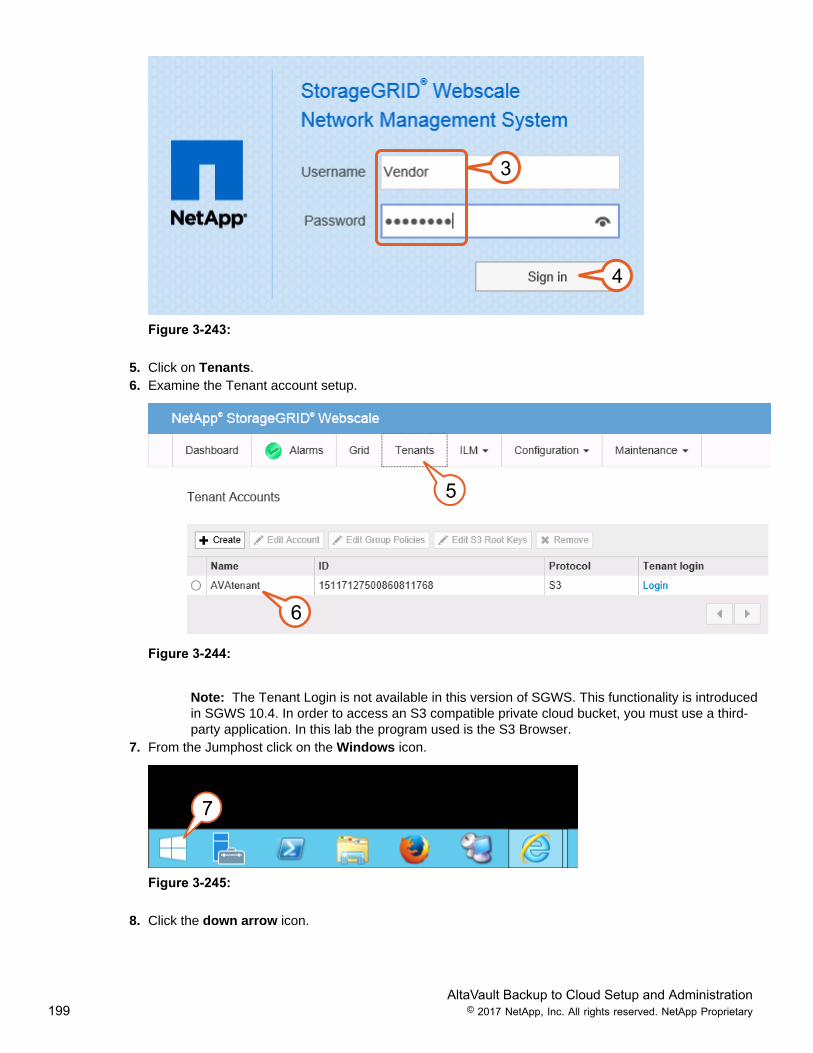
AltaVault Backup to Cloud Setup and Administration199 © 2017 NetApp, Inc. All rights reserved. NetApp Proprietary
3
4
Figure 3-243:
5. Click on Tenants.6. Examine the Tenant account setup.
5
6
Figure 3-244:
Note: The Tenant Login is not available in this version of SGWS. This functionality is introducedin SGWS 10.4. In order to access an S3 compatible private cloud bucket, you must use a third-party application. In this lab the program used is the S3 Browser.
7. From the Jumphost click on the Windows icon.
7
Figure 3-245:
8. Click the down arrow icon.
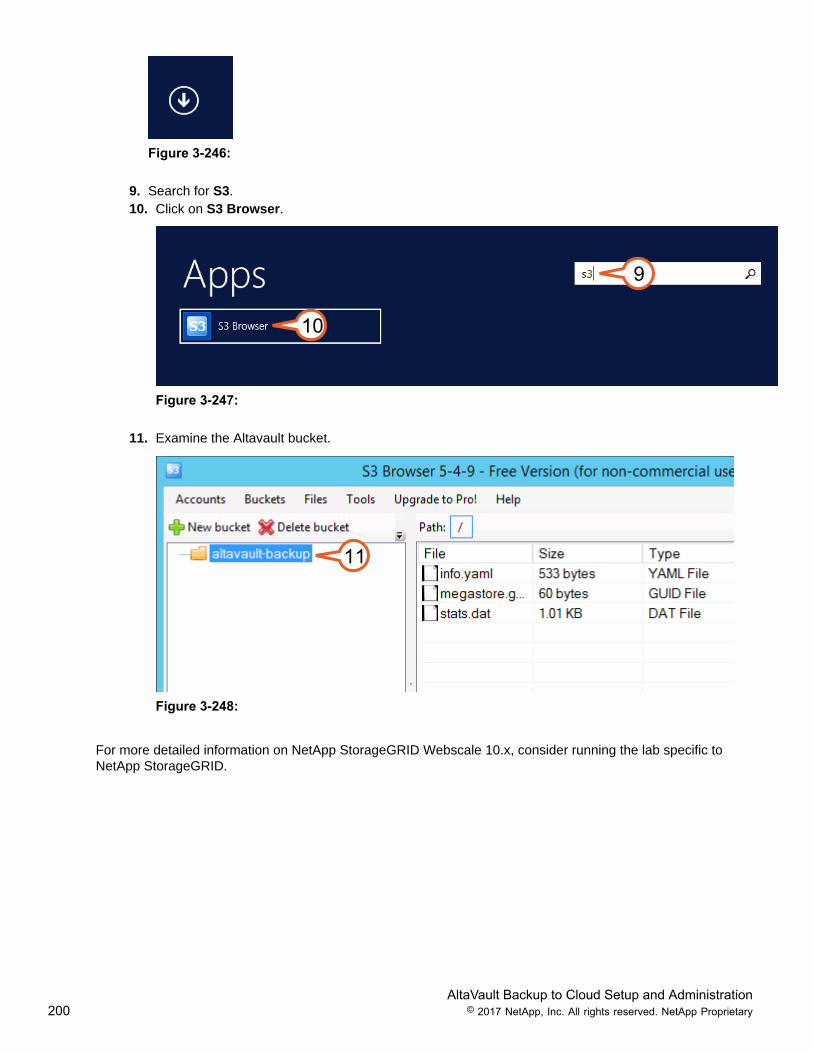
AltaVault Backup to Cloud Setup and Administration200 © 2017 NetApp, Inc. All rights reserved. NetApp Proprietary
Figure 3-246:
9. Search for S3.10. Click on S3 Browser.
9
10
Figure 3-247:
11. Examine the Altavault bucket.
11
Figure 3-248:
For more detailed information on NetApp StorageGRID Webscale 10.x, consider running the lab specific toNetApp StorageGRID.

AltaVault Backup to Cloud Setup and Administration201 © 2017 NetApp, Inc. All rights reserved. NetApp Proprietary
4 ReferencesThe following references were used to create this lab guide.
• NetApp AltaVault Resources on Support Site
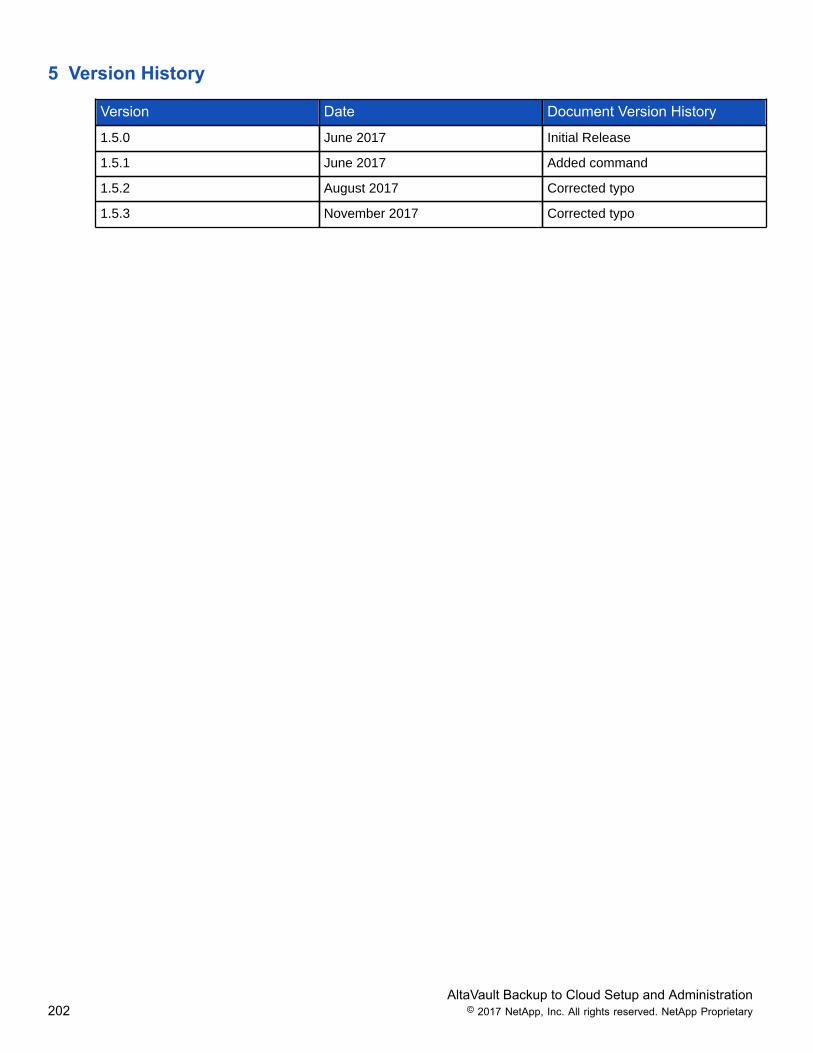
AltaVault Backup to Cloud Setup and Administration202 © 2017 NetApp, Inc. All rights reserved. NetApp Proprietary
5 Version History
Version Date Document Version History
1.5.0 June 2017 Initial Release
1.5.1 June 2017 Added command
1.5.2 August 2017 Corrected typo
1.5.3 November 2017 Corrected typo
Refer to the Interoperability Matrix Tool (IMT) on the NetApp Support site to validate that the exactproduct and feature versions described in this document are supported for your specific environment.The NetApp IMT defines the product components and versions that can be used to constructconfigurations that are supported by NetApp. Specific results depend on each customer's installation inaccordance with published specifications.
NetApp provides no representations or warranties regarding the accuracy, reliability, or serviceability of anyinformation or recommendations provided in this publication, or with respect to any results that may be obtainedby the use of the information or observance of any recommendations provided herein. The information in thisdocument is distributed AS IS, and the use of this information or the implementation of any recommendations ortechniques herein is a customer’s responsibility and depends on the customer’s ability to evaluate and integratethem into the customer’s operational environment. This document and the information contained herein may beused solely in connection with the NetApp products discussed in this document.
Go further, faster®
© 2017NetApp, Inc. All rights reserved. No portions of this document may be reproduced without prior written consentof NetApp, Inc. Specifications are subject to change without notice. NetApp, the NetApp logo, Data ONTAP®,ONTAP®, OnCommand®, SANtricity®, FlexPod®, SnapCenter®, and SolidFire® are trademarks or registeredtrademarks of NetApp, Inc. in the United States and/or other countries. All other brands or products are trademarks orregistered trademarks of their respective holders and should be treated as such.