amga single pitch instructor 2012 program manual
TRANSCRIPT
AMGA Single Pitch Instructor Program 1
AMERICAN MOUNTAIN GUIDES ASSOCIATION
American Mountain Guides Association
P.O. Box 1739
Boulder, CO 80306 Phone: 303-271-0984
Fax: 303-271-1377 www.amga.com
AMGA Single Pitch Instructor 2012 Program Manual

AMGA Single Pitch Instructor Program 2
Participation Statement The American Mountain Guides Association (AMGA) recognizes that climbing and mountaineering are activities with a danger of personal injury or death. Clients in these activities should be aware of and accept these risks and be responsible for their own actions. The AMGA provides training and assessment courses and associated literature to help leaders manage these risks and to enable new clients to have positive experiences while learning about their responsibilities. Introduction and how to use this Manual This handbook contains information for candidates and AMGA licensed SPI Program Providers privately offering AMGA SPI Programs. Operational frameworks and guidelines are provided which ensure that continuity is maintained from program to program and between instructors and examiners. Continuity provides a uniform standard for clients who are taught, coached, and examined by a variety of instructors and examiners over a period of years. Continuity also assists in ensuring the program presents a professional image to clients and outside observers, and it eases the workload of organizing, preparing, and operating courses. Instructors are encouraged to critique the manual. In this way, ongoing improvements to the training and certification of climbing instructors as well as to the profession as a whole can be made. Suggestions for improvements, questions, and recommendations should be addressed to the Climbing Instructor Program Director, SPI Discipline Coordinator, and Technical Director. Acknowledgment Many people have contributed to the preparation of this Manual by attending AMGA National Conference meetings, Training Seminars and by making detailed and constructive comments. Grateful thanks are due to the AMG SPI Program Manual Committee for help in the production and ongoing improvement of this publication. Published by: American Mountain Guides Association PO Box 1739, Boulder, CO 80306, USA Phone: (303) 271-0984 Website: www.amga.com © American Mountain Guides Association Volume 1, 2012 All rights reserved AMGA Certified Single Pitch instructor™ Logo:
AMGA Single Pitch Instructor Program 3
SPI Program Flow Chart ......................................................................................................................................... 5 SPI Program Overview ............................................................................................................................................ 6
Preface ......................................................................................................................................................... 6 Program Overview ....................................................................................................................................... 6 SPI Terrain Guidelines ................................................................................................................................. 6 SPI Course Candidate Pre-Requisites ......................................................................................................... 7 SPI Assessment Candidate Pre-Requisites ................................................................................................. 7 Gaining SPI Certification .............................................................................................................................. 7 SPI Certification First Aid Requirements ...................................................................................................... 7 SPI Certification Upkeep and Recertification ............................................................................................... 7 Exemption from Training .............................................................................................................................. 8 SPI Program Hours and Ratios .................................................................................................................... 8
SPI Course Overview ............................................................................................................................................. 9 Day One .................................................................................................................................................................. 10
Introductions ............................................................................................................................................... 10 Session 1: SPI and AMGA Program Overview .......................................................................................... 10 Session 2: Professionalism ........................................................................................................................ 10 Session 3: Equipment ................................................................................................................................ 10 Session 4: Knots and Hitches .................................................................................................................... 11 Session 5: Belaying .................................................................................................................................... 11 Session 6: Protection and Anchoring ......................................................................................................... 11 Session 7: Teaching Skills ......................................................................................................................... 12
Day Two ................................................................................................................................................................. 13 Session 8: Selecting the Climbing Site ...................................................................................................... 13 Session 9: Site Organization and Group Management .............................................................................. 13 Session 10: Base-Managed Sites .............................................................................................................. 14 Session 11: Assistance Skills – Base-Managed Sites ............................................................................... 14 Session 12: Programming and Risk Management ..................................................................................... 15
Day Three ............................................................................................................................................................... 16 Session 13: Instructor Demo Lead Climb ................................................................................................... 16 Session 14: Top-Managed Sites ................................................................................................................ 16 Session 15: Lowering ................................................................................................................................. 17 Session 16: Assistance Skills: Top-Managed Sites ................................................................................... 17 Session 17: Rappelling .............................................................................................................................. 17 Session 18: Climbing Movement ................................................................................................................ 18 Session 19: Review Session ...................................................................................................................... 18
SPI Assessment Overview ................................................................................................................................... 19 Assessment Categories ............................................................................................................................. 19
Day One .................................................................................................................................................................. 21 Session 1: SPI Assessment Orientation .................................................................................................... 21 Session 2: Lead Climbing and Top Rope Session ..................................................................................... 21 Session 3: Technical Components ............................................................................................................. 21
Day Two ................................................................................................................................................................. 22 Session 4: Group Management ................................................................................................................. 22 Session 5: Teaching Components ............................................................................................................. 22
SPI Assessment Scoring ...................................................................................................................................... 23 Marking Scale ............................................................................................................................................ 23 Interpretation of Marks ............................................................................................................................... 23

AMGA Single Pitch Instructor Program 4
SPI Technical Manual ........................................................................................................................................... 24 AMGA History ............................................................................................................................................ 24
AMGA Mission Statement .......................................................................................................... 24 AMGA Climbing Instructor Program ........................................................................................... 24 AMGA Guide Program ............................................................................................................... 24
Technical Equipment and Materials ........................................................................................................... 26 Metals Used in Climbing Equipment Manufacture ..................................................................... 26
The Climbing Site ....................................................................................................................................... 30 Ecological Impacts ..................................................................................................................... 30 Social Impacts ............................................................................................................................ 32 Cultural Resources ..................................................................................................................... 32 The Instructors Role ................................................................................................................... 32 Clean Climbing ........................................................................................................................... 32 Role Modeling ............................................................................................................................ 33 Service ....................................................................................................................................... 33 Planning and Group Management ............................................................................................. 34 Access, Conservation, and the Vertical Environment ................................................................ 34 Transportation & Parking ............................................................................................................ 34 Climbing Area ............................................................................................................................. 35 Ideas to Help Mitigate Climbing Related Impacts ....................................................................... 35
Teaching and Lesson Planning .................................................................................................................. 37 Professionalism .......................................................................................................................................... 41 Climbing Movement Instruction .................................................................................................................. 42
Coaching Techniques ................................................................................................................. 42 Drills and Drill Development ....................................................................................................... 43 Climbing Movement Concepts ................................................................................................... 43
Protection and Anchoring ........................................................................................................................... 45 Anchor Position .......................................................................................................................... 45 Natural Anchors .......................................................................................................................... 46 Artificial Anchors ......................................................................................................................... 47 Incorrect Loading of Carabiners ................................................................................................. 48 Tying It All Together ................................................................................................................... 49 Angles ........................................................................................................................................ 50 Redundancy in the Anchor System ............................................................................................ 50
Top-Managed Sites .................................................................................................................................... 51 Lowering (Top-Managed Sites) .................................................................................................................. 52
Considerations ........................................................................................................................... 52 Rappelling .................................................................................................................................................. 53 Assistance Skills: Top - Managed Sites ..................................................................................................... 54
Understanding pulleys and raising systems ............................................................................... 54 Working out forces in pulley systems ......................................................................................... 54 3:1 Raising System .................................................................................................................... 55
Base-Managed Sites .................................................................................................................................. 56 Belayer Backups ........................................................................................................................ 56
Assistance Skills: Base-Managed Sites ..................................................................................................... 57 Counter-Ascending a Rope to Assist a Climber ......................................................................... 57
Appendix ................................................................................................................................................................ 58 AMERICAN MOUNTAIN GUIDES ASSOCIATION .................................................................................... 59 Single Pitch Instructor Program Candidate Evaluation .............................................................................. 59 AMGA Membership Levels ........................................................................................................................ 61 Eligibility: Open to anyone interested in joining a larger community of rock climbers, alpine climbers and skiers interested in education, instruction and guiding in technical mountain terrain. ................................ 61 Eligibility: Instructors that have passed an AMGA Single Pitch Instructor Assessment. ............................ 61 Required Equipment List ............................................................................................................................ 62 Suggested reading for Candidates ............................................................................................................. 63
AMGA Single Pitch Instructor Program 5
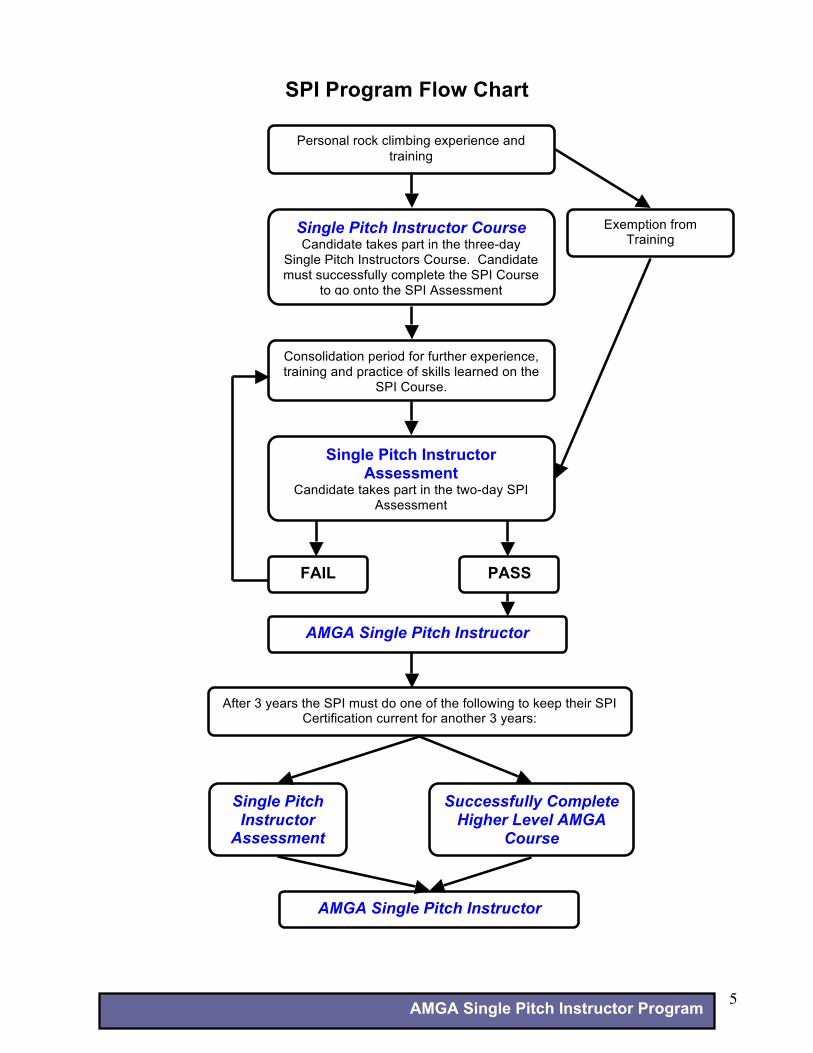
SPI Program Flow Chart
Consolidation period for further experience, training and practice of skills learned on the
SPI Course.
Personal rock climbing experience and training
Single Pitch Instructor Course Candidate takes part in the three-day
Single Pitch Instructors Course. Candidate must successfully complete the SPI Course
to go onto the SPI Assessment
Single Pitch Instructor Assessment
Candidate takes part in the two-day SPI Assessment
PASS
After 3 years the SPI must do one of the following to keep their SPI Certification current for another 3 years:
Successfully Complete Higher Level AMGA
Course
Single Pitch Instructor
Assessment
AMGA Single Pitch Instructor
FAIL
AMGA Single Pitch Instructor
Exemption from Training

AMGA Single Pitch Instructor Program 6
SPI Program Overview Preface Many people are introduced to the sport of rock climbing on single pitch cliffs across the country, a vast majority taking part in group climbing trips such as those sponsored by schools, churches, climbing gyms, Scout groups or summer camp programs. Many will hire an instructor from a guide service for their first climbing adventure or take a course from a nationally recognized organization. Through the Single Pitch Instructor Program, the American Mountain Guides Association wishes to ensure that a high standard of climbing instruction, of risk management, and enjoyment is provided in these programs, along with protection of the finite resources of single pitch crags. These high standards are achieved through experience, personal qualities, training and assessment. Program Overview The AMGA Single Pitch Instructor Program is designed to enable instructors to ‘proficiently facilitate and instruct the sport of rock climbing in a single pitch setting’. The program is for current, active rock climbers that have a real desire to teach the rock climbing to novices in a single pitch setting. Candidates should be passionate rock climbers that have their own equipment, regularly climb and have been rock climbing outdoors for at least 12 months. Candidates could be current university professors that teach climbing, climbing instructors, scout leaders, summer camp professionals or climbers who wish to achieve additional training, experience and certification to gain employment as a climbing instructor in the outdoor industry. The SPI Course is not a ‘climbing’ course. It is an instructor training course for current, proficient and active rock climbers and for climbing instructors who currently teach rock climbing who wish to gain the SPI Certification. The SPI is the second stage of the AMGA’s Climbing Instructor Certification Program and will significantly help candidates who wish to work toward the next stage, the AMGA Rock Instructor Course (RIC). The course teaches many instructor specific topics such as professionalism, teaching techniques, risk management, group site organization, climbing site conservation/LNT and assistance/rescue skills. The SPI Program is a three day (27 hour) training course and separate two day (16 hour) assessment. Certification lasts for three years as long as the candidate keeps current AMGA Membership and First Aid Certification. After three years, current SPIs can re-take the SPI Assessment to re-gain the SPI certification. Any current SPI who attains certification in any Mountain Guide Program discipline attains permanent SPI certification status provided they maintain AMGA membership and the appropriate level of emergency medical certification. SPI Terrain Guidelines The SPI will be able to proficiently facilitate and instruct the sport of rock climbing in a single pitch setting. Single Pitch Instructors supervise and teach climbing at any single pitch cliff, able to work both at the base and from the top of the climb. The instructor can work at sites where the anchors are accessed by either non-technical terrain or by leading. For the purpose of the SPI Program a single pitch climb is one which: • Is climbed without intermediate belays • Presents no difficulties on approach or retreat from the area, such as route finding, scrambling or navigating There are special considerations when the SPI leads to access anchors where there is only a technical (5th class) retreat. In a situation where the SPI is utilizing a top managed site in this setting they should only bring up then lower the climber back to the ground. The SPI should not bring multiple climbers up into this terrain as this would require techniques out of the scope of the SPI Program. These techniques are covered in the next level, the AMGA Rock Instructor Program. The SPI Program does not cover multipitch guiding. These skills are taught in the AMGA Rock Instructor Course. SPI’s that guide clients in multipitch terrain would possibly be working outside of their terrain guidelines. Please refer to the AMGA’s ‘Code of Ethics’ for more information.

AMGA Single Pitch Instructor Program 7
SPI Course Candidate Pre-Requisites A candidate meets the pre-requisites for the SPI course if they:
1. have a genuine interest in rock climbing and instructing novices on single pitch crags. 2. are at least 18 years old at the time of the course. 3. have at least 12 months prior climbing experience. 4. are an active climber with traditional lead climbing experience (leader placing pro). 5. have traditionally lead climbed a minimum of 15 rock climbing pitches (any grade). 6. are capable of comfortably climbing 5.8 while on a top rope.
The above pre-requisites are absolute minimums and most candidates exceed them. Without having at least this amount experience one is unlikely to play a constructive part on the course or be able to make best use of the training. If one is unsure of their skill levels we suggest hiring an AMGA/IFMGA certified guide to evaluate and enhance their skills and experience prior to enrollment in an SPI program. SPI Assessment Candidate Pre-Requisites The SPI Assessment can be taken directly following the SPI Course if the candidate successfully completed the course and meets the Assessment pre-requisites. However, it is highly recommended that the SPI Course graduate take time practicing and consolidating the skills learned on the course before assessment (6-12 months). A candidate meets the SPI Assessment pre-requisites if:
1. They have successfully completed an AMGA Single Pitch Instructor Course or AMGA Top Rope Site Manager Course.
2. They have traditionally lead climbed a minimum of 40 rock climbing pitches. A large number of these should be at 5.6 grade (or higher) in various locations and on a variety of different rock types.
3. They are capable of comfortably lead climbing (leader placing own protection) on any 5.6 traditional route. The candidate will demonstrate their leading ability on a variety of routes during the assessment.
4. They are capable of comfortably climbing 5.8 while on a top rope. Gaining SPI Certification To gain SPI Certification, the candidate must:
1. Successfully pass the SPI Assessment 2. Hold current AMGA Membership at Associate level or higher 3. Hold current First Aid Certification (see SPI Certification First Aid Requirements)
SPI Certification First Aid Requirements First aid training is not required in order to take the course or assessment. For the Single Pitch Instructor certification to be valid, the AMGA requires the instructor to hold appropriate medical certification for the location in which they will be working. If the instructor’s medical certification lapse, their AMGA SPI Certification is also invalid. It is the responsibility of the individual to maintain appropriate medical certification. SPI Certification Upkeep and Recertification SPI Certification is only valid with current AMGA Membership and valid current First Aid Certification. If the instructor allows either of these to lapse, their SPI Certification is invalid until they rectify this by updating their AMGA Membership or First Aid Certification. It is the instructor’s professional responsibility to ensure they have current AMGA Membership and First Aid Certification. SPI Certification lasts for three years from the date of assessment. There are three options for renewal:
1. Certified Single Pitch Instructors can take the two-day SPI Assessment to renew their certification.
2. Certified Single Pitch Instructors who successfully complete any higher level AMGA course is granted SPI certification for three years from the course end date. After completing a course, the instructor must contact the AMGA so their records can be updated.
AMGA Single Pitch Instructor Program 8
3. Current Certified Single Pitch Instructor who becomes certified in any discipline in the AMGA Mountain Guide Program is granted permanent SPI certification.
To keep SPI Certification current, SPIs should seek out recertification before the expiration date of their certification. Candidates who let their certification lapse can take part in the SPI Assessment but they will not hold any certification between their SPI expiration date and successfully passing an SPI Assessment. From a professional standpoint, this is not advisable. Exemption from Training Extremely experienced candidates with many years of climbing experience can apply to the Climbing Instructor Program Director for exemption from training and take the SPI Assessment without completing an SPI Course. Before considering this option one should realize that ongoing training and having a chance to work with your peers in a course environment is invaluable for all instructors at anytime in their instructing career. Skills taught are instructor-specific and many topics taught on the class are updated annually as new techniques, equipment and philosophies evolve. In the rare instance that an individual would opt to miss out the AMGA SPI course, the candidate would apply via email to the AMGA CIP Director, showing the following:
• That you have current membership of the AMGA. If you are not please join the AMGA before emailing the CIP Director.
• A current climbing resume showing excess of the minimum SPI Assessment prerequisites. • An instructional resume detailing where you have worked, your role, when, for whom. • Information detailing your previous training, where, when, by whom. • Reasons for not wishing to take the AMGA SPI Course.
SPI Program Hours and Ratios The SPI course is:
1. A minimum of 27 hours, normally run as three consecutive nine hour days or day classes with evening sessions.
2. SPI courses will not exceed a ratio of six students to one current SPI Program Provider. 3. The maximum number of students on any SPI Program will be twelve and, at a minimum, include one
current SPI Program Provider and one AMGA approved SPI Assistant Provider. The SPI assessment is:
4. A minimum of 16 hours. 5. The assessment should be run over two consecutive days. Candidates who meet the assessment pre-
requisites can take the assessment directly following the course if they desire, though this is not recommended.
6. SPI assessment will not exceed a ratio of six students to one current SPI Program Provider. 7. The maximum number of students on any SPI assessment will be twelve and, at a minimum, include
one current SPI Program Provider and one AMGA approved SPI Assistant Provider. Because both the course and assessment address group leadership and site management, all providers should seek to have a minimum of three to four outside clients in order to better facilitate group concepts on which the candidates will be assessed.
AMGA Single Pitch Instructor Program 9
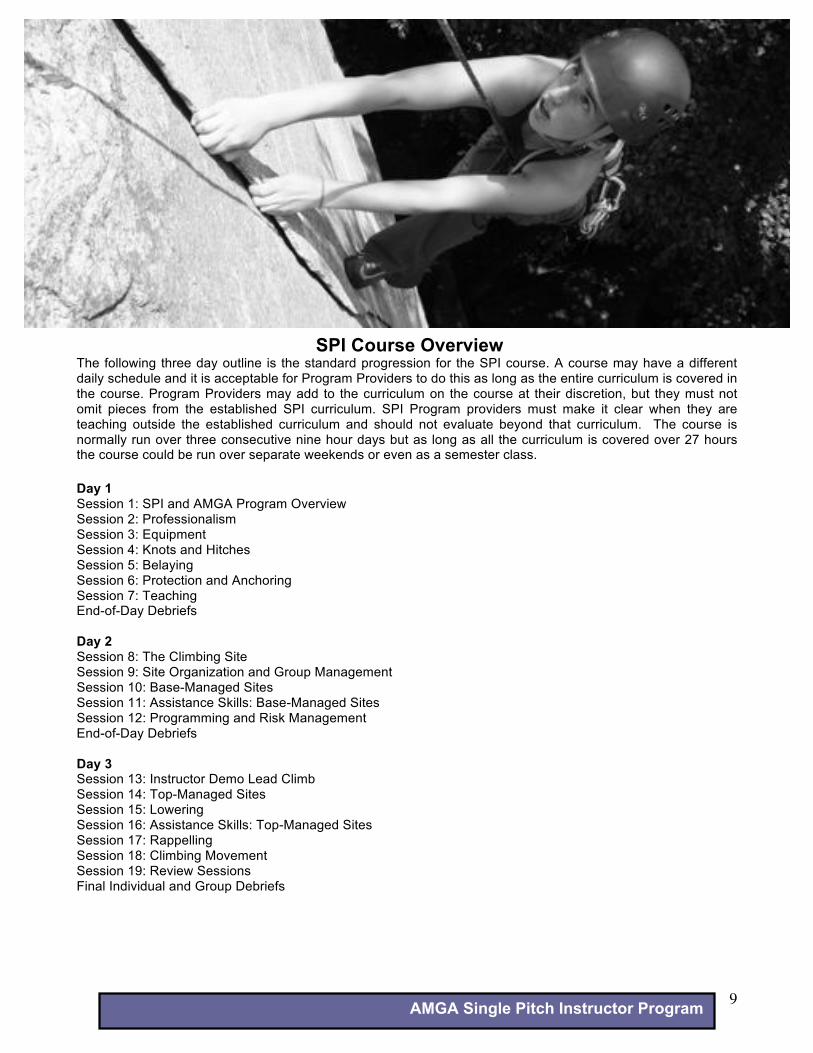
SPI Course Overview The following three day outline is the standard progression for the SPI course. A course may have a different daily schedule and it is acceptable for Program Providers to do this as long as the entire curriculum is covered in the course. Program Providers may add to the curriculum on the course at their discretion, but they must not omit pieces from the established SPI curriculum. SPI Program providers must make it clear when they are teaching outside the established curriculum and should not evaluate beyond that curriculum. The course is normally run over three consecutive nine hour days but as long as all the curriculum is covered over 27 hours the course could be run over separate weekends or even as a semester class. Day 1 Session 1: SPI and AMGA Program Overview Session 2: Professionalism Session 3: Equipment Session 4: Knots and Hitches Session 5: Belaying Session 6: Protection and Anchoring Session 7: Teaching End-of-Day Debriefs Day 2 Session 8: The Climbing Site Session 9: Site Organization and Group Management Session 10: Base-Managed Sites Session 11: Assistance Skills: Base-Managed Sites Session 12: Programming and Risk Management End-of-Day Debriefs Day 3 Session 13: Instructor Demo Lead Climb Session 14: Top-Managed Sites Session 15: Lowering Session 16: Assistance Skills: Top-Managed Sites Session 17: Rappelling Session 18: Climbing Movement Session 19: Review Sessions Final Individual and Group Debriefs
AMGA Single Pitch Instructor Program 10
Day One Summary: Session 1: SPI and AMGA Program Overview Session 2: Professionalism Session 3: Equipment Session 4: Knots and Hitches Session 5: Belaying Session 6: Protection and Anchoring Session 7: Teaching End-of-Day Debriefs Introductions Use this time to help clients get to know each other, to express expectations and experience, etc. and to introduce the instructors and candidates and the course objectives. Session 1: SPI and AMGA Program Overview Goals: The candidate should have good understanding of the SPI Program, AMGA organization, programs, certification levels, history and mission. Location: Classroom setting or crag Equipment: Discussion format. No equipment is required. Overview: An overview of the AMGA, and an introduction to instruction,
• History, mission, programs and certification levels of the AMGA • Recreational climbing and how it differs from professional instruction • SPI Program overview, course and assessment and scope and boundaries of the program • The Single Pitch Instructors terrain guidelines and boundaries • Misrepresentation of one’s AMGA training and certification level to their clients and the public,
and the AMGA Logo Use Policy Session 2: Professionalism Goals: To introduce and discuss the traits of a professional instructor. Location: Classroom or at the crag Equipment: Discussion format. No equipment is required. Overview: This session will present a discussion on what it means to be a professional instructor.
• Appearance, clean clothes, neat, gear in good condition and organized • Time keeping and time management • Organization and leadership skills • Technical skills and climbing ability • Instructional skills • Good demeanor, appropriate language, positive attitude • Additional training and certifications (i.e. first aid, rescue, LNT) • Instructor’s notebook, keeping instructor notes
Session 3: Equipment Goals: Candidates should have a good understanding of all equipment and materials used in single- pitch climbing, and be knowledgeable about equipment use, care, applications, and storage. Location: Classroom setting or crag Equipment: All types of climbing equipment that will be used in the SPI program Overview: A hands-on review of climbing equipment and materials
• Hardware (carabiners, belay devices and protection will be covered later) • Dynamic and static materials: ropes, cords, slings: Spectra, Dynema and Nylon. • Harnesses (types and fitting) • Creating a chest harness from cord or webbing. • Helmets

AMGA Single Pitch Instructor Program 11
• The instructor’s pack (personal technical gear, first aid kit, communication device, etc). Session 4: Knots and Hitches Goals: Candidates must show they can efficiently perform the knots listed below. The following knots are prerequisite knowledge and are required for the SPI program. Location: Classroom setting or crag Equipment: Climbing ropes (ground ropes) Overview: A hands-on review of climbing knots and hitches which should include the following:
• Figure 8 family • Overhand family • Double overhand on a bight (BHK) • Water knot (Tape) • Clove hitch • Bowlines • Münter hitch • Münter mule • Friction hitches (autoblock, prussik, Klemhiest) • Grapevine (double fisherman’s) • Patagonia Knot (flat overhand)
Session 5: Belaying Goals: Candidates must have thorough understanding of belaying devices, techniques and communication. Candidates must also have the ability to teach belaying clearly. Location: Classroom setting or crag Equipment: Various belay devices and climbing ropes Overview: A hands-on review of belaying which must include the following types and techniques:
• At the top of the cliff from the anchor: o Belaying a Münter Hitch (also practice blocking with Münter Mule) o Belaying with an assisted braking device – Petzl GriGri, Trango Cinch
• At the base of the cliff from the harness belay loop: o Belaying with various plate devices o Belaying with an assisted braking device – Petzl GriGri, Trango Cinch
• Belaying the leader • Communication • Ground anchors
Session 6: Protection and Anchoring Goals: Candidates should have a complete understanding of anchoring principles and risk management practices for single pitch crags. Location: Single-pitch climbing site with plenty of anchoring possibilities, either at the base or at the top Equipment: instructor’s rack Overview: This session should be a review of anchoring principles and practice with instruction at a single-
pitch crag. Time should be focused on the candidates building anchor systems that are efficient in regards to both gear and time. As stated in the prerequisites, the SPI course is not an anchor class, and candidates should already be well-versed in anchor building skills and gear placement.
• Rock and natural anchor component evaluation • Artificial gear SLCD/Stoppers/Hexes/TriCams placement and evaluation • Bolt and Piton evaluation • Creating the master point in an anchor • Anchors for instruction, location, anticipated loads • Anchors for top-managed sites (creating extensions) • Anchors for base-managed sites

AMGA Single Pitch Instructor Program 12
Session 7: Teaching Skills Goals: Candidates should be aware of and have an understanding of the different ways people learn and how to effectively teach different people, both individually and in a group setting. Location: Classroom or at the crag. Equipment: Discussion format. No equipment needed. Overview: This session will look at lesson planning, basic learning styles and teaching methods for various climbing and movement topics.
• Overview of the three main ways people prefer to learn: ! Theoretical – students who learn best by thinking or reflecting on the skill or activity ! Physical – students who learn best by participating/doing the skill or activity ! Visual – student who learn best by watching the skill or activity
• Lesson planning • The use of visual aids; video, PowerPoint presentations, text, photo or diagram handouts, white boards,
objects/examples to hand out and examine. • Effective communication skills and body language • Program and lesson sequencing; creating a logical order
End of Day Debriefs
AMGA Single Pitch Instructor Program 13
Day Two Summary: Session 8: Selecting the Climbing Site Session 9: Site Organization and Group Management Session 10: Base-Managed Sites Session 11: Assistance Skills: Base-Managed Sites Session 12: Programming and Risk Management End-of-Day Debriefs Session 8: Selecting the Climbing Site Goals: Candidates should be able to research an area and interpret guidebooks, topos and climbing grades to select an appropriate area for institutional climbing. The candidate should have knowledge of the different land management structures in the US and their varying permitting requirements. Location: Single-pitch site Equipment: Discussion format. No equipment needed. Overview: In this session, groups will discuss the single-pitch crag environment as it relates to commercial
use, including an overview of land management and permitting systems (USFS, NPS, BLM, state parks, private owners, etc.), and criteria for selecting the best climbing area and routes for specifically-skilled clients.
• Land managers and commercial use permit systems • Local and national climbing and commercial use ethics and etiquette • Site selection and considerations for commercial and group users • Selecting appropriate climbs for clients (physical ability, clients’ goals, etc.) • Reading topographic maps and interpreting route descriptions • Understanding climbing ratings, grades and terrain classifications
! Yosemite Decimal System (5.0-5.15, including letter grades) ! Terrain classification (1st, 2nd, 3rd, 4th, 5th class terrain) ! Commitment grade (I-VI) (III-VI not required for single-pitch climbing, but good
additional knowledge) Session 9: Site Organization and Group Management Goals: For candidates to have a good understanding of station general site organization and group management whether they are working at the top or base of the crag. Candidates should understand the finite and fragile resource of the crag environment and have an understanding of the instructor’s role in the field teaching and practicing Leave No Trace and proper crag etiquette Location: Single-pitch crag Equipment: Discussion format. No equipment needed. Overview: This session will look in detail at group management considerations and the organization of a single-pitch climbing site.
• Group orientations ! Goals for the day ! Client roles, behavior expectations and boundaries ! Explanation of hazards and risks ! Fitting and checking equipment (harness, helmets, shoes, etc.)
• Equipment organization – individual and group • Leave No Trace and impact reduction for groups • Group location at the crag ‘corral’ location away from the base of the crag on a safe, hardened surface
out of the way of other users of the crag. • Involving the clients; climber, belayer, backup belayer • Crag etiquette
! How many ropes should be set-up ! What type of climbs should be set-up ! Is it the first pitch of a multi-pitch climb?
AMGA Single Pitch Instructor Program 14
! Is the route a classic climb with high traffic? ! Noise pollution ! Group control ! Share the crag with other users
Session 10: Base-Managed Sites Goals: The candidate should have mastery of the skills required to work at the base of any single-pitch crag and understand the differences and reasons for selecting to operate from the base rather than the top of the crag. Location: Base of a single-pitch crag Equipment: Ropes, anchoring equipment Overview: This session will look in detail at a base-managed site and the reasons for choosing that system verses top-managed.
• Reasons for Base-Managed Sites: ! Easy to see climbers and coach them ! Ropes should hang free and not go over an edge. This creates less rope wear. ! Easier to communicate and manage large groups at the base ! Higher client-to-instructor ratios, more clients/fewer instructors required (i.e. 6:1) ! Faster “change-overs” so more climbing is accomplished
• Concerns for Base-Managed Sites: ! Possibility of any object falling from above, striking belayer or clients ! More rope in the system compared to a top belay system (more rope elongation) ! Climbs over half the rope length have to be belayed at the top unless two ropes are tied
together ! Cannot monitor the anchor systems as well
• Base-Site Management ! Keeping things neat ! Rope organization ! Closing the system - Always
• Ground Anchors ! When are they required? ! ABC, (Anchor-Belayer-Climber), always inline ! Using natural features for ground anchors ! No features available – using other clients as ground anchors
• Back-up belayers • Use of ‘catastrophe knots’
Session 11: Assistance Skills – Base-Managed Sites Goals: Candidates must be able to carry out a variety of assistance skills that may be required when working at the base of a single pitch crag. Location: Single-pitch crag. Equipment: Top rope set-up Overview: A detailed look at and practice of weighted and un-weighted belay take-overs, climber pick-offs and counter-balance assists.
• Belay take-overs: ! Weighted ! Un-weighted
• Counter ascension to assist stuck climber • Counter-balance lower with stuck climber
AMGA Single Pitch Instructor Program 15
Session 12: Programming and Risk Management Goals: The candidate should have an understanding of programming and risk management issues that face the single pitch instructor. Location: Classroom or crag. Equipment: Discussion format. No equipment needed. Overview: This session will look at client orientations, comfort and security, instructor responsibilities, legal considerations and liability insurance. Also, this session will cover equipment record keeping and storage, program objectives and boundaries.
• Overview of the four main types of risks that could be encountered in a climbing environment, and how to reduce and manage those risks:
! Psychological – fear of falling, fear of heights ! Sociological – peer pressure, fear of ridicule from other clients ! Financial – poor course, waste of money, lost/broken personal equipment ! Physical – client injuries, fatalities
• Client orientations, security and comfort • Equipment inspection, record keeping and storage • Legal issues in commercial instruction, waivers, informed risk, medical screening of clients • Identifying your program’s goals and boundaries • Creating an Emergency Response Plan • Daily and weekly instructor meetings
End-of-Day Debriefs
AMGA Single Pitch Instructor Program 16
Day Three Summary: Session 13: Instructor Demo Lead Climb Session 14: Top-Managed Sites Session 15: Lowering Session 16: Assistance Skills: Top-Managed Sites Session 17: Rappelling Session 18: Climbing Movement Session 19: Review Sessions Final Individual and Group Debriefs Session 13: Instructor Demo Lead Climb Goals: For the candidates to see the course instructor complete a single-pitch lead climb which demonstrates sound leading practices and demonstrates considerations when having a student belayer. (Note: the SPI is not a lead climbing course and the demo should only focus on lead climbing considerations as an instructor). Location: Single-pitch crag Equipment: Ropes, lead rack, etc. Overview: The SPI course instructor (not candidate) will demonstrate a lead climb that focuses on considerations when having students belaying a leading instructor. This is a short lead that will demonstrate and should be a catalyst for the following points of discussion:
! Selection of an appropriate climb to lead in order to set-up anchors ! Considerations for belayer ground position for appropriate lead belay and ground
anchor ! Modeling of sound leading practices (plenty of solid protection, no soloing) ! Closing the climbing system ! Belayer/climber communication
Session 14: Top-Managed Sites Goals: The candidate should have acquired the skills required to work at the top of any single pitch crag, and understand the differences and reasons for choosing to operate from that position,
rather than the base. Location: Top of a single-pitch crag Equipment: Ropes, anchoring equipment, etc. Overview: This session will look in detail at working at the top in a single-pitch setting and the reasons for doing so verses working at the base.
• Reasons for Top-Managed Sites: ! No chance of rocks striking belayer below ! 50% less rope in the system, less elongation ! Some climbers like climbing to the instructor rather than away ! Climbs over half the rope length have to be belayed from the top unless two ropes are
tied together ! May be too dangerous to work at the base of the cliff (sea cliff, steep ground, etc) ! Ability to monitor the anchor system
• Concerns for Top-Managed Sites: ! Difficult (or sometimes impossible) to see climber from above on many crags ! The climber’s rope will always go over the edge when belaying from above ! Possible impact on fragile cliff top ecosystem ! Cliff edge dangerous to manage
• Instructor and client risk management at the top of the crag ! Tying directly in to the master point (with a clove hitch) ! Instructor tether lines ! Possible use of fixed lines for movement of clients in exposed areas
• Belaying from the anchor master point ! With an assisted breaking device (GriGri/Cinch:) when, why, considerations ! With a Münter hitch: when, why, considerations
AMGA Single Pitch Instructor Program 17
• Station Management
! Keeping things neat, thinking ahead to avoid organizational and systemic issues ! Rope organization, stacking
• Incorporating a student belayer: clove hitch the student belayer to master point, belay as instructor from master point with GriGri/Cynch, Münter hitch
Session 15: Lowering Goals: Candidates must be able to select when it is appropriate to lower a client and employ appropriate back-ups. Location: Single-pitch crag Equipment: Top rope set-up Overview: This session will look in detail at lowering methods, considerations, back-ups and reasons for lowering clients.
• Reasons and considerations for lowering clients • Lowering methods
! Assisted Breaking Device with re-directs ! Münter hitch
• Friction hitch back-ups • Closing the climbing system • Visual contact with the client
Session 16: Assistance Skills: Top-Managed Sites Goals: Candidates must possess the skills to assist climbers from the top of a crag in a single-pitch setting. Location: Single-pitch crag Equipment: Top rope set-up Overview: This session will look at raising and assistance techniques from the top of the crag. In the single-pitch setting, there is no need for in-depth raising systems training since all problems have a “gravity feed” solution. In the rare instance when an instructor is working at a sea cliff environment or single-pitch crag where the access to the base is problematic, a prudent Instructor would belay with an assisted braking device to affect a simple raise if required.
• 3:1 raise with Assisted Breaking Device • 3:1 Assisted raise with Assisted Breaking Device
Session 17: Rappelling Goals: Candidates must be able to select when it is appropriate to rappel clients and to employ appropriate back-ups. Location: Single-pitch crag Equipment: Top rope set-up Overview: This session will look in detail at rappelling methods, considerations, back-ups and when it is appropriate to let clients rappel.
• Reasons and considerations for rappelling: ! Part of program, learning experience, least hazardous way to the base of the crag?
• Rappel set-ups: ! High master points, set back from the edge ! Releasable rappels ! Single and double line rappels
• Rappel back-ups: ! Fireman’s belay (discussed, not taught at SPI level.) ! Independent belay
• Problem avoidance: ! Tying back long hair, loose clothing/jewelry ! Coaching ! Starting novice rappelers on low-angle terrain, moving to steeper/vertical terrain later ! Visual contact with the client
• Rappel assistance:
AMGA Single Pitch Instructor Program 18
! Practice releasable rappel load transfers for a rappeler with something stuck in their device
Session 18: Climbing Movement Goals: Single Pitch Instructors should have a solid understanding of climbing movement and how to effectively teach the skills of climbing movement to novice climbers. Location: base of crag, boulders or artificial wall Equipment: Top rope set-up Overview: This session will look at teaching climbing movement skills on single-pitch crags and facilitating safe, effective bouldering sessions for novice climbers.
• Basics of vertical movement and balance • Common climbing skills
! Hand holds and how to utilize them: edges, slopers, buckets, pockets ! Foot positioning: smears, edging ! Techniques: laybacks, stemming, chimneying, crack climbing, mantling
• Movement exercises to focus on: balance, body position, etc. • Movement and Climbing games • Coaching skills • Facilitating Bouldering
! Risk Management (i.e. does your program/insurance company allow ‘un-roped’ climbing?)
! Correct use of bouldering pads, spotters Session 19: Review Session Goals: Time for candidates to review all material covered and to go over SPI assessment questions. Location: Single-pitch crag Equipment: Top rope set-up Overview: Review time End of Course Group and Individual Debriefs Goals: Complete a debrief of group and individuals. Instructors will outline the areas candidates need to work on so as to prepare them for their future SPI assessment. Location: Single-pitch crag or classroom
AMGA Single Pitch Instructor Program 19
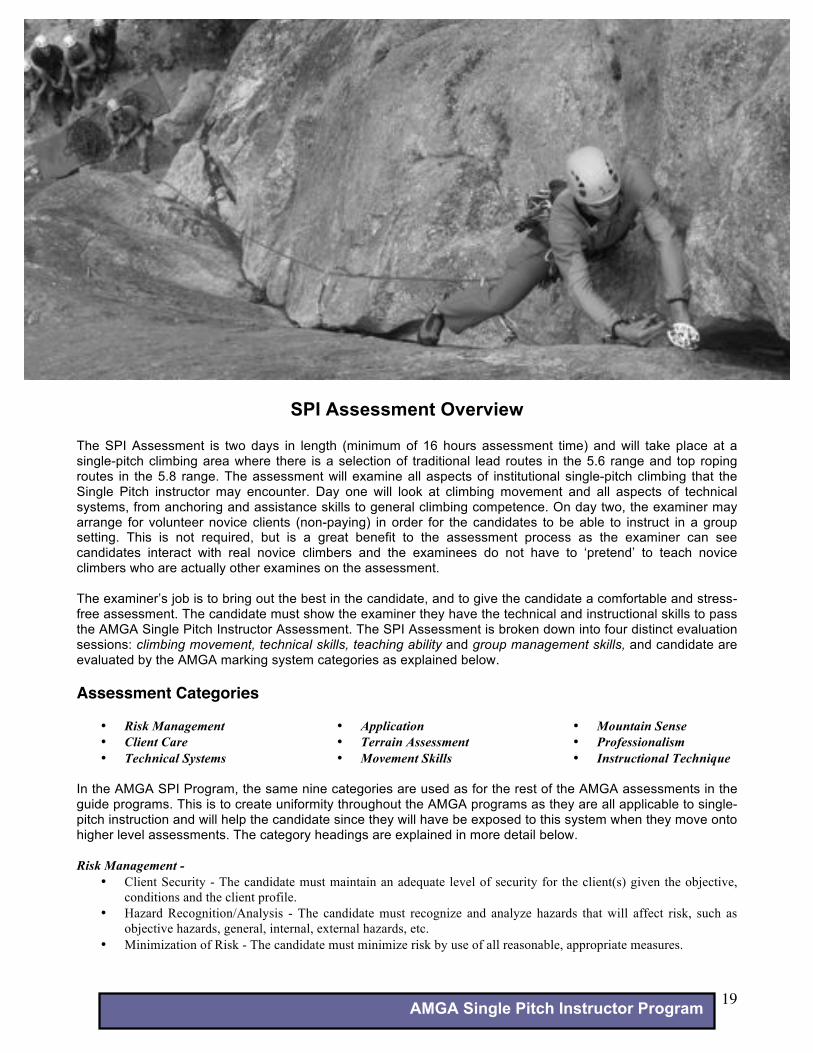
SPI Assessment Overview The SPI Assessment is two days in length (minimum of 16 hours assessment time) and will take place at a single-pitch climbing area where there is a selection of traditional lead routes in the 5.6 range and top roping routes in the 5.8 range. The assessment will examine all aspects of institutional single-pitch climbing that the Single Pitch instructor may encounter. Day one will look at climbing movement and all aspects of technical systems, from anchoring and assistance skills to general climbing competence. On day two, the examiner may arrange for volunteer novice clients (non-paying) in order for the candidates to be able to instruct in a group setting. This is not required, but is a great benefit to the assessment process as the examiner can see candidates interact with real novice climbers and the examinees do not have to ‘pretend’ to teach novice climbers who are actually other examines on the assessment. The examiner’s job is to bring out the best in the candidate, and to give the candidate a comfortable and stress-free assessment. The candidate must show the examiner they have the technical and instructional skills to pass the AMGA Single Pitch Instructor Assessment. The SPI Assessment is broken down into four distinct evaluation sessions: climbing movement, technical skills, teaching ability and group management skills, and candidate are evaluated by the AMGA marking system categories as explained below. Assessment Categories
• Risk Management • Client Care • Technical Systems
• Application • Terrain Assessment • Movement Skills
• Mountain Sense • Professionalism • Instructional Technique
In the AMGA SPI Program, the same nine categories are used as for the rest of the AMGA assessments in the guide programs. This is to create uniformity throughout the AMGA programs as they are all applicable to single-pitch instruction and will help the candidate since they will have be exposed to this system when they move onto higher level assessments. The category headings are explained in more detail below. Risk Management -
• Client Security - The candidate must maintain an adequate level of security for the client(s) given the objective, conditions and the client profile.
• Hazard Recognition/Analysis - The candidate must recognize and analyze hazards that will affect risk, such as objective hazards, general, internal, external hazards, etc.
• Minimization of Risk - The candidate must minimize risk by use of all reasonable, appropriate measures.
AMGA Single Pitch Instructor Program 20
• Instructor Security - The candidate must maintain an adequate level of security for the instructor, given the objective and conditions.
Client Care -
• Comfort - The candidate must be aware of clients’ comfort levels and ensure not to compromise risk management. • Communication - The candidate must clearly and professionally communicate instructions for a comfortable and
enjoyable client experience. • Client Orientation - The candidate must provide adequate information to the client. • Quality of Experience - The candidate must provide a rewarding and enjoyable experience within the confines of
conditions, risk management, client profile and assessment assignment. Technical Systems - The candidate must understand and correctly use:
• Protection/Anchors/Belays - protection, anchor, and belay techniques • Rappelling/Lowering - rappelling and lowering techniques • Rope Management - appropriate rope management techniques for both top- and bottom-managed sites • Assistance Skills – assistance and ‘rescue’ systems
Application - The candidate must:
• “Apply the right technique in the right place at the right time.” Terrain Assessment -
• Route Selection – selects appropriate routes for teaching novice climbers. • Route finding - appropriately approach, ascend, and descend routes.
Movement Skills -
• The candidate must demonstrate smooth, confident, and efficient movement while protecting, anchoring, belaying. • The candidate must demonstrate capability of leading 5.6 traditional routes and top roping 5.8. • Fitness & stamina – The candidate must be in adequate physical shape to complete the day’s objective and
maintain a reasonable margin of additional energy. • Pace & time management – The candidate must show efficient use of time and good pace, given the day’s
objectives, conditions and client profile. Mountain Sense -
• Decision Making - The candidate must effectively identify, act upon, and carry out options. • Stress Management - The candidate must manage stress without unduly compromising performance. • Error Correction - The candidate must correct errors in due time, without compromising risk management or the
objective and with minimum disruption of activity. Professionalism -
• Personal Presentation – The candidate must have a well-presented, professional appearance • Attitude/Demeanor- The candidate should be professional at all times. • Planning/Preparation - The candidate must plan and prepare adequately for all activities, including research,
knowledge of options, and familiarity with alternatives. • Environmental Consciousness - The candidate must exhibit current environmentally-sensitive back country travel
and climbing practices. Instructional Technique -
• Lesson Planning - The candidate must use and implement appropriate lesson plans and teaching progressions. • Pedagogy - The candidate must understand and use a variety of teaching methods adaptable to learner types, and
communicate clearly with a positive attitude. • Coaching and Tips - The candidate must provide appropriate coaching and tips to assist in creating a comfortable
and rewarding experience for the client(s).
AMGA Single Pitch Instructor Program 21
Day One Session 1: SPI Assessment Orientation Goals: Introductions of candidates and examiners, detailing candidates’ climbing and instructing experience since the SPI Course Location: Single-pitch crag or classroom Equipment: Classroom setting-none required Overview: To introduce everyone and get an idea of how much personal and professional experience candidates have had since the SPI Course. At this time, examiners can review candidates’ updated resumes. Session 2: Lead Climbing and Top Rope Session Goals: For candidates to successfully complete the SPI Assessment requirements of comfortably top roping 5.8 and leading 5.6 traditional climbs Location: Single-pitch crag Equipment: Top roping and traditional leading equipment Overview: Two-four hours of relaxed climbing time where candidates will be asked to top rope various single-pitch climbs up to a 5.8 grade and trad lead to a 5.6 grade. The examiner will be able to observe candidates interact with other climbers, select appropriate climbs, build anchors and belay from the top and base of the crag, as requested by the examiner. The examiner will have time to assess candidates’ climbing ability, anchors, rope work, station management, communication and general climbing proficiency in a single-pitch setting. Session 3: Technical Components Goals: For candidates to successfully complete the SPI Assessment technical components.
Location: Single-pitch crag
Equipment: Top roping and traditional leading equipment
Overview: Candidates should display competence in the following technical skills;
• Base-managed Site: ! Rappelling over an edge to the base of the crag ! Weighted and un-weighted take-over of belays ! Counter-ascend to a stuck climber ! Counter-balanced lower with a climber
• Top-Managed Site: ! 3:1 Raise using Assisted Breaking Device ! 3:1 Assisted raise using Assisted Breaking Device ! Releasable rappel set-up, fixing problems on rappel such as stuck rappel device ! Lowering clients
End-of-Day Debriefs
AMGA Single Pitch Instructor Program 22
Day Two Session 4: Group Management Goals: For candidates to successfully complete the SPI Assessment requirements of proficiently supervising and instructing a group of climbers at a single-pitch crag
Location: Single-pitch crag
Equipment: Top roping equipment
Overview: Candidates must display the proficient instructional and organizational techniques for running a group single pitch climbing session. Candidates should be given clear assignments, starting at the morning meeting. A candidate should be in charge, ensure the group has all required equipment, give an overview of the day, ensure all paperwork is completed (waivers), and complete the group and instructor briefing. Another candidate should lead the group into the site from the trailhead and brief LNT, safety, etc. Another candidate can be lead instructor at the site, overseeing anchor building and setups for the climbs/rappels. Various candidates will oversee the day’s proceedings in different roles.
Candidates will demonstrate their ability in the following:
• Morning client orientations, briefings • Paperwork, waivers • Equipment selection, fitting, explanations • Client safety, comfort and communication • Group management • Overseeing multiple climbers in a base-managed site • Running a rappel site
Session 5: Teaching Components Goals: For candidates to demonstrate proficient teaching ability.
Location: Single pitch crag
Equipment: Candidate’s choice
Overview: Candidates should display proficient teaching ability of various climbing related topics. Lessons should be at least 15-20 minutes long and address multiple learning styles. The lessons will be assigned either via email before the assessment or on the morning of day one of the assessment. Candidates should spend time preparing a lesson plan and have a hard copy of the lesson for review by the examiner the morning of the assessment.
Some possible topics to assign are:
! Interpreting guide books, topos and climbing grades ! Belaying ! Equipment types, care and storage ! Helmets and harness: types, selection and fitting ! Rope dynamics and care ! Knots and friction hitches ! Rappelling ! Climbing movement ! Leave No trace ! Bouldering ! Communication in climbing
End-of-Assessment Group and Individual Debriefs
AMGA Single Pitch Instructor Program 23
SPI Assessment Scoring Skills are evaluated and graded on both days of the Assessment. The Assessment is based on the ability of the candidate to provide a safe and rewarding experience to their clients. “Passing” or “Not Passing” a candidate is primarily an issue of risk management, thus any reasonable doubt in the mind of the assessor as to the ability of the candidate to instruct within the bounds of acceptable risk management practices, as supported by documentation, is grounds for a failing grade. Candidates are graded on their performance in 9 designated skill areas. These skills are divided into sub-categories which better define those main skill areas. A summary score card will be generated from daily scores to determine whether to pass or fail a candidate. Personal interviews are held at the end of the exam where a verbal assessment will be given by the examiner(s). This is meant to help the candidates assess their own performance. Candidates are informed at this time whether they passed or did not pass the assessment. To pass the assessment, a candidate’s final summary score sheet must show a passing score in each of the 9 assessment categories. Marking Scale The marking scale used is P=”Pass”, M=”Marginal”, and NP=”Not Pass”. The marks will be based on the following criteria: P = Acceptable performance - The candidate shows consistently strong performance in all instructional techniques and skills. A high and consistent level of good judgment with respect to risk management and objectives is shown. The candidate is comfortable in a leadership role and has sufficient energy to meet the needs of the clients. M = Marginal performance - The candidate displays weakness in important techniques, knowledge, or experience. Poor or inconsistent application of instructing techniques or principles is apparent. Multiple attempts and/or excessive time are required to attain acceptable performance. The candidate is preoccupied with her/his own needs and has limited energy for the clients. NP = Substandard performance - The candidate makes a major error (or is stopped in the process of making a major error) that has potentially life-threatening ramifications, seriously compromises objectives, or chronically makes mistakes of a lesser magnitude and/or has little energy for client needs. Interpretation of Marks One (1) No Pass is equal to two (2) Marginals.
Earning the following scores over the two days will result in failure of the SPI Assessment:
• 4 or more Marginal scores • 3 Marginal scores in the same category
Remember, since a No Pass score is equal to two Marginal scores, an evaluation of a No Pass score in one category on day one, followed by a Marginal score in the same category the following day, would be criteria for failure of the SPI assessment.
AMGA Single Pitch Instructor Program 24
SPI Technical Manual AMGA History For over 25 years, the American Mountain Guides Association (AMGA) has been dedicated to supporting the guiding community through excellence in education, standards and certification to enhance the quality of services provided to the public, while serving as a resource for accessing and protecting the natural environment. As a group, the AMGA presents a strong, unified voice for supporting high standards of professionalism of guiding and climbing instruction in the United States. The AMGA is an organization grounded in a powerful tradition that continues to evolve with the ever-changing arena of mountain guiding and climbing instruction. We offer a series of training courses and exams designed to certify guides and climbing instructors to the highly respected, internationally recognized standards of the AMGA. The AMGA is our nation’s sole representative to the 21-member International Federation of Mountain Guides Associations (IFMGA), the international governing body responsible for guiding standards and education around the world. The heart of the AMGA is its membership. Spread across the country, AMGA members represent an incredible variety of educators, outdoor enthusiasts, and environmental stewards. Nearly every aspect of mountain guiding and instruction is represented through the AMGA’s vast member base, from the glaciated high-altitude peaks of the Alaskan ranges to the big walls of Yosemite, from the diverse climbing areas in the Rockies to the world class ice and rock climbing of the east coast, you will most likely find AMGA-trained and certified guides and climbing instructors. These professionals could work in any part of the industry from instructors who teach on climbing walls and single-pitch cliffs to guides leading long rock routes, alpine climbs, and ski mountaineering trips. Through its membership, the AMGA is closely connected to every issue that faces the industry and our treasured crags, peaks, powder-covered slopes, and frozen waterfalls. Guiding in the mountains has been a profession in the U.S. that spans back to the start of the nation. Only in 1979 did a group of 12 guides decide that it was time to formalize an organization to represent the greater guiding community. As a result, the American Professional Mountain Guides Association was born. Over the next few years the “P” was dropped and the AMGA developed and grew throughout the United States. The organization sharpened its focus of supporting the guiding profession by providing representation for land use access, education, training, and examination based on international standards for guiding. In 1997, the AMGA achieved one of its most notable accomplishments when it was accepted into the International Federation of Mountain Guides Associations, IFMGA / UIAGM. As a member of the IFMGA, the organization’s educational and certification programs meet the international standards recognized by more than 20 nations worldwide. Today, the AMGA continues to develop its programs to meet the changing standards and support the growing community of guides and climbing instructors in the United States. In addition, the organization has become a resource for land managers and outdoor industry leaders through its promotion of land stewardship, world-class training, and sustainable practices to protect our natural resources. AMGA Mission Statement The AMGA inspires an exceptional client experience as the premier source for training, credentials, resource stewardship and services for professional mountain guides and climbing instructors in the United States. AMGA Climbing Instructor Program The AMGA Climbing Instructor Program consists of three (3) certification levels: AMGA Climbing Wall Instructor, AMGA Single Pitch Instructor, and AMGA Climbing Instructor. The Climbing Instructor Program is intended for individuals who facilitate climbing experiences, instruct climbing skills, and/or monitor climbing activities. The AMGA Single Pitch Instructor Program is for all individuals that facilitate the sport of rock climbing in a single pitch setting. AMGA Mountain Guide Program The Mountain Guide Program consists of three (3) certification streams: Alpine, Rock, and Ski Mountaineering. By completing all three disciplines a guide achieves international recognition as an International Federation of Mountain Guides Associations (IFMGA/UIAGM) Guide. This achievement is the highest level of credential
AMGA Single Pitch Instructor Program 25
attainable by a professional mountain guide anywhere in the world and is recognized in the more than 20-member countries of the IFMGA. There is no better way to grow as a professional than learning from certified guides with experience from around the world and from a group of your peers with diverse backgrounds. The AMGA strives to incorporate a wealth of knowledge accumulated and polished over decades of guiding experience into its Guide Program. AMGA Code of Ethics 1. The safety and care of our clients must be our prime concern at all times. All personal objectives and
the objectives of our clients must be subordinate to this concern.
2. The safety of the public is also our concern and we must, where possible and practical, provide assistance to those having difficulty by offering help which is appropriate under the circumstances. This, however, we can do only if it does not compromise the safety of our clients.
3. Our clients have the right to expect us to be up-to-date on methods and techniques and to use appropriate and well-functioning equipment.
4. We must always be aware of our own physical, technical and experiential limitations. We must use routes and terrain which are within our expertise and capabilities.
5. As AMGA guides, whether certified, aspirant or student, and as instructors and Members, we are expected to teach and practice Leave No Trace principles at all times.
6. We should also strive to be knowledgeable of local natural and cultural history.
7. At all times, we are representatives of the AMGA and should conduct ourselves in a manner that reflects well on the AMGA. This applies not only on AMGA courses, but anytime we are interacting with clients, the public, or others including government agencies. We must always strive to work within the framework of the AMGA Professional and Terrain Guidelines as defined by the Training and Certification Program Handbook and by Accreditation Contracts. This includes accurately and unambiguously representing the level of our certification to clients, government agencies, the public and others.
8. As AMGA guides, whether certified, aspirant or student, and as instructors and Members, we are expected to work within the permit, certification and aspirant requirements of the country and/or land agency in or under which we intend to work. We are also required to obey all laws, rules and regulations applicable to our guiding or other activities. AMGA Members should represent themselves fairly and adequately.
AMGA Single Pitch Instructor Program 26
Technical Equipment and Materials Metals Used in Climbing Equipment Manufacture Mild and Alloy Steels (low carbon steels) Properties: Heavier material than aluminum, corrosive Uses: Originally used for all climbing hardware (carabiners, stoppers, bolts, hangers, etc). Low carbon
steels have now been superseded by aluminum as the choice material for most climbing hardware applications. They are now mainly used in rescue and ropes course applications where excessive wear could take place, i.e. carabiners on steel cables from ropes course “lobster claws” where aluminum carabiners would face excessive wear.
Aluminum Properties: Aluminum is resistant to corrosion and has a high strength-to-weight ratio. Lightest material
used in climbing equipment. Cold working the metal (such as the cold forging of carabiners) approximately doubles its strength. At subzero temperatures, aluminum is stronger than at room temperature. It is a very “soft” material and wears very easily. Nicks and groves cut into the corners of carabiners are caused by bolt hangers, especially stainless steel, the very hard material used in some climbing equipment.
Uses: Used for everything from stoppers and cam lobes on SLCDs to cable swages and carabiners. Stainless Steel Properties: “304” Stainless Steel is the most widely used stainless steel in climbing equipment. It has
excellent resistance to corrosion, is extremely strong and is a very hard material. However, it is very heavy.
Uses: Mainly for bolts and hangers where high corrosion, wear resistance and strength are needed.
Too heavy for most other climbing equipment applications Titanium Properties: Titanium is extremely resistant to corrosive environments, is light weight, has a very high
strength-to-weight ratio, and non-magnetic properties. Uses: Used in some Jummar casings, ice screws etc. Excerpts from the BMC website www.thebmc.co.uk General corrosion This is the most easily detectable form of damage as it is visually obvious on the outer surfaces of equipment. This corrosion does not usually cause a problem, as items are usually retired when they acquire a thin surface layer of corrosion, but its presence is a useful indicator that other, more serious forms of corrosion may be active elsewhere on the component. This form of attack is however an issue with in-situ pitons where only slight surface corrosion might be evident, but deep in the crack the piton may be completely corroded away. Galvanic corrosion Galvanic corrosion occurs when two dissimilar metals are in contact in the presence of an electrolyte (i.e. rain, seawater). These conditions are met, for example, in the hinges of carabiners and on the axles of camming devices where aluminum alloy and steel are in contact with each other. Such small gaps provide ideal sites for water to collect, and corrosion in these locations can lead to a much stiffer action of the moving parts, or even complete sticking. This could result in the gate of a carabiner not opening or closing properly, or the cams of a camming device failing to operate. Stress corrosion cracking (SCC) Is the formation of brittle cracks in a normally sound material through the simultaneous action of a “tensile stress” or “cyclic loading” and corrosive environments. In most cases, SCC takes place at specific localized sites
AMGA Single Pitch Instructor Program 27
and is focused along specific paths within the material, i.e. at welds and where the metal has been bent or shaped. Fatigue Fatigue is the gradual weakening of materials due to “cyclic loading”. It is caused by the growth of microscopic cracks within the material until they weaken the structure sufficiently that the material fails at loads well below the original maximum design. Each load application is known as a cycle, and the lower the load, the more cycles are required to cause a failure. If the loads are low enough, fatigue does not occur. The design of climbing equipment should take fatigue into account in the following way: The usual loads expected should be such that many thousands of cycles are required before fatigue failure, and this should be beyond the expected usable lifetime of the equipment. However, if, through exceptionally heavy or abnormal use, too many cycles have been accumulated and failure is near, then cracks in the highest stressed areas will be forming and growing. A close examination with a magnifying glass on well-used equipment will be very worthwhile - a common example is cracking on the cast body of Tri Cams and cracks emanating from pins on the gates of carabiners. In climbing terms, this means that reasonable use should avoid any chance of fatigue failure by limiting the number and/or severity of the load cycles. Wear This is the erosion of material by friction and contact with other surfaces. For climbing equipment, any contacting surfaces are liable to wear since the most commonly used material in climbing equipment (aluminum) is relatively soft. The most frequent high-wear situation is rope passing over carabiners during rappelling and belaying activities, causing wear to belay/rappel devices. Grooves can appear in these items and, since a noticeable groove represents a significant reduction in cross sectional area (and therefore strength), a safe course of action is to retire the piece of equipment when such a groove becomes noticeable. It has been noted that excessive rope wear on the first generation Petzl “Reverso” can create sharp edges on the device. Seawater Corrosion Seawater and airborne sea spray present a number of corrosion problems of varying severity. In terms of metals used for climbing equipment, only titanium is resistant to seawater corrosion. Aluminum and steel (even stainless steel) are not. It is recommended that all equipment should be dried, and any hinges, movable joints, wires, cables, etc. be treated with a suitable aerosol lubricant, the surplus wiped away, and the movement of the piece checked.

AMGA Single Pitch Instructor Program 28
Belaying and Device Types Excerpts from the BMC webpage www.thebmc.co.uk How do belay devices work? Belaying devices use a combination of friction and pinching to produce a braking effect on the rope and a device’s design dictates which effect will predominate upon loading. Devices relying principally on friction (e.g. Figure-of-8) will tend to be smooth running and are entirely reliant on the belayer reacting quickly by providing a controlling force on the rope and thereby forcing it into the optimum braking configuration. Devices producing a strong pinch effect will tend to grab the rope and lock up under load. They also require skilled use particularly when paying out rope but are ‘helpful’ to the belayer when dealing with high forces or unexpected falls. Flat plate devices such as the Stitch plate, whilst giving a braking effect via friction, also give strong pinch effects when loaded and correctly operated. Some devices have very little friction element and operate solely by pinching or camming the rope, a typical example being the GriGri. Intermediate, Slick, Grabbing and Assisted Braking Devices: Slick: Such devices rely principally on friction to provide braking. Devices of this type allow smooth, quick rope feed and are less likely to jam when rope is being paid out. They require more care on the part of the belayer in applying and maintaining a controlling force when arresting a fall or during a lower. Example: Figure 8, ATC Intermediate: Devices neither particularly slick nor grabbing. Good general purpose devices. Example: Sprung Stitch Plate. Grabbing: A device giving a sharp braking effect when suddenly loaded. Likely to be pinching devices. Care needs to be taken to ensure smooth rope feed, otherwise may jam. Have a tendency to lock up easily. Effective at holding falls which may not be anticipated by the belayer and or where a high controlling force is required. Example: Flat Stitch. Assisted Breaking Devices: Are not friction based but rather lock the rope via a camming action. Ability to hold falls not dependent on controlling force of the belayer. To be effective they require load to be applied rapidly and should not be regarded as automatic devices. Tend to be particularly sensitive to rope diameter. Although effective in holding a fall, require care and skill in use particularly when lowering. Example: GriGri, Cinch. Devices which can provide some frictional braking but reconfigure to lock under load by a pinching action are a subset of the category. Example: Single Rope Controller.
Appropriate use So belaying devices act in different ways and can be described as shown in the box. But how do you select the appropriate device for a particular use? You need to look at the factors that are likely to come into play during
AMGA Single Pitch Instructor Program 29
use and choose a device that is going to give the best performance in these circumstances. Here are some suggestions. The following factors would suggest the use of a grabbing device: Heavyweight Lead Climber Inexperienced Belayer Thin ropes Quick rope feed not essential The following would suggest the use of a slick device: Thick or stiff ropes Experienced attentive belayer Quick rope feed essential Icy ropes The following factors would suggest the use of an assisted braking device: Experienced belayer with knowledge of the device Solid runners and belay Quick rope feed not essential ‘Working’ routes Single rope Choosing the right device reduces the chance of an accident whilst belaying or lowering and makes for smoother climbing. However any device needs to be properly operated in order to be effective and so make sure you know how to use the device, pay attention and remember your partner is relying on you.
AMGA Single Pitch Instructor Program 30
The Climbing Site
Managing the Climbing Resource
© Aram Attarian, Ph.D. [email protected] Introduction It has been estimated by a number of different sources that there are over 500,000 active rock climbers in the United States today. Contributing to this growth are a variety of factors: the development and use of artificial climbing walls, the introduction of sport climbing, newer, safer, and more available equipment, popularity of instructional programs, texts and videos, a proliferation of commercial guide and instructional programs, visibility on television, and in motion pictures, magazine and newspaper coverage, and people seeking healthier lifestyles through activities that offer adventure and challenge. As a result of this growth impacts have emerged that have the potential are to compromise the sport. An impact is defined as an undesirable change in environmental or social condition of a recreation site or experience. Impacts can compromise the objectives of preserving the naturalness of an area by making recreational areas less attractive, appealing or functional to the visitor. Impacts can also detract from the recreation experience of visitors through crowding, conflicts between users, dissatisfaction, and visible human impacts. A number of impacts associated with the sport of rock climbing have been identified in areas throughout the United States; notably, impacts to soil, vegetation, disruption of wildlife, and the improper disposal of human waste. Litter, noise, visual impacts to the rock and its environs, bolting practices, and potential damage to historical and cultural sites have also been identified as major problems. The impact created from increased climbing activity is causing concern among resource managers and climbers alike. One problem confronting resource managers is their ability to integrate the growth of climbing with the requirements of protecting, preserving, and administering public and in some cases private lands. Currently, policies are being developed in climbing areas throughout the United States that will have repercussions on the future of climbing and the freedom climbers currently enjoy. The purpose of this section is to provide guides with a better understanding of the mechanisms by which ecological and social impacts are created through the sport of rock climbing. Resource managers on federal, state have documented impacts to soil, vegetation, wildlife, and the effects of climbing activity on cultural and historic sites and other visitors, and private lands where climbing has been an accepted recreational activity. In addition, a number of minimal impact or clean climbing practices are identified to help climbers minimize their impact on the vertical world and its environs to help usher in a new era of clean climbing. Ecological Impacts Ecological or environmental impacts are those impacts that have a detrimental effect on the physical and biological characteristics of a site or resource, thus making the area less natural. Examples of these impacts include soil erosion, vegetation damage, water pollution, and disruption of wildlife habitat. It has been documented that ecological impacts to natural areas will occur as a result of recreational use. Frequency of use usually identified as the cause for most of these impacts is a partial factor as to why some areas receive more damage than others. Behavior of the visitor and environmental conditions also play an important role. Other contributing factors include the type and season of use and the environmental condition of the site being used. Investigations have revealed that certain types of impacts are cumulative and tend to worsen over time and that the greatest amount of impact generally occurs with very little use. Impacts to Soil Observable damage to soil is usually a result of climbers seeking access to climbing areas. Damage to soil can limit aeration, affect soil temperature, moisture content, nutrition, and soil micro-organisms. Erosion, the most damaging impact to soil, occurs primarily through the development and use of trails. Problems may be more serious at higher elevations where the soil is thinner and rainfall greater. Climbers contribute to erosion by establishing access trails to climbing sites, developing trails at staging areas, and creating descent trails. In some instances, trails leading to climbing sites are usually ill-defined causing climbers to unknowingly take several paths to the same destination. In a short period of time, this practice leads to the development of steep, secondary trails, which begin to divert water, causing soil and vegetation loss, and

AMGA Single Pitch Instructor Program 31
trenching. Trail erosion can also occur when climbers and others take shortcuts through switchback trails. In some instances climbers have consciously engineered their own trails without official consent or knowledge. Impacts to soil on the rock are initiated during the development of a new climb. This happens when climbers resort to "gardening" techniques requiring the manual removal of soil and other debris from cracks and rock faces in order to place protection, provide handholds, and expose a climbable surface. In some cases, soil is mechanically removed from the rock face by using a wire brush to scour away soil and vegetation. Other climbing practices like the placement of fixed anchors may also damage the rock face leaving it unnatural in appearance. Climbers along with other recreationists may unknowingly have an impact on the quality of surface water through the secondary effects of soil erosion and the deposition of solid human waste. Erosion can reduce water quality resulting in a detrimental effect on plant and animal life. Along with soil erosion, the presence of humans in the backcountry can lead to the contamination of surface water with Giardia. The presence of Giardia in some areas has become a serious health problem. Climbers may contribute to water contamination in several ways: Giardia cysts may enter streams through surface run-off, especially when fecal matter is deposited both directly and indirectly by humans or by dogs (this fact in itself may warrant a greater awareness on part of the owner for the proper disposal of his/her pet's solid waste) and where little soil or organic matter is present. Increases in surface water contamination may also be linked to an increase in the population of rodents and other mammals made possible by the availability of human food sources. Climbers can compound this problem by disposing human waste improperly. Fecal matter may be present at the base of climbs, discarded on belay and bivouac ledges, or thrown off the rock face rather than disposed of properly. Impacts to Vegetation Of all the changes that occur as a result of recreational use, impacts to vegetation are the most visible. Impacts to vegetation are caused directly through stem breakage, crushed, torn, or abraded foliage, mutilation, and dead and dying vegetation. Damage to vegetation occurs most frequently through trampling. This act reduces plant vigor, limits reproduction or causes vegetation to die. Soil compaction as a result of trampling, minimizes the ability of roots to penetrate soil, impedes seed germination, reduces water infiltration rates, and may alter the physical properties of soil. Trees can also be affected with light use. Damage to vegetation occurs during the initial development and use of a recreational site, for example during the development of a new rock climbing area. The most common impacts to vegetation are caused through off trail hiking and mechanically removing vegetation from the rock surface when establishing new climbing routes. Trees can also be damaged due to the effects of trampling and their constant use as rappel/belay anchors, or being manually removed to make way for a climb. Some types of vegetation are more resistant to the effects of trampling than others. This suggests that climbers should be conscious of their approach to a climbing area and use resilient and resistant surfaces to access climbs whenever possible. For example, climbs should be approached using existing trails or resistant surfaces that might include dry creek beds, boulderfields, talus slopes, and slickrock. Greater care should be taken in deserts and alpine areas, which are highly susceptible to vegetation damage. The lack of vegetation, water, and organic soils in desert or arid environments like Canyonlands, Joshua Tree, and Red Rocks make it difficult for plants to regenerate once they have been damaged. Alpine environments similar to those found in Rocky Mountain National Park, the Wind Rivers, and the Tetons are the most fragile and impacts very noticeable. Low temperatures preserve impacts and extend the time needed for recovery. This is compounded by a short growing season. Impacts to Wildlife Investigations exploring human-wildlife encounters have not been documented as well as other impacts. However, while limited, past research has suggested that human-wildlife interactions may have a negative effect on population densities, feeding and migration patterns, reproduction, and diversity of wildlife. Moreover, impacts to wildlife are usually a result of recreationists unknowingly producing stressful situations for certain species. For example, the greatest potential for disruption to wildlife usually occurs when wildlife has a limited habitat; especially a habitat that attracts recreationists due to a particular feature. This may be true in the case of rock climbing, whereby climbers are attracted to remote rock faces to pursue their sport. In some instances these rock faces are ideal nest sites for raptors, especially peregrine and prairie falcons, and golden eagles.
AMGA Single Pitch Instructor Program 32
Behavior of cliff nesting birds may be altered by 1) human activity in close proximity to nest sites; 2) activity of significant duration; and 3) human presence above the nest site. The presence of climbers on a rock face can affect wildlife primarily through indirect interaction. Indirect interactions are usually a result of disturbance to habitat and other problems, which have been initiated by recreationists, primarily through unintentional harassment. Studies have suggested that the interactions of humans and wildlife are dependent primarily on the frequency of human presence rather than on the total amount of recreational activity or the number of recreationists present at a given time. For these and other reasons, many popular climbing areas are closed to climbing during nesting season. Social Impacts A growing number of climbing related social impacts have been reported in many areas. Social impacts are those impacts that have a negative effect on an individual's recreation experience through the interaction or behavior of others. Examples of climbing related social impacts may include: the crowding, the use of brightly colored software (clothing, webbing, rope) that contrasts with the rock face, shiny hardware (bolts, carabiners), the use of chalk, noise generated by climbers, litter, other visitors in the area, and the presence of climbers on the rock face (especially in scenic areas where their presence may detract from the experience of other visitors). The impacts of trail and rock erosion and vegetation damage may also detract from the aesthetic quality of a recreation area. Litter deposited by climbers is perhaps the most significant social impact. Litter generated by climbers usually appears in the form of cigarette butts, athletic tape, and food and water containers usually left at the base of a climb or on the climb itself. Spectators may also contribute to this problem by leaving litter in areas from which they view rock climbers for example, El Cap Meadows in Yosemite. Noise, another common social impact may detract from the experience of other recreationists and may also disturb wildlife. Audio devices popular with some climbers contribute to noise levels, as do obnoxious climbers, and the noise generated from portable power drills used to place bolts as dictated by current climbing practices. Of the impacts mentioned, bolting practices have received the greatest amount of attention, especially in climbing areas found within Wilderness areas. The placement of these permanent anchors provides a safe climbing experience when other means for safeguarding the climb may not be possible. While this practice may contribute to safer climbing, it's considered by some as a “human-caused alteration of the rock”. Cultural Resources Instructors and their clients may encounter cultural and historic when visiting climbing sites. These resources are varied and include Native American sacred sites, archaeological sites, petroglyphs and pictographs, ancient and historic trails, historic mining areas, cabins, hearths, springs, and rocks that have been used for grinding. Approach trails, impacts to staging areas and the rock face, and other factors may affect cultural resources just as they do natural resources. The Instructors Role As Instructors we have been given the unique task of providing our clients with challenging and fun climbing experiences while managing the risks associated with climbing. As part of this process you should also serve as environmental educators, giving clients the appropriate information, “tools”, and opportunities to make informed decisions on natural resource and management issues. To promote a meaningful climbing experience a good instructor will exhibit a high level of skill, risk management, a positive attitude, and awareness towards the vertical and surrounding environment. Instructors should also be enthusiastic, aware of their clients’ needs and abilities, show eagerness in helping clients learn the skills and techniques associated with rock climbing, and are in a unique position to educate their students on the merits of clean climbing. Clean Climbing The concept of clean climbing was initiated over thirty years ago through the 1972 Chouinard Equipment catalog. This new approach to climbing was in response to increases in climbing activity, advances in techniques, and improvements in equipment. These variables have combined to compromise the sport. The practice of clean climbing is more than the act of placing protection that doesn't damage the rock; it's an idea that promotes stewardship and appreciation of the vertical world and surrounding environment. Clean climbing should reflect concern for both the social and natural environment and introduce practices and techniques that encourage responsible climbing and environmental awareness. Clean climbing embraces the principles of LNT.
AMGA Single Pitch Instructor Program 33
Climbers, land managers, and grass roots climbing organizations across the country to minimize impacts and enhance the climbing experience have introduced these practices along with others. Teaching Strategies When introducing clean climbing practices the reasons for each technique or practice should be explained to clients in order to heighten the chance for compliance. Once skills have been taught, decision-making should be relinquished to clients allowing them the opportunity to gain a better understanding of the principles and practices introduced.
To help in this process, the Instructors job is threefold:
1. Help clients recognize the broader implications of their climbing experience, 2. Encourage each client to act responsibly by emphasizing the importance of clean climbing, and 3. Help the client understand the need to establish a set of personal environmental standards they can
use later in life. A variety of strategies can be used to help teach and reinforce the principles and practices of clean climbing including: role modeling, education, teachable moments, and service.
Role Modeling Instructors should present themselves as good role models by striving to maintain environmentally sound practices throughout the climbing experience. Role modeling has been shown by researchers to be an effective way of changing resource behavior. Similar behavior may also be effective for climbing environments. In this "practice what you preach" approach, the Instructor leads by explaining the concepts of clean climbing to heighten the client's awareness, followed by modeling the appropriate behavior and techniques and leading through example. Once clients begin to see and understand the practices presented, they begin to change their patterns of behavior. Education The use of education and information has been shown to be a successful method for minimizing the impacts associated with recreation in natural environments. However, in order for education and information programs to be effective they must be well organized and contain a variety of communication techniques to reinforce intended messages. Guides can be important sources for disseminating information and educating aspiring rock climbers on the virtues of clean climbing. Education programs that incorporate a hands on approach to teaching minimal impact techniques are generally viewed as having the greatest potential for influencing appropriate behavior. For example, while on-route to your climbing site take time to identify climber related impacts, discuss the implications, management practices, and introduce effective clean climbing practices. This information can be reinforced during subsequent climbing outings where students can continue to practice appropriate clean climbing techniques. Teachable Moments Instructors can utilize the occurrence of unplanned opportunities or circumstances to present topics and reinforce clean climbing practices when presented with them. These events allow clients to explore specific issues and meet them head on. For example, you and your clients arrive at a climbing area to discover the rock face above crowded with climbers with more waiting to get started. As a teachable moment a discussion might ensue on the issues surrounding crowding; what are the social and environmental impacts involved; how does this encounter affect your climbing experience; or what are some of the ways of reducing this type of encounter? Service Engaging in activities that promote service to the climbing environment can encourage your clients to participate in local projects (for example Adopt-A-Crag) to reinforce practices and attitudes developed earlier in earlier programs. Invite students back to participate in service projects and reward them with more climbing activities. This practice may be good for business and for the environment. Climbing area clean-ups, trail maintenance projects, participation in local climbing coalitions, special events, or involvement in access issues are all ways of getting involved and giving something back to the vertical environment.
AMGA Single Pitch Instructor Program 34
Conclusion As Instructors we can provide our clients with the experiences to help them become more knowledgeable climbers and outdoor persons. Participation in our programs can give all of us the opportunity for fun, excitement, adventure, and challenge. Perhaps most of all, the climbing experience offers us a chance to explore and shape our attitudes towards the vertical environment and ourselves and act responsibly on its behalf. "Rock climbing, as such, should be accepted with the greatest enthusiasm; yet I feel that certain values should be preserved in our contact with the mountains. While it is rarely a case of the complete ascendancy of acrobatics over esthetics, we should bear in mind that the mountains are more to us than a mere proving ground of strength and alert skill. Rock climbing should be considered a thrilling means to a more important end". Ansel Adams, 1932 Some Ideas for Reducing Group Impacts at Climbing Areas Planning and Group Management ! Climbing area choice and options – What level of impact can the area withstand? Are there any
environmental considerations or sensitive areas?
! Access information – As an Instructor, are you up to date with current access issues? ! Group size and staffing ratios – Is your group a manageable size?
! Liaison w/other groups – Could you reduce overcrowding through closer communication with other climbing groups?
! Timing visits – Do you avoid popular climbing areas during weekends and holidays?
! Skills training – Do you do any preliminary teaching before leaving for the climbing site, or is all of the training (equipment, knots, belaying) done on-site?
! Transportation and Parking – What are the parking considerations at the site you plan to visit? Is there adequate parking for all?
! Climber education – What opportunities are there for educating clients on the merits of “clean climbing” or LNT? What are the rules, ethics, etc. for the area you plan to visit?
Access, Conservation, and the Vertical Environment ! Access Restrictions – All climbing parties should familiarize themselves with any restrictions and/or
closures.
! Trails – Always use established trails to access and egress climbs, rather than creating new ones.
! Climbing Site – Is the site large enough to accommodate your group? Consideration should be given to risk management, resource impacts, and the overall recreation experience of your group and others.
! Questions – When in doubt about access, rules, regulations, etc. contact the local managing agency.
! Education – Take time to explain the environmental, social, and ethical aspects of climbing to your group.
! Boundaries – Establish geographical boundaries for your activities to help keep control of your group.
! Human Disposal – Make sure your group knows where the toilet facilities are or, if not available, how to deposit waste properly (“cat hole”, wag bag?).
! Use belay anchors where they are provided, rather than trees.
! Keep dogs under control (or leave them at home) and remove any dog poop from the cliff and its approach trail.
Transportation & Parking ! Parking – Is there sufficient parking where you intend to visit? If not, go elsewhere.
AMGA Single Pitch Instructor Program 35
! Options – Consider walking in, as this can add an additional dimension to your group’s experience.
! Respect local residents – Park in designated areas or off the road away from gates and driveways. Always respect the privacy of local landowners.
Climbing Area ! Site Selection – Select areas and routes that are appropriate for the age, skill level, etc. of your group.
Would artificial walls or other less-popular areas meet your needs?
! Group Size – Ensure that your group is manageable. Larger groups are more difficult to manage unless your staffing ratio is adjusted accordingly. Consider spreading large groups over a number of sites.
! Overcrowding – Respect the space of other climbers and make an attempt not to “overrun” a popular climbing area. Try, instead, to develop a system of rotating around different routes. This could also add variety to the day and help reduce possible conflicts with other climbers.
! Chalk Use – Is it really necessary for your group to use chalk? Beginners do not need chalk.
! Large groups can mitigate the effects of their size on soils and vegetation by:
• breaking into smaller groups • climbing in high-impact sites • meeting infrequently as a large group and only on durable sites
Ideas to Help Mitigate Climbing Related Impacts Soil/Vegetation • Encourage the use of resilient or resistant surfaces to access/descend climbs. • Use existing trails to access areas. • Flagstone or mulch high-use staging areas when/where appropriate. • Install fixed anchors at cliff-tops to discourage the use of trees as anchors. • Education is an important management tool for helping climbers to understand how they can reduce their impact on soils and vegetation. Fixed Protection • Encourage self-regulation among climbers. • Zoning (limit the placement of bolts to specified areas). • Peer-review process re: new route development. • Pre-paint bolts to match rock color. • Education is an important management tool to help climbers understand the nuances of placing fixed anchors. Chalk Use • Encourage the use of earth tone colors. • Continue use with education. • Volunteer clean-up of rock surfaces. • If available, use chalk alternatives. • Prohibit or minimize chalk use in high-impact areas. • Discourage beginner climbers from using chalk. Wildlife • Respect seasonal closures. • Be aware of critical habitats and avoid them. • Educating climbers on how they impact wildlife is an important management approach. Visual Impacts • Encourage the use of natural colored webbing for belay/rappel anchors. • Wear earth-tone colored clothing. • Install permanent belay/rappel anchors when conditions merit such.

AMGA Single Pitch Instructor Program 36
• Educating climbers on how to reduce their visual presence on the rock is an important management approach. Waste Disposal • Properly dispose of all human and animal waste. • Locate and use latrines or other waste disposal units at popular sites. • Use containers (Wag bags, Blue Bags, Mountain Cans, Poop Tubes) for waste disposal, and pack it out. • Educating climbers on proper waste disposal is an important management and public health consideration. Cultural/Historical Resources • Clearly mark trails to route foot traffic away from sensitive sites. • Close staging areas with significant cultural resources. • Create buffer zones, especially on cliff faces with petroglyphs, pictographs, cliff dwellings, etc. • Implement temporary voluntary moratoriums. • Educating climbers on how to recognize and reduce their impact on cultural and historical resources is an important management tool.
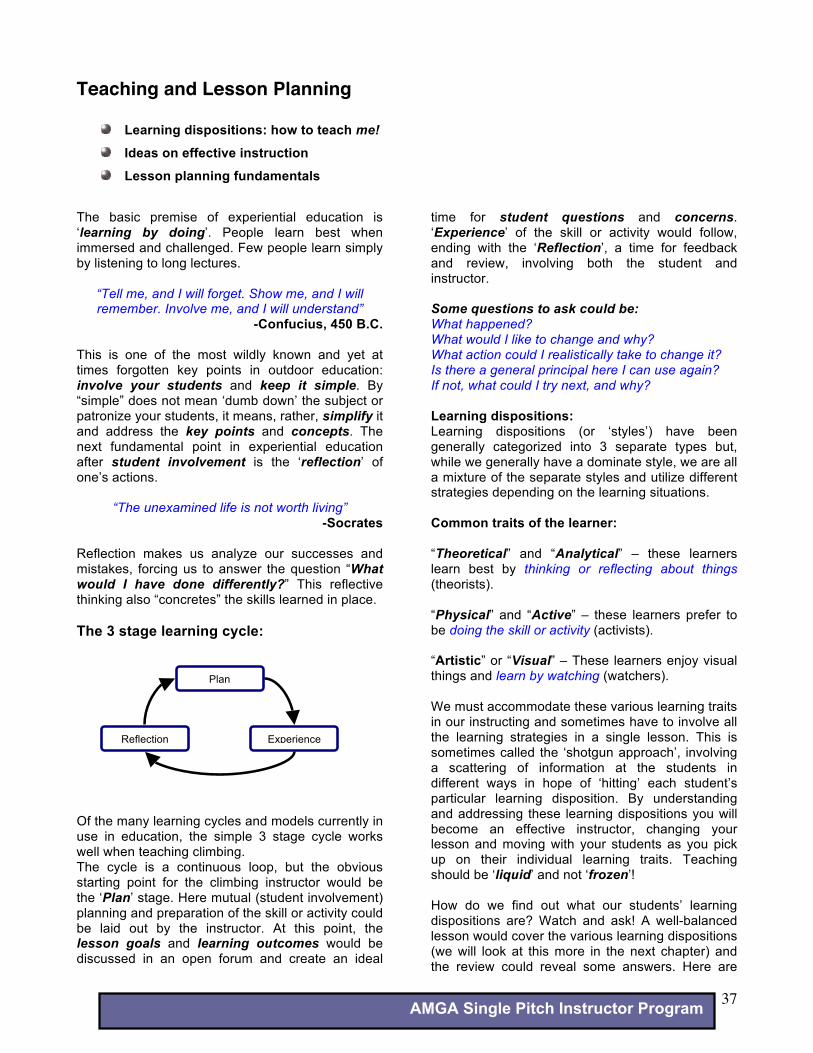
AMGA Single Pitch Instructor Program 37
Teaching and Lesson Planning
Learning dispositions: how to teach me!
Ideas on effective instruction
Lesson planning fundamentals
The basic premise of experiential education is ‘learning by doing’. People learn best when immersed and challenged. Few people learn simply by listening to long lectures.
“Tell me, and I will forget. Show me, and I will remember. Involve me, and I will understand”
-Confucius, 450 B.C. This is one of the most wildly known and yet at times forgotten key points in outdoor education: involve your students and keep it simple. By “simple” does not mean ‘dumb down’ the subject or patronize your students, it means, rather, simplify it and address the key points and concepts. The next fundamental point in experiential education after student involvement is the ‘reflection’ of one’s actions.
“The unexamined life is not worth living” -Socrates
Reflection makes us analyze our successes and mistakes, forcing us to answer the question “What would I have done differently?” This reflective thinking also “concretes” the skills learned in place. The 3 stage learning cycle:
Of the many learning cycles and models currently in use in education, the simple 3 stage cycle works well when teaching climbing. The cycle is a continuous loop, but the obvious starting point for the climbing instructor would be the ‘Plan’ stage. Here mutual (student involvement) planning and preparation of the skill or activity could be laid out by the instructor. At this point, the lesson goals and learning outcomes would be discussed in an open forum and create an ideal
time for student questions and concerns. ‘Experience’ of the skill or activity would follow, ending with the ‘Reflection’, a time for feedback and review, involving both the student and instructor. Some questions to ask could be: What happened? What would I like to change and why? What action could I realistically take to change it? Is there a general principal here I can use again? If not, what could I try next, and why? Learning dispositions: Learning dispositions (or ‘styles’) have been generally categorized into 3 separate types but, while we generally have a dominate style, we are all a mixture of the separate styles and utilize different strategies depending on the learning situations. Common traits of the learner: “Theoretical” and “Analytical” – these learners learn best by thinking or reflecting about things (theorists). “Physical” and “Active” – these learners prefer to be doing the skill or activity (activists). “Artistic” or “Visual” – These learners enjoy visual things and learn by watching (watchers). We must accommodate these various learning traits in our instructing and sometimes have to involve all the learning strategies in a single lesson. This is sometimes called the ‘shotgun approach’, involving a scattering of information at the students in different ways in hope of ‘hitting’ each student’s particular learning disposition. By understanding and addressing these learning dispositions you will become an effective instructor, changing your lesson and moving with your students as you pick up on their individual learning traits. Teaching should be ‘liquid’ and not ‘frozen’! How do we find out what our students’ learning dispositions are? Watch and ask! A well-balanced lesson would cover the various learning dispositions (we will look at this more in the next chapter) and the review could reveal some answers. Here are
Plan
Experience Reflection
AMGA Single Pitch Instructor Program 38
some questions you could ask during and after the lesson or activity: “What part of the lesson did you enjoy most?” “Why did that appeal to you?” “What part of the lesson didn’t you like and why?” “What would you like to do more of and why?” From here, you can start to build an idea of the student’s particular learning disposition and modify your lesson or activity to better suit them. Some questions can be pointless to you and the student, so think before you ask. Try to avoid one word answer or meaningless questions such as: “Did you like the demonstration on belaying?” “Didn’t you like my lecture on anchors?” “What do you think your learning style is?” Ideas on effective instruction: Students learn through vivid color, touch, smell, seeing, doing, stories that relate, and being actively involved both physically and mentally. It is our job as instructors to incorporate as many of the five senses in our teaching as we can. Some of this can be achieved by using effective communication skills.
Speech and body language are the two main communication devices of the human. The talented instructor should have a basic understanding of these tools and use them to their advantage. Firstly, let us look at the elements of speech: Tone can express anger, enthusiasm or boredom, so be aware of what you are (even subconsciously) conveying. Pitch is the level of volume. Don’t be afraid to raise or lower your voice once and a while for effect. Emphasizing words can stress the importance of something you say. Be careful to simplify, not overcomplicate, your speech. Be aware of the terminology and content. Be sure the students understand the meaning of words. Using metaphors and other figurative speech can help get the point across and make things more interesting.
Some of the main elements of body language are facial expressions, which convey a myriad of inner emotions. The talented instructor should be aware of this and use it to their advantage when trying to capture a student’s interest. Eye contact can be a reassuring sign of attentiveness but, at the same time, a stare could be perceived as a sign of aggression. Posture communicates signs of our inner emotions and is too broad a subject to mention here! Some recognizable posture-related emotions are: standing with your hands on your hips (this can be seen as aggressive), leaning towards someone (this can show warmth), and a purposeful walk (which might be interpreted as self confidence, whereas a stiff or rigid posture may reflect anger). “Good teaching is one-fourth preparation and three-fourths theater.”
-Gail Godwin Ideas on effective instruction: Visual aids are extremely useful in teaching to address students’ different learning traits, and can be of great use to the climbing instructor. Small whiteboards can be used in the field to display data or summarize information and act as a focal point in field lectures. Handouts of relevant information, key points, diagrams, graphs or photographs can be used with great effect if they are well laid out, clear, concise and convey the relevant information. Video and DVD is now more widely available to the instructor and is another great tool, partly because students generally are very familiar with this format. Only in the last few years with the new possibilities of recording in DVD format, editing, burning copies, and playing DVDs on a laptop has this format become more accessible, therefore practical for outdoor educators. Another key aid in conveying information is passing around examples for students to touch, feel and look at first-hand. For example, discussing the effect of rust on fixed pitons is one thing, to have a selection of brand new and rusted, rotten pins for students to pass round, examine and compare is infinitely better. This is also true for lessons on belaying, climbing protection; actually handling the equipment at the beginning of the lesson creates a better understanding and incorporates the different senses and learning styles.
Communication skills - the ability to: ! Speak to students as individuals and as
groups. ! Listen to students as individuals and as
groups. ! Pre-preparing handouts and other learning
materials. ! Give clear explanations. ! Summarize information. ! Use language appropriate to your audience. ! Use language appropriate to your situation.
AMGA Single Pitch Instructor Program 39
Teachable moments are times in a lesson when a key point may be brought up by a student, or something happens in the field that can illustrate a point. These can arise at any time during the lesson or activity and are an ideal time to get across key pieces of information. Be sure that the information is relevant and worthwhile stopping the class for. Be wary of going off on tangents with the lesson. Lesson planning fundamentals: Planning and preparation are key elements to giving a successful lesson. The first objectives when planning a lesson is lesson goals and objectives. Are you preparing a day for novice climbers on a single-pitch crag, or teaching advanced anchoring principles to novice instructors? You must work out what are achievable and expected outcomes for these different circumstances and plan your lesson accordingly. You must always plan to be flexible. This ensures that you are ready for anything. For example, what happens if it rains, the students don’t bring the required equipment, or a group is already at the site you had planed to use for the day? Remember the ‘Five P’s’:
‘Prior Planning Prevents Poor Performance’
While preparing for a lesson, it is a good idea to jot down ideas in a lesson plan. A good lesson plan should have the following basic information: Location: Is the area free, have you alternatives? Activity/Level: Here, the activity should be detailed, along with what level. For example, “single- pitch climbing for novice climbers”. Duration: How long will the lesson take? How much time do you have? Aims: What do you specifically want to cover in the lesson or activity? Outcomes: What do want the students to achieve from this lesson? Content: An overview of how you are going to ‘break down’ the lesson. Methods: What are the teaching methods you will employ to present the information. Assessment: How will you asses if the students understand the lesson? Question/Answer sessions? Demonstrating a skill? Does this lesson need assessment? Resources: What equipment will you need? See the next page for an example of a lesson plan.
The lesson: ! Prepare for the lesson, have a plan! ! Look professional - neat, well presented,
prepared, and be early for the lesson! ! Know your audience. Start with introductions
and ask student their backgrounds and goals for the lesson.
! Discuss expectations and logistics. What you will be doing, for how long, where, what you will need, etc.
! Try to ensure the group is not too hot, cold, tired or distracted.
Effective instruction: ! Physically move around the group while
talking and discussing. ! Involve the whole group in all aspects of the
lesson. ! Know your subject. ! Address all the student’s learning dispositions
in your teaching. ! Pitch the lesson at the correct level for the
students; it is your job to simplify the information, not complicate it!
! Summarize and conclude key information in the lesson.
! Allow ample time for feedback and review of lesson, instructor and students.
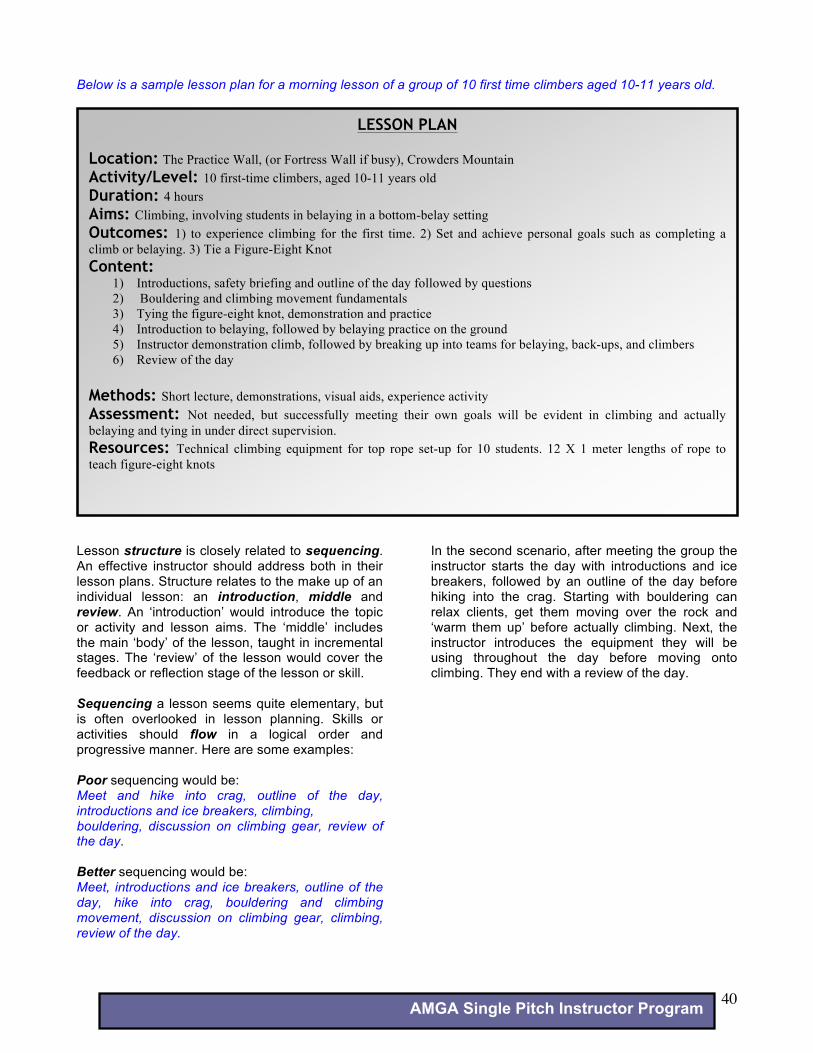
AMGA Single Pitch Instructor Program 40
Below is a sample lesson plan for a morning lesson of a group of 10 first time climbers aged 10-11 years old.
Lesson structure is closely related to sequencing. An effective instructor should address both in their lesson plans. Structure relates to the make up of an individual lesson: an introduction, middle and review. An ‘introduction’ would introduce the topic or activity and lesson aims. The ‘middle’ includes the main ‘body’ of the lesson, taught in incremental stages. The ‘review’ of the lesson would cover the feedback or reflection stage of the lesson or skill. Sequencing a lesson seems quite elementary, but is often overlooked in lesson planning. Skills or activities should flow in a logical order and progressive manner. Here are some examples: Poor sequencing would be: Meet and hike into crag, outline of the day, introductions and ice breakers, climbing, bouldering, discussion on climbing gear, review of the day. Better sequencing would be: Meet, introductions and ice breakers, outline of the day, hike into crag, bouldering and climbing movement, discussion on climbing gear, climbing, review of the day.
In the second scenario, after meeting the group the instructor starts the day with introductions and ice breakers, followed by an outline of the day before hiking into the crag. Starting with bouldering can relax clients, get them moving over the rock and ‘warm them up’ before actually climbing. Next, the instructor introduces the equipment they will be using throughout the day before moving onto climbing. They end with a review of the day.
LESSON PLAN Location: The Practice Wall, (or Fortress Wall if busy), Crowders Mountain Activity/Level: 10 first-time climbers, aged 10-11 years old Duration: 4 hours Aims: Climbing, involving students in belaying in a bottom-belay setting Outcomes: 1) to experience climbing for the first time. 2) Set and achieve personal goals such as completing a climb or belaying. 3) Tie a Figure-Eight Knot Content:
1) Introductions, safety briefing and outline of the day followed by questions 2) Bouldering and climbing movement fundamentals 3) Tying the figure-eight knot, demonstration and practice 4) Introduction to belaying, followed by belaying practice on the ground 5) Instructor demonstration climb, followed by breaking up into teams for belaying, back-ups, and climbers 6) Review of the day
Methods: Short lecture, demonstrations, visual aids, experience activity Assessment: Not needed, but successfully meeting their own goals will be evident in climbing and actually belaying and tying in under direct supervision. Resources: Technical climbing equipment for top rope set-up for 10 students. 12 X 1 meter lengths of rope to teach figure-eight knots
AMGA Single Pitch Instructor Program 41
Professionalism Quality instructors should exhibit professional behavior at all times. What does it mean to be a ‘professional instructor’? We will look at the following common required traits and skills in detail to discover the foundations of a professional instructor. Appearance The professional instructor should be well-presented at all times. A neat and clean appearance will inspire confidence in your clients, whereas a scruffy-looking instructor with dirty, torn and patched clothes will not. People come to a decision of what they think about a person after only a few moments of meeting and talking with them so make a good impression! Demeanor Being courteous to the clients and other climbers and recreationalists is a key trait of a professional instructor. Use ‘acceptable’ language, avoiding curses or derogatory remarks of any form. It is wise in most cases to keep political and religious viewpoints to oneself while in the professional guiding capacity. Timekeeping Good timekeeping is very important to the professional instructor. Showing up just in time or late when meeting clients is a bad start to the day. The instructor should arrive early and organized for the day ahead and be prepared for when the clients arrive. The instructor should also have a time plan for the day and keep on track to ensure the day runs smoothly. Equipment The instructor’s equipment should be in good condition and organized, having gone over all their equipment needs and inspected their gear the evening before and packed their backpack for the next day. A hastily organized backpack in the morning will lead to the instructor possibly forgetting key items. Equipment should be checked and checked again after meeting the clients and sorting out their equipment needs. Technical Skills and Risk Management The instructor should have mastery of all technical skills required to work effectively in a single-pitch setting. As well as technical skills, the instructor should also be knowledgeable in such skills as risk management, weather interpretation, navigation and first aid. The professional instructor should not try and meet the minimum standard for ongoing education or re-certification. Rather, they should seek out additional training on an annual basis. This could be in the form of attending conference workshops, training days with co-workers, a guide service or nationally recognized organization. Environmental The professional instructor should teach and practice current Leave No Trace (LNT) protocols in their purest form, as clients will always take away a watered-down version. The instructor should keep up-to-date with current LNT protocols for the region they are working in (desert, forest, etc). Every day the instructor should plan to have their trip impact the wilderness as little as possible. Organizational Skills A good instructor should have the ability to effectively organize logistics such as arrange food requirements, transportation, commercial use and camping permits, personal and group equipment needs, etc. Instructional and Facilitation Skills A professional instructor should have great teaching ability and will adapt their style to suite the needs of the clients. They should have good communication skills and be able to resolve conflicts. Instructors must have excellent “people skills”, adaptability and tact.
AMGA Single Pitch Instructor Program 42
Climbing Movement Instruction As climbers, we know how to climb rock efficiently, moving, pulling and pushing with our limbs, but how can you be effective at instructing climbing and what should instructors be teaching beginners about climbing movement? This article will present: (a) ideas on coaching techniques for climbing, (b) drills and drill development, and (c) concepts for climbing movement instruction. Coaching Techniques Goals Instruction and coaching is an interaction between the instructor and the client. Even if you are exceptional at climbing movement skills, the quality of this interaction depends on your communication skills and instructional techniques. Good instruction begins with setting reasonable and attainable expectations. There are three types of instructional goals:
• Outcome goals – getting to the top of Bloody Crack • Performance goals – holding body weight on a hand jam • Process goals – laying the thumb across the palm and folding the fingers over to hand jam
Beginners will focus on outcomes and, as an instructor, you should be directing the clients focus toward performance goals and process goals. Clearly defining the process goals for beginners will direct their attention on one task. This is an important part of coaching, focusing on one thing at a time. Too much information will lead to paralysis by analysis; focus on one goal at a time. Feedback There is more to coaching that simply saying, “Good job, you can do it”. Excellent instruction is dependent on what you say, when you say it and how much you say. Guidelines for coaching feedback follow these general principles:
• Limit feedback – focus on one task • Direct attention on external dimension of focus • Use internal focus sparingly • Use the appropriate type of feedback
When giving feedback, focus on the most critical task only. For example, saying “You need to fold the fingers more on the hand jam, your left heel was too high and your body position was too far left” would be too much information at one time for it to be of any value to the client. Proper coaching feedback would be, “Move your hip two inches to the right.” This comment has one focus, and directs the client toward an external focus. External focus direct attention toward external reference points that the client can clearly see, rather than using internal or what feels good. Even if there are other problems with technique, focus on one thing until the client is having success. There are generally three types of feedback: motivational, reinforcement, and informational.
• Motivational – encouragement for the client • Reinforcement – encourages positive results • Informational – instructions on improvement and error correction
At times, it will be valuable to provide motivational feedback to encourage people to keep trying. Use this sparingly, otherwise it will loose effectiveness and become a distraction. If you find the need to give lots of motivational feedback to keep the client engaged in what you are teaching, you may have set the goals too high. When a client executes a task correctly, use reinforcement feedback. Begin by having the client self assess his or her performance; follow this with your assessment and lots of praise. This is an appropriate time to use an internal focus. “You shifted your hip completely over the foot, excellent; how did that feel? Was it easier?” Informational feedback is given when the client understands what to do, but is failing to execute the task properly. Be prescriptive in how you phrase the feedback. Tell the client what he or she needs to do to improve rather than what they are doing wrong; focus on positives.

AMGA Single Pitch Instructor Program 43
Drills and Drill Development Climbing is a seemingly complex arrangement of movement for the inexperienced. Drills are an excellent tool for instructing climbing movement. Drills will help provide focus for the client and simplify a complex serial task, such as footwork. A properly designed progression of drills will break down the complexity of climbing and build it up again through logical systematic progression. Setting the goals for the client precedes drill develop. Upon determining the goals for instruction, you will be able to define a serial task, such as footwork. To develop drills from this point, follow these steps:
• Break the serial task into discrete tasks • Determine the proper sequence if necessary • Develop individual drills for serial tasks
Develop the individual drills for instruction by following the general guidelines:
• Isolation – act of diverting focus on a single task • Exaggeration – emphasizing a particular element of the discrete task • Repetition – repeat the drill using a variety of patterns
Isolate the focus of each drill. For example, using a 1-2 hesitation count before weighting the foot on a hold will direct the attention of the person toward carefully placing the foot. This concept should be frontloaded before the drill. Frontloading should address: What are you trying to accomplish, and how you are going to learn this? Practice one task at a time. Exaggeration of each task will further focus the client. Techniques that will exaggerate each drill include:
• Slow motion • Hesitations • Training devices • Cueing words
Over emphasizing a skill will assist in the learning process for the client. Certain skills may be too subtle for beginners to grasp; exaggeration aids in the learning. Using simple devices can also exaggerate tasks. A rope folded in half, placed on the ground can be used to develop weight shifts. Place each strand 12” to 18” apart and have the clients keep the rope between the feet as they walk. Hesitating with each foot placement greatly enhances this drill. Repetition of each task will engrain the motor pattern into the brain. Proper repetition will have a specific order: blocking, random, and varied. Begin by blocking the practice or repeating the same drill. Random practice combines two or three drills and rehearsing each drill in a single session. Next, varied practice takes the drills to different environments such as slabs, vertical and overhangs, or sandstone versus granite. Following this progression of block, random and varied practice will greatly enhance development and retention of skills. Climbing Movement Concepts Experienced climbers realize the wide variety of climbing techniques, but what should instructors teach a beginner? Climbing instruction can be broken down into three concepts: contact, body position, and movement patterns. Contact relates to how we touch the rock. As an instructor, you should teach the general concepts about contact, as well as frontload any specific techniques the client will be utilizing for a given environment. If you were in an area with a lot of slab climbing, it would seem inappropriate to teach hand jamming. General concepts to teach include:
• Friction is dependent on the surfaces and the pressure directed perpendicular (or inward) towards the rock
• Foot placement should be precise – watch your feet until you make contact • Select the best position on the rock relative to your body position • Use the best part of the shoe, usually the big toe • Relax – lower the heels and relax the grip • Correct body position will increase friction of the shoes • Overall goal is to get as much of our weight on the feet
AMGA Single Pitch Instructor Program 44
Most beginners will over reach holds and over grip. This is indicated by observing elevated heels. Additionally, beginners will have sloppy foot placements and tend to slap the feet on the rock. Be aware of these tendencies and coach the climber to eliminate these habits. Body Position The correct body position is dependent on the angle of the rock; however, there are a few general principles to consider when instructing climbing. The more stable a climber is, the less he or she will have to pull. Stability is a function of a wide base and a low center of gravity (balance point or CG) over this base. When teaching climbing position, these concepts apply Center – move the CG between the feet or over one foot Settle – lower the CG by bending the knees Straight – keep the dominant (top) arm straight and try to have the CG under this hand Movement Patterns When instructing climbing, one of the most overlooked concepts is the movement pattern. Too frequently, instructors focus on how to crimp and smear when real gains can come from developing movement patterns. The movement cycle has three steps:
• Step Up – during this step, the climber repositions the feet higher by using weight shifts and flagging. Do not move the torso up at this time.
• Extension - with the feet repositioned higher, push the torso toward the new target handhold. • Stabilization – again, reposition the feet if necessary and go through the process of CSS
Beginners will have a strong tendency to press out the leg every time they step up with the foot. This forces the climber into a bent arm position 80% of the time and is why beginners pump out so easily. Additionally, climbers who do this will loose the benefit of pushing with both feet. In the extension step, typically beginners will over extend the torso and will end up with a bent arm when they grab the new handhold. Instruct the climber to extend the torso just enough to reach the next hold and no more. Lastly, beginning climbers fail to stabilize once a new hold is reached. Teach beginners to find the best configuration for the body relative to the new hold. This may mean the feet need to be repositioned, weight should shift to the left or right, a foot switch, or flagging; these techniques are dependent on the available holds and skill of the climber. Teaching the movement cycle will also give the client something to focus on when having difficulties. Remind them of what they need to do based on where they are faltering: “Your problem is with your step up; you need to focus on keeping the torso lower while you reposition your feet.” In summary, the ability for an instructor to teach climbing movement is dependent on a variety of skills: setting realistic goals, coaching techniques and communication, developing drills that foster learning, and instructing climbing concepts that apply in a variety of situations. Be creative and understand that not everyone learns the same way you do; seek to find ways to reach everyone. © 2008 Patrick Weaver
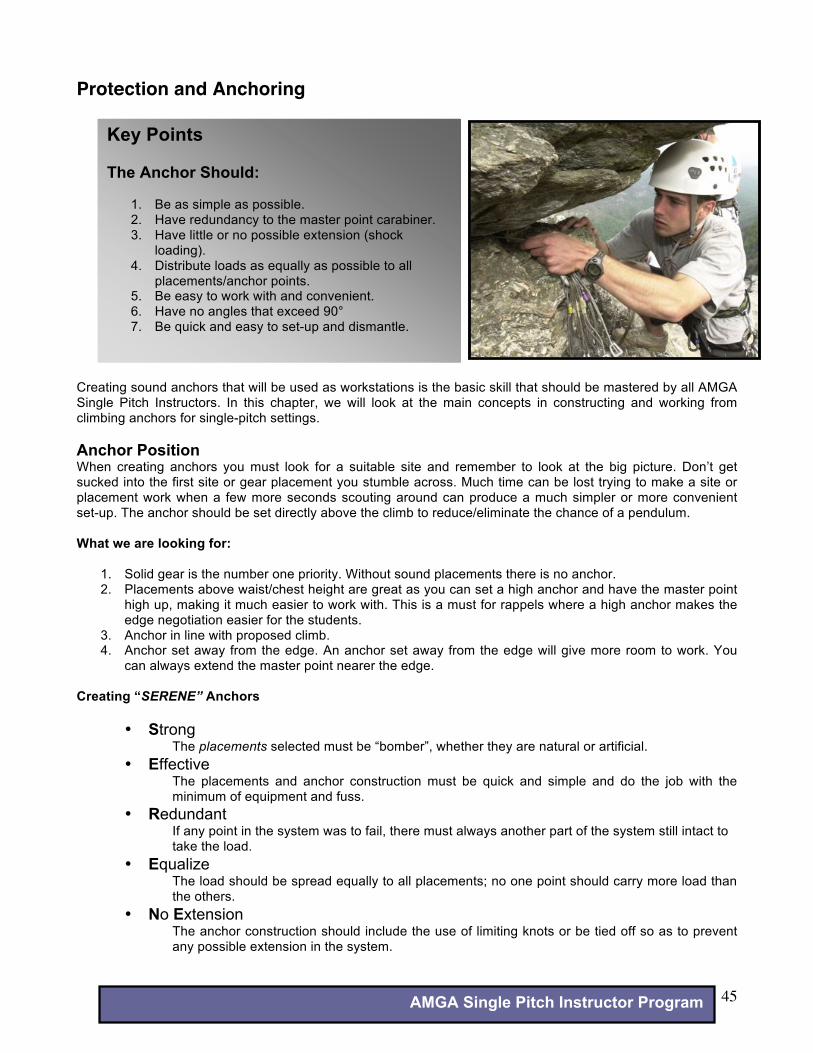
AMGA Single Pitch Instructor Program 45
Protection and Anchoring
Creating sound anchors that will be used as workstations is the basic skill that should be mastered by all AMGA Single Pitch Instructors. In this chapter, we will look at the main concepts in constructing and working from climbing anchors for single-pitch settings. Anchor Position When creating anchors you must look for a suitable site and remember to look at the big picture. Don’t get sucked into the first site or gear placement you stumble across. Much time can be lost trying to make a site or placement work when a few more seconds scouting around can produce a much simpler or more convenient set-up. The anchor should be set directly above the climb to reduce/eliminate the chance of a pendulum. What we are looking for:
1. Solid gear is the number one priority. Without sound placements there is no anchor. 2. Placements above waist/chest height are great as you can set a high anchor and have the master point
high up, making it much easier to work with. This is a must for rappels where a high anchor makes the edge negotiation easier for the students.
3. Anchor in line with proposed climb. 4. Anchor set away from the edge. An anchor set away from the edge will give more room to work. You
can always extend the master point nearer the edge. Creating “SERENE” Anchors
• Strong The placements selected must be “bomber”, whether they are natural or artificial.
• Effective The placements and anchor construction must be quick and simple and do the job with the minimum of equipment and fuss.
• Redundant If any point in the system was to fail, there must always another part of the system still intact to take the load.
• Equalize The load should be spread equally to all placements; no one point should carry more load than the others.
• No Extension The anchor construction should include the use of limiting knots or be tied off so as to prevent any possible extension in the system.
Key Points The Anchor Should:
1. Be as simple as possible. 2. Have redundancy to the master point carabiner. 3. Have little or no possible extension (shock
loading). 4. Distribute loads as equally as possible to all
placements/anchor points. 5. Be easy to work with and convenient. 6. Have no angles that exceed 90° 7. Be quick and easy to set-up and dismantle.
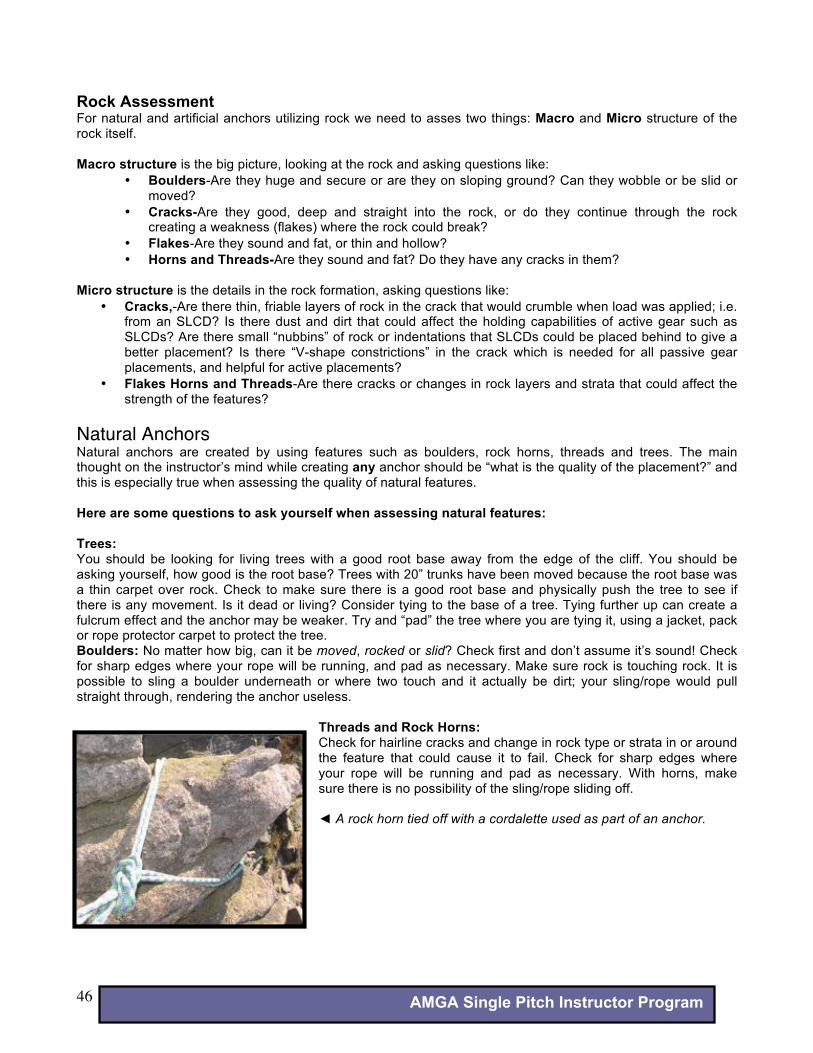
AMGA Single Pitch Instructor Program 46
Rock Assessment For natural and artificial anchors utilizing rock we need to asses two things: Macro and Micro structure of the rock itself. Macro structure is the big picture, looking at the rock and asking questions like:
• Boulders-Are they huge and secure or are they on sloping ground? Can they wobble or be slid or moved?
• Cracks-Are they good, deep and straight into the rock, or do they continue through the rock creating a weakness (flakes) where the rock could break?
• Flakes-Are they sound and fat, or thin and hollow? • Horns and Threads-Are they sound and fat? Do they have any cracks in them?
Micro structure is the details in the rock formation, asking questions like:
• Cracks,-Are there thin, friable layers of rock in the crack that would crumble when load was applied; i.e. from an SLCD? Is there dust and dirt that could affect the holding capabilities of active gear such as SLCDs? Are there small “nubbins” of rock or indentations that SLCDs could be placed behind to give a better placement? Is there “V-shape constrictions” in the crack which is needed for all passive gear placements, and helpful for active placements?
• Flakes Horns and Threads-Are there cracks or changes in rock layers and strata that could affect the strength of the features?
Natural Anchors Natural anchors are created by using features such as boulders, rock horns, threads and trees. The main thought on the instructor’s mind while creating any anchor should be “what is the quality of the placement?” and this is especially true when assessing the quality of natural features. Here are some questions to ask yourself when assessing natural features: Trees: You should be looking for living trees with a good root base away from the edge of the cliff. You should be asking yourself, how good is the root base? Trees with 20” trunks have been moved because the root base was a thin carpet over rock. Check to make sure there is a good root base and physically push the tree to see if there is any movement. Is it dead or living? Consider tying to the base of a tree. Tying further up can create a fulcrum effect and the anchor may be weaker. Try and “pad” the tree where you are tying it, using a jacket, pack or rope protector carpet to protect the tree. Boulders: No matter how big, can it be moved, rocked or slid? Check first and don’t assume it’s sound! Check for sharp edges where your rope will be running, and pad as necessary. Make sure rock is touching rock. It is possible to sling a boulder underneath or where two touch and it actually be dirt; your sling/rope would pull straight through, rendering the anchor useless.
Threads and Rock Horns: Check for hairline cracks and change in rock type or strata in or around the feature that could cause it to fail. Check for sharp edges where your rope will be running and pad as necessary. With horns, make sure there is no possibility of the sling/rope sliding off. ! A rock horn tied off with a cordalette used as part of an anchor.
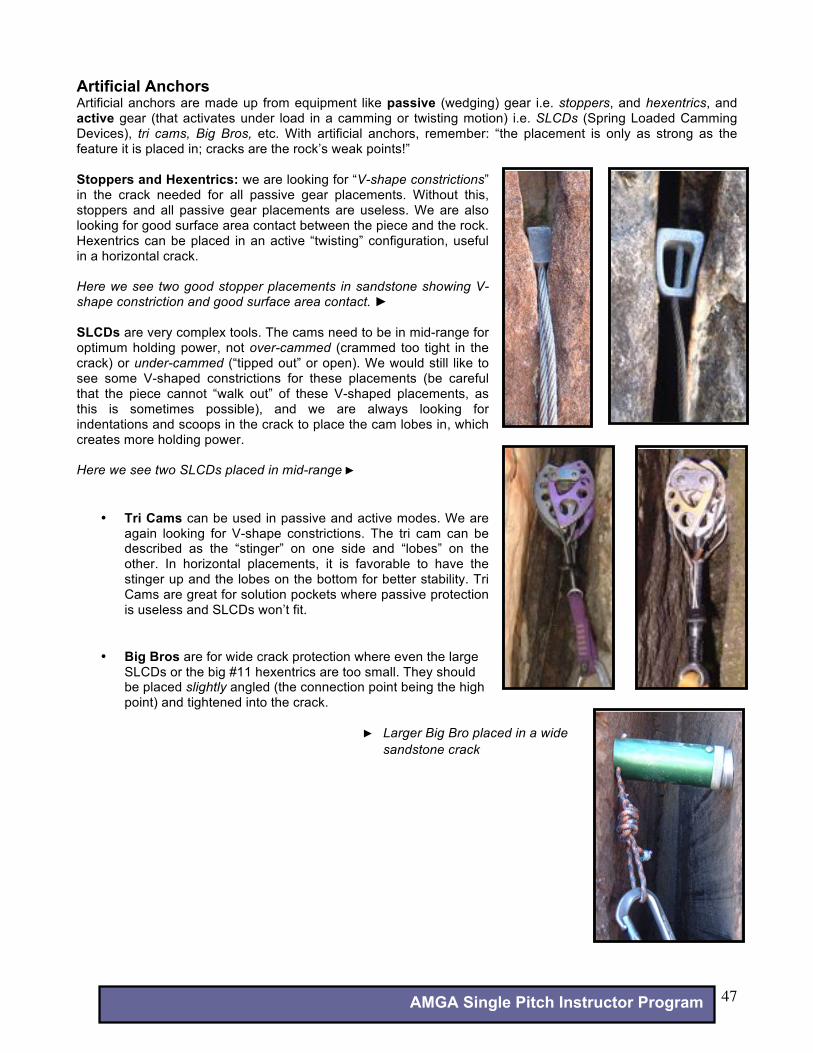
AMGA Single Pitch Instructor Program 47
Artificial Anchors Artificial anchors are made up from equipment like passive (wedging) gear i.e. stoppers, and hexentrics, and active gear (that activates under load in a camming or twisting motion) i.e. SLCDs (Spring Loaded Camming Devices), tri cams, Big Bros, etc. With artificial anchors, remember: “the placement is only as strong as the feature it is placed in; cracks are the rock’s weak points!”
Stoppers and Hexentrics: we are looking for “V-shape constrictions” in the crack needed for all passive gear placements. Without this, stoppers and all passive gear placements are useless. We are also looking for good surface area contact between the piece and the rock. Hexentrics can be placed in an active “twisting” configuration, useful in a horizontal crack.
Here we see two good stopper placements in sandstone showing V-shape constriction and good surface area contact. " SLCDs are very complex tools. The cams need to be in mid-range for optimum holding power, not over-cammed (crammed too tight in the crack) or under-cammed (“tipped out” or open). We would still like to see some V-shaped constrictions for these placements (be careful that the piece cannot “walk out” of these V-shaped placements, as this is sometimes possible), and we are always looking for indentations and scoops in the crack to place the cam lobes in, which creates more holding power. Here we see two SLCDs placed in mid-range !
• Tri Cams can be used in passive and active modes. We are
again looking for V-shape constrictions. The tri cam can be described as the “stinger” on one side and “lobes” on the other. In horizontal placements, it is favorable to have the stinger up and the lobes on the bottom for better stability. Tri Cams are great for solution pockets where passive protection is useless and SLCDs won’t fit.
• Big Bros are for wide crack protection where even the large SLCDs or the big #11 hexentrics are too small. They should be placed slightly angled (the connection point being the high point) and tightened into the crack.
! Larger Big Bro placed in a wide
sandstone crack
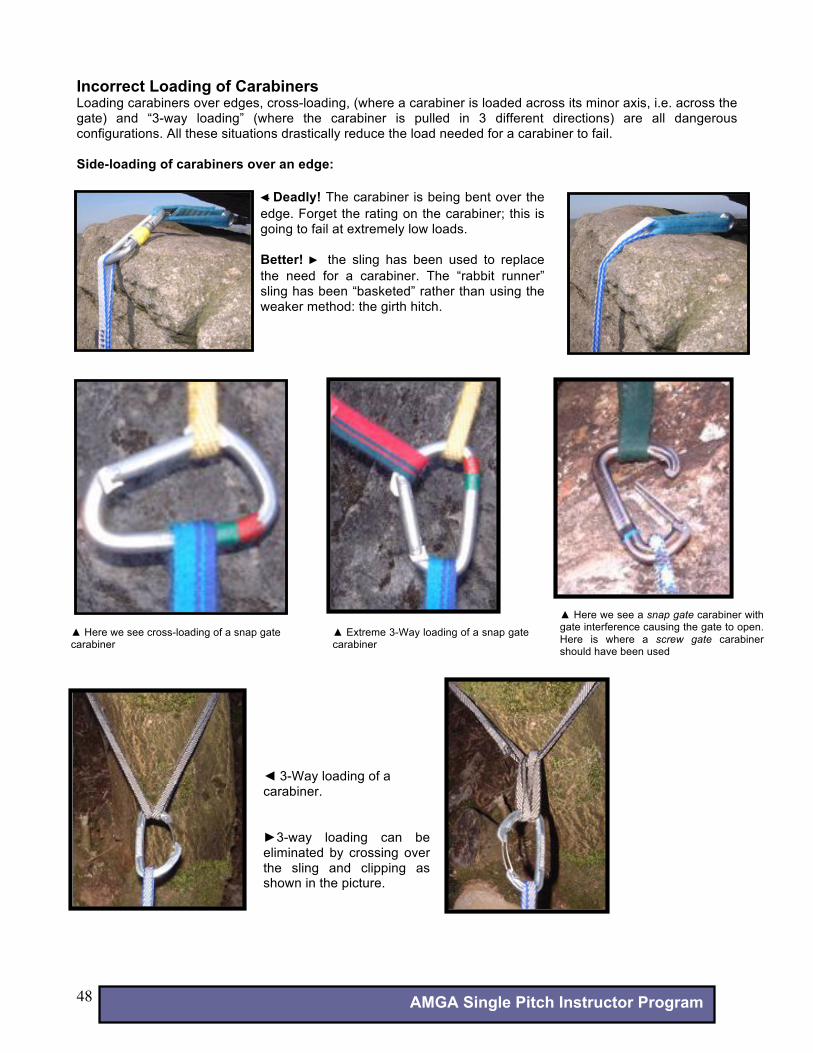
AMGA Single Pitch Instructor Program 48
Incorrect Loading of Carabiners Loading carabiners over edges, cross-loading, (where a carabiner is loaded across its minor axis, i.e. across the gate) and “3-way loading” (where the carabiner is pulled in 3 different directions) are all dangerous configurations. All these situations drastically reduce the load needed for a carabiner to fail. Side-loading of carabiners over an edge:
.
" Deadly! The carabiner is being bent over the edge. Forget the rating on the carabiner; this is going to fail at extremely low loads. Better! ! the sling has been used to replace the need for a carabiner. The “rabbit runner” sling has been “basketed” rather than using the weaker method: the girth hitch.
! 3-Way loading of a carabiner. "3-way loading can be eliminated by crossing over the sling and clipping as shown in the picture.
# Here we see cross-loading of a snap gate carabiner
# Extreme 3-Way loading of a snap gate carabiner
# Here we see a snap gate carabiner with gate interference causing the gate to open. Here is where a screw gate carabiner should have been used
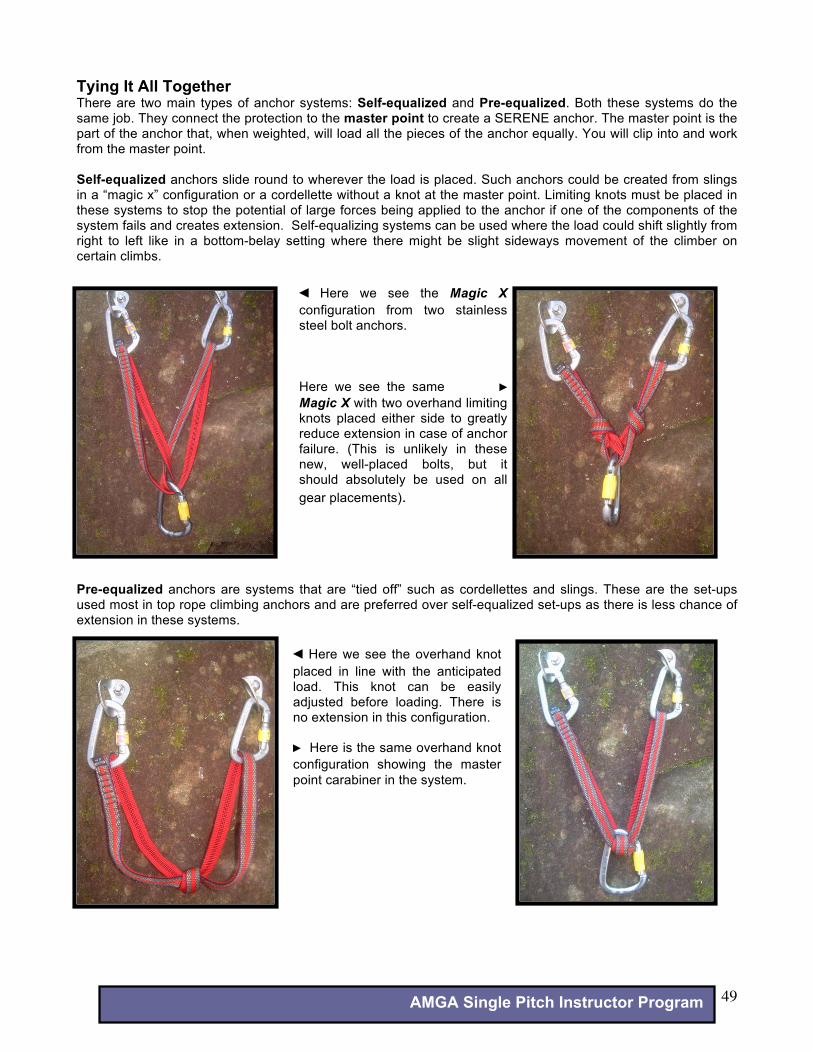
AMGA Single Pitch Instructor Program 49
Tying It All Together There are two main types of anchor systems: Self-equalized and Pre-equalized. Both these systems do the same job. They connect the protection to the master point to create a SERENE anchor. The master point is the part of the anchor that, when weighted, will load all the pieces of the anchor equally. You will clip into and work from the master point. Self-equalized anchors slide round to wherever the load is placed. Such anchors could be created from slings in a “magic x” configuration or a cordellette without a knot at the master point. Limiting knots must be placed in these systems to stop the potential of large forces being applied to the anchor if one of the components of the system fails and creates extension. Self-equalizing systems can be used where the load could shift slightly from right to left like in a bottom-belay setting where there might be slight sideways movement of the climber on certain climbs.
Pre-equalized anchors are systems that are “tied off” such as cordellettes and slings. These are the set-ups used most in top rope climbing anchors and are preferred over self-equalized set-ups as there is less chance of extension in these systems.
" Here we see the Magic X configuration from two stainless steel bolt anchors. Here we see the same ! Magic X with two overhand limiting knots placed either side to greatly reduce extension in case of anchor failure. (This is unlikely in these new, well-placed bolts, but it should absolutely be used on all gear placements).
" Here we see the overhand knot placed in line with the anticipated load. This knot can be easily adjusted before loading. There is no extension in this configuration. ! Here is the same overhand knot configuration showing the master point carabiner in the system.
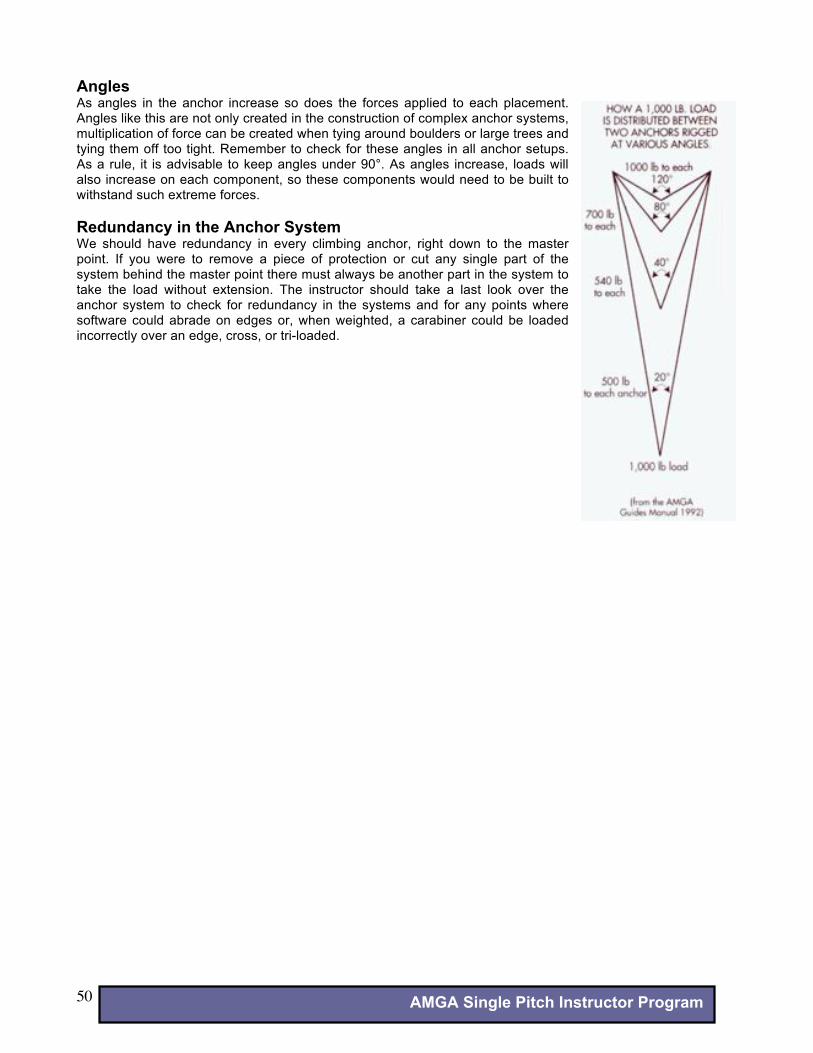
AMGA Single Pitch Instructor Program 50
Angles As angles in the anchor increase so does the forces applied to each placement. Angles like this are not only created in the construction of complex anchor systems, multiplication of force can be created when tying around boulders or large trees and tying them off too tight. Remember to check for these angles in all anchor setups. As a rule, it is advisable to keep angles under 90°. As angles increase, loads will also increase on each component, so these components would need to be built to withstand such extreme forces. Redundancy in the Anchor System We should have redundancy in every climbing anchor, right down to the master point. If you were to remove a piece of protection or cut any single part of the system behind the master point there must always be another part in the system to take the load without extension. The instructor should take a last look over the anchor system to check for redundancy in the systems and for any points where software could abrade on edges or, when weighted, a carabiner could be loaded incorrectly over an edge, cross, or tri-loaded.
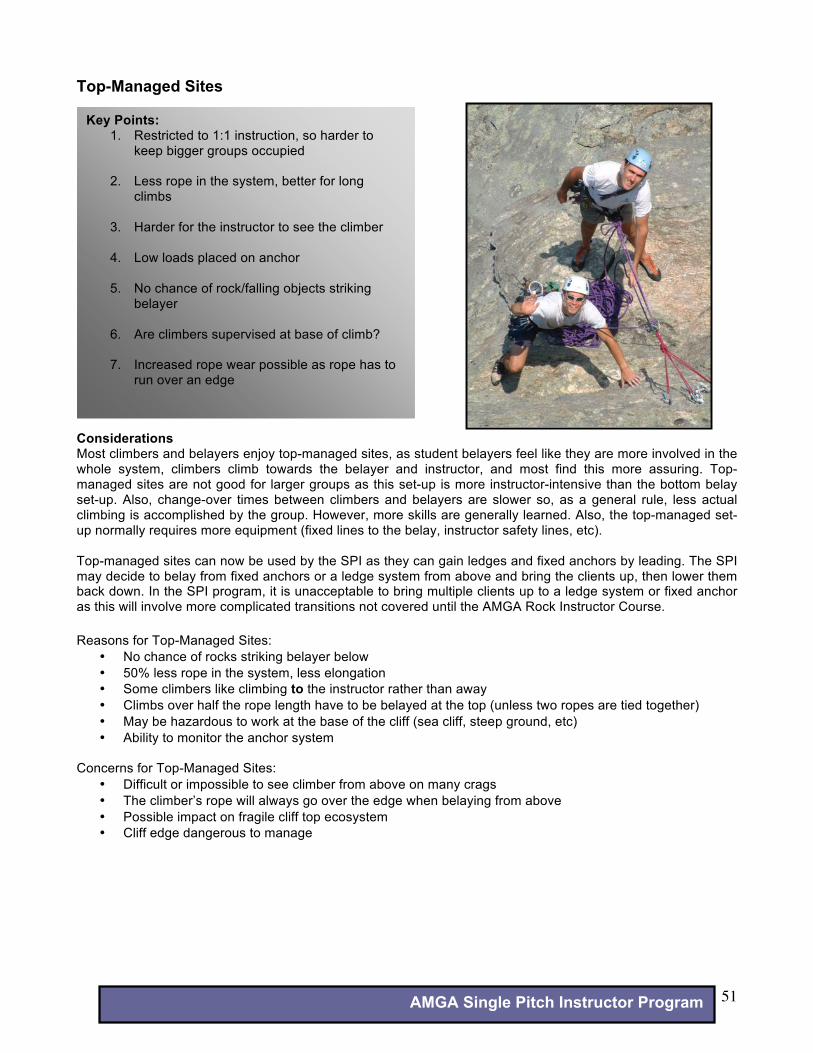
AMGA Single Pitch Instructor Program 51
Top-Managed Sites
Considerations Most climbers and belayers enjoy top-managed sites, as student belayers feel like they are more involved in the whole system, climbers climb towards the belayer and instructor, and most find this more assuring. Top- managed sites are not good for larger groups as this set-up is more instructor-intensive than the bottom belay set-up. Also, change-over times between climbers and belayers are slower so, as a general rule, less actual climbing is accomplished by the group. However, more skills are generally learned. Also, the top-managed set-up normally requires more equipment (fixed lines to the belay, instructor safety lines, etc). Top-managed sites can now be used by the SPI as they can gain ledges and fixed anchors by leading. The SPI may decide to belay from fixed anchors or a ledge system from above and bring the clients up, then lower them back down. In the SPI program, it is unacceptable to bring multiple clients up to a ledge system or fixed anchor as this will involve more complicated transitions not covered until the AMGA Rock Instructor Course. Reasons for Top-Managed Sites:
• No chance of rocks striking belayer below • 50% less rope in the system, less elongation • Some climbers like climbing to the instructor rather than away • Climbs over half the rope length have to be belayed at the top (unless two ropes are tied together) • May be hazardous to work at the base of the cliff (sea cliff, steep ground, etc) • Ability to monitor the anchor system
Concerns for Top-Managed Sites:
• Difficult or impossible to see climber from above on many crags • The climber’s rope will always go over the edge when belaying from above • Possible impact on fragile cliff top ecosystem • Cliff edge dangerous to manage
Key Points: 1. Restricted to 1:1 instruction, so harder to
keep bigger groups occupied 2. Less rope in the system, better for long
climbs
3. Harder for the instructor to see the climber
4. Low loads placed on anchor
5. No chance of rock/falling objects striking belayer
6. Are climbers supervised at base of climb? 7. Increased rope wear possible as rope has to
run over an edge
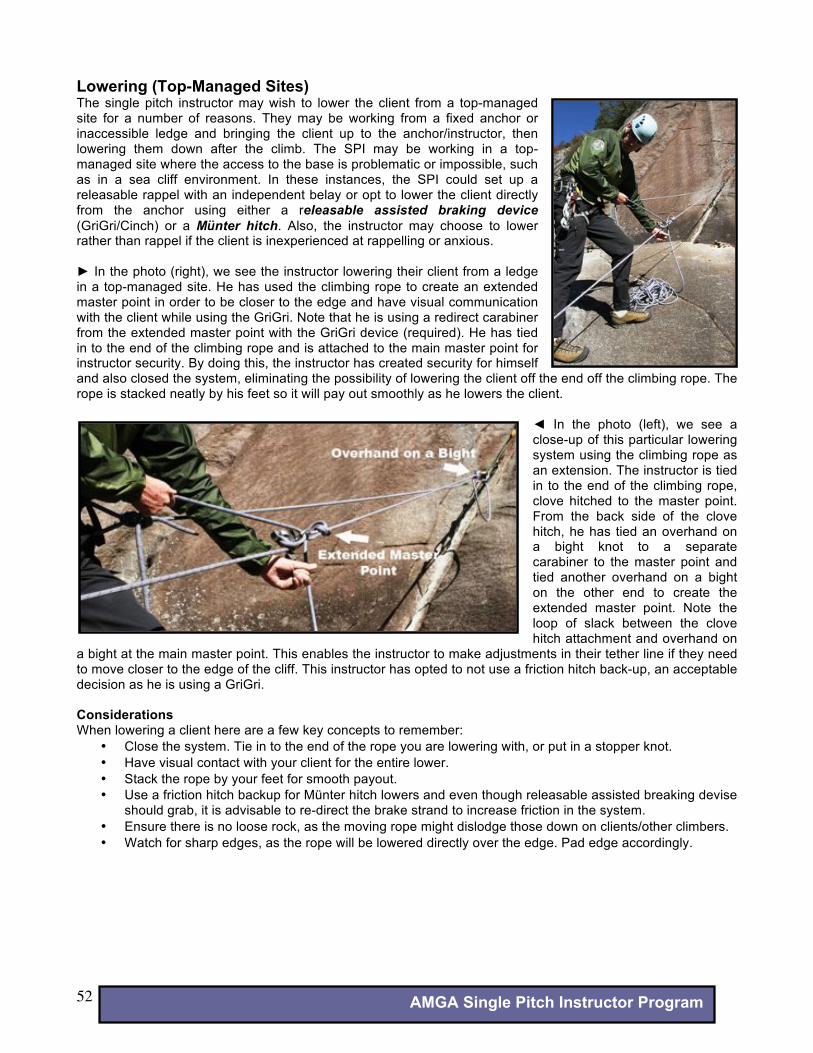
AMGA Single Pitch Instructor Program 52
Lowering (Top-Managed Sites) The single pitch instructor may wish to lower the client from a top-managed site for a number of reasons. They may be working from a fixed anchor or inaccessible ledge and bringing the client up to the anchor/instructor, then lowering them down after the climb. The SPI may be working in a top- managed site where the access to the base is problematic or impossible, such as in a sea cliff environment. In these instances, the SPI could set up a releasable rappel with an independent belay or opt to lower the client directly from the anchor using either a releasable assisted braking device (GriGri/Cinch) or a Münter hitch. Also, the instructor may choose to lower rather than rappel if the client is inexperienced at rappelling or anxious. " In the photo (right), we see the instructor lowering their client from a ledge in a top-managed site. He has used the climbing rope to create an extended master point in order to be closer to the edge and have visual communication with the client while using the GriGri. Note that he is using a redirect carabiner from the extended master point with the GriGri device (required). He has tied in to the end of the climbing rope and is attached to the main master point for instructor security. By doing this, the instructor has created security for himself and also closed the system, eliminating the possibility of lowering the client off the end off the climbing rope. The rope is stacked neatly by his feet so it will pay out smoothly as he lowers the client.
! In the photo (left), we see a close-up of this particular lowering system using the climbing rope as an extension. The instructor is tied in to the end of the climbing rope, clove hitched to the master point. From the back side of the clove hitch, he has tied an overhand on a bight knot to a separate carabiner to the master point and tied another overhand on a bight on the other end to create the extended master point. Note the loop of slack between the clove hitch attachment and overhand on
a bight at the main master point. This enables the instructor to make adjustments in their tether line if they need to move closer to the edge of the cliff. This instructor has opted to not use a friction hitch back-up, an acceptable decision as he is using a GriGri. Considerations When lowering a client here are a few key concepts to remember:
• Close the system. Tie in to the end of the rope you are lowering with, or put in a stopper knot. • Have visual contact with your client for the entire lower. • Stack the rope by your feet for smooth payout. • Use a friction hitch backup for Münter hitch lowers and even though releasable assisted breaking devise
should grab, it is advisable to re-direct the brake strand to increase friction in the system. • Ensure there is no loose rock, as the moving rope might dislodge those down on clients/other climbers. • Watch for sharp edges, as the rope will be lowered directly over the edge. Pad edge accordingly.
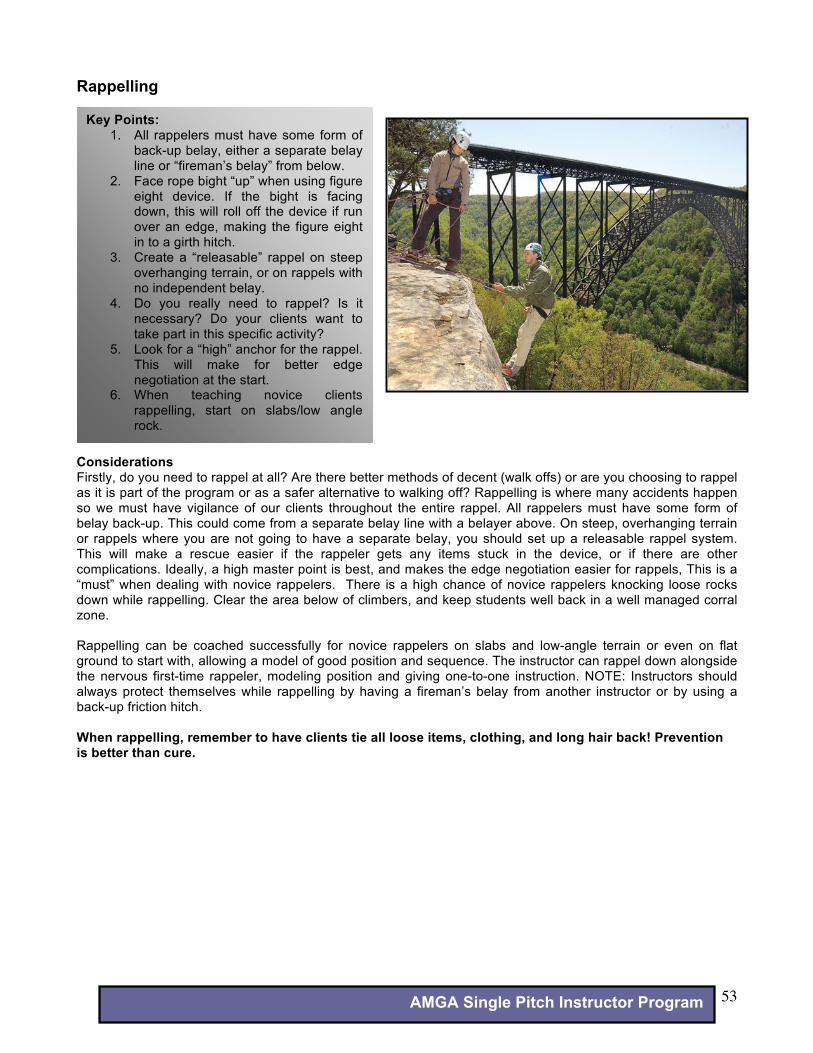
AMGA Single Pitch Instructor Program 53
Rappelling
Considerations Firstly, do you need to rappel at all? Are there better methods of decent (walk offs) or are you choosing to rappel as it is part of the program or as a safer alternative to walking off? Rappelling is where many accidents happen so we must have vigilance of our clients throughout the entire rappel. All rappelers must have some form of belay back-up. This could come from a separate belay line with a belayer above. On steep, overhanging terrain or rappels where you are not going to have a separate belay, you should set up a releasable rappel system. This will make a rescue easier if the rappeler gets any items stuck in the device, or if there are other complications. Ideally, a high master point is best, and makes the edge negotiation easier for rappels, This is a “must” when dealing with novice rappelers. There is a high chance of novice rappelers knocking loose rocks down while rappelling. Clear the area below of climbers, and keep students well back in a well managed corral zone. Rappelling can be coached successfully for novice rappelers on slabs and low-angle terrain or even on flat ground to start with, allowing a model of good position and sequence. The instructor can rappel down alongside the nervous first-time rappeler, modeling position and giving one-to-one instruction. NOTE: Instructors should always protect themselves while rappelling by having a fireman’s belay from another instructor or by using a back-up friction hitch. When rappelling, remember to have clients tie all loose items, clothing, and long hair back! Prevention is better than cure.
Key Points: 1. All rappelers must have some form of
back-up belay, either a separate belay line or “fireman’s belay” from below.
2. Face rope bight “up” when using figure eight device. If the bight is facing down, this will roll off the device if run over an edge, making the figure eight in to a girth hitch.
3. Create a “releasable” rappel on steep overhanging terrain, or on rappels with no independent belay.
4. Do you really need to rappel? Is it necessary? Do your clients want to take part in this specific activity?
5. Look for a “high” anchor for the rappel. This will make for better edge negotiation at the start.
6. When teaching novice clients rappelling, start on slabs/low angle rock.
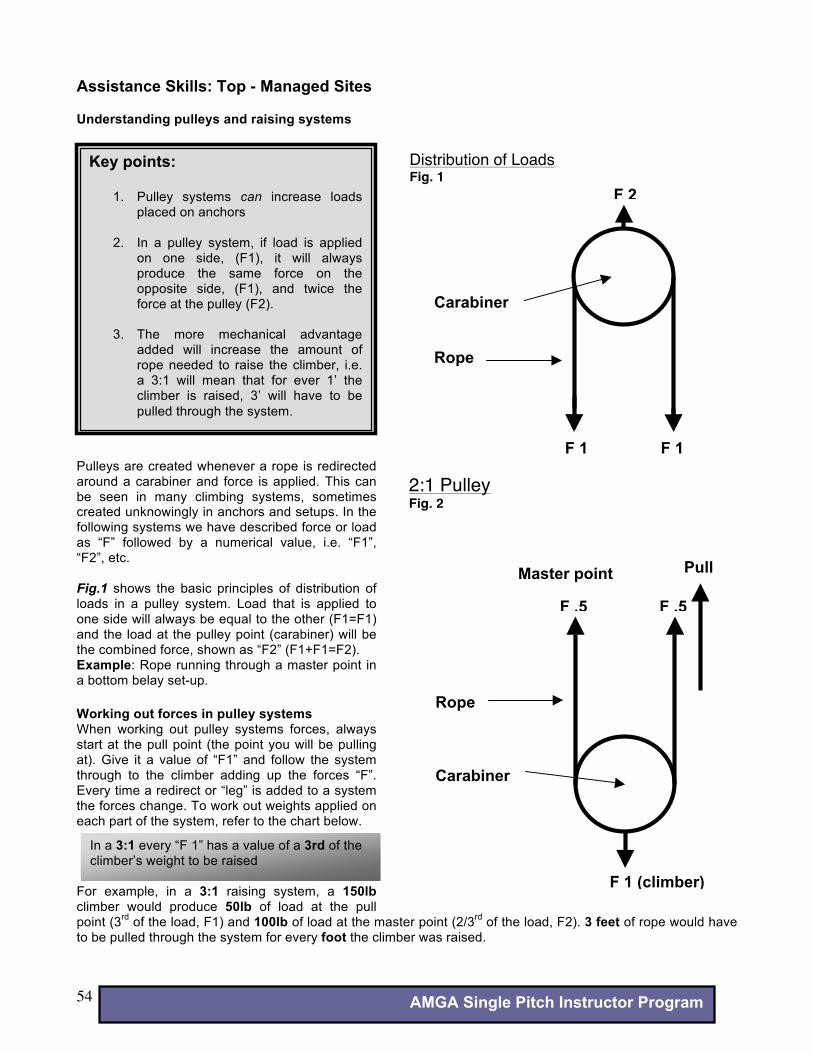
AMGA Single Pitch Instructor Program 54
Assistance Skills: Top - Managed Sites Understanding pulleys and raising systems Pulleys are created whenever a rope is redirected around a carabiner and force is applied. This can be seen in many climbing systems, sometimes created unknowingly in anchors and setups. In the following systems we have described force or load as “F” followed by a numerical value, i.e. “F1”, “F2”, etc. Fig.1 shows the basic principles of distribution of loads in a pulley system. Load that is applied to one side will always be equal to the other (F1=F1) and the load at the pulley point (carabiner) will be the combined force, shown as “F2” (F1+F1=F2). Example: Rope running through a master point in a bottom belay set-up. Working out forces in pulley systems When working out pulley systems forces, always start at the pull point (the point you will be pulling at). Give it a value of “F1” and follow the system through to the climber adding up the forces “F”. Every time a redirect or “leg” is added to a system the forces change. To work out weights applied on each part of the system, refer to the chart below. For example, in a 3:1 raising system, a 150lb climber would produce 50lb of load at the pull point (3rd of the load, F1) and 100lb of load at the master point (2/3rd of the load, F2). 3 feet of rope would have to be pulled through the system for every foot the climber was raised.
Key points:
1. Pulley systems can increase loads placed on anchors
2. In a pulley system, if load is applied
on one side, (F1), it will always produce the same force on the opposite side, (F1), and twice the force at the pulley (F2).
3. The more mechanical advantage
added will increase the amount of rope needed to raise the climber, i.e. a 3:1 will mean that for ever 1’ the climber is raised, 3’ will have to be pulled through the system.
F 2
Distribution of Loads Fig. 1
Carabiner Rope
F 1 (climber)
2:1 Pulley Fig. 2
Rope Carabiner
F .5 F .5
Master point Pull
In a 3:1 every “F 1” has a value of a 3rd of the climber’s weight to be raised
F 1 F 1
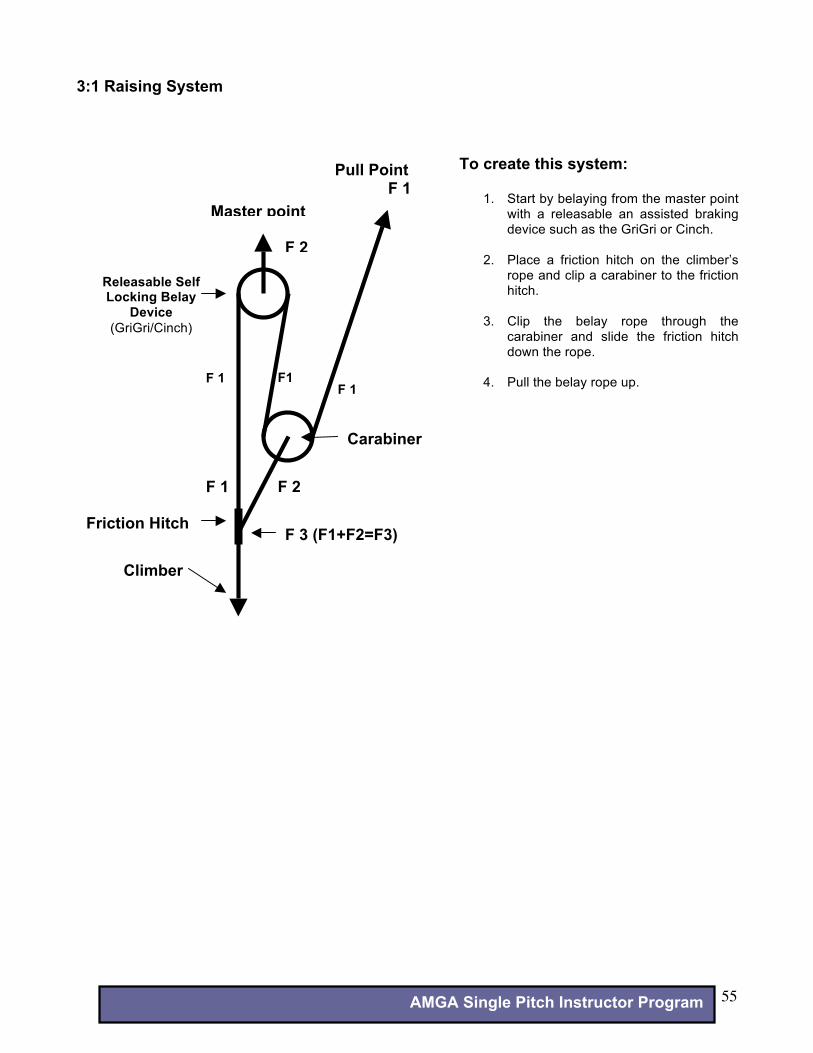
AMGA Single Pitch Instructor Program 55
3:1 Raising System
Friction Hitch
Master point
F 2
Pull Point F 1
Releasable Self Locking Belay
Device (GriGri/Cinch)
F 3 (F1+F2=F3)
F 2
F 1 F1 F 1
F 1
Carabiner
Climber
To create this system:
1. Start by belaying from the master point with a releasable an assisted braking device such as the GriGri or Cinch.
2. Place a friction hitch on the climber’s
rope and clip a carabiner to the friction hitch.
3. Clip the belay rope through the
carabiner and slide the friction hitch down the rope.
4. Pull the belay rope up.

AMGA Single Pitch Instructor Program 56
Base-Managed Sites
‘Base Managed’ single-pitch sites are very useful for the single pitch instructor, as larger groups can be accommodated and taught climbing in this setting. For instance, a group of 9 can all have something to do, i.e. on 3 climbs you would have 3 climbers, 3 belayers and 3 back-up belayers. This set-up normally requires less equipment and less set-up time and, as a general rule, more climbing is accomplished because of the quick change-over times between climbers and belayers. Belayer Backups Inexperienced student belayers should have some form of backup. Back-up options include using a ‘back-up’ belayer to manage the brake stand of the rope from the belayer. This person stacks the rope neatly and is an extra set of hands in case of loading the belayer. The back-up belayer, to be effective, should stay behind the belayer (in the braking plane of the belay device). Also, it is prudent to tie single or multiple ‘catastrophe knots’ (overhand on a bight) in the brake strand as the climber makes upward progress. This should be done by the backup belayer or the instructor (not the belayer). The instructor can give a back-up behind the belayer, or if they need to give instruction in front, they can add a re-direct from a ground anchor. See pictures below.
Key Points: • Easy to see climbers and coach them • Ropes should hang free and not go over the edge,
producing less rope wear • Easier to manage large groups at the base • Higher participant to instructor ratios, more clients and
less instructors required, i.e. 6:1 • Faster change overs, so more climbing accomplished • Possibility of any object falling from above striking
belayer or participants is increased • More rope in the system compared to a top-belay
system (more elongation) • Climbs over half the rope length have to be belayed at
the top unless two ropes are tied together • Cannot constantly monitor the anchor systems
" Here we see an instructor back-up of a student belayer. Note the student is tied down using a clove hitch on her climbing rope. This closes the system, ties her down while allowing for adjustment, and makes taking over the belay in an emergency situation more straight-forward. ! Here a re-direct on an extra carabiner has been added to the ground anchor. This allows the instructor to move around more and approach the climb to give instruction while still giving an effective backup.
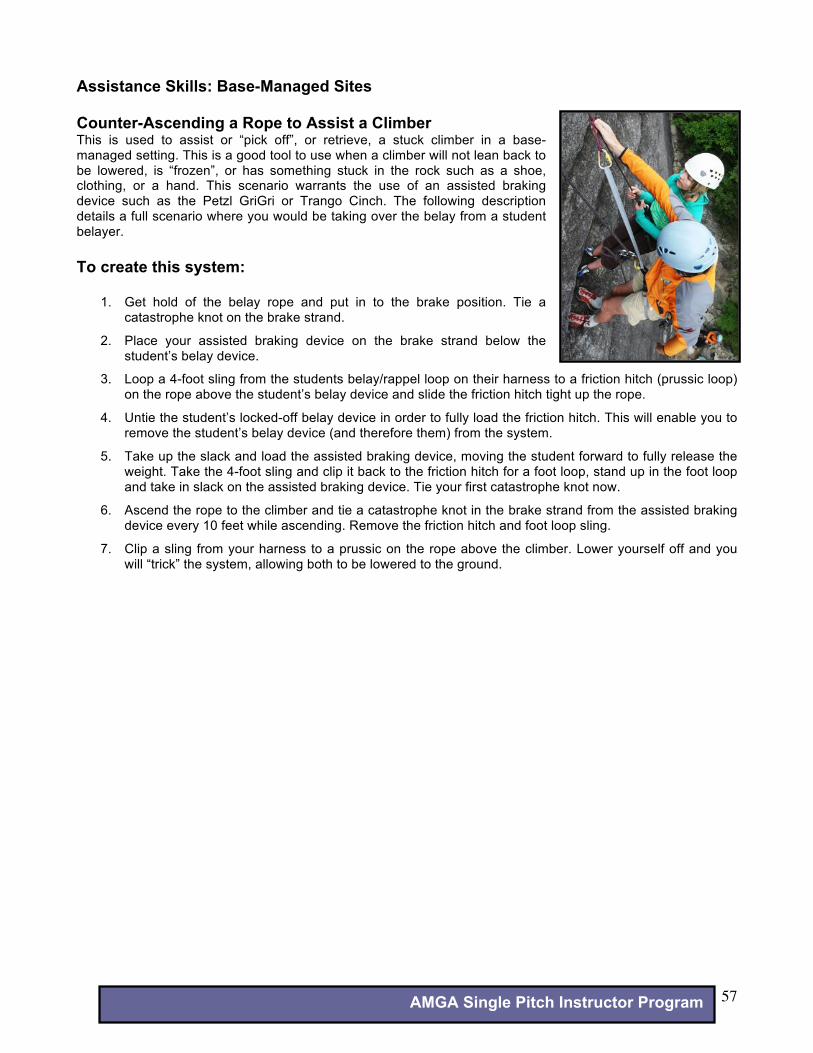
AMGA Single Pitch Instructor Program 57
Assistance Skills: Base-Managed Sites Counter-Ascending a Rope to Assist a Climber This is used to assist or “pick off”, or retrieve, a stuck climber in a base-managed setting. This is a good tool to use when a climber will not lean back to be lowered, is “frozen”, or has something stuck in the rock such as a shoe, clothing, or a hand. This scenario warrants the use of an assisted braking device such as the Petzl GriGri or Trango Cinch. The following description details a full scenario where you would be taking over the belay from a student belayer. To create this system:
1. Get hold of the belay rope and put in to the brake position. Tie a
catastrophe knot on the brake strand.
2. Place your assisted braking device on the brake strand below the student’s belay device.
3. Loop a 4-foot sling from the students belay/rappel loop on their harness to a friction hitch (prussic loop) on the rope above the student’s belay device and slide the friction hitch tight up the rope.
4. Untie the student’s locked-off belay device in order to fully load the friction hitch. This will enable you to remove the student’s belay device (and therefore them) from the system.
5. Take up the slack and load the assisted braking device, moving the student forward to fully release the weight. Take the 4-foot sling and clip it back to the friction hitch for a foot loop, stand up in the foot loop and take in slack on the assisted braking device. Tie your first catastrophe knot now.
6. Ascend the rope to the climber and tie a catastrophe knot in the brake strand from the assisted braking device every 10 feet while ascending. Remove the friction hitch and foot loop sling.
7. Clip a sling from your harness to a prussic on the rope above the climber. Lower yourself off and you will “trick” the system, allowing both to be lowered to the ground.

AMGA Single Pitch Instructor Program 58
Appendix
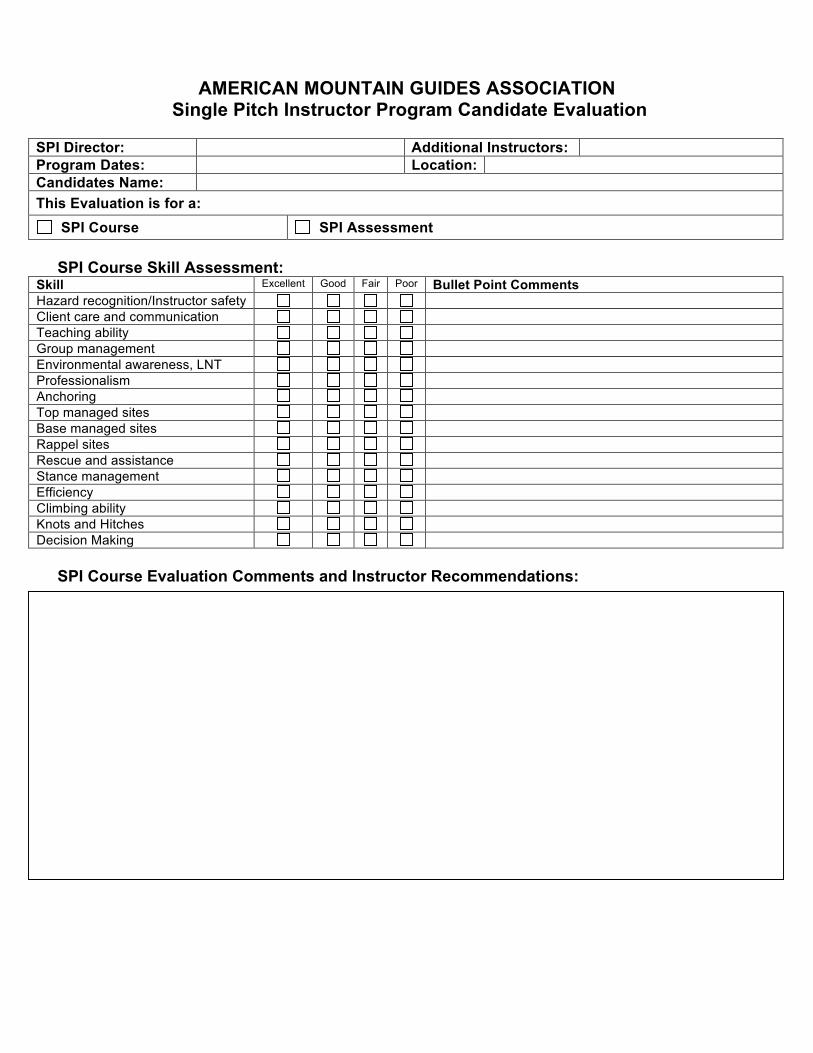
AMERICAN MOUNTAIN GUIDES ASSOCIATION Single Pitch Instructor Program Candidate Evaluation
SPI Director: Additional Instructors: Program Dates: Location: Candidates Name: This Evaluation is for a:
SPI Course SPI Assessment SPI Course Skill Assessment:
Skill Excellent Good Fair Poor Bullet Point Comments Hazard recognition/Instructor safety Client care and communication Teaching ability Group management Environmental awareness, LNT Professionalism Anchoring Top managed sites Base managed sites Rappel sites Rescue and assistance Stance management Efficiency Climbing ability Knots and Hitches Decision Making
SPI Course Evaluation Comments and Instructor Recommendations:
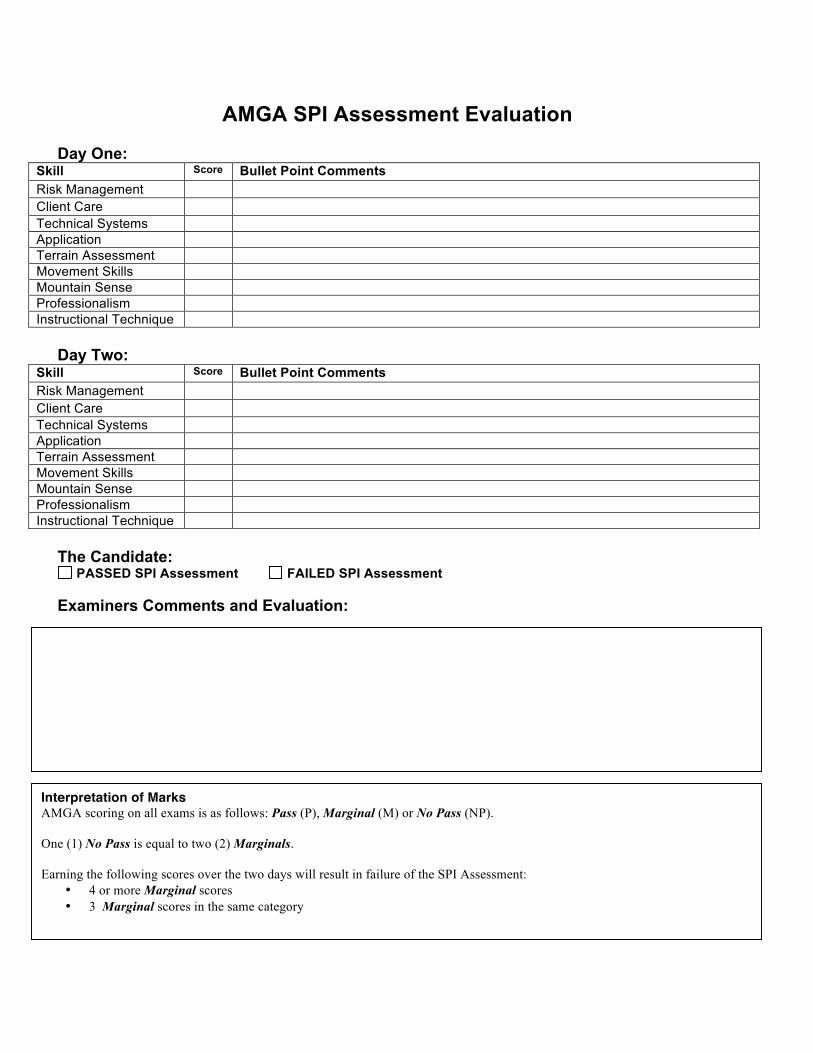
AMGA SPI Assessment Evaluation
Day One:
Skill Score Bullet Point Comments Risk Management Client Care Technical Systems Application Terrain Assessment Movement Skills Mountain Sense Professionalism Instructional Technique
Day Two:
Skill Score Bullet Point Comments Risk Management Client Care Technical Systems Application Terrain Assessment Movement Skills Mountain Sense Professionalism Instructional Technique
The Candidate:
PASSED SPI Assessment FAILED SPI Assessment Examiners Comments and Evaluation:
Interpretation of Marks AMGA scoring on all exams is as follows: Pass (P), Marginal (M) or No Pass (NP). One (1) No Pass is equal to two (2) Marginals.
Earning the following scores over the two days will result in failure of the SPI Assessment:
• 4 or more Marginal scores • 3 Marginal scores in the same category

AMGA Membership Levels Clients in an AMGA Single Pitch Instructor Course are granted AMGA Associate Membership for 12 months from the ending date of the course. Associate Membership Eligibility: Open to anyone interested in joining a larger community of rock climbers, alpine climbers and skiers interested in education, instruction and guiding in technical mountain terrain. Fee: $65 Benefits:
• Quarterly AMGA Newsletter the Mountain Bulletin • Monthly AMGA E-newsletter and E-news updates on important issues in guiding as they arise • Discounts on AMGA publications • Invitation to attend the AMGA Annual Conference and professional development clinics • Eligibility to apply for AMGA instructor level courses (CWI and SPI) and introduction level guide courses
(RIC, AGC and SGC) Certified Single Pitch Instructor Membership Eligibility: Instructors that have passed an AMGA Single Pitch Instructor Assessment. Fee: $75 Benefits same as Associate Level plus:
• Eligible to vote in the annual Board of Directors election • Eligible to run for AMGA Board of Directors • Eligible for numerous Pro-Purchase deals • Eligibility to apply for AMGA advanced level guide courses (RGC, AAGC, SMGC) • Eligibility to apply for an AMGA Logo Use Agreement to use the AMGA logo to promote yourself in
advertising and marketing.
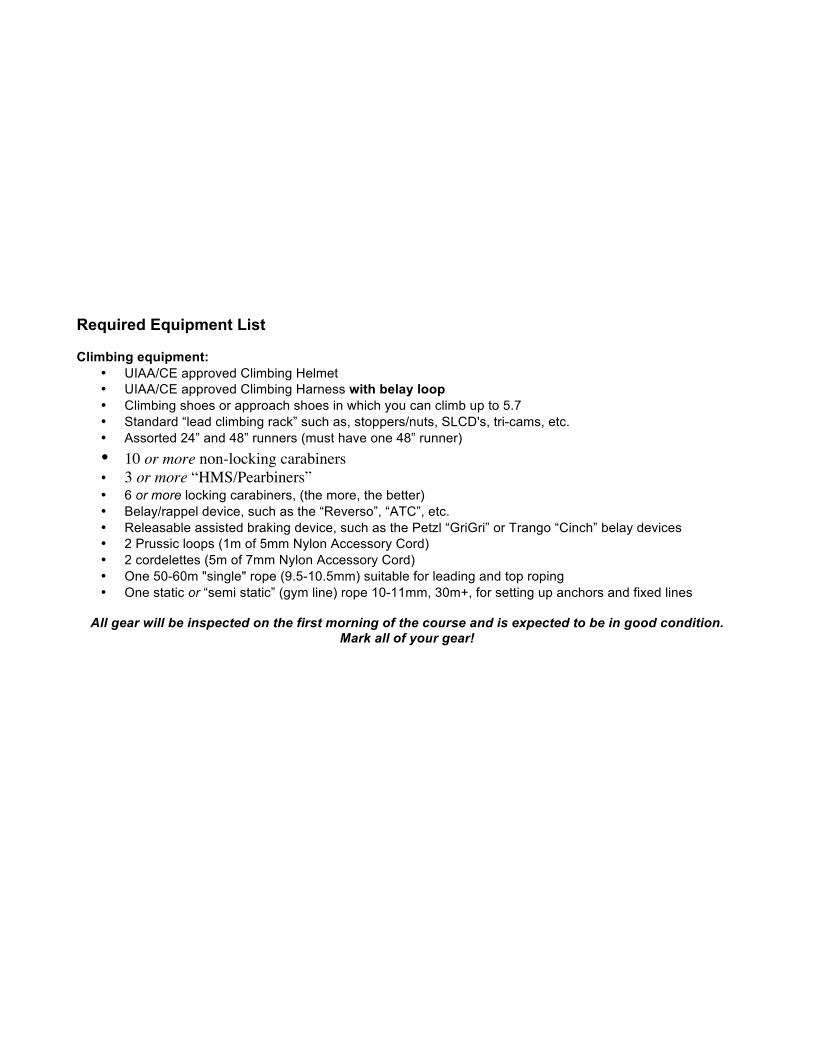
Required Equipment List Climbing equipment:
• UIAA/CE approved Climbing Helmet • UIAA/CE approved Climbing Harness with belay loop • Climbing shoes or approach shoes in which you can climb up to 5.7 • Standard “lead climbing rack” such as, stoppers/nuts, SLCD's, tri-cams, etc. • Assorted 24” and 48” runners (must have one 48” runner) • 10 or more non-locking carabiners • 3 or more “HMS/Pearbiners” • 6 or more locking carabiners, (the more, the better) • Belay/rappel device, such as the “Reverso”, “ATC”, etc. • Releasable assisted braking device, such as the Petzl “GriGri” or Trango “Cinch” belay devices • 2 Prussic loops (1m of 5mm Nylon Accessory Cord) • 2 cordelettes (5m of 7mm Nylon Accessory Cord) • One 50-60m "single" rope (9.5-10.5mm) suitable for leading and top roping • One static or “semi static” (gym line) rope 10-11mm, 30m+, for setting up anchors and fixed lines
All gear will be inspected on the first morning of the course and is expected to be in good condition.
Mark all of your gear!
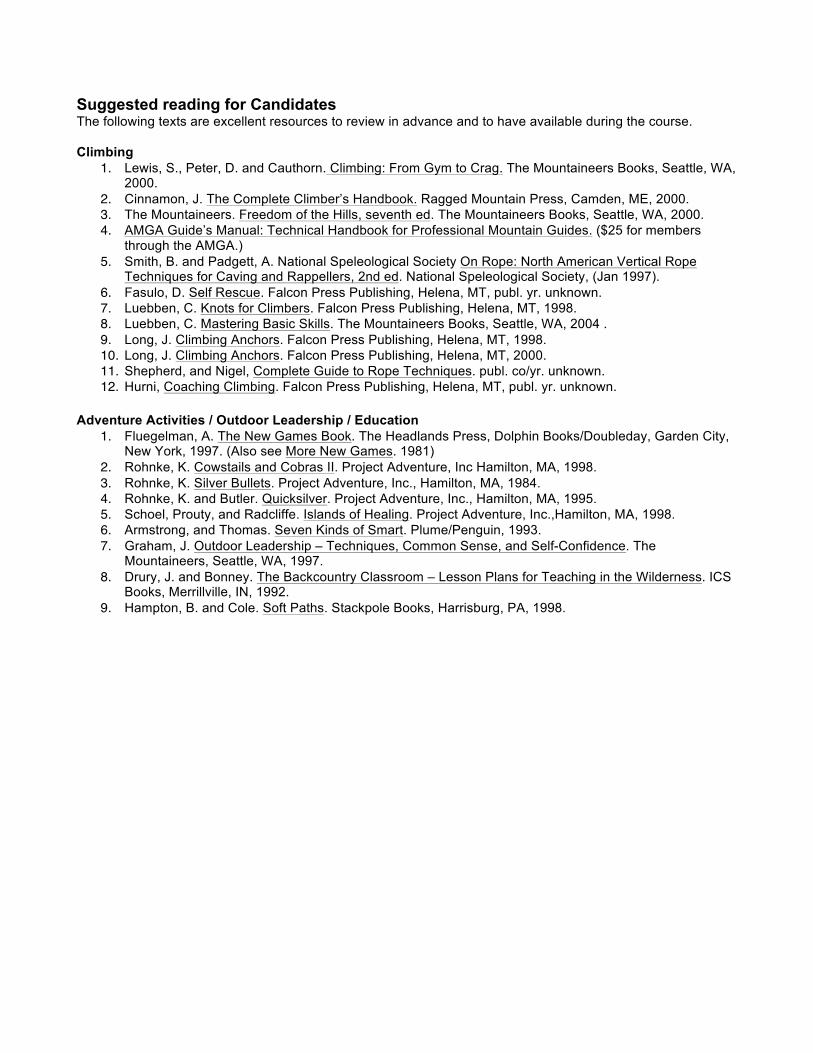
Suggested reading for Candidates The following texts are excellent resources to review in advance and to have available during the course. Climbing
1. Lewis, S., Peter, D. and Cauthorn. Climbing: From Gym to Crag. The Mountaineers Books, Seattle, WA, 2000.
2. Cinnamon, J. The Complete Climber’s Handbook. Ragged Mountain Press, Camden, ME, 2000. 3. The Mountaineers. Freedom of the Hills, seventh ed. The Mountaineers Books, Seattle, WA, 2000. 4. AMGA Guide’s Manual: Technical Handbook for Professional Mountain Guides. ($25 for members
through the AMGA.) 5. Smith, B. and Padgett, A. National Speleological Society On Rope: North American Vertical Rope
Techniques for Caving and Rappellers, 2nd ed. National Speleological Society, (Jan 1997). 6. Fasulo, D. Self Rescue. Falcon Press Publishing, Helena, MT, publ. yr. unknown. 7. Luebben, C. Knots for Climbers. Falcon Press Publishing, Helena, MT, 1998. 8. Luebben, C. Mastering Basic Skills. The Mountaineers Books, Seattle, WA, 2004 . 9. Long, J. Climbing Anchors. Falcon Press Publishing, Helena, MT, 1998. 10. Long, J. Climbing Anchors. Falcon Press Publishing, Helena, MT, 2000. 11. Shepherd, and Nigel, Complete Guide to Rope Techniques. publ. co/yr. unknown. 12. Hurni, Coaching Climbing. Falcon Press Publishing, Helena, MT, publ. yr. unknown.
Adventure Activities / Outdoor Leadership / Education 1. Fluegelman, A. The New Games Book. The Headlands Press, Dolphin Books/Doubleday, Garden City,
New York, 1997. (Also see More New Games. 1981) 2. Rohnke, K. Cowstails and Cobras II. Project Adventure, Inc Hamilton, MA, 1998. 3. Rohnke, K. Silver Bullets. Project Adventure, Inc., Hamilton, MA, 1984. 4. Rohnke, K. and Butler. Quicksilver. Project Adventure, Inc., Hamilton, MA, 1995. 5. Schoel, Prouty, and Radcliffe. Islands of Healing. Project Adventure, Inc.,Hamilton, MA, 1998. 6. Armstrong, and Thomas. Seven Kinds of Smart. Plume/Penguin, 1993. 7. Graham, J. Outdoor Leadership – Techniques, Common Sense, and Self-Confidence. The
Mountaineers, Seattle, WA, 1997. 8. Drury, J. and Bonney. The Backcountry Classroom – Lesson Plans for Teaching in the Wilderness. ICS
Books, Merrillville, IN, 1992. 9. Hampton, B. and Cole. Soft Paths. Stackpole Books, Harrisburg, PA, 1998.