and oldering tutorial for fine pitch qfp devices · optional equipment includes a pcb vise and an...
TRANSCRIPT

Rev. 1.1 12/03 Copyright © 2003 by Silicon Laboratories AN114
AN114
HAND SOLDERING TUTORIAL FOR FINE PITCH QFP DEVICES
ScopeThis document is intended to help designers createtheir initial prototype systems using Silicon Lab'sTQFP and LQFP devices where surface mountassembly equipment is not readily available. Thisapplication note assumes that the reader has at leastbasic hand soldering skills for through-hole solder-ing. The example presented will be the removal,cleanup and replacement of a TQFP with 48 leadsand 0.5 mm lead pitch.
SafetyWork should be done in a well-ventilated area. Pro-longed exposure to solder fumes and solvents canbe hazardous. There should be no presence ofsparks or flames when solvents are in use.
MaterialsThe right materials are key to a good solder job.The list below are the recommendations from Sili-con Labs. Other materials may work, so the usershould feel free to substitute and experiment. Theuse of organic solder is highly recommended.
Required1. Wire wrap wire (30 gauge) *
2. Wire strippers for wire wrap wire *
3. Soldering station - variable temperature, ESD-safe. Should support temperatures 800°F(425°C). This example uses a Weller modelEC1201A. The soldering wand should have afine tip no more than 1 mm wide.
4. Solder - 10/18 organic core; 0.2" (0.5 mm)diameter
5. Solder flux - liquid type in dispenser
6. Solder wick - size C 0.075" (1.9 mm)
7. Magnifier - 4X minimum. An inexpensiveheadset OptiVISOR by Donegan Optical Co. isused for this example.
8. ESD mat or tabletop and ESD wrist strap - bothgrounded
9. Tweezers with pointed (not flat) tips
10. Isopropyl Alcohol
11. Small stiff bristle brush for cleaning (nylon orother non-metallic material). Cut off hair toapproximately 0.25" (6 mm)
* Required for device removal only.
Optional 1. Board vise to hold printed circuit board
2. Dental pick (90 degree bend)
3. Compressed dry air or nitrogen to dry boards

AN114
2 Rev. 1.1
4. Optical inspection stereo microscope 30-40X
Figure 1. Some of the materials to get started...
Figure 2. clock-wise from left: 4X magnifying headset, solder wick,wire wrap wire, stiff cleaning brush, wire strippers,
and pointed tweezers

AN114
Rev. 1.1 3
Figure 3. Solder wick andwire wrap wire
Figure 3. Isopropyl Alcohol
Figure 4. ESD safe soldering station with fine tip wand.This one is Weller model EC1201A
Figure 5. Optional equipment includes a PCB vise andan inspection microscope 7-40X

AN114
4 Rev. 1.1
ProcedureThe following procedures cover the replacement ofa TQFP 48 pin device with 0.5 mm lead pitch. Thelead shape is the standard gullwing associated withJEDEC standard QFPs. This procedure section isdivided into three parts:
A. Part Removal
B. Board Cleanup
C. Soldering a new device.
If you are soldering parts to a new printed circuitboard, skip part A and refer to the new boardcleanup section in part B.
A. Part RemovalPreparation:
• Board with IC to be removed is mounted in a holder or vise. A PCB holder/vise is optional but it is required that the PCB is held steady for the part removal.
• The soldering station is warmed up to 800°F (422°C) and the solder tip is clean.
• ESD precautions have been taken.
Begin by wetting all the leads with flux to enhancethe initial solder wicking cleanup. Wick up solderas much as possible from the QFP leads. Be carefulnot to scorch the PCB board with prolonged solderheat.
Figure 6. Ready to get started

AN114
Rev. 1.1 5
Next, strip off approximately 3 inches of insulation from a piece of the 30 gauge wire wrap wire. Cut thewire at a comfortable 12 inch length or so.
Figure 7. Apply flux; wick excess solder from pins
Figure 8. Wire stripping

AN114
6 Rev. 1.1
Feed the wire behind and under the leads on one side of the IC as shown in Figure 9.
Solder tack (anchor) one end of the 3 inch wire to a nearby via or component on the PCB. The anchorpoint should be in a location similar to that should in Figure 10.
Figure 9. Feeding wire under QFP leads
Figure 9. Wire with one side anchored to nearby component

AN114
Rev. 1.1 7
Dispense a small amount of liquid flux across the leads.
Figure 10. Bus wire is anchored on C6

AN114
8 Rev. 1.1
Hold the loose (non-anchored) end of the wire with tweezers in close proximity to the device as shown inFigure 11.
You will now need to simultaneously apply solder heat and pull the wire away from the QFP, pulling at aslight upward angle from the board surface. Apply solder heat beginning at the lead closest to your twee-zers. As the solder melts, gently pull the wire away from the QFP while continuing to move the solderheat from pin to pin to the right. You should not pull very hard. Pull as the solder melts. Do not leave thesolder heat on any lead for more than necessary. The first lead will take the longest to heat, and after thewire gets hot, solder on the other leads will melt quickly. Excessive heat will damage the IC device andthe PCB pad. The removal of 12 pins from a 48TQFP should take about 5 seconds total. Signs of exces-sive heat are:
• Melted plastic on the IC device • PCB pads that lift off • Brown scorch marks on the PCB
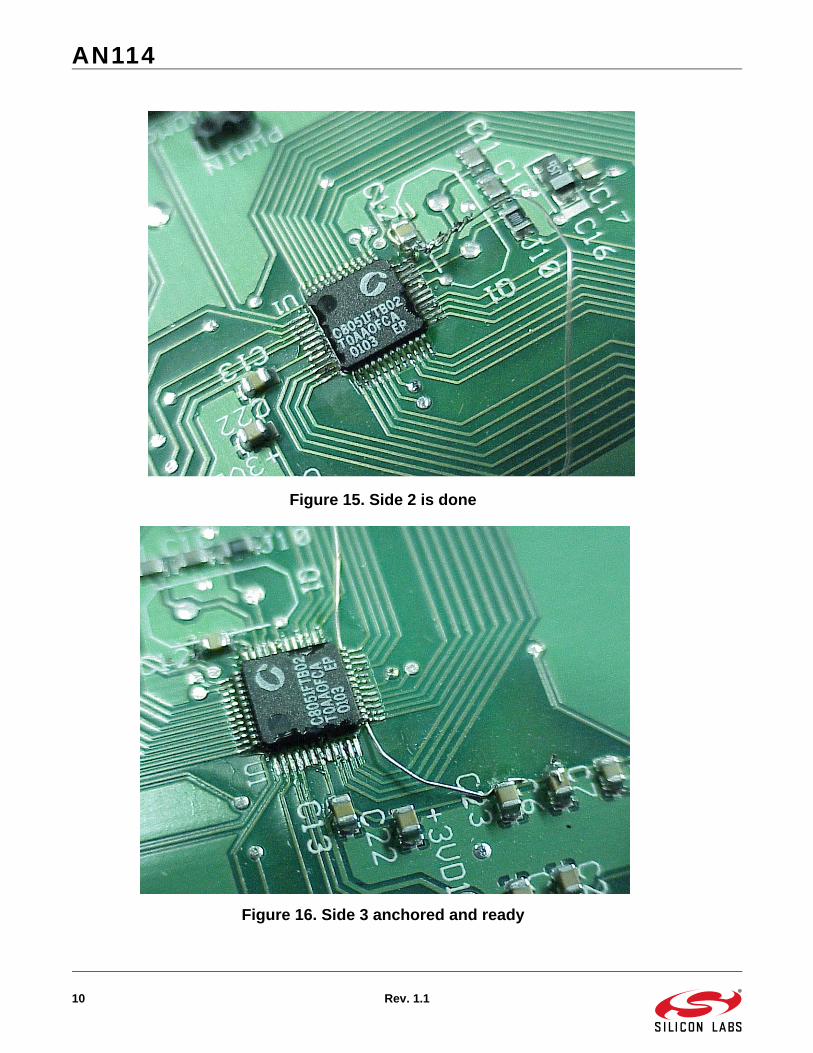
With one side of the QFP completed, repeat the same procedure on the other three sides of the QFP. Cutoff the dirty part of the wire wrap wire or use a new piece for each side. Dispense flux again for each side.
Figure 11. Side 2 anchored and ready for solder heat

AN114
Rev. 1.1 9
Note that in the following pictures, the old IC device is not being saved. There is slightly more heat beingapplied here than necessary to speed up the process. This result is some melted plastic and missing gull-wing leads. These are visible in the pictures that follow. If you are trying to save the IC being removed,then you must be very careful to apply as little heat as possible during the removal process such that theQFP leads remain intact in the plastic QFP body. This will require some experimentation with solder heatsettings and timing.
Figure 12. Hold tweezers close to device
Figure 14. Side 2 almost complete
AN114
10 Rev. 1.1
Figure 15. Side 2 is done
Figure 16. Side 3 anchored and ready

AN114
Rev. 1.1 11
Figure 17. Side 4 anchored to a via
Figure 18. Side 4 removal started
Figure 19. QFP removal a second before completion

AN114
12 Rev. 1.1
B. Board CleanupNew PCBs
For mounting a device to a new PCB, the amountof cleanup should be minimal. On a new PCB,there should be no solder on the pads. Brushingthe pads with isopropyl alcohol (Figure 33) anddrying the board should be enough preparation tobegin the mounting procedure.
Reworked PCBs
The following section is the cleanup sequence thatfollows the QFP removal in the previous section.After removing the device, the solder pads willneed cleanup. The idea is to clean the pads so thatthey are flat and free or solder and flux. Solderwick the pads until they are flat and dull. A cleanpad appearance should be a dull silver color.
Figure 20. Pads after QFP removal procedure

AN114
Rev. 1.1 13
If any pads become loose from the PCB, use a dental pick or other pointed object to re-align the pad(Figure 23 and Figure 24).
Figure 21. Solder wick to remove solder on the pads
Figure 22. Repeat for all pads

AN114
14 Rev. 1.1
Figure 23. Clean pads but one pad is slightly crooked
Figure 24. Pad straightened out

AN114
Rev. 1.1 15
B. Soldering a new QFPThe pads on the PCB should be clean and free of any solder.
Carefully place the new QFP device on the PCB using tweezers or another safe method. Make sure thepart is not dropped as the leads can be easily damaged.
Align the part over the pads using a small pick or similar tool to push the part. Get the alignment as accu-rate as you can. Also, make sure that the part is oriented correctly (pin 1 orientation).
Figure 25. New QFP near pads, ready for alignment
Figure 26. QFP aligned

AN114
16 Rev. 1.1
Adjust the soldering station temperature to 725°F (385°C). Put a small amount of solder on the tip of thesolder iron. While holding down the aligned QFP with a pick or other pointed tool, add a small amount ofsolder flux to the corner leads in two opposite corners. While still holding the part down with the pick,solder down two opposite corner leads on the QFP. Do not worry about excess solder or shorts betweenadjacent leads at this time. The idea is to anchor down the aligned QFP with solder so it does not move.
Re-check the QFP alignment after soldering the corners. If necessary, make adjustments or remove andstart over to get good QFP to PCB alignment.
Figure 27. Aligned QFP ready for solder anchoring
Figure 28. Aligned QFP with corners soldered down

AN114
Rev. 1.1 17
Now you are ready to solder all the leads. Add solder to the tip of the soldering iron. Dispense flux overall the leads to keep them wet.
Touch the solder iron tip to the end of each QFP lead until the solder is seen running up the lead. Repeatfor all the leads. Add small amounts of solder as needed to the soldering iron tip. Again, do not worry ifyou see some solder bridging as you will clean that up in the next step.
When soldering, keep the soldering iron tip parallel with the pins being soldered to prevent excessive sol-der shorts.
Figure 29. Keep iron tip parallel to pins being soldered

AN114
18 Rev. 1.1
After soldering all the leads, wet all the leads with flux to enhance the solder wicking cleanup. Wick upsolder where needed to eliminate any shorts/bridging.
Figure 30. Wicking Solder #1
Figure 31. Wicking Solder #2

AN114
Rev. 1.1 19
Hand inspect the board using 4X magnification (or higher) for shorts or marginal solder joints. Solderjoints should have a smooth melt transition between each device pin and the PCB. Rework any pins asneeded
After the inspection passes, it is time to clean the flux off the board. Dip the stiff bristle brush into alcoholand wipe in the direction of the leads. Use moderate, but not excessive pressure. Use liberal amounts ofalcohol and brush well between the QFP leads until the flux disappears.
Figure 32. Visual Inspection
Figure 33. Isopropyl Alcohol and stiff brush used for cleanup.Brush only in direction of leads

AN114
20 Rev. 1.1
Dry the board with compressed dry air or nitrogen. If this is not available, let the board dry for 30 minutesor more to let the alcohol evaporate under the QFP. The QFP leads should look bright and there should beno flux residue.
Re-inspect the board for workmanship. Rework any leads if needed.
Figure 34. Clean and Pristine
Figure 35. Stereo zoom inspection station (7X to 40X magnification)helps to inspect solder joint workmanship

http://www.silabs.com
Silicon Laboratories Inc.400 West Cesar ChavezAustin, TX 78701USA
Simplicity Studio
One-click access to MCU and wireless tools, documentation, software, source code libraries & more. Available for Windows, Mac and Linux!
IoT Portfoliowww.silabs.com/IoT
SW/HWwww.silabs.com/simplicity
Qualitywww.silabs.com/quality
Support and Communitycommunity.silabs.com
DisclaimerSilicon Labs intends to provide customers with the latest, accurate, and in-depth documentation of all peripherals and modules available for system and software implementers using or intending to use the Silicon Labs products. Characterization data, available modules and peripherals, memory sizes and memory addresses refer to each specific device, and "Typical" parameters provided can and do vary in different applications. Application examples described herein are for illustrative purposes only. Silicon Labs reserves the right to make changes without further notice and limitation to product information, specifications, and descriptions herein, and does not give warranties as to the accuracy or completeness of the included information. Silicon Labs shall have no liability for the consequences of use of the information supplied herein. This document does not imply or express copyright licenses granted hereunder to design or fabricate any integrated circuits. The products are not designed or authorized to be used within any Life Support System without the specific written consent of Silicon Labs. A "Life Support System" is any product or system intended to support or sustain life and/or health, which, if it fails, can be reasonably expected to result in significant personal injury or death. Silicon Labs products are not designed or authorized for military applications. Silicon Labs products shall under no circumstances be used in weapons of mass destruction including (but not limited to) nuclear, biological or chemical weapons, or missiles capable of delivering such weapons.
Trademark InformationSilicon Laboratories Inc.® , Silicon Laboratories®, Silicon Labs®, SiLabs® and the Silicon Labs logo®, Bluegiga®, Bluegiga Logo®, Clockbuilder®, CMEMS®, DSPLL®, EFM®, EFM32®, EFR, Ember®, Energy Micro, Energy Micro logo and combinations thereof, "the world’s most energy friendly microcontrollers", Ember®, EZLink®, EZRadio®, EZRadioPRO®, Gecko®, ISOmodem®, Precision32®, ProSLIC®, Simplicity Studio®, SiPHY®, Telegesis, the Telegesis Logo®, USBXpress® and others are trademarks or registered trademarks of Silicon Labs. ARM, CORTEX, Cortex-M3 and THUMB are trademarks or registered trademarks of ARM Holdings. Keil is a registered trademark of ARM Limited. All other products or brand names mentioned herein are trademarks of their respective holders.