andrew's vector plugin's volume 5 manual
DESCRIPTION
Manual for the Andrew's Vector Plugins set 5 for Illustrator CS5 CS4 CS3 CS2 etc - Zigzag toolTRANSCRIPT
Plug-ins notes
file:///C|/...Andrew/Products/Documentation%20NOT%20FOR%20RELEASE/Illustrator%20plugins/Volume%205/GX05_Documentation.htm[30/10/2008 19:28:39]
Zigzag tool (Andrew's vector plug-ins volume 5)
Plug-in introduction
This is a plug-in to design zigzags, patterns, abstract designs and more.
Andrew
Installation of plug-in / symbols / brushes
Please place the GX05_Zigzag.aip file in the
c:\program files\adobe\illustrator CS\plug-ins folder [pc Illustrator ® CS] or c:\program files\adobe\illustrator 10\plug-ins [pcillustrator 10] or CS1 or CS2 or CS3 or CS4
for the mac, please place the GX05_Zigzag file in
HD:Applications:Adobe Illustrator CS2:plug-ins [mac Illustrator ®CS] or CS3 or CS4 equivalent
HD:Applications:Adobe Illustrator CS:plug-ins [mac Illustrator ® CS]
or HD:Applications:Adobe Illustrator 10:plug-ins [mac Illustrator 10]
Please note for CS2, the entire folder/file of Zigzag plug-in must be placed in the plugin path and no names of the files shouldbe changed
Possible installation paths
PC CS4 C:\program files\adobe\adobe illustrator CS4\plug-ins\graphicxtrasPC CS3 C:\program files\adobe\adobe illustrator CS3\plug-ins\graphicxtrasPC CS2/12 c:\program files\adobe\adobe illustrator CS2\plug-ins\graphicxtrasPC CS/11 c:\program files\adobe\illustrator CS\plug-ins\graphicxtrasPC 10 c:\program files\adobe\illustrator 10\plug-ins\graphicxtras
OS X CS4 HD:applications:adobe illustrator CS4:plug-ins:graphicxtras OS X CS3 HD:applications:adobe illustrator CS3:plug-ins:graphicxtras OS X CS2 HD:applications:adobe illustrator CS2:plug-ins:graphicxtras OS X CS HD:applications:adobe illustrator CS:plug-ins:graphicxtras OS X 10 HD:applications:adobe illustrator 10:plug-ins:graphicxtras
(if the 'graphicxtras' folder does not exist, simply create it in the plug-ins folder or use another folder name if you wish. Youcan also just place the file in the top level plug-ins folder if you wish but putting it in a sub folder makes it easier to find at alater date)
Alternate plug-in installation location
Because of recent improvements in security, you may wish to install the plug-in sets in an alternate location such as an useraccount and not the default plug-in folder. If you are using a basic level account and one without admin features, you mightnot be able to save the AIP plug-in files to the usual folder. Set up an alternate or secondary plug-in folder in your useraccount and then copy the files there.
To specify an alternate plug-in for Illustrator ®
1) Go to the edit > preferences > plug-ins
2) Check the additional plug-ins folder option
3) Specify / browse for your required file in your user account (such as 'third party plug-ins' etc)
Symbols install
The symbols files (*.ai files) should be placed in the c:\program files\Adobe\Illustrator...\presets\symbols folder (or macequivalent). Access the symbols files via the windows\symbols menu (please consult the Illustrator documentation
Initial Use of plug-in
The plug-in appears in the Illustrator plugin toolbox with a small 'zigzag' icon.

Plug-ins notes
file:///C|/...Andrew/Products/Documentation%20NOT%20FOR%20RELEASE/Illustrator%20plugins/Volume%205/GX05_Documentation.htm[30/10/2008 19:28:39]
Double click to the see the options for the plugin (or press enter while selecting the plugin icon) (CS3 CS2 CS 10)
To display the dialog, select the zigzag tool. You can delete the dialog but if you delete the dialog, there is no option to re-display it without re-starting the application. The zizgag tool dialog can be joined to the rest of the other palettes andexpanded in the same way as the others (CS4)
Key / plug-in modifiers
Holding the shift key (during the drag) etc will modify the behavior of the plugin.
'Shift': increases the number of groups
'Shift' and 'ctrl/command key' at the same time will increase the zigzag group type
'Ctrl/command key' will 'stop' the action of the trail cursor temporarily (not much use if the trail cursor is active though)
'space bar' to move the start position of the zigzag to a new position (that of the end point)
Plug-in dialogs
Zigzag panel
This is the basic screen to control the zigzag used and the number of zigzag groups
'Zigzag': a selection of 60 zigzags from basic zigzag to maze or intense pulse zigzags.
The plugin now has two zigzag options. The first zigzag option refers to the first 'zag', the second to the second 'zag' and soon.

Plug-ins notes
file:///C|/...Andrew/Products/Documentation%20NOT%20FOR%20RELEASE/Illustrator%20plugins/Volume%205/GX05_Documentation.htm[30/10/2008 19:28:39]
If you select zigzag - arrowhead and for the second palette, sky rise.. the zigzag will be made up of arrowhead / sky rise /arrowhead / sky rise etc. Thus, 60 x 60 possible zigzag types can be created.
'Zigzag elements': The zigzag is made up of groups of paths. The zigzag groups controls the number of these groupings. Inthe default mode of the plugin, the groupings of paths are a contiguous path.
'Fill / stroke style to separate elements': By default on. The color settings are applied to separated items (if the separatepaths is set). If off, the color setting is ignored.
'Separate zigzag path elements': The plugin applies all the points as a single zigzag by default. If separate paths is set,each group is a new path. This means the paths can be individually colored/filled and different strokes applied; as well asdifferent warps to each path of the zigzag; as well as different styles and different rotations and scaling.
'Link Zigzag 2 to 1': If set, the second zigzag is linked to the first zigzag (and the display is not enabled). If off, the firstzigzag is used for the first element, the second for the second element, the first for the third, the second for the fourth etc

Plug-ins notes
file:///C|/...Andrew/Products/Documentation%20NOT%20FOR%20RELEASE/Illustrator%20plugins/Volume%205/GX05_Documentation.htm[30/10/2008 19:28:39]
Points panel
Controls the modification or tweaking of points on a group basis
'Jitter points (p)': Jitters the distance from the default position of the point (depends on the type of zigzag). The jitterdistance is a random distance, positive or negative, from the default position, in the horizontal direction.
'Jitter points (p)': as above but for the vertical direction. This can result in bunching of points and overlaps
'Scaling pattern 1': The scaling applied to the horizontal and vertical distance (from the center of the zigzag line and the'top' of the group respectively) for the first 'group' (and third and fifth...)
Plug-ins notes
file:///C|/...Andrew/Products/Documentation%20NOT%20FOR%20RELEASE/Illustrator%20plugins/Volume%205/GX05_Documentation.htm[30/10/2008 19:28:39]
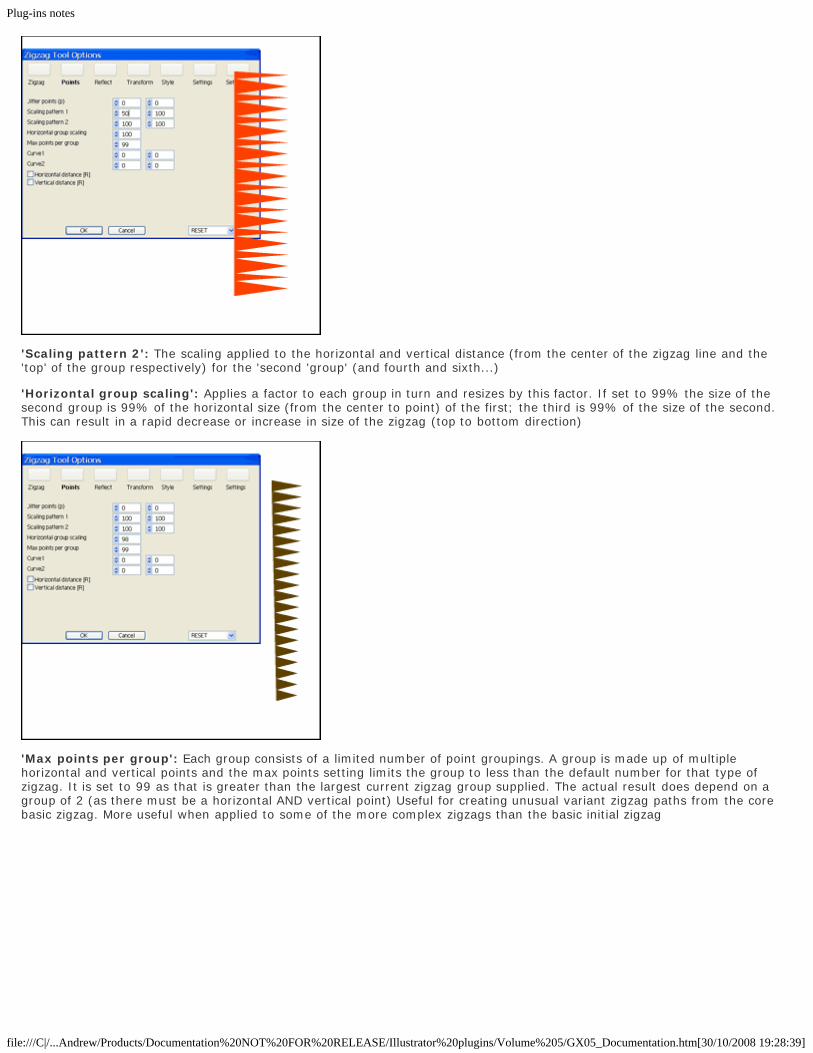
'Scaling pattern 2': The scaling applied to the horizontal and vertical distance (from the center of the zigzag line and the'top' of the group respectively) for the 'second 'group' (and fourth and sixth...)
'Horizontal group scaling': Applies a factor to each group in turn and resizes by this factor. If set to 99% the size of thesecond group is 99% of the horizontal size (from the center to point) of the first; the third is 99% of the size of the second.This can result in a rapid decrease or increase in size of the zigzag (top to bottom direction)
'Max points per group': Each group consists of a limited number of point groupings. A group is made up of multiplehorizontal and vertical points and the max points setting limits the group to less than the default number for that type ofzigzag. It is set to 99 as that is greater than the largest current zigzag group supplied. The actual result does depend on agroup of 2 (as there must be a horizontal AND vertical point) Useful for creating unusual variant zigzag paths from the corebasic zigzag. More useful when applied to some of the more complex zigzags than the basic initial zigzag

Plug-ins notes
file:///C|/...Andrew/Products/Documentation%20NOT%20FOR%20RELEASE/Illustrator%20plugins/Volume%205/GX05_Documentation.htm[30/10/2008 19:28:39]
Curve 1 2: Adds an element of curvature to the zigzag
'Horizontal distance (R)': Randomizes the zigzag horizontal distance based against the default distance of the point fromthe center of the zigzag. Useful for creating unusual zigzag formations from even a basic zigzag. The randomization is applieddifferently to each group of the zigzag
'Vertical distance (R)': Randomizes the distance of the point from the start point of the group. This is different from groupto group and can create unusual zigzag formations even from the basic zigzag shape.
Reflect panel
Instead of just having a single zigzag, the plugin can also generate multiple zigzags running parallel, and reflected / mirrored
'Number of reflections': Creates additional paths parallel to the original (by default). If set to 0, no additional items arecreated and the other settings are not enabled Can create lots of paths and can be tricky to control at times (depending onother settings)
Plug-ins notes
file:///C|/...Andrew/Products/Documentation%20NOT%20FOR%20RELEASE/Illustrator%20plugins/Volume%205/GX05_Documentation.htm[30/10/2008 19:28:39]
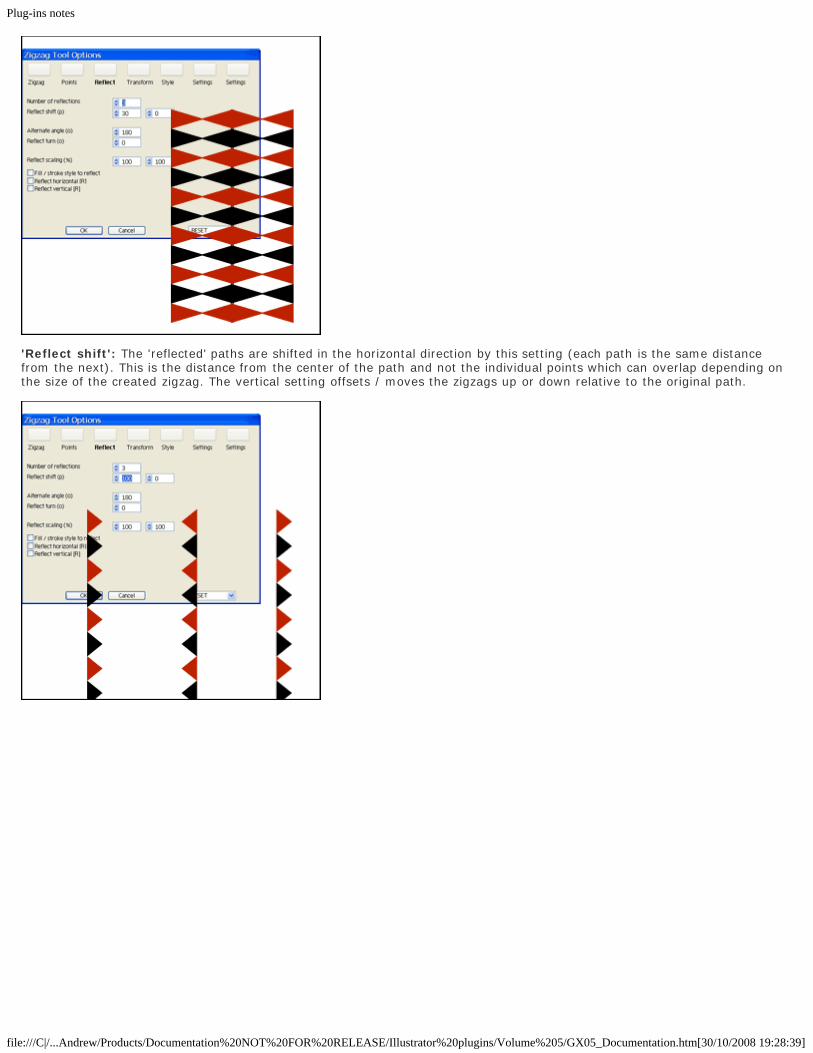
'Reflect shift': The 'reflected' paths are shifted in the horizontal direction by this setting (each path is the same distancefrom the next). This is the distance from the center of the path and not the individual points which can overlap depending onthe size of the created zigzag. The vertical setting offsets / moves the zigzags up or down relative to the original path.
Plug-ins notes
file:///C|/...Andrew/Products/Documentation%20NOT%20FOR%20RELEASE/Illustrator%20plugins/Volume%205/GX05_Documentation.htm[30/10/2008 19:28:39]
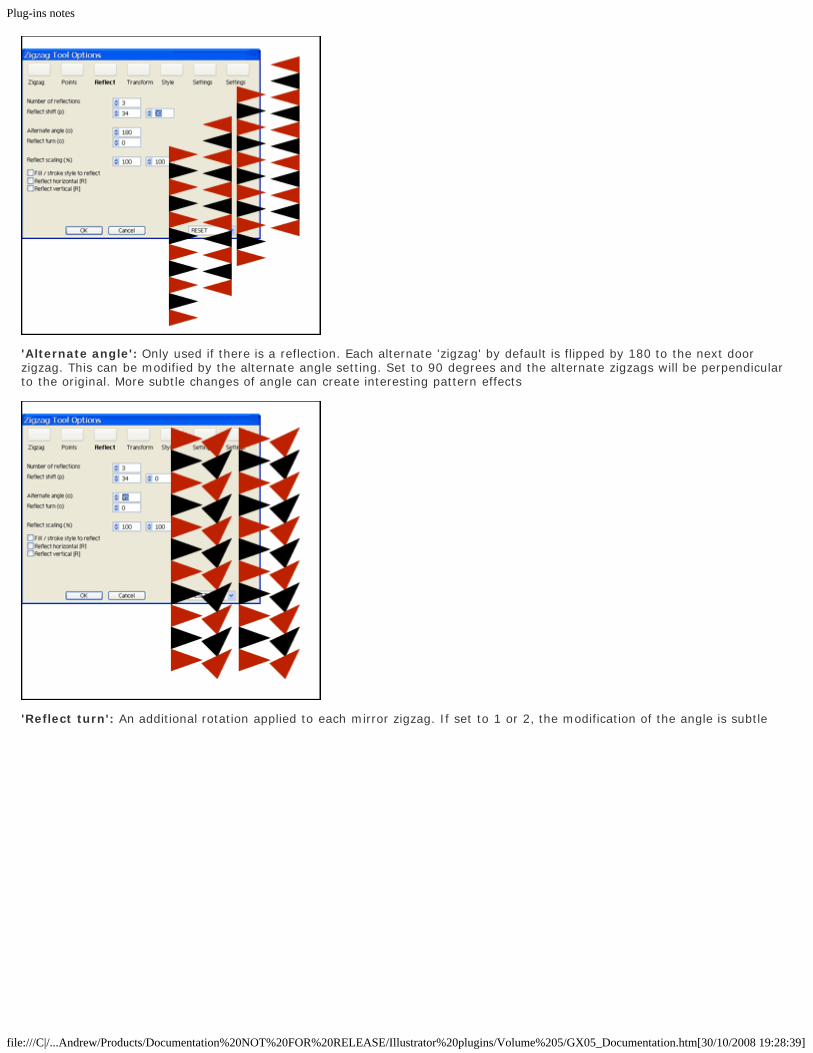
'Alternate angle': Only used if there is a reflection. Each alternate 'zigzag' by default is flipped by 180 to the next doorzigzag. This can be modified by the alternate angle setting. Set to 90 degrees and the alternate zigzags will be perpendicularto the original. More subtle changes of angle can create interesting pattern effects
'Reflect turn': An additional rotation applied to each mirror zigzag. If set to 1 or 2, the modification of the angle is subtle
Plug-ins notes
file:///C|/...Andrew/Products/Documentation%20NOT%20FOR%20RELEASE/Illustrator%20plugins/Volume%205/GX05_Documentation.htm[30/10/2008 19:28:39]
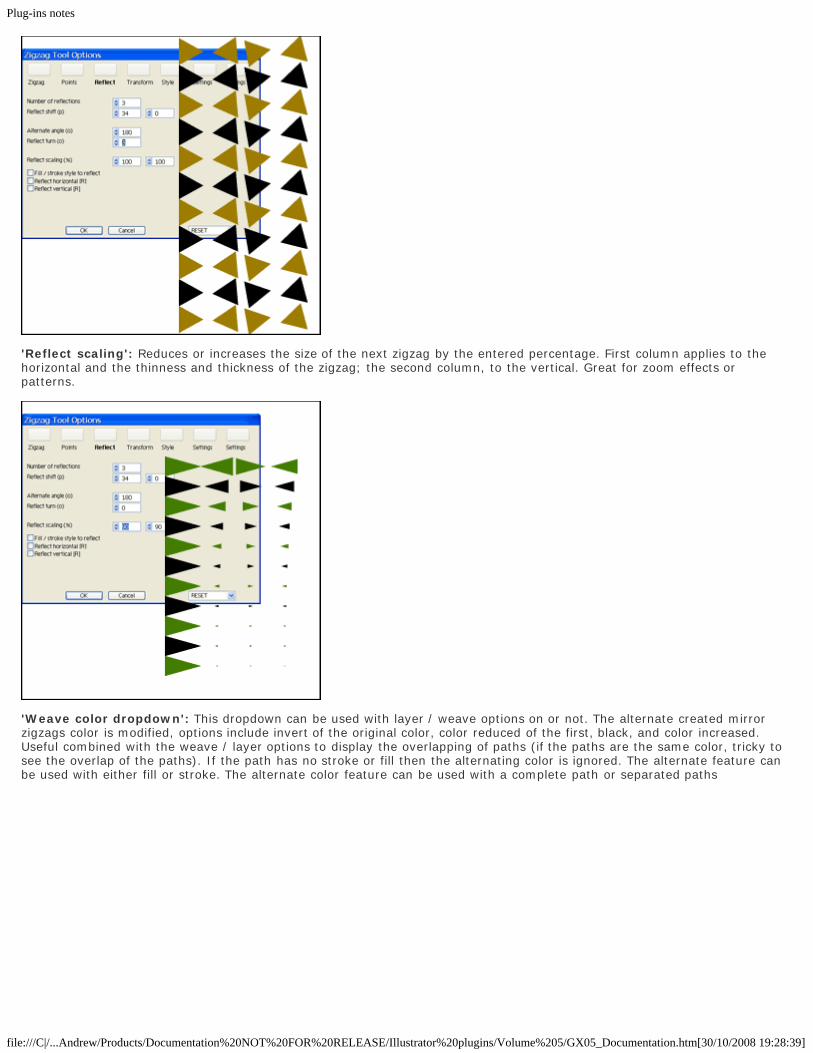
'Reflect scaling': Reduces or increases the size of the next zigzag by the entered percentage. First column applies to thehorizontal and the thinness and thickness of the zigzag; the second column, to the vertical. Great for zoom effects orpatterns.
'Weave color dropdown': This dropdown can be used with layer / weave options on or not. The alternate created mirrorzigzags color is modified, options include invert of the original color, color reduced of the first, black, and color increased.Useful combined with the weave / layer options to display the overlapping of paths (if the paths are the same color, tricky tosee the overlap of the paths). If the path has no stroke or fill then the alternating color is ignored. The alternate feature canbe used with either fill or stroke. The alternate color feature can be used with a complete path or separated paths

Plug-ins notes
file:///C|/...Andrew/Products/Documentation%20NOT%20FOR%20RELEASE/Illustrator%20plugins/Volume%205/GX05_Documentation.htm[30/10/2008 19:28:39]
'Weave dropdown': The weave feature only works well with separated paths (see first panel). If set to on, the zigzag ismade up of individual paths. The paths by default are placed above the previous created path. Using the weave options, thepaths can be created above and then below and then above (or other variants), creating, combined with the color settings)paths weaving in and out (like a coil or patchwork). Many different combinations of layering are included such as alternatingpath layering or alternating each third item or placing below random zigzag elements. The weave feature also works with thedrop shadow but is less effective with the pattern feature of the plug-in.
Transform panel
This applies to the overall zigzag
'Initial angle': The zigzag by default is created from vertically and depends on the direction of the drag of the mouse or pen.
Plug-ins notes
file:///C|/...Andrew/Products/Documentation%20NOT%20FOR%20RELEASE/Illustrator%20plugins/Volume%205/GX05_Documentation.htm[30/10/2008 19:28:39]
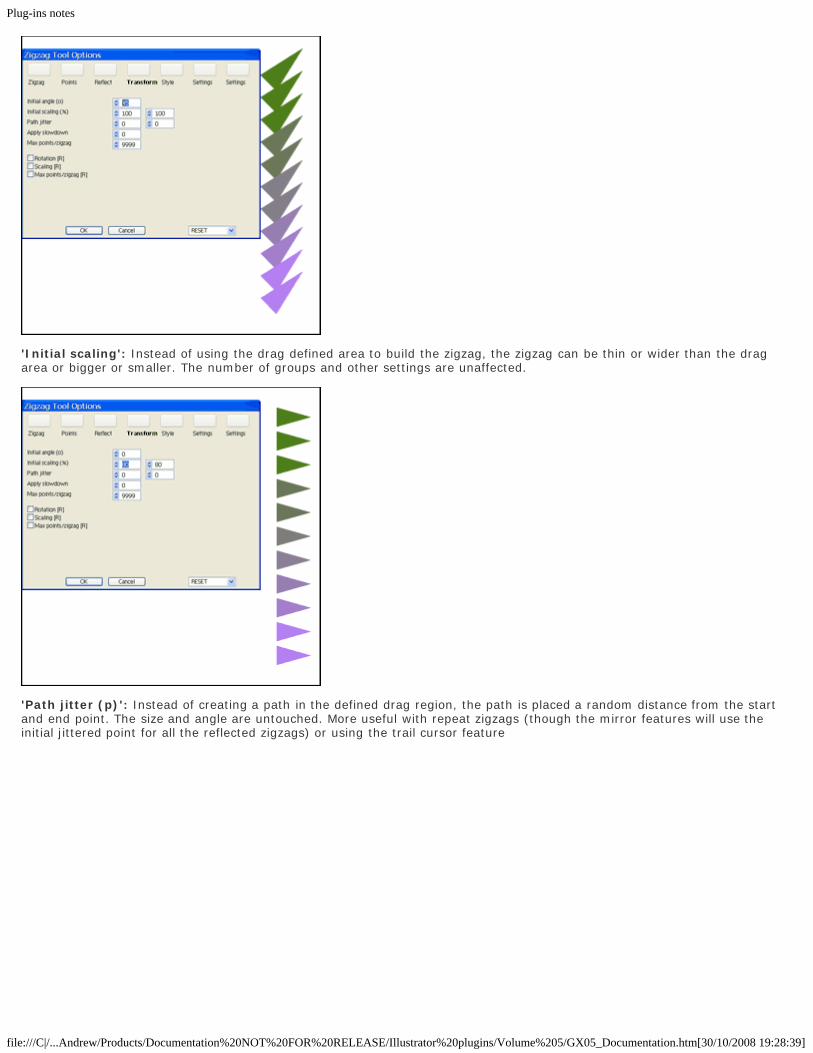
'Initial scaling': Instead of using the drag defined area to build the zigzag, the zigzag can be thin or wider than the dragarea or bigger or smaller. The number of groups and other settings are unaffected.
'Path jitter (p)': Instead of creating a path in the defined drag region, the path is placed a random distance from the startand end point. The size and angle are untouched. More useful with repeat zigzags (though the mirror features will use theinitial jittered point for all the reflected zigzags) or using the trail cursor feature

Plug-ins notes
file:///C|/...Andrew/Products/Documentation%20NOT%20FOR%20RELEASE/Illustrator%20plugins/Volume%205/GX05_Documentation.htm[30/10/2008 19:28:39]
'Apply slowdown': Not much use outside of the trail cursor option. This slows the rate of zigzag production. Set to 20 and itwill skip 19 creates of zigzag and place a zigzag on the document on the 20th pass (this is an internal repeat of the zigzagcreation and depends on the system and resource and complexity of the zigzag). Useful for creating more controlled trailcursor zigzags
'Max points/zigzag':A zigzag is made of many points (each physical point having a vertical and horizontal position). Themax points options reduces the overall zigzag points to the entered value. If the zigzag only creates a limited number ofpoints, this might have no effect. If a zigzag consists of a 100 vertical and horizontal points, then setting the value to 40 orso, will reduce the size of the zigzag considerably and this might create unusual and interesting cutoffs of the zigzag(depending on the structure of the zigzag). Useful in combination with the randomization of max points. The points setting bydefault is set to a huge (ish) number to avoid any accidental cutoff of points.
'Rotation (R)': Randomizes the rotation between 0 and 360. Useful in combo with the trail cursor for unusual pencil sketcheffects
'Scaling (R)': Randomizes the scaling from 0 to the current value. Can create really tiny zigzags.

Plug-ins notes
file:///C|/...Andrew/Products/Documentation%20NOT%20FOR%20RELEASE/Illustrator%20plugins/Volume%205/GX05_Documentation.htm[30/10/2008 19:28:39]
'Max points/zigzag (R)': Randomizes the number of 'points' (internal horizontal and vertical) from 1 to the current maxpoints. If the current max is set to 9999 then the randomization might have little effect as the setting might result in 999points or 2043 points etc and therefore little reduction in points used in the creation of the zigzag. Set the max points tosomething like double of the size of the actual points (guess... is also good) and the randomization will produce a random setof variant zigzags (useful in combo with the trail cursor)
Style panel
Color and pattern settings.
'Fill': If set to ignored, the current color will be used. Requires a fill to be set. Offers options to fill the zigzag with randomcolors, alternate colors etc. Most of the options only work with separate path elements or reflection settings. In the case ofthe to swatch setting, the swatch number can be set by the first entry field. The second entry field controls the midpoint ofthe fill 'to' process. Options to 'to white' 'to black' etc take the current color and fill subsequent paths with colors until the lastpath (set to the color listed). Alternate color options alternate the current color with the black or swatch or inverted etc color.

Plug-ins notes
file:///C|/...Andrew/Products/Documentation%20NOT%20FOR%20RELEASE/Illustrator%20plugins/Volume%205/GX05_Documentation.htm[30/10/2008 19:28:39]
'Stroke': As with fill but applied to the stroke settings.
Plug-ins notes
file:///C|/...Andrew/Products/Documentation%20NOT%20FOR%20RELEASE/Illustrator%20plugins/Volume%205/GX05_Documentation.htm[30/10/2008 19:28:39]
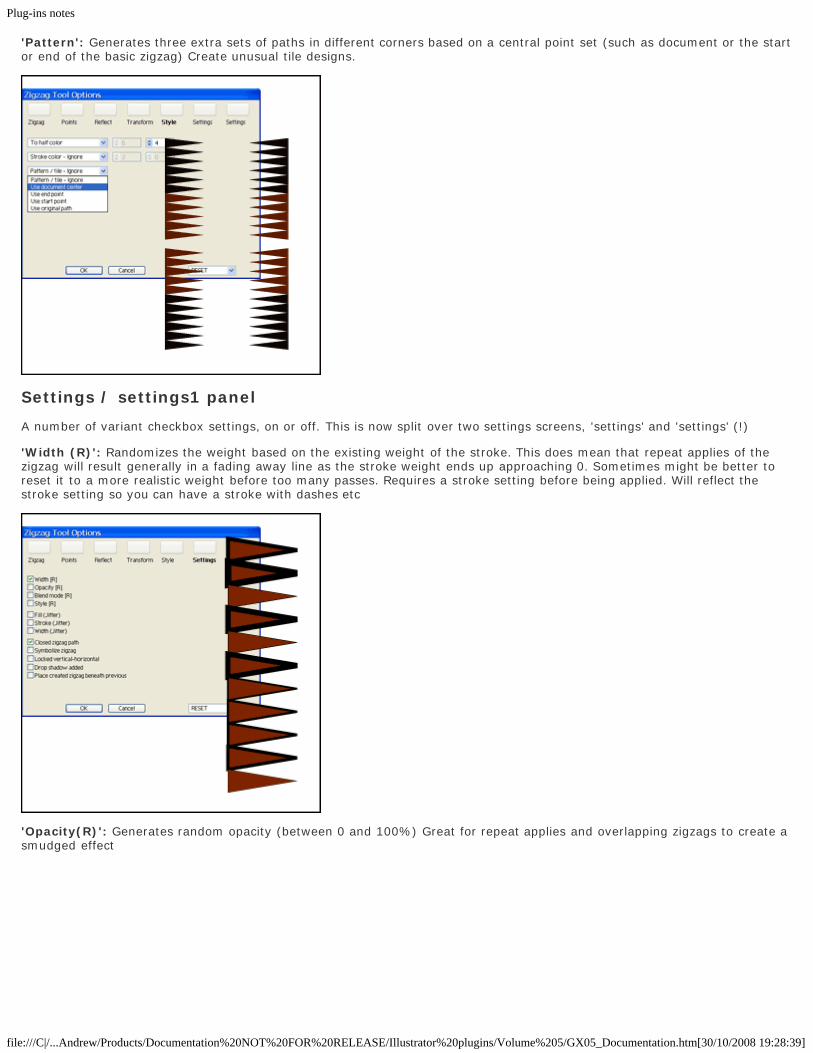
'Pattern': Generates three extra sets of paths in different corners based on a central point set (such as document or the startor end of the basic zigzag) Create unusual tile designs.
Settings / settings1 panel
A number of variant checkbox settings, on or off. This is now split over two settings screens, 'settings' and 'settings' (!)
'Width (R)': Randomizes the weight based on the existing weight of the stroke. This does mean that repeat applies of thezigzag will result generally in a fading away line as the stroke weight ends up approaching 0. Sometimes might be better toreset it to a more realistic weight before too many passes. Requires a stroke setting before being applied. Will reflect thestroke setting so you can have a stroke with dashes etc
'Opacity(R)': Generates random opacity (between 0 and 100%) Great for repeat applies and overlapping zigzags to create asmudged effect

Plug-ins notes
file:///C|/...Andrew/Products/Documentation%20NOT%20FOR%20RELEASE/Illustrator%20plugins/Volume%205/GX05_Documentation.htm[30/10/2008 19:28:39]
'Blend mode (R)': Randomizes the blend mode of the zigzag, from normal to difference to multiply to saturation
'Style (R)': Randomizes the styles applied to the zigzag. If there are no styles in the current styles palette, ignored. The styleoverrides nearly everything. Requires some setup if you wish to apply a set of 3D styles or neon styles say. The styles can bequick or very very slow to apply, so response time will be slow when used in reflections (and especially the trail cursor.. notrecommended). Styles only appear after you have released the mouse.
'Fill (jitter)': Requires all the settings as with fill and stroke (same color model etc) but instead of a totally random fill, thejitter only modifies the color fill by 10 % either way, so the color will be a subtle set of oranges or blues etc

Plug-ins notes
file:///C|/...Andrew/Products/Documentation%20NOT%20FOR%20RELEASE/Illustrator%20plugins/Volume%205/GX05_Documentation.htm[30/10/2008 19:28:39]
'Stroke (jitter)': As with fill, the color is modified 10% either way of the previous color setting, creating a set of zigzags oforange and subtle orange variants (if orange was the initial color) or greens
'Width (jitter)': The line weight is jittered by a certain percentage, so if you start with a set of 10pts lines, the actual lineweight could end up as 10.2 pts or 9.8pts etc.
Plug-ins notes
file:///C|/...Andrew/Products/Documentation%20NOT%20FOR%20RELEASE/Illustrator%20plugins/Volume%205/GX05_Documentation.htm[30/10/2008 19:28:39]
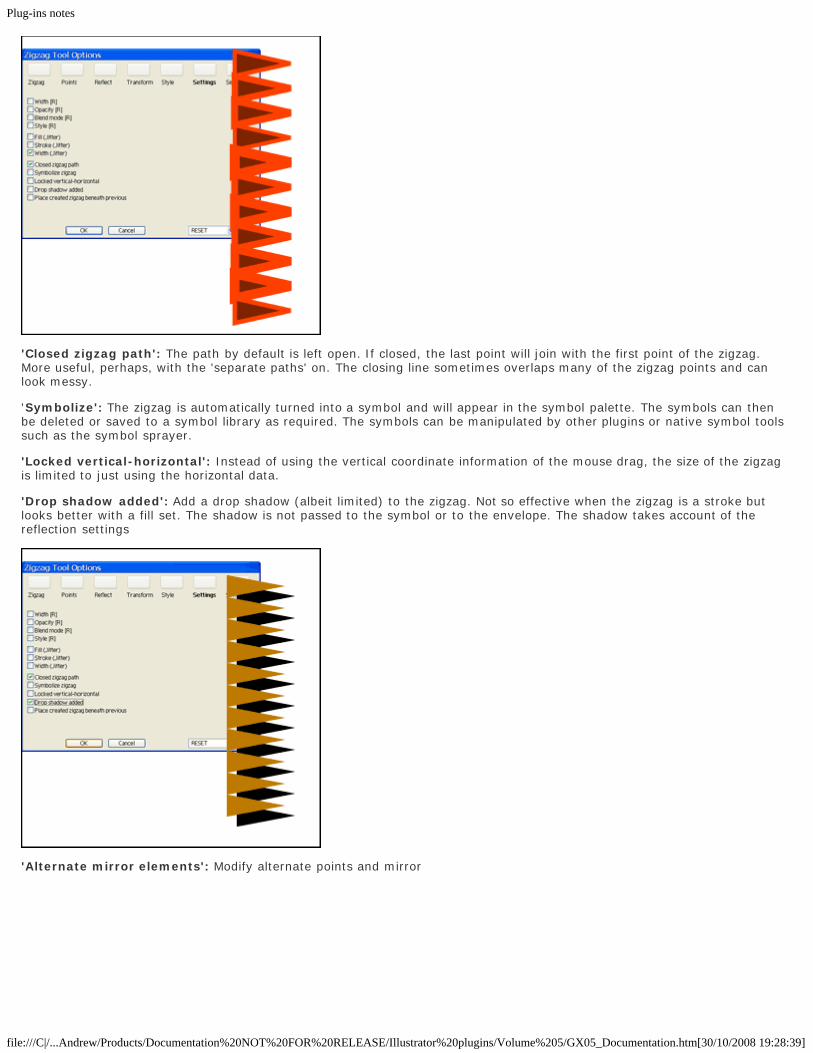
'Closed zigzag path': The path by default is left open. If closed, the last point will join with the first point of the zigzag.More useful, perhaps, with the 'separate paths' on. The closing line sometimes overlaps many of the zigzag points and canlook messy.
'Symbolize': The zigzag is automatically turned into a symbol and will appear in the symbol palette. The symbols can thenbe deleted or saved to a symbol library as required. The symbols can be manipulated by other plugins or native symbol toolssuch as the symbol sprayer.
'Locked vertical-horizontal': Instead of using the vertical coordinate information of the mouse drag, the size of the zigzagis limited to just using the horizontal data.
'Drop shadow added': Add a drop shadow (albeit limited) to the zigzag. Not so effective when the zigzag is a stroke butlooks better with a fill set. The shadow is not passed to the symbol or to the envelope. The shadow takes account of thereflection settings
'Alternate mirror elements': Modify alternate points and mirror
Plug-ins notes
file:///C|/...Andrew/Products/Documentation%20NOT%20FOR%20RELEASE/Illustrator%20plugins/Volume%205/GX05_Documentation.htm[30/10/2008 19:28:39]
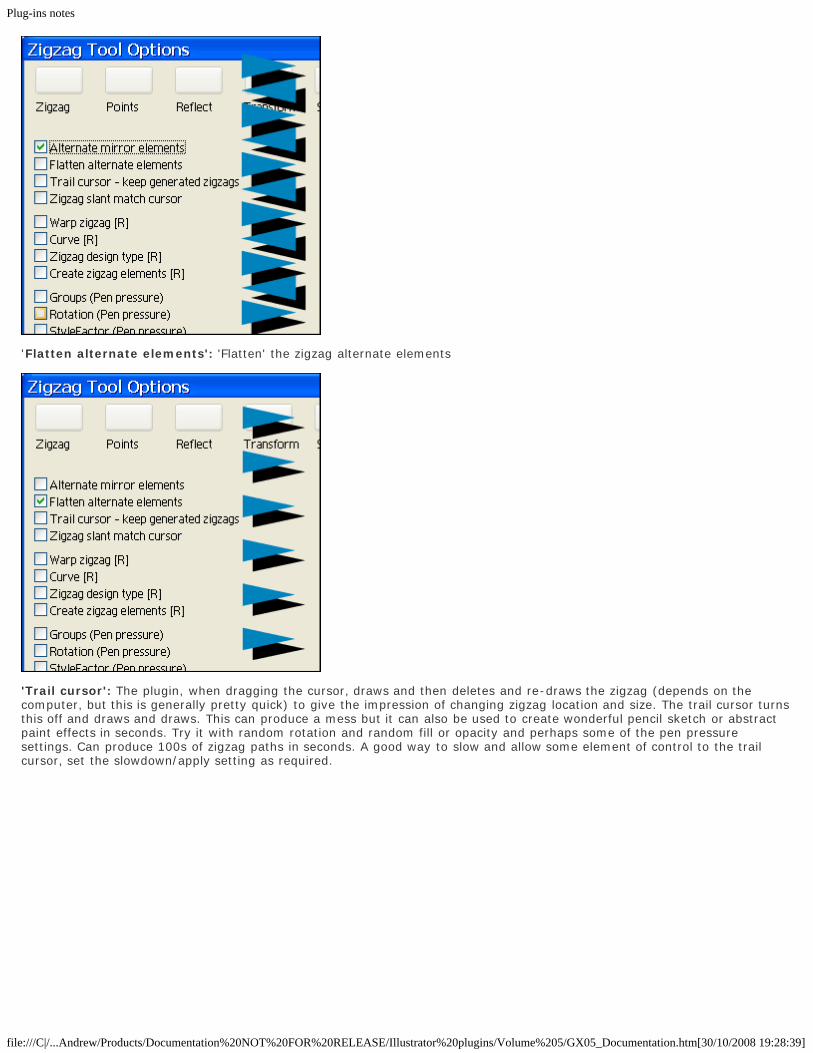
'Flatten alternate elements': 'Flatten' the zigzag alternate elements
'Trail cursor': The plugin, when dragging the cursor, draws and then deletes and re-draws the zigzag (depends on thecomputer, but this is generally pretty quick) to give the impression of changing zigzag location and size. The trail cursor turnsthis off and draws and draws. This can produce a mess but it can also be used to create wonderful pencil sketch or abstractpaint effects in seconds. Try it with random rotation and random fill or opacity and perhaps some of the pen pressuresettings. Can produce 100s of zigzag paths in seconds. A good way to slow and allow some element of control to the trailcursor, set the slowdown/apply setting as required.
Plug-ins notes
file:///C|/...Andrew/Products/Documentation%20NOT%20FOR%20RELEASE/Illustrator%20plugins/Volume%205/GX05_Documentation.htm[30/10/2008 19:28:39]
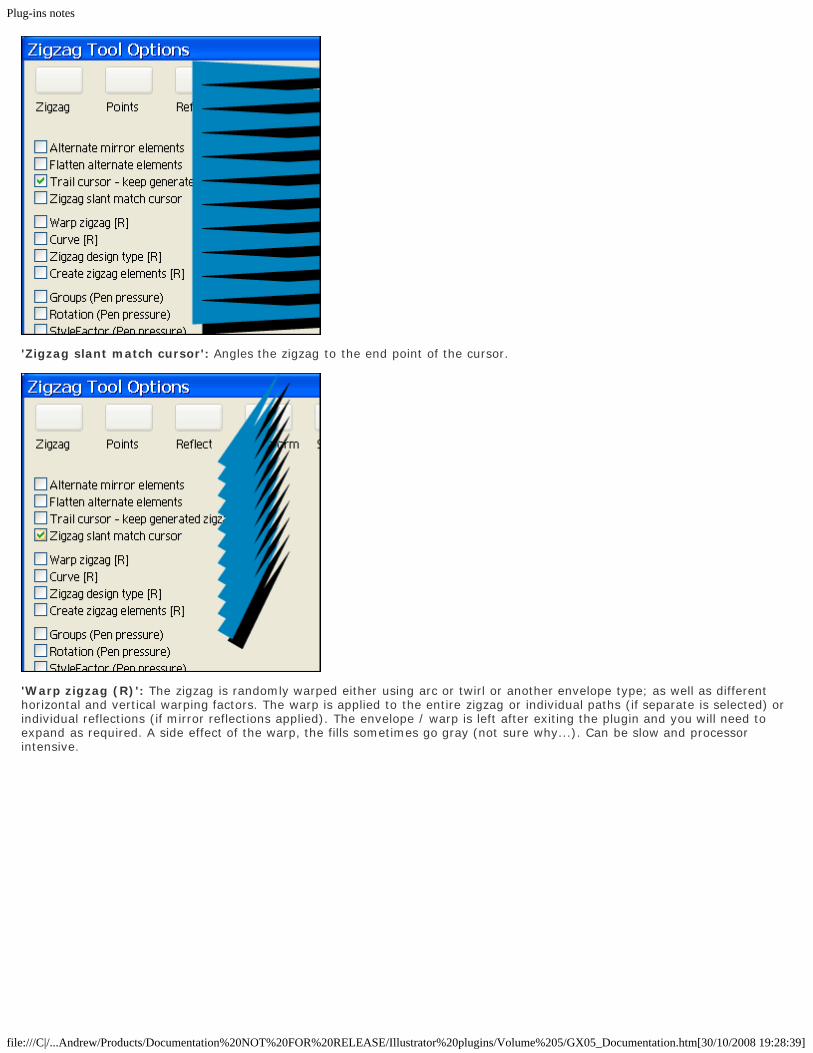
'Zigzag slant match cursor': Angles the zigzag to the end point of the cursor.
'Warp zigzag (R)': The zigzag is randomly warped either using arc or twirl or another envelope type; as well as differenthorizontal and vertical warping factors. The warp is applied to the entire zigzag or individual paths (if separate is selected) orindividual reflections (if mirror reflections applied). The envelope / warp is left after exiting the plugin and you will need toexpand as required. A side effect of the warp, the fills sometimes go gray (not sure why...). Can be slow and processorintensive.
Plug-ins notes
file:///C|/...Andrew/Products/Documentation%20NOT%20FOR%20RELEASE/Illustrator%20plugins/Volume%205/GX05_Documentation.htm[30/10/2008 19:28:39]
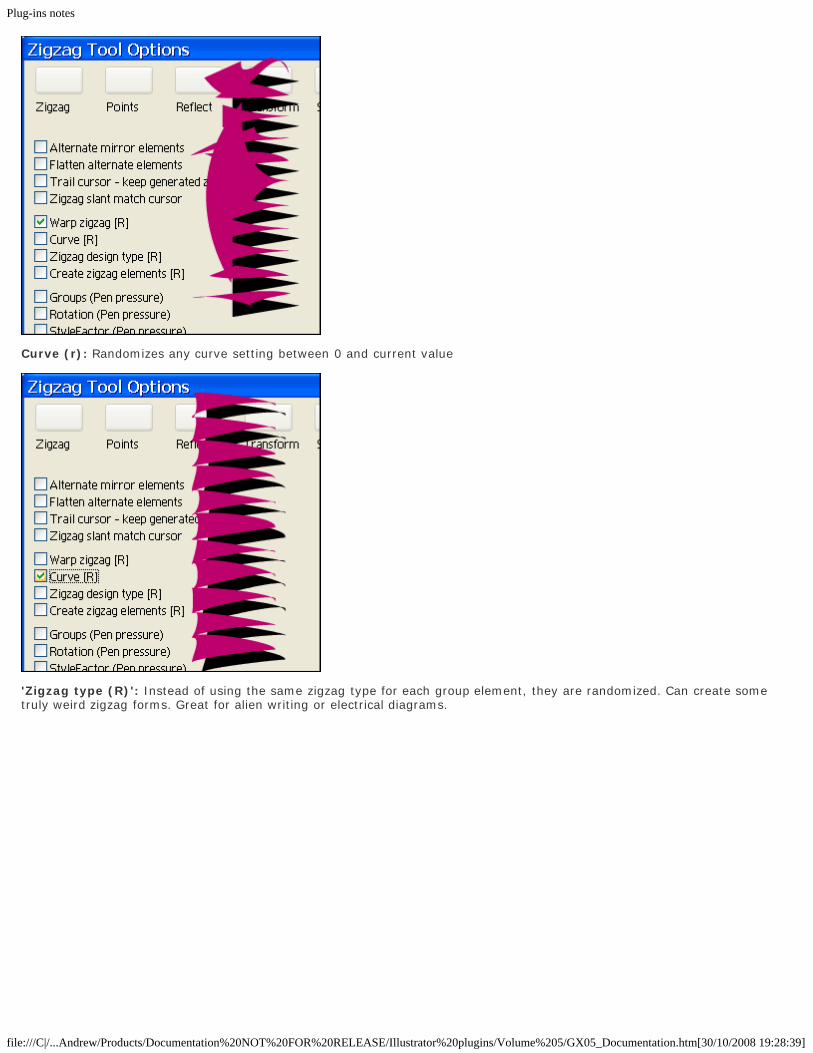
Curve (r): Randomizes any curve setting between 0 and current value
'Zigzag type (R)': Instead of using the same zigzag type for each group element, they are randomized. Can create sometruly weird zigzag forms. Great for alien writing or electrical diagrams.

Plug-ins notes
file:///C|/...Andrew/Products/Documentation%20NOT%20FOR%20RELEASE/Illustrator%20plugins/Volume%205/GX05_Documentation.htm[30/10/2008 19:28:39]
'Create zigzag elements': Creates a point or not. This can create some truly odd and randomized zigzags even from thebasic first type of zigzag.
'Groups (pen)': Only useful when used with a pen and pad and pressure. Use a pen and control (to a degree) the number oflines in the zigzag. Can be tricky but you should be able to get the hang of it. Good for creating random sets of zigzags.
'Rotation (pen)': rotate the path dependent on the pressure applied. The rotation depends on the initial angle. If set to 100,the angle will be from 0 to 100. Set initial angle to 360 to get the full range of rotation
'Stylefactor (pen)': Pressure modifies the style being applied. If no style is being applied (style (R) needs to be set to ON aswell), this is ignored. This one is perhaps the trickiest of all as the style is not visible while you drag the pen across thedocument but it can be interesting to create subtle or different sketched style effects from the same random style. Somestyles have no style factor and any modification will have no effect
'Weight 10pts (pen): The line weight is modified by pen pressure. Again tricky, and some experimentation is required (theline weight is not visible as you drag the pen)
'Opacity (pen)': The opacity of the line is modified by the pen pressure
Tutorials
Tutorial 1
Double click the zigzag icon to access the zigzag dialog
Plug-ins notes
file:///C|/...Andrew/Products/Documentation%20NOT%20FOR%20RELEASE/Illustrator%20plugins/Volume%205/GX05_Documentation.htm[30/10/2008 19:28:39]
To create the above effect, the FILL must be set to nil, the stroke set to RED and the stroke size set to 10px
Open the stroke palette and set round cap to be ON and round join to be ON
Set the reflections number to 1 (the dropdowns won't be available unless this value is changed from 0). This creates anadditional identical zigzag (rotated by 180 degrees)
Set the plug-in weave dropdown to alternate reduced (weave color) and weave options dropdown to weave 01 (basicinterweaving)
Set the separate zigzag path elements to ON to create individual elements of the zigzag instead of just a single path
Click the document and drag to fill the cursor space with 10 zigzag elements + mirror zigzag. The zigzags will be overlapping.Select the zigzag and re-size or rotate or apply effects etc or export.
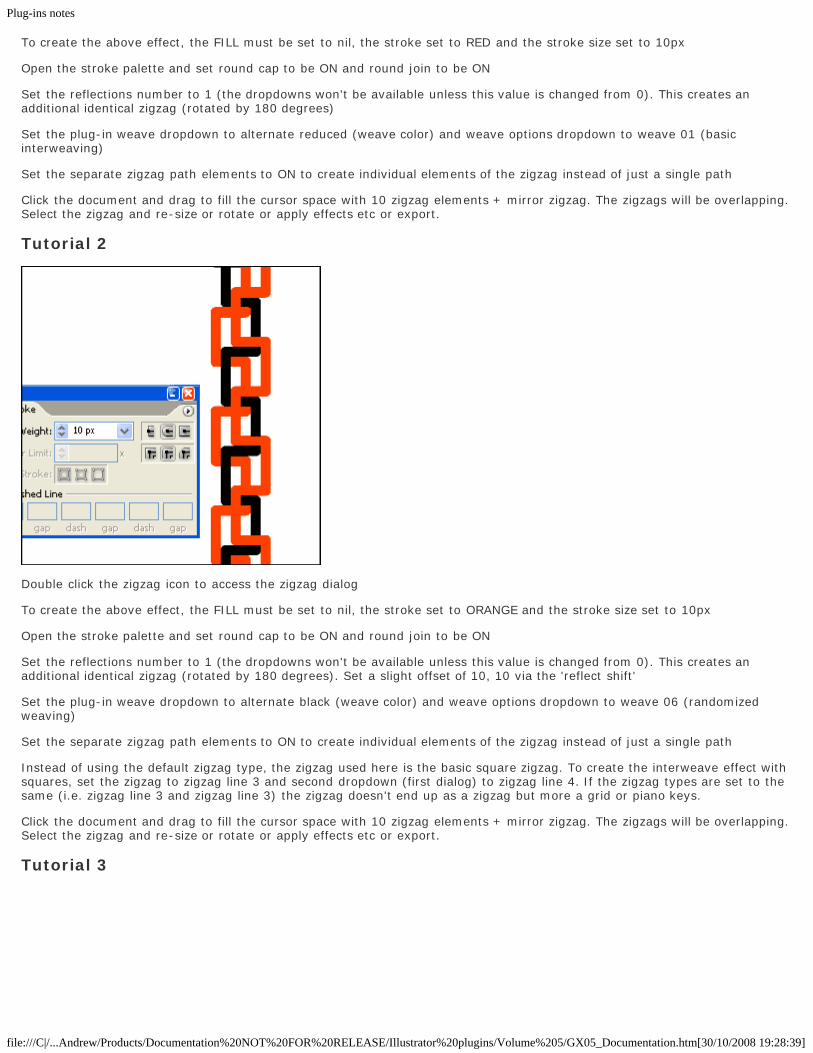
Tutorial 2
Double click the zigzag icon to access the zigzag dialog
To create the above effect, the FILL must be set to nil, the stroke set to ORANGE and the stroke size set to 10px
Open the stroke palette and set round cap to be ON and round join to be ON
Set the reflections number to 1 (the dropdowns won't be available unless this value is changed from 0). This creates anadditional identical zigzag (rotated by 180 degrees). Set a slight offset of 10, 10 via the 'reflect shift'
Set the plug-in weave dropdown to alternate black (weave color) and weave options dropdown to weave 06 (randomizedweaving)
Set the separate zigzag path elements to ON to create individual elements of the zigzag instead of just a single path
Instead of using the default zigzag type, the zigzag used here is the basic square zigzag. To create the interweave effect withsquares, set the zigzag to zigzag line 3 and second dropdown (first dialog) to zigzag line 4. If the zigzag types are set to thesame (i.e. zigzag line 3 and zigzag line 3) the zigzag doesn't end up as a zigzag but more a grid or piano keys.
Click the document and drag to fill the cursor space with 10 zigzag elements + mirror zigzag. The zigzags will be overlapping.Select the zigzag and re-size or rotate or apply effects etc or export.
Tutorial 3
Plug-ins notes
file:///C|/...Andrew/Products/Documentation%20NOT%20FOR%20RELEASE/Illustrator%20plugins/Volume%205/GX05_Documentation.htm[30/10/2008 19:28:39]
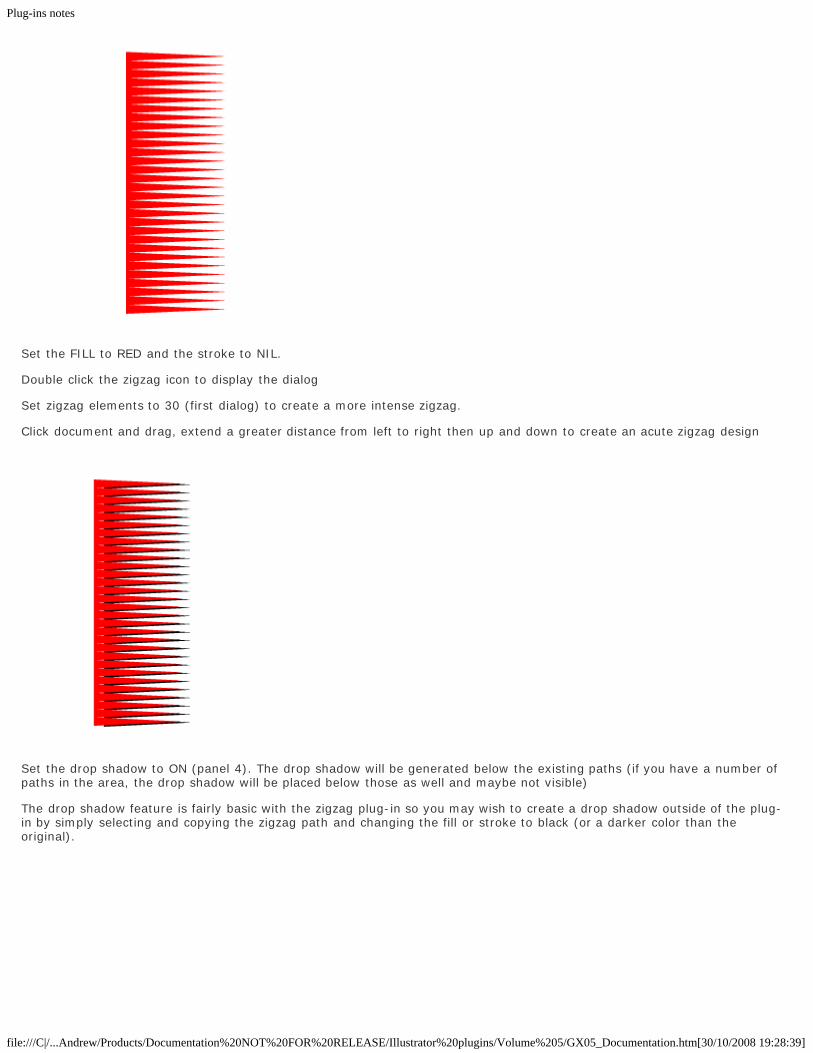
Set the FILL to RED and the stroke to NIL.
Double click the zigzag icon to display the dialog
Set zigzag elements to 30 (first dialog) to create a more intense zigzag.
Click document and drag, extend a greater distance from left to right then up and down to create an acute zigzag design
Set the drop shadow to ON (panel 4). The drop shadow will be generated below the existing paths (if you have a number ofpaths in the area, the drop shadow will be placed below those as well and maybe not visible)
The drop shadow feature is fairly basic with the zigzag plug-in so you may wish to create a drop shadow outside of the plug-in by simply selecting and copying the zigzag path and changing the fill or stroke to black (or a darker color than theoriginal).
Plug-ins notes
file:///C|/...Andrew/Products/Documentation%20NOT%20FOR%20RELEASE/Illustrator%20plugins/Volume%205/GX05_Documentation.htm[30/10/2008 19:28:39]
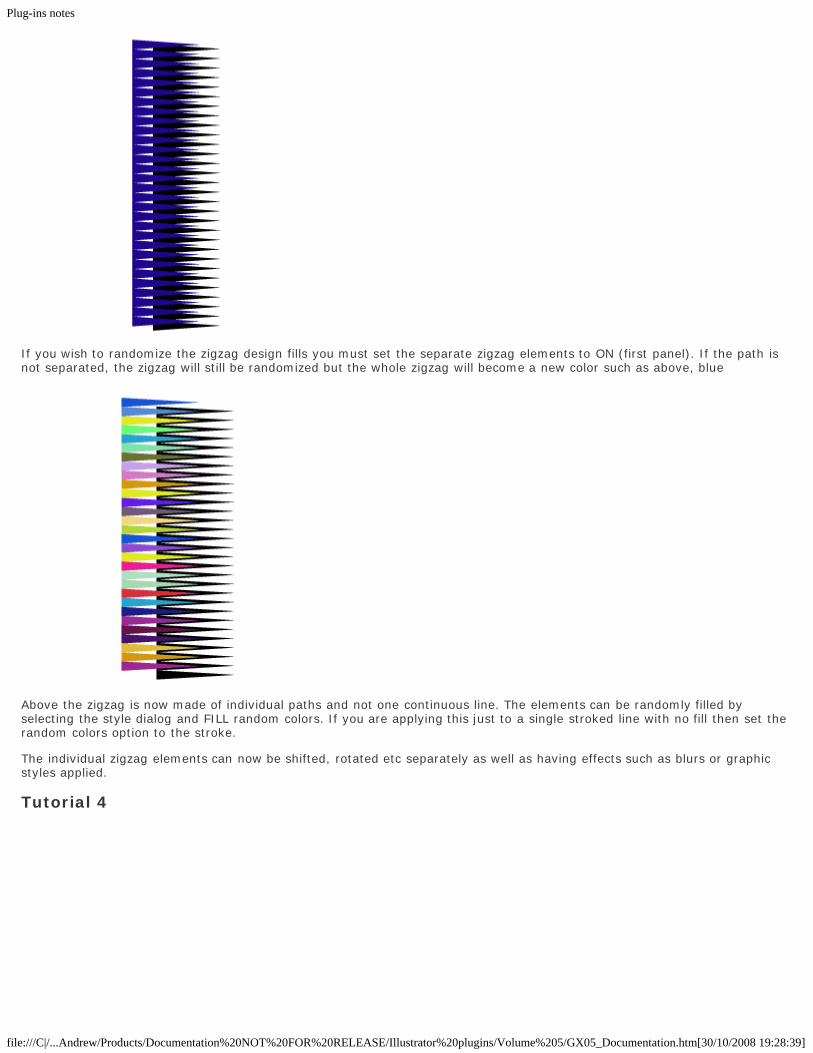
If you wish to randomize the zigzag design fills you must set the separate zigzag elements to ON (first panel). If the path isnot separated, the zigzag will still be randomized but the whole zigzag will become a new color such as above, blue
Above the zigzag is now made of individual paths and not one continuous line. The elements can be randomly filled byselecting the style dialog and FILL random colors. If you are applying this just to a single stroked line with no fill then set therandom colors option to the stroke.
The individual zigzag elements can now be shifted, rotated etc separately as well as having effects such as blurs or graphicstyles applied.
Tutorial 4
Plug-ins notes
file:///C|/...Andrew/Products/Documentation%20NOT%20FOR%20RELEASE/Illustrator%20plugins/Volume%205/GX05_Documentation.htm[30/10/2008 19:28:39]
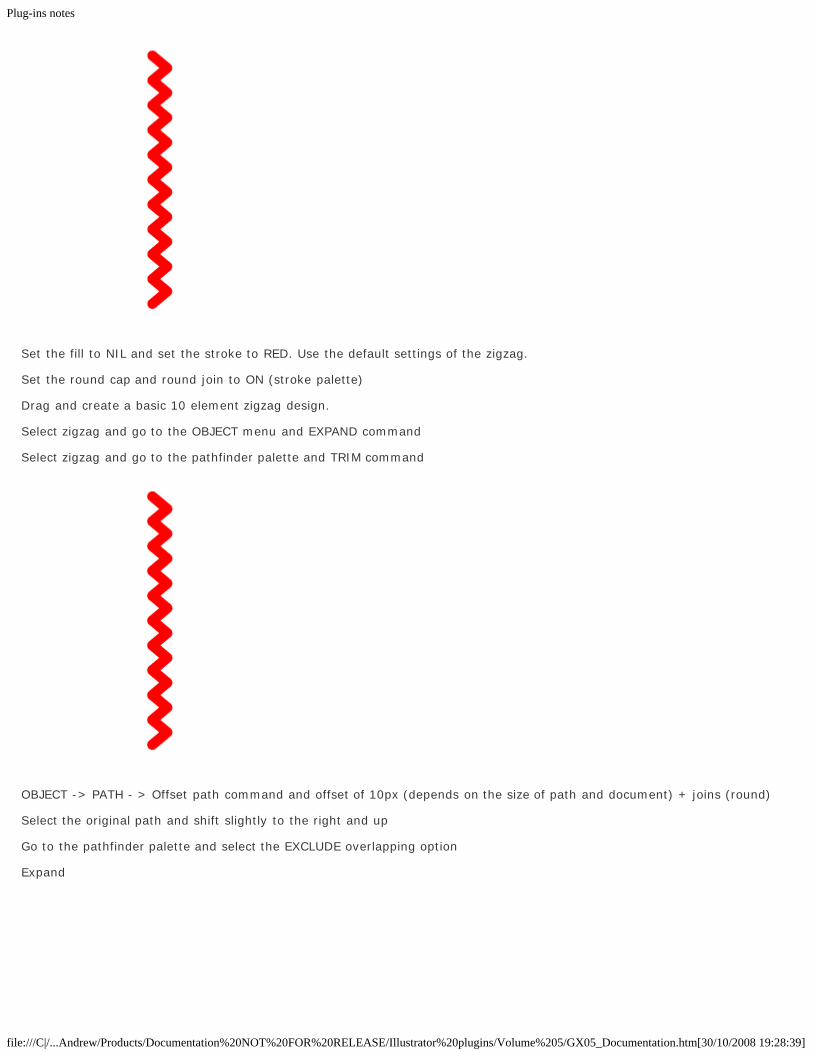
Set the fill to NIL and set the stroke to RED. Use the default settings of the zigzag.
Set the round cap and round join to ON (stroke palette)
Drag and create a basic 10 element zigzag design.
Select zigzag and go to the OBJECT menu and EXPAND command
Select zigzag and go to the pathfinder palette and TRIM command
OBJECT -> PATH - > Offset path command and offset of 10px (depends on the size of path and document) + joins (round)
Select the original path and shift slightly to the right and up
Go to the pathfinder palette and select the EXCLUDE overlapping option
Expand
Plug-ins notes
file:///C|/...Andrew/Products/Documentation%20NOT%20FOR%20RELEASE/Illustrator%20plugins/Volume%205/GX05_Documentation.htm[30/10/2008 19:28:39]
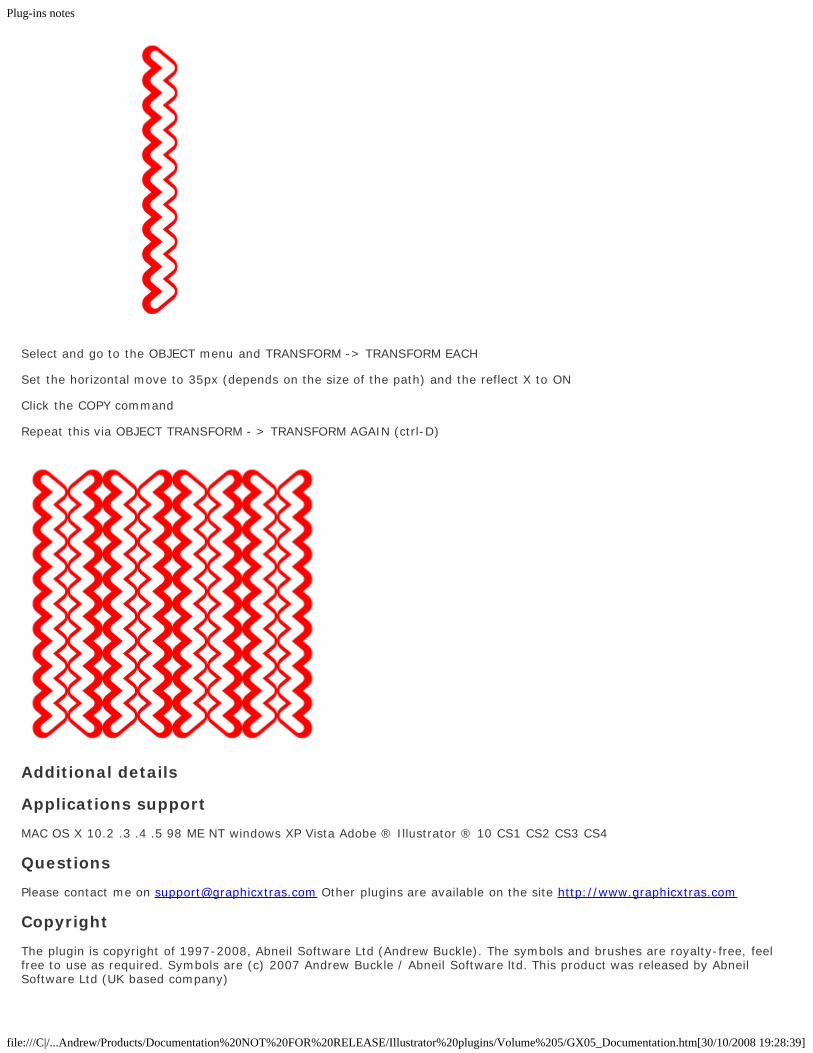
Select and go to the OBJECT menu and TRANSFORM -> TRANSFORM EACH
Set the horizontal move to 35px (depends on the size of the path) and the reflect X to ON
Click the COPY command
Repeat this via OBJECT TRANSFORM - > TRANSFORM AGAIN (ctrl-D)
Additional details
Applications support
MAC OS X 10.2 .3 .4 .5 98 ME NT windows XP Vista Adobe ® Illustrator ® 10 CS1 CS2 CS3 CS4
Questions
Please contact me on [email protected] Other plugins are available on the site http://www.graphicxtras.com
Copyright
The plugin is copyright of 1997-2008, Abneil Software Ltd (Andrew Buckle). The symbols and brushes are royalty-free, feelfree to use as required. Symbols are (c) 2007 Andrew Buckle / Abneil Software ltd. This product was released by AbneilSoftware Ltd (UK based company)

Plug-ins notes
file:///C|/...Andrew/Products/Documentation%20NOT%20FOR%20RELEASE/Illustrator%20plugins/Volume%205/GX05_Documentation.htm[30/10/2008 19:28:39]
Trademarks
Illustrator and Adobe and Photoshop are registered trademarks of Adobe Systems Incorporated. We have no connectionwhatsoever with Adobe. Adobe product screen shot(s) reprinted with permission from Adobe Systems Incorporated.
Symbols
Installation of symbols
Please place the symbols in C:\Program Files\Adobe\Illustrator 10\Presets\Symbols or mac equivalent such asHD:applications:adobe illustrator CS:presets:symbols.
The symbols can be accessed from any folder but this is probably the best location as the file/s can be accessed via thesymbols dropdown. Use in conjunction with the document symbols palette.
De-install the symbols
Please remove the AI files from the preset libraries folders
Symbols format
The symbols were created in 10 format symbols.
Saving AI symbols
You can always save the files as CS format if so required, just use the save command on the document symbols palette (inCS) and save all the current symbols or you can always open the original symbols file and copy some new symbols or deletesymbols from the symbols palette there and then save the symbols file.
Copyright
All the symbols are copyright Andrew Buckle 2007, but they are royalty-free...
Symbols use
The symbols can be used as is, just use them as a image resource and drag the symbol from the palette and use as a path(though you will have to expand the symbol to do this), sometimes it is best to just keep it as a symbol as all the effectmenu options can be applied to the symbol such as free distort and transform and styles can be applied as required. None ofthe filter menu filters can be used on symbols, though many of the 3rd party plugins such as the graphicxtras.com Andrew's(vector) plugins can be applied to symbols as well as paths.
Flash export
Symbols are useful in flash export (for low file size). The symbols can be exported to SWF format and also manipulatedacross layers to create animation effects. Or exported to SVG format.
Sprayer tool
Symbols can be used with the native symbol sprayer tool, the symbols can be applied and then using the scruncher etcadditional tools, the symbols can be re-sized and rotated and stained as required (graphicxtras.com also have some excellenttools that have a vast additional set of options and features to handle symbols from the toolbox).
Replace symbols
Symbols can be replaced at a later point of the creative process, so create an image with a box, multiple boxes and thenselect the symbols and then the replacement symbol in the symbol palette and then use 'replace symbol' from the menu tochange all the boxes into the more complex art. All the live effects remain as before.
Brush symbols
Symbols can be converted to a brush, simply drag the symbol (and any associated effects) to the brushes palette and you willbe asked to store the brush as a scatter / artistic or pattern brush.
Copy
Symbols can be copied and repeated as required with minimal file size overhead. Also of great use with transformations, the

Plug-ins notes
file:///C|/...Andrew/Products/Documentation%20NOT%20FOR%20RELEASE/Illustrator%20plugins/Volume%205/GX05_Documentation.htm[30/10/2008 19:28:39]
transform effect. This tool has a 'copies' feature which can be used to create unusual zoom effects and rotations and can beused in combo with the appearance palette to create multiple transformations for a single symbol.
Photoshop ®
Symbols can also be copied via the pasteboard to other applications such as Photoshop (so a wonderful background symbolcan be used as a wonderful background texture in Photoshop.. along with transparency information for use with layer effectssuch as bevels)
Envelopes / 3D
Symbols can be warped by the envelope filter
3D symbols: Symbols can be turned into 3D shapes by using the 3D features of AI CS (extrude and bevel...) By using theappearance palette, multiple warps can be applied to a single symbol. So create an arc warp effect, duplicate it and modifythe direction (say vertical instead of horizontal). This can create truly weird shapes from even the most basic symbol.