anz easytransact · and populate the employee’s tfn. the tfn will then be sent directly to the...
TRANSCRIPT

DETAILED TRAINING GUIDE
APRIL 2019
ANZ EASYTRANSACT

2
1. Accessing ANZ EasyTransact 4
2. Adding new members 82.1 Manual direct entry 8
2.2 Troubleshooting – Adding new members (Default Fund only) 11
3. Linking to Choice Funds 123.1 Linking by USI 12
3.2 Troubleshooting – Searching for a Unique Superannuation Identifier (USI) 14
3.3 ANZ Products – USI Listing 16
3.4 Linking by SPIN 17
3.5 Troubleshooting – Searching for a SPIN 18
3.6 ANZ SPIN Codes 19
3.7 Linking by ABN 22
3.8 Troubleshooting – Searching for the ABN 25
4. Add Choice Member 26
5. Creating Contribution Schedules 285.1 Direct entry 28
6. Processing a contribution 326.1 Direct entry 32
7. Paying for your contributions 357.1 Direct debit payment method 36
7.2 Direct credit payment method 37
7.3 Bpay® payment method 39
8. Exiting members 408.1 Member exit manual entry 40
8.2 Exit Choice Member screen 44
9. Transferring members 469.1 Transferring Choice Members 50
10. Searching for transactions 5210.1 Search by batch 52
10.2 Search by member 55
11. Changing ANZ EasyTransact details 5711.1 Modify a password 57
11.2 Modify employer details 58
11.3 Modify fund details (includes SMSFs) 59
12. Choice of Fund 6112.1 Link to Choice Fund 61
12.2 Outstanding requests 61
12.3 Payment instructions 62
12.4 Payroll fund codes 63
12.5 Fund information 63
12.6 Payment status 64
13. Viewing member details 66
14. Reporting for members 6814.1 Member reports 68
14.2 Employee advices 69
15. SuperStream 7015.1 Download of Choice member data 70
15.2 Updating the Choice member data 71
15.3 Uploading the Choice member data 72
16. File uploads 7416.1 Payroll file uploads 74
16.2 Troubleshooting – File upload 78
16.3 Uploading Contributions 79
16.4 Payroll upload 81
16.5 Troubleshooting – Payroll upload 83
16.6 Member exit file upload 85
16.7 Troubleshooting – Member exit file upload 88
16.8 Today’s exits 89
17. Deleting incomplete members 90
18. Member amendments 9318.1 Update member details 93
18.2 Update member payroll number 96
19. Feedback 98
20. Terms and definitions 99
CONTENTS
3
ANZ’s online solution that makes superannuation administration easier for employers
What is ANZ EasyTransact?
ANZ EasyTransact is an online payroll interface designed to make administering super easier for employers. ANZ EasyTransact allows you to electronically transfer your employees’ super information direct from your payroll system to super providers over a secure internet connection.
How can ANZ EasyTransact add value to my business?
Employers who use ANZ EasyTransact benefit from reduced time spent administering super for employees, control over the information allocated to member accounts, a range of payment options that best suit the cash flow needs of your business, comprehensive upfront training and ongoing support through a dedicated Employer Services team.
Above all, employers who use ANZ EasyTransact may generate greater efficiency in their business operations.
What does ANZ EasyTransact do?
Once you register to use ANZ EasyTransact, you no longer need paper and forms to administer your employer plan.
ANZ EasyTransact allows you to do the following online:
• pay your regular super contributions,
• pay your regular Choice of Fund contributions through our free Clearing Service,
• set up new employees when they join your company,
• notify us of employees who leave your company and
• update your employees’ basic details such as salaries, addresses and Tax File Numbers (TFNs).
Is ANZ EasyTransact SuperStream Compliant?
Yes, ANZ EasyTransact enables employers to meet their SuperStream obligations.
Alternatively, employers can utilize the SuperStream Industry Gateway to send Contribution Transaction Requests (CTR’s) for all ANZ and OnePath products, and Member Registration Requests (MRR’s) for ANZ Smart Choice Super, to set up new members.
How do I get started?
Please register with us over the phone on 13 47 43.
Need further assistance?
If you require further assistance you may:
• contact Employer Services on 13 47 43 (select option 1) weekdays from 8.30am to 6.30pm (AEST).
• arrange a training session with one of our Employer Services consultants.
WELCOME TO
ANZEASYTRANSACT

4
1. ACCESSINGANZEASYTRANSACT
Register now by calling us on 13 47 43 (option 1), weekdays between 8.30am and 6.30pm (AEST).
Step 1
Go to https://www.superchoice.com.au/anz
Step 2
Enter your user ID and password provided and click ‘Logon’.
Note: User IDs and passwords are case sensitive.
FORGOTTEN YOUR ANZ EASYTRANSACT USER ID OR PASSWORD?
CONTACT EMPLOYER SERVICES ON 13 47 43 (OPTION 1)

5
Step 3
On logging in for the first time, you will see the following important message.
You must review the PDS before agreeing to the terms and conditions.
Step 4
On acceptance of the terms and conditions there may be important messages that require review. Read and click ‘continue’.
6
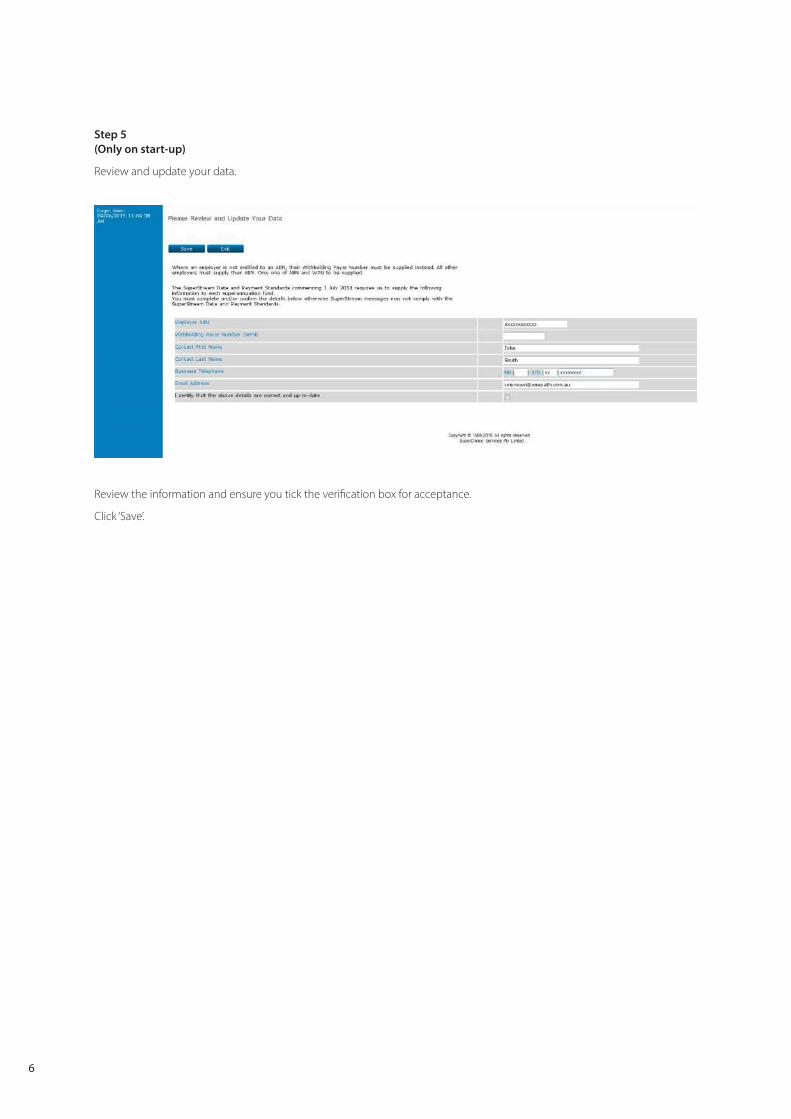
Step 5 (Only on start-up)
Review and update your data.
Review the information and ensure you tick the verification box for acceptance.
Click ‘Save’.
7
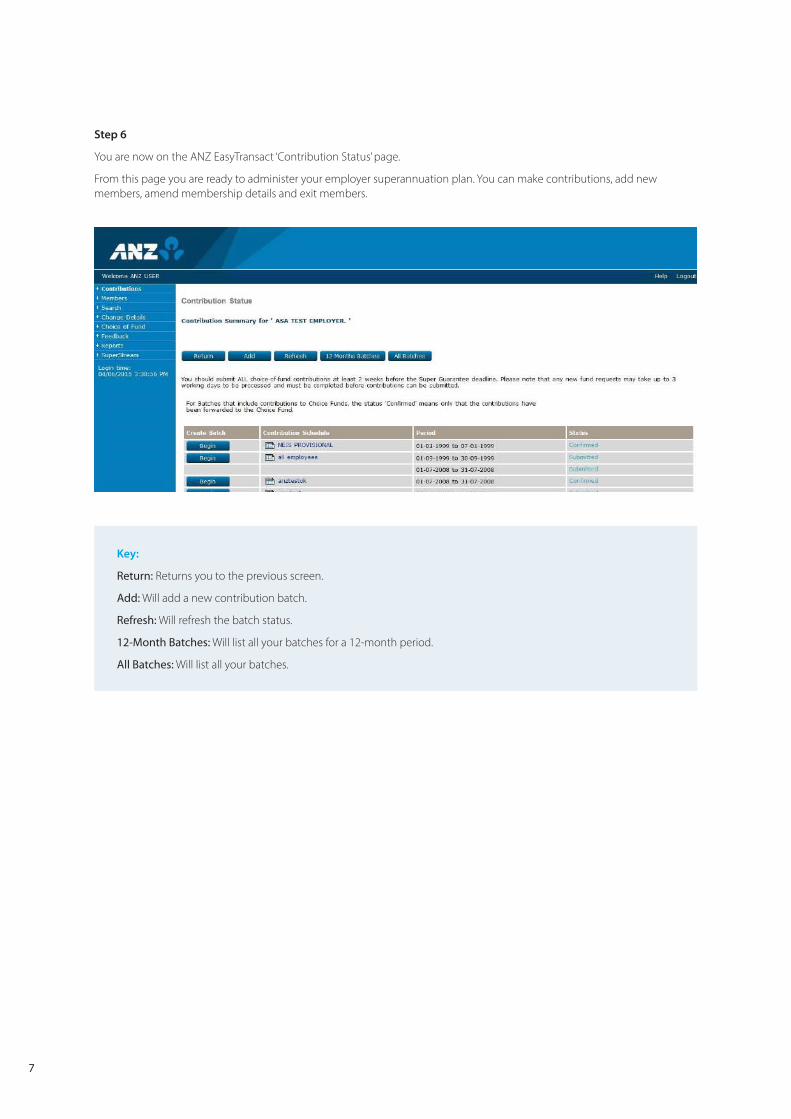
Step 6
You are now on the ANZ EasyTransact ‘Contribution Status’ page.
From this page you are ready to administer your employer superannuation plan. You can make contributions, add new members, amend membership details and exit members.
Key:
Return: Returns you to the previous screen.
Add: Will add a new contribution batch.
Refresh: Will refresh the batch status.
12-Month Batches: Will list all your batches for a 12-month period.
All Batches: Will list all your batches.

8
2. ADDINGNEWMEMBERS
Adding new members via ANZ EasyTransact is quick and easy. New members can be added to your employer default fund or to a member’s choice fund within minutes.
Depending on the volume of new members you are adding, you can select one of two methods for adding new members using ANZ EasyTransact; manual direct entry or via a payroll file upload. For information on how to bulk upload a payroll file for new members please refer to section 16.1.
2.1 MANUAL DIRECT ENTRY
Adding new members manually will often be the quickest method, especially when you only have one member to add. You will be required to key in all member information into the online form.
Within minutes you will be able to see your new member number in the ‘Today’s Members’ section of this page
Step 1
You are now on the ‘New Member Application Status Summary’ page.
On the left navigation menu, click ‘Members’.
Click ‘New Members’.
You are now on the ‘New Member Application Status Summary’ page.
Click ‘Add’.
9
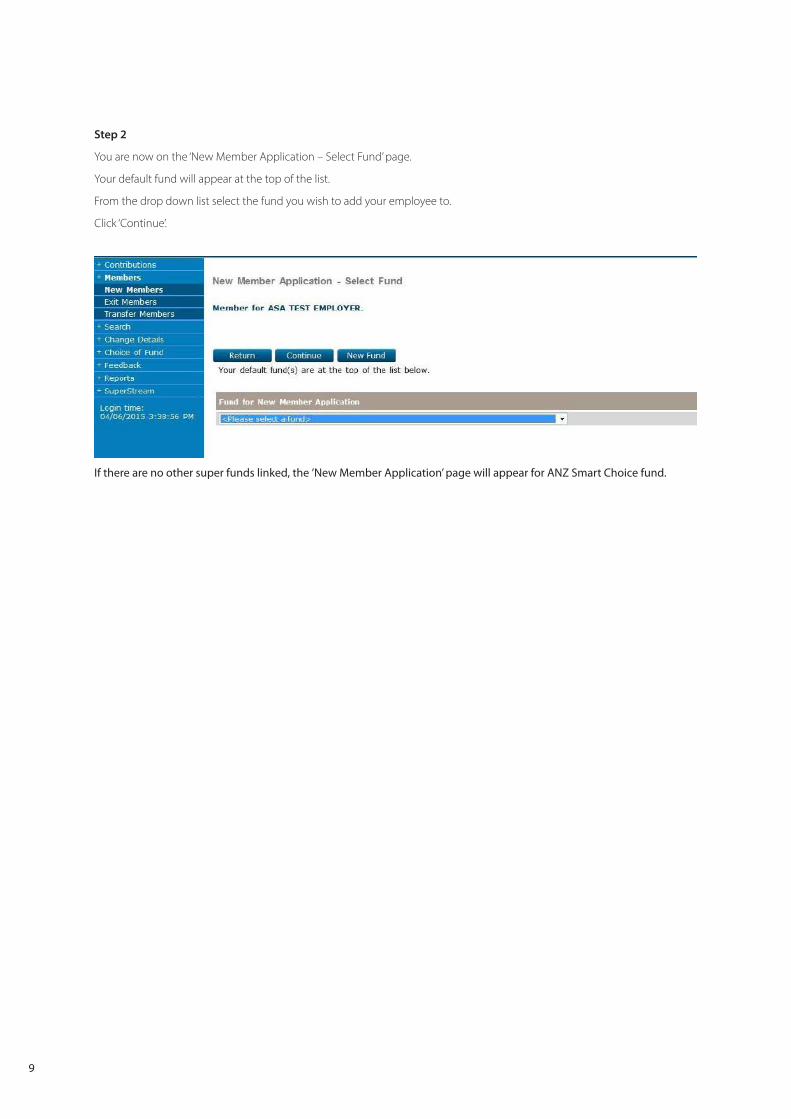
Step 2
You are now on the ‘New Member Application – Select Fund’ page.
Your default fund will appear at the top of the list.
From the drop down list select the fund you wish to add your employee to.
Click ‘Continue’.
If there are no other super funds linked, the ’New Member Application’ page will appear for ANZ Smart Choice fund.

10
Step 3
You are now on the ‘New Member Application’ page.
Fill in all the member details. All fields highlighted blue are compulsory fields.
Fewer details are required for Choice of Fund members.
Note: Employer must provide the following information: full name, Tax File Number (TFN), gender, date of birth and residential address if the employee has provided it for Superannuation purposes.
Note: A ‘no TFN Contributions Tax’ could apply to the employee if the TFN is not provided and personal (non-concessional) contributions cannot be accepted.
You can supply an employee’s TFN to their choice fund using ANZ EasyTransact. Simply click on ’Supply TFN now’ and populate the employee’s TFN. The TFN will then be sent directly to the member’s choice fund.
This is recommended as it allows your employee to make after tax contributions to their choice fund.
In the field ‘Date Joined Employer’, enter the date the employee started work with your company.
In the field ‘Date Joined Fund’, enter the date the employee is joining the superannuation fund.
In the field ‘Occupation’, it is important that you enter a correct occupation. If you cannot find an exact title, use a similar or equivalent occupation to ensure correct insurance cover for your employees. If you need further assistance for this, contact Employer Services on 13 47 43 (select option 1) weekdays from 8.30am to 6.30pm (AEST).
Once you have entered in all the member details, click on ‘Submit Now’.
If you wish to submit the new member details at a later stage, click ‘Submit Later’.
The new member page will clear, allowing you to enter in other new members, or click ‘Return’ to go to the ‘New Member Application Status Summary’ page.
If you are submitting an employee’s TFN to a choice fund that has selected to receive TFNs by email, a final confirmation page is displayed. This page allows you to verify and correct the email address if necessary.

11
2.2 TROUBLESHOOTING – ADDING NEW MEMBERS (DEFAULT FUND ONLY)
The following is a list of error messages and how to correct each one:
Invalid suburb, state and postcode combination
The ‘Helper’ button may be used to correct the error. If this does not work, try looking up the postcode or suburb name on the Australia Post website. Go to auspost.com.au/postcode
Sex is not valid for given Title
This error occurs when a ‘Title’ is entered that does not correspond to the selected sex. It may be something as simple as “Mr” has been entered with a female sex. To correct, simply update the incorrect details.
Tax File Number is invalid
The Australian Tax Office (ATO) has a formula for verifying Tax File Numbers (TFNs). If you receive this error, check that the details you have entered are correct and, if so, contact your employee to obtain their correct TFN.
‘Date Joined Fund’ cannot be a future date
You cannot enter future dates. Review and update if necessary and you will then be able to submit the member details successfully.
‘Date Joined Fund’ must be after last plan review date (DATE)
If a plan review has been run, it means that all members before that date have been finalised and you cannot enter details prior to the last plan review date. If your member’s ‘Date Joined Fund’ is correct, please contact our Employer Services team.
If it was entered incorrectly simply change the ‘Date Joined Fund’ to the correct date and submit the member details for processing.
Date of birth is invalid; members must be older than 14 years and 9 months
All members of the plan must be older than 14 years and 9 months before they can join. If the member you are trying to register is under that age and you require more information on this rule, please contact Employer Services.
Alternatively, if you have entered the date of birth incorrectly, simply change it to the correct date and submit the member for processing.
Entering Sent
This indicates that there is a delay between systems due to high processing volumes and the data has not yet synced. If the status has not changed to ‘Active’ within 24 hours please inform Employer Services on 13 47 43 (select option 1) weekdays from 8.30am to 6.30pm (AEST).
IF YOU ARE STILL HAVING PROBLEMS SOLVING MEMBER ERRORS,
PLEASE CONTACT EMPLOYER SERVICES ON 13 47 43 (SELECT OPTION 1)
WEEKDAYS FROM 8.30AM TO 6.30PM (AEST)

12
3. LINKINGTOCHOICEFUNDS
Choice Funds are all superannuation funds which are not sponsored by you, the employer. These are the funds that have been selected by your employees who have exercised their right to select a Choice Fund for you to make Superannuation Guarantee contributions to on their behalf.
You can make a single contribution payment to multiple Choice Funds using ANZ EasyTransact.
Before linking a new member to an external fund or transferring an existing member to an external fund, you need to link to the Choice Fund on ANZ EasyTransact.
Linking a specific Choice Fund on ANZ EasyTransact only needs to occur when no other members of your fund have previously joined that fund.
The initial steps for linking to Choice Funds are outlined in this section.
3.1 LINKING BY USI
A USI (Unique Superannuation Identifier), is a unique code used to identify a super fund. All public, corporate and industry super funds will generally have a USI and can be easily linked using this number. If a fund has a USI you must use this to link to the fund on ANZ EasyTransact.
First you need to obtain the USI for your employee’s nominated Choice Fund. Often the USI will appear on your employee’s super fund paperwork, or you can follow Steps 1 and 2 below to obtain a USI.
Note: Under SuperStream legislation, all contributions must include the correct USI.
13
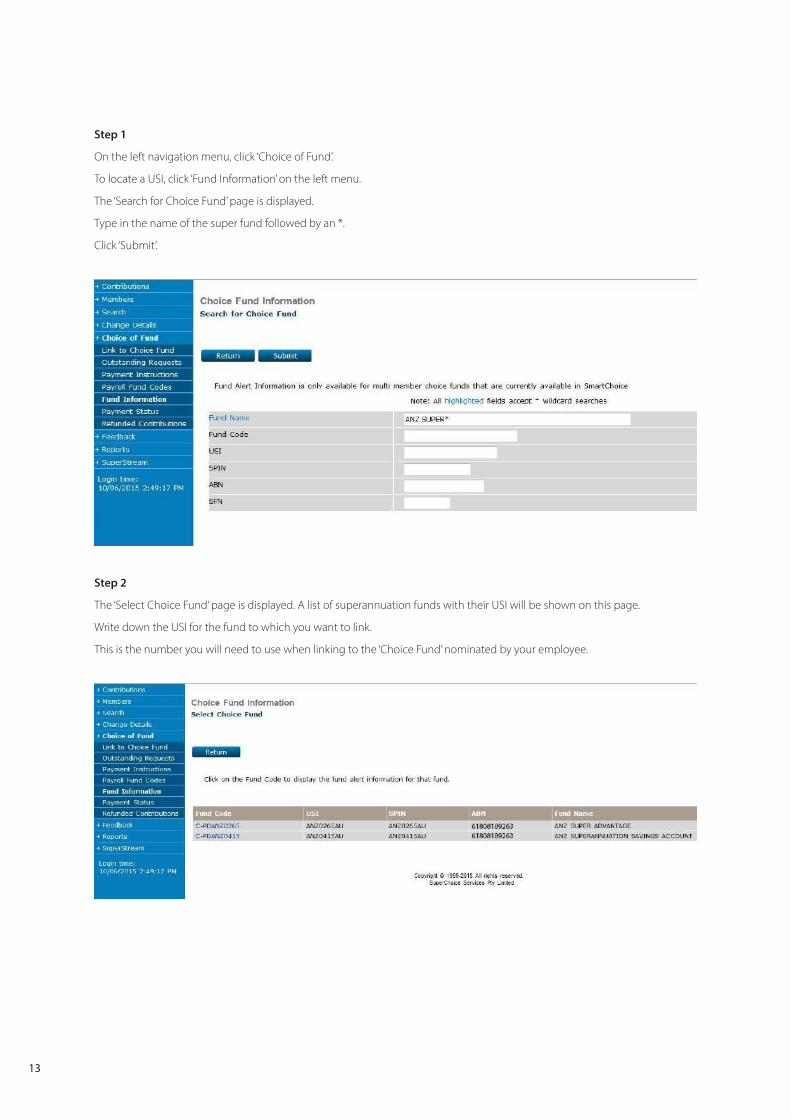
Step 1
On the left navigation menu, click ‘Choice of Fund’.
To locate a USI, click ‘Fund Information’ on the left menu.
The ‘Search for Choice Fund’ page is displayed.
Type in the name of the super fund followed by an *.
Click ‘Submit’.
Step 2
The ‘Select Choice Fund’ page is displayed. A list of superannuation funds with their USI will be shown on this page.
Write down the USI for the fund to which you want to link.
This is the number you will need to use when linking to the ‘Choice Fund’ nominated by your employee.

14
3.2 TROUBLESHOOTING – SEARCHING FOR A UNIQUE SUPERANNUATION IDENTIFIER (USI)
If the USI for the nominated superannuation fund is not on the list, you can contact the super fund directly to obtain these details. Alternatively, you can also search for Choice Funds using the fund’s Superannuation Product Identification Number (SPIN) or Australian Business Number (ABN).
Step 3
Once you have the USI, click ‘Choice of Fund’ on the left navigation menu.
Click ‘Link to Choice Fund’ on the left navigation menu.
You are now on the ‘Choice of Fund Search’ page.
Type in the USI next to the field called ‘USI’.
Click ‘Search’.

15
Step 4
You will now view a disclaimer page allowing you to link to the superannuation fund.
Click ‘Link’ to add the ‘Choice Fund’.
Note: Depending on the ‘Choice Fund’ to which you are trying to link, a ‘Fund Employer Number’ may need to be provided.
Please contact the ‘Choice Fund’ directly for more information on how to obtain a ‘Fund Employer Number’.
After selecting ‘Link’, you will be returned to the ‘Choice Fund Search’ page where you will be able to link another fund.
Note: If ANZ EasyTransact does not recognise the USI you have entered, the following message will be displayed:
‘This USI is not currently available for Choice of Fund contributions. Please check the USI and if correct, contact Employer Services on 13 47 43 (select option 1) weekdays from 8.30am to 6.30pm (AEST).
If you already have a link to the fund a message will appear saying ’You are already linked to this Fund’. You can now add new members to this external fund.

16
3.3 ANZ PRODUCTS – USI LISTING
Product Name Unique Superannuation Identifier (USI)
ANZ OneAnswer Personal Super – Entry Fee ANZ0325AU
ANZ OneAnswer Personal Super – Nil Entry Fee ANZ0326AU
ANZ Personal Superannuation Bond ANZ0074AU
ANZ Smart Choice Super MMF2076AU
ANZ Super Advantage ANZ0265AU
Integra Super MMF0146AU
OneAnswer Frontier Personal Super MMF0334AU
OnePath Plus Personal Super 61808189263003
OptiMix Superannuation LEF0160AU
Note: Under SuperStream legislation, all contributions must include the correct USI. If you are unsure of your USI, please contact Employer Services on 13 47 43 (select option 1) weekdays from 8.30am to 6.30pm (AEST) for the relevant ANZ product USI.

17
3.4 LINKING BY SPIN
A Superannuation Product Identification Number (SPIN) is a unique code used to identify a super fund. All public, corporate and industry super funds will generally have a SPIN and can be easily linked using this number.
First you need to obtain the SPIN for your employee’s nominated Choice Fund. Often the SPIN will appear on your employee’s super fund paperwork, or you can follow Steps 1 and 2 below to obtain a SPIN.
Step 1
On the left navigation menu, click ‘Choice of Fund’.
To locate a SPIN, click ‘Fund Information’ on the left menu.
The ‘Search for Choice Fund’ page is displayed.
Type in the name of the super fund followed by an *.
Click ‘Submit’.
18
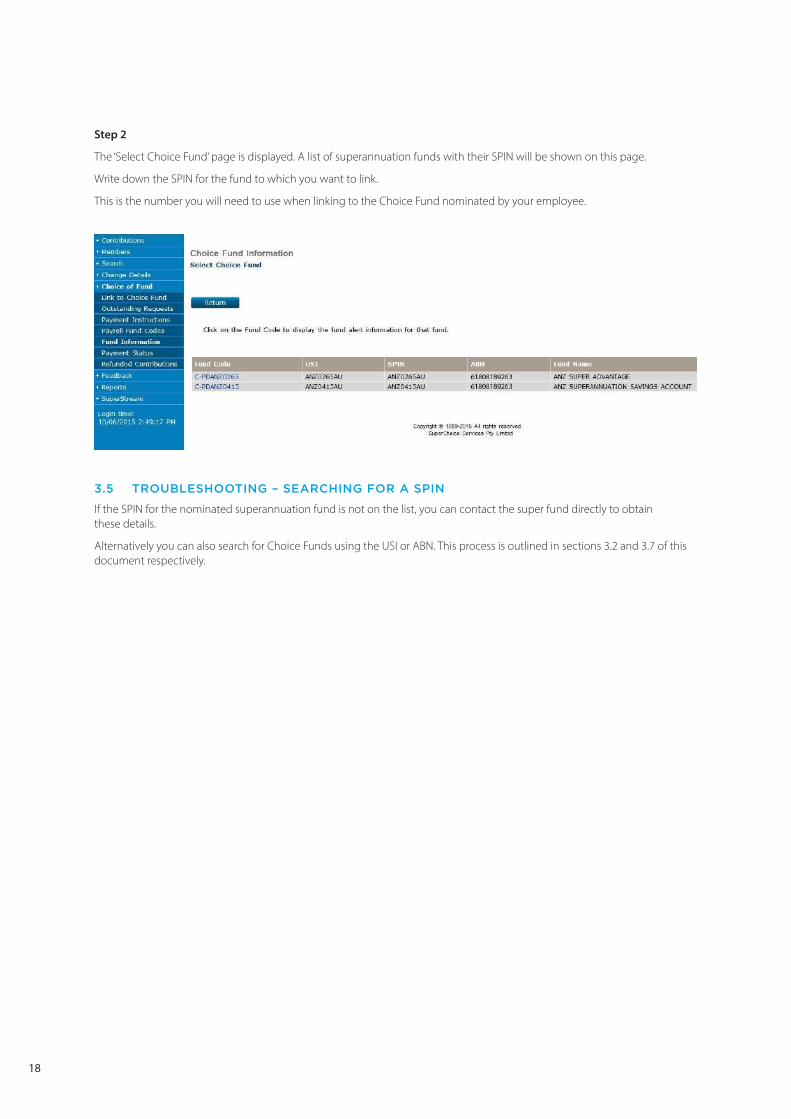
Step 2
The ‘Select Choice Fund’ page is displayed. A list of superannuation funds with their SPIN will be shown on this page.
Write down the SPIN for the fund to which you want to link.
This is the number you will need to use when linking to the Choice Fund nominated by your employee.
3.5 TROUBLESHOOTING – SEARCHING FOR A SPIN
If the SPIN for the nominated superannuation fund is not on the list, you can contact the super fund directly to obtain these details.
Alternatively you can also search for Choice Funds using the USI or ABN. This process is outlined in sections 3.2 and 3.7 of this document respectively.
19
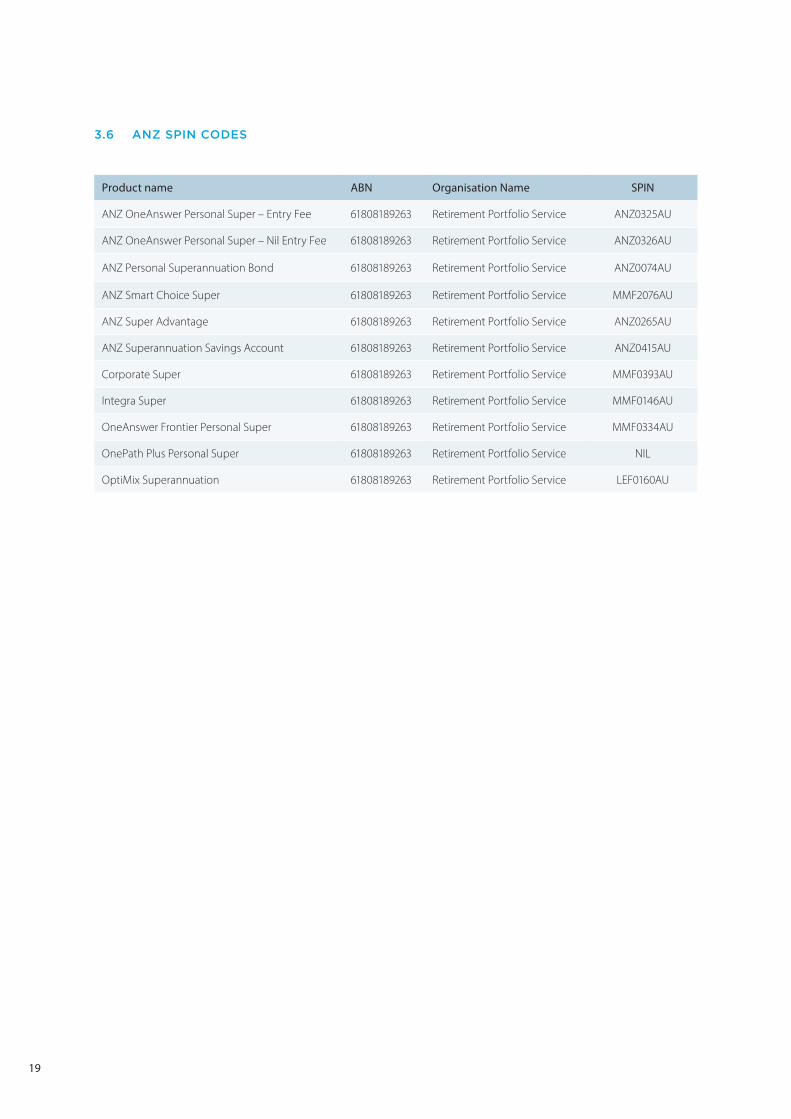
3.6 ANZ SPIN CODES
Product name ABN Organisation Name SPIN
ANZ OneAnswer Personal Super – Entry Fee 61808189263 Retirement Portfolio Service ANZ0325AU
ANZ OneAnswer Personal Super – Nil Entry Fee 61808189263 Retirement Portfolio Service ANZ0326AU
ANZ Personal Superannuation Bond 61808189263 Retirement Portfolio Service ANZ0074AU
ANZ Smart Choice Super 61808189263 Retirement Portfolio Service MMF2076AU
ANZ Super Advantage 61808189263 Retirement Portfolio Service ANZ0265AU
ANZ Superannuation Savings Account 61808189263 Retirement Portfolio Service ANZ0415AU
Corporate Super 61808189263 Retirement Portfolio Service MMF0393AU
Integra Super 61808189263 Retirement Portfolio Service MMF0146AU
OneAnswer Frontier Personal Super 61808189263 Retirement Portfolio Service MMF0334AU
OnePath Plus Personal Super 61808189263 Retirement Portfolio Service NIL
OptiMix Superannuation 61808189263 Retirement Portfolio Service LEF0160AU

20
Step 3
Once you have the SPIN, click ‘Choice of Fund’ on the left navigation menu.
Click ‘Link to Choice Fund’ on the left navigation menu.
You are now on the ‘Choice of Fund Search’ page.
Type in the SPIN next to the field called ‘SPIN’.
Click ‘Search’.

21
Step 4
You will now view a disclaimer page allowing you to link to the superannuation fund.
Click ‘Link’ to add the Choice Fund.
Note: Depending on the Choice Fund of which you are trying to link, a Fund Employer Number may need to be provided.
Please contact the Choice Fund directly for more information on how to obtain a Fund Employer Number.
After selecting ‘Link’, you will be returned to the ‘Choice Fund Search’ page where you will be able to link another fund.
Note: If ANZ EasyTransact does not recognise the SPIN you have entered, the following message will be displayed:
‘This SPIN is not currently available for Choice of Fund contributions’.
Please check the SPIN and if correct, contact Employer Services on 13 47 43 (select option 1) weekdays from 8.30am to 6.30pm (AEST).
If you already have a link to the fund, a message will appear saying ’You are already linked to this Fund’. You can now add new members to this external fund.

22
3.7 LINKING BY ABN
Linking to a Choice Fund using an ABN can only be done when the fund is a Self-Managed Super Fund (SMSF) or the superannuation fund does not have a USI or SPIN.
Step 1
On the left navigation menu, click ‘Choice of Fund’.
On the left navigation menu, click ‘Link to Choice Fund’.
You are now on the ‘Choice of Fund Search’ page.
Type in the ABN as provided by your employee.
Click ‘Search’.
Note: If you need to link to a superannuation fund using the fund’s ABN, you will need to obtain the bank details, email address and the Electronic Service Address (ESA) for EFT payments, in addition to the ABN. Your employee should provide you with payment details for the Choice Fund. Please ensure you use the ABN of the superannuation fund and not the company.
Step 2
If ANZ EasyTransact identifies that the ABN is a complying superannuation fund, the ‘Choice Fund Application’ page will appear within the search results.
You will then be required to select a payment method for the fund. This is how the superannuation fund wishes to accept payments for contributions. Your employee should provide you with payment details for the external fund.
23
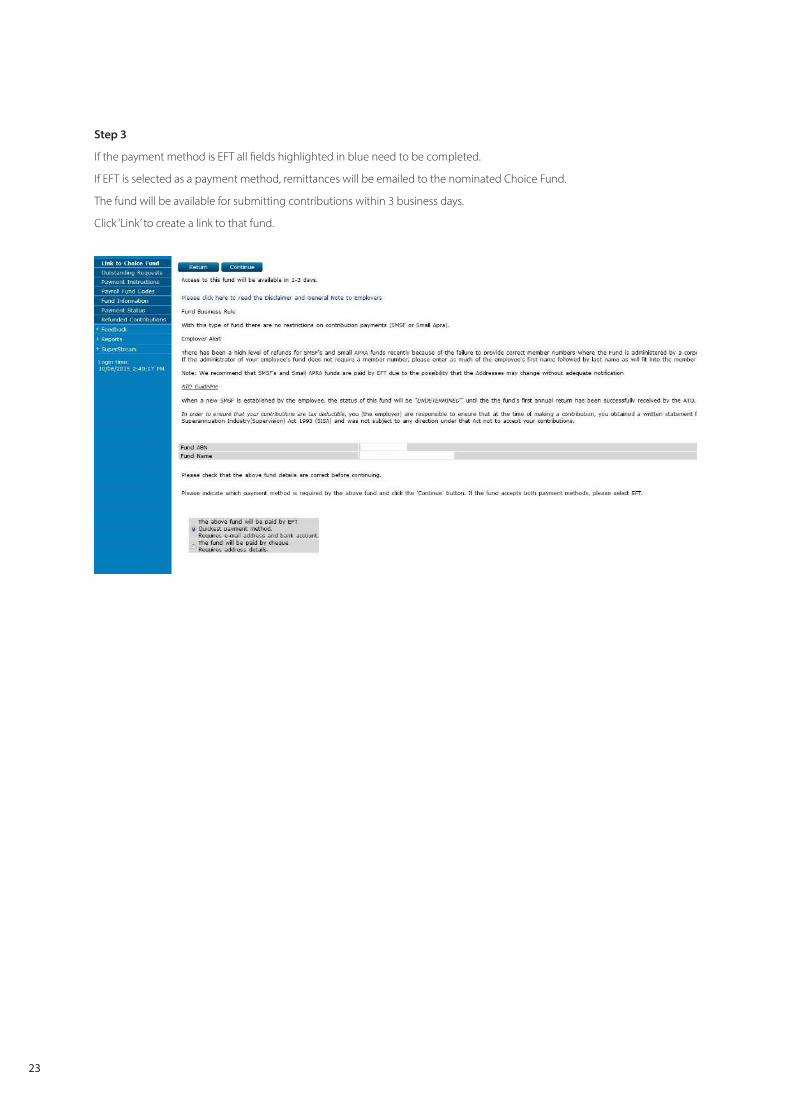
Step 3
If the payment method is EFT all fields highlighted in blue need to be completed.
If EFT is selected as a payment method, remittances will be emailed to the nominated Choice Fund.
The fund will be available for submitting contributions within 3 business days.
Click ‘Link’ to create a link to that fund.

24
Step 4
Double check the bank and details are correct then click ‘Yes’ to accept or ‘No’ to amend. Please ensure you select the correct Electronic Service Address (ESA) from the available drop-down to ensure the remittance correctly reaches the fund. This information should be supplied by your employee.
Note: Where a payment has been entered for a Choice Fund which has been previously utilised by another ANZ EasyTransact user, the bank details may be different. If the bank details do not match the current details ANZ EasyTransact holds, the following message will be displayed:
‘The bank account details you have entered are different from the details attached to this fund. Please check the bank’s details and re-enter them if entered incorrectly. If the bank details are correct, contact Employer Services.
25
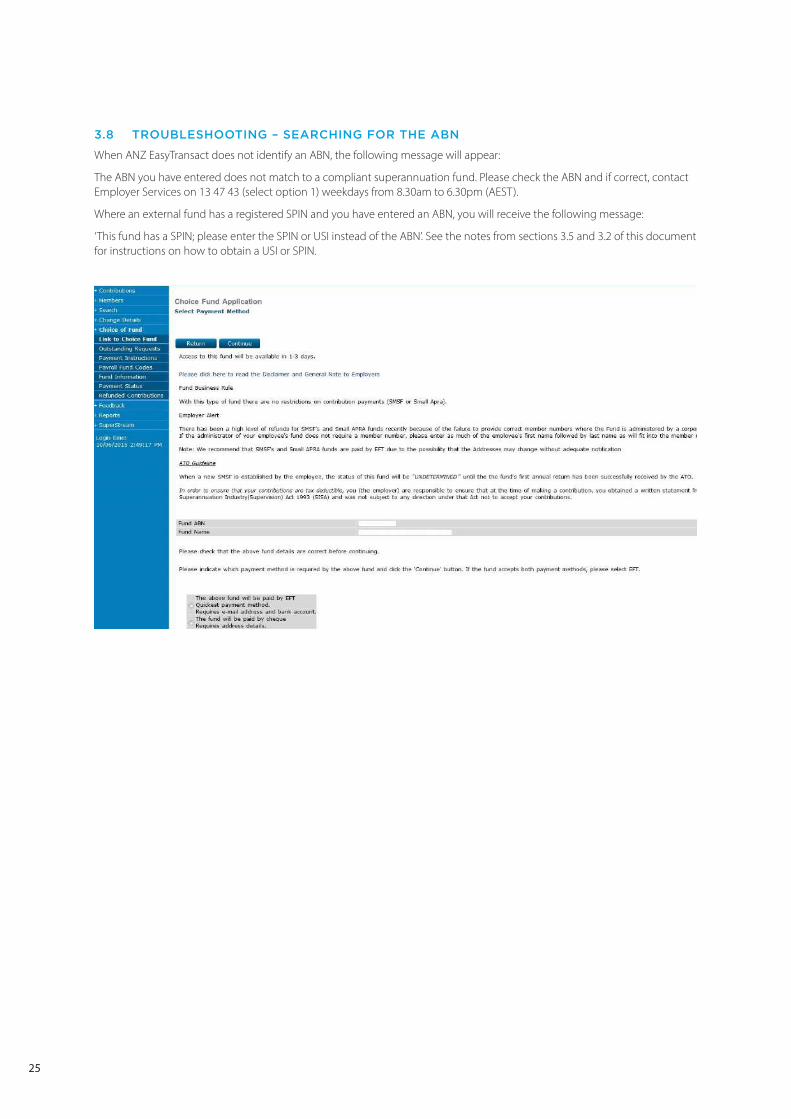
3.8 TROUBLESHOOTING – SEARCHING FOR THE ABN
When ANZ EasyTransact does not identify an ABN, the following message will appear:
The ABN you have entered does not match to a compliant superannuation fund. Please check the ABN and if correct, contact Employer Services on 13 47 43 (select option 1) weekdays from 8.30am to 6.30pm (AEST).
Where an external fund has a registered SPIN and you have entered an ABN, you will receive the following message:
‘This fund has a SPIN; please enter the SPIN or USI instead of the ABN’. See the notes from sections 3.5 and 3.2 of this document for instructions on how to obtain a USI or SPIN.

26
4. ADDCHOICEMEMBER
Step 1
On the left navigation menu, click ‘Members’.
Then, click ‘New Members’.
You are now on the ‘New Member Application Status Summary’ page
Click ‘Add’
Step 2
From the drop-down list, select the choice fund you wish to add your employee to.
Click ‘Continue’

27
Step 3
You are now on the ‘New Member Application’ page.
The following new ‘Add Choice Member’ screen will show.
Click ‘Submit Now’.
Click ‘Return’ to return to ‘Contribution Status Summary’ screen.
To review today’s added members, click on ‘today’s members’.
28
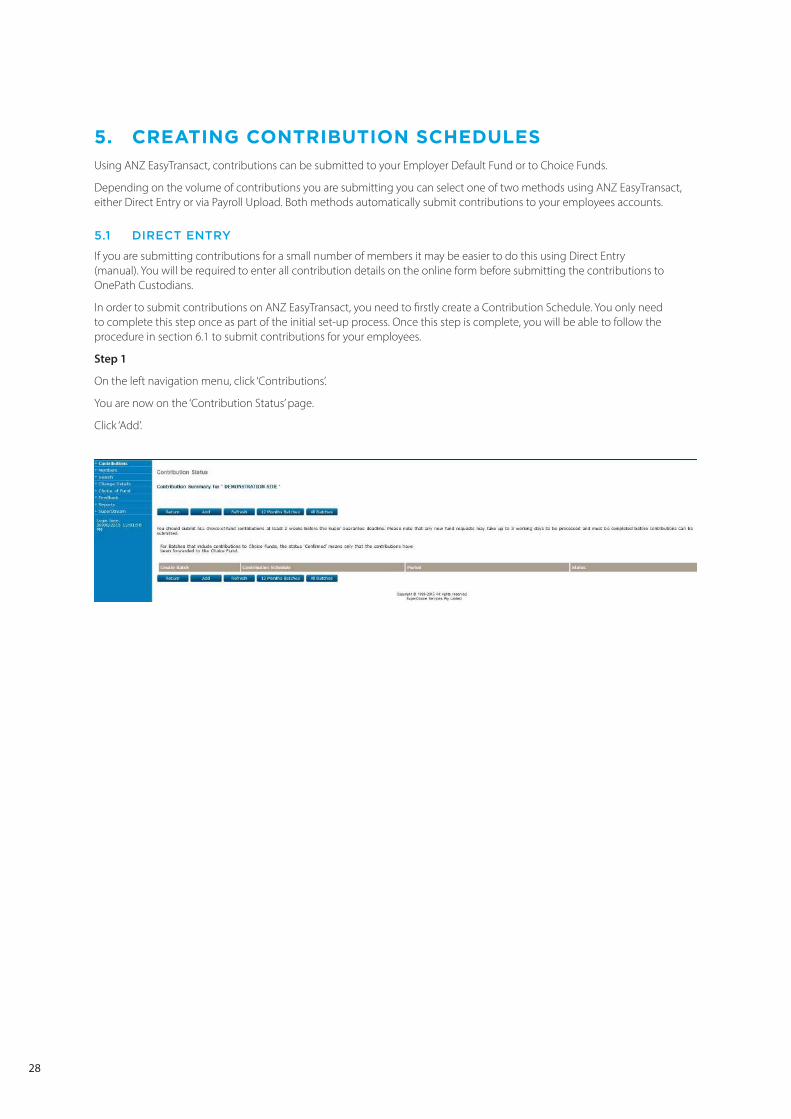
5. CREATINGCONTRIBUTIONSCHEDULES
Using ANZ EasyTransact, contributions can be submitted to your Employer Default Fund or to Choice Funds.
Depending on the volume of contributions you are submitting you can select one of two methods using ANZ EasyTransact, either Direct Entry or via Payroll Upload. Both methods automatically submit contributions to your employees accounts.
5.1 DIRECT ENTRY
If you are submitting contributions for a small number of members it may be easier to do this using Direct Entry (manual). You will be required to enter all contribution details on the online form before submitting the contributions to OnePath Custodians.
In order to submit contributions on ANZ EasyTransact, you need to firstly create a Contribution Schedule. You only need to complete this step once as part of the initial set-up process. Once this step is complete, you will be able to follow the procedure in section 6.1 to submit contributions for your employees.
Step 1
On the left navigation menu, click ‘Contributions’.
You are now on the ‘Contribution Status’ page.
Click ‘Add’.

29
Step 2
You are now on the ‘Contribution Schedule Maintenance’ page.
Enter the following details:
• Schedule Name – use any name you consider appropriate e.g. Super Contributions Manual Schedule.
• Schedule Type – select Direct Entry.
• Submission Period – you can either select a default payment frequency or select ‘None’ (this allows you to make amendments to dates).
• Next Start Date – this is the first day of the period you are paying, for example, if you are paying for July 2015 you would use 01-07-2015.
• Default Schedule – leave check box unchecked.
• Select Members by Search – leave check box unchecked.
• Then click ‘Save’.

30
Step 3
You are now on the ‘Select Members’ page.
Click ‘Select All’ to add all of your members to this schedule for future contributions or individually tick the ‘Members in Schedule’ box next to each member you want to add to this schedule.
Members who are selected will then be able to receive future contributions made using this schedule.
Once you are happy with the members you have selected, click ‘Save’.

31
Step 4
You are now on the ‘Contribution Schedule Maintenance’ page.
Click ‘Return’.
The process is now complete.

32
6. PROCESSINGACONTRIBUTION
Now that you have your contribution schedule set up, it is time to process a contribution batch. For Direct Entry, simply follow the steps outlined below or for a Payroll Upload follow the procedure outlined within section 16.1.
Don’t forget, if it is the first time you have processed contributions, you will need to contact Employer Services on 13 47 43 (select option 1) weekdays from 8.30am to 6.30pm (AEST) before you can use Payroll Upload.
Once you complete the appropriate procedure below, you must then submit your batch payment by following the procedures outlined in section 7 of this document.
6.1 DIRECT ENTRY
Step 1
On the left navigation menu, click ‘Contributions’.
You are now on the ‘Contribution Status’ page.
For the schedule you wish to process click on ‘Begin’ under the heading ‘Create batch’.

33
Step 2
You are now on the ‘Batch Input’ page.
Enter the correct dates for the payment period. If you have selected a Submission type (e.g. weekly) then the payment period dates will be locked.
Enter the amounts payable to each member in the relevant columns.
Click ‘Calculate Total’ to populate the total contribution amount for this schedule.
Once you have entered all contributions that you want to submit click ‘Save and Continue’.
Note: To select members to appear in a batch, click on ‘Members Schedule’. Select the employees you want to pay for. Once this is completed click ‘Save’. This will return you to the ‘Batch Input’ page.
34
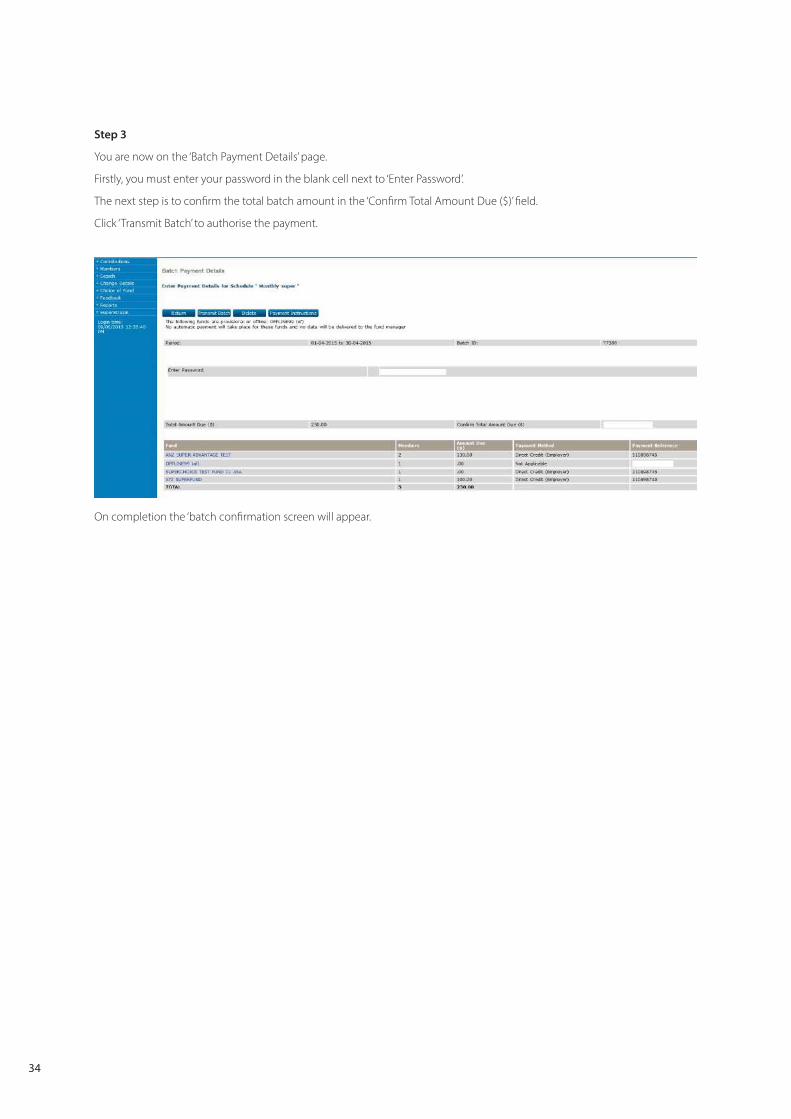
Step 3
You are now on the ‘Batch Payment Details’ page.
Firstly, you must enter your password in the blank cell next to ‘Enter Password’.
The next step is to confirm the total batch amount in the ‘Confirm Total Amount Due ($)’ field.
Click ‘Transmit Batch’ to authorise the payment.
On completion the ‘batch confirmation screen will appear.

35
7. PAYINGFORYOURCONTRIBUTIONS
There are three methods you can use when paying for your contributions. All three methods are initiated by you.
The options for payment are:
• Direct Debit
• Direct Credit
• Bpay®
® Registered to Bpay Pty Ltd ABN 69 079 137 518
Employer initiated Direct Debit has a number of advantages you should consider:
• As Direct Debit is employer initiated, money will only be debited from your account when you have approved the payment of your batch. With employer initiated Direct Debit, you can control the timing for money to be debited from your account.
• The Direct Debit facility reads the payment amount directly from the contribution batch you have submitted. Therefore the payment amount will match the contribution batch every time. This will remove any reconciliation issues and potential errors that can occur by other payment methods where you are required to enter account numbers and payment amounts.
• Once you approve payment, that’s it, you don’t need to login to your Internet banking to make a separate payment.
Direct Credit and Bpay® are the other payment methods offered by OnePath Custodians.
Once you have submitted your batch, you will then be required to login to your internet banking service and transfer the total amount of your batch payment to OnePath Custodians via money transfer or Bpay®.
The procedures for payment are outlined following.
36
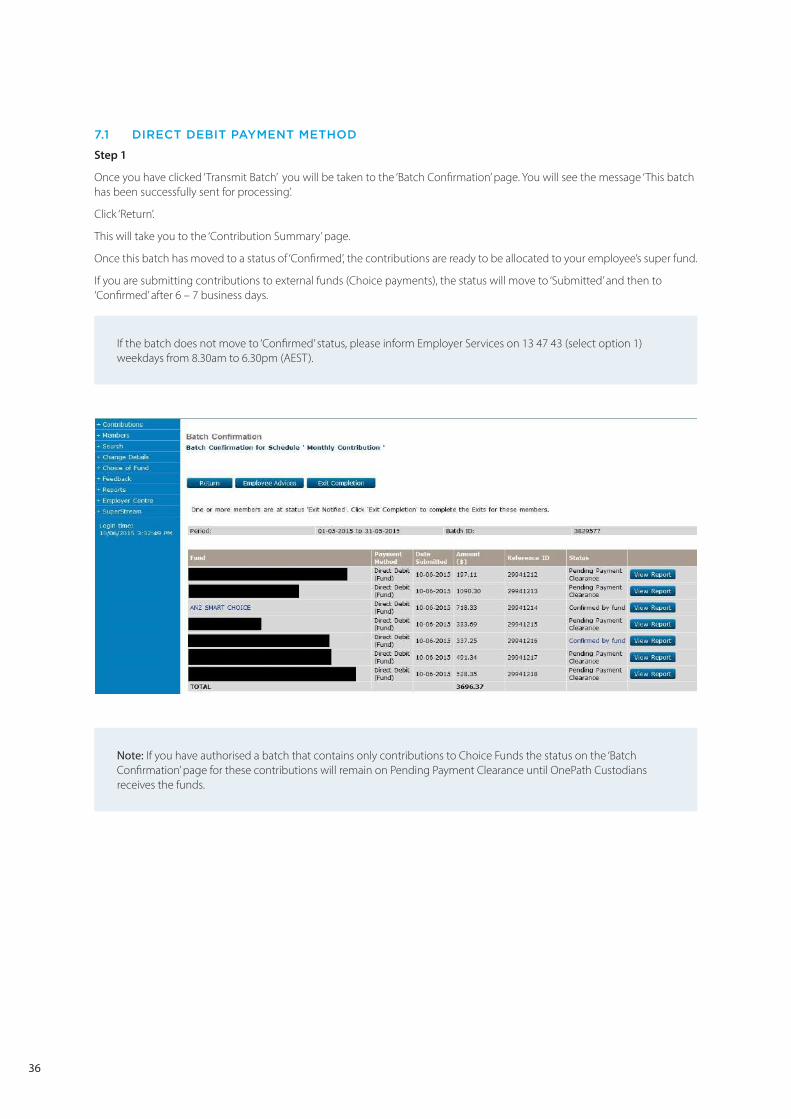
7.1 DIRECT DEBIT PAYMENT METHOD
Step 1
Once you have clicked ‘Transmit Batch’ you will be taken to the ‘Batch Confirmation’ page. You will see the message ‘This batch has been successfully sent for processing’.
Click ‘Return’.
This will take you to the ‘Contribution Summary’ page.
Once this batch has moved to a status of ‘Confirmed’, the contributions are ready to be allocated to your employee’s super fund.
If you are submitting contributions to external funds (Choice payments), the status will move to ‘Submitted’ and then to ‘Confirmed’ after 6 – 7 business days.
If the batch does not move to ‘Confirmed’ status, please inform Employer Services on 13 47 43 (select option 1) weekdays from 8.30am to 6.30pm (AEST).
Note: If you have authorised a batch that contains only contributions to Choice Funds the status on the ‘Batch Confirmation’ page for these contributions will remain on Pending Payment Clearance until OnePath Custodians receives the funds.

37
7.2 DIRECT CREDIT PAYMENT METHOD
Step 1
From the ‘Contribution Summary’ page, click on ‘Pending Payment Clearance’.
This will take you to the ‘Batch Confirmation’ page.
Click ‘Payment Instructions’ to retrieve your payment details.

38
Step 2
Use the bank account and reference details to make your payment from your financial institution.
Once OnePath Custodians has confirmed that the contribution data and payment has been received, the batch will move to a ‘Confirmed’ status, and member contributions will be allocated.
Note: If you are submitting contributions to Choice Funds the status will first move to ‘Submitted’ and then to ‘Confirmed’ after 6–7 business days.
If the batch does not move to a ’Confirmed’ status please inform Employer Services on 13 47 43 (select option 1) weekdays from 8.30am to 6.30pm (AEST).
If payment is not received by OnePath Custodians within 7 business days, your ANZ EasyTransact Contribution Batch will be cancelled.
39
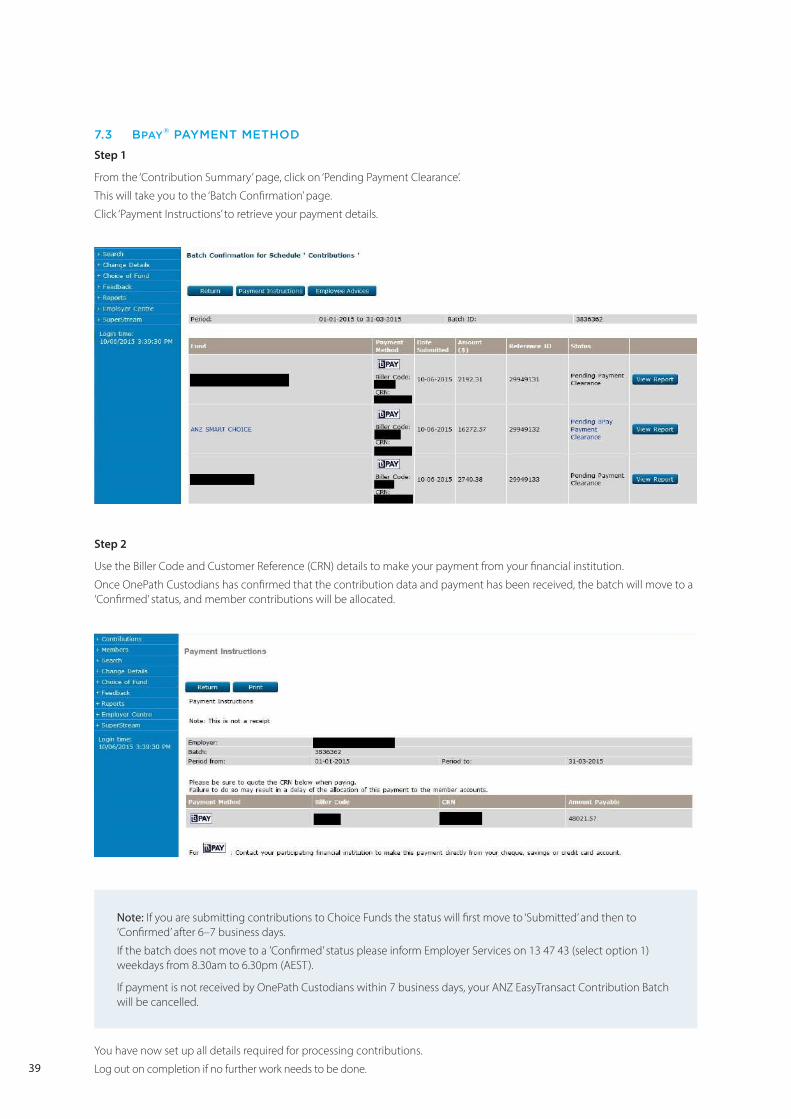
7.3 Bpay® PAYMENT METHOD
Step 1
From the ‘Contribution Summary’ page, click on ‘Pending Payment Clearance’.
This will take you to the ‘Batch Confirmation’ page.
Click ‘Payment Instructions’ to retrieve your payment details.
Step 2
Use the Biller Code and Customer Reference (CRN) details to make your payment from your financial institution.
Once OnePath Custodians has confirmed that the contribution data and payment has been received, the batch will move to a ‘Confirmed’ status, and member contributions will be allocated.
Note: If you are submitting contributions to Choice Funds the status will first move to ‘Submitted’ and then to ‘Confirmed’ after 6–7 business days.
If the batch does not move to a ’Confirmed’ status please inform Employer Services on 13 47 43 (select option 1) weekdays from 8.30am to 6.30pm (AEST).
If payment is not received by OnePath Custodians within 7 business days, your ANZ EasyTransact Contribution Batch will be cancelled.
You have now set up all details required for processing contributions.
Log out on completion if no further work needs to be done.

40
8. EXITINGMEMBERS
When exiting members, it is important that all contributions are up to date, as contributions cannot be paid to a member with an exited status.
Note: OnePath Custodians has the capability to accept file uploads for exits (section 16.6). This is recommended if you are submitting an average of 10 or more exits per remittance.
Please contact Employer Services on 13 47 43 (select option 1) weekdays from 8.30am to 6.30pm (AEST) to set up this facility.
8.1 MEMBER EXIT MANUAL ENTRY
Step 1
On the left navigation menu, click ‘Member’.
Click ‘Exit Members’.
You are now on the ‘Status of Member Exits’ page.
Click ‘Exit Member’.

41
Step 2
You are now on the ‘Member Exits Search’ page.
Type member details into one of the search fields e.g. ‘Member Last Name’ then click ‘Search’.
Step 3
You are now on the ‘Exit Member’ page.
Type the member’s ‘Date Left Employment’ and select the ‘Exit Reason’. You may also enter address details if requested by the employee.
Click ‘Exit Member’.

42
Step 4
You are now on the ‘Confirm Member Exit’ page.
The details you have entered will be displayed for you to confirm.
If details are correct click ‘Yes’ to confirm or ‘No’ to change details.

43
Step 5
You are back at the ‘Status of Member Exits’ page.
Once the exit record you have entered disappears from this page, the exit is processed.
If the member status is ‘Exit Queued’ or ‘Exit Requested’, the exit is still processing.
If the status shows as ‘Exit Waiting’, the member is still appearing in a contribution schedule.
If the member displays ‘Exit Rejected’ contact Employer Services on 13 47 43 (select option 1) weekdays from 8.30am to 6.30pm (AEST).

44
8.2 EXIT CHOICE MEMBER SCREEN
Step 1
On the left navigation menu, click ‘Members’.
Click ‘Exit Members’.
Step 2
You are now on the ‘Member Exits Search’ page.
Type the member details into one of the search fields, e.g. ‘Member Last Name’ then click ‘Search’.
45
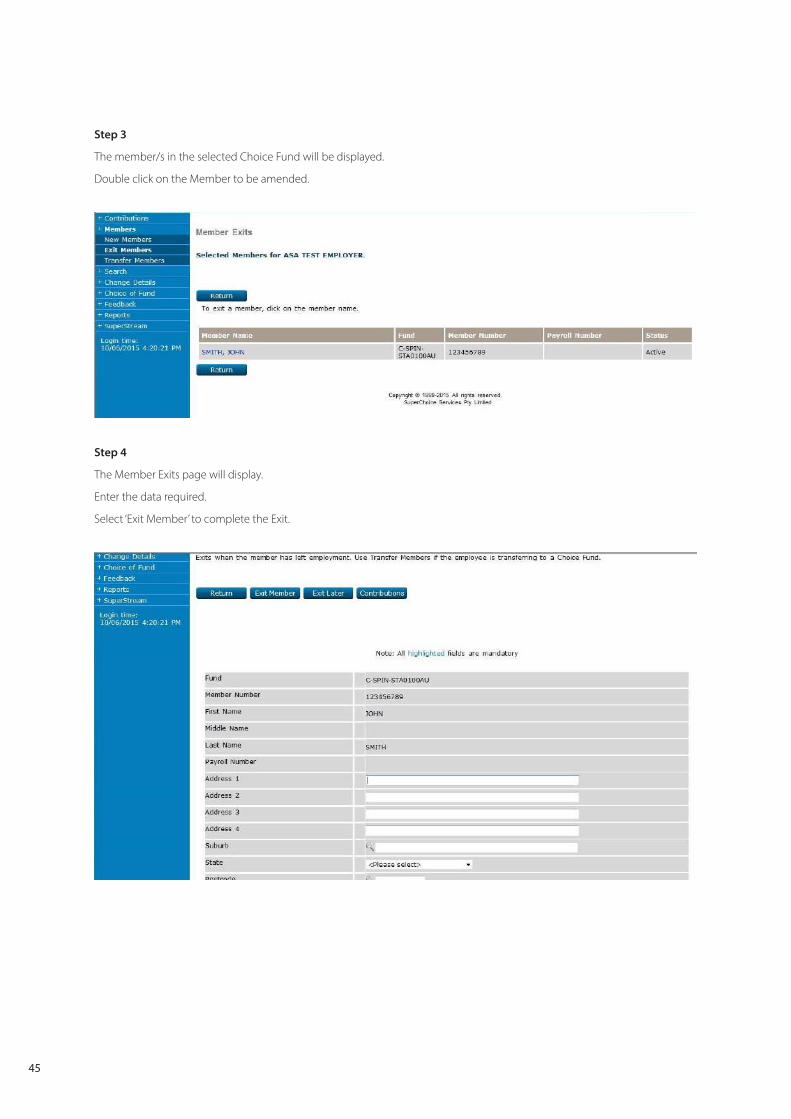
Step 3
The member/s in the selected Choice Fund will be displayed.
Double click on the Member to be amended.
Step 4
The Member Exits page will display.
Enter the data required.
Select ‘Exit Member’ to complete the Exit.
46
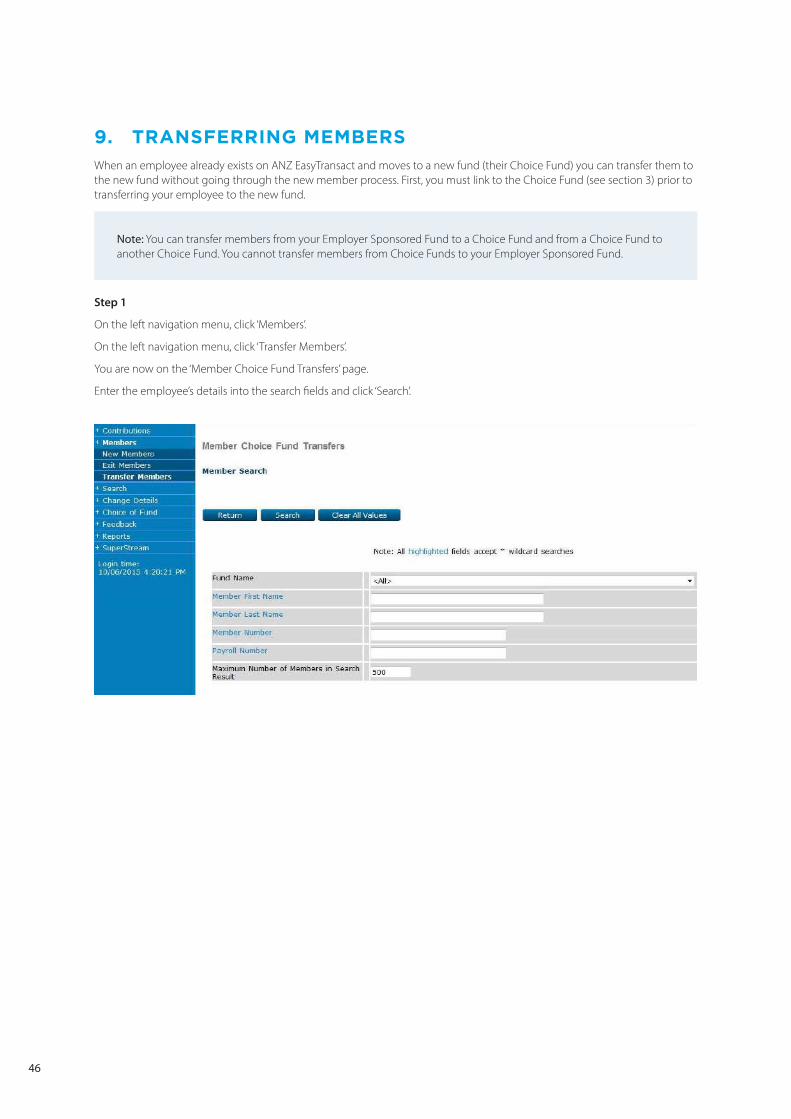
9. TRANSFERRINGMEMBERS
When an employee already exists on ANZ EasyTransact and moves to a new fund (their Choice Fund) you can transfer them to the new fund without going through the new member process. First, you must link to the Choice Fund (see section 3) prior to transferring your employee to the new fund.
Note: You can transfer members from your Employer Sponsored Fund to a Choice Fund and from a Choice Fund to another Choice Fund. You cannot transfer members from Choice Funds to your Employer Sponsored Fund.
Step 1
On the left navigation menu, click ‘Members’.
On the left navigation menu, click ‘Transfer Members’.
You are now on the ‘Member Choice Fund Transfers’ page.
Enter the employee’s details into the search fields and click ‘Search’.
47
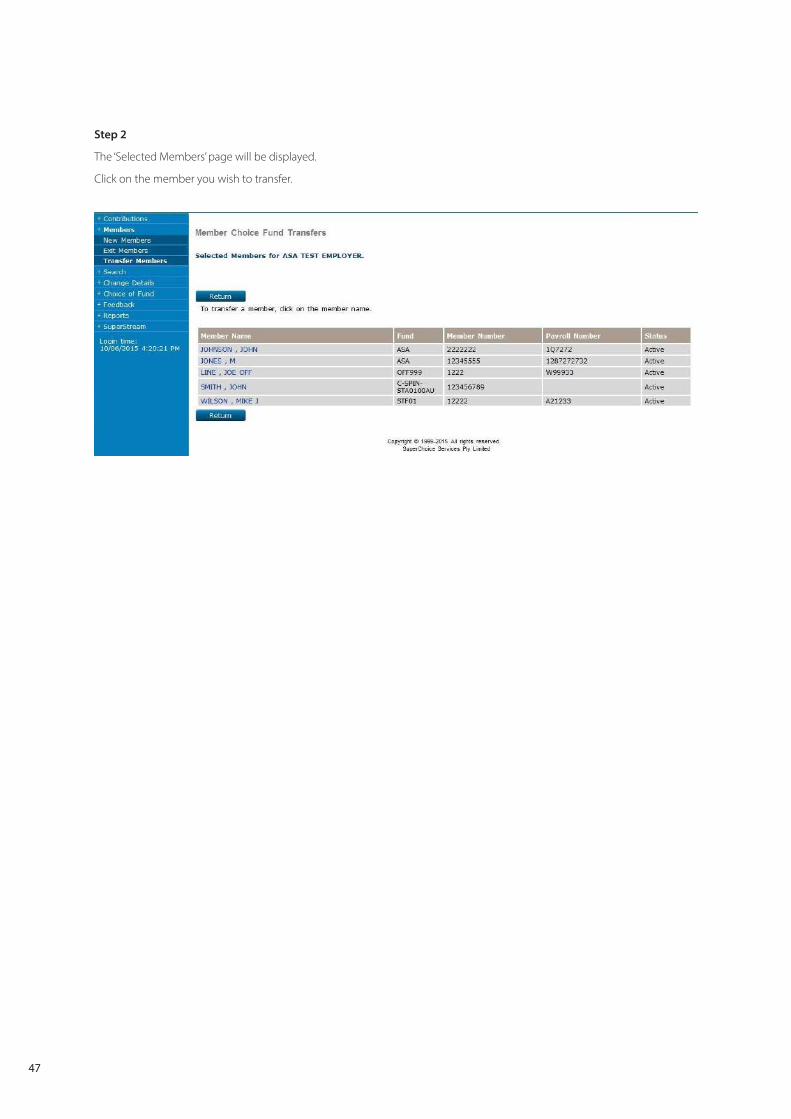
Step 2
The ‘Selected Members’ page will be displayed.
Click on the member you wish to transfer.

48
Step 3
Enter the date in the ‘Effective Date of Transfer’ field then scroll down to the bottom of the page. Note: Cannot be today’s date.
Select the employee’s new Choice Fund from the ‘New Choice Fund’ drop-down list.
You must create a link to the Choice Fund first (see Section 3 ‘Linking to Choice Funds’).
Enter the employee’s new Choice Fund Member Number in the ‘New Fund Member Number’ field.
Click ‘Transfer Member’.
Note: You can supply your employee’s TFN to their Choice Fund using ANZ EasyTransact. Simply click on ’Supply TFN now’ and populate the member’s TFN. The TFN will then be sent directly to the member’s Choice Fund. This is recommended as it allows your employee to make after tax contributions to their Choice Fund.

49
Step 4
You are now on the ‘Confirm Member Transfer’ page.
Check the new Choice Fund Details for your employee.
Check that the details are correct and click ‘Yes’ to complete the transfer or ‘No’ to change details.
Note: If you have chosen to supply the members TFN to the Choice Fund, the Confirm Member Transfer page may ask you to confirm your email address. This will ensure the Choice Fund can contact you to clarify any necessary information.

50
9.1 TRANSFERRING CHOICE MEMBERS
Step 1
On the left navigation menu, click ‘Member’.
Click ‘Transfer Member’.
Step 2
From the drop-down menu, select the Choice Fund of the Member which you want to transfer.
Then select ‘Search’.
51
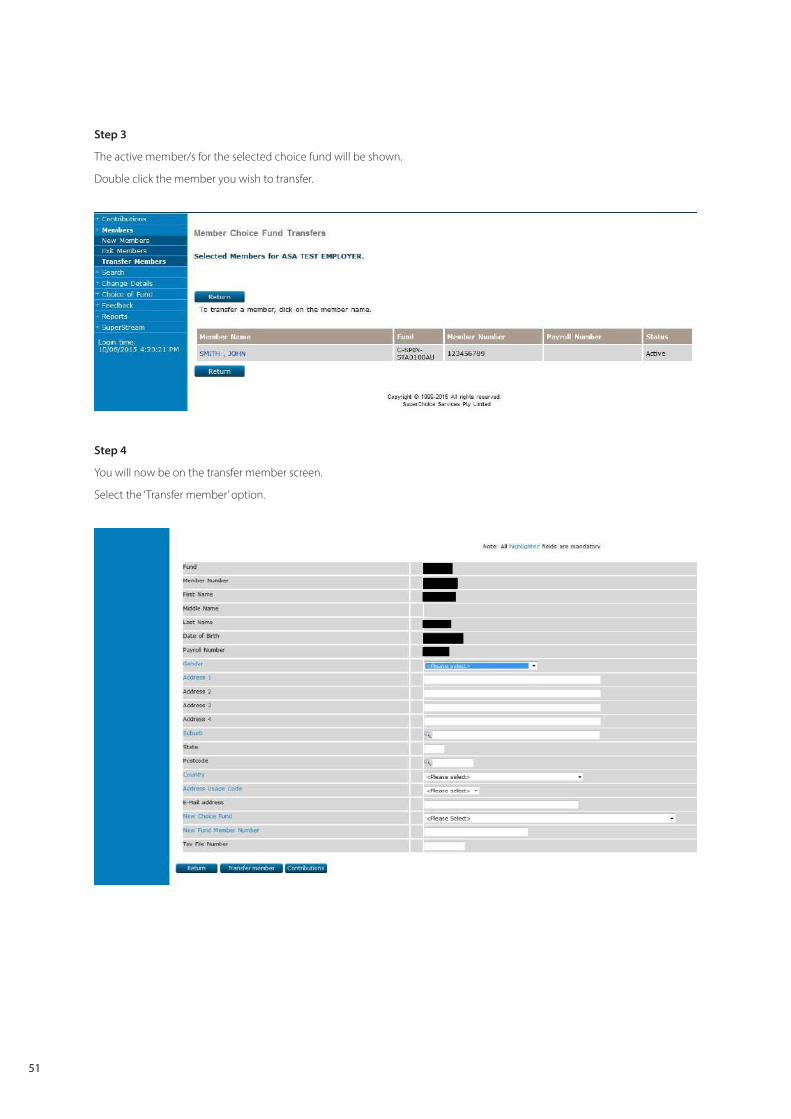
Step 3
The active member/s for the selected choice fund will be shown.
Double click the member you wish to transfer.
Step 4
You will now be on the transfer member screen.
Select the ‘Transfer member’ option.
52
10. SEARCHINGFORTRANSACTIONS
10.1 SEARCH BY BATCH
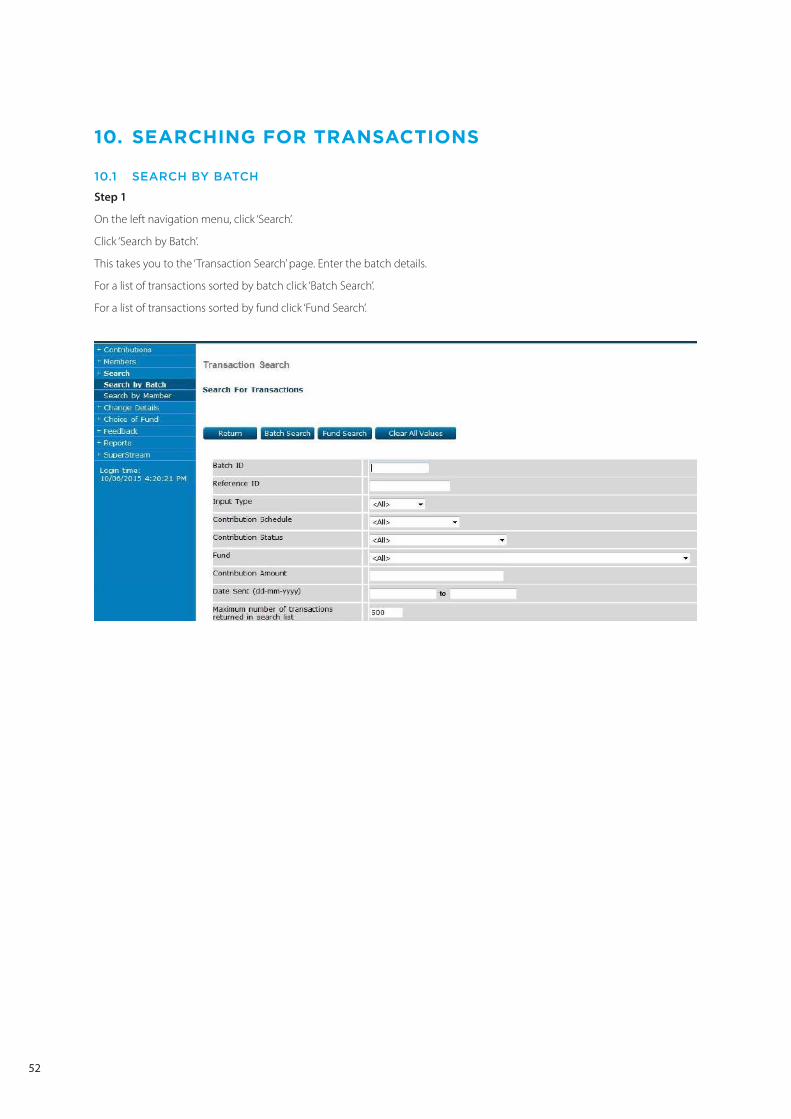
Step 1
On the left navigation menu, click ‘Search’.
Click ‘Search by Batch’.
This takes you to the ‘Transaction Search’ page. Enter the batch details.
For a list of transactions sorted by batch click ‘Batch Search’.
For a list of transactions sorted by fund click ‘Fund Search’.

53
Step 2
You are now on the ‘Batch List’ page.
Click on the ‘Batch ID’ of the schedule you wish to view.
Step 3
You are now on the ‘Transaction List’ page.
Click on ‘Batch ID’ or ‘Reference ID’ to view transaction details of the batch.

54
Step 4
You are now on the ‘Transaction Details’ page.
The details of the batch will now be displayed and can be printed if required.

55
10.2 SEARCH BY MEMBER
Step 1
To search for a batch by member, on the left navigation menu click ‘Search’.
Click ‘Search by Member’.
Enter the member’s details and click ‘Search’.
Step 2
You are now on the ‘Select Member and Date Range’ page.
Enter the dates you wish to search for and then click the member’s name.
56
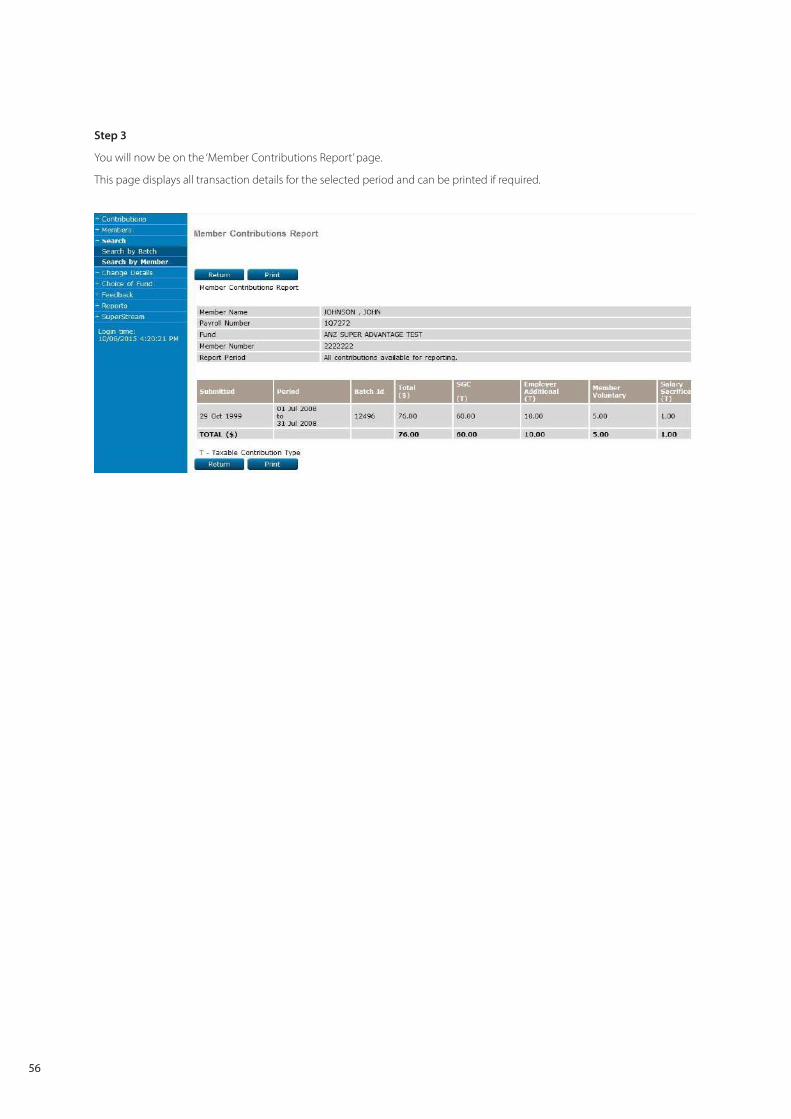
Step 3
You will now be on the ‘Member Contributions Report’ page.
This page displays all transaction details for the selected period and can be printed if required.

57
11. CHANGINGANZEASYTRANSACTDETAILS
Details stored within ANZ EasyTransact can be modified using the ‘Change Details’ left menu option.
11.1 MODIFY A PASSWORD
When you first access ANZ EasyTransact, you should change your password. In the event that you forget your password, you can request a reset by calling Employer Services on 13 47 43 (select option 1) weekdays from 8.30am to 6.30pm (AEST).
Step 1
On the left navigation menu, click ‘Change Details’.
Click ‘Users’.
You are now on the ‘User Modify’ page.
Type in the old password.
Select a new password and type it into the ‘New Password’ field.
Confirm your new password by re-typing it into the ‘Verify New Password’ field.
Click ‘Submit’.
Your password is now changed.

58
11.2 MODIFY EMPLOYER DETAILS
Step 1
On the left navigation menu, click ‘Change Details’.
Click ‘Employer’.
You are now on the ‘Employers’ page.
You can change your details on this page. When finished click ‘Save’ or ‘Return’ to exit.
59
11.3 MODIFY FUND DETAILS (INCLUDES SMSFS)
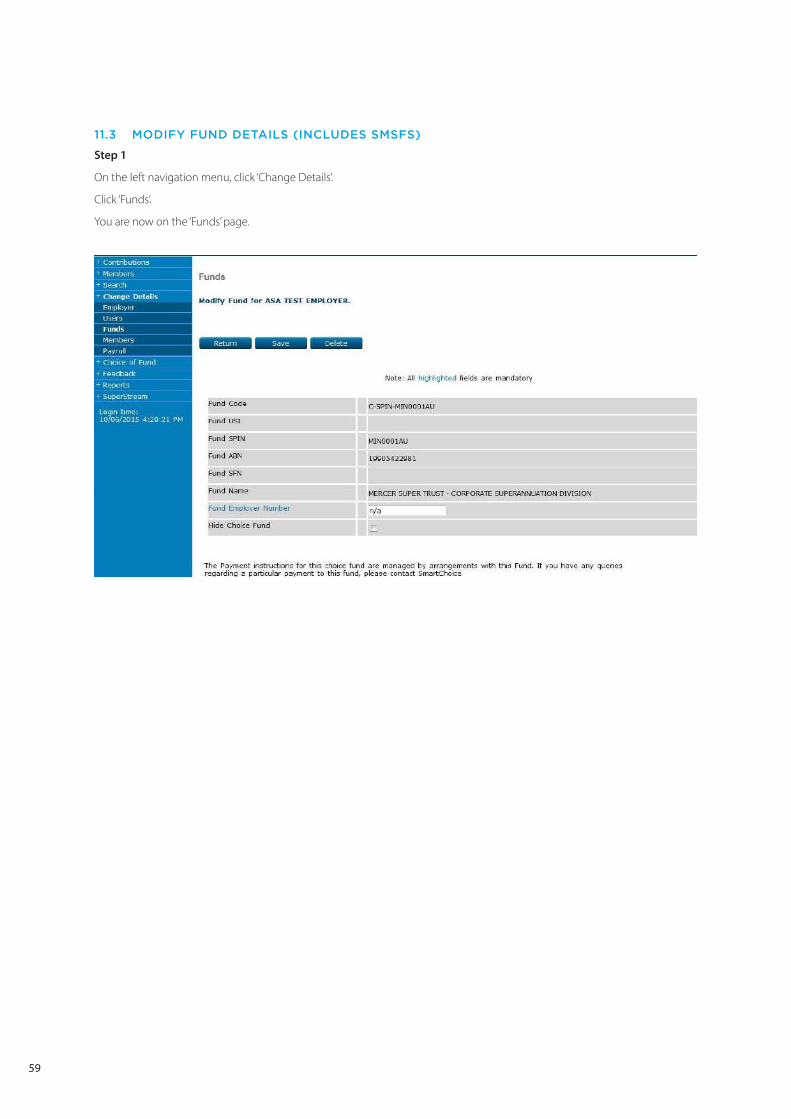
Step 1
On the left navigation menu, click ‘Change Details’.
Click ‘Funds’.
You are now on the ‘Funds’ page.
60
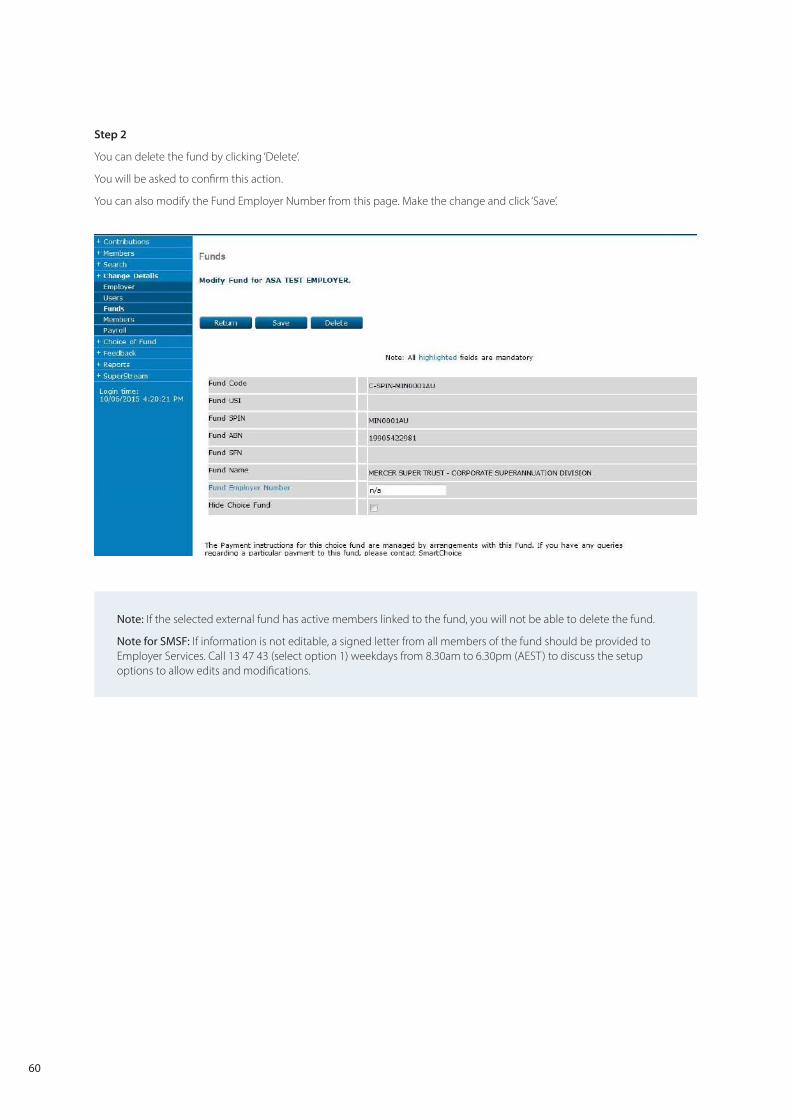
Step 2
You can delete the fund by clicking ‘Delete’.
You will be asked to confirm this action.
You can also modify the Fund Employer Number from this page. Make the change and click ‘Save’.
Note: If the selected external fund has active members linked to the fund, you will not be able to delete the fund.
Note for SMSF: If information is not editable, a signed letter from all members of the fund should be provided to Employer Services. Call 13 47 43 (select option 1) weekdays from 8.30am to 6.30pm (AEST) to discuss the setup options to allow edits and modifications.

61
12. CHOICEOFFUND
12.1 LINK TO CHOICE FUND
See section 3 of this document for details on how to use this function.
12.2 OUTSTANDING REQUESTS
When a new external fund is set up using an ABN (see section 3.7) it takes up to 3 business days for the fund to be established on ANZ EasyTransact. The status of these requests can be viewed in this function.
Step 1
On the left navigation menu, click ‘Choice of Fund’.
Click ‘Outstanding Requests’.
The list of outstanding funds will be displayed on this page.
Once the fund has been established it will no longer appear on this page.

62
12.3 PAYMENT INSTRUCTIONS
See section 7 of this document for details on how to use this function.
This page can be used to view the payment details of a selected Choice Fund.
Step 1
On the left navigation menu, click ‘Choice of Fund’.
Click ‘Payment Instructions’.
You are now on the ‘Choice Fund Payment Instructions’ page.
Select a Choice Fund from the drop-down list then click ‘Continue’.
Step 2
Details on how payments are sent to the Choice Fund will be displayed on the ‘Choice Fund Payment Instructions’ page.
63
12.4 PAYROLL FUND CODES
This function can assist with the contribution payroll upload file mapping. This function requires specialised training. Please contact Employer Services on 13 47 43 (select option 1) weekdays from 8.30am to 6.30pm (AEST) if you believe this service will benefit you with processing Choice of Fund payroll file uploads.
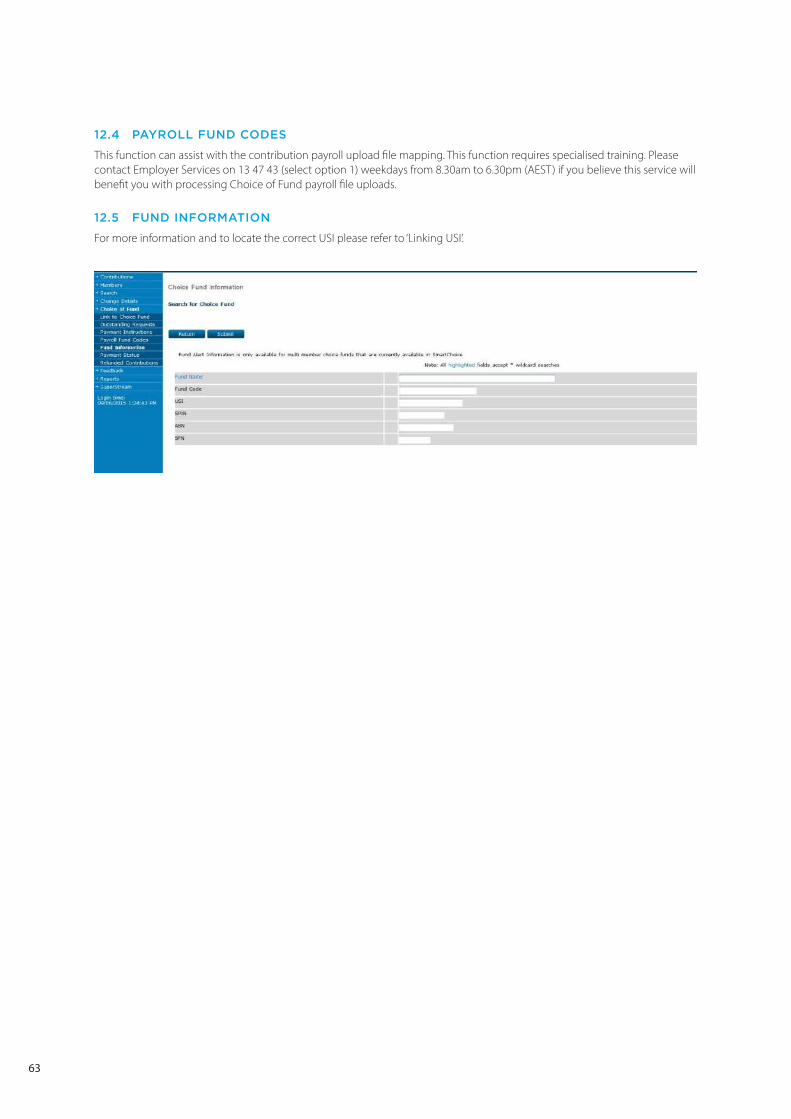
12.5 FUND INFORMATION
For more information and to locate the correct USI please refer to ‘Linking USI’.
64
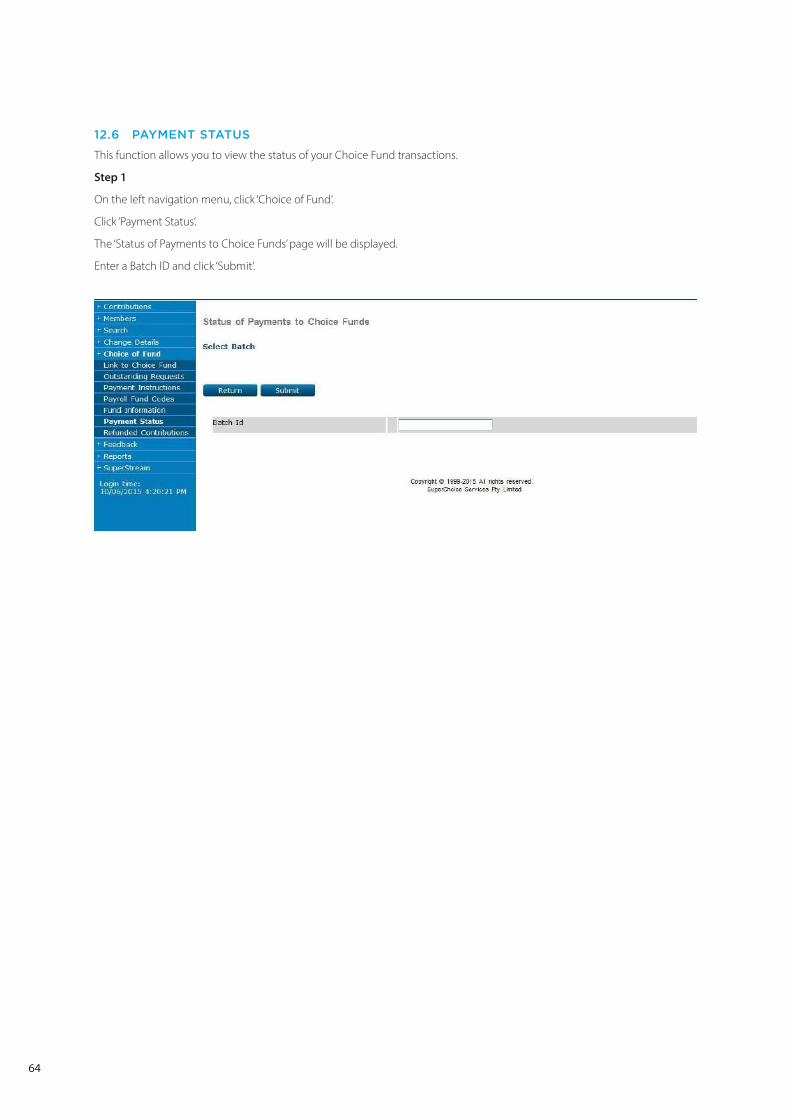
12.6 PAYMENT STATUS
This function allows you to view the status of your Choice Fund transactions.
Step 1
On the left navigation menu, click ‘Choice of Fund’.
Click ‘Payment Status’.
The ‘Status of Payments to Choice Funds’ page will be displayed.
Enter a Batch ID and click ‘Submit’.

65
Step 2
If the batch has been submitted to the Clearing Service, the ‘Status of Payments to Choice Funds’ page will be displayed.
This page shows a list of payments to individual Choice Funds and the status of those payments.
If the batch has not been submitted to the Clearing Service, a message will be displayed notifying this.

66
13. VIEWINGMEMBERDETAILS
This function allows you to view the member details for all fund members.
Step 1
On the left navigation menu, click ‘Change Details’.
Click ‘Members’.
The member search page is displayed.
Select the member’s fund from the drop-down menu and select ‘Search’.
67
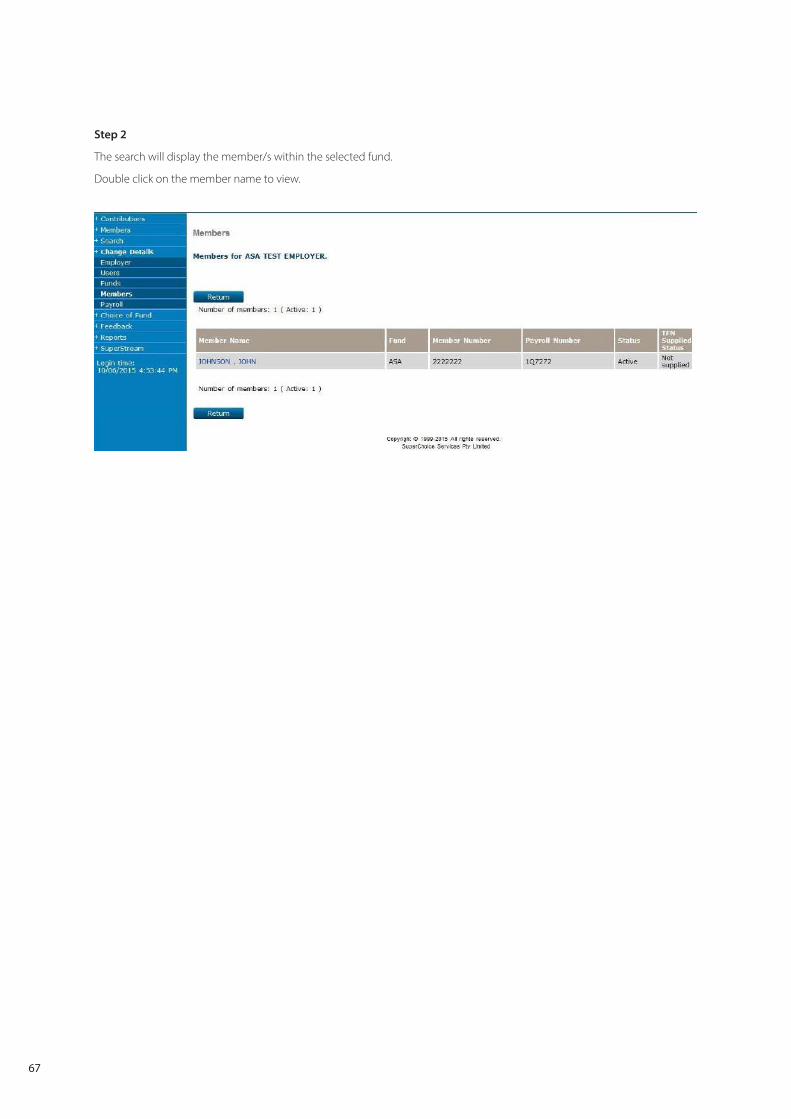
Step 2
The search will display the member/s within the selected fund.
Double click on the member name to view.

68
14. REPORTINGFORMEMBERS
14.1 MEMBER REPORTS
Step 1
On the left navigation menu, click ‘Reports’.
Click ‘Member Reports’.
You are now on the ‘Member Reporting’ page.
The report can be customised using the different filter options on this page.
Click ‘Search and Display’ to display the report within the web page, or click ‘Search and Download’ to download the results of your report as a Text file.
69
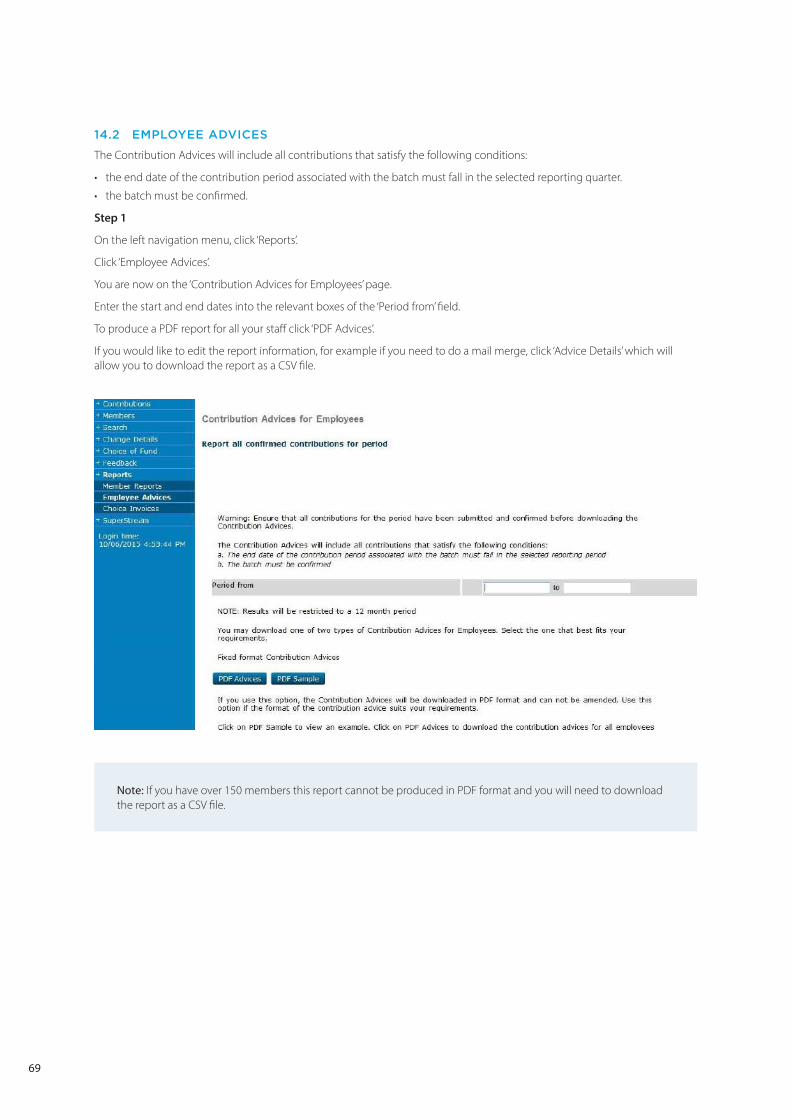
14.2 EMPLOYEE ADVICES
The Contribution Advices will include all contributions that satisfy the following conditions:
• the end date of the contribution period associated with the batch must fall in the selected reporting quarter.
• the batch must be confirmed.
Step 1
On the left navigation menu, click ‘Reports’.
Click ‘Employee Advices’.
You are now on the ‘Contribution Advices for Employees’ page.
Enter the start and end dates into the relevant boxes of the ‘Period from’ field.
To produce a PDF report for all your staff click ‘PDF Advices’.
If you would like to edit the report information, for example if you need to do a mail merge, click ‘Advice Details’ which will allow you to download the report as a CSV file.
Note: If you have over 150 members this report cannot be produced in PDF format and you will need to download the report as a CSV file.

70
15. SUPERSTREAM
As part of industry reforms for superannuation, ANZ EasyTransact has become a SuperStream compliant portal through which superannuation payments, member registrations and updates can be made.
As an employer, if you are paying superannuation contributions to funds outside of ANZ and OnePath for employees who exercise Choice of Fund, it is mandated that you supply required employee data with each contribution (full name, residential address, TFN and phone number) in order to remain compliant.
You can also update member details for employees who have exercised Choice of Fund at any time, by loading updates for individual employees or in bulk.
15.1 DOWNLOAD OF CHOICE MEMBER DATA
Step 1
From left-hand menu, select SuperStream, then Download Member Data.
Step 2
From drop-down on Member Data Augmentation page, select the Choice fund which member data needs to be updated for, otherwise select ‘All Choice Funds’ if all Choice members need to be updated.
Step 3
Select Download Members button to initiate download of the member data. If prompted, select to ‘Save’ the file to your computer.

71
15.2 UPDATING THE CHOICE MEMBER DATA
Step 1
Open the saved Excel file. Choice member data will be displayed in the format outlined in the below screen.
Step 2
Insert the required data into columns E to R. The data format for each column is as follows:
• Column E (Family Name) – Mandatory – May be up to 40 characters.
• Column F (Given Name) – Mandatory – May be up to 40 characters.
• Column G (Gender) – Mandatory – Must supply as 1 (male), 2 (female) or 3 (intersex or indeterminate).
• Column H (Date of Birth) – Mandatory – Must be supplied in format DD-MM-YYYY.
• Column I (Address Usage Code) – Mandatory – Indicates address type being supplied; RES for residential, or POS for postal.
• Column J (Address Line 1) – Mandatory – May be up to 50 characters.
• Column K (Address Line 2) – Optional – May be up to 50 characters.
• Column L (Address Line 3) – Optional – May be up to 50 characters.
• Column M (Address Line 4) – Optional – May be up to 50 characters.
• Column N (Suburb) – Optional – May be up to 50 characters.
• Column O (State or Territory) – Optional – This field must be provided if the country (column Q) is Australia. If country is not Australia, this field must not be used, and details must be entered in Address lines 2, 3 or 4 instead. State field must use the following codes: ACT – NSW – NT – QLD – SA – VIC – WA – AAT (note: AAT = Australian Antarctic Territory)
• Column P (Postcode) – Optional – This field must be provided if the country (column Q) is Australia. If country is not Australia, this field must not be used, and details must be entered in Address lines 2, 3 or 4 instead. Field can only accept numerals, 4 digits in length.
• Column Q (Country) – Mandatory – AUS to be used for all Australian resident members. Should a member reside outside of Australia, please contact Employer Services on 13 47 43 (select option 1) weekdays from 8.30am to 6.30pm (AEST).
• Column R (TFN) – Optional – This field is noted as optional but must be supplied by you if these details have been provided to you by your employee. Field can only accept numerals, 9 digits in length.
Step 3
Save the updated version of the file.
Note: Make sure not to change the file format type (e.g. changing the file format to .csv) or the worksheet name otherwise the upload will not correctly work.
72
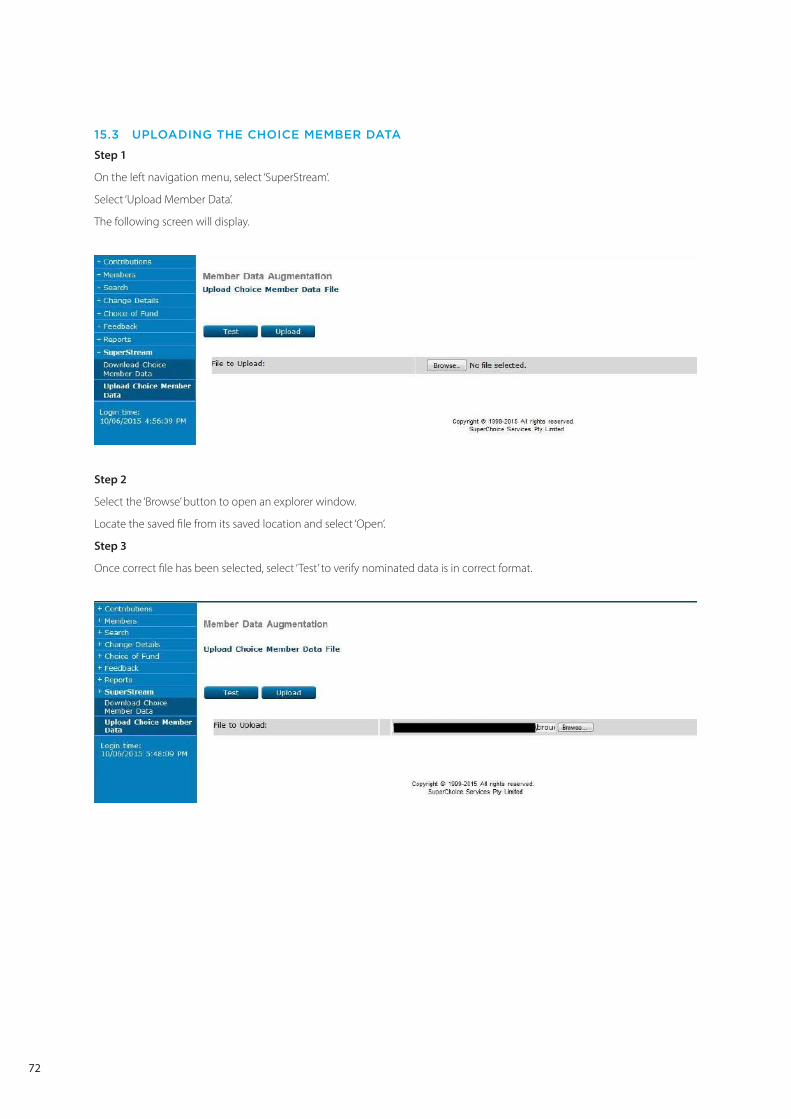
15.3 UPLOADING THE CHOICE MEMBER DATA
Step 1
On the left navigation menu, select ‘SuperStream’.
Select ‘Upload Member Data’.
The following screen will display.
Step 2
Select the ‘Browse’ button to open an explorer window.
Locate the saved file from its saved location and select ‘Open’.
Step 3
Once correct file has been selected, select ‘Test’ to verify nominated data is in correct format.

73
Step 4
If the file contains data in the invalid format, the details are provided in a summary page per error record.
Step 5
Correct the error records based on the provided comments, then select ‘Return’ from the test results page.
Step 6
From the Upload Member Data File page, select the ‘Browse’ button to locate and select the corrected file. Select ‘Upload’ to load the file.
Step 7
Select ‘Submit’ from the summary screen to complete the process.

74
16. FILEUPLOADS
16.1 PAYROLL FILE UPLOADS
Adding new members using a Payroll File Upload on ANZ EasyTransact can significantly reduce your administration tasks if you have a large number of new members to add.
This function allows a file, produced by your payroll system, to be uploaded directly into the ANZ EasyTransact site. Within minutes you will be able to see your new member numbers within the ‘Today’s Members’ function.
Note: If this is the first time you have used the Payroll File Upload facility on ANZ EasyTransact, it is essential that you contact Employer Services on 13 47 43 (select option 1) weekdays from 8.30am to 6.30pm (AEST) before you commence this process. They will ensure that the file format you are using is correctly configured. This only occurs the first time you submit a Payroll File Upload.
Step 1
On the left navigation menu, click ‘Members’.
Click ‘New Members’.
You are now on the ‘New Member Application Status Summary’ page. Click ‘Upload Members’.

75
Step 2
You are now on the ‘New Member File Upload’ page.
Click ‘Browse’ to search for and select the correct file for upload from your computer directory.
Using the drop-down menus on the New Member File Upload screen, populate the necessary fields.
When you are happy with the data you have entered you can choose to test the file or upload the file. Most of our clients simply upload the file, as the next step requires you to confirm what you have loaded.
Click ‘Upload’ to load the file.

76
Step 3
You are now on the ‘New Member Upload Results’ page.
Errors may be encountered for certain members. If you do encounter errors, refer to the notes at the end of this procedure on how to correct these errors.
Once you are happy with the file being uploaded, click ‘Yes’ to confirm the upload.
77
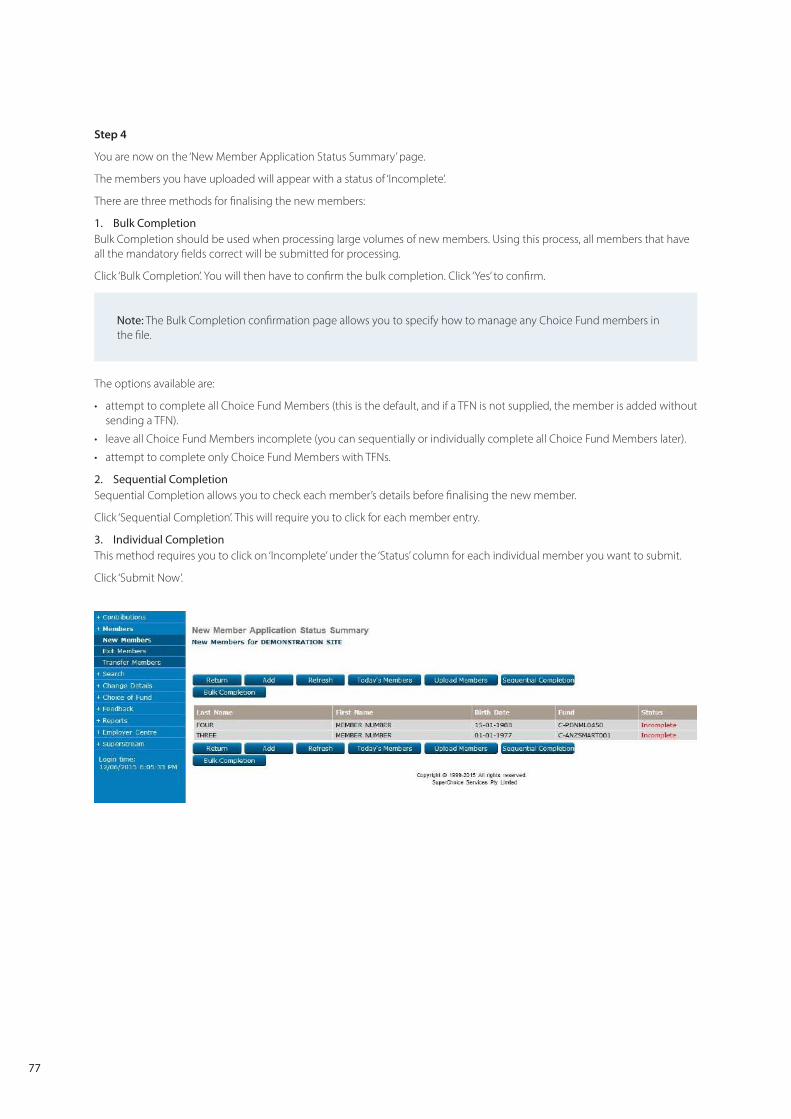
Step 4
You are now on the ‘New Member Application Status Summary’ page.
The members you have uploaded will appear with a status of ‘Incomplete’.
There are three methods for finalising the new members:
1. Bulk CompletionBulk Completion should be used when processing large volumes of new members. Using this process, all members that have all the mandatory fields correct will be submitted for processing.
Click ‘Bulk Completion’. You will then have to confirm the bulk completion. Click ‘Yes’ to confirm.
Note: The Bulk Completion confirmation page allows you to specify how to manage any Choice Fund members in the file.
The options available are:
• attempt to complete all Choice Fund Members (this is the default, and if a TFN is not supplied, the member is added without sending a TFN).
• leave all Choice Fund Members incomplete (you can sequentially or individually complete all Choice Fund Members later).
• attempt to complete only Choice Fund Members with TFNs.
2. Sequential CompletionSequential Completion allows you to check each member’s details before finalising the new member.
Click ‘Sequential Completion’. This will require you to click for each member entry.
3. Individual CompletionThis method requires you to click on ‘Incomplete’ under the ‘Status’ column for each individual member you want to submit.
Click ‘Submit Now’.

78
16.2 TROUBLESHOOTING – FILE UPLOAD
You may encounter some errors during this process. The following is a list of example error messages and how to correct each error:
Error on processed line: 2. Payroll Number already exists
This error occurs when a member in the file has the same payroll number as an existing registered member under your plan. It may be that the member already exists or the payroll number is incorrect. If the member has already been set up, remove the member from the file. If the existing member has an incorrect payroll number, update the payroll number (see section 18.2 of this document).
Error on processed line: 3. Fund and employer are not associated. Fund OnePath Custodians.
Either the Fund Code is incorrect or the Choice Fund has not yet been established on ANZ EasyTransact.
If the Fund Code is incorrect, map the Fund Codes via Payroll Fund Codes functionality (see section 3 of this document).
If the Choice Fund has not been set up, set up the Choice Fund via Link to Choice Fund functionality (see section 3 of this document).
Error at line: 2 Error is on the first record Error Line [Illegal.combination.of.digits.in.date:.’8/95. Crane.St’] A date field had an invalid format.
This error indicates that the file format being used is incorrect. A quick method to determine if the file format is correct is to compare it to a previous file you have successfully uploaded to the ANZ EasyTransact website.
If you are still having problems please contact Employer Services on 13 47 43 (select option 1) weekdays from 8.30am to 6.30pm (AEST).

79
16.3 UPLOADING CONTRIBUTIONS
Loading contributions using Payroll Upload is the most efficient way of loading high volume contribution batches. Most employers use payroll systems that allow superannuation contribution details to be exported to CSV or text files. We can customise ANZ EasyTransact to read your payroll system’s file format. All we need is a sample file for the initial set-up and then you can use Payroll Upload whenever a new batch needs to be loaded.
Note: Contact Employer Services on 13 47 43 (select option 1) weekdays from 8.30am to 6.30pm (AEST) if you are a new user of the ANZ EasyTransact service and want to use this function.
In order to submit contributions on ANZ EasyTransact, you need to firstly create a Contribution Schedule. You only need to complete this step once as part of the initial set-up process. Once this step is complete, you will be able to follow the procedure in section 5 to submit contributions for your employees.
Step 1
On the left navigation menu, click ‘Contributions’.
You are now on the ‘Contribution Status’ page.
Click ‘Add’.

80
Step 2
You are now on the ‘Contribution Schedule Maintenance’ page.
Enter the following details:
• Schedule Name – use any name you consider appropriate e.g. Super Contributions Upload Schedule.
• Schedule Type – select Payroll File Transfer.
• Submission Period – select ‘None’. This allows you to make amendments to dates.
• Next Start Date – this is the first day of the period you are paying for example, if you are paying for July 2015 you would use 01-07-2015.
• Default Schedule – leave blank.
• Select Members by Search – leave blank.
• Click ‘Save’.
Step 3
You are now on the ‘Contribution Schedule Maintenance’ page.
This confirms what you have set up. If you wish to make amendments, click ‘Modify’.
Click ‘Return’ to go back to the ‘Contribution Summary’ page.
The process is now complete.
81
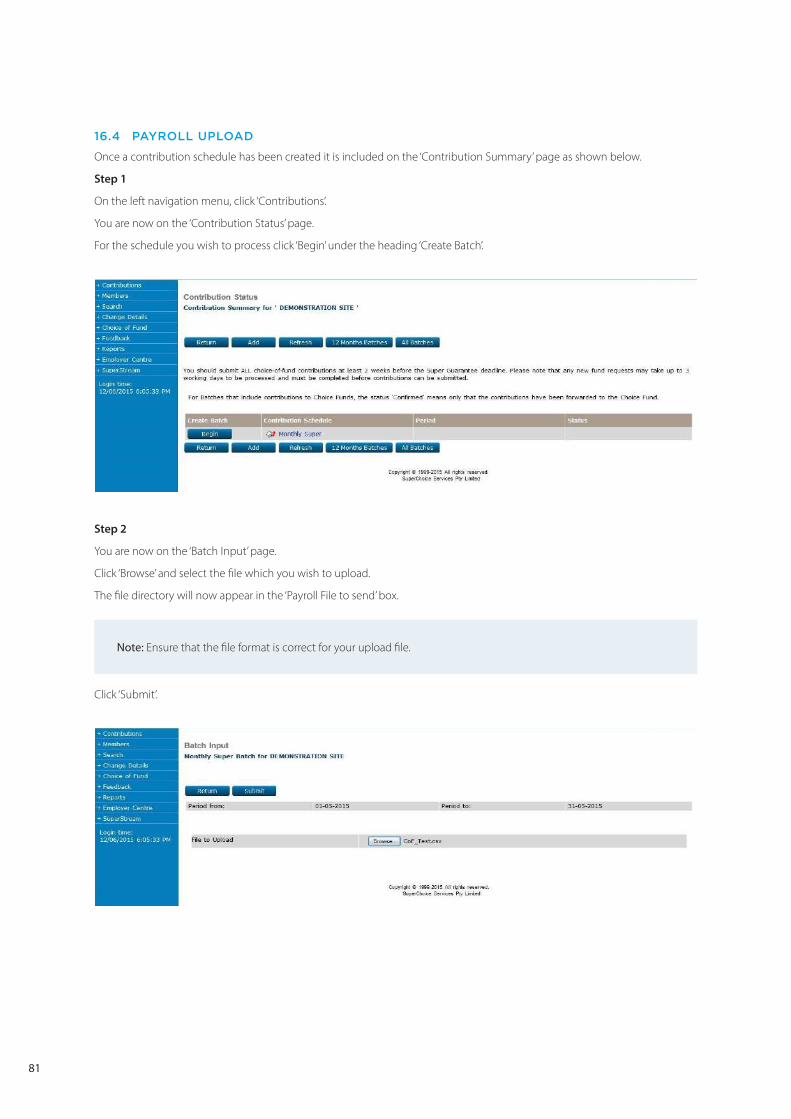
16.4 PAYROLL UPLOAD
Once a contribution schedule has been created it is included on the ‘Contribution Summary’ page as shown below.
Step 1
On the left navigation menu, click ‘Contributions’.
You are now on the ‘Contribution Status’ page.
For the schedule you wish to process click ‘Begin’ under the heading ‘Create Batch’.
Step 2
You are now on the ‘Batch Input’ page.
Click ‘Browse’ and select the file which you wish to upload.
The file directory will now appear in the ‘Payroll File to send’ box.
Note: Ensure that the file format is correct for your upload file.
Click ‘Submit’.
82
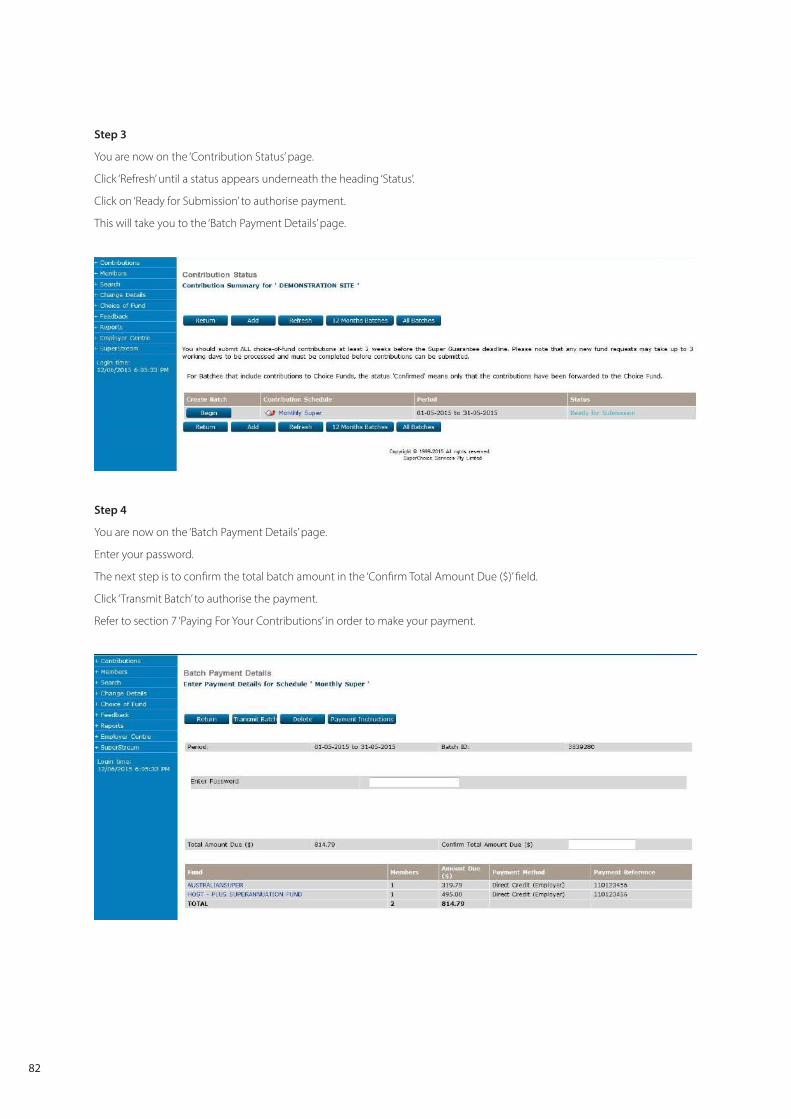
Step 3
You are now on the ‘Contribution Status’ page.
Click ‘Refresh’ until a status appears underneath the heading ‘Status’.
Click on ‘Ready for Submission’ to authorise payment.
This will take you to the ‘Batch Payment Details’ page.
Step 4
You are now on the ‘Batch Payment Details’ page.
Enter your password.
The next step is to confirm the total batch amount in the ‘Confirm Total Amount Due ($)’ field.
Click ‘Transmit Batch’ to authorise the payment.
Refer to section 7 ‘Paying For Your Contributions’ in order to make your payment.

83
16.5 TROUBLESHOOTING – PAYROLL UPLOAD
If the status ‘Input Error’ shows, click on ‘Input Error’. This will take you to the ‘Batch Input Error’ page.
Click ‘View errors’. A window containing an explanation of each error will appear. The following is a list of example error messages and how to correct each error:
Error on processed line: 1. Either payroll number or member number not found for any fund. Payroll number 1
This error will occur for one of two reasons:
• either the member on the file is new and has not been established on ANZ EasyTransact.
• the member’s payroll number does not match the payroll number recorded for this member on ANZ EasyTransact.
If the member is new, and therefore has not been setup on ANZ EasyTransact, simply create the new member. Refer to section 2 of this document for procedures on how to create a new member.
If the payroll number is incorrect, either update the file you uploaded or update the payroll number for the member stored on ANZ EasyTransact. Refer to section 18.2 of this document for procedures on how to update member payroll numbers.
Error on processed line: 2. Member 000001 cannot make a contribution while in state EXITED payroll number 2
The member has been exited on the website.
If the member does not require contributions, simply remove the member from the upload file.
If the member is still receiving contributions, set up the member as a new member.
Refer to section 2 of this document for procedures on how to create a new member.
Error on processed line: 3. Member 000001 cannot make a contribution while in state Inactive payroll number 3
The member status has been changed on the website to inactive.
Check if the member has been transferred to a Choice Fund. If so, update the member Choice Fund payroll number. Refer to section 18.2 of this document for procedures on how to update member payroll numbers.
If the member has been transferred to another pay site, please contact Employer Services on 13 47 43 (select option 1) weekdays from 8.30am to 6.30pm (AEST).
Error on processed line: 4. Multiple members found. No fund specified. Payroll number 4
This error is caused when one member is active in more than one fund under your ANZ EasyTransact registration.
A member can only be active within one fund at any point in time. The member needs to exit any inactive funds that no longer receive contributions.
Refer to section 8 of this document for procedures on how to exit members.

84
Error on processed line: 5. Inconsistent date of birth: 01-07-1977 (01-01-1978) Fund XYZ SUPER FUND payroll number 5
The member’s date of birth on the file does not match the date of birth stored on ANZ EasyTransact.
If the error is on the file, simply update the file with the correct date of birth before re-submitting the contribution file.
If the date of birth error is on the ANZ EasyTransact website, you must contact OnePath Custodians to have the date of birth updated.
Error on processed line: 6. Inconsistent last name: SMITH (Smyth) Fund XYZ SUPER FUND payroll number 6
The member name on the file does not match the name stored on ANZ EasyTransact.
If the error is on the file, simply update the file with the correct name before re-submitting the contribution file.
If the name error is on the ANZ EasyTransact website, you must contact OnePath Custodians to have the name updated.
When all errors have been identified and corrected, the file can be resubmitted.
If you are still having problems solving errors please contact Employer Services on 13 47 43 (select option 1) weekdays from 8.30am to 6.30pm (AEST).

85
16.6 MEMBER EXIT FILE UPLOAD
Step 1
On the left navigation menu, click ‘Members’.
Click ‘Exit Members’.
You will be on the ‘Status of Member Exits’ page.
Click ‘Upload Exits’ to go to the ‘Member Exit File Upload’ page.
Step 2
You are now on the ‘Member Exit File Upload’ page.
Click the ‘Browse’ button to search for and select the appropriate file from your directory.
Using the drop-down menus, populate the appropriate fields.
Click ‘Upload’ to load the file.
86
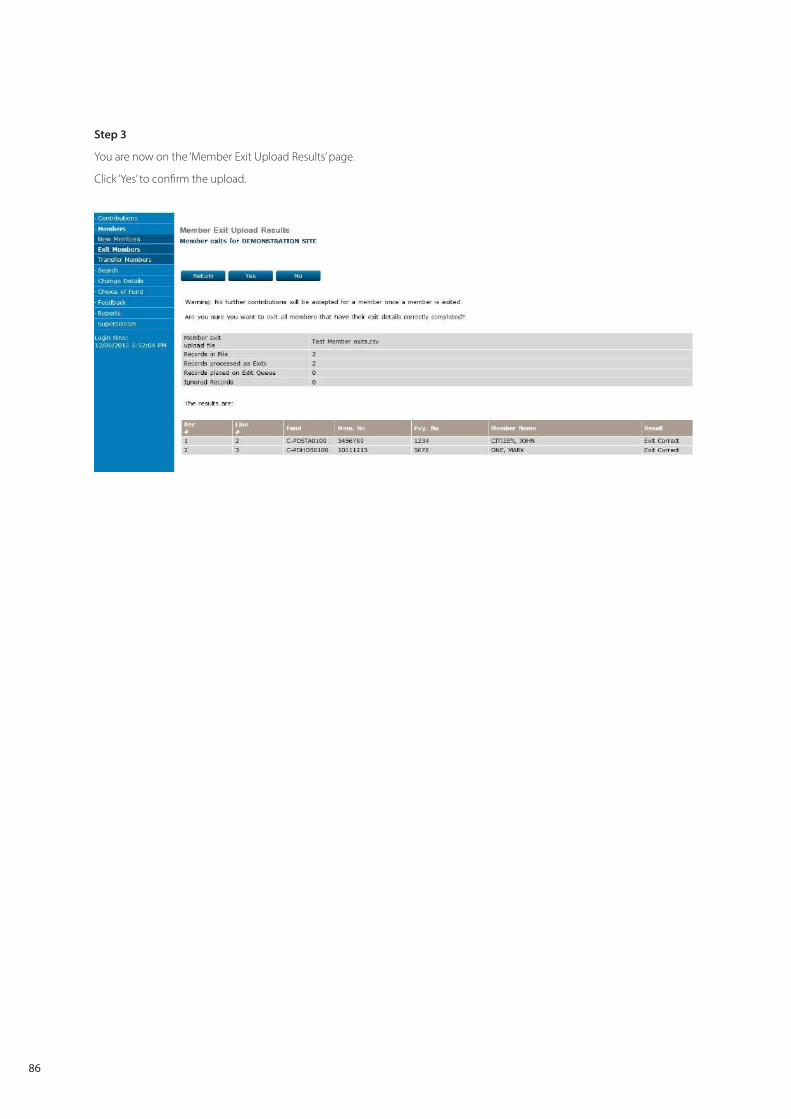
Step 3
You are now on the ‘Member Exit Upload Results’ page.
Click ‘Yes’ to confirm the upload.

87
Step 4
You are back at the ‘Status of Member Exits’ page.
Once the exit record you have entered disappears from this page, the exit is processed.
If the member status is ‘Exit Queued’ or ‘Exit Requested’, the exit is still processing.
If the status shows as ‘Exit Waiting’, the member is still appearing in a contribution schedule.
If the member displays ‘Exit Rejected’ contact Employer Services on 13 47 43 (select option 1) weekdays from 8.30am to 6.30pm (AEST).
88
16.7 TROUBLESHOOTING – MEMBER EXIT FILE UPLOAD
If you receive an error message when uploading the exit file, the reason for this error will be displayed. The following is a list of error messages and how to correct each error.
Error on processed line: 2. Either payroll number or member number does not represent a member of Fund
Either the payroll number or member number does not match an existing registered member on ANZ EasyTransact. To correct, check the file to make sure both numbers are correct and modify if necessary. If these details still register as an error please contact Employer Services.
Error on processed line: 3. Missing or Invalid Date Left Employment
It is compulsory to populate the Date Left Employment field on the exit file for all members you are trying to exit from ANZ EasyTransact. Check your file and make sure that the column is populated for all members on the file.
Error on processed line: 4. Date Left Employment in the past can only be a maximum of one year ago
This error limits how far back you can exit a member. Update the Date Left Employment on the exit file if it is incorrect. If the date still registers as an error please contact Employer Services.
Error on processed line: 5. Member has invalid status
This error occurs when the member has already been exited from ANZ EasyTransact. Remove this member from the exit file before re-submitting.
If you are still having problems solving member errors please contact Employer Services. To contact Employer Services, call 13 47 43 (select option 1) weekdays from 8.30am to 6.30pm (AEST).
89
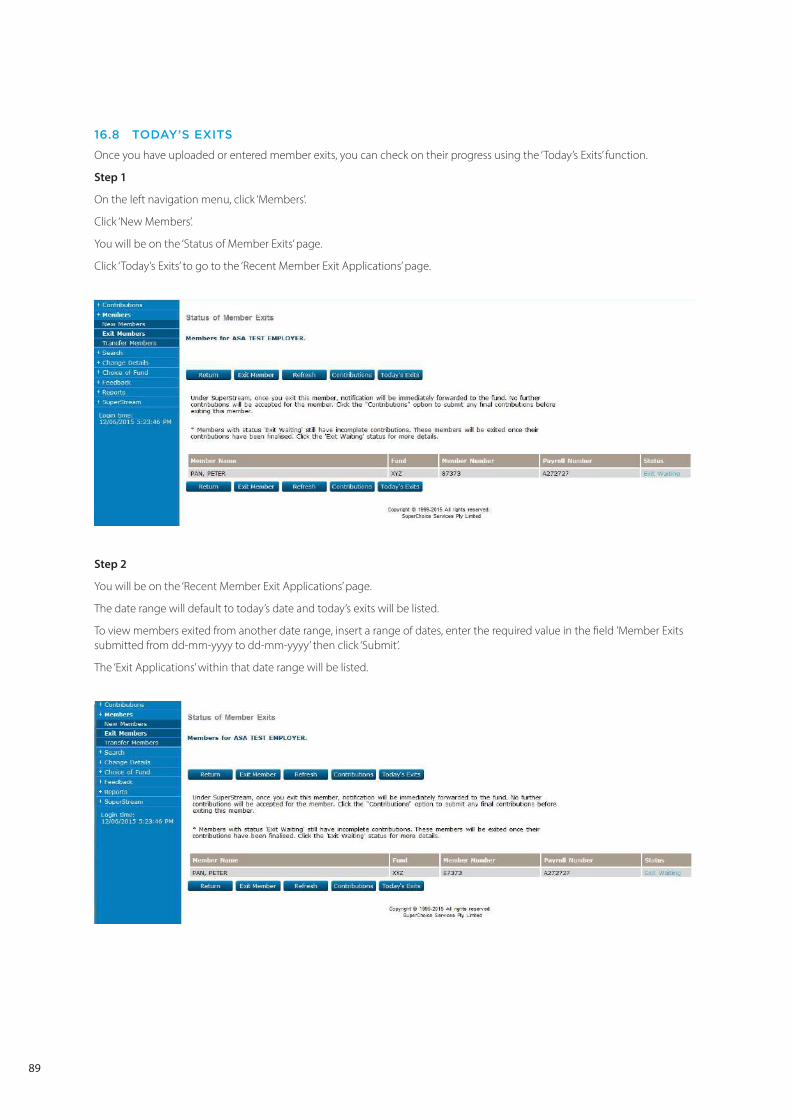
16.8 TODAY’S EXITS
Once you have uploaded or entered member exits, you can check on their progress using the ‘Today’s Exits’ function.
Step 1
On the left navigation menu, click ‘Members’.
Click ‘New Members’.
You will be on the ‘Status of Member Exits’ page.
Click ‘Today’s Exits’ to go to the ‘Recent Member Exit Applications’ page.
Step 2
You will be on the ‘Recent Member Exit Applications’ page.
The date range will default to today’s date and today’s exits will be listed.
To view members exited from another date range, insert a range of dates, enter the required value in the field ’Member Exits submitted from dd-mm-yyyy to dd-mm-yyyy’ then click ‘Submit’.
The ‘Exit Applications’ within that date range will be listed.

90
17. DELETINGINCOMPLETEMEMBERS
This function allows you to delete a member with an incomplete status, if you have added the member by mistake or added them incorrectly.
Step 1
On the left navigation menu, click ‘Members’.
Click ‘New Members’.
You are now on the ‘New Member Application Status Summary’ page.
Click ‘Incomplete’ under the ‘Status’ column for the member you want to delete.

91
Step 2
You are now on the ‘New Member Completion’ page.
Confirm that this is the member you wish to delete.
Click ‘Delete’.
Step 3
You are now on the ‘Delete Member Confirm’ page.
Click ‘Delete’.

92
Step 4
The ‘New Member Application Status Summary’ page is displayed. The deleted member has been removed.
The process is now complete.
93
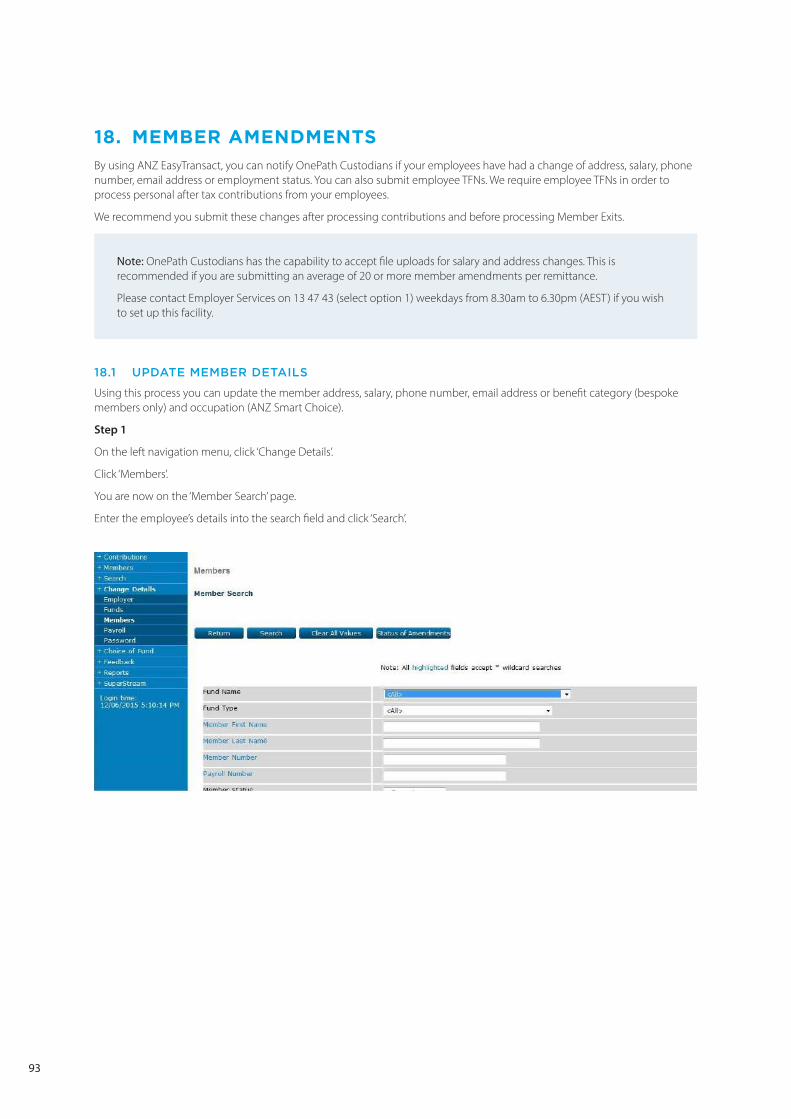
18. MEMBERAMENDMENTS
By using ANZ EasyTransact, you can notify OnePath Custodians if your employees have had a change of address, salary, phone number, email address or employment status. You can also submit employee TFNs. We require employee TFNs in order to process personal after tax contributions from your employees.
We recommend you submit these changes after processing contributions and before processing Member Exits.
Note: OnePath Custodians has the capability to accept file uploads for salary and address changes. This is recommended if you are submitting an average of 20 or more member amendments per remittance.
Please contact Employer Services on 13 47 43 (select option 1) weekdays from 8.30am to 6.30pm (AEST) if you wish to set up this facility.
18.1 UPDATE MEMBER DETAILS
Using this process you can update the member address, salary, phone number, email address or benefit category (bespoke members only) and occupation (ANZ Smart Choice).
Step 1
On the left navigation menu, click ‘Change Details’.
Click ‘Members’.
You are now on the ‘Member Search’ page.
Enter the employee’s details into the search field and click ‘Search’.

94
Step 2
You are now on the ‘Members’ page.
Click on the member’s name you wish to amend.
Step 3
You are now on the ‘Details of Member’ page.
Click ‘Amend Member’.

95
Step 4
You are now on the ‘Amend Member Details’ page.
Type in the details you want to amend and click ‘Submit’.

96
18.2 UPDATE MEMBER PAYROLL NUMBER
This function allows you to update payroll numbers for your members.
Step 1
On the left navigation menu, click ‘Change Details’.
Click ‘Payroll’.
You are now on the ‘Payroll Members’ page.
Click ‘Search’.
Step 2
You are now on the ‘Payroll Numbers’ page.
Update the payroll numbers you need to update by entering or altering them in the ‘Payroll Number’ column.
Click ‘Save’.

97
Step 3
You are now on the ‘Payroll Member’ page, the process is complete.

98
19. FEEDBACK
Fund Administrator Feedback is a function that facilitates the receipt of information by a contributing employer from a participating Choice Fund. If feedback has been provided by a Choice Fund, an alert will be displayed when you log in. The alert will state:
’Click here to view new Fund Administrator feedback’.
To view the message, there are two options:
1. click on the hyperlink or
2. select the ‘Feedback’ option.
The Feedback page allows an employer to:
• display the specified Choice Fund information by clicking the hyperlink under ‘Fund’.
• display the specified ‘Member details’ page, where necessary changes can be made by clicking the ‘Member Number/Name’.
• show all messages, including hidden or archived messages, by selecting the appropriate button.
• ‘hide’ or archive individual messages. Note: this will prevent the notification (hyperlink) from displaying on the ‘Login’ page.
• download all messages currently displayed by selecting the appropriate button.

99
20.TERMSANDDEFINITIONS
Australian Business Number (ABN)
The term used to describe a unique 11 digit number that identifies your business or organisation to the government and community.
Bpay®The term used to describe an electronic bill payment system which allows payments to be made through a financial institution’s online or telephone banking facility to merchants who are registered Bpay® billers.
ChoiceThe term used to describe a contribution that will be paid to a fund other than your default fund.
Contribution Batch The term used to describe the dollar amount contributed to a selected member.
Contribution Transaction Request (CTRs)
An electronic contribution message that contains data.
Direct CreditThe term used to describe monies transferred from your company’s account once contributions have been authorised and confirmed.
Direct DebitThe term used to describe monies automatically debited out of your company’s account once contributions have been authorised and confirmed.
Electronic Funds Transfer (EFT)
The term used to describe an electronic transfer of funds.
Electronic Service Address (ESA)
The term used to identify where contribution messages are to be sent.
Exit MemberThe term used to remove a member from your plan, usually an exiting employee. Includes employees who subsequently elect Choice of Fund.
Member Registration Request (MRRs)
The term used to describe a new member registration or a member maintenance task.
New MemberThe term used to describe the addition of a new member into the plan, usually a new employee that qualifies for superannuation.
ScheduleThe term used to describe how you can nominate the members you wish to make payments for and where you can name the payment for your future reference.
SPIN(Superannuation Product Identification Number) - The term used to describe a unique code used to identify a super fund. All public, corporate and industry super funds will generally have a SPIN and can be easily linked using this number.
SuperStreamThe name used to describe the program introduced by the Federal Government to improve the way super contributions are submitted, by standardising the format needed and the way in which payments are made.
Tax File Number (TFN)The term used to describe the number issued by the Australian Taxation Office (ATO) to recognize an individual or organisation for taxation purposes.
Total Amount Payable The term used to describe the amount payable from you after each contribution.
USI – (Unique Superannuation Identifier)
A unique code used to identify a super fund (except SMSFs) or a specific super product within a large fund.

13 47 43 weekdays from 8.30am to 6.30pm (AEST)
ANZ Smart Choice Super GPO Box 5107, Sydney NSW 2001
ANZ Smart Choice Super Employer Services
ANZ EasyTransact Help Desk
Important Information
The Super Clearing Service offered via ANZ EasyTransact is issued by OnePath Custodians Pty Limited (ABN 12 008 508 496, AFSL 238346, RSE L0000673). Although ANZ distributes this product, ANZ does not guarantee or stand behind the issuer or this product. Neither the issuer, nor any other related or associated company, guarantee the repayment of capital or the performance or any rate of return of the investment options chosen in the Fund. Investments made into the investment options are subject to investment risks and other risks. This could involve delays in the repayment of principal and loss of income or principal invested. This information is of a general nature and has been prepared without taking account of your personal needs, financial situation or objectives. Before acting on this information, you should consider whether the information is appropriate for you having regard to your personal needs, financial circumstances or objectives. You should read the ANZ Financial Services Guide, and the ANZ EasyTransact and the Super Clearing System Product Disclosure Statement (PDS) before deciding to acquire or hold the product. A copy of the PDS and ANZ Financial Services Guide is available by visiting anz.com or by calling Customer Services on 13 47 43. OnePath Custodians Pty Limited currently does not charge for ANZ EasyTransact but reserves the right to change the fees in the future. Where this occurs, notification will be provided to existing users.
OnePath Custodians Pty Limited 347 Kent St Sydney NSW 2000 Phone 13 47 43 Email [email protected] Website anz.com
13 47 43, option 1, weekdays between 8.30am and 6.30pm (AEST)
