application notes for avaya aura communication manager 6.2
TRANSCRIPT

DDT; Reviewed:
SPOC 7/16/2013
Solution & Interoperability Test Lab Application Notes
©2013 Avaya Inc. All Rights Reserved.
1 of 96
CM62SM63-VzBIPT
Avaya Solution & Interoperability Test Lab
Application Notes for Avaya Aura® Communication
Manager 6.2, Avaya Aura® Session Manager 6.3, and Avaya
Session Border Controller for Enterprise with Verizon
Business IP Trunk SIP Trunk Service – Issue 1.0
Abstract
These Application Notes illustrate a sample configuration using Avaya Aura® Session
Manager Release 6.3 and Avaya Aura® Communication Manager Release 6.2 with the
Verizon Business Private IP (PIP) IP Trunk service. These Application Notes update
previously published Application Notes with newer versions of Avaya Aura® Communication
Manager and Avaya Aura® Session Manager. The Verizon Business SIP trunk redundant
architecture (2-CPE) provides for redundant SIP trunk access between the Verizon Business IP
Trunk service offer and the customer premises equipment (CPE) and is supported by dual
Avaya Session Border Controllers for Enterprise.
The Verizon Business IP Trunk service offer referenced within these Application Notes is
designed for business customers with an Avaya SIP trunk solution. The service provides local
and/or long distance PSTN calling via standards-based SIP trunks directly, without the need
for additional TDM enterprise gateways or TDM cards and the associated maintenance costs.
The configuration and software versions described in these Application Notes have not
yet been independently certified by Verizon labs. These Application Notes can be used to
facilitate customer engagements via the Verizon field trial process, pending Verizon labs
independent certification.
Information in these Application Notes has been obtained through DevConnect compliance
testing and additional technical discussions. Testing was conducted via the DevConnect
Program at the Avaya Solution and Interoperability Test Lab, utilizing a Verizon Business
Private IP (PIP) circuit connection to the production Verizon Business IP Trunking service.

DDT; Reviewed:
SPOC 7/16/2013
Solution & Interoperability Test Lab Application Notes
©2013 Avaya Inc. All Rights Reserved.
2 of 96
CM62SM63-VzBIPT
Table of Contents 1. Introduction .................................................................................................................4
2. General Test Approach and Test Results ....................................................................5
2.1. Interoperability Compliance Testing ..........................................................................5
2.2. Test Results .................................................................................................................5
2.3. The SIP Trunk Redundant (2-CPE) Architecture Option ...........................................6
2.4. Support ........................................................................................................................6
2.4.1 Avaya ..........................................................................................................................6
2.4.2 Verizon ........................................................................................................................6
3. Reference Configuration .............................................................................................7
3.1. History Info and Diversion Headers ...........................................................................8
4. Equipment and Software Validated ............................................................................9
5. Configure Avaya Aura® Communication Manager Release 6.2 .............................10
5.1. Verify Licensed Features ..........................................................................................10
5.2. Dial Plan....................................................................................................................13
5.3. Node Names ..............................................................................................................13
5.4. Processor Ethernet Configuration on Avaya Aura® Communication Manager.......14
5.5. Network Regions for Gateway, Telephones .............................................................15
5.6. IP Codec Sets ............................................................................................................19
5.7. SIP Signaling Group .................................................................................................20
5.8. SIP Trunk Group .......................................................................................................21
5.9. Route Pattern Directing Outbound Calls to Verizon ................................................26
5.10. Route Pattern for Internal Calls via Avaya Aura® Session Manager.......................27
5.11. Private Numbering ....................................................................................................28
5.12. ARS Routing For Outbound Calls ............................................................................28
5.13. Avaya Aura® Communication Manager Stations ....................................................29
5.14. EC500 Configuration for Diversion Header Testing ................................................30
5.15. Saving Avaya Aura® Communication Manager Configuration Changes ................30
6. Configure Avaya Aura® Session Manager Release 6.3 ...........................................31
6.1. Domains ....................................................................................................................34
6.2. Locations ...................................................................................................................34
6.3. Adaptations ...............................................................................................................37
6.4. SIP Entities................................................................................................................39
6.5. Entity Links ...............................................................................................................45
6.6. Time Ranges .............................................................................................................46
6.7. Routing Policies ........................................................................................................46
6.8. Dial Patterns ..............................................................................................................50
7. Avaya Session Border Controller for Enterprise ......................................................53
7.1. Network Management ...............................................................................................56
7.2. Routing Profile ..........................................................................................................57
7.3. Topology Hiding Profile ...........................................................................................58
7.4. Server Interworking Profile ......................................................................................60
7.4.1 Server Interworking– Avaya .....................................................................................60
7.4.2 Server Interworking – Verizon IP Trunk ..................................................................63
7.5. Signaling Manipulation .............................................................................................66
7.6. Server Configuration .................................................................................................67

DDT; Reviewed:
SPOC 7/16/2013
Solution & Interoperability Test Lab Application Notes
©2013 Avaya Inc. All Rights Reserved.
3 of 96
CM62SM63-VzBIPT
7.6.1 Server Configuration for Avaya Aura® Session Manager .......................................68
7.6.2 Server Configuration for Verizon IP Trunk ..............................................................70
7.7. Media Rule ................................................................................................................72
7.8. Signaling Rule ...........................................................................................................73
7.9. Application Rule .......................................................................................................75
7.10. Endpoint Policy Group .............................................................................................76
7.11. Media Interface .........................................................................................................78
7.12. Signaling Interface ....................................................................................................79
7.13. End Point Flows - Server Flow .................................................................................79
8. Verizon Business IP Trunk Services Suite Configuration ........................................82
8.1. Service Access Information ......................................................................................82
9. Verification Steps......................................................................................................83
9.1. Avaya Aura® Communication Manager Verifications ............................................83
9.1.1 Example Incoming Call from PSTN via Verizon SIP Trunk ...................................83
9.1.2 Example Outgoing Calls to PSTN via Verizon IP Trunk .........................................84
9.2. Avaya Aura® System Manager and Avaya Aura® Session Manager Verifications86
9.2.1 Verify SIP Entity Link Status ...................................................................................86
9.2.2 Call Routing Test ......................................................................................................88
9.3. Avaya Session Border Controller for Enterprise Verification ..................................90
9.3.1 Welcome Screen .......................................................................................................90
9.3.2 Alarms .......................................................................................................................90
9.3.3 Incidents ....................................................................................................................91
9.3.4 Diagnostics ................................................................................................................92
9.3.5 Tracing ......................................................................................................................93
10. Conclusion ................................................................................................................94
11. Additional References ...............................................................................................95
11.1. Avaya ........................................................................................................................95
11.2. Verizon Business ......................................................................................................95

DDT; Reviewed:
SPOC 7/16/2013
Solution & Interoperability Test Lab Application Notes
©2013 Avaya Inc. All Rights Reserved.
4 of 96
CM62SM63-VzBIPT
1. Introduction These Application Notes illustrate a sample configuration using Avaya Aura® Session Manager
Release 6.3 and Avaya Aura® Communication Manager Release 6.2 with the Verizon Business
Private IP (PIP) IP Trunk service. The Verizon Business IP Trunk service provides local and/or
long-distance calls (with PSTN endpoints) via standards-based SIP trunks. These Application
Notes update previously published Application Notes with newer versions of Avaya Aura®
Communication Manager and Avaya Aura® Session Manager. The Verizon Business SIP trunk
redundant architecture (2-CPE) is supported by dual Avaya Session Border Controllers for
Enterprise (SBCE). The Verizon Business SIP Trunk redundant (2-CPE) architecture provides for
redundant SIP trunk access between the Verizon Business IP Trunk service offer and the customer
premises equipment (CPE).
Dual Avaya SBCEs are used as edge devices between the Avaya CPE and the Verizon Business
network, and to provide for Verizon Business 2-CPE redundancy. In addition, the Avaya SBCEs
provide Network Address Translation (NAT) functionality to convert the addresses used within the
enterprise to the Verizon routable addresses.
Note - The Verizon Business SIP Trunk Redundant (2-CPE) architecture is a service option and its
use is not a requirement of the Verizon Business IP Trunk service offer.
Verizon Business and Avaya developed the SIP Trunk Redundant (2-CPE) architecture to ensure
that SIP trunk calls can be automatically re-routed to bypass SIP trunk failures due to network or
component outages. The 2-CPE architecture described in these Application Notes is based on a
customer location having two Avaya SBCEs. One Avaya SBCE is designated as Primary and one
as Secondary.
Avaya Aura® Session Manager is provisioned for fail-over of outbound calls from one Avaya
SBCE to the other, if there is a failure (e.g., timeout, or error response) associated with the first
choice. Similarly, the Verizon Business Private IP Trunk service node will send inbound calls to
the Primary Avaya SBCE. If there is a failure (e.g., timeout, or error response), then the call will
be sent to the Secondary Avaya SBCE.
The configuration and software versions described in these Application Notes have not yet
been independently certified by Verizon labs. These Application Notes can be used to
facilitate customer engagements via the Verizon field trial process, pending Verizon labs
independent certification.

DDT; Reviewed:
SPOC 7/16/2013
Solution & Interoperability Test Lab Application Notes
©2013 Avaya Inc. All Rights Reserved.
5 of 96
CM62SM63-VzBIPT
2. General Test Approach and Test Results DevConnect Compliance Testing is conducted jointly by Avaya and DevConnect members. The
jointly-defined test plan focuses on exercising APIs and/or standards-based interfaces pertinent to
the interoperability of the tested products and their functionalities. DevConnect Compliance
Testing is not intended to substitute full product performance or feature testing performed by
DevConnect members, nor is it to be construed as an endorsement by Avaya of the suitability or
completeness of a DevConnect member’s solution.
2.1. Interoperability Compliance Testing
Compliance testing scenarios for the configuration described in these Application Notes included
the following:
• Inbound and outbound voice calls between telephones controlled by Communication
Manager and the PSTN can be made using G.711MU or G.729A codecs.
• Direct IP-to-IP Media (also known as “Shuffling”) when applicable.
• DTMF using RFC 2833
o Outbound call to PSTN application requiring post-answer DTMF (e.g., an IVR or
voice mail system)
o Inbound call from PSTN to Avaya CPE application requiring post-answer DTMF
(e.g., Communication Manager Messaging, Avaya vector digit collection steps)
• Additional PSTN numbering plans (e.g., International, operator assist, 411)
• Hold / Retrieve with music on hold
• Call transfer using two approaches
o REFER approach (Communication Manager Network Call Redirection flag on
trunk group form set to “y”)
o INVITE approach (Communication Manager Network Call Redirection flag on
trunk group form set to “n”)
• Conference calls
• SIP Diversion Header for call redirection
o Call Forwarding
o EC500
• Long hold time calls
• Automatic fail-over testing associated with the 2-CPE redundancy (i.e., calls automatically
re-routed around component outages).
2.2. Test Results
Interoperability testing of Verizon Business IP Trunk SIP Trunk Service was completed with
successful results for all test cases. The following limitations are noted for the sample
configuration described in these Application Notes
• When a PSTN caller is transferred off-net (to another PSTN user) the 2nd
PSTN phone will
see the Caller-ID of the CPE phone.

DDT; Reviewed:
SPOC 7/16/2013
Solution & Interoperability Test Lab Application Notes
©2013 Avaya Inc. All Rights Reserved.
6 of 96
CM62SM63-VzBIPT
• Emergency 911/E911 Services Limitations and Restrictions - Although Verizon provides
911/E911 calling capabilities, 911 capabilities were not tested, therefore, it is Customer’s
responsibility to ensure proper operation with its equipment/software vendor.
• Verizon Business IP Trunking service does not support G.711a codec for domestic service
(EMEA only).
• Verizon Business IP Trunking service does not support G.729B codec.
• 2 – CPE testing. Although Avaya SBCE will proxy OPTIONS messages from inside the
network to outside, sourcing of OPTIONS must be turned on if a 2-CPE configuration is
used or failover will not occur properly.
Note - These Application Notes describe the provisioning used for the sample configuration shown
in Figure 1. Other configurations may require modifications to the provisioning described in this
document.
2.3. The SIP Trunk Redundant (2-CPE) Architecture Option Verizon Business and Avaya developed the SIP Trunk Redundant (2-CPE) architecture to ensure that
SIP trunk calls can be automatically re-routed to bypass SIP trunk failures due to network or
component outages. The 2-CPE architecture described in these Application Notes is based on a
customer location having two Avaya Session Border Controllers for Enterprise. One Avaya SBCE is
designated as Primary and one as Secondary. The Avaya SBCEs reside at the edge of the customer
network.
Avaya Aura® Session Manager is provisioned to attempt outbound calls to the Primary Avaya SBCE
first. If that attempt fails, the Secondary Avaya SBCE is used. Similarly, the Verizon Business Private
IP Trunk service node will send inbound calls to the Primary Avaya SBCE. If there is no response then
the call will be sent to the Secondary Avaya SBCE.
2.4. Support
2.4.1 Avaya
For technical support on the Avaya products described in these Application Notes visit
http://support.avaya.com
2.4.2 Verizon
For technical support on Verizon Business IP Trunk service offer, visit online support at
http://www.verizonbusiness.com/us/customer/

DDT; Reviewed:
SPOC 7/16/2013
Solution & Interoperability Test Lab Application Notes
©2013 Avaya Inc. All Rights Reserved.
7 of 96
CM62SM63-VzBIPT
3. Reference Configuration
Figure 1 illustrates the sample configuration used for the testing. The Avaya CPE location
simulates a customer site. The PIP service defines a secure MPLS connection between the Avaya
CPE T1 connection and the Verizon service node.
The Avaya SBCEs receive traffic from the Verizon Business IP Trunk service on port 5060 and
sends traffic to the Verizon Business IP trunk service on port 5071, using UDP protocol for
network transport (required by the Verizon Business IP Trunk service). The Verizon Business IP
Trunk service provides Direct Inward Dial (DID) 10 digit numbers. These DID numbers can be
mapped by Session Manager or Communication Manager to Avaya telephone extensions.
Figure 1: Avaya Interoperability Test Lab Configuration

DDT; Reviewed:
SPOC 7/16/2013
Solution & Interoperability Test Lab Application Notes
©2013 Avaya Inc. All Rights Reserved.
8 of 96
CM62SM63-VzBIPT
The Verizon Business IP Trunk service used FQDN pcelban0001.avayalincroft.globalipcom.com.
The Avaya CPE environment was known to Verizon Business IP Trunk service as FQDN
adevc.avaya.globalipcom.com. Access to the Verizon Business IP Trunk service was added to a
configuration that already used domain “avayalab.com” at the enterprise. As such, the Avaya
SBCE is used to adapt the “avayalab.com” domain to the domain known to Verizon. These
Application Notes indicate a configuration that would not be required in cases where the CPE
domain in Communication Manager and Session Manager match the CPE domain known to the
Verizon Business IP Trunk service.
Note – The Fully Qualified Domain Names and IP addressing specified in these Application Notes
apply only to the reference configuration shown in Figure 1. Verizon Business customers will use
their own FQDNs and IP addressing as required.
In summary, the following components were used in the reference configuration.
• Verizon Business IP Trunk network Fully Qualified Domain Name (FQDN)
o pcelban0001.avayalincroft.globalipcom.com
• Avaya CPE Fully Qualified Domain Name (FQDN) known to Verizon
o adevc.avaya.globalipcom.com
• Primary and Secondary Avaya Session Border Controllers for Enterprise
• Avaya Aura® Communication Manager Release 6.2
• Avaya Aura® Session Manager Release 6.3
• Avaya 96X1 Series IP telephones using the SIP and H.323 software bundle
• Avaya 9600 Series IP telephones using the H.323 software bundle
• Avaya Digital Phones
3.1. History Info and Diversion Headers
The Verizon Business IP Trunk service does not support SIP History Info Headers. Instead, the
Verizon Business IP Trunk service requires that SIP Diversion Header be sent for redirected calls.
The Communication Manager SIP trunk group form provides options for specifying whether
History Info Headers or Diversion Headers are sent.
If Communication Manager sends the History Info Header, Session Manager can convert the
History Info header into the Diversion Header. This is performed by specifying the
“VerizonAdapter” adaptation in Session Manager.
The Communication Manager Call Forwarding or Extension to Cellular (EC500) features may be
used for the call scenarios testing Diversion Header.

DDT; Reviewed:
SPOC 7/16/2013
Solution & Interoperability Test Lab Application Notes
©2013 Avaya Inc. All Rights Reserved.
9 of 96
CM62SM63-VzBIPT
4. Equipment and Software Validated The following equipment and software were used in the sample configuration.
Equipment/Software: Release/Version:
Avaya Aura ® Communication Manager running on HP
ProLiant DL360 G7
Release 6.2 SP5
Avaya Aura® System Manager running on HP ProLiant
DL360 G7
Release 6.3 SP1
Avaya Aura® Session Manager running on HP ProLiant
DL360 G7
Release 6.3 SP1
G450 Gateway 32.24.0
Avaya Session Border Controller for Enterprise running on
DELL 210 RII Version 4.0.5Q19
Avaya 9600-Series Telephones (H.323) R 3.103S
Avaya 96X1- Series Telephones (SIP) R6.2.1.26
Avaya 96X1- Series Telephones (H323) R6.2209
Avaya One-X Communicator (H.323) 6.1.5.07-SP5-37495
Avaya Desktop Video Device Flare 1.1.2
Avaya 2400-Series and 6400-Series Digital Telephones N/A
Okidata Analog Fax N/A
Table 1: Equipment and Software Used in the Sample Configuration
DDT; Reviewed:
SPOC 7/16/2013
Solution & Interoperability Test Lab Application Notes
©2013 Avaya Inc. All Rights Reserved.
10 of 96
CM62SM63-VzBIPT
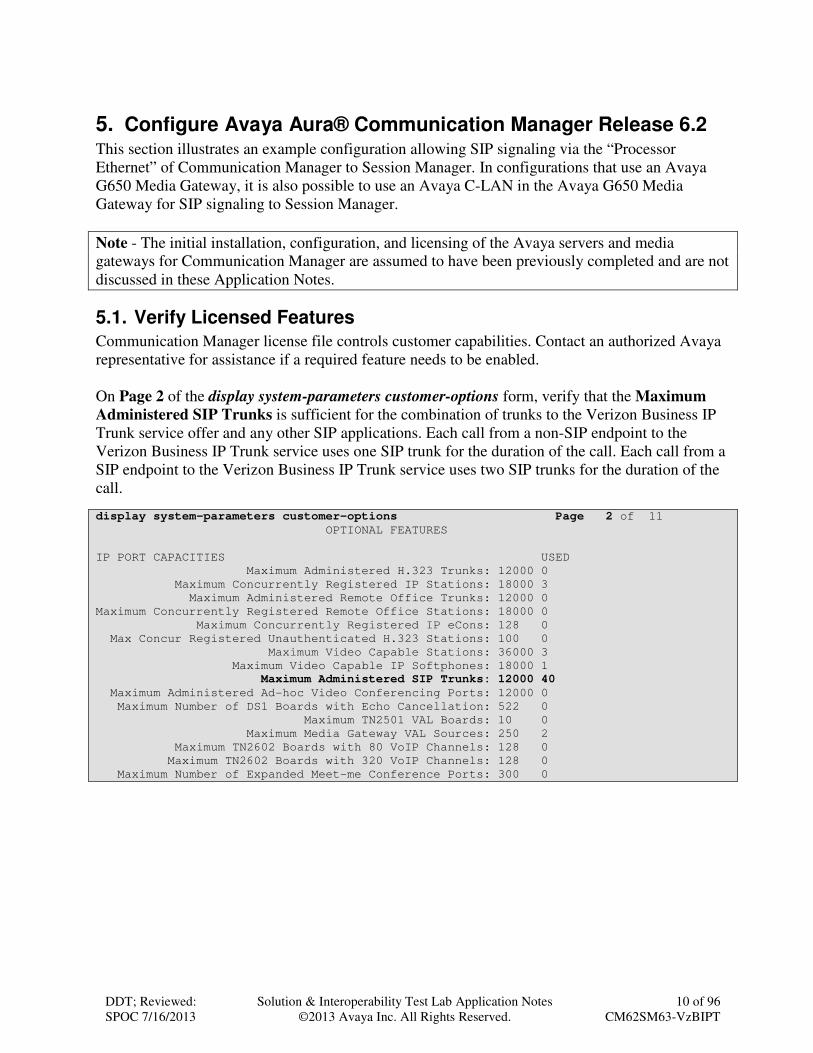
5. Configure Avaya Aura® Communication Manager Release 6.2 This section illustrates an example configuration allowing SIP signaling via the “Processor
Ethernet” of Communication Manager to Session Manager. In configurations that use an Avaya
G650 Media Gateway, it is also possible to use an Avaya C-LAN in the Avaya G650 Media
Gateway for SIP signaling to Session Manager.
Note - The initial installation, configuration, and licensing of the Avaya servers and media
gateways for Communication Manager are assumed to have been previously completed and are not
discussed in these Application Notes.
5.1. Verify Licensed Features
Communication Manager license file controls customer capabilities. Contact an authorized Avaya
representative for assistance if a required feature needs to be enabled.
On Page 2 of the display system-parameters customer-options form, verify that the Maximum
Administered SIP Trunks is sufficient for the combination of trunks to the Verizon Business IP
Trunk service offer and any other SIP applications. Each call from a non-SIP endpoint to the
Verizon Business IP Trunk service uses one SIP trunk for the duration of the call. Each call from a
SIP endpoint to the Verizon Business IP Trunk service uses two SIP trunks for the duration of the
call.
display system-parameters customer-options Page 2 of 11
OPTIONAL FEATURES
IP PORT CAPACITIES USED
Maximum Administered H.323 Trunks: 12000 0
Maximum Concurrently Registered IP Stations: 18000 3
Maximum Administered Remote Office Trunks: 12000 0
Maximum Concurrently Registered Remote Office Stations: 18000 0
Maximum Concurrently Registered IP eCons: 128 0
Max Concur Registered Unauthenticated H.323 Stations: 100 0
Maximum Video Capable Stations: 36000 3
Maximum Video Capable IP Softphones: 18000 1
Maximum Administered SIP Trunks: 12000 40
Maximum Administered Ad-hoc Video Conferencing Ports: 12000 0
Maximum Number of DS1 Boards with Echo Cancellation: 522 0
Maximum TN2501 VAL Boards: 10 0
Maximum Media Gateway VAL Sources: 250 2
Maximum TN2602 Boards with 80 VoIP Channels: 128 0
Maximum TN2602 Boards with 320 VoIP Channels: 128 0
Maximum Number of Expanded Meet-me Conference Ports: 300 0

DDT; Reviewed:
SPOC 7/16/2013
Solution & Interoperability Test Lab Application Notes
©2013 Avaya Inc. All Rights Reserved.
11 of 96
CM62SM63-VzBIPT
On Page 3 of the display system-parameters customer-options form, verify that ARS is enabled.
display system-parameters customer-options Page 3 of 11
OPTIONAL FEATURES
Abbreviated Dialing Enhanced List? y Audible Message Waiting? y
Access Security Gateway (ASG)? n Authorization Codes? y
Analog Trunk Incoming Call ID? y CAS Branch? n
A/D Grp/Sys List Dialing Start at 01? y CAS Main? n
Answer Supervision by Call Classifier? y Change COR by FAC? n
ARS? y Computer Telephony Adjunct Links? y
ARS/AAR Partitioning? y Cvg Of Calls Redirected Off-net? y
ARS/AAR Dialing without FAC? n DCS (Basic)? y
ASAI Link Core Capabilities? n DCS Call Coverage? y
ASAI Link Plus Capabilities? n DCS with Rerouting? y
Async. Transfer Mode (ATM) PNC? n
Async. Transfer Mode (ATM) Trunking? n Digital Loss Plan Modification? y
ATM WAN Spare Processor? n DS1 MSP? y
ATMS? y DS1 Echo Cancellation? y
Attendant Vectoring? y

DDT; Reviewed:
SPOC 7/16/2013
Solution & Interoperability Test Lab Application Notes
©2013 Avaya Inc. All Rights Reserved.
12 of 96
CM62SM63-VzBIPT
On Page 4 of the display system-parameters customer-options form, verify that the Enhanced
EC500, IP Trunks, IP Stations, and ISDN-PRI features are enabled. If the use of SIP REFER
messaging or send-only SDP attributes will be required verify that the ISDN/SIP Network Call
Redirection feature is enabled.
display system-parameters customer-options Page 4 of 11
OPTIONAL FEATURES
Emergency Access to Attendant? y IP Stations? y
Enable 'dadmin' Login? y
Enhanced Conferencing? y ISDN Feature Plus? n
Enhanced EC500? y ISDN/SIP Network Call Redirection? y
Enterprise Survivable Server? n ISDN-BRI Trunks? y
Enterprise Wide Licensing? n ISDN-PRI? y
ESS Administration? y Local Survivable Processor? n
Extended Cvg/Fwd Admin? y Malicious Call Trace? y
External Device Alarm Admin? y Media Encryption Over IP? n
Five Port Networks Max Per MCC? n Mode Code for Centralized Voice Mail? n
Flexible Billing? n
Forced Entry of Account Codes? y Multifrequency Signaling? y
Global Call Classification? y Multimedia Call Handling (Basic)? y
Hospitality (Basic)? y Multimedia Call Handling (Enhanced)? y
Hospitality (G3V3 Enhancements)? y Multimedia IP SIP Trunking? y
IP Trunks? y
IP Attendant Consoles? y
On Page 5 of the display system-parameters customer-options form, verify that the Private
Networking and Processor Ethernet features are enabled.
display system-parameters customer-options Page 5 of 11
OPTIONAL FEATURES
Multinational Locations? n Station and Trunk MSP? y
Multiple Level Precedence & Preemption? n Station as Virtual Extension? y
Multiple Locations? n
System Management Data Transfer? n
Personal Station Access (PSA)? y Tenant Partitioning? y
PNC Duplication? n Terminal Trans. Init. (TTI)? y
Port Network Support? y Time of Day Routing? y
Posted Messages? y TN2501 VAL Maximum Capacity? y
Uniform Dialing Plan? y
Private Networking? y Usage Allocation Enhancements? y
Processor and System MSP? y
Processor Ethernet? y Wideband Switching? y
Wireless? n
Remote Office? y
Restrict Call Forward Off Net? y
Secondary Data Module? y

DDT; Reviewed:
SPOC 7/16/2013
Solution & Interoperability Test Lab Application Notes
©2013 Avaya Inc. All Rights Reserved.
13 of 96
CM62SM63-VzBIPT
5.2. Dial Plan
In the reference configuration the Avaya CPE environment uses five digit local extensions, such as
12xxx, 14xxx or 20xxx. Trunk Access Codes (TAC) are 3 digits in length and begin with *. The
Feature Access Code (FAC) to access ARS is the single digit 9. The Feature Access Code (FAC)
to access AAR is the single digit 8. The dial plan illustrated here is not intended to be prescriptive;
any valid dial plan may be used.
The dial plan is modified with the change dialplan analysis command as shown below.
change dialplan analysis Page 1 of 12
DIAL PLAN ANALYSIS TABLE
Location: all Percent Full: 1
Dialed Total Call Dialed Total Call Dialed Total Call
String Length Type String Length Type String Length Type
1 5 ext
2 5 ext
8 1 fac
9 1 fac
* 3 dac
# 3 dac
5.3. Node Names
Node names are mappings of names to IP addresses that can be used in various screens. The
following change node-names ip output shows relevant node-names in the sample configuration.
As shown in bold, the node name for Session Manager is “SM63” with IP address 10.64.19.226.
The node name and IP address for the Processor Ethernet “procr” is 10.64.19.205.
change node-names ip Page 1 of 2
IP NODE NAMES
Name IP Address
SM63 10.64.19.226
default 0.0.0.0
procr 10.64.19.205
procr6 ::

DDT; Reviewed:
SPOC 7/16/2013
Solution & Interoperability Test Lab Application Notes
©2013 Avaya Inc. All Rights Reserved.
14 of 96
CM62SM63-VzBIPT
5.4. Processor Ethernet Configuration on Avaya Aura® Communication Manager
The add ip-interface procr or change ip-interface procr command can be used to configure the
Processor Ethernet (PE) parameters. The following screen shows the parameters used in the
sample configuration. While the focus here is the use of the PE for SIP Trunk Signaling, observe
that the Processor Ethernet will also be used for registrations from H.323 IP Telephones and H.248
gateways in the sample configuration. change ip-interface procr Page 1 of 2
IP INTERFACES
Type: PROCR
Target socket load: 1700
Enable Interface? y Allow H.323 Endpoints? y
Allow H.248 Gateways? y
Network Region: 1 Gatekeeper Priority: 5
IPV4 PARAMETERS
Node Name: procr IP Address: 10.80.150.225
Subnet Mask: /24

DDT; Reviewed:
SPOC 7/16/2013
Solution & Interoperability Test Lab Application Notes
©2013 Avaya Inc. All Rights Reserved.
15 of 96
CM62SM63-VzBIPT
5.5. Network Regions for Gateway, Telephones
Network regions provide a means to logically group resources. In the shared Communication
Manager configuration used for the testing, the Avaya G450 Media Gateway is in network region
1. To provide testing flexibility, network region 2 was associated with other components used
specifically for the Verizon testing.
Non-IP telephones (e.g., analog, digital) derive network region and location configuration from the
Avaya gateway to which the device is connected. The following display command shows that
Media Gateway 1 is an Avaya G450 Media Gateway configured for network region 1. It can also
be observed that the Controller IP Address is the Avaya Processor Ethernet (10.64.19.205), and
that the gateway IP address is 10.64.19.81. These fields are not configured in this screen, but just
display the current information for the Media Gateway.
display media-gateway 1 Page 1 of 2
MEDIA GATEWAY 1
Type: g450
Name: G450-1
Serial No: 08IS38199678
Encrypt Link? y Enable CF? n
Network Region: 1 Location: 1
Site Data:
Recovery Rule: 1
Registered? y
FW Version/HW Vintage: 32 .24 .0 /1
MGP IPV4 Address: 10.64.19.81
MGP IPV6 Address:
Controller IP Address: 10.64.19.205
MAC Address: 00:1b:4f:03:52:18

DDT; Reviewed:
SPOC 7/16/2013
Solution & Interoperability Test Lab Application Notes
©2013 Avaya Inc. All Rights Reserved.
16 of 96
CM62SM63-VzBIPT
The following screen shows Page 2 for Media Gateway 1. The gateway has an S8300 in slot V1
(unused), an MM712 media module supporting Avaya digital phones in slot V2, an MM711
supporting analog devices in slot V3, and the capability to provide announcements and music on
hold via “gateway-announcements” in logical slot V9.
change media-gateway 1 Page 2 of 2
MEDIA GATEWAY 1
Type: g450
Slot Module Type Name DSP Type FW/HW version
V1: S8300 ICC MM MP80 68 3
V2: MM712 DCP MM
V3: MM711 ANA MM
V4:
V5:
V6:
V7:
V8: Max Survivable IP Ext: 8
V9: gateway-announcements ANN VMM
IP telephones can be assigned to a network region based on an IP address mapping. The network
region can also associate the IP telephone to a location for location-based routing decisions. The
following screen illustrates a subset of the IP network map configuration used in these Application
Notes. If the IP address of a registering IP Telephone does not appear in the ip-network-map, the
phone is assigned the network region of the “gatekeeper” (e.g., CLAN or PE) to which it registers.
When the IP address of a registering IP telephone is in the ip-network-map, the phone is assigned
the network region assigned by the form shown below. For example, the IP address 10.64.19.109
would be mapped to network region 1, based on the configuration in bold below. In production
environments, different sites will typically be on different networks. The range of IP addresses
assigned by the DHCP scope serving the site can be entered as one entry in the network map in
order to assign all telephones in a range to a specific network region.
change ip-network-map Page 1 of 63
IP ADDRESS MAPPING
Subnet Network Emergency
IP Address Bits Region VLAN Location Ext
--------------------------------------------- ------ ------ ---- -------------
FROM: 10.64.19.100 / 1 n
TO: 10.64.19.119
FROM: / n
TO:

DDT; Reviewed:
SPOC 7/16/2013
Solution & Interoperability Test Lab Application Notes
©2013 Avaya Inc. All Rights Reserved.
17 of 96
CM62SM63-VzBIPT
The following screen shows IP Network Region 2 configuration. In the shared test environment,
network region 2 is used to allow unique behaviors for the Verizon test environment. In this
example, codec set 2 will be used for calls within network region 2. The shared Avaya
Interoperability Lab test environment uses the domain “avayalab.com” (i.e., for network region 1,
including the network region of the Processor Ethernet “procr”). Session Manager also uses this
domain to determine routes for calls based on the domain information of the calls and for SIP
phone registration. Avaya SBCE will adapt “avayalab.com” to “adevc.avaya.globalipcom.com”,
the domain known to Verizon as the enterprise SIP domain, for the From, PAI and Diversion
headers using a Topology Hiding Profile shown in Section 7.3.
change ip-network-region 2 Page 1 of 20
IP NETWORK REGION
Region: 2
Location: Authoritative Domain: avayalab.com
Name: Session Manager
MEDIA PARAMETERS Intra-region IP-IP Direct Audio: yes
Codec Set: 2 Inter-region IP-IP Direct Audio: yes
UDP Port Min: 2048 IP Audio Hairpinning? n
UDP Port Max: 3329
DIFFSERV/TOS PARAMETERS
Call Control PHB Value: 46
Audio PHB Value: 46
Video PHB Value: 26
802.1P/Q PARAMETERS
Call Control 802.1p Priority: 6
Audio 802.1p Priority: 6
Video 802.1p Priority: 5 AUDIO RESOURCE RESERVATION PARAMETERS
H.323 IP ENDPOINTS RSVP Enabled? n
H.323 Link Bounce Recovery? y
Idle Traffic Interval (sec): 20
Keep-Alive Interval (sec): 5
Keep-Alive Count: 5
The following screen shows the inter-network region connection configuration for network region
2. The first bold row shows that network region 2 is directly connected to network region 1, and
that codec set 2 will also be used for any connections between network region 2 and network
region 1. For configurations where multiple remote gateways are used, each gateway will typically
be configured for a different network region, and this screen can be used to specify a unique codec
or call admission control parameters for the pairs of regions. If a different codec should be used for
inter-region connectivity than for intra-region connectivity, a different codec set can be entered in
the codec set column for the appropriate row in the screen shown below. Once submitted, the
configuration becomes symmetric, meaning that network region 1, Page 4 will also show codec set
2 for network region 2 to network region 1 connectivity.
change ip-network-region 2 Page 4 of 20
Source Region: 2 Inter Network Region Connection Management I M
G A t
dst codec direct WAN-BW-limits Video Intervening Dyn A G c
rgn set WAN Units Total Norm Prio Shr Regions CAC R L e
1 2 y NoLimit n t
2 2 all
3
4

DDT; Reviewed:
SPOC 7/16/2013
Solution & Interoperability Test Lab Application Notes
©2013 Avaya Inc. All Rights Reserved.
18 of 96
CM62SM63-VzBIPT
The following screen shows IP Network Region 1 configuration. In this example, codec set 1 will
be used for calls within network region 1 due to the Codec Set parameter on Page 1, but codec set
2 will be used for connections between network region 1 and network region 2 as noted previously.
change ip-network-region 1 Page 1 of 20
IP NETWORK REGION
Region: 1
Location: Authoritative Domain: avayalab.com
Name: Enterprise
MEDIA PARAMETERS Intra-region IP-IP Direct Audio: yes
Codec Set: 1 Inter-region IP-IP Direct Audio: yes
UDP Port Min: 2048 IP Audio Hairpinning? n
UDP Port Max: 3329
DIFFSERV/TOS PARAMETERS
Call Control PHB Value: 46
Audio PHB Value: 46
Video PHB Value: 26
802.1P/Q PARAMETERS
Call Control 802.1p Priority: 6
Audio 802.1p Priority: 6
Video 802.1p Priority: 5 AUDIO RESOURCE RESERVATION PARAMETERS
H.323 IP ENDPOINTS RSVP Enabled? n
H.323 Link Bounce Recovery? y
Idle Traffic Interval (sec): 20
Keep-Alive Interval (sec): 5
Keep-Alive Count: 5
The following screen shows the inter-network region connection configuration for network region
1. The bold row shows that network region 1 is directly connected to network region 2, and that
codec set 2 will be used for any connections between network region 2 and network region 1.
change ip-network-region 1 Page 4 of 20
Source Region: 1 Inter Network Region Connection Management I M
G A t
dst codec direct WAN-BW-limits Video Intervening Dyn A G c
rgn set WAN Units Total Norm Prio Shr Regions CAC R L e
1 1 all
2 2 y NoLimit n t

DDT; Reviewed:
SPOC 7/16/2013
Solution & Interoperability Test Lab Application Notes
©2013 Avaya Inc. All Rights Reserved.
19 of 96
CM62SM63-VzBIPT
5.6. IP Codec Sets
The following screen shows the configuration for codec set 2, the codec set configured to be used
for calls within network region 2 and for calls between network region 1 and network region 2. In
general, an IP codec set is a list of allowable codecs in priority order. Using the example
configuration shown below, all calls to and from the PSTN via the SIP trunks would use G.729A,
since G.729A is preferred by both Verizon and the Avaya ip-codec-set. Any calls using this same
codec set that are between devices capable of the G.722-64K codec (e.g., Avaya 9600-Series IP
Telephone) can use G.722. Include G.711MU in the ip-codec-set if fax will be used.
change ip-codec-set 2 Page 1 of 2
IP Codec Set
Codec Set: 2
Audio Silence Frames Packet
Codec Suppression Per Pkt Size(ms)
1: G.722-64K 2 20
2: G.729A n 2 20
3: G.711MU n 2 20
4:
On Page 2 of the form:
• Configure the Fax Mode field to “t.38-standard”.
• Configure the Fax Redundancy field to “0”.
change ip-codec-set 2 Page 2 of 2 IP Codec Set
Allow Direct-IP Multimedia? n
Mode Redundancy
FAX t.38-standard 0
Modem off 0
TDD/TTY US 3
Clear-channel n 0
The following screen shows the configuration for codec set 1. This configuration for codec set 1 is
used for analog, digital, H.323 phones and other connections within network region 1.
change ip-codec-set 1 Page 1 of 2
IP Codec Set
Codec Set: 1
Audio Silence Frames Packet
Codec Suppression Per Pkt Size(ms)
1: G.722.2 n 1 20
2: G.722-64K 2 20
3: G.711MU n 2 20
4:

DDT; Reviewed:
SPOC 7/16/2013
Solution & Interoperability Test Lab Application Notes
©2013 Avaya Inc. All Rights Reserved.
20 of 96
CM62SM63-VzBIPT
5.7. SIP Signaling Group
This section illustrates the configuration of the SIP Signaling Groups. Each signaling group has a
Group Type of “sip”, a Near-end Node Name of “procr”, and a Far-end Node Name of
“SM63”. In the example screens, the Transport Method for all signaling groups is “tls”. The Peer
Detection Enabled field is set to “y” and a peer Session Manager has been previously detected.
The Far-end Domain is set to “avayalab.com” matching the configuration in place prior to adding
the Verizon IP SIP Trunking configuration. The Enable Layer 3 Test field is enabled on each of
the signaling groups to allow Communication Manager to maintain the signaling group using the
SIP OPTIONS method. The Initial IP-IP Direct Media? field is set to “n”. Fields that are not
referenced in the text below can be left at default values, including DTMF over IP set to “rtp-
payload”, which corresponds to RFC 2833.
The following screen shows signaling group 1. Signaling group 1 will be used for processing
PSTN calls to / from Verizon via Session Manager. The Far-end Network Region is configured
to network region 2. Port 5081 has been configured as both the Near-end Listen Port and Far-
end Listen Port. Session Manager will be configured to direct calls arriving from the PSTN with
Verizon DID numbers to a route policy that uses a SIP entity link to Communication Manager
specifying port 5081. The use of different ports is one means to allow Communication Manager to
distinguish different types of calls arriving from the same Session Manager. Other parameters may
be left at default values.
The Alternate Route Timer that defaults to 6 seconds impacts fail-over timing for outbound calls.
If Communication Manager does not get an expected response, Look-Ahead Routing (LAR) can
be triggered, after the expiration of the Alternate Route Timer.
change signaling-group 1 Page 1 of 2
SIGNALING GROUP
Group Number: 1 Group Type: sip
IMS Enabled? n Transport Method: tls
Q-SIP? n
IP Video? n Enforce SIPS URI for SRTP? y
Peer Detection Enabled? y Peer Server: SM
Near-end Node Name: procr Far-end Node Name: SM63
Near-end Listen Port: 5081 Far-end Listen Port: 5081
Far-end Network Region: 2
Far-end Domain: avayalab.com
Bypass If IP Threshold Exceeded? n
Incoming Dialog Loopbacks: eliminate RFC 3389 Comfort Noise? n
DTMF over IP: rtp-payload Direct IP-IP Audio Connections? y
Session Establishment Timer(min): 3 IP Audio Hairpinning? n
Enable Layer 3 Test? y Initial IP-IP Direct Media? n
H.323 Station Outgoing Direct Media? n Alternate Route Timer(sec): 6
The following screen shows signaling group 3, this is the signaling group to Session Manager that
was in place prior to adding the Verizon IP Trunk configuration to the shared Avaya Solutions and
Interoperability Test Lab configuration. This signaling group reflects configuration not specifically
related to Verizon IP Trunk but will be used to enable SIP phones to register to Session Manager
and to use features from Communication Manager. Again, the Near-end Node Name is “procr”

DDT; Reviewed:
SPOC 7/16/2013
Solution & Interoperability Test Lab Application Notes
©2013 Avaya Inc. All Rights Reserved.
21 of 96
CM62SM63-VzBIPT
and the Far-end Node Name is “SM63”, the node name of the Session Manager. Unlike the
signaling group used for the Verizon IP Trunk signaling, the Far-end Network Region is “1”. The
Peer Detection Enabled field is set to “y” and a peer Session Manager has been previously
detected.
change signaling-group 3 Page 1 of 2
SIGNALING GROUP
Group Number: 3 Group Type: sip
IMS Enabled? n Transport Method: tls
Q-SIP? n
IP Video? n Enforce SIPS URI for SRTP? y
Peer Detection Enabled? y Peer Server: SM
Near-end Node Name: procr Far-end Node Name: SM63
Near-end Listen Port: 5061 Far-end Listen Port: 5061
Far-end Network Region: 1
Far-end Domain: avayalab.com
Bypass If IP Threshold Exceeded? n
Incoming Dialog Loopbacks: eliminate RFC 3389 Comfort Noise? n
DTMF over IP: rtp-payload Direct IP-IP Audio Connections? y
Session Establishment Timer(min): 3 IP Audio Hairpinning? n
Enable Layer 3 Test? y Initial IP-IP Direct Media? n
H.323 Station Outgoing Direct Media? n Alternate Route Timer(sec): 6
5.8. SIP Trunk Group
This section illustrates the configuration of the SIP Trunk Groups corresponding to the SIP
signaling group from the previous section.
The following shows Page 1 for trunk group 1, which will be used for incoming and outgoing
PSTN calls from Verizon. The Number of Members field defines how many simultaneous calls
are permitted for the trunk group. The Service Type field is set to “public-ntwrk” for the trunks
that will handle calls with Verizon. The Direction has been configured to “two-way” to allow
incoming and outgoing calls in the sample configuration.
change trunk-group 1 Page 1 of 21
TRUNK GROUP
Group Number: 1 Group Type: sip CDR Reports: y
Group Name: OUTSIDE CALL COR: 1 TN: 1 TAC: *01
Direction: two-way Outgoing Display? n
Dial Access? n Night Service:
Queue Length: 0
Service Type: public-ntwrk Auth Code? n
Member Assignment Method: auto
Signaling Group: 1
Number of Members: 10

DDT; Reviewed:
SPOC 7/16/2013
Solution & Interoperability Test Lab Application Notes
©2013 Avaya Inc. All Rights Reserved.
22 of 96
CM62SM63-VzBIPT
The following screen shows Page 2 for trunk group 1. All parameters shown are default values,
except for the Preferred Minimum Session Refresh Interval, which has been changed from the
default 600 to “900”. Although not strictly necessary, some SIP products prefer a higher session
refresh interval than Communication Manager default value, which can result in unnecessary SIP
messages to re-establish a higher refresh interval for each call.
change trunk-group 1 Page 2 of 21
Group Type: sip
TRUNK PARAMETERS
Unicode Name: auto
Redirect On OPTIM Failure: 5000
SCCAN? n Digital Loss Group: 18
Preferred Minimum Session Refresh Interval(sec): 900
Disconnect Supervision - In? y Out? y
XOIP Treatment: auto Delay Call Setup When Accessed Via IGAR? n
The following screen shows Page 3 for trunk group 1. All parameters except those in bold are
default values. The Numbering Format will use “private” numbering, meaning that the private
numbering table would be consulted for any mappings of Communication Manager extensions to
alternate numbers to be sent to Session Manager.
change trunk-group 1 Page 3 of 21
TRUNK FEATURES
ACA Assignment? n Measured: none
Maintenance Tests? y
Numbering Format: private
UUI Treatment: service-provider
Replace Restricted Numbers? n
Replace Unavailable Numbers? n
Modify Tandem Calling Number: no
Show ANSWERED BY on Display? y

DDT; Reviewed:
SPOC 7/16/2013
Solution & Interoperability Test Lab Application Notes
©2013 Avaya Inc. All Rights Reserved.
23 of 96
CM62SM63-VzBIPT
The following screen shows Page 4 for trunk group 1. The bold fields have non-default values.
Verizon recommends that inbound calls to the enterprise result in a 183 with SDP rather than a 180
with SDP, and setting Convert 180 to 183 for Early Media to “y” for the trunk group handling
inbound calls from Verizon produces this result. Although not strictly necessary, the Telephone
Event Payload Type has been set to “101” to match Verizon configuration. Setting the Network
Call Redirection flag to “y” enables advanced services associated with the use of the REFER
message, while also implicitly enabling Communication Manager to signal “send-only” media
conditions for calls placed on hold at the enterprise site. If neither REFER signaling nor “send-
only” media signaling is required, this field may be left at the default “n” value. In the testing
associated with these Application Notes, transfer testing using REFER was successfully completed
with the Network Call Redirection flag set to “y”, and transfer testing using INVITE was
successfully completed with the Network Call Redirection flag set to “n”.
For redirected calls, Verizon supports the Diversion header, but not the History-Info header.
Communication Manager can send the Diversion header by marking Send Diversion Header to
“y”. Alternatively, Communication can send the History-Info header by setting Support Request
History to “y”, and Session Manager can adapt the History-Info header to the Diversion header
using the “VerizonAdapter”. In the testing associated with these Application Notes, call redirection
testing with Communication Manager sending History-Info and Session Manager adapting to
Diversion Header was completed successfully. This allows for the same SIP trunk group to be used
for Communication Manager Messaging, or any other SIP devices which requires the History-Info
header.
change trunk-group 1 Page 4 of 21
PROTOCOL VARIATIONS
Mark Users as Phone? n
Prepend '+' to Calling Number? n
Send Transferring Party Information? n
Network Call Redirection? y
Send Diversion Header? n
Support Request History? y
Telephone Event Payload Type: 101
Convert 180 to 183 for Early Media? y
Always Use re-INVITE for Display Updates? n
Identity for Calling Party Display: P-Asserted-Identity
Block Sending Calling Party Location in INVITE? n
Enable Q-SIP? n

DDT; Reviewed:
SPOC 7/16/2013
Solution & Interoperability Test Lab Application Notes
©2013 Avaya Inc. All Rights Reserved.
24 of 96
CM62SM63-VzBIPT
The following screen shows Page 1 for trunk group 3, the bi-directional “tie” trunk group to
Session Manager that existed before adding the Verizon SIP Trunk configuration to the shared
Avaya Interoperability Lab network. Recall that this trunk is used to enable SIP phones to use
features from Communication Manager and to communicate with other Avaya applications, such
as Avaya Modular Messaging, and does not reflect any unique Verizon configuration.
change trunk-group 3 Page 1 of 21
TRUNK GROUP
Group Number: 3 Group Type: sip CDR Reports: y
Group Name: To SM Enterprise COR: 1 TN: 1 TAC: *03
Direction: two-way Outgoing Display? n
Dial Access? n Night Service:
Queue Length: 0
Service Type: tie Auth Code? n
Member Assignment Method: auto
Signaling Group: 3
Number of Members: 20
The following shows Page 3 for trunk group 3. Note that this tie trunk group uses a “private”
Numbering Format.
change trunk-group 3 Page 3 of 21
TRUNK FEATURES
ACA Assignment? n Measured: none
Maintenance Tests? y
Numbering Format: private
UUI Treatment: service-provider
Replace Restricted Numbers? n
Replace Unavailable Numbers? n
Modify Tandem Calling Number: no

DDT; Reviewed:
SPOC 7/16/2013
Solution & Interoperability Test Lab Application Notes
©2013 Avaya Inc. All Rights Reserved.
25 of 96
CM62SM63-VzBIPT
The following screen shows Page 4 for trunk group 3. Note that unlike the trunks associated with
Verizon calls that have non-default “protocol variations”, this trunk group maintains all default
values. Support Request History must remain set to the default “y” to support proper subscriber
mailbox identification by Modular Messaging.
change trunk-group 3 Page 4 of 21
PROTOCOL VARIATIONS
Mark Users as Phone? n
Prepend '+' to Calling Number? n
Send Transferring Party Information? n
Network Call Redirection? n
Send Diversion Header? n
Support Request History? y
Telephone Event Payload Type:
Convert 180 to 183 for Early Media? n
Always Use re-INVITE for Display Updates? n
Identity for Calling Party Display: P-Asserted-Identity
Block Sending Calling Party Location in INVITE? n
Enable Q-SIP? n

DDT; Reviewed:
SPOC 7/16/2013
Solution & Interoperability Test Lab Application Notes
©2013 Avaya Inc. All Rights Reserved.
26 of 96
CM62SM63-VzBIPT
5.9. Route Pattern Directing Outbound Calls to Verizon
Route pattern 1 will be used for calls destined for the PSTN via the Verizon IP Trunk service. Set
the Facility Restriction Level (FRL) field to a level that allows access to this trunk for all users
that require it. The value of “0” is the least restrictive level. The Numbering Format “unk-unk” means no special numbering format will be included.
If desired, one or more alternate Communication Manager trunks can be listed in the route pattern
so that the Look-Ahead Routing (LAR) “next” setting can route-advance to attempt to complete
the call using alternate trunks should there be no response or an error response from the far-end.
change route-pattern 1 Page 1 of 3
Pattern Number: 1 Pattern Name: To PSTN SIP Trk
SCCAN? n Secure SIP? n
Grp FRL NPA Pfx Hop Toll No. Inserted DCS/ IXC
No Mrk Lmt List Del Digits QSIG
Dgts Intw
1: 1 0 n user
2: n user
3: n user
4: n user
5: n user
6: n user
BCC VALUE TSC CA-TSC ITC BCIE Service/Feature PARM No. Numbering LAR
0 1 2 M 4 W Request Dgts Format
Subaddress
1: y y y y y n n rest unk-unk next
2: y y y y y n n rest none
3: y y y y y n n rest none
4: y y y y y n n rest none
5: y y y y y n n rest none
6: y y y y y n n rest none

DDT; Reviewed:
SPOC 7/16/2013
Solution & Interoperability Test Lab Application Notes
©2013 Avaya Inc. All Rights Reserved.
27 of 96
CM62SM63-VzBIPT
5.10. Route Pattern for Internal Calls via Avaya Aura® Session Manager
Route pattern 3 contains trunk group 3, the “private” tie trunk group to Session Manager. The Numbering Format “lev0-pvt” insures proper numbering format for internal local calls to Session
Manager.
change route-pattern 3 Page 1 of 3
Pattern Number: 3 Pattern Name: ToSM Enterprise
SCCAN? n Secure SIP? n
Grp FRL NPA Pfx Hop Toll No. Inserted DCS/ IXC
No Mrk Lmt List Del Digits QSIG
Dgts Intw
1: 3 0 n user
2: n user
3: n user
4: n user
5: n user
6: n user
BCC VALUE TSC CA-TSC ITC BCIE Service/Feature PARM No. Numbering LAR
0 1 2 M 4 W Request Dgts Format
Subaddress
1: y y y y y y n rest lev0-pvt none
2: y y y y y n n rest none
3: y y y y y n n rest none
4: y y y y y n n rest none
5: y y y y y n n rest none
6: y y y y y n n rest none

DDT; Reviewed:
SPOC 7/16/2013
Solution & Interoperability Test Lab Application Notes
©2013 Avaya Inc. All Rights Reserved.
28 of 96
CM62SM63-VzBIPT
5.11. Private Numbering
The change private-unknown-numbering command may be used to define the format of numbers
sent to Verizon in SIP headers such as the “From” and “PAI” headers. In general, the mappings of
internal extensions to Verizon DID numbers may be done in Communication Manager (via
private-numbering form for outbound calls, and incoming call handling treatment form for the
inbound trunk group).
In the example abridged output below, a specific Communication Manager extension (x10000) is
mapped to a DID number that is known to Verizon for this SIP Trunk connection (7329450243),
when the call uses trunk group 1. Alternatively, Communication Manager can send the five digit
extension to Session Manager, and Session Manager can adapt the number to the Verizon DID.
Both methods were tested successfully.
change private-numbering 0 Page 1 of 2
NUMBERING - PRIVATE FORMAT
Ext Ext Trk Private Total
Len Code Grp(s) Prefix Len
5 10 5 Total Administered: 5
5 12 5 Maximum Entries: 540
5 14 5
5 20 5
5 10000 1 7329450243 10
5.12. ARS Routing For Outbound Calls
Although not illustrated in these Application Notes, location-based routing may be configured so
that users at different locations that dial the same telephone number can have calls choose different
route-patterns.
The following screen shows a specific ARS configuration as an example. If a user dials the ARS
access code followed by 13035387024, the call will select route pattern 1. Of course, matching of
the dialed string need not be this specific. The ARS configuration shown here is not intended to be
prescriptive.
change ars analysis 13035387024 Page 1 of 2
ARS DIGIT ANALYSIS TABLE
Location: all Percent Full: 1
Dialed Total Route Call Node ANI
String Min Max Pattern Type Num Reqd
13035387024 11 11 1 fnpa n

DDT; Reviewed:
SPOC 7/16/2013
Solution & Interoperability Test Lab Application Notes
©2013 Avaya Inc. All Rights Reserved.
29 of 96
CM62SM63-VzBIPT
The list ars route-chosen command can be used on a target dialed number to check whether
routing will behave as intended. An example is shown below.
list ars route-chosen 13035387024
ARS ROUTE CHOSEN REPORT
Location: 1 Partitioned Group Number: 1
Dialed Total Route Call Node
String Min Max Pattern Type Number Location
13035387024 11 11 1 fnpa all
Actual Outpulsed Digits by Preference (leading 35 of maximum 42 digit)
1: 13035387024
5.13. Avaya Aura® Communication Manager Stations
In the sample configuration, five digit station extensions were used with the format 12xxx, and
14xxx. The following abbreviated screen shows an example extension for an Avaya H.323 IP
telephone.
change station 12005 Page 1 of 5
STATION
Extension: 12005 Lock Messages? n BCC: 0
Type: 1616 Security Code: * TN: 1
Port: S00003 Coverage Path 1: 1 COR: 1
Name: IP Phone 1616 Coverage Path 2: COS: 1
Hunt-to Station:
STATION OPTIONS
Time of Day Lock Table:
Loss Group: 19 Personalized Ringing Pattern: 1
Message Lamp Ext: 12005
Speakerphone: 2-way Mute Button Enabled? y
Display Language: english Button Modules: 0
Survivable GK Node Name:
Survivable COR: internal Media Complex Ext:
Survivable Trunk Dest? y IP SoftPhone? n
IP Video? n
Short/Prefixed Registration Allowed: default

DDT; Reviewed:
SPOC 7/16/2013
Solution & Interoperability Test Lab Application Notes
©2013 Avaya Inc. All Rights Reserved.
30 of 96
CM62SM63-VzBIPT
5.14. EC500 Configuration for Diversion Header Testing
When EC500 is enabled for a Communication Manager station, a call to that station will generate a
new outbound call from Communication Manager to the configured EC500 destination, typically a
mobile phone. The following screen shows an example EC500 configuration for the user with
station extension 12005. Use the command change off-pbx-telephone station mapping x where x
is a Communication Manager station (e.g. 12005).
• Station Extension – This field will automatically populate
• Application – Enter “EC500”
• Dial Prefix – Enter a prefix (e.g., 1) if required by the routing configuration
• Phone Number – Enter the phone that will also be called (e.g., 3035387024)
• Trunk Selection – Enter “ars”. This means ARS will be used to determine how
Communication Manager will route to the Phone Number destination.
• Config Set – Enter “1”
• Other parameters can retain default values
change off-pbx-telephone station-mapping 12005 Page 1 of 3
STATIONS WITH OFF-PBX TELEPHONE INTEGRATION
Station Application Dial CC Phone Number Trunk Config Dual
Extension Prefix Selection Set Mode
12005 EC500 - 1 3035387024 ars 1
5.15. Saving Avaya Aura® Communication Manager Configuration Changes
The command save translation all can be used to save the configuration.

DDT; Reviewed:
SPOC 7/16/2013
Solution & Interoperability Test Lab Application Notes
©2013 Avaya Inc. All Rights Reserved.
31 of 96
CM62SM63-VzBIPT
6. Configure Avaya Aura® Session Manager Release 6.3 This section illustrates relevant aspects of the Session Manager configuration used in the
verification of these Application Notes.
Note – The following sections assume that Session Manager and System Manager have been
installed and that network connectivity exists between System Manager and Session Manager.
Session Manager is managed via System Manager. Using a web browser, access “https://<ip-addr
of System Manager>/SMGR”. In the Log On screen, enter appropriate User ID and Password and
press the Log On button (not shown).

DDT; Reviewed:
SPOC 7/16/2013
Solution & Interoperability Test Lab Application Notes
©2013 Avaya Inc. All Rights Reserved.
32 of 96
CM62SM63-VzBIPT
Once logged in, a Home Screen is displayed. An abridged Home Screen is shown below.
Under the heading “Elements” in the center, select Routing. The screen shown below shows the
various sub-headings available on the left hand side menu.

DDT; Reviewed:
SPOC 7/16/2013
Solution & Interoperability Test Lab Application Notes
©2013 Avaya Inc. All Rights Reserved.
33 of 96
CM62SM63-VzBIPT
The right side of the screen, illustrated below, outlines a series of steps. The sub-sections that
follow are in the same order as the steps outlined under Introduction to Network Routing Policy
in the abridged screen shown below.
Scroll down to review additional information as shown below. In these Application Notes, all steps
are illustrated with the exception of Step 9, since “Regular Expressions” were not used.

DDT; Reviewed:
SPOC 7/16/2013
Solution & Interoperability Test Lab Application Notes
©2013 Avaya Inc. All Rights Reserved.
34 of 96
CM62SM63-VzBIPT
6.1. Domains
To view or change SIP domains, select Routing ���� Domains. Click on the checkbox next to the
name of the SIP domain and Edit to edit an existing domain, or the New button to add a domain.
Click the Commit button after changes are completed.
The following screen shows a list of configured SIP domains. The Session Manager used in the
verification of these Application Notes was shared among other Avaya interoperability test efforts.
The domain “avayalab.com” was used for communication with Avaya SIP Telephones and other
Avaya systems and applications. The domain “avayalab.com” is not known to the Verizon
production service.
The domain “adevc.avaya.globalipcom.com” is the domain known to Verizon as the enterprise SIP
domain. In the sample configuration, the Avaya SBCE was used to convert this domain to the
internal domain “avayalab.com” known within the enterprise, as shown in Section 7.3.
6.2. Locations
To view or change locations, select Routing ���� Locations. The following screen shows an
abridged list of configured locations. Click on the checkbox corresponding to the name of a
location and Edit to edit an existing location, or the New button to add a location. Click on the
Commit button (not shown) after changes are completed. Assigning unique locations can allow
Session Manager to perform location-based routing, bandwidth management, and call admission
control.

DDT; Reviewed:
SPOC 7/16/2013
Solution & Interoperability Test Lab Application Notes
©2013 Avaya Inc. All Rights Reserved.
35 of 96
CM62SM63-VzBIPT
The following screen shows the location details for the location named “Vz-ASBCE”,
corresponding to the Avaya SBCEs relevant to these Application Notes. Later in Section 6.4, the
location with name “Vz-ASBCE” will be assigned to the corresponding Avaya SBCE SIP Entities.
The Location Pattern is used to identify call routing based on IP address. Session Manager
matches the IP address of SIP Entities against the patterns defined in this section. If a call is from a
SIP Entity that does not match the IP address pattern then Session Manager uses the Location
administered in the SIP Entity form. In this sample configuration Locations are added to SIP
Entities in Section 6.4, so it was not necessary to add a pattern.

DDT; Reviewed:
SPOC 7/16/2013
Solution & Interoperability Test Lab Application Notes
©2013 Avaya Inc. All Rights Reserved.
36 of 96
CM62SM63-VzBIPT
The following screen shows the location details for the location named “Loc19-CM”,
corresponding to Communication Manager. Later, the location with name “Loc19-CM” will be
assigned to the corresponding Communication Manager SIP Entity. In the sample configuration,
other location parameters (not shown) retained the default values.
The following screen shows the location details for the location named “SM-Denver”,
corresponding to Session Manager. This location was created during the installation of Session
Manager and was assigned to the Session Manager SIP Entity. In the sample configuration, other
location parameters (not shown) retained the default values.

DDT; Reviewed:
SPOC 7/16/2013
Solution & Interoperability Test Lab Application Notes
©2013 Avaya Inc. All Rights Reserved.
37 of 96
CM62SM63-VzBIPT
6.3. Adaptations
To view or change adaptations, select Routing ���� Adaptations. Click on the checkbox
corresponding to the name of an adaptation and Edit to edit an existing adaptation, or the New
button to add an adaptation. Click the Commit button after changes are completed (not shown).
The following screen shows the adaptation details. The adapter named “Verizon to Avaya” will
later be assigned to the SIP Entities for the Avaya SBCEs in Section 6.4, specifying that all
communication from Session Manager to the Avaya SBCEs will use this adapter. This adaptation
uses the “VerizonAdapter” module and specifies the “fromto=true” parameter to adapt the From
and To headers along with the Request-Line and PAI headers.

DDT; Reviewed:
SPOC 7/16/2013
Solution & Interoperability Test Lab Application Notes
©2013 Avaya Inc. All Rights Reserved.
38 of 96
CM62SM63-VzBIPT
Scrolling down, the following screen shows a portion of the “Verizon to Avaya” adapter that can
be used to convert digits between the extension number used on Communication Manager and the
10 digit DID numbers assigned by Verizon. Since the adapter will be assigned to the SIP Entities
receiving calls from Avaya SBCEs for routing to Communication Manager, the settings for Digit
Conversion for Incoming Calls to SM correspond with incoming calls from Verizon to
Communication Manager. Similarly, the settings for Digit Conversion for Outgoing Calls from
SM correspond to outgoing calls from Communication Manager to the PSTN using the Verizon IP
Trunk service. In general, digit conversion such as this, that converts a Communication Manager
extension (e.g., 12xxx) to a corresponding LDN or DID number known to the PSTN (e.g.,
73294502xx), can be performed in Session Manager as shown below.
In the example shown above, if a user on the PSTN dials 732-945-0231, Session Manager will
convert the number to 12001 before sending the SIP INVITE to Communication Manager. As
such, it would not be necessary to use the incoming call handling table of the receiving
Communication Manager trunk group to convert the DID number to its corresponding extension.
For an outbound call, if extension 12001 dials the PSTN, and if Communication Manager sends
the extension 12001 to Session manager as the calling number, Session Manager would convert the
calling number to 7329450231.

DDT; Reviewed:
SPOC 7/16/2013
Solution & Interoperability Test Lab Application Notes
©2013 Avaya Inc. All Rights Reserved.
39 of 96
CM62SM63-VzBIPT
6.4. SIP Entities
To view or change SIP entities, select Routing ���� SIP Entities. Click the checkbox corresponding
to the name of an entity and Edit to edit an existing entity, or the New button to add an entity.
Click the Commit button after changes are completed.
The following screen shows the list of configured SIP entities in the shared test environment.

DDT; Reviewed:
SPOC 7/16/2013
Solution & Interoperability Test Lab Application Notes
©2013 Avaya Inc. All Rights Reserved.
40 of 96
CM62SM63-VzBIPT
The following screen shows the upper portion of the SIP Entity Details corresponding to “ASM”.
The FQDN or IP Address field for “ASM” is the Session Manager Security Module IP Address
(10.64.19.226), which is used for SIP signaling with other networked SIP entities. The Type for
this SIP entity is “Session Manager”. Select an appropriate location for the Session Manager from
the Location drop-down menu. In the shared test environment, the Session Manager used location
“SM-Denver”. The default SIP Link Monitoring parameters may be used. Unless changed
elsewhere, links from other SIP entities to this instance of Session Manager will use the default
SIP Link Monitoring timers, configurable at the Session Manager level. If desired, these timers
may be customized for each entity.
Scrolling down, the following screen shows the middle portion of the SIP Entity Details, a listing
of the Entity Links previously configured for “ASM”. The links relevant to these Application
Notes are described in the subsequent section.

DDT; Reviewed:
SPOC 7/16/2013
Solution & Interoperability Test Lab Application Notes
©2013 Avaya Inc. All Rights Reserved.
41 of 96
CM62SM63-VzBIPT
Scrolling down, the following screen shows the lower portion of the SIP Entity Details,
illustrating the configured ports for “ASM”. This section is only present for Session Manager SIP
entities. This section defines a default set of ports that Session Manager will use to listen for SIP
requests, typically from registered SIP endpoints. Session Manager can also listen on additional
ports defined elsewhere such as the ports specified in the SIP Entity Link definition in Section 6.5.
The following screen shows the upper portion of the SIP Entity Details corresponding to
“Vz_ASBCE-1”. The FQDN or IP Address field is configured with the Avaya SBCE inside IP
Address (10.64.19.140). “SIP Trunk” is selected from the Type drop-down menu for Avaya SBCE
SIP Entities. This Avaya SBCE has been assigned to Location “Vz-ASBCE”, and the “Verizon to
Avaya” adapter is applied. Other parameters (not shown) retain default values.

DDT; Reviewed:
SPOC 7/16/2013
Solution & Interoperability Test Lab Application Notes
©2013 Avaya Inc. All Rights Reserved.
42 of 96
CM62SM63-VzBIPT
The following screen shows the upper portion of the SIP Entity Details corresponding to
“Vz_ASBCE-2”. The FQDN or IP Address field is configured with the Avaya SBCE inside IP
Address (10.64.19.141). “SIP Trunk” is selected from the Type drop-down menu for Avaya SBCE
SIP Entities. This Avaya SBCE has been assigned to Location “Vz-ASBCE”, and the “Verizon to
Avaya” adapter is applied. Other parameters (not shown) retain default values.

DDT; Reviewed:
SPOC 7/16/2013
Solution & Interoperability Test Lab Application Notes
©2013 Avaya Inc. All Rights Reserved.
43 of 96
CM62SM63-VzBIPT
The following screen shows a portion of the SIP Entity Details corresponding to a
Communication Manager SIP Entity named “Loc19-CM-TG3” This is the SIP Entity that was
already in place in the shared Avaya Interoperability Test Lab environment, prior to adding the
Verizon IP Trunk configuration. The FQDN or IP Address field contains the IP Address of the
“processor Ethernet” (10.64.19.205). In systems with Avaya G650 Media Gateways containing C-
LAN cards, C-LAN cards may also be used as SIP entities, instead of, or in addition to, the
“processor Ethernet”. “CM” is selected from the Type drop-down menu and “Loc19-CM” is
selected for the Location.

DDT; Reviewed:
SPOC 7/16/2013
Solution & Interoperability Test Lab Application Notes
©2013 Avaya Inc. All Rights Reserved.
44 of 96
CM62SM63-VzBIPT
The following screen shows the SIP Entity Details for an entity named “Loc19-CM-TG1”. This
entity uses the same FQDN or IP Address (10.64.19.205) as the prior entity with name “Loc19-
CM-TG3”; both correspond to Communication Manager Processor Ethernet IP Address. Later, a
unique port, 5081, will be used for the Entity Link to “Loc19-CM-TG1”. Using a different port is
one approach that will allow Communication Manager to distinguish traffic originally from
Verizon IP Trunk from other SIP traffic arriving from the same IP Address of the Session
Manager, such as SIP traffic associated with SIP Telephones or other SIP-integrated applications.
“CM” is selected from the Type drop-down menu, and “Loc19-CM” is selected for the Location.

DDT; Reviewed:
SPOC 7/16/2013
Solution & Interoperability Test Lab Application Notes
©2013 Avaya Inc. All Rights Reserved.
45 of 96
CM62SM63-VzBIPT
6.5. Entity Links
To view or change Entity Links, select Routing ���� Entity Links. Click on the checkbox
corresponding to the name of a link and Edit to edit an existing link, or the New button to add a
link. Click the Commit button after changes are completed.
The following screen shows a list of configured links. In the screen below, the links named “SM to
Vz_ASBCE-1”, “SM to Vz_ASBCE-2” and “SM to Loc19-CM-TG1” are most relevant to these
Application Notes. Each link uses the entity named “ASM” as SIP Entity 1, and the appropriate
entity, such as “Vz_ASBCE-1”, for SIP Entity 2.
The link named “SM to Loc19-CM-TG3” links Session Manager “ASM” with Communication
Manager processor Ethernet. This link existed in the configuration prior to adding the Verizon IP
Trunk related configuration. This link, using port 5061, can carry traffic between Session Manager
and Communication Manager that is not necessarily related to calls with Verizon, such as traffic
related to SIP Telephones registered to Session Manager.
The link named “SM to Loc19-CM-TG1” also links Session Manager “ASM” with
Communication Manager processor Ethernet. However, this link uses port 5081 for both entities in
the link. This link was created to allow Communication Manager to distinguish calls from Verizon
IP Trunk from other calls that arrive from the same Session Manager. Other methods of
distinguishing traffic could be used, if desired.

DDT; Reviewed:
SPOC 7/16/2013
Solution & Interoperability Test Lab Application Notes
©2013 Avaya Inc. All Rights Reserved.
46 of 96
CM62SM63-VzBIPT
6.6. Time Ranges
To view or change Time Ranges, select Routing ���� Time Ranges. The Routing Policies shown
subsequently will use the “24/7” range since time-based routing was not the focus of these
Application Notes. Click the Commit button (not shown) after changes are completed.
6.7. Routing Policies
To view or change routing policies, select Routing ���� Policies. Click on the checkbox
corresponding to the name of a policy and Edit to edit an existing policy, or New to add a policy.
Click the Commit button after changes are completed (not shown).
The following screen shows the Routing Policy Details for the policy named “To-Loc19-CM-
TG1” associated with incoming PSTN calls from Verizon to Communication Manager. Observe
the SIP Entity as Destination is the entity named “Loc19-CM-TG1”.

DDT; Reviewed:
SPOC 7/16/2013
Solution & Interoperability Test Lab Application Notes
©2013 Avaya Inc. All Rights Reserved.
47 of 96
CM62SM63-VzBIPT
The following screen shows the Routing Policy Details for the policy named “To Vz-ASBCE-1”
associated with outgoing calls from Communication Manager to the PSTN via Verizon through
Avaya SBCE. Observe the SIP Entity as Destination as the entity named “Vz_ASBCE-1” that
was created in Section 6.4.

DDT; Reviewed:
SPOC 7/16/2013
Solution & Interoperability Test Lab Application Notes
©2013 Avaya Inc. All Rights Reserved.
48 of 96
CM62SM63-VzBIPT
The following screen shows the Routing Policy Details for the policy named “To Vz-ASBCE-2”
associated with outgoing calls from Communication Manager to the PSTN via Verizon through the
Avaya SBCE. Observe the SIP Entity as Destination is the entity named “Vz_ASBCE-2”. In the
Time of Day area, note that a Ranking can be configured. To allow the Vz_ASBCE-2 SIP Entity
to receive calls from Session Manager even when SIP Entity Vz_ASBCE-1 is operational, the
default rank of “0” (also assigned to the routing policy for Vz_ASBCE-1) can be retained.

DDT; Reviewed:
SPOC 7/16/2013
Solution & Interoperability Test Lab Application Notes
©2013 Avaya Inc. All Rights Reserved.
49 of 96
CM62SM63-VzBIPT
If it is intended that SIP Entity Vz_ASBCE-1 should always be tried by Session Manager before
SIP Entity Vz_ASBCE-2, the Ranking of the routing policy for Vz_ASBCE-2 can be changed to
“1” as shown below. Both the “load sharing” approach where Vz_ASBCE-1 and Vz_ASBCE-2
use the same rank, and the strict rank order priority of Vz_ASBCE-1 over Vz_ASBCE-2 were
successfully tested in the sample configuration.

DDT; Reviewed:
SPOC 7/16/2013
Solution & Interoperability Test Lab Application Notes
©2013 Avaya Inc. All Rights Reserved.
50 of 96
CM62SM63-VzBIPT
6.8. Dial Patterns
To view or change dial patterns, select Routing ���� Dial Patterns. Click on the checkbox
corresponding to the name of a pattern and Edit to edit an existing pattern, or New to add a
pattern. Click the Commit button after changes are completed.
The following screen illustrates an example dial pattern used to verify inbound PSTN calls to the
enterprise. When a user on the PSTN dials a number assigned to the Verizon IP Trunk service,
such as 732-945-0231, Verizon delivers the number to the enterprise, and the Avaya SBCE sends
the call to Session Manager. Session Manager will then convert the digits to the corresponding five
digit extension number using an Adaptation created in Section 6.3, in this case 12001. The pattern
below matches on a range of numbers 120XX. Under Originating Locations and Routing
Policies, the routing policy named “To-Loc19-CM-TG1” is chosen when the call originates from
Originating Location Name “Vz-ASBCE”. This sends the call to Communication Manager using
port 5081 as described previously. Calls originating from any other location route to
Communication Manager using port 5061.

DDT; Reviewed:
SPOC 7/16/2013
Solution & Interoperability Test Lab Application Notes
©2013 Avaya Inc. All Rights Reserved.
51 of 96
CM62SM63-VzBIPT
The following screen illustrates an example dial pattern used to verify outbound calls from the
enterprise to the PSTN. When a Communication Manager user dials a PSTN number such as 9-
303-XXX-XXX, Communication Manager sends the call to Session Manager via the processor
Ethernet. Session Manager will match the dial pattern shown below and send the call to the one of
the Avaya SBCEs via the Routing Policy Name “To Vz-ASBCE-1”and “To Vz-ASBCE-2”. The
routing policy associated with Vz_ASBCE-2 has a rank of 1. With this configuration, all calls will
use Vz_ASBCE-1 first and only try Vz_ASBCE-2 if the call attempt through Vz_ASBCE-1 is
unsuccessful. Session Manager can be configured to distribute the calls among the same SBCs
(same rank) or prefer one SBC of another (different ranks).

DDT; Reviewed:
SPOC 7/16/2013
Solution & Interoperability Test Lab Application Notes
©2013 Avaya Inc. All Rights Reserved.
52 of 96
CM62SM63-VzBIPT
The following screen shows the complete list of dial patterns defined for the sample configuration.

DDT; Reviewed:
SPOC 7/16/2013
Solution & Interoperability Test Lab Application Notes
©2013 Avaya Inc. All Rights Reserved.
53 of 96
CM62SM63-VzBIPT
7. Avaya Session Border Controller for Enterprise In the sample configuration, dual Avaya SBCEs are used as edge devices between the CPE and
Verizon Business.
These Application Notes assume that the installation of the Avaya SBCE and the assignment of a
management IP Address have already been completed.
As described in Section 1, Verizon Business IP Trunking supports a redundant (2-CPE)
architecture that provides for redundant SIP trunk access between the Verizon Business IP Trunk
service offer and the SIP trunk architecture customer premises equipment (CPE). In the reference
configuration two Avaya SBCEs were used to provide the 2-CPE redundant access.
Note – The following Sections describe the provisioning of the Primary Avaya SBCE. The
configuration of the Secondary Avaya SBCE is identical unless otherwise noted (e.g. IP
addressing).
In the sample configuration, the management IP is 10.80.140.140. Access the web management
interface by entering https://<ip-address> where <ip-address> is the management IP address
assigned during installation. Select UC-Sec Control Center.

DDT; Reviewed:
SPOC 7/16/2013
Solution & Interoperability Test Lab Application Notes
©2013 Avaya Inc. All Rights Reserved.
54 of 96
CM62SM63-VzBIPT
Log in with the appropriate credentials. Click Sign In.
The main page of the UC-Sec Control Center will appear.

DDT; Reviewed:
SPOC 7/16/2013
Solution & Interoperability Test Lab Application Notes
©2013 Avaya Inc. All Rights Reserved.
55 of 96
CM62SM63-VzBIPT
To view system information that was configured during installation, navigate to UC-Sec Control
Center ���� System Management. A list of installed devices is shown in the right pane. In the case
of the sample configuration, a single device named “VZ_1” is shown. To view the configuration of
this device, click the monitor icon as highlighted below.
The System Information screen shows the Network Settings, DNS Configuration and
Management IP information provided during installation and corresponds to Figure 1. The Box
Type was set to “SIP” and the Deployment Mode was set to “Proxy”. Default values were used
for all other fields.

DDT; Reviewed:
SPOC 7/16/2013
Solution & Interoperability Test Lab Application Notes
©2013 Avaya Inc. All Rights Reserved.
56 of 96
CM62SM63-VzBIPT
7.1. Network Management
The Network Management screen is where the network interface settings are configured and
enabled. During the installation process, certain network-specific information is defined such as
device IP address(es), public IP address(es), netmask, gateway, etc., to interface the device to the
network. It is this information that populates the various Network Management tab displays, which
can be edited as needed to optimize device performance and network efficiency. Navigate to UC-
Sec Control Center ���� Device Specific Settings ���� Network Management and verify the IP
addresses assigned to the interfaces and that the interfaces are enabled. The following screen
shows the Network Configuration tab with the internal interface assigned to A1 and the external
interface is assigned to B1.
Select the Interface Configuration tab and verify interfaces A1 and B1 are Enabled. To enable
an interface click the corresponding Toggle State button.

DDT; Reviewed:
SPOC 7/16/2013
Solution & Interoperability Test Lab Application Notes
©2013 Avaya Inc. All Rights Reserved.
57 of 96
CM62SM63-VzBIPT
7.2. Routing Profile
Routing profiles define a specific set of packet routing criteria that are used in conjunction with
other types of domain policies to identify a particular call flow and thereby ascertain which
security features will be applied to those packets. Parameters defined by Routing Profiles include
packet transport settings, name server addresses and resolution methods, next hop routing
information, and packet transport types.
Create a Routing Profile for Session Manager and Verizon IP Trunk service. To add a routing
profile, navigate to UC-Sec Control Center ���� Global Profiles ���� Routing and select Add
Profile. Enter a Profile Name and click Next to continue.
In the shared test environment the following screen shows Routing Profile “Route to SM6.3”
created for Session Manager. The Next Hop Server 1 IP address must match the IP address of
Session Manager Entity created in Section 6.4. The Outgoing Transport is set to TCP and
matched the Protocol set in the Session Manager Entity Link for Avaya SBCE in Section 6.5.

DDT; Reviewed:
SPOC 7/16/2013
Solution & Interoperability Test Lab Application Notes
©2013 Avaya Inc. All Rights Reserved.
58 of 96
CM62SM63-VzBIPT
The following screen shows Routing Profile “Route To Vz_IPT” created for Verizon. For the Next
Hop Routing, enter the IP Address and port of the Verizon SIP signaling interface as Next Hop
Server 1, as shown below. Check Next Hop Priority. Choose UDP for Outgoing Transport,
then click Finish (not shown).
7.3. Topology Hiding Profile
The Topology Hiding profile manages how various source, destination and routing information in
SIP and SDP message headers are substituted or changed to maintain the integrity of the network.
It hides the topology of the enterprise network from external networks.
Click the Add Profile button (not shown) to add a new profile, or select an existing topology
hiding profile to edit. If adding a profile, a screen such as the following is displayed. Enter a
Profile Name such as “Avaya” shown below. Click Next.
In the resultant screen, click the Add Header button in the upper right multiple times to reveal
additional headers.

DDT; Reviewed:
SPOC 7/16/2013
Solution & Interoperability Test Lab Application Notes
©2013 Avaya Inc. All Rights Reserved.
59 of 96
CM62SM63-VzBIPT
In the Replace Action column an action of “Auto” will replace the header field with the IP address
of the Avaya SBCE interface and the “Overwrite” will use the value in the Overwrite Value. In
the example shown, this profile will later be applied in the direction of the Session Manager and
“Overwrite” has been selected for the To/From and Request-Line headers and the shared interop
lab domain of “avayalab.com” has been inserted. Click Finish.
After configuration is completed, the Topology Hiding for profile “Avaya” will appear as follows.
This profile will later be applied to the Server Flow for Avaya.

DDT; Reviewed:
SPOC 7/16/2013
Solution & Interoperability Test Lab Application Notes
©2013 Avaya Inc. All Rights Reserved.
60 of 96
CM62SM63-VzBIPT
Similarly, create a Topology Hiding profile for Verizon. The following screen shows Topology
Hiding profile “VzIPT” created for Verizon. This configuration enables the From, PAI, and
Diversion header domains to be overwritten with “adevc.avaya.globalipcom.com”, the domain
known to Verizon Business IP Trunk service for the Avaya CPE environment. This profile will
later be applied to the Server Flow for Verizon.
7.4. Server Interworking Profile
The Server Internetworking profile configures and manages various SIP call server-specific
parameters such as TCP and UDP port assignments, heartbeat signaling parameters (for HA
deployments), DoS security statistics, and trusted domains. Interworking Profile features are
configured based on different Trunk Servers. There are default profiles available that may be used
as is, or modified, or new profiles can be configured as described below.
In the sample configuration, separate Server Interworking Profiles were created for Avaya and
Verizon IP Trunk.
7.4.1 Server Interworking– Avaya
Navigate to UC-Sec Control Center ���� Global Profiles ���� Server Interworking and click the
Add Profile button (not shown) to add a new profile or select an existing interworking profile. If
adding a profile, a screen such as the following is displayed. Enter an appropriate Profile Name
such as “Avaya” shown below. Click Next.

DDT; Reviewed:
SPOC 7/16/2013
Solution & Interoperability Test Lab Application Notes
©2013 Avaya Inc. All Rights Reserved.
61 of 96
CM62SM63-VzBIPT
The following screens illustrate the “General” parameters used in the sample configuration for the
Interworking Profile named “Avaya”. Most parameters retain default values. In the sample
configuration, T.38 support was checked.
Click Next (not shown) to advance to configure Privacy and DTMF General parameters, which
may retain default values.

DDT; Reviewed:
SPOC 7/16/2013
Solution & Interoperability Test Lab Application Notes
©2013 Avaya Inc. All Rights Reserved.
62 of 96
CM62SM63-VzBIPT
The 2-CPE configuration requires the configuring of certain timers to assist in the failover process
to happen smoothly. One of the timers is the Trans Expire timer. This timer is set to 6 seconds as
shown below.

DDT; Reviewed:
SPOC 7/16/2013
Solution & Interoperability Test Lab Application Notes
©2013 Avaya Inc. All Rights Reserved.
63 of 96
CM62SM63-VzBIPT
The following screen illustrates the Advanced Settings configuration. The Topology Hiding:
Change Call-ID default was changed to “No”. All other parameters shown are default values.
Note that the default configuration will result in Record-Route headers in SIP messages.
7.4.2 Server Interworking – Verizon IP Trunk
Click the Add Profile button (not shown) to add a new profile or select an existing interworking
profile. If adding a profile, a screen such as the following is displayed. Enter an appropriate Profile
Name such as “Verizon” shown below. Click Next.

DDT; Reviewed:
SPOC 7/16/2013
Solution & Interoperability Test Lab Application Notes
©2013 Avaya Inc. All Rights Reserved.
64 of 96
CM62SM63-VzBIPT
The following screens illustrate the “General” parameters used in the sample configuration for the
Interworking Profile named “Verizon”. Most parameters retain default values. In the sample
configuration, T.38 support was set to “Yes”, Hold Support was set for RFC3264, and all other
fields retained default values.

DDT; Reviewed:
SPOC 7/16/2013
Solution & Interoperability Test Lab Application Notes
©2013 Avaya Inc. All Rights Reserved.
65 of 96
CM62SM63-VzBIPT
On the Timers tab, select 6 seconds for the Trans Expire timer as shown below.
The following screen illustrates the Advanced Settings configuration. The Topology Hiding:
Change Call-ID and Change Max Forwards defaults were changed to “No”. All other
parameters shown are default values. Note that the default configuration will result in Record-
Route headers in SIP messages.

DDT; Reviewed:
SPOC 7/16/2013
Solution & Interoperability Test Lab Application Notes
©2013 Avaya Inc. All Rights Reserved.
66 of 96
CM62SM63-VzBIPT
7.5. Signaling Manipulation
The Signaling Manipulation feature allows the ability to add, change and delete any of the headers
in a SIP message. This feature will add the ability to configure such manipulation in a highly
flexible manner using a proprietary scripting language called SigMa.
The SigMa scripting language is designed to express any of the SIP header manipulation
operations to be done by the Avaya SBCE. Using this language, a script can be written and tied to
a given flow through the Avaya SBCE web interface. The Avaya SBCE appliance then interprets
this script at the given entry point or “hook point”.
These application notes will not discuss the full feature of the Signaling Manipulation but will
show an example of a script created during compliance testing. The sample script was used to
remove the “epv” parameter Session Manager places in the Contact header that contains Endpoint-
View information, including the internal domain. This parameter was removed to aid the topology
hiding of the enterprise. The Endpoint-View header and other proprietary headers were removed
using a Signaling Rule as illustrated in Section 7.8. This configuration is optional in that the “epv”
parameter did not cause any user-perceivable problems if presented to Verizon.
To create a new Signaling Manipulation, navigate to UC-Sec Control Center ���� Global Profiles
���� Signaling Manipulation and click on Add Script. A new blank SigMa Editor window will pop
up.
In the sample configuration, the script named “Remove epv” was created as shown below:
In the Signaling Manipulation script above, the statement act on request where
%DIRECTION="OUTBOUND" and%ENTRY_POINT="POST_ROUTING" specifies the
portion of the script that will take effect on request SIP messages for an outbound call and the
manipulation will be done after routing. The manipulation will be according to the rules contained
in this statement.
within session "ALL"
{
act on request where %DIRECTION="OUTBOUND" and %ENTRY_POINT="POST_ROUTING"
{
//OPTIONAL- Remove epv parameter from CONTACT header to hide internal domain
remove(%HEADERS["Contact"][1].URI.PARAMS["epv"]);
}
}

DDT; Reviewed:
SPOC 7/16/2013
Solution & Interoperability Test Lab Application Notes
©2013 Avaya Inc. All Rights Reserved.
67 of 96
CM62SM63-VzBIPT
The following screen shows the finished Signaling Manipulation Script “Remove epv” used during
compliance testing. This script will later be applied to the Verizon Server Configuration in Section
7.6.2.
7.6. Server Configuration
The Server Configuration screen contains four tabs: General, Authentication, Heartbeat, and
Advanced. Together, these tabs configure and manage various SIP call server-specific parameters
such as TCP and UDP port assignments, heartbeat signaling parameters, DoS security statistics,
and trusted domains.
Select Global Profiles ���� Server Configuration from the left-side menu as shown below.

DDT; Reviewed:
SPOC 7/16/2013
Solution & Interoperability Test Lab Application Notes
©2013 Avaya Inc. All Rights Reserved.
68 of 96
CM62SM63-VzBIPT
7.6.1 Server Configuration for Avaya Aura® Session Manager
Click the Add Profile button (not shown) to add a new profile, or select an existing profile to edit.
If adding a profile, a screen such as the following is displayed. Enter an appropriate Profile Name
such as “Avaya_SM6.3” shown below. Click Next.
The following screens illustrate the Server Configuration for the Profile name “Avaya_SM6.3”.
On the General tab, select “Call Server” from the Server Type drop-down menu. In the IP
Addresses / Supported FQDNs area, the IP Address of the Session Manager SIP signaling
interface in the sample configuration is entered. This IP Address is 10.64.19.226. In the Supported
Transports area, TCP is selected, and the TCP Port is set to 5060. This configuration
corresponds with the Session Manager entity link configuration for the entity link to the Avaya
SBCE created in Section 6.4. If adding a new profile, click Next (not shown). If editing an existing
profile, click Finish.

DDT; Reviewed:
SPOC 7/16/2013
Solution & Interoperability Test Lab Application Notes
©2013 Avaya Inc. All Rights Reserved.
69 of 96
CM62SM63-VzBIPT
If adding the profile, click Next to accept default parameters for the Authentication tab (not
shown), and advance to the Heartbeat area. If editing an existing profile, select the Heartbeat tab
and click Edit (not shown).
Avaya SBCE can be configured to source “heartbeats” in the form of SIP OPTIONS. In the sample
configuration, with one Session Manager, this configuration is optional unless 2- CPE is used. If 2-
CPE is used, the OPTIONS must be configured along with the TCP Probe Frequency at 10
seconds.
If Avaya SBCE-sourced OPTIONS messages are desired, check the Enable Heartbeat box. Select
“OPTIONS” from the Method drop-down menu. Select the desired frequency that the Avaya
SBCE will source OPTIONS to this server. The From URI and To URI may be filled in to
configure easily identifiable URIs to appear in SIP OPTIONS sourced by the Avaya SBCE
towards Session Manager. If adding a new profile, click Next (not shown). If editing an existing
profile, click Finish (not shown).
If adding a profile, click Next to continue to the “Advanced” settings (not shown). If editing an
existing profile, select the Advanced tab and Edit (not shown). In the resultant screen, select
Enable Grooming to allow the same TCP connection to be used for all SIP messages from this
device. Select the Interworking Profile “Avaya” created previously. Click Finish.

DDT; Reviewed:
SPOC 7/16/2013
Solution & Interoperability Test Lab Application Notes
©2013 Avaya Inc. All Rights Reserved.
70 of 96
CM62SM63-VzBIPT
7.6.2 Server Configuration for Verizon IP Trunk
Click the Add Profile button (not shown) to add a new profile, or select an existing profile to edit.
If adding a profile, a screen such as the following is displayed. Enter an appropriate Profile Name
such as “Vz_IPT” shown below. Click Next
The following screens illustrate the Server Configuration with Profile name “Vz_IPT”. In
“General” parameters, select “Trunk Server” from the Server Type drop-down menu. In the IP
Addresses / Supported FQDNs area, the Verizon-provided IP Trunk IP Address is entered. This
IP Address is 172.30.209.21. In the Supported Transports area, UDP is selected, and the UDP
Port is set to 5071. Click Next to proceed to the Authentication Tab.

DDT; Reviewed:
SPOC 7/16/2013
Solution & Interoperability Test Lab Application Notes
©2013 Avaya Inc. All Rights Reserved.
71 of 96
CM62SM63-VzBIPT
If adding the profile, click Next to accept default parameters for the Authentication tab (not
shown), and advance to the Heartbeat area. If editing an existing profile, select the Heartbeat tab
and click Edit (not shown).
The ASBCE can be configured to source “heartbeats” in the form of SIP OPTIONS towards
Verizon. This configuration is optional. Independent of whether the ASBCE is configured to
source SIP OPTIONS towards Verizon, Verizon will receive OPTIONS from the enterprise site as
a result of the SIP Entity Monitoring configured for Session Manager. When Session Manager
sends SIP OPTIONS to the inside private IP Address of the Avaya SBCE, the Avaya SBCE will
send SIP OPTIONS to Verizon. When Verizon responds, the Avaya SBCE will pass the response
to Session Manager.
Select “OPTIONS” from the Method drop-down menu. Select the desired frequency that the
SBCE will source OPTIONS. The From URI and To URI may be filled in to configure easily
identifiable URIs to appear in SIP OPTIONS sourced by the Avaya SBCE. If adding a new profile,
click Next to continuing to the “Advanced” settings. If editing an existing profile, click Finish (not
shown).
If editing an existing profile, highlight the desired profile and select the Advanced tab and then
click the Edit button (not shown). In the resultant screen, select the Interworking Profile
“Verizon_IPT” created previously, and Signaling Manipulation Script will be the script shown in
the previous section titled “Remove epv”. Click Finish.

DDT; Reviewed:
SPOC 7/16/2013
Solution & Interoperability Test Lab Application Notes
©2013 Avaya Inc. All Rights Reserved.
72 of 96
CM62SM63-VzBIPT
7.7. Media Rule
Media Rules define RTP media packet parameters such as prioritizing encryption techniques and
packet encryption techniques. Together these media-related parameters define a strict profile that is
associated with other SIP-specific policies to determine how media packets matching these criteria
will be handled by the Avaya SBCE security product.
In the sample configuration, a single media rule was created by cloning the default rule called
“default-low-med”. Select the default-low-med rule and click the Clone Rule button.
Enter a name in the Clone Name field, such as “default-low-med-QoS” as shown below. Click
Finish.
Select the newly created rule, select the Media QoS tab (shown in previous screen), and click the
Edit button (not shown). In the resulting screen below, check the Media QoS Marking Enabled
checkbox. Select DSCP and select “EF” for expedited forwarding as shown below. Click Finish.

DDT; Reviewed:
SPOC 7/16/2013
Solution & Interoperability Test Lab Application Notes
©2013 Avaya Inc. All Rights Reserved.
73 of 96
CM62SM63-VzBIPT
When configuration is complete, the “default-low-med-QoS” media rule Media QoS tab appears
as follows.
7.8. Signaling Rule
Signaling Rules define the action to be taken (Allow, Block, Block with Response, etc.) for each
type of SIP-specific signaling request and response message. When SIP signaling packets are
received by Avaya SBCE, they are parsed and “pattern-matched” against the particular signaling
criteria defined by these rules. Packets matching the criteria defined by the Signaling Rules are
tagged for further policy matching.
Click the Add Rule button (not shown) to add a new signaling rule. In the Rule Name field, enter
an appropriate name, such as “Block_Hdr_Remark” and click Next.

DDT; Reviewed:
SPOC 7/16/2013
Solution & Interoperability Test Lab Application Notes
©2013 Avaya Inc. All Rights Reserved.
74 of 96
CM62SM63-VzBIPT
In the subsequent screen (not shown), click Next to accept defaults. In the Signaling QoS screen
below, select DSCP and select the desired Value for Signaling QoS from the drop-down box. In
the sample configuration, “AF32” was selected for Assured Forwarding 32. Click Finish (not
shown).
After this configuration, the new “Block_Hdr_Remark” will appear as follows.
Select this rule in the center pane, then select the Request Headers tab to view the manipulations
performed on the request messages such as the initial INVITE or UPDATE message. The
following screen shows the “Alert-Info”, “Endpoint-View”, and “P-Location" headers removed
during the compliance test. This configuration is optional in that these headers do not cause any
user-perceivable problems if presented to Verizon.

DDT; Reviewed:
SPOC 7/16/2013
Solution & Interoperability Test Lab Application Notes
©2013 Avaya Inc. All Rights Reserved.
75 of 96
CM62SM63-VzBIPT
Similarly, manipulations can be performed on the SIP response messages. These can be viewed by
selecting the Response Headers tab as shown below.
7.9. Application Rule
Application Rules define which types of SIP-based Unified Communications (UC) applications the
Avaya SBCE security device will protect: voice, video, and/or Instant Messaging (IM). In addition,
the maximum number of concurrent voice and video sessions the network will process can be
determined in order to prevent resource exhaustion.
Create an Application Rule to increase the number of concurrent voice traffic. The sample
configuration cloned and modified the default application rule to increase the number of
Maximum Concurrent Session and Maximum Sessions Per Endpoint. To clone an application
rule, navigate to UC-Sec Control Center ���� Domain Policies ���� Application Rules. With the
default rule chosen, click on Clone Rule (not shown). Enter a descriptive name for the new rule,
such as “Vz_App_Rule” as shown below. Click Finish.

DDT; Reviewed:
SPOC 7/16/2013
Solution & Interoperability Test Lab Application Notes
©2013 Avaya Inc. All Rights Reserved.
76 of 96
CM62SM63-VzBIPT
Select the newly created rule and click the Edit button (not shown). In the resulting screen, change
the default Maximum Concurrent Sessions to “2000”, the Maximum Session per Endpoint to
“2000”. Click Finish.
7.10. Endpoint Policy Group
The rules created within the Domain Policy section are assigned to an Endpoint Policy Group. The
Endpoint Policy Group is then applied to a Server Flow in Section 7.13. Create a separate
Endpoint Policy Group for the enterprise and the Verizon IP Trunk.
To create a new policy group, navigate to UC-Sec Control Center ���� Domain Policies ����
Endpoint Policy Groups. Select the Add Group button.
Enter a name in the Group Name field, such as “default-low-remark” as shown below. Click
Next.

DDT; Reviewed:
SPOC 7/16/2013
Solution & Interoperability Test Lab Application Notes
©2013 Avaya Inc. All Rights Reserved.
77 of 96
CM62SM63-VzBIPT
In the sample configuration, defaults were selected for all fields, with the exception of the
Application Rule which was set to “Vz_App_Rule”, Media Rule which was set to “default-low-
med-QoS”, and the Signaling Rule, which was set to “Block_Hdr_Remark” as shown below. The
selected non-default media rule and signaling rule chosen were created in previous sections. Click
Finish.
Once configuration is completed, the “default-low-remark” policy group will appear as follows.

DDT; Reviewed:
SPOC 7/16/2013
Solution & Interoperability Test Lab Application Notes
©2013 Avaya Inc. All Rights Reserved.
78 of 96
CM62SM63-VzBIPT
7.11. Media Interface
The Media Interface screen is where the SIP media ports are defined. Avaya SBCE will send SIP
media on the defined ports. Create a SIP Media Interface for both the inside and outside IP
interfaces.
To create a new Signaling Interface, navigate to UC-Sec Control Center ���� Device Specific
Settings ���� Media Interface and click Add Media Interface.
The following screen shows the media interfaces created in the sample configuration for the inside
and outside IP interfaces.
After the media interfaces are created, an application restart is necessary before the changes will
take effect. Navigate to UC-Sec Control Center ���� System Management and click the fourth
icon from the right to restart the applications as highlighted below.

DDT; Reviewed:
SPOC 7/16/2013
Solution & Interoperability Test Lab Application Notes
©2013 Avaya Inc. All Rights Reserved.
79 of 96
CM62SM63-VzBIPT
7.12. Signaling Interface
The Signaling Interface screen is where the SIP signaling ports are defined. Avaya SBCE will
listen for SIP requests on the defined ports. Create a Signaling Interface for both the inside and
outside IP interfaces.
To create a new Signaling Interface, navigate to UC-Sec Control Center ���� Device Specific
Settings ���� Signaling Interface and click Add Signaling Interface.
The following screen shows the signaling interfaces created in the sample configuration for the
inside and outside IP interfaces.
7.13. End Point Flows - Server Flow
When a packet is received by Avaya SBCE, the content of the packet (IP addresses, URIs, etc.) is
used to determine which flow it matches. Once the flow is determined, the flow points to a policy
which contains several rules concerning processing, privileges, authentication, routing, etc. Once
routing is applied and the destination endpoint is determined, the policies for this destination
endpoint are applied. The context is maintained, so as to be applied to future packets in the same
flow. The following screen illustrates the flow through the Avaya SBCE to secure a SIP Trunk
call.

DDT; Reviewed:
SPOC 7/16/2013
Solution & Interoperability Test Lab Application Notes
©2013 Avaya Inc. All Rights Reserved.
80 of 96
CM62SM63-VzBIPT
Create a Server Flow for Session Manager and the Verizon IP Trunk. To create a Server Flow,
navigate to UC-Sec Control Center ���� Device Specific Settings ���� End Point Flows. Select the
Server Flows tab and click Add Flow as shown in below.
The following screen shows the flow named “Avaya SM6.3 Flow” being added to the sample
configuration. This flow uses the interfaces, policies, and profiles defined in previous sections.
Click Finish.

DDT; Reviewed:
SPOC 7/16/2013
Solution & Interoperability Test Lab Application Notes
©2013 Avaya Inc. All Rights Reserved.
81 of 96
CM62SM63-VzBIPT
Once again, select the Server Flows tab and click Add Flow. The following screen shows the flow
named “Verizon_IP_Trunk” created in the sample configuration. This flow uses the interfaces,
polices, and profiles defined in previous sections. Click Finish.
The following screen summarizes the Server Flows configured in the sample configuration.

DDT; Reviewed:
SPOC 7/16/2013
Solution & Interoperability Test Lab Application Notes
©2013 Avaya Inc. All Rights Reserved.
82 of 96
CM62SM63-VzBIPT
8. Verizon Business IP Trunk Services Suite Configuration Information regarding Verizon Business IP Trunk Services suite offer can be found at
http://www.verizonbusiness.com/Products/communications/ip-telephony/ or by contacting a
Verizon Business sales representative.
The reference configuration described in these Application Notes is located in the Avaya Solutions
and Interoperability Test Lab. Access to the Verizon Business IP Trunk Services suite was via a
Verizon Private IP (PIP) T1 connection. Verizon Business provided all of the necessary service
provisioning.
8.1. Service Access Information
The following service access information (FQDN, ports, DID numbers) was provided by Verizon
for the sample configuration.
CPE (Avaya) Verizon Network
adevc.avaya.globalipcom.com
UDP port 5060
pcelban0001.avayalincroft.globalipcom.com
UDP Port 5071
IP DID Numbers
732-945-0240
732-945-0241
732-945-0242
732-945-0243
732-945-0244
732-945-0285
732-945-0286
732-945-0287
732-945-0288

DDT; Reviewed:
SPOC 7/16/2013
Solution & Interoperability Test Lab Application Notes
©2013 Avaya Inc. All Rights Reserved.
83 of 96
CM62SM63-VzBIPT
9. Verification Steps This section provides example verifications of the Avaya configuration with Verizon Business
Private IP (PIP) Trunk service.
9.1. Avaya Aura® Communication Manager Verifications
This section illustrates verifications from Communication Manager.
9.1.1 Example Incoming Call from PSTN via Verizon SIP Trunk
Incoming PSTN calls arrive from Verizon at Avaya SBCE, which sends the call to Session
Manager. In the sample configuration, when the Avaya SBCE is in-service, Verizon sends all
inbound calls to Vz_ASBCE-1 (i.e., not load balanced). Session Manager sends the call to
Communication Manager. On Communication Manager, the incoming call arrives via signaling
group 1 and trunk group 1.
The following edited Communication Manager list trace tac trace output shows a call incoming on
trunk group 1. The PSTN telephone dialed 732-945-0232. Session Manager mapped the number
received from Verizon to the extension of a Communication Manager telephone (x12002).
Extension 12002 is an IP Telephone with IP address 10.64.19.109 in network region 1. The RTP
media path is “ip-direct” from the IP Telephone (10.64.19.109) to the “inside” of the Avaya SBCE
(10.64.19.140) in network region 2.
list trace tac *01 Page 1
LIST TRACE
time data
14:30:19 TRACE STARTED 03/26/2013 CM Release String cold-02.0.823.0-20396
14:30:26 SIP<INVITE sip:[email protected] SIP/2.0
14:30:26 Call-ID: [email protected]
14:30:26 active trunk-group 1 member 249 cid 0x32d
14:30:26 SIP>SIP/2.0 180 Ringing
14:30:26 Call-ID: [email protected]
14:30:26 dial 12002
14:30:26 ring station 12002 cid 0x32d
14:30:28 SIP>SIP/2.0 200 OK
14:30:28 Call-ID: [email protected]
14:30:28 active station 12002 cid 0x32d
14:30:28 G729A ss:off ps:20
rgn:1 [10.64.19.109]:3132
rgn:2 [10.64.19.140]:35022
14:30:28 G729A ss:off ps:20
rgn:2 [10.64.19.140]:35022
rgn:1 [10.64.19.109]:3132
14:30:28 SIP<ACK sip:[email protected]:5061;transport=tls SIP/2.0
14:30:28 Call-ID: [email protected]
14:30:35 SIP>BYE sip:[email protected]:5060;transport=tcp;gsid
14:30:35 SIP>=fded8570-9653-11e2-b83f-9c8e992b0a68 SIP/2.0
14:30:35 Call-ID: [email protected]
14:30:35 idle station 12002 cid 0x32d

DDT; Reviewed:
SPOC 7/16/2013
Solution & Interoperability Test Lab Application Notes
©2013 Avaya Inc. All Rights Reserved.
84 of 96
CM62SM63-VzBIPT
The following screen shows Page 2 of the output of the status trunk command pertaining to this
same call. Note the signaling using port 5061 between Communication Manager and Session
Manager. Note the media is “ip-direct” from the IP Telephone (10.64.19.109) to the inside IP
address of Avaya SBCE (10.64.19.140) using codec G.729a.
status trunk 1/249 Page 2 of 3
CALL CONTROL SIGNALING
Near-end Signaling Loc: PROCR
Signaling IP Address Port
Near-end: 10.64.19.205 : 5061
Far-end: 10.64.19.226 : 5061
H.245 Near:
H.245 Far:
H.245 Signaling Loc: H.245 Tunneled in Q.931? no
Audio Connection Type: ip-direct Authentication Type: None
Near-end Audio Loc: Codec Type: G.729A
Audio IP Address Port
Near-end: 10.64.19.109 : 3132
Far-end: 10.64.19.140 : 35024
Video Near:
Video Far:
Video Port:
Video Near-end Codec: Video Far-end Codec:
The following screen shows Page 3 of the output of the status trunk command pertaining to this
same call. Here it can be observed that G.729a codec is used.
status trunk 1/249 Page 3 of 3
SRC PORT TO DEST PORT TALKPATH
src port: T00249 T00249:TX:10.64.19.140:35024/g729a/20ms
S00025:RX:10.64.19.109:3132/g729a/20ms
9.1.2 Example Outgoing Calls to PSTN via Verizon IP Trunk
Depending on the Session Manager configuration of the “rank” for the routing policies, outbound
calls can either use Vz_ASBCE-1 preferentially or distribute calls across Vz_ASBCE-1 and
Vz_ASBCE-2. At the time of the following trace, Session Manager was configured such that
Vz_ASBCE-1 was the preferred destination. Outbound calls using Vz_ASBCE-2 look similar and
will not be repeated here.

DDT; Reviewed:
SPOC 7/16/2013
Solution & Interoperability Test Lab Application Notes
©2013 Avaya Inc. All Rights Reserved.
85 of 96
CM62SM63-VzBIPT
The following edited trace shows an outbound ARS call from IP Telephone x12002 to the PSTN
number 9-1-303-538-7024. The call is routed to route pattern 1 and trunk group 1. The call initially
uses the G450 gateway (10.64.19.81), but after the call is answered, the call is “shuffled” to
become an “ip-direct” connection between the IP Telephone (10.64.19.109) and the “inside” of the
Avaya SBCE (10.64.19.140).
list trace tac *01 Page 1
LIST TRACE
time data
14:40:29 TRACE STARTED 03/26/2013 CM Release String cold-02.0.823.0-20396
14:40:34 dial 913035387024 route:PREFIX|FNPA|ARS
14:40:34 route-pattern 1 preference 1 location 1/ALL cid 0x330
14:40:34 seize trunk-group 1 member 20 cid 0x330
14:40:34 Calling Number & Name 12002 test IP
14:40:34 SIP>INVITE sip:[email protected] SIP/2.0
14:40:34 Call-ID: 070bf25995e2188225156b4a00
14:40:34 Setup digits 13035387024
14:40:34 Calling Number & Name 12002 test IP
14:40:34 SIP<SIP/2.0 100 Trying
14:40:34 Call-ID: 070bf25995e2188225156b4a00
14:40:34 Proceed trunk-group 1 member 20 cid 0x330
14:40:37 SIP<SIP/2.0 183 Session Progress
14:40:37 Call-ID: 070bf25995e2188225156b4a00
14:40:37 G729 ss:off ps:20
rgn:2 [10.64.19.140]:35026
rgn:1 [10.64.19.81]:2052
14:40:37 xoip options: fax:T38 modem:off tty:US uid:0x5000c
xoip ip: [10.64.19.81]:2052
14:40:39 SIP<SIP/2.0 200 OK
14:40:39 Call-ID: 070bf25995e2188225156b4a00
14:40:39 SIP>ACK sip:[email protected]:5060;transport=tcp;gsi
14:40:39 SIP>d=68c5b470-9655-11e2-b83f-9c8e992b0a68 SIP/2.0
14:40:39 Call-ID: 070bf25995e2188225156b4a00
14:40:39 active trunk-group 1 member 20 cid 0x330
14:40:39 SIP>INVITE sip:[email protected]:5060;transport=tcp;
14:40:39 SIP>gsid=68c5b470-9655-11e2-b83f-9c8e992b0a68 SIP/2.0
14:40:39 Call-ID: 070bf25995e2188225156b4a00
14:40:39 SIP<SIP/2.0 100 Trying
14:40:39 Call-ID: 070bf25995e2188225156b4a00
14:40:39 SIP<SIP/2.0 200 OK
14:40:39 Call-ID: 070bf25995e2188225156b4a00
14:40:39 G729 ss:off ps:20
rgn:1 [10.64.19.109]:3132
rgn:2 [10.64.19.140]:35026
14:40:39 SIP>ACK sip:[email protected]:5060;transport=tcp;gsi
14:40:39 SIP>d=68c5b470-9655-11e2-b83f-9c8e992b0a68 SIP/2.0
14:40:39 Call-ID: 070bf25995e2188225156b4a00
14:40:39 G729A ss:off ps:20
rgn:2 [10.64.19.140]:35026
rgn:1 [10.64.19.109]:3132
14:41:16 SIP<BYE sip:[email protected]:5061;transport=tls SIP/2.0
14:41:16 Call-ID: 070bf25995e2188225156b4a00
14:41:16 SIP>SIP/2.0 200 OK
14:41:16 Call-ID: 070bf25995e2188225156b4a00
14:41:16 idle trunk-group 1 member 20 cid 0x330

DDT; Reviewed:
SPOC 7/16/2013
Solution & Interoperability Test Lab Application Notes
©2013 Avaya Inc. All Rights Reserved.
86 of 96
CM62SM63-VzBIPT
9.2. Avaya Aura® System Manager and Avaya Aura® Session Manager Verifications
This section contains verification steps that may be performed using System Manager for Session
Manager.
9.2.1 Verify SIP Entity Link Status
Log in to System Manager. Expand Elements � Session Manager � System Status ���� SIP
Entity Monitoring, as shown below.

DDT; Reviewed:
SPOC 7/16/2013
Solution & Interoperability Test Lab Application Notes
©2013 Avaya Inc. All Rights Reserved.
87 of 96
CM62SM63-VzBIPT
From the list of monitored entities, select an entity of interest, such as “Vz_ASBCE-1”. Under
normal operating conditions, the Link Status should be “UP” as shown in the example screen
below.

DDT; Reviewed:
SPOC 7/16/2013
Solution & Interoperability Test Lab Application Notes
©2013 Avaya Inc. All Rights Reserved.
88 of 96
CM62SM63-VzBIPT
9.2.2 Call Routing Test
The Call Routing Test verifies the routing for a particular source and destination. To run the
routing test, expand Elements � Session Manager � System Tools ���� Call Routing Test, as
shown below.
A screen such as the following is displayed.

DDT; Reviewed:
SPOC 7/16/2013
Solution & Interoperability Test Lab Application Notes
©2013 Avaya Inc. All Rights Reserved.
89 of 96
CM62SM63-VzBIPT
Populate the fields for the call parameters of interest. For example, the following screen shows an
example call routing test for an outbound call to the PSTN via Verizon. Under Routing Decisions,
observe that the call will route via an Avaya SBCE on the path to Verizon. Scroll down to inspect
the details of the Routing Decision Process if desired (not shown).
Another example shows an inbound call to one of Verizon assigned DID numbers. Observe that
the DID number 732-945-0232 has been converted to Communication Manager extension 12002
under Routing Decisions and will be routed to Communication Manager.

DDT; Reviewed:
SPOC 7/16/2013
Solution & Interoperability Test Lab Application Notes
©2013 Avaya Inc. All Rights Reserved.
90 of 96
CM62SM63-VzBIPT
9.3. Avaya Session Border Controller for Enterprise Verification
9.3.1 Welcome Screen
The welcome screen shows alarms, incidents, and the status of all managed Avaya SBCEs at a
glance.
9.3.2 Alarms
A list of the most recent alarms can be found under the Alarm tab on the top left bar.
Alarms Viewer.

DDT; Reviewed:
SPOC 7/16/2013
Solution & Interoperability Test Lab Application Notes
©2013 Avaya Inc. All Rights Reserved.
91 of 96
CM62SM63-VzBIPT
9.3.3 Incidents
A list of all recent incidents can be found under the incidents tab at the top left next to the Alarms.
Incident Viewer
Further Information can be obtained by clicking on an incident in the incident viewer.

DDT; Reviewed:
SPOC 7/16/2013
Solution & Interoperability Test Lab Application Notes
©2013 Avaya Inc. All Rights Reserved.
92 of 96
CM62SM63-VzBIPT
9.3.4 Diagnostics
The full diagnostics check that can be run, can run line checks in both directions.
Click on Diagnostics on the top bar, select the Avaya SBCE from the list of devices and then click
“Start Diagnostics”
A green check mark or a red x will indicate success or failure.

DDT; Reviewed:
SPOC 7/16/2013
Solution & Interoperability Test Lab Application Notes
©2013 Avaya Inc. All Rights Reserved.
93 of 96
CM62SM63-VzBIPT
9.3.5 Tracing
To take a call trace, Select Troubleshooting ���� Trace Settings from the left-side menu as shown
below.
Select the Packet Capture tab and set the desired configuration for a call trace, hit Start Capture.
Only one interface can be selected at once, so only an inside or only an outside trace is possible.

DDT; Reviewed:
SPOC 7/16/2013
Solution & Interoperability Test Lab Application Notes
©2013 Avaya Inc. All Rights Reserved.
94 of 96
CM62SM63-VzBIPT
When tracing has reached the desired number of packets, the trace will stop automatically, or
alternatively, hit the Stop Capture button at the bottom.
Select the Captures tab at the top and the capture will be listed; select the File Name and choose to
open it with an application like Wireshark.
10. Conclusion As illustrated in these Application Notes, Avaya Aura® Communication Manager 6.2, Avaya
Aura® Session Manager 6.3, and Avaya Session Border Controller for Enterprise can be
configured to interoperate successfully with Verizon Business IP Trunk service, inclusive of the
“2-CPE” SIP trunk redundancy architecture. This solution allows Avaya Aura® Communication
Manager and Avaya Aura® Session Manager users access to the PSTN using a Verizon Business
IP Trunk public SIP trunk service connection.
The configuration and software versions described in these Application Notes have not yet
been independently certified by Verizon labs. These Application Notes can be used to
facilitate customer engagements via the Verizon field trial process, pending Verizon labs
independent certification.

DDT; Reviewed:
SPOC 7/16/2013
Solution & Interoperability Test Lab Application Notes
©2013 Avaya Inc. All Rights Reserved.
95 of 96
CM62SM63-VzBIPT
11. Additional References
11.1. Avaya
Avaya product documentation, including the following, is available at http://support.avaya.com
[1] Installing and Configuring Avaya Aura® Communication Manager, Doc ID 03-603558,
Release 6.2
[2] Administering Avaya Aura® Communication Manager, Doc ID 03-300509, Release 6.2
[3] Implementing Avaya Aura® Session Manager, Release 6.3
[4] Installing Service Packs for Avaya Aura® Session Manager, Release 6.3
[5] Upgrading Avaya Aura® Session Manager, Release 6.3
[6] Maintaining and Troubleshooting Avaya Aura® Session Manager, Release 6.3
[7] Implementing Avaya Aura® System Manager, Release 6.3
Avaya Application Notes, including the following, are also available at http://support.avaya.com
The following Application Notes cover Avaya Aura® Session Manager 6.2 with Verizon IP SIP
Trunk Service using the Avaya Session Border Controller for Enterprise.
[MO-VZIPT-SM62] Application Notes for Avaya Aura® Communication Manager 6.2, Avaya
Aura® Session Manager 6.2, and Avaya Session Border Controller for Enterprise with Verizon
Business IP Trunk SIP Trunk Service – Issue 1.0
http://downloads.avaya.com/css/P8/documents/100162132
The following Application Notes cover Avaya Aura® Session Manager 6.1 with Verizon IP SIP
Trunk Service using the Avaya Session Border Controller for Enterprise.
[MO-VZIPT-SM61] Application Notes for Avaya Aura® Communication Manager 6.0.1, Avaya
Aura® Session Manager 6.1, and Avaya Session Border Controller for Enterprise with Verizon
Business IP Trunk SIP Trunk Service – Issue 1.0
http://downloads.avaya.com/css/P8/documents/100164354
11.2. Verizon Business
The following documents may be obtained by contacting a Verizon Business Account
Representative.
• Retail VoIP Interoperability Test Plan
• Network Interface Specification Retail VoIP Trunk Interface (for non-registering devices)

DDT; Reviewed:
SPOC 7/16/2013
Solution & Interoperability Test Lab Application Notes
©2013 Avaya Inc. All Rights Reserved.
96 of 96
CM62SM63-VzBIPT
©2013 Avaya Inc. All Rights Reserved.
Avaya and the Avaya Logo are trademarks of Avaya Inc. All trademarks identified by ® and
™ are registered trademarks or trademarks, respectively, of Avaya Inc. All other trademarks
are the property of their respective owners. The information provided in these Application
Notes is subject to change without notice. The configurations, technical data, and
recommendations provided in these Application Notes are believed to be accurate and
dependable, but are presented without express or implied warranty. Users are responsible for
their application of any products specified in these Application Notes.
Please e-mail any questions or comments pertaining to these Application Notes along with the
full title name and filename, located in the lower right corner, directly to the Avaya
DevConnect Program at [email protected].